In erno 52/64 - Squarespacestatic1.squarespace.com/static/...Infierno_52_64_Installation_Use.pdf ·...
12
® Infierno 52/64 ® Installation & Use
Transcript of In erno 52/64 - Squarespacestatic1.squarespace.com/static/...Infierno_52_64_Installation_Use.pdf ·...
®
Infierno 52/64®
Installation & Use
INTRODUCTION
INSTALLATION
GETTING STARTED
FUEL & COOKING
CLEANING & MAINTENANCE
COMPONENTS
Infierno 52/64®
3 4
6
7
9
10
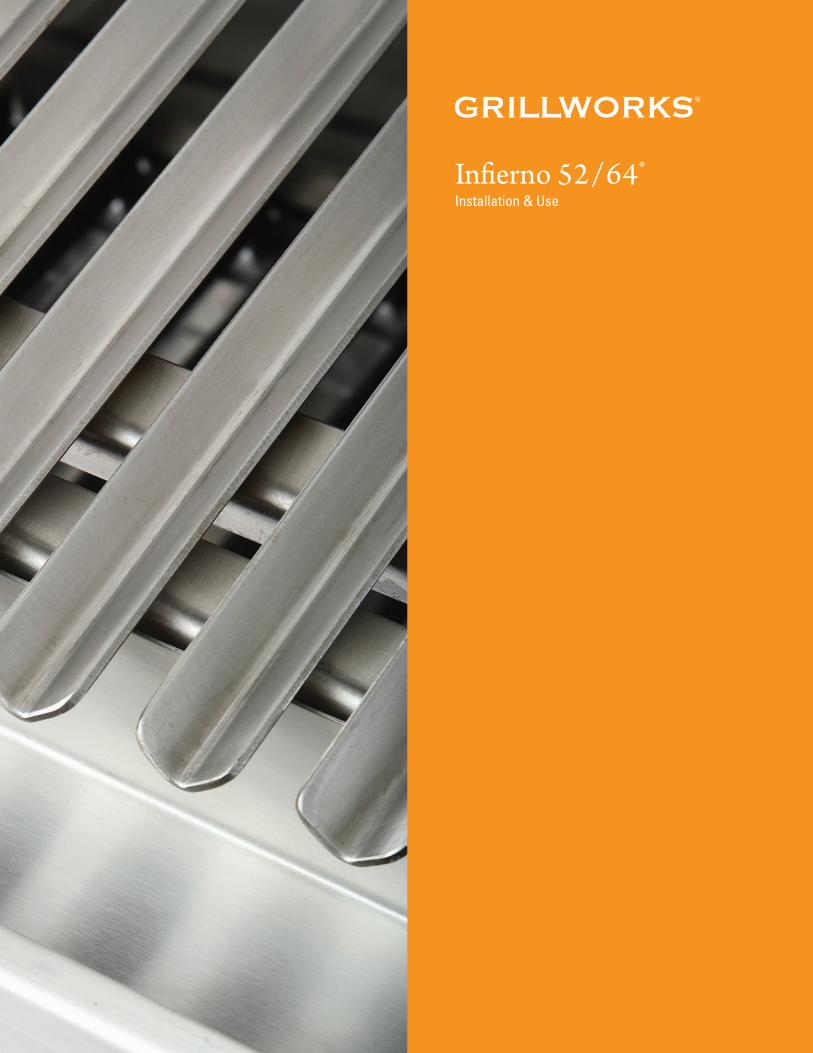
The Infierno 52 and 64 are both designed for the ultimate in wood-fired flexibility, performance and showmanship, in a footprint friendly to a cooking line or multiple-station installation. Operated and cared for correctly these units will thrill chefs and guests alike.
In this guide you’ll find recommendations for transport, preparation, operation and care of the Infierno 52 and 64. Please read every word here and ensure everyone working around the grill does too—rewarding Infierno operation is dependent on a skilled and informed restaurant team. Take care also to follow local codes regarding solid fuel installations and food safety guidelines.
If you have any questions or comments about your Infierno do not hesitate to call or email us. We want to hear from you.
Best regards,
Benjamin Eisendrath President & CEO
[email protected] / (855) 434-3473
Infierno 52/64®
Installation & Use
INTRODUCTION 3
Please read the entire manual before installing the Infierno, and distribute to anyone involved in the installation. Failure to follow instructions may result in property damage, bodily injury or death. Contact your local building or fire officials about restrictions and installation inspections in your area.
IF THE INFIERNO IS IMPROPERLY INSTALLED A FIRE MAY RESULT. FOLLOW THE INSTALLATION MANUAL TO REDUCE RISK.
KEEP FLAMMABLE ITEMS CLEAR OF THE AREA AROUND THE GRILL: Do not store flammable liquids such as gasoline, kerosene or lighter fluids in the vicinity of the Infierno. Always keep the area around it free and clear of any and all combustible materials.
MAINTENANCE AND SERVICE SAFETY: Improper installation, adjustment, alteration, service or maintenance can cause property damage, injury or death. Read the installation, operating and maintenance instructions thoroughly before installing, operating or servicing this appliance.
WARNING: Never use gasoline, kerosene, lighter fluid or similar accelerants to start or maintain a fire in this grill. Keep all such items well away from the grill when in use.
IMPORTANT: This grill must be installed, maintained, operated and serviced by authorized professionals.
A MAJOR CAUSE OF GRILL RELATED FIRES IS A FAILURE TO MAINTAIN REQUIRED CLEARANCES TO COMBUSTIBLE MATERIAL. IT IS CRITICAL THAT THIS GRILL BE INSTALLED IN ACCORDANCE WITH THESE INSTRUCTIONS.
USE SOLID FUEL ONLY—WOOD OR CHARCOAL—DO NOT USE PRODUCTS NOT SPECIFIED FOR THIS GRILL
READ ALL INSTRUCTIONS BEFORE INSTALLING AND USING THIS APPLIANCE
SAVE THESE INSTRUCTIONS
Infierno 52/64®
Installation & Use
INSTALLATION 4
UNLOADING & MOVING
USING A CRANEThe grill travels in a large crate. It may be lifted while still in the crate using straps rated to at least 2500 lbs. It also may be lifted after the crate is removed using the same type of straps. The grill is very top and back-heavy due to the large amount of fire brick lining the floor and back. TAKE THIS WEIGHT DISTRIBUTION INTO ACCOUNT WHEN LIFTING THE GRILL.
USING A FORKLIFTLift the grill from the rear, positioning the forks as widely as possible under the center station of the Infierno grill. The grill is very rear-heavy due to the large amount of firebrick lining the floor and back. TAKE WEIGHT DISTRIBUTION INTO ACCOUNT. The grill weighs approximately 1600 lbs, make sure the forklift is rated to lift well in excess of this weight.
USING A PALLET JACKYou may use a pallet jack once the grill has beenremoved from the delivery vehicle. Whether inside or removed from the crate, make sure to lift from the back, positioning the jack under the center of the grill spread as wide a possible. ONLY USE ON A FLAT SURFACE— MOVING THIS GRILL ON AN INCLINE WITHA PALLET JACK IS NOT SAFE AND CAN CAUSE INJURY OR DAMAGE TO PROPERTY ORTHE GRILL.
NEVER PUT THE INFIERNO ON ITS BACK, FRONT OR SIDE! SIGNIFICANT DAMAGE TO COMPONENTS OF THE GRILL CAN OCCUR.
USE GREAT CARE WHEN MOVING AN INFIERNO. IF YOU HAVE ANY QUESTIONS OR CONCERNS CONTACT GRILLWORKS AT (855) 434-3473—BE SAFE!
CLEARANCES
The Infierno should be installed with 2” clearance to noncombustible materials on the sides and back of the unit. The front of the unit must have at least 36” clearance to other equipment or walls for proper operation.
DO NOT FILL AIR SPACES SURROUNDING THE GRILL WITH INSULATION. The grill is adequately insulated and the best outer insulator is free air space.
Only install the Infierno on a non-combustible floor. This non-combustible floor must extend at least 48” at the front of the unit, 36” at the sides and 48” at the rear (if the grill is installed exposed at the back). If installed as a built-in (without legs) the base it is installed on must also be non-combustible.
THE ENTIRE AREA OVER THE INFIERNO MUST BE NONCOMBUSTIBLE EXTENDING 48” IN ALL DIRECTIONS (IF NOT ENCLOSED) AND THE GRILL MUST BE INSTALLED UNDER A SUITABLE TYPE 1 SOLID FUEL HOOD SYSTEM.
Any façade materials to the front or over the grill MUST BE NON-COMBUSTIBLE.
IF THIS GRILL IS NOT PROPERLY INSTALLED A FIRE MAY RESULT. A MAJOR CAUSE OF GRILL RELATED FIRES IS A FAILURE TO MAINTAIN REQUIRED CLEARANCES (AIR SPACES) TO COMBUSTIBLE MATERIALS. IT IS CRITICAL THAT THE INFIERNO GRILL BE INSTALLED BY A QUALIFIED PROFESSIONAL AND ONLY IN ACCORDANCE WITH THESE INSTRUCTIONS.
WARNING: DO NOT PACK AIR SPACES AROUND GRILL WITH INSULATION—OPEN AIR IS THE BEST INSULATOR
Infierno 52/64®
Installation & Use
INSTALLATION 5
ALERT: Installation, operation and servicing ofthis appliance can expose you to ceramic dust.ALWAYS WEAR PROTECTIVE EYEWEAR AND RESPIRATORY PROTECTION AS A PRECAUTION AGAINST INHALLATION OR EYE INJURY.
HAND PROTECTION IS ALSO RECOMMENDED AGAINST POSSIBLE SHARP EDGES. Please read this entire manual before you install the grill. Failure to follow the instructions may result in property damage, bodily injury or death. Contact your local building or fire officials about restrictions and installation inspection in your area.
PLEASE READ THIS ENTIRE MANUAL BEFORE YOU INSTALL THE INFIERNO GRILL. FAILURE TO FOLLOW INSTRUCTIONS MAY RESULT IN PROPERTY DAMAGE, BODILY INJURY OR EVEN DEATH. CONTACT YOUR LOCAL BUILDING OR FIRE OFFICIALS ABOUT RESTRICTIONS AND INSTALLATION INSPECTION IN YOUR AREA.
VENTING
The hood and ductwork used over the Infierno mustbe approved for solid fuel and installed in accordance with NFPA 96 and all relevant local and nationalcode requirements for solid fuel appliances. A SOLID FUEL NFPA 96 COMPLIANT HOOD IS REQUIRED FOR USE OF THIS GRILL. As with all solid
fuel cooking equipment and ductwork, regular cleaning and inspection is critical to prevent fire risk. Typically this cleaning and inspection should occur AT LEAST monthly.
A fire suppression system (ANSUL) is required for the Infierno grill. Refer to local and national requirements to determine the system required for your installation of this grill.
Infierno 52/64®
Installation & Use
GETTING STARTED 6
GETTING STARTED
In order to produce the most consistent results and get the most out of the flexible design of the Infierno, you’ll need a good fire. There are two approaches to starting that fire.
Fire Cage IgnitionThe Infierno is equipped with a rear-mounted fire cage. This cage is based on the South American “brasero” which is a basket used to burn whole pieces of wood down to charcoal. Load the fire cage with paper, kindling and smaller pieces of wood—in that order from the bottom—LOOSELY to ensure good air flow. You may also use natural starters like “Fat Wood” or other non- toxic solid fuel starters in the fire cage. Place a few more pieces of wood and/or chunk charcoal underneath the cage. This fuel will be ignited by the coals that will begin falling out of the bottom of the cage once it is going. Light the cage from the bottom and feed it larger pieces of wood as the fire progresses. The combination ofcoals produced by the cage and the coals/wood ignited underneath the cage will fuel the Infierno’s fire bed. Rake them forward under the cooking surfaces when you are ready to cook.
WARNING: THE FIRE CAGE PRODUCES A POWERFUL VERTICAL BURN. FLAME SHOULD NEVER EXTEND HIGHER THAN THE TOP OF THE GRILL’S FIRE BRICK BACK. MAINTAIN A SMALL FIRE TO REDUCE THE POTENTIAL FOR EMBER ESCAPE AND TO PREVENT TRIGGERING YOUR ANSUL SYSTEM.
Conventional IgnitionThe Infierno can also be lit like a traditional solid fuel grill by starting the cooking fire on the hearth under the cooking surfaces. Using paper, kindling and smaller pieces of wood, build the fire over the ash grates in the middle of the Infierno’s brick floor, they will aerate the young fire. You may use natural starters here too, like Fat Wood or natural starter bricks. Charcoal chimneys (found in many hardware stores) are also a good way to build a quick hot coal bed if not using the fire cage.
TIP: It is recommended that the Infierno be lit at least one hour before cooking to ensure the grill’s fire box and brick has come up to uniform temperature.
Infierno 52/64®
Installation & Use
FUEL & COOKING 7
WOOD VS CHARCOAL Both wood and charcoal are instrumental in running a successful cooking fire in the Infierno.
Charcoal, being dry and burning slowly over a long period, is a reliable source of heat, but will not add much in the way of flavor to what is being cooked over it.
Well seasoned (10-15% moisture content) wood will burn relatively quickly and produce a moderate amount of flavorful smoke. You should consider the whole wood you burn to be the “seasoning” heat. The moisture left in the wood is what will carry the unique flavor of the wood type being used to the food and ultimately the diner.
In a restaurant setting, balancing the use of both high- quality chunk charcoal for heat with a supply of excellent whole wood for flavor is often the most economical and practical approach to getting the best of both heat and flavor worlds. Consumption levels for both types of fuel can vary widely as the Infierno allows open air flow. The operator can control this by using more or less charcoal, building smaller fires, or lighting only a single grilling station when less grilling area is needed.
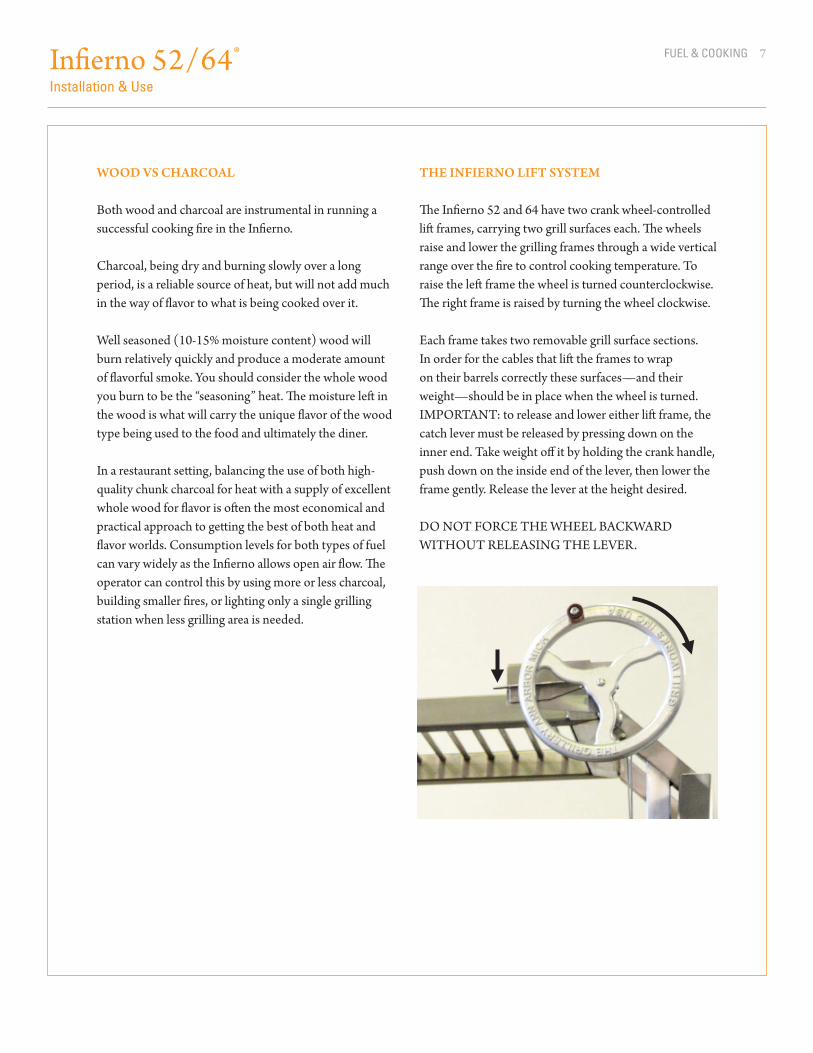
THE INFIERNO LIFT SYSTEM The Infierno 52 and 64 have two crank wheel-controlled lift frames, carrying two grill surfaces each. The wheels raise and lower the grilling frames through a wide vertical range over the fire to control cooking temperature. To raise the left frame the wheel is turned counterclockwise. The right frame is raised by turning the wheel clockwise.
Each frame takes two removable grill surface sections.In order for the cables that lift the frames to wrapon their barrels correctly these surfaces—and their weight—should be in place when the wheel is turned. IMPORTANT: to release and lower either lift frame, the catch lever must be released by pressing down on the inner end. Take weight off it by holding the crank handle, push down on the inside end of the lever, then lower the frame gently. Release the lever at the height desired.
DO NOT FORCE THE WHEEL BACKWARD WITHOUT RELEASING THE LEVER.
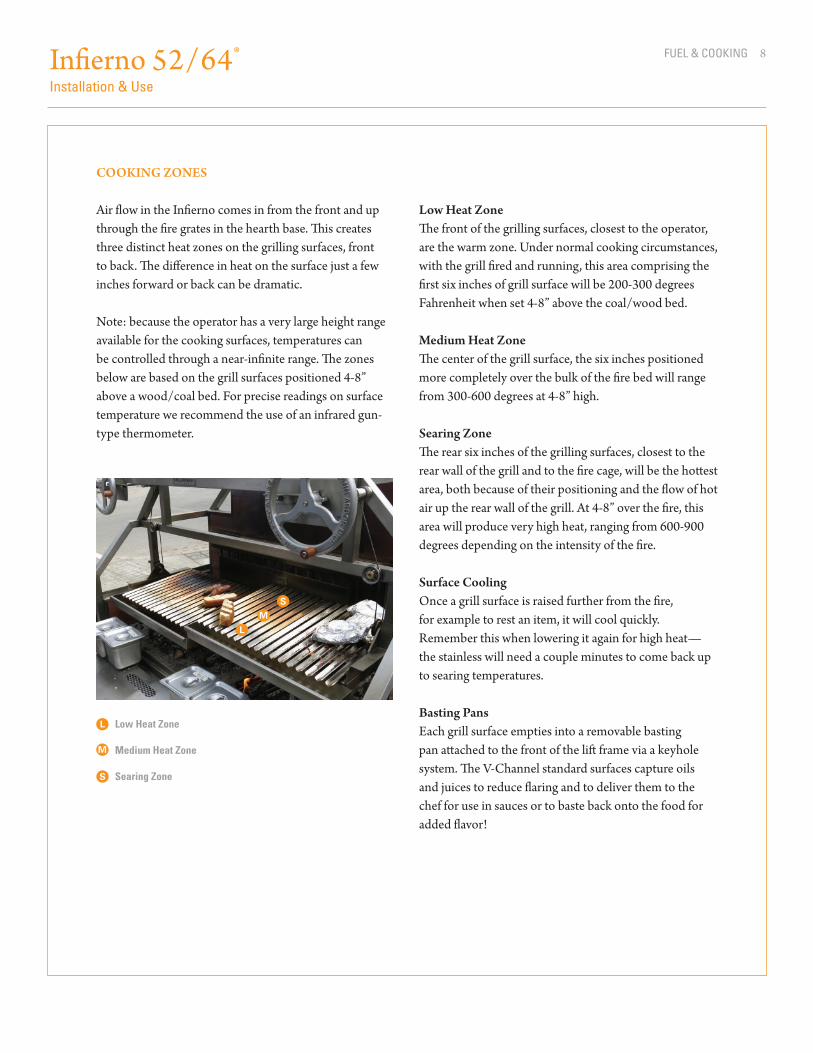
COOKING ZONES
Air flow in the Infierno comes in from the front and up through the fire grates in the hearth base. This creates three distinct heat zones on the grilling surfaces, front to back. The difference in heat on the surface just a few inches forward or back can be dramatic.
Note: because the operator has a very large height range available for the cooking surfaces, temperatures canbe controlled through a near-infinite range. The zones below are based on the grill surfaces positioned 4-8” above a wood/coal bed. For precise readings on surface temperature we recommend the use of an infrared gun- type thermometer.
Low Heat ZoneThe front of the grilling surfaces, closest to the operator, are the warm zone. Under normal cooking circumstances, with the grill fired and running, this area comprising the first six inches of grill surface will be 200-300 degrees Fahrenheit when set 4-8” above the coal/wood bed.
Medium Heat Zone The center of the grill surface, the six inches positioned more completely over the bulk of the fire bed will range from 300-600 degrees at 4-8” high.
Searing ZoneThe rear six inches of the grilling surfaces, closest to the rear wall of the grill and to the fire cage, will be the hottest area, both because of their positioning and the flow of hot air up the rear wall of the grill. At 4-8” over the fire, this area will produce very high heat, ranging from 600-900 degrees depending on the intensity of the fire.
Surface CoolingOnce a grill surface is raised further from the fire,for example to rest an item, it will cool quickly. Remember this when lowering it again for high heat— the stainless will need a couple minutes to come back up to searing temperatures.
Basting PansEach grill surface empties into a removable basting pan attached to the front of the lift frame via a keyhole system. The V-Channel standard surfaces capture oils and juices to reduce flaring and to deliver them to the chef for use in sauces or to baste back onto the food for added flavor!
Infierno 52/64®
Installation & Use
FUEL & COOKING 8
L
M
S
LM
S
Low Heat Zone
Medium Heat Zone
Searing Zone
Infierno 52/64®
Installation & Use
CLEANING & MAINTENANCE 9
CLEAN UP
The Infierno’s grill surfaces and basting pans all lift off for cleaning. They are 304 stainless steel and can be washed by hand or in a commercial dishwasher. If using a dishwasher, the grill surfaces should be re-oiled (seasoned) again before cooking as they will be dry after going through the machine.
Ash collects in the drawers below the firebrick base.The ash falls through the fire grates placed in the fire brick. WAIT UNTIL THE GRILL HAS COOLED BEFORE EMPTYING THE ASH DRAWERS. Pull out the drawers when full and empty them into a fire-safe container for disposal. EMBERS MAY STILL BE IN THE ASH—THE CONTAINER MUST BE FIRE PROOF TO PREVENT RISK OF FIRE.
Excess grease or ash buildup around the grill’s moving parts and external surfaces should be wiped off once the grill has cooled.
MAINTENANCE & CARE
The Infierno’s body is constructed entirely in 304 stainless steel. The tubular main frame is 1.5” x 1.5” in 16 gauge square. The side and bottom panels are 14 gauge. The back plate is 7 gauge. The grate supporting the fire brick is 1” x 3/16” 19SW4. The fire brick floor is constructed of 1.25” x 4.5” x 9” brick, the sides are lined in 1.125” x 4.5” x 9” brick. Any individual brick can be replaced by lifting it out of the floor or loosening the back cap at the top of the grill with a hex key.
The Infierno’s cooking system is designed for maximum motion and flexibility. All moving parts, especially the lift systems, need to be checked for free motion BEFORE EVERY USE. Ash and other normal side-products of cooking and fire can build up on the tracks the lift system travels on and can impede motion if left uncleaned.
BEFORE EVERY USE check that the rollers that the lift system uses to travel up and down the track are free to move. Do not over tighten them. It is recommended that the rollers be lightly lubed with cooking oil before use to ensure they roll smoothly.
BEFORE EVERY USE check the hex screws in the barrels that pick up the cables to ensure they are tight and seated correctly. Do the same with the set screws in the star wheel (the 4-pronged cog that holds the grill at height). Also inspect or clear the rollers that travel up and down the tracks to ensure they can turn freely.
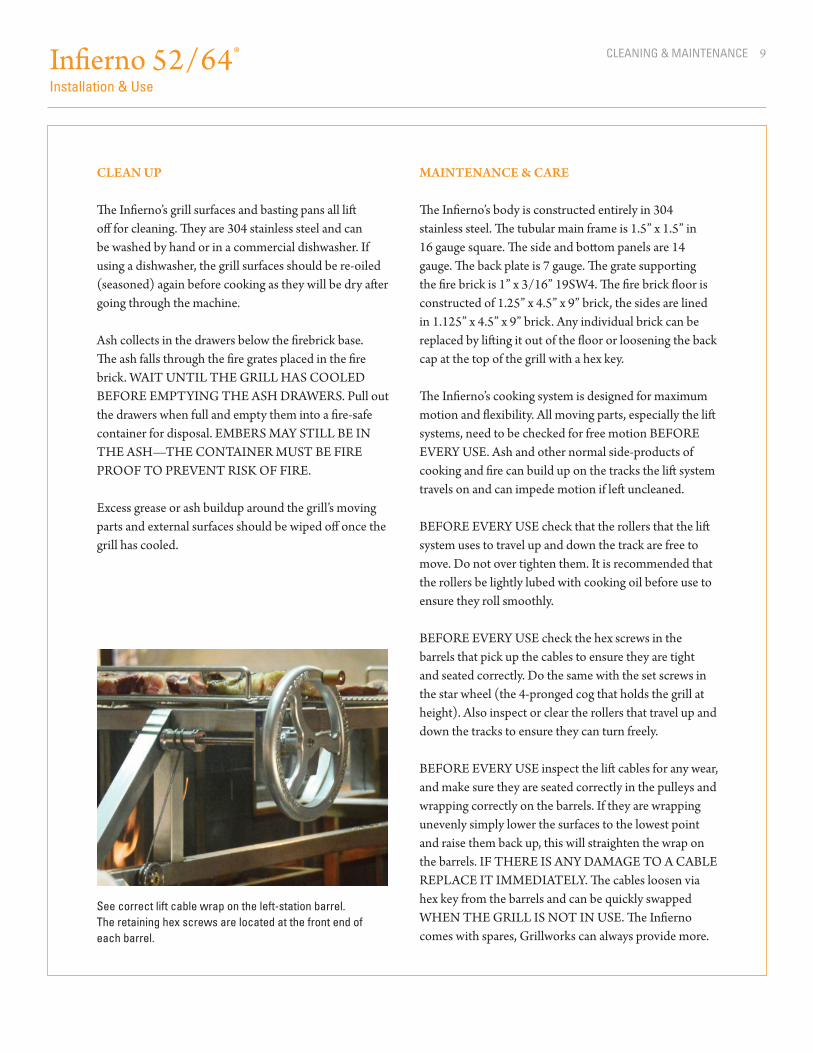
BEFORE EVERY USE inspect the lift cables for any wear, and make sure they are seated correctly in the pulleys and wrapping correctly on the barrels. If they are wrapping unevenly simply lower the surfaces to the lowest point and raise them back up, this will straighten the wrap on the barrels. IF THERE IS ANY DAMAGE TO A CABLE REPLACE IT IMMEDIATELY. The cables loosen via hex key from the barrels and can be quickly swapped WHEN THE GRILL IS NOT IN USE. The Infierno comes with spares, Grillworks can always provide more.
See correct lift cable wrap on the left-station barrel. The retaining hex screws are located at the front end of each barrel.
Infierno 52/64®
Installation & Use
COMPONENTS 10
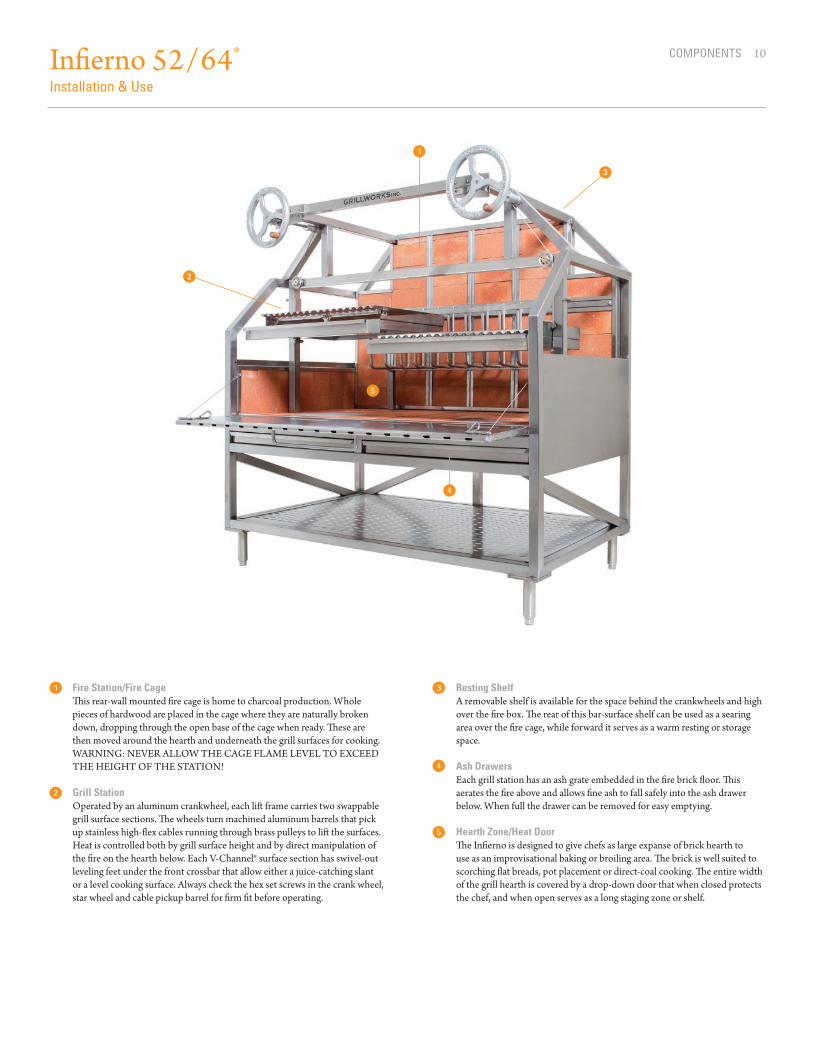
Fire Station/Fire Cage This rear-wall mounted fire cage is home to charcoal production. Whole pieces of hardwood are placed in the cage where they are naturally broken down, dropping through the open base of the cage when ready. These are then moved around the hearth and underneath the grill surfaces for cooking. WARNING: NEVER ALLOW THE CAGE FLAME LEVEL TO EXCEED THE HEIGHT OF THE STATION!
Grill Station Operated by an aluminum crankwheel, each lift frame carries two swappable grill surface sections. The wheels turn machined aluminum barrels that pick up stainless high-flex cables running through brass pulleys to lift the surfaces. Heat is controlled both by grill surface height and by direct manipulation of the fire on the hearth below. Each V-Channel® surface section has swivel-out leveling feet under the front crossbar that allow either a juice-catching slant or a level cooking surface. Always check the hex set screws in the crank wheel, star wheel and cable pickup barrel for firm fit before operating.
Resting Shelf A removable shelf is available for the space behind the crankwheels and high over the fire box. The rear of this bar-surface shelf can be used as a searing area over the fire cage, while forward it serves as a warm resting or storage space.
Ash Drawers Each grill station has an ash grate embedded in the fire brick floor. This aerates the fire above and allows fine ash to fall safely into the ash drawer below. When full the drawer can be removed for easy emptying.
Hearth Zone/Heat Door The Infierno is designed to give chefs as large expanse of brick hearth to use as an improvisational baking or broiling area. The brick is well suited to scorching flat breads, pot placement or direct-coal cooking. The entire width of the grill hearth is covered by a drop-down door that when closed protects the chef, and when open serves as a long staging zone or shelf.

All professional Grillworks products areNSF listed and approved for use in food service.
KEEP THESE INSTRUCTIONS!
[email protected](855) 434-3473
The Grillery®, The Grillworks®, V-Channels®, Grillworks Infierno® and Argentine Inspired, American Made® are registered trademarks of ® Grillworks LLC. U.S. PAT. 4,462,306, U. S. PAT. D708,889 S, additional patents pending
Made in USA
Argentine Inspired. American Made.TM
®