Hospira, Inc., 275 North Field Drive, 430-98344-001 ( , 2016-0
258
430-98344-001 (%, 2016-0) Hospira, Inc., 275 North Field Drive, Lake Forest, IL 60045, USA
Transcript of Hospira, Inc., 275 North Field Drive, 430-98344-001 ( , 2016-0

430-98344-001 (B, 2016-09)
Hospira, Inc., 275 North Field Drive,Lake Forest, IL 60045, USA

Notes:
Hospira MedNet Meds Software User Guide iNote: For a list of Hospira MedNet compatible devices approved by country, refer to the Hospira MedNet Device Compatibility Matrix
available through your Hospira Support Center.
Hospira MedNet™ Meds™
Software User Guide
IMPORTANT
Refer to this User Guide for complete instructions for use, warnings, and cautions associated with the Hospira MedNet™ Meds™ Software after it has been properly installed. Refer to the Installation and Configuration Guide for proper use, warnings, and cautions associated with installing and configuring the Hospira MedNet™ Meds™ Software. The help files included with the Hospira MedNet™ Meds™ Software are provided as reference only.
Intended Use
The Hospira MedNet™ Medication Management Suite (MMS) is intended to facilitate networkedcommunication between MMS compatible computer systems and Hospira Infusion pumps.The MMS provides trained healthcare professionals with the capability to send, receive, report,and store information from interfaced external systems, and to configure and edit infusionprogramming parameters.
The MMS is intended to provide a way to automate the programming of infusion parameters,thereby decreasing the amount of manual steps necessary to enter infusion data. All dataentry and validation of infusion parameters is performed by a trained healthcare professionalaccording to physician's orders.
Please read this entire guide before using the Hospira MedNet™ Meds™ Software.
List No. 16037-64-04
Rx Only
For a list of Hospira MedNet™ compatible devices approved for your country and/or
From our Hospira website, you can access our System Operating Manuals and this guidevia the Support Center’s Infusion Pumps + Clinical Software.
to obtain a copy of this guide, contact:
in the USAThe Hospira Technical Support Center
1-800-241-4002
outside the USAThe Support Center listed in your Hospira.com regional website

Change History
Part Number Description of Change Pages Changed
430-98344-001 (A, 2016-08) Initial Release including SapphirePlus
430-98344-001 (B, 2016-09) updated software help links N/A
ii Hospira MedNet Meds Software User Guide
Note: For a list of Hospira MedNet compatible devices approved by country, refer to the Hospira MedNet Device Compatibility Matrix available through your Hospira Support Center.
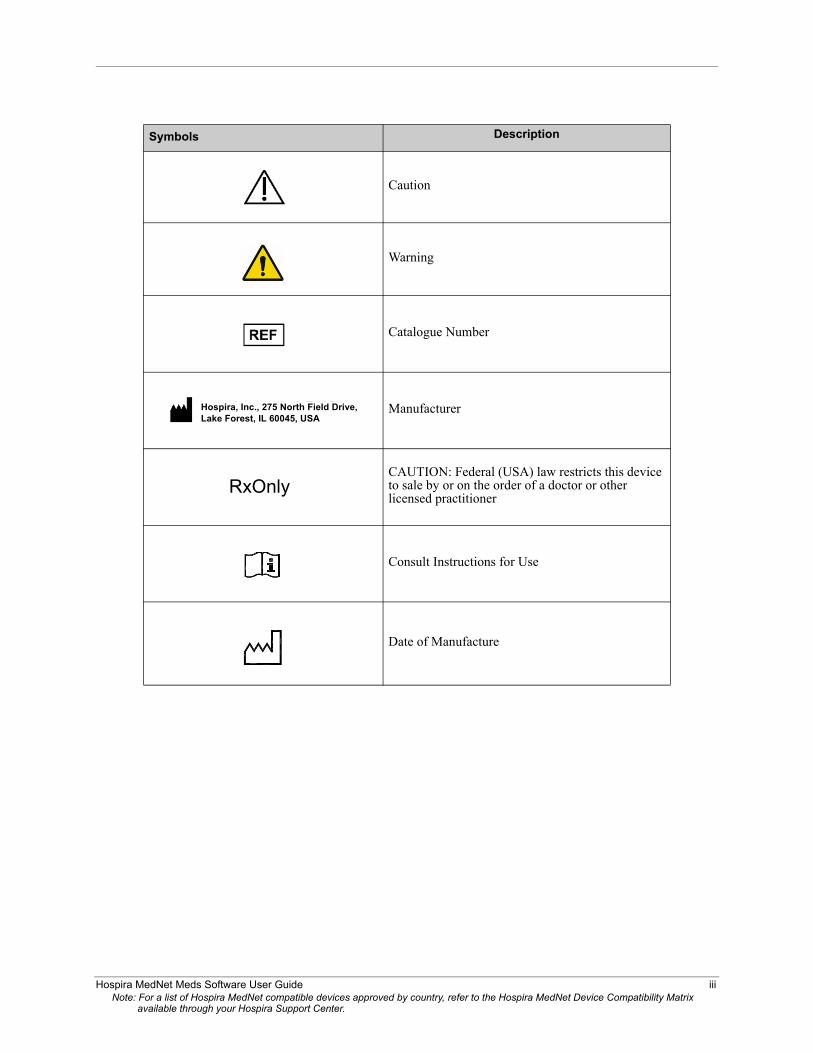
Symbols Description
Caution
Warning
Catalogue Number
Manufacturer
CAUTION: Federal (USA) law restricts this device to sale by or on the order of a doctor or other licensed practitioner
Consult Instructions for Use
Date of Manufacture
Hospira, Inc., 275 North Field Drive,Lake Forest, IL 60045, USA
RxOnly
Hospira MedNet Meds Software User Guide iiiNote: For a list of Hospira MedNet compatible devices approved by country, refer to the Hospira MedNet Device Compatibility Matrix
available through your Hospira Support Center.

Notes:
iv Hospira MedNet Meds Software User Guide
Note: For a list of Hospira MedNet compatible devices approved by country, refer to the Hospira MedNet Device Compatibility Matrix available through your Hospira Support Center.
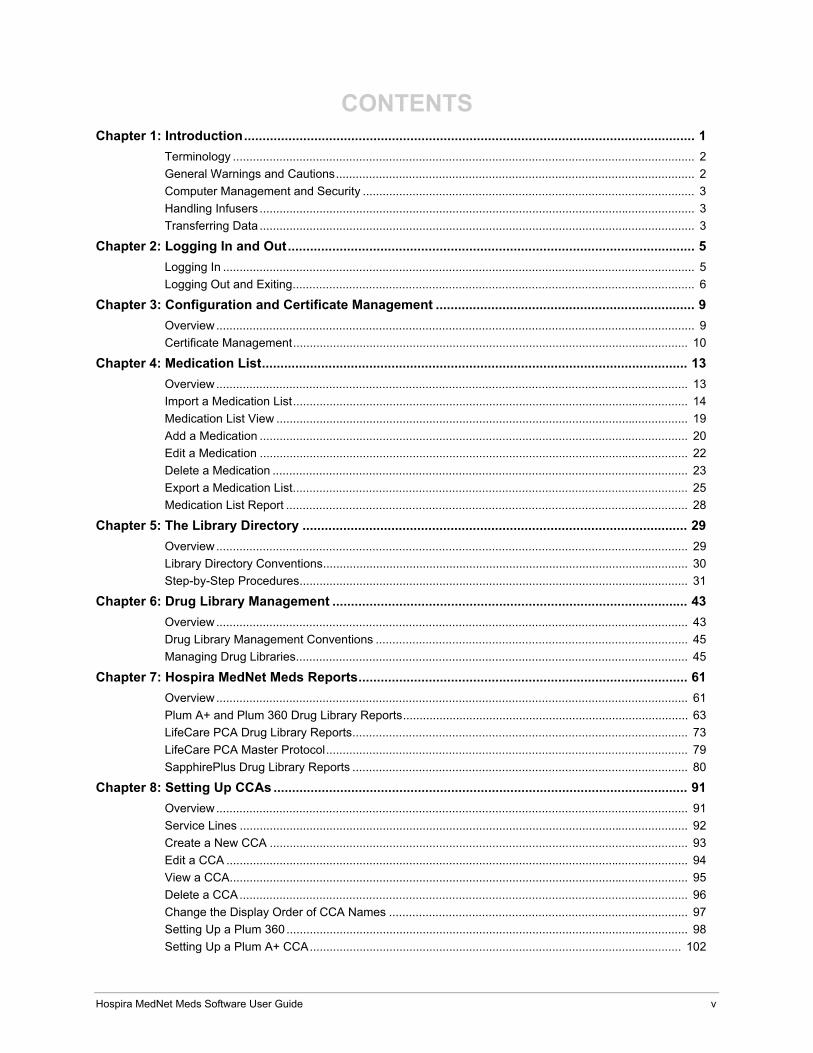
CONTENTSChapter 1: Introduction.......................................................................................................................... 1
Terminology ........................................................................................................................................... 2
General Warnings and Cautions............................................................................................................ 2
Computer Management and Security .................................................................................................... 3
Handling Infusers ................................................................................................................................... 3
Transferring Data ................................................................................................................................... 3
Chapter 2: Logging In and Out.............................................................................................................. 5
Logging In .............................................................................................................................................. 5
Logging Out and Exiting......................................................................................................................... 6
Chapter 3: Configuration and Certificate Management ...................................................................... 9
Overview................................................................................................................................................ 9
Certificate Management....................................................................................................................... 10
Chapter 4: Medication List................................................................................................................... 13
Overview.............................................................................................................................................. 13
Import a Medication List....................................................................................................................... 14
Medication List View ............................................................................................................................ 19
Add a Medication ................................................................................................................................. 20
Edit a Medication ................................................................................................................................. 22
Delete a Medication ............................................................................................................................. 23
Export a Medication List....................................................................................................................... 25
Medication List Report ......................................................................................................................... 28
Chapter 5: The Library Directory ........................................................................................................ 29
Overview.............................................................................................................................................. 29
Library Directory Conventions.............................................................................................................. 30
Step-by-Step Procedures..................................................................................................................... 31
Chapter 6: Drug Library Management ................................................................................................ 43
Overview.............................................................................................................................................. 43
Drug Library Management Conventions .............................................................................................. 45
Managing Drug Libraries...................................................................................................................... 45
Chapter 7: Hospira MedNet Meds Reports......................................................................................... 61
Overview.............................................................................................................................................. 61
Plum A+ and Plum 360 Drug Library Reports...................................................................................... 63
LifeCare PCA Drug Library Reports..................................................................................................... 73
LifeCare PCA Master Protocol............................................................................................................. 79
SapphirePlus Drug Library Reports ..................................................................................................... 80
Chapter 8: Setting Up CCAs ................................................................................................................ 91
Overview.............................................................................................................................................. 91
Service Lines ....................................................................................................................................... 92
Create a New CCA .............................................................................................................................. 93
Edit a CCA ........................................................................................................................................... 94
View a CCA.......................................................................................................................................... 95
Delete a CCA....................................................................................................................................... 96
Change the Display Order of CCA Names .......................................................................................... 97
Setting Up a Plum 360 ......................................................................................................................... 98
Setting Up a Plum A+ CCA................................................................................................................ 102
Hospira MedNet Meds Software User Guide v

Setting Up a LifeCare PCA CCA........................................................................................................ 104
Setting Up a SapphirePlus CCA ........................................................................................................ 105
Chapter 9: Plum A+, and Plum 360 Medication Entries .................................................................. 111
Overview............................................................................................................................................ 111
Part 1: Plum 360 ................................................................................................................................ 112
Defining Rule Sets ............................................................................................................................. 112
Setting Dose Rate Limits ................................................................................................................... 114
Medication Entry Rules and Conventions .......................................................................................... 116
The Plum 360 Medication Rule Set ................................................................................................... 117
Step-by-step Procedures ................................................................................................................... 120
Working with CCA Medication Entries (Plum 360)............................................................................. 121
Working with the Master Drug Formulary (Plum 360)........................................................................ 134
Part 2: Plum A+.................................................................................................................................. 145
Defining Rule Sets ............................................................................................................................. 145
Setting Dose Rate Limits ................................................................................................................... 147
Medication Entry Rules and Conventions .......................................................................................... 148
The Plum A+ Medication Rule Set..................................................................................................... 149
Step-by-step Procedures ................................................................................................................... 151
Working with CCA Medication Entries (Plum A+) .............................................................................. 152
Working with the Master Drug Formulary (Plum A+) ......................................................................... 161
Chapter 10: LifeCare PCA Medication Entries................................................................................. 171
Overview............................................................................................................................................ 171
Defining Rule Sets ............................................................................................................................. 171
Setting Dose Limits ............................................................................................................................ 172
Medication Entry Rules and Conventions .......................................................................................... 173
The LifeCare PCA Medication Rule Set............................................................................................. 174
Step-by-step Procedures ................................................................................................................... 177
Working with the Master Drug Formulary .......................................................................................... 183
Chapter 11: Setting Up LifeCare PCA Protocols ............................................................................. 191
Overview............................................................................................................................................ 191
Chapter 12: SapphirePlus Medication Entries................................................................................. 203
Defining Rule Sets ............................................................................................................................. 203
Setting Limits ..................................................................................................................................... 208
SapphirePlus Therapy Modes............................................................................................................ 209
Medication Entry Rules and Conventions .......................................................................................... 210
The SapphirePlus Medication Rule Set ............................................................................................. 211
Step-by-step Procedures ................................................................................................................... 216
Working with the Master Drug Formulary .......................................................................................... 224
Chapter 13: Master Infuser Setup ..................................................................................................... 233
Plum 360 Master Infuser Settings...................................................................................................... 233
Plum A+ Master Infuser Settings ....................................................................................................... 236
LifeCare PCA Master Infuser Settings ............................................................................................... 239
SapphirePlus 13.x Master Infuser Settings........................................................................................ 241
SapphirePlus 14.x Master Infuser Settings........................................................................................ 242
Appendix A: Hospira MedNet Integrator .......................................................................................... 243
Overview............................................................................................................................................ 243
Glossary .............................................................................................................................................. 245
Hospira MedNet Meds Software User Guidevi

Chapter 1: Introduction
Chapter 1: Introduction Hospira MedNet™ is a server-based safety software product intended for use in healthcare facilities by trained healthcare professionals to provide valuable bedside guidance by managing IV infusion information with compatible Hospira infusion systems. The Hospira MedNet™ suite of software also includes a separate application, Hospira MedNet™ Meds™.
Hospira MedNet™ software enhances safety at the point of care with highly customizable drug libraries that guides users and help to protect patients by alerting to hard and soft, upper and lower dosing limits intended to help prevent infusion errors. These limits are based on a hospital’s specific IV administration practices.
Hospira MedNet™ software reduces manual programming steps by providing the option to allow pharmacy settings to flow directly into the compatible infusion pumps through the IV Clinical Integration (IVCI) solution. Hospira MedNet™ software connects the pharmacy validated medication order with the infusion pump and the patient’s electronic medical record (EMR), providing the opportunity for automated programming of the infusion pump.
Hospira MedNet™software generates more than 20 different reports based on data, settings, and changes that are automatically and wirelessly collected from the compatible infusion pumps. The generated reports help to turn data into actionable data to provide visibility to clinical practice. Depending on the EMR system capability, automated documentation in the EMR is also supported by Hospira MedNet™.
Hospira MedNet™ software packages consist of the components listed below. The specific components available to you will depend on your institution’s license.
Hospira MedNet™ Administrator™ provides the ability to manage system users, infusers, drug library downloads, infuser software updates, access points, and other configurations.
Hospira MedNet™ Connect™ establishes the connectivity between the Hospira MedNet™ server and the infusers. It incorporates ethernet and wireless components permitting Hospira MedNet™ Meds™ and Hospira MedNet™ Administrator™ to exchange information with infusers.
Hospira MedNet™ Integrator™ provides interfaces to a hospital’s enterprise level applications and serves as the conduit for the exchange of data between infusers, the Hospira MedNet™ server, and a variety of hospital information systems.
Hospira MedNet™ Meds™ provides functionality to the pharmacy for the definition and management of medications, drug libraries, clinical care areas, and infuser configurations.
Hospira MedNet™ Performance™ delivers data from the Hospira MedNet™ server into reports designed for asset management as well as clinical assessment of Hospira MedNet™ use with selectable options to best meet the needs of the user.
Hospira MedNet™ Programmer™ takes medication dispensing orders from the Bar Code Medication Administration (BCMA) system and translates them into operational commands which automatically populate settings on the infuser. For more information, see Hospira MedNet™ Software User Guide, Appendix B.
Hospira MedNet Meds Software User Guide 1
Note: For a list of Hospira MedNet compatible devices approved by country, refer to the Hospira MedNet Device Compatibility Matrix available through your Hospira Support Center.

Chapter 1: Introduction Terminology
TerminologyThis document uses the following conventions:
• References to specific values are approximations only, unless otherwise indicated.• The terms “Hospira MedNet™ Software” and “the Software” are used interchangeably
throughout this manual.
Note: Illustrations and screen representations are for illustrative purposes only and may vary from the actual software. Your computer’s display settings may affect screen representations.
General Warnings and CautionsThe following conventions are used in this user guide to denote warnings or cautions:
Caution: Contains information that could prevent product damage or hardware failure. Failure to observe a caution could result in patient or user injury.
WARNING: Warning messages contain special safety emphasis and must be observed at all times. Failure to observe a warning message is potentially life threatening.
Caution: Federal (USA) law restricts this device to sale by or on the order of a physician or other licensed practitioner.
2 Hospira MedNet Meds Software User Guide
Note: For a list of Hospira MedNet compatible devices approved by country, refer to the Hospira MedNet Device Compatibility Matrix available through your Hospira Support Center.
Computer Management and Security Chapter 1: Introduction
Computer Management and Security• Except for virus data files (typically called “dat” files), do not install upgrades, service packs,
or patches to non-Hospira software on computers on which Hospira MedNet™ Software is installed, except as authorized by Hospira.
• Do not enable automatic updates to operating systems on computers on which Hospira MedNet™ Software is installed.
• Ensure that procedures are in place for backing up and restoring data, and that administrators can successfully restore data from earlier backups.
• Ensure that the network on which Hospira MedNet™ Software is used has effective security procedures in place, including physical and network access control.
• Ensure that user passwords are protected.• Ensure a backup power supply (uninterrupted power source) is available to prevent critical
data loss.
Important: We highly recommend that you regularly backup and purge your database. A database can grow to a large size that will affect the performance of your Hospira MedNet™ system.
Although we suggest to purge a database every four years at a minimum, if you have more than 2,000 infusers it would be wise to consider doing so more often. Complete backup instructions are in the Installation and Configuration Guide or you can consult our Technical Support Center.
Handling Infusers• Refer to the System Operating Manual for the applicable infuser for warnings and cautions
before handling the infusers.
• Use care when handling connectors and cables.
• Avoid twisting or bending cables and connectors.
• Ensure compliance to IEC 60601-1-1 for connecting accessories to medical devices.
Note: The infusion devices compatible with Hospira MedNet will display selectable options based on your licensing and Hospira's compatibility matrix.
Transferring Data• Ensure that only one instance of the Hospira MedNet™ Meds™ software is running on a
computer at a time.• To avoid inconsistencies between drug libraries, and reports, ensure that all infusers are using
the same drug library version.
Hospira MedNet Meds Software User Guide 3
Note: For a list of Hospira MedNet compatible devices approved by country, refer to the Hospira MedNet Device Compatibility Matrix available through your Hospira Support Center.

Chapter 1: Introduction Transferring Data
Notes:
4 Hospira MedNet Meds Software User Guide
Note: For a list of Hospira MedNet compatible devices approved by country, refer to the Hospira MedNet Device Compatibility Matrix available through your Hospira Support Center.
Logging In Chapter 2: Logging In and Out
Chapter 2: Logging In and Out
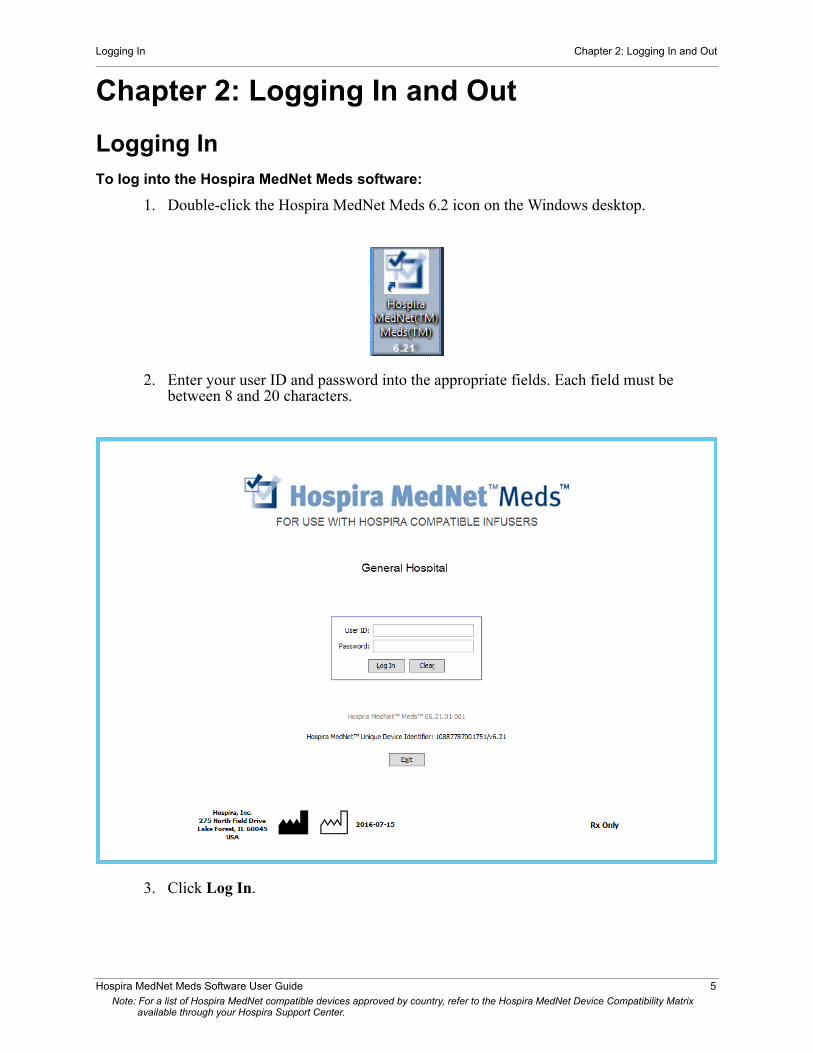
Logging InTo log into the Hospira MedNet Meds software:
1. Double-click the Hospira MedNet Meds 6.2 icon on the Windows desktop.
2. Enter your user ID and password into the appropriate fields. Each field must be between 8 and 20 characters.
3. Click Log In.
Hospira MedNet Meds Software User Guide 5Note: For a list of Hospira MedNet compatible devices approved by country, refer to the Hospira MedNet Device Compatibility Matrix
available through your Hospira Support Center.
Chapter 2: Logging In and Out Logging Out and Exiting
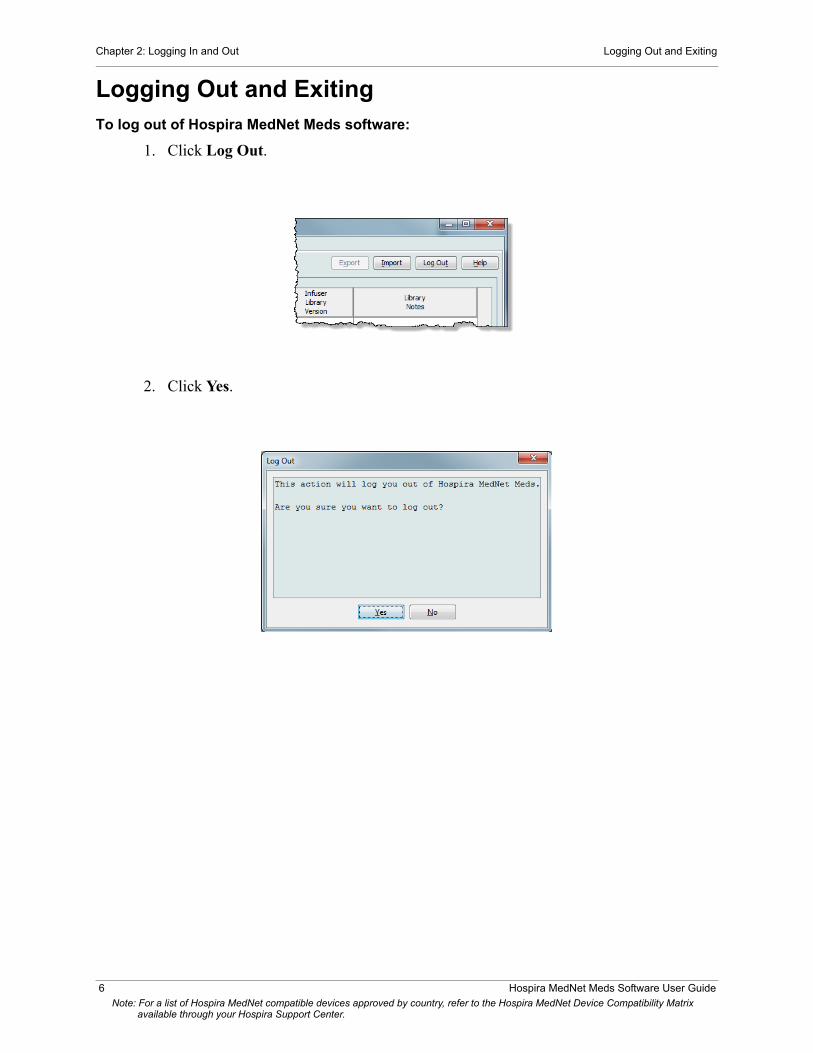
Logging Out and ExitingTo log out of Hospira MedNet Meds software:
1. Click Log Out.
2. Click Yes.
6 Hospira MedNet Meds Software User GuideNote: For a list of Hospira MedNet compatible devices approved by country, refer to the Hospira MedNet Device Compatibility Matrix
available through your Hospira Support Center.

Logging Out and Exiting Chapter 2: Logging In and Out
3. Click Exit.
4. Click Yes.
Note: You will be automatically logged out of the application after 60 minutes of inactivity.
Hospira MedNet Meds Software User Guide 7Note: For a list of Hospira MedNet compatible devices approved by country, refer to the Hospira MedNet Device Compatibility Matrix
available through your Hospira Support Center.

Chapter 2: Logging In and Out Logging Out and Exiting
Notes:
8 Hospira MedNet Meds Software User GuideNote: For a list of Hospira MedNet compatible devices approved by country, refer to the Hospira MedNet Device Compatibility Matrix
available through your Hospira Support Center.

Overview Chapter 3: Configuration and Certificate Management
Chapter 3: Configuration and Certificate Management
OverviewThe configuration view allows you to set either English (United States) or French (Canadian). Once you make a selection, the software will display all information in that language.
Libraries associated with a language will be viewed, edited, imported or finalized in that language option.
For English (United States), the date format is displayed as mmddyyyy, and the distal pressure unit is psi.
For French (Canadian), the date format can be displayed as follows:
• dd/mm/yy• dd/mm/yyyy• dd/mmm/yy• dd/mmm/yyyy
and the distal pressure unit is mmHg.
You will need to navigate to the Configuration tab and make your selection.
Click Save and the appropriate language will be applied immediately.
Note: The language selected in Hospira MedNet Meds will automatically apply to the Hospira MedNet Software.
Hospira MedNet Meds Software User Guide 9
Note: For a list of Hospira MedNet compatible devices approved by country, refer to the Hospira MedNet Device Compatibility Matrix available through your Hospira Support Center.

Chapter 3: Configuration and Certificate Management Certificate Management
Certificate Management
Important: Certificates are required in order to finalize drug libraries and to download a drug library to a Plum 360. Detailed instructions regarding the installation of certificates are available from the Technical Support Center or your local Hospira representative.
Following are the Hospira MedNet supported certificate formats:Suitable for Import:
PKCS #8 allows for several password based encryption algorithms. The supported algorithms are:
• no password• PBEwithMD5andDES• PBEwithSHA1and3KEYDESede• PBEwithSHA1and40BITRC2
Note: You cannot import private keys using PKCS #8
Suitable for Export:
FormatEncoding
ContentsDER encoded binary Base64 PEM
X.509 Yes Yes Certificate only (no private key)
PKCS #7 Yes Yes Certificate chain only (no private key
PKCS #8 Yes Yes Private key only (no certificate)
PKCS #12 Yes N/A Certificate with private key
FormatEncoding
DER encoded binaryContents
X.509 Yes Certificate only (no private key)
PKCS #7 Yes Certificate chain only (no private key)
PKCS #12 Yes Certificate with private key
10 Hospira MedNet Meds Software User Guide
Note: For a list of Hospira MedNet compatible devices approved by country, refer to the Hospira MedNet Device Compatibility Matrix available through your Hospira Support Center.
Certificate Management Chapter 3: Configuration and Certificate Management
We recommend the use of PKCS#12 for easier installation.
The following three files must be installed:
• MedNet (HMSS) certificate (without private key) .cer file • DLE (Hospira MedNet Meds) certificate (with private key) password-protected .p12 file• Root CA certificate - cer file
Important: Certificates have an expiration date and will need to be renewed.
Hospira MedNet Meds Software User Guide 11
Note: For a list of Hospira MedNet compatible devices approved by country, refer to the Hospira MedNet Device Compatibility Matrix available through your Hospira Support Center.
Chapter 3: Configuration and Certificate Management Certificate Management
Notes:
12 Hospira MedNet Meds Software User Guide
Note: For a list of Hospira MedNet compatible devices approved by country, refer to the Hospira MedNet Device Compatibility Matrix available through your Hospira Support Center.
Overview Chapter 4: Medication List
Chapter 4: Medication List
OverviewThe Medication List is the list of medications used by the hospital; it contains important data elements used in the development of drug libraries for the infusers used in your hospital.
In this chapter, you will learn how to create, import, and manage the Medication List. The chapters that follow contain detailed information on developing a drug library.
Note: When a user is in the Medication List, no other user can be in the Medication List or any library. Each library allows only one user at a time. When you are using a library, no other user can be in the Medication List.
Identifying medications in the Medication ListThe Medication List requires each medication to have an External identifier (ID). The External ID is especially important if your Hospira MedNet system is integrated with another system that sends programming information to the infuser. The External ID is used to assure a match between the medication sent by the sending system and the medication rule set used by the Hospira MedNet software.
Considerations for assigning an External ID
If Hospira MedNet is to be integrated with another system (such as a BCMA system) that sends programming information to the infuser (medication, concentration, rate, etc.), each generic name in the Medication List must have a unique External ID. This External ID must be also be used by the sending system (in this case, the BCMA system). This allows, for example, all dopamine products, such as amps, vials, and syringes, to be represented as a single entry in the Medication List referring to the generic name “dopamine.” The corresponding generic level External ID number will vary depending on the BCMA system integrated to Hospira MedNet, for example, catalog code or Multum ID for Cerner Millennium, etc. Your Pharmacy Consultant will work with you to create the correct file for your implementation.
If Hospira MedNet is not to be integrated with another hospital system that sends programming information to the infuser, all that is required is that each item in the Medication List has a corresponding External ID. In this case, you may want to have various manufacturers or package sizes of the same medication represented in the Medication List. Each generic name can appear multiple times as long as each has its own unique External ID. Numeric sequences or charge master identifiers can be used for this purpose.
How External ID is used in Drug Libraries
When a drug library is developed, certain rules (listed below) that involve the External ID are enforced.
Within a drug library, for medication entries in a Clinical Care Area (CCA):
1. There can be only one rule set for each combination of External ID and Concentration.
2. There can be only one rule set for each combination of Displayed Name and Concentration.
Hospira MedNet Meds Software User Guide 13Note: For a list of Hospira MedNet compatible devices approved by country, refer to the Hospira MedNet Device Compatibility Matrix
available through your Hospira Support Center.

Chapter 4: Medication List Import a Medication List
These rules enable both the Hospira MedNet software and the infuser software to positively identify the specific medication rule set in the drug library.
Import a Medication ListA Medication List file may be imported into Hospira MedNet Meds multiple times. Each import file should contain all medications that can be infused even if they have been imported previously.
Formatting the CSV file
Importing a Medication List involves the creation of a Comma Separated Value (.csv) file containing the medication information. Your pharmacy system may support creating a file in this format or in a similar format that can be manipulated in Excel. The file can have 12 columns as specified below, if importing an entire Medication List. However, if you want to edit only the External ID and Generic Names, you can do it through the Export feature as described in Export a Medication List.
a. The first line of the file is ignored by the Medication List Import function. It should contain the field names in the table below.
b. Each subsequent line in the file should include one medication entry per line.c. Each subsequent line in the file must include data in the External ID and Generic
Name fields.
Note: External ID and Generic Name are the only fields in which data is required.
The Medication List can be created as a spreadsheet and saved in .csv format to be imported. An example of a 12-column spreadsheet containing the medication list information is as follows:
Field Name Field Type Number of Characters allowed1
External ID String 20
NDC String 20
Generic Name String 100
Brand Name String 100
Strength Numeric 20
Strength Units String 25
Volume Numeric 20
Volume Units String 25
Therapeutic Class ID String 20
Therapeutic Class Description String 200
Dosage Form ID String 20
Dosage Form Description String 2001 Comma (,), angle bracket (<>), and double-quote (“) characters are not permitted within fields in the import file.
14 Hospira MedNet Meds Software User GuideNote: For a list of Hospira MedNet compatible devices approved by country, refer to the Hospira MedNet Device Compatibility Matrix
available through your Hospira Support Center.
Import a Medication List Chapter 4: Medication List
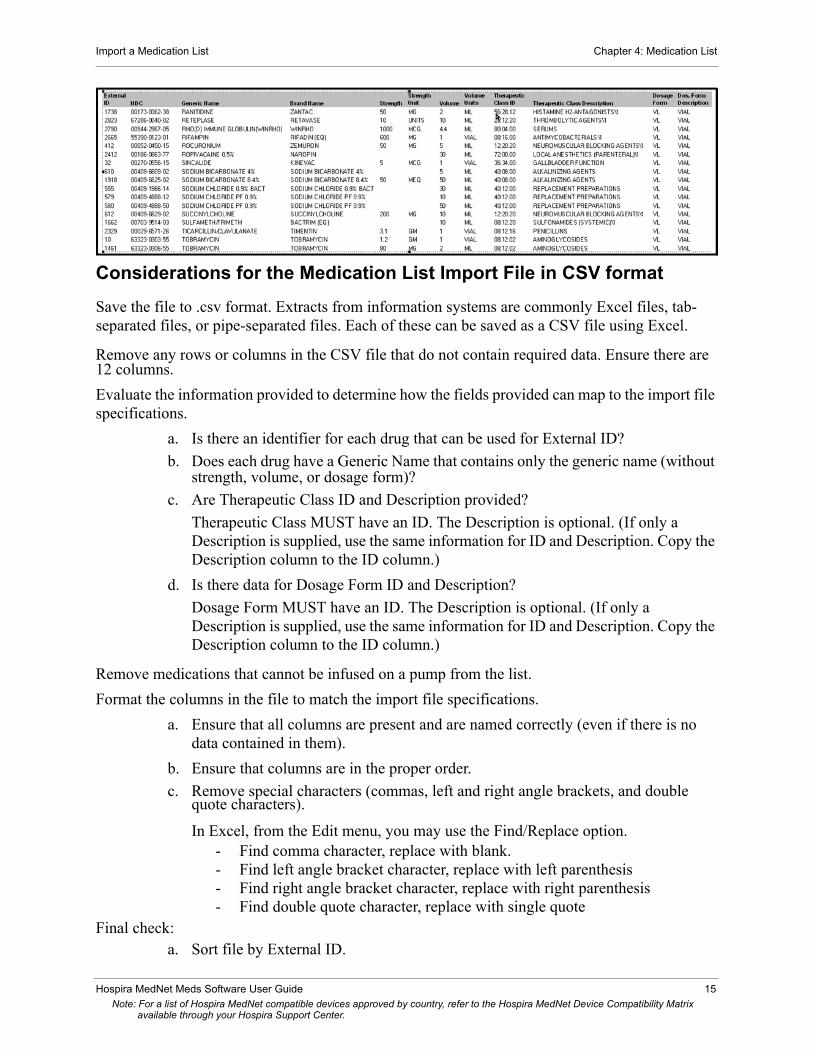
Considerations for the Medication List Import File in CSV format
Save the file to .csv format. Extracts from information systems are commonly Excel files, tab-separated files, or pipe-separated files. Each of these can be saved as a CSV file using Excel.
Remove any rows or columns in the CSV file that do not contain required data. Ensure there are 12 columns.
Evaluate the information provided to determine how the fields provided can map to the import file specifications.
a. Is there an identifier for each drug that can be used for External ID?
b. Does each drug have a Generic Name that contains only the generic name (without strength, volume, or dosage form)?
c. Are Therapeutic Class ID and Description provided?
Therapeutic Class MUST have an ID. The Description is optional. (If only a Description is supplied, use the same information for ID and Description. Copy the Description column to the ID column.)
d. Is there data for Dosage Form ID and Description?
Dosage Form MUST have an ID. The Description is optional. (If only a Description is supplied, use the same information for ID and Description. Copy the Description column to the ID column.)
Remove medications that cannot be infused on a pump from the list.
Format the columns in the file to match the import file specifications.
a. Ensure that all columns are present and are named correctly (even if there is no data contained in them).
b. Ensure that columns are in the proper order.
c. Remove special characters (commas, left and right angle brackets, and double quote characters).
In Excel, from the Edit menu, you may use the Find/Replace option.- Find comma character, replace with blank.- Find left angle bracket character, replace with left parenthesis- Find right angle bracket character, replace with right parenthesis- Find double quote character, replace with single quote
Final check:a. Sort file by External ID.
Hospira MedNet Meds Software User Guide 15Note: For a list of Hospira MedNet compatible devices approved by country, refer to the Hospira MedNet Device Compatibility Matrix
available through your Hospira Support Center.

Chapter 4: Medication List Import a Medication List
b. A particular External ID should only appear in one row in the file.c. Ensure that each medication has data in both the External ID and Generic Name
columns.
d. A Generic Name can appear multiple times in the file with different External IDs.
Importing the Medication List
Important: Importing the Medication List replaces any medications already in the list. Complete instructions are provided in the next segment, Working with the Medication List, on page 18.
Once the file has been formatted as described above:
1. From the Medication List view, select Import.
The File to Import screen displays.
2. Navigate to the location of the Medication List to import.
16 Hospira MedNet Meds Software User GuideNote: For a list of Hospira MedNet compatible devices approved by country, refer to the Hospira MedNet Device Compatibility Matrix
available through your Hospira Support Center.

Import a Medication List Chapter 4: Medication List
3. Click Select. A pop-up window displays a preview of changes to the Medication List. Medications that are being added are displayed in green. If the Medication List currently contains medications, you will see medications that are being deleted displayed in red and medications that are being updated displayed in blue.
4. If satisfied with the preview, click OK.
5. To prevent the import, click Cancel.
6. If you selected OK, a message confirming the import displays.
7. Click OK.
Note: It is not possible to undo the import of the medication list once it has been completed.
Hospira MedNet Meds Software User Guide 17Note: For a list of Hospira MedNet compatible devices approved by country, refer to the Hospira MedNet Device Compatibility Matrix
available through your Hospira Support Center.
Chapter 4: Medication List Import a Medication List
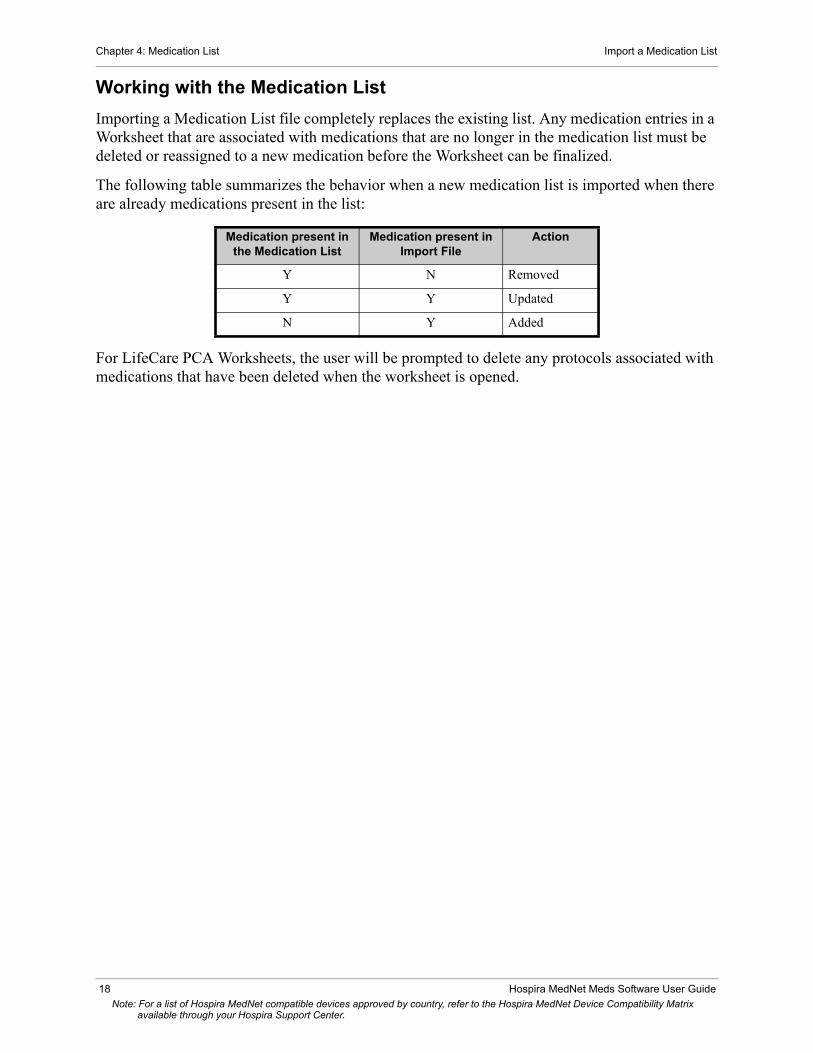
Working with the Medication List
Importing a Medication List file completely replaces the existing list. Any medication entries in a Worksheet that are associated with medications that are no longer in the medication list must be deleted or reassigned to a new medication before the Worksheet can be finalized.
The following table summarizes the behavior when a new medication list is imported when there are already medications present in the list:
For LifeCare PCA Worksheets, the user will be prompted to delete any protocols associated with medications that have been deleted when the worksheet is opened.
Medication present in the Medication List
Medication present in Import File
Action
Y N Removed
Y Y Updated
N Y Added
18 Hospira MedNet Meds Software User GuideNote: For a list of Hospira MedNet compatible devices approved by country, refer to the Hospira MedNet Device Compatibility Matrix
available through your Hospira Support Center.

Medication List View Chapter 4: Medication List
Medication List ViewThe Medication List view displays:
• Generic Name• Brand Name• External ID• Strength• Volume• Dosage Form• Received/Updated• Status
You can filter the medications displayed by:
• active medications• active and pending medications• pending medications
with• any generic name or External ID • generic names beginning with (any character)• External IDs beginning with (any character)
Hospira MedNet Meds Software User Guide 19Note: For a list of Hospira MedNet compatible devices approved by country, refer to the Hospira MedNet Device Compatibility Matrix
available through your Hospira Support Center.

Chapter 4: Medication List Add a Medication
Add a Medication1. Click the Medications tab.
2. Click Add.
3. Enter the medication name into the Generic Name field. This is a mandatory field.
4. Enter the Brand Name (optional field).
5. Enter the External ID. This is a mandatory field.
20 Hospira MedNet Meds Software User GuideNote: For a list of Hospira MedNet compatible devices approved by country, refer to the Hospira MedNet Device Compatibility Matrix
available through your Hospira Support Center.

Add a Medication Chapter 4: Medication List
6. Enter the following optional information, if needed:
• NDC (National Drug Code)• Strength - Amount and Unit• Volume - Amount and Unit• Therapeutic Class Code and Description (click on a row in the table to select)• Dosage Form Code and Description (click on a row in the table to select)
Note: The contents of the Therapeutic Class and Dosage Form tables are determined by the information in the Medication List import file.
Status, Source, Created On, Last Edited On, and Last Edited By, will be filled automatically after the medication has been added.
Caution: Generic names cannot contain the special characters greater than (>), less than (<), ampersand (&), double quotes (“), and single quotes (‘).
7. Click Save.
Hospira MedNet Meds Software User Guide 21Note: For a list of Hospira MedNet compatible devices approved by country, refer to the Hospira MedNet Device Compatibility Matrix
available through your Hospira Support Center.

Chapter 4: Medication List Edit a Medication
Edit a Medication 1. From the Medication List view, highlight the medication you want to edit.
2. Click Edit.
3. Make the changes needed.
4. Click Save.
22 Hospira MedNet Meds Software User GuideNote: For a list of Hospira MedNet compatible devices approved by country, refer to the Hospira MedNet Device Compatibility Matrix
available through your Hospira Support Center.
Delete a Medication Chapter 4: Medication List
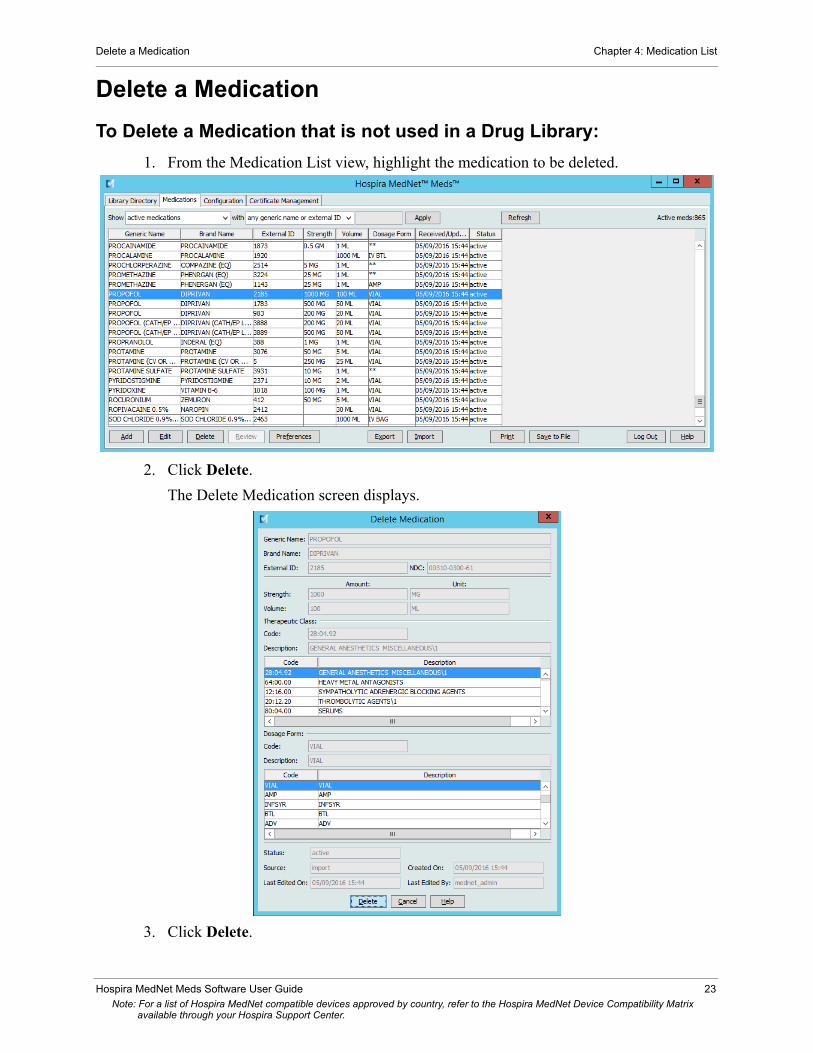
Delete a Medication
To Delete a Medication that is not used in a Drug Library:
1. From the Medication List view, highlight the medication to be deleted.
2. Click Delete.
The Delete Medication screen displays.
3. Click Delete.
Hospira MedNet Meds Software User Guide 23Note: For a list of Hospira MedNet compatible devices approved by country, refer to the Hospira MedNet Device Compatibility Matrix
available through your Hospira Support Center.

Chapter 4: Medication List Delete a Medication
The confirmation screen indicates the medication is not used in any drug library.
4. If you still wish to delete the medication, click Yes.
To Delete a Medication that is used in a Drug Library:
1. From the Medication List view, highlight the medication to be deleted.
The Delete Medication pop-up displays.
2. Click Delete.
The pop-up indicates the Drug Libraries that contain the medication.
3. After reading the message, if you still wish to delete the medication, click Yes.
24 Hospira MedNet Meds Software User GuideNote: For a list of Hospira MedNet compatible devices approved by country, refer to the Hospira MedNet Device Compatibility Matrix
available through your Hospira Support Center.

Export a Medication List Chapter 4: Medication List
Export a Medication ListBy selecting Export, you can export a file to a location of your choice.
1. From the Medication List view, select Export.
The Select Export File Content screen displays.
2. Select All Medication Fields or Only External ID and Generic Names.
Note: Selecting to export only the external ID and Generic Names allows you to edit those two fields and then re-import them into the Medication List.
3. Click OK. The Export to File screen displays.
Hospira MedNet Meds Software User Guide 25Note: For a list of Hospira MedNet compatible devices approved by country, refer to the Hospira MedNet Device Compatibility Matrix
available through your Hospira Support Center.
Chapter 4: Medication List Export a Medication List
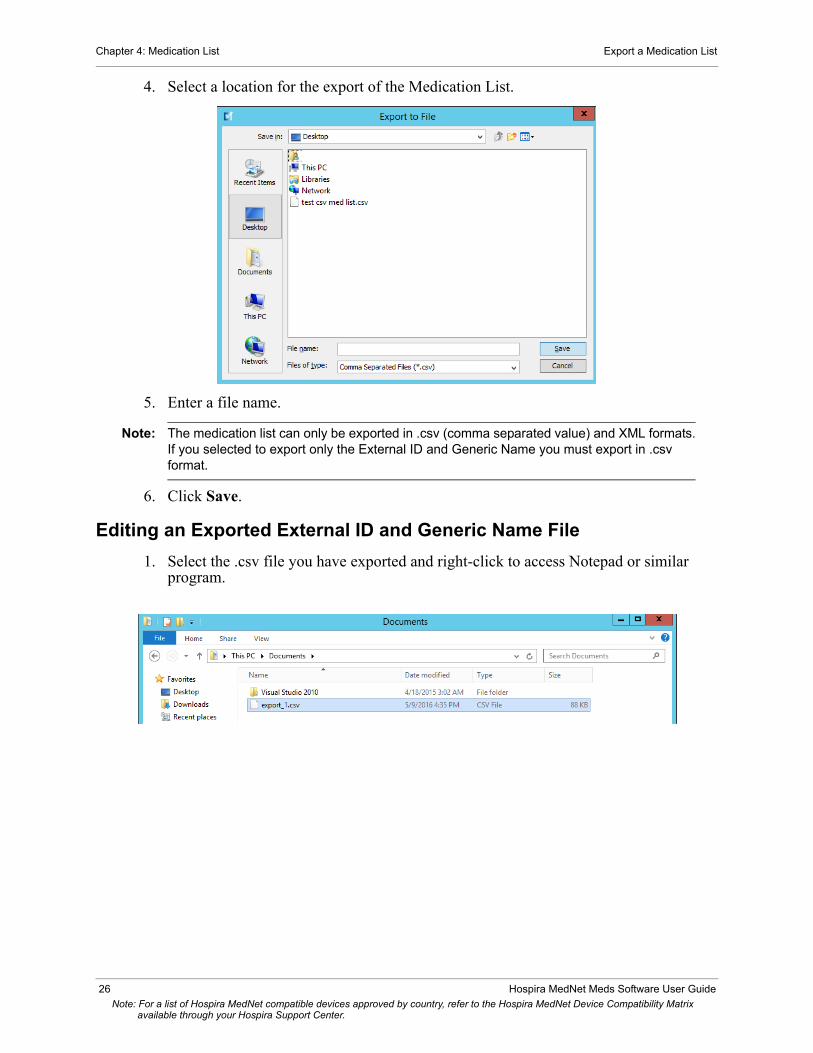
4. Select a location for the export of the Medication List.
5. Enter a file name.
Note: The medication list can only be exported in .csv (comma separated value) and XML formats. If you selected to export only the External ID and Generic Name you must export in .csv format.
6. Click Save.
Editing an Exported External ID and Generic Name File
1. Select the .csv file you have exported and right-click to access Notepad or similar program.
26 Hospira MedNet Meds Software User GuideNote: For a list of Hospira MedNet compatible devices approved by country, refer to the Hospira MedNet Device Compatibility Matrix
available through your Hospira Support Center.
Export a Medication List Chapter 4: Medication List
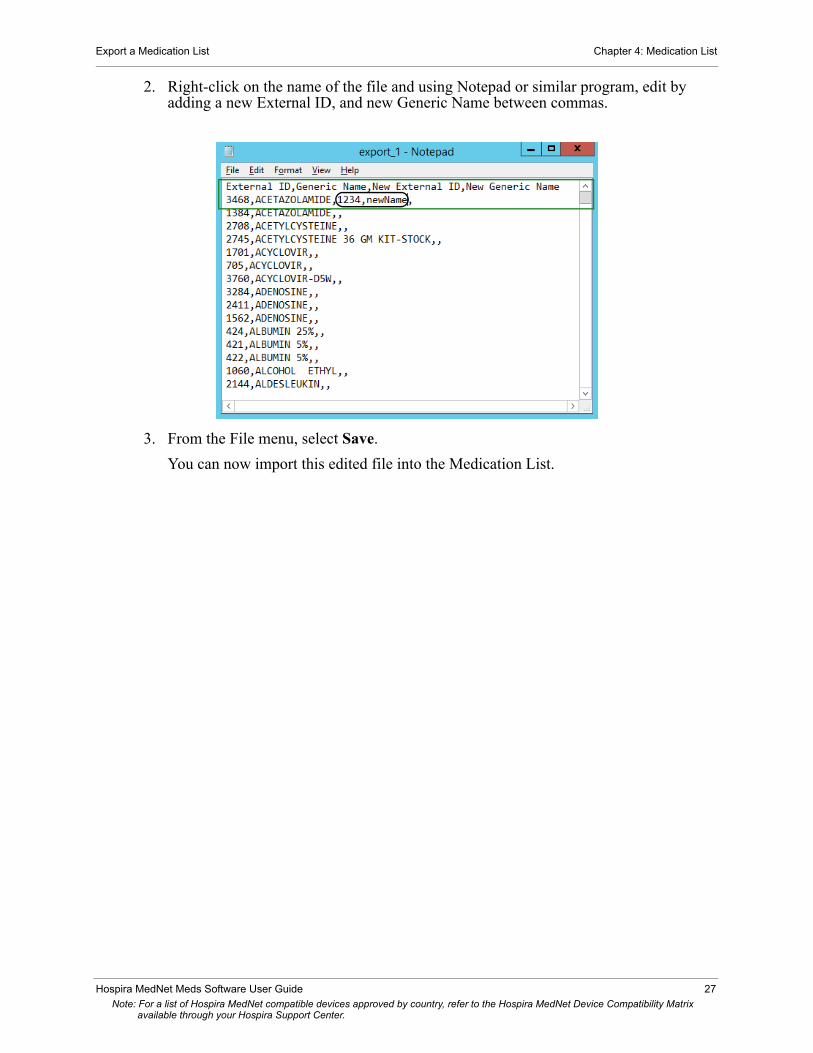
2. Right-click on the name of the file and using Notepad or similar program, edit by adding a new External ID, and new Generic Name between commas.
3. From the File menu, select Save.
You can now import this edited file into the Medication List.
Hospira MedNet Meds Software User Guide 27Note: For a list of Hospira MedNet compatible devices approved by country, refer to the Hospira MedNet Device Compatibility Matrix
available through your Hospira Support Center.
Chapter 4: Medication List Medication List Report
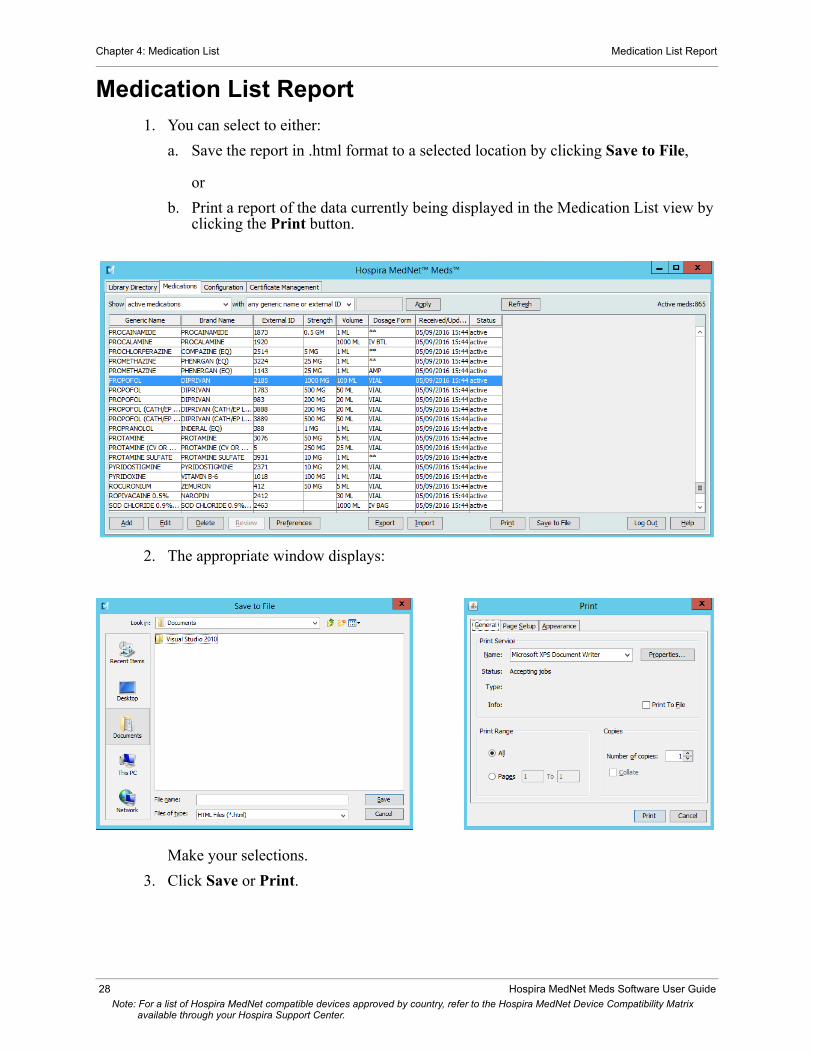
Medication List Report1. You can select to either:
a. Save the report in .html format to a selected location by clicking Save to File,
or
b. Print a report of the data currently being displayed in the Medication List view by clicking the Print button.
2. The appropriate window displays:
Make your selections.
3. Click Save or Print.
28 Hospira MedNet Meds Software User GuideNote: For a list of Hospira MedNet compatible devices approved by country, refer to the Hospira MedNet Device Compatibility Matrix
available through your Hospira Support Center.

Overview Chapter 5: The Library Directory
Chapter 5: The Library Directory
OverviewA drug library is a collection of medication names, rule sets, Clinical Care Areas (CCAs), and infuser settings. Hospira MedNet Meds software stores drug libraries in three ways:
• Worksheets• Active Libraries• Archived Libraries
A Worksheet is a library that has not yet been approved (finalized) for transfer to infusers. You can store multiple Worksheets in the database; however, you may only edit one Worksheet at a time.
An Active library is a Worksheet that has been finalized. (To learn more about finalization, see Finalizing Worksheets on page 59.) Once a Worksheet has been finalized, no more changes can be made to it. Only an Active library can be transferred to infusers. Only one Active library per infuser type can exist at a time in the Hospira MedNet Meds software database.
An Archived library is a previously Active library that has been deactivated for transfer to infusers. Archived libraries can be copied but cannot be edited or downloaded to infusers.
Unless otherwise specified (for example, “Active library”), the term library used alone refers to Worksheets and to both Active and Archived libraries.
Finalizing is the process of converting a Worksheet into an Active library.
When adding a Worksheet, you need to set up CCA names, infuser settings, and medication entries in order to create a complete library.
You can create Worksheets and libraries in the following ways:
• By creating new, blank Worksheets• By copying existing libraries, Archived libraries, or Worksheets• By importing special files that Hospira MedNet Meds software is able to convert into a
Worksheet
Hospira MedNet Meds Software User Guide 29
Note: For a list of Hospira MedNet compatible devices approved by country, refer to the Hospira MedNet Device Compatibility Matrix available through your Hospira Support Center.
Chapter 5: The Library Directory Library Directory Conventions
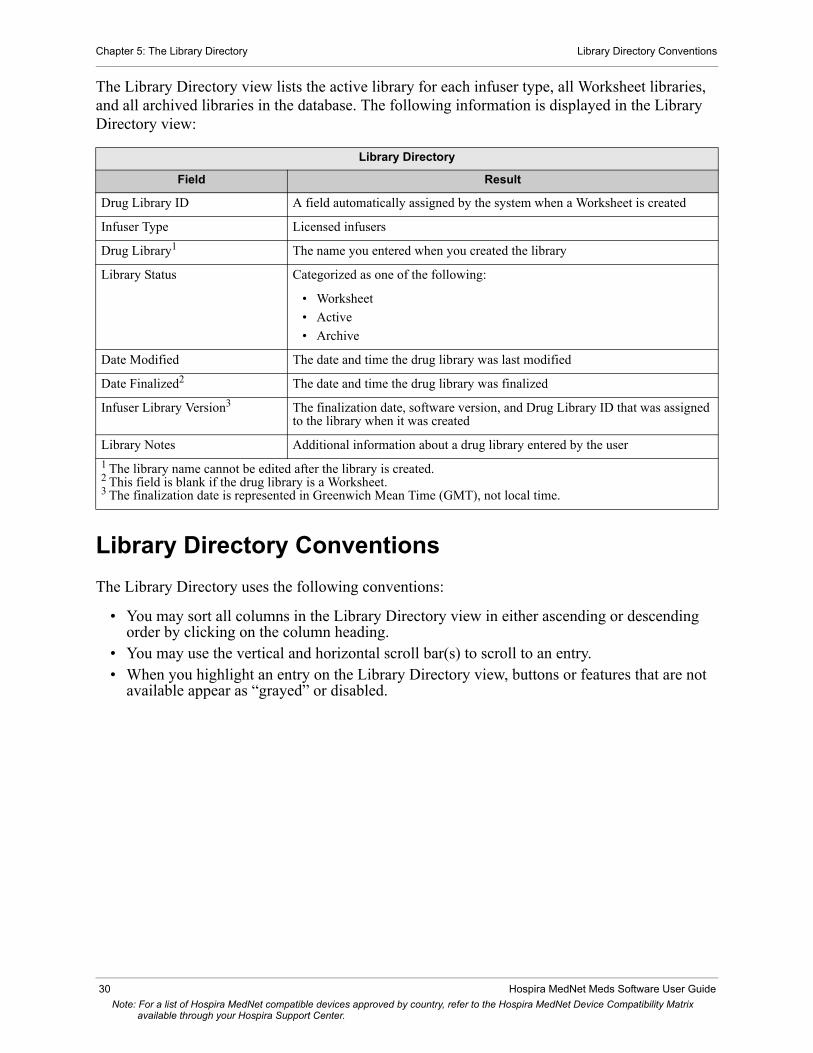
The Library Directory view lists the active library for each infuser type, all Worksheet libraries, and all archived libraries in the database. The following information is displayed in the Library Directory view:
Library Directory Conventions
The Library Directory uses the following conventions:
• You may sort all columns in the Library Directory view in either ascending or descending order by clicking on the column heading.
• You may use the vertical and horizontal scroll bar(s) to scroll to an entry.• When you highlight an entry on the Library Directory view, buttons or features that are not
available appear as “grayed” or disabled.
Library Directory
Field Result
Drug Library ID A field automatically assigned by the system when a Worksheet is created
Infuser Type Licensed infusers
Drug Library1 The name you entered when you created the library
Library Status Categorized as one of the following:
• Worksheet
• Active
• Archive
Date Modified The date and time the drug library was last modified
Date Finalized2 The date and time the drug library was finalized
Infuser Library Version3 The finalization date, software version, and Drug Library ID that was assigned to the library when it was created
Library Notes Additional information about a drug library entered by the user
1 The library name cannot be edited after the library is created.2 This field is blank if the drug library is a Worksheet.3 The finalization date is represented in Greenwich Mean Time (GMT), not local time.
30 Hospira MedNet Meds Software User Guide
Note: For a list of Hospira MedNet compatible devices approved by country, refer to the Hospira MedNet Device Compatibility Matrix available through your Hospira Support Center.

Step-by-Step Procedures Chapter 5: The Library Directory
Step-by-Step ProceduresThe following section provides step-by-step procedures that enable you to manage the Library Directory. In this section you will learn how to do the following:
• Navigate to the Library Directory list view• Create, edit, and add a note to a Worksheet• Delete Worksheets and archived drug libraries • View a drug library• Copy a drug library• Import a drug library• Export a drug library
To navigate to the Library Directory list view, do the following:
1. Double-click the Hospira MedNet Meds software icon on the Windows desktop.
2. Enter your User ID and Password.
Note: In order to log in to the application and perform the procedures in this chapter, you must have the appropriate access privileges.
3. Click Log in.
The Library Directory view appears.
Note: You will not see any entries in the list until you create a Worksheet or import a library.
Hospira MedNet Meds Software User Guide 31
Note: For a list of Hospira MedNet compatible devices approved by country, refer to the Hospira MedNet Device Compatibility Matrix available through your Hospira Support Center.

Chapter 5: The Library Directory Step-by-Step Procedures
Create a Worksheet
1. On the Library Directory view, click Create.
The Create Worksheet screen appears.
2. From the Infuser Type drop-down list, select an infuser type.
3. In the Drug Library field, type a name for the library.
4. Enter a Note, if desired, for the library.
Note: Your note may contain information such as “For P & T Review” or other helpful hints to keep you organized as you build the library.
5. Click OK.
The Create Worksheet screen closes and your entry appears in the Library Directory view.
32 Hospira MedNet Meds Software User Guide
Note: For a list of Hospira MedNet compatible devices approved by country, refer to the Hospira MedNet Device Compatibility Matrix available through your Hospira Support Center.
Step-by-Step Procedures Chapter 5: The Library Directory
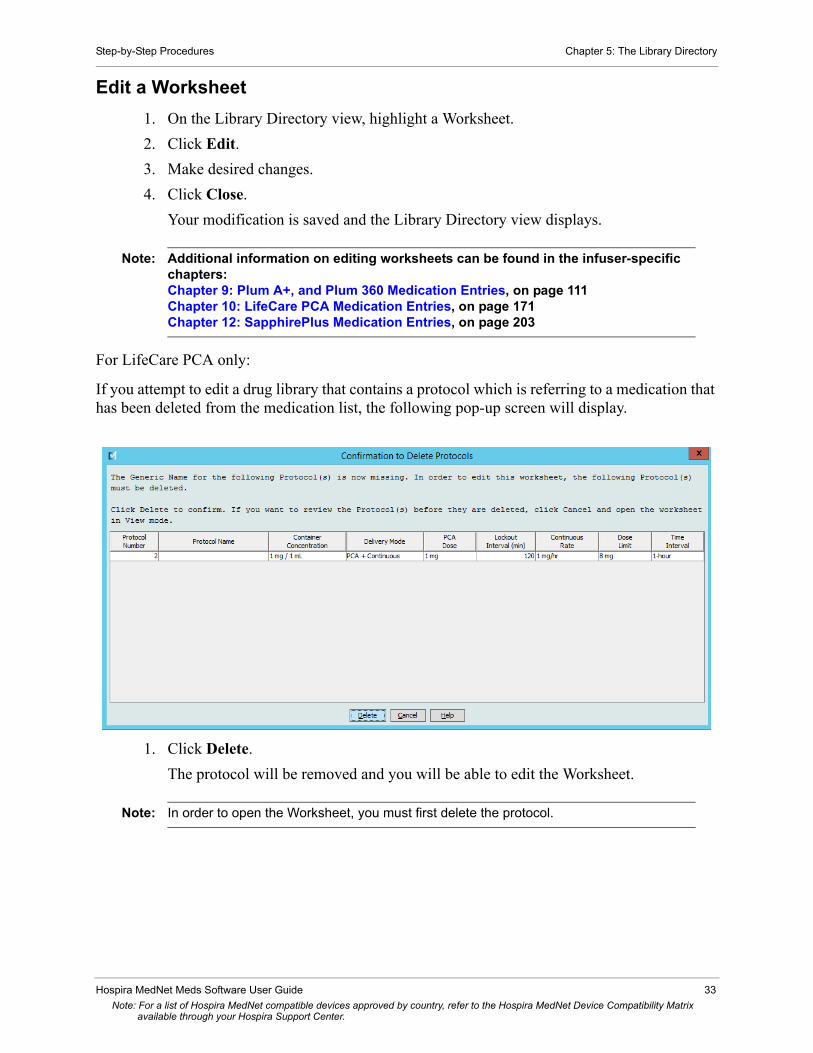
Edit a Worksheet
1. On the Library Directory view, highlight a Worksheet.
2. Click Edit.
3. Make desired changes.
4. Click Close.
Your modification is saved and the Library Directory view displays.
Note: Additional information on editing worksheets can be found in the infuser-specific chapters:Chapter 9: Plum A+, and Plum 360 Medication Entries, on page 111Chapter 10: LifeCare PCA Medication Entries, on page 171Chapter 12: SapphirePlus Medication Entries, on page 203
For LifeCare PCA only:
If you attempt to edit a drug library that contains a protocol which is referring to a medication that has been deleted from the medication list, the following pop-up screen will display.
1. Click Delete.
The protocol will be removed and you will be able to edit the Worksheet.
Note: In order to open the Worksheet, you must first delete the protocol.
Hospira MedNet Meds Software User Guide 33
Note: For a list of Hospira MedNet compatible devices approved by country, refer to the Hospira MedNet Device Compatibility Matrix available through your Hospira Support Center.
Chapter 5: The Library Directory Step-by-Step Procedures
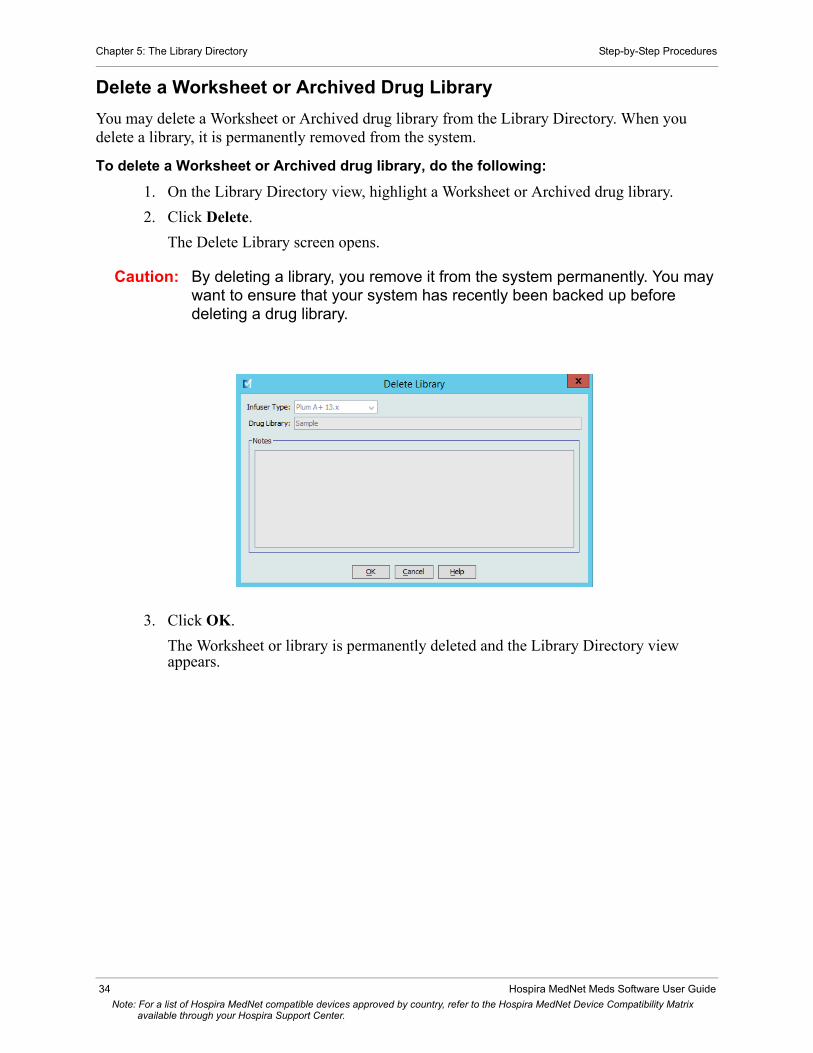
Delete a Worksheet or Archived Drug Library
You may delete a Worksheet or Archived drug library from the Library Directory. When you delete a library, it is permanently removed from the system.
To delete a Worksheet or Archived drug library, do the following:
1. On the Library Directory view, highlight a Worksheet or Archived drug library.
2. Click Delete.
The Delete Library screen opens.
Caution: By deleting a library, you remove it from the system permanently. You may want to ensure that your system has recently been backed up before deleting a drug library.
3. Click OK.
The Worksheet or library is permanently deleted and the Library Directory view appears.
34 Hospira MedNet Meds Software User Guide
Note: For a list of Hospira MedNet compatible devices approved by country, refer to the Hospira MedNet Device Compatibility Matrix available through your Hospira Support Center.
Step-by-Step Procedures Chapter 5: The Library Directory
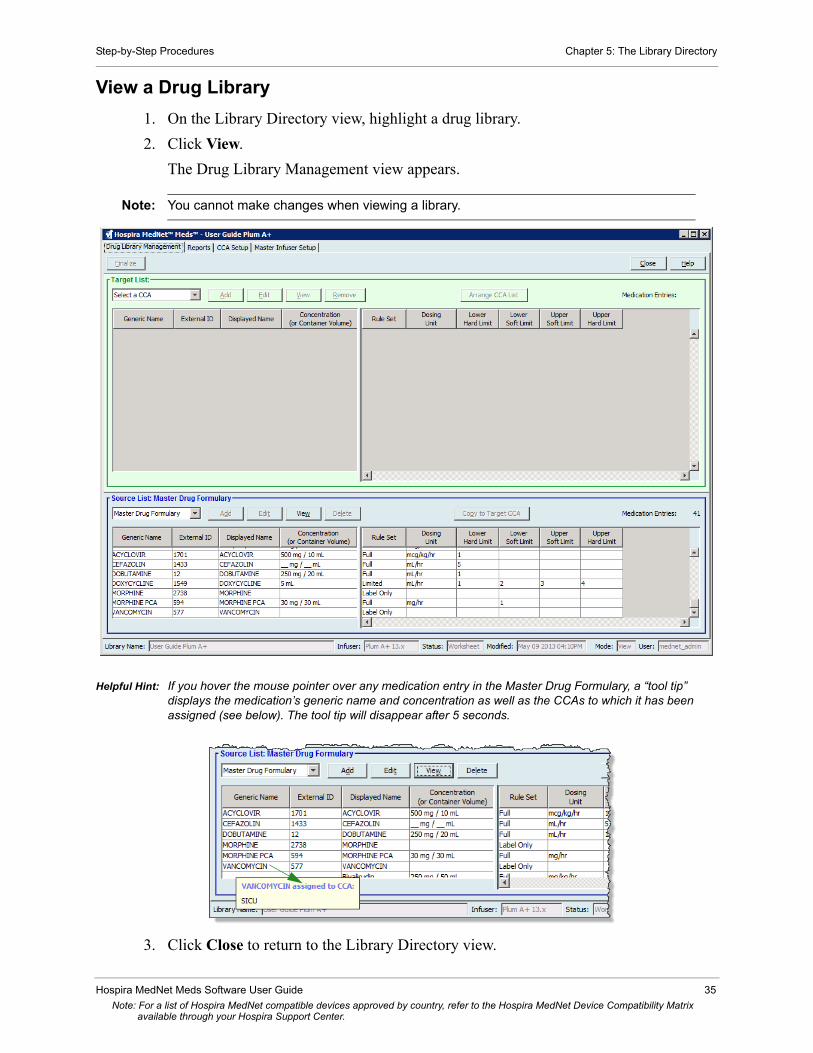
View a Drug Library
1. On the Library Directory view, highlight a drug library.
2. Click View.
The Drug Library Management view appears.
Note: You cannot make changes when viewing a library.
Helpful Hint: If you hover the mouse pointer over any medication entry in the Master Drug Formulary, a “tool tip” displays the medication’s generic name and concentration as well as the CCAs to which it has been assigned (see below). The tool tip will disappear after 5 seconds.
3. Click Close to return to the Library Directory view.
Hospira MedNet Meds Software User Guide 35
Note: For a list of Hospira MedNet compatible devices approved by country, refer to the Hospira MedNet Device Compatibility Matrix available through your Hospira Support Center.

Chapter 5: The Library Directory Step-by-Step Procedures
Copy an Archived Library, Active Library, or Worksheet
In order to facilitate creating or updating a drug library, you may copy Active or Archived drug libraries as well as Worksheets. When you copy a drug library, all medication rule sets, infuser settings, and CCA settings are included. The copied drug library appears as a new entry on the Library Directory view.
1. On the Library Directory view, highlight the desired drug library entry.
2. Click Copy.
The Copy Library screen opens.
3. In the Drug Library field, type the name of the new drug library as you wish it to appear on the Library Directory view.
Note: You may enter information into the Notes field, if needed.
4. Click OK.
Your drug library is copied. The new Worksheet appears on the Library Directory view.
Note: Copying is allowed only between libraries for the same infuser type.
36 Hospira MedNet Meds Software User Guide
Note: For a list of Hospira MedNet compatible devices approved by country, refer to the Hospira MedNet Device Compatibility Matrix available through your Hospira Support Center.

Step-by-Step Procedures Chapter 5: The Library Directory
Add or Edit Notes to a Worksheet.
1. On the Library Directory view, highlight a Worksheet.
2. Click Notes.
The Notes screen opens.
Note: The Infuser Type and Drug Library fields cannot be edited.
3. Type the note or edit text in the Notes field.
4. Click OK. The note is saved and appears in the Library Notes field of the Library Directory.
Note: The Notes field cannot be modified after a drug library is finalized.
Hospira MedNet Meds Software User Guide 37
Note: For a list of Hospira MedNet compatible devices approved by country, refer to the Hospira MedNet Device Compatibility Matrix available through your Hospira Support Center.

Chapter 5: The Library Directory Step-by-Step Procedures
Export an Archived Library, Active Library, or Worksheet
Note: Only users with the appropriate login privileges are able to export files.
You can export the rule sets from Worksheets, Archived libraries, and Active libraries as XML (Extensible Markup Language) files.
Note: If the exported XML file is modified, it cannot be re-imported into Hospira MedNet Meds.
You can also export a Worksheet, Archived library, or Active library as a Comma Separated (CSV) file. CSV filenames end in “.csv.” The file can be used to view rule sets in Microsoft Excel.
Note: Comma Separated files cannot be re-imported into Hospira MedNet Meds.
When exporting a Worksheet, Archived library, or Active library, only medication entries that have been assigned to CCAs will be exported; medication entries that are listed only in the Master Drug Formulary are not exported.
The Master Infuser and CCA Settings are included in exported XML files. When a LifeCare PCA Worksheet is exported in the CSV format, the bar code values will appear to begin with a single quote (‘) character if the file is viewed in Microsoft Excel.
Note: Protocols are not exported with an XML file for a LifeCare PCA Drug Library. Protocols must be manually re-entered after a PCA Drug Library is imported back into Hospira MedNet Meds.
You may export a drug library to an external location on your network or hard drive.
1. On the Library Directory view, highlight the desired drug library.
2. Click Export.
38 Hospira MedNet Meds Software User Guide
Note: For a list of Hospira MedNet compatible devices approved by country, refer to the Hospira MedNet Device Compatibility Matrix available through your Hospira Support Center.

Step-by-Step Procedures Chapter 5: The Library Directory
The Export Library screen opens.
3. Click Browse.
4. In the File Name field, type in a path and file name to use for the exported file.
5. Select either XML Files or Comma Separated Files (CSV) from the drop-down list.
6. Click OK.
The Export Library screen closes. The drug library is exported to the desired location.
Hospira MedNet Meds Software User Guide 39
Note: For a list of Hospira MedNet compatible devices approved by country, refer to the Hospira MedNet Device Compatibility Matrix available through your Hospira Support Center.

Chapter 5: The Library Directory Step-by-Step Procedures
Import a Drug Library
You may import a drug library from an XML file created by Hospira MedNet Meds. When you import a drug library, it becomes a Worksheet. The software fully validates the data ranges, precision, and relationships before adding imported data to the database.
1. From the Library Directory view, click Import.
The Import Library screen opens.
2. In the Import From screen area, select the Infuser Type that corresponds to the library you are importing.
3. In the File Name: field, type in the path and file name of the drug library you wish to import.
Helpful Hint: You may search for the file name and path by clicking Browse and navigating to the desired file.
4. In the Import To screen area, select the Infuser Type that corresponds to the library you are importing.
5. In the Drug Library field, type in a name for the imported library, as you would like it to appear on the Library Directory view.
Note: You may enter information into the Notes field, if needed.
6. Click OK.
40 Hospira MedNet Meds Software User Guide
Note: For a list of Hospira MedNet compatible devices approved by country, refer to the Hospira MedNet Device Compatibility Matrix available through your Hospira Support Center.

Step-by-Step Procedures Chapter 5: The Library Directory
The Import Library screen closes and the newly imported Worksheet appears on the Library Directory view.
Note: A Drug Library that contains one or more Medication Entries referring to a medication which is not in the Medication List will be imported. In order for the library to be finalized, all medication entries will need to be assigned to a medication in the Medication List.
If the file you are attempting to import contains unusable data, the software displays an error message and does not import the file.
WARNING: If you make changes to an exported XML file, the file cannot be imported.
Hospira MedNet Meds Software User Guide 41
Note: For a list of Hospira MedNet compatible devices approved by country, refer to the Hospira MedNet Device Compatibility Matrix available through your Hospira Support Center.

Chapter 5: The Library Directory Step-by-Step Procedures
Notes:
42 Hospira MedNet Meds Software User Guide
Note: For a list of Hospira MedNet compatible devices approved by country, refer to the Hospira MedNet Device Compatibility Matrix available through your Hospira Support Center.
Overview Chapter 6: Drug Library Management
Chapter 6: Drug Library Management
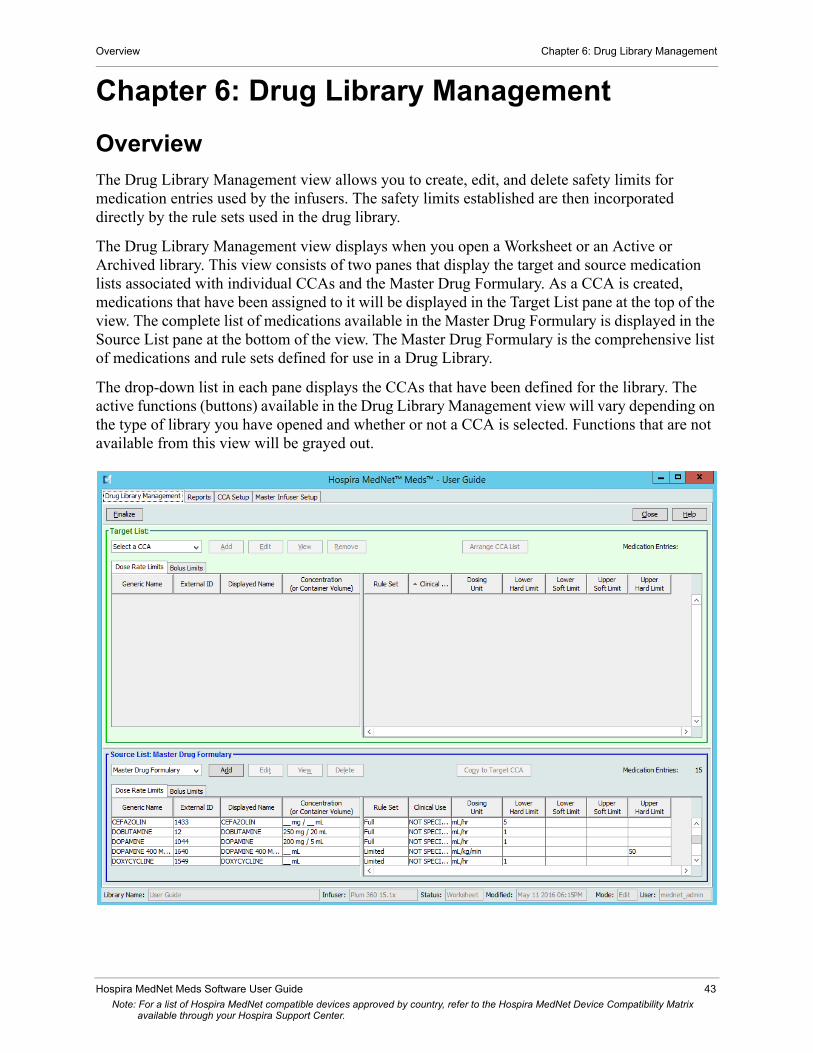
OverviewThe Drug Library Management view allows you to create, edit, and delete safety limits for medication entries used by the infusers. The safety limits established are then incorporated directly by the rule sets used in the drug library.
The Drug Library Management view displays when you open a Worksheet or an Active or Archived library. This view consists of two panes that display the target and source medication lists associated with individual CCAs and the Master Drug Formulary. As a CCA is created, medications that have been assigned to it will be displayed in the Target List pane at the top of the view. The complete list of medications available in the Master Drug Formulary is displayed in the Source List pane at the bottom of the view. The Master Drug Formulary is the comprehensive list of medications and rule sets defined for use in a Drug Library.
The drop-down list in each pane displays the CCAs that have been defined for the library. The active functions (buttons) available in the Drug Library Management view will vary depending on the type of library you have opened and whether or not a CCA is selected. Functions that are not available from this view will be grayed out.
Hospira MedNet Meds Software User Guide 43
Note: For a list of Hospira MedNet compatible devices approved by country, refer to the Hospira MedNet Device Compatibility Matrix available through your Hospira Support Center.

Chapter 6: Drug Library Management Overview
Note: The Master Drug Formulary (MDF) contains a list of all medications available for use by the CCAs in the library. The MDF list functions as a “parent” to the medication entries in the Target List.
To create and complete a drug library suitable for transfer to an infuser, you will need to:
• Define the desired CCAs.
See: Chapter 8: Setting Up CCAs, on page 91
• Create the medication entries.
See: Chapter 9: Plum A+, and Plum 360 Medication Entries, on page 111
See: Chapter 10: LifeCare PCA Medication Entries, on page 171
See: Chapter 12: SapphirePlus Medication Entries, on page 203
• Arrange the medication list in the desired order.
See: Changing the Display Order of Medication Entries, on page 48
• Create protocols for the LifeCare PCA infuser - Optional.
See: Chapter 11: Setting Up LifeCare PCA Protocols, on page 191
• Define the Master Infuser setting.
See: Chapter 13: Master Infuser Setup, on page 233
44 Hospira MedNet Meds Software User Guide
Note: For a list of Hospira MedNet compatible devices approved by country, refer to the Hospira MedNet Device Compatibility Matrix available through your Hospira Support Center.

Drug Library Management Conventions Chapter 6: Drug Library Management
Drug Library Management ConventionsThe Drug Library Management view uses the following conventions:
• The fields in the Target List and Source List panes are identical.• The list grid includes a moveable split bar located after the fourth column. The remaining
columns scroll under the first three. • The Target List and Source List panes include a read-only field that displays the total number
of medications in a selected list. • All columns are re-sizeable and may be sorted in ascending or descending order by clicking
on the column header.• The view includes a read-only bottom status bar that displays the Library Name, Infuser,
Status, Modified [date], Mode, and User.• Commas (,) double quotes (“) and angle brackets (< >) are considered invalid characters and
cannot be used in a name.
Managing Drug LibrariesThe following procedures enable you to manage drug libraries for each infuser. The data that you see in the target and source panes will be different for each infuser and is consistent with the medication entry for the infuser.
Target List Procedures
• Viewing Medication Entries in a CCA• Removing Medication Entries from a CCA• Changing the Display Order of Medication Entries
Source List Procedures
• Viewing Medication Entries in the Master Drug Formulary• Copying Medication Entries from One CCA to Another• Deleting Medication Entries from the Master Drug Formulary
General Procedures
• Finalizing Worksheets• Closing Worksheets
Caution: In the case of an auto-program, if the Hospira MedNet Software is unable to locate a matching rule set, the order will be sent to the infuser under “No Drug Selected” (infuser- and CCA-dependent) and the order data will be transmitted to the infuser. No Rule Set Limits will be available for this order. If the order is a partial auto-program, the remaining parameters will be manually programmed. See the specific infuser operating manual for additional information.
Hospira MedNet Meds Software User Guide 45
Note: For a list of Hospira MedNet compatible devices approved by country, refer to the Hospira MedNet Device Compatibility Matrix available through your Hospira Support Center.
Chapter 6: Drug Library Management Managing Drug Libraries
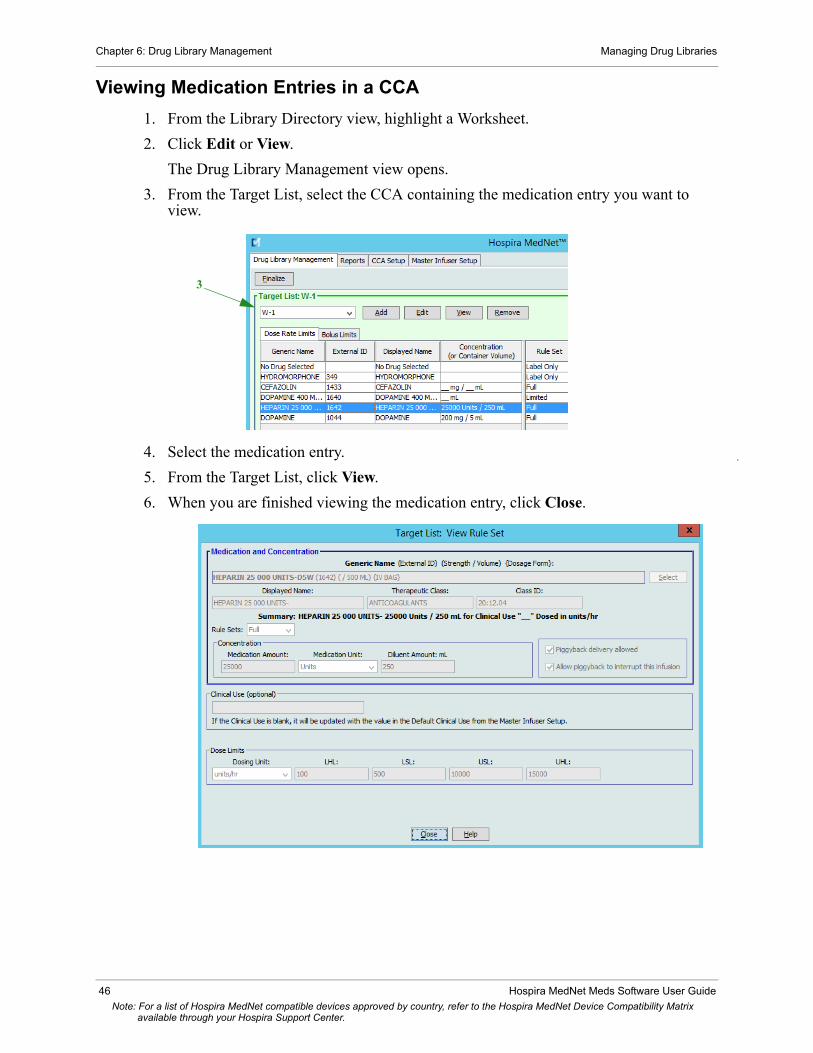
Viewing Medication Entries in a CCA
1. From the Library Directory view, highlight a Worksheet.
2. Click Edit or View.
The Drug Library Management view opens.
3. From the Target List, select the CCA containing the medication entry you want to view.
4. Select the medication entry.
5. From the Target List, click View.
6. When you are finished viewing the medication entry, click Close.
3
46 Hospira MedNet Meds Software User Guide
Note: For a list of Hospira MedNet compatible devices approved by country, refer to the Hospira MedNet Device Compatibility Matrix available through your Hospira Support Center.

Managing Drug Libraries Chapter 6: Drug Library Management
Removing Medication Entries from a CCA
Note: Only users with the appropriate login privileges are able to add and remove medication entries from CCAs.
1. From the Library Directory view, open a Worksheet for editing.
2. From the Target List, select the CCA containing the medication entry you want to remove.
3. Select the medication entry to remove.
4. From the Target List, click Remove.
5. At Confirm Remove from CCA, click Remove.
Note: You can delete one medication at a time from the Master Drug Formulary or you can delete several at a time by highlighting them, using the shift key or control key, and deleting them.
2
Hospira MedNet Meds Software User Guide 47
Note: For a list of Hospira MedNet compatible devices approved by country, refer to the Hospira MedNet Device Compatibility Matrix available through your Hospira Support Center.

Chapter 6: Drug Library Management Managing Drug Libraries
Changing the Display Order of Medication Entries
Note: Only users with the appropriate login privileges are able to change the display order of medication entries.
Important: The order in which the medications appear in the target list panel may not be the order in which the medications will appear on the infuser.
To change or view the order in which medication entries are displayed:
1. From the Target List, select a CCA.
2. Click Arrange CCA List.
3. Select the medication entry you want to move.
Helpful Hint: You can select multiple medications to move by highlighting them.
4. Click Move Up or Move Down to position the selected medication entries.
5. Repeat for all medication entries as needed.
6. Click Save.
Medication entries newly added to a CCA are placed at the bottom of the assigned medications list.
48 Hospira MedNet Meds Software User Guide
Note: For a list of Hospira MedNet compatible devices approved by country, refer to the Hospira MedNet Device Compatibility Matrix available through your Hospira Support Center.

Managing Drug Libraries Chapter 6: Drug Library Management
Sorting the medication entries within a CCA:
1. From the Library Directory view, open a Worksheet for editing.
2. On the Drug Library Management view, select a CCA from the Target List.
3. Click Arrange CCA List.
4. On the pop-up that appears, from the Sort By list, select the primary sorting criteria from the list. The selection will vary according to the infuser.
5. From the Then By list, select the secondary sorting criteria, if desired.
6. Click Sort by.
Hospira MedNet Meds Software User Guide 49
Note: For a list of Hospira MedNet compatible devices approved by country, refer to the Hospira MedNet Device Compatibility Matrix available through your Hospira Support Center.
Chapter 6: Drug Library Management Managing Drug Libraries
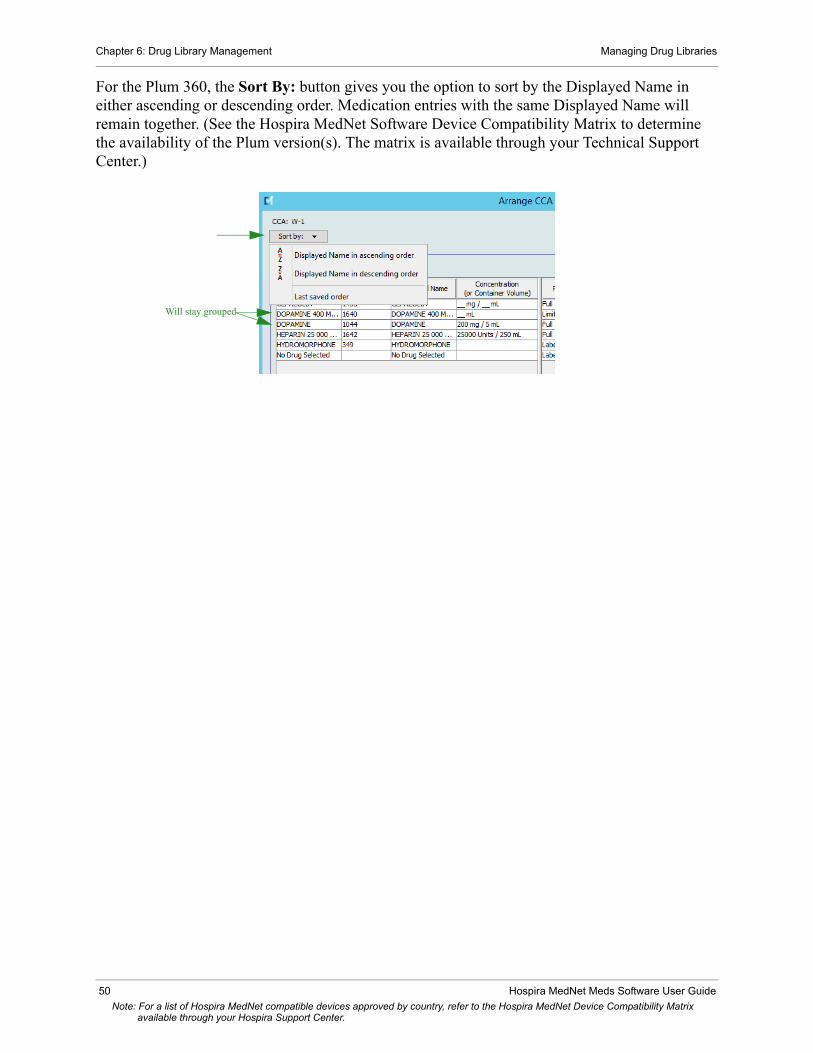
For the Plum 360, the Sort By: button gives you the option to sort by the Displayed Name in either ascending or descending order. Medication entries with the same Displayed Name will remain together. (See the Hospira MedNet Software Device Compatibility Matrix to determine the availability of the Plum version(s). The matrix is available through your Technical Support Center.)
Will stay grouped
50 Hospira MedNet Meds Software User Guide
Note: For a list of Hospira MedNet compatible devices approved by country, refer to the Hospira MedNet Device Compatibility Matrix available through your Hospira Support Center.

Managing Drug Libraries Chapter 6: Drug Library Management
Viewing Medication Entries in the Master Drug Formulary
To view a medication entry in the Master Drug Formulary:
1. Select Master Drug Formulary as the source location.
Helpful Hint: If you hover your mouse pointer over any medication entry in the Master Drug Formulary, a “tool tip” displays the medication’s generic name and concentration as well as the CCAs to which it has been assigned. The tool tip will disappear after 5 seconds.
2. Select the medication entry you want to view.
3. From the Source List, click View.
4. When you are finished viewing, click Close.
Helpful Hint: If you are viewing an Active or Archived library, you may also double-click the medication entry to view it.
Hospira MedNet Meds Software User Guide 51
Note: For a list of Hospira MedNet compatible devices approved by country, refer to the Hospira MedNet Device Compatibility Matrix available through your Hospira Support Center.

Chapter 6: Drug Library Management Managing Drug Libraries
Keeping or Clearing Rule Sets for Medication Entries
1. Highlight a medication entry with existing rule sets, in either the Source List Master Drug Formulary or Target List.
2. Click Edit.
The selected medication entry displays with its rule sets.
52 Hospira MedNet Meds Software User Guide
Note: For a list of Hospira MedNet compatible devices approved by country, refer to the Hospira MedNet Device Compatibility Matrix available through your Hospira Support Center.

Managing Drug Libraries Chapter 6: Drug Library Management
3. Click Select.
At this point, you will be able to either apply the current Rule Set to another medication or select the medication highlighted and clear its current Rule Set.
Hospira MedNet Meds Software User Guide 53
Note: For a list of Hospira MedNet compatible devices approved by country, refer to the Hospira MedNet Device Compatibility Matrix available through your Hospira Support Center.

Chapter 6: Drug Library Management Managing Drug Libraries
4. If you click Select Medication and CLEAR Current Rule Set, a confirmation message displays: Rule set will be reset to default values.
5. Click OK and the medication entry selected displays but the rule set fields are now empty.
6. You can now fill in the new rule set and then click Save and Close when satisfied or use the Cancel button.
7. If you want to keep the rule set of the medication entry highlighted but want to apply that rule set to another medication:
• Highlight the “new” medication entry
Helpful Hint: To select the medication, you can use the scroll bar or type the first letter(s) of the medication or the entire name next to Show generic names beginning with. You can also find the medication by external ID if you use the drop-down button and select to show the medication using the External ID, then entering the External ID.
• Click Select Medication and KEEP Current Rule Set
A confirmation message displays: Review rule set values before saving this rule set.
8. Click OK.
9. The new entry displays. Click Save and Close if the entry is to your satisfaction. If not, use the Cancel button.
54 Hospira MedNet Meds Software User Guide
Note: For a list of Hospira MedNet compatible devices approved by country, refer to the Hospira MedNet Device Compatibility Matrix available through your Hospira Support Center.
Managing Drug Libraries Chapter 6: Drug Library Management
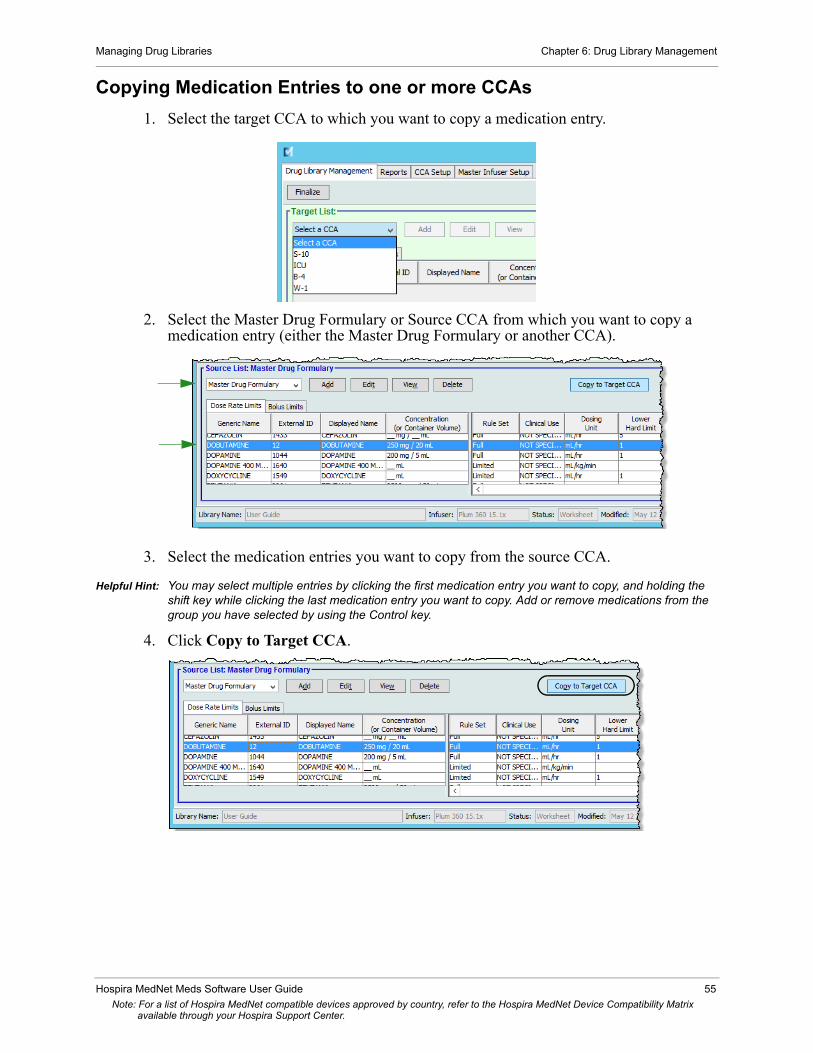
Copying Medication Entries to one or more CCAs
1. Select the target CCA to which you want to copy a medication entry.
2. Select the Master Drug Formulary or Source CCA from which you want to copy a medication entry (either the Master Drug Formulary or another CCA).
3. Select the medication entries you want to copy from the source CCA.
Helpful Hint: You may select multiple entries by clicking the first medication entry you want to copy, and holding the shift key while clicking the last medication entry you want to copy. Add or remove medications from the group you have selected by using the Control key.
4. Click Copy to Target CCA.
Hospira MedNet Meds Software User Guide 55
Note: For a list of Hospira MedNet compatible devices approved by country, refer to the Hospira MedNet Device Compatibility Matrix available through your Hospira Support Center.

Chapter 6: Drug Library Management Managing Drug Libraries
5. Verify you have selected the correct medication entries.
6. Click Copy to copy the selected medication entries to the target CCA.
Note: The maximum number of medication entries in a CCA is 25 for a LifeCare PCA, and 150 for the Plum A+. For certain Plum infusers licensed for Drug Library Size Level 2, a CCA can contain up to 400 medication entries. (See the Hospira MedNet Software Device Compatibility Matrix to determine the availability of the Plum version. The matrix is available through the Technical Support Center).
Note: Duplicate or conflicting medication entries cannot be copied.
56 Hospira MedNet Meds Software User Guide
Note: For a list of Hospira MedNet compatible devices approved by country, refer to the Hospira MedNet Device Compatibility Matrix available through your Hospira Support Center.

Managing Drug Libraries Chapter 6: Drug Library Management
Deleting Medication Entries from the Master Drug Formulary
Note: Deleted medication entries are permanently removed from the Master Drug Formulary and from all CCAs in which they appear.
Only users with the appropriate login privileges are able to delete medication entries from the Master Drug Formulary.
1. Select Master Drug Formulary as the Source List.
2. From the Source List, select the medication entry you want to delete.
3. Click Delete.
4. From the Source List: Delete Rule Set window, click Delete.
Hospira MedNet Meds Software User Guide 57
Note: For a list of Hospira MedNet compatible devices approved by country, refer to the Hospira MedNet Device Compatibility Matrix available through your Hospira Support Center.
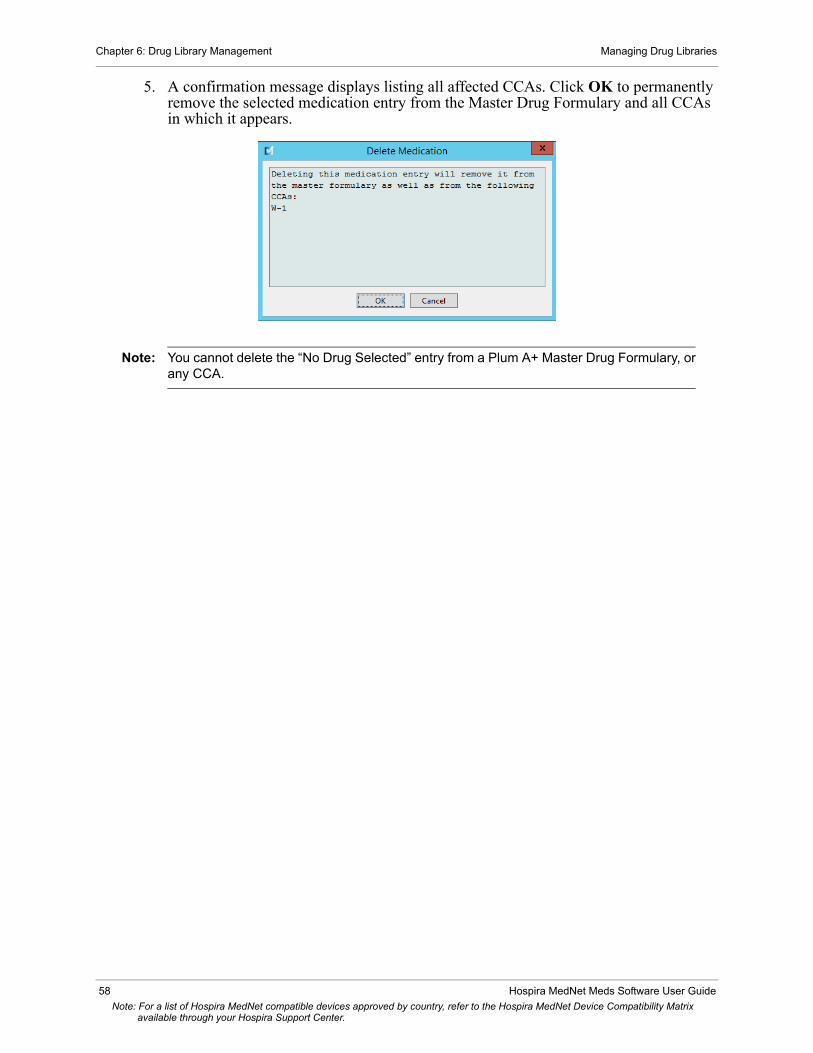
Chapter 6: Drug Library Management Managing Drug Libraries
5. A confirmation message displays listing all affected CCAs. Click OK to permanently remove the selected medication entry from the Master Drug Formulary and all CCAs in which it appears.
Note: You cannot delete the “No Drug Selected” entry from a Plum A+ Master Drug Formulary, or any CCA.
58 Hospira MedNet Meds Software User Guide
Note: For a list of Hospira MedNet compatible devices approved by country, refer to the Hospira MedNet Device Compatibility Matrix available through your Hospira Support Center.

Managing Drug Libraries Chapter 6: Drug Library Management
Finalizing Worksheets
Note: Before finalizing a Worksheet, we recommend that a qualified person such as a hospital pharmacist or a multidisciplinary committee of clinicians review the drug library for accuracy, per hospital policy.
Only users with the appropriate login privileges are able to finalize a Worksheet.
Certificates are required in order to finalize drug libraries.
To finalize a Worksheet:
Note: The Generic Name and External ID of a medication entry must be present in the Master Drug Formulary for the Worksheet to be finalized.
1. From the Drug Library Management view, click Finalize.
Note: Once the finalization process begins, it cannot be stopped or undone.
2. Click OK to finalize the Worksheet.
3. A progress bar appears briefly.
Hospira MedNet Meds Software User Guide 59
Note: For a list of Hospira MedNet compatible devices approved by country, refer to the Hospira MedNet Device Compatibility Matrix available through your Hospira Support Center.
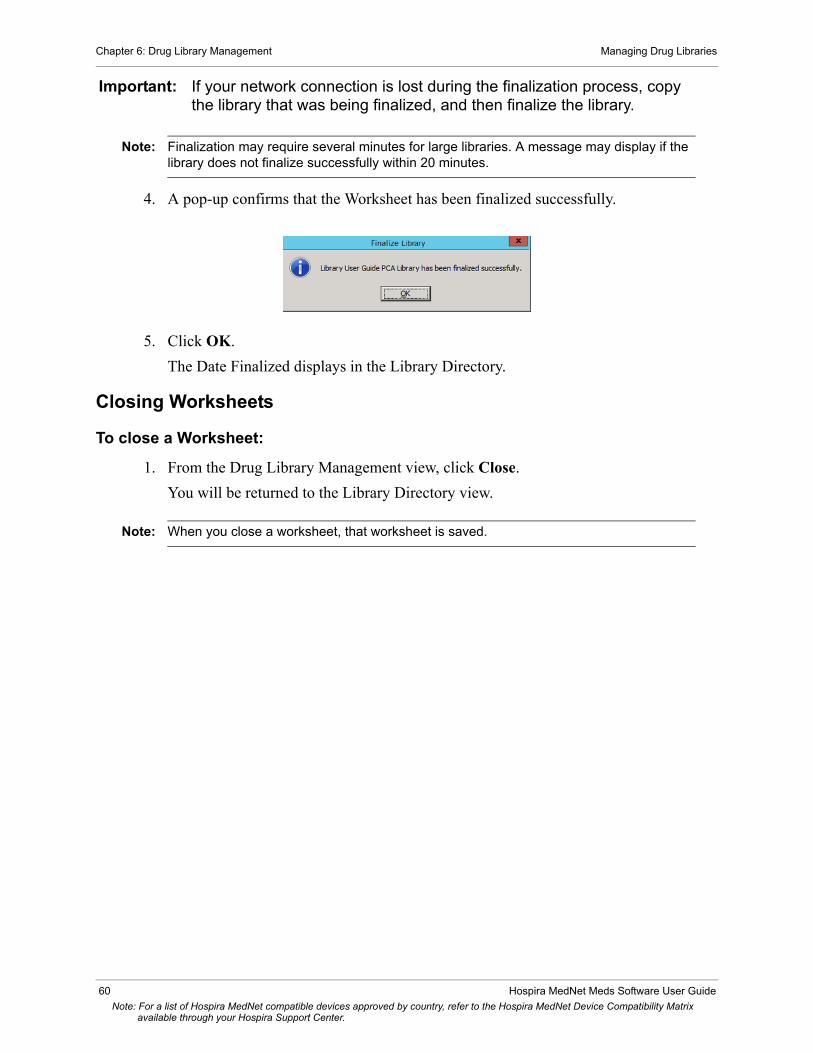
Chapter 6: Drug Library Management Managing Drug Libraries
Important: If your network connection is lost during the finalization process, copy the library that was being finalized, and then finalize the library.
Note: Finalization may require several minutes for large libraries. A message may display if the library does not finalize successfully within 20 minutes.
4. A pop-up confirms that the Worksheet has been finalized successfully.
5. Click OK.
The Date Finalized displays in the Library Directory.
Closing Worksheets
To close a Worksheet:
1. From the Drug Library Management view, click Close.
You will be returned to the Library Directory view.
Note: When you close a worksheet, that worksheet is saved.
60 Hospira MedNet Meds Software User Guide
Note: For a list of Hospira MedNet compatible devices approved by country, refer to the Hospira MedNet Device Compatibility Matrix available through your Hospira Support Center.

Overview Chapter 7: Hospira MedNet Meds Reports
Chapter 7: Hospira MedNet Meds Reports
OverviewThe Hospira MedNet Meds Reports view allows you to create and print reports on drug libraries for the licensed infusers. For individual report details, refer to the report by name later in this chapter.
Note: For information about the Hospira MedNet Software reports, see Chapter 16: Reports in the Hospira MedNet Software User Guide.
Report Conventions
The following conventions are common to all reports:
• Users with the appropriate logon privileges have access to the Reports View.• Drop-down lists display all valid selections.• Fields appear blank when no data is available.
Report Details
Reports may span multiple pages and are navigable using the vertical and horizontal scroll bars.
All Drug Library reports display the following information:
Additional details will vary depending on the infuser you select, as described later in this chapter.
The reports will also reflect the date format and distal pressure specific to the configuration you selected.
Note: The structure of reports from Hospira MedNet Meds cannot be altered or configured by the user.
Licensed Infusers
Field Description
Drug Library The name of the drug library or Worksheet
Infuser Type The type of infuser
Date Finalized The date or time when the Active library or Archive was finalized (not available for Worksheets)
Library State The state of the library: Active, Archive, or Worksheet
Hospira MedNet Meds Software User Guide 61Note: For a list of Hospira MedNet compatible devices approved by country, refer to the Hospira MedNet Device Compatibility Matrix
available through your Hospira Support Center.

Chapter 7: Hospira MedNet Meds Reports Overview
To display the Reports page:
1. Open a Worksheet or library. (For instructions on opening a Worksheet or library, see Chapter 5: The Library Directory, on page 29.)
2. Click the Reports tab.
3. Select a report from the Choose a report drop-down list.
The report selection will vary depending on the infuser, as described further in this chapter.
62 Hospira MedNet Meds Software User GuideNote: For a list of Hospira MedNet compatible devices approved by country, refer to the Hospira MedNet Device Compatibility Matrix
available through your Hospira Support Center.

Plum A+ and Plum 360 Drug Library Reports Chapter 7: Hospira MedNet Meds Reports
Plum A+ and Plum 360 Drug Library ReportsThe following reports are available:
• Drug Library• CCA Drug Library• Master Infuser & CCA Settings
Plum 360 Drug Library
This report displays detailed information on all medications in the Plum 360 Master Drug Formulary.
Plum 360 with Bolus
Hospira MedNet Meds Software User Guide 63Note: For a list of Hospira MedNet compatible devices approved by country, refer to the Hospira MedNet Device Compatibility Matrix
available through your Hospira Support Center.
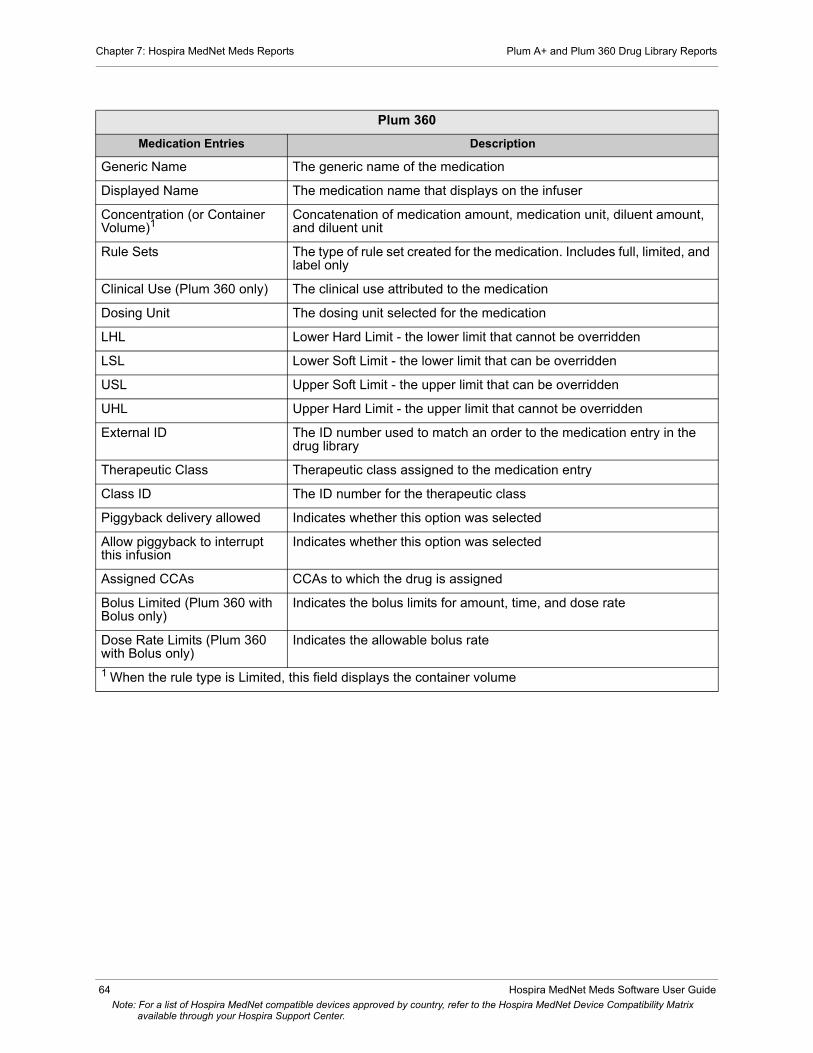
Chapter 7: Hospira MedNet Meds Reports Plum A+ and Plum 360 Drug Library Reports
Plum 360
Medication Entries Description
Generic Name The generic name of the medication
Displayed Name The medication name that displays on the infuser
Concentration (or Container Volume)1
Concatenation of medication amount, medication unit, diluent amount, and diluent unit
Rule Sets The type of rule set created for the medication. Includes full, limited, and label only
Clinical Use (Plum 360 only) The clinical use attributed to the medication
Dosing Unit The dosing unit selected for the medication
LHL Lower Hard Limit - the lower limit that cannot be overridden
LSL Lower Soft Limit - the lower limit that can be overridden
USL Upper Soft Limit - the upper limit that can be overridden
UHL Upper Hard Limit - the upper limit that cannot be overridden
External ID The ID number used to match an order to the medication entry in the drug library
Therapeutic Class Therapeutic class assigned to the medication entry
Class ID The ID number for the therapeutic class
Piggyback delivery allowed Indicates whether this option was selected
Allow piggyback to interrupt this infusion
Indicates whether this option was selected
Assigned CCAs CCAs to which the drug is assigned
Bolus Limited (Plum 360 with Bolus only)
Indicates the bolus limits for amount, time, and dose rate
Dose Rate Limits (Plum 360 with Bolus only)
Indicates the allowable bolus rate
1 When the rule type is Limited, this field displays the container volume
64 Hospira MedNet Meds Software User GuideNote: For a list of Hospira MedNet compatible devices approved by country, refer to the Hospira MedNet Device Compatibility Matrix
available through your Hospira Support Center.

Plum A+ and Plum 360 Drug Library Reports Chapter 7: Hospira MedNet Meds Reports
Plum A+ Drug Library
This report displays detailed information on all medications in the Plum A+ Master Drug Formulary.
Plum A+
Medication Entries Description
Generic Name The generic name of the medication
Displayed Name The medication name that displays on the infuser
Concentration (or Container Volume)1
Concatenation of medication amount, medication unit, diluent amount, and diluent unit
Rule Sets The type of rule set created for the medication. Includes full, limited, and label only
Hospira MedNet Meds Software User Guide 65Note: For a list of Hospira MedNet compatible devices approved by country, refer to the Hospira MedNet Device Compatibility Matrix
available through your Hospira Support Center.
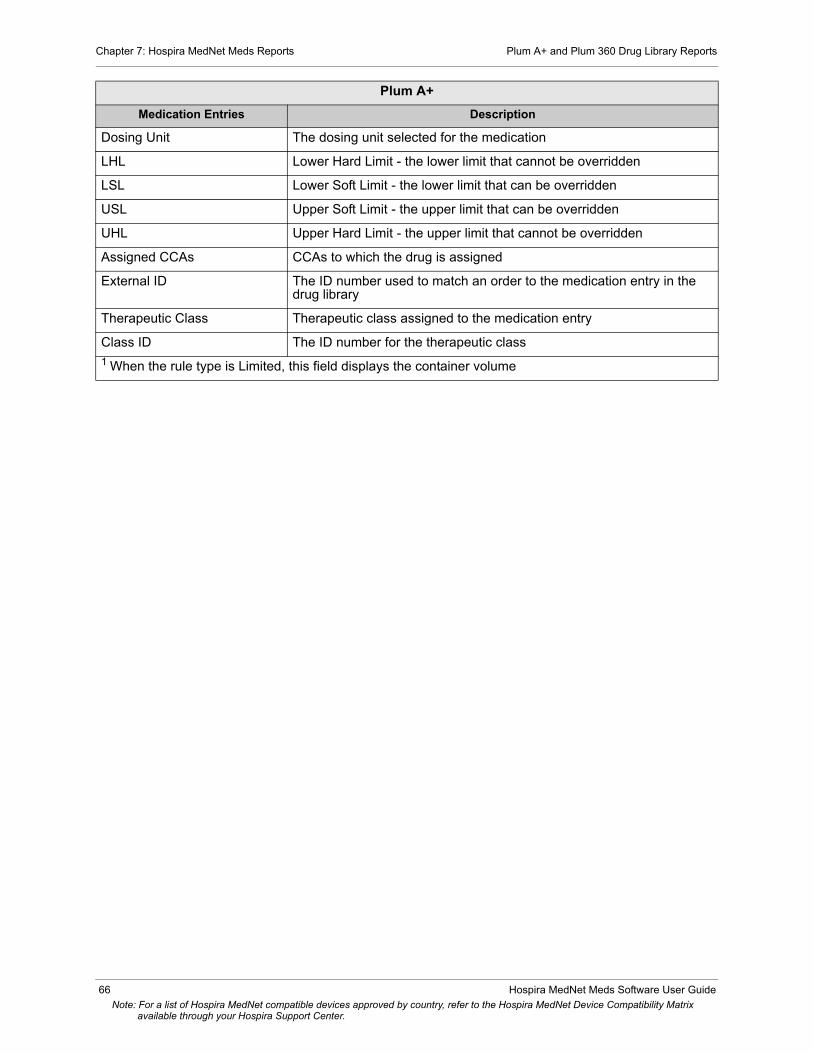
Chapter 7: Hospira MedNet Meds Reports Plum A+ and Plum 360 Drug Library Reports
Dosing Unit The dosing unit selected for the medication
LHL Lower Hard Limit - the lower limit that cannot be overridden
LSL Lower Soft Limit - the lower limit that can be overridden
USL Upper Soft Limit - the upper limit that can be overridden
UHL Upper Hard Limit - the upper limit that cannot be overridden
Assigned CCAs CCAs to which the drug is assigned
External ID The ID number used to match an order to the medication entry in the drug library
Therapeutic Class Therapeutic class assigned to the medication entry
Class ID The ID number for the therapeutic class
1 When the rule type is Limited, this field displays the container volume
Plum A+
Medication Entries Description
66 Hospira MedNet Meds Software User GuideNote: For a list of Hospira MedNet compatible devices approved by country, refer to the Hospira MedNet Device Compatibility Matrix
available through your Hospira Support Center.

Plum A+ and Plum 360 Drug Library Reports Chapter 7: Hospira MedNet Meds Reports
Plum 360 - CCA Drug Library
This report shows each CCA along with its associated medication entries. CCAs are listed in the order in which thy are created.
Plum 360 - CCA with Bolus
Hospira MedNet Meds Software User Guide 67Note: For a list of Hospira MedNet compatible devices approved by country, refer to the Hospira MedNet Device Compatibility Matrix
available through your Hospira Support Center.

Chapter 7: Hospira MedNet Meds Reports Plum A+ and Plum 360 Drug Library Reports
Plum 360
Medication Entries Description
Generic Name The generic name of the medication
Displayed Name The medication name that displays on the infuser
Concentration (or Container Volume)1
Concatenation of medication amount, medication unit, diluent amount, and diluent unit
Rule Sets The type of rule set created for the medication. Includes full, limited, and label only
Clinical Use (Plum 360 only) The clinical use attributed to the medication
Dosing Unit The dosing unit selected for the medication
LHL Lower Hard Limit - the lower limit that cannot be overridden
LSL Lower Soft Limit - the lower limit that can be overridden
USL Upper Soft Limit - the upper limit that can be overridden
UHL Upper Hard Limit - the upper limit that cannot be overridden
External ID The ID number used to match an order to the medication entry in the drug library
Therapeutic Class Therapeutic class assigned to the medication entry
Class ID The ID number for the therapeutic class
Piggyback delivery allowed Indicates whether this option was selected
Allow piggyback to interrupt this infusion
Indicates whether this option was selected
Assigned CCAs CCAs to which the drug is assigned
Bolus Limits (Plum 360 with Bolus only)
Indicates the bolus limits for amount, time, and dose rate
Dose Rate Limits (Plum 360 with Bolus only)
Indicates the allowable bolus rate
1 When the rule type is Limited, this field displays the container volume
68 Hospira MedNet Meds Software User GuideNote: For a list of Hospira MedNet compatible devices approved by country, refer to the Hospira MedNet Device Compatibility Matrix
available through your Hospira Support Center.
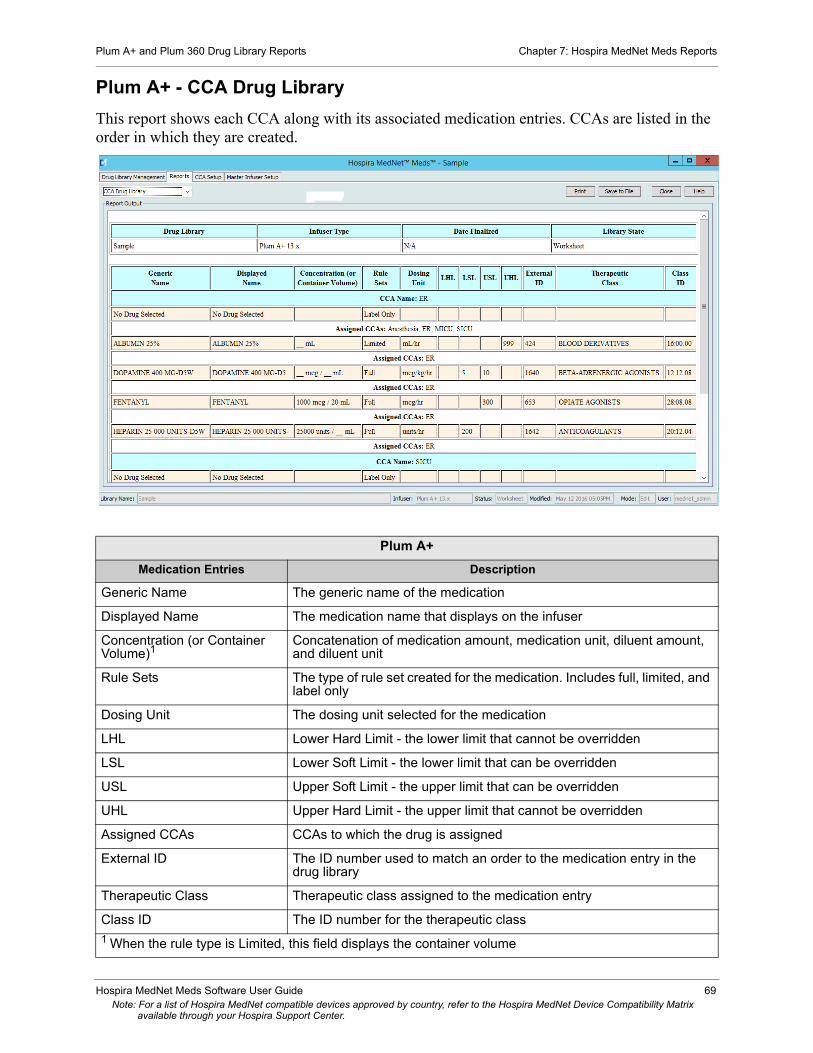
Plum A+ and Plum 360 Drug Library Reports Chapter 7: Hospira MedNet Meds Reports
Plum A+ - CCA Drug Library
This report shows each CCA along with its associated medication entries. CCAs are listed in the order in which they are created.
Plum A+
Medication Entries Description
Generic Name The generic name of the medication
Displayed Name The medication name that displays on the infuser
Concentration (or Container Volume)1
Concatenation of medication amount, medication unit, diluent amount, and diluent unit
Rule Sets The type of rule set created for the medication. Includes full, limited, and label only
Dosing Unit The dosing unit selected for the medication
LHL Lower Hard Limit - the lower limit that cannot be overridden
LSL Lower Soft Limit - the lower limit that can be overridden
USL Upper Soft Limit - the upper limit that can be overridden
UHL Upper Hard Limit - the upper limit that cannot be overridden
Assigned CCAs CCAs to which the drug is assigned
External ID The ID number used to match an order to the medication entry in the drug library
Therapeutic Class Therapeutic class assigned to the medication entry
Class ID The ID number for the therapeutic class
1 When the rule type is Limited, this field displays the container volume
Hospira MedNet Meds Software User Guide 69Note: For a list of Hospira MedNet compatible devices approved by country, refer to the Hospira MedNet Device Compatibility Matrix
available through your Hospira Support Center.

Chapter 7: Hospira MedNet Meds Reports Plum A+ and Plum 360 Drug Library Reports
Plum 360 Master Infuser and CCA Settings
This report displays detailed information on all Plum 360 master infusers and active CCA settings.
70 Hospira MedNet Meds Software User GuideNote: For a list of Hospira MedNet compatible devices approved by country, refer to the Hospira MedNet Device Compatibility Matrix
available through your Hospira Support Center.

Plum A+ and Plum 360 Drug Library Reports Chapter 7: Hospira MedNet Meds Reports
Plum 360
Master Infuser Settings Description
Continue Rate The default delivery rate the infuser switches to after a therapy completes: KVO or programmed rate
Callback Notification The default callback setting: Yes or No
Deliver Together The default deliver together method: Piggyback or Concurrent
Force Pump to Accept Drug Library Power Down
To automatically install a new Medication Library upon infuser turn off. The default is No.
Auto-program Rejection Reason Timeout (seconds)
The amount of time a rejection reason appears on the infuser
Maximum Standby Time (hours)
The period of time the infuser can wait before beginning a therapy
Default Clinical Use The default clinical use entered that will replace “Not Specified” fields in the rule set
CCA Settings Description
CCA Name The CCA name
Service Line The service line name
BSA The minimum and maximum value
Patient Height The minimum and maximum patient height
Patient Weight The minimum and maximum patient weight
Distal Occlusion Pressure The default and maximum setting
Occlusion Pressure Auto-Reset
The occlusion pressure auto-resets
Distal Occlusion Auto-Reset The distal occlusion auto-resets
Delayed Start The default delay start setting: Enabled or Disabled
Standby The default setting to Enable or Disable standby before the beginning of a therapy
Maximum Dose Rate (mL/hr) The maximum delivery rate
Hospira MedNet Meds Software User Guide 71Note: For a list of Hospira MedNet compatible devices approved by country, refer to the Hospira MedNet Device Compatibility Matrix
available through your Hospira Support Center.
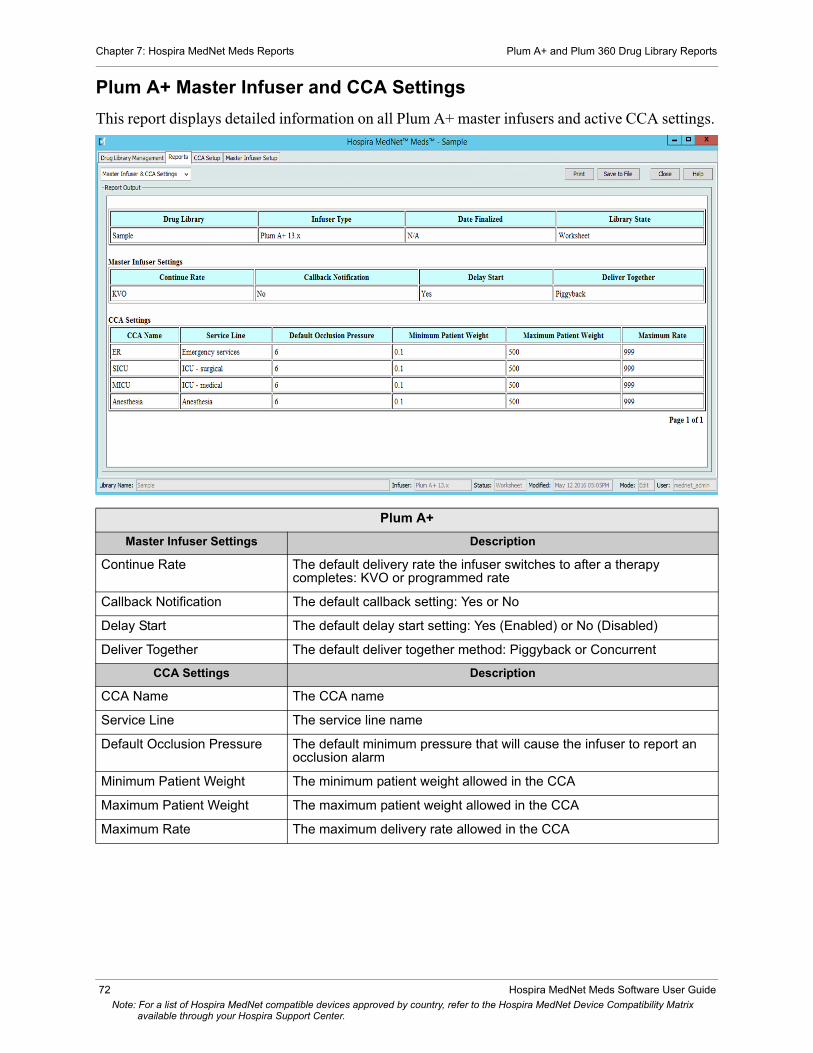
Chapter 7: Hospira MedNet Meds Reports Plum A+ and Plum 360 Drug Library Reports
Plum A+ Master Infuser and CCA Settings
This report displays detailed information on all Plum A+ master infusers and active CCA settings.
Plum A+
Master Infuser Settings Description
Continue Rate The default delivery rate the infuser switches to after a therapy completes: KVO or programmed rate
Callback Notification The default callback setting: Yes or No
Delay Start The default delay start setting: Yes (Enabled) or No (Disabled)
Deliver Together The default deliver together method: Piggyback or Concurrent
CCA Settings Description
CCA Name The CCA name
Service Line The service line name
Default Occlusion Pressure The default minimum pressure that will cause the infuser to report an occlusion alarm
Minimum Patient Weight The minimum patient weight allowed in the CCA
Maximum Patient Weight The maximum patient weight allowed in the CCA
Maximum Rate The maximum delivery rate allowed in the CCA
72 Hospira MedNet Meds Software User GuideNote: For a list of Hospira MedNet compatible devices approved by country, refer to the Hospira MedNet Device Compatibility Matrix
available through your Hospira Support Center.
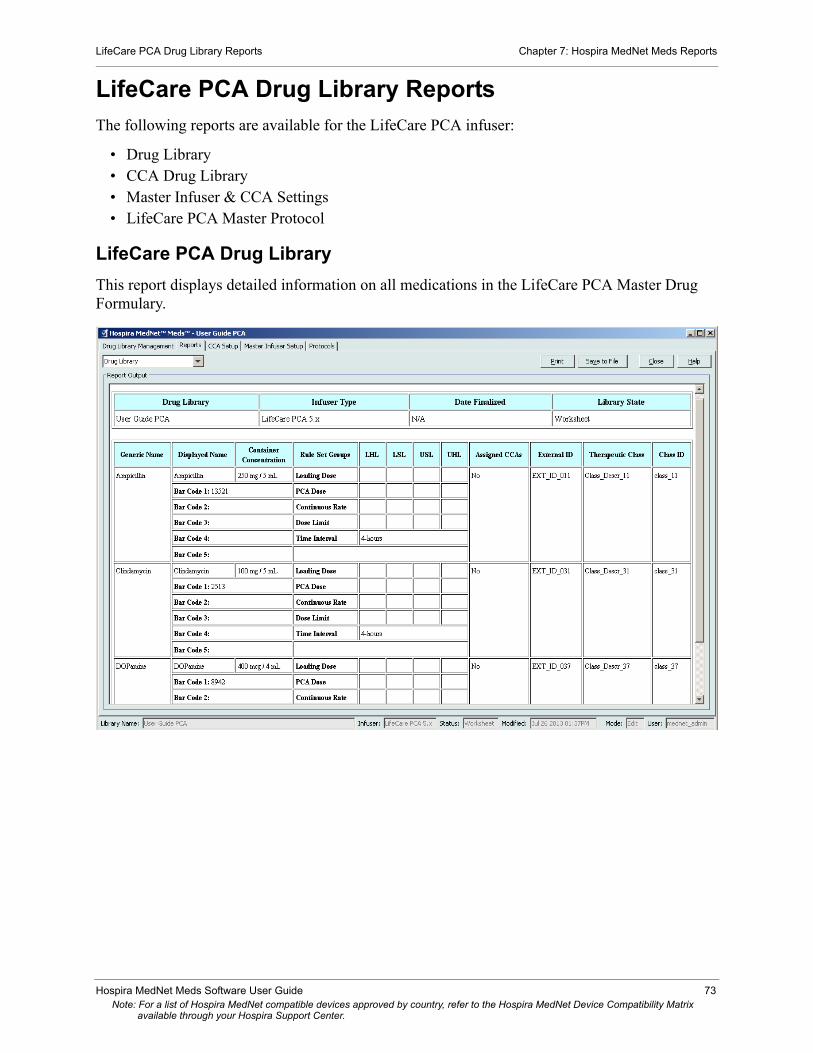
LifeCare PCA Drug Library Reports Chapter 7: Hospira MedNet Meds Reports
LifeCare PCA Drug Library ReportsThe following reports are available for the LifeCare PCA infuser:
• Drug Library• CCA Drug Library• Master Infuser & CCA Settings• LifeCare PCA Master Protocol
LifeCare PCA Drug Library
This report displays detailed information on all medications in the LifeCare PCA Master Drug Formulary.
Hospira MedNet Meds Software User Guide 73Note: For a list of Hospira MedNet compatible devices approved by country, refer to the Hospira MedNet Device Compatibility Matrix
available through your Hospira Support Center.

Chapter 7: Hospira MedNet Meds Reports LifeCare PCA Drug Library Reports
LifeCare PCA
Field Description
Generic Name The generic name of the medication
Displayed Name The medication name that displays on the infuser
Container Concentration Concatenation of medication amount, medication unit, diluent amount, and diluent unit
Bar Code The bar code(s) associated with the medication entry. Up to five bar codes are possible
Rule Set Groups Dosing limits defined for the medication. Dosing limits can be defined for Loading Dose, Continuous Rate, PCA Dose, and Dose Limit
LHL Lower Hard Limit - the lower limit that cannot be overridden
LSL Lower Soft Limit - the lower limit that can be overridden
USL Upper Soft Limit - the upper limit that can be overridden
UHL Upper Hard Limit - the upper limit that cannot be overridden
Time Interval Period of time over which the Dose Limit is evaluated
Assigned CCAs CCAs to which the drug is assigned
External ID The ID number used to match an order to the medication entry in the drug library
Therapeutic Class Therapeutic class assigned to the medication
Class ID The ID for the therapeutic class
74 Hospira MedNet Meds Software User GuideNote: For a list of Hospira MedNet compatible devices approved by country, refer to the Hospira MedNet Device Compatibility Matrix
available through your Hospira Support Center.

LifeCare PCA Drug Library Reports Chapter 7: Hospira MedNet Meds Reports
LifeCare PCA CCA Drug Library
This report provides information on all medication entries assigned to a specific CCA.
Note: This report lists CCAs in the order in which they were created.
Hospira MedNet Meds Software User Guide 75Note: For a list of Hospira MedNet compatible devices approved by country, refer to the Hospira MedNet Device Compatibility Matrix
available through your Hospira Support Center.

Chapter 7: Hospira MedNet Meds Reports LifeCare PCA Drug Library Reports
LifeCare PCA
Medication Entries Description
Generic Name The generic name of the medication
Displayed Name The medication name that displays on the infuser
Container Concentration Concatenation of medication amount, medication unit, diluent amount, and diluent unit
Bar Code The bar code(s) associated with the medication entry. Up to five bar codes are possible
Rule Set Groups Dosing limits defined for the medication. Dosing limits can be defined for loading dose, continuous rate, PCA dose, and dose limit
LHL Lower Hard Limit - the lower limit that cannot be overridden
LSL Lower Soft Limit - the lower limit that can be overridden
USL Upper Soft Limit - the upper limit that can be overridden
UHL Upper Hard Limit - the upper limit that cannot be overridden
Time Interval Period of time over which the Dose Limit is evaluated
Assigned CCAs CCAs to which the drug is assigned
External ID The ID number used to match an order to the medication entry in the drug library
Therapeutic Class Therapeutic class assigned to the medication
Class ID The ID for the therapeutic class
76 Hospira MedNet Meds Software User GuideNote: For a list of Hospira MedNet compatible devices approved by country, refer to the Hospira MedNet Device Compatibility Matrix
available through your Hospira Support Center.
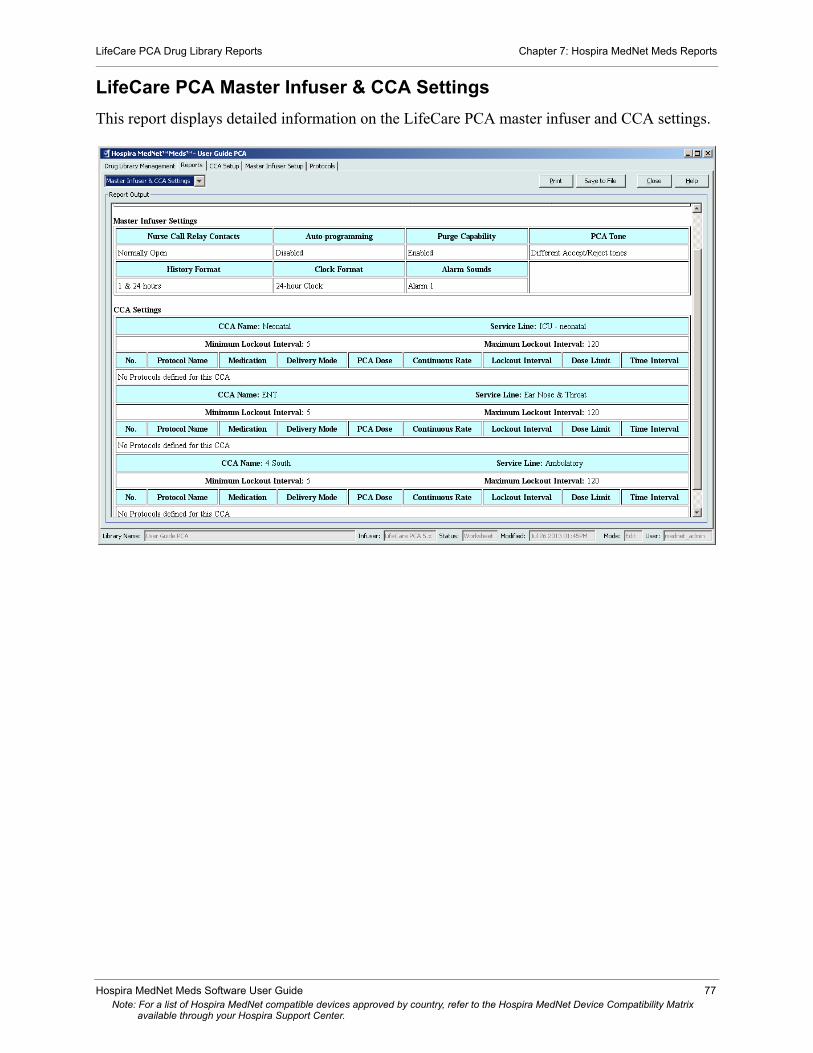
LifeCare PCA Drug Library Reports Chapter 7: Hospira MedNet Meds Reports
LifeCare PCA Master Infuser & CCA Settings
This report displays detailed information on the LifeCare PCA master infuser and CCA settings.
Hospira MedNet Meds Software User Guide 77Note: For a list of Hospira MedNet compatible devices approved by country, refer to the Hospira MedNet Device Compatibility Matrix
available through your Hospira Support Center.
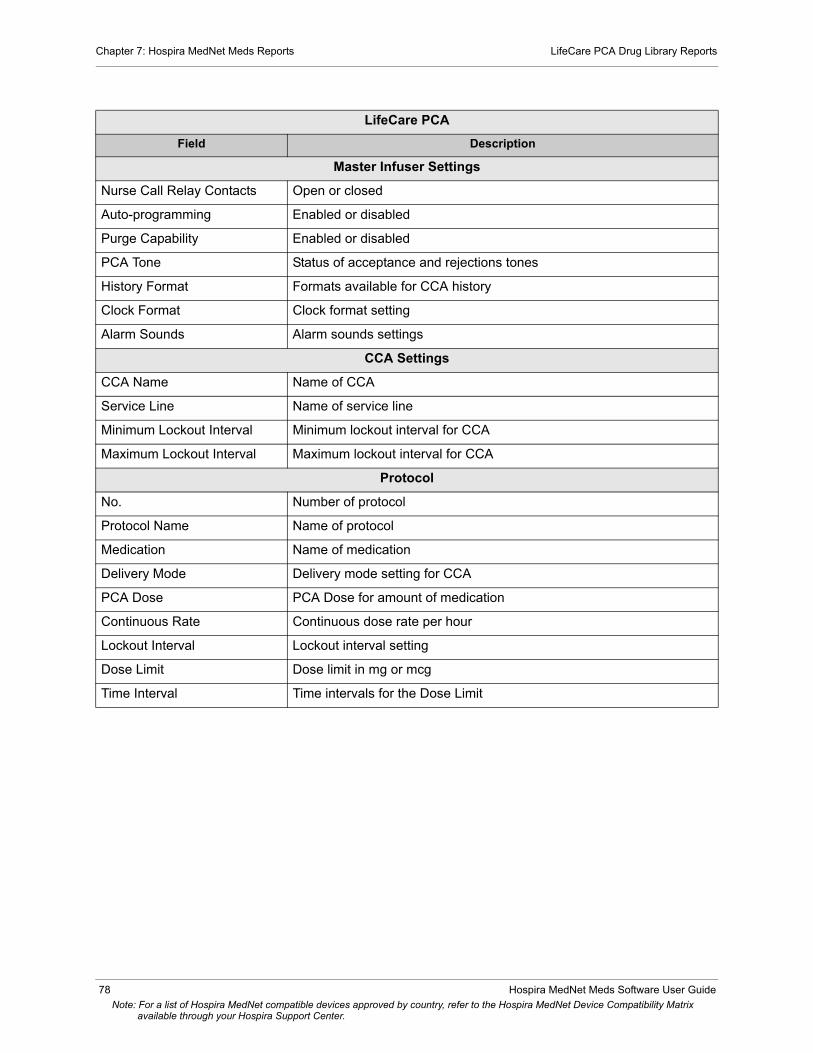
Chapter 7: Hospira MedNet Meds Reports LifeCare PCA Drug Library Reports
LifeCare PCA
Field Description
Master Infuser Settings
Nurse Call Relay Contacts Open or closed
Auto-programming Enabled or disabled
Purge Capability Enabled or disabled
PCA Tone Status of acceptance and rejections tones
History Format Formats available for CCA history
Clock Format Clock format setting
Alarm Sounds Alarm sounds settings
CCA Settings
CCA Name Name of CCA
Service Line Name of service line
Minimum Lockout Interval Minimum lockout interval for CCA
Maximum Lockout Interval Maximum lockout interval for CCA
Protocol
No. Number of protocol
Protocol Name Name of protocol
Medication Name of medication
Delivery Mode Delivery mode setting for CCA
PCA Dose PCA Dose for amount of medication
Continuous Rate Continuous dose rate per hour
Lockout Interval Lockout interval setting
Dose Limit Dose limit in mg or mcg
Time Interval Time intervals for the Dose Limit
78 Hospira MedNet Meds Software User GuideNote: For a list of Hospira MedNet compatible devices approved by country, refer to the Hospira MedNet Device Compatibility Matrix
available through your Hospira Support Center.

LifeCare PCA Master Protocol Chapter 7: Hospira MedNet Meds Reports
LifeCare PCA Master Protocol
This report displays detailed information on each master protocol for the LifeCare PCA infuser.
LifeCare PCA
Field Description
Master Protocol Details for each protocol in the library's Master Protocol List
No. Number of protocol
Protocol Name Name of protocol
Medication Displayed name of medication
Delivery Mode Delivery mode for each protocol
PCA Dose PCA dose for each protocol
Continuous Rate Continuous rate for each protocol in medication unit per hour format
Lockout Interval Lockout interval for each protocol
Dose Limit Dose limit for each protocol
Time Interval Time interval for each protocol
Hospira MedNet Meds Software User Guide 79Note: For a list of Hospira MedNet compatible devices approved by country, refer to the Hospira MedNet Device Compatibility Matrix
available through your Hospira Support Center.

Chapter 7: Hospira MedNet Meds Reports SapphirePlus Drug Library Reports
SapphirePlus Drug Library ReportsThe following reports are available for the SapphirePlus infuser:
• Drug Library• CCA Drug Library• Master Infuser & CCA Settings
SapphirePlus Drug Library
This report displays detailed information on all medications in the SapphirePlus Master Drug Formulary.
80 Hospira MedNet Meds Software User GuideNote: For a list of Hospira MedNet compatible devices approved by country, refer to the Hospira MedNet Device Compatibility Matrix
available through your Hospira Support Center.
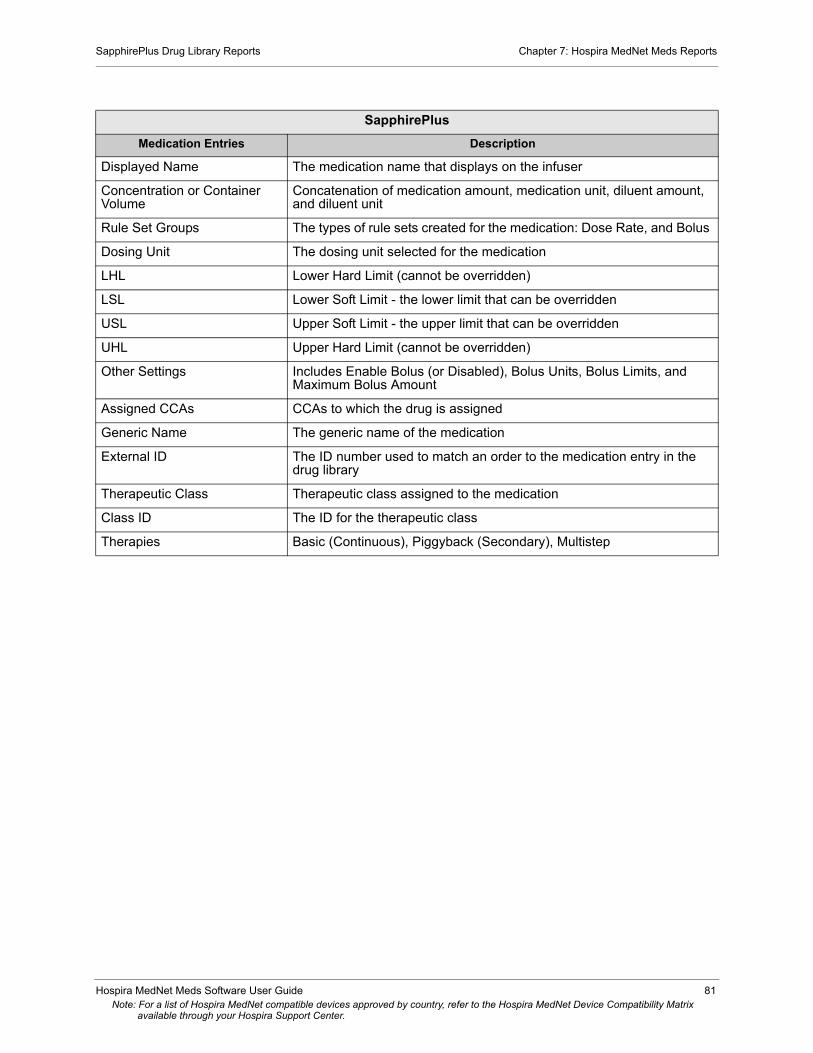
SapphirePlus Drug Library Reports Chapter 7: Hospira MedNet Meds Reports
SapphirePlus
Medication Entries Description
Displayed Name The medication name that displays on the infuser
Concentration or Container Volume
Concatenation of medication amount, medication unit, diluent amount, and diluent unit
Rule Set Groups The types of rule sets created for the medication: Dose Rate, and Bolus
Dosing Unit The dosing unit selected for the medication
LHL Lower Hard Limit (cannot be overridden)
LSL Lower Soft Limit - the lower limit that can be overridden
USL Upper Soft Limit - the upper limit that can be overridden
UHL Upper Hard Limit (cannot be overridden)
Other Settings Includes Enable Bolus (or Disabled), Bolus Units, Bolus Limits, and Maximum Bolus Amount
Assigned CCAs CCAs to which the drug is assigned
Generic Name The generic name of the medication
External ID The ID number used to match an order to the medication entry in the drug library
Therapeutic Class Therapeutic class assigned to the medication
Class ID The ID for the therapeutic class
Therapies Basic (Continuous), Piggyback (Secondary), Multistep
Hospira MedNet Meds Software User Guide 81Note: For a list of Hospira MedNet compatible devices approved by country, refer to the Hospira MedNet Device Compatibility Matrix
available through your Hospira Support Center.
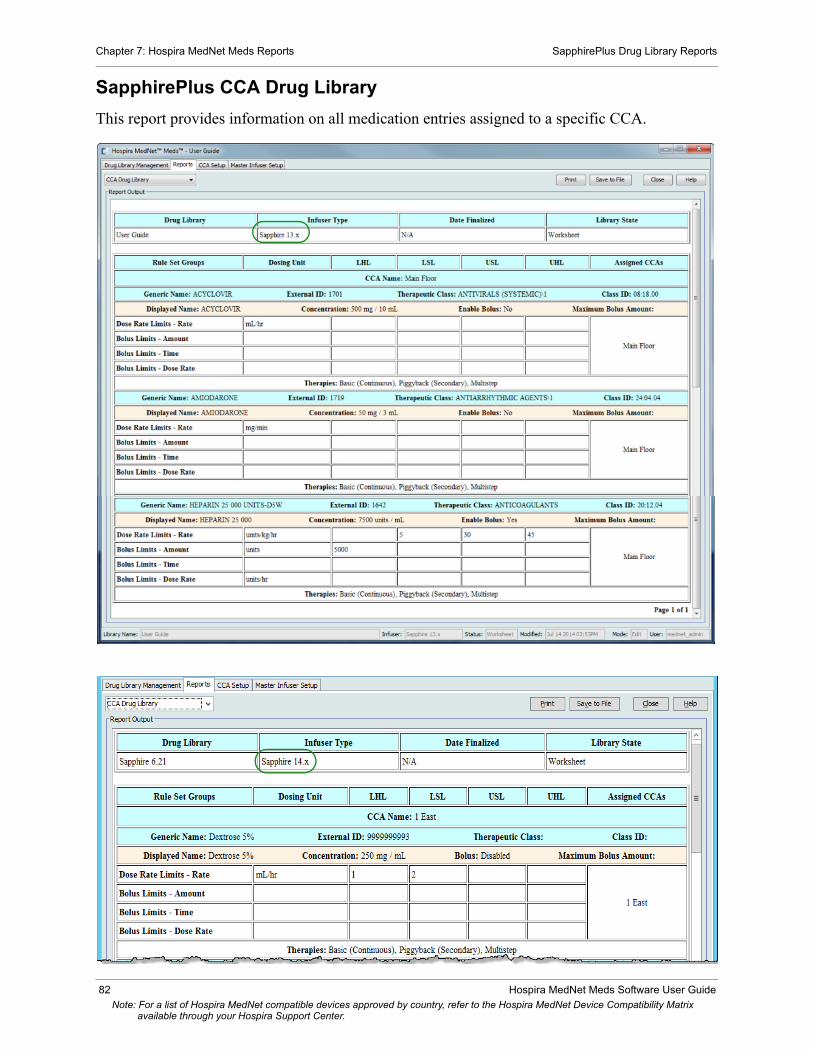
Chapter 7: Hospira MedNet Meds Reports SapphirePlus Drug Library Reports
SapphirePlus CCA Drug Library
This report provides information on all medication entries assigned to a specific CCA.
82 Hospira MedNet Meds Software User GuideNote: For a list of Hospira MedNet compatible devices approved by country, refer to the Hospira MedNet Device Compatibility Matrix
available through your Hospira Support Center.

SapphirePlus Drug Library Reports Chapter 7: Hospira MedNet Meds Reports
SapphirePlus
Medication Entries Description
Displayed Name The medication name that displays on the infuser
Concentration or Container Volume
Concatenation of medication amount, medication unit, diluent amount, and diluent unit
Rule Set Groups The types of rule sets created for the medication: Dose Rate, and Bolus
Dosing Unit The dosing unit selected for the medication
LHL Lower Hard Limit (cannot be overridden)
LSL Lower Soft Limit - the lower limit that can be overridden
USL Upper Soft Limit - the upper limit that can be overridden
UHL Upper Hard Limit (cannot be overridden)
Other Settings Includes Enable Bolus, Bolus Units, Bolus Limits, and Maximum Bolus Amount
Assigned CCAs CCAs to which the drug is assigned
Generic Name The generic name of the medication
External ID The ID number used to match an order to the medication entry in the drug library
Therapeutic Class Therapeutic class assigned to the medication entry
Class ID The ID number for the therapeutic class
Hospira MedNet Meds Software User Guide 83Note: For a list of Hospira MedNet compatible devices approved by country, refer to the Hospira MedNet Device Compatibility Matrix
available through your Hospira Support Center.
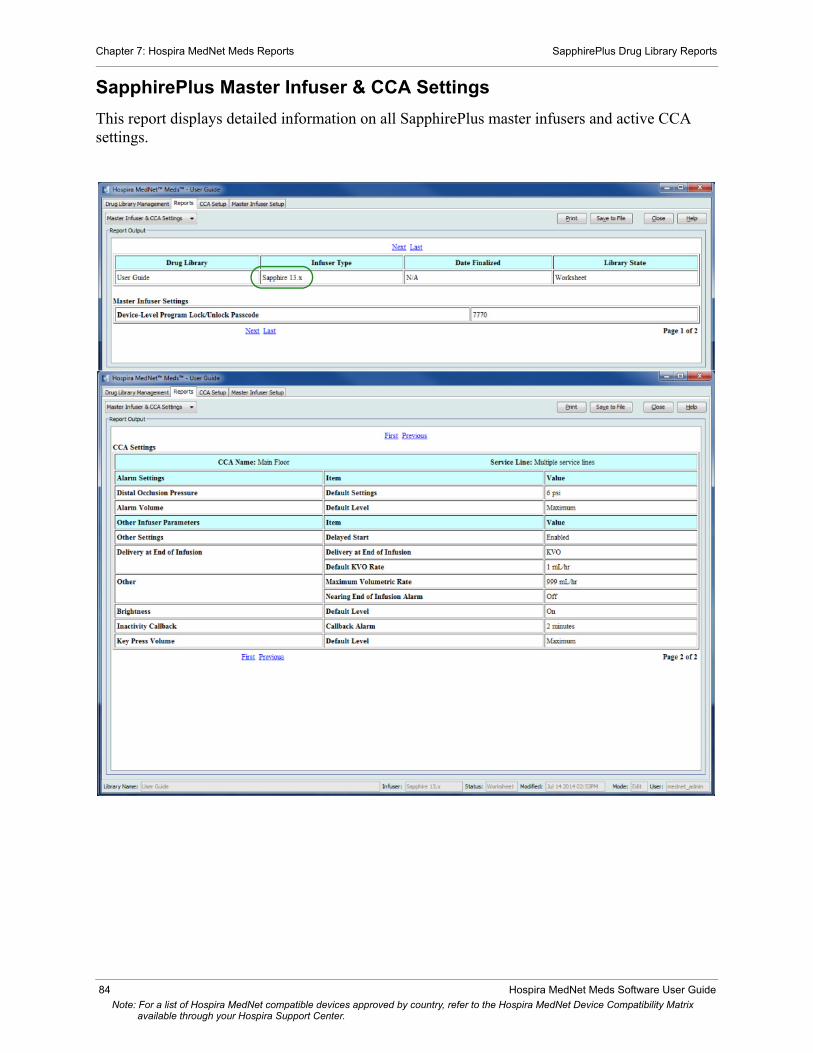
Chapter 7: Hospira MedNet Meds Reports SapphirePlus Drug Library Reports
SapphirePlus Master Infuser & CCA Settings
This report displays detailed information on all SapphirePlus master infusers and active CCA settings.
84 Hospira MedNet Meds Software User GuideNote: For a list of Hospira MedNet compatible devices approved by country, refer to the Hospira MedNet Device Compatibility Matrix
available through your Hospira Support Center.
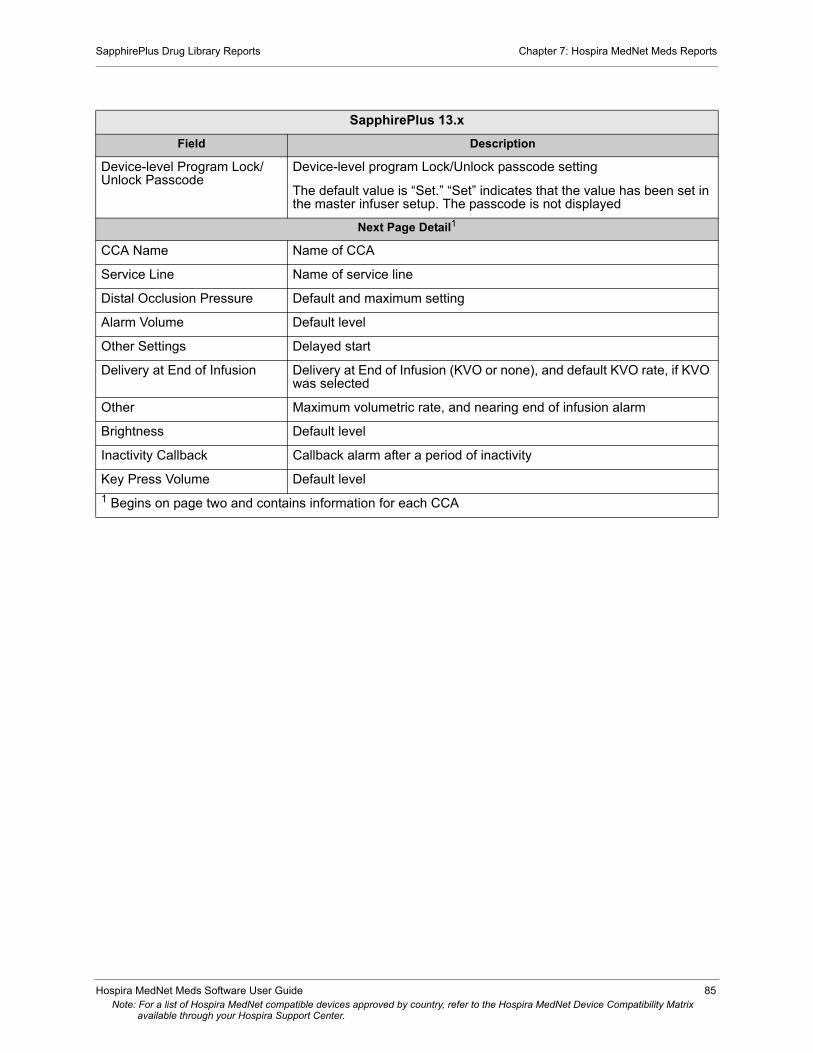
SapphirePlus Drug Library Reports Chapter 7: Hospira MedNet Meds Reports
SapphirePlus 13.x
Field Description
Device-level Program Lock/Unlock Passcode
Device-level program Lock/Unlock passcode setting
The default value is “Set.” “Set” indicates that the value has been set in the master infuser setup. The passcode is not displayed
Next Page Detail1
CCA Name Name of CCA
Service Line Name of service line
Distal Occlusion Pressure Default and maximum setting
Alarm Volume Default level
Other Settings Delayed start
Delivery at End of Infusion Delivery at End of Infusion (KVO or none), and default KVO rate, if KVO was selected
Other Maximum volumetric rate, and nearing end of infusion alarm
Brightness Default level
Inactivity Callback Callback alarm after a period of inactivity
Key Press Volume Default level
1 Begins on page two and contains information for each CCA
Hospira MedNet Meds Software User Guide 85Note: For a list of Hospira MedNet compatible devices approved by country, refer to the Hospira MedNet Device Compatibility Matrix
available through your Hospira Support Center.

Chapter 7: Hospira MedNet Meds Reports SapphirePlus Drug Library Reports
86 Hospira MedNet Meds Software User GuideNote: For a list of Hospira MedNet compatible devices approved by country, refer to the Hospira MedNet Device Compatibility Matrix
available through your Hospira Support Center.

SapphirePlus Drug Library Reports Chapter 7: Hospira MedNet Meds Reports
SapphirePlus 14.x
Field Description
Device-level Passwords Device High Level password and Preprogram password settings
The default value is “Set.” “Set” indicates that the value has been set in the master infuser setup. The passcode is not displayed
Reduced Access Passwords Medium and Low Level passwords
The default value is “Set.” “Set” indicates that the value has been set in the master infuser setup. The passcode is not displayed
Infuser Settings Enable New Patient. Default value: Yes
Enable US Format (for date and time). Default value: Yes
Next Page Detail1
CCA Name Name of CCA
Service Line Name of service line
Distal Occlusion Pressure Default and maximum setting
Alarm Volume Default level
Air In Line Single Bubble Size, Accumulated Bubble Size, Accumulated Threshold default levels
Occlusion Pressure Auto-Restart
Default: Enabled
Delivery Modes Continuous and Multistep
Other Settings Delayed start and standby, prime reminder, allow secondary, allow repeat last infusion, allow preprogram calculate concentration, enable automatic patient lockout, enable screen saver (Far View)
Delivery at End of Infusion (General)
Delivery at End of Infusion (KVO or none), and default KVO rate, if KVO was selected. (General applies to No Drug Selected only)
Bolus (General) Default Level Bolus Default level and rate for No Drug Selected
Prime Volume Default level
Other Maximum volumetric rate, and nearing end of infusion alarm
Primary Hard Limits Maximum VTBI default level
Secondary Hard Limits Maximum VTBI default level
Multistep Hard Limits Maximum VTBI default level, and maximum Time default
Brightness Default level
Inactivity Callback Callback alarm after a period of inactivity
Key Press Volume Default level
1 Begins on page two and contains information for each CCA
Hospira MedNet Meds Software User Guide 87Note: For a list of Hospira MedNet compatible devices approved by country, refer to the Hospira MedNet Device Compatibility Matrix
available through your Hospira Support Center.
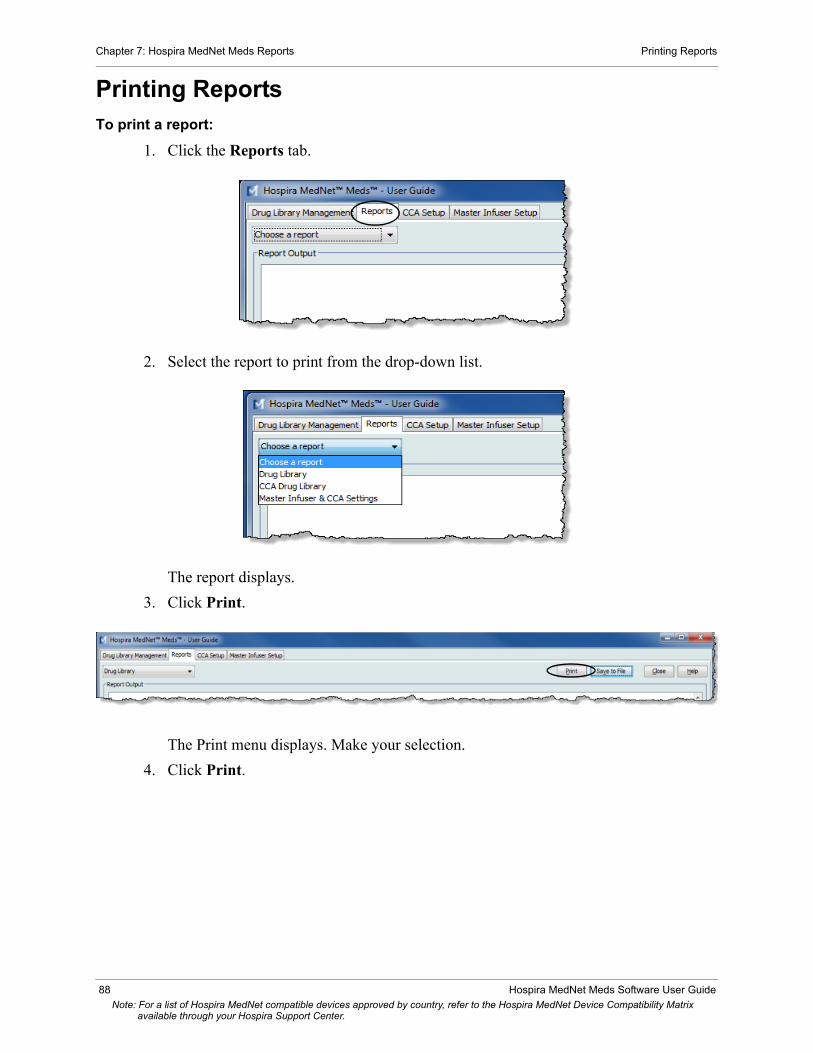
Chapter 7: Hospira MedNet Meds Reports Printing Reports
Printing ReportsTo print a report:
1. Click the Reports tab.
2. Select the report to print from the drop-down list.
The report displays.
3. Click Print.
The Print menu displays. Make your selection.
4. Click Print.
88 Hospira MedNet Meds Software User GuideNote: For a list of Hospira MedNet compatible devices approved by country, refer to the Hospira MedNet Device Compatibility Matrix
available through your Hospira Support Center.

Printing Reports Chapter 7: Hospira MedNet Meds Reports
To Save a Report
1. Select a report that you want to save.
2. Click Save to File.
3. Navigate to a location of your choice.
4. Type in a File name.
5. Click Save and the report will be saved in .html format.
Hospira MedNet Meds Software User Guide 89Note: For a list of Hospira MedNet compatible devices approved by country, refer to the Hospira MedNet Device Compatibility Matrix
available through your Hospira Support Center.

Chapter 7: Hospira MedNet Meds Reports Printing Reports
Notes:
90 Hospira MedNet Meds Software User GuideNote: For a list of Hospira MedNet compatible devices approved by country, refer to the Hospira MedNet Device Compatibility Matrix
available through your Hospira Support Center.
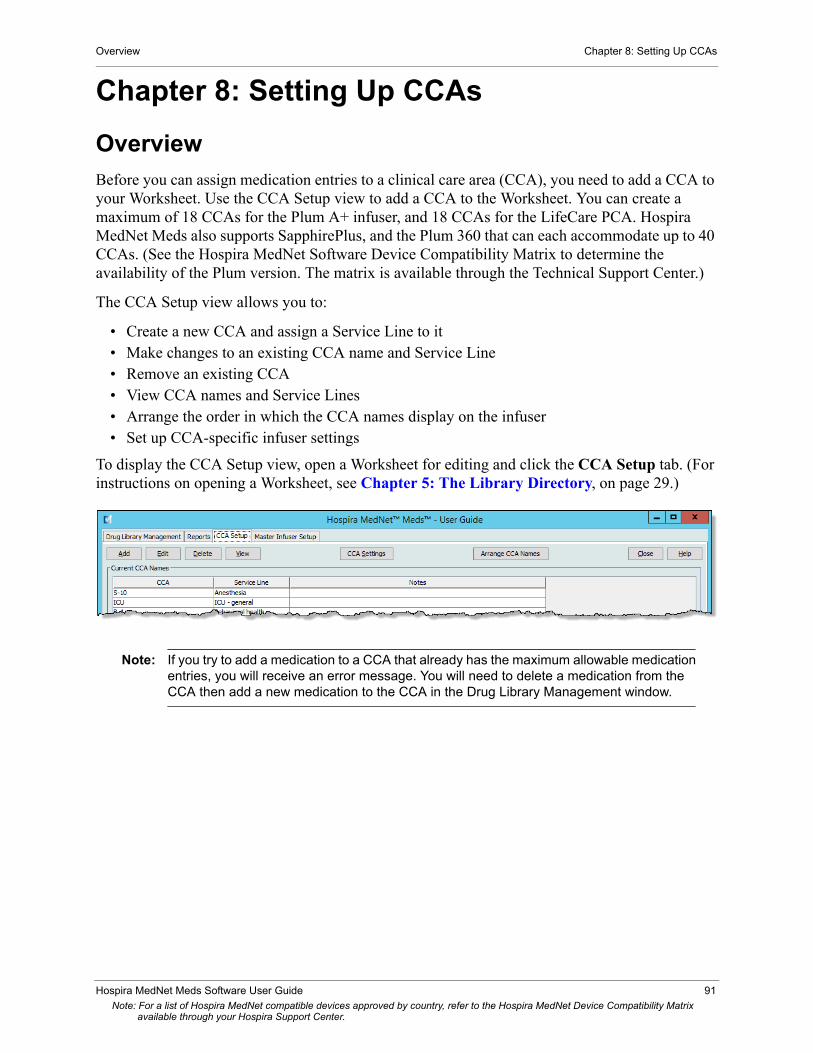
Overview Chapter 8: Setting Up CCAs
Chapter 8: Setting Up CCAs
OverviewBefore you can assign medication entries to a clinical care area (CCA), you need to add a CCA to your Worksheet. Use the CCA Setup view to add a CCA to the Worksheet. You can create a maximum of 18 CCAs for the Plum A+ infuser, and 18 CCAs for the LifeCare PCA. Hospira MedNet Meds also supports SapphirePlus, and the Plum 360 that can each accommodate up to 40 CCAs. (See the Hospira MedNet Software Device Compatibility Matrix to determine the availability of the Plum version. The matrix is available through the Technical Support Center.)
The CCA Setup view allows you to:
• Create a new CCA and assign a Service Line to it• Make changes to an existing CCA name and Service Line• Remove an existing CCA• View CCA names and Service Lines• Arrange the order in which the CCA names display on the infuser• Set up CCA-specific infuser settings
To display the CCA Setup view, open a Worksheet for editing and click the CCA Setup tab. (For instructions on opening a Worksheet, see Chapter 5: The Library Directory, on page 29.)
Note: If you try to add a medication to a CCA that already has the maximum allowable medication entries, you will receive an error message. You will need to delete a medication from the CCA then add a new medication to the CCA in the Drug Library Management window.
Hospira MedNet Meds Software User Guide 91
Note: For a list of Hospira MedNet compatible devices approved by country, refer to the Hospira MedNet Device Compatibility Matrix available through your Hospira Support Center.
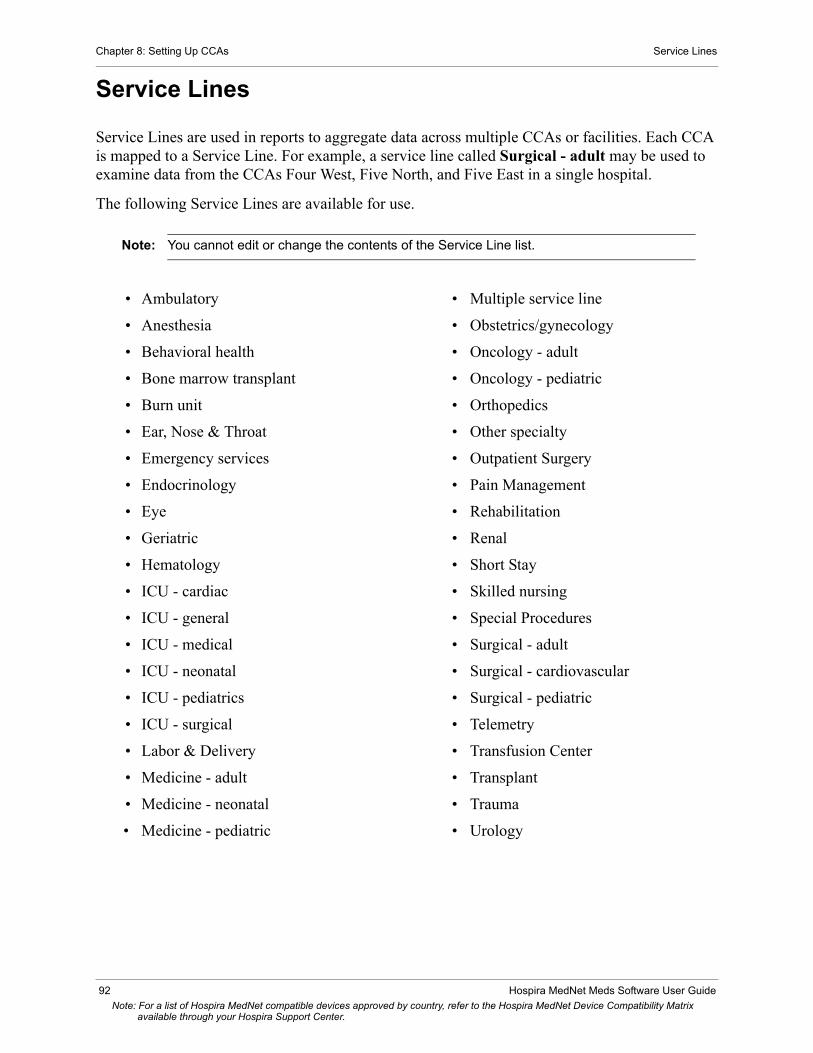
Chapter 8: Setting Up CCAs Service Lines
Service Lines
Service Lines are used in reports to aggregate data across multiple CCAs or facilities. Each CCA is mapped to a Service Line. For example, a service line called Surgical - adult may be used to examine data from the CCAs Four West, Five North, and Five East in a single hospital.
The following Service Lines are available for use.
Note: You cannot edit or change the contents of the Service Line list.
• Ambulatory
• Anesthesia
• Behavioral health
• Bone marrow transplant
• Burn unit
• Ear, Nose & Throat
• Emergency services
• Endocrinology
• Eye
• Geriatric
• Hematology
• ICU - cardiac
• ICU - general
• ICU - medical
• ICU - neonatal
• ICU - pediatrics
• ICU - surgical
• Labor & Delivery
• Medicine - adult
• Medicine - neonatal
• Medicine - pediatric
• Multiple service line
• Obstetrics/gynecology
• Oncology - adult
• Oncology - pediatric
• Orthopedics
• Other specialty
• Outpatient Surgery
• Pain Management
• Rehabilitation
• Renal
• Short Stay
• Skilled nursing
• Special Procedures
• Surgical - adult
• Surgical - cardiovascular
• Surgical - pediatric
• Telemetry
• Transfusion Center
• Transplant
• Trauma
• Urology
92 Hospira MedNet Meds Software User Guide
Note: For a list of Hospira MedNet compatible devices approved by country, refer to the Hospira MedNet Device Compatibility Matrix available through your Hospira Support Center.

Create a New CCA Chapter 8: Setting Up CCAs
Create a New CCA1. Click the CCA Setup tab.
2. Click Add.
3. Enter the name of the new CCA.
Note: Displayed Names and CCA Names do not allow either commas (,) or double-quotes (“). An underscore (_) cannot be used in SapphirePlus CCA names. The number of characters allowed in a CCA name varies for each type of infuser; Plum maximum: 29; LifeCare PCA maximum: 16; and SapphirePlus maximum 15. You cannot exceed the maximum characters.
4. Select a Service Line for your CCA from the drop-down list.
5. To exclude the CCA from the reports, place a check mark in the box next to Exclude from clinical reports.
Note: Clinical reports include all reports except Asset Tracker, Asset Utilization, Event/Alarm Log, Infuser Status, and Software Download.
6. Enter a Note if desired.
7. Click Save & Add Another or Save & Close.
Hospira MedNet Meds Software User Guide 93
Note: For a list of Hospira MedNet compatible devices approved by country, refer to the Hospira MedNet Device Compatibility Matrix available through your Hospira Support Center.

Chapter 8: Setting Up CCAs Edit a CCA
Edit a CCA1. Click the CCA Setup tab.
2. Select the CCA you want to change.
3. Click Edit.
4. Edit the CCA Name, Service Line, and Notes if desired.
5. Click Save & Edit Next or Save & Close.
94 Hospira MedNet Meds Software User Guide
Note: For a list of Hospira MedNet compatible devices approved by country, refer to the Hospira MedNet Device Compatibility Matrix available through your Hospira Support Center.
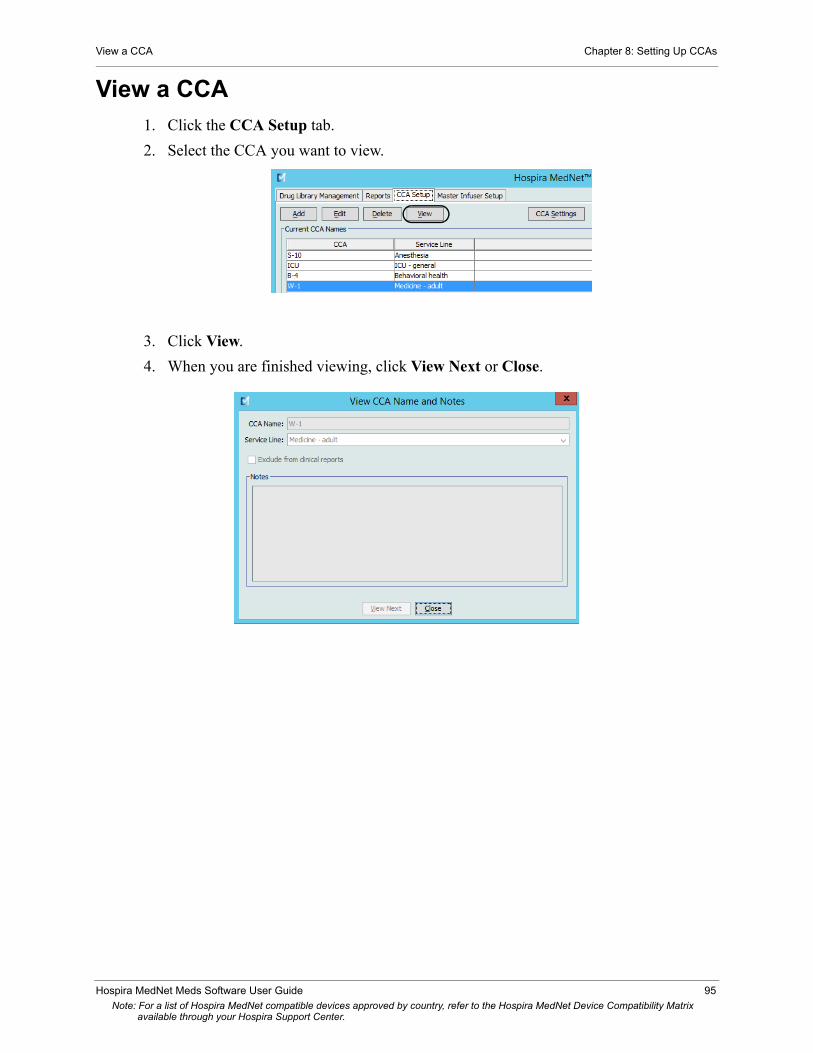
View a CCA Chapter 8: Setting Up CCAs
View a CCA1. Click the CCA Setup tab.
2. Select the CCA you want to view.
3. Click View.
4. When you are finished viewing, click View Next or Close.
Hospira MedNet Meds Software User Guide 95
Note: For a list of Hospira MedNet compatible devices approved by country, refer to the Hospira MedNet Device Compatibility Matrix available through your Hospira Support Center.

Chapter 8: Setting Up CCAs Delete a CCA
Delete a CCA 1. Click the CCA Setup tab.
2. Select the CCA you want to delete.
3. Click Delete.
4. A pop-up window appears to confirm the deletion.
5. Click Delete.
The CCA is permanently deleted from the Worksheet.
Note: Medication entries assigned to the deleted CCA will remain in the Master Drug Formulary and any other CCAs to which they were assigned.
96 Hospira MedNet Meds Software User Guide
Note: For a list of Hospira MedNet compatible devices approved by country, refer to the Hospira MedNet Device Compatibility Matrix available through your Hospira Support Center.

Change the Display Order of CCA Names Chapter 8: Setting Up CCAs
Change the Display Order of CCA Names1. Click the CCA Setup tab.
2. Click Arrange CCA Names.
3. Select the CCA names you want to move.
4. Click Move Up and Move Down to reorder the list as desired.
5. Click Save when you are satisfied with the display order.
Helpful Hint: You may select multiple CCAs by selecting the first CCA you want to move, and then holding the shift key while clicking the last CCA you want to move.
Hospira MedNet Meds Software User Guide 97
Note: For a list of Hospira MedNet compatible devices approved by country, refer to the Hospira MedNet Device Compatibility Matrix available through your Hospira Support Center.

Chapter 8: Setting Up CCAs Setting Up a Plum 360
Setting Up a Plum 360
Note: Only users with the appropriate login privileges are able to edit CCA infuser settings.
Each CCA is associated with specific infuser settings. For Plum 360 infusers that can support 40 CCAs, the following settings are supported: Patient Limits consisting of minimum and maximum body surface area (BSA); minimum and maximum patient height and weight; Alarm Settings for the default occlusion pressure; and Other Infuser Parameters relating to start and standby, and dose rates.
Note: The CCA settings apply to all medications in the CCA.
The Body Surface Area setting allows you to set a minimum to maximum range for the specific CCA.
The Minimum Patient Height setting allows you to set the minimum patient height allowed in the CCA.
The Maximum Patient Height setting allows you to set the maximum patient height allowed in the CCA.
The Minimum Patient Weight setting allows you to set the minimum patient weight allowed in the CCA.
The Maximum Patient Weight setting allows you to set the maximum patient weight allowed in the CCA.
The Default Occlusion Pressure setting allows you to select the pressure at which the infuser will sound the distal occlusion alarm. This setting is used as the default setting for the selected CCA and can be changed when programming the infuser.
The Distal Occlusion Pressure Auto-Reset setting allows you to set the number of times the infuser will resume an infusion automatically if a distal occlusion is cleared within 60 seconds of detection. If you leave the Auto-Reset at zero, the default setting, occlusion alarms will not be automatically reset.
The Delayed Start setting allows you to select this option in the CCA and in turn allows that option for the infuser.
The Standby setting allows you to select this option in the CCA and in turn allows that option for the infuser.
The Maximum Dose Rate is the maximum delivery rate allowed in the CCA.
Note: The Minimum Patient Weight, Maximum Patient Weight, and Maximum Dose Rate cannot be changed by the clinician when programming the infuser.
98 Hospira MedNet Meds Software User Guide
Note: For a list of Hospira MedNet compatible devices approved by country, refer to the Hospira MedNet Device Compatibility Matrix available through your Hospira Support Center.

Setting Up a Plum 360 Chapter 8: Setting Up CCAs
Following are the default CCA infuser settings:
Minimum BSA 0.012 (m2)Maximum BSA 7.07 (m2)
Minimum Patient Height 7.5 cmMaximum Patient Height 305 cmMinimum Patient Weight 0.1 kgMaximum Patient Weight 500 kg
Default Occlusion Pressure 6 psi (310 mmHg)Distal Occlusion Pressure Auto-Reset 0
Maximum Dose Rate 999 mL/hrDelayed Start Enabled
Standby Enabled
Note: When you create a new CCA, it contains the default infuser settings until you change them.
To set up CCA settings:
1. Display the CCA Setup view by opening a Worksheet for editing and clicking the CCA Setup tab (for instructions on opening a Worksheet, see Chapter 5: The Library Directory on page 29).
2. Select a CCA from the CCA setup view.
3. Click the CCA Settings button.
Hospira MedNet Meds Software User Guide 99
Note: For a list of Hospira MedNet compatible devices approved by country, refer to the Hospira MedNet Device Compatibility Matrix available through your Hospira Support Center.

Chapter 8: Setting Up CCAs Setting Up a Plum 360
4. Select the Patient Limits tab and edit the following information:
• Minimum BSA (0.012 to 7.07) • Maximum BSA (0.012 to 7.07) • Minimum Patient Height (7.5 to 305 cm)• Maximum Patient Height (7.5 to 305 cm)• Minimum Patient Weight (0.1 to 500 kg)• Maximum Patient Weight (0.1 to 500 kg)
5. Select the Alarm Settings tab and edit the following information:
• Distal Occlusion Pressure (1 psi to 15 psi or 52 mmHg to 776 mmHg)• Distal Occlusion Auto-Reset (0 to 10)
100 Hospira MedNet Meds Software User Guide
Note: For a list of Hospira MedNet compatible devices approved by country, refer to the Hospira MedNet Device Compatibility Matrix available through your Hospira Support Center.

Setting Up a Plum 360 Chapter 8: Setting Up CCAs
6. Select the Other Infuser Parameters tab.
7. Select to allow the Delayed Start and Standby settings (recommended).
8. Edit the Maximum Dose Rate.
9. Click Save & Continue or Save & Close.
Hospira MedNet Meds Software User Guide 101
Note: For a list of Hospira MedNet compatible devices approved by country, refer to the Hospira MedNet Device Compatibility Matrix available through your Hospira Support Center.

Chapter 8: Setting Up CCAs Setting Up a Plum A+ CCA
Setting Up a Plum A+ CCA
Note: Only users with the appropriate log in privileges are able to edit CCA infuser settings.
Each CCA is associated with specific infuser settings. These settings include: the default occlusion pressure, minimum and maximum patient weight, and maximum dose rate settings.
Note: The CCA settings apply to all medications in the CCA.
The Default Occlusion Pressure setting allows you to select the pressure at which the infuser will sound the distal occlusion alarm. This setting is used as the default setting for the selected CCA and can be changed when programming the infuser.
The Minimum Patient Weight setting allows you to set the minimum patient weight allowed in the CCA.
The Maximum Patient Weight setting allows you to set the maximum patient weight allowed in the CCA.
The Maximum Dose Rate is the maximum delivery rate allowed in the CCA.
Note: The Minimum Patient Weight, Maximum Patient Weight, and Maximum Dose Rate cannot be changed by the clinician when programming the infuser.
Following are the default CCA infuser settings:
Default Occlusion Pressure 6 psi (310 mmHg)Minimum Patient Weight 0.1 kgMaximum Patient Weight 500 kg
Maximum Dose Rate 999 mL/hr
Note: When you create a new CCA, it contains the default infuser settings until you change them.
To set up the Plum A+ CCA settings:
1. Display the CCA Setup view by opening a Worksheet for editing and clicking the CCA Setup tab (for instructions on opening a Worksheet, see Chapter 5: The Library Directory on page 29).
102 Hospira MedNet Meds Software User Guide
Note: For a list of Hospira MedNet compatible devices approved by country, refer to the Hospira MedNet Device Compatibility Matrix available through your Hospira Support Center.

Setting Up a Plum A+ CCA Chapter 8: Setting Up CCAs
2. Select a CCA from the CCA setup view.
3. Click the CCA Settings button.
4. Edit the following information:
• Default Occlusion Pressure (1 psi to 15 psi or 52 to 776 mmHg). The Default Occlusion Pressure is the threshold for the distal occlusion alarm.
Note: If your institution uses Plum A+ HB Hyperbaric infusers (version 13.5), refer to the infuser's System Operating Manual for this model's expanded default occlusion pressure range. The clinician is able to set the default occlusion pressure value while programming the infuser for hyperbaric use.
• Minimum Patient Weight (0.1 to 500 kg)• Maximum Patient Weight (0.1 to 500 kg)• Maximum Dose Rate (0.1 to 999 mL/hr)
5. Click Save to save the settings in the selected CCA.
Hospira MedNet Meds Software User Guide 103
Note: For a list of Hospira MedNet compatible devices approved by country, refer to the Hospira MedNet Device Compatibility Matrix available through your Hospira Support Center.

Chapter 8: Setting Up CCAs Setting Up a LifeCare PCA CCA
Setting Up a LifeCare PCA CCA
Note: Only users with the appropriate login privileges are able to edit CCA infuser settings.
The only CCA-specific infuser setting for the LifeCare PCA is the Lockout Interval. The lockout interval allows you to define the minimum and maximum lockout period between PCA doses. The interval you set will apply to all medication entries in the CCA.
The default values for the LifeCare PCA are:
• Minimum Default Lockout Interval (5 minutes)• Maximum Default Lockout Interval (120 minutes)
Note: When you create a new CCA, it contains the default infuser settings until you change them.
Note: The limits on the lockout interval cannot be changed when programming the infuser.
To set up the LifeCare PCA CCA:
1. Display the CCA Setup view by opening a Worksheet for editing and clicking the CCA Setup tab (for instructions on opening a Worksheet, see Chapter 5: The Library Directory on page 29).
2. Select a CCA from the CCA Setup view.
3. Click the CCA Settings button.
4. Edit the minimum and maximum lockout intervals (5–120 minutes) on the pop-up.
5. Click Save.
104 Hospira MedNet Meds Software User Guide
Note: For a list of Hospira MedNet compatible devices approved by country, refer to the Hospira MedNet Device Compatibility Matrix available through your Hospira Support Center.

Setting Up a SapphirePlus CCA Chapter 8: Setting Up CCAs
Setting Up a SapphirePlus CCA
Note: Only users with the appropriate login privileges are able to edit CCA infuser settings.
Each CCA is associated with specific infuser settings, including alarm capabilities for distal occlusion and air-in-line. Infuser parameters can also be set such as delivery at end of infusion.
Note: The CCA settings apply to all medications in the CCA.
The default CCA infuser settings are: Alarm Settings and Other Infuser Parameters.When you create a CCA, the default settings are displayed.
Note: Settings with the term “default” before them in the above list can be changed on the infuser by the clinician programming the device, or an authorized technician. To see all functions that can be adjusted on the infuser, refer to the SapphirePlus operating manual.
To set up the SapphirePlus CCA:
1. Display the CCA Setup view by opening a Worksheet for editing and clicking the CCA Setup tab (for instructions on opening a Worksheet, see Chapter 5: The Library Directory on page 29.
2. Select a CCA from the CCA Setup view.
3. Click the CCA Settings button.
CCA settings for the SapphirePlus infuser are arranged in two tabs:
• Alarm Settings• Other Infuser Parameters
Hospira MedNet Meds Software User Guide 105
Note: For a list of Hospira MedNet compatible devices approved by country, refer to the Hospira MedNet Device Compatibility Matrix available through your Hospira Support Center.

Chapter 8: Setting Up CCAs Setting Up a SapphirePlus CCA
Alarm Settings
1. For Distal Occlusion Pressure, do the following:
• Select the default setting units (psi or mmHg).• Select a default setting from the drop-down list (psi can be in 0.5 psi
increments; mmHg can be in 25 mmHg increments).
2. Select a default setting for the Alarm Volume, either Minimum or Maximum.
3. For Air-in-line, select Single Bubble Size and Accumulated (Bubble Size and/ or Threshold).
• Single Bubble Size: The minimum bubble size to alarm for a single bubble• Accumulated Bubble Size: the size of the bubble that when detected will be
added to the accumulated threshold. Only bubbles from the selected size and above will be added to the threshold
• Accumulated Threshold: The threshold from which the pump will alarm
Note: Single Bubble Size and Accumulated Threshold cannot be both OFF. At least one of the selections must be ON. An accumulated air-in-line alarm can only occur if enough air is accumulated over a 15-minute period.
12
3
106 Hospira MedNet Meds Software User Guide
Note: For a list of Hospira MedNet compatible devices approved by country, refer to the Hospira MedNet Device Compatibility Matrix available through your Hospira Support Center.
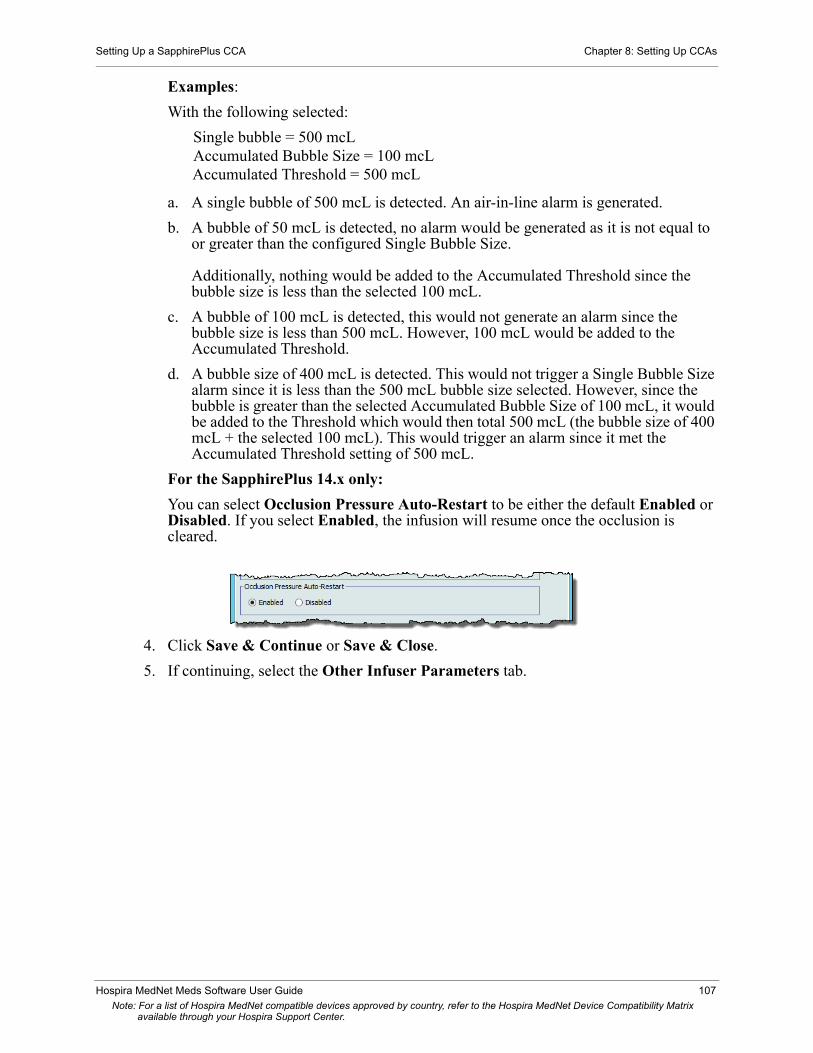
Setting Up a SapphirePlus CCA Chapter 8: Setting Up CCAs
Examples:
With the following selected:
Single bubble = 500 mcLAccumulated Bubble Size = 100 mcLAccumulated Threshold = 500 mcL
a. A single bubble of 500 mcL is detected. An air-in-line alarm is generated.
b. A bubble of 50 mcL is detected, no alarm would be generated as it is not equal to or greater than the configured Single Bubble Size.
Additionally, nothing would be added to the Accumulated Threshold since the bubble size is less than the selected 100 mcL.
c. A bubble of 100 mcL is detected, this would not generate an alarm since the bubble size is less than 500 mcL. However, 100 mcL would be added to the Accumulated Threshold.
d. A bubble size of 400 mcL is detected. This would not trigger a Single Bubble Size alarm since it is less than the 500 mcL bubble size selected. However, since the bubble is greater than the selected Accumulated Bubble Size of 100 mcL, it would be added to the Threshold which would then total 500 mcL (the bubble size of 400 mcL + the selected 100 mcL). This would trigger an alarm since it met the Accumulated Threshold setting of 500 mcL.
For the SapphirePlus 14.x only:
You can select Occlusion Pressure Auto-Restart to be either the default Enabled or Disabled. If you select Enabled, the infusion will resume once the occlusion is cleared.
4. Click Save & Continue or Save & Close.
5. If continuing, select the Other Infuser Parameters tab.
Hospira MedNet Meds Software User Guide 107
Note: For a list of Hospira MedNet compatible devices approved by country, refer to the Hospira MedNet Device Compatibility Matrix available through your Hospira Support Center.

Chapter 8: Setting Up CCAs Setting Up a SapphirePlus CCA
Other Infuser Parameters for SapphirePlus 14.x
1. At Delivery Modes, select Continuous and/or Multistep. You must select at least one.
2. At Other Settings, select any or all of the following:
• Delayed Start and Standby• Prime Reminder • Allow Secondary. Allows a secondary infusion.• Allow Repeat Last Infusion. To enable repeating an infusion using identical
same settings.• Allow Pre-Program• Calculate Concentration• Enable Automatic Patient Lockout. This setting prevents patient access to
settings.• Enable Screen Saver (Far View)
3. At Delivery at End of Infusion (General), either select None/Stop, Continue Rate, or KVO. The Default KVO Rate is between 0.1 and 20 mL/hr). The selection made will represent the default settings for that CCA when there is no drug selected. This setting does not affect rule sets.
108 Hospira MedNet Meds Software User Guide
Note: For a list of Hospira MedNet compatible devices approved by country, refer to the Hospira MedNet Device Compatibility Matrix available through your Hospira Support Center.

Setting Up a SapphirePlus CCA Chapter 8: Setting Up CCAs
4. At Bolus (General), select the Default Level of either Off, Simple or Advanced. This default applies only when there is no drug selected and does not affect the rule sets. The rate can be set between 1 - 999 mL/hr with a default of 125 mL/hr.
5. At Prime Volume, allow the default of 20 mL or select from 2 - 25 mL.
6. At Other:
a. Enter a Maximum Volumetric Rate can be selected from 0.1 - 999 mL/hr or leave the default at 999.
b. From the drop-down list select the time interval to alert the user that an infusion is nearly complete. Choices are Off, 1 minute, 3 minutes, 5 minutes and 10 minutes.
Note: For a multistep infusion, the Nearing End of Infusion Alarm occurs x minutes before treatment ends (if x = 10 and there are 7 steps of 5 minutes each, the message will appear after 25 minutes).
For a continuous/secondary infusion, the Nearing End of Infusion Alarm occurs x minutes before the primary and secondary will be ended (if x = 10 and primary is 1 minute and secondary is 30 minutes the message will appear after 21 minutes).
7. At Primary Hard Limits, set Maximum VTBI from 1-9999 mL or leave the default at 9999.
8. At Secondary Hard Limits, set Maximum VTBI from 1-9999 mL or leave the default at 9999.
9. At Multistep Hard Limits, set Maximum VTBI from 1-9999 mL or leave the default at 9999. Select the Maximum Time from the 24-hour clock. The default is 24:00.
10. At Brightness, select the brightness level for the infuser from On, Partial or Off.
11. At Inactivity Callback (Pump Unattended), set the Callback Alarm at 2 minutes, 5 minutes or 10 minutes.
12. Select the default Key Press Volume level.
Note: You can Restore Default Values by clicking on that button.
13. Click Save & Close.
Hospira MedNet Meds Software User Guide 109
Note: For a list of Hospira MedNet compatible devices approved by country, refer to the Hospira MedNet Device Compatibility Matrix available through your Hospira Support Center.

Chapter 8: Setting Up CCAs Setting Up a SapphirePlus CCA
Other Infuser Parameters for SapphirePlus 13.x
1. At Other Settings, accept the checked default Delayed Start or uncheck the default.
2. For Delivery at End of Infusion, either select None or KVO. The Default KVO Rate is between 0.1 and 20 mL/hr).
3. For Other:
a. Enter a Maximum Volumetric Rate.
b. From the drop-down list select the time interval to alert the user that an infusion is nearly complete. Choices are Off, 1 minute, 3 minutes, 5 minutes and 10 minutes.
Note: For a multistep infusion, the Nearing End of Infusion Alarm occurs x minutes before treatment ends (if x = 10 and there are 7 steps of 5 minutes each, the message will appear after 25 minutes).
For a continuous/secondary infusion, the Nearing End of Infusion Alarm occurs x minutes before the primary and secondary will be ended (if x = 10 and primary is 1 minute and secondary is 30 minutes the message will appear after 21 minutes).
4. Select the default Brightness level. Choices are On, Partial and Off.
5. For Inactivity Callback (Pump Unattended), select the notification interval for period of no activity from the drop-down list. Choices are 2 minutes, 5 minutes and 10 minutes.
6. Select the default Key Press Volume level.
Note: You can Restore Default Values by clicking on that button.
7. Click Save & Close.
1
23
110 Hospira MedNet Meds Software User Guide
Note: For a list of Hospira MedNet compatible devices approved by country, refer to the Hospira MedNet Device Compatibility Matrix available through your Hospira Support Center.

Overview Chapter 9: Plum A+, and Plum 360 Medication Entries
Chapter 9: Plum A+, and Plum 360 Medication Entries
OverviewIn this chapter, you will learn how to define clinical decision rules for medications in the Plum A+ drug library. Hospira MedNet Meds software enables you to customize dose limits for medications used in drug libraries. You can customize clinical decision rules for up to the maximum number of clinical care areas (CCAs) in the hospital, and 150 (Plum A+) or 400 medication entries (Plum 360) in each CCA, depending on your licensing.
Medication entries can be created with one of three types of rule sets, described below.
• Full Rule Set: Medication entries configured with a medication name, a complete or partial concentration, a specific dosing unit, and corresponding dose rate limits.
• Limited Rule Set: Medication entries configured with a medication name, optional diluent volume, and rate limits.
• Label Only Rule Set: Medication entries configured with a medication name, complete or partial concentration, and a specific dosing unit.
The display of the medication in the Drug List and the programming sequence for the clinician on the infuser will vary depending on the type of rule set defined in the drug library.
Note: The Clinical Use field (Plum 360 only) is an optional field and can be left blank. The default value of Clinical Use can be updated in the Master Infuser Setup.
Hospira MedNet Meds Software User Guide 111
Note: For a list of Hospira MedNet compatible devices approved by country, refer to the Hospira MedNet Device Compatibility Matrix available through your Hospira Support Center.
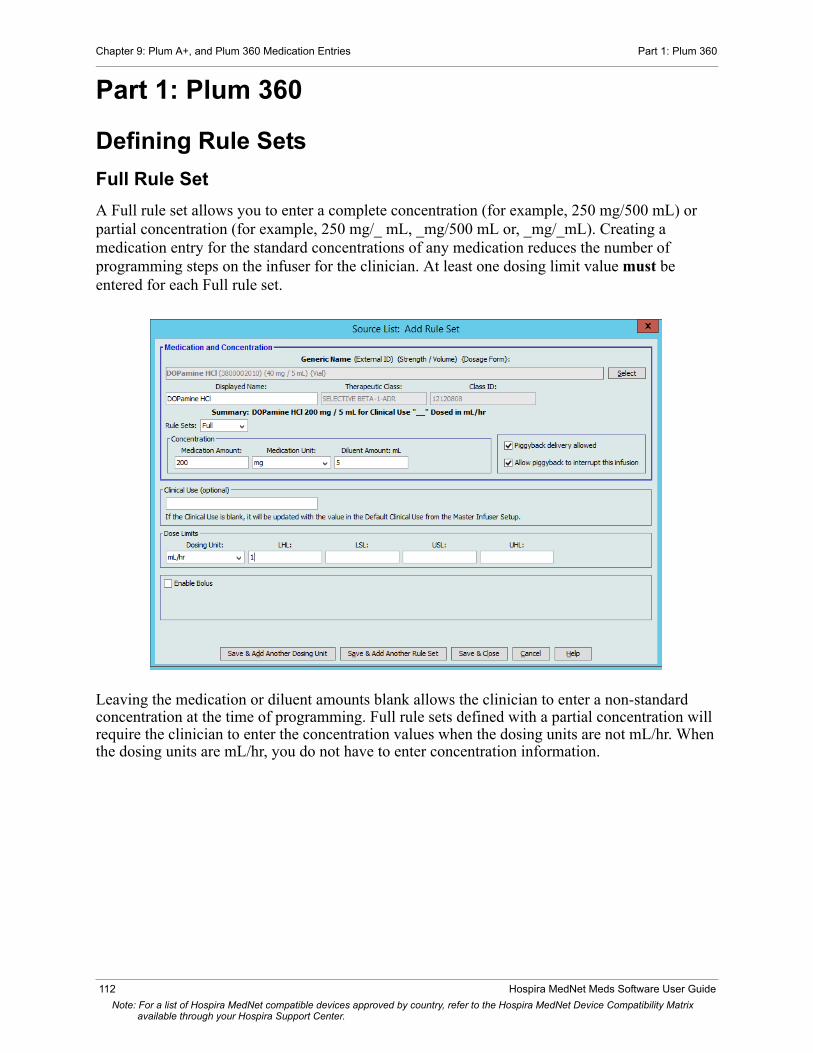
Chapter 9: Plum A+, and Plum 360 Medication Entries Part 1: Plum 360
Part 1: Plum 360
Defining Rule Sets
Full Rule Set
A Full rule set allows you to enter a complete concentration (for example, 250 mg/500 mL) or partial concentration (for example, 250 mg/_ mL, _mg/500 mL or, _mg/_mL). Creating a medication entry for the standard concentrations of any medication reduces the number of programming steps on the infuser for the clinician. At least one dosing limit value must be entered for each Full rule set.
Leaving the medication or diluent amounts blank allows the clinician to enter a non-standard concentration at the time of programming. Full rule sets defined with a partial concentration will require the clinician to enter the concentration values when the dosing units are not mL/hr. When the dosing units are mL/hr, you do not have to enter concentration information.
112 Hospira MedNet Meds Software User Guide
Note: For a list of Hospira MedNet compatible devices approved by country, refer to the Hospira MedNet Device Compatibility Matrix available through your Hospira Support Center.
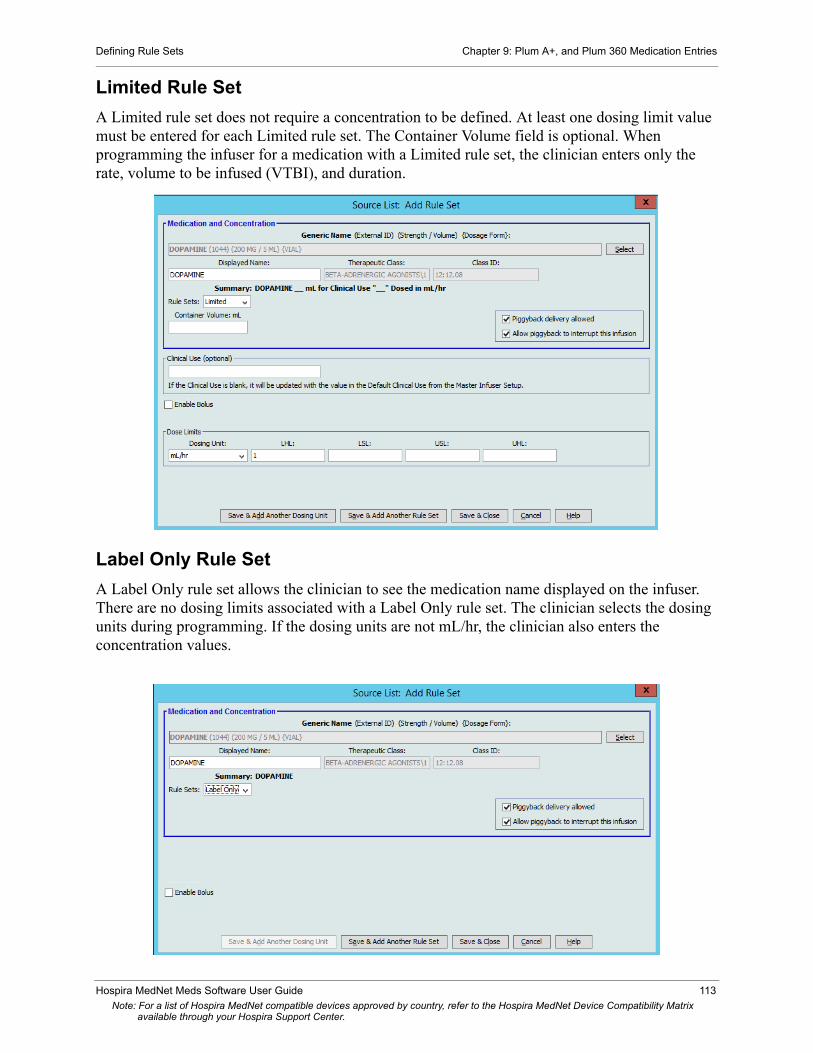
Defining Rule Sets Chapter 9: Plum A+, and Plum 360 Medication Entries
Limited Rule Set
A Limited rule set does not require a concentration to be defined. At least one dosing limit value must be entered for each Limited rule set. The Container Volume field is optional. When programming the infuser for a medication with a Limited rule set, the clinician enters only the rate, volume to be infused (VTBI), and duration.
Label Only Rule Set
A Label Only rule set allows the clinician to see the medication name displayed on the infuser. There are no dosing limits associated with a Label Only rule set. The clinician selects the dosing units during programming. If the dosing units are not mL/hr, the clinician also enters the concentration values.
need screen /Clinical use
Hospira MedNet Meds Software User Guide 113
Note: For a list of Hospira MedNet compatible devices approved by country, refer to the Hospira MedNet Device Compatibility Matrix available through your Hospira Support Center.

Chapter 9: Plum A+, and Plum 360 Medication Entries Setting Dose Rate Limits
Each type of rule set will create a different display for the medication in the Drug List on the infuser.
You can create medication entries by adding them to the Master Drug Formulary or by adding them directly to a CCA. Medication entries added to a CCA are automatically added to the Master Drug Formulary.
Within a CCA, no two medication entries may have exactly the same External ID and Concentration. Also, no two medication entries may have exactly the same Displayed Name and Concentration.
Within a CCA, a medication entry with a Displayed Name and a Concentration can have up to four Clinical Uses. Each Clinical Use can have up to four dosing units or a total of 16 possible dosing units for one medication in one CCA.
In the Master Drug Formulary, two medication entries may have the same display name, medication amount, medication unit, diluent amount, and dosing units, as long as one or more of the following limits are different:
• Lower soft limit (LSL)• Lower hard limit (LHL)• Upper soft limit (USL)• Upper hard limit (UHL)
Setting Dose Rate LimitsHospira MedNet Meds allows you to define dose rate limits for both primary and secondary infusions. It is important that you understand how the dose rate limits function so please read this section carefully.
You can define upper and lower soft and hard limits as part of the rule set for each medication entry that you create in the library. As you configure the limits, the software enforces the following rule:
Lower Hard Limit (LHL) < Lower Soft Limit (LSL) <= Upper Soft Limit (USL) < Upper Hard Limit (UHL)
Soft Limits
Soft Limits are dose rate limits that can be overridden when programming the infuser. When a value entered on the infuser is lower than the lower soft limit or higher than the upper soft limit, the infuser displays a soft limit override confirmation message. The infuser records soft limit alerts and the user’s response to the alert in its history logs.
For example, if the upper soft limit is set to 15 mL/hr and the clinician enters 16 mL/hr, the infuser will display a soft limit override alert. This alert notifies the clinician that the entry is outside the range of the soft limits set for that medication entry. The clinician can choose to continue programming using the override, or cancel the override and edit the value. Both the override and edit events are recorded separately in the infuser’s history log.
114 Hospira MedNet Meds Software User Guide
Note: For a list of Hospira MedNet compatible devices approved by country, refer to the Hospira MedNet Device Compatibility Matrix available through your Hospira Support Center.

Setting Dose Rate Limits Chapter 9: Plum A+, and Plum 360 Medication Entries
Hard Limits
Hard limits are dose rate limits that cannot be overridden; the infuser cannot be programmed with a rate that is lower than the lower hard limit or higher than the upper hard limit.
Note: The actual patient weight is not entered until the clinician programs the infuser. Therefore, Hospira MedNet Meds software cannot verify the validity of a lower limit when entering a weight-based medication entry. The infuser performs the final check when the clinician programs the infuser.
Bolus Limits (Plum 360 with Bolus)
Bolus Limits can be defined in three ways:
- Pump Bolus Amount allows you to define the pump bolus amount unit, set lower and upper limits, select the maximum bolus unit, and the maximum amount of medication that can be administered in a bolus.
- Bolus Time Limits allow you to define the time period over which a bolus can be administered. A minimum administration time for the bolus is defined as a lower limit, while a maximum administration time is defined as an upper limit.
- Bolus Dose Rate Limits allow you to define the rate at which a bolus can be administered.
Note: If defining Bolus Rules using weight-based or BSA-based units:The Bolus Dose Rate limits can be defined based on weight only if the Bolus Amount units are also based on weight. The Bolus Dose Rate limits can be defined based on BSA only if the Bolus Amount units are also based on BSA.
Hospira MedNet Meds Software User Guide 115
Note: For a list of Hospira MedNet compatible devices approved by country, refer to the Hospira MedNet Device Compatibility Matrix available through your Hospira Support Center.

Chapter 9: Plum A+, and Plum 360 Medication Entries Medication Entry Rules and Conventions
Medication Entry Rules and Conventions
The Hospira MedNet Meds software uses the following conventions for Plum A+ medication entries:
• Full or Limited rule sets require at least one hard or soft limit. • You can create medication entries by adding them to the Master Drug Formulary or by
adding them directly to a CCA. Medication entries added to a CCA Target List are automatically added to the Master Drug Formulary List.
• “Validity” messages appear in red at the bottom of the Rule Set window. When you enter a value that is not allowed, the message specifies the defined range for the field, or the reason the value is not permitted.
• You cannot use the following characters in the medication name: comma (,), less than (<), greater than (>), single quotes (‘), double quotes (“), and ampersand (&).
• Once you select a medication unit, the dosing unit field will display only the enabled unit type.
• The software prohibits invalid numeric entries and signals such with an audible “beep.” • You may use the vertical and horizontal scroll bars to navigate to an entry.• If you do not select or populate a required field, an error message appears.• When you highlight an entry on the Drug Library Management list view, buttons or features
that are not allowed appear as “grayed” or disabled.• When you add a new medication in the Generic Name field of the rule set window, you may
search for a medication by typing the first few characters of its generic name. The drop-down list will navigate to show any matching medications.
116 Hospira MedNet Meds Software User Guide
Note: For a list of Hospira MedNet compatible devices approved by country, refer to the Hospira MedNet Device Compatibility Matrix available through your Hospira Support Center.

The Plum 360 Medication Rule Set Chapter 9: Plum A+, and Plum 360 Medication Entries
The Plum 360 Medication Rule Set The Rule Set window shown here is used to configure a medication entry for the Plum 360 drug library.
Plum 360 with Bolus Enabled
Hospira MedNet Meds Software User Guide 117
Note: For a list of Hospira MedNet compatible devices approved by country, refer to the Hospira MedNet Device Compatibility Matrix available through your Hospira Support Center.

Chapter 9: Plum A+, and Plum 360 Medication Entries The Plum 360 Medication Rule Set
Rule Set Fields
The following table lists the fields, a brief description, and allowed value range for the infuser.
Each medication entry must have a generic name and a displayed name; you cannot save a medication entry without a name in these fields. The number of characters in the displayed name is determined by how it is displayed on the infuser’s screen. Depending on character width, the maximum number of characters allowed in a displayed name can vary from 17 to 29.
To avoid potential confusion when creating medication entries, use only the medication name in the Displayed Name field and ensure that the External ID is identical to the External ID used in your institution’s formulary. Do not include the diluent as part of the medication name.
Parameter Description Allowable Range
Generic Name This is the medication name from your Medication List. It is selected from the drop-down list and displays the External ID (the hospital's identifier for a medication). Strength/Volume and Dosage Form display only if part of your Medication List.
Not editable in the Rule Set
Displayed Name This is the name that will be displayed on the infuser.
• Varies depending on the character width
• Cannot be blank
Caution: You cannot use the following characters in the displayed name: comma (,), less than (<), greater than (>), single quotes (‘), double quotes (“), and ampersand (&).
Note: The display font changes on the Plum A+ infuser for lengthy displayed names.
Therapeutic Class The therapeutic class assigned to the medication entries.
Not editable in the Rule Set
Class ID The ID number for the therapeutic class assigned to the medication entry.
Not editable in the Rule Set
Medication Amount Allows you to enter the medication amount in the units selected.
The combination of medication amount, medication unit, and diluent amount creates the medication’s concentration.
For medication amounts in mcg, mg, grams, mEq, million units, or mmol:
• 0.1–9999 and “Blank”
For medication amounts in units:
• 0.1–99999999 and “Blank”
Medication Unit Allows you to select the unit of measure for your medication amount.
mcg, mg, grams, mEq, Million Units, mmol and units
118 Hospira MedNet Meds Software User Guide
Note: For a list of Hospira MedNet compatible devices approved by country, refer to the Hospira MedNet Device Compatibility Matrix available through your Hospira Support Center.

The Plum 360 Medication Rule Set Chapter 9: Plum A+, and Plum 360 Medication Entries
Diluent Amount Allows you to set the diluent amount associated with the medication entry. The diluent amount will vary depending on the container size, overfill, and volume of added solution.
• 0.1–9999 and “Blank”
Piggyback delivery allowed
Allows you to enable a piggyback infusion.
Checked to enable or Unchecked (does not allow the functionality)
Allow piggyback to interrupt this infusion
Allows you to configure whether this medication can be interrupted by a piggyback infusion.
Checked to enable or Unchecked (does not allow the functionality)
Dosing Unit Allows you to set the standard dosing unit for the medication. This will be the default value displayed on the infuser.
For complete dosing units, please consult your infuser’s System Operating Manual
LHL, LSL, USL, UHL Lower hard limit, lower soft limit, upper soft limit, upper hard limit.
Allows you to set the upper and/or lower dose rate limits for the selected medication.
The units for the soft and hard limits are the same as the dosing units selected in the medication rule set
Enable Bolus (Plum 360 with Bolus)
Pump Bolus Amount Units, and Bolus Dose Rate Units are dependent upon the selection of the medication unit.
The medication unit selected will determine the allowable bolus units that can be selected from the available fields’ drop-down list.
Refer to your infuser's System Operating Manual for complete details and allowable range.
Parameter Description Allowable Range
Hospira MedNet Meds Software User Guide 119
Note: For a list of Hospira MedNet compatible devices approved by country, refer to the Hospira MedNet Device Compatibility Matrix available through your Hospira Support Center.

Chapter 9: Plum A+, and Plum 360 Medication Entries Step-by-step Procedures
Step-by-step ProceduresThe following section provides step-by-step procedures that will enable you to create and manage medication entries. In this section you will learn how to do the following:
• Add a medication entry with a Full rule set in a CCA• Add a medication entry with a Limited rule set in a CCA• Add a medication entry with a Label Only rule set in a CCA• Edit a medication entry in a CCA• View a medication entry in a CCA• Remove a medication entry from a CCA• Add a medication entry with a Full rule set the Master Drug Formulary• Add a medication entry with a Limited rule set to the Master Drug Formulary• Add a Label Only medication entry to the Master Drug Formulary• Edit a medication entry in the Master Drug Formulary• View a medication entry in the Master Drug Formulary• Delete a medication entry from the Master Drug Formulary• Copy a medication entry from the Master Drug Formulary to a Target CCA
120 Hospira MedNet Meds Software User Guide
Note: For a list of Hospira MedNet compatible devices approved by country, refer to the Hospira MedNet Device Compatibility Matrix available through your Hospira Support Center.

Working with CCA Medication Entries (Plum 360) Chapter 9: Plum A+, and Plum 360 Medication Entries
Working with CCA Medication Entries (Plum 360)
Note: When adding medication entries to the Target List, both the selected CCA and the Master Drug Formulary are updated. When adding to the Source List, only the Master Drug Formulary is updated.
The maximum number of medication entries allowed in a CCA is 150-400 depending on your licensing.
In the Target List, the created medication entries are grouped by Displayed Name plus Concentration. If there is no grouping of medication entries with the same Displayed Name plus Concentration, the entry will go to the bottom of the list of medication entries.
Within the grouping there is a sorting
a. Clinical Use with the Default setting of Clinical Use topping the series
b. Each group in Alphabetical order
c. Dosing units
To add a medication entry with a Full rule set in a CCA:
1. Select the desired CCA from the Target List drop-down list.
2. From the Target List, click Add.
Hospira MedNet Meds Software User Guide 121
Note: For a list of Hospira MedNet compatible devices approved by country, refer to the Hospira MedNet Device Compatibility Matrix available through your Hospira Support Center.
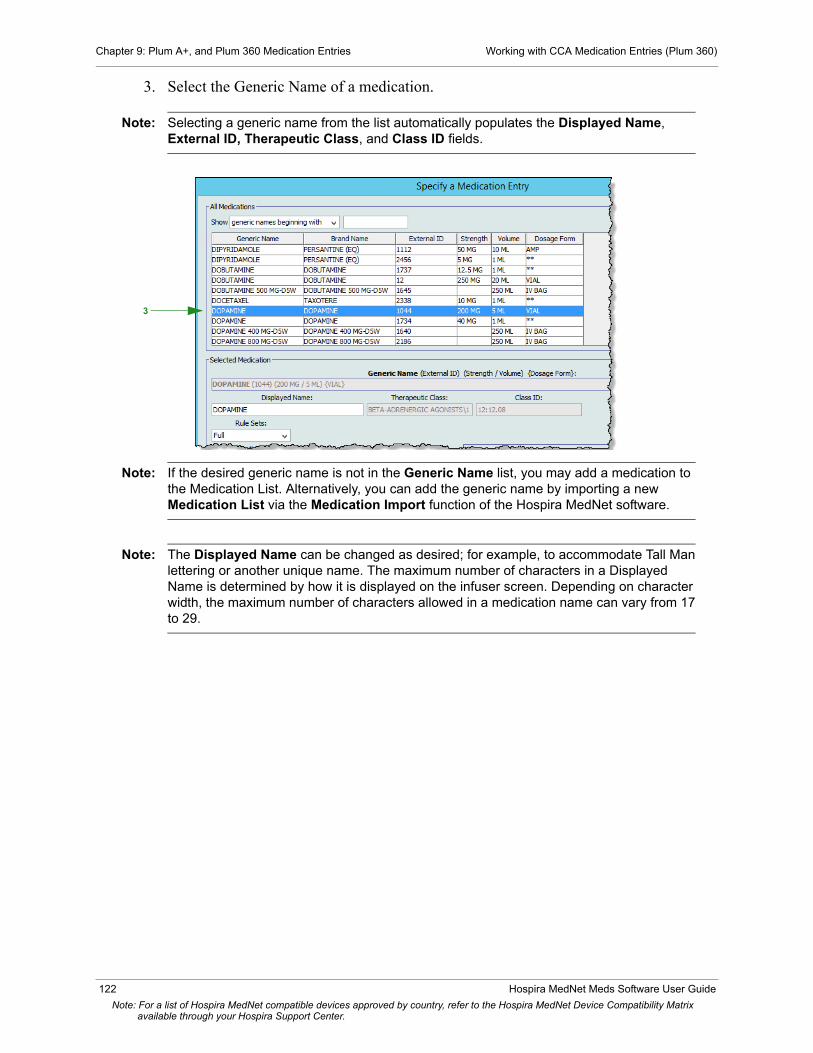
Chapter 9: Plum A+, and Plum 360 Medication Entries Working with CCA Medication Entries (Plum 360)
3. Select the Generic Name of a medication.
Note: Selecting a generic name from the list automatically populates the Displayed Name, External ID, Therapeutic Class, and Class ID fields.
Note: If the desired generic name is not in the Generic Name list, you may add a medication to the Medication List. Alternatively, you can add the generic name by importing a new Medication List via the Medication Import function of the Hospira MedNet software.
Note: The Displayed Name can be changed as desired; for example, to accommodate Tall Man lettering or another unique name. The maximum number of characters in a Displayed Name is determined by how it is displayed on the infuser screen. Depending on character width, the maximum number of characters allowed in a medication name can vary from 17 to 29.
3
122 Hospira MedNet Meds Software User Guide
Note: For a list of Hospira MedNet compatible devices approved by country, refer to the Hospira MedNet Device Compatibility Matrix available through your Hospira Support Center.

Working with CCA Medication Entries (Plum 360) Chapter 9: Plum A+, and Plum 360 Medication Entries
4. Select Full (if not selected) from the Rule Sets drop-down list.
5. Enter a Medication Amount. Select a Medication Unit from the drop-down list and enter a Diluent Amount, if desired.
6. Place a check mark in the box next to Piggyback delivery allowed, if desired.
7. Place a check mark in the box next to Allow piggyback to interrupt this infusion, if desired.
8. Enter a Clinical Use, if desired.
9. Click Next.
6
7
5
8
4
Hospira MedNet Meds Software User Guide 123
Note: For a list of Hospira MedNet compatible devices approved by country, refer to the Hospira MedNet Device Compatibility Matrix available through your Hospira Support Center.

Chapter 9: Plum A+, and Plum 360 Medication Entries Working with CCA Medication Entries (Plum 360)
10. Select the dosing unit from the drop-down list and enter the values for soft and hard limits. (You must specify at least one limit.)
11. Once you enter a value for Dosing Unit and dosing limit(s), you will be able to add three more dosing units, for a total of four dosing units for the selected medication entry with the same Displayed Name and Concentration.
You can add each selection by clicking the green plus “+” sign.
Note: A tab with red text denotes either incomplete or invalid dosing unit and/or dosing limits.
12. Click Save & Add Another Rule Set, or Save & Close to add the medication entry to the CCA.
or
If you have a Bolus enabled infuser, you can place a tick mark next to Enable Bolus if you want to set bolus dose limits for this medication (Optional).
124 Hospira MedNet Meds Software User Guide
Note: For a list of Hospira MedNet compatible devices approved by country, refer to the Hospira MedNet Device Compatibility Matrix available through your Hospira Support Center.

Working with CCA Medication Entries (Plum 360) Chapter 9: Plum A+, and Plum 360 Medication Entries
For the Plum 360 with Bolus only:
To Set a Bolus:
a. Select the Pump Bolus Amount Unit from the drop-down list. (The allowable units are determined by the selection of Medication Unit.) Enter the desired values for Lower Hard Limit, Lower Soft Limit, Upper Hard Limit, and Upper Soft Limit.
Enter Maximum Bolus Amount and Unit if desired. These fields are enabled when the Bolus Amount Limits Unit is weight-based or BSA-based.
b. Enter the desired values for Bolus Time Limits: Lower Hard Limit, Lower Soft Limit, Upper Hard Limit, and Upper Soft Limit.
c. Select the Bolus Dose Rate Limits from the drop-down list and enter the desired values for Lower Hard Limit, Lower Soft Limit, Upper Hard Limit, and Upper Soft Limit.
d. Click Save & Close.
Hospira MedNet Meds Software User Guide 125
Note: For a list of Hospira MedNet compatible devices approved by country, refer to the Hospira MedNet Device Compatibility Matrix available through your Hospira Support Center.
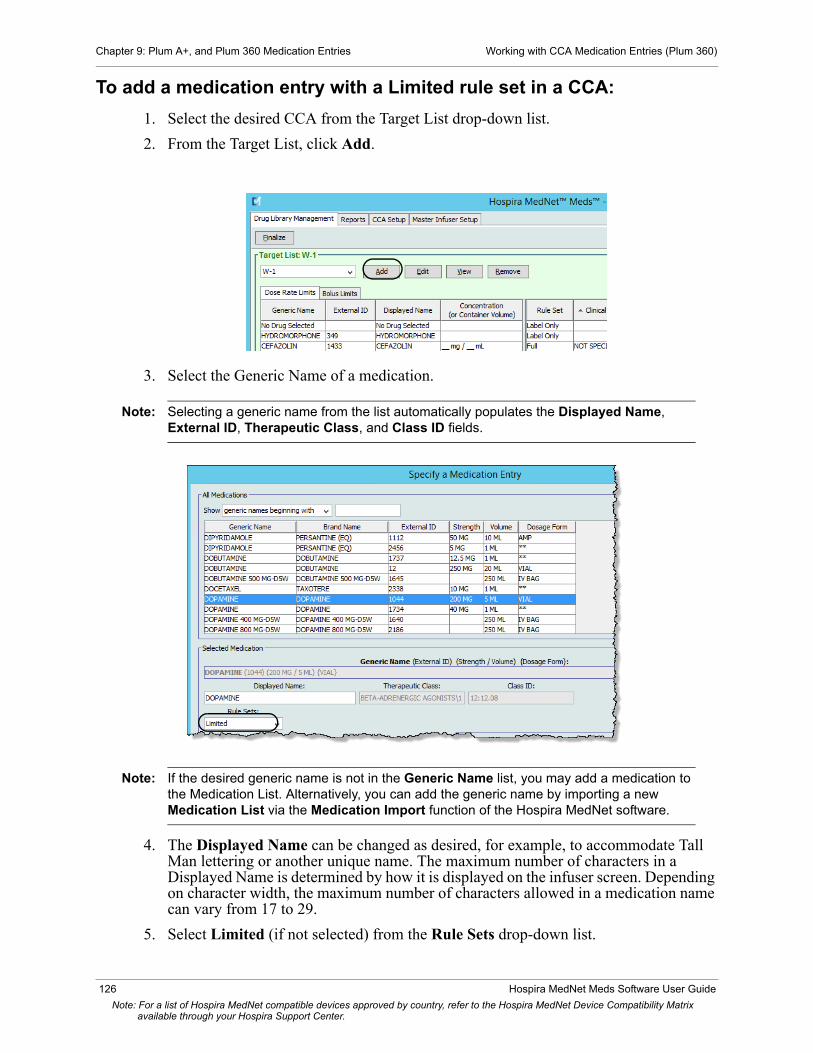
Chapter 9: Plum A+, and Plum 360 Medication Entries Working with CCA Medication Entries (Plum 360)
To add a medication entry with a Limited rule set in a CCA:
1. Select the desired CCA from the Target List drop-down list.
2. From the Target List, click Add.
3. Select the Generic Name of a medication.
Note: Selecting a generic name from the list automatically populates the Displayed Name, External ID, Therapeutic Class, and Class ID fields.
Note: If the desired generic name is not in the Generic Name list, you may add a medication to the Medication List. Alternatively, you can add the generic name by importing a new Medication List via the Medication Import function of the Hospira MedNet software.
4. The Displayed Name can be changed as desired, for example, to accommodate Tall Man lettering or another unique name. The maximum number of characters in a Displayed Name is determined by how it is displayed on the infuser screen. Depending on character width, the maximum number of characters allowed in a medication name can vary from 17 to 29.
5. Select Limited (if not selected) from the Rule Sets drop-down list.
2
126 Hospira MedNet Meds Software User Guide
Note: For a list of Hospira MedNet compatible devices approved by country, refer to the Hospira MedNet Device Compatibility Matrix available through your Hospira Support Center.
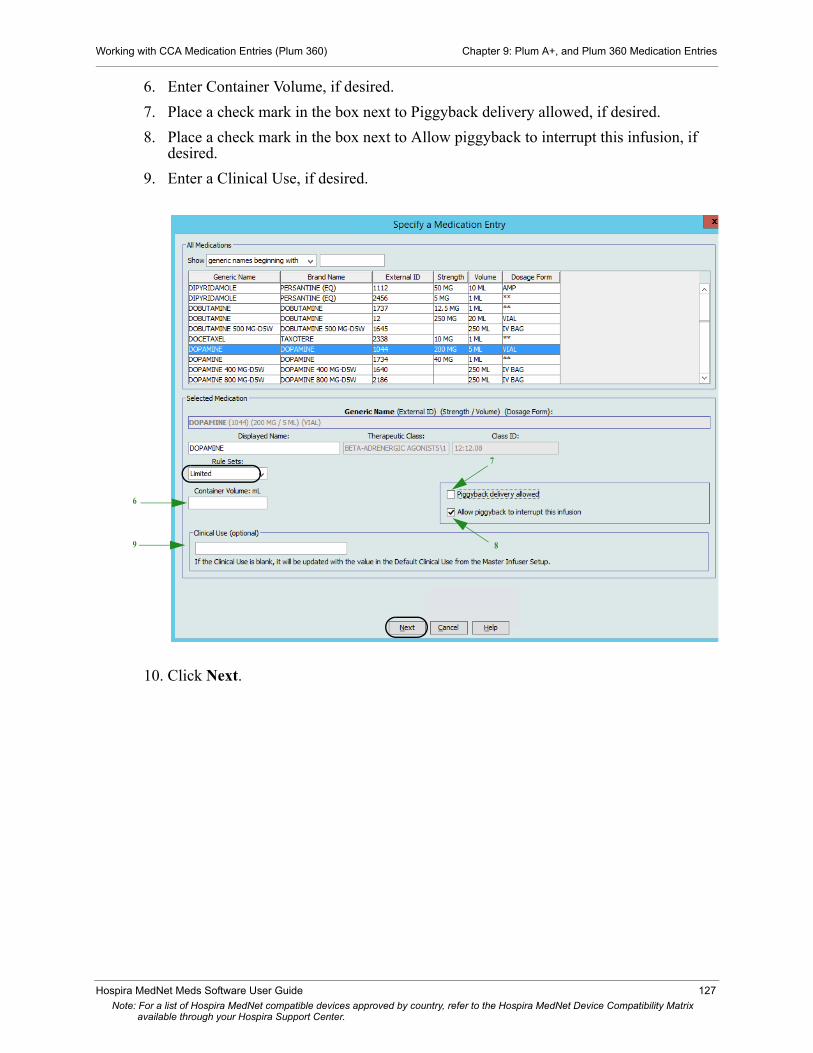
Working with CCA Medication Entries (Plum 360) Chapter 9: Plum A+, and Plum 360 Medication Entries
6. Enter Container Volume, if desired.
7. Place a check mark in the box next to Piggyback delivery allowed, if desired.
8. Place a check mark in the box next to Allow piggyback to interrupt this infusion, if desired.
9. Enter a Clinical Use, if desired.
10. Click Next.
7
8
6
9
Hospira MedNet Meds Software User Guide 127
Note: For a list of Hospira MedNet compatible devices approved by country, refer to the Hospira MedNet Device Compatibility Matrix available through your Hospira Support Center.

Chapter 9: Plum A+, and Plum 360 Medication Entries Working with CCA Medication Entries (Plum 360)
11. Select the dosing unit from the drop-down list and enter the values for soft and hard limits. (You must specify at least one limit.)
12. Once you enter a value for Dosing Unit and dosing limit(s), you will be able to add three more dosing units, for a total of four dosing units for the selected medication entry with the same Displayed Name and Concentration.
You can add each selection by clicking the green plus “+” sign.
Note: A tab with red text denotes either incomplete or invalid dosing unit and/or dosing limits.
13. Click Save & Add Another Rule Set or Save & Close to add the medication entry to the CCA.
or
If you have a Bolus enabled infuser, you can place a tick mark next to Enable Bolus if you want to set bolus dose limits for this medication. See To Set a Bolus: on page 125.
128 Hospira MedNet Meds Software User Guide
Note: For a list of Hospira MedNet compatible devices approved by country, refer to the Hospira MedNet Device Compatibility Matrix available through your Hospira Support Center.

Working with CCA Medication Entries (Plum 360) Chapter 9: Plum A+, and Plum 360 Medication Entries
To add a Label Only rule set medication entry in a CCA:
1. Select the desired CCA from the Target List drop-down list.
2. From the Target List, click Add.
3. Select the Generic Name of a medication.
Note: Selecting a Generic Name from the list automatically populates the Displayed Name, External ID, Therapeutic Class, and Class ID fields.
Note: If the desired generic name is not in the Generic Name list, you may add a medication to the Medication List. Alternatively, you can add the generic name by importing a new Medication List via the Medication Import function of the Hospira MedNet software.
Hospira MedNet Meds Software User Guide 129
Note: For a list of Hospira MedNet compatible devices approved by country, refer to the Hospira MedNet Device Compatibility Matrix available through your Hospira Support Center.

Chapter 9: Plum A+, and Plum 360 Medication Entries Working with CCA Medication Entries (Plum 360)
4. The Displayed Name can be changed as desired, for example, to accommodate Tall Man lettering or another unique name. The maximum number of characters in a Displayed Name is determined by how it is displayed on the infuser screen. Depending on character width, the maximum number of characters allowed in a medication name can vary from 17 to 29.
5. Select Label Only from the Rule Sets drop-down list.
6. Place a check mark in the box next to Piggyback delivery allowed, if desired.
7. Place a check mark in the box next to Allow Piggyback to interrupt this infusion, if desired.
8. Click Next.
9. Click Save & Add Another or Save & Close to add the medication entry to the CCA.
or
If you have a Bolus enabled infuser, you can place a tick mark next to Enable Bolus if you want to set bolus dose limits for this medication. See To Set a Bolus: on page 125.
130 Hospira MedNet Meds Software User Guide
Note: For a list of Hospira MedNet compatible devices approved by country, refer to the Hospira MedNet Device Compatibility Matrix available through your Hospira Support Center.
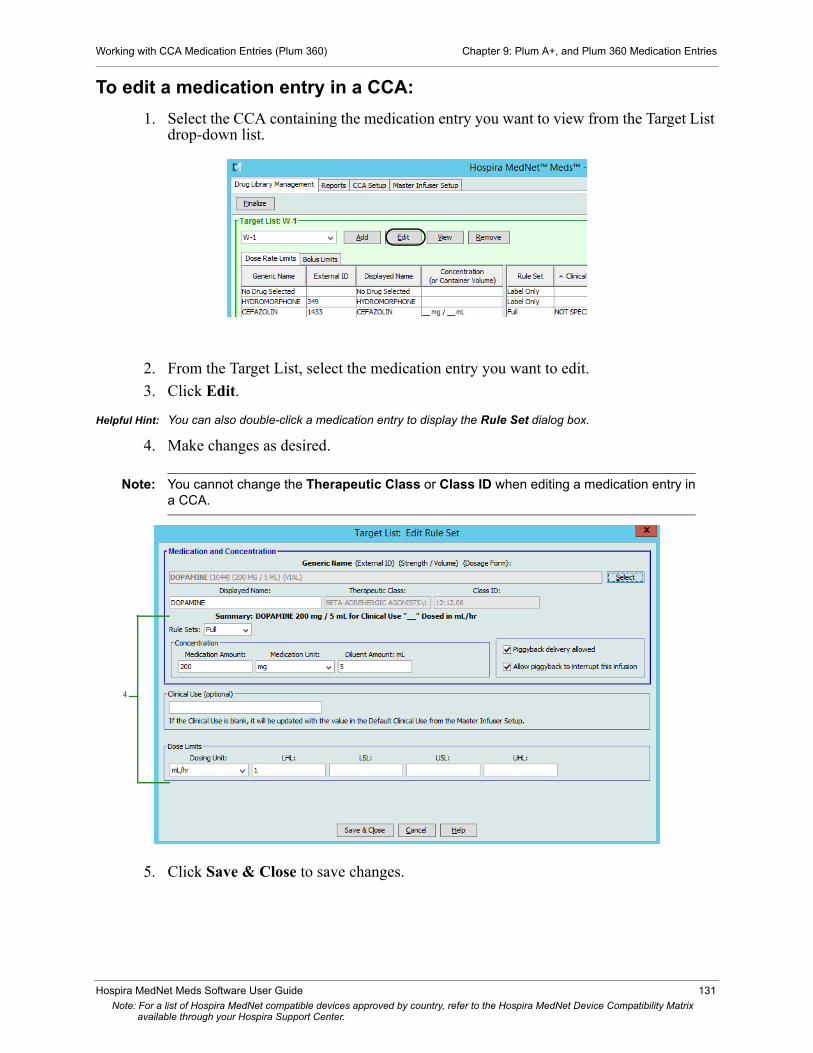
Working with CCA Medication Entries (Plum 360) Chapter 9: Plum A+, and Plum 360 Medication Entries
To edit a medication entry in a CCA:
1. Select the CCA containing the medication entry you want to view from the Target List drop-down list.
2. From the Target List, select the medication entry you want to edit.
3. Click Edit.
Helpful Hint: You can also double-click a medication entry to display the Rule Set dialog box.
4. Make changes as desired.
Note: You cannot change the Therapeutic Class or Class ID when editing a medication entry in a CCA.
5. Click Save & Close to save changes.
4
Hospira MedNet Meds Software User Guide 131
Note: For a list of Hospira MedNet compatible devices approved by country, refer to the Hospira MedNet Device Compatibility Matrix available through your Hospira Support Center.

Chapter 9: Plum A+, and Plum 360 Medication Entries Working with CCA Medication Entries (Plum 360)
Note: If the medication entry that is edited is assigned to only one CCA, the medication entry will also be updated with the same change in the Master Drug Formulary. If the medication entry that is edited is assigned to more than one CCA, a new medication entry will be created in the Master Drug Formulary.
To view a medication entry in a CCA:
1. Select the CCA containing the medication entry you want to view from the Target List drop-down list.
2. From the Target List, select the medication entry you want to view.
3. Click View.
4. Click Close to exit the screen.
132 Hospira MedNet Meds Software User Guide
Note: For a list of Hospira MedNet compatible devices approved by country, refer to the Hospira MedNet Device Compatibility Matrix available through your Hospira Support Center.

Working with CCA Medication Entries (Plum 360) Chapter 9: Plum A+, and Plum 360 Medication Entries
To remove a medication entry from a CCA:
1. Select the CCA containing the medication entry you want to remove from the Target List drop-down list.
2. Select the medication entry you want to remove.
3. Click Remove.
4. At the confirmation to remove from the CCA, click Remove.
Hospira MedNet Meds Software User Guide 133
Note: For a list of Hospira MedNet compatible devices approved by country, refer to the Hospira MedNet Device Compatibility Matrix available through your Hospira Support Center.
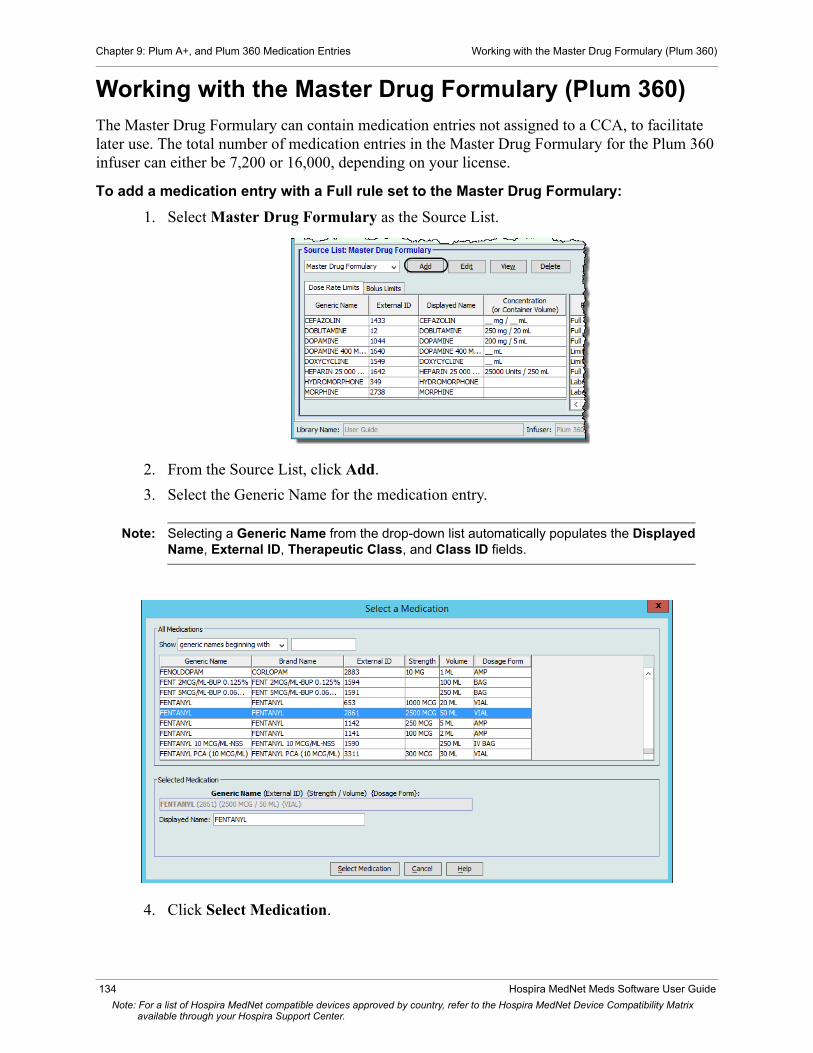
Chapter 9: Plum A+, and Plum 360 Medication Entries Working with the Master Drug Formulary (Plum 360)
Working with the Master Drug Formulary (Plum 360)The Master Drug Formulary can contain medication entries not assigned to a CCA, to facilitate later use. The total number of medication entries in the Master Drug Formulary for the Plum 360 infuser can either be 7,200 or 16,000, depending on your license.
To add a medication entry with a Full rule set to the Master Drug Formulary:
1. Select Master Drug Formulary as the Source List.
2. From the Source List, click Add.
3. Select the Generic Name for the medication entry.
Note: Selecting a Generic Name from the drop-down list automatically populates the Displayed Name, External ID, Therapeutic Class, and Class ID fields.
4. Click Select Medication.
134 Hospira MedNet Meds Software User Guide
Note: For a list of Hospira MedNet compatible devices approved by country, refer to the Hospira MedNet Device Compatibility Matrix available through your Hospira Support Center.

Working with the Master Drug Formulary (Plum 360) Chapter 9: Plum A+, and Plum 360 Medication Entries
Note: The Displayed Name field cannot be left blank. The maximum number of characters in a medication name is determined by how it is displayed on the infuser screen after it is downloaded. Depending on character width, the maximum number of characters allowed in a medication name can vary from 17 to 29.
Note: If the desired generic name is not in the Generic Name drop-down list, you may add a medication to the Medication List. Alternatively, you can add the generic name by importing a new Medication List via the Medication Import function of the Hospira MedNet software.
5. Select Full (if not already selected) from the Rule Sets drop-down list.
6. Enter a Medication Amount (optional), select the Medication Unit and Diluent Amount (optional).
7. Select the dosing unit and type the values for soft and hard limits. (You must specify at least one limit.)
8. Click Save & Add Another Dosing Unit or Save & Close to add the medication entry to the Master Drug Formulary.
Note: When a medication entry is added to the Master Drug Formulary, it is not assigned to a CCA.
5
6
7
Hospira MedNet Meds Software User Guide 135
Note: For a list of Hospira MedNet compatible devices approved by country, refer to the Hospira MedNet Device Compatibility Matrix available through your Hospira Support Center.

Chapter 9: Plum A+, and Plum 360 Medication Entries Working with the Master Drug Formulary (Plum 360)
To add a Limited rule set medication entry to the Master Drug Formulary:
1. Select Master Drug Formulary as the Source List.
2. From the Source List, click Add.
3. Select the Generic Name for the medication entry.
Note: Selecting a Generic Name from the drop-down list automatically populates the Displayed Name, External ID, Therapeutic Class, and Class ID fields.
4. Click Select Medication.
Note: The Displayed Name field cannot be left blank. The maximum number of characters in a displayed name is determined by how it is displayed on the infuser screen after it is downloaded. Depending on character width, the maximum number of characters allowed in a medication name can vary from 17 to 29.
136 Hospira MedNet Meds Software User Guide
Note: For a list of Hospira MedNet compatible devices approved by country, refer to the Hospira MedNet Device Compatibility Matrix available through your Hospira Support Center.

Working with the Master Drug Formulary (Plum 360) Chapter 9: Plum A+, and Plum 360 Medication Entries
Note: If the desired generic name is not in the Generic Name drop-down list, you may add a medication to the Medication List. Alternatively, you can add the generic name by importing a new Medication List via the Medication Import function of the Hospira MedNet software.
5. Select Limited from the Rule Sets drop-down list.
6. Type the Container Volume amount (optional).
7. Select mL/hr and enter the values for soft and hard limits. (You must specify at least one limit.)
8. Click Save & Add Another Dosing Unit or Save and Close.
or
9. If you have a Bolus enabled infuser, you can place a tick mark next to Enable Bolus if you want to set bolus dose limits for this medication. See To Set a Bolus: on page 125.
Note: When a medication entry is added to the Master Drug Formulary, it is not assigned to a CCA.
5
6
7
Hospira MedNet Meds Software User Guide 137
Note: For a list of Hospira MedNet compatible devices approved by country, refer to the Hospira MedNet Device Compatibility Matrix available through your Hospira Support Center.

Chapter 9: Plum A+, and Plum 360 Medication Entries Working with the Master Drug Formulary (Plum 360)
To add a Label Only medication entry to the Master Drug Formulary:
1. Select Master Drug Formulary as the Source List.
2. From the Source List, click Add.
3. Select the Generic Name for the medication entry.
Note: Selecting a Generic Name from the drop-down list automatically populates the Displayed Name, External ID, Therapeutic Class, and Class ID fields.
138 Hospira MedNet Meds Software User Guide
Note: For a list of Hospira MedNet compatible devices approved by country, refer to the Hospira MedNet Device Compatibility Matrix available through your Hospira Support Center.
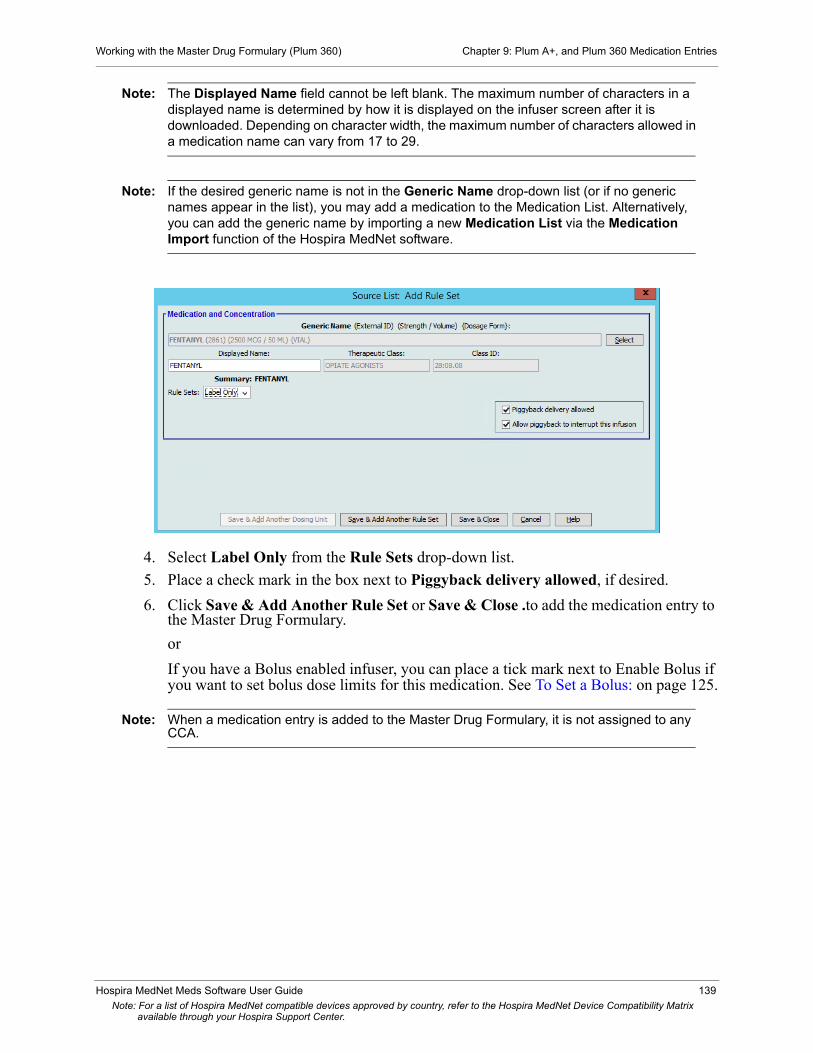
Working with the Master Drug Formulary (Plum 360) Chapter 9: Plum A+, and Plum 360 Medication Entries
Note: The Displayed Name field cannot be left blank. The maximum number of characters in a displayed name is determined by how it is displayed on the infuser screen after it is downloaded. Depending on character width, the maximum number of characters allowed in a medication name can vary from 17 to 29.
Note: If the desired generic name is not in the Generic Name drop-down list (or if no generic names appear in the list), you may add a medication to the Medication List. Alternatively, you can add the generic name by importing a new Medication List via the Medication Import function of the Hospira MedNet software.
4. Select Label Only from the Rule Sets drop-down list.
5. Place a check mark in the box next to Piggyback delivery allowed, if desired.
6. Click Save & Add Another Rule Set or Save & Close .to add the medication entry to the Master Drug Formulary.
or
If you have a Bolus enabled infuser, you can place a tick mark next to Enable Bolus if you want to set bolus dose limits for this medication. See To Set a Bolus: on page 125.
Note: When a medication entry is added to the Master Drug Formulary, it is not assigned to any CCA.
Hospira MedNet Meds Software User Guide 139
Note: For a list of Hospira MedNet compatible devices approved by country, refer to the Hospira MedNet Device Compatibility Matrix available through your Hospira Support Center.

Chapter 9: Plum A+, and Plum 360 Medication Entries Working with the Master Drug Formulary (Plum 360)
To edit a medication entry in the Master Drug Formulary:
1. Select Master Drug Formulary as the Source List.
2. From the Source List, select the medication entry you want to edit.
3. Click Edit.
Helpful Hint: You can also double-click a medication entry to display the Rule Set dialog box.
4. Make changes as desired.
5. Click Save & Close to save changes.
Important: Changing the dosing unit or medication unit will erase all previously entered limits.
Note: When a medication entry is edited, the changes are reflected in the Master Drug Formulary and a confirmation pop-up displays the CCAs that are affected.
140 Hospira MedNet Meds Software User Guide
Note: For a list of Hospira MedNet compatible devices approved by country, refer to the Hospira MedNet Device Compatibility Matrix available through your Hospira Support Center.
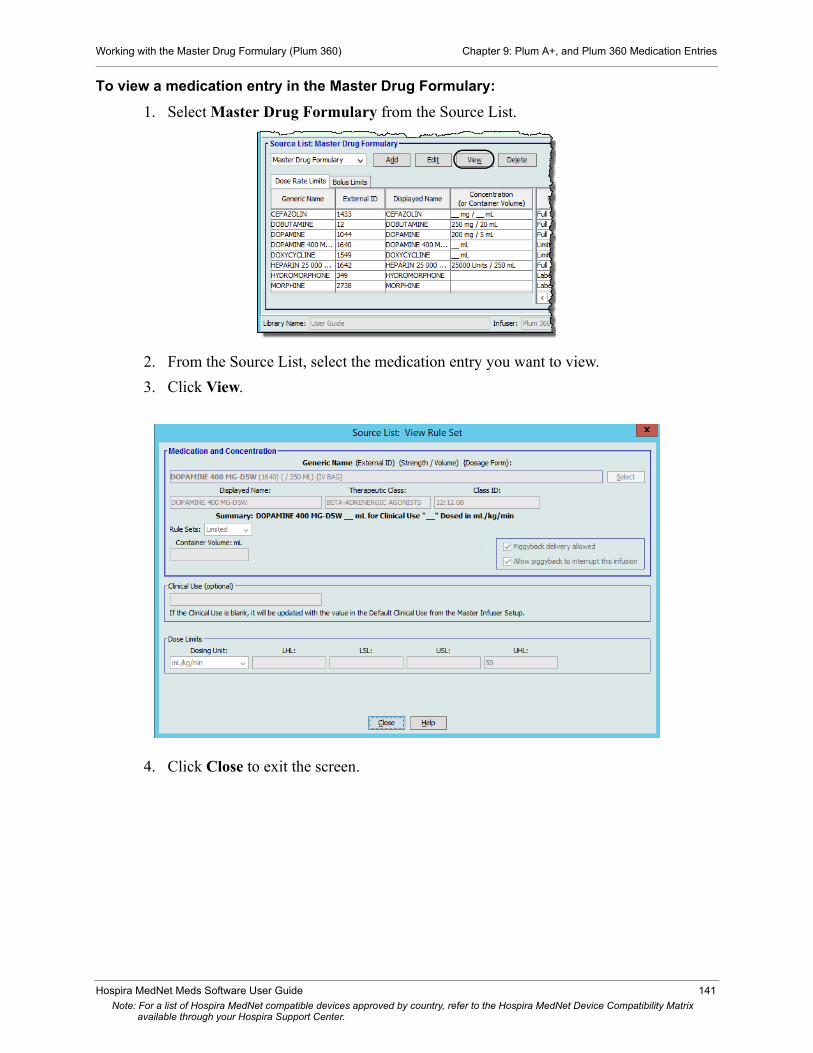
Working with the Master Drug Formulary (Plum 360) Chapter 9: Plum A+, and Plum 360 Medication Entries
To view a medication entry in the Master Drug Formulary:
1. Select Master Drug Formulary from the Source List.
2. From the Source List, select the medication entry you want to view.
3. Click View.
4. Click Close to exit the screen.
Hospira MedNet Meds Software User Guide 141
Note: For a list of Hospira MedNet compatible devices approved by country, refer to the Hospira MedNet Device Compatibility Matrix available through your Hospira Support Center.

Chapter 9: Plum A+, and Plum 360 Medication Entries Working with the Master Drug Formulary (Plum 360)
To delete a medication in the Master Drug Formulary:
1. Select Master Drug Formulary from the Source List.
2. From the Source List, select the medication entry you want to delete.
3. Click Delete.
142 Hospira MedNet Meds Software User Guide
Note: For a list of Hospira MedNet compatible devices approved by country, refer to the Hospira MedNet Device Compatibility Matrix available through your Hospira Support Center.

Working with the Master Drug Formulary (Plum 360) Chapter 9: Plum A+, and Plum 360 Medication Entries
The following pop-up will display only if the medication entry is assigned to one or more CCA.
4. Click OK.
Hospira MedNet Meds Software User Guide 143
Note: For a list of Hospira MedNet compatible devices approved by country, refer to the Hospira MedNet Device Compatibility Matrix available through your Hospira Support Center.

Chapter 9: Plum A+, and Plum 360 Medication Entries Working with the Master Drug Formulary (Plum 360)
To copy to Target CCA:
1. Select a medication entry from the Master Drug Formulary.
Note: A Target List CCA must be selected before you can copy a medication entry to a Target CCA from the Master Drug Formulary.
2. Click Copy to Target CCA.
3. Click Copy on the Confirm Copy to CCA pop-up.
144 Hospira MedNet Meds Software User Guide
Note: For a list of Hospira MedNet compatible devices approved by country, refer to the Hospira MedNet Device Compatibility Matrix available through your Hospira Support Center.

Part 2: Plum A+ Chapter 9: Plum A+, and Plum 360 Medication Entries
Part 2: Plum A+
Defining Rule Sets
Full Rule Set
A Full rule set allows you to enter a complete concentration (for example, 250 mg/500 mL) or partial concentration (for example, 250 mg/_ mL, _mg/500 mL or, _mg/_mL). Creating a medication entry for the standard concentrations of any medication reduces the number of programming steps on the infuser for the clinician. At least one dosing limit value must be entered for each Full rule set.
Leaving the medication or diluent amounts blank allows the clinician to enter a non-standard concentration at the time of programming. Full rule sets defined with a partial concentration will require the clinician to enter the concentration values when the dosing units are not mL/hr. When the dosing units are mL/hr, you do not have to enter concentration information.
Hospira MedNet Meds Software User Guide 145
Note: For a list of Hospira MedNet compatible devices approved by country, refer to the Hospira MedNet Device Compatibility Matrix available through your Hospira Support Center.

Chapter 9: Plum A+, and Plum 360 Medication Entries Defining Rule Sets
Limited Rule Set
A Limited rule set does not require a concentration to be defined. At least one dosing limit value must be entered for each Limited rule set. The Container Volume field is optional. When programming the infuser for a medication with a Limited rule set, the clinician enters only the rate, volume to be infused (VTBI) and duration.
Label Only Rule Set
A Label Only rule set allows the clinician to see the medication name displayed on the infuser. There are no dosing limits associated with a Label Only rule set. The clinician selects the dosing units during programming. If the dosing units are not mL/hr, the clinician also enters the concentration values.
146 Hospira MedNet Meds Software User Guide
Note: For a list of Hospira MedNet compatible devices approved by country, refer to the Hospira MedNet Device Compatibility Matrix available through your Hospira Support Center.

Setting Dose Rate Limits Chapter 9: Plum A+, and Plum 360 Medication Entries
Each type of rule set will create a different display for the medication in the Drug List on the infuser.
You can create medication entries by adding them to the Master Drug Formulary or by adding them directly to a CCA. Medication entries added to a CCA are automatically added to the Master Drug Formulary.
Within a CCA, no two medication entries may have exactly the same External ID and Concentration. Also, no two medication entries may have exactly the same Displayed Name and Concentration.
In the Master Drug Formulary, two medication entries may have the same display name, medication amount, medication unit, diluent amount, and dosing units, as long as one or more of the following limits are different:
• Lower soft limit (LSL)• Lower hard limit (LHL)• Upper soft limit (USL)• Upper hard limit (UHL)
Setting Dose Rate LimitsHospira MedNet Meds allows you to define dose rate limits for both primary and secondary infusions. It is important that you understand how the dose rate limits function so please read this section carefully.
You can define upper and lower soft and hard limits as part of the rule set for each medication entry that you create in the library. As you configure the limits, the software enforces the following rule:
Lower Hard Limit (LHL) < Lower Soft Limit (LSL) <= Upper Soft Limit (USL) < Upper Hard Limit (UHL)
Soft Limits
Soft Limits are dose rate limits that can be overridden when programming the infuser. When a value entered on the infuser is lower than the lower soft limit or higher than the upper soft limit, the infuser displays a soft limit override confirmation message. The infuser records soft limit alerts and the user’s response to the alert in its history logs.
For example, if the upper soft limit is set to 15 mL/hr and the clinician enters 16 mL/hr, the infuser will display a soft limit override alert. This alert notifies the clinician that the entry is outside the range of the soft limits set for that medication entry. The clinician can choose to continue programming using the override, or cancel the override and edit the value. Both the override and edit events are recorded separately in the infuser’s history log.
Hard Limits
Hard limits are dose rate limits that cannot be overridden; the infuser cannot be programmed with a rate that is lower than the lower hard limit or higher than the upper hard limit. (These events are not recorded in the infuser’s history log file for Plum infusers with software versions prior to version 13.4.)
Hospira MedNet Meds Software User Guide 147
Note: For a list of Hospira MedNet compatible devices approved by country, refer to the Hospira MedNet Device Compatibility Matrix available through your Hospira Support Center.

Chapter 9: Plum A+, and Plum 360 Medication Entries Medication Entry Rules and Conventions
Note: The actual patient weight is not entered until the clinician programs the infuser. Therefore, Hospira MedNet Meds software cannot verify the validity of a lower limit when entering a weight-based medication entry. The infuser performs the final check when the clinician programs the infuser.
Medication Entry Rules and Conventions
The Hospira MedNet Meds software uses the following conventions for Plum A+ medication entries:
• Full or Limited rule sets require at least one hard or soft limit. • You can create medication entries by adding them to the Master Drug Formulary or by
adding them directly to a CCA. Medication entries added to a CCA Target List are automatically added to the Master Drug Formulary List.
• “Validity” messages appear in red at the bottom of the Rule Set window. When you enter a value that is not allowed, the message specifies the defined range for the field, or the reason the value is not permitted.
• You cannot use the following characters in the medication name: comma (,), less than (<), greater than (>), single quotes (‘), double quotes (“), and ampersand (&).
• Once you select a medication unit, the dosing unit field will display only the enabled unit type.
• The software prohibits invalid numeric entries and signals such with an audible “beep.” • You may use the vertical and horizontal scroll bars to navigate to an entry.• If you do not select or populate a required field, an error message appears.• When you highlight an entry on the Drug Library Management list view, buttons or features
that are not allowed appear as “grayed” or disabled.• When you add a new medication in the Generic Name field of the rule set window, you may
search for a medication by typing the first few characters of its generic name. The drop-down list will navigate to show any matching medications.
148 Hospira MedNet Meds Software User Guide
Note: For a list of Hospira MedNet compatible devices approved by country, refer to the Hospira MedNet Device Compatibility Matrix available through your Hospira Support Center.

The Plum A+ Medication Rule Set Chapter 9: Plum A+, and Plum 360 Medication Entries
The Plum A+ Medication Rule Set The Rule Set window shown here is used to configure a medication entry for the Plum A+ drug library.
Hospira MedNet Meds Software User Guide 149
Note: For a list of Hospira MedNet compatible devices approved by country, refer to the Hospira MedNet Device Compatibility Matrix available through your Hospira Support Center.

Chapter 9: Plum A+, and Plum 360 Medication Entries The Plum A+ Medication Rule Set
Rule Set Fields
The following table lists the fields, a brief description and allowed value range for the infuser.
Each medication entry must have a generic name and a displayed name; you cannot save a medication entry without a name in these fields. The number of characters in the displayed name is determined by how it is displayed on the infuser’s screen. Depending on character width, the maximum number of characters allowed in a displayed name can vary from 17 to 29.
To avoid potential confusion when creating medication entries, use only the medication name in the Displayed Name field and ensure that the external ID is identical to the external ID used in your institution’s formulary. Do not include the diluent as part of the medication name.
Parameter Description Allowable Range
Generic Name This is the medication name from your Medication List. It is selected from the drop-down list and displays the External ID (the hospital's identifier for a medication). Strength/Volume and Dosage Form display only if part of your Medication List.
Not editable in the Rule Set
Displayed Name This is the name that will be displayed on the infuser.
• Varies depending on the character width
• Cannot be blank
Caution: You cannot use the following characters in the displayed name: comma (,), less than (<), greater than (>), single quotes (‘), double quotes (“), and ampersand (&).
Note: The display font changes on the Plum A+ infuser for lengthy displayed names.
Therapeutic Class The therapeutic class assigned to the medication entries.
Not editable in the Rule Set
Class ID The ID number for the therapeutic class assigned to the medication entry.
Not editable in the Rule Set
Medication Amount Allows you to enter the medication amount in the units selected.
The combination of medication amount, medication unit, and diluent amount creates the medication’s concentration.
For medication amounts in mcg, mg, grams, mEq, million units, or mmol:
• 0.1–9999 and “Blank”
For medication amounts in units:
• 0.1–99999999 and “Blank”
Medication Unit Allows you to select the unit of measure for your medication amount.
mcg, mg, grams, mEq, million units, mmol and units
150 Hospira MedNet Meds Software User Guide
Note: For a list of Hospira MedNet compatible devices approved by country, refer to the Hospira MedNet Device Compatibility Matrix available through your Hospira Support Center.

Step-by-step Procedures Chapter 9: Plum A+, and Plum 360 Medication Entries
Step-by-step ProceduresThe following section provides step-by-step procedures that will enable you to create and manage medication entries. In this section you will learn how to do the following:
• Add a medication entry with a Full rule set in a CCA• Add a medication entry with a Limited rule set in a CCA• Add a medication entry with a Label Only rule set in a CCA• Edit a medication entry in a CCA• View a medication entry in a CCA• Remove a medication entry from a CCA• Add a medication entry with a Full rule set the Master Drug Formulary• Add a medication entry with a Limited rule set to the Master Drug Formulary• Add a Label Only medication entry to the Master Drug Formulary• Edit a medication entry in the Master Drug Formulary• View a medication entry in the Master Drug Formulary• Delete a medication entry from the Master Drug Formulary• Copy a medication entry from the Master Drug Formulary to a Target CCA
Diluent Amount Allows you to set the diluent amount associated with the medication entry. The diluent amount will vary depending on the container size, overfill, and volume of added solution.
• 0.1–9999 and “Blank”
Dosing Unit Allows you to set the standard dosing unit for the medication. This will be the default value displayed on the infuser. Once dosing unit and concentration are set in Hospira MedNet Meds, they cannot be changed on the infuser by the clinician programming the device.
mL/hr, mcg/kg/min, mcg/kg/hr, mcg/min, mcg/hr, mg/kg/hr, mg/min, mg/hr, grams/hr, ng/kg/min, mmol/min, mmol/hr, mEq/hr, Million units/hr, units/kg/min, units/kg/hr, units/min, units/hr, or mUn/min
LHL, LSL, USL, UHL Lower hard limit, lower soft limit, upper soft limit, upper hard limit.
Allows you to set the upper and/or lower dose rate limits for the selected medication.
The units for the soft and hard limits are the same as the dosing units selected in the medication rule set.
For ng/kg/min, mcg/kg/min, mcg/kg/hr, mcg/min, mcg/hr, mg/min, mg/hr, mg/kg/hr, grams/hr, Million Units/hr, mEq/hr, mmol/min, mmol/hr:
• 0.001–999*
For mL/hr, mUn/min, units/min, units/hr, units/kg/hr, units/kg/min:
• 0.1–999
* Some infusers support a range of 100-9999. Refer to your infuser's System Operating Manual for complete details and allowable range.
Parameter Description Allowable Range
Hospira MedNet Meds Software User Guide 151
Note: For a list of Hospira MedNet compatible devices approved by country, refer to the Hospira MedNet Device Compatibility Matrix available through your Hospira Support Center.
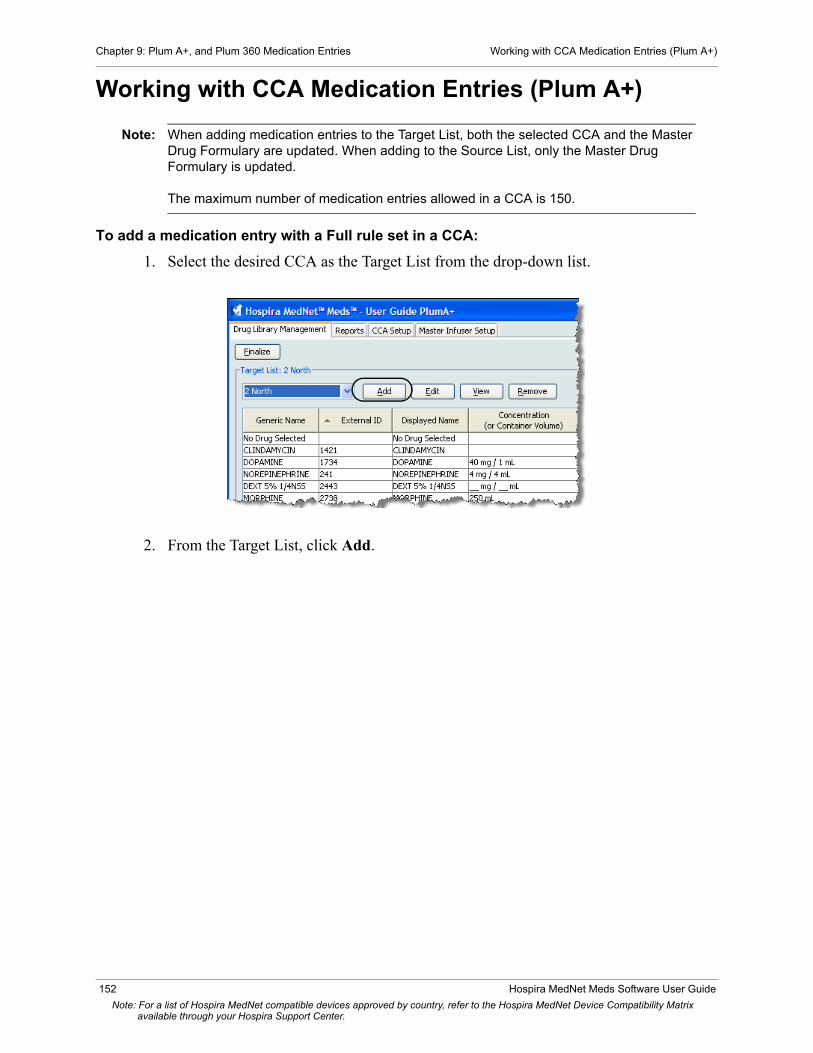
Chapter 9: Plum A+, and Plum 360 Medication Entries Working with CCA Medication Entries (Plum A+)
Working with CCA Medication Entries (Plum A+)
Note: When adding medication entries to the Target List, both the selected CCA and the Master Drug Formulary are updated. When adding to the Source List, only the Master Drug Formulary is updated.
The maximum number of medication entries allowed in a CCA is 150.
To add a medication entry with a Full rule set in a CCA:
1. Select the desired CCA as the Target List from the drop-down list.
2. From the Target List, click Add.
152 Hospira MedNet Meds Software User Guide
Note: For a list of Hospira MedNet compatible devices approved by country, refer to the Hospira MedNet Device Compatibility Matrix available through your Hospira Support Center.

Working with CCA Medication Entries (Plum A+) Chapter 9: Plum A+, and Plum 360 Medication Entries
3. Select the Generic Name for the medication entry.
Note: Selecting a generic name from the drop-down list automatically populates the Displayed Name, External ID, Therapeutic Class, and Class ID fields.
Note: The Displayed Name can be altered as desired, for example, to accommodate “Tall Man lettering.” The maximum number of characters in a Displayed Name is determined by how it is displayed on the infuser screen. Depending on character width, the maximum number of characters allowed in a medication name can vary from 17 to 29.
Note: If the desired generic name is not in the Generic Name drop-down list (or if no generic names appear in the list), you may add a medication to the Medication List. Alternatively, you can add the generic name by importing a new Medication List via the Medication Import function of the Hospira MedNet software.
4. The Displayed Name can now be changed as desired; for example, to accommodate Tall Man lettering or another unique name.
5. Select Full (if not selected) from the Rule Sets drop-down list.
6. Select the medication unit and enter a Medication Amount and Diluent Amount (if desired).
7. Select the dosing unit and enter the values for soft and hard limits. (You must specify at least one limit.)
8. Click Save & Add Another or Save & Close to add the medication entry to the CCA.
3
4
5
6
7
Hospira MedNet Meds Software User Guide 153
Note: For a list of Hospira MedNet compatible devices approved by country, refer to the Hospira MedNet Device Compatibility Matrix available through your Hospira Support Center.
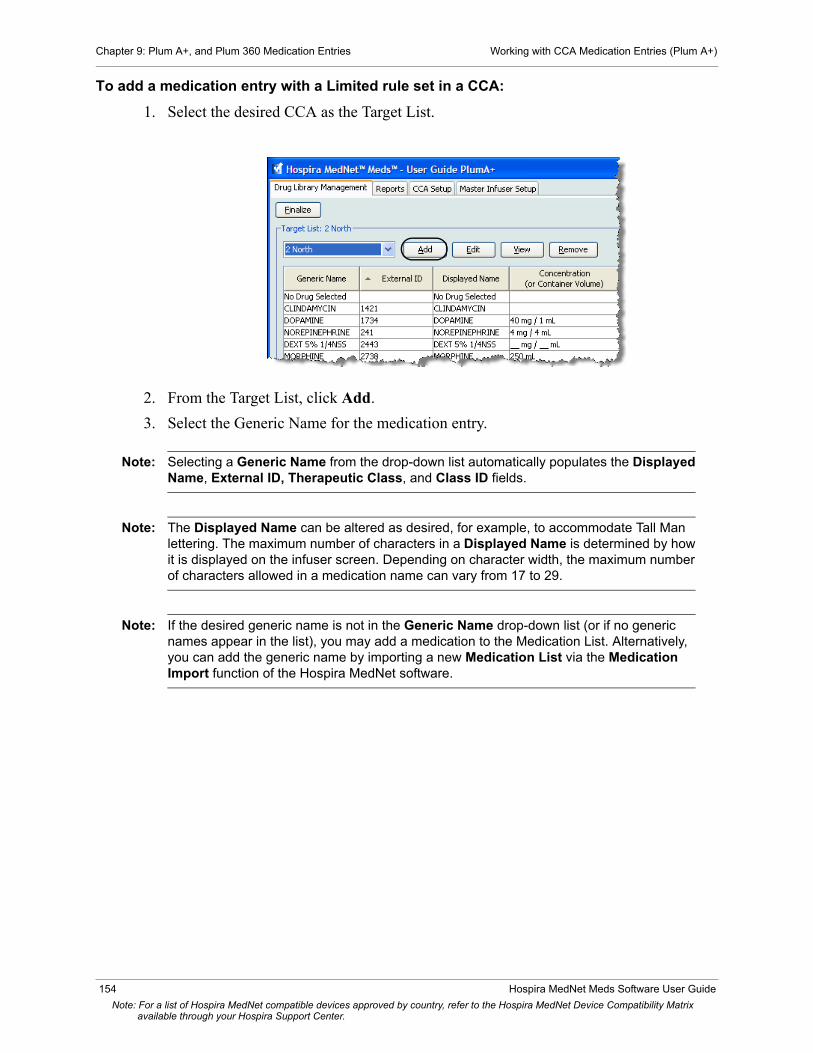
Chapter 9: Plum A+, and Plum 360 Medication Entries Working with CCA Medication Entries (Plum A+)
To add a medication entry with a Limited rule set in a CCA:
1. Select the desired CCA as the Target List.
2. From the Target List, click Add.
3. Select the Generic Name for the medication entry.
Note: Selecting a Generic Name from the drop-down list automatically populates the Displayed Name, External ID, Therapeutic Class, and Class ID fields.
Note: The Displayed Name can be altered as desired, for example, to accommodate Tall Man lettering. The maximum number of characters in a Displayed Name is determined by how it is displayed on the infuser screen. Depending on character width, the maximum number of characters allowed in a medication name can vary from 17 to 29.
Note: If the desired generic name is not in the Generic Name drop-down list (or if no generic names appear in the list), you may add a medication to the Medication List. Alternatively, you can add the generic name by importing a new Medication List via the Medication Import function of the Hospira MedNet software.
154 Hospira MedNet Meds Software User Guide
Note: For a list of Hospira MedNet compatible devices approved by country, refer to the Hospira MedNet Device Compatibility Matrix available through your Hospira Support Center.

Working with CCA Medication Entries (Plum A+) Chapter 9: Plum A+, and Plum 360 Medication Entries
4. The Displayed Name can now be changed as desired; for example, to accommodate Tall Man lettering or another unique name.
5. Select Limited from the Rule Sets drop-down list.
6. Enter the container volume amount (optional).
7. Select mL/hr and enter the values for soft and hard limits. (You must specify at least one limit.)
8. Click Save & Add Another or Save & Close to add the medication entry to the CCA.
3
4
5
6
7
Hospira MedNet Meds Software User Guide 155
Note: For a list of Hospira MedNet compatible devices approved by country, refer to the Hospira MedNet Device Compatibility Matrix available through your Hospira Support Center.

Chapter 9: Plum A+, and Plum 360 Medication Entries Working with CCA Medication Entries (Plum A+)
To add a Label Only rule set medication entry in a CCA:
1. Select the desired CCA as the Target List.
2. From the Target List, click Add.
3. Select the generic name for the medication entry from the drop-down list.
Note: Selecting a Generic Name from the drop-down list automatically populates the Displayed Name, External ID, Therapeutic Class, and Class ID fields.
Note: The Displayed Name can be altered as desired, for example, to accommodate Tall Man lettering. The maximum number of characters in a Displayed Name is determined by how it is displayed on the infuser screen. Depending on character width, the maximum number of characters allowed in a medication name can vary from 17 to 29.
Note: If the desired generic name is not in the Generic Name drop-down list (or if no generic names appear in the list), you may add a medication to the Medication List. Alternatively, you can add the generic name by importing a new Medication List via the Medication Import function of the Hospira MedNet software.
156 Hospira MedNet Meds Software User Guide
Note: For a list of Hospira MedNet compatible devices approved by country, refer to the Hospira MedNet Device Compatibility Matrix available through your Hospira Support Center.

Working with CCA Medication Entries (Plum A+) Chapter 9: Plum A+, and Plum 360 Medication Entries
4. The Displayed Name can now be changed as desired, for example, to accommodate Tall Man lettering or another unique name.
5. Select Label Only from the Rule Sets drop-down list.6. Click Save & Add Another or Save & Close to add the medication entry to the CCA.
Hospira MedNet Meds Software User Guide 157
Note: For a list of Hospira MedNet compatible devices approved by country, refer to the Hospira MedNet Device Compatibility Matrix available through your Hospira Support Center.

Chapter 9: Plum A+, and Plum 360 Medication Entries Working with CCA Medication Entries (Plum A+)
To edit a medication entry in a CCA:
1. Select the CCA containing the medication entry you want to edit from the drop-down list.
2. From the Target List, select the medication entry you want to edit.
3. Click Edit.
Helpful Hint: You can also double-click a medication entry to display the Rule Set dialog box.
4. Make changes as desired.
Note: You cannot change the Therapeutic Class or Class ID when editing a medication entry in a CCA.
5. Click Save & Close to save changes.
Note: If the medication that is edited is assigned to only one CCA, the medication will also be edited in the Master Drug Formulary. If the medication that is edited is assigned to more than one CCA, a new medication will be created in the Master Drug Formulary.
4
158 Hospira MedNet Meds Software User Guide
Note: For a list of Hospira MedNet compatible devices approved by country, refer to the Hospira MedNet Device Compatibility Matrix available through your Hospira Support Center.
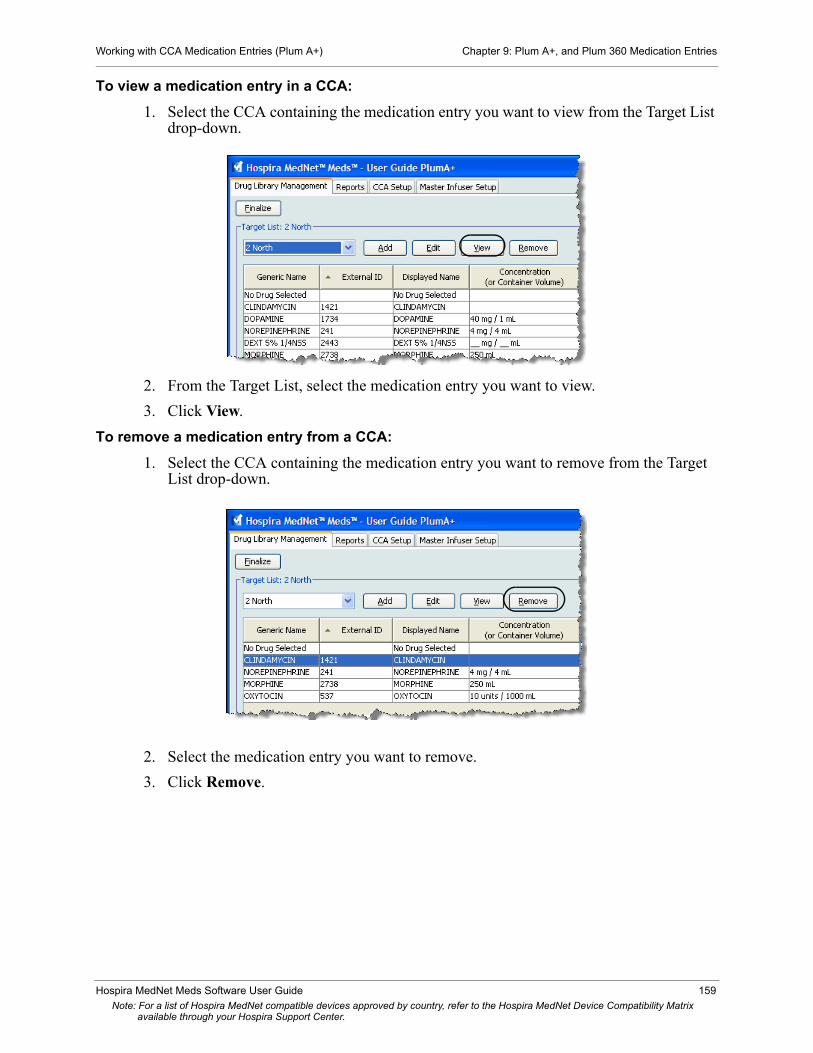
Working with CCA Medication Entries (Plum A+) Chapter 9: Plum A+, and Plum 360 Medication Entries
To view a medication entry in a CCA:
1. Select the CCA containing the medication entry you want to view from the Target List drop-down.
2. From the Target List, select the medication entry you want to view.
3. Click View.
To remove a medication entry from a CCA:
1. Select the CCA containing the medication entry you want to remove from the Target List drop-down.
2. Select the medication entry you want to remove.
3. Click Remove.
Hospira MedNet Meds Software User Guide 159
Note: For a list of Hospira MedNet compatible devices approved by country, refer to the Hospira MedNet Device Compatibility Matrix available through your Hospira Support Center.

Chapter 9: Plum A+, and Plum 360 Medication Entries Working with CCA Medication Entries (Plum A+)
4. At the confirmation to remove from the CCA, click Remove.
160 Hospira MedNet Meds Software User Guide
Note: For a list of Hospira MedNet compatible devices approved by country, refer to the Hospira MedNet Device Compatibility Matrix available through your Hospira Support Center.

Working with the Master Drug Formulary (Plum A+) Chapter 9: Plum A+, and Plum 360 Medication Entries
Working with the Master Drug Formulary (Plum A+)The Master Drug Formulary can contain medication entries not assigned to a CCA, to facilitate later use. The total number of medication entries in the Master Drug Formulary for the Plum A+ infuser cannot exceed 3,510.
To add a medication entry with a Full rule set to the Master Drug Formulary:
1. Select Master Drug Formulary as the Source List.
2. From the Source List, click Add.
3. Select the Generic Name for the medication entry from the drop-down list.
Note: Selecting a Generic Name from the drop-down list automatically populates the Displayed Name, External ID, Therapeutic Class, and Class ID fields.
Note: The Displayed Name field cannot be left blank. The maximum number of characters in a medication name is determined by how it is displayed on the infuser screen after it is downloaded. Depending on character width, the maximum number of characters allowed in a medication name can vary from 17 to 29.
Note: If the desired generic name is not in the Generic Name drop-down list, you may add a medication to the Medication List. Alternatively, you can add the generic name by importing a new Medication List via the Medication Import function of the Hospira MedNet software.
Hospira MedNet Meds Software User Guide 161
Note: For a list of Hospira MedNet compatible devices approved by country, refer to the Hospira MedNet Device Compatibility Matrix available through your Hospira Support Center.

Chapter 9: Plum A+, and Plum 360 Medication Entries Working with the Master Drug Formulary (Plum A+)
4. Select Full (if not already selected) from the Rule Sets drop-down list.
5. Select the Medication Unit and enter a Medication Amount (optional) and Diluent Amount (optional).
6. Select the dosing unit and type the values for soft and hard limits. (You must specify at least one limit.)
7. Click Save & Add Another or Save & Close to add the medication entry to the Master Drug Formulary.
Note: When a medication entry is added to the Master Drug Formulary, it is not assigned to a CCA.
4
5
6
162 Hospira MedNet Meds Software User Guide
Note: For a list of Hospira MedNet compatible devices approved by country, refer to the Hospira MedNet Device Compatibility Matrix available through your Hospira Support Center.

Working with the Master Drug Formulary (Plum A+) Chapter 9: Plum A+, and Plum 360 Medication Entries
To add a Limited rule set medication entry to the Master Drug Formulary:
1. Select Master Drug Formulary as the Source List.
2. From the Source List, click Add.
3. Select the Generic Name for the medication entry from the drop-down list.
Note: Selecting a Generic Name from the drop-down list automatically populates the Displayed Name, External ID, Therapeutic Class, and Class ID fields.
Note: The Displayed Name field cannot be left blank. The maximum number of characters in a displayed name is determined by how it is displayed on the infuser screen after it is downloaded. Depending on character width, the maximum number of characters allowed in a medication name can vary from 17 to 29.
Note: If the desired generic name is not in the Generic Name drop-down list (or if no generic names appear in the list), you may add a medication to the Medication List. Alternatively, you can add the generic name by importing a new Medication List via the Medication Import function of the Hospira MedNet software.
Hospira MedNet Meds Software User Guide 163
Note: For a list of Hospira MedNet compatible devices approved by country, refer to the Hospira MedNet Device Compatibility Matrix available through your Hospira Support Center.

Chapter 9: Plum A+, and Plum 360 Medication Entries Working with the Master Drug Formulary (Plum A+)
4. Select Limited from the Rule Sets drop-down list.
5. Type the Container Volume amount (optional).
6. Select mL/hr and enter the values for soft and hard limits. (You must specify at least one limit.)
7. Click Save & Add Another or Save & Close to add the medication entry to the Master Drug Formulary.
Note: When a medication entry is added to the Master Drug Formulary, it is not assigned to a CCA.
To add a Label Only medication entry to the Master Drug Formulary:
1. Select Master Drug Formulary as the Source List.
2. From the Source List, click Add.
3. Select the Generic Name for the medication entry from the drop-down list.
Note: Selecting a Generic Name from the drop-down list automatically populates the Displayed Name, External ID, Therapeutic Class, and Class ID fields.
164 Hospira MedNet Meds Software User Guide
Note: For a list of Hospira MedNet compatible devices approved by country, refer to the Hospira MedNet Device Compatibility Matrix available through your Hospira Support Center.
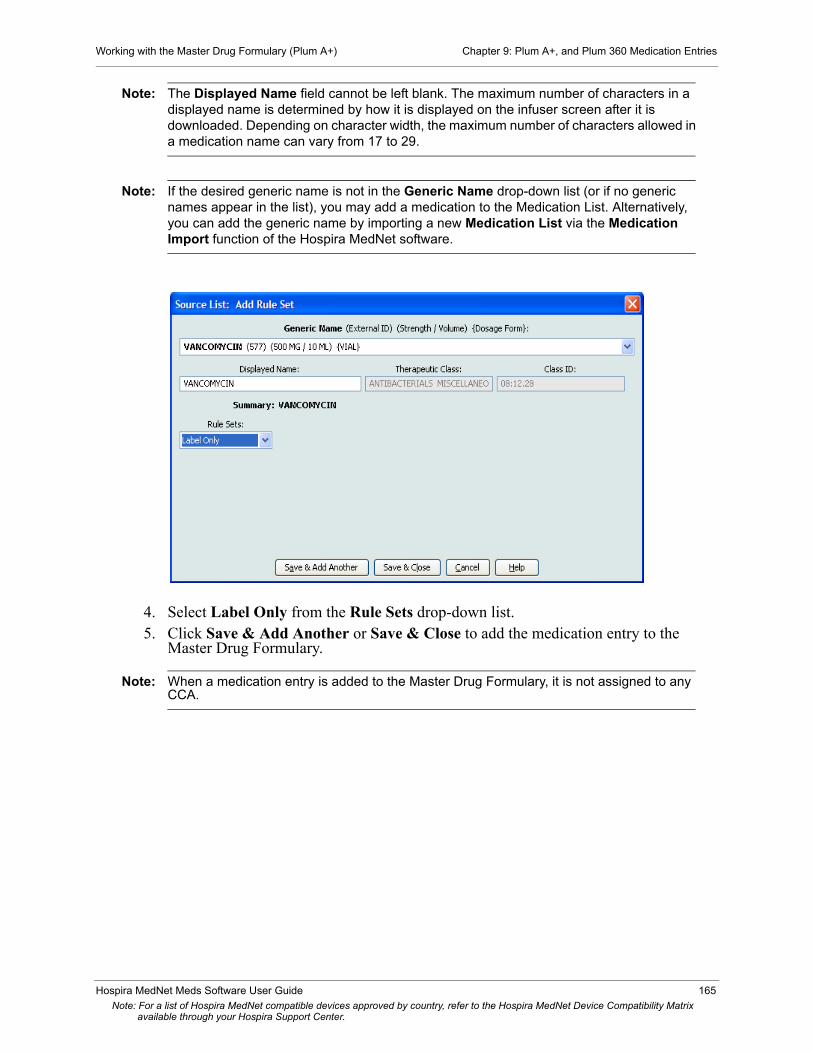
Working with the Master Drug Formulary (Plum A+) Chapter 9: Plum A+, and Plum 360 Medication Entries
Note: The Displayed Name field cannot be left blank. The maximum number of characters in a displayed name is determined by how it is displayed on the infuser screen after it is downloaded. Depending on character width, the maximum number of characters allowed in a medication name can vary from 17 to 29.
Note: If the desired generic name is not in the Generic Name drop-down list (or if no generic names appear in the list), you may add a medication to the Medication List. Alternatively, you can add the generic name by importing a new Medication List via the Medication Import function of the Hospira MedNet software.
4. Select Label Only from the Rule Sets drop-down list.5. Click Save & Add Another or Save & Close to add the medication entry to the
Master Drug Formulary.
Note: When a medication entry is added to the Master Drug Formulary, it is not assigned to any CCA.
Hospira MedNet Meds Software User Guide 165
Note: For a list of Hospira MedNet compatible devices approved by country, refer to the Hospira MedNet Device Compatibility Matrix available through your Hospira Support Center.

Chapter 9: Plum A+, and Plum 360 Medication Entries Working with the Master Drug Formulary (Plum A+)
To edit a medication entry in the Master Drug Formulary:
1. Select Master Drug Formulary as the Source List.
2. From the Source List, select the medication entry you want to edit.
3. Click Edit.
Helpful Hint: You can also double-click a medication entry to display the Rule Set dialog box.
4. Make changes as desired.
5. Click Save & Close to save changes.
Important: Changing the dosing unit or medication unit will erase all previously entered limits.
Note: When a medication entry is edited, the changes are reflected in the Master Drug Formulary and in all CCAs in which the medication is listed.
166 Hospira MedNet Meds Software User Guide
Note: For a list of Hospira MedNet compatible devices approved by country, refer to the Hospira MedNet Device Compatibility Matrix available through your Hospira Support Center.

Working with the Master Drug Formulary (Plum A+) Chapter 9: Plum A+, and Plum 360 Medication Entries
To view a medication entry in the Master Drug Formulary:
1. Select Master Drug Formulary from the Source List.
2. From the Source List, select the medication entry you want to view
3. Click View.
4. Click Close to exit the screen.
Hospira MedNet Meds Software User Guide 167
Note: For a list of Hospira MedNet compatible devices approved by country, refer to the Hospira MedNet Device Compatibility Matrix available through your Hospira Support Center.

Chapter 9: Plum A+, and Plum 360 Medication Entries Working with the Master Drug Formulary (Plum A+)
To delete a medication in the Master Drug Formulary:
1. Select Master Drug Formulary from the Source List.
2. From the Source List, select the medication entry you want to delete.
3. Click Delete.
168 Hospira MedNet Meds Software User Guide
Note: For a list of Hospira MedNet compatible devices approved by country, refer to the Hospira MedNet Device Compatibility Matrix available through your Hospira Support Center.
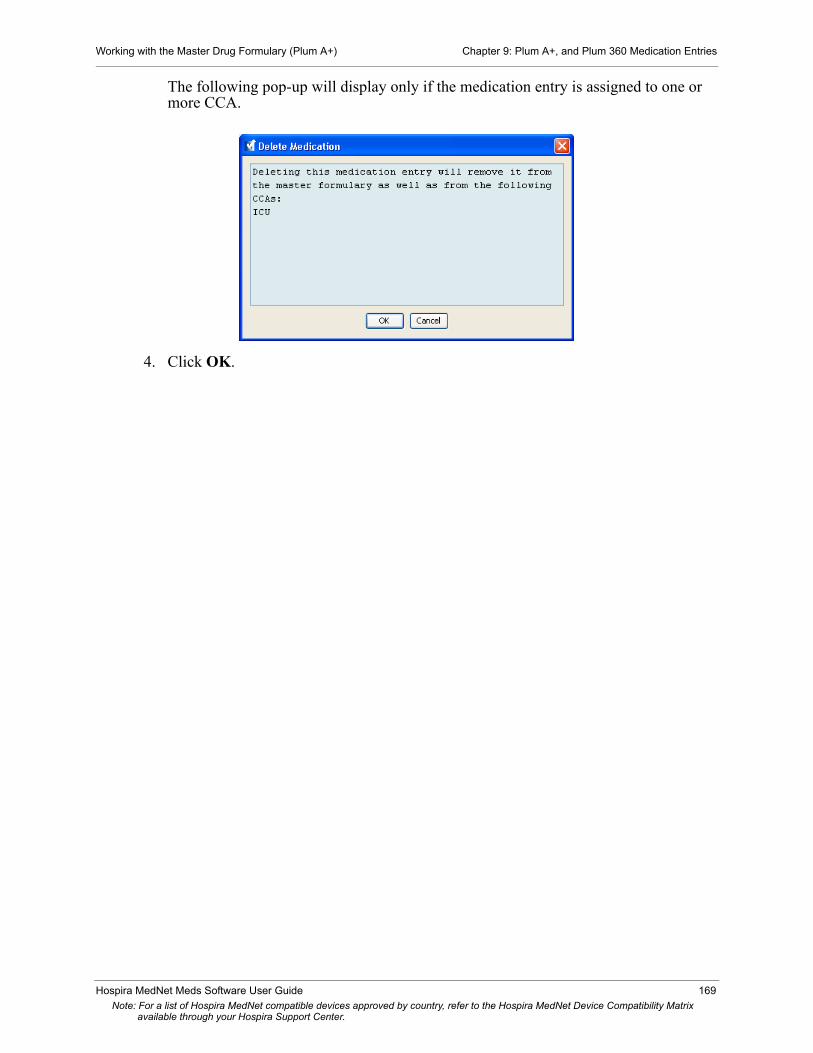
Working with the Master Drug Formulary (Plum A+) Chapter 9: Plum A+, and Plum 360 Medication Entries
The following pop-up will display only if the medication entry is assigned to one or more CCA.
4. Click OK.
Hospira MedNet Meds Software User Guide 169
Note: For a list of Hospira MedNet compatible devices approved by country, refer to the Hospira MedNet Device Compatibility Matrix available through your Hospira Support Center.
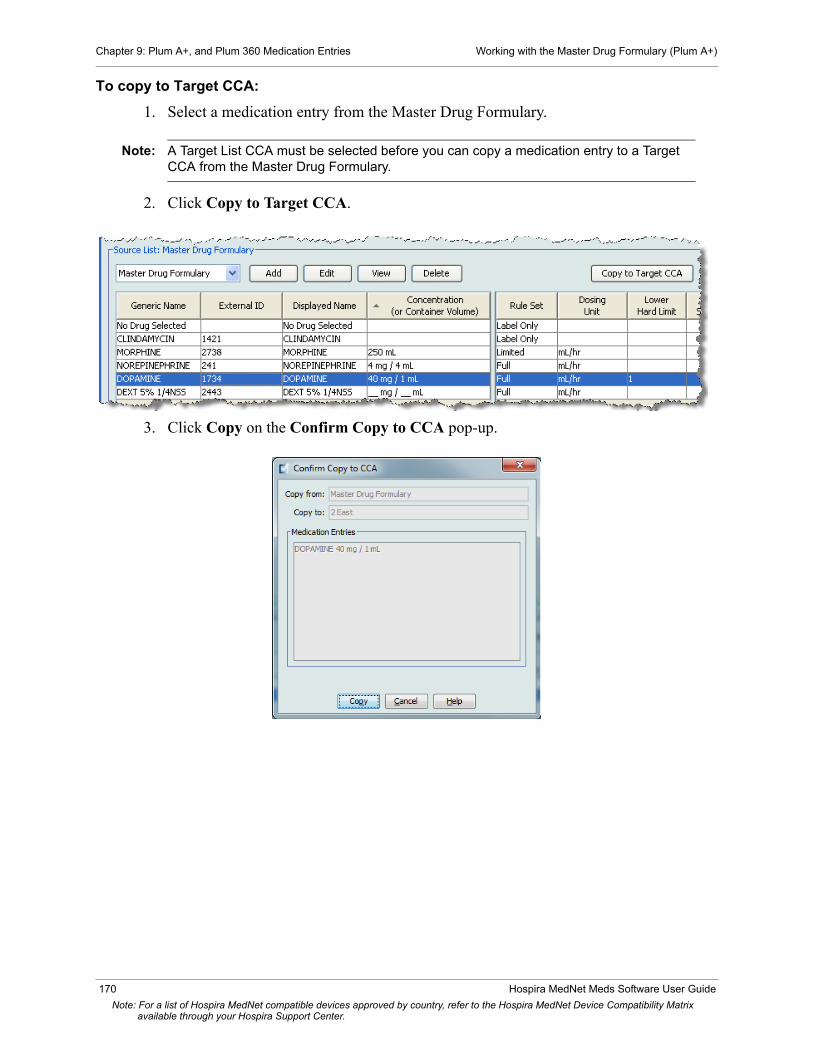
Chapter 9: Plum A+, and Plum 360 Medication Entries Working with the Master Drug Formulary (Plum A+)
To copy to Target CCA:
1. Select a medication entry from the Master Drug Formulary.
Note: A Target List CCA must be selected before you can copy a medication entry to a Target CCA from the Master Drug Formulary.
2. Click Copy to Target CCA.
3. Click Copy on the Confirm Copy to CCA pop-up.
170 Hospira MedNet Meds Software User Guide
Note: For a list of Hospira MedNet compatible devices approved by country, refer to the Hospira MedNet Device Compatibility Matrix available through your Hospira Support Center.
Overview Chapter 10: LifeCare PCA Medication Entries
Chapter 10: LifeCare PCA Medication Entries
OverviewIn this chapter you will learn to define clinical decision rules for medications in the LifeCare PCA drug library.
Hospira MedNet Meds software enables you to customize dose rate limits for medications used in drug libraries. You can customize clinical decision rules for up to 18 different clinical care areas (CCAs) in the hospital and up to 25 medication entries in each CCA.
Defining Rule SetsMedication entries in the LifeCare PCA drug library can be created with specific dose rate limits. Selected fields are required and all other fields are optional.
The required fields for a LifeCare PCA medication entry are:
• Generic name• Displayed name• Medication amount and unit• Diluent amount• One bar code identifier
You can create medication entries by adding them to the Master Drug Formulary or by adding them directly to a CCA. Medication entries added to a CCA are automatically added to the Master Drug Formulary.
Within a CCA, no two medication entries may have exactly the same External ID and Concentration. Also, no two medication entries may have exactly the same Displayed Name and Concentration.
In the Master Drug Formulary, two medication entries may have the same displayed name, medication amount, medication unit, diluent amount, and dosing units as long as one or more of the limits for loading dose, PCA dose, continuous rate, and dose limit are different:
• Lower soft limit (LSL)• Lower hard limit (LHL)• Upper soft limit (USL)• Upper hard limit (UHL)
Hospira MedNet Meds Software User Guide 171Note: For a list of Hospira MedNet compatible devices approved by country, refer to the Hospira MedNet Device Compatibility Matrix
available through your Hospira Support Center.
Chapter 10: LifeCare PCA Medication Entries Setting Dose Limits
Setting Dose LimitsHospira MedNet Meds allows you to define dose rate limits for the loading dose, PCA dose, continuous rate, and dose limit. It is important that you understand how the limits function so please read this section carefully.
You can define upper and lower soft and hard limits as part of the rule set for each medication entry you create in the library. As you configure the limits, the software enforces the following rules:
Lower Hard Limit (LHL) < Lower Soft Limit (LSL) <= Upper Soft Limit (USL) < Upper Hard Limit (UHL)
Soft limits are dose rate limits that can be overridden when programming the infuser. When a value entered on the infuser is lower than the lower soft limit or higher than the upper soft limit, the infuser displays a soft limit override confirmation message. The infuser records soft limit alerts and the users’ responses to the alerts to its history logs.
For example, if the upper soft limit is set to 1.8 mg and the clinician enters 2 mg, the infuser will display a soft limit override alert. This alert notifies the clinician that the entry is outside the range of the soft limits set for that medication in the drug library. The clinician can choose to continue programming using the override, or cancel the override and edit the value. The alert and the clinician’s response are recorded in the infuser’s history log.
Hard limits are dose rate limits that cannot be overridden; the infuser cannot be programmed with a rate that is lower than a lower hard limit or higher than an upper hard limit. Hard limit alerts are recorded in the infuser’s history log.
If a Lower Hard Limit (LHL) or an Upper Hard Limit (UHL) are not specified in the rule set, the prescription drug limits will function as the LHL or UHL.
172 Hospira MedNet Meds Software User GuideNote: For a list of Hospira MedNet compatible devices approved by country, refer to the Hospira MedNet Device Compatibility Matrix
available through your Hospira Support Center.
Medication Entry Rules and Conventions Chapter 10: LifeCare PCA Medication Entries
Medication Entry Rules and Conventions
The Hospira MedNet Meds software uses the following conventions for the LifeCare PCA medication entries:
• Entry of upper hard and soft limits and lower hard and soft limits is optional, not required. • You can create medication entries by adding them to the Master Drug Formulary or by
adding them directly to a CCA. Medication entries added to a CCA Target List are automatically added to the Master Drug Formulary List.
• “Validity” messages appear in red at the bottom of the Rule Set window. When you enter a value that is not allowed, the message specifies the defined range for the field, or the reason the value is not permitted.
• Displayed Name cannot contain comma (,) or double-quote (“) characters. Most other special characters, as well as all alphabetic and numeric characters, are acceptable.
• Once you select a medication unit, the dosing unit field will display only the enabled unit type.
• The software prohibits invalid numeric entries and signals such with an audible “beep.”• You may use the vertical and horizontal scroll bars to navigate to an entry.• If you do not select or populate a required field, an error message appears.• When you highlight an entry on the Drug Library Management list view, buttons or features
that are not allowed appear as “grayed” or disabled.• When you add a new medication in the Generic Name field of the rule set window, you may
search for a medication by typing the first few characters of its generic name. The drop-down list will navigate to show any matching medications.
Hospira MedNet Meds Software User Guide 173Note: For a list of Hospira MedNet compatible devices approved by country, refer to the Hospira MedNet Device Compatibility Matrix
available through your Hospira Support Center.

Chapter 10: LifeCare PCA Medication Entries The LifeCare PCA Medication Rule Set
The LifeCare PCA Medication Rule Set The Rule Set window, seen below, enables you to configure a medication entry for the LifeCare PCA drug library.
174 Hospira MedNet Meds Software User GuideNote: For a list of Hospira MedNet compatible devices approved by country, refer to the Hospira MedNet Device Compatibility Matrix
available through your Hospira Support Center.

The LifeCare PCA Medication Rule Set Chapter 10: LifeCare PCA Medication Entries
Rule Set Fields
The following table lists the fields, a brief description, and allowed value range for the infuser.
Field Description Allowable Range
Generic Name The medication name from your Medication List. It is selected from the drop-down list and displays the External ID (the hospital's identifier for a medication). Strength/Volume and Dosage Form display if defined in the Medication List.
Not editable in the Rule Set
Displayed Name The name that will be displayed on the infuser.
• Varies depending on the character width
• Cannot be blank
Displayed Name cannot contain comma (,) or double-quote (“) characters. All alphabetic and numeric characters are acceptable.
Therapeutic Class The therapeutic class assigned to the medication entry.
Not editable in the Rule Set
Class ID The ID of the therapeutic class assigned to the medication entry.
Not editable in the Rule Set
Medication Amount Allows you to enter the medication amount in the units selected.
• For mg: 0.1–999.9
• For mcg: 1–15,000
Medication Unit Allows you to select the unit of measure for your medication amount.
mcg or mg
Diluent Amount Allows you to set the total volume of the PCA vial.
1–30 mL
Displayed Concentration
The concentration of medication per mL.
Calculated by the software as Medication Amount divided by Diluent Amount
Bar Codes Allows you to enter up to five (5) different bar codes for each medication entry.
• Numeric or alphanumeric
• Each bar code must be unique.
• At least one bar code is required.
• The printed bar code length must be less than 4.2 cm (about 16-17 characters in a typical font).
• Enter the bar code value without any space or punctuation characters such as parentheses.
Dosing Unit The dosing unit for the medication.
The dosing unit field automatically populates once the medication unit is selected
Dose Limit Allows you to specify the amount of medication that can be administered via PCA dose and continuous delivery in a rolling time period.
• Choices include one (1), four (4), six (6), or twelve (12) hours.
• Default time interval = four (4) hours (required).
Hospira MedNet Meds Software User Guide 175Note: For a list of Hospira MedNet compatible devices approved by country, refer to the Hospira MedNet Device Compatibility Matrix
available through your Hospira Support Center.

Chapter 10: LifeCare PCA Medication Entries The LifeCare PCA Medication Rule Set
LifeCare PCA Prescription Delivery Limits
The LifeCare PCA infuser enforces Prescription Delivery limits for Loading Dose, PCA Dose, Continuous Rate, and Dose Limit. The exact limits enforced depend on the concentration of the medication. See the LifeCare PCA System Operating Manual for additional information.
Note: Drug and concentration selections are rounded up to the nearest tenth of a digit for mg/mL values or to the nearest digit for mcg/mL values. Minimum delivery rate is 0.1 mL/hr for concentrations between 0.1 and 1.0 mg/mL.
The Rule Set window displays the Prescription Delivery Limits next to each rule set type (Loading Dose, PCA Dose, Continuous Rate, and Dose Limit) once a medication has been selected and its concentration has been defined.
These limits are enforced by the infuser as hard limits, regardless of whether hard limits have been explicitly defined in Hospira MedNet Meds. Hospira MedNet Meds prevents the user from entering a hard limit value which will violate these limits.
Note: Hospira MedNet Reports will contain data for hard limits alerts encountered by the user regardless of whether the limit is one that is explicitly defined in Hospira MedNet Meds or one that is enforced by the infuser.
LHL, LSL, USL, UHL Lower hard limit, lower soft limit, upper soft limit, upper hard limit.
Allows you to set the upper and/or lower limits for loading dose, PCA dose, continuous rate, and dose limit for the selected medication.
Upper Soft Limit (USL) and Upper Hard Limit (UHL) entries are optional.
Loading dose-From 0.1 x concentration to 10 x concentration-Not less than 0.1 mg or 1 mcg-Not more than 500 mg or 5000 mcg
PCA dose-From 0.1 x concentration to 5 x concentration-Not less than 0.1 mg or 1 mcg-Not more than 250 mg or 2500 mcg
Continuous rate -From 0.1 x concentration to 20 x concentration-Not less than 0.1 mg/hr or 1 mcg/hr-Not more than 999.9 mg/hr or 9999 mcg/hr-Not more than 250 mL/hr
Dose limit (Upper Soft and Hard Limit only)-From 0.1 x concentration to (20 x concentration x period)-Not less than 0.1 mg or 1 mcg-Not more than 999.9 mg or 9999 mcg-Dose limit period is 1 hour, 4 hours, 6 hours, or 12 hours
Lockout Interval Determines the minimum and maximum amount of time between PCA and/or loading doses.
Limited to the minimum and maximum values set for the CCA associated with the medication entry
Note: Refer to the LifeCare PCA System Operating Manual for complete details and allowable range.
Concentra-tion (C)
Loading Dose
PCA Dose
Continuous Rate (per hr)
1 Hour Limit
4 Hour Limit
6 Hour Limit
12 Hour Limit
0.1–50 mg/mL
1-500 mcg/mL [0.1-10] x C [0.1-5] x C [0.1-20] x C [0.1-20] x C [0.1-80] x C [0.1-120] x C [0.1-240] x C
Field Description Allowable Range
176 Hospira MedNet Meds Software User GuideNote: For a list of Hospira MedNet compatible devices approved by country, refer to the Hospira MedNet Device Compatibility Matrix
available through your Hospira Support Center.

Step-by-step Procedures Chapter 10: LifeCare PCA Medication Entries
Navigate to the LifeCare PCA Rule Set Window
The procedures in this chapter begin at the Rule Set window. To navigate to the Rule Set window, follow the path listed below:
Library Directory -> Drug Library Worksheet - LifeCare Infuser Type -> Drug Library Management view
Step-by-step ProceduresThe following section provides step-by-step procedures that will enable you to create and manage medication entries. In this section you will learn to do the following:
• Add a medication entry in a CCA• Edit a medication entry in a CCA• View a medication entry in a CCA• Remove a medication entry from a CCA• Add a medication entry in the Master Drug Formulary• Edit a medication entry in the Master Drug Formulary• View a medication entry in the Master Drug Formulary• Delete a medication entry from the Master Drug Formulary• Copy a medication entry from the Master Drug Formulary to a Target CCA
To display the Rule Set window, open a Worksheet and click Add or Edit. (For instructions on opening a Worksheet, see Chapter 5: The Library Directory, on page 29.)
To add a medication entry in a CCA:
1. Select the desired CCA as the Target List.
2. From the Target List, click Add.
2
Hospira MedNet Meds Software User Guide 177Note: For a list of Hospira MedNet compatible devices approved by country, refer to the Hospira MedNet Device Compatibility Matrix
available through your Hospira Support Center.

Chapter 10: LifeCare PCA Medication Entries Step-by-step Procedures
3. Highlight a medication from the Select a Medication screen.
Note: Selecting a Generic Name from the medication list automatically populates the Displayed Name, External ID, the Therapeutic Class, and the Class ID fields.
4. Click Select Medication to access the Rule Set.
Note: The Displayed Name can be edited once populated.The maximum number of characters in the Displayed Name is determined by how it is displayed on the infuser screen. Depending on character width, the maximum number of characters allowed in the displayed name can vary from 10 to 16.
5
7
6
8
9
10
178 Hospira MedNet Meds Software User GuideNote: For a list of Hospira MedNet compatible devices approved by country, refer to the Hospira MedNet Device Compatibility Matrix
available through your Hospira Support Center.

Step-by-step Procedures Chapter 10: LifeCare PCA Medication Entries
5. You can edit the Medication Amount, the Medication Unit, and the Diluent Amount. The Displayed Concentration is calculated based on the data entered into these fields.
Note: The dosing units for Loading Dose, PCA Dose, Continuous Rate, and Dose Limit automatically populate after the medication unit is selected.
6. Enter the bar codes for the medication. At least one bar code is required to save the medication entry.
Note: You can use a PC-based bar code scanner (one that attaches to the PC via a “keyboard wedge”) in order to populate the bar code value. To do this, select a bar code field and scan the bar code on the medication vial. The scanner will read the medication bar code and populate the bar code field with the scanned value.
7. Enter soft and hard limits for Loading Dose (optional).
8. Enter soft and hard limits for PCA Dose (optional).
Note: The minimum and maximum values for the lockout intervals automatically populate based on the range defined for the CCA.
9. Enter soft and hard limits for Continuous Rate (optional).
10. Enter the time interval and upper soft or hard limits for Dose Limit (optional).
Note: When a soft or hard Dose Limit is entered, the clinician MUST always enter a Dose Limit on the infuser during programming.
11. Click Save & Add Another or Save & Close to add the medication entry to the CCA.
To edit a medication entry in a CCA:
1. Select the CCA containing the medication entry you want to edit from the Target List drop-down.
2. From the Target List, select the medication entry you want to edit.
3. Click Edit.
Helpful Hint: You can also double-click a medication entry to display the Rule Set dialog box.
Hospira MedNet Meds Software User Guide 179Note: For a list of Hospira MedNet compatible devices approved by country, refer to the Hospira MedNet Device Compatibility Matrix
available through your Hospira Support Center.

Chapter 10: LifeCare PCA Medication Entries Step-by-step Procedures
Note: A Medication Rule Set can be edited once a medication is assigned to a protocol without having to delete the protocol. However, if the rule set is being used by one or more protocols; medication, concentration, and time interval information cannot be edited.
4. Make changes as needed.
Note: You cannot change the Therapeutic class or the Class ID when editing a medication entry in a CCA.
5. Click Save & Close to save your changes.
Note: If the medication is assigned to another CCA, a new medication is created in the Master Drug Formulary. If the medication is not assigned to another CCA, the changes are applied to both the medication in the CCA and the medication in the Master Drug Formulary.
4
180 Hospira MedNet Meds Software User GuideNote: For a list of Hospira MedNet compatible devices approved by country, refer to the Hospira MedNet Device Compatibility Matrix
available through your Hospira Support Center.

Step-by-step Procedures Chapter 10: LifeCare PCA Medication Entries
To view a medication entry in a CCA:
1. Select the CCA containing the medication entry you want to view from the Target List drop-down.
2. Select a medication.
3. Click View.
4. Click Close to exit the screen.
Hospira MedNet Meds Software User Guide 181Note: For a list of Hospira MedNet compatible devices approved by country, refer to the Hospira MedNet Device Compatibility Matrix
available through your Hospira Support Center.

Chapter 10: LifeCare PCA Medication Entries Step-by-step Procedures
To remove a medication entry from a CCA:
1. Select the CCA containing the medication entry you want to remove from the Target List drop-down.
2. Select a medication.
3. Click Remove.
4. Click Remove on the Confirm Remove from CCA pop-up.
Note: The medication entry is not removed from the Master Drug Formulary.
182 Hospira MedNet Meds Software User GuideNote: For a list of Hospira MedNet compatible devices approved by country, refer to the Hospira MedNet Device Compatibility Matrix
available through your Hospira Support Center.

Working with the Master Drug Formulary Chapter 10: LifeCare PCA Medication Entries
Working with the Master Drug Formulary The Master Drug Formulary can contain medication entries not assigned to a CCA, to facilitate later use. The maximum number of medication entries in the Master Drug Formulary is 585, of which 100 unique medication entries can be assigned to CCAs. For example, Morphine 1 mg/mL would be considered as one unique medication entry whether it is assigned to one or more CCAs.
Note: Refer to Rule Set Fields on page 175 for information on allowable ranges.
To add a medication entry in the Master Drug Formulary:
1. Select Master Drug Formulary as the Source List.
2. From the Source List, click Add.
3. Highlight a medication from the Select a Medication screen.
Note: Selecting a Generic Name from the medication list automatically populates the Displayed Name, External ID, the Therapeutic Class, and the Class ID fields.
4. Click Select Medication to access the Rule Set.
Note: Selecting a Generic Name from the medication list automatically populates the Displayed Name, External ID, the Therapeutic Class, and the Class ID fields.
Hospira MedNet Meds Software User Guide 183Note: For a list of Hospira MedNet compatible devices approved by country, refer to the Hospira MedNet Device Compatibility Matrix
available through your Hospira Support Center.

Chapter 10: LifeCare PCA Medication Entries Working with the Master Drug Formulary
.
Note: The Displayed Name can be edited once populated. The maximum number of characters in a Displayed Name is determined by how it is displayed on the infuser screen. Depending on character width, the maximum number of characters allowed in a medication entry can vary from 10 to 16.
5. Enter the Medication Amount, select the Medication Unit, and enter the Diluent Amount. The displayed concentration is calculated based on the data entered into these fields.
Note: The dosing units for Loading Dose, PCA Dose, Continuous Rate, and Dose Limit automatically populate after the medication unit is selected.
6. Enter the bar codes for the medication. At least one bar code is required to save the medication entry.
7. Enter soft and hard limits for Loading Dose (optional).
8. Enter soft and hard limits for PCA Dose (optional).
Note: The minimum and maximum values for the lockout intervals automatically populate based on the range defined for the CCA.
9. Enter soft and hard limits for Continuous Rate (optional).
10. Enter the time interval and soft and hard limits for Dose Limit.
5
6
7
8
9
10
184 Hospira MedNet Meds Software User GuideNote: For a list of Hospira MedNet compatible devices approved by country, refer to the Hospira MedNet Device Compatibility Matrix
available through your Hospira Support Center.

Working with the Master Drug Formulary Chapter 10: LifeCare PCA Medication Entries
Note: The clinician is prompted on the infuser to enter a Dose Limit for the time interval selected.
11. Click Save & Add Another or Save & Close to add the medication entry to the CCA.
Note: When a medication entry is added to the Master Drug Formulary, it is not assigned to a CCA.
To edit a medication entry in the Master Drug Formulary:
1. Select Master Drug Formulary from the Source List.
2. From the Source List, select the medication entry you want to edit.
3. Click Edit.
Helpful Hint: You can also double-click a medication entry to display the Rule Set dialog box.
Hospira MedNet Meds Software User Guide 185Note: For a list of Hospira MedNet compatible devices approved by country, refer to the Hospira MedNet Device Compatibility Matrix
available through your Hospira Support Center.

Chapter 10: LifeCare PCA Medication Entries Working with the Master Drug Formulary
4. Make any desired changes.
Note: You cannot change the Therapeutic class or the Class ID when editing a medication entry in the Master Drug Formulary.
5. Click Save & Close to save your changes.
Note: When a medication entry is edited, the changes are reflected in the Master Drug Formulary and in all CCAs in which the medication is listed.
To view a medication entry in the Master Drug Formulary:
1. Select Master Drug Formulary from the Source List.
186 Hospira MedNet Meds Software User GuideNote: For a list of Hospira MedNet compatible devices approved by country, refer to the Hospira MedNet Device Compatibility Matrix
available through your Hospira Support Center.
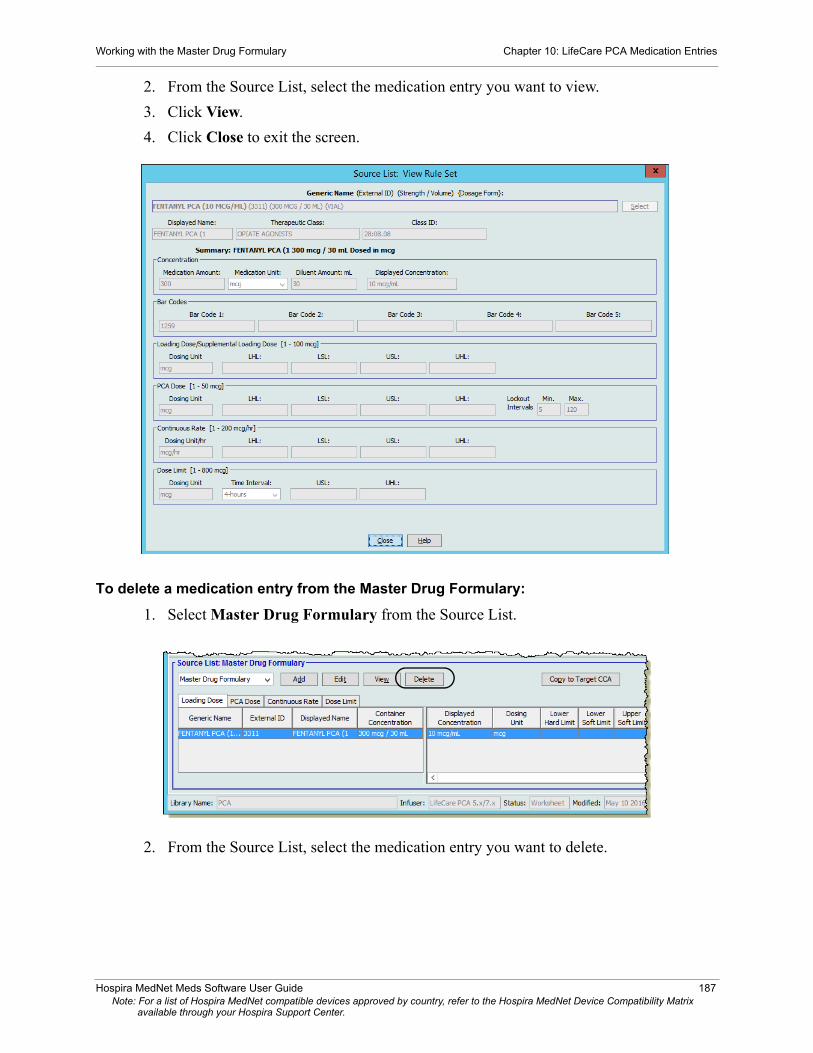
Working with the Master Drug Formulary Chapter 10: LifeCare PCA Medication Entries
2. From the Source List, select the medication entry you want to view.
3. Click View.
4. Click Close to exit the screen.
To delete a medication entry from the Master Drug Formulary:
1. Select Master Drug Formulary from the Source List.
2. From the Source List, select the medication entry you want to delete.
Hospira MedNet Meds Software User Guide 187Note: For a list of Hospira MedNet compatible devices approved by country, refer to the Hospira MedNet Device Compatibility Matrix
available through your Hospira Support Center.

Chapter 10: LifeCare PCA Medication Entries Working with the Master Drug Formulary
3. Click Delete.
4. Click OK on the Delete Medication pop-up.
Note: If the selected medication is not attached to a CCA, the medication entry will be removed from the Master Drug Formulary and no pop-up will display.
188 Hospira MedNet Meds Software User GuideNote: For a list of Hospira MedNet compatible devices approved by country, refer to the Hospira MedNet Device Compatibility Matrix
available through your Hospira Support Center.
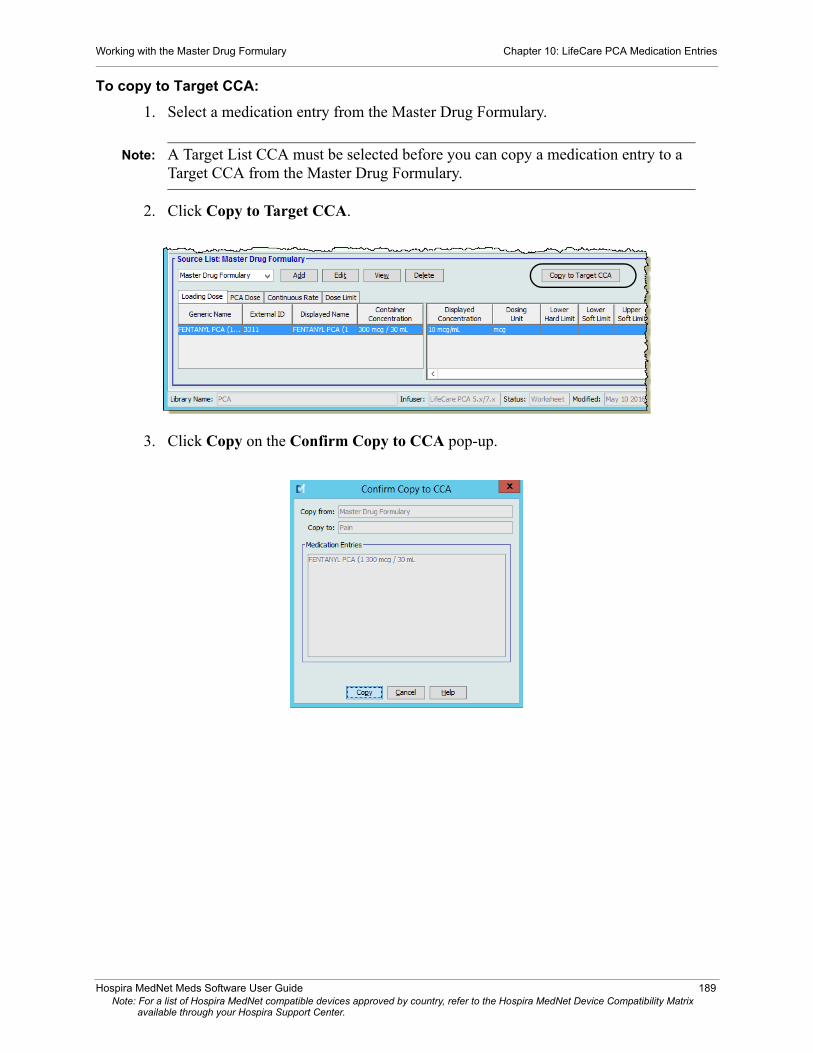
Working with the Master Drug Formulary Chapter 10: LifeCare PCA Medication Entries
To copy to Target CCA:
1. Select a medication entry from the Master Drug Formulary.
Note: A Target List CCA must be selected before you can copy a medication entry to a Target CCA from the Master Drug Formulary.
2. Click Copy to Target CCA.
3. Click Copy on the Confirm Copy to CCA pop-up.
Hospira MedNet Meds Software User Guide 189Note: For a list of Hospira MedNet compatible devices approved by country, refer to the Hospira MedNet Device Compatibility Matrix
available through your Hospira Support Center.
Chapter 10: LifeCare PCA Medication Entries Working with the Master Drug Formulary
Notes:
190 Hospira MedNet Meds Software User GuideNote: For a list of Hospira MedNet compatible devices approved by country, refer to the Hospira MedNet Device Compatibility Matrix
available through your Hospira Support Center.
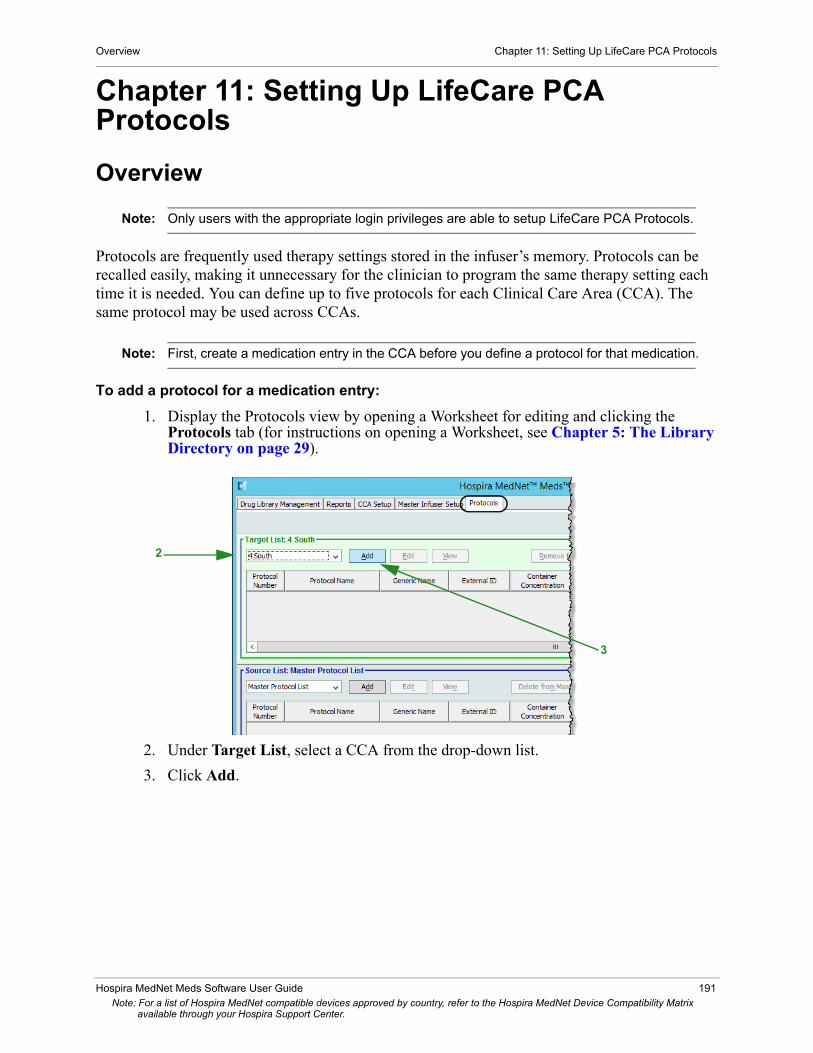
Overview Chapter 11: Setting Up LifeCare PCA Protocols
Chapter 11: Setting Up LifeCare PCA Protocols
Overview
Note: Only users with the appropriate login privileges are able to setup LifeCare PCA Protocols.
Protocols are frequently used therapy settings stored in the infuser’s memory. Protocols can be recalled easily, making it unnecessary for the clinician to program the same therapy setting each time it is needed. You can define up to five protocols for each Clinical Care Area (CCA). The same protocol may be used across CCAs.
Note: First, create a medication entry in the CCA before you define a protocol for that medication.
To add a protocol for a medication entry:
1. Display the Protocols view by opening a Worksheet for editing and clicking the Protocols tab (for instructions on opening a Worksheet, see Chapter 5: The Library Directory on page 29).
2. Under Target List, select a CCA from the drop-down list.
3. Click Add.
2
3
Hospira MedNet Meds Software User Guide 191Note: For a list of Hospira MedNet compatible devices approved by country, refer to the Hospira MedNet Device Compatibility Matrix
available through your Hospira Support Center.
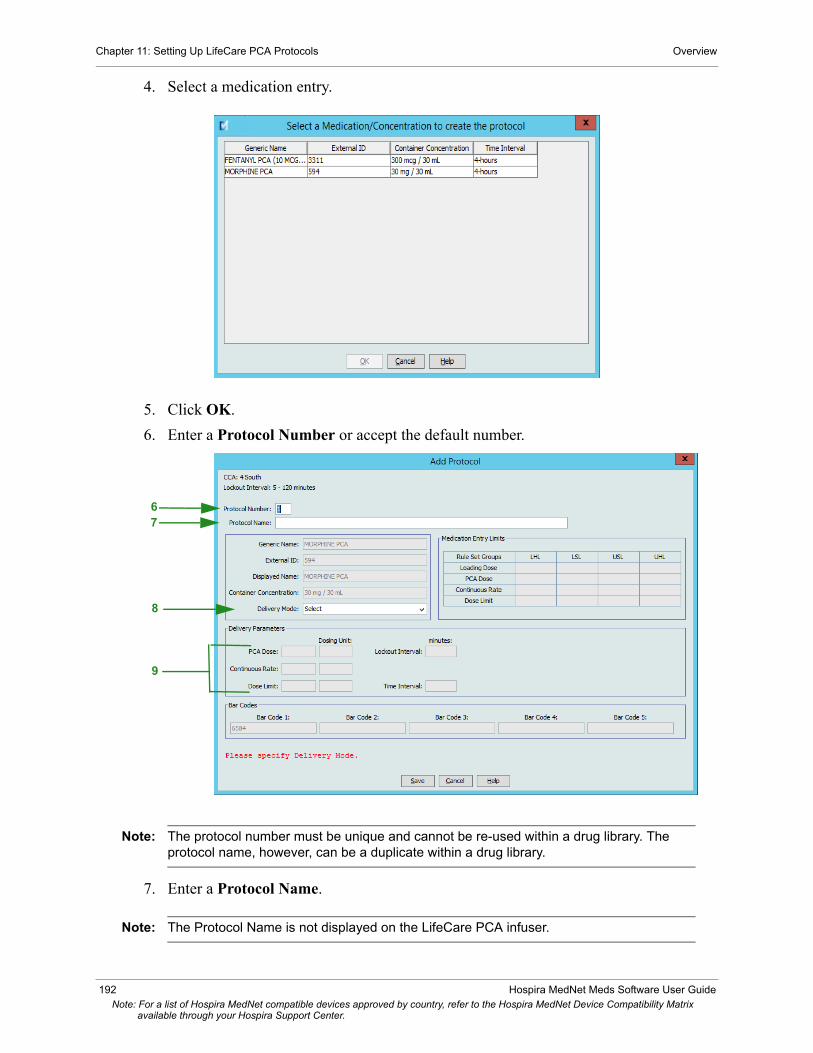
Chapter 11: Setting Up LifeCare PCA Protocols Overview
4. Select a medication entry.
5. Click OK.
6. Enter a Protocol Number or accept the default number.
Note: The protocol number must be unique and cannot be re-used within a drug library. The protocol name, however, can be a duplicate within a drug library.
7. Enter a Protocol Name.
Note: The Protocol Name is not displayed on the LifeCare PCA infuser.
67
8
9
192 Hospira MedNet Meds Software User GuideNote: For a list of Hospira MedNet compatible devices approved by country, refer to the Hospira MedNet Device Compatibility Matrix
available through your Hospira Support Center.

Overview Chapter 11: Setting Up LifeCare PCA Protocols
8. Select a Delivery Mode from the following choices:
a. PCAb. PCA + Continuousc. Continuous
9. Based on the delivery mode you have chosen, enter variables for the enabled fields. All enabled fields are required.
10. Click Save.
Note: All protocol dosing must be equal to or within the soft limits of the rule set for that medication and concentration (as shown in the Medication Entry Limits table). Values must be in the range allowed by the infuser, or an error message appears.
To edit a protocol:
1. From a Target List CCA, select the protocol to edit.
2. Click Edit.
Hospira MedNet Meds Software User Guide 193Note: For a list of Hospira MedNet compatible devices approved by country, refer to the Hospira MedNet Device Compatibility Matrix
available through your Hospira Support Center.
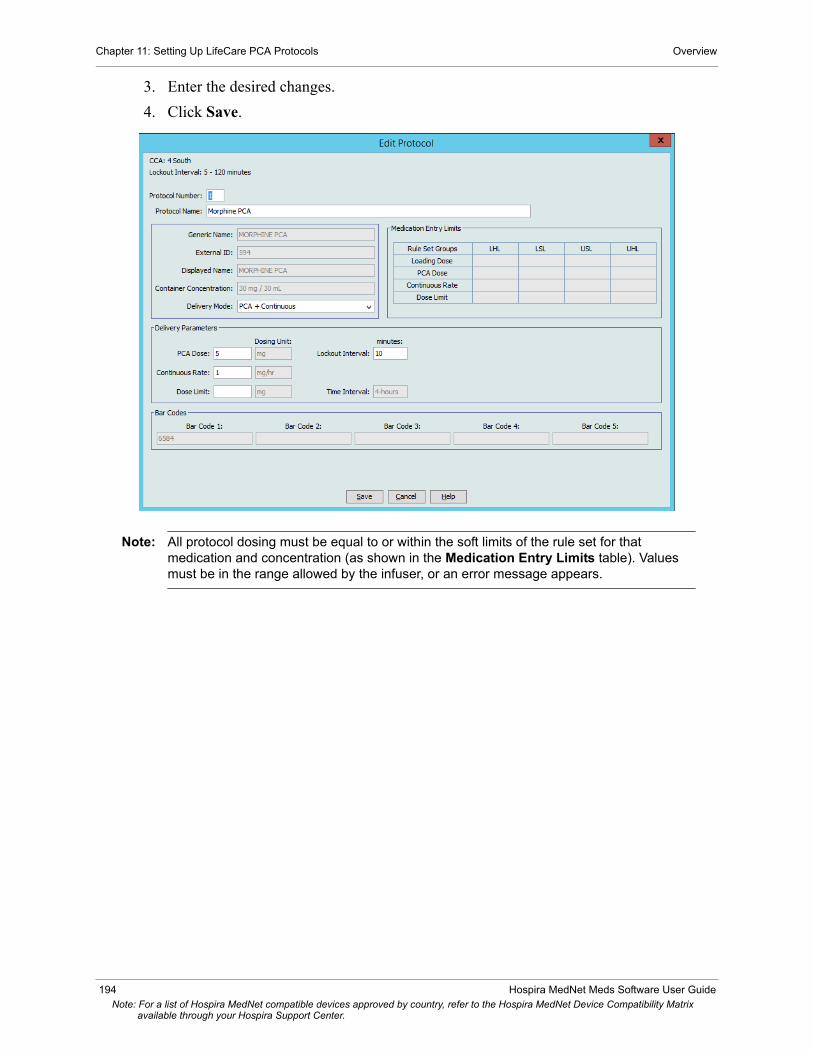
Chapter 11: Setting Up LifeCare PCA Protocols Overview
3. Enter the desired changes.
4. Click Save.
Note: All protocol dosing must be equal to or within the soft limits of the rule set for that medication and concentration (as shown in the Medication Entry Limits table). Values must be in the range allowed by the infuser, or an error message appears.
194 Hospira MedNet Meds Software User GuideNote: For a list of Hospira MedNet compatible devices approved by country, refer to the Hospira MedNet Device Compatibility Matrix
available through your Hospira Support Center.

Overview Chapter 11: Setting Up LifeCare PCA Protocols
To view a protocol:
1. From a Target List CCA, select the protocol to view.
2. Click View.
The selected protocol displays.
3. Click Close to exit the screen.
To remove a protocol from a CCA:
1. From a Target List CCA, select the protocol to be removed.
2. Click Remove from CCA.
Hospira MedNet Meds Software User Guide 195Note: For a list of Hospira MedNet compatible devices approved by country, refer to the Hospira MedNet Device Compatibility Matrix
available through your Hospira Support Center.
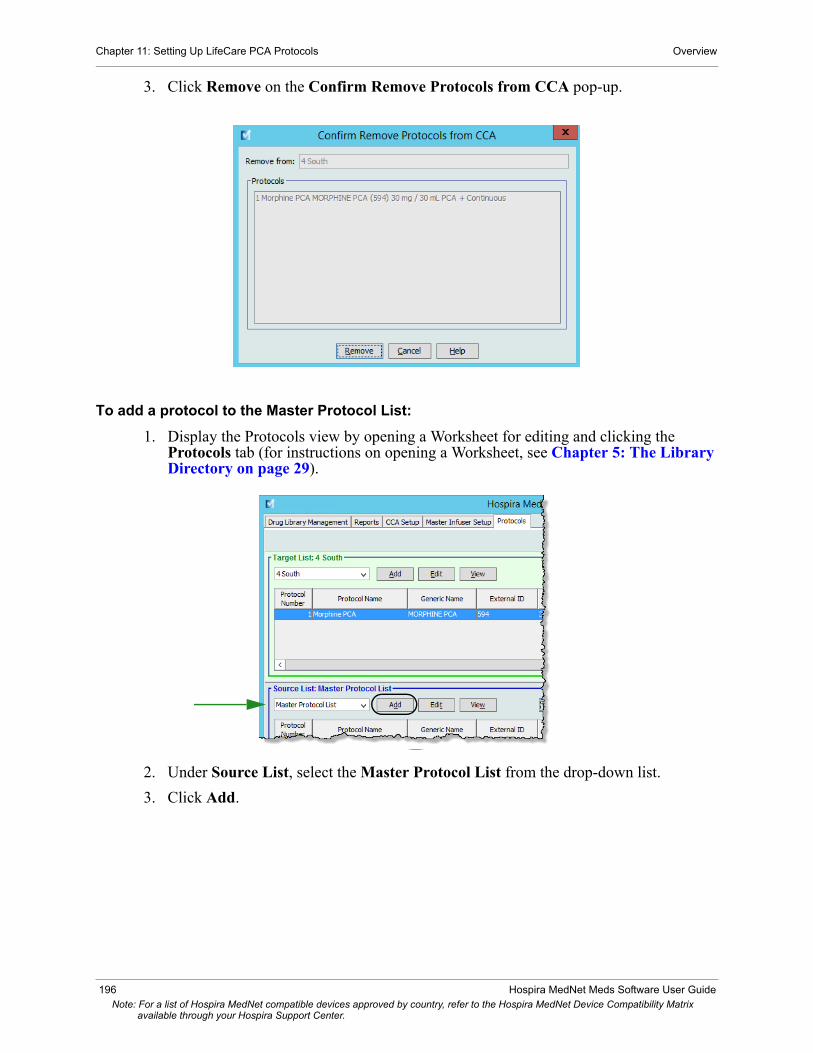
Chapter 11: Setting Up LifeCare PCA Protocols Overview
3. Click Remove on the Confirm Remove Protocols from CCA pop-up.
To add a protocol to the Master Protocol List:
1. Display the Protocols view by opening a Worksheet for editing and clicking the Protocols tab (for instructions on opening a Worksheet, see Chapter 5: The Library Directory on page 29).
2. Under Source List, select the Master Protocol List from the drop-down list.
3. Click Add.
196 Hospira MedNet Meds Software User GuideNote: For a list of Hospira MedNet compatible devices approved by country, refer to the Hospira MedNet Device Compatibility Matrix
available through your Hospira Support Center.

Overview Chapter 11: Setting Up LifeCare PCA Protocols
4. Select a medication entry.
5. Click OK.
6. Enter a Protocol Number or accept the default number.
Note: The protocol number must be unique and cannot be re-used within a drug library. The protocol name, however, can be a duplicate within a drug library.
7. Enter a Protocol Name.
Note: The Protocol Name is not displayed on the LifeCare PCA infuser.
6
7
8
9
Hospira MedNet Meds Software User Guide 197Note: For a list of Hospira MedNet compatible devices approved by country, refer to the Hospira MedNet Device Compatibility Matrix
available through your Hospira Support Center.
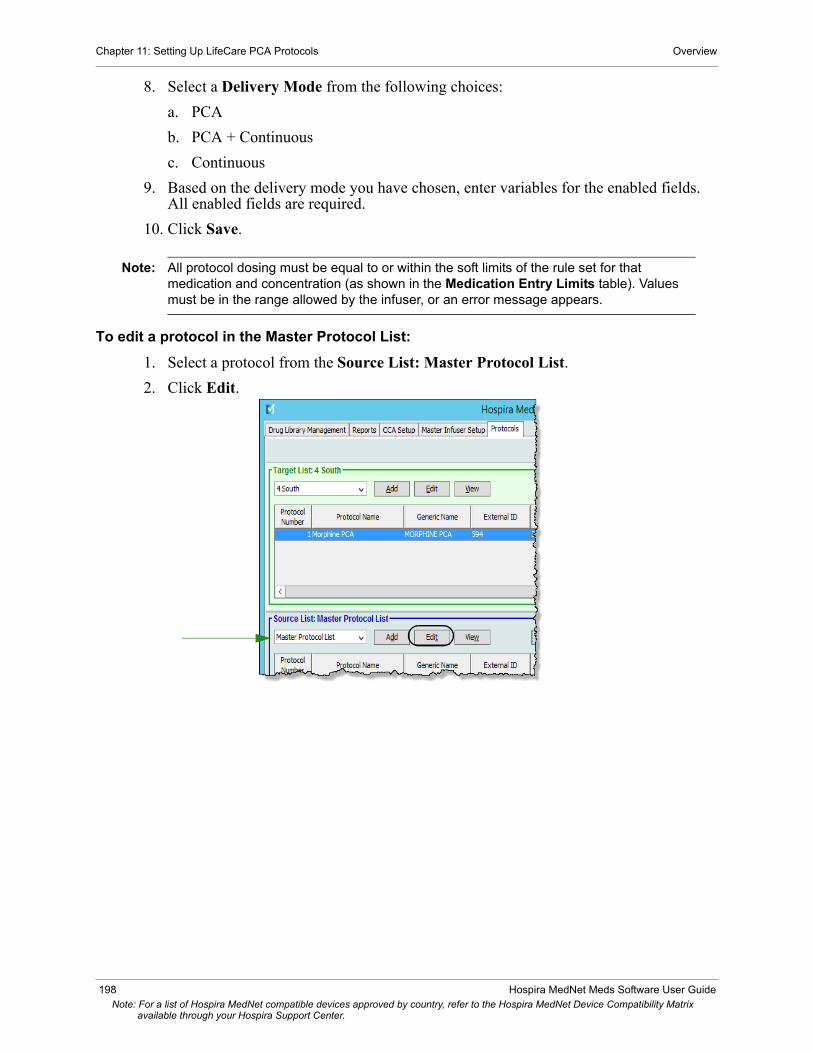
Chapter 11: Setting Up LifeCare PCA Protocols Overview
8. Select a Delivery Mode from the following choices:
a. PCA
b. PCA + Continuous
c. Continuous
9. Based on the delivery mode you have chosen, enter variables for the enabled fields. All enabled fields are required.
10. Click Save.
Note: All protocol dosing must be equal to or within the soft limits of the rule set for that medication and concentration (as shown in the Medication Entry Limits table). Values must be in the range allowed by the infuser, or an error message appears.
To edit a protocol in the Master Protocol List:
1. Select a protocol from the Source List: Master Protocol List.
2. Click Edit.
198 Hospira MedNet Meds Software User GuideNote: For a list of Hospira MedNet compatible devices approved by country, refer to the Hospira MedNet Device Compatibility Matrix
available through your Hospira Support Center.

Overview Chapter 11: Setting Up LifeCare PCA Protocols
3. Enter the desired changes.
4. Click Save.
To view a protocol in the Master Protocol List:
1. Select the protocol to view.
2. Click View.
Hospira MedNet Meds Software User Guide 199Note: For a list of Hospira MedNet compatible devices approved by country, refer to the Hospira MedNet Device Compatibility Matrix
available through your Hospira Support Center.

Chapter 11: Setting Up LifeCare PCA Protocols Overview
The selected protocol displays.
3. Click Close to exit the screen.
To delete a protocol from the Master Protocol List:
1. Select the protocol to delete.
2. Click Delete from Master Protocol List.
200 Hospira MedNet Meds Software User GuideNote: For a list of Hospira MedNet compatible devices approved by country, refer to the Hospira MedNet Device Compatibility Matrix
available through your Hospira Support Center.

Overview Chapter 11: Setting Up LifeCare PCA Protocols
3. Click Remove on the Confirm Remove Protocols from CCA pop-up.
4. Click OK.
Note: If the selected protocol is not associated with a CCA there will be no confirmation message. The protocol is removed from the Master Protocol list.
To copy a protocol to a CCA:
Note: Once a protocol has been entered and saved, the protocol is available for duplication to other CCAs using the Copy from Master Protocol List button.
1. Select a CCA from the Target List drop-down list.
2. Select a protocol to be copied from the Source List to the selected CCA.
Note: A protocol can only be copied to a CCA if a medication entry with the same Generic Name, External ID, Container Concentration, and Time Interval exists in the CCA you are copying to.
3. Click Copy to Target CCA.
1
2
3
Hospira MedNet Meds Software User Guide 201Note: For a list of Hospira MedNet compatible devices approved by country, refer to the Hospira MedNet Device Compatibility Matrix
available through your Hospira Support Center.

Chapter 11: Setting Up LifeCare PCA Protocols Overview
4. Click Copy in the Confirm Copy Protocol to CCA pop-up.
202 Hospira MedNet Meds Software User GuideNote: For a list of Hospira MedNet compatible devices approved by country, refer to the Hospira MedNet Device Compatibility Matrix
available through your Hospira Support Center.

Defining Rule Sets Chapter 12: SapphirePlus Medication Entries
Chapter 12: SapphirePlus Medication Entries
Overview
This chapter explains how to create and define clinical decision rules for medications in the SapphirePlus drug library.
The Hospira MedNet Meds software enables you to customize dose-rate limits for medications used in drug libraries. You can customize clinical decision rules for up to 40 different clinical care areas (CCAs) in the hospital and up to 400 medication entries in each CCA. The Master Drug Formulary can contain a maximum of 14,495 medication entries but can only assign up to 11,150 medication entries to the combined CCAs.
Defining Rule SetsTo create a rule set for a medication, specify the name of the medication, the concentration, dose rate limits, and bolus limits consistent with your IV infusion therapy best practices. Each medication entry must have a generic name and a displayed name. Beyond that, you can create medication entries specific to your institution.
Important: The medication entry parameters are linked together and the programming sequence displayed on the infuser is dependent on how the rule set is defined. Please read this section carefully.
The possible combinations for medication concentration include:
• Complete concentration defined (for example, 400 mg/250 mL)• Partial concentration defined (for example, 400 mg/__ mL, __mg/__ mL, __mg/250 mL)• No Concentration• Diluent Only
Once the medication unit has been selected, the units displayed in the drop-down list for dose rate limits, bolus amount limits, and bolus dose rate limits will include only the selections that are appropriate for that medication unit. For example, when the medication unit is grams, mg, or mcg, all the dosing units will be in the gram “family.”
Another characteristic of IV medication administration relates to administering a bolus dose. The Hospira MedNet Meds software accommodates defining limits for bolus administration by allowing three types of bolus rules to be configured independently:
• Bolus amount limits• Bolus time limits• Bolus dose rate limits
Bolus limits must be defined in the same unit “family” as the medication unit.
Within a CCA, no two medication entries may have exactly the same External ID and Concentration. Also, no two medication entries may have exactly the same Displayed Name and Concentration. These represent the two unique combinations.
Hospira MedNet Meds Software User Guide 203Note: For a list of Hospira MedNet compatible devices approved by country, refer to the Hospira MedNet Device Compatibility Matrix
available through your Hospira Support Center.
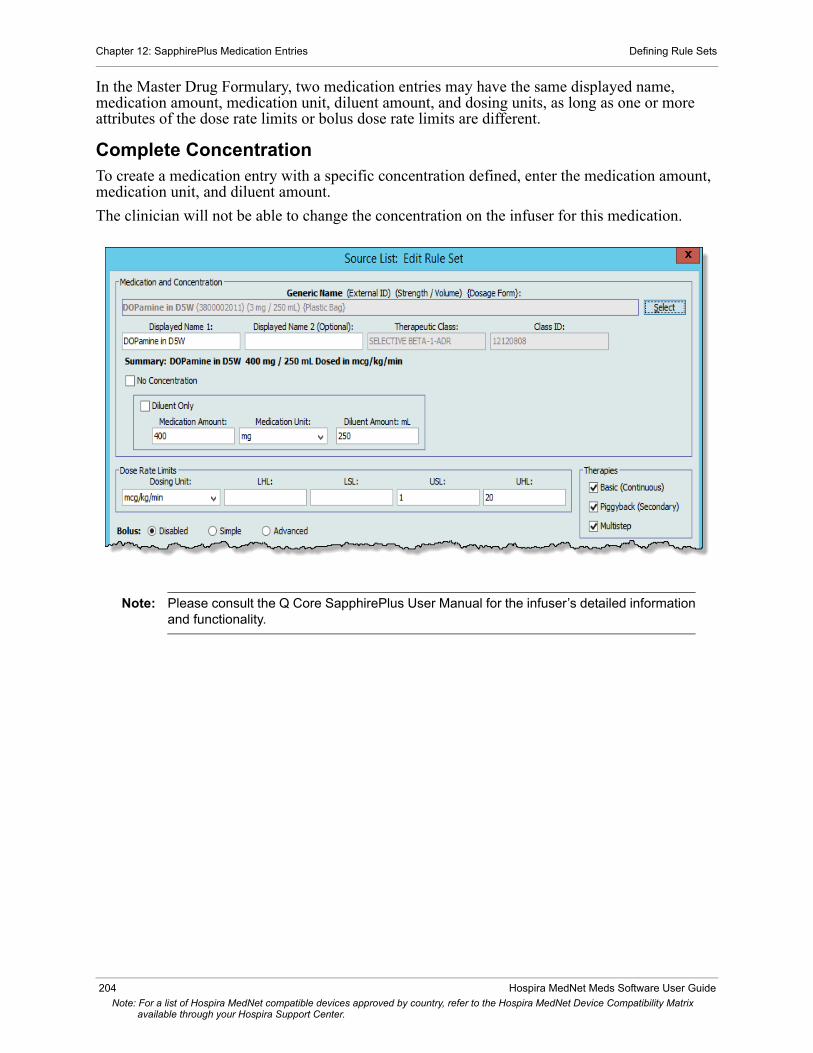
Chapter 12: SapphirePlus Medication Entries Defining Rule Sets
In the Master Drug Formulary, two medication entries may have the same displayed name, medication amount, medication unit, diluent amount, and dosing units, as long as one or more attributes of the dose rate limits or bolus dose rate limits are different.
Complete Concentration To create a medication entry with a specific concentration defined, enter the medication amount, medication unit, and diluent amount.
The clinician will not be able to change the concentration on the infuser for this medication.
Note: Please consult the Q Core SapphirePlus User Manual for the infuser’s detailed information and functionality.
204 Hospira MedNet Meds Software User GuideNote: For a list of Hospira MedNet compatible devices approved by country, refer to the Hospira MedNet Device Compatibility Matrix
available through your Hospira Support Center.

Defining Rule Sets Chapter 12: SapphirePlus Medication Entries
Partial Concentration
To create a medication entry with a partial concentration defined, you must select the desired medication unit. The other concentration fields are optional. Leaving the medication amount or the diluent amount blank allows the clinician to enter a non-standard concentration at the time of programming.
Note: Please consult the Q Core SapphirePlus User Manual for the infuser’s detailed information and functionality.
Hospira MedNet Meds Software User Guide 205Note: For a list of Hospira MedNet compatible devices approved by country, refer to the Hospira MedNet Device Compatibility Matrix
available through your Hospira Support Center.
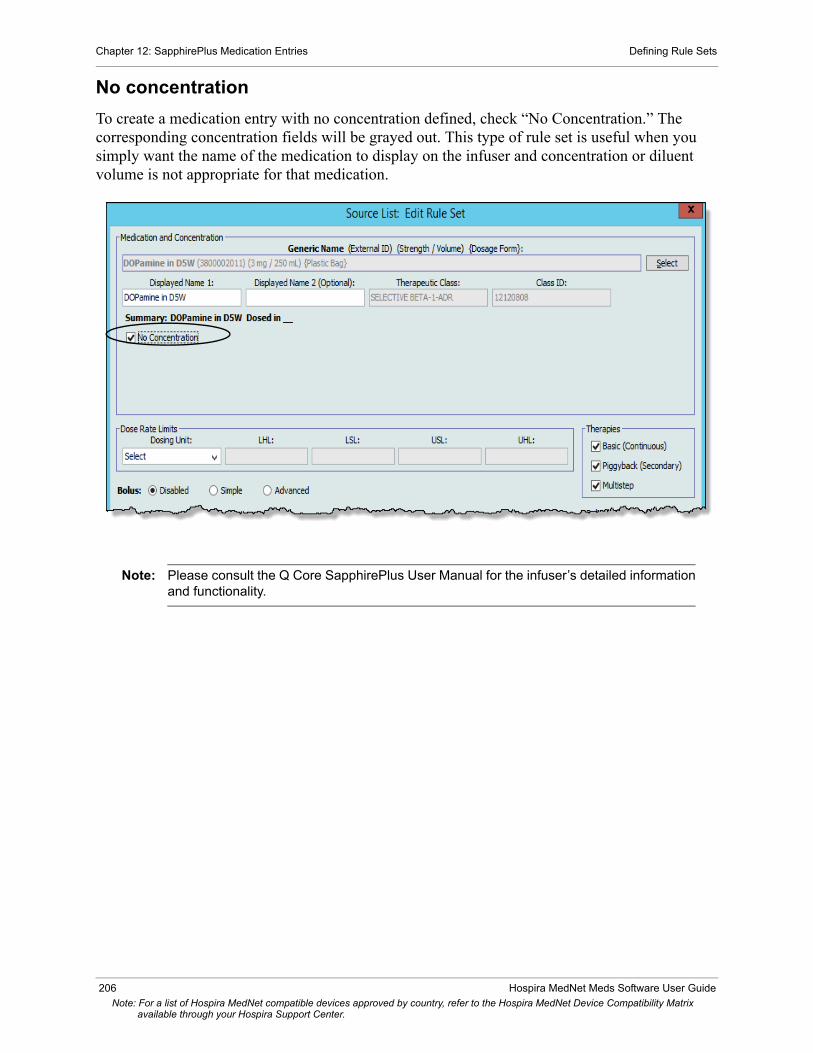
Chapter 12: SapphirePlus Medication Entries Defining Rule Sets
No concentration
To create a medication entry with no concentration defined, check “No Concentration.” The corresponding concentration fields will be grayed out. This type of rule set is useful when you simply want the name of the medication to display on the infuser and concentration or diluent volume is not appropriate for that medication.
Note: Please consult the Q Core SapphirePlus User Manual for the infuser’s detailed information and functionality.
206 Hospira MedNet Meds Software User GuideNote: For a list of Hospira MedNet compatible devices approved by country, refer to the Hospira MedNet Device Compatibility Matrix
available through your Hospira Support Center.

Defining Rule Sets Chapter 12: SapphirePlus Medication Entries
Diluent Only
To create a Diluent Only medication entry, check “Diluent Only.” You may enter a specific diluent volume or leave the field blank. The clinician will be prompted to enter the diluent volume when programming the infuser if you leave the field blank. This type of rule set is useful for solutions like Dextrose 5% in Water, TPN, and others where the medication amount is not pertinent.
Note: Please consult the Q Core SapphirePlus User Manual for the infuser’s detailed information and functionality.
.
Hospira MedNet Meds Software User Guide 207Note: For a list of Hospira MedNet compatible devices approved by country, refer to the Hospira MedNet Device Compatibility Matrix
available through your Hospira Support Center.
Chapter 12: SapphirePlus Medication Entries Setting Limits
Setting LimitsHospira MedNet Meds allows you to define dose rate limits, and bolus limits for medications infused through the SapphirePlus infuser.
You can define upper and lower soft and hard limits as part of the rule set for each medication entry created in the library. As you configure the limits, the software enforces the following rules:
Lower Hard Limit (LHL) <=Lower Soft Limit (LSL) <= Upper Soft Limit (USL) <= Upper Hard Limit (UHL)
Soft Limits are dose rate limits that can be overridden when programming the infuser. When a value entered on the infuser is lower than the lower soft limit or higher than the upper soft limit, the infuser displays a soft limit override confirmation message. The infuser records soft limit overrides.
For example, if the upper soft limit is set to 10 mcg/kg/min and the clinician enters 15 mcg/kg/min, the infuser will display a soft limit override alert. This alert notifies the clinician that the entry is outside the range of the soft limits set for that medication in the drug library. The clinician can choose to continue programming using the override or cancel the override and edit the value.
Hard Limits are dose rate limits that cannot be overridden.
Bolus Limits can be defined in three ways:
Bolus Amount Limits allow you to define the total amount of medication that can be administered in a bolus.
Bolus Time Limits allow you to define the time period over which a bolus can be administered. A minimum administration time for the bolus is defined as a lower limit, while a maximum administration time is defined as an upper limit.
Bolus Dose Rate Limits allow you to define the rate at which a bolus can be administered.
Note: If defining Bolus Rules by weight:The Bolus Dose Rate limits can be defined based on weight only if the Bolus Amount units are also based on weight.
208 Hospira MedNet Meds Software User GuideNote: For a list of Hospira MedNet compatible devices approved by country, refer to the Hospira MedNet Device Compatibility Matrix
available through your Hospira Support Center.

SapphirePlus Therapy Modes Chapter 12: SapphirePlus Medication Entries
SapphirePlus Therapy ModesProgramming workflow on the SapphirePlus infuser requires the user to select a CCA. The user can then proceed to select the medication, enter the infusion settings (rate, volume, time, patient weight, as appropriate), confirm and start the infusion.
The SapphirePlus drug library contains settings that control which therapy modes are available on the infuser for each medication entry. In the medication rule set view, checkboxes are used to enable each of the following therapy modes:
• Basic (Continuous): Allows the user to program the medication as a primary infusion.• Bolus: Allows the user to program a bolus delivery from either a primary or secondary
infusion.• Piggyback (Secondary): Allows the user to program an infusion from a secondary container
once a primary infusion has been programmed.
Note: The maximum rate for a piggyback infusion from a secondary container is 500 mL/hr.
• Multistep: Allows the user to program an infusion with up to 25 sequential steps.
Hospira MedNet Meds Software User Guide 209Note: For a list of Hospira MedNet compatible devices approved by country, refer to the Hospira MedNet Device Compatibility Matrix
available through your Hospira Support Center.
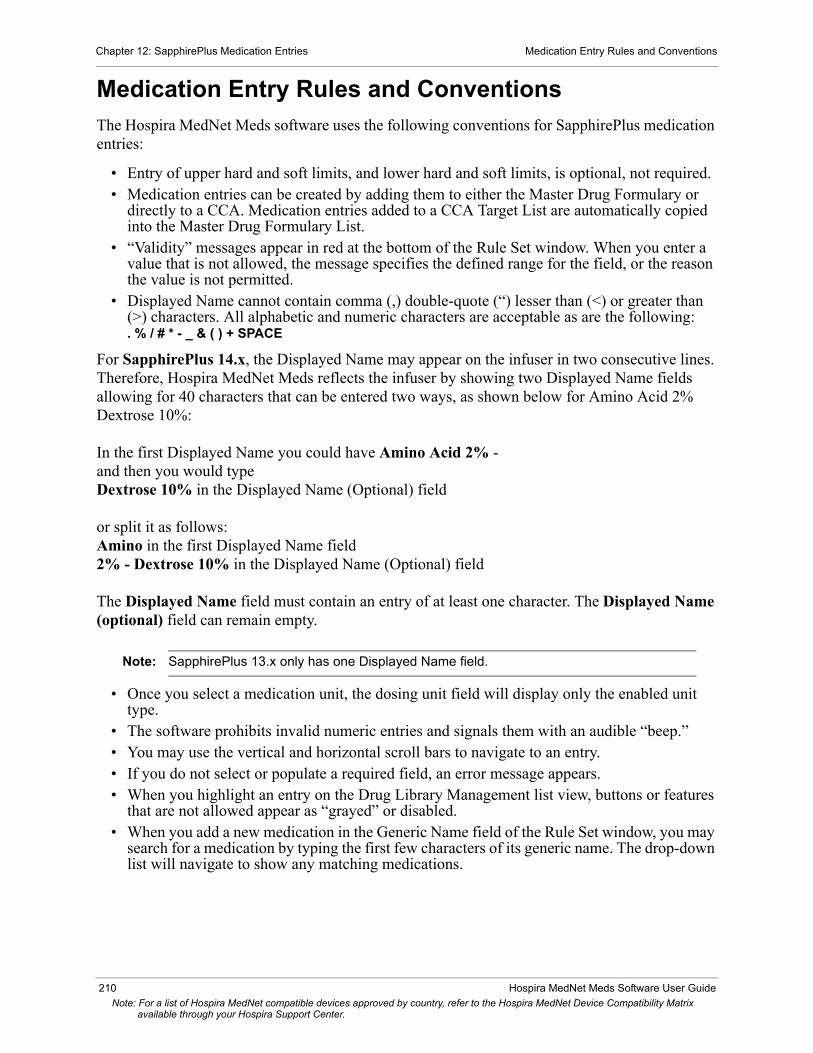
Chapter 12: SapphirePlus Medication Entries Medication Entry Rules and Conventions
Medication Entry Rules and ConventionsThe Hospira MedNet Meds software uses the following conventions for SapphirePlus medication entries:
• Entry of upper hard and soft limits, and lower hard and soft limits, is optional, not required.• Medication entries can be created by adding them to either the Master Drug Formulary or
directly to a CCA. Medication entries added to a CCA Target List are automatically copied into the Master Drug Formulary List.
• “Validity” messages appear in red at the bottom of the Rule Set window. When you enter a value that is not allowed, the message specifies the defined range for the field, or the reason the value is not permitted.
• Displayed Name cannot contain comma (,) double-quote (“) lesser than (<) or greater than (>) characters. All alphabetic and numeric characters are acceptable as are the following: . % / # * - _ & ( ) + SPACE
For SapphirePlus 14.x, the Displayed Name may appear on the infuser in two consecutive lines. Therefore, Hospira MedNet Meds reflects the infuser by showing two Displayed Name fields allowing for 40 characters that can be entered two ways, as shown below for Amino Acid 2% Dextrose 10%:
In the first Displayed Name you could have Amino Acid 2% - and then you would type Dextrose 10% in the Displayed Name (Optional) field
or split it as follows:Amino in the first Displayed Name field2% - Dextrose 10% in the Displayed Name (Optional) field
The Displayed Name field must contain an entry of at least one character. The Displayed Name (optional) field can remain empty.
Note: SapphirePlus 13.x only has one Displayed Name field.
• Once you select a medication unit, the dosing unit field will display only the enabled unit type.
• The software prohibits invalid numeric entries and signals them with an audible “beep.”• You may use the vertical and horizontal scroll bars to navigate to an entry.• If you do not select or populate a required field, an error message appears.• When you highlight an entry on the Drug Library Management list view, buttons or features
that are not allowed appear as “grayed” or disabled.• When you add a new medication in the Generic Name field of the Rule Set window, you may
search for a medication by typing the first few characters of its generic name. The drop-down list will navigate to show any matching medications.
210 Hospira MedNet Meds Software User GuideNote: For a list of Hospira MedNet compatible devices approved by country, refer to the Hospira MedNet Device Compatibility Matrix
available through your Hospira Support Center.

The SapphirePlus Medication Rule Set Chapter 12: SapphirePlus Medication Entries
The SapphirePlus Medication Rule Set When you configure a medication for use in the SapphirePlus drug library, the Rule Set window enables you to define dosage limits as seen in the screen below.
SapphirePlus 14.x
Hospira MedNet Meds Software User Guide 211Note: For a list of Hospira MedNet compatible devices approved by country, refer to the Hospira MedNet Device Compatibility Matrix
available through your Hospira Support Center.
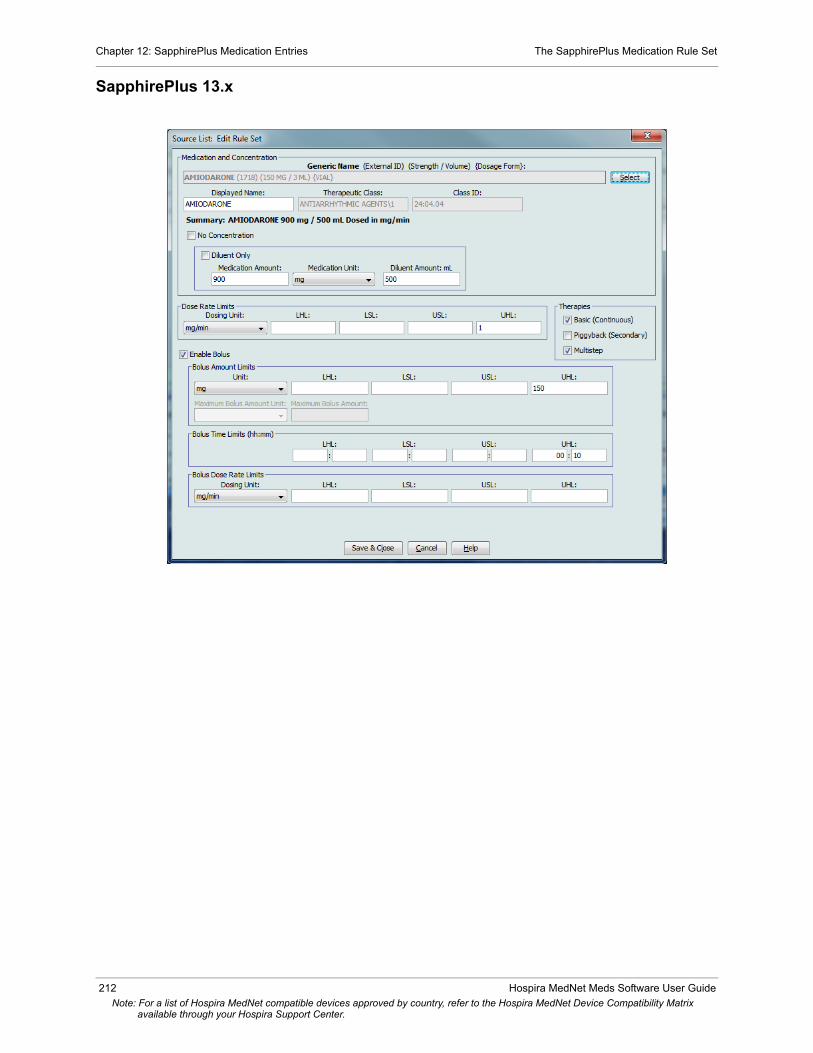
Chapter 12: SapphirePlus Medication Entries The SapphirePlus Medication Rule Set
SapphirePlus 13.x
212 Hospira MedNet Meds Software User GuideNote: For a list of Hospira MedNet compatible devices approved by country, refer to the Hospira MedNet Device Compatibility Matrix
available through your Hospira Support Center.

The SapphirePlus Medication Rule Set Chapter 12: SapphirePlus Medication Entries
Rule Set Fields
The following table lists the fields, a brief description, and allowed value range for the infuser.
Field Description Allowable Range
Generic Name The medication name from the Medication List. It is selected from the drop-down list and displays the External ID (the hospital's identifier for a medication). Strength/Volume and Dosage Form display only if part of your Medication List.
Not editable in Hospira MedNet Meds.
Displayed Name The name that will be displayed on the infuser.
• Cannot be blank
• Each medication entry must have a generic name and a displayed name; you cannot save a medication entry without a name in these fields. The number of characters in the displayed name is determined by how it is displayed on the infuser’s screen.
• The maximum number of characters allowed in a displayed name is 15 (SapphirePlus 13.x) or 40 (SapphirePlus 14.x) when using both Displayed Name fields.
• Displayed Name cannot contain comma (,) lesser than (<), greater than (>), or double-quote (“) characters. All alphabetic and numeric characters are acceptable as are . % / # * - _ & ( ) + SPACE
Therapeutic Class The therapeutic class assigned to the medication.
Not editable in Hospira MedNet Meds.
Class ID The ID of the therapeutic class assigned to the medication.
Not editable in Hospira MedNet Meds.
No Concentration Allows you to create an entry for medications when concentration is not needed.
Checked or Unchecked
Diluent Only Allows you to create a medication entry for plain IV solutions or those IV fluids where concentration is not important in defining the rule set, i.e., when dosing units are mL/kg/hr or mL/hr.
Checked or Unchecked
Medication Amount Allows you to enter the medication amount in the units selected.
mcg, mg, grams, mmol, Million Units, milliUnits, units, mEq
• 0.01-99.99 in increments of 0.01
• 100-9999999 in increments of 1
Medication Unit Allows you to select the unit of measure for the medication amount.
mcg, mg, grams, mmol, Million Units, milliUnits, units, mEq. For SapphirePlus 14.x only: nanog
Diluent Amount Allows you to set the total volume of the medication container or syringe.
For mL:
• 0.1-99.9 mL in increments of 0.1
• 100-9999 mL in increments of 1
Hospira MedNet Meds Software User Guide 213Note: For a list of Hospira MedNet compatible devices approved by country, refer to the Hospira MedNet Device Compatibility Matrix
available through your Hospira Support Center.

Chapter 12: SapphirePlus Medication Entries The SapphirePlus Medication Rule Set
Dosing Unit The dosing unit for the medication.
For complete dosing units, please consult your infuser’s System Operating Manual
Dose Rate Limits Lower hard limit, lower soft limit, upper soft limit, upper hard limit.
Allows you to set the upper and/or lower limits for dose rate, VTBI, bolus amount, bolus time, and bolus dose rate.
For complete dose rate limits, please consult your infuser’s System Operating Manual
Therapies Therapies allowed for the drug entry. Choosing one of these determines where the drug is listed on the infuser.
• Basic (Continuous)
• Piggyback (Secondary)
• Multistep
Enable Bolus Indicates this medication will be available for a bolus therapy on the infuser and may be administered as a bolus that is independent of the limits governing a basic infusion.
For SapphirePlus 13.x Checked or Unchecked
For SapphirePlus 14.x Disabled, Simple, or Advanced
Bolus Amount Limits1 Allows you to define the total amount of medication that can be administered in a bolus.
For mL:
• 0.1-99.9 in increments of 0.1
• 100-9999 in increments of 1
For nanog, mcg, mg, gram, milliUnits- and units-based, Million Units, mEq, mmol:
• 0.001-99.999 in increments of 0.001
• 100-99999999 in increments of 0.1
Maximum Bolus Amount and Units1
Enabled when the selected Bolus Amount Limits Unit is weight-based.
If the Bolus Amount Limits Unit is not mL/kg, the allowable values are the same as those in the selected Bolus Amount Limits Unit family (mmol, mEq, Units, or grams), and exclude weight-based.
If the Bolus Amount Limits Unit is mL/kg, the Maximum Bolus Amount Units are mL.
See Bolus Amount Limits.
Bolus Time1 Allows you to define the time period over which a bolus can be administered, in hh:mm format.
Entered Time:
• 00:01-99:59 in increments of 00:01
1 Visible only when Bolus is enabled.
Field Description Allowable Range
214 Hospira MedNet Meds Software User GuideNote: For a list of Hospira MedNet compatible devices approved by country, refer to the Hospira MedNet Device Compatibility Matrix
available through your Hospira Support Center.
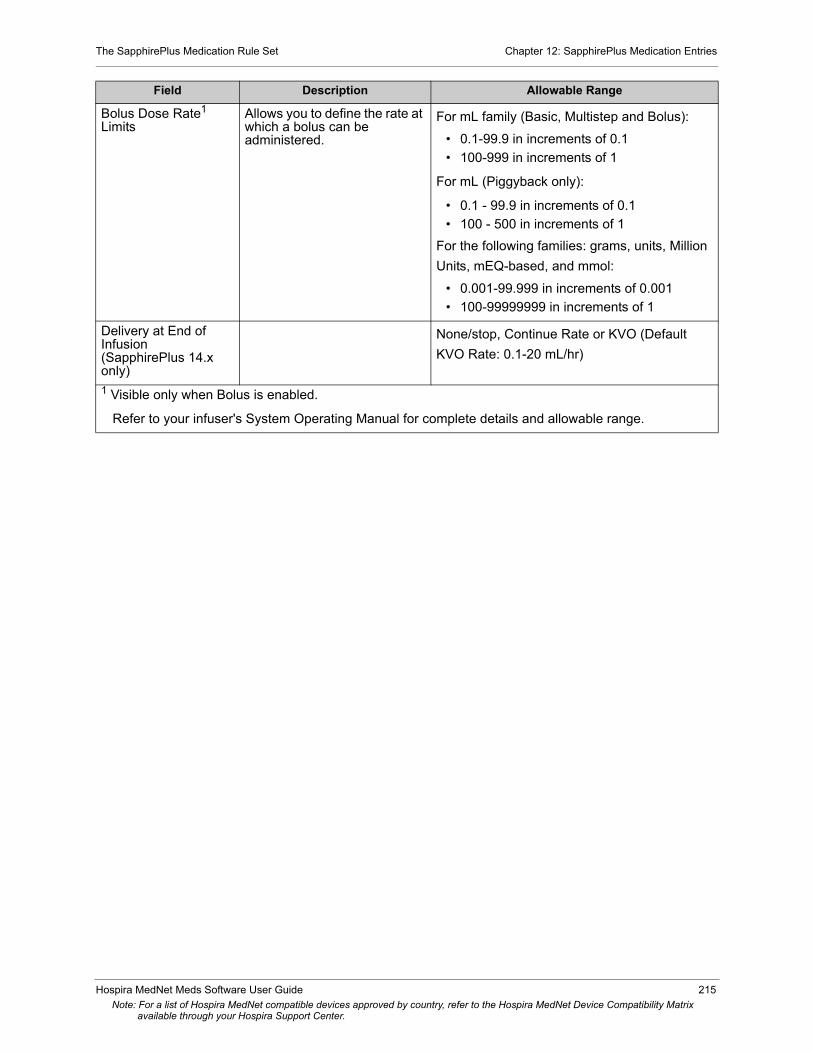
The SapphirePlus Medication Rule Set Chapter 12: SapphirePlus Medication Entries
Bolus Dose Rate1 Limits
Allows you to define the rate at which a bolus can be administered.
For mL family (Basic, Multistep and Bolus):
• 0.1-99.9 in increments of 0.1
• 100-999 in increments of 1
For mL (Piggyback only):
• 0.1 - 99.9 in increments of 0.1
• 100 - 500 in increments of 1
For the following families: grams, units, Million
Units, mEQ-based, and mmol:
• 0.001-99.999 in increments of 0.001
• 100-99999999 in increments of 1
Delivery at End of Infusion (SapphirePlus 14.x only)
None/stop, Continue Rate or KVO (Default
KVO Rate: 0.1-20 mL/hr)
1 Visible only when Bolus is enabled.
Refer to your infuser's System Operating Manual for complete details and allowable range.
Field Description Allowable Range
Hospira MedNet Meds Software User Guide 215Note: For a list of Hospira MedNet compatible devices approved by country, refer to the Hospira MedNet Device Compatibility Matrix
available through your Hospira Support Center.

Chapter 12: SapphirePlus Medication Entries Step-by-step Procedures
Step-by-step ProceduresThe following section provides step-by-step procedures that enable you to create and manage medication entries. In this section you will learn how to do the following:
• Add a medication entry in a CCA• Edit a medication entry in a CCA• Create a medication entry in the Master Drug Formulary• Edit a medication entry in the Master Drug Formulary• View a medication entry in the Master Drug Formulary• Delete a medication entry from the Master Drug Formulary• Copy a medication entry from the Master Drug Formulary to a Target CCA
To add a medication entry in a CCA:
1. Select the desired CCA from the drop-down Target List.
2. Click Add, from the Target List.
2
1
216 Hospira MedNet Meds Software User GuideNote: For a list of Hospira MedNet compatible devices approved by country, refer to the Hospira MedNet Device Compatibility Matrix
available through your Hospira Support Center.

Step-by-step Procedures Chapter 12: SapphirePlus Medication Entries
3. Select the Generic Name for the medication entry from the medication list.
4. Click Select Medication.
Note: Selecting a Generic Name from the medication list automatically populates the Displayed Name, External ID, Therapeutic Class, and the Class ID fields.
Hospira MedNet Meds Software User Guide 217Note: For a list of Hospira MedNet compatible devices approved by country, refer to the Hospira MedNet Device Compatibility Matrix
available through your Hospira Support Center.

Chapter 12: SapphirePlus Medication Entries Step-by-step Procedures
5. The Displayed Name can be edited once populated. You can either accept or edit the Displayed Name before continuing. For SapphirePlus 14.x, the maximum number of characters in the Displayed Name is 40 when using the two available fields.
For SapphirePlus 13.x, the maximum number of characters in the Displayed Name is 15. If the Displayed Name exceeds the character limit, the name will be automatically truncated.
6. Configure the desired concentration values by either:
a. Checking No Concentration, or
b. Checking Diluent Only, or
c. Entering/selecting values for Medication Amount, Medication Unit, and Diluent Amount.
7. Set the Dose Rate Limits by selecting the Dosing Unit from the drop-down list; then enter the desired values for Lower Hard Limit, Lower Soft Limit, Upper Hard Limit, and Upper Soft Limit.
Note: Dose Rate Limits are optional but Dosing Unit must be selected.
8. Select the Bolus option(s) if you want to set bolus dose limits for this medication (Optional). If you do not choose to set Enable Bolus, proceed to the next step.
5
6
218 Hospira MedNet Meds Software User GuideNote: For a list of Hospira MedNet compatible devices approved by country, refer to the Hospira MedNet Device Compatibility Matrix
available through your Hospira Support Center.
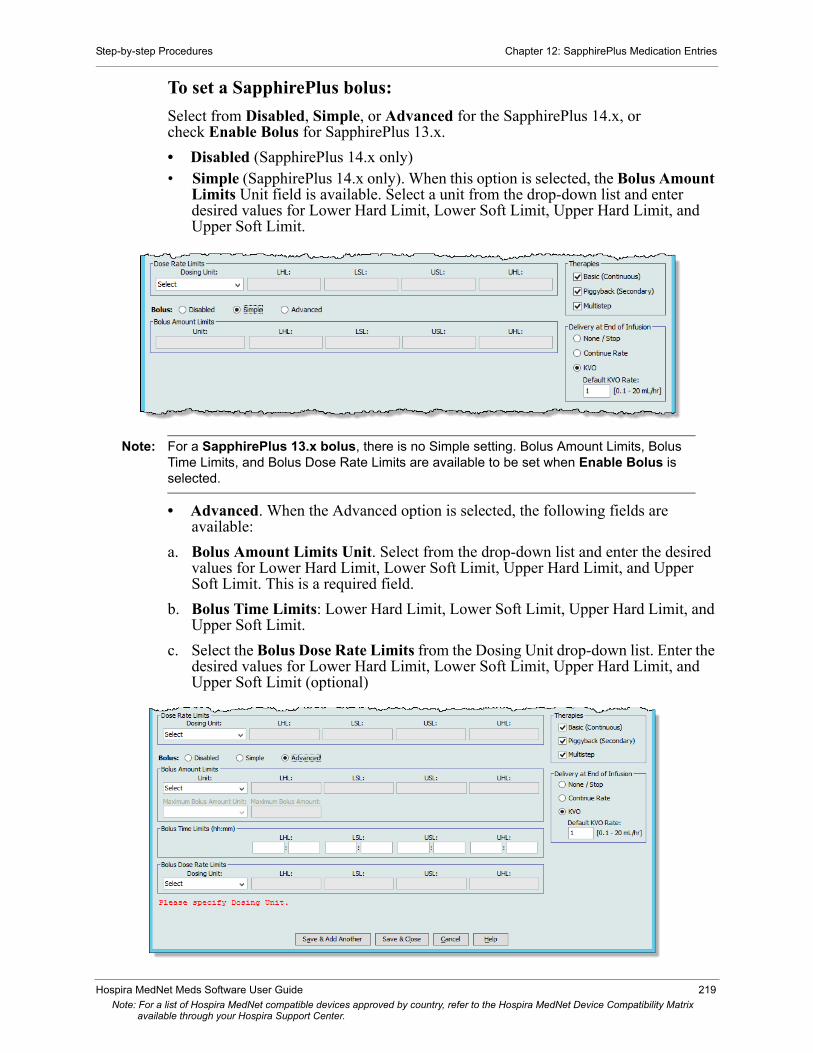
Step-by-step Procedures Chapter 12: SapphirePlus Medication Entries
To set a SapphirePlus bolus:
Select from Disabled, Simple, or Advanced for the SapphirePlus 14.x, orcheck Enable Bolus for SapphirePlus 13.x.
• Disabled (SapphirePlus 14.x only)• Simple (SapphirePlus 14.x only). When this option is selected, the Bolus Amount
Limits Unit field is available. Select a unit from the drop-down list and enter desired values for Lower Hard Limit, Lower Soft Limit, Upper Hard Limit, and Upper Soft Limit.
Note: For a SapphirePlus 13.x bolus, there is no Simple setting. Bolus Amount Limits, Bolus Time Limits, and Bolus Dose Rate Limits are available to be set when Enable Bolus is selected.
• Advanced. When the Advanced option is selected, the following fields are available:
a. Bolus Amount Limits Unit. Select from the drop-down list and enter the desired values for Lower Hard Limit, Lower Soft Limit, Upper Hard Limit, and Upper Soft Limit. This is a required field.
b. Bolus Time Limits: Lower Hard Limit, Lower Soft Limit, Upper Hard Limit, and Upper Soft Limit.
c. Select the Bolus Dose Rate Limits from the Dosing Unit drop-down list. Enter the desired values for Lower Hard Limit, Lower Soft Limit, Upper Hard Limit, and Upper Soft Limit (optional)
Hospira MedNet Meds Software User Guide 219Note: For a list of Hospira MedNet compatible devices approved by country, refer to the Hospira MedNet Device Compatibility Matrix
available through your Hospira Support Center.

Chapter 12: SapphirePlus Medication Entries Step-by-step Procedures
220 Hospira MedNet Meds Software User GuideNote: For a list of Hospira MedNet compatible devices approved by country, refer to the Hospira MedNet Device Compatibility Matrix
available through your Hospira Support Center.
9. For Therapies, check or uncheck Basic (Continuous), Piggyback (Secondary), and Multistep, as needed. At lease one of the therapies must be checked to enable the medication to be selected from the Program screen on the infuser.
10. Delivery at End of Infusion (for SapphirePlus 14.x only) allows you to select from None/Stop, Continue Rate or KVO (Default KVO rate is 0.1-20 mL/hr).
11. Click Save & Add Another or Save & Close to add the medication entry to the CCA.

Step-by-step Procedures Chapter 12: SapphirePlus Medication Entries
To edit a medication entry in a CCA:
1. Select the CCA containing the medication entry you want to edit from the Target List drop-down.
2. From the Target List, select the medication entry you want to edit.
3. Click Edit.
Helpful Hint: You can also double-click a medication entry to display the Rule Set dialog box.
4. Make changes as desired.
5. Click Save & Close to save your changes.
Note: Medication entries in the Master Drug Formulary will be updated with the same change.
If you edit a medication entry in one CCA and then edit another CCA with different rule sets, there will be two medication entries in the Master Drug Formulary that will show the same medication but each will have its own rule set.
Hospira MedNet Meds Software User Guide 221Note: For a list of Hospira MedNet compatible devices approved by country, refer to the Hospira MedNet Device Compatibility Matrix
available through your Hospira Support Center.

Chapter 12: SapphirePlus Medication Entries Step-by-step Procedures
To view a medication entry in a CCA:
1. Select the CCA containing the medication entry you want to view from the Target List drop-down list.
2. Select a medication.
3. Click View.
4. Click Close to exit the screen.
222 Hospira MedNet Meds Software User GuideNote: For a list of Hospira MedNet compatible devices approved by country, refer to the Hospira MedNet Device Compatibility Matrix
available through your Hospira Support Center.

Step-by-step Procedures Chapter 12: SapphirePlus Medication Entries
To remove a medication entry from a CCA:
1. Select the CCA containing the medication entry you want to remove from the Target List drop-down.
2. Select a medication.
3. Click Remove from CCA.
4. From the Confirm Remove from CCA pop-up, click Remove.
Note: The medication entry is not removed from the Master Drug Formulary.
Hospira MedNet Meds Software User Guide 223Note: For a list of Hospira MedNet compatible devices approved by country, refer to the Hospira MedNet Device Compatibility Matrix
available through your Hospira Support Center.
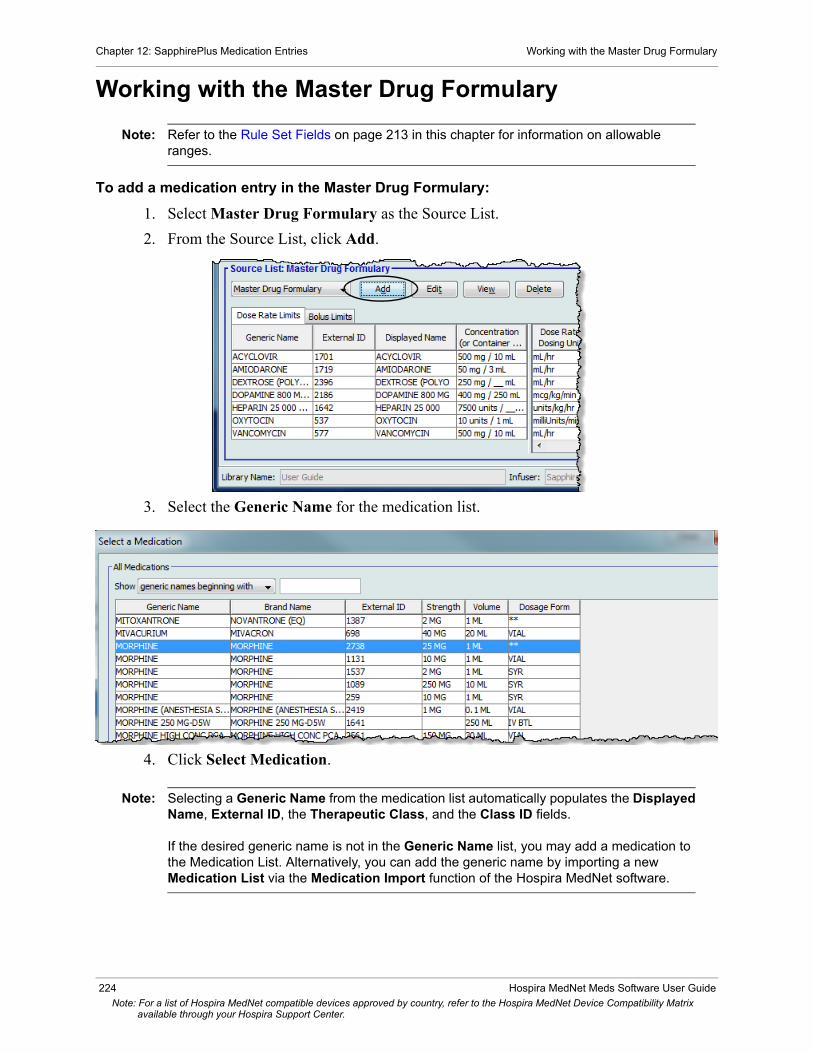
Chapter 12: SapphirePlus Medication Entries Working with the Master Drug Formulary
Working with the Master Drug Formulary
Note: Refer to the Rule Set Fields on page 213 in this chapter for information on allowable ranges.
To add a medication entry in the Master Drug Formulary:
1. Select Master Drug Formulary as the Source List.
2. From the Source List, click Add.
3. Select the Generic Name for the medication list.
4. Click Select Medication.
Note: Selecting a Generic Name from the medication list automatically populates the Displayed Name, External ID, the Therapeutic Class, and the Class ID fields.
If the desired generic name is not in the Generic Name list, you may add a medication to the Medication List. Alternatively, you can add the generic name by importing a new Medication List via the Medication Import function of the Hospira MedNet software.
224 Hospira MedNet Meds Software User GuideNote: For a list of Hospira MedNet compatible devices approved by country, refer to the Hospira MedNet Device Compatibility Matrix
available through your Hospira Support Center.

Working with the Master Drug Formulary Chapter 12: SapphirePlus Medication Entries
Note: The Displayed Name can be edited once populated. The maximum number of characters in the Displayed Name is 40 for SapphirePlus 14.x when using the two available fields.
For SapphirePlus 13 the maximum number of characters is 15. If the Displayed Name exceeds the character limit, the name will be automatically truncated.
You can either accept or edit the Displayed Name before continuing.
5. Configure the desired concentration values by either:
a. Checking No Concentration, or
b. Checking Diluent Only, or
c. Entering/selecting values for Medication Amount, Medication Unit, and Diluent Amount.
6. Set the Dose Rate Limits by selecting the Dosing Unit from the drop-down list; then enter the desired values for Lower Hard Limit, Lower Soft Limit, Upper Hard Limit, and Upper Soft Limit.
Note: Dose Rate Limits are optional but Dosing Unit must be selected.
7. Select the Bolus option(s) if you want to set bolus dose limits for this medication (Optional). If you do not choose to set Enable Bolus, proceed to the next step.
Hospira MedNet Meds Software User Guide 225Note: For a list of Hospira MedNet compatible devices approved by country, refer to the Hospira MedNet Device Compatibility Matrix
available through your Hospira Support Center.
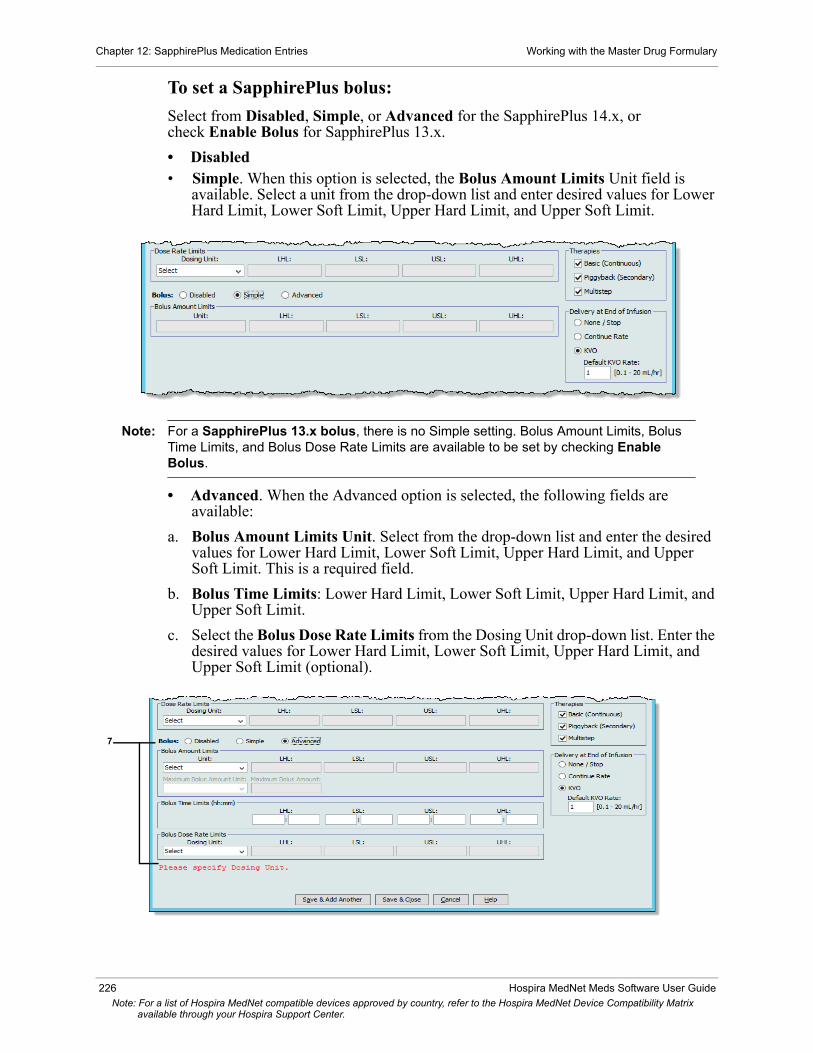
Chapter 12: SapphirePlus Medication Entries Working with the Master Drug Formulary
To set a SapphirePlus bolus:
Select from Disabled, Simple, or Advanced for the SapphirePlus 14.x, orcheck Enable Bolus for SapphirePlus 13.x.
• Disabled• Simple. When this option is selected, the Bolus Amount Limits Unit field is
available. Select a unit from the drop-down list and enter desired values for Lower Hard Limit, Lower Soft Limit, Upper Hard Limit, and Upper Soft Limit.
Note: For a SapphirePlus 13.x bolus, there is no Simple setting. Bolus Amount Limits, Bolus Time Limits, and Bolus Dose Rate Limits are available to be set by checking Enable Bolus.
• Advanced. When the Advanced option is selected, the following fields are available:
a. Bolus Amount Limits Unit. Select from the drop-down list and enter the desired values for Lower Hard Limit, Lower Soft Limit, Upper Hard Limit, and Upper Soft Limit. This is a required field.
b. Bolus Time Limits: Lower Hard Limit, Lower Soft Limit, Upper Hard Limit, and Upper Soft Limit.
c. Select the Bolus Dose Rate Limits from the Dosing Unit drop-down list. Enter the desired values for Lower Hard Limit, Lower Soft Limit, Upper Hard Limit, and Upper Soft Limit (optional).
7
226 Hospira MedNet Meds Software User GuideNote: For a list of Hospira MedNet compatible devices approved by country, refer to the Hospira MedNet Device Compatibility Matrix
available through your Hospira Support Center.

Working with the Master Drug Formulary Chapter 12: SapphirePlus Medication Entries
8. For Therapies, check or uncheck Basic (Continuous), Piggyback (Secondary), and Multistep, as desired.
9. Delivery at End of Infusion (SapphirePlus 14.x only). Select from None/Stop, Continue Rate or KVO (Default KVO rate is 0.1-20 mL/hr)
10. Click Save & Add Another or Save & Close to add the medication entry to the CCA.
Note: When a medication entry is added to the Master Drug Formulary, it is not assigned to a CCA.
8
9
Hospira MedNet Meds Software User Guide 227Note: For a list of Hospira MedNet compatible devices approved by country, refer to the Hospira MedNet Device Compatibility Matrix
available through your Hospira Support Center.
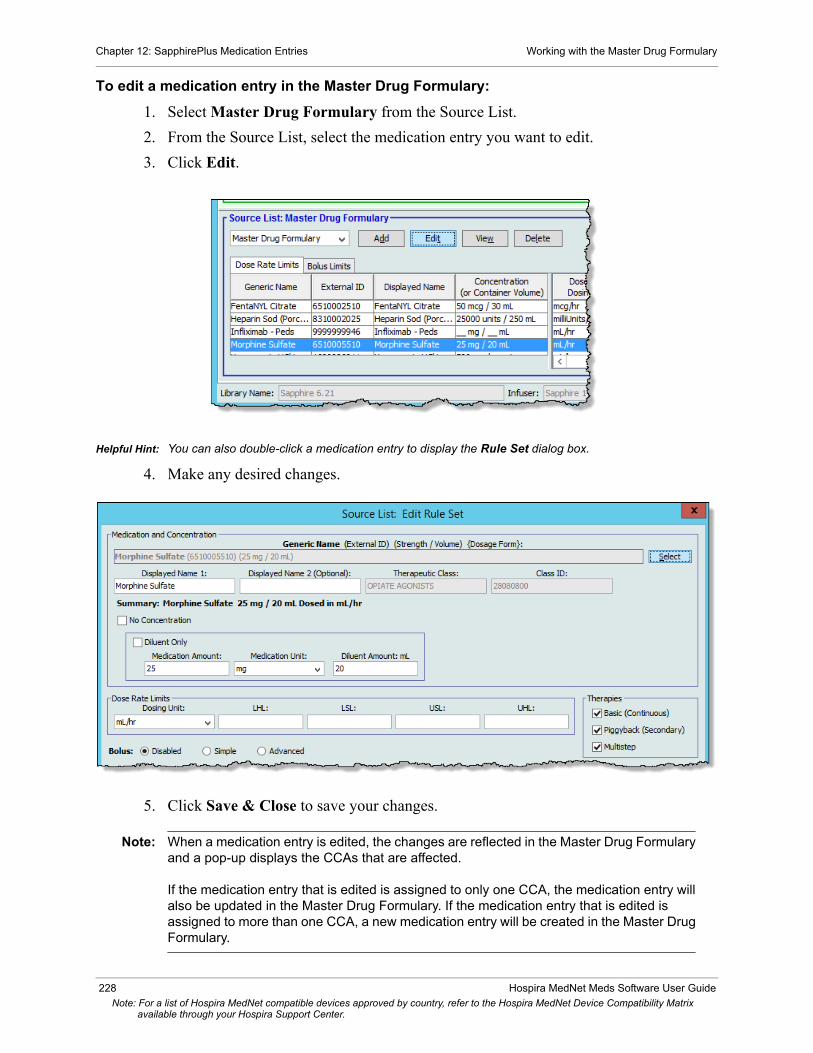
Chapter 12: SapphirePlus Medication Entries Working with the Master Drug Formulary
To edit a medication entry in the Master Drug Formulary:
1. Select Master Drug Formulary from the Source List.
2. From the Source List, select the medication entry you want to edit.
3. Click Edit.
Helpful Hint: You can also double-click a medication entry to display the Rule Set dialog box.
4. Make any desired changes.
5. Click Save & Close to save your changes.
Note: When a medication entry is edited, the changes are reflected in the Master Drug Formulary and a pop-up displays the CCAs that are affected.
If the medication entry that is edited is assigned to only one CCA, the medication entry will also be updated in the Master Drug Formulary. If the medication entry that is edited is assigned to more than one CCA, a new medication entry will be created in the Master Drug Formulary.
228 Hospira MedNet Meds Software User GuideNote: For a list of Hospira MedNet compatible devices approved by country, refer to the Hospira MedNet Device Compatibility Matrix
available through your Hospira Support Center.

Working with the Master Drug Formulary Chapter 12: SapphirePlus Medication Entries
To view a medication entry in the Master Drug Formulary:
1. Select Master Drug Formulary from the Source List.
2. From the Source List, select the medication entry you want to view.
3. Click View.
4. Click Close.
Hospira MedNet Meds Software User Guide 229Note: For a list of Hospira MedNet compatible devices approved by country, refer to the Hospira MedNet Device Compatibility Matrix
available through your Hospira Support Center.

Chapter 12: SapphirePlus Medication Entries Working with the Master Drug Formulary
To delete a medication entry from the Master Drug Formulary:
1. Select Master Drug Formulary from the Source List.
2. From the Source List, select the medication entry you want to delete.
3. Click Delete from Master Formulary.
4. Click Delete.
230 Hospira MedNet Meds Software User GuideNote: For a list of Hospira MedNet compatible devices approved by country, refer to the Hospira MedNet Device Compatibility Matrix
available through your Hospira Support Center.
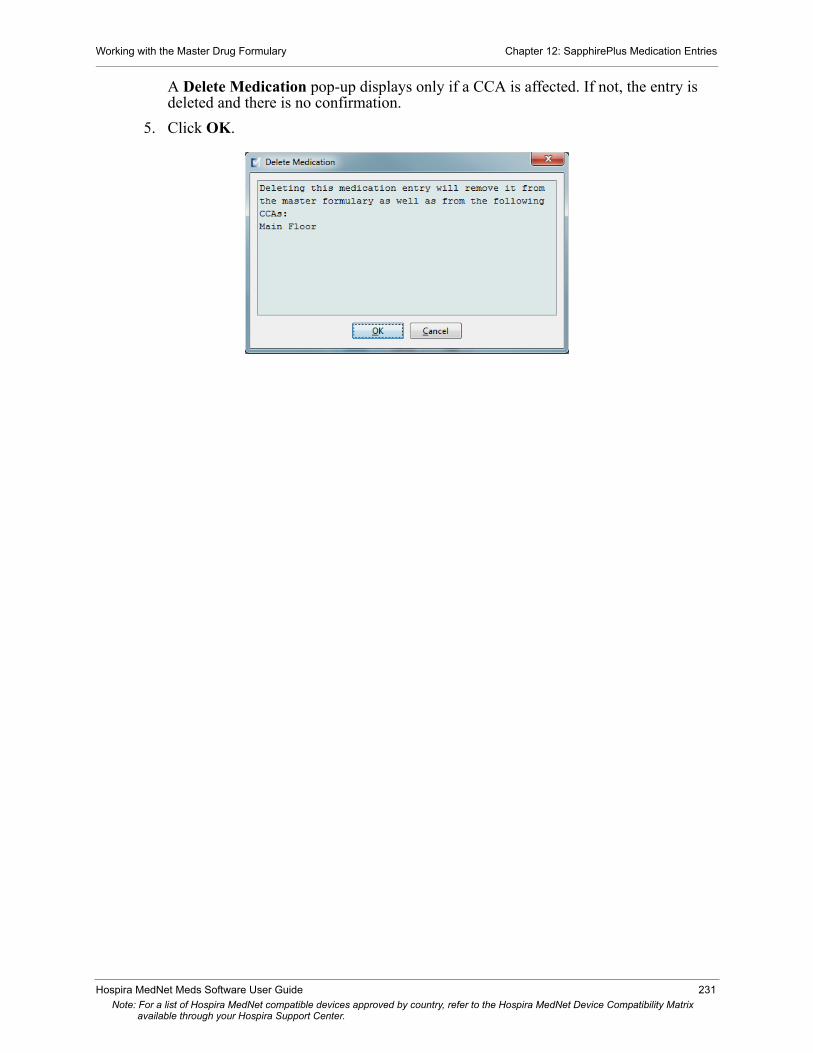
Working with the Master Drug Formulary Chapter 12: SapphirePlus Medication Entries
A Delete Medication pop-up displays only if a CCA is affected. If not, the entry is deleted and there is no confirmation.
5. Click OK.
Hospira MedNet Meds Software User Guide 231Note: For a list of Hospira MedNet compatible devices approved by country, refer to the Hospira MedNet Device Compatibility Matrix
available through your Hospira Support Center.

Chapter 12: SapphirePlus Medication Entries Working with the Master Drug Formulary
To copy to a Target CCA:
1. Select a medication entry from the Master Drug Formulary.
Note: A Target List CCA must be selected before you can copy a medication entry to a Target CCA from the Master Drug Formulary.
2. Click Copy to Target CCA.
3. Click Copy on the Confirm Copy to CCA pop-up.
232 Hospira MedNet Meds Software User GuideNote: For a list of Hospira MedNet compatible devices approved by country, refer to the Hospira MedNet Device Compatibility Matrix
available through your Hospira Support Center.

Plum 360 Master Infuser Settings Chapter 13: Master Infuser Setup
Chapter 13: Master Infuser Setup
Plum 360 Master Infuser SettingsThe Plum 360 Master Infuser Settings view allows you to select the following infuser settings:
• Continue Rate• Callback Notification• Deliver Together• Force Pump to Accept Drug Library During Power Down• Auto-program Rejection Reason Timeout (seconds)• Maximum Standby Time (hours)• Default Clinical Use
To display the Master Infuser Settings view, open a Worksheet and click the Master Infuser Setup tab. (For instructions on opening a Worksheet, see Chapter 5: The Library Directory on page 29).
Continue Rate
The Continue Rate setting allows you to select the default rate the infuser switches to after a therapy has completed. The Continue Rate options are KVO and Rate. KVO (Keep Vein Open) is a very low rate (1 mL/hr) that reduces the potential for clotting at the infusion site. Rate is the same delivery rate as the completed therapy. The Continue Rate setting can be changed when programming the infuser:
• Select KVO to make the default continue rate KVO.• Select Rate to make the default continue rate the same as the completed therapy’s rate.
Hospira MedNet Meds Software User Guide 233
Note: For a list of Hospira MedNet compatible devices approved by country, refer to the Hospira MedNet Device Compatibility Matrix available through your Hospira Support Center.

Chapter 13: Master Infuser Setup Plum 360 Master Infuser Settings
Callback Notification
The Callback Notification setting, when enabled, causes the infuser to emit an audible nurse callback alarm and display a notification between steps of a multi-step infusion, a piggyback infusion, or after a loading dose. The default Callback Notification setting is No (disabled). This setting can be changed when manually programming the infuser. For more information on nurse callback alarms, refer to the infuser’s system operating manual.
Deliver Together
The Deliver Together setting allows you to choose the default two-line delivery method. This functionality defines the default relationship between Line A and Line B on the infuser. The Deliver Together options are Piggyback and Concurrent. When Piggyback is selected, Line A delivery stops while Line B infuses. Line A delivery resumes when Line B delivery is complete. When Concurrent is selected, both lines infuse at the same time. The Deliver Together setting can be changed when programming the infuser.
• Select Piggyback to make the default deliver together setting piggyback• Select Concurrent to make the default deliver together setting concurrent
Force Pump to Accept Drug Library During Power Down
This setting determines if the infuser will automatically install a new Medication Library upon infuser turn off. If setting is Yes, the infuser will install library without prompting user during power down. The default setting is No.
Auto-program Rejection Reason Timeout (seconds)
When an auto-program is rejected by Hospira MedNet, a rejection reason appears on the infuser to notify the nurse that the auto-program has been rejected prior to sending to the infuser. The timeout setting allows you to set the length of time the message will remain on the infuser's screen. The range is 10-30 seconds and the default is 15 seconds.
Maximum Standby Time (hours)
The Maximum Standby setting allows you to select the period of time the infuser can wait before beginning a therapy. The Standby setting cannot be overridden when programming the infuser.
Note: This setting affects both delayed start and standby. If enabled, both will be available at the infuser. If disabled, neither will be available at the infuser.
The range is 24 to 72 hours in one-hour increments. The default is 72 hours.
Default Clinical Use
The Default Clinical Use setting allows you to change the “NOT SPECIFIED” value entered in a CCA to the Default Clinical Use you enter.
Note: The value entered as Default will be attributed to ALL entries marked “NOT SPECIFIED” in all CCAs and in the Master Drug Formulary.
234 Hospira MedNet Meds Software User Guide
Note: For a list of Hospira MedNet compatible devices approved by country, refer to the Hospira MedNet Device Compatibility Matrix available through your Hospira Support Center.
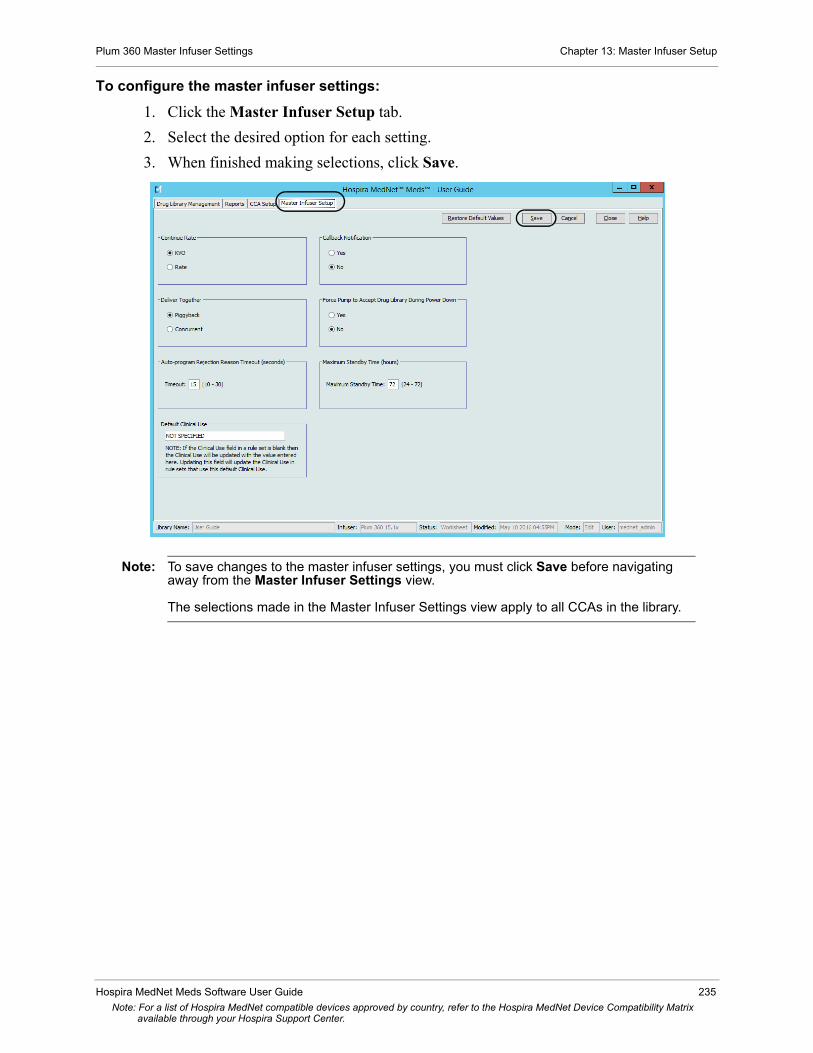
Plum 360 Master Infuser Settings Chapter 13: Master Infuser Setup
To configure the master infuser settings:
1. Click the Master Infuser Setup tab.
2. Select the desired option for each setting.
3. When finished making selections, click Save.
Note: To save changes to the master infuser settings, you must click Save before navigating away from the Master Infuser Settings view.
The selections made in the Master Infuser Settings view apply to all CCAs in the library.
Hospira MedNet Meds Software User Guide 235
Note: For a list of Hospira MedNet compatible devices approved by country, refer to the Hospira MedNet Device Compatibility Matrix available through your Hospira Support Center.

Chapter 13: Master Infuser Setup Plum A+ Master Infuser Settings
Plum A+ Master Infuser SettingsThe Plum A+ Master Infuser Settings view allows you to select the following infuser settings:
• Continue Rate• Callback Notification• Deliver Together• Enable Delay/Standby
To display the Master Infuser Settings view, open a Worksheet and click the Master Infuser Setup tab. (For instructions on opening a Worksheet, see Chapter 5: The Library Directory on page 29).
Continue Rate
The Continue Rate setting allows you to select the default rate the infuser switches to after a therapy has completed. The Continue Rate options are KVO and Rate. KVO (Keep Vein Open) is a very low rate (1 mL/hr) that reduces the potential for clotting at the infusion site. Rate is the same delivery rate as the completed therapy. The Continue Rate setting can be changed when programming the infuser:
• Select KVO to make the default continue rate KVO.• Select Rate to make the default continue rate the same as the completed therapy’s rate.
236 Hospira MedNet Meds Software User Guide
Note: For a list of Hospira MedNet compatible devices approved by country, refer to the Hospira MedNet Device Compatibility Matrix available through your Hospira Support Center.

Plum A+ Master Infuser Settings Chapter 13: Master Infuser Setup
Callback Notification
The Callback Notification setting, when enabled, causes the infuser to emit an audible nurse callback alarm and display a notification between steps of a multi-step infusion, a piggyback infusion, or after a loading dose. The default Callback Notification setting is No (disabled). This setting can be changed when manually programming the infuser. For more information on nurse callback alarms, refer to the Hospira Plum A+/A+ 3 System Operating Manual.
Deliver Together
The Deliver Together setting allows you to choose the default two-line delivery method. This functionality defines the default relationship between Line A and Line B on the infuser. The Deliver Together options are Piggyback and Concurrent. When Piggyback is selected, Line A delivery stops while Line B infuses. Line A delivery resumes when Line B delivery is complete. When Concurrent is selected, both lines infuse at the same time. The Deliver Together setting can be changed when programming the infuser.
• Select Piggyback to make the default deliver together setting piggyback• Select Concurrent to make the default deliver together setting concurrent
Enable Delay/Standby
The Enable Delay/Standby setting allows you to select the standby setting, Yes (enabled) or No (disabled). When enabled, the infuser can be programmed to wait for a period of time before beginning a therapy. When disabled, the option to program a waiting period before a therapy begins is not available. The Standby setting cannot be overridden when programming the infuser.
Note: This setting affects both delayed start and standby. If enabled, both will be available at the infuser. If disabled, neither will be available at the infuser.
• Select Yes to enable Delay/Standby• Select No to disable Delay/Standby
Hospira MedNet Meds Software User Guide 237
Note: For a list of Hospira MedNet compatible devices approved by country, refer to the Hospira MedNet Device Compatibility Matrix available through your Hospira Support Center.

Chapter 13: Master Infuser Setup Plum A+ Master Infuser Settings
To configure the master infuser settings:
1. Click the Master Infuser Setup tab.
2. Select the desired option for each setting.
3. When finished making selections, click Save.
Note: To save changes to the master infuser settings, you must click Save before navigating away from the Master Infuser Settings view.
The selections made in the Master Infuser Settings view apply to all CCAs in the library.
238 Hospira MedNet Meds Software User Guide
Note: For a list of Hospira MedNet compatible devices approved by country, refer to the Hospira MedNet Device Compatibility Matrix available through your Hospira Support Center.
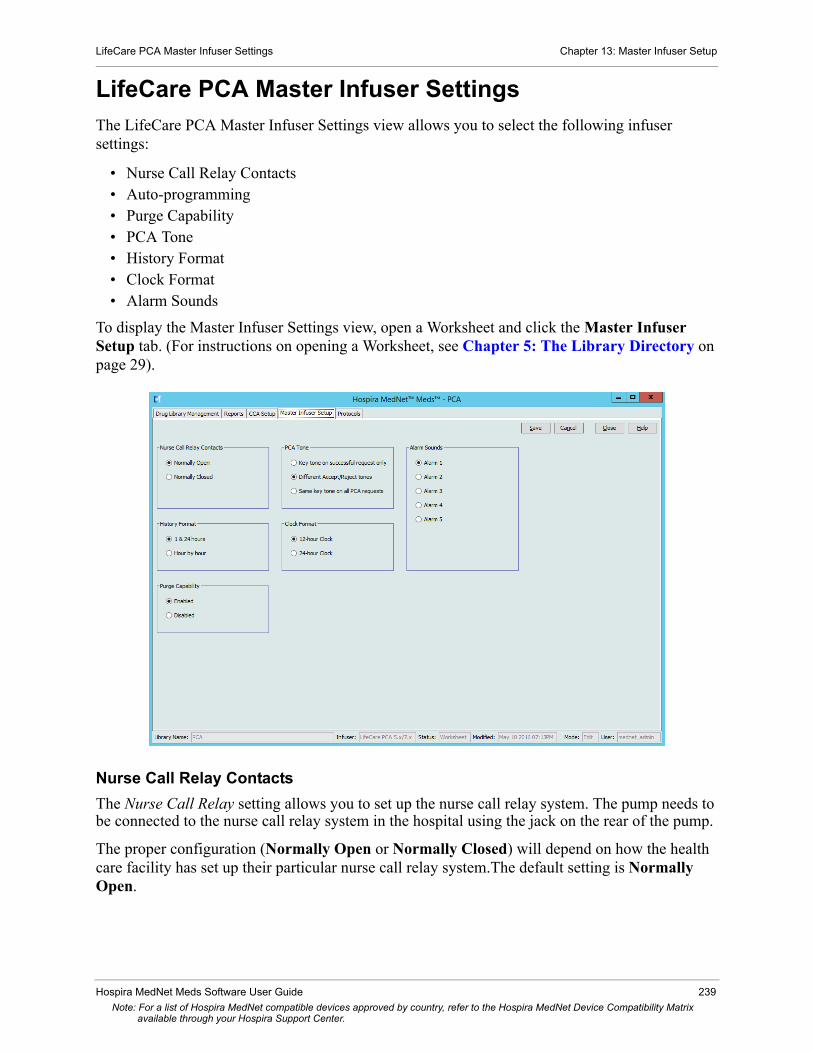
LifeCare PCA Master Infuser Settings Chapter 13: Master Infuser Setup
LifeCare PCA Master Infuser SettingsThe LifeCare PCA Master Infuser Settings view allows you to select the following infuser settings:
• Nurse Call Relay Contacts• Auto-programming • Purge Capability • PCA Tone• History Format• Clock Format• Alarm Sounds
To display the Master Infuser Settings view, open a Worksheet and click the Master Infuser Setup tab. (For instructions on opening a Worksheet, see Chapter 5: The Library Directory on page 29).
Nurse Call Relay Contacts
The Nurse Call Relay setting allows you to set up the nurse call relay system. The pump needs to be connected to the nurse call relay system in the hospital using the jack on the rear of the pump.
The proper configuration (Normally Open or Normally Closed) will depend on how the health care facility has set up their particular nurse call relay system.The default setting is Normally Open.
Hospira MedNet Meds Software User Guide 239
Note: For a list of Hospira MedNet compatible devices approved by country, refer to the Hospira MedNet Device Compatibility Matrix available through your Hospira Support Center.

Chapter 13: Master Infuser Setup LifeCare PCA Master Infuser Settings
History Format
The History Format setting allows you to select the format of the history (infusions, PCA doses, and event log) when viewed on the pump screen.
• 1 & 24 hours– shows infusion summary for the last one and 24 hours• Hour by hour – shows infusion summary by hour
The default is 1 & 24 hours.
Purge Capability
The Purge Capability setting allows you to enable the screen prompts on the pump to ask if the clinician would like to purge the set before programming the pump. The default is Enabled.
PCA Tone
The PCA Tone setting allows you to determine what tones are emitted from the pump when the pendant is pressed by the patient. A successful request means a PCA dose was delivered to the patient, while a Reject means a PCA dose was not delivered (because it was during the lockout period). The default is Different Accept/Reject tones.
• Key tone on successful request only – An audible beep is heard when a PCA dose is successfully administered.
• Different Accept/Reject tones – A different audible beep is heard when a PCA dose is accepted or rejected. This is the default setting.
• Same key tone on all PCA requests – The same audible beep is heard regardless of whether a PCA dose was successful or rejected.
Clock Format
The Clock Format setting allows you to set the display of the clock to either a 12-hour or a 24-hour format. The default is a 24-hour Clock format.
Alarm Sounds
The Alarm Sounds setting allows you to select different rhythms or cadences for the alarms on the pump. This allows you to differentiate the pump alarm sound from other devices. There are five sounds available. The default is Alarm 1.
Note: To save changes to the master infuser settings, you must click Save before navigating away from the Master Infuser Settings view.
The selections made in the Master Infuser Settings view apply to all CCAs in the library.
240 Hospira MedNet Meds Software User Guide
Note: For a list of Hospira MedNet compatible devices approved by country, refer to the Hospira MedNet Device Compatibility Matrix available through your Hospira Support Center.
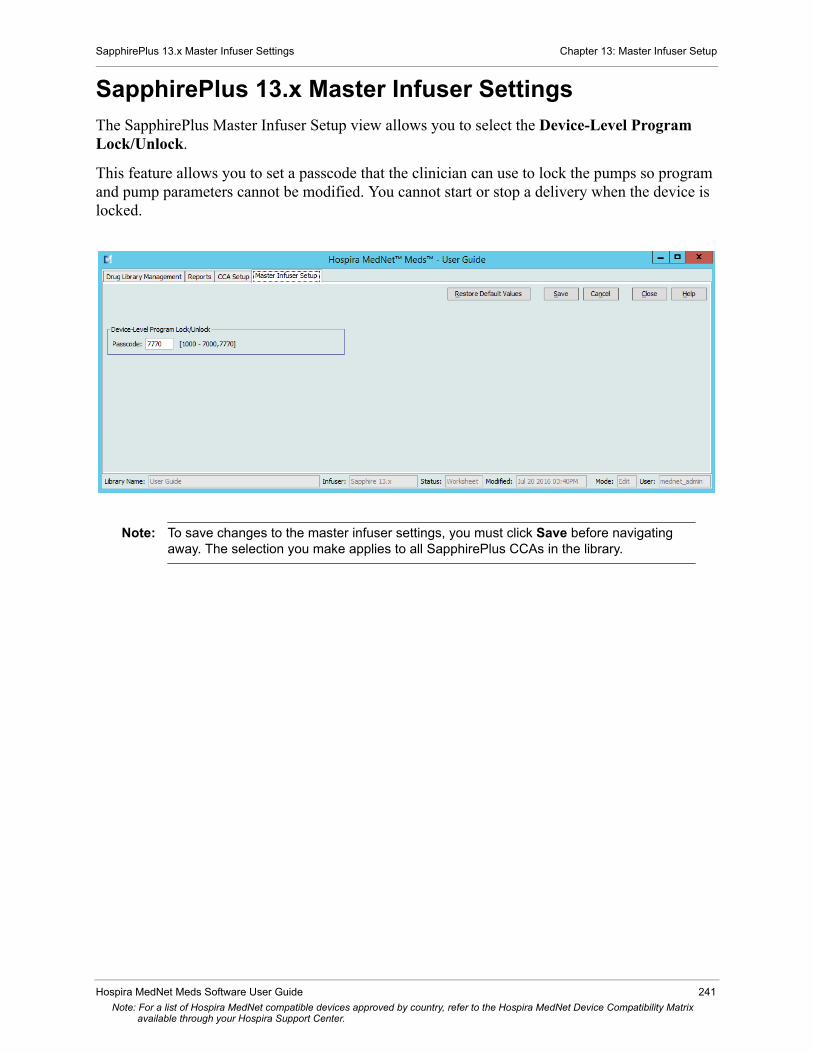
SapphirePlus 13.x Master Infuser Settings Chapter 13: Master Infuser Setup
SapphirePlus 13.x Master Infuser SettingsThe SapphirePlus Master Infuser Setup view allows you to select the Device-Level Program Lock/Unlock.
This feature allows you to set a passcode that the clinician can use to lock the pumps so program and pump parameters cannot be modified. You cannot start or stop a delivery when the device is locked.
Note: To save changes to the master infuser settings, you must click Save before navigating away. The selection you make applies to all SapphirePlus CCAs in the library.
Hospira MedNet Meds Software User Guide 241
Note: For a list of Hospira MedNet compatible devices approved by country, refer to the Hospira MedNet Device Compatibility Matrix available through your Hospira Support Center.
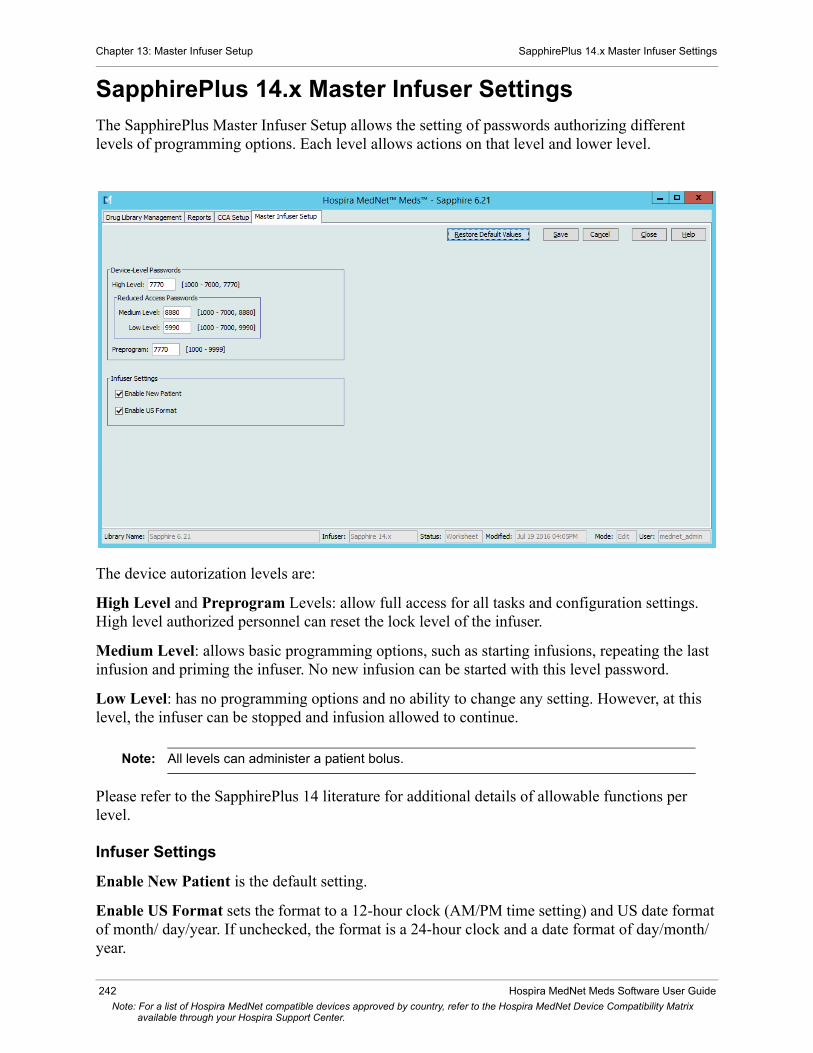
Chapter 13: Master Infuser Setup SapphirePlus 14.x Master Infuser Settings
SapphirePlus 14.x Master Infuser SettingsThe SapphirePlus Master Infuser Setup allows the setting of passwords authorizing different levels of programming options. Each level allows actions on that level and lower level.
The device autorization levels are:
High Level and Preprogram Levels: allow full access for all tasks and configuration settings. High level authorized personnel can reset the lock level of the infuser.
Medium Level: allows basic programming options, such as starting infusions, repeating the last infusion and priming the infuser. No new infusion can be started with this level password.
Low Level: has no programming options and no ability to change any setting. However, at this level, the infuser can be stopped and infusion allowed to continue.
Note: All levels can administer a patient bolus.
Please refer to the SapphirePlus 14 literature for additional details of allowable functions per level.
Infuser Settings
Enable New Patient is the default setting.
Enable US Format sets the format to a 12-hour clock (AM/PM time setting) and US date format of month/ day/year. If unchecked, the format is a 24-hour clock and a date format of day/month/year.
242 Hospira MedNet Meds Software User Guide
Note: For a list of Hospira MedNet compatible devices approved by country, refer to the Hospira MedNet Device Compatibility Matrix available through your Hospira Support Center.

Overview Appendix A: Hospira MedNet Integrator
Appendix A: Hospira MedNet Integrator
OverviewHospira MedNet Integrator provides interfaces to a hospital’s enterprise level applications and serves as the conduit for the exchange of data between infusers, the Hospira MedNet server, and a variety of hospital information systems.
When interfaced to a BCMA system, Hospira MedNet Integrator supports electronic documentation of IV administration events into the patient record. This integration also allows the BCMA system to incorporate the IV infusion rate into the five Rights verification process.
The workflow for the clinician is as follows:
• Scan the patient identification, the medication container, and the pump using the BCMA application and its bar code scanner
• Program the infuser based on the physician’s order• Confirm the programming and start the infusion
Note: Depending on the BCMA system, scanning of the patient, medication, and pump may also occur after the infusion has been started.
Once the infusion has started, Hospira MedNet sends the program values (medication/concentration, dose, rate, volume to be infused, and duration) back to the BCMA system for review by the clinician, verification, and electronic charting.
Note: The specific functionality available to you will depend on your institution’s Hospira MedNet
software license.
Setting up Hospira MedNet Integrator for BCMA integration
Define a bar code strategy for identifying each channel of the infusers that will be used; affix the bar code label to each channel
WARNING: To ensure that information is sent to the Bar Code Medication Administration (BCMA) system from the correct infuser, Hospira strongly recommends that before go-live with Hospira MedNet Integrator you verify the bar code label affixed to each infuser corresponds to the correct channel.
Important: Please compare the infuser data on the infuser with the data received from the BCMA. In the event of a discrepancy, please chart the infuser data manually.
Hospira MedNet Meds Software User Guide 243Note: For a list of Hospira MedNet compatible devices approved by country, refer to the Hospira MedNet Device Compatibility Matrix
available through your Hospira Support Center.

Appendix A: Hospira MedNet Integrator Overview
Notes:
244 Hospira MedNet Meds Software User Guide
Note: For a list of Hospira MedNet compatible devices approved by country, refer to the Hospira MedNet Device Compatibility Matrix available through your Hospira Support Center.
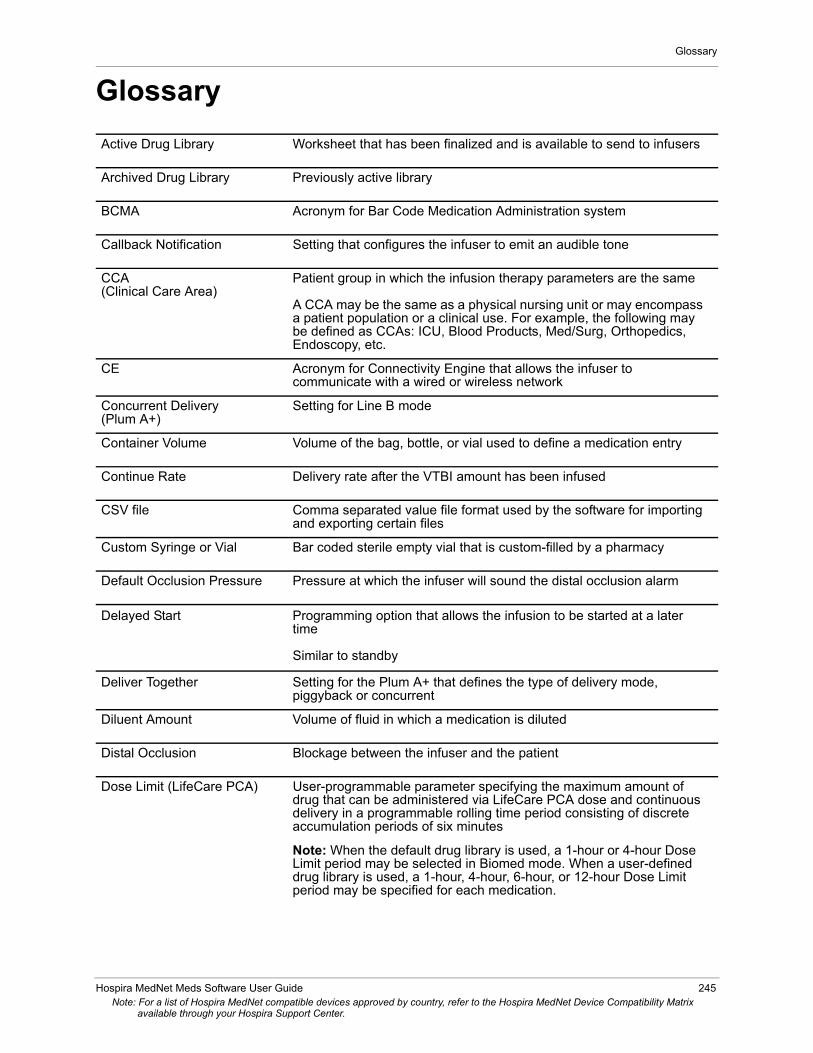
Glossary
Glossary
Active Drug Library Worksheet that has been finalized and is available to send to infusers
Archived Drug Library Previously active library
BCMA Acronym for Bar Code Medication Administration system
Callback Notification Setting that configures the infuser to emit an audible tone
CCA(Clinical Care Area)
Patient group in which the infusion therapy parameters are the same
A CCA may be the same as a physical nursing unit or may encompass a patient population or a clinical use. For example, the following may be defined as CCAs: ICU, Blood Products, Med/Surg, Orthopedics, Endoscopy, etc.
CE Acronym for Connectivity Engine that allows the infuser to communicate with a wired or wireless network
Concurrent Delivery(Plum A+)
Setting for Line B mode
Container Volume Volume of the bag, bottle, or vial used to define a medication entry
Continue Rate Delivery rate after the VTBI amount has been infused
CSV file Comma separated value file format used by the software for importing and exporting certain files
Custom Syringe or Vial Bar coded sterile empty vial that is custom-filled by a pharmacy
Default Occlusion Pressure Pressure at which the infuser will sound the distal occlusion alarm
Delayed Start Programming option that allows the infusion to be started at a later time
Similar to standby
Deliver Together Setting for the Plum A+ that defines the type of delivery mode, piggyback or concurrent
Diluent Amount Volume of fluid in which a medication is diluted
Distal Occlusion Blockage between the infuser and the patient
Dose Limit (LifeCare PCA) User-programmable parameter specifying the maximum amount of drug that can be administered via LifeCare PCA dose and continuous delivery in a programmable rolling time period consisting of discrete accumulation periods of six minutes
Note: When the default drug library is used, a 1-hour or 4-hour Dose Limit period may be selected in Biomed mode. When a user-defined drug library is used, a 1-hour, 4-hour, 6-hour, or 12-hour Dose Limit period may be specified for each medication.
Hospira MedNet Meds Software User Guide 245Note: For a list of Hospira MedNet compatible devices approved by country, refer to the Hospira MedNet Device Compatibility Matrix
available through your Hospira Support Center.

Glossary
Drug Library Collection of medication entries and infuser settings that, when used with compatible infusers, may reduce the frequency of human errors by restricting the ways in which medications can be administered
Drug Library Worksheet Drug library that can be edited but cannot be sent to infusers until it is finalized
Edit The user responded to an alert by changing the value entered
Enable Delay/Standby Infuser setting for Plum A+ that allows the infuser to be programmed for a waiting period before a therapy begins
External ID An identifier for a Medication. Each Medication in the Medication List must have a unique External ID
Finalized Drug Library Drug library that has been approved for use on infusers and can no longer be changed
Finalization The act of approving a Worksheet and making it the Active library
Full Rule Set Type of rule set that allows medication entries to be configured with a medication name, complete or partial concentration, specific dosing unit, and corresponding dose rate limits
Hard Limit Upper and/or lower limits for the selected medication and selected CCA that cannot be overridden (Plum A+ and LifeCare PCA)
Hard limits are not required to be defined for a medication
Hard limits may vary for different CCAs
Hard Limit Alert An alert presented to the user when a hard limit is exceeded. The user's response depends on the infuser: for Plum A+ and LifeCare PCA, the user must edit the value entered so that it does not exceed the hard limit.
HIS Acronym for Hospital Information System
Infusion Single medication and concentration infused on a patient
An infusion may be associated with one or more programs
KVO (keep vein open) Very low delivery rate that may reduce the potential for clot formation at the catheter tip
Label Only Rule Set(Plum A+)
Type of rule set that allows medication entries to be configured with a medication name, complete or partial concentration, and specific dosing unit
Dose rate limits cannot be assigned to a “Label Only” medication entry
The “No Rule Set” icon is displayed on the infuser when this type of rule set is used
LDAP Acronym for Lightweight Directory Access Protocol, a network protocol that enables applications to use a company’s existing network directory listing for user names and passwords, thus allowing the company’s network administrators to manage login access to multiple applications from one central source. For example, users can use their company’s network login information with the same credentials (user name and password) to access Hospira MedNet Software
246 Hospira MedNet Meds Software User GuideNote: For a list of Hospira MedNet compatible devices approved by country, refer to the Hospira MedNet Device Compatibility Matrix
available through your Hospira Support Center.
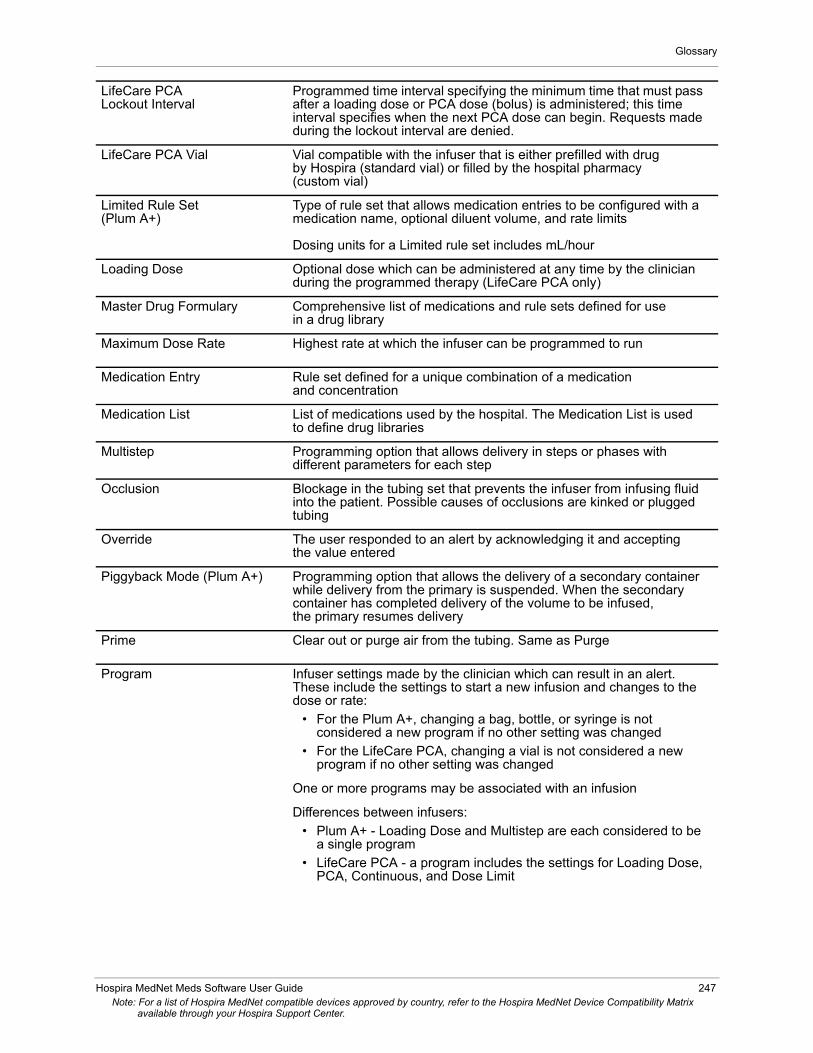
Glossary
LifeCare PCALockout Interval
Programmed time interval specifying the minimum time that must pass after a loading dose or PCA dose (bolus) is administered; this time interval specifies when the next PCA dose can begin. Requests made during the lockout interval are denied.
LifeCare PCA Vial Vial compatible with the infuser that is either prefilled with drug by Hospira (standard vial) or filled by the hospital pharmacy (custom vial)
Limited Rule Set(Plum A+)
Type of rule set that allows medication entries to be configured with a medication name, optional diluent volume, and rate limits
Dosing units for a Limited rule set includes mL/hour
Loading Dose Optional dose which can be administered at any time by the clinician during the programmed therapy (LifeCare PCA only)
Master Drug Formulary Comprehensive list of medications and rule sets defined for use in a drug library
Maximum Dose Rate Highest rate at which the infuser can be programmed to run
Medication Entry Rule set defined for a unique combination of a medication and concentration
Medication List List of medications used by the hospital. The Medication List is used to define drug libraries
Multistep Programming option that allows delivery in steps or phases with different parameters for each step
Occlusion Blockage in the tubing set that prevents the infuser from infusing fluid into the patient. Possible causes of occlusions are kinked or plugged tubing
Override The user responded to an alert by acknowledging it and accepting the value entered
Piggyback Mode (Plum A+) Programming option that allows the delivery of a secondary container while delivery from the primary is suspended. When the secondary container has completed delivery of the volume to be infused, the primary resumes delivery
Prime Clear out or purge air from the tubing. Same as Purge
Program Infuser settings made by the clinician which can result in an alert. These include the settings to start a new infusion and changes to the dose or rate:
• For the Plum A+, changing a bag, bottle, or syringe is not considered a new program if no other setting was changed
• For the LifeCare PCA, changing a vial is not considered a new program if no other setting was changed
One or more programs may be associated with an infusion
Differences between infusers:
• Plum A+ - Loading Dose and Multistep are each considered to be a single program
• LifeCare PCA - a program includes the settings for Loading Dose, PCA, Continuous, and Dose Limit
Hospira MedNet Meds Software User Guide 247Note: For a list of Hospira MedNet compatible devices approved by country, refer to the Hospira MedNet Device Compatibility Matrix
available through your Hospira Support Center.

Glossary
Note: SapphirePlus™ is a trademark of Q Core Medical Ltd.
Protocols (LifeCare PCA) Frequently used therapy settings which can be recalled making it unnecessary for the clinician to program the same settings each time. Protocols are determined by the health care facility
Proximal Occlusion Blockage between the infuser and the fluid container
Purge Clear out or purge air from the tubing. Same as Prime
Report Options Configurations entered by the user to define the desired report output. Examples include Time period, CCA, Medication, etc.
Rule Set Constraints that are assigned to medication entries. The type of rule for the medication in the drug library
• For LifeCare PCA, Rule Sets include PCA, Continuous, Loading, or Dose Limit
Rule sets can include both soft and hard limits. The Plum A+ has a single rule set
Service Line A designation used in reports to aggregate data across multiple CCAs or facilities. Each CCA is mapped to a Service Line. For example, a service line called Med/Surg may be used to examine data from the CCAs Four West, Five North, and Five East in a single hospital
Soft Limit Upper and/or lower dose limits for the selected medication and selected CCA that can be overridden. Soft limits for a particular medication may vary across CCAs
Soft Limit Alert An alert presented to the user when a soft limit is exceeded. The user may choose to edit or override the value entered in response to the alert
Standby Programming option that allows the infusion to be started at a later time. Similar to delayed start
Standard Syringe(LifeCare PCA)
Prefilled, bar-coded vial. Standard syringes are also known as prefilled medication vials
Variance Variance is a calculated value intended to represent how far away the user's initial programmed value was compared to the defined limit.
Variance is defined as (Initial Dose - Limit Violated) / Limit Violated, expressed as a percentage, shown as a negative number for Lower Limit violations and a positive number for Upper Limit violations.
VTBI Acronym for Volume To Be Infused
Worksheet Draft drug library that has not yet been finalized
248 Hospira MedNet Meds Software User GuideNote: For a list of Hospira MedNet compatible devices approved by country, refer to the Hospira MedNet Device Compatibility Matrix
available through your Hospira Support Center.

Glossary
Notes:
Hospira MedNet Meds Software User Guide 249Note: For a list of Hospira MedNet compatible devices approved by country, refer to the Hospira MedNet Device Compatibility Matrix
available through your Hospira Support Center.

Glossary
Notes:
250 Hospira MedNet Meds Software User GuideNote: For a list of Hospira MedNet compatible devices approved by country, refer to the Hospira MedNet Device Compatibility Matrix
available through your Hospira Support Center.