Plum 360™ Infuser compatible with Hospira MedNet™ Software
244
430-97315-003 (B, 2015-05) For use with the following list numbers: System Operating Manual Hospira, Inc. 275 North Field Drive Lake Forest, IL 60045 USA 30010-04, 30011-04, 30012-04, 30010-65, 30011-65, 30012-65 TM INFUSGT TM Compatible with Software
Transcript of Plum 360™ Infuser compatible with Hospira MedNet™ Software

430-97315-003 (B, 2015-05)
For use with the following list numbers:
System Operating Manual
Hospira, Inc.275 North Field DriveLake Forest, IL 60045 USA
30010-04, 30011-04, 30012-04,30010-65, 30011-65, 30012-65
TM
INFUS
TM
Compatible with
Software
ii System Operating Manual
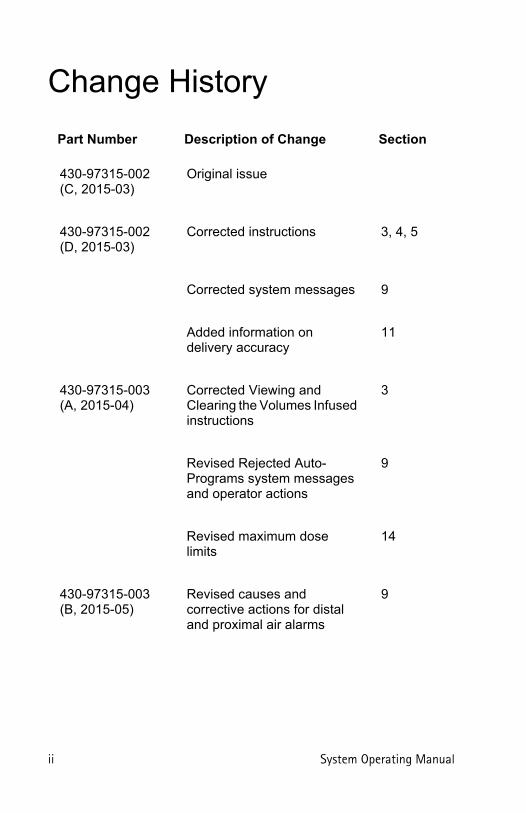
Change History
Part Number Description of Change Section
430-97315-002(C, 2015-03)
Original issue
430-97315-002(D, 2015-03)
Corrected instructions 3, 4, 5
Corrected system messages 9
Added information on delivery accuracy
11
430-97315-003(A, 2015-04)
Corrected Viewing and Clearing the Volumes Infused instructions
3
Revised Rejected Auto-Programs system messages and operator actions
9
Revised maximum dose limits
14
430-97315-003(B, 2015-05)
Revised causes and corrective actions for distal and proximal air alarms
9

Plum 360 Infuser
System Operating Manual iii
Contents
Section 1, Introduction . . . . . . . . . . . . . . . . . . . . 1-1Intended Use . . . . . . . . . . . . . . . . . . . . . . . . . . . . . . . . . . . . . . 1-2User Qualification . . . . . . . . . . . . . . . . . . . . . . . . . . . . . . . . . . 1-3Training. . . . . . . . . . . . . . . . . . . . . . . . . . . . . . . . . . . . . . . . . . . 1-3Conventions . . . . . . . . . . . . . . . . . . . . . . . . . . . . . . . . . . . . . . . 1-4Definitions . . . . . . . . . . . . . . . . . . . . . . . . . . . . . . . . . . . . . . . . 1-6Precautions. . . . . . . . . . . . . . . . . . . . . . . . . . . . . . . . . . . . . . . 1-11
Warnings, Cautions, and Guidelines . . . . . . . . . . . . . . . 1-11General Warnings and Cautions . . . . . . . . . . . . . . . . . . 1-12Piggyback, Concurrent, and Secondary Delivery
Guidelines. . . . . . . . . . . . . . . . . . . . . . . . . . . . . . . . . 1-13Guidelines When Opening the Cassette Door . . . . . . . 1-16Administration Sets and Accessories Guidelines . . . . . 1-16Precautions to Avoid a Bolus. . . . . . . . . . . . . . . . . . . . . 1-18Guidelines to Avoid Air in the Patient Line . . . . . . . . . 1-19Guidelines During Backpriming . . . . . . . . . . . . . . . . . . . 1-19Battery Guidelines . . . . . . . . . . . . . . . . . . . . . . . . . . . . . 1-20Guidelines During Cleaning . . . . . . . . . . . . . . . . . . . . . . 1-20Artifacts. . . . . . . . . . . . . . . . . . . . . . . . . . . . . . . . . . . . . . 1-21Interconnecting of Medical Equipment . . . . . . . . . . . . 1-23
Guidance on EMC Compatibility . . . . . . . . . . . . . . . . . . . . . 1-23FCC Information. . . . . . . . . . . . . . . . . . . . . . . . . . . . . . . . . . . 1-24
US FCC (Federal Communications Commission) Statement (United States Only) . . . . . . . . . . . . . . . 1-24
FCC Interference Statement (United States Only) . . . . 1-25Canadian Department of Communications Industry
Canada Notice (Canada Only). . . . . . . . . . . . . . . . . 1-25Radio Frequency Exposure Statement . . . . . . . . . . . . . 1-25FCC Rules, Part 15/Industry Canada . . . . . . . . . . . . . . . 1-26

Includes Systems Compatible with Hospira MedNet
iv System Operating Manual
Section 2, Equipment Description. . . . . . . . . . . . .2-1Keypad and Display. . . . . . . . . . . . . . . . . . . . . . . . . . . . . . . . . .2-2Operating Keys . . . . . . . . . . . . . . . . . . . . . . . . . . . . . . . . . . . . .2-3Indicators. . . . . . . . . . . . . . . . . . . . . . . . . . . . . . . . . . . . . . . . . .2-6Display Symbols . . . . . . . . . . . . . . . . . . . . . . . . . . . . . . . . . . . .2-7CE Module . . . . . . . . . . . . . . . . . . . . . . . . . . . . . . . . . . . . . . . .2-10Pole Clamp, Potential Equalization Terminal,
and Power Cord . . . . . . . . . . . . . . . . . . . . . . . . . . . . . . . .2-12Plum Administration Sets . . . . . . . . . . . . . . . . . . . . . . . . . . .2-14
The Plum Cassette . . . . . . . . . . . . . . . . . . . . . . . . . . . . . .2-15Other Administration Set Features. . . . . . . . . . . . . . . . .2-18
Section 3, Basic Operations . . . . . . . . . . . . . . . . .3-1Mounting the Infuser on an I.V. Pole . . . . . . . . . . . . . . . . . . .3-2
Mounting Multiple Infusers to an I.V. Pole . . . . . . . . . . .3-4Attaching a Nurse Call Interface Cable . . . . . . . . . . . . . . . . .3-6Opening the Cassette Door . . . . . . . . . . . . . . . . . . . . . . . . . . .3-6Opening the Cassette Door Completely . . . . . . . . . . . . . . . . .3-8Closing the Cassette Door . . . . . . . . . . . . . . . . . . . . . . . . . . .3-10Turning Power On . . . . . . . . . . . . . . . . . . . . . . . . . . . . . . . . . .3-11Turning Power Off. . . . . . . . . . . . . . . . . . . . . . . . . . . . . . . . . .3-12Viewing the Display . . . . . . . . . . . . . . . . . . . . . . . . . . . . . . . .3-12Using the Keypad and Controls . . . . . . . . . . . . . . . . . . . . . . .3-13
Using the Keypad to Enter Program Information . . . . .3-13Silencing the Keypad. . . . . . . . . . . . . . . . . . . . . . . . . . . .3-13Locking and Unlocking the Keypad . . . . . . . . . . . . . . . .3-14Using the Keypad to Search the Drug List . . . . . . . . . . .3-17
Working with Alarms . . . . . . . . . . . . . . . . . . . . . . . . . . . . . . .3-18Test the Alarm System. . . . . . . . . . . . . . . . . . . . . . . . . . .3-19Responding to an Alarm . . . . . . . . . . . . . . . . . . . . . . . . .3-19Adjusting the Audio Alarm Volume . . . . . . . . . . . . . . . .3-20Programming a Callback Alarm . . . . . . . . . . . . . . . . . . .3-21Restarting the Delivery Automatically
After a Distal Occlusion Alarm . . . . . . . . . . . . . . . .3-21Stopping and Restarting a Delivery. . . . . . . . . . . . . . . . . . . .3-22Clearing a Line . . . . . . . . . . . . . . . . . . . . . . . . . . . . . . . . . . . .3-24

Plum 360 Infuser
System Operating Manual v
Setting the Post Infusion Rate . . . . . . . . . . . . . . . . . . . . . . . 3-24Post Infusion Rate (Loading Dose Delivery
and Multistep Delivery). . . . . . . . . . . . . . . . . . . . . . 3-26Viewing and Clearing the Volumes Infused. . . . . . . . . . . . . 3-26Adjusting Display Lighting and Contrast . . . . . . . . . . . . . . . 3-28Viewing CCA and Infuser Settings . . . . . . . . . . . . . . . . . . . . 3-29
CCA/Infuser Setting Descriptions . . . . . . . . . . . . . . . . . 3-31Changing the Default Infuser Settings . . . . . . . . . . . . . 3-34
Setting the Distal Pressure Alarm Limit . . . . . . . . . . . . . . . . 3-34Changing the Default Line B Delivery Mode . . . . . . . . . . . . 3-36
Section 4, Plum Administration Sets . . . . . . . . . . 4-1Priming a Primary Administration Set . . . . . . . . . . . . . . . . . 4-2Loading a Cassette. . . . . . . . . . . . . . . . . . . . . . . . . . . . . . . . . . 4-8Preparing a Secondary Delivery
from an Administration Set . . . . . . . . . . . . . . . . . . . . . . 4-10Connecting a Secondary Line or Syringe . . . . . . . . . . . . . . . 4-13
Connecting to a Clave Port . . . . . . . . . . . . . . . . . . . . . . 4-14Connecting to a Prepierced Port . . . . . . . . . . . . . . . . . . 4-16Connecting to a Capped Port. . . . . . . . . . . . . . . . . . . . . 4-18Priming the Syringe Adapter . . . . . . . . . . . . . . . . . . . . . 4-19
Preparing a Secondary Deliveryfrom a Syringe . . . . . . . . . . . . . . . . . . . . . . . . . . . . . . . . 4-19
Backpriming . . . . . . . . . . . . . . . . . . . . . . . . . . . . . . . . . . . . . . 4-21Preparing to Backprime . . . . . . . . . . . . . . . . . . . . . . . . . 4-22Backpriming Procedure . . . . . . . . . . . . . . . . . . . . . . . . . 4-24
Discontinuing Electronic Flow Control and Setting Gravity Flow . . . . . . . . . . . . . . . . . . . . . . . . 4-26
Removing a Secondary Line or Syringe . . . . . . . . . . . . . . . . 4-28Discontinuing Fluid Administration . . . . . . . . . . . . . . . . . . . 4-29Changing Administration Sets . . . . . . . . . . . . . . . . . . . . . . . 4-30Resolving a Distal Air-in-Line Alarm . . . . . . . . . . . . . . . . . . 4-31Avoiding a Bolus While Resolving a Distal Occlusion. . . . . 4-32

Includes Systems Compatible with Hospira MedNet
vi System Operating Manual
Section 5, Programming . . . . . . . . . . . . . . . . . . . .5-1Programming Features Common to the Default Drug
Library and Custom Drug Libraries . . . . . . . . . . . . . . . . . .5-1Auto-Calculations . . . . . . . . . . . . . . . . . . . . . . . . . . . . . . .5-1Body Surface Area (BSA) Dosing Unit . . . . . . . . . . . . . . .5-1Programming Line B . . . . . . . . . . . . . . . . . . . . . . . . . . . . .5-2Clearing Line Settings . . . . . . . . . . . . . . . . . . . . . . . . . . . .5-2
Programming with a Default Drug Library . . . . . . . . . . . . . . .5-3Programming Without a Drug List . . . . . . . . . . . . . . . . . .5-3
Programming with a Drug List. . . . . . . . . . . . . . . . . . . . . . . . .5-4Programming with a Custom Drug Library . . . . . . . . . . . . . . .5-5
Hard Limits . . . . . . . . . . . . . . . . . . . . . . . . . . . . . . . . . . . . .5-6Soft Limits . . . . . . . . . . . . . . . . . . . . . . . . . . . . . . . . . . . . .5-6Programming Line B with Line A Programmed . . . . . . . .5-7Changing a CCA from the Drug List Screen. . . . . . . . . . .5-7Delaying a Line. . . . . . . . . . . . . . . . . . . . . . . . . . . . . . . . . .5-8Putting a Line in Standby – A/B Delivery Screen . . . . . .5-8Putting a Line in Standby – Confirmation Screen. . . . . .5-8Putting a Line in Standby – Piggyback Mode . . . . . . . . .5-9Canceling Standby – Piggyback Mode . . . . . . . . . . . . . . .5-9
Nurse Callback . . . . . . . . . . . . . . . . . . . . . . . . . . . . . . . . . . . . .5-9
Section 6, Auto-Programming . . . . . . . . . . . . . . .6-1Auto-Programming the Plum 360 Infuser . . . . . . . . . . . . . . .6-2
Section 7, Additional Features . . . . . . . . . . . . . . .7-1Delay a Line. . . . . . . . . . . . . . . . . . . . . . . . . . . . . . . . . . . . . . . .7-1Standby . . . . . . . . . . . . . . . . . . . . . . . . . . . . . . . . . . . . . . . . . . .7-1
Put 1 or 2 Lines in Standby from the Delivery Screen (Non-Piggyback) . . . . . . . . . . . . . . . . . . . . . . . . . . . . .7-2
Cancel Standby for 1 or 2 Lines from the Delivery Screen (Non-Piggyback). . . . . . . . . . . . . . . . . . . . . . .7-2
Put Piggyback Mode in Standby. . . . . . . . . . . . . . . . . . . .7-3Cancel Piggyback Mode Standby . . . . . . . . . . . . . . . . . . .7-3

Plum 360 Infuser
System Operating Manual vii
Examples of Automatic Calculation. . . . . . . . . . . . . . . . . . . . 7-4mL/hr - Initial Programming . . . . . . . . . . . . . . . . . . . . . . 7-4mL/hr - After VTBI Complete Alarm . . . . . . . . . . . . . . . . 7-4Non-Time-Based Dose Calculation (for example, mL) -
Initial Programming . . . . . . . . . . . . . . . . . . . . . . . . . 7-5Non-Time-Based Dose Calculation (for example, mL) -
After VTBI Complete Alarm. . . . . . . . . . . . . . . . . . . . 7-5Time-Based Dose Calculation (for example, mg/min) -
Initial Programming . . . . . . . . . . . . . . . . . . . . . . . . . 7-6Time-Based Dose Calculation (for example, mg/min) -
After VTBI Complete Alarm. . . . . . . . . . . . . . . . . . . . 7-7Recalculation Alert When Titrating a Confirmed
mL/hr or Non-Time-Based Dosing Unit . . . . . . . . . . 7-7
Section 8, Delivery Options . . . . . . . . . . . . . . . . . 8-1Programming a Loading Dose . . . . . . . . . . . . . . . . . . . . . . . . . 8-1Programming a Multistep Delivery. . . . . . . . . . . . . . . . . . . . . 8-2Adding a Step to a Multistep Delivery . . . . . . . . . . . . . . . . . . 8-4Adding VTBI to Loading Dose or Multistep Program
After VTBI Complete Alarm Activates . . . . . . . . . . . . . . . 8-5Titration . . . . . . . . . . . . . . . . . . . . . . . . . . . . . . . . . . . . . . . . . . 8-7
Loading Dose Delivery and Multistep Delivery . . . . . . . . 8-7Changing the CCA During Infusion . . . . . . . . . . . . . . . . . . . . 8-7
Section 9, Alarms and Troubleshooting . . . . . . . . 9-1Alarm Priority Levels . . . . . . . . . . . . . . . . . . . . . . . . . . . . . . . . 9-1General Alarms. . . . . . . . . . . . . . . . . . . . . . . . . . . . . . . . . . . . . 9-2
High Priority Alarms . . . . . . . . . . . . . . . . . . . . . . . . . . . . . 9-2Medium Priority Alarms . . . . . . . . . . . . . . . . . . . . . . . . . 9-5Low Priority Alarms . . . . . . . . . . . . . . . . . . . . . . . . . . . . . 9-6
Line A Alarms . . . . . . . . . . . . . . . . . . . . . . . . . . . . . . . . . . . . . . 9-7High Priority Alarms . . . . . . . . . . . . . . . . . . . . . . . . . . . . . 9-7Medium Priority Alarms . . . . . . . . . . . . . . . . . . . . . . . . . . 9-9
Line B Alarms . . . . . . . . . . . . . . . . . . . . . . . . . . . . . . . . . . . . . 9-11High Priority Alarms . . . . . . . . . . . . . . . . . . . . . . . . . . . . 9-11Medium Priority Alarms . . . . . . . . . . . . . . . . . . . . . . . . 9-14
Includes Systems Compatible with Hospira MedNet
viii System Operating Manual
Lines A and B Alarms . . . . . . . . . . . . . . . . . . . . . . . . . . . . . . .9-15Rejected Auto-Programs . . . . . . . . . . . . . . . . . . . . . . . . . . . .9-19
Partially Programmed Line . . . . . . . . . . . . . . . . . . . . . . .9-23Invalid Titration . . . . . . . . . . . . . . . . . . . . . . . . . . . . . . . .9-23
Section 10, Cleaning, Maintenance, Storage, and Service . . . . . . . . . . . . . . . . . . . . . . . . . .10-1Cleaning the Infuser . . . . . . . . . . . . . . . . . . . . . . . . . . . . . . . .10-1
Cleaning Procedure . . . . . . . . . . . . . . . . . . . . . . . . . . . . .10-2Cleaning Supplies . . . . . . . . . . . . . . . . . . . . . . . . . . . . . .10-3
Infuser Maintenance . . . . . . . . . . . . . . . . . . . . . . . . . . . . . . .10-4Battery Maintenance . . . . . . . . . . . . . . . . . . . . . . . . . . . . . . .10-4Storage . . . . . . . . . . . . . . . . . . . . . . . . . . . . . . . . . . . . . . . . . .10-5Service . . . . . . . . . . . . . . . . . . . . . . . . . . . . . . . . . . . . . . . . . . .10-6
Section 11, Specifications . . . . . . . . . . . . . . . . .11-1Physical . . . . . . . . . . . . . . . . . . . . . . . . . . . . . . . . . . . . . . . . . .11-1Electrical . . . . . . . . . . . . . . . . . . . . . . . . . . . . . . . . . . . . . . . . .11-2Connectivity Engine . . . . . . . . . . . . . . . . . . . . . . . . . . . . . . . .11-4VTBI Range . . . . . . . . . . . . . . . . . . . . . . . . . . . . . . . . . . . . . . .11-5Delivery Rate Range . . . . . . . . . . . . . . . . . . . . . . . . . . . . . . . .11-6Air-in-Line Alarm . . . . . . . . . . . . . . . . . . . . . . . . . . . . . . . . . .11-6Occlusion Alarm and Limits . . . . . . . . . . . . . . . . . . . . . . . . . .11-6Time To Detect Downstream Occlusions. . . . . . . . . . . . . . . .11-7Maximum Bolus Volume Released
After Distal Occlusion is Resolved . . . . . . . . . . . . . . . . .11-8Delivery Accuracy . . . . . . . . . . . . . . . . . . . . . . . . . . . . . . . . . .11-9
Enteral or High Viscosity Fluids Effects . . . . . . . . . . . . .11-9Trumpet Curves . . . . . . . . . . . . . . . . . . . . . . . . . . . . . . . . . . .11-10
Example . . . . . . . . . . . . . . . . . . . . . . . . . . . . . . . . . . . . .11-11

Plum 360 Infuser
System Operating Manual ix
Section 12, Supplies and Accessories. . . . . . . . . 12-1Administration Sets . . . . . . . . . . . . . . . . . . . . . . . . . . . . . . . . 12-1
Primary I.V. PlumSets . . . . . . . . . . . . . . . . . . . . . . . . . . . 12-1Secondary I.V. Set . . . . . . . . . . . . . . . . . . . . . . . . . . . . . . 12-6Burettes/Solusets . . . . . . . . . . . . . . . . . . . . . . . . . . . . . . 12-6Blood Sets . . . . . . . . . . . . . . . . . . . . . . . . . . . . . . . . . . . . 12-8Enteral Sets . . . . . . . . . . . . . . . . . . . . . . . . . . . . . . . . . . . 12-9For Epidural Administration. . . . . . . . . . . . . . . . . . . . . . 12-9Conversion PlumSets . . . . . . . . . . . . . . . . . . . . . . . . . . 12-10Extension Sets. . . . . . . . . . . . . . . . . . . . . . . . . . . . . . . . 12-11
Administration Fluids . . . . . . . . . . . . . . . . . . . . . . . . . . . . . 12-11Containers . . . . . . . . . . . . . . . . . . . . . . . . . . . . . . . . . . . 12-11
Accessories . . . . . . . . . . . . . . . . . . . . . . . . . . . . . . . . . . . . . . 12-12Tandem Carrier . . . . . . . . . . . . . . . . . . . . . . . . . . . . . . . 12-12Multiple Device Adapter . . . . . . . . . . . . . . . . . . . . . . . 12-15Hospira I.V. Pole . . . . . . . . . . . . . . . . . . . . . . . . . . . . . . 12-17T-bar Accessory. . . . . . . . . . . . . . . . . . . . . . . . . . . . . . . 12-19I.V. Mini-Pole . . . . . . . . . . . . . . . . . . . . . . . . . . . . . . . . 12-21
Hospira MedNet Safety Software. . . . . . . . . . . . . . . . . . . . 12-22Loss of Communication . . . . . . . . . . . . . . . . . . . . . . . . 12-23
Section 13, Warranty . . . . . . . . . . . . . . . . . . . . 13-1
Section 14, CCAs and Drug Libraries . . . . . . . . . 14-1DDL CCA and Drug List . . . . . . . . . . . . . . . . . . . . . . . . . . . . . 14-1Custom Drug Library (CDL) . . . . . . . . . . . . . . . . . . . . . . . . . . 14-9Dosing Units and Allowable Ranges. . . . . . . . . . . . . . . . . . 14-10Patient Data Limits . . . . . . . . . . . . . . . . . . . . . . . . . . . . . . . 14-12

Includes Systems Compatible with Hospira MedNet
x System Operating Manual
Notes
Plum 360 Infuser
System Operating Manual 1-1
Section 1
Introduction
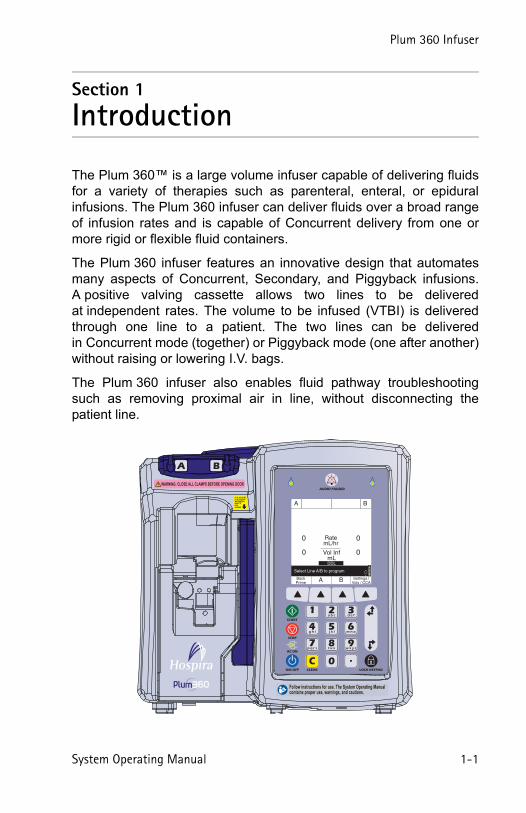
The Plum 360™ is a large volume infuser capable of delivering fluidsfor a variety of therapies such as parenteral, enteral, or epiduralinfusions. The Plum 360 infuser can deliver fluids over a broad rangeof infusion rates and is capable of Concurrent delivery from one ormore rigid or flexible fluid containers.
The Plum 360 infuser features an innovative design that automatesmany aspects of Concurrent, Secondary, and Piggyback infusions.A positive valving cassette allows two lines to be deliveredat independent rates. The volume to be infused (VTBI) is deliveredthrough one line to a patient. The two lines can be deliveredin Concurrent mode (together) or Piggyback mode (one after another)without raising or lowering I.V. bags.
The Plum 360 infuser also enables fluid pathway troubleshootingsuch as removing proximal air in line, without disconnecting thepatient line.
Includes Systems Compatible with Hospira MedNet
1-2 System Operating Manual
The Plum 360 can act as a standalone infuser, or in conjunction withthe Hospira MedNet™ software to provide medication safety softwareat the point of care, with customized drug libraries to support hospitaldefined protocols by clinical care area. In such a configuration,the Plum 360 infuser can communicate with systems on the networkvia Ethernet or state of the art wireless communication usingan 802.11 a/b/g/n/, 2.4 GHz/5 GHz dual-band radio.
The Plum 360 infuser and Hospira MedNet software interface withother hospital systems such as Electronic Health Records, ElectronicMedication Administration Records, Bar Code Point of Care, RealTime Location Services, and other systems designed to createefficiency and consistency in managing patient information andclinical workflows.
Each infuser includes a Connectivity Engine (CE) which providesboth wired Ethernet and wireless 802.11 a/b/g/n networkingcapabilities. The Plum 360 infuser interfaces with Hospira MedNetapplication software to download drug library and infuser softwareupdates and enable auto-programming of the infuser.
The Plum 360 infuser is fully compatible with LifeCare™ Plum™Series administration sets and accessories, and the LifeShield™ andCLAVE™ needleless connection systems, providing a convenientand cost-effective infuser.
Intended UseThe Plum 360 infuser is intended for parenteral, enteral, and epiduraltherapies and the administration of whole blood and blood products.
Plum 360 Infuser
System Operating Manual 1-3
User QualificationThe Plum 360 infuser is intended for use at the direction or under thesupervision of licensed physicians or certified healthcareprofessionals who are trained in the use of the infuser and theadministration of parenteral, enteral, and epidural therapies and theadministration of whole blood and blood products.
TrainingHospira Corporation offers a complete range of training andeducation to help new users and experienced personnel acquire theknowledge and confidence to operate the Plum infuser properly andefficiently.
Training is available at the time of infuser purchase. Supplementaltraining can be purchased throughout the infuser's service life.Training content is tailored to the needs of the medical facility andis presented by clinical personnel. Hospira works with hospital staffto identify training needs, including duration and frequency of training.Training is mandatory for new device installation.
Contact your Hospira Representative for more information aboutavailable training programs.
Includes Systems Compatible with Hospira MedNet
1-4 System Operating Manual
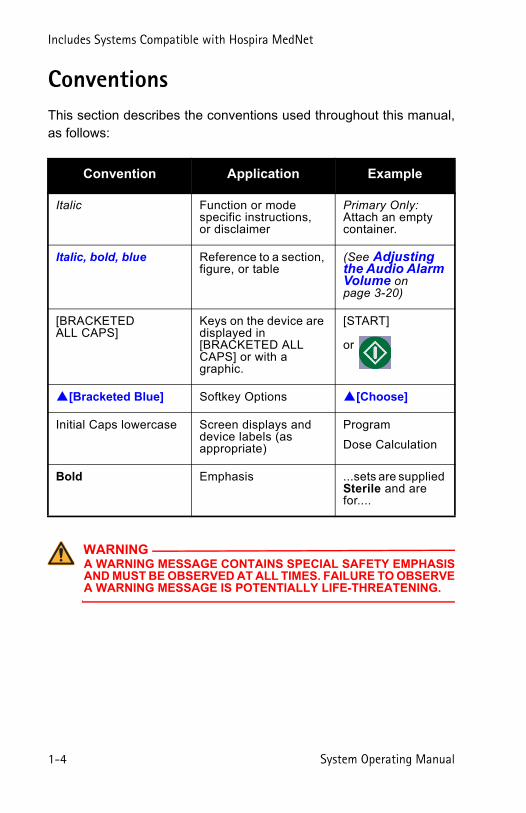
ConventionsThis section describes the conventions used throughout this manual,as follows:
Convention Application Example
Italic Function or mode specific instructions, or disclaimer
Primary Only: Attach an empty container.
Italic, bold, blue Reference to a section, figure, or table
(See Adjusting the Audio Alarm Volume on page 3-20)
[BRACKETEDALL CAPS]
Keys on the device are displayed in [BRACKETED ALL CAPS] or with a graphic.
[START]
or
[Bracketed Blue] Softkey Options [Choose]
Initial Caps lowercase Screen displays and device labels (as appropriate)
Program
Dose Calculation
Bold Emphasis ...sets are supplied Sterile and are for....
WARNINGA WARNING MESSAGE CONTAINS SPECIAL SAFETY EMPHASISAND MUST BE OBSERVED AT ALL TIMES. FAILURE TO OBSERVEA WARNING MESSAGE IS POTENTIALLY LIFE-THREATENING.
Plum 360 Infuser
System Operating Manual 1-5
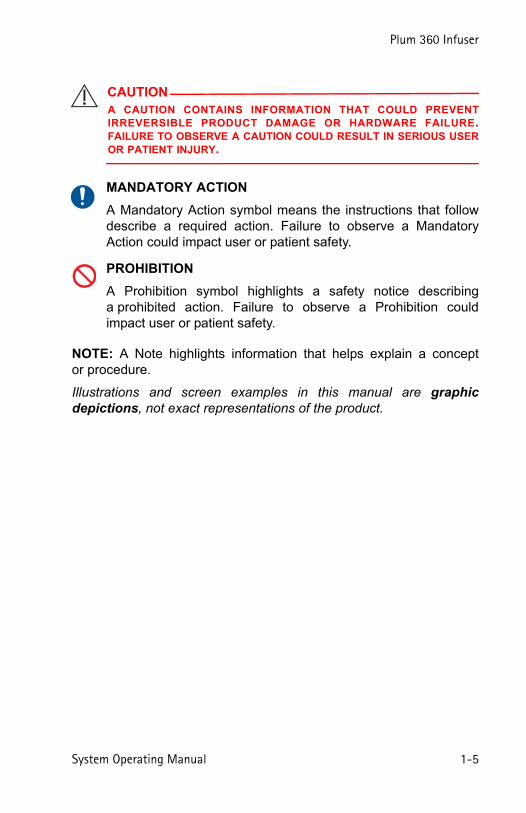
NOTE: A Note highlights information that helps explain a conceptor procedure.
Illustrations and screen examples in this manual are graphicdepictions, not exact representations of the product.
CAUTIONA CAUTION CONTAINS INFORMATION THAT COULD PREVENTIRREVERSIBLE PRODUCT DAMAGE OR HARDWARE FAILURE.FAILURE TO OBSERVE A CAUTION COULD RESULT IN SERIOUS USEROR PATIENT INJURY.
MANDATORY ACTION
A Mandatory Action symbol means the instructions that followdescribe a required action. Failure to observe a MandatoryAction could impact user or patient safety.
PROHIBITION
A Prohibition symbol highlights a safety notice describinga prohibited action. Failure to observe a Prohibition couldimpact user or patient safety.
Includes Systems Compatible with Hospira MedNet
1-6 System Operating Manual
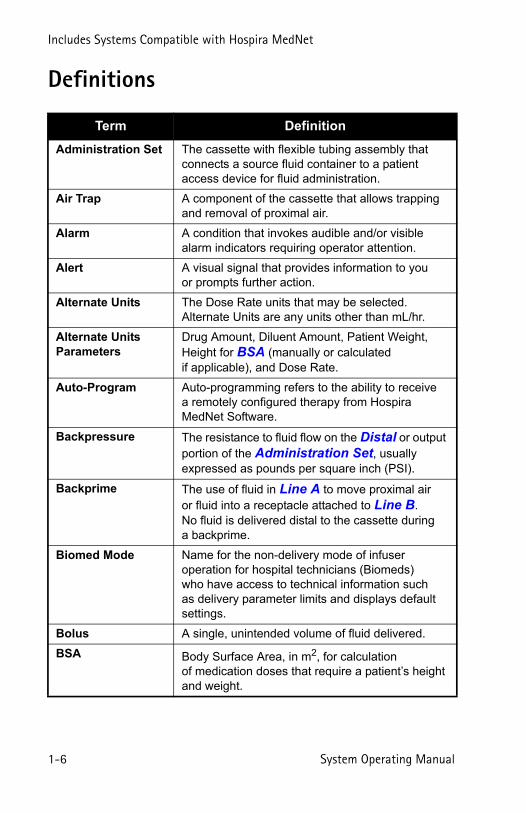
Definitions
Term Definition
Administration Set The cassette with flexible tubing assembly that connects a source fluid container to a patient access device for fluid administration.
Air Trap A component of the cassette that allows trapping and removal of proximal air.
Alarm A condition that invokes audible and/or visible alarm indicators requiring operator attention.
Alert A visual signal that provides information to you or prompts further action.
Alternate Units The Dose Rate units that may be selected. Alternate Units are any units other than mL/hr.
Alternate Units Parameters
Drug Amount, Diluent Amount, Patient Weight, Height for BSA (manually or calculated if applicable), and Dose Rate.
Auto-Program Auto-programming refers to the ability to receive a remotely configured therapy from Hospira MedNet Software.
Backpressure The resistance to fluid flow on the Distal or output portion of the Administration Set, usually expressed as pounds per square inch (PSI).
Backprime The use of fluid in Line A to move proximal air or fluid into a receptacle attached to Line B. No fluid is delivered distal to the cassette during a backprime.
Biomed Mode Name for the non-delivery mode of infuser operation for hospital technicians (Biomeds) who have access to technical information such as delivery parameter limits and displays default settings.
Bolus A single, unintended volume of fluid delivered.
BSA Body Surface Area, in m2, for calculation of medication doses that require a patient’s height and weight.
Plum 360 Infuser
System Operating Manual 1-7
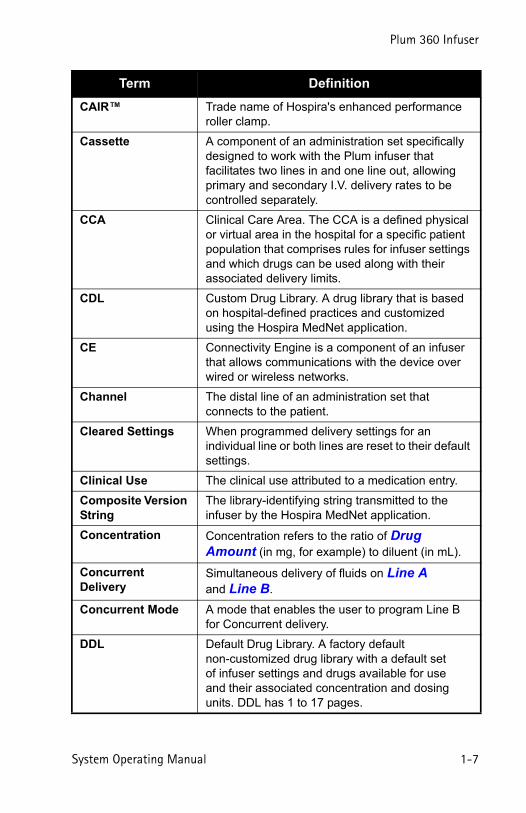
CAIR™ Trade name of Hospira's enhanced performance roller clamp.
Cassette A component of an administration set specifically designed to work with the Plum infuser that facilitates two lines in and one line out, allowing primary and secondary I.V. delivery rates to be controlled separately.
CCA Clinical Care Area. The CCA is a defined physical or virtual area in the hospital for a specific patient population that comprises rules for infuser settings and which drugs can be used along with their associated delivery limits.
CDL Custom Drug Library. A drug library that is based on hospital-defined practices and customized using the Hospira MedNet application.
CE Connectivity Engine is a component of an infuser that allows communications with the device over wired or wireless networks.
Channel The distal line of an administration set that connects to the patient.
Cleared Settings When programmed delivery settings for an individual line or both lines are reset to their default settings.
Clinical Use The clinical use attributed to a medication entry.
Composite Version String
The library-identifying string transmitted to the infuser by the Hospira MedNet application.
Concentration Concentration refers to the ratio of Drug Amount (in mg, for example) to diluent (in mL).
Concurrent Delivery
Simultaneous delivery of fluids on Line A and Line B.
Concurrent Mode A mode that enables the user to program Line B for Concurrent delivery.
DDL Default Drug Library. A factory defaultnon-customized drug library with a default set of infuser settings and drugs available for use and their associated concentration and dosing units. DDL has 1 to 17 pages.
Term Definition
Includes Systems Compatible with Hospira MedNet
1-8 System Operating Manual
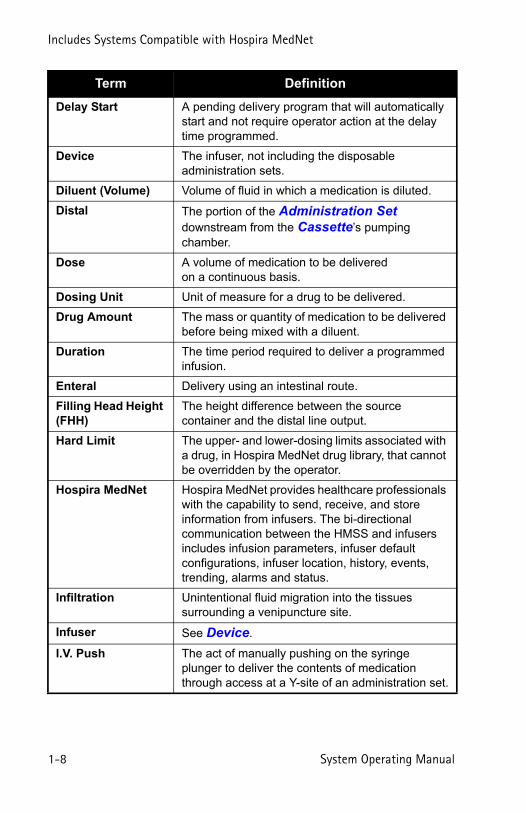
Delay Start A pending delivery program that will automatically start and not require operator action at the delay time programmed.
Device The infuser, not including the disposable administration sets.
Diluent (Volume) Volume of fluid in which a medication is diluted.
Distal The portion of the Administration Set downstream from the Cassette’s pumping chamber.
Dose A volume of medication to be deliveredon a continuous basis.
Dosing Unit Unit of measure for a drug to be delivered.
Drug Amount The mass or quantity of medication to be delivered before being mixed with a diluent.
Duration The time period required to deliver a programmed infusion.
Enteral Delivery using an intestinal route.
Filling Head Height (FHH)
The height difference between the source container and the distal line output.
Hard Limit The upper- and lower-dosing limits associated with a drug, in Hospira MedNet drug library, that cannot be overridden by the operator.
Hospira MedNet Hospira MedNet provides healthcare professionals with the capability to send, receive, and store information from infusers. The bi-directional communication between the HMSS and infusers includes infusion parameters, infuser default configurations, infuser location, history, events, trending, alarms and status.
Infiltration Unintentional fluid migration into the tissues surrounding a venipuncture site.
Infuser See Device.
I.V. Push The act of manually pushing on the syringe plunger to deliver the contents of medication through access at a Y-site of an administration set.
Term Definition

Plum 360 Infuser
System Operating Manual 1-9
Key Any of the marked locations on the front panel intended for user input via a pressing action.
KVO Keep Vein Open. The Post Infusion Rate setting that provides a minimal delivery rate (1 mL/hr or the actual programmed rate when less than 1 mL/hr), intended to provide sufficient fluid flow to decrease the potential for clotting at the I.V. infusion site.
Line A The proximal Primary tubing attached to the A port of the cassette.
Line B The proximal secondary line/syringe attached to the secondary port of the cassette.
Loading Dose Allows programming of an initial infusion rate/dose for a specific volume and duration, automatically followed by a maintenance rate/dose for a specific volume and duration from the same container (for example, a fluid challenge) using the same dosing unit.
Maintenance Dose A pre-programmed rate/dose for a specific volume and duration from the same container that automatically follows the completion of a Loading Dose.
Malfunction One of a number of alarm conditions that indicate a failure of the infuser.
Mode A type of secondary infusion, either Piggyback or Concurrent.
Multistep A sequential program that can deliver up to 10 steps from one container at different rates, doses, VTBIs and durations using the same dosing unit.
Non-Time-Based Dosing Unit
A dosing unit that does not include a time component (for example, grams).
Outgassing The release of a gas that was dissolved, trapped, frozen or absorbed in a material.
Term Definition

Includes Systems Compatible with Hospira MedNet
1-10 System Operating Manual
Override An action by a clinician that acknowledges and confirms an alert and then proceeds with a program containing a parameter that falls outside the hospital-defined Soft Limits.
Parenteral Delivery via other than an intestinal route,such as intravenous (I.V.) injection.
Piggybackable A drug setting in a custom drug library that indicates whether a drug is allowed to be delivered in Piggyback Mode.
Piggyback Mode The delivery mode that suspends Line A delivery while Line B delivers. Line A resumes when Line B delivery completes.
Prime The action of filling the Plum Administration Set, Plum Cassette, and all connected tubing with the fluid to be infused.
Proximal Upstream (input, as Line A and/or Line B) with respect to the Cassette pumping chamber portion of the Administration Set.
Rate The amount of fluid pumped to the patient over a given period of time, expressed in mL/hr.
Rule Set The programmed Soft Limits and Hard Limits associated with a drug entry from the CCA in the Hospira MedNet Drug Library.
Service Mode A non-therapeutic mode used for configuring the infuser and changing default settings.
Softkey A front panel key on the bottom portion of the display screen that is assigned specific functions within the operational context of a particular screen.
Soft Limit The upper- and lower-dosing limits associated with a drug, in the Hospira MedNet drug library, that can be overridden by the operator.
Standby A pending delivery program that requires operator action to begin the infusion.
Term Definition

Plum 360 Infuser
System Operating Manual 1-11
PrecautionsThe Plum 360 infuser has been designed and manufacturedto be safe, reliable, and easy to use. This section details precautionsand possible hazards.
Warnings, Cautions, and GuidelinesFor safe operation of the Plum 360 infuser, observe the Warnings,Cautions, and recommendations in the following sections.
Tall-Man Lettering Uses uppercase letters in combination with lowercase letters to help clinicians differentiate among sound-alike or look-alike drug names.
Time-Based Dosing
A dosing unit that includes a time component (for example, g/min).
Titration A change in Rate, Dose Duration, and/or VTBI in a currently running or programmed infusion.
Unit of Measure One of a variety of terms used to describe a drug amount, such a grams, mg, or units.
VTBI Volume To Be Infused. The volume of fluid or I.V. solution (remaining) for deliveryby a program or Therapy step from a Line.
Term Definition

Includes Systems Compatible with Hospira MedNet
1-12 System Operating Manual
General Warnings and Cautions
WARNINGPOSSIBLE EXPLOSION HAZARD EXISTS IF THE PLUM 360INFUSER IS USED IN THE PRESENCE OF FLAMMABLEANESTHETICS.
TO AVOID THE RISK OF ELECTRIC SHOCK, THE EQUIPMENTMUST ONLY BE CONNECTED TO A SUPPLY MAINS WITHPROTECTIVE EARTH.
NO MODIFICATION OF THIS EQUIPMENT IS ALLOWED.
NO ADDITIONAL DEVICES CAN BE CONNECTED TO THE INFUSERTHAT HAVE NOT BEEN SPECIFIED AS COMPATIBLE WITH THEINFUSER BY HOSPIRA.
ARRANGE TUBING, CORDS, AND CABLES TO MINIMIZE THE RISKOF PATIENT STRANGULATION OR ENTANGLEMENT.
DO NOT PLACE THE INFUSER IN SERVICE IF IT FAILS THE SELFTEST.
DO NOT OPERATE THE PLUM 360 INFUSER WITH THE CASEOPENED.
ALTHOUGH UNLIKELY, FAILURE OF CERTAIN ROBUSTMECHANICAL COMPONENTS SUCH AS THE ANTI-FREE FLOWMECHANISM OR VALVE CONTROL SPRINGS COULD CAUSEFLUID DELIVERY LIMITED TO THE CONTENTS OF THE FLUIDCONTAINER.
SINGLE FAULT FAILURE OF CERTAIN ELECTRONIC/MOTORCONTROL COMPONENTS WOULD RESULT IN NO MORE THAN5 mL OF UNEXPECTED FLUID DELIVERY.
ADMINISTER ONLY ANESTHETICS/ANALGESICS APPROVEDFOR EPIDURAL ADMINISTRATION (AS INDICATED OR ALLOWEDBY THE DRUGS’ FDA APPROVED LABELLING OR HEALTHCANADA APPROVED LABELLING). EPIDURAL ADMINISTRATIONOF DRUGS OTHER THAN THOSE INDICATED FOR EPIDURAL USECOULD RESULT IN SERIOUS INJURY TO THE PATIENT.
Plum 360 Infuser
System Operating Manual 1-13
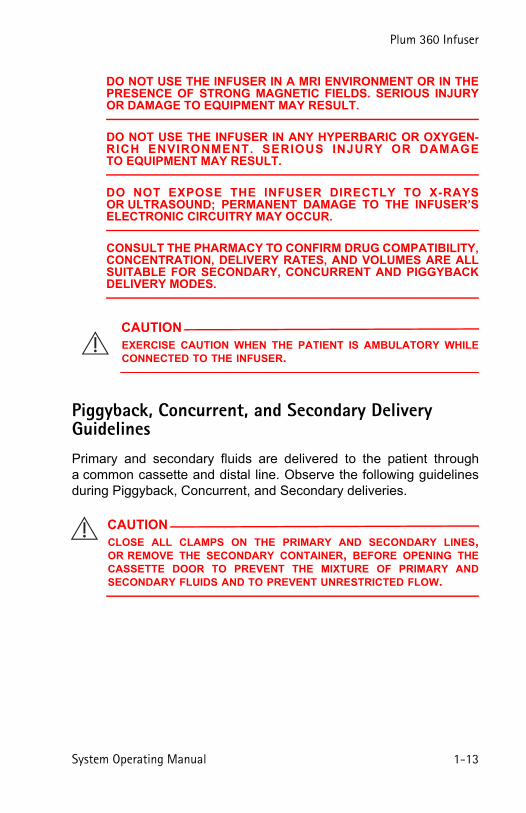
Piggyback, Concurrent, and Secondary Delivery GuidelinesPrimary and secondary fluids are delivered to the patient througha common cassette and distal line. Observe the following guidelinesduring Piggyback, Concurrent, and Secondary deliveries.
DO NOT USE THE INFUSER IN A MRI ENVIRONMENT OR IN THEPRESENCE OF STRONG MAGNETIC FIELDS. SERIOUS INJURYOR DAMAGE TO EQUIPMENT MAY RESULT.
DO NOT USE THE INFUSER IN ANY HYPERBARIC OR OXYGEN-RICH ENVIRONMENT. SERIOUS INJURY OR DAMAGETO EQUIPMENT MAY RESULT.
DO NOT EXPOSE THE INFUSER DIRECTLY TO X-RAYSOR ULTRASOUND; PERMANENT DAMAGE TO THE INFUSER’SELECTRONIC CIRCUITRY MAY OCCUR.
CONSULT THE PHARMACY TO CONFIRM DRUG COMPATIBILITY,CONCENTRATION, DELIVERY RATES, AND VOLUMES ARE ALLSUITABLE FOR SECONDARY, CONCURRENT AND PIGGYBACKDELIVERY MODES.
CAUTIONEXERCISE CAUTION WHEN THE PATIENT IS AMBULATORY WHILECONNECTED TO THE INFUSER.
CAUTIONCLOSE ALL CLAMPS ON THE PRIMARY AND SECONDARY LINES,OR REMOVE THE SECONDARY CONTAINER, BEFORE OPENING THECASSETTE DOOR TO PREVENT THE MIXTURE OF PRIMARY ANDSECONDARY FLUIDS AND TO PREVENT UNRESTRICTED FLOW.
Includes Systems Compatible with Hospira MedNet
1-14 System Operating Manual
Concurrent Delivery of Critical Drugs
When delivering short half-life critical drugs (see Critical DrugExamples on page 1-15) using the Plum 360 infuser in Concurrentmode, the following delivery rate guidelines should be observed:
• If the critical drug (with half-life less than 6 minutes) is to be infusedat less than 2 mL/hr, the other infusion should be no faster than5 times the critical drug’s rate. Dopamine, for example, deliveredat 1.5 mL/hr should not be accompanied by an infusionprogrammed any faster than 7.5 mL/hr.
• If the critical drug (with half-life less than 6 minutes) is to be infusedat 2 - 5 mL/hr the other infusion should be no faster than ten timesthe critical drug’s rate. Dopamine, for example, delivered at 3.5 mL/hr should not be accompanied by an infusion programmed anyfaster than 35 mL/hr.
• If the critical drug (with half-life less than 6 minutes) is to be infusedat 5.1 mL/hr or greater, the other infusion can be programmedat any desired rate.
CAUTIONIF THE PRIMARY RATE IS SET HIGHER THAN THE SECONDARY RATE,ANY DISTAL FLUID REMAINING FROM THE SECONDARY INFUSION WILLBE INFUSED AT THE NEW, HIGHER RATE.
IF THE SECONDARY RATE IS SET HIGHER THAN THE PRIMARY RATE,ANY DISTAL FLUID REMAINING FROM THE PRIMARY INFUSION WILL BEINFUSED AT THE NEW, HIGHER RATE.
WARNINGENSURE MEDICATIONS THAT ARE DELIVEREDCONCURRENTLY, OR IN PIGGYBACK, ARE COMPATIBLE.
CAUTIONAT RATES BELOW 0.4 mL/HR, PAUSES IN FLOW CONTINUITYOF MORE THAN 20 SECONDS WILL OCCUR, WHICH MAY IMPACT THEPHYSIOLOGIC RESPONSE TO DRUGS THAT HAVE A VERY SHORTHALF-LIFE.

Plum 360 Infuser
System Operating Manual 1-15
NOTE: The total of the primary rate plus the secondary rate cannotexceed 500 mL/hr.
These guidelines apply only when infusing short half-life critical drugsin Concurrent mode. Individual patient responses may vary requiringadjustment of delivery rates.
Critical Drug Examples
Examples of drugs with a short half-life (approximately 6 minutesor less when given intravenously) include:
For these drugs, the Concurrent flow guidelines should be followedwhen the infusion rate of the drug will be 5 mL/hr or less.
Delivery Rate Guidelines
Short Half-life(less than 6 minutes)
Critical Drug Infusion Rate
Maximum Rateof Accompanying Infusion
0.5 - 1.9 mL/hr 5 Times the Critical Drug Rate
2 - 5 mL/hr 10 Times the Critical Drug Rate
5.1 or Greater Any Desired Ratio
Dobutamine Esmolol Nitroprusside
Dopamine Isoproterenol Norepinephrine
Epinephrine Lidocaine Oxytocin
Epoprostenol Nitroglycerin Procainamide

Includes Systems Compatible with Hospira MedNet
1-16 System Operating Manual
NOTE: The list of critical drugs on page 1-15 is not intended to be all-inclusive of critical drugs or drugs with a short half-life.
The clinician should become familiar with the pharmacodynamicsof any critical drug before administration.
This information is presented to inform clinicians of a rare situationthat could be misinterpreted if they are unfamiliar with thisphenomenon.
Guidelines When Opening the Cassette DoorNOTE: Opening the cassette door will stop the infusion on oneor both the lines.
• To prevent unrestricted flow and mixing fluids in lines A and B,close all clamps, or remove the secondary container, beforeopening the cassette door.
• A small amount of fluid is expelled from the set (less than or equalto 0.1 mL) each time the door is opened or closed with a setinstalled. If potent drugs are being used, take appropriate actionto guard against over-medication of the patient.
• Keep the cassette door securely closed while the infuser is notin use to avoid cassette door damage.
Administration Sets and Accessories Guidelines
• Use only compatible LifeCare PlumSets with the Plum 360 infuser.See individual set instructions for additional information.
• Administration sets should be changed per CDC guidelinesor healthcare provider policy. Discard after use.
• LifeCare I.V. infusion sets with integral nonblood filters are not foruse in the administration of blood, blood products, emulsions,suspensions, or any medications not totally soluble in the solutionbeing administered. These medications may be administeredthrough the lower Y-injection site, below the filter.

Plum 360 Infuser
System Operating Manual 1-17
• Microbore PlumSets are not recommended at flow rates above100 mL/hr.
• When infusing at delivery rates of 0.1 to 999 mL/hr, macroborePlumSets may be used.
• When attaching a syringe to the primary port (Line A), use standardclinical practices to ensure the syringe is secure in order to reducethe chances of creating a proximal occlusion.
• Syringes must be between 3 mL (minimum) to 60 mL (maximum).Syringes larger than 10 mL may be directly attached to thesecondary port of the cassette. Use a syringe adapter on syringessmaller than 10 mL. Some 10 mL syringes may require a syringeadapter. For syringe sets on Line A, use a vented syringe adapterwith all syringes from 3 mL to 60 mL.
• Before disconnecting a syringe from the cassette, pull up theplunger slightly to avoid spilling the fluid.
• Before disconnecting a rigid container from the cassette, close theupper slide clamp or clamp proximal tubing, open the cassette door,and then remove and invert the cassette (ports down) to avoidspilling the fluid.
WARNINGWHEN INFUSING AT LOW DELIVERY RATES (5 mL/HR OR LESS)USE THICK-WALLED MICROBORE PLUMSETS. THIS WILLREDUCE THE AMOUNT OF THE FLUID BOLUS THAT MAY BEDELIVERED WHEN A DISTAL OCCLUSION IS RELEASED.
WARNINGUSE OF MICROBORE SETS AT RATES GREATER THAN 100 ML/HR MAY INCREASE THE LIKELIHOOD OF DISTALOCCLUSIONS RESULTING IN DELAY OF THERAPY, AND REDUCESYSTEM ACCURACY AS STATED IN THE Delivery AccuracySECTION STARTING ON PAGE 11-9.
Includes Systems Compatible with Hospira MedNet
1-18 System Operating Manual
Precautions to Avoid a BolusIn addition to the following procedure, refer to Maximum BolusVolume Released After Distal Occlusion is Resolved onpage 11-8
Use the following procedure to avoid the administration of a bolusfollowing a distal occlusion:
1. If the administration set does not have a clamp distal to thecassette, disconnect the tubing from the patient while eliminatingthe distal occlusion.
If the administration set has a clamp on the distal line, ensure that the clamp is closed (even if the closed clamp caused the distal occlusion alarm).
2. Close all clamps on the primary and secondary lines.
3. Open the cassette door and remove the cassette.
4. Gently pull out the flow regulator on the cassette to dissipate the pressure for a brief moment, and then push in on the flow regulator to close it.
5. Eliminate the source of occlusion, unless it was caused by a closed distal clamp. (The distal clamp must remain closed until Step 8.)
6. If the distal line was removed, reattach it to the patient access device.
7. Reinsert the cassette and close the cassette door.
8. Open all clamps and resume infusion.
For other conditions that may cause a bolus to be administered,see Guidelines When Opening the Cassette Door on page 1-16and Administration Sets and Accessories Guidelines onpage 1-16.
Plum 360 Infuser
System Operating Manual 1-19
Guidelines to Avoid Air in the Patient Line
• Air bubbles may form distal to the cassette as the result of normaloutgassing of dissolved air in the fluid in one or more of thefollowing cases:
• Chilled solution is in use
• Certain fluids known to routinely outgas are in use
• The infuser is mounted significantly above the patient. Minimizethis differential (head height) when outgassing is a concern.
• The infuser is infusing at very low rates between 0.1 and 5 mL/hr.
In these cases, an air-eliminating filter may be used when clinicallyappropriate.
• Repeated opening and closing of the door may defeat the proximalair-in-line alarm and may cause a distal air-in-line alarm, requiringrepriming.
• When using a syringe adapter, retract the plunger to drawapproximately 1 mL of fluid into the syringe to clear air from theadapter filter.
Guidelines During Backpriming
• Backpriming is not recommended for reconstituting secondarycontainers containing dry powders.
• To avoid pressurization when backpriming into a syringe, confirmthat there is sufficient empty space to accept the backprimed fluidbefore beginning a backprime. Approximately 5 mL of fluid istransferred from the primary to the secondary port during30 seconds of continuous backpriming.
• To accept the backprimed air and/or fluid, a line with a containeror a syringe needs to be attached to the secondary port.

Includes Systems Compatible with Hospira MedNet
1-20 System Operating Manual
Battery Guidelines
• Do not use the Plum 360 infuser to operate on patients when thebattery is removed. Use of a properly maintained and chargedbattery helps to ensure proper operation.
• The battery may not be fully charged upon receipt. Connect theinfuser to AC power for at least eight hours.
• If the quality of the earth grounding source is in doubt, use batterypower.
• If the low-battery alarm sounds, connect the infuser to AC powerimmediately.
Guidelines During Cleaning
• To avoid mechanical or electronic damage, do not immerse thePlum 360 infuser in any fluids or cleaning solutions.
• Do not spray cleaning solutions toward any opening in theinstrument.
• Certain cleaning and sanitizing solutions may slowly degradecomponents made from some plastic materials. Using abrasivecleaners or cleaning solutions not recommended by Hospira mayresult in product damage. Do not use compounds containingcombinations of isopropyl alcohol and dimethyl benzyl ammoniumchloride.
• Never use sharp objects such as fingernails, paper clips, or needlesto clean any part of the infuser.
• Do not sterilize by heat, steam, ethylene oxide (ETO), or radiation.
• To avoid infuser damage, cleaning solutions should only be usedas directed. The disinfecting properties of cleaning solutions vary;consult the manufacturer for specific information.
Use AC power whenever possible. Connect to AC powerduring storage to ensure a fully charged battery foremergencies.
Plum 360 Infuser
System Operating Manual 1-21
For more information, see Cleaning the Infuser on page 10-1and the Plum 360 Infuser Technical Service Manual.
ArtifactsNonhazardous, low-level electrical potentials are commonly observedwhen fluids are administered using infusion devices. These potentialsare well within accepted safety standards, but may create artifactson voltage-sensing equipment such as ECG, EMG, and EEGmachines. These artifacts vary at a rate that is associated with theinfusion rate. If the monitoring machine is not operating correctlyor has loose or defective connections to its sensing electrodes, theseartifacts may be accentuated so as to simulate actual physiologicalsignals.
To determine if the abnormality in the monitoring equipmentis caused by the infusion device instead of some other source in theenvironment, set the infusion device so that it is temporarily notdelivering fluid. Disappearance of the abnormality indicates thatit was probably caused by the electronic noise generated by theinfusion device. Proper setup and maintenance of the monitoringequipment should eliminate the artifact. Refer to the appropriatemonitoring equipment system documentation for setup andmaintenance instructions.
The Plum 360 infuser is designed to operate normally in the presenceof most encountered electromagnetic interference (EMI) conditions.In the event of extreme levels of interference, such as encounterednext to an electrosurgical generator, it is possible that the normaloperation of a sensor or microcomputer might be disrupted.Even in this event, the outcome would likely be a false alarmor detected system malfunction and would not result in a hazardto patient or operator.

Includes Systems Compatible with Hospira MedNet
1-22 System Operating Manual
This equipment has been tested and found to comply with the EMClimits for its classification of medical device. Those limits aredesigned to provide reasonable protection against harmfulinterference in a typical medical installation. The equipmentgenerates, uses and can radiate radio frequency energy and, if notinstalled and used in accordance with the instructions, may causeharmful interference to other devices in the vicinity. However, there isno guarantee that interference will not occur in a particularinstallation. If this equipment does cause harmful interference withother devices, which can be determined by turning the equipment offand on, the user is encouraged to try to correct the interference byone or more of the following measures:
• Reorient or relocate the receiving device
• Increase the separation between the equipment
• Connect the equipment into an outlet on a circuit different from thatto which the other device(s) is connected
• Consult the manufacturer or field service technician for help
Portable and mobile RF communications equipment, such as cellulartelephones, 2-way radios, Bluetooth™ devices, microwave ovens,in close proximity to this device may affect wireless and wiredcommunications with the infuser and/or the operation of the infuser.Special cautions need to be exercised regarding EMC. Theseinclude:
• Use of a shielded Ethernet cable (CAT5 STP or better) forplugging into the RJ45 Ethernet connector. Using an unshieldedEthernet cable may result in increased emissions or decreasedimmunity performance.
• Maintaining a minimum separation distance of 2 ½ ft between theinfuser system and portable/mobile RF communicationsequipment.

Plum 360 Infuser
System Operating Manual 1-23
Interconnecting of Medical EquipmentAccessory equipment connected to the analog and digital interfacesmust be certified according to the respective IEC Standards (forexample, IEC 60950 for data processing equipment and IEC 60601-1for Medical Equipment). Any person who connects additionalequipment to the signal input or output part configures a medicalsystem, and is therefore responsible for ensuring that the systemcomplies with the requirements of Standard IEC 60601-1.
Guidance on EMC CompatibilityThe Plum 360 infuser has been tested to the requirements ofIEC 60601-1-2012, IEC 60601-1-2:2007, and IEC 60601-2-24-2012.The infuser meets the EMC requirements of the Medical DeviceDirective 93/42/EEC with amendments by 2007/47/EC. Refer to thePlum 360 Infuser Technical Service Manual for further details of theEMC testing procedures and compliance levels.
There is a shared responsibility between manufacturers, customersand users to ensure that Medical Equipment and Systems aredesigned and operated as intended. Medical electrical equipmentneeds special cautions regarding electromagnetic compatibility andneeds to be installed and used according to the electromagneticcompatibility information provided in this manual.
The device is suitable for use in all establishments, includingdomestic establishments. If extended operation during power mainsinterruption is needed, use battery power.
Always manage the electromagnetic environment.
The guidance included in this manual provides information needed to:
• Determine the device’s suitability for use in the intended environment.
• Manage the electromagnetic environment to permit the device to perform as intended without disturbing other equipment.
Includes Systems Compatible with Hospira MedNet
1-24 System Operating Manual
Separate the device from all other electronic equipment. If the devicemust be used near other electrical equipment, monitor the equipmentto ensure there is no electromagnetic interference.
USE ONLY components specifically labeled for use with thePlum 360 infuser to help ensure the device operates as intended.
If you suspect external RF sources or other equipment are influencingdevice operation, contact the biomedical engineering department foradditional guidelines concerning electromagnetic immunity.
Contact the biomedical engineering department for additionalinformation in the technical service manual concerning operatingdevices near RF sources.
FCC Information
US FCC (Federal Communications Commission) Statement (United States Only)The device has been tested and found to comply with the limits fora Class B digital device, pursuant to Part 15C, 15E of the FCC rules.These limits are designed to provide reasonable protection againstharmful interference.
Operation is subject to the following two conditions: (1) This devicemay not cause interference, and (2) This device must accept anyinterference, including that may cause undesired operation of thesedevices.
WARNINGDEVICES SHOULD NOT BE USED ADJACENT TO OR STACKEDWITH OTHER EQUIPMENT. IF THE DEVICE MUST BE USEDADJACENT TO OR STACKED WITH OTHER EQUIPMENT,MONITOR THE DEVICES TO VERIFY NORMAL OPERATION.
Plum 360 Infuser
System Operating Manual 1-25
FCC Interference Statement (United States Only)This equipment has been tested and found to comply with the limitsfor a Class B digital device, pursuant to Part 15 of the FCC rules.These limits are designed to provide reasonable protection againstharmful interference in a residential installation. This equipmentgenerates, uses, and can radiate radio frequency energy and, if notinstalled and used in accordance with the instructions, may causeharmful interference to radio communications. However, there is noguarantee that interference will not occur in a particular installation.
If this equipment does cause harmful interference to radio ortelevision reception, which can be determined by turning theequipment off and on, the user is encouraged to try to correct theinterference by one or more of the following measures:
• Re-orient or relocate the receiving antenna
• Increase the separation between the equipment and receiver
• Connect the equipment to an outlet on a circuit different from thatto which the receiver is connected
• Consult the dealer or an experienced radio/television technicianfor help
This device and its antenna(s) must not be co-located or operated inconjunction with any other antenna or transmitter.
Canadian Department of Communications Industry Canada Notice (Canada Only)The Class B digital apparatus complies with Canadian ICES-003.
Radio Frequency Exposure StatementThe Wireless LAN radio device in the Connectivity Engine peripheralassembly with this infusion device has been evaluated and foundcompliant to the requirements of the following Radio Frequencyexposure standards.
Includes Systems Compatible with Hospira MedNet
1-26 System Operating Manual
FCC Rules, Part 15/Industry CanadaThis device complies with Part 15 of FCC Rules and Industry Canadalicense-exempt RSS standard(s). Operation is subject to the followingtwo conditions:
(1) This device may not cause harmful interference, and
(2) This device must accept any interference, including interferencethat may cause undesired operation of this device.
This equipment complies with FCC/IC radiation exposure limits setforth for an uncontrolled environment and meets the FCC radiofrequency (RF) Exposure Guidelines in Supplement C to OET65 andRSS-102 of the IC radio frequency (RF) Exposure rules.
Under Industry Canada regulations, this radio transmitter may onlyoperate using an antenna of a type and maximum (or lesser) gainapproved for the transmitter by Industry Canada. To reduce potentialradio interference to other users, the antenna type and its gain shouldbe so chosen that the equivalent isotropically radiated power (e.i.r.p.)is not more than that necessary for successful communication.
This radio transmitter (identify the device by certification number,or model number if Category II) has been approved by IndustryCanada to operate with the antenna types listed below with themaximum permissible gain and required antenna impedance for eachantenna type indicated. Antenna types not included in this list, havinga gain greater than the maximum gain indicated for that type, arestrictly prohibited for use with this device.
For product available in the USA/Canada market, only channels 1-11can be operated. Selection of other channels is not possible.If this device is to be operated in the 5.15~5.25 GHz frequency range,it is restricted to indoor environments only.
Antenna: Proprietary
Antenna Gain Information: Embedded Antenna: 4.2dBi (2.4 GHz),5.1dBi (5 GHz)
Frequency Tolerance: ±20ppm

Plum 360 Infuser
System Operating Manual 2-1
Section 2
Equipment DescriptionFor a technical description of the Plum 360 infuser, see the Plum 360Infuser Technical Service Manual.
The Plum 360 infuser includes the infuser (pumping module)and attached Connectivity Engine peripheral module (CE module),and this System Operating Manual. The CE module provides wiredEthernet and wireless 802.11 a/b/g/n local area networkingcapabilities. This allows the infuser to connect to the facility’s networkand communicate with the optional Hospira MedNet networkedapplication software to download software and drug libraries,and to enable auto-programming features. Optional accessories arealso available.
Each infusion requires a disposable, single-use Plum administrationset to provide the fluid path between the fluid container and thepatient access device. Each administration set includes a proprietarycassette that works with the pumping mechanism on the infuserto provide accurate fluid delivery and air management.
Includes Systems Compatible with Hospira MedNet
2-2 System Operating Manual
See Section 12 for a list of Plum administration sets and optionalaccessories.
The following sections describe the Plum 360 infuser hardware andPlum administration sets.
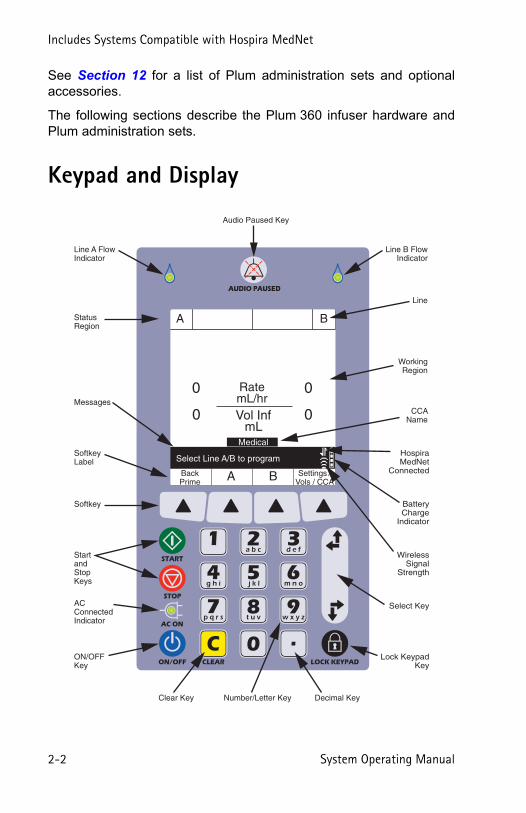
Keypad and Display
A B
A B Settings /Vols / CCA
BackPrime
RatemL/hr
Vol InfmL
0
0 0
0
Medical
Select Line A/B to program
START
STOP
AC ON
a b c d e f
g h i j k l m n o
p q r s t u v w x y z
CLEAR LOCK KEYPAD
AUDIO PAUSED
ON OFF
Line A FlowIndicator
Messages
SoftkeyLabel
Softkey
StatusRegion
Start andStop Keys
ACConnectedIndicator
ON/OFFKey
Audio Paused Key
Number/Letter KeyClear Key Decimal Key
Line B FlowIndicator
Line
WorkingRegion
CCAName
HospiraMedNet
Connected
BatteryCharge
Indicator
WirelessSignal
Strength
Select Key
Lock KeypadKey

Plum 360 Infuser
System Operating Manual 2-3
Operating Keys
[ON/OFF] - Infuser power on and off. See Turning Power On and Turning Power Off for more information.
[START] - Is the first key to press to start a delivery.
For safety reasons, every delivery must be confirmed by checking the programming and then pressing an additional softkey, in response to a prompt.
[STOP] - Stops delivery.
If two lines are pumping when you press [STOP], you must press one of the following softkeys: [Stop A], [Stop B], or [Stop All] in response to a prompt to specify which line(s) to stop (see page 2-5 for more information about softkeys).
[SELECT] - Moves the cursor between fields on the display.
The top pair of arrows moves the cursor up or to the left.
The bottom pair of arrows moves the cursor downor to the right.
[LOCK KEYPAD] - Pressing this key, followed by entering a lock passcode, disables all keys on the keypad except [STOP] until a valid unlock passcode is entered. See Locking and Unlocking the Keypad for more information.
Includes Systems Compatible with Hospira MedNet
2-4 System Operating Manual
[AUDIO PAUSED] - Has two functions, temporarily silencing all audio output for any active alarms for two minutes or temporarily silencing keypad input sound feedback for two minutes if there are no active alarms. See Programming a Callback Alarm and Silencing the Keypad for more information.
[C] - Clears all values in the currently-highlighted field.
[C] also clears the dashes (-- -- --) that are displayed when an entry is invalid or a drug delivery parameter is beyond the pre-programmed hard limits.
NOTE: [C] will NOT clear an entire program.
[DECIMAL KEY] - Adds the decimal point needed when entering numbers other than whole numbers (1.2 mL, for example).
NOTE: On the infuser display, any digits after the decimalpoint will be ¾ of the height of the whole number digits.

Plum 360 Infuser
System Operating Manual 2-5
Number keys - Have two functions, entering numbers in any highlighted field and navigating through the drug library.
See Using the Keypad to Enter Program Information and Using the Keypad to Search the Drug List for more information.
Softkeys - Offer functions that are appropriate for the screen currently being displayed. The current function for each softkey appears on the display; you press the triangular key below it to choose the function.
In this manual, softkeys are represented by a triangle and the name in brackets; [Delay], for example.
a b c d e f
g h i j k l m n o
p q r s t u v w x y z
PreviousScreen
Delay MultistepLoading
Dose
Includes Systems Compatible with Hospira MedNet
2-6 System Operating Manual
Indicators
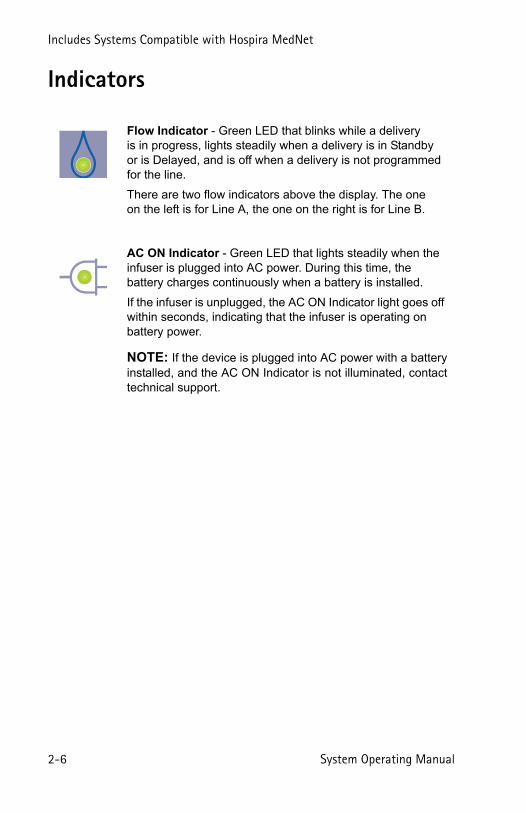
Flow Indicator - Green LED that blinks while a deliveryis in progress, lights steadily when a delivery is in Standby or is Delayed, and is off when a delivery is not programmed for the line.
There are two flow indicators above the display. The one on the left is for Line A, the one on the right is for Line B.
AC ON Indicator - Green LED that lights steadily when the infuser is plugged into AC power. During this time, the battery charges continuously when a battery is installed.
If the infuser is unplugged, the AC ON Indicator light goes off within seconds, indicating that the infuser is operating on battery power.
NOTE: If the device is plugged into AC power with a batteryinstalled, and the AC ON Indicator is not illuminated, contacttechnical support.

Plum 360 Infuser
System Operating Manual 2-7
Display Symbols
Caution - Appears on the display to tell the clinician to use CAUTION because the specified drug has NOT been programmed with specified safety limits.
Upper Soft Limit Override - appears next to the drug name when the dosage of the drug being infused is higher than the upper soft limit set for the drug in the Custom Drug Library (for systems with Hospira MedNet software only).
Lower Soft Limit Override - appears next to the drug name when the dosage of the drug being infused is less than the lower soft limit set for the drug in the Custom Drug Library (for systems with Hospira MedNet software only).
Wireless Connection - appears when the infuser is communicating with the network using a wireless connection.
The number of bars indicate the strength of the wireless connection. The following figure shows the signal strength from highest on the left to lowest on the right.
If the signal strength is low, try relocating the infuser closer to the access point.
Includes Systems Compatible with Hospira MedNet
2-8 System Operating Manual
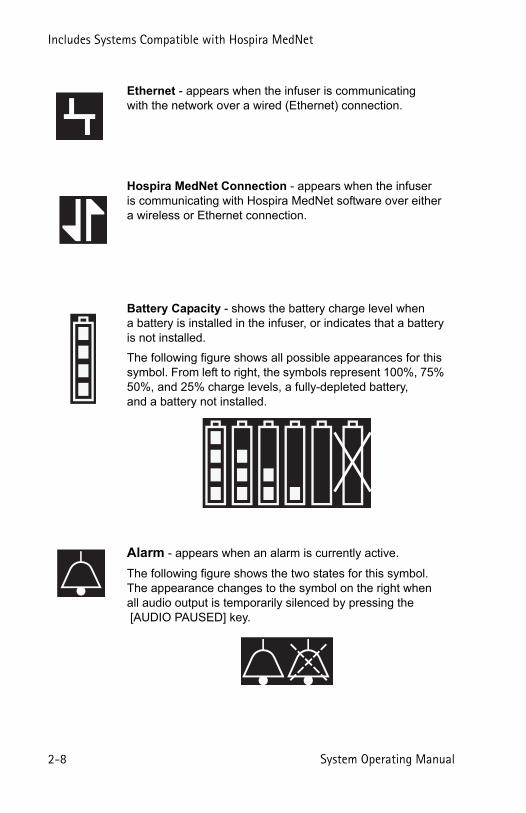
Ethernet - appears when the infuser is communicating with the network over a wired (Ethernet) connection.
Hospira MedNet Connection - appears when the infuser is communicating with Hospira MedNet software over either a wireless or Ethernet connection.
Battery Capacity - shows the battery charge level when a battery is installed in the infuser, or indicates that a battery is not installed.
The following figure shows all possible appearances for this symbol. From left to right, the symbols represent 100%, 75% 50%, and 25% charge levels, a fully-depleted battery, and a battery not installed.
Alarm - appears when an alarm is currently active.
The following figure shows the two states for this symbol. The appearance changes to the symbol on the right when all audio output is temporarily silenced by pressing the [AUDIO PAUSED] key.
Plum 360 Infuser
System Operating Manual 2-9
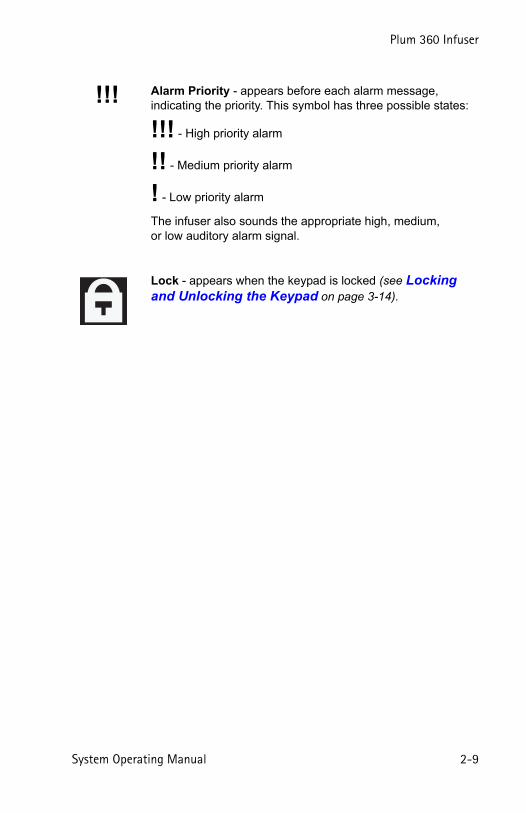
!!! Alarm Priority - appears before each alarm message, indicating the priority. This symbol has three possible states:
!!! - High priority alarm
!! - Medium priority alarm
! - Low priority alarm
The infuser also sounds the appropriate high, medium, or low auditory alarm signal.
Lock - appears when the keypad is locked (see Locking and Unlocking the Keypad on page 3-14).

Includes Systems Compatible with Hospira MedNet
2-10 System Operating Manual
CE ModuleConnection of the Plum 360 infuser to an IT network could resultin previously unidentified risks to patients, operators, or third parties.The organization that makes those connections must identify andcontrol those risks.
The wireless CE (Connectivity Engine) Module attached to the backof the infuser provides both wired Ethernet and wireless 802.11networking capabilities for connection to Hospira MedNet softwareon your facility’s network (see Hospira MedNet Safety Software onpage 12-22).
In addition to its communications features, the CE Module includesthese infuser controls:
Service Port (Hospira Use Only)
Nurse CallInterface Call Port
I/O PortCover
Ethernet Port
VolumeControlKnob
ActivityIndicatorLEDs
Plum 360 Infuser
System Operating Manual 2-11
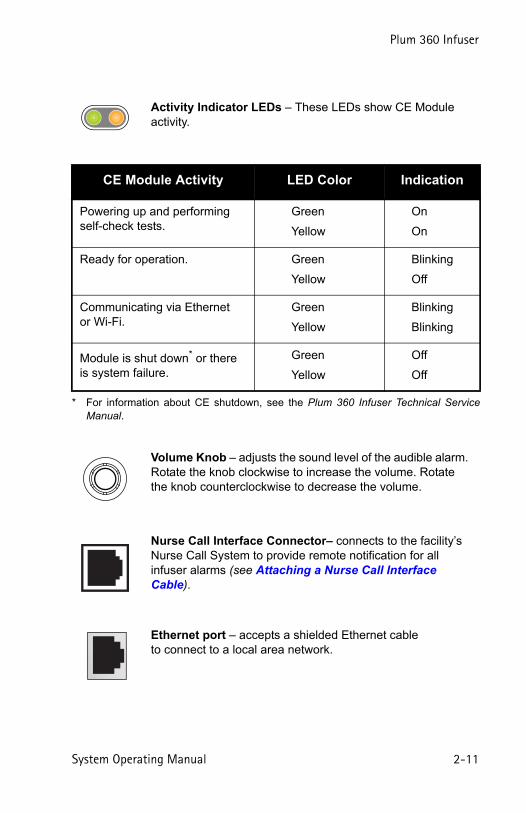
Activity Indicator LEDs – These LEDs show CE Module activity.
CE Module Activity LED Color Indication
Powering up and performing self-check tests.
Green
Yellow
On
On
Ready for operation. Green
Yellow
Blinking
Off
Communicating via Ethernet or Wi-Fi.
Green
Yellow
Blinking
Blinking
Module is shut down* or there is system failure.
* For information about CE shutdown, see the Plum 360 Infuser Technical ServiceManual.
Green
Yellow
Off
Off
Volume Knob – adjusts the sound level of the audible alarm. Rotate the knob clockwise to increase the volume. Rotate the knob counterclockwise to decrease the volume.
Nurse Call Interface Connector– connects to the facility’s Nurse Call System to provide remote notification for all infuser alarms (see Attaching a Nurse Call Interface Cable).
Ethernet port – accepts a shielded Ethernet cable to connect to a local area network.

Includes Systems Compatible with Hospira MedNet
2-12 System Operating Manual
Pole Clamp, Potential Equalization Terminal, and Power Cord
Pole Clamp - adjusts to fit round I.V. poles from 0.5 - 1.5 inches in diameter. See Mounting the Infuser on an I.V. Pole on page 3-2 for more information. When the pole clamp is tight enough, a ratcheting sound indicates that the clamp is being over-tightened.
Power Cord - Plugs into AC (mains) power to provide power, charge the battery, and ground the infuser enclosure and chassis. The power cord connection to the infuser is protected by an enclosure to prevent accidental disconnection. The power cord can be replaced if damaged (see the Plum 360 Infuser Technical Service Manual).
Plum 360 Infuser
System Operating Manual 2-13
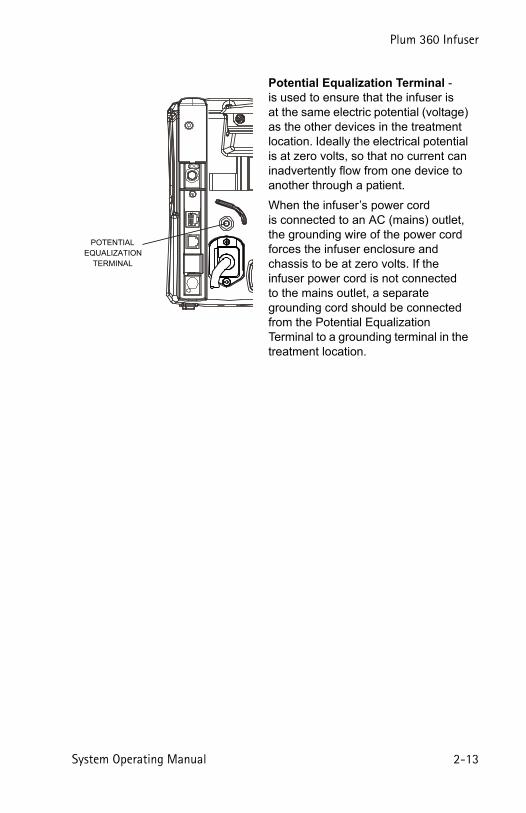
Potential Equalization Terminal - is used to ensure that the infuser is at the same electric potential (voltage) as the other devices in the treatment location. Ideally the electrical potential is at zero volts, so that no current can inadvertently flow from one device to another through a patient.
When the infuser’s power cord is connected to an AC (mains) outlet, the grounding wire of the power cord forces the infuser enclosure and chassis to be at zero volts. If the infuser power cord is not connected to the mains outlet, a separate grounding cord should be connected from the Potential Equalization Terminal to a grounding terminal in the treatment location.
POTENTIAL
TERMINAL

Includes Systems Compatible with Hospira MedNet
2-14 System Operating Manual
Plum Administration SetsPlum administration sets are available for a wide variety of uses,including intravenous, blood, enteral, and epidural deliveries.Intravenous, epidural, and blood sets are supplied sterile. Some setshave additional features such as burettes, filters, or special tubing(see Administration Sets on page 12-1 for a description of eachPlum administration set).
The following sections describe the most common features.See Section 4 for instructions on how to prepare and use Plumadministration sets. See set packaging for specific instructions.
CASSETTEFINGER
GRIPCAIR
(ROLLER)CLAMP
DISTAL(PATIENT)
LINE
Y-SITE(For IV Medicine)
LOCKING COLLARCONNECTOR
PRIMARYLINE
SECONDARY PORT(Prepierced, capped Clave
(Not for IV Medicine))
SLIDE CLAMP
FLOWREGULATOR
CONVERTIBLE PIERCING PINWITH DRIP CHAMBER
PROTECTIVE CAPWITH FILTER
(Connect to patient access device)
Plum 360 Infuser
System Operating Manual 2-15
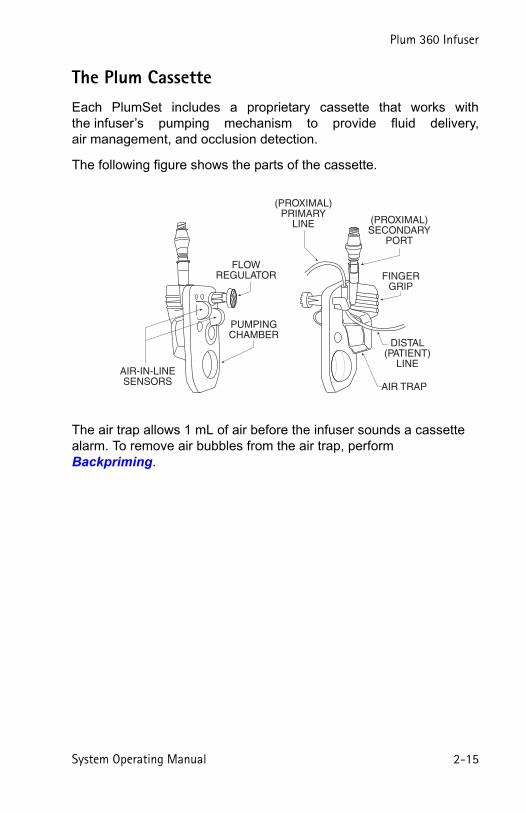
The Plum CassetteEach PlumSet includes a proprietary cassette that works withthe infuser’s pumping mechanism to provide fluid delivery,air management, and occlusion detection.
The following figure shows the parts of the cassette.
The air trap allows 1 mL of air before the infuser sounds a cassette alarm. To remove air bubbles from the air trap, perform Backpriming.
FINGERGRIP
DISTAL(PATIENT)
LINE
AIR TRAP
(PROXIMAL)PRIMARY
LINE
FLOWREGULATOR
PUMPINGCHAMBER
AIR-IN-LINESENSORS
(PROXIMAL)SECONDARY
PORT
Includes Systems Compatible with Hospira MedNet
2-16 System Operating Manual
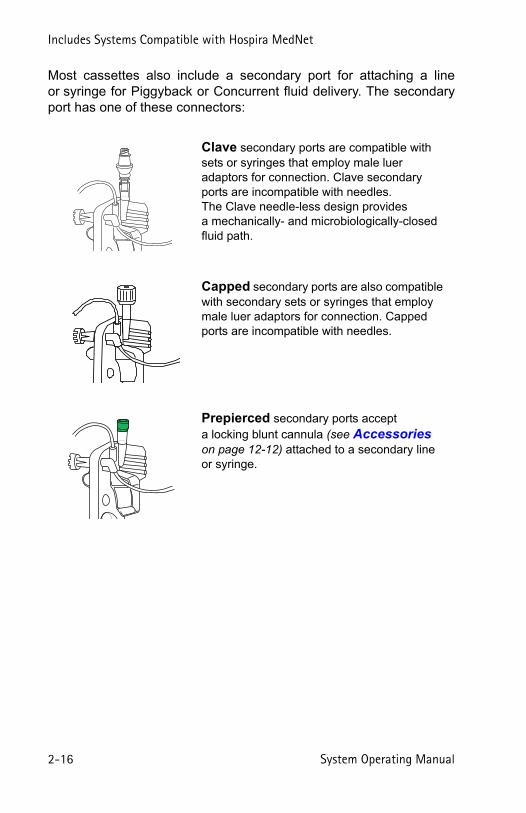
Most cassettes also include a secondary port for attaching a lineor syringe for Piggyback or Concurrent fluid delivery. The secondaryport has one of these connectors:
Clave secondary ports are compatible with sets or syringes that employ male luer adaptors for connection. Clave secondary ports are incompatible with needles. The Clave needle-less design provides a mechanically- and microbiologically-closed fluid path.
Capped secondary ports are also compatible with secondary sets or syringes that employ male luer adaptors for connection. Capped ports are incompatible with needles.
Prepierced secondary ports accept a locking blunt cannula (see Accessories on page 12-12) attached to a secondary line or syringe.
Plum 360 Infuser
System Operating Manual 2-17
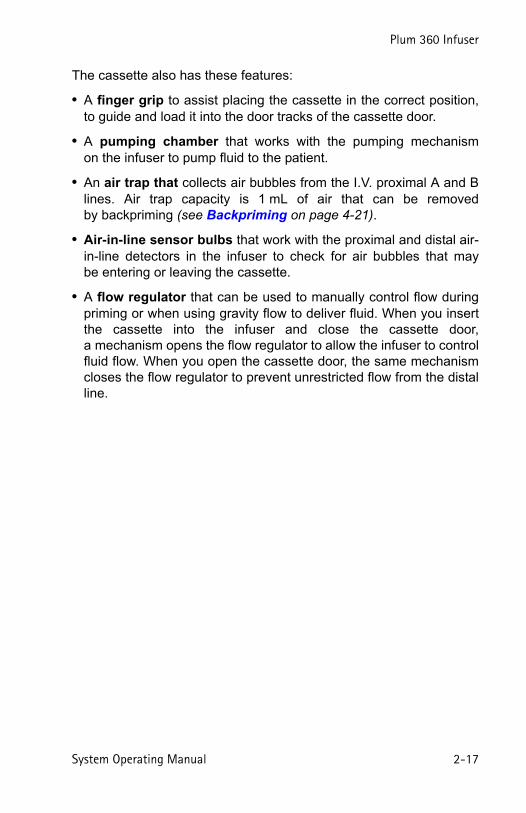
The cassette also has these features:
• A finger grip to assist placing the cassette in the correct position,to guide and load it into the door tracks of the cassette door.
• A pumping chamber that works with the pumping mechanismon the infuser to pump fluid to the patient.
• An air trap that collects air bubbles from the I.V. proximal A and Blines. Air trap capacity is 1 mL of air that can be removedby backpriming (see Backpriming on page 4-21).
• Air-in-line sensor bulbs that work with the proximal and distal air-in-line detectors in the infuser to check for air bubbles that maybe entering or leaving the cassette.
• A flow regulator that can be used to manually control flow duringpriming or when using gravity flow to deliver fluid. When you insertthe cassette into the infuser and close the cassette door,a mechanism opens the flow regulator to allow the infuser to controlfluid flow. When you open the cassette door, the same mechanismcloses the flow regulator to prevent unrestricted flow from the distalline.

Includes Systems Compatible with Hospira MedNet
2-18 System Operating Manual
Other Administration Set FeaturesMost Plum administration sets have some combination of thefollowing features. For complete information about all the featuresof a particular administration set, refer to the label on theadministration set packaging.
The convertible piercing pin spikes the seal on the fluid container and secures the administration set tubing to the container.
The piercing pin has a built-in filter vent that allows use with flexible or rigid fluid containers, and an integrated drip chamber with score mark for monitoring fluid flow.
If using a rigid fluid container (glass bottle, for example), open the filter vent cover above the drip chamber. If using a flexible plastic container, make sure this vent cover is closed.
Slide clamps can be placed anywhere on the tubing. The shape of the cutout provides three clamp positions:
• Open position, in the middle of the cutout, allows fluid to flow and also allows the clamp to slide freely on the tubing.
• Closed position, at the narrow end of the cutout, clamps the line, preventing fluid flow. The closed clamp stays in a fixed position on the tubing.
• Parked position, at the wide end of the cutout, also allows fluid to flow, but keeps the clamp in a fixed position on the tubing to prevent movement.
CLOSEDPOSITION
OPENPOSITION
PARKEDPOSITION
Plum 360 Infuser
System Operating Manual 2-19
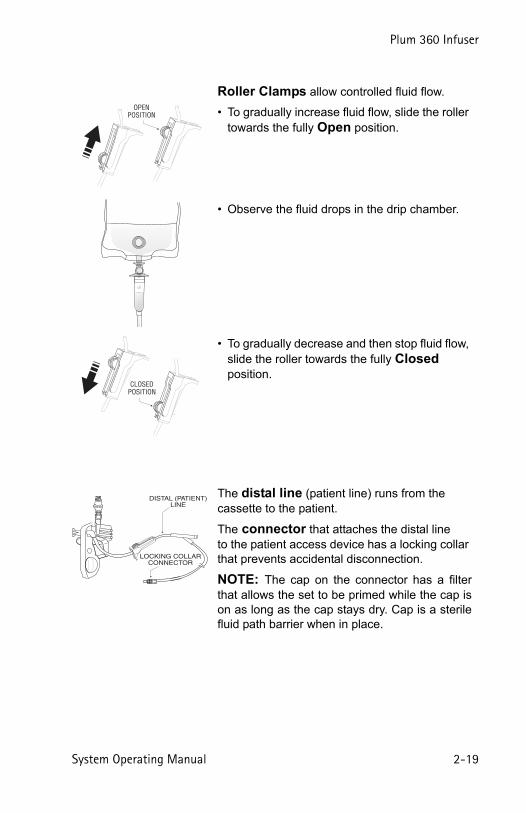
Roller Clamps allow controlled fluid flow.
• To gradually increase fluid flow, slide the roller towards the fully Open position.
• Observe the fluid drops in the drip chamber.
• To gradually decrease and then stop fluid flow, slide the roller towards the fully Closed position.
The distal line (patient line) runs from the cassette to the patient.
The connector that attaches the distal line to the patient access device has a locking collar that prevents accidental disconnection.
NOTE: The cap on the connector has a filterthat allows the set to be primed while the cap ison as long as the cap stays dry. Cap is a sterilefluid path barrier when in place.
OPENPOSITION
CLOSEDPOSITION
DISTAL (PATIENT)LINE
LOCKING COLLARCONNECTOR

Includes Systems Compatible with Hospira MedNet
2-20 System Operating Manual
Notes

Plum 360 Infuser
System Operating Manual 3-1
Section 3
Basic OperationsThe Plum 360 infuser does not require any special installation.Before placing the infuser into service for the first time, the onlypreparation needed is to have a biomedical technician customize thedefault settings according to the facility’s needs and then fully chargethe battery. See the Plum 360 Infuser Technical Service Manual formore information.
If using Hospira MedNet safety software, the infuser must alsobe connected to the facility’s network to download infuserconfiguration, Clinical Care Area (CCA), and Custom Drug Library(CDL) information before being placed into service.
Once these preparations are complete, follow these basic stepsto deliver fluids to the patient:
1. Mount the infuser on an I.V. pole (see Mounting the Infuser onan I.V. Pole on page 3-2), or place the infuser on a stablesurface.
Do not place the infuser on an unstable surface.
WARNINGCONNECT THE AC (MAINS) CORD TO A PROPERLYGROUNDED RECEPTACLE.

Includes Systems Compatible with Hospira MedNet
3-2 System Operating Manual
2. Connect the power cord to an AC (mains) power receptacle and confirm that the green AC ON indicator lights.
3. (Optional) Attach a Nurse Call Cable between the Nurse Call Interface Port on the back of the infuser and your facility’s Nurse Call system (see Attaching a Nurse Call Interface Cable on page 3-6).
4. Prime and install a Plum administration set (see Priming a Primary Administration Set on page 4-2). Confirm that the cassette door is closed before attaching an administration set to the patient access device.
5. Turn the infuser on and allow it to successfully complete the Self Test (see Turning Power On on page 3-11).
6. Attach the administration set to the patient access device.
7. Program the delivery and start the infusion (Programming on page 5-1 and Delivery Options on page 8-1).
Mounting the Infuser on an I.V. Pole
The Plum infuser pole clamp is designed to be mounted on an I.V.pole with a diameter from 0.5 - 1.5 inches. To do this:
1. Make sure the pole is assembled correctly, rests on a stable surface, and is placed where infuser operations will not be affected by other equipment.
Ensure that access to the mains plug is not blocked whileusing the infuser so that the plug can be disconnectedfrom the mains power receptacle in the event of anemergency.
CAUTIONFOR STABILITY AND TO RESIST TIPPING, MOUNT INFUSER TO THEHOSPIRA I.V. POLE LISTED IN THE ACCESSORIES SECTION PER THEINSTRUCTIONS PROVIDED WITH THE POLE. IF A DIFFERENT POLE ISUSED, THE RESPONSIBLE ORGANIZATION MUST VERIFY STABILITY.
Plum 360 Infuser
System Operating Manual 3-3
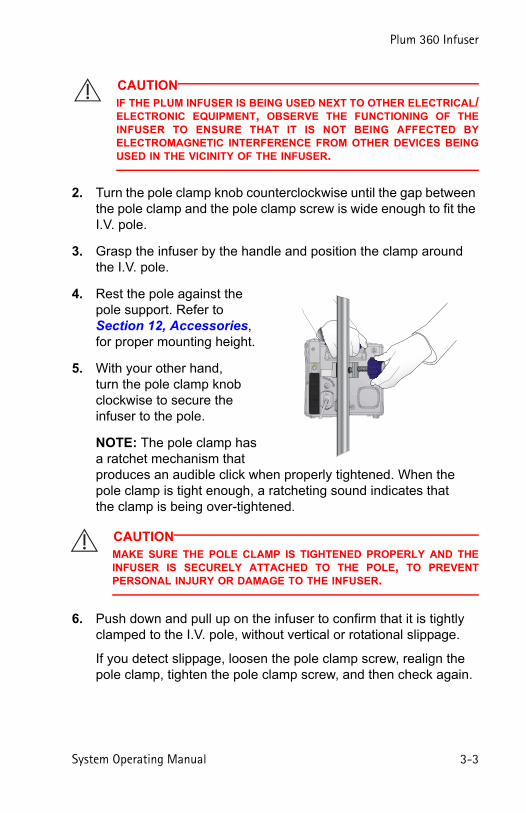
2. Turn the pole clamp knob counterclockwise until the gap between the pole clamp and the pole clamp screw is wide enough to fit the I.V. pole.
3. Grasp the infuser by the handle and position the clamp around the I.V. pole.
4. Rest the pole against the pole support. Refer to Section 12, Accessories, for proper mounting height.
5. With your other hand, turn the pole clamp knob clockwise to secure the infuser to the pole.
NOTE: The pole clamp has a ratchet mechanism that produces an audible click when properly tightened. When the pole clamp is tight enough, a ratcheting sound indicates that the clamp is being over-tightened.
6. Push down and pull up on the infuser to confirm that it is tightly clamped to the I.V. pole, without vertical or rotational slippage.
If you detect slippage, loosen the pole clamp screw, realign the pole clamp, tighten the pole clamp screw, and then check again.
CAUTIONIF THE PLUM INFUSER IS BEING USED NEXT TO OTHER ELECTRICAL/ELECTRONIC EQUIPMENT, OBSERVE THE FUNCTIONING OF THEINFUSER TO ENSURE THAT IT IS NOT BEING AFFECTED BYELECTROMAGNETIC INTERFERENCE FROM OTHER DEVICES BEINGUSED IN THE VICINITY OF THE INFUSER.
CAUTIONMAKE SURE THE POLE CLAMP IS TIGHTENED PROPERLY AND THEINFUSER IS SECURELY ATTACHED TO THE POLE, TO PREVENTPERSONAL INJURY OR DAMAGE TO THE INFUSER.

Includes Systems Compatible with Hospira MedNet
3-4 System Operating Manual
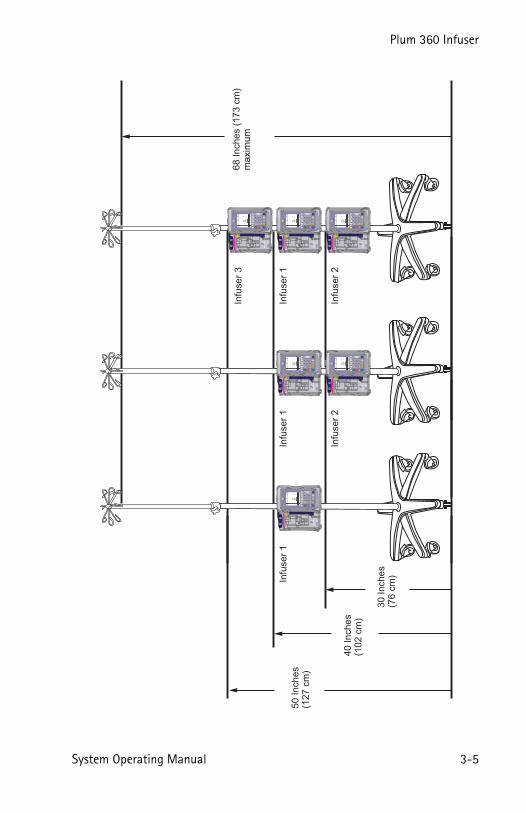
Mounting Multiple Infusers to an I.V. PoleIf there is a need to mount multiple infusers on an I.V. pole, use theapproved Hospira I.V. Pole on page 12-17 and Multiple DeviceAdapter on page 12-15. The documentation included with theHospira I.V. pole lists the allowable number of infusers and theirmounting heights to maintain the required stability of the system.For guidance, refer to the illustration on page 3-5.
Plum 360 Infuser
System Operating Manual 3-5
I.V. Pole with Three Mounted Infusers
68
In
ch
es (
17
3 c
m)
ma
xim
um
50
In
ch
es
(12
7 c
m)
40
In
ch
es
(10
2 c
m)
30
In
ch
es
(76
cm
)Infu
se
r 1
Infu
se
r 1
Infu
se
r 2
Infu
se
r 3
Infu
se
r 1
Infu
se
r 2
AB
AB
Settin
gs /
Vols
/ C
CA
Ba
ck
Prim
e
Rate
mL/h
r
Vo
l In
fm
L
0 000
DD
L
Se
lect L
ine
A/B
to
pro
gra
m
STA
RT
STO
P
AC
ON
a b
cd
e f
g h
ij k
lm
n o
p q
r s
t u
vw
x y
z
CLE
AR
LOC
K K
EY
PA
D
AU
DIO
PA
USE
D
ON
OFF
WARN
ING: C
LOSE
ALL C
LAMP
S BEF
ORE O
PENIN
G DOO
R
Follo
w ins
tructi
ons f
or us
e. The
Syste
m Op
eratin
g Man
ual
conta
ins pr
oper
use, w
arning
s, and
cauti
ons.
CL
OS
EL
EV
ER
WH
EN
N
OT
IN US
E
AB
AB
Settin
gs /
Vols
/ C
CA
Ba
ck
Prim
e
Rate
mL/h
r
Vo
l In
fm
L
0 000
DD
L
Se
lect L
ine
A/B
to
pro
gra
m
STA
RT
STO
P
AC
ON
a b
cd
e f
g h
ij k
lm
n o
p q
r s
t u
vw
x y
z
CLE
AR
LOC
K K
EY
PA
D
AU
DIO
PA
USE
D
ON
OFF
WARN
ING: C
LOSE
ALL C
LAMP
S BEF
ORE O
PENIN
G DOO
R
Follo
w ins
tructi
ons f
or us
e. The
Syste
m Op
eratin
g Man
ual
conta
ins pr
oper
use, w
arning
s, and
cauti
ons.
CL
OS
EL
EV
ER
WH
EN
N
OT
IN US
E

Includes Systems Compatible with Hospira MedNet
3-6 System Operating Manual
Attaching a Nurse Call Interface CableThe Plum 360 infuser can connect to your facility’s Nurse Call systemthrough the Plum Nurse Call Interface cable (see Accessories onpage 12-12).
To connect the infuser to a Nurse Call system:
1. Attach the rectangular connector on the Nurse Call interface cable to the Nurse Call interface connector that is built into the CE unit on the back of the infuser.
2. Attach the other end of the cable to the Nurse Call System port at the patient’s bedside.
Opening the Cassette Door
WARNINGCLOSE ALL CLAMPS ON THE PRIMARY AND SECONDARYLINES, OR REMOVE THE SECONDARY CONTAINER, BEFOREOPENING THE CASSETTE DOOR TO PREVENT THE MIXTURE OFPRIMARY AND SECONDARY FLUIDS AND TO PREVENTUNRESTRICTED FLOW.
CAUTIONA SMALL AMOUNT OF FLUID IS EXPELLED FROM THE SET (LESS THANOR EQUAL TO 0.1 mL) EACH TIME THE CASSETTE DOOR IS OPENEDOR CLOSED WITH A SET INSTALLED. IF POTENT DRUGS ARE BEINGUSED, TAKE APPROPRIATE ACTION TO GUARD AGAINSTOVERMEDICATION OF THE PATIENT.
TO CLOSESLIDE CLAMP
CLOSEDPOSITION ROLLER
ROLLER
TO CLOSECAIR CLAMP
CLOSEDPOSITION

Plum 360 Infuser
System Operating Manual 3-7
Infuser components located behind the cassette door interact with thecassette to control fluid flow, preventing primary and secondary fluidsfrom mixing, and allowing fluid to reach the patient only when theinfuser is pumping. The fluid regulator closes to prevent fluid flowto a patient.
When you open the cassette door, infuser components are no longerin contact with the cassette. Always close all clamps before youopen the cassette door so that fluid does not flow into dripchambers.
To open the cassette door:
1. Make sure that all slide clamp and lower CAIR (roller) clamps before opening the cassette door.
2. Lift the cassette door lever as shown in the following illustration.
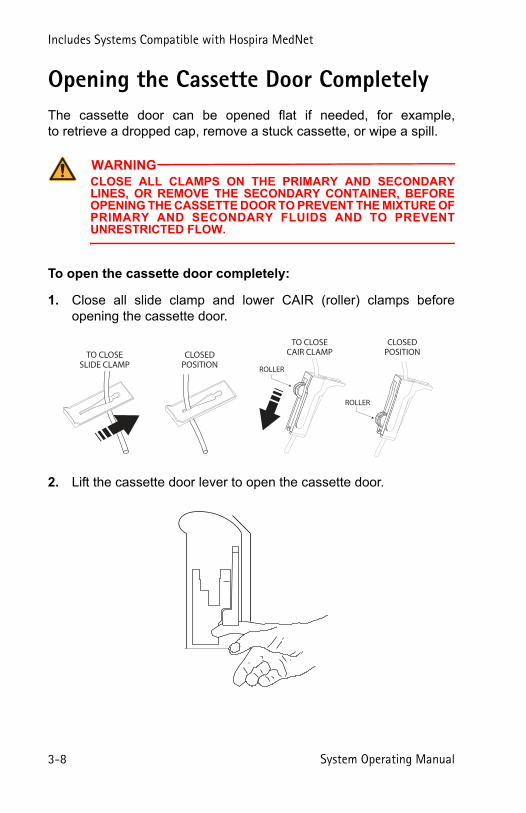
Includes Systems Compatible with Hospira MedNet
3-8 System Operating Manual
Opening the Cassette Door CompletelyThe cassette door can be opened flat if needed, for example,to retrieve a dropped cap, remove a stuck cassette, or wipe a spill.
To open the cassette door completely:
1. Close all slide clamp and lower CAIR (roller) clamps beforeopening the cassette door.
2. Lift the cassette door lever to open the cassette door.
WARNINGCLOSE ALL CLAMPS ON THE PRIMARY AND SECONDARYLINES, OR REMOVE THE SECONDARY CONTAINER, BEFOREOPENING THE CASSETTE DOOR TO PREVENT THE MIXTURE OFPRIMARY AND SECONDARY FLUIDS AND TO PREVENTUNRESTRICTED FLOW.
TO CLOSESLIDE CLAMP
CLOSEDPOSITION ROLLER
ROLLER
TO CLOSECAIR CLAMP
CLOSEDPOSITION
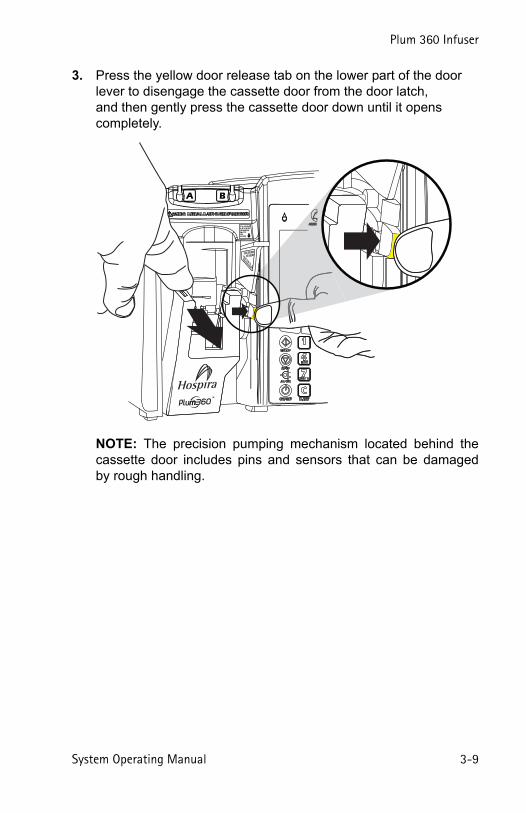
Plum 360 Infuser
System Operating Manual 3-9
3. Press the yellow door release tab on the lower part of the door lever to disengage the cassette door from the door latch, and then gently press the cassette door down until it opens completely.
NOTE: The precision pumping mechanism located behind thecassette door includes pins and sensors that can be damagedby rough handling.
CLOSELEVERWHEN NOTINUSE
CLOSE LEVER WHEN NOT IN USE PRESS TAB TO
UNLATCH DOOR
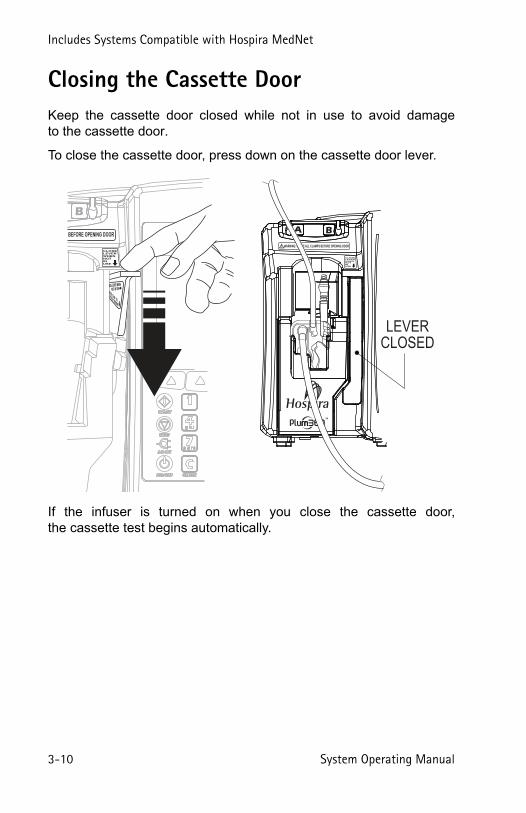
Includes Systems Compatible with Hospira MedNet
3-10 System Operating Manual
Closing the Cassette DoorKeep the cassette door closed while not in use to avoid damageto the cassette door.
To close the cassette door, press down on the cassette door lever.
If the infuser is turned on when you close the cassette door,the cassette test begins automatically.
CLOSELEVERWHEN NOTINUSE
CLOSELEVERWHEN NOTINUSE
WARNING: CLOSE ALL CLAMPS BEFORE OPENING DOOR
OSE LEVER WHEN NOT IN USE ESS TAB TO
LATCH DOOR
BEFORE OPENING DOOR
LEVERCLOSED

Plum 360 Infuser
System Operating Manual 3-11
Turning Power OnEach time you turn the power on, the infuser performs a System SelfTest to check the operation of critical systems and alarms,then prompts for a cassette, if one is not already installed. The infuserthen performs a cassette test that checks for air bubbles and verifiesthe integrity of the cassette’s pumping components.
NOTE: A small amount of fluid may be expelled from the set(less than or equal to 0.2 mL) when the infuser is powered on.If potent drugs are being used, take appropriate action to guardagainst over-medication of the patient.
Cassette test failure can be caused by improper cassette priming.In that case, perform backpriming to resolve the problem. If the teststill fails, replace the administration set with a properly primed set.If the failure persists, replace the infuser.
To turn power on:
1. Make sure the power cord is plugged into AC (mains) power andthat the infuser is mounted securely on an I.V. pole or locatedon a stable surface.
2. Press [ON/OFF] until you hear a beep, the Hospira logo appears on the screen, and the Line A and Line B flow indicators (drip symbols) briefly blink.
The infuser checks for a cassette and then begins the System Self Test, followed by the cassette test.
CAUTIONDO NOT USE THE INFUSER ON A PATIENT IF THE BATTERY IS NOTINSTALLED.
Do not use the infuser if the Self Test fails.
Ensure that access to the mains plug is not blocked whileusing the infuser so that the plug can be disconnectedfrom the mains power receptacle in the eventof an emergency.
Includes Systems Compatible with Hospira MedNet
3-12 System Operating Manual
• If you see the prompt “Insert PLUM Set, Close Lever,” inserta primed Plum cassette into the infuser to continue.
• If you see the prompt “New Patient?” the infuser has a storedprogram from the last delivery. To clear the programming, press[Yes]; to keep it, press [No].
NOTE: If the cassette test fails while the New Patient? promptis displayed, press [Yes] or [No], as appropriate, and thenhold down [Backprime] to clear air from the cassette.See Backpriming on page 4-21 for more information.
Turning Power OffNOTE: Always turn the infuser off when not in use, to reduce theconsumption of electrical energy.
You can only turn power off if the status is STOPPED or blank forboth lines.
To turn power off:
1. Stop all active deliveries (see Stopping and Restarting aDelivery on page 3-22).
2. Press [ON/OFF] until you hear a beep.
NOTE: If the Plum 360 infuser has been turned off for longer than fivehours, all delivery settings are cleared and programming options arerestored to their default selections for next use.
Viewing the DisplayWhen operating the infuser, position yourself at a distance of no morethan 39 inches (1 M) from the display.
Make sure you are directly in front of the display, or at an angleof no more than 20 degrees off this position.
Plum 360 Infuser
System Operating Manual 3-13
Using the Keypad and ControlsThe alphanumeric keypad on the Plum 360 infuser has two functions,entering information to program a delivery and searching through thedrug library.
Using the Keypad to Enter Program InformationWhen entering numbers in a Program screen (to program a deliveryrate or VTBI, for example), highlight the field and press the numberkeys as needed.
• Use [Decimal] when entering numbers other than whole numbers(1.2 mL, for example)
• Use [SELECT] to move the cursor between programming fields.
• Press the top pair of arrows to move up or to the left.
• Press the bottom pair of arrows to move down or to the right.
• Press [C] to clear all values in the currently-highlighted fieldor to clear the dashes (-- -- --) that are displayed when an entryis invalid or a drug delivery parameter is beyond the pre-programmed hard limits.
NOTE: [C] will NOT clear an entire program.
Silencing the KeypadTo silence key press feedback sounds when there are no activealarms, press [AUDIO PAUSED]. A message will display while keypress feedback is silenced.
Keypad sounds resume automatically after 2 minutes.
When the infuser enters an alarm state, silencing is deactivatedand keypad sounds automatically resume.
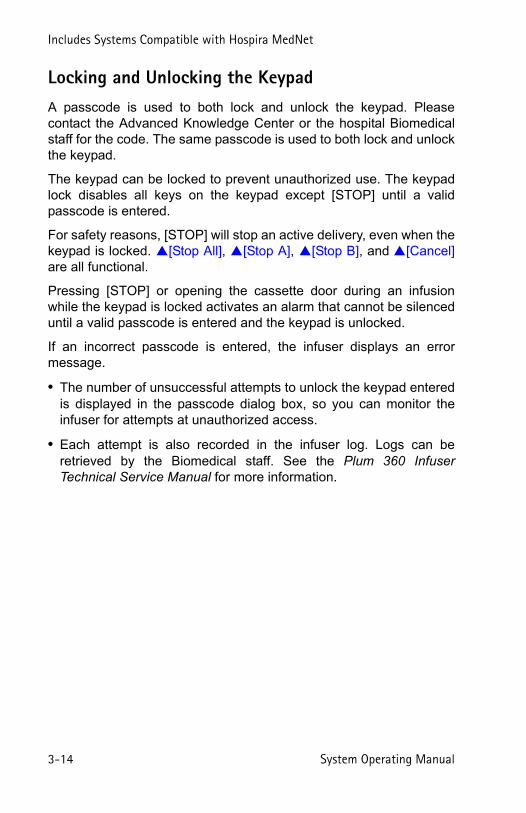
Includes Systems Compatible with Hospira MedNet
3-14 System Operating Manual
Locking and Unlocking the KeypadA passcode is used to both lock and unlock the keypad. Pleasecontact the Advanced Knowledge Center or the hospital Biomedicalstaff for the code. The same passcode is used to both lock and unlockthe keypad.
The keypad can be locked to prevent unauthorized use. The keypadlock disables all keys on the keypad except [STOP] until a validpasscode is entered.
For safety reasons, [STOP] will stop an active delivery, even when thekeypad is locked. [Stop All], [Stop A], [Stop B], and [Cancel]are all functional.
Pressing [STOP] or opening the cassette door during an infusionwhile the keypad is locked activates an alarm that cannot be silenceduntil a valid passcode is entered and the keypad is unlocked.
If an incorrect passcode is entered, the infuser displays an errormessage.
• The number of unsuccessful attempts to unlock the keypad enteredis displayed in the passcode dialog box, so you can monitor theinfuser for attempts at unauthorized access.
• Each attempt is also recorded in the infuser log. Logs can beretrieved by the Biomedical staff. See the Plum 360 InfuserTechnical Service Manual for more information.

Plum 360 Infuser
System Operating Manual 3-15
To lock the keypad (Method #1):
1. Press the [LOCK KEYPAD] hard key.
2. The Passcode data entry screen appears on the display.
3. Enter the passcode using the numeric keypad.
4. Press the [Enter] soft key.
When the keypad is locked, the lock symbol appears in thebottom right corner of the delivery screen.
To lock the keypad (Method #2):
1. At the main delivery screen, press the [Settings/Vols/CCA] softkey.
2. The Settings/Vols/CCA screen appears on the display.
A BPasscode
Enter Cancel
Use keypad then press Enter
Enter Passcode to Lock Keypad
****Passcode
Settings/Vols/CCA
Choose PreviousScreen
LockKeypad
Version 15.0.0.XX
Default Drug LibraryDDL Version 02
Select then press Choose
A B
Post Infusion Rate
Volumes InfusedLighting/Contrast
CCA SettingsPressure
DDL
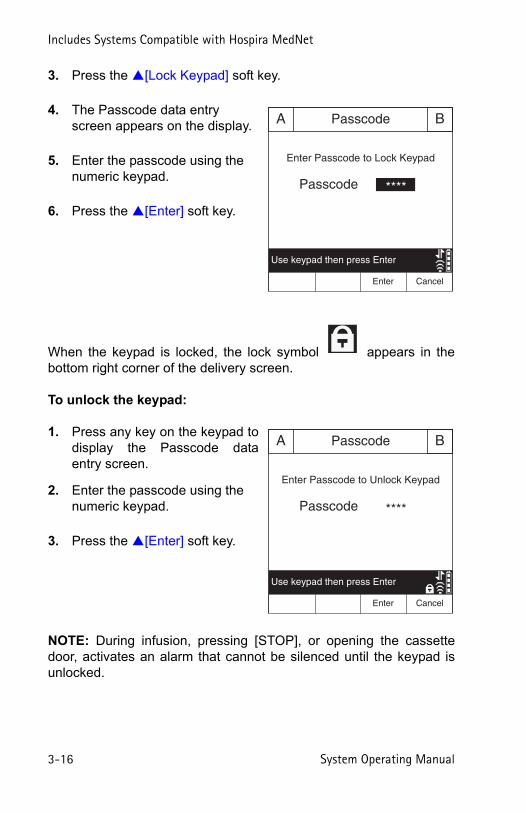
Includes Systems Compatible with Hospira MedNet
3-16 System Operating Manual
3. Press the [Lock Keypad] soft key.
4. The Passcode data entry screen appears on the display.
5. Enter the passcode using the numeric keypad.
6. Press the [Enter] soft key.
When the keypad is locked, the lock symbol appears in thebottom right corner of the delivery screen.
To unlock the keypad:
1. Press any key on the keypad todisplay the Passcode dataentry screen.
2. Enter the passcode using the numeric keypad.
3. Press the [Enter] soft key.
NOTE: During infusion, pressing [STOP], or opening the cassettedoor, activates an alarm that cannot be silenced until the keypad isunlocked.
A BPasscode
Enter Cancel
Use keypad then press Enter
Enter Passcode to Lock Keypad
****Passcode
A BPasscode
Enter Cancel
Use keypad then press Enter
Enter Passcode to Unlock Keypad
****Passcode
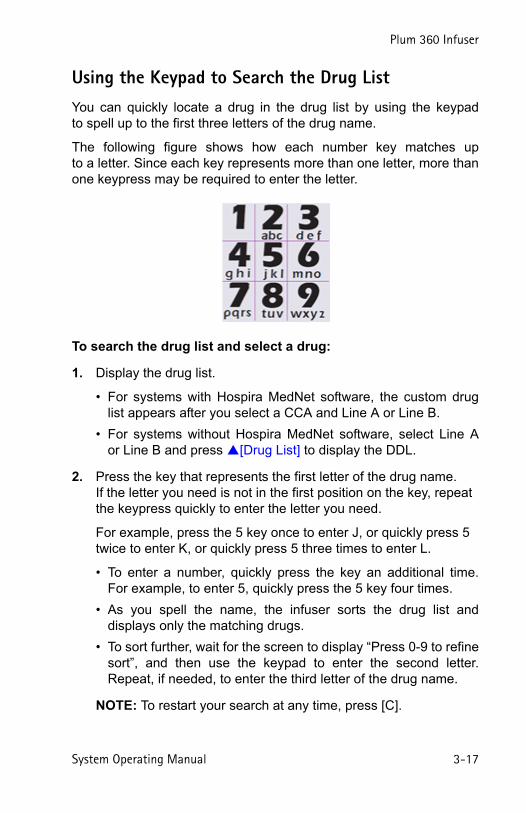
Plum 360 Infuser
System Operating Manual 3-17
Using the Keypad to Search the Drug ListYou can quickly locate a drug in the drug list by using the keypadto spell up to the first three letters of the drug name.
The following figure shows how each number key matches upto a letter. Since each key represents more than one letter, more thanone keypress may be required to enter the letter.
To search the drug list and select a drug:
1. Display the drug list.
• For systems with Hospira MedNet software, the custom druglist appears after you select a CCA and Line A or Line B.
• For systems without Hospira MedNet software, select Line Aor Line B and press [Drug List] to display the DDL.
2. Press the key that represents the first letter of the drug name. If the letter you need is not in the first position on the key, repeat the keypress quickly to enter the letter you need.
For example, press the 5 key once to enter J, or quickly press 5 twice to enter K, or quickly press 5 three times to enter L.
• To enter a number, quickly press the key an additional time.For example, to enter 5, quickly press the 5 key four times.
• As you spell the name, the infuser sorts the drug list anddisplays only the matching drugs.
• To sort further, wait for the screen to display “Press 0-9 to refinesort”, and then use the keypad to enter the second letter.Repeat, if needed, to enter the third letter of the drug name.
NOTE: To restart your search at any time, press [C].
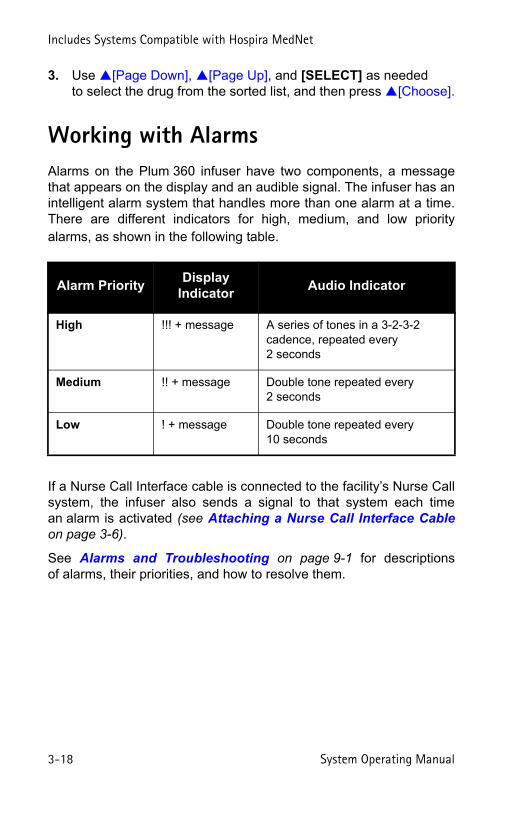
Includes Systems Compatible with Hospira MedNet
3-18 System Operating Manual
3. Use [Page Down], [Page Up], and [SELECT] as needed to select the drug from the sorted list, and then press [Choose].
Working with AlarmsAlarms on the Plum 360 infuser have two components, a messagethat appears on the display and an audible signal. The infuser has anintelligent alarm system that handles more than one alarm at a time.There are different indicators for high, medium, and low priorityalarms, as shown in the following table.
If a Nurse Call Interface cable is connected to the facility’s Nurse Callsystem, the infuser also sends a signal to that system each timean alarm is activated (see Attaching a Nurse Call Interface Cableon page 3-6).
See Alarms and Troubleshooting on page 9-1 for descriptionsof alarms, their priorities, and how to resolve them.
Alarm PriorityDisplay
IndicatorAudio Indicator
High !!! + message A series of tones in a 3-2-3-2 cadence, repeated every 2 seconds
Medium !! + message Double tone repeated every 2 seconds
Low ! + message Double tone repeated every 10 seconds

Plum 360 Infuser
System Operating Manual 3-19
Test the Alarm SystemTo test the alarm system before using on a patient:
1. Load a non-primed cassette in the infuser and power the infuseron if it is not already on.
2. Verify the Cassette Test Failure alarm activates and the audible alarm sounds.
3. Verify the alarm volume is appropriate for the patient environment.
4. Adjust the volume using the Volume Control knob on the back of the infuser, if necessary.
5. Press the [AUDIO PAUSED] key, and verify that the alarm audio is paused.
Responding to an Alarm1. If the keypad is locked out, enter the unlock code on the keypad.
2. Press [AUDIO PAUSED] to silence the audible part of an alarm for 2 minutes. The alarm symbol on the display changes:
The display also flashes and shows the alarm message until the alarm condition is resolved.
NOTE: Alarm sounds resume after 2 minutes, but can be pausedagain if resolving the alarm condition takes more time.
3. Check the display for the alarm message.
4. Correct the alarm condition (see Alarms and Troubleshooting on page 9-1).
5. Press [START] to resume infusion. If more than one line is programmed, press [Start A], [Start B], or [Start All] as needed.
Includes Systems Compatible with Hospira MedNet
3-20 System Operating Manual
NOTE: Each alarm puts an entry in the infuser logs.If troubleshooting does not correct the problem, contact theBiomedical department, who can check the logs and furtherisolate the problem.
A malfunction alarm alerts you to turn off the infuser and restart it.If the alarm continues, replace the infuser.
Adjusting the Audio Alarm Volume
The alarm volume control knob is located on the back of the infuser(see CE Module on page 2-10).
• To increase the volume, turn the knob clockwise.
• To decrease the volume, turn the knob counterclockwise.
WARNINGCHECK THAT THE ALARM VOLUME LEVEL IS APPROPRIATE FORTHE CURRENT PATIENT AND BACKGROUND NOISE LEVELBEFORE USE ON THE PATIENT.

Plum 360 Infuser
System Operating Manual 3-21
Programming a Callback AlarmYou can program a Callback Alarm to alert you to each interim stepof a Loading Dose or Multistep delivery, or to notify you thata Piggyback delivery has ended. See Delivery Options on page 8-1and Standby on page 7-1 for more information.
A Callback Alarm is a medium priority alarm that must beacknowledged by the clinician. To turn off a Callback Alarm, press[AUDIO PAUSED].
If a Nurse Call Interface cable is connected to the facility’s Nurse Callsystem, the infuser also sends an alarm signal to that system.
Restarting the Delivery Automatically After a Distal Occlusion Alarm
• When the infuser detects a distal occlusion, delivery stopsimmediately and the infuser issues an alarm. The Plum 360 infusercan restart the delivery automatically if the distal occlusion clearswithin 60 seconds. This gives time to resolve the occlusion withoutthe need to restart the delivery manually by pressing the [START]key. During the 60 seconds, the infuser monitors the pressure,the delivery screen displays the status PAUSED, and the infuserissues a medium priority alarm. As soon as the pressure dropsbelow the Distal Occlusion Alarm Limit, the alarm clears anddelivery restarts immediately.
• If the occlusion is not resolved within 60 seconds, or the maximumnumber of restarts is exceeded, the delivery status changesto STOPPED. The alarm priority changes from medium to high.The change in the audible alarm cadence alerts you that you mustintervene to resolve the alarm (see Working with Alarms onpage 3-18 for descriptions of the audible alarms).
• When two lines are delivering, if either line exceeds the maximumnumber of restarts, the priority changes to high and the alarm mustbe resolved manually by pressing the [START] key.
Includes Systems Compatible with Hospira MedNet
3-22 System Operating Manual
If Hospira MedNet software is installed, each CCA can be configuredto allow up to 10 restarts per infusion. Without Hospira MedNetsoftware, the number of restarts can be configured by the Biomedicalstaff for the default CCA (DDL). To view the maximum numberof restarts for the current CCA, see Viewing CCA and InfuserSettings on page 3-29.
Stopping and Restarting a DeliveryThe following procedure describes how to stop and restart an activedelivery. Active deliveries include not only those that have the statusPUMPING, but also those that are in STANDBY, DELAYED,or PENDING.
Where two lines are active, pressing [STOP] does not stop any lines.You must choose to stop only one line or stop all or cancel theattempt.
To stop a delivery:
1. Press [STOP].
• If only one line is active, pumping stops immediately.
• If both lines are active, the infuser prompts you to choose whichline to stop.
2. Press [Stop A] or [Stop B] to stop the individual line or press [Stop All] to stop both at once.
To cancel the request and not stop any lines, press[Cancel].
NOTE: When two lines are active when you press [STOP], the infuserwill alarm after 15 seconds if you don’t press a softkey to choose theline(s) to stop. Pressing the [STOP] hardkey does not stop infusion.
Opening the cassette door will stop the infusion on one or both thelines.

Plum 360 Infuser
System Operating Manual 3-23
If you are stopping the infusion entirely, see Discontinuing FluidAdministration on page 4-29 for instructions on removing theadministration set from the patient. See Discontinuing ElectronicFlow Control and Setting Gravity Flow on page 4-26 forinstructions on removing the administration set from the infuser butcontinuing fluid administration.
To restart a delivery:
1. Press [START]. If only one line was pumping when delivery wasstopped, pumping resumes immediately.
• If the line was in DELAY the Delay countdown resumes whereit left off when the line was stopped.
• If the line was in STANDBY, pumping resumes when you press[START]. To return the line to Standby, press [Standby].
2. If both lines are stopped, the infuser prompts you to choose which line to start. Press [Start A] or [Start B] to start the corresponding line, or press [Start All] to start both lines at once. If either line is in DELAY or STANDBY, the infuser responds as described in Step 1.
To cancel the request to resume pumping, press [Cancel]. If no soft key is pressed within 15 seconds, an alarm will sound.
WARNINGCLOSE ALL CLAMPS BEFORE OPENING THE CASSETTE DOOR!
Includes Systems Compatible with Hospira MedNet
3-24 System Operating Manual
Clearing a LineWhen you clear a line, all the programming is cleared for that line.The Volume Infused reading for that line is not cleared. The VolumeInfused reading for the other line and the Total Volume reading arenot affected.
Each time you close the cassette door or turn the infuser on,the infuser prompts “New Patient?” to give you the option to clear allsettings on both lines. This is a safety feature to ensure that a patientdoes not get a stored delivery that was programmed for a differentpatient. If you press [Yes], all programming and Volumes Infuseddata are cleared and settings are returned to their defaults.
To clear a line:
1. If the line you want to clear is pumping, press [STOP].
2. Record the volume infused for the line, if needed (see Viewing and Clearing the Volumes Infused on page 3-26).
3. Press [A] or [B] to choose the line to clear.
4. In response to the prompt, press [Yes].
5. To cancel clearing a line and resume pumping, select [No], [START], and then [Yes].
Setting the Post Infusion RateAfter the programmed VTBI is delivered, the infuser issues a VTBIComplete alarm, and begins delivering a Post Infusion Rate.The default Post Infusion Rate setting is KVO, but the default settingcan be changed in Hospira MedNet software by the CCA. On infuserswithout Hospira MedNet software, the Post Infusion Rate defaultsetting can be changed by a biomedical technician.

Plum 360 Infuser
System Operating Manual 3-25
You can change the default setting to one of the following:
• KVO - the infuser continues to deliver fluid at a Keep Vein Open(KVO) rate of 1 mL/hr. If the delivery rate of the infusion that justcompleted was less than 1 mL/hr, the KVO rate will continue at thesame delivery rate (for example, if the delivery rate was 0.5 mL/hr,the KVO rate will be 0.5 mL/hr).
• Rate - the infuser continues to deliver fluid at the programmed rate,maintaining the therapeutic rate until the VTBI Complete alarm canbe resolved
For a Concurrent delivery, the Post Infusion Rate is set for both lines.As each line completes its VTBI delivery, that line begins infusingautomatically at the Post Infusion Rate.
For a Piggyback delivery, the Post Infusion Rate does not apply onLine B. The infuser switches to Line A automatically when thePiggyback Delivery is complete.
When Line A is no longer in a Pending state (STANDBY, DELAY,CLEAR, or STOPPED) and Piggyback delivery is complete, a “VTBICompleted Line B! Add more VTBI OR Clear B” alarm is received.
To set the Post Infusion Rate:
1. On the delivery screen, press [Settings/Vols/CCA]. The Settings/Vols/CCA screen appears, with Post Infusion rate highlighted.
Settings/Vols/CCA
Choose PreviousScreen
LockKeypad
Version 15.0.0.XX
Default Drug LibraryDDL Version 02
Select then press Choose
A B
Post Infusion Rate
Volumes InfusedLighting/Contrast
CCA SettingsPressure
DDL

Includes Systems Compatible with Hospira MedNet
3-26 System Operating Manual
2. Press[Choose]. The Post Infusion Rate screen appears, with the current setting highlighted.
3. To change the current setting, press [KVO/Rate] (to return to the previous setting, press [KVO/Rate] again).
4. Press [Done] to save your changes and return to the Settings/Vols/CCA screen, and then press [Previous Screen] to return to the delivery screen.
Post Infusion Rate (Loading Dose Delivery and Multistep Delivery)During a Loading Dose delivery or a Multistep Delivery, you can stopthe Post Infusion Rate and make changes (perform titration)to the VTBI. For more information, see Adding VTBI to LoadingDose or Multistep Program After VTBI Complete Alarm Activateson page 8-5
Viewing and Clearing the Volumes InfusedThe infuser records the volume infused during each delivery andkeeps separate records for Line A and Line B, and a cumulative totalfor both lines. The recorded volume infused is retained for 5 hoursafter the infuser is turned off.
The following procedure describes how to view the volume infusedrecords and clear them when necessary.
Post Infusion Rate
PreviousScreen
KVO/Rate
Done
Change using KVO/Rate.
Press Done to save and return.
A B
KVOPost Infusion Rate

Plum 360 Infuser
System Operating Manual 3-27
NOTE: All programming, including the volumes infused, is clearedwhen you turn the infuser off, and then turn it on again, then answer“Yes” to the “New Patient?” prompt, or when you select a new CCA.
To view and clear the volumes infused:
1. On the main delivery screen (of a Plum 360 infuser with HospiraMedNet software), press [Settings/Vols/CCA] to display theSettings/Vols/CCA screen shown on page 3-25.
2. Use [SELECT] to highlight Volumes Infused and then press [Choose].
The Volumes Infused screen displays the volumes infused on Line A, Line B, and the total volume infused on both lines since the last time the values were cleared.
3. To view the Volumes Infused data without clearing any values, press [Previous Screen]. Press [Previous Screen] again to return to the delivery screen. (The screen will automatically time out after 30 seconds and return to the delivery screen if you do not press a softkey.)
4. To clear the Volumes Infused data:
• Press [Clear A] to clear the Line A total only, and return to theSettings/Vols/CCA screen.
• Press [Clear B] to clear the Line B total only, and return to theSettings/Vols/CCA screen.
• Press [Clear Total] to clear all values, including the TotalVolume, and return to the Settings/Vols/CCA screen.
• Press [Previous Screen] to return to the Settings/Vols/CCAscreen.
If you do not press a key in 30 seconds, the Delivery screenautomatically returns.
Volumes Infused
Clear A Clear B PreviousScreen
ClearTotal
Line A 4 mL
Line B 5 mL
Total Volume 9 mL
Clear A, Clear B or Clear Total?
A B
DDL
250
Heparin
units mL25,000 250
Iocane
mg mL500
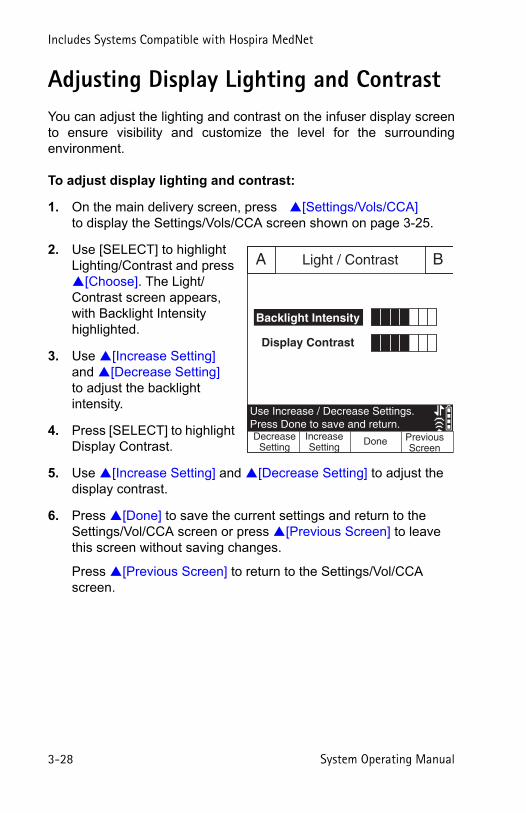
Includes Systems Compatible with Hospira MedNet
3-28 System Operating Manual
Adjusting Display Lighting and ContrastYou can adjust the lighting and contrast on the infuser display screento ensure visibility and customize the level for the surroundingenvironment.
To adjust display lighting and contrast:
1. On the main delivery screen, press[Settings/Vols/CCA] to display the Settings/Vols/CCA screen shown on page 3-25.
2. Use [SELECT] to highlight Lighting/Contrast and press [Choose]. The Light/Contrast screen appears, with Backlight Intensity highlighted.
3. Use [Increase Setting] and [Decrease Setting] to adjust the backlight intensity.
4. Press [SELECT] to highlight Display Contrast.
5. Use [Increase Setting] and [Decrease Setting] to adjust the display contrast.
6. Press [Done] to save the current settings and return to the Settings/Vol/CCA screen or press [Previous Screen] to leave this screen without saving changes.
Press [Previous Screen] to return to the Settings/Vol/CCA screen.
Light / Contrast
Done PreviousScreen
DecreaseSetting
IncreaseSetting
Use Increase / Decrease Settings.
Press Done to save and return.
A B
Backlight Intensity
Display Contrast
Plum 360 Infuser
System Operating Manual 3-29
Viewing CCA and Infuser SettingsCCA and infuser settings set defaults and limits that are appropriatefor the patient population of each Clinical Care Area (CCA).
• For systems with Hospira MedNet software, CCA/Infuser settingsare configured for each CCA through the Hospira MedNet software.The settings are downloaded to all infusers over the networkthrough a wireless or Ethernet connection.
• For systems without Hospira MedNet software, CCA/Infusersettings are configured for each infuser through a special Biomedmenu (see the Plum 360 Infuser Technical Service Manual).
To view CCA/Infuser settings when you select or change a CCA,press [CCA Details] on the Select CCA screen. You can also viewthe CCA settings for the current CCA from the Settings/Vols/CCAmenu. The following procedure describes how to do this.
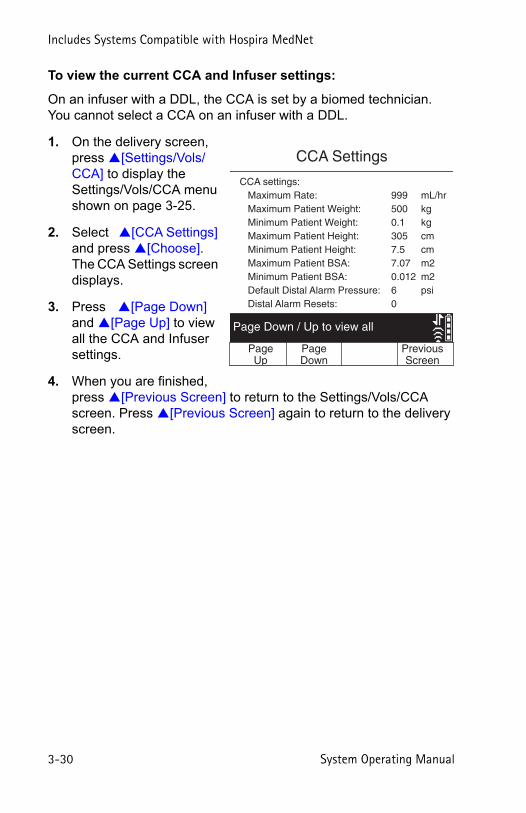
Includes Systems Compatible with Hospira MedNet
3-30 System Operating Manual
To view the current CCA and Infuser settings:
On an infuser with a DDL, the CCA is set by a biomed technician. You cannot select a CCA on an infuser with a DDL.
1. On the delivery screen, press [Settings/Vols/CCA] to display the Settings/Vols/CCA menu shown on page 3-25.
2. Select[CCA Settings] and press [Choose]. The CCA Settings screen displays.
3. Press[Page Down] and [Page Up] to view all the CCA and Infuser settings.
4. When you are finished, press [Previous Screen] to return to the Settings/Vols/CCA screen. Press [Previous Screen] again to return to the delivery screen.
CCA Settings
PreviousScreen
PageDown
PageUp
CCA settings:
Maximum Rate: 999 mL/hr
Maximum Patient Weight: 500 kg
Minimum Patient Weight: 0.1 kg
Maximum Patient Height: 305 cm
Minimum Patient Height: 7.5 cm
Maximum Patient BSA: 7.07 m2
Minimum Patient BSA: 0.012 m2
Default Distal Alarm Pressure: 6 psi
Distal Alarm Resets: 0
Page Down / Up to view all

Plum 360 Infuser
System Operating Manual 3-31
CCA/Infuser Setting Descriptions
CCA Settings Description
Maximum Rate The highest rate that you can program for a single line or Piggyback delivery.
For Concurrent delivery, the total rate for Line A + Line B must be <= 500 mL/hr. If this exceeds the maximum rate per line (for example, if the maximum rate is set to 200 mL/hr), then the maximum rate is enforced.
Maximum Patient WeightMinimum Patient Weight
Together, these display the allowable patient weight range for the CCA when you program a weight-based or BSA-based delivery.
See Patient Data Limits on page 14-12 for the increments that can be programmed for different weight ranges.
Maximum Patient HeightMinimum Patient Height
Together, these display the allowable patient height range for the CCA when you program a weight-based or BSA-based delivery.
See Patient Data Limits on page 14-12 for the increments that can be programmed for different height ranges.
Maximum Patient BSAMinimum Patient BSA
Together, these display the allowable patient BSA range for the CCA when you program a BSA-based delivery.
See Patient Data Limits on page 14-12 for the increments that can be programmed for different BSA ranges.
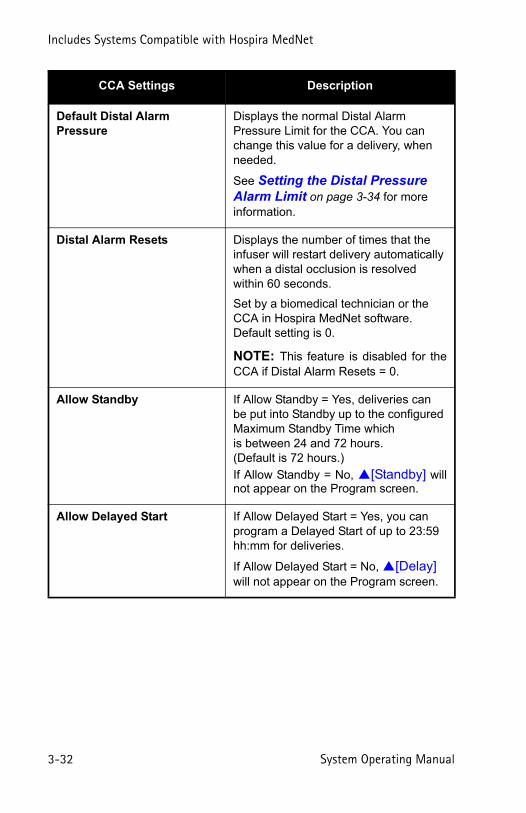
Includes Systems Compatible with Hospira MedNet
3-32 System Operating Manual
Default Distal Alarm Pressure
Displays the normal Distal Alarm Pressure Limit for the CCA. You can change this value for a delivery, when needed.
See Setting the Distal Pressure Alarm Limit on page 3-34 for more information.
Distal Alarm Resets Displays the number of times that the infuser will restart delivery automatically when a distal occlusion is resolved within 60 seconds.
Set by a biomedical technician or the CCA in Hospira MedNet software. Default setting is 0.
NOTE: This feature is disabled for theCCA if Distal Alarm Resets = 0.
Allow Standby If Allow Standby = Yes, deliveries can be put into Standby up to the configured Maximum Standby Time which is between 24 and 72 hours.(Default is 72 hours.)
If Allow Standby = No, [Standby] willnot appear on the Program screen.
Allow Delayed Start If Allow Delayed Start = Yes, you can program a Delayed Start of up to 23:59 hh:mm for deliveries.
If Allow Delayed Start = No, [Delay] will not appear on the Program screen.
CCA Settings Description
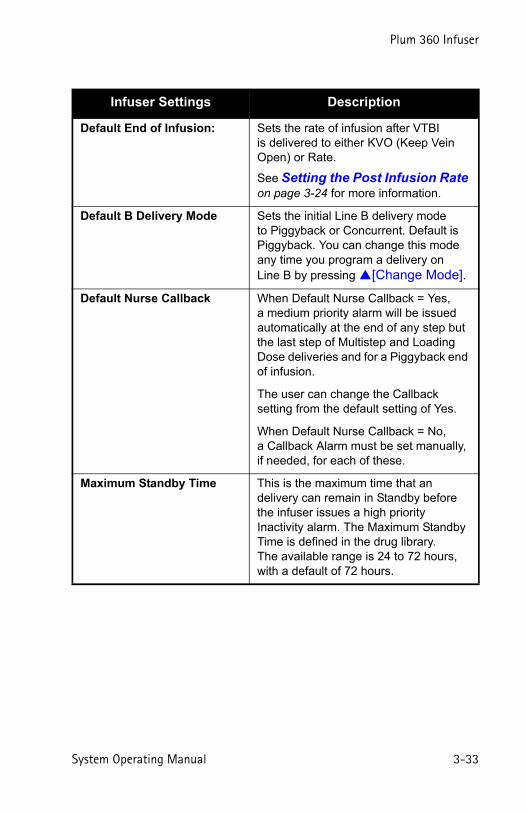
Plum 360 Infuser
System Operating Manual 3-33
Infuser Settings Description
Default End of Infusion: Sets the rate of infusion after VTBI is delivered to either KVO (Keep Vein Open) or Rate.
See Setting the Post Infusion Rate on page 3-24 for more information.
Default B Delivery Mode Sets the initial Line B delivery mode to Piggyback or Concurrent. Default is Piggyback. You can change this mode any time you program a delivery on Line B by pressing [Change Mode].
Default Nurse Callback When Default Nurse Callback = Yes, a medium priority alarm will be issued automatically at the end of any step but the last step of Multistep and Loading Dose deliveries and for a Piggyback end of infusion.
The user can change the Callback setting from the default setting of Yes.
When Default Nurse Callback = No, a Callback Alarm must be set manually, if needed, for each of these.
Maximum Standby Time This is the maximum time that an delivery can remain in Standby before the infuser issues a high priority Inactivity alarm. The Maximum Standby Time is defined in the drug library. The available range is 24 to 72 hours, with a default of 72 hours.

Includes Systems Compatible with Hospira MedNet
3-34 System Operating Manual
Changing the Default Infuser Settings
CCA settings are set based on the patient population and cannot bechanged. Infuser settings that begin with “Default” can be adjusted fora particular delivery, if clinically necessary.
• To change the Distal Alarm Pressure Limit from the preset DefaultDistal Alarm Pressure, see Setting the Distal Pressure AlarmLimit on page 3-34.
• To change the Post Infusion Rate from the value set by the DefaultEnd of Infusion setting, see Setting the Post Infusion Rate onpage 3-24.
• To change the Line B delivery mode from the Default Line BDelivery Mode setting, see Programming on page 5-1.
• To set a Nurse Callback Alarm for a Multistep, Loading Dose,or Piggyback delivery, see Programming a Callback Alarm onpage 3-21.
Setting the Distal Pressure Alarm LimitThe distal pressure limit sets the threshold for the distal occlusionalarm. When the infuser detects that the distal pressure in thecassette sensor area is greater than the distal pressure limit you set,± 3 psi, the infuser issues an alarm (see Restarting the DeliveryAutomatically After a Distal Occlusion Alarm on page 3-21 formore information).
The infuser checks the distal pressure and updates the reading everysecond. You can view the distal pressure reading on the same screenwhere you set the distal pressure limit.
Immediately after starting a delivery, verify the distal pressurealarm limit or set the appropriate limit for the patient, flow rate,and administration set.

Plum 360 Infuser
System Operating Manual 3-35
To view the current distal pressure reading and set the distalpressure limit:
1. On the main delivery screen, press[Settings/Vols/CCA] to display the Settings/Vols/CCA screen shown on page 3-25.
2. Change the Distal Pressure Alarm Limit.
Use the keypad to Press [Done] to save your changes and return to the Settings/Vols/CCA screen or press [Previous Screen] to view the settings without making changes.
3. Press[Previous Screen] to return to the main delivery screen.
Check the DistalOcclusion alarm settingbefore each patient useto ensure that thesetting is correct for thecurrent patient.
CAUTIONDO NOT SET THE DISTAL PRESSURE ALARM LEVEL LOWER THAN 3 PSI OR HIGHER THAN 12 PSI. SETTING THE ALARM OUTSIDEOF THAT RANGE MAY RESULT IN UNRELIABLE ALARM FUNCTIONING.
Pressure
PreviousScreen
Done
Enter value using keypad.
Press Done to save and return.
A B
6Distal Pressure Alarm Limit psi
1.5Current Distal Pressure psi

Includes Systems Compatible with Hospira MedNet
3-36 System Operating Manual
Changing the Default Line B Delivery ModeTo change the default Line B delivery mode:
1. Press[B] to choose Line B. The Program screen appears, displaying No Drug Selected.
2. Choose a drug and associated dosing units, if applicable.
3. Choose a dosing unit (the default is mL/hr) to display the Program screen.
4. Navigate to the current Mode field (displaying Piggyback or Concurrent), then [Change Mode].
5. Press [START] for confirmation when all program parameters have been populated, then [Yes] to start delivery.

Plum 360 Infuser
System Operating Manual 4-1
Section 4
Plum Administration Sets
Plum 360 infuser operation requires single-use LifeCare Plum seriesadministration sets (PlumSets). For a list of approved administrationsets, visit the Hospira website (http://products.hospira.com).
The following illustration shows the parts of a typical Plum primaryI.V. administration set.
CAUTIONPLUM ADMINISTRATION SETS ARE NOT FOR USE WITH HIGHPRESSURE INFUSION.
CASSETTEFINGER
GRIPCAIR
(ROLLER)CLAMP
DISTAL(PATIENT)
LINE
Y-SITE(For IV Medicine)
LOCKING COLLARCONNECTOR
PRIMARYLINE
SECONDARY PORT(Prepierced, capped Clave
(Not for IV Medicine))
SLIDE CLAMP
FLOWREGULATOR
CONVERTIBLE PIERCING PINWITH DRIP CHAMBER
PROTECTIVE CAPWITH FILTER
(Connect to patient access device)
Includes Systems Compatible with Hospira MedNet
4-2 System Operating Manual
Plum administration sets have a 96-hour performance limit. Refer tothe set packaging or facility policy for guidelines on when to changethe set.
See Plum Administration Sets on page 2-14 for more informationabout administration set features. See Supplies and Accessorieson page 12-1 for a list of Plum administration sets.
Priming a Primary Administration SetPriming fills the cassette, tubing, and any other special features of theset with fluid, displacing air. Proper priming is an important part of airmanagement.
The following procedure gives the general steps for priming a Plumadministration set. Refer to the administration set packaging forcomplete instructions on how to prime the set.
Sterile administration sets are indicated on the administration setpackaging. Refer to the packaging for the method of sterilization.\
WARNINGDO NOT PRIME THE ADMINISTRATION SET WHILE IT ISCONNECTED TO A PATIENT.
WARNINGDO NOT RESTERILIZE OR REUSE ADMINISTRATION SETS.ADMINISTRATION SETS ARE SINGLE-USE ONLY.RESTERILIZATION OR REUSE OF THE SETS MAY RESULT ININACCURATE DELIVERY, INFECTION, AND ALLERGICREACTION.
WARNINGUSE ONLY HOSPIRA PLUM ADMINISTRATION SETS WITHA CASSETTE SPECIFIED FOR USE WITH THE PLUM INFUSER.USE OF NON-PLUM CASSETTES CAN RESULT IN IMPROPERFUNCTIONING OF THE INFUSER OR INACCURATE DELIVERY.
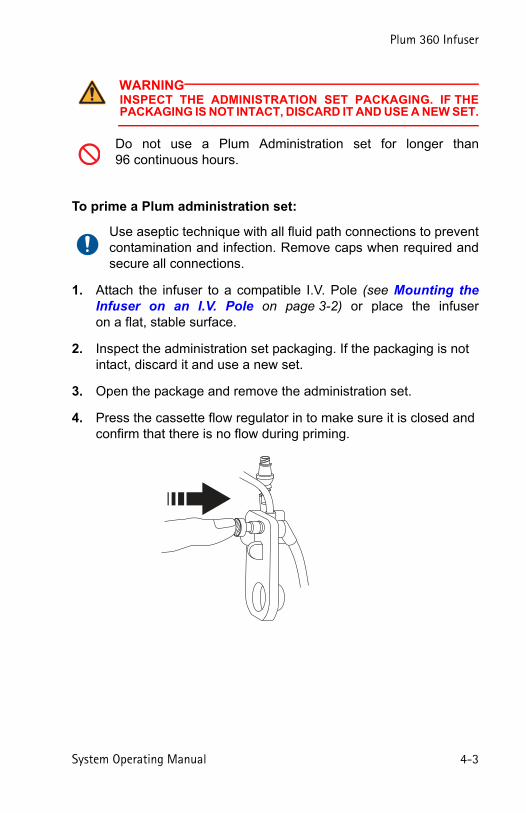
Plum 360 Infuser
System Operating Manual 4-3
To prime a Plum administration set:
1. Attach the infuser to a compatible I.V. Pole (see Mounting theInfuser on an I.V. Pole on page 3-2) or place the infuseron a flat, stable surface.
2. Inspect the administration set packaging. If the packaging is not intact, discard it and use a new set.
3. Open the package and remove the administration set.
4. Press the cassette flow regulator in to make sure it is closed and confirm that there is no flow during priming.
WARNINGINSPECT THE ADMINISTRATION SET PACKAGING. IF THEPACKAGING IS NOT INTACT, DISCARD IT AND USE A NEW SET.
Do not use a Plum Administration set for longer than96 continuous hours.
Use aseptic technique with all fluid path connections to preventcontamination and infection. Remove caps when required andsecure all connections.
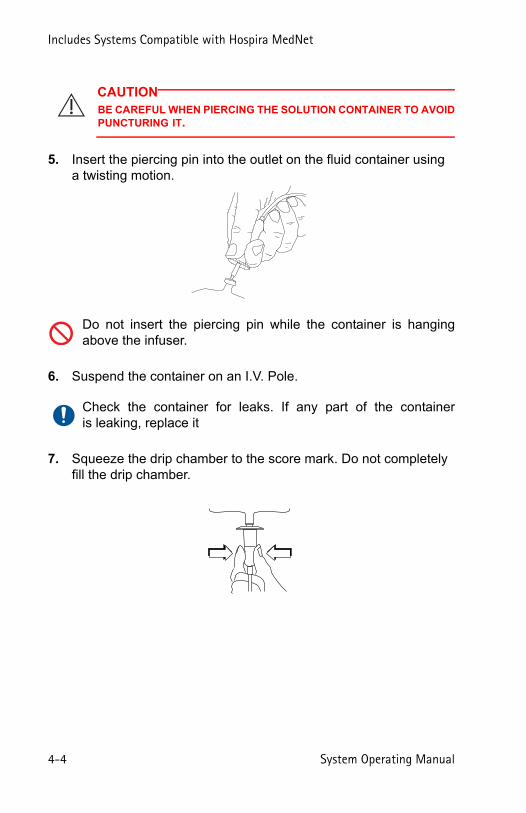
Includes Systems Compatible with Hospira MedNet
4-4 System Operating Manual
5. Insert the piercing pin into the outlet on the fluid container using a twisting motion.
6. Suspend the container on an I.V. Pole.
7. Squeeze the drip chamber to the score mark. Do not completely fill the drip chamber.
CAUTIONBE CAREFUL WHEN PIERCING THE SOLUTION CONTAINER TO AVOIDPUNCTURING IT.
Do not insert the piercing pin while the container is hangingabove the infuser.
Check the container for leaks. If any part of the containeris leaking, replace it
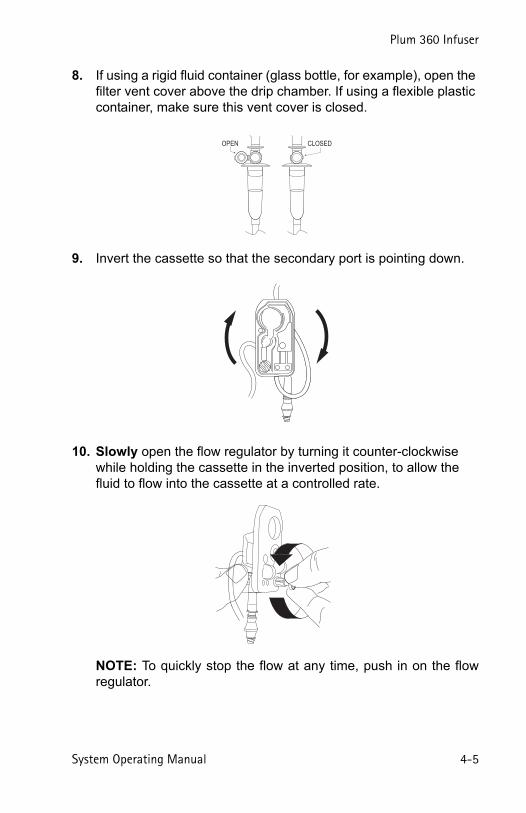
Plum 360 Infuser
System Operating Manual 4-5
8. If using a rigid fluid container (glass bottle, for example), open the filter vent cover above the drip chamber. If using a flexible plastic container, make sure this vent cover is closed.
9. Invert the cassette so that the secondary port is pointing down.
10. Slowly open the flow regulator by turning it counter-clockwise while holding the cassette in the inverted position, to allow the fluid to flow into the cassette at a controlled rate.
NOTE: To quickly stop the flow at any time, push in on the flowregulator.
OPEN CLOSED

Includes Systems Compatible with Hospira MedNet
4-6 System Operating Manual
11. When the first drop appears in the pumping chamber, turn the cassette upright.
12. Continue to slowly prime the set until all air is removed from the cassette and the remainder of the tubing.
• Tap the cassette and tubing to dislodge air bubbles.
NOTE: Invert and tap each Y-site to fill it with fluid, as shownin the following figure, and then turn the Y-site upright.
• If the filter at the distal (patient) end of the tubing gets wet, youmust temporarily remove the cap to continue priming.
FIRST DROP
FROMCASSETTE

Plum 360 Infuser
System Operating Manual 4-7
13. Once priming is complete, push the flow regulator in to close it.
The cassette is now ready to load into the infuser.
CAUTIONCHECK THE DRIP CHAMBER AND THE DISTAL END OF THE TUBINGTO CONFIRM THAT THERE IS NO FLOW AND THAT NO KINKS APPEARIN THE TUBING. IF YOU OBSERVE FLOW OR LEAKS, CLOSE ALLCLAMPS AND REPLACE THE ADMINISTRATION SET.
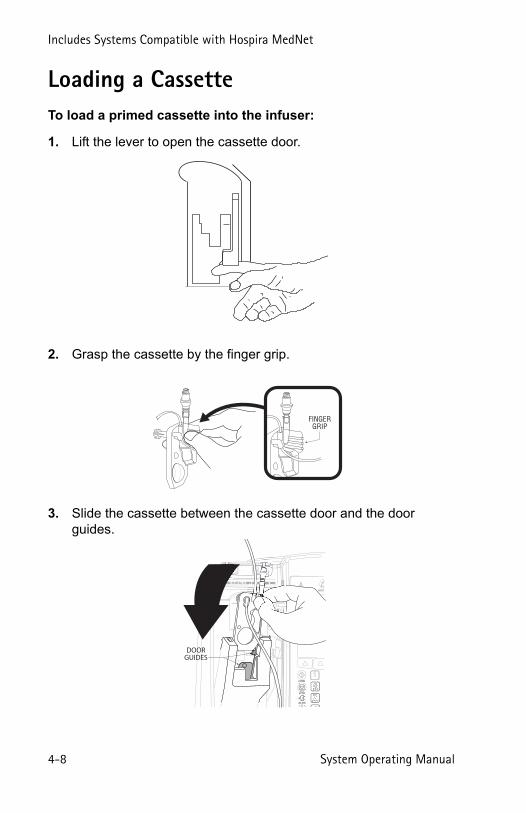
Includes Systems Compatible with Hospira MedNet
4-8 System Operating Manual
Loading a CassetteTo load a primed cassette into the infuser:
1. Lift the lever to open the cassette door.
2. Grasp the cassette by the finger grip.
3. Slide the cassette between the cassette door and the door guides.
FINGERGRIP
DOORGUIDES
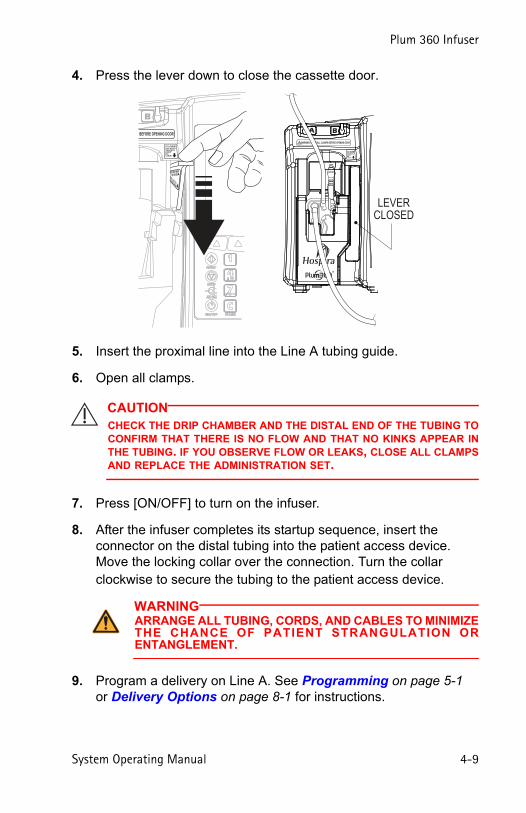
Plum 360 Infuser
System Operating Manual 4-9
4. Press the lever down to close the cassette door.
5. Insert the proximal line into the Line A tubing guide.
6. Open all clamps.
7. Press [ON/OFF] to turn on the infuser.
8. After the infuser completes its startup sequence, insert the connector on the distal tubing into the patient access device. Move the locking collar over the connection. Turn the collar clockwise to secure the tubing to the patient access device.
9. Program a delivery on Line A. See Programming on page 5-1 or Delivery Options on page 8-1 for instructions.
CAUTIONCHECK THE DRIP CHAMBER AND THE DISTAL END OF THE TUBING TOCONFIRM THAT THERE IS NO FLOW AND THAT NO KINKS APPEAR INTHE TUBING. IF YOU OBSERVE FLOW OR LEAKS, CLOSE ALL CLAMPSAND REPLACE THE ADMINISTRATION SET.
WARNINGARRANGE ALL TUBING, CORDS, AND CABLES TO MINIMIZETHE CHANCE OF PATIENT STRANGULATION ORENTANGLEMENT.
CLOSELEVERWHEN NOTINUSE
CLOSELEVERWHEN NOTINUSE
WARNING: CLOSE ALL CLAMPS BEFORE OPENING DOOR
OSE LEVER WHEN NOT IN USE ESS TAB TO
LATCH DOOR
BEFORE OPENING DOOR
LEVERCLOSED
Includes Systems Compatible with Hospira MedNet
4-10 System Operating Manual
Preparing a Secondary Deliveryfrom an Administration SetThe following procedure gives the general steps for preparing asecondary Hospira administration set for a Piggyback or Concurrentdelivery. Refer to the set packaging for complete instructions on howto prime the administration set you are about to use.
NOTE: You do not need to remove the primary administration setfrom the infuser or detach it from the patient before attaching aprimed secondary administration set.
To prime a secondary administration set:
1. Inspect the set packaging. If the packaging is not intact, discardit and use a new set.
WARNINGENSURE MEDICATIONS THAT ARE DELIVEREDCONCURRENTLY OR IN PIGGYBACK, ARE COMPATIBLE.
WARNINGUSE ONLY HOSPIRA PLUM ADMINISTRATION SETS.
WARNINGDO NOT RESTERILIZE ADMINISTRATION SETS.
WARNINGDO NOT REUSE ADMINISTRATION SETS. REUSE MAY RESULTIN INFECTIONS AND ALLERGIC REACTIONS. REUSE MAYALSO RESULT IN INACCURATE FLOW RATES.
Use aseptic technique with all fluid path connections to preventcontamination. Remove caps when required and secure allconnections.

Plum 360 Infuser
System Operating Manual 4-11
2. Open the set packaging and remove the set. Make sure the roller clamp on the set is in the closed position.
3. Insert the piercing pin into the secondary container outlet using a twisting motion.
4. Suspend the container on an I.V. Pole.
CAUTIONBE CAREFUL WHEN PIERCING THE SOLUTION CONTAINER TO AVOIDPUNCTURING IT.
Do not insert the piercing pin while the container is hangingabove the infuser.
Check the secondary container for leaks. If any part of thecontainer is leaking, replace it.
CLOSEDPOSITION

Includes Systems Compatible with Hospira MedNet
4-12 System Operating Manual
5. Squeeze the drip chamber to fill it about 1/3 full or to the score mark. Do not completely fill the drip chamber.
6. If using a rigid fluid container (glass bottle, for example), open the filter vent cover above the drip chamber. If using a flexible plastic container, make sure this vent cover is closed.
7. Slowly open the roller clamp to allow fluid to flow into the secondary tubing at a controlled rate.
OPEN CLOSED
ROLLER
ROLLER
OPENPOSITION
TO OPENCAIR CLAMP

Plum 360 Infuser
System Operating Manual 4-13
8. After all air is removed, close the roller clamp.
9. Attach the line to the secondary port (see Connecting a Secondary Line or Syringe on page 4-13).
10. Insert the secondary line into the Line B tubing guide.
11. Open all clamps. Check that no kinks appear in the tubing.
12. Program the delivery on Line B (see Programming Line B with Line A Programmed on page 5-7).
Connecting a Secondary Line or SyringeA primary PlumSet may have a Clave, prepierced, or cappedconnector on the secondary port. The following sections describehow to attach a secondary line or syringe to each secondary porttype.
WARNINGARRANGE ALL TUBING, CORDS, AND CABLES TO MINIMIZE THECHANCE OF PATIENT STRANGULATION OR ENTANGLEMENT.
Use aseptic technique with all fluid path connections to preventcontamination. Remove caps when required and secure allconnections.
ROLLER
ROLLER
TO CLOSECAIR CLAMP
CLOSEDPOSITION
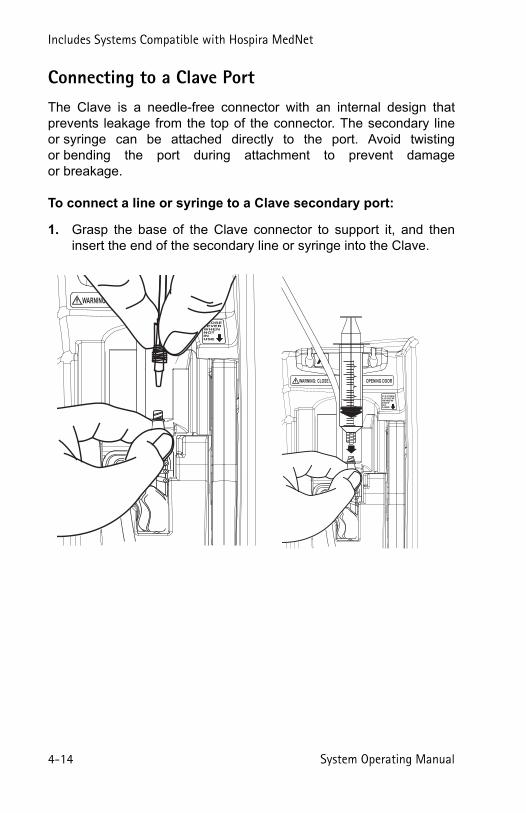
Includes Systems Compatible with Hospira MedNet
4-14 System Operating Manual
Connecting to a Clave PortThe Clave is a needle-free connector with an internal design thatprevents leakage from the top of the connector. The secondary lineor syringe can be attached directly to the port. Avoid twistingor bending the port during attachment to prevent damageor breakage.
To connect a line or syringe to a Clave secondary port:
1. Grasp the base of the Clave connector to support it, and theninsert the end of the secondary line or syringe into the Clave.
WARNING: CLOSE ALL OPENING DOOR
CLOSELEVERWHEN NOTINUSE
WARNING: CLOSE ALL OPENING DOOR
CLOSELEVERWHEN NOTINUSE
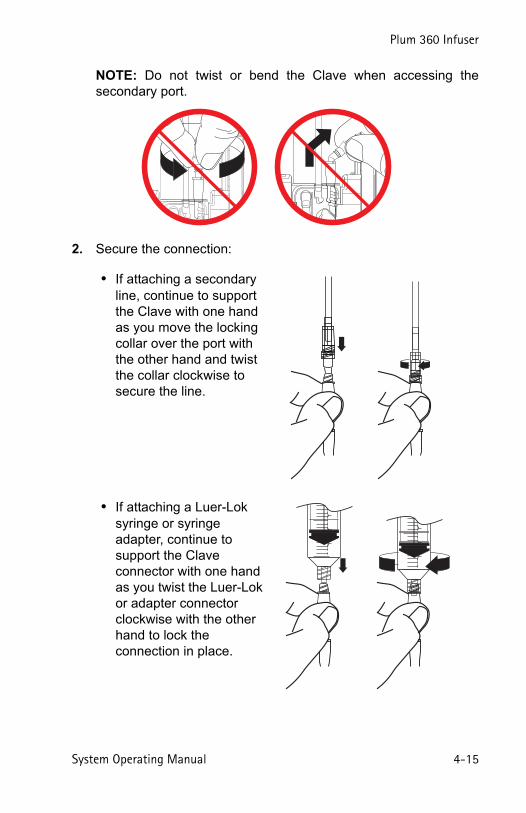
Plum 360 Infuser
System Operating Manual 4-15
NOTE: Do not twist or bend the Clave when accessing thesecondary port.
2. Secure the connection:
• If attaching a secondary line, continue to support the Clave with one hand as you move the locking collar over the port with the other hand and twist the collar clockwise to secure the line.
• If attaching a Luer-Lok syringe or syringe adapter, continue to support the Clave connector with one hand as you twist the Luer-Lok or adapter connector clockwise with the other hand to lock the connection in place.
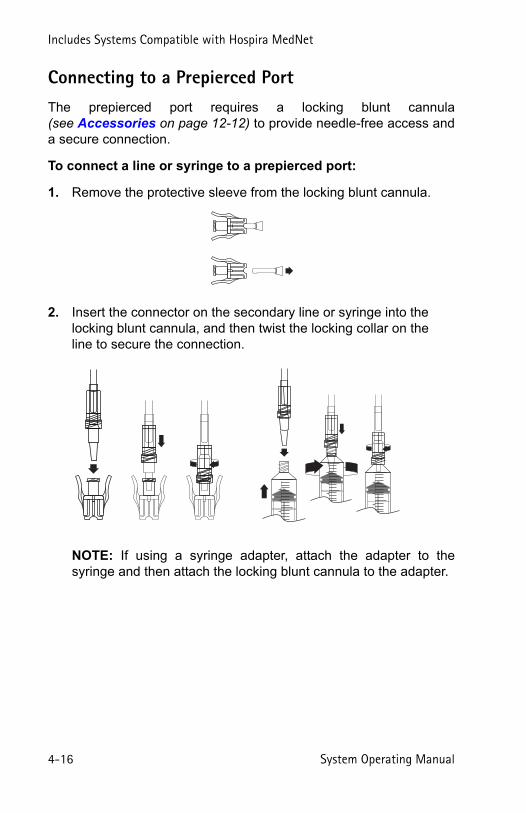
Includes Systems Compatible with Hospira MedNet
4-16 System Operating Manual
Connecting to a Prepierced PortThe prepierced port requires a locking blunt cannula(see Accessories on page 12-12) to provide needle-free access anda secure connection.
To connect a line or syringe to a prepierced port:
1. Remove the protective sleeve from the locking blunt cannula.
2. Insert the connector on the secondary line or syringe into the locking blunt cannula, and then twist the locking collar on the line to secure the connection.
NOTE: If using a syringe adapter, attach the adapter to thesyringe and then attach the locking blunt cannula to the adapter.

Plum 360 Infuser
System Operating Manual 4-17
3. Center the cannula over the prepierced secondary port and push until the cannula clicks into place.
4. Gently pull the connection between the secondary line or syringe and the locking blunt cannula to confirm that all connections are secure.
WARNING: CLOSE ALL OPENING DOOR
CLOSELEVERWHEN NOTINUSE
CLOSELEVERWHEN NOTINUSE

Includes Systems Compatible with Hospira MedNet
4-18 System Operating Manual
Connecting to a Capped PortA secondary line or syringe attaches directly to the capped port.To prevent leakage from the top of the connector during the followingprocedure, you must ensure that the cassette door remains closedor clamp the primary line (Line A) before opening the cassette door.
To connect a line or syringe to a capped port:
1. Confirm that the cassette door is closed, to prevent leakage.
2. Loosen, remove, and discard the cap.
3. Insert the connector on the secondary line or syringe into the secondary port.
4. Secure the connection:
• If attaching a secondary line, move the locking collar over theport and twist the collar clockwise to secure the line.
• If attaching a Luer-Lok syringe or syringe adapter, twist theLuer-Lok or adapter connector clockwise to lock it in place.
WARNINGCLOSE THE CLAMP ON PROXIMAL LINE A TO PREVENT FLUIDFROM SPILLING IF YOU MUST OPEN THE CASSETTE DOORTO REMOVE THE CAP.
Plum 360 Infuser
System Operating Manual 4-19
Priming the Syringe AdapterTo prime the syringe adapter:
1. Fill the syringe with solution.
2. Attach the vented syringe adapter onto syringe.
3. Press and hold [Back Prime] to prime the syringe adapter.
4. Refill the syringe.
Preparing a Secondary Deliveryfrom a Syringe
NOTE: Access ports on Plum cassette are NOT for I.V. push deliveryof medication. Ports are only for infuser-controlled delivery ofmedication.
WARNINGENSURE MEDICATIONS THAT ARE DELIVEREDCONCURRENTLY OR IN PIGGYBACK ARE COMPATIBLE.

Includes Systems Compatible with Hospira MedNet
4-20 System Operating Manual
You can attach a syringe to the secondary port on a Plum cassette forPiggyback or Concurrent delivery of a secondary fluid. Follow theseguidelines:
You do not need to remove the primary administration set from theinfuser or the patient before attaching a syringe to the secondary port.
Syringe sizes accepted:
3 mL - 60 mL
10 mL or smaller syringes require a syringe adapter to ensure delivery accuracy.
Syringes larger than 10 mL do not require a syringe adapter.
Attaching to a Clave or capped secondary port:
Attach the syringe directly to the port. If using a syringe adapter, attach the adapter to the syringe and prime the adapter before attaching the syringe/adapter assembly to the port(see Connecting a Secondary Line or Syringe on page 4-13).
Attachingto a prepierced secondary port:
Fit the syringe with a locking blunt cannula before attaching to the port.
If using a syringe adapter, attach the adapter to the syringe and prime the adapter, and then attach the locking blunt cannula to the adapter before attaching the syringe/adapter/cannula assembly to the port(see Connecting to a Prepierced Port on page 4-16).

Plum 360 Infuser
System Operating Manual 4-21
Backpriming
NOTE: A small amount of fluid may be expelled from the set(less than or equal to 0.05 mL) after backpriming. If potent drugs arebeing used, take appropriate action to guard against over-medicationof the patient.
Backpriming resolves proximal air-in-line alarms on Line A or Line Bwithout the need to disconnect the administration set from a patient.Backpriming can also relieve built-up pressure in the cassette causedby some occlusion conditions, resolving the occlusion alarms whilethe patient is still connected to the set. However, backpriming is notnecessary to clear alarms. After an obstruction or occlusionis resolved, pressing [START] clears an alarm. See Alarms andTroubleshooting on page 9-1 for alarms that can be resolvedby backpriming.
During a backprime, fluid is pumped from the container on Line A toa line or syringe attached to the secondary port (Line B) at a minimumrate of 500 mL/hr. In the process, air is cleared from the cassette airtrap and proximal line(s). The infuser closes valves to ensure that thebackprimed fluid never reaches the patient.
WARNINGTHE PLUM 360 INFUSER DOES NOT HAVE CAPABILITYTO DETECT INFILTRATION TO THE PATIENT.
CAUTIONDURING BACKPRIMING, FLUIDS CAN BECOME MIXED AND DILUTED.
Backpriming is not recommended for reconstituting secondarycontainers containing dry powders.

Includes Systems Compatible with Hospira MedNet
4-22 System Operating Manual
Preparing to BackprimeTo accept the backprimed air and/or fluid, a line with a container orsyringe must be attached to the secondary port. This attachmentprevents proximal air-in-line and occlusion alarms on the secondaryline.
NOTE: If you are using a syringe adapter, you must open and closethe lever before you will be able to backprime.
Setup for Backpriming into a Secondary Line
If you already have a delivery set up for Line B, you can backprimeinto the Line B fluid container. This setup will resolve a proximal air-in-line alarm for either Line A or Line B.
NOTE: Since the Plum 360 infuser delivers the exact VTBI thatis programmed for a line, you may need to adjust the VTBI on Line Bto account for the extra volume from backprimed fluid.
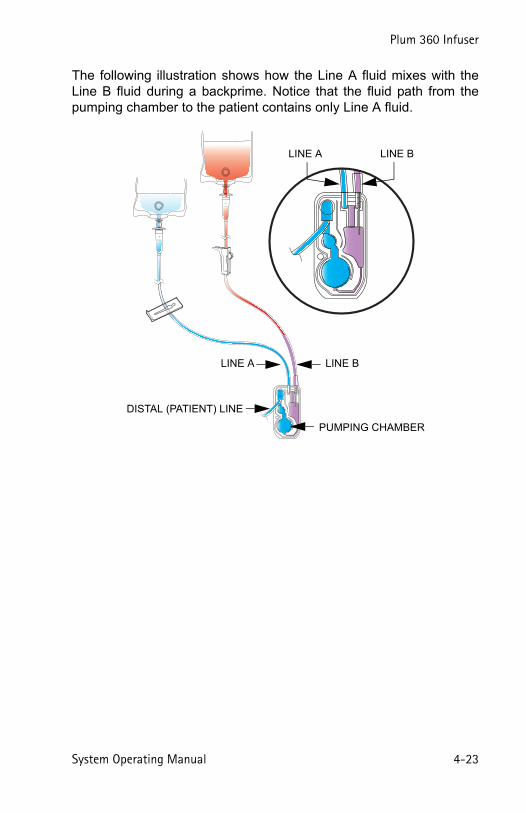
Plum 360 Infuser
System Operating Manual 4-23
The following illustration shows how the Line A fluid mixes with theLine B fluid during a backprime. Notice that the fluid path from thepumping chamber to the patient contains only Line A fluid.
LINE A LINE B
DISTAL (PATIENT) LINE
LINE A LINE B
PUMPING CHAMBER

Includes Systems Compatible with Hospira MedNet
4-24 System Operating Manual
Setup for Backpriming into a Syringe
If you do not have a delivery set upon Line B, or you need to avoidpumping air and fluid from Line Ainto Line B, you can attach a syringeto the secondary port to accept thefluid and/or air from Line A and thecassette when backpriming.
NOTE: Before you begin a backprime, ensure that the syringe has enough free space to accept the backprimed fluid. Backpriming into a full syringe will trigger a proximal occlusion alarm or a proximal air-in-line alarm.
The illustration shows the setup for backpriming into a syringe.
For instruction on how to attach a syringe to a secondary port on the cassette, see Preparing a Secondary Delivery from a Syringe on page 4-19.
Backpriming ProcedureBefore you begin a backprime, ensure that there is a line or syringeon the secondary port and a secondary container to accept thebackprimed fluid and expelled air (see Preparing to Backprime onpage 4-22).
To backprime:
1. Press and hold [Backprime] until fluid pumped from line Ato line B clears air from the cassette and from Line B (if present).
When you release [Backprime] the infuser performs a cassette test.
WARNING: CLOSE ALL OPENING DOOR
CLOSELEVERWHEN NOTINUSE

Plum 360 Infuser
System Operating Manual 4-25
NOTE: If you press and hold the [Backprime] key for twominutes, a stuck key alarm sounds and the display screen showsPower Off then On. Replace pump if alarm continues.
2. If the cassette test detects that there is still air in the line, repeat Step 1 until the cassette test is successful.
3. Press [START] to restart the delivery. If two lines were pumping when delivery stopped, press the appropriate softkey in response to the prompt (see Stopping and Restarting a Delivery on page 3-22).
If you do not see [Backprime]:
[Backprime] is available only on the delivery screen and only whendelivery is stopped. (Delivery stops automatically when there is analarm that can be resolved by backpriming.)
• If the cassette test fails while the New Patient? promptis displayed, press [Yes] or [No], as appropriate, and thenhold down [Backprime] to clear air from the cassette.
• If the cassette test fails while the CCA Selection screenis displayed, choose the correct CCA. The infuser displays thedelivery screen, where [Backprime] is available.
• If the infuser alarms and stops while you are viewing a screenother than the delivery screen (for example, Line A stops dueto an air-in-line alarm while you are programming Line B)navigate to the delivery screen and then press [Backprime].
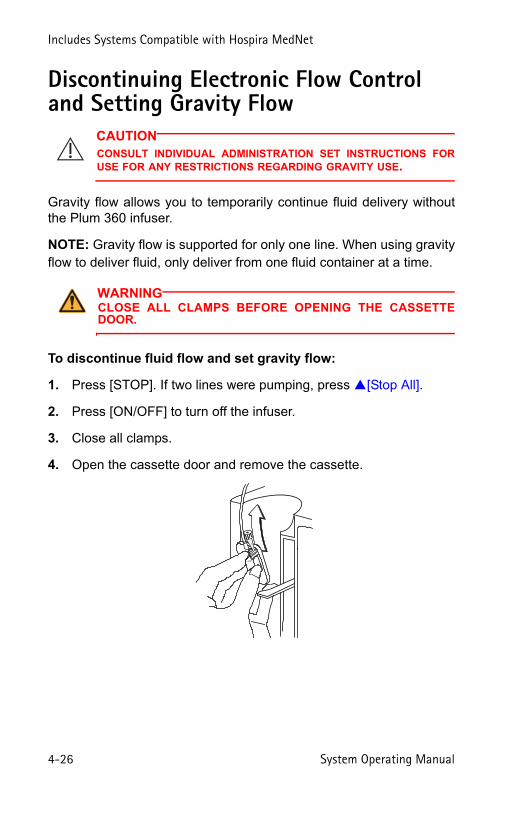
Includes Systems Compatible with Hospira MedNet
4-26 System Operating Manual
Discontinuing Electronic Flow Control and Setting Gravity Flow
Gravity flow allows you to temporarily continue fluid delivery withoutthe Plum 360 infuser.
NOTE: Gravity flow is supported for only one line. When using gravityflow to deliver fluid, only deliver from one fluid container at a time.
To discontinue fluid flow and set gravity flow:
1. Press [STOP]. If two lines were pumping, press [Stop All].
2. Press [ON/OFF] to turn off the infuser.
3. Close all clamps.
4. Open the cassette door and remove the cassette.
CAUTIONCONSULT INDIVIDUAL ADMINISTRATION SET INSTRUCTIONS FORUSE FOR ANY RESTRICTIONS REGARDING GRAVITY USE.
WARNINGCLOSE ALL CLAMPS BEFORE OPENING THE CASSETTEDOOR.
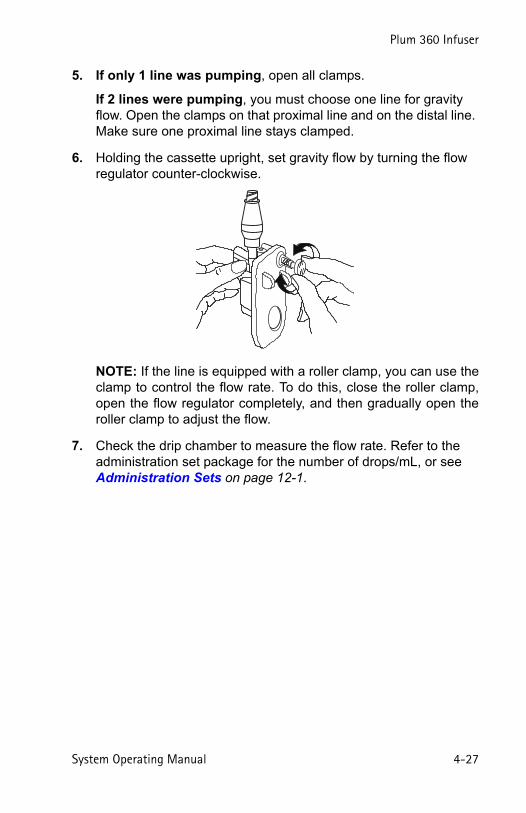
Plum 360 Infuser
System Operating Manual 4-27
5. If only 1 line was pumping, open all clamps.
If 2 lines were pumping, you must choose one line for gravity flow. Open the clamps on that proximal line and on the distal line. Make sure one proximal line stays clamped.
6. Holding the cassette upright, set gravity flow by turning the flow regulator counter-clockwise.
NOTE: If the line is equipped with a roller clamp, you can use theclamp to control the flow rate. To do this, close the roller clamp,open the flow regulator completely, and then gradually open theroller clamp to adjust the flow.
7. Check the drip chamber to measure the flow rate. Refer to the administration set package for the number of drops/mL, or see Administration Sets on page 12-1.

Includes Systems Compatible with Hospira MedNet
4-28 System Operating Manual
To resume delivery in a replacement infuser:
1. Close all clamps.
2. Insert the cassette into the infuser and close the door.
3. Open all clamps.
4. Check the drip chamber to ensure that there is no flow.
If you see flow, close all clamps and replace the set. If you still see flow from a replacement set, replace the infuser.
5. Turn on the infuser.
6. Program the delivery.
7. Start the delivery.
Removing a Secondary Line or SyringeThe following procedure describes how to disconnect a secondaryline or syringe from the Plum cassette.
• You do not need to disconnect the set from the patient during thisprocedure.
• You also do not need to stop Line A.
To remove a secondary line or syringe during delivery:
1. Press [STOP] and then press [Stop B].
2. Remove the syringe or line as follows:
• To remove a secondary line from a Clave or cappedsecondary port - Clamp the line, twist counterclockwiseto release the locking collar, and then pull up to disconnect theline. Aseptically cap a capped secondary port.
Use aseptic technique with all fluid path connections toprevent contamination. Remove caps when required andsecure all connections.
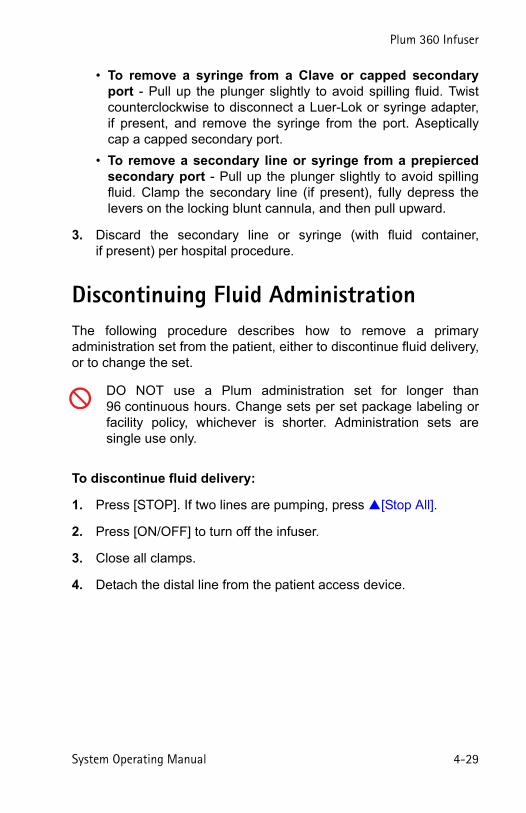
Plum 360 Infuser
System Operating Manual 4-29
• To remove a syringe from a Clave or capped secondaryport - Pull up the plunger slightly to avoid spilling fluid. Twistcounterclockwise to disconnect a Luer-Lok or syringe adapter,if present, and remove the syringe from the port. Asepticallycap a capped secondary port.
• To remove a secondary line or syringe from a prepiercedsecondary port - Pull up the plunger slightly to avoid spillingfluid. Clamp the secondary line (if present), fully depress thelevers on the locking blunt cannula, and then pull upward.
3. Discard the secondary line or syringe (with fluid container,if present) per hospital procedure.
Discontinuing Fluid AdministrationThe following procedure describes how to remove a primaryadministration set from the patient, either to discontinue fluid delivery,or to change the set.
To discontinue fluid delivery:
1. Press [STOP]. If two lines are pumping, press [Stop All].
2. Press [ON/OFF] to turn off the infuser.
3. Close all clamps.
4. Detach the distal line from the patient access device.
DO NOT use a Plum administration set for longer than96 continuous hours. Change sets per set package labeling orfacility policy, whichever is shorter. Administration sets aresingle use only.

Includes Systems Compatible with Hospira MedNet
4-30 System Operating Manual
5. Open the cassette door and remove the cassette.
6. Close the cassette door.
7. Discard the set and fluid container per hospital procedure.
Changing Administration SetsPlum administration sets should be changed per facility policyor every 96 hours, whichever is less.
DO NOT use a Plum administration set for longer than96 continuous hours. Administration sets are single use only.
Plum 360 Infuser
System Operating Manual 4-31
To change the administration set:
1. Stop the infuser, close all clamps, and then remove and discardthe old set. See Discontinuing Fluid Administration onpage 4-29 for instructions.
2. Prepare and install a new administration set. See Priming a Primary Administration Set on page 4-2 for instructions.
Resolving a Distal Air-in-Line AlarmUse the following procedure to remove air from the distal (patient) linefollowing a distal air-in-line alarm.
To resolve a distal air-in-line alarm:
1. Close all clamps.
2. Disconnect the administration set from the patient.
3. Open the cassette door and remove the cassette.
4. Unclamp the proximal tubing of the line you want to use to prime the distal line.
5. Reprime the administration set to remove the distal air(see Priming a Primary Administration Set on page 4-2).
6. Insert the cassette into the infuser, open all clamps, and then close the cassette door (see Loading a Cassette on page 4-8).
7. Reattach the administration set to the patient and restart delivery.
Use aseptic technique with all fluid path connections to preventcontamination. Remove caps when required and secure allconnections.
Use aseptic technique with all fluid path connections, to preventcontamination, and secure all connections.

Includes Systems Compatible with Hospira MedNet
4-32 System Operating Manual
Avoiding a Bolus While Resolvinga Distal OcclusionWhen using critical drugs, care must be taken to avoid a bolus.Use the following procedure to avoid the administration of a boluscaused by the buildup of pressure in the cassette caused by a distalocclusion (see Maximum Bolus Volume Released After DistalOcclusion is Resolved on page 11-8).
To resolve a distal occlusion when bolus volume is critical:
1. Close all clamps.
2. Open the cassette door and remove the cassette.
TO CLOSE
SLIDE CLAMP
TO CLOSE
CAIR (ROLLER)
CLAMP
CLOSED
POSITION
CLOSED
POSITION
Roller
Roller
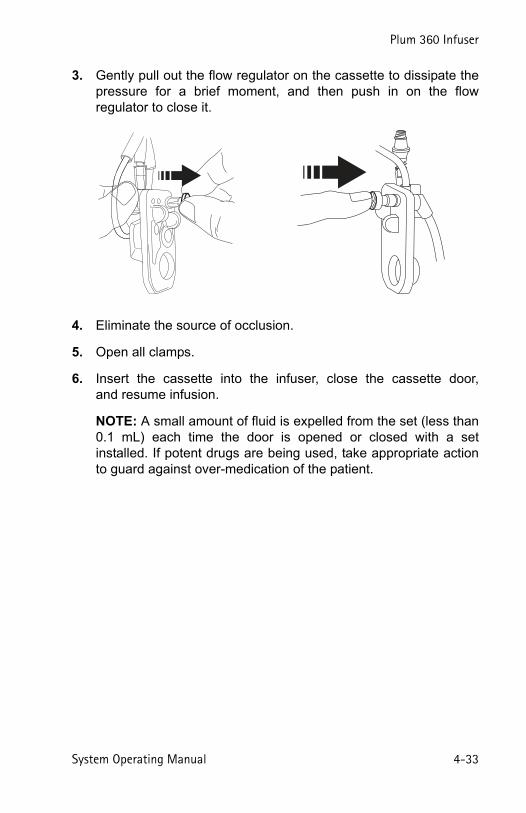
Plum 360 Infuser
System Operating Manual 4-33
3. Gently pull out the flow regulator on the cassette to dissipate thepressure for a brief moment, and then push in on the flowregulator to close it.
4. Eliminate the source of occlusion.
5. Open all clamps.
6. Insert the cassette into the infuser, close the cassette door,and resume infusion.
NOTE: A small amount of fluid is expelled from the set (less than0.1 mL) each time the door is opened or closed with a setinstalled. If potent drugs are being used, take appropriate actionto guard against over-medication of the patient.

Includes Systems Compatible with Hospira MedNet
4-34 System Operating Manual
Notes

Plum 360 Infuser
System Operating Manual 5-1
Section 5
Programming
Programming Features Commonto the Default Drug Libraryand Custom Drug Libraries
Auto-CalculationsThere are three ways that the Plum 360 infuser performs auto-calculations:
• In a time-based dosing unit such as mL/hr or mg/kg/hr, whereentering the dose calculates the rate and entering the VTBIcalculates the duration.
• In a non-time-based dosing unit such as mg/mL, where entering thedose calculates the VTBI, and entering the rate calculates theduration. Calculated VTBIs are rounded to the nearest 0.1 mLresolution.
• In mL/hr, where there is no dose value entry.
Refer to Examples of Automatic Calculation on page 7-4 foradditional information on how the infuser performs auto-calculations.
Body Surface Area (BSA) Dosing Unit
A BSA dosing unit is indicated by m2, for example, mg/m2/day.
BSA can be entered manually or, if you enter a weight and height,it will be automatically calculated.
Includes Systems Compatible with Hospira MedNet
5-2 System Operating Manual
Programming Line B
When you are programming Line B, you can select a delivery modeof Piggyback or Concurrent as the delivery mode (the defaultis Piggyback). If you are using a custom drug library, there may besome restrictions. See Programming Line B with Line AProgrammed for additional information.
To change the delivery mode, highlight the current delivery mode onthe programming screen and press [Change Mode] to toggle thedelivery mode between Piggyback or Concurrent.
To program Line B in Concurrent delivery mode, the combineddelivery rate of Line A and B must be greater than or equal to 0.5 mL/hr and less than or equal to 500 mL/hr.
If programming a Piggyback delivery on Line B, you can programa Callback alarm to activate when the Piggyback VTBI is complete.
Anytime Line B is in Piggyback mode and Line A is not in a PENDINGstate, the infuser will notify you that there is a potential for a period ofno delivery after the Piggyback VTBI is complete.
Clearing Line Settings
To clear line settings:
1. STOP either Line A or Line B to clear. The line must be stoppedbefore clearing settings.
2. Select the line that was stopped (either A or B).
WARNINGENSURE MEDICATIONS THAT ARE DELIVEREDCONCURRENTLY, OR IN PIGGYBACK, ARE COMPATIBLE.

Plum 360 Infuser
System Operating Manual 5-3
3. The infuser display asks if you want to clear the line settings.
Select [Yes] to clear the line settings.
or,
Select [No] to advance to the program screen for the line selected without clearing the settings.
NOTE: Clearing a line does not clear the volumes infused.
Programming with a Default Drug LibraryThe default drug library has 115 drugs, including No Drug Selected,which is always listed first. After you select a drug, the assigneddefault dosing unit is highlighted; however, you can change thedosing unit.
Programming Without a Drug List
To program without a drug list:
1. On the Delivery (A/B) Screen, select a line to program.
If you are programming a primary delivery, select Line A. If you are programming a secondary delivery, select Line B.
2. On the Program screen, enter the rate, VTBI, and duration.
Values can be entered in any order.
A on the Confirm Program screen alerts you that the
infuser is being operated without rule sets.
CAUTIONBEFORE STARTING DELIVERY, VERIFY THE VALUES.
Includes Systems Compatible with Hospira MedNet
5-4 System Operating Manual
Programming with a Drug ListTo program with a drug list:
1. On the Delivery (A/B) Screen, select a line to program.
If you are programming a primary delivery, select Line A. If you are programming a secondary delivery, select Line B.
2. On the Program screen, select[Drug List].
3. In the drug list, select the drug.
4. Select the dosing unit.
5. Select the drug concentration in container as required for the selected dosing units.
NOTE: The remainder of these steps is for a single-step standardprogram. For information on Loading Dose or MultistepProgramming, see Delivery Options on page 8-1.
6. On the programming screen, enter the concentration, container volume, weight or BSA information as applicable.
See Body Surface Area (BSA) Dosing Unit on page 5-1 for information on entering/calculating the BSA.
7. Enter Rate and/or Dose, VTBI, and Duration as appropriate for the displayed program parameters. These values can be entered in any order.
8. Press [START].
Press [Yes].
CAUTIONBEFORE STARTING DELIVERY, VERIFY THE VALUES.
Confirm the program.

Plum 360 Infuser
System Operating Manual 5-5
Programming with a Custom Drug LibraryTo program with a custom drug library:
1. At power on, select a CCA.
NOTE: The CCA can be changed from the Drug List screen.For more information, see Changing a CCA from the Drug ListScreen on page 5-7.
2. On the Delivery (A/B) Screen, select a line to program. If you are programming a primary delivery, select Line A. If you are programming a secondary delivery, select Line B.
3. In the drug list, select the drug.
4. Select a clinical use. If the selected drug has multiple defined clinical uses, they will be displayed.
5. Select the dosing units. If the selected drug has multiple, defined dosing units, they will be displayed.
6. Select the drug concentration in container units.
If the selected dosing units require a drug concentration in container units, the units will be displayed. In most custom drug library entries, this is already defined and will not require manual selection.
The remainder of these steps is for a single-step standard program.For information of Loading Dose or Multistep Programming,see Delivery Options on page 8-1.
7. On the programming screen, enter the concentration, container volume, weight or BSA information as applicable. See Body Surface Area (BSA) Dosing Unit on page 5-1 for information on entering/calculating the BSA.
8. Enter the rate and/or dose, VTBI, and duration as appropriate for the displayed program parameters. These values can be entered in any order.

Includes Systems Compatible with Hospira MedNet
5-6 System Operating Manual
9. Press [START].
Press [Yes].
Hard LimitsIf a maximum hard limit is exceeded, an alert appears. You cannotproceed until the entry is cleared.
Press the [C] key to clear the entry and enter a new value.
Soft LimitsIf a soft limit is exceeded, an alert appears when [START] is pressedto confirm the program.
When the alert displays:
• Select [Yes] to override and continue to the confirmationscreen.
or,
• Select [No] to return to the program screen and edit thevalue.
CAUTIONBEFORE STARTING DELIVERY, VERIFY THE VALUES.
Confirm the program.
Plum 360 Infuser
System Operating Manual 5-7
Programming Line B with Line A Programmed
When programming Line B with a non-Piggybackable drug(as defined in the custom drug library), the delivery mode for Line Bdefaults to Concurrent and cannot be changed.
If there is a confirmed program on Line A with a drug that is non-interruptible when programming Line B, the delivery mode for Line Bwill default to Concurrent and cannot be changed.
If Line A is not programmed, or is programmed with a drug that isinterruptible, and the drug selected on Line B is Piggybackable, selectPiggyback or Concurrent as the delivery mode (the defaultis Piggyback).
Changing a CCA from the Drug List ScreenThe CCA can be changed from the Drug List screen where it is thefirst highlighted selection on the screen.
To change the CCA:
1. On the Drug List screen, highlight [Change CCA] and select[Choose].
The CCA Selection screen displays. The current CCA is indicated by arrows before and after the CCA name.
2. Highlight the desired CCA and select [Choose].
The Drug List screen displays for the chosen CCA.
WARNINGENSURE MEDICATIONS THAT ARE DELIVEREDCONCURRENTLY, OR IN PIGGYBACK, ARE COMPATIBLE.
Includes Systems Compatible with Hospira MedNet
5-8 System Operating Manual
Delaying a Line1. Press[Delay].
2. Enter time, and press [Done]. Delivery screen shows DELAYED and time delayed.
3. To clear a delay, choose the line, press [Delay], then change or clear the delay settings, then press [Done].
Putting a Line in Standby – A/B Delivery Screen
1. On the delivery screen, press [Standby].
2. On the Confirm Standby screen, press [Yes] to put the Piggyback therapy in standby mode and restart the line that is infusing. To return to the Confirm Piggyback screen and program the delivery, press [No].
Putting a Line in Standby – Confirmation Screen
To put a line in standby – confirmation screen:
1. Press [Standby], select the line to put in standby mode.
2. On the Confirm Standby screen, press [Standby].
3. On the Confirm Standby screen, press [Yes] to put the delivery in standby mode and restart the line that is infusing. To return to the Confirm Piggyback screen and program the delivery, press[No].
WARNINGENSURE MEDICATIONS THAT ARE DELIVEREDCONCURRENTLY, OR IN PIGGYBACK, ARE COMPATIBLE.

Plum 360 Infuser
System Operating Manual 5-9
Putting a Line in Standby – Piggyback Mode
To put a line in standby – Piggyback mode:
1. Press [Standby] and confirm by pressing[Yes]. Line B willstand by, line A will remain pending.
2. Press [Restart A] to restart line A.
Canceling Standby – Piggyback Mode
To cancel standby – Piggyback mode:
1. On the delivery screen, select the line that is in standby.
2. On the Cancel Standby screen, press [Yes] to resume infusion. To keep the line in standby mode, press [No].
Nurse CallbackTo add a nurse callback on programming screen, press [AddCallback].
Callback is available for Piggyback, Loading Dose and Multistepdeliveries.

Includes Systems Compatible with Hospira MedNet
5-10 System Operating Manual
Notes

Plum 360 Infuser
System Operating Manual 6-1
Section 6
Auto-Programming
Auto-programming is the ability to take an I.V. medication order fromthe Bar Code Medication Administration (BCMA) system andtranslate it into operational settings that can automatically populatethe infuser. Order taking is done by using the BCMA application andits bar code scanner to scan the patient identification, the medicationcontainer, and the infuser. Scanned information is transferred to theinfuser via either its wireless antenna or RJ-45 Ethernet connectorwith a shielded Ethernet cable.
NOTE: The wireless icon does not appear when an Ethernetcable is used to connect the infuser to the BCMA system.
The integration of Hospira MedNet software with a BCMA systemenables the system to incorporate pharmacy-validated orders into theFive Rights verification process reducing the number of stepsto manually program the infuser.
After verifying that the order is within the allowed parameters, HospiraMedNet software sends the program parameters to the infuser.A clinician has the option of manually editing the programor confirming and starting the infusion.
Auto-programming can only be used if this feature has been licensedand in conjunction with the BCMA system.
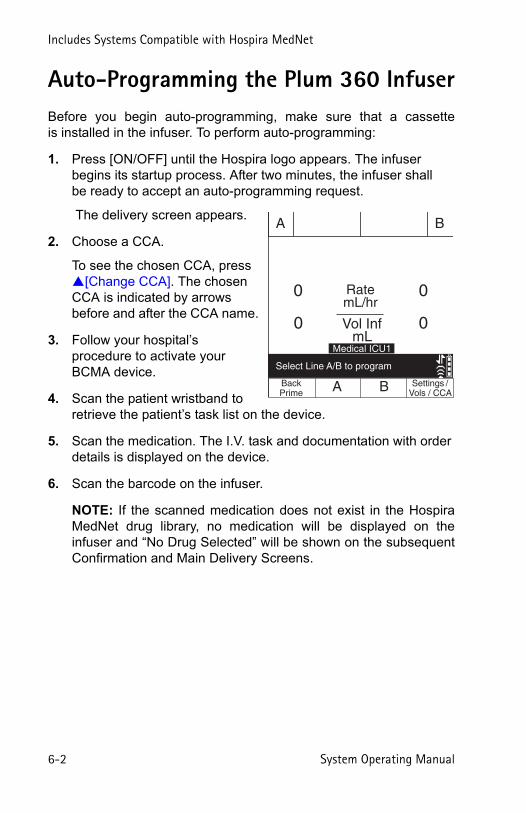
Includes Systems Compatible with Hospira MedNet
6-2 System Operating Manual
Auto-Programming the Plum 360 InfuserBefore you begin auto-programming, make sure that a cassetteis installed in the infuser. To perform auto-programming:
1. Press [ON/OFF] until the Hospira logo appears. The infuser begins its startup process. After two minutes, the infuser shall be ready to accept an auto-programming request.
The delivery screen appears.
2. Choose a CCA.
To see the chosen CCA, press [Change CCA]. The chosen CCA is indicated by arrows before and after the CCA name.
3. Follow your hospital’s procedure to activate your BCMA device.
4. Scan the patient wristband to retrieve the patient’s task list on the device.
5. Scan the medication. The I.V. task and documentation with order details is displayed on the device.
6. Scan the barcode on the infuser.
NOTE: If the scanned medication does not exist in the HospiraMedNet drug library, no medication will be displayed on theinfuser and “No Drug Selected” will be shown on the subsequentConfirmation and Main Delivery Screens.
A B
A B Settings /Vols / CCA
BackPrime
RatemL/hr
Vol InfmL
0
0 0
0
Medical ICU1
Select Line A/B to program

Plum 360 Infuser
System Operating Manual 6-3
The programming screen is automatically filled.
7. Verify ALL parameters. If changes are desired, you can manually change the infusion parameters using the keypad on the infuser.
8. When all values are completed, press [START] to confirm the program with the received order.
9. Select [Yes] to begin delivery or [No] to edit the program.
The BCMA will confirm the program with the original order.
10. Complete the transaction on the BCMA unit or document the process per hospital procedure.
If your order is rejected, refer to Rejected Auto-Programs onpage 9-19.
Before starting delivery, press [START], then confirm the program.
250
A Program
DelayReturn to
A/B
DOPamine(CARDIAC)mg mL
kg
1022.5250
11 : 06
400
Enter value using keypad
Medical ICU1
60
Conc
Weight
DoseRateVTBIDuration
mcg/kg/minmL/hrmLhr : min
250
A Confirm Program
Yes Standby No
DOPamine(CARDIAC)mg mL
kg
1022.5250
11 : 06
400
Yes: Start delivery
No: Edit
Medical ICU1
60
Conc
Weight
DoseRateVTBIDuration
mcg/kg/minmL/hrmL
hr : min

Includes Systems Compatible with Hospira MedNet
6-4 System Operating Manual
Notes
Plum 360 Infuser
System Operating Manual 7-1
Section 7
Additional Features
Delay a LineTo program a delayed start, first select a line and program the line(see Programming on page 5-1).
1. On the Program screen, press [Delay].
2. Enter time in hours and minutes up to 23:59 hh:mm, and press [Done].
The Confirmation screen displays the entered delay time.
3. Confirm the program.
The delivery screen shows DELAYED and the delay time countdown.
4. To clear a delay, choose the line, press [Delay], then change or clear the delay settings, then press [Done].
StandbyStandby is a feature that enables you to postpone starting delivery fora period of 24 hours to 72 hours. The default setting is 72 hours.The maximum standby time is configured by the Biomed if the infuseris using the Default Drug Library. It is defined in the Custom DrugLibrary per CCA if one is installed on the infuser. You can leave theinfuser in standby up to the configured maximum.
A line must be infusing to be put in Standby.
If a line is in standby and the configured maximum standby timeexpires, the program on the line is cleared and the infuser alarms2 minutes later when there has been no interaction with the infuser oneither line.

Includes Systems Compatible with Hospira MedNet
7-2 System Operating Manual
The instructions below describe how to put one or both lines inStandby from the Delivery screen. This can also be accomplished fora single line from that line's Confirmation screen.
Put 1 or 2 Lines in Standby from the Delivery Screen (Non-Piggyback)1. On the Delivery screen, press [Standby].
If both lines are PUMPING, the infuser will give you the option to select a line, select both lines, or cancel the request.
2. If the option is provided to standby a line or both lines, select the appropriate softkey.
The Confirm Standby screen displays.
3. On the Confirm Standby screen:
• Press [Yes] to confirm the requested standby selection.
• Press [No] to cancel the standby request and return to theDelivery (A/B) screen.
Cancel Standby for 1 or 2 Lines from the Delivery Screen (Non-Piggyback)1. Press [START].
The Cancel Standby screen displays. If both lines are in standby, the infuser will give you the option to select a line, select both lines, or cancel the request. If only one line is in standby, the infuser will give you the option to cancel standby for the line or cancel the request to cancel standby.
2. Select the appropriate softkey.
Delivery resumes on the selected line(s).
NOTE: A or B softkeys can be used to remove just one line fromstandby. Even if both lines are in standby, this method of cancelingstandby will only affect the line you selected the softkey for.

Plum 360 Infuser
System Operating Manual 7-3
Put Piggyback Mode in Standby
1. While Line B is PUMPING and Line A is PENDING, press[Standby].
2. On the Confirm Piggyback Therapy Standby screen:
• Press [Yes] to confirm the standby request. This will placeLine B in standby and leave Line A in PENDING.
• Press [Restart A] to confirm the standby request. This willplace Line B in standby and place Line A in PUMPING.
• Press [No] to cancel the standby request and return to theDelivery (A/B) screen.
Cancel Piggyback Mode Standby1. Press [START] or [B].
2. On the Cancel Piggyback Therapy Standby screen:
• Press [Yes] to confirm the cancel standby request. This willreturn to the Piggyback therapy with Line A PENDING and LineB PUMPING.
• Press [No] to cancel the cancel standby request and returnto the Delivery (A/B) screen leaving both lines in their currentstates.
WARNINGENSURE MEDICATIONS THAT ARE DELIVEREDCONCURRENTLY, OR IN PIGGYBACK, ARE COMPATIBLE.
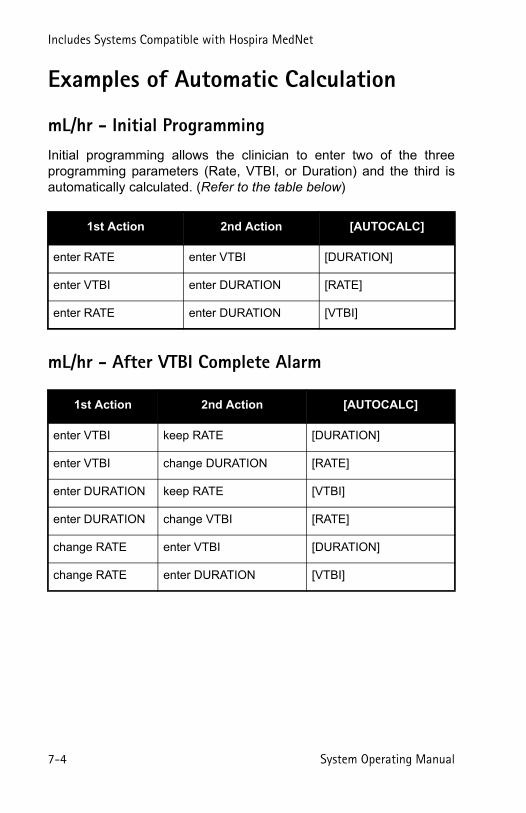
Includes Systems Compatible with Hospira MedNet
7-4 System Operating Manual
Examples of Automatic Calculation
mL/hr - Initial ProgrammingInitial programming allows the clinician to enter two of the threeprogramming parameters (Rate, VTBI, or Duration) and the third isautomatically calculated. (Refer to the table below)
mL/hr - After VTBI Complete Alarm
1st Action 2nd Action [AUTOCALC]
enter RATE enter VTBI [DURATION]
enter VTBI enter DURATION [RATE]
enter RATE enter DURATION [VTBI]
1st Action 2nd Action [AUTOCALC]
enter VTBI keep RATE [DURATION]
enter VTBI change DURATION [RATE]
enter DURATION keep RATE [VTBI]
enter DURATION change VTBI [RATE]
change RATE enter VTBI [DURATION]
change RATE enter DURATION [VTBI]

Plum 360 Infuser
System Operating Manual 7-5
Non-Time-Based Dose Calculation (for example, mL) - Initial Programming
Non-Time-Based Dose Calculation (for example, mL) - After VTBI Complete AlarmWith the exception of the entry of the VTBI auto-calculating the Doseand the entry of the Dose auto-calculating the VTBI, all auto-calculation for a non-time-based program is the same as auto-calculation for an mL/hr program after a VTBI Complete alarm.
1st Action [AUTOCALC] 2nd Action [AUTOCALC]
enter DOSE [VTBI] enter DURATION [RATE]
enter DOSE [VTBI] enter RATE [DURATION]
enter VTBI [DOSE] enter DURATION [RATE]
enter VTBI [DOSE] enter RATE [DURATION]
enter DURATION
N/A enter DOSE [RATE], [VTBI]
enter DURATION
N/A enter RATE [DOSE], [VTBI]
enter DURATION
N/A enter VTBI [RATE], [DOSE]
enter RATE N/A enter DOSE [DURATION], [VTBI]
enter RATE N/A enter DURATION [DOSE], [VTBI]
enter RATE N/A enter VTBI [DURATION], [DOSE]
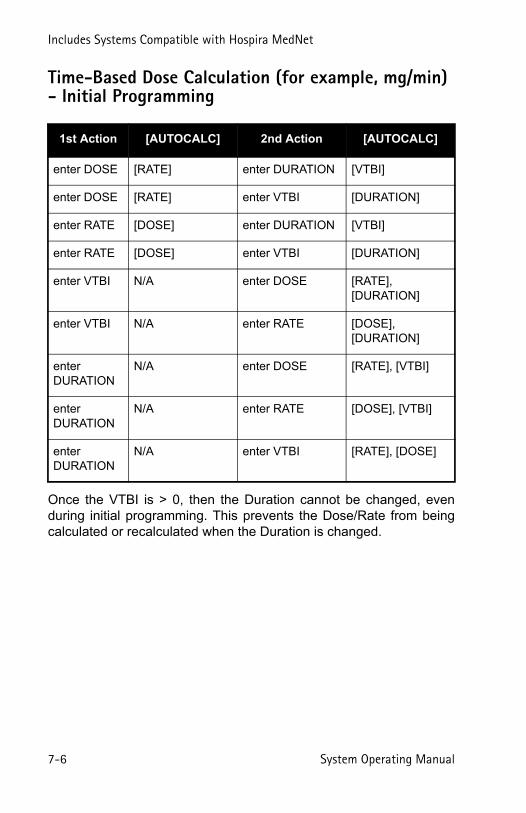
Includes Systems Compatible with Hospira MedNet
7-6 System Operating Manual
Time-Based Dose Calculation (for example, mg/min) - Initial Programming
Once the VTBI is > 0, then the Duration cannot be changed, evenduring initial programming. This prevents the Dose/Rate from beingcalculated or recalculated when the Duration is changed.
1st Action [AUTOCALC] 2nd Action [AUTOCALC]
enter DOSE [RATE] enter DURATION [VTBI]
enter DOSE [RATE] enter VTBI [DURATION]
enter RATE [DOSE] enter DURATION [VTBI]
enter RATE [DOSE] enter VTBI [DURATION]
enter VTBI N/A enter DOSE [RATE], [DURATION]
enter VTBI N/A enter RATE [DOSE], [DURATION]
enter DURATION
N/A enter DOSE [RATE], [VTBI]
enter DURATION
N/A enter RATE [DOSE], [VTBI]
enter DURATION
N/A enter VTBI [RATE], [DOSE]

Plum 360 Infuser
System Operating Manual 7-7
Time-Based Dose Calculation (for example, mg/min) - After VTBI Complete Alarm
*If VTBI is > 0, then the Duration cannot be changed.
Any changes except those listed in the above table will follow theauto-calculation rules in the Time-Based Dose Calculation (forexample, mg/min) - Initial Programming on page 7-6.
Recalculation Alert When Titrating a Confirmed mL/hr or Non-Time-Based Dosing UnitIf you change the Duration of a confirmed mL/hr or non-time-baseddosing unit program and press [START] to confirm the titration,a Recalculation Alert will be displayed indicating that the rate hasbeen recalculated due to the duration change.
Press [Yes] to continue to the Confirmation screen.
Press [No] to return to the programming screen.
The Recalculation Alert will not occur for initial programmingor programming after a VTBI Complete alarm.
1st Action [AUTOCALC] 2nd Action [AUTOCALC]
enter DURATION (if VTBI = 0)*
[VTBI] keep DOSE keep RATE
enter VTBI [DURATION] keep DOSE keep RATE
enter DURATION (if VTBI = 0)*
[VTBI] keep RATE keep DOSE
enter VTBI [DURATION] keep RATE keep DOSE

Includes Systems Compatible with Hospira MedNet
7-8 System Operating Manual
Notes
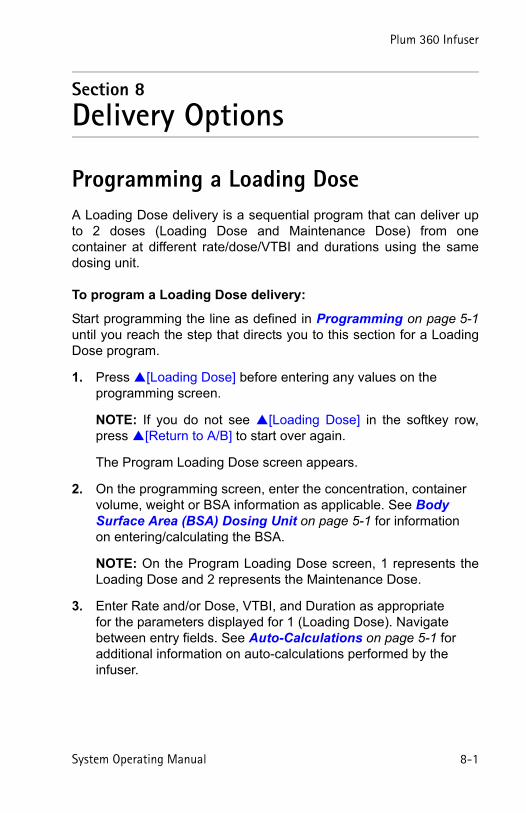
Plum 360 Infuser
System Operating Manual 8-1
Section 8
Delivery Options
Programming a Loading DoseA Loading Dose delivery is a sequential program that can deliver upto 2 doses (Loading Dose and Maintenance Dose) from onecontainer at different rate/dose/VTBI and durations using the samedosing unit.
To program a Loading Dose delivery:
Start programming the line as defined in Programming on page 5-1until you reach the step that directs you to this section for a LoadingDose program.
1. Press [Loading Dose] before entering any values on the programming screen.
NOTE: If you do not see [Loading Dose] in the softkey row,press [Return to A/B] to start over again.
The Program Loading Dose screen appears.
2. On the programming screen, enter the concentration, container volume, weight or BSA information as applicable. See Body Surface Area (BSA) Dosing Unit on page 5-1 for information on entering/calculating the BSA.
NOTE: On the Program Loading Dose screen, 1 represents theLoading Dose and 2 represents the Maintenance Dose.
3. Enter Rate and/or Dose, VTBI, and Duration as appropriate for the parameters displayed for 1 (Loading Dose). Navigate between entry fields. See Auto-Calculations on page 5-1 for additional information on auto-calculations performed by the infuser.
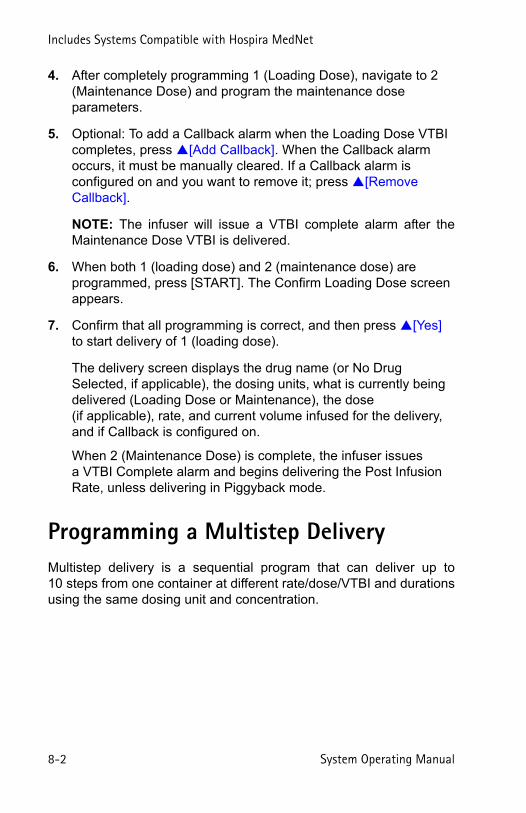
Includes Systems Compatible with Hospira MedNet
8-2 System Operating Manual
4. After completely programming 1 (Loading Dose), navigate to 2 (Maintenance Dose) and program the maintenance dose parameters.
5. Optional: To add a Callback alarm when the Loading Dose VTBI completes, press [Add Callback]. When the Callback alarm occurs, it must be manually cleared. If a Callback alarm is configured on and you want to remove it; press [Remove Callback].
NOTE: The infuser will issue a VTBI complete alarm after theMaintenance Dose VTBI is delivered.
6. When both 1 (loading dose) and 2 (maintenance dose) are programmed, press [START]. The Confirm Loading Dose screen appears.
7. Confirm that all programming is correct, and then press [Yes] to start delivery of 1 (loading dose).
The delivery screen displays the drug name (or No Drug Selected, if applicable), the dosing units, what is currently being delivered (Loading Dose or Maintenance), the dose (if applicable), rate, and current volume infused for the delivery, and if Callback is configured on.
When 2 (Maintenance Dose) is complete, the infuser issues a VTBI Complete alarm and begins delivering the Post Infusion Rate, unless delivering in Piggyback mode.
Programming a Multistep DeliveryMultistep delivery is a sequential program that can deliver up to10 steps from one container at different rate/dose/VTBI and durationsusing the same dosing unit and concentration.
Plum 360 Infuser
System Operating Manual 8-3
To program a Multistep delivery:
1. Press [Multistep] before entering any values on the programming screen.
NOTE: If you do not see [Multistep] in the softkey row, press[Return to A/B] to start over again.
The Program Multistep screen appears.
2. On the programming screen, enter the concentration, container volume, weight or BSA information as applicable. See Body Surface Area (BSA) Dosing Unit on page 5-1 for information on entering/calculating the BSA.
NOTE: On the Program Multistep screen, 1 represents Step 1,2 represents Step 2, etc.
3. Enter Rate and/or Dose, VTBI, and Duration as appropriate for the parameters displayed for Step 1. Navigate between entry fields. See Auto-Calculations on page 5-1 for additional information on auto-calculations performed by the infuser.
4. After programming all values in 1 (Step 1), navigate to the 2 (Step 2), and program that step.
5. After programming all values in 2 (Step 2), continue with 3 (Step 3) if desired.
As soon as all values in Step 3 are populated, [To Steps 4-10] appears in the softkey row.
6. Press [To Steps 4-10] to program additional steps, if needed.
7. Optional: To add a Callback alarm when each step, except the last step, completes, press [Add Callback]. When the Callback alarm occurs, it must be manually cleared. If a Callback alarm is configured on and you want to remove it, press [Remove Callback].
NOTE: The infuser will issue a VTBI complete alarm after the laststep.
Includes Systems Compatible with Hospira MedNet
8-4 System Operating Manual
8. When all steps are programmed, press [START]. The Confirm Multistep screen appears.
If no more than 3 steps are programmed, the Confirm Multistep screen prompts you to start the delivery.
Otherwise, if more than 3 steps are programmed, confirm that the programming for the first 3 steps is correct and then press [To Steps 4-10]. The confirmation screen displays for the additional steps and prompts you to start the delivery.
9. Confirm that all programming is correct, and then press[Yes] to start the delivery for 1 (Step 1).
The delivery screen displays the drug name (or No Drug Selected, if applicable), the dosing units, the step that is currently being delivered out of how many steps that have been programmed (for example, Step 1 of 4), and the information for the step that is delivering.
When the last step is complete, the infuser issues a VTBI complete alarm and begins delivering the Post Infusion Rate, unless delivering in Piggyback mode.
Adding a Step to a Multistep DeliveryA step can be added to a running Multistep infusion only aftera running step or a step that has not yet started delivery.
NOTE: If the infusion is stopped, the softkey used to add a new stepchanges to add or remove the Callback.
To add a step to a running Multistep infusion:
1. Select the line.
2. Select [Add New Step].
3. Enter the number of the step after which you want to add a new step.

Plum 360 Infuser
System Operating Manual 8-5
4. Select [Add Step].
5. Enter the Dose, Rate, VTBI, or Duration for the step as desired.
6. Press [START] and confirm the program as described in Programming a Multistep Delivery on page 8-2.
Adding VTBI to Loading Dose or Multistep Program After VTBI Complete Alarm ActivatesThe status of delivery steps is shown on the Program screens for LineA and Line B.
NOTE: When the last step has completed delivery and the post-infusion rate has begun delivery, the last step display indicator returnsto the step number.
During a Loading Dose delivery or a Multistep delivery, after the VTBIComplete alarm activates and post-infusion rate delivery has begun,as long as the post-delivery rate infusion has not been stopped youcan add more VTBI to the last delivery step, if needed.
If you stop infusion after VTBI has completed, you can add moreVTBI, but you must add it to all delivery steps before restarting theprogram.
Display Indicator Delivery Step Status
* Step is currently running
d VTBI for step has completed
Number Infusion for step not started yet OR VTBI is complete and VTBI can be added to the step as described below.

Includes Systems Compatible with Hospira MedNet
8-6 System Operating Manual
To add more VTBI to the last step (Multistep) or maintenancedose (Loading Dose) while post-infusion rate delivery continues:
1. Select the line.
2. Navigate to the VTBI for the last step. Step display indicators will have returned to the step number, indicating it is editable.
3. Enter a VTBI.
4. Press [START] and confirm the program as described in Programming a Loading Dose on page 8-1 and Programming a Multistep Delivery on page 8-2.
To stop the post-infusion rate and add more VTBI to all steps:
1. Stop the line running the program to which you want to add moreVTBI.
NOTE: When adding VTBI, you can also update other stepparameters if necessary.
2. Reselect the line.
3. In the Program screen, press [No] to edit the program. All step display indicators will have returned to numbers, indicating they are editable.
4. Enter the VTBI.
NOTE: You must add VTBI to all steps.
5. Press [START] and confirm the program as described in Programming a Loading Dose on page 8-1 and Programming a Multistep Delivery on page 8-2.
Plum 360 Infuser
System Operating Manual 8-7
TitrationTitration is a change in Dose/Rate, Duration, and/or VTBI ina currently running or programmed infusion.
Loading Dose Delivery and Multistep DeliveryIn a Loading Dose delivery or Multistep delivery, during infusion andbefore VTBI is completed, titration can be performed only on stepswhere the display indicator is an * or a number.
To perform titration:
1. Select the line to titrate.
2. Navigate to any step where the display indicator is an * or a number and change the Dose, Rate, VTBI, or Duration for the step as desired.
3. Press [START] and confirm the program as described in Programming a Loading Dose on page 8-1 and Programming a Multistep Delivery on page 8-2.
Changing the CCA During InfusionTo change the CCA during infusion:
1. Press [Settings/Vols/CCA].
2. Press [Change CCA]. The current CCA is indicated by arrows before and after the CCA name.
3. Choose a CCA.
When the Delivery screen displays, the infuser will inform the user that line is delivering under a prior CCA. Until a VTBI Complete alarm occurs for the line, you can still titrate the infusion on that line under the old CCA.

Includes Systems Compatible with Hospira MedNet
8-8 System Operating Manual
When a VTBI Complete alarm occurs on a line that is infusingunder a prior CCA:
1. Stop the line.
2. Clear the volume for the line, if desired.
3. Select the line.
4. Clear the line settings.
5. Reprogram the line under the current CCA.

Plum 360 Infuser
System Operating Manual 9-1
Section 9
Alarms and Troubleshooting
Alarm Priority LevelsThe Plum 360 infuser has an intelligent alarm system that handlesmore than one alarm at a time. Alarms are prioritized as high,medium, or low. You can distinguish the priority by the numberof beeps:
The alarm sound pressure range is from 45 dB to 70 dB, dependingon the setting of the alarm loudness control located on the back of theinfuser.
The alarm sound pressure is measured in accordance with IEC60601-1-8:2006.
Priority Number of Beeps
High 10
Medium 3
Low 2
WARNINGSETTING THE ALARM SOUND PRESSURE LEVEL LOWER THANTHE AMBIENT SOUND PRESSURE LEVEL CAN IMPEDEOPERATOR RECOGNITION OF ALARM CONDITIONS.
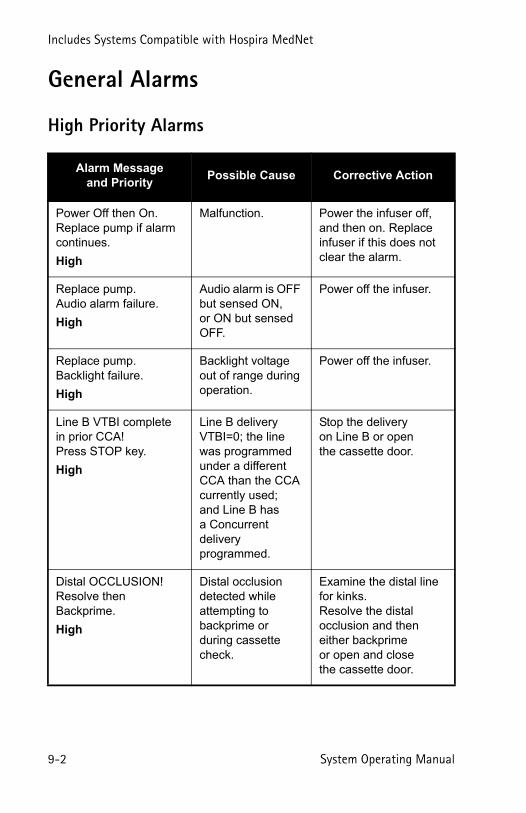
Includes Systems Compatible with Hospira MedNet
9-2 System Operating Manual
General Alarms
High Priority Alarms
Alarm Messageand Priority
Possible Cause Corrective Action
Power Off then On.Replace pump if alarm continues.
High
Malfunction. Power the infuser off, and then on. Replace infuser if this does not clear the alarm.
Replace pump. Audio alarm failure.
High
Audio alarm is OFF but sensed ON, or ON but sensed OFF.
Power off the infuser.
Replace pump. Backlight failure.
High
Backlight voltage out of range during operation.
Power off the infuser.
Line B VTBI complete in prior CCA!Press STOP key.
High
Line B delivery VTBI=0; the line was programmed under a different CCA than the CCA currently used; and Line B has a Concurrent delivery programmed.
Stop the delivery on Line B or open the cassette door.
Distal OCCLUSION!Resolve then Backprime.
High
Distal occlusion detected while attempting to backprime or during cassette check.
Examine the distal line for kinks.Resolve the distal occlusion and then either backprime or open and close the cassette door.

Plum 360 Infuser
System Operating Manual 9-3
Distal OCCLUSION!Check IV line and site.
High
A distal occlusion is detected and either the maximum auto-restarts have occurred for the infusion or auto-restart was set to zero.
Examine the distal line for kinks and correct any found.Restart the delivery.Note: The alarm can also be cleared by clearing the confirmed programs on any programmed line or opening the cassette door.
See Avoiding a Bolus While Resolving a Distal Occlusion on page 4-32.
WARNINGTHE PLUM 360 INFUSER DOES NOT HAVE CAPABILITYTO DETECT INFILTRATION TO THE PATIENT
Pump too high above patient.Lower pump or replace set.
High
Distal occlusion detected during delivery dueto too much backpressure.
Resolve the occlusion by lowering the infuser on the pole to place it closer to the level of the patient’s heart(see Delivery Accuracy on page 11-9) and then press [START].
Note: The alarm can also be cleared by clearing the confirmed programs on any programmed line or opening the cassette door.
Alarm Messageand Priority
Possible Cause Corrective Action
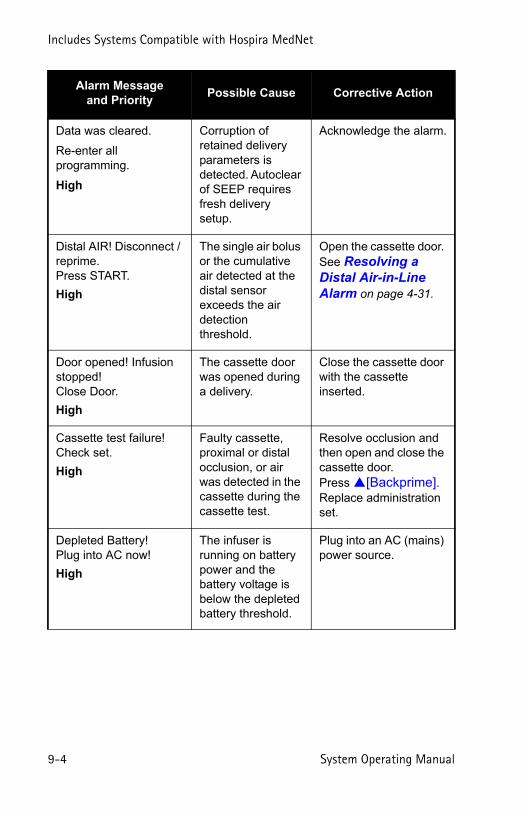
Includes Systems Compatible with Hospira MedNet
9-4 System Operating Manual
Data was cleared.
Re-enter all programming.
High
Corruption of retained delivery parameters is detected. Autoclear of SEEP requires fresh delivery setup.
Acknowledge the alarm.
Distal AIR! Disconnect / reprime.Press START.
High
The single air bolus or the cumulative air detected at the distal sensor exceeds the air detection threshold.
Open the cassette door. See Resolving a Distal Air-in-Line Alarm on page 4-31.
Door opened! Infusion stopped!Close Door.
High
The cassette door was opened during a delivery.
Close the cassette door with the cassette inserted.
Cassette test failure!Check set.
High
Faulty cassette, proximal or distal occlusion, or air was detected in the cassette during the cassette test.
Resolve occlusion and then open and close the cassette door.Press [Backprime].Replace administration set.
Depleted Battery! Plug into AC now!
High
The infuser is running on battery power and the battery voltage is below the depleted battery threshold.
Plug into an AC (mains) power source.
Alarm Messageand Priority
Possible Cause Corrective Action
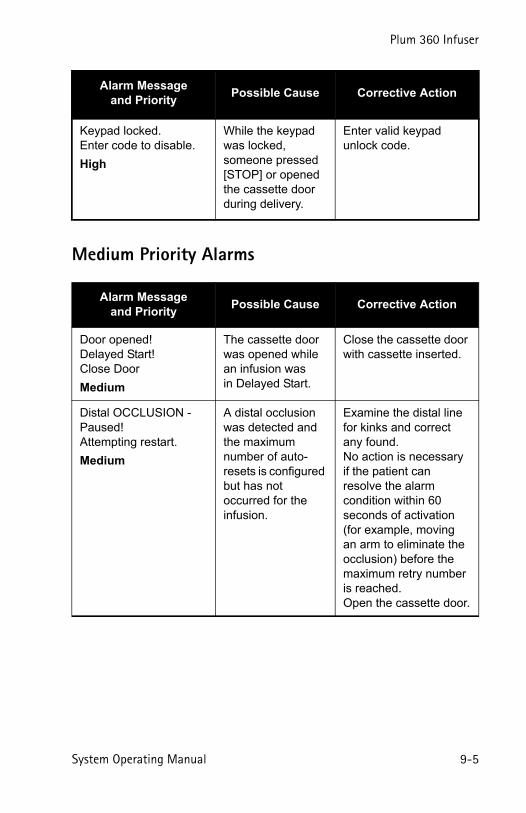
Plum 360 Infuser
System Operating Manual 9-5
Medium Priority Alarms
Keypad locked.Enter code to disable.
High
While the keypad was locked, someone pressed [STOP] or opened the cassette door during delivery.
Enter valid keypad unlock code.
Alarm Messageand Priority
Possible Cause Corrective Action
Door opened!Delayed Start!Close Door
Medium
The cassette door was opened while an infusion was in Delayed Start.
Close the cassette door with cassette inserted.
Distal OCCLUSION - Paused!Attempting restart.
Medium
A distal occlusion was detected and the maximum number of auto-resets is configured but has not occurred for the infusion.
Examine the distal line for kinks and correct any found. No action is necessaryif the patient can resolve the alarm condition within 60 seconds of activation(for example, moving an arm to eliminate the occlusion) before the maximum retry number is reached.Open the cassette door.
Alarm Messageand Priority
Possible Cause Corrective Action

Includes Systems Compatible with Hospira MedNet
9-6 System Operating Manual
Low Priority Alarms
Alarm Messageand Priority
Possible Cause Corrective Action
Keep Plugged into AC!Service battery/replace pump.
Low
The battery or battery charge circuitry needs servicing.
Power off the infuser. Replace the infuser as soon as possible, so that it can be sent for repair.
Power Off then On.Replace pump if alarm continues.
Low
Battery voltage is greater than the expected limit.
Power off the infuser.
Low Battery!Plug into AC power!
Low
The battery charge level is low.
Plug into AC (mains) power.
Programming not complete! Action required!
Low
No operator input for two minutes after the infuser is powered on in Clinical mode, except for situations that trigger an alarm.
Press any hardkey or softkey except the hardkey that silences alarms.

Plum 360 Infuser
System Operating Manual 9-7
Line A Alarms
High Priority Alarms
Alarm Messageand Priority
Possible Cause Corrective Action
No Action Alarm!Start or Clear line A.
High
No operator action for 2 minutes when Line A has been stopped by the user and is not cleared or restarted.
Note:Will reassert if the condition persists.
Press any key on the infuser except [AUDIO PAUSED].Select Line A to program or clear it.
Line A VTBI complete in prior CCA!Press STOP key.
High
Line A was programmed under a different CCA than is currently being used and delivery is complete.
Stop the delivery on Line A.Open cassette door.
VTBI Completed Line A!Add more VTBIor Clear A.
High
Line A delivery is complete and line was programmed under the CCA that is currently being used.
Add VTBI on Line A.Stop Line A.Open cassette door.

Includes Systems Compatible with Hospira MedNet
9-8 System Operating Manual
Proximal OCCLUSION A!Check Line A.
High
Proximal occlusion or air detected on Line A during delivery.
Examine the proximal line for kinks and correct any found. If the occlusion is caused by a closed clamp, open the clamp.If all clamps are open, the alarm may be caused by excessive air that is creating backpressure in the cassette.To remove the air, see Backpriming on page 4-21.Check the syringe size. See Administration Sets and Accessories Guidelines on page 1-16.Restart Line A.Note: The alarm can also be cleared by clearing the confirmed programs on any programmed line or opening the cassette door.
Alarm Messageand Priority
Possible Cause Corrective Action

Plum 360 Infuser
System Operating Manual 9-9
Medium Priority Alarms
Proximal AIR Line A!Backprime.
High
The single air bolus detected at the proximal sensor in Line A exceeds the air detection threshold.
Open cassette door.Press [Backprime].See Backpriming on page 4-21.Check the syringe size. See Administration Sets and Accessories Guidelines on page 1-16.
Alarm Messageand Priority
Possible Cause Corrective Action
Callback to Line A! Silence audio to clear.
Medium
A Callback Alarm was programmed for a Loading Dose or Multistep delivery on Line A, and a step other than the final step is complete.
Press[AUDIO PAUSED].
Alarm Messageand Priority
Possible Cause Corrective Action

Includes Systems Compatible with Hospira MedNet
9-10 System Operating Manual
Proximal OCCLUSION A!.Resolve then Backprime.
Medium
Proximal occlusion detected on Line A during backprime.
Examine Line A for kinks.Resolve the occlusion. Either backprime or open and close the cassette door.Check the syringe size. See Administration Sets and Accessories Guidelines on page 1-16.
Prox OCCLUSION A Startup!Open/close door or Backprime
Medium
A proximal occlusion was detected on Line A during the cassette integrity test.
Examine Line A for kinks.Resolve the occlusion.Either backprime or open and close the cassette door.See Opening the Cassette Door Completely on page 3-8.Check the syringe size. See Administration Sets and Accessories Guidelines on page 1-16.
Alarm Messageand Priority
Possible Cause Corrective Action

Plum 360 Infuser
System Operating Manual 9-11
Line B Alarms
High Priority Alarms
Alarm Messageand Priority
Possible Cause Corrective Action
No Action Alarm!Start or Clear line B.
High
No operator action for 2 minutes when Line B has been stopped by the user and is not cleared or restarted.Note:Will reassert if the condition persists.
Press any key onthe infuser except [AUDIO PAUSED].Select Line B to program or clear it.
Line B VTBI complete in prior CCA!Clear Line B.
High
A Line B Piggyback delivery that was programmed under a different CCA is complete, and no delivery is programmed on Line A.
Clear the delivery on Line B or open the cassette door.
VTBI Completed Line B!Add more VTBIor Clear B.
High
A Piggyback delivery on Line B is complete and the line was programmed under the current CCA and no delivery is programmed to deliver on Line A.Note:Piggyback with a line A delivery will not alarm; it will just transition to Line A delivery.
Add VTBI on Line B.Clear programon Line B.Open the cassette door.
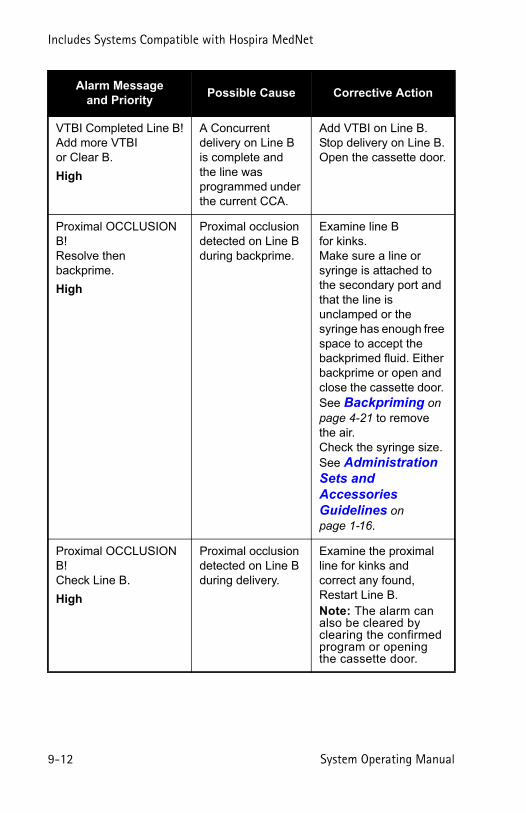
Includes Systems Compatible with Hospira MedNet
9-12 System Operating Manual
VTBI Completed Line B!Add more VTBIor Clear B.
High
A Concurrent delivery on Line B is complete and the line was programmed under the current CCA.
Add VTBI on Line B.Stop delivery on Line B.Open the cassette door.
Proximal OCCLUSION B!Resolve then backprime.
High
Proximal occlusion detected on Line B during backprime.
Examine line B for kinks.Make sure a line or syringe is attached to the secondary port and that the line is unclamped or the syringe has enough free space to accept the backprimed fluid. Either backprime or open and close the cassette door. See Backpriming on page 4-21 to remove the air.Check the syringe size. See Administration Sets and Accessories Guidelines on page 1-16.
Proximal OCCLUSION B!Check Line B.
High
Proximal occlusion detected on Line B during delivery.
Examine the proximal line for kinks and correct any found, Restart Line B.Note: The alarm can also be cleared by clearing the confirmed program or opening the cassette door.
Alarm Messageand Priority
Possible Cause Corrective Action
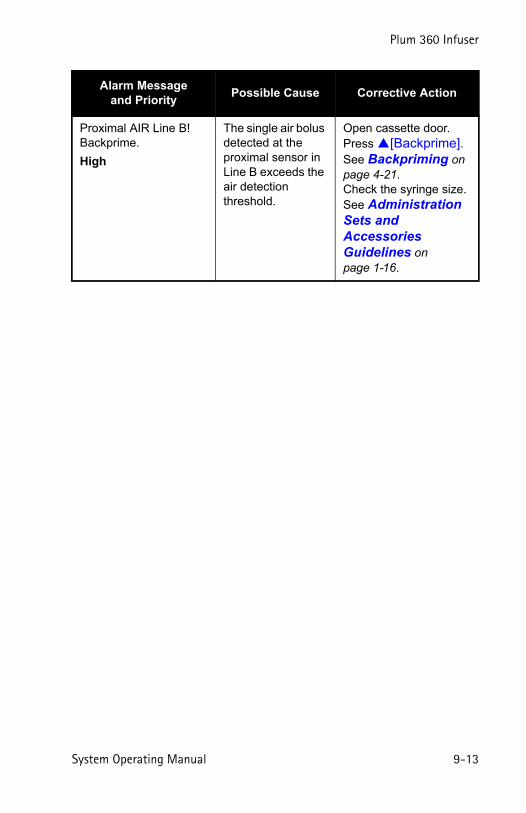
Plum 360 Infuser
System Operating Manual 9-13
Proximal AIR Line B! Backprime.
High
The single air bolus detected at the proximal sensor in Line B exceeds the air detection threshold.
Open cassette door.Press [Backprime]. See Backpriming on page 4-21.Check the syringe size. See Administration Sets and Accessories Guidelines on page 1-16.
Alarm Messageand Priority
Possible Cause Corrective Action

Includes Systems Compatible with Hospira MedNet
9-14 System Operating Manual
Medium Priority Alarms
Alarm Message and
PriorityPossible Cause Corrective Action
Callback to Line B! Silence audio to clear.
Medium
A Callback Alarm was programmed for Line B and a Piggyback delivery just completed and there is no underlying delivery or the first step of a Loading Dose or any step other than the final step of a Multistep delivery is complete.
Press [AUDIO PAUSED].
Proximal OCCLUSION B.Resolve then Backprime
Medium
Proximal occlusion detected on Line B during cassette integrity test.
Examine line B for kinks.Make sure a line or syringe is attached to the secondary port and that the line is unclamped or the syringe has enough free space to accept the backprimed fluid.Either backprime or open and close the cassette door. Check the syringe size. See Administration Sets and Accessories Guidelines on page 1-16.
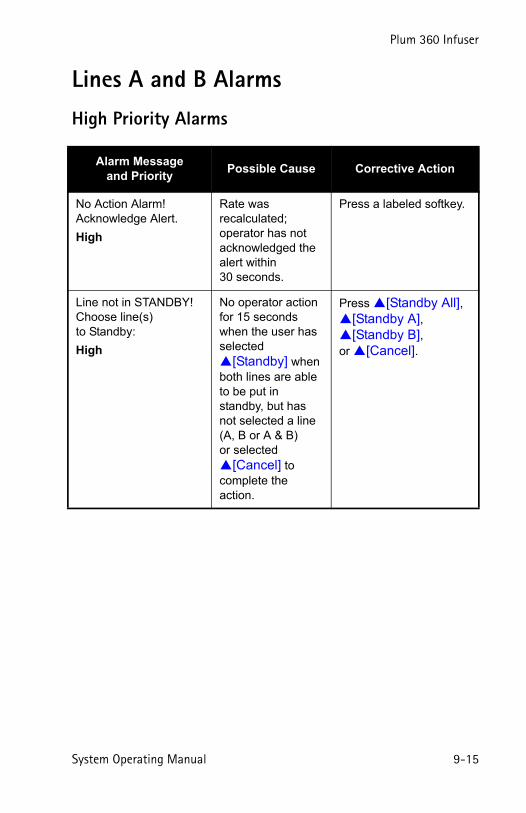
Plum 360 Infuser
System Operating Manual 9-15
Lines A and B Alarms
High Priority Alarms
Alarm Messageand Priority
Possible Cause Corrective Action
No Action Alarm!Acknowledge Alert.
High
Rate was recalculated; operator has not acknowledged the alert within 30 seconds.
Press a labeled softkey.
Line not in STANDBY!Choose line(s) to Standby:
High
No operator action for 15 seconds when the user has selected [Standby] when both lines are able to be put in standby, but has not selected a line (A, B or A & B) or selected [Cancel] to complete the action.
Press [Standby All], [Standby A], [Standby B], or [Cancel].

Includes Systems Compatible with Hospira MedNet
9-16 System Operating Manual
Delivery was not STOPPED!Choose line(s) to stop.
High
No operator action for 15 seconds when the user has attempted to stop a delivery when both lines are delivering by pressing [STOP], but has not selected a line(A, B or A & B) or selected [Cancel] to complete the action.
Press [Stop All], [Stop A], [Stop B], or [Cancel].
Delivery was not STARTED!Choose line(s) to start.
High
No operator action for 15 seconds when the user has attempted to start a delivery when both lines are confirmed by pressing [START], but has not selected a line(A, B or A & B) or selected [Cancel] to complete the action.
Press [Start All], [Start A], [Start B], or [Cancel].
Yes: Start titration. No: Edit
High
Standby is not possible and no operator action for 30 seconds when a titrated program is waiting to be confirmed.
Press [Yes] to confirm the program or [No] to go back to the Program screen.
Alarm Messageand Priority
Possible Cause Corrective Action
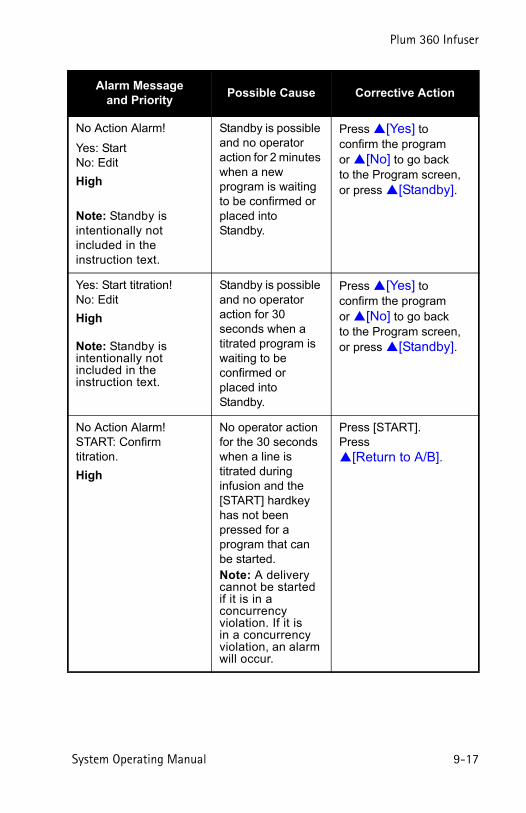
Plum 360 Infuser
System Operating Manual 9-17
No Action Alarm!
Yes: Start No: Edit
High
Note: Standby is intentionally not included in the instruction text.
Standby is possible and no operator action for 2 minutes when a new program is waiting to be confirmed or placed into Standby.
Press [Yes] to confirm the program or [No] to go back to the Program screen, or press [Standby].
Yes: Start titration! No: Edit
High
Note: Standby is intentionally not included in the instruction text.
Standby is possible and no operator action for 30 seconds when a titrated program is waiting to be confirmed or placed into Standby.
Press [Yes] to confirm the program or [No] to go back to the Program screen, or press [Standby].
No Action Alarm! START: Confirm titration.
High
No operator action for the 30 seconds when a line is titrated during infusion and the [START] hardkey has not been pressed for a program that can be started.Note: A delivery cannot be started if it is in a concurrency violation. If it isin a concurrency violation, an alarm will occur.
Press [START].Press[Return to A/B].
Alarm Messageand Priority
Possible Cause Corrective Action
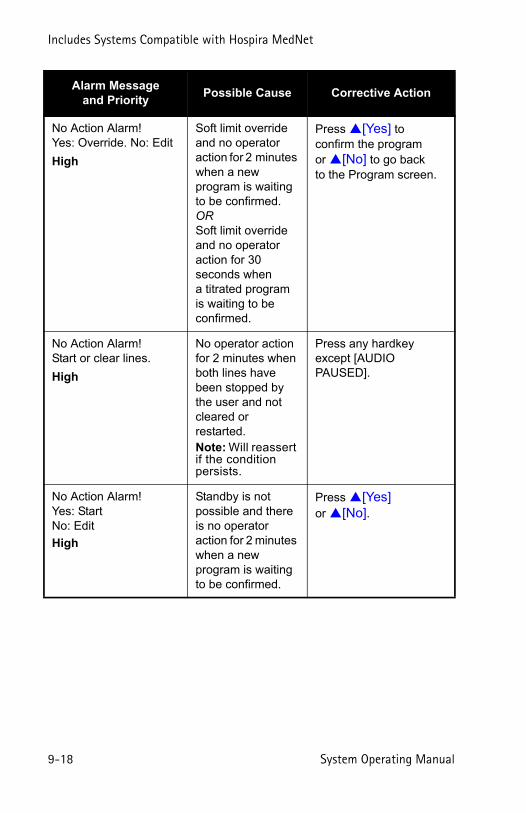
Includes Systems Compatible with Hospira MedNet
9-18 System Operating Manual
No Action Alarm!Yes: Override. No: Edit
High
Soft limit override and no operator action for 2 minutes when a new program is waiting to be confirmed.ORSoft limit override and no operator action for 30 seconds when a titrated program is waiting to be confirmed.
Press [Yes] to confirm the program or [No] to go back to the Program screen.
No Action Alarm!Start or clear lines.
High
No operator action for 2 minutes when both lines have been stopped by the user and not cleared or restarted.Note: Will reassert if the condition persists.
Press any hardkey except [AUDIO PAUSED].
No Action Alarm!Yes: StartNo: Edit
High
Standby is not possible and there is no operator action for 2 minutes when a new program is waiting to be confirmed.
Press [Yes] or [No].
Alarm Messageand Priority
Possible Cause Corrective Action

Plum 360 Infuser
System Operating Manual 9-19
Rejected Auto-ProgramsIf a physician’s order for an automatically programmed therapy(see Auto-Programming on page 6-1) exceeds the capabilitiesof the infuser or is above a hospital-defined hard drug limit, the orderwill be rejected. If your order is rejected, recheck the order.
The following table is a list of auto-program rejection messages andoperator actions to respond to rejections.
Proximal AIR!Backprime.
High
The cumulative air detected at the proximal sensors in Line A and Line B exceeds the air detection threshold.
Press [Backprime]. Open the cassette door. See Backpriming on page 4-21.Check the syringe size. See Administration Sets and Accessories Guidelines on page 1-16.
Message Action
The program was rejected because there is no custom drug library installed.
Press [Reject], or wait for this screen to automatically dismiss.
The program was rejected because a CCA has not been selected.
Press [Reject], or wait for this screen to automatically dismiss.
Select a CCA and resubmit the program.
The program was rejected because the patient weight is different than the weight being used on the other line.
Press [Reject], or wait for this screen to automatically dismiss.
Alarm Messageand Priority
Possible Cause Corrective Action
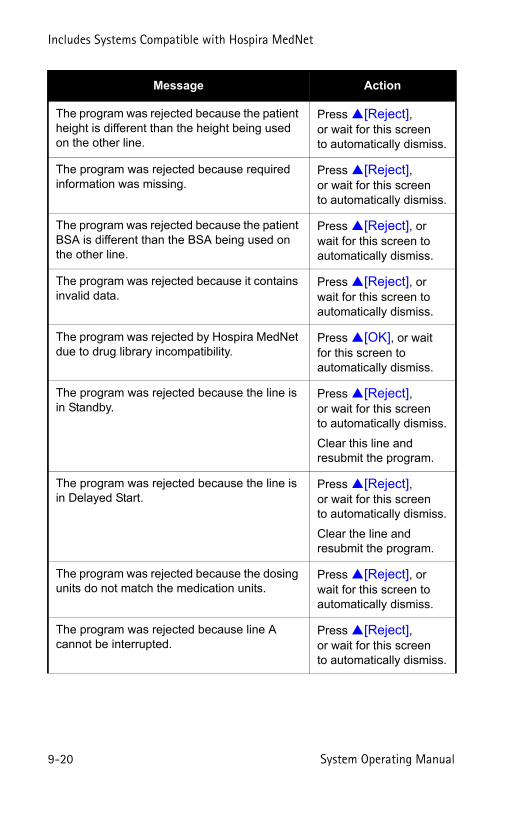
Includes Systems Compatible with Hospira MedNet
9-20 System Operating Manual
The program was rejected because the patient height is different than the height being used on the other line.
Press [Reject], or wait for this screen to automatically dismiss.
The program was rejected because required information was missing.
Press [Reject], or wait for this screen to automatically dismiss.
The program was rejected because the patient BSA is different than the BSA being used on the other line.
Press [Reject], or wait for this screen to automatically dismiss.
The program was rejected because it contains invalid data.
Press [Reject], or wait for this screen to automatically dismiss.
The program was rejected by Hospira MedNet due to drug library incompatibility.
Press [OK], or wait for this screen to automatically dismiss.
The program was rejected because the line is in Standby.
Press [Reject], or wait for this screen to automatically dismiss.
Clear this line and resubmit the program.
The program was rejected because the line is in Delayed Start.
Press [Reject], or wait for this screen to automatically dismiss.
Clear the line and resubmit the program.
The program was rejected because the dosing units do not match the medication units.
Press [Reject], or wait for this screen to automatically dismiss.
The program was rejected because line A cannot be interrupted.
Press [Reject], or wait for this screen to automatically dismiss.
Message Action
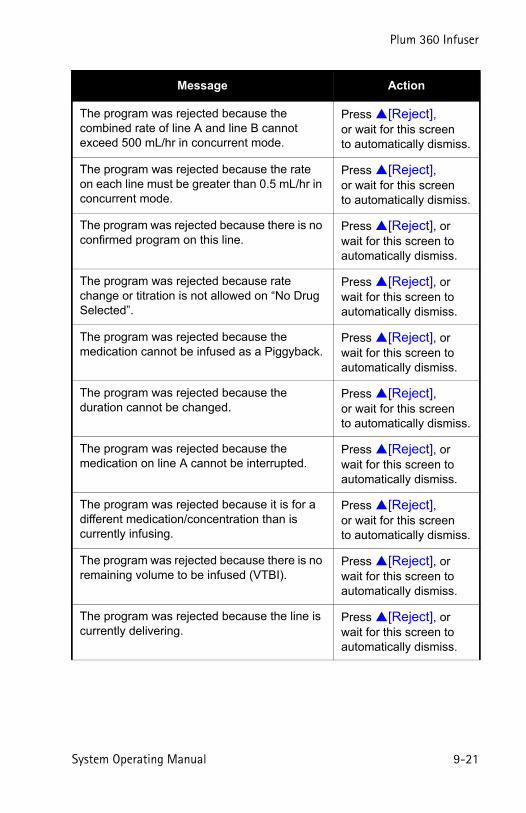
Plum 360 Infuser
System Operating Manual 9-21
The program was rejected because the combined rate of line A and line B cannot exceed 500 mL/hr in concurrent mode.
Press [Reject], or wait for this screen to automatically dismiss.
The program was rejected because the rate on each line must be greater than 0.5 mL/hr in concurrent mode.
Press [Reject], or wait for this screen to automatically dismiss.
The program was rejected because there is no confirmed program on this line.
Press [Reject], or wait for this screen to automatically dismiss.
The program was rejected because rate change or titration is not allowed on “No Drug Selected”.
Press [Reject], or wait for this screen to automatically dismiss.
The program was rejected because the medication cannot be infused as a Piggyback.
Press [Reject], or wait for this screen to automatically dismiss.
The program was rejected because the duration cannot be changed.
Press [Reject], or wait for this screen to automatically dismiss.
The program was rejected because the medication on line A cannot be interrupted.
Press [Reject], or wait for this screen to automatically dismiss.
The program was rejected because it is for a different medication/concentration than is currently infusing.
Press [Reject], or wait for this screen to automatically dismiss.
The program was rejected because there is no remaining volume to be infused (VTBI).
Press [Reject], or wait for this screen to automatically dismiss.
The program was rejected because the line is currently delivering.
Press [Reject], or wait for this screen to automatically dismiss.
Message Action
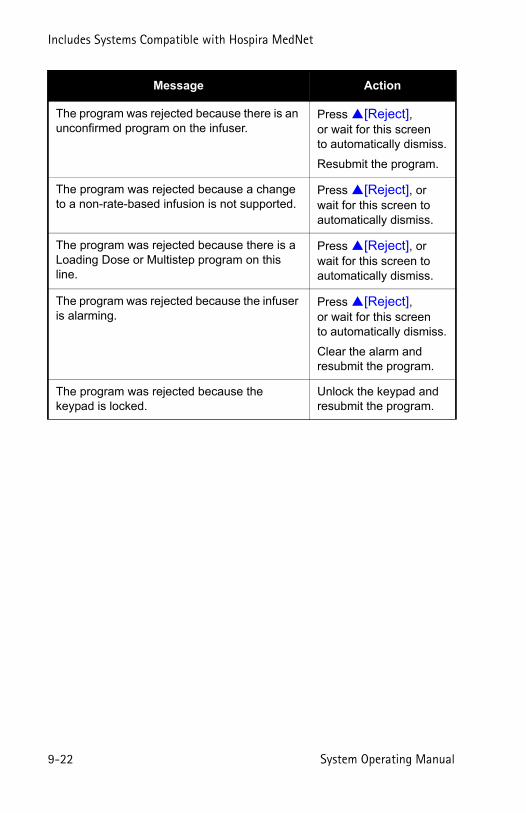
Includes Systems Compatible with Hospira MedNet
9-22 System Operating Manual
The program was rejected because there is an unconfirmed program on the infuser.
Press [Reject], or wait for this screen to automatically dismiss.
Resubmit the program.
The program was rejected because a change to a non-rate-based infusion is not supported.
Press [Reject], or wait for this screen to automatically dismiss.
The program was rejected because there is a Loading Dose or Multistep program on this line.
Press [Reject], or wait for this screen to automatically dismiss.
The program was rejected because the infuser is alarming.
Press [Reject], or wait for this screen to automatically dismiss.
Clear the alarm and resubmit the program.
The program was rejected because the keypad is locked.
Unlock the keypad and resubmit the program.
Message Action

Plum 360 Infuser
System Operating Manual 9-23
Partially Programmed LineIn this case, an auto-program is rejected because of a partiallyprogrammed line. A line is partially programmed when a drugis selected for the line and the line program has not been clearedor confirmed.
An infuser with an installed cassette was started. The CCA wasselected. A new I.V. bag containing the same or different drug washung. A line was selected and a drug was selected. The barcode wasscanned and the order was sent.
The standard auto-program for line A was sent to the infuser, whichrejects the auto-program.
Invalid TitrationIn this case, an auto-program is rejected because auto-programmingis performed on a line in the PENDING or PUMPING state and thePost Infusion Rate (KVO or RATE) is interpreted as not beinga titration.
An infuser with an installed cassette was started. The CCA wasselected. Line A was programmed and delivery was started.A barcode was scanned and an order on line A was placed. The auto-program for line A was sent to the infuser.
The infuser determines that the auto-program is a new delivery basedon titration rules and rejects the auto-program.
Includes Systems Compatible with Hospira MedNet
9-24 System Operating Manual
Notes
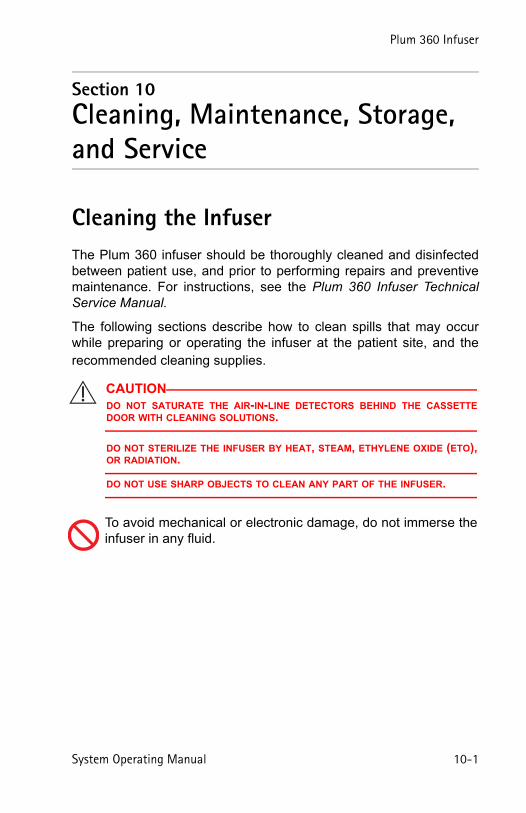
Plum 360 Infuser
System Operating Manual 10-1
Section 10 Cleaning, Maintenance, Storage, and Service
Cleaning the InfuserThe Plum 360 infuser should be thoroughly cleaned and disinfectedbetween patient use, and prior to performing repairs and preventivemaintenance. For instructions, see the Plum 360 Infuser TechnicalService Manual.
The following sections describe how to clean spills that may occurwhile preparing or operating the infuser at the patient site, and therecommended cleaning supplies.
CAUTIONDO NOT SATURATE THE AIR-IN-LINE DETECTORS BEHIND THE CASSETTEDOOR WITH CLEANING SOLUTIONS.
DO NOT STERILIZE THE INFUSER BY HEAT, STEAM, ETHYLENE OXIDE (ETO),OR RADIATION.
DO NOT USE SHARP OBJECTS TO CLEAN ANY PART OF THE INFUSER.
To avoid mechanical or electronic damage, do not immerse theinfuser in any fluid.

Includes Systems Compatible with Hospira MedNet
10-2 System Operating Manual
Cleaning ProcedureThe following procedure describes how to clean nonhazardous spillsor soil from the infuser during the course of patient care.
• Non-hazardous fluid spills should be wiped up as soon aspossible, and not allowed to dry on the infuser.
• Hazardous spills (such as blood or chemotherapy drugs) should beprocessed per facility policy.
To clean non-hazardous spills or soil at the patient site:
1. Inspect the infuser enclosure, display, and keypad for visiblecracks or damage that may allow fluid to reach internalcomponents.
2. With gloves on, remove a wipe from the dispenser and unfoldit to expose the maximum surface area before wiping, or spray an approved cleaning solution on a clean, lint-free cloth.
See Cleaning Supplies on page 10-3 for approved cleaning solutions.
CAUTIONDO NOT USE THE INFUSER IF THE ENCLOSURE, KEYPAD, OR DISPLAY ISDAMAGED OR CRACKED.
IF DAMAGE OR CRACKS ARE FOUND, REPLACE THE INFUSER.
CAUTIONDO NOT SPRAY CLEANING SOLUTIONS TOWARD ANY OPENING IN THEINFUSER.

Plum 360 Infuser
System Operating Manual 10-3
3. Wipe up the spill.
• Use a spiral pattern when wiping, moving from the innerto outer edges of each surface to avoid recontaminating theareas you have already wiped.
• When part of the cleaning cloth or wipe becomes soiledor saturated, start wiping with an unused part.
• Change cloths or wipes as needed to avoid spreading the spillfrom one area of the infuser to another.
• Do not allow cleaning fluid to run into internal parts of theinfuser.
• When wiping behind the cassette door, take care to avoiddamaging the precision parts of the pumping mechanism.
NOTE: If sticky or high-viscosity fluids such as TPN are spilled behindthe cassette door, replace the infuser as soon as possible so it can bethoroughly cleaned. Dried, built-up residue from these type of fluidscan damage the pumping mechanism.
Cleaning SuppliesTo clean the infuser, you will need commercial wipes or clean, soft,lint-free cloths moistened with an approved cleaning solution.The following table lists the approved cleaning solutions.
CAUTIONCERTAIN SOLUTIONS AND ABRASIVES MAY DAMAGE THE INFUSER. DO NOTUSE COMPOUNDS CONTAINING COMBINATIONS OF ISOPROPYL ALCOHOL ANDDIMETHYL BENZYL AMMONIUM CHLORIDE.
PREPARE CLEANING SOLUTIONS AS SPECIFIED BY THE MANUFACTURER TOAVOID INFUSER DAMAGE.

Includes Systems Compatible with Hospira MedNet
10-4 System Operating Manual
Infuser MaintenanceThe Plum 360 infuser requires annual preventive maintenance that isperformed by qualified service personnel. There is no clinician-required maintenance. See the Plum 360 Infuser Technical ServiceManual for instructions.
Battery Maintenance
Approved Cleaning Solutions
Class of Cleaning Solution Manufacturer Preparation
Enzymatic Detergent Enzol™ Use per manufacturer’s recommendations and instructions in this manual.
Household Bleach Clorox™ Germicidal Bleach(8.25% concentration)
Do not exceed1 part bleach in 10 parts water.
WARNINGCONNECT THE AC (MAINS) CORD TO A PROPERLY GROUNDEDRECEPTACLE.
CAUTIONDO NOT OPERATE THE INFUSER ON PATIENTS WITH THE BATTERYREMOVED. USE OF A PROPERLY MAINTAINED AND CHARGED BATTERYHELPS CONFIRM PROPER OPERATION.
If the low-battery alarm sounds, connect to AC (mains) powerimmediately.

Plum 360 Infuser
System Operating Manual 10-5
NOTE: If spare parts other than Hospira-approved spare parts areused for battery replacement, the warranty on the Plum 360 infusershall be void.
The battery system requires annual preventive maintenance. See thePlum 360 Infuser Technical Service Manual for instructions.Additionally, there are specific storage conditions for the battery(see Delivery Rate Range on page 11-6). There is no clinician-required battery maintenance.
The Plum 360 infuser is battery-powered for emergency backup andtemporary portable operation. A fully-charged, at least new batteryprovides at least 3 hours of operation at 125 mL/hr on a single line,or delivers 250 mL total volume if pumping at a rate of 126 mL/hror greater, whichever occurs first.
The battery charges whenever connected to AC (mains) power.If the infuser is switched OFF, recharge takes approximately eighthours. Recharge takes longer if the infuser is turned ON.
To maintain maximum battery charge and to prolong battery life,connect the infuser to AC (mains) power whenever possible. Connectto AC power to continually charge the battery for emergency use.
Storage
WARNINGCONNECT THE AC (MAINS) CORD TO A PROPERLYGROUNDED RECEPTACLE.
WARNINGTO PREVENT BATTERY LEAKAGE, REMOVE THE BATTERYBEFORE STORING THE INFUSER FOR AN EXTENDED PERIODOF TIME.
Includes Systems Compatible with Hospira MedNet
10-6 System Operating Manual
Store the infuser connected to AC (mains) power, with the infuserswitched OFF using the [ON/OFF] key.
For storage conditions, including extended storage conditions thatcan affect battery life, see Delivery Rate Range on page 11-6.
ServiceThe infuser has no user-serviceable parts. In addition:
• Servicing and adjustments must only be performed by Hospirapersonnel or trained, authorized service representatives. Servicetraining is available from Hospira. Contact your Hospirarepresentative.
• Replacement of fuses, power cord, or other parts must only beperformed by Hospira personnel or trained, authorized servicerepresentatives. See the Plum 360 Infuser Technical ServiceManual for repair and replacement procedures.
• Circuit diagrams and repair parts lists are available for trained,authorized service representatives. See the Plum 360 InfuserTechnical Service Manual for more information.
• See the Plum 360 Infuser Technical Service Manual for moreinformation for all battery removal and storage information,component part lists, descriptions, calibration instructions, and fusereplacement.
• The Plum 360 infuser can be disconnected from the mains supplyby removing the power cord from the wall socket.
Ensure that access to the (mains) plug is not blockedwhile using the infuser so that the plug can bedisconnected from the mains power receptacle in theevent of an emergency.

Plum 360 Infuser
System Operating Manual 11-1
Section 11
Specifications
Physical
Dimensions: Approximately 8” H x 8” W x 6” D(0.20 m H x 0.20 m W x 0.15 m),excluding pole clamp extrusionand power cord storage.
Mass: Approximately 10 lbs. (4.5 kg) with battery.
Casing: High-impact plastic.
Expected Service Life: 10 years
NOTE: At the end of the infuser’s serviceable life, the infuser parts must be recycled by an authorized electronic waste handler.
Refer to the Plum 360 Infuser Technical Service Manual or contact Hospira Service Center for the current disposal process.
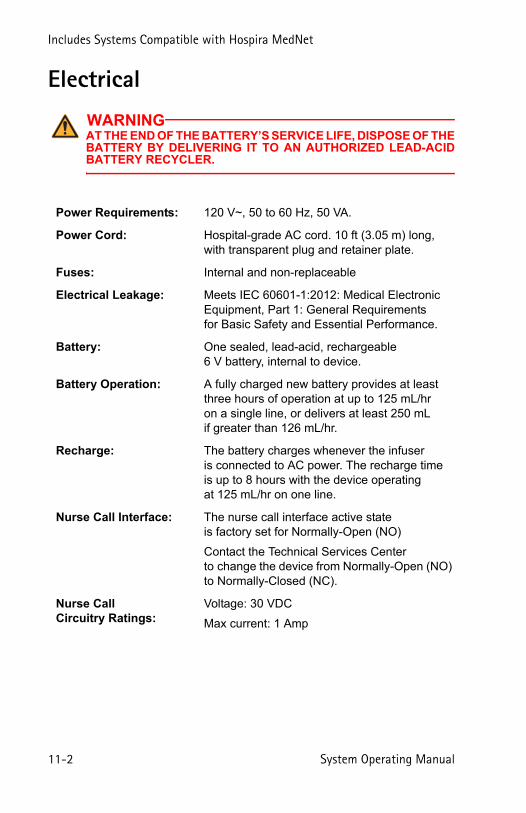
Includes Systems Compatible with Hospira MedNet
11-2 System Operating Manual
Electrical
WARNINGAT THE END OF THE BATTERY’S SERVICE LIFE, DISPOSE OF THEBATTERY BY DELIVERING IT TO AN AUTHORIZED LEAD-ACIDBATTERY RECYCLER.
Power Requirements: 120 V~, 50 to 60 Hz, 50 VA.
Power Cord: Hospital-grade AC cord. 10 ft (3.05 m) long, with transparent plug and retainer plate.
Fuses: Internal and non-replaceable
Electrical Leakage: Meets IEC 60601-1:2012: Medical Electronic Equipment, Part 1: General Requirements for Basic Safety and Essential Performance.
Battery: One sealed, lead-acid, rechargeable6 V battery, internal to device.
Battery Operation: A fully charged new battery provides at least three hours of operation at up to 125 mL/hr on a single line, or delivers at least 250 mL if greater than 126 mL/hr.
Recharge: The battery charges whenever the infuser is connected to AC power. The recharge time is up to 8 hours with the device operating at 125 mL/hr on one line.
Nurse Call Interface: The nurse call interface active stateis factory set for Normally-Open (NO)
Contact the Technical Services Center to change the device from Normally-Open (NO) to Normally-Closed (NC).
Nurse CallCircuitry Ratings:
Voltage: 30 VDC
Max current: 1 Amp

Plum 360 Infuser
System Operating Manual 11-3
Environment:
• Operating Temperature: 41°F to 104 °F (5°C to 40 °C)See Notes 1 and 2.
• Storage Temperature: –5°F to 104°F (–20°C to 40°C)See Notes 2 and 3.
• Atmospheric Pressure: 0 to 10,000 feet (0 to 3,000m)or equivalent pressure
• Relative Humidity: 10% to 90% (maximum dew point of 30°C)
See Note 4
NOTES:
1. Batteries operate on electrochemical reaction, which converts chemicalenergy to electric energy. The electrochemical reaction is reduced astemperature lowers, thus, available discharge capacity is greatly reducedat temperatures as low as –15°C.
2. Battery cycle life (number of cycles) of the battery is dependent on thedepth of discharge in each cycle. The deeper the discharge, the shorterthe cycle life (smaller number of cycles), providing the same dischargecurrent. The cycle life (number of cycles) of the battery is also relatedto such factors as the ambient temperature and rest period betweencharge and discharge. The expected life of the battery will decreaseby one-half with each rise in temperature of 10°C. In particular, the lifeof the battery will shorten at about 40°C. Therefore, careful considerationmust be taken not to use or store the battery at high temperature.A permanently damaged battery cannot be recharged to full capacity.
3. The ambient temperature range of storage shall be –15°C to 40°C.For short-term storage (up to 2 weeks), the temperature range of –20°Cto 60°C is permissible. For long-term storage (up to 12 months),the optimum temperature range is –15°C to 25°C. When it is unavoidableto store the battery for 3 months or longer, periodically recharge thebattery at the intervals recommended in the following table, dependingon ambient temperature. Avoid storing the battery for more than 12months either in the infuser or in spares inventory.

Includes Systems Compatible with Hospira MedNet
11-4 System Operating Manual
Connectivity Engine
Storage Temperature
–15°C to 25°C
25°C to 40°C
40°C to 60 °C
Refresh Charge Interval
6 months
2 months1 week
Do not store above 40°C for more than 2 weeks.
If any of the above conditions are not or cannot be met during storage,replace the battery before use.
4. The optimal relative humidity for storage or operation is 25% to 85%.For short durations (up to 2 weeks), operation or storage at a relativehumidity in the range of 10% to 90% is permissible.
Wireless Standards: IEEE 802.11 a/b/g/n
Radio Technology: 802.11a: Orthogonal Frequency DivisionMultiplex
802.11b: Direct Sequence Spread Spectrum
802.11g: Orthogonal Frequency DivisionMultiplex
802.11n: Orthogonal Frequency DivisionMultiplex
Data Transfer Rate: 802.11a: Up to 54 Mbps
802.11b: Up to 11 Mbps
802.11g: Up to 54 Mbps
802.11n: Up to 72.2 Mbps (2.4 GHz Frequency Band)
802.11n: Up to 72.2 Mbps (5.0 GHz Frequency Band, 20 MHz channel)
802.11n: Up to 150 Mbps (5.0 GHz Frequency Band, 40 MHz channel)
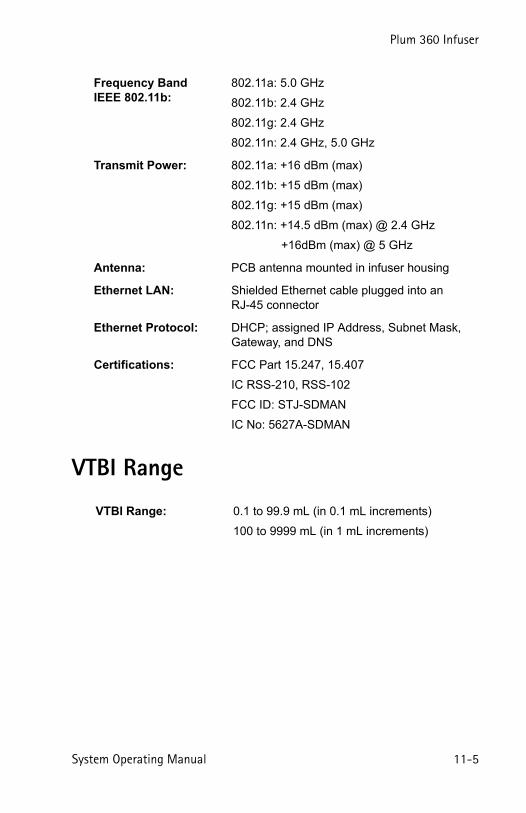
Plum 360 Infuser
System Operating Manual 11-5
VTBI Range
Frequency Band IEEE 802.11b:
802.11a: 5.0 GHz
802.11b: 2.4 GHz
802.11g: 2.4 GHz
802.11n: 2.4 GHz, 5.0 GHz
Transmit Power: 802.11a: +16 dBm (max)
802.11b: +15 dBm (max)
802.11g: +15 dBm (max)
802.11n: +14.5 dBm (max) @ 2.4 GHz
+16dBm (max) @ 5 GHz
Antenna: PCB antenna mounted in infuser housing
Ethernet LAN: Shielded Ethernet cable plugged into anRJ-45 connector
Ethernet Protocol: DHCP; assigned IP Address, Subnet Mask, Gateway, and DNS
Certifications: FCC Part 15.247, 15.407
IC RSS-210, RSS-102
FCC ID: STJ-SDMAN
IC No: 5627A-SDMAN
VTBI Range: 0.1 to 99.9 mL (in 0.1 mL increments)
100 to 9999 mL (in 1 mL increments)

Includes Systems Compatible with Hospira MedNet
11-6 System Operating Manual
Delivery Rate Range
Air-in-Line Alarm
Occlusion Alarm and LimitsTemperature and length of administration set affect the maximumocclusion detection time.
Lines A and B: 0.1 to 99.9 mL/hr (in 0.1 mL increments)
100 to 999 mL/hr (in 1 mL increments)
Concurrent Delivery: 0.5 mL/hr minimum for each line
PlumSet: 500 mL/hr cumulative (A+B) maximum
KVO: 1.0 mL/hr or the last delivery rate on the associated line, whichever is less
PlumSet (Distal): Bolus at 0.1 mL or larger
Cumulative 0.25 mL out of 4.9 mL
PlumSet (Proximal): Bolus at 0.5 mL Cumulative 1.0 mL
Distal Occlusion: The DISTAL OCCLUSION alarm sounds after the distal set tubing or set outlet fitting becomes occluded or vacuum occurs.
Proximal Occlusion:
The PROXIMAL OCCLUSION alarm sounds if the tubing proximal to the cassette becomes occluded or pressurized.
Distal Pressure Limit(without alarm):
Maximum pressure limit: user-selectable.
Factory default setting: 6 psi
Selectable range: 1 to 15 psi with display accuracy ±3 psi.
Maximum Instantaneous Distal Pressure:
20 psi

Plum 360 Infuser
System Operating Manual 11-7
Time To Detect Downstream Occlusions
FlowRate
Distal Pressure
Alarm Limit Setting
DistalTubingType
Maximum Time to Detect
Downstream Occlusion
.1 mL/hr 1 psi Microbore 27 minutes
.1 mL/hr 15 psi Microbore 3 hours
1 mL/hr 1 psi Microbore 2 minutes
1 mL/hr 15 psi Microbore 15 minutes
25 mL/hr 1 psi Microbore 5 seconds
25 mL/hr 15 psi Microbore 30 seconds
.1 mL/hr 1 psi Macrobore 27 minutes
.1 mL/hr 15 psi Macrobore 9 hours
1 mL/hr 1 psi Macrobore 3 minutes
1 mL/hr 15 psi Macrobore 45 minutes
25 mL/hr 1 psi Macrobore 5 seconds
25 mL/hr 15 psi Macrobore 90 seconds
* Baseline backpressure is 0 psi *
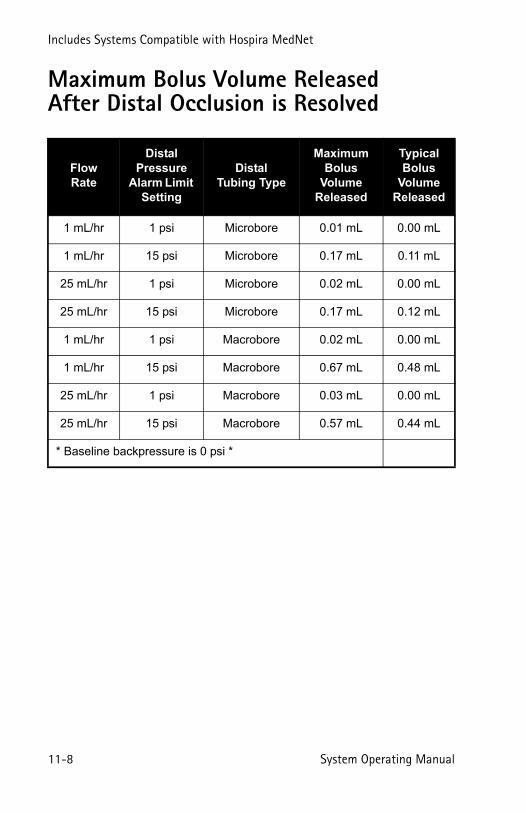
Includes Systems Compatible with Hospira MedNet
11-8 System Operating Manual
Maximum Bolus Volume Released After Distal Occlusion is Resolved
FlowRate
Distal Pressure
Alarm Limit Setting
DistalTubing Type
Maximum Bolus
Volume Released
Typical Bolus
Volume Released
1 mL/hr 1 psi Microbore 0.01 mL 0.00 mL
1 mL/hr 15 psi Microbore 0.17 mL 0.11 mL
25 mL/hr 1 psi Microbore 0.02 mL 0.00 mL
25 mL/hr 15 psi Microbore 0.17 mL 0.12 mL
1 mL/hr 1 psi Macrobore 0.02 mL 0.00 mL
1 mL/hr 15 psi Macrobore 0.67 mL 0.48 mL
25 mL/hr 1 psi Macrobore 0.03 mL 0.00 mL
25 mL/hr 15 psi Macrobore 0.57 mL 0.44 mL
* Baseline backpressure is 0 psi *
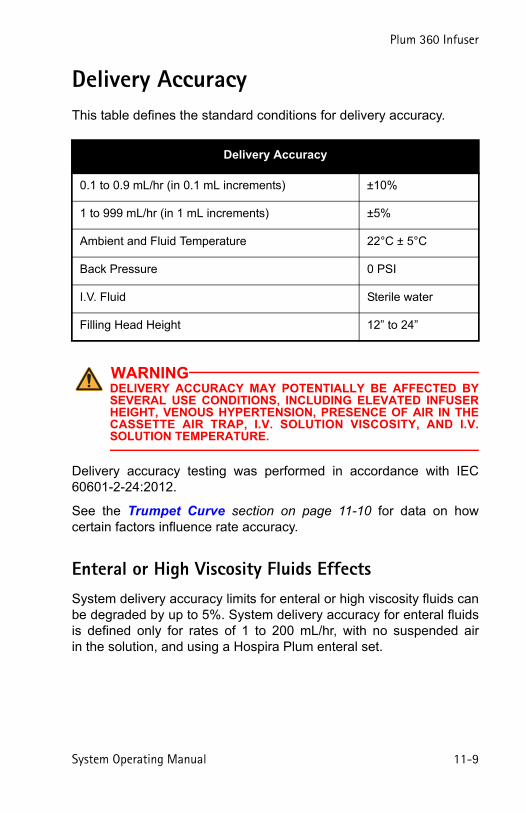
Plum 360 Infuser
System Operating Manual 11-9
Delivery AccuracyThis table defines the standard conditions for delivery accuracy.
Delivery accuracy testing was performed in accordance with IEC60601-2-24:2012.
See the Trumpet Curve section on page 11-10 for data on howcertain factors influence rate accuracy.
Enteral or High Viscosity Fluids EffectsSystem delivery accuracy limits for enteral or high viscosity fluids canbe degraded by up to 5%. System delivery accuracy for enteral fluidsis defined only for rates of 1 to 200 mL/hr, with no suspended airin the solution, and using a Hospira Plum enteral set.
Delivery Accuracy
0.1 to 0.9 mL/hr (in 0.1 mL increments) ±10%
1 to 999 mL/hr (in 1 mL increments) ±5%
Ambient and Fluid Temperature 22°C ± 5°C
Back Pressure 0 PSI
I.V. Fluid Sterile water
Filling Head Height 12” to 24”
WARNINGDELIVERY ACCURACY MAY POTENTIALLY BE AFFECTED BYSEVERAL USE CONDITIONS, INCLUDING ELEVATED INFUSERHEIGHT, VENOUS HYPERTENSION, PRESENCE OF AIR IN THECASSETTE AIR TRAP, I.V. SOLUTION VISCOSITY, AND I.V.SOLUTION TEMPERATURE.
Includes Systems Compatible with Hospira MedNet
11-10 System Operating Manual
Trumpet CurvesThe Trumpet Curve graphs following the example showrepresentative maximum and minimum percent flow rate deviationfrom the programmed rate over time. This information was developedin accordance with IEC 60601-2-24:2012, Sub-Clause 201.12.1.102.Refer to this standard for detailed information.
How to read a Trumpet Curve Graph (Refer to example on thefollowing page): The graphs following the Example plot flow ratesat 30 second intervals for the first 2 hours and for the 96th hourof delivery. The graph plots mean delivery rate error for the 2nd hourand the 96th hour as a straight line. The graph also presentsmaximum and minimum average delivery rate error for this intervalplotted by averaging delivery errors over intervals of 2, 5, 11, 19, and31 minutes (“Trumpet Curve”).
Trumpet Curve data was generated using a representative sampleof administration sets from the Plum set portfolio.
Note that at extremely low flow rates (that is, 0.1–0.3 mL/hr) and atnon-standard negative back pressures (-1 psi), the accuracy errorrate can be up to ±25%.
Backpressure Effect – At 25 mL/hr flow rate, backpressures of +/- 2 psi on the distal line do not affect system delivery accuracy.
Filling Head Effect – At 25 mL/hr flow rate, filling head variations of -15 and +35 inches of water (such as container height) do not affectsystem delivery accuracy.
Concurrent Delivery Effect – When both lines (A & B) aredelivering, the concentration deviation for the lower rate maybe affected by up to 2.5%.
When air of volume greater than 0.05 mL is present in the cassette airtrap, the total system flow rate accuracy may be affected by upto 2.0%.
When variations in container height are present, the concentrationdeviation for the lower rate may be affected by up to 4.0% for up to 24inches of container height differences.

Plum 360 Infuser
System Operating Manual 11-11
ExampleFrom the Trumpet Curve Graph sample that follows, find the 5 minuteinterval (A) at the horizontal axis and read the corresponding points(B) and (C) on the vertical axis. The values are approximately +2.8%and –0.5%.
This means that at the rate of 25 mL/hr the average maximum flowrate fluctuation for any 5 minute time interval during the 2nd hourof operation was within the limits of +2.8% and –0.5% from thenominal rate. The average delivery rate error over the entire 2nd hourwas +1.6% (D).
For other time intervals look at other points at the horizontal axis anddetermine corresponding limits as above.
A trained professional can use the resulting graphs to selectan infuser with the appropriate startup and flow characteristicsto suit the clinical application.
NOTE: As an example of how the trumpet curves can be used,consider the maximum and minimum deviations at the 5 minuteaverage interval. The upper curve provides the maximum expecteddelivery rate error over a 5 minute interval, the lower curve providesthe minimum expected delivery rate error over a 5 minute interval.An example would be Dopamine administered at 5 µgm/kg/min.At 5 minutes, the average drug delivery error would be within therange of +2.8% and –0.5% of the expected nominal rate.
0 5 10 15 20 25 30
15.0%
10.0%
5.0%
0.0%
-5.0%
-10.0%
-15.0%
25 ML/HR, 0 mm Hg DELIVERY HEAD, START UP
PE
RC
EN
TE
RR
OR
(%
)
Observation Interval (minutes)
++ ++ +
Max Mean+ Min
Average DeliveryRate Error = +1.6%
A
D
Max Negative Error over 5Minute Interval = -0.5%
C
Max Positive Error over 5Minute Interval = +2.8%
B
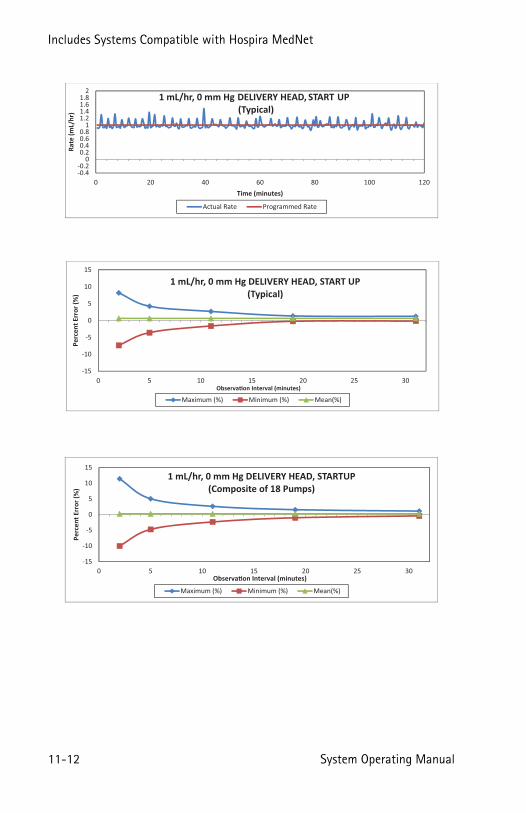
Includes Systems Compatible with Hospira MedNet
11-12 System Operating Manual
-0.4-0.2
00.20.40.60.8
11.21.41.61.8
2
0 20 40 60 80 100 120
Rate
(mL/
hr)
Time (minutes)
1 mL/hr, 0 mm Hg DELIVERY HEAD, START UP(Typical)
Actual Rate Programmed Rate

Plum 360 Infuser
System Operating Manual 11-13
-0.4-0.2
00.20.40.60.8
11.21.41.61.8
2
2820 2830 2840 2850 2860 2870 2880
Rate
(mL/
hr)
Time (minutes)
1 mL/hr, 0 mm Hg DELIVERY HEAD, 48 HOURS(Typical)
Actual Rate Programmed Rate
-15
-10
-5
0
5
10
15
0 5 10 15 20 25 30
Perc
ent E
rror
(%)
Interval (minutes)
1 mL/hr, 0 mm Hg DELIVERY HEAD, 48 HOURS (Typical)
Maximum (%) Minimum (%) Mean(%)
-15
-10
-5
0
5
10
15
0 5 10 15 20 25 30
Perc
ent E
rror
(%)
Interval (minutes)
1 mL/hr, 0 mm Hg DELIVERY HEAD, 48 HOURS(Composite of 18 Pumps)
Maximum (%) Minimum (%) Mean(%)
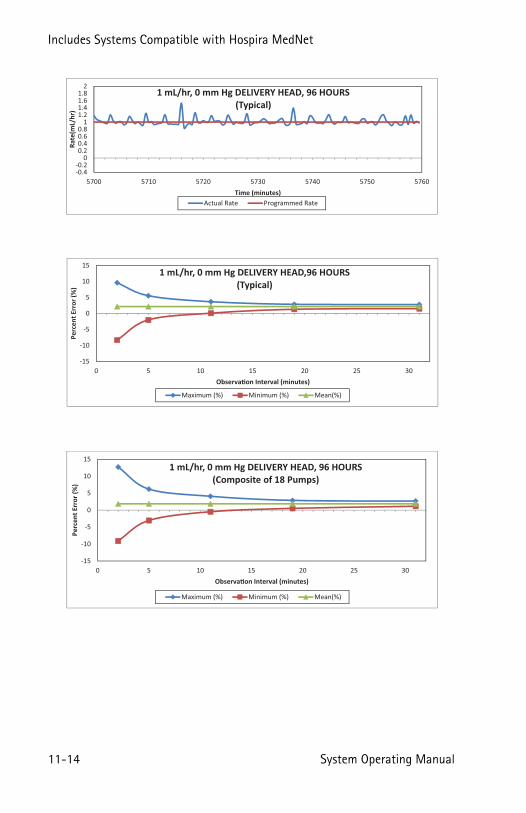
Includes Systems Compatible with Hospira MedNet
11-14 System Operating Manual
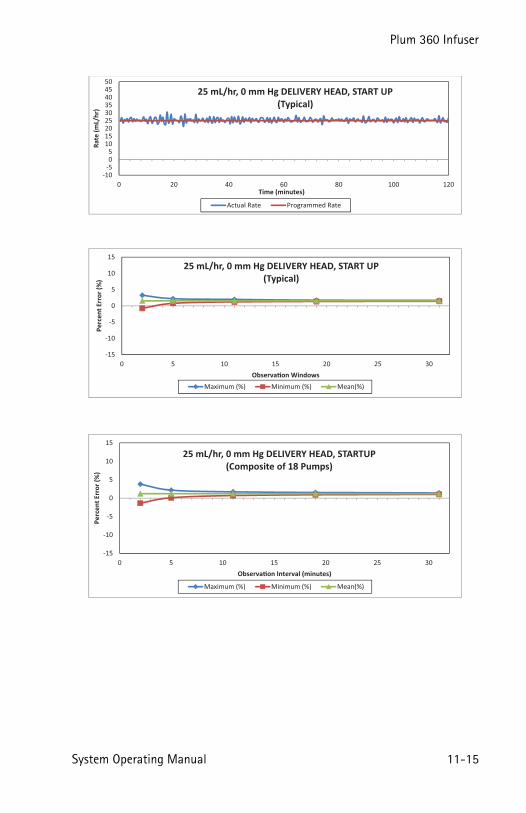
Plum 360 Infuser
System Operating Manual 11-15
-10-505
101520253035404550
0 20 40 60 80 100 120
Rate
(mL/
hr)
Time (minutes)
25 mL/hr, 0 mm Hg DELIVERY HEAD, START UP(Typical)
Actual Rate Programmed Rate
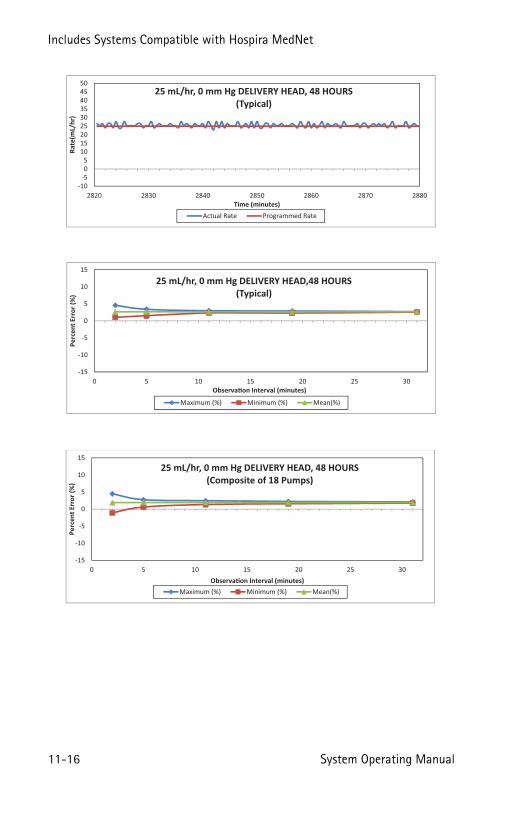
Includes Systems Compatible with Hospira MedNet
11-16 System Operating Manual
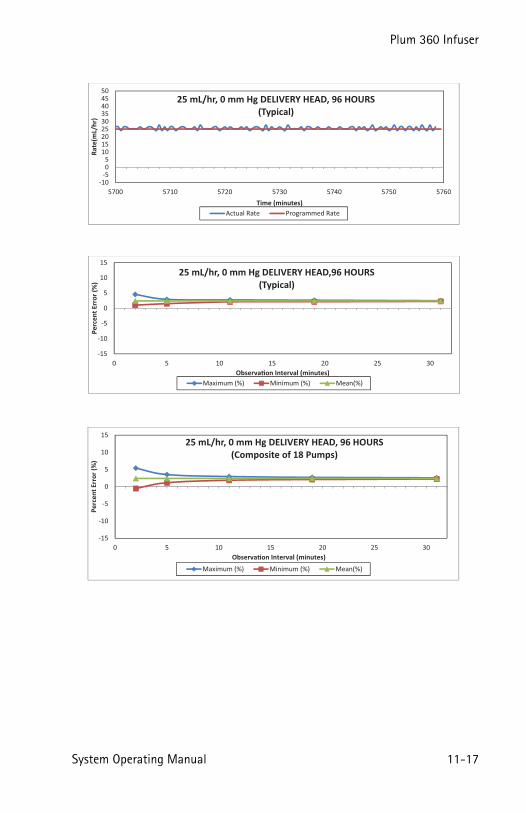
Plum 360 Infuser
System Operating Manual 11-17

Includes Systems Compatible with Hospira MedNet
11-18 System Operating Manual
Notes

Plum 360 Infuser
System Operating Manual 12-1
Section 12 Supplies and AccessoriesAdministration SetsPrimary I.V. PlumSets
List Number
DescriptionLength
(in)Secondary
PortDrops/
mL
11003 LifeShield Primary PlumSet, Prepierced Port, PrepiercedY-Site, 104 Inch,Non-DEHP
104 Prepierced 15
11373 LifeShield Primary PlumSet, Proximal0.2 Micron Filter, Prepierced Y-Site,112 Inch, Non-DEHP
112 Capped 15
11893 LifeShield Primary PlumSet, Prepierced Port, 1.2 Micron Filter, Prepierced Y-Site,104 Inch, Non-DEHP
104 Prepierced 15
12030 LifeShield Primary PlumSet, Clave Port, Clave Y-Site, 104 Inch
104 Clave 15
12336 LifeShield Primary PlumSet, Proximal0.2 Micron Filter,Clave Y-Site,112 Inch, Non-DEHP
112 Capped 15

Includes Systems Compatible with Hospira MedNet
12-2 System Operating Manual
12339 LifeShield Latex-Free Primary I.V. PlumSet, Convertible Pin,103 Inch with Orange Polyethylene-Lined*/Light Resistant Tubing, Clave Y-Site, and Option-Lok Connector
103 Capped 15
12538 LifeShield Primary PlumSet Clave Port, Clave Y-Site, 103 Inch, Non-DEHP
103 Clave 15
12539 LifeShield Primary PlumSet, 1.2 Micron Filter, Clave Y-Site, 104 Inch, Non-DEHP
104 Capped 15
14242 LifeShield Primary PlumSet, Clave Y-Site, 104 Inch, Non-DEHP
104 Capped 15
14243 LifeShield Primary PlumSet, 2 ClaveY-Sites, 104 Inch,Non-DEHP
104 Capped 15
14245 LifeShield Primary PlumSet, Sight Chamber with Ball Check Valve,Clave Y-Site, Distal Microbore Tubing,98 Inch, Non-DEHP
98 Capped 15
List Number
DescriptionLength
(in)Secondary
PortDrops/
mL

Plum 360 Infuser
System Operating Manual 12-3
14246 LifeShield Primary PlumSet Prepierced Port, PrepiercedY-Site, Distal Microbore Tubing,104 Inch, Non-DEHP
104 Prepierced 15
14247 LifeShield Primary PlumSet, ClaveY-Site, Distal Microbore Tubing,104 Inch, Non-DEHP
104 Capped 15
14248 Primary PlumSetPE Lined Tubing,107 Inch, Non-DEHP
107 Capped 15
14249 LifeShield Primary PlumSet, 2 Prepierced Y-Sites, 104 Inch,Non-DEHP
104 Capped 15
14250 LifeShield Primary PlumSet, Prepierced Port, 2 Prepierced Y-Sites, 113 Inch,Non-DEHP
113 Prepierced 15
14251 LifeShield Primary PlumSet, Piggyback with Backcheck Valve, 2 Clave Y-Sites,103 Inch, Non-DEHP
103 Capped 15
14252 LifeShield Primary PlumSet, Prepierced Port, 2 Prepierced Y-Sites, 0.2 Micron Filter, 112 Inch, Non-DEHP
112 Prepierced 15
List Number
DescriptionLength
(in)Secondary
PortDrops/
mL

Includes Systems Compatible with Hospira MedNet
12-4 System Operating Manual
14253 LifeShield Primary PlumSet, 2 Clave Y-Sites, 0.2 Micron Filter, 112 Inch, Non-DEHP
112 Capped 15
14254 LifeShield Primary PlumSet Clave Port, 2 Clave Y-Sites,0.2 Micron Filter, 112 Inch, Non-DEHP
112 Clave 15
14255 LifeShield Primary PlumSet, 0.2 Micron Filter, Clave Y-Site,PE Lined Tubing,104 Inch, Non-DEHP
104 Capped 15
14256 LifeShield Primary PlumSet, 0.2 Micron Filter, Prepierced Y-Site, PE LinedLight-Resistant Tubing, Distal Microbore Tubing,104 Inch, Non-DEHP
104 Capped 15
14679 LifeShield Primary PlumSet, PrepiercedY-Site, 104 Inch, Non-DEHP
104 Capped 15
14687-28 LifeShield Primary PlumSet, Clave Port, Clave Y-Site,103 Inch, Non-DEHP
103 Clave 15
List Number
DescriptionLength
(in)Secondary
PortDrops/
mL
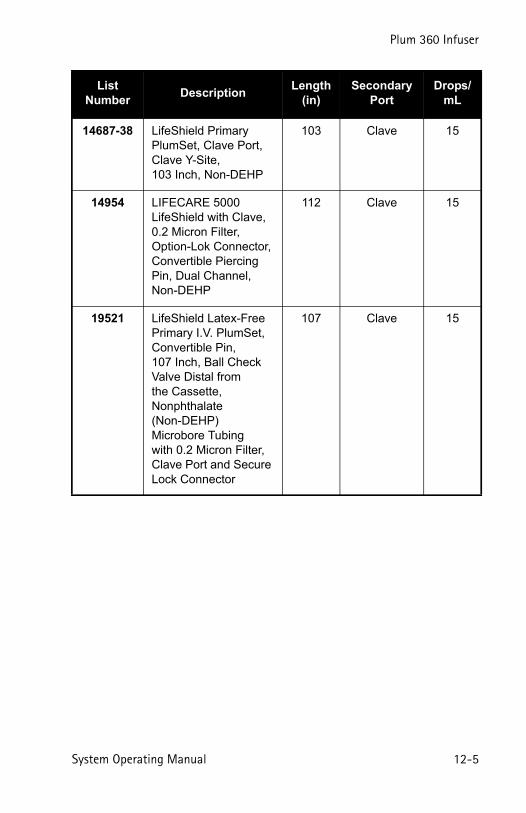
Plum 360 Infuser
System Operating Manual 12-5
14687-38 LifeShield Primary PlumSet, Clave Port, Clave Y-Site,103 Inch, Non-DEHP
103 Clave 15
14954 LIFECARE 5000 LifeShield with Clave, 0.2 Micron Filter, Option-Lok Connector, Convertible Piercing Pin, Dual Channel, Non-DEHP
112 Clave 15
19521 LifeShield Latex-Free Primary I.V. PlumSet, Convertible Pin,107 Inch, Ball Check Valve Distal fromthe Cassette, Nonphthalate(Non-DEHP) Microbore Tubingwith 0.2 Micron Filter, Clave Port and Secure Lock Connector
107 Clave 15
List Number
DescriptionLength
(in)Secondary
PortDrops/
mL

Includes Systems Compatible with Hospira MedNet
12-6 System Operating Manual
Secondary I.V. Set
Burettes/Solusets
List Number
DescriptionLength
(in)Secondary
PortDrops/
mL
20619 Latex-Free Secondary I.V. PlumSet, Convertible Pin,19 Inch, with Option-Lok Connector,Non-DEHP
19 N/A 15
List Number
DescriptionLength
(in)Secondary
PortDrops/
mL
11374 LifeShield Plum150 mL Burette Set, Prepierced Injection Site, 0.2 Micron Filter, Prepierced Y-Site,100 Inch, Non-DEHP
100 Capped 15
11980 LifeShield Plum150 mL Burette Set, Prepierced Injection Site, 0.2 Micron Filter, Prepierced Y-Site, 100 Inch, Non-DEHP
100 Capped 15
14271 LifeShield Plum Microdrip 150 mL Burette Set, Clave Injection Site, Clave Port, 0.2 Micron Filter, 3 Clave Y-Sites,140 Inch, Non-DEHP
140 Clave 60
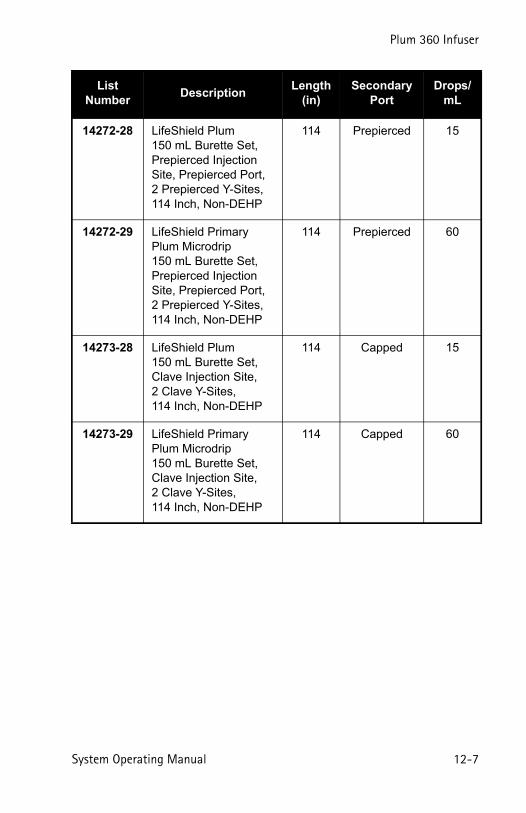
Plum 360 Infuser
System Operating Manual 12-7
14272-28 LifeShield Plum150 mL Burette Set, Prepierced Injection Site, Prepierced Port,2 Prepierced Y-Sites, 114 Inch, Non-DEHP
114 Prepierced 15
14272-29 LifeShield Primary Plum Microdrip150 mL Burette Set, Prepierced Injection Site, Prepierced Port, 2 Prepierced Y-Sites, 114 Inch, Non-DEHP
114 Prepierced 60
14273-28 LifeShield Plum150 mL Burette Set, Clave Injection Site, 2 Clave Y-Sites, 114 Inch, Non-DEHP
114 Capped 15
14273-29 LifeShield Primary Plum Microdrip 150 mL Burette Set, Clave Injection Site, 2 Clave Y-Sites, 114 Inch, Non-DEHP
114 Capped 60
List Number
DescriptionLength
(in)Secondary
PortDrops/
mL
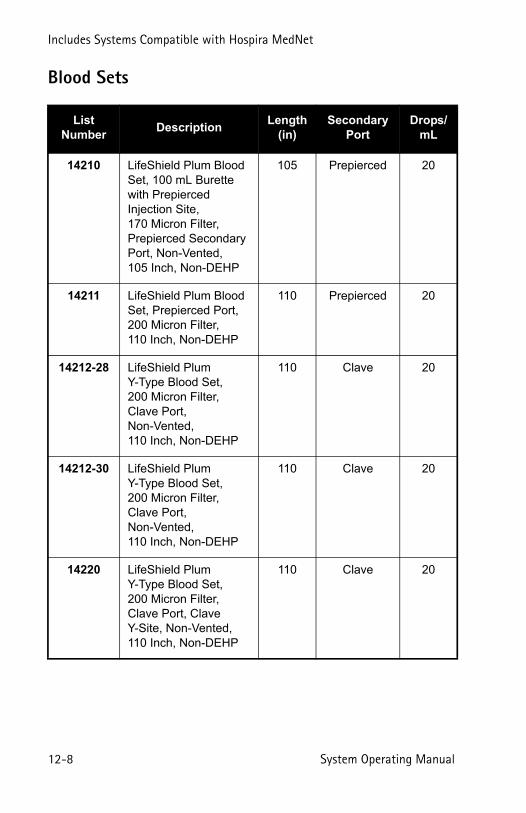
Includes Systems Compatible with Hospira MedNet
12-8 System Operating Manual
Blood Sets
List Number
DescriptionLength
(in)Secondary
PortDrops/
mL
14210 LifeShield Plum Blood Set, 100 mL Burette with Prepierced Injection Site, 170 Micron Filter, Prepierced Secondary Port, Non-Vented, 105 Inch, Non-DEHP
105 Prepierced 20
14211 LifeShield Plum Blood Set, Prepierced Port, 200 Micron Filter, 110 Inch, Non-DEHP
110 Prepierced 20
14212-28 LifeShield PlumY-Type Blood Set, 200 Micron Filter, Clave Port,Non-Vented, 110 Inch, Non-DEHP
110 Clave 20
14212-30 LifeShield PlumY-Type Blood Set, 200 Micron Filter, Clave Port, Non-Vented, 110 Inch, Non-DEHP
110 Clave 20
14220 LifeShield Plum Y-Type Blood Set, 200 Micron Filter, Clave Port, Clave Y-Site, Non-Vented, 110 Inch, Non-DEHP
110 Clave 20
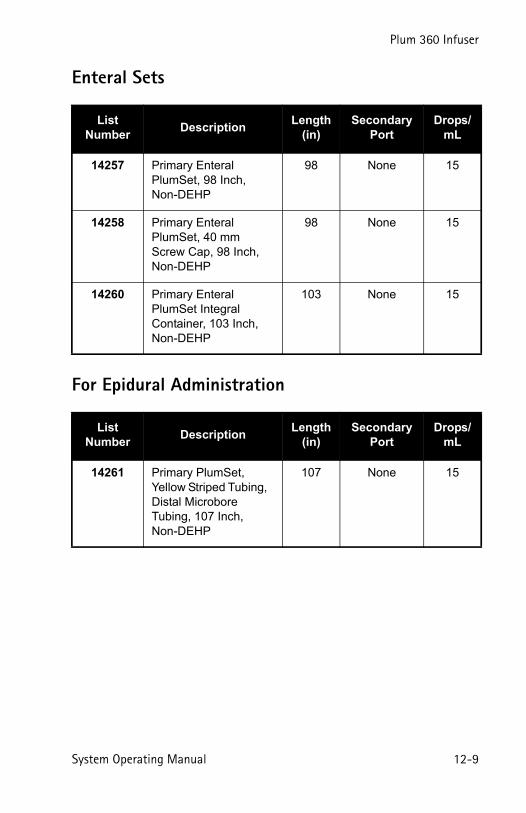
Plum 360 Infuser
System Operating Manual 12-9
Enteral Sets
For Epidural Administration
List Number
DescriptionLength
(in)Secondary
PortDrops/
mL
14257 Primary Enteral PlumSet, 98 Inch,Non-DEHP
98 None 15
14258 Primary Enteral PlumSet, 40 mm Screw Cap, 98 Inch, Non-DEHP
98 None 15
14260 Primary Enteral PlumSet Integral Container, 103 Inch, Non-DEHP
103 None 15
List Number
DescriptionLength
(in)Secondary
PortDrops/
mL
14261 Primary PlumSet, Yellow Striped Tubing, Distal Microbore Tubing, 107 Inch,Non-DEHP
107 None 15

Includes Systems Compatible with Hospira MedNet
12-10 System Operating Manual
Conversion PlumSets
)
Clave or Capped primary port:
Luer-Lok syringes must be fitted with a syringe adapter to decrease the possibility of proximal occlusion alarms.
Slip syringes smaller than 10 mL also require a syringe adapter.
Note: For instructions on how to prime the cassette with a syringe, refer to the administration set packaging.
List Number
DescriptionLength
(in)Primary
PortSecondary
Port
12338 LifeShield Microbore Conversion PlumSet,2 Clave Y-Sites, 76 Inch, Non-DEHP
76 Blue Capped
White Capped
14262 LifeShield Microbore Conversion PlumSet, Prepierced Y-Site, 76 Inch, Non-DEHP
76 Blue Capped
White Capped
14951 LifeShield Latex-Free Conversion PlumSet, Prepierced Y-Site, 104 Inch, 2 Clave Ports, Clave Secondary Port, Option-Lok Connector
104 Clave Clave
19557 LifeShield Latex-Free PlumSet, Convertible Piercing Pin, 110 Inch 2 Clave Ports, Clave Secondary Port, Option-Lok Connector
110 Clave Clave

Plum 360 Infuser
System Operating Manual 12-11
Extension Sets
Administration FluidsThe Plum 360 infuser is intended for parenteral, enteral, and epiduraltherapies and the administration of whole blood and blood products.
ContainersThe Plum 360 infuser and its compatible administration sets supporta wide variety of containers, including:
• Dual Chamber Parenteral flexible container (Nutrimix™)
• Large Volume Parenteral flexible plastic containers
• Large Volume Parenteral glass containers
• Part Fill Parenteral flexible plastic containers,including ADD-Vantage™
• Part Fill Parenteral glass containers
• Small Volume Parenterals
• Syringes - minimum 3 mL, maximum 60 mL(syringes from 3 mL-10 mL require syringe adapters)
• Top Filled Enteral bags
• Ready-to-Hang Enteral solution containers
List Number
DescriptionLength
(in)Secondary
PortDrops/
mL
19098 LifeShield Latex-Free Macrobore PlumSet, Extension Set
12 Capped N/A
19553 Plum Extension Set, 28 Inch, with Clave Secondary Port
28 Clave N/A
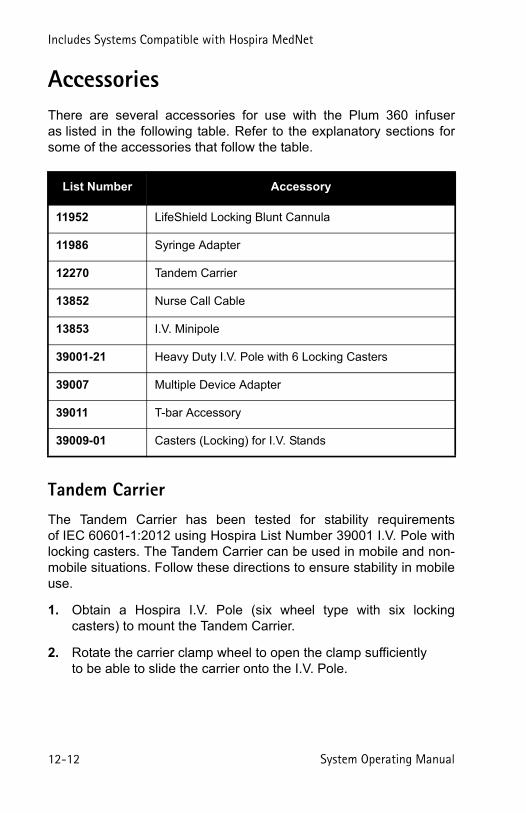
Includes Systems Compatible with Hospira MedNet
12-12 System Operating Manual
AccessoriesThere are several accessories for use with the Plum 360 infuseras listed in the following table. Refer to the explanatory sections forsome of the accessories that follow the table.
Tandem CarrierThe Tandem Carrier has been tested for stability requirementsof IEC 60601-1:2012 using Hospira List Number 39001 I.V. Pole withlocking casters. The Tandem Carrier can be used in mobile and non-mobile situations. Follow these directions to ensure stability in mobileuse.
1. Obtain a Hospira I.V. Pole (six wheel type with six lockingcasters) to mount the Tandem Carrier.
2. Rotate the carrier clamp wheel to open the clamp sufficiently to be able to slide the carrier onto the I.V. Pole.
List Number Accessory
11952 LifeShield Locking Blunt Cannula
11986 Syringe Adapter
12270 Tandem Carrier
13852 Nurse Call Cable
13853 I.V. Minipole
39001-21 Heavy Duty I.V. Pole with 6 Locking Casters
39007 Multiple Device Adapter
39011 T-bar Accessory
39009-01 Casters (Locking) for I.V. Stands

Plum 360 Infuser
System Operating Manual 12-13
3. Prevent the I.V. Pole from moving while sliding the carrier onto the I.V. Pole.
4. Choose a mounting position for the carrier that is NOT GREATER than the maximum allowed mounting height as shown in the picture.
5. Tighten the carrier clamp so that it grips the pole firmly.
6. Pull downward on the carrier. Confirm that the carrier does not slide down the pole.
7. Attach an infuser to each arm of the carrier.
8. Check the I.V. Pole and Carrier assembly for stability and tight mounting connections. If the assembly is NOT STABLE, check the mounting height of the Tandem Carrier and the extension height of the I.V. Pole. Adjust those settings until the assembly is stable.
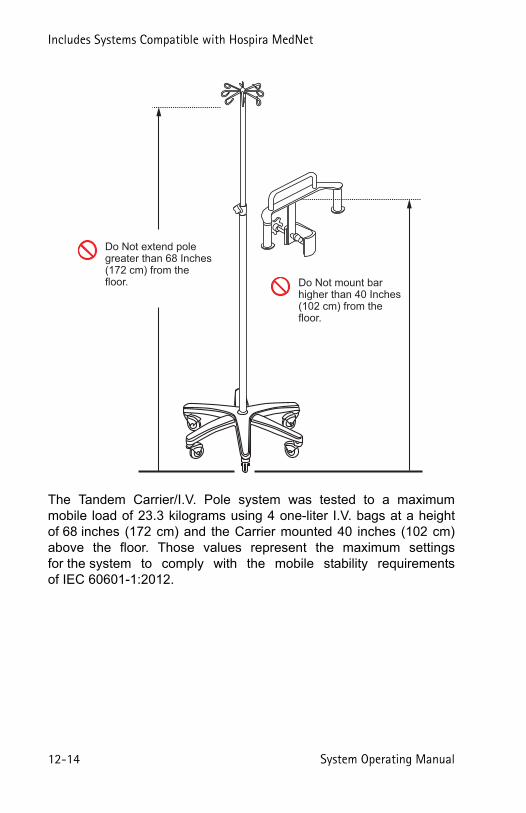
Includes Systems Compatible with Hospira MedNet
12-14 System Operating Manual
The Tandem Carrier/I.V. Pole system was tested to a maximummobile load of 23.3 kilograms using 4 one-liter I.V. bags at a heightof 68 inches (172 cm) and the Carrier mounted 40 inches (102 cm)above the floor. Those values represent the maximum settingsfor the system to comply with the mobile stability requirementsof IEC 60601-1:2012.
Do Not extend polegreater than 68 Inches(172 cm) from thefloor. Do Not mount bar
higher than 40 Inches(102 cm) from thefloor.
Plum 360 Infuser
System Operating Manual 12-15
Multiple Device AdapterThe Multi-device Adapter (MDA) has been tested for stabilityaccording to the requirements of IEC 60601-1:2012 using HospiraList Number 39001 I.V. Pole with locking casters. The MDA may onlybe used in non-mobile situations. Follow these directions to ensurestability in non-mobile use.
1. Obtain a Hospira I.V. Pole (six wheel type with six lockingcasters) to mount the MDA.
2. For the upper and lower I.V. Pole clamp pieces: Loosen and remove the two screws that hold the semi-circular clamp pieces together. (Each screw has a lock washer. Use care to not losethe lock washer.)
3. Prevent the I.V. Pole from moving while attaching each clamp to the I.V. Pole shaft.
4. Mount the accessory as shown in the picture. Ensure that the upper mounting block recess rests on the I.V. Pole clamp collar.
5. Tighten the MDA clamps so that they grip the pole firmly.
6. Pull downward on the MDA. Confirm that the MDA does not slide down the pole.
7. Attach infusers to each arm of the MDA. Balance the loading of infusers. For example, if mounting three infusers, do not mount all three infusers on one side of the MDA, mount two infusers on one side of the MDA and the remaining infuseron the other side of the MDA.
8. Check the I.V. Pole and MDA/Infuser assembly for stability and tight mounting connections. If the assembly is NOT STABLE, check the infusers mounting position(s) on the MDA andthe extension height of the I.V. Pole. Adjust those settings until the assembly is stable.

Includes Systems Compatible with Hospira MedNet
12-16 System Operating Manual
The MDA/I.V. Pole system was tested to a maximum non-mobile loadof 49.5 kilograms using 6 Plum Infusers and 12 one-liter I.V. bagsat a height of 72 inches (183 cm) above the floor. Those valuesrepresent the maximum settings for the system to comply with thenon-mobile stability requirements of IEC 60601-1:2012.
Do Not extend polegreater than 72 Inches(183 cm) from thefloor.
Position top bracketslot to fit around knoband recess in uppermounting block to reston collar of IV Poleclamp.

Plum 360 Infuser
System Operating Manual 12-17
Hospira I.V. PoleThe Hospira I.V. Pole with locking casters has been tested for stabilityaccording to the requirements of IEC 60601-1:2012. The I.V. Pole canbe used in mobile and non-mobile situations. Follow these directionsto ensure stability in mobile use.
• For Mobile Use, the I.V. Pole may not have more than three (3) infusers mounted to the pole, may not be extended higher than 68 inches from the floor, and not have more than 2000 mL of solution hanging from the I.V. Pole hangers. See the illustration on page 12-18 for the allowable positions of the infusers.
• For Mobile Use, the I.V. Pole may also accept the Hospira Tandem Carrier accessory. See Tandem Carrier on page 12-12.
• For Non-mobile Use, the I.V. Pole can accept the Hospira Multi Device Adapter (MDA). See Multiple Device Adapter on page 12-15.
• After mounting infusers, check the I.V. Pole/infusers assembly for stability and tight mounting connections. If the assembly is NOT STABLE, check the mounting heights and the extension height of the I.V. Pole. Adjust those settings until the assembly is stable.
The Infuser/I.V. Pole system was tested to a maximum mobile loadof 24.0 kilograms using 2 one-liter I.V. bags at a height of 68 inches(173 cm) and the infusers mounted at 50, 40, and 30 inches(127, 102, and 76 cm) above the floor. Those values represent themaximum settings for the system to comply with the mobile stabilityrequirements of IEC 60601-1:2012.

Includes Systems Compatible with Hospira MedNet
12-18 System Operating Manual
ole with multiple infusers
68
In
ch
es (
17
3 c
m)
ma
xim
um
50
In
ch
es
(12
7 c
m)
40
In
ch
es
(10
2 c
m)
30
In
ch
es
(76
cm
)Infu
se
r 1
Infu
se
r 1
Infu
se
r 2
Infu
se
r 3
Infu
se
r 1
Infu
se
r 2
AB
AB
Settin
gs /
Vols
/ C
CA
Ba
ck
Prim
e
Rate
mL/h
r
Vo
l In
fm
L
0 000
DD
L
Se
lect L
ine
A/B
to
pro
gra
m
STA
RT
STO
P
AC
ON
a b
cd
e f
g h
ij k
lm
n o
p q
r s
t u
vw
x y
z
CLE
AR
LOC
K K
EY
PA
D
AU
DIO
PA
USE
D
ON
OFF
WARN
ING: C
LOSE
ALL C
LAMP
S BEF
ORE O
PENIN
G DOO
R
Follo
w ins
tructi
ons f
or us
e. The
Syste
m Op
eratin
g Man
ual
conta
ins pr
oper
use, w
arning
s, and
cauti
ons.
CL
OS
EL
EV
ER
WH
EN
N
OT
IN US
E
AB
AB
Settin
gs /
Vols
/ C
CA
Ba
ck
Prim
e
Rate
mL/h
r
Vo
l In
fm
L
0 000
DD
L
Se
lect L
ine
A/B
to
pro
gra
m
STA
RT
STO
P
AC
ON
a b
cd
e f
g h
ij k
lm
n o
p q
r s
t u
vw
x y
z
CLE
AR
LOC
K K
EY
PA
D
AU
DIO
PA
USE
D
ON
OFF
WARN
ING: C
LOSE
ALL C
LAMP
S BEF
ORE O
PENIN
G DOO
R
Follo
w ins
tructi
ons f
or us
e. The
Syste
m Op
eratin
g Man
ual
conta
ins pr
oper
use, w
arning
s, and
cauti
ons.
CL
OS
EL
EV
ER
WH
EN
N
OT
IN US
E
AB
AB
Settin
gs /
Vols
/ C
CA
Ba
ck
Prim
e
Rate
mL/h
r
Vo
l In
fm
L
0 000
DD
L
Se
lect L
ine
A/B
to
pro
gra
m
STA
RT
STO
P
AC
ON
a b
cd
e f
g h
ij k
lm
n o
p q
r s
t u
vw
x y
z
CLE
AR
LOC
K K
EY
PA
D
AU
DIO
PA
USE
D
ON
OFF
WARN
ING: C
LOSE
ALL C
LAMP
S BEF
ORE O
PENIN
G DOO
R
Follo
w ins
tructi
ons f
or us
e. The
Syste
m Op
eratin
g Man
ual
conta
ins pr
oper
use, w
arning
s, and
cauti
ons.
CL
OS
EL
EV
ER
WH
EN
N
OT
IN US
E
AB
AB
Settin
gs /
Vols
/ C
CA
Ba
ck
Prim
e
Rate
mL/h
r
Vo
l In
fm
L
0 000
DD
L
Se
lect L
ine
A/B
to
pro
gra
m
STA
RT
STO
P
AC
ON
a b
cd
e f
g h
ij k
lm
n o
p q
r s
t u
vw
x y
z
CLE
AR
LOC
K K
EY
PA
D
AU
DIO
PA
USE
D
ON
OFF
WARN
ING: C
LOSE
ALL C
LAMP
S BEF
ORE O
PENIN
G DOO
R
Follo
w ins
tructi
ons f
or us
e. The
Syste
m Op
eratin
g Man
ual
conta
ins pr
oper
use, w
arning
s, and
cauti
ons.
CL
OS
EL
EV
ER
WH
EN
N
OT
IN US
E
AB
AB
Settin
gs /
Vols
/ C
CA
Ba
ck
Prim
e
Rate
mL/h
r
Vo
l In
fm
L
0 000
DD
L
Se
lect L
ine
A/B
to
pro
gra
m
STA
RT
STO
P
AC
ON
a b
cd
e f
g h
ij k
lm
n o
p q
r s
t u
vw
x y
z
CLE
AR
LOC
K K
EY
PA
D
AU
DIO
PA
USE
D
ON
OFF
WARN
ING: C
LOSE
ALL C
LAMP
S BEF
ORE O
PENIN
G DOO
R
Follo
w ins
tructi
ons f
or us
e. The
Syste
m Op
eratin
g Man
ual
conta
ins pr
oper
use, w
arning
s, and
cauti
ons.
CL
OS
EL
EV
ER
WH
EN
N
OT
IN US
E
AB
AB
Settin
gs /
Vols
/ C
CA
Ba
ck
Prim
e
Rate
mL/h
r
Vo
l In
fm
L
0 000
DD
L
Se
lect L
ine
A/B
to
pro
gra
m
STA
RT
STO
P
AC
ON
a b
cd
e f
g h
ij k
lm
n o
p q
r s
t u
vw
x y
z
CLE
AR
LOC
K K
EY
PA
D
AU
DIO
PA
USE
D
ON
OFF
WARN
ING: C
LOSE
ALL C
LAMP
S BEF
ORE O
PENIN
G DOO
R
Follo
w ins
tructi
ons f
or us
e. The
Syste
m Op
eratin
g Man
ual
conta
ins pr
oper
use, w
arning
s, and
cauti
ons.
CL
OS
EL
EV
ER
WH
EN
N
OT
IN US
E
Plum 360 Infuser
System Operating Manual 12-19
T-bar AccessoryThe T-bar Accessory (T-BA) can be mounted to the Hospira I.V. Poleas shown in the diagram below. It can be used in mobile and non-mobile situations.
1. Obtain a Hospira I.V. Pole (six wheel type with six lockingcasters) to mount the T-BA.
2. Rotate the T-BA clamp wheel to open the clamp sufficientlyto be able to slide the T-BA onto the I.V. Pole.
3. Prevent the I.V. Pole from moving while sliding the T-BA ontothe I.V. Pole.
4. Choose a mounting position for the upper T-BA that is NOT GREATER than the maximum allowed mounting heightas shown in the picture.
5. Tighten the T-BA clamp so that it grips the pole firmly.
6. Pull downward on the T-BA. Confirm that the T-BA does not slide down the pole.
7. Attach the desired container or hanging style componentto the T-BA.
8. Check the I.V. Pole and T-BA for stability and tight mounting connections.
9. Repeat the mounting steps for the lower T-BA. It can be mounted anywhere below the upper T-BA.

Includes Systems Compatible with Hospira MedNet
12-20 System Operating Manual
Maximum extensionheight -72 Inches (183 cm)
Maximum mountingheight - 0 Inches (127 cm)

Plum 360 Infuser
System Operating Manual 12-21
I.V. Mini-PoleThe I.V. Mini-Pole (MP) mounts to the rear pole clamp frame of thePlum 360 infuser as shown in the diagram below. It can be usedin mobile and non-mobile situations.
1. Remove the Locking Clip from the pole shaft.
2. Slide the two shafts of the mini-pole into the two holes in the infuser pole clamp.
3. Adjust the pole to the desired height.
4. Push the locking clip through the shaft hole.
5. Confirm that the Mini-Pole is secure in the infuser pole clamp.
To remove the MP:
1. Remove the locking clip.
2. Rotate the clutch handle to lessen the spring grip of the MP.
3. Pull up on the MP and pull it out of the pole clamp.
CLUTCH HOUSING
BAG HANGER
HAIRPIN CLIP
CLUTCH SPRING
POLE CLAMPEXTRUSION
Includes Systems Compatible with Hospira MedNet
12-22 System Operating Manual
Hospira MedNet Safety SoftwareHospira MedNet is a server-based safety software application thatmanages infusion information across Hospira infusion platformsincluding the Plum 360, Plum A+, and LifeCare PCA systems.Hospira MedNet software facilitates networked communicationbetween the server and Hospira MedNet-compatible infusers.
Hospira MedNet safety software facilitates best practicesto streamline clinical workflows.
• Pharmacy-validated I.V. administration protocols are available to clinicians at the point of care
• Upper and lower dosing limits help protect against infusion errors
• Hard and soft limits create a clinically acceptable range to guide clinicians based on hospital and clinical care area practices
Hospira MedNet safety software delivers standard performancereports that enable hospital staff to:
• Assess medication infusion practices in the hospital
• Track clinician drug library utilization or compliance
• Identify I.V. administration practices that can be improved
• Highlight medication use to simplify the drug library
• Identify management issues that can be altered to save costs
• Assess rule set (hard/soft limits) alignment with clinical practice
Hospira MedNet software is a modular system capable of managingsystem users, infusers, drug libraries, clinical care areas,I.V. medication rule sets, infuser software updates, as well as systemand infuser configurations.

Plum 360 Infuser
System Operating Manual 12-23
Hospira MedNet software can also be integrated with third-partyapplications to provide I.V. Clinical Integration, which connectspharmacy validated medication orders with the I.V. infuser, the patientand the patient's electronic medical record (EMR). Other third partyapplications enable additional functions such as infuser assetmanagement and tracking, and infuser alarm forwarding.
Contact your Hospira sales representative for ordering andinstallation information.
Loss of CommunicationIf the Plum 360 infuser loses communication with Hospira MedNetsoftware, it will continue to infuse without interruption. However,log content and status will not be sent and auto-programs andsoftware/drug library updates will not be received until communicationis restored.

Includes Systems Compatible with Hospira MedNet
12-24 System Operating Manual
Notes

Plum 360 Infuser
System Operating Manual 13-1
Section 13
Warranty
Subject to the terms and conditions herein, Hospira, Inc., hereinreferred to as Hospira, warrants that (a) the product shall conform toHospira's standard specifications and be free from defects in materialand workmanship under normal use and service for a period of oneyear after purchase, and (b) the replaceable battery shall be free fromdefects in material and workmanship under normal use and servicefor a period of 90 days after purchase. Hospira makes no otherwarranties, express or implied, as to merchantability, fitness for aparticular purpose, or any other matter.
Purchaser's exclusive remedy shall be, at Hospira's option, the repairor replacement of the product. In no event shall Hospira's liabilityarising out of any cause whatsoever (whether such cause be based incontract, negligence, strict liability, other tort, or otherwise) exceedthe price of such product, and in no event shall Hospira be liable forincidental, consequential, or special damages or losses or for lostbusiness, revenues, or profits. Warranty product returned to Hospiramust be properly packaged and sent freight prepaid.
The foregoing warranty shall be void in the event the product hasbeen misused, damaged, altered, or used other than in accordancewith product manuals so as, in Hospira's judgment, to affect itsstability or reliability, or in the event the serial number or lot numberhas been altered, effaced, or removed.
The foregoing warranty shall also be void in the event any person,including the Purchaser, performs or attempts to perform any majorrepair or other service on the product without having been trained byan authorized representative of Hospira and using Hospiradocumentation and approved spare parts. For purposes of thepreceding sentence, “major repair or other service” means any repairor service other than the replacement of accessory items such asbatteries and detachable mains power cords.

Includes Systems Compatible with Hospira MedNet
13-2 System Operating Manual
However, the foregoing warranty also shall be voided if any person,including the Purchaser, uses other than Hospira-approved spareparts for replacement of batteries.
In providing any parts for repair or service of the product, Hospirashall have no responsibility or liability for the actions or inactions ofthe person performing such repair or service, regardless of whethersuch person has been trained to perform such repair or service. It isunderstood and acknowledged that any person other than an Hospirarepresentative performing repair or service is not an authorized agentof Hospira.

Plum 360 Infuser
System Operating Manual 14-1
Section 14
CCAs and Drug Libraries
Plum 360 infuser programming is based on the concepts of a ClinicalCare Area (CCA) with a Drug Library and infuser settings that supportthe needs of the CCAs patient population.
When Hospira MedNet software is installed, the infuser can downloadmultiple CCAs, each with its own Custom Drug Library (CDL) andinfuser settings.
When the Plum 360 infuser is used without Hospira MedNet software,the infuser has a single default CCA with associated infuser settingsand a drug library. The CCA and the drug library are both called theDDL (Default Drug Library).
This section describes how the DDL and Custom Drug Libraries work.It also lists the Dosing Units that are available when programminga delivery, the allowable input ranges for each dosing unit, and theupper and lower limits that are enforced by the infuser when youenter patient data while programming a delivery.
DDL CCA and Drug ListThe DDL CCA includes an extensive list of commonly-infused drugs,and a group of default infuser settings. It is only available if no customdrug library has been installed on the infuser using Hospira MedNetsoftware.
If an infuser does not have Hospira MedNet software installed,the DDL offers you the capability of programming the infuser withoutusing the drug list. You can program mL/hr dosing units in single step(single rate) delivery. Alternatively, two delivery options – LoadingDose and Multistep – offer multiple step (multiple rate) delivery.These options enable you to program multiple steps and multipledelivery rates, including mL/hr delivery, with a named drug.

Includes Systems Compatible with Hospira MedNet
14-2 System Operating Manual
NOTE: Once a custom drug library has been installed, the DDL CCAand its default drug list will no longer be available. To restore theDDL, see the Plum 360 Infuser Technical Service Manual.
When you select a drug from the DDL during programming,the selected drug appears on the delivery screen, allowing the clinicalteam to see what drug is being delivered. In addition, you must selecta drug from the DDL to program any delivery type other than mL/hr.
Default Dose Rate and Concentration
Each drug in the DDL has a preselected Default Dose Rate basedon the manufacturer’s recommendations. This rate is provided forconvenience and can be changed when you program a delivery.
In addition, if the drug is formulated as a concentration dissolved ina diluent (mg/mL, for example), the DDL information includesa Default Concentration, which can also be changed duringprogramming.
DDL Drug List
The following table lists the 115 drugs, including No Drug Selected,in the DDL, with their assigned Default Dose Rate and DoseConcentration. Use drug manufacturer recommendations for I.V.administration when using the Plum 360 infuser.

Plum 360 Infuser
System Operating Manual 14-3
Drug Name Dosing UnitsDefault
Concentration
No Drug Selected mL/hr N/A
Abciximab mcg/kg/min mg/mL
Acetaminophen mg/hr mg/mL
Acyclovir mL/hr N/A
Albumin mL/hr N/A
Aldesleukin mL/hr N/A
Alteplase (rt-PA) mg/kg/hr mg/mL
Aminophylline mg/hr mg/mL
Amiodarone mg/min mg/mL
Amiodarone-BOLUS mL/hr N/A
Amphotericin B mg/kg/hr mg/mL
Ampicillin mg/hr mg/mL
Argatroban mcg/kg/min mg/mL
Azithromycin mL/hr N/A
Bevacizumab mg/kg mg/mL
Bivalirudin mg/hr mg/mL
Bleomycin mL/hr N/A
Blood Products mL/hr N/A
Calcium gluconate mL/hr gms/mL
Carboplatin mL/hr N/A
Carmustine mg/m2 mg/mL
Cefazolin mL/hr N/A
Cefepime mL/hr N/A
CefoPERAZONE mL/hr N/A
CefoTAXIME mL/hr N/A
CeftAZIDime mL/hr N/A

Includes Systems Compatible with Hospira MedNet
14-4 System Operating Manual
Ceftriaxone mL/hr N/A
Cetuximab mg/m2/hr mg/mL
Ciprofloxacin mL/hr N/A
Cisplatin mL/hr N/A
Clindamycin mL/hr N/A
Cyclophosphamide mL/hr N/A
Cytarabine mL/hr N/A
Dacarbazine mg/m2/min mg
Dexamethasone mg/hr mg/mL
Dexmedetomidine mcg/kg/hr mcg/mL
Diltiazem mg/hr mg/mL
DOBUTamine mcg/kg/min mg/mL
Docetaxel mL/hr N/A
DOPamine mcg/kg/min mg/mL
DOXOrubicin mL/hr N/A
Epinephrine mcg/min mg/mL
Epirubicin mg/m2/min mg/mL
Epoprostenol ng/kg/min mg/mL
Eptifibatide mcg/kg/min mg/mL
Esmolol mcg/kg/min mg/mL
Etoposide mL/hr N/A
Famotidine mL/hr N/A
Fentanyl mL/hr N/A
Fluconazole mL/hr N/A
Flumazenil mL/hr N/A
Folinic Acid mg/m2 mg/mL
Drug Name Dosing UnitsDefault
Concentration
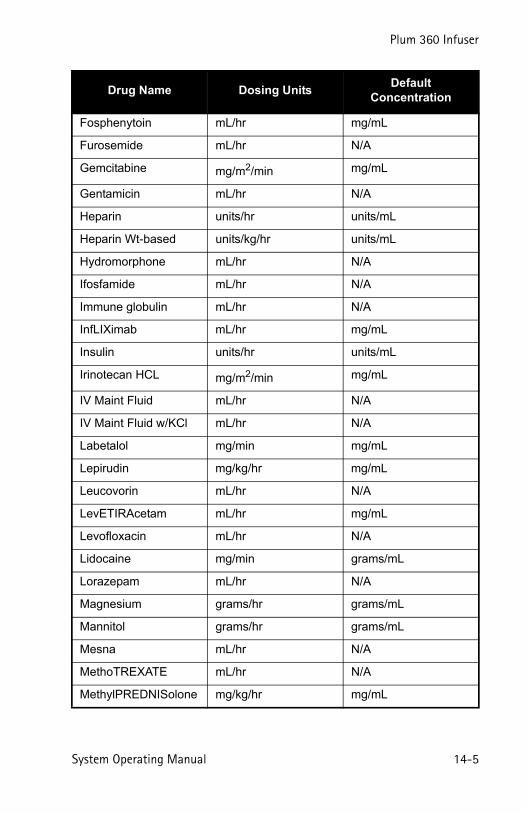
Plum 360 Infuser
System Operating Manual 14-5
Fosphenytoin mL/hr mg/mL
Furosemide mL/hr N/A
Gemcitabine mg/m2/min mg/mL
Gentamicin mL/hr N/A
Heparin units/hr units/mL
Heparin Wt-based units/kg/hr units/mL
Hydromorphone mL/hr N/A
Ifosfamide mL/hr N/A
Immune globulin mL/hr N/A
InfLIXimab mL/hr mg/mL
Insulin units/hr units/mL
Irinotecan HCL mg/m2/min mg/mL
IV Maint Fluid mL/hr N/A
IV Maint Fluid w/KCl mL/hr N/A
Labetalol mg/min mg/mL
Lepirudin mg/kg/hr mg/mL
Leucovorin mL/hr N/A
LevETIRAcetam mL/hr mg/mL
Levofloxacin mL/hr N/A
Lidocaine mg/min grams/mL
Lorazepam mL/hr N/A
Magnesium grams/hr grams/mL
Mannitol grams/hr grams/mL
Mesna mL/hr N/A
MethoTREXATE mL/hr N/A
MethylPREDNISolone mg/kg/hr mg/mL
Drug Name Dosing UnitsDefault
Concentration
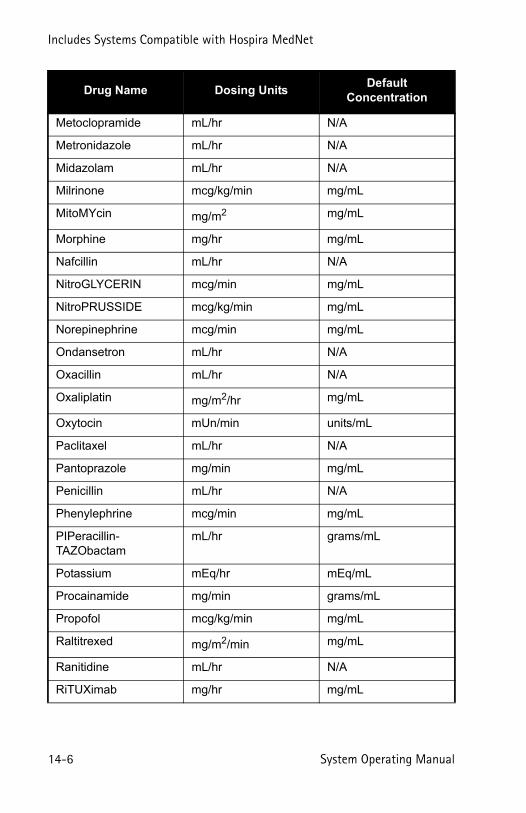
Includes Systems Compatible with Hospira MedNet
14-6 System Operating Manual
Metoclopramide mL/hr N/A
Metronidazole mL/hr N/A
Midazolam mL/hr N/A
Milrinone mcg/kg/min mg/mL
MitoMYcin mg/m2 mg/mL
Morphine mg/hr mg/mL
Nafcillin mL/hr N/A
NitroGLYCERIN mcg/min mg/mL
NitroPRUSSIDE mcg/kg/min mg/mL
Norepinephrine mcg/min mg/mL
Ondansetron mL/hr N/A
Oxacillin mL/hr N/A
Oxaliplatin mg/m2/hr mg/mL
Oxytocin mUn/min units/mL
Paclitaxel mL/hr N/A
Pantoprazole mg/min mg/mL
Penicillin mL/hr N/A
Phenylephrine mcg/min mg/mL
PIPeracillin-TAZObactam
mL/hr grams/mL
Potassium mEq/hr mEq/mL
Procainamide mg/min grams/mL
Propofol mcg/kg/min mg/mL
Raltitrexed mg/m2/min mg/mL
Ranitidine mL/hr N/A
RiTUXimab mg/hr mg/mL
Drug Name Dosing UnitsDefault
Concentration

Plum 360 Infuser
System Operating Manual 14-7
Tobramycin mL/hr N/A
TPN mL/hr N/A
Trastuzumab mg/kg mg/mL
UROkinase mL/hr N/A
Valproate sodium mL/hr mg/mL
Vancomycin mL/hr N/A
Vasopressin units/min units/mL
Verapamil mL/hr N/A
VinBLAStine mg/m2 mg/mL
VinCRIStine mL/hr N/A
Drug Name Dosing UnitsDefault
Concentration
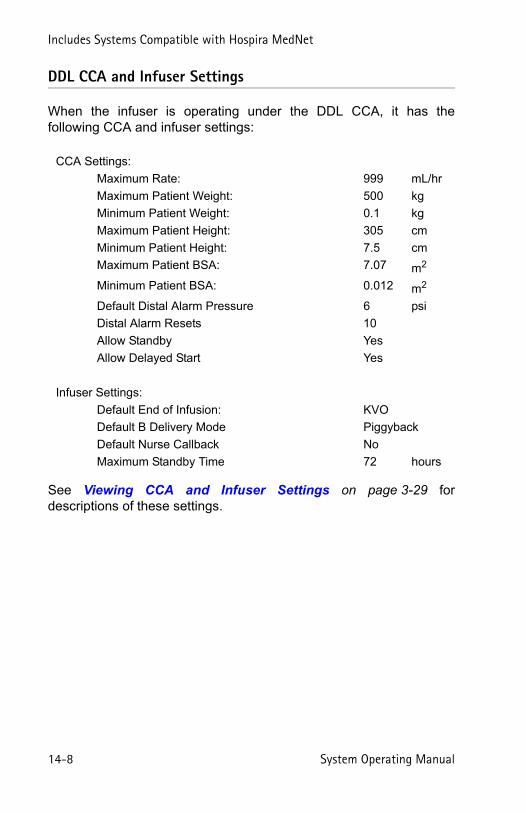
Includes Systems Compatible with Hospira MedNet
14-8 System Operating Manual
DDL CCA and Infuser Settings
When the infuser is operating under the DDL CCA, it has thefollowing CCA and infuser settings:
See Viewing CCA and Infuser Settings on page 3-29 fordescriptions of these settings.
CCA Settings:
Maximum Rate: 999 mL/hr
Maximum Patient Weight: 500 kg
Minimum Patient Weight: 0.1 kg
Maximum Patient Height: 305 cm
Minimum Patient Height: 7.5 cm
Maximum Patient BSA: 7.07 m2
Minimum Patient BSA: 0.012 m2
Default Distal Alarm Pressure 6 psi
Distal Alarm Resets 10
Allow Standby Yes
Allow Delayed Start Yes
Infuser Settings:
Default End of Infusion: KVO
Default B Delivery Mode Piggyback
Default Nurse Callback No
Maximum Standby Time 72 hours
Plum 360 Infuser
System Operating Manual 14-9
Custom Drug Library (CDL)Hospira MedNet safety software enables your facility to builda custom list of CCAs. Each CCA has its own CDL, to incorporatepharmacy-validated I.V. administration practices for each CCA’spatient population.
Every drug in a CDL is assigned upper and lower dosing limits to helpprotect against infusion errors. These dosing limits can be specifiedas hard and soft limits, to create a clinically acceptable range for eachdrug based on hospital and CCA practices.
• Soft limits trigger an alarm that can be overridden duringprogramming. When the soft limit is overridden, the delivery screendisplays this symbol next to the drug during delivery:
• The following hard limits cannot be overridden:
The hard and soft limits together comprise a Rule Set.
See the Hospira MedNet Meds Software User Guide for moreinformation about custom drug libraries and how to build them.
Clinical Care Areas (CCAs) 40
Medications per CCA 400
Total Medications 2,500a
a. Each drug counts only once, even when used in multiple CCAs
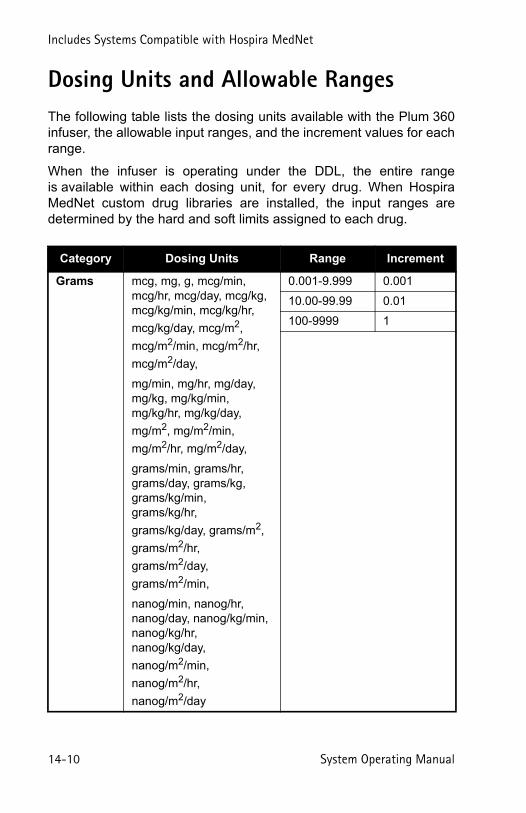
Includes Systems Compatible with Hospira MedNet
14-10 System Operating Manual
Dosing Units and Allowable RangesThe following table lists the dosing units available with the Plum 360infuser, the allowable input ranges, and the increment values for eachrange.
When the infuser is operating under the DDL, the entire rangeis available within each dosing unit, for every drug. When HospiraMedNet custom drug libraries are installed, the input ranges aredetermined by the hard and soft limits assigned to each drug.
Category Dosing Units Range Increment
Grams mcg, mg, g, mcg/min, mcg/hr, mcg/day, mcg/kg,mcg/kg/min, mcg/kg/hr,
mcg/kg/day, mcg/m2,
mcg/m2/min, mcg/m2/hr,
mcg/m2/day,
mg/min, mg/hr, mg/day, mg/kg, mg/kg/min, mg/kg/hr, mg/kg/day,
mg/m2, mg/m2/min,
mg/m2/hr, mg/m2/day,
grams/min, grams/hr, grams/day, grams/kg, grams/kg/min, grams/kg/hr,
grams/kg/day, grams/m2,
grams/m2/hr,
grams/m2/day,
grams/m2/min,
nanog/min, nanog/hr, nanog/day, nanog/kg/min, nanog/kg/hr, nanog/kg/day,
nanog/m2/min,
nanog/m2/hr,
nanog/m2/day
0.001-9.999 0.001
10.00-99.99 0.01
100-9999 1

Plum 360 Infuser
System Operating Manual 14-11
Liters liters/m2/day, liters/m2/hr,
liters/m2/min
0.001-9.999 0.001
10.00-99.99 0.01
100-9999 1
mEq mEq/min, mEq/hr, mEq/day, mEq/kg/min, mEq/kg/hr, mEq/kg/day,
mEq/m2/min, mEq/m2/hr,
mEq/m2/day
0.001-0.999 0.001
1.00-9.99 0.01
10.0-99.9 0.1
100-9999 1
mL mL/hr 0.1-99.9 0.1
100-999 1
mL, mL/min, mL/kg, mL/kg/min, mL/kg/hr,
mL/kg/day, mL/m2/hr,
mL/m2/min, mL/m2/day
0.001-9.999 0.001
10.00-99.99 0.01
100-9999 1
mmol mmol/min, mmol/hr, mmol/day, mmol/kg, mmol/kg/min, mmol/kg/hr, mmol/kg/day
0.001-0.999 0.001
1.00-9.99 0.01
10.0-99.9 0.1
100-999 1
Units milliUnits/min, milliUnits/hr, milliUnits/day, milliUnits/kg, milliUnits/kg/min, milliUnits/kg/hr, milliUnits/kg/day,
milliUnits/m2/min,
milliUnits/m2/hr,
milliUnits/m2/day
units/min, units/hr, units/day, units/kg, units/kg/min, units/kg/hr,
units/kg/day, units/m2,
units/m2/min, units/m2/hr,
units/m2/day
0.001-0.999 0.001
1.00-9.99 0.01
10.0-99.9 0.1
100-99999999 1
Category Dosing Units Range Increment

Includes Systems Compatible with Hospira MedNet
14-12 System Operating Manual
Patient Data LimitsWhen you program a delivery for a weight-based dosage (mg/kg/hr,for example), you must enter the patient’s weight.When programming a BSA (Body Surface Area)-based delivery(grams/m2/min, for example), you must enter either the patient’sheight and weight, or enter the BSA directly.
NOTE: If you enter the height and weight, the BSA is computed usingthe DuBois method.
The following table shows the valid ranges for patient weight, height,and BSA, and the increments for each range.
For more information about dose calculations, see Programming onpage 5-1.
For more information about BSA-based deliveries, see Body SurfaceArea (BSA) Dosing Unit on page 5-1.
Million Units
Million Units/min, Million Units/hr,
Million Units/m2
0.001-0.999 0.001
1.00-9.99 0.01
10.0-99.9 0.1
100-999 1
Patient Data Range Increment
Weight (kg) 0.100 to 9.999 0.001
10.00 to 99.99 0.01
100.0 to 500.0 0.1
Height (cm) 7.5 to 305.0 0.1
BSA (m2) 0.012 to 0.999 0.001
1.00 to 7.07 0.01
Category Dosing Units Range Increment

Plum 360 Infuser
For customer service within the United States, contact:
1-877-9-HOSPIRA (1-877-946-7747)
For technical assistance, product return authorization, and to order parts, accessories, or manuals within the United States,
contact Hospira, Inc. Advanced Knowledge Center.
1-800-241-4002
To order parts using the online eCatalog, download technical publications, technical training courses, and additional services,
visit the website at:
www.hospiraparts.com
Outside the U.S., contact your local Hospira, Inc. sales office.
CAUTIONFEDERAL (USA) LAW RESTRICTS THIS INFUSER TO SALE BY OR ONTHE ORDER OF A PHYSICIAN OR OTHER LICENSED PRACTITIONER.
WARNINGPOSSIBLE EXPLOSION HAZARD EXISTS IF THE INFUSER IS USEDIN THE PRESENCE OF FLAMMABLE ANESTHETICS.
Contact Information

Printed in USA
Caution Warning
Mains supply equipment using protective earth
Protection against vertically falling water drops
Fragile, Handle with Care Temperature limitation
This Way Up Keep dry
Dangerous VoltageDevice includes an RF transmitter that complies with IEEE 802.11 a/b/g/n
Mandatory Action Follow Instructions For Use
Alarm Volume Control Nurse Call Interface Port
Wired Ethernet InterfacePort
Equipotential Terminal (Ground)
Complies with limits for Class B digital device established by FCC Rules, Part 15
Indicates that Federal (USA) law restricts this device to sale by or on the order of a physician or other licensed practitioner
The administration set, which comprises the infusion liquid pathway, is an applied part for the Plum infuser. The administration set is a Type CF applied part complying with the higher degree of protection against electric shock, as defined in IEC 60601-1:2012. Type CF Applied Parts are those parts suitable for direct cardiac application.
The ‘C’ and ‘US’ indicators adjacent to the CSA Mark signify that the product has been evaluated to the applicable CSA and ANSI/UL Standards, for use in Canada and the U.S., respectively. This ‘US’ indicator includes products eligible to bear the ‘NRTL’ indicator. NRTL (National Recognized Testing Laboratory), is a designation granted by the U.S. Occupational Safety and Health Administration (OSHA) to laboratories which have been recognized to perform certification to U.S. Standards.
IPX2
Type CF
Back