GUIDEBOOK - JVC USA - Productsresources.jvc.com/Resources/00/01/34/LYT2043-003B.pdf · GUIDEBOOK EN...
84
GUIDEBOOK EN HARD DISK CAMERA ENGLISH Dear Customers Thank you for purchasing this camcorder. Before use, please read the safety information and precautions contained in pages 2 and 3 to ensure safe use of this product. For Future Reference: Enter the Model No. (located on the bottom of the camcorder) and Serial No. (located on the battery pack mount of the camcorder) below. Model No. Serial No. U U GZ-HD320 GZ-HD300
Transcript of GUIDEBOOK - JVC USA - Productsresources.jvc.com/Resources/00/01/34/LYT2043-003B.pdf · GUIDEBOOK EN...

GUIDEBOOK ENHARD DISK CAMERA
ENGLISH
Dear CustomersThank you for purchasing this camcorder. Before use, please read the safety information and precautions contained in pages 2 and 3 to ensure safe use of this product.
For Future Reference: Enter the Model No. (located on the bottom of the camcorder) and Serial No. (located on the battery pack mount of the camcorder) below.
Model No.Serial No.
U
U
GZ-HD320GZ-HD300

� EN
Safety Precautions
SAFETY1
CAUTIONRISK OF ELECTRIC SHOCK
DO NOT OPEN
CAUTION: TO REDUCE THE RISK OF ELECTRIC SHOCK, DO NOT REMOVE COVER (OR BACK).NO USER-SERVICEABLE PARTS INSIDE.
REFER SERVICING TO QUALIFIED SERVICE PERSONNEL.
The lightning flash with arrowhead symbol, within an equilateral triangle, is intended to alert the user to the presence of uninsulated "dangerous voltage" within the product's enclosure that may be of sufficient magnitude to constitute a risk of electric shock to persons.
The exclamation point within an equilateral triangle is intended to alert the user to the presence of important operating and maintenance (servicing) instructions in the literature accompanying the appliance.
WARNING: TO PREVENT FIRE OR SHOCK HAZARD, DO NOT EXPOSE THIS UNIT TO RAIN OR MOISTURE.
NOTES:• The rating plate and safety caution are on the
bottom and/or the back of the main unit.• The serial number plate is on the battery pack
mount.• The rating information and safety caution of the
AC adapter are on its upper and lower sides.
Caution on Replaceable lithium batteryThe battery used in this device may present a fire or chemical burn hazard if mistreated.Do not recharge, disassemble, heat above 100°C or incinerate.Replace battery with Panasonic, Sanyo, Sony or Maxell CR2025.Danger of explosion or Risk of fire if the battery is incorrectly replaced.• Dispose of used battery promptly.• Keep away from children.• Do not disassemble and do not dispose of in fire.
For USA-California OnlyThis product contains a CR Coin Cell Lithium Battery which contains Perchlorate Material – special handling may apply.See www.dtsc.ca.gov/hazardouswaste/perchlorate
When the equipment is installed in a cabinet or on a shelf, make sure that it has sufficient space on all sides to allow for ventilation (10 cm (3-15/16") or more on both sides, on top and at the rear).Do not block the ventilation holes.(If the ventilation holes are blocked by a newspaper, or cloth etc. the heat may not be able to get out.)No naked flame sources, such as lighted candles, should be placed on the apparatus.When discarding batteries, environmental problems must be considered and the local rules or laws governing the disposal of these batteries must be followed strictly.The apparatus shall not be exposed to dripping or splashing.Do not use this equipment in a bathroom or places with water.Also do not place any containers filled with water or liquids (such as cosmetics or medicines, flower vases, potted plants, cups etc.) on top of this unit.(If water or liquid is allowed to enter this equipment, fire or electric shock may be caused.)
Do not point the lens directly into the sun. This can cause eye injuries, as well as lead to the malfunctioning of internal circuitry. There is also a risk of fire or electric shock.
CAUTION!The following notes concern possible physical damage to the camcorder and to the user.Carrying or holding the camcorder by the LCD monitor can result in dropping the unit, or in a malfunction.Do not use a tripod on unsteady or unlevel surfaces. It could tip over, causing serious damage to the camcorder.
CAUTION!Connecting cables (Audio/Video, S-Video, etc.) to the camcorder and leaving it on top of the TV is not recommended, as tripping on the cables will cause the camcorder to fall, resulting in damage.
CAUTION:The mains plug shall remain readily operable.
WARNING:The battery pack, the camcorder with battery installed, and the remote control with battery installed should not be exposed to excessive heat such as direct sunshine, fire or the like.

�EN
IMPORTANT SAFETY INSTRUCTIONS1. Read these instructions.2. Keep these instructions.3. Heed all warnings.4. Follow all instructions.5. Do not use this apparatus near water.6. Clean only with dry cloth.7. Do not block any ventilation openings. Install in
accordance with the manufacturer’s instructions.8. Do not install near any heat sources such
as radiators, heat registers, stoves, or other apparatus (including amplifiers) that produce heat.
9. Only use attachments/accessories specified by the manufacturer.
10. Use only with the cart, stand, tripod, bracket, or table specified by the manufacturer, or sold with the apparatus. When a cart is used, use caution when moving the cart/apparatus combination to avoid injury from tip-over.
11. Unplug this apparatus during lightning storms or when unused for long periods of time.
12. Refer all servicing to qualified service personnel. Servicing is required when the apparatus has been damaged in any way, such as power-supply cord or plug is damaged, liquid has been spilled or objects have fallen into the apparatus, the apparatus has been exposed to rain or moisture, does not operate normally, or has been dropped.
Remember that this camcorder is intended for private consumer use only.Any commercial use without proper permission is prohibited. (Even if you record an event such as a show, performance or exhibition for personal enjoyment, it is strongly recommended that you obtain permission beforehand.)
Trademarks• “AVCHD” and the “AVCHD” logo are trademarks
of Panasonic Corporation and Sony Corporation.• Manufactured under license from Dolby
Laboratories. Dolby and the double-D symbol are trademarks of Dolby Laboratories.
• x.v.Color™ is a trademark of Sony Corporation.
• HDMI is a trademark of HDMI Licensing, LLC.
• Windows® is either registered trademark or trademark of Microsoft Corporation in the United States and/or other countries.
• Macintosh is a registered trademark of Apple Inc.
• iTunes, iMovie, iPhoto are trademarks of Apple Inc., registered in the U.S. and other countries.
• YouTube and the YouTube logo are trademarks and/or registered trademarks of YouTube LLC.
• Other product and company names included in this instruction manual are trademarks and/or registered trademarks of their respective holders.
If this symbol is shown, it is only valid in the European Union.

� EN
Easy Start Guide
CAUTION
• Be sure to use JVC battery packs. If you use any other battery packs besides JVC battery packs, safety and performance can not be guaranteed.
Charge the battery before recordingTurn off the camcorder and attach the battery pack.
Grip AdjustmentAdjust the strap and fasten.
• Fasten the strap when you grip the camcorder.
• When carrying the camcorder, please be careful not to drop it.
Grip Strap
Fasten
Power/charge lampblinks: Charginggoes out: Charging finished
Battery Pack
AC AdapterTo AC Outlet(110V to 240V)
Open the cover
The battery pack is not charged at the time of purchase.
Access lampblinks: Accessing files
Do not remove the AC adapter, the battery pack or the microSD card when the lamp is blinking.

�EN
Date/Time Setting
Q Open the LCD monitor to turn on the camcorder
Power button
LCD monitor
R Select [YES] within 10 seconds
• When the message disappears, press the power button for at least 2 seconds to turn off the power, and then press it again for at least 2 seconds.
• Touch the sensors with your finger. The sensors do not function if you touch them with your finger nail or with gloves on.
S Select [CLOCK SETTING]
T Select the city closest to the area where you use the camcorder
U Select [ON] if daylight saving time is observed
V Set the date and time
Slide your finger up and down on the sensor. Then touch OK.
Touch sensor: Sets the date and time}: Moves the cursor to the rightOK: Clock starts

� EN
Video recording
CAUTION
Before recording an important scene, it is recommended to conduct a trial recording.
S Start recording
Press the START/STOP button to start recording, and press it again to stop.
Remaining space on the hard disk
Video Quality Record-standby
Recording
Q Slide the mode switch to select ! (video) mode
R Select recording mode (REC)
The mode changes when you press the button.
The auto recording indicator appears.

�EN
Playing back
To perform operations such as forward search or reverse search (Z p. 24)To view files on TV (Z p. 32)
CAUTION
Do not forget to make copies after recording!• To copy files onto discs (Z p. 47)• To dub files to a VCR/DVD recorder (Z p. 53)• To play back a created disc (Z p. 50)• To edit files on your computer (Z p. 54)
Q Select playback mode (PLAY)
The mode changes when you press the button.
R Select the desired fileIndex screen
S Select F (Touch OK)Playback screen
� EN
Contents
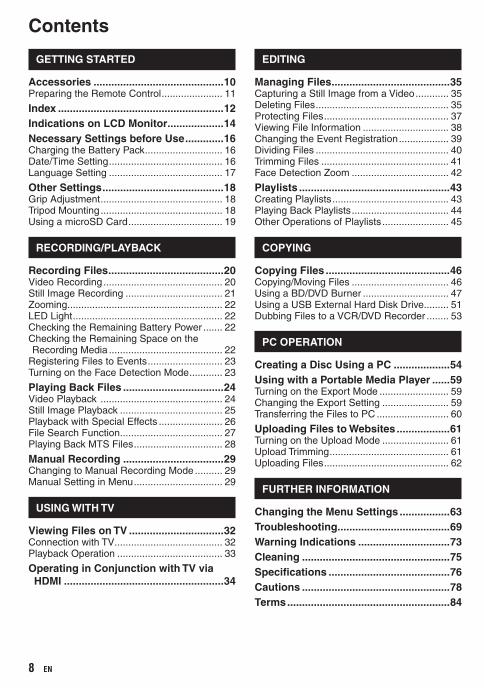
GETTING STARTED
Accessories ............................................10Preparing the Remote Control ...................... 11
Index ........................................................12Indications on LCD Monitor ...................14Necessary Settings before Use .............16Charging the Battery Pack ............................ 16Date/Time Setting ......................................... 16Language Setting ......................................... 17
Other Settings .........................................18Grip Adjustment ............................................ 18Tripod Mounting ............................................ 18Using a microSD Card .................................. 19
RECORDING/PLAYBACK
Recording Files .......................................20Video Recording ........................................... 20Still Image Recording ................................... 21Zooming ........................................................ 22LED Light ...................................................... 22Checking the Remaining Battery Power ....... 22Checking the Remaining Space on the Recording Media ......................................... 22
Registering Files to Events ........................... 23Turning on the Face Detection Mode ............ 23
Playing Back Files ..................................24Video Playback ............................................ 24Still Image Playback ..................................... 25Playback with Special Effects ....................... 26File Search Function ..................................... 27Playing Back MTS Files ................................ 28
Manual Recording ..................................29Changing to Manual Recording Mode .......... 29Manual Setting in Menu ................................ 29
USING WITH TV
Viewing Files on TV ................................32Connection with TV....................................... 32Playback Operation ...................................... 33
Operating in Conjunction with TV via HDMI ......................................................34
EDITING
Managing Files ........................................35Capturing a Still Image from a Video ............ 35Deleting Files ................................................ 35Protecting Files ............................................. 37Viewing File Information ............................... 38Changing the Event Registration .................. 39Dividing Files ................................................ 40Trimming Files .............................................. 41Face Detection Zoom ................................... 42
Playlists ...................................................43Creating Playlists .......................................... 43Playing Back Playlists ................................... 44Other Operations of Playlists ........................ 45
COPYING
Copying Files ..........................................46Copying/Moving Files ................................... 46Using a BD/DVD Burner ............................... 47Using a USB External Hard Disk Drive......... 51Dubbing Files to a VCR/DVD Recorder ........ 53
PC OPERATION
Creating a Disc Using a PC ...................54Using with a Portable Media Player ......59Turning on the Export Mode ......................... 59Changing the Export Setting ........................ 59Transferring the Files to PC .......................... 60
Uploading Files to Websites ..................61Turning on the Upload Mode ........................ 61Upload Trimming ........................................... 61Uploading Files ............................................. 62
FURTHER INFORMATION
Changing the Menu Settings .................63Troubleshooting ......................................69Warning Indications ...............................73Cleaning ..................................................75Specifications .........................................76Cautions ..................................................78Terms .......................................................84

�EN
Read This First!Make a backup of important recorded dataIt is recommended to copy your important recorded data to a DVD or other recording media for storage. JVC will not be responsible for any lost data.
Make a trial recordingBefore the actual recording of important data, make a trial recording and play back the recorded data to check that the video and sound have been recorded correctly.
Reset the camcorder if it does not operate correctlyClose the LCD monitor and remove the power supply (battery pack or AC adapter) from the camcorder, then reattach it.
Precautions on handling batteries• Be sure to use the JVC BN-VF808U/
VF815U/VF823U battery packs. This product includes patented and other proprietary technology and is made to be used with the JVC battery and not with other batteries.
JVC cannot guarantee safety or performance of this product when it is operated by other batteries.
• If the camcorder is subjected to electrostatic discharge, turn off the power before using it again.
If a malfunction occurs, stop using the camcorder immediately and contact www.jvc.com or by phone at 1-800-252-5722• Recorded data may be erased while the
camcorder is being repaired or inspected. Back up all data before requesting repairs or inspections.
Because camcorders may be used for demonstration in a shop, the demonstration mode is set to on by defaultTo deactivate the demonstration mode, set [DEMO MODE] to [OFF]. (Z p. 65)
How to use the Touch SensorAfter the menu is displayed on the LCD monitor:
Q Slide your finger up and down on the sensor.R Select [SET]. (Touch OK.)
A To select an on-screen button appearing on the left side, touch the portion of the sensor next to the on-screen button.
B To select an on-screen button appearing at the bottom of the screen, touch the buttons underneath them.

10 EN
AccessoriesGETTING STARTED
AP-V20U BN-VF808U
AC Adapter Battery Pack Component Cable AV Cable
RM-V751UCR2025
USB Cable Remote Control Lithium BatteryPre-installed in the
remote control.
CD-ROM
NOTE
Make sure to use the provided cables for connections. Do not use any other cables.

11EN
Preparing the Remote Control
A battery is included inside the remote control at the time of purchase.Remove the insulation sheet before use.
Beam Effective Area To Reinsert the Battery
NOTE
The transmitted beam may not be effective or may cause incorrect operation when the remote sensor is directly exposed to sunlight or powerful lighting.
Pull out the battery holder by pressing the lock tab.
Effective distance:Max. 5 m (16 ft)
Remote Sensor
Lock Tab
Lithium Battery(CR2025)

1� EN
Index
NOTE
• Be careful not to cover 3, 4, 5, and 6 during shooting.
• The LCD monitor can rotate 270°.

1�EN
Remote Control
Q Infrared Beam Transmitting WindowR ZOOM (T/W) Buttons (Zoom in/Out)S Up ButtonT Skip Backward Button
U Left ButtonV Back ButtonW PLAYLIST ButtonX START/STOP Button
Y S.SHOT(SNAPSHOT) ButtonZ INFO Buttona Skip Forward Buttonb PLAY/PAUSE/SET Button
c Right Buttond Next Buttone Down Buttonf INDEX Button*g DISP Button
* Each time you press INDEX, the screen switches as shown below:
! mode:Index Screen « Group Index Screen# mode:Index Screen « Date Index Screen
Camcorder
! Power Button# HDMI Mini Connector (Z p. 32)$ Component Connector (Z p. 32)% DISPLAY Button (Z p. 15)& Speaker( Ventilation hole) Zoom Lever (Z p. 22)
Speaker Volume Control* SNAPSHOT Button (Z p. 21)
+ Touch Sensor, OK Button- MENU Button
. Mode Switch [!, #]/ UPLOAD Button (Z p. 61)
TITLE Button (Z p. 44)0 EXPORT Button (Z p. 59)1 DIRECT DISC Button (Z p. 48)
INFO Button (Z p. 22, 38)2 PLAY/REC Button (Z p. 20, 21, 24, 25)
3 LED Light (Z p. 22)4 Remote Sensor5 Lens6 Stereo Microphone
7 DC Connector8 START/STOP Button (Z p. 20)9 AV Connector (Z p. 33, 53): USB Connector (Z p. 47, 51, 55)
; Tripod Mounting Socket< microSD Card Slot= Battery Release Button
1� EN
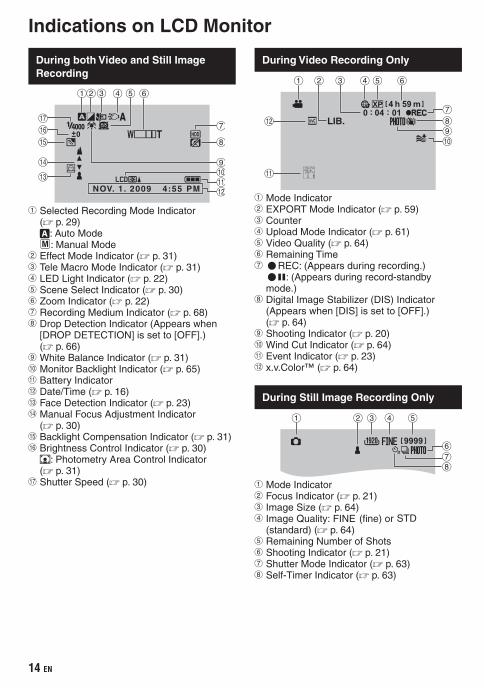
Indications on LCD Monitor
During both Video and Still Image Recording
4:55 PMNOV. 1. 2009
! Selected Recording Mode Indicator (Z p. 29)
@: Auto Mode 3: Manual Mode# Effect Mode Indicator (Z p. 31)$ Tele Macro Mode Indicator (Z p. 31)% LED Light Indicator (Z p. 22)& Scene Select Indicator (Z p. 30)( Zoom Indicator (Z p. 22)) Recording Medium Indicator (Z p. 68)* Drop Detection Indicator (Appears when
[DROP DETECTION] is set to [OFF].) (Z p. 66)
+ White Balance Indicator (Z p. 31), Monitor Backlight Indicator (Z p. 65)- Battery Indicator. Date/Time (Z p. 16)/ Face Detection Indicator (Z p. 23)0 Manual Focus Adjustment Indicator
(Z p. 30)1 Backlight Compensation Indicator (Z p. 31)2 Brightness Control Indicator (Z p. 30) .: Photometry Area Control Indicator
(Z p. 31)3 Shutter Speed (Z p. 30)
During Video Recording Only
! Mode Indicator# EXPORT Mode Indicator (Z p. 59)$ Counter% Upload Mode Indicator (Z p. 61)& Video Quality (Z p. 64)( Remaining Time) MREC: (Appears during recording.) MQ: (Appears during record-standby
mode.)* Digital Image Stabilizer (DIS) Indicator
(Appears when [DIS] is set to [OFF].) (Z p. 64)
+ Shooting Indicator (Z p. 20), Wind Cut Indicator (Z p. 64)- Event Indicator (Z p. 23). x.v.Color™ (Z p. 64)
During Still Image Recording Only
! Mode Indicator# Focus Indicator (Z p. 21)$ Image Size (Z p. 64)% Image Quality: FINE (fine) or STD
(standard) (Z p. 64)& Remaining Number of Shots( Shooting Indicator (Z p. 21)) Shutter Mode Indicator (Z p. 63)* Self-Timer Indicator (Z p. 63)
1�EN
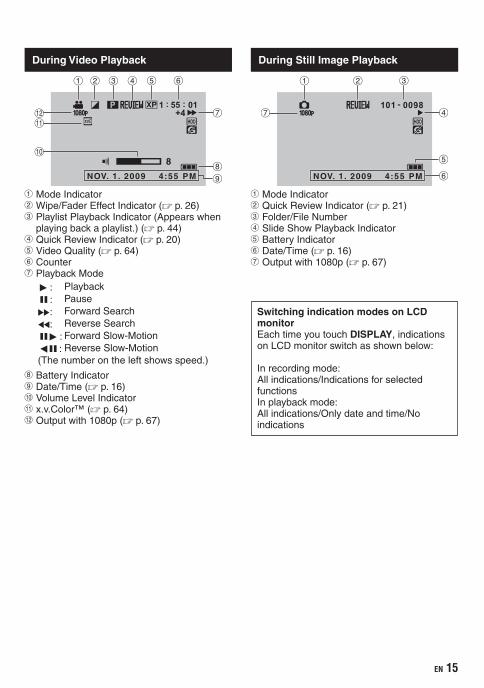
During Video Playback
8
4:55 PMNOV. 1. 2009
! Mode Indicator# Wipe/Fader Effect Indicator (Z p. 26)$ Playlist Playback Indicator (Appears when
playing back a playlist.) (Z p. 44)% Quick Review Indicator (Z p. 20)& Video Quality (Z p. 64)( Counter) Playback Mode
F: PlaybackQ: PauseK: Forward SearchJ: Reverse SearchQF: Forward Slow-MotionPQ: Reverse Slow-Motion(The number on the left shows speed.)
* Battery Indicator+ Date/Time (Z p. 16), Volume Level Indicator- x.v.Color™ (Z p. 64). Output with 1080p (Z p. 67)
During Still Image Playback
4:55 PMNOV. 1. 2009
! Mode Indicator# Quick Review Indicator (Z p. 21)$ Folder/File Number% Slide Show Playback Indicator& Battery Indicator( Date/Time (Z p. 16)) Output with 1080p (Z p. 67)
Switching indication modes on LCD monitorEach time you touch DISPLAY, indications on LCD monitor switch as shown below:
In recording mode:All indications/Indications for selected functionsIn playback mode:All indications/Only date and time/No indications

1� EN
Necessary Settings before Use
Charging the Battery Pack
1 Close the LCD monitor to turn off the camcorder.
2 Attach the battery pack, then connect the AC adapter.
• The power/charge lamp blinks to indicate charging has started.
• When the lamp goes out, charging is finished.
To check the remaining battery powerSee page 22.
Battery pack Charging time
BN-VF808U(Provided) 1 h 50 m
BN-VF815U 2 h 40 m
BN-VF823U 3 h 40 m
To detach the battery pack
NOTE
• You can also use the camcorder with just the AC adapter.
• The actual recording time may shorten depending on the recording environment, such as when recording scenes with fast moving subject.
• Please do not pull or bend the AC adapter plug and cable. This may damage the AC adapter.
Date/Time Setting
1 Open the LCD monitor to turn on the camcorder.
2 Touch MENU.
3 Select [DISPLAY SETTINGS].
4 Select [CLOCK ADJUST].
AC AdapterTo AC Outlet(110V to 240V)

1�EN
5 Select [CLOCK SETTING].
6 Select the city closest to the area where you use the camcorder.
Selected area is highlighted
7 Select [ON] if daylight saving time is observed.
8 Set the date and time.Change the setting by using the touch sensor and select [&] to set.
9 Select [SAVE].To reset the setting, select [QUIT].
Setting the clock to local time when traveling
After performing steps 1-4 (Z p. 16)
5 Select [AREA SETTING].
6 Select the city closest to the area you are traveling.
To return to the previous screenSelect @.
To quit the screenSelect [QUIT].
Language Setting
The language on the display can be changed.
1 Open the LCD monitor to turn on the camcorder.
2 Touch MENU.
3 Select [DISPLAY SETTINGS].
4 Select [LANGUAGE].
5 Select the desired language.
To return to the previous screenSelect @.
To quit the screenSelect [QUIT].
Principal city of the selected area
Time difference to GMT

1� EN
Other Settings
Grip Adjustment
NOTE
• Fasten the strap when you grip the camcorder.
• When carrying the camcorder, please be careful not to drop it.
Tripod Mounting
Align the camcorder stud hole with the tripod stud, and the mounting socket with the screw, and then rotate the camcorder clockwise to mount it to the tripod.
NOTE
Do not use a tripod on unsteady or unlevel surfaces. It could tip over, causing serious damage to the camcorder.

1�EN
Using a microSD Card
The camcorder is programmed to record on the built-in hard disk when it is shipped from the factory. You can change the recording medium to microSD card.• Operations are confirmed on the following
microSD cards. - Panasonic - TOSHIBA - SanDisk - ATP Video recording: Class 4 or higher compatible microSDHC
card (4 GB to 8 GB) For UXP mode, use Class 6 or higher. Still image recording: microSD card (256 MB to 2 GB) or
microSDHC card (4 GB to 8 GB)• If other media are used, they may fail to
record data correctly, or they may lose data that had already been recorded.
• MultiMediaCards are not supported.• Video data may not be recorded onto the
microSD cards on which video data have already been recorded using the devices from other manufacturers.
Insert a microSD card
Preparation: Close the LCD monitor to turn off the camcorder.
1 Open the microSD card cover.
2 Firmly insert the card with its clipped edge first.
3 Close the microSD card cover.
To remove a microSD cardPush the microSD card once.After the card comes out a little, pull it out.
NOTE
• Insert and remove the microSD card only while the power is turned off. Otherwise, data on the card may be corrupted.
• Do not touch the terminal on the reverse side of the label.
Change the recording medium
Set [REC MEDIA FOR VIDEO] and [REC MEDIA FOR IMAGE] to [SD]. (Z p. 68)
Format a microSD card when using it for the first time
Select [FORMAT SD CARD] to format the card. (Z p. 68)

�0 EN
SNAPSHOT
Video Recording
Recording FilesRECORDING/PLAYBACK
Press PLAY/REC to select the recording mode.
Press START/STOP to start recording.
You can also start/stop recording by selecting [REC] on the LCD monitor.(On-screen recording control)
To stop recordingPress START/STOP again.
To view the last recorded sceneSelect A while recording is paused.Selecting $ during playback deletes that scene.
To record a still image during video recordingPress SNAPSHOT.
Slide the mode switch to select ! (video) mode.
NOTE
• The video recording mode is automatically selected when you turn off the camcorder and then turn on again.
• If the camcorder is not operated for 5 minutes while the power is on, it turns itself off automatically to conserve power.
• Do not move or shake the camcorder suddenly during recording. If you do so, the driving sound (hum) of the hard disk may be recorded.
To change the video qualityChange the settings in [VIDEO QUALITY]. (Z p. 64)
Approximate remaining time for recording

�1EN
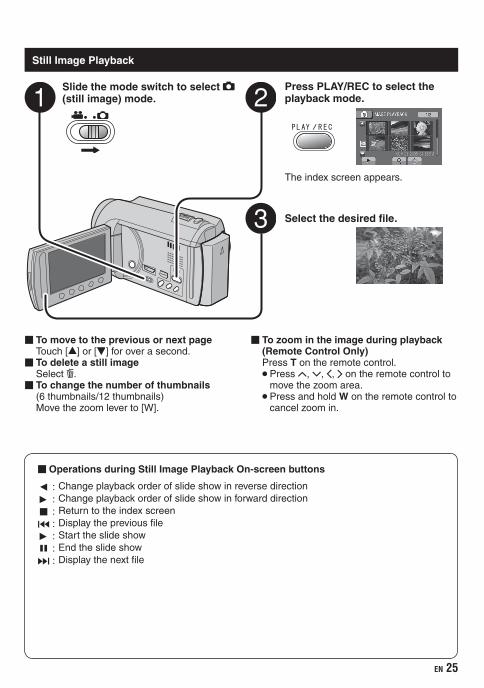
Slide the mode switch to select # (still image) mode.
Press PLAY/REC to select the recording mode.
Press and hold SNAPSHOT halfway.
The ? indicator becomes green when the captured image is focused.
Press SNAPSHOT fully to take a still image.
NOTE
• DIS (Digital Image Stabilizer) does not function during still image recording.• If the camcorder is not operated for 5 minutes while the power is on, it turns itself off
automatically to conserve power.• The sides of still images recorded in 16:9 size may be cut off when printed. Check whether 16:9
size prints can be printed at your local print store.
Still Image Recording
To view the last recorded imageSelect A after shooting. Selecting $ during playback deletes that image.
To change the image quality Change the settings in [IMAGE QUALITY]. (Z p. 64)
To change the image sizeChange the settings in [IMAGE SIZE]. (Z p. 64)
To record still images continuouslySet to [CONTINUOUS SHOOTING] in [SHUTTER MODE]. (Z p. 63)

�� EN
Recording Files (Continued)
Zooming
Preparation:• Select ! or # mode.• Select the recording mode.
Zoom out Zoom in
W: Wide angle T: Telephoto
You can also zoom out/zoom in by selecting [W] or [T] on the LCD monitor. (On-screen zoom control)
Zoom ratio (factory-preset)
! mode # mode
[20X / OPTICAL] [20X / OPTICAL]
To change the maximum zoom ratio (! mode only)Change the settings in [ZOOM]. (Z p. 64)
NOTE
Macro shooting is possible as close as approx. 5 cm (2") to the subject when the zoom lever is set all the way to W.
LED Light
Preparation:• Select ! or # mode.• Select the recording mode.
1 Touch MENU.
2 Select [LIGHT].
3 Select the desired setting.
ONThe LED light remains on regardless of the surrounding conditions.
AUTOThe LED light turns on automatically when shooting in insufficient light conditions.
OFF Deactivates this function.
Checking the Remaining Battery Power
! mode: Press INFO twice or INFO and then select ;.
# mode:Press INFO.
To quit the screenSelect [QUIT] or press INFO.
NOTE
The recordable time display should only be used as a guide. It is displayed in 10 minute units.
Checking the Remaining Space on the Recording Media
Preparation:• Select ! mode.• Select the recording mode.
Press INFO.
The maximum recording time is displayed for each video quality mode.
To change the video quality1) Select the video quality.2) Select [SET].
To quit the screenSelect [QUIT].

��EN
Registering Files to Events
If you select an event to register the file to before starting recording, you can find the file easily at playback.
Preparation:• Select ! mode.• Select the recording mode.
1 Touch MENU.
2 Select [REGISTER EVENT].
3 Select the event.
The selected event is displayed on the screen.
To quit the screenSelect [QUIT].
To search by eventSee page 28.
NOTE
Once you select a certain event to register a file, the setting will remain even if you turn off the camcorder.
Turning on the Face Detection Mode
If you set this mode on, the camcorder detects the faces and adjust brightness and focus so that the faces are recorded clearly.
Preparation:• Select ! or # mode.• Select the recording mode.
Select .
To turn off the face detection modeSelect again.
Recording still images with the face detection mode turned on
1) Press and hold SNAPSHOT half way.
2) Press SNAPSHOT.
Using the self-timer in the face detection mode
Preparation:Set [SELF-TIMER] to [FACE DETECTION].
1) Press SNAPSHOT.Faces are detected.
2) The still image is recorded 3 seconds after the face of the photographer is detected.
NOTE
• If the LCD monitor is turned upside down, is not displayed. Change the setting when
the LCD monitor is in the normal position.• You cannot turn on the face detection mode if
[SELF-TIMER] is set to [FACE DETECTION]. (This is indicated by blinking .)
• Depending on the condition, faces may not be detected.
• If the face detection does not work correctly, turn off the mode before recording.
Photographer

�� EN
— : Turn down the volume
+ : Turn up the volume
Speaker volume
Playing Back Files
Video Playback
Slide the mode switch to select ! (video) mode.
Press PLAY/REC to select the playback mode.
The index screen appears.
Select the desired file.
To move to the previous or next pageTouch [ ] or [ ] for over a second.To play back a few seconds from the beginning of each videoTouch [ ].
NOTE
• In some cases, parts of video other than the beginning may be played back.
• Some video may not be played back at all.To delete a videoSelect $ when playback is stopped.
To change the number of thumbnails(6 thumbnails/12 thumbnails)Move the zoom lever to [W].To zoom in the video during pause (Remote Control Only)Press T on the remote control.• Press ¡, ¢, £, ¤ on the remote control to
move the zoom area.• Press and hold W on the remote control to
cancel zoom in.
Operations during Video Playback On-screen buttons
N : Return to the first scene of the fileO : Go to the first scene of the next fileL : Return to the index screenJ : Reverse search (during playback)E : Frame-by-frame playback in reverse
direction (during pause)*F : PlaybackQ : PauseK : Forward search (during playback)G : Frame-by-frame playback in forward
direction (during pause)*
* Slow playback starts when you keep touching the sensor button under E / G for a while.
��EN
To move to the previous or next pageTouch [ ] or [ ] for over a second.To delete a still imageSelect $.To change the number of thumbnails(6 thumbnails/12 thumbnails)Move the zoom lever to [W].
Press PLAY/REC to select the playback mode.
The index screen appears.
Select the desired file.
Slide the mode switch to select # (still image) mode.
To zoom in the image during playback (Remote Control Only)Press T on the remote control.• Press ¡, ¢, £, ¤ on the remote control to
move the zoom area.• Press and hold W on the remote control to
cancel zoom in.
Still Image Playback
Operations during Still Image Playback On-screen buttons
P : Change playback order of slide show in reverse directionF : Change playback order of slide show in forward directionL : Return to the index screenN : Display the previous fileF : Start the slide showQ : End the slide showO : Display the next file

�� EN
Playing Back Files (Continued)
Playback with Special Effects
Wipe or fader effectsAdd effects at the beginning and end of videos.These effects cannot be set for still images.Preparation:• Select ! mode.• Select the playback mode.
1 Touch MENU.
2 Select [WIPE/FADER].
3 Select a desired effect.For details on each effect, see the right column.
4 Select the file you want to play back.
To quit the screenTouch MENU.
To turn off the effectSelect [OFF] in step 3.
Items for WIPE/FADER setting• O FADER-WHITE:
Fades in or out with a white screen.• P FADER-BLACK:
Fades in or out with a black screen.• T WIPE-SLIDE:
Wipes in from right to left, or wipes out in the opposite way.
• U WIPE-DOOR:Wipes in as the two halves of a black screen which open to the left and right revealing the scene, or wipes out in the opposite way.
• V WIPE-SCROLL:Wipes in from the bottom to the top of a black screen, or wipes out in the opposite way.
• W WIPE-SHUTTER:Wipes in from the center of a black screen toward the top and bottom, or wipes out in the opposite way.
NOTE
No effect will be applied on files with a play time shorter than 7 seconds.

��EN
File Search Function
Preparation:• Select ! or # mode.• Select the playback mode.
Group Index Screen !You can search the desired file by the group. The group is created automatically based on recording date and time. And the contents of the group are changed when adding/deleting or editing scenes.
1 Select .
2 Select [GROUP].
3 Select the file you want to play back.
The number of files in the group is displayed in the thumbnails.
To return to the index screenSelect @.
To quit the screenSelect [QUIT].
NOTE
• The contents of the group may be changed depending on the interval of the recording time. To change the contents, register the event. (Z p. 23)
• The created groups may not be listed by recording date such as when copying the files to a microSD card.
Date Index Screen
You can search the desired file by the recording date.
1 Select .In case of # mode, go to step 3.
2 Select [SEARCH DATE].
3 Select the recording date.
4 Select the file you want to play back.
To return to the index screenSelect @.
To quit the screenSelect [QUIT].
�� EN
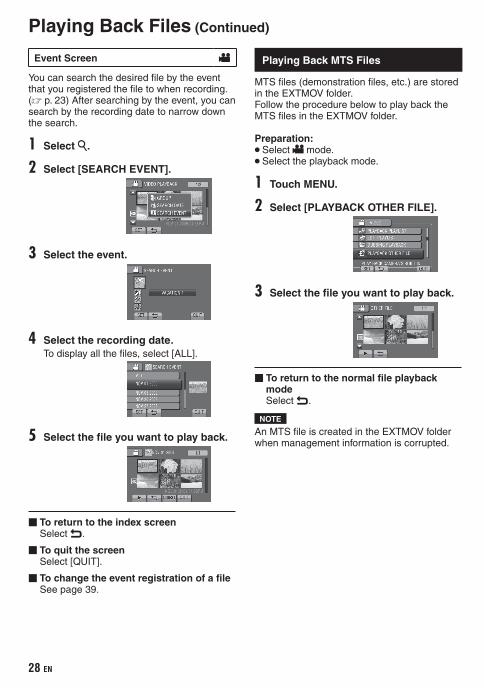
Event Screen !You can search the desired file by the event that you registered the file to when recording. (Z p. 23) After searching by the event, you can search by the recording date to narrow down the search.
1 Select .
2 Select [SEARCH EVENT].
3 Select the event.
4 Select the recording date.To display all the files, select [ALL].
5 Select the file you want to play back.
To return to the index screenSelect @.
To quit the screenSelect [QUIT].
To change the event registration of a file See page 39.
Playing Back MTS Files
MTS files (demonstration files, etc.) are stored in the EXTMOV folder.Follow the procedure below to play back the MTS files in the EXTMOV folder.
Preparation:• Select ! mode.• Select the playback mode.
1 Touch MENU.
2 Select [PLAYBACK OTHER FILE].
3 Select the file you want to play back.
To return to the normal file playback modeSelect @.
NOTE
An MTS file is created in the EXTMOV folder when management information is corrupted.
Playing Back Files (Continued)
��EN
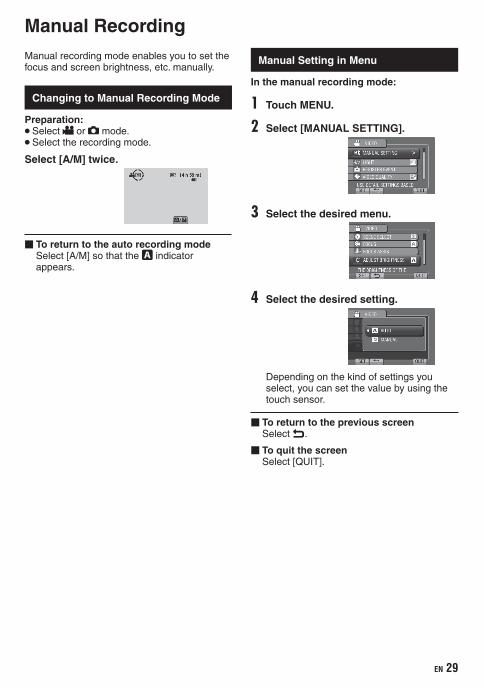
Manual recording mode enables you to set the focus and screen brightness, etc. manually.
Changing to Manual Recording Mode
Preparation:• Select ! or # mode.• Select the recording mode.
Select [A/M] twice.
To return to the auto recording modeSelect [A/M] so that the @ indicator appears.
Manual Setting in Menu
In the manual recording mode:
1 Touch MENU.
2 Select [MANUAL SETTING].
3 Select the desired menu.
4 Select the desired setting.
Depending on the kind of settings you select, you can set the value by using the touch sensor.
To return to the previous screenSelect @.
To quit the screenSelect [QUIT].
Manual Recording

�0 EN
Menus Settings: [ ] = Factory-preset
SCENE SELECTAdjusts the exposure and shutter speed to suit your surroundings or the subject.
1 [OFF]: Deactivates the function.5 NIGHT: Records with more sensitivity in dim locations by
adjusting the shutter speed automatically.V TWILIGHT: Makes evening scenes look more natural.6 PORTRAIT: The subject in the foreground is accentuated
by blurring the background.H SPORTS: Records fast moving subjects clearly.G SNOW: Compensates for subjects that may appear too dark
when shooting in extremely bright surroundings, such as in snow.
/ SPOTLIGHT: Select this when a spotlight makes a subject appear too bright.
N FOCUSAdjusts the focus.
@ [AUTO]: The focus is adjusted automatically.3 MANUAL: @ A : Adjusts the focus manually. (When zooming, the
subject will not go out of focus if you adjust the focus at the telephoto (T) side before zooming to the wide angle (W) side.)
FOCUS ASSISTAssists you to adjust the focus.
The image becomes black and white. The outline of focused object is displayed in blue.Use this for adjusting the focus more precisely.Adjust the focus, then select [SET] to fix the focus.
g ADJUST BRIGHTNESSAdjusts the brightness.
! mode@ [AUTO]: The brightness is adjusted automatically.3 MANUAL: –6 to +6: Corrects the brightness within this range in increments
of 1.
# mode@ [AUTO]: The brightness is adjusted automatically.3 MANUAL: –2.0 to +2.0 (EV): Corrects the brightness within this range in
increments of 1/3EV.
9 SHUTTER SPEEDA fast shutter speed can freeze the motion of a fast-moving subject, and a slow shutter speed can blur the subject to give the impression of motion.
! mode@ [AUTO]: The shutter speed is adjusted automatically.3 MANUAL: 1/2 to 1/4000: The smaller the value, the faster the shutter
speed.# mode@ [AUTO]: The shutter speed is adjusted automatically.3 MANUAL: 1/2 to 1/4000: The smaller the value, the faster the shutter
speed.
NOTE
It is recommended to use the tripod when recording with a slow shutter speed.
Manual Recording (Continued)

�1EN
Menus Settings: [ ] = Factory-preset
= WBAdjusts the white balance to achieve the optimum colors for the amount of light in your surroundings during recording.
@ [AUTO]: White balance is adjusted automatically.3 MANUAL: B MWB: Adjusts the white balance manually depending on
the light source.1) Hold a sheet of plain white paper in front of
the camcorder so that the white paper fills the screen.
2) Keep touching OK until the B indicator appears.
D FINE: When shooting outdoors on a sunny day.E CLOUD: When shooting outdoors on a cloudy day.F HALOGEN: When a video light or similar type of lighting is
used.
- BACKLIGHT COMP.Backlight compensation brightens the subject by increasing the exposure.
1 [OFF]: Deactivates the function.0 ON: Activates the function.
PHOTOMETRY AREAEnables you to adjust the brightness in the desired spot when backlight compensation does not work well.
6 [WHOLE SCREEN]: Brightness is adjusted automatically for whole screen.
7 SPOT: Brightness for the specified spot is adjusted automatically.
w EFFECTEnables you to record videos or still images with special effects.
1 [OFF]: No effect is used.J SEPIA: The image has a brownish tint like old still images.K MONOTONE: The image becomes black and white like old
movies.L CLASSIC FILM*�: This effect skips frames to give images of
an old movie atmosphere.M STROBE*�: The image looks like a series of consecutive
snapshots.*� ! mode only
t TELE MACROEnables you to shoot a subject as large as possible at a distance of approx. 50 cm (1.64 ft).
1 [OFF]: Deactivates the function.0 ON: Activates the function.
NOTE
Set [TELE MACRO] to [OFF] if you will not take close-up still images.Non-close-up still images will be blurred if [TELE MACRO] is set to [ON].

�� EN
This camcorder is designed to be used with high-definition or NTSC-type color television signals. It cannot be used with a television of a different standard.
Connection with TV
You can output videos from the HDMI connector, COMPONENT connector, or AV connector. Select the connector that best suits your television.
Preparation:Turn off all units.
To connect using the HDMI mini connectorWe recommend using the Category 2 HDMI cable (High Speed cable).
NOTE
• When connecting to the HDMI cable, the image or sound may not appear on the TV properly depending on the TV connected. In such cases, perform the following operations.1) Disconnect the HDMI cable and
connect it again.2) Turn off and on the camcorder again.
To connect using the COMPONENT connector
COMPONENT
NOTE
Change the settings in [COMPONENT OUTPUT] according to the connection. (Z p. 67)
Viewing Files on TVUSING WITH TV
HDMI Mini Connector
AC Adapter
DC Connector
HDMI Connector
HDMI Cable (optional)(Mini to full-sized HDMI cable)
To AC Outlet
AC AdapterDC Connector
Component Cable
To AC Outlet
AV Connector
COMPONENT Connector
AV Cable
COMPONENT Input Connector
Audio L/R Input Connector
Video Connector is not in use.

��EN
To connect using the AV connector
NOTE
Change the settings in [VIDEO OUTPUT] to suit the screen size of your television. (Z p. 67)
Playback Operation
After the connection with TV is completed
1 Turn on the camcorder and the TV.
2 Set the TV to its VIDEO mode.
3 (Only when connecting the camcorder to the VCR/DVD recorder) Turn on the VCR/DVD recorder, and set the VCR/DVD recorder to its AUX input mode.
4 Start playback on the camcorder. (Z p. 24, 25)
To display camcorder’s on-screen display on TVSet [DISPLAY ON TV] to [ON]. (Z p. 67)
NOTE
When the video was recorded with x.v.Color™ set to [ON], change the x.v.Color™ setting on TV. (Z p. 64) For details, refer to the TV’s instruction manual.
AV Cable
DC ConnectorAC Adapter
To AC Outlet
AV Connector
AV Input Connector

�� EN
Operating in Conjunction with TV via HDMIConnecting the camcorder to an HDMI-CEC-enabled TV using the HDMI cable allows you to utilize the following convenient functions.
• HDMI-CEC (Consumer Electronics Control) is an industry standard that enables interoperability between HDMI-CEC compliant devices that are connected via HDMI cables.
NOTE
• Not all HDMI-control devices comply with the HDMI-CEC standard. The HDMI control function of the camcorder will not work when connected to these devices.
• The camcorder is not guaranteed to operate with all HDMI-CEC-enabled devices.
• Depending on the specifications of each HDMI-CEC-enabled device, some functions may not work with the camcorder. (For details, refer to the instruction manual of your TV.)
• Unintended operations may occur with some connected devices. In these cases, set [HDMI CONTROL] to [OFF].
Preparation:• Connect an HDMI cable between the
camcorder and the TV. (Z p. 32)• Turn on the TV and set the HDMI-CEC
related setting to on. (For details, refer to the instruction manual of the TV.)
• Turn on the camcorder and set [HDMI CONTROL] to [ON]. (Z p. 67)
Operation method 1
! Turn on the camcorder.
# Select the playback mode.
$ Connect the HDMI cable.
TV turns on automatically and switches to HDMI input mode when the camcorder is turned on.
Operation method 2
Turn off the TV. The camcorder turns off automatically.
Operation method 3• Depending on the TV connected, the display
language of the camcorder will automatically switch to the language that is used for the TV when the camcorder is turned on. (This is applicable only if the camcorder supports the language selected for the TV.) To use the camcorder with a language that differs from the display language of the TV, set [HDMI CONTROL] to [OFF].
NOTE
• The display language of the TV will not switch automatically, even if the display language of the camcorder is changed.
• These functions may not work correctly when devices such as amplifier and selector are connected. Set [HDMI CONTROL] to [OFF].
• If HDMI-CEC does not work properly, turn off and on the camcorder again.
��EN
Managing FilesEDITING
CAUTION
Do not remove the recording medium or perform any other operation (such as turning off the power) while accessing files. Also, be sure to use the provided AC adapter, as the data on the recording medium may be corrupted if the battery becomes exhausted during operation. If the data on the recording medium becomes corrupted, format the recording medium to use the medium again. (Z p. 68)
Capturing a Still Image from a Video
You can capture the desired scene from a recorded video, and store it as a still image.
Preparation:• Select ! mode.• Select the playback mode.
Press SNAPSHOT when playback is paused.
NOTE
• Captured still images are stored at a resolution of 1920 x 1080. The image can be elongated in the horizontal or vertical directions depending on the quality of the source video file.
• The continuous shooting function cannot be used to capture images.
• You cannot capture video during playback.
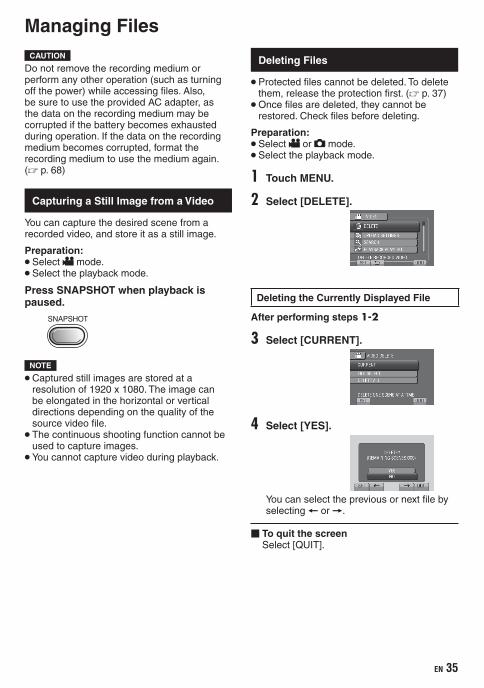
Deleting Files
• Protected files cannot be deleted. To delete them, release the protection first. (Z p. 37)
• Once files are deleted, they cannot be restored. Check files before deleting.
Preparation:• Select ! or # mode.• Select the playback mode.
1 Touch MENU.
2 Select [DELETE].
Deleting the Currently Displayed File
After performing steps 1-2
3 Select [CURRENT].
4 Select [YES].
You can select the previous or next file by selecting % or &.
To quit the screenSelect [QUIT].
�� EN
Managing Files (Continued)
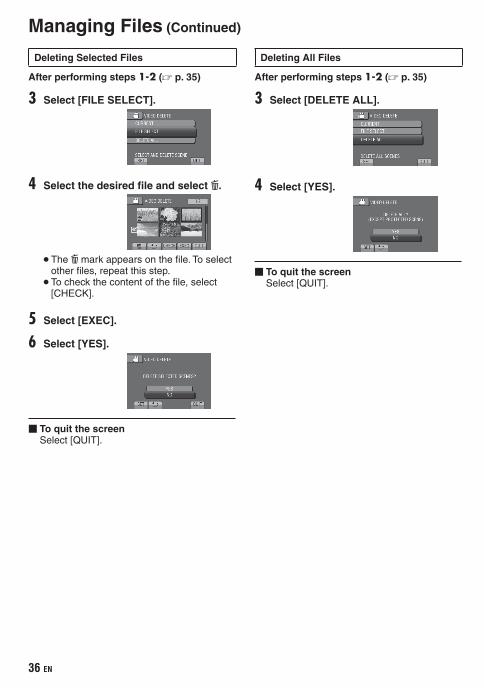
Deleting Selected Files
After performing steps 1-2 (Z p. 35)
3 Select [FILE SELECT].
4 Select the desired file and select $.
• The $ mark appears on the file. To select other files, repeat this step.
• To check the content of the file, select [CHECK].
5 Select [EXEC].
6 Select [YES].
To quit the screenSelect [QUIT].
Deleting All Files
After performing steps 1-2 (Z p. 35)
3 Select [DELETE ALL].
4 Select [YES].
To quit the screenSelect [QUIT].
��EN
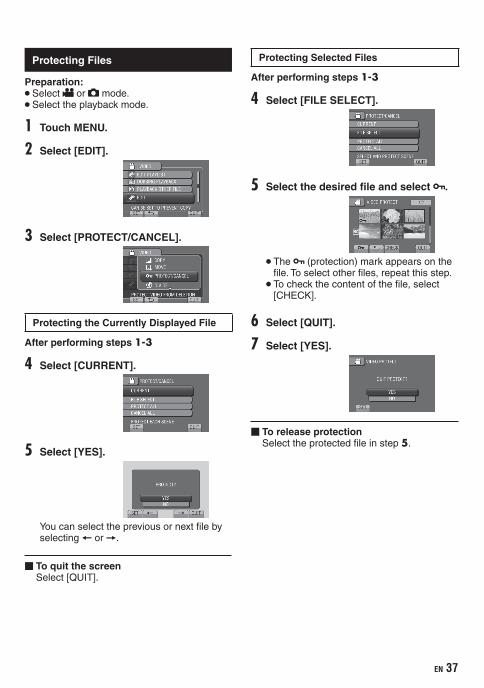
Protecting Files
Preparation:• Select ! or # mode.• Select the playback mode.
1 Touch MENU.
2 Select [EDIT].
3 Select [PROTECT/CANCEL].
Protecting the Currently Displayed File
After performing steps 1-3
4 Select [CURRENT].
5 Select [YES].
You can select the previous or next file by selecting % or &.
To quit the screenSelect [QUIT].
Protecting Selected Files
After performing steps 1-3
4 Select [FILE SELECT].
5 Select the desired file and select x.
• The x (protection) mark appears on the file. To select other files, repeat this step.
• To check the content of the file, select [CHECK].
6 Select [QUIT].
7 Select [YES].
To release protectionSelect the protected file in step 5.

�� EN
Managing Files (Continued)
Protecting All Files
After performing steps 1-3 (Z p. 37)
4 Select [PROTECT ALL].
5 Select [YES].
To quit the screenSelect [QUIT].
To release protection of all files1) In step 4, select [CANCEL ALL].2) Select [YES].
Viewing File Information
Preparation:! mode:Pause the playback. Otherwise, select the file on the index screen.# mode:Play back the still image. Otherwise, select the file on the index screen.Press INFO.
• FOLDER (# mode): Folder name• DATE/TIME: Date and time of the recording• PB TIME (! mode): Playback time (length
of the file)• SIZE (# mode): Image size (Z p. 64)• QUALITY: Video quality/Image quality
(Z p. 64)• PROTECT: File protection status (Z p. 37)
To turn off the file information displayPress INFO again.

��EN
Changing the Event Registration
Preparation:• Select ! mode.• Select the playback mode.
1 Touch MENU.
2 Select [EDIT].
3 Select [CHANGE EVENT REG.].
Changing the Event of the Currently Displayed File
After performing steps 1-3
4 Select [CURRENT].
5 Select [YES].
You can select the previous or next file by selecting % or &.
6 Select a new event.To cancel the event registration, select [CANCEL].
Changing the Event of the Selected Files
After performing steps 1-3
4 Select [SET RANGE AND CHANGE].
5 Select the first file of the range.
To preview scenes, select the file and select [CHECK].
6 Select the last file of the range.
7 Select a new event.To cancel the event registration, select [CANCEL].
To quit the screenSelect [QUIT].

�0 EN
Managing Files (Continued)
Dividing Files
You can divide a selected video into two.
Preparation:• Select ! mode.• Select the playback mode.
1 Touch MENU.
2 Select [EDIT].
3 Select [DIVIDE].
4 Select the desired file.
Playback starts.
5 Select [SET] at the point you want to divide the file.It is recommended to select [SET] after the pause button is pressed.
Use these controls to locate the division point.
The actual division point may differ slightly from the point that is set.
6 Select [DIVIDE HERE].
To set the division point again, select [CANCEL].
To quit the screenSelect [QUIT].
NOTE
• When playing back the divided file, the recording date of the division point is displayed.
• You cannot divide the files with the export setting or the upload setting turned on.

�1EN
Trimming Files
You can select the necessary part of the video and save it as a new video file.
Preparation:• Select ! mode.• Select the playback mode.
1 Touch MENU.
2 Select [EDIT].
3 Select [TRIMMING].
4 Select the desired file.
5 Select [SET] at the start point.It is recommended to select [SET] after the pause button is pressed.
Use these controls to locate the starting point.
6 Select [SET] at the end point.It is recommended to select [SET] after the pause button is pressed.
To cancel the start point setting, select [CANCEL].
7 Select [CAPTURE TRIMMED FILE].
To set the start/end point again, select [REDEFINE AREA].
8 Select [YES].When copying is finished, the copied file is added to the index screen.
9 Touch OK.
To quit the screenSelect [QUIT].

�� EN
Managing Files (Continued)
Face Detection Zoom
You can enlarge the part including a face in a still image and save it as a new file.
Preparation:• Select # mode.• Select the playback mode.
1 Select the desired still image.
2 Select .
3 Touch the touch sensor to select the face to zoom.
4 Select + .
5 Adjust the zoom area.
• Touch the touch sensor to move the area upwards or downwards.
• Select + to change the zoom ratio.
6 Select [SAVE].
Zoom images are saved in 16:9 aspect regardless of the original aspect.
7 Select [YES].
8 Touch OK.

��EN
PlaylistsIt is a list that enables you to organize recorded videos in order of preference.
Preparation:• Select ! mode.• Select the playback mode.
Creating Playlists
1 Touch MENU.
2 Select [EDIT PLAYLIST].
3 Select [NEW LIST].
4 Select an item and display files.
• [CREATE FROM SCENE]: Display all files individually.• [CREATE BY GROUP]: Display all files listed by group.• [CREATE BY DATE]: Display all the files listed by recording
date.• [CREATE BY EVENT]: Search for an event and display the
corresponding files listed by recording date.
5 Select the file to add to playlist.
To preview scenes, select the file and select [CHECK].
6 Select the insertion point.
• To add other files, repeat steps 5 and 6.• To delete a registered scene, select the
registered file, then select [CANCEL].
7 Select [SAVE].
8 Select [SAVE AND QUIT].
To quit the screenSelect [QUIT].
To add a picture title after creating a playlist See page 45.
NOTE
• A maximum of 99 playlists can be created.• If you delete the original files, the
corresponding files are also deleted from the playlist.

�� EN
Playlists (Continued)
Creating Playlists Including Picture Titles
You can easily create a playlist including a picture title.
1 Press TITLE.
2 Select the desired picture title.
You can check the picture title in full-screen by selecting [CHECK].
3 Select the desired file.
You can check the scene by selecting [CHECK].
4 Select [OK].
To return to the previous screenSelect @.
To quit the screenSelect [QUIT].
Playing Back Playlists
1 Touch MENU.
2 Select [PLAYBACK PLAYLIST].
3 Select the playlist.
To stop playbackSelect L.
To quit the screenSelect [QUIT].
To play back from the desired scene1) In step 3, select [CHECK]. (The index
screen for playlist appears.)2) Select the desired scene.
NOTE
• When playing back a playlist with a picture title, playback starts after the title is displayed for 5 seconds.
• When adding a picture title to playlist, mark appears on the left side of the file
name.

��EN
Other Operations of Playlists
You can perform additional editing and deletefiles in a created playlist.
Adding/Deleting Files in Playlist
After performing steps 1-2 (Z p. 43)
3 Select [EDIT].
4 Select the playlist you want to edit.To add or delete files, follow the steps 5 to 8. (Z p. 43)
Deleting Playlist
Original files are not deleted even if you delete the playlist.
After performing steps 1-2 (Z p. 43)
3 Select [DELETE].
4 Select a playlist you want to delete.To delete all playlists at once, select [DELETE ALL].
5 When [DELETE PLAYLIST?] appears, select [YES].
Adding a Picture Title to Playlist
After performing steps 1-2 (Z p. 43)
3 Select [SET TITLE].
4 Select the desired playlist.
5 Select the desired picture title.

�� EN
Copying FilesCOPYING
Types of Copying and Connectable Device
The CamcorderYou can copy files between the HDD and microSD card with this camcorder alone.
DVD BurnerCU-VD50/CU-VD3You can copy files recorded on this camcorder onto discs.
BD BurnerLaCie Model No. 301828You can copy files recorded on this camcorder onto discs.
USB External Hard Disk DriveYou can copy files recorded on this camcorder onto a USB external hard disk drive.
PCYou can copy files from the camcorder to a disc using a PC.
VCR/DVD RecorderYou can dub video recorded on this camcorder onto VCR/DVD recorder.
NOTE
• It is recommended to use the JVC DVD burner (CU-VD50/CU-VD3). When using CU-VD20 or CU-VD40, the recording time may take approx. 2 times longer than the time that is described in the instruction manual of DVD burner.
• Recommended USB external hard disk drive
Seagate FreeAgentTM Desk series
LaCie Design by Neil Poulton series
• USB external hard disk drive with the capacity over 2 TB cannot be used.
Copying/Moving Files
You can copy or move files between the HDD and microSD card.
! mode
# mode
Preparation:• Select ! or # mode.• Select the playback mode.• Make sure that microSD card is inserted in
the microSD slot.• Make sure that enough free space is left in
the copy/move destination medium.
1 Touch MENU.
2 Select [EDIT].
3 Select [COPY] or [MOVE].
• [COPY]: Files are copied to the destination
medium while leaving original files in the source medium.
• [MOVE]: Files are moved to the destination
medium while deleting original files in the source medium.
4 Select the direction. ([HDD & SD] or [SD & HDD])

��EN
5 Select the desired menu.
• [COPY ALL]/[MOVE ALL]: Select this to transfer all files in the
recording medium. When the size of all files in the HDD is
larger than the free space of the microSD card, only the files that can be contained in the free space will be copied.
• [SELECT AND COPY]/[SELECT AND MOVE]:
Select when you want to transfer the selected files.
1) Select the desired file. To select other files, repeat this process.
2) Select [EXEC].
6 Select [YES].
File transfer starts. When [COPYING COMPLETED]/[MOVING COMPLETED] appears, touch OK.
To quit the screenSelect [QUIT].
To stop the file transfer1) Select [STOP].2) When [QUIT?] appears, select [YES].
Using a BD/DVD Burner
The files in the camcorder can be backed up to a disc using a BD/DVD burner.• Use one of the following methods to view
the disc. (If you try to play back the disc with incompatible player, the disc may not be ejected.)
- Playback the disc using the camcorder. (Z p. 50)- Playback the disc using a BD/DVD burner.*- Playback on a PC.*- Playback the disc using a BD/DVD player
that supports BD-MV and AVCHD.** The DVD must first be finalized on the camcorder.
• Other than the created BD/DVD using a BD/DVD burner cannot be played.
• When connecting a DVD burner (CU-VD50) to a TV, you can play back the created disc without using the camcorder. When playing back disconnect the USB cable.
Connection with a BD/DVD Burner
Preparation:Turn on the camcorder first, then turn on the BD/DVD burner.
NOTE
• Refer also to the optional BD/DVD burner’s instruction manual.
• When connecting to a DVD burner, use the USB cable that came with the DVD burner.
• When connecting to a BD burner, use a USB cable with Mini-A(Male) to B(Male) connectors. JVC’s QAM0852-001 (optional) is recommended. Refer to page 58 for details.
DC ConnectorUSB Connector
AC Adapter
To AC Outlet
USB Cable
BD/DVD Burner
USB Connector

�� EN
Backup All Files
Preparation:• Select ! or # mode.• Select HDD or microSD card.• Connect the camcorder to the BD/DVD
burner.• When using a BD burner, select [CHANGE
REC. MEDIA] and select the disc type.
1 Select [CREATE FROM ALL] (! mode) or [SAVE ALL] (# mode).
2 Select the desired menu.
• ! mode: [ALL SCENES] # mode: [ALL IMAGES] All files in the recording medium are
copied.• ! mode: [UNSAVED SCENES]# mode: [UNSAVED IMAGES] Files that have never been copied are
automatically selected and copied.
3 Select [EXECUTE].
4 Select [YES] or [NO].• [YES]: Displays the thumbnails by group.• [NO]: Displays the thumbnails by date or
by playlist.
5 Select [EXECUTE].• The files are copied on the disc. When
[COMPLETED] appears, touch OK.• When [INSERT NEXT DISC PRESS
[STOP] TO EXIT CREATE] appears, change the disc. Remaining files are copied on the second disc.
• To cancel copying, select [STOP].
Copying Video Files that Have Never Been Copied
Files that have never been copied to the discs are automatically selected and copied.
1 Open the LCD monitor to turn on the camcorder.
2 Press DIRECT DISC.
3 Select [YES] or [NO].• [YES]: Displays the thumbnails by group.• [NO]: Displays the thumbnails by date or
by playlist.
4 Select [EXECUTE].
• The disc begins to be created. When [COMPLETED] appears, touch OK.
• When [INSERT NEXT DISC PRESS [STOP] TO EXIT CREATE] appears, change the disc. Remaining files are copied on the second disc.
• To cancel the disc creation, select [CANCEL].
To quit the screen1) Select [QUIT].2) When [QUIT?] appears, select [YES].
Copying Files (Continued)

��EN
Selecting Files for Backup
Preparation:• Select ! or # mode.• Select HDD or microSD card.• Connect the camcorder to the BD/DVD
burner.• When using a BD burner, select [CHANGE
REC. MEDIA] and select the disc type.
1 Select [SELECT AND CREATE] (! mode) or [SELECT AND SAVE] (# mode).
2 Select the desired menu.
! mode:
• [CREATE BY DATE]: Files are sorted according to the date
on which they were recorded. Relevant files are displayed in a list. Select the recording date.
• [CREATE BY EVENT]: Files are sorted according to event.
Relevant files are displayed in a list. Select the event.
• [CREATE BY PLAYLIST]: Select the desired playlist from the list
of playlists. The selected playlists are displayed in a list.
1) Select the desired list. 2) Select the insertion point. To select
other lists, repeat this process. 3) Select [SAVE].
• [SELECT FROM SCENES]: Select files individually. 1) Select the desired file. To select other
files, repeat this process. 2) Select [SAVE].
# mode:
• [SAVE BY DATE]: Files are sorted according to the date
on which they were recorded. Relevant files are displayed in a list. Select the recording date.
• [SELECT FROM IMAGES]: Select files individually. 1) Select the desired file. To select other
files, repeat this process. 2) Select [SAVE].
3 Select [YES] or [NO].• [YES]: Displays the thumbnails by group.• [NO]: Displays the thumbnails by date or
by playlist.
4 Select [EXECUTE].• The files are copied on the disc. When
[COMPLETED] appears, touch OK.• When [INSERT NEXT DISC PRESS
[STOP] TO EXIT CREATE] appears, change the disc. Remaining files are copied on the second disc.
• To cancel copying, select [STOP].
To quit the screen1) Select [QUIT].2) When [QUIT?] appears, select [YES].
NOTE
In case of [CREATE BY PLAYLIST], date/time on the file information display shows the date of copying the file, instead of the actual recording date.
To finalize the disc after copy is finished1) Connect the camcorder to the BD/DVD
burner.2) Turn on the camcorder.3) Select [FINALIZE].4) Select [EXECUTE].5) When [COMPLETED] appears, select
[OK].

�0 EN
To check whether the disc was created properlyIn step 1, select [PLAYBACK].
To play back the created disc using the camcorder1) Connect the camcorder to the BD/DVD
burner.2) Turn on the camcorder first, then turn on
the BD/DVD burner.3) Select [PLAYBACK].4) Select the desired folder. (# mode)5) Select the desired file. To return to the
previous screen, select @.
Digest Playback
You can view a few seconds from the beginning of each video (digest) in the created DVD.Create a DVD using a DVD burner (CU-VD50/CU-VD3).
1 Load the created DVD on the DVD player.
2 On the TV, select [DIGEST PLAYBACK].*�
You can view the previous or next page by selecting £ / ¤.* The screen does not appear on the
camcorder.
3 The digest is played back continuously.
To normal playback / To the index menu1) Press the top menu button on the remote
control of the DVD device during the digest playback.
2) Select the desired item.
NOTE
• “Digest Playback” menu is not available when DVD is burned using the provided MediaBrowser software.
• In some cases, parts of video other than the beginning may be played back.
• Some video may not be played back at all.
Copying Files (Continued)

�1EN
Using a USB External Hard Disk Drive
You can copy video and still image files to a USB external hard disk drive from the camcorder. You can also play the files in the USB external hard disk drive on the camcorder.
Connection with a USB External Hard Disk Drive
Preparation:Turn on the camcorder first, then turn on the USB external hard disk drive.
NOTE
• Refer also to the optional USB external hard disk drive’s instruction manual.
• When connecting to a Seagate’s FreeAgent™ Desk series product, use a USB cable with Mini-A(Male) to Mini-B(Male) connectors. JVC’s QAM0852-001 (optional) is recommended. Refer to page 58 for details.
• When connecting to a Design by Neil Poulton series product, use a USB cable with Mini-A(Male) to B(Male) connectors. JVC’s QAM0852-001 (optional) is recommended. Refer to page 58 for details.
Backup All Files
Preparation:• Select ! or # mode.• Select HDD or microSD card.• Connect the camcorder to the USB external
hard disk drive.
1 Select the desired menu.
• ! mode: [ALL SCENES] # mode: [ALL IMAGES] All files in the recording medium are
copied.• ! mode: [UNSAVED SCENES]# mode: [UNSAVED IMAGES] Files that have never been copied are
automatically selected and copied.
2 Select [OK].
• The files are copied on the disc. When [COMPLETED] appears, touch OK.
• To cancel copying, select [STOP].
To delete the files in the USB external hard disk driveIn step 1, select [DELETE].
DC Connector
USB Connector
AC Adapter
To AC Outlet USB Cable
USB External Hard Disk Drive
USB Connector
Mini-A (Male) – USB-A (Female)
USB-A (Male) – Mini-B (Male)

�� EN
To play back the files in the USB external hard disk drive1) In step 1, select [PLAYBACK].2) Select the desired folder.3) Select the desired file. To return to the
previous screen, select @.
To format the USB external hard disk driveIn step 1, select [FORMAT].
When connecting a USB external hard disk drive to the camcorder
• Do not connect a USB hub between the camcorder and the USB external hard disk drive.
• Disconnect the USB external hard disk drive when using other USB devices such as BD/DVD burner or another USB external hard disk drive.
• Format the USB external hard disk drive when connecting it to the camcorder for the first time. (All data is deleted.)
When copying or playing back• Copying may take time. (For example, saving
1 hour video in XP mode takes about 20 minutes.)
• Avoid the following operations during copying and playing back.- Turning off the camcorder or the USB
external hard disk drive.- Disconnecting the USB cable.
• Files in the USB external hard disk drive cannot be copied back to the camcorder.
• Files deleted from the camcorder cannot be written to a disc using a BD/DVD burner, even if they have been copied in the USB external hard disk drive.
• Sound or video may be interrupted during playback.
When connecting a USB external hard disk drive to a PC
• Do not format the USB external hard disk drive using the PC. If you did, format again using the camcorder. (All the data in the USB external hard disk drive will be erased.)
• Avoid the following operations using the PC.- Deleting files or folders in the USB external
hard disk drive.- Moving files or folders in the USB external
hard disk drive.- Changing the name of files or folders in the
USB external hard disk drive. These operations make the data impossible
to be played back on the camcorder.• When you use the PC to edit the data in the
USB external hard disk drive, copy the data to the PC before editing. Editing the data in the USB external hard disk drive directly from the PC makes the data impossible to be played back on the camcorder.
NOTE
Refer to the help of the provided Everio MediaBrowser software when you use the PC to operate the data in the USB external hard disk drive directly copied from the camcorder.
Copying Files (Continued)

��EN
Dubbing Files to a VCR/DVD Recorder
Preparation:• Create a playlist.• Turn off all units.
To connect using the AV connectors (analog dubbing)
1 Open the LCD monitor to turn on the camcorder.
2 Set the VCR/DVD recorder to its AUX input mode.Check that the images from the camcorder are input correctly to the VCR/DVD recorder.
3 Play back playlists on the camcorder.1) Touch MENU.2) Select [DUBBING PLAYBACK].3) Select the desired playlist.4) Select [YES]. (A black screen is
displayed for 5 seconds at the first and the last scene.)
4 At the point you want to start dubbing, start recording on the VCR/DVD recorder.Refer to the VCR/DVD recorder’s instruction manual.
To stop dubbingStop recording on the VCR/DVD recorder.
To hide the date or icons on the screenChange the settings in [DISPLAY ON TV]. (Z p. 67)
AV Cable
DC Connector
AC Adapter
To AC Outlet
AV Connector
VCR/DVD Recorder
AV Connector(Input)
Switching indication modes on LCD monitorEach time you touch DISPLAY, indications on LCD monitor switch as shown below:
In recording mode:All indications/Indications for selected functionsIn playback mode:All indications/Only date and time/No indications

�� EN
You can copy the data from the camcorder and create a disc using a PC.
Q Installing the software to the PC
System Requirements
Windows Vista
OS: Windows Vista® Home Basic (SP1)Home Premium (SP1)(32-bit, pre-installed)
CPU: Intel® CoreTM Duo, 1.66 GHz or higher (Intel® CoreTM 2 Duo 2.13 GHz or higher recommended.)
RAM: At least 2 GB
Windows XP
OS: Windows® XPHome Edition (SP2/SP3)Professional (SP2/SP3)(pre-installed)
CPU: Intel® CoreTM Duo, 1.66 GHz or higher (Intel® CoreTM 2 Duo 2.13 GHz or higher recommended.)
RAM: At least 1 GB
To check the PC specificationRight-click on [Computer] (or [My Computer]) in the [Start] menu and select [Properties].
NOTE
• Make sure your PC has a recordable BD/DVD drive.
• If your system does not meet the requirements, it is recommended to copy files using the BD/DVD burner. (Z p. 47)
• Macintosh users may use the software included with their Macintosh (iMovie ’08, iPhoto) to import files to their computer.
Preparation:Load the provided CD-ROM into the PC.In Windows Vista, the auto play dialog box appears.
1 Click [Easy Installation].
Follow the on-screen instructions.
2 Click [Next].
3 Click [Finish].
Everio MediaBrowser icons are created on the desktop.
Everio MediaBrowser Player is a software that plays AVCHD discs on the PC. (DVD discs cannot be played.)
To see the Instruction Guide for Everio MediaBrowser
1) Double-click the icon of Everio MediaBrowser.
2) Click [Help], and click [MediaBrowser Help].
Creating a Disc Using a PC
Click Click
PC OPERATION

��EN
R Making Backup on the PC
Preparation:• Install the software to the PC.• Make sure that enough free space is left in
the PC’s HDD.• Close the LCD monitor to turn off the
camcorder.
1 Open the LCD monitor to turn on the camcorder.
2 Select [BACK UP].
Everio MediaBrowser starts on the PC.
3 Click [All volume in camcorder] and click [Next].
4 Click [Start].
Backup starts.
To disconnect the camcorder from the PC1) Right-click the icon (Safely Remove
Hardware) on the task bar and select [Safely remove USB Mass Storage Device].
2) Follow the on-screen instructions and make sure that the device can be safely removed.
3) Disconnect the USB cable and close the LCD monitor.
NOTE
It takes time to back up many videos.
USB Connector
USB Cable
USB Connector

�� EN
Creating a Disc Using a PC (Continued)
S Making User Lists to Arrange the Files
You can make a user list of a certain subject (such as Travel, Athletic meet) and put the files related to the subject into the user list.
Preparation:Make backup on the PC.
1 Double-click the icon to open the calendar.
2 Select [Movies only].
3 Click [+].
4 Input the name of the new user list and click [OK].
5 Click the recording date.
The files recorded on the day are displayed.
6 Drag the file and drop into the user list.
To add other files into the user list, repeat steps 5 and 6.

��EN
T Copying Files to a disc
Everio MediaBrowser supports 3 disc formats. Select the one that suits your purpose.
DVD-Video disc:
Suitable if you will give the disc to your friends and relatives.
AVCHD disc: Suitable for high quality video.
BD: Suitable for high quality video with long recording time.
1 Select the user list and click [Create Disc].
2 Select the disc type and click [Next].
3 Click [Select files individually] and click [Next].To add all the files onto discs, click [Select all files displayed], then go to step 5.
4 Drag the file, and drop into the part at the bottom and click [Next].
5 Input the disc name, select the top menu style and click [Next].
6 Click [Start].
NOTE
• When copying video recorded in UXP recording mode to create an AVCHD disc, the video needs to be converted to XP recording mode before copying. Therefore, it may take longer time than copying video recorded in other modes.
• Use Everio MediaBrowser Player to playback the disc. Refer to the help of the provided Everio MediaBrowser software to operate.
• For detail on operating Everio MediaBrowser, click [Help] and refer to [MediaBrowser Help].
• Adobe® Reader® must be installed to read [MediaBrowser Help]. Adobe® Reader® can be loaded from Adobe’s web site:
http://www.adobe.com• For assistance in operating the provided
software, refer to the support information. (Z p. 58)

�� EN
Folder Structure and Extensions
[DEM_XXXX.MTS][MOV_XXXX.MTS]
[XXXJVCSO]
[AVCHD]
[DCIM]
[EXTMOV]
[PRIVATE]
[BDMV]
[STREAM]
[XXXXX.MTS][BACKUP][CLIPINF][PLAYLIST][INDEX.BDM][MOVIEOBJ.BDM]
[DEM_XXXX.MTS][MOV_XXXX.MTS]
[JVC]
[XXXJVCSO]
[AVCHD]
[DCIM]
[EXTMOV]
[PRIVATE]
[BDMV]
[STREAM]
[XXXXX.MTS][BACKUP][CLIPINF][PLAYLIST][INDEX.BDM][MOVIEOBJ.BDM]
Customer Support Information
Use of this software is authorized according to the terms of the software license.
JVCWhen contacting the nearest JVC office or agency in your country (refer to the JVC Worldwide Service Network at http://www.jvc-victor.co.jp/english/worldmap/index-e.html) about this software, please have the following information ready.• Product Name, Model, Problem, Error Message• PC (Manufacturer, Model (Desktop/Laptop), CPU, OS, Memory (MB), Available Hard Disk Space (GB))
Please note that it may take some time to respond to your questions, depending on their subject matter.JVC cannot answer questions regarding basic operation of your PC, or questions regarding specifications or performance of the OS, other applications or drivers.
PixelaRegion Language Phone #
USA and Canada English +1-800-458-4029 (toll-free)
Europe (UK, Germany, France, and Spain) English/German/French/Spanish +800-1532-4865 (toll-free)
Other Countries in Europe English/German/French/Spanish/Italian/Dutch +44-1489-564-764
Asia (Philippines) English +63-2-438-0090
China Chinese +86-21-5385-3786
Homepage: http://www.pixela.co.jp/oem/jvc/mediabrowser/e/Please check our website for latest information and downloading.
Creating a Disc Using a PC (Continued)
X = numberContains the still image folders.
Video file in AVCHD format
Video files with defective management information are saved.
Contains management information files of event and/or disc creation information for the files taken with the camcorder.
EVERIO_HDD EVERIO_SD

��EN
Using with a Portable Media Player
Turning on the Export Mode
You can easily transfer videos recorded in export mode to iTunes®. All the files with the export setting turned on are transferred to PC.For details on transferring, refer to the operation guide of MediaBrowser in the CD-ROM.
Preparation:• Select ! mode.• Select the recording mode.
Press EXPORT twice.
To turn off the export modePress EXPORT twice.
Changing the Export Setting
You can set the recorded videos to the export setting.
Preparation:• Select ! mode.• Select the playback mode.
1 Press EXPORT.
2 Select the file and set [ ].
To check the content of the file, select [CHECK].
3 Select [DONE].
To cancel the export settingSelect the file and select [ ] again.
To quit the screen1) Select [DONE].2) Select [YES].
To confirm the export settingPress EXPORT on the index screen.

�0 EN
Transferring the Files to PC
Preparation:Install iTunes® on a PC.http://www.apple.com/itunes/
1 Connect the camcorder to the PC with the USB cable.
2 Select [EXPORT TO LIBRARY].
All the files with the export setting turned on are transferred to PC.
If you cannot export the file to iTunes®
Refer to “Q&A”, “Latest Information”, “Download Information”, etc. in [Click for Latest Product Info] in the help of the provided Everio MediaBrowser software.
Using with a Portable Media Player (Continued)
�1EN
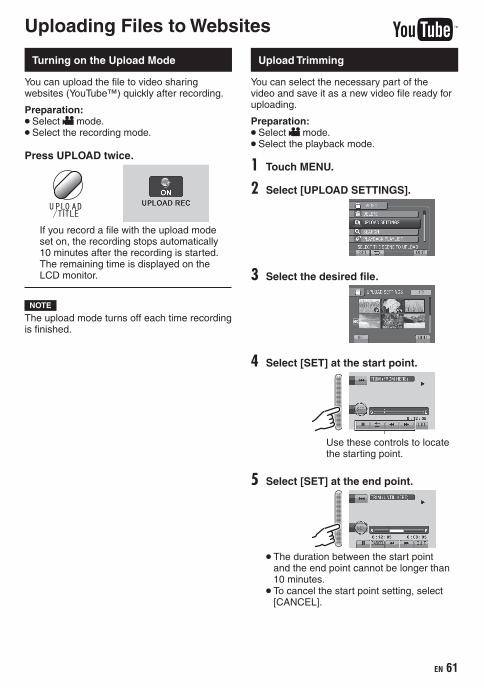
Turning on the Upload Mode
You can upload the file to video sharing websites (YouTube™) quickly after recording.
Preparation:• Select ! mode.• Select the recording mode.
Press UPLOAD twice.
If you record a file with the upload mode set on, the recording stops automatically 10 minutes after the recording is started.The remaining time is displayed on the LCD monitor.
NOTE
The upload mode turns off each time recording is finished.
Uploading Files to Websites
Upload Trimming
You can select the necessary part of the video and save it as a new video file ready for uploading.
Preparation:• Select ! mode.• Select the playback mode.
1 Touch MENU.
2 Select [UPLOAD SETTINGS].
3 Select the desired file.
4 Select [SET] at the start point.
Use these controls to locate the starting point.
5 Select [SET] at the end point.
• The duration between the start point and the end point cannot be longer than 10 minutes.
• To cancel the start point setting, select [CANCEL].

�� EN
6 Select [CAPTURE TRIMMED FILE].
To set the start/end point again, select [REDEFINE AREA].
7 Select [YES].When copying is finished, the copied file is added to the index screen.
To quit the screenSelect [QUIT].
Uploading Files
For details on uploading files, refer to the operation guide of MediaBrowser in the CD-ROM.
1 Connect the camcorder to the PC with the USB cable.
2 Select [UPLOAD].
If you cannot upload the file to YouTube™• You need your YouTube™ account to
upload files to YouTube™. Create your account.
• Refer to “Q&A”, “Latest Information”, “Download Information”, etc. in [Click for Latest Product Info] in the help of the provided Everio MediaBrowser software.
Uploading Files to Websites (Continued)
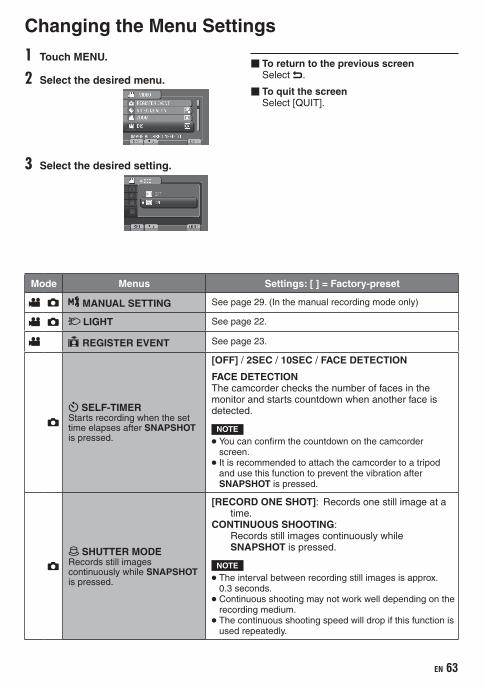
��EN
1 Touch MENU.
2 Select the desired menu.
3 Select the desired setting.
Changing the Menu SettingsFURTHER INFORMATION
Mode Menus Settings: [ ] = Factory-preset
! # MANUAL SETTING See page 29. (In the manual recording mode only)
! # D LIGHT See page 22.
! REGISTER EVENT See page 23.
#z SELF-TIMERStarts recording when the set time elapses after SNAPSHOT is pressed.
[OFF] / 2SEC / 10SEC / FACE DETECTION
FACE DETECTIONThe camcorder checks the number of faces in the monitor and starts countdown when another face is detected.
NOTE
• You can confirm the countdown on the camcorder screen.
• It is recommended to attach the camcorder to a tripod and use this function to prevent the vibration after SNAPSHOT is pressed.
#8 SHUTTER MODERecords still images continuously while SNAPSHOT is pressed.
[RECORD ONE SHOT]: Records one still image at a time.
CONTINUOUS SHOOTING: Records still images continuously while SNAPSHOT is pressed.
NOTE
• The interval between recording still images is approx. 0.3 seconds.
• Continuous shooting may not work well depending on the recording medium.
• The continuous shooting speed will drop if this function is used repeatedly.
To return to the previous screenSelect @.
To quit the screenSelect [QUIT].
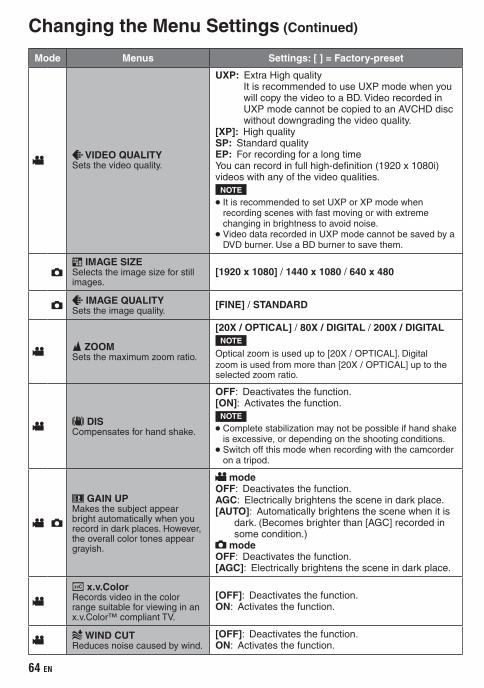
�� EN
Changing the Menu Settings (Continued)
Mode Menus Settings: [ ] = Factory-preset
! n VIDEO QUALITYSets the video quality.
UXP: Extra High qualityIt is recommended to use UXP mode when you will copy the video to a BD. Video recorded in UXP mode cannot be copied to an AVCHD disc without downgrading the video quality.
[XP]: High qualitySP: Standard qualityEP: For recording for a long timeYou can record in full high-definition (1920 x 1080i) videos with any of the video qualities.
NOTE
• It is recommended to set UXP or XP mode when recording scenes with fast moving or with extreme changing in brightness to avoid noise.
• Video data recorded in UXP mode cannot be saved by a DVD burner. Use a BD burner to save them.
#y IMAGE SIZESelects the image size for still images.
[1920 x 1080] / 1440 x 1080 / 640 x 480
# n IMAGE QUALITYSets the image quality.
[FINE] / STANDARD
! @ ZOOMSets the maximum zoom ratio.
[20X / OPTICAL] / 80X / DIGITAL / 200X / DIGITALNOTE
Optical zoom is used up to [20X / OPTICAL]. Digital zoom is used from more than [20X / OPTICAL] up to the selected zoom ratio.
! q DISCompensates for hand shake.
OFF: Deactivates the function.[ON]: Activates the function.
NOTE
• Complete stabilization may not be possible if hand shake is excessive, or depending on the shooting conditions.
• Switch off this mode when recording with the camcorder on a tripod.
! #
[ GAIN UPMakes the subject appear bright automatically when you record in dark places. However, the overall color tones appear grayish.
! modeOFF: Deactivates the function.AGC: Electrically brightens the scene in dark place.[AUTO]: Automatically brightens the scene when it is
dark. (Becomes brighter than [AGC] recorded in some condition.)
# modeOFF: Deactivates the function.[AGC]: Electrically brightens the scene in dark place.
!X x.v.ColorRecords video in the color range suitable for viewing in an x.v.Color™ compliant TV.
[OFF]: Deactivates the function.ON: Activates the function.
! o WIND CUTReduces noise caused by wind.
[OFF]: Deactivates the function.ON: Activates the function.

��EN
Menus Settings: [ ] = Factory-preset
DISPLAY SETTINGS Select [DISPLAY SETTINGS], then select sub-menus.
9 LANGUAGESets the display language.
[ENGLISH]See page 17.
: CLOCK ADJUSTSets the time.
See page 16.
; DATE DISPLAY STYLESets the date and time display format.
DATE STYLE:[month.day.year] / year.month.day / day.month.yearTIME:24h / [12h]
B MONITOR BRIGHTSets the brightness of the LCD monitor.
Adjusts the brightness of the display by using the touch sensor.
C MONITOR BACKLIGHTEnables you to adjust the brightness of backlight on the monitor.
BRIGHTER: Brightens the backlight on the monitor regardless of the surrounding conditions.
STANDARD: Select this when saving the battery life.[AUTO]: The brightness will automatically be set
to [BRIGHTER] when using outdoors and to [STANDARD] when using indoors (when using the battery pack).
FOCUS ASSIST CAMERAWhen this function is used, the outline of the focused object is displayed in the selected color.
RED / GREEN / [BLUE]
Y BASIC SETTINGS Select [BASIC SETTINGS], then select sub-menus.
[ DEMO MODEIntroduces special features of the camcorder when there is no operation for about 3 minutes during recording mode.
OFF: Deactivates the function.[ON]: Activates the function.
NOTE
• The demonstration only works when the AC adapter is connected, not with the battery pack.
• If a microSD card is in the camcorder, demonstration will not take place even if this mode is set to [ON].
( AUTO POWER OFFIf the camcorder is not operated for 5 minutes while the power is on, it turns itself off automatically to conserve power.
OFF: Disables the function.[ON]: Activates the function.
To turn the camcorder on again, close the LCD monitor and open it again when using the battery pack. When using the AC adapter, perform any operation such as zooming.
\ OPERATION SOUNDTurns on/off the operation sound.
OFF: Turns off the operation sound.[ON]: The melody sounds when operations are performed.

�� EN
Changing the Menu Settings (Continued)
Menus Settings: [ ] = Factory-preset
RECORD BUTTON Enables the recording button [REC] on the LCD monitor.
OFF: Deactivates the function.[ON]: Activates the function.
` QUICK RESTARTEnables the camcorder to start up quickly when you turn off the camcorder and then on again within 5 minutes by closing and opening the LCD monitor.
OFF: Deactivates the function.[ON]: If the LCD monitor is opened again within 5 minutes,
the camcorder starts quickly. The power consumption used for the 5 minute period after the LCD monitor is closed is approximately 1/3 that used during recording. This enables you to save more power than leaving the power on.
^ DROP DETECTIONPrevents damage to the HDD by turning off the power automatically when it is detected that the camcorder dropped.
OFF: Deactivates the function.[ON]: Activates the function.
To turn on the camcorder when the drop detection worked, close the LCD monitor and open it again.
NOTE
• The built-in hard disk of the camcorder may not be protected even if the setting is [ON].
• When recording/playback stops even if the camcorder is not dropped, set the setting to [OFF] or set [REC MEDIA FOR VIDEO] to [SD]. (Z p. 68)
] REMOTETurns on/off reception of the operation signal from the remote control.
OFF: Does not receive the signal from the remote control.[ON]: Enables operation with the remote control.
_ AUTO FINALIZESets the DVD to a readable state.
OFF: Makes created DVDs recordable (not playable on device other than the camcorder).
[ON]: Finalizes created DVDs so that they can be played back on DVD burner.
NOTE
• When you play back a DVD created when [OFF] is set on DVD burner, select [FINALIZE] on the DVD creation screen. (Z p. 49)
• When you create two or more DVDs at the same time, other than the last DVD is finalized automatically even if the setting is [OFF].
UPDATEUpdates and improves the system software.
YES: Performs this function.[NO]: Cancels this function.
NOTE
Information about obtaining system update will be made available on the JVC’s web site.
Z FACTORY PRESETReturns all the camcorder settings to their default values.
YES: Performs this function.[NO]: Returns to the menu screen without executing reset.

��EN
Menus Settings: [ ] = Factory-preset
CONNECTION SETTINGS Select [CONNECTION SETTINGS], then select sub-menus.
% DISPLAY ON TVDisplays camcorder’s on-screen display on a TV screen.
[OFF]: Does not display on TV.ON: Displays on TV.
R VIDEO OUTPUTSets the aspect (16:9/4:3) to the screen of the connected television when outputting videos from the AV connector.
4:3 / [16:9]
S COMPONENT OUTPUTSets the definition of the video output from the COMPONENT connector.
[480i]: Outputs at 480i.1080i: Outputs at 1080i.
T HDMI OUTPUTSets the definition of the video output from the HDMI mini connector.
[AUTO 1]: It is recommended to select [AUTO 1] usually.AUTO 2: Select when the video is not projected in
[AUTO 1] correctly.480p: Select when the video is not projected in [AUTO 2]
correctly.
NOTE
When connecting to a 1080p compatible TV, set [HDMI OUTPUT] to [AUTO 1]. When this is set, “1080P” appears at the top of the LCD monitor.** Playback mode only
HDMI CONTROLSelects whether you use the linked operations with the TV, when you connect the TV using the HDMI mini connector.
OFF: Turns off the linked operations.[ON]: Turns on the linked operations.

�� EN
Menus Settings: [ ] = Factory-preset
MEDIA SETTINGS Select [MEDIA SETTINGS], then select sub-menus.
REC MEDIA FOR IMAGESets the recording medium for still images.
[HDD] / SD
REC MEDIA FOR VIDEOSets the recording medium for video.
[HDD] / SD
2 FORMAT HDDEnsures stable speeds and operation when accessing the HDD.
[FILE]: Initializes all files in the HDD.FILE + MANAGEMENT NO:
Initializes all files and management numbers in the HDD.
NOTE
Be aware that all files and data including protected files will be erased by the formatting process.
, FORMAT SD CARDYou have to format newly purchased microSD cards with this camcorder before using them.This will also ensure stable speeds and operation when accessing the microSD card.
[FILE]: Initializes all files in the microSD card.FILE + MANAGEMENT NO:
Initializes all files and management numbers in the microSD card.
NOTE
Be aware that all files and data including protected files will be erased by the formatting process.
0 DELETE DATA ON HDDWhen you dispose of the camcorder, perform this to make it difficult to recover data on the HDD.
YES: Performs this function. Select [OK] when completed.[NO]: Cancels this function.
Changing the Menu Settings (Continued)

��EN
Troubleshooting
Trouble Action
Po
wer
No power is supplied. • Connect the AC adapter correctly. • Recharge the battery pack.
After the low temperature message is displayed, the power turns off when the camcorder warms up.
• When the camcorder has warmed up after being cold, the camcorder may switch itself off to check it is operating correctly. Turn on the camcorder again to start using it.
The power was turned off accidentally.
• If you connect to a TV compatible with HDMI-CEC with an HDMI cable (optional) and turn off the power on the TV, the power on the camcorder also turns off. If you are not using HDMI-CEC, set [HDMI CONTROL] to [OFF].
Disp
layThe remaining battery display is not correct.
• Fully charge the battery pack, run it down, and then recharge it again.
• If the camcorder is used for long periods of time in high or low temperatures, or if the battery pack is repeatedly charged, the amount of remaining battery may not be displayed correctly.
The LCD monitor is difficult to see.
• The LCD monitor may be difficult to see if used in bright areas such as under direct sunlight.
Before requesting service, consult the following chart. If the solutions indicated in the chart do not solve the problem, consult your nearest JVC dealer or JVC service center for instructions.Refer also to the FAQ of new products on JVC’s website.
The following phenomena are not malfunctions.• The camcorder heats up when it is used for a
long time.• The battery heats up during charging.• When playing back a video, the image stops
momentarily or the sound is interrupted at junctions between scenes.
• LCD monitor momentarily become red or black when sunlight is recorded.
• Black spots, or red, green, or blue spots appear on the LCD monitor. (The LCD monitor contains 99.99% effective pixels, but 0.01% of fewer pixels may be ineffective.)

�0 EN
Troubleshooting (Continued)
Trouble Action
Reco
rdin
g
Recording cannot be performed.
• Slide the mode switch to select the desired mode (! or #).
Vertical lines appear on recorded images.
• Such a phenomenon occurs when shooting a subject illuminated by bright light. This is not a malfunction.
Recording stops by itself.
• If the camcorder temperature increases, REC flashes in the LCD monitor and recording stops automatically to protect the HDD. Turn off the camcorder, wait for a while, and start recording again.
• Move away from a place where the camcorder is affected by excessive sound or vibration (such as a concert hall).
• A malfunction may occur in the HDD of the camcorder. In this case, record to a microSD card.
• Insert a commercially available microSD card, and set each of the [REC MEDIA FOR VIDEO] and [REC MEDIA FOR IMAGE] to [SD].
• Recording stops automatically after 12 hours of continuous recording.
The recorded subject is too dark.
• Use backlight compensation.• Set [GAIN UP] to [AGC] or [AUTO].• Use [NIGHT] from scene select.• Set the brightness to the [+] side.
The recorded subject is too bright.
• Set the backlight compensation to [OFF] if it is being used. Set the brightness to the [–] side.
Digital zoom does not work.
• Change [ZOOM] to [80X / DIGITAL] or [200X / DIGITAL].• Digital zoom is not available in the still image recording mode.
The focus is not adjusted automatically.
• Wipe the lens with lens cleaning cloth.• If you are recording in a dark place or a subject that has no
contrast between dark and light, adjust the focus manually.
The color looks strange. (Too bluish, too reddish, etc)
• Set [WB] in [MANUAL SETTING] appropriately to the light source.• Select [MWB] in [WB] while holding a sheet of plain white paper
in front of the camcorder so that the white paper fills the screen. Keep touching OK until the B indicator appears.
White balance setting cannot be activated.
• This cannot be used if [SEPIA] or [MONOTONE] are selected as effects.
• Do not use [TWILIGHT] from scene select.
The continuous shooting speed is slow.
• The continuous shooting speed will drop after continuous shots.• Continuous shooting speed may drop depending on the recording
media or under certain recording conditions.
Band of bright light appears on the LCD monitor.
• This occurs when there is a bright light source near the camcorder. This is not a malfunction. Change the direction of the camcorder to prevent the light source comes into view.
Mosaic-type noise occurs when recording scenes with fast moving or with extreme changing in brightness.
• Record videos with high quality mode, such as UXP or XP mode.

�1EN
Trouble Action
Playb
ack
Sound or video are interrupted.
• Sometimes playback is interrupted at the connecting section between two scenes. This is not a malfunction.
Cannot find a recorded video.
• Select [PLAYBACK OTHER FILE] then search the video on the index screen.
(Video files that have damaged management information can be played back.)
• Cancel group display and date search functions.• Change the setting in [REC MEDIA FOR VIDEO] or [REC MEDIA
FOR IMAGE]. (Files on other media are not displayed.)
Some functions cannot be used when playing back a backup BD/DVD through a BD/DVD burner connected to the camcorder.
• The following functions cannot be used for a backup BD/DVD. When playing back video - Search index by date - Playback effects When playing back still image - Playback effects
The color of images looks strange.
• When recording the white balance was not correctly adjusted.• When the video was recorded with x.v.Color™ set to [ON], change
the setting as desired on TV.• Set [EFFECT] to [OFF].
Oth
er pro
blem
s
The camcorder operates slowly when switching between video mode and still image mode, or when switching the power on or off.
• If there are many files (such as video) in the camcorder, it takes time for the camcorder to respond. It is recommended that you copy all files from the camcorder onto your computer, and erase the files from the camcorder.
The lamp does not flash during battery pack charging.
• Check the remaining battery pack charge. (When the battery pack is fully charged, the lamp does not flash.)• When recharging in either a hot or cold environment, ensure that
battery is being charged within the permitted temperature range. (If the battery pack is being recharged outside the permitted
temperature range, recharging may stop to protect the battery pack.)
The remote control does not work.
• Replace the battery.• Set [REMOTE] to [ON].• The remote control may not operate outdoors or in places
exposed to strong light.
When connecting to the HDMI cable, the image or sound does not appear on the TV properly.
• When connecting to the HDMI cable, the image or sound may not appear on the TV properly depending on the TV connected. In such cases, perform the following operations.
1) Disconnect the HDMI cable and connect it again. 2) Turn off and on the camcorder again.
HDMI-CEC functions do not work properly, and the TV does not work in conjunction with the camcorder.
• TVs may operate differently depending on the specifications, even if they are HDMI-CEC compliant. Therefore, the HDMI-CEC functions of the camcorder cannot be guaranteed to operate in combination with all the TVs. In such cases, set [HDMI CONTROL] to [OFF].

�� EN
Troubleshooting (Continued)
Trouble Action
Oth
er pro
blem
s
The language on the display changed.
• It may occur when you connect the camcorder to a TV with different language setting using an HDMI cable.
Cannot upload the file to YouTube™
• You need your YouTube™ account to upload files to YouTube™. Create your account.
• Refer to “Q&A”, “Latest Information”, “Download Information”, etc. in [Click for Latest Product Info] in the help of the provided Everio MediaBrowser software.
Cannot export the file to iTunes®
• Refer to “Q&A”, “Latest Information”, “Download Information”, etc. in [Click for Latest Product Info] in the help of the provided Everio MediaBrowser software.
If a malfunction occurs in the HDD!Perform [FORMAT HDD]. (All data is deleted.)# If this does not solve the problem, contact the JVC customer service for repairs.
To reset the camcorder when it does not operate normally! Close the LCD monitor and remove the power supply (battery pack or AC adapter) from the
camcorder, then reattach it.# Execute [FACTORY PRESET]. (Z p. 66)

��EN
Warning Indications
Indication Action
SET DATE/TIME!• Set the clock. If the message still appears after setting the
clock, the battery for the clock has been depleted. Consult your nearest JVC dealer.
COMMUNICATING ERROR • Be sure to use JVC battery packs.
CANNOT USE INVIDEO MODE
• Set [REC MEDIA FOR VIDEO] to [HDD]. • Replace the microSD card. (Files recorded with other devices
that support AVCHD cannot be played back on this camcorder.)
NOT FORMATTED • Select [OK] and select [YES] to perform formatting.
FORMAT ERROR! • Check the operating procedure, and perform once again. • Turn off the camcorder, and turn it on again.
DATA DELETION ERROR
HDD ERROR! • Perform formatting. (All data is deleted.)• Turn off the camcorder, and turn it on again.
MEMORY CARD ERROR!
• Perform formatting. (All data is deleted.)• Remove and re-insert the microSD card. (MultiMediaCard
cannot be used.)• Remove any dirt from the microSD card terminals. • Insert the microSD card before switching the power on. • Turn off the camcorder, and turn it on again.
CANNOT TAKE MORE STILL IMAGES AT THE MOMENT
• Stop video recording, and then record a still image. (If an microSD card is removed or inserted during video recording, a still image cannot be recorded.)
DROP DETECTION WORKED ANDTHE POWER IS TURNED OFF
• Set [REC MEDIA FOR VIDEO] to [SD], then record to a microSD card.
• Turn off the camcorder and turn it on again.• Prevent the camcorder from vibration and shock.RECORDING CANCELLED
RECORDING FAILURE microSD card:• Remove and re-insert the microSD card. (MultiMediaCard
cannot be used.)• Remove any dirt from the microSD card terminals. • Insert the microSD card before switching the power on. HDD:• Do not allow the camcorder to be subject to impact/vibrations.
PLAYBACK FAILED
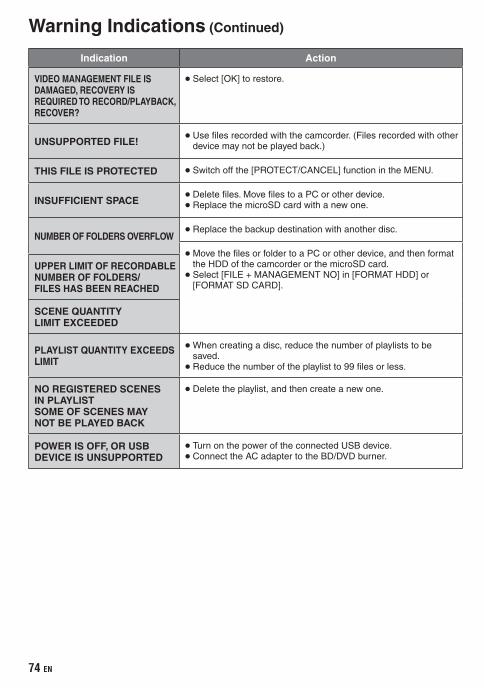
�� EN
Indication Action
VIDEO MANAGEMENT FILE ISDAMAGED, RECOVERY ISREQUIRED TO RECORD/PLAYBACK,RECOVER?
• Select [OK] to restore.
UNSUPPORTED FILE! • Use files recorded with the camcorder. (Files recorded with other device may not be played back.)
THIS FILE IS PROTECTED • Switch off the [PROTECT/CANCEL] function in the MENU.
INSUFFICIENT SPACE • Delete files. Move files to a PC or other device.• Replace the microSD card with a new one.
NUMBER OF FOLDERS OVERFLOW • Replace the backup destination with another disc.
• Move the files or folder to a PC or other device, and then format the HDD of the camcorder or the microSD card.
• Select [FILE + MANAGEMENT NO] in [FORMAT HDD] or [FORMAT SD CARD].
UPPER LIMIT OF RECORDABLE NUMBER OF FOLDERS/FILES HAS BEEN REACHED
SCENE QUANTITYLIMIT EXCEEDED
PLAYLIST QUANTITY EXCEEDSLIMIT
• When creating a disc, reduce the number of playlists to be saved.
• Reduce the number of the playlist to 99 files or less.
NO REGISTERED SCENESIN PLAYLISTSOME OF SCENES MAYNOT BE PLAYED BACK
• Delete the playlist, and then create a new one.
POWER IS OFF, OR USBDEVICE IS UNSUPPORTED
• Turn on the power of the connected USB device. • Connect the AC adapter to the BD/DVD burner.
Warning Indications (Continued)
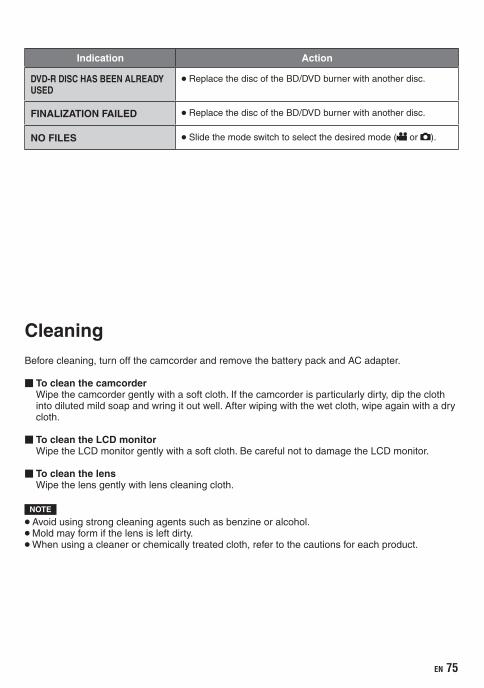
��EN
Indication Action
DVD-R DISC HAS BEEN ALREADYUSED
• Replace the disc of the BD/DVD burner with another disc.
FINALIZATION FAILED • Replace the disc of the BD/DVD burner with another disc.
NO FILES • Slide the mode switch to select the desired mode (! or #).
CleaningBefore cleaning, turn off the camcorder and remove the battery pack and AC adapter.
To clean the camcorderWipe the camcorder gently with a soft cloth. If the camcorder is particularly dirty, dip the cloth into diluted mild soap and wring it out well. After wiping with the wet cloth, wipe again with a dry cloth.
To clean the LCD monitorWipe the LCD monitor gently with a soft cloth. Be careful not to damage the LCD monitor.
To clean the lensWipe the lens gently with lens cleaning cloth.
NOTE
• Avoid using strong cleaning agents such as benzine or alcohol.• Mold may form if the lens is left dirty.• When using a cleaner or chemically treated cloth, refer to the cautions for each product.
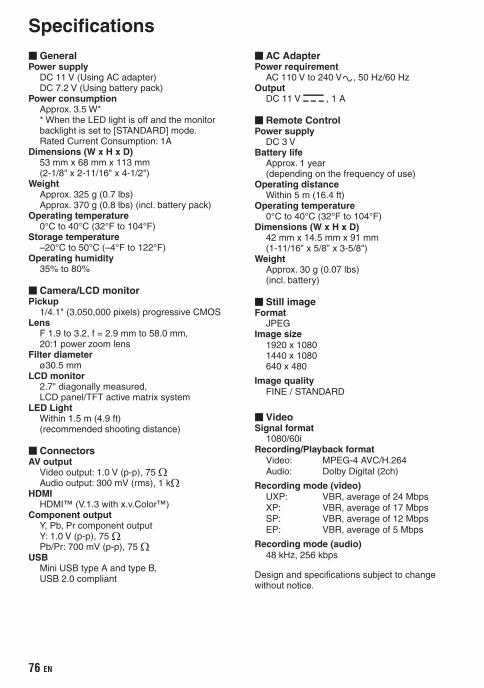
�� EN
SpecificationsGeneral
Power supplyDC 11 V (Using AC adapter)DC 7.2 V (Using battery pack)
Power consumptionApprox. 3.5 W** When the LED light is off and the monitor backlight is set to [STANDARD] mode.Rated Current Consumption: 1A
Dimensions (W x H x D)53 mm x 68 mm x 113 mm(2-1/8" x 2-11/16" x 4-1/2")
WeightApprox. 325 g (0.7 lbs)Approx. 370 g (0.8 lbs) (incl. battery pack)
Operating temperature0°C to 40°C (32°F to 104°F)
Storage temperature–20°C to 50°C (–4°F to 122°F)
Operating humidity35% to 80%
Camera/LCD monitorPickup
1/4.1" (3,050,000 pixels) progressive CMOSLens
F 1.9 to 3.2, f = 2.9 mm to 58.0 mm,20:1 power zoom lens
Filter diameterø30.5 mm
LCD monitor2.7" diagonally measured, LCD panel/TFT active matrix system
LED LightWithin 1.5 m (4.9 ft)(recommended shooting distance)
ConnectorsAV output
Video output: 1.0 V (p-p), 75 WAudio output: 300 mV (rms), 1 kW
HDMIHDMI™ (V.1.3 with x.v.Color™)
Component outputY, Pb, Pr component outputY: 1.0 V (p-p), 75 WPb/Pr: 700 mV (p-p), 75 W
USBMini USB type A and type B, USB 2.0 compliant
AC AdapterPower requirement
AC 110 V to 240 V$, 50 Hz/60 HzOutput
DC 11 V § , 1 A
Remote ControlPower supply
DC 3 VBattery life
Approx. 1 year (depending on the frequency of use)
Operating distanceWithin 5 m (16.4 ft)
Operating temperature0°C to 40°C (32°F to 104°F)
Dimensions (W x H x D)42 mm x 14.5 mm x 91 mm(1-11/16" x 5/8" x 3-5/8")
WeightApprox. 30 g (0.07 lbs)(incl. battery)
Still imageFormat
JPEGImage size
1920 x 10801440 x 1080640 x 480
Image qualityFINE / STANDARD
VideoSignal format
1080/60iRecording/Playback format
Video: MPEG-4 AVC/H.264Audio: Dolby Digital (2ch)
Recording mode (video)UXP: VBR, average of 24 MbpsXP: VBR, average of 17 MbpsSP: VBR, average of 12 MbpsEP: VBR, average of 5 Mbps
Recording mode (audio)48 kHz, 256 kbps
Design and specifications subject to change without notice.

��EN
h: hour/m: minuteApproximate recordable time (for video)
Recording medium
Quality
HDD microSD Card
GZ-HD30060 GB
GZ-HD320120 GB 4 GB 8 GB
UXP 5 h 30 m 11 h 20 m 40 m
XP 7 h 30 m 15 h 30 m 1 h 00 m
SP 10 h 21 h 44 m 1 h 28 m
EP 25 h 50 h 1 h 40 m 3 h 20 m
Approximate number of images (for still image)The HDD can record up to 9999 still images in either mode.
Recording medium
Image size/Quality
microSD Card
512 MB 1 GB 2 GB 4 GB 8 GB
16:9
1920 x 1080 / FINE 510 1040 2100 4200 8420
1920 x 1080 / STANDARD 800 1630 3210 6410 9999
4:3
1440 x 1080 / FINE 680 1370 2770 5540 9999
1440 x 1080 / STANDARD 1060 2160 4360 8700 9999
640 x 480 / FINE 3320 6720 9999 9999 9999
640 x 480 / STANDARD 5980 9999 9999 9999 9999
h: hour/m: minuteRequired charging/recording time (approx.)
Battery pack Charging time Recording time
BN-VF808U (Provided) 1 h 50 m 1 h 20 m*
BN-VF815U 2 h 40 m 2 h 50 m*
BN-VF823U 3 h 40 m 4 h 10 m*
* When the LED light is off and the monitor backlight is set to [STANDARD] mode.

�� EN
Cautions
AC Adapter
When using the AC adapter in areas other than the USAThe provided AC adapter features automatic voltage selection in the AC range from 110 V to 240 V.USING HOUSEHOLD AC PLUG ADAPTERIn case of connecting the unit’s power cord to an AC wall outlet other than American National Standard C73 series type use an AC plug adapter, called a “Siemens Plug”, as shown.For this AC plug adapter, consult your nearest JVC dealer.
Plug Adapter
Battery Pack
The supplied battery pack is a lithium-ion battery. Before using the supplied battery pack or an optional battery pack, be sure to read the following cautions:
Terminals
• To avoid hazards... do not burn.... do not short-circuit the terminals. Keep it away
from metallic objects when not in use. When transporting, make sure the provided battery cap is attached to the battery. If the battery cap is misplaced, carry the battery in a plastic bag.
... do not modify or disassemble.
... do not expose the battery to temperatures exceeding 60°C (140°F), as this may cause the battery to overheat, explode or catch fire.
... use only specified chargers.• To prevent damage and prolong service life... do not subject to unnecessary shock.... charge within the temperature range of 10°C
to 35°C (50°F to 95°F). Cooler temperatures require longer charging time, or in some cases stop charging at all.
Warmer temperatures prevent complete charging, or in some cases stop charging at all.
... store in a cool, dry place. Extended exposure to high temperatures will increase natural discharge and shorten service life.
... fully charge and then fully discharge the battery every 6 months when storing the battery pack over a long period of time.
... remove from charger or powered unit when not in use, as some machines use current even when switched off.
ATTENTION:The product you have purchased is powered by a rechargeable battery that is recyclable.Please call 1-800-8-BATTERY for information on how to recycle this battery.
Recording Medium
• Be sure to follow the guidelines below to prevent corruption or damage to your recorded data.• Do not bend or drop the recording medium,
or subject it to strong pressure, jolts or vibrations.
• Do not splash the recording medium with water.• Do not use, replace, or store the recording
medium in locations that are exposed to strong static electricity or electrical noise.
• Do not turn off the camcorder power or remove the battery or AC adapter during shooting, playback, or when otherwise accessing the recording medium.
• Do not bring the recording medium near objects that have a strong magnetic field or that emit strong electromagnetic waves.
• Do not store the recording medium in locations with high temperature or high humidity.
• Do not touch the metal parts.• When formatting or erasing data using
the camcorder, only the file administration information is changed. The data is not completely erased from the hard disk. If you want to completely erase all of the data, we recommend either using commercially available software that is specially designed for that purpose, or by physically destroying the camcorder with a hammer etc.
Hard Disk
• Do not use the unit where it is subject to vibrations or loud sounds.
• If you move the unit suddenly, the drop detection function may operate and the power may be turned off.
LCD Monitor
• To prevent damage to the LCD monitor, DO NOT
... push it strongly or apply any shocks.
... place the camcorder with LCD monitor on the bottom.
• To prolong service life... avoid rubbing it with coarse cloth.

��EN
Main Unit
• For safety, DO NOT... open the camcorder’s chassis.... disassemble or modify the unit.... allow inflammables, water or metallic objects to
enter the unit.... remove the battery pack or disconnect the
power supply while the power is on.... leave the battery pack attached when the
camcorder is not in use.... place naked flame sources, such as lighted
candles, on the apparatus.... expose the apparatus to dripping or splashing.... leave dust or metal objects adhered to the
power plug or an AC wall outlet.... insert any objects in the camcorder.• Avoid using the unit... in places subject to excessive humidity or dust.... in places subject to soot or steam such as near
a cooking stove.... in places subject to excessive shock or vibration.... near a television set.... near appliances generating strong magnetic
or electric fields (speakers, broadcasting antennas, etc.).
... in places subject to extremely high (over 40°C or 104°F) or extremely low (under 0°C or 32°F) temperatures.
... in places where air pressure is low (more than 3000 m (9870 ft) above the sea level).
• DO NOT leave the unit... in places of over 50°C (122°F).... in places where humidity is extremely low
(below 35%) or extremely high (above 80%).... in direct sunlight.... in a closed car in summer.... near a heater.... in high places such as on a TV. Leaving the unit
in high places while a cable is connected may result in a malfunction if the cable is caught and the unit falls onto the floor.
• To protect the unit, DO NOT... allow it to become wet.... drop the unit or strike it against hard objects.... subject it to shock or excessive vibration during
transportation.... keep the lens directed at extremely bright
objects for long periods.... expose the lens to direct sunlight.... swing it excessively when using the hand strap.... swing the soft camcorder case excessively
when the camcorder is inside it.... place the camcorder in dusty or sandy areas,
such as on a beach.
• To prevent the unit from dropping,• Fasten the grip belt securely.• When using the camcorder with a tripod,
attach the camcorder to the tripod securely. If the camcorder drops, you may be injured and
the camcorder may be damaged. When a child uses the unit, there must be
parental guidance.
Declaration of ConformityModel Number : GZ-HD320U/300UTrade Name : JVCResponsible party : JVC AMERICAS CORP.Address : 1700 Valley Road Wayne, N. J. 07470Telephone Number : 973-317-5000
This device complies with Part 15 of FCC Rules. Operation is subject to the following two conditions: (1) This device may not cause harmful interference, and (2) this device must accept any interference received, including interference that may cause undesired operation.
Changes or modifications not approved by JVC could void the user’s authority to operate the equipment. This equipment has been tested and found to comply with the limits for a Class B digital device, pursuant to Part 15 of the FCC Rules. These limits are designed to provide reasonable protection against harmful interference in a residential installation. This equipment generates, uses, and can radiate radio frequency energy and, if not installed and used in accordance with the instructions, may cause harmful interference to radio communications. However, there is no guarantee that interference will not occur in a particular installation. If this equipment does cause harmful interference to radio or television reception, which can be determined by turning the equipment off and on, the user is encouraged to try to correct the interference by one or more of the following measures: Reorient or relocate the receiving antenna. Increase the separation between the equipment and receiver.Connect the equipment into an outlet on a circuit different from that to which the receiver is connected.Consult the dealer or an experienced radio/TV technician for help.
This Class B digital apparatus complies with Canadian ICES-003.Cet appareil numérique de la classe B est conforme à la norme NMB-003 du Canada.

�0 EN
JVC Software License AgreementJVC SOFTWARE LICENSE AGREEMENT
IMPORTANTTO CUSTOMERS: PLEASE MAKE SURE TO READ THIS CAREFULLY BEFORE INSTALLING OR USING THE SOFTWARE PROGRAM NAMED “DIGITAL PHOTO NAVIGATOR” (“Program”) ON YOUR PC.The right to use the Program is granted by Victor Company of Japan, Limited (“JVC”) to You only on the condition that You agree to the following.Should You not agree to the terms hereof, You may not install or use the Program. HOWEVER, INSTALLING OR USING THE PROGRAM INDICATES YOUR ACCEPTANCE OF THESE TERMS AND CONDITIONS.
1 COPYRIGHT; OWNERSHIPYou acknowledge that all copyrights and other intellectual property rights in the Program are owned by JVC and its licensor, and remain vested in JVC and such licensor. The Program is protected under the copyright law of Japan and other countries, and related Conventions.
2 GRANT OF LICENSE(1) Subject to the conditions of this Agreement,
JVC grants to You a non-exclusive right to use the Program. You may install and use the Program on a HDD or other storage devices incorporated in Your PC.
(2) You may make one (1) copy of the Program solely for your personal backup or archival purposes.
3 RESTRICTION ON THE PROGRAM(1) You may not reverse engineer, decompile,
disassemble, revise or modify the Program, except to the extent that expressly permitted by applicable law.
(2) You may not copy or use the Program, in whole or in part, other than as expressly specified in this Agreement.
(3) You have no right to grant a license to use the Program, and may not distribute, rent, lease or transfer the Program to any third party or otherwise let them use the Program.
4 LIMITED WARRANTYJVC warrants that any media in which the Program is embodied are free from any defects in materials and workmanship for a period of thirty (30) days from the date of Your purchasing any our products accompanying the Program. JVC’s entire liability and your exclusive remedy in connection with the Program shall be replacement of such defective media. EXCEPT FOR THE EXPRESS WARRANTIES STATED HEREIN AND TO THE EXTENT PERMITTED BY APPLICABLE LAW, JVC AND ITS LICENSORS DISCLAIM ANY OTHER WARRANTIES, EITHER EXPRESS OR IMPLIED, INCLUDING BUT NOT LIMITED TO IMPLIED WARRANTIES OF MERCHANTABILITY AND FITNESS FOR A PARTICULAR PURPOSE IN REGARD TO THE PROGRAM AND THE ACCOMPANYING PRINTED MATERIALS. SHOULD THERE BE ANY PROBLEM ARISING FROM OR CAUSED BY THE PROGRAM, YOU SHOULD SETTLE ALL SUCH PROBLEM AT YOUR OWN COST AND EXPENSE.
5 LIMITED LIABILITYTO THE EXTENT PERMITTED BY APPLICABLE LAW, IN NO EVENT SHALL JVC AND ITS LICENSORS BE LIABLE FOR ANY INDIRECT, SPECIAL, INCIDENTAL OR CONSEQUENTIAL DAMAGES WHATSOEVER, REGARDLESS OF THE FORM OF ACTION WHETHER IN CONTRACT, TORT OR OTHERWISE ARISING OUT OF OR IN CONNECTION WITH THE USE OF OR INABILITY TO USE THE PROGRAM, EVEN IF JVC HAS BEEN ADVISED OF THE POSSIBILITY OF SUCH DAMAGES. YOU WILL INDEMNIFY AND HOLD HARMLESS JVC FROM ANY LOSS, LIABILITY OR COST ARISING OUT OF OR IN ANY WAY CONNECTED TO CLAIMS FROM ANY THIRD PARTY RELATING TO THE USE OF THE PROGRAM.

�1EN
6 TERMThis Agreement will become effective on the date when You install and use the Program on Your machine, and continue to be in effect until the termination under the following provision.Should You breach any provision of this Agreement, JVC may terminate this Agreement without giving any notice to You. In this event, JVC may claim against You for any damages caused by Your breach. Should this Agreement be terminated, You must immediately destroy the Program stored in Your machine (including the erasing from any memory in Your PC), and no longer own such Program.
7 EXPORT CONTROLYou agree that You will not ship, transfer or export the Program or underlying information and technology to any countries to which Japan and other relevant countries have initiated an embargo on such goods.
8 U.S. GOVERNMENT USERIf You are an agency of the United States of America (the “Government”), You acknowledge JVC’s representation that the Program is a “Commercial Item” as defined in Federal Acquisition Regulation (FAR) part 2.101 (g) consisting unpublished “Commercial Computer Software” as those items are used at FAR part 12.212 and is only licensed to You with the same use rights JVC grants all commercial end users pursuant to the terms of this Agreement.
9 GENERAL(1) No modification, change, addition, deletion
or other alternation of or to this Agreement will be valid unless reduced to writing and signed by an authorized representative of JVC.
(2) If any part of this Agreement is held invalid by or in conflict with any law having jurisdiction over this Agreement, the remaining provisions will remain in full force and effect.
(3) This Agreement shall be governed by and interpreted under the laws of Japan. The Tokyo District Court has jurisdiction over all disputes which may arise with respect to the execution, interpretation and performance of this Agreement. Victor Company of Japan, Limited
NOTE
If You acquired the Program in Germany, the provisions of Sections 4 (Limited Warranty) and 5 (Limited Liability) provided above will be replaced with those of the German version of this Agreement.
CAUTION:• Operate this equipment according to the
operating procedures described in this manual.
• Use only the provided CD-ROM. Never use any other CD-ROM to run this software.
• Do not attempt to modify this software.• Changes or modifications not approved by
JVC could void user’s authority to operate the equipment.
How to handle a CD-ROM• Take care not to soil or scratch the mirror
surface (opposite to the printed surface). Do not write anything or put a sticker on either the front or back surface. If the CD-ROM gets dirty, gently wipe it with a soft cloth outward from the center hole.
• Do not use conventional disc cleaners or cleaning spray.
• Do not bend the CD-ROM or touch its mirror surface.
• Do not store your CD-ROM in a dusty, hot or humid environment. Keep it away from direct sunlight.
You can find the latest information (in English) on the provided software program at our world wide web server at http://www.jvc-victor.co.jp/english/global-e.html

�� EN
MEMO

��EN

0109FOH-AL-OTUS© 2009 Victor Company of Japan, Limited
A AC Adapter ..................................................16, 78Adjust Brightness ..............................................30Auto Finalize ......................................................66Auto Power Off ..................................................65AV Connection .............................................33, 53
B Backlight Compensation ....................................31Battery Pack ................................................16, 78BD/DVD Backup ................................................47BD/DVD Burner .................................................47
C CD-ROM ......................................................10, 54Clock Adjust ......................................................16Component Connection ....................................32Component Output ............................................67Copying Files .....................................................46
D Date/Time Setting ...............................................5Date Display Style .............................................65Delete Data on HDD .........................................68Deleting Files ....................................................35Demo Mode .......................................................65Digest Playback ...........................................24, 50Digital Image Stabilizer (DIS) ............................64Display on TV ....................................................67Dividing Files .....................................................40Drop Detection ..................................................66Dubbing Playback ..............................................53
E Effect .................................................................31Event Registration .............................................23Export to Library Mode ......................................59
F Face Detection ......................................23, 42, 63Factory Preset ...................................................66File Information ..................................................38File Search ..................................................27, 28
Date Index ScreenEvent ScreenGroup Index Screen
Focus .................................................................30Focus Assist ......................................................30Focus Assist Camera ........................................65Format HDD ......................................................68Format SD Card ................................................68
G Gain Up .............................................................64
H Hard Disk ..........................................................78HDMI .....................................................32, 34, 67
I Image Quality ....................................................64Image Size ........................................................64iTunes ................................................................59
L Language Setting ..............................................17LCD Monitor ................................................14, 78LED Light ..........................................................22
M Manual Recording .............................................29Menu Settings ...................................................63microSD Card ....................................................19Monitor Backlight ...............................................65Monitor Bright ....................................................65Moving Files ......................................................46
N Number of Images .............................................77
O On-screen recording control ..............................20On-screen zoom control ....................................22Operation Sound ...............................................65
P Photometry Area ...............................................31Picture Title .......................................................44Playback Zoom ............................................24, 25Playlists .............................................................43Portable Media Player .......................................59Protecting Files .................................................37
Q Quick Restart ....................................................66Quick Review ...............................................20, 21
R Recordable Time ...............................................77Record Button ...................................................66Recording Media for Image ...............................68Recording Media for Video ................................68Recording Medium ............................................78Remaining Battery Power ..................................22Remaining Recording Time ...............................22Remote Control .....................................11, 13, 66
S Scene Select .....................................................30Self-Timer ..........................................................63Shutter Mode .....................................................63Shutter Speed ...................................................30Speaker Volume ................................................24
T Tele Macro .........................................................31Trimming Files ...................................................41
U Updating Software .............................................66Uploading Files .................................................61USB Cable .............................................47, 51, 55USB External Hard Disk Drive ..........................51
V Video Output .....................................................67Video Quality .....................................................64Viewing Files on TV ...........................................32
W White Balance (WB) ..........................................31Wind Cut ...........................................................64Wipe or Fader Effects ........................................26
X x.v.Color ............................................................64
Y YouTube .............................................................61
Z Zoom ...........................................................22, 64
Terms