Cutting Plotter Controller USER'S MANUAL - Graphtec Corporation
1 | P a g e
Graphtec CE6000 Vinyl Cutter Training Resource
800.4.STAHLS (800.478.2457) STAHLS.COM
Graphtec CE6000 Series Installation & Setup
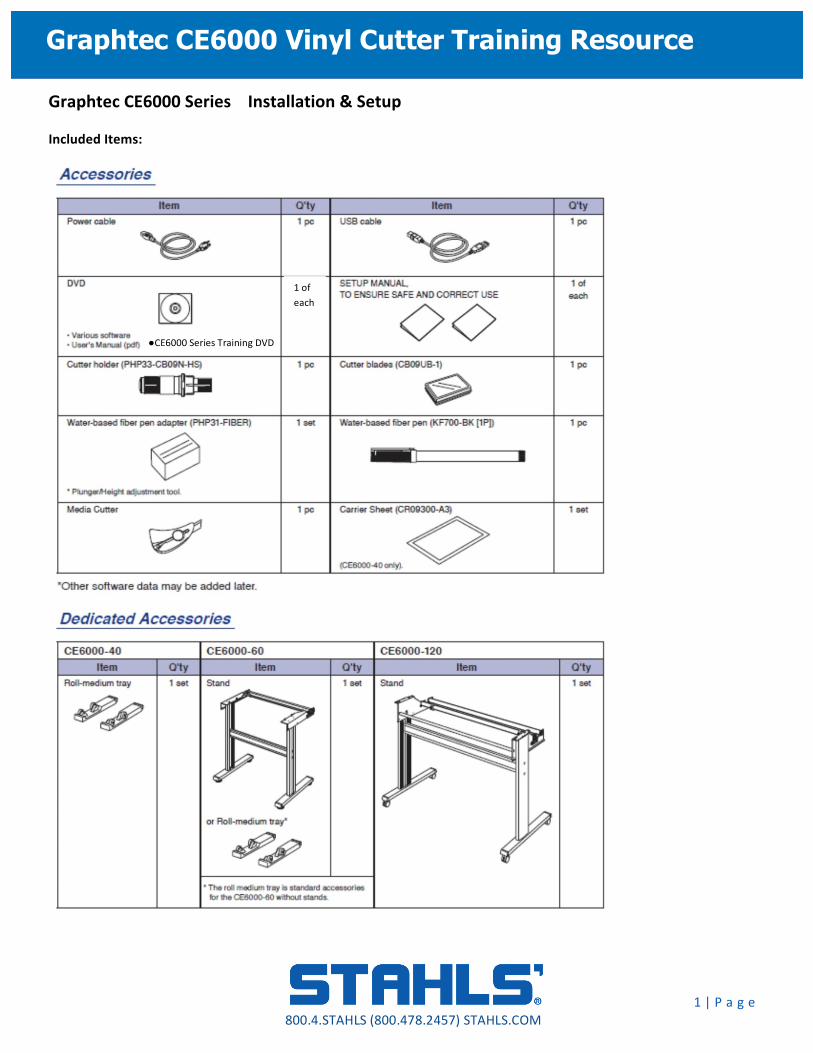
Included Items:
●CE6000 Series Training DVD
1 of each

2 | P a g e
Graphtec CE6000 Vinyl Cutter Training Resource
800.4.STAHLS (800.478.2457) STAHLS.COM
Software Installation:
1. Refer to SETUP MANUAL 2. Watch Installation & Setup lesson on DVD
Installation overview:
1. Install the CE6000 software cutting plotter controller and plotter driver by turning machine on with USB cord plugged-‐in.
2. When installing driver select English on the display screen of the cutter then the automated message will appear: installing the device driver
3. Install Graphtec Studio which is the design software 4. Install Cutting Master 3 (C M 3) which is cut driver software (compatible with CorelDraw X4 – X6 & AI CS4 – CC) –
plug-‐in automatically installs • Plug-‐in auto-‐attaches to the top of CorelDraw versions X4 – X5 • Manually attach plug-‐in via Macros in
CorelDraw X6: o Open CorelDraw o Select Tools o Select Customization o Select Commands o Change File to Macros o Click & Drag
Main.ExportDocToCM3 file to desired location on properties bar
• Manually attach plug-‐in via Macros in Adobe Illustrator:
o Open Adobe Illustrator o To find plug-‐in folder
location: Edit > Preferences > Plug-‐in & Scratch Discs
o Plug-‐in is found under Windows
5. Install the Graphtec CE6000 User Manual

3 | P a g e
Graphtec CE6000 Vinyl Cutter Training Resource
800.4.STAHLS (800.478.2457) STAHLS.COM
Graphtec CE6000 Series Getting Started
Operation instructions covered in this resource are irrelevant to the Mode Option on the cutter keypad. In the Training DVD, mode options are reviewed. Brief overview:
Mode Options: Normal Mode / Simple Mode
You can use the [SIMPLE] key on the default screen to switch between Simple mode and Normal mode. CE6000 will be reset once when you switch.
In Simple mode, you can change easy settings from the menu screen.
In Normal mode, you will be able to change more detailed settings and have an option for pre-‐set settings. For detail, please suggest the customer to reference the user manual or contact support.
Keypad Pre-‐sets:
Easily customize the pre-‐set Conditions: 1) Select All Programs 2) Select Graphtec Cutting Plotter Controller for CE6000 3) Select Cutting Plotter Controller for CE6000
The following steps are irrelevant to the Mode Option because they are executed within Cutting Master 3 Software.
4 | P a g e
Graphtec CE6000 Vinyl Cutter Training Resource
800.4.STAHLS (800.478.2457) STAHLS.COM
1. Load Material 1) Load material onto machine and lock pinch wheels
• Adjust pinch roller are underneath blue area; one pinch wheel always located in larger blue section. • Adjust pinch roller from back of cutter
2) Setting Feeding Method (do not select continue) • Roll – 1 Front Edge: measures the distance between the two pinch wheels (cutting width) and
maneuvers the blade to the corner front edge of the material. • Roll – 2 Current Position: measures the distance between the two pinch wheels (cutting width) and the
blade stays in position. • Sheet: measures the distance between the two pinch wheels (cutting width) and the distance between
the front and back sensor (cutting length). The back sensor must always be covered, so you lose about 2 inches of cutting length.
Note: To re-‐set the feeding method without powering off the cutter: unlock > lock the pinch wheels.
2. Set the Origin (on cutter keypad) 1) Move blade into position with up, down, left, right arrows. 2) Select ORIGIN button
3. Adjust the Blade 1) Turn blade holder cap to increase or decrease blade depth “lefty loosey righty tighty”
• Only a credit card to half a credit card width is needed with a sharp blade • It’s better to increase the force on the cutter than to increase the blade depth
4. Insert Blade Holder into Tool Holder • Make sure blade holder is secured under the clip (flange) before tightening.
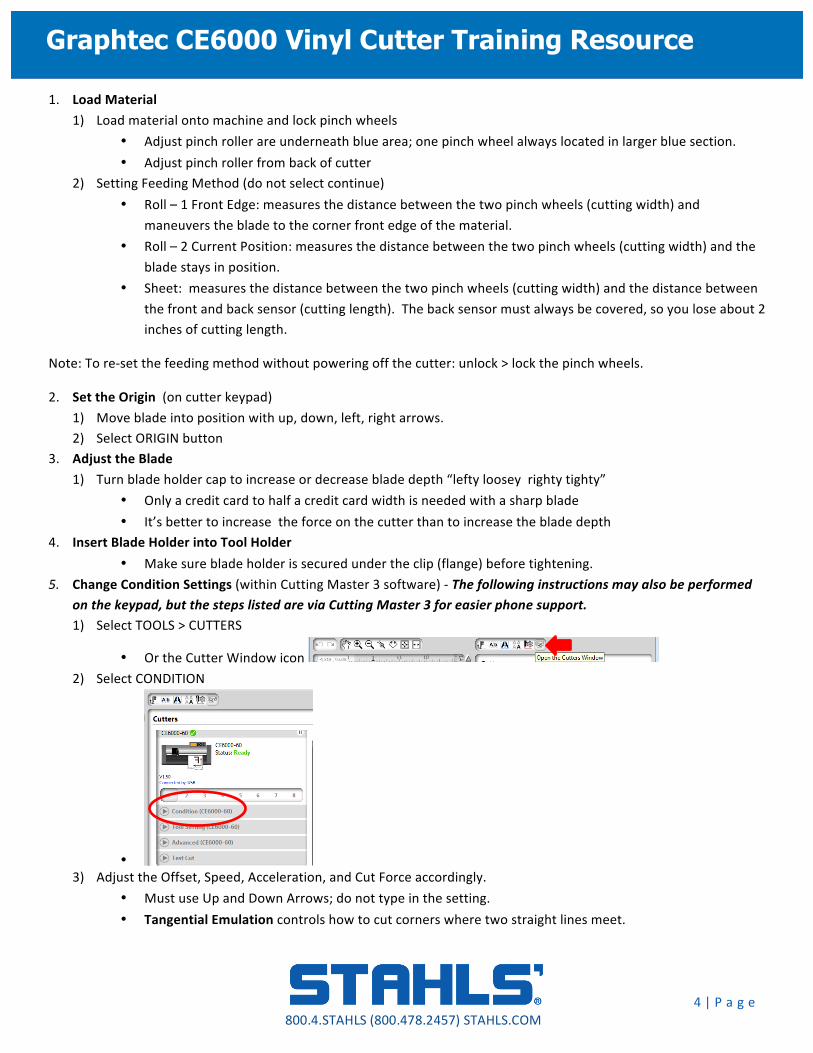
5. Change Condition Settings (within Cutting Master 3 software) -‐ The following instructions may also be performed on the keypad, but the steps listed are via Cutting Master 3 for easier phone support. 1) Select TOOLS > CUTTERS
• Or the Cutter Window icon 2) Select CONDITION
• 3) Adjust the Offset, Speed, Acceleration, and Cut Force accordingly.
• Must use Up and Down Arrows; do not type in the setting. • Tangential Emulation controls how to cut corners where two straight lines meet.
5 | P a g e
Graphtec CE6000 Vinyl Cutter Training Resource
800.4.STAHLS (800.478.2457) STAHLS.COM
1. Mode 1: Overcuts the start and end points of corners to eliminate uncut sections. 2. Mode 2: Overcuts the start and end points only and results in a shorts cutting time.
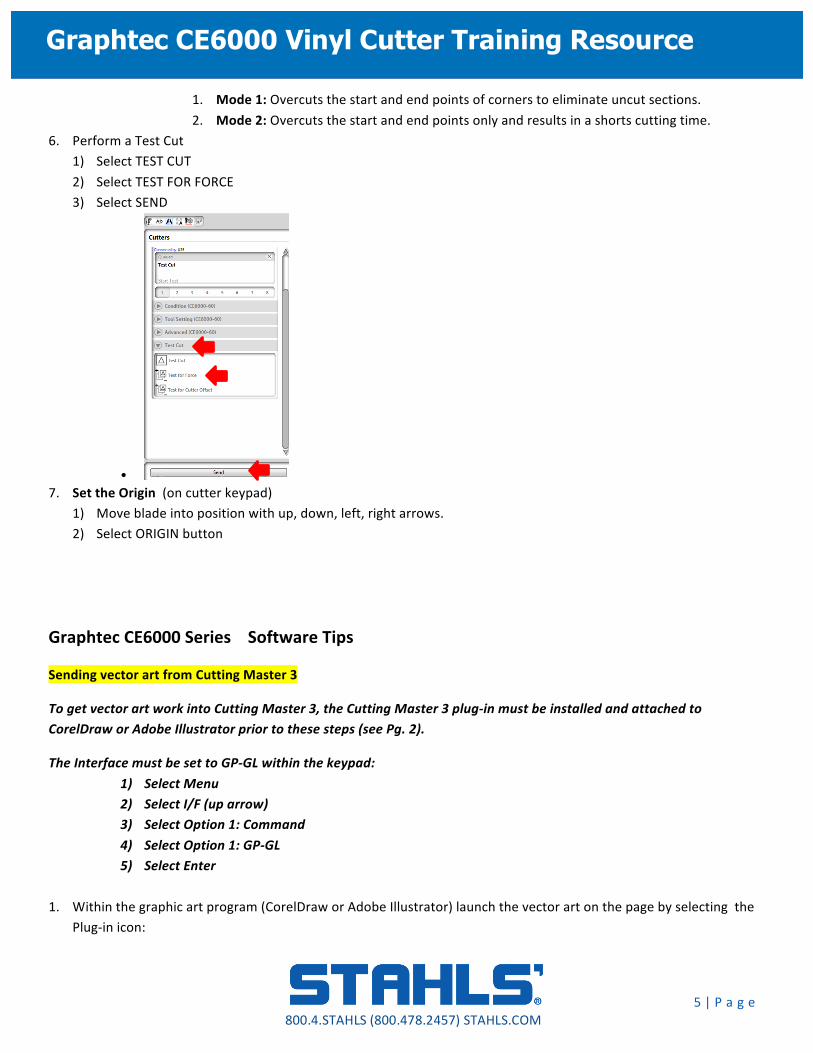
6. Perform a Test Cut 1) Select TEST CUT 2) Select TEST FOR FORCE 3) Select SEND
• 7. Set the Origin (on cutter keypad)
1) Move blade into position with up, down, left, right arrows. 2) Select ORIGIN button
Graphtec CE6000 Series Software Tips
Sending vector art from Cutting Master 3
To get vector art work into Cutting Master 3, the Cutting Master 3 plug-‐in must be installed and attached to CorelDraw or Adobe Illustrator prior to these steps (see Pg. 2).
The Interface must be set to GP-‐GL within the keypad: 1) Select Menu 2) Select I/F (up arrow) 3) Select Option 1: Command 4) Select Option 1: GP-‐GL 5) Select Enter
1. Within the graphic art program (CorelDraw or Adobe Illustrator) launch the vector art on the page by selecting the
Plug-‐in icon:
6 | P a g e
Graphtec CE6000 Vinyl Cutter Training Resource
800.4.STAHLS (800.478.2457) STAHLS.COM
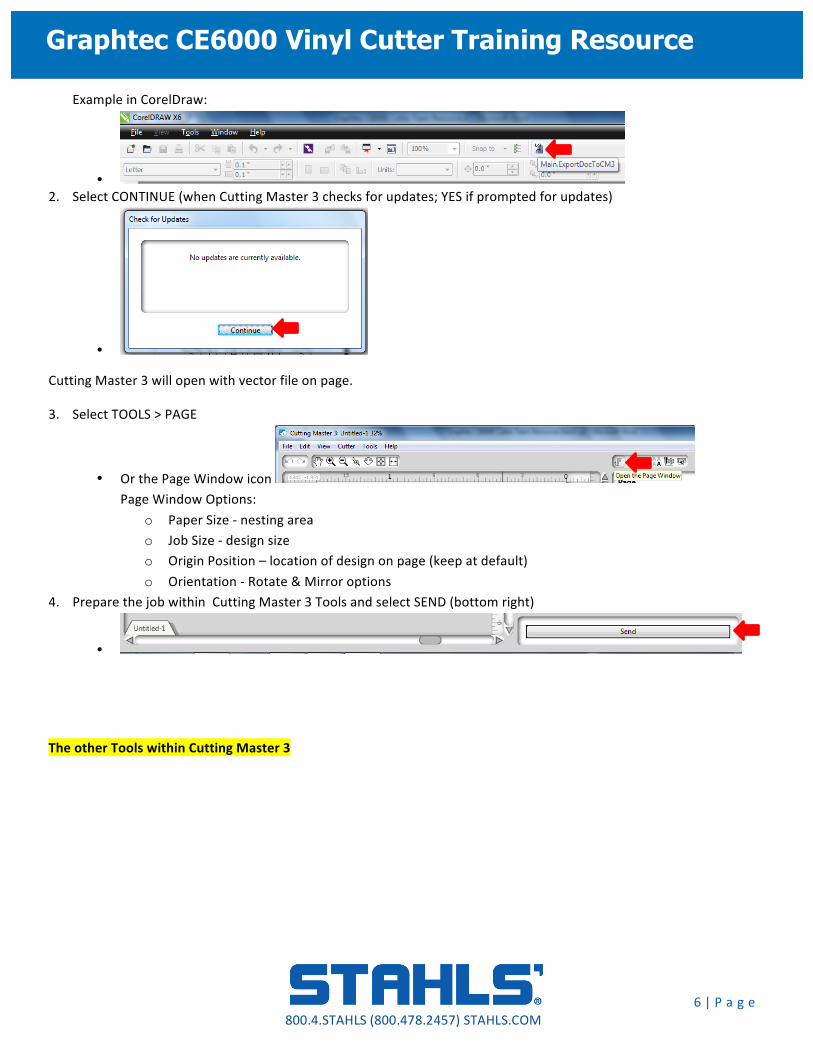
Example in CorelDraw:
• 2. Select CONTINUE (when Cutting Master 3 checks for updates; YES if prompted for updates)
•
Cutting Master 3 will open with vector file on page.
3. Select TOOLS > PAGE
• Or the Page Window icon Page Window Options:
o Paper Size -‐ nesting area o Job Size -‐ design size o Origin Position – location of design on page (keep at default) o Orientation -‐ Rotate & Mirror options
4. Prepare the job within Cutting Master 3 Tools and select SEND (bottom right)
•
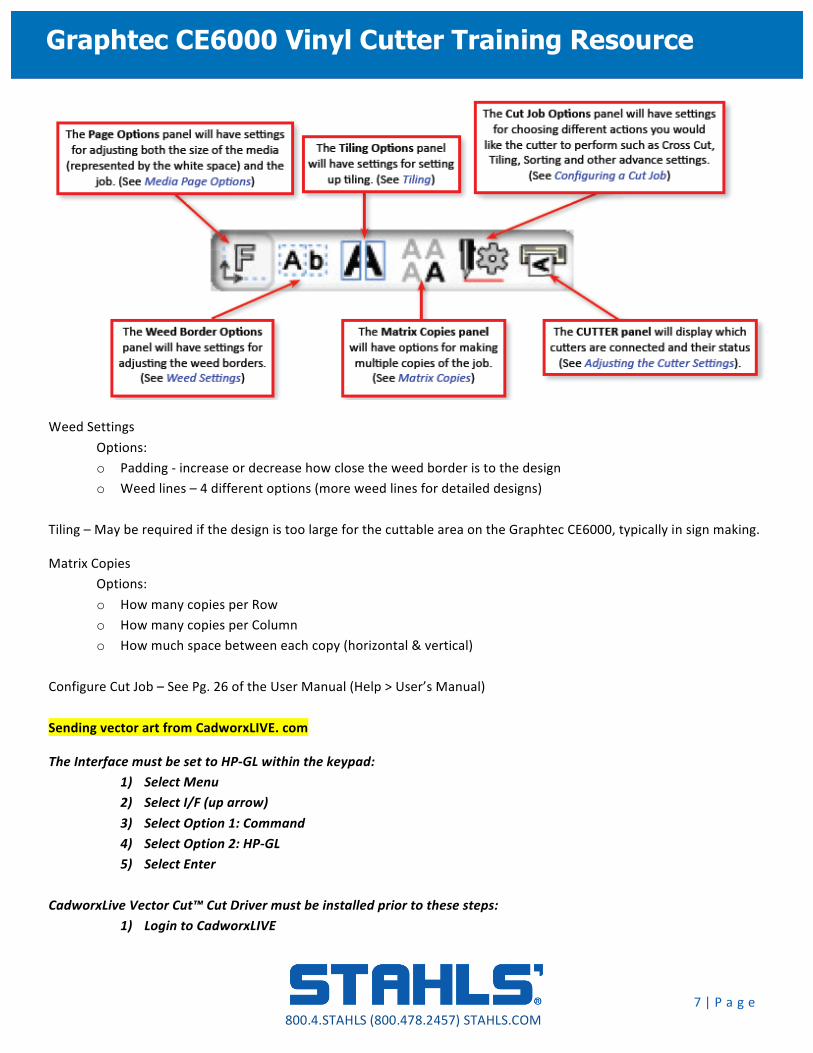
The other Tools within Cutting Master 3
7 | P a g e
Graphtec CE6000 Vinyl Cutter Training Resource
800.4.STAHLS (800.478.2457) STAHLS.COM
Weed Settings Options: o Padding -‐ increase or decrease how close the weed border is to the design o Weed lines – 4 different options (more weed lines for detailed designs)
Tiling – May be required if the design is too large for the cuttable area on the Graphtec CE6000, typically in sign making.
Matrix Copies Options:
o How many copies per Row o How many copies per Column o How much space between each copy (horizontal & vertical)
Configure Cut Job – See Pg. 26 of the User Manual (Help > User’s Manual) Sending vector art from CadworxLIVE. com
The Interface must be set to HP-‐GL within the keypad: 1) Select Menu 2) Select I/F (up arrow) 3) Select Option 1: Command 4) Select Option 2: HP-‐GL 5) Select Enter
CadworxLive Vector Cut™ Cut Driver must be installed prior to these steps:
1) Login to CadworxLIVE
8 | P a g e
Graphtec CE6000 Vinyl Cutter Training Resource
800.4.STAHLS (800.478.2457) STAHLS.COM
2) Select Support 3) Select Downloads
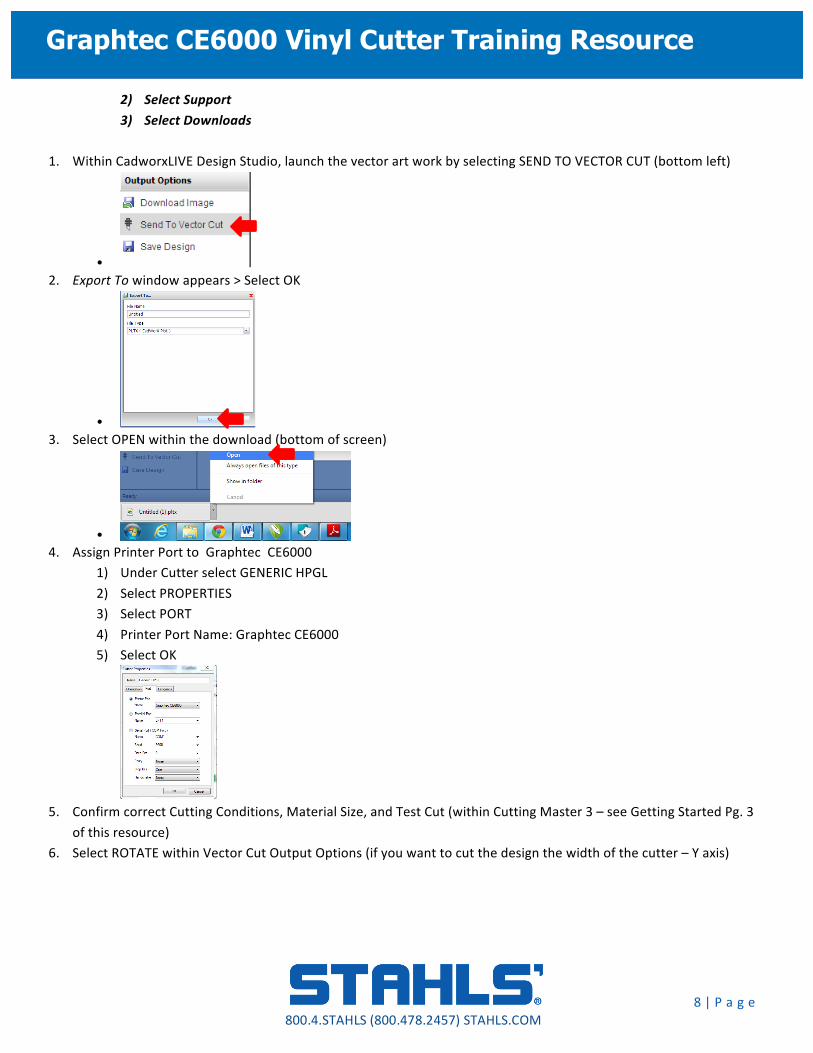
1. Within CadworxLIVE Design Studio, launch the vector art work by selecting SEND TO VECTOR CUT (bottom left)
• 2. Export To window appears > Select OK
• 3. Select OPEN within the download (bottom of screen)
• 4. Assign Printer Port to Graphtec CE6000
1) Under Cutter select GENERIC HPGL 2) Select PROPERTIES 3) Select PORT 4) Printer Port Name: Graphtec CE6000 5) Select OK
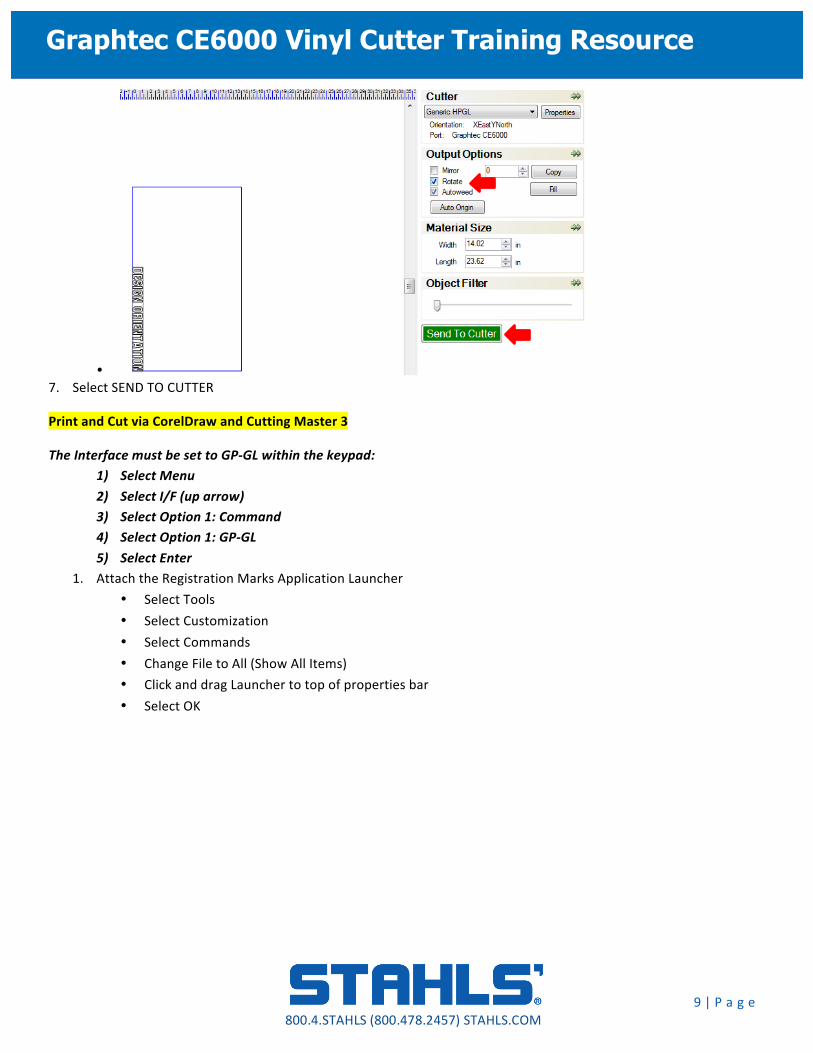
5. Confirm correct Cutting Conditions, Material Size, and Test Cut (within Cutting Master 3 – see Getting Started Pg. 3
of this resource) 6. Select ROTATE within Vector Cut Output Options (if you want to cut the design the width of the cutter – Y axis)
9 | P a g e
Graphtec CE6000 Vinyl Cutter Training Resource
800.4.STAHLS (800.478.2457) STAHLS.COM
• 7. Select SEND TO CUTTER
Print and Cut via CorelDraw and Cutting Master 3
The Interface must be set to GP-‐GL within the keypad: 1) Select Menu 2) Select I/F (up arrow) 3) Select Option 1: Command 4) Select Option 1: GP-‐GL 5) Select Enter
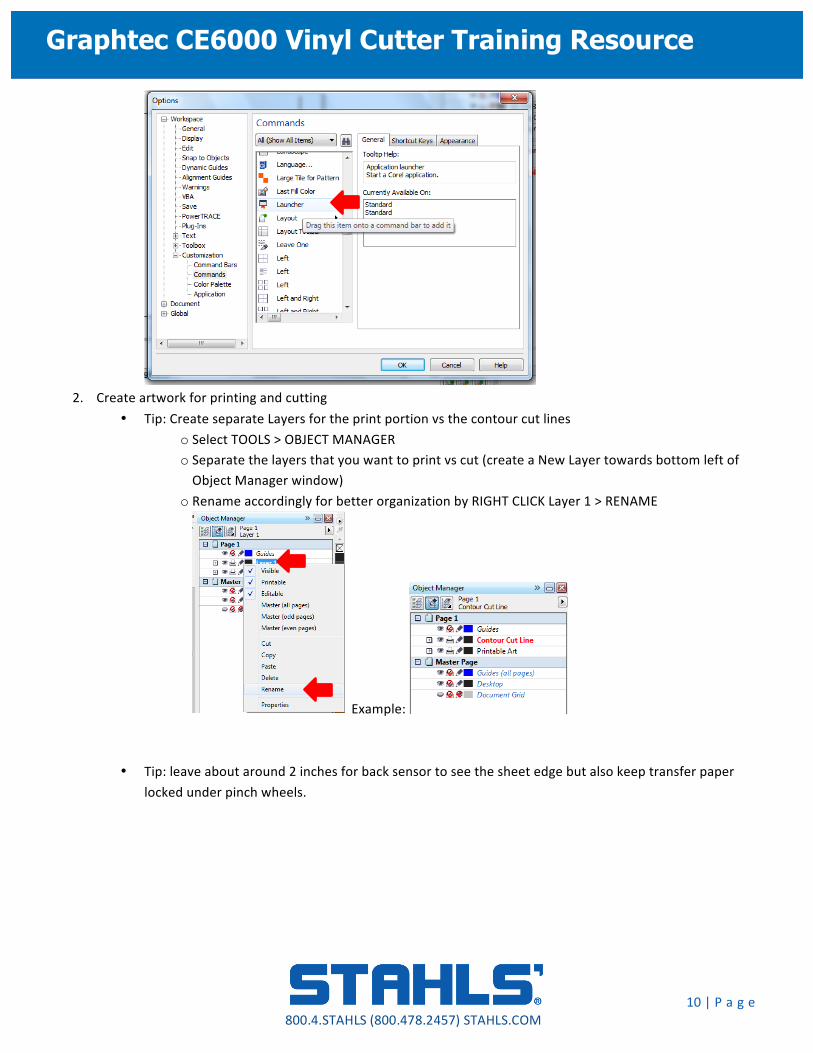
1. Attach the Registration Marks Application Launcher • Select Tools • Select Customization • Select Commands • Change File to All (Show All Items) • Click and drag Launcher to top of properties bar • Select OK
10 | P a g e
Graphtec CE6000 Vinyl Cutter Training Resource
800.4.STAHLS (800.478.2457) STAHLS.COM
2. Create artwork for printing and cutting
• Tip: Create separate Layers for the print portion vs the contour cut lines o Select TOOLS > OBJECT MANAGER o Separate the layers that you want to print vs cut (create a New Layer towards bottom left of Object Manager window)
o Rename accordingly for better organization by RIGHT CLICK Layer 1 > RENAME
Example:
• Tip: leave about around 2 inches for back sensor to see the sheet edge but also keep transfer paper locked under pinch wheels.
11 | P a g e
Graphtec CE6000 Vinyl Cutter Training Resource
800.4.STAHLS (800.478.2457) STAHLS.COM
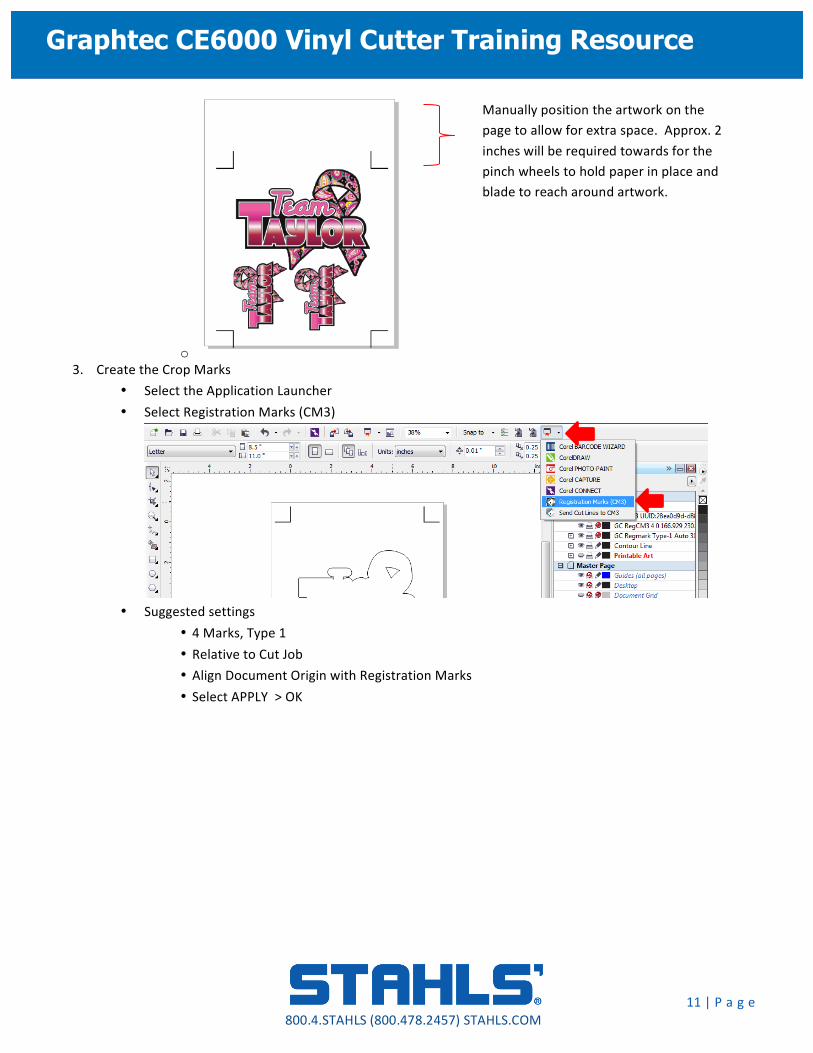
o 3. Create the Crop Marks
• Select the Application Launcher • Select Registration Marks (CM3)
• Suggested settings
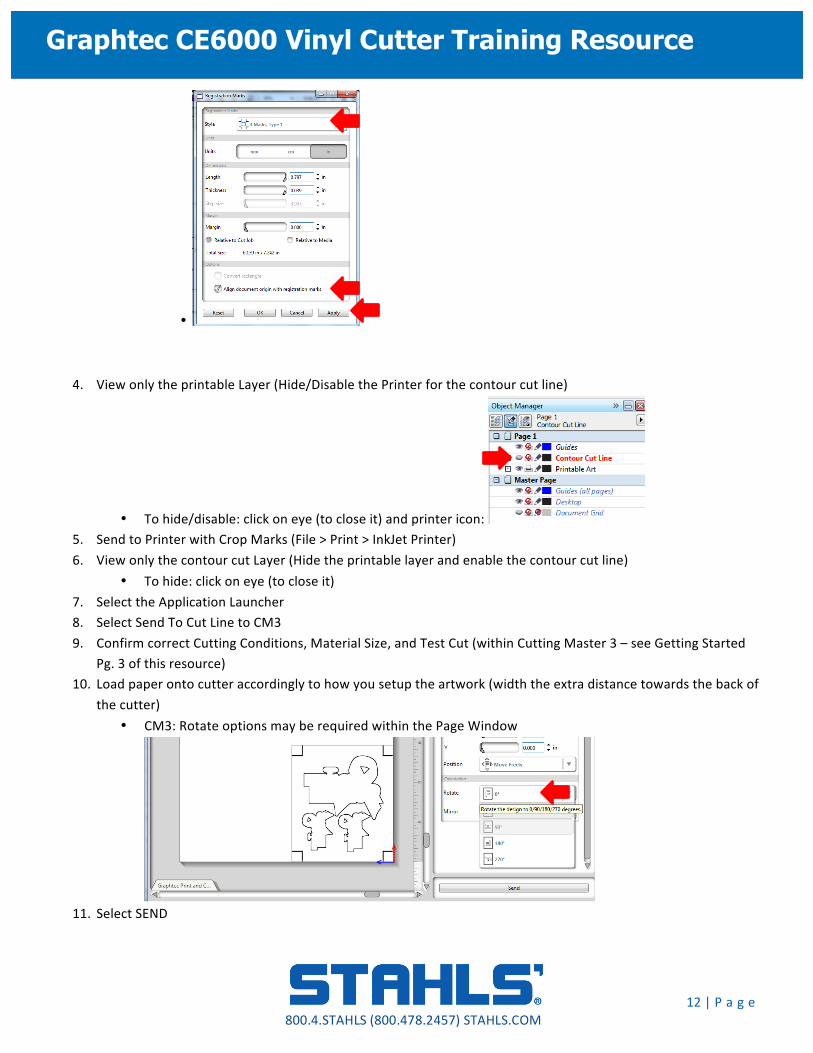
• 4 Marks, Type 1 • Relative to Cut Job • Align Document Origin with Registration Marks • Select APPLY > OK
Manually position the artwork on the page to allow for extra space. Approx. 2 inches will be required towards for the pinch wheels to hold paper in place and blade to reach around artwork.
12 | P a g e
Graphtec CE6000 Vinyl Cutter Training Resource
800.4.STAHLS (800.478.2457) STAHLS.COM
•
4. View only the printable Layer (Hide/Disable the Printer for the contour cut line)
• To hide/disable: click on eye (to close it) and printer icon: 5. Send to Printer with Crop Marks (File > Print > InkJet Printer) 6. View only the contour cut Layer (Hide the printable layer and enable the contour cut line)
• To hide: click on eye (to close it) 7. Select the Application Launcher 8. Select Send To Cut Line to CM3 9. Confirm correct Cutting Conditions, Material Size, and Test Cut (within Cutting Master 3 – see Getting Started
Pg. 3 of this resource) 10. Load paper onto cutter accordingly to how you setup the artwork (width the extra distance towards the back of
the cutter) • CM3: Rotate options may be required within the Page Window
11. Select SEND