
GE Healthcare IT Centricity Practice Solution Centricity®...
65
1 Copyright 2012 General Electric Company. All rights reserved. Proprietary Information GE Healthcare IT Centricity® Practice Solution Centricity® EMR LinkLogic Companion Guide Centricity® Services
Transcript of GE Healthcare IT Centricity Practice Solution Centricity®...

1 Copyright 2012 General Electric Company. All rights reserved. Proprietary Information
GE Healthcare IT
Centricity® Practice Solution Centricity® EMR LinkLogic Companion Guide
Centricity® Services

2 Copyright 2012 General Electric Company. All rights reserved. Proprietary Information
Proprietary Rights and Limitations and Conditions of Use This document is the property of GE Healthcare, a division of General Electric Company (“GE Healthcare”) and is furnished to you, a current GE Healthcare customer, pursuant to an agreement between you and GE Healthcare. If you are not (i) a current GE Healthcare customer, and (ii) subject to non-disclosure obligations pursuant to an agreement with GE Healthcare, you are not authorized to access this document. No part of this document may be reproduced in any form, by Photostat, microfilm, xerography, or any other means, or incorporated into any information retrieval system, electronic or mechanical, without the written permission of GE Healthcare. Contact your GE Healthcare representative with any inquiries regarding copying and/or using the materials contained in this document outside of the limited scope described herein. GE Healthcare reminds you that there may be legal, ethical, and moral obligations for medical care providers to protect sensitive patient information when dealing with vendors such as GE Healthcare. You should obtain explicit written consent from both the patient and GE Healthcare before you disclose sensitive patient information to GE Healthcare. Trademarks GE, the GE Monogram, Imagination at work, and Centricity are trademarks of General Electric Company. All other product names and logos are trademarks or registered trademarks of their respective companies Copyright Notice Copyright 2012 General Electric Company. All rights reserved. Disclaimers Any information related to clinical functionality is intended for clinical professionals. Clinical professionals are expected to know the medical procedures, practices and terminology required to monitor patients. Operation of the product should neither circumvent nor take precedence over required patient care, nor should it impede the human intervention of attending nurses, physicians or other medical personnel in a manner that would have a negative impact on patient health. General Electric Company reserves the right to make changes in specifications and features shown herein, or discontinue the products described at any time without notice or obligation. This does not constitute a representation or warranty regarding the product or service featured. All illustrations or examples are provided for informational or reference purposes and/or as fictional examples only. Your product features and configuration may be different than those shown. GE Healthcare IT 540 West Northwest Highway Barrington, IL 60010 U.S.A. www.gehealthcare.com

3 Copyright 2012 General Electric Company. All rights reserved. Proprietary Information
How to Use This Companion Guide:
This Companion Guide is provided as an ancillary instructional guide to be used in conjunction with the CPS or EMR Computer Based Tutorials (CBT's), CPS or EMR Help Guides (F1), and CPS or EMR New Version Release Notes available to you with the purchase of the CPS product(s). Additionally, during your CPS or EMR Implementation or Upgrade, you will have GE Healthcare professionals available to assist you as designed by your purchase. For field-by-field explanation of the product or for point-and-click functionality explanation, please reference the CBTs, Help Guides, and/or New Version Release Notes. This Companion Guide is a compilation of “best practices” obtained from multiple healthcare practice workflows, which are combined with the functionality of CPS or EMR software, to provide the most commonly used workflows within an ambulatory physician office. The workflows described in this Companion Guide are recommendations ONLY and do not necessarily reflect mandatory setup/settings. The Companion Guide should be used as a reference in determining the best workflow designs for your specific medical practice needs. The Companion Guide is divided into sections that represent major functionality areas and/or workflows of the CPS or EMR product. Please note that topics affecting more than one area of functionality may be cross-referenced. Also, at the end of each section, you will find a Notes area available for your own customized notes. For more information on customer education services and tools concerning the CPS or EMR products, please visit the Customer Education website: www.cpstraining-gehc.com.

4 Copyright 2012 General Electric Company. All rights reserved. Proprietary Information
Table of Contents Introduction ...................................................................................................................................................... 5 Enable LinkLogic on a Workstation ........................................................................................................ 6 Jobs ...................................................................................................................................................................... 7 Process Jobs in "Manual" State ................................................................................................................ 8 DTS Monitor ...................................................................................................................................................... 9 Activity Log ......................................................................................................................................................10 Activity Log Message Types .....................................................................................................................11 Filter to Specific Message Codes ...........................................................................................................12 Removing Activity Log Messages ..........................................................................................................13 Automatically Manage Activity Log .....................................................................................................14 Exclude Messages From Activity Log ..................................................................................................15 Errors..................................................................................................................................................................16 File Extensions / Error Types ...................................................................................................................17 Viewing HL7 Messages ..............................................................................................................................18 Typical Segments in HL7 Messages .....................................................................................................19 Reading HL7 Files .........................................................................................................................................20 Typical Error: Demographics Interface ..............................................................................................21 Typical Error: Appointment Interface .................................................................................................23 Resolve Appointment Book/Type Errors ............................................................................................26 Typical Error: Lab Results Interface ......................................................................................................27 Typical Error: "No Existing Data…." .......................................................................................................28 Resolve "No Existing Data…." Errors .....................................................................................................29 Merging Charts ..............................................................................................................................................32 Merging Charts - Centricity EMR ...........................................................................................................35 Cross-Reference Files .................................................................................................................................36 Sample Cross-Reference File: Lab Results .......................................................................................37 Sample Cross-Reference File: Document Types ...........................................................................38 Sample Cross-Reference File: Providers ...........................................................................................39 Sample Cross-Reference File: Locations of Care ..........................................................................40 Sample Cross-Reference File: Appointment Books......................................................................41 Sample Cross-Reference File: Appointment Types ......................................................................42 Maintaining Cross-Reference Files .......................................................................................................43 MIK Mapping...................................................................................................................................................44 MIK Mapping: 4 Key Areas to Map .......................................................................................................45 Additional Items & Supported EMR Values .......................................................................................46 Integration Kit Configuration ..................................................................................................................47 MIK Mapping: Appointment Types ......................................................................................................52 MIK Mapping: Doctors ...............................................................................................................................53 MIK Mapping: Facilities .............................................................................................................................54 MIK Mapping: Resources .........................................................................................................................55 Save Mapping Changes.............................................................................................................................56 Centricity Clinical Gateway (CCG) ..........................................................................................................57 Notes ..................................................................................................................................................................65

5 Copyright 2012 General Electric Company. All rights reserved. Proprietary Information
Scenario: Monitoring LinkLogic is essential in ensuring that data from outside systems is successfully imported into Centricity; therefore, you must know how to navigate your way through LinkLogic.
Typical Staff Responsible and/or impacted with this Process: LinkLogic Manager, Administration Set up Staff
Introduction
*IMPORTANT NOTICE: This Companion Guide can be used for both CPS & Centricity EMR. The majority of screen shots are from CPS 10. Any major differences between versions are included in this documentation, and 2 sets of screen shots are included when noteworthy.
LinkLogic enables the efficient and intelligent sharing of data between Centricity and a variety of external systems, such as practice management, transcription, laboratory, hospital information, document scanning systems and clinical data repositories. LinkLogic uses interfaces to share data.
Considerations: You will need to designate a staff member who will serve as the LinkLogic
Manager. The LinkLogic Manager will monitor messages in LinkLogic and resolve
errors. This staff member will also alert others to possible interface issues as
applicable. Security / Privileges must be granted to access LinkLogic.

6 Copyright 2012 General Electric Company. All rights reserved. Proprietary Information
Enable LinkLogic on a Workstation
CPS: Assigning applicable security to LinkLogic will enable the module for the user. Centricity EMR: In addition to enabling privileges in Setup, LinkLogic must be enabled during installation of the EMR client.

7 Copyright 2012 General Electric Company. All rights reserved. Proprietary Information
Jobs
LinkLogic queues and processes jobs to import or export data. The Data Transfer Station handles jobs automatically. Jobs can also be imported or exported manually from the jobs section of LinkLogic. When error files are opened up in the errors section but canceled out rather than resolving, this causes jobs to appear in the Jobs section. These jobs will need to be processed manually to place the error files back in the errors section in order to resolve the corresponding errors. “Manual” will appear in the state column when this is necessary. You should organize the jobs section to “All Stations” & save as your preference to ensure that you can see and process all jobs that appear in “Manual” state when this occurs.

8 Copyright 2012 General Electric Company. All rights reserved. Proprietary Information
Process Jobs in “Manual” State
To process jobs in “manual” state:
1. Highlight job(s). 2. Click the Process button to send job(s) back to the errors section. 3. Also, click OK to any screens that pop up during this process.

9 Copyright 2012 General Electric Company. All rights reserved. Proprietary Information
DTS Monitor
The DTS Monitor section will show you whether or not the Data Transfer Station (DTS) is “active”. You should see a line item that states the DTS Status is “Active”. If there is not a line item in the DTS section that states that the Data Transfer Station (DTS) is “Active”, or if the DTS Status is “Error”, the DTS needs to be restarted.

10 Copyright 2012 General Electric Company. All rights reserved. Proprietary Information
Activity Log
The Activity Log lists notes, warnings, and error messages for every job manually imported or exported, and for every job the DTS processes. If you import and export many jobs, the log can get extremely large. If the activity log gets too many messages in it, the DTS can stop processing until the activity log is cleaned out. Under most circumstances, it is important that the activity log be organized so that messages are viewed for All Stations. This should be saved as your preference, which will ensure that you are viewing ALL messages when clearing the log.

11 Copyright 2012 General Electric Company. All rights reserved. Proprietary Information
Activity Log Message Types
The activity log message type is indicated in the “severity” column. The 3 different message types are:
• Error • Warning • Note
Error messages indicate a possible problem in importing or exporting data. Warning messages inform you about LinkLogic actions, indicate missing data in optional fields, or data that is not used by the EMR application. Note messages primarily convey information. You typically do not need to take any action. Go to “LinkLogic Activity Log Message Codes” in HELP (F1) to understand the notes, warnings, and errors that you see in the Activity Log.

12 Copyright 2012 General Electric Company. All rights reserved. Proprietary Information
Filter to Specific Message Codes
Filtering to specific message codes is one way to organize the current view, making it easier to clear multiple items at one time. In the message code range area, enter the minimum & maximum code range, and then click the OK button. Only messages in the specified range will be seen until the view is reorganized. To view every instance of a specific message code, enter the same number in the minimum code range field and the maximum code range field. Messages in the activity log can also be organized to specific dates, severity, and/or interface type.

13 Copyright 2012 General Electric Company. All rights reserved. Proprietary Information
Removing Activity Log Messages
To clear messages in the current view:
1. Click the SELECT button, which will highlight every* message in the current view.
2. Once all messages are highlighted, click the REMOVE button. 3. After all messages in the current view are removed, click the ORGANIZE button
again, and then click OK to return to your normal preferred view. *The maximum number of messages that the select button will highlight is 14,000, so you may have to follow this process multiple times to remove all instances. NOTE: Activity log messages should not be cleared out prior to working the associated errors in the errors section, as these messages can sometimes be helpful when resolving the errors.

14 Copyright 2012 General Electric Company. All rights reserved. Proprietary Information
Automatically Manage Activity Log
CPS: Go to Administration>System>LinkLogic>Defaults. Centricity EMR: Go to Setup>Settings>LinkLogic>Defaults. To automatically remove error* entries from the Activity Log:
1. Check “Automatically remove error entries from the Activity Log”. 2. Enter the number of days in the “Remove entries after” field.
To automatically remove warning and note* entries:
1. Check “Automatically remove warnings and note entries from the Activity Log”.
2. Enter the number of days in the “Remove entries after” field. NOTE: Activity log messages should not be cleared out prior to working the associated errors in the errors section, as these messages can sometimes be helpful when resolving the errors. Be sure you set the “number of days” fields far enough out so that the activity log messages are not removed sooner than you will be working the errors. *Message types appear in the severity column of the Activity Log.

15 Copyright 2012 General Electric Company. All rights reserved. Proprietary Information
Exclude Messages From Activity Log
Every time a job is queued, LinkLogic adds message code 7 to the Activity Log. LinkLogic adds message code 1 every time a job completes. If you don’t want these messages to accumulate in the Activity Log, you can modify a configuration file to filter or exclude these messages from the log.
To exclude specific messages from the Activity Log:
1. Navigate to folder containing CPS or Centricity EMR. Examples - CPS: C:\Program Files\Centricity Practice Solution\Client. Centricity EMR: C:\Program Files\Centricity EMR
2. Locate & open the file for your version of the product in Notepad. (CPS: emr.ini / Centricity EMR: cfw.ini)
3. Find the L3IgnoreMessages entry.
4. Type the message codes you don’t want to see, separated by commas. For example: L3IgnoreMessages=1,7
5. Shut down & restart CPS on the workstation or the Data Transfer Station (as applicable).
**This must be done all on workstations with access to Linklogic, including the Data Transfer Station.**

16 Copyright 2012 General Electric Company. All rights reserved. Proprietary Information
Errors
When you import and export data, errors can occasionally occur. Errors can occur for many reasons. The following list shows some of the reasons for errors:
• LinkLogic can’t process the import file, possibly due to a patient mismatch or the wrong data format.
• LinkLogic can’t find the responsible provider.
• LinkLogic can’t find a relationship for the data, or the header record in the data file isn’t correct.
• LinkLogic can’t process the job, due to a missing configuration file or a bad export segment.
• LinkLogic can’t import the data because the patient’s chart is being updated by another user.
• LinkLogic can’t find the appointment book or the appointment type.
The Errors section in LinkLogic contains the Pending Errors to be resolved as well as associated Activity Log messages for each error. The associated activity log messages can sometimes be used to help determine what you need to do to resolve the errors.

17 Copyright 2012 General Electric Company. All rights reserved. Proprietary Information
File Extensions / Error Types
.HR = Lab Results, PatientLink, Docutrak Observations
.HD = Demographic Messages
.HT = Docutrak and Noteslink Documents
.SL = Scheduling Messages
The file extensions shown above are the most common, but this is not an all-inclusive list.

18 Copyright 2012 General Electric Company. All rights reserved. Proprietary Information
Viewing HL7 Files
HL7 (Health Level 7) is a standard for electronic data exchange in healthcare environments. LinkLogic’s use of this format is defined in the Interface Specifications for each interface type. These specifications can be found in Managing Interfaces for CPS on the Support web site (see next page for more information).
The error files you will work with will be HL7 files. To avoid horizontal scrolling through the messages, set viewing options to “Wrap to Window”.
If Using WordPad to view the files:
1. Click on the “View” menu.
2. Click Options.
3. Click Wrap to Window, and then click OK.
If Using Notepad to view the files:
1. Click on the “Format” menu.
2. Click “Word Wrap”.
19 Copyright 2012 General Electric Company. All rights reserved. Proprietary Information
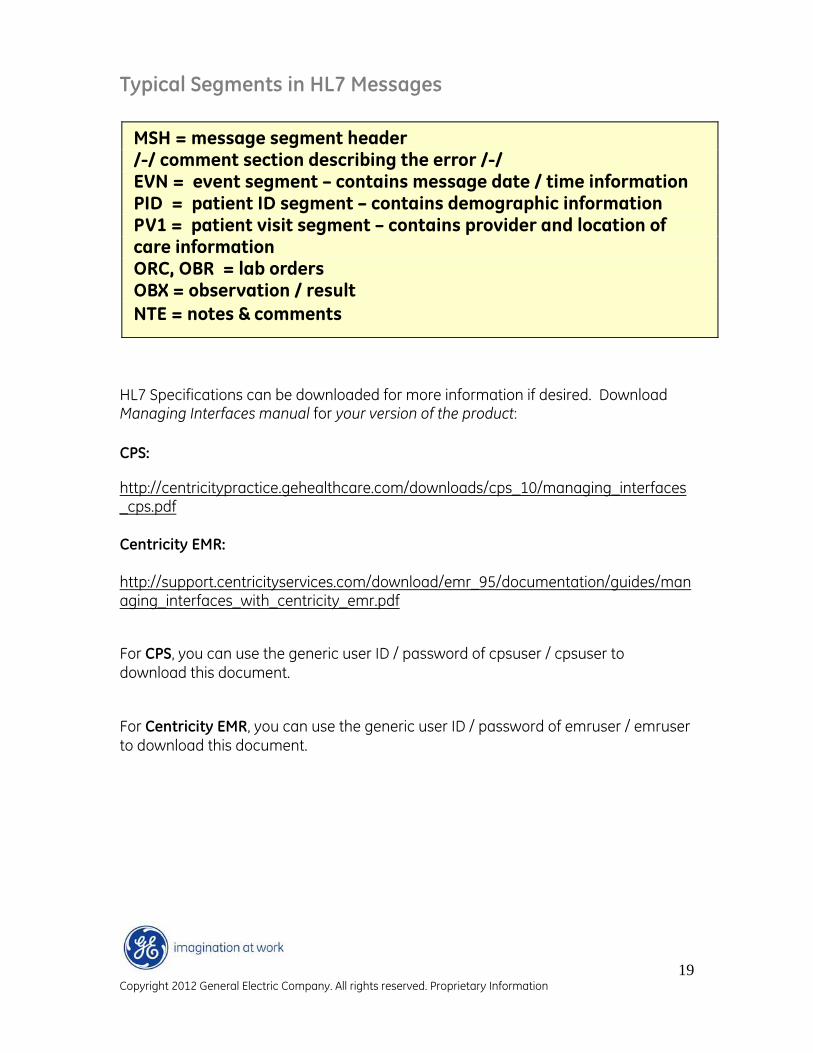
Typical Segments in HL7 Messages
HL7 Specifications can be downloaded for more information if desired. Download Managing Interfaces manual for your version of the product: CPS:
http://centricitypractice.gehealthcare.com/downloads/cps_10/managing_interfaces_cps.pdf Centricity EMR: http://support.centricityservices.com/download/emr_95/documentation/guides/managing_interfaces_with_centricity_emr.pdf
For CPS, you can use the generic user ID / password of cpsuser / cpsuser to download this document.
For Centricity EMR, you can use the generic user ID / password of emruser / emruser to download this document.
MSH = message segment header /-/ comment section describing the error /-/
EVN = event segment – contains message date / time information
PID = patient ID segment – contains demographic information
PV1 = patient visit segment – contains provider and location of care information
ORC, OBR = lab orders
OBX = observation / result
NTE = notes & comments

20 Copyright 2012 General Electric Company. All rights reserved. Proprietary Information
Reading HL7 Files In the example PID segment above, individual fields are separated by vertical bars or “pipes”. When counting fields, empty fields are also counted. Segment names and field numbers are referenced together for identification purposes. Example: PID-1, PID-2, PID-3, etc. Error messages frequently refer to specific segments and fields, where data is missing or formatted incorrectly.
PID|||MR-101-003|MR-101-003|Ellis^Virgil||19431208|M ||B|2545 SW 78th^^Portland^OR^97229^USA||503-292-3590|503-225-2147|English|D|||815-83-5639|
1 2 3 4 5 6 7 8 etc.
Segment Name

21 Copyright 2012 General Electric Company. All rights reserved. Proprietary Information
Scenario: There is an error in LinkLogic stating a required field is missing. Note: This scenario is more typical for Centricity EMR, but could also be applicable if demographic data is electronically sent from another system to CPS. Typical Staff Responsible and/or impacted with this Process: LinkLogic Manager, Administration Set up Staff
Typical Error: Demographics Interface
Errors referring to missing or bad demographic information should NOT be resolved in LinkLogic. These should be resolved in the originating system.
For this example, you should:
1. Find the patient’s date of birth.
2. Enter it into the patient’s record in the originating system. (Doing this will generate a new HL7 message.)
3. Verify that the record was created / updated in CPS or Centricity EMR.
4. Remove the original error from the errors section of LinkLogic.
Always follow the procedure above to ensure that data is kept in synch between systems. Also remember that the originating system is the MASTER system and that Centricity is the RECEIVING system.
22 Copyright 2012 General Electric Company. All rights reserved. Proprietary Information
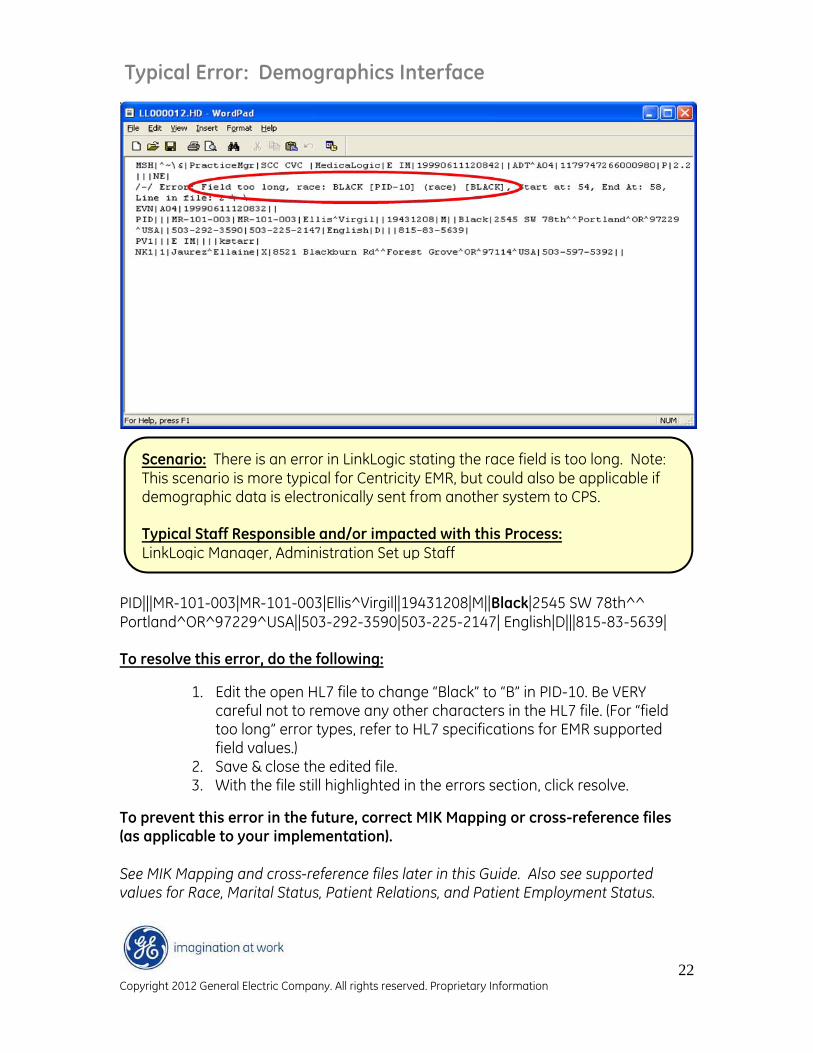
Scenario: There is an error in LinkLogic stating the race field is too long. Note: This scenario is more typical for Centricity EMR, but could also be applicable if demographic data is electronically sent from another system to CPS. Typical Staff Responsible and/or impacted with this Process: LinkLogic Manager, Administration Set up Staff
Typical Error: Demographics Interface
PID|||MR-101-003|MR-101-003|Ellis^Virgil||19431208|M||Black|2545 SW 78th^^ Portland^OR^97229^USA||503-292-3590|503-225-2147| English|D|||815-83-5639| To resolve this error, do the following:
1. Edit the open HL7 file to change “Black” to “B” in PID-10. Be VERY careful not to remove any other characters in the HL7 file. (For “field too long” error types, refer to HL7 specifications for EMR supported field values.)
2. Save & close the edited file. 3. With the file still highlighted in the errors section, click resolve.
To prevent this error in the future, correct MIK Mapping or cross-reference files (as applicable to your implementation). See MIK Mapping and cross-reference files later in this Guide. Also see supported values for Race, Marital Status, Patient Relations, and Patient Employment Status.

23 Copyright 2012 General Electric Company. All rights reserved. Proprietary Information
Scenario: There is a “Missing Appt Book and/or Type” error in LinkLogic. Note: This scenario is more typical for Centricity EMR, but could also be applicable if appointment messages are electronically sent from another system to CPS. Typical Staff Responsible and/or impacted with this Process: LinkLogic Manager, Administration Set up Staff
Typical Error: Appointment Interface
****NOTE: Screen print above is from Centricity EMR.**** Errors like the one shown here occur when an appointment book related to the imported appointment message is not mapped and/or set up in Centricity. Example associated activity log message: Appointment book ‘Star’ could not be found.
To resolve: 1. Set up appointment book in Centricity as applicable. 2. Double-click the highlighted error message in LinkLogic. 3. Select the appropriate appointment book from the dropdown as
applicable & click OK.
Tip: Highlight the associated activity log message for the error, as shown above. Activity log message code # 2081 will show what came across the interface for the appointment book. Checking here will reduce the amount of time spent going back

24 Copyright 2012 General Electric Company. All rights reserved. Proprietary Information
Scenario: There is a “Missing Appt Book and/or Type” error in LinkLogic. Note: This scenario is more typical for Centricity EMR, but could also be applicable if appointment messages are electronically sent from another system to CPS. Typical Staff Responsible and/or impacted with this Process: LinkLogic Manager, Administration Set up Staff
and forth from the external scheduling system to LinkLogic and help you resolve these errors quickly.
Typical Error: Appointment Interface
****NOTE: Screen print above is from Centricity EMR.**** Errors like the one shown here occur when an appointment type related to the imported appointment message is not mapped and/or set up in Centricity. Example associated activity log message: Appointment type ‘FU is not defined…..
To resolve: 1. Set up appointment type in Centricity EMR as applicable.
(Go>Setup>Settings>Appointments) 2. Double-click the highlighted message in the errors tab. 3. Select the appropriate appointment type as applicable & click OK.
Tip: Highlight the associated activity log message for the error, as shown above. Activity log message code # 2073 will show what came across the interface for the

25 Copyright 2012 General Electric Company. All rights reserved. Proprietary Information
Scenario: There is a “Missing Appt Book and/or Type” error in LinkLogic. Note: This scenario is more typical for Centricity EMR, but could also be applicable if appointment messages are electronically sent from another system to CPS. Typical Staff Responsible and/or impacted with this Process: LinkLogic Manager, Administration Set up Staff
appointment type. Checking here will reduce the amount of time spent going back and forth from PM Scheduling and LinkLogic and help you resolve these errors quickly.
Typical Error: Appointment Interface
****NOTE: Screen print above is from Centricity EMR.**** This error was generated because the appointment book was not mapped or cross-referenced, as applicable. Example associated activity log message: Appointment Book ’53’ could not be found. (Activity Log Message Code #2081) To resolve:
1. Double-click the highlighted error in LinkLogic. 2. Select the appointment book as applicable from the drop-down list & click OK.
To prevent this error in the future, correct MIK Mapping or your Appointment Cross-Reference file (as applicable). Refer to MIK Mapping or Cross-Reference sections of this Guide as needed.

26 Copyright 2012 General Electric Company. All rights reserved. Proprietary Information
Scenario: There is a “Missing Appt Book and/or Type” error in LinkLogic. Note: This scenario is more typical for Centricity EMR, but could also be applicable if appointment messages are electronically sent from another system to CPS. Typical Staff Responsible and/or impacted with this Process: LinkLogic Manager, Administration Set up Staff
Resolve Appointment Book / Type Errors
Missing Appointment Book and/or Type errors will be resolved using the screens above. There are no associated HL7 files for these. Select the book and/or type from the dropdown or binoculars. To prevent these errors in the future, ensure that the corresponding appointment books and types are present in Centricity and correct MIK Mapping or your Appointment Cross-Reference file (as applicable).

27 Copyright 2012 General Electric Company. All rights reserved. Proprietary Information
Scenario: There is an error in LinkLogic in the PV1-3 segment. You need to resolve the location of care error before you can import the HL7 message into Centricity. Typical Staff Responsible and/or impacted with this Process: Li kL i M Ad i i t ti S t St ff
Typical Error: Lab Results Interface
PV1|1|R|^^^128^East Surg||||hwinston^Winston^Harry^S. To resolve:
1. Very carefully type the location of care abbreviation in place of the number in PV1-3, without removing any other characters in the message.
2. Save & close the HL7 file. 3. Click RESOLVE.
To prevent this error in the future, correct MIK Mapping or your Location of Care Cross-Reference file (as applicable).
Note: Location of Care abbreviations can be found in CPS: Administration>System> User and Resource Management>Users; in Centricity EMR: Setup>Settings>System

28 Copyright 2012 General Electric Company. All rights reserved. Proprietary Information
Scenario: There is an error in LinkLogic that you need to resolve before you can import the HL7 message into Centricity. This message requires manual matching to a patient in Centricity, as the incoming data is not an exact match. Typical Staff Responsible and/or impacted with this Process: LinkLogic Manager, Administration Set up Staff
Typical Error: “No Existing Data….”
This type of error is possible for all interface types.
Follow the directions on the following pages to resolve this type of error.
NOTE: It is sometimes helpful to highlight the patient’s external ID in PID-2 or PID-3, right click & copy the patient ID, and then paste this ID into the patient search dialog when resolving this type of error.

29 Copyright 2012 General Electric Company. All rights reserved. Proprietary Information
Resolve “No Existing Data…” Errors
To resolve:
1. Make note of the patient’s demographic information in the comments section of the HL7 file, then close the file. (You may opt to copy the external patient ID in PID-2 or PID-3 and use this in step 5 on the next page.)
2. With the error still highlighted, click Resolve.
…….Continued on next page
Comments Section of HL7 File

30 Copyright 2012 General Electric Company. All rights reserved. Proprietary Information
Resolve “No Existing Data…” Errors
…….continued from previous page
3. Highlight the entry in the “Data to Patient Matching” window.
4. Click “Set Patient” button.
5. Click “Search” on the “Find Patient” window. (Note: If searching by external ID, paste the ID copied from PID-2 or PID-3 and verify that the “search by” field has been changed to “External ID” prior to clicking the “Search” button.) If you believe the patient could be inactive, uncheck the “Search active patients only” checkbox prior to clicking the “Search” button.
6. Highlight the correct patient’s name, and then click OK.

31 Copyright 2012 General Electric Company. All rights reserved. Proprietary Information
Resolve “No Existing Data…” Errors
…….continued from previous page
7. Highlight the “User-Specified Match” line item in the “Data to Patient Matching” window, and then click OK.
8. Click OK again when processing is complete.

32 Copyright 2012 General Electric Company. All rights reserved. Proprietary Information
Merging Charts
If you have duplicate charts, you should merge them prior to resolving related LinkLogic errors.
Note: There can be no unsigned documents in either chart and no other user can be in either chart when you perform this function.
If you have privileges to merge charts, follow these steps:
1. Open the chart you want to merge (the “bad” chart)
2. Make sure you are in the patient’s chart summary.
3. Go to “Actions” in the toolbar
4. Choose Administration>Merge Chart…..
continued on next page…….
NOTE: If the source chart is completely blank with no documents (including filed in error) you may choose to Delete the chart instead, eliminating the need to merge. Proper privileges are also required to perform this function.

33 Copyright 2012 General Electric Company. All rights reserved. Proprietary Information
Merging Charts – cont’d
……continued from previous page
5. Click the binoculars and find the Destination Patient (the duplicate chart you want to keep).
6. Highlight the correct patient and click OK.
continued on next page………

34 Copyright 2012 General Electric Company. All rights reserved. Proprietary Information
Merging Charts
……continued from previous page 7. Click Merge
8. Then, click YES.
The charts will be merged as one chart (into the destination chart), and the source chart will be deactivated.

35 Copyright 2012 General Electric Company. All rights reserved. Proprietary Information
Merging Charts – Centricity EMR
For Centricity EMR, the window above will appear upon selecting the Destination patient from the Find Patient dialog. The left side of the screen shows the source chart (“bad” chart), and the right side shows the destination chart (the one you want to keep & will contain the merged data). To merge selected charts:
1. Uncheck the checkboxes for “Merge Insurance Information” and “Merge Contact Information”.
2. Check the checkbox for “Delete Source after Merge”. This will delete the “bad” chart after the merge.
3. Click Merge. 4. The charts are now merged. Click OK to the confirmation message (shown
above).

36 Copyright 2012 General Electric Company. All rights reserved. Proprietary Information
Cross-Reference Files
Sample cross-reference files are included on the next few pages of this Guide. See Managing Interfaces manual for your version of Centricity for complete information as well as examples of additional cross-reference file types.
Some interfaces require the creation & use of cross reference files. Cross reference files translate data field values to values that can be recognized by Centricity on import or the external system on export.
For example, if you import laboratory results, you will need a cross-reference file to translate laboratory test result codes to Centricity observation term codes.

37 Copyright 2012 General Electric Company. All rights reserved. Proprietary Information
Scenario: You need to create a lab cross-reference file for your lab results interface to ensure lab results populate patient flowsheets. Typical Staff Responsible and/or impacted with this Process: LinkLogic Manager, Administration Set up Staff, IT Staff
Sample Cross-Reference File: Lab Results
I = Import Relationship
The first value after I = laboratory test result code
The last value = matching code for Centricity observation term
Considerations: You will need to get a list of laboratory result codes or a lab result codes
“compendium” from your lab vendor or lab system. You will need a spreadsheet of Centricity observation terms with associated
obs term codes.

38 Copyright 2012 General Electric Company. All rights reserved. Proprietary Information
Scenario: You need to create a document types cross-reference file for a document interface. Typical Staff Responsible and/or impacted with this Process: LinkLogic Manager, Administration Set up Staff, IT Staff
Sample Cross-Reference File: Document Types
I = Import Relationship
The first value after I = document type being imported from outside system
The last value = corresponding document type abbreviation in Centricity
This type of cross reference file is needed when importing scanned documents.
Considerations: You will need to obtain a list of document types for the incoming data. You will need to map the incoming document types to Centricity document
type abbreviations.

39 Copyright 2012 General Electric Company. All rights reserved. Proprietary Information
Scenario: You need to create a provider cross-reference file for a lab results interface. Typical Staff Responsible and/or impacted with this Process: LinkLogic Manager, Administration Set up Staff, IT Staff
Sample Cross-Reference File: Providers
I = Import Relationship The first value after I = Provider’s UPIN number The last value = corresponding Provider’s user ID in Centricity Using this type of cross reference file ensures that lab results and other documents go to the corresponding provider’s desktop.
Considerations: You will need to obtain a list of provider identifiers for the incoming data.
Typical identifiers might be UPIN or NPI numbers. You will need to map the incoming provider identifiers to Centricity providers’
user IDs.

40 Copyright 2012 General Electric Company. All rights reserved. Proprietary Information
Scenario: You need to create a location of care cross-reference file for a lab results interface. Typical Staff Responsible and/or impacted with this Process: LinkLogic Manager, Administration Set up Staff, IT Staff
Sample Cross-Reference File: Locations of Care
I = Import Relationship The first value after I = Location or Facility Number from Outside System The last value = corresponding Location of Care abbreviation in Centricity
Considerations: You will need to obtain a list of location or facility codes for the incoming
data. You will need to map the incoming codes to Centricity location of care
abbreviations.

41 Copyright 2012 General Electric Company. All rights reserved. Proprietary Information
Scenario: You need to create an Appointment Book cross-reference file. Typical Staff Responsible and/or impacted with this Process: LinkLogic Manager, Administration Set up Staff, IT Staff
Sample Cross-Reference File: Appointment Books
I = Import Relationship The first value after I = Appointment Book Identifier from Outside System The last value = corresponding Book name in Centricity
Considerations: You will need to obtain a list of appointment book identifiers for the incoming
data. You will need to map the incoming identifiers to Centricity appointment book
names. Important: Appointment Book mappings are case-and-space sensitive.

42 Copyright 2012 General Electric Company. All rights reserved. Proprietary Information
Scenario: You need to create an appointment type cross-reference file. Typical Staff Responsible and/or impacted with this Process: LinkLogic Manager, Administration Set up Staff, IT Staff
Sample Cross Reference File: Appointment Types
I = Import Relationship The first value after I = Appointment Type Identifier from Outside System The last value = corresponding Appointment Type in Centricity
Considerations: You will need to obtain a list of appointment type identifiers for the incoming
data. You will need to map the incoming identifiers to Centricity appointment
types. Important: Appointment Type mappings are case-and-space sensitive.
43 Copyright 2012 General Electric Company. All rights reserved. Proprietary Information
Maintaining Cross-Reference Files
You will need to locate the drive on the DTS or other designated network location where LinkLogic is installed.* The files will be located in LinkLogic’s config\local folder on the network. Each file will have an .xrf extension. Example CPS path: <Drive on your DTS or other location>\Program Files\ Centricity Practice Solution\Client\llogic\config\local Example Centricity path: <Drive on your DTS or other location>\Program Files\ Centricity EMR\llogic\config\local To Edit:
1. Open the file you want to edit, using Notepad. 2. Go to the very end of the file contents, using CTRL-END. 3. On a new line, add another I with a comma. 4. Add the new information, making sure to follow the same formatting you see
in the file. 5. Add each new item as applicable, per instructions in steps 3 & 4 above. 6. Save & close the file when finished. 7. Simultaneously press the following keys on your keyboard & release: CTRL-
SHIFT-D. This will clear the LinkLogic cache. (Alternatively, you can restart the DTS.)
8. After using CTRL-SHIFT-D, click OK to the pop-up stating that the LinkLogic cache will be destroyed the next time a job is run.
*Check with your organization’s network administrator if you cannot locate the cross-reference files you need to edit.
Cross-Reference files should be updated any time your organization adds new appointment types, resources / books, providers, facilities / locations of care, or document types.
The lab results cross-reference file should also be edited any time your organization begins ordering new laboratory tests to ensure that the corresponding lab results will populate flowsheets.
To edit cross reference files, navigate to the LinkLogic folders located on the Data Transfer Station (DTS) or other designated network location.

44 Copyright 2012 General Electric Company. All rights reserved. Proprietary Information
MIK Mapping
The MIK is a component of Centricity Bridge, which is a service that synchronizes data between Centricity Electronic Medical Record (EMR) and Centricity Practice Management (PM). Centricity Bridge allows patient demographic, scheduling, and procedure data to be shared between the applications. The next few pages contain basic mapping instructions. For complete information, refer to the Centricity Bridge Installation Guide: Centricity EMR: http://support.centricityservices.com/download/centricity_bridge/centricity_bridge_installation_guide.pdf CPS: http://centricitypractice.gehealthcare.com/downloads/centricity_bridge/centricity_bridge_installation_guide.pdf
Very Important: Mapping should be updated as soon as possible any time your organization adds new appointment types, resources, doctors, or facilities to avoid LinkLogic errors.
Customers with separate stand-alone Centricity Practice Management and EMR databases use the Millbrook Integration Kit (MIK) to map data fields between PM and EMR. Similar to cross-reference files, the MIK translates incoming and outgoing data fields to values that can be recognized by both Centricity Practice Management and EMR.

45 Copyright 2012 General Electric Company. All rights reserved. Proprietary Information
MIK Mapping – 4 Key Areas to Map
Items in PM Map to Items in EMR
Appointment Types Appointment Types
Doctors Responsible Providers’ EMR user IDs
Facilities Location of Care Abbreviations
Resources Appointment Books
Ensure all items are set up in CPS Administration and EMR Setup. Additional information is included on the next few pages. For complete information, refer to the Centricity Bridge Installation Guide.

46 Copyright 2012 General Electric Company. All rights reserved. Proprietary Information
Additional Items & Supported EMR Values
Refer to Managing Interfaces manual for your version of Centricity and Centricity Bridge Installation Guide for additional information on these fields.

47 Copyright 2012 General Electric Company. All rights reserved. Proprietary Information
Integration Kit Configuration
The MIK application is located on the PM server. You will need access to the PM server to set up and maintain MIK Mapping.
To open the application & set up MIK Mapping:
1. Double-click the “Shortcut to Server Setup” icon on the desktop or launch from Program Files menu.
2. Click the “Advanced Setup Options” radio button.
3. Click NEXT.
continued on next page……….

48 Copyright 2012 General Electric Company. All rights reserved. Proprietary Information
Integration Kit Configuration
…..continued from previous page
4. Click the “Millbrook Integration Kit Configuration” radio button.
5. Click NEXT.
continued on next page………

49 Copyright 2012 General Electric Company. All rights reserved. Proprietary Information
Integration Kit Configuration
…….continued from previous page 6. Click NEXT here & on the following screens until you arrive at the Destination
LinkLogic window.
continued on next page…….
NOTE: Startup Type should be set to Automatic as shown above. MIK can also be stopped and started from this screen as needed. An alternate method of stopping / starting the MIK service, would be from Control Panel>Administrative Tools>Services on the server.

50 Copyright 2012 General Electric Company. All rights reserved. Proprietary Information
Integration Kit Configuration
….continued from previous page
7. With Destination LinkLogic highlighted, click MODIFY.
continued on next page…….

51 Copyright 2012 General Electric Company. All rights reserved. Proprietary Information
Integration Kit Configuration
….continued from previous page
8. Click Modify Map.
9. Click the Mapping tab to see mapped items.
10. Highlight the item in the list (i.e. Appointment Types) that you wish to map and click Modify.

52 Copyright 2012 General Electric Company. All rights reserved. Proprietary Information
Scenario: You need to map Appointment Types. Typical Staff Responsible and/or impacted with this Process: LinkLogic Manager, Administration Set up Staff, IT Staff
MIK Mapping: Appointment Types
“List names” in the left column are the items that are currently set up in PM. (List names appear automatically as items are set up in PM.) The external ID column is for EMR equivalents of those items.
To Map Appointment Types in PM to Appointment Types in EMR:
1. Highlight “List Name” item to map 2. Click MODIFY. 3. Type EMR value for item in External ID field. 4. Click OK.
Considerations: The External ID value must exactly match what is set up in EMR. Appointment Types are case & space sensitive and should contain no
punctuation in EMR setup or mapping. Copy/paste can be used in this process to ensure exact matching of values.

53 Copyright 2012 General Electric Company. All rights reserved. Proprietary Information
Scenario: You need to map Doctors. Typical Staff Responsible and/or impacted with this Process: LinkLogic Manager, Administration Set up Staff, IT Staff
MIK Mapping: Doctors
To Map Doctors in PM to User IDs in EMR:
1. Highlight “List Name” item to map 2. Click MODIFY. 3. Type EMR value for item in External ID field. 4. Click OK.
Considerations: The External ID value must exactly match what is set up in EMR. Doctors in PM are mapped to corresponding user IDs in EMR. Copy/paste can be used in this process to ensure exact matching of values.

54 Copyright 2012 General Electric Company. All rights reserved. Proprietary Information
Scenario: You need to map Facilities. Typical Staff Responsible and/or impacted with this Process: LinkLogic Manager, Administration Set up Staff, IT Staff
MIK Mapping: Facilities
To Map Facilities in PM to Locations of Care in EMR:
1. Highlight “List Name” item to map 2. Click MODIFY. 3. Type EMR value for item in External ID field. 4. Click OK.
Considerations: The External ID value must exactly match what is set up in EMR. Facilities in PM are mapped to corresponding Location of Care abbreviations in
EMR. Copy/paste can be used in this process to ensure exact matching of values.

55 Copyright 2012 General Electric Company. All rights reserved. Proprietary Information
Scenario: You need to map Resources. Typical Staff Responsible and/or impacted with this Process: LinkLogic Manager, Administration Set up Staff, IT Staff
MIK Mapping: Resources
To Map Resources in PM to Appointment Books in EMR:
1. Highlight “List Name” item to map 2. Click MODIFY. 3. Type EMR value for item in External ID field. 4. Click OK.
Considerations: The External ID value must exactly match what is set up in EMR. Resources in PM are mapped to corresponding Appointment Book
abbreviations in EMR. Copy/paste can be used in this process to ensure exact matching of values.

56 Copyright 2012 General Electric Company. All rights reserved. Proprietary Information
Save Mapping Changes
IMPORTANT: To save any mapping you have done: 1. Click NEXT until you get to the Installation window.
2. Once you arrive at this window, click NEXT again to SAVE your mapping
changes!
3. You will see a “return” button on the next window & a message at the top of the screen that says “MIK configuration is complete!”
4. At that point, mapping is complete.
57 Copyright 2012 General Electric Company. All rights reserved. Proprietary Information
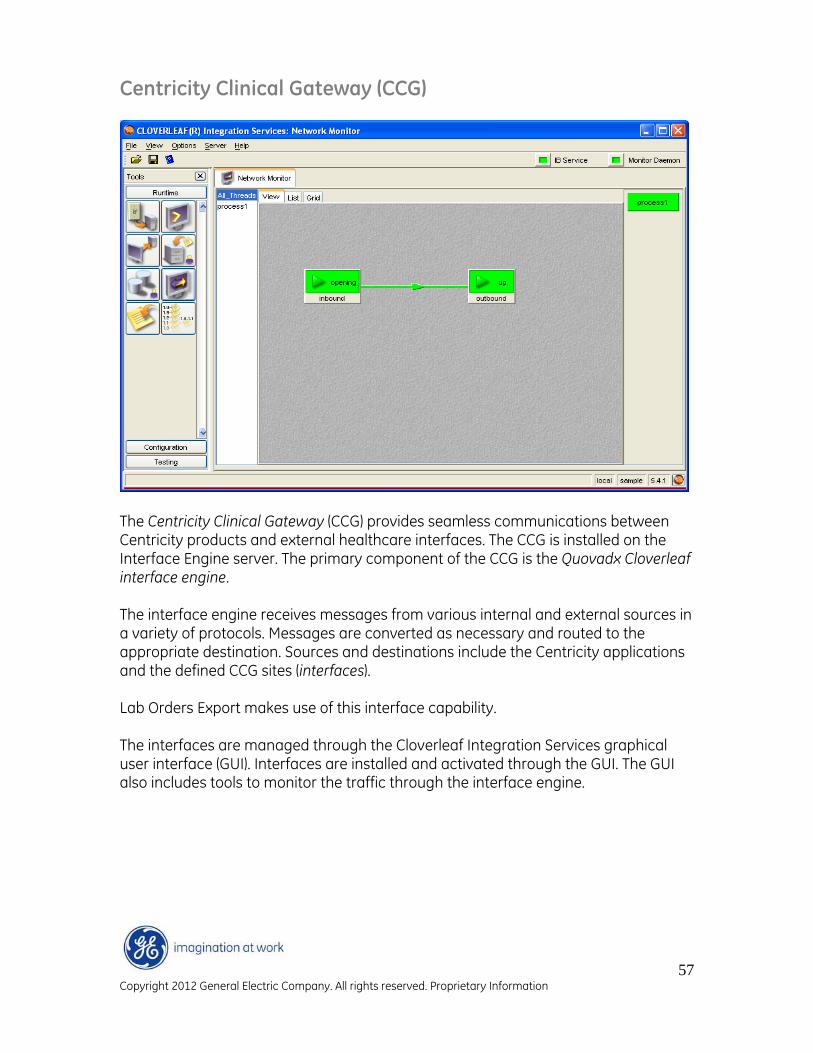
Centricity Clinical Gateway (CCG)
The Centricity Clinical Gateway (CCG) provides seamless communications between Centricity products and external healthcare interfaces. The CCG is installed on the Interface Engine server. The primary component of the CCG is the Quovadx Cloverleaf interface engine. The interface engine receives messages from various internal and external sources in a variety of protocols. Messages are converted as necessary and routed to the appropriate destination. Sources and destinations include the Centricity applications and the defined CCG sites (interfaces). Lab Orders Export makes use of this interface capability. The interfaces are managed through the Cloverleaf Integration Services graphical user interface (GUI). Interfaces are installed and activated through the GUI. The GUI also includes tools to monitor the traffic through the interface engine.
58 Copyright 2012 General Electric Company. All rights reserved. Proprietary Information
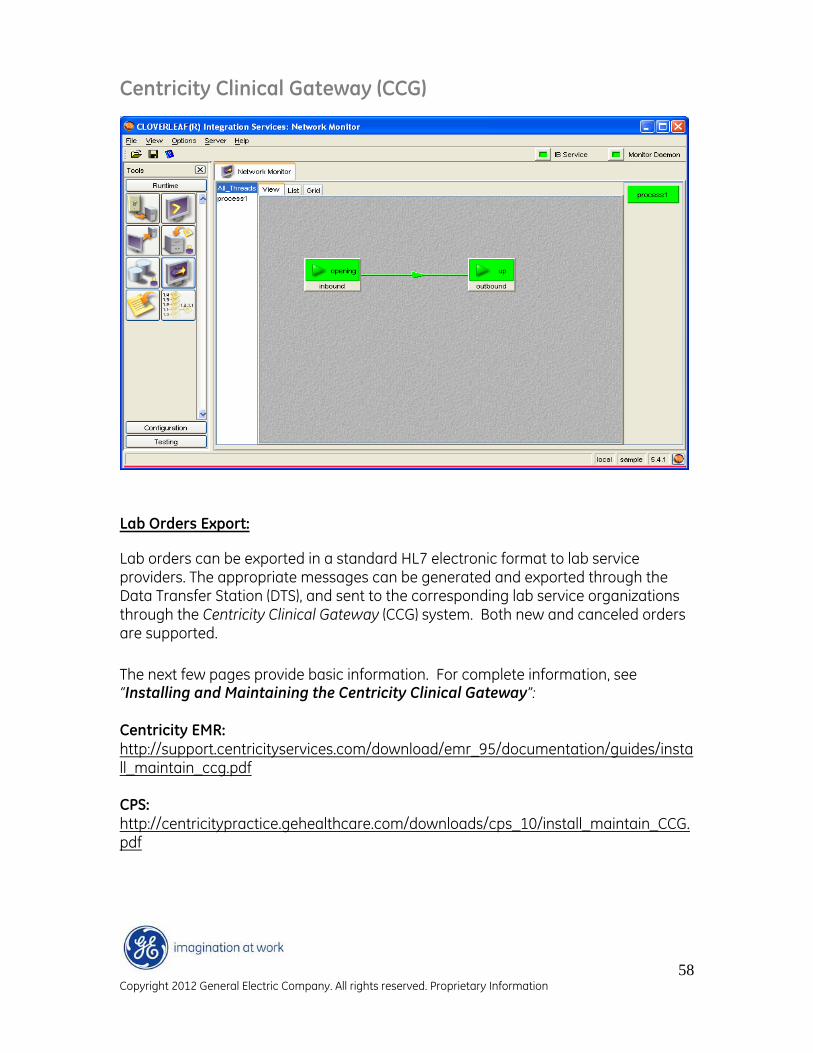
Centricity Clinical Gateway (CCG)
Lab Orders Export:
Lab orders can be exported in a standard HL7 electronic format to lab service providers. The appropriate messages can be generated and exported through the Data Transfer Station (DTS), and sent to the corresponding lab service organizations through the Centricity Clinical Gateway (CCG) system. Both new and canceled orders are supported. The next few pages provide basic information. For complete information, see “Installing and Maintaining the Centricity Clinical Gateway”: Centricity EMR:
http://support.centricityservices.com/download/emr_95/documentation/guides/install_maintain_ccg.pdf CPS: http://centricitypractice.gehealthcare.com/downloads/cps_10/install_maintain_CCG.pdf

59 Copyright 2012 General Electric Company. All rights reserved. Proprietary Information
Viewing the Processes
Shown above is an example of the Cloverleaf Integration Services graphical user interface (GUI). Process statuses are color-coded, as indicated. Examples of additional statuses are shown on the next page.

60 Copyright 2012 General Electric Company. All rights reserved. Proprietary Information
Process Statuses / Color Schemes
Examples of process statuses and color schemes are shown above.

61 Copyright 2012 General Electric Company. All rights reserved. Proprietary Information
CCG Services
The CCG Service Tools are web-based. The following services must be running in order for the tools to be available:
• Centricity Clinical Gateway Service Tools
• Centricity Clinical Gateway Webmin Service
(Start these services via Control Panel>Administrative Tools>Services)

62 Copyright 2012 General Electric Company. All rights reserved. Proprietary Information
Accessing the Webmin Tool
The Webmin tool in CCG allows errors to be viewed and re-sent through the Interface Engine.
The tools may be accessed via the Microsoft Internet Explorer web browser. If you are working on the server where the CCG is installed, the URL is:
http://localhost:10000
NOTE: If you are working remotely, type http://<ipaddress>:10000/
The default port for Webmin service is 10000. It is recommended that you don’t change this port.
The default Username is: geservice
The default Password is: geservice
After logging on, the Service Tools page is displayed. Click the Interface Monitor link on the Service tab, as shown above.

63 Copyright 2012 General Electric Company. All rights reserved. Proprietary Information
CCG Interface Monitor
The CCG Interface monitor provides a snapshot of the current status of active interface sites (Cloverleaf sites) on the CCG. The CCG Interface monitor has an error message browser, which allows you to:
• Browse the list of messages in the Cloverleaf error database for the selected site
• Re-send one or more messages (Messages that are successfully re-sent are deleted from the error database.)
• Delete one or more messages without re-sending (Messages that are deleted without being re-sent are also deleted from the error database.)
When you click a link showing the number of errors for a particular site, the CCG Interface Monitor displays a list of all the messages in the Cloverleaf error database for that site. Click the “Monitor all sites” link to review statistics for all interfaces.

64 Copyright 2012 General Electric Company. All rights reserved. Proprietary Information
Viewing and Working with Errors
Clicking the message ID link, as shown above, will open the specific HL7 message that errored out in the CCG. The message can be resent by clicking the Send button at the bottom of the screen for the message shown.** To resend multiple messages, click the checkboxes next to the specific messages to be resent (or click the Select All button at the bottom of the window). Click the Resend button at the bottom of the window to resend the selected messages. Messages that are successfully resent are deleted from the error database. To delete multiple messages, click the checkboxes next to the specific messages to be deleted (or click the Select All button at the bottom of the window). Click the Delete button at the bottom of the window to delete the selected messages from the error database. **Note: If editing is required, this cannot be done within the CCG Interface Monitor at this time. You will need to contact a designated person on your IT staff or GE Support for help, so that the source of the error messages can be corrected.

65 Copyright 2012 General Electric Company. All rights reserved. Proprietary Information
Notes ________________________________________________________________________________________________________________________________________________________________________________________________________________________________________________________________________________________________________________________________________________________________________________________________________________________________________________________________________________________________________________________________________________________________________________________________________________________________________________________________________________________________________________________________________________________________________________________________________________________________________________________________________________________________________________________________________________________________________________________________________________________________________________________________________________________________________________________________________________________________________________________________________________________________________________________________________________________________________________________________________________________________________________________________________________________________________________________________________________________________________________________________________________________________________________________________________________________________________________________________________________________________________________________________________________________________________________________________________________________________________________________________________________________________________________________________________________________________________________________________________________________________________________________________________________________________________________________________________________________________________________________________________________________________________________________________________________________________________________________________________________________________________________________________________________________________________________________________________________________________________________________________________________________________________________________________________________________________________________________________________________________________________________________________________________________________________________________________________________________________________________________________________________________________________________________________________________________________________________________________________________________________________________________________________________________________________________________________________________________________________________________________________________________