Garden Storage Shed - RyanShedPlans - 12,000 Shed … STORAGE SHED 2 Garden StoraGe Shed I s your...
22
Garden StoraGe Shed
Transcript of Garden Storage Shed - RyanShedPlans - 12,000 Shed … STORAGE SHED 2 Garden StoraGe Shed I s your...
Garden StoraGe Shed
GARDEN STORAGE SHED 2
GardenStoraGe Shed
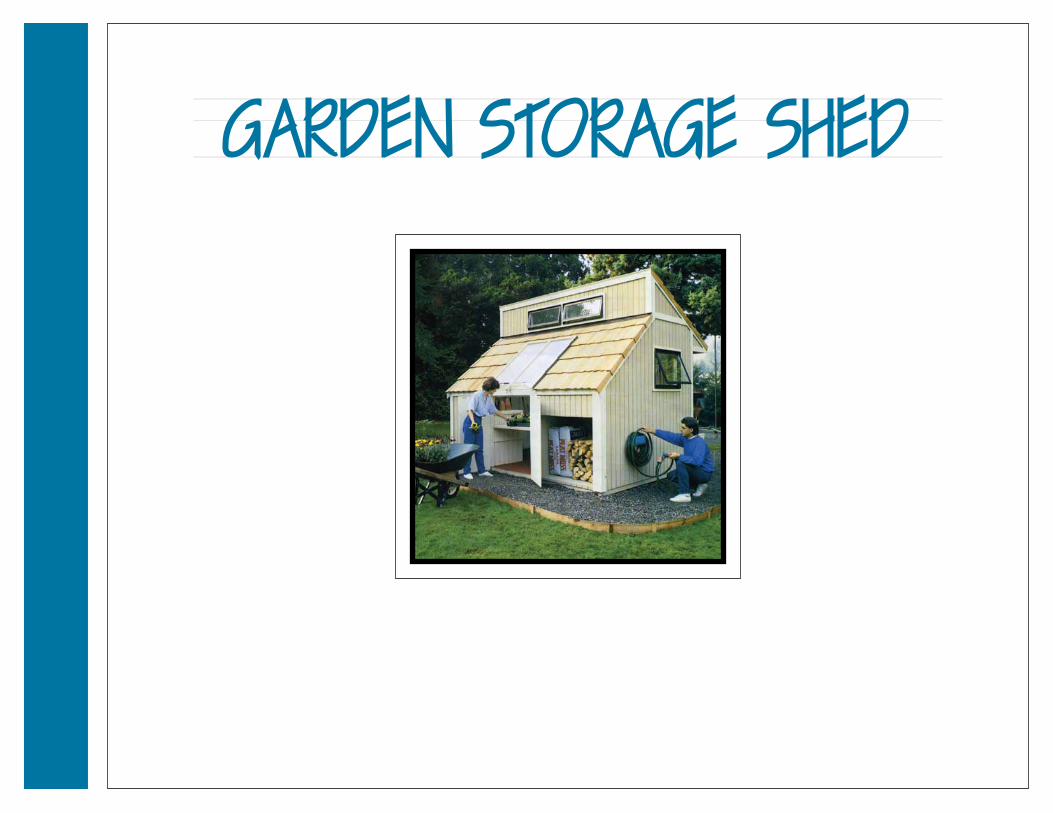
Is your garage overrun by garden
tools, hoses, and empty flower pots?
The Garden Storage Shed is an attractive
solution that you can build yourself. it has
space for lawn and garden tools and a
counter that’s perfect for potting plants. You
can even get a head start on your vegetable
and flower gardens in the greenhouse
window. The feeling of spaciousness inside
belies the shed’s 8- x 12-foot exterior
dimensions. Straightforward lumber and
plywood construction simplifies the project.
The easy-to-build barn door, constructed
of plywood siding, provides a wide entry
to the shed. inside, clerestory windows
and a Plexiglas skylight lend a greenhouse
atmosphere to the shed. want to design
storage shelves and bins that meet your
unique storage requirements? This plan
gives you a good start with deep, easy-
access bins for firewood, bark dust or peat
moss, and a storage bin for rakes, hoes
and brooms.
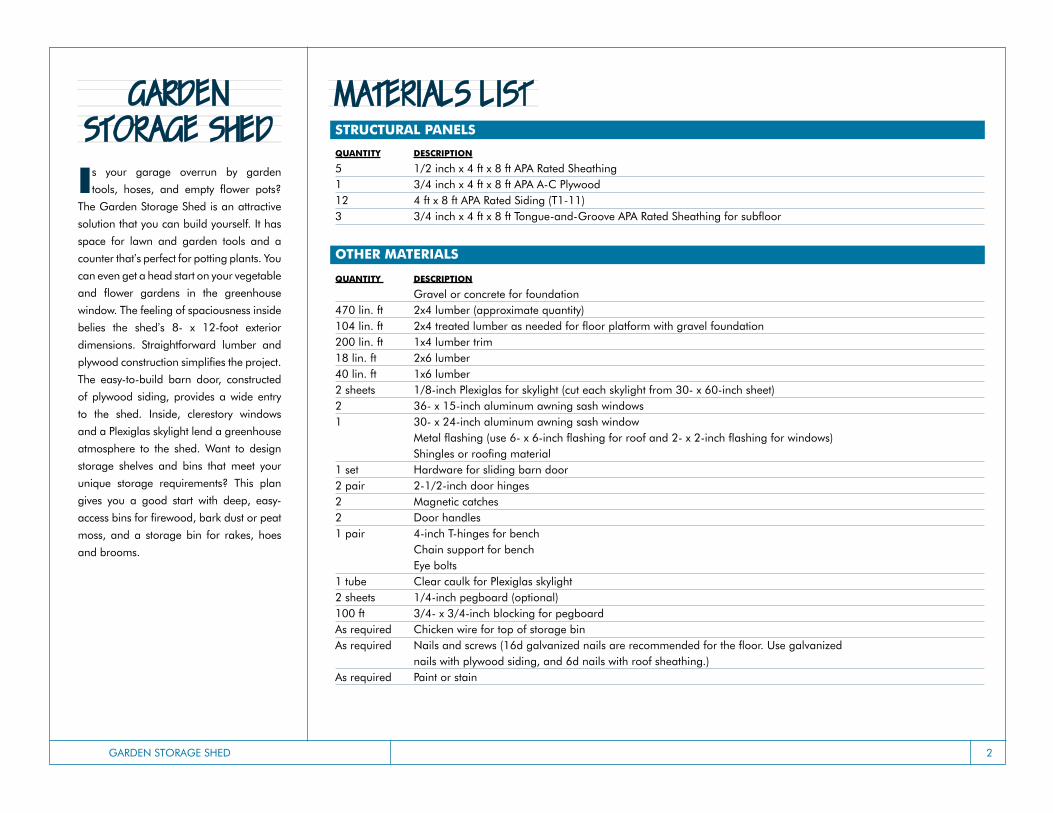
MaterialS liStStructurAl PAnelS
QuAntity deScriPtion
5 1/2 inch x 4 ft x 8 ft APA Rated Sheathing 1 3/4 inch x 4 ft x 8 ft APA A-C Plywood12 4 ft x 8 ft APA Rated Siding (T1-11)3 3/4 inch x 4 ft x 8 ft Tongue-and-Groove APA Rated Sheathing for subfloor
otHer MAteriAlS
QuAntity deScriPtion
Gravel or concrete for foundation470 lin. ft 2x4 lumber (approximate quantity)104 lin. ft 2x4 treated lumber as needed for floor platform with gravel foundation200 lin. ft 1x4 lumber trim18 lin. ft 2x6 lumber40 lin. ft 1x6 lumber2 sheets 1/8-inch Plexiglas for skylight (cut each skylight from 30- x 60-inch sheet)2 36- x 15-inch aluminum awning sash windows1 30- x 24-inch aluminum awning sash window metal flashing (use 6- x 6-inch flashing for roof and 2- x 2-inch flashing for windows)
Shingles or roofing material1 set Hardware for sliding barn door2 pair 2-1/2-inch door hinges2 magnetic catches2 Door handles1 pair 4-inch T-hinges for bench
Chain support for bench Eye bolts
1 tube Clear caulk for Plexiglas skylight2 sheets 1/4-inch pegboard (optional)100 ft 3/4- x 3/4-inch blocking for pegboardAs required Chicken wire for top of storage binAs required Nails and screws (16d galvanized nails are recommended for the floor. Use galvanized
nails with plywood siding, and 6d nails with roof sheathing.)As required Paint or stain
GARDEN STORAGE SHED 3
when all the walls are up, install the
center beam and clerestory. To construct
center beam at bottom of clerestory,
install outer 2x4, toenailing the 2x4 to
lumber framing of the outside wall. Nail
rafters of lower roof to the center beam
and top plate of the outside wall. Rafters
should be spaced 24 inches on center.
Nail a second 2x4 to the inside of the
first beam, creating a double center
beam. Frame the clerestory, allowing
space for the windows. Nail clerestory
framing to the center beam. Fasten the
upper roof rafters to the top plate of the
clerestory and top plate of the outside
wall. Nail a 2x6 to the rafter ends to
finish the overhang. Apply plywood
siding to the clerestory and plywood
or OSB sheathing on the roof. install
awning windows in the clerestory.
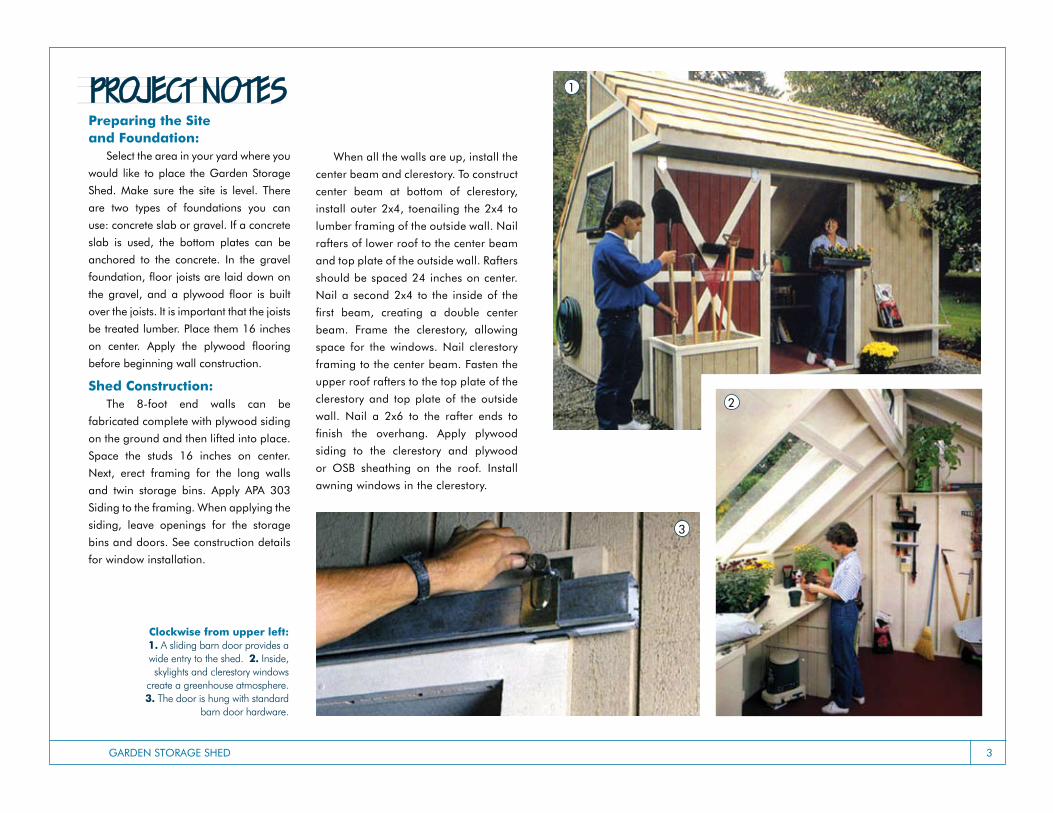
Project noteSPreparing the Site and Foundation:
Select the area in your yard where you
would like to place the Garden Storage
Shed. make sure the site is level. There
are two types of foundations you can
use: concrete slab or gravel. if a concrete
slab is used, the bottom plates can be
anchored to the concrete. in the gravel
foundation, floor joists are laid down on
the gravel, and a plywood floor is built
over the joists. it is important that the joists
be treated lumber. Place them 16 inches
on center. Apply the plywood flooring
before beginning wall construction.
Shed construction:The 8-foot end walls can be
fabricated complete with plywood siding
on the ground and then lifted into place.
Space the studs 16 inches on center.
Next, erect framing for the long walls
and twin storage bins. Apply APA 303
Siding to the framing. when applying the
siding, leave openings for the storage
bins and doors. See construction details
for window installation.
clockwise from upper left: 1. A sliding barn door provides awide entry to the shed. 2. Inside, skylights and clerestory windows
create a greenhouse atmosphere. 3. The door is hung with standard
barn door hardware.
1
3
2
GARDEN STORAGE SHED 4
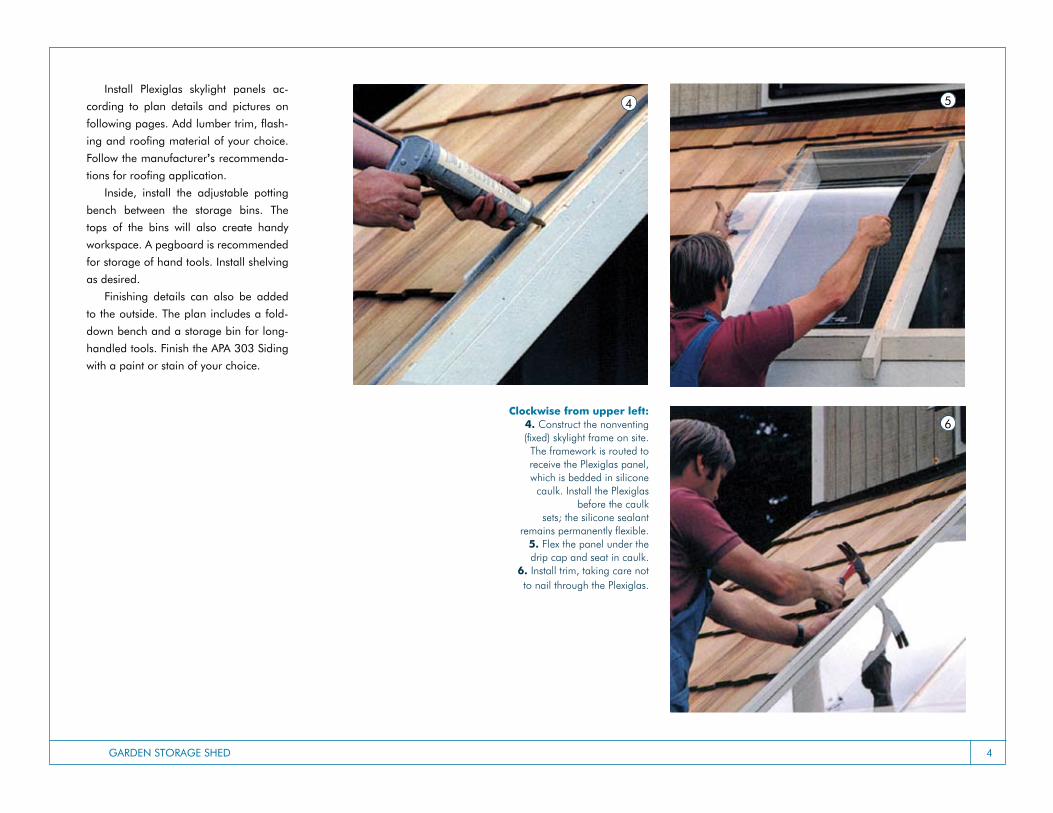
clockwise from upper left: 4. Construct the nonventing(fixed) skylight frame on site.
The framework is routed to receive the Plexiglas panel, which is bedded in silicone
caulk. Install the Plexiglas before the caulk
sets; the silicone sealant remains permanently flexible.
5. Flex the panel under thedrip cap and seat in caulk.
6. Install trim, taking care notto nail through the Plexiglas.
4 5
6
install Plexiglas skylight panels ac-
cording to plan details and pictures on
following pages. Add lumber trim, flash-
ing and roofing material of your choice.
Follow the manufacturer’s recommenda-
tions for roofing application.
inside, install the adjustable potting
bench between the storage bins. The
tops of the bins will also create handy
workspace. A pegboard is recommended
for storage of hand tools. install shelving
as desired.
Finishing details can also be added
to the outside. The plan includes a fold-
down bench and a storage bin for long-
handled tools. Finish the APA 303 Siding
with a paint or stain of your choice.
GARDEN STORAGE SHED 5
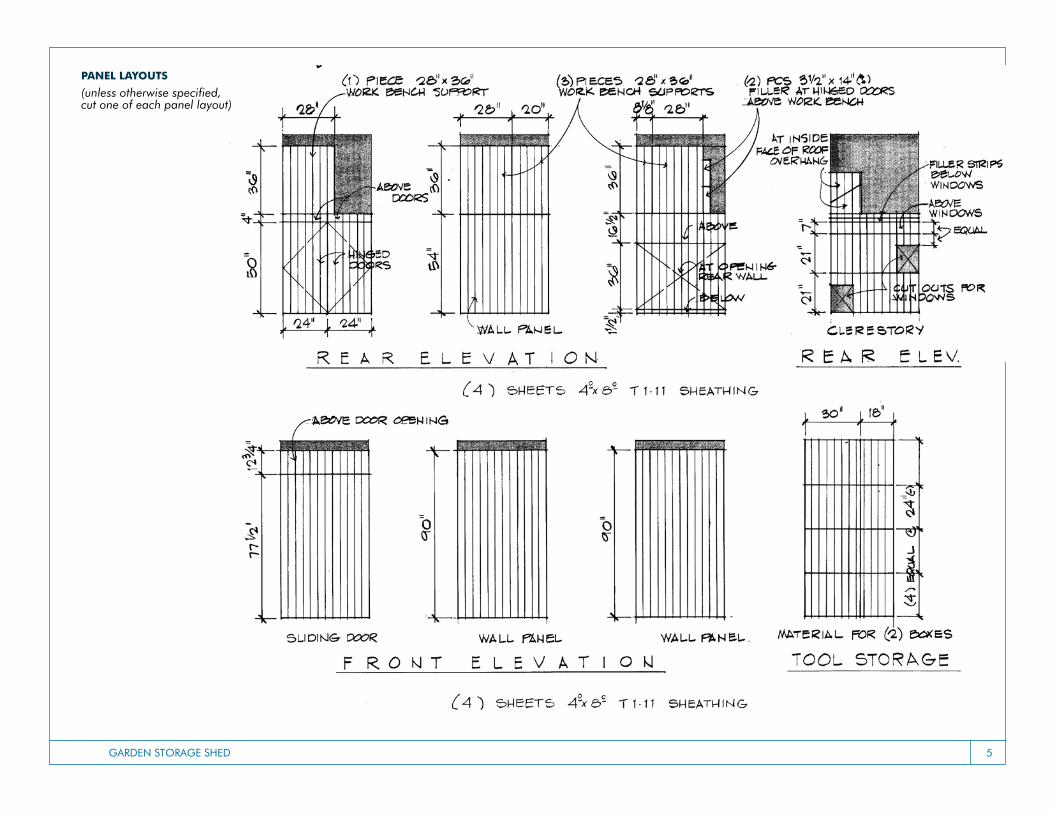
PAnel lAyoutS
(unless otherwise specified, cut one of each panel layout)
GARDEN STORAGE SHED 6
faSt en erS: 6d r inG or ScreW Shan K 6" a lonG SU PPort ededGeS, 12" on int erM ediat eSU PPortS
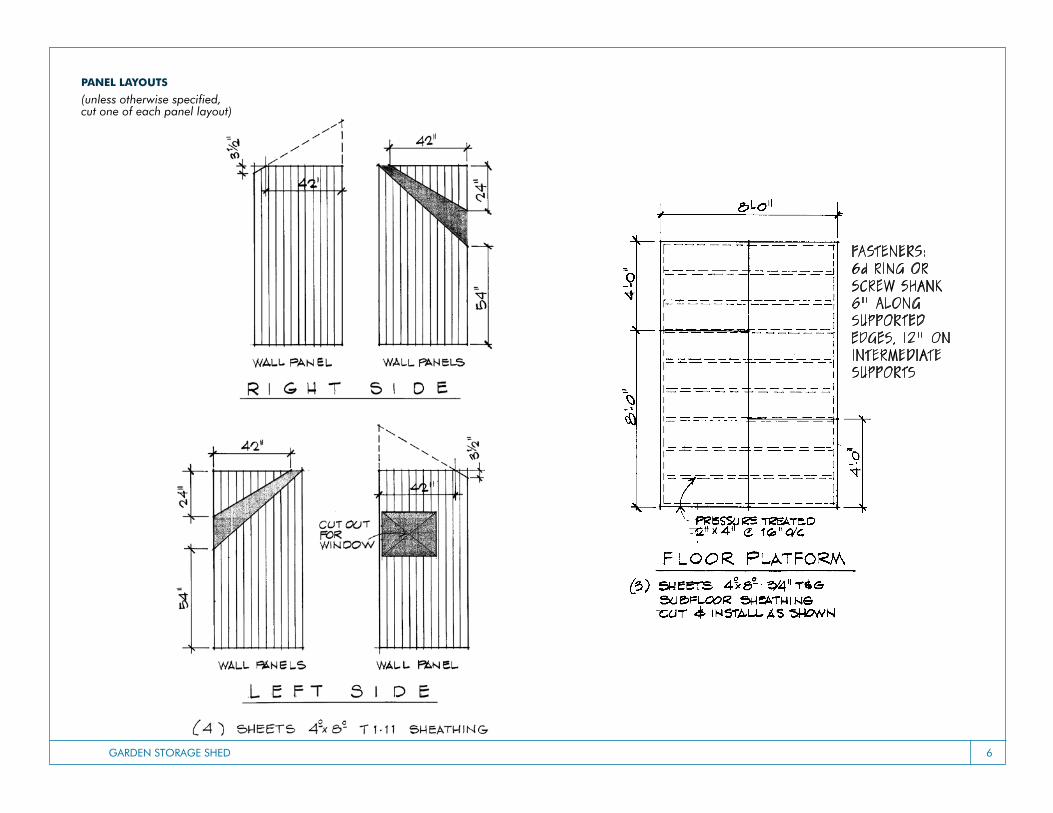
PAnel lAyoutS
(unless otherwise specified, cut one of each panel layout)
GARDEN STORAGE SHED 7
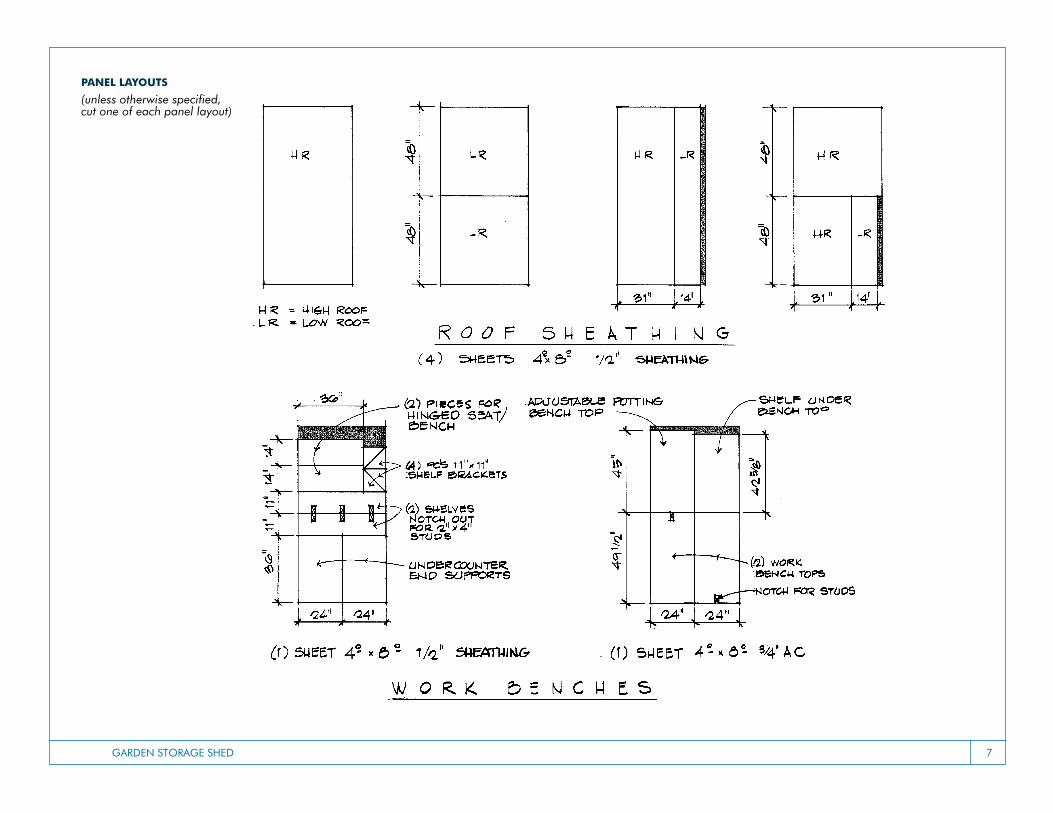
PAnel lAyoutS
(unless otherwise specified, cut one of each panel layout)
GARDEN STORAGE SHED 8
SEE PAGE 17SEE PAGE 17
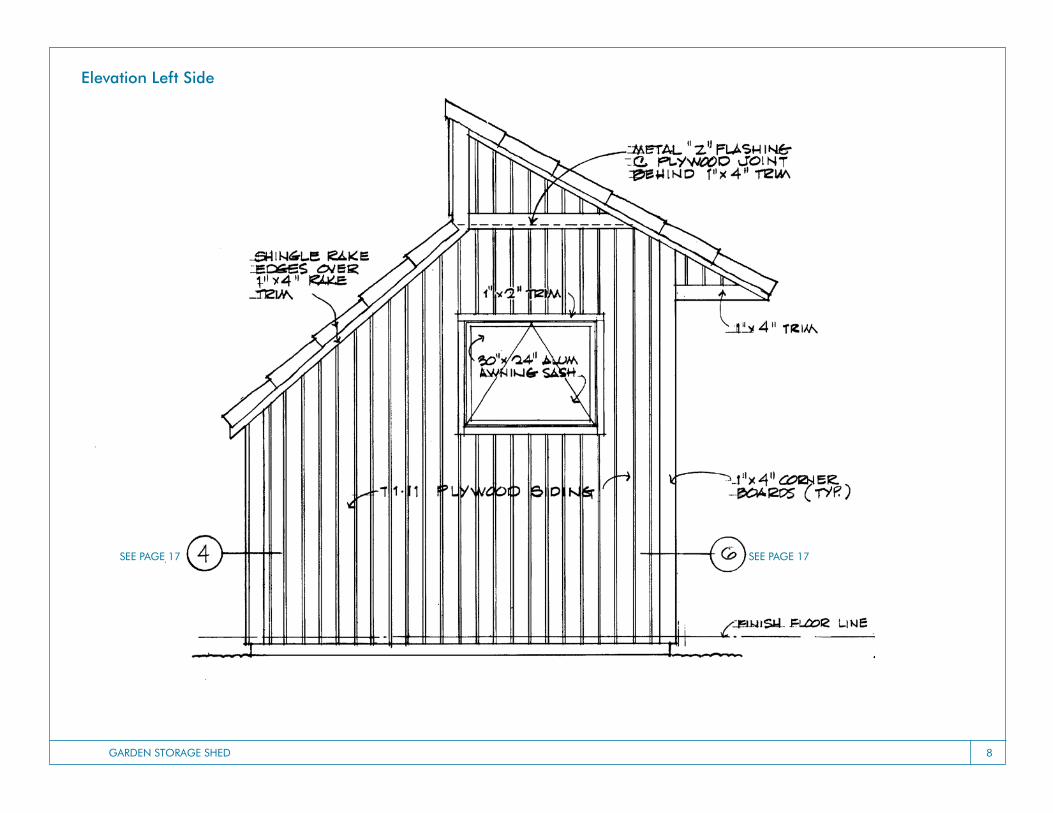
Elevation Left Side
GARDEN STORAGE SHED �
SEE PAGE 17
SEE PAGE 17
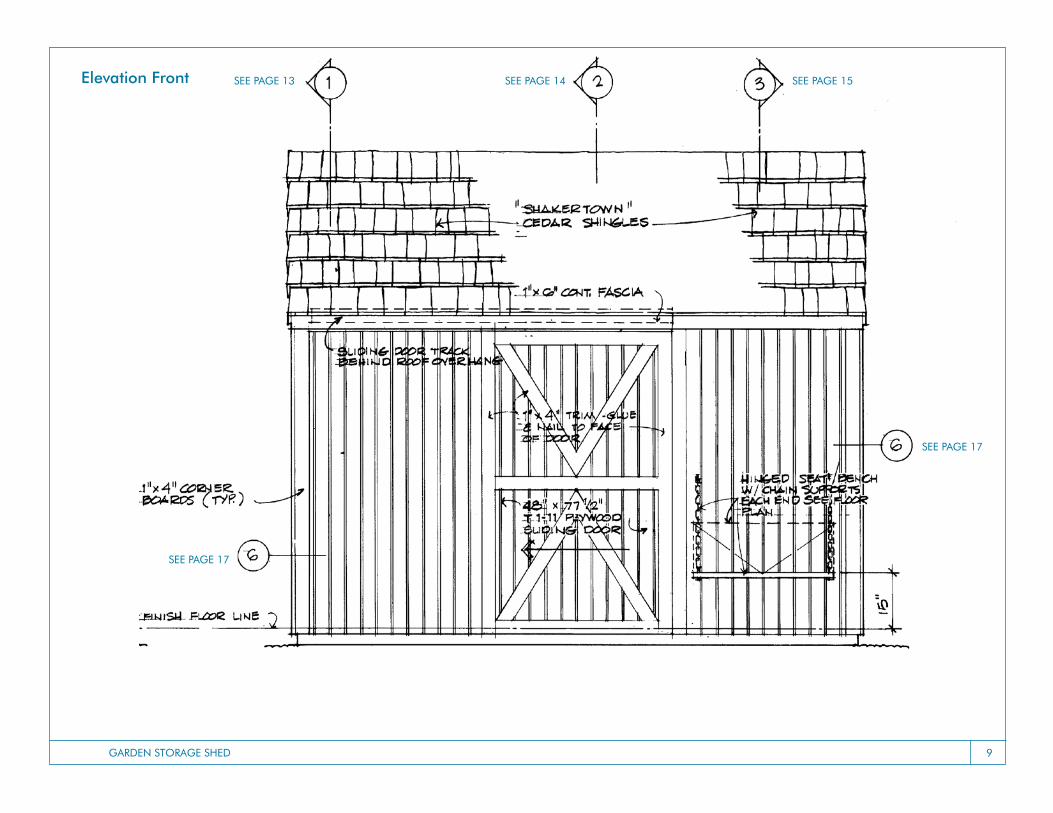
SEE PAGE 13 SEE PAGE 14 SEE PAGE 15Elevation Front

GARDEN STORAGE SHED 10
SEE PAGE 17
Elevation Right Side
GARDEN STORAGE SHED 11
SEE PAGE 17
SEE PAGES18 and 1�
SEE PAGE 17SEE PAGE 17
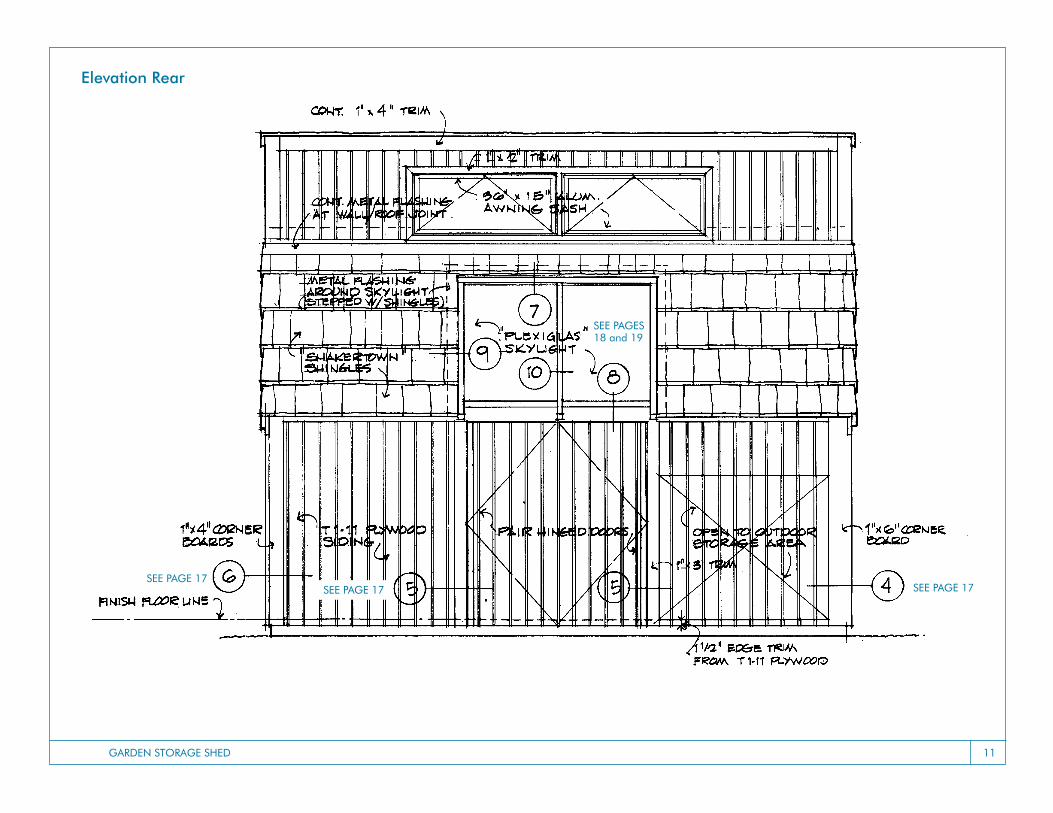
Elevation Rear
GARDEN STORAGE SHED 12
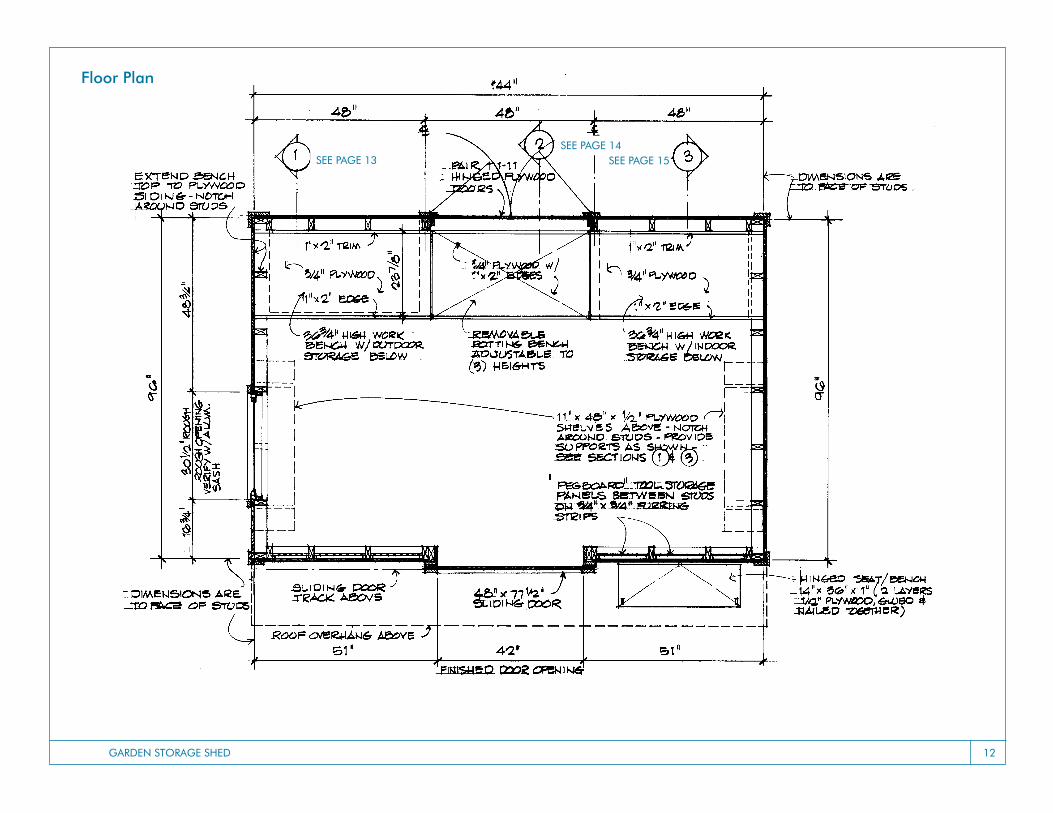
SEE PAGE 13SEE PAGE 14
SEE PAGE 15
Floor Plan
GARDEN STORAGE SHED 13
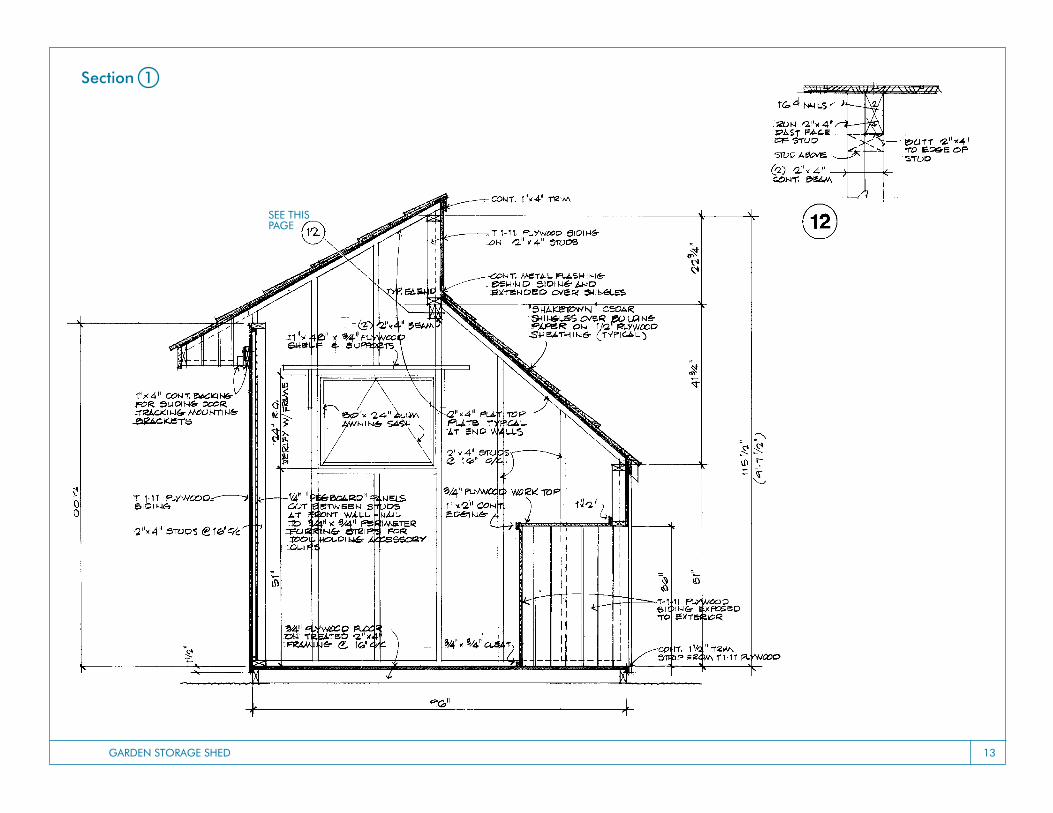
Section 1
SEE THiS PAGE
GARDEN STORAGE SHED 14
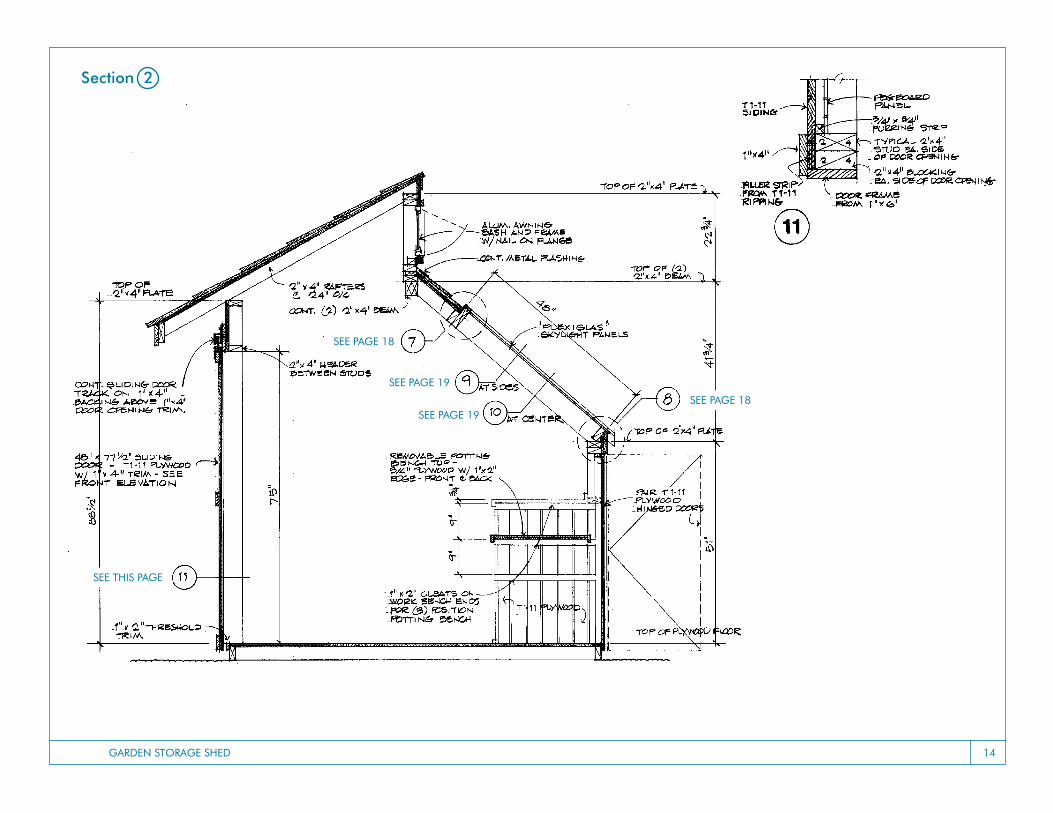
SEE PAGE 18
SEE PAGE 1�
SEE PAGE 1�SEE PAGE 18
SEE THiS PAGE
Section 2
GARDEN STORAGE SHED 15
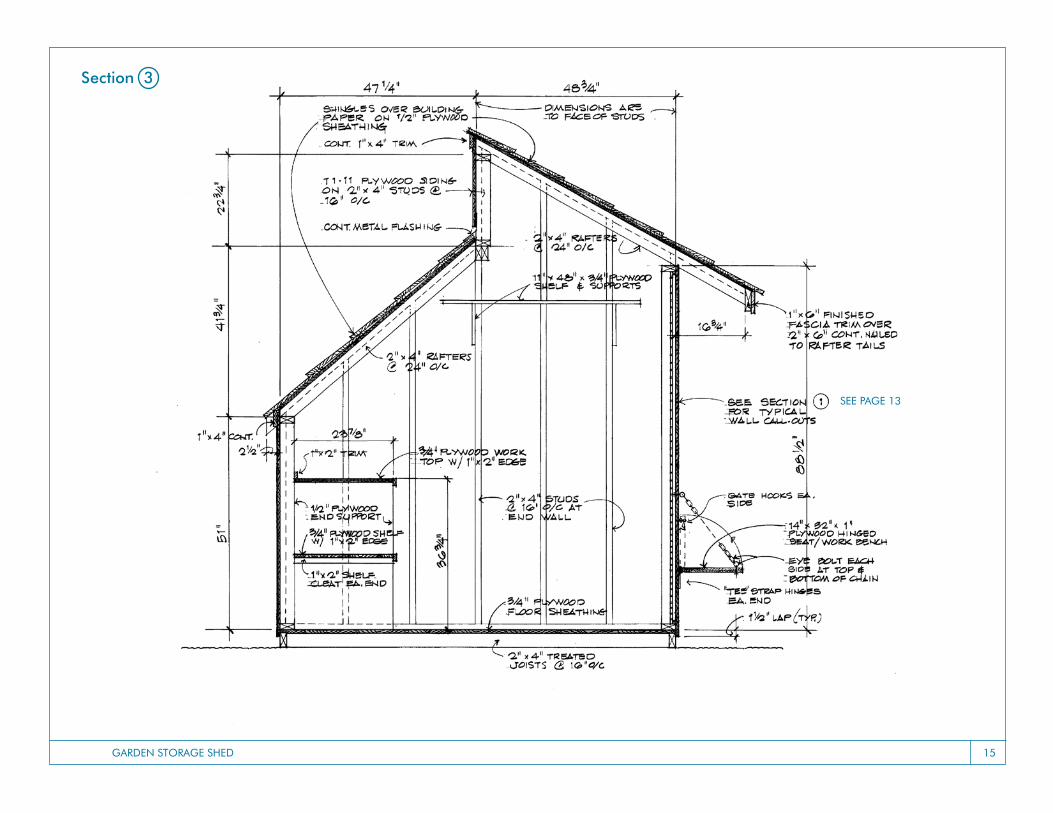
SEE PAGE 13
Section 3
GARDEN STORAGE SHED 16
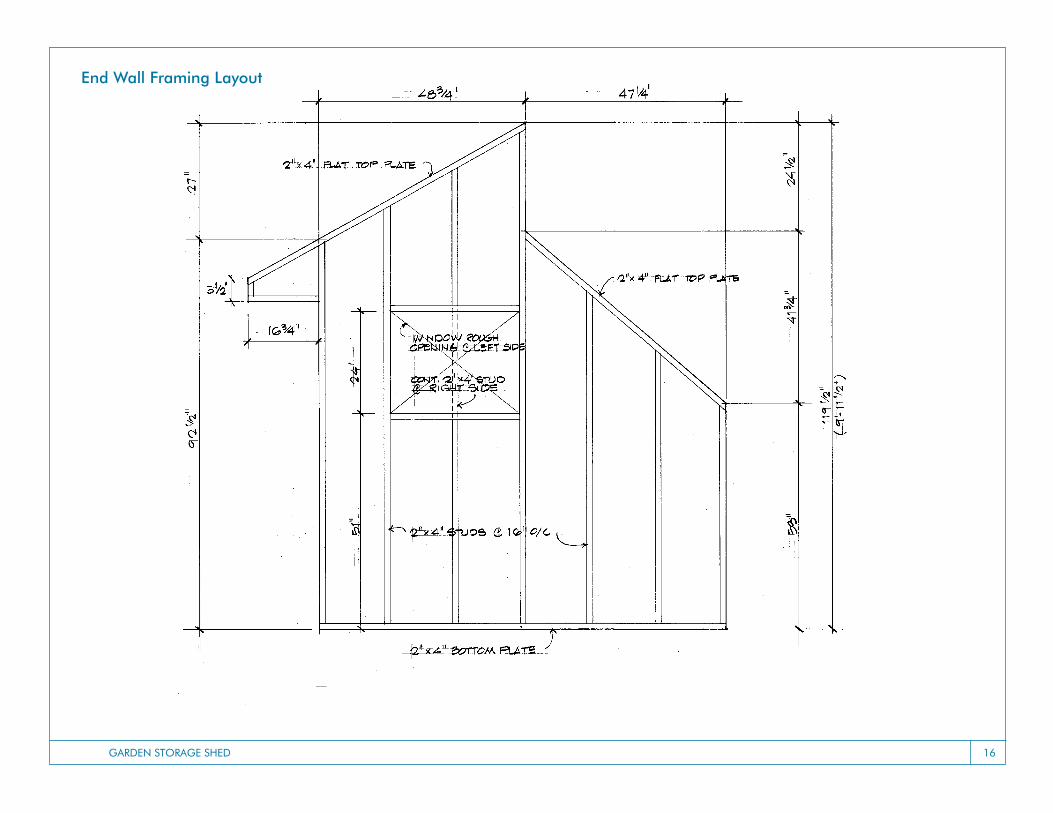
End Wall Framing Layout
GARDEN STORAGE SHED 17
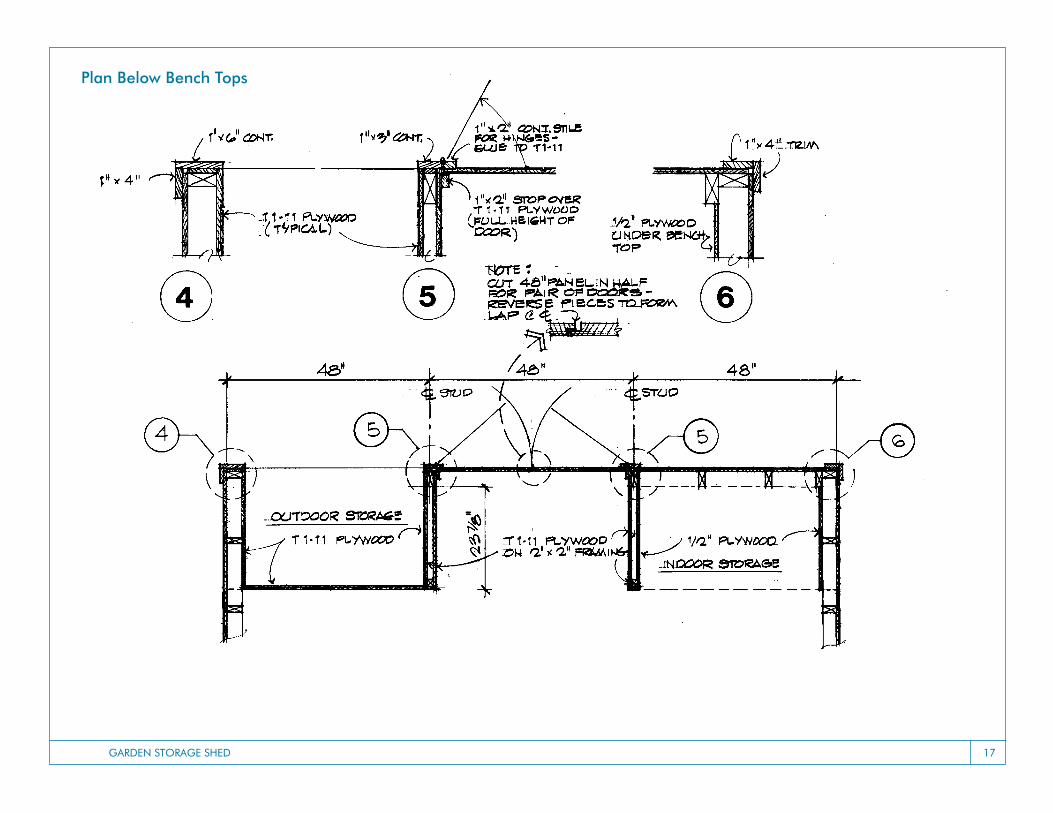
Plan Below Bench Tops
GARDEN STORAGE SHED 18
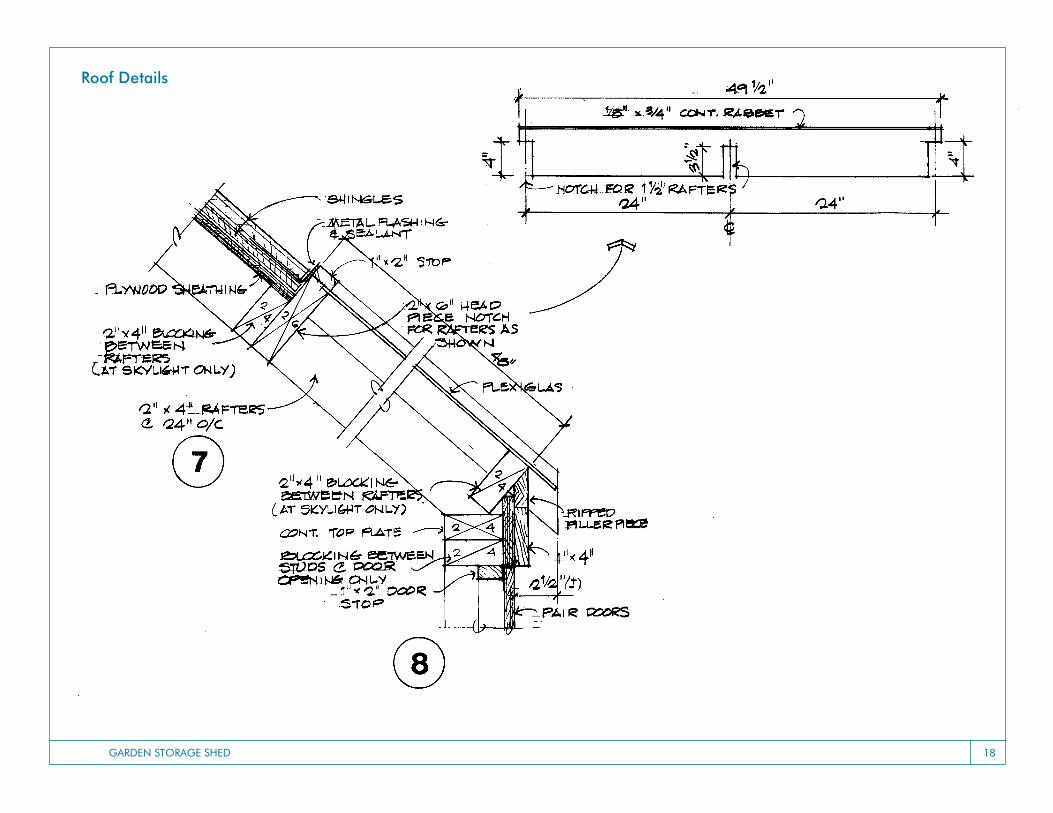
Roof Details
GARDEN STORAGE SHED 1�
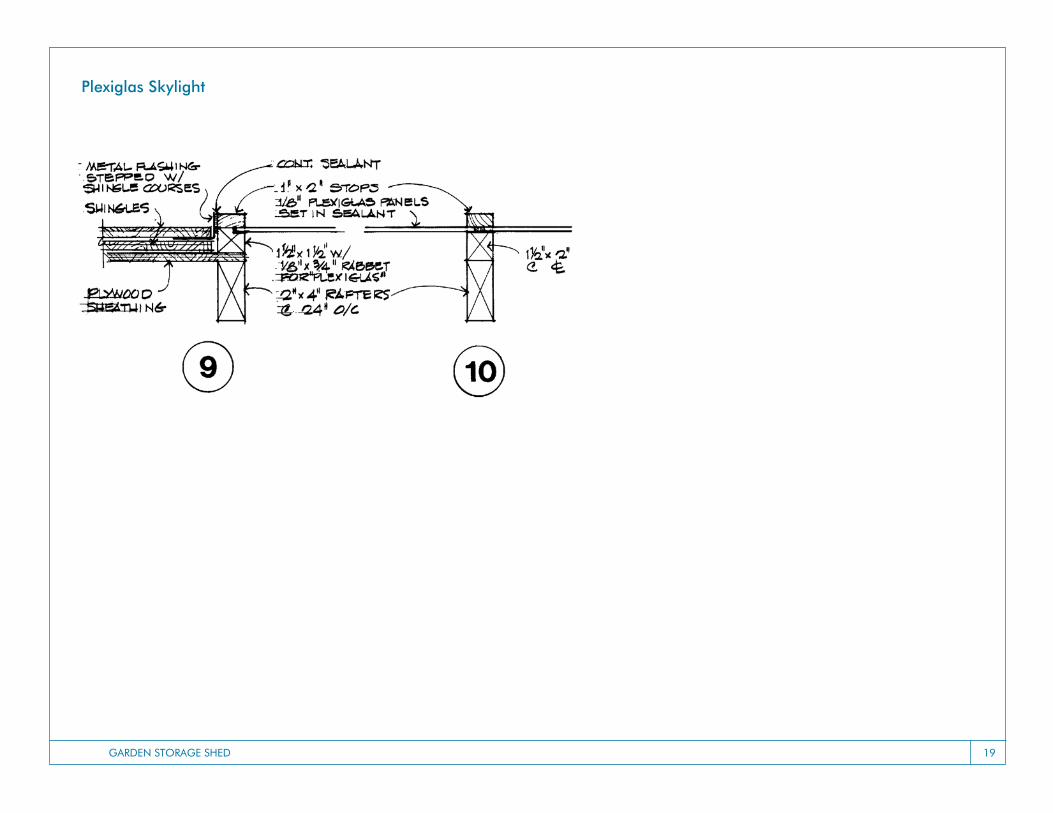
Plexiglas Skylight
GARDEN STORAGE SHED 20
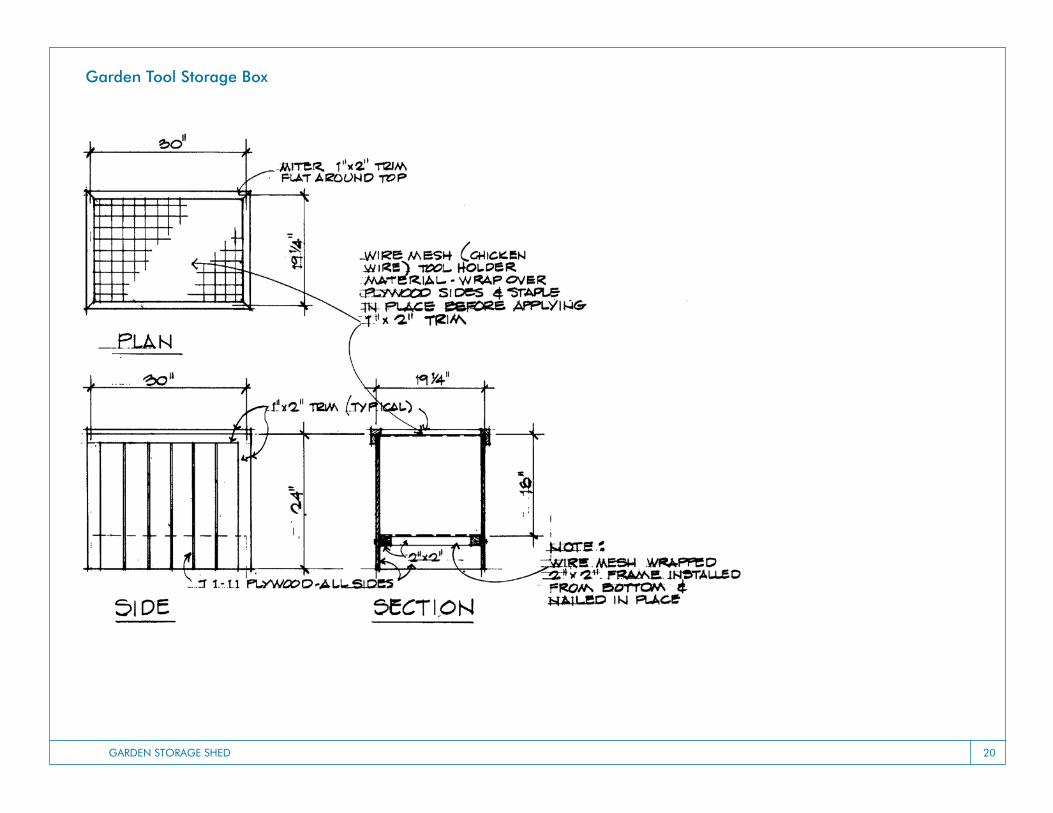
Garden Tool Storage Box
GARDEN STORAGE SHED 21
BUildinG hintS These general hints will help you achieve
the best possible results in working with
APA wood structural panel products. They
apply not only to this plan but to all proj-
ects you may undertake using APA trade-
marked panels. Since building methods
and interpretation of suggestions may vary,
APA cannot accept responsibility for results
of an individual’s project efforts.
PlAnninG. Before starting, study
the plan carefully to make sure you
understand all details.
MAKinG lAyout. Following the
panel layout, draw all parts on the panel
using a straightedge and carpenter’s square for accuracy. Use a compass to
draw corner radii. Be sure to check the
width of your saw cut and allow for saw
kerfs when plotting dimensions.
cuttinG. when hand-sawing, support
panel firmly with the best side facing up.
Use a 10 to 15 point cross-cut saw. Use
a fine-toothed coping saw for curves. For
inside cuts, start hole with a drill and use
a coping or keyhole saw. when power
sawing on a radial or table saw, the best
side of the panel should be face up. A
plywood blade works best, but a sharp
combination blade may be used. when
using a portable power saw, the best side
of the panel should be down. For curved
cuts, use a jigsaw, bandsaw or saber saw.
Be sure the blade enters the face of the
panel. Use the finest tooth possible for
a smooth and even cut. For prolonged
cutting of nonveneer panels and those
containing layers of reconstituted wood, a
carbide-tipped blade is suggested.
Reduce panel to pieces small enough
for easy handling with first cuts. Plan to
cut matching parts with the same saw
setting. Scrap lumber clamped or tacked
securely in place beneath the panel
prevents splintering on the back side.
Overlaid panels can be worked in the
same manner as regular grades with these
exceptions: sawing and drilling should
always be done with the cutting edge
of the tool entering the panel face. To
minimize chipping at the point of tool exit,
use a piece of scrap wood as a backup or
place tape along the line of the cut.
drillinG. Support panel firmly. Use
brace and bit for larger holes. when
point appears through panel, reverse
and complete hole from back. Finish
slowly to avoid splintering.
PlAninG. Remember, edge grain
of the panel runs in alternate directions
so plane from ends toward center. Use
shallow set blade.
SAndinG. many APA panels are
sanded smooth in manufacture – one of
the big time-savers in their use – so only
minimum surface sanding is necessary.
You may find it easier to sand cut edges
smooth before assembling each unit. Use
medium or finer sandpaper before sealer
or flat undercoat is applied. Use fine
sandpaper after sealing and in direction
of grain only.
ASSeMBly. Construction by section
makes final assembly easier. Drawers,
cabinet shells and compartments,
for example, should be handled as
individual units. For strongest possible
joints, use glue with screws or nails.
Check for a good fit by holding pieces
together. Contact should be made at
all points for lasting strength. mark
nail location along edge of piece to be
nailed. in careful work where nails must
be very close to an edge, predrill using
a drill bit slightly smaller than nail size.
Always predrill for screws.
Apply glue to clean surfaces according
to manufacturer’s instructions. Press
surfaces together until bead appears.
Check for square, then nail and apply
clamps if possible to maintain pressure
until glue sets. For exterior exposure, use
resorcinol-type (waterproof) glue; for
interior work, use liquid resin (white) or
urea resin-type glues. Other glues are
available for special gluing needs.
GARDEN STORAGE SHED 22
FiniSHinG For interior uSe. Little, if any, surface preparation is usually
required. Sanded panels require only light
sanding to remove blemishes or to smooth
fillers which might be used to patch any
dents or openings in the surface. Sand
in the direction of the grain only with fine
sandpaper. if an opaque finish is to be used,
cover any knots, pitch streaks, or sap spots
with shellac or a stain-resistant sealer. Do not
apply finishes over dust, glue, or spots of oil.
Three types of finishing systems may
be used for interior applications: paints,
stains and natural finishes.
when using paint systems, a solvent-
thinned (oil-based) primer should be used
to minimize grain raise and prevent staining.
Gloss and semi-gloss enamel top coat
provide a washable, durable surface. The
top coat may be oil-based or alkyd-based
(solvent-thinned) or latex (water-thinned),
provided it is compatible with the primer.
Panels used for natural finishes
should be carefully selected for pattern
and appearance. For the most natural
appearance, use two coats of a clear finish,
such as a urethane, varnish or clear sealer.
To pleasantly subdue any grain irregularities
or repairs, a light stain finish may be
applied either by color toning, which uses
companion stain and non-penetrating
sealer, or light staining, which uses a
pigmented sealer, tinting material (stain,
thin enamel or undercoat) and finish coat
(varnish or lacquer). Finish medium Density
Overlaid (mDO) panels with solid-color
acrylic latex stain or a two-coat paint system
(primer plus companion top coat).
FiniSHinG For eXterior uSe. A top quality stain or paint will help
maintain the panel’s appearance and
protect it from weathering. Since end
grain absorbs and loses moisture rapidly,
panels should be edge-sealed to help
minimize possible damage. Use paint
primer to seal panels to be painted, or use
a paintable water-repellent preservative
for panels which are to be stained.
For rough or textured panels, either
high quality stain or acrylic house paint
systems are recommended. Use a
solvent-thinned semi-transparent stain
for maximum grain show-through. Use
only acrylic latex solid-color stain when
it is desirable to hide the grain and color
of the wood surface, but not its texture.
maximum protection of the wood is
obtained by using a house paint system
which consists of a stain-resistant primer
and one or more acrylic latex top coats.
Finish medium Density Overlaid (mDO)
panels with solid-color acrylic latex or
a two-coat paint system (primer plus
companion top coat).
Best performance is achieved by
applying the first coat of finish by brushing. if
the first coat of finish is sprayed on, it should
be back-brushed or back-rolled to work it
well into the wood surface. Additional coats
may be sprayed without back-brushing.
whatever finishing method is used
– paint or stain – always use top quality
materials and follow the manufacturer’s instructions.