Flash CS4 - Adobe to edit one (or both) to get the balance right before you begin synchronizing them...
34
THE MISSING MANUAL ® Flash CS4 Chris Grover with E.A. Vander Veer Beijing • Cambridge • Farnham • Köln • Sebastopol • Taipei • Tokyo
Transcript of Flash CS4 - Adobe to edit one (or both) to get the balance right before you begin synchronizing them...

THE MISSINGMANUAL®
Flash CS4
Chris Grover withE.A. Vander Veer
Beijing • Cambridge • Farnham • Köln • Sebastopol • Taipei • Tokyo

This excerpt is protected by copyright law. It is your responsibility to obtain permissions necessary for any
proposed use of this material. Please direct your inquiries to [email protected].

341
Chapter 10chapter
10
Incorporating Soundand Video
You can create almost any kind of picture or effect in Flash, but sometimes youalready have the perfect piece of sound or video…and it’s in another file. No prob-lem: Flash lets you pull in all kinds of other media files—like songs in MP3 files orQuickTime videos. Whether you’re showcasing your band’s performances, creat-ing an employee training Web site, or creating an online wedding album, Flash hasall the multimedia tools for the job.
When Flash was born, it was a big deal to have moving pictures on the Internet.Most folks had pretty slow Internet connections, so it was kick to see picturesmove, even if they were simple cartoonish images. The same was true of even themost basic sound effects. Today, we’re used to full screen video delivered over theNet, and sounds have gone from beeps and bells to radio broadcasts, audio books,and entire albums of music. Things have changed, and Flash is at the center of therevolution.
One change, of course, is the number of people who use fast Internet connections.The other change came when Web developers began to use Flash video (FLV).Most of the Web browsers in the world have Flash capabilities—Adobe’s estimatesare way above 90%. For you, the good news is that when you wrap your audio andvideo offerings in Flash, you don’t have to force your audience to download andinstall yet another plug-in. This chapter explains how to add sound to your anima-tions and how to edit that sound for the best fit. You’ll also learn how to presentvideo in a predesigned component that gives the audience playback controls.

342 Flash CS4: The Missing Manual
Incorporating Sound
Incorporating SoundFlash lets you score your animations much the same way a filmmaker scores amovie. You can add a soundtrack that begins when your animation begins andends when it ends. Or you can tie different sound clips to different scenes (series offrames) of your animation. For example, say you’re creating an instructional ani-mation to demonstrate your company’s egg slicer. You can play music during theopening seconds of your animation, switch to a voice-over to describe your prod-uct, and then end with realistic sounds of chopping, slicing, and boiling to matchthe visual of cooks using your product in a real-life setting.
You can also tie sounds to specific events in Flash. For example, say you want yourinstructional animation to contain a button someone can press to get orderinginformation. You can tie the sound of a button clicking to the Down state of yourbutton, so when someone clicks your button, she actually hears a realistic clickingsound.
Note: Early on (that is, before version 8), Flash included a library of sound effects you could add to youranimations. Now in Flash CS4, the Sounds Library is back, and crammed full of noises made by animals,machines, and nature. To add a library sound to your animation, choose Window ➝ Common Libraries➝ Sounds, and drag a sound to the stage.
Importing Sound FilesBefore you can work with sound in Flash, you need to import a sound file either tothe stage, the Library, or both. Flash lets you import a variety of sound files, as youcan see in Table 10-1.
Table 10-1. Audio file formats you can import into Flash
File Type Extension Note
MPEG-1 Audio Layer 3 .mp3 Works on both Mac and Windows.
Windows Wave .wav Works on Windows only, unless you haveQuickTime 4 (or later) installed; then you canimport .wav files into Flash on the Mac, too.
Audio Interchange File format aiff, .aif Works on Mac only, unless you have Quick-Time 4 (or later) installed; then you can importAIFF files into Flash running in Windows, too.
Sound Designer II .sd2 Only works on Mac, and only if you haveQuickTime 4 (or later) installed.
Sound-only QuickTime movies .mov, .qtif Works on both Windows and Mac, but onlyif you have QuickTime 4 (or later) installed.
Sun AU .au Works on both Windows and Mac, but onlyif you have QuickTime 4 (or later) installed.

Chapter 10: Incorporating Sound and Video 343
Incorporating Sound
To import a sound file:
1. Select File ➝ Import ➝ “Import to Library”.
The “Import to Library” dialog box appears.
2. In the “File name” field, type the name of the sound file you want to import(or, in the file window, click the file to have Flash fill in the name for you).
To see the different types of sound files you can import, you can either click thedrop-down menu at the bottom of the “Import to Library” dialog box, or checkout Table 10-1.
3. Click Open (“Import to Library” on a Mac).
The “Import to Library” dialog box disappears, and Flash places a copy of theimported sound file into the Library (Figure 10-1, top). When you click toselect any of the frames in your timeline, the Sound subpanel appears in theProperties panel.
Figure 10-1:The visual representationFlash displays when youselect an imported soundclip is called a waveform.(As discussed on page 349,you use this waveformwhen you’re editing asound clip in Flash.)When you click thePlay button that Flashdisplays along with thewaveform, you canpreview the sound. Flashputs a copy of yourimported file in theLibrary and makes theimported file available inthe Properties panel.
Select soundSound in library

344 Flash CS4: The Missing Manual
Incorporating Sound
Adding an Imported Sound to a Frame (or Series of Frames)You can tell Flash to play an animated sound beginning with any frame of youranimation. Depending on the settings you choose, Flash keeps playing the soundfile either until it finishes (regardless of whether your animation is still playing ornot) or until you tell it to stop.
The example below shows you how to use the stream option to synchronize a shortsound clip of a fly buzzing with an animated sequence showing—what else?—abuzzing fly. Then you’ll learn how to start and stop a second sound (the sound ofthe fly becoming a frog’s lunch).
To add an imported sound to a series of frames:
1. Open the file happy_frog.fla.
You can find this file on the “Missing CD” page at http://missingmanuals.com/cds.(To see a working version, check out happy_frog_sound.fla.)
2. In the Layers window, click to select the topmost layer (Guide: Layer 1).
Flash highlights the layer name, as well as all the frames in that layer.
3. Select Insert ➝ Timeline ➝ Layer.
Flash creates a new layer and places it above the selected layer.
Double-click the new layer name, and then type in soundtrack, as shown inFigure 10-2.
Figure 10-2:Technically speaking, youcan add a sound clip to anylayer you like. But if you’resmart, you create a separatelayer for your sounds (somefolks even create a separatelayer for each sound).Creating separate layershelps keep your keyframesfrom becoming so clutteredthat you can’t see everythingyou’ve added to them. Italso helps you find yoursounds quickly in case youwant to make a changedown the road.
Select name
Sound in library
Chapter 10: Incorporating Sound and Video 345
Incorporating Sound
Tip: You add a sound to a button the same way you see shown here, but with two exceptions: You typi-cally add a sound file for a button to the button’s third, or Down, frame (so that the sound plays whenyour audience clicks down on the button) and you leave the synchronization option set to Event. To seean example, check out the file button_sound.fla on the “Missing CD” page.
4. Click the first keyframe in the soundtrack layer.
In the Properties panel, Flash activates the Frame properties. With a sound filein the Library, the Sound subpanel appears in the Properties panel.
5. In the Sound subpanel, click the Name drop-down menu, and then choose theimported sound file fly_buzz.wav.
Alternatively, you can drag the sound file symbol from the Library to the stage.Either way, the sound properties for the file appear at the bottom of the Proper-ties panel, and the waveform for the buzzing fly sound appears in thesoundtrack layer (Figure 10-3).
DESIGN TIME
Using Sound EffectivelyIf you’ve ever watched a movie that had a breathtakinglybeautiful (or laughably cheesy) musical score, you’ve expe-rienced the power of sound firsthand. Effective sound canelevate a decent visual experience into the realm of art.Ineffective sound can turn that same visual experience intoa nerve-shredding mess.
If you’re thinking about adding sound to your animation,consider these points:
• Why do you want to add sound? If your answeris to add emotional punch; to cue your audienceaurally to the interactive features you’ve added toyour animation, like buttons that click or draggableobjects that whoosh; or to deliver information youcan’t deliver any other way (like a voice-overexplaining an animated sequence or realistic soundsto accompany the sequence); then by all means gofor it. But if your answer is “Because I can,” youneed to rethink your decision. Sound—as much asany graphic element—needs to add to the overallmessage you’re trying to deliver or it’ll end updetracting from that message.
• Are you sure your audience will be able tohear your sound? Sound files are big. They taketime to download. If you’re planning to put youranimation on a Web site, Flash gives you a couple ofdifferent options for managing download time—butkeep in mind that not everyone in your audiencemay have a fast connection or the volume knob onher speaker turned up. (For that matter, some folkscan’t hear. Check out the box on page 30 for tips onproviding hearing-impaired folks with an alternateway of getting your information.)
• How important is it that your soundtrackmatches your animation precisely? Flash givesyou options to help you synchronize your soundclips with your frames. But you can’t match a 2-sec-ond sound clip to a 10-second animated sequencewithout either slowing down the sound or speedingup the animation. If you want to match a specificsound clip to a specific series of frames, you mayneed to edit one (or both) to get the balance rightbefore you begin synchronizing them in Flash.

346 Flash CS4: The Missing Manual
Incorporating Sound
Note: If you don’t see the waveform in the timeline after you’ve added it, click the first keyframe, andthen Shift-click Frame 20 to select all of the frames, from 1 to 20. Finally, choose Insert ➝ Timeline ➝
Frame.
6. In the Properties panel, click the Sync field, and then, from the first drop-downlist that appears, choose Stream.
Your synchronization choices include:
• Event. Tells Flash to give the sound its very own timeline. In other words,Flash keeps playing the sound until the sound finishes, regardless of whetheror not the animation has ended. If you repeat (or loop) the animation in theController, Flash begins playing a new sound clip every time the animationbegins again—with the result that, after a dozen or so loops, you hear adozen flies buzzing! Flash assumes you want your sound to behave this wayunless you tell it otherwise.
• Start. Similar to Event, but tells Flash not to begin playing a new sound if theanimation repeats.
• Stop. Tells Flash to stop playing the sound.
• Stream. Tells Flash to match the animation to the sound clip as best it can,either by speeding up or slowing down the frames-per-second that it playsthe animation. This option is the one you want for lip-synching, when you’re
Figure 10-3:It’s rare that the length ofa sound clip preciselymatches the length of theanimated clip to whichyou want to assign it.Here, the sound clipstretches only toFrame 14—but the layershowing the buzzing flystretches all the way toFrame 20. You could cutand paste the sound tofill those last fourframes so that thefly doesn’t becomeuncharacteristically silentall of a sudden, but Flashgives you much easierways to match a soundclip to a frame span:streaming, repeating,and looping.
Expanded layer Sound file details

Chapter 10: Incorporating Sound and Video 347
Incorporating Sound
trying to match a voice-over to an animated sequence featuring a talkinghead. Because choosing this option also tells Flash to stream the sound file(play it before it’s fully downloaded in those cases where you’ve put youranimation on a Web site), someone with a slow connection can get a herky-jerky animation.
Tip: To preview your newly added sound on the stage, drag (scrub) the playhead along the timeline. Youcan scrub forward or backward. To hear just the sound in a specific frame, Shift-click the playhead overthat frame. Flash keeps playing the sound until you let up on either the Shift key or the mouse.
7. From the second drop-down menu next to the Sync field, choose Loop.
Loop tells Flash to repeat the sound clip until the animation ends. Repeat letsyou tell Flash how many times you want it to play the sound clip (regardless ofthe length of the frame span).
8. Test the soundtracked animation by choosing Control ➝ Test Movie.
You hear a buzzing sound as the fly loops its way across the test movie.
9. Add a second, short sound clip to your animation to make the scene more real-istic. To do so:
In the soundtrack layer, click Frame 20.
On the stage, you see the frog’s tongue appear (Figure 10-4).
10. Select Insert ➝ Timeline ➝ Blank Keyframe, or press F6.
Flash places a blank keyframe (a hollow circle) in Frame 20.
11. In the Sound subpanel, click the arrow next to Name, and then, from the drop-down list that appears, choose zot.wav.
Flash places the waveform for the sound file into the timeline, beginning withFrame 20.
Tip: If you need a better view of the sound’s waveform in your timeline, right-click the layer with thesound, and then choose Properties. The Properties panel opens. At the bottom set the layer height toeither 200% or 300%, as shown in Figure 10-3.
12. In the Properties panel, click the arrow next to Sync, and then, from the drop-down list that appears, choose Start. Then, in the soundtrack layer, click toselect Frame 22.
On the stage, you see a very satisfied frog (Figure 10-5).
13. Select Insert ➝ Timeline ➝ Blank Keyframe or press F6.
Flash places a blank keyframe (a hollow circle) in Frame 22.

348 Flash CS4: The Missing Manual
Incorporating Sound
Figure 10-4:Beginning sound clips in individualkeyframes lets you change thesoundtrack at the exact momentyour visuals change. Here, you seethe frog’s tongue appear in Frame20 of the frog layer, and it doesn’tchange until Frame 22 (whichcontains the final keyframe of theanimation). So to match the “zot!”sound to the tongue action, youwant to tell Flash to start playingthe zot.wav file on Frame 20 andstop playing it on Frame 22.
Figure 10-5:Because the synchronization optionfor the “zot!” sound was set to startin Frame 20, Flash automaticallystops playing the zot.wav sound filewhen the animation ends. Still, it’sgood practice to tell Flashspecifically when you want it tostop playing a sound file. You’ll beglad you did when you come backto the animation a week or twolater because you won’t have anycleanup to do before you addadditional sounds to the timeline.

Chapter 10: Incorporating Sound and Video 349
Incorporating Sound
14. In the Sound subpanel, click the Name drop-down menu, and then choose zot.wav.Click the arrow next to Sync, and then, from the drop-down list that appears,choose Stop.
You’re done!
15. Test the new sound by choosing Control ➝ Test Movie.
You hear a buzzing sound as the fly loops its way across the test movie. But asthe frog’s tongue appears, the buzzing stops and you hear a satisfying “zot!”
Tip: If you don’t hear any sounds, select Control and see whether the checkbox next to Mute Sounds isturned on. If it is, click it to turn it off.
Editing Sound Clips in FlashYou can change the way your imported sound clips play in Flash. You can’t doanything super-fancy, like mix down multiple audio channels or add reverb—Flash isn’t a sound-editing program, after all—but you can crop the clips, add sim-ple fade-in/fade-out effects, and even choose which speaker (right or left) they playout of.
DESIGN TIME
Stock Images, Sounds, and Video ClipsIf you’re using Flash to create stuff for work—presentations,tutorials, Web advertisements, marketing materials, or whathave you—you or someone else on your team is probablygoing to be creating all your content from scratch. Butthere’s a place in every Flash fan’s toolkit for stock media:generic images, sound clips, and video clips that you pur-chase (or, more rarely, get for free) from companies whosejob it is to produce such items.
Typically, you pay a modest fee to use stock images,sounds, and video clips. Sometimes, you also pay a royaltyfee based on the number of times you use a stock elementin your animation.
If you’re using Flash to jazz-up your personal Web site, youmay find stock media is just what the doctor ordered: Youget something cool that you can use for a relatively lowprice without having to invest time and money buyingaudio and video equipment and tracking down thattwister yourself.
But even professional animators have been known to relyon stock media occasionally because it lets them test out aconcept quickly and cheaply.
Places to find stock images, sound clips, and video clipsabound on the Web. Here are a few you might want tocheck out:
www.freestockfootage.com
www.bigshotmedia.com
www.wildform.com/videolibrary
www.flashkit.com/soundfx
www.a1freesoundeffects.com/household.html
www.findsounds.com
www.gettyimages.com

350 Flash CS4: The Missing Manual
Incorporating Video
First, import the sound clip you want to edit, as described on page 342. To edit it,follow these steps:
1. In the timeline, click any frame that contains a portion of the sound clip’swaveform.
Flash activates the sound options you see in the Properties panel.
2. In the Properties panel, click the drop-down box next to Effect, and thenchoose from the following menu options:
• Left channel. Tells Flash to play the sound through the left speaker.
• Right channel. Tells Flash to play the sound through the right speaker.
• Fade left to right. Tells Flash to begin playing the sound through the leftspeaker, and then switch midway through the clip to the right speaker.
• Fade right to left. Tells Flash to begin playing the sound through the rightspeaker, and then switch midway through the clip to the left speaker.
• Fade in. Tells Flash to start playing the sound softly, and then build to fullvolume.
• Fade out. Tells Flash to start playing the sound at full volume, and then taperoff toward the end.
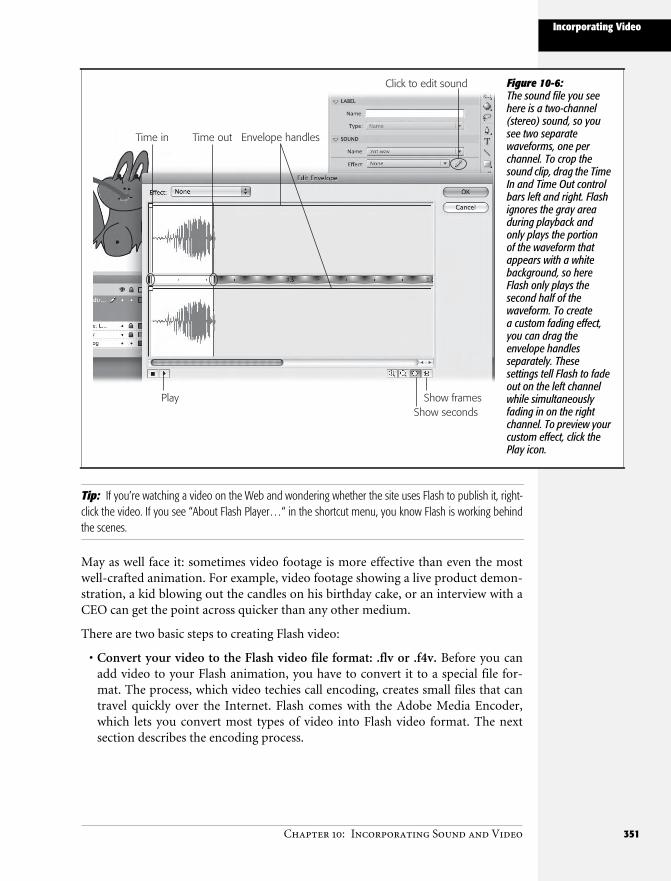
• Custom. Tells Flash to display the Edit Envelope window you see inFigure 10-6, which lets you choose the in point (the point where you wantFlash to begin playing the sound) and the out point (where you want thesound clip to end). You can also choose a custom fading effect; for example,you can fade in, then out, then in again.
Note: Clicking the Property panel’s Edit button displays the same Edit Envelope window you see whenyou choose the Custom option.
Incorporating VideoIn the past few years, Flash has become the video champion of the Internet. Youfind Flash video on sites from YouTube to CNET. It wasn’t long ago that a battleroyale raged between Microsoft, Apple, and RealMedia for Web video braggingrights. Flash was seldom mentioned in the contest; after all, it was just for makinglittle animations. But, like the Trojans with their famous horse, Flash Player man-aged to sneak onto about 90% of today’s computers. And guess what? Flash doesvideo, too. It’s easy for you to add video to a Web page or any other project byadding it to a Flash animation. It’s easy for your audience, too, since they don’thave to download and install a special plug-in to watch your masterpiece. Flash isalso fueling the recent surge in video blogging, or vlogging—adding video clips toplain-vanilla Web logs. You can find out more at sites like www.vidblogs.com andwww.wearethemedia.com.
Chapter 10: Incorporating Sound and Video 351
Incorporating Video
Tip: If you’re watching a video on the Web and wondering whether the site uses Flash to publish it, right-click the video. If you see “About Flash Player…“ in the shortcut menu, you know Flash is working behindthe scenes.
May as well face it: sometimes video footage is more effective than even the mostwell-crafted animation. For example, video footage showing a live product demon-stration, a kid blowing out the candles on his birthday cake, or an interview with aCEO can get the point across quicker than any other medium.
There are two basic steps to creating Flash video:
• Convert your video to the Flash video file format: .flv or .f4v. Before you canadd video to your Flash animation, you have to convert it to a special file for-mat. The process, which video techies call encoding, creates small files that cantravel quickly over the Internet. Flash comes with the Adobe Media Encoder,which lets you convert most types of video into Flash video format. The nextsection describes the encoding process.
Figure 10-6:The sound file you seehere is a two-channel(stereo) sound, so yousee two separatewaveforms, one perchannel. To crop thesound clip, drag the TimeIn and Time Out controlbars left and right. Flashignores the gray areaduring playback andonly plays the portionof the waveform thatappears with a whitebackground, so hereFlash only plays thesecond half of thewaveform. To createa custom fading effect,you can drag theenvelope handlesseparately. Thesesettings tell Flash to fadeout on the left channelwhile simultaneouslyfading in on the rightchannel. To preview yourcustom effect, click thePlay icon.
Time in Time out Envelope handles
Click to edit sound
Show secondsShow framesPlay

352 Flash CS4: The Missing Manual
Incorporating Video
Note: Adobe is working hard to keep Flash at the forefront of the Internet video revolution. With version9.0.124 of the Flash Player (codenamed Moviestar), Adobe added capabilities for HD (high definition)video and audio, similar to what you find in Blu-Ray DVDs. The amount of data needed for HD videowould overwhelm most of today’s Internet connections, but it’s certainly an indication of what to expect inthe future.
• Import your video into a Flash animation. Once your video clip is in Flashvideo format, you can import it into your project. Flash stores a copy of thevideo in the Library, and you can drag the video to the stage like any othergraphic. It’s remarkably easy to add video playback controls to your Flash video.If you have a video that’s already in the Flash video format (.flv or .f4v), you canjump ahead to page 365 to learn how to import it into your Flash file.
Note: Neither Flash nor the Adobe Media Encoder let you do extensive editing. At best, they let you cropa segment out of a larger video clip. If you’re interested in piecing together different video segments tocreate a movie or a scene, turn to a specialized video editing program like Adobe Premiere or Apple Final CutPro. If your needs are more modest, you can probably get by with Apple’s iMovie or Microsoft’s MovieMaker.Using those programs, you can either save clips as Flash video, or you can save clips in a different format(.mpg, .mov, or .avi), and then convert them using Adobe Media Encoder.
Encoding: Making Flash Video FilesVideo files are notoriously huge, which means standard video files take a long timeto travel the Internet. To solve this problem, Flash uses special video formats thatshrink or compress video into smaller files. The quality might not be what you’dexpect from your 50-inch plasma HDTV, but it’s certainly acceptable for Webdelivery. The process of converting a video from its original format to Flash video(.flv or .f4v) is called encoding. If you already have a file in the Flash video formator if someone else is responsible for this part of the job, you can jump ahead to“Importing Video Files” on page 365.
Using the Adobe Media Encoder, you can encode any of the common video fileslisted in Table 10-2. As explained in the box on page 356, it’s best to start off with ahigh quality, uncompressed video. You can add prebuilt controls that let youraudience control the playback and adjust the volume. You can even apply effects toa video clip in Flash: for example, skewing and tinting.
Table 10-2. video file formats you can convert to Flash Video with Adobe Media Encoder
File Type Extension Note
QuickTime movie .mov The audio/video format.Apple’s video player uses. A free version ofQuickTime player is available for both Macsand PCs.
Audio Video Interleaved .avi Microsoft audio/video format.

Chapter 10: Incorporating Sound and Video 353
Incorporating Video
The hardest part of encoding video files is the wait. It takes time to encode largevideo files, but it’s getting better with today’s faster computers. Flash CS4’sinstaller automatically puts Adobe Media Encoder on your computer. Fire it up,and it looks like Figure 10-7. There are two basic things you need to do: locate thefile you want to encode, and give Adobe Media Encoder instructions about how toprocess it. Here are the steps:
Motion Picture Experts Group .mpg, .mpeg MPEG-1 is an early standard for compressedaudio and video media.MPEG-2 is what standard DVDs use.MPEG-4 Part 2 is used by the DivX and Xvidcodecs.MPEG Part 10 is used by QuickTime 7 and theH.264 codec.
Digital video .dv Many camcorders use this digital video format.
Windows Media .asf, .wmv These Microsoft formats are for compressedaudio/video files.
Flash video .flv, .f4v Flash’s video format employs a “lossy” com-pression technique to produce very small filessuitable for broadcast over the Internet.
Table 10-2. video file formats you can convert to Flash Video with Adobe Media Encoder (continued)
File Type Extension Note
Figure 10-7:Adobe Media Encoderis a multipurposeconversion tool thatcomes with severaldifferent Adobe products,including Flash. You addmedia files to the queueand tell Flash what typeof file you want it toproduce.

354 Flash CS4: The Missing Manual
Incorporating Video
1. In Adobe Media Encoder, click Add.
Flash displays a standard Open window similar to the one you use to open aFlash document.
2. Navigate to the file on your computer that you want to encode, and then clickOpen.
The name of the video file appears under Source Name.
3. Under Format, choose the Flash video format: FLV/F4V.
Flash video files automatically determine whether your fill is encoded in theFLV or the F4V format. That determination depends on the preset you choosein the next step. Flash gives you these presets (predetermined settings) becausechoosing all the settings to encode video can be ridiculously complicated. Evenwhen you choose a file format like FLV or F4V, there are still dozens of settingsyou can choose based on how the video is distributed and viewed. Adobe helpsyou wade through the swamp of video settings by providing presets for com-mon video needs.
4. Under Preset, choose a preset format that matches your project.
Flash has what may seem like a bewildering number of presets as shown inFigure 10-8. The names are marginally descriptive. If your project is destinedfor a Web page, try FLV – Web Medium to start. The FLV format works withFlash Player 8 and 9. The F4V formats show better quality video in smaller files,but work only in Flash Player 9. Experienced videographers may want to tweakthe encoding settings or trim the video clip before it’s encoded.
5. Under Output you can change the name or location of the file.
If you don’t make any changes under Output, the encoded file appears in thesame folder as the original video file. It has the same name, but will end witheither .flv or .f4v.
6. Click Start Queue.
Adobe Media Encoder starts to encode your file. A bar at the bottom of thewindow tracks the progress (Figure 10-9). If you have several files to encode,you add them all to the queue before you hit Start Queue. The encoder makesno changes to the original file. When the encoder is finished, a checkmarkappears next to the file in the queue, and you have a new file with a .flv or .f4vextension.
Batch encoding to save time
No matter how you cut it, encoding video takes time and can slow down yourcomputing workflow. If you have lots of video to encode, prepare several videoclips for encoding using the steps described in this section. You can add severalencoding jobs to the encoding queue, and then run them all at the same time when

Chapter 10: Incorporating Sound and Video 355
Incorporating Video
you click Start Queue. Why not do all that encoding overnight or when you headout to lunch?
Figure 10-8:When you first use Adobe Media Encoder, it’sbest to use one of the presets that matchyour project. Later, you may want to createyour own settings by clicking Edit ExportSettings.
Figure 10-9:While the Media Encoderprocesses your file, itkeeps you updated witha progress bar and theEstimated Remainingtime. The video alsoappears in a previewwindow.
Progress bar Estimatedremaining time

356 Flash CS4: The Missing Manual
Incorporating Video
Encoding Part of a Video ClipThere are a few reasons why you might want to dig into Adobe Media Encoder’sexport settings before you encode a file. One of the most common scenarios is thatyou have a long video and you only need to bring a small part of it into your Flashproject. To do so, follow the encoding steps that begin on page 354. When youreach step 4, instead of choosing one of Adobe’s presets, click Edit Export Settingat the bottom of the list. The next thing you see looks like a video editing window,shown in Figure 10-10. You can’t do extensive editing in this window like you canwith Adobe Premiere or Apple’s Final cut, but you can select a portion of a videoclip to encode. Encoding is pretty slow business, and there’s no reason to wastetime converting video that you won’t use.
In the upper-left corner of the Export Settings window is a small preview screen.Below the screen is a timeline with a playhead, similar to Flash’s. Drag the play-head to see different frames in your video. The two markers in the timeline belowthe playhead are called the In point and the Out point. You use these two points toselect a segment of the video. As you drag either point, the preview window showsthe image (or video frame) for that point in time. A highlight appears on theselected segment of video.
UP TO SPEED
Over-Compression: Too Much of a Good ThingThe final destination for many Flash projects is a Web site.One of Flash’s great virtues is the ability to present anima-tions, video, and sound over the Web without making theaudience wait while humongous files travel the Internet.Flash makes big files small by compressing them. It usesdifferent compression methods for images, sound files, andvideo files. Some types of compression actually degradethe image, sound, or video quality. It’s a tradeoff, but it’s thebest way to create really small files that travel the Net fast.The idea is to keep as much information as is needed tomaintain acceptable quality and throw out the extra bits.These types of compression schemes are called lossy for-mats because they lose data and as a result lose quality.Examples of lossy formats are: JPEG photo files, MP3 audiofiles, and FLV or F4V Flash video files. While compression isa good thing because it keeps the file size down and helpsWeb-based Flash animations load quickly, it’s possible toover-compress a file. One way that happens is when youcompress a file that’s already been compressed.
If you repeatedly compress photos, sound files and videofiles you can end up with media mush. For example, take aJPEG and save it five times using 50% quality and you findthat the last copy is much poorer in quality than the first.You can do the same thing to MP3 audio files and videofiles. Ideally, it’s best to bring uncompressed files into Flash,and then let Flash do the compression once, when it pub-lishes a SWF file. For audio files, that means it’s best to useuncompressed AIFF files on a Mac or WAV files on a PC. Forvideo files, use video that hasn’t already been compressed.With video, the compression takes place when you use theAdobe Media Encoder to make .flv or .f4v files. So, if youjust shot the video with your camcorder, feed the raw .dvfile to Adobe Media encoder for the best results. If the fileis coming from someone else, ask him to give you the bestquality possible.

Chapter 10: Incorporating Sound and Video 357
Incorporating Video
If you want to use one of Adobe’s encoding presets, you can choose one in theupper-right corner of the Export Settings window. (If you’d rather tweak theexport settings on your own, see page 359.) Click OK, and you’re back at theMedia Encoder, where you can change the name and location for your encodedfile, as described in step 5 on page 354. Or, you can simply click the Start Queuebutton to encode the video segment you selected.
Resizing and Cropping a Video ClipWhen you choose an encoding preset in Adobe Media Encoder, the preset deter-mines the dimensions of the video image. For comparison, a wide-screen TVsmight show a high-definition image that’s 1920 pixels wide by 1080 pixels high.When you choose the FLV – Web Medium setting, the preset encodes an imagethat’s 360 pixels wide by 264 pixels high. When you’re in Export Settings, you canchoose any size you want. Understandably, large dimensions, like those for thathi-def TV, mean much larger files. If your video is traveling the Internet, you candramatically reduce the travel time by reducing the video dimensions. The 360× 264size of the FLV – Web Medium preset is a nice compact size for the Net. If youknow everyone in your audience is going to have a fast cable or DSL connection,you can go ahead and bump the dimension up to 640× 480, another fairly standarddimension for video.
Figure 10-10:You can’t do extensiveediting in Adobe MediaEncoder, but you canselect the portion of avideo file that you wantencode. The programalso provides tools toresize the entire video,select portions of theimage, and fine-tunethe video codec usedto encode your Flashvideo file.
Preview source or output Export video and/or audio Advanced/Simple Mode toggle
In point Playhead Out point Resize video Codec options

358 Flash CS4: The Missing Manual
Incorporating Video
After you’ve opened Adobe Media Encoder and added a video to the encodingqueue, as described on page 354, follow these steps to choose a custom size for theencoded video:
1. Instead of choosing one of Adobe’s presets, click Edit Export Setting at the bottomof the list.
The Export Settings window appears, where you can fine-tune many aspects ofthe encoding process.
2. On the left side of the Export Settings window, click the Video tab.
If you don’t see tabs in the Export Settings window, click the Advanced/SimpleMode toggle button, as shown in Figure 10-10.
3. Click the Resize Video checkbox.
Once you’ve checked the Resize Video box, the encoder uses the size dimensionsentered in the next step.
4. Change the height and width dimensions, as shown in Figure 10-11.
Most of the time, you want to maintain your video’s proportions to keep theimages from looking too tall or too fat. To constrain the proportion, make surethe Constrain width/height button is depressed. Then, you can enter either awidth or height dimension, and the other dimension automatically sizes itself.
5. Click OK.
The Export Settings window closes, and you see the Adobe Media Encoder queue.
Cropping a video while encoding
Cropping a video is just like cropping a photo. Instead of resizing the entire image,you select a portion of the image that you want to view. With moving pictures it’s alittle trickier, because the image is changing at multiple frames per second. Thecrop that looks great for the first 20 seconds of a clip might not look as good aminute later. Also keep in mind, when you crop a video, you’re changing thedimensions and the quality of the image. When you crop into an image too far,you end up with a blurry picture.
To crop your video, follow the steps on page 358 to open the Export Settings win-dow in Adobe Media Encoder. Above the preview window, click the Crop button.A frame appears around the video image with handles at the corner. Drag the han-dles to frame the portion of the picture you want to keep, as shown inFigure 10-12. If you need specific dimensions in pixels, you can click the Cropdimension numbers, and then type new values. Keep in mind, these numbers areshowing the number of pixels being trimmed from the edges of the picture. To seethe dimensions of the cropped image, point to one of the frame handles. A tooltipappears near the mouse cursor with the width/height dimensions in pixels.

Chapter 10: Incorporating Sound and Video 359
Incorporating Video
Figure 10-11:Open Adobe MediaEncoder’s Export Settingswindow to choose acustom size for yourencoded videos. Click theConstrain width/heightbutton to maintain thepicture’s originalproportions.
Figure 10-12:Drag the handles in the“crop frame” to select theportion of the video pictureyou want to keep in yourencoded video.
Video tabResize check box
Width Constrain width/heightHeight
Crop button Crop dimensions
Crop frame

360 Flash CS4: The Missing Manual
Incorporating Video
Adding Cue Points to Your VideoFlash lets you place cue points (markers) in your movie clips, which you can thenuse to trigger other actions in your Flash animation. For example, perhaps you’dlike to show text on the screen at a certain point in the video, or perhaps you’d liketo trigger a certain sound or narration track. You give cue points names—like“narration”—as you create them. Then you use ActionScript code to identify thecue points and trigger the actions you want performed. (There’s more on Action-Script starting in Chapter 11.)
You add cue points in Adobe Media Encoder, using the same Export Settings windowthat you use to resize or crop your video.
1. In Media Encoder select Edit ➝ Export Settings to open the Export Settingswindow.
You see a preview window showing your video, with a timeline underneath, asshown in Figure 10-13. Just as in Flash, the timeline has a playhead. Drag theplayhead to a point in the timeline, and you see that frame in your video. Belowthe preview, there are two panels: one for cue points and one for parameters.
2. Drag the playback head to the point in your video you want to mark.
The video image changes as you move the playback head.
3. Click the + button to add cue points; click the – button to remove them if youmake a mistake.
Flash creates a cue point in the list and gives it a name, a time setting, and atype. The time setting is determined by the playback head’s position in thevideo clip. In the next steps, you’ll change the name and type of cue point.
Figure 10-13:You use cue points to place markers inyour video. With the help of ActionScript,you can use the cue points to triggerevents in your animation.
Cue Point Name Cue Point Type
Add Cue Point
Delete Cue Point
Parameter panel

Chapter 10: Incorporating Sound and Video 361
Incorporating Video
4. Click the name, and then type a descriptive name for your cue point.
Flash names all cue points “cue point” when it first creates them. It’s up to youto type something more descriptive.
5. Choose the type of cue point you want to create—Event or Navigation. If you’rean ActionScript hotshot, set parameters.
Event cue points trigger an action when the video reaches them. Navigation cuepoints let you locate and play certain portions of your video. Both Event andNavigation cue points require ActionScript to work their magic.
6. Click the + button to add parameters to your cue point; click the – button toremove them if you make a mistake.
Parameters are key-value pairs that programmers use to store and retrieveinformation. So the parameter values are available to ActionScript programswhen the video reaches the cue point.
7. Repeat steps 2–6 to add more cue points, or click OK to go back to the encoderqueue.
Choosing a Video CodecPart of the encoding process is choosing the codec (compressor/decompressor…getit?) that shrinks your video as it converts it to the Flash video format. Over itsshort history, Flash video has used three different codecs. The makers of Flash haveupdated the Flash Player to use new codecs as they’ve become available. The newcodecs provide new features and produce better quality video using smaller filesizes. As a Flash designer, you need to guess which version of the Flash Player youraudience is likely to have when you choose the best codec for encoding.
Flash CS4 makes these decisions relatively easy for you. If you use one of the presetswhen you encode, all you need to do is choose the Flash player your audience willuse, and then decide the relative size. For example, one of the choices is FLV – WebMedium (Flash 8 or higher). If you customize the Export Settings, you can choosethe video codec that’s used to shrink your video file to size. Here’s a guide to theFlash Players that work with different codecs (the year the Flash Player wasreleased is shown in parentheses):
• Sorenson Spark: Flash Player 6 (2002) and above. It’s the safest choice; if youraudience’s Flash Player is video-capable, this codec will work.
• On2 VP6: Flash Player 8 (2005) and above. This choice is pretty safe, unlessyou’re sure that your audience has older computers. One advantage of thiscodec is you can perform tricks like making part of the video image transpar-ent, just like the news folks do when they put the weather guy in front of a map.
• F4V (H.264): Flash Player 9.2 (2008) and above. This choice produces the bestquality video using smaller file sizes. If you choose the F4V Flash video format,it automatically uses the same H.264 codec that Apple uses for iTunes andApple TV.

362 Flash CS4: The Missing Manual
Incorporating Video
You can manually choose a codec from the Export Settings window of the AdobeMedia Encoder. Here are the steps:
1. In the Media Encoder, select Edit ➝ Export Settings.
The Export Settings window opens, as shown in Figure 10-10.
2. Click the Format tab, as shown in Figure 10-14.
If you don’t see tabs in the Export Settings window, click the Advanced/SimpleMode toggle button, as shown in Figure 10-10.
3. Choose either FLV or F4V format.
If you choose the F4V format to take advantage of its good looks and small filesizes, your job is done. The encoder uses the H.264 codec. If you choose theFLV file format so you have compatibility with the older Flash Players out there,then you need to go on to step 4 to specifically choose a codec.
4. If you’re using the FLV format, click the Video tab, and then select eitherSorenson Spark or On2 VP6.
The bullet points before these steps explain the advantages between these twocodecs. If you choose Sorenson Spark, you’re done. If you choose On2 VP6, youcan go on to the next step to choose whether or not to add an Alpha channel(transparency) to your video.
Figure 10-14:Flash video uses two file formats. The FLVformat works with more Flash Players, but theF4V format uses the latest, greatest technologyto create good looking video in small file sizes.
Format tab
FLV F4V
Video tab

Chapter 10: Incorporating Sound and Video 363
Incorporating Video
5. If you chose the On2 VP6 codec, you can click the Encode Alpha Channelcheckbox.
With an Alpha Channel encoded in your video, you have the ability to replace aspecific color with transparency. Called chroma-keying, this technique is com-mon in newscasts and feature films.
Other Techniques for Reducing Video File SizesNo one likes to wait while a Web page loads. So when you’re publishing video onthe Web, life is a constant quest to shrink the size of your video files so they’lltravel the Net faster. In addition to the encoding tricks already mentioned, here aresome tips for shrinking those files while still providing a good video experience.Some of these techniques are related to creating the video, and others are related toAdobe Media Encoder and Export Settings.
Video techniques for reducing file sizes
• Start out with good quality video. When possible, use uncompressed videobefore you encode to Flash Video. If your video has blips and glitches (callednoise by videographers) before you encode it, the video file ends up bigger.
• Avoid fancy effects and transitions. Special effects like fancy wipes or spiraltransitions don’t work as well in Flash video as a plain cut from one scene to thenext. Even dissolves add to the size of your video file.
Encoding techniques for reducing file sizes
• Reduce the dimensions of the video. It’s great to have a high-resolution videothat looks beautiful when the audience clicks the full-screen button. But if ittakes too long to download over the Internet, you won’t have an audience. Asdescribed on page 357, you can change the dimensions of your video to reducethe file size.
• Consider using a lower frame rate. You can set the frame rate in the Video tabof the Export Settings window. The standard frame rate for American TV is29.97 frames per second (don’t ask about the decimal; it’s a long story). Thestandard for film is 24 fps. Test your videos at 18, 15, or even 12 fps to seewhether the quality/file size tradeoff is worth it.
• Use mono sound where possible. If your video is a musical performance, it maybe important to have stereo sound, but otherwise you can save precious filespace by clicking the Audio tab in the Export Settings window, and then choos-ing Mono.
• Use a lower bit rate for sounds that are mostly voices or don’t require high-fidelity. Go to the Audio tab in Export Settings, and then use the drop-downmenu to reduce the bit rate for sound. The encoder has bit rates from 16 to 256.A bit rate of 64 works for many Flash videos. You can go even lower if thesound track is primarily voice, with no music.

364 Flash CS4: The Missing Manual
Incorporating Video
Preparing to Import Video FilesBefore you can import a video clip into Flash, it’s good to know up front how youexpect to link the video file to your finished Flash animation file at runtime: byembedding the video file directly into your Flash timeline, or by linking to thevideo file at runtime, and so on.
This cart-before-the-horse consideration isn’t quite as odd as it seems at firstblush. Video files tend to be so huge you don’t usually want to embed themdirectly into your Flash document the way you embed graphics and sound files(page 319 and page 342, respectively). The process of setting up your Flash animationand Flash video files for the public to view them is called deploying.
Note: Chapter 19 tells you all you need to know about publishing Flash files, including Flash files con-taining video clips.
Your deployment options include:
• Progressive download from a Web server. This option is one of the most popularbecause all you need to publish video on the Internet is a regular, garden-vari-ety Web server. Your Flash animation files (.swf) and Flash video files (.flv or .f4v) are stored on the server. It’s called progressive because the video startsplaying for your visitors before the entire video file is downloaded. The down-side to this option is the fact that the entire video is eventually stored on yourvisitor’s computer, giving her the ability, if she’s clever, to make a copy of yourvideo. If you aren’t comfortable with bootleg copies, then consider one of thenext two options.
• Stream from Flash Video Streaming Service. This option is the most popularway to show videos without letting others copy them. Basically, you hire a com-pany to stream your video from their computers to your Web site visitors. Yourvisitors never have a complete copy on their computers, making it more diffi-cult for them to swipe it. You can find a long list of companies that provide thisservice on Adobe’s Web site (www.adobe.com/products/flashmediaserver/fvss/).These companies have a program called Flash Media Server on their comput-ers, which detects the speed of your Web visitor’s Internet connection andsends the video at a speed it can handle. Your visitor gets a higher-quality videoexperience, and you get added security for copyrighted material. All you have todo is pay for the service.
• Stream from Flash Media Server. This option is similar to the second optionabove, except that you (or, more likely, your organization’s IT department) buythe server hardware, install the server software, and maintain the resulting sys-tem. This option is best if you have deep pockets (Flash Media Server costs$4,500) and don’t mind the hassle of maintaining a media server.

Chapter 10: Incorporating Sound and Video 365
Importing VideoFiles
Note: If you have your own Web server and want to dip your toe in the Media Server water, you maywant to investigate Red5, an open source (free) Flash Server (http://osflash.org/red5).
• As mobile device video bundled in SWF. Use this option in combination withFlash’s templates for consumer devices and handsets to create animations forsmall handheld devices. This option is used to place video inside of SWF filesused with phones and handsets.
• Embed video in SWF and play in timeline. This option represents the simplestway to embed video into your animation, but it only works for very short videoclips (somewhere between 5 and 10 seconds or less). Any more than that, andthe size of your animation file grows so large that you have trouble editing thefile in Flash and your audience has trouble viewing it in their Flash Player.
Importing Video FilesOnce you have access to a video in the Flash Video format (.flv or .f4v), you’reready to begin importing the video file into Flash. When you begin this process,your video can be on your computer or it can be on the Web, where it’s served upby a Flash Media Server. In this section, you see step-by-step examples for bothscenarios.
Importing a Flash Video File Stored on Your ComputerWhen you have a video on your computer in one of Flash’s two video formats (.flvor .f4v), it’s easy to import it into your Flash project. By making a couple ofchoices along the way, you can give your Flash audience standard controls to playand pause your video and adjust its sound. To work on the following exercise, youcan download the video building_implode.flv from the “Missing CD” page at http://missingmanuals.com/cds.
Note: If you need to convert a video to one of the Flash video formats (.flv or .f4v), see page 352.
When you add video to your Flash project using this method, Flash creates a linkbetween the Flash file and your project. Even after you publish a Flash .swf file forfinal distribution, the Flash file and your video file remain separate. If the project isfor a Web site, you need to place both the Flash .swf file and the video file (.flv or.f4v) on the Web site, ideally in the same folder. To make things easy for yourself,it’s best to put your Flash video in same folder where you save your Flash work file(.fla) and publish your Flash animation (.swf).
1. Create a new Flash document, and then save it.
It’s always good to name and save your Flash projects at the beginning. It’s evenmore helpful when you work with external video files as you do in this project.A name like building_bye_bye.fla might be appropriate for this one.
366 Flash CS4: The Missing Manual
Importing VideoFiles
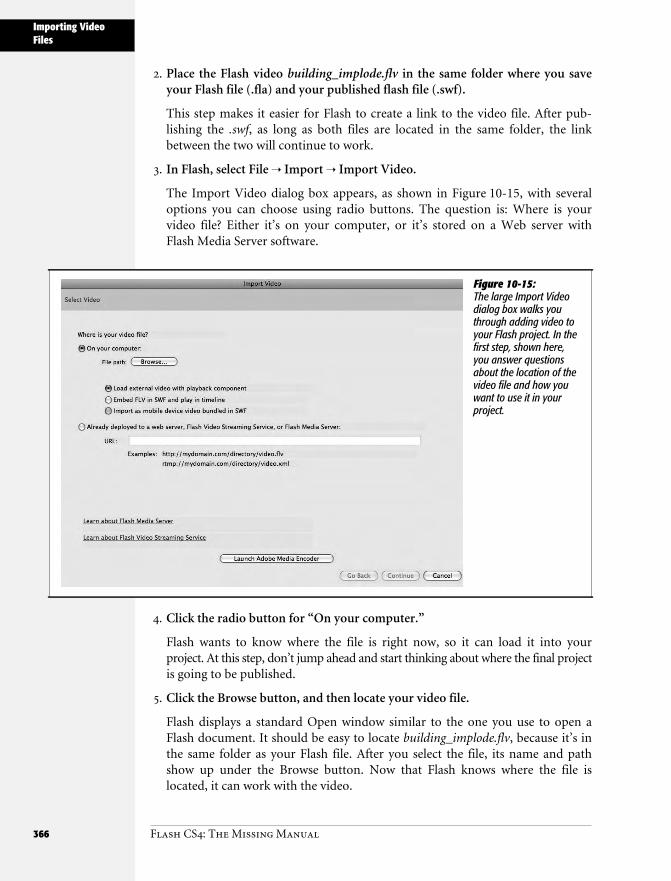
2. Place the Flash video building_implode.flv in the same folder where you saveyour Flash file (.fla) and your published flash file (.swf).
This step makes it easier for Flash to create a link to the video file. After pub-lishing the .swf, as long as both files are located in the same folder, the linkbetween the two will continue to work.
3. In Flash, select File ➝ Import ➝ Import Video.
The Import Video dialog box appears, as shown in Figure 10-15, with severaloptions you can choose using radio buttons. The question is: Where is yourvideo file? Either it’s on your computer, or it’s stored on a Web server withFlash Media Server software.
4. Click the radio button for “On your computer.”
Flash wants to know where the file is right now, so it can load it into yourproject. At this step, don’t jump ahead and start thinking about where the final projectis going to be published.
5. Click the Browse button, and then locate your video file.
Flash displays a standard Open window similar to the one you use to open aFlash document. It should be easy to locate building_implode.flv, because it’s inthe same folder as your Flash file. After you select the file, its name and pathshow up under the Browse button. Now that Flash knows where the file islocated, it can work with the video.
Figure 10-15:The large Import Videodialog box walks youthrough adding video toyour Flash project. In thefirst step, shown here,you answer questionsabout the location of thevideo file and how youwant to use it in yourproject.

Chapter 10: Incorporating Sound and Video 367
Importing VideoFiles
6. Tell Flash how you want to work with the video by clicking the radio buttonlabeled: “Load external video with playback component.”
• Load external video with playback component creates a link between yourFlash file and an external video file. When Flash gets a command to play thevideo, it finds and plays the external file.
The other two options are used less frequently, but they’re useful for specialcases:
• Embed FLV in SWF and play in timeline. This option embeds video intoyour animation. Each frame of video becomes a frame in the Flash timeline.The result is the Flash file gets huge very fast, and your audience will be frus-trated trying to download and play the video. Don’t try this option with clipsany larger than 5 or 10 seconds.
• Import as mobile device video bundled in SWF. Use this option in combinationwith Flash’s templates for consumer devices and handsets to create animationsfor small handheld devices (a topic not covered in this book).
7. Click Continue to move to the next Import Video step.
The Import Video box changes to show skinning options for your video. A skinis a sort of container that adds play/pause/stop type controls to your video, asshown in Figure 10-16.
Figure 10-16:There are two basic types of skins forFlash video. “Over” skins like the oneshown here sit on top of the videoimage, hiding some parts of thepicture. “Under” skins are completelyoutside of the image.
Pause
Stop RewindFast Forward Mute
VolumeFull Screen
Captions

368 Flash CS4: The Missing Manual
Importing VideoFiles
8. From the Skin drop-down box, choose SkinOverAll.swf.
Use the drop-down menu to choose an Adobe predesigned skin, as shown inFigure 10-17. Adobe supplies a whole slew of skins with different combinationsof controls. SkinOverAll includes all of the controls, so this exercise shows youwhat’s available. When you tackle a real-world project, you may find you don’tneed quite so many gadgets on your videos.
There are also options to provide no controls at all (usually not the best option)or to use a custom-designed skin. For example, you might want to put your client’slogo on the video skin as another way to establish their brand.
9. Click Continue.
Flash displays the Import Video: Finish Video Import dialog box you see inFigure 10-18. The details shown may not seem that important until it’s time to pub-lish your Flash project on a Web page. Here’s a translation for each of the lines:
• The video you are using is located at: This line lists the folder where thevideo file lives. If your final project is going on a Web server, you have togive both building_implode.flv and building_bye_bye.swf to your Webmaster.
• The video will be located at: (relative paths are relative to your .swf) Thisline explains the relationship of your files when you publish your Flash ani-mation. It shows you the path that has to exist between the .swf and yourvideo file (building_implode.flv). In this case, there is no path (just a filename) because you’re planning on keeping both the .swf and the .flv in thesame folder, whether it’s on your computer or a Web server.
Figure 10-17:Give your audience snazzyvideo controls by simplychoosing from the Skindrop-down menu. Use thebuttons in the lower-rightcorner of the Import Videodialog box to move forward(Continue) or backward (GoBack) in the Import Videoprocess. Or you can give upentirely (Cancel).

Chapter 10: Incorporating Sound and Video 369
Importing VideoFiles
• A Flash video component will be created on the stage and configured forlocal playback. This line simply tells you that your video and whatever skinyou selected will appear on the stage in your Flash document.
• The video component uses a skin that has been copied next to your .fla.This file will need to be deployed to your server. These sentences are aroundabout way of saying that the skin for your video is stored in a sepa-rate .swf file. Flash places it in the same folder on your computer withbuilding_bye_bye.fla. This skin has a name similar to the name you choose instep 8. In this case, it’s named SkinOverAll.swf, and it has to be in the samefolder with building_bye_bye.swf and building_implode.flv when you publishyour Flash animation.
• Before exporting and deploying your .swf you may need to… If building_bye_bye.swf and building_implode.flv aren’t in the same folder when you putyour animation on a Web server, you need to change the path in the videocomponent. For more on video components, see the next section, page 371.
10. Click Finish.
The Import Video: Finish Video Import dialog box disappears. As promised,you see the video on your stage along with the skin (video controls). There’salso copy of the video in the Library, as shown in Figure 10-19.
Figure 10-18:The last details displayedin the Import Videodialog box deal with thelocation of files. Thisinformation is helpfulwhen it’s time to publishyour Flash project on aWeb page.

370 Flash CS4: The Missing Manual
Importing VideoFiles
11. Press Ctrl+Enter (c-Return on a Mac) to test your Flash project and view thevideo.
In the Flash animation, you see your video running. Using the skin controls,you can start and stop the playback.
Deploying your flash video on the Web
Most of the time, Flash projects that incorporate videos end up on the Web.Whether you’re uploading the video to a Web page or someone’s doing it for you,make sure that three files make the journey: the Flash animation (.swf), the Flashvideo file (.flv or f4v), and the skin file (named something like SkinOverAll.swf).
Importing a Flash Video from the WebSurprisingly, importing a video file that’s stored on the Web isn’t much differentfrom importing one that’s on your computer, as described on page 365. The Flashvideo file may be in a standard Web server or one that has Flash Media Server soft-ware. (Don’t worry if you don’t have a video file stored on a Web server; there’s anexample file you can practice with, as you’ll see in the following steps.)
The only differences in the importing process happen at the very beginning.
1. Select File ➝ Import ➝ Import Video.
The Import Video: Select window appears.
Figure 10-19:When you finishimporting your video toFlash, it shows up in theLibrary and there’s aninstance already placedon the stage. If you needanother instance of thevideo, say in anotherscene, you can simplydrag it from the Libraryto the stage in that scene.

Chapter 10: Incorporating Sound and Video 371
Importing VideoFiles
2. Turn on the radio button next to “Already deployed to a web server, FlashVideo Streaming Service, or Flash Media Server” (Figure 10-15). In the URLbox, type the Web address where the file lives, and then click Continue.
The URL for the practice file is http://examples.oreilly.com/flashcs4mm/building_implode.flv. When you click Continue, the Import Video: Skinning window yousee in Figure 10-17 appears.
The rest of the steps are identical to those for importing a Flash video file on yourown computer. You can pick up the process at step 8 on page 368.
Customizing the Video Playback ComponentIn Flash-speak, once your video is added to your Flash file, it’s called the FLVPlay-back component. Components are prebuilt widgets that you drop into your ani-mations. Someone else went to all the trouble of building (and hopefully testing)the component. All you have to do is drop a component into your Flash projectand let it do its stuff. Components save you design and programming time, so it’sworthwhile to learn about them. There’s a whole chapter on components(Chapter 15), but since you’re already using one in this example, it’s worth cover-ing some of the specific ways you can customize the FLVPlayback component.
Most components provide a few options that let you customize them for yournefarious purposes. For example, in the case of the FLVPlayback component, youcan change the playback behavior of the video and the appearance of the videocontrols. You can even change the video source file if you have a newly edited andimproved video. You change the settings for a component by changing its parame-ters. Here’s how to view and edit the FLVPlayback parameters:
1. In Flash, click the FLVPlayback component on the stage.
You don’t see many settings in the Properties panel for the FLVPlayback com-ponent. Instead, you use the Component Inspector to make most adjustments,as described in the next step.
2. Select Window ➝ Component Inspector.
The Component Inspector panel opens in Flash. The name of each parameter(setting) is listed on the left, and its value is shown on the right.
3. Make changes to the FLVPlayback parameters.
You can change multiple parameters without closing the Component Inspec-tor. For example, to change the appearance of the skin (video playback con-trols), click skinAutoHide, and then set the value to true. To change the color ofthe skin, click the skinBackgroundColor swatch, and then choose a new colorfrom the Color Picker.
Here’s a complete description of the parameters for the FLVPlayback component:
• align. Determines the alignment of the video image when the video scaleMode(below) isn’t set to exactFit.

372 Flash CS4: The Missing Manual
Importing VideoFiles
• autoPlay. If set to true, the video automatically plays when the Flash animationframe that holds it is loaded.
• cuePoints. You can add cue points to your video when it’s encoded, asexplained on page 360. Or you can add them using the FLVPlayback component.Click the magnifying glass to open a window where you can add manual cuepoints by typing in a name and a time.
• islive. Used with a Flash Media Server, this value is set to true when streaming alive performance.
• preview. Used for the live preview feature that helps you test the parameter set-tings. Click the magnifying glass to see your video with the current settings.
• scaleMode. This setting determines how the video image sizes itself after it’sloaded. There are three options: noScale, where the video uses the size of theFlash video source file; maintainAspectRatio, where the video retains its propor-tions when enlarged or shrunk; and exactFit, which forces the video to fit thedimension of the component as shown in the Properties panel.
• skin. The name and path for the .swf file that adds playback controls to thevideo.
• skinAutoHide. If set to true, the playback controls disappear unless the mouseis hovering over the video image.
• skinBackgroundAlpha. Playback controls can be transparent. A value of 1.0 =opaque and 0 = invisible. So, a value of .8 provides an 80% opacity effect.
• skinBackgroundColor. Click the color swatch, and then choose a new colorfrom the color picker.
• source. The name and path for the Flash video file.
• volume. Sets the audio volume for video playback. A value of 1.0 = full volumeand 0 = no volume. So a value of .5 provides half the available volume for audioplayback.