FAS 50 Asset Accounting - Peachtree Edition User’s...
520
FAS 50 Asset Accounting - Peachtree Edition User’s Guide Version 2011.1
Transcript of FAS 50 Asset Accounting - Peachtree Edition User’s...
U
FAS 50 Asset Accounting - Peachtree Edition
ser’s Guide Version 2011.1
© 2011 Sage Software, Inc. All rights reserved.Portions Copyrighted ©1991-2001 by iAnywhere Solutions, Inc.
Published bySage2325 Dulles Corner Boulevard, Suite 700Herndon, VA 20171(703) 793-2700 • FAX (703) 793-2770
Notice: Sage has made every effort to ensure this manual is correct and accurate, but reserves the right to make changes without notice at its sole discretion at any time. Use, duplication, modification, or transfer of the product described in this publication, except as expressly permitted by the Sage License Agreement, is strictly prohibited. Individuals who make any unauthorized use of this product may be subject to civil and criminal penalties.
Sage makes no warranties (expressed or implied) or representations with respect to the information contained herein; and Sage shall not be liable for damages resulting from any errors or omissions herein or from the use of information contained in this manual.
© 2011 Sage Software, Inc. All rights reserved. Sage, the Sage logos, and the Sage product and service names mentioned herein are registered trademarks or trademarks of Sage Software, Inc., or its affiliated entities. Peachtree and Peachtree Complete are registered trademarks of Peachtree Software, Inc. Business Objects and the Business Objects logo, BusinessObjects and Crystal Reports are trademarks or registered trademarks of SAP France in the United States and in other countries. Microsoft SQL Server, Windows Vista and the Windows Vista logo are trademarks or registered trademarks of Microsoft Corporation in the United States and/or other countries. All other trademarks are the property of their respective owners.
Contents
Chapter 1. IntroductionVerifying Your Computer’s Equipment . . . . . . . . . . . . . 1-2Key Steps in Implementing the Application . . . . . . . . . . 1-2
Chapter 2. Getting StartedInstalling the Application . . . . . . . . . . . . . . . . . . . . . . . . . . 2-1Starting the Application . . . . . . . . . . . . . . . . . . . . . . . . . . . 2-1Getting Help . . . . . . . . . . . . . . . . . . . . . . . . . . . . . . . . . . . . . 2-2
Using Online Help . . . . . . . . . . . . . . . . . . . . . . . . . . . . 2-2Viewing the FAS Depreciation Guide . . . . . . . . . . . . 2-3Contacting Sage FAS . . . . . . . . . . . . . . . . . . . . . . . . . . 2-4Sage Live Connect . . . . . . . . . . . . . . . . . . . . . . . . . . . . 2-5Updating Your Customer Number . . . . . . . . . . . . . . 2-5
Exiting the Application . . . . . . . . . . . . . . . . . . . . . . . . . . . . 2-7The Application Interface . . . . . . . . . . . . . . . . . . . . . . . . . . 2-7
Viewing Your Assets—Group View, Detail View . 2-8Elements of the Main Screen . . . . . . . . . . . . . . . . . . . . . . . 2-9
Group View . . . . . . . . . . . . . . . . . . . . . . . . . . . . . . . . . . 2-9Detail View . . . . . . . . . . . . . . . . . . . . . . . . . . . . . . . . . 2-11
Viewing Groups . . . . . . . . . . . . . . . . . . . . . . . . . . . . . . . . 2-13Selecting Assets . . . . . . . . . . . . . . . . . . . . . . . . . . . . . . . . . 2-13Keyboard Shortcuts . . . . . . . . . . . . . . . . . . . . . . . . . . . . . . 2-15Toolbar Buttons . . . . . . . . . . . . . . . . . . . . . . . . . . . . . . . . . 2-16Finding Specific Assets or Specific Data . . . . . . . . . . . . 2-19Globally Replacing Data . . . . . . . . . . . . . . . . . . . . . . . . . . 2-21Browsing Your Assets . . . . . . . . . . . . . . . . . . . . . . . . . . . . 2-22Using the Right Mouse Button . . . . . . . . . . . . . . . . . . . . 2-24Changing the Column Width . . . . . . . . . . . . . . . . . . . . . 2-24Temporarily Changing the Asset Sort Order . . . . . . . . 2-25Accessing the Windows Calculator . . . . . . . . . . . . . . . . 2-26Entering Dates in Date Fields . . . . . . . . . . . . . . . . . . . . . 2-26
Selecting Dates in the Calendar . . . . . . . . . . . . . . . . 2-27Date Formats . . . . . . . . . . . . . . . . . . . . . . . . . . . . . . . . 2-27This Date Is in Which Century? . . . . . . . . . . . . . . . . 2-27
Cutting, Copying, and Pasting Data . . . . . . . . . . . . . . . . 2-28
ii / Contents
Chapter 3. Understanding Key ElementsUnderstanding Data Structure . . . . . . . . . . . . . . . . . . . . . 3-1Understanding Companies . . . . . . . . . . . . . . . . . . . . . . . . 3-2
Why Use More Than One Company? . . . . . . . . . . . . 3-2When to Keep Assets in One Company? . . . . . . . . . 3-4
Understanding Groups . . . . . . . . . . . . . . . . . . . . . . . . . . . . 3-4What Is a Group? . . . . . . . . . . . . . . . . . . . . . . . . . . . . . 3-5How the Application Updates Groups . . . . . . . . . . . 3-6
Understanding Asset Fields and SmartLists . . . . . . . . . . 3-7Understanding Asset Identification . . . . . . . . . . . . . . . . . 3-8Understanding Activity Codes . . . . . . . . . . . . . . . . . . . . . 3-8
Chapter 4. Setting Up the ApplicationCreating a New Database . . . . . . . . . . . . . . . . . . . . . . . . . . 4-1Creating a New Company . . . . . . . . . . . . . . . . . . . . . . . . . 4-4
Book Emulation for the ACE Book . . . . . . . . . . . . . 4-24Mapping the Company to a Peachtree Company . . . . 4-26
Updating General Ledger Accounts . . . . . . . . . . . . 4-28Predefined Groups . . . . . . . . . . . . . . . . . . . . . . . . . . . . . . 4-29Creating Groups . . . . . . . . . . . . . . . . . . . . . . . . . . . . . . . . 4-30Updating Groups . . . . . . . . . . . . . . . . . . . . . . . . . . . . . . . 4-39Editing, Renaming, or Deleting Groups . . . . . . . . . . . . 4-39Customizing Your Asset Fields . . . . . . . . . . . . . . . . . . . . 4-40
Reserved Field Names . . . . . . . . . . . . . . . . . . . . . . . . 4-44Creating Valid Field Entries with SmartLists . . . . . . . . 4-46Setting Preferences . . . . . . . . . . . . . . . . . . . . . . . . . . . . . . 4-52
Setting the Default Folder for File Creation . . . . . . 4-53Setting Up Your Printer . . . . . . . . . . . . . . . . . . . . . . . . . . 4-58
Chapter 5. Working with CompaniesOpening an Existing Company . . . . . . . . . . . . . . . . . . . . . 5-1Editing a Company Setup . . . . . . . . . . . . . . . . . . . . . . . . . 5-2Closing a Company . . . . . . . . . . . . . . . . . . . . . . . . . . . . . . . 5-3Deleting Companies and Databases . . . . . . . . . . . . . . . . . 5-3Copying a Company . . . . . . . . . . . . . . . . . . . . . . . . . . . . . . 5-5Backing Up Your Companies . . . . . . . . . . . . . . . . . . . . . . 5-8Restoring a Backed-Up Company . . . . . . . . . . . . . . . . . . 5-10Exporting Data . . . . . . . . . . . . . . . . . . . . . . . . . . . . . . . . . . 5-15Importing Data . . . . . . . . . . . . . . . . . . . . . . . . . . . . . . . . . 5-15Managing Your Databases . . . . . . . . . . . . . . . . . . . . . . . . 5-16
Using Windows Explorer to Manage Your Databases . . . . . . . . . . . . . . . . . . . . . . . . . . . . . . . 5-16

Contents / iii
Chapter 6. Working with AssetsEntering New Assets . . . . . . . . . . . . . . . . . . . . . . . . . . . . . 6-1
Entering Assets Using Wizard Screens . . . . . . . . . . . 6-2Entering Assets in Detail View . . . . . . . . . . . . . . . . . 6-8Completing the General Information Fields . . . . . 6-10Completing the Book-Related Fields . . . . . . . . . . . . 6-12
Replicating Assets . . . . . . . . . . . . . . . . . . . . . . . . . . . . . . . 6-34Copying Book Information . . . . . . . . . . . . . . . . . . . . . . . 6-35Creating a New Template . . . . . . . . . . . . . . . . . . . . . . . . 6-38Applying Asset Templates . . . . . . . . . . . . . . . . . . . . . . . . 6-40Printing Asset Pages . . . . . . . . . . . . . . . . . . . . . . . . . . . . . 6-41Viewing Asset History . . . . . . . . . . . . . . . . . . . . . . . . . . . 6-43
Setting Up History Events . . . . . . . . . . . . . . . . . . . . 6-46Purging Asset History . . . . . . . . . . . . . . . . . . . . . . . . 6-47
The Notes Page . . . . . . . . . . . . . . . . . . . . . . . . . . . . . . . . . 6-49Editing Asset Data . . . . . . . . . . . . . . . . . . . . . . . . . . . . . . . 6-49Forcing Book Defaults . . . . . . . . . . . . . . . . . . . . . . . . . . . 6-50
Chapter 7. Performing Asset FunctionsDisposing Assets . . . . . . . . . . . . . . . . . . . . . . . . . . . . . . . . . 7-1Performing Individual Asset Disposals . . . . . . . . . . . . . . 7-2Performing Bulk Disposals . . . . . . . . . . . . . . . . . . . . . . . . 7-6Like-Kind Exchanges and Involuntary Conversions
After 1/2/2000 . . . . . . . . . . . . . . . . . . . . . . . . . . . 7-8Entering a Like-Kind Exchange or an Involuntary
Conversion . . . . . . . . . . . . . . . . . . . . . . . . . . . . . . 7-10Editing Disposal Information . . . . . . . . . . . . . . . . . . . . . 7-14Viewing the Disposal Calculation . . . . . . . . . . . . . . . . . 7-15Viewing Current-Year Disposals . . . . . . . . . . . . . . . . . . 7-15Deleting Asset Disposals . . . . . . . . . . . . . . . . . . . . . . . . . 7-16Inactivating and Reactivating Assets . . . . . . . . . . . . . . . 7-16
Why Inactivate Assets? . . . . . . . . . . . . . . . . . . . . . . . 7-17Why Reactivate an Asset? . . . . . . . . . . . . . . . . . . . . . 7-18
Deleting Assets . . . . . . . . . . . . . . . . . . . . . . . . . . . . . . . . . 7-18
Chapter 8. DepreciationUnderstanding Depreciation Calculation Concepts . . . 8-1
Depreciation Calculation Dates . . . . . . . . . . . . . . . . . 8-1Obtaining Monthly Depreciation Figures . . . . . . . . 8-2Calculating Depreciation for Earlier Periods . . . . . . 8-3Midquarter Convention . . . . . . . . . . . . . . . . . . . . . . . 8-3Multiple Books . . . . . . . . . . . . . . . . . . . . . . . . . . . . . . . 8-4
Calculating Depreciation for Your Assets . . . . . . . . . . . . 8-5
iv / Contents
Posting Depreciation to Peachtree by Sage . . . . . . . . . . . 8-8Calculating Depreciation Before Posting . . . . . . . . . 8-8Posting Depreciation . . . . . . . . . . . . . . . . . . . . . . . . . . 8-9
Resetting Depreciation . . . . . . . . . . . . . . . . . . . . . . . . . . . 8-11Running a Budgetary Projection . . . . . . . . . . . . . . . . . . . 8-14Running a Quick Projection . . . . . . . . . . . . . . . . . . . . . . . 8-17
Quick Projection Report . . . . . . . . . . . . . . . . . . . . . . 8-18Changing Depreciation-Critical Information . . . . . . . . 8-20
Changing the Beginning Depreciation Fields . . . . 8-22Conducting a Period Close . . . . . . . . . . . . . . . . . . . . . . . 8-23
Saving Calculations with a Period Close . . . . . . . . 8-25Relying on the Period Close Calculations . . . . . . . 8-26Period Close and Beginning Depreciation Fields . 8-27Clearing the Period Close Fields . . . . . . . . . . . . . . . 8-28
Creating Custom Depreciation Methods . . . . . . . . . . . . 8-30Editing, Deleting, Copying, or Replacing
a Custom Depreciation Method . . . . . . . . . . . . 8-33Electing the 168 Allowance . . . . . . . . . . . . . . . . . . . . . . . 8-36
Assets That Qualify for the 168 Allowance . . . . . . 8-38Changing the Depreciation Method of
a Single Asset . . . . . . . . . . . . . . . . . . . . . . . . . . . . 8-39Performing a 168 Allowance Switch . . . . . . . . . . . . 8-41Electing Out of the 168 Allowance . . . . . . . . . . . . . 8-46Including Section 168 Allowance and Section 179
in Depreciation Expense . . . . . . . . . . . . . . . . . . 8-46New York Liberty Zone Property . . . . . . . . . . . . . . . . . . 8-49
Entering New York Liberty Zone Property . . . . . . 8-51Section 179 Limits for New York Liberty Zone
Property . . . . . . . . . . . . . . . . . . . . . . . . . . . . . . . . 8-53Overriding Section 179 Limits on the Form 4562 . 8-55
Section 179 Limits for Enterprise Zone Property . . . . . 8-59Qualified Gulf Opportunity Zone Property . . . . . . . . . 8-60
Section 179 Limits for Qualified Gulf Opportunity Zone Property . . . . . . . . . . . . . . . . . . . . . . . . . . . 8-61
Qualified Recovery Assistance Property (Kansas Disaster Zone) . . . . . . . . . . . . . . . . . . . . . . . . . . . 8-64
Section 179 Limits for Kansas Disaster Zone Property . . . . . . . . . . . . . . . . . . . . . . . . . . . . . . . . 8-65
Qualified Disaster Assistance Property . . . . . . . . . . . . . 8-67Section 179 Limits for Qualified Disaster Zone
Property . . . . . . . . . . . . . . . . . . . . . . . . . . . . . . . . 8-68Reviewing Assets for Tax Compliance . . . . . . . . . . . . . 8-70
Audit Advisor Validations . . . . . . . . . . . . . . . . . . . . 8-72
Contents / v
Chapter 9. ReportsList of Reports . . . . . . . . . . . . . . . . . . . . . . . . . . . . . . . . . . . 9-1Running a Standard Report . . . . . . . . . . . . . . . . . . . . . . . . 9-5
Adding a Report to the Favorites Menu . . . . . . . . . . 9-7Verifying the Run Date for Each Book . . . . . . . . . . . 9-9Completing the Report Definition Screen . . . . . . . 9-11
Viewing a Report . . . . . . . . . . . . . . . . . . . . . . . . . . . . . . . . 9-19Interpreting Common Report Data . . . . . . . . . . . . . 9-21Using the Group Tree . . . . . . . . . . . . . . . . . . . . . . . . 9-23Drilling Down for More Details . . . . . . . . . . . . . . . . 9-24
Exporting a Report . . . . . . . . . . . . . . . . . . . . . . . . . . . . . . 9-26Setting the Current Reporting Period . . . . . . . . . . . . . . 9-27
Appendix A. Depreciation and Fixed Asset Concepts
Depreciation Books . . . . . . . . . . . . . . . . . . . . . . . . . . . . . . . A-2The Tax Book . . . . . . . . . . . . . . . . . . . . . . . . . . . . . . . . A-2The Internal Book . . . . . . . . . . . . . . . . . . . . . . . . . . . . . A-3The State Book . . . . . . . . . . . . . . . . . . . . . . . . . . . . . . . A-3The AMT Book . . . . . . . . . . . . . . . . . . . . . . . . . . . . . . . A-3The ACE Book . . . . . . . . . . . . . . . . . . . . . . . . . . . . . . . A-4Books 6 and 7 . . . . . . . . . . . . . . . . . . . . . . . . . . . . . . . . A-5
Depreciation: An Overview . . . . . . . . . . . . . . . . . . . . . . . . A-6Elements of Depreciation . . . . . . . . . . . . . . . . . . . . . . . . . . A-7
Types of Property . . . . . . . . . . . . . . . . . . . . . . . . . . . . . A-7Date Placed in Service . . . . . . . . . . . . . . . . . . . . . . . . A-15Depreciable Basis . . . . . . . . . . . . . . . . . . . . . . . . . . . . A-20Estimated Life and ADS Life . . . . . . . . . . . . . . . . . . A-31
Depreciation Defaults . . . . . . . . . . . . . . . . . . . . . . . . . . . . A-34The Tax Book Defaults . . . . . . . . . . . . . . . . . . . . . . . A-35The User Books Defaults . . . . . . . . . . . . . . . . . . . . . . A-36The State Book Defaults . . . . . . . . . . . . . . . . . . . . . . A-38The AMT Book Defaults . . . . . . . . . . . . . . . . . . . . . . A-38The ACE Book Defaults . . . . . . . . . . . . . . . . . . . . . . . A-40
Asset Disposals . . . . . . . . . . . . . . . . . . . . . . . . . . . . . . . . . A-42Disposal Methods . . . . . . . . . . . . . . . . . . . . . . . . . . . . A-42Gains and Losses . . . . . . . . . . . . . . . . . . . . . . . . . . . . A-44
Appendix B. Depreciation MethodsMACRS Methods . . . . . . . . . . . . . . . . . . . . . . . . . . . . . . . . . B-2
MACRS Formula (Method MF) . . . . . . . . . . . . . . . . . B-3MACRS Formula Plus 168 (Method MA) . . . . . . . . . B-8
vi / Contents
MACRS Table (Method MT) . . . . . . . . . . . . . . . . . . B-10ADS, Straight-Line MACRS (Method AD) . . . . . . . B-15ADS Straight-Line MACRS Plus 168
(Method AA) . . . . . . . . . . . . . . . . . . . . . . . . . . . . B-17MACRS Indian Reservation (Method MI) . . . . . . . B-18MACRS Indian Reservation Plus 168
(Method MR) . . . . . . . . . . . . . . . . . . . . . . . . . . . . B-19ACRS Methods . . . . . . . . . . . . . . . . . . . . . . . . . . . . . . . . . B-21
ACRS Table (Method AT) . . . . . . . . . . . . . . . . . . . . . B-22Straight-Line, Alternate ACRS (Methods SA
and ST) . . . . . . . . . . . . . . . . . . . . . . . . . . . . . . . . . B-25Straight-Line Methods . . . . . . . . . . . . . . . . . . . . . . . . . . . B-28
Straight-Line (Method SL) . . . . . . . . . . . . . . . . . . . . B-29Straight-Line, Full-Month (Method SF) . . . . . . . . . B-30Straight-Line, Full-Month Plus 168 (Method SB) . B-31Straight-Line, Half-Year (Method SH) . . . . . . . . . . B-32Straight-Line, Modified Half-Year (Method SD) . . B-34
Declining-Balance Methods . . . . . . . . . . . . . . . . . . . . . . . B-36Declining-Balance (Methods DB and DC) . . . . . . . B-37Declining-Balance, Half-Year (Methods DH
and DI) . . . . . . . . . . . . . . . . . . . . . . . . . . . . . . . . . B-39Declining-Balance, Modified Half-Year (Methods
DD and DE) . . . . . . . . . . . . . . . . . . . . . . . . . . . . . B-40Sum-of-the-Years’-Digits Depreciation . . . . . . . . . . . . . B-42
Sum-of-the-Years’-Digits (Method YS) . . . . . . . . . . B-43Sum-of-the-Years’-Digits, Half-Year (Method YH) B-46Sum-of-the-Years’-Digits, Modified Half-Year
(Method YD) . . . . . . . . . . . . . . . . . . . . . . . . . . . . B-47Remaining Value Over Remaining Life (Method RV) . B-49Own Calculation (Method OC) . . . . . . . . . . . . . . . . . . . . B-52No Depreciation (Method NO) . . . . . . . . . . . . . . . . . . . . B-53Custom Depreciation Methods . . . . . . . . . . . . . . . . . . . . B-53
Custom Depreciation Method Conventions . . . . . B-53Custom Depreciation Method Calculation . . . . . . B-54Custom Depreciation Method Example . . . . . . . . . B-54Custom Depreciation Methods and Short Years . . B-55
Appendix C. Understanding and Specifying Criteria
Simple Expressions . . . . . . . . . . . . . . . . . . . . . . . . . . . . . . . C-1Complex Expressions . . . . . . . . . . . . . . . . . . . . . . . . . . . . . C-2Sorting Groups . . . . . . . . . . . . . . . . . . . . . . . . . . . . . . . . . . . C-5

Contents / vii
Appendix D. Custom ExportExporting Asset Data Using the Export Helper . . . . . . . D-1List of Exportable Fields . . . . . . . . . . . . . . . . . . . . . . . . . . D-11
Appendix E. Custom ImportImport Helper File Types . . . . . . . . . . . . . . . . . . . . . . . . . . E-1Importing Depreciation-Critical Fields . . . . . . . . . . . . . . E-2Setting Asset Warning Preference . . . . . . . . . . . . . . . . . . E-2Importing Asset Data . . . . . . . . . . . . . . . . . . . . . . . . . . . . . E-3
Navigating the Import Helper . . . . . . . . . . . . . . . . . . E-3List of Importable Fields . . . . . . . . . . . . . . . . . . . . . . . . . E-17Field Specifications . . . . . . . . . . . . . . . . . . . . . . . . . . . . . . E-23
Appendix F. How Do I ...?Get Depreciation Numbers for a Prior Period . . . . . . . . F-1Force Depreciation Numbers . . . . . . . . . . . . . . . . . . . . . . . F-5Change Critical Depreciation Fields . . . . . . . . . . . . . . . . . F-6Reset Depreciation . . . . . . . . . . . . . . . . . . . . . . . . . . . . . . . F-8Fix the Depreciation This Run Amount . . . . . . . . . . . . . F-10Import Assets into the Application . . . . . . . . . . . . . . . . F-11Undo a Disposal . . . . . . . . . . . . . . . . . . . . . . . . . . . . . . . . F-12
Appendix G. Glossary
Index

viii / Contents
1 Introduction
Congratulations on having purchased FAS 50 Asset Accounting - Peachtree Edition. We think you’ll find it to be the easiest and most complete application tool available to help you calculate the depreciation of your fixed assets. It contains all the tools necessary for you to complete depreciation calculations without ever having to lift a pencil or press the keys on a calculator—that’s because FAS 50 Asset Accounting does all the work for you!
At this time, we’d like to introduce you to the best depreciation experts around: our staff. You can turn to us to get the depreciation expertise you need to make your fixed asset management a breeze. Whether it’s depreciation questions or technical advice, we’re here to help you and to answer your questions. Having FAS 50 Asset Accounting and our expert staff on hand is like having money in the bank and a financial advisor to show you how to invest it.
Here are some of the features included in the application and some of the tasks the application performs:
• The application organizes your asset information for you in one easy-to-use screen. All your asset information is easily accessible using two specially designed asset displays, Group View and Detail View.
• The application automatically imports the chart of accounts from the Peachtree by Sage application.
• The application posts depreciation expense directly to the Peachtree by Sage general ledger.
• The application contains special rapid data entry features, ensuring that adding assets and performing asset maintenance are fast and easy tasks, without sacrificing accuracy.
• The built-in calculations implement the complicated tax laws related to the depreciation of fixed assets.
1-2 / FAS 50 Asset Accounting - Peachtree Edition
• The reports are clear and easy-to-use, and provide tax and financial information necessary for both tax filings and financial statement reporting, as well as for financial planning.
• The application comes ready to use, or you can use it’s many customization features. Create an interface that feels as if it were programmed just for you!
Verifying Your Computer’s Equipment
For information on the minimum and optimal system requirements for operating the application, please refer to the FAS 50 Asset Accounting - Peachtree Edition Quick Start Guide, which is available on the installation CD. The Quick Start Guide is also available at www.sagefas.com/support.
Key Steps in Implementing the Application
There are numerous implementation plans you can develop in order to get the application up and running and working efficiently with your existing fixed asset management solution. Two benefits of the product are its extreme flexibility and its customization features. Following is just one possible implementation plan you could follow.
Install FAS 50 Asset AccountingUse the installation instructions provided in the FAS 50 Asset Accounting - Peachtree Edition Quick Start Guide to install the product on your computer.
Read Chapter 3 of this ManualThis short chapter introduces you to the basic concepts necessary for you to understand how the application works. Make your life easier, see Chapter 3, “Understanding Key Elements.” Don’t skip this step.
Set Up a Company/Define BooksCreate and set up a new company to store your asset data. When creating a new company you can also set up the seven accounting books necessary for your individual accounting
Introduction / 1-3
needs, from the Internal and Tax books to the two user-defined books. For full instructions on setting up a company and the seven depreciation books, see Chapter 4, “Setting Up the Application.”
Customize FieldsThe application has numerous fields you can use to describe your assets (most of which are fully customizable). The majority of fields are pre-defined, using common fixed asset terminology. It also contains five user-defined fields, so you can tailor the application to meet the specific needs of your company. Since there are so many user-defined fields, you might not find it necessary to change any of the pre-defined fields. You can also create lists of valid entries for each of these fields. These lists are called SmartLists. For details on the customization process, see Chapter 4, “Setting Up the Application.”
Enter Asset Data InformationIf your asset data is not already contained in some electronic form, then you must enter your asset data into the application from scratch. If you currently use a spreadsheet to track your assets, you can quickly import your data using Custom Import. For more information on importing your data, see Appendix E, “Custom Import.” For details on entering asset information and using templates, see Chapter 6, “Working with Assets.”
Create GroupsUse Group Manager to divide your assets into useful groups. Groups logically divide and order your assets, and make reporting on assets much easier. For a full conceptual discussion of groups, see Chapter 3, “Understanding Key Elements.” For detailed instructions on how to create groups, see Chapter 4, “Setting Up the Application.”
Perform Depreciation-Related Tasks and Budgetary ProjectionsCalculate depreciation for the current period, past periods, and future periods. You can also reset depreciation, make changes to assets, and then recalculate depreciation. For details on running depreciation-related tasks, see Chapter 8, “Depreciation.”
1-4 / FAS 50 Asset Accounting - Peachtree Edition
Perform Asset MaintenancePerform basic asset maintenance, such as adding assets or disposing of assets. For information about the disposing of assets, see Chapter 7, “Performing Asset Functions.”
Run ReportsRun any or all of the 27 available reports. These reports provide information on every aspect of your asset maintenance, including, of course, budgetary projections and depreciation. For report information, see Chapter 9, “Reports.”
2 Getting Started
This chapter introduces you to FAS 50 Asset Accounting - Peachtree Edition and describes the application’s interface. You’ll learn about the two views of your assets—Group View for looking at a group of assets and Detail View for looking at a single asset. You’ll also learn how to accomplish some basic tasks, such as finding and selecting assets, globally replacing data, entering dates in date fields, and browsing the currently selected group of assets.
Installing the Application
This chapter assumes you have already installed the application on your computer. Installing FAS 50 Asset Accounting is a simple task that takes only a few minutes. For complete instructions on installing the application, please refer to the FAS 50 Asset Accounting - Peachtree Edition Quick Start Guide.
Starting the Application
The FAS 50 Asset Accounting - Peachtree Edition software icon appears under the Sage Software software group by default.
To start the application
1. Click the Start button on the Windows taskbar, and then select Programs from the Start menu.
2-2 / FAS 50 Asset Accounting - Peachtree Edition
2. Select Sage Software from the Programs submenu, and then select the FAS 50 Asset Accounting - Peachtree Edition software group.
3. Select the FAS 50 Asset Accounting - Peachtree Edition software icon.
The application opens and displays the main screen.
The application contains demonstration data for a company called “Westfields Bakery - Demo.” This demonstration data makes it much easier for new users to learn the application. Depending on whether you are a new user, or the first user of the product for your company, Westfields Bakery - Demo might open automatically after startup. If not, you can open Westfields Bakery - Demo as you would any other company. See “Opening an Existing Company,” page 5-1.
Getting Help
There are many ways to learn to use the application. Your options include:
• Using the online Help system
• Viewing the online user’s guide
• Viewing the FAS Depreciation Guide
• Contacting Sage FAS
• Sage Live Connect
Using Online Help
Sometimes the quickest way to get help with the application is to use its extensive online Help. All Windows-based online Help systems contain three main sections—Contents, Index, and Search. The Contents section presents the information contained within the online system in an easy-to-follow manner. The Index and Search features allow you to quickly locate specific information.

Getting Started / 2-3
To activate the online Help
1. Select Help/Contents from the menu bar. The online Help screen appears.
2. Do one of the following:
• Click the Contents tab to explore the Table of Contents.
• Click the Index tab to find a topic by entering an index key word.
• Click the Search tab to search for any word or phrase in the online Help.
• Click the Favorites tab to add the current topic to a list of favorite topics, so you can quickly locate it at a later time.
• Click the Glossary tab to find the definition of an unfamiliar term.
Viewing the FAS Depreciation Guide
The FAS Depreciation Guide contains everything you need to know about depreciation for both Tax and GAAP purposes, written in easy-to-understand language.
When you installed the application, you also installed the FAS Depreciation Guide, an electronic reference tool that answers all of your questions about depreciation.
You must have Adobe Reader installed on your computer to view the FAS Depreciation Guide. We have included the Adobe Reader software on the installation CD in the \ACROBAT directory. You can also download the Adobe Reader software from the Adobe web site (www.adobe.com).
Follow these steps to view the online FAS Depreciation Guide.
To view the FAS Depreciation Guide
1. Select Help/Depreciation Guide from the menu bar. The application opens Adobe Reader and displays the first page of the FAS Depreciation Guide.
2-4 / FAS 50 Asset Accounting - Peachtree Edition
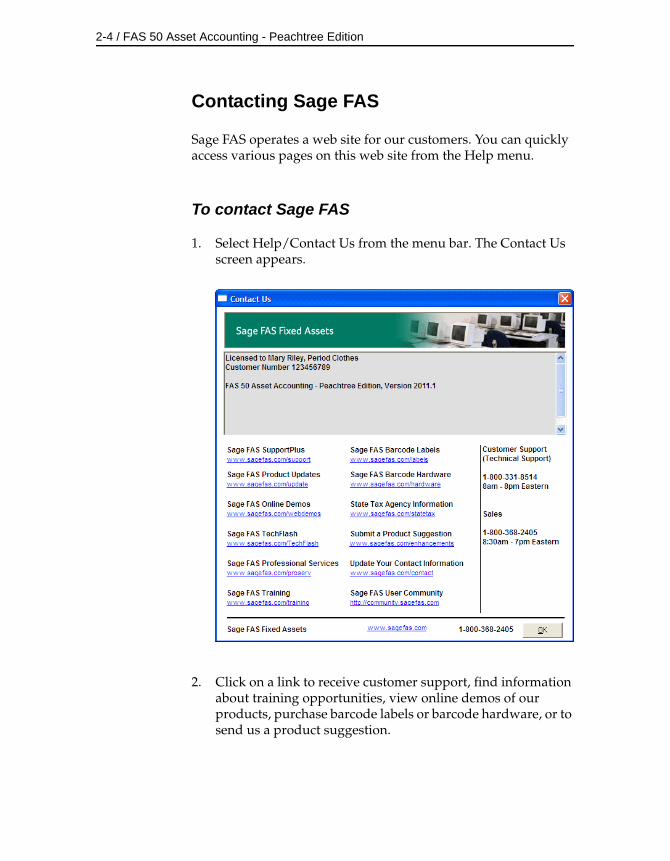
Contacting Sage FAS
Sage FAS operates a web site for our customers. You can quickly access various pages on this web site from the Help menu.
To contact Sage FAS
1. Select Help/Contact Us from the menu bar. The Contact Us screen appears.
2. Click on a link to receive customer support, find information about training opportunities, view online demos of our products, purchase barcode labels or barcode hardware, or to send us a product suggestion.
Getting Started / 2-5
Sage Live Connect
The Sage Live Connect option on the Help menu allows you to connect your computer directly to a Customer Support representative. The Customer Support representative can then take control of your computer to more quickly diagnose your computer’s problem.
Before using the Sage Live Connect feature, you must first contact Sage FAS Customer Support by calling 800-331-8514. If the Customer Support representative decides that taking control of your computer would be helpful, you will be asked to click on Sage Live Connect.
To access Sage Live Connect
1. At the request of a Customer Support representative, select Help/Sage Live Connect from the menu bar. A screen appears that provides further instructions.
Note You must have access to the Internet to use the Sage Live Connect.
Updating Your Customer Number
After you purchase the application, you will be given a customer number. You must have your customer number when you call Customer Support with a question about using the application.
After you receive your customer number, you can enter it in a screen so it will be readily available when you need it.
To update your customer number
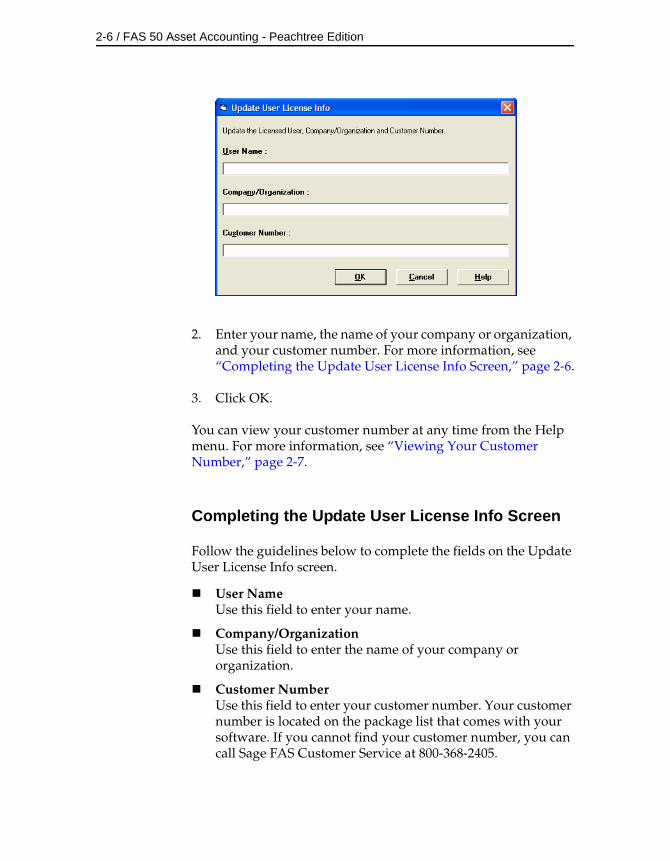
1. Select Help/Update User License Info from the menu bar. The Update User License Info screen appears.
2-6 / FAS 50 Asset Accounting - Peachtree Edition
2. Enter your name, the name of your company or organization, and your customer number. For more information, see “Completing the Update User License Info Screen,” page 2-6.
3. Click OK.
You can view your customer number at any time from the Help menu. For more information, see “Viewing Your Customer Number,” page 2-7.
Completing the Update User License Info Screen
Follow the guidelines below to complete the fields on the Update User License Info screen.
User NameUse this field to enter your name.
Company/OrganizationUse this field to enter the name of your company or organization.
Customer NumberUse this field to enter your customer number. Your customer number is located on the package list that comes with your software. If you cannot find your customer number, you can call Sage FAS Customer Service at 800-368-2405.
Getting Started / 2-7
Viewing Your Customer Number
You must have your customer number when you call Customer Support with a question about using the application.
To view your customer number
1. Select Help/About FAS Asset Accounting from the menu bar. A screen appears containing information about your application, including your customer number.
Exiting the Application
There are many ways to exit the application.
To exit the application
1. Do any one of the following:
• Select File/Exit from the menu bar.
• Press ALT+F4.
• Click the close box button in the upper right corner.
The Application Interface
After starting the application, the main screen appears. It is in the main screen that you’ll be working most of the time.
The main screen contains all the elements of a standard Windows application, plus many features that are specific to FAS 50 Asset Accounting.
2-8 / FAS 50 Asset Accounting - Peachtree Edition
Viewing Your Assets—Group View, Detail View
In the main screen, there are two ways in which to view your assets—Group View and Detail View. Group View displays all assets in the currently selected group. Detail View displays four pages of information about a single selected asset. Each page is designated by a display tab.
FAS 50 Asset Accounting opens in Group View.
To switch between Group View and Detail View
1. Do any one of the following:
• Click the Detail View or Group View button.
• Select Asset/Detail View or Asset/Group View from the menu bar.
• Click the Detail View or Group View button from the toolbar.
• Right-click anywhere on the spreadsheet, and then select either Detail View or Group View from the pop-up menu.
You can also switch from Group View to Detail View using methods not available when switching from Detail View to Group View.
• Double-click on any asset in Group View.
• Select any asset in Group View and press ENTER.
• Enter an asset’s System Number in the Goto field, and then press ENTER.
Getting Started / 2-9
Me
DeVie
Go
GeInfFie
Elements of the Main Screen
The diagrams on the following pages illustrate the most important elements of the main screen in both Group View and Detail View. Following the diagrams are brief explanations of most elements.
Group View
The following describes most elements of the FAS 50 Asset Accounting interface listed in the above illustrations.
Menu BarThe menu bar is a standard Windows interface tool used to access specific areas of an application. The menu bar contains menu headings that list specific functions or actions. To initiate an action, click the menu heading that corresponds to
Name of Currently Open Company
nu BarToolbar
Asset List
tail/Group w Button
Group To
neral ormation ld Names
2-10 / FAS 50 Asset Accounting - Peachtree Edition
the desired action, or use keyboard commands to access the menu heading.
ToolbarThe toolbar is a standard Windows interface tool used to initiate specific functions in an application through the use of buttons. The toolbar makes many standard tasks easier to accomplish.
GroupThis field provides easy access to the complete list of available asset groups. An asset group is a group of assets that you design for specific purposes such as running reports, calculating depreciation, and performing depreciation projections. The asset list displays only the assets contained in the currently selected group.
GotoThis field allows you to quickly enter a specific asset that you want to display in Detail View. When in Detail View, the Goto field moves the asset list forward and backward.
Asset ListIn Group View, the application displays all assets of the currently selected group in your database. A single horizontal row represents one asset. General information fields, which contain information about the asset, appear at the top of each vertical row. Use the horizontal scroll bar to view all general information field information.
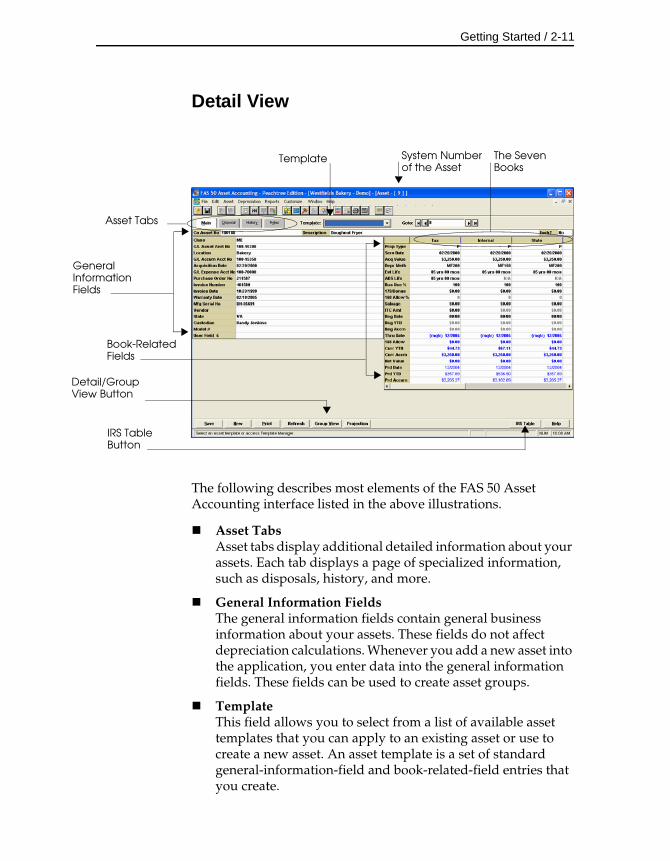
Getting Started / 2-11
GeInfFie
DeVie
Detail View
The following describes most elements of the FAS 50 Asset Accounting interface listed in the above illustrations.
Asset TabsAsset tabs display additional detailed information about your assets. Each tab displays a page of specialized information, such as disposals, history, and more.
General Information FieldsThe general information fields contain general business information about your assets. These fields do not affect depreciation calculations. Whenever you add a new asset into the application, you enter data into the general information fields. These fields can be used to create asset groups.
TemplateThis field allows you to select from a list of available asset templates that you can apply to an existing asset or use to create a new asset. An asset template is a set of standard general-information-field and book-related-field entries that you create.
System Number of the Asset
Asset Tabs
neralormation lds
The Seven Books
Book-Related Fields
tail/Group w Button
Template
IRS Table Button
2-12 / FAS 50 Asset Accounting - Peachtree Edition
The Seven BooksThe seven depreciation books available in the application are displayed across each of these column headings. Data in each column relates to the book listed at the top of the column.
Book-Related FieldsThe book-related fields display depreciation data specific to each book displayed in the column headings. In Detail View, you can view all depreciation data for a single asset. Use the horizontal scroll bar at the bottom of the fields to scroll through all seven books.
IRS Table ButtonThe IRS Table button provides an easy-to-access method for determining an asset’s MACRS GDS or ADS life for the Tax book. Click the button to display the IRS ADR Class Life Table, per Revenue Procedure 87-56, which we have reformatted and alphabetized for ease of use. By clicking the See Also button, you can navigate to three different tables:
• Commonly used assets.
• Assets used in manufacturing, alphabetized by end product. (For example, assets used to manufacture photographic equipment are listed under “P” in this table.)
• Assets used in specialized businesses. (For example, assets used in recreational services are listed under “R” in this table.)
By locating an asset in the appropriate table and entering both its MACRS GDS life and ADS life, the application will default the correct lives into both the AMT and ACE books as needed.
Getting Started / 2-13
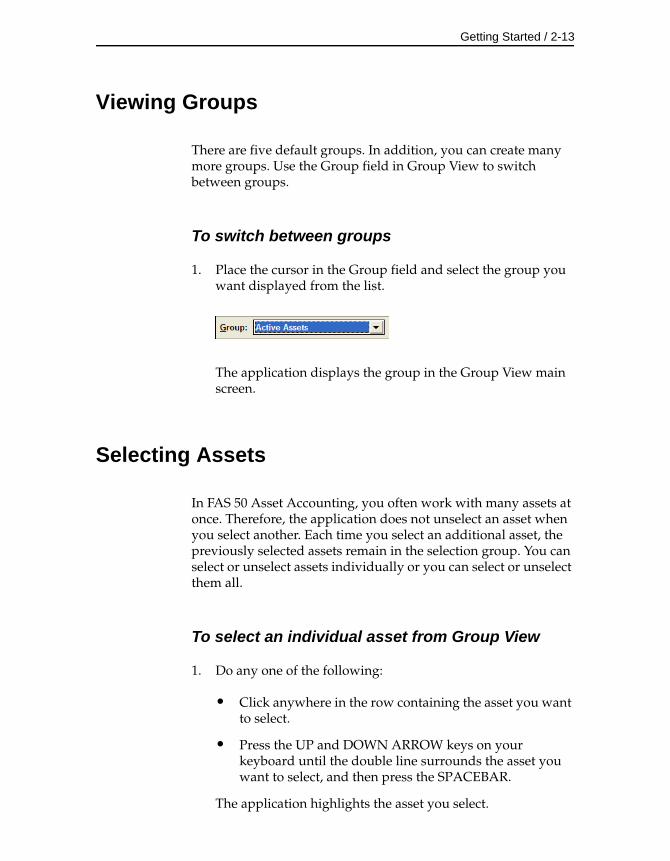
Viewing Groups
There are five default groups. In addition, you can create many more groups. Use the Group field in Group View to switch between groups.
To switch between groups
1. Place the cursor in the Group field and select the group you want displayed from the list.
The application displays the group in the Group View main screen.
Selecting Assets
In FAS 50 Asset Accounting, you often work with many assets at once. Therefore, the application does not unselect an asset when you select another. Each time you select an additional asset, the previously selected assets remain in the selection group. You can select or unselect assets individually or you can select or unselect them all.
To select an individual asset from Group View
1. Do any one of the following:
• Click anywhere in the row containing the asset you want to select.
• Press the UP and DOWN ARROW keys on your keyboard until the double line surrounds the asset you want to select, and then press the SPACEBAR.
The application highlights the asset you select.
2-14 / FAS 50 Asset Accounting - Peachtree Edition
To unselect assets individually from Group View
1. Do any one of the following:
• Click on the highlighted asset. The application removes the center of the highlight bar. The next time you click anywhere else in the asset list, the double line surrounding the asset disappears.
• Press the UP and DOWN ARROW keys on your keyboard until the double line surrounds the asset you want to unselect, and then press the SPACEBAR.
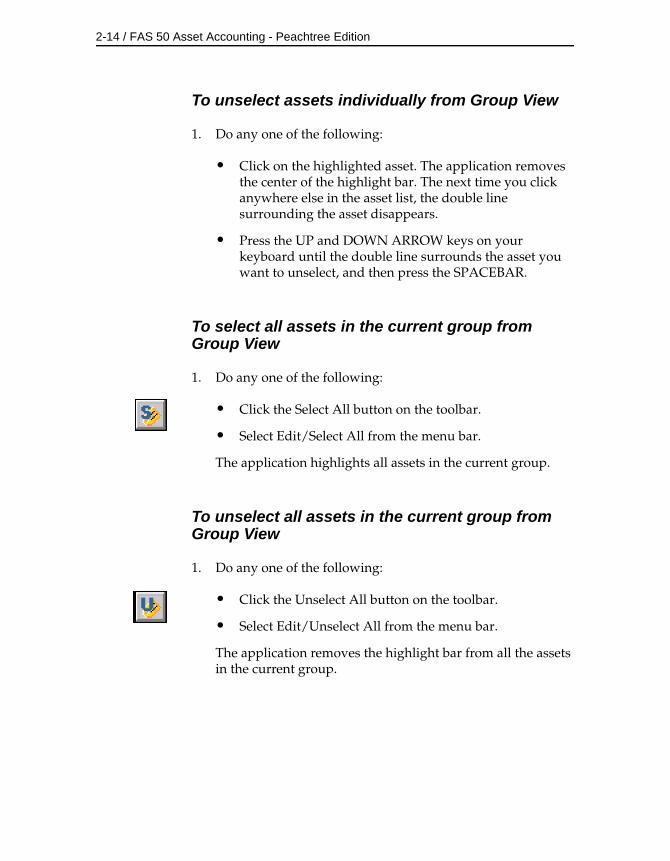
To select all assets in the current group from Group View
1. Do any one of the following:
• Click the Select All button on the toolbar.
• Select Edit/Select All from the menu bar.
The application highlights all assets in the current group.
To unselect all assets in the current group from Group View
1. Do any one of the following:
• Click the Unselect All button on the toolbar.
• Select Edit/Unselect All from the menu bar.
The application removes the highlight bar from all the assets in the current group.
Getting Started / 2-15
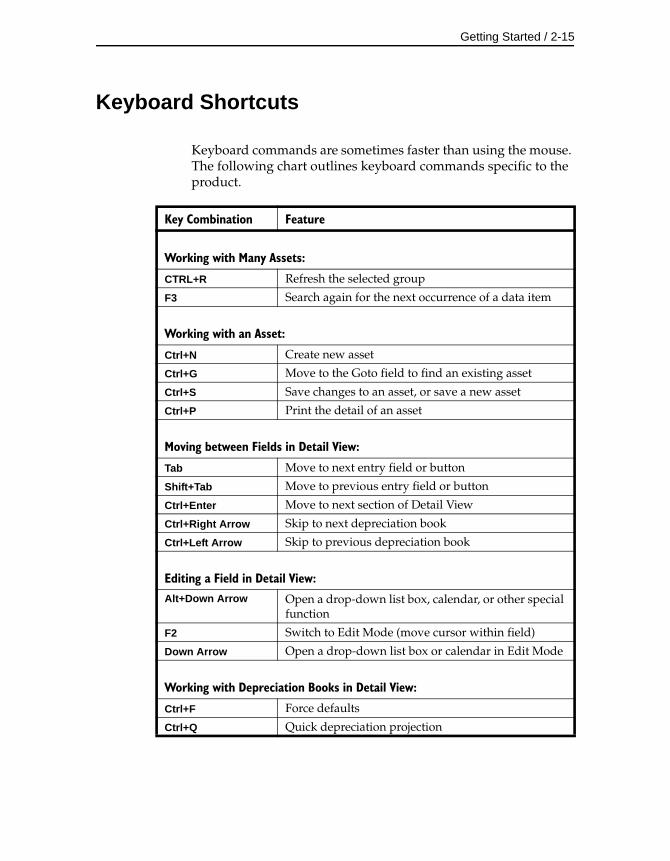
Keyboard Shortcuts
Keyboard commands are sometimes faster than using the mouse. The following chart outlines keyboard commands specific to the product.
Key Combination Feature
Working with Many Assets:
CTRL+R Refresh the selected group
F3 Search again for the next occurrence of a data item
Working with an Asset:
Ctrl+N Create new asset
Ctrl+G Move to the Goto field to find an existing asset
Ctrl+S Save changes to an asset, or save a new asset
Ctrl+P Print the detail of an asset
Moving between Fields in Detail View:
Tab Move to next entry field or button
Shift+Tab Move to previous entry field or button
Ctrl+Enter Move to next section of Detail View
Ctrl+Right Arrow Skip to next depreciation book
Ctrl+Left Arrow Skip to previous depreciation book
Editing a Field in Detail View:Alt+Down Arrow Open a drop-down list box, calendar, or other special
function
F2 Switch to Edit Mode (move cursor within field)
Down Arrow Open a drop-down list box or calendar in Edit Mode
Working with Depreciation Books in Detail View:
Ctrl+F Force defaults
Ctrl+Q Quick depreciation projection
2-16 / FAS 50 Asset Accounting - Peachtree Edition
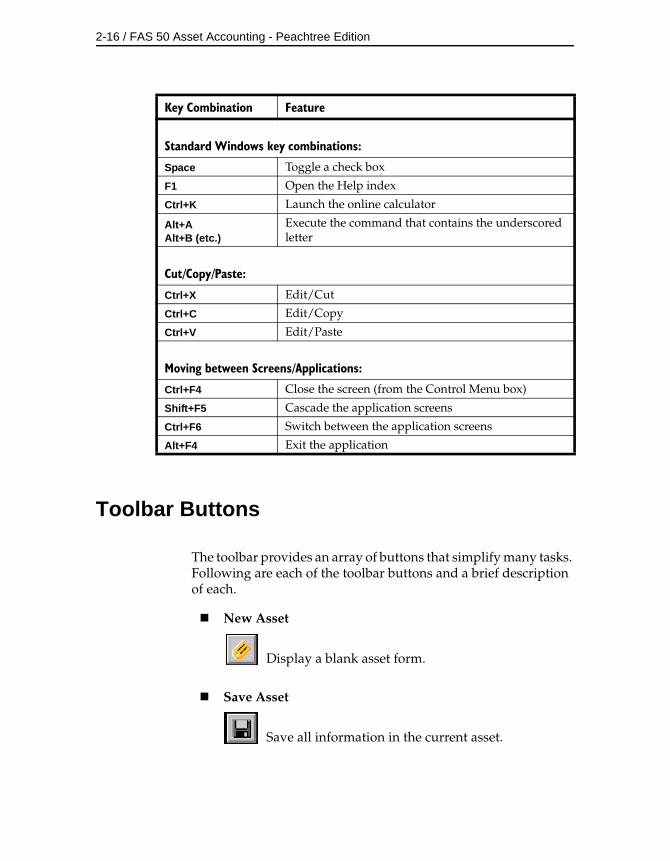
Toolbar Buttons
The toolbar provides an array of buttons that simplify many tasks. Following are each of the toolbar buttons and a brief description of each.
Standard Windows key combinations:
Space Toggle a check box
F1 Open the Help index
Ctrl+K Launch the online calculator
Alt+AAlt+B (etc.)
Execute the command that contains the underscored letter
Cut/Copy/Paste:
Ctrl+X Edit/Cut
Ctrl+C Edit/Copy
Ctrl+V Edit/Paste
Moving between Screens/Applications:
Ctrl+F4 Close the screen (from the Control Menu box)
Shift+F5 Cascade the application screens
Ctrl+F6 Switch between the application screens
Alt+F4 Exit the application
Key Combination Feature
New Asset
Display a blank asset form.
Save Asset
Save all information in the current asset.
Getting Started / 2-17
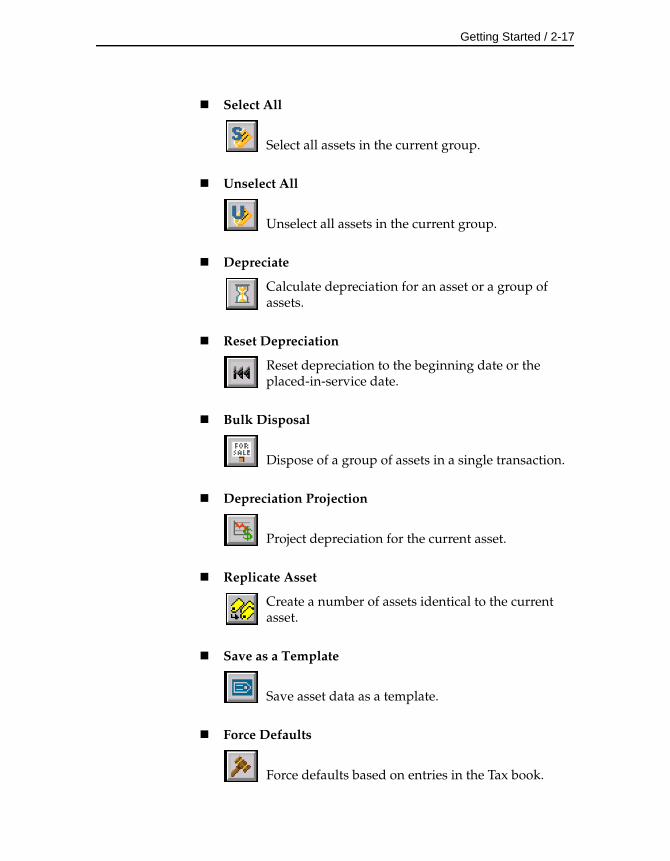
Select All
Select all assets in the current group.
Unselect All
Unselect all assets in the current group.
Depreciate
Calculate depreciation for an asset or a group of assets.
Reset Depreciation
Reset depreciation to the beginning date or the placed-in-service date.
Bulk Disposal
Dispose of a group of assets in a single transaction.
Depreciation Projection
Project depreciation for the current asset.
Replicate Asset
Create a number of assets identical to the current asset.
Save as a Template
Save asset data as a template.
Force Defaults
Force defaults based on entries in the Tax book.
2-18 / FAS 50 Asset Accounting - Peachtree Edition
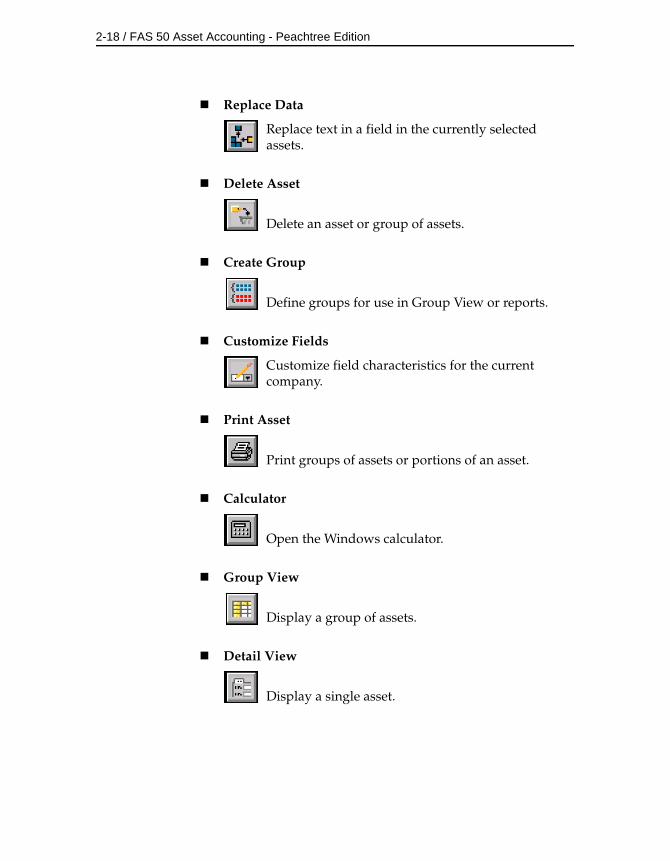
Replace Data
Replace text in a field in the currently selected assets.
Delete Asset
Delete an asset or group of assets.
Create Group
Define groups for use in Group View or reports.
Customize Fields
Customize field characteristics for the current company.
Print Asset
Print groups of assets or portions of an asset.
Calculator
Open the Windows calculator.
Group View
Display a group of assets.
Detail View
Display a single asset.
Getting Started / 2-19
Finding Specific Assets or Specific Data
You have two tools available to help you find specific assets. One of these tools also helps you find specific data in the general information fields of an asset. The two tools are:
• The Goto field
• The Search feature
The Goto field is available in both Group View and Detail View. It is useful when you know the System Number or the Company Asset Number of an asset you want to display in Detail View. (You specify which of the two types of numbers you want to use in the Goto field in the Preferences screen.) For more information, see “Setting Preferences,” page 4-52.
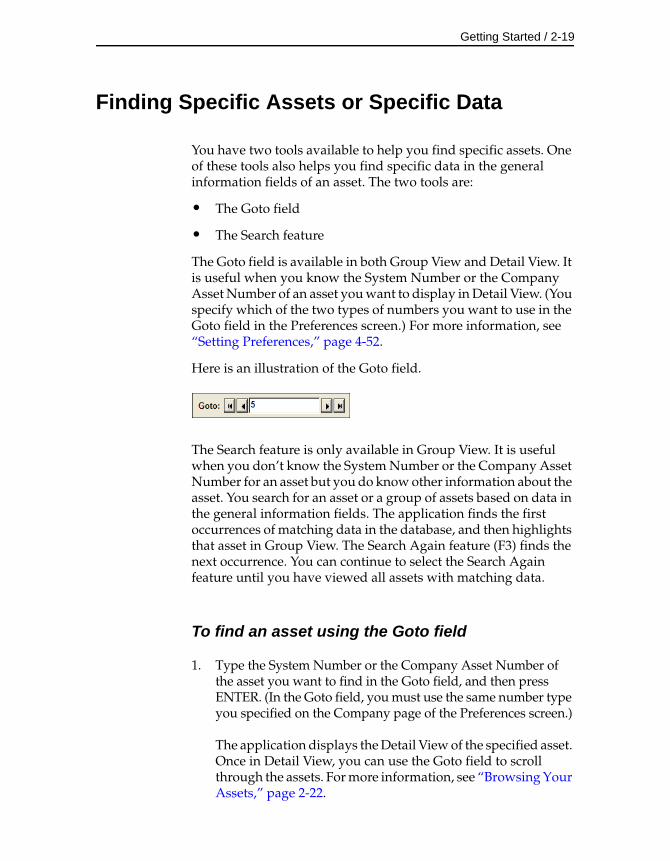
Here is an illustration of the Goto field.
The Search feature is only available in Group View. It is useful when you don’t know the System Number or the Company Asset Number for an asset but you do know other information about the asset. You search for an asset or a group of assets based on data in the general information fields. The application finds the first occurrences of matching data in the database, and then highlights that asset in Group View. The Search Again feature (F3) finds the next occurrence. You can continue to select the Search Again feature until you have viewed all assets with matching data.
To find an asset using the Goto field
1. Type the System Number or the Company Asset Number of the asset you want to find in the Goto field, and then press ENTER. (In the Goto field, you must use the same number type you specified on the Company page of the Preferences screen.)
The application displays the Detail View of the specified asset. Once in Detail View, you can use the Goto field to scroll through the assets. For more information, see “Browsing Your Assets,” page 2-22.
2-20 / FAS 50 Asset Accounting - Peachtree Edition
To find an asset using the Search feature
When using the Search feature, don’t worry about entering upper or lower case letters. This feature is not case-sensitive. The Search feature does not support the use of wild card characters.
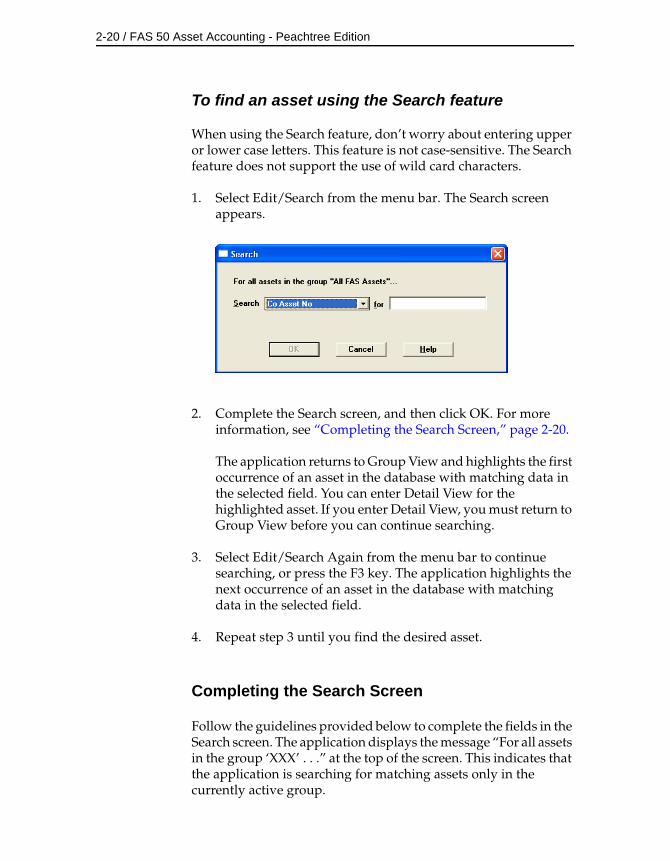
1. Select Edit/Search from the menu bar. The Search screen appears.
2. Complete the Search screen, and then click OK. For more information, see “Completing the Search Screen,” page 2-20.
The application returns to Group View and highlights the first occurrence of an asset in the database with matching data in the selected field. You can enter Detail View for the highlighted asset. If you enter Detail View, you must return to Group View before you can continue searching.
3. Select Edit/Search Again from the menu bar to continue searching, or press the F3 key. The application highlights the next occurrence of an asset in the database with matching data in the selected field.
4. Repeat step 3 until you find the desired asset.
Completing the Search Screen
Follow the guidelines provided below to complete the fields in the Search screen. The application displays the message “For all assets in the group ‘XXX’ . . .” at the top of the screen. This indicates that the application is searching for matching assets only in the currently active group.
Getting Started / 2-21
SearchUse this field to select the general information field that you want to use in the search to look for specific data.
ForUse this field to type the specific data you want to find in the selected field.
Globally Replacing Data
You can globally replace data in any one of the general information fields for selected assets. The Replace feature is only available in Group View, and it operates only on assets that have been selected from the currently active group. That is, you must first select the assets from the currently active group before using the Replace command. For information on selecting assets, see “Selecting Assets,” page 2-13.
To globally replace data
1. Select the assets in which you want to replace data. (To globally replace data for all assets in a company, make sure the currently active group is All Assets, and then click the Select All button from the toolbar.)
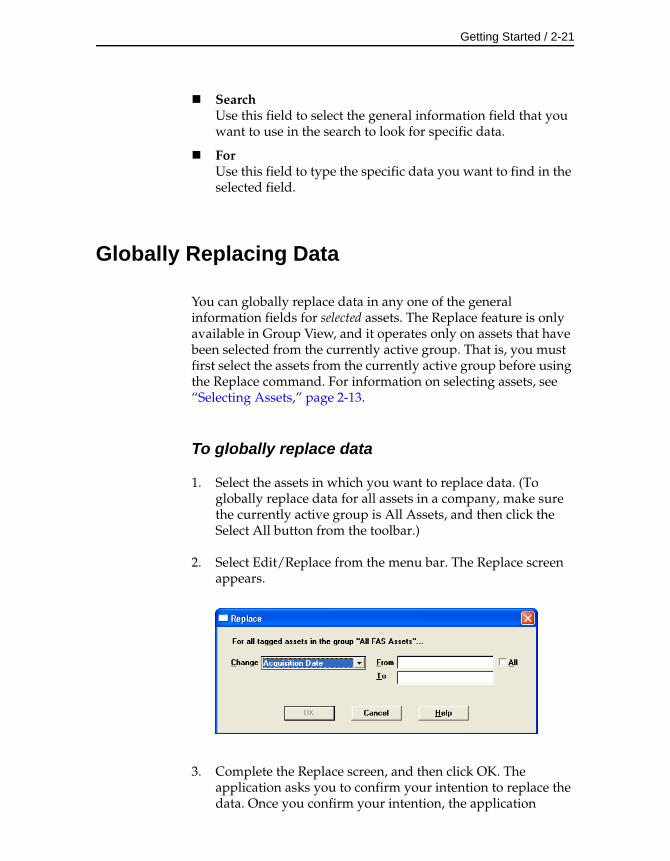
2. Select Edit/Replace from the menu bar. The Replace screen appears.
3. Complete the Replace screen, and then click OK. The application asks you to confirm your intention to replace the data. Once you confirm your intention, the application
2-22 / FAS 50 Asset Accounting - Peachtree Edition
informs you of how many replacements were made, and then returns to Group View.
Completing the Replace Screen
Follow the guidelines provided below to complete the fields in the Replace screen. The application displays the message “For all tagged assets in the group ‘XXX’ . . .” at the top of the screen. This indicates that the application is searching for matching assets only in selected assets of the currently active group. That is, you must first select the assets in the currently active group before using the Replace command. For information on selecting assets, see “Selecting Assets,” page 2-13.
ChangeUse this field to select the general information field in which you want to replace data.
FromUse this field to type the old data you want to replace.
ToUse this field to type the specific data you want replacing the old data.
AllSelect this check box if you don’t want to enter data in the From field and would rather have the application replace all data in the specified field for the selected assets.
Browsing Your Assets
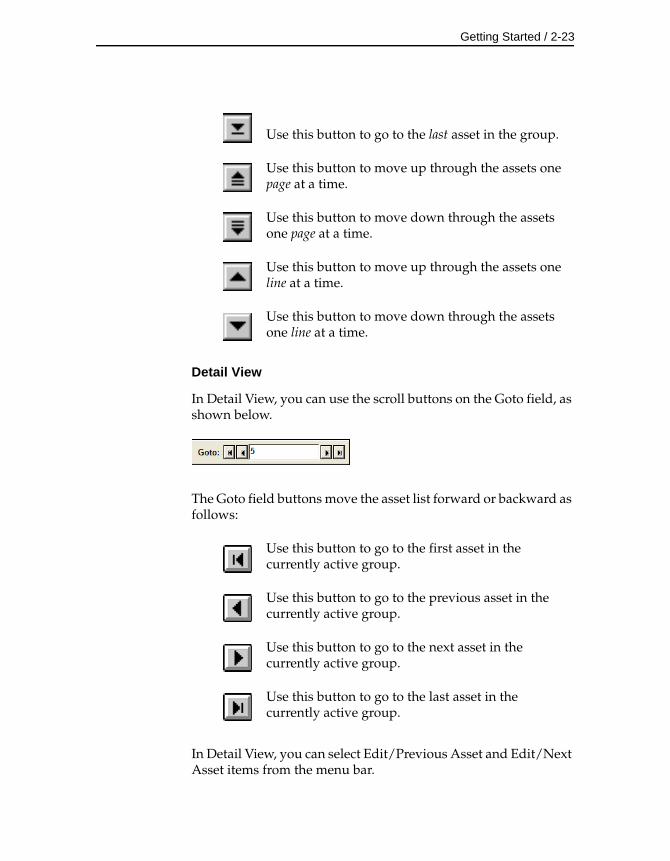
The application uses scroll buttons so you can easily browse the assets in the currently active group.
Group View
In Group View, use the scroll buttons located on the right-hand side of the asset list as follows:
Use this button to go to the first asset in the group.
Getting Started / 2-23
Detail View
In Detail View, you can use the scroll buttons on the Goto field, as shown below.
The Goto field buttons move the asset list forward or backward as follows:
In Detail View, you can select Edit/Previous Asset and Edit/Next Asset items from the menu bar.
Use this button to go to the last asset in the group.
Use this button to move up through the assets one page at a time.
Use this button to move down through the assets one page at a time.
Use this button to move up through the assets one line at a time.
Use this button to move down through the assets one line at a time.
Use this button to go to the first asset in the currently active group.
Use this button to go to the previous asset in the currently active group.
Use this button to go to the next asset in the currently active group.
Use this button to go to the last asset in the currently active group.
2-24 / FAS 50 Asset Accounting - Peachtree Edition
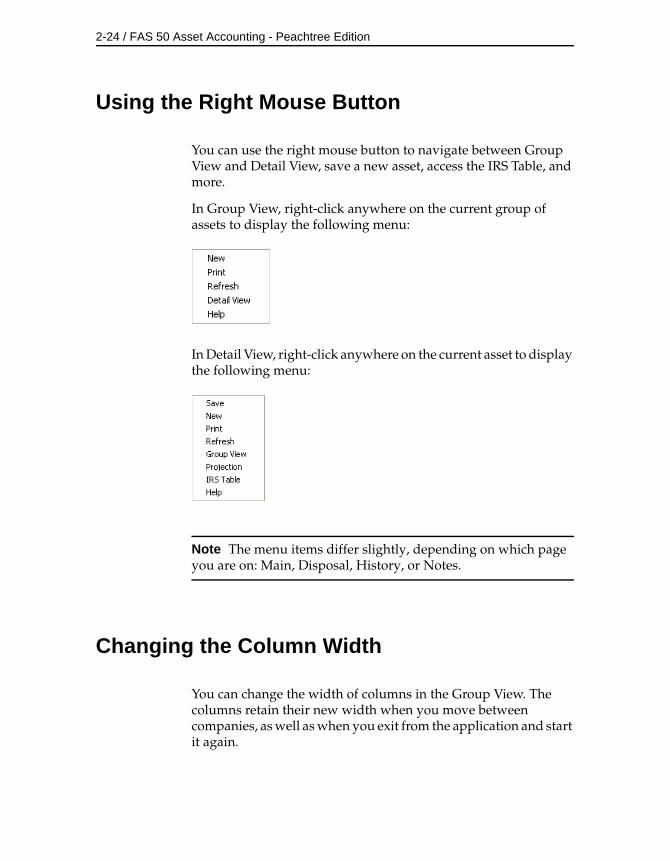
Using the Right Mouse Button
You can use the right mouse button to navigate between Group View and Detail View, save a new asset, access the IRS Table, and more.
In Group View, right-click anywhere on the current group of assets to display the following menu:
In Detail View, right-click anywhere on the current asset to display the following menu:
Note The menu items differ slightly, depending on which page you are on: Main, Disposal, History, or Notes.
Changing the Column Width
You can change the width of columns in the Group View. The columns retain their new width when you move between companies, as well as when you exit from the application and start it again.
Getting Started / 2-25
To change the column width
1. Click and hold the vertical line separating the column you want to change.
2. Drag the line right or left to increase or decrease the width of the column, and then release the line.
To restore the column width
1. Select Customize/Restore Columns from the menu bar. The application returns the columns to their default widths.
Temporarily Changing the Asset Sort Order
You can temporarily alter the Group View interface by changing the sort order of your assets.
The application displays assets in Group View according to the Sort Criteria page of the currently active group (most often by System Number or Company Asset Number). To temporarily change asset sort order, select another general-information field by which to sort the group. The general-information field names are listed at the top of each column in Group View.
You can use this procedure to find out if any asset fields are blank. For example, to quickly discover if any assets have blank G/L Expense Account Numbers, sort your assets by that field. Any assets with blank G/L Expense Account Numbers will appear at the top of the list.
To temporarily change asset sort order
1. Double-click the general-information field name by which you want the assets sorted. The application sorts the assets by the selected field.
To return to the normal sort order, double-click on the same general-information field name.
2-26 / FAS 50 Asset Accounting - Peachtree Edition
Note When you use this method to sort assets, the new sort order is only temporary. When you exit from the company and then open it, the assets will be sorted in their original order.
Accessing the Windows Calculator
You can easily access the Windows calculator while using the application.
To access the Windows calculator
1. Do any one of the following:
• Click the Calculator button on the toolbar.
• Select Window/Calculator from the menu bar.
The Windows calculator appears.
Click the Close button in the upper right corner of the calculator screen to close the calculator.
Entering Dates in Date Fields
The application contains an easy-to-use calendar feature that you can access in any date field by selecting the arrow button that appears when the cursor is in the field.
To use the built-in calendar
1. Click the arrow button that appears in any date field when you place the cursor in the field. The calendar appears.
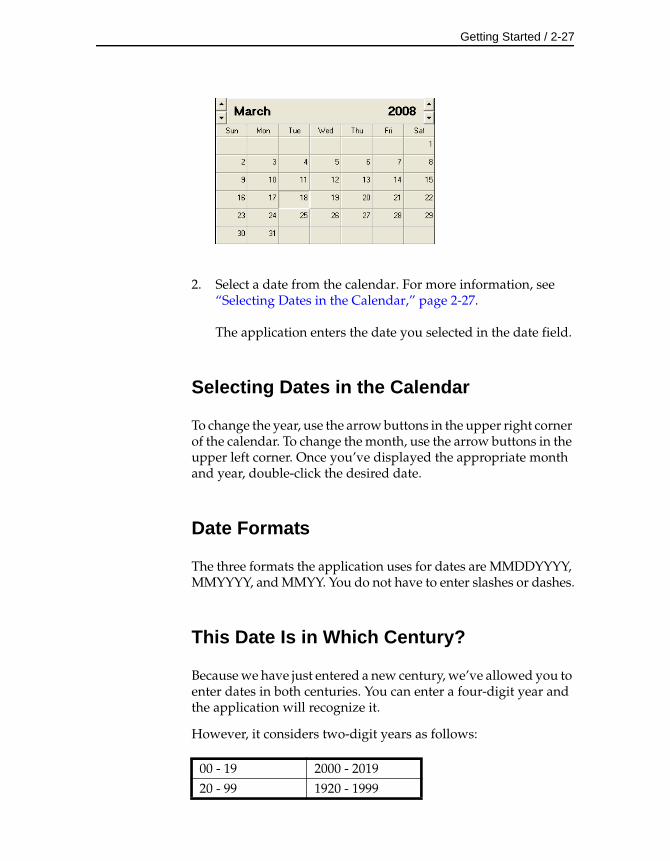
Getting Started / 2-27
2. Select a date from the calendar. For more information, see “Selecting Dates in the Calendar,” page 2-27.
The application enters the date you selected in the date field.
Selecting Dates in the Calendar
To change the year, use the arrow buttons in the upper right corner of the calendar. To change the month, use the arrow buttons in the upper left corner. Once you’ve displayed the appropriate month and year, double-click the desired date.
Date Formats
The three formats the application uses for dates are MMDDYYYY, MMYYYY, and MMYY. You do not have to enter slashes or dashes.
This Date Is in Which Century?
Because we have just entered a new century, we’ve allowed you to enter dates in both centuries. You can enter a four-digit year and the application will recognize it.
However, it considers two-digit years as follows:
00 - 19 2000 - 201920 - 99 1920 - 1999
2-28 / FAS 50 Asset Accounting - Peachtree Edition
Cutting, Copying, and Pasting Data
In the application, you can cut, copy, and paste data just as you can in any other Windows-based software. Follow the guidelines provided below to cut, copy, or paste data.
Cutting Data
When you cut data, you delete highlighted data from one area of the application. That data is placed in the Windows clipboard so you can then paste it somewhere else.
To cut data
1. Highlight the data you want to cut.
2. Do any one of the following:
• Select Edit/Cut from the menu bar.
• Press CTRL+X.
The application deletes the highlighted data and places it in the clipboard.
Copying Data
When you copy data, you place a copy of highlighted data in the Windows clipboard so you can then paste it somewhere else. The old copy remains behind.
To copy data
1. Highlight the data you want to copy.
2. Do any one of the following:
• Select Edit/Copy from the menu bar.
Getting Started / 2-29
• Press CTRL+C.
The application copies the highlighted data and places it in the clipboard.
Pasting Data
When you paste data, you paste data from the Windows clipboard into a new location.
To paste data
1. Place the cursor in the area where you want to paste the data.
2. Do any one of the following:
• Select Edit/Paste from the menu bar.
• Press CTRL+V.
The application pastes the contents of the clipboard into the cursor location.

2-30 / FAS 50 Asset Accounting - Peachtree Edition
3 Understanding Key Elements
This chapter explains the concepts of the application operating structure and its key features: databases, companies, groups, asset fields, and SmartLists. Taking the time to read and digest these concepts will help you accomplish your asset management tasks in a smarter, more efficient manner. The better you plan for using an automated asset manager, the easier your job will be.
Understanding Data Structure
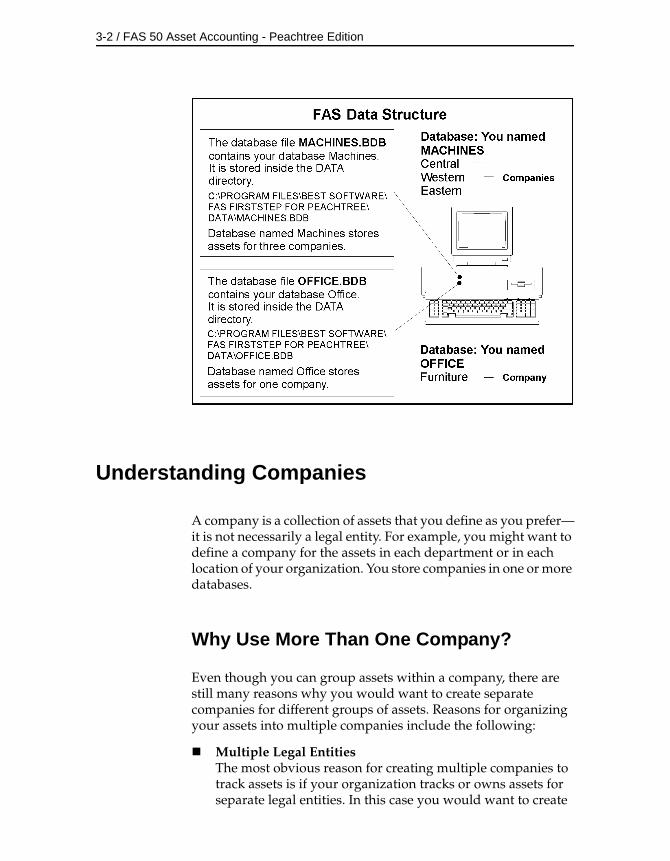
The application stores your asset data in an internal software structure called a database. A database holds data in a manner that makes it extremely easy to search, sort, organize, and retrieve your data. Additionally, you can create many databases in order to organize your data further.
You store each company you create in a database. You can store one or more companies in one database, or you can create multiple databases for storing multiple companies. To optimize application processing speed and convenience, determine which number of databases is best for you. Storing all your companies in one database is convenient because you do all your work in one place. However, distributing your companies among multiple databases optimizes application processing speed.
You can create more than one database in each directory (or file folder) on your computer. The database is a file with a BDB extension. You can give this file any name that conforms to Windows file naming standards. You can assign each database a unique name that you use to reference the database within the application. For example, you might create two databases—named MACHINES and OFFICE—as shown below.
3-2 / FAS 50 Asset Accounting - Peachtree Edition
Understanding Companies
A company is a collection of assets that you define as you prefer—it is not necessarily a legal entity. For example, you might want to define a company for the assets in each department or in each location of your organization. You store companies in one or more databases.
Why Use More Than One Company?
Even though you can group assets within a company, there are still many reasons why you would want to create separate companies for different groups of assets. Reasons for organizing your assets into multiple companies include the following:
Multiple Legal EntitiesThe most obvious reason for creating multiple companies to track assets is if your organization tracks or owns assets for separate legal entities. In this case you would want to create
Understanding Key Elements / 3-3
at least one company for each of the legal entities. You might also want to create more than one company for a legal entity if it met other criteria as listed below.
Mergers or AcquisitionsIf the legal entity that is your organization has merged with another organization or has acquired one, you might want to maintain the assets for these entities in separate companies within the application.
Different Fiscal Year Ends or Short YearsFiscal year ends and short years must be the same within a single company. If this is not so for the different reporting units within your organization, then you must create separate companies for each reporting unit.
Decentralized Corporate StructureIf the culture of your organization is decentralized, or if different organizational units maintain autonomous jurisdiction over assets or accounting, or if they track and report to a central authority separately, then you will want to create separate companies for each of these organizational units.
Multi-State OrganizationIf your organization owns assets in multiple states that require unique calculations, then you might need to enter these assets into different companies. Within the application you have one default state tax book. You also have two user-defined books that can be used for different state tax books. So, depending on how many states your organization has assets in and how many user-defined books you have used for purposes other than state tax books, you might need to create separate companies for those assets or for additional State books.
Large Number of AssetsThe application processing speed depends on how many assets you store in your working database. Many functions process all data in all companies in the working database. Therefore, if you maintain a large number of assets (more than about thirty thousand), to gain optimal processing speed you should organize them into multiple companies stored in multiple databases. For example, you might organize your assets according to the reporting structure for different areas of your organization based on accounting principles.

3-4 / FAS 50 Asset Accounting - Peachtree Edition
Strict Separation of Asset Classifications/Diversified Products or MarketsEven if your organization is centralized, and accounting is controlled by one umbrella administrative unit, you might want to create separate companies for your assets if the assets are strictly divided by classification. For instance, one arm of your organization may be devoted to manufacturing and another to medical supplies.
When to Keep Assets in One Company?
Many of the situations outlined above are special situations. If your organization does not fit into any of the above situations, then you probably want to store all your assets in one company.
Use one company to store assets, if:
• Your organization is a single legal entity.
• Your organization has a centralized management and accounting structure.
• Your organization does not have diversified products or markets.
• All units in your organization have the same fiscal year end and short years.
Understanding Groups
A group is a logical—not physical—subset of assets within a company. You can define multiple groups per company, and include any asset in multiple groups. For example, you might want to organize your assets into several groups because you have different reporting requirements for each group. In addition, because a group is simply a logical view of a company, it is always current—you never have to update a group.
It is important that you understand how assets are grouped within the same company and why you would want to group your assets.
Understanding Key Elements / 3-5
The specific action of creating groups is accomplished through the Group Manager option. Creating groups can be a single task or a series of tasks, depending on the complexity of the criteria you are using to define your group.
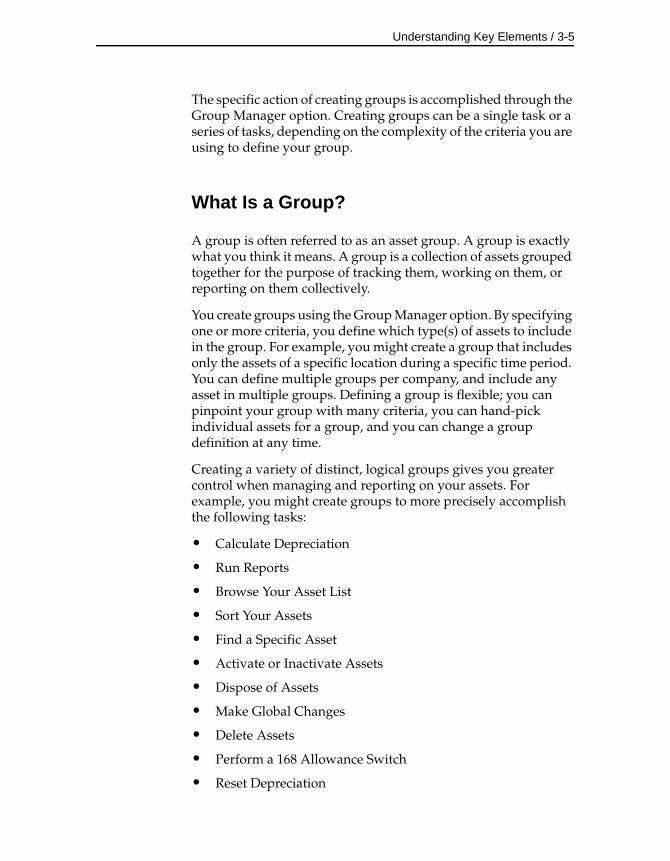
What Is a Group?
A group is often referred to as an asset group. A group is exactly what you think it means. A group is a collection of assets grouped together for the purpose of tracking them, working on them, or reporting on them collectively.
You create groups using the Group Manager option. By specifying one or more criteria, you define which type(s) of assets to include in the group. For example, you might create a group that includes only the assets of a specific location during a specific time period. You can define multiple groups per company, and include any asset in multiple groups. Defining a group is flexible; you can pinpoint your group with many criteria, you can hand-pick individual assets for a group, and you can change a group definition at any time.
Creating a variety of distinct, logical groups gives you greater control when managing and reporting on your assets. For example, you might create groups to more precisely accomplish the following tasks:
• Calculate Depreciation
• Run Reports
• Browse Your Asset List
• Sort Your Assets
• Find a Specific Asset
• Activate or Inactivate Assets
• Dispose of Assets
• Make Global Changes
• Delete Assets
• Perform a 168 Allowance Switch
• Reset Depreciation
3-6 / FAS 50 Asset Accounting - Peachtree Edition
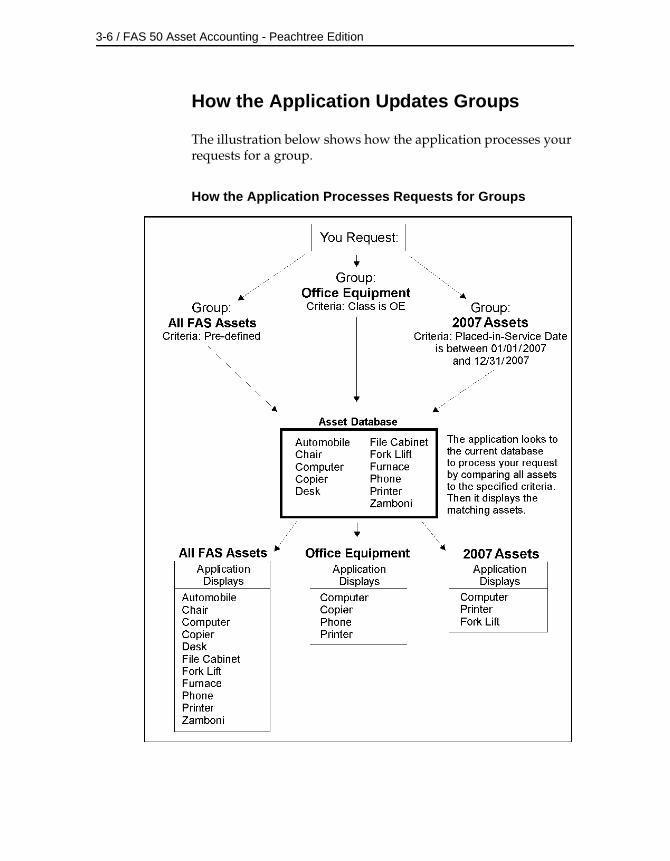
How the Application Updates Groups
The illustration below shows how the application processes your requests for a group.
How the Application Processes Requests for Groups
Understanding Key Elements / 3-7
Understanding Asset Fields and SmartLists
Nearly everything you do in asset management is based on information about your assets. In order to identify an asset you must know its description, its classification, its location, its serial number, its purchase order number, or any of a myriad of bits of information available on an asset. The application contains asset fields for each of these bits of information and many more.
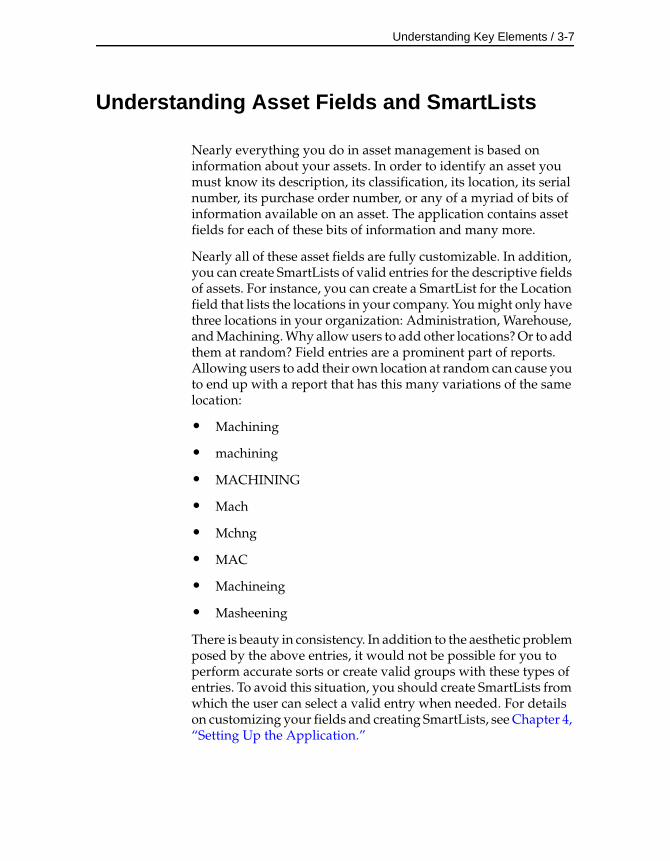
Nearly all of these asset fields are fully customizable. In addition, you can create SmartLists of valid entries for the descriptive fields of assets. For instance, you can create a SmartList for the Location field that lists the locations in your company. You might only have three locations in your organization: Administration, Warehouse, and Machining. Why allow users to add other locations? Or to add them at random? Field entries are a prominent part of reports. Allowing users to add their own location at random can cause you to end up with a report that has this many variations of the same location:
• Machining
• machining
• MACHINING
• Mach
• Mchng
• MAC
• Machineing
• Masheening
There is beauty in consistency. In addition to the aesthetic problem posed by the above entries, it would not be possible for you to perform accurate sorts or create valid groups with these types of entries. To avoid this situation, you should create SmartLists from which the user can select a valid entry when needed. For details on customizing your fields and creating SmartLists, see Chapter 4, “Setting Up the Application.”
3-8 / FAS 50 Asset Accounting - Peachtree Edition
Understanding Asset Identification
Assets are identified by their System Number. The application assigns a unique System Number to each asset in a company. You also have the ability to track assets based on your own identification scheme by entering pre-existing or internal numbers into the Company Asset Number field.
Understanding Activity Codes
Activity Code is an important field that indicates the activity status of an asset. Activity Codes are automatically assigned by the application during asset activity.
The activity status of an asset affects your ability to perform certain functions on the asset. It also affects how the asset appears in reports. For instance, after you have disposed of an asset, the Activity Code of that asset changes from Active to Disposed. Once disposed, you cannot perform any asset functions on the asset. The asset appears on most reports indefinitely. Two exceptions to this rule are the Depreciation Expense report and the Adjusted Current Earnings report, where a disposed asset appears on the report only until the end of the year in which it was disposed. On reports in which it does appear, the application flags the asset as disposed by placing a “D” in the Key column of the report.
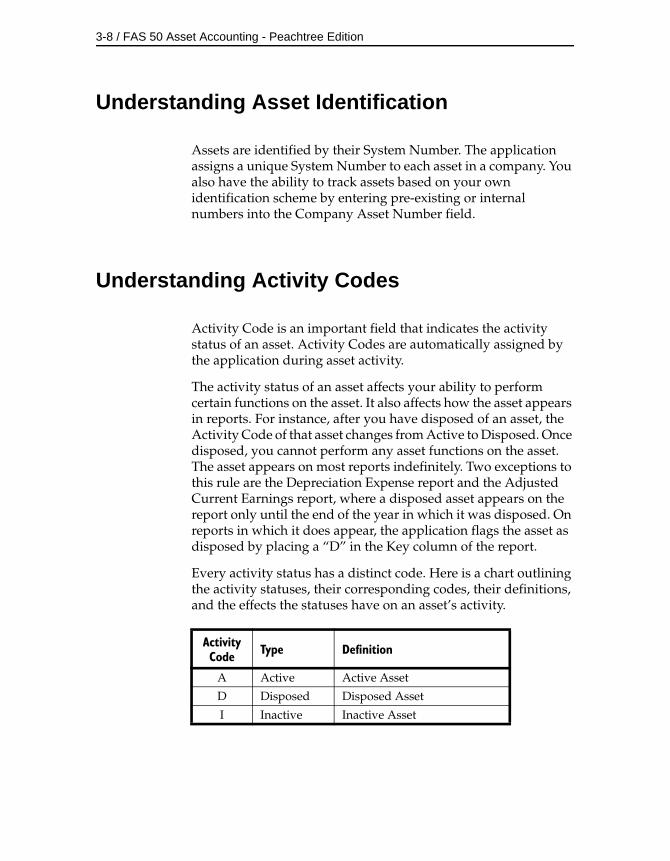
Every activity status has a distinct code. Here is a chart outlining the activity statuses, their corresponding codes, their definitions, and the effects the statuses have on an asset’s activity.
Activity Code Type Definition
A Active Active Asset
D Disposed Disposed Asset
I Inactive Inactive Asset
4 Setting Up the Application
In Chapter 3 you learned about the most important elements of the application and about how those elements work together to make the application work for you. In this chapter you’ll learn the steps necessary to making each of those elements a reality. Specifically, you’ll learn how to create databases, companies, and groups. You’ll also learn how to customize your asset fields to suit your needs, create valid field entries with the SmartList feature, and fine-tune the application by selecting preferences.
Creating a New Database
The application already contains a default database where the demonstration data for Westfields Bakery - Demo is located. You can store your new company in the default database, but you might also want to start creating databases with unique names to assist your database management. The default database is located in the C:\Program Files\SageFAS\FAS FirstStep for Peachtree\Data directory (if you accepted the defaults during installation). It is recommended that you store your databases in directories created in this location as well.
Before creating your first database, make sure you read “Understanding Data Structure,” page 3-1. A folder can contain two or more databases.
4-2 / FAS 50 Asset Accounting - Peachtree Edition
To create a new database
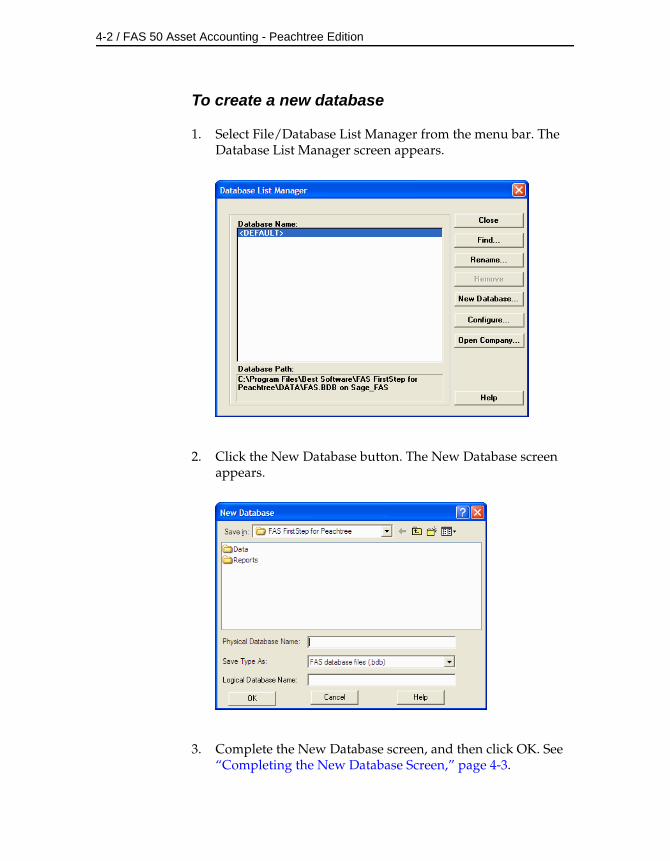
1. Select File/Database List Manager from the menu bar. The Database List Manager screen appears.
2. Click the New Database button. The New Database screen appears.
3. Complete the New Database screen, and then click OK. See “Completing the New Database Screen,” page 4-3.

Setting Up the Application / 4-3
You should now see your new database name displayed in the Database Name field of the Database List Manager screen.
4. Click the Close button to exit the Database List Manager screen.
Completing the New Database Screen
Follow the guidelines provided below to complete the fields in the New Database screen. A folder can contain two or more databases.
Save InThis field displays the folder where you want to store the database. (Long file names for folder names are supported by the application.) Use the box below this field to select the folder. Use the toolbar buttons to the right of this field to move up a level or to create a new folder. Click the arrow button to select another drive letter.
Physical Database NameUse this field to enter the file name for the database you are creating. This is the name of the file as it appears in Windows Explorer. You do not need to enter a file extension because the application automatically adds a BDB extension to the file name.
Save Type AsThis field displays the file type of the database file. You must accept the default file type of .BDB.
Logical Database NameUse this field to enter the logical database name of the database. This is the name of the database that appears in the Database field of other application screens.
Note Each logical database name in the Sage FAS system must be unique. You cannot enter a logical database name that already exists in the Database List Manager.
4-4 / FAS 50 Asset Accounting - Peachtree Edition
Creating a New Company
There are many fields available to you when setting up a new company. Many of these fields do not have to be completed immediately. Depending on your implementation plan, you might want to set up a company quickly in order to begin data entry. If you choose to do so, you can go back later and complete the rest of the fields in the company setup.
The most important fields are the book-related fields. These fields set up your company so that the application can properly depreciate all assets in the company.
Note If your company uses short fiscal years, make sure you complete the Short Years page before you calculate depreciation.
Before creating your first company, make sure you read “Understanding Companies,” page 3-2.
There are two methods of creating a new company:
• Completing a series of wizard screens that guide you through the process of creating a new company.
• Completing the New Company screen.
Many users find the wizard screens easier to use at first because the wizards ask for information in a logical sequence. If you decide you would rather not use the wizards, you can always turn them off and complete the New Company screen instead.
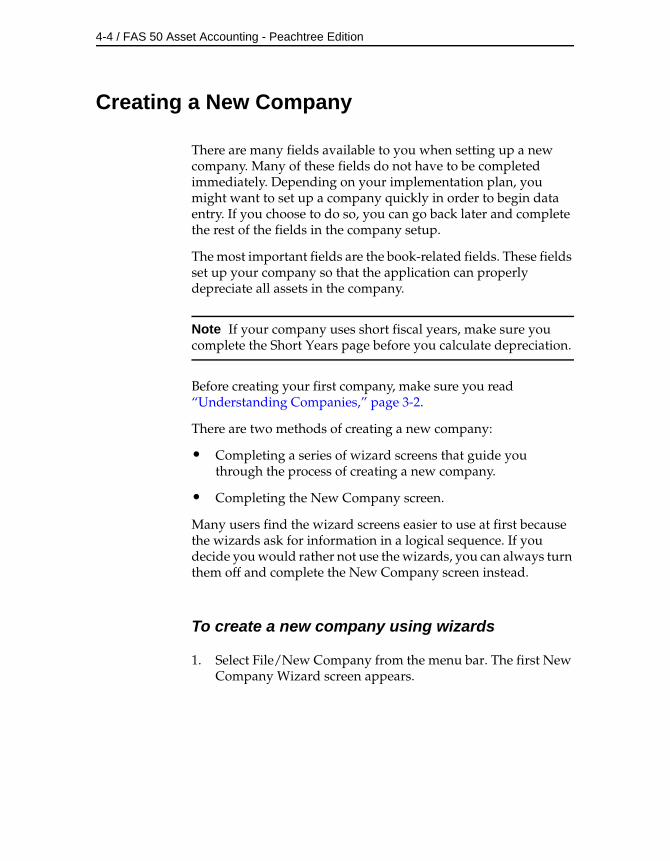
To create a new company using wizards
1. Select File/New Company from the menu bar. The first New Company Wizard screen appears.
Setting Up the Application / 4-5
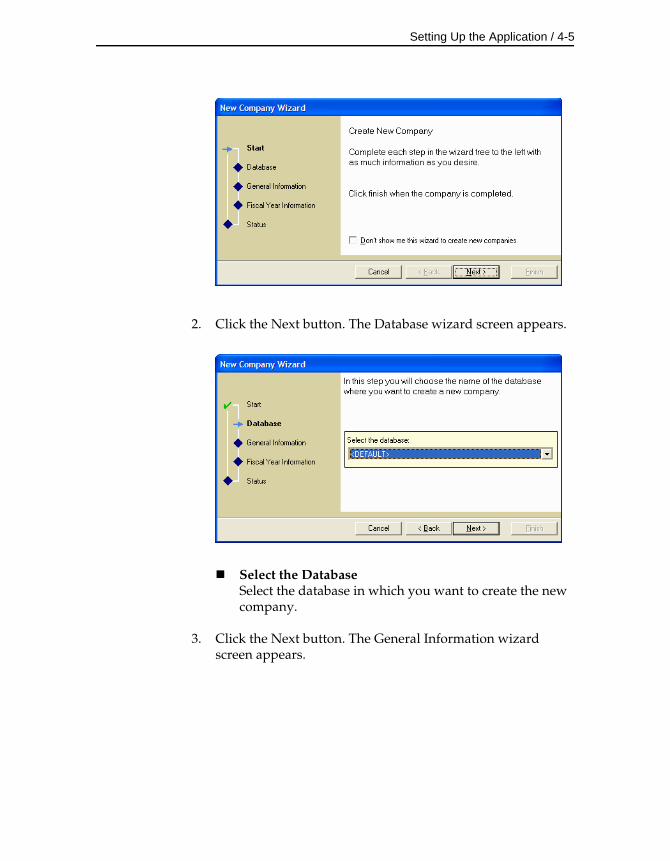
2. Click the Next button. The Database wizard screen appears.
Select the DatabaseSelect the database in which you want to create the new company.
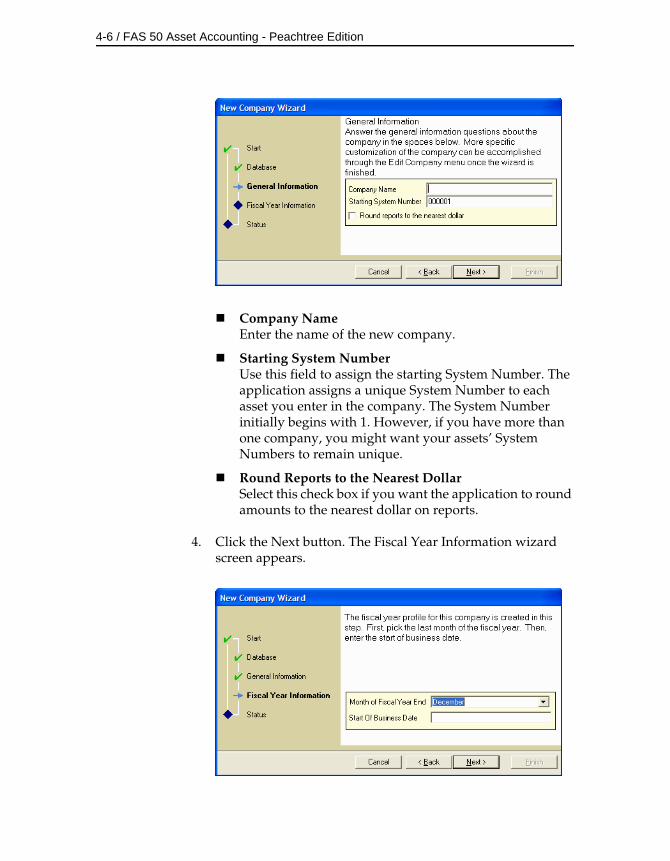
3. Click the Next button. The General Information wizard screen appears.
4-6 / FAS 50 Asset Accounting - Peachtree Edition
Company NameEnter the name of the new company.
Starting System NumberUse this field to assign the starting System Number. The application assigns a unique System Number to each asset you enter in the company. The System Number initially begins with 1. However, if you have more than one company, you might want your assets’ System Numbers to remain unique.
Round Reports to the Nearest DollarSelect this check box if you want the application to round amounts to the nearest dollar on reports.
4. Click the Next button. The Fiscal Year Information wizard screen appears.
Setting Up the Application / 4-7
Month of Fiscal Year EndSelect the last month of the fiscal year from the drop-down list.
Start of Business DateEnter the date on which your business began. Enter the date in either MM/YYYY or MM/YY format. This date must be earlier than the date the company’s oldest asset was placed in service.
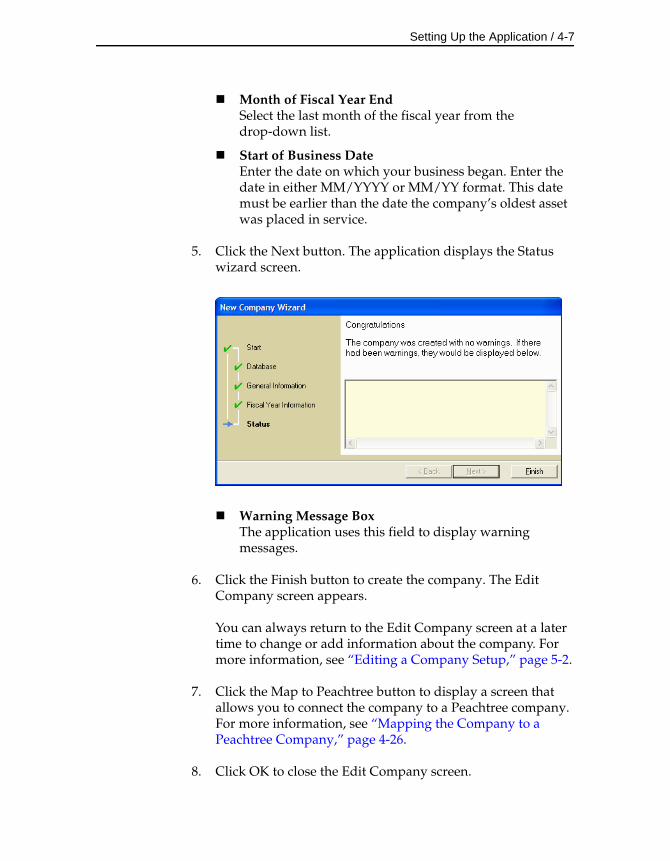
5. Click the Next button. The application displays the Status wizard screen.
Warning Message BoxThe application uses this field to display warning messages.
6. Click the Finish button to create the company. The Edit Company screen appears.
You can always return to the Edit Company screen at a later time to change or add information about the company. For more information, see “Editing a Company Setup,” page 5-2.
7. Click the Map to Peachtree button to display a screen that allows you to connect the company to a Peachtree company. For more information, see “Mapping the Company to a Peachtree Company,” page 4-26.
8. Click OK to close the Edit Company screen.
4-8 / FAS 50 Asset Accounting - Peachtree Edition
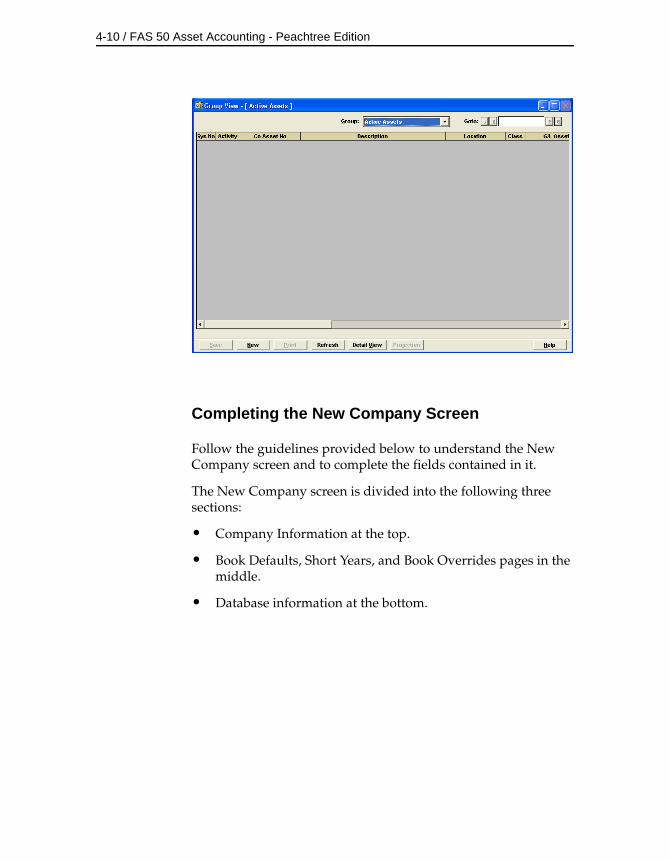
The application opens the new company in Group View, and you are ready to begin adding assets.
If you decide you want to turn off the wizard screens, follow the instructions below. After you turn off the wizard screens, the New Company screen appears when you create a new company.
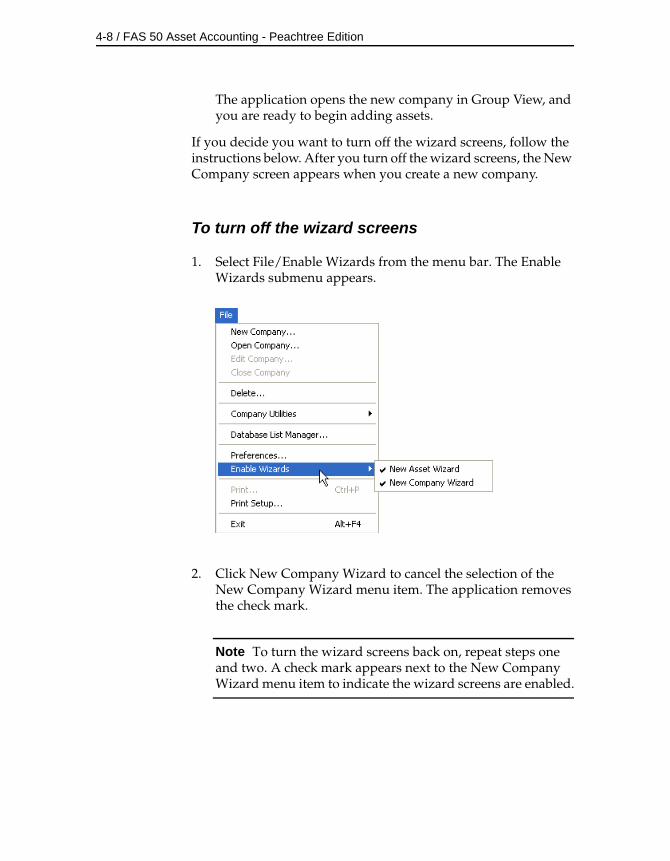
To turn off the wizard screens
1. Select File/Enable Wizards from the menu bar. The Enable Wizards submenu appears.
2. Click New Company Wizard to cancel the selection of the New Company Wizard menu item. The application removes the check mark.
Note To turn the wizard screens back on, repeat steps one and two. A check mark appears next to the New Company Wizard menu item to indicate the wizard screens are enabled.
Setting Up the Application / 4-9
To create a new company using the New Company screen
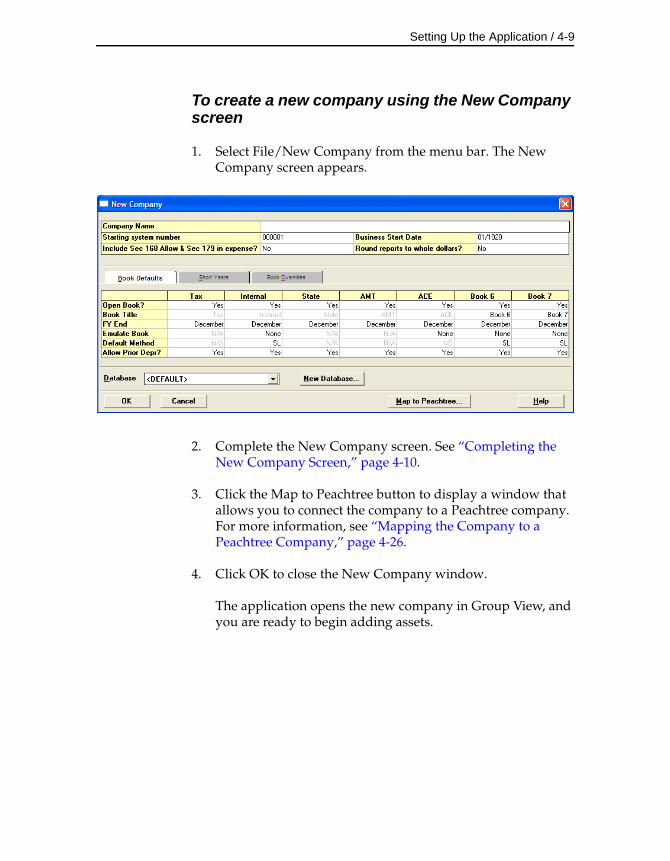
1. Select File/New Company from the menu bar. The New Company screen appears.
2. Complete the New Company screen. See “Completing the New Company Screen,” page 4-10.
3. Click the Map to Peachtree button to display a window that allows you to connect the company to a Peachtree company. For more information, see “Mapping the Company to a Peachtree Company,” page 4-26.
4. Click OK to close the New Company window.
The application opens the new company in Group View, and you are ready to begin adding assets.
4-10 / FAS 50 Asset Accounting - Peachtree Edition
Completing the New Company Screen
Follow the guidelines provided below to understand the New Company screen and to complete the fields contained in it.
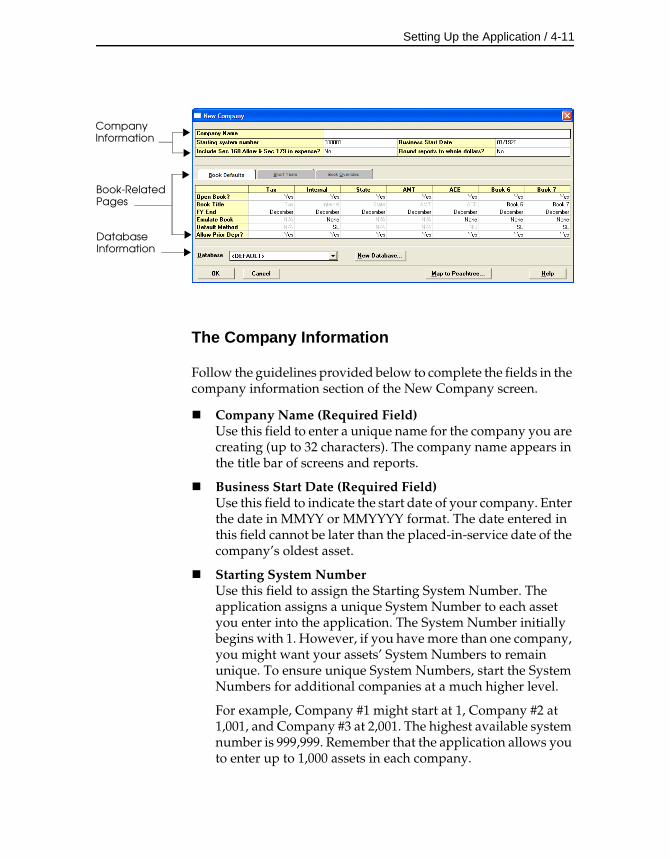
The New Company screen is divided into the following three sections:
• Company Information at the top.
• Book Defaults, Short Years, and Book Overrides pages in the middle.
• Database information at the bottom.
Setting Up the Application / 4-11
The Company Information
Follow the guidelines provided below to complete the fields in the company information section of the New Company screen.
Company Name (Required Field)Use this field to enter a unique name for the company you are creating (up to 32 characters). The company name appears in the title bar of screens and reports.
Business Start Date (Required Field)Use this field to indicate the start date of your company. Enter the date in MMYY or MMYYYY format. The date entered in this field cannot be later than the placed-in-service date of the company’s oldest asset.
Starting System NumberUse this field to assign the Starting System Number. The application assigns a unique System Number to each asset you enter into the application. The System Number initially begins with 1. However, if you have more than one company, you might want your assets’ System Numbers to remain unique. To ensure unique System Numbers, start the System Numbers for additional companies at a much higher level.
For example, Company #1 might start at 1, Company #2 at 1,001, and Company #3 at 2,001. The highest available system number is 999,999. Remember that the application allows you to enter up to 1,000 assets in each company.
Company Information
Book-Related Pages
Database Information

4-12 / FAS 50 Asset Accounting - Peachtree Edition
Note You cannot change the starting System Number after you begin adding assets.
To change a fiscal year end date after you’ve calculated depreciation, see “The Short Years Page,” page 4-16.
Round Reports to Whole Dollars?Use this field to indicate whether you want dollar amounts to print as whole dollars on tax reports. Select Yes if you want dollar amounts rounded. Select No if not. This field does not affect dollar amounts in calculations and quick projections, because neither of these are ever rounded.
Include Section 168 Allowance and Section 179 in Expense?Use this field to indicate whether you want the Section 168 Allowance and Section 179 expense included, when applicable, in depreciation expense for reporting purposes only.
• If you select Yes, the application includes these two amounts when displaying the following columns on reports: Prior Accumulated Depreciation, Depreciation This Run, Current Year to Date, and Current Accumulated Depreciation. Both Section 179 and the Section 168 Allowance are claimed on the first day of the placed-in-service month.
• If you select No, the Section 168 Allowance and Section 179 expense are not included in depreciation expense on reports.
Whether you select Yes or No, the application always reduces the acquired value by the Section 168 Allowance and Section 179 expense, if applicable, when calculating the depreciable basis. Also, because the Section 168 Allowance and Sec. 179 expense can be both basis reductions and included in expense, selecting Yes does not change the amounts displayed in the Current Year-to-Date field and Current Accumulated Depreciation field in Detail View. The Current Year-to-Date field and the Current Accumulated Depreciation field in Detail View always display depreciation without inclusion of the Section 168 Allowance and Section 179 expense, which are displayed separately.
Changing the selection in this field (from Yes to No or from No to Yes) will affect the depreciation expense amounts shown on
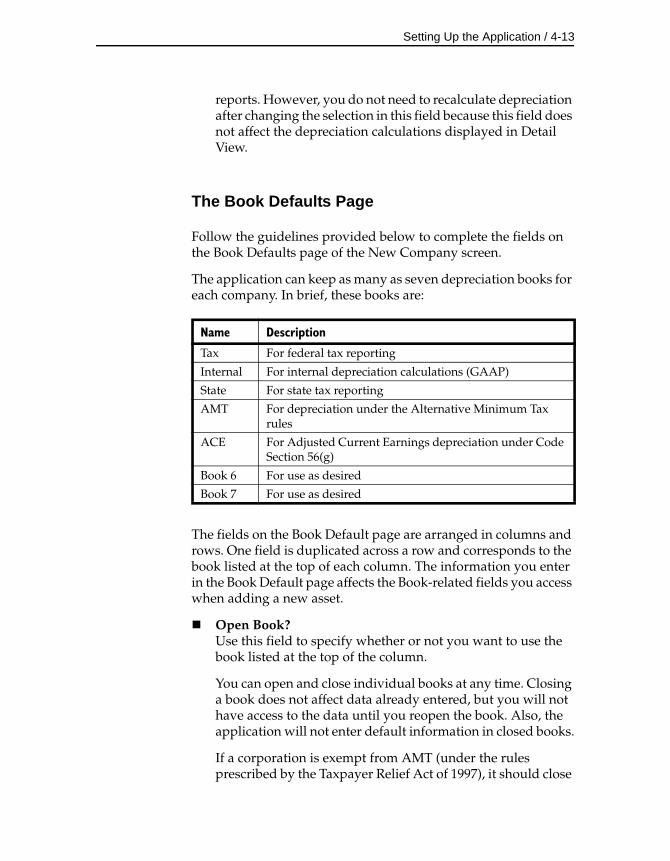
Setting Up the Application / 4-13
reports. However, you do not need to recalculate depreciation after changing the selection in this field because this field does not affect the depreciation calculations displayed in Detail View.
The Book Defaults Page
Follow the guidelines provided below to complete the fields on the Book Defaults page of the New Company screen.
The application can keep as many as seven depreciation books for each company. In brief, these books are:
The fields on the Book Default page are arranged in columns and rows. One field is duplicated across a row and corresponds to the book listed at the top of each column. The information you enter in the Book Default page affects the Book-related fields you access when adding a new asset.
Open Book?Use this field to specify whether or not you want to use the book listed at the top of the column.
You can open and close individual books at any time. Closing a book does not affect data already entered, but you will not have access to the data until you reopen the book. Also, the application will not enter default information in closed books.
If a corporation is exempt from AMT (under the rules prescribed by the Taxpayer Relief Act of 1997), it should close
Name Description
Tax For federal tax reporting
Internal For internal depreciation calculations (GAAP)
State For state tax reporting
AMT For depreciation under the Alternative Minimum Tax rules
ACE For Adjusted Current Earnings depreciation under Code Section 56(g)
Book 6 For use as desired
Book 7 For use as desired
4-14 / FAS 50 Asset Accounting - Peachtree Edition
the AMT book, as well as the ACE book, for the first year beginning after December 31, 1997.
Book TitleThis field displays the name of the book in the current column. You cannot edit the book title for the Tax, Internal, State, AMT, and ACE books because the purpose of these books is pre-defined. For Book 6 and Book 7, you can change the title to identify your use of the book.
Fiscal Year-End (FY End)Use this field to select the last month of the company’s original fiscal year. The end of the fiscal year may be different in different books. The default fiscal year-end is December.
Note If the end of the fiscal year has changed since the company’s first year, select the Short Years Page and enter the change(s) there. Afterwards, the fiscal year-end field will reflect the current fiscal year-end.
If the company’s first year of business was less than 12 months and you later need to correct the original fiscal year-end date, you must first clear all the short years. For information on clearing short years, see “Clearing Short Years,” page 4-17. If you have already calculated depreciation, you must also reset depreciation. See “Resetting Depreciation,” page 8-11.
Emulate BookUse this field to specify whether you want a book to emulate another book’s default information.
When you enter data into the Tax book, the application automatically applies data to the other books based on GAAP principles or IRS rules and regulations that pertain to the destination book. This procedure is referred to as setting the book defaults. You can also force the application to update default data anytime you change asset information. See “Forcing Book Defaults,” page 6-50.
Default MethodUse this field to select a default depreciation method for the user books. The application default method for the user books is the straight-line method (method SL). This field is disabled if the Emulate Book field is set to anything but None.
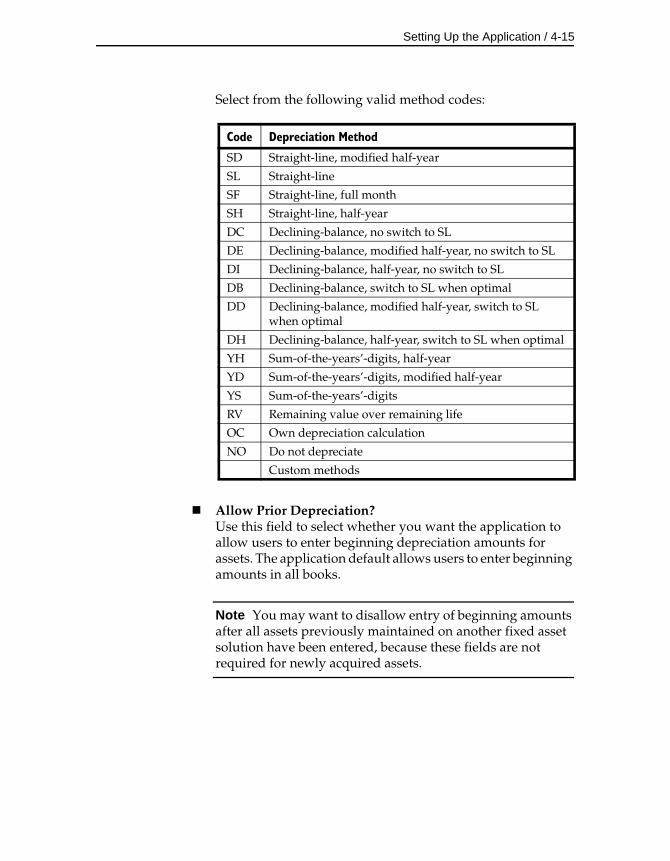
Setting Up the Application / 4-15
Select from the following valid method codes:
Allow Prior Depreciation?Use this field to select whether you want the application to allow users to enter beginning depreciation amounts for assets. The application default allows users to enter beginning amounts in all books.
Note You may want to disallow entry of beginning amounts after all assets previously maintained on another fixed asset solution have been entered, because these fields are not required for newly acquired assets.
Code Depreciation Method
SD Straight-line, modified half-year
SL Straight-line
SF Straight-line, full month
SH Straight-line, half-year
DC Declining-balance, no switch to SL
DE Declining-balance, modified half-year, no switch to SL
DI Declining-balance, half-year, no switch to SL
DB Declining-balance, switch to SL when optimal
DD Declining-balance, modified half-year, switch to SL when optimal
DH Declining-balance, half-year, switch to SL when optimal
YH Sum-of-the-years’-digits, half-year
YD Sum-of-the-years’-digits, modified half-year
YS Sum-of-the-years’-digits
RV Remaining value over remaining life
OC Own depreciation calculation
NO Do not depreciate
Custom methods
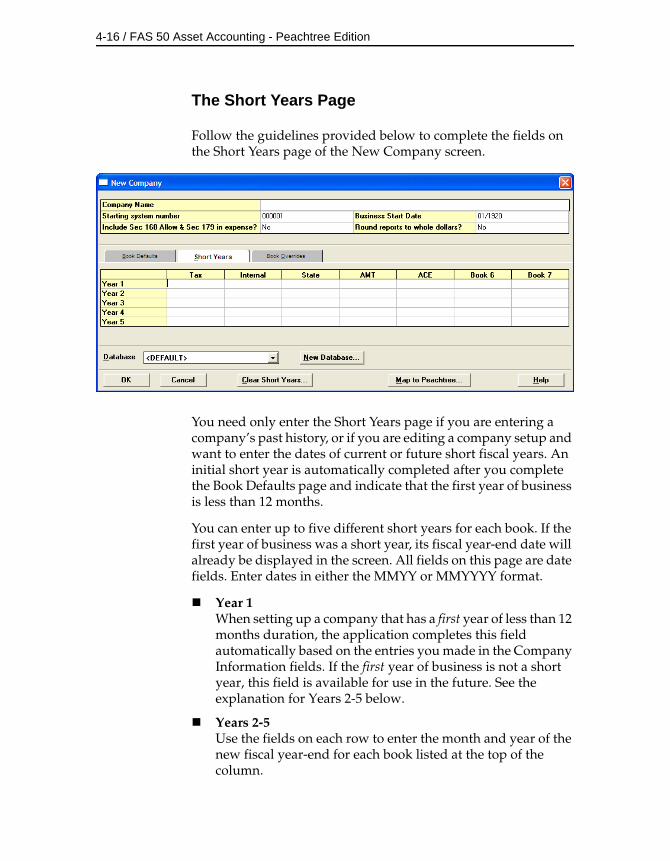
4-16 / FAS 50 Asset Accounting - Peachtree Edition
The Short Years Page
Follow the guidelines provided below to complete the fields on the Short Years page of the New Company screen.
You need only enter the Short Years page if you are entering a company’s past history, or if you are editing a company setup and want to enter the dates of current or future short fiscal years. An initial short year is automatically completed after you complete the Book Defaults page and indicate that the first year of business is less than 12 months.
You can enter up to five different short years for each book. If the first year of business was a short year, its fiscal year-end date will already be displayed in the screen. All fields on this page are date fields. Enter dates in either the MMYY or MMYYYY format.
Year 1When setting up a company that has a first year of less than 12 months duration, the application completes this field automatically based on the entries you made in the Company Information fields. If the first year of business is not a short year, this field is available for use in the future. See the explanation for Years 2-5 below.
Years 2-5Use the fields on each row to enter the month and year of the new fiscal year-end for each book listed at the top of the column.
Setting Up the Application / 4-17
The application assumes that a fiscal year ends with the last day of the month. It also assumes the new fiscal year-end is in effect for subsequent years, unless you enter another new fiscal year-end.
Example: Suppose that the Original Company was established in May 1999 and decided to use a fiscal year-end of April. In 2002, the company adopted a new fiscal year-end of December. In 2007, the Bigger Company bought the Original Company and required that it change its fiscal year-end to September, to match its own. How would you enter this in the application?
Notice that the first year of business for the Original Company was not a short year. For the fiscal year-end, you enter April. The company had two subsequent short years, so you select the Short Years page. In the Year 1 field, you enter the first new fiscal year-end date, 12/2002. Then you enter the second new fiscal year-end date of 09/2007 in the Year 2 field.
The application considers the fiscal year-end from 2002 through 2006 to be December, and the fiscal year-end after 2006 to be September. The Fiscal Year-End field on the Book Defaults page will now show September. The application automatically makes all adjustments necessary to prorate depreciation for the short years when you update depreciation.
Clearing Short Years
You can clear the short years entered in Years 2 to 5 on the Short Years page by clicking the Clear Short Years button. The application asks for your confirmation before clearing the short years.
To clear the Year 1 field, you must select the Book Defaults page and enter a month in the Fiscal Year-End field that is 12 months after the Business Start Date. For example, if the Business Start Date is 01/2007, then enter December in the Fiscal Year-End field. Because the fiscal year-end is now 12 months after the date the business began, the application clears the short years in the Year 1 field on the Short Years page.
If you clear short years, you must also reset depreciation for all assets. For information on resetting depreciation, see “Resetting Depreciation,” page 8-11.
4-18 / FAS 50 Asset Accounting - Peachtree Edition
Note Ideally, you should enter short years when you first set up a company, before you use the application to calculate depreciation. However, if you need to enter short years after you’ve calculated depreciation for those years, or if you need to change the short-year dates you’ve entered (including a short first year of business), you must clear all application-calculated depreciation figures first by resetting depreciation. See “Resetting Depreciation,” page 8-11.
You do not need to reset depreciation if you are adding a short-year date later than the date(s) through which current depreciation has been calculated for all assets.
The Book Overrides Page
Follow the guidelines provided below to complete the fields on the Book Overrides page of the New Company screen.
The Book Overrides page displays some of the default settings the application uses for the way it calculates the depreciation of your assets. The Midquarter field should be reviewed annually to decide whether or not the midquarter convention applies to the current year asset additions. You can override any of the defaults on this page by entering the field you want to change and then selecting another valid option.
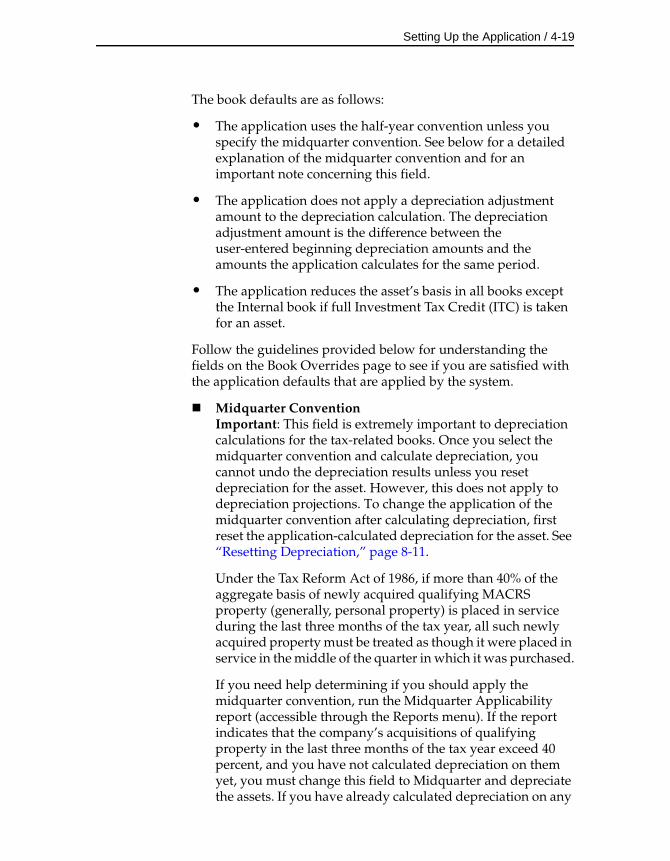
Setting Up the Application / 4-19
The book defaults are as follows:
• The application uses the half-year convention unless you specify the midquarter convention. See below for a detailed explanation of the midquarter convention and for an important note concerning this field.
• The application does not apply a depreciation adjustment amount to the depreciation calculation. The depreciation adjustment amount is the difference between the user-entered beginning depreciation amounts and the amounts the application calculates for the same period.
• The application reduces the asset’s basis in all books except the Internal book if full Investment Tax Credit (ITC) is taken for an asset.
Follow the guidelines provided below for understanding the fields on the Book Overrides page to see if you are satisfied with the application defaults that are applied by the system.
Midquarter ConventionImportant: This field is extremely important to depreciation calculations for the tax-related books. Once you select the midquarter convention and calculate depreciation, you cannot undo the depreciation results unless you reset depreciation for the asset. However, this does not apply to depreciation projections. To change the application of the midquarter convention after calculating depreciation, first reset the application-calculated depreciation for the asset. See “Resetting Depreciation,” page 8-11.
Under the Tax Reform Act of 1986, if more than 40% of the aggregate basis of newly acquired qualifying MACRS property (generally, personal property) is placed in service during the last three months of the tax year, all such newly acquired property must be treated as though it were placed in service in the middle of the quarter in which it was purchased.
If you need help determining if you should apply the midquarter convention, run the Midquarter Applicability report (accessible through the Reports menu). If the report indicates that the company’s acquisitions of qualifying property in the last three months of the tax year exceed 40 percent, and you have not calculated depreciation on them yet, you must change this field to Midquarter and depreciate the assets. If you have already calculated depreciation on any
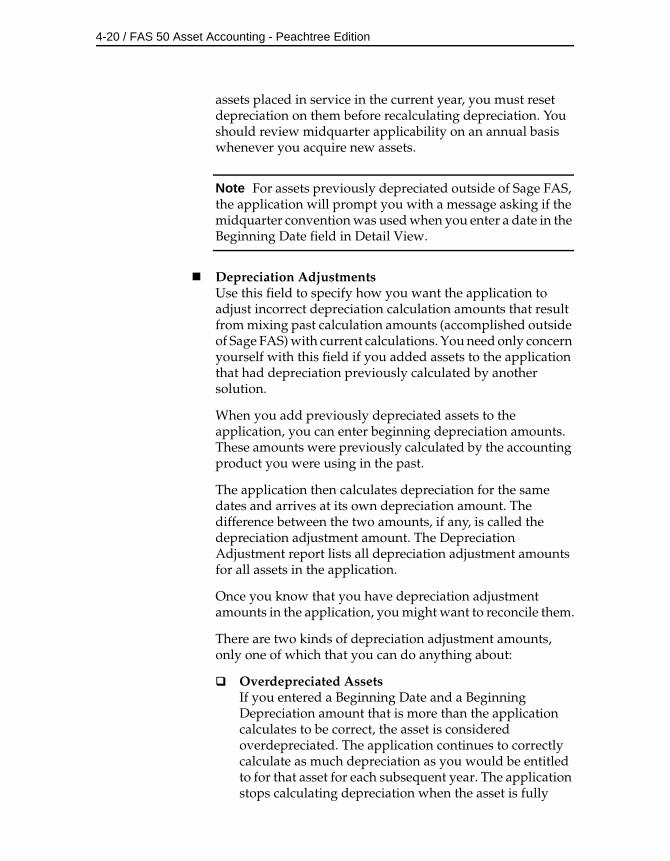
4-20 / FAS 50 Asset Accounting - Peachtree Edition
assets placed in service in the current year, you must reset depreciation on them before recalculating depreciation. You should review midquarter applicability on an annual basis whenever you acquire new assets.
Note For assets previously depreciated outside of Sage FAS, the application will prompt you with a message asking if the midquarter convention was used when you enter a date in the Beginning Date field in Detail View.
Depreciation AdjustmentsUse this field to specify how you want the application to adjust incorrect depreciation calculation amounts that result from mixing past calculation amounts (accomplished outside of Sage FAS) with current calculations. You need only concern yourself with this field if you added assets to the application that had depreciation previously calculated by another solution.
When you add previously depreciated assets to the application, you can enter beginning depreciation amounts. These amounts were previously calculated by the accounting product you were using in the past.
The application then calculates depreciation for the same dates and arrives at its own depreciation amount. The difference between the two amounts, if any, is called the depreciation adjustment amount. The Depreciation Adjustment report lists all depreciation adjustment amounts for all assets in the application.
Once you know that you have depreciation adjustment amounts in the application, you might want to reconcile them.
There are two kinds of depreciation adjustment amounts, only one of which that you can do anything about:
Overdepreciated AssetsIf you entered a Beginning Date and a Beginning Depreciation amount that is more than the application calculates to be correct, the asset is considered overdepreciated. The application continues to correctly calculate as much depreciation as you would be entitled to for that asset for each subsequent year. The application stops calculating depreciation when the asset is fully
Setting Up the Application / 4-21
depreciated, thereby actually taking less depreciation than you would otherwise be entitled to in the last year of the asset’s life. This is because you took that depreciation earlier in the asset’s life than you should have.
Underdepreciated AssetsIf you entered a Beginning Date and a Beginning Depreciation amount that is less than the application calculates to be correct, the asset is considered underdepreciated. Again, the application continues to correctly calculate as much depreciation as you would be entitled to for that asset for each subsequent year. However, because it generally will not calculate depreciation beyond an asset’s estimated life, the asset might remain on the books indefinitely with a net book value remaining unless you set an adjustment convention. There are a number of ways you may handle the adjustment, depending on which depreciation method you are using.
To handle underdepreciated assets you have three options from which to select. Each of these options contains at least one exception. The exceptions are explained below.
• None: Select this option to take no adjustment. The asset will never be fully depreciated, leaving a residual value of the adjustment amount. (This is not the case for the depreciation methods listed below. These methods handle the None option differently, as explained.)
• Immediate: Select this option to take an immediate adjustment. After entering the beginning depreciation amount, the application takes the adjustment amount the next time you calculate depreciation. (This is not the case for depreciation method RV, which handles this adjustment type the same as it does for None and Postrecovery, as explained below.) The adjustment will be included in the Current-Year-to-Date figures. In reports, the Key column displays an “a” for adjustment.
• Postrecovery: Select this option to take a postrecovery period adjustment. The application takes the adjustment amount in the first period in the next fiscal year after the end of the asset’s life. The asset is then fully depreciated. On the Depreciation
4-22 / FAS 50 Asset Accounting - Peachtree Edition
Expense report for the postrecovery period, the Year-to-Date columns reflect the adjustment amount, and the Key column displays an “a” for adjustment. (This is not the case for the depreciation methods listed below. These methods handle this adjustment type differently, as explained.)
If you are using the depreciation methods listed below, both the None and Post Recovery adjustment types prorate the adjustment amount over the asset’s remaining life. These methods do not make the adjustment as explained above, because the calculations are based on the remaining net book value.
• MACRS (MF, MA, MI, MR, AD, and AA)
• Declining-balance (DB)
• Declining-balance half-year (DH)
• Declining-balance modified half-year (DD)
• Declining balance, no switch to SL (DC)
• Declining-balance, half-year, no switch to SL (DI)
• Declining-balance, modified half-year, no switch to SL (DE)
• Remaining value over remaining life (RV)
There is an exception to how the application applies a Post Recovery adjustment for the MACRS and declining-balance depreciation methods listed above.
When an asset’s Beginning Date is during the fiscal year in which the asset’s life ends, the application takes the Post Recovery adjustment in the first period of the following fiscal year. When an asset’s Beginning Date is after the fiscal year in which the asset’s life ends, the application takes the Post Recovery adjustment in the period following the Beginning Date. Here are some examples:
An asset’s life ends on 6/30/07, at which point it should be fully depreciated. XYZ Manufacturing, a calendar year company, has under-depreciated the asset in another product and now enters it in the application.
Setting Up the Application / 4-23
Example A: XYZ Manufacturing enters a Beginning Date of 03/07 (that is, in the last year of the asset’s life). The application takes the adjustment amount when it calculates depreciation for 1/31/08, the first period in the following fiscal year.
Example B: XYZ Manufacturing enters a Beginning Date of 03/08 (that is, in the fiscal year following the fiscal year in which the asset’s life ends). The application takes the adjustment amount when it calculates depreciation for 4/30/08, the first period following the Beginning Date.
Reduce by ITCUse this field to select which of the two ITC options you want to apply. The selection you make here applies to all assets in the application, whether previously depreciated or not.
For assets that were placed in service after 1982 and before 1986, companies taking an Investment Tax Credit (ITC) had two choices:
• Take the full ITC but reduce the basis of the asset.
• Take a reduced ITC without adjusting the basis.
For assets that were placed in service after 1985, only the first option applies.
The default setting is to reduce the basis of all assets for which the full ITC was taken. This reduction is taken for all books except the Internal book, to which the ITC does not apply.
To have the application not reduce the basis of appropriate assets in a book, select No.
Depending on the book and the ITC option chosen for an asset, you may need to override the application-calculated ITC percentage and ITC amount in Detail View to conform to IRS regulations.
4-24 / FAS 50 Asset Accounting - Peachtree Edition
The Database Information and Map to Peachtree Button
Follow the guidelines provided below to complete the database information section of the New Company screen.
Database Use this field to select the database in which you want the application to store the company you are creating. You can select a database only when you first create a company.
New Database ButtonClick this button if you want to create a new database in which to store the company you are creating. The application displays the New Database screen. This button is available only when you first create a company. See “Completing the New Database Screen,” page 4-3.
Map to Peachtree ButtonClick this button to connect (or “map”) the company to a Peachtree company. For more information, see “Mapping the Company to a Peachtree Company,” page 4-26.
Book Emulation for the ACE Book
The Revenue Reconciliation Act of 1993 changed the tax rules for ACE depreciation when it eliminated the ACE Depreciation Adjustment for property placed in service after December 31, 1993. Although all property with a placed-in-service date prior to 1994 continues to be depreciated under the pre-Tax Act ACE rules, post-1993 property is handled differently.
In your company setup, if you have not specified a book emulation for the ACE book, then the Depreciation Method field automatically defaults to “No” in the ACE book for these assets. Therefore, in some reports, the application does not provide detail on these assets. Additionally, ACE depreciation information for these assets is not available in Detail View. All post-1993 assets display a zero in report columns referring to ACE Depreciation Adjustment amounts.
You can force the application to display depreciation information in reports and in Detail View by making the ACE book emulate the AMT book. If you choose to do so, the application still displays
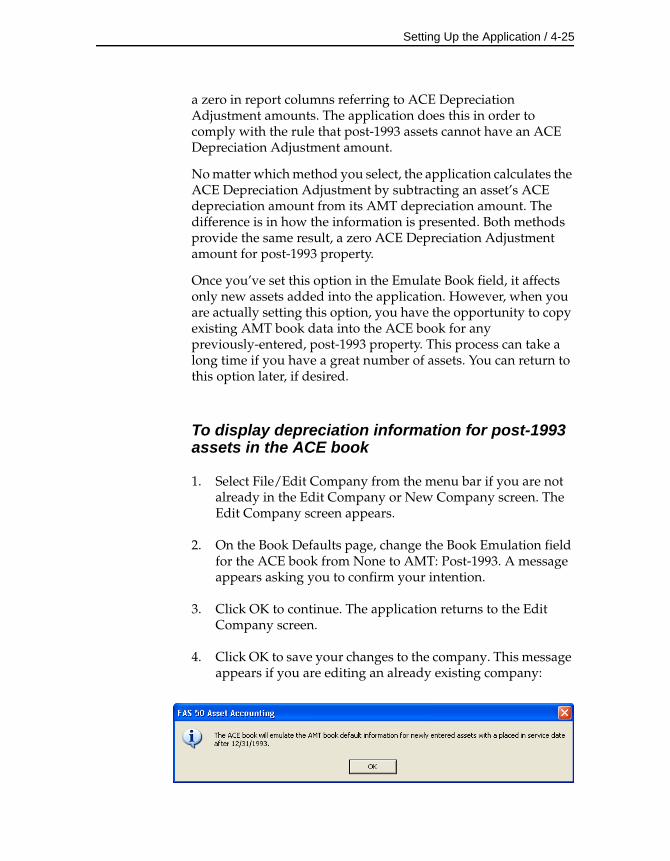
Setting Up the Application / 4-25
a zero in report columns referring to ACE Depreciation Adjustment amounts. The application does this in order to comply with the rule that post-1993 assets cannot have an ACE Depreciation Adjustment amount.
No matter which method you select, the application calculates the ACE Depreciation Adjustment by subtracting an asset’s ACE depreciation amount from its AMT depreciation amount. The difference is in how the information is presented. Both methods provide the same result, a zero ACE Depreciation Adjustment amount for post-1993 property.
Once you’ve set this option in the Emulate Book field, it affects only new assets added into the application. However, when you are actually setting this option, you have the opportunity to copy existing AMT book data into the ACE book for any previously-entered, post-1993 property. This process can take a long time if you have a great number of assets. You can return to this option later, if desired.
To display depreciation information for post-1993 assets in the ACE book
1. Select File/Edit Company from the menu bar if you are not already in the Edit Company or New Company screen. The Edit Company screen appears.
2. On the Book Defaults page, change the Book Emulation field for the ACE book from None to AMT: Post-1993. A message appears asking you to confirm your intention.
3. Click OK to continue. The application returns to the Edit Company screen.
4. Click OK to save your changes to the company. This message appears if you are editing an already existing company:
4-26 / FAS 50 Asset Accounting - Peachtree Edition
5. Click Yes or No based on the information below:
• Click Yes to override existing data (including depreciation and gain/loss calculations) in the ACE book for any previously entered, post-1993 assets with AMT information.
• Click No if you do not want to override existing data. This action does not void the AMT book emulation in the ACE book for newly entered assets.
The application copies data into the ACE book, then returns to your previous view.
Mapping the Company to a Peachtree Company
When you create a company in the application, you must connect (or “map”) it to a company in Peachtree by Sage.
After you create this connection between a FAS 50 Asset Accounting company and a Peachtree company, you can exchange the following information between the two companies.
• General Ledger Account Fields: The application imports the general ledger account names and numbers automatically from the Peachtree company. You can access them from the general ledger account fields in Detail View.
• Depreciation Expense: You can post the depreciation expense journal entry from the FAS 50 Asset Accounting company directly into the Peachtree company.
You can map a FAS 50 Asset Accounting company to only one Peachtree company.
To map a FAS 50 Asset Accounting company to a Peachtree company
1. Start Peachtree by Sage. The Peachtree application must be open before you can map a FAS 50 Asset Accounting company to a Peachtree company.
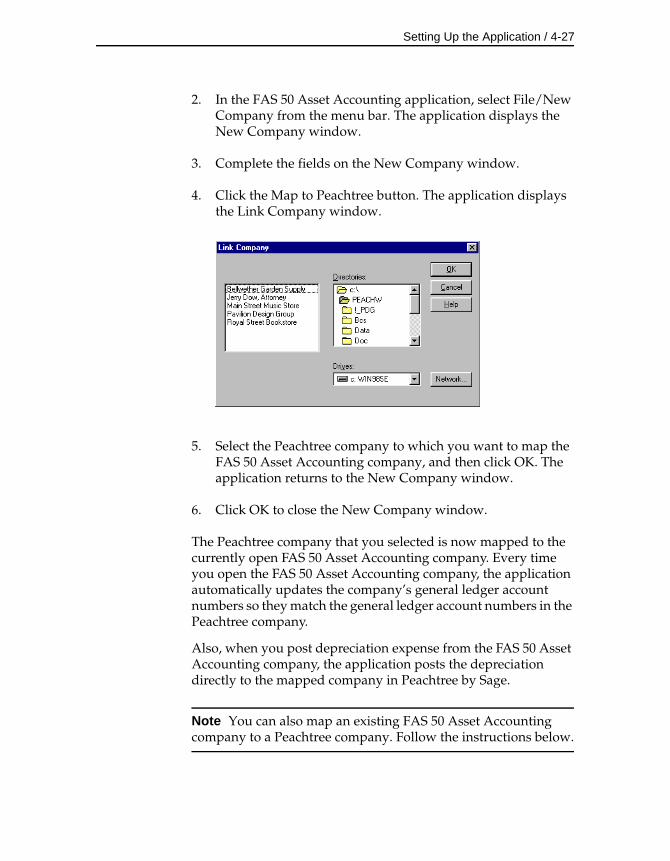
Setting Up the Application / 4-27
2. In the FAS 50 Asset Accounting application, select File/New Company from the menu bar. The application displays the New Company window.
3. Complete the fields on the New Company window.
4. Click the Map to Peachtree button. The application displays the Link Company window.
5. Select the Peachtree company to which you want to map the FAS 50 Asset Accounting company, and then click OK. The application returns to the New Company window.
6. Click OK to close the New Company window.
The Peachtree company that you selected is now mapped to the currently open FAS 50 Asset Accounting company. Every time you open the FAS 50 Asset Accounting company, the application automatically updates the company’s general ledger account numbers so they match the general ledger account numbers in the Peachtree company.
Also, when you post depreciation expense from the FAS 50 Asset Accounting company, the application posts the depreciation directly to the mapped company in Peachtree by Sage.
Note You can also map an existing FAS 50 Asset Accounting company to a Peachtree company. Follow the instructions below.
4-28 / FAS 50 Asset Accounting - Peachtree Edition
To map an existing FAS 50 Asset Accounting company
1. Start Peachtree by Sage. The application must be open before you can map a FAS 50 Asset Accounting company to a Peachtree company.
2. In FAS 50 Asset Accounting, open the company that you want to map to a Peachtree company.
3. Select File/Edit Company from the menu bar. The application displays the Edit Company window.
4. Click the Map to Peachtree button. The application displays the Link Company window.
5. Select the Peachtree company to which you want to map the FAS 50 Asset Accounting company, and then click OK. The application returns to the Edit Company window.
6. Click OK to close the Edit Company window.
Updating General Ledger Accounts
By now you have mapped a FAS 50 Asset Accounting company to a Peachtree company. When you open this FAS 50 Asset Accounting company, the application automatically compares the general ledger account numbers of the FAS 50 Asset Accounting company to the chart of accounts in this Peachtree company to make sure they match. If they do not match, the application updates the general ledger fields in the FAS 50 Asset Accounting company.
You can also manually update the general ledger account numbers after you have opened the FAS 50 Asset Accounting company. You might want to do this if you think the chart of accounts has changed in the mapped Peachtree company after you opened the FAS 50 Asset Accounting company.
The general ledger fields in FAS 50 Asset Accounting appear in the left-hand column in Detail View. When you select one of these fields, the application displays a list of the valid entries for the field. This list of valid field entries is called a SmartList.
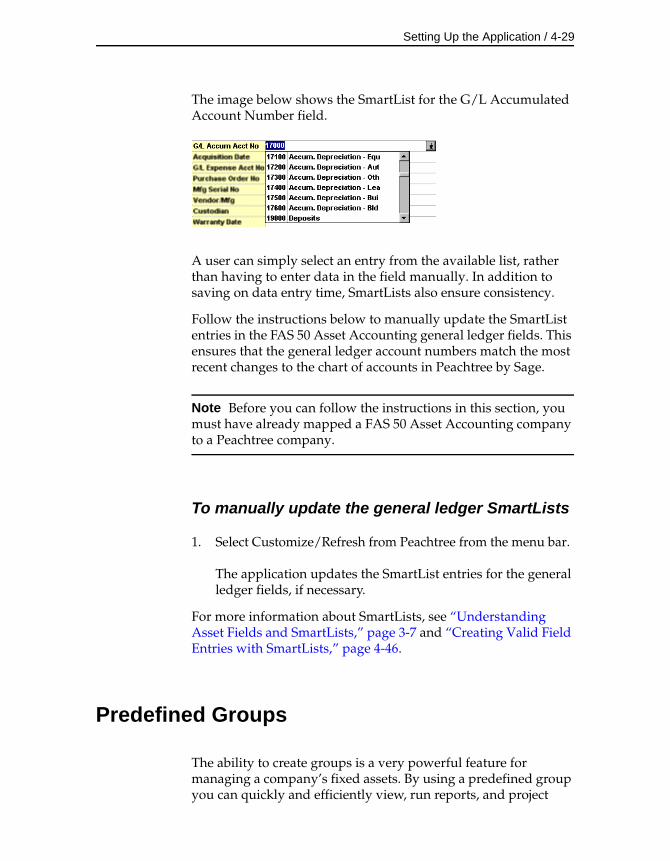
Setting Up the Application / 4-29
The image below shows the SmartList for the G/L Accumulated Account Number field.
A user can simply select an entry from the available list, rather than having to enter data in the field manually. In addition to saving on data entry time, SmartLists also ensure consistency.
Follow the instructions below to manually update the SmartList entries in the FAS 50 Asset Accounting general ledger fields. This ensures that the general ledger account numbers match the most recent changes to the chart of accounts in Peachtree by Sage.
Note Before you can follow the instructions in this section, you must have already mapped a FAS 50 Asset Accounting company to a Peachtree company.
To manually update the general ledger SmartLists
1. Select Customize/Refresh from Peachtree from the menu bar.
The application updates the SmartList entries for the general ledger fields, if necessary.
For more information about SmartLists, see “Understanding Asset Fields and SmartLists,” page 3-7 and “Creating Valid Field Entries with SmartLists,” page 4-46.
Predefined Groups
The ability to create groups is a very powerful feature for managing a company’s fixed assets. By using a predefined group you can quickly and efficiently view, run reports, and project
4-30 / FAS 50 Asset Accounting - Peachtree Edition
depreciation for a very select group of assets. Once you have identified the assets to be defined as a group, you can also decide the order in which you want them to appear. In addition, you can decide whether you want the assets in a group to be subtotaled during reports.
The more groups you have, the more control you have over your assets. Groups provide you with a way to permanently sort selected assets into logical formations. Groups can also narrow-down the number of assets you have to browse in order to find a specific asset. The application contains four pre-defined groups for you to use:
• All FAS Assets: Activity codes A, D, and I. For a description of each activity code, see “Understanding Activity Codes,” page 3-8.
• Active Assets: Activity codes A and D. (Disposals are included in the Active Assets group because they are considered to have current activity in the year of disposal.)
• Disposed Assets: Activity code D.
• Inactive Assets: Activity code I.
Creating Groups
You can create groups of assets based on any asset attributes specified in the general information fields. Therefore, a group is a request to search the current company for assets matching criteria you specify. To create groups you should have a basic understanding of how to apply criteria to build expressions. See Appendix C, “Understanding and Specifying Criteria.”
The application contains a tool called Group Manager. Use Group Manager to create a new group, edit an existing group, rename an existing group, or delete a group.
Note As a precaution, the application does not permit you to edit or delete the All FAS Assets group.

Setting Up the Application / 4-31
You can access Group Manager from either the menu bar or from the Group field.
If you access Group Manager from the Group field, the group you create or edit becomes the active group when you return to Group View. This is not the case when you access Group Manager from the Customize menu.
Before creating your first group, make sure you read “Understanding Groups,” page 3-4.
To create a group using Group Manager
1. Do any one of the following:
• Select Customize/Group Manager from the menu bar.
• Select Group Manager in the Group field, located in Group View.
• Click the Group Manager button from the toolbar.
The Group Manager screen appears.
Group Manager
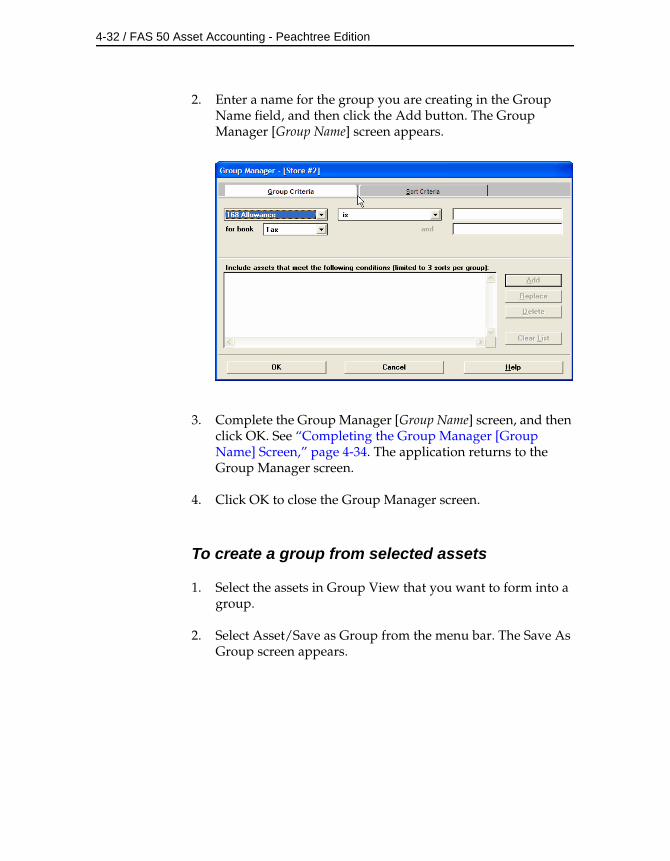
4-32 / FAS 50 Asset Accounting - Peachtree Edition
2. Enter a name for the group you are creating in the Group Name field, and then click the Add button. The Group Manager [Group Name] screen appears.
3. Complete the Group Manager [Group Name] screen, and then click OK. See “Completing the Group Manager [Group Name] Screen,” page 4-34. The application returns to the Group Manager screen.
4. Click OK to close the Group Manager screen.
To create a group from selected assets
1. Select the assets in Group View that you want to form into a group.
2. Select Asset/Save as Group from the menu bar. The Save As Group screen appears.
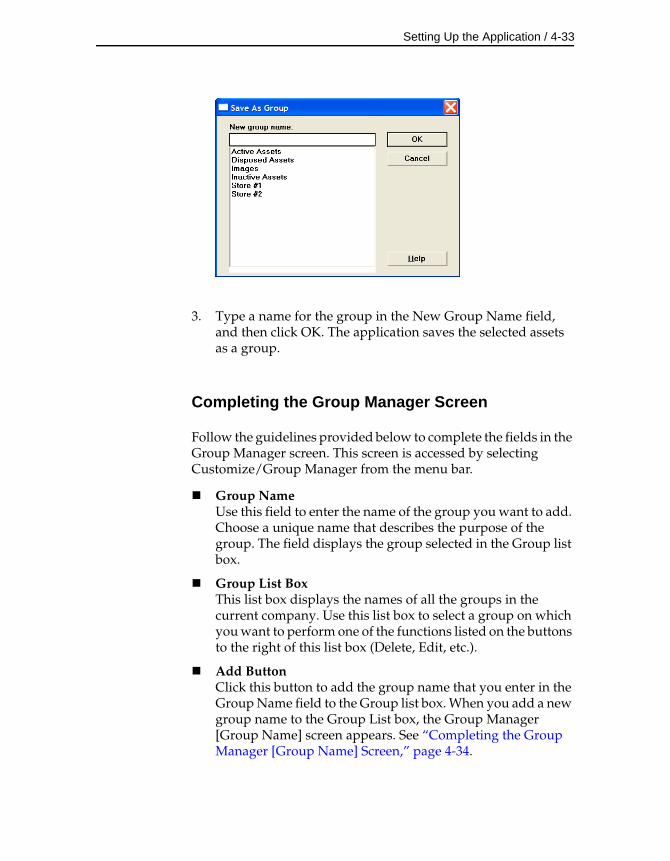
Setting Up the Application / 4-33
3. Type a name for the group in the New Group Name field, and then click OK. The application saves the selected assets as a group.
Completing the Group Manager Screen
Follow the guidelines provided below to complete the fields in the Group Manager screen. This screen is accessed by selecting Customize/Group Manager from the menu bar.
Group NameUse this field to enter the name of the group you want to add. Choose a unique name that describes the purpose of the group. The field displays the group selected in the Group list box.
Group List BoxThis list box displays the names of all the groups in the current company. Use this list box to select a group on which you want to perform one of the functions listed on the buttons to the right of this list box (Delete, Edit, etc.).
Add ButtonClick this button to add the group name that you enter in the Group Name field to the Group list box. When you add a new group name to the Group List box, the Group Manager [Group Name] screen appears. See “Completing the Group Manager [Group Name] Screen,” page 4-34.
4-34 / FAS 50 Asset Accounting - Peachtree Edition
Edit ButtonClick this button to display a screen that allows you to edit the criteria for the selected group. See “Completing the Group Manager [Group Name] Screen,” page 4-34.
Rename ButtonClick this button to rename the selected group. Select the group you want to rename in the Group List Box. Enter the new name in the Group Name field, and then click the Rename button.
Delete ButtonClick this button to delete the selected group. When you delete a group, the application deletes that logical organization of assets; it does not delete the assets that belonged to the deleted group.
Completing the Group Manager [Group Name] Screen
The Group Manager [Group Name] screen contains two pages. In the Group Criteria page, you define the group. In the Sort Criteria page, you define how the group is sorted.
If you intend to specify complex criteria to build a group, there is information critical to both of these pages in Appendix C, “Understanding and Specifying Criteria.”
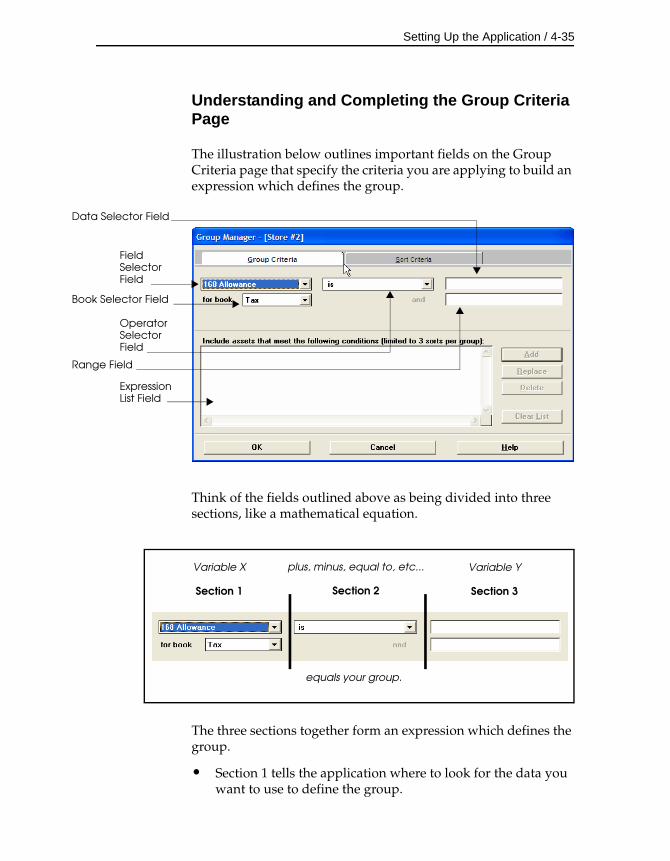
Setting Up the Application / 4-35
Da
Bo
Ra
Understanding and Completing the Group Criteria Page
The illustration below outlines important fields on the Group Criteria page that specify the criteria you are applying to build an expression which defines the group.
Think of the fields outlined above as being divided into three sections, like a mathematical equation.
The three sections together form an expression which defines the group.
• Section 1 tells the application where to look for the data you want to use to define the group.
ta Selector Field
Field Selector Field
ok Selector Field
Operator Selector Field
nge Field
Expression List Field
Variable X
Section 1
plus, minus, equal to, etc...
Section 2
Variable Y
Section 3
equals your group.

4-36 / FAS 50 Asset Accounting - Peachtree Edition
• Section 2 tells the application how to look at the data in Section 3.
• Section 3 tells the application what specifically to look for in Section 1. The application then compares what it finds based on how it is looking at it as specified in Section 2.
Once you’ve created an expression, you add that expression to the Expression list field. You can create multiple expressions to define a group. Each added expression further restricts the asset selection for the group. For example, suppose you choose to select by date placed-in-service and then by location. The application selects assets that match both criteria. However, if you add two expressions using the same field but requesting different data, it selects all assets that fall in either range (for instance, location is New York or location is Chicago). To understand how multiple expressions work together, see “Complex Expressions,” page C-2.
Follow the guidelines provided below to complete the fields in the Group Criteria page.
Field Selector Use this field to specify the asset field you want to use to define your group. For non-FAS fields, the application displays the product name in parentheses next to the field name in the drop-down list.
Book SelectorUse this field to specify the book containing the field you selected above. This field is only enabled if you selected a book-related field in the Field Selector drop-down list box.
Operator SelectorUse this field to specify the operator you want to use for the expression you are building to define the group. Operators are very much like mathematical symbols. For a full discussion of operators, see Appendix C, “Understanding and Specifying Criteria.”
Data SelectorUse this field to specify the data you want to find or not find in the field you selected above. This is a case-sensitive field; that is, if you enter Bakery, the application will not find assets that contain BAKERY in their Location fields. Enter dates in the format MMDDYYYY. For operators that require a range, enter the first value in the range in this field. See below.
Setting Up the Application / 4-37
RangeUse this field when you select an operator that requires a range of data, such as the between operator. The between operator looks for data between two values; for example, all assets with a System Number between 4 and 7. In this case, you would enter the 7 in this field. Enter dates in the format MMDDYYYY.
Expression List FieldThis field displays all the expressions you have created for this group.
Add ButtonClick this button to add an expression you have created into the Expression list field.
Replace ButtonClick this button to replace an expression selected in the Expression list field with a newly created expression. Select the expression you want to change in the Expression list field, make the desired changes, and then click the Replace button.
Delete ButtonClick this button to delete a selected expression from the Expression list field.
Clear List ButtonClick this button to clear the Expression list field of all expressions.
Understanding and Completing the Sort Criteria Page
By default, assets are listed in Group View in order by System Number. In reports, they are also ordered by book. The Sort Criteria page allows you to change the order in which assets are listed in Group View and in reports. You can also indicate whether or not you want subtotals to appear for each sort level. There is information critical to creating complex sort criteria in “Complex Expressions,” page C-2. Refer to it if you plan to build such a sort.
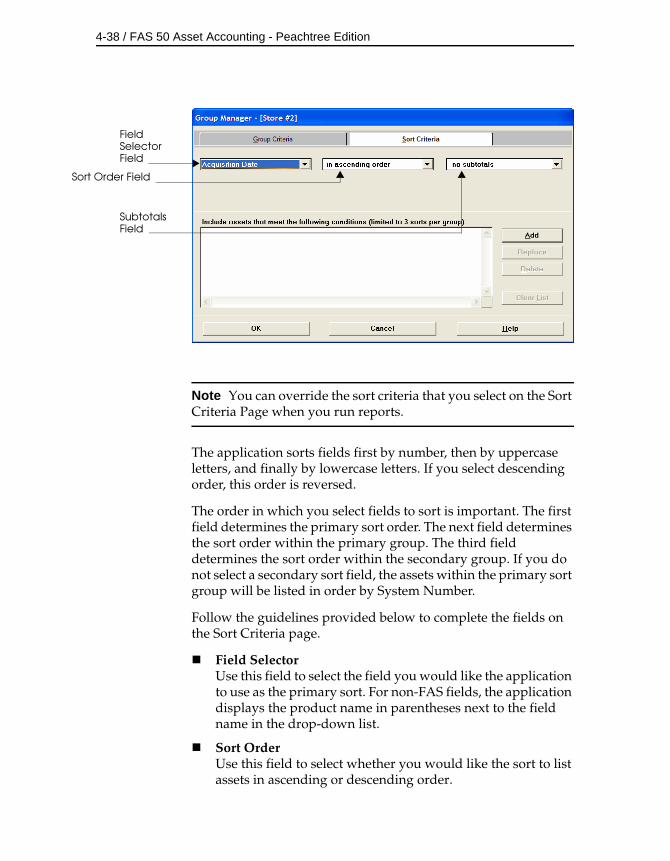
4-38 / FAS 50 Asset Accounting - Peachtree Edition
So
Note You can override the sort criteria that you select on the Sort Criteria Page when you run reports.
The application sorts fields first by number, then by uppercase letters, and finally by lowercase letters. If you select descending order, this order is reversed.
The order in which you select fields to sort is important. The first field determines the primary sort order. The next field determines the sort order within the primary group. The third field determines the sort order within the secondary group. If you do not select a secondary sort field, the assets within the primary sort group will be listed in order by System Number.
Follow the guidelines provided below to complete the fields on the Sort Criteria page.
Field SelectorUse this field to select the field you would like the application to use as the primary sort. For non-FAS fields, the application displays the product name in parentheses next to the field name in the drop-down list.
Sort OrderUse this field to select whether you would like the sort to list assets in ascending or descending order.
Field Selector Field
rt Order Field
Subtotals Field
Setting Up the Application / 4-39
SubtotalsUse this field to indicate the type of subtotaling system, if any, that you want to use in reports for the field selected. Any type of subtotaling will increase the size of your reports.
Updating Groups
When you make changes to asset information, you might make a change that affects an asset in such a way that it no longer qualifies for the current group, or you might add an asset that should be part of the current group. In order for the current group to reflect such changes, a refresh group action must occur.
Inside the Preferences option, you can specify that you want to automatically update groups. For more information, see “Setting Preferences,” page 4-52. You can also force the application to update groups anytime you want. When you use the manual refresh group option, the application refreshes the current group only when you perform the procedure. This eliminates the need for you to wait every time the application refreshes the group as specified in the Preference settings.
To update the current group
1. Select Asset/Refresh from the menu bar.
The application automatically updates the current group. Any assets you added are displayed if they meet the criteria of the current group.
Editing, Renaming, or Deleting Groups
See “Completing the Group Manager Screen,” page 4-33.
4-40 / FAS 50 Asset Accounting - Peachtree Edition
Customizing Your Asset Fields
You can customize the assets’ general information fields to suit the individual needs of your organization. When customizing these fields, keep in mind that the application contains five alphanumeric User Fields for you to customize. Therefore, you might not want to customize any of the pre-existing fields until you’ve exhausted the User Fields. You customize the pre-existing fields or the User Fields using the same set of procedures.
You should not customize the four asset fields listed below so that their overall purpose is changed:
• Company Asset Number.
• The three G/L asset account numbers: G/L Asset Account Number, G/L Accumulated Account Number, and G/L Expense Account Number.
Before attempting to customize your fields for the first time, make sure you read “Understanding Asset Fields and SmartLists,” page 3-7.
Warning Do not change the name of a field to a name that is reserved for use by a Sage FAS application. For more information, see “Reserved Field Names,” page 4-44.
To customize asset fields
1. Select Customize/Fields from the menu bar. The Customize Fields screen appears.
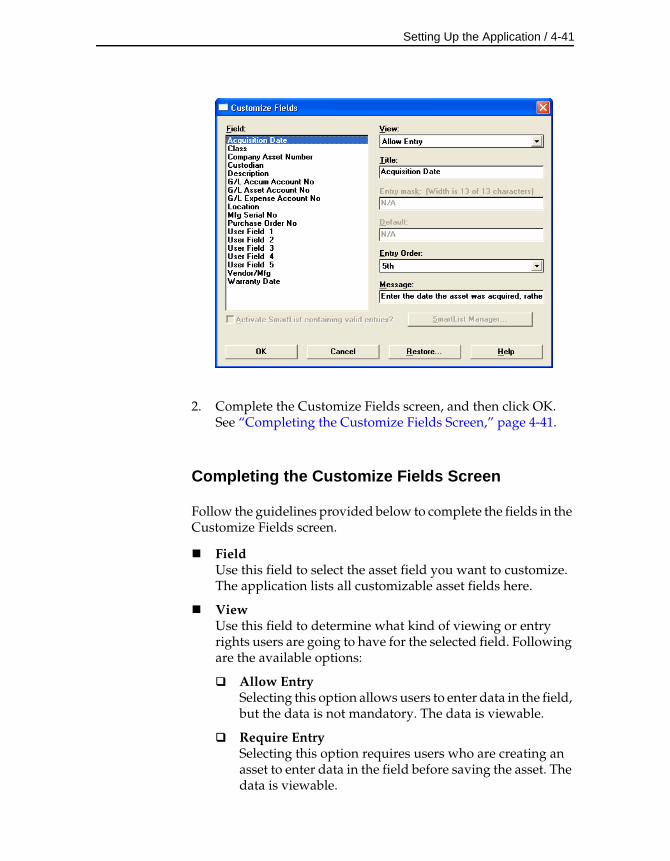
Setting Up the Application / 4-41
2. Complete the Customize Fields screen, and then click OK. See “Completing the Customize Fields Screen,” page 4-41.
Completing the Customize Fields Screen
Follow the guidelines provided below to complete the fields in the Customize Fields screen.
FieldUse this field to select the asset field you want to customize. The application lists all customizable asset fields here.
ViewUse this field to determine what kind of viewing or entry rights users are going to have for the selected field. Following are the available options:
Allow EntrySelecting this option allows users to enter data in the field, but the data is not mandatory. The data is viewable.
Require EntrySelecting this option requires users who are creating an asset to enter data in the field before saving the asset. The data is viewable.
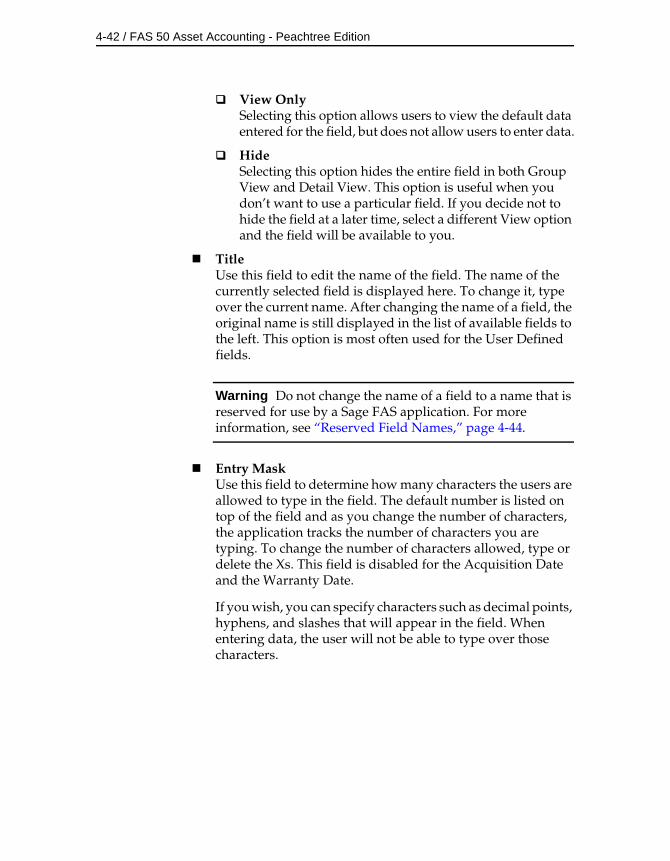
4-42 / FAS 50 Asset Accounting - Peachtree Edition
View OnlySelecting this option allows users to view the default data entered for the field, but does not allow users to enter data.
HideSelecting this option hides the entire field in both Group View and Detail View. This option is useful when you don’t want to use a particular field. If you decide not to hide the field at a later time, select a different View option and the field will be available to you.
TitleUse this field to edit the name of the field. The name of the currently selected field is displayed here. To change it, type over the current name. After changing the name of a field, the original name is still displayed in the list of available fields to the left. This option is most often used for the User Defined fields.
Warning Do not change the name of a field to a name that is reserved for use by a Sage FAS application. For more information, see “Reserved Field Names,” page 4-44.
Entry MaskUse this field to determine how many characters the users are allowed to type in the field. The default number is listed on top of the field and as you change the number of characters, the application tracks the number of characters you are typing. To change the number of characters allowed, type or delete the Xs. This field is disabled for the Acquisition Date and the Warranty Date.
If you wish, you can specify characters such as decimal points, hyphens, and slashes that will appear in the field. When entering data, the user will not be able to type over those characters.
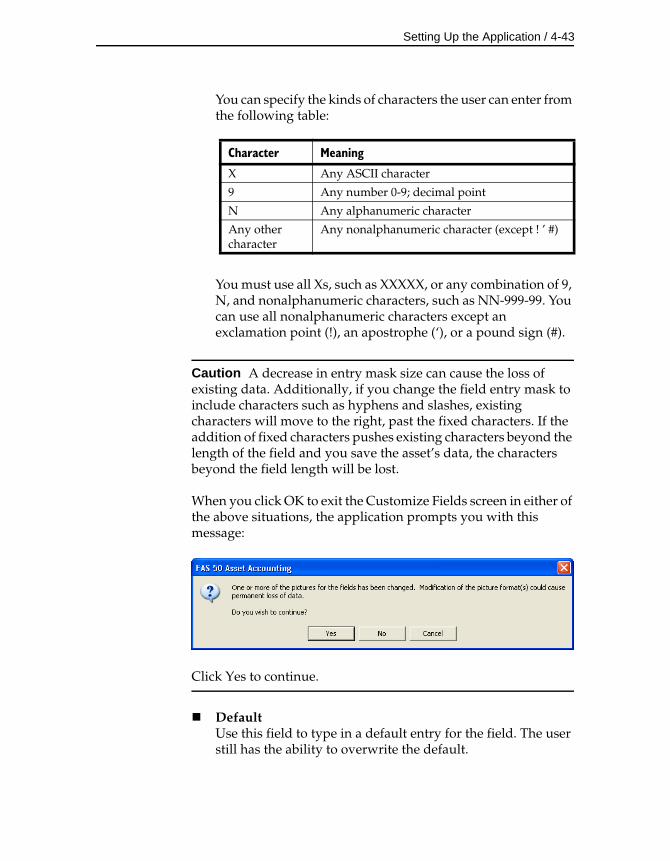
Setting Up the Application / 4-43
You can specify the kinds of characters the user can enter from the following table:
You must use all Xs, such as XXXXX, or any combination of 9, N, and nonalphanumeric characters, such as NN-999-99. You can use all nonalphanumeric characters except an exclamation point (!), an apostrophe (‘), or a pound sign (#).
Caution A decrease in entry mask size can cause the loss of existing data. Additionally, if you change the field entry mask to include characters such as hyphens and slashes, existing characters will move to the right, past the fixed characters. If the addition of fixed characters pushes existing characters beyond the length of the field and you save the asset’s data, the characters beyond the field length will be lost.
When you click OK to exit the Customize Fields screen in either of the above situations, the application prompts you with this message:
Click Yes to continue.
DefaultUse this field to type in a default entry for the field. The user still has the ability to overwrite the default.
Character Meaning
X Any ASCII character
9 Any number 0-9; decimal point
N Any alphanumeric character
Any other character
Any nonalphanumeric character (except ! ’ #)
4-44 / FAS 50 Asset Accounting - Peachtree Edition
Entry OrderUse this field to select the order in which you want the fields to appear. The succeeding fields will be renumbered.
MessageUse this field to enter a brief explanatory message that will appear in the status bar when a user enters the field. For example, if you rename User Field 1 to Branch, you might want the prompt to read “Enter the branch office number where the asset is located.”
Activate SmartList Containing Valid EntriesSelect this check box if you want to enable the SmartList Manager button. This option is not available for those fields where SmartLists cannot be created.
SmartList Manager ButtonClick this button to display the List Manager screen, which allows you to create valid entries for asset fields. A list of valid entries for an asset is called a SmartList. See “Creating Valid Field Entries with SmartLists,” page 4-46.
Restore ButtonClick this button to restore the default settings for this screen. Choosing this command erases all modifications you’ve made to all the fields.
Reserved Field Names
You can customize the names of fields so that you can tailor the application to meet the specific needs of your organization. However, you should not rename a field to a name that is reserved for use in FAS 50 Asset Accounting.
Renaming a field to a reserved field name can cause problems when you create a group or change the sort order when running a report.
Below is a list of field names that you should avoid because they are reserved for use by a Sage FAS application.
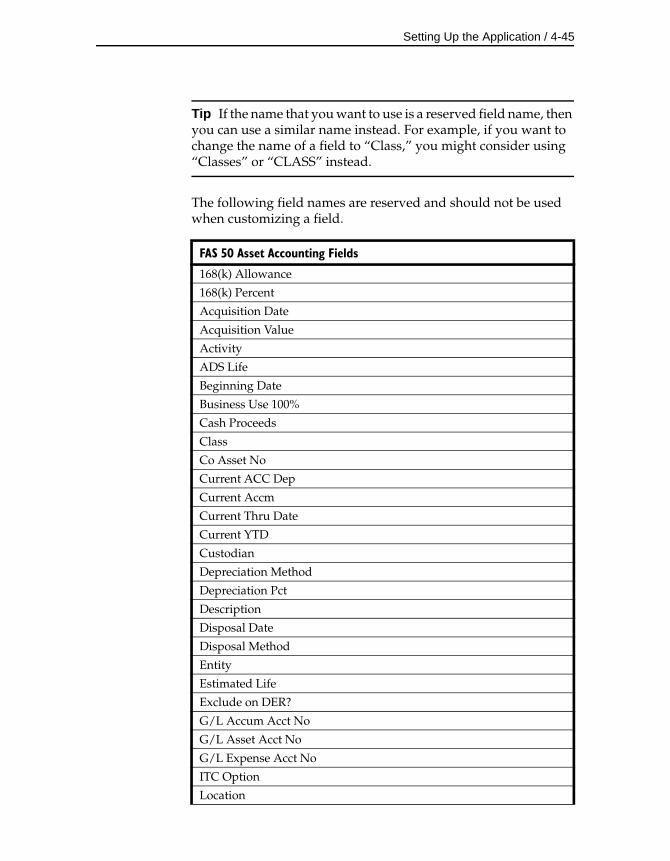
Setting Up the Application / 4-45
Tip If the name that you want to use is a reserved field name, then you can use a similar name instead. For example, if you want to change the name of a field to “Class,” you might consider using “Classes” or “CLASS” instead.
The following field names are reserved and should not be used when customizing a field.
FAS 50 Asset Accounting Fields
168(k) Allowance
168(k) Percent
Acquisition Date
Acquisition Value
Activity
ADS Life
Beginning Date
Business Use 100%
Cash Proceeds
Class
Co Asset No
Current ACC Dep
Current Accm
Current Thru Date
Current YTD
Custodian
Depreciation Method
Depreciation Pct
Description
Disposal Date
Disposal Method
Entity
Estimated Life
Exclude on DER?
G/L Accum Acct No
G/L Asset Acct No
G/L Expense Acct No
ITC Option
Location
4-46 / FAS 50 Asset Accounting - Peachtree Edition
Creating Valid Field Entries with SmartLists
The application allows you to create valid entries for your assets’ general information fields. A list of valid entries for an asset is called a SmartList. Once you’ve created a SmartList for a field, a user can simply select an option from the available list, rather than having to enter the data in the field manually. In addition to saving on data entry time, SmartLists also ensure consistency.
Creating a SmartList does not necessarily eliminate the ability of a user to add an entry to a field that is not currently on the SmartList. The ability or inability to perform such an action is controlled in the List Manager screen.
Mfg Serial No
Net Value
Non Cash Proceeds
Period Accum
Period Date
Period YTD
Placed In Service Date
Property Type
Purchase Order No
Section 179 / Bonus
Section 179 Qualified?
Section 179/Other Amount
Section 179/Other Code
System No
User Field 1
User Field 2
User Field 3
User Field 4
User Field 5
Vendor/Mfg
Warranty Date
FAS 50 Asset Accounting Fields
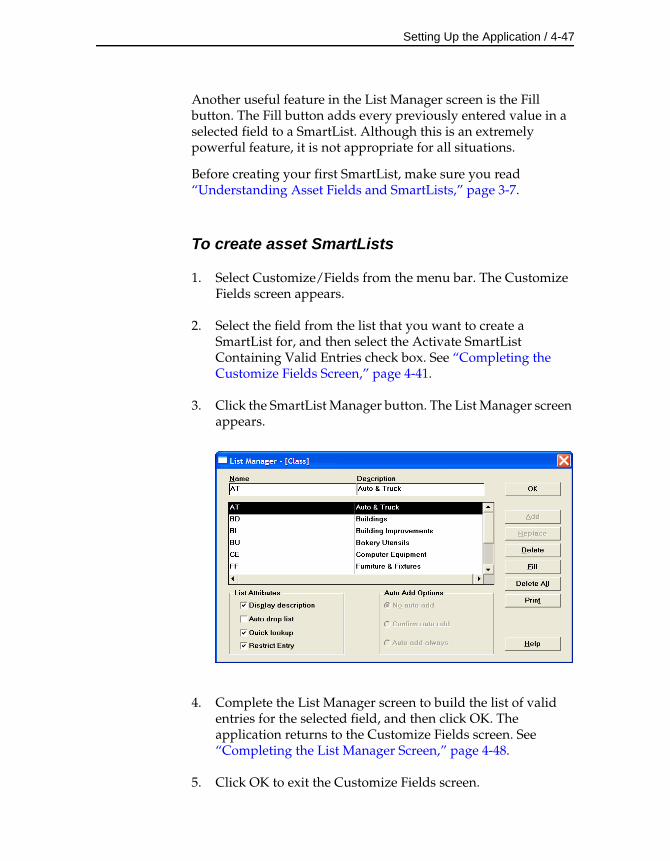
Setting Up the Application / 4-47
Another useful feature in the List Manager screen is the Fill button. The Fill button adds every previously entered value in a selected field to a SmartList. Although this is an extremely powerful feature, it is not appropriate for all situations.
Before creating your first SmartList, make sure you read “Understanding Asset Fields and SmartLists,” page 3-7.
To create asset SmartLists
1. Select Customize/Fields from the menu bar. The Customize Fields screen appears.
2. Select the field from the list that you want to create a SmartList for, and then select the Activate SmartList Containing Valid Entries check box. See “Completing the Customize Fields Screen,” page 4-41.
3. Click the SmartList Manager button. The List Manager screen appears.
4. Complete the List Manager screen to build the list of valid entries for the selected field, and then click OK. The application returns to the Customize Fields screen. See “Completing the List Manager Screen,” page 4-48.
5. Click OK to exit the Customize Fields screen.
4-48 / FAS 50 Asset Accounting - Peachtree Edition
Completing the List Manager Screen
Follow the guidelines provided below to complete the fields in the List Manager screen.
NameUse this field to type the valid entry you want your users to have the option of selecting from the SmartList when they create or edit an asset. The number of characters is determined by setting the entry mask in the Customize Fields screen.
DescriptionUse this field to provide users with more detail about the SmartList entry. For example, if the name is HW, then a description of computer hardware would greatly aid your users. You have the option of selecting whether to display descriptions in a SmartList by using this screen in conjunction with the Display Description field (see below). If you don’t want to display descriptions, skip this field.
SmartList List BoxThis list box displays all SmartList entries that you have added to the list.
List AttributesSelect the attributes you want applied to your SmartList:
Display Description.Select this check box if you want to display the description beside the valid entry. This is extremely useful for fields where you are using codes instead of full names.
Auto Drop ListSelect this check box if you want the application to automatically open the drop-down list box whenever the cursor is in the field.
Quick LookupSelect this check box if you want to enable the quick lookup feature. The quick lookup feature allows users to enter only the first three characters of an entry in the drop-down list box, and then the application quickly finds the first entry in the list box that matches the characters.
Setting Up the Application / 4-49
Restrict EntrySelect this check box if you want users to only be able to enter data in a field by using an entry from the SmartList. Selecting this option disables the Auto Add options.
Auto Add OptionsSelect the option that describes how you want the application to react to users making entries that are not currently in the SmartList.
No Auto AddClick this option button if you want users to be able to make entries that are not on the SmartList into the selected field, but you don’t want the application to add those entries to the SmartList.
Confirm Auto AddClick this option button if you want users to be able to make entries that are not on the SmartList into the selected field, and you also want to add the entry into the SmartList after confirmation by the user.
Auto Add AlwaysClick this option button if you want users to be able to make entries that are not on the SmartList into the selected field, and you also want to automatically add the entry into the SmartList every time. Think twice before selecting this one.
Add ButtonClick this button to add an entry to the SmartList. To add another entry, enter the Name field and complete the rest of the screen.
Replace ButtonClick this button to replace the selected SmartList entry with another entry you have created. If the SmartList entry you are replacing has already been used for an asset, a screen appears informing you of the number of existing assets in the current company that will be affected by the change. You then have three update options available:
Keep the Original EntryClick this option button to keep the original entry in the field for existing assets, but still replace the entry in the SmartList.
4-50 / FAS 50 Asset Accounting - Peachtree Edition
Blank the Original EntryClick this option button to remove the original entry from the field for existing assets and leave it blank.
Globally Replace the Original Entry with the New EntryClick this option button to replace the original entry in the field with the new entry for all existing assets.
Delete ButtonClick this button to delete the selected SmartList entry. If the SmartList entry you are deleting has already been used for an asset, a screen appears informing you of the number of existing assets in the current company that will be affected by the change. You then have two update options available:
Keep the Original EntryClick this option button to keep the original entry in the field for existing assets, but still delete the entry from the SmartList.
Blank the Original EntryClick this option button to remove the original entry from the field for existing assets and leave it blank.
Fill ButtonClick this button to create a SmartList from all previously existing data in this field.
Note The application displays a warning during the Fill process if it detects over 1,000 unique entries. This warning indicates that application performance may be affected by such a large volume of data in a single field.
Delete All ButtonClick this button to delete all SmartList entries from the list. If the SmartList entries you are deleting have already been used for an asset, a screen appears informing you of the number of existing assets in the current company that will be affected by the change. You then have two update options available:
Keep the Original EntryClick this option button to keep the original entries in the field for existing assets, but still delete the entries from the SmartList.
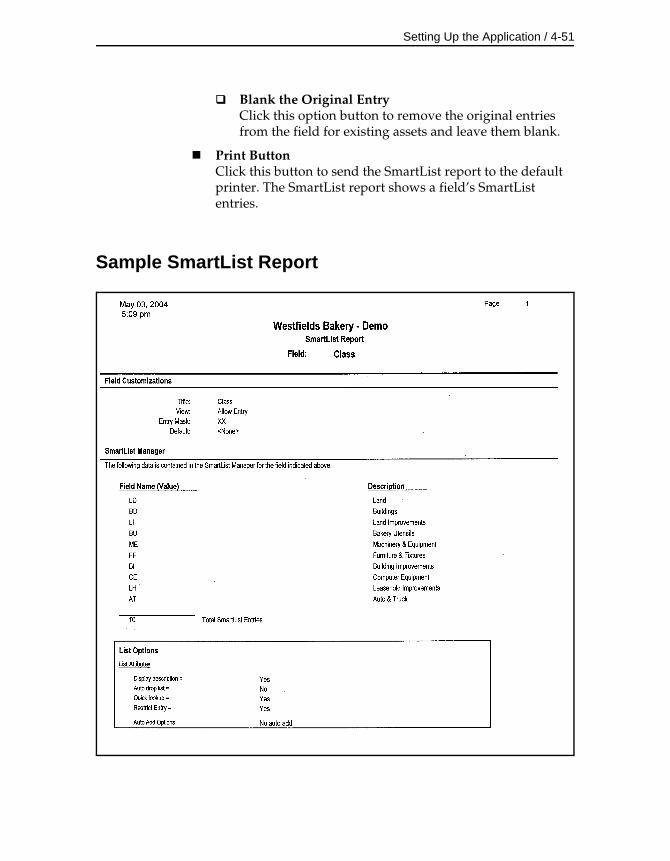
Setting Up the Application / 4-51
Blank the Original EntryClick this option button to remove the original entries from the field for existing assets and leave them blank.
Print ButtonClick this button to send the SmartList report to the default printer. The SmartList report shows a field’s SmartList entries.
Sample SmartList Report
4-52 / FAS 50 Asset Accounting - Peachtree Edition
SmartList Report Sections
The SmartList report contains three sections:
Field CustomizationsThis section of the report displays the contents of the following fields on the Customize Fields screen for the selected field:
• Title field
• View field
• Entry Mask field
• Default field
SmartList ManagerThis section of the report displays the following information for the selected field:
• List of available SmartList entries
• Description of each available SmartList entry
• Total number of available SmartList entries
List OptionsThis section of the report displays the following information about the fields on the List Manager screen for the selected field:
• Which of the List Attributes have been selected
• Which one of the Auto Add Options has been selected
Setting Preferences
The application contains a Preferences screen that allows you to make several decisions about how your system operates. The Preferences screen contains three pages of options.
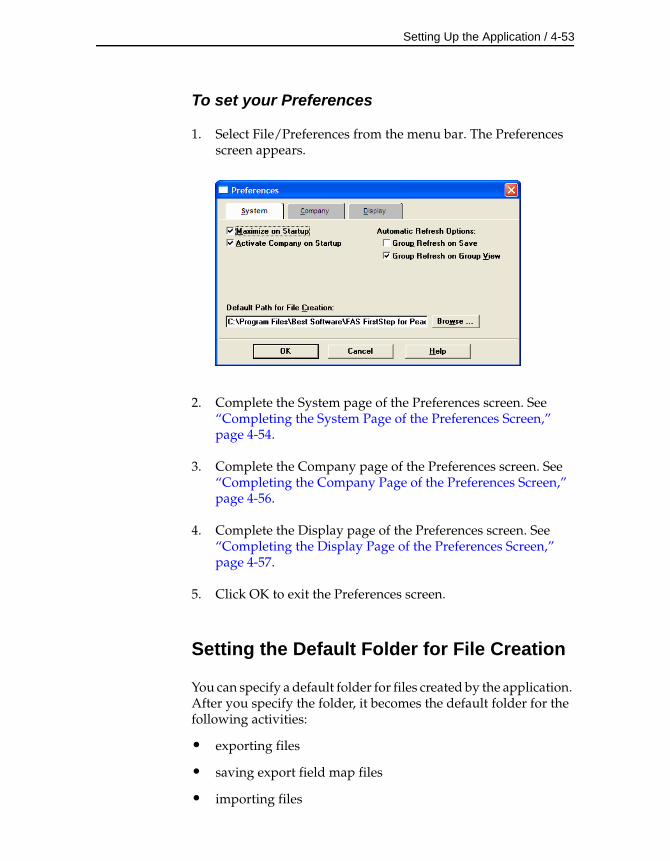
Setting Up the Application / 4-53
To set your Preferences
1. Select File/Preferences from the menu bar. The Preferences screen appears.
2. Complete the System page of the Preferences screen. See “Completing the System Page of the Preferences Screen,” page 4-54.
3. Complete the Company page of the Preferences screen. See “Completing the Company Page of the Preferences Screen,” page 4-56.
4. Complete the Display page of the Preferences screen. See “Completing the Display Page of the Preferences Screen,” page 4-57.
5. Click OK to exit the Preferences screen.
Setting the Default Folder for File Creation
You can specify a default folder for files created by the application. After you specify the folder, it becomes the default folder for the following activities:
• exporting files
• saving export field map files
• importing files
4-54 / FAS 50 Asset Accounting - Peachtree Edition
• saving import field map files
• backing up companies
• restoring backed-up companies
To specify the default folder for file creation
1. Select File/Preferences from the menu bar. The Preferences screen appears.
2. Select the System page of the Preferences screen (it may already be selected). For more information, see “Completing the System Page of the Preferences Screen,” page 4-54.
3. Click the Browse button to select the default folder. After you select the folder, the directory path to the folder appears in the Default Path for File Creation field.
4. Click OK to close the Preferences screen.
Completing the System Page of the Preferences Screen
Follow the guidelines provided below to complete the fields on the System page of the Preferences screen.
Note The preferences that you select on this page apply only to the individual workstation.
Maximize on StartupSelect this check box to maximize the Main System screen so that it occupies the entire screen when the application starts up. (For the application to occupy the entire screen, you must also activate the Microsoft Windows “auto hide” feature for the Windows taskbar and the Microsoft Office toolbar, if present.)
Activate Company on StartupSelect this check box if you want the last open company to open when the application starts up.
Setting Up the Application / 4-55
Automatic Refresh Options Group Refresh on Save
If you select this option, the application automatically refreshes the list of assets in the current group when you save new assets or changes to existing assets. If the additions or changes do not meet the criteria of the current group, you will no longer be able to locate the assets using the previous and next (arrow) buttons in the Goto field. If you do not select this option, you can continue to use the Goto field to find the assets until a refresh occurs. You can manually refresh the current group by clicking the Refresh button. See “Updating Groups,” page 4-39.
Group Refresh on Group ViewIf you select this option and add new assets or make changes to existing assets while in Detail View, the application automatically refreshes the current group when you return to Group View. Group View will display the most recent changes to the assets, display any new assets that qualify for the group, and remove any assets that no longer qualify for the group. If you do not select this option, Group View does not reflect changes made to existing assets or new assets until a refresh occurs. You can manually refresh the current group by clicking the Refresh button. See “Updating Groups,” page 4-39.
Default Path for File CreationUse this field to specify the default folder for creating files in the application. The folder that you select becomes the default folder for exporting files, saving export field map files, importing files, saving import field map files, and backing up and restoring companies. See “Setting the Default Folder for File Creation,” page 4-53.
Browse ButtonClick this button to select the default folder for file creation.
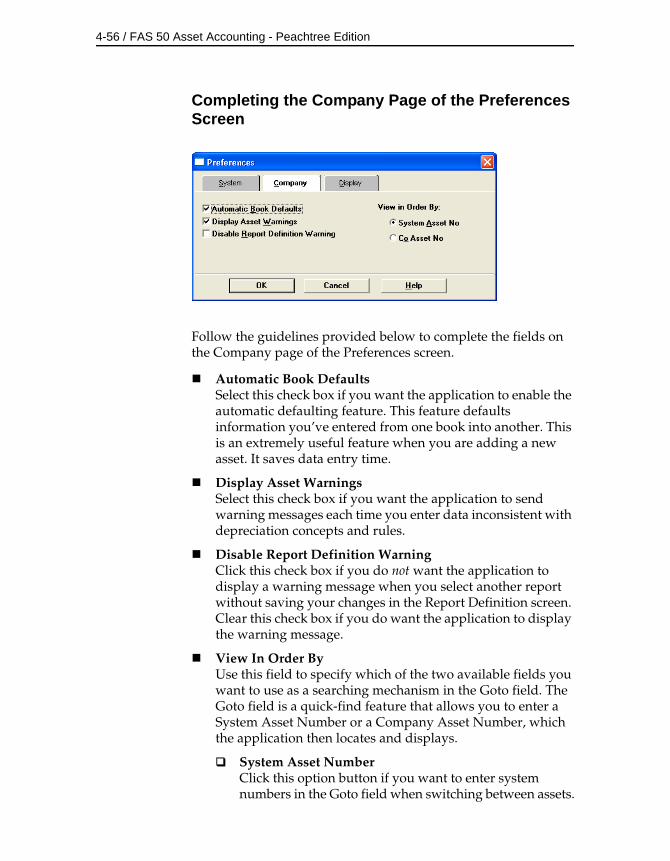
4-56 / FAS 50 Asset Accounting - Peachtree Edition
Completing the Company Page of the Preferences Screen
Follow the guidelines provided below to complete the fields on the Company page of the Preferences screen.
Automatic Book DefaultsSelect this check box if you want the application to enable the automatic defaulting feature. This feature defaults information you’ve entered from one book into another. This is an extremely useful feature when you are adding a new asset. It saves data entry time.
Display Asset WarningsSelect this check box if you want the application to send warning messages each time you enter data inconsistent with depreciation concepts and rules.
Disable Report Definition WarningClick this check box if you do not want the application to display a warning message when you select another report without saving your changes in the Report Definition screen. Clear this check box if you do want the application to display the warning message.
View In Order ByUse this field to specify which of the two available fields you want to use as a searching mechanism in the Goto field. The Goto field is a quick-find feature that allows you to enter a System Asset Number or a Company Asset Number, which the application then locates and displays.
System Asset NumberClick this option button if you want to enter system numbers in the Goto field when switching between assets.
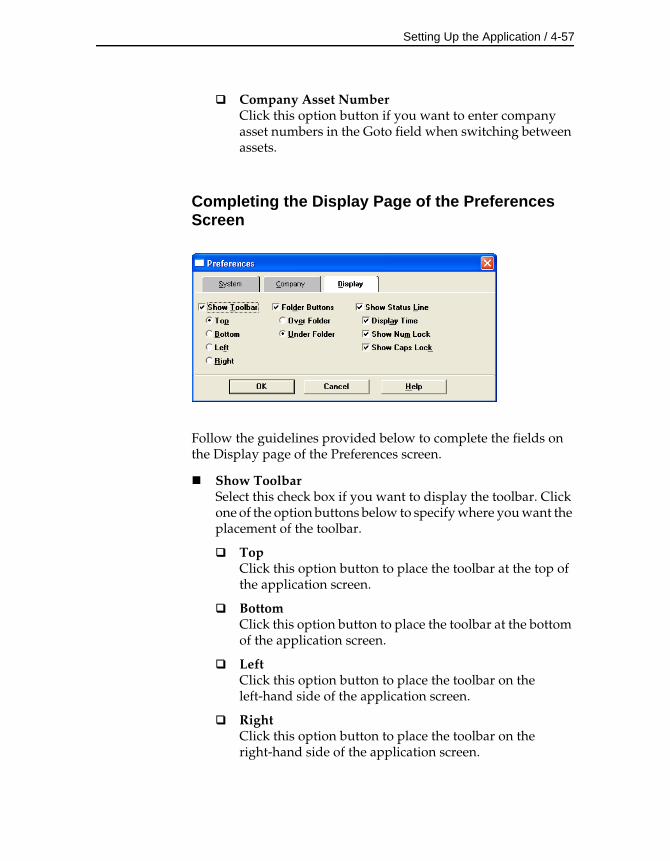
Setting Up the Application / 4-57
Company Asset NumberClick this option button if you want to enter company asset numbers in the Goto field when switching between assets.
Completing the Display Page of the Preferences Screen
Follow the guidelines provided below to complete the fields on the Display page of the Preferences screen.
Show ToolbarSelect this check box if you want to display the toolbar. Click one of the option buttons below to specify where you want the placement of the toolbar.
TopClick this option button to place the toolbar at the top of the application screen.
BottomClick this option button to place the toolbar at the bottom of the application screen.
LeftClick this option button to place the toolbar on the left-hand side of the application screen.
RightClick this option button to place the toolbar on the right-hand side of the application screen.
4-58 / FAS 50 Asset Accounting - Peachtree Edition
Folder ButtonsSelect this check box if you want to display the folder buttons (for example, Save, New, Print, Refresh, Detail View/Group View, and Projection).
Over FolderClick this option button to display the folder buttons at the top of the spreadsheet, just above the Template, Group, and Goto fields.
Under FolderClick this option button to display the folder buttons at the bottom of the spreadsheet. This is the default position for the folder buttons.
Show Status LineSelect this check box to display the status line at the bottom of the application screen. The status line displays a brief and informative message based on the location of the cursor. For example, if the cursor is over an active toolbar icon, the status line displays a message explaining the function of the icon. Select the check boxes below to specify which additional options you want displayed on the status line.
Display TimeSelect this check box to display the time on the status line.
Show Num LockSelect this check box to display the Num Lock indicator on the status line.
Show Caps LockSelect this check box to display the Caps Lock indicator on the status line.
Setting Up Your Printer
The Print Setup option is a standard Windows option. It allows you to select the printer that you want to use to print asset pages and reports.
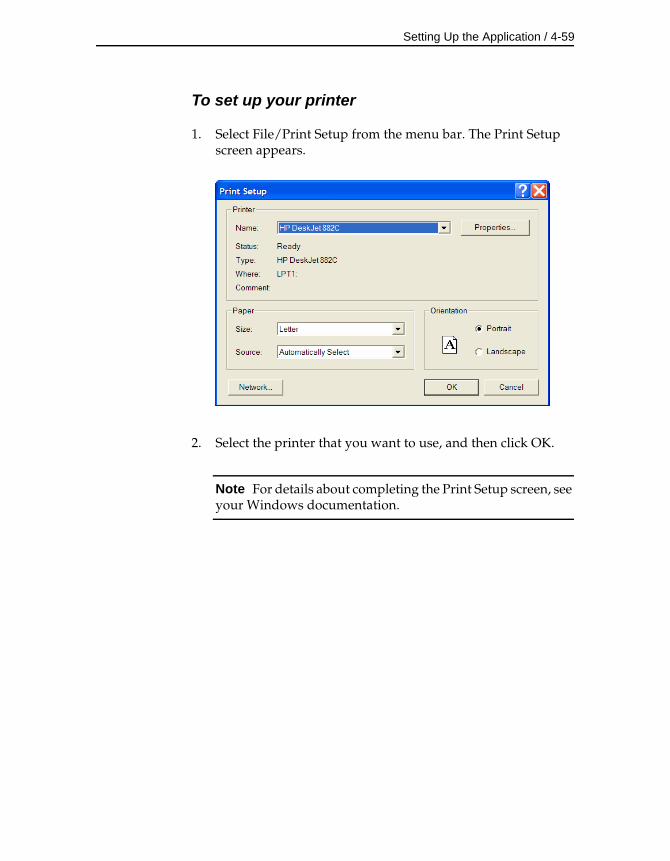
Setting Up the Application / 4-59
To set up your printer
1. Select File/Print Setup from the menu bar. The Print Setup screen appears.
2. Select the printer that you want to use, and then click OK.
Note For details about completing the Print Setup screen, see your Windows documentation.

4-60 / FAS 50 Asset Accounting - Peachtree Edition
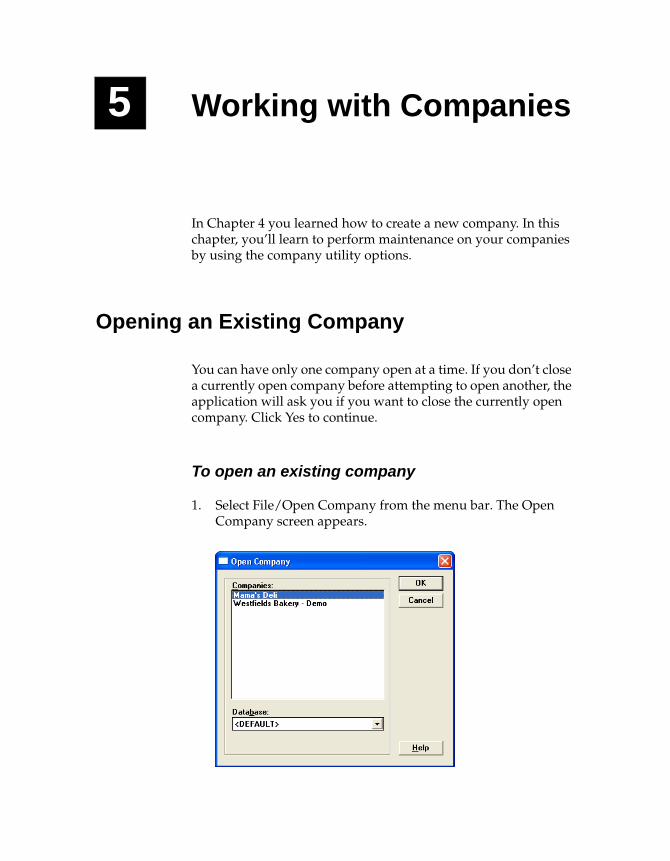
5 Working with Companies
In Chapter 4 you learned how to create a new company. In this chapter, you’ll learn to perform maintenance on your companies by using the company utility options.
Opening an Existing Company
You can have only one company open at a time. If you don’t close a currently open company before attempting to open another, the application will ask you if you want to close the currently open company. Click Yes to continue.
To open an existing company
1. Select File/Open Company from the menu bar. The Open Company screen appears.
5-2 / FAS 50 Asset Accounting - Peachtree Edition
2. Complete the Open Company screen, and then click OK. See “Completing the Open Company Screen,” page 5-2. The application opens the company and displays it in Group View.
Completing the Open Company Screen
Follow the guidelines provided below to complete the fields in the Open Company screen.
CompaniesUse this field to select the name of the company you want to open from the list of existing companies. If the name of the company you want to open is not displayed, you might be looking in the wrong database. To view companies in another database, you must change to that database.
DatabasesUse this field to select the database containing the company you want to open. You can select Database List Manager from the list if you don’t see the database you want or if you want to create a new database. See “Managing Your Databases,” page 5-16.
Editing a Company Setup
A company setup defines critical depreciation-related elements of a company, such as short years and depreciation methods. Without a proper company setup, the application cannot properly calculate depreciation on your assets. Once you’ve defined a company setup, you can edit that setup.
To edit a company setup
1. Make sure the company you want to edit is open.
2. Select File/Edit Company from the menu bar. The Edit Company screen appears.
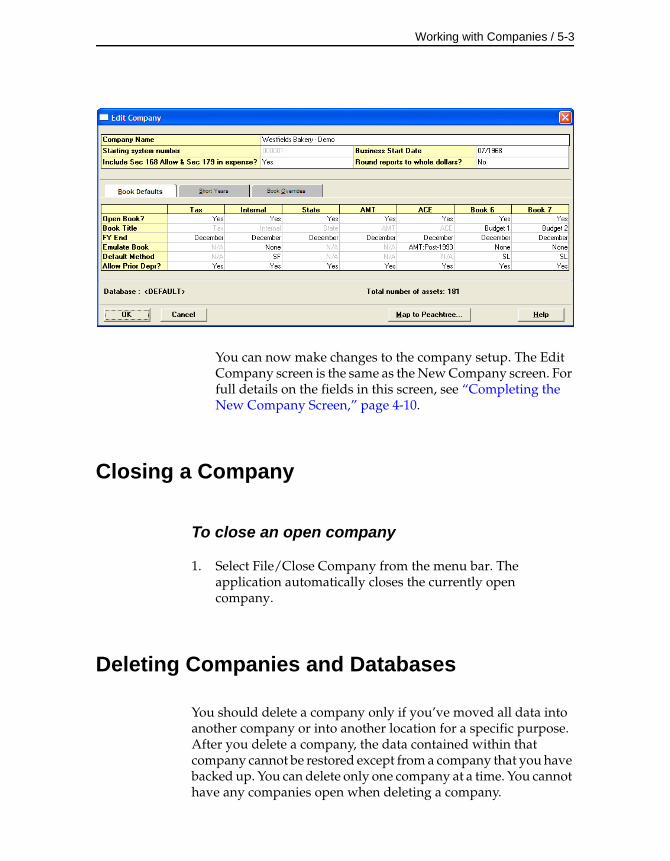
Working with Companies / 5-3
You can now make changes to the company setup. The Edit Company screen is the same as the New Company screen. For full details on the fields in this screen, see “Completing the New Company Screen,” page 4-10.
Closing a Company
To close an open company
1. Select File/Close Company from the menu bar. The application automatically closes the currently open company.
Deleting Companies and Databases
You should delete a company only if you’ve moved all data into another company or into another location for a specific purpose. After you delete a company, the data contained within that company cannot be restored except from a company that you have backed up. You can delete only one company at a time. You cannot have any companies open when deleting a company.
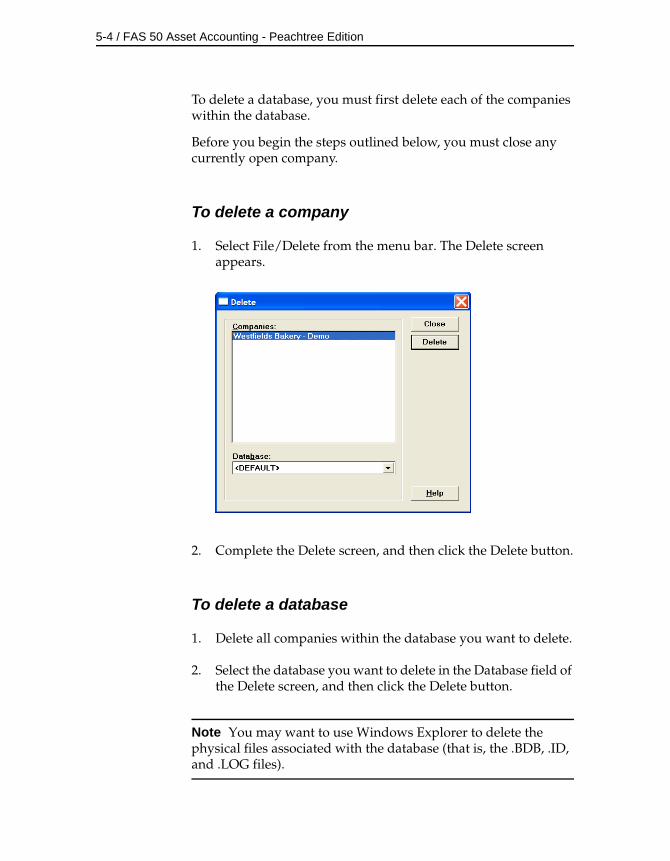
5-4 / FAS 50 Asset Accounting - Peachtree Edition
To delete a database, you must first delete each of the companies within the database.
Before you begin the steps outlined below, you must close any currently open company.
To delete a company
1. Select File/Delete from the menu bar. The Delete screen appears.
2. Complete the Delete screen, and then click the Delete button.
To delete a database
1. Delete all companies within the database you want to delete.
2. Select the database you want to delete in the Database field of the Delete screen, and then click the Delete button.
Note You may want to use Windows Explorer to delete the physical files associated with the database (that is, the .BDB, .ID, and .LOG files).
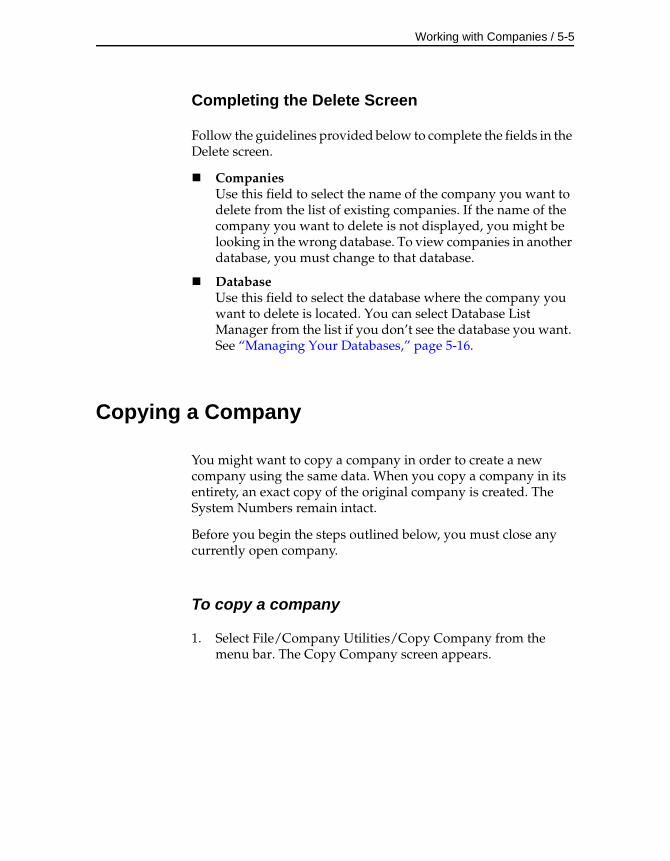
Working with Companies / 5-5
Completing the Delete Screen
Follow the guidelines provided below to complete the fields in the Delete screen.
CompaniesUse this field to select the name of the company you want to delete from the list of existing companies. If the name of the company you want to delete is not displayed, you might be looking in the wrong database. To view companies in another database, you must change to that database.
DatabaseUse this field to select the database where the company you want to delete is located. You can select Database List Manager from the list if you don’t see the database you want. See “Managing Your Databases,” page 5-16.
Copying a Company
You might want to copy a company in order to create a new company using the same data. When you copy a company in its entirety, an exact copy of the original company is created. The System Numbers remain intact.
Before you begin the steps outlined below, you must close any currently open company.
To copy a company
1. Select File/Company Utilities/Copy Company from the menu bar. The Copy Company screen appears.
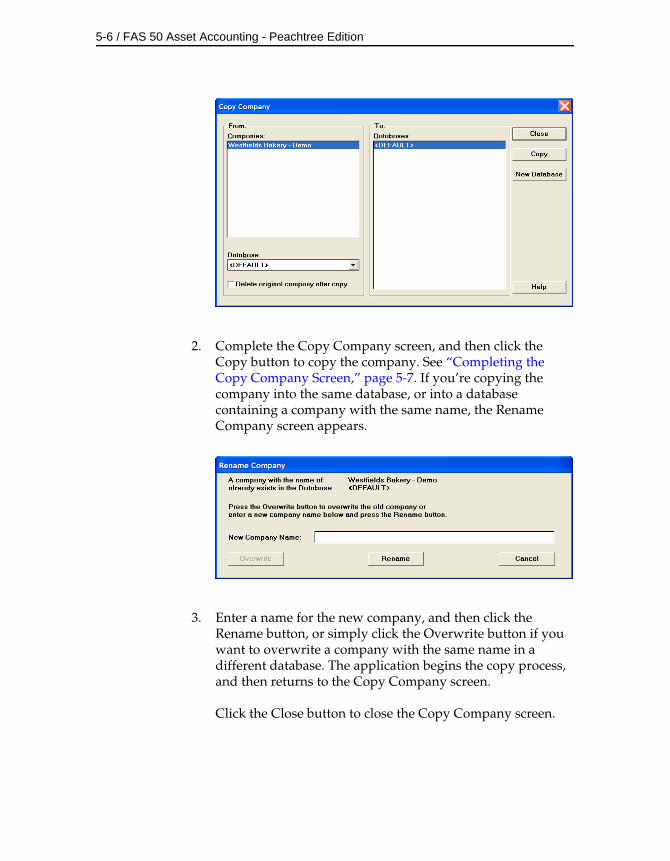
5-6 / FAS 50 Asset Accounting - Peachtree Edition
2. Complete the Copy Company screen, and then click the Copy button to copy the company. See “Completing the Copy Company Screen,” page 5-7. If you’re copying the company into the same database, or into a database containing a company with the same name, the Rename Company screen appears.
3. Enter a name for the new company, and then click the Rename button, or simply click the Overwrite button if you want to overwrite a company with the same name in a different database. The application begins the copy process, and then returns to the Copy Company screen.
Click the Close button to close the Copy Company screen.
Working with Companies / 5-7
Completing the Copy Company Screen
Follow the guidelines provided below to complete the fields in the Copy Company screen.
FromThe fields contained in this section describe the original company you are copying.
CompaniesUse this field to select the company you want to copy from the list of existing companies. If the name of the company you want to copy is not displayed, you might be looking in the wrong database. To view companies in another database, you must change to that database.
DatabaseUse this field to select the database containing the company you want to copy. You can select Database List Manager from the list if you don’t see the database you want. See “Managing Your Databases,” page 5-16.
Delete Original Company After CopySelect this check box if you want to delete the original company after the copy is made. When you click the Copy button, the application asks you to confirm the deletion.
ToThe field contained in this section describes the company you are creating during the copying process.
DatabasesUse this field to select the database you want to hold the new company created by the copying process.
Note We recommend copying a company to a new database. Copying a company to the database in which it currently resides may cause performance problems.
Copy ButtonClick this button to copy the selected company.
New Database ButtonClick this button if you want to create a new database to store the company you are copying. The New Database screen appears. For more information, see “Completing the New Database Screen,” page 4-3.
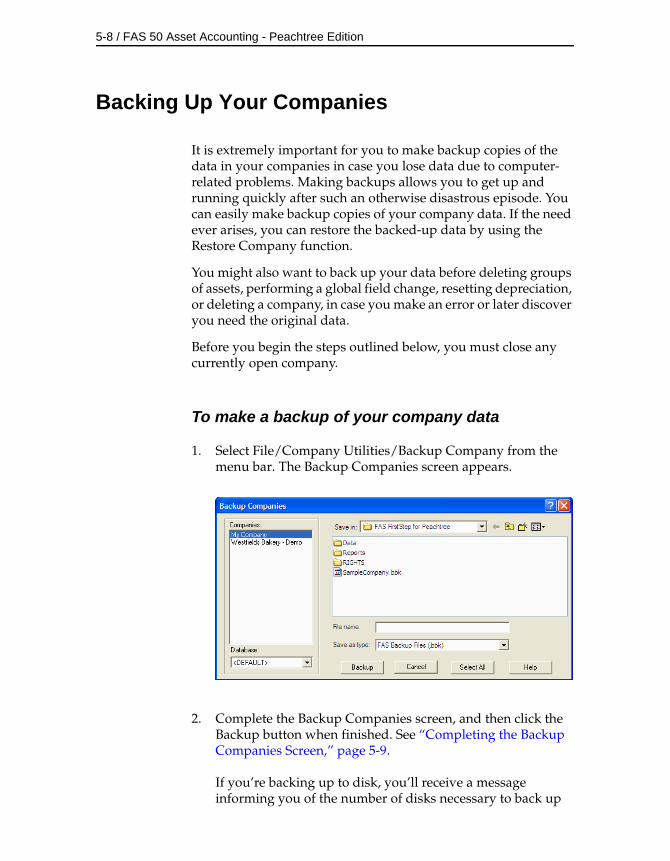
5-8 / FAS 50 Asset Accounting - Peachtree Edition
Backing Up Your Companies
It is extremely important for you to make backup copies of the data in your companies in case you lose data due to computer-related problems. Making backups allows you to get up and running quickly after such an otherwise disastrous episode. You can easily make backup copies of your company data. If the need ever arises, you can restore the backed-up data by using the Restore Company function.
You might also want to back up your data before deleting groups of assets, performing a global field change, resetting depreciation, or deleting a company, in case you make an error or later discover you need the original data.
Before you begin the steps outlined below, you must close any currently open company.
To make a backup of your company data
1. Select File/Company Utilities/Backup Company from the menu bar. The Backup Companies screen appears.
2. Complete the Backup Companies screen, and then click the Backup button when finished. See “Completing the Backup Companies Screen,” page 5-9.
If you’re backing up to disk, you’ll receive a message informing you of the number of disks necessary to back up
Working with Companies / 5-9
your data. Then you’ll be prompted to change disks at the appropriate time. During the backup, you’ll receive a series of status messages.
Caution If the name that you enter for the backup file already exists, the application asks if you want to overwrite the file. Click Yes to overwrite the existing backup file; otherwise, click No and enter a different file name. If you click Yes to overwrite the file and then cancel the backup process, the application deletes the backup file and you cannot recover it.
3. Once the backup is complete, click the Cancel button to close the Backup Companies screen.
The application saves the backed-up company (or companies) in a file with a BBK extension. Because the data is compressed, you can restore it only by using the Restore option.
Completing the Backup Companies Screen
Follow the guidelines provided below to complete the fields in the Backup Companies screen.
CompaniesUse this field to select the company (or companies) you want to back up.
Note To select more than one company in the Companies field, hold down the CTRL key when you select the companies. The application highlights each company as you select it. To select several companies that appear consecutively in the list, hold down the SHIFT key, and then select the first and last companies. The application highlights the first and last companies and all of the companies in between them.
DatabaseUse this field to select the database that contains the company (or companies) you want to back up.
5-10 / FAS 50 Asset Accounting - Peachtree Edition
Save InThis field displays the folder in which you want to store the backed-up company (or companies). Use the box below this field to select the folder. Use the toolbar buttons to the right of this field to move up a level or to create a new folder. Click the arrow to select another drive letter.
File NameUse this field to enter the name of the backup file. You do not need to enter a file extension because the application automatically adds a BBK extension to the file name.
Save As TypeThis field displays the file type of the backup file.
Backup ButtonClick this button to begin backing up the selected company (or companies) to the selected directory.
Select All ButtonClick this button to select all of the companies displayed in the Companies field for the backup.
Restoring a Backed-Up Company
If you ever lose data due to a computer-related problem, or if you want to restore data to a previous state, you will need to restore the companies you have backed up.
During the restore process, you can choose whether to delete the Depreciate history events from the backed-up database that you are restoring. Deleting unwanted Depreciate history events can decrease the size of the database, speed up the restore process, and improve on on-going application performance.
You must close any open company prior to initiating a restore.
To restore a backed-up company
1. Select File/Company Utilities/Restore Company from the menu bar. The Restore Companies screen appears.
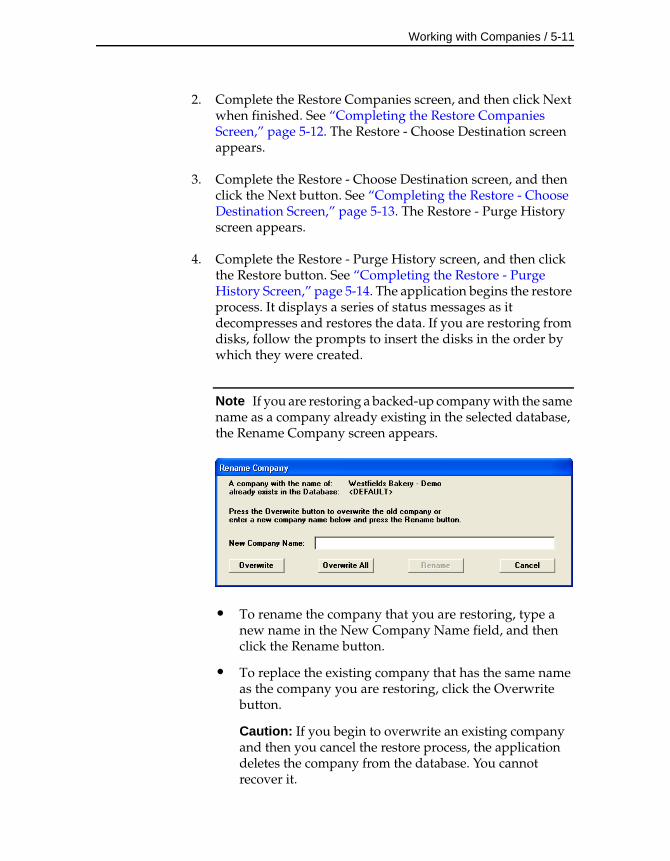
Working with Companies / 5-11
2. Complete the Restore Companies screen, and then click Next when finished. See “Completing the Restore Companies Screen,” page 5-12. The Restore - Choose Destination screen appears.
3. Complete the Restore - Choose Destination screen, and then click the Next button. See “Completing the Restore - Choose Destination Screen,” page 5-13. The Restore - Purge History screen appears.
4. Complete the Restore - Purge History screen, and then click the Restore button. See “Completing the Restore - Purge History Screen,” page 5-14. The application begins the restore process. It displays a series of status messages as it decompresses and restores the data. If you are restoring from disks, follow the prompts to insert the disks in the order by which they were created.
Note If you are restoring a backed-up company with the same name as a company already existing in the selected database, the Rename Company screen appears.
• To rename the company that you are restoring, type a new name in the New Company Name field, and then click the Rename button.
• To replace the existing company that has the same name as the company you are restoring, click the Overwrite button.
Caution: If you begin to overwrite an existing company and then you cancel the restore process, the application deletes the company from the database. You cannot recover it.
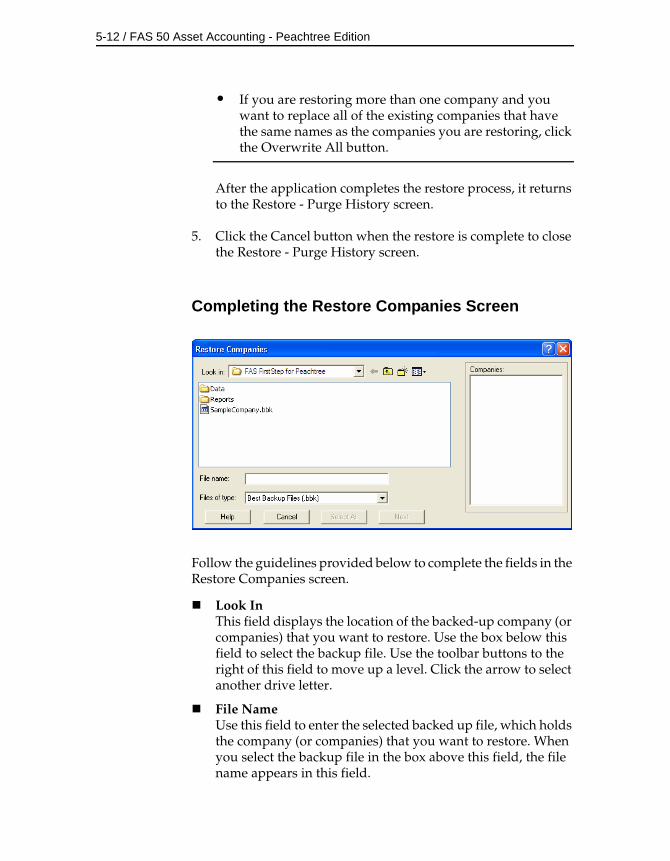
5-12 / FAS 50 Asset Accounting - Peachtree Edition
• If you are restoring more than one company and you want to replace all of the existing companies that have the same names as the companies you are restoring, click the Overwrite All button.
After the application completes the restore process, it returns to the Restore - Purge History screen.
5. Click the Cancel button when the restore is complete to close the Restore - Purge History screen.
Completing the Restore Companies Screen
Follow the guidelines provided below to complete the fields in the Restore Companies screen.
Look InThis field displays the location of the backed-up company (or companies) that you want to restore. Use the box below this field to select the backup file. Use the toolbar buttons to the right of this field to move up a level. Click the arrow to select another drive letter.
File NameUse this field to enter the selected backed up file, which holds the company (or companies) that you want to restore. When you select the backup file in the box above this field, the file name appears in this field.
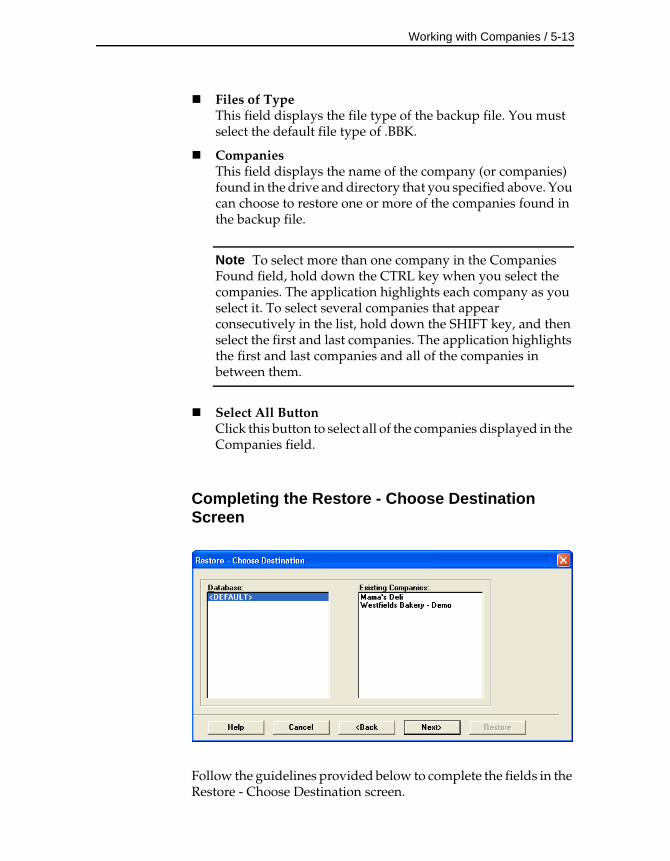
Working with Companies / 5-13
Files of TypeThis field displays the file type of the backup file. You must select the default file type of .BBK.
CompaniesThis field displays the name of the company (or companies) found in the drive and directory that you specified above. You can choose to restore one or more of the companies found in the backup file.
Note To select more than one company in the Companies Found field, hold down the CTRL key when you select the companies. The application highlights each company as you select it. To select several companies that appear consecutively in the list, hold down the SHIFT key, and then select the first and last companies. The application highlights the first and last companies and all of the companies in between them.
Select All ButtonClick this button to select all of the companies displayed in the Companies field.
Completing the Restore - Choose Destination Screen
Follow the guidelines provided below to complete the fields in the Restore - Choose Destination screen.
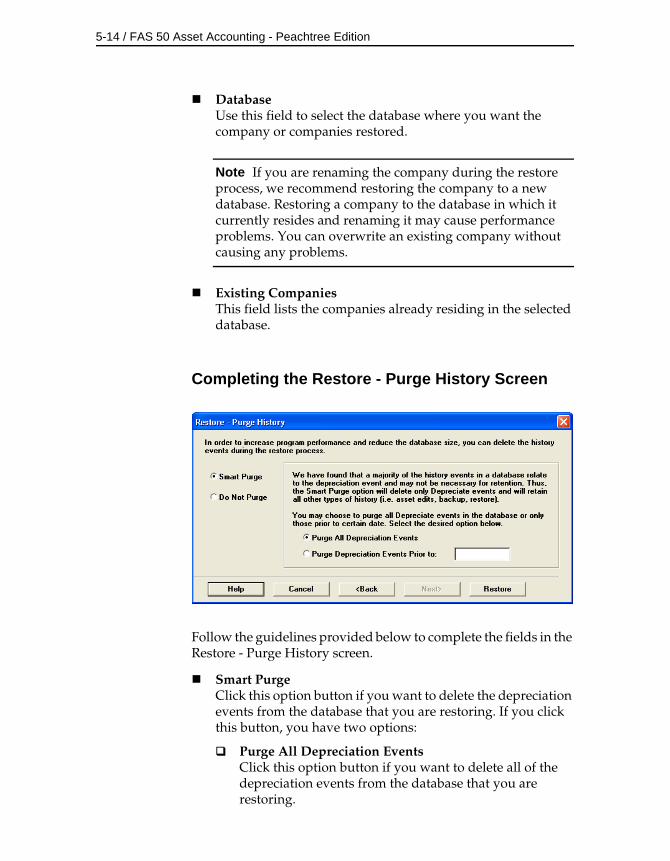
5-14 / FAS 50 Asset Accounting - Peachtree Edition
DatabaseUse this field to select the database where you want the company or companies restored.
Note If you are renaming the company during the restore process, we recommend restoring the company to a new database. Restoring a company to the database in which it currently resides and renaming it may cause performance problems. You can overwrite an existing company without causing any problems.
Existing CompaniesThis field lists the companies already residing in the selected database.
Completing the Restore - Purge History Screen
Follow the guidelines provided below to complete the fields in the Restore - Purge History screen.
Smart PurgeClick this option button if you want to delete the depreciation events from the database that you are restoring. If you click this button, you have two options:
Purge All Depreciation EventsClick this option button if you want to delete all of the depreciation events from the database that you are restoring.
Working with Companies / 5-15
Purge Depreciation Events Prior ToClick this option button if you want to delete only the depreciation events prior to the date that you enter in the date field.
Do Not PurgeClick this option button if you do not want to delete any history events from the database that you are restoring.
Restore ButtonClick this button to begin restoring the company or companies you selected in the Restore Companies screen to the selected database. If you are restoring a backed-up company with the same name as a company already existing in the selected database, the application asks you if you want to overwrite the existing company. You can either overwrite the existing company or rename it by typing a new name in the New Company Name field.
Exporting Data
The Sage FAS Export Helper guides you through the process of exporting asset data to an ASCII Comma Separated Value (CSV) file. A wide range of applications, including popular spreadsheet, can read this file format. For detailed instructions on using the Export Helper, see Appendix D, “Custom Export.”
Importing Data
The Sage FAS Import Helper guides you through the process of importing asset data from other sources into your application. When importing data, you can add the assets into a new or existing company. When using the Import Helper, you can import asset data only as new assets (that is, the application assigns new system numbers to the imported assets). The new assets you import can be either active or fully disposed. You can import inactive assets if you also import the Activity Code field. For detailed instructions on using the Import Helper, see Appendix E, “Custom Import.”
5-16 / FAS 50 Asset Accounting - Peachtree Edition
Managing Your Databases
The application contains a utility for managing your databases. This utility is called the Database List Manager. In addition to helping you create and rename databases, Database List Manager also helps you find databases. After using the application for some time, you, or other users, might have created databases in locations that you might not remember. Database List Manager is extremely useful when you need to connect to a database created by another user in an unknown location.
Once Database List Manager locates a database, you can add the database to a list of databases that you have created. The application remembers where the database is located. To create a new database using Database List Manager, click the New Database button and complete the New Database screen as outlined in Chapter 3, “Understanding Key Elements.”
Using Windows Explorer to Manage Your Databases
You can use Windows Explorer to move and copy your database file. The database file name can have any name that complies with Windows standards, as long as it has a BDB file extension. A single folder can contain two or more database files.
If you use Windows Explorer to move your database file, make sure that you also move the files with the following extensions:
• ID
• LOG
For example, if you move the MYDATA.BDB file to a new folder, make sure you also move MYDATA.ID and MYDATA.LOG to the same folder.
After you move a database using Windows Explorer, you must locate the database using the Database List Manager.
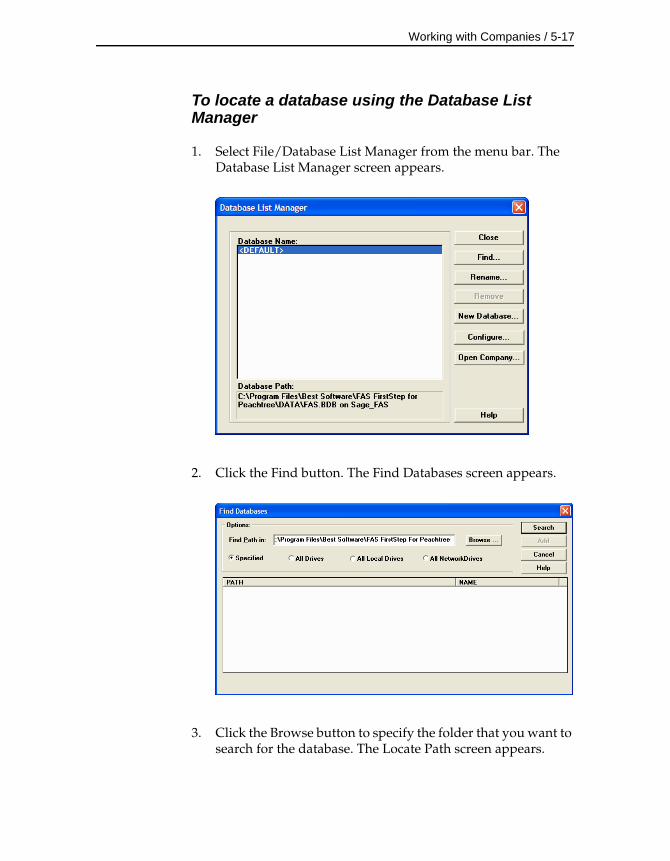
Working with Companies / 5-17
To locate a database using the Database List Manager
1. Select File/Database List Manager from the menu bar. The Database List Manager screen appears.
2. Click the Find button. The Find Databases screen appears.
3. Click the Browse button to specify the folder that you want to search for the database. The Locate Path screen appears.
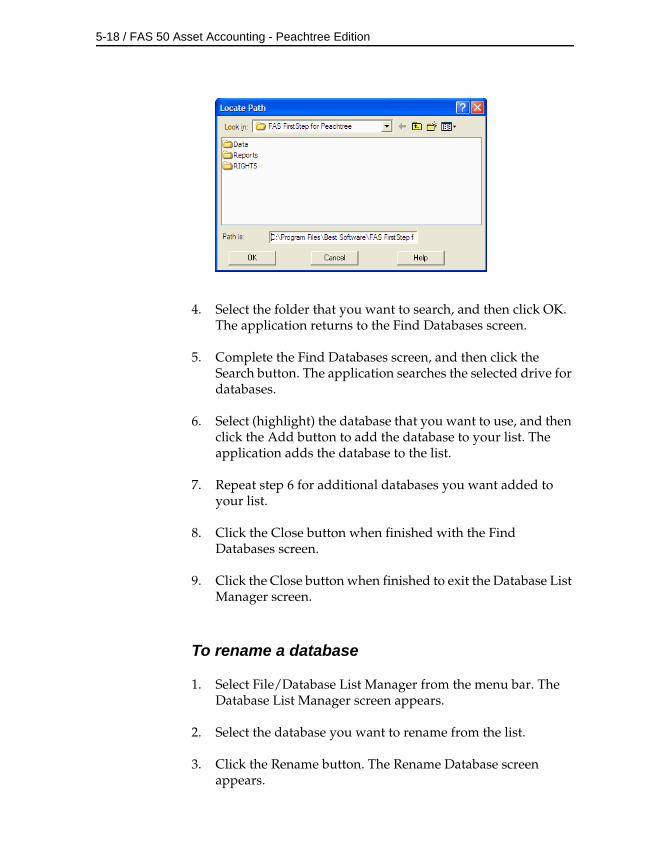
5-18 / FAS 50 Asset Accounting - Peachtree Edition
4. Select the folder that you want to search, and then click OK. The application returns to the Find Databases screen.
5. Complete the Find Databases screen, and then click the Search button. The application searches the selected drive for databases.
6. Select (highlight) the database that you want to use, and then click the Add button to add the database to your list. The application adds the database to the list.
7. Repeat step 6 for additional databases you want added to your list.
8. Click the Close button when finished with the Find Databases screen.
9. Click the Close button when finished to exit the Database List Manager screen.
To rename a database
1. Select File/Database List Manager from the menu bar. The Database List Manager screen appears.
2. Select the database you want to rename from the list.
3. Click the Rename button. The Rename Database screen appears.
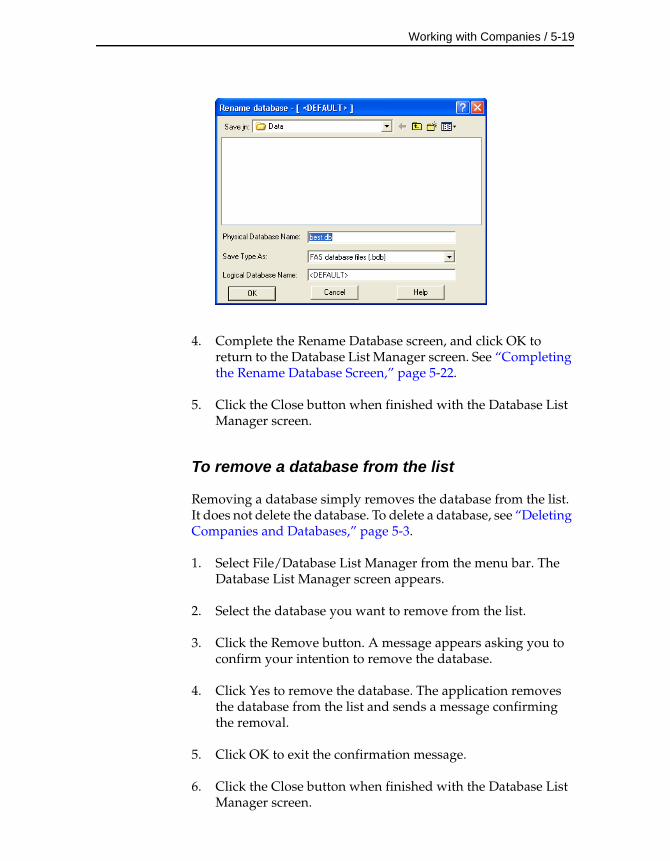
Working with Companies / 5-19
4. Complete the Rename Database screen, and click OK to return to the Database List Manager screen. See “Completing the Rename Database Screen,” page 5-22.
5. Click the Close button when finished with the Database List Manager screen.
To remove a database from the list
Removing a database simply removes the database from the list. It does not delete the database. To delete a database, see “Deleting Companies and Databases,” page 5-3.
1. Select File/Database List Manager from the menu bar. The Database List Manager screen appears.
2. Select the database you want to remove from the list.
3. Click the Remove button. A message appears asking you to confirm your intention to remove the database.
4. Click Yes to remove the database. The application removes the database from the list and sends a message confirming the removal.
5. Click OK to exit the confirmation message.
6. Click the Close button when finished with the Database List Manager screen.
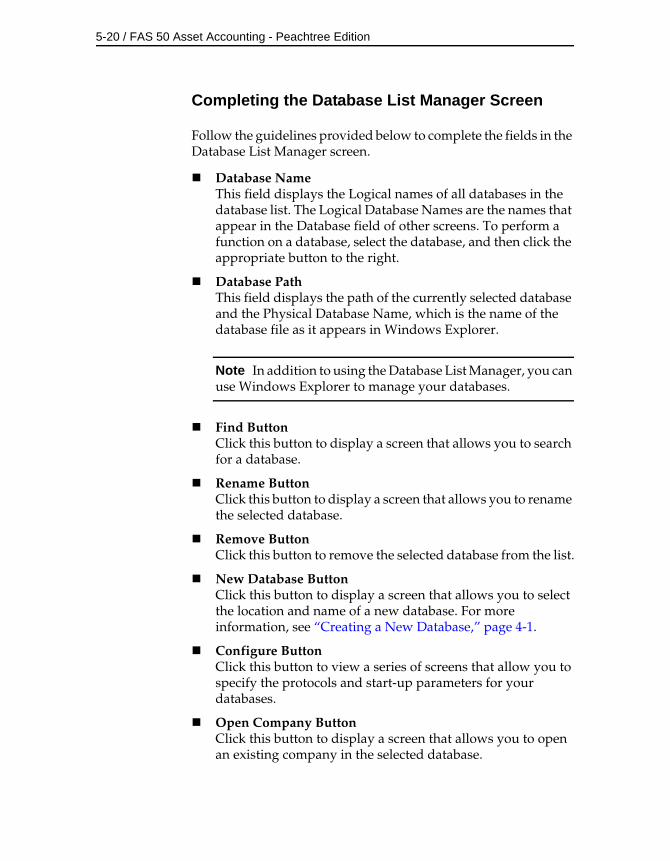
5-20 / FAS 50 Asset Accounting - Peachtree Edition
Completing the Database List Manager Screen
Follow the guidelines provided below to complete the fields in the Database List Manager screen.
Database NameThis field displays the Logical names of all databases in the database list. The Logical Database Names are the names that appear in the Database field of other screens. To perform a function on a database, select the database, and then click the appropriate button to the right.
Database PathThis field displays the path of the currently selected database and the Physical Database Name, which is the name of the database file as it appears in Windows Explorer.
Note In addition to using the Database List Manager, you can use Windows Explorer to manage your databases.
Find ButtonClick this button to display a screen that allows you to search for a database.
Rename ButtonClick this button to display a screen that allows you to rename the selected database.
Remove ButtonClick this button to remove the selected database from the list.
New Database ButtonClick this button to display a screen that allows you to select the location and name of a new database. For more information, see “Creating a New Database,” page 4-1.
Configure ButtonClick this button to view a series of screens that allow you to specify the protocols and start-up parameters for your databases.
Open Company ButtonClick this button to display a screen that allows you to open an existing company in the selected database.
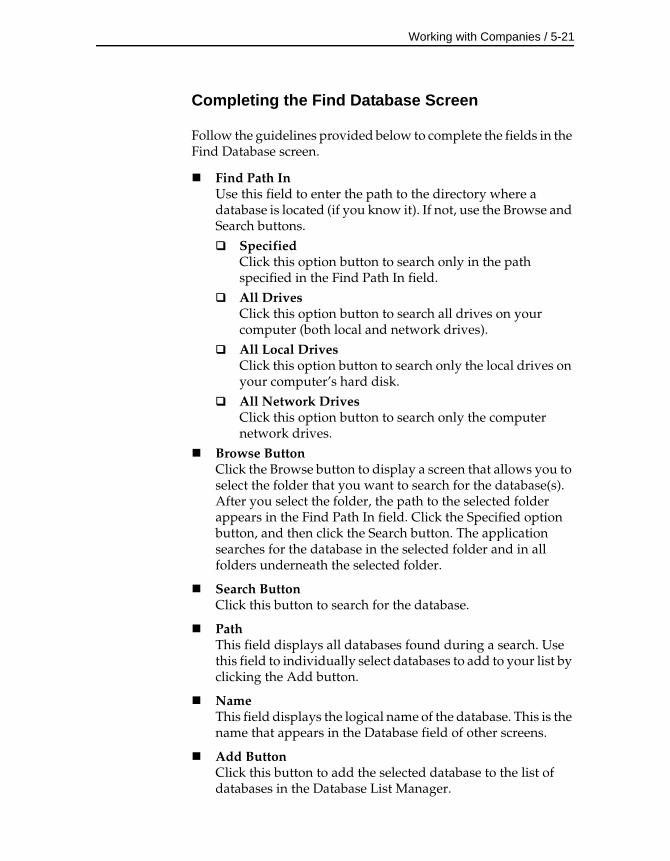
Working with Companies / 5-21
Completing the Find Database Screen
Follow the guidelines provided below to complete the fields in the Find Database screen.
Find Path InUse this field to enter the path to the directory where a database is located (if you know it). If not, use the Browse and Search buttons. Specified
Click this option button to search only in the path specified in the Find Path In field.
All DrivesClick this option button to search all drives on your computer (both local and network drives).
All Local DrivesClick this option button to search only the local drives on your computer’s hard disk.
All Network DrivesClick this option button to search only the computer network drives.
Browse ButtonClick the Browse button to display a screen that allows you to select the folder that you want to search for the database(s). After you select the folder, the path to the selected folder appears in the Find Path In field. Click the Specified option button, and then click the Search button. The application searches for the database in the selected folder and in all folders underneath the selected folder.
Search ButtonClick this button to search for the database.
PathThis field displays all databases found during a search. Use this field to individually select databases to add to your list by clicking the Add button.
NameThis field displays the logical name of the database. This is the name that appears in the Database field of other screens.
Add ButtonClick this button to add the selected database to the list of databases in the Database List Manager.

5-22 / FAS 50 Asset Accounting - Peachtree Edition
Completing the Rename Database Screen
Follow the guidelines provided below to complete the fields in the Rename Database screen.
Save InThis field displays the folder containing the database file that you want to rename. Use the box below this field to select the folder. Use the toolbar buttons to the right of this field to move up a level. Click the arrow button to select another drive letter.
Physical Database NameThis field displays the physical file name of the database. This is the name that appears in Windows Explorer. You cannot use this field to change the file name.
Save Type AsThis field displays the file type of the database. The database is a file with a BDB extension.
Logical Database NameUse this field to enter a new name for the database. The logical database name is the name that appears in the Database field of other screens.
6 Working with Assets
In addition to the import options, there are four additional methods available for adding assets into the application. The first method is to complete a series of wizard screens. In the second method, you enter data in each of the asset fields individually. In the third method, you apply an asset template that you have created to a new asset. In the fourth method, you replicate an asset that closely matches the asset you are adding. The third and fourth methods drastically reduce your data-entry time, because you only have to complete a few asset fields (the rest are completed automatically). This chapter details the procedures for all the different methods of creating assets, as well as explains the asset pages in Detail View of an asset. Before advancing further into this chapter, make sure you’ve read “Understanding Asset Fields and SmartLists,” page 3-7. Creating SmartLists before adding assets will be a great help.
Entering New Assets
Each asset is an individual entry into a company’s database. To add an asset to a company, you should have the company to which you want to add the asset open.
Note The application allows you to enter up to 1,000 assets per company. It does not permit you to enter new assets in a company after 1,000 assets have been created.
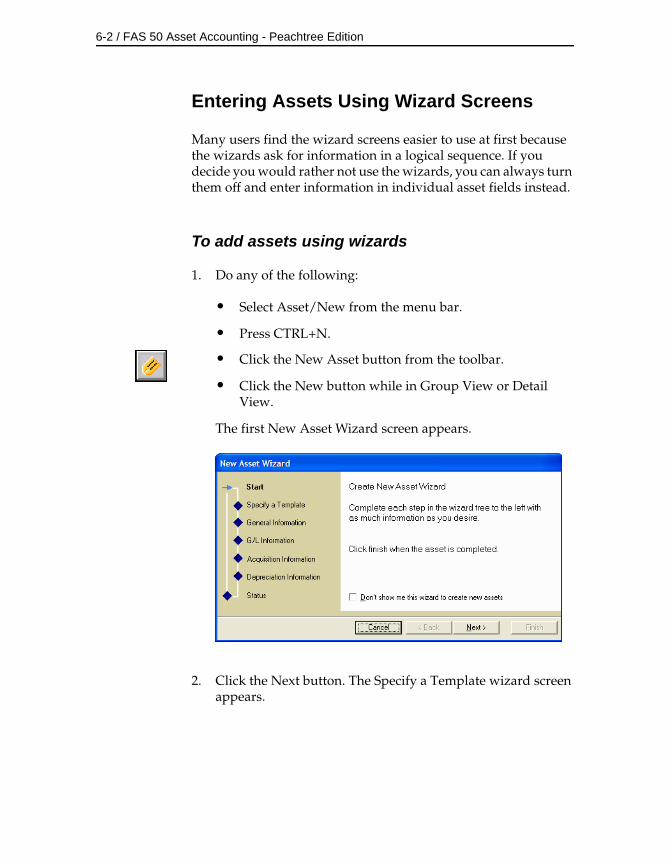
6-2 / FAS 50 Asset Accounting - Peachtree Edition
Entering Assets Using Wizard Screens
Many users find the wizard screens easier to use at first because the wizards ask for information in a logical sequence. If you decide you would rather not use the wizards, you can always turn them off and enter information in individual asset fields instead.
To add assets using wizards
1. Do any of the following:
• Select Asset/New from the menu bar.
• Press CTRL+N.
• Click the New Asset button from the toolbar.
• Click the New button while in Group View or Detail View.
The first New Asset Wizard screen appears.
2. Click the Next button. The Specify a Template wizard screen appears.
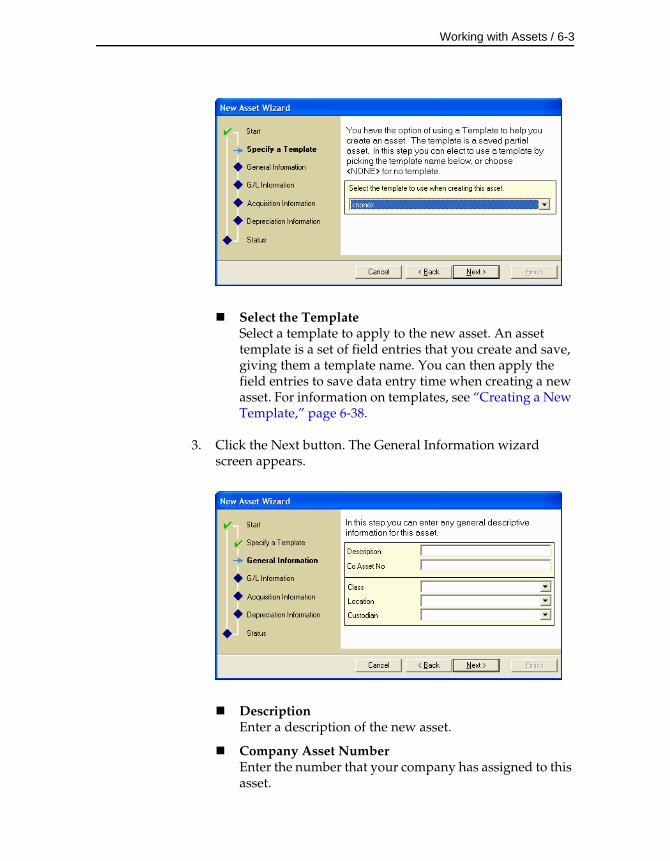
Working with Assets / 6-3
Select the TemplateSelect a template to apply to the new asset. An asset template is a set of field entries that you create and save, giving them a template name. You can then apply the field entries to save data entry time when creating a new asset. For information on templates, see “Creating a New Template,” page 6-38.
3. Click the Next button. The General Information wizard screen appears.
DescriptionEnter a description of the new asset.
Company Asset NumberEnter the number that your company has assigned to this asset.
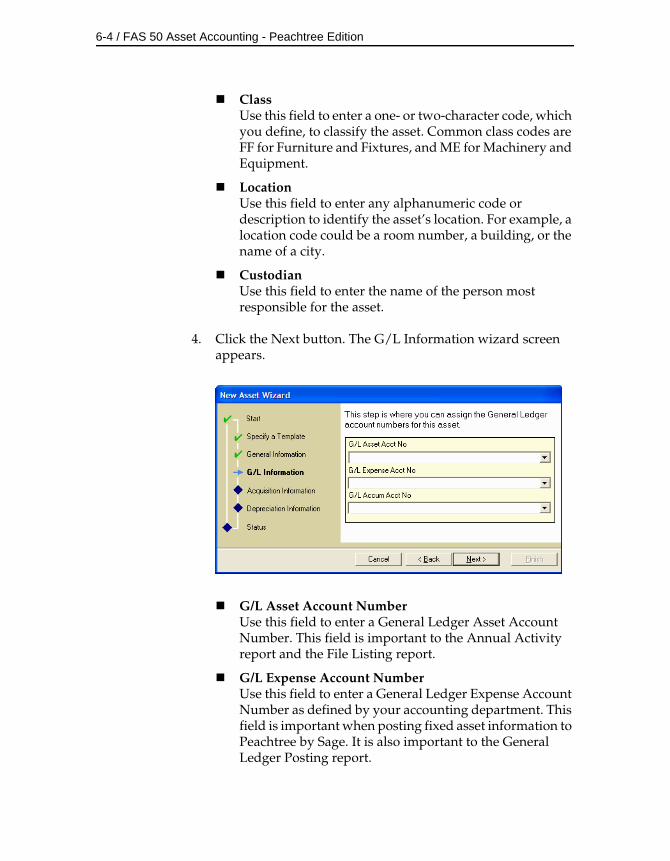
6-4 / FAS 50 Asset Accounting - Peachtree Edition
ClassUse this field to enter a one- or two-character code, which you define, to classify the asset. Common class codes are FF for Furniture and Fixtures, and ME for Machinery and Equipment.
LocationUse this field to enter any alphanumeric code or description to identify the asset’s location. For example, a location code could be a room number, a building, or the name of a city.
CustodianUse this field to enter the name of the person most responsible for the asset.
4. Click the Next button. The G/L Information wizard screen appears.
G/L Asset Account NumberUse this field to enter a General Ledger Asset Account Number. This field is important to the Annual Activity report and the File Listing report.
G/L Expense Account NumberUse this field to enter a General Ledger Expense Account Number as defined by your accounting department. This field is important when posting fixed asset information to Peachtree by Sage. It is also important to the General Ledger Posting report.
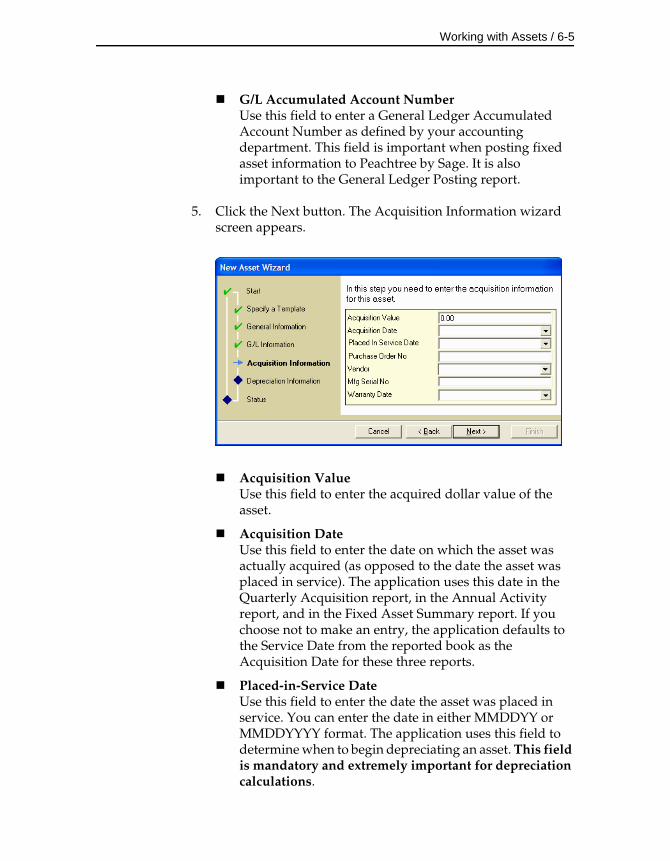
Working with Assets / 6-5
G/L Accumulated Account NumberUse this field to enter a General Ledger Accumulated Account Number as defined by your accounting department. This field is important when posting fixed asset information to Peachtree by Sage. It is also important to the General Ledger Posting report.
5. Click the Next button. The Acquisition Information wizard screen appears.
Acquisition ValueUse this field to enter the acquired dollar value of the asset.
Acquisition DateUse this field to enter the date on which the asset was actually acquired (as opposed to the date the asset was placed in service). The application uses this date in the Quarterly Acquisition report, in the Annual Activity report, and in the Fixed Asset Summary report. If you choose not to make an entry, the application defaults to the Service Date from the reported book as the Acquisition Date for these three reports.
Placed-in-Service DateUse this field to enter the date the asset was placed in service. You can enter the date in either MMDDYY or MMDDYYYY format. The application uses this field to determine when to begin depreciating an asset. This field is mandatory and extremely important for depreciation calculations.
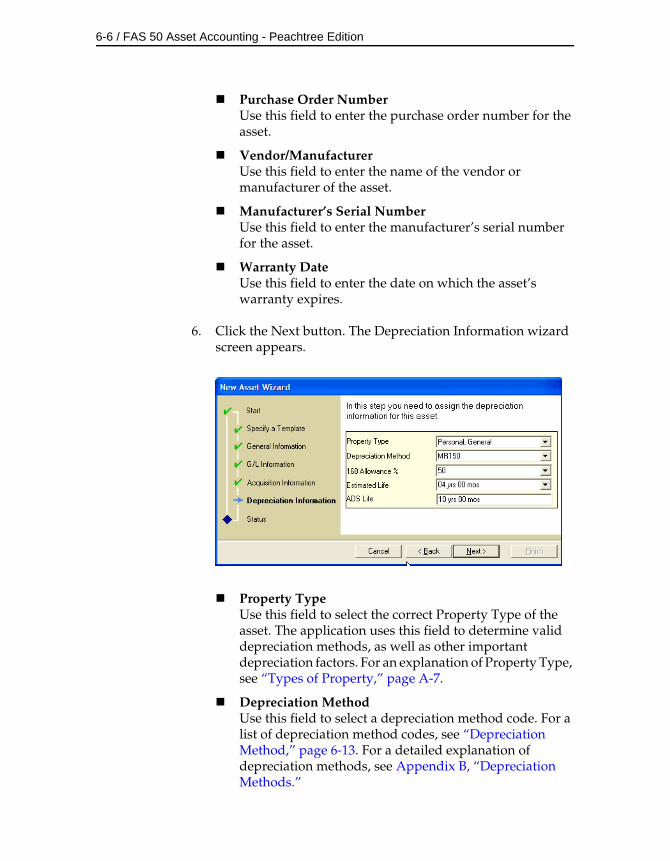
6-6 / FAS 50 Asset Accounting - Peachtree Edition
Purchase Order NumberUse this field to enter the purchase order number for the asset.
Vendor/ManufacturerUse this field to enter the name of the vendor or manufacturer of the asset.
Manufacturer’s Serial NumberUse this field to enter the manufacturer’s serial number for the asset.
Warranty DateUse this field to enter the date on which the asset’s warranty expires.
6. Click the Next button. The Depreciation Information wizard screen appears.
Property TypeUse this field to select the correct Property Type of the asset. The application uses this field to determine valid depreciation methods, as well as other important depreciation factors. For an explanation of Property Type, see “Types of Property,” page A-7.
Depreciation MethodUse this field to select a depreciation method code. For a list of depreciation method codes, see “Depreciation Method,” page 6-13. For a detailed explanation of depreciation methods, see Appendix B, “Depreciation Methods.”
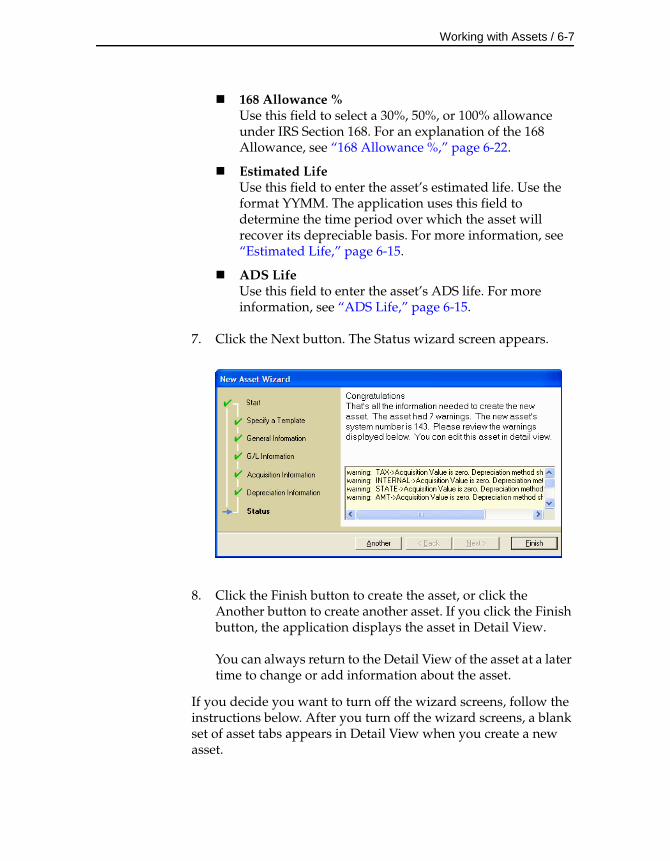
Working with Assets / 6-7
168 Allowance %Use this field to select a 30%, 50%, or 100% allowance under IRS Section 168. For an explanation of the 168 Allowance, see “168 Allowance %,” page 6-22.
Estimated LifeUse this field to enter the asset’s estimated life. Use the format YYMM. The application uses this field to determine the time period over which the asset will recover its depreciable basis. For more information, see “Estimated Life,” page 6-15.
ADS LifeUse this field to enter the asset’s ADS life. For more information, see “ADS Life,” page 6-15.
7. Click the Next button. The Status wizard screen appears.
8. Click the Finish button to create the asset, or click the Another button to create another asset. If you click the Finish button, the application displays the asset in Detail View.
You can always return to the Detail View of the asset at a later time to change or add information about the asset.
If you decide you want to turn off the wizard screens, follow the instructions below. After you turn off the wizard screens, a blank set of asset tabs appears in Detail View when you create a new asset.
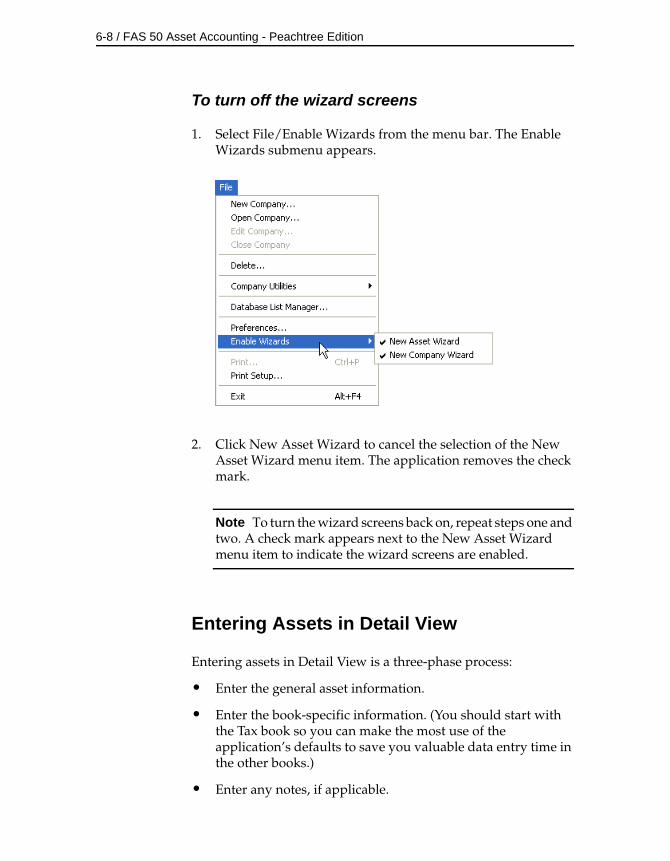
6-8 / FAS 50 Asset Accounting - Peachtree Edition
To turn off the wizard screens
1. Select File/Enable Wizards from the menu bar. The Enable Wizards submenu appears.
2. Click New Asset Wizard to cancel the selection of the New Asset Wizard menu item. The application removes the check mark.
Note To turn the wizard screens back on, repeat steps one and two. A check mark appears next to the New Asset Wizard menu item to indicate the wizard screens are enabled.
Entering Assets in Detail View
Entering assets in Detail View is a three-phase process:
• Enter the general asset information.
• Enter the book-specific information. (You should start with the Tax book so you can make the most use of the application’s defaults to save you valuable data entry time in the other books.)
• Enter any notes, if applicable.
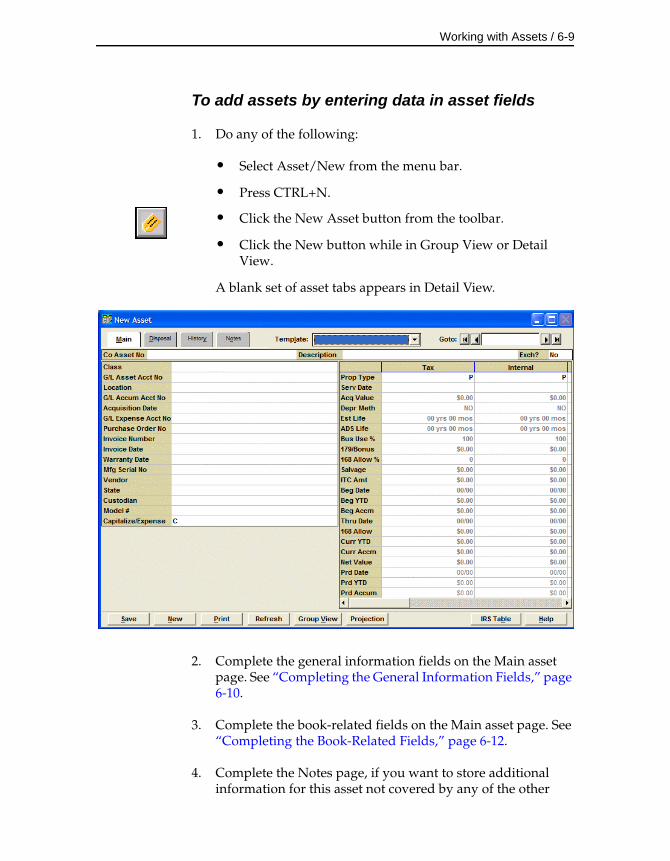
Working with Assets / 6-9
To add assets by entering data in asset fields
1. Do any of the following:
• Select Asset/New from the menu bar.
• Press CTRL+N.
• Click the New Asset button from the toolbar.
• Click the New button while in Group View or Detail View.
A blank set of asset tabs appears in Detail View.
2. Complete the general information fields on the Main asset page. See “Completing the General Information Fields,” page 6-10.
3. Complete the book-related fields on the Main asset page. See “Completing the Book-Related Fields,” page 6-12.
4. Complete the Notes page, if you want to store additional information for this asset not covered by any of the other
6-10 / FAS 50 Asset Accounting - Peachtree Edition
pages. For additional information on this page, see “The Notes Page,” page 6-49.
5. Save the asset by doing any one of the following:
• Click the Save button.
• Press CTRL+S.
• Select Asset/Save from the menu bar.
• Click the Save Asset button from the toolbar.
The application assigns the asset an asset number and displays the asset number in the title bar of Detail View. The asset is now saved.
Completing the General Information Fields
Follow the guidelines provided below to complete the general information fields.
These guidelines are based upon all available fields in the general information field set. If your application has been customized, it is possible that some of these fields are not displayed on your system or that other fields are displayed instead. A brief descriptive message appears in the status bar as you enter each field.
Once you complete the fields that are in full view, use the scroll bar to the right of the general information fields to make the rest of the fields available.
Company Asset NumberUse this field to enter the number that your company has assigned to this asset. This number can be any number you’ve been using in the past to track this asset. You can assign the same company asset number to more than one asset.
DescriptionUse this field to enter a description of the asset. This description prints on all reports that include the description field. However, on many reports the Description field is truncated to ten characters. Therefore, when creating a description, you might want to make the first ten characters the most descriptive.
Working with Assets / 6-11
Exchange?Use this field to indicate whether the asset was received in a like-kind exchange or involuntary conversion. Selecting Yes in this field tells the application that the asset should not appear on any reports that are run prior to the date the asset was received in an exchange. For information about like-kind exchanges and involuntary conversions, see “Like-Kind Exchanges and Involuntary Conversions After 1/2/2000,” page 7-8.
ClassUse this field to enter any one- or two-character code, which you define, to classify this asset. Common class codes are FF for Furniture and Fixtures, and ME for Machinery and Equipment.
LocationUse this field to enter any alphanumeric code or description to identify this asset’s location. For example, a location code could be a room number, a building name, or the name of a city.
Acquisition DateUse this field to enter the date on which the asset was actually acquired (as opposed to the date the asset was placed in service). The application uses this date in the Quarterly Acquisition report, in the Annual Activity report, and in the Fixed Asset Summary report. If you choose not to make an entry, the application defaults to the Service Date from the reported book as the Acquisition Date for these three reports.
G/L Asset Account NumberUse this field to enter a General Ledger Asset Account Number as defined by your accounting department. This field is important to the Annual Activity report and the File Listing report.
G/L Accumulated Account NumberUse this field to enter a General Ledger Accumulated Account Number as defined by your accounting department. This field is important when posting fixed asset information to Peachtree by Sage. It is also important to the General Ledger Posting report.
G/L Expense Account NumberUse this field to enter a General Ledger Expense Account Number as defined by your accounting department. This field is important when posting fixed asset information to
6-12 / FAS 50 Asset Accounting - Peachtree Edition
Peachtree by Sage. It is also important to the General Ledger Posting report.
Manufacturer’s Serial NumberUse this field to enter the manufacturer’s serial number for the asset.
CustodianUse this field to enter the name of the person most responsible for the asset.
Purchase Order NumberUse this field to enter the purchase order number for the asset.
Vendor/ManufacturerUse this field to enter the name of the vendor or manufacturer of the asset.
Warranty DateUse this field to enter the date on which the asset’s warranty expires.
User Fields 1 Through 5Use these additional five alphanumeric fields for entering information that is not appropriate for the other fields. The application treats entries in these fields as text. These fields may have been customized with new names.
Completing the Book-Related Fields
Follow the guidelines provided below to complete the book-related fields on the Main asset page.
The book-related fields are extremely important. They are what determine your depreciation calculations. Most of the fields must be completed according to rules imposed under GAAP or by the IRS. Although the application displays a warning message when it detects entries inconsistent with these rules, it does allow you to override the warning and make your own entries (it assumes you know what you’re doing). However, if you don’t know what you’re doing, we recommend you heed the warning messages and rethink your entry. If you need a brush-up on depreciation rules and regulations, or if you need to simply look up a depreciation concept, refer to Appendix A, “Depreciation and Fixed Asset Concepts.”
Working with Assets / 6-13
The book-related fields on the Main asset page are organized in rows and columns. Each field contains depreciation data specific to the book heading up the column.
The application enters default information in the other open books based on the Tax book entries. For this reason, you might want to complete the Tax book first, and then it’s possible you will only need to make slight changes to each additional book. If you need to set default values in other books after the initial setting, you must use the Force Defaults option located in the Asset menu. See “Forcing Book Defaults,” page 6-50.
Property TypeUse this field to select the correct Property Type of the asset. The application uses this field to determine valid depreciation methods, as well as other important depreciation factors. For an explanation of Property Type, see “Types of Property,” page A-7.
Service DateUse this field to enter the date the asset was placed in service. You can enter the date in either MMDDYY or MMDDYYYY format. The application uses this field to determine when to begin depreciating an asset.
Acquired ValueUse this field to enter the acquired dollar value of the asset. You may use a negative number when you have a credit or rebate on an asset that reduces its value below zero. To enter a negative number, use the minus sign on the keyboard. The application displays -$200 using parentheses—($200).
Note The acquired value is used in determining the asset’s depreciable basis. The formula for determining the depreciable basis depends on the depreciation method. In general, the depreciable basis is the acquired value, multiplied by the business-use percentage if applicable, minus any salvage value, Section 179 expense or bonus depreciation, Section 168 Allowance, and Investment Tax Credit reduction amount.
Depreciation MethodUse this field to select a depreciation method code. Once you complete the Property Type and Service Date fields, the
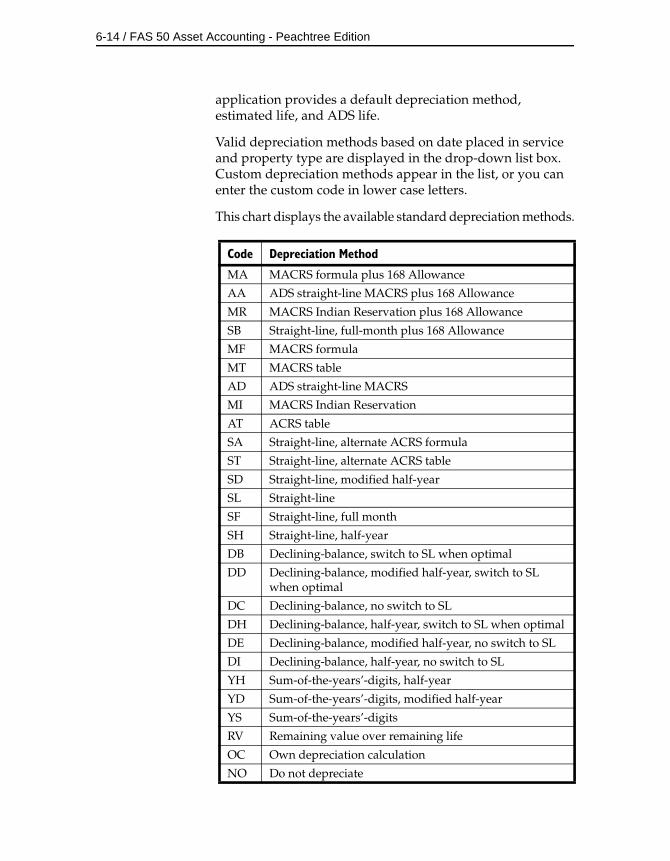
6-14 / FAS 50 Asset Accounting - Peachtree Edition
application provides a default depreciation method, estimated life, and ADS life.
Valid depreciation methods based on date placed in service and property type are displayed in the drop-down list box. Custom depreciation methods appear in the list, or you can enter the custom code in lower case letters.
This chart displays the available standard depreciation methods.
Code Depreciation Method
MA MACRS formula plus 168 Allowance
AA ADS straight-line MACRS plus 168 Allowance
MR MACRS Indian Reservation plus 168 Allowance
SB Straight-line, full-month plus 168 Allowance
MF MACRS formula
MT MACRS table
AD ADS straight-line MACRS
MI MACRS Indian Reservation
AT ACRS table
SA Straight-line, alternate ACRS formula
ST Straight-line, alternate ACRS table
SD Straight-line, modified half-year
SL Straight-line
SF Straight-line, full month
SH Straight-line, half-year
DB Declining-balance, switch to SL when optimal
DD Declining-balance, modified half-year, switch to SL when optimal
DC Declining-balance, no switch to SL
DH Declining-balance, half-year, switch to SL when optimal
DE Declining-balance, modified half-year, no switch to SL
DI Declining-balance, half-year, no switch to SL
YH Sum-of-the-years’-digits, half-year
YD Sum-of-the-years’-digits, modified half-year
YS Sum-of-the-years’-digits
RV Remaining value over remaining life
OC Own depreciation calculation
NO Do not depreciate
Working with Assets / 6-15
For a detailed explanation of depreciation methods, see Appendix B, “Depreciation Methods.”
Estimated LifeUse this field to enter the asset’s estimated life. Use the format YYMM. The application uses this field to determine the time period over which the asset will recover its depreciable basis. For some methods you can select the estimated life from a list of valid entries. Generally, you cannot enter an estimated life of less than 1 year for an asset. Exceptions are:
• If the asset’s depreciation method is MACRS formula (MF or MA), 150% declining-balance, and the property type is real or personal property other than an automobile, the estimated life can be 6 months.
• If the asset’s depreciation method is straight-line (SL), ADS straight-line MACRS (AD or AA), remaining value over remaining life (RV), or your own depreciation calculation (OC), the estimated life can be 1 to 11 months. Method OC lets you manually enter depreciation amounts; the application will not calculate depreciation for the asset.
Note To help you determine the correct estimated life for an asset for the Tax book, you can use the IRS Table button located in Detail View. Here you will find the easy-to-use version of the IRS ADR Class Life Table.
ADS LifeUse this field to enter the asset’s ADS life. The ADS life is assigned to an asset type under the MACRS Alternative Depreciation System. For most assets, the ADS life is the midpoint of the Asset Depreciation Range (ADR) in which the asset belongs.
The application uses this field as the asset’s default estimated life in the user books (Internal and Books 6 and 7) and in the AMT and ACE books (where applicable).
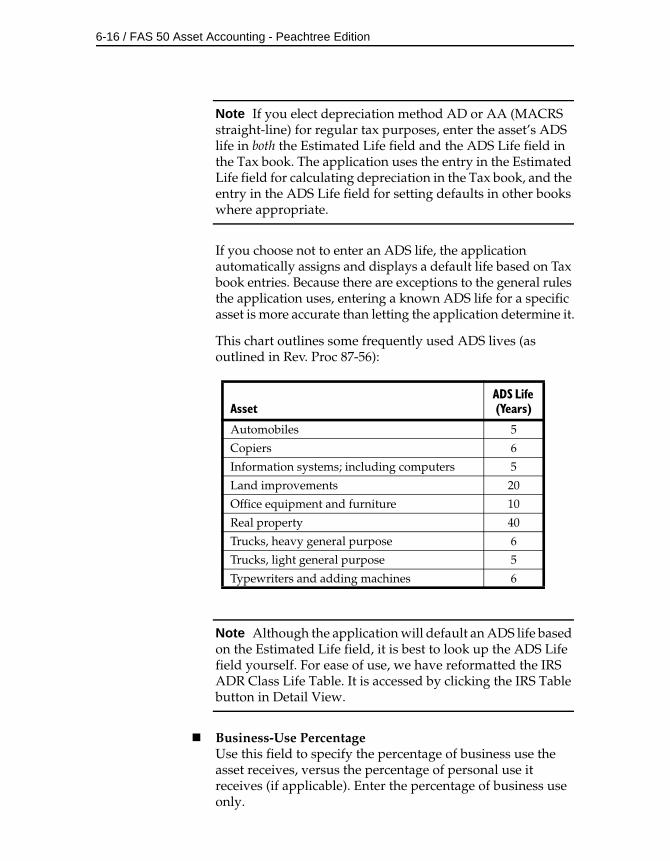
6-16 / FAS 50 Asset Accounting - Peachtree Edition
Note If you elect depreciation method AD or AA (MACRS straight-line) for regular tax purposes, enter the asset’s ADS life in both the Estimated Life field and the ADS Life field in the Tax book. The application uses the entry in the Estimated Life field for calculating depreciation in the Tax book, and the entry in the ADS Life field for setting defaults in other books where appropriate.
If you choose not to enter an ADS life, the application automatically assigns and displays a default life based on Tax book entries. Because there are exceptions to the general rules the application uses, entering a known ADS life for a specific asset is more accurate than letting the application determine it.
This chart outlines some frequently used ADS lives (as outlined in Rev. Proc 87-56):
Note Although the application will default an ADS life based on the Estimated Life field, it is best to look up the ADS Life field yourself. For ease of use, we have reformatted the IRS ADR Class Life Table. It is accessed by clicking the IRS Table button in Detail View.
Business-Use PercentageUse this field to specify the percentage of business use the asset receives, versus the percentage of personal use it receives (if applicable). Enter the percentage of business use only.
AssetADS Life (Years)
Automobiles 5
Copiers 6
Information systems; including computers 5
Land improvements 20
Office equipment and furniture 10
Real property 40
Trucks, heavy general purpose 6
Trucks, light general purpose 5
Typewriters and adding machines 6
Working with Assets / 6-17
If you enter any number besides 100 in the Business Use Percentage field, the application displays the Business Use screen.
The Business Use screen allows you to enter up to ten different business percentage rates for time periods that you specify lasting the asset’s entire life. The effective date for each change in business-use percentage must be the beginning date of a fiscal year. See “Completing the Business-Use Screen,” page 6-28.
Section 179/BonusUse this book-related field in Detail View to enter either a Section 179 amount or a pre-1981 bonus amount (if one of these options applies). You decide which of these two options applies based on the asset’s service date and several other factors. If neither option applies, accept the default of zero. If a previous entry disqualifies the application of either of these options, this field is disabled.
This field displays the total Section 179/Bonus amount calculated in the §179/Bonus Details screen. To access this screen, click in the Section 179/Bonus field, and then click the down-arrow to the right of the field. See “Completing the §179/Bonus Details Screen,” page 6-30.
Section 179
Note This section describes the Section 179 deduction that is claimed on the Form 4562 at the end of the tax year. For information on taking a deduction under Other Section 179 Deductions, see “Section 179 Deductions,” page 6-21.
This option is only used for assets using an ACRS or MACRS depreciation method (methods MF, MA, MT, MI, MR, AD, AA, AT, SF, SB, SA, ST, or custom method). A Section 179 deduction allows you to treat the cost of a qualifying asset as an expense, rather than as a capital investment to be depreciated in the future.
Enter the amount of the asset’s cost (if any) that you wish to deduct. If you have already expensed the maximum amount for the year (see below) or if you are not taking the deduction, enter zero as the dollar amount.
The following guidelines apply only to property that qualifies under section 179. For property placed in service
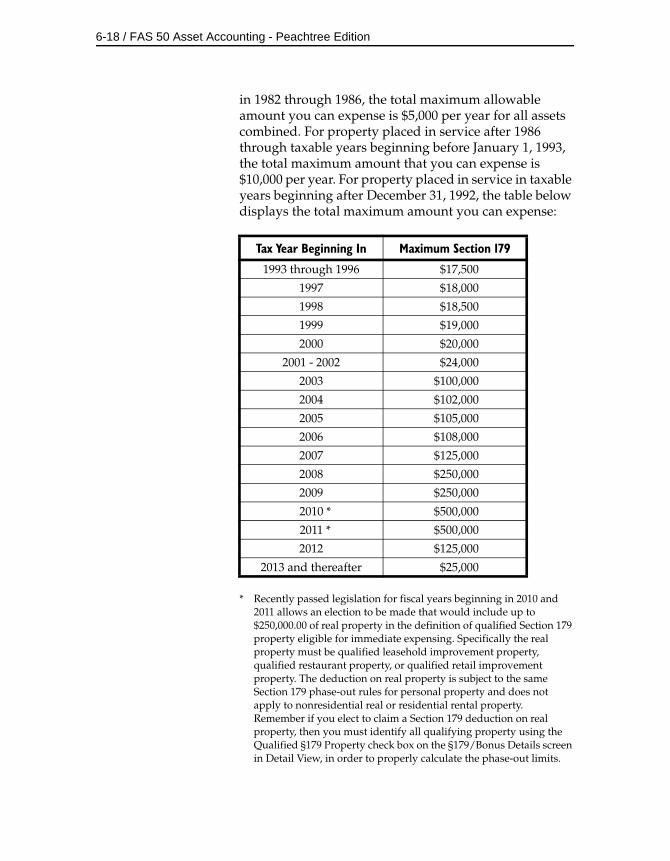
6-18 / FAS 50 Asset Accounting - Peachtree Edition
in 1982 through 1986, the total maximum allowable amount you can expense is $5,000 per year for all assets combined. For property placed in service after 1986 through taxable years beginning before January 1, 1993, the total maximum amount that you can expense is $10,000 per year. For property placed in service in taxable years beginning after December 31, 1992, the table below displays the total maximum amount you can expense:
* Recently passed legislation for fiscal years beginning in 2010 and 2011 allows an election to be made that would include up to $250,000.00 of real property in the definition of qualified Section 179 property eligible for immediate expensing. Specifically the real property must be qualified leasehold improvement property, qualified restaurant property, or qualified retail improvement property. The deduction on real property is subject to the same Section 179 phase-out rules for personal property and does not apply to nonresidential real or residential rental property. Remember if you elect to claim a Section 179 deduction on real property, then you must identify all qualifying property using the Qualified §179 Property check box on the §179/Bonus Details screen in Detail View, in order to properly calculate the phase-out limits.
Tax Year Beginning In Maximum Section 179
1993 through 1996 $17,500
1997 $18,000
1998 $18,500
1999 $19,000
2000 $20,000
2001 - 2002 $24,000
2003 $100,000
2004 $102,000
2005 $105,000
2006 $108,000
2007 $125,000
2008 $250,000
2009 $250,000
2010 * $500,000
2011 * $500,000
2012 $125,000
2013 and thereafter $25,000
Working with Assets / 6-19
Sport Utility VehiclesThe American Jobs Creation Act of 2004 limits the Section 179 expense on a Sport Utility Vehicle (SUV) weighing between 6,000 and 14,000 pounds to $25,000. The $25,000 limit applies to SUVs placed in service after 10/22/04. To enter an asset as an SUV, use property type Q, listed property.
The maximum amount of Section 179 that you can take in one year is also limited by the threshold amount (see below).
Note There are increased limits for:
New York Liberty Zone property; see “Section 179 Limits for New York Liberty Zone Property,” page 8-53.
Enterprise Zone property; see “Section 179 Limits for Enterprise Zone Property,” page 8-59.
Qualified Gulf Opportunity Zone property; see “Section 179 Limits for Qualified Gulf Opportunity Zone Property,” page 8-61.
Qualified Recovery Assistance property (Kansas Disaster Zone property); see “Section 179 Limits for Kansas Disaster Zone Property,” page 8-65.
Qualified Disaster Assistance property (Qualified Disaster Zone property); see “Section 179 Limits for Qualified Disaster Zone Property,” page 8-68.
Threshold AmountsIf the total acquired value of qualifying property placed in service during the year exceeds the threshold amount for that year, the amount of Section 179 expense that you can take decreases one dollar for each dollar exceeding the threshold amount. For example, if the total acquired value of property placed in service in a taxable year beginning in 2010 exceeds $2,500,000 ($2,000,000 threshold + $500,000 dollar limit for 2010), you cannot take any Section 179 expense deduction.
Recently passed legislation for fiscal years beginning in 2010 and 2011 allows an election to be made that would include up to $250,000.00 of real property in the definition of qualified Section 179 property eligible for immediate
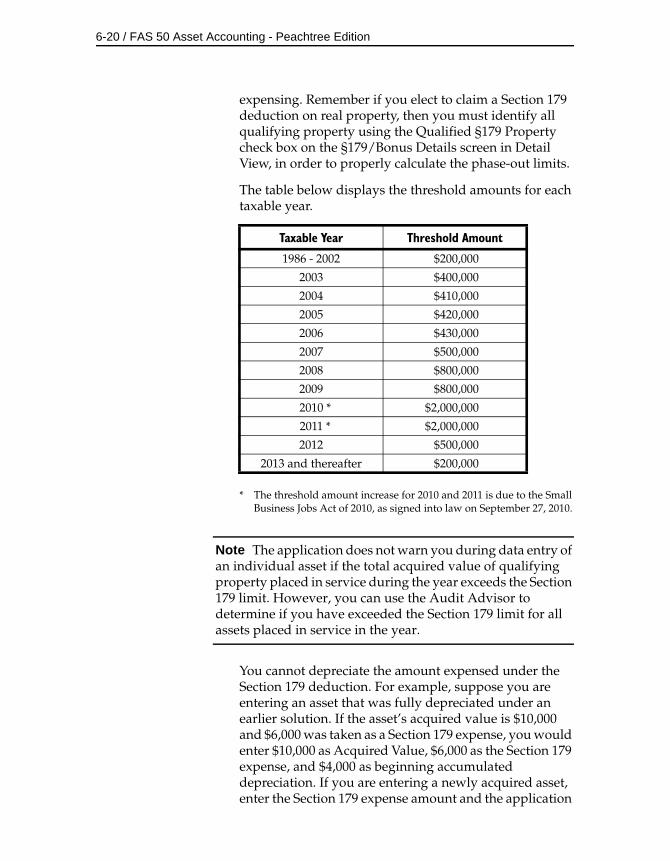
6-20 / FAS 50 Asset Accounting - Peachtree Edition
expensing. Remember if you elect to claim a Section 179 deduction on real property, then you must identify all qualifying property using the Qualified §179 Property check box on the §179/Bonus Details screen in Detail View, in order to properly calculate the phase-out limits.
The table below displays the threshold amounts for each taxable year.
* The threshold amount increase for 2010 and 2011 is due to the Small Business Jobs Act of 2010, as signed into law on September 27, 2010.
Note The application does not warn you during data entry of an individual asset if the total acquired value of qualifying property placed in service during the year exceeds the Section 179 limit. However, you can use the Audit Advisor to determine if you have exceeded the Section 179 limit for all assets placed in service in the year.
You cannot depreciate the amount expensed under the Section 179 deduction. For example, suppose you are entering an asset that was fully depreciated under an earlier solution. If the asset’s acquired value is $10,000 and $6,000 was taken as a Section 179 expense, you would enter $10,000 as Acquired Value, $6,000 as the Section 179 expense, and $4,000 as beginning accumulated depreciation. If you are entering a newly acquired asset, enter the Section 179 expense amount and the application
Taxable Year Threshold Amount
1986 - 2002 $200,000
2003 $400,000
2004 $410,000
2005 $420,000
2006 $430,000
2007 $500,000
2008 $800,000
2009 $800,000
2010 * $2,000,000
2011 * $2,000,000
2012 $500,000
2013 and thereafter $200,000
Working with Assets / 6-21
will calculate the correct depreciation on any remaining depreciable basis.
You also cannot take any Investment Tax Credit (ITC) on the part of an asset’s cost that is expensed under Section 179. The application automatically takes any Section 179 expense into account when it calculates ITC for the asset.
The application will not let you enter more than the maximum Section 179 expense for one asset. To view Section 179 amounts for each asset and totals for the fiscal year, run the Tax Expense report.
Section 179 DeductionsThe Jobs Creation Act of 2004 provided a new deduction under Section 179B. The Energy Tax Incentives Act of 2005 added additional deductions under Sections 179C and 179D. The Small Business Act of 2007 created a new deduction under Section 179E. To take a deduction under Section 179B, 179C, 179D, or 179E, you must select the desired code in the §179/Bonus Details screen.
To access this screen, click in the Section 179/Bonus field in Detail View, and then click the down arrow. The §179/Bonus Details screen appears. For information on completing this screen, see “Completing the §179/Bonus Details Screen,” page 6-30.
For a brief description of the deductions available under Section 179B, 179C, 179D, and 179E, see “§179/Other Codes,” page 6-32.
Bonus DepreciationThis option is only used for assets using a depreciation method other than an ACRS or MACRS method. In addition, the asset must be personal property, it must have an estimated life of at least 6 years, and it must use a straight-line, declining-balance, sum-of-the-years’ digits, own calculation, or custom calculation depreciation method.
For qualifying assets, you may be entitled to a 20% first-year depreciation bonus on up to $10,000 of eligible property placed in service during a taxable year prior to 1981.
The application calculates the bonus amount based on the preliminary depreciable basis of the asset without
6-22 / FAS 50 Asset Accounting - Peachtree Edition
subtracting the salvage value. (The preliminary depreciable basis here is the acquired value times the business-use percentage.) If you take the bonus, the application subtracts it from the preliminary depreciable basis before making any further calculations. On reports, however, the bonus amount is included in accumulated depreciation, rather than being shown as subtracted from the depreciable basis.
The application will not let you enter more than $2,000 or 20% of the depreciable basis, whichever is less, as the bonus amount for any one asset. It does not keep track of your total bonus taken as you enter asset information. You must limit the first-year bonus depreciation taken according to IRS rules.
168 Allowance %Use this field to select a 30%, 50%, or 100% allowance under IRS Section 168. The 30% Allowance is available for personal property placed in service after September 10, 2001 and before January 1, 2007. The 30% Allowance is available for real property after September 10, 2001 and before January 1, 2010. After May 5, 2003, you can elect a 50% Allowance.
The 2010 Tax Relief Act allows for a 168 Allowance of 100% for assets placed in service after September 8, 2010 and through December 31, 2011 (or December 31, 2012 for assets with longer production lives).
The 168 Allowance will still be available for qualified property placed in service in a special disaster zone through 2012 for personal property and through 2013 for real property, and for cellulosic biofuel plant property through 2012. Beginning in 2006, the 168 Allowance can also be taken for reuse and recycling property. Currently, there is no expiration of the 168 Allowance for reuse and recycling property.
This field is available only if you select a “Plus 168” depreciation method (that is, depreciation method MA, MR, AA, or SB.)
After you select a “Plus 168” depreciation method, 30, 50, or 100 appears in the 168 Allowance % field. The default selection is 50 for property placed in service after May 5, 2003. The calculated amount of the allowance is also displayed in the 168 Allowance field. For more information, see “168 Allowance,” page 6-26.
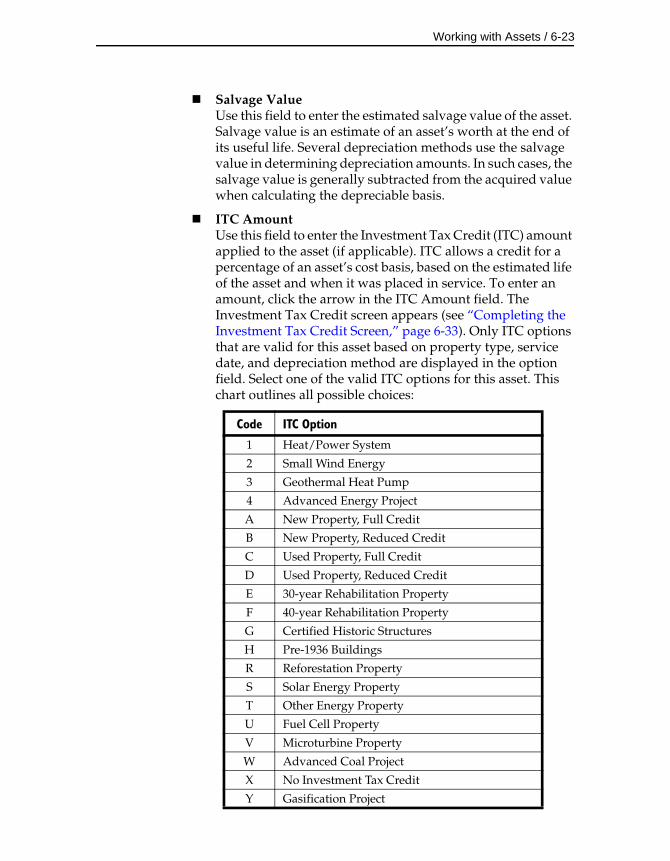
Working with Assets / 6-23
Salvage ValueUse this field to enter the estimated salvage value of the asset. Salvage value is an estimate of an asset’s worth at the end of its useful life. Several depreciation methods use the salvage value in determining depreciation amounts. In such cases, the salvage value is generally subtracted from the acquired value when calculating the depreciable basis.
ITC AmountUse this field to enter the Investment Tax Credit (ITC) amount applied to the asset (if applicable). ITC allows a credit for a percentage of an asset’s cost basis, based on the estimated life of the asset and when it was placed in service. To enter an amount, click the arrow in the ITC Amount field. The Investment Tax Credit screen appears (see “Completing the Investment Tax Credit Screen,” page 6-33). Only ITC options that are valid for this asset based on property type, service date, and depreciation method are displayed in the option field. Select one of the valid ITC options for this asset. This chart outlines all possible choices:
Code ITC Option
1 Heat/Power System
2 Small Wind Energy
3 Geothermal Heat Pump
4 Advanced Energy Project
A New Property, Full Credit
B New Property, Reduced Credit
C Used Property, Full Credit
D Used Property, Reduced Credit
E 30-year Rehabilitation Property
F 40-year Rehabilitation Property
G Certified Historic Structures
H Pre-1936 Buildings
R Reforestation Property
S Solar Energy Property
T Other Energy Property
U Fuel Cell Property
V Microturbine Property
W Advanced Coal Project
X No Investment Tax Credit
Y Gasification Project
6-24 / FAS 50 Asset Accounting - Peachtree Edition
For assets acquired after 1985, you usually cannot take ITC and you should select X. If you choose an ITC option other than X, the application automatically determines the ITC percentage based on the option chosen, the year the asset was placed in service, its property type, its estimated life, and its depreciable basis. The percentage field displays the application-determined percentage. You can override the percentage or amount of ITC taken, which may be useful if the asset is allowed more than one type of credit (such as an energy credit and a regular credit).
After you enter the percentage, the application calculates the amount of the ITC as the asset’s depreciable basis multiplied by the ITC percentage. If the asset’s depreciable basis was not the same as its at-risk basis, you may need to adjust the calculated amount.
You can override the calculated amount in this field; however, the amount in this field cannot exceed the asset’s depreciable basis.
Beginning Depreciation FieldsThe application has three fields that handle beginning depreciation: Beginning Date, Beginning Year-to-Date, and Beginning Accumulated Depreciation.
You are required to enter data in these fields only if you are entering an asset on which depreciation was calculated in another product. These fields are not required for newly acquired assets.
Entering beginning depreciation amounts is your way of telling the application to simply accept your prior depreciation balances and to calculate depreciation from that point forward.
Example: Suppose your company owns an asset with an acquired value of $1,000 and a life of 10 years, and you are depreciating it using the straight-line method. The company’s fiscal year-end is June. You placed the asset in service on July 1, 1998, and you are adding it to the application on June 30, 2007, after you have taken 9 years of depreciation. You would enter a beginning current YTD depreciation of $100, beginning accumulated depreciation of $900, and a beginning date of 06/07, for June 2007. Note that the beginning accumulated depreciation amount includes the $100 depreciation for the current fiscal year.
Working with Assets / 6-25
Note When applicable, the Beginning Year-To-Date and Beginning Accumulated Depreciation fields should include bonus depreciation but not Section 179 expense or the 168 Allowance. You enter Section 179 expense in the Section 179/Bonus field. The application calculates the 168 Allowance and displays the amount in the 168 Allowance field. The Section 179 expense and the 168 Allowance are displayed separately in Detail View because special rules and limitations apply to these values.
Beginning DateUse this field to enter the date through which the amounts for beginning YTD depreciation and beginning accumulated depreciation have been calculated. You can enter the date in either MMYY or MMYYYY format.
The application will calculate depreciation for this asset starting from the next month and will add the beginning amounts to the amounts it calculates for future periods. The simplest approach is to enter the end of the last fiscal year as the beginning date and let the application begin calculating depreciation for the new fiscal year. This field is required only if you are entering depreciation for an asset that was calculated in another product.
Do not confuse the Beginning Date with the date on which you are entering assets for the first time. For example, if an asset was placed in service on 8/1/06, was depreciated through 12/06, and entered in the application on 5/3/07, the Beginning Date field should be 12/06. The application starts depreciating the asset on 1/1/07. If you were to mistakenly enter 5/07 in the Beginning Date field, you would have zero depreciation in the Beginning Year-to-Date field (because the asset was not yet depreciated in 2007), and the accumulated depreciation through 12/06 would be entered in the Beginning Accumulated field. What would happen is that the application would start calculating depreciation on 6/1/07 and five months of depreciation (1/1/07 through 5/31/07) would be missing!
Beginning Year-To-DateUse this field to enter the amount of depreciation, if any, already taken on this asset for the fiscal year in which you
6-26 / FAS 50 Asset Accounting - Peachtree Edition
are switching the asset’s depreciation to the application. This amount is the amount of depreciation taken from the beginning of that fiscal year through the date you will enter as the beginning date for depreciation. If the beginning date is any date other than the end of a fiscal year, you must enter an amount in this field to get correct results for the current fiscal year. If you do not enter an amount in this field, the application assumes that no depreciation was taken in the current fiscal year.
Beginning Accumulated DepreciationUse this field to enter the total of all depreciation calculated on the asset since it was placed in service, including the amount entered above as the beginning YTD depreciation.
Through DateThis field displays the date through which depreciation was last calculated. The application automatically updates this field every time you calculate depreciation for the asset.
168 AllowanceThis field displays the 168 Allowance deduction. This amount is calculated only when you select one of the following “Plus 168” depreciation methods:
• MA: MACRS formula plus 168 Allowance
• MR: MACRS Indian Reservation plus 168 Allowance
• AA: ADS straight-line MACRS plus 168 Allowance
• SB: Straight-line, full-month plus 168 Allowance
In addition, you must select a 30%, 50%, or 100% allowance deduction in the 168 Allowance % field. For more information, see “168 Allowance %,” page 6-22.
The 30% Allowance is available for personal property placed in service after September 10, 2001 and before January 1, 2007. The 30% Allowance is available for real property after September 10, 2001 and before January 1, 2010. After May 5, 2003, you can elect a 50% Allowance.
You can select a 50% allowance for property placed in service after May 5, 2003.
The 2010 Tax Relief Act allows for a 168 Allowance of 100% for assets placed in service after September 8, 2010 and through
Working with Assets / 6-27
December 31, 2011 (or December 31, 2012 for assets with longer production lives).
The 168 Allowance will still be available for qualified property placed in service in a special disaster zone through 2012 for personal property and through 2013 for real property, and for cellulosic biofuel plant property through 2012. Beginning in 2006, the 168 Allowance can also be taken for reuse and recycling property. Currently, there is no expiration of the 168 Allowance for reuse and recycling property.
Current Year-To-DateThis field displays the current year-to-date depreciation amount for the asset through the current Through Date (the last date on which you calculated depreciation for the asset in the current year). The application automatically updates this field every time you calculate depreciation for the asset. The Current Year-To-Date amount never includes the 168 Allowance or Section 179 expense deduction because these amounts are displayed separately in Detail View.
Current Accumulated DepreciationThis field displays the asset’s depreciation from the asset’s placed-in-service date through the current Through Date (the last date on which you calculated depreciation), including any current year-to-date depreciation. The application automatically updates this field every time you calculate depreciation for the asset. The Current Accumulated Depreciation amount never includes the 168 Allowance or Section 179 expense deduction because these amounts are displayed separately in Detail View.
Net ValueThis field displays the current net book value for the asset through the current Through Date. The application automatically updates the net book value when current depreciation is updated.
Period DateThis field shows the date through which depreciation was last saved for a period close. Each time you run a period close, the application automatically updates this field with the results of your last depreciation calculation.
Period Year-to-DateThis field displays the current year-to-date depreciation amount through the most recent period close date. Each time
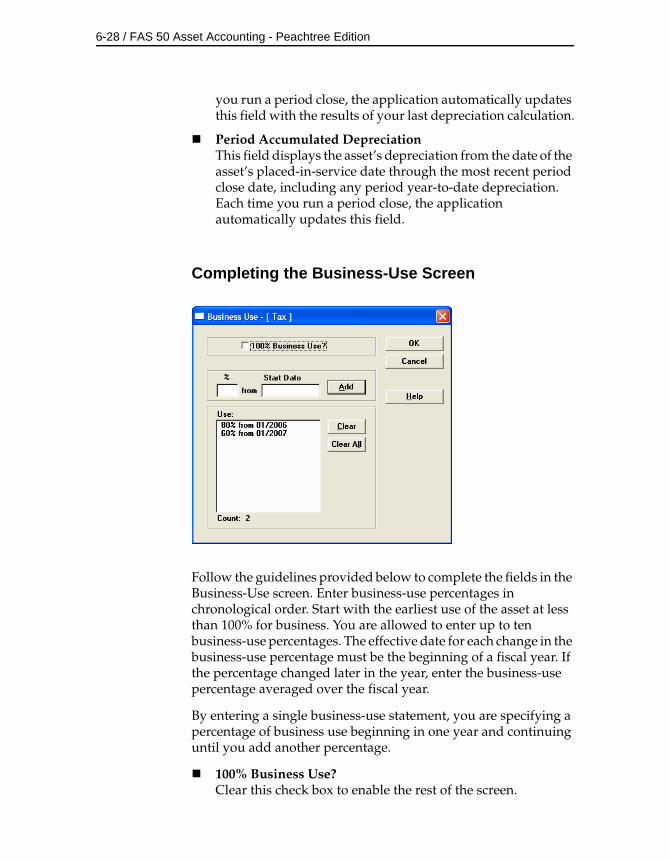
6-28 / FAS 50 Asset Accounting - Peachtree Edition
you run a period close, the application automatically updates this field with the results of your last depreciation calculation.
Period Accumulated DepreciationThis field displays the asset’s depreciation from the date of the asset’s placed-in-service date through the most recent period close date, including any period year-to-date depreciation. Each time you run a period close, the application automatically updates this field.
Completing the Business-Use Screen
Follow the guidelines provided below to complete the fields in the Business-Use screen. Enter business-use percentages in chronological order. Start with the earliest use of the asset at less than 100% for business. You are allowed to enter up to ten business-use percentages. The effective date for each change in the business-use percentage must be the beginning of a fiscal year. If the percentage changed later in the year, enter the business-use percentage averaged over the fiscal year.
By entering a single business-use statement, you are specifying a percentage of business use beginning in one year and continuing until you add another percentage.
100% Business Use?Clear this check box to enable the rest of the screen.
Working with Assets / 6-29
%Enter the percentage of business use the asset received for the time period you are going to enter in the Start Date.
Start DateEnter a date that is the beginning of a fiscal year on which you started using the asset at less than 100% business use.
Add ButtonClick this button to add the business-use statement you’ve specified to the string of statements in the Use field.
UseThis field displays the business-use statements you’ve specified above.
Clear ButtonClick this button to delete the currently selected business-use statement from the Use field.
Clear All ButtonClick this button to delete all business-use statements from the Use field.
CountThe application uses this field to display the number of percentages you have added.
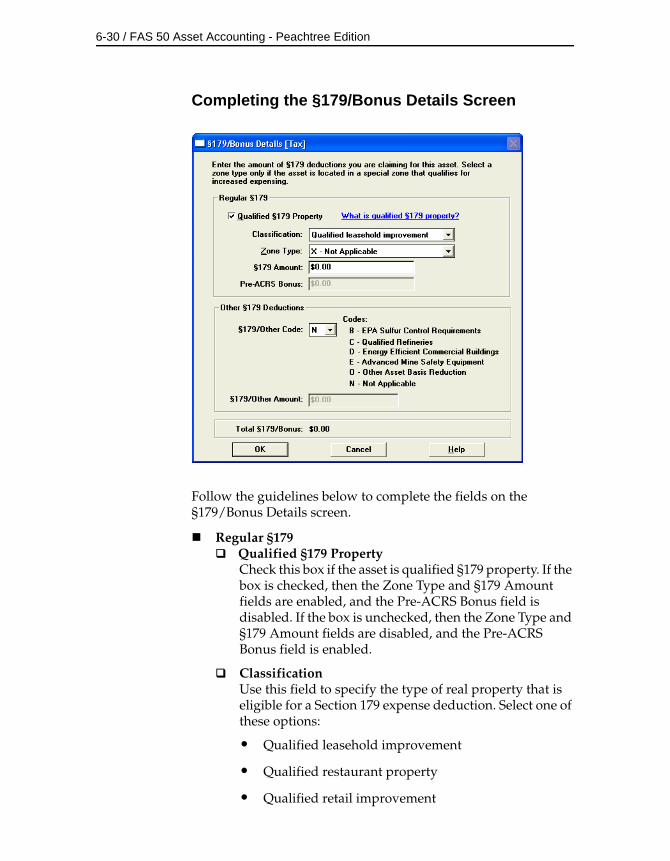
6-30 / FAS 50 Asset Accounting - Peachtree Edition
Completing the §179/Bonus Details Screen
Follow the guidelines below to complete the fields on the §179/Bonus Details screen.
Regular §179Qualified §179 Property
Check this box if the asset is qualified §179 property. If the box is checked, then the Zone Type and §179 Amount fields are enabled, and the Pre-ACRS Bonus field is disabled. If the box is unchecked, then the Zone Type and §179 Amount fields are disabled, and the Pre-ACRS Bonus field is enabled.
ClassificationUse this field to specify the type of real property that is eligible for a Section 179 expense deduction. Select one of these options:
• Qualified leasehold improvement
• Qualified restaurant property
• Qualified retail improvement
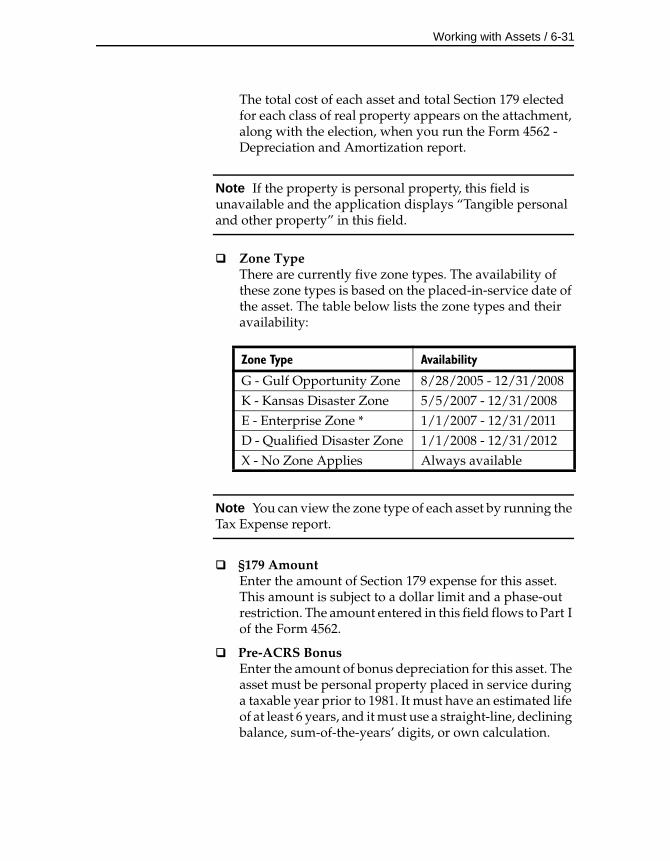
Working with Assets / 6-31
The total cost of each asset and total Section 179 elected for each class of real property appears on the attachment, along with the election, when you run the Form 4562 - Depreciation and Amortization report.
Note If the property is personal property, this field is unavailable and the application displays “Tangible personal and other property” in this field.
Zone TypeThere are currently five zone types. The availability of these zone types is based on the placed-in-service date of the asset. The table below lists the zone types and their availability:
Note You can view the zone type of each asset by running the Tax Expense report.
§179 AmountEnter the amount of Section 179 expense for this asset. This amount is subject to a dollar limit and a phase-out restriction. The amount entered in this field flows to Part I of the Form 4562.
Pre-ACRS BonusEnter the amount of bonus depreciation for this asset. The asset must be personal property placed in service during a taxable year prior to 1981. It must have an estimated life of at least 6 years, and it must use a straight-line, declining balance, sum-of-the-years’ digits, or own calculation.
Zone Type Availability
G - Gulf Opportunity Zone 8/28/2005 - 12/31/2008K - Kansas Disaster Zone 5/5/2007 - 12/31/2008E - Enterprise Zone * 1/1/2007 - 12/31/2011D - Qualified Disaster Zone 1/1/2008 - 12/31/2012X - No Zone Applies Always available
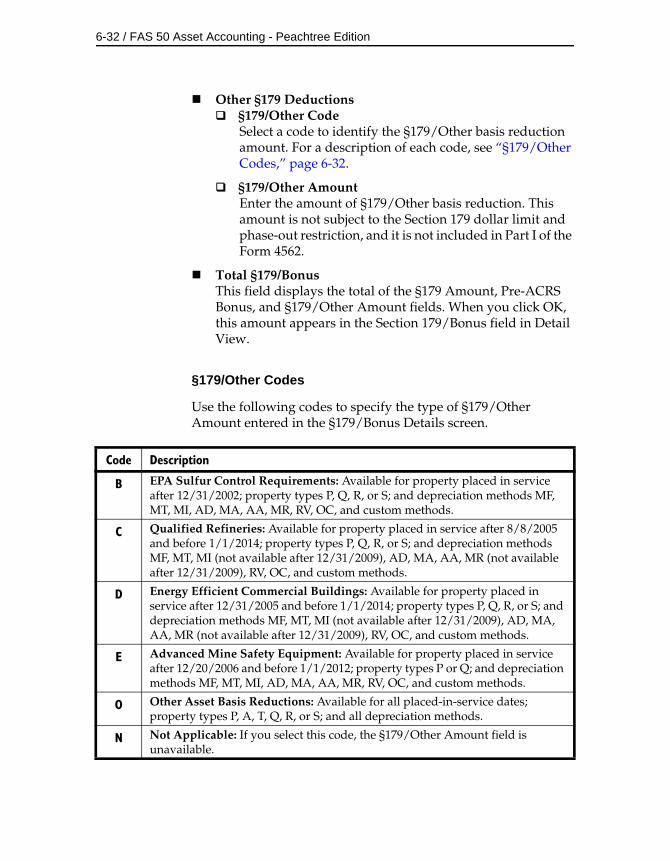
6-32 / FAS 50 Asset Accounting - Peachtree Edition
Other §179 Deductions§179/Other Code
Select a code to identify the §179/Other basis reduction amount. For a description of each code, see “§179/Other Codes,” page 6-32.
§179/Other AmountEnter the amount of §179/Other basis reduction. This amount is not subject to the Section 179 dollar limit and phase-out restriction, and it is not included in Part I of the Form 4562.
Total §179/BonusThis field displays the total of the §179 Amount, Pre-ACRS Bonus, and §179/Other Amount fields. When you click OK, this amount appears in the Section 179/Bonus field in Detail View.
§179/Other Codes
Use the following codes to specify the type of §179/Other Amount entered in the §179/Bonus Details screen.
Code Description
B EPA Sulfur Control Requirements: Available for property placed in service after 12/31/2002; property types P, Q, R, or S; and depreciation methods MF, MT, MI, AD, MA, AA, MR, RV, OC, and custom methods.
C Qualified Refineries: Available for property placed in service after 8/8/2005 and before 1/1/2014; property types P, Q, R, or S; and depreciation methods MF, MT, MI (not available after 12/31/2009), AD, MA, AA, MR (not available after 12/31/2009), RV, OC, and custom methods.
D Energy Efficient Commercial Buildings: Available for property placed in service after 12/31/2005 and before 1/1/2014; property types P, Q, R, or S; and depreciation methods MF, MT, MI (not available after 12/31/2009), AD, MA, AA, MR (not available after 12/31/2009), RV, OC, and custom methods.
E Advanced Mine Safety Equipment: Available for property placed in service after 12/20/2006 and before 1/1/2012; property types P or Q; and depreciation methods MF, MT, MI, AD, MA, AA, MR, RV, OC, and custom methods.
O Other Asset Basis Reductions: Available for all placed-in-service dates; property types P, A, T, Q, R, or S; and all depreciation methods.
N Not Applicable: If you select this code, the §179/Other Amount field is unavailable.
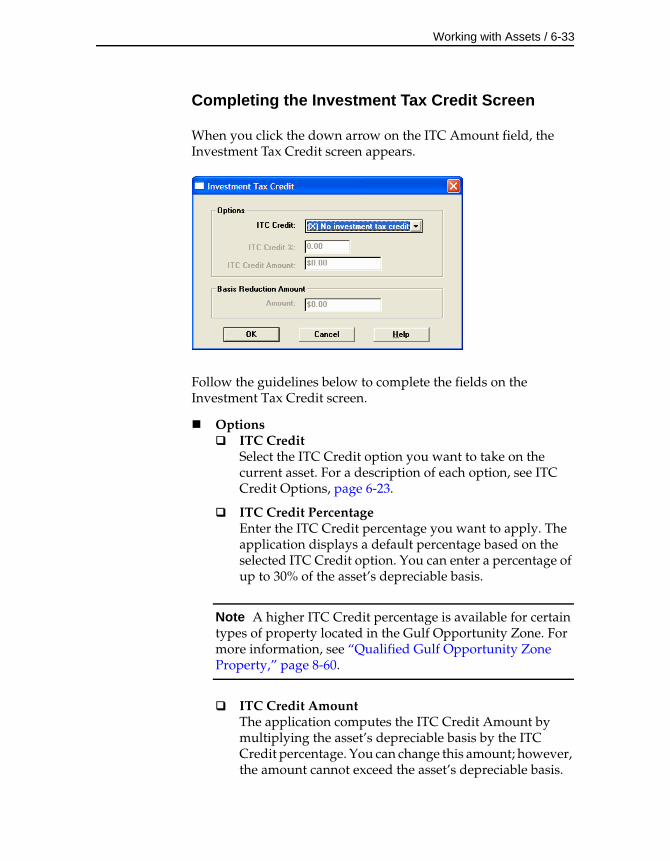
Working with Assets / 6-33
Completing the Investment Tax Credit Screen
When you click the down arrow on the ITC Amount field, the Investment Tax Credit screen appears.
Follow the guidelines below to complete the fields on the Investment Tax Credit screen.
Options ITC Credit
Select the ITC Credit option you want to take on the current asset. For a description of each option, see ITC Credit Options, page 6-23.
ITC Credit PercentageEnter the ITC Credit percentage you want to apply. The application displays a default percentage based on the selected ITC Credit option. You can enter a percentage of up to 30% of the asset’s depreciable basis.
Note A higher ITC Credit percentage is available for certain types of property located in the Gulf Opportunity Zone. For more information, see “Qualified Gulf Opportunity Zone Property,” page 8-60.
ITC Credit AmountThe application computes the ITC Credit Amount by multiplying the asset’s depreciable basis by the ITC Credit percentage. You can change this amount; however, the amount cannot exceed the asset’s depreciable basis.
6-34 / FAS 50 Asset Accounting - Peachtree Edition
Basis Reduction AmountAmount
This field displays the amount by which the depreciable basis will be reduced for the current asset.
Replicating Assets
If you are adding multiple assets that are similar in nature, you can add the first one, save it, and then replicate it as needed. The application can create as many as 99 assets out of a single entry. Once you’ve replicated an asset, you can change each asset individually to modify specific fields as needed. This feature is particularly useful for adding grouped assets from the same invoice.
Note If you replicate an asset that has Section 179 expense or bonus depreciation, you may receive a warning message stating that the total amount for all replicated assets will exceed allowable limits. If you choose to continue, remember to reduce the Section 179 or bonus depreciation amounts for the replicated assets, as needed.
To replicate an asset
1. Enter Detail View of the asset you want to replicate.
2. Do any one of the following:
• Select Asset/Replicate from the menu bar.
• Click the Replicate button from the toolbar.
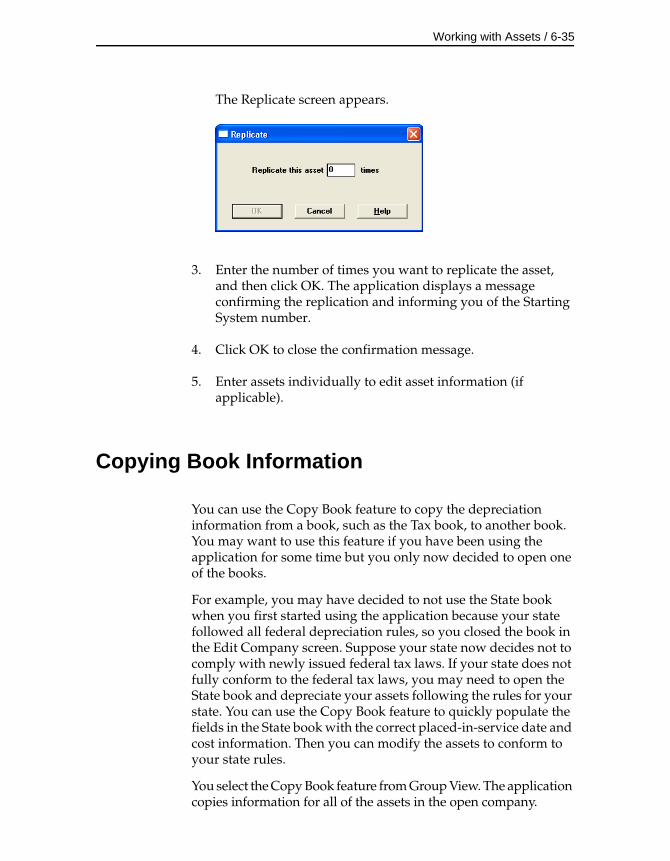
Working with Assets / 6-35
The Replicate screen appears.
3. Enter the number of times you want to replicate the asset, and then click OK. The application displays a message confirming the replication and informing you of the Starting System number.
4. Click OK to close the confirmation message.
5. Enter assets individually to edit asset information (if applicable).
Copying Book Information
You can use the Copy Book feature to copy the depreciation information from a book, such as the Tax book, to another book. You may want to use this feature if you have been using the application for some time but you only now decided to open one of the books.
For example, you may have decided to not use the State book when you first started using the application because your state followed all federal depreciation rules, so you closed the book in the Edit Company screen. Suppose your state now decides not to comply with newly issued federal tax laws. If your state does not fully conform to the federal tax laws, you may need to open the State book and depreciate your assets following the rules for your state. You can use the Copy Book feature to quickly populate the fields in the State book with the correct placed-in-service date and cost information. Then you can modify the assets to conform to your state rules.
You select the Copy Book feature from Group View. The application copies information for all of the assets in the open company.
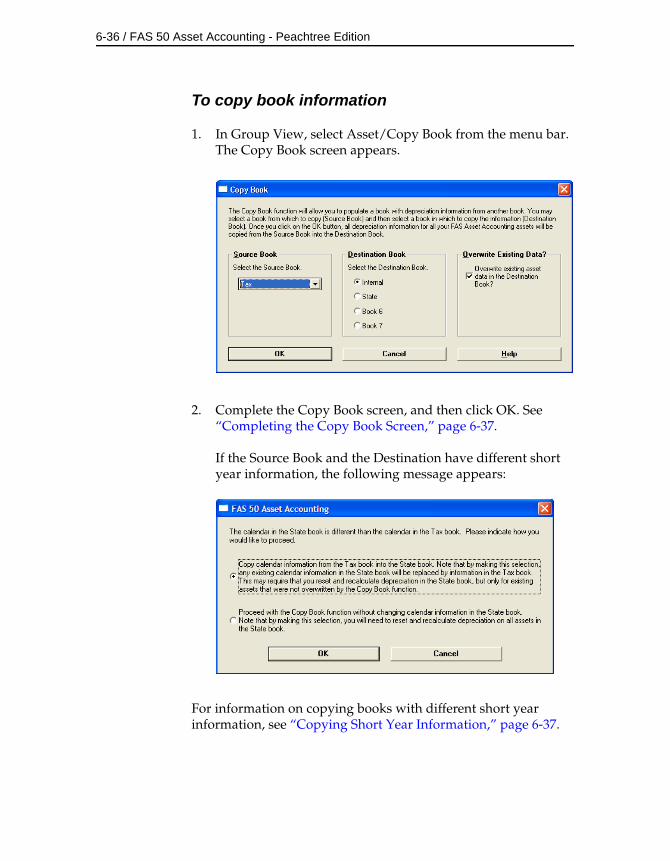
6-36 / FAS 50 Asset Accounting - Peachtree Edition
To copy book information
1. In Group View, select Asset/Copy Book from the menu bar. The Copy Book screen appears.
2. Complete the Copy Book screen, and then click OK. See “Completing the Copy Book Screen,” page 6-37.
If the Source Book and the Destination have different short year information, the following message appears:
For information on copying books with different short year information, see “Copying Short Year Information,” page 6-37.
Working with Assets / 6-37
Completing the Copy Book Screen
Follow the guidelines below to complete the fields on the Copy Book screen.
Source BookSelect the book from which you want to copy depreciation information. You can select a book only if it is currently open.
Destination BookClick the option button for the book to which you want to copy depreciation information. The Destination book must be open.
Overwrite Existing DataSelect this check box if you want to overwrite existing data in the Destination Book with the depreciation information from the Source Book. If the box is left unchecked, the application skips assets with existing book data in the Destination Book when completing the copy function.
Copying Short Year Information
When you change the short year information for an asset, you must reset and recalculate its depreciation. The short year information may change for assets when you copy depreciation information, and the Source Book and the Destination Book have different short year information.
If the Source Book and the Destination Book have different short year information, you have two options:
• You can copy the short year information from the Source Book into the Destination Book. This overwrites the short year information in the Destination Book, and replaces it with the short year information in the Source Book.
• You can keep the short year information in the Destination Book.
If you select the first option, you would not need to reset and recalculate depreciation unless you cleared the Overwrite Existing Data check box in the Copy Book screen.
6-38 / FAS 50 Asset Accounting - Peachtree Edition
If you select the second option, we recommend that you reset depreciation to the beginning date and recalculate depreciation for all of the assets in the Destination Book.
Creating a New Template
The Asset Templates feature lets you create predefined assets, which can then be copied into individual assets. You should create an asset specifically made to be saved as a template. This is because you probably do not want to complete certain fields, such as the company asset number field. If you completed this field for the template, you would have to change it every time you applied the template to an asset.
Asset templates provide more flexibility than the Replicate function.
With an asset template, you can:
• Assign it a recognizable name for quick and easy recall.
• Enter data in all fields or only in a few fields.
• Use the template to create a new asset.
• Use the template over an existing asset. If you use a template over an existing asset, the template information will overwrite any existing information that was entered for the asset before you used the template. If, however, the asset has information in a field that is blank in the template, such preexisting information will not be overwritten.
You cannot view or edit an existing template once it is created. However, you can apply it to a new asset to view the setup of the template, and then exit the new asset without saving it. A way around the edit restriction is to apply the template to a new asset, make changes, and then save it as a template using the same template name. To rename or delete an asset template, select Customize/Template Manager from the menu bar, and then complete the Template Manager screen.
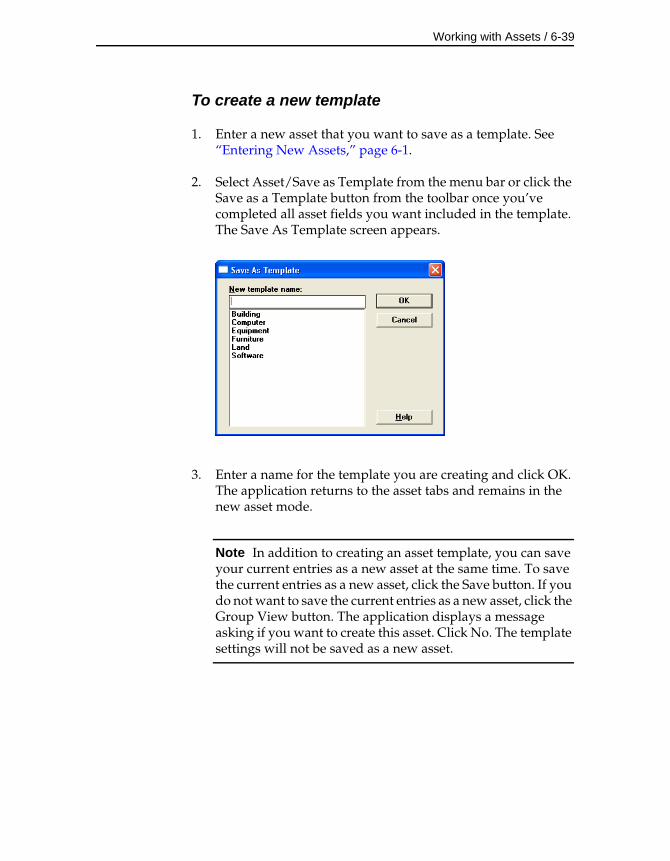
Working with Assets / 6-39
To create a new template
1. Enter a new asset that you want to save as a template. See “Entering New Assets,” page 6-1.
2. Select Asset/Save as Template from the menu bar or click the Save as a Template button from the toolbar once you’ve completed all asset fields you want included in the template. The Save As Template screen appears.
3. Enter a name for the template you are creating and click OK. The application returns to the asset tabs and remains in the new asset mode.
Note In addition to creating an asset template, you can save your current entries as a new asset at the same time. To save the current entries as a new asset, click the Save button. If you do not want to save the current entries as a new asset, click the Group View button. The application displays a message asking if you want to create this asset. Click No. The template settings will not be saved as a new asset.
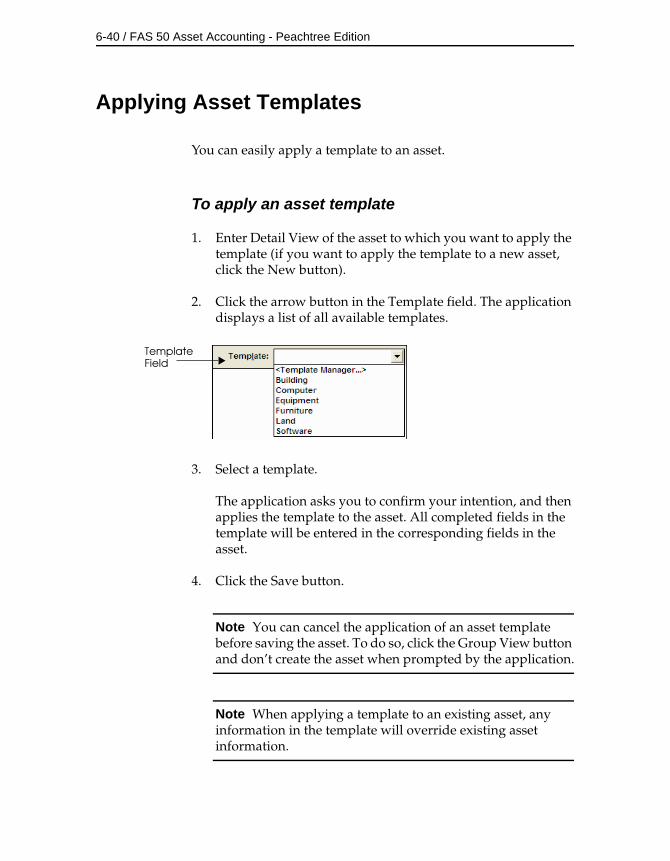
6-40 / FAS 50 Asset Accounting - Peachtree Edition
Applying Asset Templates
You can easily apply a template to an asset.
To apply an asset template
1. Enter Detail View of the asset to which you want to apply the template (if you want to apply the template to a new asset, click the New button).
2. Click the arrow button in the Template field. The application displays a list of all available templates.
3. Select a template.
The application asks you to confirm your intention, and then applies the template to the asset. All completed fields in the template will be entered in the corresponding fields in the asset.
4. Click the Save button.
Note You can cancel the application of an asset template before saving the asset. To do so, click the Group View button and don’t create the asset when prompted by the application.
Note When applying a template to an existing asset, any information in the template will override existing asset information.
Template Field
Working with Assets / 6-41
Printing Asset Pages
It is possible to print a copy of each of the Asset pages as seen in Detail View. When you print them, you can include asset information, or you can print blank pages for the purpose of data collection. To print the asset pages, you either make a selection of one or more assets, or you select an entire group.
Hint We recommend that before you print the Disposal asset pages, use the Group Manager to create a group consisting only of disposed assets. Then, select that group when you print the asset pages for the Disposal page.
When you print asset pages, they are sent to the printer as a graphic. Make sure you have sufficient computer hardware to handle the request.
To enable the print function, you must have at least one asset selected.
To print copies of asset pages
1. Select an asset or make a selection of assets in Group View, or enter Detail view for an asset. (To print one set of blank tabs, enter Detail View for a new asset, or select the Only Print Blank Forms for Main and Disposal Tabs check box in the Print Asset Information screen.)
2. Do any one of the following:
• Select File/Print.
• Press CTRL+P.
• Click the Print button from the toolbar.
• Click the Print button at the bottom of Detail or Group View.
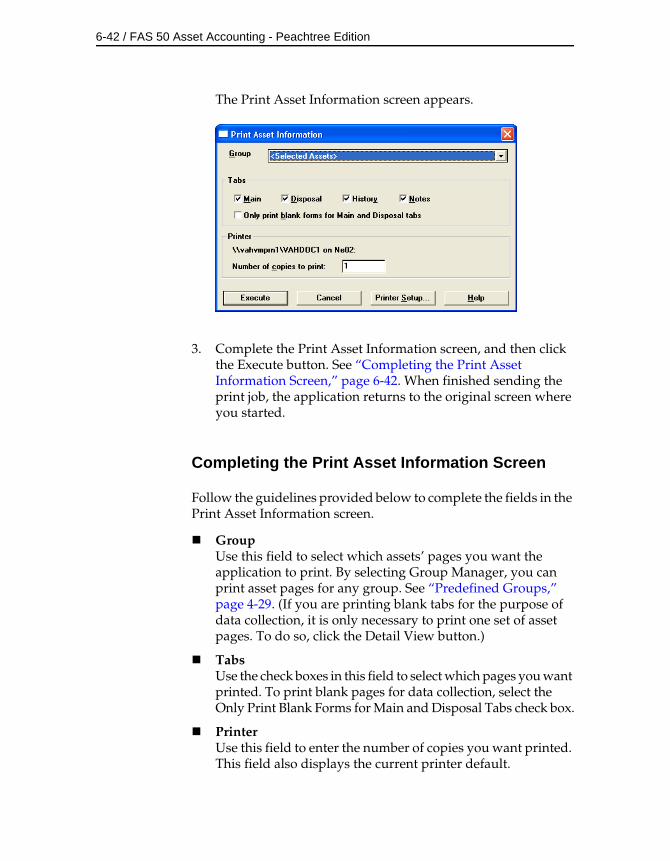
6-42 / FAS 50 Asset Accounting - Peachtree Edition
The Print Asset Information screen appears.
3. Complete the Print Asset Information screen, and then click the Execute button. See “Completing the Print Asset Information Screen,” page 6-42. When finished sending the print job, the application returns to the original screen where you started.
Completing the Print Asset Information Screen
Follow the guidelines provided below to complete the fields in the Print Asset Information screen.
GroupUse this field to select which assets’ pages you want the application to print. By selecting Group Manager, you can print asset pages for any group. See “Predefined Groups,” page 4-29. (If you are printing blank tabs for the purpose of data collection, it is only necessary to print one set of asset pages. To do so, click the Detail View button.)
TabsUse the check boxes in this field to select which pages you want printed. To print blank pages for data collection, select the Only Print Blank Forms for Main and Disposal Tabs check box.
PrinterUse this field to enter the number of copies you want printed. This field also displays the current printer default.
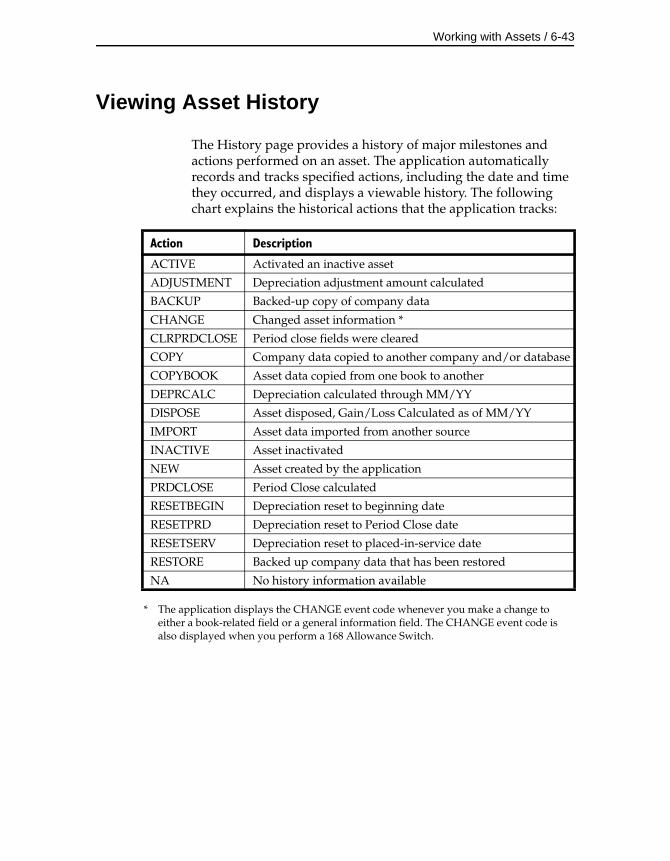
Working with Assets / 6-43
Viewing Asset History
The History page provides a history of major milestones and actions performed on an asset. The application automatically records and tracks specified actions, including the date and time they occurred, and displays a viewable history. The following chart explains the historical actions that the application tracks:
* The application displays the CHANGE event code whenever you make a change to either a book-related field or a general information field. The CHANGE event code is also displayed when you perform a 168 Allowance Switch.
Action Description
ACTIVE Activated an inactive asset
ADJUSTMENT Depreciation adjustment amount calculated
BACKUP Backed-up copy of company data
CHANGE Changed asset information *
CLRPRDCLOSE Period close fields were cleared
COPY Company data copied to another company and/or database
COPYBOOK Asset data copied from one book to another
DEPRCALC Depreciation calculated through MM/YY
DISPOSE Asset disposed, Gain/Loss Calculated as of MM/YY
IMPORT Asset data imported from another source
INACTIVE Asset inactivated
NEW Asset created by the application
PRDCLOSE Period Close calculated
RESETBEGIN Depreciation reset to beginning date
RESETPRD Depreciation reset to Period Close date
RESETSERV Depreciation reset to placed-in-service date
RESTORE Backed up company data that has been restored
NA No history information available
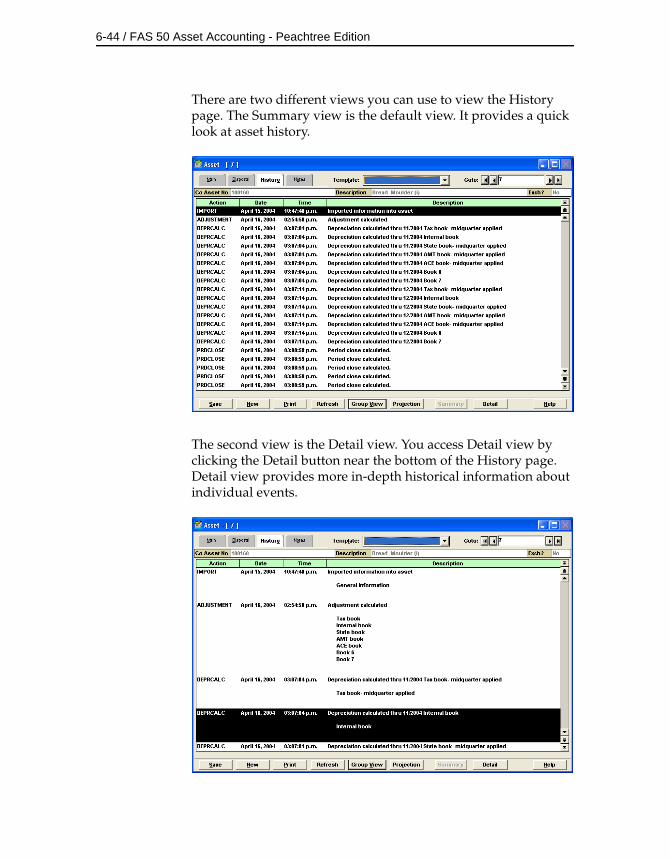
6-44 / FAS 50 Asset Accounting - Peachtree Edition
There are two different views you can use to view the History page. The Summary view is the default view. It provides a quick look at asset history.
The second view is the Detail view. You access Detail view by clicking the Detail button near the bottom of the History page. Detail view provides more in-depth historical information about individual events.
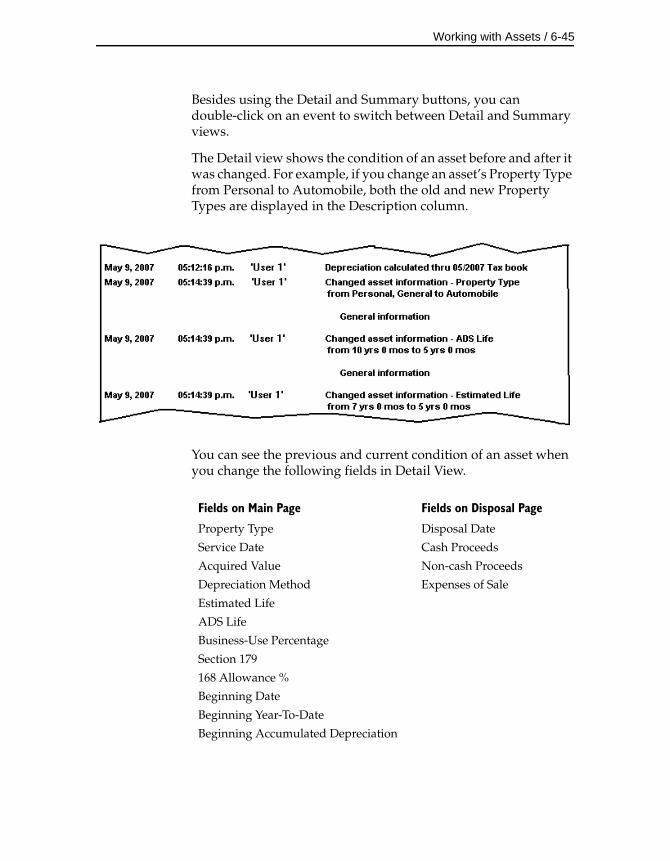
Working with Assets / 6-45
Besides using the Detail and Summary buttons, you can double-click on an event to switch between Detail and Summary views.
The Detail view shows the condition of an asset before and after it was changed. For example, if you change an asset’s Property Type from Personal to Automobile, both the old and new Property Types are displayed in the Description column.
You can see the previous and current condition of an asset when you change the following fields in Detail View.
Fields on Main Page Fields on Disposal Page
Property Type Disposal Date
Service Date Cash Proceeds
Acquired Value Non-cash Proceeds
Depreciation Method Expenses of Sale
Estimated Life
ADS Life
Business-Use Percentage
Section 179
168 Allowance %
Beginning Date
Beginning Year-To-Date
Beginning Accumulated Depreciation

6-46 / FAS 50 Asset Accounting - Peachtree Edition
Setting Up History Events
You can decide which events in an asset’s life you want the application to track. When you use the Setup History feature, the application tracks only the events that are important to you.
To set up history events
1. Select File/Company Utilities/History/Setup History from the menu bar. The Setup History screen appears. See “Completing the Setup History Screen,” page 6-46.
2. Complete the Setup History screen, and then click OK.
Completing the Setup History Screen
Follow the guidelines provided below to complete the fields on the Setup History screen.
History EventsThis column displays the events in an asset’s life that you can track.
Working with Assets / 6-47
OnUse this column to indicate whether you want to track an event in the asset’s life. If a check mark appears in this column, then the application will track the event. Click once in this column if you want to track the event. Click on a check mark to remove it if you do not want to track the event.
Restore ButtonClick this button to restore the default settings for this screen.
Purging Asset History
The purge history feature allows you to eliminate history entries prior to a date that you specify, which frees up application resources and improves its processing speed.
When you purge the asset history from a company, you lose the record of events that pertain to each asset. For more information, see “Viewing Asset History,” page 6-43. Before you decide to do this, you may want to back up your company so that you can recover the asset history information at a later date. For information on backing up your company, see “Backing Up Your Companies,” page 5-8.
You have two options for deleting the asset history from a company. You can delete all history entries in the company, or you can delete all history entries prior to a date that you specify.
You can purge the asset history from a single company, or you can purge the asset history from all of the companies in the selected database.
Before you begin the steps outlined below, you must close any open companies.
To purge asset history
1. Select File/Company Utilities/History/Purge History from the menu bar. The History screen appears.
2. Complete the History screen, and then click OK. See “Completing the History Screen,” page 6-48. The application displays a confirmation message.
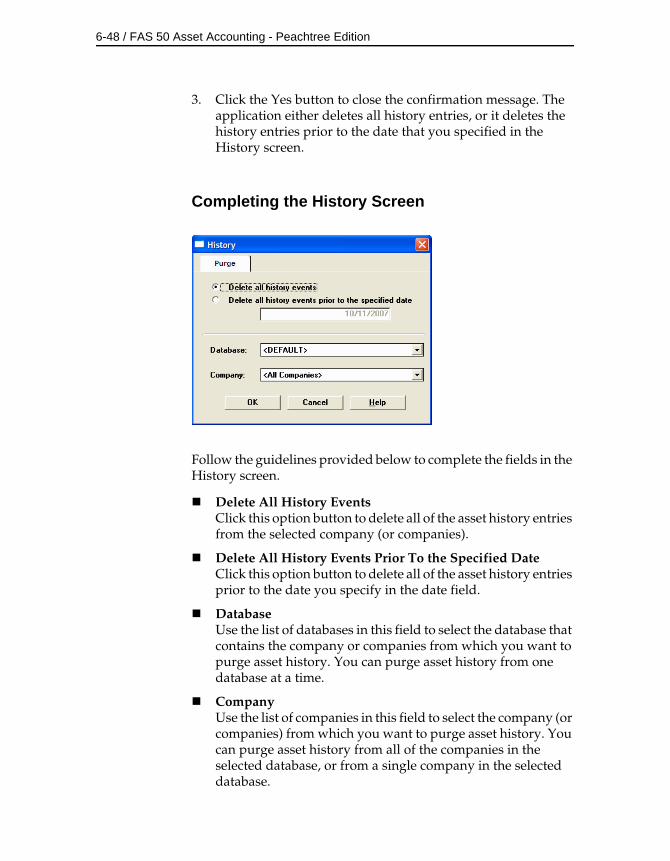
6-48 / FAS 50 Asset Accounting - Peachtree Edition
3. Click the Yes button to close the confirmation message. The application either deletes all history entries, or it deletes the history entries prior to the date that you specified in the History screen.
Completing the History Screen
Follow the guidelines provided below to complete the fields in the History screen.
Delete All History EventsClick this option button to delete all of the asset history entries from the selected company (or companies).
Delete All History Events Prior To the Specified DateClick this option button to delete all of the asset history entries prior to the date you specify in the date field.
DatabaseUse the list of databases in this field to select the database that contains the company or companies from which you want to purge asset history. You can purge asset history from one database at a time.
CompanyUse the list of companies in this field to select the company (or companies) from which you want to purge asset history. You can purge asset history from all of the companies in the selected database, or from a single company in the selected database.
Working with Assets / 6-49
The Notes Page
The Notes page provides additional space for you to enter any notes or special information about the asset. You may choose to document certain changes made to the asset or the reasons for the changes, or provide further detail on asset maintenance information. The Notes page can be used for any purpose. Click the Notes tab and the application displays the date, the time, and writing space. For easy identification, the company asset number and description are also displayed.
Editing Asset Data
Once you’ve entered asset data, you can edit the data anytime by entering Detail View and making changes directly in asset fields. However, when you make changes to any fields used in calculations, you’ll have to perform additional tasks in order to update the data. Follow the guidelines provided below when editing asset data.
Editing Descriptive FieldsThe descriptive fields do not affect depreciation. You can change the data in descriptive fields at any time.
Editing Book-Related FieldsWhen you change an entry in the book-specific fields after you have calculated depreciation or entered beginning depreciation for the asset, the application assumes that the current depreciation figures are no longer correct. A message appears asking you if you want to accept the change and reset the current depreciation amount. If you answer No, the change will not take effect. If you answer Yes, a second message appears asking when you want to apply the change to the depreciation-critical field.
After you have reset depreciation and made your changes, execute the Depreciate command from the Depreciation menu to get current depreciation figures.
Editing Tax Book FieldsIf you change information in the Tax book, you can force the application to determine new default values for the other
6-50 / FAS 50 Asset Accounting - Peachtree Edition
books. For example, if you change the Tax book depreciation method from MT to AD, the AMT book depreciation method should change from MF to AD. However, if you already changed information in the other books to values you want, you may not want to overwrite your data with the new default values.
For this reason, before you leave the asset after making changes in the Tax book, you must decide whether you want the new defaults to overwrite the existing data in the other books. If so, select Force Defaults on the Asset Menu. A message appears asking you to confirm your intent to overwrite information in all open books.
Editing Disposal DateIn order to edit a disposal date, you’ll first have to delete the transactions. See “Resetting Depreciation,” page 8-11.
Editing Inactive AssetsYou cannot edit inactive assets. To edit an inactive asset, you must first reactivate it. See “Inactivating and Reactivating Assets,” page 7-16.
Forcing Book Defaults
The application contains an option that allows you to force the defaults from the Tax Book into the other books. This option is called Force Defaults. There are two instances where you will want to use the Force Defaults function:
• If you change an entry in the Tax book that you want to affect the other books.
• If you change data in any of the depreciation books other than the Tax book, and you want to return to the defaults based on the Tax book.
To force book defaults
1. Enter Detail View for the intended asset.
Working with Assets / 6-51
2. Do any one of the following:
• Select Asset/Force Defaults from the menu bar.
• Click the Force Defaults button on the toolbar.
• Press CTRL+F.
The application displays a confirmation message.
3. Select Yes to force the defaults.
Note If you want to force defaults only in certain books, you can close books in the Edit Company screen. The Force Defaults feature will reset defaults only in the open books.

6-52 / FAS 50 Asset Accounting - Peachtree Edition
7 Performing Asset Functions
This chapter outlines the steps necessary to perform basic asset management tasks. These tasks include disposing assets (individually or in bulk); inactivating, reactivating, and deleting assets.
Disposing Assets
When you sell, exchange, abandon, retire, or in some other way dispose of an asset, you must inform the application of the transaction so it can calculate the gain or loss and halt depreciation on the asset. The application automatically calculates depreciation through the disposal date, so you don’t have to update current depreciation before disposing of the asset.
The application indicates that an asset is disposed in many ways. In reports, it displays the code for a disposal in the Key Code Column. The code for a disposal is “d.” To signify disposed assets, the application also displays the word “Disposed” in the title bar of the asset when in Detail View. In Group View, it displays the word “Disposed” in the Activity field of the asset.
You can perform bulk disposals or individual disposals.
Note When you reset depreciation on an asset that was entirely disposed, the disposal is canceled.
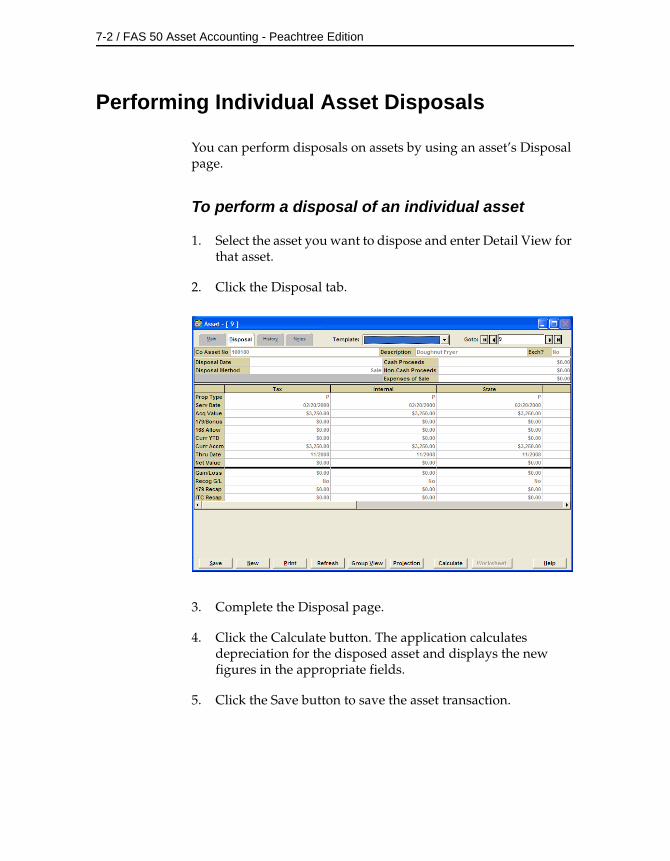
7-2 / FAS 50 Asset Accounting - Peachtree Edition
Performing Individual Asset Disposals
You can perform disposals on assets by using an asset’s Disposal page.
To perform a disposal of an individual asset
1. Select the asset you want to dispose and enter Detail View for that asset.
2. Click the Disposal tab.
3. Complete the Disposal page.
4. Click the Calculate button. The application calculates depreciation for the disposed asset and displays the new figures in the appropriate fields.
5. Click the Save button to save the asset transaction.
Performing Asset Functions / 7-3
Completing the Disposal Page
Follow the guidelines provided below to complete the fields in the Disposal page, or to view disposal information.
Company Asset Number/DescriptionThis field displays the Company Asset Number and the description for the current asset.
Disposal Date (Required Field)Use this field to enter the date of the asset disposal in either MMDDYY or MMDDYYYY format. The application uses this date and the appropriate averaging convention to calculate gain or loss on the disposal. If you enter a date prior to the asset’s current through date, the application recalculates depreciation as of the disposal date. The disposal date must be on or after the Beginning Date and after the Period Close Date, if any.
Note If the asset uses a “Plus 168” depreciation method, the disposal date cannot occur in the same year that you placed the asset in service. This is to comply with IRS regulations on claiming the Section 168 Allowance. If the disposal date is in the placed-in-service year, you must first change the depreciation method in all books so that the asset does not take the 168 Allowance. Then you can enter the disposal information.
Disposal MethodUse this field to select the disposal method. The disposal method you select determines the default gain or loss treatment of the disposed asset. For a full description of each disposal method, see the online Help or “Disposal Methods,” page A-42.
Cash ProceedsUse this field to enter the dollar amount of all cash received plus the value of any debts or other liabilities assumed by the buyer. If the disposal is a like-kind exchange, also include the value of any property received that is not like-kind.
Non-cash ProceedsUse this field to enter the dollar value of any noncash items received. If the disposal is a like-kind exchange, include the value of any like-kind property received.
7-4 / FAS 50 Asset Accounting - Peachtree Edition
Expenses of SaleUse this field to enter the dollar amount of direct expenses incurred in selling or otherwise disposing of the asset. The application adds this amount to the asset’s basis when calculating the gain or loss reported on Form 4797—Sales of Property worksheet, which is accessible through the Reports menu.
Gain or Loss AmountThis field displays the realized gain or loss on the disposal after the Calculation is complete. The realized gain or loss is determined by the disposal method. You can override the amount by entering your own figure. Precede a negative number with a negative sign. Do not enclose a loss amount in parentheses.
Recognize Gain or LossUse this field to select the appropriate recognition choice. Select Yes if you want the application to recognize a gain or loss (that is, report on it in the tax and company books). Select No if you don’t want the application to recognize a gain or loss.
You can also select Defer to defer the recognition until a later date. Selecting Defer causes the application to add a Defer Date field below the Recognize Gain or Loss field. The Recognize Gain or Loss field is automatically set to default based on the disposal method chosen. For default settings, see “Gain or Loss Recognition Defaults,” page A-46.
Defer DateThis field appears only if you have selected Defer in the Recognize Gain or Loss field. Enter the month and year for which you want the gain or loss to be recognized. The asset will appear on the Form 4797 in the year entered.
Section 179 RecaptureThis field displays the Section 179 recapture amount as required by tax law (if the asset was expensed under Section 179 before December 31, 1986, and was disposed of before the second tax year after the acquisition year). You can enter another amount to override the calculated amount. The amount in this field is carried to the Form 4797—Sales of Property worksheet, accessible through the Reports menu.
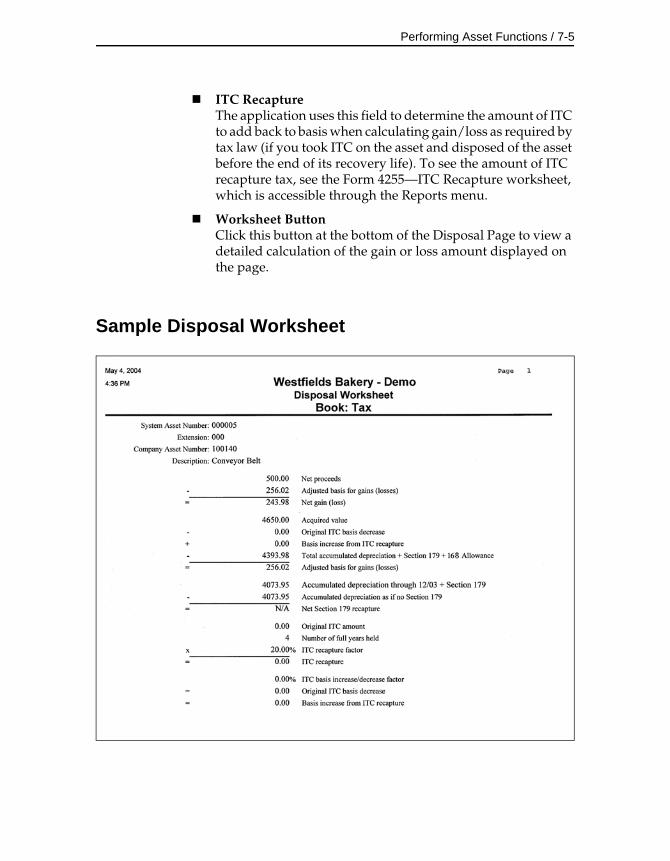
Performing Asset Functions / 7-5
ITC RecaptureThe application uses this field to determine the amount of ITC to add back to basis when calculating gain/loss as required by tax law (if you took ITC on the asset and disposed of the asset before the end of its recovery life). To see the amount of ITC recapture tax, see the Form 4255—ITC Recapture worksheet, which is accessible through the Reports menu.
Worksheet ButtonClick this button at the bottom of the Disposal Page to view a detailed calculation of the gain or loss amount displayed on the page.
Sample Disposal Worksheet
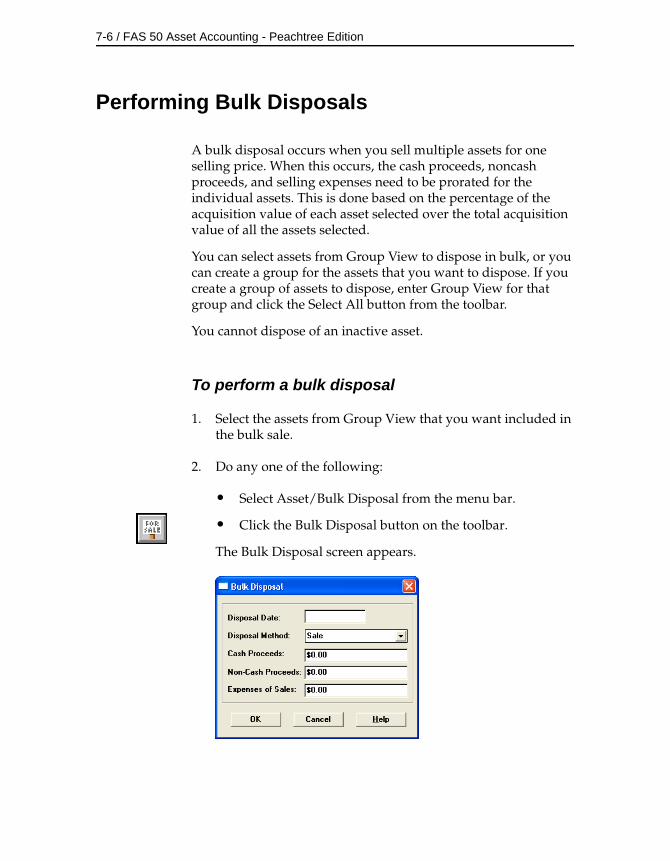
7-6 / FAS 50 Asset Accounting - Peachtree Edition
Performing Bulk Disposals
A bulk disposal occurs when you sell multiple assets for one selling price. When this occurs, the cash proceeds, noncash proceeds, and selling expenses need to be prorated for the individual assets. This is done based on the percentage of the acquisition value of each asset selected over the total acquisition value of all the assets selected.
You can select assets from Group View to dispose in bulk, or you can create a group for the assets that you want to dispose. If you create a group of assets to dispose, enter Group View for that group and click the Select All button from the toolbar.
You cannot dispose of an inactive asset.
To perform a bulk disposal
1. Select the assets from Group View that you want included in the bulk sale.
2. Do any one of the following:
• Select Asset/Bulk Disposal from the menu bar.
• Click the Bulk Disposal button on the toolbar.
The Bulk Disposal screen appears.
Performing Asset Functions / 7-7
Note The Bulk Disposal menu item is not activated unless at least one asset is selected.
3. Complete the Bulk Disposal screen. “Completing the Bulk Disposal Screen,” page 7-7.
4. Click OK. The Bulk Disposal report definition screen appears.
5. Execute the report or click Cancel to exit. For information about reports, see Chapter 9, “Reports.”
Completing the Bulk Disposal Screen
Follow the guidelines provided below to complete the fields in the Bulk Disposal screen.
Disposal DateType the date of the asset disposal in either MM/DD/YY or MM/DD/YYYY format. The application uses this date when calculating gain or loss on the disposal. It applies the appropriate averaging convention.
Disposal MethodUse this field to select the disposal method. The disposal method you select determines the default gain or loss treatment of the disposed assets. For a full description of each disposal method, see the online Help or “Disposal Methods,” page A-42. The application applies the selected disposal method to all of the assets you have selected for the bulk disposal. However, you can edit the Disposal Method field after you have completed the bulk disposal.
Note When you perform a bulk disposal, the following disposal methods are unavailable: Like-Kind Exchange and Involuntary Conversion.
Cash ProceedsEnter the dollar amount of all cash received plus the value of any debts or other liabilities assumed by the buyer.
7-8 / FAS 50 Asset Accounting - Peachtree Edition
Non-cash ProceedsEnter the dollar value of any noncash items received.
Expenses of SalesEnter the dollar amount of direct expenses incurred in selling or otherwise disposing of the assets. The application adds this amount to the bases of the assets when calculating the gain or loss reported on the Form 4797—Sales of Property worksheet.
Like-Kind Exchanges and Involuntary Conversions After 1/2/2000
A like-kind exchange is a type of disposal that occurs when two parties exchange assets that are similar in nature. The exchange can include the receipt of money or other dissimilar property.
In 2000, the IRS issued new guidelines concerning property received in a like-kind exchange or an involuntary conversion. If you exchange a MACRS asset for a similar asset, for depreciation purposes the newly acquired asset “steps into the shoes” of the asset that you give up. If cash or its equivalent (“boot”) is paid at the time of the exchange, the newly acquired asset is depreciated as if it were two separate assets:
• Asset #1: This asset is a continuation of the asset given up in the exchange. It has the same placed-in-service date, acquired value, averaging convention, and recovery period as the original asset.
• Asset #2: This asset is treated as a new asset received in the exchange. It has an acquired value that is equal to the basis in the new asset less the adjusted basis in the original asset. (Generally, this is the amount of any boot paid.) The new asset’s placed-in-service date is the date on which the exchange occurred. This asset should be assigned an appropriate depreciation method and a new recovery period starting with its new placed-in-service date.
If no boot is paid at the time of the exchange, the newly acquired asset is depreciated as a single asset, with the same attributes as Asset #1 above.
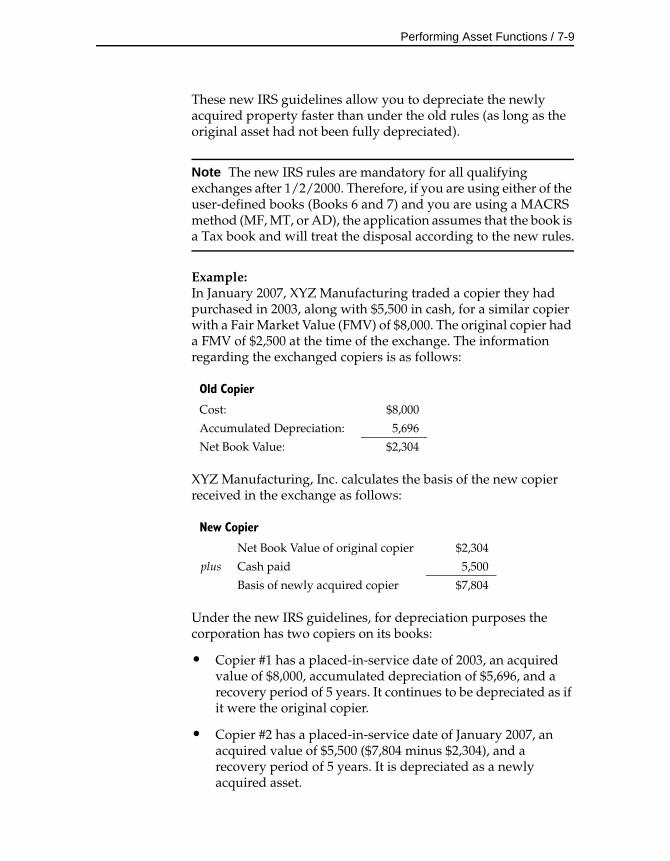
Performing Asset Functions / 7-9
These new IRS guidelines allow you to depreciate the newly acquired property faster than under the old rules (as long as the original asset had not been fully depreciated).
Note The new IRS rules are mandatory for all qualifying exchanges after 1/2/2000. Therefore, if you are using either of the user-defined books (Books 6 and 7) and you are using a MACRS method (MF, MT, or AD), the application assumes that the book is a Tax book and will treat the disposal according to the new rules.
Example:In January 2007, XYZ Manufacturing traded a copier they had purchased in 2003, along with $5,500 in cash, for a similar copier with a Fair Market Value (FMV) of $8,000. The original copier had a FMV of $2,500 at the time of the exchange. The information regarding the exchanged copiers is as follows:
XYZ Manufacturing, Inc. calculates the basis of the new copier received in the exchange as follows:
Under the new IRS guidelines, for depreciation purposes the corporation has two copiers on its books:
• Copier #1 has a placed-in-service date of 2003, an acquired value of $8,000, accumulated depreciation of $5,696, and a recovery period of 5 years. It continues to be depreciated as if it were the original copier.
• Copier #2 has a placed-in-service date of January 2007, an acquired value of $5,500 ($7,804 minus $2,304), and a recovery period of 5 years. It is depreciated as a newly acquired asset.
Old Copier
Cost: $8,000
Accumulated Depreciation: 5,696
Net Book Value: $2,304
New Copier
Net Book Value of original copier $2,304
plus Cash paid 5,500
Basis of newly acquired copier $7,804
7-10 / FAS 50 Asset Accounting - Peachtree Edition
Entering a Like-Kind Exchange or an Involuntary Conversion
Entering a like-kind exchange or involuntary conversion in the application is a two-step process:
1. Dispose of the asset given up in the exchange.
2. Enter the asset(s) received in the exchange.
Note If you are exchanging a vehicle that qualifies for the luxury car limits, see “Luxury Cars and Like-Kind Exchanges,” page 7-14.
To enter a like-kind exchange or an involuntary conversion after 1/2/2000
Step 1: Dispose of the original asset
1. Make sure you have depreciated the asset to be disposed through the month-end prior to the exchange.
2. Print the asset page for the Main tab, and note the amount of Current Year-to-Date and Current Accumulated Depreciation taken on the asset prior to the exchange for each book used for tax purposes. These books include the Tax, ACE, AMT, and State books, and possibly Book 6 and Book 7. This is important information that you will need when entering the new asset(s) received in the exchange.
3. Select the asset that you are disposing, and go to Detail View for that asset.
4. Select the Disposal tab.
5. In the Disposal Method field, select Like-Kind Exchange: Post-1/2/2000 (or Involuntary Conversion: Post-1/2/2000) if you want to apply the new IRS guidelines.
6. Complete the Disposal tab.
7. Click the Calculate button, and then click the Save button.
Performing Asset Functions / 7-11
Step 2: Enter the newly acquired asset
This next step may consist of two parts if you are required to depreciate the newly acquired asset as if it were two assets.
Step 2(a)
In Step 2(a), you enter the portion of the newly acquired asset that is treated as a continuation of the asset given up in the exchange. You should perform Step 2(a) whether or not boot was paid.
1. In the Description field, enter a description of the newly acquired asset.
2. Select Yes in the Exchange field (located next to the Description field) to indicate the asset was acquired in an exchange.
Note Selecting Yes in the Exchange field tells the application that this asset should not appear on any reports that are run prior to the date the asset was received in the exchange.
3. In the books used for tax purposes (for example, the Tax, AMT, and State books), enter the same Property Type, Service Date, Acquired Value, Depreciation Method, and Estimated Life as for the original asset (that is, the asset given up in the exchange). (For more about entering information in the ACE book, see “ACE Book,” page 7-12.)
Note If this asset is personal property, be sure that the MACRS averaging convention is correctly set in the Edit Company screen before you depreciate the asset for the first time. The averaging convention should be the same as the one used by the original asset.
4. In the Beginning Date field, enter the month-end prior to when the exchange occurred. For example, if the exchange occurred on October 15, 2007, enter September 30, 2007 (assuming a monthly accounting cycle).
7-12 / FAS 50 Asset Accounting - Peachtree Edition
5. In the Beginning Year-To-Date field, enter the amount of depreciation already claimed on the original asset in the year of the exchange. This is the information calculated above in step 1 before you disposed of the original asset. The Beginning Year-to-Date depreciation is the amount of depreciation taken from the first day of the disposal year through the Beginning Date entered in step 4.
6. In the Beginning Accumulated field, enter the amount of depreciation that was taken on the original asset plus the amount entered in the Beginning Year-to-Date field above. For example, if the exchange occurred on October 15, 2007, enter the depreciation taken from the original asset’s placed-in-service date through September 30, 2007.
7. If boot was paid, in the Internal book (and any other financial book), enter $0 in the Acquired Value field and NO in the Depreciation Method field. (If boot was paid, this asset exists only for tax purposes, not for financial purposes.)
If boot was not paid, follow the instructions for steps 2 and 5 under 2(b) below for entering information in the Internal book. You do not need to create a second asset.
8. Click the Save button to save the information.
ACE Book
If you have accepted our default of NONE in the Emulate Book field for the ACE book on the Book Defaults page of the New Company (or Edit Company) screen, you must make the following changes in the ACE book when entering the newly acquired asset.
Note If you have already changed the Emulate Book field for the ACE book to “AMT: Post-1993,” you should apply the instructions given above for the books used for tax purposes to the ACE book and ignore the instructions below.
When entering the portion of the newly acquired asset that is treated as a continuation of the asset given up in the exchange, you must do the following in the ACE book:
Performing Asset Functions / 7-13
1. Change the Depreciation Method from NO to OC (Own Calculation).
2. In the Beginning Date field, enter the month-end prior to when the exchange occurred. (This is the same date as entered in the Tax book.)
3. In the Beginning Year-To-Date and the Beginning Accumulated fields, accept the default entry of zero.
Step 2(b)
In Step 2(b), you enter the portion of the newly acquired asset that is treated as a new asset. This step is necessary only if boot is paid, or if you are entering the newly acquired asset in the Internal book for GAAP purposes (see step 7 above).
1. In the Description field, enter a description of the newly acquired asset.
Note In order to link this asset to the first asset, use the Description field and/or the Company Asset Number fields. This is important because the two assets actually represent one physical asset. If this asset is disposed in the future, you must locate and dispose both assets.
2. In the Service Date field, enter the date on which the exchange occurred.
3. In the Tax book, enter an appropriate depreciation method and recovery period based on the new placed-in-service date.
4. In the Tax book, enter an Acquired Value equal to the basis in the newly acquired asset less the adjusted basis in the original asset. This amount is generally the same as the cash paid for the new asset. If only like-kind property was exchanged (that is, no additional payment was made), enter an Acquired Value of $0 and NO in the Depreciation Method field.
7-14 / FAS 50 Asset Accounting - Peachtree Edition
Note Do not enter anything in the Beginning Depreciation fields (Beginning Date, Beginning Year-to-Date, and Beginning Accumulated Depreciation).
5. In the Internal book, enter an Acquired Value equal to the basis calculated for financial purposes, and enter an appropriate depreciation method and recovery period.
6. Click the Save button to save the information.
Luxury Cars and Like-Kind Exchanges
If you are entering a luxury car that was received in a like-kind exchange or involuntary conversion, you should consider entering it as one asset, rather than two assets, with a placed-in-service date of the exchange, in order to ensure that the application correctly applies the luxury auto limits. The Acquired Value of this asset should be the full basis in the newly acquired asset. Using this approach, you should not select Yes in the Exchange field, and there is no need to enter any data in the Beginning Depreciation fields. The IRS has not yet issued regulations on this issue.
Editing Disposal Information
You can change disposal information after you perform a disposal of an asset.
To edit disposal information
1. Go to the Detail View of the disposed asset.
2. Click the Disposal tab.
3. Edit any of the fields.
Performing Asset Functions / 7-15
4. Click the Save button. The application displays a message asking you to confirm your changes.
5. Click the Yes button to confirm the changes to the disposal information.
Note You cannot edit disposal information when the asset was disposed during a like-kind exchange or an involuntary conversion. For more information, see “Like-Kind Exchanges and Involuntary Conversions After 1/2/2000,” page 7-8.
Viewing the Disposal Calculation
You can view a detailed worksheet of the calculations used to determine the gain or loss for an individual asset by clicking the Worksheet button. The application initially displays the worksheet for the Tax book. However, you can view the worksheet for each of the seven books by clicking the page scroll buttons at the top of the report.
You can also print the worksheet by clicking the Print button on the Worksheet screen. For more information about viewing and printing the worksheet, see “Viewing a Report,” page 9-19.
Viewing Current-Year Disposals
By default, the Disposal report includes all disposed assets in the company, no matter how long ago they were disposed. However, you can specify a range of disposal dates when you run the Disposal report. To see only the assets disposed during the current year on the Disposal report, follow the steps below.
7-16 / FAS 50 Asset Accounting - Peachtree Edition
To view only current-year disposals
1. Select Reports/Standard Reports/Disposal from the menu bar. The Report Definition screen appears.
Notice the Run for Assets Disposed field, which contains two fields for entering dates.
2. In the From field, enter the beginning date of the current fiscal year.
3. In the To field, enter the ending date of the current fiscal year.
4. Complete the remaining fields on the Report Definition screen, and then click the Run Report button.
The application either displays the Disposal report in the report viewer or sends the Disposal report to the default printer, or both. The Disposal report now includes only those assets disposed during the current fiscal year. Notice that the range of dates that you entered appears beneath the title of the report.
Deleting Asset Disposals
If you reset depreciation on an asset the disposal is cancelled. You can also delete the entire asset in order to delete disposal information. However, deleting assets is generally not recommended.
Inactivating and Reactivating Assets
Reactivating and Inactivating assets is an important element of the asset maintenance activities.
Performing Asset Functions / 7-17
Why Inactivate Assets?
Because you don’t want to delete them. If you delete an asset, you lose all of its history information. If you inactivate an asset, you retain that asset’s history and accomplish most other goals you would attain by deleting an asset.
You should inactivate (rather than delete) an asset that has been disposed of if you believe that you may need the asset’s data again for an audit or other such purposes.
Inactivating an asset affects the asset in these ways:
• The application removes the asset from all reports except the File Listing report.
• No additional depreciation is calculated on the asset.
• The asset’s tabs become disabled. You are allowed to view but not edit the inactive asset’s descriptive fields.
• The asset’s title bar indicates its inactive status.
• In Group View, the Activity field indicates the asset’s inactive status.
Be sure you have completed all necessary processing on an asset before you inactivate it.
To inactivate assets
You can inactivate an asset individually or inactivate a selection of assets. Or you can create a group and inactivate the entire group of assets by clicking the Select All button on the toolbar.
1. Select the asset or assets you want to inactivate.
2. Select Asset/Inactivate from the menu bar. A message appears asking you to confirm your intention to inactivate the selected assets.
3. Click Yes.
7-18 / FAS 50 Asset Accounting - Peachtree Edition
Why Reactivate an Asset?
Once you inactivate an asset you can no longer perform asset functions on it or edit it. To make changes to an inactive asset, you must first reactivate the asset. You also reactivate an asset to make it appear on reports again. The next time depreciation is calculated after an asset is reactivated, the application calculates depreciation through the inactive period.
To reactivate assets
You can reactivate an asset individually or you can reactivate a selection of assets. Or you can create a group and reactivate the entire group of assets by clicking the Select All button on the toolbar.
1. Select the asset or assets you want to reactivate.
2. Select Asset/Reactivate from the menu bar. A message appears asking you to confirm your intention to reactivate the selected assets.
3. Click Yes.
Deleting Assets
Generally, you don’t want to delete an asset. If you delete an asset, you lose all of its history information. If you inactivate the asset instead, you retain that asset’s history and accomplish most other goals you would attain by deleting an asset. Delete an asset only if you think you will never again need a single piece of information from that asset (say, for instance, for a tax audit).
Deleted asset numbers are not reused unless it is the last asset number issued.
Caution Deleted assets cannot be undeleted.

Performing Asset Functions / 7-19
If you still want to delete an asset, follow the procedures outlined below.
To delete a single asset
1. Enter Detail View for the asset you want to delete.
2. Do any one of the following:
• Select Asset/Delete from the menu bar.
• Click the Delete button on the toolbar.
The application displays a confirmation message.
3. Click Yes to delete the asset.
To delete multiple assets
1. Select the assets you want to delete from the spreadsheet in Group View.
2. Select Asset/Delete from the menu bar. The application displays a confirmation message.
3. Click Yes to delete the assets.

7-20 / FAS 50 Asset Accounting - Peachtree Edition
8 Depreciation
Calculating depreciation is one of the most important aspects of working with fixed assets. You can calculate and update current depreciation, project future depreciation amounts, or recalculate depreciation for an earlier period.
The Depreciation menu is where you go to calculate current depreciation for all assets or for a group of assets. You can depreciate monthly, quarterly, or annually. You can also reset depreciation back to an earlier date. Using this menu, you can choose to project depreciation amounts for future years for a group of assets or for an entire company.
This chapter covers these topics plus the steps necessary to create custom depreciation methods. For additional detailed information about the elements of depreciation, depreciation defaults, and disposal methods, you may also want to refer to Appendix A, “Depreciation and Fixed Asset Concepts.”
Understanding Depreciation Calculation Concepts
Following are several hints regarding the proper methods for calculating depreciation effectively.
Depreciation Calculation Dates
The placed-in-service date, the beginning date, the period close date, and the through date are the four dates from which the application calculates depreciation. The placed-in-service date is self-explanatory. The beginning date is the date through which depreciation was already calculated for the asset at the time you entered it in the application. The period close date is the date on
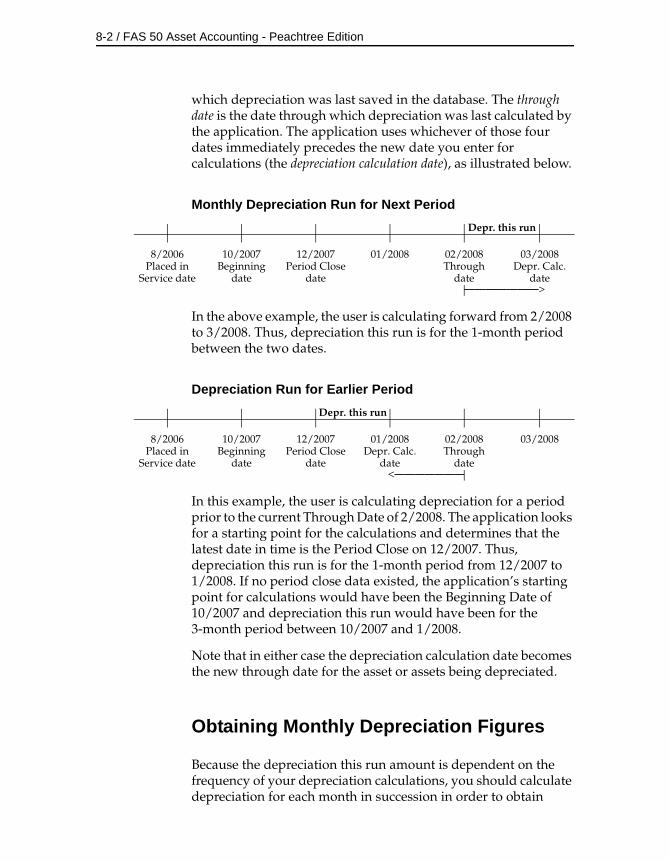
8-2 / FAS 50 Asset Accounting - Peachtree Edition
which depreciation was last saved in the database. The through date is the date through which depreciation was last calculated by the application. The application uses whichever of those four dates immediately precedes the new date you enter for calculations (the depreciation calculation date), as illustrated below.
Monthly Depreciation Run for Next Period
In the above example, the user is calculating forward from 2/2008 to 3/2008. Thus, depreciation this run is for the 1-month period between the two dates.
Depreciation Run for Earlier Period
In this example, the user is calculating depreciation for a period prior to the current Through Date of 2/2008. The application looks for a starting point for the calculations and determines that the latest date in time is the Period Close on 12/2007. Thus, depreciation this run is for the 1-month period from 12/2007 to 1/2008. If no period close data existed, the application’s starting point for calculations would have been the Beginning Date of 10/2007 and depreciation this run would have been for the 3-month period between 10/2007 and 1/2008.
Note that in either case the depreciation calculation date becomes the new through date for the asset or assets being depreciated.
Obtaining Monthly Depreciation Figures
Because the depreciation this run amount is dependent on the frequency of your depreciation calculations, you should calculate depreciation for each month in succession in order to obtain
Depr. this run
8/2006Placed in
Service date
10/2007Beginning
date
12/2007Period Close
date
01/2008 02/2008Through
date
03/2008Depr. Calc.
date———————>
Depr. this run
8/2006Placed in
Service date
10/2007Beginning
date
12/2007Period Close
date
01/2008Depr. Calc.
date
02/2008Through
date
03/2008
<———————
Depreciation / 8-3
accurate monthly depreciation figures. For example, suppose today is April 2, 2007. You last calculated depreciation for all assets and all books through February 2007. This means that current year-to-date and accumulated depreciation for all assets has been calculated through February 2007, and the current through date in Detail View is February 2007.
To calculate depreciation for March, you would type 03/07 as the date through which you want to calculate depreciation and select an output option. If you run a Depreciation Expense report at the time you calculate depreciation, the column that shows depreciation for this run will give you the March figures; that is, depreciation is calculated from the current through date (February) through the depreciation calculation date (March). After you calculate depreciation, the new through date in Detail View for your assets will be March 2007, and each asset’s current depreciation figures will include the March numbers.
Note If you need only to update the assets in the application and don’t need to generate a report, make sure you clear all Send To check boxes.
Calculating Depreciation for Earlier Periods
If you calculate depreciation for an earlier period, you will reset current depreciation for the selected assets to the figures for the earlier period. Note that if you include a disposed asset in a report with a run date earlier than the disposal date, the gain/loss figures on the Disposal report will be incorrect for that asset. In any case, you can return to the current period amounts by executing the Depreciate command again, through the disposal date, after you finish calculating depreciation for the earlier period.
Midquarter Convention
One way to determine whether the midquarter convention applies is to run the Midquarter Applicability report before you execute the Depreciate command. If the report states that more than 40% of the aggregate basis of newly acquired qualifying MACRS property (generally, personal property) was placed in service in the last
8-4 / FAS 50 Asset Accounting - Peachtree Edition
three months of the tax year, you need to select Edit Company from the File menu, change the Book Override to Midquarter, and depreciate the assets. For details regarding the midquarter convention settings, see Chapter 4, “Setting Up the Application.”
Changes to the Book Overrides’ settings have no effect on future depreciation calculations for the assets that have already been depreciated. The only exception is if you reset an asset’s depreciation to the placed-in-service date and clear the MACRS convention setting in the Reset Depreciation screen.
The midquarter convention is optional for the 2001 tax year if September 11, 2001 occurs in the third or fourth quarter of your fiscal year. Pursuant to IRS Notice 2001-70 and 2001-74, you can elect to use the half-year convention, even if more than 40% of the aggregate depreciable basis of newly acquired qualifying MACRS property was placed in the last three months of the tax year.
To make the half-year convention election when you would otherwise be required to use the midquarter convention, write “Election Pursuant to Notice 2001-70” across the top of Form 4562, Depreciation and Amortization. You can tell the application to write this text on the form when you complete the Form 4562 report definition screen.
Multiple Books
Because you can select which books to include for depreciation calculations, a given asset may have current depreciation calculated through different dates in different books. Similarly, because you can select which assets to depreciate, different assets belonging to the same company may have current depreciation calculated through different dates. If you want all assets in all books to have depreciation calculated through the same date, select all books at the Depreciate screen and use the All FAS Assets group when calculating depreciation. This does not affect any disposed assets.
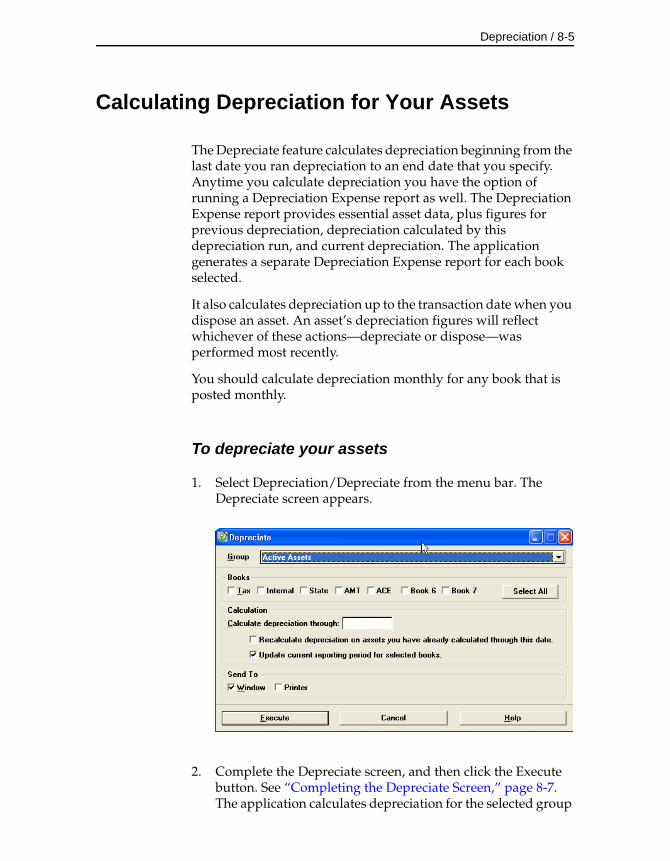
Depreciation / 8-5
Calculating Depreciation for Your Assets
The Depreciate feature calculates depreciation beginning from the last date you ran depreciation to an end date that you specify. Anytime you calculate depreciation you have the option of running a Depreciation Expense report as well. The Depreciation Expense report provides essential asset data, plus figures for previous depreciation, depreciation calculated by this depreciation run, and current depreciation. The application generates a separate Depreciation Expense report for each book selected.
It also calculates depreciation up to the transaction date when you dispose an asset. An asset’s depreciation figures will reflect whichever of these actions—depreciate or dispose—was performed most recently.
You should calculate depreciation monthly for any book that is posted monthly.
To depreciate your assets
1. Select Depreciation/Depreciate from the menu bar. The Depreciate screen appears.
2. Complete the Depreciate screen, and then click the Execute button. See “Completing the Depreciate Screen,” page 8-7. The application calculates depreciation for the selected group
8-6 / FAS 50 Asset Accounting - Peachtree Edition
of assets. If you select a Send To option, the application either displays the results in the Report Viewer or sends them to a printer.
If you opted to display the results, click the Close button to exit the Report Viewer.
You can also depreciate only selected assets or an individual assets.
To depreciate only selected assets
1. In Group View, select the assets you want to depreciate.
2. Select Depreciation/Depreciate from the menu bar. The Depreciate screen appears.
3. In the Group field, select <Selected Assets>. (You may have to scroll up to select this option in the Group field.)
4. Complete the Depreciate screen, then click the Execute button. The application calculates depreciation for the selected assets, then either displays the results in the Report Viewer or sends them to a printer.
To depreciate only a single asset
1. Select the asset for which you want to calculate depreciation, and then go to the Detail View.
2. Select Depreciation/Depreciate from the menu bar. The Depreciate screen appears.
3. In the Group field, select <Detailed Asset #XX>, where XX is the System Number of the selected asset. (You may have to scroll up to select this option in the Group field.)
4. Complete the Depreciate screen, then click the Execute button. The application calculates depreciation for the selected asset, then either displays the results in the Report Viewer or sends them to a printer.
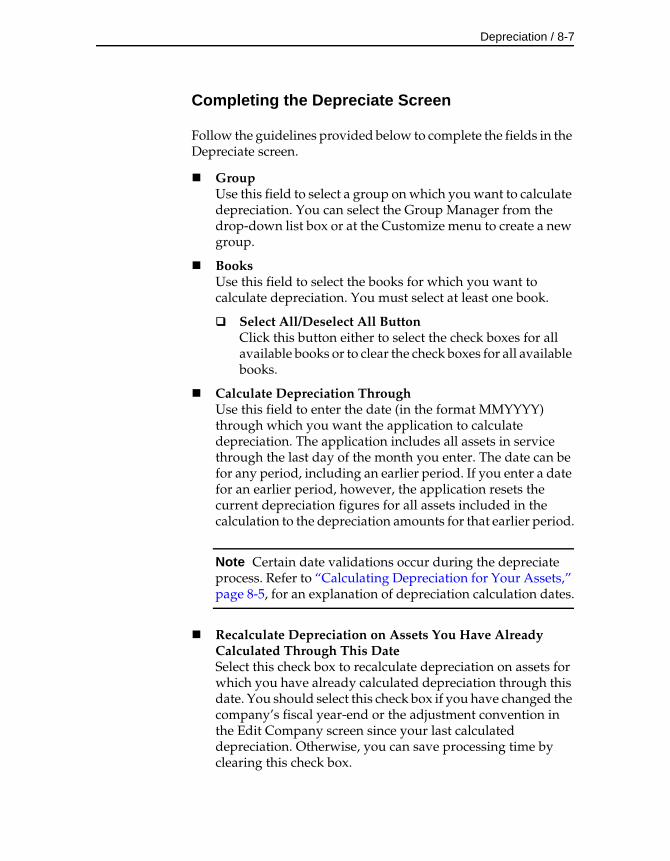
Depreciation / 8-7
Completing the Depreciate Screen
Follow the guidelines provided below to complete the fields in the Depreciate screen.
GroupUse this field to select a group on which you want to calculate depreciation. You can select the Group Manager from the drop-down list box or at the Customize menu to create a new group.
BooksUse this field to select the books for which you want to calculate depreciation. You must select at least one book.
Select All/Deselect All ButtonClick this button either to select the check boxes for all available books or to clear the check boxes for all available books.
Calculate Depreciation ThroughUse this field to enter the date (in the format MMYYYY) through which you want the application to calculate depreciation. The application includes all assets in service through the last day of the month you enter. The date can be for any period, including an earlier period. If you enter a date for an earlier period, however, the application resets the current depreciation figures for all assets included in the calculation to the depreciation amounts for that earlier period.
Note Certain date validations occur during the depreciate process. Refer to “Calculating Depreciation for Your Assets,” page 8-5, for an explanation of depreciation calculation dates.
Recalculate Depreciation on Assets You Have Already Calculated Through This DateSelect this check box to recalculate depreciation on assets for which you have already calculated depreciation through this date. You should select this check box if you have changed the company’s fiscal year-end or the adjustment convention in the Edit Company screen since your last calculated depreciation. Otherwise, you can save processing time by clearing this check box.
8-8 / FAS 50 Asset Accounting - Peachtree Edition
Update Current Reporting Period for Selected BooksSelect this check box to change the current reporting period to the date entered in the Calculate Depreciation Through field.
Send ToYou can send a report to two possible destinations: a display window or a printer. Click the appropriate check box. If you do not want to generate a report, clear both check boxes. When no boxes are selected, the application calculates depreciation for the selected assets and updates them in Detail View.
Posting Depreciation to Peachtree by Sage
You can post depreciation expense directly from FAS 50 Asset Accounting to Peachtree by Sage.
Calculating Depreciation Before Posting
Before you can post depreciation, you must calculate depreciation for all assets to be included in your posting file. You should calculate depreciation for each period (whether monthly, quarterly, or annually) you plan to post. Do this through the Depreciate command from the Depreciation menu. Calculate depreciation through the posting date, making sure to select the depreciation book you use for financial reporting, typically the Internal book. Run and review the report for all assets to be included in your output file.
Caution The application uses the amount in the Depreciation This Run column for the depreciation amounts in the output file. Therefore, it is important that the amount of depreciation in the Depreciation This Run column represents the depreciation expense for the period you want to post. To ensure the amounts in the Depreciation This Run column represent the period you want to post, follow the guidelines below.
If you post depreciation monthly and calculate depreciation monthly, simply post depreciation after you calculate your monthly depreciation figures. However, if you are not sure what
Depreciation / 8-9
period was included in the last depreciation run figures, use the following procedure:
1. Calculate depreciation through the month-end before the beginning of the posting period. For example, to post depreciation for October 2001, first calculate depreciation through September 2001.
2. Next, calculate depreciation through the end of the posting period. Continuing the example, you would calculate depreciation through October 2001. The period included in the Depreciation This Run column, shown on the Depreciation Expense report, would include only the month of October (the period since the last time you calculated depreciation). The “As of” date at the top of the report should be October 2001, and all active assets should have a thru date of September 2001.
3. Post depreciation using a posting date of October 2001.
In most cases, you will want to include all assets in both the depreciation calculations and the posting file. To include all assets, calculate depreciation for the group All FAS Assets.
Posting Depreciation
Now that you have prepared your assets in the application, you are ready to post depreciation expense.
Before you follow the instructions below, make sure you have done the following:
• Mapped the FAS 50 Asset Accounting company to a company in Peachtree by Sage.
• Calculated depreciation on the group of assets for which you are posting depreciation.
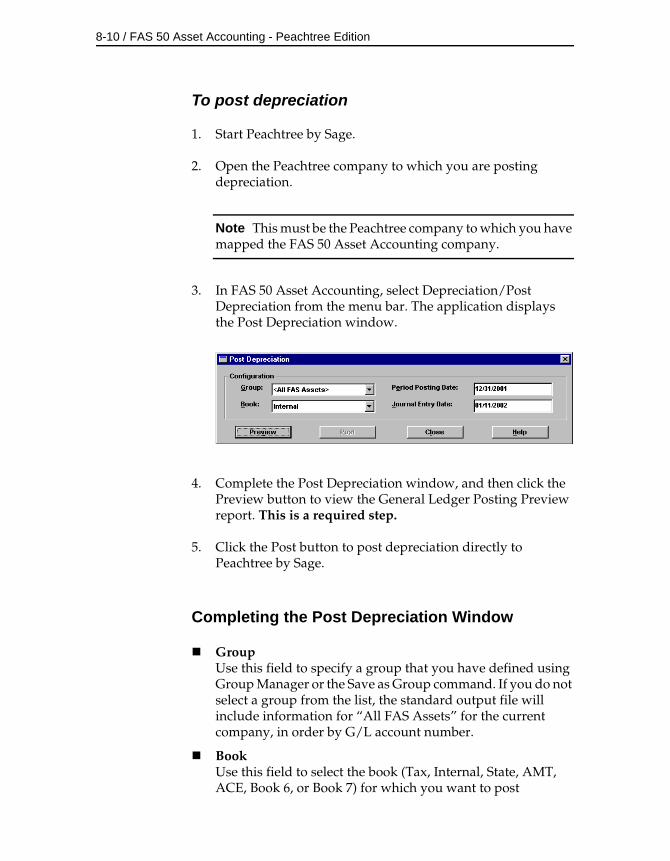
8-10 / FAS 50 Asset Accounting - Peachtree Edition
To post depreciation
1. Start Peachtree by Sage.
2. Open the Peachtree company to which you are posting depreciation.
Note This must be the Peachtree company to which you have mapped the FAS 50 Asset Accounting company.
3. In FAS 50 Asset Accounting, select Depreciation/Post Depreciation from the menu bar. The application displays the Post Depreciation window.
4. Complete the Post Depreciation window, and then click the Preview button to view the General Ledger Posting Preview report. This is a required step.
5. Click the Post button to post depreciation directly to Peachtree by Sage.
Completing the Post Depreciation Window
GroupUse this field to specify a group that you have defined using Group Manager or the Save as Group command. If you do not select a group from the list, the standard output file will include information for “All FAS Assets” for the current company, in order by G/L account number.
BookUse this field to select the book (Tax, Internal, State, AMT, ACE, Book 6, or Book 7) for which you want to post

Depreciation / 8-11
depreciation expense. The Internal book is the default selection.
The application will post depreciation to the standard output file for any of the seven books, but it will only do so for one book at a time. On the Edit Company window, make sure that the book for which you are posting depreciation to the output file is open.
Period Posting DateUse this field to specify the end of the period through which you want to post depreciation expense. Enter the date in MM/YY, MM/YYYY, or MM/DD/YYYY format. The application validates that the date entered is the end of a period. The standard output file will include the Depreciation This Run figures only for the assets for which depreciation has been calculated through the posting date you enter in this field. If you do not enter a date in this field, you are unable to preview the Posting report or post depreciation.
Journal Entry DateUse this field to specify the date on which you want to post the transaction in Peachtree by Sage. Enter the date in MM/DD/YYYY format. The default date is the system date; generally, this is the date that you are completing the window. However, you can change this date if you want.
Example: Suppose you closed the books for March in Peachtree by Sage, but inadvertently did not post the depreciation expense journal entry at that time. Now it is April, and you want to post the depreciation expense journal entry for March. You would enter a March date in the Period Posting Date field and an April date in the Journal Entry Date field.
Resetting Depreciation
Resetting depreciation on an asset allows you to roll back depreciation information to an archived date. Depreciation can be reset to either the placed-in-service date or the beginning date. You can reset depreciation for a single asset or a group of assets. Only those assets that are selected either in Group View or Detail View will be reset.

8-12 / FAS 50 Asset Accounting - Peachtree Edition
Note Resetting depreciation on a disposed asset cancels the disposal.
To reset depreciation
1. Select the asset or assets on which you want to reset depreciation.
2. Select Depreciation/Reset Depreciation from the menu bar, or click the Reset Depreciation button on the toolbar. The Reset Depreciation screen appears.
3. Complete the Reset Depreciation screen, and then click OK. See “Completing the Reset Depreciation Screen,” page 8-12.
The application resets depreciation for the selected assets.
Completing the Reset Depreciation Screen
Follow the guidelines provided below to complete the fields in the Reset Depreciation screen.
BooksSelect the check box next to the books for which you want to reset depreciation.
Depreciation / 8-13
Select All/Deselect All ButtonClick this button either to select the check boxes for all available books or to clear the check boxes for all available books.
ToUse this field to specify the date to which you want to reset depreciation.
Placed-In-Service DateClick this option button to reset depreciation to the asset’s Placed-In-Service Date. Selecting this option resets all depreciation figures to zero (the amount of depreciation on the date the asset was placed in service). The amounts in the Period Close fields, if any, will be deleted. Select this option if critical depreciation values, such as the acquired value or depreciation method, were entered incorrectly. In this case, you need to reenter the beginning amounts and other values after resetting depreciation and before executing the Depreciate command.
Beginning DateClick this option button to reset the current depreciation fields to the beginning date of the asset (if applicable). Selecting this option resets depreciation figures to the amounts entered in the asset’s beginning depreciation fields. The amounts in the Period Close fields, if any, will be deleted. This is the default. Select this option when the beginning values are correct but the current or period close depreciation figures are not. After you reset to the beginning depreciation amounts, you can change asset data as needed and recalculate depreciation by executing the Depreciate command.
Note If there is no date in the Beginning Date field, the application automatically resets the asset’s depreciation to the Placed-In-Service Date.
Period Close DateClick this option button if you want to reset depreciation back to the last period close date. Selecting this option resets the current depreciation figures to the amounts entered when the last period close was performed.
8-14 / FAS 50 Asset Accounting - Peachtree Edition
Note If there is no date in the Period Close Date field, the application automatically resets the asset’s depreciation to the Beginning Date (if one exists). If there is no date in the Beginning Date field, the application resets the asset’s depreciation to the Placed-In-Service Date.
Clear MACRS Convention?Select this check box if you want to change the averaging convention on qualifying MACRS property when you reset depreciation. Qualifying MACRS property is generally property types P, Q, A, and T, as well as those property type R assets that do not use the midmonth convention. You must also change the averaging convention in the Edit Company screen (on the Book Overrides page) before you recalculate depreciation. This check box is available only when you select the Beginning Date or the Placed-in-Service Date options; it is not available when you select the Period Close Date.
Note If you want to reset depreciation on an asset that is qualifying MACRS property (or on a group of assets that includes qualifying MACRS property), and you want to recalculate depreciation using a different averaging convention (that is, use the half-year convention instead of the midquarter convention, or vice versa), follow these steps: First, select the Clear MACRS Convention check box. Next, change the averaging convention in the Edit Company screen (on the Book Overrides page). Finally, recalculate depreciation.
Running a Budgetary Projection
For each fiscal year, it’s easy to view the projected depreciation expense for one asset or for a group of assets.You can view the projected depreciation expense in two ways:
• Run a monthly projection, which shows the projected depreciation expense for each month in a single year.
• Run an annual projection, which shows the projected depreciation expense for multiple years.
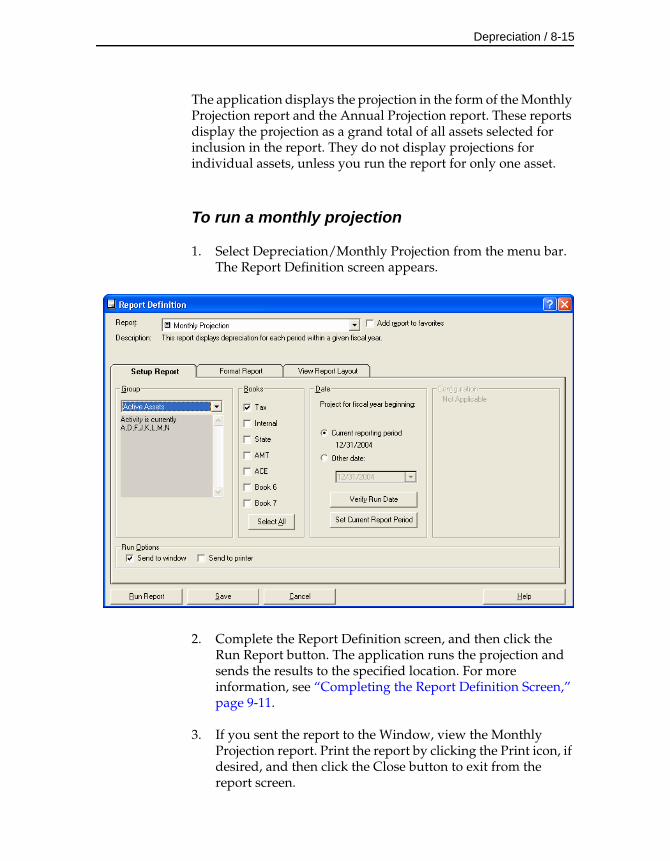
Depreciation / 8-15
The application displays the projection in the form of the Monthly Projection report and the Annual Projection report. These reports display the projection as a grand total of all assets selected for inclusion in the report. They do not display projections for individual assets, unless you run the report for only one asset.
To run a monthly projection
1. Select Depreciation/Monthly Projection from the menu bar. The Report Definition screen appears.
2. Complete the Report Definition screen, and then click the Run Report button. The application runs the projection and sends the results to the specified location. For more information, see “Completing the Report Definition Screen,” page 9-11.
3. If you sent the report to the Window, view the Monthly Projection report. Print the report by clicking the Print icon, if desired, and then click the Close button to exit from the report screen.
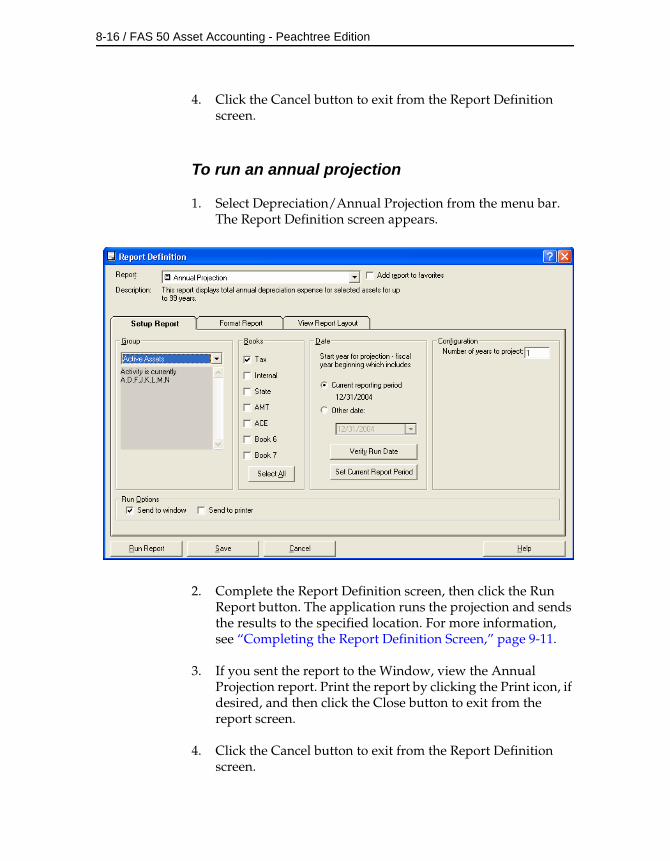
8-16 / FAS 50 Asset Accounting - Peachtree Edition
4. Click the Cancel button to exit from the Report Definition screen.
To run an annual projection
1. Select Depreciation/Annual Projection from the menu bar. The Report Definition screen appears.
2. Complete the Report Definition screen, then click the Run Report button. The application runs the projection and sends the results to the specified location. For more information, see “Completing the Report Definition Screen,” page 9-11.
3. If you sent the report to the Window, view the Annual Projection report. Print the report by clicking the Print icon, if desired, and then click the Close button to exit from the report screen.
4. Click the Cancel button to exit from the Report Definition screen.
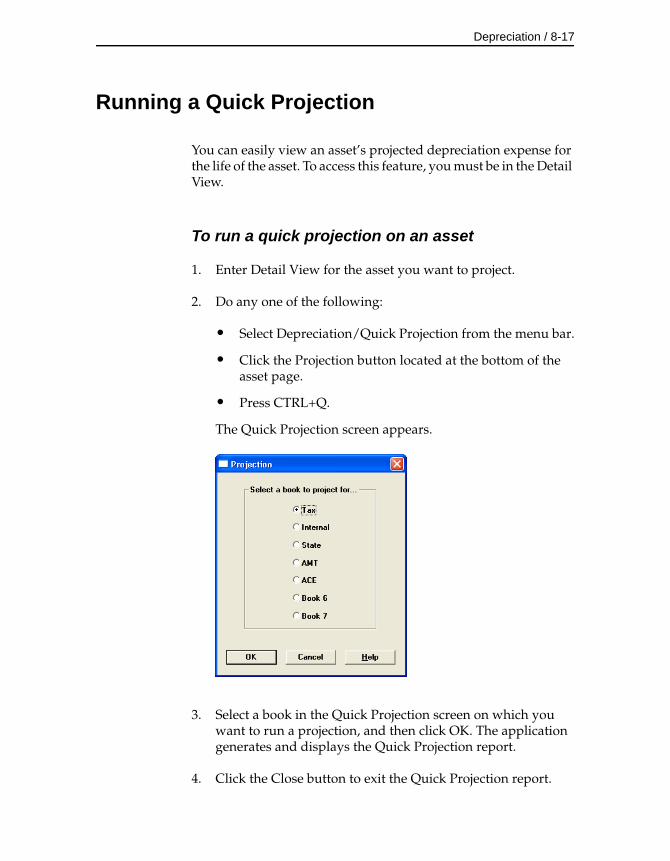
Depreciation / 8-17
Running a Quick Projection
You can easily view an asset’s projected depreciation expense for the life of the asset. To access this feature, you must be in the Detail View.
To run a quick projection on an asset
1. Enter Detail View for the asset you want to project.
2. Do any one of the following:
• Select Depreciation/Quick Projection from the menu bar.
• Click the Projection button located at the bottom of the asset page.
• Press CTRL+Q.
The Quick Projection screen appears.
3. Select a book in the Quick Projection screen on which you want to run a projection, and then click OK. The application generates and displays the Quick Projection report.
4. Click the Close button to exit the Quick Projection report.
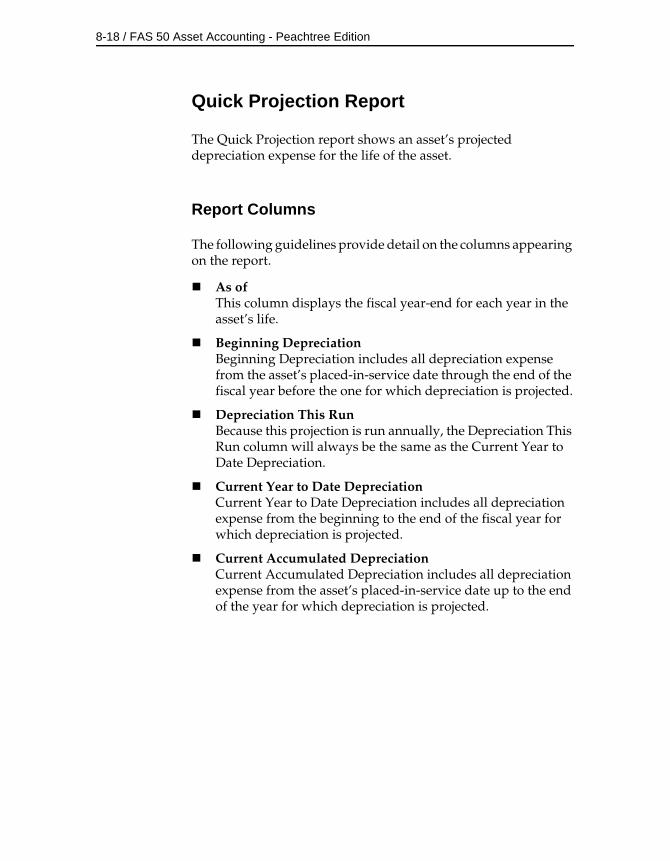
8-18 / FAS 50 Asset Accounting - Peachtree Edition
Quick Projection Report
The Quick Projection report shows an asset’s projected depreciation expense for the life of the asset.
Report Columns
The following guidelines provide detail on the columns appearing on the report.
As ofThis column displays the fiscal year-end for each year in the asset’s life.
Beginning DepreciationBeginning Depreciation includes all depreciation expense from the asset’s placed-in-service date through the end of the fiscal year before the one for which depreciation is projected.
Depreciation This RunBecause this projection is run annually, the Depreciation This Run column will always be the same as the Current Year to Date Depreciation.
Current Year to Date DepreciationCurrent Year to Date Depreciation includes all depreciation expense from the beginning to the end of the fiscal year for which depreciation is projected.
Current Accumulated DepreciationCurrent Accumulated Depreciation includes all depreciation expense from the asset’s placed-in-service date up to the end of the year for which depreciation is projected.
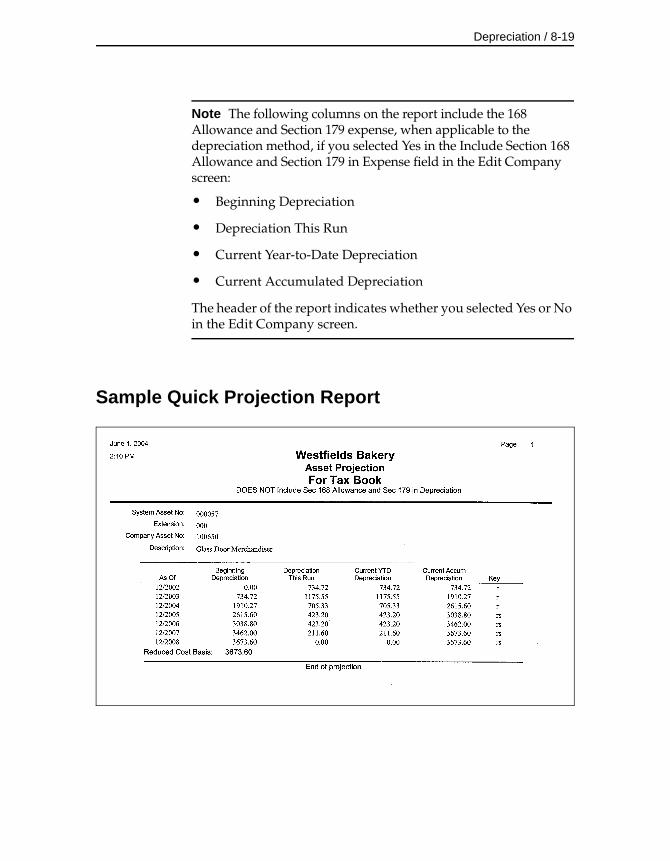
Depreciation / 8-19
Note The following columns on the report include the 168 Allowance and Section 179 expense, when applicable to the depreciation method, if you selected Yes in the Include Section 168 Allowance and Section 179 in Expense field in the Edit Company screen:
• Beginning Depreciation
• Depreciation This Run
• Current Year-to-Date Depreciation
• Current Accumulated Depreciation
The header of the report indicates whether you selected Yes or No in the Edit Company screen.
Sample Quick Projection Report

8-20 / FAS 50 Asset Accounting - Peachtree Edition
Changing Depreciation-Critical Information
The application uses the information entered in several fields to calculate depreciation. The following fields are the depreciation-critical fields:
• Property Type
• Placed-In-Service Date
• Acquisition Value
• Depreciation Method
• Estimated Life
• Salvage Value
• Section 168 Allowance % (if applicable to method)
• Section 179
• Business-Use Percentage
When you change a value in a depreciation-critical field after you have calculated depreciation for the asset, you must tell the application when to apply the change. The application could apply the new information at several different points in the life of the asset. A message box will prompt you to select the date after you make the change to the depreciation-critical field.
To change depreciation-critical information
1. Go to Detail View for the asset whose depreciation-critical information you want to change.
2. Change the information in one of the depreciation-critical fields. When you tab out of the field, the application displays a message warning you that you are making a change to a depreciation-critical field and asking if you want to continue.
3. Click the Yes button to continue. The application displays a message asking when you want to apply the change to the depreciation-critical field.
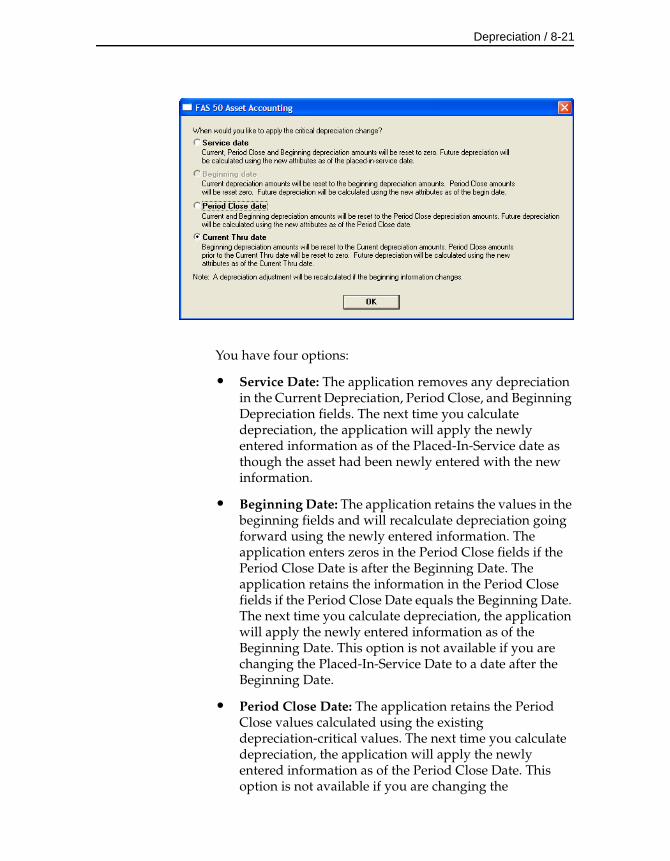
Depreciation / 8-21
You have four options:
• Service Date: The application removes any depreciation in the Current Depreciation, Period Close, and Beginning Depreciation fields. The next time you calculate depreciation, the application will apply the newly entered information as of the Placed-In-Service date as though the asset had been newly entered with the new information.
• Beginning Date: The application retains the values in the beginning fields and will recalculate depreciation going forward using the newly entered information. The application enters zeros in the Period Close fields if the Period Close Date is after the Beginning Date. The application retains the information in the Period Close fields if the Period Close Date equals the Beginning Date. The next time you calculate depreciation, the application will apply the newly entered information as of the Beginning Date. This option is not available if you are changing the Placed-In-Service Date to a date after the Beginning Date.
• Period Close Date: The application retains the Period Close values calculated using the existing depreciation-critical values. The next time you calculate depreciation, the application will apply the newly entered information as of the Period Close Date. This option is not available if you are changing the
8-22 / FAS 50 Asset Accounting - Peachtree Edition
Placed-In-Service Date to a date after the Period Close Date.
• Current Through Date: The application retains the Current Through Date values calculated using the existing depreciation-critical values. Period Close amounts before the Current Through Date will be reset to zero. The next time you calculate depreciation beyond the Current Through Date, the application will apply the newly entered information. This option is not available if you are changing the Placed-In-Service Date to a date after the Current Through Date.
4. Click one of the four option buttons on the message box, and then click OK. The application updates the information in the Beginning Depreciation, Current Depreciation, and Period Close fields.
5. Click the Save button.
Changing the Beginning Depreciation Fields
When you make a change to any of the Beginning Depreciation fields (Beginning Date, Beginning Year-to-Date Depreciation, or Beginning Accumulated Depreciation), the application makes the following changes to the asset:
• The newly entered Beginning Depreciation information is copied into the Current Depreciation fields (Current Through Date, Current Year-to-Date Depreciation, and Current Accumulated Depreciation).
• The information in the Period Close fields (Period Date, Period Year-to-Date Depreciation, and Period Accumulated Depreciation) is set to zero.
• The Depreciation adjustment, if any, is recalculated.
Depreciation / 8-23
Conducting a Period Close
The Period Close feature allows you to store and protect current depreciation values for all assets. This feature provides a security blanket against future calculation problems, such as changes made to assets that lead to incorrect calculations. If needed, you can then later reset depreciation to the period close date, a time when you last tied out to your general ledger.
The tasks involved in conducting a period close are exactly the same as those for running a Depreciation Expense report. The only difference is how you access the feature. Plus, the application stores the results of conducting the period close in the Period Close fields. This allows you to later reset depreciation to a period close date if necessary.
You can view period close calculation amounts in Detail View of an asset. The last three book-related fields display those figures:
• Period Close Date
• Period Year-to-Date Depreciation
• Period Accumulated Depreciation
Hints for Conducting a Period Close
• Before you conduct a Period Close, calculate depreciation on the assets you want to include in the process. To calculate depreciation, execute the Depreciate command from the Depreciation menu. The date that you enter in the Period Close screen must be the same as the date through which you have calculated depreciation. If depreciation on an asset has not been calculated through the date in this field, it will not appear on the Period Close report.
• We recommend that you select the All FAS Asset group when you conduct a period close.
Note The date of the Period Close must be on or after the Beginning Date for each asset for which you are conducting the Period Close. The application prevents you from conducting a Period Close prior to an asset’s Beginning Date.
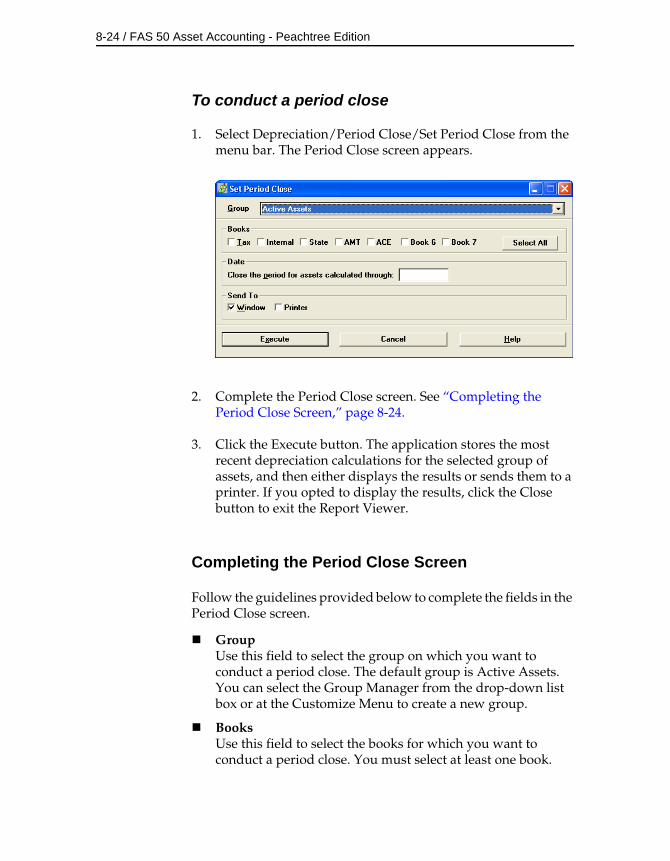
8-24 / FAS 50 Asset Accounting - Peachtree Edition
To conduct a period close
1. Select Depreciation/Period Close/Set Period Close from the menu bar. The Period Close screen appears.
2. Complete the Period Close screen. See “Completing the Period Close Screen,” page 8-24.
3. Click the Execute button. The application stores the most recent depreciation calculations for the selected group of assets, and then either displays the results or sends them to a printer. If you opted to display the results, click the Close button to exit the Report Viewer.
Completing the Period Close Screen
Follow the guidelines provided below to complete the fields in the Period Close screen.
GroupUse this field to select the group on which you want to conduct a period close. The default group is Active Assets. You can select the Group Manager from the drop-down list box or at the Customize Menu to create a new group.
BooksUse this field to select the books for which you want to conduct a period close. You must select at least one book.
Depreciation / 8-25
Select All/Deselect All ButtonClick this button either to select the check boxes for all available books or to clear the check boxes for all available books.
Close the Period for Assets Calculated ThroughUse this field to enter the date (in the format MMYYYY) through which you want the application to save previously calculated depreciation amounts. The application will include all assets for which depreciation has been calculated through the last day of the month entered. The date may be for any period, including an earlier period. If you enter a date for an earlier period, however, be sure you have calculated depreciation through that date for the assets you want to include in the report. The assets’ current through date must be the same as the date you enter in this field. This ensures that the selected assets appear on the report.
Send ToUse this field to specify where you want to send the report: display window or printer. If you do not want to generate a report, clear both check boxes.
Saving Calculations with a Period Close
The Period Close feature saves the most recent depreciation calculations and displays them in the three Period Close fields. When you conduct a period close, the application copies the amounts in the three depreciation-related fields to the three Period Close fields.
The table below shows the three fields that contain your depreciation calculations and the corresponding Period Close fields.
Depreciation Fields Period Close Fields
Current Year-to-Date Depreciation Period Year-to-Date Depreciation
Current Accumulated Depreciation Period Accumulated Depreciation
Through Date Period Close Date
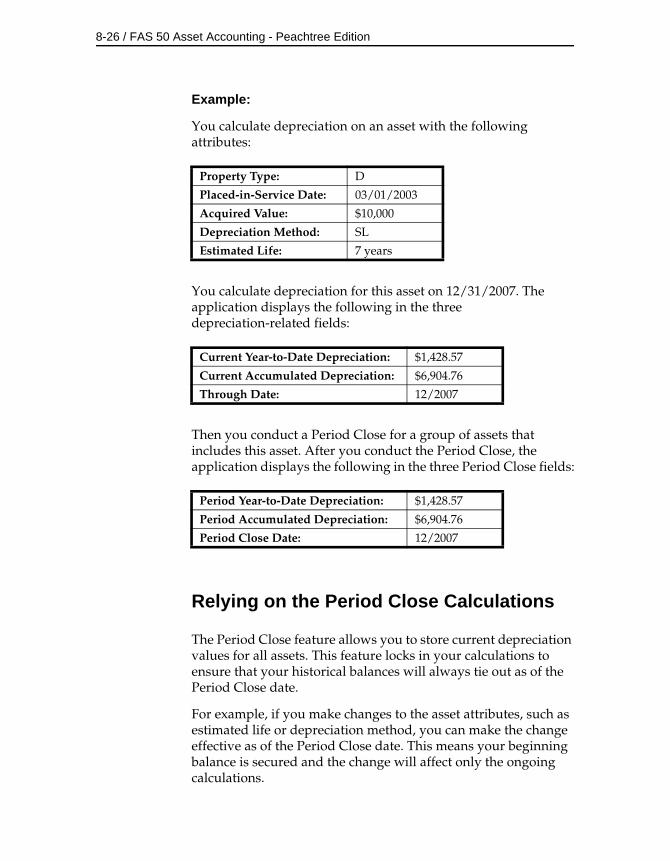
8-26 / FAS 50 Asset Accounting - Peachtree Edition
Example:
You calculate depreciation on an asset with the following attributes:
You calculate depreciation for this asset on 12/31/2007. The application displays the following in the three depreciation-related fields:
Then you conduct a Period Close for a group of assets that includes this asset. After you conduct the Period Close, the application displays the following in the three Period Close fields:
Relying on the Period Close Calculations
The Period Close feature allows you to store current depreciation values for all assets. This feature locks in your calculations to ensure that your historical balances will always tie out as of the Period Close date.
For example, if you make changes to the asset attributes, such as estimated life or depreciation method, you can make the change effective as of the Period Close date. This means your beginning balance is secured and the change will affect only the ongoing calculations.
Property Type: D
Placed-in-Service Date: 03/01/2003
Acquired Value: $10,000
Depreciation Method: SL
Estimated Life: 7 years
Current Year-to-Date Depreciation: $1,428.57
Current Accumulated Depreciation: $6,904.76
Through Date: 12/2007
Period Year-to-Date Depreciation: $1,428.57
Period Accumulated Depreciation: $6,904.76
Period Close Date: 12/2007
Depreciation / 8-27
The application uses the Period Close amounts as a “starting point” when you calculate depreciation. The Period Close amounts serve as the foundation on which future depreciation is calculated.
Example:
You enter an asset in January of 2007, and you calculate depreciation on the asset each month. In December 2007, you conduct a Period Close for a group of assets that includes this asset. The information in the current depreciation fields for December 2007 is now saved in your Period Close depreciation fields.
You continue to calculate depreciation monthly through March 2008. Then you realize that an error was made on the asset during data entry, and you need to change the estimated life from seven years to five years.
After you make the depreciation-critical change, the application will recalculate depreciation, starting with the December 2007 values, which are locked in and stored in the Period Close fields. The application will also calculate an adjustment as of December 2007 for the change in estimated life. Therefore, you are able to make the depreciation-critical change and claim an adjustment in the current year, without restating your historical values.
Period Close and Beginning Depreciation Fields
Both the Period Close fields and the Beginning Depreciation fields protect your depreciation calculations. The application does not allow you to calculate depreciation prior to the Beginning Date or the Period Close Date. (To do so, you must first reset depreciation back to the Placed-In-Service date.)
Please note the following rules for the Period Close and Beginning Depreciation fields:
• You cannot conduct a Period Close before the date in the Beginning Date field. (This is because you cannot calculate depreciation prior to the date in the Beginning Date field.)
8-28 / FAS 50 Asset Accounting - Peachtree Edition
• You can conduct a Period Close on the same date as the date in the Beginning Date field. If you do so, then all three sets of depreciation fields (the Beginning Depreciation fields, the Period Close fields, and the Current Depreciation fields) will contain the same information.
• When you conduct a Period Close after the Beginning Date, the application copies the depreciation amounts from the Current Depreciation fields into the Period Close fields. The information in the Beginning Depreciation fields remains the same. The application does not recalculate an adjustment.
• The application calculates adjustments to depreciation based on the information in the Beginning Depreciation fields. You can run a Depreciation Adjustment report to view the difference between depreciation calculated by the application and the amounts entered in the Beginning Depreciation fields.
Clearing the Period Close Fields
You can remove information from the period close fields for a single asset or for a group of assets, allowing you to easily rerun depreciation reports for periods prior to a period close. When you use the Clear Period Close feature, the application removes the period close date and enters zeros in the period close depreciation fields.
If an asset has been involved in a partial transfer or partial disposal, the application removes period close information for the original asset extension as well as all of the remaining extensions.
The application does not remove period close information from an asset whose status is Inactive.
Note Removing period close data does not immediately change the current depreciation data. However, if you made changes to asset attributes after the Period Close date, then depreciation calculations may be affected the next time depreciation is calculated prior to the current through date.
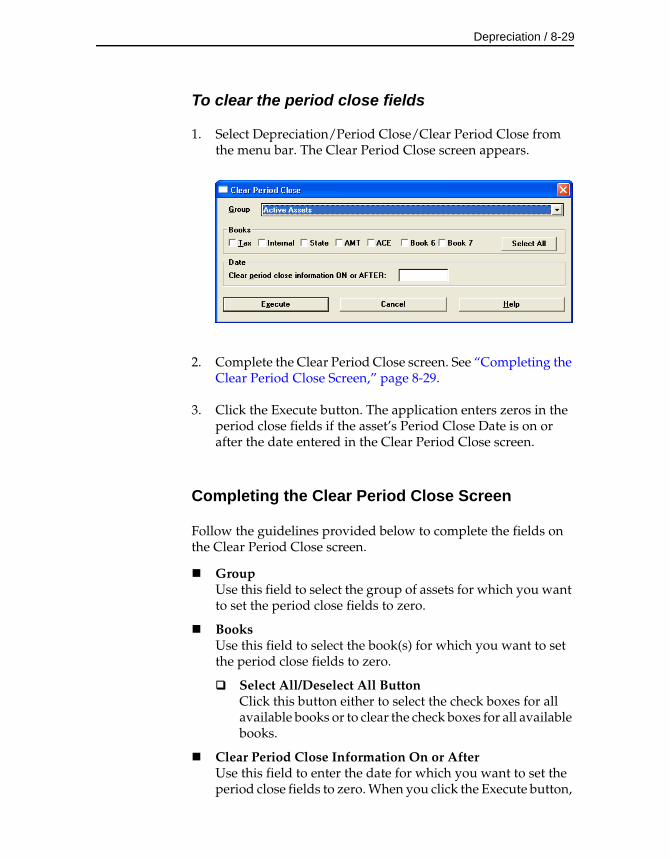
Depreciation / 8-29
To clear the period close fields
1. Select Depreciation/Period Close/Clear Period Close from the menu bar. The Clear Period Close screen appears.
2. Complete the Clear Period Close screen. See “Completing the Clear Period Close Screen,” page 8-29.
3. Click the Execute button. The application enters zeros in the period close fields if the asset’s Period Close Date is on or after the date entered in the Clear Period Close screen.
Completing the Clear Period Close Screen
Follow the guidelines provided below to complete the fields on the Clear Period Close screen.
GroupUse this field to select the group of assets for which you want to set the period close fields to zero.
BooksUse this field to select the book(s) for which you want to set the period close fields to zero.
Select All/Deselect All ButtonClick this button either to select the check boxes for all available books or to clear the check boxes for all available books.
Clear Period Close Information On or AfterUse this field to enter the date for which you want to set the period close fields to zero. When you click the Execute button,
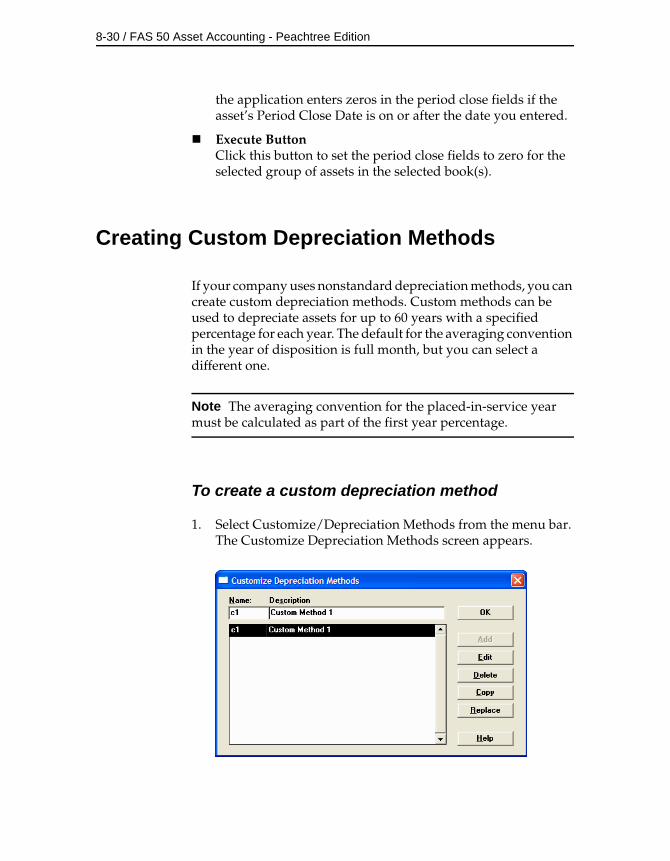
8-30 / FAS 50 Asset Accounting - Peachtree Edition
the application enters zeros in the period close fields if the asset’s Period Close Date is on or after the date you entered.
Execute ButtonClick this button to set the period close fields to zero for the selected group of assets in the selected book(s).
Creating Custom Depreciation Methods
If your company uses nonstandard depreciation methods, you can create custom depreciation methods. Custom methods can be used to depreciate assets for up to 60 years with a specified percentage for each year. The default for the averaging convention in the year of disposition is full month, but you can select a different one.
Note The averaging convention for the placed-in-service year must be calculated as part of the first year percentage.
To create a custom depreciation method
1. Select Customize/Depreciation Methods from the menu bar. The Customize Depreciation Methods screen appears.
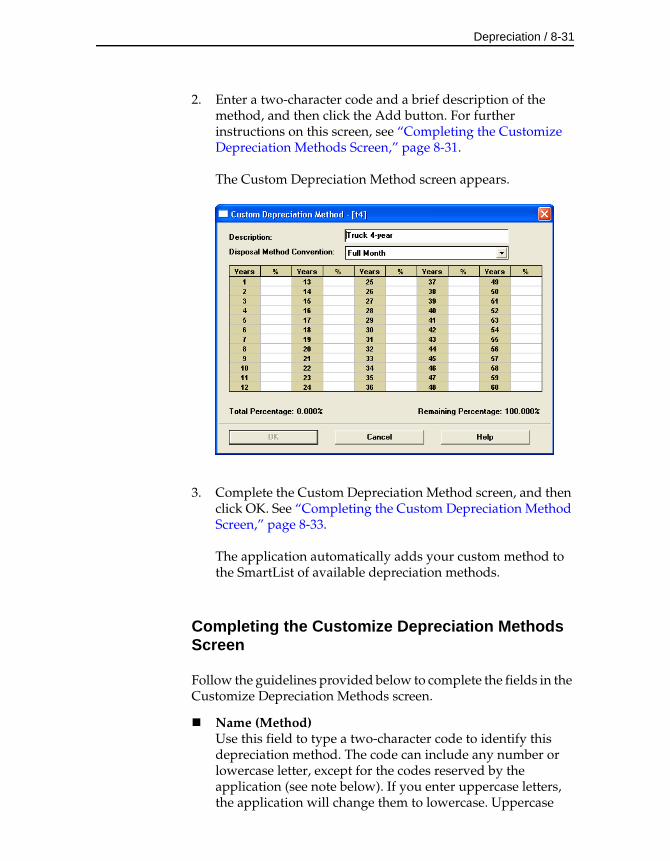
Depreciation / 8-31
2. Enter a two-character code and a brief description of the method, and then click the Add button. For further instructions on this screen, see “Completing the Customize Depreciation Methods Screen,” page 8-31.
The Custom Depreciation Method screen appears.
3. Complete the Custom Depreciation Method screen, and then click OK. See “Completing the Custom Depreciation Method Screen,” page 8-33.
The application automatically adds your custom method to the SmartList of available depreciation methods.
Completing the Customize Depreciation Methods Screen
Follow the guidelines provided below to complete the fields in the Customize Depreciation Methods screen.
Name (Method)Use this field to type a two-character code to identify this depreciation method. The code can include any number or lowercase letter, except for the codes reserved by the application (see note below). If you enter uppercase letters, the application will change them to lowercase. Uppercase
8-32 / FAS 50 Asset Accounting - Peachtree Edition
letters are reserved for the application’s standard depreciation methods.
Note The following two-character codes are reserved by the application. Therefore, you cannot enter the following codes in this field:
DescriptionUse this field to enter a description that identifies the custom method you are creating.
Custom Methods List BoxThe list box displays the names of all the custom methods in your application. Use this list box to select a custom method on which you want to perform one of the functions listed on the buttons to the right of this list box (delete, edit, etc.).
Add ButtonClick this button to display a screen that allows you to define the custom method you specify in the Name field. The application automatically adds your custom method to the SmartList of available depreciation methods.
Edit ButtonClick this button to display a screen that allows you to edit a custom method you select from the Custom Methods List Box. See “Completing the Custom Depreciation Method Screen,” page 8-33. If you edit a custom method used by an existing asset, you must use the depreciate function to redepreciate the asset and apply the new percentages.
Delete ButtonClick this button to delete the custom method you select from the Custom Methods List Box. If you delete a custom method used by an existing asset, the asset’s depreciation method will change to RV.
aa de ma oc sh
ad dh mf rv sl
at di mi sa st
db dl mr sb yd
dc dm mt sd yh
dd dy no sf ys
Depreciation / 8-33
Copy ButtonClick this button to display a screen that allows you to copy the custom method you select from the Custom Methods List Box. See “Completing the Copy Custom Method Screen,” page 8-35.
Replace ButtonClick this button to display a screen that allows you to replace the custom method you select from the Custom Methods List Box. See “Completing the Replace Custom Method Screen,” page 8-35.
Editing, Deleting, Copying, or Replacing a Custom Depreciation Method
See “Completing the Customize Depreciation Methods Screen,” page 8-31.
Completing the Custom Depreciation Method Screen
Follow the guidelines provided below to complete the fields in the Custom Depreciation Method screen.
DescriptionThe field displays the description you entered in the Customize Depreciation Methods screen.
Disposal Method ConventionUse this field to select a disposal year averaging convention. The default disposal year convention is full month. The following disposal year conventions are available:
• Full-month
• Midmonth
• Half-year, ACRS
• Half-year, MACRS and pre-ACRS
• Modified half-year
8-34 / FAS 50 Asset Accounting - Peachtree Edition
Note The application uses the selected averaging convention only in the disposal year. The averaging convention for the placed-in-service year must be calculated as part of the first year percentage.
Averaging conventions are discussed at length in Appendix A, “Depreciation and Fixed Asset Concepts.”
Percent (%)For each year, enter the percentage of depreciation to be taken in that year. Year 1 is the year the asset was placed in service, and you can enter percentages for up to 60 years. Enter the percentage as a whole number or a whole number with a decimal; for example, enter 10% as 10, and enter 14.5% as 14.5.
Note For the placed-in-service year, the asset always receives a full year’s depreciation, no matter when the asset is placed in service. For example, suppose you enter 20% in the Percent Field for Year 1. Even if you place the asset in service on the last day of the year, the application would multiply the asset’s depreciable basis by 20% for the first year. If you want the asset to receive only partial depreciation for the first year, you must enter a smaller percentage.
You should not enter a percentage greater than 100.000.
As you enter the percentages for each year, notice the change in the two display fields at the bottom of the screen. Total percentage shows the total percentage of depreciation for all years entered thus far. This amount cannot exceed 100.000. Remaining percentage shows the difference between the total percentage and 100.000 (100% depreciation).
For most depreciation methods, the total percentage should be 100.000 and the remaining percentage should be zero when you’re finished entering annual percentages. You may, however, create a depreciation method that does not fully depreciate assets.
When the application calculates depreciation, it applies the percentage entered for each year to the depreciable basis of the asset and evenly distributes the depreciation amount over the 12-month period.
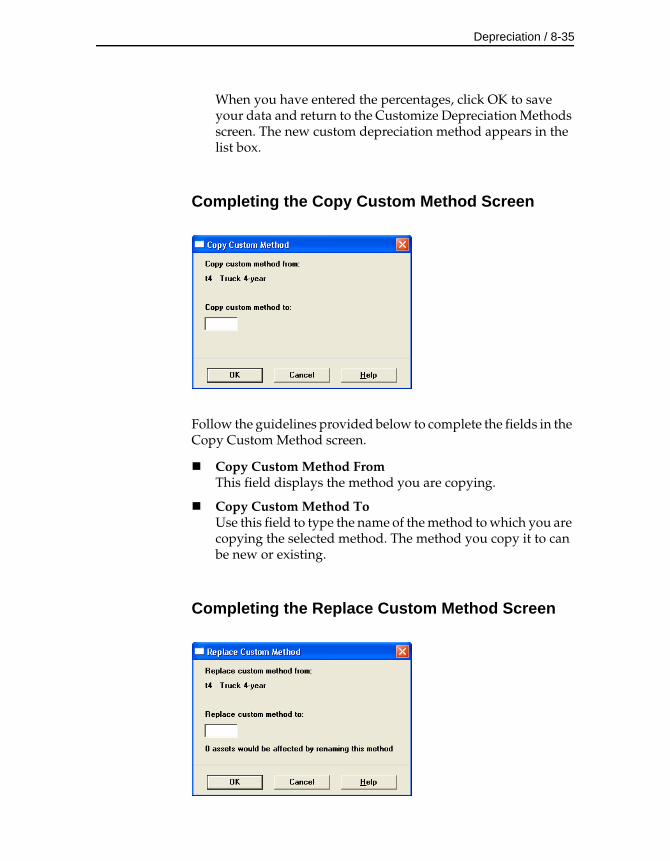
Depreciation / 8-35
When you have entered the percentages, click OK to save your data and return to the Customize Depreciation Methods screen. The new custom depreciation method appears in the list box.
Completing the Copy Custom Method Screen
Follow the guidelines provided below to complete the fields in the Copy Custom Method screen.
Copy Custom Method FromThis field displays the method you are copying.
Copy Custom Method ToUse this field to type the name of the method to which you are copying the selected method. The method you copy it to can be new or existing.
Completing the Replace Custom Method Screen
8-36 / FAS 50 Asset Accounting - Peachtree Edition
Follow the guidelines provided below to complete the fields in the Replace Custom Method screen.
Replace Custom Method FromThis field displays the method you want to replace with the method you type in the Replace Custom Method To field.
Replace Custom Method ToUse this field to type the name of the method that you want to replace the method displayed in the Replace Custom Method From field. You can enter either a new or existing method in this field.
Electing the 168 Allowance
The Job Creation and Worker Assistance Act of 2002 (JCWAA) includes a provision allowing an additional depreciation deduction for qualifying MACRS property in the first year you place an asset in service. The JCWAA was revised by the Jobs and Growth Tax Relief Reconciliation Act of 2003 (JGTRRA) and again by the Economic Stimulus Act of 2008. The new rules are covered under IRS Code Section 168.
The 2010 Tax Relief Act allows for a 168 Allowance of 100% for assets placed in service after September 8, 2010 and through December 31, 2011 (or December 31, 2012 for assets with longer production lives).
The 168 Allowance will still be available for qualified property placed in service in a special disaster zone through 2012 for personal property and through 2013 for real property, and for cellulosic biofuel plant property through 2012. Beginning in 2006, the 168 Allowance can also be taken for reuse and recycling property. Currently, there is no expiration of the 168 Allowance for reuse and recycling property.
There are special 168 Allowance rules for property located in the New York Liberty Zone and the Gulf Opportunity Zone. For more information, see “New York Liberty Zone Property,” page 8-49 and “Qualified Gulf Opportunity Zone Property,” page 8-60.
The additional allowance is 50% of the asset’s depreciable basis for property placed in service after May 5, 2003. The 50% allowance is

Depreciation / 8-37
a provision of the Jobs and Growth Tax Relief Reconciliation Act of 2003.
Originally, the additional allowance was 30% of the asset’s depreciable basis for property acquired after September 10, 2001 and placed in service before January 1, 2005 (or January 1, 2006 for certain property with longer production periods).
The Section 168 Allowance is an election made each year it is applicable. In Sage FAS, the election is made by choosing a depreciation method especially designed to calculate and claim the allowance. Therefore, you make the election when you save the asset using a “Plus 168” depreciation method.
To elect the 168 Allowance
1. In Detail View, select one of the following “Plus 168” depreciation methods:
2. After selecting the method, select 30, 50, or 100 in the 168 Allowance % field. The application displays the calculated amount of the allowance in the 168 Allowance field.
The additional allowance applies to qualifying assets, but you can elect out of the allowance for each class of assets (that is, 3-year, 5-year, 7-year, etc.) on a year-to-year basis.
Note You can select a 30%, 50%, or 100% allowance, depending on when the property was placed in service. You select the desired percentage in the 168 Allowance % field.
Depreciation Method Description
MA200 MACRS Formula 200 + 168
MA150 MACRS Formula 150 + 168
MA100 MACRS Formula 100 + 168
MR200 MACRS Indian Reservation 200 + 168
MR150 MACRS Indian Reservation 150 + 168
MR100 MACRS Indian Reservation 100 + 168
AA ADS Straight-line MACRS + 168
SB Straight-line Full-month + 168
8-38 / FAS 50 Asset Accounting - Peachtree Edition
3. Click the Save button to save the asset.
Note You can also select the 168 Allowance for a group of assets by performing a 168 Allowance Switch. For more information, see “Performing a 168 Allowance Switch,” page 8-41.
Assets That Qualify for the 168 Allowance
The Job Creation and Worker Assistance Act of 2002 (JCWAA) allows you to take an additional 30% depreciation allowance in the year you place an asset in service. In 2003, the allowance was increased to 50% for assets placed in service after May 5, 2003.
The 2010 Tax Relief Act allows for a 168 Allowance of 100% for assets placed in service after September 8, 2010 and through December 31, 2011, (or December 31, 2012 for assets with longer production lives).
The 168 Allowance will still be available for qualified property placed in service in a special disaster zone through 2012 for personal property and through 2013 for real property, and for cellulosic biofuel plant property through 2012. Beginning in 2006, the 168 Allowance can also be taken for reuse and recycling property. Currently, there is no expiration of the 168 Allowance for reuse and recycling property.
To qualify for the 168 Allowance under the JCWAA, an asset must be one of the following:
• MACRS property with a recovery period of 20 years or less
• Section 167(f)(1)(B) computer software
• Qualified leasehold improvements
• Water utility property, which has a 25-year recovery period
• Other property that is also qualified New York Liberty Zone property
In addition, qualifying property must meet certain other rules. It must be acquired after September 10, 2001 and placed in service before January 1, 2005 with no binding written contract for the acquisition in effect before September 11, 2001, or it must be
Depreciation / 8-39
acquired pursuant to a binding written contract that was entered into after September 10, 2001 and before January 1, 2005.
The asset must be placed in service before January 1, 2005, except for certain other property. Such property must be placed in service before January 1, 2006.
The original use of the property must commence with the taxpayer. Used property does not qualify; however, there are exceptions for New York Liberty Zone property.
Additional rules apply to property which the taxpayer self-constructed or sold and leased back. These are covered in IRS Code Section 168(k)(2)(D).
Note There are special 168 Allowance rules for property located in the New York Liberty Zone and the Gulf Opportunity Zone. For more information, see “New York Liberty Zone Property,” page 8-49 and “Qualified Gulf Opportunity Zone Property,” page 8-60.
In 2006 the Tax Relief and Reconciliation Act introduced a 168 Allowance of 50% that is available for qualified cellulosic biomass ethanol plant property.
Any of the following attributes disqualify the asset:
• The property is listed property that is used 50% or less for business purposes.
• The property is required to be depreciated under the Alternative Depreciation System (ADS).
• The property is New York Liberty Zone qualified leasehold improvement property. Such property is eligible for a 5-year life however.
Changing the Depreciation Method of a Single Asset
You can change an existing asset’s depreciation method so that it receives the 168 Allowance, assuming the asset qualifies for the additional allowance. For information on which assets qualify for
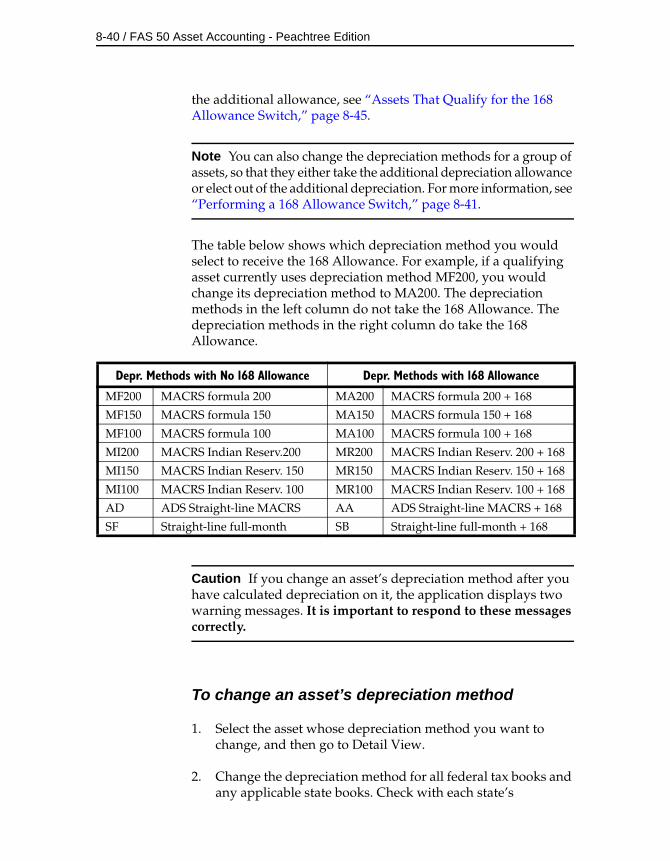
8-40 / FAS 50 Asset Accounting - Peachtree Edition
the additional allowance, see “Assets That Qualify for the 168 Allowance Switch,” page 8-45.
Note You can also change the depreciation methods for a group of assets, so that they either take the additional depreciation allowance or elect out of the additional depreciation. For more information, see “Performing a 168 Allowance Switch,” page 8-41.
The table below shows which depreciation method you would select to receive the 168 Allowance. For example, if a qualifying asset currently uses depreciation method MF200, you would change its depreciation method to MA200. The depreciation methods in the left column do not take the 168 Allowance. The depreciation methods in the right column do take the 168 Allowance.
Caution If you change an asset’s depreciation method after you have calculated depreciation on it, the application displays two warning messages. It is important to respond to these messages correctly.
To change an asset’s depreciation method
1. Select the asset whose depreciation method you want to change, and then go to Detail View.
2. Change the depreciation method for all federal tax books and any applicable state books. Check with each state’s
Depr. Methods with No 168 Allowance Depr. Methods with 168 Allowance
MF200 MACRS formula 200 MA200 MACRS formula 200 + 168
MF150 MACRS formula 150 MA150 MACRS formula 150 + 168
MF100 MACRS formula 100 MA100 MACRS formula 100 + 168
MI200 MACRS Indian Reserv.200 MR200 MACRS Indian Reserv. 200 + 168
MI150 MACRS Indian Reserv. 150 MR150 MACRS Indian Reserv. 150 + 168
MI100 MACRS Indian Reserv. 100 MR100 MACRS Indian Reserv. 100 + 168
AD ADS Straight-line MACRS AA ADS Straight-line MACRS + 168
SF Straight-line full-month SB Straight-line full-month + 168
Depreciation / 8-41
Department of Revenue to determine whether they have adopted the 168 Allowance before switching to one of the “Plus 168” depreciation methods.
Note Do not change any information in the Internal book.
The application displays a message warning you that changing the depreciation method affects the current depreciation amount and asking if you want to continue.
3. Click the Yes button. The application displays a message asking when you want to apply the change to the depreciation-critical field.
4. Click the Service Date option, and then click OK. The application clears all of the previously calculated depreciation amounts. This enables the application to correctly calculate the additional 168 Allowance.
5. Select 30, 50, or 100 in the 168 Allowance % field if you have selected a “Plus 168” depreciation method.
6. Click the Save button to save the asset.
Performing a 168 Allowance Switch
You can select a group of assets and change the depreciation method for the group so that the group will take the additional 30% or 50% allowance. You can also change the group’s depreciation methods so that the group does not take the additional allowance at all.
The application changes the depreciation method for only those assets that qualify for the switch. For more information, see “Assets That Qualify for the 168 Allowance Switch,” page 8-45.
Before you use this feature, you should spend some time planning and creating your asset groups. Remember that you elect the 168 Allowance for entire classes of assets (3-year property, 5-year property, etc.). Your asset group could include multiple classes of property, as long as you include all of the qualifying assets for each class in the group. Also, make sure that groups for which you
8-42 / FAS 50 Asset Accounting - Peachtree Edition
are applying the “Plus 168” depreciation methods consist of assets that are eligible for the additional depreciation.
You may also want to reset depreciation on your assets to the placed-in-service date before you use this feature, especially if your assets contain beginning depreciation amounts. If you want to retain the information in the beginning depreciation fields, then reset depreciation to the Beginning Date instead. For more information, see “Resetting Depreciation,” page 8-11.
The application switches depreciation methods as outlined in the table in “Changing the Depreciation Method of a Single Asset,” page 8-39. For example, suppose Asset A currently uses depreciation method MF200. You create a group of assets called “7-year MACRS Property” that includes Asset A. If you perform a 168 Allowance Switch on this group of assets, then Asset A will use depreciation method MA200.
The application changes depreciation methods as indicated in the table above. The application does not change the depreciation method of an asset that has a custom depreciation method.
Note If you switch an asset that uses a MACRS table depreciation method, the application applies a MACRS formula Plus 168 depreciation method. For example, the application switches an asset with an MT200 depreciation method to MA200. However, you cannot switch an asset back to a MACRS table method. For example, the application switches an asset with an MA200 depreciation method to MF200, even if that asset once used depreciation method MT200. To change the depreciation method back to MT200, you must edit the Depreciation Method field in Detail View. For more information, see “Changing the Depreciation Method of a Single Asset,” page 8-39.
To perform the 168 Allowance Switch
1. Create a group consisting of one or more classes of assets for which you want to change depreciation methods.
2. Select Depreciate/168 Allowance Switch from the menu bar. The 168 Allowance Switch screen appears.
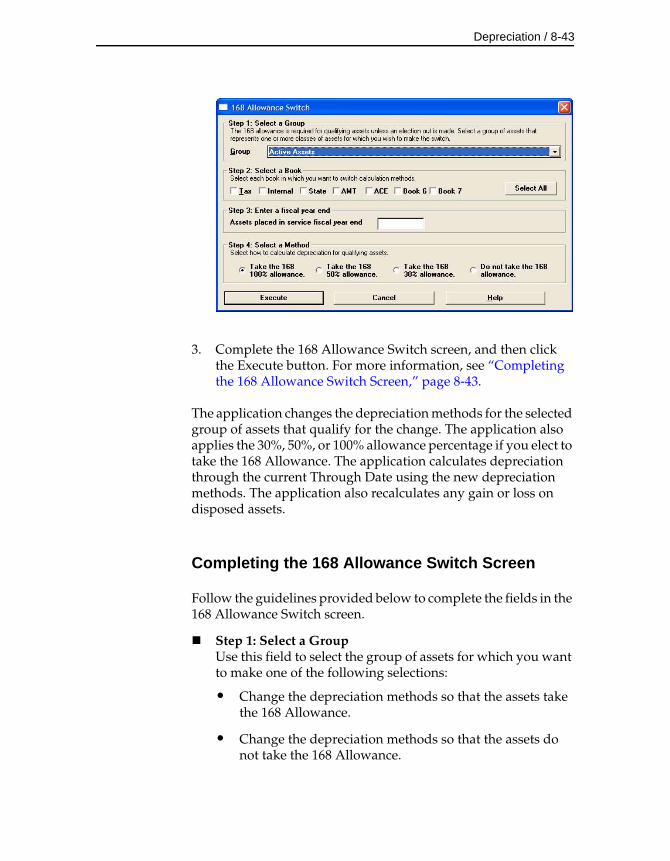
Depreciation / 8-43
3. Complete the 168 Allowance Switch screen, and then click the Execute button. For more information, see “Completing the 168 Allowance Switch Screen,” page 8-43.
The application changes the depreciation methods for the selected group of assets that qualify for the change. The application also applies the 30%, 50%, or 100% allowance percentage if you elect to take the 168 Allowance. The application calculates depreciation through the current Through Date using the new depreciation methods. The application also recalculates any gain or loss on disposed assets.
Completing the 168 Allowance Switch Screen
Follow the guidelines provided below to complete the fields in the 168 Allowance Switch screen.
Step 1: Select a Group Use this field to select the group of assets for which you want to make one of the following selections:
• Change the depreciation methods so that the assets take the 168 Allowance.
• Change the depreciation methods so that the assets do not take the 168 Allowance.
8-44 / FAS 50 Asset Accounting - Peachtree Edition
Step 2: Select a BookSelect the check box for each book for which you want to make the election.
Note If you select one federal tax book, you should select all federal tax books.
Select All/Deselect All ButtonClick this button either to select the check boxes for all available books or to clear the check boxes for all available books.
Step 3: Enter a Fiscal Year End Assets Placed in Service Fiscal Year End
Use this text box to enter the fiscal year-end for which you want to make the election. The application changes the depreciation methods only for valid assets that have been placed in service during the fiscal year that you enter.
Step 4: Select a MethodSelect one of the following elections:
Take the 168 100% AllowanceClick this option button if you want the selected group of assets to take the additional 100% depreciation allowance. The 100% allowance is available for assets placed in service after September 8, 2010 and through December 31, 2011 (or December 31, 2012 for assets with longer production lives).
Take the 168 50% AllowanceClick this option button if you want the selected group of assets to take the additional 50% depreciation allowance.
Take the 168 30% AllowanceClick this option button if you want the selected group of assets to take the additional 30% depreciation allowance.
Do Not Take the 168 AllowanceClick this option button if you want the selected group of assets to not take the 168 Allowance.
Execute ButtonClick this button to make the election for the selected group of assets.
Depreciation / 8-45
Assets That Qualify for the 168 Allowance Switch
The 168 Allowance Switch feature changes an asset’s depreciation method to (or from) the “Plus 168” depreciation methods. The application makes the change only for assets that meet the following criteria:
• Activity code is A (active) or D (disposed).
• Placed-in-service date is 09/11/01 to 12/31/09. (Restrictions based on property type and placed-in-service date apply.)
• Depreciation method is a MACRS method, SF (straight-line, full-month), or SB (straight-line, full-month plus 168 Allowance).
• Property type is P, A, T, Q, R, S, C, E, or F.
• Business use is 51% or greater.
For example, the application will change an active asset placed in service on 01/01/02 with the MF200 depreciation method to MA200 or vice versa.
The 2010 Tax Relief Act allows for a 168 Allowance of 100% for assets placed in service after September 8, 2010 and through December 31, 2011, (or December 31, 2012 for assets with longer production lives).
The 168 Allowance will still be available for qualified property placed in service in a special disaster zone through 2012 for personal property and through 2013 for real property, and for cellulosic biofuel plant property through 2012. Beginning in 2006, the 168 Allowance can also be taken for reuse and recycling property. Currently, there is no expiration of the 168 Allowance for reuse and recycling property.
Note The 168 Allowance generally applies to real property only if the asset is a leasehold improvement. If you want an asset with a property type of R, S, C, E, or F to take the 168 Allowance, make sure it is a qualifying leasehold improvement. The application cannot make this determination for you.
8-46 / FAS 50 Asset Accounting - Peachtree Edition
Electing Out of the 168 Allowance
The 168 Allowance is taken by all qualifying assets, unless you elect out of the allowance. You can elect out of the allowance for each class of assets (that is, 3-year property, 5-year property, 7-year property, etc.) on a year-to-year basis.
To elect out of the allowance
1. Select one of the depreciation methods that does not include the additional allowance, such as MACRS formula (MF) or MACRS table (MT).
2. When you file the Form 4562, you must attach a statement indicating the class of property for which you are electing not to claim the additional depreciation allowance.
Including Section 168 Allowance and Section 179 in Depreciation Expense
The Section 168 Allowance and the Section 179 expense are basis deductions before MACRS depreciation is calculated. They are separately stated items in Detail View and on reports by default. However, you can choose whether to combine the Section 168 Allowance and Section 179 expense, when applicable, with MACRS depreciation expense on reports.
You indicate your selection in the Edit Company window. If you decide to include these amounts in depreciation expense on reports, the application includes the Section 168 Allowance and Section 179 expense in the following columns:
• Prior Accumulated Depreciation
• Depreciation This Run
• Current Year to Date
• Current Accumulated Depreciation
Generally, the entire Section 168 Allowance and Section 179 expense are claimed in the placed-in-service month. After the
Depreciation / 8-47
placed-in-service year, the amounts become part of the Prior Accumulated Depreciation. Neither the Section 168 Allowance nor the Section 179 expense is prorated for a short year or affected by the asset’s averaging convention.
Although you can include the Section 168 Allowance and Section 179 expense in depreciation amounts for reporting, the application does not include them when displaying the Current Year-to-Date field and Current Accumulation field in Detail View. Both the Section 168 Allowance and Section 179 expense are separately stated in Detail View because special rules and limitations apply to these values. To view a breakdown of all the components of Tax Expense, including the Section 179 expense and Section 168 Allowance, you can run the Tax Expense report from the Reports menu.
Also, please note that the application always reduces the asset’s acquired value by the Section 168 Allowance and Section 179 expense, if applicable, when calculating and displaying the asset’s depreciable basis. Thus, if you choose to include the Section 168 Allowance and Section 179 in expense, then the total accumulated depreciation at the end of the asset’s life will be greater than the depreciable basis by the amount of the Section 168 Allowance and the Section 179 expense.
The decision whether to include the Section 168 Allowance and Section 179 in depreciation expense applies to all of the assets in a company.
8-48 / FAS 50 Asset Accounting - Peachtree Edition
To include the Section 168 Allowance and Section 179 in depreciation expense
1. Select File/Edit Company from the menu bar. The Edit Company screen appears.
2. Select Yes in the Include Section 168 Allowance and Section 179 in Expense field.
The application displays a warning that changing the entry in this field will change the depreciation values on reports.
3. Click the Yes button to continue.
4. Click OK to close the Edit Company screen.
Example: You acquire office equipment that costs $10,000 and has an estimated life of 5 years. You place it in service on January 1, 2002 and claim $2,000 of Section 179 expense. A Section 168 Allowance of $2,400 (30% of $8,000) is calculated when you use depreciation method MA200.
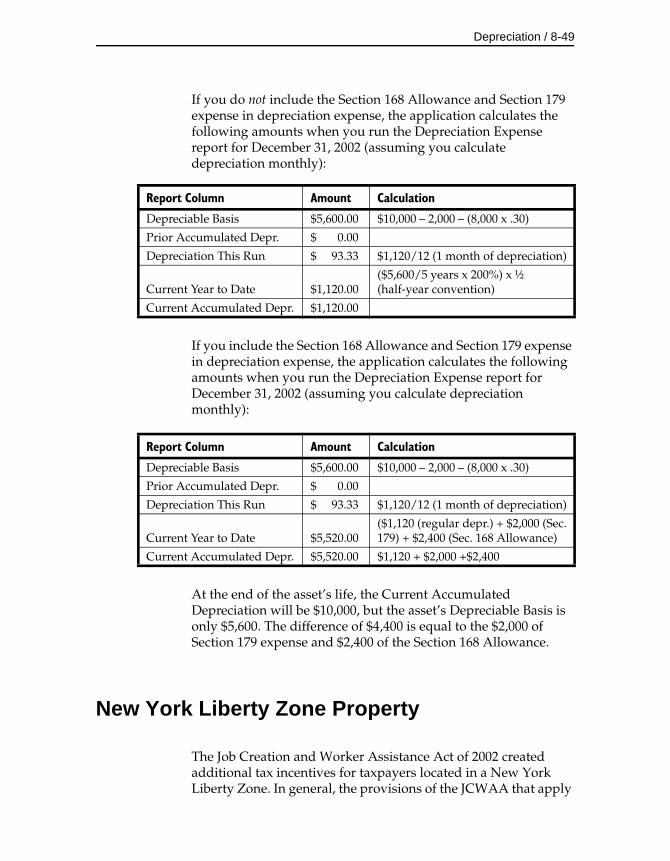
Depreciation / 8-49
If you do not include the Section 168 Allowance and Section 179 expense in depreciation expense, the application calculates the following amounts when you run the Depreciation Expense report for December 31, 2002 (assuming you calculate depreciation monthly):
If you include the Section 168 Allowance and Section 179 expense in depreciation expense, the application calculates the following amounts when you run the Depreciation Expense report for December 31, 2002 (assuming you calculate depreciation monthly):
At the end of the asset’s life, the Current Accumulated Depreciation will be $10,000, but the asset’s Depreciable Basis is only $5,600. The difference of $4,400 is equal to the $2,000 of Section 179 expense and $2,400 of the Section 168 Allowance.
New York Liberty Zone Property
The Job Creation and Worker Assistance Act of 2002 created additional tax incentives for taxpayers located in a New York Liberty Zone. In general, the provisions of the JCWAA that apply
Report Column Amount Calculation
Depreciable Basis $5,600.00 $10,000 – 2,000 – (8,000 x .30)
Prior Accumulated Depr. $ 0.00
Depreciation This Run $ 93.33 $1,120/12 (1 month of depreciation)
Current Year to Date $1,120.00($5,600/5 years x 200%) x ½ (half-year convention)
Current Accumulated Depr. $1,120.00
Report Column Amount Calculation
Depreciable Basis $5,600.00 $10,000 – 2,000 – (8,000 x .30)
Prior Accumulated Depr. $ 0.00
Depreciation This Run $ 93.33 $1,120/12 (1 month of depreciation)
Current Year to Date $5,520.00($1,120 (regular depr.) + $2,000 (Sec. 179) + $2,400 (Sec. 168 Allowance)
Current Accumulated Depr. $5,520.00 $1,120 + $2,000 +$2,400
8-50 / FAS 50 Asset Accounting - Peachtree Edition
to the New York Liberty Zone allow the taxpayers additional time to claim incentives and also include:
• Expansion of the 168 Allowance to additional types of property
• Decrease in depreciable life for leasehold improvements
• Increase in the Section 179 deduction
• The 30% allowance is available for New York Liberty Zone property placed in service after September 10, 2001 and before January 1, 2007. It is available for residential rental property and non-residential real property placed in service before January 1, 2010. *
* The availability of the 30% 168 Allowance for residential rental and non-residential real property in the New York Liberty Zone was set to expire on 12/31/2009; however, it is expected that these provisions will be extended. Please check with your tax advisor for updated information.
Note The 168 Allowance is deductible for both regular tax and AMT purposes.
Qualifying NY Liberty Zone property is one of the following:
• MACRS property with a recovery period of 20 years or less
• Water utility property, with a 25-year recovery period
• Section 167(f)(1)(B) computer software
• Residential rental and non-residential real property, to the extent that it rehabilitates real property damaged, or replaces real property destroyed or condemned, as a result of the September 11, 2001 terrorist attack.
NY Liberty Zone property must also meet the following tests:
• Property must be acquired after September 10, 2001.
• If property is acquired after September 10, 2001 and before January 1, 2005, it must be “used” property. If acquired after January 1, 2005, it can be either new or used property.
• Property must be placed into service before January 1, 2007 (January 1, 2010 for residential rental and non-residential real property).
Depreciation / 8-51
• Substantially all property must be in use in the NY Liberty Zone, and used in the active conduct of a trade or business in the NY Liberty Zone.
• The original use of the property in the NY Liberty Zone must have begun after September 10, 2001. Used property qualifies if it has not previously been used within the NY Liberty Zone.
The following property does not qualify as NY Liberty Zone property:
• Property to which Section 168 Allowance applies (that is, property that qualifies for the additional 30%, 50%, or 100% depreciation allowance)
• Listed property that is used 50% or less for business purposes
• Property that is required to be depreciated under the Alternative Depreciation System (ADS)
• Qualified NY Liberty Zone Leasehold Improvement property
New York Liberty Zone Definition
The New York Liberty Zone is the area located on or south of Canal Street, East Broadway (east of its intersection with Canal Street), or Grand Street (east of its intersection with East Broadway) in the Borough of Manhattan in the City of New York, New York.
Entering New York Liberty Zone Property
You enter New York Liberty Zone property in the application the same way you enter any other asset. There is no special field that designates an asset as New York Liberty Zone property.
You can identify the asset as New York Liberty Zone property in the Description field or in one of the User fields if desired.
8-52 / FAS 50 Asset Accounting - Peachtree Edition
The following rules apply to New York Liberty Zone property:
Personal Property
You can select a “Plus 168” depreciation method if the placed-in-service date is after September 10, 2001 and before January 1, 2007. (If the placed-in-service date is after December 31, 2004, the application reminds you that a “Plus 168” depreciation method is allowed only for New York Liberty Zone property or certain property having longer production periods.)
Note The 30% allowance is available for New York Liberty Zone property placed in service after September 10, 2001 and before January 1, 2007. It is available for residential rental property and non-residential real property placed in service before January 1, 2010.
The availability of the 30% 168 Allowance for residential rental and non-residential real property in the New York Liberty Zone was set to expire on 12/31/2009; however, it is expected that these provisions will be extended. Please check with your tax advisor for updated information.
Non-Residential Real and Residential Rental Property
The “Plus 168” depreciation methods are also available for non-residential real property and residential rental property in the Liberty Zone if it “rehabilitates real property damaged, or replaces real property destroyed or condemned, as a result of the September 11, 2001 terrorist attack” and is placed in service by December 31, 2009. You can select a “Plus 168” depreciation method when the placed-in-service date is after September 10, 2001 and before January 1, 2010 and the property type is R, S, C, E, or F.
Leasehold Improvements
You can enter qualified leasehold improvements with a 5-year estimated life (GDS life) and a 9-year ADS life. Select a real property type (R, S, C, E, or F) and the MF100 depreciation method to enter a leasehold improvement. (New York Liberty Zone leasehold improvements do not qualify for the 168 Allowance.) The application reminds you that a 5-year estimated life is available only for leasehold property located in the New York Liberty Zone.

Depreciation / 8-53
Section 179 Limits for New York Liberty Zone Property
The Job Creation and Worker Assistance Act of 2002 changed both the dollar limit and the investment limit for Section 179 property located in the New York Liberty Zone.
Dollar Limit
The yearly Section 179 limits increase for New York Liberty Zone property. The new limitations treat New York Liberty Zone property in a similar manner to Enterprise Zone property, which has had increased limits since 1993. For more information, see “Section 179 Limits for Enterprise Zone Property,” page 8-59.
The table below shows the standard Section 179 limits, as well as the increased limits for New York Liberty Zone (NYLZ) property.
* The increased limit applies only to property placed in service after September 10, 2001 for taxable years beginning in this year.
** Qualified property must be placed in service by December 31, 2006. NOTE: The December 31, 2006 end date is valid for calendar and fiscal year filers.
*** The increased limit for New York Liberty Zone property is not available for property placed in service after 2006. The normal Section 179 limits apply. For more information, see the table on page 6-18.
The increase in the Section 179 limit is the lesser of $35,000 or the cost of the Section 179 property located in the New York Liberty Zone. The IRS publication “Supplement to Publication 946” provides the following two examples:
Year Sec. 179Base Limit
Increased Limit for NYLZ Property
2000 20,000 20,000 + 35,000 = 55,000 *
2001 24,000 24,000 + 35,000 = 59,000 *
2002 24,000 24,000 + 35,000 = 59,000
2003 100,000 100,000 + 35,000 = 135,000
2004 102,000 102,000 + 35,000 = 137,000
2005 105,000 105,000 + 35,000 = 140,000
2006 108,000 108,000 + 35,000 = 143,000 **
2007 and thereafter -- Not applicable ***
8-54 / FAS 50 Asset Accounting - Peachtree Edition
Example 1:In 2002, you place in service a fixed asset located in the New York Liberty Zone with an acquired value of $25,000. The cost is less than $35,000; therefore, the limit on the Section 179 deduction increases to $49,000 ($24,000 + $25,000).
Example 2:In 2002, you place in service a fixed asset located in the New York Liberty Zone with an acquired value of $75,000. The cost is greater than $35,000; therefore, the limit on the Section 179 deduction increases to $59,000 ($24,000 + $35,000).
Investment Limit
Special rules also exist for New York Liberty Zone property when calculating the investment limit.
For property NOT in the New York Liberty Zone, the allowable amount deducted under Section 179 is reduced by one dollar for every dollar of investment over the threshold amount for property qualifying for Section 179 and placed in service in the same taxable year. For information about the threshold amounts for each taxable year, see “Threshold Amounts,” page 6-19.
For example, a business places in service qualifying property costing $222,000 in 2002 when the maximum dollar limit is $24,000. Assuming the property is not located in the New York Liberty Zone, only $2,000 of Section 179 expense deduction is allowed for that year due to the investment limit ($24,000 - $22,000).
For New York Liberty Zone property, as well as Enterprise Zone property, you consider only 50% of the cost of the property placed in service in the tax year. The IRS “Supplement to Publication 946” provides the following example:
In 2002, you place in service fixed assets with combined acquired values of $460,000 within the New York Liberty Zone. The maximum dollar limit increases to $59,000 ($35,000 + $24,000). Fifty percent of the cost of the property ($230,000) is $30,000 over $200,000; therefore, the investment limit is reduced to $29,000 ($59,000 - $30,000).
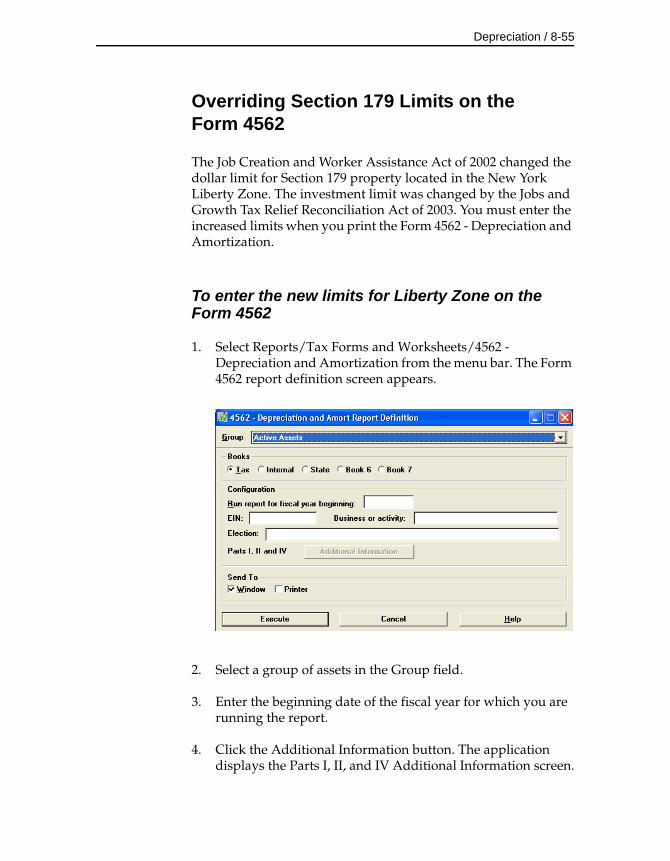
Depreciation / 8-55
Overriding Section 179 Limits on the Form 4562
The Job Creation and Worker Assistance Act of 2002 changed the dollar limit for Section 179 property located in the New York Liberty Zone. The investment limit was changed by the Jobs and Growth Tax Relief Reconciliation Act of 2003. You must enter the increased limits when you print the Form 4562 - Depreciation and Amortization.
To enter the new limits for Liberty Zone on the Form 4562
1. Select Reports/Tax Forms and Worksheets/4562 - Depreciation and Amortization from the menu bar. The Form 4562 report definition screen appears.
2. Select a group of assets in the Group field.
3. Enter the beginning date of the fiscal year for which you are running the report.
4. Click the Additional Information button. The application displays the Parts I, II, and IV Additional Information screen.

8-56 / FAS 50 Asset Accounting - Peachtree Edition
5. In the Override: Section 179 Maximum Amount field, enter the increased dollar limit for the year. The application prints the entered amount on Part I, Line 1 of the Form 4562.
6. In the Override: Total Cost of Section 179 Property field, enter the total cost of qualifying Section 179 property placed in service in the tax year. The application prints the entered amount on Part I, Line 2 of the Form 4562.
Note In general, if you enter an amount in the Override: Section 179 Maximum Amount field, you should also enter an amount in the Override: Total Cost of Section 179 Property field.
7. In the Override: Threshold Cost of Section 179 Property field, enter the total cost of property allowed before the Section 179 phaseout begins. The application prints the amount on Part I, Line 3 of the Form 4562.
8. Complete the remaining fields in the Parts I, II, and IV Additional Information screen, and then click OK. The application returns to the Form 4562 report definition screen.
9. Complete the Form 4562 report definition screen, and then click the Execute button. The application displays the Form 4562 - Depreciation and Amortization report in the Report Viewer.
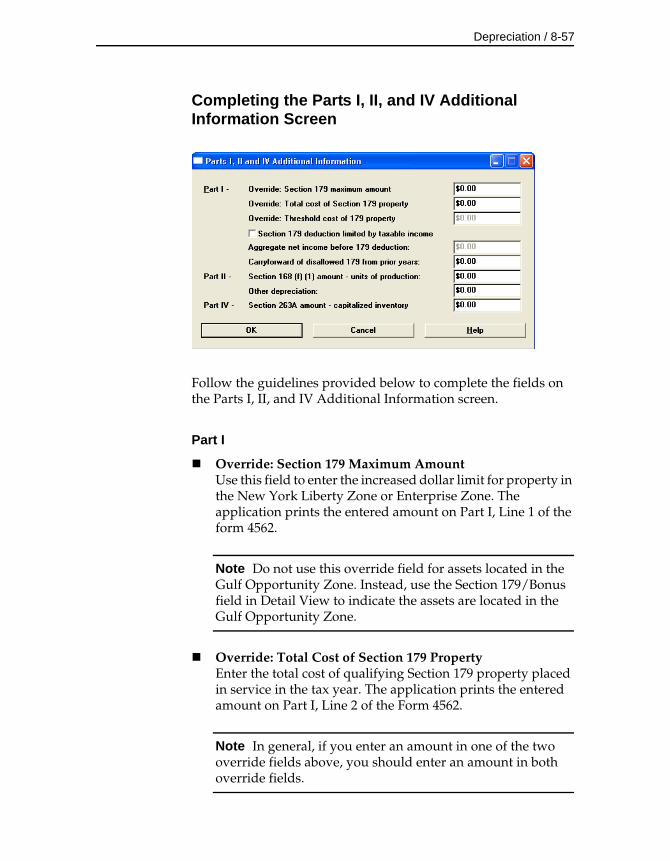
Depreciation / 8-57
Completing the Parts I, II, and IV Additional Information Screen
Follow the guidelines provided below to complete the fields on the Parts I, II, and IV Additional Information screen.
Part I
Override: Section 179 Maximum AmountUse this field to enter the increased dollar limit for property in the New York Liberty Zone or Enterprise Zone. The application prints the entered amount on Part I, Line 1 of the form 4562.
Note Do not use this override field for assets located in the Gulf Opportunity Zone. Instead, use the Section 179/Bonus field in Detail View to indicate the assets are located in the Gulf Opportunity Zone.
Override: Total Cost of Section 179 PropertyEnter the total cost of qualifying Section 179 property placed in service in the tax year. The application prints the entered amount on Part I, Line 2 of the Form 4562.
Note In general, if you enter an amount in one of the two override fields above, you should enter an amount in both override fields.
8-58 / FAS 50 Asset Accounting - Peachtree Edition
Override: Threshold Cost of Section 179 PropertyWhen the threshold amount differs from the federal threshold amount, enter the total cost of property allowed before the Section 179 phaseout begins. The application prints the entered amount on Part I, Line 3 of the Form 4562.
Section 179 Deduction Limited by Taxable IncomeClick this check box if the company’s Section 179 expense deduction is limited by taxable income under Code Section 179(b)(3).
Aggregate Net Income Before Section 179 DeductionUse this field to enter the company’s taxable income before subtracting any Section 179 expense.
Carryforward of Disallowed 179 From Prior YearsUse this field to enter the amount of Section 179 expense, if any, elected to be expensed in previous years but not allowed as a deduction due to the taxable income limitation.
Part II
Section 168(f)(1) Amount - Units of ProductionUse this field to enter the depreciation deduction for property the company has elected to depreciate by the units-of-production method or other method as allowed under Code Section 168(f)(1).
Other DepreciationUse this field to enter the current year depreciation for assets that you do not amortize, expense, or depreciate under MACRS and that are not maintained in the application.
Part IV
Section 263A Amount - Capitalized Inventory CostUse this field to enter the increase in basis from costs that you are required to capitalize under the uniform capitalization rules of Code Section 263A. For more information, see IRS Regulation 1.263A-1.

Depreciation / 8-59
Section 179 Limits for Enterprise Zone Property
Since 1993, the amount of allowable Section 179 expense deduction has been increased for qualifying property by an “enterprise zone business” (as defined in IRS Code Sec. 137B).
Dollar Limit
The table below shows the standard Section 179 limits, as well as the increased limits for Enterprise Zone property.
Investment Limit
For property NOT qualifying as Enterprise Zone property, the allowable amount deducted under Section 179 is reduced by one dollar for every dollar of investment over the threshold amount
Year Sec. 179Base Limit
Increased Limit forEnterprise Zones
1993 - 1996 17,500 17,500 + 20,000 = 37,500
1997 18,000 18,000 + 20,000 = 38,000
1998 18,500 18,500 + 20,000 = 38,500
1999 19,000 19,000 + 20,000 = 39,000
2000 20,000 20,000 + 20,000 = 40,000
2001 24,000 24,000 + 20,000 = 40,000
2002 24,000 24,000 + 35,000 = 59,000
2003 100,000 100,000 + 35,000 = 135,000
2004 102,000 102,000 + 35,000 = 137,000
2005 105,000 105,000 + 35,000 = 140,000
2006 108,000 108,000 + 35,000 = 143,000
2007 125,000 125,000 + 35,000 = 160,000
2008 250,000 250,000 + 35,000 = 285,000
2009 250,000 250,000 + 35,000 = 285,000
2010 500,000 500,000 + 35,000 = 535,000
2011 500,000 500,000 + 35,000 = 535,000
2012 125,000 N/A
2013 and thereafter 25,000 N/A
8-60 / FAS 50 Asset Accounting - Peachtree Edition
for property qualifying for Section 179 and placed in service in the same taxable year. For information about the threshold amounts for each taxable year, see “Threshold Amounts,” page 6-19.
For property that DOES qualify as Enterprise Zone property, you consider only 50% of the cost of the property placed in service in the tax year.
Example:You place $900,000 of Section 179 property that is qualified zone property in service during 2006. Because the property is qualified zone property, only $450,000 (50% of $900,000) is used to calculate the investment limit. Because $450,000 is $20,000 more than the beginning-of-phase-out amount for tax years beginning in 2006 of $430,000, the amount allowed to be expensed for 2006 is $123,000 ($108,000 + $35,000 [additional section 179 expense deduction allowed for Enterprise Zone property] - $20,000).
Qualified Gulf Opportunity Zone Property
In order for property to be qualified Gulf Opportunity Zone (GO Zone) property, it must meet all of the following requirements:
1. The property must be MACRS property that meets one of the following criteria:
• Has a recovery period of 20 years or less
• Is computer software not covered under Section 197
• Is water utility property
• Is qualified leasehold improvement property
• Is nonresidential real property or residential rental property.
2. Substantially all of the use of such property must be in the Gulf Opportunity Zone and in the active conduct of a trade or business by the taxpayer in such Zone.
3. The original use of the property in the Gulf Opportunity Zone must commence with the taxpayer on or after August 28, 2005.
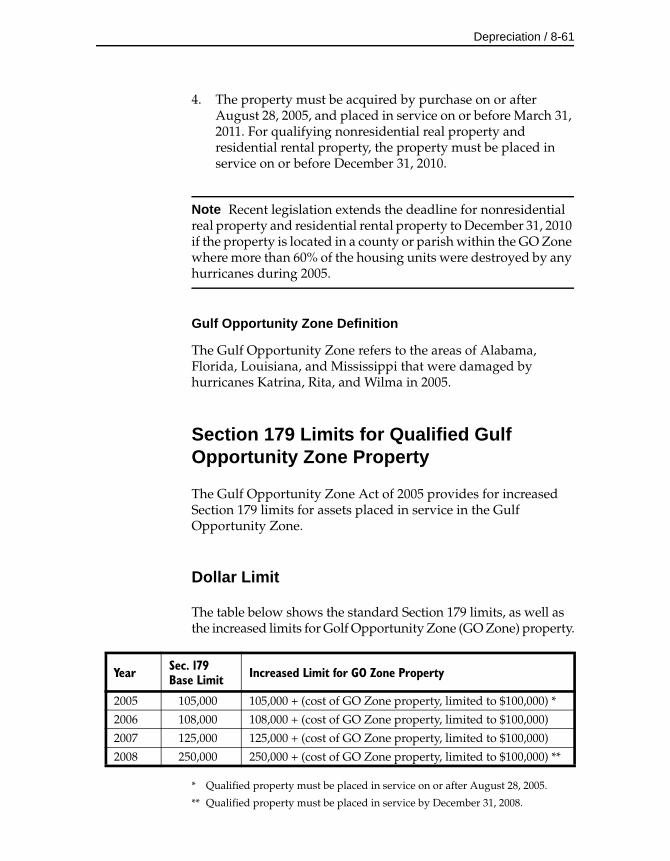
Depreciation / 8-61
4. The property must be acquired by purchase on or after August 28, 2005, and placed in service on or before March 31, 2011. For qualifying nonresidential real property and residential rental property, the property must be placed in service on or before December 31, 2010.
Note Recent legislation extends the deadline for nonresidential real property and residential rental property to December 31, 2010 if the property is located in a county or parish within the GO Zone where more than 60% of the housing units were destroyed by any hurricanes during 2005.
Gulf Opportunity Zone Definition
The Gulf Opportunity Zone refers to the areas of Alabama, Florida, Louisiana, and Mississippi that were damaged by hurricanes Katrina, Rita, and Wilma in 2005.
Section 179 Limits for Qualified Gulf Opportunity Zone Property
The Gulf Opportunity Zone Act of 2005 provides for increased Section 179 limits for assets placed in service in the Gulf Opportunity Zone.
Dollar Limit
The table below shows the standard Section 179 limits, as well as the increased limits for Golf Opportunity Zone (GO Zone) property.
* Qualified property must be placed in service on or after August 28, 2005.
** Qualified property must be placed in service by December 31, 2008.
Year Sec. 179Base Limit Increased Limit for GO Zone Property
2005 105,000 105,000 + (cost of GO Zone property, limited to $100,000) *
2006 108,000 108,000 + (cost of GO Zone property, limited to $100,000)
2007 125,000 125,000 + (cost of GO Zone property, limited to $100,000)
2008 250,000 250,000 + (cost of GO Zone property, limited to $100,000) **
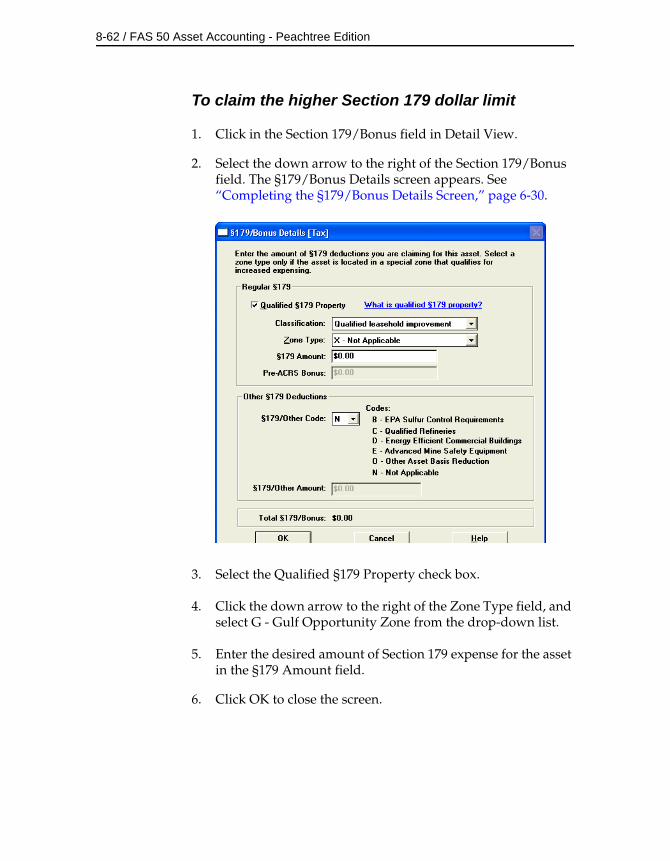
8-62 / FAS 50 Asset Accounting - Peachtree Edition
To claim the higher Section 179 dollar limit
1. Click in the Section 179/Bonus field in Detail View.
2. Select the down arrow to the right of the Section 179/Bonus field. The §179/Bonus Details screen appears. See “Completing the §179/Bonus Details Screen,” page 6-30.
3. Select the Qualified §179 Property check box.
4. Click the down arrow to the right of the Zone Type field, and select G - Gulf Opportunity Zone from the drop-down list.
5. Enter the desired amount of Section 179 expense for the asset in the §179 Amount field.
6. Click OK to close the screen.
Depreciation / 8-63
Threshold Amount
When you have property located in the Gulf Opportunity Zone, the Section 179 threshold amount is increased by the lesser of:
• $600,000 or
• the cost of the qualified Section 179 Gulf Opportunity Zone property placed in service during the taxable year.
For information about the threshold amounts for each taxable year, see “Threshold Amounts,” page 6-19.
The application calculates the threshold amount for you when you indicate which assets are located in the Gulf Opportunity Zone. You do this by selecting the Qualified §179 Property check box, and then selecting G - Gulf Opportunity Zone from the drop-down list in the §179/Bonus Details screen for each asset located in the GO Zone. See “Completing the §179/Bonus Details Screen,” page 6-30.
Here are two examples:
Example 1:In a tax year beginning in 2006, you place in service qualified section 179 GO Zone property with a cost of $800,000. You may take an expense deduction of $208,000 for the tax year ($108,000 regular maximum deduction plus $100,000, which is the lesser of $100,000 or the cost of qualified section 179 GO Zone property placed in service during the tax year). The $208,000 of cost is not subject to depreciation. The remaining $592,000 of cost is subject to depreciation.
Example 2:In a tax year beginning in 2006, you place in service qualified section 179 GO Zone property with a cost of $1,100,000. You may take an expense deduction of $138,000 for 2006:
The $138,000 of cost is not subject to depreciation. The remaining $962,000 of cost is subject to depreciation.
$108,000 Regular maximum deduction for 2006
+ $100,000 Lesser of $100,000 or the cost of qualified section 179 GO Zone property placed in service during 2006
- $ 70,000 The amount by which $1,100,000 exceeds $1,030,000 ($430,000 beginning-of-phaseout amount for 2006 + $600,000)
8-64 / FAS 50 Asset Accounting - Peachtree Edition
Qualified Recovery Assistance Property (Kansas Disaster Zone)
The Heartland, Habitat, Harvest, and Horticulture Act of 2008 - Title XV of the Food, Conservation, and Energy Act of 2008 (The 2008 Farm Act) replaces the term qualified Gulf Opportunity Zone property with the term qualified Recovery Assistance property (Kansas Disaster Zone property).
In order for property to be qualified Recovery Assistance property, it must meet all of the following requirements:
1. The property must be MACRS property that meets one of the following criteria:
• Has a recovery period of 20 years or less
• Is computer software not covered under Section 197
• Is water utility property
• Is qualified leasehold improvement property
• Is nonresidential real property or residential rental property.
2. Substantially all of the use of such property must be in the Kansas disaster zone and in the active conduct of a trade or business by the taxpayer in such zone.
3. The original use of the property in the Kansas disaster zone must begin with the taxpayer after May 4, 2007.
4. The property must be acquired by purchase after May 4, 2007, and placed in service on or before December 31, 2008. For qualifying nonresidential real property and residential rental property, the property must be placed in service on or before December 31, 2009.
Kansas Disaster Zone Definition
The Kansas Disaster Zone refers to the following 24 counties located in Kansas that were damaged by severe storms and tornados beginning on May 4, 2007: Barton, Clay, Cloud, Comanche, Dickinson, Edwards, Ellsworth, Kiowa, Leavenworth,
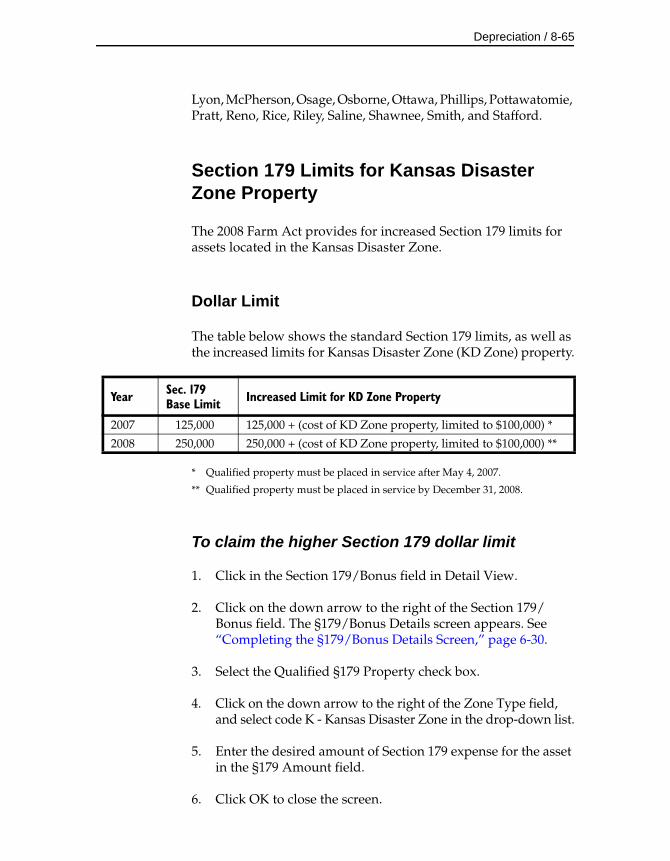
Depreciation / 8-65
Lyon, McPherson, Osage, Osborne, Ottawa, Phillips, Pottawatomie, Pratt, Reno, Rice, Riley, Saline, Shawnee, Smith, and Stafford.
Section 179 Limits for Kansas Disaster Zone Property
The 2008 Farm Act provides for increased Section 179 limits for assets located in the Kansas Disaster Zone.
Dollar Limit
The table below shows the standard Section 179 limits, as well as the increased limits for Kansas Disaster Zone (KD Zone) property.
* Qualified property must be placed in service after May 4, 2007.
** Qualified property must be placed in service by December 31, 2008.
To claim the higher Section 179 dollar limit
1. Click in the Section 179/Bonus field in Detail View.
2. Click on the down arrow to the right of the Section 179/Bonus field. The §179/Bonus Details screen appears. See “Completing the §179/Bonus Details Screen,” page 6-30.
3. Select the Qualified §179 Property check box.
4. Click on the down arrow to the right of the Zone Type field, and select code K - Kansas Disaster Zone in the drop-down list.
5. Enter the desired amount of Section 179 expense for the asset in the §179 Amount field.
6. Click OK to close the screen.
Year Sec. 179Base Limit Increased Limit for KD Zone Property
2007 125,000 125,000 + (cost of KD Zone property, limited to $100,000) *
2008 250,000 250,000 + (cost of KD Zone property, limited to $100,000) **
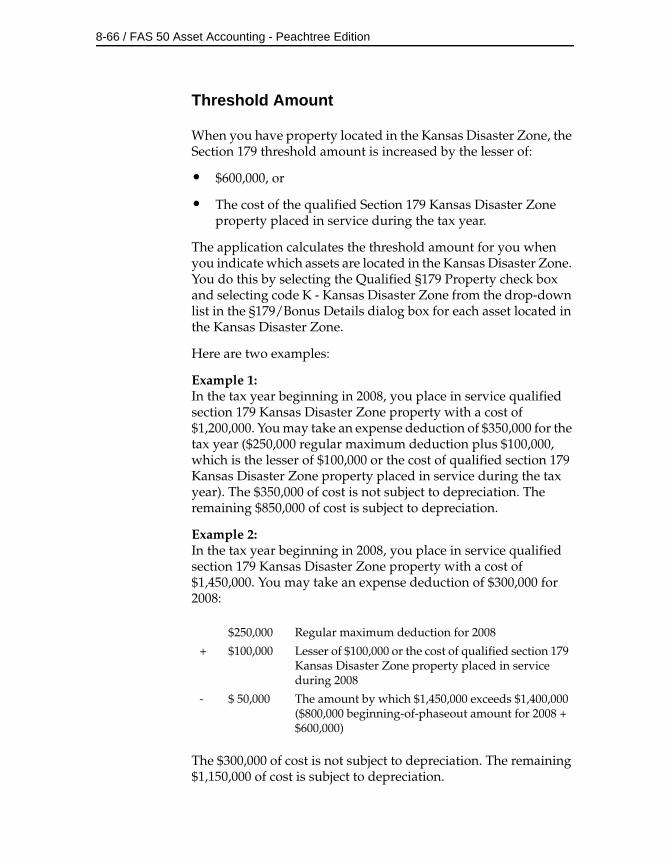
8-66 / FAS 50 Asset Accounting - Peachtree Edition
Threshold Amount
When you have property located in the Kansas Disaster Zone, the Section 179 threshold amount is increased by the lesser of:
• $600,000, or
• The cost of the qualified Section 179 Kansas Disaster Zone property placed in service during the tax year.
The application calculates the threshold amount for you when you indicate which assets are located in the Kansas Disaster Zone. You do this by selecting the Qualified §179 Property check box and selecting code K - Kansas Disaster Zone from the drop-down list in the §179/Bonus Details dialog box for each asset located in the Kansas Disaster Zone.
Here are two examples:
Example 1:In the tax year beginning in 2008, you place in service qualified section 179 Kansas Disaster Zone property with a cost of $1,200,000. You may take an expense deduction of $350,000 for the tax year ($250,000 regular maximum deduction plus $100,000, which is the lesser of $100,000 or the cost of qualified section 179 Kansas Disaster Zone property placed in service during the tax year). The $350,000 of cost is not subject to depreciation. The remaining $850,000 of cost is subject to depreciation.
Example 2:In the tax year beginning in 2008, you place in service qualified section 179 Kansas Disaster Zone property with a cost of $1,450,000. You may take an expense deduction of $300,000 for 2008:
The $300,000 of cost is not subject to depreciation. The remaining $1,150,000 of cost is subject to depreciation.
$250,000 Regular maximum deduction for 2008
+ $100,000 Lesser of $100,000 or the cost of qualified section 179 Kansas Disaster Zone property placed in service during 2008
- $ 50,000 The amount by which $1,450,000 exceeds $1,400,000 ($800,000 beginning-of-phaseout amount for 2008 + $600,000)
Depreciation / 8-67
Qualified Disaster Assistance Property
In order for property to be qualified Disaster Assistance property, it must meet all of the following requirements:
1. The property must be MACRS property that meets one of the following criteria:
• Has a recovery period of 20 years or less
• Is computer software not covered under Section 197
• Is water utility property
• Is qualified leasehold improvement property
• Is nonresidential real property or residential rental property.
2. Substantially all of the use of such property must be in a disaster area with respect to a federally declared disaster occurring between January 1, 2008 and December 31, 2009, and in the active conduct of a trade or business by the taxpayer in such area.
3. The property must rehabilitate property damaged, or replace property destroyed or condemned, as a result of the federally declared disaster.
4. The original use of the property in the disaster area must begin with the taxpayer on or after the applicable disaster date.
5. The property must be acquired by purchase on or after the applicable disaster date, and placed in service by the end of the third calendar year following the applicable disaster date. For qualifying nonresidential real property and residential rental property, the property must be placed in service by the end of the fourth calendar year following the applicable disaster date.
Qualified Disaster Zone Definition
The Emergency Economic Stabilization Act of 2008 defines qualified disaster zone as any disaster area, in which the property
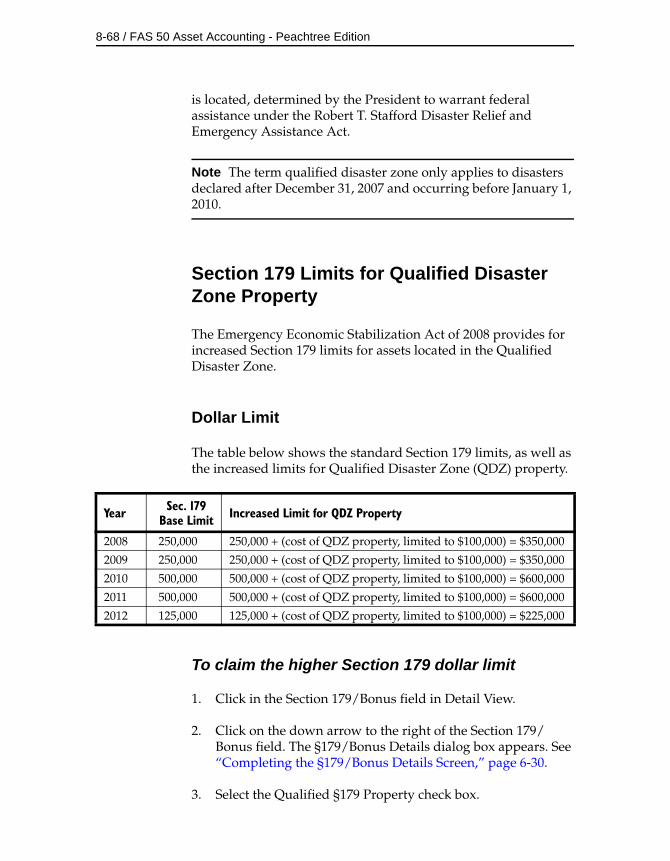
8-68 / FAS 50 Asset Accounting - Peachtree Edition
is located, determined by the President to warrant federal assistance under the Robert T. Stafford Disaster Relief and Emergency Assistance Act.
Note The term qualified disaster zone only applies to disasters declared after December 31, 2007 and occurring before January 1, 2010.
Section 179 Limits for Qualified Disaster Zone Property
The Emergency Economic Stabilization Act of 2008 provides for increased Section 179 limits for assets located in the Qualified Disaster Zone.
Dollar Limit
The table below shows the standard Section 179 limits, as well as the increased limits for Qualified Disaster Zone (QDZ) property.
To claim the higher Section 179 dollar limit
1. Click in the Section 179/Bonus field in Detail View.
2. Click on the down arrow to the right of the Section 179/Bonus field. The §179/Bonus Details dialog box appears. See “Completing the §179/Bonus Details Screen,” page 6-30.
3. Select the Qualified §179 Property check box.
Year Sec. 179Base Limit Increased Limit for QDZ Property
2008 250,000 250,000 + (cost of QDZ property, limited to $100,000) = $350,000
2009 250,000 250,000 + (cost of QDZ property, limited to $100,000) = $350,000
2010 500,000 500,000 + (cost of QDZ property, limited to $100,000) = $600,000
2011 500,000 500,000 + (cost of QDZ property, limited to $100,000) = $600,000
2012 125,000 125,000 + (cost of QDZ property, limited to $100,000) = $225,000
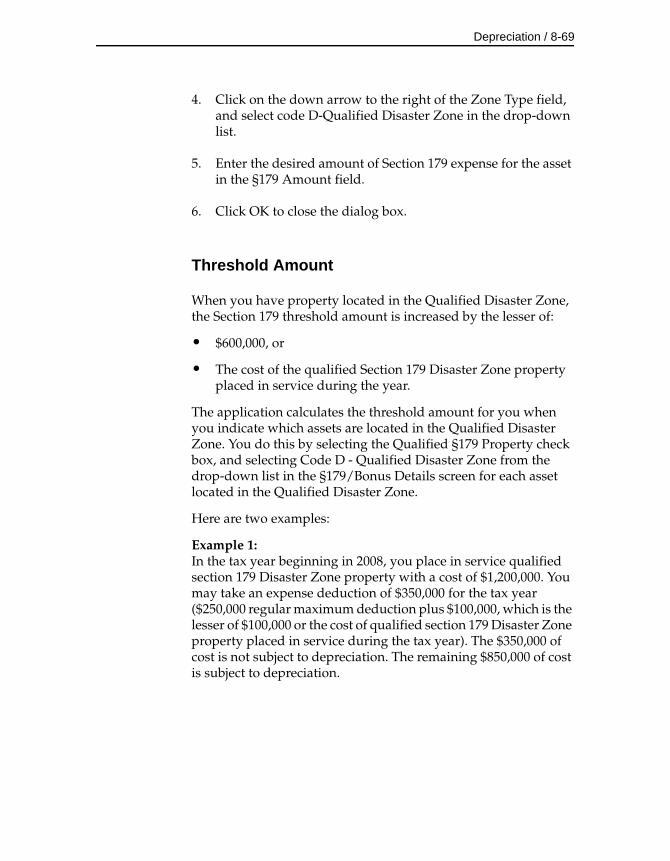
Depreciation / 8-69
4. Click on the down arrow to the right of the Zone Type field, and select code D-Qualified Disaster Zone in the drop-down list.
5. Enter the desired amount of Section 179 expense for the asset in the §179 Amount field.
6. Click OK to close the dialog box.
Threshold Amount
When you have property located in the Qualified Disaster Zone, the Section 179 threshold amount is increased by the lesser of:
• $600,000, or
• The cost of the qualified Section 179 Disaster Zone property placed in service during the year.
The application calculates the threshold amount for you when you indicate which assets are located in the Qualified Disaster Zone. You do this by selecting the Qualified §179 Property check box, and selecting Code D - Qualified Disaster Zone from the drop-down list in the §179/Bonus Details screen for each asset located in the Qualified Disaster Zone.
Here are two examples:
Example 1:In the tax year beginning in 2008, you place in service qualified section 179 Disaster Zone property with a cost of $1,200,000. You may take an expense deduction of $350,000 for the tax year ($250,000 regular maximum deduction plus $100,000, which is the lesser of $100,000 or the cost of qualified section 179 Disaster Zone property placed in service during the tax year). The $350,000 of cost is not subject to depreciation. The remaining $850,000 of cost is subject to depreciation.
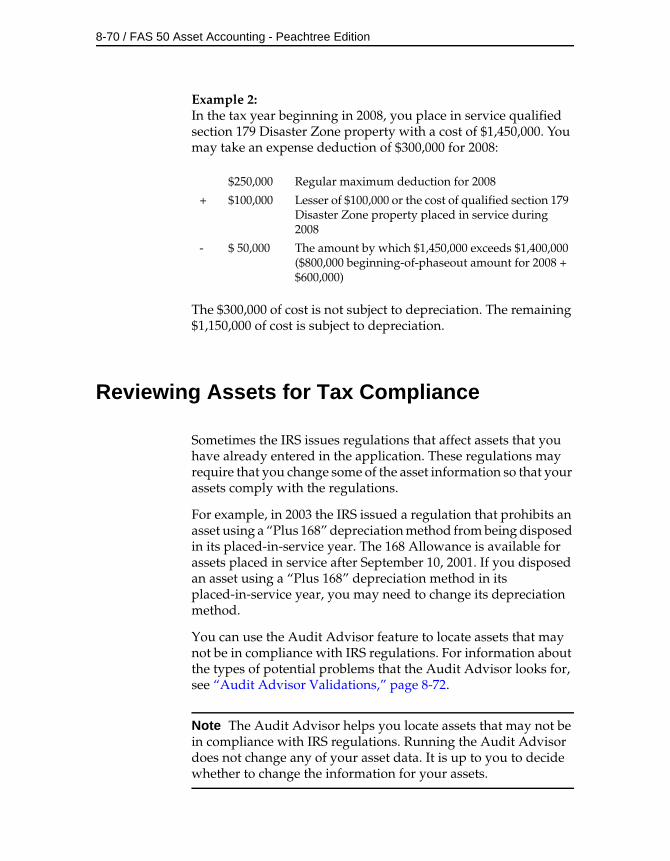
8-70 / FAS 50 Asset Accounting - Peachtree Edition
Example 2:In the tax year beginning in 2008, you place in service qualified section 179 Disaster Zone property with a cost of $1,450,000. You may take an expense deduction of $300,000 for 2008:
The $300,000 of cost is not subject to depreciation. The remaining $1,150,000 of cost is subject to depreciation.
Reviewing Assets for Tax Compliance
Sometimes the IRS issues regulations that affect assets that you have already entered in the application. These regulations may require that you change some of the asset information so that your assets comply with the regulations.
For example, in 2003 the IRS issued a regulation that prohibits an asset using a “Plus 168” depreciation method from being disposed in its placed-in-service year. The 168 Allowance is available for assets placed in service after September 10, 2001. If you disposed an asset using a “Plus 168” depreciation method in its placed-in-service year, you may need to change its depreciation method.
You can use the Audit Advisor feature to locate assets that may not be in compliance with IRS regulations. For information about the types of potential problems that the Audit Advisor looks for, see “Audit Advisor Validations,” page 8-72.
Note The Audit Advisor helps you locate assets that may not be in compliance with IRS regulations. Running the Audit Advisor does not change any of your asset data. It is up to you to decide whether to change the information for your assets.
$250,000 Regular maximum deduction for 2008
+ $100,000 Lesser of $100,000 or the cost of qualified section 179 Disaster Zone property placed in service during 2008
- $ 50,000 The amount by which $1,450,000 exceeds $1,400,000 ($800,000 beginning-of-phaseout amount for 2008 + $600,000)
Depreciation / 8-71
To review assets for tax compliance
1. Select Depreciation/Audit Advisor from the menu bar. The Audit Advisor screen appears.
2. Complete the Audit Advisor screen, and then click the Run Review button. The application reviews the assets in the selected book for the selected fiscal year, and it displays the results on your computer’s screen.
The application also creates groups of assets that may not comply with IRS regulations so that you can review the assets more easily. The report indicates the names of the groups that the application creates.
Completing the Audit Advisor Screen
Follow the guidelines below to complete the fields on the Audit Advisor screen.
Step 1: Select a BookUse this field to select the book containing the assets that you want the Audit Advisor to check for compliance with tax regulations. You can select only one book at a time.
Step 2: Enter a Fiscal Year EndUse this field to enter a fiscal year end-date. The Audit Advisor will review only the assets that were placed in service
8-72 / FAS 50 Asset Accounting - Peachtree Edition
in the selected fiscal year. You can enter the date in either MM/YY or MM/DD/YYYY format.
Note The date that you enter must be in 2001 or later.
Run Review ButtonClick this button to begin the review process. The application reviews the assets in the selected book for the selected fiscal year, and it displays the results on your computer’s screen.
The application also creates groups of assets that may not comply with IRS regulations so that you can review the assets more easily. The report indicates the names of the groups that the application creates.
For information about the types of potential problems that the Audit Advisor looks for, see “Audit Advisor Validations,” page 8-72.
Audit Advisor Validations
The Audit Advisor reviews your assets to help you determine if they comply with the following IRS regulations:
• 168 Allowance Disposals in the Placed-in-Service YearYou cannot dispose an asset using a “Plus 168 Allow” depreciation method in its placed-in-service year. For more information, see “168 Allowance Disposals in the Placed-in-Service Year,” page 8-74.
• MACRS MethodsGenerally, all assets placed in service after 12/31/1986 must use a MACRS (Modified Accelerated Cost Recovery System) depreciation method. For more information, see “MACRS Methods,” page 8-75.
• Light Trucks and VansIRS regulations allow depreciation limits for light trucks and vans that are greater than the limits on luxury automobiles. For more information, see “Light Trucks and Vans,” page 8-76.
• Section 179 Dollar LimitIRS regulations limit the total amount of Section 179 that you
Depreciation / 8-73
can take on assets placed in service in a taxable year. For more information, see “Section 179 Dollar Limit,” page 8-76.
• Section 179 Disposals in the Placed-in-Service YearIRS regulations prohibit you from claiming a Section 179 deduction on an asset that was disposed in its placed-in-service year. For more information, see “Section 179 Disposals in the Placed-in-Service Year,” page 8-79.
• Section 179 Sport Utility Vehicle Dollar LimitThe Section 179 expense deduction is limited to $25,000 for Sport Utility Vehicles placed in service after October 22, 2004. For more information, see “Section 179 Sport Utility Vehicle Dollar Limit,” page 8-80.
• Leasehold Improvements and Qualified Restaurant PropertyLeasehold improvements placed in service after October 22, 2004 and before January 1, 2012 must be depreciated using a 15-year estimated life (or 9 years for Indian Reservation property). For more information, see “Leasehold Improvements and Qualified Restaurant Property,” page 8-81.
• MACRS Depreciation ElectionCertain MACRS depreciation elections must be made on a class-by-class basis. For more information, see “MACRS Depreciation Election,” page 8-82.
• Assets with Beginning InformationEntering data in the beginning information fields overrides the application’s depreciation calculations. For more information, see “Assets with Beginning Information,” page 8-83.
• Qualified Retail Improvement PropertyQualified retail improvement property placed in service after December 31, 2008 and before January 1, 2012 must be depreciated using a 15-year estimated life (or 9 years for Indian Reservation property). For more information, see “Qualified Retail Improvement Property,” page 8-84.
• Assets with Less Than 100% Business UseAssets with less than 100% business use are not entitled to a full year’s depreciation deduction. The business-use percentage may change over time and should be reviewed on
8-74 / FAS 50 Asset Accounting - Peachtree Edition
an annual basis. For more information, see “Assets with Less Than 100% Business Use,” page 8-85.
• Section 179 Qualified Real PropertyFor tax years beginning in 2010 or 2011, you can elect to expense under Section 179 up to $250,000 of qualified real property purchases. For more information, see “Section 179 Qualified Real Property,” page 8-86.
• Increased 168 Allowance % AllowedA 168 Allowance of 100%, instead of 50%, should generally be taken for assets placed in service from 9/9/2010 through 12/31/2011 (or 12/31/2012 for assets with longer production lives). For more information, see “Increased 168 Allowance % Allowed,” page 8-87.
168 Allowance Disposals in the Placed-in-Service Year
The Audit Advisor finds assets using a “Plus 168” depreciation method that were disposed in the year that they were placed in service.
Issue
An Asset that uses a “Plus 168” depreciation method cannot be disposed in its placed-in-service year.
Resolution
Use the 168 Allowance Switch feature to change the depreciation methods for such assets so they do not take the 168 Allowance.
1. Select Depreciation/168 Allowance Switch from the menu bar. The 168 Allowance Switch screen appears.
2. Select the group that the Audit Advisor created consisting of assets using a “Plus 168” depreciation method that were disposed in their placed-in-service year.
The group is named AA (for Audit Advisor), followed by “168 Disp,” followed by the book name, followed by the fiscal year end. For example, if you selected the Tax book and a fiscal
Depreciation / 8-75
year ending in December, 2003 in the Audit Advisor screen, then the group would be called AA-168 Disp-Tax-12/03.
3. Select the same book and fiscal year end that you selected in the Audit Advisor screen.
4. Select the Do Not Take the 168 Allowance option.
5. Click the Execute button. The application changes the depreciation methods for the selected group of assets and recalculates the gain/loss for these assets.
MACRS Methods
The Audit Advisor finds assets using a non-MACRS depreciation method that were placed in service in a year for which MACRS depreciation methods are required.
Issue
Generally, all assets placed in service after 12/31/1986 must use a MACRS (Modified Accelerated Cost Recovery System) depreciation method. When you run the Audit Advisor, the application determines if you have assets using non-MACRS depreciation methods that were placed in service in a year for which MACRS depreciation methods are required.
Resolution
1. In Group View, display the group of assets that the application created.
The group is named AA (for Audit Advisor), followed by “MACRS Meth,” followed by the book name, followed by the fiscal year end. For example, if you selected the Tax book and a fiscal year ending in December, 2003 in the Audit Advisor screen, then the group would be called AA-MACRS Meth-Tax-12/03.
2. Review the depreciation method for each of the assets in the group.
8-76 / FAS 50 Asset Accounting - Peachtree Edition
If you determine that an asset is incorrectly using a non-MACRS depreciation method, then you need to change the depreciation method to a MACRS method (that is, MA, MR, AA, SB, MF, MT, AD, or MI).
Also, note that if you decide to change depreciation methods, you may be required to file a Form 3115 - Application for Change in Accounting Method.
Light Trucks and Vans
The Audit Advisor finds assets using property type A (for Automobiles). You might want to see if these assets qualify for the higher depreciation limitations allowed for light trucks and vans.
Issue
The IRS issued regulations allowing increased depreciation limitations for light trucks and vans. These regulations apply to vehicles placed in service on or after January 1, 2003. You may have entered assets in the application using property type A for autos, which qualify for the higher depreciation limits.
Resolution
1. Change the property type from property type A to property type T for any vehicle currently designated as an auto that would qualify for the light trucks and vans category.
Section 179 Dollar Limit
The Audit Advisor determines if the Section 179 expense taken in a taxable year exceeds the dollar limit for that year.
Issue
You are allowed to claim a Section 179 deduction each year subject to certain dollar limits. The dollar limits are determined each year based on published IRS figures adjusted for increased expensing for assets placed in service in certain zones and after applying a phase-out calculation. In addition, the limits are applied across all
Depreciation / 8-77
assets placed in service for the fiscal year. The published IRS dollar limit (without applying phase-out rules) for the fiscal year is calculated, without taking into consideration any assets located in a special zone. For tax years beginning in 2010 and 2011, up to $250,000 of the total Section 179 deduction can be claimed on qualified leasehold improvements, qualified restaurant property, and qualified retail improvements.
Note that the Section 179 validation above does not apply to companies in a consolidated group. Separate limits and rules apply for companies in this situation. Check with your tax advisor for more information.
Resolution 1(If Section 179 dollar limit has been exceeded, but Section 179 limit for real property has not been exceeded)
You have exceeded the maximum Section 179 deduction allowed for the fiscal year. The application calculates the Section 179 dollar limit for the current company after applying the phase-out rules. The application has created a group of all assets claiming a Section 179 deduction that were placed in service during the fiscal year. You should review the list of assets and reduce the total Section 179 claimed by the indicated amount. To complete this analysis, run the Tax Expense report for the selected year using the group created by the application. Once the Section 179 claimed has been reduced to the appropriate limit you must recalculate depreciation for the fiscal year end.
Resolution 2(If Section 179 dollar limit has been exceeded and Section 179 limit for real property has been exceeded)
You have exceeded the maximum Section 179 deduction allowed for the fiscal year. The application calculates the Section 179 dollar limit for the current company after applying the phase-out rules. In addition, the portion of Section 179 attributable to real property exceeds the limit of $250,000.
The application has created a group of all assets claiming a Section 179 deduction that were placed in service during the fiscal year. You should review the list of assets and reduce the total Section 179 claimed by the indicated amount. You must also reduce the amount of Section 179 claimed on real property by the indicated amount. To complete this analysis, run the Tax Expense Report for
8-78 / FAS 50 Asset Accounting - Peachtree Edition
the selected year using the group created by the application. Once the Section 179 claimed has been reduced to the appropriate limit you must recalculate depreciation for the fiscal year end.
Resolution 3(If Section 179 limit for real property has been exceeded, but Section 179 dollar limit has not been exceeded)
You have exceeded the maximum Section 179 deduction allowed for real property. The application calculates the Section 179 dollar limit for the current company after applying the phase-out rules. In addition, the portion of Section 179 attributable to real property exceeds the limit of $250,000.
The application has created a group of all assets claiming a Section 179 deduction that were placed in service during the fiscal year. You must also reduce the amount of Section 179 claimed on real property by the indicated amount. You may be eligible to increase the deduction on personal property by the same amount. To complete this analysis, run the Tax Expense Report for the selected year using the group created by the application. Once the Section 179 claimed has been reduced to the appropriate limit you must recalculate depreciation for the fiscal year end.
1. Run the Tax Expense report for the group of assets created by the Audit Advisor.
The group is named AA-179 Limit-XXX-MM/YY, where XXX stands for the book name, and MM/YY stands for the fiscal year-end. For example, if you selected the Tax book and a fiscal year ending in December, 2007 in the Audit Advisor screen, then the group would be called AA-179 Limit-Tax-12/07.
The Tax Expense report shows the Section 179 deduction for each asset placed in service in the fiscal year and the total Section 179 deduction for all assets.
2. Reduce the Section 179 deduction for one or more assets in the group so that the total Section 179 deduction does not exceed the limit for the fiscal year.
7. Reduce the amount of Section 179 claimed on real property, if necessary.
Depreciation / 8-79
3. Recalculate depreciation for the group of assets for the fiscal year-end.
Section 179 Disposals in the Placed-in-Service Year
The Audit Advisor finds assets taking a Section 179 deduction that were disposed in the placed-in-service year.
Issue
You are allowed to claim a Section 179 deduction on assets placed in service during the year. However, if you dispose of the asset during the year it was placed in service, then you cannot claim a Section 179 deduction.
Resolution
You must delete the disposal transaction, remove the Section 179 deduction claimed, and then reenter the disposal information.
1. Run the Disposal report for the group of assets created by the Audit Advisor.
The group is named AA-179 Disp-XXX-MM/YY, where XXX is the selected book and MM/YY is the fiscal year entered. For example, if you selected the Tax book and a fiscal year ending in December 2007 in the Audit Advisor screen, then the group would be called AA-179 Disp-Tax-12/07.
2. For whole disposals, you can delete the disposal information by selecting the assets in Group View and selecting the Reset Depreciation command from the Depreciation menu. Reset depreciation to the assets’ Beginning Dates. The application automatically removes the disposal information.
3. For each asset in the group, change the Section 179 deduction to zero for all books.
4. Reenter the disposal information for each asset.
8-80 / FAS 50 Asset Accounting - Peachtree Edition
Section 179 Sport Utility Vehicle Dollar Limit
The Audit Advisor finds assets claiming a Section 179 expense deduction of more than $25,000. You should examine these assets to determine if any of them are Sport Utility Vehicles.
Issue
Effective October 22, 2004, the IRS issued regulations regarding the amount of Section 179 expense that can be claimed on Sport Utility Vehicles (SUVs) that are over 6,000 and less than 14,000 pounds. The amount of Section 179 expense for these vehicles is limited to $25,000 for each SUV placed in service.
Resolution
You may have claimed more than $25,000 of Section 179 expense for a Sport Utility Vehicle for the fiscal year. The application has created a group of assets claiming a Section 179 deduction in excess of $25,000.
1. In Group View, display the group of assets created by the application.
The group is named AA (for Audit Advisor), followed by “179 SUV,” followed by the book name, followed by the fiscal year-end. For example, if you selected the Tax book and a fiscal year ending in December, 2007 in the Audit Advisor screen, then the group would be called AA-179 SUV-Tax-12/07.
2. Review each asset to determine if any of the assets are SUVs.
3. For any SUV, you must reduce the Section 179 expense to $25,000 or less in Detail View.
4. Recalculate depreciation for the fiscal year.
Depreciation / 8-81
Leasehold Improvements and Qualified Restaurant Property
The Audit Advisor finds assets that are real property (property types R, S, C, E, or F) and have an estimated life of 39 years. You should examine these assets and determine if any of them are leasehold improvements or qualified restaurant property.
Issue
Leasehold improvements and qualified restaurant property placed in service after October 22, 2004 and before January 1, 2012 must be depreciated using an estimated life of 15 years (or 9 years for Indian Reservation property), a straight-line depreciation method, and either the half-year or midquarter averaging convention.
Resolution
You may have entered an estimated life of 39 years instead of 15 years for leasehold property or qualified restaurant property (or 9 years for Indian Reservation property). The application has created a group of assets that are real property and have an estimated life of 39 years (or 22 years for Indian Reservation property).
1. In Group View, display the group of assets created by the application.
The group is named AA (for Audit Advisor), followed by “Leasehold,” followed by the book name, followed by the fiscal year-end. For example, if you selected the Tax book and a fiscal year ending in December, 2009 in the Audit Advisor screen, then the group would be called AA-Leasehold-Tax-12/09.
2. Review each asset to determine if any of the assets are leasehold improvements.
3. For each leasehold improvement or qualified restaurant property, change the estimated life to 15 years (or 9 years for Indian Reservation property) in Detail View.
4. Recalculate depreciation for the fiscal year.

8-82 / FAS 50 Asset Accounting - Peachtree Edition
MACRS Depreciation Election
The Audit Advisor finds assets for which you have made one or more of the following MACRS depreciation elections:
• Alternative Depreciation System (ADS): Assets use depreciation method AD or AA.
• 150% declining-balance depreciation method over the General Depreciation System (GDS) recovery period: Assets use depreciation method MF150, MT150, MI150, MA150, or MR150.
• Straight-line depreciation method over the GDS recovery period: Assets use depreciation method MF100, MT100, MI100, MA100, or MR100.
Review your assets to determine if each MACRS election was made for an entire class of assets.
Issue
The application uses the IRS default depreciation methods during data entry for the tax-related books. However, you can make an alternate election on a class-by-class basis to use the Alternative Depreciation System (ADS), 150% declining-balance method, or the straight-line method over the General Depreciation System (GDS) recovery period. Note, however, this rule does not apply to residential rental and nonresidential real property, for which the election is made on a property-by-property basis.
Resolution
1. In Group View, display the group of assets that the Audit Advisor created.
The group is named AA (for Audit Advisor), followed by “MACRS Elec,” followed by the book name, followed by the fiscal year end. For example, if you select the Tax book and a fiscal year ending in December, 2007 in the Audit Advisor screen, then the group would be called AA-MACRS Elec-Tax 12/07.
2. Review the depreciation method and estimated life for each asset in the group.
Depreciation / 8-83
3. Make sure that each MACRS election was made for an entire class of assets. If an election was not made for an entire class of assets, then the non-conforming assets must be updated.
Assets with Beginning Information
The Audit Advisor finds assets containing data in the beginning information fields.
Issue
Entering data in the beginning information fields overrides the application’s depreciation calculations. If you are using your own calculation for depreciation (depreciation method OC), assets will include beginning information.
Resolution
1. In Group View, display the group of assets that the Audit Advisor created.
The group is named AA (for Audit Advisor), followed by “Beg Info,” followed by the book name, followed by the fiscal year end. For example, if you selected the Tax book and a fiscal year ending in December, 2007 in the Audit Advisor screen, then the group would be called AA-Beg Info-Tax 12/07.
2. Examine each asset to make sure that the data in the beginning information fields is correct.
3. If the data in the beginning information fields is incorrect, you can reset depreciation for the asset.
Caution Use extreme caution when resetting depreciation to ensure you achieve the desired results.
8-84 / FAS 50 Asset Accounting - Peachtree Edition
Qualified Retail Improvement Property
The Audit Advisor finds assets that are real property (property types R, S, C, E, or F), have an estimated life of 39 (or 22) years, and were placed in service after December 31, 2008 and before January 1, 2012. You should examine these assets and determine if any of them are qualified retail improvements.
Issue
The IRS has issued regulations shortening the recovery period for qualified retail improvement property placed in service after December 31, 2008 and before January 1, 2012. The new estimated life is 15 years (or 9 years for Indian Reservation property). Qualified retail improvements use a straight-line depreciation method and the half-year averaging convention, unless the midquarter averaging convention applies.
Resolution
Prior to the enactment date of January 1, 2009, qualified retail improvements were depreciated using a straight-line method over a 39-year period (or 22 years for Indian Reservation property). You may have entered an estimated life of 39 years (or 22 years) instead of 15 years (or 9 years) for qualified retail improvement property.
The application has created a group of assets that are real property and have an estimated life of 39 (or 22) years. Please review this group of assets to determine if any of the assets are qualified retail improvements. If any qualified retail improvements are found, you must reduce the estimated life to 15 years (or 9 years for Indian Reservation property). Also, note that a Section 168 Allowance cannot be claimed on qualified retail improvement property.
1. In Group View, display the group of assets created by the application.
The group is named AA (for Audit Advisor), followed by “Retail Prop,” followed by the book name, followed by the fiscal year-end. For example, if you selected the Tax book and a fiscal year ending in December, 2009 in the Audit Advisor
Depreciation / 8-85
screen, then the group would be called AA-Retail Prop-Tax-12/09.
2. Review each asset to determine if any of the assets are qualified retail improvements.
3. For each qualified retail improvement, change the estimated life to 15 years (or 9 years for Indian Reservation property) in Detail View.
4. Recalculate depreciation for the fiscal year.
Assets with Less Than 100% Business Use
The Audit Advisor finds assets in the selected fiscal year that have ever been used for less than 100% business use.
Issue
Assets with less than 100% business use are not entitled to a full year’s depreciation deduction. The business-use percentage may change over time and therefore should be reviewed and updated on an annual basis. The application detects if one or more assets in the selected fiscal year have ever been used for less than 100% business use.
Resolution
1. In Group View, display the group of assets that the Audit Advisor created.
The group is named AA (for Audit Advisor), followed by “Bus Use,” followed by the book name, followed by the fiscal year end. For example, if you selected the Tax book and a fiscal year ending in December 2010 in the Audit Advisor screen, then the group would be called AA-Bus Use-Tax-12/10.
2. Examine each asset to make sure that the Business Use Percentage field has been appropriately updated for the selected fiscal year.
8-86 / FAS 50 Asset Accounting - Peachtree Edition
3. If the percentage in the Business Use Percentage field is incorrect, you must enter the correct business use, which is a depreciation-critical change.
4. After you have updated the Business Use Percentage fields, recalculate depreciation for the affected assets for the created group.
Section 179 Qualified Real Property
The Audit Advisor finds assets that are real property and that may be qualified for the Section 179 deduction.
Issue
Recently passed legislation for fiscal years beginning in 2010 and 2011 allows an election to be made that would include up to $250,000 of real property in the definition of qualified Section 179 property eligible for immediate expensing. Specifically the real property must be qualified leasehold improvement property, qualified restaurant property, or qualified retail improvement property in the definition of qualified Section 179 property. The deduction on real property is subject to the same Section 179 phase-out rules for personal and does not apply to nonresidential real or residential rental property.
Resolution
You may have entered a real property that may qualify for a Section 179 deduction. Before claiming a Section 179 deduction on real property, be sure to check the Section 179 Dollar Limit Review to determine how much, if any, additional Section 179 deduction you can claim. Remember if you elect to claim a Section 179 deduction on real property, then you must identify all qualifying property using the Qualified §179 Property check box, found on the §179/Bonus Details screen in Detail View, in order to properly calculate the phase-out limits.
The application has created a group of real property assets. Please review this group of assets to determine if any of the assets are qualified leasehold improvement property, qualified restaurant property or qualified retail improvement property.
Depreciation / 8-87
1. In Group View, display the group of assets created by the application.
The group is named AA (for Audit Advisor), followed by “179 Qual?,” followed by the book name, followed by the fiscal year-end. For example, if you selected the Tax book and a fiscal year ending in December, 2010 in the Audit Advisor screen, then the group would be called AA-179 Qual?-Tax-12/10.
2. Review each asset to determine if any of the assets are qualified leasehold improvement property, qualified restaurant property, or qualified retail improvement property.
3. Identify each qualified Section 179 property by selecting the Qualified §179 Property check box on the §179/Bonus Details screen in Detail View.
4. Recalculate depreciation for the group of assets for the fiscal year-end.
Increased 168 Allowance % Allowed
The Audit Advisor finds assets that are qualified for a 168 Allowance percentage of 100%.
Issue
Recently passed legislation allows for a 168 Allowance of 100% for assets placed in service from 9/9/2010 through 12/31/2011 (or 12/31/2012 for assets with longer production lives). You have claimed a 168 Allowance on assets within this date range using a 50% rate. A 168 Allowance percent of 50% is applicable during this time period only for qualifying assets placed in service in the Gulf Opportunity Zones (Go Zone) or in a Qualified Disaster Zone.
Resolution
If you would like to claim a Section 168 Allowance using the 100% rate rather than 50%, you can use the 168 Allowance Switch on the Depreciate menu to update your assets.
8-88 / FAS 50 Asset Accounting - Peachtree Edition
The system has created a group of assets using the 50% rate. Please review this group of assets to determine which, if any, of the assets should be switched to 100%.
1. In Group View, display the group of assets created by the application.
The group is named AA (for Audit Advisor), followed by “168 50Pct,” followed by the book name, followed by the fiscal year-end. For example, if you selected the Tax book and a fiscal year ending in December, 2010 in the Audit Advisor screen, then the group would be called AA-168 50Pct-Tax-12/10.
2. Review the assets in the group to determine which, if any, of the assets should be switched to 100%.
3. Select Depreciate/168 Allowance Switch to change the deduction from 50% to 100% for these assets.
9 Reports
The application contains 27 standard reports to help you manage your assets and keep track of their depreciation, both for tax purposes and for your internal books. You decide which assets and which books to include in each report, and how the assets should be sorted and subtotaled. You can print a report or display it on the screen.
This chapter explains how to run the reports and how to interpret each report.
List of Reports
Following is a list of each report and a brief description of each.
You run the following reports by selecting Standard Reports from the Reports menu:
Depreciation Expense ReportThe Depreciation Expense report displays depreciation-related information for assets on which depreciation has been calculated. The report includes assets containing depreciation calculations through the date you enter for the report. Along with essential asset data, the report shows figures for previous depreciation, depreciation that was calculated for the last depreciation run, and current depreciation.
Tax Expense ReportThe Tax Expense report displays the components of the current year’s depreciation expense for tax purposes. For each asset, the report displays the current year’s Section 179 expense deduction, Section 168 Expense, and the current year-to-date depreciation. In the Total Tax Year-to-Date Expense column, the report displays the total of these three amounts.
9-2 / FAS 50 Asset Accounting - Peachtree Edition
Depreciation Summary Report The Depreciation Summary report provides a concise list of the selected assets’ depreciation-related information, including their acquired values and any Section 179 amounts.
Period Close Summary ReportThe Period Close Summary report displays the period close dates for the assets on the report. It also shows the last date that depreciation was calculated (the Current Through Date).
Depreciation Adjustment ReportThe Depreciation Adjustment report shows the difference between the beginning depreciation amounts you enter and the depreciation amounts the application calculated for the same period. The report includes only those selected assets that have adjustment amounts.
Disposal ReportThe Disposal report lists the assets in the selected group that have been disposed and shows the amounts of realized, recognized, and deferred gain or loss on each asset.
Annual Activity ReportThe Annual Activity report shows the asset account balance activity for Acquired Value over a requested fiscal year. It presents the asset account balance as of the beginning of the fiscal year, the cost of any acquisitions and disposals during the year, and the account’s balance at the end of the fiscal year.
Asset Basis ReportThe Asset Basis report shows how the application calculated the depreciable basis used in the asset’s last depreciation run.
File Listing ReportFor each selected asset and book, the File Listing report presents a summary of commonly used information, such as the asset’s description, depreciation method, and acquired value. It also includes an activity code that differentiates between active, inactive, and disposed assets.
Fixed Asset Summary ReportThe Fixed Asset Summary report presents account balance activity for Acquired Value and Depreciation over the requested fiscal year for each asset or, if elected, for each subtotal by category. It is designed to help you tie into the asset and accumulated depreciation amounts on the balance sheet.
Reports / 9-3
General Ledger Posting ReportThe General Ledger Posting report prints a journal entry you can use to post the Depreciation This Run figures stored from the most recent depreciation calculation for the requested books to the Peachtree by Sage general ledger.
Note You can also post depreciation expense directly to Peachtree by Sage by selecting Post Depreciation from the Depreciation menu. For more information, see “Posting Depreciation to Peachtree by Sage,” page 8-8.
Net Book Value ReportThe Net Book Value report shows the current net book value of each selected asset and how that value is calculated. It also calculates the percentage of total depreciation taken to date for each asset.
Quarterly Acquisition ReportYou can run the Quarterly Acquisition report to determine the total of all assets acquired in each quarter of a fiscal year.
Property Tax - Detail ReportThe Property Tax - Detail report shows detailed asset information for a selected date. The report sorts assets first by a defined property tax category, and then by each acquisition year.
Property Tax - Summary ReportThe Property Tax - Summary report summarizes the acquisition value of active assets for a selected date. The report sorts assets first by a defined property tax category, and then by each acquisition year.
You run the following reports by selecting Tax Forms and Worksheets from the Reports menu:
Adjusted Current Earnings ReportThe Adjusted Current Earnings report displays ACE depreciation that has been calculated for the selected assets. It also shows each asset’s remaining basis and remaining life as of the close of the last tax year beginning before 1990.
Alternative Minimum Tax ReportThe Alternative Minimum Tax report shows the depreciation differences between the Tax and the AMT books. It also shows
9-4 / FAS 50 Asset Accounting - Peachtree Edition
the Tax Preferences and Adjustments that arise from those differences.
Midquarter Applicability ReportThe Midquarter Applicability report determines whether you should use the midquarter convention. You should run this report at the end of each tax year and, if midquarter applies, recalculate depreciation for all qualifying assets using the midquarter convention.
Form 3468: Investment Tax Credit WorksheetThis report is a worksheet that gathers the Investment Tax Credit information needed to file IRS Form 3468.
Form 4255: Investment Tax Credit Recapture WorksheetThis report is a worksheet that gathers the Investment Tax Credit recapture information needed to file IRS Form 4255.
Form 4562: Depreciation and AmortizationThis option prints an IRS Form 4562 that reports depreciation and amortization expense in a format acceptable for filing with the IRS.
Form 4626: Corporate Alternative Minimum Tax WorksheetThis report is a worksheet that gathers the Alternative Minimum Tax information needed to complete IRS Form 4626.
Form 4626: Adjusted Current Earnings SupplementThis report is a worksheet that helps you complete the IRS Form 4626 ACE Worksheet.
Form 4797: Sales of Property WorksheetThis report is a worksheet that gathers the asset disposal information needed to file IRS Form 4797.
You run the following reports by selecting them from the Depreciation menu:
Annual Projection ReportThe Annual Projection report projects the total annual depreciation expense for selected assets for up to 99 years.
Monthly Projection ReportThe Monthly Projection report displays projected depreciation amounts for each month (or period) in a fiscal year for the selected group of assets.
FASB 109 Projection ReportFor each selected asset, the FASB 109 Projection report identifies the temporary differences between the various
Reports / 9-5
books’ depreciation amounts and projects the reversal of those differences.
Quick Projection ReportThe Quick Projection report displays an asset’s projected depreciation expense for the life of the asset.
Running a Standard Report
There are two main steps to running a report. First, you use the menu bar to select the report you want to run. You then complete the fields on the Report Definition screen. For more information, see “Completing the Report Definition Screen,” page 9-11.
When completing the Report Definition screen, you must decide where you want to send the report. The available options are to a report viewer on your computer (Window) or to the default printer. If you want to view the report before it prints, select the Window check box. From the report viewer, you can then send the report to the default printer or export it to several different file formats.
Note Before you run a report that includes depreciation figures, be sure you have calculated depreciation through the desired depreciation date for the assets you want to include in the report. To calculate depreciation, execute the Depreciate command at the Depreciation menu; otherwise your depreciation figures will not be current.
To run a standard report
1. Select Reports/Standard Reports from the menu bar. The application displays a submenu containing all of the standard reports.
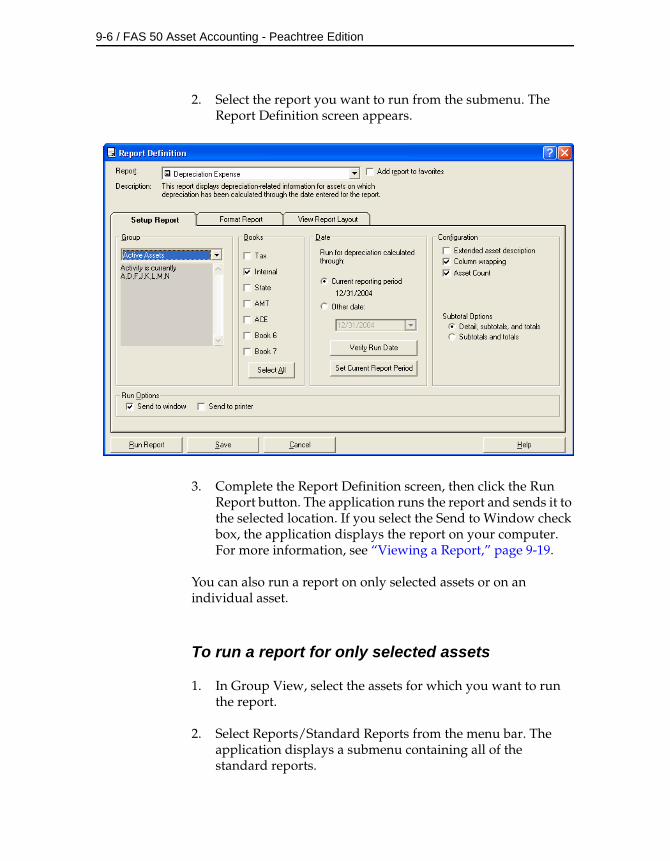
9-6 / FAS 50 Asset Accounting - Peachtree Edition
2. Select the report you want to run from the submenu. The Report Definition screen appears.
3. Complete the Report Definition screen, then click the Run Report button. The application runs the report and sends it to the selected location. If you select the Send to Window check box, the application displays the report on your computer. For more information, see “Viewing a Report,” page 9-19.
You can also run a report on only selected assets or on an individual asset.
To run a report for only selected assets
1. In Group View, select the assets for which you want to run the report.
2. Select Reports/Standard Reports from the menu bar. The application displays a submenu containing all of the standard reports.
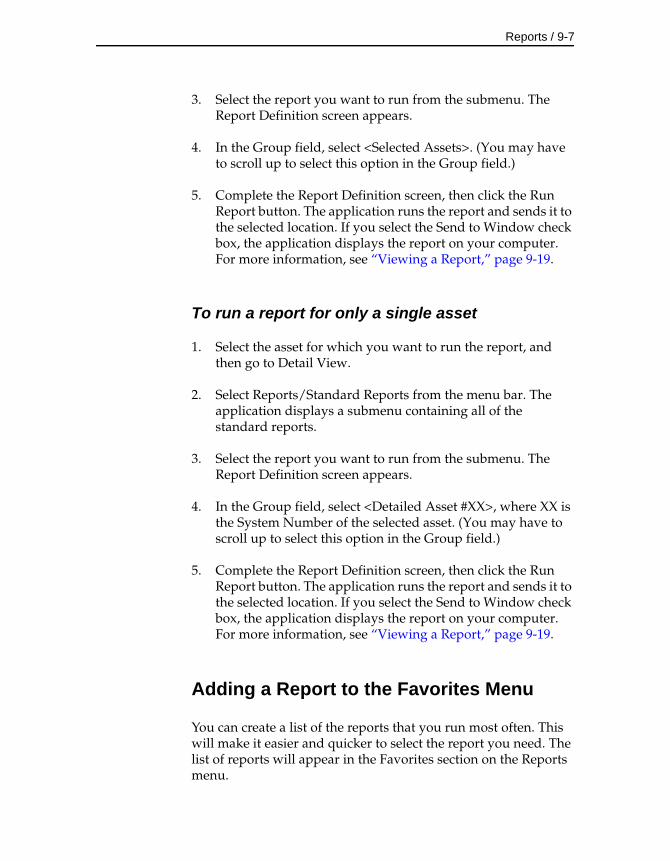
Reports / 9-7
3. Select the report you want to run from the submenu. The Report Definition screen appears.
4. In the Group field, select <Selected Assets>. (You may have to scroll up to select this option in the Group field.)
5. Complete the Report Definition screen, then click the Run Report button. The application runs the report and sends it to the selected location. If you select the Send to Window check box, the application displays the report on your computer. For more information, see “Viewing a Report,” page 9-19.
To run a report for only a single asset
1. Select the asset for which you want to run the report, and then go to Detail View.
2. Select Reports/Standard Reports from the menu bar. The application displays a submenu containing all of the standard reports.
3. Select the report you want to run from the submenu. The Report Definition screen appears.
4. In the Group field, select <Detailed Asset #XX>, where XX is the System Number of the selected asset. (You may have to scroll up to select this option in the Group field.)
5. Complete the Report Definition screen, then click the Run Report button. The application runs the report and sends it to the selected location. If you select the Send to Window check box, the application displays the report on your computer. For more information, see “Viewing a Report,” page 9-19.
Adding a Report to the Favorites Menu
You can create a list of the reports that you run most often. This will make it easier and quicker to select the report you need. The list of reports will appear in the Favorites section on the Reports menu.
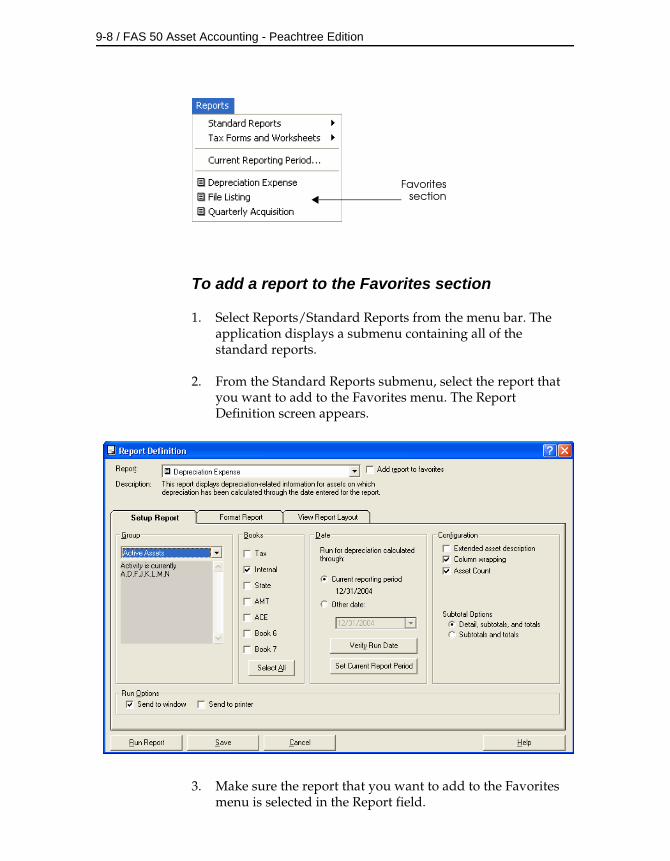
9-8 / FAS 50 Asset Accounting - Peachtree Edition
To add a report to the Favorites section
1. Select Reports/Standard Reports from the menu bar. The application displays a submenu containing all of the standard reports.
2. From the Standard Reports submenu, select the report that you want to add to the Favorites menu. The Report Definition screen appears.
3. Make sure the report that you want to add to the Favorites menu is selected in the Report field.
Favoritessection
Reports / 9-9
Note You can select either a standard report or a report that you have already customized.
4. Select the Add Report to Favorites check box.
5. Click the Save button. The application saves the change you have made to the Report Definition screen.
6. Click the Cancel button to close the Report Definition screen. The application adds the selected report to the Favorites section on the bottom of the Reports menu.
Verifying the Run Date for Each Book
When you run a report, you enter the date for which you want to run the report. You may want to run the report for the end of the month or for the end of the year.
However, suppose your company has different year-ends in the tax books and the Internal book. In that case, you can use the Verify Run Date button on the Setup Report page of the Report Definition screen to select a separate report run date for each book.
To verify the run date of the report for each book
1. On the Setup Report page of the Report Definition screen, click the Other Date option button.
2. In the text box underneath the Other Date field, enter the date for which you want to run the report.
Hint You can also click the Down arrow to display a calendar that allows you to select the date.
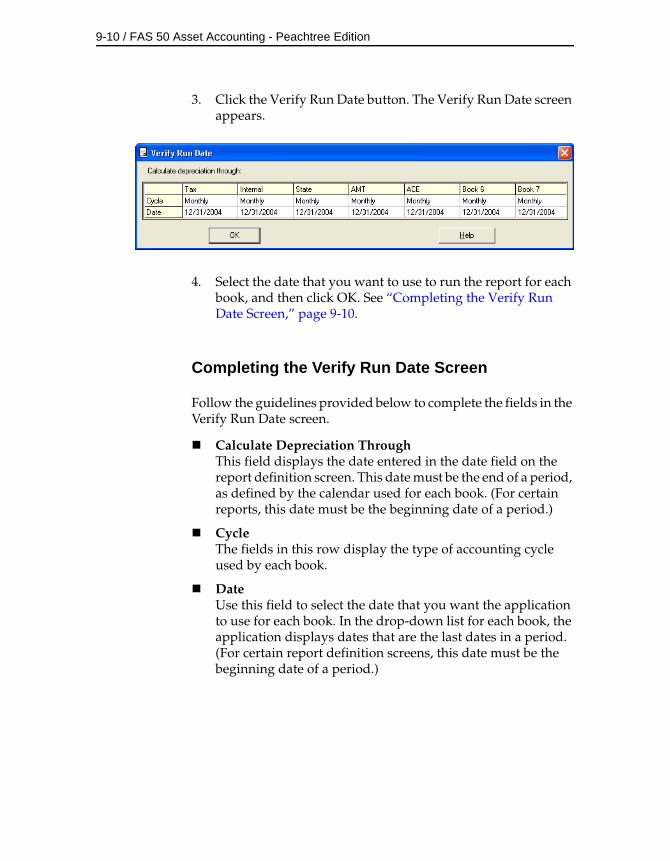
9-10 / FAS 50 Asset Accounting - Peachtree Edition
3. Click the Verify Run Date button. The Verify Run Date screen appears.
4. Select the date that you want to use to run the report for each book, and then click OK. See “Completing the Verify Run Date Screen,” page 9-10.
Completing the Verify Run Date Screen
Follow the guidelines provided below to complete the fields in the Verify Run Date screen.
Calculate Depreciation ThroughThis field displays the date entered in the date field on the report definition screen. This date must be the end of a period, as defined by the calendar used for each book. (For certain reports, this date must be the beginning date of a period.)
CycleThe fields in this row display the type of accounting cycle used by each book.
DateUse this field to select the date that you want the application to use for each book. In the drop-down list for each book, the application displays dates that are the last dates in a period. (For certain report definition screens, this date must be the beginning date of a period.)
Reports / 9-11
Completing the Report Definition Screen
Follow the guidelines provided below to complete the fields on the Report Definition screen. There are three pages:
• Setup Report Page (for more information, see “Completing the Setup Report Page of the Report Definition Screen,” page 9-12)
• Format Report Page (for information, see “Completing the Format Report Page of the Report Definition Screen,” page 9-15)
• View Report Layout Page (for information, see “Completing the View Report Layout Page of the Report Definition Screen,” page 9-18)
ReportUse this field to select the report that you want to run. The Report field allows you to run multiple reports without having to go back to the Reports menu.
DescriptionThis field displays a brief description of the selected report. You can enter a description of a customized report; however, you cannot change the description of a standard report.
Add Report to Favorites MenuSelect this check box to add the selected report to the Favorites section on the bottom of the Reports menu.
Run Report ButtonClick this button to run the selected report.
Save ButtonClick this button to save the report definition under the current name. The report definition includes all of the fields on the Setup Report and Format Report pages. If you do not save your changes to the report definition, all of the fields on these pages revert to the default settings for the selected report.
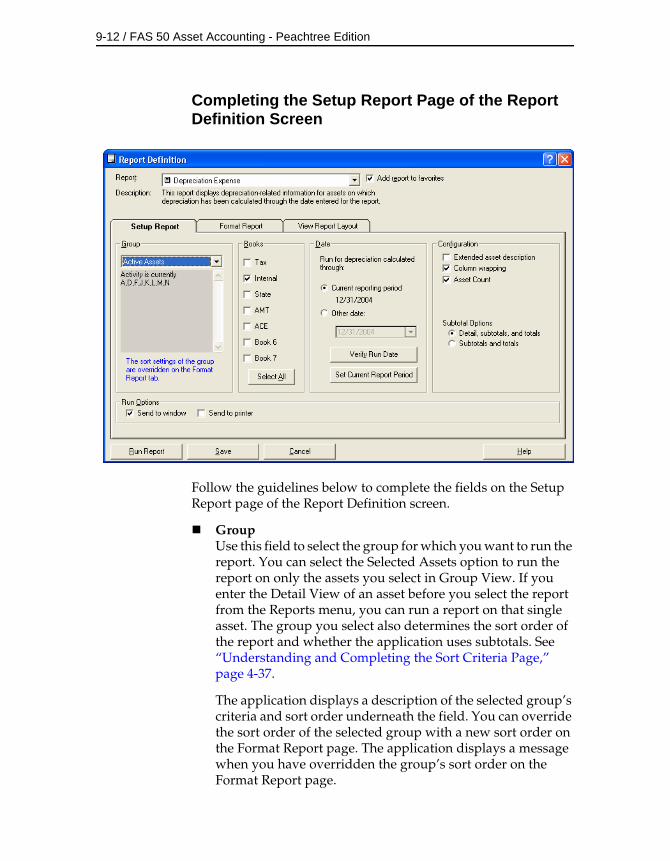
9-12 / FAS 50 Asset Accounting - Peachtree Edition
Completing the Setup Report Page of the Report Definition Screen
Follow the guidelines below to complete the fields on the Setup Report page of the Report Definition screen.
GroupUse this field to select the group for which you want to run the report. You can select the Selected Assets option to run the report on only the assets you select in Group View. If you enter the Detail View of an asset before you select the report from the Reports menu, you can run a report on that single asset. The group you select also determines the sort order of the report and whether the application uses subtotals. See “Understanding and Completing the Sort Criteria Page,” page 4-37.
The application displays a description of the selected group’s criteria and sort order underneath the field. You can override the sort order of the selected group with a new sort order on the Format Report page. The application displays a message when you have overridden the group’s sort order on the Format Report page.
Reports / 9-13
BooksUse this field to select the book or books you want to include in the report. For most reports, you must select at least one book to include in the report.
Select All/Deselect All ButtonClick this button either to select the check boxes for all available books or to clear the check boxes for all available books.
DateUse this field to run the report for either the current reporting period or for a date that you select.
Current Reporting PeriodClick this option button to run the report for the current reporting period. You can set the current reporting period for each book. For more information, see “Setting the Current Reporting Period,” page 9-27.
If you select only one book, the application displays the current reporting period for that book. If you select more than one book with different current reporting periods, you can view the current reporting periods by clicking the Verify Run Date button.
Other DateClick this option button if you want to run the report for a date other than the current reporting period. Enter the date for which you want to run the report in MM/DD/YYYY format. Click the down arrow to use the calendar to select the date. For most reports, this date must be the end of a period.
Verify Run Date ButtonClick this button to display a screen that allows you to view which period end the date you entered falls within, given the books selected. This button is unavailable if you have not selected a book in the Books field. For information about using this feature, see “Verifying the Run Date for Each Book,” page 9-9.
Set Current Report Period ButtonClick this button to display a screen that allows you to set the end date of the current reporting period for each book.
9-14 / FAS 50 Asset Accounting - Peachtree Edition
ConfigurationThe options in this field allow you to specify what you want included in the report. The available options vary depending on which report you are running.
Extended Asset DescriptionSelect this check box if you want the report to include the full 80-character asset description rather than the abbreviated version usually used for reports. The asset’s full description prints on a line above the asset’s other information. Selecting this check box doubles the size of your report.
Column WrappingSelect this check box if you want text fields that exceed the column width to print on the next line(s), so that all of the data in the field is displayed on the report.
Asset CountSelect this check box if you want the application to display the number of assets on subtotal and total lines.
Subtotal OptionsUse this field to determine how you want subtotals to display on the report.
• Detail, Subtotals, and TotalsClick this option button if you want the report to display details about every asset included in the report in addition to subtotals and the grand total.
• Subtotals and Totals OnlyClick this option button if you want the report to display only subtotals and the grand total. Even if you choose to display subtotals and totals only, you can drill down to view the details when you send the report to Window.
Run OptionsUse this field to specify where you want the application to send the report.
Send to WindowSelect this check box if you want to display the report on your computer screen in the report viewer. You must first select a default printer to display the report in the report viewer. After you display the report in the report viewer,
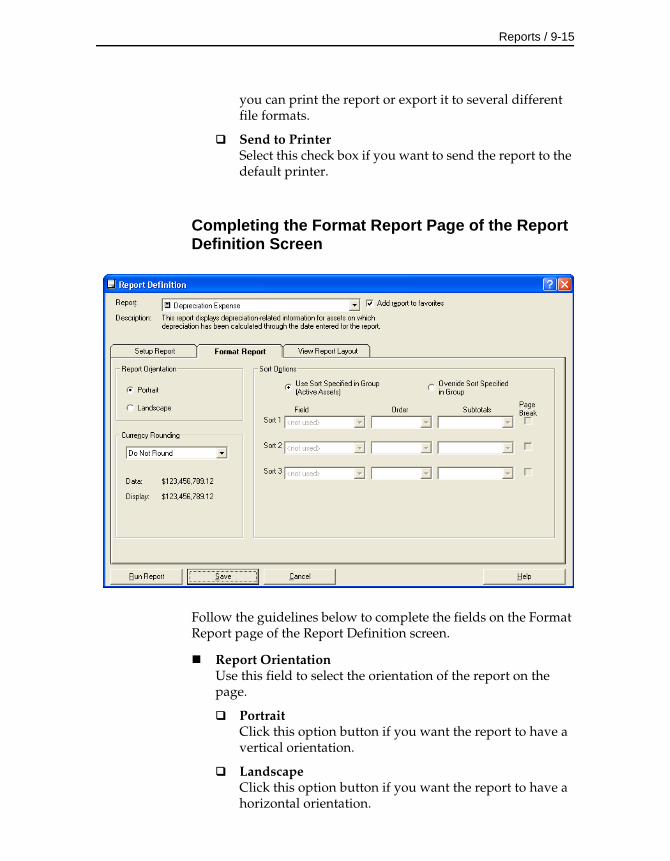
Reports / 9-15
you can print the report or export it to several different file formats.
Send to PrinterSelect this check box if you want to send the report to the default printer.
Completing the Format Report Page of the Report Definition Screen
Follow the guidelines below to complete the fields on the Format Report page of the Report Definition screen.
Report OrientationUse this field to select the orientation of the report on the page.
PortraitClick this option button if you want the report to have a vertical orientation.
LandscapeClick this option button if you want the report to have a horizontal orientation.

9-16 / FAS 50 Asset Accounting - Peachtree Edition
Currency RoundingUse this field to specify how you want the application to round dollar amounts on the report.
Do Not RoundSelect this option if you want the application to display both dollars and cents.
Whole DollarsSelect this option if you want the application to round dollar amounts to the nearest dollar.
ThousandsSelect this option if you want the application to round dollar amounts to the nearest thousand.
MillionsSelect this option if you want the application to round dollar amounts to the nearest million.
DataThis field displays an example of a dollar amount before the rounding option is applied to it.
DisplayThis field displays the dollar amount shown in the Data field after the rounding option has been applied.
Sort OptionsUse these fields to specify how you want the application to sort the information on the report.
Use Sort Specified in GroupClick this option button if you want the application to sort the information as specified for the selected group on the Sort Criteria page of the Group Manager. The application displays the group’s criteria and sort order underneath the Group field on the Setup Report page.
Override Sort Specified in GroupClick this option button if you want to override the sorting information specified for the selected group on the Sort Criteria page of the Group Manager.
The following fields are available only if you click the Override Sort Specified in Group option button.
FieldSelect up to three fields on which you want the application to sort the report.
Reports / 9-17
OrderUse these fields to select the order in which you want the application to display the data. Select Ascending to display the assets from A to Z or from 0 to 9. Select Descending to display the data from Z to A or from 9 to 0.
SubtotalsUse these fields to specify how you want the application to display subtotals on the report.
• No SubtotalsSelect this option if you do not want the application to display subtotals on the report for the corresponding field.
• SubtotalsSelect this option if you want the application to display subtotals on the report for the corresponding field.
• Year SubtotalsSelect this option if you want the application to display subtotals for each year. This option is available only for date fields.
• Year and Month SubtotalsSelect this option if you want the application to display subtotals for each year and for each month within each year. This option is available only for date fields.
Note You can select subtotal options for up to three sort levels. The Year and Month Subtotals option counts as two sort levels. Therefore, if you select Year and Month Subtotals for either the first or second field, the application ignores the subtotal selection for the third field. In addition, the Year and Month Subtotals sort option is not available for the third field because selecting it would exceed the limit of three sort levels.
Page BreakSelect this check box if you want the application to start a new page when the sort value changes. For example, if you select the Page Break check box for the Location field, then the application starts a new page every time the location changes.
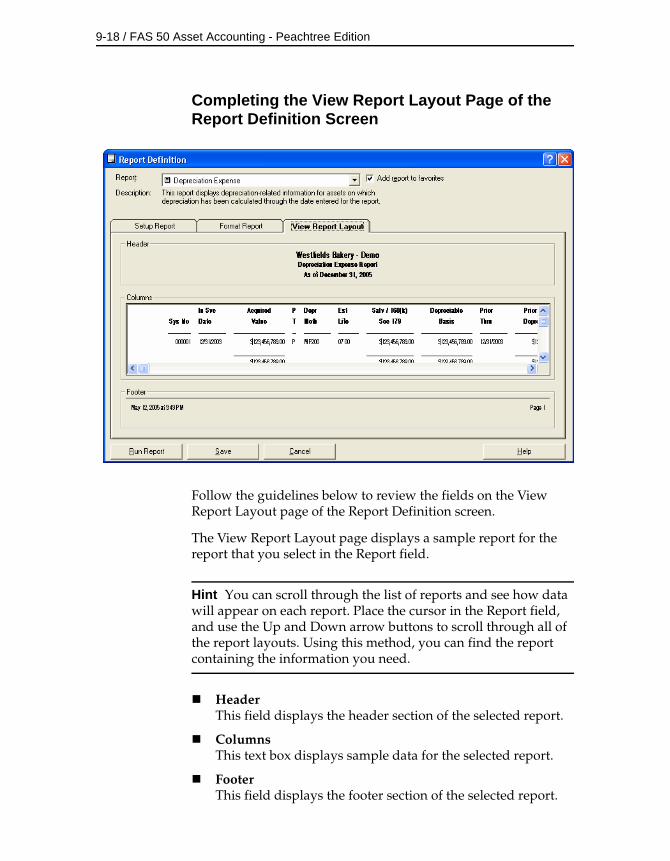
9-18 / FAS 50 Asset Accounting - Peachtree Edition
Completing the View Report Layout Page of the Report Definition Screen
Follow the guidelines below to review the fields on the View Report Layout page of the Report Definition screen.
The View Report Layout page displays a sample report for the report that you select in the Report field.
Hint You can scroll through the list of reports and see how data will appear on each report. Place the cursor in the Report field, and use the Up and Down arrow buttons to scroll through all of the report layouts. Using this method, you can find the report containing the information you need.
HeaderThis field displays the header section of the selected report.
ColumnsThis text box displays sample data for the selected report.
FooterThis field displays the footer section of the selected report.

Reports / 9-19
Viewing a Report
When you select the Send to Window check box in the Run Options field on the Report Definition screen, the application displays the report on your screen. Reports appear in a standard report viewer that contains many features that make it easy for you to view, manipulate, and print the report.
Here is the Depreciation Expense report displayed in the standard report viewer with each of the elements of the report viewer displayed.
The standard report viewer elements are as follows:
ReportThis field displays the name of the report on your computer’s screen.
BookUse this field to select the book for which you want to view a report. The application creates a separate report for each book selected on the report definition screen.
Go To Page NumberExport Report
Page Scroll Buttons SearchGroup Tree Button
Group Tree
Print Zoom size
9-20 / FAS 50 Asset Accounting - Peachtree Edition
Print All Reports ButtonClick this button to send the reports for all books to the printer. You can use this button to print reports before you drill down for details. After you drill down, you must use the Print button (see below).
Note Selecting the Print All Reports button prints only one report when you run a report for only one book (for example, running the report for only the Internal book).
Export Report ButtonClick this button to display the Export screen, which allows you to export the report to an external file or e-mail. You can export the report in many different file formats, including Adobe Acrobat (PDF), comma-separated values (CSV), Microsoft Excel (XLS), Microsoft Word for Windows (DOC), HTML, and XML.
Print Report ButtonClick this button to send the report to the default printer. You can use this button to print reports after you drill down for details.
Toggle Group Tree ButtonClick this button to either display or hide the group tree. The group tree displays the sort levels of the report. The application displays the group tree only if you have selected to subtotal the sort criteria for the group of assets on which you are reporting. If you have not selected to subtotal the sort criteria for the group of assets on which you are reporting, the application displays a blank navigation area when you click the Group Tree button. For more information, see “Using the Group Tree,” page 9-23.
Page Scroll ButtonsClick these buttons to scroll through the pages of the report. You can scroll to the next, previous, first, and last pages of the report.
Go To Page Number X/YThis field displays the current page number. You can enter a page number and press Enter to go to that page of the report. To view the total number of pages in the report, you must first use the page scroll buttons to move to the last page of the report.
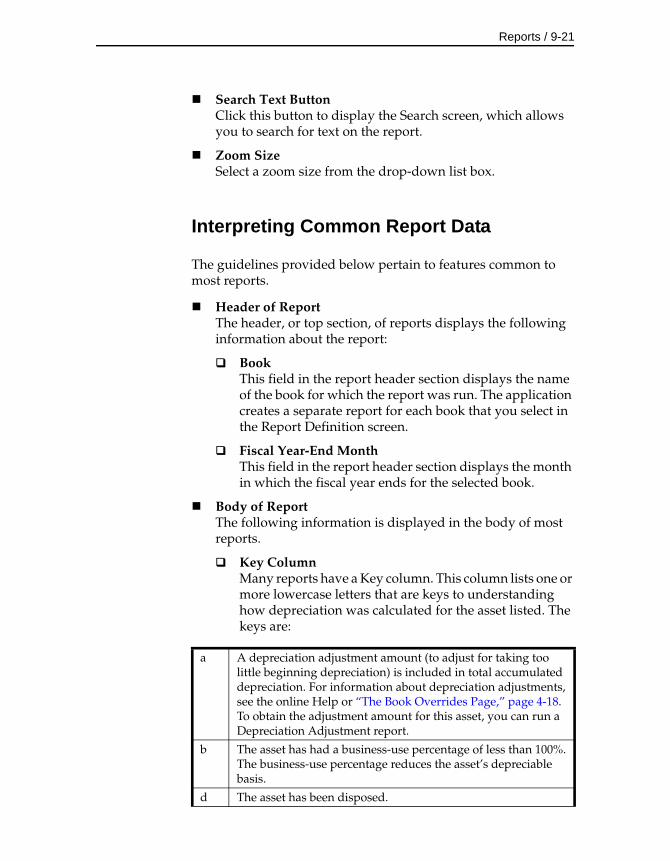
Reports / 9-21
Search Text ButtonClick this button to display the Search screen, which allows you to search for text on the report.
Zoom SizeSelect a zoom size from the drop-down list box.
Interpreting Common Report Data
The guidelines provided below pertain to features common to most reports.
Header of ReportThe header, or top section, of reports displays the following information about the report:
BookThis field in the report header section displays the name of the book for which the report was run. The application creates a separate report for each book that you select in the Report Definition screen.
Fiscal Year-End MonthThis field in the report header section displays the month in which the fiscal year ends for the selected book.
Body of ReportThe following information is displayed in the body of most reports.
Key ColumnMany reports have a Key column. This column lists one or more lowercase letters that are keys to understanding how depreciation was calculated for the asset listed. The keys are:
a A depreciation adjustment amount (to adjust for taking too little beginning depreciation) is included in total accumulated depreciation. For information about depreciation adjustments, see the online Help or “The Book Overrides Page,” page 4-18. To obtain the adjustment amount for this asset, you can run a Depreciation Adjustment report.
b The asset has had a business-use percentage of less than 100%. The business-use percentage reduces the asset’s depreciable basis.
d The asset has been disposed.

9-22 / FAS 50 Asset Accounting - Peachtree Edition
Report AssumptionsThe last page of most reports displays important information about the data included on the report. It is divided into four sections that give more information about the report.
Report IdentificationThe report identification section displays the following information:
• Report NameThis field displays the name of the report.
• Source ReportIf you have customized a standard report, this field displays the standard report on which the customized report is based. The application always displays <Standard Report> in this field because the customize report feature is not available in FAS 50 Asset Accounting.
Calculation AssumptionsThe calculation assumptions section shows:
• Whether the company had any short years during the report period.
• The depreciation adjustment convention used when an asset’s depreciation is less than the amount the application calculates for the beginning period (no
f The asset has switched from the MACRS table depreciation calculation to the MACRS formula depreciation calculation because of a short tax year.
l The asset’s depreciation has been limited by the cap on annual recovery allowances for luxury automobiles.
m The midquarter convention was applied to the asset’s depreciation.
r The asset’s acquired value was reduced to arrive at the depreciable basis. Salvage value, Section 179 expense or bonus depreciation, ITC, 168 Allowance, and business-use percentage may have reduced the acquired value.
s The asset switched from a declining-balance depreciation method to a straight-line depreciation method when straight-line depreciation resulted in more depreciation than declining balance.
v The asset has switched to a remaining value over remaining life depreciation calculation due to ACE rules.
Reports / 9-23
adjustment, immediate adjustment, or postrecovery adjustment).
• Whether the setting for the Include Section 168 Allowance and Section 179 in Expense field was on or off for the company.
Key CodesThe key section lists all of the available key codes that can appear in the Key column, along with a brief explanation of each code.
Group/Sorting CriteriaThis section shows the group name, group definition, and sort criteria. You can override the sort order specified in the group by completing the Sort Order fields on the Format Report page of the Report Definition screen.
Using the Group Tree
The group tree in the report viewer displays the sort levels of a report. You can use the group tree to view the sort levels and to quickly move from one section of the report to another.
To view the group tree, click the Group Tree button on the report viewer.
Note The application displays the group tree only if you have selected to subtotal the sort criteria for the group of assets on which you are reporting. You can select whether to subtotal the sort criteria when you define the group in the Group Manager. For more information about creating groups, see “Creating Groups,” page 4-30. You can also select to subtotal the sort criteria on the Format Report page of the Report Definition screen. If you have not selected to subtotal the sort criteria for the group of assets on which you are reporting, the application displays a blank navigation area when you click the Group Tree button.
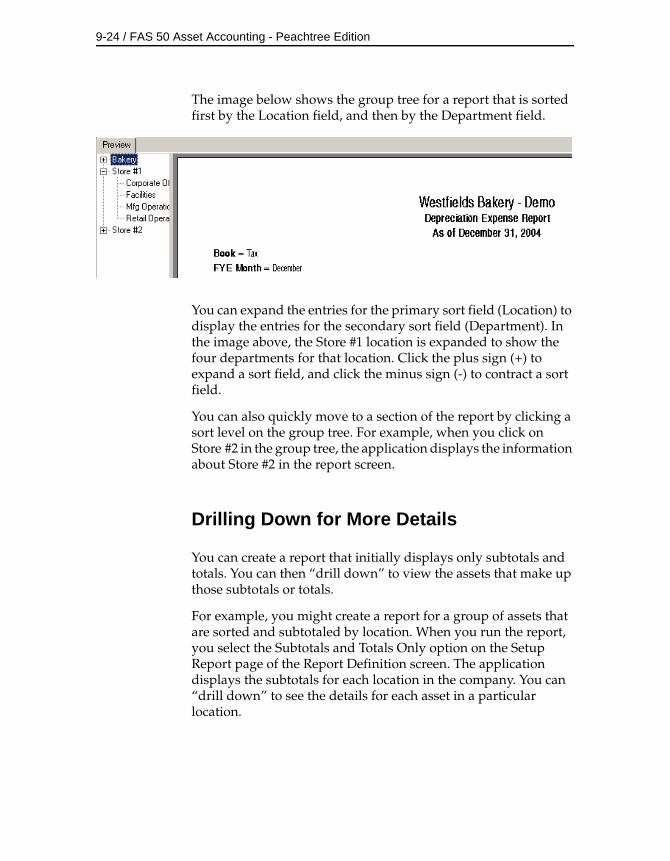
9-24 / FAS 50 Asset Accounting - Peachtree Edition
The image below shows the group tree for a report that is sorted first by the Location field, and then by the Department field.
You can expand the entries for the primary sort field (Location) to display the entries for the secondary sort field (Department). In the image above, the Store #1 location is expanded to show the four departments for that location. Click the plus sign (+) to expand a sort field, and click the minus sign (-) to contract a sort field.
You can also quickly move to a section of the report by clicking a sort level on the group tree. For example, when you click on Store #2 in the group tree, the application displays the information about Store #2 in the report screen.
Drilling Down for More Details
You can create a report that initially displays only subtotals and totals. You can then “drill down” to view the assets that make up those subtotals or totals.
For example, you might create a report for a group of assets that are sorted and subtotaled by location. When you run the report, you select the Subtotals and Totals Only option on the Setup Report page of the Report Definition screen. The application displays the subtotals for each location in the company. You can “drill down” to see the details for each asset in a particular location.
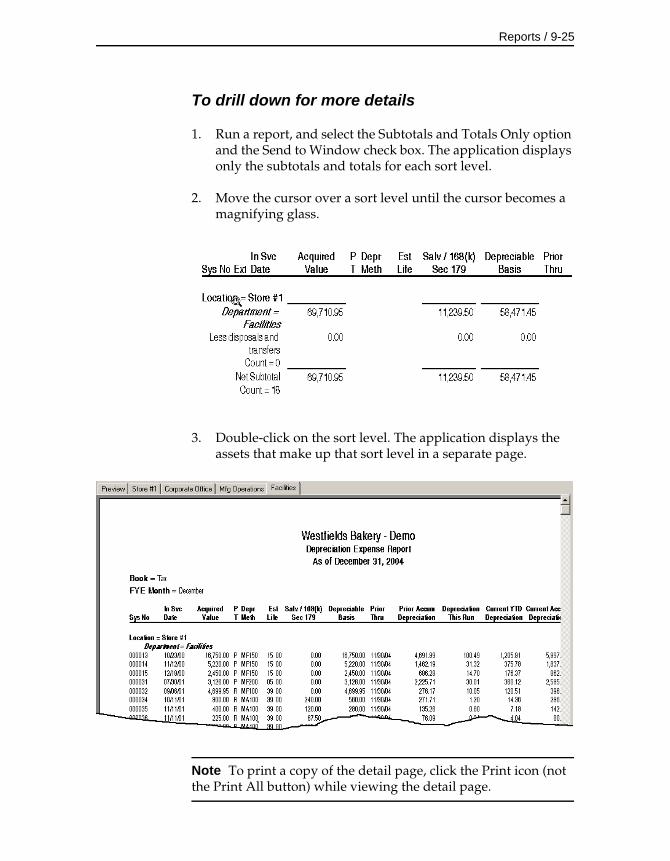
Reports / 9-25
To drill down for more details
1. Run a report, and select the Subtotals and Totals Only option and the Send to Window check box. The application displays only the subtotals and totals for each sort level.
2. Move the cursor over a sort level until the cursor becomes a magnifying glass.
3. Double-click on the sort level. The application displays the assets that make up that sort level in a separate page.
Note To print a copy of the detail page, click the Print icon (not the Print All button) while viewing the detail page.
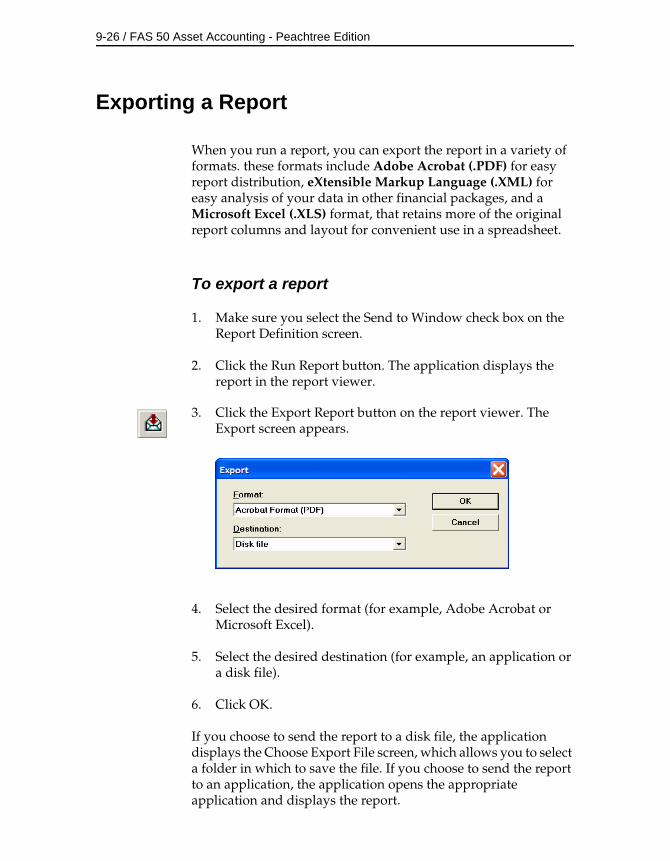
9-26 / FAS 50 Asset Accounting - Peachtree Edition
Exporting a Report
When you run a report, you can export the report in a variety of formats. these formats include Adobe Acrobat (.PDF) for easy report distribution, eXtensible Markup Language (.XML) for easy analysis of your data in other financial packages, and a Microsoft Excel (.XLS) format, that retains more of the original report columns and layout for convenient use in a spreadsheet.
To export a report
1. Make sure you select the Send to Window check box on the Report Definition screen.
2. Click the Run Report button. The application displays the report in the report viewer.
3. Click the Export Report button on the report viewer. The Export screen appears.
4. Select the desired format (for example, Adobe Acrobat or Microsoft Excel).
5. Select the desired destination (for example, an application or a disk file).
6. Click OK.
If you choose to send the report to a disk file, the application displays the Choose Export File screen, which allows you to select a folder in which to save the file. If you choose to send the report to an application, the application opens the appropriate application and displays the report.
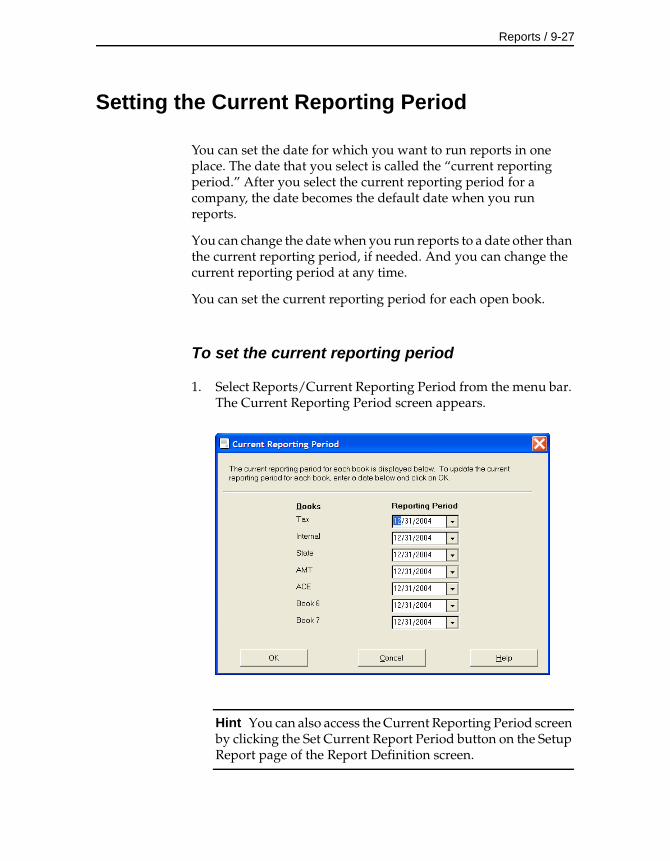
Reports / 9-27
Setting the Current Reporting Period
You can set the date for which you want to run reports in one place. The date that you select is called the “current reporting period.” After you select the current reporting period for a company, the date becomes the default date when you run reports.
You can change the date when you run reports to a date other than the current reporting period, if needed. And you can change the current reporting period at any time.
You can set the current reporting period for each open book.
To set the current reporting period
1. Select Reports/Current Reporting Period from the menu bar. The Current Reporting Period screen appears.
Hint You can also access the Current Reporting Period screen by clicking the Set Current Report Period button on the Setup Report page of the Report Definition screen.
9-28 / FAS 50 Asset Accounting - Peachtree Edition
2. Complete the Current Reporting Period screen, and then click OK.
The application uses the date that you select for each book when you run a report.
Note You can also set the current reporting period when you calculate depreciation. See “Completing the Depreciate Screen,” page 8-7.
Completing the Current Reporting Period Screen
Follow the guidelines below to complete the fields on the Current Reporting Period screen.
BooksThis field displays the name of the book for which you can set the current reporting period.
Reporting PeriodUse this field to select the period end date for the current reporting period for each book. The date must be the end of a period. If you enter a date that is not the end of a period, the application automatically enters the end date for the period that contains the date you entered.
A Depreciation and Fixed Asset Concepts
Tax laws and accounting standards that apply to depreciation are complex and ever-changing. Whether you are a business executive, an administrator, or an accountant, depreciation can be a confusing and worrisome aspect of fixed asset management.
The application is designed to reduce the burden of these tax laws and accounting standards by performing the many complicated calculations that are required. It also disallows entries that are clearly invalid under the law. To produce the optimal depreciation results for your company, however, you must understand several things:
• The concepts involved in the depreciation of fixed assets.
• The assumptions and decisions the application makes when calculating depreciation and setting defaults for the depreciation books, whenever choices are available under the law.
• The different depreciation methods available to you and their effects on your books.
This appendix provides detailed information about depreciation concepts and methods. It can help you make the right decisions about your entries in the depreciation books. Because depreciation and the IRS regulations that govern depreciation for tax purposes are very complex and frequently require professional judgment, this discussion is no substitute for the advice of an accountant or tax advisor.
Although the application takes much of the work out of depreciation by applying the correct depreciation rules and calculations to each asset, its calculations can only be as correct as the information you enter. For example, while the application can keep a user from entering a depreciation method that is invalid for the asset’s property type and date placed in service, the application cannot determine whether the property type is correct
A-2 / FAS 50 Asset Accounting - Peachtree Edition
for the asset or whether the user has chosen the most appropriate of the valid depreciation methods. The person who sets guidelines for entering asset information and who sets up the books should have a thorough understanding of depreciation and the way the application calculates it. The person who enters asset data (if different) may find it helpful to have a basic understanding of depreciation—as accountants understand it and as the IRS requires it.
This appendix discusses the basics of depreciation, how the application determines default values for the elements of depreciation, and the application’s disposal methods.
Depreciation Books
The application has five predefined depreciation books, including one user book (the Internal book) and two user-defined books. There is also an area where you can enter general information about an asset—data that does not affect depreciation. To learn more about the general information fields, see Chapter 6, “Working with Assets.”
This section of the appendix describes the seven depreciation books.
The Tax Book
The Tax book is for asset depreciation information as it will be reported to the IRS on the company’s federal income tax return for regular tax purposes. The application uses the entries in this book to set appropriate defaults for the other open books. For example, if you enter a personal property asset’s depreciation method in the Tax book as MF200 (MACRS Formula), the application will set the asset’s depreciation method in the AMT book to MF150. The specific defaults for all depreciation books are explained in “Depreciation Defaults,” page A-34. Note that if you close the Tax book, the State, AMT, and ACE books will not have any default information.
Depreciation and Fixed Asset Concepts / A-3
The application limits entries in the Tax book to choices that are valid under the depreciation sections of the Internal Revenue Code, principally Sections 167 and 168.
The Internal Book
The Internal book is for asset depreciation as needed for the company’s internal accounting. The application default information, based on the Tax book, conforms to Generally Accepted Accounting Principles (GAAP). The application uses data from this book in certain reports, such as the FASB 109 Projection report. The Internal book fiscal year does not need to be the same as the Tax book fiscal year.
Guidelines for internal book depreciation, as outlined by GAAP, tend to be far less restrictive than for tax depreciation. GAAP requires only that depreciation be a systematic and rational measure of asset wear and tear and that any selected depreciation method be applied consistently. Some rules are, however, quite specific, and you should refer to the GAAP guidelines for detailed information.
The State Book
The State book is for asset depreciation information as it will be reported on the company’s state income tax return. The application uses the data from the Tax book as the default information for this book. You must know the tax laws for your state; the application does not enforce specific state tax requirements. Generally, the State book fiscal year should be the same as the Tax book fiscal year.
When you run a FASB 109 Projection report, you can get an additional report for the State book.
The AMT Book
The rules for computing the Alternative Minimum Tax (AMT) differ from those used in computing depreciation for the regular federal tax. The Alternative Minimum Tax was created to ensure
A-4 / FAS 50 Asset Accounting - Peachtree Edition
that both individual taxpayers and corporations pay at least a certain amount of minimum tax. The application applies these rules to determine the default information for this book based on the Tax book entries. Generally, you should not change the default entries, as they already comply with AMT rules. The AMT book fiscal year should be the same as the Tax book fiscal year.
Note If a corporation is exempt from AMT (under the rules prescribed by the Taxpayer Relief Act of 1997), it should close the AMT book, as well as the ACE book, for the first year beginning after December 31, 1997. The exemption from AMT may only be temporary (that is, if the corporation grows sufficiently, it may have to start calculating AMT again).
The Alternative Minimum Tax report shows Tax Preferences for ACRS real property and Adjustments for MACRS assets as required under the AMT.
The ACE Book
For years after 1989, the Alternative Minimum Tax rules require a special income calculation under Code Section 56(g) to arrive at Adjusted Current Earnings (ACE). A major component of ACE is an adjustment for accelerated depreciation on recovery property placed in service prior to January 1, 1994. ACE depreciation, for which the ACE book is intended, is Alternative Minimum Tax depreciation with the following modifications, which the application applies for the ACE book defaults:
• For MACRS assets placed in service after 1993, the ACE Depreciation Adjustment has been eliminated.
• All MACRS assets placed in service in 1990 through 1993 must be depreciated using ADS straight-line MACRS depreciation (method AD). For these assets, the application defaults the estimated life from the ADS life for use as the recovery period.
• For MACRS assets placed in service before 1990 and ACRS assets, the application determines the asset’s remaining depreciable basis (using the AMT book for MACRS property and the Tax book for ACRS property) as of the end of the last tax year that began before 1990. After that date, the asset’s

Depreciation and Fixed Asset Concepts / A-5
depreciation method changes to a remaining value over remaining ADS life calculation; however, the ACE book still shows the original depreciation method.
• For all other assets, depreciation under ACE is the same as allowed for regular tax purposes.
Because the application establishes the ACE book defaults, under these rules, from entries in the Tax book, you should not override the defaults unless you are thoroughly familiar with Code Section 56(g) and fully understand the impact of your changes.
Note If a corporation is exempt from AMT (under the rules prescribed by the Taxpayer Relief Act of 1997), it should close the ACE book, as well as the AMT book, for the first year beginning after December 31, 1997. Although the exemption from AMT may only be temporary (that is, if the corporation grows sufficiently, it may have to start calculating AMT again), the exemption from ACE calculation is permanent.
The ACE book fiscal year should be the same as the Tax book fiscal year.
Books 6 and 7
Books 6 and 7 are for the company to use as it wishes. The application sets the default values just as it does for the Internal book, but it does not use the information in these books for any report calculations (other than those required to run Book 6 or 7 reports). You may choose either of these books to use as the applicable financial statement for the FASB 109 Projection report.
Some examples of possible uses for these books are:
• Compliance with special industry regulations
• Insurance valuations
• Additional state income tax books
A-6 / FAS 50 Asset Accounting - Peachtree Edition
Depreciation: An Overview
Depreciation is an allowance for the decline in an asset’s value. It has two aspects, an accounting aspect and a practical aspect. Both aspects have tax and financial implications.
In accounting terms, depreciation is the process of allocating the cost of tangible property against income over a period of time, rather than deducting the cost as a cash expense in the year of acquisition. Generally, at the end of an asset’s life, the sum of the amounts set aside for depreciation each accounting period will equal original cost less salvage value (the value of an asset at the end of its life). The method used to calculate an asset’s depreciation is important because depreciation affects net profit. Higher depreciation deductions reduce net profit while lower depreciation deductions increase net profit.
In practical terms, depreciation suggests a gradual decline in an asset’s market value because of use and wear and tear. Federal and state tax laws recognize that businesses need to account for this aspect of depreciation. As a result, IRS and state tax authorities allow businesses to write off or expense a certain amount each year for the actual use of an asset. This amount is treated as an expense even though the company may not have purchased the asset in the current period.
Good accounting and financial management practices require that a company take both the cost expiration and the declining market value of an asset into account. The cost expiration of a company’s assets must be recognized if the cost of doing business is to be realistic. Also, the decline in the market value of those assets must be considered if the company’s net worth is to be realistic.
The application is concerned solely with fixed assets, which the IRS defines as property or equipment with an estimated life in excess of 1 year. Note that the application does support assets with a life as short as 6 months for the following depreciation methods:
• MF150% and MA150% (MACRS Formula)
• AD and AA (MACRS Alternative Depreciation System)
Depreciation and Fixed Asset Concepts / A-7
To be depreciated, a fixed asset must:
• Be used in business or held for the production of income.
• Have an estimated life greater than 1 year.
• Be subject to wear, decay, or expiration.
• Be fully installed and ready for use.
Elements of Depreciation
To calculate depreciation on a fixed asset, you must know five things:
• The type of property.
• The date the asset was placed in service.
• The asset’s depreciable basis.
• The asset’s estimated useful life.
• The depreciation method.
The rest of this section explains each of the first four elements of depreciation.
Types of Property
An asset’s property type often dictates the depreciation method to be used in the depreciation calculation. Businesses use two general types of property: personal property and real property. Under the Internal Revenue Code, personal property includes all depreciable property other than real estate (real property). Real property includes buildings and their structural components.
A-8 / FAS 50 Asset Accounting - Peachtree Edition
Note Accountants often refer to a property by its depreciation method, such as a declining-balance property or an ACRS asset. Assets depreciated under ACRS and MACRS methods are called recovery properties because depreciation is taken over statutory estimated lives called recovery periods. You designate qualifying property as Indian Reservation property by selecting depreciation method MI, rather than by selecting a specific property type.
Within the two broad property type categories—personal and real—the Internal Revenue Code makes further distinctions for depreciation purposes. The application identifies property by the following types:
General Personal Property (Type P)This type includes all personal property other than listed personal property and automobiles.
Automobile (Type A)IRS rules place a cap on annual recovery allowances (including any deductions under Code Section 179) for qualifying vehicles placed in service after June 18, 1984. The following table summarizes the limitations on recovery allowances and investment tax credits for luxury vehicles, which the application enforces for assets using ACRS and MACRS methods (methods AT, SA, ST, MF, MT, MA, MR, AA, SB, MI, and AD). You should not use this property type for assets placed in service before June 19, 1984.
Luxury Automobile Limitations
Car Placed in Service
AssetLife
Maximum Recovery ($)
Max.ITCAfter Before Yr. 1 Yr. 2 Yr. 3 Yr. 4
Add’lYears
6/18/84 1/1/85 3 years 4,000 6,000 6,000 6,000 6,000 1,000
12/31/84 4/3/85 3 years 4,100 6,200 6,200 6,200 6,200 1,000
4/2/85 1/1/87 3 years 3,200 4,800 4,800 4,800 4,800 675
12/31/86 1/1/89 5 years 2,560 4,100 2,450 1,475 1,475 0
12/31/88 1/1/91 5 years 2,660 4,200 2,550 1,475 1,475 0
12/31/90 1/1/92 5 years 2,660 4,300 2,550 1,475 1,575 0
12/31/91 1/1/93 5 years 2,760 4,400 2,650 1,575 1,575 0
12/31/92 1/1/94 5 years 2,860 4,600 2,750 1,675 1,675 0
12/31/93 1/1/95 5 years 2,960 4,700 2,850 1,675 1,675 0
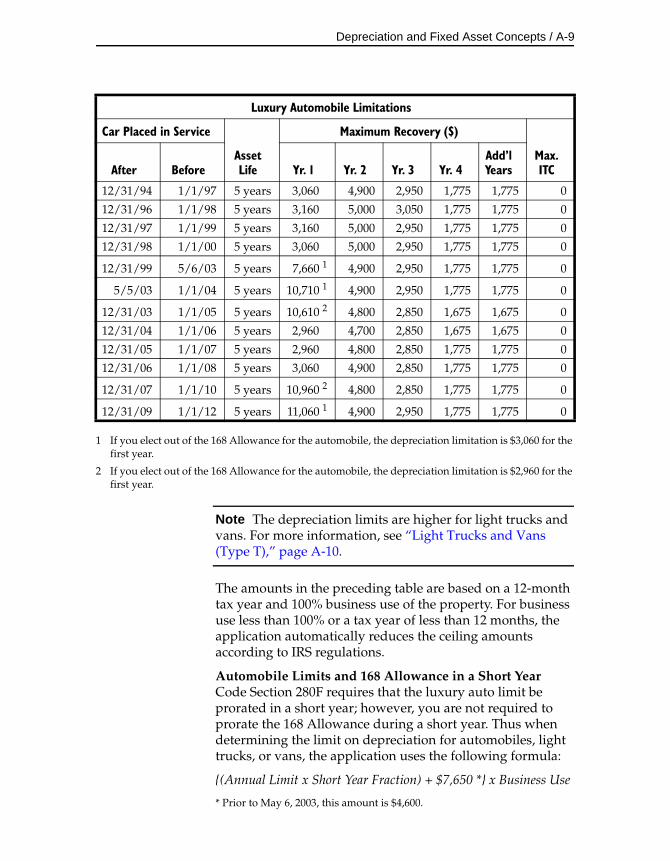
Depreciation and Fixed Asset Concepts / A-9
1 If you elect out of the 168 Allowance for the automobile, the depreciation limitation is $3,060 for the first year.
2 If you elect out of the 168 Allowance for the automobile, the depreciation limitation is $2,960 for the first year.
Note The depreciation limits are higher for light trucks and vans. For more information, see “Light Trucks and Vans (Type T),” page A-10.
The amounts in the preceding table are based on a 12-month tax year and 100% business use of the property. For business use less than 100% or a tax year of less than 12 months, the application automatically reduces the ceiling amounts according to IRS regulations.
Automobile Limits and 168 Allowance in a Short YearCode Section 280F requires that the luxury auto limit be prorated in a short year; however, you are not required to prorate the 168 Allowance during a short year. Thus when determining the limit on depreciation for automobiles, light trucks, or vans, the application uses the following formula:
{(Annual Limit x Short Year Fraction) + $7,650 *} x Business Use
* Prior to May 6, 2003, this amount is $4,600.
12/31/94 1/1/97 5 years 3,060 4,900 2,950 1,775 1,775 0
12/31/96 1/1/98 5 years 3,160 5,000 3,050 1,775 1,775 0
12/31/97 1/1/99 5 years 3,160 5,000 2,950 1,775 1,775 0
12/31/98 1/1/00 5 years 3,060 5,000 2,950 1,775 1,775 0
12/31/99 5/6/03 5 years 7,660 1 4,900 2,950 1,775 1,775 0
5/5/03 1/1/04 5 years 10,710 1 4,900 2,950 1,775 1,775 0
12/31/03 1/1/05 5 years 10,610 2 4,800 2,850 1,675 1,675 0
12/31/04 1/1/06 5 years 2,960 4,700 2,850 1,675 1,675 0
12/31/05 1/1/07 5 years 2,960 4,800 2,850 1,775 1,775 0
12/31/06 1/1/08 5 years 3,060 4,900 2,850 1,775 1,775 0
12/31/07 1/1/10 5 years 10,960 2 4,800 2,850 1,775 1,775 0
12/31/09 1/1/12 5 years 11,060 1 4,900 2,950 1,775 1,775 0
Luxury Automobile Limitations
Car Placed in Service
AssetLife
Maximum Recovery ($)
Max.ITCAfter Before Yr. 1 Yr. 2 Yr. 3 Yr. 4
Add’lYears
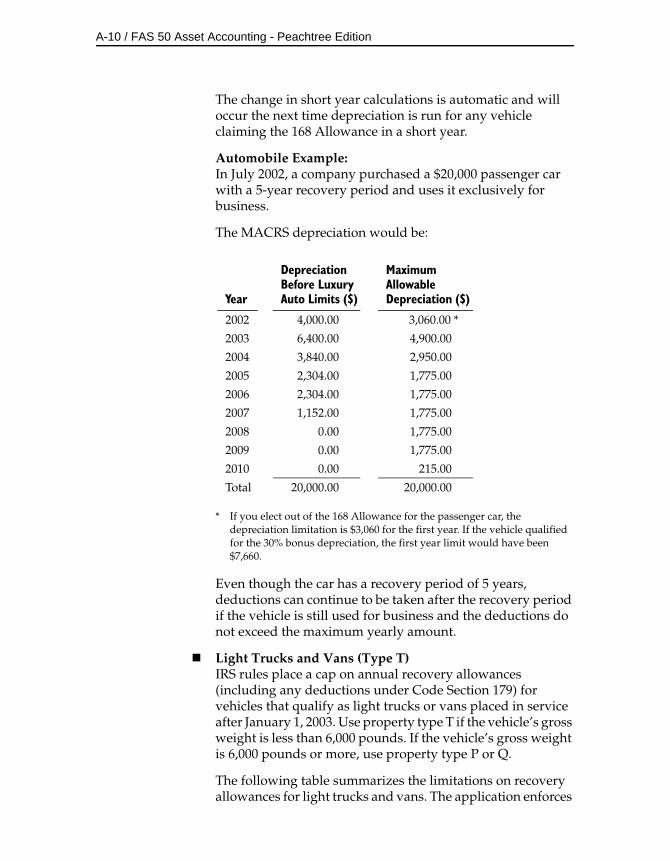
A-10 / FAS 50 Asset Accounting - Peachtree Edition
The change in short year calculations is automatic and will occur the next time depreciation is run for any vehicle claiming the 168 Allowance in a short year.
Automobile Example:In July 2002, a company purchased a $20,000 passenger car with a 5-year recovery period and uses it exclusively for business.
The MACRS depreciation would be:
* If you elect out of the 168 Allowance for the passenger car, the depreciation limitation is $3,060 for the first year. If the vehicle qualified for the 30% bonus depreciation, the first year limit would have been $7,660.
Even though the car has a recovery period of 5 years, deductions can continue to be taken after the recovery period if the vehicle is still used for business and the deductions do not exceed the maximum yearly amount.
Light Trucks and Vans (Type T)IRS rules place a cap on annual recovery allowances (including any deductions under Code Section 179) for vehicles that qualify as light trucks or vans placed in service after January 1, 2003. Use property type T if the vehicle’s gross weight is less than 6,000 pounds. If the vehicle’s gross weight is 6,000 pounds or more, use property type P or Q.
The following table summarizes the limitations on recovery allowances for light trucks and vans. The application enforces
Year
DepreciationBefore LuxuryAuto Limits ($)
MaximumAllowableDepreciation ($)
2002 4,000.00 3,060.00 *
2003 6,400.00 4,900.00
2004 3,840.00 2,950.00
2005 2,304.00 1,775.00
2006 2,304.00 1,775.00
2007 1,152.00 1,775.00
2008 0.00 1,775.00
2009 0.00 1,775.00
2010 0.00 215.00
Total 20,000.00 20,000.00
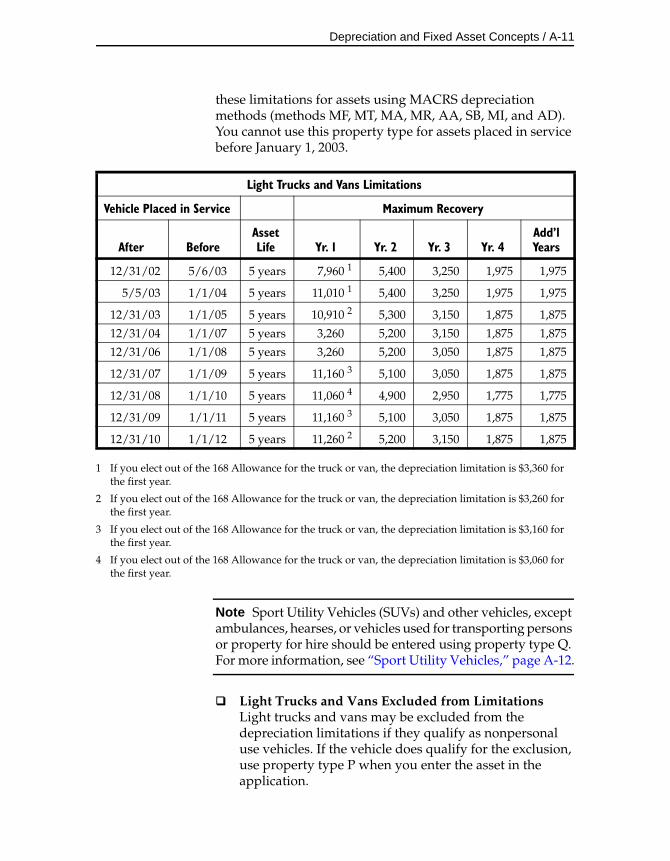
Depreciation and Fixed Asset Concepts / A-11
these limitations for assets using MACRS depreciation methods (methods MF, MT, MA, MR, AA, SB, MI, and AD). You cannot use this property type for assets placed in service before January 1, 2003.
1 If you elect out of the 168 Allowance for the truck or van, the depreciation limitation is $3,360 for the first year.
2 If you elect out of the 168 Allowance for the truck or van, the depreciation limitation is $3,260 for the first year.
3 If you elect out of the 168 Allowance for the truck or van, the depreciation limitation is $3,160 for the first year.
4 If you elect out of the 168 Allowance for the truck or van, the depreciation limitation is $3,060 for the first year.
Note Sport Utility Vehicles (SUVs) and other vehicles, except ambulances, hearses, or vehicles used for transporting persons or property for hire should be entered using property type Q. For more information, see “Sport Utility Vehicles,” page A-12.
Light Trucks and Vans Excluded from LimitationsLight trucks and vans may be excluded from the depreciation limitations if they qualify as nonpersonal use vehicles. If the vehicle does qualify for the exclusion, use property type P when you enter the asset in the application.
Light Trucks and Vans Limitations
Vehicle Placed in Service Maximum Recovery
After BeforeAsset Life Yr. 1 Yr. 2 Yr. 3 Yr. 4
Add’l Years
12/31/02 5/6/03 5 years 7,960 1 5,400 3,250 1,975 1,975
5/5/03 1/1/04 5 years 11,010 1 5,400 3,250 1,975 1,975
12/31/03 1/1/05 5 years 10,910 2 5,300 3,150 1,875 1,875
12/31/04 1/1/07 5 years 3,260 5,200 3,150 1,875 1,875
12/31/06 1/1/08 5 years 3,260 5,200 3,050 1,875 1,875
12/31/07 1/1/09 5 years 11,160 3 5,100 3,050 1,875 1,875
12/31/08 1/1/10 5 years 11,060 4 4,900 2,950 1,775 1,775
12/31/09 1/1/11 5 years 11,160 3 5,100 3,050 1,875 1,875
12/31/10 1/1/12 5 years 11,260 2 5,200 3,150 1,875 1,875

A-12 / FAS 50 Asset Accounting - Peachtree Edition
To qualify as a nonpersonal use vehicle, the truck or van must meet the following requirements:
• The vehicle was specially modified so it is not likely to be used more than minimally for personal purposes.
• The vehicle was placed in service on or after July 7, 2003.
IRS Reg. § 1.274-5T(k)(7) provides the following example of a vehicle that was modified so that it would not be used for personal purposes:
“A van that has only a front bench for seating, in which permanent shelving that fills most of the cargo area has been installed, that constantly carried merchandise or equipment, and that has been specially painted with advertising or the company’s name.”
Vehicles that are exempt from the depreciation limitations also include those listed under (k)(2) of the same regulation. This list includes cranes, school buses, forklifts, and ambulances.
Listed Personal Property (Type Q)Code Section 280F lists certain kinds of property for which ACRS and MACRS deductions may be limited. Listed personal properties include passenger cars or other forms of transportation that can be used for personal as well as business purposes, such as airplanes, trucks, and boats; amusement equipment such as pinball machines; cellular phones; and certain computers. For a complete list, see Code Section 280F.
Sport Utility VehiclesVehicles weighing less than 6,000 pounds are subject to the luxury automobile limits on depreciation. Sport Utility Vehicles (SUVs) weighing between 6,000 and 14,000 pounds were not subject to these limitations. Since 2003, a business could deduct up to $100,000 in the placed-in-service year for the cost of an SUV under Section 179 because these vehicles were not subject to the automobile limits.
However, the American Jobs Creation Act of 2004 limits the Section 179 expense that can be taken in a single year

Depreciation and Fixed Asset Concepts / A-13
on an SUV to $25,000. The $25,000 limit applies to SUVs placed in service after 10/22/04.
To enter an asset as an SUV, use property type Q, listed property.
General Real Property (Type R)This type includes all real property that is not listed or required to be reported separately for tax purposes.
Listed Real Property (Type S)Code Section 280F lists real property as well as personal property for which ACRS and MACRS deductions may be limited. Listed real properties include entertainment, recreational, and amusement properties, such as sports stadium boxes, beach houses, and hunting lodges. For a complete list, see Code Section 280F.
Other Real Properties (Types C, E, and F)Because you must report different real property types separately for several federal tax forms (most notably Form 4797), the application has separate property types for conservation property (type C); oil, gas, and energy property (type E); and farm property (type F).
Low-Income Housing (Type H)Special ACRS allowances are available for low-income housing placed in service after 1980 and before 1987. These periods allow for costs to be recovered at twice the straight-line rate. Property allowed to be recovered under this method includes housing projects insured under the National Housing Act.
Between 1980 and 1987, low-income housing was given a special full month’s depreciation during the months of acquisition and disposal. Low-income housing was also assigned a 15-year recovery period with 200% declining-balance depreciation.
After 1986, low-income housing uses the same midmonth convention as other residential property, with a half-month’s depreciation given during months of acquisition and disposal. For this reason, there is no special treatment for low-income housing placed in service after 1986 and it should therefore be treated as general real property (type R).
The short tax year rule does not apply to low-income housing in the year of acquisition or disposition. The deduction is
A-14 / FAS 50 Asset Accounting - Peachtree Edition
based on the number of months in which the property was in service during the short tax year, as is the case with other real property.
Amortizable Property (Type Z)The tax law requires taxpayers to recover certain specified capital expenditures through a process known as amortization. Amortization uses straight-line depreciation over certain specified periods of time. You can select only straight-line depreciation methods (methods SD, SL, SF, SH, and RV, plus OC, NO, and custom methods) for amortizable assets. Only certain expenditures may be amortized.
Many intangible assets that cannot be depreciated can be amortized. Among them are business startup costs, organizational expenses of corporations and partnerships, and covenants not to compete. Some tangible assets, including pollution control facilities, pre-1982 child-care facilities, and the rehabilitation of certified historic structures, can also be amortized. You should assign such assets to property type Z.
Vintage Account Property (Type V)From 1971 through 1980, Asset Depreciation Range (ADR) depreciation allowed the use of accounts having multiple assets. These accounts are called vintage accounts. Vintage accounts require the use of either the half-year or modified half-year convention; the application limits the valid depreciation methods accordingly.
Property type V also requires special handling of salvage value, whereby salvage value does not reduce the depreciable basis yet the asset cannot be depreciated below the salvage value. The application treats type V assets this way automatically.
Enter a vintage account as a single asset and select property type V.
Leasehold Improvement Property
Leasehold improvements are permanent betterments made to leased property, which is owned by someone else and which will usually revert to the owner at the end of the lease period. For example, a tenant may build shelves or install fixtures on the walls
Depreciation and Fixed Asset Concepts / A-15
of a rented store. Although for income tax purposes leasehold improvements are depreciated, for financial reporting they are amortized.
Previously, leasehold improvements were required to be depreciated using the same depreciation method, life, and averaging convention as the underlying property to which they were attached. Generally, this meant most leaseholds were depreciated using straight-line depreciation with a mid-month averaging convention over 39 years.
Currently, leasehold improvement property placed in service from 10/23/2004 - 12/31/2011 is required to depreciate using the straight-line depreciation method over a 15-year life (9-year life for Indian Reservation property), and apply either a half-year or midquarter averaging convention.
Date Placed in Service
Along with the type of property, the date on which an asset is placed in service can determine the depreciation method required. As the Internal Revenue Code changes, so do the depreciation methods that are valid for assets newly placed in service. The application lets you use only those depreciation methods that are valid for an asset given the property type and the date placed in service.
The date an asset is placed in service affects depreciation in two other ways: the averaging convention that is used, and whether the asset was placed in service during a short tax year. Averaging conventions and short tax years are discussed in the text that follows.
Averaging ConventionsTo avoid the complications of depreciating each asset from the specific date on which it was placed in service, the IRS and GAAP support guidelines that assume various assets are placed in service or disposed of at designated dates throughout the year. These guidelines are called averaging conventions. By assuming an average placed-in-service date, the amount of total depreciation allowed for all assets approximates the total depreciation that would be calculated based on the actual days in service.
A-16 / FAS 50 Asset Accounting - Peachtree Edition
Under GAAP and IRS rules, different depreciation methods use specific averaging conventions.
There are five averaging conventions, as described below.
Half-Year ConventionUnder the half-year convention, an asset is treated as though it were placed in service or disposed of on July 1 (or on the first day of the 7th month of a fiscal year). One-half of a full year’s depreciation is allowed for the asset in its first year placed in service, regardless of when it was actually placed in service during that year.
If you dispose of an asset in its final year, the amount of depreciation depends on when it is disposed. If the asset is disposed of before July 1 (or before the first day of the 7th month of the fiscal year), it receives one half of the depreciation it would have received if it had not been disposed. The asset will not be fully depreciated. If the asset is disposed of on or after July 1 (on or after the first day of the 7th month of the fiscal year), it receives the full amount of depreciation for its final year.
Under earlier legislation, personal property placed in service before 1987 and depreciated under the ACRS tables used the half-year convention in the year of acquisition. Such personal property was entitled to no depreciation in the year it was disposed of. The MACRS rules of the 1986 Tax Reform Act keep the half-year averaging in the year of acquisition, but they also allow for a half-year of depreciation in the year of disposition.
Note The half-year convention can be used for all MACRS property except residential rental and nonresidential real property. It is used for MACRS 3-, 5-, 7-, 10-, 15-, 20-, and 25-year property (unless the midquarter convention applies).
Modified Half-Year ConventionUnder this convention, assets placed in service during the first half of the year are considered to have been placed in service on the first day of the year. Therefore, they receive a full year’s depreciation in the acquisition year. Assets placed in service during the second half of the year are considered to have been placed in service on the first day of the following year. Therefore, they receive no
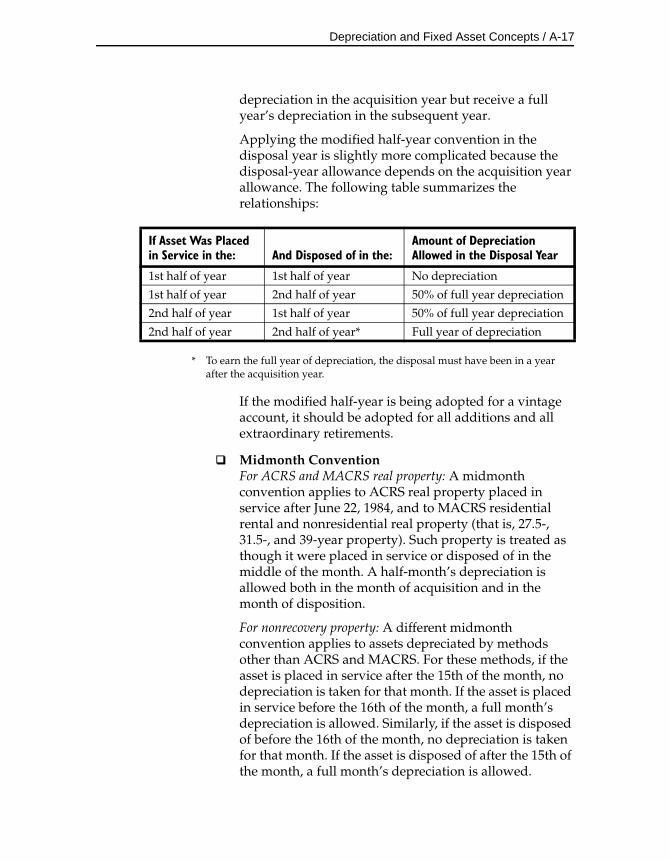
Depreciation and Fixed Asset Concepts / A-17
depreciation in the acquisition year but receive a full year’s depreciation in the subsequent year.
Applying the modified half-year convention in the disposal year is slightly more complicated because the disposal-year allowance depends on the acquisition year allowance. The following table summarizes the relationships:
* To earn the full year of depreciation, the disposal must have been in a year after the acquisition year.
If the modified half-year is being adopted for a vintage account, it should be adopted for all additions and all extraordinary retirements.
Midmonth ConventionFor ACRS and MACRS real property: A midmonth convention applies to ACRS real property placed in service after June 22, 1984, and to MACRS residential rental and nonresidential real property (that is, 27.5-, 31.5-, and 39-year property). Such property is treated as though it were placed in service or disposed of in the middle of the month. A half-month’s depreciation is allowed both in the month of acquisition and in the month of disposition.
For nonrecovery property: A different midmonth convention applies to assets depreciated by methods other than ACRS and MACRS. For these methods, if the asset is placed in service after the 15th of the month, no depreciation is taken for that month. If the asset is placed in service before the 16th of the month, a full month’s depreciation is allowed. Similarly, if the asset is disposed of before the 16th of the month, no depreciation is taken for that month. If the asset is disposed of after the 15th of the month, a full month’s depreciation is allowed.
If Asset Was Placed in Service in the: And Disposed of in the:
Amount of Depreciation Allowed in the Disposal Year
1st half of year 1st half of year No depreciation
1st half of year 2nd half of year 50% of full year depreciation
2nd half of year 1st half of year 50% of full year depreciation
2nd half of year 2nd half of year* Full year of depreciation
A-18 / FAS 50 Asset Accounting - Peachtree Edition
Full-Month ConventionUnder a full-month convention, property placed in service at any time during a given month is treated as if it had been placed in service on the first of that month. This allows depreciation to be taken for the entire month in which the asset is placed in service. If the property is disposed of before the end of the recovery period, no depreciation is allowed for the month in which the property is disposed of.
Midquarter ConventionThe Tax Reform Act of 1986 created a midquarter convention to be used if more than 40% of the aggregate depreciable basis of newly acquired MACRS personal property is placed in service during the last 3 months of a tax year. Under this midquarter convention, MACRS personal property is treated as though it were placed in service in the middle of the quarter in which it was purchased.
The midquarter convention is optional for the 2001 tax year if September 11, 2001 occurs in the third or fourth quarter of your fiscal year. Pursuant to IRS Notice 2001-70 and 2001-74, you can elect to use the half-year convention, even if more than 40% of the aggregate depreciable basis of newly acquired qualifying MACRS property was placed in the last three months of the tax year.
To make the half-year convention election when you would otherwise be required to use the midquarter convention, write “Election Pursuant to Notice 2001-70” across the top of Form 4562, Depreciation and Amortization. You can tell the application to write this text on the form when you complete the Form 4562 report definition screen.
Note When applicable, the midquarter convention can be used for all MACRS property except residential rental and nonresidential real property. It is used for MACRS 3-, 5-, 7-, 10-, 15-, 20-, and 25-year property (unless the half-year convention applies).
Depreciation and Fixed Asset Concepts / A-19
Short Tax YearsA short tax year occurs when there is an accounting period of less than 12 calendar months. A short tax year can be:
• The first tax reporting period.
• The final tax reporting period.
• The result of a change in an annual accounting period.
A short tax period requires special calculations for depreciation. In general, a short accounting period requires that depreciation calculations be allocated based on the number of months in the short year. The way this is accomplished differs depending on the depreciation method selected.
When annual depreciation allowances for ACRS personal property are determined through the use of IRS tables (methods AT and ST), an amount of unrecovered short-year depreciation is created, carried forward, and recovered in the period following the normal depreciable life. You cannot use the MACRS table method (method MT) if a short year occurs during an asset’s life.
For ACRS personal property, the full year’s depreciation is multiplied by the short-year fraction to determine the annual short-year amount. The short-year fraction is:
For example, if a company changes its fiscal year-end month from September to December, the short-year fraction is 3/12. The remaining unrecovered deduction (9/12 of the full year’s deduction) is taken in the first year of the post-recovery period.
Depreciation methods that use a half-year convention (methods SH, DH, and YH) need to use the half-rate rule, which requires that one-half of the depreciation calculated for the full short-year period be used. Depreciation methods that use the modified half-year convention (methods SD, DD, and YD) apply special rules to the short-year calculation. When an asset is placed in service in the first half of a short year, then the full amount of the short-year depreciation is allowed. In such cases, the regular full-year recovery is multiplied by the short-year fraction.
Months in a short year12
------------------------------------------------------
A-20 / FAS 50 Asset Accounting - Peachtree Edition
Depreciable Basis
An asset’s depreciable basis is the amount of the asset’s acquired value for which a business is allowed to claim depreciation. A percentage of this basis is deducted each year. The depreciable basis is often (but not always) the cost or acquired value of the asset. Under some depreciation rules, other factors adjust the cost to determine the depreciable basis. These factors are salvage value, Section 179 expense or bonus depreciation, Section 168 Allowance, the ITC amount, and the business use percentage. Each element of the depreciable basis is discussed in this section.
In summary, the asset’s depreciable basis equals the following:
* The application always reduces the acquired value by the 168 Allowance and Section 179 expense, if applicable to the depreciation method, when calculating the depreciable basis. The selection in the Include Section 168 Allowance and Section 179 in Expense field on the Edit Company screen does not affect the calculation of depreciable basis. Therefore, if you select Yes in this field (to include the 168 Allowance and Section 179 expense in depreciation), the depreciable basis will be less than the accumulated depreciation at the end of the asset’s life.
To see the figures used to calculate a particular asset’s depreciable basis, run an Asset Basis report for that asset. For instructions, see “Running a Standard Report,” page 9-5.
Acquired ValueOne measure of an asset’s acquired value is its purchase price. If something other than cash is used to pay for the asset, then the fair market value of the noncash payment or consideration determines the acquired value. A noncash consideration often takes the form of an account payable or another obligation to pay. When the value of the consideration paid can’t be
the asset’s acquired valuetimes the business-use percentageminus the salvage value (if the asset uses a straight-line,
sum-of-the-years’-digits, or custom depreciation method)minus * any Section 179 expense deduction or first-year bonus
depreciationminus any ITC reduction amountminus * the 168 Allowance
Depreciation and Fixed Asset Concepts / A-21
determined, the fair market value of the asset determines its acquired value.
With few exceptions, an asset’s acquired value should also include necessary costs incurred to place the asset in service. These costs will then be capitalized, not expensed. Costs that can be capitalized include the invoice price plus incidental costs (insurance during transit, freight, duties, title search, registration fees, and installation costs). Exceptions to this rule include interest expenses associated with deferred payments and real estate taxes paid in the acquisition of property.
The GAAP method used to determine acquired value may not always apply for tax purposes. To accommodate different tax and GAAP needs, the application lets you enter a different acquired value for each depreciation book maintained.
Business-Use PercentageUnder IRS rules, you can take depreciation only on the portion of an asset that is used for business. The application multiplies the asset’s basis by the business-use percentage, and then it subtracts any adjustment for salvage value, Section 179 or bonus depreciation, ITC, and 168 Allowance to determine the asset’s depreciable basis.
Business-Use Percentage ExampleA company purchases an automobile for $32,000 in December 2005, which is subject to luxury automobile limits on recovery allowances. The employee who uses the car is allowed to drive it for personal use as well as for business. The business-use percentages are 90%, 80%, and 70% for 2005, 2006, and 2007, respectively, and 60% for the remaining life of the car. The calculation of the depreciation allowances, using a MACRS table calculation (method MT) over the life of the car, is as follows:
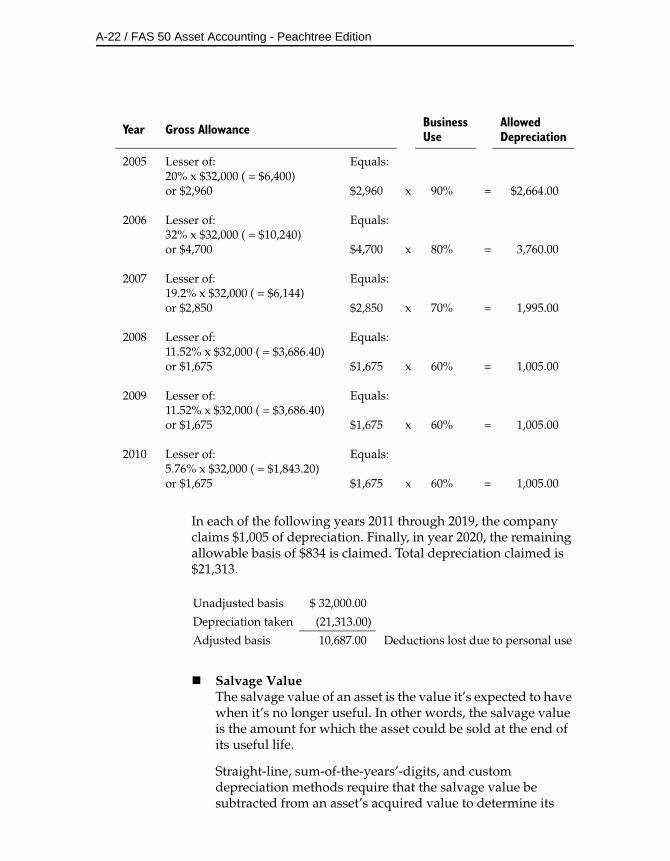
A-22 / FAS 50 Asset Accounting - Peachtree Edition
In each of the following years 2011 through 2019, the company claims $1,005 of depreciation. Finally, in year 2020, the remaining allowable basis of $834 is claimed. Total depreciation claimed is $21,313.
Salvage ValueThe salvage value of an asset is the value it’s expected to have when it’s no longer useful. In other words, the salvage value is the amount for which the asset could be sold at the end of its useful life.
Straight-line, sum-of-the-years’-digits, and custom depreciation methods require that the salvage value be subtracted from an asset’s acquired value to determine its
Year Gross Allowance Business Use
Allowed Depreciation
2005 Lesser of: Equals:20% x $32,000 ( = $6,400)or $2,960 $2,960 x 90% = $2,664.00
2006 Lesser of: Equals:32% x $32,000 ( = $10,240)or $4,700 $4,700 x 80% = 3,760.00
2007 Lesser of: Equals:19.2% x $32,000 ( = $6,144)or $2,850 $2,850 x 70% = 1,995.00
2008 Lesser of: Equals:11.52% x $32,000 ( = $3,686.40)or $1,675 $1,675 x 60% = 1,005.00
2009 Lesser of: Equals:11.52% x $32,000 ( = $3,686.40)or $1,675 $1,675 x 60% = 1,005.00
2010 Lesser of: Equals:5.76% x $32,000 ( = $1,843.20)or $1,675 $1,675 x 60% = 1,005.00
Unadjusted basis $ 32,000.00
Depreciation taken (21,313.00)
Adjusted basis 10,687.00 Deductions lost due to personal use

Depreciation and Fixed Asset Concepts / A-23
depreciable basis. Other methods (such as declining-balance) and vintage account property do not subtract the salvage value to determine the basis but will not depreciate an asset below its salvage value. ACRS and MACRS depreciation methods ignore salvage value in determining the depreciable basis and will depreciate an asset below its salvage value.
Section 179 Expense DeductionThe Section 179 election lets you treat the cost of certain new assets as an expense rather than as a capital expenditure to be depreciated. This allows an expense deduction for part of the cost instead of a depreciation deduction. You cannot depreciate the amount expensed under Section 179 and you must deduct it from an asset’s acquired value when determining its depreciable basis. To qualify for the Section 179 election, an asset must be recovery property that is purchased and used by an active trade or business.
Section 179 Expense Deduction for Real PropertyFor any tax year beginning in 2010 or 2011, you can elect to expense under Section 179 up to $250,000 of qualified real property purchases. Qualified real property includes:
• Qualified leasehold improvement property
• Qualified restaurant property, and
• Qualified retail improvement property
Note Off-the-shelf computer software qualifies for the Section 179 expense deduction if it is placed in service before 01/01/2013. To enter off-the-shelf computer software, select property type P, a depreciation method of SF or SB, and an estimated life of 3 years.
For information on entering the Section 179 Expense Deduction, see “Section 179/Bonus,” page 6-17.
First-Year Bonus DepreciationAn additional first-year depreciation bonus of 20% may be taken for personal property that was acquired before 1981 and that has an estimated useful life of at least 6 years. This bonus is in addition to the depreciation that would normally be taken in the first year. If the bonus is taken, the amount of the bonus is subtracted from the depreciable basis before any further calculations are made. The 20% first-year bonus
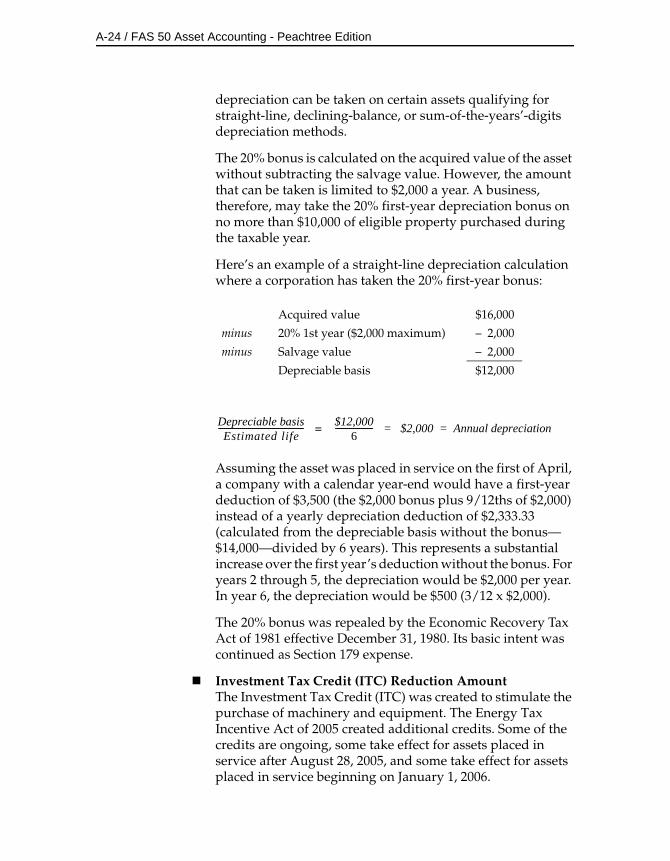
A-24 / FAS 50 Asset Accounting - Peachtree Edition
depreciation can be taken on certain assets qualifying for straight-line, declining-balance, or sum-of-the-years’-digits depreciation methods.
The 20% bonus is calculated on the acquired value of the asset without subtracting the salvage value. However, the amount that can be taken is limited to $2,000 a year. A business, therefore, may take the 20% first-year depreciation bonus on no more than $10,000 of eligible property purchased during the taxable year.
Here’s an example of a straight-line depreciation calculation where a corporation has taken the 20% first-year bonus:
Assuming the asset was placed in service on the first of April, a company with a calendar year-end would have a first-year deduction of $3,500 (the $2,000 bonus plus 9/12ths of $2,000) instead of a yearly depreciation deduction of $2,333.33 (calculated from the depreciable basis without the bonus—$14,000—divided by 6 years). This represents a substantial increase over the first year’s deduction without the bonus. For years 2 through 5, the depreciation would be $2,000 per year. In year 6, the depreciation would be $500 (3/12 x $2,000).
The 20% bonus was repealed by the Economic Recovery Tax Act of 1981 effective December 31, 1980. Its basic intent was continued as Section 179 expense.
Investment Tax Credit (ITC) Reduction AmountThe Investment Tax Credit (ITC) was created to stimulate the purchase of machinery and equipment. The Energy Tax Incentive Act of 2005 created additional credits. Some of the credits are ongoing, some take effect for assets placed in service after August 28, 2005, and some take effect for assets placed in service beginning on January 1, 2006.
Acquired value $16,000
minus 20% 1st year ($2,000 maximum) – 2,000
minus Salvage value – 2,000
Depreciable basis $12,000
Depreciable basisEstimated life
------------------------------------------- $12,000
6------------------- = $2,000 = Annual depreciation=
Depreciation and Fixed Asset Concepts / A-25
As a reminder, a tax credit reduces the amount of tax to be paid, whereas a tax deduction reduces the amount of net income subject to tax.
An ITC was previously allowed for the taxable year in which a qualified asset was placed in service. The amount of allowable credit depended on the date placed in service, the type of property, and the estimated life of the asset.
For assets placed in service between 1975 and 1980, the ITC was 10% for those with estimated lives of 7 years or more, 6.67% for lives of 5 or 6 years, and 3.33% for lives of 3 or 4 years. No credit was allowed for assets with estimated lives of less than 3 years.
For assets placed in service after 1980, the Economic Recovery Tax Act of 1981 and the Tax Equity and Fiscal Responsibility Act of 1982 set the allowable ITC amounts at 10% for estimated lives of more than 3 years and 6% for estimated lives of 3 years.
For assets placed in service after 1982 but before 1986, a company has two choices:
• Take the full ITC but reduce the depreciable basis of the asset.
• Take a reduced ITC without adjusting the basis.
Deciding which option is better depends on other tax and depreciation considerations. You choose the ITC option when you add or change the asset in Detail View by specifying whether to take a full credit (thus reducing the basis) or a reduced credit, or that the asset meets special ITC option rules for certain property types, such as certified and noncertified historic structures and energy properties.
Under the Tax Reform Act of 1986, the regular 10% ITC was repealed for property placed in service after December 31, 1985. Certain assets may still qualify for the ITC (if, for example, the company was subject to a binding contract to buy the qualifying property as of December 31, 1985). Certain limitations exist for the ITC on acquisitions of used property, and the ITC carryover rules continue to apply for property placed in service before 1986.
When you take the ITC, by default the application automatically reduces the basis based on the date a property
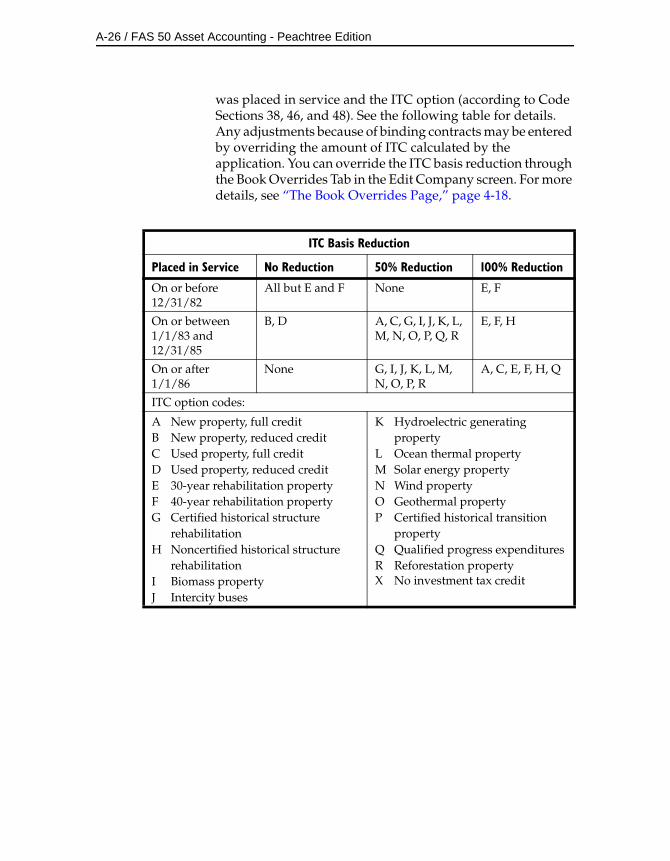
A-26 / FAS 50 Asset Accounting - Peachtree Edition
was placed in service and the ITC option (according to Code Sections 38, 46, and 48). See the following table for details. Any adjustments because of binding contracts may be entered by overriding the amount of ITC calculated by the application. You can override the ITC basis reduction through the Book Overrides Tab in the Edit Company screen. For more details, see “The Book Overrides Page,” page 4-18.
ITC Basis Reduction
Placed in Service No Reduction 50% Reduction 100% Reduction
On or before 12/31/82
All but E and F None E, F
On or between 1/1/83 and 12/31/85
B, D A, C, G, I, J, K, L, M, N, O, P, Q, R
E, F, H
On or after 1/1/86
None G, I, J, K, L, M, N, O, P, R
A, C, E, F, H, Q
ITC option codes:
A New property, full creditB New property, reduced creditC Used property, full creditD Used property, reduced creditE 30-year rehabilitation propertyF 40-year rehabilitation propertyG Certified historical structure
rehabilitationH Noncertified historical structure
rehabilitationI Biomass propertyJ Intercity buses
K Hydroelectric generatingproperty
L Ocean thermal propertyM Solar energy propertyN Wind propertyO Geothermal propertyP Certified historical transition
propertyQ Qualified progress expendituresR Reforestation propertyX No investment tax credit
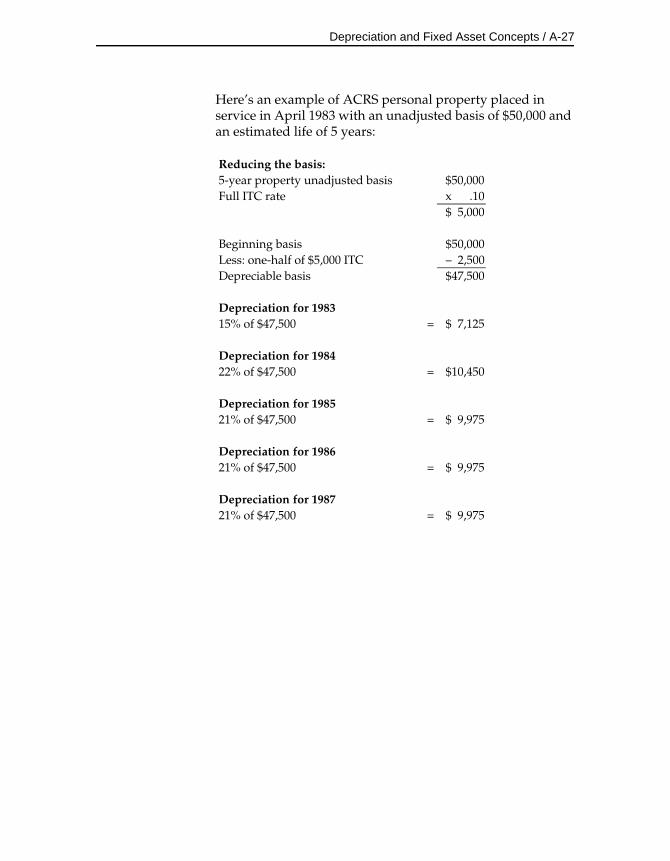
Depreciation and Fixed Asset Concepts / A-27
Here’s an example of ACRS personal property placed in service in April 1983 with an unadjusted basis of $50,000 and an estimated life of 5 years:
Reducing the basis:5-year property unadjusted basis $50,000Full ITC rate x .10
$ 5,000
Beginning basis $50,000Less: one-half of $5,000 ITC – 2,500Depreciable basis $47,500
Depreciation for 198315% of $47,500 = $ 7,125
Depreciation for 198422% of $47,500 = $10,450
Depreciation for 198521% of $47,500 = $ 9,975
Depreciation for 198621% of $47,500 = $ 9,975
Depreciation for 198721% of $47,500 = $ 9,975
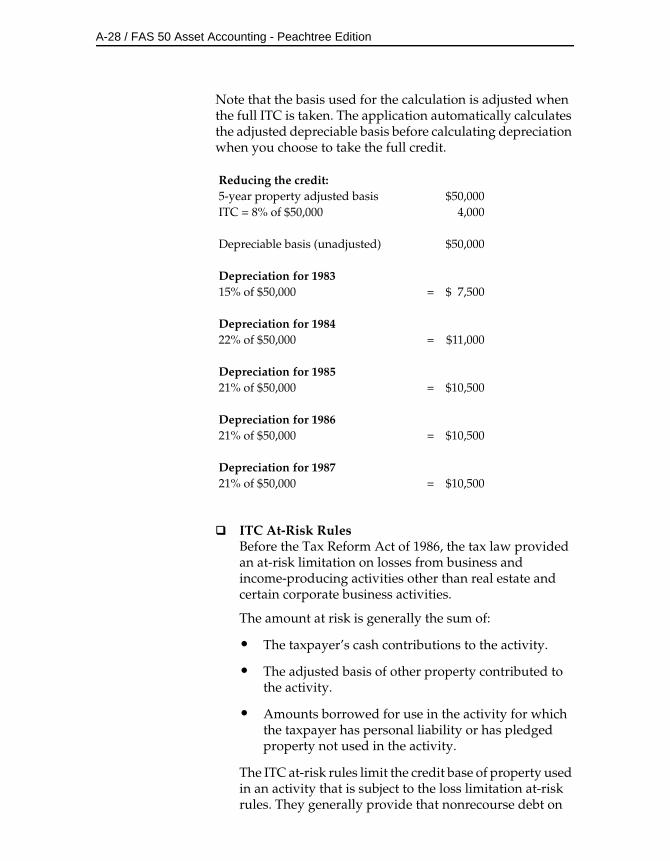
A-28 / FAS 50 Asset Accounting - Peachtree Edition
Note that the basis used for the calculation is adjusted when the full ITC is taken. The application automatically calculates the adjusted depreciable basis before calculating depreciation when you choose to take the full credit.
ITC At-Risk RulesBefore the Tax Reform Act of 1986, the tax law provided an at-risk limitation on losses from business and income-producing activities other than real estate and certain corporate business activities.
The amount at risk is generally the sum of:
• The taxpayer’s cash contributions to the activity.
• The adjusted basis of other property contributed to the activity.
• Amounts borrowed for use in the activity for which the taxpayer has personal liability or has pledged property not used in the activity.
The ITC at-risk rules limit the credit base of property used in an activity that is subject to the loss limitation at-risk rules. They generally provide that nonrecourse debt on
Reducing the credit:5-year property adjusted basis $50,000ITC = 8% of $50,000 4,000
Depreciable basis (unadjusted) $50,000
Depreciation for 198315% of $50,000 = $ 7,500
Depreciation for 198422% of $50,000 = $11,000
Depreciation for 198521% of $50,000 = $10,500
Depreciation for 198621% of $50,000 = $10,500
Depreciation for 198721% of $50,000 = $10,500

Depreciation and Fixed Asset Concepts / A-29
real property be treated as an amount at risk for investment credit purposes.
The at-risk limitation amounts must be less than or equal to the acquisition value. The at-risk limitation will be used to calculate tax credits. The tax credit should equal the at-risk amount multiplied by the credit percentage.
The application assumes the acquired value of an asset in the Tax book to be the amount at risk. If it is not, you may need to override the ITC amount calculated by the application in Detail View.
168 AllowanceThe Job Creation and Workers Assistance Act of 2002 allows you to take an additional 30% depreciation allowance in the year you place an asset in service. In 2003, the allowance was increased to 50% for assets placed in service after May 5, 2003.
The 2010 Tax Relief Act allows for a 168 Allowance of 100% for assets placed in service after September 8, 2010 and through December 31, 2011 (or December 31, 2012 for assets with longer production lives).
The 168 Allowance will still be available for qualified property placed in service in a special disaster zone through 2012 for personal property and through 2013 for real property, and for cellulosic biofuel plant property through 2012. Beginning in 2006, the 168 Allowance can also be taken for reuse and recycling property. Currently, there is no expiration of the 168 Allowance for reuse and recycling property.
Generally, qualifying property includes:
• MACRS property with a recovery period of 20 years or less
• Section 167(f)(1)(B) computer software
• Qualified leasehold improvements
• Water utility property, which has a 25-year recovery period.
• Other property that is also qualified New York Liberty Zone property
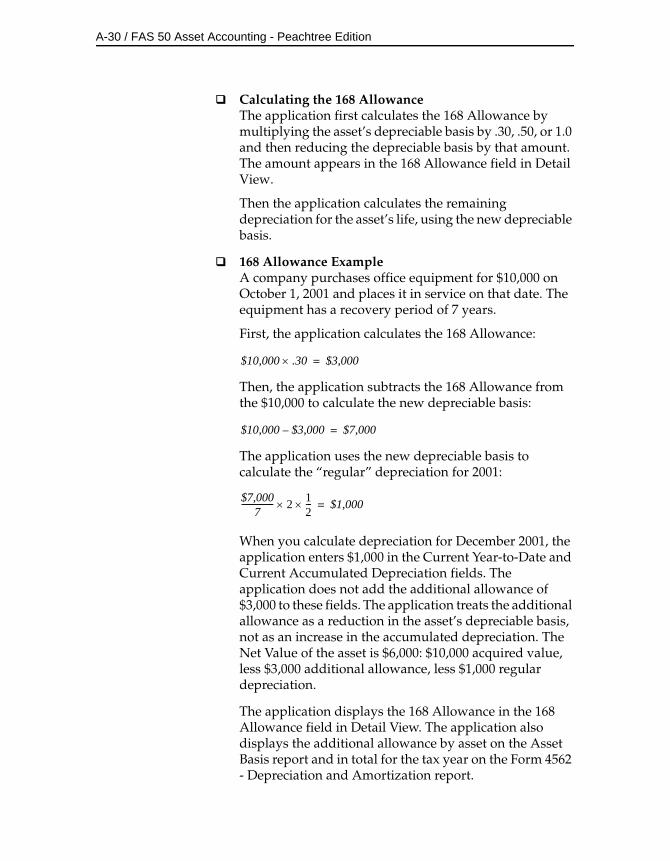
A-30 / FAS 50 Asset Accounting - Peachtree Edition
Calculating the 168 AllowanceThe application first calculates the 168 Allowance by multiplying the asset’s depreciable basis by .30, .50, or 1.0 and then reducing the depreciable basis by that amount. The amount appears in the 168 Allowance field in Detail View.
Then the application calculates the remaining depreciation for the asset’s life, using the new depreciable basis.
168 Allowance ExampleA company purchases office equipment for $10,000 on October 1, 2001 and places it in service on that date. The equipment has a recovery period of 7 years.
First, the application calculates the 168 Allowance:
Then, the application subtracts the 168 Allowance from the $10,000 to calculate the new depreciable basis:
The application uses the new depreciable basis to calculate the “regular” depreciation for 2001:
When you calculate depreciation for December 2001, the application enters $1,000 in the Current Year-to-Date and Current Accumulated Depreciation fields. The application does not add the additional allowance of $3,000 to these fields. The application treats the additional allowance as a reduction in the asset’s depreciable basis, not as an increase in the accumulated depreciation. The Net Value of the asset is $6,000: $10,000 acquired value, less $3,000 additional allowance, less $1,000 regular depreciation.
The application displays the 168 Allowance in the 168 Allowance field in Detail View. The application also displays the additional allowance by asset on the Asset Basis report and in total for the tax year on the Form 4562 - Depreciation and Amortization report.
$10,000 .30 $3,000=
$10,000 $3,000– $7,000=
$7,0007
---------------- 2 12--- $1,000=
Depreciation and Fixed Asset Concepts / A-31
Estimated Life and ADS Life
The estimated life of an asset is the period over which an asset is to be depreciated or its cost is to be recovered. The estimated life often has nothing to do with the physical life span of an individual asset. Physical life is the normal period of use in the particular business or trade, during which the asset remains physically productive as a capital asset. Physical life is usually based on experience in replacing that type of property. Often an asset’s physical life is far longer than its estimated life. The shorter the estimated life, the more rapidly the cost of an asset can be recovered through depreciation.
ADS life is similar to estimated life in that it also is a period over which an asset is to be depreciated, not a period of physical usefulness. ADS life is the life assigned to the asset type under the MACRS Alternative Depreciation System. For most assets, the ADS life is the midpoint of the Asset Depreciation Range (ADR) in which the asset belongs. ADS lives tend to be longer than estimated lives and so are often used in internal books, where they reduce profits more slowly than estimated lives.
Note For information on how the application uses entries in the Estimated Life and ADS Life fields, see “Completing the Book-Related Fields,” page 6-12.
To control the tax advantages that result from estimated life, Congress has prescribed estimated lives for various classes of assets. Estimated lives created under the IRS rules for ACRS and MACRS assets are called recovery periods. Recovery periods are set by statute for different kinds of property. These IRS recovery periods are generally shorter than estimated lives in other depreciation methods and shorter than physical lives. A combination of shorter recovery lives and higher recovery rates in the early years of an asset’s life accelerate cost recovery.
Important: To help you determine the correct estimated life and/or ADS life for an asset for the Tax book, you can use the IRS Table button located in Detail View. Here you will find an easy-to-use version of the IRS ADS Class Life Table.
A-32 / FAS 50 Asset Accounting - Peachtree Edition
Recovery PeriodsThe Tax Reform Act of 1986 and subsequent tax acts set MACRS recovery periods for the different kinds of property. ACRS recovery periods were also defined by statute. The statutory ACRS and MACRS lives are shown in the following text. To view a table that shows the application’s conversion values for estimated life to ADS life when you do not enter an ADS life, see “The Tax Book Defaults,” page A-35.
Note In addition to the recovery periods shown below, qualifying Indian Reservation property must be depreciated over shorter recovery periods than otherwise allowed.
3-Year PropertyThree-year property is tangible ACRS or MACRS personal property having a class life of more than 1 year and no more than 4 years. It includes automobiles for which ACRS recovery is elected.
5-Year PropertyFive-year property is tangible ACRS or MACRS personal property having a class life of more than 4 years and less than 10 years. The Tax Reform Act of 1986 specifically added the following assets to the list of 5-year properties (some were previously 3-year properties):
• Automobiles.
• Light-duty trucks (less than 13,000 pounds).
• Qualified technological equipment.
• Computer-based telephone central office switching equipment.
• Biomass properties that are small power production facilities within the meaning of Section (3)(17)(c) of the Federal Power Act (16 USC Section 796 (17)(c)), as in effect on September 1, 1986.
• Property used for research and experimentation.
• Semiconductor manufacturing equipment.
• Geothermal, ocean thermal, solar, and wind energy properties.
Depreciation and Fixed Asset Concepts / A-33
7-Year PropertySeven-year property is tangible ACRS or MACRS property (personal or real) with a class life of 10 to 15 years, inclusive.
10-Year PropertyTen-year property is tangible ACRS or MACRS property (personal or real) with a class life of 16 to 19 years, inclusive. Single-purpose agricultural structures are included if placed in service after 1988.
15-Year PropertyFifteen-year property includes both personal and real property.
MACRS fifteen-year property is tangible property with a class life of 20 to 24 years, inclusive. It includes roads, municipal waste water treatment plants, and depreciable landscaping. Leasehold improvements placed in service after October 22, 2004 and before January 1, 2010 are also considered 15-year property.
ACRS fifteen-year property is real property placed in service after 1980 and before March 16, 1984, and low-income housing.
18-Year PropertyEighteen-year property is qualifying ACRS depreciable real property placed in service after March 15, 1984, but before May 9, 1985.
19-Year PropertyNineteen-year property is qualifying ACRS depreciable real property acquired after May 8, 1985, but before 1987.
20-Year PropertyTwenty-year property is tangible MACRS property, personal or real, with a class life of more than 24 years (excluding 25-year property and real property with a class life of 27.5 years and more). It includes farm buildings and various railroad structures.
25-Year PropertyTwenty-five-year property is tangible MACRS property set by the Small Business Job Protection Act of 1996. It is water utility property and municipal sewers that are placed in service after June 12, 1996.

A-34 / FAS 50 Asset Accounting - Peachtree Edition
27.5-Year Residential Rental PropertyResidential rental property is MACRS depreciable real property for which 80% or more of the gross rental income comes from dwelling units. A dwelling unit is a house (including a manufactured house) or apartment used to provide living accommodations. A unit in a hotel, motel, inn, or other establishment in which more than 50% of the units are used on a transient basis does not qualify as a dwelling unit. If any portion of the building or structure is occupied by the taxpayer, the gross rental income from the property includes the rental value of the unit occupied by the taxpayer.
31.5-Year Nonresidential Real PropertyNonresidential real property is MACRS depreciable real property that is neither residential rental property nor property with an ADS life of less than 27.5 years. This includes MACRS property with no defined ADS life or with an ADS life of 27.5 years or more. It also includes elevators and escalators that are not part of residential rental property. Nonresidential real property placed in service before May 13, 1993, has a recovery period of 31.5 years.
39-Year Nonresidential Real PropertyNonresidential real property placed in service after May 12, 1993, has a recovery period of 39 years.
Depreciation Defaults
As stated earlier, the application sets defaults for the book-related fields in all open depreciation books based on the entries in the Tax book. This section specifies which defaults the application sets for each book. After you finish entering information for the Tax book, press the Tab key to move to the next open book and the defaults will be set. If you want to change the defaults, you can override them for any asset by entering other data.
The ITC option is copied from the Tax book to all other books and cannot be changed in the other books. The date placed in service and the acquired value are also copied from the Tax book to all other books, where they can be overridden.
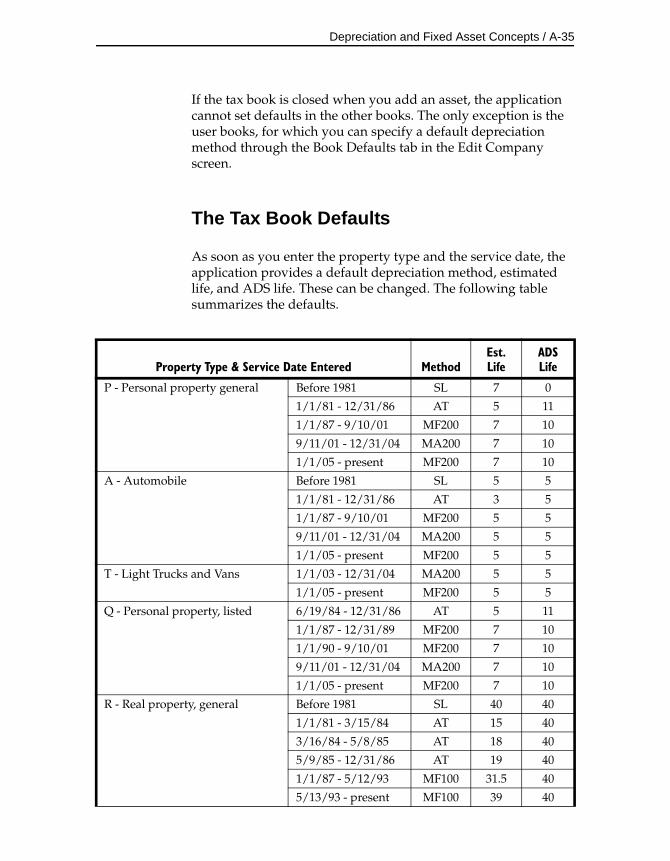
Depreciation and Fixed Asset Concepts / A-35
If the tax book is closed when you add an asset, the application cannot set defaults in the other books. The only exception is the user books, for which you can specify a default depreciation method through the Book Defaults tab in the Edit Company screen.
The Tax Book Defaults
As soon as you enter the property type and the service date, the application provides a default depreciation method, estimated life, and ADS life. These can be changed. The following table summarizes the defaults.
Property Type & Service Date Entered MethodEst. Life
ADS Life
P - Personal property general Before 1981 SL 7 0
1/1/81 - 12/31/86 AT 5 11
1/1/87 - 9/10/01 MF200 7 10
9/11/01 - 12/31/04 MA200 7 10
1/1/05 - present MF200 7 10
A - Automobile Before 1981 SL 5 5
1/1/81 - 12/31/86 AT 3 5
1/1/87 - 9/10/01 MF200 5 5
9/11/01 - 12/31/04 MA200 5 5
1/1/05 - present MF200 5 5
T - Light Trucks and Vans 1/1/03 - 12/31/04 MA200 5 5
1/1/05 - present MF200 5 5
Q - Personal property, listed 6/19/84 - 12/31/86 AT 5 11
1/1/87 - 12/31/89 MF200 7 10
1/1/90 - 9/10/01 MF200 7 10
9/11/01 - 12/31/04 MA200 7 10
1/1/05 - present MF200 7 10
R - Real property, general Before 1981 SL 40 40
1/1/81 - 3/15/84 AT 15 40
3/16/84 - 5/8/85 AT 18 40
5/9/85 - 12/31/86 AT 19 40
1/1/87 - 5/12/93 MF100 31.5 40
5/13/93 - present MF100 39 40
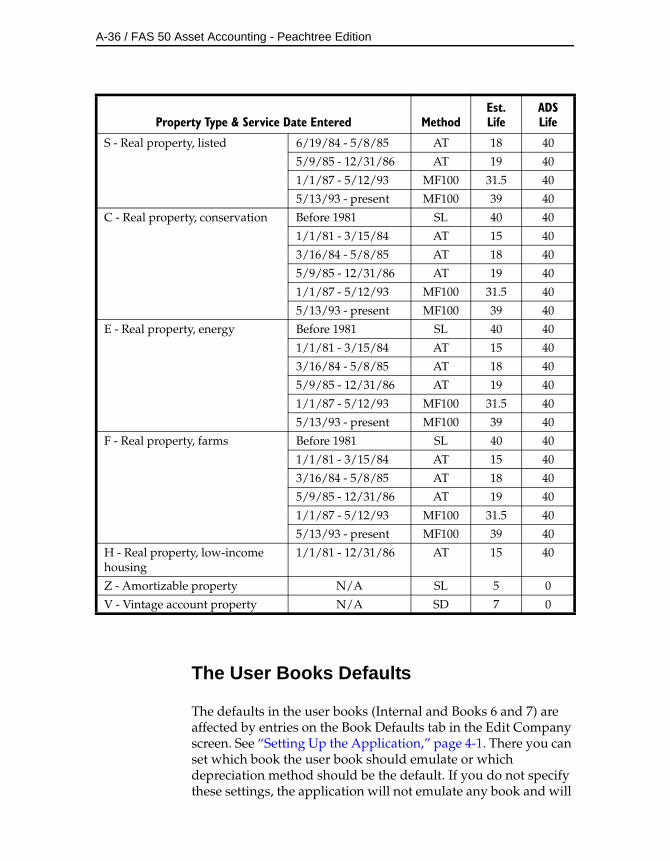
A-36 / FAS 50 Asset Accounting - Peachtree Edition
The User Books Defaults
The defaults in the user books (Internal and Books 6 and 7) are affected by entries on the Book Defaults tab in the Edit Company screen. See “Setting Up the Application,” page 4-1. There you can set which book the user book should emulate or which depreciation method should be the default. If you do not specify these settings, the application will not emulate any book and will
S - Real property, listed 6/19/84 - 5/8/85 AT 18 40
5/9/85 - 12/31/86 AT 19 40
1/1/87 - 5/12/93 MF100 31.5 40
5/13/93 - present MF100 39 40
C - Real property, conservation Before 1981 SL 40 40
1/1/81 - 3/15/84 AT 15 40
3/16/84 - 5/8/85 AT 18 40
5/9/85 - 12/31/86 AT 19 40
1/1/87 - 5/12/93 MF100 31.5 40
5/13/93 - present MF100 39 40
E - Real property, energy Before 1981 SL 40 40
1/1/81 - 3/15/84 AT 15 40
3/16/84 - 5/8/85 AT 18 40
5/9/85 - 12/31/86 AT 19 40
1/1/87 - 5/12/93 MF100 31.5 40
5/13/93 - present MF100 39 40
F - Real property, farms Before 1981 SL 40 40
1/1/81 - 3/15/84 AT 15 40
3/16/84 - 5/8/85 AT 18 40
5/9/85 - 12/31/86 AT 19 40
1/1/87 - 5/12/93 MF100 31.5 40
5/13/93 - present MF100 39 40
H - Real property, low-income housing
1/1/81 - 12/31/86 AT 15 40
Z - Amortizable property N/A SL 5 0
V - Vintage account property N/A SD 7 0
Property Type & Service Date Entered MethodEst. Life
ADS Life
Depreciation and Fixed Asset Concepts / A-37
default to the straight-line (SL) depreciation method. Set up short years on the Short Years tab in the Edit Company screen.
The application determines the default settings for the book-related fields as follows.
Business-Use Percentages and Their Effective DatesIf you chose a book to emulate on the Book Defaults tab in the Edit Company screen, the application copies the default information from that book. If no book is to be emulated and if the user book’s fiscal year-end date and short-year dates are the same as in the Tax book, the application copies the information from the Tax book. Otherwise, the application leaves the default of 100% business use.
Depreciation MethodBy default, the application determines the depreciation method as follows:
• If you chose a book to emulate on the Book Defaults tab in the Edit Company screen, the application copies the default depreciation method from that book.
• If you did not choose a book to emulate, the application uses the default depreciation method specified on the Book Defaults tab in the Edit Company screen if it is valid for the asset’s property type.
• If the default depreciation method is not valid for the property type, the application chooses the straight-line (SL) method if valid or the straight-line method with the same averaging convention as the method in the Tax book.
Estimated LifeBy default, the application determines the estimated life as follows:
• If you chose a book to emulate on the Book Defaults tab in the Edit Company screen, the application copies the default estimated life from that book.
• If you did not choose a book to emulate but did enter an ADS life for the asset, the application uses the ADS life as the default estimated life.
Section 179 or Bonus, Salvage Value, Beginning Depreciation Amounts and DateIf you chose a book to emulate on the Book Defaults tab in the Edit Company screen, the application copies the default
A-38 / FAS 50 Asset Accounting - Peachtree Edition
information from that book. Otherwise, the application sets the value to zero.
The State Book Defaults
The application copies the book-related field entries from the Tax book directly to the State book.
The AMT Book Defaults
The defaults for the AMT book are automatically displayed based on the Tax book entries according to Alternative Minimum Tax rules.
Business-Use Percentages and Their Effective DatesFor these fields, if the Tax book and the AMT book have the same fiscal year end and short years, the application copies the entries in the Tax book to the AMT book as the defaults. If not, the business-use percentage defaults to 100%.
Section 179 or BonusThe application copies the Section 179 or bonus field entries from the Tax book.
Depreciation Method, Rate, and Estimated LifeThe application sets the defaults for these fields as shown in the following table. This table is for assets placed in service before 1999.
The table below displays the AMT defaults that are appropriate for assets placed in service before 1999. The Taxpayer Relief Act of 1997 made changes to the AMT Depreciation Adjustment for assets placed in service after December 31, 1998. For more information, see “AMT Depreciation Adjustment: Assets Placed in Service After 1998,” page A-39.
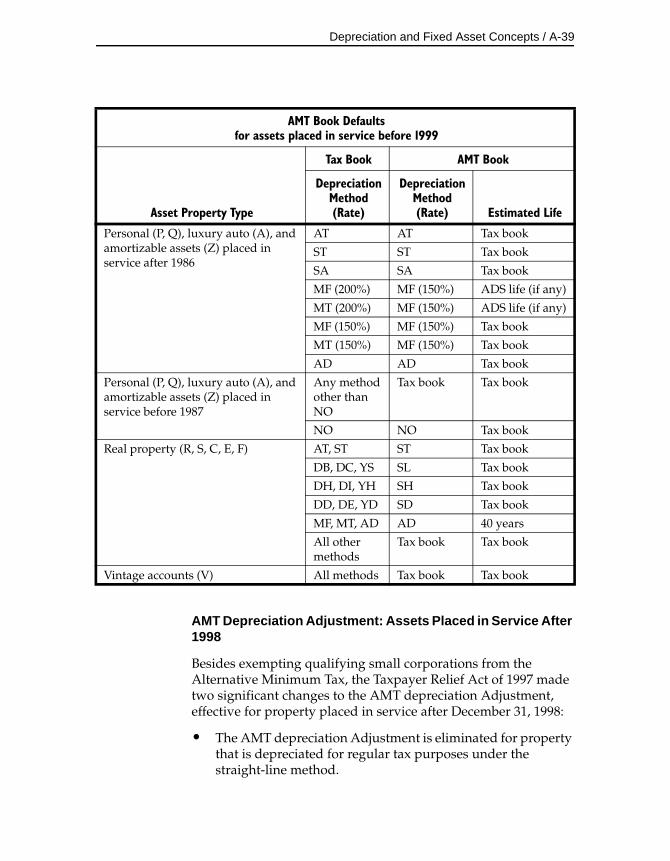
Depreciation and Fixed Asset Concepts / A-39
AMT Depreciation Adjustment: Assets Placed in Service After 1998
Besides exempting qualifying small corporations from the Alternative Minimum Tax, the Taxpayer Relief Act of 1997 made two significant changes to the AMT depreciation Adjustment, effective for property placed in service after December 31, 1998:
• The AMT depreciation Adjustment is eliminated for property that is depreciated for regular tax purposes under the straight-line method.
AMT Book Defaultsfor assets placed in service before 1999
Asset Property Type
Tax Book AMT Book
Depreciation Method (Rate)
Depreciation Method (Rate) Estimated Life
Personal (P, Q), luxury auto (A), and amortizable assets (Z) placed in service after 1986
AT AT Tax book
ST ST Tax book
SA SA Tax book
MF (200%) MF (150%) ADS life (if any)
MT (200%) MF (150%) ADS life (if any)
MF (150%) MF (150%) Tax book
MT (150%) MF (150%) Tax book
AD AD Tax book
Personal (P, Q), luxury auto (A), and amortizable assets (Z) placed in service before 1987
Any method other than NO
Tax book Tax book
NO NO Tax book
Real property (R, S, C, E, F) AT, ST ST Tax book
DB, DC, YS SL Tax book
DH, DI, YH SH Tax book
DD, DE, YD SD Tax book
MF, MT, AD AD 40 years
All other methods
Tax book Tax book
Vintage accounts (V) All methods Tax book Tax book
A-40 / FAS 50 Asset Accounting - Peachtree Edition
• The recovery periods for calculating AMT depreciation on all other property will be the same as for regular tax purposes, which will decrease the amount of the AMT depreciation Adjustment.
The Job Creation and Worker Assistance Act of 2002 provides a 168 Allowance deduction of 30%, 50%, or 100% for qualifying MACRS property in the first year you place an asset in service. There is no AMT adjustment for property using the 168 Allowance deduction.
The ACE Book Defaults
The defaults for the ACE book are automatically displayed based on the Tax book entries, ADS life field, and the AMT book, if applicable, as needed to calculate Adjusted Current Earnings.
Default Depreciation MethodThe default depreciation method in the ACE book for property placed in service after 1993 is NO. You can change the ACE book to emulate the AMT book default data for post-1993 property. On the Book Defaults page of the New Company screen or the Edit Company screen, select the AMT: Post-1993 option in the Emulate Book field of the ACE column. Whether you accept the default of NO as the depreciation method in the ACE book or change the default to emulate the AMT book, the result is the same: a zero ACE Depreciation Adjustment amount for post-1993 property when you run the Form 4626 Worksheet. These are simply two different approaches with the same end result. See “Book Emulation for the ACE Book,” page 4-24.
Business-Use Percentages and Their Effective DatesFor these fields, if the Tax book and the ACE book have the same fiscal year end and short years, the application copies the entries in the Tax book to the ACE book as the defaults. If not, the business-use percentage defaults to 100%.
Section 179 or BonusThe application copies the Section 179 or bonus field entries from the Tax book.
Depreciation Method and Estimated LifeThe application sets the defaults for these fields as shown in the following table.
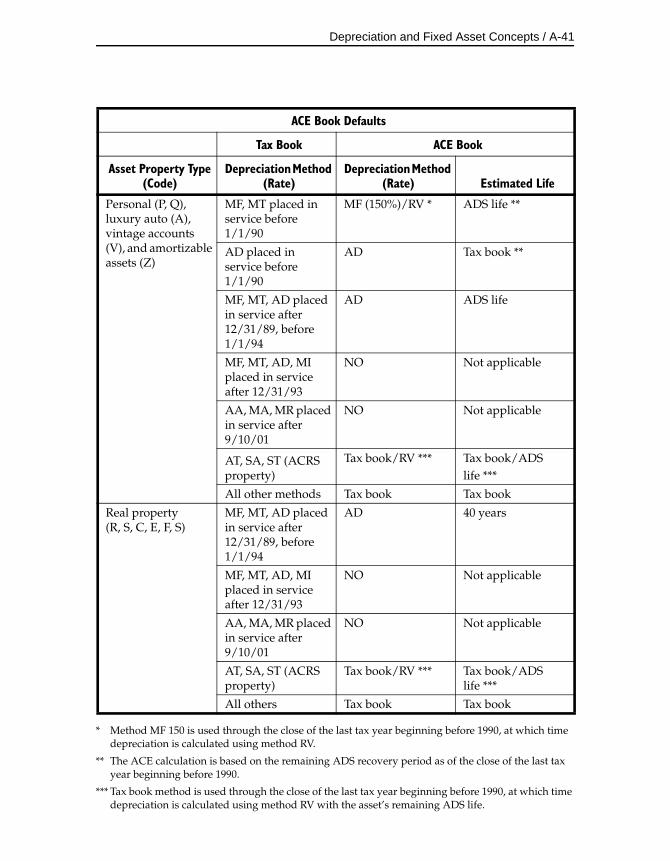
Depreciation and Fixed Asset Concepts / A-41
* Method MF 150 is used through the close of the last tax year beginning before 1990, at which time depreciation is calculated using method RV.
** The ACE calculation is based on the remaining ADS recovery period as of the close of the last tax year beginning before 1990.
*** Tax book method is used through the close of the last tax year beginning before 1990, at which time depreciation is calculated using method RV with the asset’s remaining ADS life.
ACE Book Defaults
Tax Book ACE Book
Asset Property Type (Code)
Depreciation Method (Rate)
Depreciation Method (Rate) Estimated Life
Personal (P, Q), luxury auto (A), vintage accounts (V), and amortizable assets (Z)
MF, MT placed in service before 1/1/90
MF (150%)/RV * ADS life **
AD placed in service before 1/1/90
AD Tax book **
MF, MT, AD placed in service after 12/31/89, before 1/1/94
AD ADS life
MF, MT, AD, MI placed in service after 12/31/93
NO Not applicable
AA, MA, MR placed in service after 9/10/01
NO Not applicable
AT, SA, ST (ACRS property)
Tax book/RV *** Tax book/ADSlife ***
All other methods Tax book Tax book
Real property(R, S, C, E, F, S)
MF, MT, AD placed in service after 12/31/89, before 1/1/94
AD 40 years
MF, MT, AD, MI placed in service after 12/31/93
NO Not applicable
AA, MA, MR placed in service after 9/10/01
NO Not applicable
AT, SA, ST (ACRS property)
Tax book/RV *** Tax book/ADSlife ***
All others Tax book Tax book
A-42 / FAS 50 Asset Accounting - Peachtree Edition
Asset Disposals
A fixed asset may be disposed of voluntarily or involuntarily. The application categorizes five kinds of voluntary disposition: sale, abandonment, like-kind exchange, taxable exchange, and bulk disposal. Similarly, you can choose between two kinds of involuntary disposition: involuntary conversion and casualty. The application also provides a category for all other kinds of disposals.
When you dispose of an asset, the application calculates the realized gain or loss as appropriate for the kind of disposition. The application has defaults for gain or loss recognition (shown in a later chart), which you can override. You can also override the calculated gain or loss amount.
The following text explains each of the available disposal methods, how the application determines an asset’s gain or loss, and the gain or loss recognition defaults.
Disposal Methods
SaleThis is the default method on the Disposal page. It applies to assets that you sell either for:
• Cash
• Cash and noncash items (if not qualifying as an exchange)
By default, when an asset is sold, the application recognizes gains and losses in all books.
AbandonmentAn asset that is voluntarily scrapped because of obsolescence, lack of suitability, or other reasons is considered an abandonment. If the asset is abandoned before the end of its useful life, any basis that has not been depreciated becomes a loss that can be deducted in the current period. Insurance reimbursements or other proceeds reduce the amount of the loss and can result in a gain. By default, the application recognizes gains and losses on abandoned assets in all books.
Depreciation and Fixed Asset Concepts / A-43
Like-Kind Exchange: Pre-1/3/2000A like-kind exchange occurs when an asset is exchanged for a similar asset, such as exchanging an old car for a new one. The exchange may also include the receipt of money or dissimilar property. Any resulting gain from a like-kind exchange is recognized only to the extent of cash proceeds (sometimes called “boot”). Any resulting loss should be recognized for tax purposes.
In 2000, the IRS issued new guidelines concerning property received in a like-kind exchange. Use this disposal method for a like-kind exchange that occurred before 1/3/2000, and therefore does not require the use of the new guidelines.
Like-Kind Exchange: Post-1/2/2000In 2000, the IRS issued new guidelines concerning property received in a like-kind exchange. Use this disposal method for a like-kind exchange that occurred after 1/2/2000, and therefore requires the use of the new guidelines. For more information, see “Like-Kind Exchanges and Involuntary Conversions After 1/2/2000,” page 7-8.
Taxable ExchangeAn exchange of dissimilar property, such as exchanging a car for land, is generally taxable and recognized in full. The exchange may also include the receipt of money. The gain or loss is calculated the same as for a sale.
Bulk DisposalA bulk disposal occurs when you sell more than one asset for one selling price. When this occurs, the cash proceeds, any noncash proceeds, and any selling expenses need to be prorated for the individual assets. This is done based on the percentage of the acquisition value of each asset selected over the total acquisition value of all the assets selected.
CasualtyWhen an asset is stolen or damaged by a sudden natural cause or vandalism, the disposal is a casualty. Casualties are often compensated for by insurance or other means, which may produce a taxable gain unless a similar asset is acquired for replacement. Casualty losses are generally tax deductible only in the tax year in which the casualty occurred or was discovered. For the user books, the gain or loss is recognized in the current period.
A-44 / FAS 50 Asset Accounting - Peachtree Edition
Involuntary Conversion: Pre-1/3/2000When an asset is involuntarily retired due to breakdown, condemnation, or reasons other than casualty, classify the disposal as an involuntary conversion. An involuntary conversion may be compensated for by a condemnation award or other means, which may produce a taxable gain unless a similar asset is acquired for replacement. By default, the application does not recognize the gain or loss from an involuntary conversion except in the user books.
In 2000, the IRS issued new guidelines concerning property received in an involuntary conversion. Use this disposal method for an involuntary conversion that occurred before 1/3/2000, and therefore does not require the use of the new guidelines.
Involuntary Conversion: Post-1/2/2000In 2000, the IRS issued new guidelines concerning property received in an involuntary conversion. Use this disposal method for an involuntary conversion that occurred after 1/2/2000, and therefore requires the use of the new guidelines. For more information, see “Like-Kind Exchanges and Involuntary Conversions After 1/2/2000,” page 7-8.
OtherIf the asset was disposed of in a way not addressed by any of the other disposal methods, choose this method. By default, the application recognizes gains and losses from such assets in all books.
Gains and Losses
The application calculates the realized gain or loss amount for all disposed assets. You can decide whether to recognize the gain or loss. This section first describes the gain or loss calculation, then details the application defaults for recognizing gains and losses.
The Gain or Loss CalculationCalculating the gain or loss on a disposed asset requires determining the net proceeds from the disposal and the asset’s adjusted basis. The adjusted basis is then subtracted from the net proceeds to arrive at the net gain or loss.
Depreciation and Fixed Asset Concepts / A-45
Net proceeds are calculated as:
Determining the asset’s adjusted basis is more complex. Most of the components of the adjusted basis are described in “Depreciable Basis,” page A-20. The others are explained after the gain or loss equation that follows.
The adjusted basis for the gain or loss calculation equals:
The ITC Basis AddbackWhen an asset is disposed of before the end of its estimated life, a prorated amount of the ITC must be recaptured. If the asset’s basis was reduced for the original ITC, a percentage of that recaptured amount must be added back to the asset’s basis.
The following table shows the percentages the application applies to the full ITC amount to determine the ITC recapture amount. The application uses the depreciation method and estimated life entered in the Tax book.
cash proceeds
plus noncash proceeds
minus expenses of the sale
the asset’s depreciable basis
plus the ITC basis addback
plus the Section 179 addback
plus the salvage value if it was subtracted in determining the depreciable basis
minus total accumulated depreciation through the disposal date
ITC Recapture Percentages
Holding Period
Depreciation MethodsMF, MA, MT, MI, MR, AD, AA,
AT, SA, ST, OC All Other Methods
3 YearEst. Life (%)
> 3 YearEst. Life (%)
3 to < 5 Year Est. Life (%)
5 to < 7 Year Est. Life (%)
7 YearEst. Life
(%)
0 100 100 100 100 100.0
1 66 80 100 100 100.0
2 33 60 100 100 100.0
A-46 / FAS 50 Asset Accounting - Peachtree Edition
After the ITC recapture amount is determined, the application multiplies the recapture amount by the rate used for computing the ITC. The result is the ITC basis addback amount.
The Section 179 AddbackWhen a pre-1987 asset on which the Section 179 expense deduction has been taken is disposed of during either of the two taxable years following the acquisition year, all or part of the Section 179 expense must be added back to the asset’s basis (that is, recaptured).
The calculation for the amount added back to the basis is:
where the depreciation on the Section 179 is the amount of depreciation that would have been taken on the Section 179 amount had there been no Section 179 deduction.
Gain or Loss Recognition DefaultsThe application determines the gain or loss recognition defaults according to the disposal method selected and the depreciation book. You can override the default when you dispose of the asset.
3 0 40 0 50 66.6
4 0 20 0 50 66.6
5 0 0 0 0 33.3
6 0 0 0 0 33.3
ITC Recapture Percentages
Holding Period
Depreciation MethodsMF, MA, MT, MI, MR, AD, AA,
AT, SA, ST, OC All Other Methods
3 YearEst. Life (%)
> 3 YearEst. Life (%)
3 to < 5 Year Est. Life (%)
5 to < 7 Year Est. Life (%)
7 YearEst. Life
(%)
ITC recapture amt. ITC basis reduct. factor ITC basis addback=
Section 179 taken
Depreciation on 179 amount– Section 179 addback ---------------------------------------------------------------------------
Depreciation and Fixed Asset Concepts / A-47
Gain or Loss Recognition Defaults
Disposal Method (Code)Tax, State, AMT, and
ACE Books User Books
Like-kind exchange (L)
No cash Do not recognize Do not recognize
Cash included Recognize to the extent of cash proceeds
Recognize to the extent of cash proceeds
Involuntary conversion (I) Do not recognize Recognize
All others Recognize Recognize

A-48 / FAS 50 Asset Accounting - Peachtree Edition
B Depreciation Methods
There are many different methods used to calculate depreciation. Some methods allow more depreciation in early years than in later years. Some apply the same percentage each year while the basis declines. Others apply different percentages each year while the basis remains the same.
For tax purposes, the depreciation method used for a particular asset depends on the IRS depreciation rules at the time the asset was placed in service. There is some flexibility in the choices that you can make. To make sure you select depreciation methods that best suit your needs, talk to a professional tax advisor.
You do not need to use the same depreciation method for every fixed asset. Once you choose a method for a particular asset, however, you generally must stick with it. A change of method requires approval from the IRS except when the change is from declining-balance to straight-line or remaining life.
The same asset may be subject to various methods of depreciation, depending on the book for which depreciation is being calculated. Federal tax books may require MACRS depreciation, for example, while internal books may use straight-line. Other books may use 150% declining-balance depreciation. You may use up to seven depreciation books.
This appendix describes each of the available standard depreciation methods. They are grouped by general method type:
• MACRS, page B-2
• ACRS, page B-21
• Straight-line, page B-28
• Declining-balance, page B-36
• Sum-of-the-years’-digits, page B-42
• Remaining value, page B-49
B-2 / FAS 50 Asset Accounting - Peachtree Edition
Following the standard methods are descriptions of two special depreciation codes for use within the application:
• Own calculation (OC), page B-52
• No depreciation (NO), page B-53
Finally, this appendix discusses possible uses for custom depreciation methods you can create and how the application applies depreciation to custom methods. See page B-53.
MACRS Methods
The Tax Reform Act of 1986 created a number of changes in the way depreciation is calculated for all assets acquired after December 31, 1986. This tax act made significant changes to the earlier Accelerated Cost Recovery System (ACRS), and created the modified ACRS (MACRS).
Recovery periods were generally extended. The typical recovery period for most personal property increased from 5 to 7 years, using 27.5 years for residential real property and 31.5 years for nonresidential real property. (The Revenue Reconciliation Act of 1993 extended the life of nonresidential real property placed in service after May 12, 1993, to 39 years.) A 200% declining-balance MACRS formula replaced the 150% declining-balance ACRS tables. However, the recovery rate for real property fell from 175% declining-balance to a straight-line computation in MACRS.
The MACRS methods created by the Tax Reform Act of 1986 are mandatory for most tangible property placed in service after December 31, 1986. Taxpayers could also choose to use MACRS for certain transitional property placed in service after July 31, 1986, and before January 1, 1987. Post-1986 depreciation on property placed in service before 1987 will continue to be computed under the method used when the property was placed in service.
There are three standard MACRS depreciation methods: MACRS formula, MACRS table, and Alternative Depreciation System (ADS) straight-line MACRS. A fourth depreciation method, MACRS method MI, permits entry of the shorter recovery periods allowed for qualifying Indian Reservation property. Method MI is available for qualified assets placed in service after 12/31/93 and before 2012. This section discusses each method separately.
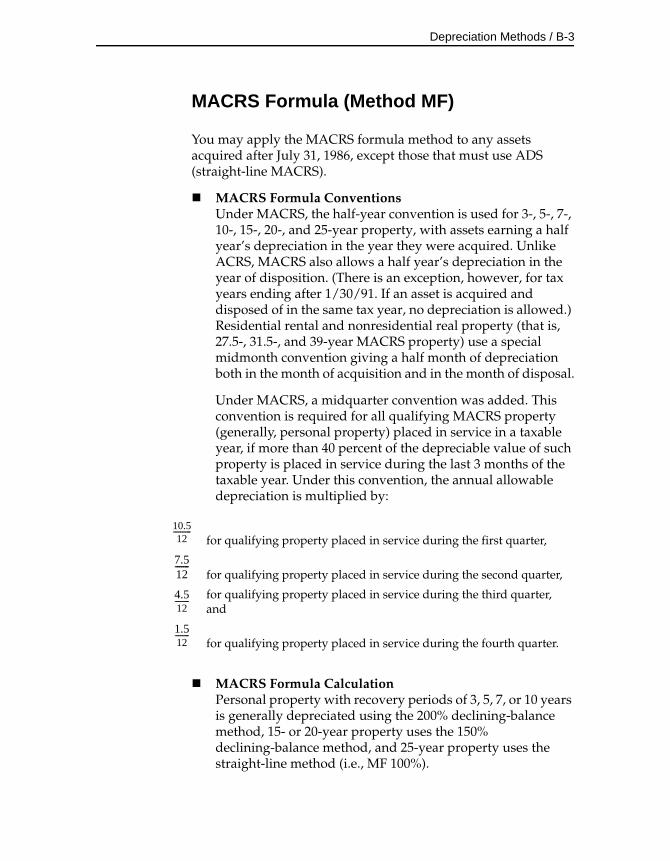
Depreciation Methods / B-3
MACRS Formula (Method MF)
You may apply the MACRS formula method to any assets acquired after July 31, 1986, except those that must use ADS (straight-line MACRS).
MACRS Formula ConventionsUnder MACRS, the half-year convention is used for 3-, 5-, 7-, 10-, 15-, 20-, and 25-year property, with assets earning a half year’s depreciation in the year they were acquired. Unlike ACRS, MACRS also allows a half year’s depreciation in the year of disposition. (There is an exception, however, for tax years ending after 1/30/91. If an asset is acquired and disposed of in the same tax year, no depreciation is allowed.) Residential rental and nonresidential real property (that is, 27.5-, 31.5-, and 39-year MACRS property) use a special midmonth convention giving a half month of depreciation both in the month of acquisition and in the month of disposal.
Under MACRS, a midquarter convention was added. This convention is required for all qualifying MACRS property (generally, personal property) placed in service in a taxable year, if more than 40 percent of the depreciable value of such property is placed in service during the last 3 months of the taxable year. Under this convention, the annual allowable depreciation is multiplied by:
MACRS Formula CalculationPersonal property with recovery periods of 3, 5, 7, or 10 years is generally depreciated using the 200% declining-balance method, 15- or 20-year property uses the 150% declining-balance method, and 25-year property uses the straight-line method (i.e., MF 100%).
for qualifying property placed in service during the first quarter,
for qualifying property placed in service during the second quarter,
for qualifying property placed in service during the third quarter, and
for qualifying property placed in service during the fourth quarter.
10.512
----------
7.512-------
4.512--------
1.512--------

B-4 / FAS 50 Asset Accounting - Peachtree Edition
Instead of using the 200% declining-balance method for personal property, you can elect to use a slower 150% rate. You can elect to use the 150% rate either over the GDS life, for property placed in service after 12/31/98, or over the longer ADS life, for property placed in service before 1/1/99. (The change in the recovery period used for this election was due to the IRS Restructuring and Reform Act of 1998.) The election to use the 150% rate can be helpful in eliminating the degree of exposure to the Alternative Minimum Tax (AMT). The declining-balance method switches to straight-line at the point in time that maximizes the deduction (the application does this automatically). A half-year convention is used to calculate allowed depreciation both in the year of acquisition and in the year of disposal.
MACRS real property has a recovery period of 27.5 years for residential real property and a recovery period of either 31.5 years or 39 years for nonresidential real property. The midquarter convention required for personal property by the Tax Reform Act of 1986 does not apply to real property.
To compute the depreciation deduction for real property acquired after 1986, the application uses the straight-line method over a 27.5-year period for residential real property and a 31.5-year period for nonresidential real property (if acquired before May 13, 1993). For nonresidential property placed in service after May 12, 1993, the application uses a 39-year period. The midmonth convention is used both for the year of acquisition and the year of disposition. One exception to this rule, however, does exist for leasehold improvements placed in service after October 22, 2004 and before January 1, 2010. These improvements are to be depreciated over a 15-year recovery period (9-year recovery period for Indian Reservation property) using the straight-line method of depreciation, and half-year convention (or midquarter, if applicable).
MACRS Formula ExampleIn March 2007, a company placed in service a network server for which it paid $5,000. Under MACRS, the asset has a 5-year estimated life.
For MACRS personal property, the applicable convention (provided that the midquarter convention does not apply) is a half-year convention allowing a half-year’s depreciation in the year of acquisition and disposal.
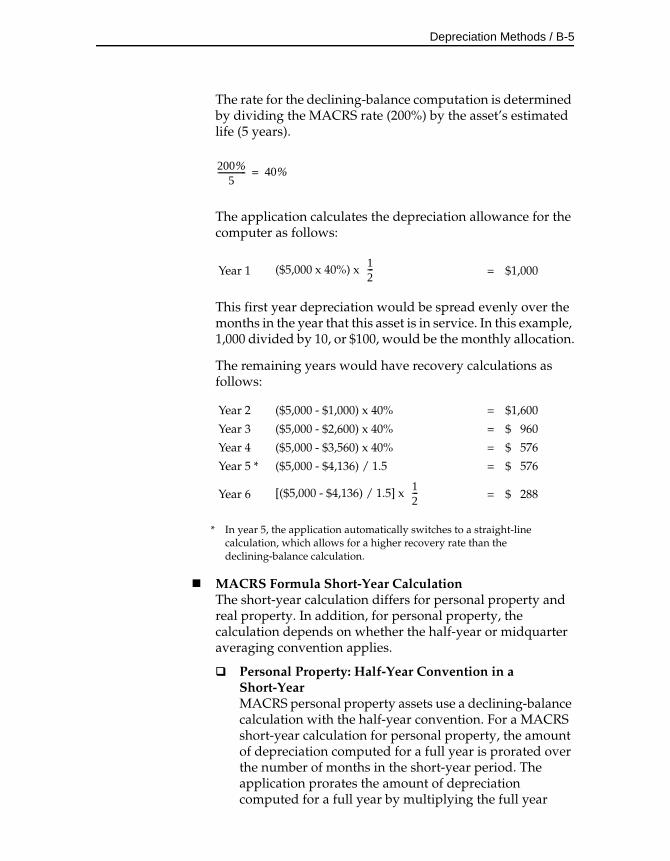
Depreciation Methods / B-5
The rate for the declining-balance computation is determined by dividing the MACRS rate (200%) by the asset’s estimated life (5 years).
The application calculates the depreciation allowance for the computer as follows:
This first year depreciation would be spread evenly over the months in the year that this asset is in service. In this example, 1,000 divided by 10, or $100, would be the monthly allocation.
The remaining years would have recovery calculations as follows:
* In year 5, the application automatically switches to a straight-line calculation, which allows for a higher recovery rate than the declining-balance calculation.
MACRS Formula Short-Year CalculationThe short-year calculation differs for personal property and real property. In addition, for personal property, the calculation depends on whether the half-year or midquarter averaging convention applies.
Personal Property: Half-Year Convention in a Short-YearMACRS personal property assets use a declining-balance calculation with the half-year convention. For a MACRS short-year calculation for personal property, the amount of depreciation computed for a full year is prorated over the number of months in the short-year period. The application prorates the amount of depreciation computed for a full year by multiplying the full year
Year 1 ($5,000 x 40%) x = $1,000
Year 2 ($5,000 - $1,000) x 40% = $1,600
Year 3 ($5,000 - $2,600) x 40% = $ 960
Year 4 ($5,000 - $3,560) x 40% = $ 576
Year 5 * ($5,000 - $4,136) / 1.5 = $ 576
Year 6 [($5,000 - $4,136) / 1.5] x = $ 288
200%5
-------------- 40%=
12---
12---
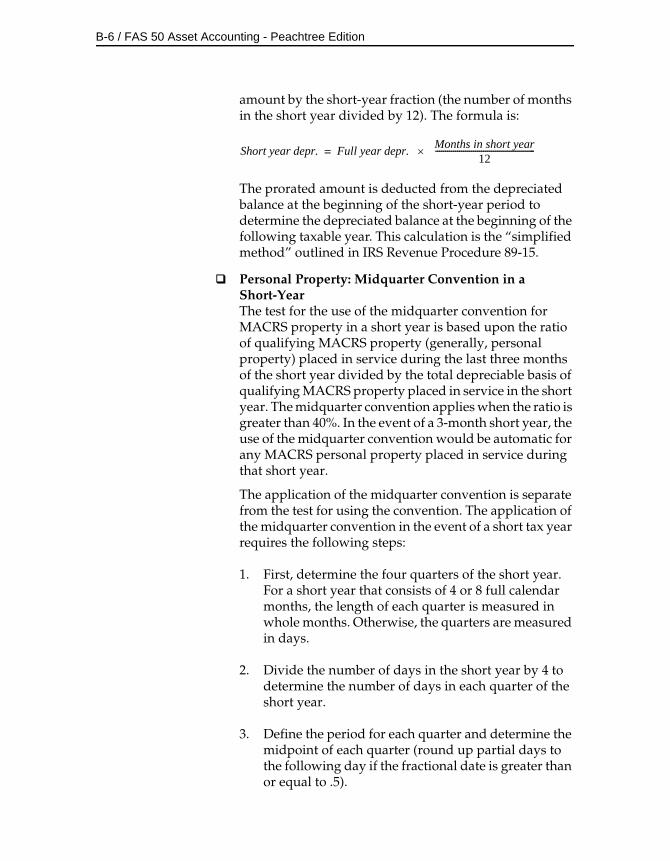
B-6 / FAS 50 Asset Accounting - Peachtree Edition
amount by the short-year fraction (the number of months in the short year divided by 12). The formula is:
The prorated amount is deducted from the depreciated balance at the beginning of the short-year period to determine the depreciated balance at the beginning of the following taxable year. This calculation is the “simplified method” outlined in IRS Revenue Procedure 89-15.
Personal Property: Midquarter Convention in a Short-YearThe test for the use of the midquarter convention for MACRS property in a short year is based upon the ratio of qualifying MACRS property (generally, personal property) placed in service during the last three months of the short year divided by the total depreciable basis of qualifying MACRS property placed in service in the short year. The midquarter convention applies when the ratio is greater than 40%. In the event of a 3-month short year, the use of the midquarter convention would be automatic for any MACRS personal property placed in service during that short year.
The application of the midquarter convention is separate from the test for using the convention. The application of the midquarter convention in the event of a short tax year requires the following steps:
1. First, determine the four quarters of the short year. For a short year that consists of 4 or 8 full calendar months, the length of each quarter is measured in whole months. Otherwise, the quarters are measured in days.
2. Divide the number of days in the short year by 4 to determine the number of days in each quarter of the short year.
3. Define the period for each quarter and determine the midpoint of each quarter (round up partial days to the following day if the fractional date is greater than or equal to .5).
Short year depr. Full year depr. Months in short year
12--------------------------------------------------=
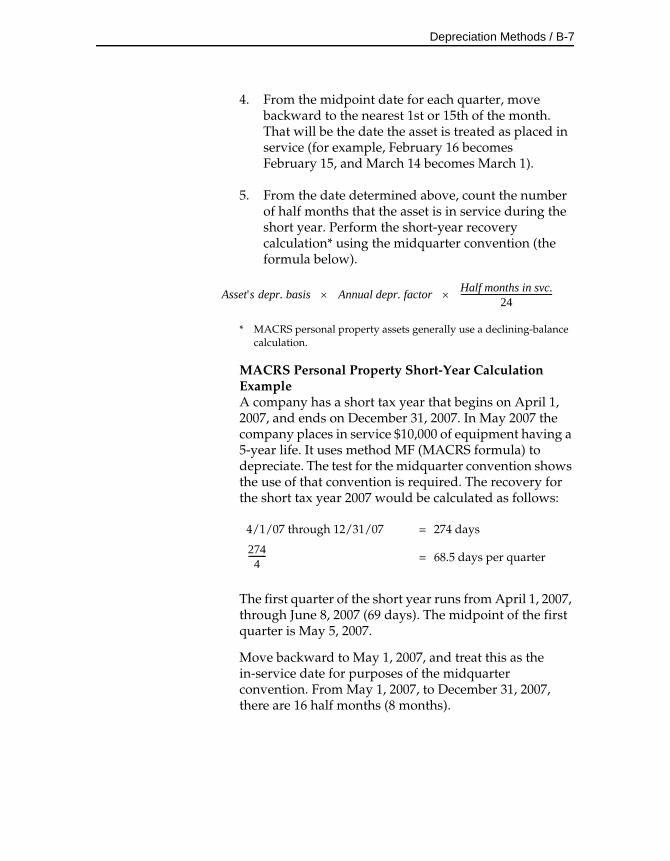
Depreciation Methods / B-7
4. From the midpoint date for each quarter, move backward to the nearest 1st or 15th of the month. That will be the date the asset is treated as placed in service (for example, February 16 becomes February 15, and March 14 becomes March 1).
5. From the date determined above, count the number of half months that the asset is in service during the short year. Perform the short-year recovery calculation* using the midquarter convention (the formula below).
* MACRS personal property assets generally use a declining-balance calculation.
MACRS Personal Property Short-Year Calculation ExampleA company has a short tax year that begins on April 1, 2007, and ends on December 31, 2007. In May 2007 the company places in service $10,000 of equipment having a 5-year life. It uses method MF (MACRS formula) to depreciate. The test for the midquarter convention shows the use of that convention is required. The recovery for the short tax year 2007 would be calculated as follows:
The first quarter of the short year runs from April 1, 2007, through June 8, 2007 (69 days). The midpoint of the first quarter is May 5, 2007.
Move backward to May 1, 2007, and treat this as the in-service date for purposes of the midquarter convention. From May 1, 2007, to December 31, 2007, there are 16 half months (8 months).
4/1/07 through 12/31/07 = 274 days
= 68.5 days per quarter
Asset's depr. basis Annual depr. factor Half months in svc.24
----------------------------------------------
2744
---------
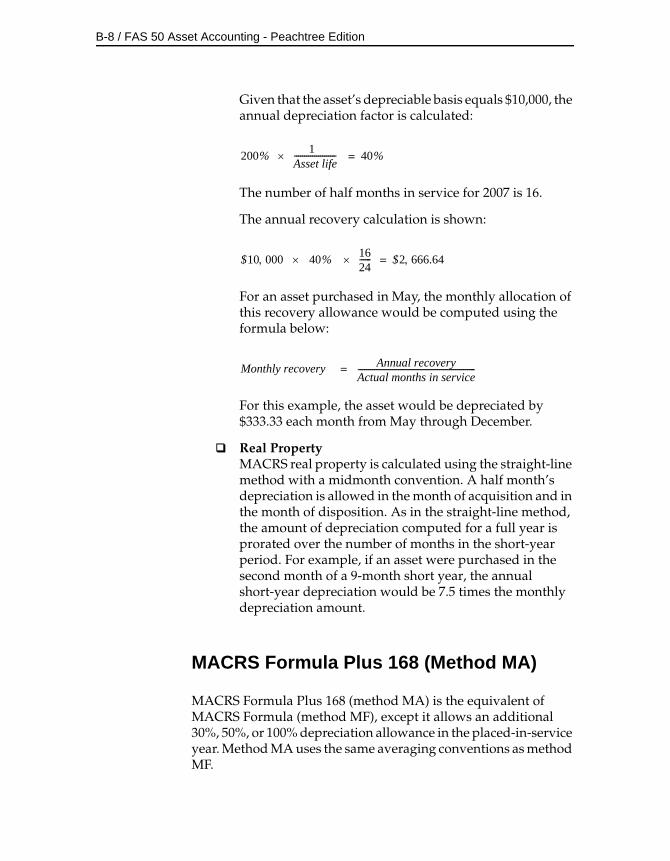
B-8 / FAS 50 Asset Accounting - Peachtree Edition
Given that the asset’s depreciable basis equals $10,000, the annual depreciation factor is calculated:
The number of half months in service for 2007 is 16.
The annual recovery calculation is shown:
For an asset purchased in May, the monthly allocation of this recovery allowance would be computed using the formula below:
For this example, the asset would be depreciated by $333.33 each month from May through December.
Real PropertyMACRS real property is calculated using the straight-line method with a midmonth convention. A half month’s depreciation is allowed in the month of acquisition and in the month of disposition. As in the straight-line method, the amount of depreciation computed for a full year is prorated over the number of months in the short-year period. For example, if an asset were purchased in the second month of a 9-month short year, the annual short-year depreciation would be 7.5 times the monthly depreciation amount.
MACRS Formula Plus 168 (Method MA)
MACRS Formula Plus 168 (method MA) is the equivalent of MACRS Formula (method MF), except it allows an additional 30%, 50%, or 100% depreciation allowance in the placed-in-service year. Method MA uses the same averaging conventions as method MF.
200% 1
Asset life--------------------- 40%=
$10 000 40% 1624------ $2 666.64=
Monthly recovery Annual recoveryActual months in service-----------------------------------------------------------=
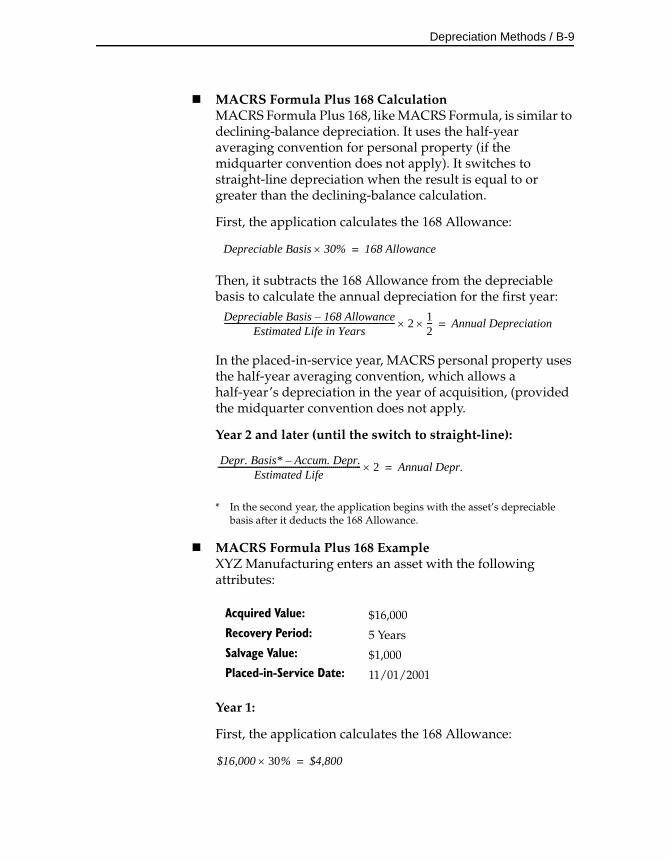
Depreciation Methods / B-9
MACRS Formula Plus 168 CalculationMACRS Formula Plus 168, like MACRS Formula, is similar to declining-balance depreciation. It uses the half-year averaging convention for personal property (if the midquarter convention does not apply). It switches to straight-line depreciation when the result is equal to or greater than the declining-balance calculation.
First, the application calculates the 168 Allowance:
Then, it subtracts the 168 Allowance from the depreciable basis to calculate the annual depreciation for the first year:
In the placed-in-service year, MACRS personal property uses the half-year averaging convention, which allows a half-year’s depreciation in the year of acquisition, (provided the midquarter convention does not apply.
Year 2 and later (until the switch to straight-line):
* In the second year, the application begins with the asset’s depreciable basis after it deducts the 168 Allowance.
MACRS Formula Plus 168 ExampleXYZ Manufacturing enters an asset with the following attributes:
Year 1:
First, the application calculates the 168 Allowance:
Acquired Value: $16,000
Recovery Period: 5 Years
Salvage Value: $1,000
Placed-in-Service Date: 11/01/2001
Depreciable Basis 30% 168 Allowance=
Depreciable Basis 168 Allowance–Estimated Life in Years
-------------------------------------------------------------------------------------- 212--- Annual Depreciation=
Depr. Basis* Accum. Depr.–Estimated Life
------------------------------------------------------------------------ 2 Annual Depr.=
$16,000 30% $4,800=
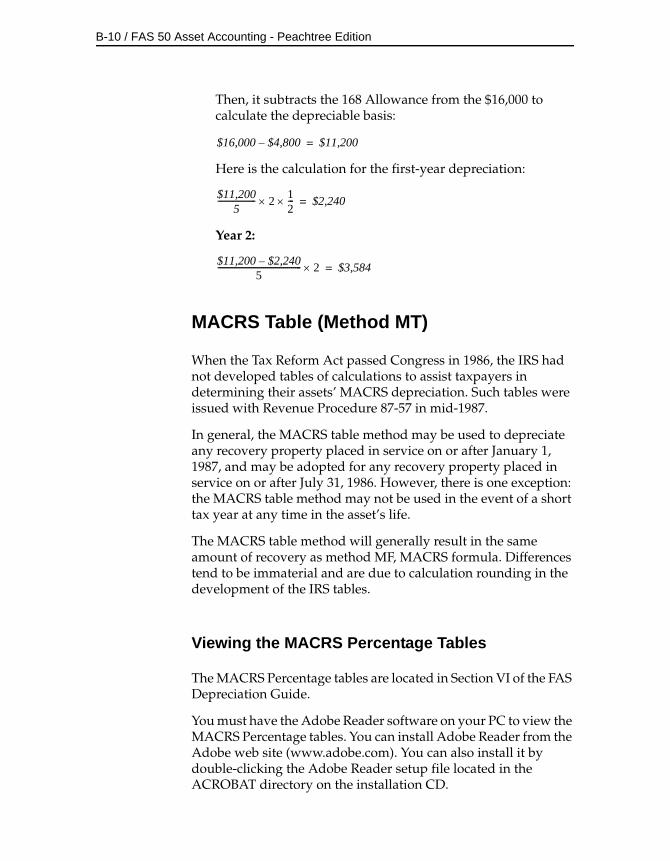
B-10 / FAS 50 Asset Accounting - Peachtree Edition
Then, it subtracts the 168 Allowance from the $16,000 to calculate the depreciable basis:
Here is the calculation for the first-year depreciation:
Year 2:
MACRS Table (Method MT)
When the Tax Reform Act passed Congress in 1986, the IRS had not developed tables of calculations to assist taxpayers in determining their assets’ MACRS depreciation. Such tables were issued with Revenue Procedure 87-57 in mid-1987.
In general, the MACRS table method may be used to depreciate any recovery property placed in service on or after January 1, 1987, and may be adopted for any recovery property placed in service on or after July 31, 1986. However, there is one exception: the MACRS table method may not be used in the event of a short tax year at any time in the asset’s life.
The MACRS table method will generally result in the same amount of recovery as method MF, MACRS formula. Differences tend to be immaterial and are due to calculation rounding in the development of the IRS tables.
Viewing the MACRS Percentage Tables
The MACRS Percentage tables are located in Section VI of the FAS Depreciation Guide.
You must have the Adobe Reader software on your PC to view the MACRS Percentage tables. You can install Adobe Reader from the Adobe web site (www.adobe.com). You can also install it by double-clicking the Adobe Reader setup file located in the ACROBAT directory on the installation CD.
$16,000 $4,800– $11,200=
$11,2005
------------------- 2 12--- $2,240=
$11,200 $2,240–5
------------------------------------------ 2 $3,584=

Depreciation Methods / B-11
To view the MACRS Percentage tables
1. Select Help/Depreciation Guide from the menu bar. The application opens Adobe Reader and displays the FAS Depreciation Guide.
2. Using either the bookmarks on the left or the Table of Contents, navigate to Section VI: Tables.
3. Select the link to “How to Use the MACRS Percentage Tables.” The application displays the section of the FAS Depreciation Guide that contains the MACRS Percentage tables.
MACRS Table ConventionsThe conventions used for MACRS tables are the same as the conventions used in the MACRS formula method. The difference is that the table values take into consideration the acquisition year convention required to be used for a particular asset.
For MACRS personal property using the MACRS table method, the tables used within the application generally follow the half-year convention. They allow for a half year of depreciation in the year of acquisition and a half year’s recovery in the last year of the asset’s estimated life. If the asset is disposed of before the end of its estimated life, then the application automatically superimposes the half-year convention on the ordinary full-year recovery amount in the tables.
Where the midquarter convention applies or is chosen by the user for all MACRS personal property, the appropriate midquarter tables will be used. (See the preceding MACRS formula method description for a more complete explanation of the effect of the midquarter convention election on the allowed recovery amounts in the acquisition and disposal years.)
For MACRS real property, a midmonth convention is built into the real property tables and allows for a half month’s depreciation in both the acquisition and disposal months. The midquarter convention does not apply to real property.
B-12 / FAS 50 Asset Accounting - Peachtree Edition
MACRS Table CalculationThe MACRS recovery allowance under the table method is substantially equivalent to the allowance under the formula method. As with the MACRS formula calculation, the MACRS table calculation allows personal property to be recovered over its estimated life at a rate of 200% (declining balance) with a switch to straight-line at the optimal point. Unlike the formula method, with the table method depreciation is computed by applying different depreciation rates to a constant property basis over the life of the asset.
You generally use the 200% declining-balance method to depreciate personal property with recovery periods of 3, 5, 7, or 10 years, while you use the 150% declining-balance method for 15- or 20-year property. Instead of using the 200% declining-balance method for personal property, you can elect to use a slower 150% rate. You can elect to use the 150% rate either over the GDS life, for property placed in service after 12/31/98, or over the longer ADS life, for property placed in service before 1/1/99. (The change in the recovery period used for this election was due to the IRS Restructuring and Reform Act of 1998.) The election to use the 150% rate can be helpful in eliminating the degree of exposure to the Alternative Minimum Tax (AMT). While the application does not support every possible ADS life when electing the 150% rate for pre-1999 property, it does support a number of the most regularly used ones. For unusual assets with unusual ADS lives, a MACRS formula calculation allows for more flexibility in meeting the slower rate, longer-life option.
For real property, the MACRS table calculation allows recovery at a straight-line rate over the recovery period. Generally, either a 31.5-year or a 39-year estimated life is used for nonresidential real property (depending on when it was placed in service) and 27.5 years for residential property. Other valid estimated lives include 7, 10, 15, 20, and 25 years. The tables use 200% declining balance for 7- and 10-year lives, 150% declining balance for 15- and 20-year lives, and 100% (straight-line) for a 25-year life, regardless of whether the property type is real or personal.
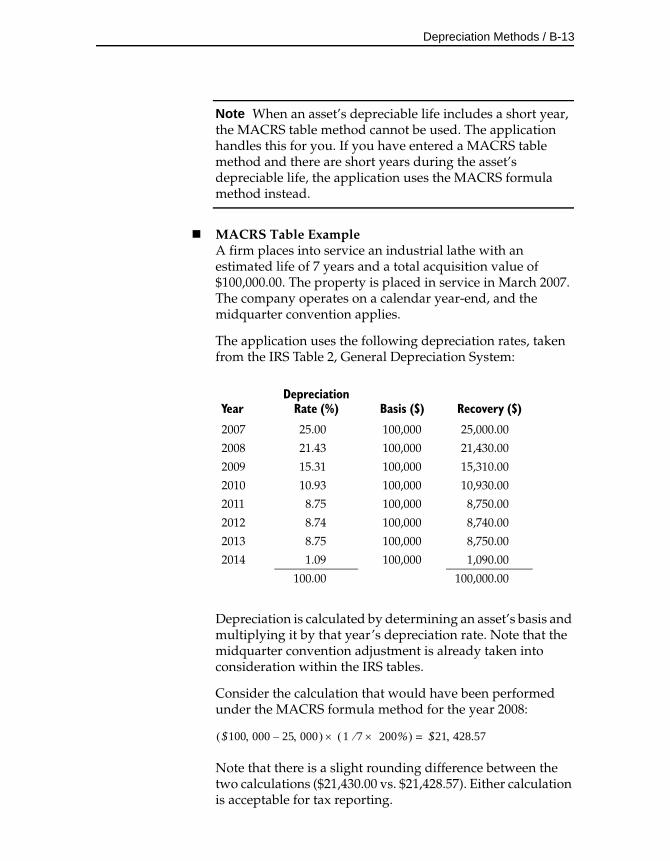
Depreciation Methods / B-13
Note When an asset’s depreciable life includes a short year, the MACRS table method cannot be used. The application handles this for you. If you have entered a MACRS table method and there are short years during the asset’s depreciable life, the application uses the MACRS formula method instead.
MACRS Table ExampleA firm places into service an industrial lathe with an estimated life of 7 years and a total acquisition value of $100,000.00. The property is placed in service in March 2007. The company operates on a calendar year-end, and the midquarter convention applies.
The application uses the following depreciation rates, taken from the IRS Table 2, General Depreciation System:
Depreciation is calculated by determining an asset’s basis and multiplying it by that year’s depreciation rate. Note that the midquarter convention adjustment is already taken into consideration within the IRS tables.
Consider the calculation that would have been performed under the MACRS formula method for the year 2008:
Note that there is a slight rounding difference between the two calculations ($21,430.00 vs. $21,428.57). Either calculation is acceptable for tax reporting.
YearDepreciation
Rate (%) Basis ($) Recovery ($)
2007 25.00 100,000 25,000.00
2008 21.43 100,000 21,430.00
2009 15.31 100,000 15,310.00
2010 10.93 100,000 10,930.00
2011 8.75 100,000 8,750.00
2012 8.74 100,000 8,740.00
2013 8.75 100,000 8,750.00
2014 1.09 100,000 1,090.00
100.00 100,000.00
$100 000 25 000– 1 7 200% $21 428.57=
B-14 / FAS 50 Asset Accounting - Peachtree Edition
MACRS Table Short-Year CalculationA problem is created when MACRS tables are used and a short tax year occurs. Revenue Procedure 87-57 states:
“The MACRS depreciation tables . . . may not be used in the following situations, where:
• property is placed in service in a short tax year,
• a short tax year occurs during the recovery period of property, or
• a disposition of property occurs in a short tax year.”
Because of these special restrictions, when a user elects the MACRS table method, the application checks whether a short year occurred during the year that the asset was placed in service. If the acquisition year was a short tax year, the user will not be allowed to select the MACRS table method. Rather, the user will be prompted to use the MACRS formula method.
If a short year is established after an asset that uses the MACRS table method has been entered in the application, the asset’s depreciation calculation will be changed. All depreciation calculations beginning from the start of the first short tax year of the asset’s life will be made using the formula method. The date of the last calculation before the short year is considered by the application to be the date of conversion to the MACRS formula method. All depreciation taken to that date will be treated as total prior depreciation in computing remaining depreciable basis.
Any differences between the table and formula methods (adjustments due to the effects of rounding in the tables) are taken into consideration automatically in the formula calculation, which is based on a declining depreciable basis with a fixed depreciation rate.
When an asset has its depreciation calculated through the conversion from MACRS table to MACRS formula, affected reports still show the use of the table method but will also print an f in the Key column, indicating the conversion to the formula calculation.
Depreciation Methods / B-15
ADS, Straight-Line MACRS (Method AD)
Under the Tax Reform Act of 1986, the Alternative Depreciation System (ADS) straight-line MACRS method replaces the straight-line, alternate ACRS formula and table methods (methods SA and ST) for assets acquired after 1986. ADS is a straight-line method that combines the features of straight-line and MACRS depreciation. Under this method, costs are recovered evenly over recovery periods that are as long as or longer than recovery periods prescribed under MACRS.
ADS straight-line must be used for certain property (property located outside the United States, property used for tax-exempt purposes, and others). Businesses that do not want to take advantage of accelerated depreciation in the early years of an asset’s life can use this method. The ADS election is made year by year, but for personal property it must be made for all properties of the same class acquired during the year. For real property, ADS can be elected on a property-by-property basis.
ADS ConventionsThis method uses the same half-year (personal property) and midmonth (real property) conventions as the other MACRS methods. The half-year convention allows a half year’s depreciation in both the year of acquisition and the year of disposal. The midquarter convention rules apply to this method as previously explained for the MACRS formula method.
ADS CalculationADS uses a straight-line calculation over an asset’s ADS life. This generally slows the rate of recovery as compared with other MACRS methods. Even MACRS real property, which already uses a straight-line calculation, is recovered more slowly using the asset’s ADS life.
When electing a depreciation method of AD (MACRS straight-line), enter the asset’s ADS life in both the Estimated Life field and the ADS Life field in the Tax book. The application uses the entry in the Estimated Life field for calculating depreciation in the Tax book, and the entry in the ADS Life field for setting defaults in other books where appropriate.
B-16 / FAS 50 Asset Accounting - Peachtree Edition
ADS ExampleIn October 2007, a calendar-year corporation purchased a building for $150,000. Thirty thousand dollars was attributable to the cost of the land. Under the MACRS formula method, the 2007 depreciation allowance would be computed as follows:
If the corporation elected the ADS straight-line MACRS method, the 2007 depreciation allowance would be computed as follows:
ADS Short-Year CalculationUnder the ADS straight-line MACRS method, the amount of depreciation computed for a full year is prorated over the number of months in the short-year period. The application prorates the amount of depreciation computed for a full year by multiplying the amount by the short-year fraction.
For personal property using this method, the half-year convention applies to the disposition year, which requires that one-half of the depreciation calculated for the full short-year period be used. For real property, the midmonth convention applies.
If the property is placed in service or disposed of during a short tax year and the midquarter convention applies, the deduction is computed as if the property had been placed in service or disposed of in the middle of the quarter. See the MACRS formula method for details regarding the use of the midquarter convention.
= $3,077 Annual MACRS recovery
= $ 641 2007 depreciation allowance
= $3,000 Annual MACRS recovery
= $ 625 2007 depreciation allowance
$150 000 $30 000–39
---------------------------------------------------
2.512------- $3 077
$150 000 $30 000–40
---------------------------------------------------
2.512------- $3 000
Depreciation Methods / B-17
ADS Straight-Line MACRS Plus 168 (Method AA)
ADS straight-line MACRS plus 168 (method AA) is the equivalent of ADS straight-line MACRS (method AD), except it allows an additional 30%, 50%, or 100% depreciation allowance in the placed-in-service year. Method AA uses the same averaging conventions as method AD.
ADS Straight-Line MACRS Plus 168 CalculationFirst, the application calculates the 168 Allowance:
Then, it subtracts the 168 Allowance from the depreciable basis to calculate the annual depreciation for the first year:
In the placed-in-service year, MACRS personal property uses the half-year averaging convention, which allows a half-year’s depreciation in the year of acquisition (provided that the midquarter convention does not apply).
Year 2 and later:
* In the second year, the application begins with the asset’s depreciable basis after it deducts the 168 Allowance.
ADS Straight-line MACRS Plus 168 ExampleXYZ Manufacturing acquires an asset with the following attributes:
Year 1:
First, the application calculates the 168 Allowance:
Acquired Value: $16,000
Placed-in-Service Date: 11/01/2001
Estimated Life: 10 Years
Salvage Value: $1,000
Depreciable Basis 30% 168 Allowance=
Depr. Basis 168 Allowance–Estimated Life in Years
---------------------------------------------------------------------- 12--- Annual Depr.=
Depr. Basis *Estimated Life---------------------------------- Annual Depr.=
$16,000 .30 $4,800=
B-18 / FAS 50 Asset Accounting - Peachtree Edition
Then, the application subtracts the 168 Allowance from the $16,000 to calculate the depreciable basis:
Here is the calculation for the first-year depreciation:
Years 2 through 10:
Year 11:
MACRS Indian Reservation (Method MI)
In 1993, Congress created a system whereby qualifying Indian Reservation property must be depreciated over shorter recovery periods than otherwise allowed. This accelerates the allowable depreciation deductions. Property that qualifies for the shorter recovery periods must be placed in service after 12/31/93 and before 2012. There is no AMT Adjustment for Indian Reservation property.
MACRS Indian Reservation ConventionsThis method uses the same averaging conventions as the other MACRS methods: half-year for personal property and midmonth for real property, with the exception of leasehold improvements placed in service after October 22, 2004 and before January 1, 2012 in which case the half-year convention is used.
The MACRS recovery allowance under the MI method is substantially equivalent to the allowance under the formula method. As with the MACRS formula calculation, the MACRS Indian Reservation method allows either a 200% or 150% rate (declining-balance) with a switch to straight-line at the optimal point for personal property, and a 100% rate (straight-line) for real property. Also, real property in the 15-
$16,000 $4,800– $11,200=
$11,20010
------------------- 12--- $560=
$11,20010
------------------- $1,120=
$11,20010
------------------- 12--- $560=
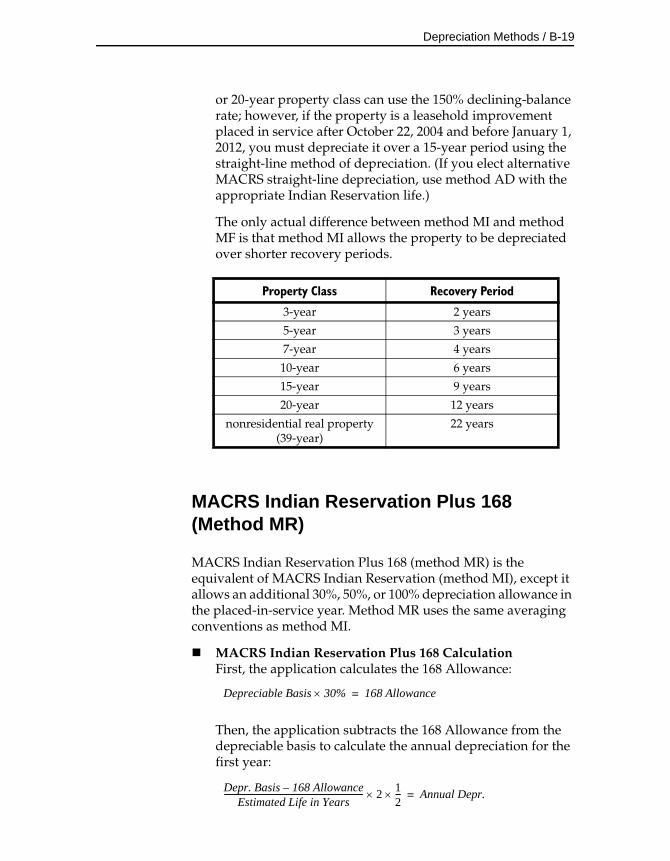
Depreciation Methods / B-19
or 20-year property class can use the 150% declining-balance rate; however, if the property is a leasehold improvement placed in service after October 22, 2004 and before January 1, 2012, you must depreciate it over a 15-year period using the straight-line method of depreciation. (If you elect alternative MACRS straight-line depreciation, use method AD with the appropriate Indian Reservation life.)
The only actual difference between method MI and method MF is that method MI allows the property to be depreciated over shorter recovery periods.
MACRS Indian Reservation Plus 168 (Method MR)
MACRS Indian Reservation Plus 168 (method MR) is the equivalent of MACRS Indian Reservation (method MI), except it allows an additional 30%, 50%, or 100% depreciation allowance in the placed-in-service year. Method MR uses the same averaging conventions as method MI.
MACRS Indian Reservation Plus 168 CalculationFirst, the application calculates the 168 Allowance:
Then, the application subtracts the 168 Allowance from the depreciable basis to calculate the annual depreciation for the first year:
Property Class Recovery Period
3-year 2 years
5-year 3 years
7-year 4 years
10-year 6 years
15-year 9 years
20-year 12 years
nonresidential real property (39-year)
22 years
Depreciable Basis 30% 168 Allowance=
Depr. Basis 168 Allowance–Estimated Life in Years
---------------------------------------------------------------------- 2 12--- Annual Depr.=
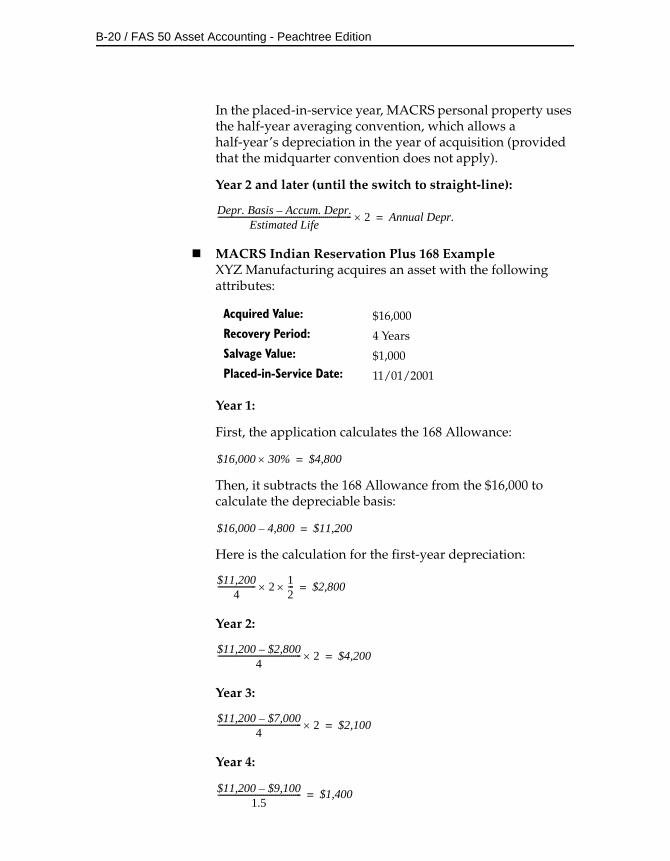
B-20 / FAS 50 Asset Accounting - Peachtree Edition
In the placed-in-service year, MACRS personal property uses the half-year averaging convention, which allows a half-year’s depreciation in the year of acquisition (provided that the midquarter convention does not apply).
Year 2 and later (until the switch to straight-line):
MACRS Indian Reservation Plus 168 ExampleXYZ Manufacturing acquires an asset with the following attributes:
Year 1:
First, the application calculates the 168 Allowance:
Then, it subtracts the 168 Allowance from the $16,000 to calculate the depreciable basis:
Here is the calculation for the first-year depreciation:
Year 2:
Year 3:
Year 4:
Depr. Basis Accum. Depr.–Estimated Life
------------------------------------------------------------------- 2 Annual Depr.=
Acquired Value: $16,000
Recovery Period: 4 Years
Salvage Value: $1,000
Placed-in-Service Date: 11/01/2001
$16,000 30% $4,800=
$16,000 4,800– $11,200=
$11,2004
------------------- 2 12--- $2,800=
$11,200 $2,800–4
------------------------------------------ 2 $4,200=
$11,200 $7,000–4
------------------------------------------ 2 $2,100=
$11,200 $9,100–1.5
------------------------------------------ $1,400=
Depreciation Methods / B-21
Notice that in year 4 the calculation switches to straight-line depreciation, using the following formula:
Because you have already taken 2.5 years of depreciation, the remaining life is 1.5 years.
Year 5:
Year 5 is the last year of the asset’s life. The asset receives only a half-year of depreciation because of the half-year averaging convention.
Note When using the MACRS Indian Reservation depreciation method, you recover the asset’s full acquisition value. In contrast, declining-balance depreciation does not recover the salvage value.
ACRS Methods
The Accelerated Cost Recovery System (ACRS) is an IRS-prescribed method for recovering the cost of personal and real property placed in service from 1981 through 1986. ACRS is a modification of the Asset Depreciation Range (ADR) method used in the 1970s. It was created by the Economic Recovery Tax Act of 1981, which required the use of ACRS or alternate ACRS for assets placed in service from 1981 through July 1986. ACRS may have been elected for qualifying assets through December 31, 1986. For tax purposes, assets acquired after 1986 (other than transitional property) must use one of the MACRS methods discussed earlier in this appendix.
The application supports three ACRS methods: ACRS table; straight-line, alternate ACRS formula; and straight-line, alternate ACRS table. The two straight-line, alternate ACRS methods are essentially the same, except that rounding in the IRS tables produces small differences from the formula calculation in the recovery amount per period.
Acquisition Cost Accumulated Depr.–Remaining Life
-------------------------------------------------------------------------------------------- Annual Depr.=
$11,200 $10,500–0.5
--------------------------------------------- 12--- $700=
B-22 / FAS 50 Asset Accounting - Peachtree Edition
ACRS Table (Method AT)
The ACRS table method uses the 150% declining-balance method for personal property and 175% declining-balance for real property. Recovery periods are assigned by the IRS according to class of property.
ACRS Table ConventionsACRS uses different conventions determined by the type of asset being depreciated and the date that the asset was placed in service. The following table summarizes these applicable conventions.
* Allows for a full month’s recovery in the month of acquisition but no recovery in the month of disposal.
** Allows for a half month’s recovery in the month of acquisition and a half month’s recovery in the month of disposal.
ACRS Table CalculationsACRS depreciation is calculated by multiplying the asset’s depreciable basis by a percentage for each year in the recovery period. The percentages, which are specified in Internal Revenue Code tables, vary according to the type of property, the recovery period assigned to the asset, and the date the asset was placed in service.
Personal PropertyPersonal property uses the half-year convention, which is built into the tables. Under the half-year convention, the tables allow a half year of depreciation in the first year for each asset regardless of the date it was placed in service. ACRS (unlike MACRS) does not allow any depreciation for personal property during the year of disposition.
ACRS Table Conventions
Asset Type Date Placed in Service Applicable Convention
Personal Property
3-, 5-, 10-, and 15-year 1/1/81 - 12/31/86 Half-year
Real Property
15-year 1/1/81 - 3/15/84 Full-month *
18-year 3/16/84 - 6/22/846/23/84 - 5/8/85
Full-month *Half-month **
19-year 5/9/85 - 12/31/86 Half-month **
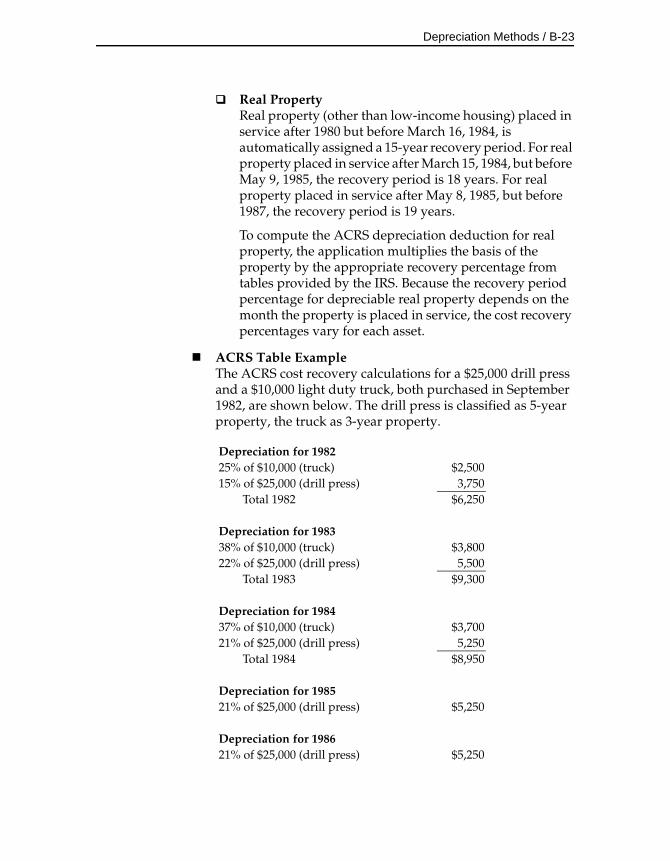
Depreciation Methods / B-23
Real PropertyReal property (other than low-income housing) placed in service after 1980 but before March 16, 1984, is automatically assigned a 15-year recovery period. For real property placed in service after March 15, 1984, but before May 9, 1985, the recovery period is 18 years. For real property placed in service after May 8, 1985, but before 1987, the recovery period is 19 years.
To compute the ACRS depreciation deduction for real property, the application multiplies the basis of the property by the appropriate recovery percentage from tables provided by the IRS. Because the recovery period percentage for depreciable real property depends on the month the property is placed in service, the cost recovery percentages vary for each asset.
ACRS Table ExampleThe ACRS cost recovery calculations for a $25,000 drill press and a $10,000 light duty truck, both purchased in September 1982, are shown below. The drill press is classified as 5-year property, the truck as 3-year property.
Depreciation for 198225% of $10,000 (truck) $2,50015% of $25,000 (drill press) 3,750
Total 1982 $6,250
Depreciation for 198338% of $10,000 (truck) $3,80022% of $25,000 (drill press) 5,500
Total 1983 $9,300
Depreciation for 198437% of $10,000 (truck) $3,70021% of $25,000 (drill press) 5,250
Total 1984 $8,950
Depreciation for 198521% of $25,000 (drill press) $5,250
Depreciation for 198621% of $25,000 (drill press) $5,250
B-24 / FAS 50 Asset Accounting - Peachtree Edition
The half-year convention allowed a half year of depreciation in 1982, although the two pieces of equipment were only in service for 4 months (September to December). No extra calculations were needed to handle the half-year convention in the acquisition year; it is built into the tables.
ACRS Table Short-Year CalculationThe short-year calculation for assets using the ACRS table method differs for personal and real property.
Personal PropertyThe amount of ACRS deduction for a short tax year is prorated on a 12-month basis. The ACRS deduction is computed by determining the recovery deduction for a full year and multiplying it by the short-year fraction. The numerator for this equation is the number of months in the short tax year; the denominator is 12. Recovery allowances for years in a recovery period following a short tax year will be determined without regard to the short tax year.
The unrecovered short-year allowance is the difference between the recovery allowance permitted for the short tax year and the recovery allowance which would have been allowed if the year were not a short tax year. It is claimed in the tax year following the last tax year of the recovery period.
Real PropertyThe depreciation calculation for 15-, 18-, or 19-year real property is much simpler than for personal property if there is a short tax year in the year of acquisition or disposition. The deduction is based on the number of months in which the property was in service during the short tax year.
When a short year occurs in a year other than the acquisition year or disposal year, the table amount for the short year is prorated according to the number of months in the short year. The remainder of the table factor is taken as unrecovered short-year amounts in the post-recovery period.
Depreciation Methods / B-25
Straight-Line, Alternate ACRS (Methods SA and ST)
As its name implies, straight-line, alternate ACRS depreciation combines features of straight-line and regular ACRS table depreciation.
Like straight-line depreciation, the alternate straight-line method yields a uniform yearly depreciation amount. Whereas straight-line depreciation is based on the estimated life of the asset, alternate straight-line depreciation uses specific recovery periods (defined by law) similar to those used by ACRS table depreciation.
Under the federal tax law, if you use the alternate straight-line method for a personal property asset, you must apply the alternate straight-line method to all assets of the same class placed in service in the same tax year. A different method may be used for assets of the same class in the next year or for assets of a different class in the same tax year. This rule does not apply to real property. The choice of depreciation method for real property is made on a property-by-property basis, not on a class-by-class basis.
The application can calculate straight-line, alternate ACRS depreciation either by using a formula that divides the asset’s basis by its recovery period or by using IRS tables. The difference between the two methods in the recovery amount per period is due to rounding in the tables. The following text applies to both methods unless stated otherwise.
Straight-Line, Alternate ACRS ConventionsThe conventions for this method are the same as the ACRS table conventions. For details, see the ACRS convention table in “ACRS Table (Method AT),” page B-22.
Straight-Line, Alternate ACRS CalculationFor assets using this alternate ACRS depreciation method, the recovery periods vary. Businesses may choose to use IRS-approved recovery periods that are different from those used for ACRS depreciation, as shown in the following table.
For method SA, the application uses a formula allowing 16.75% for the first year for a 3-year property, 33.33% for the second and third years, and 16.75% for the fourth year. Proportionate formulas are used for other recovery periods. For method ST, the percentages are built into the tables.

B-26 / FAS 50 Asset Accounting - Peachtree Edition
Straight-Line, Alternate ACRS ExampleFollowing are two examples of straight-line, alternate ACRS depreciation using the formula (method SA). One example is for personal property and the other is for real property. An example using the table (method ST) would produce slightly different recovery period amounts due to rounding differences.
Personal Property ExampleA company purchased a drill press in August 1983 for $20,000. Since the recovery period for the drill press under regular ACRS table depreciation would be 5 years, the company has the option of selecting a recovery period of 5, 12, or 25 years.
Although the property was placed in service in August, the half-year convention applies under ACRS rules. Cost recovery of an asset with an elected 5-year life is therefore taken over 6 years.
ACRS Recovery Periods for Personal Property
ACRS Table Straight-Line, Alternate ACRS
3 years 3, 5, or 12 years
5 years 5, 12, or 25 years
10 years 10, 25, or 35 years
ACRS Recovery Periods for Real Property
Placed in Service ACRS Table Straight-Line, Alternate ACRS
Before 3/16/84 15 years 15, 35, or 45 years
3/16/84 - 5/8/85 18 years 18, 35, or 45 years
5/9/85 - 12/31/87 19 years 19, 35, or 45 years

Depreciation Methods / B-27
Real Property ExampleDepreciation for real property begins in the month the property is placed in service. The straight-line deductions for the first and last years must be adjusted to reflect the number of months the property is actually in service.
Assume a corporation acquired a factory building in June 1982 for $400,000. The land is worth $100,000, so the depreciable basis of the building is $300,000. The date the building was placed in service makes the property a 15-year property under regular ACRS table rules and allows the use of 15, 35, or 45 years under alternate straight-line depreciation. Using the formula, the annual recovery rate for a 35-year recovery period is 2.857% (1/35 = 2.857%).
Basis = $20,000Recovery period = 5 yearsRate =
Cost recovery for 1983
x $20,000 x = $2,000
Cost recovery for 1984
x $20,000 = $4,000
Cost recovery for 1985
x $20,000 = $4,000
Cost recovery for 1986
x $20,000 = $4,000
Cost recovery for 1987
x $20,000 = $4,000
Cost recovery for 1988
x $20,000 x = $2,000
1 5
15--- 1
2---
15---
15---
15---
15---
15--- 1
2---
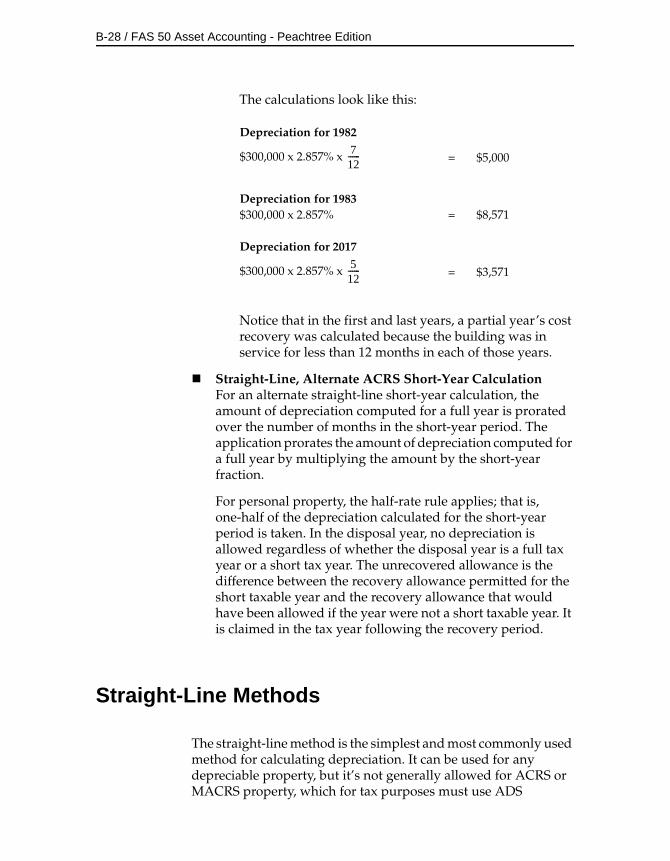
B-28 / FAS 50 Asset Accounting - Peachtree Edition
The calculations look like this:
Notice that in the first and last years, a partial year’s cost recovery was calculated because the building was in service for less than 12 months in each of those years.
Straight-Line, Alternate ACRS Short-Year CalculationFor an alternate straight-line short-year calculation, the amount of depreciation computed for a full year is prorated over the number of months in the short-year period. The application prorates the amount of depreciation computed for a full year by multiplying the amount by the short-year fraction.
For personal property, the half-rate rule applies; that is, one-half of the depreciation calculated for the short-year period is taken. In the disposal year, no depreciation is allowed regardless of whether the disposal year is a full tax year or a short tax year. The unrecovered allowance is the difference between the recovery allowance permitted for the short taxable year and the recovery allowance that would have been allowed if the year were not a short taxable year. It is claimed in the tax year following the recovery period.
Straight-Line Methods
The straight-line method is the simplest and most commonly used method for calculating depreciation. It can be used for any depreciable property, but it’s not generally allowed for ACRS or MACRS property, which for tax purposes must use ADS
Depreciation for 1982
$300,000 x 2.857% x = $5,000
Depreciation for 1983$300,000 x 2.857% = $8,571
Depreciation for 2017
$300,000 x 2.857% x = $3,571
712------
512------
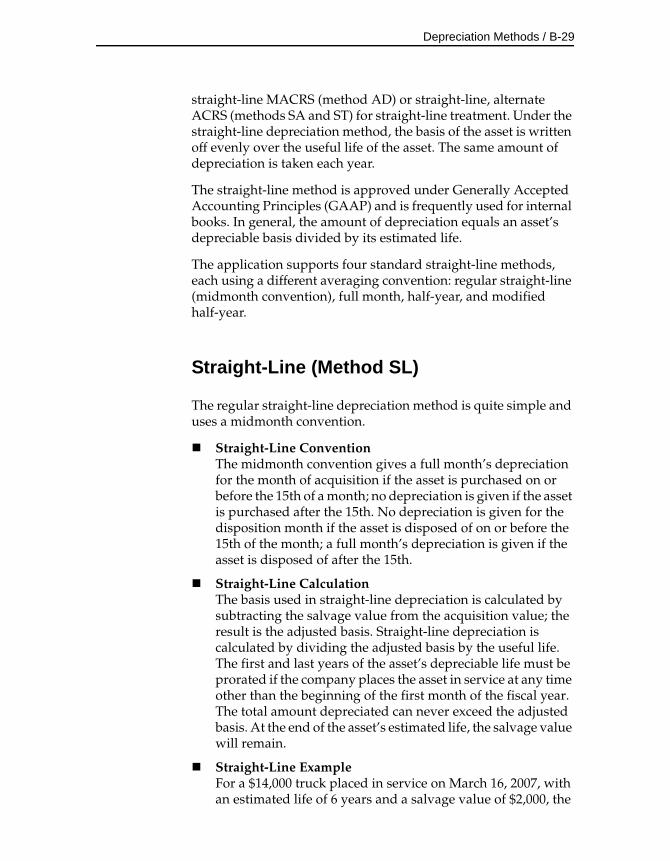
Depreciation Methods / B-29
straight-line MACRS (method AD) or straight-line, alternate ACRS (methods SA and ST) for straight-line treatment. Under the straight-line depreciation method, the basis of the asset is written off evenly over the useful life of the asset. The same amount of depreciation is taken each year.
The straight-line method is approved under Generally Accepted Accounting Principles (GAAP) and is frequently used for internal books. In general, the amount of depreciation equals an asset’s depreciable basis divided by its estimated life.
The application supports four standard straight-line methods, each using a different averaging convention: regular straight-line (midmonth convention), full month, half-year, and modified half-year.
Straight-Line (Method SL)
The regular straight-line depreciation method is quite simple and uses a midmonth convention.
Straight-Line ConventionThe midmonth convention gives a full month’s depreciation for the month of acquisition if the asset is purchased on or before the 15th of a month; no depreciation is given if the asset is purchased after the 15th. No depreciation is given for the disposition month if the asset is disposed of on or before the 15th of the month; a full month’s depreciation is given if the asset is disposed of after the 15th.
Straight-Line CalculationThe basis used in straight-line depreciation is calculated by subtracting the salvage value from the acquisition value; the result is the adjusted basis. Straight-line depreciation is calculated by dividing the adjusted basis by the useful life. The first and last years of the asset’s depreciable life must be prorated if the company places the asset in service at any time other than the beginning of the first month of the fiscal year. The total amount depreciated can never exceed the adjusted basis. At the end of the asset’s estimated life, the salvage value will remain.
Straight-Line ExampleFor a $14,000 truck placed in service on March 16, 2007, with an estimated life of 6 years and a salvage value of $2,000, the
B-30 / FAS 50 Asset Accounting - Peachtree Edition
depreciation calculation for the straight-line method would look like this:
Yearly depreciation would be $2,000 for the years 2008 through 2012. Under the midmonth convention, the truck was considered to be placed in service in April, so the acquisition year depreciation would be 9/12ths of the annual depreciation ($1,500). The deduction for the last year would be 3/12ths of the annual depreciation ($500).
Straight-Line Short-Year CalculationFor a straight-line short year, the amount of depreciation computed for a full year is prorated over the number of months in the short-year period. The application prorates the amount of depreciation computed for a full year by multiplying the amount by the short-year fraction.
Straight-Line, Full-Month (Method SF)
The straight-line, full-month method is a GAAP-approved method of depreciation that is very similar to the regular straight-line depreciation method. The key distinction between the two is a full-month versus a midmonth convention.
Straight-Line, Full-Month ConventionUnder a full-month convention, property placed in service at any time during a given month is treated as if it had been placed in service on the first of that month. This permits depreciation for the entire month in which the asset is placed in service. If the property is disposed of before the end of the recovery period, no depreciation is allowed for the disposal month.
Straight-Line, Full-Month CalculationThe calculation for the straight-line, full-month method is the same as for regular straight-line (method SL), except for the averaging convention.
Original cost $14,000
– Salvage value 2,000
Adjusted basis $12,000
Adjusted basisEstimated life---------------------------------- $12 000
6--------------------- $2 000= =
Depreciation Methods / B-31
Straight-Line, Full-Month ExampleThe example shown for method SL is valid for this method, except that the full-month convention allows depreciation for the month of March. The acquisition year depreciation would be 10/12ths of the annual depreciation ($1,666.67) and the final year depreciation would be 2/12ths of the annual depreciation ($333.33).
Straight-Line, Full-Month Short-Year CalculationThe short-year calculation for this method is the same as for method SL.
Straight-Line, Full-Month Plus 168 (Method SB)
The straight-line, full-month plus 168 depreciation method (method SB) calculates depreciation in the same manner as straight-line, full-month (method SF), except that the application takes an additional 30%, 50%, or 100% depreciation allowance in the placed-in-service year. Method SB uses the same averaging convention as method SF.
Straight-Line, Full-Month Plus 168 CalculationFirst, the application calculates the 168 Allowance:
Then, it subtracts the 168 Allowance from the depreciable basis to calculate the annual depreciation:
Straight-Line, Full-Month Plus 168 ExampleXYZ Manufacturing purchases an asset with the following attributes:
Acquired Value: $16,000
Estimated Life: 5 Years
Salvage Value: $1,000
Placed-in-Service Date: 11/30/01
Depreciable Basis 30% 168 Allowance=
Depreciable Basis 168 Allowance–Estimated Life
-------------------------------------------------------------------------------------- Annual Depreciation=

B-32 / FAS 50 Asset Accounting - Peachtree Edition
Year 1:
First, the application subtracts the salvage value from the acquired value:
Next, it calculates the 168 Allowance:
Then, it subtracts the 168 Allowance from the $15,000 to calculate the depreciable basis:
Next, it calculates the first-year depreciation:
The full-month averaging convention allows a full month of depreciation for November. Therefore, the asset receives two months of depreciation in the first year.
Years 2 through 5:
The application calculates the annual depreciation up to the final year as follows:
Year 6:
Straight-Line, Half-Year (Method SH)
The straight-line, half-year method is a method of depreciation that is similar to the regular straight-line depreciation method. It uses a half-year convention instead of a midmonth convention.
Straight-Line, Half-Year ConventionAs the name implies, straight-line half-year depreciation uses a half-year convention. The half-year convention gives a half year’s depreciation in the year of acquisition, regardless of the
$16,000 $1,000– $15,000=
$15,000 .30 $4,500=
$15,000 $4,500– $10,500=
$10,5005
------------------- 212------ $350=
$10,5005
------------------- $2,100=
$10,5005
------------------- 1012------ $1,750=

Depreciation Methods / B-33
actual acquisition date, and a half year’s depreciation in the year of disposal.
If you dispose of an asset in its final year, the amount of depreciation depends on when it is disposed. If the asset is disposed of before July 1 (or before the first day of the 7th month of the fiscal year), it receives one half of the depreciation it would have received if it had not been disposed. The asset will not be fully depreciated. If the asset is disposed of on or after July 1 (on or after the first day of the 7th month of the fiscal year), it receives the full amount of depreciation for its final year.
Straight-Line, Half-Year CalculationThe calculation for the straight-line, half-year method is the same as for regular straight-line (method SL), except for the averaging convention.
Straight-Line, Half-Year ExampleFor a $14,000 truck placed in service on March 16, 2007, with an estimated life of 6 years and a salvage value of $2,000, the depreciation calculation for the straight-line method would look like this:
Yearly depreciation would be $2,000 for the years 2008 through 2012. Since the truck was placed in service in March, the 2007 depreciation using the half-year convention would be one-half of the annual depreciation, or $1,000. The depreciation for the last year would also be one-half of the annual depreciation, or $1,000.
Straight-Line, Half-Year Short-Year CalculationBecause this method uses a half-year convention, the half-rate rule applies. The depreciation is calculated as if the asset were placed in service or disposed of during the middle of the short tax year. For example, if an asset were placed in service during a short tax year of 3 months, the annual depreciation
Original cost $14,000
– Salvage value 2,000
Adjusted basis $12,000
Adjusted basisEstimated life---------------------------------- $12 000
6--------------------- $2 000= =

B-34 / FAS 50 Asset Accounting - Peachtree Edition
would be one-half of the 3-month depreciation deduction. The formula is:
Straight-Line, Modified Half-Year (Method SD)
Method SD is like the regular straight-line depreciation calculation in every way except that it uses the modified half-year averaging convention. It is a GAAP-approved method that allows for an even flow of depreciation over an asset’s life.
Straight-Line, Modified Half-Year ConventionUnder the modified half-year convention, assets that are placed in service during the first half of the year are considered to have been placed in service on the first day of the year. Therefore, they receive a full year’s depreciation in the acquisition year. Assets that are placed in service during the second half of the year are considered to have been placed in service on the first day of the following year. Therefore, they receive no depreciation in the acquisition year but receive a full year’s depreciation in the subsequent year.
Applying the modified half-year convention in the disposal year is slightly more complicated. For details, see the description of this convention in “Modified Half-Year Convention,” page A-16.
Straight-Line, Modified Half-Year CalculationThe calculation for the straight-line, half-year method is the same as for regular straight-line (method SL), except for the averaging convention.
When calculating depreciation under this method for property type V, vintage account property, there is no adjustment to the depreciable basis for salvage value. However, the asset may not be depreciated below its salvage value. This alternate salvage treatment is applied automatically only to those assets with V for property type.
Short year depr. 12--- Full year depr.
Months in short year12
--------------------------------------------------=
Depreciation Methods / B-35
Straight-Line, Modified Half-Year ExampleA piece of equipment with a 5-year life is placed in service in April 2003. The asset, which was purchased for $10,000 and has a salvage value of $2,000, is sold in July 2007.
Had the asset been sold in the first half of the year, no depreciation (rather than 50%) would have been allowed in the disposal year. This is due to the effect of the convention type on the disposal year.
In the above example, the asset was placed in service in April, the first half of the year. Therefore, a full year of depreciation is allowed in the acquisition year. The annual allowance is earned evenly over the number of months that the asset was in service in that year.
Straight-Line, Modified Half-Year Short-Year CalculationThe formula is the same as for the regular straight-line method (method SL). However, because of the modified half-year convention, the treatment in the first and disposal years is different. Continuing the example shown above, the example below depicts what would happen in the event that a short tax year of 9 months had occurred in 2006:
In the event of a short year in either the acquisition or disposal year, the determination of the cutoff date for the first half of the year can get complicated. In such an event, the following rules apply:
YearDepreciation
Allowance Calculation
2003 $1,600.00 [($10,000 - 2,000 salvage) / 5 years] x 100%
2004 1,600.00 ($10,000 - 2,000 salvage) / 5 years
2005 1,600.00 ($10,000 - 2,000 salvage) / 5 years
2006 1,600.00 ($10,000 - 2,000 salvage) / 5 years
2007 800.00 [($10,000 - 2,000 salvage) / 5 years] x 50%
YearDepreciation
Allowance Calculation
2006 $1,200.00 [($10,000 - 2,000 salvage) / 5 years] x
2007 800.00 [($10,000 - 2,000 salvage) / 5 years] x 50%
912------
B-36 / FAS 50 Asset Accounting - Peachtree Edition
• If the duration of the short year is exactly 1 month, the cutoff of the short year is the 15th of that month, regardless of the actual number of days in that month.
• If the duration of the short year is an even number of months, the cutoff of the short year is the last day of the month that ends the first half of the short tax year.
• If the duration of the short year is an odd number of months, the cutoff of the short year is determined by dividing the number of days in the short year by two to arrive at the midpoint of the year. From that midpoint, advance or retreat to the closest end of a month and treat that month’s end as the cutoff. If the midpoint is an equal distance from the prior month’s end and the current month’s end, advance to the current month’s end as the cutoff.
Declining-Balance Methods
Declining-balance depreciation is a method that depreciates an asset at a higher rate in the earlier years of the asset’s life than straight-line depreciation. It applies only to tangible assets with a useful life equal to or greater than 3 years. The declining-balance methods are approved under Generally Accepted Accounting Principles (GAAP). For tax purposes, for new assets placed in service from 1954 through 1980, declining-balance rates were allowed to a maximum of twice the straight-line rate (200%). When you enter a declining-balance method, you select the rate you want to apply.
Using declining-balance depreciation for each year of an asset’s life will never completely depreciate the asset. Therefore, the IRS lets you switch from declining-balance depreciation to straight-line depreciation once during the life of an asset. This switch is one of few changes in depreciation method that can be made without special IRS approval.
The application provides 6 standard declining-balance methods. When paired with the 4 possible depreciation rates (125%, 150%, 175%, and 200%), you have 24 choices.

Depreciation Methods / B-37
Each method is different based on the percentage used, the averaging convention used, and whether it will switch from declining-balance to straight-line at the optimal point. The optimal point for switching to straight-line depreciation is when the deductions allowed by the straight-line method equal or exceed the deductions allowed by the declining-balance method. When the change to straight-line is made, the unrecovered basis of the asset is spread over the remaining estimated life, ensuring that the entire amount is depreciated. When straight-line depreciation is applied in this way, it is often called remaining value over remaining life depreciation. The methods are as follows:
Declining-Balance (Methods DB and DC)
Declining-Balance ConventionThe midmonth convention gives a full month’s depreciation for the month of acquisition if the asset is placed in service on or before the 15th of a month. No depreciation is given if the asset is placed in service after the 15th. No depreciation is given for the disposition month if the asset is disposed of on or before the 15th of the month. A full month’s depreciation is given if the asset is disposed of after the 15th.
Declining-Balance CalculationDeclining-balance depreciation is computed at the same rate each year, but each year this rate is applied to the asset’s depreciable basis remaining at the beginning of that tax period. As a result, annual depreciation deduction amounts are greater in the early years and lower in the later years of an asset’s life.
The four most common rate structures for declining-balance depreciation are 125%, 150%, 175%, and 200%, where the
DB Declining-balance, midmonth convention, switch to SL when optimal
DC Declining-balance, midmonth convention, no switch to SL
DD Declining-balance, modified half-year, switch to SL when optimal
DE Declining-balance, modified half-year, no switch to SL
DH Declining-balance, half-year, switch to SL when optimal
DI Declining-balance, half-year, no switch to SL
B-38 / FAS 50 Asset Accounting - Peachtree Edition
straight-line rate would be 100%. Two hundred percent, also known as double declining-balance, is the most widely used. Salvage value does not reduce the depreciable basis for declining balance as it does in other methods. However, the total amount depreciated cannot exceed the difference between the acquisition value and the salvage value.
The declining-balance formula is:
For an asset with an expected life of 8 years and the double declining-balance method, the rate would be:
Remember that if you choose to switch the asset to straight-line (method DB), the calculation changes when deductions allowed by straight-line equal or exceed deductions allowed by declining-balance. If you choose not to switch (method DC), the asset will never fully depreciate and will have a residual value at the end of its estimated life.
Declining-Balance ExampleA company bought new cleaning equipment worth $4,800 on August 15, 2007, with an estimated life of 8 years and a salvage value of $300. The company would see the following results from calculating depreciation using double declining-balance depreciation. If the company uses method DB (switch to straight-line when optimal), the application calculates straight-line depreciation figures at the same time to determine when to make the switch. The straight-line amount is calculated on the remaining basis for each year.
The rate for the double declining-balance computations is figured by dividing the percentage by the estimated life:
The beginning depreciable basis for the declining-balance computations is $4,800.
1Estimated life--------------------------------- Percentage Rate=
Rate Remaining depreciable basis Annual depreciation=
18--- 200% 25%=
200%8
-------------- 25%=

Depreciation Methods / B-39
For the first year, during which the equipment was in service only 5 months (August to December using the midmonth convention), the declining-balance calculation would be:
For subsequent years, the asset’s remaining depreciable basis is figured by subtracting the accumulated depreciation from the beginning depreciable basis.
The second and third year declining-balance calculations would be:
If the company uses method DB (switches to straight-line when optimal), the switch will occur for the year in which the straight-line depreciation is greater than the declining-balance depreciation. This occurs in year 7, when straight-line depreciation is $278.87 and declining-balance is $255.10.
Declining-Balance Short-Year CalculationFor a declining-balance short year, the amount of depreciation computed for a full year is prorated over the number of months in the short-year period. The application prorates the amount of depreciation computed for a full year by multiplying the amount by the short-year fraction.
The prorated amount is deducted from the remaining depreciable basis at the beginning of the short-year period to determine the remaining depreciable basis at the beginning of the following taxable year.
Declining-Balance, Half-Year (Methods DH and DI)
For an overview of declining-balance depreciation, see “Declining-Balance Methods,” page B-36. The methods are the same as the declining-balance methods DB and DC except for the averaging convention.
Year 2 ($4,800 - 500) x .25 = $1,075.00
Year 3 [$4,800 - (500 + 1,075)] x .25 = $ 806.25
$4 800, .25 512------ $500=
B-40 / FAS 50 Asset Accounting - Peachtree Edition
Declining-Balance, Half-Year ConventionThe half-year convention gives a half-year’s depreciation in the year of acquisition and a half year’s depreciation in the year of disposal. There is no distinction between real and personal property for applying the convention.
Declining-Balance, Half-Year CalculationThe calculation for this method is the same as for methods DB and DC except for the averaging convention applied to the acquisition and disposal years.
Declining-Balance, Half-Year ExampleUsing the same asset example for this method as for methods DB and DC, the first year declining-balance, half-year deduction would be $600, as calculated below:
Under the half-year convention, this calculation is used regardless of the month in which the asset was placed in service within that year.
Declining-Balance, Half-Year Short-Year CalculationThe short-year calculation for this method is the same as for methods DB and DC except that the half-rate rule applies. The depreciation is calculated as if the asset were placed in service or disposed of during the middle of the short tax year. For example, if an asset were placed in service during a short tax year of 3 months, the annual depreciation would be one-half of the 3-month depreciation deduction.
Declining-Balance, Modified Half-Year (Methods DD and DE)
These methods are like the declining-balance depreciation methods DB and DC in every way except that they use a different averaging convention.
Declining-Balance, Modified Half-Year ConventionUnder the modified half-year convention, assets that are placed in service during the first half of the year are considered to be placed in service on the first day of the year. Therefore, they receive a full year’s depreciation in the
$4 800, .25 12--- $600=
Depreciation Methods / B-41
acquisition year. Assets that are placed in service during the second half of the year are considered to be placed in service on the first day of the following year. Therefore, they receive no depreciation in the acquisition year but receive a full year’s depreciation in the subsequent year.
Applying the modified half-year convention in the disposal year is more complicated. For details, see the description of this averaging convention in “Modified Half-Year Convention,” page A-16.
Declining-Balance, Modified Half-Year CalculationThe calculation for this method is the same as for methods DB and DC except for the averaging convention applied to the acquisition and disposal years.
Declining-Balance, Modified Half-Year ExampleA company places a supply cabinet with a 5-year life in service in June 2004. The asset, which was purchased for $10,000, is sold in February 2008. The schedule of allowable depreciation for internal books under the declining-balance method DE, modified half-year method with a 200% rate (without switching to straight-line) is shown below.
In this example, the asset was placed in service in June, the first half of the year. Therefore, a full year of depreciation is allowed in the acquisition year. Had the asset been sold in the second half of the year, a half year’s depreciation (rather than none) would have been allowed in the disposal year.
Declining-Balance, Modified Half-Year Short-Year CalculationFor a declining-balance short-year calculation where the modified half-year convention is used, the amount of depreciation allowed in the short year is the normal full year’s allowance prorated over the number of months the asset was
YearDepreciation
Allowance Calculation
2004 $4,000.00 [$10,000 x (200% / 5 years)] x 100%
2005 2,400.00 ($10,000 - 4,000) x (200% / 5 years)
2006 1,440.00 ($10,000 - 4,000 - 2,400) x (200% / 5 years)
2007 864.00 ($10,000 - 4,000 - 2,400 - 1,440) x (200% / 5 years)
2008 0.00 No depreciation allowed
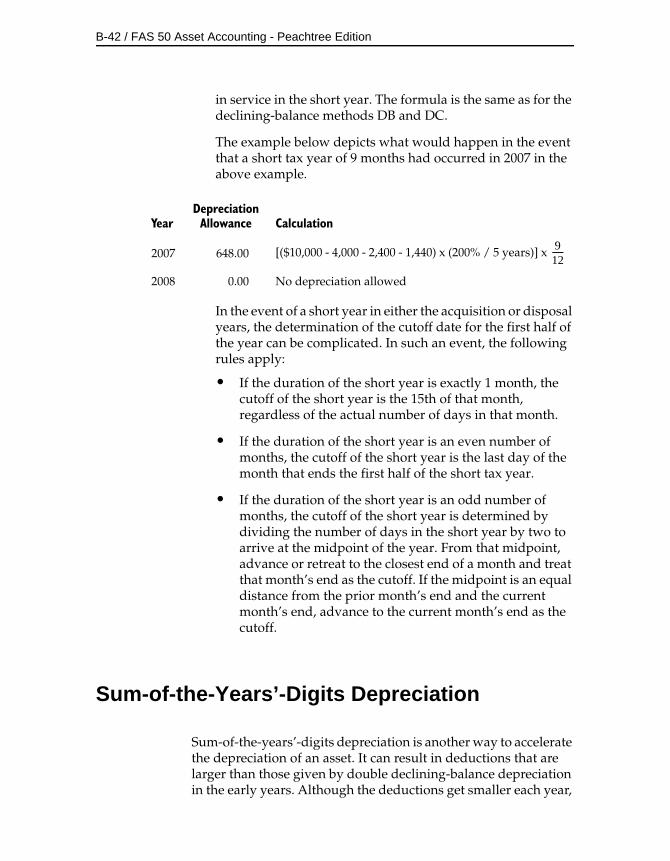
B-42 / FAS 50 Asset Accounting - Peachtree Edition
in service in the short year. The formula is the same as for the declining-balance methods DB and DC.
The example below depicts what would happen in the event that a short tax year of 9 months had occurred in 2007 in the above example.
In the event of a short year in either the acquisition or disposal years, the determination of the cutoff date for the first half of the year can be complicated. In such an event, the following rules apply:
• If the duration of the short year is exactly 1 month, the cutoff of the short year is the 15th of that month, regardless of the actual number of days in that month.
• If the duration of the short year is an even number of months, the cutoff of the short year is the last day of the month that ends the first half of the short tax year.
• If the duration of the short year is an odd number of months, the cutoff of the short year is determined by dividing the number of days in the short year by two to arrive at the midpoint of the year. From that midpoint, advance or retreat to the closest end of a month and treat that month’s end as the cutoff. If the midpoint is an equal distance from the prior month’s end and the current month’s end, advance to the current month’s end as the cutoff.
Sum-of-the-Years’-Digits Depreciation
Sum-of-the-years’-digits depreciation is another way to accelerate the depreciation of an asset. It can result in deductions that are larger than those given by double declining-balance depreciation in the early years. Although the deductions get smaller each year,
YearDepreciation
Allowance Calculation
2007 648.00 [($10,000 - 4,000 - 2,400 - 1,440) x (200% / 5 years)] x
2008 0.00 No depreciation allowed
912------
Depreciation Methods / B-43
all of the asset’s depreciable basis is written off over the property’s useful life. It applies only to tangible assets with a useful life equal to or greater than 3 years.
For the Tax book, sum-of-the-years’-digits depreciation is normally used only for assets in service before 1981.
The application provides three standard sum-of-the-years’-digits depreciation methods, each using a different averaging convention: sum-of-the-years’-digits (midmonth), half-year, and modified half-year.
Sum-of-the-Years’-Digits (Method YS)
Sum-of-the-Years’-Digits ConventionThe sum-of-the-years’-digits depreciation method applies a midmonth convention, giving a full month’s depreciation in the acquisition month if the asset is purchased on or before the 15th of the month. No depreciation is allowed if the asset is acquired after the 15th. In the disposal month, no depreciation is allowed if the asset is disposed of before the 16th; a full month’s depreciation is allowed if the asset is disposed of after the 15th.
Sum-of-the-Years’-Digits CalculationThe sum-of-the-years’-digits depreciation method bases its depreciation computations on a decreasing fraction of the depreciable basis (acquired value less the salvage value and any bonus depreciation). The numerator of the fraction changes each year. For any one year, the numerator represents the remaining estimated life of the asset. The denominator, which represents (but does not equal) the entire estimated life, does not change.
Here are two ways to calculate the denominator. One way is to add the digits for each year in the estimated life; that is, add 1 for the first year, 2 for the second year, and so on through the final year. For example, the sum of the years’ digits for an asset with an estimated life of 5 years is:
Another, faster way to calculate the sum, when the life is expressed in whole years only, is to multiply the estimated life
1 2 3 4 5 15=+ + + +
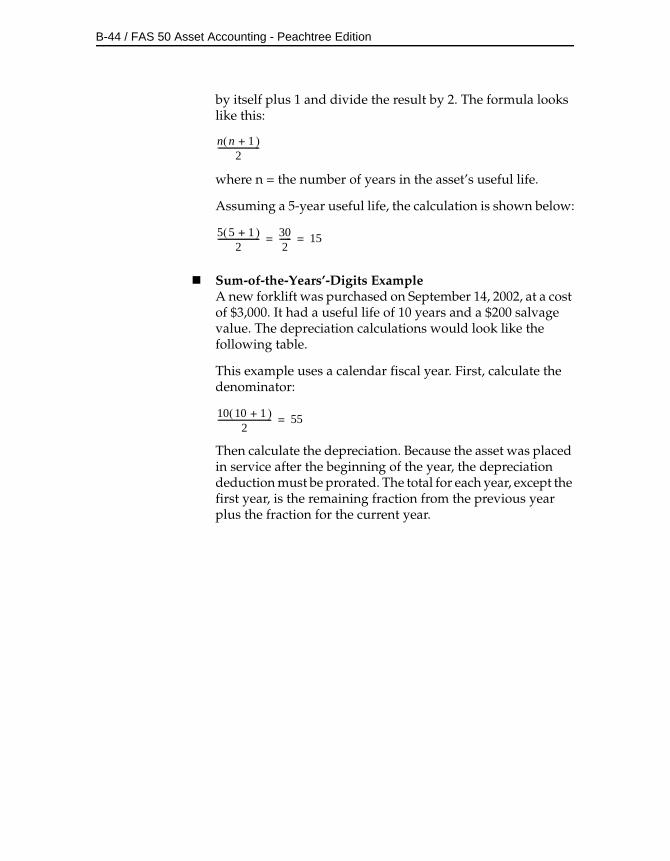
B-44 / FAS 50 Asset Accounting - Peachtree Edition
by itself plus 1 and divide the result by 2. The formula looks like this:
where n = the number of years in the asset’s useful life.
Assuming a 5-year useful life, the calculation is shown below:
Sum-of-the-Years’-Digits ExampleA new forklift was purchased on September 14, 2002, at a cost of $3,000. It had a useful life of 10 years and a $200 salvage value. The depreciation calculations would look like the following table.
This example uses a calendar fiscal year. First, calculate the denominator:
Then calculate the depreciation. Because the asset was placed in service after the beginning of the year, the depreciation deduction must be prorated. The total for each year, except the first year, is the remaining fraction from the previous year plus the fraction for the current year.
n n 1 +2
---------------------
5 5 1 +2
--------------------- 302------ 15= =
10 10 1 +2
--------------------------- 55=
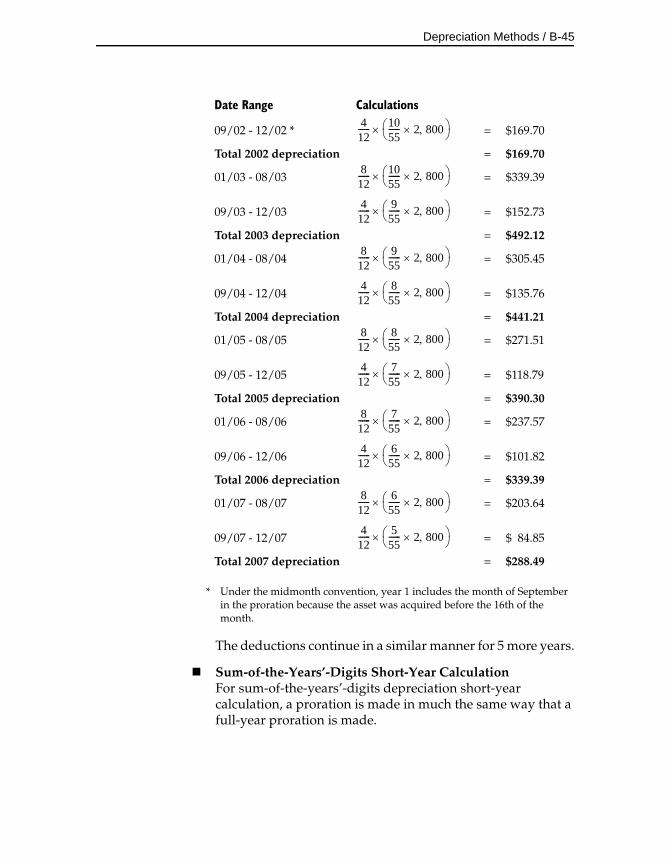
Depreciation Methods / B-45
* Under the midmonth convention, year 1 includes the month of September in the proration because the asset was acquired before the 16th of the month.
The deductions continue in a similar manner for 5 more years.
Sum-of-the-Years’-Digits Short-Year CalculationFor sum-of-the-years’-digits depreciation short-year calculation, a proration is made in much the same way that a full-year proration is made.
Date Range Calculations
09/02 - 12/02 * = $169.70
Total 2002 depreciation = $169.70
01/03 - 08/03 = $339.39
09/03 - 12/03 = $152.73
Total 2003 depreciation = $492.12
01/04 - 08/04 = $305.45
09/04 - 12/04 = $135.76
Total 2004 depreciation = $441.21
01/05 - 08/05 = $271.51
09/05 - 12/05 = $118.79
Total 2005 depreciation = $390.30
01/06 - 08/06 = $237.57
09/06 - 12/06 = $101.82
Total 2006 depreciation = $339.39
01/07 - 08/07 = $203.64
09/07 - 12/07 = $ 84.85
Total 2007 depreciation = $288.49
412------ 10
55------ 2 800
812------ 10
55------ 2 800
412------ 9
55------ 2 800
812------ 9
55------ 2 800
412------ 8
55------ 2 800
812------ 8
55------ 2 800
412------ 7
55------ 2 800
812------ 7
55------ 2 800
412------ 6
55------ 2 800
812------ 6
55------ 2 800
412------ 5
55------ 2 800
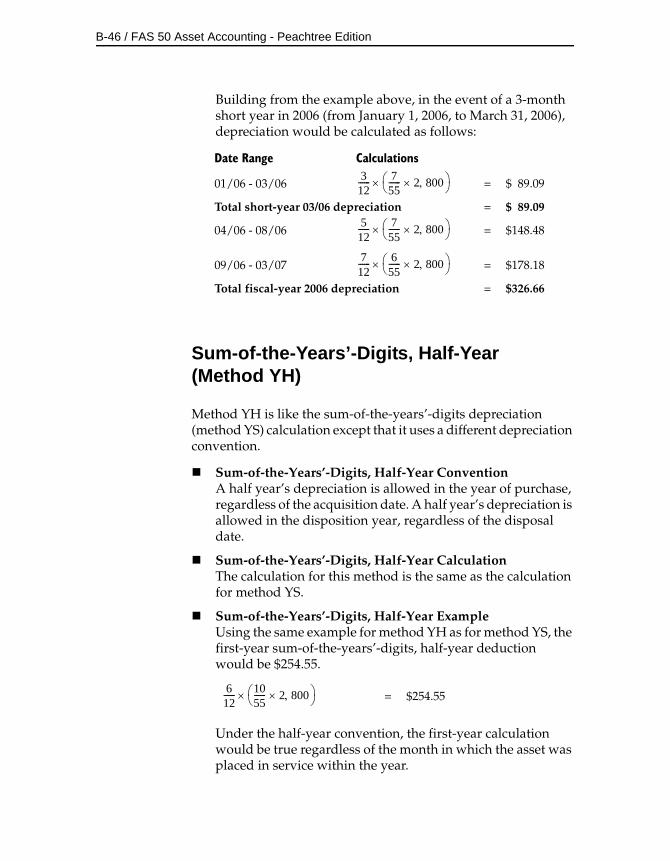
B-46 / FAS 50 Asset Accounting - Peachtree Edition
Building from the example above, in the event of a 3-month short year in 2006 (from January 1, 2006, to March 31, 2006), depreciation would be calculated as follows:
Sum-of-the-Years’-Digits, Half-Year (Method YH)
Method YH is like the sum-of-the-years’-digits depreciation (method YS) calculation except that it uses a different depreciation convention.
Sum-of-the-Years’-Digits, Half-Year ConventionA half year’s depreciation is allowed in the year of purchase, regardless of the acquisition date. A half year’s depreciation is allowed in the disposition year, regardless of the disposal date.
Sum-of-the-Years’-Digits, Half-Year CalculationThe calculation for this method is the same as the calculation for method YS.
Sum-of-the-Years’-Digits, Half-Year ExampleUsing the same example for method YH as for method YS, the first-year sum-of-the-years’-digits, half-year deduction would be $254.55.
Under the half-year convention, the first-year calculation would be true regardless of the month in which the asset was placed in service within the year.
Date Range Calculations
01/06 - 03/06 = $ 89.09
Total short-year 03/06 depreciation = $ 89.09
04/06 - 08/06 = $148.48
09/06 - 03/07 = $178.18
Total fiscal-year 2006 depreciation = $326.66
= $254.55
312------ 7
55------ 2 800
512------ 7
55------ 2 800
712------ 6
55------ 2 800
612------ 10
55------ 2 800
Depreciation Methods / B-47
The second-year calculations would then be computed as follows:
Sum-of-the-Years’-Digits, Half-Year Short-Year CalculationThe short-year calculation for method YH is the same as the short-year calculation for method YS, except when the short year is the acquisition or disposal year. If the short year is the acquisition or disposal year, the half-rate rule applies: only one-half of the depreciation calculated for the full short-year period may be taken.
Sum-of-the-Years’-Digits, Modified Half-Year (Method YD)
Method YD is like the sum-of-the-years’-digits depreciation (method YS) calculation except that it uses the modified half-year averaging convention.
Sum-of-the-Years’-Digits, Modified Half-Year ConventionUnder the modified half-year convention, assets that are placed in service during the first half of the year are considered placed in service on the first day of the year. Therefore, they receive a full year’s depreciation in the acquisition year. Assets that are placed in service during the second half of the year are considered placed in service on the first day of the following year. Therefore, they receive no depreciation in the acquisition year, but receive a full year’s depreciation in the subsequent year.
Applying the modified half-year convention in the disposal year is more complicated. For details, see “Modified Half-Year Convention,” page A-16.
Sum-of-the-Years’-Digits, Modified Half-Year CalculationThe calculation for method YD is the same as for method YS. When calculating depreciation under this method for vintage
= $254.55
= $229.09
Total year 2 depreciation = $483.64
612------ 10
55------ 2 800
612------ 9
55------ 2 800

B-48 / FAS 50 Asset Accounting - Peachtree Edition
account property (type V) only, there is no adjustment to the depreciable basis for salvage value. However, the asset may not be depreciated below its salvage value.
Sum-of-the-Years’-Digits, Modified Half-Year ExampleA single asset is placed in service in October 1998, and treated as vintage account property with a 10-year life. The asset, which was purchased for $10,000 and had a salvage value of $250, was sold in July 2007. The schedule of allowable depreciation under the sum-of-the-years’-digits, modified half-year method is shown below. Notice that, because the asset is vintage account property, the salvage value is not subtracted from the acquired value in determining the depreciable basis.
* Because total depreciation is limited to $9,750 ($10,000 minus the salvage value of $250), 2007 depreciation is limited to $295.45.
Sum-of-the-Years’-Digits, Modified Half-Year Short-Year CalculationFor a short-year calculation where the sum-of-the-years’-digits modified half-year convention is used, a proration is made in much the same way that a full-year proration is made. The following example shows what would have happened if a short tax year of 9 months had occurred in 2006.
YearDepreciation
Allowance Calculation
1998 $ 0.00 (Purchased after the midpoint of the year)
1999 1,818.18 10/55 x 10,000
2000 1,636.36 9/55 x 10,000
2001 1,454.55 8/55 x 10,000
2002 1,272.73 7/55 x 10,000
2003 1,090.91 6/55 x 10,000
2004 909.09 5/55 x 10,000
2005 727.27 4/55 x 10,000
2006 545.45 3/55 x 10,000
2007 295.45 2/55 x 10,000 x 100% *
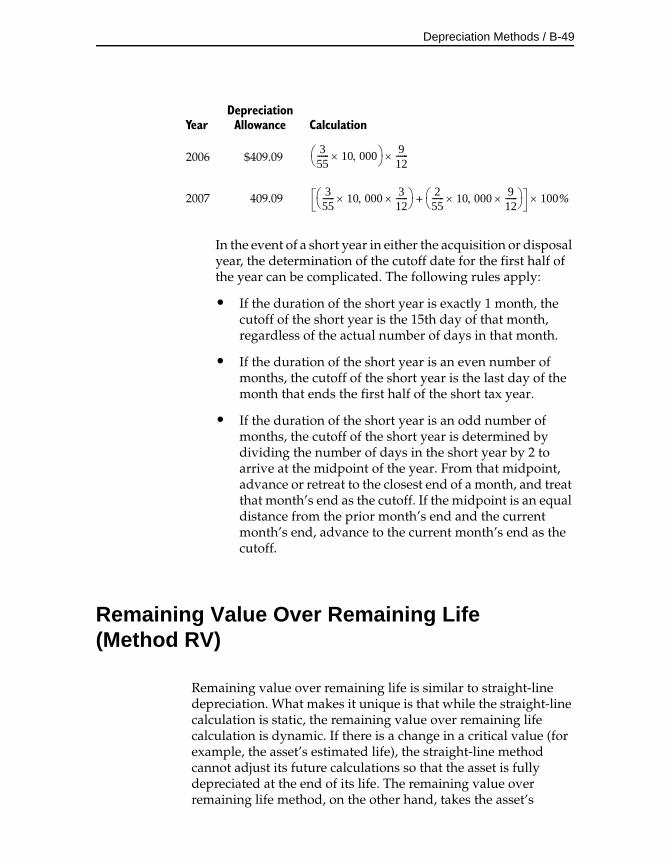
Depreciation Methods / B-49
In the event of a short year in either the acquisition or disposal year, the determination of the cutoff date for the first half of the year can be complicated. The following rules apply:
• If the duration of the short year is exactly 1 month, the cutoff of the short year is the 15th day of that month, regardless of the actual number of days in that month.
• If the duration of the short year is an even number of months, the cutoff of the short year is the last day of the month that ends the first half of the short tax year.
• If the duration of the short year is an odd number of months, the cutoff of the short year is determined by dividing the number of days in the short year by 2 to arrive at the midpoint of the year. From that midpoint, advance or retreat to the closest end of a month, and treat that month’s end as the cutoff. If the midpoint is an equal distance from the prior month’s end and the current month’s end, advance to the current month’s end as the cutoff.
Remaining Value Over Remaining Life (Method RV)
Remaining value over remaining life is similar to straight-line depreciation. What makes it unique is that while the straight-line calculation is static, the remaining value over remaining life calculation is dynamic. If there is a change in a critical value (for example, the asset’s estimated life), the straight-line method cannot adjust its future calculations so that the asset is fully depreciated at the end of its life. The remaining value over remaining life method, on the other hand, takes the asset’s
YearDepreciation
Allowance Calculation
2006 $409.09
2007 409.09
355------ 10 000 9
12------
355------ 10 000 3
12------
255------ 10 000 9
12------
+ 100%
B-50 / FAS 50 Asset Accounting - Peachtree Edition
remaining depreciable basis and depreciates that amount evenly over the asset’s remaining estimated life.
Converting to remaining value over remaining life is generally the best way to take an adjustment evenly over the rest of an asset’s life. It is the suggested approach to handling a change in an accounting estimate under the Accounting Principles Board (APB) Opinion Number 20.
You can convert from any other depreciation method to the remaining value over remaining life method. To do this, follow these steps:
1. Calculate depreciation through the date that the conversion to remaining value over remaining life is to be effective.
2. Change the depreciation method field selection to RV. The application displays a confirmation message.
3. Click the Yes button to confirm that you want the application to reset depreciation. The application displays a message asking if you want to update the beginning depreciation fields with the current depreciation amounts, or clear the beginning and current depreciation.
If you click the Yes button, the application saves the current depreciation information as beginning depreciation. If you click the No button, the application resets depreciation to zero.
If you change to remaining life in the Tax book, carefully consider the implications of replacing the information in the other books with new defaults before you respond to the prompt concerning changes to the Tax book. Generally, you should respond No.
If the remaining value over remaining life method is chosen for an asset in the year the asset was placed in service, and if the asset was placed in service on or before the 15th of the month, the depreciation calculated is identical to that calculated using the straight-line method.
Remaining Value Over Remaining Life ConventionThe remaining value over remaining life method uses a full-month convention in calculating depreciation allowances. The full-month convention allows an asset a full
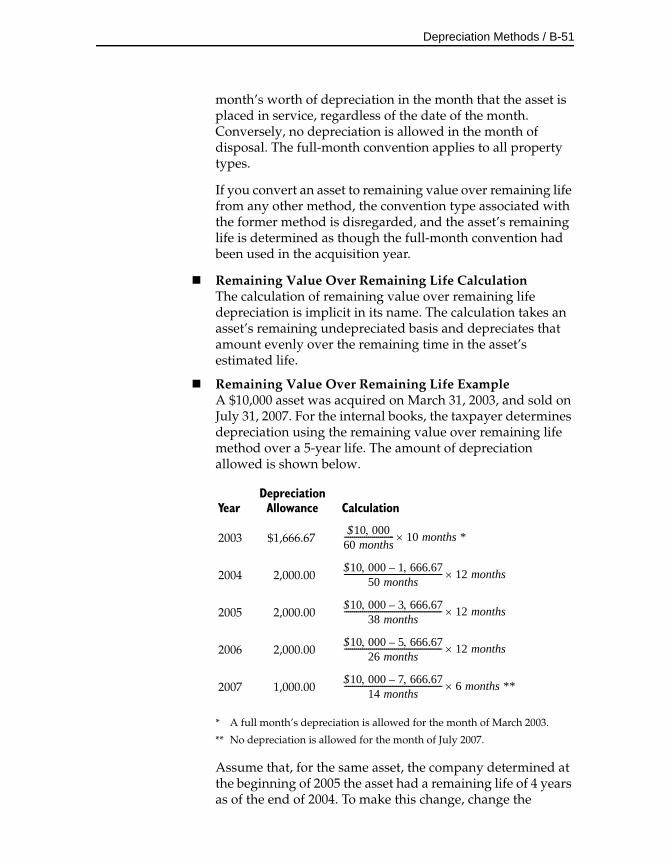
Depreciation Methods / B-51
month’s worth of depreciation in the month that the asset is placed in service, regardless of the date of the month. Conversely, no depreciation is allowed in the month of disposal. The full-month convention applies to all property types.
If you convert an asset to remaining value over remaining life from any other method, the convention type associated with the former method is disregarded, and the asset’s remaining life is determined as though the full-month convention had been used in the acquisition year.
Remaining Value Over Remaining Life CalculationThe calculation of remaining value over remaining life depreciation is implicit in its name. The calculation takes an asset’s remaining undepreciated basis and depreciates that amount evenly over the remaining time in the asset’s estimated life.
Remaining Value Over Remaining Life ExampleA $10,000 asset was acquired on March 31, 2003, and sold on July 31, 2007. For the internal books, the taxpayer determines depreciation using the remaining value over remaining life method over a 5-year life. The amount of depreciation allowed is shown below.
* A full month’s depreciation is allowed for the month of March 2003.
** No depreciation is allowed for the month of July 2007.
Assume that, for the same asset, the company determined at the beginning of 2005 the asset had a remaining life of 4 years as of the end of 2004. To make this change, change the
YearDepreciation
Allowance Calculation
2003 $1,666.67
2004 2,000.00
2005 2,000.00
2006 2,000.00
2007 1,000.00
$10 00060 months------------------------- 10 months *
$10 000 1 666.67–50 months
------------------------------------------------- 12 months
$10 000 3 666.67–38 months
------------------------------------------------- 12 months
$10 000 5 666.67–26 months
------------------------------------------------- 12 months
$10 000 7 666.67–14 months
------------------------------------------------- 6 months **
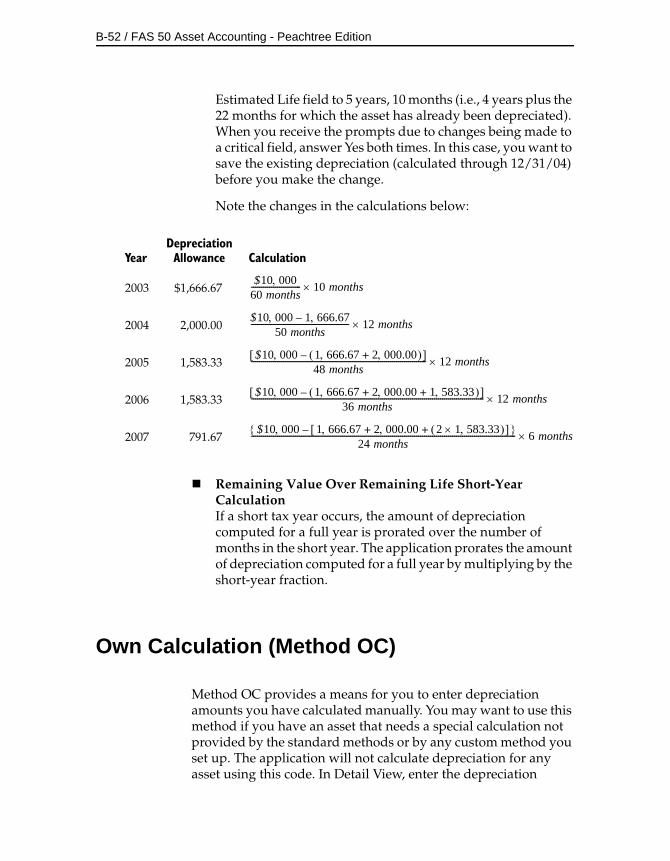
B-52 / FAS 50 Asset Accounting - Peachtree Edition
Estimated Life field to 5 years, 10 months (i.e., 4 years plus the 22 months for which the asset has already been depreciated). When you receive the prompts due to changes being made to a critical field, answer Yes both times. In this case, you want to save the existing depreciation (calculated through 12/31/04) before you make the change.
Note the changes in the calculations below:
Remaining Value Over Remaining Life Short-Year CalculationIf a short tax year occurs, the amount of depreciation computed for a full year is prorated over the number of months in the short year. The application prorates the amount of depreciation computed for a full year by multiplying by the short-year fraction.
Own Calculation (Method OC)
Method OC provides a means for you to enter depreciation amounts you have calculated manually. You may want to use this method if you have an asset that needs a special calculation not provided by the standard methods or by any custom method you set up. The application will not calculate depreciation for any asset using this code. In Detail View, enter the depreciation
YearDepreciation
Allowance Calculation
2003 $1,666.67
2004 2,000.00
2005 1,583.33
2006 1,583.33
2007 791.67
$10 00060 months------------------------- 10 months
$10 000 1 666.67–50 months
------------------------------------------------- 12 months
$10 000 1 666.67 2 000.00+ – 48 months
---------------------------------------------------------------------------------------- 12 months
$10 000 1 666.67 2 000.00 1 583.33+ + – 36 months
--------------------------------------------------------------------------------------------------------------------- 12 months
$10 000 1 666.67 2 000.00 2 1 583.33 + + – 24 months
------------------------------------------------------------------------------------------------------------------------------------- 6 months
Depreciation Methods / B-53
amounts in the beginning depreciation fields. They will appear in applicable reports as current depreciation.
The application cannot check whether any amounts you enter using this code are correct. As the asset depreciates, you must update the depreciation amounts yourself by entering new figures in the beginning depreciation fields.
No Depreciation (Method NO)
If you select method NO, the application will not calculate depreciation for the asset. Method NO applies to all non-depreciable assets, including non-depreciable land. You can enter any other general asset information you want. Assets using method NO will appear in the Depreciation Expense report but depreciation amounts will be zero.
Custom Depreciation Methods
You can set up custom depreciation methods through the Customize option on the menu bar. See “Creating Custom Depreciation Methods,” page 8-30. The custom method codes must be two characters and can include any number or lowercase letter. The Custom Depreciation Methods feature lets you create depreciation method calculations that the application does not provide.
Custom Depreciation Method Conventions
When you set up the custom depreciation method, you can choose the disposal year averaging convention. You can choose full month, midmonth, half-year (ACRS, or MACRS and pre-ACRS), or modified half-year. To learn about the conventions, see “Averaging Conventions,” page A-15.
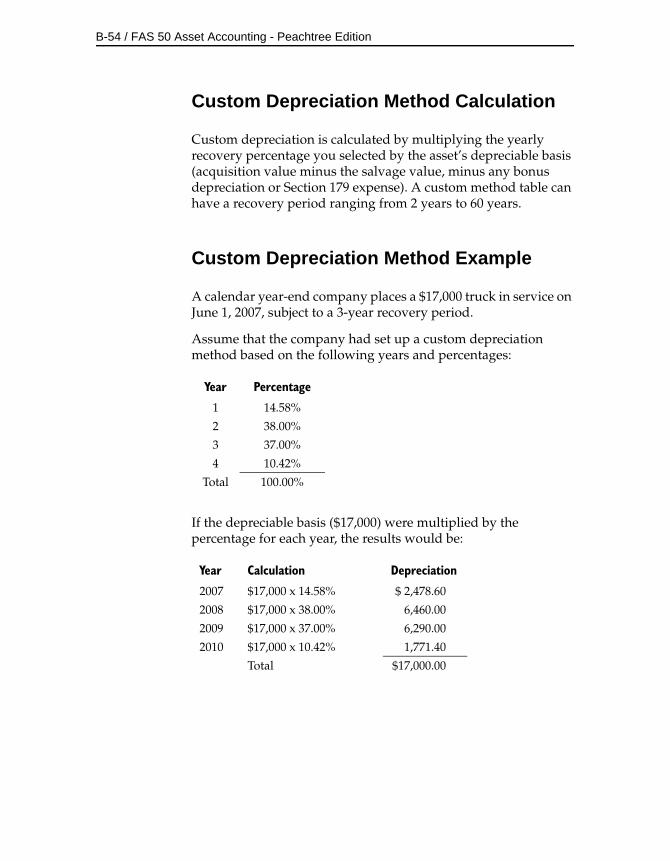
B-54 / FAS 50 Asset Accounting - Peachtree Edition
Custom Depreciation Method Calculation
Custom depreciation is calculated by multiplying the yearly recovery percentage you selected by the asset’s depreciable basis (acquisition value minus the salvage value, minus any bonus depreciation or Section 179 expense). A custom method table can have a recovery period ranging from 2 years to 60 years.
Custom Depreciation Method Example
A calendar year-end company places a $17,000 truck in service on June 1, 2007, subject to a 3-year recovery period.
Assume that the company had set up a custom depreciation method based on the following years and percentages:
If the depreciable basis ($17,000) were multiplied by the percentage for each year, the results would be:
Year Percentage
1 14.58%
2 38.00%
3 37.00%
4 10.42%
Total 100.00%
Year Calculation Depreciation
2007 $17,000 x 14.58% $ 2,478.60
2008 $17,000 x 38.00% 6,460.00
2009 $17,000 x 37.00% 6,290.00
2010 $17,000 x 10.42% 1,771.40
Total $17,000.00
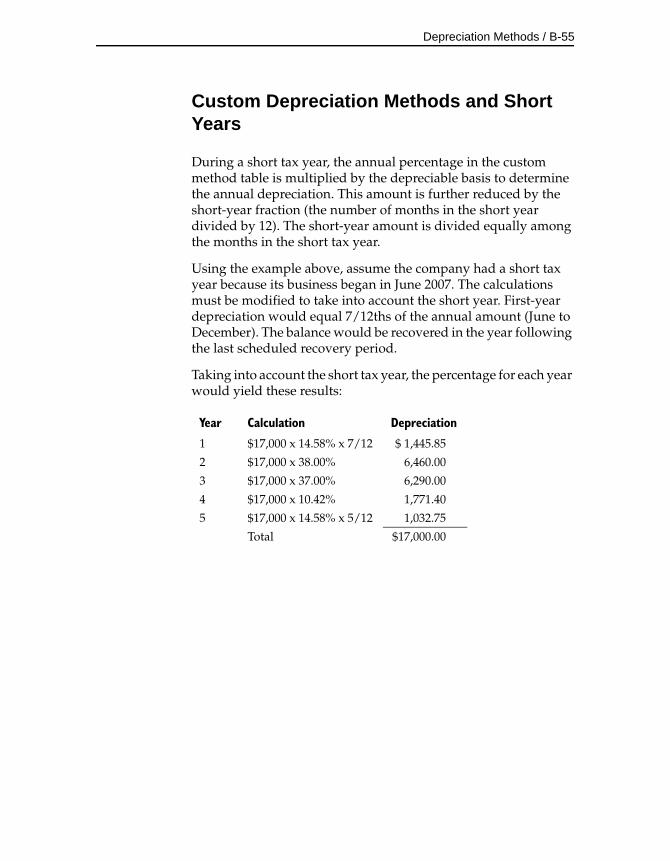
Depreciation Methods / B-55
Custom Depreciation Methods and Short Years
During a short tax year, the annual percentage in the custom method table is multiplied by the depreciable basis to determine the annual depreciation. This amount is further reduced by the short-year fraction (the number of months in the short year divided by 12). The short-year amount is divided equally among the months in the short tax year.
Using the example above, assume the company had a short tax year because its business began in June 2007. The calculations must be modified to take into account the short year. First-year depreciation would equal 7/12ths of the annual amount (June to December). The balance would be recovered in the year following the last scheduled recovery period.
Taking into account the short tax year, the percentage for each year would yield these results:
Year Calculation Depreciation
1 $17,000 x 14.58% x 7/12 $ 1,445.85
2 $17,000 x 38.00% 6,460.00
3 $17,000 x 37.00% 6,290.00
4 $17,000 x 10.42% 1,771.40
5 $17,000 x 14.58% x 5/12 1,032.75
Total $17,000.00

B-56 / FAS 50 Asset Accounting - Peachtree Edition
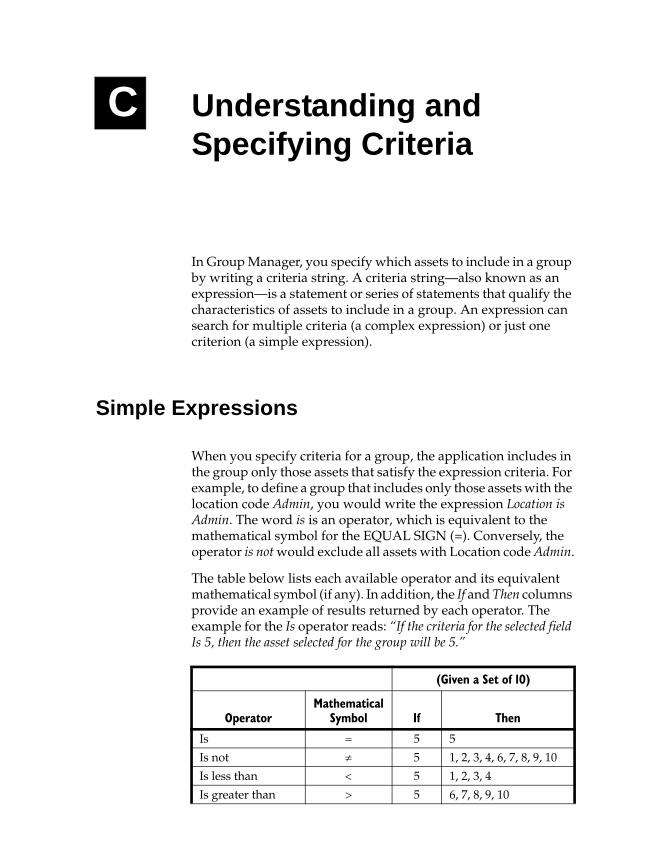
C Understanding and Specifying Criteria
In Group Manager, you specify which assets to include in a group by writing a criteria string. A criteria string—also known as an expression—is a statement or series of statements that qualify the characteristics of assets to include in a group. An expression can search for multiple criteria (a complex expression) or just one criterion (a simple expression).
Simple Expressions
When you specify criteria for a group, the application includes in the group only those assets that satisfy the expression criteria. For example, to define a group that includes only those assets with the location code Admin, you would write the expression Location is Admin. The word is is an operator, which is equivalent to the mathematical symbol for the EQUAL SIGN (=). Conversely, the operator is not would exclude all assets with Location code Admin.
The table below lists each available operator and its equivalent mathematical symbol (if any). In addition, the If and Then columns provide an example of results returned by each operator. The example for the Is operator reads: “If the criteria for the selected field Is 5, then the asset selected for the group will be 5.”
(Given a Set of 10)
OperatorMathematical
Symbol If Then
Is 5 5
Is not 5 1, 2, 3, 4, 6, 7, 8, 9, 10
Is less than 5 1, 2, 3, 4
Is greater than 5 6, 7, 8, 9, 10
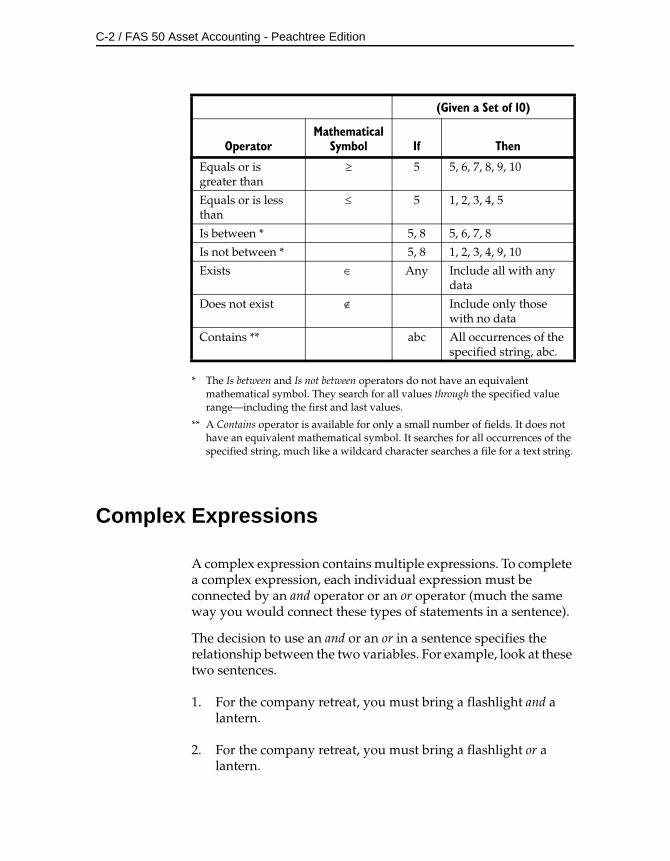
C-2 / FAS 50 Asset Accounting - Peachtree Edition
* The Is between and Is not between operators do not have an equivalent mathematical symbol. They search for all values through the specified value range—including the first and last values.
** A Contains operator is available for only a small number of fields. It does not have an equivalent mathematical symbol. It searches for all occurrences of the specified string, much like a wildcard character searches a file for a text string.
Complex Expressions
A complex expression contains multiple expressions. To complete a complex expression, each individual expression must be connected by an and operator or an or operator (much the same way you would connect these types of statements in a sentence).
The decision to use an and or an or in a sentence specifies the relationship between the two variables. For example, look at these two sentences.
1. For the company retreat, you must bring a flashlight and a lantern.
2. For the company retreat, you must bring a flashlight or a lantern.
Equals or is greater than
5 5, 6, 7, 8, 9, 10
Equals or is less than
5 1, 2, 3, 4, 5
Is between * 5, 8 5, 6, 7, 8
Is not between * 5, 8 1, 2, 3, 4, 9, 10
Exists Any Include all with any data
Does not exist Include only those with no data
Contains ** abc All occurrences of the specified string, abc.
(Given a Set of 10)
OperatorMathematical
Symbol If Then
Understanding and Specifying Criteria / C-3
These statements written in the same format as an expression specifying a group would read:
We separated the individuals attending the company retreat into two groups. Group One brought a flashlight and a lantern. Group Two brought a flashlight or a lantern.
This example illustrates how the use of the or statement tends to create a larger group.
The application applies the and and or statements automatically.
• An and operator connects multiple expressions specifying criteria for different fields.
• An or operator connects multiple expressions specifying criteria for the same field.
To illustrate this important point further, here is an example of each type.
An And Operator Connecting a Complex ExpressionA series of statements connected by the and operator indicates that the criteria of all statements must be satisfied. For example, to define a group that includes all assets whose Class is not CE and whose Tax Book Depreciation Method is MF, write this expression:
Class is not CE
Tax Book Depreciation Method is MF
The application automatically employs the and operator because these expressions do not specify criteria for the same field.
An Or Operator Connecting a Complex ExpressionA series of statements connected by the or operator indicates that the criteria of any one of the statements must be satisfied. For example, to define a group that includes all assets whose Tax Book Depreciation Method is either MF or MT, write this expression:
Tax Book Depreciation Method is MF
Tax Book Depreciation Method is MT
The application automatically employs the or operator because these expressions specify criteria for the same field.
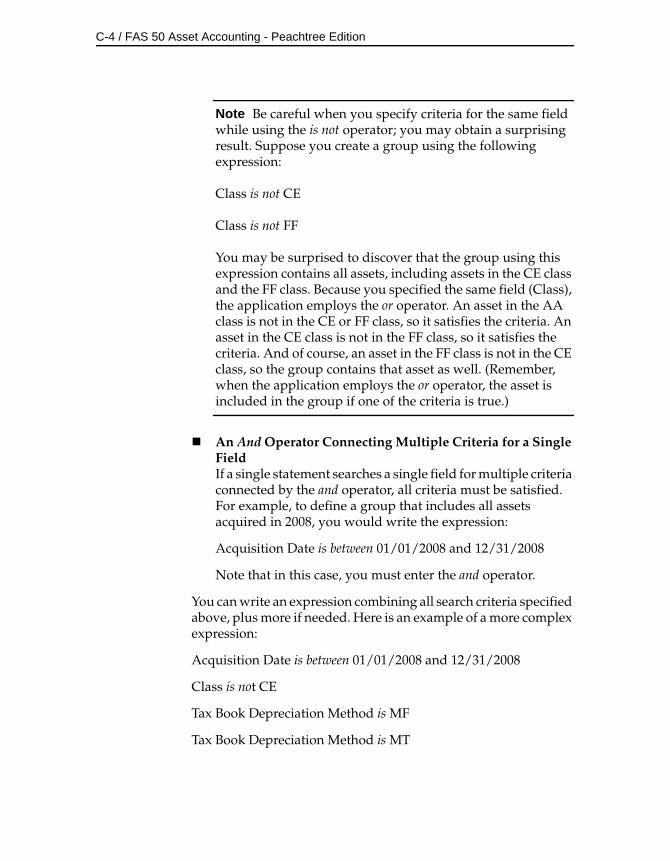
C-4 / FAS 50 Asset Accounting - Peachtree Edition
Note Be careful when you specify criteria for the same field while using the is not operator; you may obtain a surprising result. Suppose you create a group using the following expression:
Class is not CE
Class is not FF
You may be surprised to discover that the group using this expression contains all assets, including assets in the CE class and the FF class. Because you specified the same field (Class), the application employs the or operator. An asset in the AA class is not in the CE or FF class, so it satisfies the criteria. An asset in the CE class is not in the FF class, so it satisfies the criteria. And of course, an asset in the FF class is not in the CE class, so the group contains that asset as well. (Remember, when the application employs the or operator, the asset is included in the group if one of the criteria is true.)
An And Operator Connecting Multiple Criteria for a Single FieldIf a single statement searches a single field for multiple criteria connected by the and operator, all criteria must be satisfied. For example, to define a group that includes all assets acquired in 2008, you would write the expression:
Acquisition Date is between 01/01/2008 and 12/31/2008
Note that in this case, you must enter the and operator.
You can write an expression combining all search criteria specified above, plus more if needed. Here is an example of a more complex expression:
Acquisition Date is between 01/01/2008 and 12/31/2008
Class is not CE
Tax Book Depreciation Method is MF
Tax Book Depreciation Method is MT
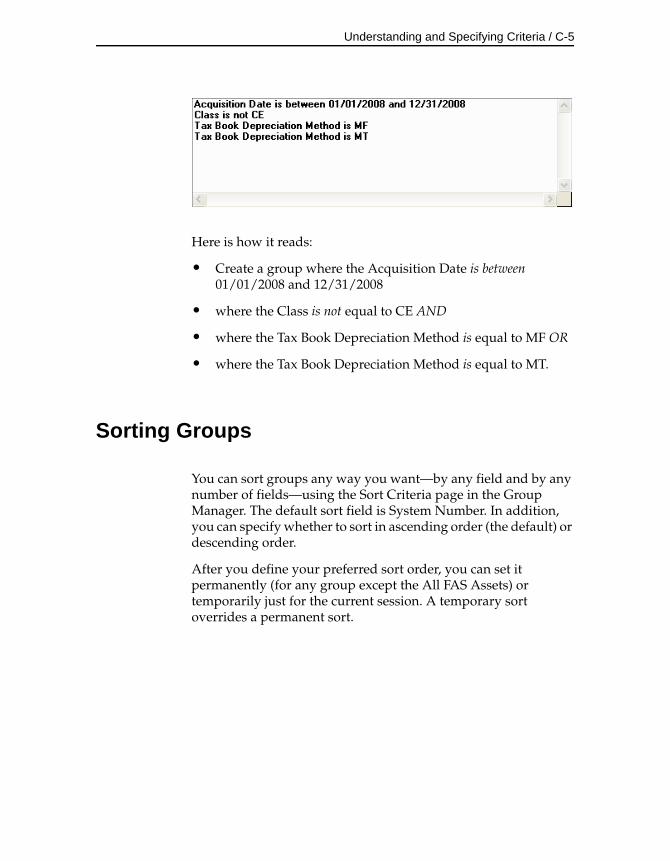
Understanding and Specifying Criteria / C-5
Here is how it reads:
• Create a group where the Acquisition Date is between 01/01/2008 and 12/31/2008
• where the Class is not equal to CE AND
• where the Tax Book Depreciation Method is equal to MF OR
• where the Tax Book Depreciation Method is equal to MT.
Sorting Groups
You can sort groups any way you want—by any field and by any number of fields—using the Sort Criteria page in the Group Manager. The default sort field is System Number. In addition, you can specify whether to sort in ascending order (the default) or descending order.
After you define your preferred sort order, you can set it permanently (for any group except the All FAS Assets) or temporarily just for the current session. A temporary sort overrides a permanent sort.

C-6 / FAS 50 Asset Accounting - Peachtree Edition
D Custom Export
The Custom Export uses a series of wizard screens called the Sage FAS Export Helper. The Export Helper guides you through the process of exporting asset data to an ASCII Comma Separated Value (CSV) file. A wide range of applications, including popular spreadsheet software, can read this file format.
Exporting Asset Data Using the Export Helper
The Export Helper is a series of wizard screens that assist you in exporting asset information from the application. The Export Helper guides you through the process of exporting asset data to an ASCII Comma Separated Value (CSV) file. In addition to creating the CSV file, you also create an export field map file during the export process. The field map file lists the names of the asset fields that you are exporting. You can reuse the field map in subsequent exports. By using an existing field map, you don’t have to select the fields you want to export each time you perform the export.
Navigating the Export Helper
The guidelines provided below explain the navigation buttons common to all Export Helper screens.
Help ButtonClick this button to access the online Help.
Cancel ButtonClick this button to cancel the current export and return you to the main screen.
Back ButtonClick this button to return to the previous Export Helper screen.
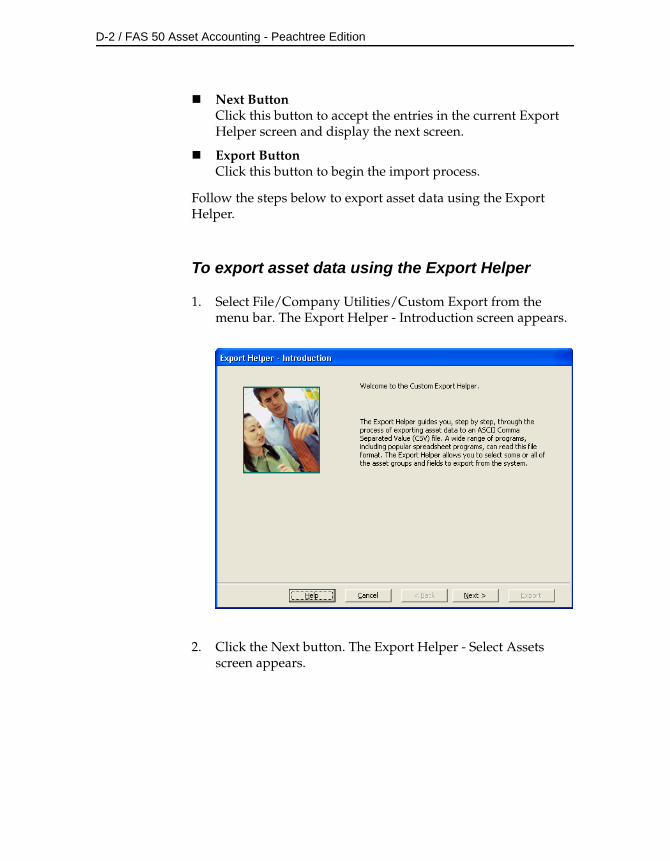
D-2 / FAS 50 Asset Accounting - Peachtree Edition
Next ButtonClick this button to accept the entries in the current Export Helper screen and display the next screen.
Export ButtonClick this button to begin the import process.
Follow the steps below to export asset data using the Export Helper.
To export asset data using the Export Helper
1. Select File/Company Utilities/Custom Export from the menu bar. The Export Helper - Introduction screen appears.
2. Click the Next button. The Export Helper - Select Assets screen appears.
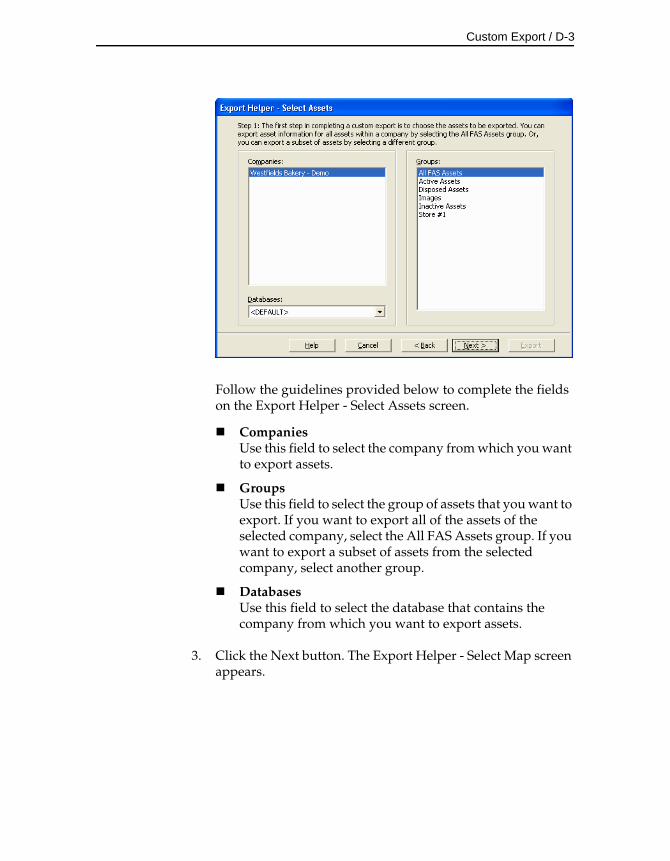
Custom Export / D-3
Follow the guidelines provided below to complete the fields on the Export Helper - Select Assets screen.
CompaniesUse this field to select the company from which you want to export assets.
GroupsUse this field to select the group of assets that you want to export. If you want to export all of the assets of the selected company, select the All FAS Assets group. If you want to export a subset of assets from the selected company, select another group.
DatabasesUse this field to select the database that contains the company from which you want to export assets.
3. Click the Next button. The Export Helper - Select Map screen appears.
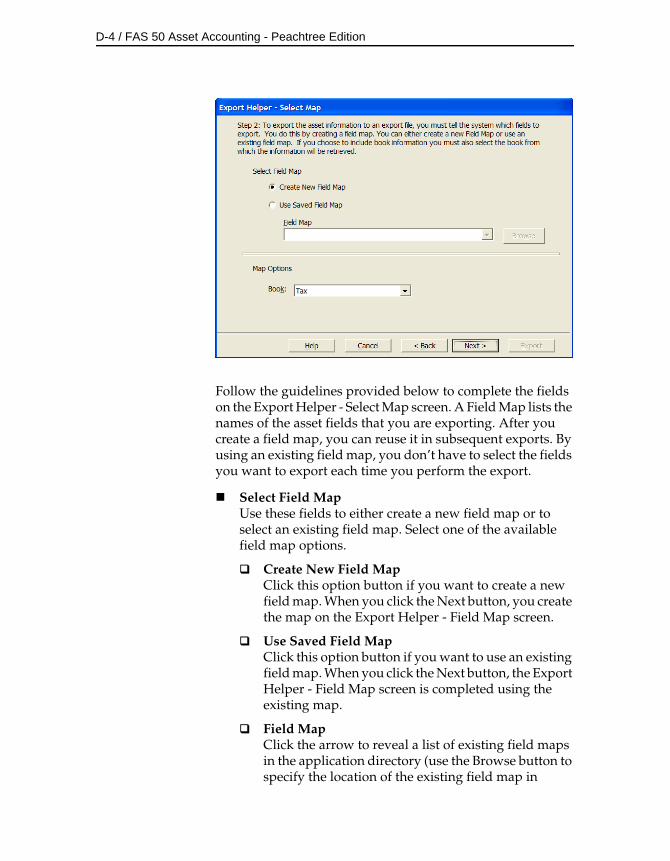
D-4 / FAS 50 Asset Accounting - Peachtree Edition
Follow the guidelines provided below to complete the fields on the Export Helper - Select Map screen. A Field Map lists the names of the asset fields that you are exporting. After you create a field map, you can reuse it in subsequent exports. By using an existing field map, you don’t have to select the fields you want to export each time you perform the export.
Select Field MapUse these fields to either create a new field map or to select an existing field map. Select one of the available field map options.
Create New Field MapClick this option button if you want to create a new field map. When you click the Next button, you create the map on the Export Helper - Field Map screen.
Use Saved Field MapClick this option button if you want to use an existing field map. When you click the Next button, the Export Helper - Field Map screen is completed using the existing map.
Field MapClick the arrow to reveal a list of existing field maps in the application directory (use the Browse button to specify the location of the existing field map in
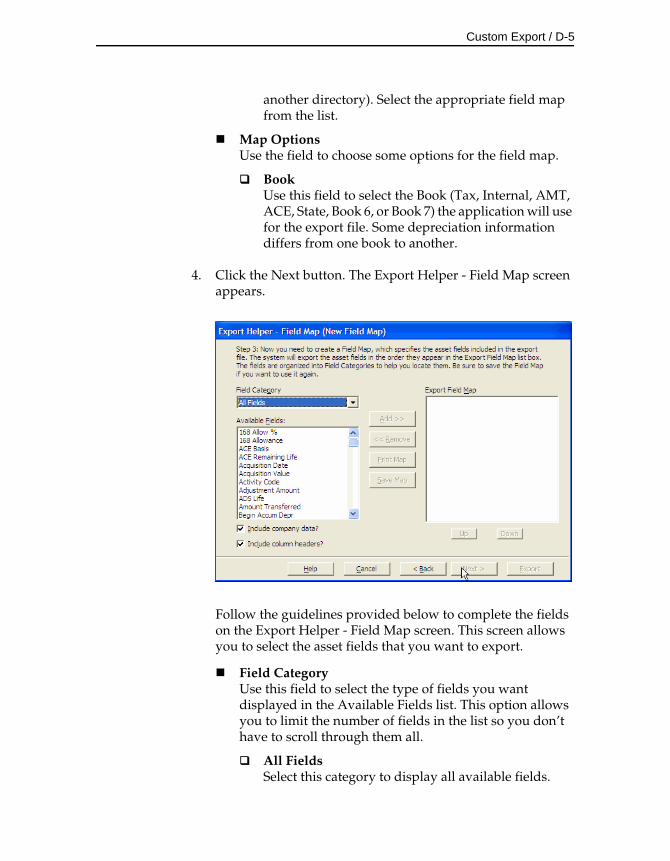
Custom Export / D-5
another directory). Select the appropriate field map from the list.
Map OptionsUse the field to choose some options for the field map.
BookUse this field to select the Book (Tax, Internal, AMT, ACE, State, Book 6, or Book 7) the application will use for the export file. Some depreciation information differs from one book to another.
4. Click the Next button. The Export Helper - Field Map screen appears.
Follow the guidelines provided below to complete the fields on the Export Helper - Field Map screen. This screen allows you to select the asset fields that you want to export.
Field CategoryUse this field to select the type of fields you want displayed in the Available Fields list. This option allows you to limit the number of fields in the list so you don’t have to scroll through them all.
All FieldsSelect this category to display all available fields.
D-6 / FAS 50 Asset Accounting - Peachtree Edition
General Info FieldsSelect this category to display only the fields that contain general information about an asset, such as its location, but do not affect the asset’s depreciation calculations.
Critical FieldsSelect this category to display only the fields that are critical to calculating depreciation.
Book Related FieldsSelect this category to display additional data entry fields that affect depreciation calculations (in addition to the fields in the Critical Fields category). Most of these fields can have different values in each book.
Depreciation FieldsSelect this category to display only the fields that contain depreciation amounts or information about those amounts (such as the dates for which depreciation was calculated).
Disposal FieldsSelect this category to display only fields that pertain to asset disposals.
Available FieldsUse this field to select the field(s) that you want to include in the field map. You can add a field to the field map by highlighting it and then clicking the Add button. The field appears in the Export Field Map list box.
Export Field MapThis list box displays a list of the fields you have added to the field map.
Add ButtonClick this button to add the selected field(s) to the field map file.
Remove ButtonClick this button to remove the selected fields from the field map file.
Print Map ButtonClick this button to send the map you have created to the default printer.
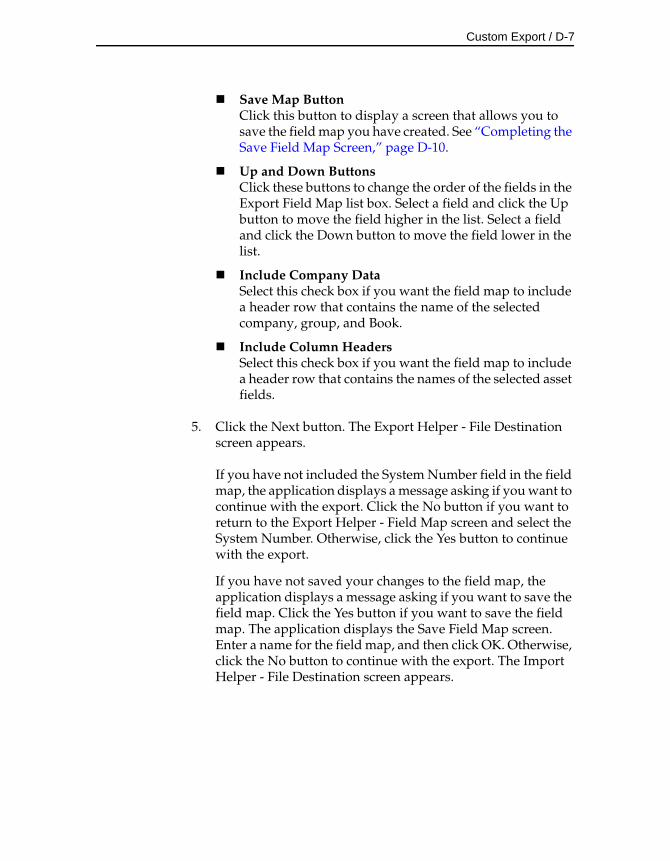
Custom Export / D-7
Save Map ButtonClick this button to display a screen that allows you to save the field map you have created. See “Completing the Save Field Map Screen,” page D-10.
Up and Down ButtonsClick these buttons to change the order of the fields in the Export Field Map list box. Select a field and click the Up button to move the field higher in the list. Select a field and click the Down button to move the field lower in the list.
Include Company DataSelect this check box if you want the field map to include a header row that contains the name of the selected company, group, and Book.
Include Column HeadersSelect this check box if you want the field map to include a header row that contains the names of the selected asset fields.
5. Click the Next button. The Export Helper - File Destination screen appears.
If you have not included the System Number field in the field map, the application displays a message asking if you want to continue with the export. Click the No button if you want to return to the Export Helper - Field Map screen and select the System Number. Otherwise, click the Yes button to continue with the export.
If you have not saved your changes to the field map, the application displays a message asking if you want to save the field map. Click the Yes button if you want to save the field map. The application displays the Save Field Map screen. Enter a name for the field map, and then click OK. Otherwise, click the No button to continue with the export. The Import Helper - File Destination screen appears.
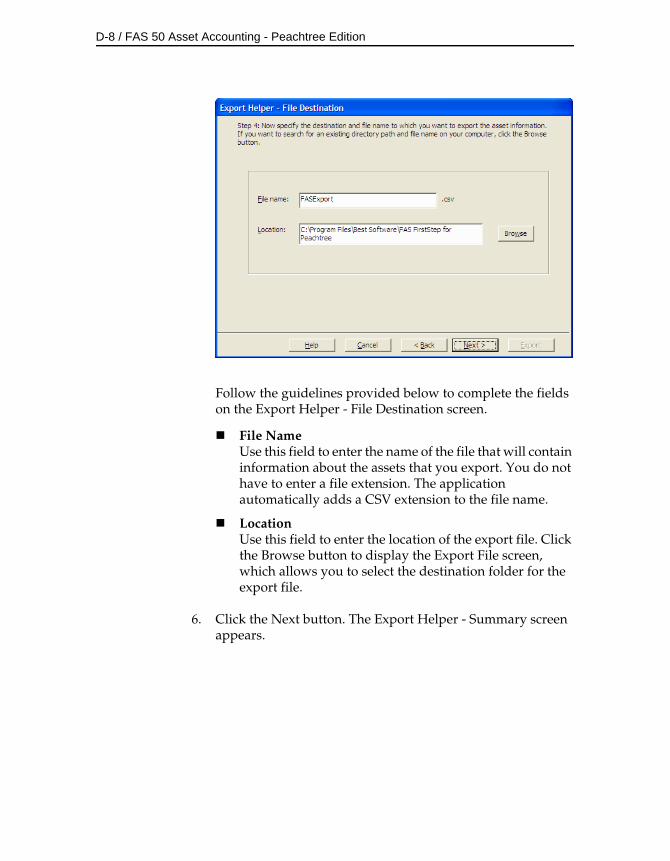
D-8 / FAS 50 Asset Accounting - Peachtree Edition
Follow the guidelines provided below to complete the fields on the Export Helper - File Destination screen.
File NameUse this field to enter the name of the file that will contain information about the assets that you export. You do not have to enter a file extension. The application automatically adds a CSV extension to the file name.
LocationUse this field to enter the location of the export file. Click the Browse button to display the Export File screen, which allows you to select the destination folder for the export file.
6. Click the Next button. The Export Helper - Summary screen appears.
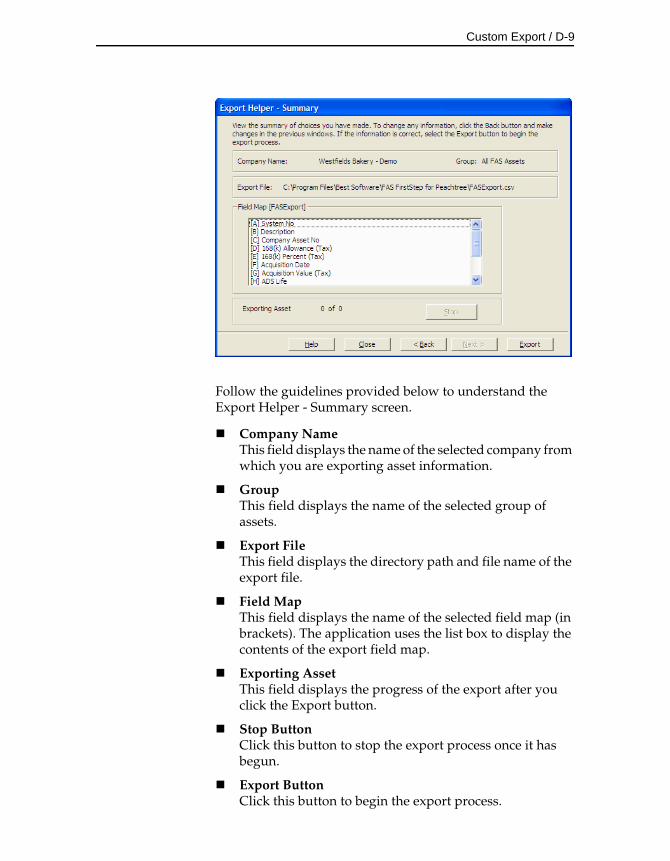
Custom Export / D-9
Follow the guidelines provided below to understand the Export Helper - Summary screen.
Company NameThis field displays the name of the selected company from which you are exporting asset information.
GroupThis field displays the name of the selected group of assets.
Export FileThis field displays the directory path and file name of the export file.
Field MapThis field displays the name of the selected field map (in brackets). The application uses the list box to display the contents of the export field map.
Exporting AssetThis field displays the progress of the export after you click the Export button.
Stop ButtonClick this button to stop the export process once it has begun.
Export ButtonClick this button to begin the export process.
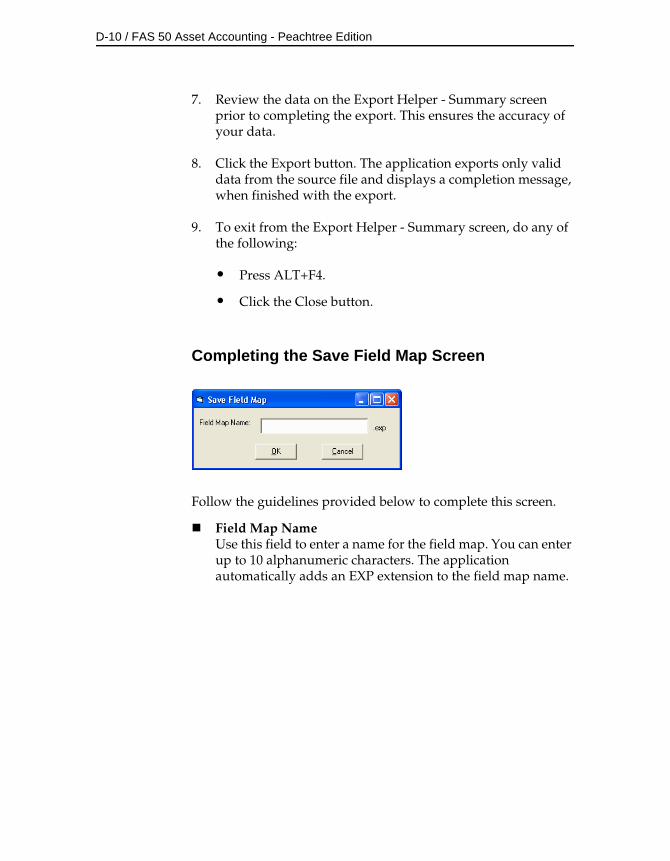
D-10 / FAS 50 Asset Accounting - Peachtree Edition
7. Review the data on the Export Helper - Summary screen prior to completing the export. This ensures the accuracy of your data.
8. Click the Export button. The application exports only valid data from the source file and displays a completion message, when finished with the export.
9. To exit from the Export Helper - Summary screen, do any of the following:
• Press ALT+F4.
• Click the Close button.
Completing the Save Field Map Screen
Follow the guidelines provided below to complete this screen.
Field Map NameUse this field to enter a name for the field map. You can enter up to 10 alphanumeric characters. The application automatically adds an EXP extension to the field map name.
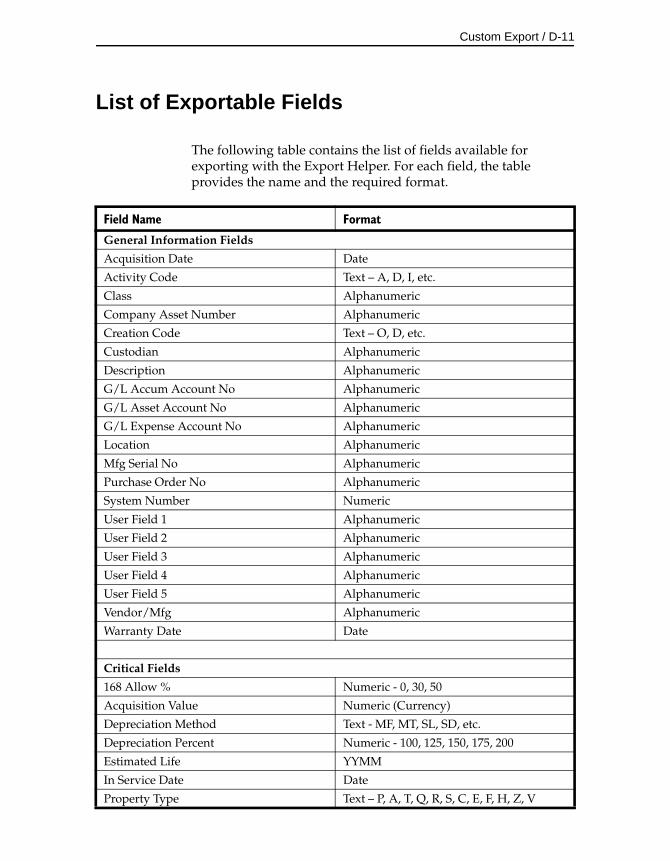
Custom Export / D-11
List of Exportable Fields
The following table contains the list of fields available for exporting with the Export Helper. For each field, the table provides the name and the required format.
Field Name Format
General Information Fields
Acquisition Date Date
Activity Code Text – A, D, I, etc.
Class Alphanumeric
Company Asset Number Alphanumeric
Creation Code Text – O, D, etc.
Custodian Alphanumeric
Description Alphanumeric
G/L Accum Account No Alphanumeric
G/L Asset Account No Alphanumeric
G/L Expense Account No Alphanumeric
Location Alphanumeric
Mfg Serial No Alphanumeric
Purchase Order No Alphanumeric
System Number Numeric
User Field 1 Alphanumeric
User Field 2 Alphanumeric
User Field 3 Alphanumeric
User Field 4 Alphanumeric
User Field 5 Alphanumeric
Vendor/Mfg Alphanumeric
Warranty Date Date
Critical Fields
168 Allow % Numeric - 0, 30, 50
Acquisition Value Numeric (Currency)
Depreciation Method Text - MF, MT, SL, SD, etc.
Depreciation Percent Numeric - 100, 125, 150, 175, 200
Estimated Life YYMM
In Service Date Date
Property Type Text – P, A, T, Q, R, S, C, E, F, H, Z, V
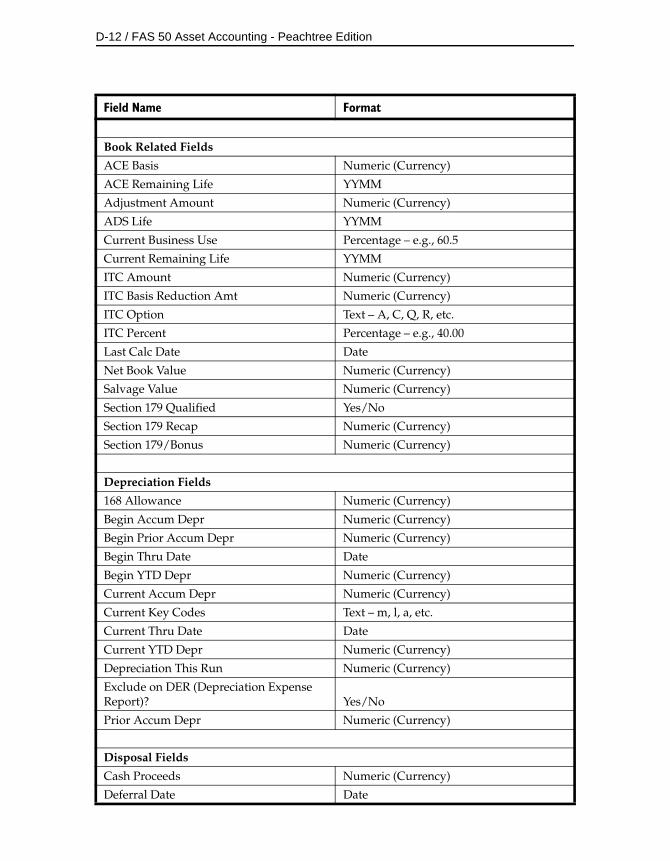
D-12 / FAS 50 Asset Accounting - Peachtree Edition
Book Related Fields
ACE Basis Numeric (Currency)
ACE Remaining Life YYMM
Adjustment Amount Numeric (Currency)
ADS Life YYMM
Current Business Use Percentage – e.g., 60.5
Current Remaining Life YYMM
ITC Amount Numeric (Currency)
ITC Basis Reduction Amt Numeric (Currency)
ITC Option Text – A, C, Q, R, etc.
ITC Percent Percentage – e.g., 40.00
Last Calc Date Date
Net Book Value Numeric (Currency)
Salvage Value Numeric (Currency)
Section 179 Qualified Yes/No
Section 179 Recap Numeric (Currency)
Section 179/Bonus Numeric (Currency)
Depreciation Fields
168 Allowance Numeric (Currency)
Begin Accum Depr Numeric (Currency)
Begin Prior Accum Depr Numeric (Currency)
Begin Thru Date Date
Begin YTD Depr Numeric (Currency)
Current Accum Depr Numeric (Currency)
Current Key Codes Text – m, l, a, etc.
Current Thru Date Date
Current YTD Depr Numeric (Currency)
Depreciation This Run Numeric (Currency)
Exclude on DER (Depreciation Expense Report)? Yes/No
Prior Accum Depr Numeric (Currency)
Disposal Fields
Cash Proceeds Numeric (Currency)
Deferral Date Date
Field Name Format
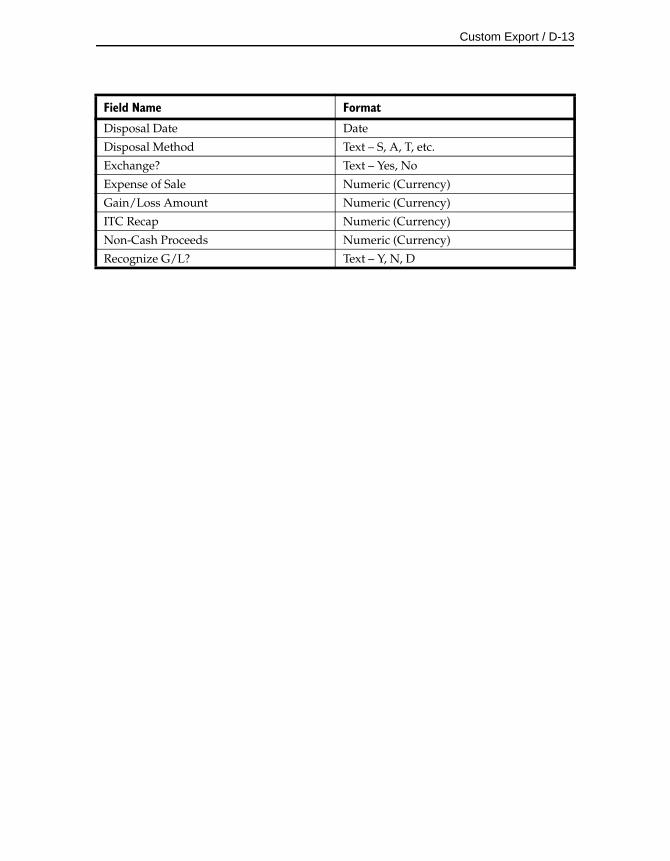
Custom Export / D-13
Disposal Date Date
Disposal Method Text – S, A, T, etc.
Exchange? Text – Yes, No
Expense of Sale Numeric (Currency)
Gain/Loss Amount Numeric (Currency)
ITC Recap Numeric (Currency)
Non-Cash Proceeds Numeric (Currency)
Recognize G/L? Text – Y, N, D
Field Name Format

D-14 / FAS 50 Asset Accounting - Peachtree Edition
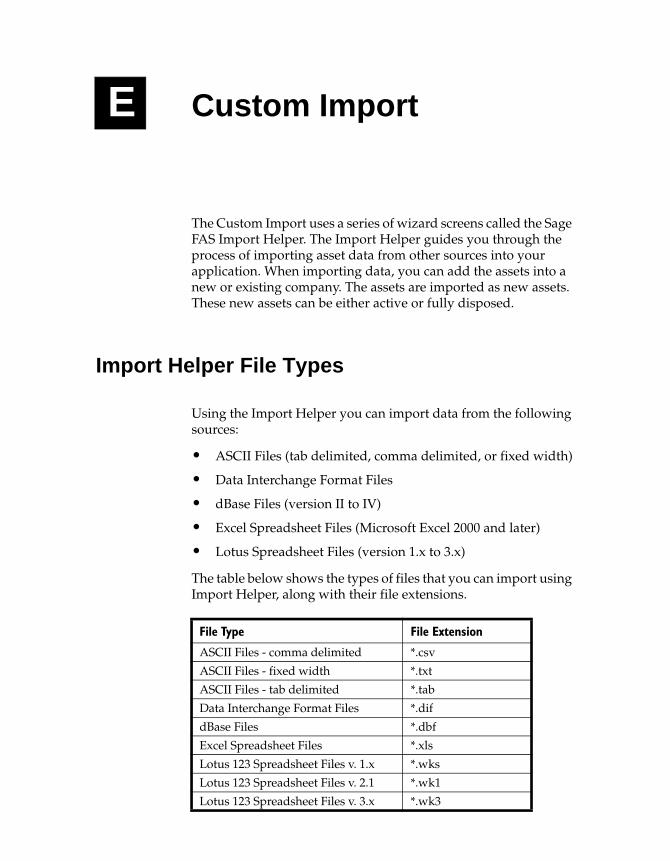
E Custom Import
The Custom Import uses a series of wizard screens called the Sage FAS Import Helper. The Import Helper guides you through the process of importing asset data from other sources into your application. When importing data, you can add the assets into a new or existing company. The assets are imported as new assets. These new assets can be either active or fully disposed.
Import Helper File Types
Using the Import Helper you can import data from the following sources:
• ASCII Files (tab delimited, comma delimited, or fixed width)
• Data Interchange Format Files
• dBase Files (version II to IV)
• Excel Spreadsheet Files (Microsoft Excel 2000 and later)
• Lotus Spreadsheet Files (version 1.x to 3.x)
The table below shows the types of files that you can import using Import Helper, along with their file extensions.
File Type File Extension
ASCII Files - comma delimited *.csv
ASCII Files - fixed width *.txt
ASCII Files - tab delimited *.tab
Data Interchange Format Files *.dif
dBase Files *.dbf
Excel Spreadsheet Files *.xls
Lotus 123 Spreadsheet Files v. 1.x *.wks
Lotus 123 Spreadsheet Files v. 2.1 *.wk1
Lotus 123 Spreadsheet Files v. 3.x *.wk3
E-2 / FAS 50 Asset Accounting - Peachtree Edition
Importing Depreciation-Critical Fields
Each asset contains five fields that are critical to your depreciation calculations. You can import these fields into each of the seven depreciation books. If you choose to import one of these fields for a book, you must import all of them for that book. However, you must import critical fields into at least one book. You are not required to import all seven books. The five critical fields are listed below.
• Acquisition Value
• Depreciation Method
• Estimated Life
• Placed-In-Service Date
• Property Type
Note Declining balance methods require a depreciation percentage in addition to the depreciation method. These depreciation methods are MF, MA, MT, MI, MR, DB, DC, DD, DE, DH, and DI. When these methods are used, a field is required for the depreciation percentage.
Note The “Plus 168” depreciation methods require a value in the 168 Allowance % field. If you use depreciation method MA, MR, SB, or AA, then a value of 30, 50, or 100 must appear in the 168 Allowance % field.
Setting Asset Warning Preference
The Import Helper reports two types of messages when validating or importing a data file. Error messages indicate invalid information in your data file, and will always be displayed. Warning messages indicate data inconsistent with depreciation concepts and rules. The application does not import an asset if the Import Exceptions report displays an error message for that asset.
Custom Import / E-3
However, the application does import an asset if the report displays a warning message for that asset.
To turn on or turn off the display of asset warnings on the Import Exceptions report, select File/Preferences from the menu bar. Click the Company tab in the Preferences screen. Note that if you clear the Display Asset Warnings check box, you will not see any warning messages when adding or changing assets in the application.
Importing Asset Data
When using the Import Helper to import data, you create a map that correctly links the field data from your originating source file to the fields in the application. The Import Helper guides you through this entire process. The order of the data within the source file is not important; however, you may need to convert some of your data to the correct format. For more information on preparing your data for import, see “List of Importable Fields,” page E-17, and “Field Specifications,” page E-23.
Note The list of fields in the Import Helper includes fields that are specific to FAS 100 Asset Accounting. These fields can be matched to data in your source file, but they will not be imported into your company. For the fields that are specific to FAS 100 Asset Accounting, see the table, “Fields Available for Importing,” page E-18.
Navigating the Import Helper
The guidelines provided below explain the navigation buttons common to all Import Helper screens.
Help ButtonClick this button to access the online Help.
Cancel ButtonClick this button to cancel the current import and return you to the main screen.
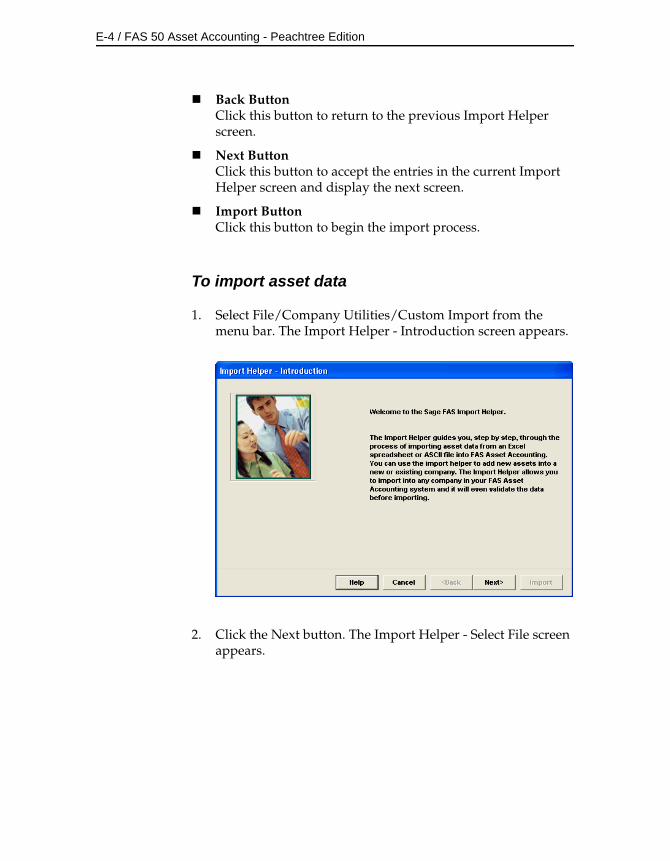
E-4 / FAS 50 Asset Accounting - Peachtree Edition
Back ButtonClick this button to return to the previous Import Helper screen.
Next ButtonClick this button to accept the entries in the current Import Helper screen and display the next screen.
Import ButtonClick this button to begin the import process.
To import asset data
1. Select File/Company Utilities/Custom Import from the menu bar. The Import Helper - Introduction screen appears.
2. Click the Next button. The Import Helper - Select File screen appears.
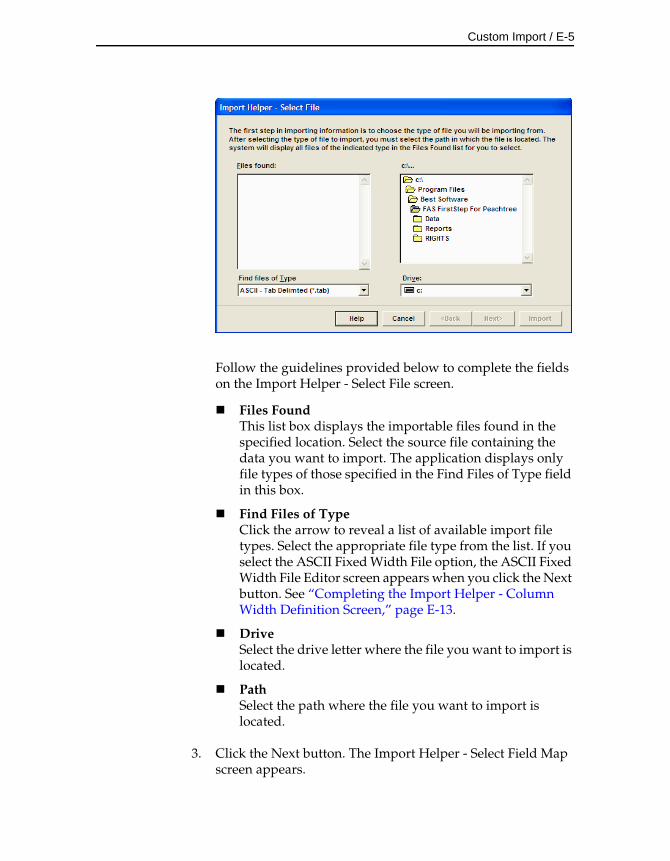
Custom Import / E-5
Follow the guidelines provided below to complete the fields on the Import Helper - Select File screen.
Files FoundThis list box displays the importable files found in the specified location. Select the source file containing the data you want to import. The application displays only file types of those specified in the Find Files of Type field in this box.
Find Files of TypeClick the arrow to reveal a list of available import file types. Select the appropriate file type from the list. If you select the ASCII Fixed Width File option, the ASCII Fixed Width File Editor screen appears when you click the Next button. See “Completing the Import Helper - Column Width Definition Screen,” page E-13.
DriveSelect the drive letter where the file you want to import is located.
PathSelect the path where the file you want to import is located.
3. Click the Next button. The Import Helper - Select Field Map screen appears.
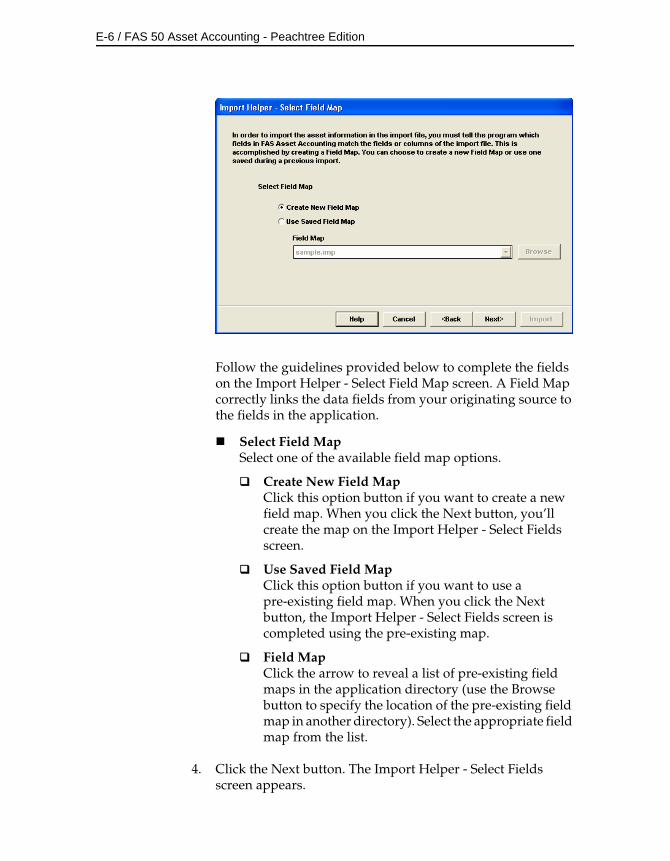
E-6 / FAS 50 Asset Accounting - Peachtree Edition
Follow the guidelines provided below to complete the fields on the Import Helper - Select Field Map screen. A Field Map correctly links the data fields from your originating source to the fields in the application.
Select Field MapSelect one of the available field map options.
Create New Field MapClick this option button if you want to create a new field map. When you click the Next button, you’ll create the map on the Import Helper - Select Fields screen.
Use Saved Field MapClick this option button if you want to use a pre-existing field map. When you click the Next button, the Import Helper - Select Fields screen is completed using the pre-existing map.
Field MapClick the arrow to reveal a list of pre-existing field maps in the application directory (use the Browse button to specify the location of the pre-existing field map in another directory). Select the appropriate field map from the list.
4. Click the Next button. The Import Helper - Select Fields screen appears.
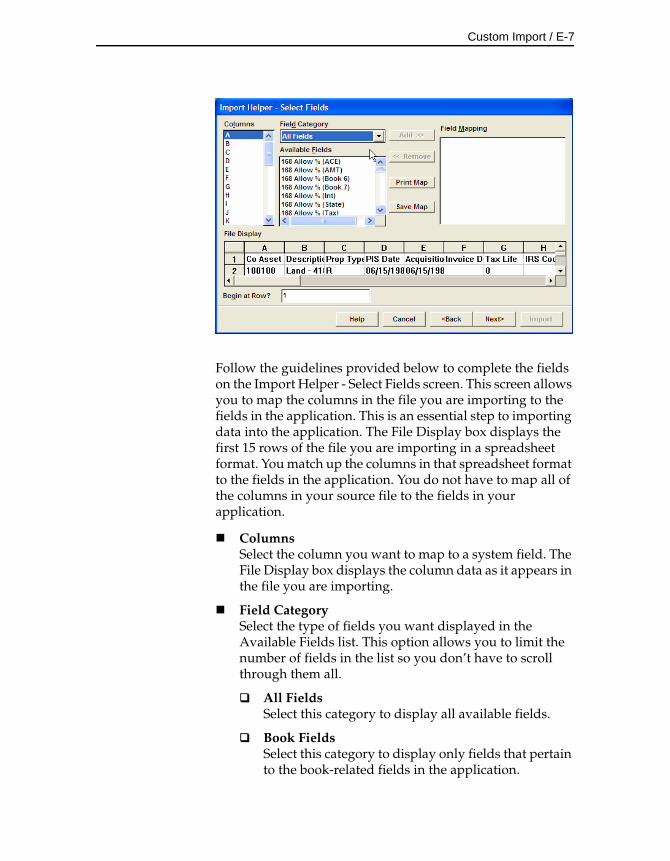
Custom Import / E-7
Follow the guidelines provided below to complete the fields on the Import Helper - Select Fields screen. This screen allows you to map the columns in the file you are importing to the fields in the application. This is an essential step to importing data into the application. The File Display box displays the first 15 rows of the file you are importing in a spreadsheet format. You match up the columns in that spreadsheet format to the fields in the application. You do not have to map all of the columns in your source file to the fields in your application.
ColumnsSelect the column you want to map to a system field. The File Display box displays the column data as it appears in the file you are importing.
Field CategorySelect the type of fields you want displayed in the Available Fields list. This option allows you to limit the number of fields in the list so you don’t have to scroll through them all.
All FieldsSelect this category to display all available fields.
Book FieldsSelect this category to display only fields that pertain to the book-related fields in the application.
E-8 / FAS 50 Asset Accounting - Peachtree Edition
Critical FieldsSelect this category to display only the fields that are critical to calculating depreciation.
Descriptive FieldsSelect this category to display only the descriptive fields that are not critical to calculating depreciation.
Disposal FieldsSelect this category to display only fields that pertain to asset disposals.
Available FieldsAfter you’ve selected the column you want to map from the Columns list, select the system field you want to map to that column. You can select multiple fields from this list in order to map the data in a column to multiple system fields. For example, the placed-in-service date might appear only once in your source file, but you can map it to the Placed-in-Service field in all seven books. Once you’ve mapped a field to a column, the field no longer appears in the Available Fields list.
Field MappingThis list box displays a list of the fields you’ve added to the map.
File DisplayThis box displays the column data as it appears in the file you are importing. This is where you view the data to decide which column you want to map to a system field.
Begin at Row?Type the row number of the file you are importing that you want the application to start importing from. This option allows you to view header rows from your source file in the File Display box without importing them.
Add ButtonClick this button to add the selected fields to the map file.
Remove ButtonClick this button to remove the selected fields from the map file.
Print Map ButtonClick this button to send the map you have created to the default printer.
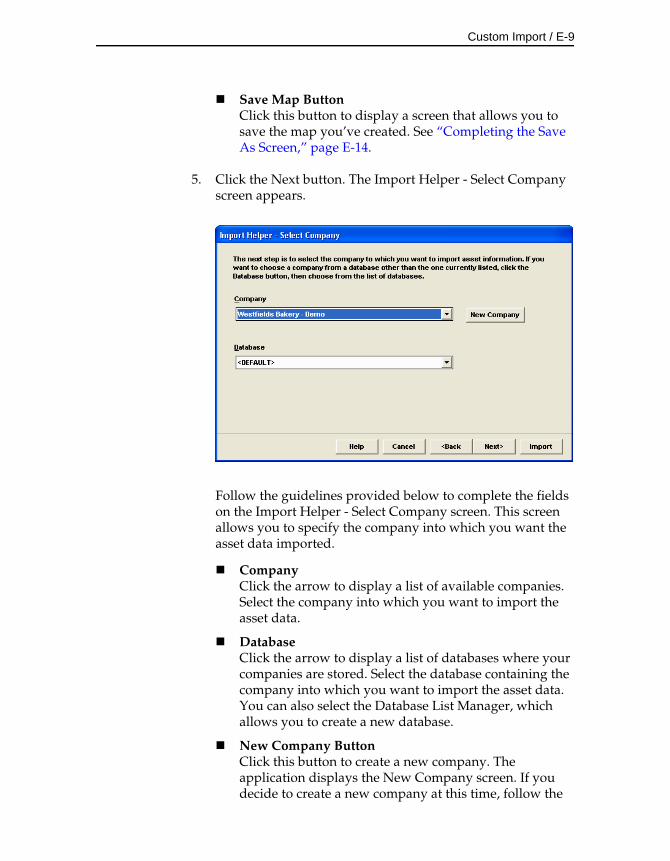
Custom Import / E-9
Save Map ButtonClick this button to display a screen that allows you to save the map you’ve created. See “Completing the Save As Screen,” page E-14.
5. Click the Next button. The Import Helper - Select Company screen appears.
Follow the guidelines provided below to complete the fields on the Import Helper - Select Company screen. This screen allows you to specify the company into which you want the asset data imported.
CompanyClick the arrow to display a list of available companies. Select the company into which you want to import the asset data.
DatabaseClick the arrow to display a list of databases where your companies are stored. Select the database containing the company into which you want to import the asset data. You can also select the Database List Manager, which allows you to create a new database.
New Company ButtonClick this button to create a new company. The application displays the New Company screen. If you decide to create a new company at this time, follow the
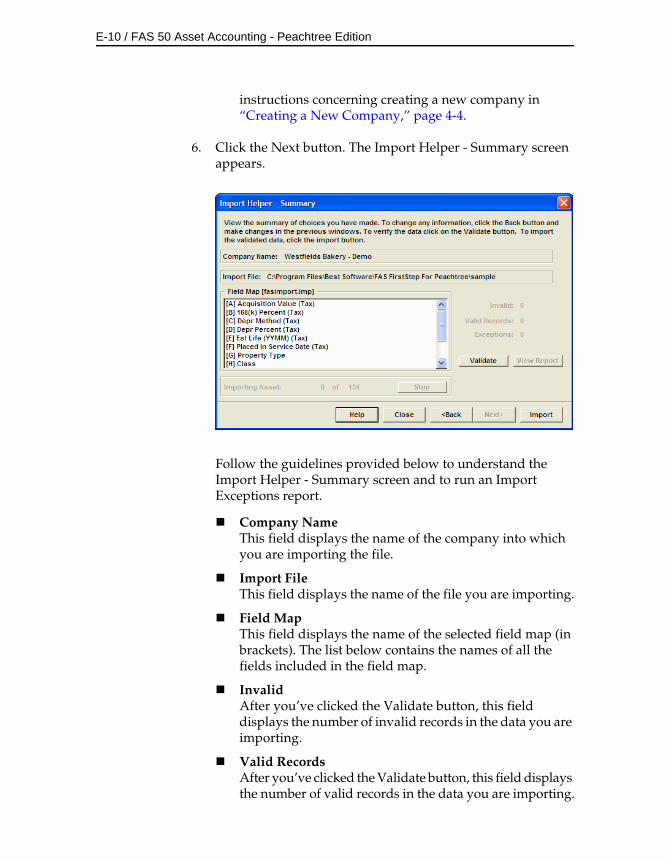
E-10 / FAS 50 Asset Accounting - Peachtree Edition
instructions concerning creating a new company in “Creating a New Company,” page 4-4.
6. Click the Next button. The Import Helper - Summary screen appears.
Follow the guidelines provided below to understand the Import Helper - Summary screen and to run an Import Exceptions report.
Company NameThis field displays the name of the company into which you are importing the file.
Import FileThis field displays the name of the file you are importing.
Field MapThis field displays the name of the selected field map (in brackets). The list below contains the names of all the fields included in the field map.
InvalidAfter you’ve clicked the Validate button, this field displays the number of invalid records in the data you are importing.
Valid RecordsAfter you’ve clicked the Validate button, this field displays the number of valid records in the data you are importing.
Custom Import / E-11
ExceptionsAfter you’ve clicked the Validate button, this field displays the number of individual exceptions in the data you are importing. An exception is an error in the data you are importing. Each record can have many exceptions. The Import Exceptions report details these errors.
Validate ButtonClick this button to validate the data in the source file you are importing.
View Report ButtonClick this button to display the Import Exceptions report. The Import Exceptions report provides information about invalid records and their trouble spots. See “Sample Import Exceptions Report,” page E-16.
Import ButtonClick this button to import the data into the application. Import Helper imports only valid records. You can validate the data and view an Import Exceptions report prior to importing.
7. Review the data on the Import Helper - Summary screen prior to completing the import. This ensures the accuracy of your data.
8. Click the Validate button to validate the data of the source file before importing. The application determines whether the data in the originating source file is valid and then displays the number of valid and invalid records. You can also run an Import Exceptions report from this screen. An Import Exceptions report indicates incompatible or invalid records in the file you are importing. It also indicates the reason the record is invalid.
9. If desired, click the View Report button to view the Import Exceptions report, and then click the Close button. If the application finds invalid fields in the import file, this report explains why the fields are invalid. If you choose to run the report at this time, the application displays the report in the Report Viewer, where you can then print the report or save it in a file. You must close the Report Viewer in order to return to the import function.
E-12 / FAS 50 Asset Accounting - Peachtree Edition
10. Correct any errors in your data (you can click the Back button to move backwards through the screens).
Note You cannot have the spreadsheet open while you are in Import Helper.
11. Click the Import button. The application imports only valid data from the source file and displays a completion message, when finished with the import.
Note Avoid importing valid records twice. The application imports valid records, but it does not import invalid records. If some records in your data file are invalid, you can correct the data file and reimport the records that were invalid. Make sure you import only the records that contained errors, and do not reimport the records that were valid more than once.
12. To exit from the Import Helper - Summary screen, do any one of the following:
• Press ALT+F4.
• Click the Close button.

Custom Import / E-13
Completing the Import Helper - Column Width Definition Screen
In the ASCII fixed width file format, all field data is assigned a fixed width. This screen allows you to re-assign the width of individual fields.
When the Column Width Definition screen appears, the Import Helper displays the ASCII file with its fixed width field data in a spreadsheet. The application estimates the breaks in the source file data, but you can edit these estimated breaks.
You can insert a line break by clicking inside the spreadsheet on the area where you want the line break to occur; a line-break marker will appear. To delete a line break, double-click on the line-break marker. To change the length of individual fields, click on the line-break marker and drag it to the right to increase the field width, or drag it to the left to decrease the field width.
When finished, click the Next button to continue with the import process.
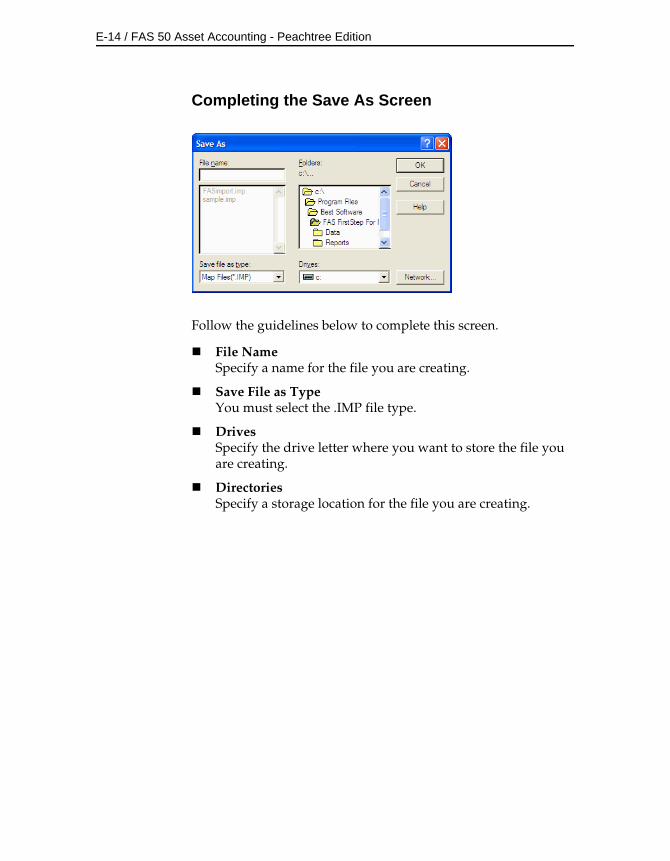
E-14 / FAS 50 Asset Accounting - Peachtree Edition
Completing the Save As Screen
Follow the guidelines below to complete this screen.
File NameSpecify a name for the file you are creating.
Save File as TypeYou must select the .IMP file type.
DrivesSpecify the drive letter where you want to store the file you are creating.
DirectoriesSpecify a storage location for the file you are creating.
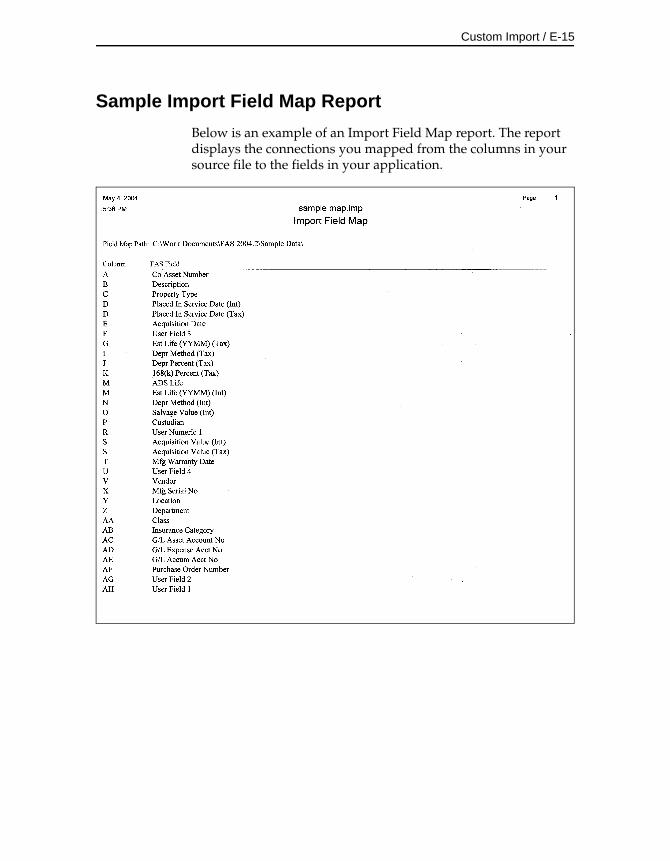
Custom Import / E-15
Sample Import Field Map Report
Below is an example of an Import Field Map report. The report displays the connections you mapped from the columns in your source file to the fields in your application.
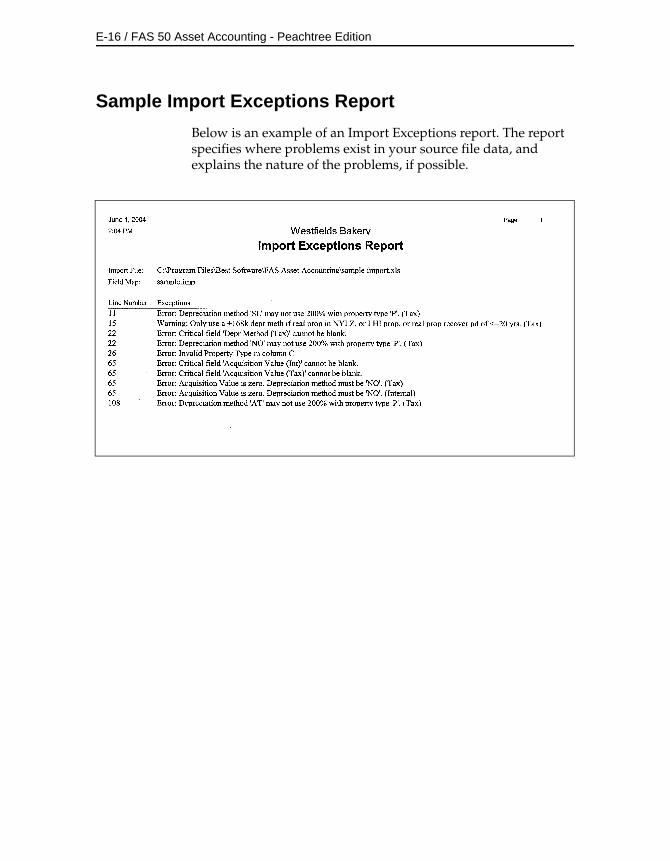
E-16 / FAS 50 Asset Accounting - Peachtree Edition
Sample Import Exceptions Report
Below is an example of an Import Exceptions report. The report specifies where problems exist in your source file data, and explains the nature of the problems, if possible.
Custom Import / E-17
List of Importable Fields
The following table contains the list of fields available for mapping with Import Helper. For each field, the table provides the name and the required format. Some fields require a particular code that is specified by the application. These fields are noted with an asterisk in the Field No. column. For the correct codes for these fields, see “Field Specifications,” page E-23. Please pay particular attention to the format of date fields and the Estimated Life field.
Date Fields
Enter dates in MM/DD/YYYY format.
Please note that both the Beginning Through Date and Current Through Date fields should always be expressed as the end of the month.
The application assumes that a date entered with only five characters contains a leading zero in the month field.
Numeric Fields
Numeric fields must be stored as integers (0 through 9), not as formulas or special functions.
Estimated Life
The Estimated Life field generally should be formatted as YYMM. Data received without leading or trailing zeroes will be assumed to have the following format:
Data Format Example
1 character Y 5 or five years
2 characters YY 15 or fifteen years
3 characters YMM 506 or five years and six months
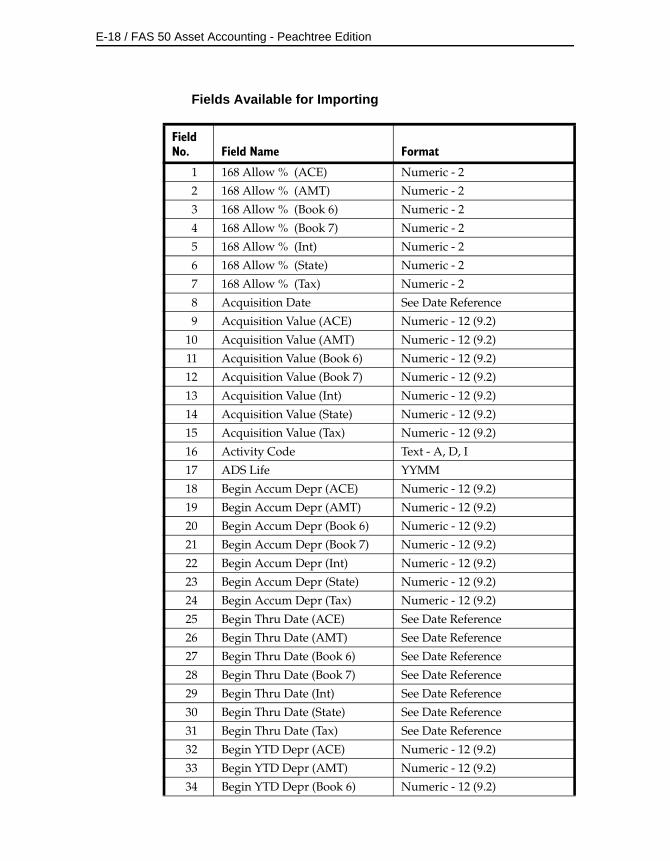
E-18 / FAS 50 Asset Accounting - Peachtree Edition
Fields Available for Importing
Field No. Field Name Format
1 168 Allow % (ACE) Numeric - 2
2 168 Allow % (AMT) Numeric - 2
3 168 Allow % (Book 6) Numeric - 2
4 168 Allow % (Book 7) Numeric - 2
5 168 Allow % (Int) Numeric - 2
6 168 Allow % (State) Numeric - 2
7 168 Allow % (Tax) Numeric - 2
8 Acquisition Date See Date Reference
9 Acquisition Value (ACE) Numeric - 12 (9.2)
10 Acquisition Value (AMT) Numeric - 12 (9.2)
11 Acquisition Value (Book 6) Numeric - 12 (9.2)
12 Acquisition Value (Book 7) Numeric - 12 (9.2)
13 Acquisition Value (Int) Numeric - 12 (9.2)
14 Acquisition Value (State) Numeric - 12 (9.2)
15 Acquisition Value (Tax) Numeric - 12 (9.2)
16 Activity Code Text - A, D, I
17 ADS Life YYMM
18 Begin Accum Depr (ACE) Numeric - 12 (9.2)
19 Begin Accum Depr (AMT) Numeric - 12 (9.2)
20 Begin Accum Depr (Book 6) Numeric - 12 (9.2)
21 Begin Accum Depr (Book 7) Numeric - 12 (9.2)
22 Begin Accum Depr (Int) Numeric - 12 (9.2)
23 Begin Accum Depr (State) Numeric - 12 (9.2)
24 Begin Accum Depr (Tax) Numeric - 12 (9.2)
25 Begin Thru Date (ACE) See Date Reference
26 Begin Thru Date (AMT) See Date Reference
27 Begin Thru Date (Book 6) See Date Reference
28 Begin Thru Date (Book 7) See Date Reference
29 Begin Thru Date (Int) See Date Reference
30 Begin Thru Date (State) See Date Reference
31 Begin Thru Date (Tax) See Date Reference
32 Begin YTD Depr (ACE) Numeric - 12 (9.2)
33 Begin YTD Depr (AMT) Numeric - 12 (9.2)
34 Begin YTD Depr (Book 6) Numeric - 12 (9.2)

Custom Import / E-19
35 Begin YTD Depr (Book 7) Numeric - 12 (9.2)
36 Begin YTD Depr (Int) Numeric - 12 (9.2)
37 Begin YTD Depr (State) Numeric - 12 (9.2)
38 Begin YTD Depr (Tax) Numeric - 12 (9.2)
39 Cash Proceeds Numeric - 12 (9.2)
40 Class Text - 2 - Alphanumeric
41 Co Asset Number Text - 25 - Alphanumeric
42 Custodian Text - 25 - Alphanumeric
43 Deferred Disp Date (ACE) See Date Reference
44 Deferred Disp Date (AMT) See Date Reference
45 Deferred Disp Date (Book 6) See Date Reference
46 Deferred Disp Date (Book 7) See Date Reference
47 Deferred Disp Date (Int) See Date Reference
48 Deferred Disp Date (State) See Date Reference
49 Deferred Disp Date (Tax) See Date Reference
50 Department FAS 100 Asset Accounting only
* 51 Depr Method (ACE) Text - 2
* 52 Depr Method (AMT) Text - 2
* 53 Depr Method (Book 6) Text - 2
* 54 Depr Method (Book 7) Text - 2
* 55 Depr Method (Int) Text - 2
* 56 Depr Method (State) Text - 2
* 57 Depr Method (Tax) Text - 2
58 Depr Percent (ACE) Numeric - 3
59 Depr Percent (AMT) Numeric - 3
60 Depr Percent (Book 6) Numeric - 3
61 Depr Percent (Book 7) Numeric - 3
62 Depr Percent (Int) Numeric - 3
63 Depr Percent (State) Numeric - 3
64 Depr Percent (Tax) Numeric - 3
65 Description Text - 80
66 Disposal Date See Date Reference
67 Disposal Method Text - 1
* 68 Disposal Recog Code (ACE) Text - Alpha (Y/N/D)
* 69 Disposal Recog Code (AMT) Text - Alpha (Y/N/D)
* 70 Disposal Recog Code (Book 6) Text - Alpha (Y/N/D)
Field No. Field Name Format
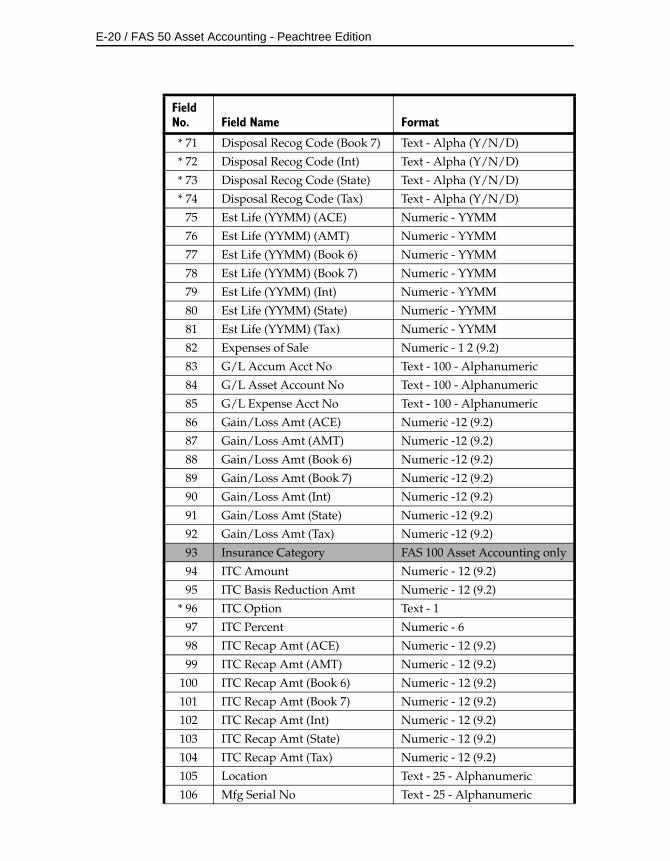
E-20 / FAS 50 Asset Accounting - Peachtree Edition
* 71 Disposal Recog Code (Book 7) Text - Alpha (Y/N/D)
* 72 Disposal Recog Code (Int) Text - Alpha (Y/N/D)
* 73 Disposal Recog Code (State) Text - Alpha (Y/N/D)
* 74 Disposal Recog Code (Tax) Text - Alpha (Y/N/D)
75 Est Life (YYMM) (ACE) Numeric - YYMM
76 Est Life (YYMM) (AMT) Numeric - YYMM
77 Est Life (YYMM) (Book 6) Numeric - YYMM
78 Est Life (YYMM) (Book 7) Numeric - YYMM
79 Est Life (YYMM) (Int) Numeric - YYMM
80 Est Life (YYMM) (State) Numeric - YYMM
81 Est Life (YYMM) (Tax) Numeric - YYMM
82 Expenses of Sale Numeric - 1 2 (9.2)
83 G/L Accum Acct No Text - 100 - Alphanumeric
84 G/L Asset Account No Text - 100 - Alphanumeric
85 G/L Expense Acct No Text - 100 - Alphanumeric
86 Gain/Loss Amt (ACE) Numeric -12 (9.2)
87 Gain/Loss Amt (AMT) Numeric -12 (9.2)
88 Gain/Loss Amt (Book 6) Numeric -12 (9.2)
89 Gain/Loss Amt (Book 7) Numeric -12 (9.2)
90 Gain/Loss Amt (Int) Numeric -12 (9.2)
91 Gain/Loss Amt (State) Numeric -12 (9.2)
92 Gain/Loss Amt (Tax) Numeric -12 (9.2)
93 Insurance Category FAS 100 Asset Accounting only
94 ITC Amount Numeric - 12 (9.2)
95 ITC Basis Reduction Amt Numeric - 12 (9.2)
* 96 ITC Option Text - 1
97 ITC Percent Numeric - 6
98 ITC Recap Amt (ACE) Numeric - 12 (9.2)
99 ITC Recap Amt (AMT) Numeric - 12 (9.2)
100 ITC Recap Amt (Book 6) Numeric - 12 (9.2)
101 ITC Recap Amt (Book 7) Numeric - 12 (9.2)
102 ITC Recap Amt (Int) Numeric - 12 (9.2)
103 ITC Recap Amt (State) Numeric - 12 (9.2)
104 ITC Recap Amt (Tax) Numeric - 12 (9.2)
105 Location Text - 25 - Alphanumeric
106 Mfg Serial No Text - 25 - Alphanumeric
Field No. Field Name Format
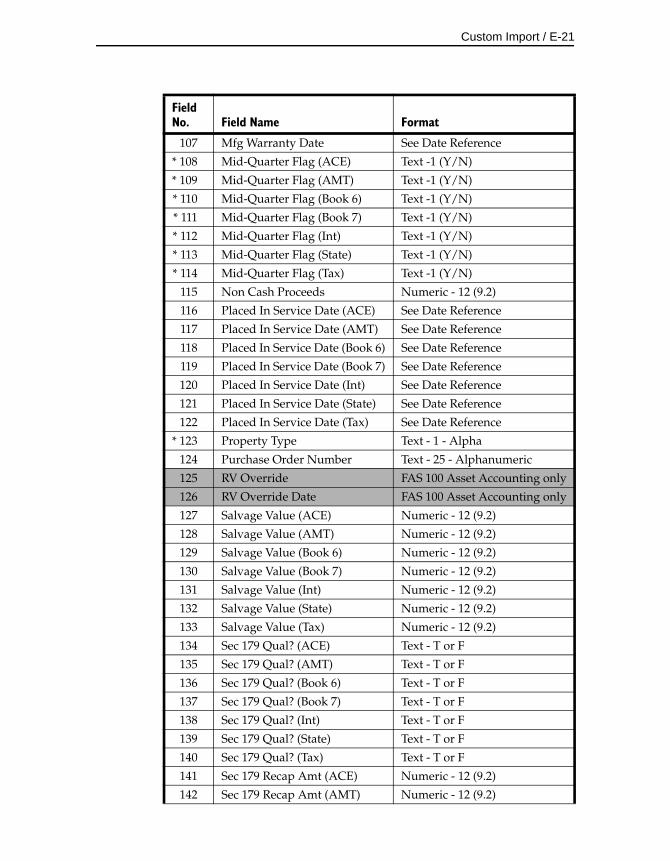
Custom Import / E-21
107 Mfg Warranty Date See Date Reference
* 108 Mid-Quarter Flag (ACE) Text -1 (Y/N)
* 109 Mid-Quarter Flag (AMT) Text -1 (Y/N)
* 110 Mid-Quarter Flag (Book 6) Text -1 (Y/N)
* 111 Mid-Quarter Flag (Book 7) Text -1 (Y/N)
* 112 Mid-Quarter Flag (Int) Text -1 (Y/N)
* 113 Mid-Quarter Flag (State) Text -1 (Y/N)
* 114 Mid-Quarter Flag (Tax) Text -1 (Y/N)
115 Non Cash Proceeds Numeric - 12 (9.2)
116 Placed In Service Date (ACE) See Date Reference
117 Placed In Service Date (AMT) See Date Reference
118 Placed In Service Date (Book 6) See Date Reference
119 Placed In Service Date (Book 7) See Date Reference
120 Placed In Service Date (Int) See Date Reference
121 Placed In Service Date (State) See Date Reference
122 Placed In Service Date (Tax) See Date Reference
* 123 Property Type Text - 1 - Alpha
124 Purchase Order Number Text - 25 - Alphanumeric
125 RV Override FAS 100 Asset Accounting only
126 RV Override Date FAS 100 Asset Accounting only
127 Salvage Value (ACE) Numeric - 12 (9.2)
128 Salvage Value (AMT) Numeric - 12 (9.2)
129 Salvage Value (Book 6) Numeric - 12 (9.2)
130 Salvage Value (Book 7) Numeric - 12 (9.2)
131 Salvage Value (Int) Numeric - 12 (9.2)
132 Salvage Value (State) Numeric - 12 (9.2)
133 Salvage Value (Tax) Numeric - 12 (9.2)
134 Sec 179 Qual? (ACE) Text - T or F
135 Sec 179 Qual? (AMT) Text - T or F
136 Sec 179 Qual? (Book 6) Text - T or F
137 Sec 179 Qual? (Book 7) Text - T or F
138 Sec 179 Qual? (Int) Text - T or F
139 Sec 179 Qual? (State) Text - T or F
140 Sec 179 Qual? (Tax) Text - T or F
141 Sec 179 Recap Amt (ACE) Numeric - 12 (9.2)
142 Sec 179 Recap Amt (AMT) Numeric - 12 (9.2)
Field No. Field Name Format
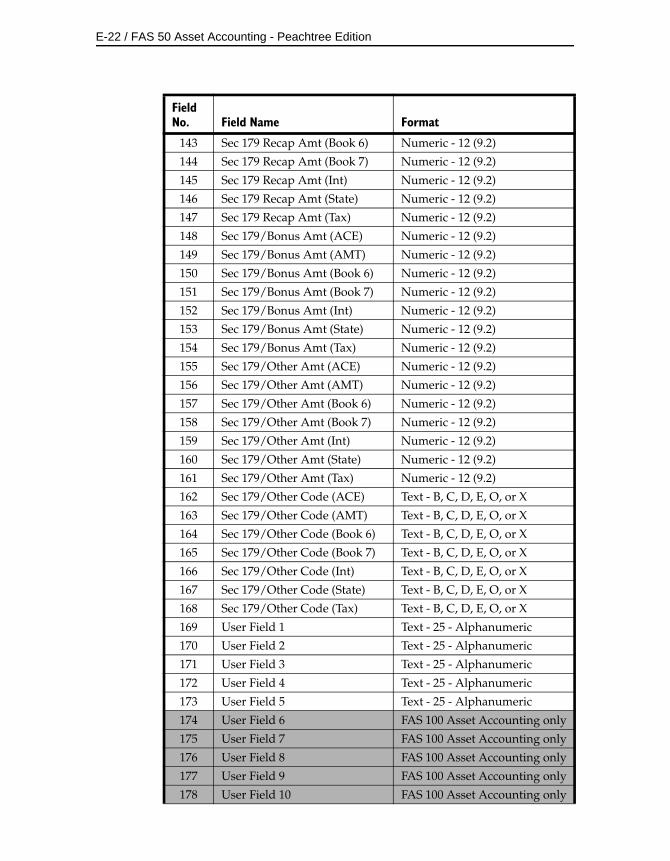
E-22 / FAS 50 Asset Accounting - Peachtree Edition
143 Sec 179 Recap Amt (Book 6) Numeric - 12 (9.2)
144 Sec 179 Recap Amt (Book 7) Numeric - 12 (9.2)
145 Sec 179 Recap Amt (Int) Numeric - 12 (9.2)
146 Sec 179 Recap Amt (State) Numeric - 12 (9.2)
147 Sec 179 Recap Amt (Tax) Numeric - 12 (9.2)
148 Sec 179/Bonus Amt (ACE) Numeric - 12 (9.2)
149 Sec 179/Bonus Amt (AMT) Numeric - 12 (9.2)
150 Sec 179/Bonus Amt (Book 6) Numeric - 12 (9.2)
151 Sec 179/Bonus Amt (Book 7) Numeric - 12 (9.2)
152 Sec 179/Bonus Amt (Int) Numeric - 12 (9.2)
153 Sec 179/Bonus Amt (State) Numeric - 12 (9.2)
154 Sec 179/Bonus Amt (Tax) Numeric - 12 (9.2)
155 Sec 179/Other Amt (ACE) Numeric - 12 (9.2)
156 Sec 179/Other Amt (AMT) Numeric - 12 (9.2)
157 Sec 179/Other Amt (Book 6) Numeric - 12 (9.2)
158 Sec 179/Other Amt (Book 7) Numeric - 12 (9.2)
159 Sec 179/Other Amt (Int) Numeric - 12 (9.2)
160 Sec 179/Other Amt (State) Numeric - 12 (9.2)
161 Sec 179/Other Amt (Tax) Numeric - 12 (9.2)
162 Sec 179/Other Code (ACE) Text - B, C, D, E, O, or X
163 Sec 179/Other Code (AMT) Text - B, C, D, E, O, or X
164 Sec 179/Other Code (Book 6) Text - B, C, D, E, O, or X
165 Sec 179/Other Code (Book 7) Text - B, C, D, E, O, or X
166 Sec 179/Other Code (Int) Text - B, C, D, E, O, or X
167 Sec 179/Other Code (State) Text - B, C, D, E, O, or X
168 Sec 179/Other Code (Tax) Text - B, C, D, E, O, or X
169 User Field 1 Text - 25 - Alphanumeric
170 User Field 2 Text - 25 - Alphanumeric
171 User Field 3 Text - 25 - Alphanumeric
172 User Field 4 Text - 25 - Alphanumeric
173 User Field 5 Text - 25 - Alphanumeric
174 User Field 6 FAS 100 Asset Accounting only
175 User Field 7 FAS 100 Asset Accounting only
176 User Field 8 FAS 100 Asset Accounting only
177 User Field 9 FAS 100 Asset Accounting only
178 User Field 10 FAS 100 Asset Accounting only
Field No. Field Name Format
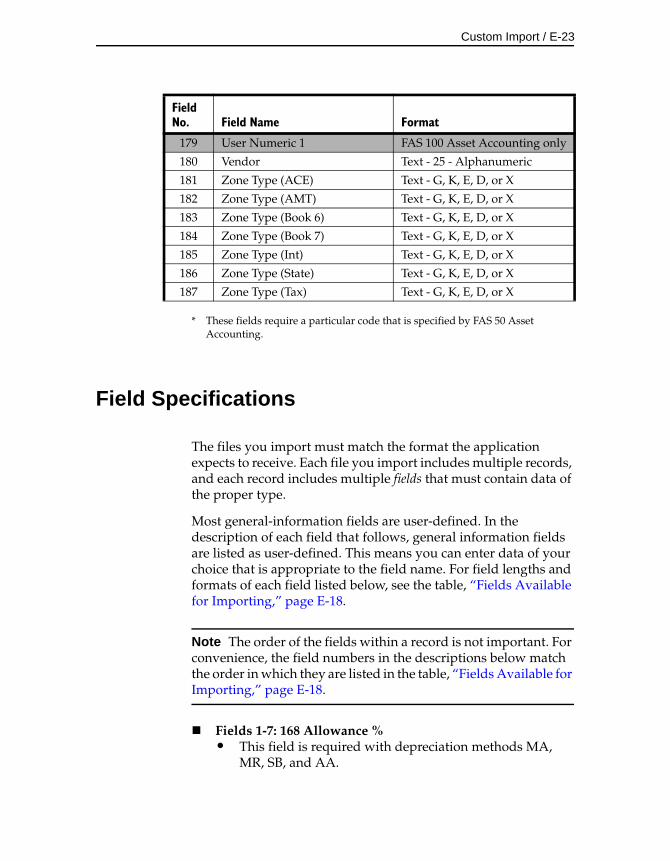
Custom Import / E-23
* These fields require a particular code that is specified by FAS 50 Asset Accounting.
Field Specifications
The files you import must match the format the application expects to receive. Each file you import includes multiple records, and each record includes multiple fields that must contain data of the proper type.
Most general-information fields are user-defined. In the description of each field that follows, general information fields are listed as user-defined. This means you can enter data of your choice that is appropriate to the field name. For field lengths and formats of each field listed below, see the table, “Fields Available for Importing,” page E-18.
Note The order of the fields within a record is not important. For convenience, the field numbers in the descriptions below match the order in which they are listed in the table, “Fields Available for Importing,” page E-18.
Fields 1-7: 168 Allowance %• This field is required with depreciation methods MA,
MR, SB, and AA.
179 User Numeric 1 FAS 100 Asset Accounting only
180 Vendor Text - 25 - Alphanumeric
181 Zone Type (ACE) Text - G, K, E, D, or X
182 Zone Type (AMT) Text - G, K, E, D, or X
183 Zone Type (Book 6) Text - G, K, E, D, or X
184 Zone Type (Book 7) Text - G, K, E, D, or X
185 Zone Type (Int) Text - G, K, E, D, or X
186 Zone Type (State) Text - G, K, E, D, or X
187 Zone Type (Tax) Text - G, K, E, D, or X
Field No. Field Name Format
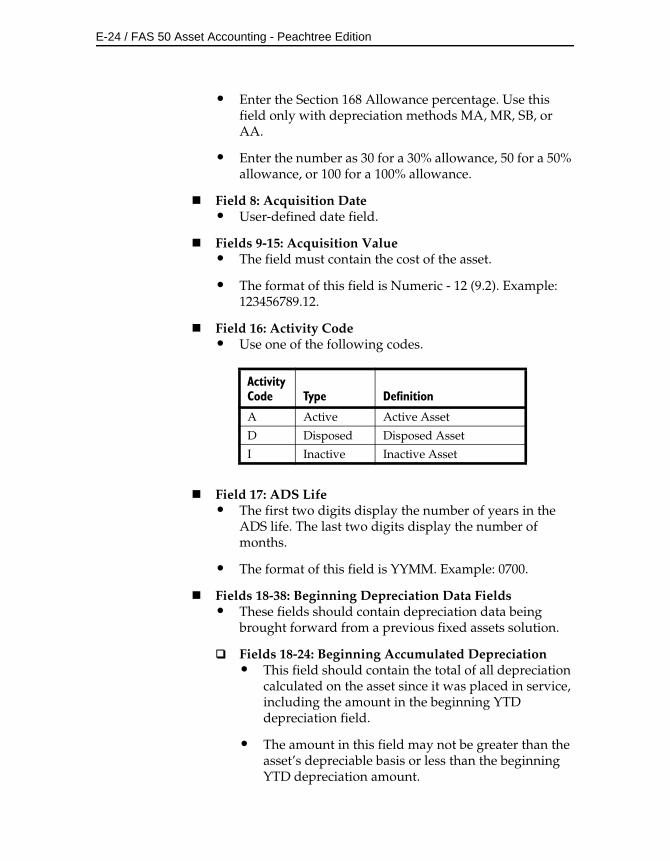
E-24 / FAS 50 Asset Accounting - Peachtree Edition
• Enter the Section 168 Allowance percentage. Use this field only with depreciation methods MA, MR, SB, or AA.
• Enter the number as 30 for a 30% allowance, 50 for a 50% allowance, or 100 for a 100% allowance.
Field 8: Acquisition Date• User-defined date field.
Fields 9-15: Acquisition Value• The field must contain the cost of the asset.
• The format of this field is Numeric - 12 (9.2). Example: 123456789.12.
Field 16: Activity Code• Use one of the following codes.
Field 17: ADS Life• The first two digits display the number of years in the
ADS life. The last two digits display the number of months.
• The format of this field is YYMM. Example: 0700.
Fields 18-38: Beginning Depreciation Data Fields• These fields should contain depreciation data being
brought forward from a previous fixed assets solution.
Fields 18-24: Beginning Accumulated Depreciation• This field should contain the total of all depreciation
calculated on the asset since it was placed in service, including the amount in the beginning YTD depreciation field.
• The amount in this field may not be greater than the asset’s depreciable basis or less than the beginning YTD depreciation amount.
Activity Code Type Definition
A Active Active Asset
D Disposed Disposed Asset
I Inactive Inactive Asset
Custom Import / E-25
Fields 25-31: Beginning Through Date• Required if the beginning accumulated amount is
greater than 0. The date must be in the format MMDDYYYY, where the day represents the end of the month.
Fields 32-38: Beginning YTD Depreciation• This field should contain the amount of depreciation,
if any, already taken on this asset in this book for the fiscal year in which you are importing the data. This is the amount of depreciation taken from the beginning of that fiscal year through the date in the beginning date field. If the beginning date is any date other than the end of a fiscal year, this field must contain the YTD depreciation to get correct results when you run depreciation for the current fiscal year. If this field is blank, the application assumes no depreciation for the fiscal year as of the beginning date has been taken.
• The amount in this field may not be greater than the asset’s depreciable basis, or the beginning accumulated depreciation amount.
Field 39: Cash Proceeds• You may leave this field blank. However, if the gain/loss
amount is based on this figure, the number should be entered.
Field 40: Class• User-defined.
Field 41: Company Asset Number• User-defined.
• The format for this field is alphanumeric text, up to 25 characters.
Field 42: Custodian• User-defined.
Fields 43-49: Deferred Disposal Date• Enter a deferred disposal date only if you entered “D” in
the Disposal Recognition Code field.
Field 50: Department• Field for FAS 100 Asset Accounting only. You can
customize one of the user fields as a Department field if you choose.
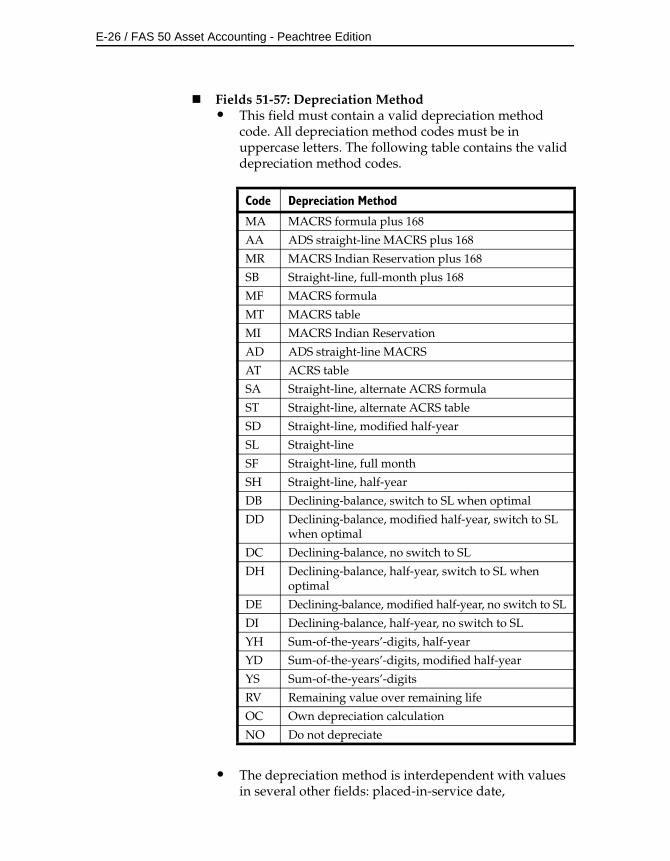
E-26 / FAS 50 Asset Accounting - Peachtree Edition
Fields 51-57: Depreciation Method• This field must contain a valid depreciation method
code. All depreciation method codes must be in uppercase letters. The following table contains the valid depreciation method codes.
• The depreciation method is interdependent with values in several other fields: placed-in-service date,
Code Depreciation Method
MA MACRS formula plus 168
AA ADS straight-line MACRS plus 168
MR MACRS Indian Reservation plus 168
SB Straight-line, full-month plus 168
MF MACRS formula
MT MACRS table
MI MACRS Indian Reservation
AD ADS straight-line MACRS
AT ACRS table
SA Straight-line, alternate ACRS formula
ST Straight-line, alternate ACRS table
SD Straight-line, modified half-year
SL Straight-line
SF Straight-line, full month
SH Straight-line, half-year
DB Declining-balance, switch to SL when optimal
DD Declining-balance, modified half-year, switch to SL when optimal
DC Declining-balance, no switch to SL
DH Declining-balance, half-year, switch to SL when optimal
DE Declining-balance, modified half-year, no switch to SL
DI Declining-balance, half-year, no switch to SL
YH Sum-of-the-years’-digits, half-year
YD Sum-of-the-years’-digits, modified half-year
YS Sum-of-the-years’-digits
RV Remaining value over remaining life
OC Own depreciation calculation
NO Do not depreciate
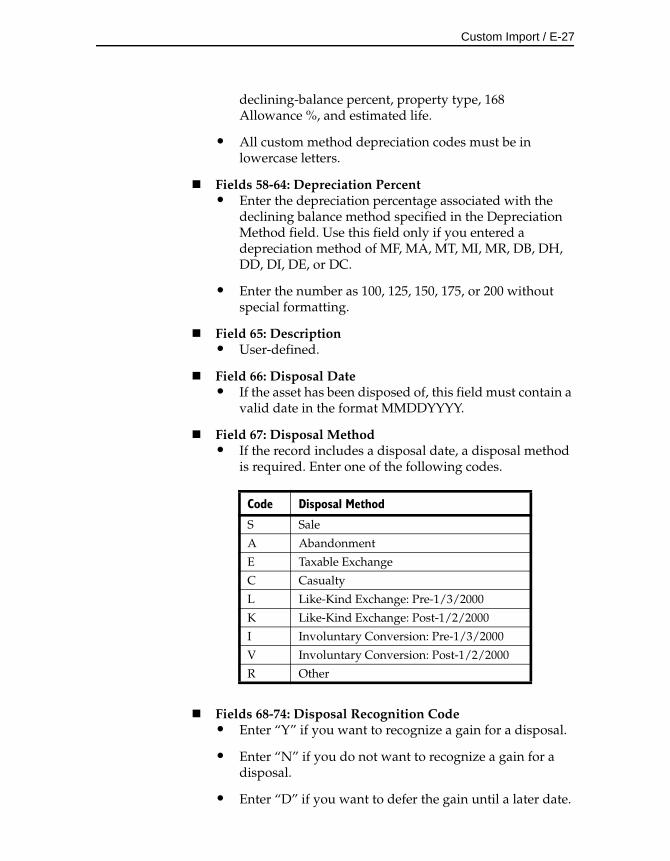
Custom Import / E-27
declining-balance percent, property type, 168 Allowance %, and estimated life.
• All custom method depreciation codes must be in lowercase letters.
Fields 58-64: Depreciation Percent• Enter the depreciation percentage associated with the
declining balance method specified in the Depreciation Method field. Use this field only if you entered a depreciation method of MF, MA, MT, MI, MR, DB, DH, DD, DI, DE, or DC.
• Enter the number as 100, 125, 150, 175, or 200 without special formatting.
Field 65: Description• User-defined.
Field 66: Disposal Date• If the asset has been disposed of, this field must contain a
valid date in the format MMDDYYYY.
Field 67: Disposal Method• If the record includes a disposal date, a disposal method
is required. Enter one of the following codes.
Fields 68-74: Disposal Recognition Code• Enter “Y” if you want to recognize a gain for a disposal.
• Enter “N” if you do not want to recognize a gain for a disposal.
• Enter “D” if you want to defer the gain until a later date.
Code Disposal Method
S Sale
A Abandonment
E Taxable Exchange
C Casualty
L Like-Kind Exchange: Pre-1/3/2000
K Like-Kind Exchange: Post-1/2/2000
I Involuntary Conversion: Pre-1/3/2000
V Involuntary Conversion: Post-1/2/2000
R Other
E-28 / FAS 50 Asset Accounting - Peachtree Edition
Fields 75-81: Estimated Life• This field must have an estimated life in years and
months that is valid for the depreciation method used. The format of this field is YYMM. For example, enter 5 ½ years as 0506.
Field 82: Expenses of Sale• This field may be left blank. However, if the gain/loss
amount is based on this figure, the number should be entered.
Field 83: G/L Accumulated Account Number• User-defined.
Field 84: G/L Asset Account Number• User-defined.
Field 85: G/L Expense Account Number• User-defined.
Fields 86-92: Gain/Loss Amount• Enter the gain/loss amount for this asset. This field may
be left blank.
• Denote a loss by a negative sign before the amount.
Field 93: Insurance Category• Field for FAS 100 Asset Accounting only. You can
customize one of the user fields as an Insurance Category field if you choose.
Field 94: ITC Amount• The ITC Amount field cannot exceed the asset’s
depreciable basis.
Field 95: ITC Basis Reduction Amount• This field displays the amount of the ITC credit used to
reduce the basis when calculating depreciation. If no value is entered in this field, the application calculates the basis reduction using the default reduction percentage based on the type of ITC taken in the ITC Option field.
Field 96: ITC Option• Complete this field based on whether ITC was taken.
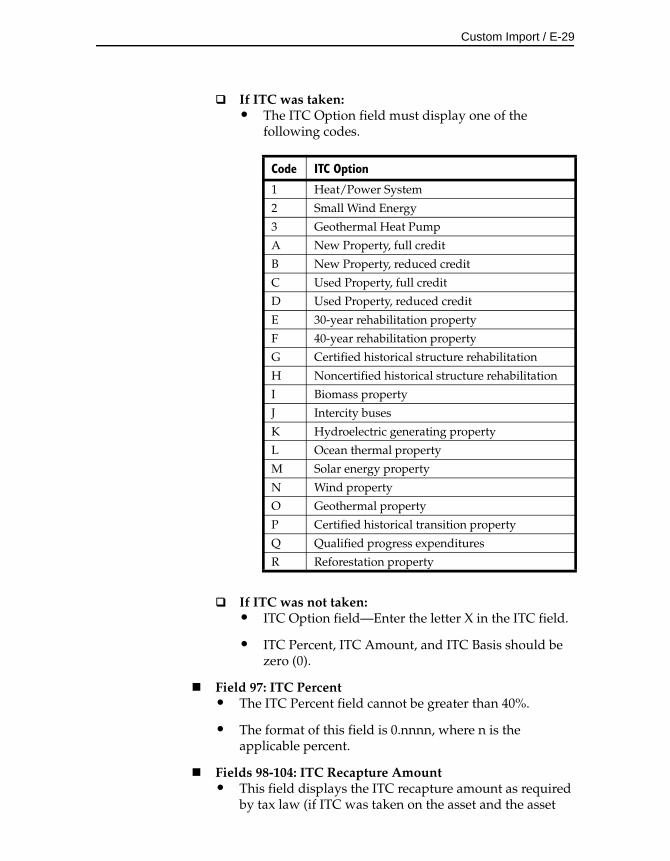
Custom Import / E-29
If ITC was taken:• The ITC Option field must display one of the
following codes.
If ITC was not taken:• ITC Option field—Enter the letter X in the ITC field.
• ITC Percent, ITC Amount, and ITC Basis should be zero (0).
Field 97: ITC Percent• The ITC Percent field cannot be greater than 40%.
• The format of this field is 0.nnnn, where n is the applicable percent.
Fields 98-104: ITC Recapture Amount• This field displays the ITC recapture amount as required
by tax law (if ITC was taken on the asset and the asset
Code ITC Option
1 Heat/Power System
2 Small Wind Energy
3 Geothermal Heat Pump
A New Property, full credit
B New Property, reduced credit
C Used Property, full credit
D Used Property, reduced credit
E 30-year rehabilitation property
F 40-year rehabilitation property
G Certified historical structure rehabilitation
H Noncertified historical structure rehabilitation
I Biomass property
J Intercity buses
K Hydroelectric generating property
L Ocean thermal property
M Solar energy property
N Wind property
O Geothermal property
P Certified historical transition property
Q Qualified progress expenditures
R Reforestation property
E-30 / FAS 50 Asset Accounting - Peachtree Edition
was disposed of before the end of its recovery life). The amount in this field is carried to the Form 4255—ITC Recapture worksheet, which is accessible through the Reports Menu.
Field 105: Location• User-defined.
Field 106: Manufacturer’s Serial Number• User-defined.
Field 107: Manufacturer’s Warranty Date• User-defined date field.
Fields 108-114: Mid-Quarter Flag• Enter “Y” to use the midquarter convention for
depreciation methods MF, MA, MT, MI, MR, AD, or AA.
• Enter “N” to use the half-year convention for depreciation methods MF, MA, MT, MI, MR, AD, or AA.
• Leave this field blank if using other depreciation methods.
Field 115: Non-Cash Proceeds• This field may be left blank. However, if the gain/loss
amount is based on this figure, the number should be entered.
Fields 116-122: Placed-in-Service Date• The placed-in-service date must be valid for the
depreciation method entered in the Depreciation Method field and the property types listed below.
• Property types:
• Property type H is valid only for dates in the range of 01/01/81 to 12/31/86.
• Property types P, R, C, E, F, Z, and V are valid with any placed-in-service date.
• Property types A, Q, and S are valid only for dates after 06/18/84.
• Depreciation Methods:
• ACRS = 1/1/81 - 12/31/86
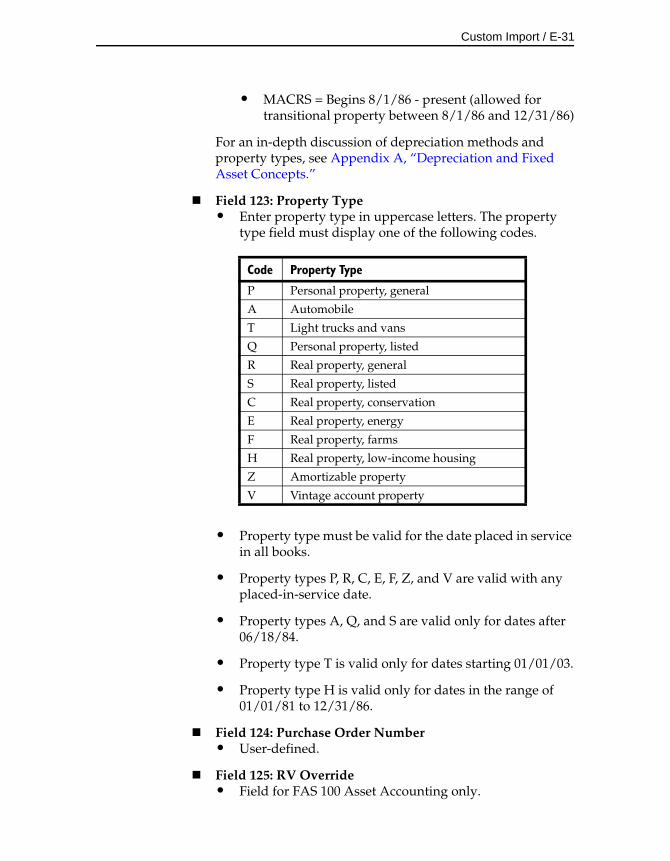
Custom Import / E-31
• MACRS = Begins 8/1/86 - present (allowed for transitional property between 8/1/86 and 12/31/86)
For an in-depth discussion of depreciation methods and property types, see Appendix A, “Depreciation and Fixed Asset Concepts.”
Field 123: Property Type• Enter property type in uppercase letters. The property
type field must display one of the following codes.
• Property type must be valid for the date placed in service in all books.
• Property types P, R, C, E, F, Z, and V are valid with any placed-in-service date.
• Property types A, Q, and S are valid only for dates after 06/18/84.
• Property type T is valid only for dates starting 01/01/03.
• Property type H is valid only for dates in the range of 01/01/81 to 12/31/86.
Field 124: Purchase Order Number• User-defined.
Field 125: RV Override• Field for FAS 100 Asset Accounting only.
Code Property Type
P Personal property, general
A Automobile
T Light trucks and vans
Q Personal property, listed
R Real property, general
S Real property, listed
C Real property, conservation
E Real property, energy
F Real property, farms
H Real property, low-income housing
Z Amortizable property
V Vintage account property
E-32 / FAS 50 Asset Accounting - Peachtree Edition
Field 126: RV Override Date• Field for FAS 100 Asset Accounting only.
Fields 127-133: Salvage Value• The salvage value cannot be greater than the asset’s
depreciable basis.
Fields 134-140: Section 179 Qualified?• This field indicates whether the asset is qualified to take
a Section 179 deduction and should be included in the phase-out calculations, whether or not the asset actually claims a Section 179 deduction.
• Enter “T” (for True) if the asset is qualified Sec. 179 property.
• Enter “F” (for False) if the asset is not qualified Sec. 179 property.
Fields 141-147: Section 179 Recapture Amount• When a pre-1987 asset on which the Section 179 expense
deduction has been taken is disposed of during either of the two taxable years following the acquisition year, all or part of the Section 179 expense must be added back to the asset’s basis (that is, recaptured).
• The calculation for the amount added back to the basis is:
• In the above equation, the depreciation on the Section 179 amount is the amount of depreciation that would have been taken on the Section 179 amount had there been no Section 179 deduction.
Fields 148-154: Section 179/Bonus Amount• This field should contain either a zero if no Bonus or
Section 179 were taken in the acquisition year or the total amount of Bonus or Section 179 that was applied to the asset.
• Bonus amount should not exceed $2,000 or 20% of the asset’s depreciable basis, whichever is less.
Section 179 taken
Depreciation on 179 amount–
Section 179 recapture
Custom Import / E-33
• Section 179 amount may not exceed the asset’s depreciable basis. Limitations for this field are based on the applicable law.
Fields 155-161: Section 179/Other Amount• Complete this field based on whether or not you are
claiming a Section 179 Other deduction. In order to enter an amount here you must enter a corresponding code in the Section 179/Other Code field.
Fields 162-168: Section 179/Other Code• Complete this field based on whether a Sec. 179/Other
deduction was taken.
If Sec. 179/Other was taken:• The Section 179/Other Code field must display one
of the following codes:
If Sec. 179/Other was not taken:• Enter the letter “X” in the Sec. 179/Other Code field.
Field 169-173: User Fields 1 through 5• User-defined.
Fields 174-79: User Fields 6 through 10 and User Numeric 1• Fields for FAS 100 Asset Accounting only.
Field 180: Vendor• User-defined.
Fields 181-187: Zone Type• Enter a zone type code in this field if your asset is located
in a special zone which entitles the asset to claim an additional Sec. 179 deduction above the regular dollar limits.
Code Sec. 179/Other Option
B EPA Sulfur Control Requirements
C Qualified Refineries
D Energy Efficient Commercial Buildings
E Advanced Mine Safety Equipment
O Other Basis Reduction
E-34 / FAS 50 Asset Accounting - Peachtree Edition
If the asset is located in a special zone:• The Zone Type field must display one of the
following codes.
If the asset is not located in a special zone:• Enter the letter “X” in the Zone Type field.
Code Definition
G Gulf Opportunity Zone
K Kansas Disaster Zone
E Enterprise Zone
D Qualified Disaster Zone
X No Zone Applies
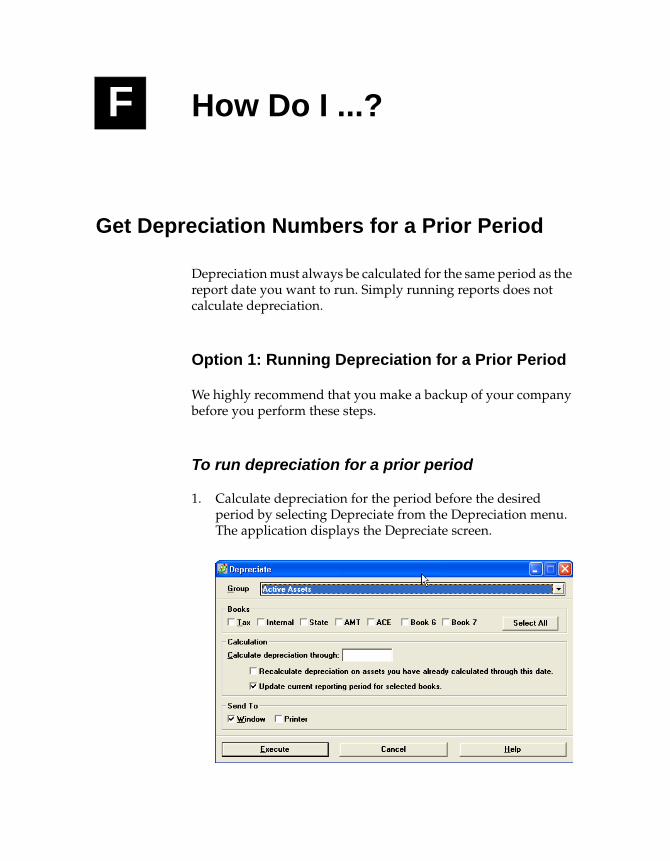
F How Do I ...?
Get Depreciation Numbers for a Prior Period
Depreciation must always be calculated for the same period as the report date you want to run. Simply running reports does not calculate depreciation.
Option 1: Running Depreciation for a Prior Period
We highly recommend that you make a backup of your company before you perform these steps.
To run depreciation for a prior period
1. Calculate depreciation for the period before the desired period by selecting Depreciate from the Depreciation menu. The application displays the Depreciate screen.
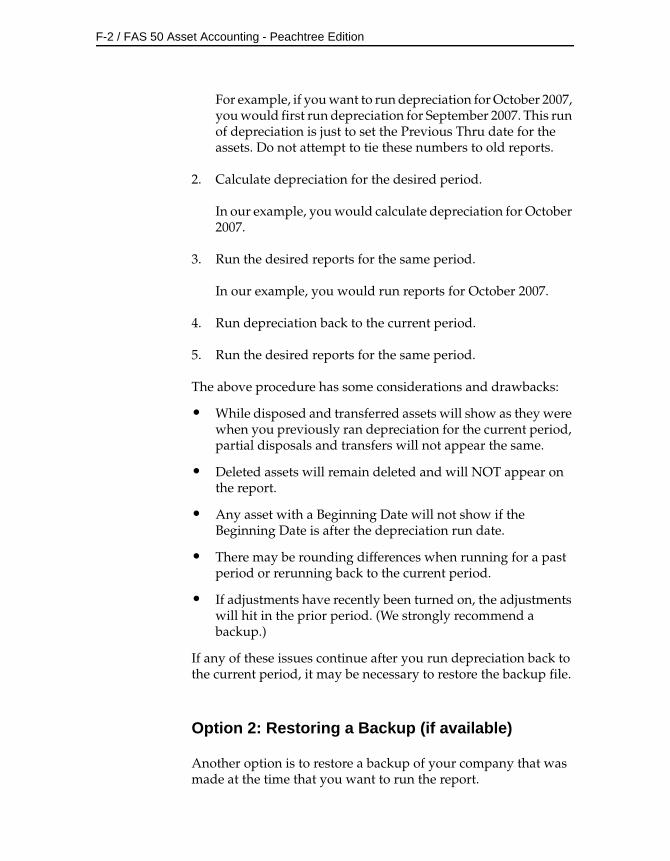
F-2 / FAS 50 Asset Accounting - Peachtree Edition
For example, if you want to run depreciation for October 2007, you would first run depreciation for September 2007. This run of depreciation is just to set the Previous Thru date for the assets. Do not attempt to tie these numbers to old reports.
2. Calculate depreciation for the desired period.
In our example, you would calculate depreciation for October 2007.
3. Run the desired reports for the same period.
In our example, you would run reports for October 2007.
4. Run depreciation back to the current period.
5. Run the desired reports for the same period.
The above procedure has some considerations and drawbacks:
• While disposed and transferred assets will show as they were when you previously ran depreciation for the current period, partial disposals and transfers will not appear the same.
• Deleted assets will remain deleted and will NOT appear on the report.
• Any asset with a Beginning Date will not show if the Beginning Date is after the depreciation run date.
• There may be rounding differences when running for a past period or rerunning back to the current period.
• If adjustments have recently been turned on, the adjustments will hit in the prior period. (We strongly recommend a backup.)
If any of these issues continue after you run depreciation back to the current period, it may be necessary to restore the backup file.
Option 2: Restoring a Backup (if available)
Another option is to restore a backup of your company that was made at the time that you want to run the report.
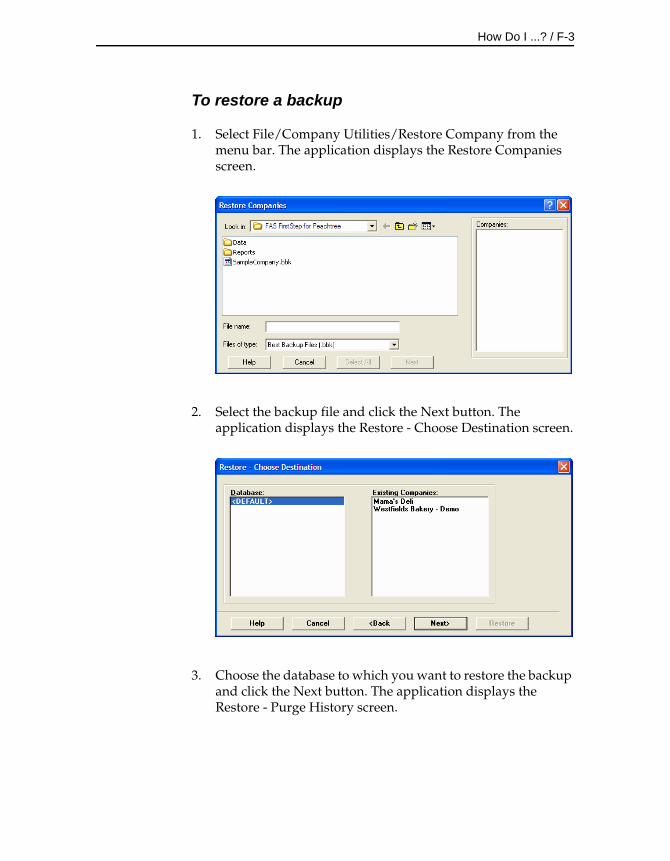
How Do I ...? / F-3
To restore a backup
1. Select File/Company Utilities/Restore Company from the menu bar. The application displays the Restore Companies screen.
2. Select the backup file and click the Next button. The application displays the Restore - Choose Destination screen.
3. Choose the database to which you want to restore the backup and click the Next button. The application displays the Restore - Purge History screen.

F-4 / FAS 50 Asset Accounting - Peachtree Edition
Note If the combined number of assets in all companies in your existing database will exceed 8,000 to 10,000 assets, then we strongly recommend that you restore the company to a new database.
4. Select the history events that you want to delete from the database, if any, and then click the Next button.
If you decide to use an existing database, a message indicates that a company with that name already exists in the database and asks if you want to overwrite the company or rename it.
5. Type a new company name, and then click the Rename button. (You may want to name the company after the date of the backup, such as Restore FY END 2007.)
Important If you click the Overwrite button, you will lose your current company information.
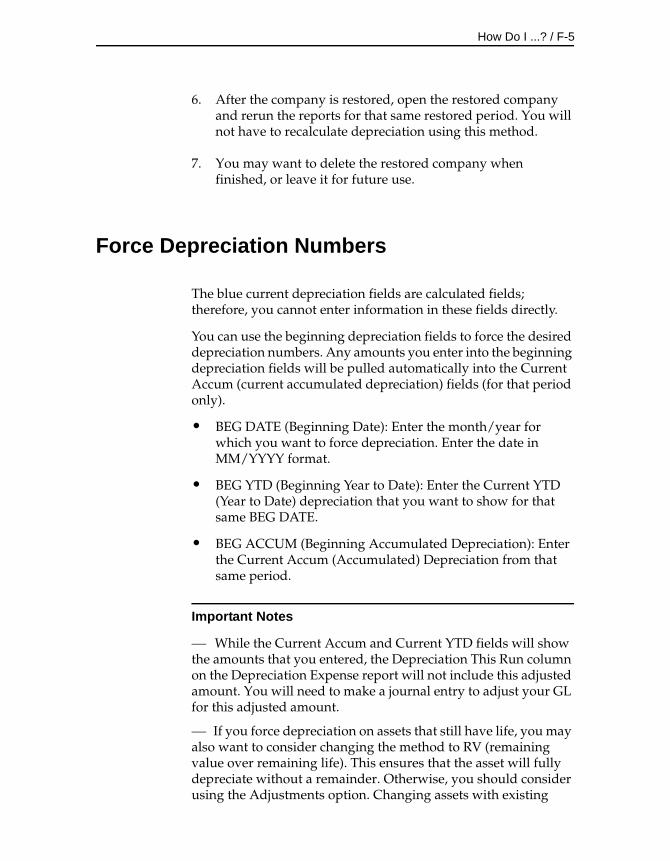
How Do I ...? / F-5
6. After the company is restored, open the restored company and rerun the reports for that same restored period. You will not have to recalculate depreciation using this method.
7. You may want to delete the restored company when finished, or leave it for future use.
Force Depreciation Numbers
The blue current depreciation fields are calculated fields; therefore, you cannot enter information in these fields directly.
You can use the beginning depreciation fields to force the desired depreciation numbers. Any amounts you enter into the beginning depreciation fields will be pulled automatically into the Current Accum (current accumulated depreciation) fields (for that period only).
• BEG DATE (Beginning Date): Enter the month/year for which you want to force depreciation. Enter the date in MM/YYYY format.
• BEG YTD (Beginning Year to Date): Enter the Current YTD (Year to Date) depreciation that you want to show for that same BEG DATE.
• BEG ACCUM (Beginning Accumulated Depreciation): Enter the Current Accum (Accumulated) Depreciation from that same period.
Important Notes
While the Current Accum and Current YTD fields will show the amounts that you entered, the Depreciation This Run column on the Depreciation Expense report will not include this adjusted amount. You will need to make a journal entry to adjust your GL for this adjusted amount.
If you force depreciation on assets that still have life, you may also want to consider changing the method to RV (remaining value over remaining life). This ensures that the asset will fully depreciate without a remainder. Otherwise, you should consider using the Adjustments option. Changing assets with existing
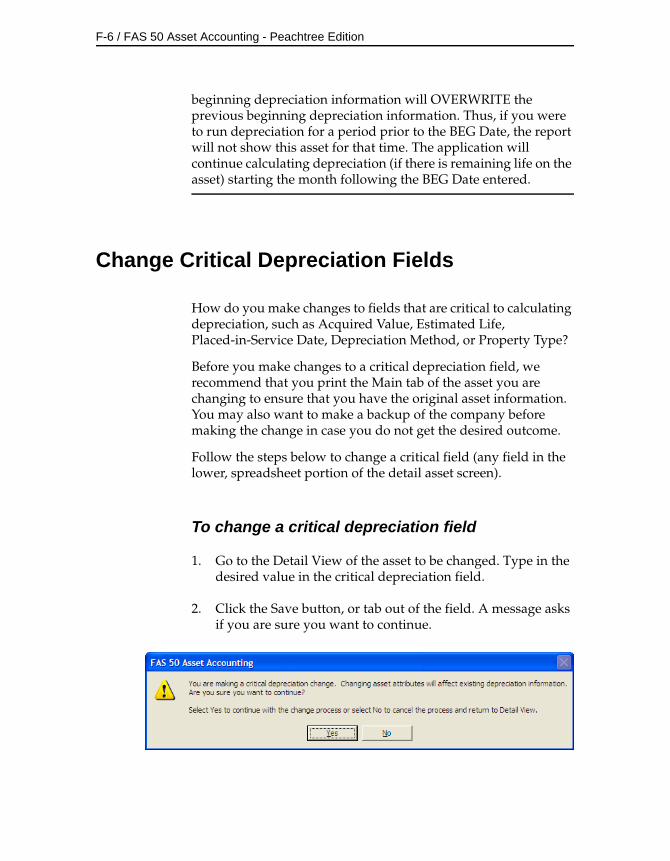
F-6 / FAS 50 Asset Accounting - Peachtree Edition
beginning depreciation information will OVERWRITE the previous beginning depreciation information. Thus, if you were to run depreciation for a period prior to the BEG Date, the report will not show this asset for that time. The application will continue calculating depreciation (if there is remaining life on the asset) starting the month following the BEG Date entered.
Change Critical Depreciation Fields
How do you make changes to fields that are critical to calculating depreciation, such as Acquired Value, Estimated Life, Placed-in-Service Date, Depreciation Method, or Property Type?
Before you make changes to a critical depreciation field, we recommend that you print the Main tab of the asset you are changing to ensure that you have the original asset information. You may also want to make a backup of the company before making the change in case you do not get the desired outcome.
Follow the steps below to change a critical field (any field in the lower, spreadsheet portion of the detail asset screen).
To change a critical depreciation field
1. Go to the Detail View of the asset to be changed. Type in the desired value in the critical depreciation field.
2. Click the Save button, or tab out of the field. A message asks if you are sure you want to continue.
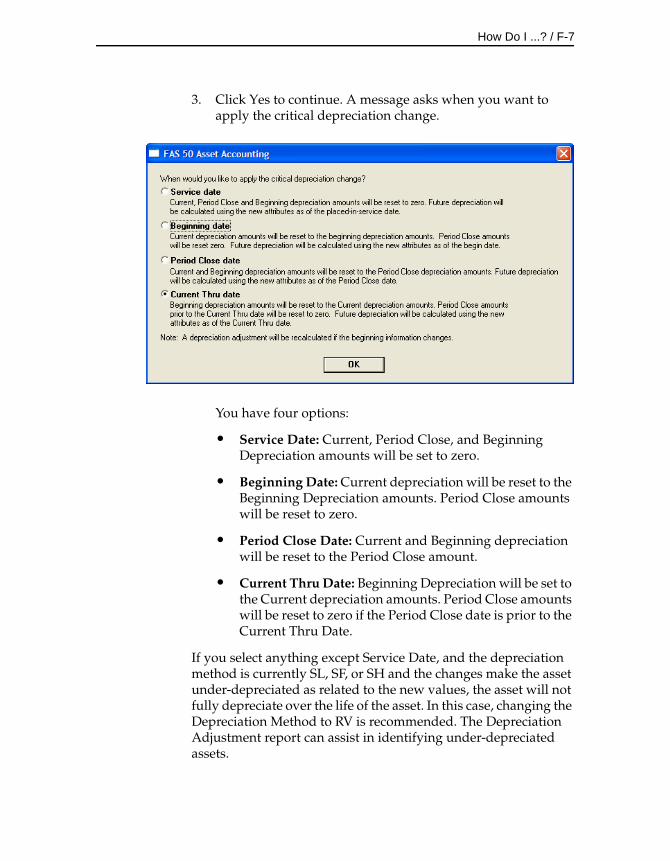
How Do I ...? / F-7
3. Click Yes to continue. A message asks when you want to apply the critical depreciation change.
You have four options:
• Service Date: Current, Period Close, and Beginning Depreciation amounts will be set to zero.
• Beginning Date: Current depreciation will be reset to the Beginning Depreciation amounts. Period Close amounts will be reset to zero.
• Period Close Date: Current and Beginning depreciation will be reset to the Period Close amount.
• Current Thru Date: Beginning Depreciation will be set to the Current depreciation amounts. Period Close amounts will be reset to zero if the Period Close date is prior to the Current Thru Date.
If you select anything except Service Date, and the depreciation method is currently SL, SF, or SH and the changes make the asset under-depreciated as related to the new values, the asset will not fully depreciate over the life of the asset. In this case, changing the Depreciation Method to RV is recommended. The Depreciation Adjustment report can assist in identifying under-depreciated assets.
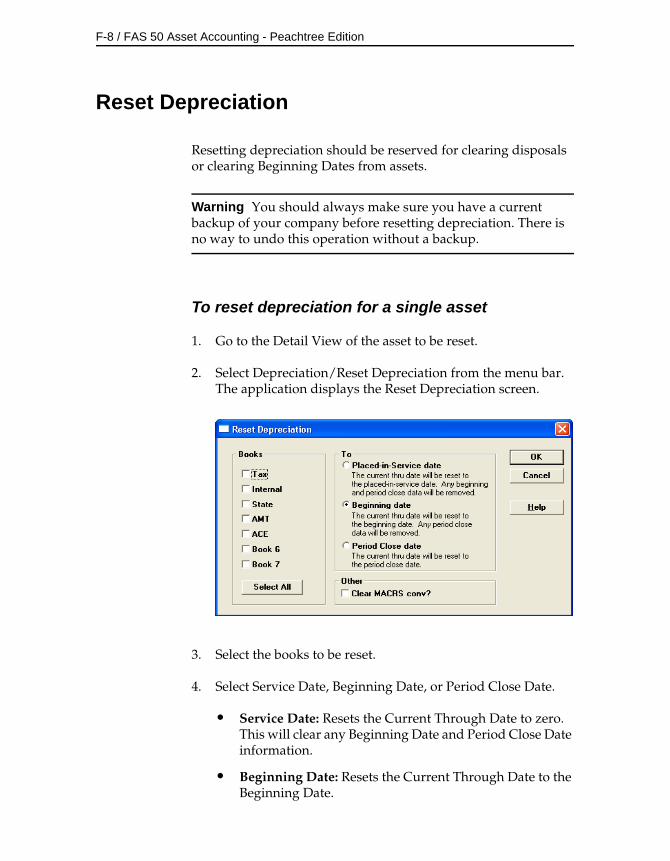
F-8 / FAS 50 Asset Accounting - Peachtree Edition
Reset Depreciation
Resetting depreciation should be reserved for clearing disposals or clearing Beginning Dates from assets.
Warning You should always make sure you have a current backup of your company before resetting depreciation. There is no way to undo this operation without a backup.
To reset depreciation for a single asset
1. Go to the Detail View of the asset to be reset.
2. Select Depreciation/Reset Depreciation from the menu bar. The application displays the Reset Depreciation screen.
3. Select the books to be reset.
4. Select Service Date, Beginning Date, or Period Close Date.
• Service Date: Resets the Current Through Date to zero. This will clear any Beginning Date and Period Close Date information.
• Beginning Date: Resets the Current Through Date to the Beginning Date.
How Do I ...? / F-9
• Period Close Date: Resets the Current Through Date to the last period close date.
5. Select Clear the Midquarter Convention if desired (affects MACRS assets only).
6. Click OK to execute the command.
7. Select Depreciation/Depreciate to recalculate depreciation after the reset.
To reset depreciation for a group of assets
1. Create a group of assets to be reset.
2. In Group View, select this group of assets in the Group field.
3. Select Edit/Select All from the menu bar.
4. Select Depreciation/Reset Depreciation from the menu bar.
5. Select the books to be reset.
6. Select Service Date, Beginning Date, or Period Close Date.
• Service Date: Resets the Current Through Date to zero. This will clear any Beginning Date and Period Close Date information.
• Beginning Date: Resets the Current Through Date to the Beginning Date.
• Period Close Date: Resets the Current Through Date to the last period close date.
7. Select Clear the Midquarter Convention if desired (affects MACRS assets only).
8. Click OK to execute the command.
9. Select Depreciation/Depreciate to recalculate depreciation after the reset.
F-10 / FAS 50 Asset Accounting - Peachtree Edition
Fix the Depreciation This Run Amount
What if Depreciation This Run is incorrect?
What do you do if you believe the Depreciation This Run amount on the Depreciation Expense report is incorrect? For example, the amount is too high or too low, or the amount is for the wrong month.
There could be several reasons for the problem. You may have skipped a month when running depreciation. You may have run depreciation on the same asset(s) more than once.
Depreciation This Run is defined as the depreciation from the last time depreciation was run to the current run of depreciation. For example, if you last ran depreciation for August 2007 and then ran depreciation for September 2007, the Depreciation This Run on the September Depreciation Expense report will be one month of depreciation. (We are assuming the asset is still taking depreciation and is not taking adjustments due to adjustment conventions.) If you last ran depreciation for September 2006 and then ran depreciation again for September 2007, then Depreciation This Run will reflect one year’s worth of depreciation.
When you dispose of an asset in a given month, the application calculates depreciation through that month and marks that asset with a through date of the month of disposal. If you then calculate depreciation on that asset for the month of disposal, the application sees it as the second time the asset has been run for the same month, so it reports Depreciation This Run from the Beginning Date (or Service Date if there is no Beginning Date). You can check this by looking at the Previous Thru Date column for the asset on the Depreciation Expense report.
To fix the Depreciation This Run amount
1. Calculate depreciation for the period (or month) before the desired period by selecting Depreciate from the Depreciation menu.
For example, if you want to run depreciation for October 2007, you would first run depreciation for September 2007. This run

How Do I ...? / F-11
of depreciation is just to set the Previous Thru date for the assets. Do not attempt to tie these numbers to old reports.
2. Calculate depreciation for the desired period (or month).
In our example, you would calculate depreciation for October 2007.
The Previous Thru column on the Depreciation Expense report represents the month that depreciation was last run. If you ran for September 2007 last month and October 2007 this month, you will see 09/2007 in the Previous Thru column. If the Previous Thru column says 00/00/00, this would represent an asset that was reset to its placed-in-service date or a new asset depreciated for the first time.
Import Assets into the Application
For instructions on importing assets into the application, see Appendix E, “Custom Import.” If you are having trouble importing assets, here are some things you may want to check:
• Make sure that the Excel file does not have extra worksheets. Even blank sheets need to be deleted. Only a file containing a single worksheet will import.
• The file cannot have any special formatting (besides General, Text (preferred), or Date-MMDDYY or MM/DD/YYYY). if you click on the upper-left hand corner box that highlights all cells in the worksheet and then right-click, select Formatting and choose Text. Then format the date columns to Date (MMDDYY or MM/DD/YYYY).
• The spreadsheet cannot contain formulas. If you suspect formulas may be the issue, you can Cut/Paste Special Values into a new worksheet.
• Save the file as an Excel 4.0 worksheet or Comma-Separated Values (.CSV) file. (In Excel, select File/Save as 4.0 Worksheet.)
• If you are importing any assets that have a depreciation percentage (for example, MT100, MF200, DB150), you will have to map a column for Depreciation Method and another
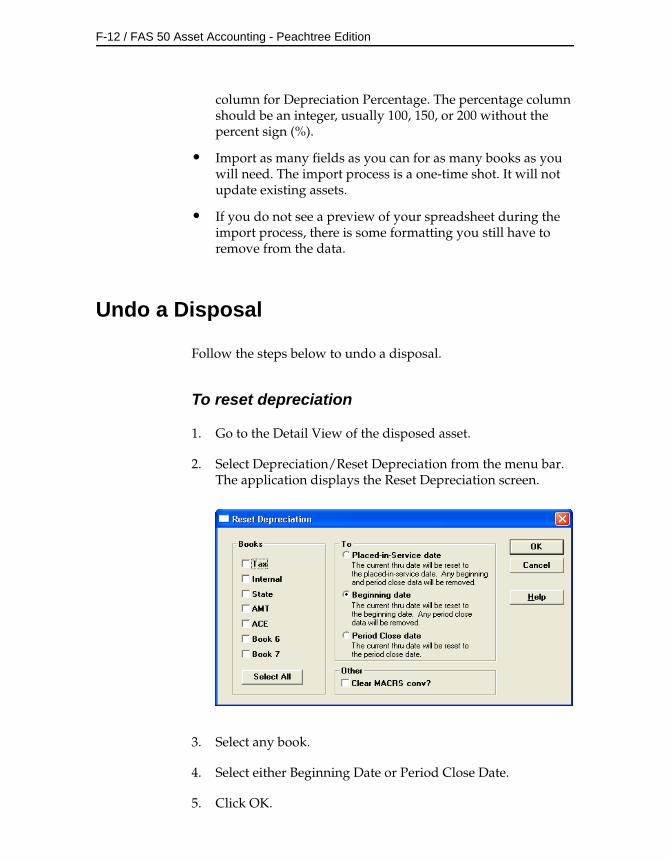
F-12 / FAS 50 Asset Accounting - Peachtree Edition
column for Depreciation Percentage. The percentage column should be an integer, usually 100, 150, or 200 without the percent sign (%).
• Import as many fields as you can for as many books as you will need. The import process is a one-time shot. It will not update existing assets.
• If you do not see a preview of your spreadsheet during the import process, there is some formatting you still have to remove from the data.
Undo a Disposal
Follow the steps below to undo a disposal.
To reset depreciation
1. Go to the Detail View of the disposed asset.
2. Select Depreciation/Reset Depreciation from the menu bar. The application displays the Reset Depreciation screen.
3. Select any book.
4. Select either Beginning Date or Period Close Date.
5. Click OK.

How Do I ...? / F-13
Important: You will need to run depreciation for the month prior to the month of disposal before redoing the disposal of the asset, and then run depreciation on the asset for the current month.

F-14 / FAS 50 Asset Accounting - Peachtree Edition
G Glossary
For greater detail about many of the terms in this glossary, see the appropriate section of this manual. The index will direct you to specific pages.
abandonmentA type of disposal where you voluntarily scrap an asset because of obsolescence, lack of suitability, or other reasons.
accounting periodAn accounting period is the economic cycle for which financial records are maintained. It may be a twelve-month period or a year that is less than twelve months (a short year). A calendar year is an accounting period that begins on January 1 and ends on December 31.
accumulated depreciationCurrent accumulated depreciation for an asset is the amount of depreciation taken, including current year-to-date depreciation, from the date the asset was placed in service to the date through which depreciation was last calculated.
ACEACE means Adjusted Current Earnings. ACE, as defined in Code Section 56(g), is the recalculation of C corporation income for purposes of computing an adjustment amount as required for the Alternative Minimum Tax.
acquired valueAn asset’s acquired value is the cost of obtaining the asset. This may be the asset’s purchase price, its fair market value, or its basis in the hands of the transferor, depending on the type of transaction. The acquired value is used as the beginning value for calculating the depreciable basis. See “depreciable basis.”
acquisition dateThe acquisition date is a general information field. It represents the date the asset was actually acquired, which may not be the same as the date it was placed in service.
G-2 / FAS 50 Asset Accounting - Peachtree Edition
ACRSACRS means Accelerated Cost Recovery System, a depreciation method created by the Economic Recovery Tax Act of 1981. ACRS allows faster depreciation of fixed assets than earlier depreciation methods. It provides a tax break and was intended to encourage the purchase of capital goods. It was modified by the Tax Reform Act of 1986 to become modified ACRS. See “MACRS.”
adjusted basisThe application uses an adjusted basis for the gain or loss calculation when assets are disposed. This adjusted basis is the depreciable basis plus a percentage of the ITC recapture amount (if any), plus salvage value (if subtracted in determining depreciable basis), minus current accumulated depreciation.
Adjusted Current EarningsSee “ACE.”
ADRADR means Asset Depreciation Range. ADR is a pre-1981 (that is, pre-ACRS) depreciation system that grouped assets by industry type.
ADSADS means Alternative Depreciation System. ADS is a straight-line alternative MACRS depreciation method using generally longer recovery periods than GDS recovery periods. ADS was created by the Tax Reform Act of 1986.
ADS lifeThe ADS life is generally used to depreciate pre-1999 MACRS property for AMT purposes. This is approximately the midpoint of the Asset Depreciation Range (ADR) in which the asset belongs.
alphanumeric fieldAn alphanumeric character is any letter or number you can create using your keyboard.
Alternative Depreciation SystemSee “ADS.”
Alternative Minimum TaxSee “AMT.”
Glossary / G-3
amortizationThe tax law requires taxpayers to recover certain specified capital expenditures through a process known as amortization. Amortization uses a straight-line calculation over certain specified time periods. Many intangible assets that can’t be depreciated can be amortized, such as business startup expenses, covenants not to compete, trademarks, and goodwill. Some tangible assets, such as pollution control facilities, some low-income housing, and the rehabilitation of certified historic structures, can also be amortized.
AMTAMT means Alternative Minimum Tax. The Tax Reform Act of 1986 changed the Alternative Minimum Tax rules to make it more difficult to avoid tax through the use of certain tax benefits known as tax preference items. The provisions for depreciation under the Alternative Minimum Tax rules serve to reduce the advantages available under the regular tax rules for accelerated depreciation and other preferences. The reductions in these advantages are added to taxable income.
ASCII fileASCII means American Standard Code for Information Interchange. An ASCII file is a text file without any special control characters such as for bold text or underlining.
Asset Depreciation RangeSee “ADR.”
asset groupAn asset group is a request from a user to search the company database for assets matching the range criteria the user has entered. For example, you could specify a range of 0 to 500 for the acquired value field, and the application would display a list of assets having an acquired value of $500 or less. For more information, see Chapter 3, “Understanding Key Elements.”
at-risk basisAn Investment Tax Credit on Section 38 property is allowable only to the extent that the asset holder is at risk. Except for real estate acquisitions, nonrecourse financing does not create risk in an investment.
averaging conventionsAveraging conventions assume assets are placed in service or disposed of at designated dates throughout the year. An averaging convention generally adopts a prescribed
G-4 / FAS 50 Asset Accounting - Peachtree Edition
in-service date that simplifies depreciation calculations and record keeping.
Examples of averaging conventions are the midmonth convention, full-month convention, half-year convention, modified half-year convention, and midquarter convention.
basisBasis usually refers to the acquired value (that is, purchase price); however, basis can have a number of meanings depending on the descriptive word that precedes it. For instance, depreciable basis is generally the acquired value adjusted for the percentage of business use, ITC taken, Section 179 expense or bonus depreciation, and salvage value (for certain depreciation methods only).
beginning dateThe date through which depreciation was calculated for the asset at the time you entered it in the application.
beginning depreciationBeginning depreciation is the amount of depreciation taken on an asset before the date you want to start calculating the asset’s depreciation. For example, if you switch from another depreciation system to FAS 50 Asset Accounting in May 2008 and you want the application to calculate depreciation from the beginning of the 2008 calendar year, an asset’s beginning depreciation would be all depreciation taken on it before 2008. For details, see Chapter 6, “Working with Assets.”
bonusFor assets acquired before 1981, some depreciation methods allowed an optional first-year bonus of up to 20% of the property’s basis. In the year of acquisition, this represented an additional amount of allowable depreciation. If the optional bonus was taken, the bonus amount was subtracted from the asset’s acquired value before the year’s regular depreciation was calculated.
book-related fieldsThe book-related fields are the data entry fields for which you enter (or accept) separate values in each depreciation book. All of these fields affect the depreciation calculations. Examples of book-related fields include the depreciation method and the acquired value.
Glossary / G-5
bootIn a trade-in of one asset for another, boot is any cash or note payable given to the seller in addition to the asset traded.
bulk disposalA type of disposal that occurs when you sell multiple assets for one selling price.
business-use percentageSome assets used in a business may also be for personal use. However, a business may only take depreciation on an asset to the extent that it is used for business. The percentage that an asset is used for business, if less than 100%, reduces the asset’s depreciable basis.
calendar yearA calendar year is the period of twelve months beginning January 1 and ending December 31. It is the most widely used accounting period.
cascadeThis command under the Window Menu places screens on top of each other, with the active screen on top and the inactive screen(s) slightly visible behind.
casualtyA type of disposal that occurs when an asset is stolen or damaged by a sudden natural cause or vandalism.
catalogThe catalog is a collection of images that can be opened on the Image Tab. You can associate any number of images in the catalog to the asset you are viewing. The catalog is built using the Image Manager, which is available at the Customize Menu.
classClass refers to user-defined classification codes for grouping fixed assets. Most companies have such codes. For example, a company might use this kind of coding system:
comma-delimited ASCII fileA file that contains a single comma between each field, double quotes around the text fields, and the extension .WFA.
A Automobiles
FF Furniture and fixtures
HW Computer hardware
G-6 / FAS 50 Asset Accounting - Peachtree Edition
companyA company is an organization you define for the purpose of grouping assets and is not necessarily a legal entity. For example, it may be an entire company, a division, a plant, or a branch.
company asset numberMany companies have an existing asset numbering system. The application lets you enter the asset’s existing number in the company asset number field and lets you search for the asset using that number.
company setupDefines critical depreciation-related elements of a company, such as short years and book defaults.
complex expressionAn expression that uses the and operator or the or operator to search for multiple criteria.
creditA tax credit is an amount that is subtracted from the income tax liability in a given year. Tax credits differ from deductions: credits are subtracted from the tax itself, resulting in a dollar-for-dollar reduction in the tax liability; deductions are subtracted from either gross income or adjusted gross income, resulting in a reduction in the amount of income subject to tax.
criteria stringA statement or series of statements that qualifies the characteristics of assets to be included in a group. Also called an expression.
current accumulated depreciationSee “accumulated depreciation.”
current through dateThe current through date is the date depreciation was last calculated for the asset in a given book. It is displayed in Detail View. Depreciation can be calculated by executing the Depreciate command from the Depreciate menu.
current year-to-date depreciationCurrent year-to-date depreciation includes all depreciation expense from the beginning of the fiscal year containing the current through date up to and including the through date. (The through date is the last date through which you calculated depreciation.)
Glossary / G-7
custom depreciation methodThe application lets you create custom depreciation methods. You enter annual depreciation percentages for the life of the asset and specify the disposal year averaging convention. When an asset uses the custom depreciation method, the application calculates depreciation each year based on that year’s percentage.
databaseAn internal software structure that stores data in a way that makes it extremely easy to search, sort, organize, and retrieve.
declining-balance depreciationUsing a declining-balance method of depreciation, assets are depreciated faster than using straight-line depreciation. The asset’s net book value is multiplied by a constant rate (125%, 150%, 175%, or 200%, divided by the estimated life or recovery period), which results in a greater amount of depreciation being expensed in the early years of an asset’s life and a smaller amount in later years.
defaultA default is a selection that appears or is used automatically if you press Enter or make no other choice. For example, if you select OK at the New Company screen, a message appears in a screen asking if you want to create the new company. The highlighted frame is on the Yes button. Therefore, Yes is the default.
A default also occurs when you enter data in certain book-related fields and the application automatically enters information in others. For example, when you enter the property type and the service date fields, the application provides a default depreciation method, estimated life, and ADS life.
depreciable basisDepreciable basis is the acquisition value adjusted to arrive at the total amount to be depreciated. See also “basis.”
depreciationDepreciation is the process of allocating the cost of an asset used in a business over the period of time during which the asset is used. It also suggests that an asset declines in value because of use, wear and tear, or obsolescence.
G-8 / FAS 50 Asset Accounting - Peachtree Edition
depreciation adjustmentThe application lets you enter year-to-date and accumulated depreciation amounts from your current depreciation books as beginning depreciation. The application then compares the difference between the depreciation entered and what the application would have calculated for the beginning period. The difference between the two, if any, is stored as an adjustment amount and appears in the Depreciation Adjustment report.
If not enough depreciation was taken for the asset, you may choose a depreciation adjustment to adjust for the difference immediately, in the post recovery period, or not at all. For instructions on choosing a depreciation adjustment for each depreciation book, see “The Book Overrides Page,” page 4-18.
depreciation methodsThe depreciation method determines the pattern of allocating the asset's cost to the specific years of its life. For example, a straight-line depreciation method allocates the asset's cost uniformly over its useful life. A declining balance depreciation method allocates a greater cost at the beginning of the useful life than at the end.
directoryA directory is a place on a hard drive, equivalent to a folder in a filing cabinet, where the application stores information. In Windows 95, directories are called folders.
disposal dateThe disposal date is the date on which the asset was sold, lost, damaged, stolen, exchanged, used up, worn out, broken, retired, or given away. It is not determined by the estimated life or recovery period, but by the actual disposal or retirement of the asset.
disposal methodThere are eight disposal methods: sale, abandonment, like-kind exchange, taxable exchange, involuntary conversion, bulk disposal, casualty, and other. The disposal method determines the default gain or loss treatment.
energy creditEnergy credits are available for certain assets used in the conservation of energy.

Glossary / G-9
estimated lifeEstimated life is the period over which an asset is to be depreciated or its cost is to be recovered. The estimated life often has nothing to do with the physical life span of an individual asset. The shorter the estimated life, the more rapidly the cost of an asset can be recovered.
expressionA statement or series of statements that qualifies the characteristics of assets to be included in a group.
fieldA field is an area that holds (or can hold) application data. Each field on the screen is labeled for its intended purpose. For example, the first field on the Bulk Disposal screen is labeled “Disposal Date.”
fiscal yearA fiscal year is the twelve-month period you use to define your accounting year.
fixed assetA fixed asset is property acquired by a business for use in its operations and having an estimated life of more than one year.
GAAPGAAP stands for Generally Accepted Accounting Principles. These include both guidelines and specific rules and procedures issued by bodies within the accounting industry, principally the Financial Accounting Standards Board (FASB) and the American Institute of Certified Public Accountants (AICPA), to standardize accounting practices. The goal of these principles is for firms to produce financial records that fairly reflect their operations.
gain or lossFixed assets that are disposed of usually are sold at a price above or below the net book value of the asset. This results in a gain or loss. For tax purposes, gain or loss is further affected by ITC recapture and Section 179 expense deductions and recapture. The Disposal Report shows whether the disposal of an asset results in a gain or loss. The calculated gain or loss is the amount realized; if this amount is reported for tax purposes, all of the amount may not be recognized. (Gains and losses on certain types of dispositions need not be recognized.) Recognition may also be deferred.
G-10 / FAS 50 Asset Accounting - Peachtree Edition
GDSGDS means General Depreciation System. GDS is the principal system used for depreciating MACRS property. Compared to the MACRS Alternative Depreciation System (ADS), the GDS system generally uses shorter recovery periods and faster depreciation methods.
general information fieldsGeneral information fields hold information about assets that does not affect the depreciation calculations but which is useful for asset management. For example, you can enter information about the G/L asset account number, the purchase order number, and the vendor or manufacturer. You can customize the general information fields and also define and use five additional fields for your own purposes.
general personal propertyAll personal property other than listed personal property and automobiles.
general real propertyAll real property that is not listed real property or required to be reported separately for tax purposes.
Generally Accepted Accounting PrinciplesSee “GAAP.”
groupAn asset group is the result of a request from a user to search the company database for assets matching the criteria the user has entered. For example, you could specify a range of 0 to 500 for the Acquired Value field, and the application would display a list of assets having an acquired value of $500 or less.
By defining and using groups you can quickly and efficiently view, run reports, and/or project depreciation for a selected group of assets.
half-year conventionThe half-year averaging convention treats all property placed in service during any taxable year (or disposed of during any taxable year) as if it were placed in service (or disposed of) at the midpoint of such year.
imageAn image can be a scanned picture of an asset, a drawing of an asset created with a number of software packages, or a
Glossary / G-11
scanned picture of documentation, such as a warranty, that you want to keep with the asset.
inactive assetsAssets can be inactivated. This removes them from all reports except the File Listing. Inactive assets can be reactivated. Inactive assets will not be depreciated, so be sure assets are fully depreciated before they are inactivated.
intangible assetsIntangible assets are those assets that provide future economic benefit but have no physical substance. Examples include goodwill, patents, copyrights, and trademarks.
Internal bookThe Internal book is for the depreciation calculations used in the preparation of financial statements. It follows Generally Accepted Accounting Principles (GAAP).
Investment Tax Credit (ITC)The ITC is a tax credit that can be taken for the purchase of specific types of business property. Although the ITC was eliminated by the Tax Reform Act of 1986, excess credit from previous years can be carried forward. Also, there are a few special situations in which the credit is still available. The credit must, however, be taken for the year in which the purchase was made, and it is limited by a maximum amount. Assets eligible to qualify for the ITC include business property, energy property, and rehabilitation property.
involuntary conversionA type of disposal that occurs when you involuntarily retire an asset due to a breakdown, condemnation, or reasons other than a casualty.
ITC recaptureIf an asset for which ITC was taken is disposed of before the end of its recapture period, the tax credit is recaptured by the IRS (repaid by the owner) on a prorated basis. The amount to be repaid is the ITC recapture amount.
like-kind exchangeA type of disposal that occurs when you exchange an asset for a similar asset. It can include the receipt of money or dissimilar property.
listed propertySection 280F of the Internal Revenue Code defines certain kinds of property for which special information must be
G-12 / FAS 50 Asset Accounting - Peachtree Edition
provided on IRS Form 4562. These assets are those that can be used for both business and personal purposes. They include passenger cars and other forms of transportation; and entertainment, amusement, and recreational properties.
low-income housingLow-income housing means any building that has met certain federal guidelines and where the dwelling units are held for occupancy on a rental basis by families and individuals of low or moderate income.
MACRSMACRS is an acronym for Modified Accelerated Cost Recovery System. It is a method of depreciation as modified by the Tax Reform Act of 1986, and it is used for most property placed in service after 1986.
menu barA standard Windows interface tool used to access specific functions or actions in the application.
midquarter conventionThe midquarter convention is a special averaging convention that applies only when more than 40% of qualifying MACRS property is placed in service in the last three months of the tax year. Under this convention, qualifying MACRS property is treated as though it were placed in service in the middle of the quarter in which it was purchased.
Modified ACRSSee “MACRS.”
net valueThe net value of an asset is its acquisition value minus any Section 179 expense deduction minus its total accumulated depreciation.
numeric fieldA numeric field accepts only numbers (no letters or other keyboard characters except a single decimal point). For example, a field used to enter dollar values is a numeric field.
168 AllowanceThe 168 Allowance refers to the additional 30%, 50%, or 100% depreciation allowance that the application calculates when you select a “plus 168” depreciation method for a qualified asset placed in service after September 10, 2001. You can select a 50% allowance on qualifying assets placed in service after May 5, 2003.
Glossary / G-13
personal propertyPersonal property generally includes fixed assets that are movable (that is, not attached to the land), and that are not real property (buildings). Equipment and machinery are examples of personal property.
placed-in-service dateThe date that an asset is ready and available for a specified use is the date it was placed in service for depreciation purposes. This date is entered for each depreciation book and may be different from the date it was acquired. You can enter an acquisition date in the general information field if you need it for warranty, insurance, or other purposes.
“plus 168” depreciation methodA “plus 168” depreciation method is one that provides an additional 30%, 50%, or 100% depreciation deduction in the year you place an asset in service. The application has four “plus 168” depreciation methods: MA, MR, AA, and SB.
postrecovery periodThe postrecovery period is the period that begins immediately after the end of an asset’s normal depreciable life.
printer portA printer port is where your printer cable connects to the computer.
property typeThere are two major types of property: tangible and intangible. Tangible property is either personal property or real property. The application breaks down personal and real property into eleven types. The property type you enter for the asset determines which depreciation methods you can use and other factors in the depreciation calculation, such as how to apply averaging conventions.
RAMRAM stands for random access memory. It is your computer’s internal memory, which the application uses as its work space and temporary storage area. The application saves data permanently on your computer’s hard drive.
rangeYou can specify which assets to include in an Asset Group or in a report by selecting a range of assets. The range specifies which values must be found in the selected field for the asset to be included. For example, if the range for acquired value is
G-14 / FAS 50 Asset Accounting - Peachtree Edition
0 to 500, any asset having an acquired value of $500 or less will be included in the group results or in the report.
reactivate assetsAn asset that has been made inactive may be made active again. An inactive asset is no longer depreciated and does not appear on reports. After being reactivated, the asset again appears in reports and recommences depreciation, if its cost is not fully recovered.
real propertyReal property includes land and generally anything erected on or attached to the land, such as a building or a parking lot.
recovery periodAs compared with the period of time over which an asset may reasonably be expected to be useful, the recovery period is a statutory designation of depreciable lives under ACRS and MACRS. Therefore, it is the period of time over which such an asset is depreciated.
recovery propertyRecovery property is property depreciated under ACRS or MACRS (method AT, SA, ST, MF, MT, MI, or AD), which requires the use of a recovery period as the asset’s estimated life.
refreshUpdates all data in the current group. Click the Refresh button on the main system screens.
remaining lifeRemaining life is an asset’s original estimated life less the number of years for which depreciation has already been taken.
remaining valueRemaining value is an asset’s original depreciable basis less depreciation taken to date. It is also called remaining basis.
replicate [an asset]Fixed assets that are similar or identical can be entered once and then replicated as many as 99 times to speed up the data entry process. For example, if you had four identical chairs, you might enter the first one and then replicate that asset three times.
Glossary / G-15
saleA type of disposal that occurs when you sell an asset for:
• Cash
• Cash and noncash items (if not qualifying as an exchange).
salvage valueThe salvage value of an asset is the value it’s expected to have at the end of its useful life. Straight-line, sum-of-the-years’-digits, and custom depreciation methods subtract salvage value from an asset’s depreciable basis, while other methods will not depreciate below the salvage value. ACRS and MACRS methods disregard salvage value in calculating depreciation.
scrollScrolling refers to the movement of a screen display in a manner similar to unrolling a scroll. This scrolling can be done by using the scroll bars or the arrow keys. You can scroll a report up, down, left, and right.
Section 179 expenseSection 179 of the Internal Revenue Code allows the costs of certain new assets to be treated as expenses rather than capital expenditures and to be deducted in the year placed in service instead of depreciated.
short yearA short year occurs when there is an accounting period of less than twelve calendar months. It often appears in the first and last years of a company’s life.
simple expressionAn expression that searches for just one criterion.
SmartListA SmartList is a customized drop-down list box of available entries for a field. You can give a field a SmartList by using the field customization feature.
sortTo sort a report means to put the items in the report in a specified order. For example, the simplest way to sort a report is to let the application print the assets in order by System Number. You can specify that you want the assets sorted by some other field, such as by class, if you want the assets
G-16 / FAS 50 Asset Accounting - Peachtree Edition
organized for a particular purpose. Use the Group Manager to define how you want the assets to be sorted.
straight-line depreciationStraight-line depreciation generally allows an equal amount of depreciation for each year in the asset’s estimated life. Exceptions for the first and last years in the life are caused by the averaging convention in use for the asset.
sum-of-the-years’-digits depreciationSum-of-the-years’-digits depreciation is an accelerated method of depreciation that results in a greater amount of depreciation being expensed in the early years of an asset’s life and a smaller amount in later years.
system (or SYS) numberThe application assigns each asset a permanent system number that can be used to find the asset in the data files. The number is different for each asset. When you set up a company, you determine what the beginning system number will be. The application also uses the system number in sorting assets in reports.
tabThe application makes efficient use of the space on a screen by providing tabs which provide access to different types of information on that screen.
tangible assetsTangible assets are those assets that provide economic benefit and have physical substance. See also “intangible assets.”
Tax bookThe Tax book is for the depreciation calculations used when reporting regular depreciation on federal tax returns under IRS rules.
tax creditA tax credit reduces, dollar for dollar, the amount of tax to be paid.
tax deductionA tax deduction reduces the amount of net income subject to tax.
tax preference (ACRS)A tax preference for ACRS real property is the difference between depreciation calculated by ACRS and that calculated using straight-line depreciation. Other pre-1987 real property
Glossary / G-17
also creates a tax preference to the extent that accelerated depreciation exceeds the straight-line depreciation amount. Tax preferences are used in calculating the Alternative Minimum Tax.
taxable exchangeAn exchange of dissimilar property, such as exchanging a car for land. It can also include the receipt of money.
taxable yearTaxable year means the period for which taxable income is computed. It may be a twelve-month period or a year that is less than twelve months (a short year). If it is a calendar year, it begins on January 1 and ends on December 31.
templateAn asset template is predefined asset information for a certain kind of asset. Once you have saved as much or as little data as you want for an asset as an asset template, you can use the template to quickly create new assets that need only a small amount of modification to be unique, for example, giving each asset its own asset number.
through dateThe date through which the application last calculated depreciation for the asset in a given book. It is displayed in Detail View. Depreciation can be calculated by executing the Depreciate command from the Depreciate menu.
toolbarA standard Windows interface tool used to initiate specific functions or actions through the use of buttons.
transitional propertyIf, at the time that a tax provision expires, a company has a firm agreement that certain property be delivered, that property is called transitional property. The rules of the tax provision can usually be applied to transitional property even though the property is not yet placed in service when the tax provision expires.
user booksUser books are depreciation books not designated for specific tax reporting purposes. The predefined user book is the Internal book. The default information in the Internal book conforms to GAAP. The other user books, Book 6 and Book 7, may be defined as you wish.
G-18 / FAS 50 Asset Accounting - Peachtree Edition
utilitiesUtilities are programs or functions of an application that help the user maintain the database and perform other tasks that are not the primary purpose of the application. For example, some of the utilities let you inactivate assets, reset depreciation, and export ASCII files.
vintage accountAsset Depreciation Range (ADR) depreciation allowed multiple asset accounts to be used from 1971 through 1980. These accounts are called vintage accounts, referring to the year in which the multiple assets that comprised a particular account were placed in service.
Index
Numerics168 Allowance
calculating A-30changing depreciation method 8-39electing 8-36electing out 8-46field 6-26including in depreciation expense 8-46luxury auto limits A-9qualifying assets 8-38, A-29switching depreciation methods 8-41
168 Allowance % field 6-22168 Allowance switch
performing 8-41qualifying assets 8-45
Aabandonment A-42Accelerated Cost Recovery System
See ACRS depreciationACE book 4-13, A-4
See also Adjusted Current Earnings (ACE)book emulation 4-24defaults A-40
acquired value 6-13overview A-20
acquisition date 6-5, 6-11ACRS depreciation
ACRS table (AT) B-22straight-line ACRS B-25
activating assets 7-16activity codes, chart 3-8Adjusted Current Earnings (ACE)
ACE book 4-13, 4-24, A-4defaults A-40
adjustments to depreciation 4-20ADS (MACRS Alternative Depreciation
System)ADS life 6-15, A-31depreciation method 6-14, B-15, E-26
alternate ACRS, straight-line B-25Alternative Minimum Tax (AMT)
AMT book 4-13, A-3defaults A-38
amortizable property A-14AMT book 4-13, A-3
See also Alternative Minimum Taxdefaults A-38
ASCII data, exporting to D-1asset list, definition 2-10asset sort order, temporary changing 2-25assets
See also purging asset historyactivating 7-16adding 6-1blank data collection forms 6-41browsing 2-22copying 6-34creating 6-1, 6-34, 6-38deleting 7-18Detail View 2-8, 2-11editing 6-49editing disposal information 7-14finding 2-19Group View 2-8, 2-9history 6-43identification 3-8identifying disposed 7-1inactivating 7-16locating 2-19new 6-1notes 6-49overview 6-1printing asset pages 6-41reactivating 7-18replicating 6-34reviewing for tax compliance 8-70save as group 4-32searching for 2-19selecting 2-13, 2-19, 9-6system number 3-8templates 6-38, 6-40viewing 2-8
at-risk rules 6-24, A-28audit advisor validations 8-72automobiles A-8averaging conventions 4-18, 8-3, A-15
Bbackups 5-8
restoring backed-up company 5-10beginning date 6-25
Index-2
beginning depreciation 6-25changing 8-22period close fields 8-27
bonus depreciation 6-17, 6-21overview A-23using bonus field 6-30
Book 6 4-13, A-36Book 7 4-13, A-36book defaults 6-50book-related fields
definition 2-12using 6-12
booksACE A-4AMT A-3copying information 6-35defaults page 4-13emulate 4-14, 4-24Internal A-3location 2-12overrides page 4-18overview A-2setting defaults 4-13State A-3Tax A-2User A-5
browsing assets 2-22budgetary projection
annually 8-16monthly 8-15running 8-14
bulk disposals 7-6, A-43business-use percentage 6-16, 6-28
overview A-21buttons, changing position of 4-58
Ccalculate depreciation through 8-7calculation assumptions 9-22calculator, accessing the Windows 2-26calendar, selecting dates 2-26casualty loss A-43changing depreciation-critical fields 8-20changing position of buttons 4-58class field 6-11column width, changing 2-24companies 5-1
activate on startup 4-54
companies (continued)backing up 5-8closing company 5-3copying 5-5creating 4-4deleting 5-3editing company setup 5-2information fields 4-11opening existing company 5-1overview 3-2restoring backed-up company 5-10why use more than one 3-2
company asset number 3-8, 6-10contacting Sage FAS 2-4conventions
See also averaging conventionsadjustment conventions 4-20
copyingassets 6-34book information 6-35data 2-28short year information 6-37
criteria C-1current year-to-date 6-27custodian field 6-12custom depreciation methods 8-30customer number
updating 2-5viewing 2-7
customized reportsadding to favorites 9-7reporting period, setting 9-27
customizingasset fields 4-40, 4-46depreciation methods 8-30, B-53own depreciation calculation B-52SmartLists 4-46status line 4-58toolbar 4-57
cutting data 2-28
Ddata
cutting, copying, pasting 2-28exporting D-1replacing data globally 2-21
data structure, overview 3-1
Index-3
databasecreating 4-1deleting 5-3locating 5-17managing 5-16renaming 5-18
Database List Manager 5-17, 5-20date fields 2-26
beginning date 6-25current year-to-date 6-27formats 2-27placed in service date 6-5, 6-13, A-15through date 6-26, 8-7which century 2-27
declining-balance depreciation, methods B-36defaults
ACE book A-40AMT book A-38book defaults 6-50depreciation 4-14, A-34forcing defaults 6-50gain or loss recognition A-46setting folder for file creation 4-53State book A-38Tax book A-35User book A-36
deletingassets 7-18companies 5-3databases 5-3groups 4-33history 6-47
depreciable basis, overview A-20depreciation
See also depreciation methodsadjustments 4-20averaging conventions 4-18, A-15calculating 8-1, 8-5calculating for different books 8-4calculating for earlier periods 8-3calculation dates 8-1concepts 8-1, A-1creating custom methods 8-30critical fields, changing 8-20defaults 4-14, A-34elements of A-7first-year bonus, overview A-23methods 4-15, 6-13, B-1midquarter convention 8-3, A-18
depreciation (continued)monthly figures 8-2no depreciation B-53overview A-1, A-6own depreciation calculation B-52period close 8-23posting to Peachtree 8-8projecting 8-14property types A-7quick projection 8-17resetting 8-3, 8-11, 8-23short years A-19storing calculations 8-23this run 8-1through date 6-26, 8-7
depreciation adjustments, setting defaults 4-20depreciation books
See booksdepreciation methods
ACRS B-22, B-25ADS B-15ADS plus 168 B-17alternate ACRS B-25changing for 168 Allowance 8-39custom methods 8-30declining-balance B-36formula plus 168 B-8Indian Reservation plus 168 B-19MACRS formula B-3MACRS Indian Reservation B-18MACRS table B-10overview 6-13, B-1own method B-52remaining value over remaining life B-49straight-line B-28straight-line plus 168 B-31sum-of-the-years’-digits B-42switching for 168 Allowance 8-41
deselect all 2-14Detail View 2-8, 2-11detail, subtotals and totals 9-14Disaster Assistance property
designating assets as QD Zone property 8-68Qualified Disaster Zone defined 8-67Section 179 limits for 8-68
Disposal worksheet 7-5disposals
bulk 7-6editing disposal information 7-14
Index-4
disposals (continued)how to dispose assets 7-2individual assets 7-2overview A-42resetting depreciation 8-11viewing calculation 7-15viewing current-year 7-15worksheet 7-15
Eediting
asset data 2-21, 6-49company setup 5-2disposal information 7-14groups 4-33
emulating books 4-14, 4-24Enterprise Zone, Section 179 limits for 8-59entry mask 4-42estimated life 6-15
overview A-31exchange field 6-11exiting application 2-7exporting asset data D-1
using Export Helper D-2expressions 4-35, C-1
FFAS Depreciation Guide, viewing 2-3fields
available for exporting D-11book-related 6-12customizing 4-40, 4-46depreciation-critical, changing 8-20general information 2-11, 6-10overview 3-7period close, clearing 8-28reserved 4-44SmartLists 4-46
file creation, setting default folder 4-53finding
assets 2-19data 2-19
first-year bonusSee bonus depreciation
fiscal year-end field 4-14folder buttons, changing position of 4-58
force defaults 6-50full-month convention A-18
GG/L accumulated account number 6-5, 6-11G/L asset account number 6-4, 6-11G/L expense account number 6-4, 6-11gains and losses A-44
recognizing 7-4general information fields 6-10
definition 2-11general ledger accounts, updating 4-28global data replacement 2-21GO Zone
definition 8-61depreciation rules for 8-60designating assets as GO Zone property 8-61Section 179 limits for 8-61
goto fielddefinition 2-10using 2-19
Group Manager, creating group 4-31Group View 2-8, 2-9groups
creating 4-30creating from selected assets 4-32criteria page 4-35defining 4-35definition 2-10deleting 4-33editing 4-33Group Manager 4-31overview 3-4refresh 4-39, 4-55renaming 4-33save as group 4-32sort criteria 4-37specifying criteria 4-35, C-1switching between 2-13updating 4-39, 4-55viewing 2-13
Gulf Opportunity Zonedefinition 8-61depreciation rules for 8-60designating assets as GO Zone property 8-61Section 179 limits for 8-61
Index-5
Hhalf-year convention 4-19, A-16help
contacting Sage FAS 2-4FAS Depreciation Guide 2-3online 2-2Sage Live Connect 2-5
historypurging during restore 5-10purging from database 6-47setting up history events 6-46viewing asset 6-43
Iidentifying assets 3-8implementing application 1-2importing data
Field Map report E-15file types E-1Import Exceptions report E-16Import Helper E-1
inactivating assets 7-16include Sec. 168 Allowance and Sec. 179 in
expense fielddefinition 4-12using 8-46
Indian Reservation property B-18installation
See FAS 50 Asset Accounting - Peachtree Edition Quick Start Guide
Internal book 4-13, A-3Investment Tax Credit (ITC) 6-23
addback A-45at-risk rules 6-24, A-28reduction of basis A-24setting defaults 4-23
involuntary conversionsdefined A-44entering 7-10IRS guidelines 7-8luxury automobiles 7-14
IRS table 2-12ITC
See Investment Tax Credit
KKansas Disaster Zone
definition 8-64designating assets as KD Zone property 8-65Section 179 limits for 8-65
key column in reports 9-21keyboard, using 2-15
Lleasehold improvement property A-14light trucks and vans A-10like-kind exchanges
defined A-43entering 7-10example 7-9IRS guidelines 7-8luxury automobiles 7-14
listed property A-12location field 6-11losses A-44
recognizing 7-4low-income housing A-13luxury automobiles A-8
involuntary conversions 7-14like-kind exchanges 7-14
MMACRS ADS
See ADSMACRS depreciation
ADS method B-15ADS plus 168 (AA) B-17formula method (MF) B-3formula plus 168 (MA) B-8Indian Reservation (MI) B-18Indian Reservation plus 168 (MR) B-19table method (MT) B-10
main screen 2-9menu bar, definition 2-9methods
See depreciation methodsmidmonth convention A-17midquarter convention 8-3
definition A-18setting 4-19
modified half-year convention A-16

Index-6
Nnet book value 6-27New York Liberty Zone
definition 8-51depreciation rules for 8-49entering assets 8-51Section 179 limits 8-53
no depreciation B-53non-depreciable assets B-53notes 6-49
Oonline Help 2-2operators C-1overdepreciated assets 4-20own depreciation calculation B-52
Ppages, definition 2-11pasting data 2-28Peachtree application
importing general ledger accounts from 4-26posting depreciation expense to 8-8updating general ledger accounts from 4-28
period close 8-23beginning depreciation fields 8-27clearing 8-28saving calculations 8-25
placed in service date 6-5, 6-13, A-15posting depreciation
calculating depreciation before posting 8-8preferences
company page 4-56display page 4-57setting 4-52system page 4-54
printingasset pages 6-41blank data collection forms 6-41setting up your printer 4-58
prior depreciation, beginning depreciation 6-25projecting depreciation
annually 8-16budgetary 8-14monthly 8-15quick 8-17
property type 6-6, 6-13, A-7purging asset history
during restore 5-10from database 6-47
QQualified Disaster Zone
definition 8-67designating assets as QD Zone property 8-68Section 179 limits for 8-68
quick projection 8-17Quick Projection report 8-18
Rreactivating assets 7-18recognize gain or loss 7-4Recovery Assistance property
designating assets as KD Zone property 8-65Kansas Disaster Zone defined 8-64Section 179 limits for 8-65
recovery periods, overview A-32refresh group 4-39, 4-55remaining value over remaining life B-49renaming groups 4-33replacing data globally 2-21replicating assets 6-34reporting period, setting 9-27reports
calculation assumptions 9-22defining 9-11Disposal Worksheet 7-5exporting 9-26Field Map E-15Import Exceptions E-16interpreting common data 9-21key column 9-21list of available 9-1overview 9-1Quick Projection 8-18round to whole dollars 4-12running 9-5selecting assets 9-6SmartList 4-51verifying run date 9-9viewing 9-19
reserved field names 4-44
Index-7
resettingbook defaults 6-50depreciation 8-3, 8-11, 8-23
restoring backups 5-10round to whole dollars 4-12run date on reports 9-9
SSage Live Connect 2-5sale of assets
See disposalssalvage value 6-23
overview A-22save as group 4-32search for data 2-19Section 179 expense deduction 6-17
addback A-46including in depreciation expense 8-46limits for Enterprise Zone property 8-59limits for Gulf Opportunity Zone property
8-61limits for Kansas Disaster Zone property 8-65limits for New York Liberty Zone property
8-53limits for Qualified Disaster Zone property
8-68maximum dollar limit 6-17overriding on Form 4562 8-55overview A-23sport utility vehicles A-12using Section 179 field 6-30
select all 2-14selecting assets 2-13service date 6-5, 6-13
overview A-15short years A-19
clearing 4-17copying 6-37page 4-16
SmartLists 4-46creating 4-47overview 3-7
sortingasset list 4-37asset order 2-25assets for reports 4-37
sport utility vehicles, Sec. 179 limit on A-12starting application 2-1
starting system number field 4-11State book 4-13, A-3
defaults A-38status line 4-58straight-line methods B-28straight-line plus 168 B-31subtotals and totals only 9-14sum-of-the-years’-digits depreciation B-42system number 3-8, 4-11system requirements
See FAS 50 Asset Accounting - Peachtree Edition Quick Start Guide
Ttabs, definition 2-11Tax book 4-13, A-2
defaults A-35tax compliance, reviewing assets for 8-70taxable exchange A-43templates
applying 6-40creating 6-38definition 2-11saving asset as 6-38
through date 6-26, 8-7toolbar
buttons 2-16customizing 4-57definition 2-10icons 2-16
troubleshootingSee FAS 50 Asset Accounting - Peachtree Edition
Quick Start Guidetypes of property 6-6, 6-13, A-7
Uunderdepreciated assets 4-21unselect all 2-14updating general ledger accounts 4-28User book A-5
defaults A-36user fields 6-12
Vverifying report run date 9-9viewing assets 2-8, 2-19vintage account property A-14
Index-8
Wworksheet button 7-15
Yyear-end closing, period close 8-23