
Exor Managed Service - Bentley · This document explains how to connect and log into Exor Managed...
29
exor corporation ltd. Exor Managed Service Getting Connected
Transcript of Exor Managed Service - Bentley · This document explains how to connect and log into Exor Managed...

exor corporation ltd.
Exor Managed Service
Getting Connected


(c) Exor Corporation Ltd
Table of Contents
Table of Contents ............................................................................... 1
Document Control ............................................................................... 2
Author ..................................................................................................... 2
Document Summary ..................................................................................... 2
Document History........................................................................................ 2
Reference Documents ................................................................................... 2
Distribution ............................................................................................... 2
Document Quality Assurance ........................................................................... 2
Connecting ........................................................................................ 3
Preparation ............................................................................................... 3
Client PC setup .......................................................................................... 3
Firewall setup ............................................................................................ 3
The Managed Service Portal ................................................................... 5
Logging In ................................................................................................. 5
The Exor Application .................................................................................... 5
Discoverer Viewer ....................................................................................... 7
Discoverer Plus ........................................................................................... 9
The Remote Desktop (GBEXOR801) ........................................................ 14
Logging On .............................................................................................. 14
Discoverer Administrator ............................................................................. 17
Discoverer Desktop .................................................................................... 18
Spatial Manager ........................................................................................ 23
Appendix A ..................................................................................... 25

Managed Service
(c) Exor Corporation Ltd Page 2
Document Control
Author
Tanya Bream
Document Summary
This document explains how to connect and log into Exor Managed Service.
Document History
Version Date Changes
1.0 12 April 2010 Tanya Bream
Reference Documents
N/A
Distribution
Managed Service Customers
Document Quality Assurance
Name Date
Prepared By: Tanya Bream 13 April 2010
Reviewed By: Rich Back
Approved For Issue By: Rich Back

Managed Service
(c) Exor Corporation Ltd Page 3
Connecting
Preparation
In order to ensure a successful connection to the Exor Managed Service, there are some factors that should
be considered before the first attempt to connect.
Client PC Setup
The Forms Client is a thin 100% Java Applet that runs in the user's browser. Anyone with a Java-enabled
browser can run a Forms application, over any network: Internet, intranet, or extranet. It receives messages
from the server about what to display, and reports back to the server, what actions the user performed, so
they can be processed. No business logic is executed on the client; it is responsible for rendering the
screen. All logic is processed on the Oracle application server.
When a user runs a Forms session a Java Applet is dynamically downloaded from the Oracle9i Application
Server. This Java applet is used for any Forms application so is downloaded only once and cached on the
client, hence, is available for subsequent Forms sessions and is renewed automatically only when a new
Forms client version is detected on the Application server.
In order to run a Java applet within a browser, it is necessary to have a Java Virtual Machine (JVM) installed.
Depending on the client platform the browser is running, Oracle requires the Sun Java plug-in (JRE) version
1.6.x. This can be download from: http://java.sun.com/javase/downloads/index.jsp (click on the “Download
JRE” button nearest the top of the list).
Each client PC must contain a minimum 512MB of RAM and be running Microsoft Internet Explorer (MSIE)
version 5.5 or later.
The Java plug-in which needs to be installed on each client will automatically download and install on first
use but you should note that because of this, the first attempt to connect from each PC may take some time
due to the necessity to download this plug-in. Subsequent connections will be much faster. It may be that,
for security reasons, your IT Department will have to pre-load the Java Initiator on your PC before you
attempt to connect.
Firewall Setup
There should be no firewall issues when connecting to the Exor Managed Service to run the highways
application, as all the traffic is standard port 80. However, it is imperative that you make arrangements to
“bypass proxy” to *.exor.co.uk.
Some Customers will have additional requirements to connect to bespoke services relating to Spatial
Manager and these are dealt with in detail with each customer.

Managed Service
(c) Exor Corporation Ltd Page 4
The Exor Managed Service IP addresses are as follows:
195.188.252.96/27 (32 addresses with a sub net of 255.255.255.242 i.e. 195.188.252.96, 195.188.252.97,
195.188.252.98D..195.188.252.127)
195.188.241.192/26 (64 addresses with a sub net of 255.255.255.192 i.e. 195.188.241.192,
195.188.241.193, 195.188.241.194....195.188.241.255)
86.12.132.192/26 (64 addresses with a sub net of 255.255.255.192 i.e. 86.12.132.192, 86.12.132.193,
86.12.132.194.... 86.12.132.255)

Managed Service
(c) Exor Corporation Ltd Page 5
The Managed Service Portal
Logging In
You will have been supplied with a URL, usually in the form of a tree (e.g. silverbirch.exor.co.uk), username,
password and database name.
This information will be needed in order to log into the Managed Service.
• Enter the address in your browser, e.g. http://silverbirch.exor.co.uk Note that there is no ‘www’ in
this URL.
• Click on the appropriate hyperlink, for example, “Exor LIVE using Sun JRE 1.4.2_06”
• Enter your username, password and database in the fields at the top right of the screen and press
the [Login >>] buttonD
The Exor Application
Under certain circumstances, there will be options to connect to more than one managed service; this allows
for use of a sandbox database for forthcoming software releases. In general though, you will need to press
the ‘Exor Live using JRE’ link visible on the left-hand edge of the screen. For a few seconds you may see a
blank screen with the words ‘Java Applet loadingD’ displayed in the centre. This will then be replaced with
the Exor Launchpad, allowing access to the licensed application(s).
Remember: The first time you connect to the Managed Service, this may take several minutes while the java
archive files are downloaded and installed.

Managed Service
(c) Exor Corporation Ltd Page 6
After the files have downloaded and installed, you will get a browser similar to that shown below. There will
also be a second browser with the title “Closing this window will exit Highways by Exor”. This second
window handles the communications with the server and should be minimised and left. When you have
finished using the application, log off using the “Exit” button. Do not exit by closing the other window as
this will leave a disconnected oracle session on the server.
Please note that when running ‘Highways by Exor’ for the first time you will encounter issues with the
certificates. Please see Appendix A for further details.

Managed Service
(c) Exor Corporation Ltd Page 7
Discoverer Viewer
1. Open a browser such as Internet Explorer and enter the URL of the Managed Service Portal i.e.
treename.exor.co.uk
2. Click on “Discoverer Viewer” to run the application.
3. Enter your User Name, Password and Database and click “Go”.

Managed Service
(c) Exor Corporation Ltd Page 8
4. Under the “Result List” you will see all the Discoverer Workbooks available. By clicking on the cross,
you can drill down to see the Sheets associated with the Workbooks.
5. Click on the Sheet you wish to view to display the results.
Full instructions on the useof Discoverer Viewer can be found online:
http://download.oracle.com/docs/html/B13987_04/toc.htm

Managed Service
(c) Exor Corporation Ltd Page 9
Discoverer Plus
1. Open a browser such as Internet Explorer and enter the URL of the Managed Service Portal i.e.
treename.exor.co.uk
2. Click on “Discoverer Plus” to run the application.
3. Enter your User Name, Password and Database and click “Go”.
4. When you connect to Discoverer Plus for the first time you will be prompted to run a Java Add-on. To
do this, click the yellow bar which appears at the top of the window and select “Run Add-on”.

Managed Service
(c) Exor Corporation Ltd Page 10
Note: If you do not see the yellow bar automatically appear at the top of the window make sure you
have Pop-up Blocker disabled under the Tools menu.
5. Once logged in, you will be given the option to open an existing workbook or create a new one.
6. Click “Next” to create a new workbook.
7. Highlight the items you would like to add to your worksheet and click the right arrow to select them.

Managed Service
(c) Exor Corporation Ltd Page 11
8. After clicking “Next” you now have the option to change the layout of the items in the worksheet.
Click and drag the column headings to change how they are dsplayed.
9. Click “Next” to move onto Step 4 where you can choose how you would like to sort the data in the
worksheet. Click “Add” to enter a new row.

Managed Service
(c) Exor Corporation Ltd Page 12
10. Click “Next” to move onto Step 5 where you can define Parameters which prompt users to select or
type a value. Choosing a parameter to base it on allows you to filter the data presented in the
worksheet.
11. Click “Finish” to create the workbook.

Managed Service
(c) Exor Corporation Ltd Page 13
Full instructions on the use of Discoverer Plus can be found online:
http://download.oracle.com/docs/html/B13915_04/toc.htm

Managed Service
(c) Exor Corporation Ltd Page 14
The Remote Desktop (GBEXOR801)
Logging On
1. Log into Connect2 (https://connect2.exorcorp.com) using the username and password provided,
ensuring that the Domain “GBEXOR801” is selected.
2. Click on the Terminal Session called “GBEXOR801”.
A remote Desktop session will begin and you will be presented with the Welcome screen. Click “OK” to
proceed.

Managed Service
(c) Exor Corporation Ltd Page 15
3. If your name appears on the left, click that button, otherwise, click “Other User”.
4. Enter the same username and password as before and hit Enter or click the arrow.
5. When you log into Connect2, you may also have access to file shares on various servers. You will see
these under the heading “Files”.

Managed Service
(c) Exor Corporation Ltd Page 16
6. Click on the hyperlink to access the file share and its files.

Managed Service
(c) Exor Corporation Ltd Page 17
Discoverer Administrator
1. Log into GBEXOR801 (as shown on Page 14)
2. Double-click the Oracle Discoverer Administrator icon on the Desktop to run the application
3. Log into the appropriate database
4. A business area should have already been set up for you so select “Open an existing business area”,
select the business area e.g. “Highways By Exor”.and click “Finish”.
Full instructions for the use of Discoverer Administrator can be found online:
http://download.oracle.com/docs/html/B13916_04/toc.htm

Managed Service
(c) Exor Corporation Ltd Page 18
Discoverer Desktop
1. Log into GBEXOR801 (as shown on Page 14)
2. Double-click the Oracle Discoverer Desktop icon on the Desktop to run the application
3. Log into the appropriate database
4. Choose to “Create a new workbook” and how you would like to display the results e.g. in a table then
click “Next”.
5. Select the items you would like to add to your worksheet by highlighting them and clicking the right
arrow.
Note: You can use Shift or Ctrl and left mouse click to highlight multiple items.

Managed Service
(c) Exor Corporation Ltd Page 19
Note: If the right arrow is greyed out once you have selected the items this means that the items you
have chosen are not related and you need to deselect some of them or choose again.
6. Before clicking “Next” you have the option to change the Query Governor settings, how the Table is
displayed or the Formats used. To do this, click the “Options” button.
7. After clicking “Next” you now have the option to change the layout of the items in the worksheet.

Managed Service
(c) Exor Corporation Ltd Page 20
Click and drag the column headings to change how they are dsplayed.
8. Click “Next” to move onto Step 4 where you can define “conditions” in order to filter the data displayed
in the worksheet.
9. Click “Next” to move on to Step 5 where you can choose how you would like to sort the data in the
worksheet.

Managed Service
(c) Exor Corporation Ltd Page 21
10. Click “Next” to move on to Step 6 where you can define calculations which add new information to the
worksheet.
The data can be viewed and selected by “Item” or by “Function”.

Managed Service
(c) Exor Corporation Ltd Page 22
11. Click “Finish” to display the finished worksheet.
Full instructions on the use of Discoverer Desktop can be found online:
http://download.oracle.com/docs/html/B13917_03/toc.htm

Managed Service
(c) Exor Corporation Ltd Page 23
Spatial Manager
1. Log into GBEXOR801 (as shown on Page 14)
2. Double-click the “Arcmap” icon on the Desktop to run the application
3. You have the options to create a new empty map, a new template or open an existing map.
4. Click “OK” to create a new map.
5. Select View>Toolbars>exor Spatial Manager 9i 4.2.x.x Build (1) to display the Exor toolbar and click and
drag it to the desired location on the Menu bar.
6. Select Exor Menu>Connect.. and enter the User Name, Password and Database.
7. Right-click a geographic layer and select “Display Layer” to display the map.

Managed Service
(c) Exor Corporation Ltd Page 24
Full instructions on the use of ArcGIS 9.2 can be found online:
http://webhelp.esri.com/arcgisdesktop/9.2/index.cfm?TopicName=Tutorials

Managed Service
(c) Exor Corporation Ltd Page 25
Appendix A
When you run “Highways by Exor” for the first time you will be presented with the following warnings.
1. Tick “Always trust content from this publisher” and click “Run”.
2. Again, tick “Always trust content from this publisher” and click “Run” when you see the above
warning.

Managed Service
(c) Exor Corporation Ltd Page 26
3. When the above warning appears, make sure you click “No”.
4. Tick “Always trust content from this publisher” and click “Run” when you see the next certificate
warning below.
5. When you see the final certificate warning, again, tick “Always trust content from this publisher
and click “No”.
Managed Service
(c) Exor Corporation Ltd Page 27
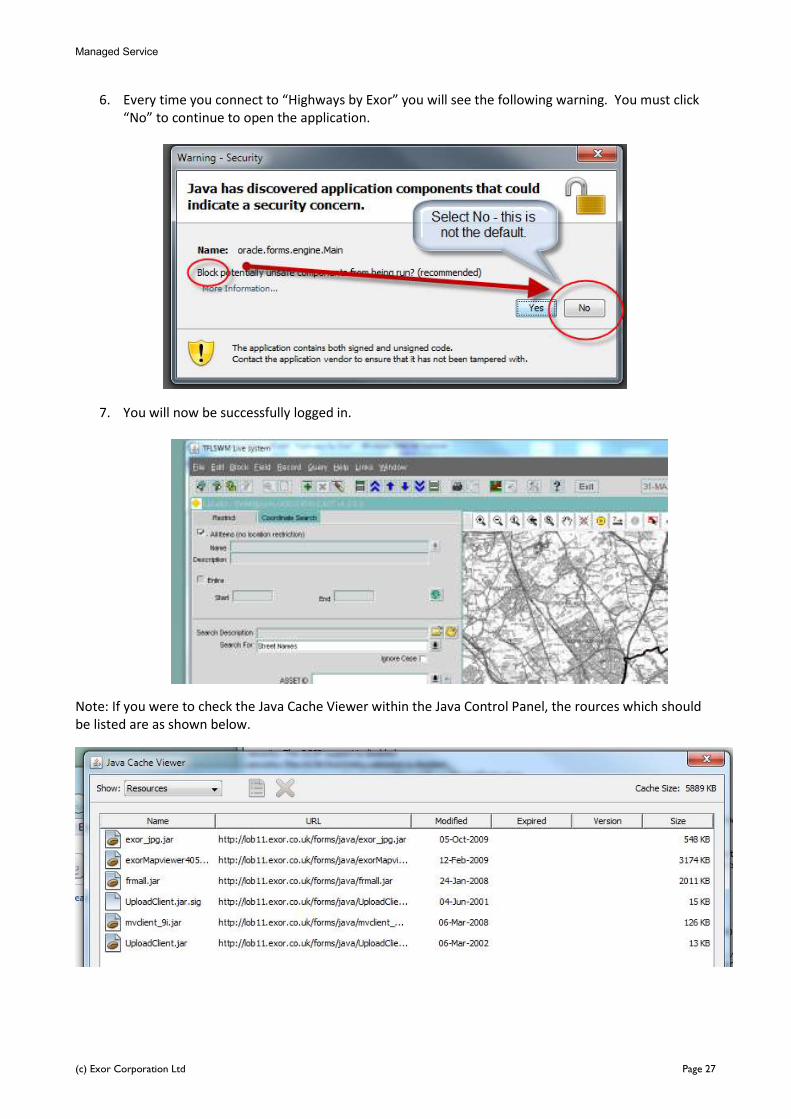
6. Every time you connect to “Highways by Exor” you will see the following warning. You must click
“No” to continue to open the application.
7. You will now be successfully logged in.
Note: If you were to check the Java Cache Viewer within the Java Control Panel, the rources which should
be listed are as shown below.