
Information Manager Admin v4 - Bentley · Exor Corporation Limited The Global Leader in...
58
Exor Corporation Limited The Global Leader in Infrastructure Asset Management Information Manager Admin v4.5
Transcript of Information Manager Admin v4 - Bentley · Exor Corporation Limited The Global Leader in...

Exor Corporation Limited
The Global Leader in Infrastructure Asset Management
Information Manager Admin v4.5

Exor Leading the way in Infrastructure Asset Management Solutions...
© Copyright Exor Corporation Ltd, England, 2009 All rights reserved
This page intentionally blank

Exor Leading the way in Infrastructure Asset Management Solutions...
© Copyright Exor Corporation Ltd., England, 2010. All rights reserved
i
Quality Assurance Statement
Document Details File: Information Manager Admin v4.5.docx
Prepared by: T.C. Stewart, S Feldman
Manual Name: Information Manager Admin v4.45
Reviewed by: Steven Feldman, Ian Turnbull
Version: 1
Approved for issue by: Steven Feldman
Date of Issue: May 2011
Product Manager: T.C. Stewart
File Name:
Document Centre/Exor/Product Manuals/4.5.0.0 Product Manuals/4.5.0.0 completed documentation/Information Manager Admin v4.5.docx
Document Version Control
Revision Date By Chapter / Page
Description
4.3 15/12/2010 SF Complete document update
4.3 19/01/2011 IS Formatted and Work Order Worktray Admin added
4.4 12/05/2011 SF Updated for 4.4 release
4.4 12/05/2011 SF Updated for 4.4 release
4.5 Nov 2011 IS Various Updated for 4.5 release

Exor Leading the way in Infrastructure Asset Management Solutions...
© Copyright Exor Corporation Ltd., England, 2009. All rights reserved
ii
Contents QUALITY ASSURANCE STATEMENT I
INTRODUCTION 3
SYSTEM ADMIN FUNCTIONS 6
LOGGING INTO INFORMATION MANAGER 7 RELEVANT PRODUCT OPTIONS 7 ACCESSING THE ADMINISTRATION FUNCTIONS 9 MANAGING BUSINESS AREAS 10 CREATE A NEW BUSINESS AREA 10 ADDING REPORTS OR POD’S TO AN EXISTING BUSINESS AREA 13 REMOVE REPORTS OR POD’S FROM A BUSINESS AREA 15 DELETE A BUSINESS AREA 17 RENAME A BUSINESS AREA 18 MANAGING MAP THEMES 19 INTRODUCTION 19 ADDING MAP THEMES 21 REMOVING MAP THEMES 22 MAP THEME SETTINGS 22 POD MAINTENANCE 26 CHANGING THE APPEARANCE OF A POD 27 CHANGING CHART ATTRIBUTES 30 IMPORTING PODS 35 CREATING A NEW POD 35 DEFINE SEARCH 36 ADDING A SEARCH 36 CHANGING A SEARCH DEFINITION 39 PRODUCT OPTIONS 41 MAP RELATED SETTINGS 42 LOGON SETTINGS 43 OTHER SETTINGS 44 MANAGING ITEM HINT TEXT 45 EDITING HINT TEXT 46 MANAGING ERROR MESSAGES 48 SUBSTITUTIONS 49 MANAGING ACCESS TO POD’S 50
WORK ORDER WORKTRAY ADMIN 51
WORK ORDER USERS 52 ROAD GROUP RESTRICTIONS 54 WORK CODE RESTRICTIONS 56

Exor Leading the way in Infrastructure Asset Management Solutions...
© Copyright Exor Corporation Ltd., England, 2010. All rights reserved
3
CHAPTER
1 Introduction For many users of an integrated infrastructure asset management system their main requirements centre around performance management and reporting. They wish to see aggregated high level executive information and only where a particular area is under performing do they wish to drill into more detailed information to investigate further. This is sometimes referred to as an executive dashboard or report scorecard. The same dashboard approach allows corporate key performance and national indicators to be displayed giving users and managers alike instant access to up to date information.
Built to run on the web, Exor‟s Information Manager is designed with the end user in mind to provide a complete reporting and information centre for all levels of Exor user from everyday „power‟ users to senior managers and users who need occasional access to information from the Exor system but do not need the ability to update or initiate processes.
Information Manager allows users to view aggregated performance management data and then drill to a more detailed level of information both textually and spatially to investigate non-performant areas.
Information Manager allows an unlimited number of dashboard indicators or „Pods‟ to be configured and displayed in a manner that best suits the nature of the information in question and each individual users preferences. Updated in real time or at a predefined time interval, „Pods‟ can be configured as Pie Charts, Bar or Line Graphs, tables or a wide number of other display formats. Each Pod can be configured to allow the user to drill to a more detailed level of information both textually and spatially.
With data security in mind, each Pod is protected by a user Role with only those users who have been granted the appropriate Role having access to the Pod.
Information Packs (currently available for Utilities and Highways Authorities) comprise a set of standard Pods focussed on a specific business area.
Pods can be configured so that the information displayed can be restricted to specific locations by setting the desired location within the IM Toolbar. The location can be set to any Network Section or Group defined within the Exor system to provide specific performance measures or information relating to only features that are located within the selected location.
Information Manager includes Web Based mapping allowing multiple data layers to be displayed providing the possibility of increasing workplace productivity through improved information access. Information Manager allows any data held within the Exor database or other 3rd party data accessed using Exor‟s „External Asset‟ functionality, to be displayed including Open Geospatial Consortium Web Map Service (WMS). Designed with ease of use in mind, Information Managers Map controls offer an experience and

Exor Leading the way in Infrastructure Asset Management Solutions...
© Copyright Exor Corporation Ltd., England, 2009. All rights reserved
4
performance similar to popular consumer mapping portals also allowing map layers to be toggled on / off allowing a wide variety of spatial information to be displayed.
Information Manager provides a powerful yet simple search feature to find Enquires or Streetworks. When used in the context of Roadworks, the IM search engine allows a user to query and display all works due to take place during a specific date range on a given street or town. The search may be further defined using the likely impact of the works on traffic flow. The results of the search may be either displayed in tabular format showing the details of each roadwork or directly on the map.
The information held within any Pod or tabular report displayed within Information Manager can be printed, saved in a variety of formats, such as html, pdf, csv, or exported directly to MS Excel or Word allowing further off line presentation or analysis. The Map display can also be saved as a .pdf file or printed along with a Map Title and Map legend if required.
Exor provide many standard reports that are required to meet specific business needs. Each report comes with a standard set of parameters, the values of which can be varied to suit the users needs. Information Manager allows these standard reports to be grouped in customer defined „Business Areas‟ with each folder containing the reports from any Exor product that relate to that specific business area.
With the new Query Builder within Information Manager a user can define personal multi conditional queries on a table that can be saved for reuse.
For the production of user specific and ad-hoc reports Information Manager also provides an option for using Oracle Discoverer. This offers data mining and offline scheduling capability. Reports written in these tools via Information Manager can be saved and added to a Business Area Folder and run by other users.
Figure 1
© Crown copyright and database right. All rights reserved
This document provides detailed instructions on the use of Information Manager. It does not provide details about specific Pods but does contain information relating to standard features of all Pods.

Exor Leading the way in Infrastructure Asset Management Solutions...
© Copyright Exor Corporation Ltd., England, 2010. All rights reserved
5
The following chapters are included within this document:
Introduction (this Chapter)
Systems Admin Functions

Exor Leading the way in Infrastructure Asset Management Solutions...
© Copyright Exor Corporation Ltd., England, 2009. All rights reserved
6
CHAPTER
2 System Admin Functions This Chapter provides detailed information regarding the Administration of Information Manager. All functions explained within this document can be carried out either through the Admin page of Information manager or via the appropriate module within the main Exor application.
They following Sections are included:
Logging into Information Manager
Product Options
Managing Business Area‟s
Defining Query Views and Fields
Pod Maintenance
Managing Map Themes
Managing Item Hint Text
Managing Error Messages
Managing access to PODS
Exor Leading the way in Infrastructure Asset Management Solutions...
© Copyright Exor Corporation Ltd., England, 2010. All rights reserved
7
Logging into Information Manager
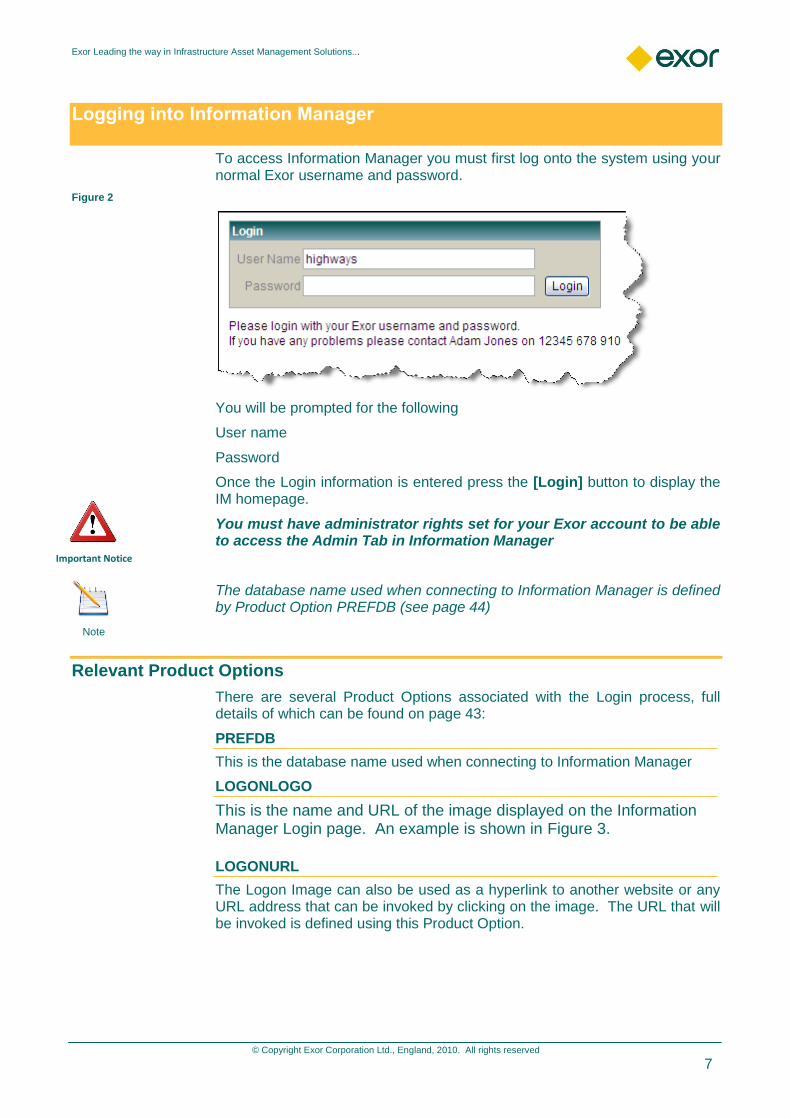
To access Information Manager you must first log onto the system using your normal Exor username and password.
Figure 2
You will be prompted for the following
User name
Password
Once the Login information is entered press the [Login] button to display the IM homepage.
You must have administrator rights set for your Exor account to be able to access the Admin Tab in Information Manager
The database name used when connecting to Information Manager is defined by Product Option PREFDB (see page 44)
Relevant Product Options
There are several Product Options associated with the Login process, full details of which can be found on page 43:
PREFDB
This is the database name used when connecting to Information Manager
LOGONLOGO
This is the name and URL of the image displayed on the Information Manager Login page. An example is shown in Figure 3.
LOGONURL
The Logon Image can also be used as a hyperlink to another website or any URL address that can be invoked by clicking on the image. The URL that will be invoked is defined using this Product Option.
Note
Important Notice

Exor Leading the way in Infrastructure Asset Management Solutions...
© Copyright Exor Corporation Ltd., England, 2009. All rights reserved
8
Figure 3
LOGONINFO
The information displayed below the Login dialogue can be amended to suit your Organisational needs by entering the appropriate text into the Product Option. An example is shown in
Figure 4
LOGONINFO is an HTML fragment, which can include hyperlinks, mail addresses and images.
Note

Exor Leading the way in Infrastructure Asset Management Solutions...
© Copyright Exor Corporation Ltd., England, 2010. All rights reserved
9
Accessing the Administration functions
The Administration functions are all managed within the Admin Tab of Information Manager
Figure 5
This Tab is only available to Users who have been granted the IM_ADMIN role within the HIG1820 – Users Module (refer to the General Systems Admin Guide for details on granting Roles to Users).
The Information Manager Administration functions are accessed by selecting the options from the menu on the left hand side of the screen.
Figure 6 Admin Functions
The available options are:
Business Areas Manage Business Areas and associated Reports, see Page 10
Map Layers Add or remove map layers and control layer visibility and properties from Map Tab and Map Pods, see Page 19
POD Maintenance Import Pods, manage Pod library groups and Pod display attributes, see Page 26
Define Search Determine which views and fields can be used by users for ad hoc queries, see Page 41
Product Options Maintain Product Option Values, see Page 41
Item Hint Text Option to modify default hint text for mouseovers, see Page 45
Error Text Option to modify default error text messages, see Page 48
Substitutions These values should only be altered on instruction from Exor Consultants or Support, see Page49
Note
Important Notice

Exor Leading the way in Infrastructure Asset Management Solutions...
© Copyright Exor Corporation Ltd., England, 2009. All rights reserved
10
Managing Business Areas
Business Areas are a means of grouping related Reports or POD‟s into a single „folder‟ therefore allowing easy User access. There is no limit to the number of Business Areas that can be created or the number of Reports or POD‟s that can be added to a specific Business Area.
The same Report may be added to more than one Business Area if required.
Figure 7 shows an example set of Business Area‟s and Reports / POD‟s within the selected Business Area.
Figure 7
Create a New Business Area
To create a new Business Area press the [Create] button below the Business Areas Title Banner (Figure 8).
Figure 8 Creating a new Business Area
Exor Leading the way in Infrastructure Asset Management Solutions...
© Copyright Exor Corporation Ltd., England, 2010. All rights reserved
11
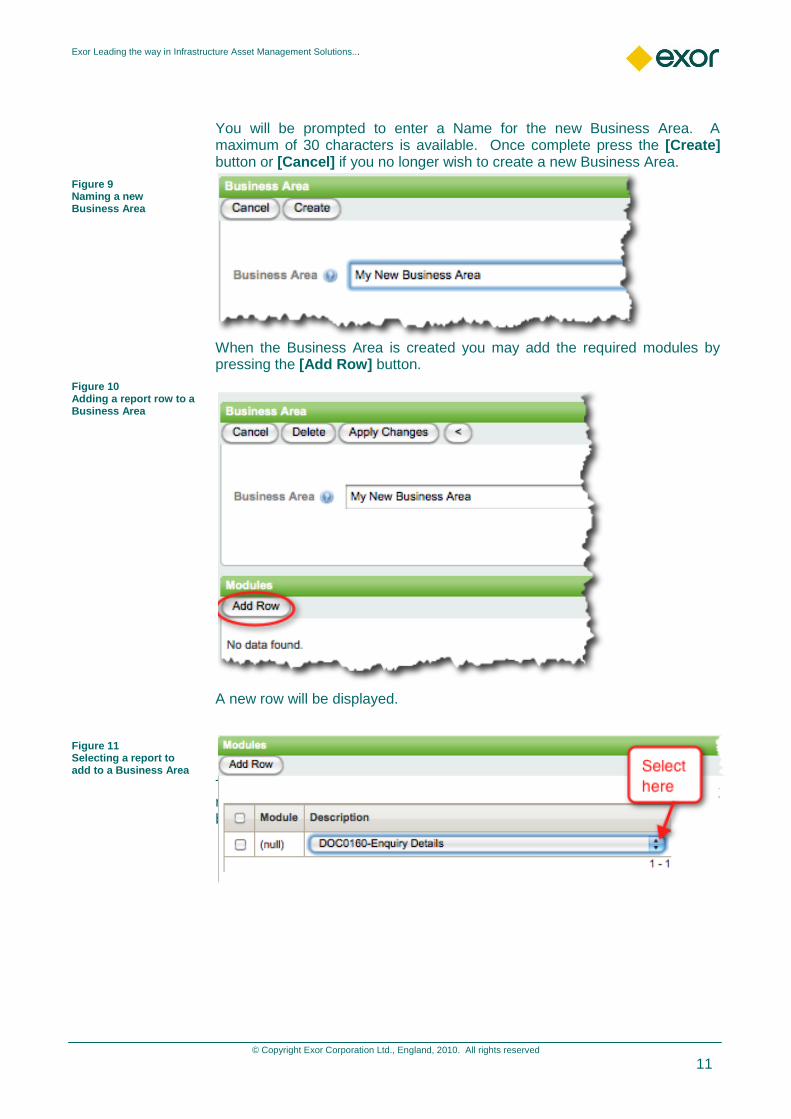
You will be prompted to enter a Name for the new Business Area. A maximum of 30 characters is available. Once complete press the [Create] button or [Cancel] if you no longer wish to create a new Business Area.
Figure 9 Naming a new Business Area
When the Business Area is created you may add the required modules by pressing the [Add Row] button.
Figure 10 Adding a report row to a Business Area
A new row will be displayed.
Figure 11 Selecting a report to add to a Business Area
To add a module to the Business Area, select and then select the required report from the drop down list then press the [Apply Changes] button on the Business Area Title banner.

Exor Leading the way in Infrastructure Asset Management Solutions...
© Copyright Exor Corporation Ltd., England, 2009. All rights reserved
12
Figure 12 Adding a report to a Business Area and Applying Changes
To add further modules to the Business Area press the [Add Row] button and repeat the exercise above.
Only Exor Modules to which the Systems Admin User has been granted Role based access will be available for selection. The list if further filtered to only display modules of the following types:
R25 Oracle Reports
APX Application Express Reports
WEB Information Manager POD‟s
URL URL Modules
DIS Oracle Discoverer Reports
Note

Exor Leading the way in Infrastructure Asset Management Solutions...
© Copyright Exor Corporation Ltd., England, 2010. All rights reserved
13
Adding Reports or POD’s to an existing Business Area
To add a new Report or Pod to an existing Business Area click on the [Edit] icon adjacent to the required Business Area. An example is shown in Figure 13
Figure 13
The modules that already exist within the selected Business Area will be displayed. An example is shown in Figure 14
Figure 14 Adding a report to an existing Business Area
Press the [Add Row] button to add a new module to the business Area.
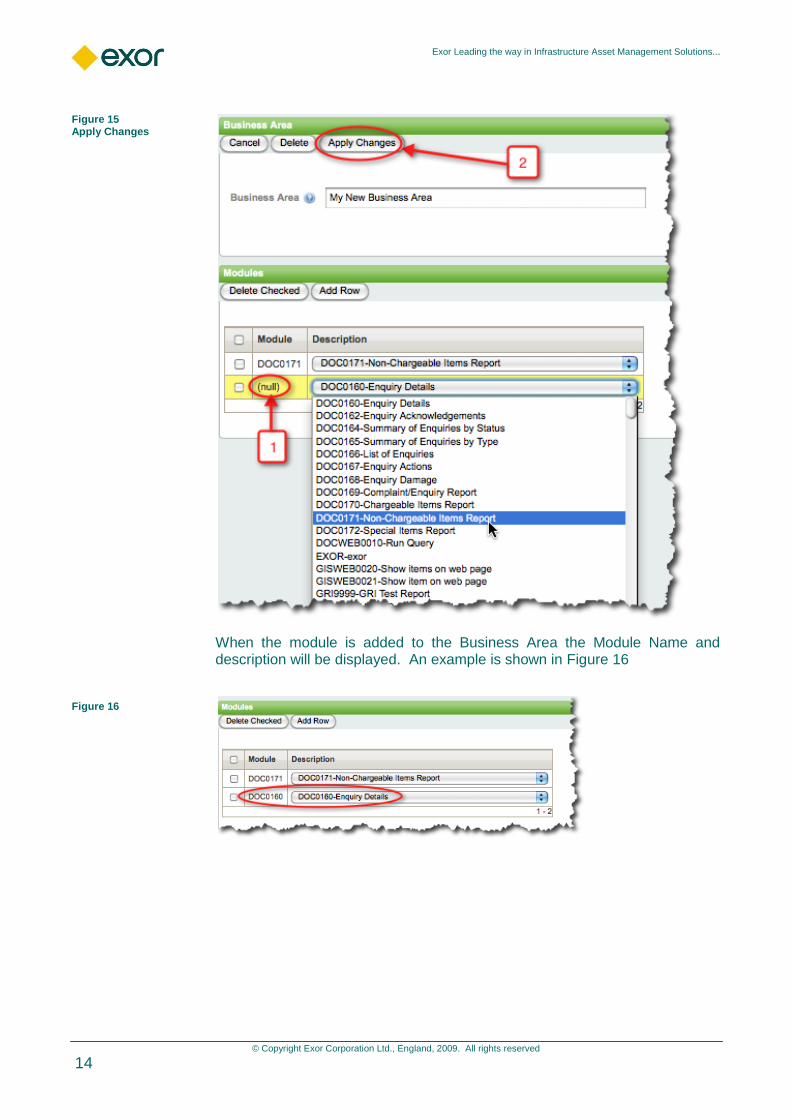
A new row will be displayed in the list of modules already added to the Business Area with a module id of ‘(null)’ (Figure 15– 1). A default value (the first row within the List of available modules) will also be shown in the new row. Using the drop down list, select the required module then press the [Apply Changes] button (Figure 15- 2) to save.
Exor Leading the way in Infrastructure Asset Management Solutions...
© Copyright Exor Corporation Ltd., England, 2009. All rights reserved
14
Figure 15 Apply Changes
When the module is added to the Business Area the Module Name and description will be displayed. An example is shown in Figure 16
Figure 16

Exor Leading the way in Infrastructure Asset Management Solutions...
© Copyright Exor Corporation Ltd., England, 2010. All rights reserved
15
Remove Reports or POD’s from a Business Area
To remove a Report or Pod from a Business Area click on the [Edit] icon adjacent to the required Business Area. An example is shown in Figure 17
Figure 17
The modules that already exist within the selected Business Area will be displayed. An example is shown in Figure 18.
Figure 18

Exor Leading the way in Infrastructure Asset Management Solutions...
© Copyright Exor Corporation Ltd., England, 2009. All rights reserved
16
More than one Module may be removed from a Business Area by ticking the checkboxes adjacent to the required modules. To remove the selected modules from the Business Area press the [Delete Checked] button. You will then be presented with a confirmation dialogue.
Figure 19 Confirm Deletion of Reports
To select or unselect all modules within a Business Area tick / untick the checkbox on the title banner.
When a module has been removed from a specific Business Area it will still exist within any other Business Areas to which it has been added.
Note
Important Notice
Exor Leading the way in Infrastructure Asset Management Solutions...
© Copyright Exor Corporation Ltd., England, 2010. All rights reserved
17
Delete a Business Area
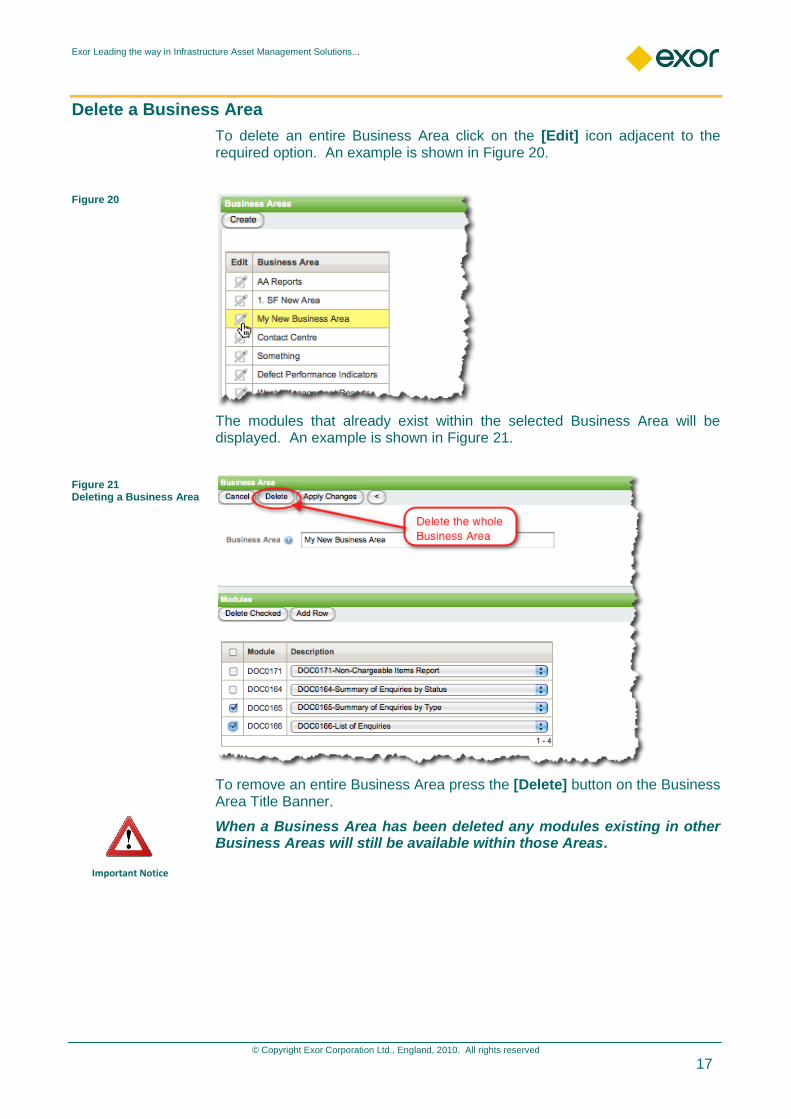
To delete an entire Business Area click on the [Edit] icon adjacent to the required option. An example is shown in Figure 20.
Figure 20
The modules that already exist within the selected Business Area will be displayed. An example is shown in Figure 21.
Figure 21 Deleting a Business Area
To remove an entire Business Area press the [Delete] button on the Business Area Title Banner.
When a Business Area has been deleted any modules existing in other Business Areas will still be available within those Areas.
Important Notice

Exor Leading the way in Infrastructure Asset Management Solutions...
© Copyright Exor Corporation Ltd., England, 2009. All rights reserved
18
Rename a Business Area
To rename a Business Area click on the [Edit] button adjacent to the required option. An example is shown in Figure 22
Figure 22
Alternatively you can place your cursor within the Business Area name and commence typing and the edit dialog will appear.
To rename the Business Area enter the new name and press the [Apply Changes] button.
Figure 23 Renaming a Business Area
Exor Leading the way in Infrastructure Asset Management Solutions...
© Copyright Exor Corporation Ltd., England, 2010. All rights reserved
19
Managing Map Themes
Introduction
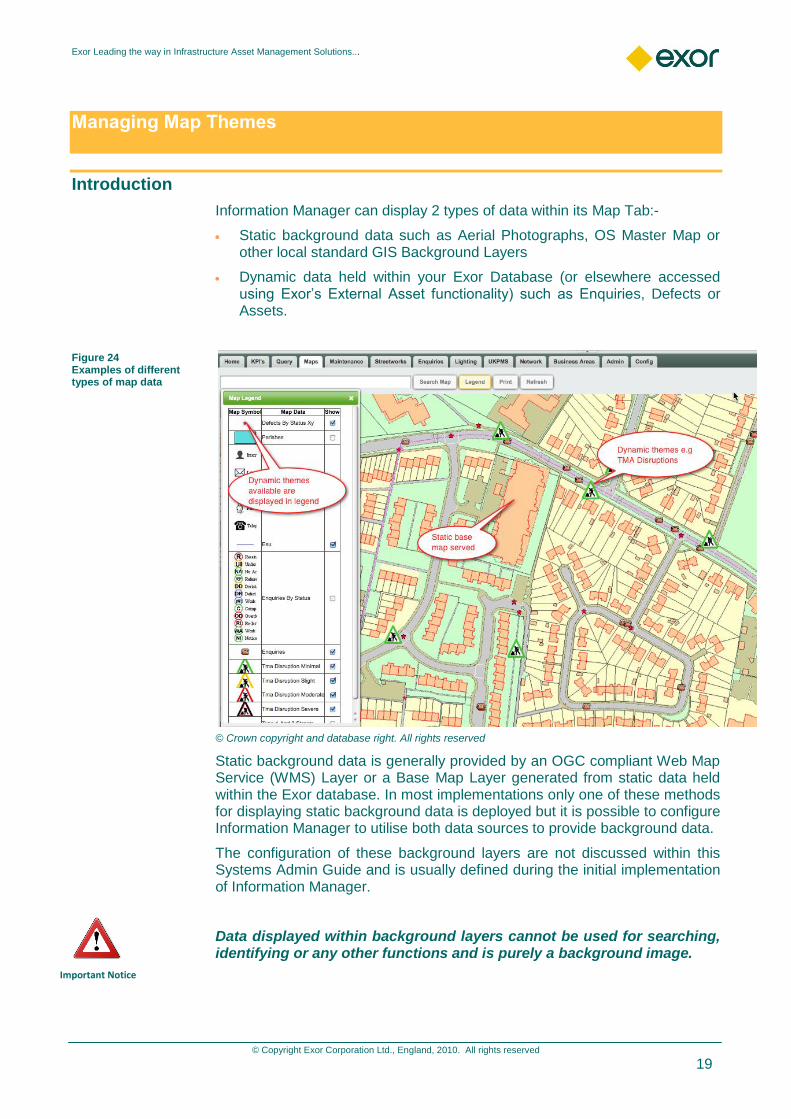
Information Manager can display 2 types of data within its Map Tab:-
Static background data such as Aerial Photographs, OS Master Map or other local standard GIS Background Layers
Dynamic data held within your Exor Database (or elsewhere accessed using Exor‟s External Asset functionality) such as Enquiries, Defects or Assets.
Figure 24 Examples of different types of map data
© Crown copyright and database right. All rights reserved
Static background data is generally provided by an OGC compliant Web Map Service (WMS) Layer or a Base Map Layer generated from static data held within the Exor database. In most implementations only one of these methods for displaying static background data is deployed but it is possible to configure Information Manager to utilise both data sources to provide background data.
The configuration of these background layers are not discussed within this Systems Admin Guide and is usually defined during the initial implementation of Information Manager.
Data displayed within background layers cannot be used for searching, identifying or any other functions and is purely a background image.
Important Notice

Exor Leading the way in Infrastructure Asset Management Solutions...
© Copyright Exor Corporation Ltd., England, 2009. All rights reserved
20
This section of the Systems Admin Guide details how dynamic themes can be added or removed for use with the Map Legend tool on the Information Manager Toolbar. An example of the Map Legend is shown in Figure 25.
Figure 25
Themes are managed by selecting the „Map Layers‟ icon on the Admin Toolbar. When selected, a list of Themes already added for use within Information Manager will be displayed. An example is shown in Figure 26.
Figure 26
Exor Leading the way in Infrastructure Asset Management Solutions...
© Copyright Exor Corporation Ltd., England, 2010. All rights reserved
21
Adding Map Themes
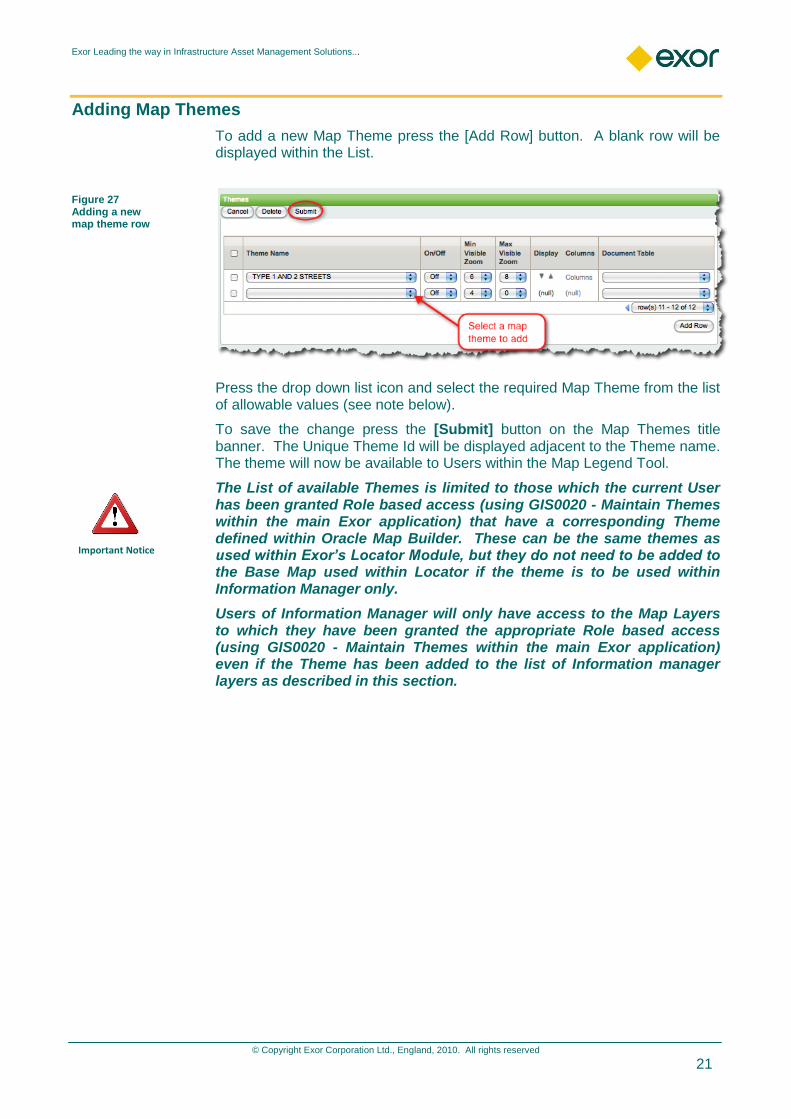
To add a new Map Theme press the [Add Row] button. A blank row will be displayed within the List.
Figure 27 Adding a new map theme row
Press the drop down list icon and select the required Map Theme from the list of allowable values (see note below).
To save the change press the [Submit] button on the Map Themes title banner. The Unique Theme Id will be displayed adjacent to the Theme name. The theme will now be available to Users within the Map Legend Tool.
The List of available Themes is limited to those which the current User has been granted Role based access (using GIS0020 - Maintain Themes within the main Exor application) that have a corresponding Theme defined within Oracle Map Builder. These can be the same themes as used within Exor’s Locator Module, but they do not need to be added to the Base Map used within Locator if the theme is to be used within Information Manager only.
Users of Information Manager will only have access to the Map Layers to which they have been granted the appropriate Role based access (using GIS0020 - Maintain Themes within the main Exor application) even if the Theme has been added to the list of Information manager layers as described in this section.
Important Notice

Exor Leading the way in Infrastructure Asset Management Solutions...
© Copyright Exor Corporation Ltd., England, 2009. All rights reserved
22
Removing Map Themes
To remove a Map Theme select the required Theme(s) and press the [Delete] button on the Map Themes Title Banner. An example is shown in Figure 28.
Figure 28 Deleting one or more layers
Themes deleted from Information Manager as described, above are still available within other areas of the Exor system and may be re-added for use within Information Manager as described on page 21.
Map Theme Settings
This section describes the settings for an individual Map Theme that control its visibility, position within the legend, the information shown in a Map Info Call Out and any associated document table.
Figure 29 Map Theme Settings
On/Off
This setting determines whether a theme is switched on or off when the map tab is opened. A check mark will appear in the Legend to signify that the theme is switched on.
Note

Exor Leading the way in Infrastructure Asset Management Solutions...
© Copyright Exor Corporation Ltd., England, 2010. All rights reserved
23
Figure 30 Legend indcating themes switched on and available
All themes are displayed in the Legend regardless of their On/Off settings. A user can switch layers on and off as they prefer via the legend.
Note that themes will only be visible when within the minimum and maximum zoom range set for the theme regardless of whether a theme has been toggled on in the legend, see Maximum and Minimum Zoom Levels below.
Maximum and Minimum Zoom Levels
There are 9 zoom levels for the map ranging from 0 to 8
The lowest level 0, is roughly equivalent to the whole of Great Britain whilst the highest level 9, is zoomed into to a map width of about 150 meters.
The minimum zoom level determines when a theme becomes visible as users zoom into the map.
The maximum zoom level determines the zoom level at which a theme is switched off as users zoom into the map.
Take care when setting zoom levels. It is generally not advisable to make themes with a large number of features visible before zoom level 3 or 4 as the display time may be unacceptably long. It may be advisable to set a polygon theme to switch off at higher zoom levels so as not to obscure other features.
Adjusting the display order of themes
Use the up and down arrows to change the display order of themes.
If objects in two themes overlap on the map display only the object in the top theme will respond to an info click. It is usually best to position polygon themes below point or line themes.
Important Notice
Important Notice
Exor Leading the way in Infrastructure Asset Management Solutions...
© Copyright Exor Corporation Ltd., England, 2009. All rights reserved
24
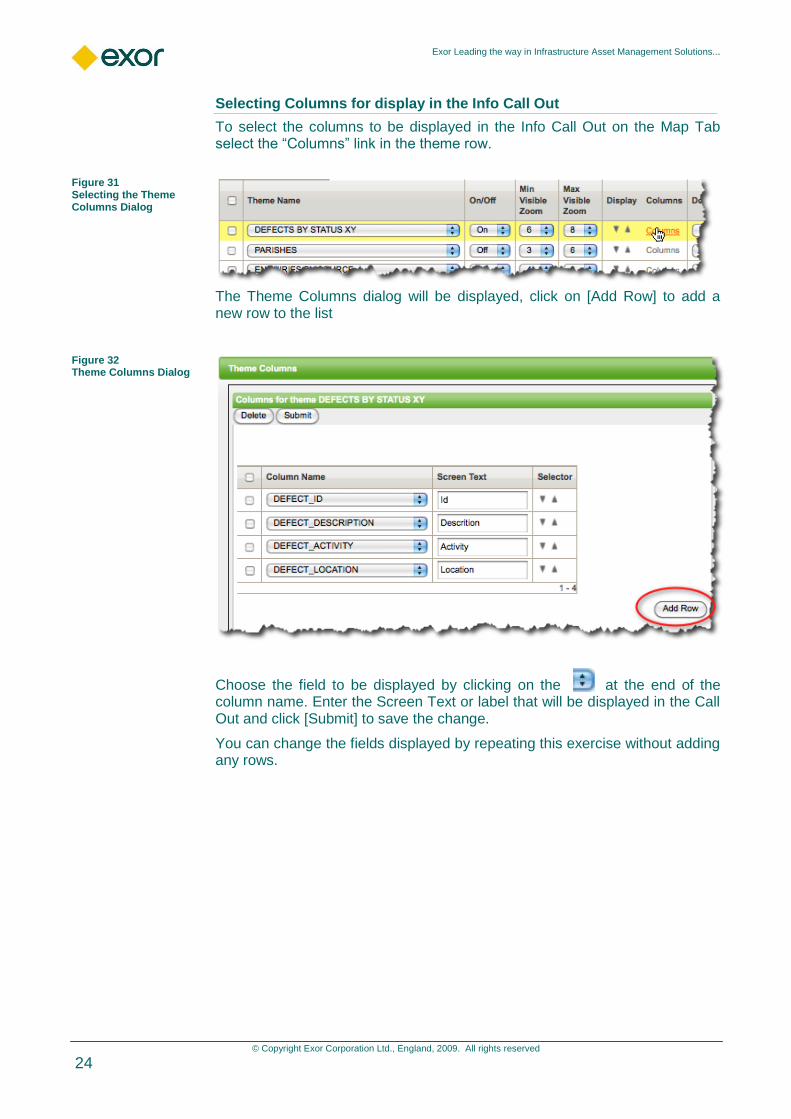
Selecting Columns for display in the Info Call Out
To select the columns to be displayed in the Info Call Out on the Map Tab select the “Columns” link in the theme row.
Figure 31 Selecting the Theme Columns Dialog
The Theme Columns dialog will be displayed, click on [Add Row] to add a new row to the list
Figure 32 Theme Columns Dialog
Choose the field to be displayed by clicking on the at the end of the column name. Enter the Screen Text or label that will be displayed in the Call Out and click [Submit] to save the change.
You can change the fields displayed by repeating this exercise without adding any rows.

Exor Leading the way in Infrastructure Asset Management Solutions...
© Copyright Exor Corporation Ltd., England, 2010. All rights reserved
25
Figure 33 Setting the Columns to be displayed within the Info Call Out
To delete a row completely select it by placing a tick in the box to the left of the row and then click on [Delete], see Figure 28 for an example.
To change the order of the Columns within the Info Call Out use the up and down arrows
Setting the Documents Table
If a theme has documents associated, you can set the document table from which documents will be displayed.
Figure 34 Selecting the Associated Documents Table
Choose the appropriate table and then click on [Submit]
A link to the document(s) will be displayed within the Info Call Out

Exor Leading the way in Infrastructure Asset Management Solutions...
© Copyright Exor Corporation Ltd., England, 2009. All rights reserved
26
POD Maintenance
The Pod Maintenance dialog allows the administrator to modify a range of chart attributes including setting the cache interval, the chart style, colours, legend, axes, background and titles.
Access Pod Maintenance via the Admin menu
Figure 35
The initial Pod Maintenance screen provides a summary of the Pods available within Information Manager.
Figure 36 Summary of Pods available
The following information is displayed:
Module The unique Pod identifier shown in Pod Info
Title The title shown in the title bar of the Pod and also within the Pod selection interface within the Config Tab
Description The detailed description of the Pod that is shown within Pod Info
Parent The unique Pod identifier of the parent Pod if the Pod is part of a drill down sequence
Drill Down Indicates whether there is a further level of drill down
Type The type of chart or table
Group The Pod Group used within the Config Tab to organise Pods
Exor Leading the way in Infrastructure Asset Management Solutions...
© Copyright Exor Corporation Ltd., England, 2010. All rights reserved
27
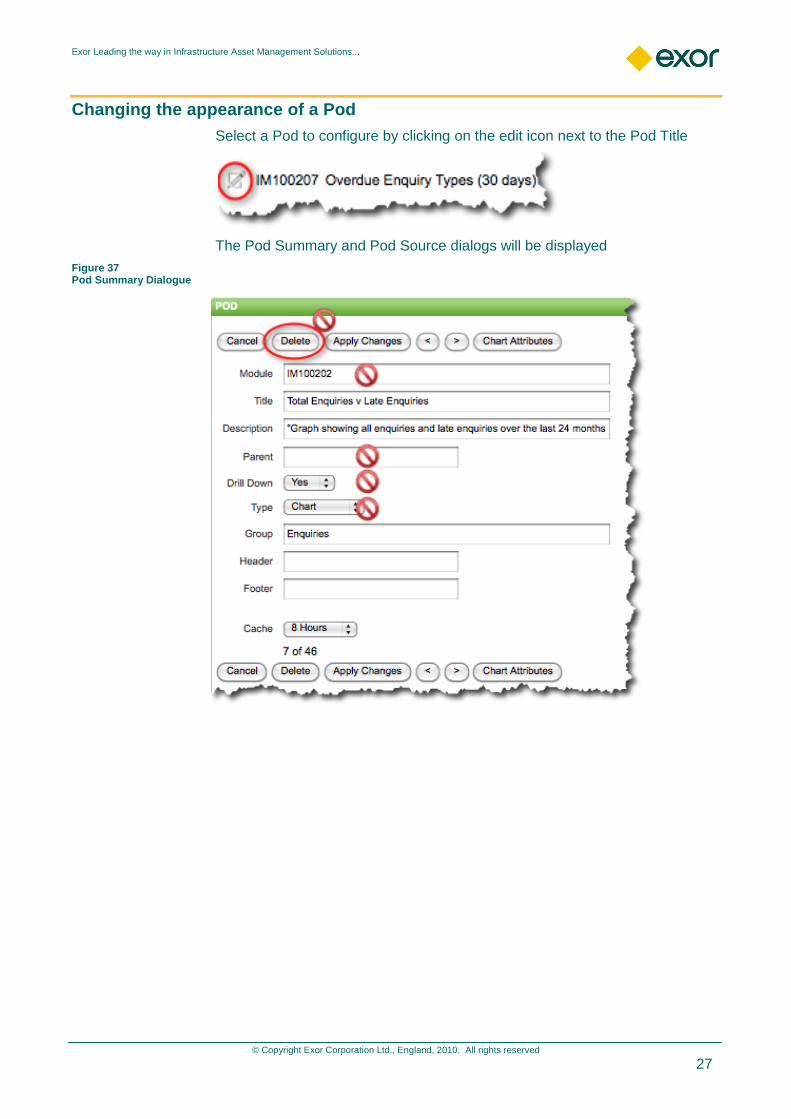
Changing the appearance of a Pod
Select a Pod to configure by clicking on the edit icon next to the Pod Title
The Pod Summary and Pod Source dialogs will be displayed
Figure 37 Pod Summary Dialogue

Exor Leading the way in Infrastructure Asset Management Solutions...
© Copyright Exor Corporation Ltd., England, 2009. All rights reserved
28
Pod Summary
Within this dialog you can edit the Pod Title, Pod Description, Pod Group and the Pod Header and Footer.
You can also set the cache interval for a pod if required.
Do not change the settings for Module, Parent, Drill Down or Type which are marked with a in Figure 37above.
When you have changed the Pod Summary save your changes by selecting [Apply Changes]
You can step through the Pod Summaries for several Pods by clicking on the left and right arrows to increment by unique identifier
Do not delete a Pod unless you have manually taken a back up of the Pod source and settings. It is not possible to recover a Pod that has been deleted.
Setting the Pod Cache Interval
Without caching, each time a pod is displayed a query is run against the relevant views within the Exor database. When a cache interval is set, the results of the query are stored resulting in much faster load times for pods, particularly when driven by complex queries against large data tables.
The cache setting allows the administrator to set an interval for the cache to be refreshed. This setting will apply to all users who view the pod.
Figure 38 Setting the pod cache refresh interval
After setting the pod cache interval remember to save your changes.
Cached pods will not return “live” results, the results can be up to 8 hours old, this should be considered by an administrator for each pod and use case.
Note
Important Notice
Important Notice
Exor Leading the way in Infrastructure Asset Management Solutions...
© Copyright Exor Corporation Ltd., England, 2010. All rights reserved
29
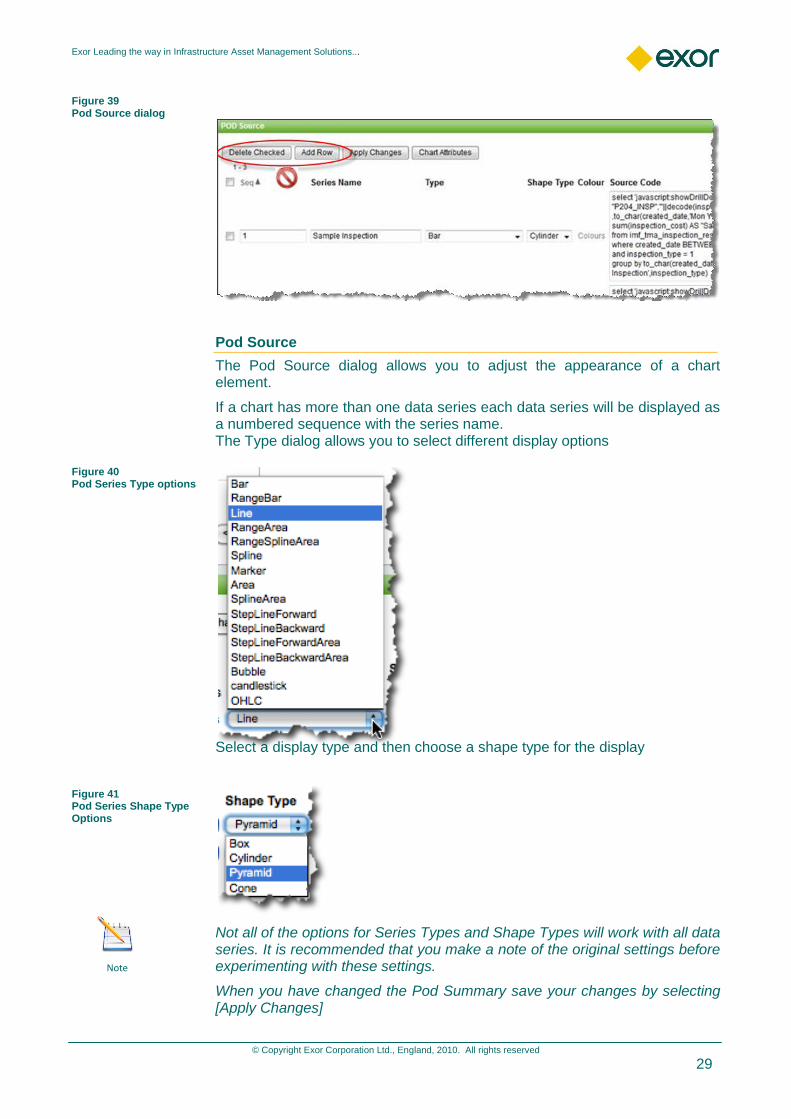
Figure 39 Pod Source dialog
Pod Source
The Pod Source dialog allows you to adjust the appearance of a chart element.
If a chart has more than one data series each data series will be displayed as a numbered sequence with the series name. The Type dialog allows you to select different display options
Figure 40 Pod Series Type options
Select a display type and then choose a shape type for the display
Figure 41 Pod Series Shape Type Options
Not all of the options for Series Types and Shape Types will work with all data series. It is recommended that you make a note of the original settings before experimenting with these settings.
When you have changed the Pod Summary save your changes by selecting [Apply Changes]
Note

Exor Leading the way in Infrastructure Asset Management Solutions...
© Copyright Exor Corporation Ltd., England, 2009. All rights reserved
30
Figure 42 Chart Colour Selector
To change the colours within a chart select the Colours button, this will display the colour selector allowing the selection of the required colour for the graph. Select [Save] to save the required colour.
Do not attempt to delete or add a row in the Pod Source unless you have taken a manual backup of the Pod and have received specific training in these functions from an Exor Consultant. You will not be able to request assistance from Exor Support if you delete a Pod or a data series. These options are provided for Exor Consultants only.
Changing Chart Attributes
To access more detailed chart attributes select [Chart Attributes] from either the Pod Settings or Pod Source dialog
Figure 43 Chart Attributes
The chart attributes dialogs allow you to adjust settings for Chart Details, Legend, X and Y Axes, Background and Display Items
Figure 44 Chart Details dialogue
Important Notice

Exor Leading the way in Infrastructure Asset Management Solutions...
© Copyright Exor Corporation Ltd., England, 2010. All rights reserved
31
Chart Details
These setting allow you to change chart types (not all types will work with all data series), set 3D options, adjust size, margins, animation and fonts.
It is recommended that you make a note of the original settings before experimenting with these settings.
Note
Exor Leading the way in Infrastructure Asset Management Solutions...
© Copyright Exor Corporation Ltd., England, 2009. All rights reserved
32
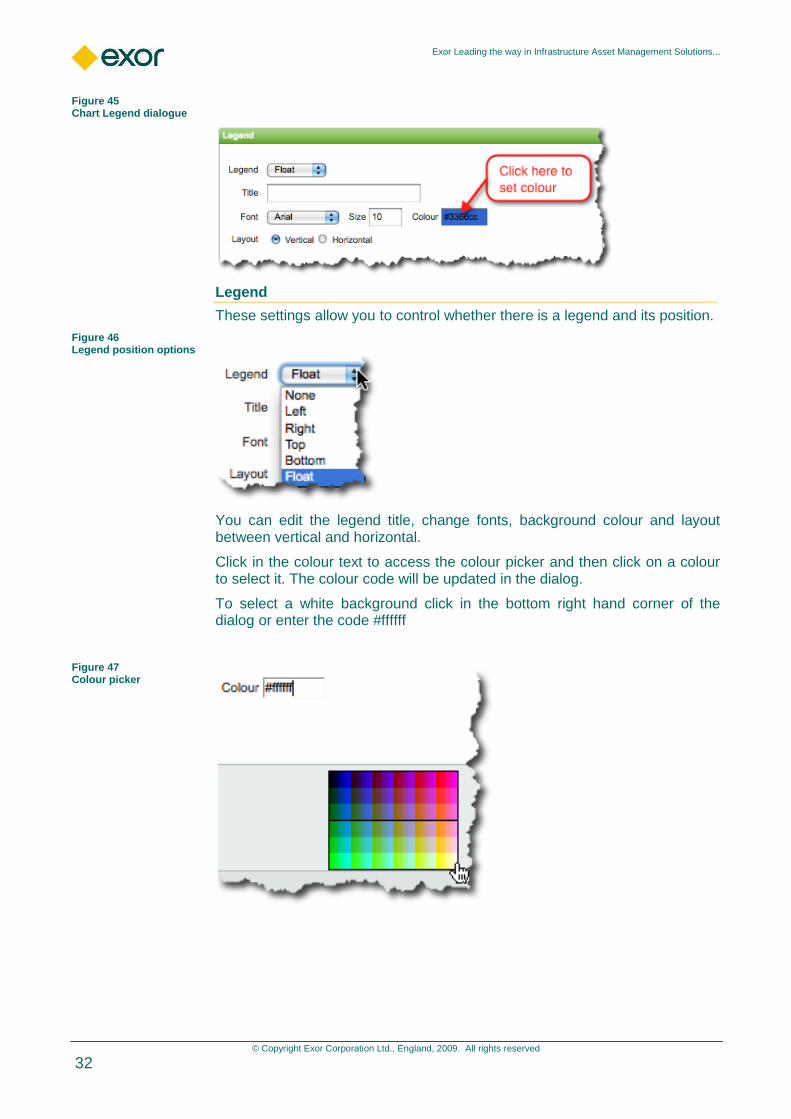
Figure 45 Chart Legend dialogue
Legend
These settings allow you to control whether there is a legend and its position.
Figure 46 Legend position options
You can edit the legend title, change fonts, background colour and layout between vertical and horizontal.
Click in the colour text to access the colour picker and then click on a colour to select it. The colour code will be updated in the dialog.
To select a white background click in the bottom right hand corner of the dialog or enter the code #ffffff
Figure 47 Colour picker

Exor Leading the way in Infrastructure Asset Management Solutions...
© Copyright Exor Corporation Ltd., England, 2010. All rights reserved
33
Figure 48 X Axis dialog
X and Y Axes
The dialogs for the X and Y axes are the same.
You can set the axis title, font and font size, prefix and postfix for the axis values, format labels and rotation.
You can force minimum and maximum scale values for the axis, leave blank for the scale to be auto set.
Figure 49 Chart Background dialog
Chart Background
You can change the background colour for a chart.
You can only select Background Colour 1 for a Solid Colour, both colours can be set for a Gradient.

Exor Leading the way in Infrastructure Asset Management Solutions...
© Copyright Exor Corporation Ltd., England, 2009. All rights reserved
34
Figure 50 Display on Chart dialog
Display on Chart
You can adjust the display of data series values, mouseover hints and axis ticks through this dialog
Figure 51 Saving Chart attributes
Saving Chart Attributes
Remember to save all of your changes to Chart Attributes by selecting [Apply Changes] before navigating away from Chart Attributes

Exor Leading the way in Infrastructure Asset Management Solutions...
© Copyright Exor Corporation Ltd., England, 2010. All rights reserved
35
Importing Pods
Pods will be imported into your Information Manager by an Exor Consultant as part of the delivery of custom Pods and Information Packs (collections of Pods)
Creating a new Pod
Do not attempt to create a new Pod unless you have received specific training in these functions from an Exor Consultant. You will not be able to request assistance from Exor Support if you attempt to create a new Pod. These options are provided for Exor Consultants only.
Figure 52 Do NOT attemprt to create a new Pod
Important Notice

Exor Leading the way in Infrastructure Asset Management Solutions...
© Copyright Exor Corporation Ltd., England, 2009. All rights reserved
36
Define Search
Define Search allows the administrator to determine which Information Manager views and which fields can be used in user ad hoc or saved queries. Select Define Search from the menu on the left hand side of the Admin Tab
Figure 53 Selecting Define Search dialog
Adding a Search
To add a new search select [Add Row] see Figure 53 above. A new blank row will be inserted at the bottom of your list of searches, if there are more than 10 searches you will be taken to the final page.
Figure 54 Inserting a new search row
Selecting the up/down arrows will display a list of the tables or views available to Information Manager (these are configured during implementation by an Exor Consultant). Usually you will want to select from the views prefixed IMF_.
Select the view that you wish to use.

Exor Leading the way in Infrastructure Asset Management Solutions...
© Copyright Exor Corporation Ltd., England, 2010. All rights reserved
37
Figure 55 Selecting the view for a search
Figure 56 Editing screen text & description
Give the search view a user friendly name and additional description which will be displayed to users. If you leave these values unaltered this search will be named “Add Screen Text” which may confuse users.
You must save the new search row before proceeding to define the columns which will be available to build queries. Select [Save]
Your new search will be placed at the top of the list of searches available, you can reorder it later.
Selecting and ordering columns within a search
Click on [columns] to the right of the search description to access the list of columns available.
Figure 57 Access the columns picker
You will presented with a blank list of search columns and will need to select [Add Row] to add the first column to your search definition.

Exor Leading the way in Infrastructure Asset Management Solutions...
© Copyright Exor Corporation Ltd., England, 2009. All rights reserved
38
Figure 58 Adding a column to a search definition
A new row will be created, click on the up/down arrows to select the column that you wish to use.
Figure 59 Selecting a column
Enter a friendly name and any hint text in the Screen text and Hint Text fields. Repeat the above steps to add more columns until you have added all of the columns that you wish to make available to users to query against. When you have finished save your selection.

Exor Leading the way in Infrastructure Asset Management Solutions...
© Copyright Exor Corporation Ltd., England, 2010. All rights reserved
39
Figure 60 Saving a selection of columns for a search definition
You can add a column more than once to a search definition. This can be useful if users may want to create between queries using dates or values, it will help users if you explain this within the Hint Text.
Reordering Searches and Columns
To reorder your searches or the columns within a search use the up and down arrows in the right hand Order column
Figure 61 Reordering Searches or Columns
Remember to [Save] any changes to the column or Search order before closing the dialog.
Changing a Search Definition
You can edit a search by selecting the table in an existing row and repeating the steps in Figure 55, Figure 56, Figure 57,
Note

Exor Leading the way in Infrastructure Asset Management Solutions...
© Copyright Exor Corporation Ltd., England, 2009. All rights reserved
40
Figure 58, Figure 59, Figure 60 and Figure 61 as needed.
Deleting a Search Definition
You can delete a search by checking the small box to the left of the search table and selecting [Delete]. You will be presented with a warning dialog as in Figure 19 select [OK] to proceed.
Figure 62 Deleting a Search Definition

Exor Leading the way in Infrastructure Asset Management Solutions...
© Copyright Exor Corporation Ltd., England, 2010. All rights reserved
41
Product Options
Product Options are the defined values that are used for setting default data values, „switches‟ that turn functionality on / off or set configuration parameters for Exor applications.
Many Product Option values are defined during implementation and should not be modified without consulting Exor Support ([email protected]).
The Product Options that can be modified are shown below:
Figure 63 Product Options Dialog

Exor Leading the way in Infrastructure Asset Management Solutions...
© Copyright Exor Corporation Ltd., England, 2009. All rights reserved
42
Map Related Settings
These settings will normally be configured during installation and should not be altered unless advised by Exor Support.
INITZOOM
The initial zoom level for the Map Tab.
A setting of 1 will zoom to the full extent of the map as defined when Locator is configured.
DATASOURCE
This is the name of the Data Source used for the Information Manager maps. This value will normally be set during the initial installation of Information Manager
WMSMAPSTR
This is the name of the OGC WMS Layer used as background data. Static background data is generally provided by an OGC compliant Web Map Service (WMS) Layer (defined using Product Option WMSMAPSTR) or a Base Map Layer generated from static data held within the Exor database (defined using Product Option BASEMAPSTR). In most implementations only one of these methods for displaying static background data is deployed but it is possible to configure Information Manager to utilise both data sources to provide background data.
STREETSTHE
This option is not currently used and should remain blank.
ROADSFOI
This option is not currently used and should remain blank.
TMATHEFOI
This is the Theme Name used when viewing Road Work related data on the Map when called from the Road Works Search Engine. This is set to TMA DISRUPTIONS during implementation and should not be amended. If TMA is not licenced, this option should be left blank.
BASEURL
This is the URL for Oracle Mapviewer.
COPYIMG
This is the full URL and file name (including extension) of the image to be used as a copyright watermark on the Map.
MAPSRID
Sets the map projection with Oracle MapViewer
COPYLINO
This is the Ordnance Survey license number which will be incorporated in printed map templates in the future.
This option is not currently used and should remain blank.
ENQTHEFOI
This is the Theme Name used when viewing Enquiries on the Map when called from the Enquiry Search Engine. This is set to IM_ENQUIRIES during
Exor Leading the way in Infrastructure Asset Management Solutions...
© Copyright Exor Corporation Ltd., England, 2010. All rights reserved
43
implementation and should not be amended. If Enquiry Manager is not licenced, this option should be left blank.
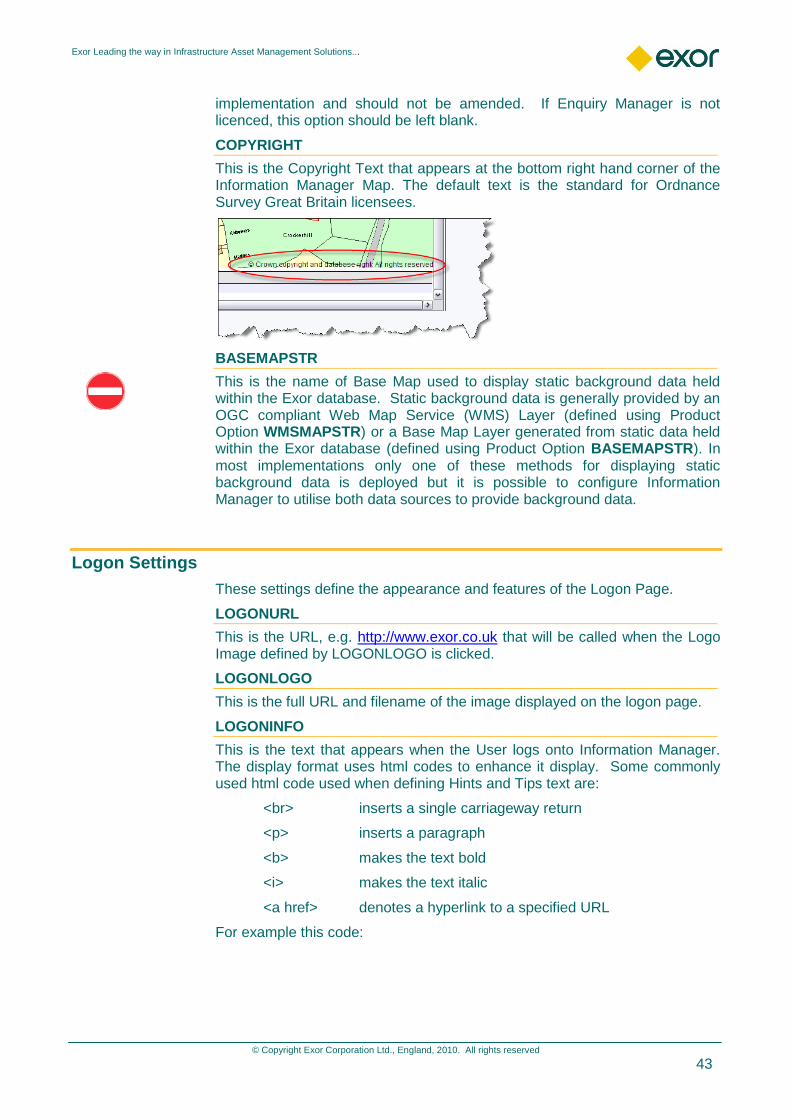
COPYRIGHT
This is the Copyright Text that appears at the bottom right hand corner of the Information Manager Map. The default text is the standard for Ordnance Survey Great Britain licensees.
BASEMAPSTR
This is the name of Base Map used to display static background data held within the Exor database. Static background data is generally provided by an OGC compliant Web Map Service (WMS) Layer (defined using Product Option WMSMAPSTR) or a Base Map Layer generated from static data held within the Exor database (defined using Product Option BASEMAPSTR). In most implementations only one of these methods for displaying static background data is deployed but it is possible to configure Information Manager to utilise both data sources to provide background data.
Logon Settings
These settings define the appearance and features of the Logon Page.
LOGONURL
This is the URL, e.g. http://www.exor.co.uk that will be called when the Logo Image defined by LOGONLOGO is clicked.
LOGONLOGO
This is the full URL and filename of the image displayed on the logon page.
LOGONINFO
This is the text that appears when the User logs onto Information Manager. The display format uses html codes to enhance it display. Some commonly used html code used when defining Hints and Tips text are:
<br> inserts a single carriageway return
<p> inserts a paragraph
<b> makes the text bold
<i> makes the text italic
<a href> denotes a hyperlink to a specified URL
For example this code:

Exor Leading the way in Infrastructure Asset Management Solutions...
© Copyright Exor Corporation Ltd., England, 2009. All rights reserved
44
will produce a Login screen with a mail link and a corporate logo sized 250 Exor 75 pixels as shown below.
Figure 64 Editing LOGONINFO
Other Settings
IMAGEURL
This is the URL for images used by Information Manager within the Framework.
IMBANNER
This option is not currently used and should remain blank.
PREFDB
This is the database name used when logging onto the Exor application. If a value is populated the User will not be prompted to enter it when logging on. If this value is left blank the User will be prompted for the database name as shown in Figure 65.
In most circumstances this value should be set to avoid the need for user input.
Figure 65 Login screen with option to enter database name
Welcome to <b> Information Manager by Exor</b>.<p>Please enter your <b>Exor</b> User Name and Password.<br> If you have any problems please contact <a href="mailto:[email protected]"> <b><i><u> System Administrator</i></b></u> </a>on <b>01234 567891</b>.<br> <br> <br> <img src="/im4_framework_43/images/exorlogo.png"/ width="250" height="75">

Exor Leading the way in Infrastructure Asset Management Solutions...
© Copyright Exor Corporation Ltd., England, 2010. All rights reserved
45
Managing Item Hint Text
Hints and Tips help is widely available throughout Information Manager to provide brief instructions and tips on how to use certain features contained within the application or to describe the function of a Pod.
The availability of „Hints and Tips‟ is signified by the cursor changing to a „Question Mark‟ when hovering over a User Prompt. To display the Hint and Tips Help click on the required User Prompt label. Several examples are shown in Figure 66.
Figure 66 Examples of Hint text
Pod descriptions can be by pressing the „Pod Info‟ button for the appropriate Pod.
When Hints and Tips are used a pop-up will appear displaying the appropriate text for the selected Item.
An example of the Hints and Tips is shown in Figure 67
Figure 67

Exor Leading the way in Infrastructure Asset Management Solutions...
© Copyright Exor Corporation Ltd., England, 2009. All rights reserved
46
Editing Hint Text
Figure 68 Accessing Item Hint Text
Hint and Tip text is managed by selecting „Item Hint Text‟ from the menu on the left of the Admin Tab. The current set of Hint and Text Tip text will be displayed. An example is shown in Figure 69.
Figure 69
To edit the Hint and Tips text for a Label or Pod navigate to the required Hint text. The appropriate item can be found by using the Item ID, which is displayed at the bottom of each Hints and Tips text callout. An example is shown in Figure 70.
Figure 70
Amend the Help text as required, then press the [Submit] button on the Title Banner, see Figure 68
The Hint text uses html to format the displayed output. Some commonly used html code used when defining Hints and Tips text are:
<BR> inserts a single carriage return
<P> inserts a paragraph
<B> makes the text bold
For example this code:
Note

Exor Leading the way in Infrastructure Asset Management Solutions...
© Copyright Exor Corporation Ltd., England, 2010. All rights reserved
47
Produces this:
There was an Old Man with a beard, Who said, 'It is just as I feared!
Two Owls and a Hen, Four Larks and a Wren, Have all built their nests in my beard!'
There was an Old Man with a beard,<BR> Who said, 'It is just as I feared! <P> Two <B>Owls and a Hen</B>,<BR> Four Larks and a Wren,<BR> Have all built their nests in my beard!'
Exor Leading the way in Infrastructure Asset Management Solutions...
© Copyright Exor Corporation Ltd., England, 2009. All rights reserved
48
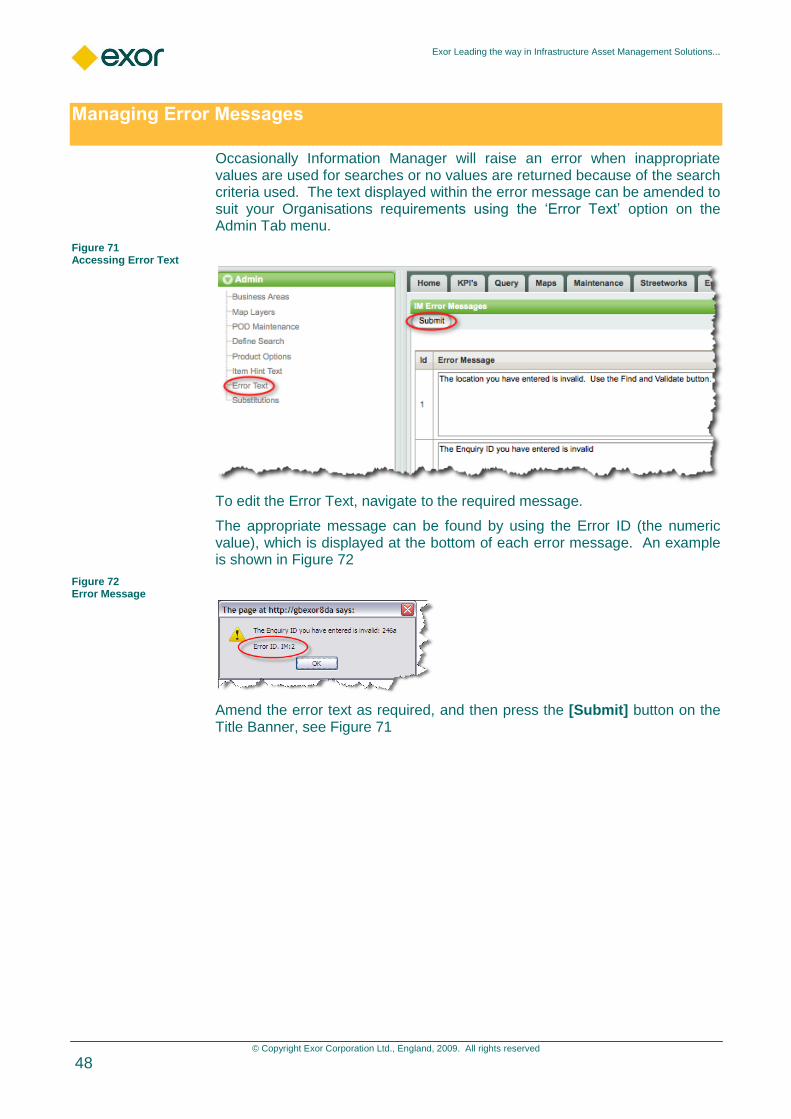
Managing Error Messages
Occasionally Information Manager will raise an error when inappropriate values are used for searches or no values are returned because of the search criteria used. The text displayed within the error message can be amended to suit your Organisations requirements using the „Error Text‟ option on the Admin Tab menu.
Figure 71 Accessing Error Text
To edit the Error Text, navigate to the required message.
The appropriate message can be found by using the Error ID (the numeric value), which is displayed at the bottom of each error message. An example is shown in Figure 72
Figure 72 Error Message
Amend the error text as required, and then press the [Submit] button on the Title Banner, see Figure 71

Exor Leading the way in Infrastructure Asset Management Solutions...
© Copyright Exor Corporation Ltd., England, 2010. All rights reserved
49
Substitutions
Most of the settings within the Substitutions menu should only be changed by Exor Consultants or on their instruction. The one setting that an administrator may wish to use is to change the logo or Header Icon that is displayed in the top left hand corner within Information Manager.
Figure 73 Substitutions
To change the logo enter the path to the logo in the Header Icon field.
Figure 74 Header Icon path
If the logo is already displayed in the gallery to the right of the Header Icon path you can simply select it by clicking on it to update the path.

Exor Leading the way in Infrastructure Asset Management Solutions...
© Copyright Exor Corporation Ltd., England, 2009. All rights reserved
50
Managing Access to Pod’s
User access to specific Pod‟s is controlled through the use of User Roles. Each Pod is built and registered as an Exor module within the HIG1880 – Modules Form (within the main Exor Application). Each module is then associated with one or more Roles. In order to access a module, or in this case use an Information Manager Pod, the User must have been granted access to one of the Module Roles using the HIG1832 – Users module (within the main Exor Application).
shows an example of an IM Pod where a User must have been granted either the IM_ENQ_USER or ENQ_ADMIN role to view and use the Pod within Information Manager
The Mode of access, i.e. NORMAL or READONLY, to the Role is not considered in the context of Information Manager Pods.
Figure 75
Figure 76 shows an example User who has been granted the IM_ENQ_USER Role.
Figure 76
The Role names used within this example are for explanation purposes only. Role names will differ in each Organisation.
Note
Note

Exor Leading the way in Infrastructure Asset Management Solutions...
© Copyright Exor Corporation Ltd., England, 2010. All rights reserved
51
CHAPTER
3 Work Order Worktray Admin This Chapter provides detailed information regarding the Administration of the Work Order Authorisation Worktray. All functions explained within this document can be carried out within the Admin tab of the Work Order Authorisation Worktray providing the user has the appropriate access rights.
The Admin tab can be found in the banner of the work order worktray window as shown in Figure 77.
Figure 77 Admin Tab
The work orders that are displayed to the user when they log on to the Worktray are restricted by their Admin Unit and any other work orders that have been forwarded to them from another user of the Worktray.
To further restrict the work orders available to users the administrator may set up restrictions based on:
Road Group
Work Category (Budget)
This additional restriction is set up and maintained using the Admin tab and associating those users that require additional restrictions.
The users that only need to be restricted by data within their own admin unit need not be entered here.
Note

Exor Leading the way in Infrastructure Asset Management Solutions...
© Copyright Exor Corporation Ltd., England, 2009. All rights reserved
52
Work Order Users
Figure 78
Users that have additional restrictions will be displayed as shown in Figure 78, if they have a „Yes‟ under one or both of the restrictions, select on the word „Yes‟ to drill down to view or amend the restriction as shown Figure 82 for road groups and Figure 84 for work codes.
To edit an existing user that currently has a restriction select the edit button
. This will display the window in Figure 79
Figure 79 Edit
To enable or disable a restriction by either road group or work code update the value in the appropriate field in this window to „Yes‟ followed by the [Apply Changes] button. Once the restriction types have been set and applied the user will be returned to the window in Figure 78.
Select the [Delete] button to remove the user and its associated restrictions, this will effectively reset the user back to the restrictions offered by the standard admin unit security.
To add an existing exor user to the list of those users with additional restrictions
select the [Create] button, this will display the following window:
Figure 80

Exor Leading the way in Infrastructure Asset Management Solutions...
© Copyright Exor Corporation Ltd., England, 2010. All rights reserved
53
User (Required) List
If a new user is to have additional restrictions applied, enter the user name into this field.
Start typing the user name into this field, the system will carry out a predictive search based on the users that are defined on the system, an example of this is shown in Figure 81.
Figure 81 Predictive search
If the user has the ‘Yes’ applied to either of the fields below without any associated road group or work code there will be no results displayed in the introduction histogram when they log in to the Worktray as no data will be made available to them.
Restrict by Road Group (Required) List
If the user is to have a restricted view of available work orders by road group enter „Yes‟ into this field. The appropriate road groups are then associated to the user as shown in Figure 82.
Restrict by Workcode (Required) List
If the user is to have a restricted view of available work orders by Work Code (Budget) enter „Yes‟ into this field. The appropriate Work Codes are then associated to the user as shown in Figure 84.
The user will see all work orders that contain at least one work order line with the Work Code the user is restricted to. The user will see all work order lines for the work orders displayed, including those that contain work codes that the user has not been specifically restricted to.
Once the values have been entered select the [Create] button. This will then take the user back to the window in Figure 78 where the restrictions are maintained.
To cancel the operation select the [Cancel] button.
Note
Note

Exor Leading the way in Infrastructure Asset Management Solutions...
© Copyright Exor Corporation Ltd., England, 2009. All rights reserved
54
Road Group Restrictions
This option is intended to reduce the number of work orders available in the users Admin Unit by road groups within that admin unit, if the Admin Unit security is sufficient to display the work orders in the users area the road groups need not be restricted.
When the „Yes‟ is selected in the road group column the drill will take the user to the window shown in Figure 82, this will display the currently selected road groups and enable the addition or removal of individual road groups for a user.
When selected, the display of the available groups may take some time depending upon the complexity of the gazetteer.
Figure 82 User Road Groups
Group Type (Optional) List
To restrict the road groups in the available groups window enter a road group type.
Start typing the group type name into this field, the system will carry out a predictive search based on the road groups that are defined on the system and will display those groups of the type selected, an example of this is shown in Figure 83.
Note

Exor Leading the way in Infrastructure Asset Management Solutions...
© Copyright Exor Corporation Ltd., England, 2010. All rights reserved
55
Figure 83
Selection / Ordering Buttons
The following buttons are used for moving groups between the Available and Selected Groups windows:
Reset, will refresh the list based on the group type selected.
Move all, will move all the road groups displayed in the available groups window to the selected groups window.
Move selected, will move all the highlighted road groups to the selected groups window. Once a group has been moved it will be removed from the available groups window.
Groups may be selected:
individually
In multiples, press the [Ctrl] key, then select multiple groups before pressing the move button.
In a band, select one group, press the [Shift] key, then select a second group, all groups between the two selections will be highlighted, press the move button.
Remove selected, will remove all the highlighted road groups from the selected groups window, groups may be selected as with the move selected button.
Remove all, will remove all the road groups from the selected groups window.
The following buttons are used to order the display in the Selected Groups window:
Top, move the selected road group to the top of the display in the window.
Up, move the selected road group up one row in the window.
Down, move the selected road group down one row in the window.

Exor Leading the way in Infrastructure Asset Management Solutions...
© Copyright Exor Corporation Ltd., England, 2009. All rights reserved
56
Bottom, move the selected road group to the bottom of the display in the window.
Once the required selections have been made select the [Save] button.
Select the Home tab to view the introduction histogram.
The [Cancel] button will return the user to the Work Order Users window Figure 78.
Work Code Restrictions
When the „Yes‟ is selected in the work code column the drill will take the user to the window shown in Figure 84, this will enable the addition or removal of individual work code restriction for a user.
The user name is displayed in the banner for the window.
Figure 84 User Work Codes
The [Cancel] button will return the user to the Work Order Users window Figure 78.
Delete a Work Code
To delete a work code selection select the checkbox for the work code that is to be removed, then select the [Delete] button followed by the [Submit] button. The next time the user logs in to the worktray they will only be presented with those work orders that contain the work codes displayed.
Add a Work Code
To add a new work code select the [Add Row] button, this will display a new row, selecting the picklist button will display a list of all work codes, this list may be restricted by starting to type the number of the required work code, the picklist will dynamically change based on the numbers entered. Once selected select the [Submit] button to save the changes.
Select the Home tab to view the introduction histogram.