EUT Course 150 TIME & LABOR - CAPPS...
114
EUT Course 150 TIME & LABOR PeopleSoft 9.2 August 2016
-
Upload
trinhxuyen -
Category
Documents
-
view
221 -
download
3
Transcript of EUT Course 150 TIME & LABOR - CAPPS...

EUT Course 150
TIME & LABOR
PeopleSoft 9.2
August 2016

CAPPS HR/PAYROLL
EUT Course
Page ii
Table of Contents Time and Labor Core ....................................................................................................... 1
Section 2 Approving and Managing Time ............................................................................... 1 Lesson 1 - Approving and Managing Time ........................................................................................... 1
Super User Timesheet Overview ........................................................................................................................ 1 Lesson 2 Timesheet Entries ................................................................................................................. 10
Entering Time for Employees ........................................................................................................................... 10 Viewing Leave Balances .................................................................................................................................. 18
Lesson 4 Overtime and Lump Sum Payouts ........................................................................................ 22 Paying Out Overtime ........................................................................................................................................ 22
Lesson 5 Payable Time ........................................................................................................................ 27 Viewing Payable Time ..................................................................................................................................... 27 Closing Payable Time ....................................................................................................................................... 30
Section 3 Sick Leave Pool ........................................................................................................ 33 Lesson 1 - Awards and Donations ....................................................................................................... 33
Awarding Sick Leave from the Pool ................................................................................................................. 33 Donating Sick Leave to the Pool ...................................................................................................................... 36 Adjusting the Agency's Sick Leave Pool Balance ............................................................................................ 38
Lesson 2 - Fiscal Year End Sick Leave Pool Process .......................................................................... 41 Fiscal Year End Sick Leave Pool Process ........................................................................................................ 41
Lesson 3 - Review and Knowledge Check ........................................................................................... 49
Section 4 Troubleshooting Time and Labor .......................................................................... 49 Lesson 1 Managing Exceptions ........................................................................................................... 49
Running the Exceptions Query ......................................................................................................................... 49 Manage Exceptions page .................................................................................................................................. 54 Running the Ad Hoc Time Admin Process ....................................................................................................... 56
Lesson 2 Updating and Processing Information................................................................................... 61 Updating the Earliest Change Date ................................................................................................................... 61
Section 5 Time and Labor Set Up ........................................................................................... 62 Lesson 1 - Time and Labor Set Up ...................................................................................................... 62
Viewing Time Reporter Data ............................................................................................................................ 62 Comp Plan Enrollment ..................................................................................................................................... 67
Lesson 2 - Modifying Work Schedules ................................................................................................ 71 Flexing or Overriding a Work Schedule ........................................................................................................... 71 Modifying Work Schedules .............................................................................................................................. 77
Lesson 3 - Shift Differential Pay .......................................................................................................... 81 Modifying Differential Pay Rate ...................................................................................................................... 81
Lesson 4 FYE Annual Leave Conversion ............................................................................................ 84 Running the FYE Annual Leave Conversion ................................................................................................... 84
Section 6 Reports and Queries ................................................................................................ 88 Lesson 1 - Reports and Queries ........................................................................................................... 88
Running the Employee Monthly T&L Report .................................................................................................. 89 Full Month of LWOP Time .............................................................................................................................. 93 Running the TRCs by Date Report ................................................................................................................... 98 Running the Comp Balances by Employee Query .......................................................................................... 104
Glossary ......................................................................................................................... 111
CAPPS HR/PAYROLL
EUT Course
Page 1
Time and Labor Core
Section 2 Approving and Managing Time
Lesson 1 - Approving and Managing Time
Super User Timesheet Overview
Section 2, Lesson 1 Exercises, Scenario 1 - Super User Timesheet Overview
Procedure
Step Action
1. Super Users can enter and or modify a timesheet for an employee or manager. They
have the ability to run the Time Administration process that calculates time and
adjusts leave balances.
Since the Super User and Sick Leave Pool Administrator have the ability to add or
adjust time they use a different timesheet called the Super User Timesheet. Time
Administrators will have a similar time sheet but they have a limited number of
transactions that they can perform.

CAPPS HR/PAYROLL
EUT Course
Page 2
Step Action
2. To view the Super User Timesheet.
Click the Time and Labor link.

CAPPS HR/PAYROLL
EUT Course
Page 3
Step Action
3. Click the Texas Time link.
4. Click the Super User Timesheet link.
5. The Super User Timesheet Search page displays.
To look at an employee's timesheet, enter their Empl ID or use the Name fields to
search for the employee.
6. In this example, locate the employee by entering their full Empl ID number.
Enter the desired information into the Empl ID field. Enter "00000000029".
7. The Date field populates to the first of the current month but can be changed as
needed.
8. NOTE: Super Users have access to all periods of activity, unlike employees and
managers that only have access to the timesheet for a defined period (ie 90 days).
This timeframe is determined by each agency, so your agency may be slightly
different.
9. NOTE: Super Users must be aware that balances prior to their Go-Live date must
be corrected in the system of record (USPS) for that time, as well as CAPPS. Super
Users should work with CAPPS and SHRPA Support Staff to correct these dates.

CAPPS HR/PAYROLL
EUT Course
Page 4
Step Action
10. Click the Search button.
11. The Super User Timesheet displays. The entire timesheet may be too large to view
on the monitor. Use the scrollbar to move across the page to view additional items
on the timesheet.
Click the scrollbar.
12. These items will be reviewed later in the lesson. To scroll to the left to see the
beginning of the timesheet, click the scrollbar.
Step Action
13. The timesheet header displays important information. Verify that the Name and
Empl ID are correct for the information that was entered.
Your security profile will determine the employees that you are able to view.
14. The Leave Balances group box displays the leave balances for this employee. The
leave balances always reflect the current amount of leave that the employee has
accrued in each area.

CAPPS HR/PAYROLL
EUT Course
Page 5
Step Action
15. In this example, this employee has 87 hours of Annual Leave. The employee has
requested 8 hours of time off that is Pending Approval, leaving an Available
balance of 79 hours.
If the leave taken is not approved, it will remain in Pending Approval. Processes
are in place to remind managers to approve their employee’s time and leave, and
Super Users must run queries to ensure Needs Approval time is managed
appropriately.
16. The next two group of boxes, called grids, contain 31 sequential days where time is
entered.
17. The first grid displays the first 15 days beginning with the effective date entered on
the Search page.
In this example, the employee is an Exception Time Reporter. The description line
displays the employee's scheduled hours for each day.
A Positive Time Reporter's timesheet would display 0.00 in the description line for
each day of the week because they do not have an assigned schedule.
18. An Exception Time Reporter enters time on their timesheet when it is different
from their assigned scheduled hours. This includes hours worked over their
scheduled hours and any leave time taken during their scheduled hours. If no leave
is taken the employee will only have to submit their time according to their agency's
policies.
19. A Positive Time Reporter must enter all hours that they work on the day that they
work. They are also required to enter leave time and must submit their time as per
their agency's deadlines in order to get paid.
20. *Time Reporting Codes are used to enter different types of time. For example
Annual Leave and Sick Leave are just two types of time that can be entered on the
timesheet.
21. Only one *Time Reporting Code (TRC) can be entered on a line. The Add a New
Line button allows the Super User to add additional lines so different types of time
can be added to the timesheet.
22. TRCs can be typed directly into the field. They can also be selected from a list of
available values.
Click the Look up Time Reporting Code (Alt+5) button.

CAPPS HR/PAYROLL
EUT Course
Page 6
Step Action
23. This agency has 115 TRCs. Some agencies have agency specific TRC’s. When your
agency goes live on CAPPS the number of TRCs maybe different from other
agencies.
24. The TRCs will be reviewed in detail in the next lesson.
Click the Cancel button.
25. The Override Reason Codes (ORC) are agency specific and can be used by
agencies to further define leave taken or hours worked.
If your agency uses ORCs this information will be provided in the agency specific
training materials.
26. The Status field will be reviewed in a later lesson.
27. To move across the page, click the scrollbar.
28. The Labor Account Code field is used by some agencies to further define time
allocated for special purposes. Agencies using Labor Account Codes will provide
training on when and how to use this field.
The FMLA ID is used to designate the FMLA Event number when an employee is
out on FMLA. The comments field may be used by employees, managers, or Super
Users.

CAPPS HR/PAYROLL
EUT Course
Page 7
Step Action
29. To move across the page, click the scrollbar.
30. The Previous button will move the timesheet back 31 days at a time.
Click the Previous button.
31. Since there are only 28 days in February, this timesheet begins on 1/29/15.
32. The Next button moves the timesheet forward 31 days.
Click the Next button.
33. To view additional detailed information about this employee's leave balances, click
the View Leave Balances link.
Step Action
34. This employee has 12 different types of Leave Balances. Use the arrow buttons to
navigate through the list or click View All to see all Leave Balances on one page.

CAPPS HR/PAYROLL
EUT Course
Page 8
Step Action
35. Click the View All link.
36. To move down the page, click the scrollbar.
37. This employee has no Administrative Leave available but does have Annual
Leave displayed.
38. To continue further down the page, click the scrollbar.
39. Some Leave time expires and the expiration dates can be seen in this view.
40. Click the Show Time Expiring in list.
41. The *Show Time Expiring in: drop down arrow allows different was to view the
time.
Click the Next 90 Days list item.
42. Notice that the list changed to show only the time that expires in 90 days.
To move up the page,
click the scrollbar.
43. Click the View 1 link.
44. Click the Return to Employee Timesheet link.
45. Click the Override Schedule link.
46. The Override Schedule Workday link allows the user to adjust the employee's
work schedule for the current week. This will be explored in detail in a later lesson.
Click the Return To Timesheet link.
47. The Maintain Leave of Absence link allows Super Users to place an employee on
Leave of Absence, Return an employee from Leave of Absence, or to change an
LOA Reason Code.
Note: The Maintain Leave of Absence link is available in Manager Self-Service for
agencies that use Full Manager Self-Service.

CAPPS HR/PAYROLL
EUT Course
Page 9
Step Action
48. The Available FMLA Balance link will only be available when it is applicable to
an employee on FMLA.
Otherwise employees will not see this link.
Click the Available FMLA Balance link.
49. The FLMA Open Events screen only displays OPEN EVENTS. It displays the
FMLA Request ID and the Date Range.
50. The Available Balance section displays the balance for FMLA and Military
Caregiver (MCL).
51. Click the Return link to go back to the Timesheet.

CAPPS HR/PAYROLL
EUT Course
Page 10
Step Action
52. Click the Home link.
53. Congratulations! You have successfully completed this lesson.
End of Procedure.
Lesson 2 Timesheet Entries
Entering Time for Employees
Section 2, Lesson 2 Exercises, Scenario 1 - Entering Time for an Employee
Procedure
Step Action
1. It is the responsibility of employees and managers to enter in their own time.
On occasion a Super User may have to enter time for someone that is not able to
enter their own time.

CAPPS HR/PAYROLL
EUT Course
Page 11
Step Action
2. The Employee Self-Service (ESS) and Manager Self-Service (MSS) training
materials provided lessons on how to enter in time on a timesheet.
3. This Super User training will provide a brief overview of timesheet entry. The
Employee Self-Service (ESS) and Manager Self-Service (MSS) materials are
available for an in depth review and refresher on entering time on the timesheet.
Step Action
4. Click the Time and Labor link.

CAPPS HR/PAYROLL
EUT Course
Page 12
Step Action
5. Click the Super User Timesheet link.
6. The Search page for the Super User Timesheet requires a complete Empl ID
number, or a search can be performed using the employee's name.
7. In this example, a Positive Time Reporter has been selected.
Enter the desired information into the Empl ID field. Enter "00000000022".
8. In addition to a name or Empl ID, a Date is required. This field will default to the
first of the current month. This date can be changed to look at a timesheet for a
different month.
9. Click the Search button.
10. Type the TRC or use the Look up feature.
Click the Look up Time Reporting Code (Alt+5) button.

CAPPS HR/PAYROLL
EUT Course
Page 13
Step Action
11. Enter the first letter of the TRC to filter the list.
Enter the desired information into the Time Reporting Code field. Enter "R".
12. Click the Look Up button.
13. Select the appropriate TRC.
Click the REGHR link.
14. Enter the number of hours worked on the day that the employee worked.
Enter the desired information into the Wed 4/1 0.00 field. Enter "8".
15. To move the cursor to the next day, press [Tab].
16. Enter the desired information into the Thu 4/2 0.00 field. Enter "8".
17. Each new TRC requires a separate line.
Click the Add a New Line for Wednesday 04/01/2015 to Wednesday 04/15/2015
button.
18. Friday April 3, 2015 was an Optional Holiday for Good Friday.
Click the Look up Time Reporting Code (Alt+5) button.
19. Enter the desired information into the Time Reporting Code field. Enter "O".
20. Click the Look Up button.

CAPPS HR/PAYROLL
EUT Course
Page 14
Step Action
21. If the employee chooses to take the optional holiday then they can enter OHCPT,
this will cause their Optional Holiday leave balance to go negative.
By taking the optional holiday they are in essence agreeing to work another skeleton
holiday before the end of the fiscal year.
When the employee works the skeleton holiday to make up for the optional holiday,
they use the REGOH TRC which will offset the negative balance.
Click the OHCPT link.

CAPPS HR/PAYROLL
EUT Course
Page 15
Step Action
22. Enter the desired information into the Fri 4/3 0.00 field. Enter "8".
23. Click the Add a New Line for Wednesday 04/01/2015 to Wednesday 04/15/2015
button.
24. In the second week the employee is taking sick time on Monday and then works
regular hours the rest of the week.
25. Enter the desired information into the Time Reporting Code field. Enter "SICKT".
26. Enter the desired information into the Mon 4/6 0.00 field. Enter "8".
27. To enter the regular work hours use the REGHR line that is already on the
timesheet.
28. Enter the desired information into the Tue 4/7 0.00 field. Enter "8".
29. Enter the desired information into the Thu 4/9 0.00 field. Enter "8".

CAPPS HR/PAYROLL
EUT Course
Page 16
Step Action
30. Click the Add a New Line for Wednesday 04/01/2015 to Wednesday 04/15/2015
button.
31. Annual Leave is entered much the say way as regular hours. The TRC is ANVLT.
Enter the hours taken on the days that the employee is using the Annual Leave time.
32. Enter the desired information into the Time Reporting Code field. Enter
"ANLVT".
33. Enter the desired information into the Fri 4/10 0.00 field. Enter "8".
34. The employee works 10 hours a day for the week of April 13 through April 17.
When Time Administration runs it will determine if the employee earns Comp Time
or FLSA Overtime and bank the hours in the appropriate Comp Time Plan.
35. The calculation is based on the employee’s FLSA Status and hours worked/leave
taken through the workweek.
In this example Time Admin will create 40 hours of regular time and 10 hours of
overtime. The overtime is banked.
36. Enter the desired information into the Mon 4/13 0.00 field. Enter "10".
37. Enter the desired information into the Wed 4/15 0.00 field. Enter "REGHR".
38. Enter the desired information into the Time Reporting Code field. Enter
"REGHR".
39. Enter the desired information into the Fri 4/17 0.00 field. Enter "10".
40. Entering hours for Comp time is just like entering Annual leave.
41. Click the Add a New Line for Thursday 04/16/2015 to Friday 05/01/2015 button.
42. Enter the desired information into the Time Reporting Code field. Enter
"COMPT".

CAPPS HR/PAYROLL
EUT Course
Page 17
Step Action
43. Enter the desired information into the Mon 4/20 0.00 field. Enter "8".
44. Click the scrollbar.
45. The Labor Account Code field is used by some agencies to further define time
allocated for special purposes. If your agency uses Labor Account Codes they will
provide training on when and how to use this field.
46. The FMLA ID is used to designate the FMLA Event number when an employee is
out on FMLA.
47. The Comments field may be used by employees, managers, or Super Users.
48. The Super User timesheet has both the
E-Sign & Approve button, and a
line Approve and Deny buttons.
It is important to understand the difference
between the two and when to use each one.
49. If the Super User wants to approve time (on behalf of the manager) that the
employee entered on the timesheet, the Super User would need to click the Approve
(or Deny) button on each line and then click the E-Sign & Approve button on the
bottom of the timesheet.
Clicking the E-Sign & Approve button will approve time that the Super User has
selected to be approved or time that the Super User has entered directly onto the
Timesheet.
50. Click the scrollbar.
51. Since the Super User entered all the time on this timesheet only the E-Sign &
Approve button needs to be clicked.
Click the E-Sign & Approve button.
52. This message indicates that there is a row on the timesheet that does not have a
TRC.
Click the OK button.

CAPPS HR/PAYROLL
EUT Course
Page 18
Step Action
53. There is not a way to delete a row once it has been added. So enter a TRC, like
REGHR, that is already on the timesheet and leave the hours blank for the entire
row. This row will disappear after clicking E-Sign & Approve.
Enter the desired information into the Time Reporting Code field. Enter
"REGHR".
54. Click the E-Sign & Approve button.
55. Click the OK button.
56. Click the Home link.
57. Congratulations! You have successfully completed this lesson.
End of Procedure.
Viewing Leave Balances
Section 2, Lesson 2 Exercises, Scenario 2 - Viewing Leave Balances
Procedure
CAPPS HR/PAYROLL
EUT Course
Page 19
Step Action
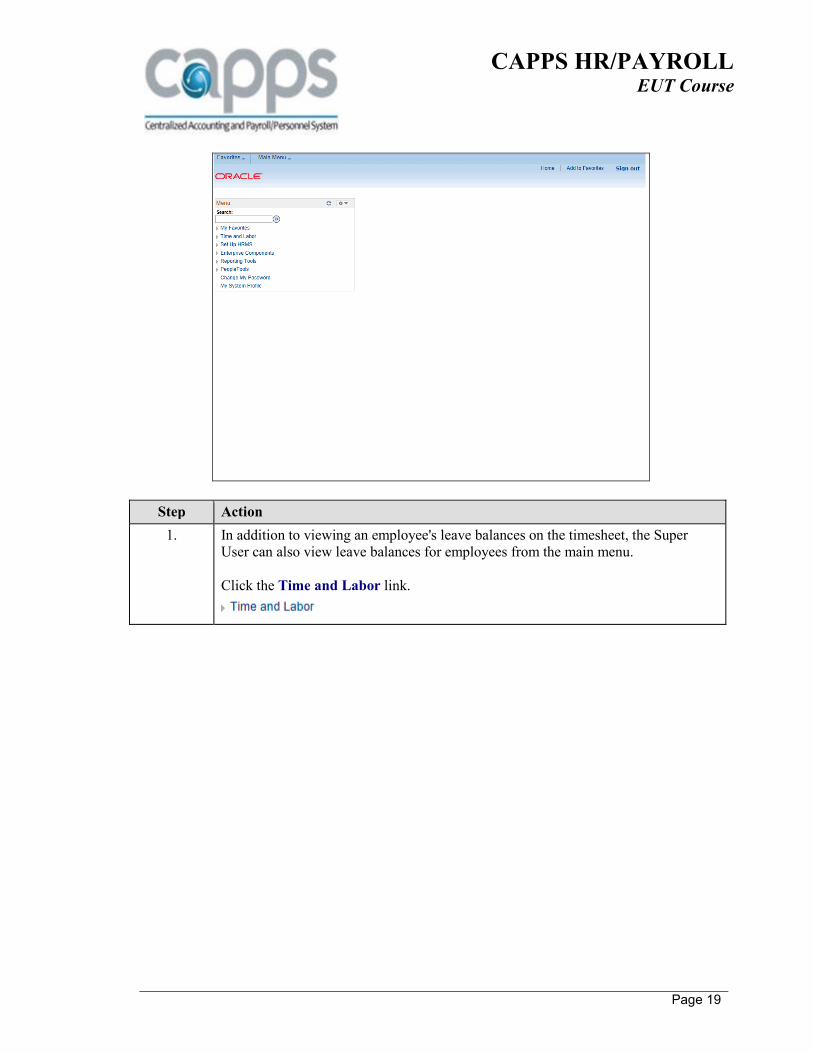
1. In addition to viewing an employee's leave balances on the timesheet, the Super
User can also view leave balances for employees from the main menu.
Click the Time and Labor link.

CAPPS HR/PAYROLL
EUT Course
Page 20
Step Action
2. Click the Texas Time link.
3. Click the View Leave Balance/Expirations link.
4. Enter the desired information into the Empl ID field. Enter "00000000029".

CAPPS HR/PAYROLL
EUT Course
Page 21
Step Action
5. Click the Search button.

CAPPS HR/PAYROLL
EUT Course
Page 22
Step Action
6. Use the navigation links to see all the balances on one page.
Click the View All link.
7. Use the View 1 link to see just one leave balance on the page.
Click the View 1 link.
8. Use the right and left arrows to navigate through the list of leave balances.
Click the Show next row (Alt+.) button.
9. This employee has a Comp Time leave balance of 10 hours. Comp Time can expire,
to view the expiration date(s) click the drop down arrow and select a timeframe.
Click the Show Time Expiring in list.
10. Click the Show All list item.
11. The expiration dates display.
Click the Home link.
12. Congratulations! You have successfully completed this lesson.
End of Procedure.
Lesson 4 Overtime and Lump Sum Payouts
Paying Out Overtime
Section 2, Lesson 4 Exercises, Scenario 1 - Paying Out Overtime
Procedure

CAPPS HR/PAYROLL
EUT Course
Page 23
Step Action
1. Overtime can accrue up to 240 hours. Once an employee accrues up to or greater
than 248 hours, the CAPPS system will automatically pay out the overtime hours
down to 240 hours.
2. There are occasions when an employee can be paid for the overtime they work in
accordance with their agency policy.
This lesson shows the Super User how to code the timesheet so the employee gets
paid for their overtime worked.
Step Action
3. Click the Time and Labor link.

CAPPS HR/PAYROLL
EUT Course
Page 24
Step Action
4. Click the Texas Time link.
5. Click the Super User Timesheet link.
6. Enter the desired information into the Empl ID field. Enter "00000000033".

CAPPS HR/PAYROLL
EUT Course
Page 25
Step Action
7. Click the Search button.
8. This employee has a balance of 63 hours of FLSA Overtime. In this example, the
employee has been approved to be paid for 40 hours of their Overtime.

CAPPS HR/PAYROLL
EUT Course
Page 26
Step Action
9. Click the Look up Time Reporting Code (Alt+5) button.
10. Use the first letter of the TRC to filter the list.
Enter the desired information into the Time Reporting Code field. Enter "F".
11. Click the Look Up button.
12. Select the Banked Overtime Paid TRC.
Click the FLSAP link.
13. Enter the desired information into the Sun 3/1 0.00 field. Enter "40".
14. Click the E-Sign & Approve button.

CAPPS HR/PAYROLL
EUT Course
Page 27
Step Action
15. In this example, the Super User has received the necessary agency approvals to pay
the employee prior to entering the FLSAP TRC.
Click the OK button.
16. The Overtime will be paid to the employee on the next payroll.
Click the Home link.
17. Congratulations! You have successfully completed this lesson.
End of Procedure.
Lesson 5 Payable Time
Viewing Payable Time
Section 2, Lesson 5 Exercises, Scenario 1 - Viewing Payable Time
Procedure
Step Action
1. There are two ways to view Payable Time. The Summary page or the Details page.
This lesson will show both pages.
2. Viewing Payable Time can be helpful when trying to assist employees or managers
with paycheck issues. It can also be helpful to help troubleshoot timesheet errors.

CAPPS HR/PAYROLL
EUT Course
Page 28
Step Action
3. Click the Time and Labor link.

CAPPS HR/PAYROLL
EUT Course
Page 29
Step Action
4. Click the Texas Time link.
5. Click the Payable Time Summary link.
6. Enter in the employees ID number.
Enter the desired information into the Empl ID field. Enter "00000000024".
7. The date defaults to the current date but can be changed as needed. In this scenario
use March 1, 2015.
It is best practice to use the employee’s FLSA workweek start date when selecting
the week to view.
Click the Choose a date (Alt+5) button.
8. Click the 1 link.
9. Click the Search button.
10. The Payable Time Summary page displays one week at a time. It shows the Time
Reporting Code (left Column), the hours that are entered on the timesheet, and the
employee’s scheduled hours.
11. Use the Previous Week and Next Week links to navigate to different payable time
weeks for the employee.
12. The Payable Time Details page shows more information.
Click the Home link.
13. Click the Time and Labor link.
14. Click the Texas Time link.
15. Click the Payable Time Detail link.

CAPPS HR/PAYROLL
EUT Course
Page 30
Step Action
16. Enter the employee's ID number.
Enter the desired information into the Empl ID field. Enter "00000000024".
17. In this scenario select March 1, 2015 as the date.
It is best practice to use the employee’s FLSA workweek start date when selecting
the week to view.
Click the Choose a date (Alt+5) button.
18. Click the 1 link.
19. Click the Search button.
20. Click the scrollbar.
21. This page provides a more complex and detailed view from the Payable Time
Summary page.
Click the Return to Select Employee link.
22. Click the Home link.
23. Congratulations! You have successfully completed this lesson.
End of Procedure.
Closing Payable Time
Section 2, Lesson 5 Exercises, Scenario 2 - Closing Payable Time
Procedure

CAPPS HR/PAYROLL
EUT Course
Page 31
Step Action
1. After Payable Time is created it is pulled in by Payroll to create paychecks.
On occasion if there is an issue, the Payroll team may need to have Payable Time
closed for an employee.
2. Payable Time should only be closed in rare instances. Once Payable Time is
closed it cannot be reopened.
An example of when Payable Time may need to be closed may occur when money
owed for a past pay period appears on the paycheck, but is no longer valid.
Contact CAPPS Support to walk through the process and verify that this is a valid
scenario before closing Payable Time.
3. Incorrectly closing the wrong Payable Time could result in an employee not getting
paid or later getting docked time on their next paycheck.
Step Action
4. Click the Time and Labor link.
CAPPS HR/PAYROLL
EUT Course
Page 32
Step Action
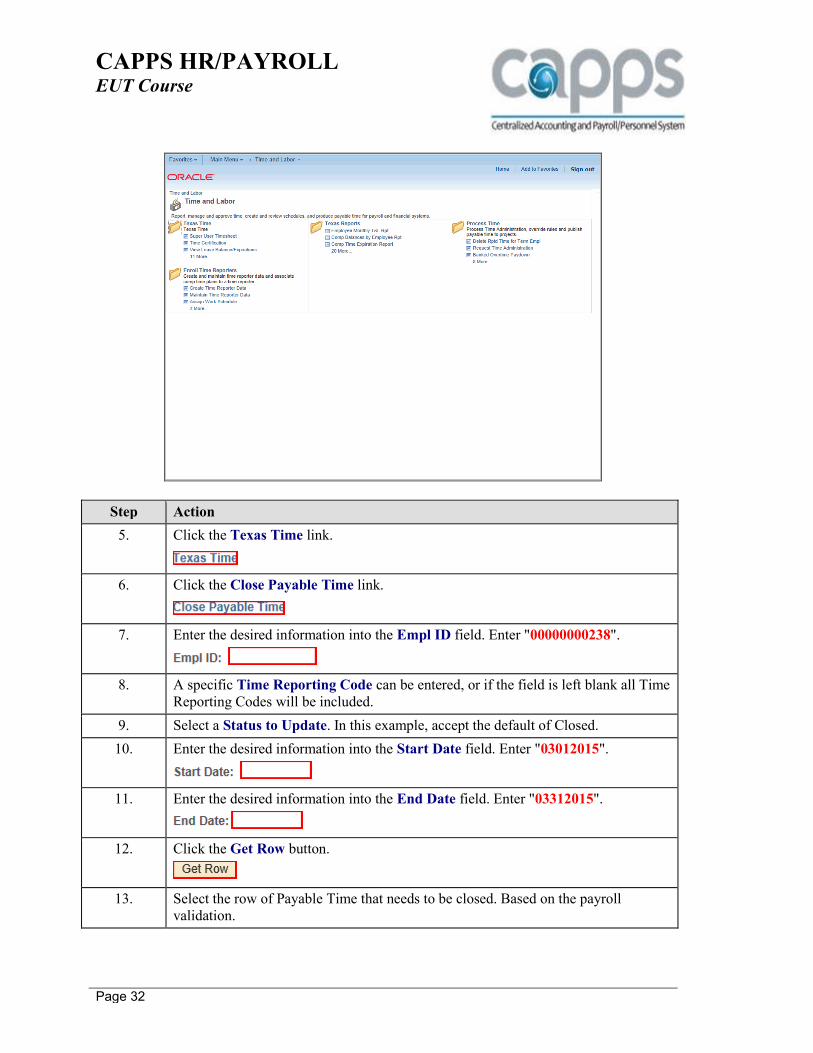
5. Click the Texas Time link.
6. Click the Close Payable Time link.
7. Enter the desired information into the Empl ID field. Enter "00000000238".
8. A specific Time Reporting Code can be entered, or if the field is left blank all Time
Reporting Codes will be included.
9. Select a Status to Update. In this example, accept the default of Closed.
10. Enter the desired information into the Start Date field. Enter "03012015".
11. Enter the desired information into the End Date field. Enter "03312015".
12. Click the Get Row button.
13. Select the row of Payable Time that needs to be closed. Based on the payroll
validation.

CAPPS HR/PAYROLL
EUT Course
Page 33
Step Action
14. To move down the page,
click the scrollbar.
15. Click the Save button.
16. Time Admin must be run for this employee before the Payable Time will close.
Click the Home link.
17. Congratulations! You have successfully completed this lesson.
End of Procedure.
Section 3 Sick Leave Pool
Lesson 1 - Awards and Donations
Awarding Sick Leave from the Pool
Section 3, Lesson 1 Exercises Scenario 1 - Awarding Sick Leave from the Pool
Procedure
Step Action
1. Each agency has the authority to award Sick Leave Pool hours to employees who
have exhausted all of their sick leave because of a catastrophic illness or injury of
the employee or of a member of the employee’s immediate family.

CAPPS HR/PAYROLL
EUT Course
Page 34
Step Action
2. Click the Time and Labor link.
3. Awarding Sick Leave Pool hours to an employee is done on the Super User
Timesheet.
Click the Super User Timesheet link.
4. Enter the Empl ID for the employee that is receiving the Sick Leave Pool hours.
Enter the desired information into the Empl ID field. Enter "00000000246".
5. The date populates with the beginning of the current month. This date may be
changed as needed.
6. Click the Search button.
7. Verify that the name matches to the employee that is receiving the Sick Leave Pool
hours.

CAPPS HR/PAYROLL
EUT Course
Page 35
Step Action
8. Only a person with the Sick Leave Pool Administrator role has access to the Sick
Leave Pool Adjustment page, View Company Sick Leave Pool page and Sick Leave
Pool FY Balance Process page.
However, both Sick Leave Pool Administrators and Super Users have the ability to
add Sick Leave Pool hours to an employee's timesheet.
The SCKPA Time Reporting Code is added to the timesheet with the amount of the
awarded hours.
9. The *Time Reporting Code can be typed into the field. In this example the Look up
button is used to enter the code.
Click the Look up Time Reporting Code (Alt+5) button.
10. Filter the list by entering the first letter of the TRC.
Enter the desired information into the Time Reporting Code field. Enter "s".
11. Click the Look Up button.
12. Select the Sick Leave Pool Awarded TRC.
Click the SCKPA link.
13. Identify the day that you wish to add the hours. In this example the Sick Leave Pool
award will occur on the first of March.
14. Enter the number of hours that is awarded to the employee.
Enter the desired information into the Sun 3/1 0.00 field. Enter "40".
15. Click the E-Sign & Approve button.
16. This warning message is a reminder that the proper documentation for your agency
must be followed prior to awarding the hours to the employee.
Click OK if the documentation is in place or click Cancel to cancel the transaction.
Click the OK button.

CAPPS HR/PAYROLL
EUT Course
Page 36
Step Action
17. Click the OK button.
18. Notice that the Sick Leave Pool hours are now on the employee's timesheet and are
available for use.
19. Click the Home link.
20. Congratulations! You have successfully completed this lesson.
End of Procedure.
Donating Sick Leave to the Pool
Section 3, Lesson 1 Exercises Scenario 2 - Donating Sick Leave to the Pool
Procedure

CAPPS HR/PAYROLL
EUT Course
Page 37
Step Action
1. Employees have the ability to donate some of their sick leave time to the Sick Leave
Pool.
Agencies will typically have some type of form or documentation that the employee
completes to authorize the donation.
Click the Time and Labor link.
2. Click the Super User Timesheet link.
3. Enter the Empl ID for the employee that is donating their sick leave to the Sick
Leave Pool.
Enter the desired information into the Empl ID field. Enter "00000000200".
4. The date populates with the beginning of the current month. This date may be
changed as needed.
5. Click the Search button.
6. Verify that the employee name matches the name of the person donating the sick
leave.
7. In this scenario the employee currently has 144 hours of Sick leave.
8. Enter the *Time Reporting Code or use the Look up button to find the code in the
list of available options.
Click the Look up Time Reporting Code (Alt+5) button.
9. To shorten the list, type the first letter of the leave type.
Enter the desired information into the Time Reporting Code field. Enter "s".
10. Click the Look Up button.
11. The list of leave codes beginning with an S displays.
Click the SICKPD list item.

CAPPS HR/PAYROLL
EUT Course
Page 38
Step Action
12. Enter the amount of hours that the employee has agreed to donate. In this example
the employee has agreed to donate 40 hours of sick leave to the Sick Leave Pool.
Enter the desired information into the Sun 3/1 0.00 field. Enter "40".
13. Click the E-Sign & Approve button.
14. Click the OK button.
15. Notice that the 40 hours is now removed from the available balance for this
employee.
16. Click the Home link.
17. Congratulations! You have successfully completed this lesson.
End of Procedure.
Adjusting the Agency's Sick Leave Pool Balance
Section 3, Lesson 1 Exercises Scenario 3 - Adjusting the Agency's Sick Leave Pool
Procedure
Step Action
1. It is only on rare occasions that this process will be utilized.
One example reason would be that the USPS balance and the original balance were
different. CAPPS would need to be adjusted so it matched the balance in USPS.

CAPPS HR/PAYROLL
EUT Course
Page 39
Step Action
2. Click the Time and Labor link.
CAPPS HR/PAYROLL
EUT Course
Page 40
Step Action
3. Click the Texas Time link.
4. Use this page to make adjustments to the overall Sick Leave Pool balance.
Note: this is an extremely rare circumstance and an agency business
practice/approval process/documentation requirements outside of CAPPS should be
created for this situation.
Click the Sick Leave Pool Adjustment link.
5. Enter in the agency number. In this example, the agency is T32.
Enter the desired information into the begins with field. Enter "T32".
6. Click the Search button.
7. The Company (agency) number display along with the name of the agency. The
Adjustment Date field lists the dates for each Sick Leave Pool Adjustment.
8. The *Sequence Number is a required field. This number is a running line count.
The *Adjustment Type has two values:
• I for an adjustment into the pool
• O for a decrease adjustment to the pool
9. The *Adjusted Amount is for the total hours that the pool is being adjusted.
10. To enter an adjustment to the total pool hours, add a new row.
Click the Add a new row at row 3 (Alt+7) button.
11. Type the date of the adjustment or use the calendar feature to select the date.
Click the Choose a date (Alt+5) button.
12. Click the 10 link.
13. Enter the next *Sequential Number. In this example the number is 4.
Enter the desired information into the Sequence Number field. Enter "4".

CAPPS HR/PAYROLL
EUT Course
Page 41
Step Action
14. Click the Look up Adjustment Type (Alt+5) button.
15. Click the Adjustment In link.
16. This example increases the agency's total Sick Leave Pool balance by 40 hours.
Enter the desired information into the Adjusted Amount field. Enter "40".
17. Enter a Comment to identify the reason for the adjustment. The field is 30
characters long.
Enter the desired information into the Comment field. Enter "Feb 2014
adjustment".
18. Click the Save button.
19. Click the Home link.
20. Congratulations! You have successfully completed this lesson.
End of Procedure.
Lesson 2 - Fiscal Year End Sick Leave Pool Process
Fiscal Year End Sick Leave Pool Process
Section 3, Lesson 2 Exercises Scenario 1 - Fiscal Year End Sick Leave Pool Process
Procedure

CAPPS HR/PAYROLL
EUT Course
Page 42
Step Action
1. In this example the year 2013 is used to run this process.
Click the Time and Labor link.

CAPPS HR/PAYROLL
EUT Course
Page 43
Step Action
2. Click the Process Time link.
3. Click the Sick Leave Pool FY Balance link.
4. Click the Add a New Value tab.
5. Run Control IDs are used to run system processes.
A Run Control ID is an identifier that, along with your User ID, uniquely identifies
the process you are running. The Run Control ID provides information used when
the process is run.
6. A Run Control ID cannot contain spaces. Use letters or numbers up to 30 characters
long. Special characters are not allowed with the exception of the underscore.
7. Run Control IDs are stored by User ID. CAPPS Support Staff can see the run
control ID’s and recommend using initials to help identify a user who runs a
process.
8. Enter the desired information into the Run Control ID field. Enter "FYE".

CAPPS HR/PAYROLL
EUT Course
Page 44
Step Action
9. Click the Add button.
10. In this example, enter 2013.
Enter the desired information into the Fiscal Year field. Enter "2013".
11. Enter in the agency's number. Or use the Look up feature to look up the agency
number.
Enter the desired information into the Company field. Enter "T32".
12. Save the information in one of two ways:
(1) Click on Save, this is useful to change the Run Control Parameters.
(2) Click Run. The Run Control ID will be saved with the information on the
screen, and the process will be run.
13. Click the Run button.
14. Use the Process Scheduler Request page to enter or update parameters, such
as report output type and format.
For this process, no information needs to be updated.
15. The Description field helps to uniquely identify a process.
16. The Process Name field displays the name of the process as it appears in the
technical definition.
17. The Process Type field displays the type of process, such as SQR Report, BI
Publisher and so on.

CAPPS HR/PAYROLL
EUT Course
Page 45
Step Action
18. Use the *Type field to select the type of output to generate for this job. The four
choices are File, Printer, Email, or Web.
File: Writes the output to a file that will appear in an Output Destination specified
by the user.
Printer: You can enter a custom printer location if you have the appropriate security
access.
Email: You can enter the destination information to send to a particular email
recipient(s). Note that Email is available only for a few process types, such as SQR,
PS/nVision, and BI Publisher reports.
Web: Sends all output of the process to the report repository, including log and trace
files.
19. Use the *Format field to define the output format for the report. The values are
dependent upon the process type selected. In this example, the default value is PDF.
Step Action
20. Click the OK button.

CAPPS HR/PAYROLL
EUT Course
Page 46
Step Action
21. The process is now running.
Notice a Process Instance number displays. This number identifies the process you
have just run; you can check its status using Process Monitor.
Step Action
22. Click the Process Monitor link.
23. The Process List group box lists all of your requested processes.
24. The current Run Status of this process displays as Processing.
The process will be finished when the Run Status is Success, and the Distribution
Status is Posted.
25. Click the Refresh button until the screen shows Success and Posted.
Click the Refresh button.
26. Click the Details link.

CAPPS HR/PAYROLL
EUT Course
Page 47
Step Action
27. Click the View Log/Trace link.
28. Click on the process name to view the results.
Some processes do not have results. If a report was selected to run as a PDF, the file
is easier to spot in the list because it will end in .pdf.
Click the htsl105_5492565.PDF link.
Step Action
29. After viewing or printing the information, click the Close button.

CAPPS HR/PAYROLL
EUT Course
Page 48
Step Action
30. Click the Close current tab button.

CAPPS HR/PAYROLL
EUT Course
Page 49
Step Action
31. Click the Return button.
32. Click the OK button.
33. Click the Home button.
34. Congratulations! You have successfully completed this lesson.
End of Procedure.
Lesson 3 - Review and Knowledge Check
Section 4 Troubleshooting Time and Labor
Lesson 1 Managing Exceptions
Running the Exceptions Query
Section 4, Lesson 1 Exercises, Scenario 1 - Running the Exceptions Query
Procedure
Step Action
1. Resolving Exceptions is a daily duty of the Time and Labor Super User.
Exceptions lock the employee and the manager out of the timesheet and they can
only edit it after the Super User has cleared all of the exceptions.
2. After Time Administration runs every night, there may be some exceptions created.
In order to identify the exceptions, the TL Super User can run the query to see the
exceptions.

CAPPS HR/PAYROLL
EUT Course
Page 50
Step Action
3. Click the Reporting Tools link.

CAPPS HR/PAYROLL
EUT Course
Page 51
Step Action
4. Click the Query Viewer link.
5. All of the Time and Labor queries will begin with TX_TL. The queries will be listed
alphabetically.
6. Enter the desired information into the begins with field. Enter "TX_TL".
7. Click the Search button.
8. There are many different queries that the TL Super User can use. This lesson
reviews only one of the queries that can be used for exceptions.
9. Queries can be run in HTML, XML, or Excel. The HTML and XML formats can be
viewed on the monitor. This is useful for displaying information in a quick manner.
Queries can also be run to Excel which puts the requested information into an Excel
spreadsheet. The spreadsheet can be sorted, printed, and saved as needed.
10. Queries can also be added as a Favorite. When a query is selected as a Favorite, it
will display on the original Query Viewer Search page. This will make navigation
easier.
11. Click the Excel link.
12. Enter the Agency number.
Enter the desired information into the Company field. Enter "T32".
13. Click the View Results button.

CAPPS HR/PAYROLL
EUT Course
Page 52
Step Action
14. Click the Open button.
15. The employees with exceptions will display in an Excel spreadsheet. The
information can be sorted and printed as needed.
16. The Description (Descr) field will provide the reason for the exceptions.
17. The Empl ID will allow the Super User to identify the employee so they can access
their timesheet to resolve the error.
18. Click the Close button.

CAPPS HR/PAYROLL
EUT Course
Page 53
Step Action
19. Internet Explorer can be set up differently so your view may be different. Close the
window to return to the CAPPS system.
Click the Close button.

CAPPS HR/PAYROLL
EUT Course
Page 54
Step Action
20. Click the Close current tab button.
21. Click the Home link.
22. Congratulations! You have successfully completed this lesson.
End of Procedure.
Manage Exceptions page
Section 4, Lesson 1 Exercises, Scenario 2 - Manage Exceptions Page
Procedure

CAPPS HR/PAYROLL
EUT Course
Page 55
Step Action
1. The Manage Exceptions page allows the TL Super User to look up the exceptions by
the Empl ID. So if you have the Empl ID this page will display the exceptions.

CAPPS HR/PAYROLL
EUT Course
Page 56
Step Action
2. Click the Time and Labor link.
3. Click the Texas Time link.
4. Click the Manage Exceptions link.
5. This search page allows the user to search for exceptions by Empl ID or for
everyone in the agency.
6. Enter the desired information into the Empl ID field. Enter "00000000020".
7. Click the Search button.
8. Click the 00000000020 link.
9. The employee name and their exception displays. In this example the exception is
TXTL0017 and the fix is to rerun Time Admin to allow the accrual to catch up for
this employee.
10. Click the Home link.
11. Congratulations! You have successfully completed this lesson.
End of Procedure.
Running the Ad Hoc Time Admin Process
Section 4, Lesson 1 Exercises Scenario 2 - Running an Ad Hoc Time Admin
Procedure

CAPPS HR/PAYROLL
EUT Course
Page 57
Step Action
1. Time Administration automatically runs every night. The exceptions are generated
during this process.
It is recommended that a Super User resolve exceptions on a daily basis. After
resolving exceptions, it is a good idea to run an ad hoc Time Admin process for that
individual to reprocess their time and ensure that all exceptions are cleared for the
employee.
Step Action
2. Click the Time and Labor link.
3. Click the Process Time link.
4. Click the Request Time Administration link.
5. Click the Add a New Value tab.

CAPPS HR/PAYROLL
EUT Course
Page 58
Step Action
6. Run Control IDs are used to run system processes.
A Run Control ID is an identifier that, along with your User ID, uniquely identifies
the process you are running. The Run Control ID provides information used when
the process is run.
7. A Run Control ID cannot contain spaces. Use letters or numbers up to 30 characters
long. Special characters are not allowed with the exception of the underscore.
8. It is a good idea to add your initials after the Run Control ID in order to make it
easier for the Production Support team to assist in the event of an issue with the
process. In training the initials have been left off.
Enter the desired information into the Run Control ID field. Enter "TA1".
9. Click the Add button.
10. If Time Admin is run for the entire agency during the day the system will slow down
for everyone in the CAPPS system.
It is important to select the run parameters for only the employees that you need to
run time administration.
11. Time Admin should be run through, and no later than, the last day of the current
month. If it is run later than the current month then Payable Time will be created for
a future month(s). In some situations this can potentially create future-dated
exceptions that the TL Super User will need to resolve.
Click the Choose a date (Alt+5) button.
12. Click the 31 link.
13. Time Admin can be run for one employee or multiple employees at one time.
14. The Group ID field can be used so Time Admin can be run for the entire agency or
a group of people within the agency. Running Time Admin for the entire group will
slow the CAPPS system down for everyone.
15. If a group is selected, people who are in the group can be excluded.
16. To add or exclude employees, use the plus sign to add additional rows. Use the
minus sign to remove a row.
17. In this example, Time Admin needs to be run for two employees.
Enter the desired information into the Empl ID field. Enter "00000000200".

CAPPS HR/PAYROLL
EUT Course
Page 59
Step Action
18. Click the Add a new row at row 1 (Alt+7) button.
19. Enter the desired information into the Empl ID field. Enter "00000000029".
20. Click the Run button.
21. Click the OK button.
22. Notice a Process Instance number displays. The process is now running. This
number identifies the process you have just run; you can check its status using
Process Monitor.
Step Action
23. Click the Process Monitor link.
24. The Process Instance number displays. It helps identify the report or process from
others in the list.

CAPPS HR/PAYROLL
EUT Course
Page 60
Step Action
25. The current Run Status of this process displays as Processing.
The process will be finished when the Run Status is Success, and the Distribution
Status is Posted.
Step Action
26. Click the Refresh button.
27. Sometimes Time Admin may need to be run multiple times for the same employee if
new exceptions are created. Super Users should check for new exceptions after an ad
hoc Time Admin run has completed.
Click the Go back to Request Time Administration link.
28. Click the Home link.
29. Congratulations! You have successfully completed this lesson.
End of Procedure.

CAPPS HR/PAYROLL
EUT Course
Page 61
Lesson 2 Updating and Processing Information
Updating the Earliest Change Date
Section 4, Lesson 1 Exercises Scenario 3 - Updating the Earliest Change Date
Procedure
Step Action
1. The Earliest Change Date (ECD) is the starting point for when Time Admin runs for
an employee.
After Time Admin has processes, the ECD is set to the 1st of the next month but
may be different when there is an exception. Normally Time Admin will reset the
ECD but there are occasions when a Super User will need to reset it manually.
2. If a Super User is entering retroactive entries or changes to the timesheets they need
to be aware that when they make these entries it changes the Earliest Change Date to
match the earliest time entry date and Time Admin will run from that date forward.
It is rare when a TL Super User would need to manually update the ECD.
CAPPS HR/PAYROLL
EUT Course
Page 62
Step Action
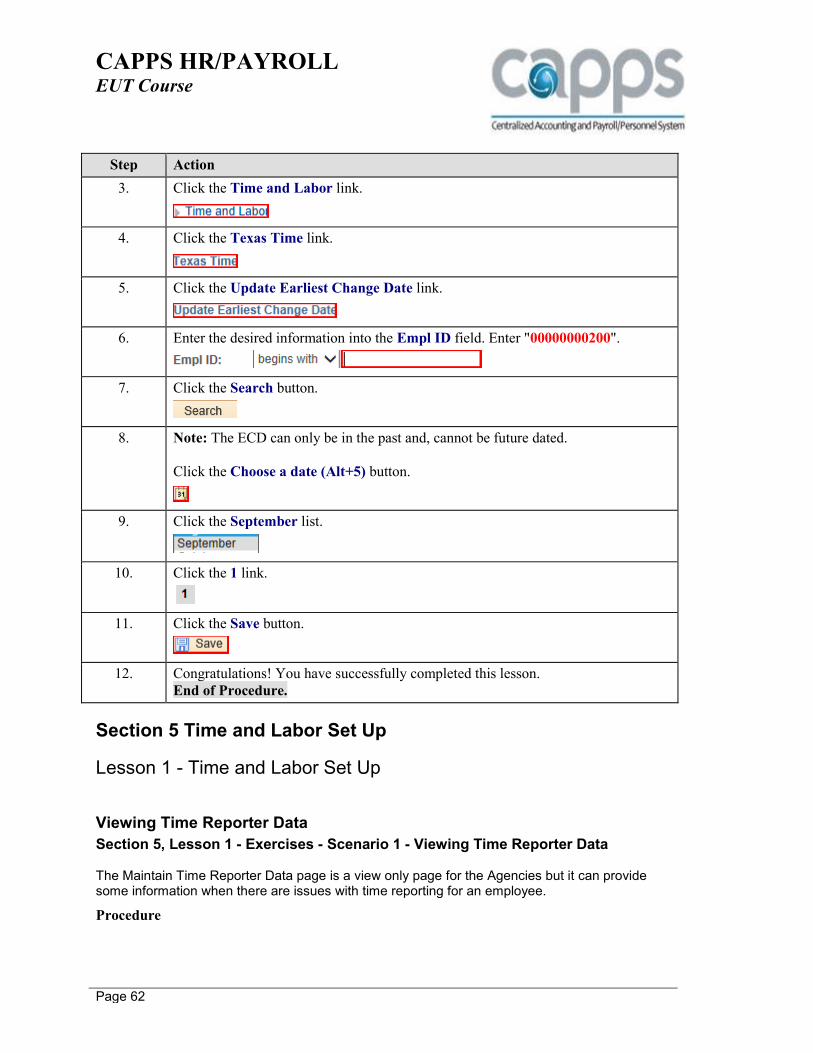
3. Click the Time and Labor link.
4. Click the Texas Time link.
5. Click the Update Earliest Change Date link.
6. Enter the desired information into the Empl ID field. Enter "00000000200".
7. Click the Search button.
8. Note: The ECD can only be in the past and, cannot be future dated.
Click the Choose a date (Alt+5) button.
9. Click the September list.
10. Click the 1 link.
11. Click the Save button.
12. Congratulations! You have successfully completed this lesson.
End of Procedure.
Section 5 Time and Labor Set Up
Lesson 1 - Time and Labor Set Up
Viewing Time Reporter Data
Section 5, Lesson 1 - Exercises - Scenario 1 - Viewing Time Reporter Data
The Maintain Time Reporter Data page is a view only page for the Agencies but it can provide some information when there are issues with time reporting for an employee.
Procedure

CAPPS HR/PAYROLL
EUT Course
Page 63
Step Action
1. When an employee is hired, their Time Reporter Data is automatically setup.
However, there may be times when this data may need to be added or updated.
Updating this information requires a support ticket.
Step Action
2. Click the Time and Labor link.

CAPPS HR/PAYROLL
EUT Course
Page 64
Step Action
3. Click the Enroll Time Reporters link.
4. Click the Maintain Time Reporter Data link.
5. Enter the desired information into the Empl ID field. Enter "00000000022".

CAPPS HR/PAYROLL
EUT Course
Page 65
Step Action
6. Click the Search button.

CAPPS HR/PAYROLL
EUT Course
Page 66
Step Action
7. The Time and Labor Time Reporter Data is set up at the time a person is hired or at
the time of conversion onto the CAPPS system.
If a change is needed to the data on this view only page, validate the employee’s job
and position data are set up correctly.
If the job and position data are incorrect then enter a support ticket and the
Production Support team will work with you to help resolve the issue.
Note: Contingent workers require a service request ticket to setup their Time
Reporter Data.
8. Understanding the fields on this page can help to explain some of the issues that
occur during the Time Administration process.
9. Verify that the correct employee is returned in your search.
10. The most recent row of data displays. It is the date that the employee was enrolled as
a time reporter with these criteria.
11. All Agency employees are Elapsed Time Reporters. That means that employees are
not required to punch in their time.
12. Verify that the Send Time to Payroll is checked for employees, but this will not be
selected for contingent workers.
13. A workgroup is a group of time reporters that have the same type of work
requirements. For example, a workgroup may include all time reporters within the
agency that are exempt hourly. Another workgroup may contain all of the non-
exempt hourly workers with the agency.
14. A taskgroup identifies the valid, default time reporting templates, task template, and
task profile(s) for time reporters with the same task reporting requirements. Each
time reporter must be associated with one taskgroup.
15. The Task Profile ID will also contain the agency number.

CAPPS HR/PAYROLL
EUT Course
Page 67
Step Action
16. If any of the items appear to be incorrect, validate the employee’s job and position
data are set up correctly.
If the job and position data are correct then enter a support ticket and the Production
Support team will make the change or discuss the situation and work with you to
help resolve the issue.
Click the Home link.
17. Congratulations! You have successfully completed this lesson.
End of Procedure.
Comp Plan Enrollment
Section 5, Exercises Scenario 1 - Comp Plan Enrollment
Procedure

CAPPS HR/PAYROLL
EUT Course
Page 68
Step Action
1. When an employee is hired, they are automatically enrolled into the Comp Plans.
However, there may be times when this data may need to be added or updated.
Step Action
2. Click the Time and Labor link.

CAPPS HR/PAYROLL
EUT Course
Page 69
Step Action
3. Click the Enroll Time Reporters link.
4. Click the Comp Plan Enrollment link.
5. Enter the desired information into the Empl ID field. Enter "0000000104".
6. Click the Search button.
7. Verify that the name matches the employee for this search.
8. There are 13 comp plans for this employee but he is only enrolled in 12.
Use the left and right arrows to navigate and see the next 3 leave plans.
9. Use the View All link to see all rows of data on one page.
Click the View All link.
10. To return to a partial view, click the View 3 link.

CAPPS HR/PAYROLL
EUT Course
Page 70
Step Action
11. Comp Plans are Effective Dated, so add a new row on the Comp Plan Enrollment
row.
Click the Add a new row at row 1 (Alt+7) button.
12. The data from the previous enrollment is copied over to the new row of data. The
Effective Date automatically populates with the current date but may be changed as
needed.
Comp Plans usually are effective at the date of hire. This row will need to have a
03/01/2015 date.
Click the Choose a date (Alt+5) button.
13. Click the 1 link.
14. Now that the Effective Date is entered, add a row to enter the additional Comp Plan.
Click the Add a new row at row 12 (Alt+7) button.
15. To view a list of all available Comp Plans,
click the Look up button.
16. This employee is missing the Emergency Fitness Leave Plan.
Click the FITNESSLV link.
17. The Status field defaults to Active. In CAPPS, employees are enrolled in all
available Comp Plans.
In this scenario the Comp Plan is being added as an Active plan.
18. If additional Comp Plans need to be added for this employee a new row can be
added. In this scenario this employee now has all 13 plans so no more rows are
needed.
If a row needs to be deleted, click the minus sign.

CAPPS HR/PAYROLL
EUT Course
Page 71
Step Action
19. To complete the transaction of adding the Emergency Fitness Leave Comp Plan for
this employee, click the Save button.
20. Click the Home link.
21. Congratulations! You have successfully completed this lesson.
End of Procedure.
Lesson 2 - Modifying Work Schedules
Flexing or Overriding a Work Schedule
Section 5, Lesson 2 Exercises Scenario 1 - Temporary Work Schedule Changes
Procedure

CAPPS HR/PAYROLL
EUT Course
Page 72
Step Action
1. The first way a schedule change can be adjusted is directly on the timesheet.
Click the Time and Labor link.
2. Click the Texas Time link.
3. Click the Super User Timesheet link.
4. Enter the desired information into the Empl ID field. Enter "00000000080".
5. Click the Search button.
6. This employee flexed their scheduled and worked 6 hours on Monday and 10 hours
on Tuesday.
The hours can be added directly to the timesheet by entering 2 hours on Monday as
FLEXS and then 10 hours on Tuesday as REGHR.
7. Enter the desired information into the Time Reporting Code field. Enter "FLEXS".
8. Enter in the number of hours that the employee flexed or did not work.
Enter the desired information into the Mon 4/6 8.00 field. Enter "2".
9. Click the Add a New Line for Wednesday 04/01/2015 to Wednesday 04/15/2015
button.
10. Enter the desired information into the Time Reporting Code field. Enter
"REGHR".
11. Enter the desired information into the Tue 4/7 8.00 field. Enter "10".
12. This employee is an exception based time reporter. If they work the rest of the week
as scheduled, then no other entries need to be made on the timesheet.

CAPPS HR/PAYROLL
EUT Course
Page 73
Step Action
13. Click the scrollbar.
14. When a Super User enters time on the Timesheet, the Status will always be AP for
Approved.
15. If your agency uses the Labor Account Code fields then complete these fields per
their instructions.
16. Click the scrollbar.
17. Use the E-Sign & Approve button to save and complete the entries on the timesheet.
Note: If there is a line on the timesheet that has the Status of NA or Needs Approval,
and the Super User needs to approve that time for the manager, the Super User will
need to click the Line Approval button before clicking the E-Sign & Approve
button.
Click the E-Sign & Approve button.
18. Click the OK button.
19. Click the Home link.

CAPPS HR/PAYROLL
EUT Course
Page 74
Step Action
20. Another way to enter the change in schedule is to use the Override Work Schedule
link on the Super User Timesheet for the employee.
Click the Time and Labor link.

CAPPS HR/PAYROLL
EUT Course
Page 75
Step Action
21. Click the Texas Time link.
22. Click the Super User Timesheet link.
23. Enter the desired information into the Empl ID field. Enter "0000000049".
24. Click the Search button.
25. This employee is working 10 hours on Monday thru Thursday and will not work on
Friday the first week in March.
Click the Override Schedule link.
26. Enter the total hours each day that the employee works per day. In this example
enter 10 on Monday thru Thursday and 0 on Friday.
Enter the desired information into the Monday 03/02/2015 field. Enter "10".
27. Press [Tab].
28. Enter the 10 hours for Tuesday and press [Tab] to go to the next day.

CAPPS HR/PAYROLL
EUT Course
Page 76
Step Action
29. Enter the 10 hours for Wednesday and press [Tab] to go to the next day.
30. Enter the 10 hours for Thursday and press [Tab] to go to the next day.
31. Enter 0 hours for Friday.
Enter the desired information into the Friday 03/06/2015 field. Enter "0".
32. Click the E-Sign & Approve button.
33. Click the OK button.
34. Notice that the scheduled hours for the first week now reflect the change to four 10
hour days.
Step Action
35. Click the Home link.
36. Congratulations! You have successfully completed this lesson.
End of Procedure.

CAPPS HR/PAYROLL
EUT Course
Page 77
Modifying Work Schedules
Section 5, Lesson 2 - Exercises - Scenario 2 - Modifying Work Schedules
Procedure
When an employee's work schedule permanently changes, use the Assign Work Schedule menu
option to change their scheduled days and hours.
In this example the employee is changing from an 8 hour day Monday through Friday, to a 10
hour day Monday through Thursday schedule.
Step Action
1. Click the Time and Labor link.

CAPPS HR/PAYROLL
EUT Course
Page 78
Step Action
2. Click the Enroll Time Reporters link.
3. Click the Assign Work Schedule link.
4. Enter the desired information into the Empl ID field. Enter "00000000312".
5. Click the Search button.

CAPPS HR/PAYROLL
EUT Course
Page 79
Step Action
6. Work Schedules are Effective Dated. To change a schedule a new row must be
added and then the new schedule can be selected.
Click the Add a new row at row 1 (Alt+7) button.
7. The data is copied to the new row and the Effective Date defaults to the current date.
Change the Effective Date to the first day that the new work schedule will take
effect. The schedule change should be made effective at the beginning of the
employee’s FLSA workweek.
Click the Choose a date (Alt+5) button.
8. In this example, change the date to March 1, 2015
Click the 1 link.
9. The schedules are loaded into the CAPPS system, so you can select from the list.
Click the Look up Schedule ID (Alt+5) button.

CAPPS HR/PAYROLL
EUT Course
Page 80
Step Action
10. There are hundreds of possible schedules and the system only displays the first 300
items.
11. Understanding the naming convention will help to narrow the search.
All schedules start with TX_, next are the total hours that are worked in a week.
12. In this example the employee is working a 40 hour work week.
13. Enter TX_40 in the Schedule ID field. This will narrow the list so that just the 40
hour work schedules display.
Enter the desired information into the Schedule ID field. Enter "TX_40".
14. Click the Look Up button.
15. Notice that just the 40 hour work week schedules display. There are currently 226
different 40 hour work week schedules to choose from.
16. The Description field contains the Sunday through Saturday work days.
An XX denotes that no hours are worked on that day. Some schedules also contain
letters on different days of the week.
17. This table shows what each letter stands for in the description field.
18. After the letter there will be a 0 or a 5. This indicates a whole or half hour.
This first schedule contains K0 which is a 16 hour work schedule. If the schedule
were K5 it would be a 16.5 hour work day.
19. In this scenario we are changing the employee to a 10 hour, Monday through
Thursday work schedule.
Enter the code based on the chart or look through the possible options in the list.
Scroll down the list to locate the correct schedule.
Click the scrollbar.
20. Click the TX_40_00DDDD0 link.
21. Use the Show Schedule link to verify that the correct schedule is selected.
Click the Show Schedule link.

CAPPS HR/PAYROLL
EUT Course
Page 81
Step Action
22. Verify that the new schedule is correct.
Click the Close button.
23. If the schedule is incorrect re-select the correct schedule.
24. Once the schedule is saved, the timesheet for exception time reporters will display
the new work hours on the correct days.
Click the Save button.
25. This message indicates that the new schedule did not start on the first scheduled
work day. Our schedule started on March 1 which is a Sunday and will not affect
our change.
The Super User should verify whether or not the schedule change can impact the
employee. Depending on the type of schedule chosen it could potentially impact an
employee’s pay.
Click the OK button.
26. This warning message indicates that we entered the change to start in the past. The
schedule should be evaluated to determine there if there are any issues. If the
schedule needs to be updated then you should edit it after clicking the OK button.
Click the OK button.
27. The new work schedule is now saved.
Click the Home link.
28. Congratulations! You have successfully completed this lesson.
End of Procedure.
Lesson 3 - Shift Differential Pay
Modifying Differential Pay Rate
Section 5, Lesson 3 Exercises - Modifying Differential Pay Rate
Procedure

CAPPS HR/PAYROLL
EUT Course
Page 82
Step Action
1. Click the Time and Labor link.
2. Click the Texas Time link.
3. Click the Differential Pay Rate Setup link.
4. Enter the desired information into the Empl ID field. Enter "00000000081".
5. Click the Search button.

CAPPS HR/PAYROLL
EUT Course
Page 83
Step Action
6. The Differential Pay Rate Setup page is an effective dated page. To change the rate,
a new row must be added.
If the employee previously did not have a shift rate, then the current row can be
adjusted accordingly.
Click the Add a new row at row 1 (Alt+7) button.
7. The data is copied to the new row and the Effective Date defaults to the current date.
Change the Effective Date to the first day that the new work schedule will take
effect In this example the new shift differential begins at the first of March 2015.
Enter the desired information into the Shift Differential Pay Effective Date field.
Enter "03012015".
8. Notice that there are now 2 rows of data.
9. Click the Shift Differential Type list.
10. The Shift Differential field must match the Regular Shift field in Job Data. If the
fields do not match an error will display and the change will not save.
Click the Night&Wknd list item.
11. The shift fields will open based on the type of shift that the employee can work. In
this example the employee is set up to work nights and weekends. So only the
Regular Night Shift and Regular Weekend Shift fields are open to a change.
12. The allowable values display the possible increase range. These values are
percentages. The current percentage for employee working a regular night shift will
receive a 1.5% increase for the hours worked on that schedule.
13. The Regular Weekend Shift differential range for this employee is between 1 and 5
percent. He currently receives a 5% increase for working a regular weekend shift.
14. In this example enter a new Regular Night Shift increase.
Enter the desired information into the Regular Night Shift (1.0 - 15.0) field. Enter
"2.5".

CAPPS HR/PAYROLL
EUT Course
Page 84
Step Action
15. Click the Save button.
16. This employee now receives the new shift differential rate for regular night shift
worked starting on 3/1/15.
Click the Home link.
17. Congratulations! You have successfully completed this lesson.
End of Procedure.
Lesson 4 FYE Annual Leave Conversion
Running the FYE Annual Leave Conversion
Section 5, Lesson 4 Exercises - Running the FYE Annual Leave Conversion
Procedure

CAPPS HR/PAYROLL
EUT Course
Page 85
Step Action
1. Click the Time and Labor link.
Step Action
2. Click the Process Time link.
3. Click the FYE Annual Leave Conversion link.

CAPPS HR/PAYROLL
EUT Course
Page 86
Step Action
4. Run Control IDs are used to run system processes.
A Run Control ID is an identifier that, along with your User ID, uniquely identifies
the process you are running. The Run Control ID provides information used when
the process is run.
5. A Run Control ID cannot contain spaces. Use letters or numbers up to 30 characters
long. Special characters are not allowed with the exception of the underscore.
6. Run Control IDs are stored by User ID. However we suggest that you add your
initials on the Run Control ID in the event that the CAPPS Support Staff needs to
assist with a possible issue.
7. Click the Add a New Value tab.
8. In training we left off the user's initials since each person would be different.
Enter the desired information into the Run Control ID field. Enter
"SickLeaveCon".
9. Click the Add button.

CAPPS HR/PAYROLL
EUT Course
Page 87
Step Action
10. Click the Look up Company (Alt+5) button.
11. Click the T32 link.
12. Save the information in one of two ways:
(1) Click on Save, this is useful to change the Run Control Parameters.
(2) Click Run. The Run Control ID will be saved with the information on the
screen, and the process will be run.
13. Click the Run button.
14. Use the Process Scheduler Request page to enter or update parameters, such
as report output type and format.
For this report, no information needs to be updated.
15. The Description field helps to uniquely identify a process.
16. The Process Name field displays the name of the process as it appears in the
technical definition.
17. The Process Type field displays the type of process, such as SQR Report, BI
Publisher and so on.
18. Use the Type field to select the type of output to generate for this job. The four
choices are File, Printer, Email, or Web.
File: Writes the output to a file that will appear in an Output Destination specified
by the user.
Printer: You can enter a custom printer location if you have the appropriate security
access.
Email: You can enter the destination information to send to a particular email
recipient(s). Note that Email is available only for a few process types, such as SQR,
PS/nVision, and BI Publisher reports.
Web: Sends all output of the process to the report repository, including log and trace
files.
19. Use the Format field to define the output format for the report. The values are
dependent upon the process type selected. In this example, the default value is PDF.
20. Click the OK button.

CAPPS HR/PAYROLL
EUT Course
Page 88
Step Action
21. The report is now running. Notice a Process Instance number displays. This number
identifies the process you have just run; you can check its status using Process
Monitor.
22. The Process Monitor provides a Process List page to view the status of submitted
report/process requests.
Click the Process Monitor link.
23. The Process List group box lists all of your requested processes.
24. The current Run Status of this process displays as Processing.
The process will be finished when the Run Status is Success, and the Distribution
Status is Posted.
25. Click the Refresh button until the screen shows Success and Posted.
Click the Refresh button.
26. After the process is run the agency should then navigate to the FYE Annual Leave
Conversion report. This report must be run in order to view the results of the
conversion.
Main Menu > Time and Labor > Texas Reports > FYE Annual Leave Conv Report
27. Employees who are terminated with an effective date greater than 09/01 through the
action date that the process is run must be cared for manually.
Super Users must evaluate those employees to ensure that the proper balance is
carried forward into the new fiscal year and that the correct lump sum hours are paid
out.
28. Click the Home link.
29. Congratulations! You have successfully completed this lesson.
End of Procedure.
Section 6 Reports and Queries
Lesson 1 - Reports and Queries
CAPPS HR/PAYROLL
EUT Course
Page 89
Running the Employee Monthly T&L Report
Section 6, Exercises Scenario 1 - Running the Employee Monthly Time and Leave Report
Procedure
Step Action
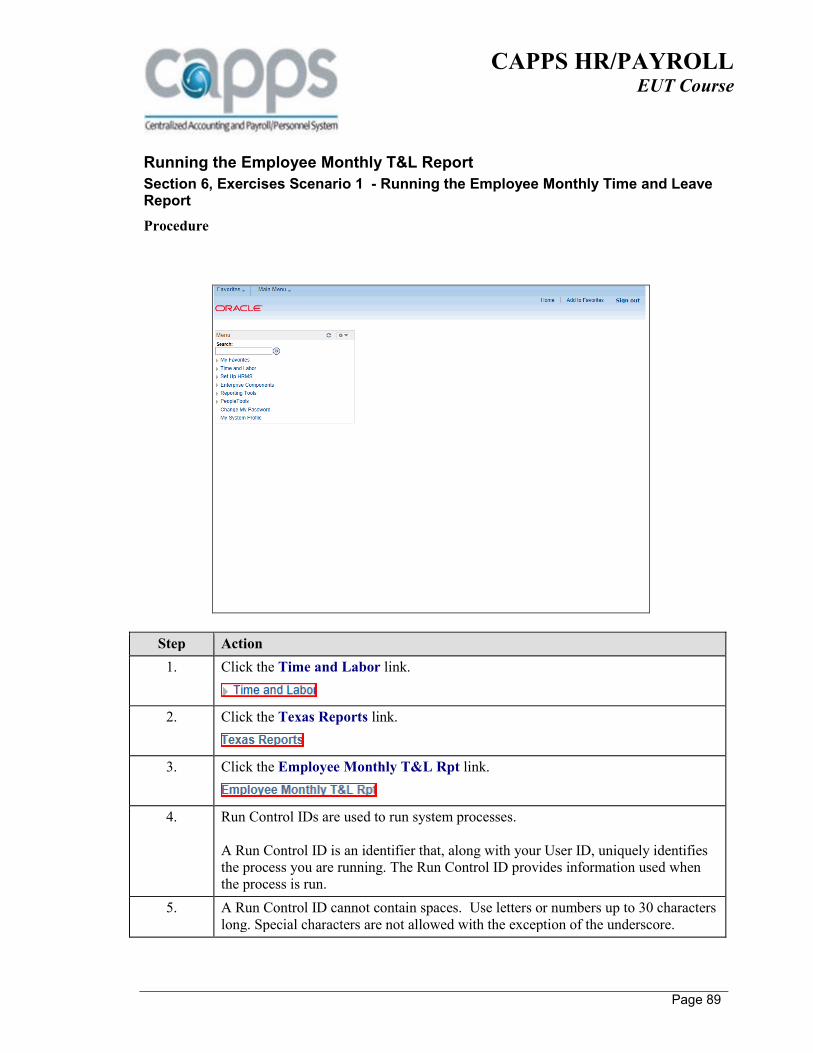
1. Click the Time and Labor link.
2. Click the Texas Reports link.
3. Click the Employee Monthly T&L Rpt link.
4. Run Control IDs are used to run system processes.
A Run Control ID is an identifier that, along with your User ID, uniquely identifies
the process you are running. The Run Control ID provides information used when
the process is run.
5. A Run Control ID cannot contain spaces. Use letters or numbers up to 30 characters
long. Special characters are not allowed with the exception of the underscore.

CAPPS HR/PAYROLL
EUT Course
Page 90
Step Action
6. If you have an established Run Control ID for this report, use that instead of adding
a new value. For this example, a new value is added.
Click the Add a New Value tab.
7. In this example enter EEMonthlyPR to identify the name of the report and your
initials.
Enter the desired information into the Run Control ID field. Enter
"EEMonthlyPR".
8. Click the Add button.
9. Use the Look up button to select the end of the month that you wish to view.
Click the Look up As of Date (Alt+5) button.
10. Click the 03/31/2015 link.
11. Select the Show LAC to view Labor Account Codes, if the agency uses them for
time reporting.
12. When the Show Attestment Indicator is selected an additional page populates. This
page contains a place for employees to sign the monthly time report.
Some agencies require employees to physically sign each month for time worked
and taken.
13. Select Output CSV if the output is needed in an unformatted Excel format.
14. Enter the desired information into the Empl ID field. Enter "00000000022".
15. Save the information in one of two ways:
(1) Click on Save, this is useful to change the Run Control Parameters.
(2) Click Run. The Run Control ID will be saved with the information on the
screen, and the process will be run.

CAPPS HR/PAYROLL
EUT Course
Page 91
Step Action
16. Click the Run button.
17. Use the Process Scheduler Request page to enter or update parameters, such
as report output type and format.
For this report, no information needs to be updated.
18. The report can be run at a different date and time by setting the Run Date and Run
Time fields.
19. The Description field helps to uniquely identify a process.
20. The Process Name field displays the name of the process as it appears in the
technical definition.
21. This report will display in PDF unless the Output CSV is selected.
Click the OK button.
22. The report is now running. Notice a Process Instance number displays. This number
identifies the process you have just run; you can check its status using Process
Monitor.
23. Click the Process Monitor link.
24. The Process Instance number displays. It helps identify the report or process from
others in the list.
25. The current Run Status of this process displays as Processing.
The process will be finished when the Run Status is Success, and the Distribution
Status is Posted.
26. Click the Refresh button until the screen shows Success and Posted.
Click the Refresh button.
27. Click the Details link.
28. Click the View Log/Trace link.

CAPPS HR/PAYROLL
EUT Course
Page 92
Step Action
29. Click the link with the .PDF extension.
Click the htl00001_5492110.PDF link.
30. This report displays the balances for the employee. It also displays any leave that
will be expiring within the next 3 months.
Step Action
31. The report can be printed as needed.
Click the Close button.

CAPPS HR/PAYROLL
EUT Course
Page 93
Step Action
32. Click the Return button.
33. Click the Cancel button.
34. Click the Home link.
35. Congratulations! You have successfully completed this lesson.
End of Procedure.
Full Month of LWOP Time
Section 6, Exercises Scenario 2 - Full Month of LWOP Time
Procedure

CAPPS HR/PAYROLL
EUT Course
Page 94
Step Action
1. Click the Texas Reports link.
2. Click the Full Month of LWOP Time Rpt link.
3. Run Control IDs are used to run system processes.
A Run Control ID is an identifier that, along with your User ID, uniquely identifies
the process you are running. The Run Control ID provides information used when
the process is run.
4. A Run Control ID cannot contain spaces. Use letters or numbers up to 30 characters
long. Special characters are not allowed with the exception of the underscore.
5. If you have an established Run Control ID for this report, use that instead of adding
a new value. For this example, a new value is added.
Click the Add a New Value tab.

CAPPS HR/PAYROLL
EUT Course
Page 95
Step Action
6. In this example enter FullMonthLWOPpr to identify the name of the report and your
initials.
Enter the desired information into the Run Control ID field. Enter
"FullMonthLWOPpr".
7. Click the Add button.
8. Use the Look up button to select the end of the month that you wish to view.
Click the Choose a date (Alt+5) button.
9. In this example, select Feb 1, 2015.
Click the February list item.
10. Click the 1 link.
11. Click the Choose a date (Alt+5) button.
12. For the Thru Date select Feb 28, 2015.
Click the February list item.
13. Click the 28 link.
14. Enter the agency's ID number. In this example enter T32.
Enter the desired information into the Company field. Enter "T32".
15. Click the Run button.
16. Use the Process Scheduler Request page to enter or update parameters, such as
report output type and format.
For this report, no information needs to be updated.
17. The Description field helps to uniquely identify a process.

CAPPS HR/PAYROLL
EUT Course
Page 96
Step Action
18. The Process Name field displays the name of the process as it appears in the
technical definition.
19. Click the OK button.
20. The report is now running.
Notice a Process Instance number displays. This number identifies the process you
have just run; you can check its status using Process Monitor.
21. Click the Process Monitor link.
22. The Process Instance number displays. It helps identify the report or process from
others in the list.
23. The current Run Status of this process displays as Processing.
The process will be finished when the Run Status is Success, and the Distribution
Status is Posted.
24. Click the Refresh button until the screen shows Success and Posted.
Click the Refresh button.
25. Click the Details link.
26. Click the View Log/Trace link.
27. Click the link with the .PDF extension.
Click the astl1016_5492663.PDF link.

CAPPS HR/PAYROLL
EUT Course
Page 97
Step Action
28. The report can be printed as needed. When finished reviewing the information, close
the report.
Click the Close button.

CAPPS HR/PAYROLL
EUT Course
Page 98
Step Action
29. Click the Return button.
30. Click the OK button.
31. Click the Home link.
32. Congratulations! You have successfully completed this lesson.
End of Procedure.
Running the TRCs by Date Report
Section 6, Lesson 1 Exercises, Scenario 3 - Running the TRCs by Date Report
Procedure

CAPPS HR/PAYROLL
EUT Course
Page 99
Step Action
1. Click the Time and Labor link.
2. Click the Texas Reports link.
3. Click the TRCs by Date Report link.
4. Run Control IDs are used to run system processes.
A Run Control ID is an identifier that, along with your User ID, uniquely identifies
the process you are running. The Run Control ID provides information used when
the process is run.
5. A Run Control ID cannot contain spaces. Use letters or numbers up to 30 characters
long. Special characters are not allowed with the exception of the underscore.
6. If you have an established Run Control ID for this report, use that instead of adding
a new value. For this example, a new value is added.
Click the Add a New Value tab.

CAPPS HR/PAYROLL
EUT Course
Page 100
Step Action
7. Enter the desired information into the Run Control ID field. Enter "TRC report".
8. Click the Add button.
9. The Process By group box generates the report with different criteria.
10. Selecting the Process By Employee option displays the specified Time Reporting
Codes, by Employee ID, by the specified dates.
11. Selecting the Process By TL Group option displays the specified Time Reporting
Codes, for a group of employees, by the specified dates.
12. Selecting the Process By Bus Unit option displays the specified Time Reporting
Codes, for the specified business unit within the agency, for the specified dates.
13. Selecting the Process By DeptID option displays the specified Time Reporting
Codes, for specified departments within the agency, for the specified dates.
14. Selecting the Process By Company Summary option displays the specified Time
Reporting Codes, for the entire agency, for the specified dates.
15. For the example, the Process By selection is Employee. Use the Start date of Jan1.
Click the Choose a date (Alt+5) button.
16. Click the 1 link.
17. Enter the desired information into the End Date field. Enter "02/28/2015".
18. Enter the desired information into the Time Reporting Code field. Enter
"REGHR".

CAPPS HR/PAYROLL
EUT Course
Page 101
Step Action
19. To add additional Time Reporting Codes, click the Add a Row button.

CAPPS HR/PAYROLL
EUT Course
Page 102
Step Action
20. Type the next Time Reporting Code (TRC) or use the Look up button to add the
additional TRC.
Click the Look up Time Reporting Code (Alt+5) button.
21. Filter the list by entering the first letter of the TRC.
Enter the desired information into the Time Reporting Code field. Enter "s".
22. Click the Look Up button.
23. For this example, select the Sick Leave Pool Awarded TRC.
Click the SCKPA link.
24. Next enter or select the Empl ID for this report.
Click in the Empl ID field.
25. Enter the desired information into the Empl ID field. Enter "00000000022".
26. Add additional employees by adding a row and entering their Empl ID.
27. Click the Run button.
28. Use the Process Scheduler Request page to enter or update parameters, such
as report output type and format.
For this report, no information needs to be updated.
29. Click the OK button.
30. The report is now running.
Notice a Process Instance number displays. This number identifies the process you
have just run; you can check its status using Process Monitor.
31. Click the Process Monitor link.

CAPPS HR/PAYROLL
EUT Course
Page 103
Step Action
32. The Process Instance number displays. It helps identify the report or process from
others in the list.
33. The current Run Status of this process displays as Processing.
The process will be finished when the Run Status is Success, and the Distribution
Status is Posted.
34. Click the Refresh button until the screen shows Success and Posted.
Click the Refresh button.
35. Click the Details link.
36. Click the View Log/Trace link.
37. Click the link with the .PDF extension.
Click the txtl0024_5492125_1.PDF link.

CAPPS HR/PAYROLL
EUT Course
Page 104
Step Action
38. This report displays the requested information and can be printed as needed.
Click the Close button.
Step Action
39. Click the Return button.
40. Click the Close button.
41. Click the Home link.
42. Congratulations! You have successfully completed this lesson.
End of Procedure.
Running the Comp Balances by Employee Query
Section 6, Lesson 1 Exercises, Scenario 4 - Running the Comp Balances by Employee Query
Procedure

CAPPS HR/PAYROLL
EUT Course
Page 105
Some information can be viewed as a Query. Some of the Reports have been created as both a
Report and a Query so that they can be run in Excel allowing the requestor to sort and modify the
data as needed.
Step Action
1. Click the Reporting Tools link.
2. Click the Query Viewer link.
3. All of the Time and Labor queries will begin with TX_TL. The queries will be listed
alphabetically.
Enter the desired information into the begins with field. Enter "TX_TL".
4. Click the Search button.

CAPPS HR/PAYROLL
EUT Course
Page 106
Step Action
5. Additional queries may be added or removed from the database.
Use the arrow buttons to navigate through the list, or click the View All link to see
the entire list on one page.
6. Queries can be run in HTML, XML, or Excel. The HTML and XML formats can be
viewed on the monitor. This is useful for displaying information in a quick manner.
Queries can also be run to Excel which puts the requested information into an Excel
spreadsheet. The spreadsheet can be sorted, printed, and saved as needed.
7. Queries can also be added as a Favorite. When a query is selected as a favorite, it
will display on the original Query Viewer Search page. This will make navigation
easier.
8. In this example, run the Comp Balances by Employee query to Excel.
Click the Excel link.
9. Enter the Empl ID for the employee you wish to view.
Enter the desired information into the Empl ID field. Enter "00000000029".

CAPPS HR/PAYROLL
EUT Course
Page 107
Step Action
10. Click the View Results button.
Step Action
11. Click the Open button.

CAPPS HR/PAYROLL
EUT Course
Page 108
Step Action
12. The results will display in a formatted Excel spreadsheet.
Click the scrollbar.
13. All of the available options, such as save, sort, and print are available.
Click the Close button.

CAPPS HR/PAYROLL
EUT Course
Page 109
Step Action
14. Click the Close button.

CAPPS HR/PAYROLL
EUT Course
Page 110
Step Action
15. Click the Home link.
16. Congratulations! You have successfully completed this lesson.
End of Procedure.

CAPPS HR/PAYROLL
EUT Course
Page 111
Glossary Business Unit
Business Unit is a business level between Company (Agency) and Department for reporting and operations.
A Business Unit value is typically the Agency Number appended with two additional characters (e.g., 30400).
Company
Company is a top-level designator. It is equivalent to Agency Number.
ESS
ESS stands for Employee Self Service.
HTML
HTML stands for HyperText Markup Language. It is a text description language used for publishing content on an internet web site.
MSS
MSS stands for Manager Self Service.
Query
A Query is an interactive tool used to gather information or data from the CAPPS system. Queries are already formulated, and you run them when you need them. The answers are shown in a browser window; alternatively, you can download the data into an Excel spreadsheet.
Run Control ID
A Run Control ID is an identifier that, when paired with a User ID, uniquely identifies a process that is running. The Run Control ID defines parameters or criteria that are used when running the process.
Warning
Message A warning message alerts of a potential data entry error or change. It does, however, allow updates to be saved.
XML
XML stands for Extensible Markup Language. It is a text-based formatting language used to share data on internet and intranet web sites.

CAPPS HR/PAYROLL
EUT Course
Page 112