EECE 2413 Electronics LaboratoryElectronics Laboratory Lab #5: MOSFETs and CMOS Goals This lab will...
16
EECE 2413 Electronics Laboratory Lab #5: MOSFETs and CMOS Goals This lab will introduce you to MOSFETs (m etal-o xide-s emiconductor f ield e ffect t ransistors). You will build a MOSFET inverter and determine the voltage transfer characteristic of this device (V out vs. V in ). From this transfer characteristic you will learn how to extract information about the MOSFET such as threshold voltage (V T ) and the device constant K. In the cutoff and triode regions the MOSFET approximates the operation of a switch. In between these two regions lies the saturation region. In saturation the MOSFET makes a good amplifier. Next, the CMOS inverter will be examined. This circuit also uses an n-channel MOSFET as the active driver, but replaces the drain resistor (R D ) with a p-channel MOSFET. This configuration dramatically reduces power consumption. As always, take your time during these experiments. Think about what you are being asked to do and why the experiments are important. Once you are comfortable with these basic MOSFET configurations, you will design and test either a CMOS logic gate or an AM radio transmitter using the CD4007 integrated circuit. Prelab Prelabs will be collected for grading at the beginning of the lab. Keep a copy for your own use during the lab! 1. In Fig. 3 find R G1 and R G2 such that V GS = 2 volts. Compute I D and V DS if V T = 1 volt and k n ’(W/L) = 0.5 mA/V 2 (see eqn. 5.20 in the 6th edition of Sedra and Smith). (If you only have the 2 nd edition of Hambley, refer to Section 5.3 and use the values of 1 volt for V to and K = 0.25 mA/V 2 in equation 5.18.) Remember that this is a DC analysis, so set v in = 0. (Note: there are many correct solutions for R G1 and R G2 !) 2. Read the lab experiment and see the instructor with any questions you may have. 3. Read Part 2, choose one of the two design projects, and sketch a circuit you think will work. (You may change your design as you work through the lab, however.)
Transcript of EECE 2413 Electronics LaboratoryElectronics Laboratory Lab #5: MOSFETs and CMOS Goals This lab will...

EECE 2413
Electronics Laboratory
Lab #5: MOSFETs and CMOS
Goals
This lab will introduce you to MOSFETs (metal-oxide-semiconductor field effect
transistors). You will build a MOSFET inverter and determine the voltage transfer
characteristic of this device (Vout vs. Vin). From this transfer characteristic you will
learn how to extract information about the MOSFET such as threshold voltage (VT)
and the device constant K.
In the cutoff and triode regions the MOSFET approximates the operation of a switch.
In between these two regions lies the saturation region. In saturation the MOSFET
makes a good amplifier.
Next, the CMOS inverter will be examined. This circuit also uses an n-channel
MOSFET as the active driver, but replaces the drain resistor (RD) with a p-channel
MOSFET. This configuration dramatically reduces power consumption.
As always, take your time during these experiments. Think about what you are being
asked to do and why the experiments are important.
Once you are comfortable with these basic MOSFET configurations, you will design
and test either a CMOS logic gate or an AM radio transmitter using the CD4007
integrated circuit.
Prelab
Prelabs will be collected for grading at the beginning of the lab. Keep a copy for your
own use during the lab!
1. In Fig. 3 find RG1 and RG2 such that VGS = 2 volts. Compute ID and VDS if
VT = 1 volt and kn’(W/L) = 0.5 mA/V2 (see eqn. 5.20 in the 6th edition of Sedra and
Smith). (If you only have the 2nd
edition of Hambley, refer to Section 5.3 and use the
values of 1 volt for Vto and K = 0.25 mA/V2 in equation 5.18.) Remember that this is
a DC analysis, so set vin = 0. (Note: there are many correct solutions for RG1 and RG2
!)
2. Read the lab experiment and see the instructor with any questions you may
have.
3. Read Part 2, choose one of the two design projects, and sketch a circuit you
think will work. (You may change your design as you work through the lab,
however.)

Laboratory #5 EECE2413 2
Part 1: MOSFET characteristics
The MOSFETs that you will be using for this lab are in a 14-pin package as shown in
Fig. 1. Study this diagram and become familiar with the layout of the individual
MOSFETs within the CD4007 chip. Notice there are three n-channel devices and
three p-channel devices. Although some devices share pins, all terminals for each
device are available at an external pin on the chip.
MOSFETs are actually 4-terminal devices: gate, drain, source, and substrate. In the
CD4007 the substrates for all n-channel devices are connected to pin 7. Likewise, the
substrates for all p-channel devices are connected to pin 14. For proper function of
the MOSFETs you must attach pin 7 to the lowest potential in your circuit (usually
ground) and you must attach pin 14 to the highest potential in your circuit (VDD).
MOSFETs are susceptible to electrostatic discharge (ESD). You have no doubt
experienced large ESDs if you have ever scuffed your feet across a carpet and touched
a metallic object. Even very small ESDs can damage a MOSFET by blowing-out the
gate oxide. This is mainly because the gate oxide is very thin (<<100 nm). These
MOSFETs have been protected from minor forms of ESD by two clamping diodes
attached to each gate. One diode prevents VGS from exceeding VDD (pin 14) + 0.7 V.
The other prevents VGS from becoming more negative than VSS ( pin 7) - 0.7 V. See
fig. 1 on the spec sheet.
Figure 1. The CD4007 Integrated Circuit.
14
1 7
8
VDD (highest voltage)
p
p p
n
n
n
(lowest voltage)
14
1 7
8
VDD (highest voltage)
p
p p
n
n
n
(lowest voltage)

Laboratory #5 EECE2413 3
Concept: The DC transfer characteristic of a MOSFET inverter
Build the simple MOSFET inverter shown in figure 2. You may use any of the three
n-channel MOSFETs on the CD4007, but don’t forget to connect pins 7 and 14 as
described above!
Figure 2. A MOSFET Inverter
RD = 10 k, VDD = 10 V, 0Vin 10 V.
a) Measure the voltage transfer characteristic for the MOSFET inverter by
varying Vin. Use the table below to guide you in selecting the appropriate data points.
Important: Please time yourself, and record the time taken to complete step a). (This
information will be used for comparison with MATLAB later in this experiment.)
Table for Inverter Transfer Characteristic
Vin Vout ID (Calculated) *
0 10
9.95
9
8
7
6
5
4
3
2
1
0.5
10
* From Vout, VDD, and RD.
V
R D
V in
V out
V DD
D
S
G

Laboratory #5 EECE2413 4
Notice that the circuit is an inverter: when the input voltage is “high,” the output
voltage is “low” and vice versa. What is the total power dissipation of this
inverter when Vin = 0? What is the power dissipation when Vin = 10 v?
b) i) When the gate reaches the threshold voltage, the MOSFET begins to conduct
current through the drain (ID). Based on the measurements in part (a), what is the
approximate Threshold voltage (VT) for this MOSFET?
ii) At home, plot the square-root of Drain current against Input voltage (VGS) .
The active region now becomes a straight line. Extrapolate this straight line to the
Input voltage axis . The intercept gives us the accurate Threshold voltage VT .
c) Remember that in the saturation region, ID = ½ kn’(W/L)(VGS - VT)2. Find
½kn’(W/L) for this MOSFET using the data from part (a), where the equation for ID is
based on the notation in the Sedra and Smith textbook.
d) Carefully and accurately plot the voltage transfer characteristic (i.e., Vout
vs.Vin) in your notebook and lab report. Identify the three regions of MOSFET
operation on your plot:
Cut-off: VGS < VT
Saturation: VGS > VT and VDS > VGS - VT
Triode: VGS > VT and VDS < VGS - VT
Concept: The MOSFET used as a switch
If we wanted to use the MOSFET as a switch, we would design a circuit so that the
MOSFET was either in the cut-off region (the switch is opened between D and S) or
the triode region (switch closed ~ short circuit). As an example, it is possible to
redesign your night-light circuit from Lab 3 using a MOSFET rather than a BJT.
e) Calculate the “on” resistance of this MOSFET when Vin = 10 v, where Ron
= VDS/ID. Next find Roff when Vin < VT. Comment on the quality of this device as
a switch. (Ideally, Ron = 0 and Roff ).
Concept: The MOSFET amplifier
The voltage gain of a circuit is defined as AV = Vout / Vin. By looking at the plot
you made in part (d), it is easy to see that Av is nearly zero in the cut-off and triode
regions since the slope in these regions is approximately zero.
f) Find the bias point (VGS, VDS) where |AV| is maximum using the voltage
transfer characteristic that you found in part (a).
g) Graphically determine the small signal voltage gain at this bias point. (Watch
the sign!)

Laboratory #5 EECE2413 5
Analog Option: ask you instructor if you should perform parts (h) and (i) below! If
not, please skip to the CMOS Logic section.
To use the circuit in Fig. 2 as an amplifier, we need to add a circuit to the gate which
sets the bias point (VGS). One way to do this is shown in Figure 3 below:
Figure 3. A common-source (CS) MOSFET amplifier
Cin = 1.5 F, RD = 10 k, VDD = 10 volts
RG1 and RG2 are to be determined.
Recall that the gate current in a MOSFET is zero and that Cin acts like an open circuit
under DC conditions.
h) Find values for RG1 and RG2 that result in the optimum operating point
determined in part (f). Notice that there is no unique solution to this design problem.
Using larger resistors will increase the input impedance of the amplifier (which is
usually good), but will also increase the amplifier’s susceptibility to noise. Record
the values for the two resistors. Also measure and record the operating point of the
circuit (when vin = 0). Explain why your MOSFET is biased in the saturation
region. NOTE: Finding the exact resistors to implement your design may be tricky.
When designing, pick one of the two values from those resistors in your parts kit.
Use series and parallel combinations for the other -- see the instructor or lab tech if
you need a resistor that is not in the kit.
i) Use the signal generator to apply a small signal to the amplifier’s input.
Measure and record the voltage gain. Compare this gain with the gain that you
determined graphically in part (g). (Remember, a “small signal” should not
produce distortion at the output of the amplifier.)
Notice that the voltage gain of this amplifier is much lower than the gain of a
comparable BJT amplifier. This is because gm is typically lower for a MOSFET than
a BJT.
R D
V out
V DD
G D
S
V in
C in
R G1
R G2
Laboratory #5 EECE2413 6
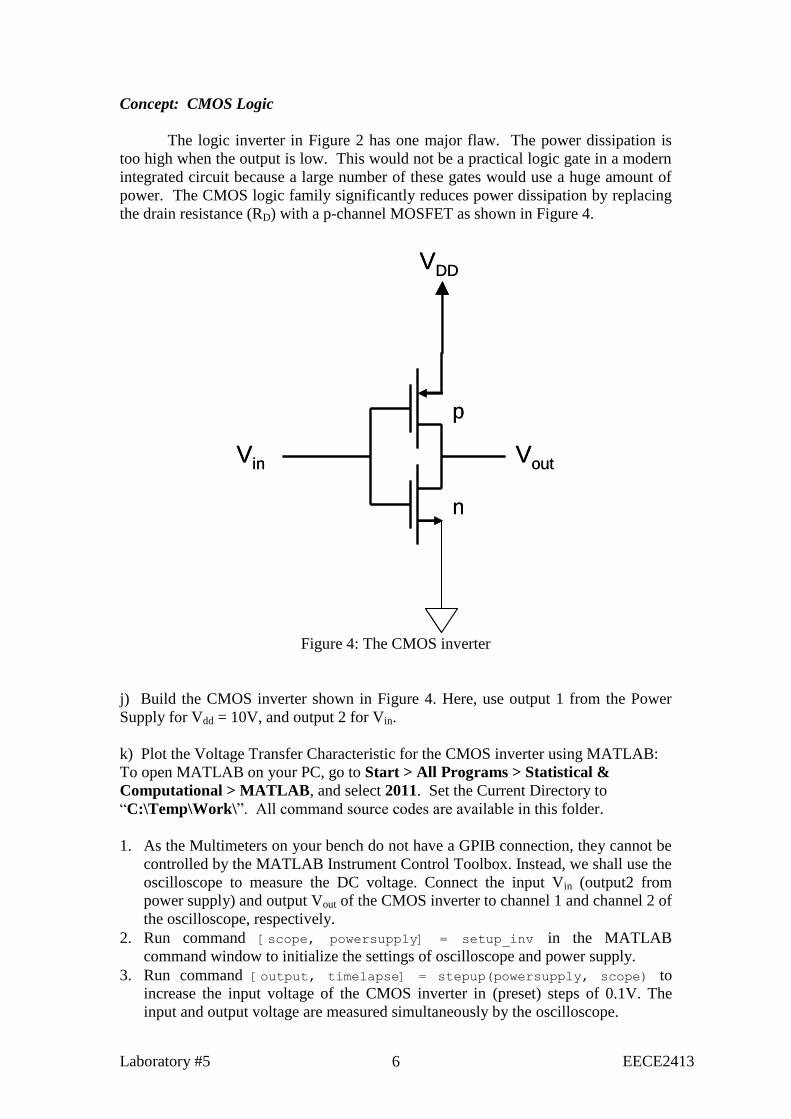
Concept: CMOS Logic
The logic inverter in Figure 2 has one major flaw. The power dissipation is
too high when the output is low. This would not be a practical logic gate in a modern
integrated circuit because a large number of these gates would use a huge amount of
power. The CMOS logic family significantly reduces power dissipation by replacing
the drain resistance (RD) with a p-channel MOSFET as shown in Figure 4.
n
p
Vin Vout
VDD
n
p
Vin Vout
VDD
Figure 4: The CMOS inverter
j) Build the CMOS inverter shown in Figure 4. Here, use output 1 from the Power
Supply for Vdd = 10V, and output 2 for Vin.
k) Plot the Voltage Transfer Characteristic for the CMOS inverter using MATLAB:
To open MATLAB on your PC, go to Start > All Programs > Statistical &
Computational > MATLAB, and select 2011. Set the Current Directory to
“C:\Temp\Work\”. All command source codes are available in this folder.
1. As the Multimeters on your bench do not have a GPIB connection, they cannot be
controlled by the MATLAB Instrument Control Toolbox. Instead, we shall use the
oscilloscope to measure the DC voltage. Connect the input Vin (output2 from
power supply) and output Vout of the CMOS inverter to channel 1 and channel 2 of
the oscilloscope, respectively.
2. Run command [scope, powersupply] = setup_inv in the MATLAB
command window to initialize the settings of oscilloscope and power supply.
3. Run command [output, timelapse] = stepup(powersupply, scope) to
increase the input voltage of the CMOS inverter in (preset) steps of 0.1V. The
input and output voltage are measured simultaneously by the oscilloscope.

Laboratory #5 EECE2413 7
(Note: The 0.1V step size can be changed by the user if desired.)
** You can find the source code of setup_inv and stepup in Appendix 1 & 2.
4. The returned value output is a two-column array (the name output is arbitrary,
and you may use any name you choose): The first column consists of the list of
input voltages, and the second column consists of the corresponding output
voltages. You may conveniently name the two column vectors Vin and Vout. They
are obtained using the array commands: vin=output(:,1);
vout=output(:,2);
5. Plot the Voltage Transfer Characteristic (VTC) for the CMOS inverter by using
the command plot(vin,vout). Provide axis names and title, as well as team #,
the names of your team members, and print a copy for each team member for
inclusion in their lab report.
6. On the plot, find out the threshold voltages of the NMOS and PMOS transistor,
respectively.
l) Find on the plot the bias point (Vin) where the voltage gain of the CMOS inverter is
maximum. Then, use the input and output voltage arrays to determine the small signal
voltage gain ( /v out inA V V ) at this bias point.
Efficiency of MATLAB:
You may type timelapse in the MATLAB command window to see how long the
program stepup took.
Estimate* how long it would have taken had you manually obtained the Voltage
Transfer Characteristic by increasing Vin in steps of 0.1V. Comment on
MATLAB’s efficiency.
* You may rely on the timing results of step a) in Part 1.
m) Using an Ammeter, determine the total power dissipation of this inverter when Vin
= 0 and when Vin = 10V. Assume that the two inverters (Figure 2 and Figure 4) are in
the high state 50% of the time and in the low state 50% of the time for many logic
applications. Compare the average power dissipation of the two inverters, and
describe the benefit of CMOS logic.

Laboratory #5 EECE2413 8
Part 2: MOSFET Design
Choose one design project below: Remember to hand-in your signed lab notebook
before leaving the lab!
1. CMOS Logic
As you discovered in lab last week, the advantage of CMOS logic is that no
drain current flows through the MOSFETs when the output is either high or low.
Because the CMOS logic family is based on the inverter, the logic functions of NOT,
NAND, and NOR are easy to create (see fig. 13.31 and 13.32 in Sedra and Smith).
The logic functions AND and OR, however, require us to build a NAND or NOR gate
and then add an inverter to the gate output: AND = NAND+NOT
Design a 3-input CMOS OR-gate using MOSFETs on the CD4007 chip.
Make certain that the power dissipation is zero when the output is both logic 1 and
logic 0. As an added challenge, design the OR gate using the minimum number of
CD4007 chips. Remember, pins 7 and 14 are committed to ground and VDD, and this
limits the placement of these two MOSFETs in your circuit. Add push-button
switches to the inputs of the OR gate so that pushing the button applies a logic “1” to
the gate and releasing the button applies a logic “0”.
2. CMOS Ring Oscillator and AM radio transmitter
For this design, you may barrow (through your Instructor / TA) an AM radio
from the Instrument Room. This radio will be used to test your AM transmitter.
A ring oscillator is made by connecting an odd number of inverters in a closed
ring as shown below. To see how this oscillates, assume that inverter A has an input
of zero and the output of inverter A is VDD. Then the input to B is VDD, and the
output of B is zero. This, in turn means the input to C is zero and the output of C is
VDD. This switches the input to inverter A from zero to VDD. The circuit “chases its
tail” causing the inverters to continuously switch from high to low. The oscillation
frequency, fosc, depends on the propagation delay time, which is the small time it
takes to charge the (gate) capacitance and switch the state of any individual inverter,
and is given by fosc = 1/(2Ntp). Here N= # of inverters and tp=average propagation
delay of an inverter driving another identical inverter.
n
p
VDD
n
p
VDD
n
p
VDD
A B C
n
p
VDD
n
p
VDD
n
p
VDD
A B C

Laboratory #5 EECE2413 9
The oscillation frequency can be controlled by changing the RC time constant
between any two inverters. This will increase the time it takes to switch the input
state. Modifying the RC time constant can be accomplished by inserting a resistor
between any output and the next input (increasing R) or by inserting capacitance
between any input and ground (increasing C).
The AM radio band is between 540 kHz and 1610 kHz. Design a ring
oscillator to generate an output frequency in the AM band. Choose a frequency where
there are no radio stations. It is strongly advised to connect a piece of wire to act as
an antenna. The antenna has a large capacitance and therefore will change the
oscillator frequency by increasing the propagation delay. To avoid this, add another
CD4007 inverter between the output of the oscillator and the antenna! This fourth
inverter acts like a buffer. A basic block diagram is shown below:
Tuning
element
buffer
CMOS ring oscillator
Tuning
element
buffer
CMOS ring oscillator
The ring oscillator generates the carrier frequency that your AM radio is tuned
to. There is no information contained in this frequency, however. To add
information, we modulate the carrier frequency in amplitude. Here we will just turn
the carrier on and off. To accomplish modulation, use the function generator (you
could also use a 555 timer). The function generator should be set up to produce a 1
kHz square wave between 0 and 5 volts. Use the DC OFFSET and AMPLITUDE
controls to adjust the function generator output while viewing it on the oscilloscope.
Once you have the necessary waveform, apply it to VDD and ground of your buffer.
Now the oscillator’s output is turning on and off at 1 kHz. Tune the AM radio until
you hear the 1 kHz signal being transmitted.
Finally, place a push-button switch in the circuit so that you can interrupt the
transmission. Pushing the switch on and off will allow you to send Morse Code to an
AM radio.
When your design is complete, get the instructor’s approval of your fully
documented schematic.
Hand-in your lab notebook for grading prior to leaving the lab!
Laboratory #5 EECE2413 10
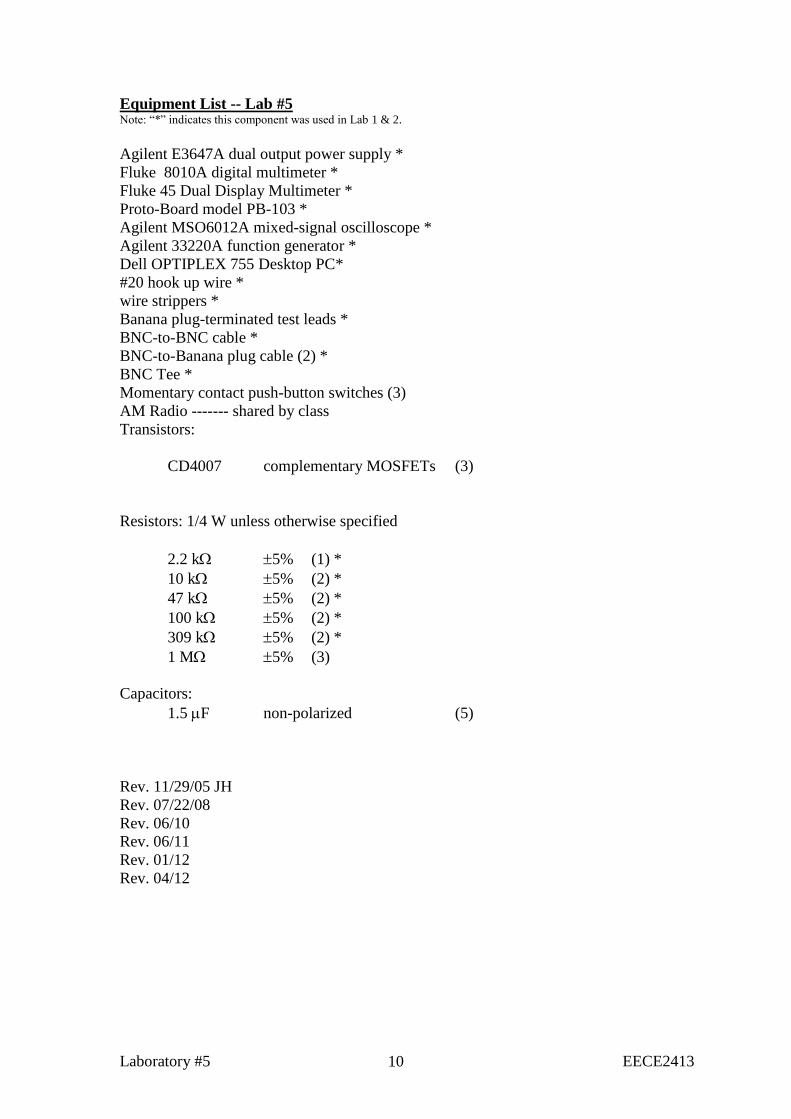
Equipment List -- Lab #5 Note: “*” indicates this component was used in Lab 1 & 2.
Agilent E3647A dual output power supply *
Fluke 8010A digital multimeter *
Fluke 45 Dual Display Multimeter *
Proto-Board model PB-103 *
Agilent MSO6012A mixed-signal oscilloscope *
Agilent 33220A function generator *
Dell OPTIPLEX 755 Desktop PC*
#20 hook up wire *
wire strippers *
Banana plug-terminated test leads *
BNC-to-BNC cable *
BNC-to-Banana plug cable (2) *
BNC Tee *
Momentary contact push-button switches (3)
AM Radio ------- shared by class
Transistors:
CD4007 complementary MOSFETs (3)
Resistors: 1/4 W unless otherwise specified
2.2 k 5% (1) *
10 k 5% (2) *
47 k 5% (2) *
100 k 5% (2) *
309 k 5% (2) *
1 M 5% (3)
Capacitors:
1.5 F non-polarized (5)
Rev. 11/29/05 JH
Rev. 07/22/08
Rev. 06/10
Rev. 06/11
Rev. 01/12
Rev. 04/12

Laboratory #5 EECE2413 11
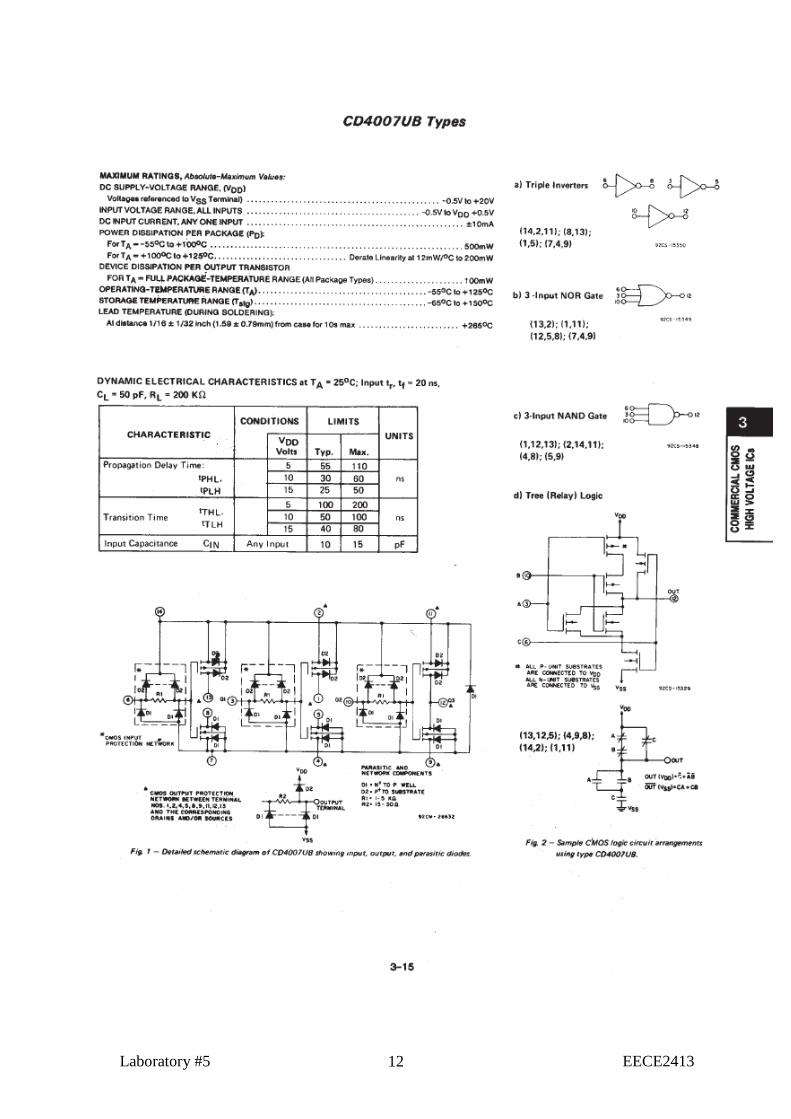
CD4007 data sheets from http://focus.ti.com/lit/ds/symlink/cd4007ub.pdf
Please refer to Figure 1 for the terminal diagram of the CD4007UBE integrated
circuit used in this lab.
Laboratory #5 EECE2413 12

Laboratory #5 EECE2413 13

Laboratory #5 EECE2413 14
APPENDIX - 1
Filename: setup_inv.m
function [scope, powersupply]=setup_inv % initializes the scope function and initializes starting settings % connect the output 1 from the power supply for Vdd, and output 2
for Vin
scope = visa('agilent','GPIB0::7::INSTR'); % open GPIB connection to
scope set(scope,'InputBufferSize', 1.024E6); % hold 1 meg of data in memory fopen(scope) if(scope.Status~='open') fprintf('Error opening GPIB connection to oscilloscope\n'); output = [0,0]; % error flags set return; end fprintf(scope,':TIMEBASE:MODE MAIN'); % required for deep memory
transfer fprintf(scope,':TIMEBASE:RANGE 5E-4'); % set scope time window to 5
ms width fprintf(scope,':TIMEBASE:REFERENCE LEFT');% put start of window at
left
fprintf(scope,':TIMEBASE:DELAY 0'); % move output pulse to left
side %change for delay fprintf(scope,':CHANNEL1:RANGE 2.0'); % set vertical sensitivity of
channel 1; heidy cambiar amplitud %fprintf(scope,':CHANNEL1:RANGE 0.8'); % set vertical sensitivity of
channel 1 fprintf(scope,':CHANNEL1:COUPLING DC'); % coupling to DC fprintf(scope,':TRIG:SOURCE EXT'); % trigger on sync from function
generator fprintf(scope,':TRIG:SLOPE POSITIVE'); % sync output goes low when
pulse starts fprintf(scope,':TRIG:LEVEL 1'); % trigger on 1V point
% To initializes the power supply % written by E. Carr Everbach for CenSSIS, last updated 15 December
2000 powersupply = visa('agilent','GPIB0::9::INSTR'); % open GPIB
connection to function generator fopen(powersupply) if(powersupply.Status~='open') fprintf('Error opening GPIB connection to power supply\n'); output = 0; % error flag set return; end
%MODIFIED FOR E3631A AGILENT, POWER SUPPLY fprintf(powersupply,'*RST');% initialze triple power supply to a
known state %fprintf(powersupply,'VOLT 25.0'); % set power supply 25V output to
1A fprintf(powersupply,'INST:SEL OUT1'); % set power supply 25V output
to 1A,MODIFY BY HEIDY fprintf(powersupply,'OUTPUT:STATE ON'); % enable power

Laboratory #5 EECE2413 15
fprintf(powersupply,'VOLT:LEVEL 10'); %MODIFY BY HEIDY fprintf(powersupply,'CURRENT:LEVEL 1'); %MODIFY BY HEIDY
fprintf(powersupply,'INST:SEL OUT2'); % set power supply 25V output
to 1A,MODIFY BY HEIDY fprintf(powersupply,'OUTPUT:STATE ON'); % enable power fprintf(powersupply,'VOLT:LEVEL 10'); %MODIFY BY HEIDY fprintf(powersupply,'CURRENT:LEVEL 1'); %MODIFY BY HEIDY fprintf(powersupply,'SYSTEM:BEEP:IMMEDIATE'); % beep to announce
success fclose(powersupply) % close the GPIB line
fprintf(scope,':AUT'); fclose(scope) % disconnect GPIB scope object
Laboratory #5 EECE2413 16
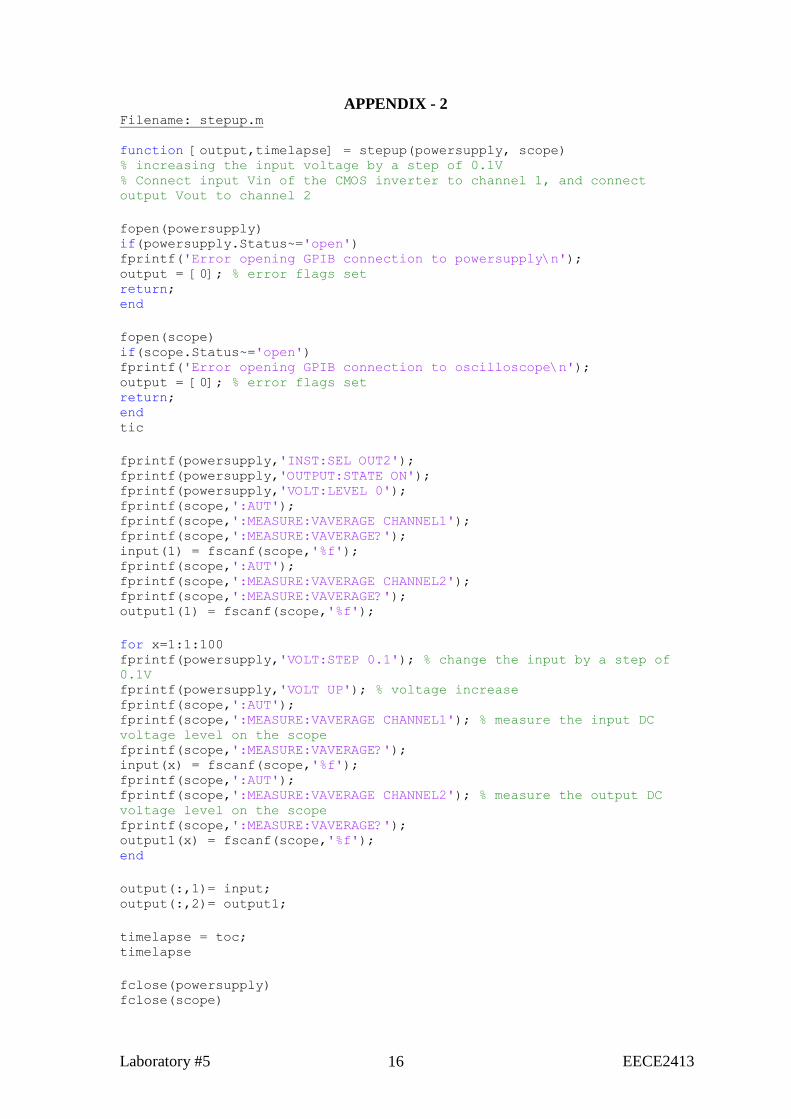
APPENDIX - 2 Filename: stepup.m
function [output,timelapse] = stepup(powersupply, scope) % increasing the input voltage by a step of 0.1V % Connect input Vin of the CMOS inverter to channel 1, and connect
output Vout to channel 2
fopen(powersupply) if(powersupply.Status~='open') fprintf('Error opening GPIB connection to powersupply\n'); output = [0]; % error flags set return; end
fopen(scope) if(scope.Status~='open') fprintf('Error opening GPIB connection to oscilloscope\n'); output = [0]; % error flags set return; end tic
fprintf(powersupply,'INST:SEL OUT2'); fprintf(powersupply,'OUTPUT:STATE ON'); fprintf(powersupply,'VOLT:LEVEL 0'); fprintf(scope,':AUT'); fprintf(scope,':MEASURE:VAVERAGE CHANNEL1'); fprintf(scope,':MEASURE:VAVERAGE?'); input(1) = fscanf(scope,'%f'); fprintf(scope,':AUT'); fprintf(scope,':MEASURE:VAVERAGE CHANNEL2'); fprintf(scope,':MEASURE:VAVERAGE?'); output1(1) = fscanf(scope,'%f');
for x=1:1:100 fprintf(powersupply,'VOLT:STEP 0.1'); % change the input by a step of
0.1V fprintf(powersupply,'VOLT UP'); % voltage increase fprintf(scope,':AUT'); fprintf(scope,':MEASURE:VAVERAGE CHANNEL1'); % measure the input DC
voltage level on the scope fprintf(scope,':MEASURE:VAVERAGE?'); input(x) = fscanf(scope,'%f'); fprintf(scope,':AUT'); fprintf(scope,':MEASURE:VAVERAGE CHANNEL2'); % measure the output DC
voltage level on the scope fprintf(scope,':MEASURE:VAVERAGE?'); output1(x) = fscanf(scope,'%f'); end
output(:,1)= input; output(:,2)= output1;
timelapse = toc; timelapse
fclose(powersupply) fclose(scope)