Eclipse Work Order Management - Epicorerpcustomer.epicor.com/docu/eclipse/etermhelparchives/Work...
69
Eclipse Work Order Management Release 8.6.4 (Eterm)
-
Upload
trinhthien -
Category
Documents
-
view
217 -
download
2
Transcript of Eclipse Work Order Management - Epicorerpcustomer.epicor.com/docu/eclipse/etermhelparchives/Work...

Eclipse Work Order Management Release 8.6.4 (Eterm)

Legal Notices © 2008 Activant Solutions Inc. All rights reserved. Unauthorized reproduction is a violation of applicable laws. Activant and the Activant logo are registered trademarks and/or registered service marks of Activant Solutions Inc. in the United States and other countries. Activant Eclipse is a trademark and/or service mark of Activant Solutions Inc. All other trademarks or service marks are the property of their respective owners and should be treated as such.
Activant® Eclipse™ 8.6.4 (Eterm) Online Help System
This online help system, as well as the software described in it, is provided under license and may be used only in accordance with the terms of the license. The content provided is for informational use only and is subject to change without notice. Activant Solutions Inc. assumes no responsibility or liability for any errors or inaccuracies that may be included in this documentation.
Publication Date: October 28, 2008
iii
Table Of Contents Work Order Management Overview .............................................................................................. 1
Work Order Processing Workflow ................................................................................................. 2
Setup Requirements for Work Order Management ........................................................................ 4
Work Order Status Codes ............................................................................................................... 7
Work Order Template Setup Workflow ......................................................................................... 8
Creating a WIP Override Account................................................................................................ 10
Creating Service Vendor Records................................................................................................. 11
Assigning User Work Order Entry Default Views ....................................................................... 13
Attaching Work Order Templates to Finished Products............................................................... 14
Determining Work Order Product Price and Cost Methods ......................................................... 15
Attaching Serial Numbers to Work Order Finished Products ...................................................... 16
Creating Standard Work Order Process Comments...................................................................... 17
Work Order Entry Overview ........................................................................................................ 18
Entering Work Orders................................................................................................................... 19
Tagging Work Orders to Sales Orders.......................................................................................... 21
Converting Suggested Work Orders to Work Orders ................................................................... 23
Creating Work Order Templates................................................................................................... 24
Creating Work Orders from Templates ........................................................................................ 25
Adding Comments to Work Order Processes ............................................................................... 26
Selecting Alternate Work Order Entry Screen Views .................................................................. 27
Adding Materials to Work Order Steps ........................................................................................ 32
Selecting Alternate Work Order Entry Material Detail Screen Views ......................................... 33
Adding Freight and Handling Charges to Work Orders ............................................................... 34
Printing Work Orders.................................................................................................................... 36
Viewing Work Order Material Shipment Information ................................................................. 37
Work Order Maintenance Overview............................................................................................. 39
Reviewing Suggested Work Orders.............................................................................................. 40
Monitoring Open Work Orders..................................................................................................... 43
Processing Work Order Steps ....................................................................................................... 45
Viewing Work Order-Related Information................................................................................... 46
Editing Work Order Processes...................................................................................................... 47

Eclipse Work Order Management
iv
Entering Work Order Backorders ................................................................................................. 50
Editing Work Order Header Information...................................................................................... 51
Viewing Work Order Material-Related Information .................................................................... 53
Moving Materials Between Work Order Steps............................................................................. 55
Canceling Work Orders ................................................................................................................ 56
Completing Work Orders.............................................................................................................. 57
Work Order Reports Overview..................................................................................................... 58
Running the Work Order Product Report ..................................................................................... 59
Running the Work Order Summary Report .................................................................................. 60
Running the Work Order Template Report .................................................................................. 61
Index ............................................................................................................................................. 63

© 2008 Activant Solutions Inc. All rights reserved. 1
Work Order Management Overview The Work Order Management companion product facilitates the process of modifying products from their original form into a more useful form, based on customer requirements. This includes transforming a basic material or group of materials into a finished product by completing a series of steps that are value-added services provided by outside vendors. Typical value add processes are: assembling a group of parts into one part, such as a toilet, or painting an unfinished piece, such as a rocking chair.
Work Order Entry Work order entry is the process of creating a record of processes that need to be completed to modify the product. You enter a step, determine how long it takes to complete, and identify the materials required to complete it. You can perform the work in house, or send it to an outside vendor for processing. If you send it to an outside vendor, you need to record the vendor's setup costs, processing costs, and any freight and handling charges, if you do not transport your own goods.
Work Order Maintenance After you enter a work order, you need to monitor it to ensure that the materials are available when you need them, that the start and completion dates are realistic, and that you are able to deliver the finished product to the customer when they have requested it. The system provides a number of queues, inquiries, and reports to assist you in doing this.

Eclipse Work Order Management Rel. 8.6.4 (Eterm)
2 © 2008 Activant Solutions Inc. All rights reserved.
Work Order Processing Workflow

Rel. 8.6.4 (Eterm) Work Order Management
© 2008 Activant Solutions Inc. All rights reserved. 3
Work Order Processing Workflow - continued

Eclipse Work Order Management Rel. 8.6.4 (Eterm)
4 © 2008 Activant Solutions Inc. All rights reserved.
Setup Requirements for Work Order Management Following are the control maintenance records and authorization keys used for work order processing, along with additional setup requirements.
Control Maintenance Records Set the following control maintenance records:
• Auto Reconcile Work Orders
• Display Process Comments in Work Order Processing Body
• Method For Calculating Process Qty For Work Orders
• Print RF Excluded Items Work Ticket
• Update Cost on Sales Order from Tagged Work Order
• Update Cost On Work Order From Tagged Purchase Order
• Update Cost On Work Order From Tagged Transfer Order
• Valid Vendor Work Order Processing Codes
• Work Order Processing Branch Selection
• Work Order Processing Default Write-Off Account
• Work Order Processing Pricing Override Vendor
• Work Order Processing Prompt For Multiplier Quantity
Authorization Keys Assign the following authorization keys:
• WOE.ALLOWED
• WOE.AUTO.REC
• WOE.CLOSE.ORDER
• WOE.CLOSED.CHANGE.VENDOR
• WOE.CLOSED.ORDER.CANCEL
• WOE.CLOSED.ORDER.EDIT
• WOE.CLOSED.PRC.EDIT
• WOE.CLOSED.QTY.EDIT
• WOE.OPEN.ORDER.EDIT
• WOE.OPEN.PRC.EDIT

Rel. 8.6.4 (Eterm) Work Order Management
© 2008 Activant Solutions Inc. All rights reserved. 5
• WOE.OPEN.QTY.EDIT
• WOE.PIL.DAYS.OVRD
• WOE.WRITER.EDIT
Product Maintenance Create records for the finished products in Product Maintenance.
• In the Buy Line field, enter the service vendor's buy line.
• If you want the system to calculate demand for the finished product, set up the item with a status of Stock.
• After you create the work order template, verify that the product price on the price sheet matches the finished product price on the template.
Note: You can set up the products as kits or assign individual prices, as needed.
Attach work order templates to finished products, as needed.
Determine work order product price and cost methods.
Attach serial numbers to finished products.
General Ledger Create a G/L override account for internal processing.
Schedule the Change Posting Date For Inprocess Work Orders driver in the phantom scheduler.
Vendor Maintenance Create service vendor records in Vendor Maintenance.
User Maintenance Assign Work Order Entry default views, as needed, for your employees.
Work Order Entry Create work order templates for often used processes, as needed.
Control Maintenance Create standard work order process comments, as needed.

Eclipse Work Order Management Rel. 8.6.4 (Eterm)
6 © 2008 Activant Solutions Inc. All rights reserved.
Form and Printer Setup You must do the following to print work orders:
• Define the Work Order form.
• Assign the form to a Work Order document.
• Assign the form to a printer.
Rel. 8.6.4 (Eterm) Work Order Management
© 2008 Activant Solutions Inc. All rights reserved. 7
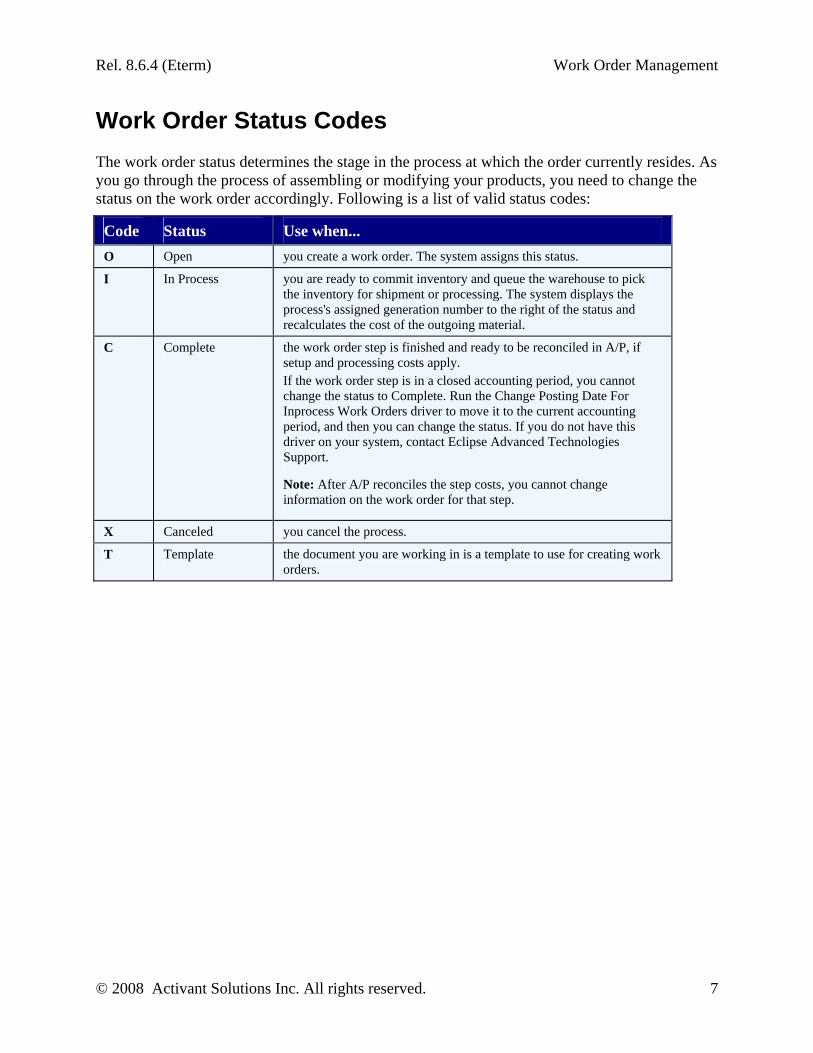
Work Order Status Codes The work order status determines the stage in the process at which the order currently resides. As you go through the process of assembling or modifying your products, you need to change the status on the work order accordingly. Following is a list of valid status codes:
Code Status Use when... O Open you create a work order. The system assigns this status.
I In Process you are ready to commit inventory and queue the warehouse to pick the inventory for shipment or processing. The system displays the process's assigned generation number to the right of the status and recalculates the cost of the outgoing material.
C Complete the work order step is finished and ready to be reconciled in A/P, if setup and processing costs apply. If the work order step is in a closed accounting period, you cannot change the status to Complete. Run the Change Posting Date For Inprocess Work Orders driver to move it to the current accounting period, and then you can change the status. If you do not have this driver on your system, contact Eclipse Advanced Technologies Support.
Note: After A/P reconciles the step costs, you cannot change information on the work order for that step.
X Canceled you cancel the process.
T Template the document you are working in is a template to use for creating work orders.

Eclipse Work Order Management Rel. 8.6.4 (Eterm)
8 © 2008 Activant Solutions Inc. All rights reserved.
Work Order Template Setup Workflow

Rel. 8.6.4 (Eterm) Work Order Management
© 2008 Activant Solutions Inc. All rights reserved. 9
Work Order Template Setup - continued

Eclipse Work Order Management Rel. 8.6.4 (Eterm)
10 © 2008 Activant Solutions Inc. All rights reserved.
Creating a WIP Override Account If any of your company's value-added processes are internal, you must set up a G/L WIP (Work in Process) override account. You can then assign this account number to your value-added department.
To create a G/L override account:
1. From the G/L > G/L Maintenance menu, select G/L Account Maintenance to display the G/L Account Maintenance screen.
2. In the Account field, type a brief description of the account.
3. Press Enter to display a list of accounts matching your description.
If the account you want does not appear in the list, select New and press Enter to return to the G/L Account Maintenance screen.
4. In the Full Description field, enter the description you first entered in the Account field.
5. In the Short Desc field, edit the description to shorten it, if needed.
6. In the Internal Desc field, enter any identifying description for internal use, if needed.
7. In the Key Words field, enter any other descriptive words to assist you in identifying the account.
8. In the Asset or Expense field, enter any character to flag the account as an asset or expense. The system converts your character to an asterisk (*).
9. In the A/P Adjustment Allowed field, delete the asterisk.
10. Press Esc to display the Reason for Change prompt.
11. At the prompt, enter a brief statement about creating a new WIP account and press Esc to save your account and clear the G/L Account Maintenance screen.
Rel. 8.6.4 (Eterm) Work Order Management
© 2008 Activant Solutions Inc. All rights reserved. 11
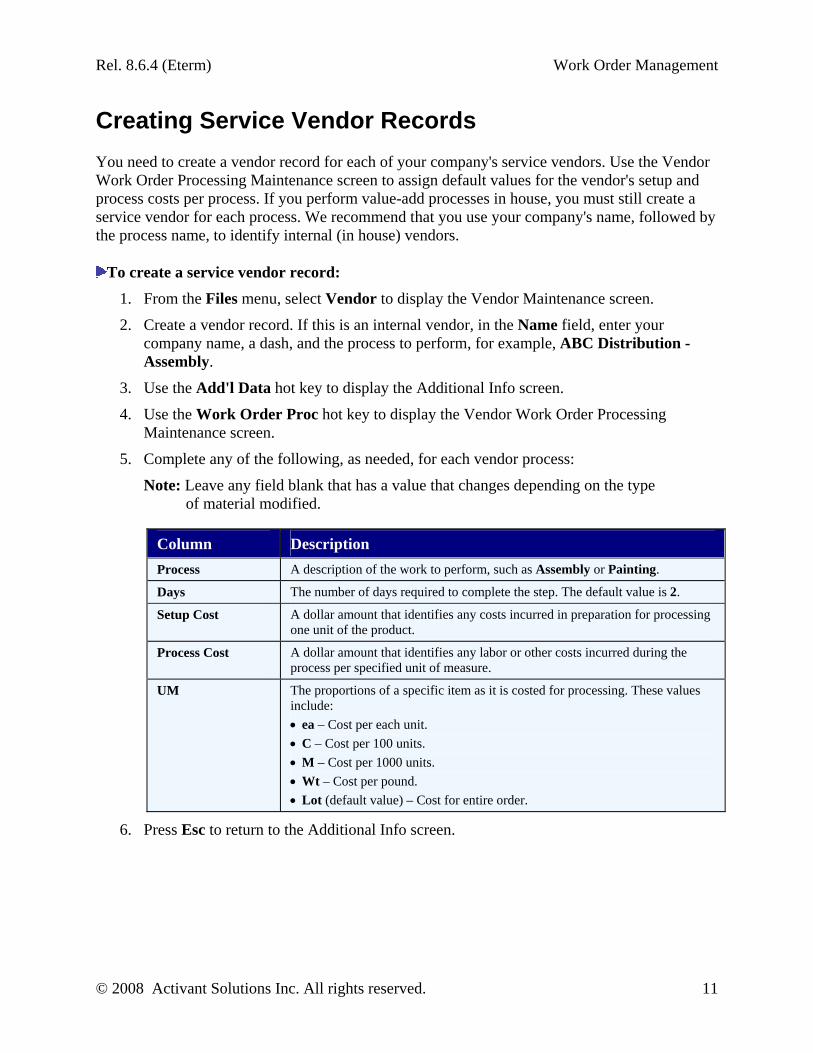
Creating Service Vendor Records You need to create a vendor record for each of your company's service vendors. Use the Vendor Work Order Processing Maintenance screen to assign default values for the vendor's setup and process costs per process. If you perform value-add processes in house, you must still create a service vendor for each process. We recommend that you use your company's name, followed by the process name, to identify internal (in house) vendors.
To create a service vendor record:
1. From the Files menu, select Vendor to display the Vendor Maintenance screen.
2. Create a vendor record. If this is an internal vendor, in the Name field, enter your company name, a dash, and the process to perform, for example, ABC Distribution - Assembly.
3. Use the Add'l Data hot key to display the Additional Info screen.
4. Use the Work Order Proc hot key to display the Vendor Work Order Processing Maintenance screen.
5. Complete any of the following, as needed, for each vendor process:
Note: Leave any field blank that has a value that changes depending on the type of material modified.
Column Description Process A description of the work to perform, such as Assembly or Painting.
Days The number of days required to complete the step. The default value is 2.
Setup Cost A dollar amount that identifies any costs incurred in preparation for processing one unit of the product.
Process Cost A dollar amount that identifies any labor or other costs incurred during the process per specified unit of measure.
UM The proportions of a specific item as it is costed for processing. These values include: • ea – Cost per each unit. • C – Cost per 100 units. • M – Cost per 1000 units. • Wt – Cost per pound. • Lot (default value) – Cost for entire order.
6. Press Esc to return to the Additional Info screen.

Eclipse Work Order Management Rel. 8.6.4 (Eterm)
12 © 2008 Activant Solutions Inc. All rights reserved.
7. Do one of the following:
If you created an...
Then...
internal vendor use the Misc Vend Info hot key to display the Miscellaneous Vendor Information screen. Continue with the next step.
external vendor Continue with step 10.
8. In the Override G/L Account Number field, enter the override account number for internal value-add processes.
Note: Never assign an override G/L account number to an external vendor, as a payable is involved.
9. Press Esc to exit the screen.

Rel. 8.6.4 (Eterm) Work Order Management
© 2008 Activant Solutions Inc. All rights reserved. 13
Assigning User Work Order Entry Default Views The Work Order Entry screen provides several column views for viewing additional information. You can use the User Maintenance screen to assign the column view your employees see when they create a work order, and the view they see to review work orders. Setting up a default view does not prevent users from viewing alternate columns, but it should be the one they use most often for the specified task.
To assign a user Work Order Entry default view:
1. From the System > System Files > User Control menu, select User Maintenance to display the User Maintenance screen.
2. In the User ID field, enter the log-in ID for the employee to whom to assign default views.
3. In the WO Recall field, enter the view to use as a default view when the user reviews a work order.
4. In the WO New field, enter the view to use as a default view when the user creates a new work order.
5. Change other user maintenance settings, as needed.
6. Press Esc to display the Reason for Change prompt.
7. At the prompt, enter a brief statement about setting default WOE views.
8. Press Esc to save your changes and clear the screen.
Note: The changes do not go into effect until the next time the user logs on to the system.

Eclipse Work Order Management Rel. 8.6.4 (Eterm)
14 © 2008 Activant Solutions Inc. All rights reserved.
Attaching Work Order Templates to Finished Products If you always use the same work order process to produce a specific finished product, you can create a work order template and attach it to a finished work order product. When you do this, each time a customer reorders the finished product, the system uses the assigned work order template to create the work order. You can then adjust the quantities, materials, or steps, as needed.
To attach a work order template to a finished product:
1. From the Files menu, select Product to display the Product Maintenance screen.
2. Select a product record.
3. Use the Add'l hot key and then the Work Order Processing Maint hot key to display the Work Order Processing Maintenance screen.
4. In the Template ID field, enter the work order number that identifies the default template to use.
If a template has already been used to create a work order for this product, the system populates this field with that number. However, you can change it, if needed.
5. To make changes to the work order template, use the Edit Template hot key to display the Work Order Entry screen.
6. Adjust the quantities, materials, or other information, as needed, and press Esc to return to the Work Order Processing Maintenance screen.
7. Press Esc to save the information and exit the screen.

Rel. 8.6.4 (Eterm) Work Order Management
© 2008 Activant Solutions Inc. All rights reserved. 15
Determining Work Order Product Price and Cost Methods Use the Work Order Processing Maintenance screen to determine how the system calculates the selling price and cost for a finished product on a work order template.
To determine the selling price and cost for a work order product:
1. From the Files menu, select Product to display the Product Maintenance screen.
2. Select a product record.
3. Use the Add'l hot key and then the Work Order Processing Maint hot key to display the Work Order Processing Maintenance screen.
4. In the Calc Sell Method field, enter the method to use to determine the selling price of the item:
• Select the Use Assembled Product Price method to calculate the price based on the price assigned to the finished product. The pricing group assigns this price to the local price basis name that corresponds to the DFLT-LIST global price basis name on the Product Price Sheet Maintenance screen.
• Select the Use Sum of Component Prices method to calculate the price based on the sum of the prices of each component used in the production of the product.
5. In the Calc Cost Method field, enter the method to use to determine the cost of the item:
• Select the Use Assembled Product Price method to calculate the cost based on the cost assigned to the finished product. The pricing group assigns this cost to the local cost basis name that corresponds to the DFLT-LIST global cost basis name on the Product Price Sheet Maintenance screen.
• Select the Use Sum of Component Prices method to calculate the cost based on the sum of the cost of each component used in the production of the product.
6. Press Esc to save the information and exit the screen.

Eclipse Work Order Management Rel. 8.6.4 (Eterm)
16 © 2008 Activant Solutions Inc. All rights reserved.
Attaching Serial Numbers to Work Order Finished Products Use the Work Order Processing Maintenance screen to specify when to prompt for serial numbers and the format to use when the system assigns serial numbers to the work order product.
To attach serial numbers to a work order finished product:
1. From the Files menu, select Product to display the Product Maintenance screen.
2. Select a product record.
3. Use the Add'l hot key and then the Work Order Processing Maint hot key to display the Work Order Processing Maintenance screen.
4. Complete the following fields:
Field Description Prompt SN# on IN Step
Identifies the point in the process when the system prompts for serial numbers: • Default Inprocess & Complete • Inprocess Only • Complete Only
Serial Number Mask
A set of characters at the beginning of a serial number that identify a particular product. The system assigns each product this identifier, followed by a series of unique numbers, upon completion of the process. Use the following criteria to format an incrementing serial number: • Enclose the serial number mask within quotation marks (' or "). • Separate incremental information with dashes (-). • Use A for alphabetical increments. • Use # for numeric increments. For example, entering "BR549"-###-AAA assigns the serial number BR549-000-AAA to the first product, BR549-000-AAB,to the second, and so forth. A serial number can have a maximum of 20 alphanumeric characters, not including the quotation marks and dashes used to establish the serial number mask format. We recommend that you not change this mask once you begin production of the finished product, as this may result in duplications.
Note: You must indicate whether you are using Serial Numbers for individual branches.
To assign serial numbers manually, leave this field blank. After you enter the Serial Number Mask, the system displays the first number in the series and the maximum number of serial numbers that will appear in the current series. The system also displays the last assigned number once you begin processing work orders.
5. Press Esc save the information and exit the screen.

Rel. 8.6.4 (Eterm) Work Order Management
© 2008 Activant Solutions Inc. All rights reserved. 17
Creating Standard Work Order Process Comments Use the Standard Comments screen to create comments commonly added to a work order process.
To create a standard comment for a work order process:
1. From the System > System Files menu, select Control Maintenance to display the Control Maintenance screen.
2. In the Keyword field, enter Valid Vendor Work Order Processing Codes to display the Process screen.
3. Select a process from the list and use the Std Cmts hot key to display a selection list.
4. Select NEW from the list to display a prompt.
5. At the Enter New Title prompt, enter a descriptive word or short phrase, up to 20 characters, that identifies the comment to display the Standard Comments screen.
6. In the Standard Comments area, enter any text relevant to the process, such as a caution, a list of steps, or other special instructions for the vendor.
If you have the Display Process Comments in Work Order Processing Body control maintenance record set to Y, this information prints in the header area on the work order, and appears on-screen just below the step to which it refers.
7. Press Esc to return to the Process screen.
If you use the Std Cmts hot key again, your comment title displays in the list.
To delete a standard comment from the list of work order processes:
1. From the System > System Files menu, select Control Maintenance to display the Control Maintenance screen.
2. In the Keyword field, enter Valid Vendor Work Order Processing Codes to display the Process screen.
3. Select a process from the list and use the Std Cmts hot key to display a selection list.
4. Select the comment to delete from the list and press Enter to display the Standard Comments screen.
5. Use the Delete hot key to display a confirmation prompt. Enter delete to remove the text from the screen and return to the Process screen.
To verify that your comment has been removed from the list, use the Std Cmts hot key again.

Eclipse Work Order Management Rel. 8.6.4 (Eterm)
18 © 2008 Activant Solutions Inc. All rights reserved.
Work Order Entry Overview When a customer orders a product that requires special processing, that processing adds value to the original product, which creates a new product. To sell the product to the customer, create a product record for it and define all of the associated pricing information.
Processes After the product record is created, you must enter a work order and define the processes and products required to produce the finished product. If it is a one-time order, you can create an individual work order to have the processing done. If the customer plans to order the same product on multiple occasions, you can create a work order template to save time when entering subsequent sales.
Materials Once you have defined the steps required to build or alter a product, you must add the materials used to create the product. Materials include not only the parts, but also the small expense items, such as nails, paint, or glue. You need to add materials proportionate to the finished product. For example, if you are assembling a door, you need 1 door, 3 hinges, 9 screws, 1 doorknob assembly, 1 striker plate, and 1 door frame. If an outside vendor is assembling the door, you might not need to supply the screws, because the vendor might consider this an expense item and include it in their processing fees.
Vendor Charges If you process work orders in-house, your setup and labor are recorded in a Work In Process (WIP) holding account. If you do not process your work orders in house, you must pay a vendor to perform the work, which creates a payable. Vendors charge you for things like setup, labor (processing), and, unless you use your own transportation, freight and handling.
Shipping and Receiving If you send a work order for outside processing, you must ship the materials out of stock to the vendor, and receive the finished product into stock so that they can be sold to the customer. This is all handled in the warehouse system, which uploads the information to the work order system so that you can monitor the status of the order.

Rel. 8.6.4 (Eterm) Work Order Management
© 2008 Activant Solutions Inc. All rights reserved. 19
Entering Work Orders Use the Work Order Entry screen to enter work orders for special value add processing. You define the steps in the process, who performs them, and how long completing each step takes. In addition, if you are not processing the order in house, you can enter the vendor's setup and processing costs. If the customer will have repeat orders for this product, you may want to create a template for this process. You must have authorization to enter work orders.
Note: If you enter a product with a Delete status and the quantity exceeds the amount on-hand to sell, a warning displays. For more information about product status, see Product Status Codes in Product Maintenance.
Before You Begin Verify that the finished product has a maintenance record. You cannot process the order without a finished product.
To create a work order:
1. From the Orders menu, select Work Order Entry to display the Work Order Entry screen.
2. In the Order ID field, enter New.
3. In the PrcBr field, if accessible, type the number that identifies the branch used to determine the pricing rules for the products on this order.
4. In the Start Date field, enter the date to begin processing the work order.
5. In the Description field, enter a brief statement that describes the finished product and the process, for example, 16lb Sledge Hammer Assembly.
6. In the Process field, enter a description of the work to perform.
Valid process values are set up in the Valid Vendor Work Order Processing Codes control maintenance record.
7. Add comments to the process, if needed.
8. In the Vendor Name field, enter the name of the individual or company that will perform the step. You must complete this field, even if you are performing the process in-house. See Creating Service Vendor Records for more information.
If you select a vendor who is not set up in Vendor Maintenance as a service vendor, you must also complete the setup and processing cost information. The vendor must be a ship-from vendor.
9. Complete additional fields, as needed.
Note: Your user profile determines which columns are visible.
10. Press Enter to display the Work Order Entry Material Detail screen.
Eclipse Work Order Management Rel. 8.6.4 (Eterm)
20 © 2008 Activant Solutions Inc. All rights reserved.
11. Enter any materials needed to perform the step and press Esc to return to the Work Order Entry screen.
12. Enter additional processes, as needed.
13. To use this order as a template for future orders, see Creating Work Order Templates.
14. Press Esc.
If the Work Order Entry Header screen displays, in the Freight field, enter the vendor's freight terms. Edit other header information as needed and press Esc to return to the Work Order Entry screen. Press Esc to save the order and clear the screen.

Rel. 8.6.4 (Eterm) Work Order Management
© 2008 Activant Solutions Inc. All rights reserved. 21
Tagging Work Orders to Sales Orders Work orders can be entered to replenish stock, or on an as-needed basis. If a customer requests a product for which a work order is required, you can enter the finished product on a sales order and then tag the resulting work order to the sales order to ensure that the customer receives the full quantity they ordered.
To tag a work order to a sales order:
1. From the Orders menu, select Sales Order Entry to display the Sales Order Entry Body screen.
2. Add or enter customer information.
3. In the Qty/Unit field, enter the quantity of the product to order.
4. Enter a finished work order product description to display the Scheduling screen. If the work order product does not have a processing template, use the Sched hot key to display the screen.
5. Position the cursor on the shipment for which the available quantity is 0 (zero) and the shipment quantity is not equal to 0 (zero) and use the Work hot key.
6. Do one of the following to display the Work Order Entry screen:
If this prompt displays... Do this... Edit Template or Create a New Work Order
• To edit the processes and quantities on the work order's template, select Edit Template.
• To create a work order, select Create a New Work Order.
Create a New Work Order Enter Y.
Note: When the Work Order Entry screen displays, you can replace the word NEW with a template ID. The system will ask you if you want to copy the template to a work order. If you enter Y (yes), the system creates a work order based on the template and tags it to the sales order. If you enter N, the system returns you to the Scheduling screen.
Depending on your system setup, you may then be prompted to use the suggested shipping branch as the work order shipping branch. If so, enter Y to use the sales order shipping branch, or N to retain the shipping branch indicated on the work order template.
7. Do one of the following:
If you selected... Do this... Create a New Work Order ( or Y)
enter a work order. If a template exists for this product, the system populates the fields, but you can change the quantities, materials, or vendors, if needed.
Eclipse Work Order Management Rel. 8.6.4 (Eterm)
22 © 2008 Activant Solutions Inc. All rights reserved.
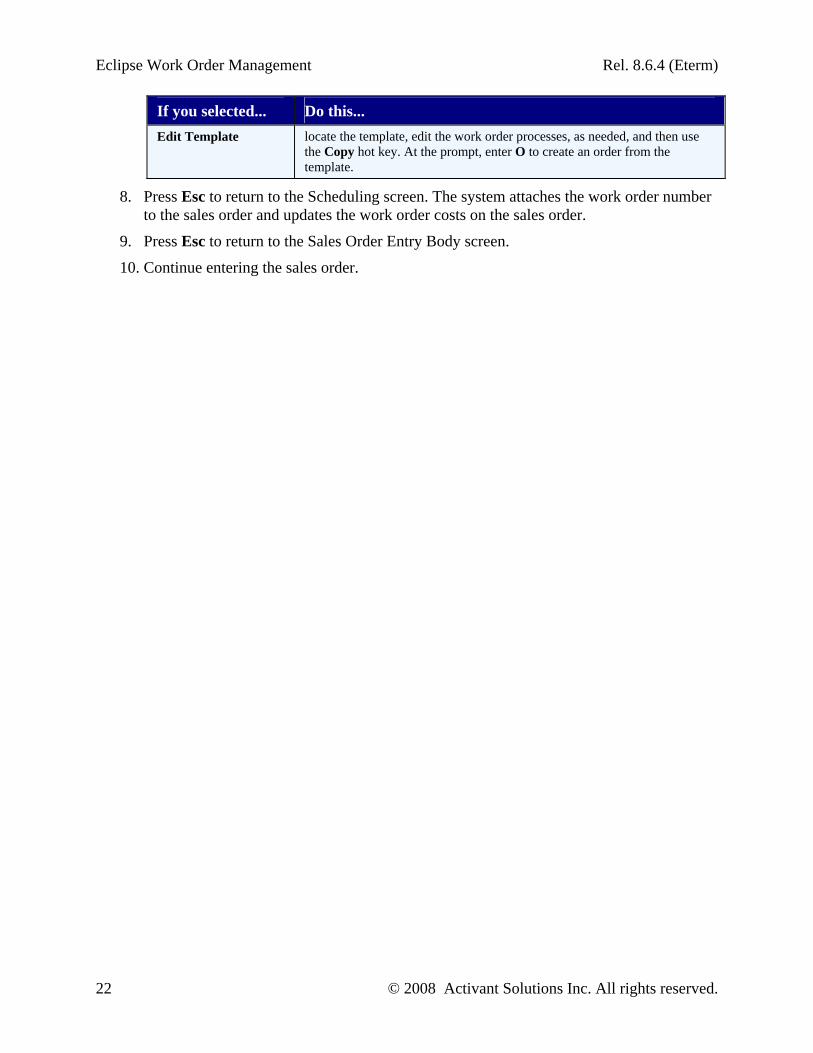
If you selected... Do this... Edit Template locate the template, edit the work order processes, as needed, and then use
the Copy hot key. At the prompt, enter O to create an order from the template.
8. Press Esc to return to the Scheduling screen. The system attaches the work order number to the sales order and updates the work order costs on the sales order.
9. Press Esc to return to the Sales Order Entry Body screen.
10. Continue entering the sales order.
Rel. 8.6.4 (Eterm) Work Order Management
© 2008 Activant Solutions Inc. All rights reserved. 23
Converting Suggested Work Orders to Work Orders Use the Suggested Work Order Queue to convert suggested work orders to open work orders. When you do this, the system populates the work order based on its associated template.
To convert a suggested work order to a work order:
1. Display the suggested work orders on the Suggested Work Order Queue screen.
2. Select the product to build or modify and use the Convert hot key to create the work orders. The system removes the product from the list.
The system first prompts you to select whether to create a work order for the short quantity or the total quantity. To select the short quantity, enter S. To select the total quantity, enter T.
Depending on your system setup, the system may prompt you to select the branch to use as the shipping and pricing branch. To accept the default, which is determined based on the product template, press Enter. Otherwise, enter a different branch.
The system displays the work order on the Work Order Entry screen. Edit the information, as needed.

Eclipse Work Order Management Rel. 8.6.4 (Eterm)
24 © 2008 Activant Solutions Inc. All rights reserved.
Creating Work Order Templates If a customer orders a product that requires value-add processing on a regular basis, you can create a template for ease of subsequent entry. The template includes each step in the process, who performs it, and how long completing the step takes. If you are not processing the product in-house, it also includes any standard setup and processing costs the vendor imposes. The template also includes the materials required and standard quantities of each, along with shipping information, if required. You can create an order and then create a template from it, or just create a template.
Note: Work order templates cannot be converted from other systems.
Before you begin, verify that the finished product has a maintenance record. You cannot process the order without a finished product.
To create a work order template:
1. Enter or open a work order or existing template.
2. Review and edit the information, as needed.
3. Do one of the following to create a template:
• To copy the order to a template, use the Copy hot key to display a prompt. Type T and press Enter.
Note: If you are creating a template from another template and the original template contains overrides, the system prompts you to decide if you want to maintain those overrides.
• To change the order into a template, use the Make Template hot key to display a prompt. Type Y and press Enter.
Note: You cannot create a template from an order if any step has a status of I - Inprocess or C - Complete.
4. Do one of the following:
• Create an order from your new template.
• Press Esc to close the template.
Rel. 8.6.4 (Eterm) Work Order Management
© 2008 Activant Solutions Inc. All rights reserved. 25
Creating Work Orders from Templates If you frequently use a work order process, you should create a template for it. The template includes all of the materials and processes needed to produce the finished product. You can then copy the template to an order to speed the entry process.
To create a work order based on a template:
1. Create or open a template.
2. Use the Copy hot key.
If the Work Order Processing Prompt For Multiplier Quantity control maintenance record is set to:
• Y – A prompt displays, showing the quantities of finished product on the template for each step. Enter the number by which to multiply those quantities to produce the requested amount of finished product.
• N – A prompt displays. At the prompt, enter O (Order).
Depending on your system setup, you may then be prompted to select the shipping branch to use to create the work order. To accept the branch indicated on the template, press Enter; otherwise, enter the branch for which to create the work order and press Enter.
Note: You cannot copy a work order template that has deleted items. If you try to copy a template with deleted items, the system displays an error.
3. Press Enter to re-display the Work Order Entry screen in order entry mode.
4. Edit the process information, if needed.
5. Edit the materials and quantities, if needed.
6. Press Esc.
If the Work Order Entry Header screen displays, in the Freight field, enter the vendor's freight terms. Edit other header information as needed and press Esc to return to the Work Order Entry screen. Press Esc to save the order and clear the screen.

Eclipse Work Order Management Rel. 8.6.4 (Eterm)
26 © 2008 Activant Solutions Inc. All rights reserved.
Adding Comments to Work Order Processes Use the Comments screen to add instructions to a step in the process. You can write order-specific comments or choose from a list of standard comments. If you have the Display Process Comments in Work Order Processing Body control maintenance record set to Y (yes), this information prints in the header area on the work order, and appears on-screen just below the step to which it refers.
Standard comments are defined in the Valid Vendor Work Order Processing Codes control maintenance record.
Adding a comment to a process: 1. Enter or open a work order.
2. Position your cursor on a process (line item) and use the Comment hot key to display the Comments screen.
Note: You cannot add a comment to a blank line.
3. Do one of the following:
To... Do This... enter a specific comment about the process
Type the comment in the Comments area.
add a standard comment to the process
Use the Standard Comments hot key. Select a comment from the list and press Enter to add it to the Comments area. You can customize the comment or add additional information to it, as needed.
4. Press Esc to return to the Work Order Entry screen. Depending on your system setup, your comment may display under the process.

Rel. 8.6.4 (Eterm) Work Order Management
© 2008 Activant Solutions Inc. All rights reserved. 27
Selecting Alternate Work Order Entry Screen Views You can change the columns on the Work Order Entry screen to display a variety of information. For example, you can change to a view that shows your setup and processing costs. The view that displays when you access this screen depends on your user maintenance settings.
Use the following screen views to enter, edit, or monitor information on your work orders:
• Setup/Unit Cost
• Status
• Start/Comp Date
• Required Date
• Earliest Avail
• Reconcile
• Line Item Detail
• Balance
• Process Qty/Cost
To enter setup and processing costs for a step:
1. Enter or open a work order.
2. Select a step, use the View hot key, and select Setup/Unit Cost from the list.
If you entered setup and processing cost defaults for this vendor, those values display.
3. Change the following fields, as needed:
Field Description Days The number of days required to complete the step in the process.
Setup Cost A dollar amount that identifies any costs incurred in preparation for processing one unit of the product, based on the unit of measure.
Proc Cost A dollar amount that identifies any labor or other costs incurred during the process, per unit of measure.
UM The proportions of a specific item as it is costed for processing, such as ea (1 each), C (cost per 100), M (cost per 1000), wt (cost based on weight), or lot (cost for entire order). Once you complete this field, press Enter to display the Work Order Entry Material Detail screen. The screen does not display automatically unless you press Enter from this field.
If you are creating this work order from within a sales order, the work order template you use determines how the selling price and the cost are calculated.
Note: If you cancel this order, you must cancel the payable before you can remove these costs.

Eclipse Work Order Management Rel. 8.6.4 (Eterm)
28 © 2008 Activant Solutions Inc. All rights reserved.
To update the status of a step:
1. Enter or open a work order.
2. Select a step, use the View hot key and select Status from the list.
3. Change the following fields, as needed:
Field Description Status Identifies the status of the selected process.
Note: When you complete a step to which an incoming material is attached, you may be prompted to enter serial numbers, if the system is not set up to assign them.
Comp Date The date by which the step in the process is expected to be complete. The date by which the step in the process is expected to be complete. If you complete this field, the system adjusts the number of days required to complete the process, based on difference between the start date and this date. If the step is in process, you cannot change this date to one in a closed accounting period. Note: If more than one process exists in this work order, the system prompts you to update the subsequent start and completion dates. Enter Y to update the process dates or N to leave them as is.
To update the start and completion dates for a step:
1. Enter or open a work order.
2. Select a step, use the View hot key, and select Start/Comp Date from the list.
3. Change the following fields, as needed:
Field Description Days The number of days required to complete the step. When you complete this
field, the system adjusts the completion date for this process and the start date for the next process.
Start Date The date work is expected to begin on the process, or the date the materials ship to the vendor. If the step is in process, you cannot change this date to one in a closed accounting period.
Comp Date The date by which the step in the process is expected to be complete. If you complete this field, the system adjusts the number of days required to complete the process, based on difference between the start date and this date. If the step is in process, you cannot change this date to one in a closed accounting period.
Note: If more than one process exists in this work order, the system prompts you to update the subsequent start and completion dates. Enter Y to update the process dates or N to leave them as is.
S Identifies the status of the selected process, for example, open, complete, or canceled.
Note: When you complete a step to which an incoming material is attached, you may be prompted to enter serial numbers, if the system is not set up to assign them.
Rel. 8.6.4 (Eterm) Work Order Management
© 2008 Activant Solutions Inc. All rights reserved. 29
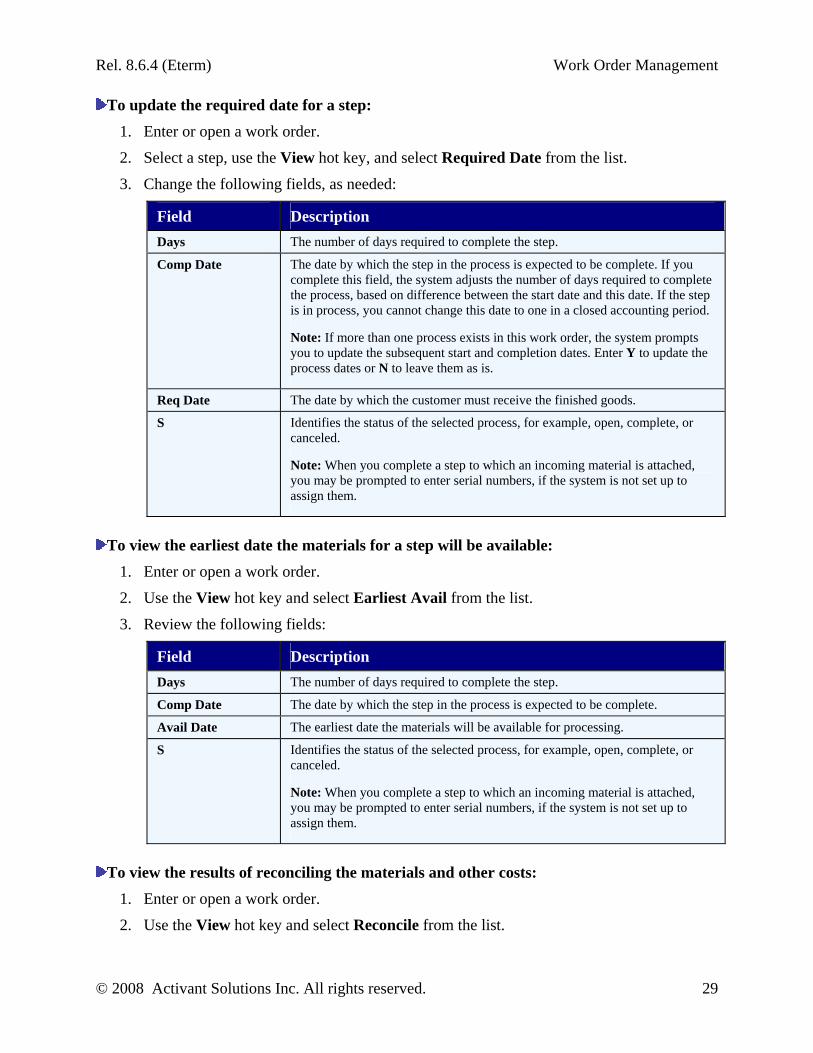
To update the required date for a step:
1. Enter or open a work order.
2. Select a step, use the View hot key, and select Required Date from the list.
3. Change the following fields, as needed:
Field Description Days The number of days required to complete the step.
Comp Date The date by which the step in the process is expected to be complete. If you complete this field, the system adjusts the number of days required to complete the process, based on difference between the start date and this date. If the step is in process, you cannot change this date to one in a closed accounting period.
Note: If more than one process exists in this work order, the system prompts you to update the subsequent start and completion dates. Enter Y to update the process dates or N to leave them as is.
Req Date The date by which the customer must receive the finished goods.
S Identifies the status of the selected process, for example, open, complete, or canceled.
Note: When you complete a step to which an incoming material is attached, you may be prompted to enter serial numbers, if the system is not set up to assign them.
To view the earliest date the materials for a step will be available:
1. Enter or open a work order.
2. Use the View hot key and select Earliest Avail from the list.
3. Review the following fields:
Field Description Days The number of days required to complete the step.
Comp Date The date by which the step in the process is expected to be complete.
Avail Date The earliest date the materials will be available for processing.
S Identifies the status of the selected process, for example, open, complete, or canceled.
Note: When you complete a step to which an incoming material is attached, you may be prompted to enter serial numbers, if the system is not set up to assign them.
To view the results of reconciling the materials and other costs:
1. Enter or open a work order.
2. Use the View hot key and select Reconcile from the list.

Eclipse Work Order Management Rel. 8.6.4 (Eterm)
30 © 2008 Activant Solutions Inc. All rights reserved.
3. Review the following fields:
Field Description Process The total vendor costs for the selected step, including setup, processing, freight,
and handling charges.
Mat'l Bal The total cost of the materials used during the selected step.
Balance The total cost of setup, processing, and materials for the selected step.
To view the quantities and costs of each material associated with a step:
1. Enter or open a work order.
2. Use the View hot key and select Line Item Detail from the list.
3. Review the following fields:
Field Description CostIn The cost of the product before processing.
CostOut The cost of the product after processing.
Balance The total process cost. If you view this field after the work order is complete, it should have a value of 0 (zero). If it does not, you need to reconcile the figures.
To view the total cost of processing the product:
1. Enter or open a work order.
2. Use the View hot key and select Balance from the list.
3. Review the following fields:
Field Description Start Date The date work is expected to begin on the process, or the date the materials
ship to the vendor.
Comp Date The date by which the step in the process is expected to be complete.
Balance The total process cost.
To view the total quantity and associated cost of the process:
1. Enter or open a work order.
2. Use the View hot key and select Process Qty/Cost from the list.
3. Review the following fields:
Field Description Days The number of days required to complete the step.
Proc Qty The quantity of product to be processed during the specified step.
Proc Cost A dollar amount that identifies any costs incurred during the process per specified unit of measure.

Rel. 8.6.4 (Eterm) Work Order Management
© 2008 Activant Solutions Inc. All rights reserved. 31
Field Description UM The proportions of a specific item as it is costed for processing, such as ea (1
each), C (cost per 100), M (cost per 1000), wt (cost based on weight), or lot (cost for entire order).

Eclipse Work Order Management Rel. 8.6.4 (Eterm)
32 © 2008 Activant Solutions Inc. All rights reserved.
Adding Materials to Work Order Steps Use the Work Order Entry Material Detail screen to identify the raw materials coming out of stock to be processed on a work order, and the finished product going into stock to be sold to the customer. If you are creating a work order, this screen displays when you finish entering a process. You can also access it using the Materials hot key if you need to change quantities or add products.
Note: The system prices items coming out of stock in the same way it does for purchase orders. For example, if you want to cost your material at COGS-COST, you must have a buy matrix for the material that calculates it this way.
To enter products associated with a step:
1. Enter or open a work order.
2. If needed, use the Material hot key to display the Work Order Entry Material Detail screen.
3. Complete one of the following fields for each entry:
Field Description Qty Out The amount of the product used in the process. You can enter a quantity of less
than 1 (one), provided you have that unit of measure assigned to the product. If you are creating a template, we recommend you enter the quantity of the material required to produce one finished product.
Qty In The amount of the finished products resulting from the process. If you are creating a template, we recommend you use a quantity of 1 (one).
Note: If you are using the Auto Reconciliation feature with the In/Out Grouping method, you must list the raw materials before listing the finished product. In addition, if you list two finished products in succession, you must manually reconcile the costs.
4. In the Product Description field, enter the product for which the quantity was entered. See Searching for Products for more information.
To add royalties, labor costs, or other miscellaneous charges to the work order, create a miscellaneous charge product, if needed, and add it to the quantity out with a quantity of 1 (one).
5. To view a summary of the material data, position your cursor on a product and use the Summary hot key to display the Work Order Product Summary screen.
When you have finished reviewing the information, press Esc to return to the Work Order Entry Material Detail screen.
6. Press Esc to exit the screen.

Rel. 8.6.4 (Eterm) Work Order Management
© 2008 Activant Solutions Inc. All rights reserved. 33
Selecting Alternate Work Order Entry Material Detail Screen Views You can change the columns on the Work Order Entry Material Detail screen to display a variety of information. For example, you can change to a view that shows your detail lots and their locations in the warehouse.
Use the following screen views to enter, edit, or monitor the products on your work orders:
• Extended Cost
• Process Qty
• Avail
• Detail Lot
• Weight
• Extended Cost Plus
To select an alternate screen view:
1. Enter or open a work order.
2. Use the Material hot key to display the Work Order Entry Material Detail screen.
3. Use the View hot key to display the View Choices selection list.
4. Select one of the following and press Enter:
Selection Displays... Which shows the.. Extended Cost the Extension column total cost for the specified quantity of the
material.
Process Qty the Proc. Qty column total amount of material processed on the order.
Avail the Available column earliest date the materials will be available for processing.
Detail Lot the Location and Lot columns material's location in the warehouse and the lot to which it belongs, if applicable.
Weight the Ext Cost and Ext Wght columns
total cost and total weight for the specified quantity of the material.
Extended Cost Plus
the Extension column full amount for total material costs exceeding $99,999.00.

Eclipse Work Order Management Rel. 8.6.4 (Eterm)
34 © 2008 Activant Solutions Inc. All rights reserved.
Adding Freight and Handling Charges to Work Orders If the vendor charges you freight and handling to return the finished product to your warehouse, you need to enter that information on the Work Order Entry Totals screen. Use this screen to view the breakdown of the total amount you owe the vendor for services rendered, and to determine the method used to capitalize those costs.
Note: After the work order has been reconciled in A/P, you can change only the freight carrier and bill of lading number.
To add freight and handling charges to an order:
1. Open a work order that has been processed.
2. Use the Totals hot key to display the Work Order Entry Totals screen.
3. Review the following fields, as needed:
Field Description Process The work performed, such as Assembly or Painting.
Comp Date The date by which the process was expected to be complete.
Proc Cost The costs incurred during the process per specified unit of measure. See the UM field on the Work Order Entry screen for the unit used to determine this amount.
Setup Cost Any costs incurred in preparation for processing one unit of the product. See the UM field on the Work Order Entry screen for the unit used to determine this amount.
4. In the Freight field, enter the freight charges from the vendor's invoice.
5. In the Capitalize Freight field, enter the general ledger line item level at which to apply the freight. Dollars is the default value.
6. In the Handling field, enter the handling charges from the vendor's invoice.
7. Review the Total field to determine the total amount your company owes the vendor.
8. Complete the following fields, as needed:
Field Description Freight Carrier The company that transported the products back to your warehouse.
Bill of Lading The number that identifies the vendor's shipping document. If you complete the Freight Carrier field, you must also complete this field.
The system populates the Pieces field from the quantity of the finished product you entered on the Work Order Entry Material Detail screen, and populates the Weight and Load Factor fields based on the product's maintenance record.

Rel. 8.6.4 (Eterm) Work Order Management
© 2008 Activant Solutions Inc. All rights reserved. 35
9. Do the following, as needed:
To... Use this hot key... edit the work order header information Header
The Work Order Entry Header screen displays.
view the payable invoice, if received View Payable The invoice displays in view-only mode.
10. Press Esc to save the charges and exit the screen.

Eclipse Work Order Management Rel. 8.6.4 (Eterm)
36 © 2008 Activant Solutions Inc. All rights reserved.
Printing Work Orders After you have created a work order, you may need to print it. You can use the Work Order Entry Printing screen to print a summary of the processes, or include all of the detail for all of the processes. You can also fax the vendors a detailed description of the steps they will perform, if needed.
You can also use the Cross-Dock program when a work order is on a procurement transfer to print work orders from the confirmation queue.
Work orders print at the printer location to which the terminal is currently assigned. If you print more than one copy of a work order, all copies after the first are labeled as "Reprint."
To print a work order:
1. From the Orders menu, select Work Order Entry to display the Work Order Entry screen.
2. Enter or open a work order.
3. To print only the information for a specific step, position the cursor on that step.
Note: Depending on your system setup, if you have any comments associated with that step, they print in the header area of the work order.
4. Use the Print hot key to display the Work Order Entry Printing screen.
5. In the # of Copies field, enter the number of copies of the work order to print. The default value is 1, but you can print up to 99 copies, if needed.
6. In the Report Type field, enter the level of detail to include on the work order.
• To view detailed information, including materials used, for a selected step in the process, select Step Detail.
• To view a summary of all processes on the work order, select Overall Summary.
• To view detailed information for each step in the process on one page, select All Detail.
Note: The materials used print along with the first step in the process only.
7. Use the Print hot key to print the work order.
You can also use the Fax hot key to fax the work order to the vendor.

Rel. 8.6.4 (Eterm) Work Order Management
© 2008 Activant Solutions Inc. All rights reserved. 37
Viewing Work Order Material Shipment Information Use the Scheduling screen to view the shipment status of a material on your work order. You can view the soonest the quantity of materials will be ready to ship, and information about its location in the warehouse. If you need items sooner than the available date shows, you can procure them from a vendor or have them transferred from another branch.
To view material shipping, quantity, status, and location information:
1. Enter or open a work order.
2. Select a process and use the Material hot key to display the Work Order Entry Material Detail screen.
3. Position your cursor on a material and use the Schedule hot key to display the Work Order Entry Scheduling screen.
4. Review the following, as needed:
Field Description Description The name of the product for which you are viewing scheduling information.
Qtys Per The unit of measure and quantity for the displayed product.
Order Qty The quantity of the product needed for processing.
Open Qty If you selected a component, this is the quantity to ship. If this is the finished product, this is the quantity not yet returned.
Ship Date If you selected a component, this is the date it is scheduled to ship. If this is the finished product, this is the date you received it back from the vendor.
Avail Qty If you selected a component, this is the date it is available to ship. If you selected the finished product, this is the date it is available for sale.
ShipQty The quantity of the product scheduled for shipment.
Stat The current order status of the selected product, for example, open, in process, or closed.
Br If you selected a component, the quantity ships from this branch. If you selected the finished product, the vendor ships the quantity to this branch.
Typ The disposition of the selected quantity of an item. If you selected a component, this is always S (Stock). If you selected the finished product, you can change this value if for some reason returned items are not returned to stock.
Location / Tag The warehouse location of the product, and the sales, purchase, or transfer order number to which this work order is tagged. You can edit this field, if needed.
5. Press Esc to exit the screen.

Eclipse Work Order Management Rel. 8.6.4 (Eterm)
38 © 2008 Activant Solutions Inc. All rights reserved.
More Options for Viewing Work Order Material Shipment Information
The Work Order Entry Scheduling screen also offers these options:
To... Use this hot key... view inventory projections for a selected product Future Ledger
The Future Ledger screen displays.
review a selected product's inventory levels Inv Inq The Inventory Inquiry screen displays.
review the order to which the work order is tagged
Tag The Body screen for the type of order (sales, purchase, or transfer) to which the work order is tagged displays.
procure the products from vendors or other branches
Procure The Order Entry Procurement screen displays.
review a product's sales/procurement history Hist Ledger The Inventory History Ledger screen displays.
attach serial numbers to the products Ser# Entry The Serial Number Entry screen displays.
select the detail lot from which a selected product will be picked
Det Lot The Detail Lot Selection screen displays.
receive product quantities into multiple locations Split Locs The Split Locations screen displays.

Rel. 8.6.4 (Eterm) Work Order Management
© 2008 Activant Solutions Inc. All rights reserved. 39
Work Order Maintenance Overview After you enter a work order, you need to monitor it to make sure that you can deliver the finished product as promised. If materials are not available, you can order them from another branch or a vendor. If the vendor you chose is unable to perform the work per your schedule, you can hire a different one. If you have a limited amount of each material needed to process the product, you can add a second process, transfer the unavailable quantities to it, and start the first process with the materials you do have on hand.
When you have a high demand for a value-add product, the system suggests work orders when the supply is dwindling. You can then convert the suggestions to work orders.
The system provides several inquiries to assist you in monitoring the progress of your work orders. You can review inventory levels, determine when more stock is available, track your communications with the vendor and the customer, and track your payments to the vendor, among other things.
You can set up the system to push the G/L post date for any work orders that are in process to the next accounting period. See Posting In-Process Work Orders to the Next Open G/L Period in the General Ledger manual for more information.

Eclipse Work Order Management Rel. 8.6.4 (Eterm)
40 © 2008 Activant Solutions Inc. All rights reserved.
Reviewing Suggested Work Orders The Suggested Work Order Queue helps you to determine when to build additional units of your value-add products. It works off of the order point and line point of a product. You can review the list of products, check inventory levels, demand, and additional factors to assist in determining which products need to be assembled now, and which can wait.
Note: Only products tagged with a work order template display in the Suggested Work Order Queue.
Before You Begin: Run the Suggest PO Report.
To review a list of suggested work orders:
1. From the Purch > Queues menu, select Suggested Work Order Queue to display the Suggested Work Order Queue screen.
2. In the Br/Tr/All field, enter a branch or territory for which to view suggested work orders. To view suggested work order for all branches and territories, enter All.
3. To view suggested work orders for a specific purchasing agent, in the Buyer field, enter the agent's user ID.
4. In the Type field, enter one of the following to determine the type of suggested work orders to display:
Select... To view.. Normal all possible suggested work orders.
Emergency products for which committed quantities have not been met.
Select a prompt. Complete one or more of these fields to reduce the number of products that display and press Enter: • Rank Number – The method to use to rank the products. • Rank – A code that identifies the ranking parameters for the products to view.
Note: Product rank parameters are set up on the Product Ranking screen.
• Minimum Hits – The minimum number of sales for the products to view.
5. Press Enter to display a list of work orders that match your selection criteria.
The date and time the last suggested orders were processed display in the upper right corner of the screen.
Note: If no suggested work orders display for the parameters you entered, the following message displays: No items found.

Rel. 8.6.4 (Eterm) Work Order Management
© 2008 Activant Solutions Inc. All rights reserved. 41
6. Review the following fields, as needed:
Field Description Br The branch at which the product is maintained.
Product The finished product that needs to be manufactured, assembled or otherwise worked on.
Short Qty The amount of the product that is needed to fulfill commitments.
Total Qty The total amount of the product needed.
PIL The projected inventory level of the product.
Template The template the system will use to create the work order for this product.
Open WO The order number of an open work order for this product. To view this or other open work orders for the product, use the Open WO hot key.
7. Press Esc to exit the screen.
More Options for Working with Suggested Work Orders
The Suggested Work Order Queue also offers these options:
To... Use this hot key... create a work order for a selected product Convert
view the work order template for the selected product
View The Work Order Entry screen displays.
edit the work order template for the selected product
Edit The Work Order Entry screen displays.
view or edit the selected product's maintenance record
Prod Maint The Product Maintenance screen displays.
view the selected product's availability and other inventory information
Inv Inq The Inventory Inquiry screen displays.
review current demand for the selected product
Inv Maint The Primary Inventory Maintenance screen displays.
view a list of open sales orders for the selected product
Fut Led The Future Ledger screen displays.
view a selected product's past transaction activity
Hist Led The Inventory History Ledger screen displays.
recalculate the suggested order values for a selected product
Recalc Product/Line (Use D) The message "Recalc for <product name> started" displays. The message system notifies you when the recalculation is complete.
recalculate the suggested order values for the buy line associated with the selected product
Recalc Product/Line (Use L) The message "Recalc for <product name> started" displays. The message system notifies you when the recalculation is complete.

Eclipse Work Order Management Rel. 8.6.4 (Eterm)
42 © 2008 Activant Solutions Inc. All rights reserved.
To... Use this hot key... view open work orders for a selected product
Open WO If the hot key is highlighted red, a list of open work orders displays. Select a work order number and press Enter to display the order on the Work Order Entry screen.
Note: If the hot key is not highlighted red, no open work orders exist for the selected product.

Rel. 8.6.4 (Eterm) Work Order Management
© 2008 Activant Solutions Inc. All rights reserved. 43
Monitoring Open Work Orders Use the Open Work Order Queue to review work orders that have enough material to release them, those whose start date is before the available date for the material, those scheduled to start in the future, or all open work orders. The person managing the work orders can monitor this queue to ensure that work orders that are in trouble start on time, and those that have material available are set in process.
Note: For outbound work orders in an RF environment, if an item is short picked, the system removes the amount shorted from the work order. For example, if five items are originally ordered, but only three are picked, the order quantity for the item on the work order step is changed to three.
To review open work orders:
1. From the Orders > Queues menu, select Open Work Order Queue to display the Open Work Orders Queue screen.
2. In the Br/Tr/ALL field, enter the branch or territory for which you want to review work orders. Enter ALL to review work orders for all branches and territories.
3. In the Type field, identify the type of open work orders to review:
• Available – Displays open work orders with enough available material to release them for processing.
• All – Displays all open work orders, regardless of status.
• Trouble – Displays work orders for which the start date is earlier than the availability date.
• Short – Displays work orders for which not all of the finished materials have been processed.
• Tagged – Displays work orders that were created from sales, purchase, or transfer orders.
4. Review the following for each work order:
Column Description Prt Determines whether to print the selected work order when you use the Print hot
key. Enter Y to include the order in a print batch, or N to exclude it.
Note: To set all displayed work orders to Yes, type Y in the first row and use the Set All hot key.
Br The branch at which the work order was created.
Work Order A letter followed by a series of numbers that identifies the work order. The decimal point followed by a number indicates the step in the process.
S The current status of the work order.
Step The affected step in the process.

Eclipse Work Order Management Rel. 8.6.4 (Eterm)
44 © 2008 Activant Solutions Inc. All rights reserved.
Column Description Process The type of work order process to perform.
Avail Date The date the materials are available for processing.
Start Date The date work is expected to begin on the process, or the date the materials ship to the vendor.
Comp Date The date by which the step in the process is expected to be complete.
5. Press Esc to clear the screen.
More Options for Working with Suggested Work Orders
The Suggested Work Order Queue also offers these options:
To... Use this hot key... view a selected order View Order
The Work Order Entry screen displays with the Status view in view-only mode.
edit a selected order Edit Order The Work Order Entry screen displays with the Status view in edit mode.
view only specific processes, such as painting, or assembly
Process The Process Selection screen displays. Enter the processes to view and press Esc.
change all of the values in the Prt field to match the value for a selected order
Set All
change the order status to In Process and print all orders with the Prt field set to Y
view processes for specific vendors only Vendor The Vendor Selection screen displays. Enter the vendors to view and press Esc.
view the orders in order of the furthest out completion date
Sort by Comp The system sorts the orders. To view the orders in order of the soonest completion date, use the hot key again.

Rel. 8.6.4 (Eterm) Work Order Management
© 2008 Activant Solutions Inc. All rights reserved. 45
Processing Work Order Steps When you are ready to work on a product, change the status of the work order step to indicate that it is in process.
To process a work order step:
1. Open a work order.
2. Change information on the work order, as needed.
3. Select the step to begin processing, use the View hot key and select Status from the list.
4. In the Status field, enter In Process.
Note: If you change the status on a work order from In Process back to Open, the system cancels the general ledger postings.
5. Press Esc to save the information and exit the screen.

Eclipse Work Order Management Rel. 8.6.4 (Eterm)
46 © 2008 Activant Solutions Inc. All rights reserved.
Viewing Work Order-Related Information Use the Work Order Inquiries screen to view additional work order information or perform various tasks.
To view work order information:
1. From the Orders menu, select Work Order Entry to display the Work Order Entry screen.
2. Enter or open a work order.
3. Position your cursor on a process and use the Inquiry hot key to display the Work Order Inquiries screen.
4. Do any of the following, as needed:
To... Use this hot key... review your company's open invoices from the vendor
A/P Inquiry The A/P Inquiry screen displays.
to view notes associated with the vendor, such as warranty information
Vendor Notes A list of note types displays. Select a type and press Enter.
view activity entries for this work order Activity Log The Order Activity Log Viewing screen
view your transaction history for this vendor
A/P Ledger The A/P Ledger screen displays.
track communications with the vendor and accounts payable issues
Ven Activity Entry The Call Tracking Entry screen displays.
view a list of vendor activity log entries
Ven Activity View The Vendor Activity Log Tracker Viewing screen displays.
5. Press Esc to return to the Work Order Entry screen.

Rel. 8.6.4 (Eterm) Work Order Management
© 2008 Activant Solutions Inc. All rights reserved. 47
Editing Work Order Processes After you enter a work order, but before it is processed, you may need to make some changes to it. However, if the work order has been reconciled in A/P, you cannot change the setup, processing, freight, or handling costs. You must have authorization to edit work orders.
Note: If you enter a product with a Delete status and the quantity exceeds the amount on-hand to sell, a warning displays. For more information about product status, see Product Status Codes in Product Maintenance.
To open a work order:
1. From the Orders menu, select Work Order Entry to display the Work Order Entry screen.
2. In the Order ID field, do one of the following to display a work order:
• Enter the work order number. If you know the step number you want to edit, you can enter it at the end of the work order number to position the cursor on that step. For example, if you enter W1234567.2, the system displays the order and moves the cursor to step 2 of the process.
If your work order number is preceded by zeroes (0), you do not have to enter the zeroes.
• Enter all or part of the finished product description to display a list of orders including that product. Select the order to view and press Enter to return it to the Work Order Entry screen.
• Press F10 to view a list of recent work orders. Select the finished product description and press Enter to return it to the Work Order Entry screen.
To edit a work order process:
1. Open a work order.
2. If the order opens in view-only mode, use the Edit hot key to change the order to edit mode. You must have authorization to do this.
3. Edit or add additional processes in the following fields, as needed:
Column Description Process A description of the work to perform, such as Assembly or Painting.
Vendor Name The name of the company or individual who will perform the work. If you select a vendor who is not set up in Vendor Maintenance as a service vendor, you must complete the setup and processing cost information manually. The vendor must be a ship-from vendor.
4. Press Esc to accept your changes and clear the screen.
Eclipse Work Order Management Rel. 8.6.4 (Eterm)
48 © 2008 Activant Solutions Inc. All rights reserved.
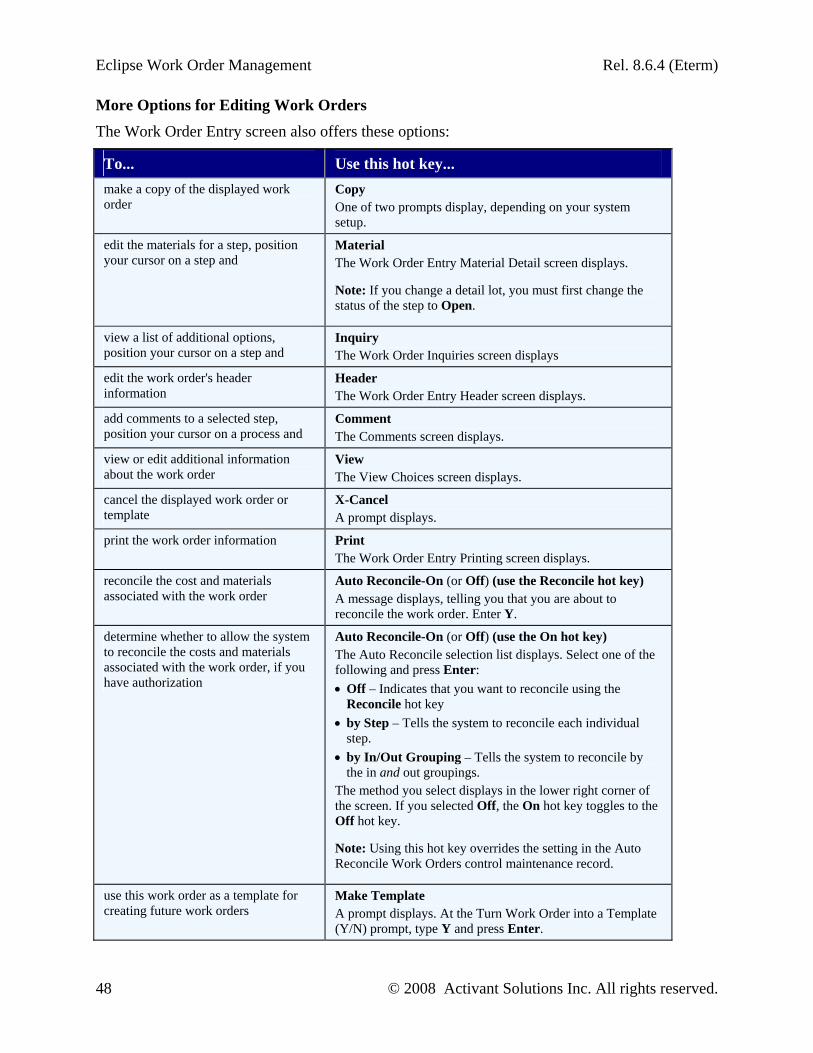
More Options for Editing Work Orders
The Work Order Entry screen also offers these options:
To... Use this hot key... make a copy of the displayed work order
Copy One of two prompts display, depending on your system setup.
edit the materials for a step, position your cursor on a step and
Material The Work Order Entry Material Detail screen displays.
Note: If you change a detail lot, you must first change the status of the step to Open.
view a list of additional options, position your cursor on a step and
Inquiry The Work Order Inquiries screen displays
edit the work order's header information
Header The Work Order Entry Header screen displays.
add comments to a selected step, position your cursor on a process and
Comment The Comments screen displays.
view or edit additional information about the work order
View The View Choices screen displays.
cancel the displayed work order or template
X-Cancel A prompt displays.
print the work order information Print The Work Order Entry Printing screen displays.
reconcile the cost and materials associated with the work order
Auto Reconcile-On (or Off) (use the Reconcile hot key) A message displays, telling you that you are about to reconcile the work order. Enter Y.
determine whether to allow the system to reconcile the costs and materials associated with the work order, if you have authorization
Auto Reconcile-On (or Off) (use the On hot key) The Auto Reconcile selection list displays. Select one of the following and press Enter: • Off – Indicates that you want to reconcile using the
Reconcile hot key • by Step – Tells the system to reconcile each individual
step. • by In/Out Grouping – Tells the system to reconcile by
the in and out groupings. The method you select displays in the lower right corner of the screen. If you selected Off, the On hot key toggles to the Off hot key.
Note: Using this hot key overrides the setting in the Auto Reconcile Work Orders control maintenance record.
use this work order as a template for creating future work orders
Make Template A prompt displays. At the Turn Work Order into a Template (Y/N) prompt, type Y and press Enter.

Rel. 8.6.4 (Eterm) Work Order Management
© 2008 Activant Solutions Inc. All rights reserved. 49
To... Use this hot key... view the total cost of a step and add freight and handling charges, position your cursor on a step and
Totals The Work Order Entry Totals screen displays.
show any canceled steps in the process View Canceled The hot key toggles to Hide Canceled.
hide any canceled steps in the process Hide Canceled The hot key toggles to View Canceled.

Eclipse Work Order Management Rel. 8.6.4 (Eterm)
50 © 2008 Activant Solutions Inc. All rights reserved.
Entering Work Order Backorders If the vendor returns only a partial quantity on a work order to you, you need to backorder the outstanding quantity. When you backorder the incomplete quantities, you can then receive the completed quantities. Use the Work Order Entry Material Detail screen to change the quantity and the completion date. The system creates a new process for the remaining quantity.
To backorder partial quantities:
1. From the Orders menu, select Work Order Entry to display the Work Order Entry screen.
2. Open a work order.
3. Position the cursor in the row for the step for which you received only a partial quantity and use the Material hot key to display the Work Order Entry Material Detail screen.
4. In the Qty In field, change the quantity to reflect the actual quantity the vendor sent you.
5. Press Enter to display a prompt.
6. At the prompt, enter the new completion date for the remaining materials.
7. Press Enter to return to the Work Order Entry Material Detail screen.
8. Press Esc to return to the Work Order Entry screen. The system creates a new process with a status of I - In Process and adds the remaining quantity to it.
Note: If you have chosen to auto reconcile by In/Out Grouping and are using incoming material as your basis for costing the process, the original step retains the full amount of process costs. If you add process costs to the new step, the system considers this to be an increase in process costs for the backordered quantity.

Rel. 8.6.4 (Eterm) Work Order Management
© 2008 Activant Solutions Inc. All rights reserved. 51
Editing Work Order Header Information Use the Work Order Entry Header screen to change information that defaults from the vendor's maintenance record. You can change information for one step in the process or copy your changes to the entire process.
Note: If the work order has been reconciled in A/P, you cannot change the setup, processing, freight, or handling costs.
To edit work order header information:
1. Enter or open a work order.
2. Position your cursor next to a process and use the Header hot key to display the Work Order Entry Header screen.
3. Review or edit the following fields:
Field Description Ship From The name and address of the company or individual who will perform the
selected process.
Branch # A number that identifies the branch that is supplying the materials.
Start Date The date the materials needed to perform the selected step will ship.
Comp Date The date by which the step in the process is expected to be complete. If this is the last step in the process, this is also the date the product is ready for sale.
Picked by The user ID of the person who removed the materials from the shelves and packaged them for shipment.
Written by The user ID of the person who entered the work order.
Ship Via The method used to transport the materials to the vendor's site.
Step* The number assigned to the process to which this header information applies.
Ordered with The name of the vendor's employee who took the order.
Payment Terms A code the system uses to calculate when your payment is due to the vendor. For example, 10N30 indicates that the net payment is due 30 days after the order date, but if you pay the vendor before that date, you receive a 10% discount.
Phone Number The telephone number of the company or individual with whom you placed the order.
Freight A code that indicates whether freight charges are applicable, and if so, who is responsible for paying what part of them.
Vendor to Vendor If multiple vendors are involved in the manufacture of the item, indicates whether the item ships from vendor to vendor, or returns to your receiving area after each step in the process. Type Y to allow shipments between vendor locations, or N to return the product to your location after each step.
Process* The process to which this header information applies.
Order #* A letter followed by a series of unique numbers that identifies the work order.

Eclipse Work Order Management Rel. 8.6.4 (Eterm)
52 © 2008 Activant Solutions Inc. All rights reserved.
Field Description Vendor Instructions
Any special information about the process the vendor needs to know. This information prints on the work order.
Internal Notes Use this free-form text field to enter confidential, specific information about the order. This information does not print on any documents.
* View-Only
4. Use the Change Log hot key to display the Change Log Viewing screen.
5. Review any changes you made to the header information and press Esc to return to the Work Order Entry Header screen.
6. Press Esc to display a prompt.
7. At the prompt, enter Y to copy any changes you made to the header information of the other steps in the process; otherwise, type N.
8. Press Esc to return to the Work Order Entry screen.

Rel. 8.6.4 (Eterm) Work Order Management
© 2008 Activant Solutions Inc. All rights reserved. 53
Viewing Work Order Material-Related Information Use the Work Order Inquiries screen to view additional work order material information or perform various tasks.
To view work order inquiries:
1. Enter or open a work order.
2. Use the Material hot key to display the Work Order Entry Material Detail screen.
3. Position your cursor on a product and use the Inquiry hot key to display the Work Order Inquiries screen.
4. Do any of the following, as needed:
To... Use this hot key... review your company's open invoices from the vendor
A/P Inquiry The A/P Inquiry screen displays.
view your transaction history for this vendor
A/P Ledger The A/P Ledger screen displays.
to view notes associated with the vendor, such as warranty information
Vendor Notes A list of note types displays. Select a type and press Enter.
view a list of vendor activity log entries
Ven Activity View The Vendor Activity Log Tracker Viewing screen displays.
view or change a selected material's product maintenance record
Product Maint The Product Maintenance screen displays.
review the product's inventory levels Inventory Inq The Inventory Inquiry screen displays.
review the product's sales/procurement history
Inven History The Inventory History Ledger screen displays.
attach notes to the line item Product Notes The notes selection list displays. Select a type of note and press Enter to display the standard notes for that type. Press Enter.
track communications with the vendor and accounts payable issues
Ven Activity Entry The Call Tracking Entry screen displays.
view where the product is located in the warehouse
Product Loc The Product Location Maintenance screen displays.
view materials that are being processed Inprocess Queue The Warehouse In Process Queue screen displays.
locate serial numbers associated with this product
Serialized Search The Serialized Search screen displays.
view inventory projections for the product
Future Ledger The Future Ledger screen displays.

Eclipse Work Order Management Rel. 8.6.4 (Eterm)
54 © 2008 Activant Solutions Inc. All rights reserved.
To... Use this hot key... view or enter order-specific trackers Activity Log
The Order Activity Log Viewing screen displays.
5. Press Esc to exit the screen.

Rel. 8.6.4 (Eterm) Work Order Management
© 2008 Activant Solutions Inc. All rights reserved. 55
Moving Materials Between Work Order Steps The system requires that you process all of the materials in a step before you can move on to the next step. If you do not have all of the raw materials available when you start a work order, you can use the Move hot key to move a line item's quantity or part of the quantity to a new or different step. For example, if you need 25 widgets to make 25 of a finished product, but you have only 12 on hand, you can transfer the remaining 13 widgets to a new step with a later start date, process the 12 widgets through the step, and as soon as the 13 widgets are available, send them through the same process.
Note: You cannot move quantities to canceled steps, or at all on a work order template.
To move materials between processes:
1. From the Orders menu, select Work Order Entry to display the Work Order Entry screen.
2. Enter or open a work order.
3. Select a process and use the Material hot key to display the Work Order Entry Material Detail screen.
4. Position your cursor on the materials to move and use the Move hot key to display a prompt.
5. At the prompt, type the number of line items to move.
6. Press Enter to display the Move Materials screen.
7. Select the step to which to move the materials and press Enter to return to the Work Order Entry Material Detail screen. The selected line item is no longer in the list.
8. Press Esc to return to the Work Order Entry screen.
9. Select the process to which the materials were moved and use the Material hot key to display the Work Order Entry Material Detail screen.
10. Verify that the material was moved and press Esc to return to the Work Order Entry screen.

Eclipse Work Order Management Rel. 8.6.4 (Eterm)
56 © 2008 Activant Solutions Inc. All rights reserved.
Canceling Work Orders If you determine that the demand for a value-add product has waned, you can cancel the work order for it. If a customer requests that you not include a feature of the value-add product, for example, painting the item, you can eliminate that step from the process.
This topic shows how to cancel:
• A work order.
• A work order step.
To cancel a work order:
1. Open a work order.
2. Use the X-Cancel hot key to display the Cancel Open Work Order (Y/N) prompt.
Important: After you cancel an order, you cannot re-open it.
Note: You cannot cancel a work order if it is tagged to a sales order. Open the sales order and remove the finished product from it first.
3. At the prompt, enter Y.
4. At the next prompt, enter the reason for the cancellation.
5. At the next prompt, enter the reason for the change to the work order.
6. Press Esc to exit the screen.
To cancel a work order step:
1. Open a work order.
2. Select the step to begin processing, use the View hot key and select Status from the list.
3. In the Status field, enter Cancel.
4. To display the canceled step, use the View Canceled hot key. Use the Hide Canceled hot key to hide it again.
Note: If the customer later changes their mind, you can change the status back to In Process.
5. Press Esc to save the information and exit the screen.

Rel. 8.6.4 (Eterm) Work Order Management
© 2008 Activant Solutions Inc. All rights reserved. 57
Completing Work Orders When you finish assembling or modifying your value-add products, you need to close the work order.
Note: If a work order is closed using the Warehouse InProcess Queue, the system removes it from the print review.
To complete a work order:
1. Open a work order.
2. Change information on the work order, as needed.
3. Select the step to complete, use the View hot key and select Status from the list.
4. In the Status field, enter Complete.
5. Press Esc to save the information and exit the screen.

Eclipse Work Order Management Rel. 8.6.4 (Eterm)
58 © 2008 Activant Solutions Inc. All rights reserved.
Work Order Reports Overview The system provides three reports to assist you in tracking your work orders:
• Work Order Product – Lists all of the materials purchased, processed, or sold during a specified time period.
• Work Order Summary – Lists all of the processes scheduled during a specified time period.
• Work Order Template – Lists all products, vendors, and processes attached to a template.
• Work Order Item Sales Report - Lists all products sold in a work order.

Rel. 8.6.4 (Eterm) Work Order Management
© 2008 Activant Solutions Inc. All rights reserved. 59
Running the Work Order Product Report Run the Work Order Product report to review the quantity of products created, purchased, or sold on work orders within a specified time frame.
To run the Work Order Product report:
1. From the Orders > Reports > Work Order Reports menu, select Work Order Product to display the Work Order Product Report screen.
2. In the Br/Tr/ALL field, enter the branch or territory for which you want to print work order products. To print work order products for all branches and territories, enter ALL.
3. In the Start Date field, enter the first date in a range of work order creation dates.
4. In the End Date field, enter the last date in a range of work order creation dates.
5. In the Detail/Summary field, indicate the level of detail to show on the report:
• Summary – Shows product information and totals only.
• Detail – Shows order numbers, dates, and quantities in addition to the product information and totals.
6. In the Line Type field, indicate whether to view products by price line or buy line.
7. In the Price Line or Buy Line field, enter a specific price or buy line to use to narrow the number of products on the report, if needed.
To select multiple price or buy lines, use the Price Lines or Buy Lines hot key to display the Price Line Selection screen.
8. Set options, if needed, and generate the report.

Eclipse Work Order Management Rel. 8.6.4 (Eterm)
60 © 2008 Activant Solutions Inc. All rights reserved.
Running the Work Order Summary Report Use the Work Order Summary report to review all of the processes scheduled during a specified time period. You can view open work orders, work orders that are being processed, work orders that are complete, or a combination of all of these. You can also review orders specific to a vendor, or to several vendors.
To run the Work Order Summary report:
1. From the Orders > Reports > Work Order Reports menu, select Work Order Summary to display the Work Order Summary Report screen.
2. In the Br/Tr/ALL field, enter the branch or territory for which you want to print work order summary information. To print work order products for all branches and territories, enter ALL.
3. In the Start Date field, enter the first date in a range of work order creation dates.
4. In the End Date field, enter the last date in a range of work order creation dates.
5. In the Status field, enter the status of the work orders to review.
• All – Displays all work orders created during the specified period, regardless of status.
• Open – Displays only open work orders.
• In Process – Displays work orders that are being processed.
• Complete – Displays work orders that have been processed and are ready for sale.
6. In the Sort by field, indicate whether to sort by vendor, order number, process type, or completion date.
7. In the Vendor field, enter the name of the vendor whose processes you want to review, if needed.
8. In the Line Type field, indicate whether to view orders by price line or buy line.
9. In the Price Line or Buy Line field, enter a specific price or buy line to use to narrow the number of work orders on the report, if needed.
To select multiple price or buy lines, use the Price Lines or Buy Lines hot key to display the Price (or Buy) Line Selection screen.
10. Set options, if needed, and generate the report.
Rel. 8.6.4 (Eterm) Work Order Management
© 2008 Activant Solutions Inc. All rights reserved. 61
Running the Work Order Template Report Use the Work Order Template report to view every work order on which a product is present. With this report, if you want to replace a component item with a different product, you can review a list of all of the affected templates.
In addition, you can view the templates to which a vendor, a product, or a process is assigned. You can also set it to review templates for multiple vendors or products. You can view raw materials, the finished product, or both.
To run the Work Order Template report:
1. From the Orders > Reports > Work Order Reports menu, select Work Order Template to display the Work Order Template Report screen.
2. In the Vendor field, enter the name of a vendor to which templates are attached, as needed.
To review templates for multiple vendors, use the Vend hot key to display the Vendor Selection screen.
3. In the Product field, enter the description of a product to which templates are attached, as needed. If you complete the Product Desc field, this field is not accessible.
To review templates for multiple products, use the Prod hot key to display the Product Selection screen.
4. In the Product Desc field, enter a keyword that describes the product. If you complete the Product field, this field is not accessible.
5. In the Stock(In/Out/Both) field, indicate whether to show raw materials (Out), finished products (In), or both.
6. In the Process field, enter the type of process for which to review template information, for example, Assembly, or Painting.
7. Set options, if needed, and generate the report.


© 2008 Activant Solutions Inc. All rights reserved. 63
Index A accounting, work order ............................. 10
B backorders, work order ............................. 50
C costing methods, work order..................... 15
F finished goods, work order
adding to processes ............................... 32
adding to sales orders............................ 21
pricing and costing methods ................. 15
report ..................................................... 59
viewing shipment information .............. 37
freight charges, work order ....................... 34
H handling charges, work order.................... 34
M materials, work order
adding to processes ............................... 32
backordering ......................................... 50
moving between processes.................... 55
report ..................................................... 59
viewing shipment information .............. 37
O Open Work Orders Queue ........................ 43
P
pricing methods, work order ..................... 15
processes, work order
adding products..................................... 32
canceling ............................................... 56
comments
adding to processes ........................... 26
creating.............................................. 17
completing............................................. 57
editing ................................................... 47
entering ................................................. 19
in process status .................................... 45
moving materials between .................... 55
report ..................................................... 60
setting up................................................. 4
workflow................................................. 2
products, work order
adding to processes ............................... 32
adding to sales orders............................ 21
backordering ......................................... 50
moving between processes.................... 55
pricing and costing methods ................. 15
report ..................................................... 59
viewing shipment information .............. 37
Q queues, work order
about...................................................... 39
open work orders................................... 43
suggested work orders........................... 40
R raw materials, work order ......................... 32
reports, work order
about...................................................... 58
Work Order Product.............................. 59
Work Order Summary........................... 60

Eclipse Work Order Management Rel. 8.6.4 (Eterm)
64 © 2008 Activant Solutions Inc. All rights reserved.
Work Order Template ........................... 61
S serial numbers, work orders...................... 16
service vendor ........................................... 11
steps, work order
adding products..................................... 32
canceling ............................................... 56
comments
adding to processes ........................... 26
creating.............................................. 17
completing............................................. 57
editing ................................................... 47
entering ................................................. 19
in process status .................................... 45
moving materials between .................... 55
report ..................................................... 60
setting up................................................. 4
workflow................................................. 2
Suggested Work Order Queue .................. 40
T templates, work order
attaching to finished products ............... 14
copying orders from.............................. 25
creating.................................................. 24
editing ............................................. 14, 21
report ..................................................... 61
setting up................................................. 4
workflow................................................. 8
U users, work order default views ................ 13
V vendors, service......................................... 11
W Work Order Product Report...................... 59
Work Order Summary Report................... 60
Work Order Template Report ................... 61
work orders
about.................................................. 1, 18
backorders ............................................. 50
canceling ............................................... 56
completing............................................. 57
copying from templates......................... 25
creating.................................................. 19
default views ......................................... 13
freight charges....................................... 34
handling charges ................................... 34
header.................................................... 51
in process
pushing to next G/L period ............... 39
updating status .................................. 45
inquiries........................................... 46, 53
override account.................................... 10
printing.................................................. 36
queues
about.................................................. 39
open work orders............................... 43
suggested work orders....................... 40
reports ................................................... 58
serial numbers ....................................... 14
setting up................................................. 4
suggested............................................... 23
tagging to sales orders........................... 21
workflow................................................. 2
work orders, processes
adding products..................................... 32
Index
© 2008 Activant Solutions Inc. All rights reserved. 65
canceling ............................................... 56
comments
adding to processes ........................... 26
creating.............................................. 17
completing............................................. 57
editing ................................................... 47
entering ................................................. 19
in process status .................................... 45
moving materials between .................... 55
report ..................................................... 60
setting up................................................. 4
workflow................................................. 2
work orders, products
adding to processes ............................... 32
backordering ......................................... 50
moving between processes.................... 55
pricing and costing methods ................. 15
report ..................................................... 59
tagging to sales orders........................... 21
viewing shipment information .............. 37
work orders, templates
attaching to finished products ............... 14
copying orders from.............................. 25
creating.................................................. 24
editing ............................................. 14, 21
report ..................................................... 61
setting up................................................. 4
workflow................................................. 8