e-SUGAM User's Manual
36
Commercial Taxes Department Government of Karnataka National Informatics Centre Bangalore e - Sugam User Manual For Dealers National Informatics Centre Karnataka State Unit, Mini Tower, Bangalore Commercial Taxes Department Vanijya Terige Karyalaya Gandhi Nagar, Bangalore Other Related Documents • User Manual for m-SUGAM available in the CTD’s website. • Guidelines to use Excel to XML Converter enclosed in the Excel to XML downloaded File.
Transcript of e-SUGAM User's Manual
Commercial Taxes Department
Government of Karnataka
National Informatics Centre
Bangalore
e - Sugam
User Manual
For
Dealers
National Informatics Centre
Karnataka State Unit,
Mini Tower, Bangalore
Commercial Taxes Department
Vanijya Terige KaryalayaGandhi Nagar, Bangalore
Other Related Documents
• User Manual for m-SUGAM available in the CTD’s website.
• Guidelines to use Excel to XML Converter enclosed in the Excel to XML downloaded File.
e - Sugam
User Manual Version 1.0 Release Date: 29/10/13 Page i
No part of this document shall be reproduced without prior permission of National
Informatics Centre, Bangalore and Commercial Taxes Department, Bangalore.
e - Sugam
User Manual Version 1.1 Release Date: 29/10/13 Page ii
TableofContents
1. About e-SUGAM .............................................................................................................................. 1
1.1 Architecture of e-SUGAM ....................................................................................................... 1
1.2 Advantages of e-SUGAM System ............................................................................................ 2
1.3 Methods of e – SUGAM Generation ....................................................................................... 3
2. Login ................................................................................................................................................ 4
3. e - SUGAM Forms – New Entry ....................................................................................................... 8
3.1 To Add e-SUGAM Commodities ............................................................................................ 11
3.2 Print e-SUGAM Form ............................................................................................................. 12
4. Upload XML File ............................................................................................................................ 15
4.1 Download the Converter and Convert the Excel File to XML Format ................................... 15
4.2 Upload XML File to the system ............................................................................................. 18
5. Update and Submit ....................................................................................................................... 21
6. Cancel ............................................................................................................................................ 24
7. Sample XML File .......................................................................................................................... 266
8. Codes Assigned for the Purpose of e-SUGAM Form for use in the XML format ........................ 288
9. State Codes of Various State and Union Territories ................................................................... 299
10. Regular Verification of e-SUGAM Account ............................................................................... 30
e - Sugam
User Manual Version 1.1 Release Date: 29/10/13 Page iii
IntroductiontoUserManual
This manual is the primary reference for e‐SUGAM: Dealer Module. The purpose of this manual
is to introduce the system to the new user and to provide sufficient details so that
as users progress through the manual they gain a full understanding of the application.
The manual is organized overall to flow from a general to a specific perspective. The
purpose being that as one reads through this manual he will be able to develop a
conceptual framework.
Also, whenever any terminology has been borrowed from the application, it has been marked in
bold. This manual is prepared for dealers/traders.
URL
Citizens • http://www.ctax.kar.nic.in/
• http://sugam.kar.nic.in/
e - Sugam
User Manual Version 1.1 Release Date: 29/10/13 Page iv
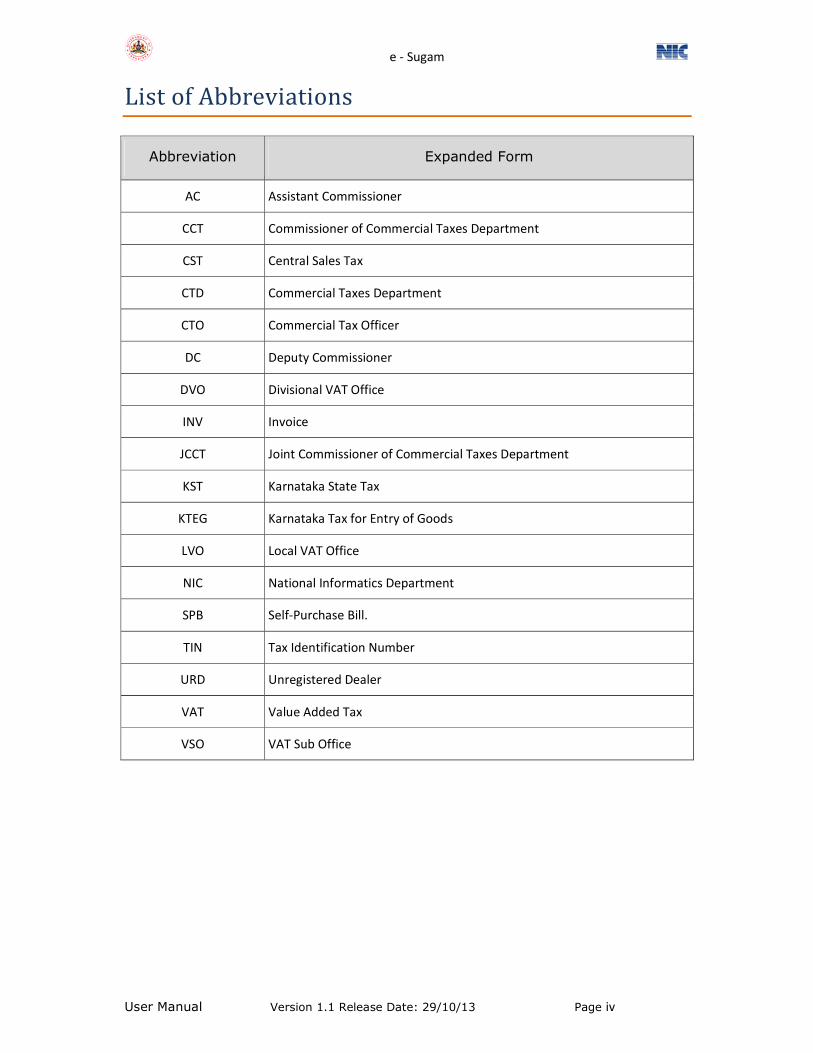
ListofAbbreviations
Abbreviation Expanded Form
AC Assistant Commissioner
CCT Commissioner of Commercial Taxes Department
CST Central Sales Tax
CTD Commercial Taxes Department
CTO Commercial Tax Officer
DC Deputy Commissioner
DVO Divisional VAT Office
INV Invoice
JCCT Joint Commissioner of Commercial Taxes Department
KST Karnataka State Tax
KTEG Karnataka Tax for Entry of Goods
LVO Local VAT Office
NIC National Informatics Department
SPB Self-Purchase Bill.
TIN Tax Identification Number
URD Unregistered Dealer
VAT Value Added Tax
VSO VAT Sub Office
e - Sugam
User Manual Version 1.0 Release Date: 19/10/11 Page 1
1. Aboute-SUGAM
e ‐ Sugam is a procedure set by the Commercial Taxes Department of Karnataka State for all the
dealers who are transporting the designated goods of worth over Rs.20000 to other dealers and
upload the same in the department’s website and obtain a unique number as proof of uploading
such transporting details. The unique number thus obtained shall be produced to the check post
officer on reaching a check post.
Every dealer registered under Karnataka Value Added Tax 2003, needs to upload the details of
notified goods being dispatched or transported, in the format available in CTD’s website before the
movement of goods commences.
Thus a dealer/trader before dispatching goods by a truck, first uploads each transaction details
onto the CTD’s website electronically, obtains an acknowledgement, e-SUGAM for having uploaded
and then uses this e-SUGAM as a valid document for the transportation of goods. This would ensure
that all sales are properly accounted and there will not be any problem of tax evasion.
1.1 Architectureofe-SUGAM
All the registered dealers are given a unique identity through which they can upload the
transaction details. The access is controlled by a user name and password assigned to each dealer. A
user friendly uploading screen has been designed for use by dealers. The screen captures vital details
of each transaction like details of buyer, value of transaction, name of commodity etc. On uploading
the data, the central server stores the data and generates a unique number for each transaction.
While generating the e-SUGAM number, the dealer may enter the vehicle number in the e-
SUGAM form, or in any case if the dealer is unaware of the vehicle number, he may enter the
transporters mobile number in the e-SUGAM form and generate the e-SUGAM number. The
dealer/transporter can later (before reaching the check post) update the vehicle number either
online through the VAT e-Filing System or through the SUGAM mobile updation service from the
registered mobile number (of the dealer) or from the transporters mobile number entered in the e-
SUGAM form.
In the course of transportation of goods from the source place to the destination place, if there
is any transit of vehicle at the transit place, the dealer shall enter the transit place and also the
mobile number of the transporter authorized to update the transit vehicle number, in the e-SUGAM
Form and shall generate the SUGAM number. The dealer/transporter shall then update the transit
vehicle number from the registered mobile number in the prescribed format to the number
‘9212357123’. The transit vehicle number will be updated in the system. Any further changes in the
transit vehicle number should be done within half an hour from the time of updation of the transit
vehicle number beyond which the transit vehicle number cannot be changed.
The dealer gives this unique number to the driver/person-in-charge of the goods vehicle. When
the goods vehicle reports at the check post the driver/person-in-charge simply gives the unique
number to the check post officer. The check post officer feeds this unique number into the system,
e - Sugam
User Manual Version 1.0 Release Date: 19/10/11 Page 2
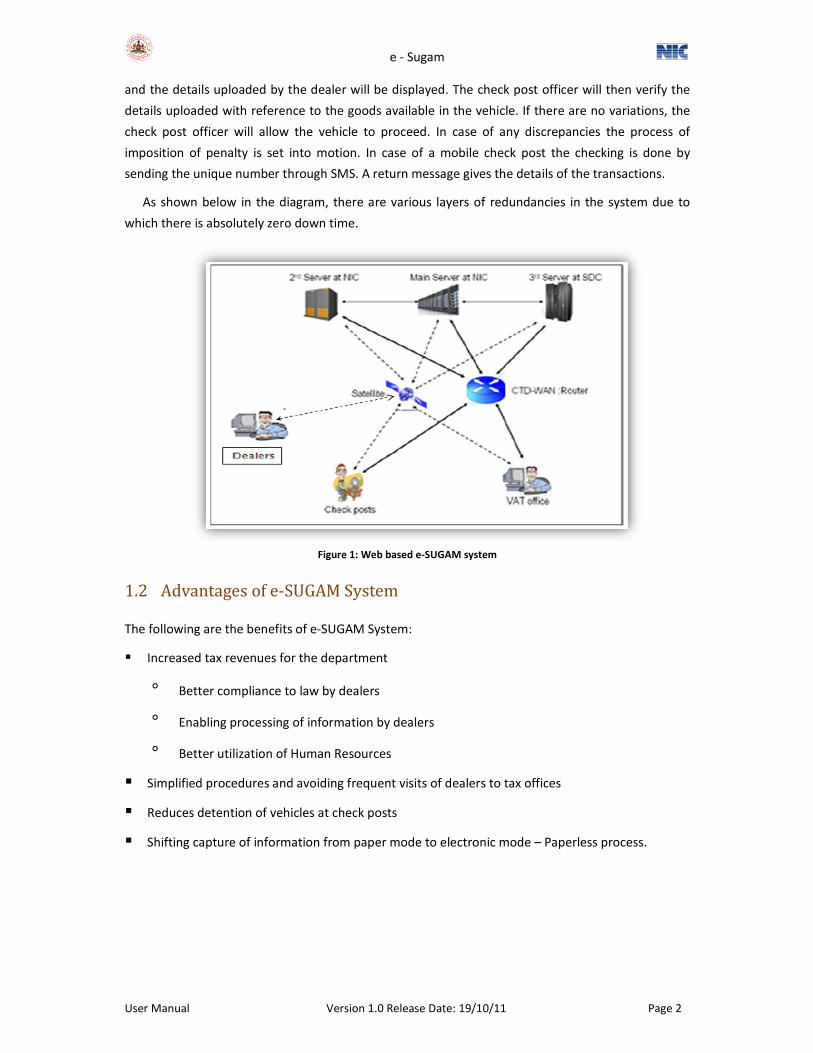
and the details uploaded by the dealer will be displayed. The check post officer will then verify the
details uploaded with reference to the goods available in the vehicle. If there are no variations, the
check post officer will allow the vehicle to proceed. In case of any discrepancies the process of
imposition of penalty is set into motion. In case of a mobile check post the checking is done by
sending the unique number through SMS. A return message gives the details of the transactions.
As shown below in the diagram, there are various layers of redundancies in the system due to
which there is absolutely zero down time.
Figure 1: Web based e‐SUGAM system
1.2 Advantagesofe-SUGAMSystem
The following are the benefits of e-SUGAM System:
� Increased tax revenues for the department
° Better compliance to law by dealers
° Enabling processing of information by dealers
° Better utilization of Human Resources
� Simplified procedures and avoiding frequent visits of dealers to tax offices
� Reduces detention of vehicles at check posts
� Shifting capture of information from paper mode to electronic mode – Paperless process.
e - Sugam
User Manual Version 1.0 Release Date: 19/10/11 Page 3
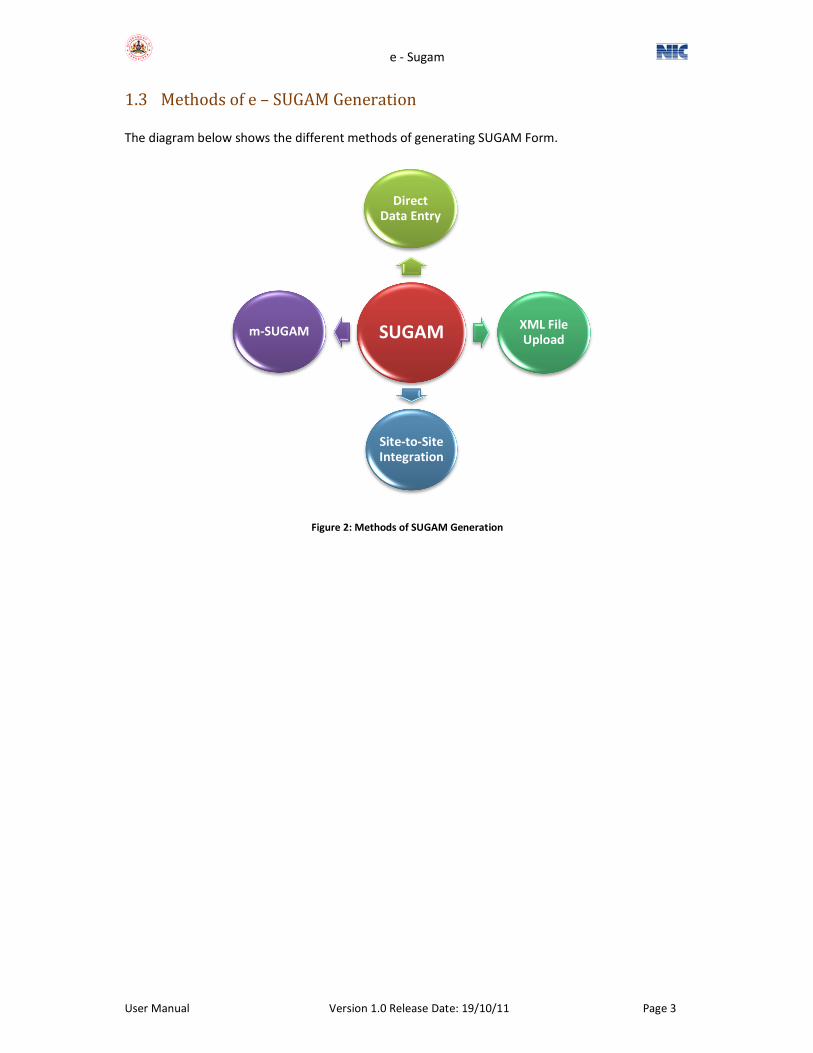
1.3 Methodsofe–SUGAMGeneration
The diagram below shows the different methods of generating SUGAM Form.
Figure 2: Methods of SUGAM Generation
SUGAM
Direct Data Entry
XML File Upload
Site‐to‐Site Integration
m‐SUGAM
e - Sugam
User Manual Version 1.0 Release Date: 19/10/11 Page 4
2. Login
• Getting Login Account
You need to request the concerned Local VAT office (LVO) or VAT Sub office (VSO) for an account
in VAT e-filing system by submitting an application to the jurisdictional LVO/VSO. After processing,
the jurisdictional LVO/VSO will provide the user name and Password. In case you have already
obtained the username and password for other purposes like e-filing of taxes, for obtaining the ‘C’
form etc, you may use the same user name and password for the purpose of obtaining e-SUGAM.
However for the first time, the jurisdictional LVO/VSO has to enable you to obtain the e-SUGAM. It is
important to maintain the user name and password securely and confidentially so as to avoid the
misuse of the same.
• Regular Logging In
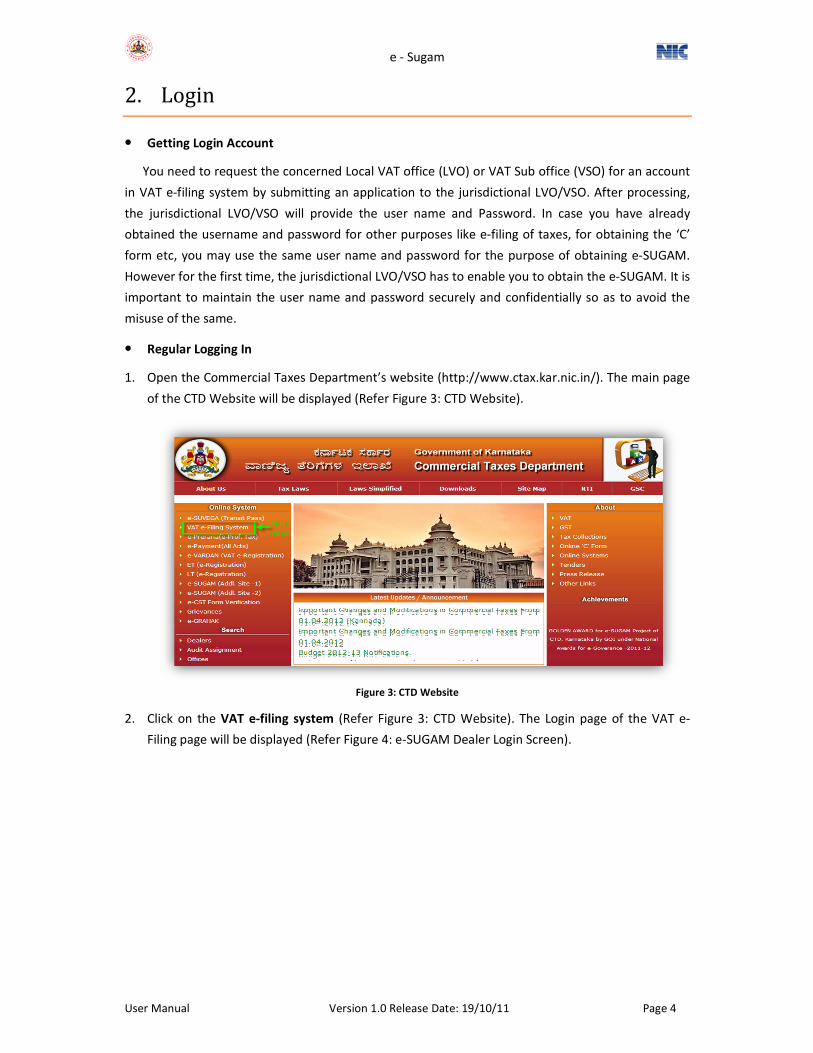
1. Open the Commercial Taxes Department’s website (http://www.ctax.kar.nic.in/). The main page
of the CTD Website will be displayed (Refer Figure 3: CTD Website).
Figure 3: CTD Website
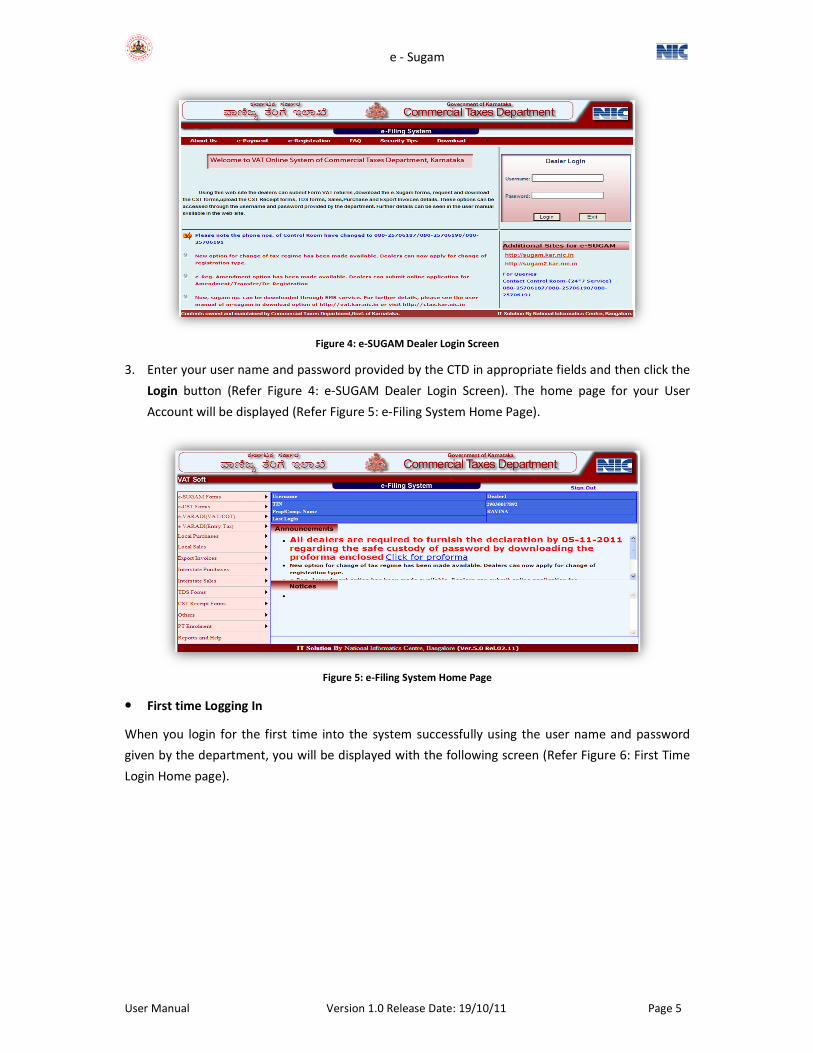
2. Click on the VAT e‐filing system (Refer Figure 3: CTD Website). The Login page of the VAT e-
Filing page will be displayed (Refer Figure 4: e-SUGAM Dealer Login Screen).
e - Sugam
User Manual Version 1.0 Release Date: 19/10/11 Page 5
Figure 4: e‐SUGAM Dealer Login Screen
3. Enter your user name and password provided by the CTD in appropriate fields and then click the
Login button (Refer Figure 4: e-SUGAM Dealer Login Screen). The home page for your User
Account will be displayed (Refer Figure 5: e-Filing System Home Page).
Figure 5: e‐Filing System Home Page
• First time Logging In
When you login for the first time into the system successfully using the user name and password
given by the department, you will be displayed with the following screen (Refer Figure 6: First Time
Login Home page).
e - Sugam
User Manual Version 1.0 Release Date: 19/10/11 Page 6
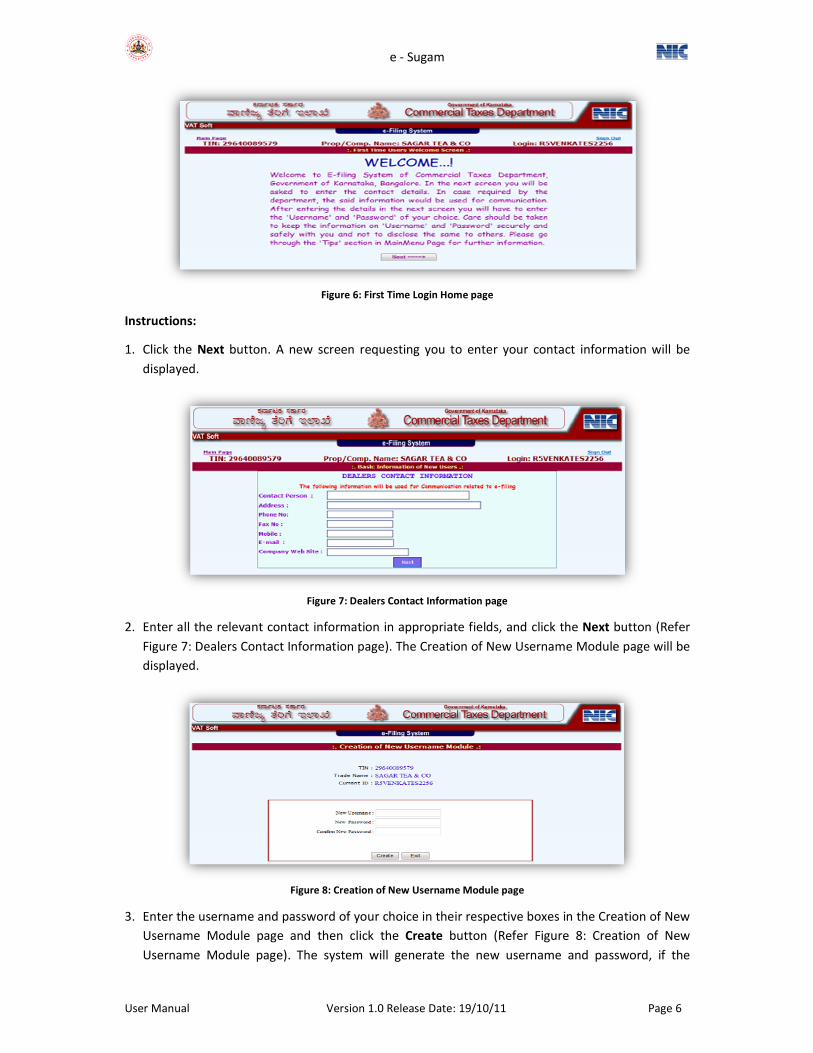
Figure 6: First Time Login Home page
Instructions:
1. Click the Next button. A new screen requesting you to enter your contact information will be
displayed.
Figure 7: Dealers Contact Information page
2. Enter all the relevant contact information in appropriate fields, and click the Next button (Refer
Figure 7: Dealers Contact Information page). The Creation of New Username Module page will be
displayed.
Figure 8: Creation of New Username Module page
3. Enter the username and password of your choice in their respective boxes in the Creation of New
Username Module page and then click the Create button (Refer Figure 8: Creation of New
Username Module page). The system will generate the new username and password, if the
e - Sugam
User Manual Version 1.0 Release Date: 19/10/11 Page 7
username does not already exist. Once the Sign In process is complete, you will be directed to the
e-Filing system Main Page (Refer Figure 5: e-Filing System Home Page).
The e-SUGAM module has the following sub modules:
• New Entry
• Upload XML/ZIP file
• Update and Submit
• Cancel
NoteNoteNoteNote:
1. When you enter the contact information, the contact person’s name should start with a capital letter.
2. The username should be of at least 5characters.
3. The password should be of at least 8 characters with a combination of alphabets (A-Z/a-z), numerals (0-
9) and special characters (@, #, $, %, &, *, ^).
4. Keep your User Name and Password securely. Do not share it with anybody. Ensure that only authorized
person uses this to work on e-Filing System.
5. Change your password regularly, at least once in 30-45 days and maintain/remember the password.
6. Remember to Sign Out/Log Out of the system after completion of your work.
Other NotesOther NotesOther NotesOther Notes:
1. All fields marked in * are mandatory.
2. To log out of the e-Filing System, click Sign OutSign OutSign OutSign Out at the top right hand side of any page.
3. To go to the main page of the e-Filing System, click Main PageMain PageMain PageMain Page at the top left hand side of any page.
4. Click the ExitExitExitExit button in any page to exit from the respective page.
5. Enter the date in the dd/mm/yyyy format.

e - Sugam
User Manual Version 1.0 Release Date: 19/10/11 Page 8
3. e-SUGAMForms–NewEntry
Every dealer who is transporting goods of value over Rs.20000 should possess the e-SUGAM
form. The dealer has to enter the details of the goods being transported in the e-SUGAM New Entry
form. On submitting the e-SUGAM New Entry form, the system generates a unique number and an
acknowledgement letter. The printed copy of this acknowledgement letter or the e-SUGAM serial
number should be available with the driver/person-in-charge of the goods vehicle while transporting
the goods.
Instruction:
1. In the e-Filing System home page, click e‐SUGAM Forms and then click New Entry option from
the drop-down list (Refer Figure 9: e-SUGAM Forms). The e-SUGAM New Entry Form will be
displayed (Refer Figure 10: e-SUGAM - New Entry Form).
Figure 9: e‐SUGAM Forms
e - Sugam
User Manual Version 1.0 Release Date: 19/10/11 Page 9
Figure 10: e‐SUGAM ‐ New Entry Form
2. In the e-SUGAM New Entry Form, enter the starting point and the end point of the
transportation of goods in the From Place and To Place fields respectively. In the Goods Details
section, enter the details of the goods being transported. Click the Commodity drop-down and
select the commodity from the list. If the commodity you are dealing with is not available in the
list, you can add the commodity. To add the commodity you are dealing with, refer Section 3.1
To Add e‐SUGAM Commodities. Enter the commodity description, quantity and net value and
tax value of the commodity in their respective boxes.
3. Enter the details of the transporter in the Transporter Owner Details section. Enter the details
of the other dealer to whom the goods are being supplied to, in the Details of other party as per
the category of transporting goods section. The Category of Transaction and the Document
Type are correlated. The details are as given in the table below:
Category of Transaction Document Type
After Sale, After Purchase Invoice (INV)
To his Principal Invoice (INV), Consignment Note
For goods purchased from URD’s, the category will
be ‘After Purchase’. Self-Purchase bill
Consignment Sale (Receipt), Consignment Sale
(Dispatch) Consignment Note
e - Sugam
User Manual Version 1.0 Release Date: 19/10/11 Page 10
To his shop/Godown/Storage, Stock
Transfer(Dispatches) Stock Transfer Memo
Job work, Return after Job work Labor charges bill/Job work Voucher,
Others
4. The Mines and Geology Department Permit Details section is applicable for dealers transporting
Mineral ores/Rocks from the quarry. Other dealers can skip this section.
5. After all the details are entered, select the type of print (Form Print/PDF Print) in the Select Print
Type section and then do one of the following:
• SAVE: Click the SAVE button. The details entered will be saved and you can continue to enter
other e-SUGAM forms. To submit this form, refer Section 5 Update and Submit.
• SAVE and SUBMIT: The form will be saved and submitted. The e-SUGAM form with the unique
number will be displayed (Refer Figure 11: e-SUGAM Form). You can take a print out of this
form. To print this form refer, section 3.1 Print e-SUGAM Form.
• DELETE: To delete all the details entered in the e-SUGAM form, click the DELETE button.
• Exit: To exit from the e-SUGAM New Entry form page, click the Exit button. The e-Filing
system main page will be displayed.
Figure 11: e‐SUGAM Form
e - Sugam
User Manual Version 1.0 Release Date: 19/10/11 Page 11
3.1 ToAdde-SUGAMCommodities
If the commodity you are dealing with is not available in the list of commodities in the Commodity
drop-down in the e-SUGAM New Entry form, you can add the same.
Instructions:
1. In the e-Filing system home page, click the Reports and Help tab (Refer Figure 12: Reports and
Help). The screen as shown in Figure 13: Add e-SUGAM Commodity will be displayed.
Figure 12: Reports and Help
Figure 13: Add e‐SUGAM Commodity
2. In the Reports and Help page, click Add e‐SUGAM Commodities under the heading Other
Options in the above screen (Figure 13: Add e-SUGAM Commodity). The e-SUGAM Commodities
page will be displayed.
NoteNoteNoteNote:
1. If the dealer is unregistered, enter the TIN number as 29000000000.
2. To view instructions to fill the e-SUGAM form, click ‘How to fill eHow to fill eHow to fill eHow to fill e----SUGAM Screen?SUGAM Screen?SUGAM Screen?SUGAM Screen?’
e - Sugam
User Manual Version 1.0 Release Date: 19/10/11 Page 12
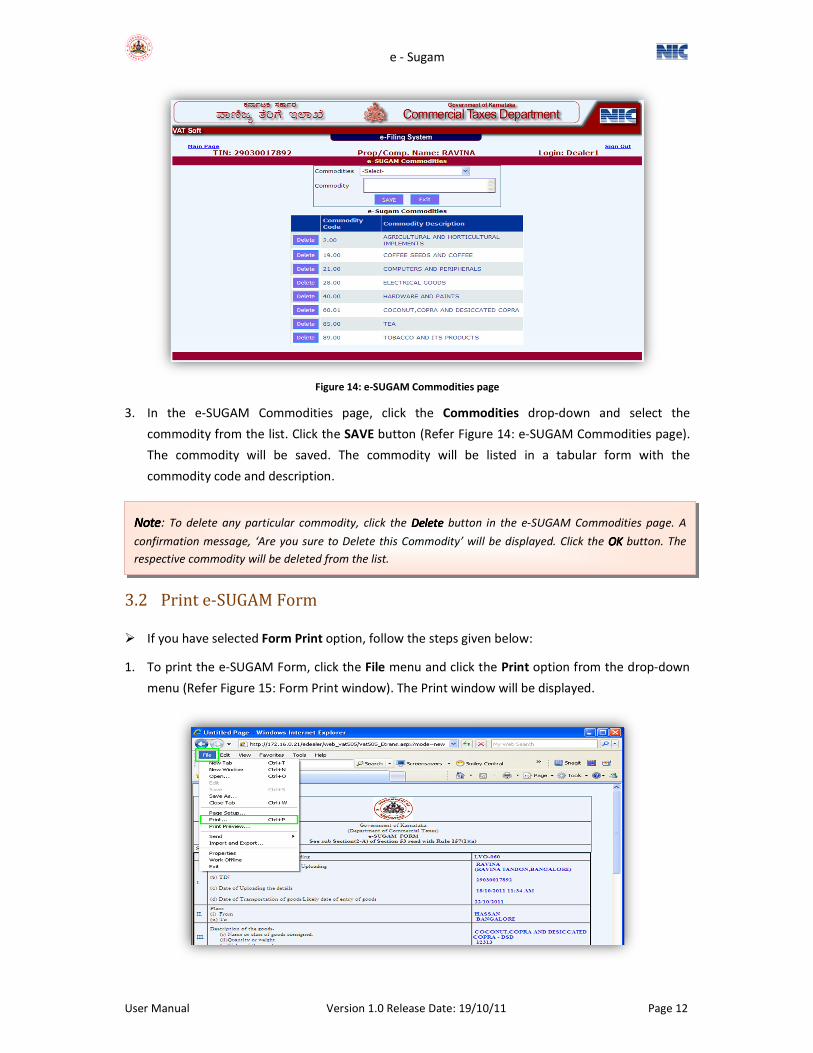
Figure 14: e‐SUGAM Commodities page
3. In the e-SUGAM Commodities page, click the Commodities drop-down and select the
commodity from the list. Click the SAVE button (Refer Figure 14: e-SUGAM Commodities page).
The commodity will be saved. The commodity will be listed in a tabular form with the
commodity code and description.
3.2 Printe-SUGAMForm
� If you have selected Form Print option, follow the steps given below:
1. To print the e-SUGAM Form, click the File menu and click the Print option from the drop-down
menu (Refer Figure 15: Form Print window). The Print window will be displayed.
NoteNoteNoteNote: To delete any particular commodity, click the DeleteDeleteDeleteDelete button in the e-SUGAM Commodities page. A
confirmation message, ‘Are you sure to Delete this Commodity’ will be displayed. Click the OK OK OK OK button. The
respective commodity will be deleted from the list.

e - Sugam
User Manual Version 1.0 Release Date: 19/10/11 Page 13
Figure 15: Form Print window
Figure 16: Print window
2. In the Print window, select the printer from the list available in the Select Printer section. In the
Page Range section select ‘All’ option and then enter the Number of copies and then click the
Print button (Refer Figure 16: Print window). The copy of e-SUGAM form will be printed in the
printer selected by you.
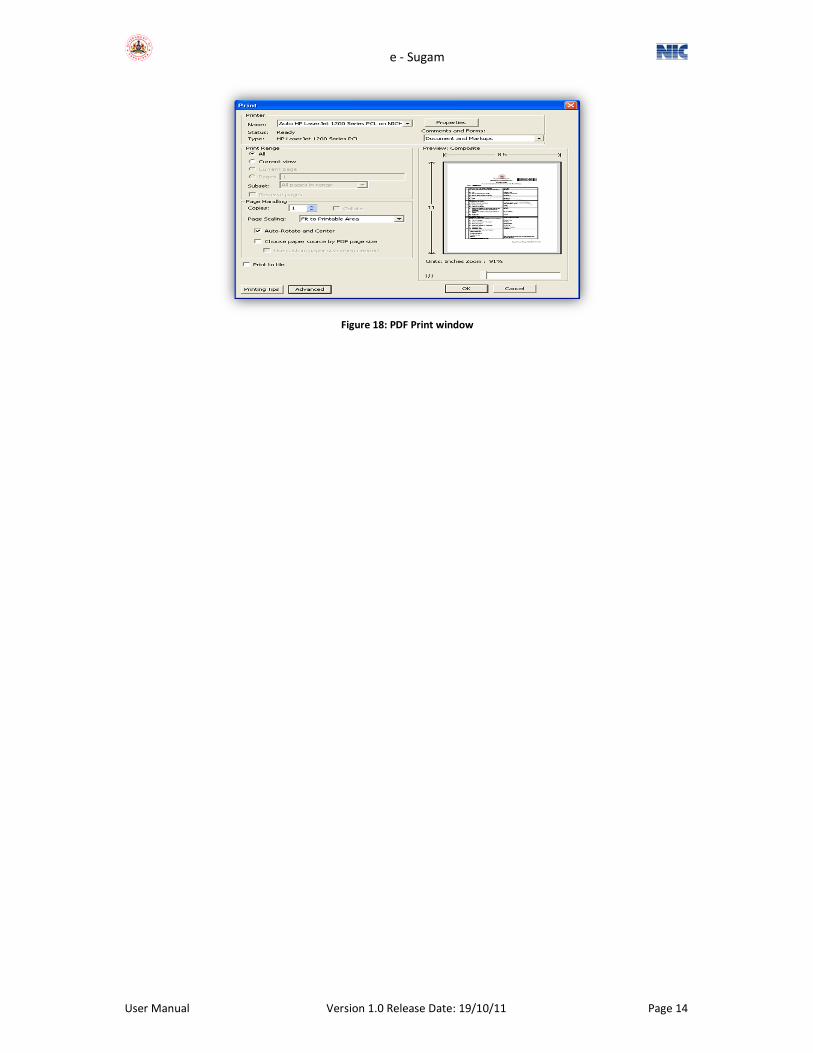
� If you have selected Pdf Print option, follow the steps given below:
1. Click the Print icon on your computer screen (Refer Figure 17: PDF Print). The Print
window will be displayed.
Figure 17: PDF Print
2. In the Printer section, click the Name drop-down and select the name of the printer. In the Page
range section, select ‘All’. In the Page Handling section, enter the number of copies in the Copies
field and click the Page Scaling drop-down and select Fit to Printable Area option from the list.
Check the Auto Rotate and Center option. Click the OK button. The form will be printed in the
printer selected by you.
e - Sugam
User Manual Version 1.0 Release Date: 19/10/11 Page 14
Figure 18: PDF Print window
e - Sugam
User Manual Version 1.0 Release Date: 19/10/11 Page 15
4. UploadXMLFile
If a dealer has to generate large number of e-SUGAM numbers, you may use the facility of
uploading the XML file. The dealer can enter the details in the excel file prescribed by the
department and then convert it to XML format and then upload it to the system. The size of the XML
file should not exceed 3 MB.
The dealer can download the converter from the department’s website.
4.1 DownloadtheConverterandConverttheExcelFiletoXMLFormat
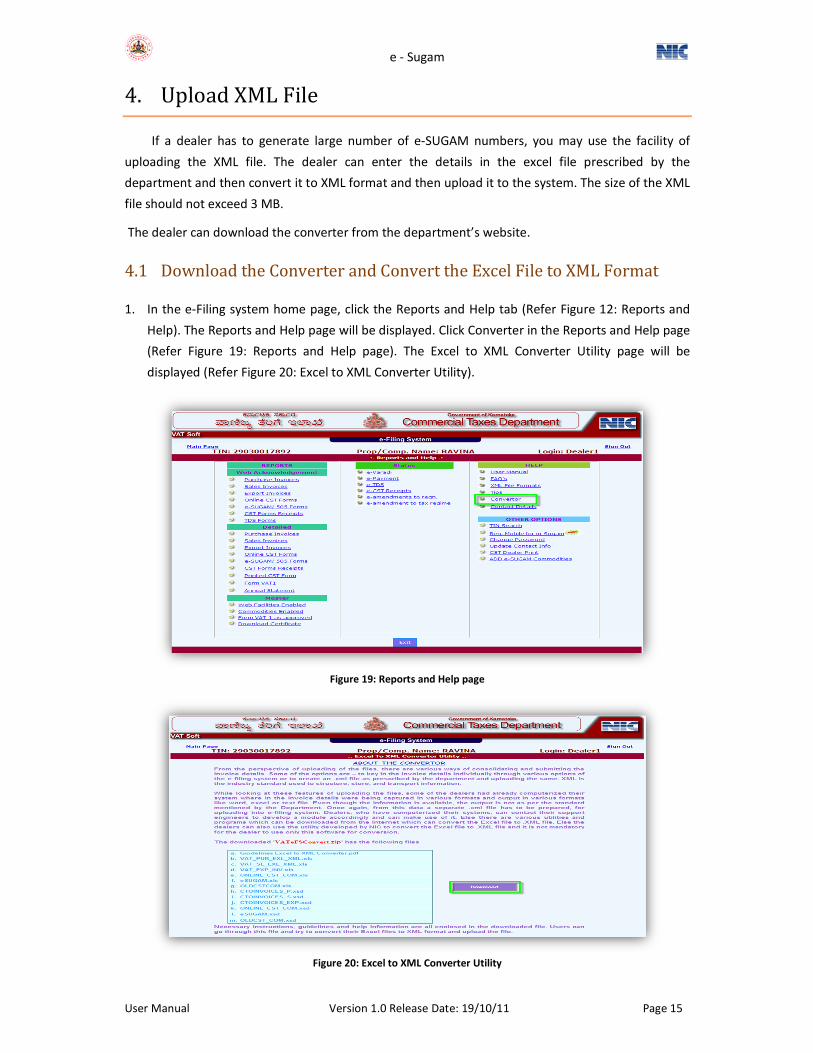
1. In the e-Filing system home page, click the Reports and Help tab (Refer Figure 12: Reports and
Help). The Reports and Help page will be displayed. Click Converter in the Reports and Help page
(Refer Figure 19: Reports and Help page). The Excel to XML Converter Utility page will be
displayed (Refer Figure 20: Excel to XML Converter Utility).
Figure 19: Reports and Help page
Figure 20: Excel to XML Converter Utility
e - Sugam
User Manual Version 1.0 Release Date: 19/10/11 Page 16
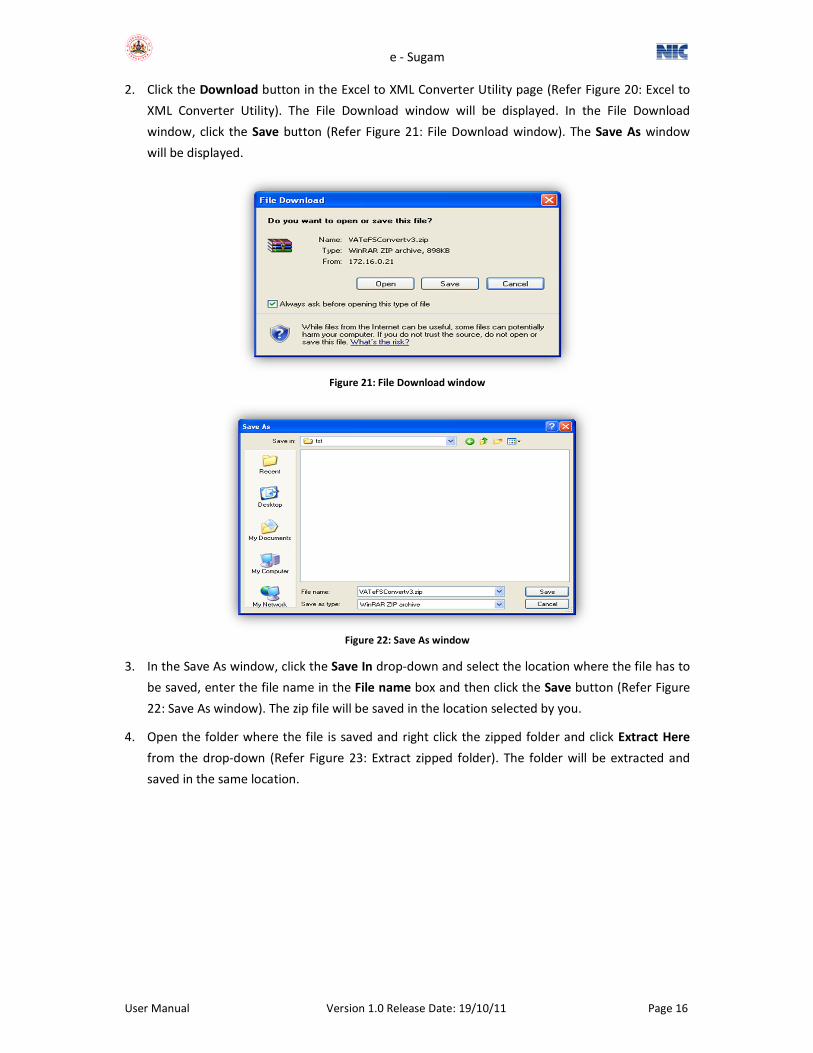
2. Click the Download button in the Excel to XML Converter Utility page (Refer Figure 20: Excel to
XML Converter Utility). The File Download window will be displayed. In the File Download
window, click the Save button (Refer Figure 21: File Download window). The Save As window
will be displayed.
Figure 21: File Download window
Figure 22: Save As window
3. In the Save As window, click the Save In drop-down and select the location where the file has to
be saved, enter the file name in the File name box and then click the Save button (Refer Figure
22: Save As window). The zip file will be saved in the location selected by you.
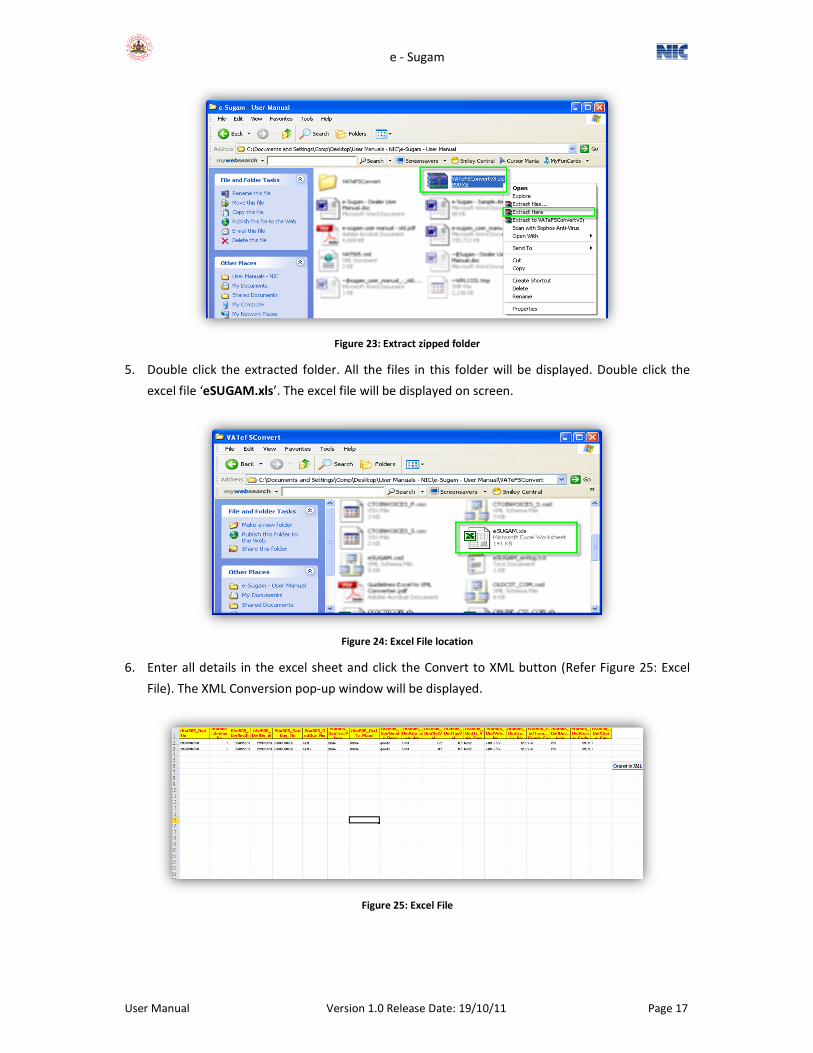
4. Open the folder where the file is saved and right click the zipped folder and click Extract Here
from the drop-down (Refer Figure 23: Extract zipped folder). The folder will be extracted and
saved in the same location.
e - Sugam
User Manual Version 1.0 Release Date: 19/10/11 Page 17
Figure 23: Extract zipped folder
5. Double click the extracted folder. All the files in this folder will be displayed. Double click the
excel file ‘eSUGAM.xls’. The excel file will be displayed on screen.
Figure 24: Excel File location
6. Enter all details in the excel sheet and click the Convert to XML button (Refer Figure 25: Excel
File). The XML Conversion pop-up window will be displayed.
Figure 25: Excel File
e - Sugam
User Manual Version 1.0 Release Date: 19/10/11 Page 18
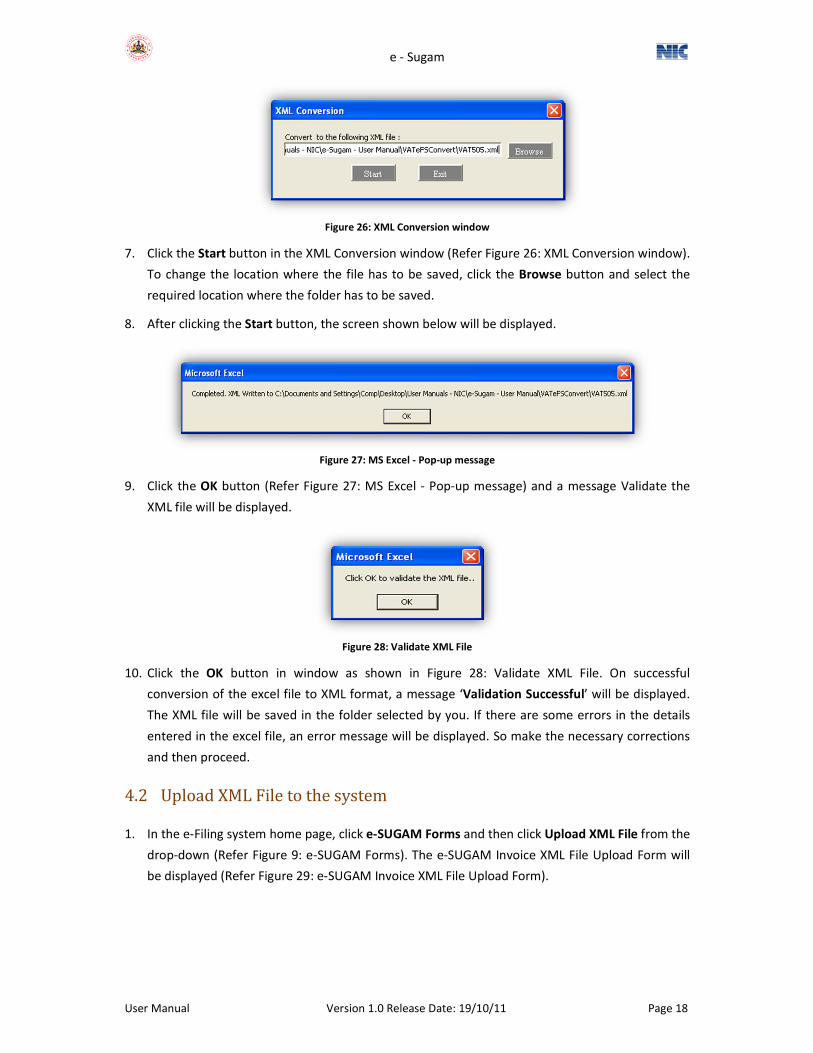
Figure 26: XML Conversion window
7. Click the Start button in the XML Conversion window (Refer Figure 26: XML Conversion window).
To change the location where the file has to be saved, click the Browse button and select the
required location where the folder has to be saved.
8. After clicking the Start button, the screen shown below will be displayed.
Figure 27: MS Excel ‐ Pop‐up message
9. Click the OK button (Refer Figure 27: MS Excel - Pop-up message) and a message Validate the
XML file will be displayed.
Figure 28: Validate XML File
10. Click the OK button in window as shown in Figure 28: Validate XML File. On successful
conversion of the excel file to XML format, a message ‘Validation Successful’ will be displayed.
The XML file will be saved in the folder selected by you. If there are some errors in the details
entered in the excel file, an error message will be displayed. So make the necessary corrections
and then proceed.
4.2 UploadXMLFiletothesystem
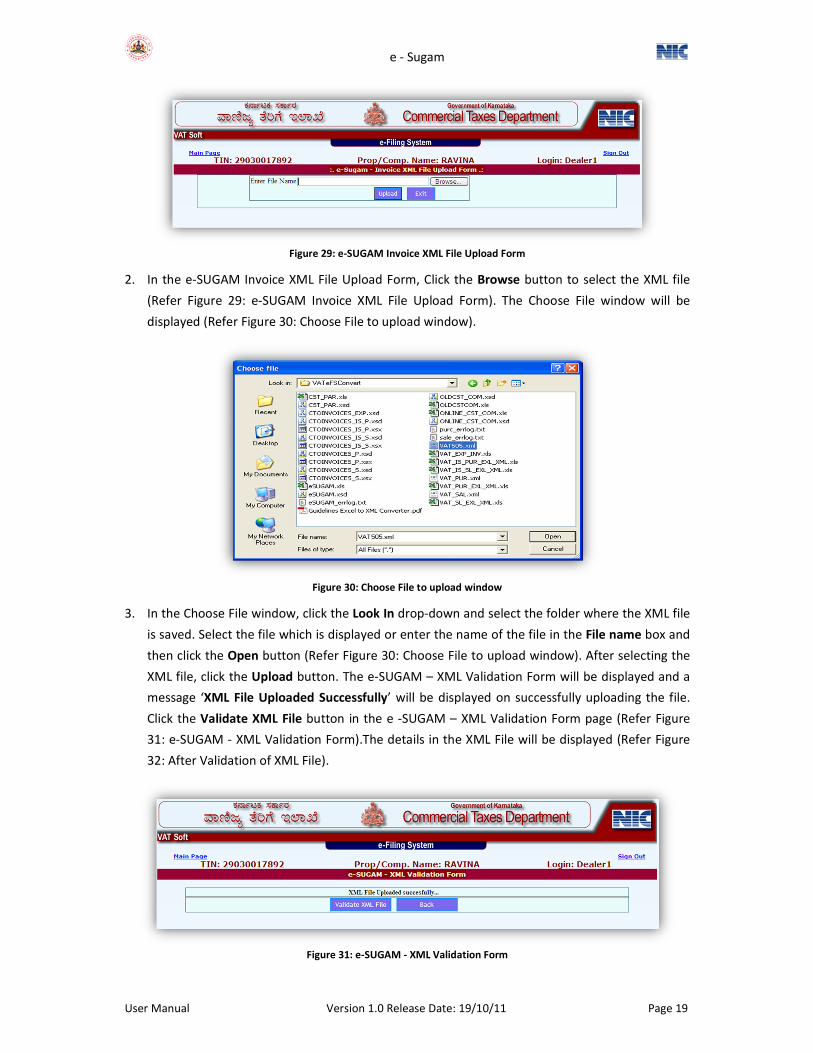
1. In the e-Filing system home page, click e‐SUGAM Forms and then click Upload XML File from the
drop-down (Refer Figure 9: e-SUGAM Forms). The e-SUGAM Invoice XML File Upload Form will
be displayed (Refer Figure 29: e-SUGAM Invoice XML File Upload Form).
e - Sugam
User Manual Version 1.0 Release Date: 19/10/11 Page 19
Figure 29: e‐SUGAM Invoice XML File Upload Form
2. In the e-SUGAM Invoice XML File Upload Form, Click the Browse button to select the XML file
(Refer Figure 29: e-SUGAM Invoice XML File Upload Form). The Choose File window will be
displayed (Refer Figure 30: Choose File to upload window).
Figure 30: Choose File to upload window
3. In the Choose File window, click the Look In drop-down and select the folder where the XML file
is saved. Select the file which is displayed or enter the name of the file in the File name box and
then click the Open button (Refer Figure 30: Choose File to upload window). After selecting the
XML file, click the Upload button. The e-SUGAM – XML Validation Form will be displayed and a
message ‘XML File Uploaded Successfully’ will be displayed on successfully uploading the file.
Click the Validate XML File button in the e -SUGAM – XML Validation Form page (Refer Figure
31: e-SUGAM - XML Validation Form).The details in the XML File will be displayed (Refer Figure
32: After Validation of XML File).
Figure 31: e‐SUGAM ‐ XML Validation Form
e - Sugam
User Manual Version 1.0 Release Date: 19/10/11 Page 20
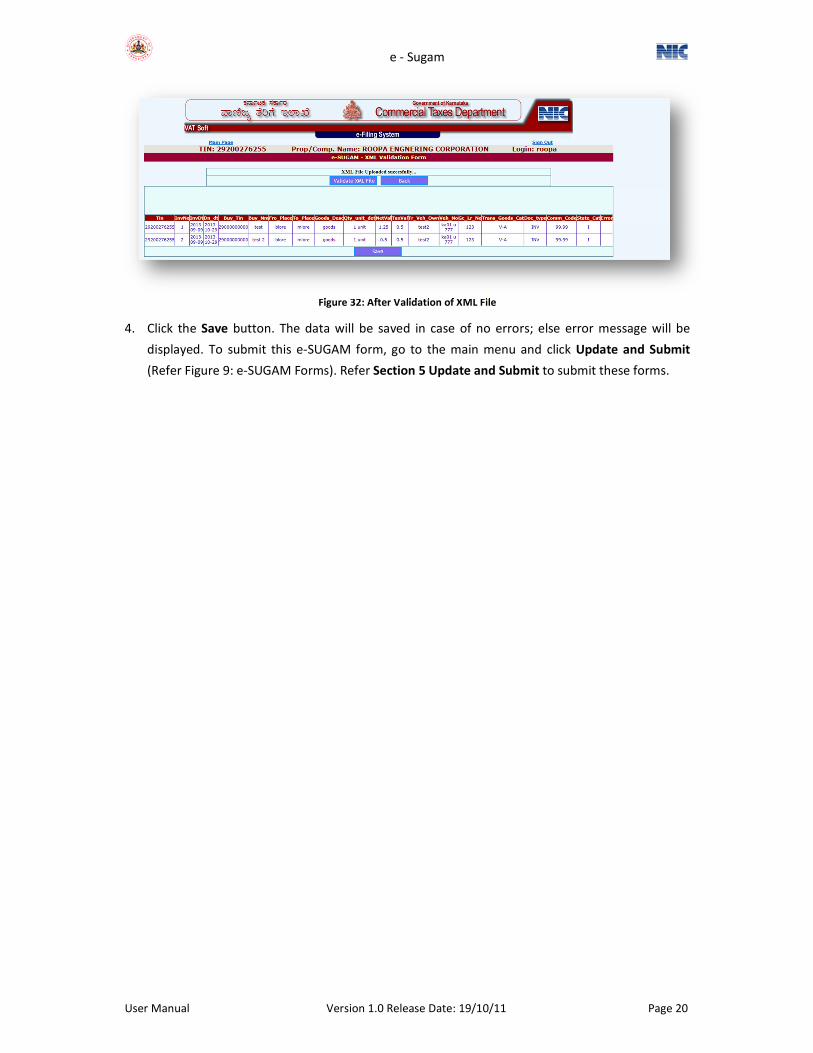
Figure 32: After Validation of XML File
4. Click the Save button. The data will be saved in case of no errors; else error message will be
displayed. To submit this e-SUGAM form, go to the main menu and click Update and Submit
(Refer Figure 9: e-SUGAM Forms). Refer Section 5 Update and Submit to submit these forms.

e - Sugam
User Manual Version 1.0 Release Date: 19/10/11 Page 21
5. UpdateandSubmit
This option enables the dealers to update and submit the e-SUGAM Forms. In this system, the
dealers have an option to enter and save multiple e-SUGAM forms. The dealer can then select the
form, update it and then submit the form to generate the unique number.
Instructions:
1. In the e-Filing System home page, click e‐SUGAM Forms and then click Update and Submit from
the drop-down (Refer Figure 9: e-SUGAM Forms). The e-SUGAM Verify/Submit Form page will be
displayed (Refer Figure 33: e-SUGAM Verify/Submit Form). All the e-SUGAM forms saved by you
will be displayed.
Figure 33: e‐SUGAM Verify/Submit Form
2. To submit all the e-SUGAM forms, click the Submit All button in the e-SUGAM Verify/Submit
Form page. (Refer Figure 33: e-SUGAM Verify/Submit Form). The e-SUGAM Verify/Submit Form
will be displayed. The serial numbers will be generated.
Figure 34: e‐SUGAM Verify/Submit Form
3. Click Select against each e-SUGAM form in the e-SUGAM Verify/Submit page (Refer Figure 34: e-
SUGAM Verify/Submit Form). The Print e-SUGAM Details page will be displayed (Refer Figure 35:
Print e-SUGAM Details).
e - Sugam
User Manual Version 1.0 Release Date: 19/10/11 Page 22
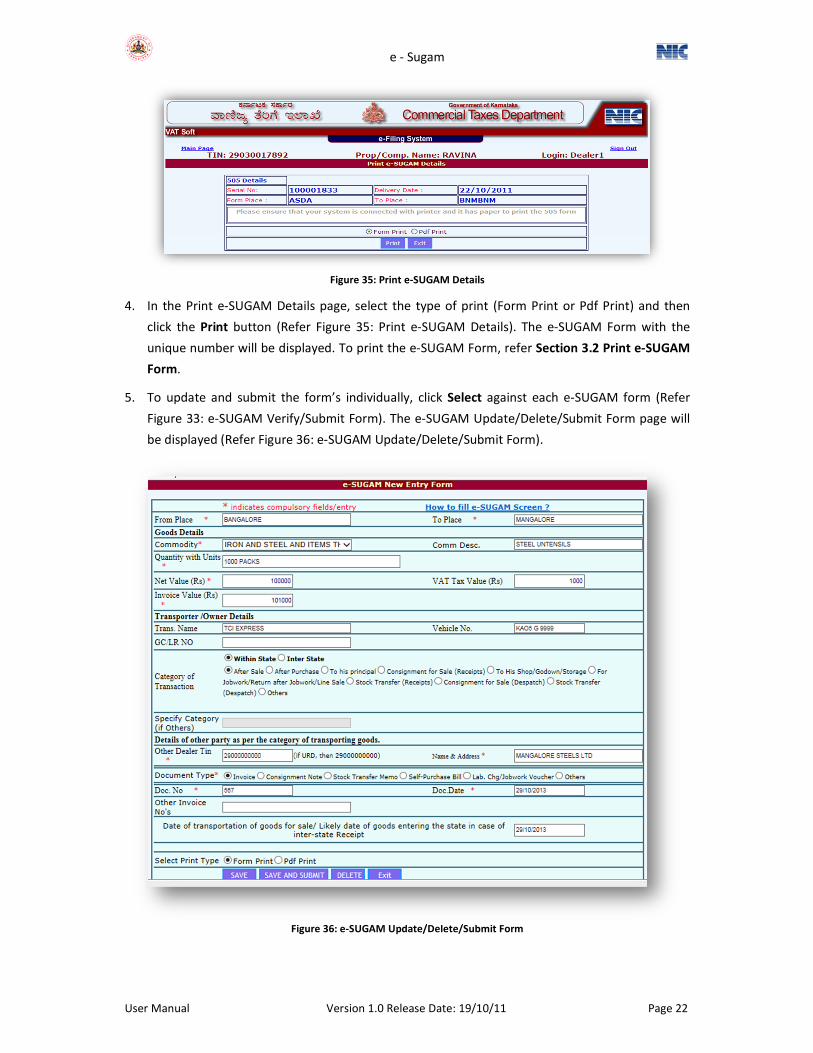
Figure 35: Print e‐SUGAM Details
4. In the Print e-SUGAM Details page, select the type of print (Form Print or Pdf Print) and then
click the Print button (Refer Figure 35: Print e-SUGAM Details). The e-SUGAM Form with the
unique number will be displayed. To print the e-SUGAM Form, refer Section 3.2 Print e‐SUGAM
Form.
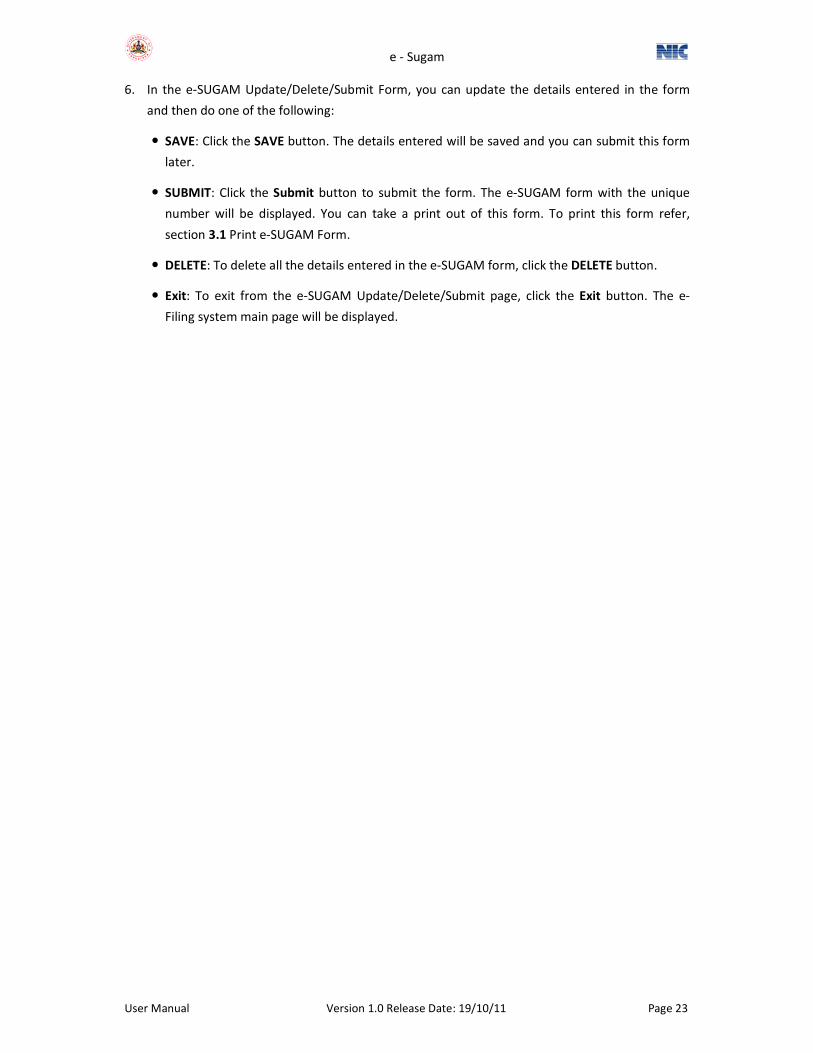
5. To update and submit the form’s individually, click Select against each e-SUGAM form (Refer
Figure 33: e-SUGAM Verify/Submit Form). The e-SUGAM Update/Delete/Submit Form page will
be displayed (Refer Figure 36: e-SUGAM Update/Delete/Submit Form).
Figure 36: e‐SUGAM Update/Delete/Submit Form
e - Sugam
User Manual Version 1.0 Release Date: 19/10/11 Page 23
6. In the e-SUGAM Update/Delete/Submit Form, you can update the details entered in the form
and then do one of the following:
• SAVE: Click the SAVE button. The details entered will be saved and you can submit this form
later.
• SUBMIT: Click the Submit button to submit the form. The e-SUGAM form with the unique
number will be displayed. You can take a print out of this form. To print this form refer,
section 3.1 Print e-SUGAM Form.
• DELETE: To delete all the details entered in the e-SUGAM form, click the DELETE button.
• Exit: To exit from the e-SUGAM Update/Delete/Submit page, click the Exit button. The e-
Filing system main page will be displayed.
e - Sugam
User Manual Version 1.0 Release Date: 19/10/11 Page 24
6. Cancel
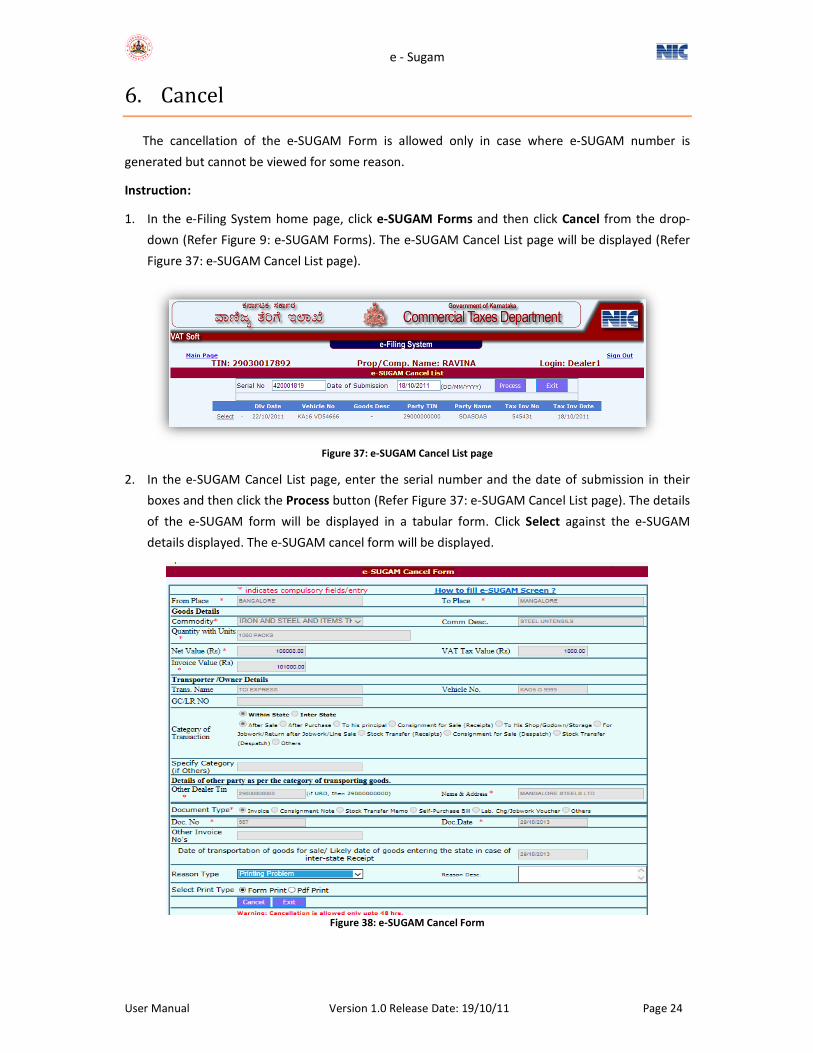
The cancellation of the e-SUGAM Form is allowed only in case where e-SUGAM number is
generated but cannot be viewed for some reason.
Instruction:
1. In the e-Filing System home page, click e‐SUGAM Forms and then click Cancel from the drop-
down (Refer Figure 9: e-SUGAM Forms). The e-SUGAM Cancel List page will be displayed (Refer
Figure 37: e-SUGAM Cancel List page).
Figure 37: e‐SUGAM Cancel List page
2. In the e-SUGAM Cancel List page, enter the serial number and the date of submission in their
boxes and then click the Process button (Refer Figure 37: e-SUGAM Cancel List page). The details
of the e-SUGAM form will be displayed in a tabular form. Click Select against the e-SUGAM
details displayed. The e-SUGAM cancel form will be displayed.
Figure 38: e‐SUGAM Cancel Form
e - Sugam
User Manual Version 1.0 Release Date: 19/10/11 Page 25
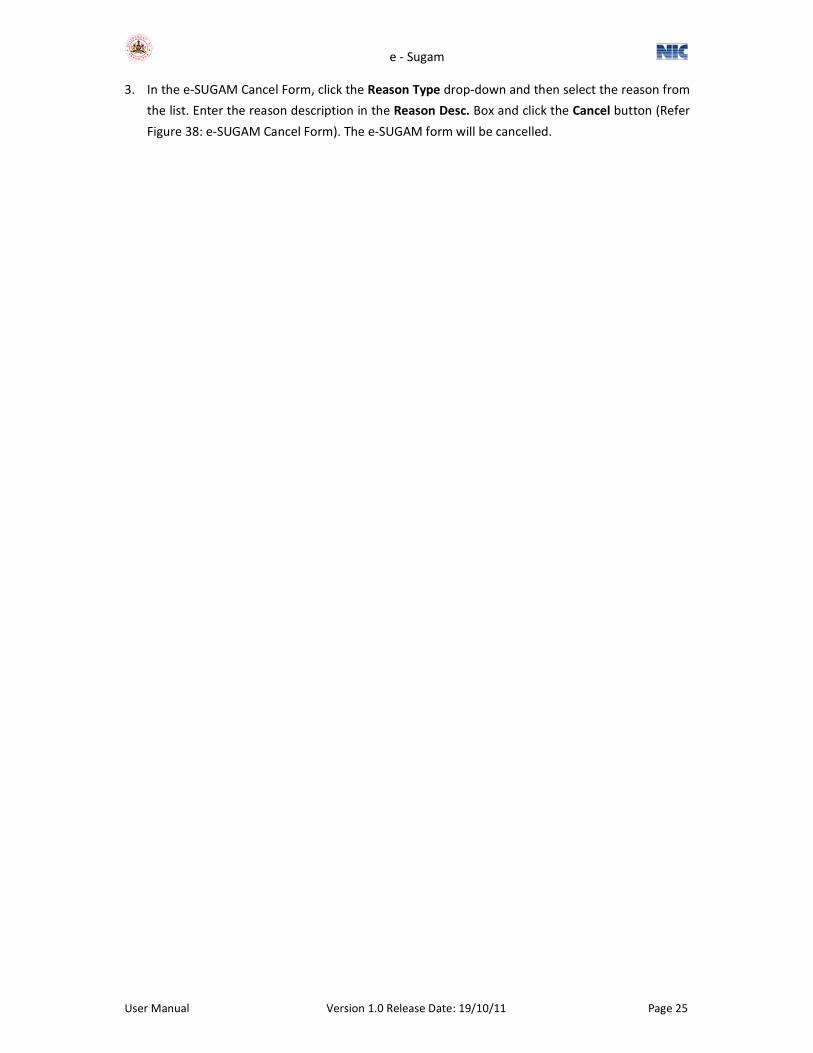
3. In the e-SUGAM Cancel Form, click the Reason Type drop-down and then select the reason from
the list. Enter the reason description in the Reason Desc. Box and click the Cancel button (Refer
Figure 38: e-SUGAM Cancel Form). The e-SUGAM form will be cancelled.
e - Sugam
User Manual Version 1.0 Release Date: 19/10/11 Page 26
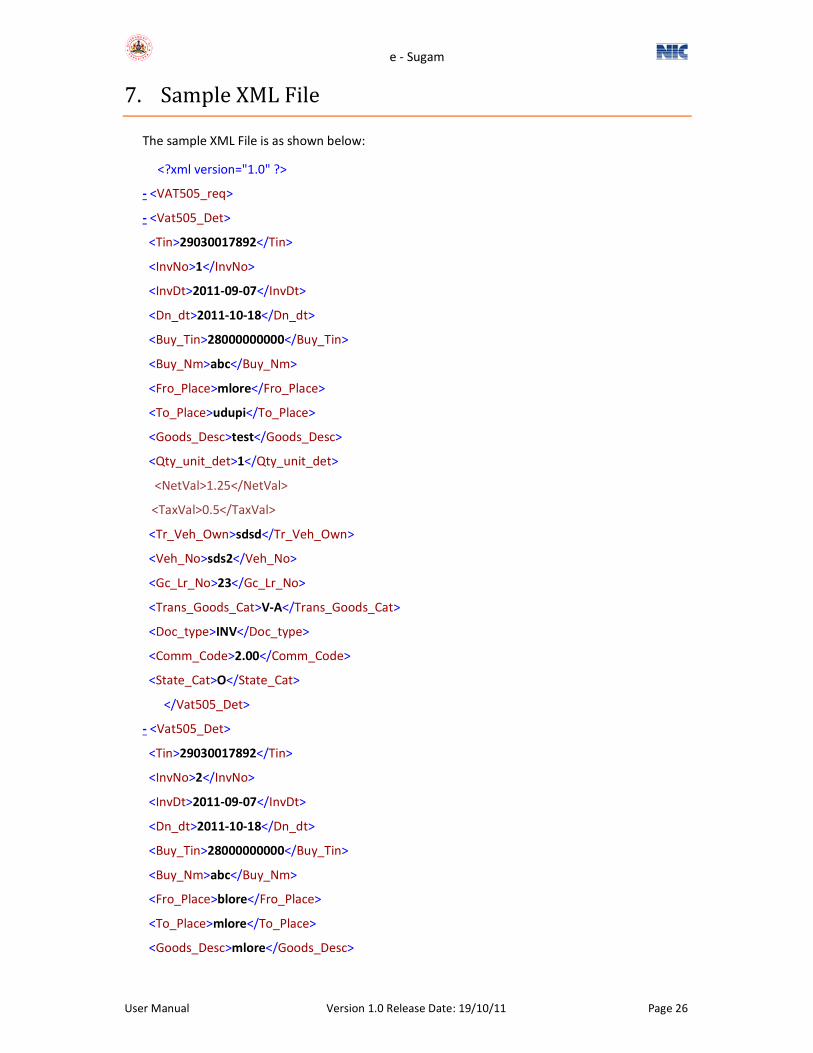
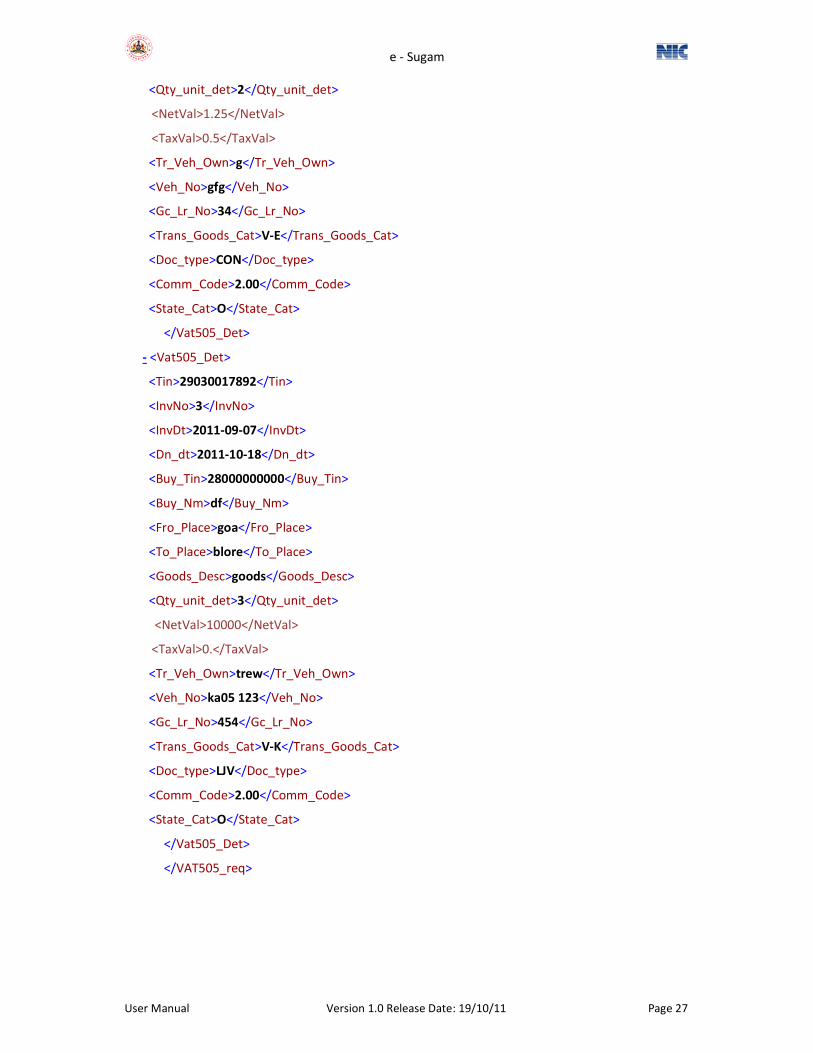
7. SampleXMLFile
The sample XML File is as shown below:
<?xml version="1.0" ?>
‐ <VAT505_req>
‐ <Vat505_Det>
<Tin>29030017892</Tin>
<InvNo>1</InvNo>
<InvDt>2011‐09‐07</InvDt>
<Dn_dt>2011‐10‐18</Dn_dt>
<Buy_Tin>28000000000</Buy_Tin>
<Buy_Nm>abc</Buy_Nm>
<Fro_Place>mlore</Fro_Place>
<To_Place>udupi</To_Place>
<Goods_Desc>test</Goods_Desc>
<Qty_unit_det>1</Qty_unit_det>
<NetVal>1.25</NetVal>
<TaxVal>0.5</TaxVal>
<Tr_Veh_Own>sdsd</Tr_Veh_Own>
<Veh_No>sds2</Veh_No>
<Gc_Lr_No>23</Gc_Lr_No>
<Trans_Goods_Cat>V‐A</Trans_Goods_Cat>
<Doc_type>INV</Doc_type>
<Comm_Code>2.00</Comm_Code>
<State_Cat>O</State_Cat>
</Vat505_Det>
‐ <Vat505_Det>
<Tin>29030017892</Tin>
<InvNo>2</InvNo>
<InvDt>2011‐09‐07</InvDt>
<Dn_dt>2011‐10‐18</Dn_dt>
<Buy_Tin>28000000000</Buy_Tin>
<Buy_Nm>abc</Buy_Nm>
<Fro_Place>blore</Fro_Place>
<To_Place>mlore</To_Place>
<Goods_Desc>mlore</Goods_Desc>
e - Sugam
User Manual Version 1.0 Release Date: 19/10/11 Page 27
<Qty_unit_det>2</Qty_unit_det>
<NetVal>1.25</NetVal>
<TaxVal>0.5</TaxVal>
<Tr_Veh_Own>g</Tr_Veh_Own>
<Veh_No>gfg</Veh_No>
<Gc_Lr_No>34</Gc_Lr_No>
<Trans_Goods_Cat>V‐E</Trans_Goods_Cat>
<Doc_type>CON</Doc_type>
<Comm_Code>2.00</Comm_Code>
<State_Cat>O</State_Cat>
</Vat505_Det>
‐ <Vat505_Det>
<Tin>29030017892</Tin>
<InvNo>3</InvNo>
<InvDt>2011‐09‐07</InvDt>
<Dn_dt>2011‐10‐18</Dn_dt>
<Buy_Tin>28000000000</Buy_Tin>
<Buy_Nm>df</Buy_Nm>
<Fro_Place>goa</Fro_Place>
<To_Place>blore</To_Place>
<Goods_Desc>goods</Goods_Desc>
<Qty_unit_det>3</Qty_unit_det>
<NetVal>10000</NetVal>
<TaxVal>0.</TaxVal>
<Tr_Veh_Own>trew</Tr_Veh_Own>
<Veh_No>ka05 123</Veh_No>
<Gc_Lr_No>454</Gc_Lr_No>
<Trans_Goods_Cat>V‐K</Trans_Goods_Cat>
<Doc_type>LJV</Doc_type>
<Comm_Code>2.00</Comm_Code>
<State_Cat>O</State_Cat>
</Vat505_Det>
</VAT505_req>
e - Sugam
User Manual Version 1.0 Release Date: 19/10/11 Page 28
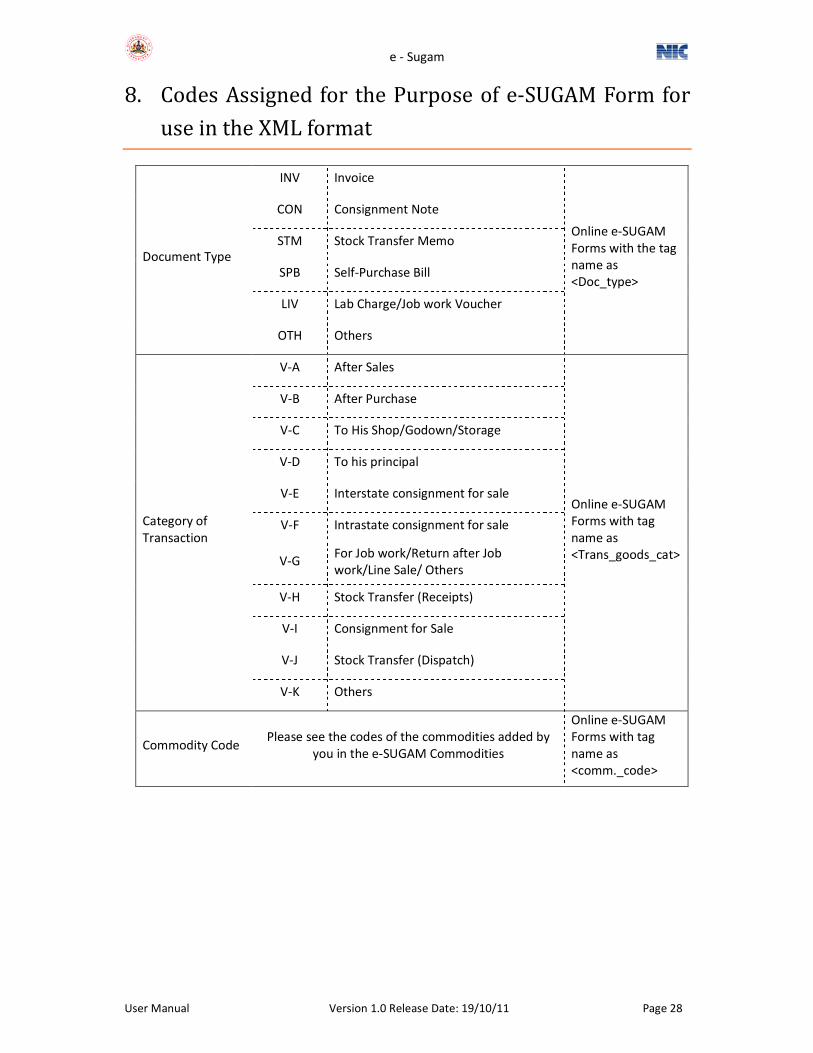
8. CodesAssignedfor thePurposeofe-SUGAMFormfor
useintheXMLformat
Document Type
INV Invoice
Online e-SUGAM
Forms with the tag
name as
<Doc_type>
CON Consignment Note
STM Stock Transfer Memo
SPB Self-Purchase Bill
LIV Lab Charge/Job work Voucher
OTH Others
Category of
Transaction
V-A After Sales
Online e-SUGAM
Forms with tag
name as
<Trans_goods_cat>
V-B After Purchase
V-C To His Shop/Godown/Storage
V-D To his principal
V-E Interstate consignment for sale
V-F Intrastate consignment for sale
V-G For Job work/Return after Job
work/Line Sale/ Others
V-H Stock Transfer (Receipts)
V-I Consignment for Sale
V-J Stock Transfer (Dispatch)
V-K Others
Commodity Code Please see the codes of the commodities added by
you in the e-SUGAM Commodities
Online e-SUGAM
Forms with tag
name as
<comm._code>
e - Sugam
User Manual Version 1.0 Release Date: 19/10/11 Page 29
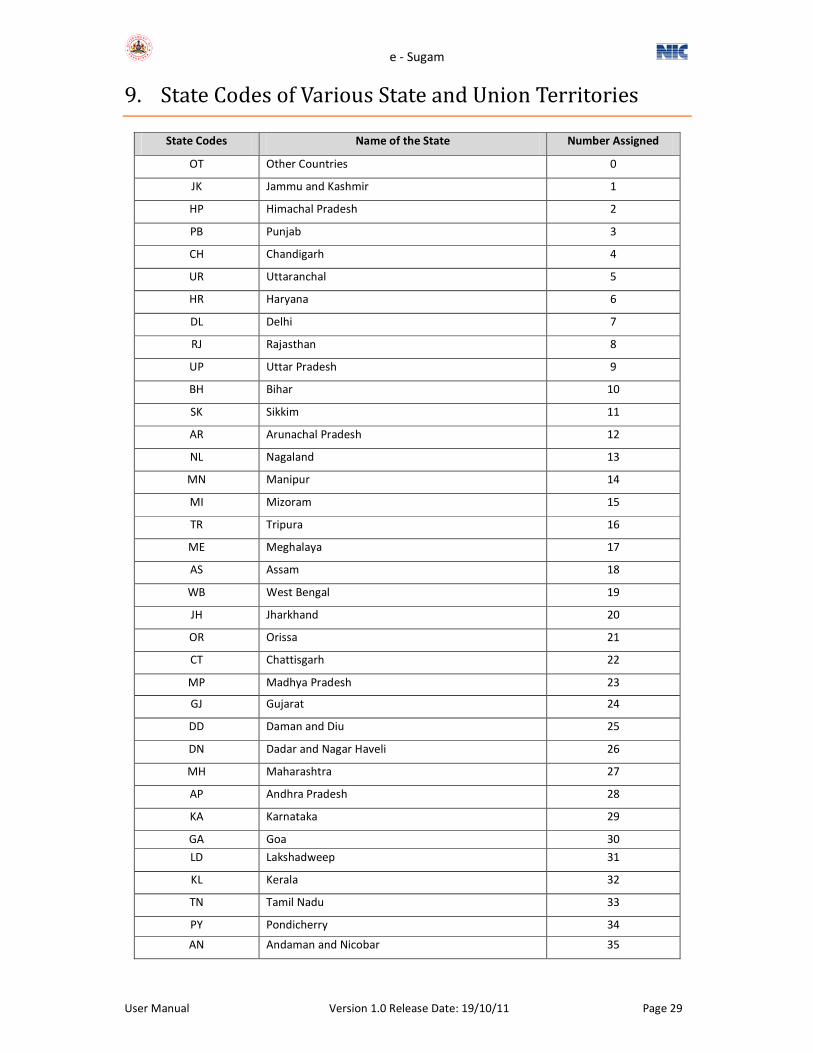
9. StateCodesofVariousStateandUnionTerritories
State Codes Name of the State Number Assigned
OT Other Countries 0
JK Jammu and Kashmir 1
HP Himachal Pradesh 2
PB Punjab 3
CH Chandigarh 4
UR Uttaranchal 5
HR Haryana 6
DL Delhi 7
RJ Rajasthan 8
UP Uttar Pradesh 9
BH Bihar 10
SK Sikkim 11
AR Arunachal Pradesh 12
NL Nagaland 13
MN Manipur 14
MI Mizoram 15
TR Tripura 16
ME Meghalaya 17
AS Assam 18
WB West Bengal 19
JH Jharkhand 20
OR Orissa 21
CT Chattisgarh 22
MP Madhya Pradesh 23
GJ Gujarat 24
DD Daman and Diu 25
DN Dadar and Nagar Haveli 26
MH Maharashtra 27
AP Andhra Pradesh 28
KA Karnataka 29
GA Goa 30
LD Lakshadweep 31
KL Kerala 32
TN Tamil Nadu 33
PY Pondicherry 34
AN Andaman and Nicobar 35
e - Sugam
User Manual Version 1.0 Release Date: 19/10/11 Page 30
10. RegularVerificationofe-SUGAMAccount
Every dealer shall view the report of all such entries made and the unique numbers generated
by him during every week for which a facility is provided on the websites to ensure the correctness
of the entries and also to ensure that the facility of entry of transactions made by him is not misused
by any unauthorized person. The verification of your account can be done as below:
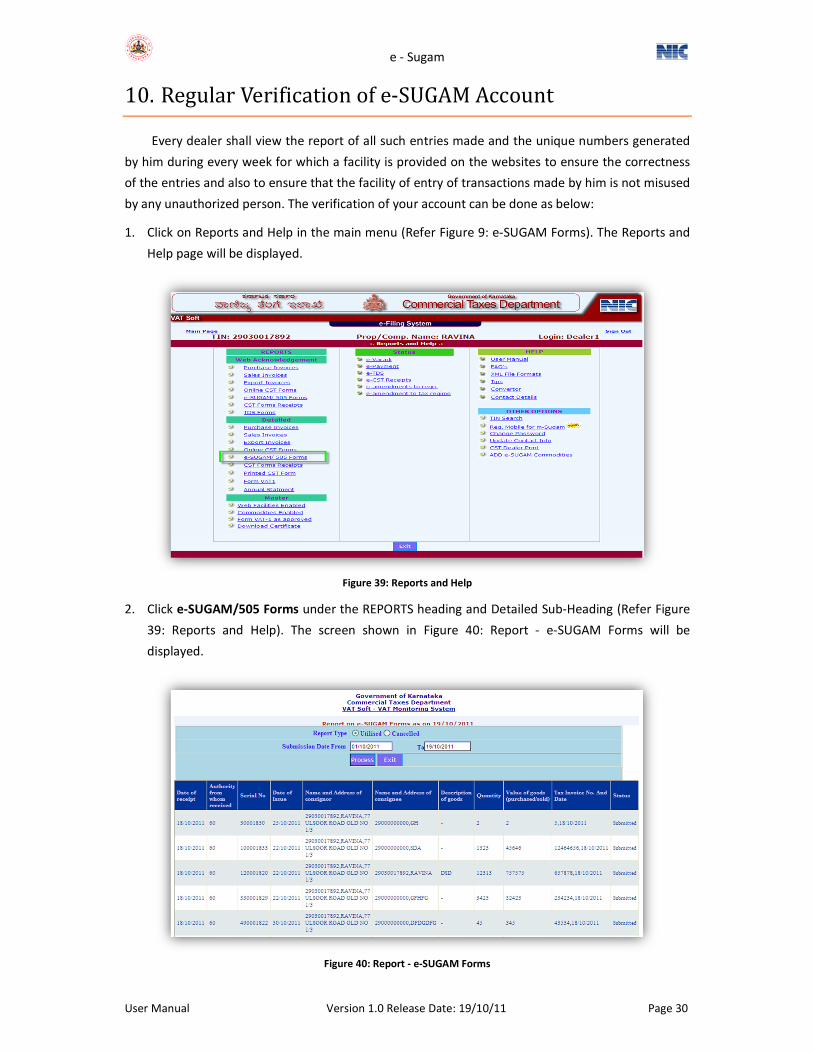
1. Click on Reports and Help in the main menu (Refer Figure 9: e-SUGAM Forms). The Reports and
Help page will be displayed.
Figure 39: Reports and Help
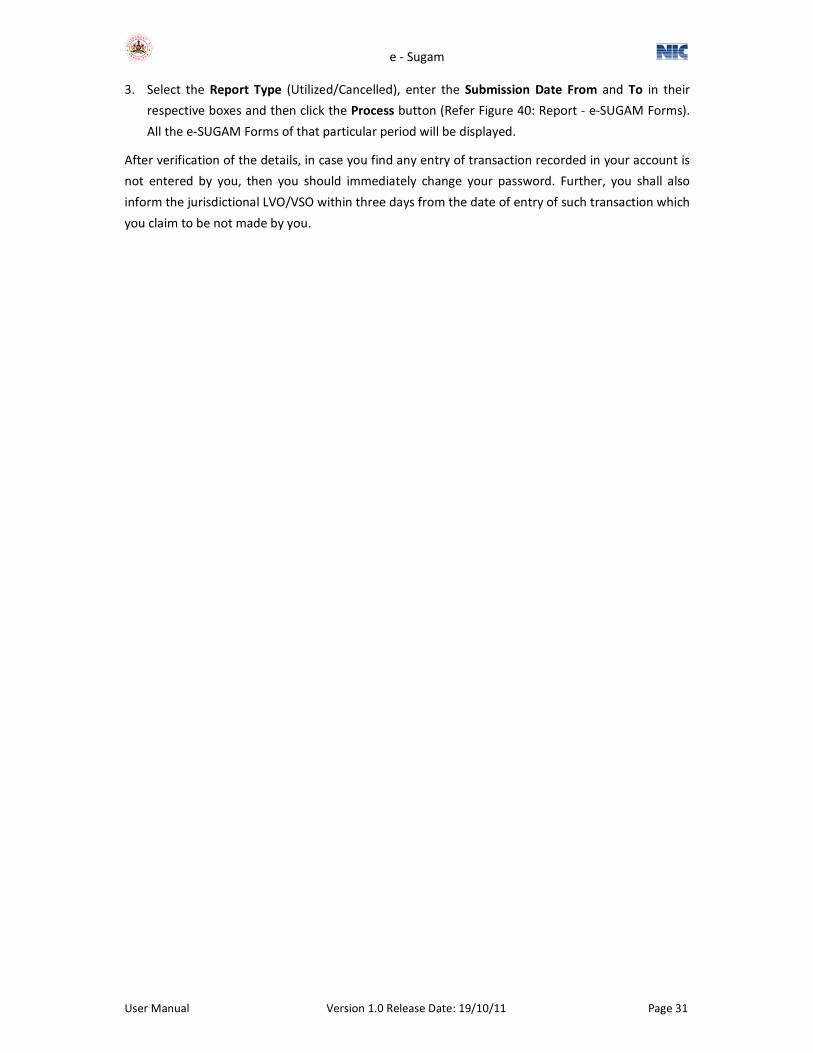
2. Click e‐SUGAM/505 Forms under the REPORTS heading and Detailed Sub-Heading (Refer Figure
39: Reports and Help). The screen shown in Figure 40: Report - e-SUGAM Forms will be
displayed.
Figure 40: Report ‐ e‐SUGAM Forms
e - Sugam
User Manual Version 1.0 Release Date: 19/10/11 Page 31
3. Select the Report Type (Utilized/Cancelled), enter the Submission Date From and To in their
respective boxes and then click the Process button (Refer Figure 40: Report - e-SUGAM Forms).
All the e-SUGAM Forms of that particular period will be displayed.
After verification of the details, in case you find any entry of transaction recorded in your account is
not entered by you, then you should immediately change your password. Further, you shall also
inform the jurisdictional LVO/VSO within three days from the date of entry of such transaction which
you claim to be not made by you.