E-Commerce Configuration Guide - Sitecore Documentation · 2019-03-06 · E-Commerce Configuration...
120
Sitecore E-Commerce Services 2.2 for CMS 7.0 or Later E-Commerce Configuration Guide Rev: 2014-02-20 Sitecore E-Commerce Services 2.2 for CMS 7.0 or Later E-Commerce Configuration Guide A developer's guide to configuring Sitecore E-Commerce Services
Transcript of E-Commerce Configuration Guide - Sitecore Documentation · 2019-03-06 · E-Commerce Configuration...

Sitecore E-Commerce Services 2.2 for CMS 7.0 or Later E-Commerce Configuration Guide Rev: 2014-02-20
Sitecore E-Commerce Services 2.2 for CMS 7.0 or Later
E-Commerce Configuration Guide A developer's guide to configuring Sitecore E-Commerce Services

Sitecore E-Commerce Services 2.2 for CMS 7.0 or Later
Sitecore® is a registered trademark. All other brand and product names are the property of their respective holders. The contents of this document are the property of Sitecore. Copyright © 2001-2014 Sitecore. All rights reserved.
Page 2 of 120
Table of Contents
Chapter 1 Introduction .................................................................................................................... 4 Chapter 2 Configuring a Webshop .................................................................................................. 5
2.1 Configuring a Webshop ...................................................................................................... 6 2.2 Configuring a Product ......................................................................................................... 9
2.2.1 The Product Items .......................................................................................................... 9 2.2.2 Product Variants ........................................................................................................... 10
Adding a Product to a Webshop Page ................................................................................... 11 Configuring the Fields in a Product Item ................................................................................ 14
2.3 Product Presentation ........................................................................................................ 18 Chapter 3 Configuring Sitecore E-Commerce Services ................................................................. 20
3.1 Sitecore E-Commerce Services ........................................................................................ 21 3.2 Webshop Functions .......................................................................................................... 22
3.2.1 Order Detail Mail .......................................................................................................... 22 3.2.2 Authentication .............................................................................................................. 24
Identifying the Form on a Page.............................................................................................. 26 3.2.3 Password ..................................................................................................................... 28 3.2.4 Create New Account ..................................................................................................... 30
3.3 Checkout .......................................................................................................................... 32 3.3.1 Process Line ................................................................................................................ 32 3.3.2 Shopping Cart .............................................................................................................. 34
Continue Shopping................................................................................................................ 36 Checkout .............................................................................................................................. 36
3.3.3 Customer Details .......................................................................................................... 37 Navigation Links.................................................................................................................... 38
3.3.4 Payment ....................................................................................................................... 39 Navigation Links.................................................................................................................... 40
3.3.5 Payment Cancel Page .................................................................................................. 40 Navigation Links.................................................................................................................... 41
3.3.6 Payment Error Page ..................................................................................................... 41 Navigation Links.................................................................................................................... 41
3.3.7 Payment Return ........................................................................................................... 42 3.3.8 Confirmation ................................................................................................................. 42
Navigation Links.................................................................................................................... 42 Order Sections ...................................................................................................................... 43
3.4 Webshop Site Settings ..................................................................................................... 46 3.4.1 Business Catalog ......................................................................................................... 46 3.4.2 Design Settings ............................................................................................................ 48 3.4.3 General ........................................................................................................................ 49
Changing the Decimal Separator ........................................................................................... 50 3.4.4 Shopping Cart .............................................................................................................. 51 3.4.5 Shopping Cart Spot ...................................................................................................... 52 3.4.6 MailTemplates .............................................................................................................. 53
Editing a Sample E-Mail Template......................................................................................... 54 3.5 Webshop Business Settings ............................................................................................. 55
3.5.1 VAT Regions ................................................................................................................ 55 3.5.2 Orders .......................................................................................................................... 56 3.5.3 Order State................................................................................................................... 56
Creating States and Sub States ............................................................................................ 56 Configuring States ................................................................................................................ 57
3.5.4 Countries ...................................................................................................................... 61 3.5.5 VAT .............................................................................................................................. 61 3.5.6 Currencies .................................................................................................................... 62 3.5.7 Shipping Options .......................................................................................................... 62 3.5.8 Currency Conversion .................................................................................................... 64

E-Commerce Configuration Guide
Sitecore® is a registered trademark. All other brand and product names are the property of their respective holders. The contents of this document are the property of Sitecore. Copyright © 2001-2014 Sitecore. All rights reserved.
Page 3 of 120
3.5.9 Notification Options ...................................................................................................... 64 3.5.10 Languages ............................................................................................................... 65 3.5.11 Payment Options ...................................................................................................... 65 3.5.12 Company Master Data .............................................................................................. 68
3.6 System/Modules/Ecommerce ........................................................................................... 71 3.6.1 Catalogs ....................................................................................................................... 71
Order Catalog ....................................................................................................................... 71 Product Catalog .................................................................................................................... 77 Creating a Check Box List ..................................................................................................... 81
3.6.2 System ......................................................................................................................... 83 Display Product Modes ......................................................................................................... 84 Product Presentation Repository ........................................................................................... 87 Product Selection Method ..................................................................................................... 88
3.6.3 Price Matrix .................................................................................................................. 90 3.7 Templates/Ecommerce ..................................................................................................... 93 3.8 My Page ........................................................................................................................... 94
Edit Customer Account.......................................................................................................... 94 Change Password ................................................................................................................. 96 Order History ........................................................................................................................ 96
Chapter 4 Editing the Webshop .................................................................................................. 100 4.1 Viewing User Information................................................................................................ 101 4.2 Redesigning a Form ....................................................................................................... 103
Chapter 5 Appendix .................................................................................................................... 113 5.1 Orders ............................................................................................................................ 114 5.2 Order Status ................................................................................................................... 117 5.3 Configuring Sitecore E-Commerce Services to Be Backward Compatible with Orders in the Content Tree ............................................................................................................................. 119

Sitecore E-Commerce Services 2.2 for CMS 7.0 or Later
Sitecore® is a registered trademark. All other brand and product names are the property of their respective holders. The contents of this document are the property of Sitecore. Copyright © 2001-2014 Sitecore. All rights reserved.
Page 4 of 120
Chapter 1
Introduction
The Sitecore E-Commerce is a framework for implementing e-commerce solutions on the Sitecore platform.
This document describes the configuration tasks that you need to carry out in the Content Editor when you implement an e-commerce solution. The Sitecore E-Commerce solution comes with example webshop pages. This cookbook demonstrates the functionality of Sitecore E-Commerce Services solution and how you implement it in the sample site.
This document contains the following chapters:
Chapter 1 — Introduction This is an introduction to the document.
Chapter 2 — Configuring a Webshop This chapter describes how to configure product items.
Chapter 3 — Configuring Sitecore E-Commerce Services This chapter describes all the elements that you can configure in Sitecore E-Commerce Services.
Chapter 4 — Editing the Webshop This chapter describes some of the ways in which you can edit the information displayed on the webshop.
Chapter 5 — Appendix The Appendix contains deprecated information.Editing the Webshop

E-Commerce Configuration Guide
Sitecore® is a registered trademark. All other brand and product names are the property of their respective holders. The contents of this document are the property of Sitecore. Copyright © 2001-2014 Sitecore. All rights reserved.
Page 5 of 120
Chapter 2
Configuring a Webshop
You must configure you webshop correctly to make full use of the functionality contained in the Sitecore E-Commerce Services. This chapter lists the major items that you must configure.
Before you can launch your e-commerce solution, you must decide how your products are going to be displayed and configure the information that you want to display with each product.
This chapter describes how products are displayed on the demo website and how to configure the information for each product.
This chapter contains the following sections:
Configuring a Webshop
Configuring a Product
Product Presentation

Sitecore E-Commerce Services 2.2 for CMS 7.0 or Later
Sitecore® is a registered trademark. All other brand and product names are the property of their respective holders. The contents of this document are the property of Sitecore. Copyright © 2001-2014 Sitecore. All rights reserved.
Page 6 of 120
2.1 Configuring a Webshop
When you design a new webshop there are a number of items that you must create and configure.
Here is a list the elements that you must configure when you create a webshop. You do not have to configure them in any particular order.
Webshop Settings
The Webshop Business Settings item contains some essential webshop items that you must configure.
VAT Regions — /sitecore/content/E-Commerce Examples/Home/Business
Catalog/VAT Regions — different regions can have different rates of VAT.
For more information about configuring the VAT regions, see the section VAT Regions.
VAT — /sitecore/content/E-Commerce Examples/Home/Business Catalog/VAT
— the different kinds of VAT that you want to support.
For more information about configuring VAT, see the section VAT.
Currencies — /sitecore/content/E-Commerce Examples/Home/Business
Catalog/Currencies — the currencies that you want to support.
For more information about configuring currencies, see the section Currencies
Currency Conversion — /sitecore/content/E-Commerce Examples/Home/Business Catalog/Currency Matrix
If you use the default price matrix to calculate prices, product prices are stored and displayed in one currency. If you need to display product prices in a different currency, you must configure the currency conversion items to enable automatic price conversion based on the appropriate exchange rates.
For more information about configuring currency conversion, see the section Currency Conversion.
Shipping Options — /sitecore/content/E-Commerce Examples/Home/Business Catalog/Shipping Providers
If you are going to ship products to your customers, you must configure the shipping options.
For more information about configuring shipping options, see the section Shipping Options.
Payment Options — /sitecore/content/E-Commerce Examples/Home/Business Catalog/Payments
If you are going to allow your customers to use payment providers you must configure the payment options.
For more information about configuring the payment options, see the section Payment Options and the Payment Method Reference Guide.
Company Master Data — /sitecore/content/E-Commerce Examples/Home/Business Catalog/Company Master Data
If you want the sales department to receive e-mail notifications whenever a customer places an order, you must configure the Company Master Data item.
The E-Commerce module only sends out e-mails when the MailServer setting in the web.config file is set correctly.
For more information about configuring the Company Master Data item, see the section Company Master Data.

E-Commerce Configuration Guide
Sitecore® is a registered trademark. All other brand and product names are the property of their respective holders. The contents of this document are the property of Sitecore. Copyright © 2001-2014 Sitecore. All rights reserved.
Page 7 of 120
Business Catalog — /sitecore/content/E-Commerce Examples/Home/Site Settings/Business Catalog
For more information about configuring the business catalog, see the section Business Catalog.
General Settings — Site Settings /sitecore/content/E-Commerce Examples/Home/Site Settings/General
For more information about configuring the general settings, see the section General.
Product Settings
Product Repositories
For more information about configuring the product repositories, see the section Configuring a Product.
Product detail presentation items.
For more information about configuring the product detail presentation items, see the section Product Presentation
Create and configure the inherited product templates. The product related templates that come with the product are:
o Product Base. The most basic template that all products must inherit from.
This template is a base template (root) and contains no fields.
o Product Base Data. The base data that should apply to all the products and contains the Product Code), EAN, SKU, and the Title.
o Product Base Presentation. This template contains additional base data for product presentation (not Sitecore presentation) such as: short description, long description, product images, and brand.
o Product Meta Info.
o Product Presentation Storage
For more information about configuring product presentation storage, see the section Product Presentation.
o Product — the default implementation (in the core package).
For more information about product templates, see the section Configuring the Fields in a Product Item.
Consider the product variants that you are going to sell and how to configure the product data.
For more information about configuring product data, see the section Product Variants.
General Settings
Configure the customer profile template in the Core database. The E-Commerce module comes with a default profile template that extends the user profile by adding invoice information and a shipping address along with other webshop related information.
Configure the order and the order line templates to ensure that they suit your business.
Configure the product catalog search form.
For more information about configuring the product catalog search form, see the section Catalogs.
Configure the order catalog search form.
For more information about the order catalog search form, see the section Catalogs.

Sitecore E-Commerce Services 2.2 for CMS 7.0 or Later
Sitecore® is a registered trademark. All other brand and product names are the property of their respective holders. The contents of this document are the property of Sitecore. Copyright © 2001-2014 Sitecore. All rights reserved.
Page 8 of 120
Configure the order detail confirmation page. Set up the information that you want to appear on the order confirmation page and in the confirmation e-mail that you want to send to the customer.
For more information about configuring the order detail confirmation page, see the section Confirmation.
Configure the e-mail templates for the mails that the webshop will send — /sitecore/content/E-Commerce Examples/Home/Site
Settings/MailTemplates
For more information about configuring the e-mail templates, see the section MailTemplates.

E-Commerce Configuration Guide
Sitecore® is a registered trademark. All other brand and product names are the property of their respective holders. The contents of this document are the property of Sitecore. Copyright © 2001-2014 Sitecore. All rights reserved.
Page 9 of 120
2.2 Configuring a Product
You use the Content Editor to access and configure all of the items in the Sitecore E-Commerce Services module.
The Sitecore E-Commerce Services module comes with some sample pages that demonstrate the functionality contained in this module. They also illustrate some of the different ways in which you can implement an e-commerce solution. The sample pages are from a webshop that sells photographic equipment.
This document explains the setting in the E-Commerce Services module and uses the sample pages to demonstrate the functionality contained in the Sitecore E-Commerce Services module. However, the sample pages have only been designed for demonstration purposes and do not represent any recommended methodology for implementing an e-commerce solution.
For example, the checkout pages in the website examples are just one way in which you can implement this important feature in your webshop — some webshops could contain more pages, or fewer pages, or have separate check out processes for members and non-members. Similarly, all of the product pages are not displayed in the same way.
Sometimes the same features have been implemented in several different ways to illustrate the flexibility of Sitecore. For example, some of the forms have been implemented in different ways.
2.2.1 The Product Items
The E-Commerce webshop product pages display the products that you want to sell on your webshop. These product items should not be stored with the website pages. They should be stored in the Product Repositories item.
The Product Repositories item contains repositories based on the Product Repository template. Each repository can contain products and product categories. You can create a structure that suits the needs of your product range.
You can add products manually or you can integrate the E-Commerce module with a back-end ERP system or data warehouse.
If you use a back-end system to manage your products, the way in which you add products depends largely on which back-end system you use. Explaining this integration is beyond the scope of this manual. You must create a Sitecore item in the product repository for each product that you want to sell on your webshop.

Sitecore E-Commerce Services 2.2 for CMS 7.0 or Later
Sitecore® is a registered trademark. All other brand and product names are the property of their respective holders. The contents of this document are the property of Sitecore. Copyright © 2001-2014 Sitecore. All rights reserved.
Page 10 of 120
For more information about how to integrate Sitecore E-Commerce Services with your ERP system or data warehouse, consult you Sitecore partner.
Each product category contains the products that belong to this category:
Note When you add custom product templates to the webshop, you must update the Insert Options of the product category template to include the additional templates. You can also create custom product category templates.
You can create multiple product repositories. In the webshop Site Settings/ Business Catalog item, the webshop is linked to the product repository that it uses.
2.2.2 Product Variants
Your webshop may need to sell different variations of the same product, for example, a shoe can come in different colors and sizes.
Sitecore E-Commerce treats product variants like any other product items because product variants are often created according to different requirements. The example pages do not contain any product variants.
When you implement Sitecore E-Commerce product templates for product variants, you should consider the following:
Product variants can be based either on standard product templates or on special product templates.

E-Commerce Configuration Guide
Sitecore® is a registered trademark. All other brand and product names are the property of their respective holders. The contents of this document are the property of Sitecore. Copyright © 2001-2014 Sitecore. All rights reserved.
Page 11 of 120
Some product variants may contain unique SKU’s.
Other product variants may not have SKU’s.
You can indicate that the items are product variants either by storing them under the main product item or by marking them in a special way.
Product variants can contain custom fields, or they can be identified by selecting an option from a dropdown list.
You can use inheritance to customize the product variant implementation by basing the product variant on the product template for which it is a variant.
If you don’t store the product variants like ordinary products you must replace the default IProductRepository and IProductRepositoryItem implementations, see developer guide. You must also do this if the products are stored outside of Sitecore and are not stored as items in Sitecore.
Your implementation can affect whether the product variants are displayed in the product catalogs when you configure the product pages. You may or may not want them to be displayed. If you don’t want them to be displayed, do not base them on the Product Base template.
We can recommend that:
You should use inheritance to define the product variant templates or use ordinary product templates.
Product variants should only vary in the values that are stored in dropdown lists that contain pre-defined options, such as color, size — for example, shoe size, TV screen size, and so on.
You do not use additional free-text fields in product variant templates.
Adding a Product to a Webshop Page
To add products to a webshop page:
1. In the content tree, select the page that you want to add products to.

Sitecore E-Commerce Services 2.2 for CMS 7.0 or Later
Sitecore® is a registered trademark. All other brand and product names are the property of their respective holders. The contents of this document are the property of Sitecore. Copyright © 2001-2014 Sitecore. All rights reserved.
Page 12 of 120
Note The webshop page must be inherited from the Product Search Group template.
2. Click the Product Page tab.
You use the fields in this search form to search for the products that you want to add. You can either search by the Product Code, ID, or the Brand names or a combination of these.
3. The products that match your search criteria are listed in the left-hand panel.
4. In the Display products by selecting field, you can decide whether you want to display the products that are listed as a result of the search on the web page or you want to manually select some of these products and display them on the web page.

E-Commerce Configuration Guide
Sitecore® is a registered trademark. All other brand and product names are the property of their respective holders. The contents of this document are the property of Sitecore. Copyright © 2001-2014 Sitecore. All rights reserved.
Page 13 of 120
5. If you want to manually select some of the products, select a product and click Add.
The product is added to the right-hand panel.
The webshop will display all the items in the right-hand panel in the order that they are listed in the right-hand panel of the search form.

Sitecore E-Commerce Services 2.2 for CMS 7.0 or Later
Sitecore® is a registered trademark. All other brand and product names are the property of their respective holders. The contents of this document are the property of Sitecore. Copyright © 2001-2014 Sitecore. All rights reserved.
Page 14 of 120
Configuring the Fields in a Product Item
In the Sitecore E-Commerce module, you can configure all the fields in every product item. You can use the templates that a product item is based on to add, change, or delete the fields in a product item.
To configure the fields in a product item:
1. In the content tree, locate the product item whose fields you want to configure.
2. In the right-hand pane, you see all the fields in this product item.
3. In the Quick Info section, in the Template field, click the link to open the Template Manager.

E-Commerce Configuration Guide
Sitecore® is a registered trademark. All other brand and product names are the property of their respective holders. The contents of this document are the property of Sitecore. Copyright © 2001-2014 Sitecore. All rights reserved.
Page 15 of 120
4. In the Template Manager, you can see all of the fields that this template contains.
5. In the right-hand pane, click the Inheritance tab.

Sitecore E-Commerce Services 2.2 for CMS 7.0 or Later
Sitecore® is a registered trademark. All other brand and product names are the property of their respective holders. The contents of this document are the property of Sitecore. Copyright © 2001-2014 Sitecore. All rights reserved.
Page 16 of 120
The Inheritance tab lists all the templates that the product item is based on.
6. Click the template whose fields you want to edit.
Now you can modify the contents of the fields.
Important If you modify any of the fields in the template, remember that these changes will affect all of the items that are based on this template.

E-Commerce Configuration Guide
Sitecore® is a registered trademark. All other brand and product names are the property of their respective holders. The contents of this document are the property of Sitecore. Copyright © 2001-2014 Sitecore. All rights reserved.
Page 17 of 120
To make sure that the changes only affect the current product item and its immediate product category, only edit the Specifications part that is displayed on the Builder tab.

Sitecore E-Commerce Services 2.2 for CMS 7.0 or Later
Sitecore® is a registered trademark. All other brand and product names are the property of their respective holders. The contents of this document are the property of Sitecore. Copyright © 2001-2014 Sitecore. All rights reserved.
Page 18 of 120
2.3 Product Presentation
When you use a search form to select the products that should be displayed on a particular page, the product items are still stored in the product repository and are not copied to the page that they are displayed on. This page lists all the products that you have selected and has a layout associated with it that determines how the list is presented on the page. When you click a product in the list, the product is displayed on a page of its own.
However, the list page can only contain one layout and therefore does not contain a layout that determines how the individual products are presented when you click them.
To specify how the individual products should be displayed:
1. In the Content Editor, select the page that lists the products.
2. In the right-hand pane, select the Content tab and scroll down to the Product in Category section.
3. In the Product Detail Presentation Storage field, select the product presentation that you want to use for the individual products contained on this page.
The Product Detail Presentation Storage field lists all the product presentations that have been defined for this site. The product presentations are stored in the /sitecore/system/Modules/Ecommerce/System/Product Presentation
Repository item.
A product presentation item does not contain any data fields because it is used to configure layout information. Each product presentations item has a layout assigned to it.

E-Commerce Configuration Guide
Sitecore® is a registered trademark. All other brand and product names are the property of their respective holders. The contents of this document are the property of Sitecore. Copyright © 2001-2014 Sitecore. All rights reserved.
Page 19 of 120
To configure the layout for a product presentation:
1. In the Content Editor, select the product presentation item and then on the Presentation tab, in the Layout group, click Details.
In the Layout Details dialog box, you can see that the PageMain layout has been assigned to this item.
2. In the Layout Details dialog box, click the PageMain layout.
3. In the Device Editor dialog box, select the layout that you want to assign to the product presentation item.

Sitecore E-Commerce Services 2.2 for CMS 7.0 or Later
Sitecore® is a registered trademark. All other brand and product names are the property of their respective holders. The contents of this document are the property of Sitecore. Copyright © 2001-2014 Sitecore. All rights reserved.
Page 20 of 120
Chapter 3
Configuring Sitecore E-Commerce Services
This chapter describes the various items that you can configure in Sitecore E-Commerce Services. It lists the important items that you can configure in the Sitecore E-Commerce Services and how they are linked together.
It describes how to edit the texts that appear on various pages, such as, My Page and Create an Account. It explains how to identify the forms that appear on the different pages in the demo website solution. There is also a brief description of how to edit and redesign a form.
This chapter contains the following sections:
Sitecore E-Commerce
Webshop Functions
Webshop Site Settings
Webshop Business
System/Modules/Ecommerce
My Page

E-Commerce Configuration Guide
Sitecore® is a registered trademark. All other brand and product names are the property of their respective holders. The contents of this document are the property of Sitecore. Copyright © 2001-2014 Sitecore. All rights reserved.
Page 21 of 120
3.1 Sitecore E-Commerce Services
You use the Content Editor to access and configure all of the items in Sitecore E-Commerce Services.
Sitecore E-Commerce Services comes with some examples of web pages that demonstrate the functionality contained in this application. They also illustrate some of the different ways in which you can implement an e-commerce solution.
When you open Sitecore E-Commerce Services in the Content Editor, you can see that most of its content is stored under the Examples item in the sitecore/Content/E-Commerce
Examples/Home folder:
The Home item includes the following elements:
Checkout — an exemplary checkout.
Layout Section — layouts that are used for the examples pages.
My Page — the My page example page and its functions.
Webshop Functions — they are used to link the web pages that are used for one particular purpose.
Webshop Site Settings — E-Commerce specific settings.
Webshop Business Catalog — important elements for the Sitecore E-Commerce solution are stored here.
The Sitecore E-Commerce Services also includes:
Product Repositories — this is where you store all of the product items.

Sitecore E-Commerce Services 2.2 for CMS 7.0 or Later
Sitecore® is a registered trademark. All other brand and product names are the property of their respective holders. The contents of this document are the property of Sitecore. Copyright © 2001-2014 Sitecore. All rights reserved.
Page 22 of 120
3.2 Webshop Functions
This section describes the items in the Webshop Functions node.
The Webshop Functions node contains some of the basic functionality and pages that you need in a webshop.
The functionality it contains includes:
Pages for managing the checkout process.
Pages for managing the shopping cart.
Pages for authenticating users.
Pages for creating and resetting passwords.
There is an example of how you can use these functions to create a checkout process for a webshop in the Checkout section.
3.2.1 Order Detail Mail
You use the Order Detail Mail item to specify the information that should be displayed in the order confirmation e-mail that is sent to a customer after they have placed an order.

E-Commerce Configuration Guide
Sitecore® is a registered trademark. All other brand and product names are the property of their respective holders. The contents of this document are the property of Sitecore. Copyright © 2001-2014 Sitecore. All rights reserved.
Page 23 of 120
The Order Detail Mail item contains the following fields:
Field Name Field Type Description
Title Single-Line Text The text in this field is the title of the item.
Short Description Multi-line text The text written in this field is displayed as an introduction under the Title.
The Order Detail Mail item itself doesn’t contain very much information. However, it does have a sub item — Order Sections:
The Order Sections item only contains one field, Use Other Order Sections.
The Use Other Order Sections field links to the
sitecore/content/Examples/Home/Checkout/Confirmation/Order Sections folder and
this is where the order confirmation e-mail draws its content from.

Sitecore E-Commerce Services 2.2 for CMS 7.0 or Later
Sitecore® is a registered trademark. All other brand and product names are the property of their respective holders. The contents of this document are the property of Sitecore. Copyright © 2001-2014 Sitecore. All rights reserved.
Page 24 of 120
In the example pages, the Confirmation page contains the details of the order:
Linking the items in this way ensures that the confirmation e-mail contains the same information as the order confirmation page that the user sees after they have placed their order.
3.2.2 Authentication
The Authentication function contains one item — the Login page. This is where a visitor to your website who has already created a customer account, can log in to your webshop, view their order history, and so on.
For example, to log in to the demo webshop with your customer account, click Login at the top of the page.

E-Commerce Configuration Guide
Sitecore® is a registered trademark. All other brand and product names are the property of their respective holders. The contents of this document are the property of Sitecore. Copyright © 2001-2014 Sitecore. All rights reserved.
Page 25 of 120
The Login page is displayed.
On the Login page you can either log in with your existing customer account or click a link and create a new customer account. If you have a customer account, but do not remember the credentials, you can click the Forgot password link to Reset Password page.
In the Content Editor, the Authentication item itself doesn’t contain any information but it does have a sub item called Login:
The Login item contains the following fields:
Field Name Field Type Description
Title Single-Line Text The text in this field is the title of the item.
Short Description Multi-line text The text written in this field is displayed as an introduction under the Title.
The Title and Short Description fields are not displayed on the Login page of the demo website.
The Login page contains a form and all of the information displayed on this page is drawn from this form.

Sitecore E-Commerce Services 2.2 for CMS 7.0 or Later
Sitecore® is a registered trademark. All other brand and product names are the property of their respective holders. The contents of this document are the property of Sitecore. Copyright © 2001-2014 Sitecore. All rights reserved.
Page 26 of 120
Identifying the Form on a Page
To see which form an item contains:
1. In the Content Editor, click the Presentation tab, and then in the Layout group, click Details.
If the item contains a form, the Layout Details dialog box lists a Form Interpreter in the PageMain section.
If the item contains more than one form, the Layout Details dialog box lists a different form interpreter for each from.
2. In the Layout Details dialog box, in the PageMain section, click Form Interpreter.
3. In the Control Properties dialog box, in the Data section, in the FormID field, you can see the name of the form, and where it is stored.

E-Commerce Configuration Guide
Sitecore® is a registered trademark. All other brand and product names are the property of their respective holders. The contents of this document are the property of Sitecore. Copyright © 2001-2014 Sitecore. All rights reserved.
Page 27 of 120
This form is stored in System/Modules/Web Forms for Marketers/Website/Log In.
The Title and Introduction fields in the Login form item contain the texts that are displayed on the Login page.
The form is also divided into two sections — one for creating a new account and one for logging in with an existing customer account.
The form looks like this on the page:
For more information about editing a form, see the section 4.2 Redesigning a Form.
Navigation Links
The Login item contains a sub item called Navigation Links. Navigation links are designed to contain the buttons on the item that allow you to move on to another item.
The Login item contains a navigation link — Login.

Sitecore E-Commerce Services 2.2 for CMS 7.0 or Later
Sitecore® is a registered trademark. All other brand and product names are the property of their respective holders. The contents of this document are the property of Sitecore. Copyright © 2001-2014 Sitecore. All rights reserved.
Page 28 of 120
The Login navigation link corresponds to the Log in button that appears on the Login page and this redirects you to the My Page page after you enter your user name and password.
A navigation link contains the following fields:
Field Name Field Type Description
Key Single-Line Text The name of this item.
Title Single-Line Text The text in this field is the name of the button on the Login page.
Link General Link The path to another item in the content tree.
Note The Navigation Links are not standard Sitecore functionality and have been created specifically for the demo website solution.
3.2.3 Password
The Password function contains the items that customers, who have already created a customer account, use to change their password. They may have forgotten their password or might just want to change it.
The Password function contains two sub items:
ResetPasswordForm
NewPasswordForm

E-Commerce Configuration Guide
Sitecore® is a registered trademark. All other brand and product names are the property of their respective holders. The contents of this document are the property of Sitecore. Copyright © 2001-2014 Sitecore. All rights reserved.
Page 29 of 120
Each of these items contains a form and these forms are stored in System/Modules/Web Forms
for Marketers/Website/.
The forms are called Reset Password and New Password respectively.
You use the Reset Password form if you have forgotten your password.
You use the New Password form to change your password.
Reset Password
In the demo website, the Reset password page looks like this:
This page contains the form that you use to reset your password when you have forgotten your current password.
To reset your password, enter your user name and an e-mail is sent to your e-mail address. This e-mail contains a link that you should follow to change your password.
Navigation Links
The Reset Password item contains a New Password navigation link.

Sitecore E-Commerce Services 2.2 for CMS 7.0 or Later
Sitecore® is a registered trademark. All other brand and product names are the property of their respective holders. The contents of this document are the property of Sitecore. Copyright © 2001-2014 Sitecore. All rights reserved.
Page 30 of 120
The New Password navigation link points to the New Password page.
New Password
The link in the reset password e-mail takes you to the New Password page.
After you enter and confirm your new password, another e-mail is sent to you confirming that the password has been changed.
3.2.4 Create New Account
Most visitors to your webshop who want to become customers will create a customer account so that they can check on the progress of their order and hear about special offers or promotions that you run on your website.
You use the Create New Account function to create a new customer account. The link to this function is displayed on the Log In page.

E-Commerce Configuration Guide
Sitecore® is a registered trademark. All other brand and product names are the property of their respective holders. The contents of this document are the property of Sitecore. Copyright © 2001-2014 Sitecore. All rights reserved.
Page 31 of 120
In the Content Editor, you can edit the fields of the Create Account function to change the appearance of the Create New Account or Log in page.
The Create Account item contains the following fields:
Field Name Field Type Description
Title Single-Line Text Displays the text written in this field in the menu.
Short Description
Multi-line text Displays the text written in this field under the Title as a page introduction.
For more information about editing forms, see the section Redesigning a Form on page 101.

Sitecore E-Commerce Services 2.2 for CMS 7.0 or Later
Sitecore® is a registered trademark. All other brand and product names are the property of their respective holders. The contents of this document are the property of Sitecore. Copyright © 2001-2014 Sitecore. All rights reserved.
Page 32 of 120
3.3 Checkout
The Checkout consists of a chain of pages that are all part to the checkout procedure.
The Checkout contains the following sub items:
Process Line
Shopping Cart
Customer Details
Payment
Confirmation
PaymentReturnPage
PaymentErrorPage
PaymentCancelPage
Each page in the checkout process contains a number of navigation links. These links help the customer navigate forwards and backwards through the checkout process. These links are generally Previous and Next.
3.3.1 Process Line
The Checkout includes a Process line item that contains some sub items.
These sub items correspond to the overall steps in the checkout process and are displayed as steps in the checkout.
In the demo website, the checkout process contains the following steps:
Customer Details

E-Commerce Configuration Guide
Sitecore® is a registered trademark. All other brand and product names are the property of their respective holders. The contents of this document are the property of Sitecore. Copyright © 2001-2014 Sitecore. All rights reserved.
Page 33 of 120
Payment
Confirmation
These steps are listed at the top of the page.
Each Process Line item contains the following fields:
Name — the name that appears in the tab in the checkout.
ChainedPage — a link to the items that are tied to this step in the checkout.

Sitecore E-Commerce Services 2.2 for CMS 7.0 or Later
Sitecore® is a registered trademark. All other brand and product names are the property of their respective holders. The contents of this document are the property of Sitecore. Copyright © 2001-2014 Sitecore. All rights reserved.
Page 34 of 120
Header Image — the image that is associated with this step in the checkout process.
3.3.2 Shopping Cart
Every e-commerce site needs a shopping cart to store the items that the customer selects on their way to the check out.
The Shopping Cart item contains the following fields:
Field Name Field Type Description
Title Single-Line Text The text in this field is the title of the item.
Short Description Multi-line text The text written in this field is displayed as an introduction under the Title.
In the sample pages, you can only access the shopping cart after you have added an item to it.

E-Commerce Configuration Guide
Sitecore® is a registered trademark. All other brand and product names are the property of their respective holders. The contents of this document are the property of Sitecore. Copyright © 2001-2014 Sitecore. All rights reserved.
Page 35 of 120
To access the Shopping Cart, click the Proceed to Checkout button or the Edit shopping cart link in the Shopping Cart on the right.
In the shopping cart, the Empty Cart button is used to empty the shopping cart of all its items. The Update Cart button is used to update the changes to the shopping items’ details if you left shopping items in the shopping cart for some time.
In the Content Editor, the Shopping Cart item contains two navigation links which correspond to the other links in the shopping cart:
Continue Shopping — the Continue Shopping button
Checkout — the Continue check out button

Sitecore E-Commerce Services 2.2 for CMS 7.0 or Later
Sitecore® is a registered trademark. All other brand and product names are the property of their respective holders. The contents of this document are the property of Sitecore. Copyright © 2001-2014 Sitecore. All rights reserved.
Page 36 of 120
Continue Shopping
The Continue Shopping navigation link points to the Home.aspx page — the Home page of the demo
website and you can continue shopping from there.
Checkout
The Checkout navigation link points to the Customer Details page which is the first page in the checkout process.
For more information on how to edit the shopping cart, see Shopping Cart and Shopping Cart Spot sections.

E-Commerce Configuration Guide
Sitecore® is a registered trademark. All other brand and product names are the property of their respective holders. The contents of this document are the property of Sitecore. Copyright © 2001-2014 Sitecore. All rights reserved.
Page 37 of 120
3.3.3 Customer Details
Customer Details is the first page in the Checkout process.
As you can see, the Customer Details page contains 2 forms.
Customer Details
Existing Customer
If you select the Use a different shipping address check box, the Customer Details form is reused for entering the shipping address.

Sitecore E-Commerce Services 2.2 for CMS 7.0 or Later
Sitecore® is a registered trademark. All other brand and product names are the property of their respective holders. The contents of this document are the property of Sitecore. Copyright © 2001-2014 Sitecore. All rights reserved.
Page 38 of 120
If you select the Create a customer account check box, the Existing Customer form is reused.
These forms are stored in System/Modules/Web Forms for Marketers/Website/Check
Out Process.
For more information about editing forms, see the section Redesigning a Form on page 101.
For more information about the Web Forms module visit the Sitecore Developer Network.
Navigation Links
The Customer Details function contains one navigation link:
Next — the Proceed to Checkout button.

E-Commerce Configuration Guide
Sitecore® is a registered trademark. All other brand and product names are the property of their respective holders. The contents of this document are the property of Sitecore. Copyright © 2001-2014 Sitecore. All rights reserved.
Page 39 of 120
The Next navigation link points to the Payment page of the checkout process.
3.3.4 Payment
Payment is the second page in the checkout process. When you click Proceed to Checkout on the Customer Details page, the Payment page appears.
This is where you select a payment provider for the products you are buying.
The payment methods that are displayed on this page are stored in the Webshop Business Settings.

Sitecore E-Commerce Services 2.2 for CMS 7.0 or Later
Sitecore® is a registered trademark. All other brand and product names are the property of their respective holders. The contents of this document are the property of Sitecore. Copyright © 2001-2014 Sitecore. All rights reserved.
Page 40 of 120
For more information about configuring the Webshop Business Settings, see Webshop Business Settings section.
Navigation Links
The Payment function contains one navigation link:
Confirm Order
The Confirm Order link points to the Confirmation page of the checkout process.
On the Payment page, the Confirm Order link is displayed as the Confirm Payment button.
3.3.5 Payment Cancel Page
In a webshop, you must ensure that appropriate messages are displayed to customers. The checkout process is the heart of every webshop and you must ensure that customers receive meaningful messages if they cancel their purchase or if anything goes wrong during the payment process.
In Sitecore E-Commerce Services, you create these message pages as part of the checkout process.
Some of the online payment providers allow customers to cancel the payment before they complete the payment process and the Payment Cancel Page is the page that customers are directed to when they cancel the payment.
For more information about configuring the website so that the user is directed to this page, see the Payment section on page 65.
The Payment Cancel Page item contains the following fields:

E-Commerce Configuration Guide
Sitecore® is a registered trademark. All other brand and product names are the property of their respective holders. The contents of this document are the property of Sitecore. Copyright © 2001-2014 Sitecore. All rights reserved.
Page 41 of 120
Field Name Field Type Description
Title Single-Line Text Displays the text written in this field in the menu.
Short Description Multi-line text Displays the text written in this field under the Title as a page introduction.
Default Payment Method Droplink Displays the default payment method.
Is Error Page Checkbox The Payment Cancel page is an error page if the check box is selected
Error Message Single-Line Text The message that is displayed on the Payment Cancel page.
Navigation Links
The Payment Cancel Page function contains one navigation link:
Confirm Order
This link corresponds to the button at the bottom of the Payment Cancel page.
3.3.6 Payment Error Page
The Payment Error Page is displayed when an error occurs in the payment process.
The Payment Error Page function is the same type of item as the Payment Cancel Page function and contains the same fields.
For information about configuring the website so that the user is directed to this page, see the Payment section on page 65.
Navigation Links
The Payment Error Page function contains one navigation link:
Confirm Order

Sitecore E-Commerce Services 2.2 for CMS 7.0 or Later
Sitecore® is a registered trademark. All other brand and product names are the property of their respective holders. The contents of this document are the property of Sitecore. Copyright © 2001-2014 Sitecore. All rights reserved.
Page 42 of 120
This link corresponds to the navigation button at the bottom of the Payment Error page.
3.3.7 Payment Return
When a customer selects an online payment provider (for example, Amazon), the Payment Return Page function is used to return them to the Payment page.
3.3.8 Confirmation
After a customer has successfully completed the payment process and clicked Return to Shop on the Provider’s page, the Confirmation page is displayed.
The Confirmation item contains the following fields:
Field Name Field Type Description
Title Single-Line Text Displays the text on the top of the page, the title of the page.
Short Description Multi-line text Displays the text written in this field under the Title as a page introduction.
Navigation Links
The Confirmation function contains a navigation link:
Go to Shop
This link corresponds to the Continue Shopping button at the bottom of the Confirmation page.

E-Commerce Configuration Guide
Sitecore® is a registered trademark. All other brand and product names are the property of their respective holders. The contents of this document are the property of Sitecore. Copyright © 2001-2014 Sitecore. All rights reserved.
Page 43 of 120
Order Sections
The Confirmation function also contains an Order Sections item.
This item is used to specify how the details of your order are displayed on the Confirmation page.
The Order Sections item contains one field:
Field Name Field Type Description
Use Other Order Section Droplink Links to the order sections that have been defined for another item and displays those order sections on this page.
In the Confirmation item, the Use Other Order Section field is not used. The order sections that you want to display on this page have been defined specifically for this item. You cannot reuse the order sections from another item on this page because the status of your order is changed when you confirm payment.
The Order Sections item contains the following sub items:

Sitecore E-Commerce Services 2.2 for CMS 7.0 or Later
Sitecore® is a registered trademark. All other brand and product names are the property of their respective holders. The contents of this document are the property of Sitecore. Copyright © 2001-2014 Sitecore. All rights reserved.
Page 44 of 120
The Row 1 item corresponds to the following section on the Confirmation page.
The Row item contains the following fields:
Field Name Field Type Description
CSS Class Droplink The number of columns displayed in the row.
Max height for sections Single-Line Text The maximum height of the sections in pixels.

E-Commerce Configuration Guide
Sitecore® is a registered trademark. All other brand and product names are the property of their respective holders. The contents of this document are the property of Sitecore. Copyright © 2001-2014 Sitecore. All rights reserved.
Page 45 of 120
The Billing Info item contains the following fields:
Field Name Field Type Description
Title Single-Line Text Displays the text written in this field in the title.
Show Label Column Checkbox Displays the names of all the fields in this section.
Hide Section Checkbox Hides the section if selected.
If you select the Show Label Column checkbox, the names of the fields are displayed on the web page.
Each order section field item contains the following fields:
Field Name Field Type Description
Title Single-Line Text Displays the text written in this field in the title.
Field Droptree The path to the information that is displayed in this field.
Show Label Checkbox Displays the name of the field name if selected.
Hide Field Checkbox Hides the field if selected.

Sitecore E-Commerce Services 2.2 for CMS 7.0 or Later
Sitecore® is a registered trademark. All other brand and product names are the property of their respective holders. The contents of this document are the property of Sitecore. Copyright © 2001-2014 Sitecore. All rights reserved.
Page 46 of 120
3.4 Webshop Site Settings
The Sitecore E-Commerce Services also contains a number of settings that you use to specify how the various elements in your website appear on the page and to determine some of the information that they display. Some of the settings determine how the different elements of your webshop interact with one another.
The Sitecore E-Commerce Services contains the following site settings:
Business Catalog
Design Settings
General
Shopping Cart
Shopping Cart Spot
Mail Templates
3.4.1 Business Catalog The Business Catalog item contains the settings that define the path to the Webshop Business Settings folders.
Each field in the Business Catalog item contains a link to the corresponding item in the Webshop Business Settings. In the default configuration, all of these items are stored in the

E-Commerce Configuration Guide
Sitecore® is a registered trademark. All other brand and product names are the property of their respective holders. The contents of this document are the property of Sitecore. Copyright © 2001-2014 Sitecore. All rights reserved.
Page 47 of 120
Webshop Business Settings node. However, the various items can be stored in different locations in which case you use the drop down lists in the fields to select the alternative location.
The Business Catalog folder can also contain a subfolder with order states and links between them. If you create the order states based on the branch templates, the links are not updated and point to the items of the branch templates. Instead of using branch templates, use the command templates with the following paths:
sitecore/templates/Branches/Ecommerce/States With Adjusted Links
sitecore/templates/Branches/Ecommerce/Webshop Business Settings With
Adjusted Links For States
Each of these templates contains the definition of the ses:updateBranchLinks command:
ses:updateBranchLinks(itemId=$ParentID,branchId={34D926FF-D5BF-49F0-A3BF-
E5F9AE2B06BE},name=States)
ses:updateBranchLinks(itemId=$ParentID,branchId={F1603625-8AA3-4270-9F3F-
9F8E31C7ABE0},name=Webshop Business Settings)
The command has the following format:
ses:updateBranchLinks(itemId=$ParentID,branchId={id_of_the_branch_to_create
_tree_from},name=name_of_the_newly_created_item)
The command is registered in the /App_Config/Sitecore.Ecommerce.config file as follows:
<command name="ses:updateBranchLinks"
type="Sitecore.Ecommerce.CommandTemplates.UpdateBranchLinksCommand,
Sitecore.Ecommerce.Core"/>
To use the command templates, you must assign them to the insert options. For example:
The States With Adjusted Links command is assigned to the insert options of the
standard values of the Business Catalog.

Sitecore E-Commerce Services 2.2 for CMS 7.0 or Later
Sitecore® is a registered trademark. All other brand and product names are the property of their respective holders. The contents of this document are the property of Sitecore. Copyright © 2001-2014 Sitecore. All rights reserved.
Page 48 of 120
The Webshop Business Settings With Adjusted Links For States template is
assigned to the insert options of the standard values of the Product Search Folder Group template.
3.4.2 Design Settings
You use the Design Settings item to define some of the basic layout specifications of your webshop.
In the Layout Sections, you specify the width and height of the columns used in the various layouts on the website.
In the Product Image section, you specify the size of the images displayed in the product pages on the website as well as the background color used for the images.
In the Product Info section, you specify the size of the image displayed on the product information page for each product.

E-Commerce Configuration Guide
Sitecore® is a registered trademark. All other brand and product names are the property of their respective holders. The contents of this document are the property of Sitecore. Copyright © 2001-2014 Sitecore. All rights reserved.
Page 49 of 120
3.4.3 General You use the General item to specify more settings for your webshop.
These settings include the default VAT region that your webshop is in, the currency used on the webshop, and the role assigned to customers on your webshop.

Sitecore E-Commerce Services 2.2 for CMS 7.0 or Later
Sitecore® is a registered trademark. All other brand and product names are the property of their respective holders. The contents of this document are the property of Sitecore. Copyright © 2001-2014 Sitecore. All rights reserved.
Page 50 of 120
The General item contains the following fields:
Field Name Field Type Description
Default VAT Region Droptree The VAT region that the webshop is in.
Price Format String Single-Line Text The format in which prices are displayed (except for the Shopping Cart page and the Shopping Cart spot, see more details in sectionsShopping Cart Spot, Shopping Cart Spot). For more information about editing the Price Format String, see the following web links: http://msdn.microsoft.com/en-us/library/txafckwd(v=VS.90).aspx http://www.csharp-examples.net/string-format-double/
Master Currency Droplink The currency in which a product is priced in the shop.
Display Currency Droplink The currency in which the price of a product is displayed on the webshop pages.
Display Currency on Prices
Check box If you select this check box, the currency will be displayed along with the price.
Main Login Link Droptree The link to the Login page.
Password Reminder Link
Droptree The link to the Reset Password page.
New User Account Link
Droptree The link to the Create New Account page.
My Page Link Droptree The link to the My Page page.
Search Page Link Droptree The link to the Search Results page.
Mail Templates Link Droptree The link to the mail templates folder that contains the templates for all the e-mails used on the webshop.
Default Customer Roles
Single-Line Text In this field, you enter the names of the default security roles that are assigned to visitors to your webshop who have created a customer account. If there is more than one role, enter them in a pipe (‘|’) separated list.
Note If you change the Price Format String setting for the General item, it will only affect the way the prices are displayed on all pages of your webshop except for the Shopping Cart page and the shopping cart spot.
Changing the Decimal Separator
If you want that the prices in your webshop are displayed with comma between the numerals and decimals, see the SES Developer’s Cookbook.

E-Commerce Configuration Guide
Sitecore® is a registered trademark. All other brand and product names are the property of their respective holders. The contents of this document are the property of Sitecore. Copyright © 2001-2014 Sitecore. All rights reserved.
Page 51 of 120
3.4.4 Shopping Cart You use the Shopping Cart item to specify the kind of information that is displayed in the shopping cart on the website.
The Shopping Cart item contains the following fields:
Field Name Field Type Description
Price Format String Single-Line Text The way that prices are displayed in the shopping cart. For more information about editing the Price Format String, see the following web links: http://msdn.microsoft.com/en-us/library/txafckwd(v=VS.90).aspx http://www.csharp-examples.net/string-format-double/
Show Image Checkbox Whether or not product images are displayed in the shopping cart.
Show Price Incl. VAT Checkbox Whether or not the prices shown should include VAT.
Note If you change the Price Format String setting for the Shopping Cart item, it will only affect the way the prices are displayed on this page of your webshop.

Sitecore E-Commerce Services 2.2 for CMS 7.0 or Later
Sitecore® is a registered trademark. All other brand and product names are the property of their respective holders. The contents of this document are the property of Sitecore. Copyright © 2001-2014 Sitecore. All rights reserved.
Page 52 of 120
3.4.5 Shopping Cart Spot
You use the Shopping Cart Spot item to configure the information that is displayed in the small shopping cart.
The Shopping Cart Spot item contains the following fields:
Field Name Field Type Description
Show Shopping Cart Item Lines
Checkbox Whether or not the spot should display a line for each item in the shopping cart.
Show Total Checkbox Whether or not a total is displayed in the shopping cart spot.
Show Price Info Checkbox Whether or not the Price Info field is displayed.
Price Info Single-Line Text A description of the price — for example, whether it includes VAT or not.
Show Total Incl. VAT Checkbox Whether or not the total price displayed should include VAT.
Show Amount in Shopping Cart Status Line
Checkbox Whether or not the number of items that are currently in the shopping cart is displayed.
Always Show Shopping Cart
Checkbox Whether or not the shopping cart should be displayed on every page.
Price Format String Single-Line Text The way that prices are displayed in the shopping cart spot. For more information about editing the Price Format String, see the following web links: http://msdn.microsoft.com/en-us/library/txafckwd(v=VS.90).aspx http://www.csharp-examples.net/string-format-double/

E-Commerce Configuration Guide
Sitecore® is a registered trademark. All other brand and product names are the property of their respective holders. The contents of this document are the property of Sitecore. Copyright © 2001-2014 Sitecore. All rights reserved.
Page 53 of 120
Field Name Field Type Description
Show Delete Option Checkbox Whether or not the delete item button is displayed beside each item in the shopping cart spot.
Show Image Checkbox Whether or not an image of each item is displayed in the shopping cart spot.
Show Price Incl. VAT Checkbox Whether or not the price of each item that is displayed should include VAT.
CheckOut Link Droptree The link to the first page in the checkout process. This is the link that is contained in the Check out button.
Edit Shopping Cart Link
Droptree The link to the shopping cart. This is the link that is contained in the Shopping Cart button.
Note If you change the Price Format String setting for the Shopping Cart Spot item, it will only affect the way the prices are displayed on the shopping cart spot all over the website.
3.4.6 MailTemplates The MailTemplates folder contains e-mail templates that are used in Sitecore E-Commerce Services.
The MailTemplates folder contains the following e-mail templates:
Contact Us
New User Confirmation
Order Mail To Admin
Order Mail To Customer
Your password has been changed
Your password has been reset
Reset your password
The e-mail templates contain the following fields:
Field Name Field Type Description
From Single-Line Text The e-mail address of the sender.
To Single-Line Text The e-mail address of the recipient.
Subject Single-Line Text The subject of the e-mail.

Sitecore E-Commerce Services 2.2 for CMS 7.0 or Later
Sitecore® is a registered trademark. All other brand and product names are the property of their respective holders. The contents of this document are the property of Sitecore. Copyright © 2001-2014 Sitecore. All rights reserved.
Page 54 of 120
Field Name Field Type Description
Body Rich text The body text of the e-mail.
BodySource Droptree The field contains a link to the item that is the source of the information contained in the Body field.
Editing a Sample E-Mail Template
You can edit all the fields in an e-mail template:
Some of the fields in the e-mail templates can contain variables. For example, the To field can contain {Recipient}.

E-Commerce Configuration Guide
Sitecore® is a registered trademark. All other brand and product names are the property of their respective holders. The contents of this document are the property of Sitecore. Copyright © 2001-2014 Sitecore. All rights reserved.
Page 55 of 120
3.5 Webshop Business Settings
The Webshop Business Settings item contains all of the items that affect the business aspects of your webshop, such as, the list of currencies that the webshop supports, what delivery alternatives are available, and so on.
3.5.1 VAT Regions
The VAT Regions item lists the different VAT regions that are used in the VAT item of the Business Catalog. For more information about VAT, see the section VAT.
Under the VAT Regions item, you can add new VAT regions, but also edit or delete them.

Sitecore E-Commerce Services 2.2 for CMS 7.0 or Later
Sitecore® is a registered trademark. All other brand and product names are the property of their respective holders. The contents of this document are the property of Sitecore. Copyright © 2001-2014 Sitecore. All rights reserved.
Page 56 of 120
3.5.2 Orders
Sitecore E-Commerce Services Order Manager stores all customer orders in a Microsoft SQL Server database.
It is beyond the scope of this guide to explain how SQL Server handles customer orders.
Note In SES 2.0.0 and later orders are no longer stored in the Sitecore content tree under Webshop Business Settings. If you need to refer to the documentation that describes this deprecated functionality, see the Orders section in the Appendix or refer to an earlier version of this documentation.
3.5.3 Order State
In Order Manager, order states and sub states indicate to end users the current progress or ‘state’ of an order. For example, it can show an order processor how far an order has progressed through the order fulfillment process or can indicate if an order is closed or cancelled. States and sub states can also trigger actions, such as money capture.
In Order Manager, there are five default states and six sub states. You can use or re-configure default states or create your own states or sub states.
Note In SES 2.0.0 and later order status is deprecated and has been replaced with order state. If you need more information on how to use order status, see the Order Status section in the Appendix.
In the Sitecore Content Editor, content tree, the States folder appears under the Webshop Business Settings.node.
Use the States folder to configure and create new states.
Creating States and Sub States
In the Content Editor, you can create new states and sub states by using the insert options available on the Sitecore ribbon.
To create a state:
1. In the Content Editor, content tree, select the States folder.
2. On the ribbon, Insert group, click State.

E-Commerce Configuration Guide
Sitecore® is a registered trademark. All other brand and product names are the property of their respective holders. The contents of this document are the property of Sitecore. Copyright © 2001-2014 Sitecore. All rights reserved.
Page 57 of 120
3. Name the new state ‘Test’.
4. Select and expand the ‘Test’ state item and you see that by default it has three sub folders called FollowingStates, SubStates and SubstateCombinations.
The next section explains how you can use these folders to configure your own states and sub states.
Configuring States
Using the In process state as an example, the following section describes how you can use state folders to configure your own states and sub states.
FollowingStates and Conditions
Use the FollowingStates folder to define which state must logically follow on from another state and then create conditions that must be met before moving on to the next state.
To create a new following state:
1. Select the FollowingStates folder
2. In Insert Options, click Following State Link.
3. Give your following state a name. In this example, the In process state is followed by two states:
Closed
Cancelled

Sitecore E-Commerce Services 2.2 for CMS 7.0 or Later
Sitecore® is a registered trademark. All other brand and product names are the property of their respective holders. The contents of this document are the property of Sitecore. Copyright © 2001-2014 Sitecore. All rights reserved.
Page 58 of 120
4. Select a following state from the drop-down list:
5. In the Sitecore ribbon, click Save.
Create conditions as sub items below FollowingStates that must be met before you can move to the next state.
To create a following state condition:
1. Select the following state item you just created.
2. In Insert Options, click Substate set.
3. Specify a name for the new condition; if Captured, Packed and Shipped In Full.
4. With this condition selected, configure the checkboxes in the Substates field. Select the sub state check boxes that you want to include in this condition.
In this example, the if Captured, Packed and Shipped In Full condition defines all the possible sub states that must be completed before an order can move to the Closed or Cancelled state:
5. In the Sitecore ribbon, click Save.
Note You can create conditions that only allow the selection of a single sub state or you can create others that allow multiple selections.

E-Commerce Configuration Guide
Sitecore® is a registered trademark. All other brand and product names are the property of their respective holders. The contents of this document are the property of Sitecore. Copyright © 2001-2014 Sitecore. All rights reserved.
Page 59 of 120
Substates
You create sub states as insert options below the Substates folder.
Create a separate content item for each sub state. In this example, the In process state, has the following three sub states:
Captured in full
Packed in full
Shipped in full
To create a sub state:
1. Select the SubStates folder.
2. In Insert Options, click Substate.
3. Enter a name for your sub state. For example, Captured in full.
4. Complete the Code, Name and Abbreviations fields.
The following table describes how the data in these fields is used:
Field Name Description
Code Values stored in the Orders database. This is the primary key that connects the data in the Order Manager database with the content in the CMS database, so that orders appear in the UI.
Name Full state or sub state display name used in the Smart panel and the Order Details page.
Abbreviations Used in some lists displayed as tables. For example, the tables displayed in the dashboard and order list pages.
5. On the Sitecore ribbon, click Save.
Your SubstateCombinations depend on the sub states that you define here.
SubstateCombinations
You create sub state combinations as insert options below the SubstateCombinations folder.

Sitecore E-Commerce Services 2.2 for CMS 7.0 or Later
Sitecore® is a registered trademark. All other brand and product names are the property of their respective holders. The contents of this document are the property of Sitecore. Copyright © 2001-2014 Sitecore. All rights reserved.
Page 60 of 120
When you create a new SubstateCombinations item, the options that appear in the Substates field are determined by what you have defined in the Substates folder.
Below the SubstateCombinations folder create a content item for every possible sub state combination for the selected state. In the Substates field, select or clear the appropriate check boxes to configure sub states. In this example, you can see all the possible check box combinations for the In process state.
For example, where the Packed in full check box is selected:
For example, where the Packed in full and Shipped in full check boxes are selected
You can change the configuration of the default states and sub states or create your own.
Note As a precaution, it is good practice to back up any default states that you re-configure so you have the option to restore these states later.
For more information about using states and sub states, see the Order Management Cookbook.

E-Commerce Configuration Guide
Sitecore® is a registered trademark. All other brand and product names are the property of their respective holders. The contents of this document are the property of Sitecore. Copyright © 2001-2014 Sitecore. All rights reserved.
Page 61 of 120
3.5.4 Countries
The Countries item contains a list of the countries to which your webshop ships orders.
The Country items contain the following fields:
Field Name Type of Field Field Purpose
Code Single-Line Text The code of the country as it appears in the provider.
Name Single-Line Text The name of the country as it appears in the provider.
Title Single-Line Text The title of the country.
VAT Region Droplink Displays the VAT region value as it appears for example in the VAT item.
3.5.5 VAT
Some countries have multiple rates of VAT, for example, one rate for food and another for luxury goods. In the Webshop Business Settings, in the VAT item, you create items for the different kinds of VAT that your webshop supports.
You can specify which rate of VAT is used by each country. In this example, Norway has a special VAT rate for food.
The different VAT options, such as Default and Food VAT, are based on the VAT OptionValue template and contain the following fields:
Field Name Field Type Description
Code Single-Line Text The code of the kind of VAT.
Name Single-Line Text The name of the kind of VAT.

Sitecore E-Commerce Services 2.2 for CMS 7.0 or Later
Sitecore® is a registered trademark. All other brand and product names are the property of their respective holders. The contents of this document are the property of Sitecore. Copyright © 2001-2014 Sitecore. All rights reserved.
Page 62 of 120
Field Name Field Type Description
Title Single-Line Text The title of the kind of VAT.
The different VAT items that are stored under VAT options, such as Denmark and US, are based on the VAT Region Value template and contain the following fields:
Field Name Field Type Description
VAT Region Droptree This field maps a VAT region to the corresponding VAT Regions item
VAT Value Number The rate of VAT used in this region.
3.5.6 Currencies
In the Currencies item, you create an item for each currency that your webshop supports.
A currency item contains the following fields:
Field Name Field Type Description
Code Single-Line Text This feature is disabled in this version of the Sitecore E-commerce.
Name Single-Line Text The name of the currency.
Title Single-Line Text The symbol of the currency.
Sitecore E-Commerce Services only supports one currency per shop. However, you can store product prices in one currency and display the prices in another currency on the webshop.
3.5.7 Shipping Options
Your webshop must support a number of options for delivering products to your customers. The shipping options that your webshop supports can be displayed on the Payment page during the checkout and the customer can then select the shipping option that they prefer.
Note The shipping options in the E-Commerce webshop have not been implemented and are just for demonstration purposes.

E-Commerce Configuration Guide
Sitecore® is a registered trademark. All other brand and product names are the property of their respective holders. The contents of this document are the property of Sitecore. Copyright © 2001-2014 Sitecore. All rights reserved.
Page 63 of 120
You can create new shipping options in the Shipping Options item.
A shipping option contains the following fields:
Field Name Field Type Description
Code Droplist The code of the shipping option.
Name Single-Line Text The name of the shipping option as it appears in the option.
Title Single-Line Text The title of the shipping option.
Short Description Single-Line Text A short description of the shipping option. This description is displayed under the name of the delivery option.
Icon Image The logo or icon of the shipping option.
Available Notification Options
Multilist Displays the list of notification options that are available. You select the notification options that apply for each shipping option.
Price Single-Line Text Fill in this field to enter the cost of delivery if a customer chooses the selected shipping option.
Delivery Time Single-Line Text In this field, you can specify when the products can be delivered using the selected shipping option.
For more information about configuring the Payment page, see the Payment section.

Sitecore E-Commerce Services 2.2 for CMS 7.0 or Later
Sitecore® is a registered trademark. All other brand and product names are the property of their respective holders. The contents of this document are the property of Sitecore. Copyright © 2001-2014 Sitecore. All rights reserved.
Page 64 of 120
3.5.8 Currency Conversion
In the Currency Conversion item, you specify the exchange rate for a currency.
A currency item contains the following fields:
Field Name Field Type Description
Currency Link Droplink The link to the corresponding currency in the currency item.
Exchange Rate Single-Line Text Here you can specify the exchange rate of the selected currency to the first currency in the list.
Sitecore E-Commerce Services only supports one currency per shop. However, you can store product prices in one currency and display the prices in another currency on the webshop.
3.5.9 Notification Options
A notification option describes the way a customer is notified when the products they have ordered are shipped from your warehouse.
You can create new notification options in the Notification Options item.
The notification options that you create here are the ones that you can specify for the different delivery methods.
A notification option contains the following fields:
Field Name Field Type Description
Code Single-Line Text The notification option code.
Name Single-Line Text The name of the notification option.
Title Single-Line Text The title of the notification option.

E-Commerce Configuration Guide
Sitecore® is a registered trademark. All other brand and product names are the property of their respective holders. The contents of this document are the property of Sitecore. Copyright © 2001-2014 Sitecore. All rights reserved.
Page 65 of 120
3.5.10 Languages
In the Business Catalog, the Languages item contains the language items that have been defined for mapping the languages to external ERP systems.
You can create new language items when you need them.
A language item contains the following fields:
Field Name Field Type Description
Code Single-Line Text The language code.
Name Single-Line Text The name of the language.
Title Single-Line Text The title of the language.
Sitecore Language Droplist Associates the E-commerce language with the language abbreviation that corresponds to it in Sitecore.
When you import products from an external ERP system, the products can contain values in different languages. These values in the ERP system are exported in an XML file and you can map them to the language items in the Business Catalog. There is no import module to help you import this data so you must do this manually.
3.5.11 Payment Options
Your webshop must support different payment options so that customers can select the payment option that they want to use when paying for the goods that they order. You must create a payment option for each kind of payment that your website supports. You must also configure the pages that are displayed to the user after they have successfully posted their order, if an error occurs, or if they cancel the payment.
Most webshops, even very big ones, use one or more online payment services to manage this important feature of their site. Creating your own secure payment system is both extremely costly and very time consuming. You can even integrate the online payment service functionality into your own website so that it looks like an integral part of your website.

Sitecore E-Commerce Services 2.2 for CMS 7.0 or Later
Sitecore® is a registered trademark. All other brand and product names are the property of their respective holders. The contents of this document are the property of Sitecore. Copyright © 2001-2014 Sitecore. All rights reserved.
Page 66 of 120
The Payment Options item contains the following fields:
Field Name Field Type Description
Payment Return Page URL General Link The URL of the payment return page. For more information, see the Payment Return section.
Payment Succeeded URL General Link The URL of the page that you are directed to after successfully paying for a purchase.
Payment Failed URL General Link The URL of the page that you are directed to if the payment process fails for some reason.
Payment Cancel URL General Link Some of the online payment providers allow you to cancel payment and this is the URL of the page you are directed to if you decide to cancel the payment for some reason.
For more information about these message pages, see the Checkout section on page 32.
Sitecore distributes a number of packages that contain payment providers for other payment options. These packages contain the code and the necessary Sitecore items. These payment provider packages are available on the SDN.
You can install as many of these packages as you need in your E-Commerce Services solution.

E-Commerce Configuration Guide
Sitecore® is a registered trademark. All other brand and product names are the property of their respective holders. The contents of this document are the property of Sitecore. Copyright © 2001-2014 Sitecore. All rights reserved.
Page 67 of 120
When you install a payment provider package, an item is created in the /sitecore/system/Modules/Ecommerce/Payment Options folder.
To configure a payment provider, you must copy the corresponding new payment option item from here and place it in the Webshop Business Settings/Payments Options folder of your webshop, for
example, E-Commerce Examples/Home/Webshop Business settings/Payment Options.
The payment options contain the following fields:
Field Name Field Type Description
Code Droplist The payment method code.
Name Single-Line Text The name of the payment method.
Title Single-Line Text The title of the payment method.
Short Description Single-Line Text A short description of the payment method. This description is displayed under the name of the payment method.
Icon Image The logo of the payment method.
Online Payment Checkbox Indicates whether or not the payment method is an online one.
Username Single-Line Text The user name that the webshop uses to log in to the payment provider.
Password Single-Line Text The password that the webshop uses to log in to the payment provider.
Payment Provider URL General Link The URL of the payment provider.
Payment Provider Secondary URL
General Link Some payment providers have an alternative URL to send a call to another resource. It can be inserted in this field.
Settings Multi-Line Text The settings that the webshop uses when it logs into the payment provider.

Sitecore E-Commerce Services 2.2 for CMS 7.0 or Later
Sitecore® is a registered trademark. All other brand and product names are the property of their respective holders. The contents of this document are the property of Sitecore. Copyright © 2001-2014 Sitecore. All rights reserved.
Page 68 of 120
The payment options are displayed on the Payment page during the checkout process.
Before you can use an online payment service in your webshop, you must enter into an agreement with them.
For more information about installing and configuring the SES payment providers, see the SES Payment Provider Guide.
3.5.12 Company Master Data
The Company Master Data item is used to store the name, address, e-mail address, and so on of the company. This and other information about the company can then be displayed on multiple pages without you having to create items or fill out forms all over the website.
For example, the Company Master Data can be displayed in the footer of every page.
In the Webshop Business Settings, in the Company Master Data item, you can edit your company information.

E-Commerce Configuration Guide
Sitecore® is a registered trademark. All other brand and product names are the property of their respective holders. The contents of this document are the property of Sitecore. Copyright © 2001-2014 Sitecore. All rights reserved.
Page 69 of 120
All of the fields in the Company Master Data item are Single-Line Text fields.
The Company Master Data item contains some business unit sub items — Sales, Support, and Technical — that can contain details about some departments or offices in the company.
You can create as many of these business unit items as you need.
The business unit sub items contain only one field — Email, a Single-Line Text field.
You enter the e-mail address of the business unit in this field.
In your webshop, on the Contact Us page, you can select the business unit that you want to contact and your message is sent to the e-mail address of that business unit.
Important When a customer places an order in your webshop, Sitecore E-Commerce Services sends an e-mail to the customer confirming their order. Sitecore E-Commerce Services also sends an e-mail to the sales department informing them that an order has been placed and that they need to process it. This e-mail is sent to the e-mail address contained in the Sale item.

Sitecore E-Commerce Services 2.2 for CMS 7.0 or Later
Sitecore® is a registered trademark. All other brand and product names are the property of their respective holders. The contents of this document are the property of Sitecore. Copyright © 2001-2014 Sitecore. All rights reserved.
Page 70 of 120
This means that you cannot delete the Sale item from the Company Master Data.
If you don’t want to send an e-mail to your Sales Department and want to ensure that you do not receive an exception, remove the following line from the Sitecore.Ecommerce.config file, in the
/configuration/sitecore/pipelines/ordercreated element:
<processor type="Sitecore.Ecommerce.Pipelines.OrderCreated.SendMailToAdmin,
Sitecore.Ecommerce.Kernel"/>

E-Commerce Configuration Guide
Sitecore® is a registered trademark. All other brand and product names are the property of their respective holders. The contents of this document are the property of Sitecore. Copyright © 2001-2014 Sitecore. All rights reserved.
Page 71 of 120
3.6 System/Modules/Ecommerce
The Sitecore E-commerce Services contains some more items that you can configure. These are stored in the Sitecore/System/Modules/Ecommerce folder.
3.6.1 Catalogs
The Catalogs folder contains two sub items:
Order Catalog
Product Catalog
Order Catalog
You use the Order Catalog item to control the appearance of the Webshop Business
Settings/Orders search form when you view it in the Custom Editor.

Sitecore E-Commerce Services 2.2 for CMS 7.0 or Later
Sitecore® is a registered trademark. All other brand and product names are the property of their respective holders. The contents of this document are the property of Sitecore. Copyright © 2001-2014 Sitecore. All rights reserved.
Page 72 of 120
The Order Catalog item includes the following fields:
Field Name Field Type Description
Templates Multi-list Using the mutli-list field, you can select the template for the Order Catalog item.
Provider Single-Line Text This field defines the search provider for the Order Catalog item.
Ribbon Source URI Single-Line Text This field contains the ribbon item URI. The catalog reads the ribbon item and displays it as a contextual ribbon.
Editor Fields Multi-list The catalog grid opens the Field Editor application on double click and allows you to edit the selected row.
The Order Catalog folder contains the following subfolders:
Search Fields
Checklists
Grid

E-Commerce Configuration Guide
Sitecore® is a registered trademark. All other brand and product names are the property of their respective holders. The contents of this document are the property of Sitecore. Copyright © 2001-2014 Sitecore. All rights reserved.
Page 73 of 120
Search Fields
The Search Fields subfolder contains the following item:
The Order ID item is the uppermost search field on the Orders search form.
The Order ID item contains the following fields:
Field Name Field Type Description
Field Single-Line Text The name of the field that should be entered to search for a particular order.
Title Single-Line Text Change this field to modify the title of the item in the form.

Sitecore E-Commerce Services 2.2 for CMS 7.0 or Later
Sitecore® is a registered trademark. All other brand and product names are the property of their respective holders. The contents of this document are the property of Sitecore. Copyright © 2001-2014 Sitecore. All rights reserved.
Page 74 of 120
Checklists
The Checklists subfolder contains a number of Column sub items that control the appearance and the number of columns displayed in the Search Results pane of the Orders search form.
Each Column item contains the following fields:
Field Name Field Type Description
Field Single-Line Text The name of the field for the program or script to refer to.
Root Droplist The link to the relevant folder options in the Business Catalog.

E-Commerce Configuration Guide
Sitecore® is a registered trademark. All other brand and product names are the property of their respective holders. The contents of this document are the property of Sitecore. Copyright © 2001-2014 Sitecore. All rights reserved.
Page 75 of 120
The root field in the Notification item establishes a reference to the Notification Options folder options in the Business Catalog.
For more information on how to add a new checklist for the Order Catalog form, see section Creating a Check Box List.
Grid
The Grid subfolder contains a number of column heading items in the Orders form.

Sitecore E-Commerce Services 2.2 for CMS 7.0 or Later
Sitecore® is a registered trademark. All other brand and product names are the property of their respective holders. The contents of this document are the property of Sitecore. Copyright © 2001-2014 Sitecore. All rights reserved.
Page 76 of 120
The Order Catalog/Grid items are the column headings in the Search Results form.
Each Column item contains the following fields:
Field Name Field Type Description
Header Single-Line Text The title of the field on the Orders search form.
Field Name Single-Line Text The name of the field for the program or script to refer to.
Format String Single-Line Text The field where you can enter the format of the item.
Hidden Check Box Select this check box if you want to make the column hidden in the search form.
Row ID Check Box Select this check box if you want to make the current item the row ID. If you save and publish the changes, the search form will search for the item ID processing these items.

E-Commerce Configuration Guide
Sitecore® is a registered trademark. All other brand and product names are the property of their respective holders. The contents of this document are the property of Sitecore. Copyright © 2001-2014 Sitecore. All rights reserved.
Page 77 of 120
Product Catalog
The Product Catalog item defines the appearance and the number of columns on the Search page of an item that lists products. In the list of you can see what items contain product catalogs.
For information about the fields in the Product Catalog item, see section Order Catalog.
In the Product Catalog folder, you can edit the following sub items:
Search Test Fields
CheckLists
Grid

Sitecore E-Commerce Services 2.2 for CMS 7.0 or Later
Sitecore® is a registered trademark. All other brand and product names are the property of their respective holders. The contents of this document are the property of Sitecore. Copyright © 2001-2014 Sitecore. All rights reserved.
Page 78 of 120
Search Test Fields The Search Test Fields folder includes the items that describe the following fields on a Product Catalog search form page of an item:
While managing a Search Text Folder item, you can edit the following fields:
Field Name Field Type Description
Field Single-Line Text The name of the field for the program or script to refer to.
Title Single-Line Text Displays the title of the column, as it appears in the search form.

E-Commerce Configuration Guide
Sitecore® is a registered trademark. All other brand and product names are the property of their respective holders. The contents of this document are the property of Sitecore. Copyright © 2001-2014 Sitecore. All rights reserved.
Page 79 of 120
Check Box Lists
The CheckLists folder includes the item that describes the following fields on a Product Catalog search form page of an item:
While managing the CheckLists item, you can edit the following fields:
Field Name Field Type Description
Field Single-Line Text The name of the field for the program or script to refer to.
Root Droplist The link to the relevant folder options in the Product Repositories.
The link in the Root field points to the Brands item under Product Repositories.

Sitecore E-Commerce Services 2.2 for CMS 7.0 or Later
Sitecore® is a registered trademark. All other brand and product names are the property of their respective holders. The contents of this document are the property of Sitecore. Copyright © 2001-2014 Sitecore. All rights reserved.
Page 80 of 120
For more information on how to add a new checklist for the Product Catalog form, see section Creating a Check Box List.
Grid
The Grid folder contains the items that represent the following fields on a Product Catalog search page:
While managing a Grid item, you can edit the following fields:
Field Name Field Type Description
Header Single-Line Text The field displays the name of the header of the column in the search form.
Field Name Single-Line Text The name of the field for the program or script to refer to.
Format String Single-Line Text The field where you can enter the format of the item.
Hidden Check Box If you select this check box, the header of the column will not be seen on the search form (see the first screenshot in the Grid section as an example).

E-Commerce Configuration Guide
Sitecore® is a registered trademark. All other brand and product names are the property of their respective holders. The contents of this document are the property of Sitecore. Copyright © 2001-2014 Sitecore. All rights reserved.
Page 81 of 120
Field Name Field Type Description
Row ID Check Box Select this check box if you want to make the current item the row ID. If you save and publish the changes, the search form will search for the item ID processing these items.
Creating a Check Box List
You can easily create a check box list.
To create a check box list:
1. In the Page Editor, in the System/Modules/E-Commerce/Catalogs/Product
Catalog/Checklists folder, right-click the Brands item and duplicate the Brands item to
create a VAT checklist item.
2. In the Field field, enter the name of the item and in the Root field click the drop down arrow
and select the /sitecore/content/E-Commerce Examples/Home/Business
Catalog/VAT item.

Sitecore E-Commerce Services 2.2 for CMS 7.0 or Later
Sitecore® is a registered trademark. All other brand and product names are the property of their respective holders. The contents of this document are the property of Sitecore. Copyright © 2001-2014 Sitecore. All rights reserved.
Page 82 of 120
3. Click any product category item and you can see that the new check box list has been added to the search page.
4. After you have added a check box list to the Product Catalog, you need to ensure that the name of the field is displayed in the search results list. The VAT column in the search results list will display the VAT option after which you will be searching for.
5. Create a VAT item in the
sitecore/system/Modules/Ecommerce/Catalogs/Product Catalog/Grid folder.
6. Ensure that the fields in the VAT sub item contain the following information:
For more information about filling in the VAT item fields, see the section Catalogs.

E-Commerce Configuration Guide
Sitecore® is a registered trademark. All other brand and product names are the property of their respective holders. The contents of this document are the property of Sitecore. Copyright © 2001-2014 Sitecore. All rights reserved.
Page 83 of 120
7. If you now go back to the product category, the search results list on the Product Catalog page will display the VAT column.
All of the search results in the VAT column have the Default value, because there is no Food VAT for a camera.
8. The check box list is now fully functional. If you want to find only the products that have the default VAT, select the Default check box in the VAT check box list and then click Search.
The search results display all the products with the default VAT.
3.6.2 System
The System folder contains a number of items that determine how products, search results, and some other items are displayed on the website.

Sitecore E-Commerce Services 2.2 for CMS 7.0 or Later
Sitecore® is a registered trademark. All other brand and product names are the property of their respective holders. The contents of this document are the property of Sitecore. Copyright © 2001-2014 Sitecore. All rights reserved.
Page 84 of 120
The System folder contains the following sub items:
Display Product Modes
Product Presentation
Product Selection Method
Display Product Modes
Use this item to specify the information that is displayed in the URL for your product items.
Sitecore E-Commerce Services supports the following URL display options:
Resolve Products By Item Name
Resolve Products by Item Name and Product Code
Resolve Products by Product Code
You specify which option is used on your webshop in the Display Products Mode field.

E-Commerce Configuration Guide
Sitecore® is a registered trademark. All other brand and product names are the property of their respective holders. The contents of this document are the property of Sitecore. Copyright © 2001-2014 Sitecore. All rights reserved.
Page 85 of 120
If you select Resolve Products by Item Name, the product item will resolve the product by the item name.

Sitecore E-Commerce Services 2.2 for CMS 7.0 or Later
Sitecore® is a registered trademark. All other brand and product names are the property of their respective holders. The contents of this document are the property of Sitecore. Copyright © 2001-2014 Sitecore. All rights reserved.
Page 86 of 120
If you select Resolve Products by Product Code, the product item will resolve the product by the product code.

E-Commerce Configuration Guide
Sitecore® is a registered trademark. All other brand and product names are the property of their respective holders. The contents of this document are the property of Sitecore. Copyright © 2001-2014 Sitecore. All rights reserved.
Page 87 of 120
If you select Resolve Products by item Name and Product Code, the product item will resolve the product by the item name and the product code.
Product Presentation Repository
The Product Details item in this folder specifies where the template that defines the appearance or presentation of a product is stored. In other words, it defines from where the product data for the

Sitecore E-Commerce Services 2.2 for CMS 7.0 or Later
Sitecore® is a registered trademark. All other brand and product names are the property of their respective holders. The contents of this document are the property of Sitecore. Copyright © 2001-2014 Sitecore. All rights reserved.
Page 88 of 120
search forms on the Product Page tab are drawn.
The folder contains one item that can also be found as an only option on the Content tab:
Warning If you delete the Product Details item, the search forms on the Product Page tab of an item will not function properly.
Product Selection Method
The Product Selection Method folder contains the following items:
Results of Search Query
Manually Picked Products

E-Commerce Configuration Guide
Sitecore® is a registered trademark. All other brand and product names are the property of their respective holders. The contents of this document are the property of Sitecore. Copyright © 2001-2014 Sitecore. All rights reserved.
Page 89 of 120
These two items specify the way that products are displayed on a product page.
A Product Selection Method item contains the following fields:
Field Name Field Type Description
Code Single-Line Text In this field, you can edit the name of the item in the code.
Name Single-Line Text In this field you can edit the name of the item.
Title Single-Line Text The name of the option as displayed on a product page.

Sitecore E-Commerce Services 2.2 for CMS 7.0 or Later
Sitecore® is a registered trademark. All other brand and product names are the property of their respective holders. The contents of this document are the property of Sitecore. Copyright © 2001-2014 Sitecore. All rights reserved.
Page 90 of 120
On the Content tab of the item, in the Product Selection Method field, you can select the default product selection method.
3.6.3 Price Matrix
You use the Price Matrix section to define the different price structures that are available on your webshop. The Price Matrix item contains PriceMatix Site sub items. Each PriceMatix Site sub item represents a webshop.
The PriceMatrix Site item contains the following fields:
Field Name Field Type Description
Title Single-Line Text The name of the webshop.
Default Price Droplink The default price used on the webshop

E-Commerce Configuration Guide
Sitecore® is a registered trademark. All other brand and product names are the property of their respective holders. The contents of this document are the property of Sitecore. Copyright © 2001-2014 Sitecore. All rights reserved.
Page 91 of 120
Each PriceMatrix Site item contains sub items that define the price structure that is used on that site.
A Price Matrix Price item only contains one field — Title, the name of the price.
In the sample pages, the Shop item contains two Price Matrix Price items:
Normal Price
Member Price
Normal Price the price that ordinary customers pay for items on this webshop and Member Price is the price that members for the same items.

Sitecore E-Commerce Services 2.2 for CMS 7.0 or Later
Sitecore® is a registered trademark. All other brand and product names are the property of their respective holders. The contents of this document are the property of Sitecore. Copyright © 2001-2014 Sitecore. All rights reserved.
Page 92 of 120
You specify the price of each product on the product item, in the Product Meta Info section.

E-Commerce Configuration Guide
Sitecore® is a registered trademark. All other brand and product names are the property of their respective holders. The contents of this document are the property of Sitecore. Copyright © 2001-2014 Sitecore. All rights reserved.
Page 93 of 120
3.7 Templates/Ecommerce
All of the templates that Sitecore E-Commerce Services uses are stored in the Sitecore/Templates/Ecommerce folder.
You can edit these templates just like any other template in Sitecore.

Sitecore E-Commerce Services 2.2 for CMS 7.0 or Later
Sitecore® is a registered trademark. All other brand and product names are the property of their respective holders. The contents of this document are the property of Sitecore. Copyright © 2001-2014 Sitecore. All rights reserved.
Page 94 of 120
3.8 My Page
When a visitor to your website creates a customer account, they are given access to a My Page section.
In their My Page section, a customer is able to:
Edit the information in their customer account — their address, phone number, and so on.
Change their password.
View their order history.
The webshop can also use the My Page section to push targeted information and products to the customer.
When you have created a customer account, you can click the Login link at the top of the screen and log in to the webshop:
After you log in, a My Page link appears at the top of the screen:
Click the My Page link and your personal page is displayed.
As you can see, My Page displays a list of products.
Edit Customer Account
The webshop customers can edit their customer account, using the Edit your Customer Account
page. To open the Edit your Customer Account page, type /My%20Page/Edit%20Account.aspx
after the URL of your website in the URL field of your browser and press ENTER.
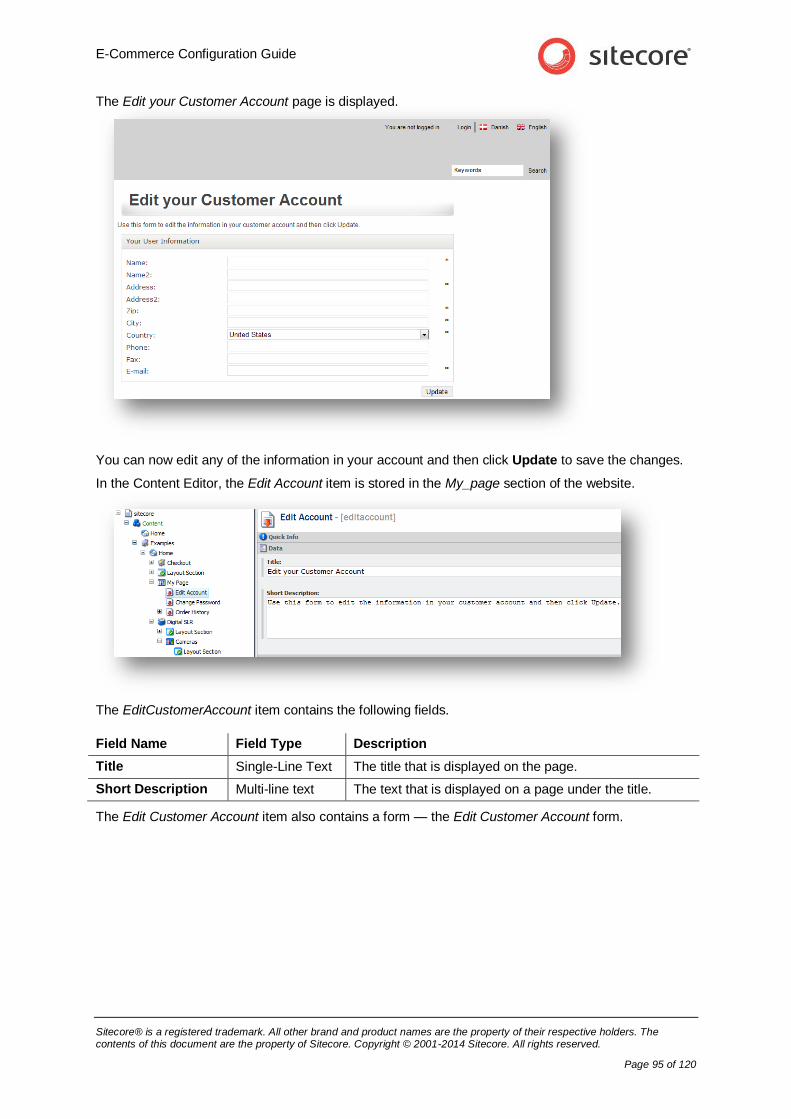
E-Commerce Configuration Guide
Sitecore® is a registered trademark. All other brand and product names are the property of their respective holders. The contents of this document are the property of Sitecore. Copyright © 2001-2014 Sitecore. All rights reserved.
Page 95 of 120
The Edit your Customer Account page is displayed.
You can now edit any of the information in your account and then click Update to save the changes.
In the Content Editor, the Edit Account item is stored in the My_page section of the website.
The EditCustomerAccount item contains the following fields.
Field Name Field Type Description
Title Single-Line Text The title that is displayed on the page.
Short Description Multi-line text The text that is displayed on a page under the title.
The Edit Customer Account item also contains a form — the Edit Customer Account form.
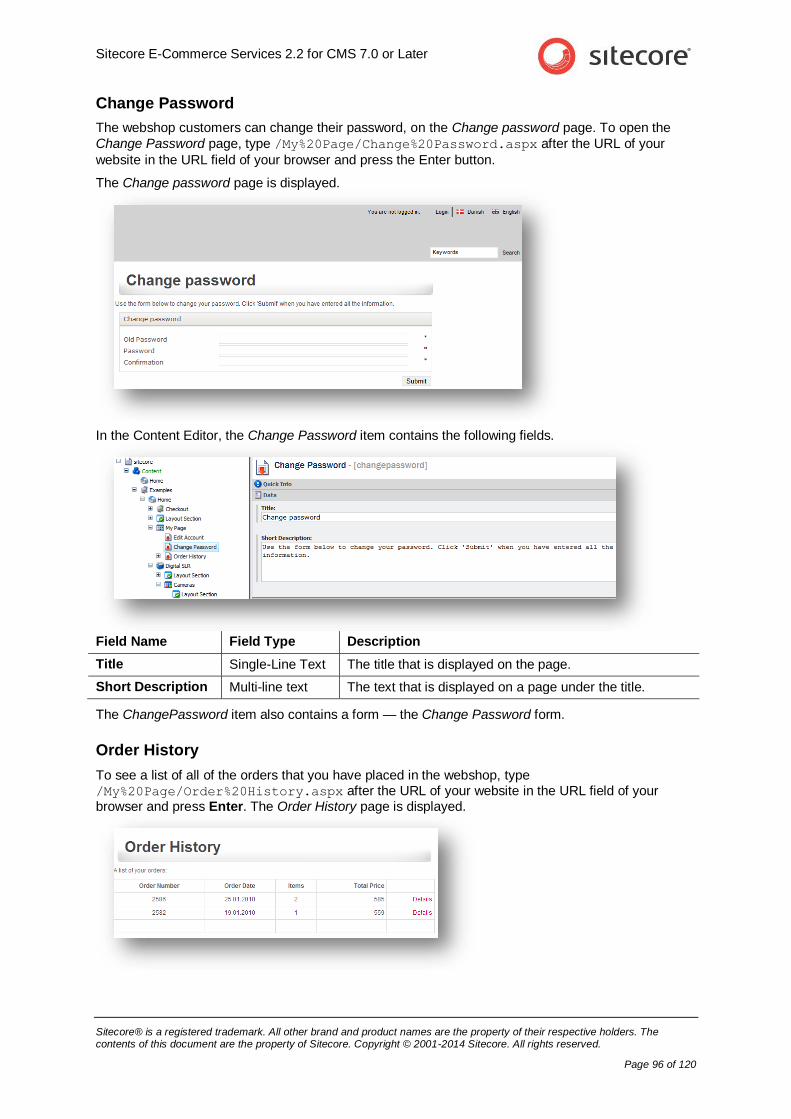
Sitecore E-Commerce Services 2.2 for CMS 7.0 or Later
Sitecore® is a registered trademark. All other brand and product names are the property of their respective holders. The contents of this document are the property of Sitecore. Copyright © 2001-2014 Sitecore. All rights reserved.
Page 96 of 120
Change Password
The webshop customers can change their password, on the Change password page. To open the
Change Password page, type /My%20Page/Change%20Password.aspx after the URL of your
website in the URL field of your browser and press the Enter button.
The Change password page is displayed.
In the Content Editor, the Change Password item contains the following fields.
Field Name Field Type Description
Title Single-Line Text The title that is displayed on the page.
Short Description Multi-line text The text that is displayed on a page under the title.
The ChangePassword item also contains a form — the Change Password form.
Order History
To see a list of all of the orders that you have placed in the webshop, type /My%20Page/Order%20History.aspx after the URL of your website in the URL field of your browser and press Enter. The Order History page is displayed.

E-Commerce Configuration Guide
Sitecore® is a registered trademark. All other brand and product names are the property of their respective holders. The contents of this document are the property of Sitecore. Copyright © 2001-2014 Sitecore. All rights reserved.
Page 97 of 120
The Order History page displays a list of the orders that you have made. Click Details to see a more detailed description of an order.
In the Content Editor, the Order History item contains the following fields.
Field Name Field Type Description
Title Single-Line Text The title that is displayed on the page.
Short Description
Multi-line text The text that is displayed on a page under the title.
The Order History item contains the following sub items:
Navigation Links
Order Details
The Navigation Links item contains the link to the Order Details item. This link lets you navigate from the Order History page to the Order Details page.
Navigation Links/View Details
The View Details navigation link contains the following fields:
Field Name Field Type Description
Key Single-Line Text The name of the navigation link.
Title Single-Line Text The text in this field is displayed on the Order History page as the link to the Order Details page.
Dictionary Entry Grouped Droplist If the Title field is empty, the value in this field is used.
Link General Link The path to the Order Details page.

Sitecore E-Commerce Services 2.2 for CMS 7.0 or Later
Sitecore® is a registered trademark. All other brand and product names are the property of their respective holders. The contents of this document are the property of Sitecore. Copyright © 2001-2014 Sitecore. All rights reserved.
Page 98 of 120
OrderDetails Page
The Order Details page looks like this.
The Order Details item contains the following fields:
Field Name Field Type Description
Title Single-Line Text The title that is displayed on the page.
Short Description Multi-line text The text that is displayed on a page under the title.
The Order Details item also contains a navigation link that takes you back to the Home page of the shop.
Order Sections
The Order Sections item only contains one field:
Field Name Field Type Description
Use Other Order Section Droptree Links to the details of the order.

E-Commerce Configuration Guide
Sitecore® is a registered trademark. All other brand and product names are the property of their respective holders. The contents of this document are the property of Sitecore. Copyright © 2001-2014 Sitecore. All rights reserved.
Page 99 of 120
The link in the Use Other Order Section field points to the Order Sections item that is generated for the confirmation page of the checkout process: And this is where the information it displays is drawn from.

Sitecore E-Commerce Services 2.2 for CMS 7.0 or Later
Sitecore® is a registered trademark. All other brand and product names are the property of their respective holders. The contents of this document are the property of Sitecore. Copyright © 2001-2014 Sitecore. All rights reserved.
Page 100 of 120
Chapter 4
Editing the Webshop
This chapter describes how to edit some of the basic pages and functionality in the demo website.
This chapter contains the following sections:
Viewing User Information
Redesigning a Form

E-Commerce Configuration Guide
Sitecore® is a registered trademark. All other brand and product names are the property of their respective holders. The contents of this document are the property of Sitecore. Copyright © 2001-2014 Sitecore. All rights reserved.
Page 101 of 120
4.1 Viewing User Information
When a visitor to your webshop creates a customer account, their account is stored in the User Manager in Sitecore. Webshop administrators may need to access this information from time to time.
Note The information that customers enter when they purchase goods in a webshop, is also stored in the User Manager.
To view the information in a customer account:
1. Log in to your website. Open the Content Editor.
2. On the Security tab, in the Tools group, click the User Manager.
3. The User Manager is displayed.
The User Manager lists all the accounts of the users and customers who have access to the webshop.
4. Click the user whose information you want to view or edit.

Sitecore E-Commerce Services 2.2 for CMS 7.0 or Later
Sitecore® is a registered trademark. All other brand and product names are the property of their respective holders. The contents of this document are the property of Sitecore. Copyright © 2001-2014 Sitecore. All rights reserved.
Page 102 of 120
5. In the User Manager, click Edit and the Edit User window is displayed.
6. To view the fields that a new user of your webshop fills in on the Customer Details form (for more information, see the Customer Details section, on page 37), in the Edit User window, click the Profile tab. You can find the fields in the Additional Properties field.
Note For more information on how to edit a user, see the Security Administrator’s Cookbook.

E-Commerce Configuration Guide
Sitecore® is a registered trademark. All other brand and product names are the property of their respective holders. The contents of this document are the property of Sitecore. Copyright © 2001-2014 Sitecore. All rights reserved.
Page 103 of 120
4.2 Redesigning a Form
You can edit any of the examples pages.
Let’s have a closer look at the design of the Login page and see if it can be improved.
There are number of things on this page that could easily be improved, for example, this is the Login page that you use to login to your website. However, the title of the page seems a bit confusing, the page contains some spelling mistakes, and the design of the links on the page is inconsistent, and so on.
Furthermore, the form is designed to let users who have already created a customer account log in and view their account details, order details, and so on. It therefore also seems appropriate to rename the form and to rearrange the two sections in the form.
To edit this page:
1. In the Content Editor, open the Sitecore/Content/Examples/Home/Webshop
Functions/Authentication/Login item.
2. In the Title field, change the name of the page to Log in or Create a Customer Account.

Sitecore E-Commerce Services 2.2 for CMS 7.0 or Later
Sitecore® is a registered trademark. All other brand and product names are the property of their respective holders. The contents of this document are the property of Sitecore. Copyright © 2001-2014 Sitecore. All rights reserved.
Page 104 of 120
3. In the Short Description field, change the text to You can either log in as an existing user or create a customer account.
4. Click Save to save your changes.
5. Open another browser window and navigate to the Login page.
The Login page still looks the same. This is because all of the information displayed on the page is contained in a form. You must therefore edit the form.
To identify the form that the Login page contains:
1. In the Content Editor, open the Login item, and click the Presentation tab, and then in the Layout group, click Details.
2. In the Layout Details dialog box, in the PageMain section, click Form Interpreter.
3. In the Control Properties dialog box, in the Data section, in the FormID field, you can see the name of the form that is displayed on the Login page and where it is stored.
This form is stored in sitecore/system/Modules/Web Forms for Marketers/Website/
Ecommerce/Examples/Log In.

E-Commerce Configuration Guide
Sitecore® is a registered trademark. All other brand and product names are the property of their respective holders. The contents of this document are the property of Sitecore. Copyright © 2001-2014 Sitecore. All rights reserved.
Page 105 of 120
To edit the form:
1. In the Content Editor, navigate to the Log In form and open it.
2. In the Title field, change the name of the form to Log in or Create a Customer Account.
3. In the Introduction field, enter some meaningful text that describes the form — for example, If you already have a customer account, you can log in. If you don't have a customer account and would like to create one, click Create a customer account.

Sitecore E-Commerce Services 2.2 for CMS 7.0 or Later
Sitecore® is a registered trademark. All other brand and product names are the property of their respective holders. The contents of this document are the property of Sitecore. Copyright © 2001-2014 Sitecore. All rights reserved.
Page 106 of 120
4. Click the Forms tab, and in the Forms group, click Design to open the form in the Form Designer.
As you can see, the name of the form and the information contained in the form has changed.
The Form Designer displays all of the sections and fields that have been created for this form. You can use the From Designer to add or remove sections and fields in the form. You can edit all of the information in the form either here in the Form Designer or in the Content Editor.

E-Commerce Configuration Guide
Sitecore® is a registered trademark. All other brand and product names are the property of their respective holders. The contents of this document are the property of Sitecore. Copyright © 2001-2014 Sitecore. All rights reserved.
Page 107 of 120
To rearrange the sections on the form:
1. In the Form Designer, select the New user account section of the form.
2. Drag this section and place it under the Returning customer section of the form.
3. Save your changes.
4. Open a new browser window and click Login to see the changes that you have made to the form.

Sitecore E-Commerce Services 2.2 for CMS 7.0 or Later
Sitecore® is a registered trademark. All other brand and product names are the property of their respective holders. The contents of this document are the property of Sitecore. Copyright © 2001-2014 Sitecore. All rights reserved.
Page 108 of 120
The Login page should look something like this:
Note It is the style sheet that specifies that the form sections should be displayed beside each other. The default behavior is for form sections to be placed under each other.
You can also rearrange the order of the form sections in the Content Editor.
In the Content Editor, you can see that the form sections have been rearranged.
To move a form section, select the section and in the Home tab, in the Sorting group, click Up or Down.
The links on the Login page have not been implemented consistently and the text displayed on the page could be improved.
Let’s have a look at the way the links have been implemented in each section of the form.
1. In the Content Editor, navigate to sitecore/system/Modules/Web Forms for
Marketers/Website/ Ecommerce/Examples/Log In.

E-Commerce Configuration Guide
Sitecore® is a registered trademark. All other brand and product names are the property of their respective holders. The contents of this document are the property of Sitecore. Copyright © 2001-2014 Sitecore. All rights reserved.
Page 109 of 120
2. Expand both form sections to get an overview of all the fields in the form.
Each of the section sub items corresponds to a field on the form.
3. In the Content Editor, select the Log In item.
4. In the Forms tab, in the Forms group, click Design.
5. In the Returning Customer section, select the Forgot Password field.
This field contains the Forgot Password link that is displayed on the form.
This field is of the Info Field field type. This is a custom field type that has been created for the demo website site so that is can display text or information on the form without it being displayed in a frame like the other fields.
You can edit this field in the left-hand pane of the Form Designer, in the Appearance section, in the HTML field, but this is very cramped even though you can resize the left-hand pane.

Sitecore E-Commerce Services 2.2 for CMS 7.0 or Later
Sitecore® is a registered trademark. All other brand and product names are the property of their respective holders. The contents of this document are the property of Sitecore. Copyright © 2001-2014 Sitecore. All rights reserved.
Page 110 of 120
6. In the Content Editor, select the Forgot Password item.
7. In the Localize Parameters field, change the text in the link to Forgot your Password!
The Localize Parameters field contains the HTML code that defines the link — se be careful not to change any of the HTML tags.
<Information><br/><br/><a
href="/Ecommerce/Functions/Password/ResetPasswordForm.aspx">Forgot your
password!</a></Information>
This link points to the ResetPasswordForm function that contains the Reset Password form that visitors use to change their password.
8. In the Content Editor, save your changes.
9. In the Form Designer, select the UserName item.
10. In the Title field, enter a space between User and Name.
11. Save your changes and close the Form Designer.
12. Switch to your other browser instance and refresh the Login page.
It should look something like this:

E-Commerce Configuration Guide
Sitecore® is a registered trademark. All other brand and product names are the property of their respective holders. The contents of this document are the property of Sitecore. Copyright © 2001-2014 Sitecore. All rights reserved.
Page 111 of 120
Let’s have a look at the other half of the form.
1. In the Content Editor, in the Create user account section of the Log In form, select the New user account item.
This field is also an Info Field and it contains the Create new account link.
2. In the Localize Parameters field, edit the link:
<Information><a href="/en/Functions/CreateNewAccount.aspx">Create a
customer account</a></Information>
This link points to the CreateNewAccount function on the website. This page contains the Create New Account form that visitors use to create a customer account.
3. Save your changes.
4. Select the Create user account section item.
5. In the Title field, enter New customer account.
In the Localize Parameters field, you can see the description that is displayed in the Create user account section of the form.
6. In the Localize Parameters field, edit the text.

Sitecore E-Commerce Services 2.2 for CMS 7.0 or Later
Sitecore® is a registered trademark. All other brand and product names are the property of their respective holders. The contents of this document are the property of Sitecore. Copyright © 2001-2014 Sitecore. All rights reserved.
Page 112 of 120
With a customer account, you can check out more quickly, review your order history, and edit your profile information.
Be careful of the HTML code.
7. Save your changes.
8. Switch to your other browser instance, refresh the Login page, and it should look something like this:
For more information about working with Web forms, see the Web Forms for Marketers Users Guide or visit http://sdn.sitecore.net/Products/Web%20Forms%20for%20Marketers/Web%20Forms%20for%20Marketers%202,-d-,0/Documentation.aspx and download the documentation for the Web Forms module.

E-Commerce Configuration Guide
Sitecore® is a registered trademark. All other brand and product names are the property of their respective holders. The contents of this document are the property of Sitecore. Copyright © 2001-2014 Sitecore. All rights reserved.
Page 113 of 120
Chapter 5
Appendix
In Sitecore E-Commerce Services, the following sections have been deprecated. In Sitecore E-Commerce Services 2.0.0 and later, storing orders in the content tree is no longer possible and Order Status has been replaced by Order State. However, you can still use the order status template to store and convert the orders that were created in previous versions of Sitecore E-Commerce Services:
Orders
Order Status
Configuring Sitecore E-Commerce Services to Be Backward Compatible with Orders in the Content Tree

Sitecore E-Commerce Services 2.2 for CMS 7.0 or Later
Sitecore® is a registered trademark. All other brand and product names are the property of their respective holders. The contents of this document are the property of Sitecore. Copyright © 2001-2014 Sitecore. All rights reserved.
Page 114 of 120
5.1 Orders
Every time a customer places an order in the webshop, Sitecore E-Commerce Services creates two items — an Order item and an Orderline item. These items contain all of the information that about
each individual order. These items are stored in the Webshop Business Settings/Orders folder.
Every time an order is placed, Sitecore creates a folder system to store that order and this system ensures that every order is given a unique ID.
This structured data folder system is generated dynamically and does not need to be configured.
The Orders item contains the following fields:
Field Name Field Type Description
LatestOrderID Single-Line Text The ID of the last order created on the website.
StructuredDataFolderLevels The number of levels created for the structured data folders.
The Order item contains all of the information about the order while the Orderline item contains the information about each item in that order. For example, in the following screenshot, you can see that there is one order — 2586, that contains two order lines — a Nikkor lens and a camera case.
If a customer orders two copies of the same item, there is only one order line for that item but the quantity is set to two.
The Order and Orderline items contain information about the products that the customer ordered and the order itself. The product information is extracted from the product items.
An Order item contains the following sections:
Order Metainfo
Customer Details

E-Commerce Configuration Guide
Sitecore® is a registered trademark. All other brand and product names are the property of their respective holders. The contents of this document are the property of Sitecore. Copyright © 2001-2014 Sitecore. All rights reserved.
Page 115 of 120
Billing Address
Shipping Address
Totals
The Order Metainfo section contains the following fields:
Field Name Field Type Description
OrderNumber Single-Line Text The number of the order.
OrderDate Datetime The date and time when the order was placed.
Status Droplink Displays the state of the order. You can change the status of the order.
TrackingNumber Single-Line Text This field is disabled in the current build and will be available in later E-Commerce versions.
TransactionNumber Single-Line Text When a payment has been made, the payment provider creates a transaction number for the current order.
PaymentSystem Droplink The payment system that the customer selected when they placed the order.
Currency Single-Line Text The currency that the order was placed in.
DiscountCode Single-Line Text The discount code that the customer entered when they placed the order.
Comment Single-Line Text In this field a comment to the order meta-info can be entered.
ShippingProvider Droplink The delivery option that the customer selected when they placed the order.
NotificationOption Droplink The notification option that the customer selected when they placed the order.
NotificationOptionValue Single-Line Text In this field, the value or the e-mail address, a telephone number for the SMS notification and the like are displayed.
The Totals section contains the following fields:
Field Name Field Type Description
ItemsInShoppingCart Single-Line Text The total number of items in the shopping cart.
Vat Single-Line Text The total VAT on the order.
PriceExVat Single-Line Text The total price excluding VAT.
PriceIncVat Single-Line Text The total price including VAT.
DiscountExVat Single-Line Text The total discount excluding VAT.
DiscountIncVat Single-Line Text The total discount including VAT.
PossibleDiscountExVat Single-Line Text The total possible discount excluding VAT.
PossibleDiscountIncVat Single-Line Text The total possible discount including VAT.
The other sections and the fields that they contain are self-explanatory.

Sitecore E-Commerce Services 2.2 for CMS 7.0 or Later
Sitecore® is a registered trademark. All other brand and product names are the property of their respective holders. The contents of this document are the property of Sitecore. Copyright © 2001-2014 Sitecore. All rights reserved.
Page 116 of 120
The Orderline item contains the following fields:
Field Name Field Type Description
Type Single-Line Text The type of the product.
Id Single-Line Text The ID of the item.
Description Single-Line Text The description of the item.
Vat Single-Line Text The total VAT on the order.
TotalPriceExVat Single-Line Text The total price excluding VAT.
TotalPriceIncVat Single-Line Text The total price including VAT.
DiscountExVat Single-Line Text The total discount excluding VAT.
DiscountIncVat Single-Line Text The total discount including VAT.
PriceExVat Single-Line Text The price of this item excluding VAT.
PriceIncVat Single-Line Text The price of this item including VAT.
TotalVat Single-Line Text The total VAT.
PossibleDiscountExVat Single-Line Text The possible discount excluding VAT.
PossibleDiscountIncVat Single-Line Text The possible discount including VAT.
Quantity Single-Line Text The number of this item that the customer ordered.

E-Commerce Configuration Guide
Sitecore® is a registered trademark. All other brand and product names are the property of their respective holders. The contents of this document are the property of Sitecore. Copyright © 2001-2014 Sitecore. All rights reserved.
Page 117 of 120
5.2 Order Status
The order status specifies the current status of the order.
In the Business Catalog, in the Order Status item, you can create new order status options and edit the existing ones.
An Order Status item contains the following fields:
Field Name Type of Field Description
Code Single-Line Text Displays the code of the order status as it appears in the provider.
Name Single-Line Text Displays the name of the order status as it appears in the provider.
Title Single-Line Text Displays the title of the order status.
Available List Multilist Use this field to select the statuses that you are going to use by placing them in the right-hand column. In the Available List field, you can select the status options that are available for this webshop.

Sitecore E-Commerce Services 2.2 for CMS 7.0 or Later
Sitecore® is a registered trademark. All other brand and product names are the property of their respective holders. The contents of this document are the property of Sitecore. Copyright © 2001-2014 Sitecore. All rights reserved.
Page 118 of 120
When a customer orders a product in the webshop, the order status of the product is automatically set to New.
In the Status field of the current order item, you can manually change the status of the order.

E-Commerce Configuration Guide
Sitecore® is a registered trademark. All other brand and product names are the property of their respective holders. The contents of this document are the property of Sitecore. Copyright © 2001-2014 Sitecore. All rights reserved.
Page 119 of 120
5.3 Configuring Sitecore E-Commerce Services to Be Backward Compatible with Orders in the Content Tree
Note You cannot use the new Order Manager application with SES configured to use old order storage where orders are stored in Content.
Sitecore E-Commerce Services store orders in the SQL database using the Entity Framework for object-relational mapping.
You may want to view the orders that you created earlier. The older orders are also stored in the /sitecore/Content/E-Commerce Examples/Home/Webshop Business Settings/Orders
folder.
To display the orders that you created earlier:
1. Make a backup copy of the /App_Config/Unity.config file.
2. In the unity.config file, map the IOrderManager<T> contract to the obsolete
Sitecore.Ecommerce.Orders.OrderManager<T>, Sitecore.Ecommerce.Kernel
implementation:
<register type="IOrderManager" mapTo="OrderManager">
<lifetime type="hierarchical" />
</register>
3. In the /sitecore/Content/E-Commerce Examples/Home/Webshop Site
Settings/Business Catalog item, point the Order Statuses Link setting to the root of the
earlier order states: /sitecore/content/E-Commerce Examples/Home/Business
Catalog/Order Statuses:
4. Publish the Webshop Business Settings item.
Important After you change the Order Statuses Link, the orders are no longer stored in the database. Therefore, after you view the earlier orders, you must return to the previous Order Statuses Link value.

Sitecore E-Commerce Services 2.2 for CMS 7.0 or Later
Sitecore® is a registered trademark. All other brand and product names are the property of their respective holders. The contents of this document are the property of Sitecore. Copyright © 2001-2014 Sitecore. All rights reserved.
Page 120 of 120
5. To return to the previous Order Statuses Link value, in the /sitecore/Content/E-
Commerce Examples/Home/Webshop Site Settings/Business Catalog item, in
the Order Statuses Link setting, select /sitecore/Content/E-Commerce
Examples/Home/Business Catalog/States.