DVD PLAYER & VIDEO CASSETTE RECORDER HR-XVC33UM
92
Filename [XVC33UM_02Cov1.fm] DVD PLAYER & VIDEO CASSETTE RECORDER INSTRUCTIONS LPT0854-001B HR-XVC33UM EN XVC33UM_02Cov1.fm Page 1 Friday, August 29, 2003 4:59 PM
Transcript of DVD PLAYER & VIDEO CASSETTE RECORDER HR-XVC33UM

Filename [XVC33UM_02Cov1.fm]
DVD PLAYER &VIDEO CASSETTE RECORDER
INSTRUCTIONS
LPT0854-001B
HR-XVC33UM
EN
XVC33UM_02Cov1.fm Page 1 Friday, August 29, 2003 4:59 PM

Filename [XVC33UM_03Safety.fm]
Masterpage:Left0XVC33UM_01.book Page 2 Monday, August 4, 2003 7:24 PM
2 EN SAFETY FIRST
CAUTIONSWARNING: DANGEROUS VOLTAGE INSIDEWARNING: TO PREVENT FIRE OR SHOCK
HAZARD, DO NOT EXPOSE THIS UNIT TO RAIN OR MOISTURE.
CLASS 1 LASER PRODUCTREPRODUCTION OF LABELSWARNING LABEL INSIDE OF THE UNIT
Use only discs marked with the following.
Dear Customer,Thank you for purchasing the JVC DVD player & VHS video cassette recorder. Before use, please read the safety information and precautions to ensure safe use of your new unit.
The POWER 1 button does not completely shut off mains power from the unit, but switches operating current on and off. “`” shows electrical power standby and “ ! ” shows ON.
CAUTION:A DVD/VCR IS A CLASS 1 LASER PRODUCT. HOWEVER THIS DVD/VCR USES A VISIBLE LASER BEAM WHICH COULD CAUSE HAZARDOUS RADIATION EXPOSURE IF DIRECTED. BE SURE TO OPERATE THE UNIT CORRECTLY AS INSTRUCTED.WHEN THIS DVD/VCR IS PLUGGED INTO THE WALL OUTLET, DO NOT PLACE YOUR EYES CLOSE TO THE OPENING OF THE DISC TRAY AND OTHER OPENINGS TO LOOK INTO THE INSIDE OF THIS DVD/VCR.USE OF CONTROLS OR ADJUSTMENTS OR PERFORMANCE OF PROCEDURES OTHER THAN THOSE SPECIFIED HEREIN MAY RESULT IN HAZARDOUS RADIATION EXPOSURE.DO NOT OPEN COVERS AND DO NOT REPAIR YOURSELF. REFER SERVICING TO QUALIFIED PERSONNEL.
IMPORTANTIt may be unlawful to record or play back copyrighted material without the consent of the copyright owner.
CAUTION� When you are not using the unit for a long period of
time, it is recommended that you disconnect the power cord from the AC outlet.
� Dangerous voltage inside. Refer internal servicing to qualified service personnel. To prevent electric shock or fire hazard, remove the power cord from the AC outlet prior to connecting or disconnecting any signal lead or aerial.
� Changes or modifications not approved by JVC could void user’s authority to operate the equipment.
The rating plate and safety caution are on the rear of the unit.
This unit is produced to comply with Standard IEC 60065.
POWER SYSTEM:This set operates on voltage of AC 110 – 220Vd, 50/60 Hz with automatic switching.
Use the conversion plug (provided) depending on the type of your AC WALL outlet.
DVD(8 cm /12 cm disc)
Audio CDs(8 cm /12 cm disc)
Video CDs(8 cm /12 cm disc)
SVCD(8 cm /12 cm disc)
Page 2 4 August 2003 6:02 pm

Masterpage:Right-No-Heading
EN 3
Filename [XVC33UM_03Safety.fm]
XVC33UM_01.book Page 3 Monday, August 4, 2003 7:24 PM
● Manufactured under license from Dolby Laboratories. “Dolby” and the double-D symbol are trademarks of Dolby Laboratories.
● “DTS” and “DTS Digital Out” are trademarks of Digital Theater Systems, Inc.
● Cassettes marked “VHS” (or “S-VHS”) can be used with this unit. However, S-VHS recording is not possible with this model.
● This model is equipped with SQPB (S-VHS QUASI PLAYBACK) that makes it possible to play back S-VHS recordings with regular VHS resolution.
● HQ VHS is compatible with existing VHS equipment.● This product incorporates copyright protection technology that
is protected by method claims of certain U.S. patents and other intellectual property rights owned by Macrovision Corporation and other rights owners. Use of this copyright protection technology must be authorized by Macrovision Corporation, and is intended for home and other limited viewing users only unless otherwise authorized by Macrovision Corporation. Reverse engineering or disassembly is prohibited.
When the equipment is installed in a cabinet or a shelf, make sure that it has sufficient space on all sides to allow for ventilation (10 cm or more on both sides, on top and at the rear.)
When discarding batteries, environmental problems must be considered and the local rules or laws governing the disposal of these batteries must be followed strictly.
Failure to heed the following precautions may result in damage to the unit, Remote or video cassette.1. DO NOT place the unit —
— in an environment prone to extreme temperatures or humidity.— in direct sunlight.— in a dusty environment.— in an environment where strong magnetic fields are generated.— on a surface that is unstable or subject to vibration.
2. DO NOT block the unit’s ventilation openings or holes.(If the ventilation openings or holes are blocked by a newspaper or cloth, etc., the heat may not be able to get out.)
3. DO NOT place heavy objects on the unit or Remote.4. DO NOT place anything which might spill on top of
the unit or Remote.(If water or liquid is allowed to enter this equipment, fire or electric shock may be caused.)
5. DO NOT expose the apparatus to dripping or splashing.
6. DO NOT use this equipment in a bathroom or places with water. Also DO NOT place any containers filled with water or liquids (such as cosmetics or medicines, flower vases, potted plants, cups, etc.) on top of this unit.
7. DO NOT place any naked flame sources, such as lighted candles, on the apparatus.
8. AVOID violent shocks to the unit during transport.
MOISTURE CONDENSATIONMoisture in the air will condense on the unit when you move it from a cold place to a warm place, or under extremely humid conditions—just as water droplets form in the surface of a glass filled with cold liquid. Moisture condensation on the head drum will cause damage to the tape. In conditions where condensation may occur, keep the unit turned on for a few hours to let the moisture dry.
ATTENTIONTo mobile phone users:Using a mobile phone in the vicinity of the unit may cause picture vibration on the TV screen or change the screen to a blue back display.On placing the unit:Some TVs or other appliances generates strong magnetic fields. Do not place such appliance on top of the unit as it may cause picture disturbance.
Page 3 4 August 2003 6:02 pm

Filename [XVC33UM_04TOC.fm]
Masterpage:LeftXVC33UM_01.book Page 4 Monday, August 4, 2003 7:24 PM
4 EN CONTENTS
SAFETY FIRST 2
DISC INFORMATION 5About Discs ......................................................... 5
INDEX 8
INSTALLING YOUR NEW UNIT 13Basic Connections ............................................. 13S-VIDEO Connection (DVD deck only) ............. 14Component Video Connection
(DVD deck only) ............................................ 15
INITIAL SETTINGS 16Plug & Play Set .................................................. 16Monitor Set (DVD deck) .................................... 18Language ........................................................... 20Clock Set ........................................................... 24Tuner Set ........................................................... 26
OPERATIONS ON VCR DECK 28Basic Playback .................................................. 28Playback Features .............................................. 29Basic Recording ................................................ 33Recording Features ............................................ 34Express Timer Programing ................................. 36Satellite Auto Recording .................................... 41
OPERATIONS ON DVD DECK 42Basic Playback .................................................. 42Playback Features .............................................. 43Using the on-screen bar .................................... 48Parental Lock .................................................... 58About MP3 Disc ................................................ 62MP3 Playback ................................................... 63About JPEG Disc ............................................... 65JPEG Playback ................................................... 66
EDITING (VCR DECK) 68Edit From A Camcorder ..................................... 68Edit To Or From Another Video Recorder .......... 69Dubbing (from DVD to VCR) ............................. 70
EDITING (DVD DECK) 71Digital Audio Dubbing ...................................... 71
REMOTE 72Remote Control Functions ................................. 72Connecting To A Dolby Digital Decoder or
An Amplifier With A Built-in DTS(DVD deck only) ............................................ 74
SUBSIDIARY SETTINGS 75Mode Set (VCR deck) ......................................... 75Mode Set (DVD deck) ........................................ 78Child Lock ......................................................... 82Scan Mode Set (DVD deck) ............................... 82
TROUBLESHOOTING 83
QUESTIONS AND ANSWERS 88
SPECIFICATIONS 89
LIST OF TERMS 90
Page 4 August 4, 2003 6:54 pm

Masterpage:Right0
Filename [XVC33UM_05DiscInfo.fm]
XVC33UM_01.book Page 5 Monday, August 4, 2003 7:24 PM
EN 5DISC INFORMATION
About DiscsPlayable DiscsYou can use the discs with the following logos for playback only.
● The following discs also can be played back.• DVD-R/RW discs recorded in DVD VIDEO format and
finalized• CD-R/RW discs recorded in Super Video CD, Video CD or
Audio CD format and finalized.• CD-R/RW discs recorded in MP3 format in accordance with
the “ISO 9660” format. (See page 62 for details.)• CD-R/RW discs recorded in JPEG format in accordance with
the “ISO 9660” format. (See page 65 for details.)● Discs other than the above cannot be played back.● Operation and audio quality of this unit are not guaranteed for
discs that do not conform to the Compact Disc specification (CD-DA).Before you play back a CD, check for the CD logo and read the notes on the package to confirm that it conforms to the Compact Disc specification.
● Depending on the intentions of the author of the software, recording conditions of DVD discs and Video CD discs may be restricted. Since this unit plays back discs according to the intentions of the author of the software as indicated on the disc, some functions may not operate as commanded.
● When switching from the first layer to the second layer of double-layered DVD VIDEO discs, the image and sound may be momentarily distorted. This is not a malfunction.
Unplayable DiscsThe following types of discs cannot be played using this unit.Do not attempt to play back any kind of disc that is damaged (cracked, warped, or repaired with adhesive tape) or discs in unusual shapes (heart-shaped, octagonal, or other forms). If such discs are accidentally played back, it may cause noise that can lead to speaker damage.● CD-ROM discs (including PHOTO-CD)● DVD AUDIO discs● Super Audio CDs (SACD)● DVD-RW discs recorded in VR format● DVD-RAM● Discs which have a region number other than “4”
Region NumberThe world is divided into 6 regions for DVD VIDEO discs. DVD VIDEO discs are assigned a region number to indicate which region they may be played back in. A disc cannot be played back on this unit unless the region number of the disc matches that of the unit. The region number for this unit is “4”. Only discs whose region number includes “4” can be played back such as shown below.
Examples of DVD VIDEO labels which can be played back using this unit.
Marks of discs in this instruction manual
DVD VIDEO Video CD/Super Video CD
Audio CD
CD-DA files
Allows operation with a DVD VIDEO disc.
Allows operation with a CD-R/RW disc.
Allows operation with a Video CD disc.
Allows operation with a SVCD disc.
Allows operation with a disc including MP3 files.
Allows operation with a disc including JPEG files.
Allows operation with a Audio CD disc.
Page 5 4 August 2003 6:42 pm

Filename [XVC33UM_05DiscInfo.fm]
Masterpage:Left+
6 EN DISC INFORMATION (cont.)
XVC33UM_01.book Page 6 Monday, August 4, 2003 7:24 PM
DVD VIDEO MarksSometimes marks are printed on a DVD disc and/or on its packaging to indicate information regarding the contents and functions of a disc. Check marks indicating the contents and functions of a disc. Note, however, that in some cases a disc may not include a mark even for a function it supports.
Marks related to video
Marks related to audio
File Structure of DiscsDVD VIDEOTypically, DVD VIDEO discs are made up of larger units called “titles”. Each title has a number (title number) that can be used to select desired titles. Titles are further divided into units called “chapters”. Each chapter has a number (chapter number) that can also be used to select desired chapters. Note that some discs are not divided into titles and chapters.
Audio CD/Video CDTypically, Audio CD discs are divided into separate tracks each containing one song. Each track is assigned a number. For example, the third track is Track 3. The same is true for Video CD discs.
NOTE:Video CD discs that support Playback Control (PBC)The still image or motion image which follows a menu screen is called a “scene”. Each scene has a scene number.For more details, refer to “Locating a desired scene using the menu of the Video CD with PBC” (� pg. 43).
Mark Description
Number of subtitles
Number of angles
Recorded under the standard 4:3 aspect ratio
Screen includes black bands at top and bottom of image which has a standard 4:3 aspect ratio (letter box)
Video playback is in Wide video mode (16:9) on wide televisions, but in letter box on televisions with standard 4:3 aspect ratio.
Video playback is in Wide video mode (16:9) on wide televisions, but pan and scan is used on televisions with standard 4:3 aspect ratio (either the left or right side of the image is cut-out).
Mark Description
Number of audio tracks
Dolby Digital markDolby Laboratories has developed a digital surround system for the home. This mark indicates that you may enjoy 5.1-channel audio (front left and right, center, rear left and right, and a channel for LFE (Low-Frequency Effects)).
DTS (Digital Theater System)You can enjoy DTS audio if you connect the amplifier with a built-in DTS decoder to the DIGITAL AUDIO OUT connector of the unit.
Title 1 Title 2
Chapter 1 Chapter 2Chapter 1Chapter 3Chapter 2
Track 1 Track 4Track 3Track 2
Page 6 4 August 2003 6:42 pm

Masterpage:Right-No-Heading
EN 7
Filename [XVC33UM_05DiscInfo.fm]
XVC33UM_01.book Page 7 Monday, August 4, 2003 7:24 PM
Placing a Disc1 Open the disc tray.Press OPEN/CLOSE (x) on the DVD deck to open the disc tray.
● Pressing the button again closes the disc tray.● Do not block the disc tray with your hand while it is opening
or closing as this may result in hardware failure.● Do not place unplayable discs or any object other than a disc
in the disc tray.● Do not press down strongly on the disc tray or place any heavy
objects on it.
2 Place the disc.Place the disc in the disc tray with the label side facing up.● Since disc size changes depending
on the disc to be played back, be sure to correctly align the disc with the grooves for its size. If the disc is not in its groove, it may be scratched or otherwise damaged.
● To insert an 8 cm disc, place it according to the inner groove.
Care and Handling of DiscsHow to handle discsWhen handling a disc, do not touch the surface of the disc. Since discs are made of plastic, they are easily damaged. If a disc gets dirty, dusty, scratched or warped, the images and sound will not be picked up correctly, and such a disc may cause the unit to malfunction.
Label sideDo not damage the label side, stick paper to or use any adhesive on its surface.
StorageMake sure that discs are kept in their cases. If discs are piled on top of one another without their protective cases, they can be damaged. Do not put discs in a location where they may be exposed to direct sunlight, or in a place where the humidity or temperature is high. Avoid leaving discs in your car!
Maintenance of discsIf there are fingerprints or other dirt adhering to a disc, wipe with a soft dry cloth, moving from the center outwards.If a disc is difficult to clean, wipe with a cloth moistened with water. Never use record cleaners, petrol, alcohol or any anti-static agents.
x
CAUTIONSometimes during playback, noise or images may be garbled. This is sometimes due to the disc. (It may not be up to industry standards.)These symptoms are caused by the discs, not by the malfunction of the unit.
Page 7 4 August 2003 6:42 pm

Filename [XVC33UM_06Index.fm]
Masterpage:Left0XVC33UM_01.book Page 8 Monday, August 4, 2003 7:24 PM
8 EN INDEX
FRONT VIEW
A Power Button (POWER (1)) � pg. 18B VCR Indicator � pg. 28, 33C VHS Cassette Loading SlotD VCR/DVD Button � pg. 28, 33, 42E Disc TrayF Stop Button (STOP (8)) � pg. 28, 33, 42G DVD Indicator � pg. 42H Play Button (PLAY (4)) � pg. 28, 42I DVD Open/Close Button (OPEN/CLOSE (x))
� pg. 42J VHS Eject Button (EJECT (x)) � pg. 28, 33
K Video/Audio Input Connectors (VIDEO/AUDIO) � pg. 68
L Remote SensorM Front Display Panel � pg. 10N Record Button (REC (7)) � pg. 33O Rewind Button (REW (3)) � pg. 28, 29, 44P Fast Forward Button (FF (5)) � pg. 28, 29, 44Q Channel Button (CH +/–) � pg. 33R Progressive Scan Button (PROGRESSIVE SCAN)
� pg. 82
Page 8 4 August 2003 6:42 pm

Masterpage:Right-No-Heading
EN 9
Filename [XVC33UM_06Index.fm]
XVC33UM_06Index.fm Page 9 Friday, August 29, 2003 5:00 PM
REAR VIEW
A Region Number Label � pg. 5B AC Power Cord � pg. 13C S-video Output Connector (S VIDEO OUTPUT)*
� pg. 14* This connector is for DVD deck only.
D Audio/Video Input Connectors (AUDIO/VIDEO INPUT) � pg. 41, 68
E Audio/Video Output Connectors (AUDIO/VIDEO OUTPUT) � pg. 13, 14, 15, 69
F Antenna Input Connector (VHF/UHF IN) � pg. 13
G Digital Audio Output Connector (DIGITAL AUDIO OUT) � pg. 71
H Audio Output Connectors (AUDIO OUTPUT (L/R))** These are analogue audio output connectors for DVD deck only.
I Component Video Output Connectors (COMPONENT VIDEO OUT) � pg. 15
J Remote Pause Connector (REMOTE PAUSE) � pg. 68
K Antenna Output Connector (VHF/UHF OUT) � pg. 13
Page 9 29 August 2003 5:00 pm
Filename [XVC33UM_06Index.fm]
Masterpage:Left+
10 EN INDEX (cont.)
XVC33UM_01.book Page 10 Monday, August 4, 2003 7:24 PM
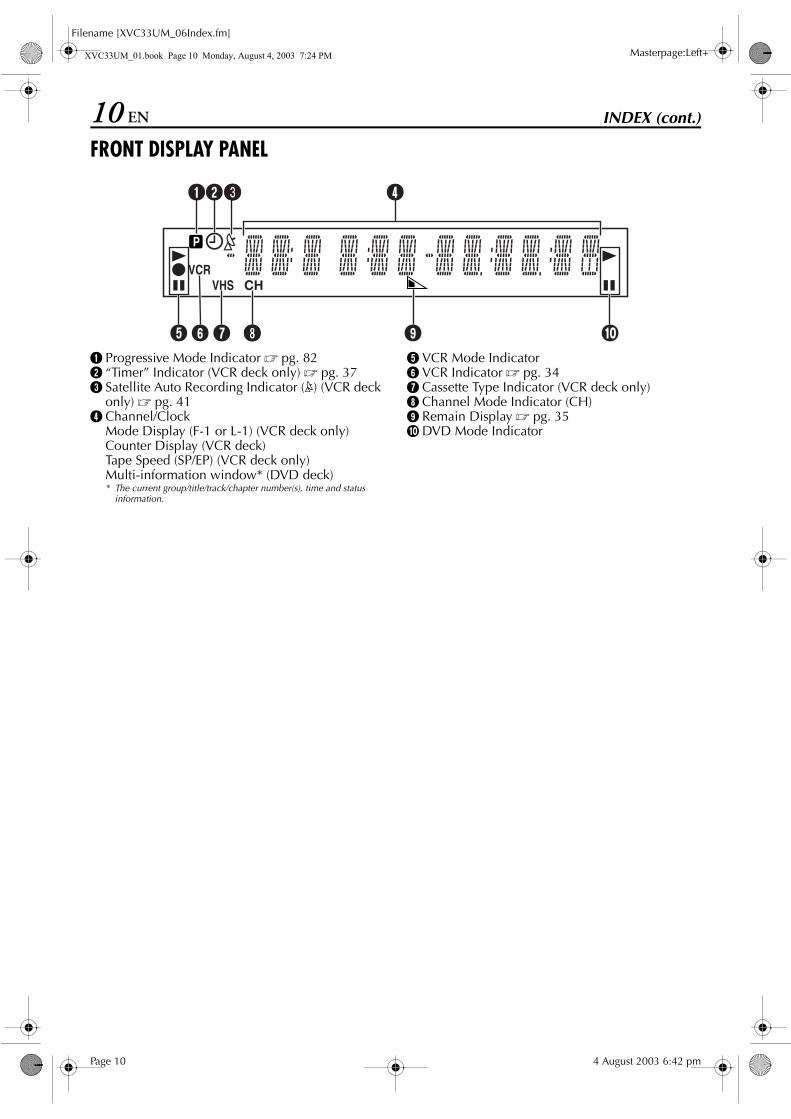
FRONT DISPLAY PANEL
A Progressive Mode Indicator � pg. 82B “Timer” Indicator (VCR deck only) � pg. 37C Satellite Auto Recording Indicator (N) (VCR deck
only) � pg. 41D Channel/Clock
Mode Display (F-1 or L-1) (VCR deck only)Counter Display (VCR deck)Tape Speed (SP/EP) (VCR deck only)Multi-information window* (DVD deck)* The current group/title/track/chapter number(s), time and status
information.
E VCR Mode IndicatorF VCR Indicator � pg. 34G Cassette Type Indicator (VCR deck only)H Channel Mode Indicator (CH)I Remain Display � pg. 35J DVD Mode Indicator
Page 10 4 August 2003 6:42 pm

Masterpage:Right-No-Heading
EN 11
Filename [XVC33UM_06Index.fm]
XVC33UM_01.book Page 11 Monday, August 4, 2003 7:24 PM
ON-SCREEN DISPLAY (VCR deck)If you press DISPLAY on the Remote when “SUPERIMPOSE” is set to “ON” (� pg. 76), various operational indicators appear on the TV screen.For On-screen display for DVD deck, refer to “Using the on-screen bar” (� pg. 48).
A Operation Mode Indicators B Tape Speed (SP/EP)C Tape Position Indicator
The tape position indicator appears on the TV screen when you press REW (3) or FF (5) from the Stop mode or perform an Index Search. (� pg. 30) The position of “q” in relation to “0” (beginning) or “+” (end) shows you where you are on the tape.
NOTE:Depending on the type of tape being used, the tape position indicator may not appear correctly.
D Index number � pg. 30E Tape Remaining Time Indicator � pg. 35F Counter DisplayG Audio Mode Display � pg. 32H SAP Indicator � pg. 35 I Stereo Program Indicator � pg. 35J Day/Clock DisplayK Channel Position Number/Auxiliary Input
Indicator (F-1 or L-1)L “Cassette Loaded” Mark
Beginning End
To recall an indicationA Press DISPLAY.
● All indications corresponding to the current status are displayed for 5 seconds. After that, the counter information and RECORD/PAUSE if in the Record Pause mode, remain on the screen.
B Press DISPLAY again to clear the display.● The RECORD/PAUSE indication remains on the screen.
Page 11 4 August 2003 6:42 pm

Filename [XVC33UM_06Index.fm]
Masterpage:Left+
12 EN INDEX (cont.)
XVC33UM_01.book Page 12 Monday, August 4, 2003 7:24 PM
REMOTE
A VCR Button � pg. 28, 33B TV/VCR/DVD switch � pg. 18C Menu Button (MENU) � pg. 43D SP/EP Button � pg. 33
Top Menu Button (TOP MENU) � pg. 43E Stop Time Button (STOP +/–) � pg. 36
Display Button (PLAY SETUP) � pg. 48Title Button (TITLE) � pg. 64
F Start Time Button (START +/–) � pg. 36Repeat Button (REPEAT) � pg. 50, 64, 67Zooming Button (ZOOM) � pg. 45
G Number Keys � pg. 27, 33, 64H Daily Button (DAILY) � pg. 37I Counter Reset Button (C.RESET) � pg. 35
Cancel Button (CANCEL) � pg. 3910 Button
J Play Button (PLAY (4)) � pg. 28, 42K Rewind Button (REW (3)) � pg. 28, 29, 44L Stop Button (STOP (8)) � pg. 28, 33, 42M Record Button (REC (7)) � pg. 33
N Reverse Skip/Index Button (SKIP/INDEX (2)) � pg. 30, 43Review Button ( ) � pg. 30
O rt Button � pg. 18TV/VCR Channel Button (TV/VCR CH +/–) � pg. 73
P Set Up Menu Button (SET UP MENU) � pg. 18Q 3D-Phonic Button (3D-PHONIC) � pg. 46R TV Volume Button (TV VOL+/–) � pg. 73S DVD Button � pg. 42T Power Button (POWER (1)) � pg. 18U TV Muting Button (MUTE) � pg. 73
Audio Monitor Button (A.MONITOR) � pg. 32, 56, 57
V TV/VCR Button � pg. 34W Date Button (DATE +/–) � pg. 36
Subtitle Button (SUB TITLE) � pg. 54Angle Button (ANGLE) � pg. 55* With this button, you can also adjust the brightness of front
display panel.+: brightens the display–: darkens the display
X Channel Button (CH +/–) � pg. 33Y Programing Button (PROG.) � pg. 36Z Timer Button (TIMER) � pg. 37a Weekly Button (WEEKLY) � pg. 37b Program Check Button (PROG. CHECK)
� pg. 38Return Button (RETURN) � pg. 43
c Satellite Auto Recording Button (REC LINK) � pg. 41
d +10 Buttone Auxiliary Button (AUX) � pg. 68f Fast Forward Button (FF (5)) � pg. 28, 29, 44g Pause Button (PAUSE (9)) � pg. 29, 33h Forward Skip/Index Button (SKIP/INDEX (6))
� pg. 30, 43i OK Button � pg. 18jw e Button � pg. 18k Display Button (DISPLAY) � pg. 35l Skip Search Button (SKIP SEARCH) � pg. 30
DVD Picture Button (DVD PICTURE) � pg. 47
Buttons with a small dot on the left side of the name can also be used to operate your TV. (� pg. 73)
How To UseBefore use, insert two AA size batteries into the Remote with the polarity ( and ) matched correctly as indicated on the battery compartment or on the lid.
The Remote can operate most of your unit’s functions, as well as basic functions of TV sets of JVC and other brands. (� pg. 73)● Point the Remote toward the remote sensor.● The maximum operating distance of the remote control is
about 8 m.
NOTE:If the Remote doesn’t work properly, remove its batteries, wait a short time, replace the batteries and then try again.
Page 12 4 August 2003 6:42 pm

Masterpage:Right0
Filename [XVC33UM_06Index.fm]
XVC33UM_06Index.fm Page 13 Tuesday, September 9, 2003 9:27 AM
EN 13INSTALLING YOUR NEW UNIT
Basic Connections
It’s essential that your unit be properly connected.
A Check the contents.Make sure the package contains all of the accessories listed in “SPECIFICATIONS” on page 89.
B Situate the unit.Place the unit on a stable, horizontal surface.
C Connect the unit to TV.The connection method you use depends on the type of TV you have.
RF Connection8To connect to a TV with NO AV input connectors —A Disconnect the TV antenna from the TV.B Connect the TV antenna cable to the VHF/UHF IN
connector on the rear panel of the unit.C Connect the supplied RF cable between the VHF/UHF
OUT connector on the rear panel of the unit and the TV’s antenna terminal.
AV Connection8To connect to a TV with AV input connectors —A Connect the antenna, unit and TV as per “RF
Connection”.B Connect an optional audio/video cable between the
AUDIO/VIDEO OUTPUT connectors on the rear panel of the unit and the TV’s audio/video input connectors.
● Set your TV to AV mode.● For switching the TV’s mode, refer to the instruction manual of
your television.● To obtain high-quality pictures, you can also use the S-VIDEO
connection or Component Video Connection. (DVD deck only) (� pg. 14, 15)
D Connect the unit to power source.Plug the end of the AC power cord into an AC outlet.
E Set the VCR channel.The VCR channel is the channel on which you can watch the picture from the unit on the TV when only using RF connection.With RF connection, set the VCR channel to “3 CH” or “4 CH”.● The VCR channel is preset to “3 CH”. Set to “4 CH” if the
Channel 3 is used for broadcasting in your area.With AV connection, set the VCR channel to “– CH” (off). To set the VCR channel, perform the following steps:
A When the unit is turned off, press STOP (8) on the unit for more than 5 seconds. “3 CH” appears on the front display panel.
B Press CH +/– on the Remote to select “3 CH”, “4 CH” or “– CH” (off), then press OK.
● If Plug&Play or Tuner setting has not previously been performed, the Language Select screen appears and Plug&Play takes place automatically.
THESE STEPS MUST BE COMPLETED BEFORE ANY VIDEO OPERATION CAN BE PERFORMED.
COAXIALOPTICAL
PCM/STREAM
Antenna or Cable
Matching transformer (not supplied)
Coaxial cable
VHF/UHF OUT
VIDEO OUTPUT
AC Outlet
RF cable(supplied)
Back of unit VHF/UHF IN
AUDIOOUTPUT
Audio/video cable(not supplied)
Flat feeder
TV
AC Power Cord
To 75 ohm Terminal
To Audio/videoinput connectors
Before performing the following steps:● Make sure there is no cassette inserted in the unit.● Make sure the unit is turned on, then press VCR/
DVD on the unit or VCR on the Remote so that the VCR indicator lights up.
Page 13 9 September 2003 9:26 am

Filename [XVC33UM_06Index.fm]
Masterpage:Left+
14 EN INSTALLING YOUR NEW UNIT (cont.)
XVC33UM_06Index.fm Page 14 Tuesday, September 9, 2003 9:27 AM
S-VIDEO Connection(DVD deck only)
8To connect to a TV with S-VIDEO/AUDIO input connectors . . .
A Connect the unit to TV.A Connect the antenna, unit and TV as per “AV
Connection”. (� pg. 13)B Connect the unit’s S VIDEO OUTPUT (DVD)
connector to the TV’s S-VIDEO input connector.
B Connect the unit to power source.Plug the end of the AC power cord into an AC outlet.
C Set the VCR channel to off.
A When the unit is turned off, press STOP (8) on the unit for more than 5 seconds. “3 CH” appears on the front display panel.
B Press CH +/– on the Remote to select “– CH” (off), then press OK.
● If Plug&Play or Tuner setting has not previously been performed, the Language Select screen appears and Plug&Play takes place automatically.
NOTES:● You can obtain high-quality S-VHS pictures when you play
back discs on the DVD deck.● If your TV is not stereo-capable, use the unit’s AUDIO
OUTPUT connectors to connect to an audio amplifier for Hi-Fi stereo sound reproduction.
● To operate the unit with your TV using the S-VIDEO connection, set your TV to its AV mode. You can also use the TV/VCR button on the unit’s Remote to set your TV to the AV mode. (� pg. 73)
● For switching the TV’s mode, refer to the instruction manual of your television.
ATTENTIONBe sure to connect the unit’s VIDEO OUTPUT (DVD/VCR) connector to the TV’s VIDEO input connector.
COAXIALOPTICAL
PCM/STREAM
TV
To S-VIDEO inputconnector
AUDIO OUTPUT
S-Video cable(not supplied)
Audio/videocable
(not supplied)
AC outlet
AC power cord
Back of unit
RF cable(supplied)
S VIDEO OUTPUT
Antenna or Cable
Matching transformer (not supplied)
Coaxial cable
Flat feeder
VIDEO OUTPUT
To 75 ohm Terminal
VHF/UHFOUT
VHF/UHF IN
Before performing the following steps:● Make sure there is no cassette inserted in the unit.● Make sure the unit is turned on, then press VCR/
DVD on the unit or VCR on the Remote so that the VCR indicator lights up.
Page 14 9 September 2003 9:26 am

Masterpage:Right-No-Heading
EN 15
Filename [XVC33UM_06Index.fm]
XVC33UM_06Index.fm Page 15 Tuesday, September 9, 2003 9:27 AM
Component Video Connection(DVD deck only)
8To connect to a TV with component video input connectors . . .
A Connect the unit to TV.A Connect the aerial, unit and TV as per “AV
Connection”. (� pg. 13)B Connect the unit’s COMPONENT VIDEO OUT
connectors to the TV’s component video input connectors.
B Connect the unit to power source.Plug the end of the AC power cord into an AC outlet.
C Set the VCR channel to off.
A When the unit is turned off, press STOP (8) on the unit for more than 5 seconds. “3 CH” appears on the front display panel.
B Press CH +/– on the Remote to select “– CH” (off), then press OK.
● If Plug&Play or Tuner setting has not previously been performed, the Language Select screen appears and Plug&Play takes place automatically.
NOTES:● You can obtain high-quality component video pictures when
you play back discs on the DVD deck.● If your TV is not stereo-capable, use the unit’s AUDIO
OUTPUT connectors to connect to an audio amplifier for Hi-Fi stereo sound reproduction.
● To operate the unit with your TV using the Component Video connection, set your TV to its AV mode. You can also use the TV/VCR button on the unit’s Remote to set your TV to the AV mode. (� pg. 73)
● For switching the TV’s mode, refer to the instruction manual of your television.
ATTENTIONBe sure to connect the unit’s VIDEO OUTPUT (DVD/VCR) connector to the TV’s VIDEO input connector.
COAXIALOPTICAL
PCM/STREAM
TV
To Component VideoInput connector
ComponentVideo cable
(not supplied)
Audio/Videocable
(not supplied)
AC outlet
AC power cord
Back of unit
RF cable(supplied)
COMPONENTVIDEO OUT
Antenna or Cable
Matching transformer (not supplied)
Coaxial cable
Flat feeder
VIDEO OUTPUT
AUDIOOUTPUT
VHF/UHFOUT
VHF/UHF IN
To 75 ohm Terminal
Before performing the following steps:● Make sure there is no cassette inserted in the unit.● Make sure the unit is turned on, then press VCR/
DVD on the unit or VCR on the Remote so that the VCR indicator lights up.
Page 15 9 September 2003 9:26 am

Filename [XVC33UM_06Index.fm]
Masterpage:Left0XVC33UM_01.book Page 16 Monday, August 4, 2003 7:24 PM
16 EN INITIAL SETTINGS
Plug & Play SetAuto Channel SetThe Plug & Playn Set simplifies installation by guiding you through the procedures of setting the language, clock and tuner channels — simply follow the on-screen menus that appear.
A Turn on the unit.Press 1 on the unit or Remote. The Language Select screen appears on the TV screen.
B Select the language.
NOTE:The selected language is only available on the screen for VCR deck. Set manually the on-screen language for the DVD deck. (� pg. 21)
C Set the time.
D Set the date.Press rt to set the date, then press OK or e.● Press and hold rt to change the date by 15 days.
E Set the year.Press rt to set the year.
Before starting, make sure of the following:● The TV aerial cable should be connected to the unit.● The unit’s AC power cord should be connected to a AC
outlet.● The TV should be set to its AV mode (with AV, S-VIDEO or
Component Video connection (� pg. 13, 14, 15) or VCR channel (with RF connection � pg. 13).
● Slide the TV/VCR/DVD switch to the right.
Press rt to move the highlight bar (arrow) to the language of your choice, then press OK or e.● The Clock Set screen appears.
Press rt to set the hour, then press OK or e.● Press and hold rt to change
the time by 30 minutes.
LANGUAGE SELECT
ENGLISHESPAÑOL
PRESS ( , ), THEN (OK)PRESS (MENU) TO END
PRESS ( , ), THEN (OK)PRESS (MENU) TO END
CLOCK SET
TIME DATE YEAR– –:– –AM 1/ 1 03
Page 16 4 August 2003 6:42 pm

Masterpage:Right-No-Heading
EN 17
Filename [XVC33UM_06Index.fm]
XVC33UM_01.book Page 17 Monday, August 4, 2003 7:24 PM
F Start Auto Channel Set.Press MENU.
● Receivable channels in your area are automatically assigned to the CH +/– buttons, and non-receivable channels are skipped.
● When Auto Channel Set is completed, “SCAN COMPLETED” will appear on the TV screen. If “SCAN COMPLETED –NO SIGNAL–” is displayed on the TV screen, make sure that the aerial cable is connected to the unit properly and press OK on the Remote. The unit will try Auto Channel Set again.
NOTE:If there is a power cut, or if you press 1 or SET UP MENU while Auto Channel Set is in progress, Auto Channel Set will be interrupted; be sure to turn off the unit power once and try again from step A.
DO NOT press any button on the unit or Remote while Auto Channel Set is in progress.
AUTO CHANNEL SET
SCANNING...
PRESS (MENU) TO END
ATTENTIONIf you perform Auto Channel Set successfully during installation, there's no need to separately perform the Language Select, Clock Set or Channel Set procedures, but if adjustments become necessary, they can be performed as follows:● Language setting � pg. 20● Tuner setting � pg. 26● Clock setting � pg. 24
Page 17 4 August 2003 6:42 pm

Filename [XVC33UM_06Index.fm]
Masterpage:Left+
18 EN INITIAL SETTINGS (cont.)
XVC33UM_01.book Page 18 Monday, August 4, 2003 7:24 PM
Monitor Set(DVD deck)You can select the monitor type depending the TV used when you play back DVD VIDEO discs recorded for wide-screen TVs.
A Turn on the unit.Press POWER (1).
B Select the DVD deck.On the unitPress VCR/DVD repeatedly so that the DVD indicator lights up.
On the RemotePress DVD so that the DVD indicator lights up.
C Access the DVD Set Up menu screen.
D Select the mode.
E Select the mode setting.Press rt to select the desired setting, then press OK.
F Return to the normal screen.Press SET UP MENU.
● Turn on the TV and select the VCR channel (or AV mode).
● Slide the TV/VCR/DVD switch to the right.
A Press SET UP MENU.B Press w e to select
“ PICTURE”.
Press rt to move � to “MONITOR TYPE”, then press OK.
4:3LB
PICTURE
MONITOR TYPE
PICTURE SOURCE
SCREEN SAVER
AUTO
ON
USE TO SELECT, USE OK TO CONFIRM.TO EXIT, PRESS [SET UP MENU].OK
SELECT
MP3 / JPEG MP3
4:3LB
PICTURE
MONITOR TYPE
PICTURE SOURCE
SCREEN SAVER
AUTO
ON
USE TO SELECT, USE OK TO CONFIRM.TO EXIT, PRESS [SET UP MENU].OK
SELECT
MP3 / JPEG MP3
Page 18 4 August 2003 6:42 pm
Masterpage:Right-No-Heading
EN 19
Filename [XVC33UM_06Index.fm]
XVC33UM_01.book Page 19 Monday, August 4, 2003 7:24 PM
* The default setting is bold in the table below.
8 MONITOR TYPE16:9 NORMAL (Wide television conversion):
Select this when the aspect ratio of your TV is 16:9 (wide TV).
16:9 AUTO (Wide television conversion):Select this when the aspect ratio of your TV is fixed to 16:9 (wide TV). The unit automatically adjusts the screen width of the output signal correctly when playing back a picture whose aspect ratio is 4:3.
4:3 LB (Letter Box conversion):Select this when the aspect ratio of your TV is 4:3 (conventional TV). While viewing a wide screen picture, the black bars appear on the top and the bottom of the screen.
4:3 PS (Pan&Scan):Select this when the aspect ratio of your TV is 4:3 (conventional TV). While viewing a wide screen picture, the black bars do not appear; however, the left and right edges of the pictures will not be shown on the screen.
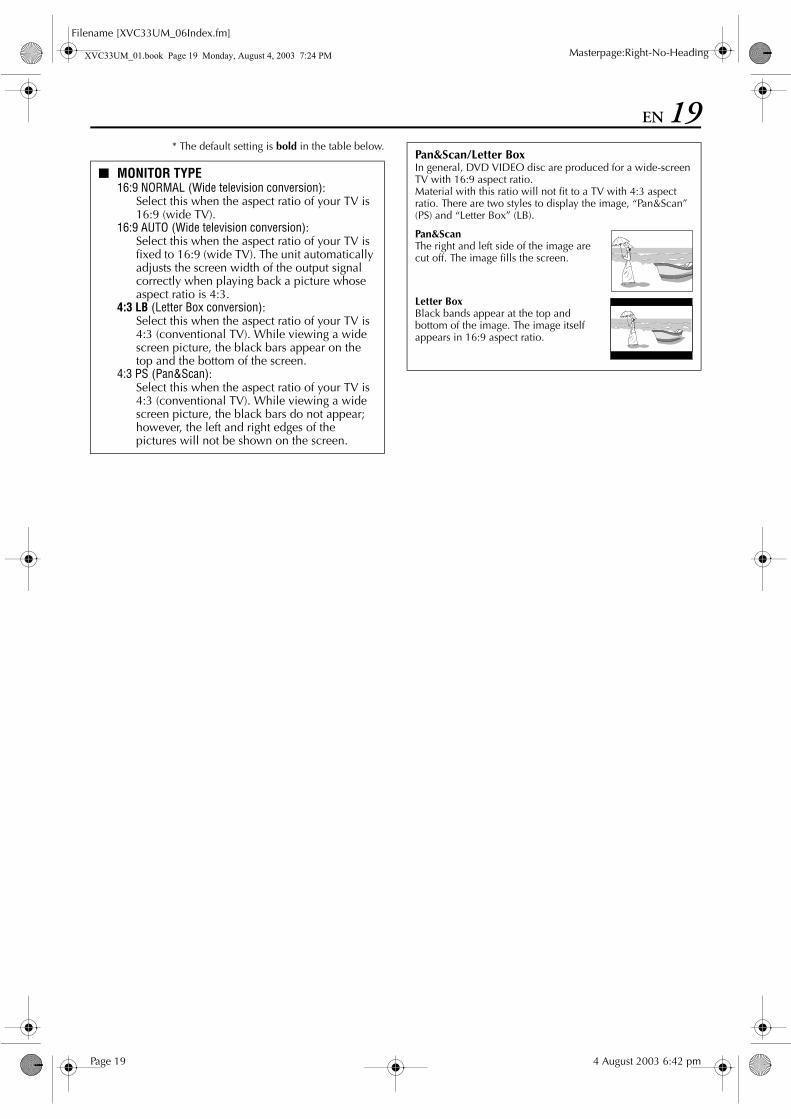
Pan&Scan/Letter BoxIn general, DVD VIDEO disc are produced for a wide-screen TV with 16:9 aspect ratio. Material with this ratio will not fit to a TV with 4:3 aspect ratio. There are two styles to display the image, “Pan&Scan” (PS) and “Letter Box” (LB).
Pan&ScanThe right and left side of the image are cut off. The image fills the screen.
Letter BoxBlack bands appear at the top and bottom of the image. The image itself appears in 16:9 aspect ratio.
Page 19 4 August 2003 6:42 pm

Filename [XVC33UM_06Index.fm]
Masterpage:Left+
20 EN INITIAL SETTINGS (cont.)
XVC33UM_01.book Page 20 Monday, August 4, 2003 7:24 PM
Language On-screen Language Set (VCR deck)Use language setting only if the language have not been set correctly by the Plug&Play setting. The default setting is “ESPAÑOL”.
A Turn on the unit.Press POWER (1).
B Select the VCR deck.On the unitPress VCR/DVD repeatedly so that the VCR indicator lights up.
On the RemotePress VCR so that the VCR indicator lights up.
C Access the Main Menu screen.Press SET UP MENU.
D Access the Initial Set screen.
E Select the language.
F Return to the normal screen.Press SET UP MENU.
● Turn on the TV and select the VCR channel (or AV mode).
● Slide the TV/VCR/DVD switch to the right.
Press rt to move the highlight bar (arrow) to “INITIAL SET”, then press OK or e.
Press rt to move the highlight bar (arrow) to “LANGUAGE”, then press OK or e repeatedly until the desired language is selected.
Page 20 4 August 2003 6:42 pm
Masterpage:Right-No-Heading
EN 21
Filename [XVC33UM_06Index.fm]
XVC33UM_01.book Page 21 Monday, August 4, 2003 7:24 PM
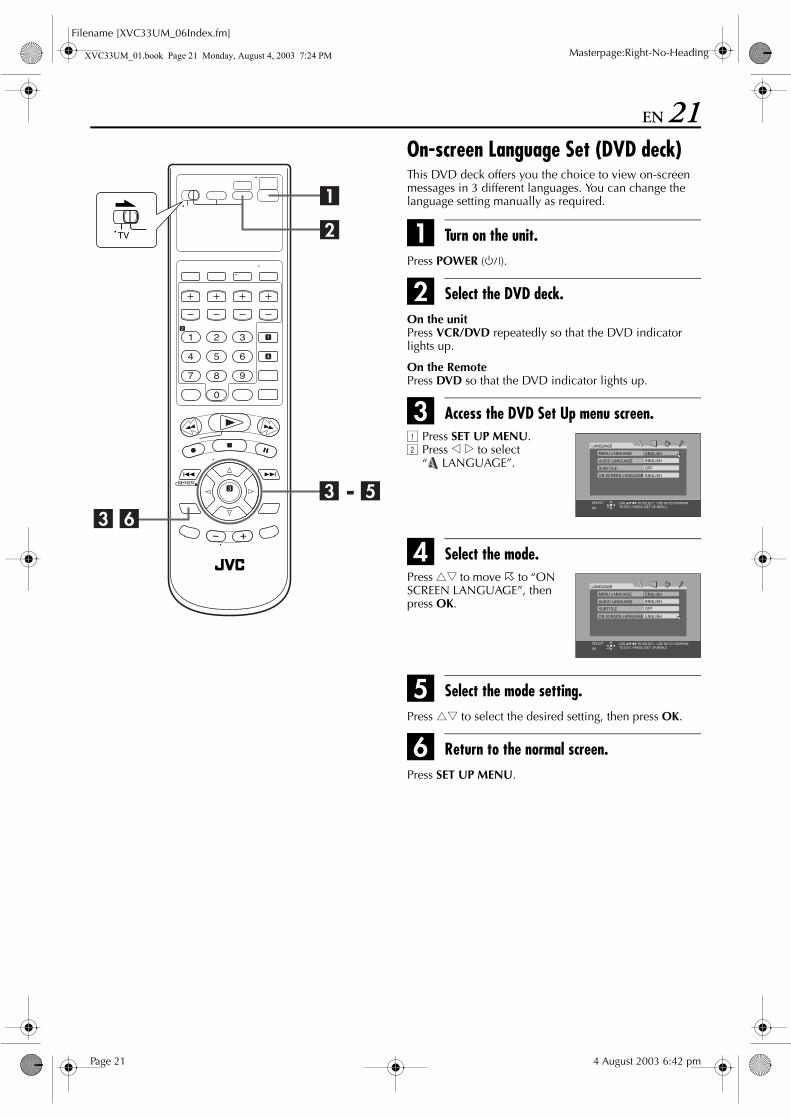
On-screen Language Set (DVD deck)This DVD deck offers you the choice to view on-screen messages in 3 different languages. You can change the language setting manually as required.
A Turn on the unit.Press POWER (1).
B Select the DVD deck.On the unitPress VCR/DVD repeatedly so that the DVD indicator lights up.
On the RemotePress DVD so that the DVD indicator lights up.
C Access the DVD Set Up menu screen.
D Select the mode.
E Select the mode setting.Press rt to select the desired setting, then press OK.
F Return to the normal screen.Press SET UP MENU.
A Press SET UP MENU.B Press w e to select
“ LANGUAGE”.
Press rt to move � to “ON SCREEN LANGUAGE”, then press OK.
ENGLISH
ENGLISH
ENGLISH
OFF
LANGUAGE
MENU LANGUAGE
ON SCREEN LANGUAGE
AUDIO LANGUAGE
SUBTITLE
USE TO SELECT, USE OK TO CONFIRM.TO EXIT, PRESS [SET UP MENU].OK
SELECT
ENGLISH
ENGLISH
ENGLISH
OFF
LANGUAGE
MENU LANGUAGE
ON SCREEN LANGUAGE
AUDIO LANGUAGE
SUBTITLE
USE TO SELECT, USE OK TO CONFIRM.TO EXIT, PRESS [SET UP MENU].OK
SELECT
Page 21 4 August 2003 6:42 pm

Filename [XVC33UM_06Index.fm]
Masterpage:Left+
22 EN INITIAL SETTINGS (cont.)
XVC33UM_01.book Page 22 Monday, August 4, 2003 7:24 PM
Menu/Audio/Subtitle Language Set (DVD deck only)Some DVD discs contain the DVD menu display, audio, subtitle in the multiple languages. With these discs, you can set the default language as you like.● The procedure shows how to set “MENU LANGUAGE”
on the DVD Set Up menu screen as an example.
A Turn on the unit.Press POWER (1).
B Select the DVD deck.On the unitPress VCR/DVD repeatedly so that the DVD indicator lights up.
On the RemotePress DVD so that the DVD indicator lights up.
C Access the DVD Set Up menu screen.
D Select the mode.
E Select the mode setting.Press rt to select the desired setting, then press OK.● See “Language Code List” (� pg. 23).
F Return to the normal screen.Press SET UP MENU.
NOTE:When the selected language is not available on the disc, the disc’s default menu language is played back.
A Press SET UP MENU.B Press w e to select
“ LANGUAGE”.
Press rt to move � to “MENU LANGUAGE”, then press OK.
ENGLISH
ENGLISH
ENGLISH
OFF
LANGUAGE
MENU LANGUAGE
ON SCREEN LANGUAGE
AUDIO LANGUAGE
SUBTITLE
USE TO SELECT, USE OK TO CONFIRM.TO EXIT, PRESS [SET UP MENU].OK
SELECT
ENGLISH
ENGLISH
ENGLISH
OFF
LANGUAGE
MENU LANGUAGE
ON SCREEN LANGUAGE
AUDIO LANGUAGE
SUBTITLE
USE TO SELECT, USE OK TO CONFIRM.TO EXIT, PRESS [SET UP MENU].OK
SELECT
Page 22 4 August 2003 6:42 pm

Masterpage:Right 3Column
EN 23
Filename [XVC33UM_06Index.fm]
XVC33UM_01.book Page 23 Monday, August 4, 2003 7:24 PM
Language Code ListAAABAFAMARASAYAZBABEBGBHBIBNBOBRCACOCSCYDADZELEOETEUFAFIFJFOFYGAGDGLGNGUHAHIHRHUHYIAIE
AfarAbkhazianAfrikaansAmeharicArabicAssameseAymaraAzerbaijaniBashkirByelorussianBulgarianBihariBislamaBengali, BanglaTibetanBretonCatalanCorsicanCzechWelshDanishBhutaniGreekEsperantoEstonianBasquePersianFinnishFijiFaroeseFrisianIrishScots GaelicGalicianGuaraniGujaratiHausaHindiCroatianHungarianArmenianInterlinguaInterlingue
IKINISIWJIJWKAKKKLKMKNKOKSKUKYLALNLOLTLVMGMIMKMLMNMOMRMSMTMYNANENLNOOCOMORPAPLPSPTQURM
InupiakIndonesianIcelandicHebrewYiddishJavaneseGeorgianKazakhGreenlandicCambodianKannadaKorean (KOR)KashmiriKurdishKirghizLatinLingalaLaothianLithuanianLatvian, LettishMalagasyMaoriMacedonianMalayalamMongolianMoldavianMarathiMalay (MAY)MalteseBurmeseNauruNepaliDutchNorwegianOccitan(Afan) OromoOriyaPanjabiPolishPashto, PushtoPortugueseQuechuaRhaeto-Romance
RNRORURWSASDSGSHSISKSLSMSNSOSQSRSSSTSUSVSWTATETGTHTITKTLTNTOTRTSTTTWUKURUZVIVOWOXHYOZU
KirundiRumanianRussianKinyarwandaSanskritSindhiSanghoSerbo-CroatianSinghaleseSlovakSlovenianSamoanShonaSomaliAlbanianSerbianSiswatiSesothoSundaneseSwedishSwahiliTamilTeluguTajikThaiTigrinyaTurkmenTagalogSetswanaTongaTurkishTsongaTatarTwiUkrainianUrduUzbekVietnameseVolapukWolofXhosaYorubaZulu
Page 23 4 August 2003 6:42 pm

Filename [XVC33UM_06Index.fm]
Masterpage:Left+
24 EN INITIAL SETTINGS (cont.)
XVC33UM_01.book Page 24 Monday, August 4, 2003 7:24 PM
Clock Set Perform clock setting only if the clock has not been set correctly by the Plug&Play setting.
A Turn on the unit.Press POWER (1).
B Select the VCR deck.On the unitPress VCR/DVD repeatedly so that the VCR indicator lights up.
On the RemotePress VCR so that the VCR indicator lights up.
C Access the Main Menu screen.Press SET UP MENU.
D Access the Initial Set screen.
E Access the Clock Set screen.
● Turn on the TV and select the VCR channel (or AV mode).
● Slide the TV/VCR/DVD switch to the right.
Press rt to move the highlight bar (arrow) to “INITIAL SET”, then press OK or e.
Press rt to move the highlight bar (arrow) to “CLOCK SET”, then press OK or e.
Page 24 4 August 2003 6:42 pm

Masterpage:Right-No-Heading
EN 25
Filename [XVC33UM_06Index.fm]
XVC33UM_01.book Page 25 Monday, August 4, 2003 7:24 PM
F Set the time.
G Set the date.Press rt to set the date, then press OK or e.● Press and hold rt to change the date by 15 days.
H Set the year.Press rt to set the year.
I Start clock.Press SET UP MENU and normal screen appears.
To make corrections any time during the processPress OK or e repeatedly until the item you want to change blinks, then press rt.
Press rt to set the hour, then press OK or e.● Press and hold rt to change
the time by 30 minutes.
PRESS ( , ), THEN (OK)PRESS (MENU) TO END
CLOCK SET
TIME DATE YEAR– –:– –AM 1/ 1 03
Page 25 4 August 2003 6:42 pm

Filename [XVC33UM_06Index.fm]
Masterpage:Left+
26 EN INITIAL SETTINGS (cont.)
XVC33UM_01.book Page 26 Monday, August 4, 2003 7:24 PM
Tuner Set Auto Channel SetPerform Auto Channel Set only if channels have not been set correctly by the Plug&Play setting.
A Turn on the unit.Press POWER (1).
B Select the VCR deck.On the unitPress VCR/DVD repeatedly so that the VCR indicator lights up.
On the RemotePress VCR so that the VCR indicator lights up.
C Access the Main Menu screen.Press SET UP MENU.
D Access the Tuner Set screen.
E Perform Auto Channel Set.Press rt to move the highlight bar (arrow) to “AUTO CHANNEL SET”, then press OK or e. You can automatically set the receivable channels in your area in the order of their frequencies. ● When Auto Channel Set is
complete, “SCAN COMPLETED” appears on the TV screen.
● If the scan was unsuccessful, “SCAN COMPLETED–NO SIGNAL–” appears on screen. Check the connections and start again.
F Return to the normal screen.Press SET UP MENU.
● Turn on the TV and select the VCR channel (or AV mode).
● Slide the TV/VCR/DVD switch to the right.
INFORMATIONThe unit selects the correct band (TV or CATV) automatically during Auto Channel Set. The selected band will be displayed on the right side of “BAND” on the Tuner Set screen.
Press rt to move the highlight bar (arrow) to “TUNER SET”, then press OK or e.
Page 26 4 August 2003 6:42 pm

Masterpage:Right-No-Heading
EN 27
Filename [XVC33UM_06Index.fm]
XVC33UM_01.book Page 27 Monday, August 4, 2003 7:24 PM
Manual Channel SetYou can add the channels you want or delete the channels you do not want manually.
A Turn on the unit.Press POWER (1).
B Select the VCR deck.On the unitPress VCR/DVD repeatedly so that the VCR indicator lights up.
On the RemotePress VCR so that the VCR indicator lights up.
C Access the Main Menu screen.Press SET UP MENU.
D Access the Tuner Set screen.Press rt to move the highlight bar (arrow) to “TUNER SET”, then press OK or e.
E Access the Manual Channel Set screen.
F Add or skip the desired channels.To add channelsA Press the number keys to
input a channel number you want to add.
B Press OK or e to set to “ADD”.
C Repeat A to B to add other channels.
To skip channelsA Press rt or the number keys to select a channel
number you want to skip.B Press OK or e to set to “SKIP”.C Repeat A and B to skip other channels.
G Return to the normal screen.Press SET UP MENU.
Press rt to move the highlight bar (arrow) to “MANUAL CHANNEL SET”, then press OK or e.
Page 27 4 August 2003 6:42 pm

Filename [XVC33UM_07S-VHS.fm]
Masterpage:Left0XVC33UM_01.book Page 28 Monday, August 4, 2003 7:24 PM
28 EN OPERATIONS ON VCR DECK
Basic Playback A Load a cassette.Make sure the window side is up, the rear label side is facing you and the arrow on the front of the cassette is pointed toward the unit.● Do not apply too much pressure when inserting.● If the record safety tab has been removed, playback begins
automatically. Although the DVD deck is selected, the VCR deck is selected automatically if the DVD deck is in stop mode.
● The unit’s power comes on automatically and the counter is reset to 0:00:00.
B Select the VCR deck.On the unitPress VCR/DVD repeatedly so that the VCR indicator lights up.
On the RemotePress VCR so that the VCR indicator lights up.
C Find the program start point.If the tape is advanced past the start point, press REW (3). To go forward, press FF (5).
D Start playback.Press PLAY (4).
E Stop playback.Press STOP (8). Then press EJECT (x) on the VCR deck to remove the cassette.
● Turn on the TV and select the VCR channel (or AV mode).
● Slide the TV/VCR/DVD switch to the right.
Clean the video heads using a dry cleaning cassette — ECL-3F — when:● Rough, poor picture appears while a tape is played back.● The picture is unclear or no picture appears.● “USE CLEANING CASSETTE” appears on the screen (only
with “SUPERIMPOSE” set to “ON”). (� pg. 76)
NOTE:The heads get dirty in the following cases:● in an environment prone to extreme temperature or
humidity● in a dusty environment● flaw, dirt or mold on video tapes● continuous usage for a long time
Usable cassettesFull-Size VHST-30 (ST-30**)T-60 (ST-60**)T90T-120 (ST-120**)T-160 (ST-160**)ST-210**
Compact VHS*TC-20 (ST-C20**)TC-30 (ST-C30**)TC-40 (ST-C40**)* Compact VHS camcorder recordings can be played on
this unit. Simply place the recorded cassette into a VHS Cassette Adapter and it can be used just like any full-sized VHS cassette.
** This unit can record on regular VHS and Super VHS cassettes. However, it will record regular VHS signals only.• S-VHS recording is not possible with this unit.
This unit is equipped with SQPB (S-VHS QUASI PLAYBACK) that lets you watch tapes recorded in the S-VHS format and the SP mode with regular VHS resolution.● SQPB does not deliver Super VHS resolution.
Page 28 4 August 2003 6:42 pm

Masterpage:Right-No-Heading
EN 29
Filename [XVC33UM_07S-VHS.fm]
XVC33UM_01.book Page 29 Monday, August 4, 2003 7:24 PM
Playback Features Still Picture/Frame-By-Frame Playback1 Pause during playback.Press PAUSE (9).● If there is vertical jitter, press CH +/– on the Remote to correct
the picture.
2 Activate frame-by-frame playback.Press PAUSE (9) to advance a still picture.
Slow Motion1 Pause during playback.Press PAUSE (9).
2 Activate slow motion playback.Press and hold PAUSE (9) for 2 seconds, then release. Press PAUSE (9) and release again to return to still picture.● The speed changes for each direction by pressing REW (3)
and FF (5) repeatedly.
NOTE:During slow motion playback, some noise may appear on the TV screen. Press CH + or – on the Remote to eliminate the noises.
High-Speed (Turbo) SearchDuring playback, press FF (5) for forward high-speed search, or REW (3) for reverse high-speed search.● The speed changes for each direction by pressing REW (3)
and FF (5) repeatedly.When pressing FF (5):(SP): +5x{+7x(EP): +11x{+21xWhen pressing REW (3):Once REW (3) is pressed, reverse search starts in –1x normal playback speed. After this process, each press of REW (3) changes the search speed between –5x and –7x in SP mode, –11x and –21x in EP mode.(SP): –1x]–5x{–7x(EP): –1x]–11x{–21x
● Turn on the TV and select the VCR channel (or AV mode).
● Slide the TV/VCR/DVD switch to the right.
ATTENTIONIn the search, still, slow-motion or frame-by-frame playback mode,● the picture will be distorted.● the noise bars will appear.● there may be a loss of colour.● you cannot hear the sound.
To resume normal playback, press PLAY (4).
Page 29 4 August 2003 6:42 pm

Filename [XVC33UM_07S-VHS.fm]
Masterpage:Left+
30 EN OPERATIONS ON VCR DECK (cont.)
XVC33UM_01.book Page 30 Monday, August 4, 2003 7:24 PM
Skip SearchDuring playback, press SKIP SEARCH 1 to 6 times to skip over unwanted sections.Each press initiates a 30-second period of fast-motion playback. Normal playback resumes automatically.
Index SearchYour unit automatically marks index codes at the beginning of each recording. This function gives you quick access to any one of 9 index codes in either direction.
NOTE:Before starting, make sure the unit is in the Stop mode.
Activate Index Search.Press INDEX (2) or INDEX (6). “INDEX –1” or “INDEX 1” is displayed on the TV screen and search begins in the corresponding direction.● To access index codes 2 through 9, press INDEX (2) or
INDEX (6) repeatedly until the correct index number is displayed. Example:To locate the beginning of B from the current position, press INDEX (2) twice.To locate the beginning of D from the current position, press INDEX (6) once.
● When the specified index code is located, playback begins automatically.
Instant ReViewSimply by pressing a single button, the unit power comes on, rewinds, and begins playback of the last timer-recorded program. If you have several programs recorded, you can easily access any of them.
NOTE:Before starting, make sure that the unit is off and that the Timer mode is disengaged.
Activate Instant ReView.Press . The unit power comes on and the unit searches for the index code indicating the start of the last timer-recorded program. Once it’s found, playback begins automatically.● To watch the first of the 3 programs, press three
times. The unit searches and begins playback automatically. You can access a program as far as 9 index codes away from the current tape position.
To resume normal playback during a Skip Search, press PLAY (4).
Current position
Index number
Page 30 4 August 2003 6:42 pm

Masterpage:Right-No-Heading
EN 31
Filename [XVC33UM_07S-VHS.fm]
XVC33UM_01.book Page 31 Monday, August 4, 2003 7:24 PM
Next Function MemoryThe Next Function Memory “tells” the unit what to do after rewinding. Before continuing, make sure the unit is in the Stop mode.
a- For Automatic Start Of PlaybackPress REW (3), then press PLAY (4) within 2 seconds.
b- For Automatic Power OffPress REW (3), then press POWER (1) within 2 seconds.
c- For Automatic Timer StandbyPress REW (3), then press TIMER within 2 seconds.
d- For Automatic Cassette Ejection After Tape RewindPress REW (3), then press EJECT (x) within 2 seconds.
Repeat PlaybackYour unit can automatically play back the whole tape 100 times repeatedly.
1 Start playback.Press PLAY (4).
2 Activate Repeat Playback.Press PLAY (4) and hold for over 5 seconds, then release.● The Play indicator ($) on the front display panel blinks slowly.● After playing back a tape 100 times, the unit stops
automatically.
3 Stop Repeat Playback.Press STOP (8) at any time.● Pressing PLAY (4), REW (3), FF (5) or PAUSE (9) also
stops Repeat Playback.
x
Page 31 4 August 2003 6:42 pm

Filename [XVC33UM_07S-VHS.fm]
Masterpage:Left+
32 EN OPERATIONS ON VCR DECK (cont.)
XVC33UM_01.book Page 32 Monday, August 4, 2003 7:24 PM
Manual TrackingYour unit is equipped with automatic tracking control. During playback, you can override this and adjust the tracking manually by pressing the CH buttons.
1 Override automatic tracking.During playback, press SP/EP on the Remote.
2 Adjust the tracking manually.Press CH + or – on the Remote.● Press SP/EP again to return to automatic tracking.
NOTE:When a new tape is inserted, the unit enters the automatic tracking mode automatically.
Soundtrack SelectionYour unit is capable of recording three soundtracks (HI-FI L, HI-FI R and NORM) and will play back the one you select.During PlaybackPressing A.MONITOR changes the soundtrack as follows:● You can also select the soundtrack on the Function Set screen.
(� pg. 77)
NOTES:● “HIFI” should normally be selected. In this mode, Hi-Fi stereo
tapes are played back in stereo, and the normal audio track is played back automatically for tapes with only normal audio.
● “SUPERIMPOSE” must be set to “ON” or the on-screen displays will not appear. (� pg. 76)
TRACKUSE
On-Screen Display
H I-F I Hi-Fi sound is played back
H I-F I L Sound on the left Hi-Fi channel is played back
H I-F I R Sound on the right Hi-Fi channel is played back
NORM Sound on the normal track is played back
NORMH I-F I
Both sounds on the Hi-Fi track and normal track are mixed and played back
Page 32 4 August 2003 6:42 pm

Masterpage:Right-No-Heading
EN 33
Filename [XVC33UM_07S-VHS.fm]
XVC33UM_01.book Page 33 Monday, August 4, 2003 7:24 PM
Basic Recording A Load a cassette.Insert a cassette with the record safety tab intact.● The unit’s power comes on automatically and the counter is
reset to 0:00:00.
B Select the VCR deck.On the unitPress VCR/DVD repeatedly so that the VCR indicator lights up.
On the RemotePress VCR so that the VCR indicator lights up.
C Choose a program.Press CH +/– or the number keys to select the channel you wish to record.
D Set the tape speed.Press SP/EP. The current setting appears on the front display panel or TV screen. Press SP/EP again to change the setting while the tape speed is displayed on the TV screen.
E Start recording.Press and hold REC (7) and press PLAY (4) on the Remote, or press REC (7) on the unit.
F Pause/Resume recording.Press PAUSE (9). Press PLAY (4) to resume recording.● You can select channel during the Record Pause mode.
G Stop recording.Press STOP (8). Then press EJECT (x) on the VCR deck to remove the cassette.
● Turn on the TV and select the VCR channel (or AV mode).
● Slide the TV/VCR/DVD switch to the right.
Recording Resume FunctionIf there is a power outage during recording, Instant Timer Recording or timer recording (� pg. 33, 34, 36), the recording will resume automatically when power is restored to the unit unless the unit’s memory backup has expired.
Page 33 4 August 2003 6:42 pm

Filename [XVC33UM_07S-VHS.fm]
Masterpage:Left+
34 EN OPERATIONS ON VCR DECK (cont.)
XVC33UM_01.book Page 34 Monday, August 4, 2003 7:24 PM
Recording Features Record One Program While Watching AnotherIf your unit is connected to the TV via the AV connection, press TV/VCR. The unit’s VCR indicator and the TV broadcast being recorded disappear.Once recording is in progress, all you need to do is to set the channel controls on the TV for the station you wish to view.● The program selected with the TV’s channel controls appears
on the TV screen, while the one selected with the unit’s CH buttons is recorded on the tape.
NOTE:You can also use the DVD deck in the following cases. Before use, be sure to turn on the unit and select the DVD deck.● During recording● During timer recording● During timer standby mode
Instant Timer Recording (ITR)This easy method lets you record for from 30 minutes to 6 hours (selectable in 30-min. increments), and shuts the unit off after recording is finished.
1 Start recording.Press REC (7) on the unit.
2 Engage the ITR mode.Press REC (7) again. “�” blinks and “0:30” appears on the front display panel.
3 Set the recording duration.If you want to record for more than 30 minutes, press REC (7) to extend the time. Each press extends recording time by 30 minutes.
NOTES:● You can only perform ITR using the REC (7) button on the
unit’s front panel.● Still picture playback stops automatically after 5 minutes to
protect the heads.● When the end of the tape is reached during timer recording,
the unit stops and “�” and “$” blink on the front display panel.
● When the end of the tape is reached during timer recording or Instant Timer Recording, the unit is turned off and “�” and “$” blink on the front display panel.
● During Instant Timer Recording, any other timer programed recording won’t start even if their start time has come. In such a case, the timer programed recording starts (if the end time of the timer programed recording is set after the end of Instant Timer Recording) after the Instant Timer Recording finishes.
● Turn on the TV and select the VCR channel (or AV mode).
● Slide the TV/VCR/DVD switch to the right.
Accidental erasure preventionTo prevent accidental recording on a recorded cassette, remove its safety tab. To record on it later, cover the hole with adhesive tape.
Record safety tab
Page 34 4 August 2003 6:42 pm

Masterpage:Right-No-Heading
EN 35
Filename [XVC33UM_07S-VHS.fm]
XVC33UM_01.book Page 35 Monday, August 4, 2003 7:24 PM
Elapsed Recording Time Indication1 Set the counter display.Press DISPLAY until a counter reading appears on the front display panel.
2 Reset the counter.Press C.RESET before starting recording or playback.● The counter is reset to “0:00:00” and shows the exact elapsed
time as the tape runs. You can check the exact time of a recording or playback.
Tape Remaining TimePress DISPLAY until the time remaining on the tape appears.● The front display panel shows the tape remaining time with
“z” displayed.
● By pressing the DISPLAY button, you can change display to show the clock time, counter reading or tape remaining time.
NOTES:● When you press DISPLAY, the on-screen display appears on
the TV screen for 5 seconds, then the displays other than the counter disappears. To clear the counter display, press DISPLAY.
● Depending on the type of tape being used, the tape remaining time reading may not appear right away, or is not correct. “– –:– –” may sometimes appear, or the display may blink on occasion.
Second Audio RecordingThis unit’s built-in MTS decoder enables reception of Multichannel TV Sound broadcast. To record a SAP program received, set “2ND AUDIO RECORD” to “ON”. (� pg. 77)
NOTE:When the channel is changed on the unit;● The “STEREO” indicator appears on the screen for about
5 seconds if the program is a stereo broadcast.● The “SAP” indicator appears on the screen for about 5 seconds
if the program is a SAP broadcast.● Both indicators appear when a stereo program is accompanied
by SAP sound.
Page 35 4 August 2003 6:42 pm

Filename [XVC33UM_07S-VHS.fm]
Masterpage:Left+
36 EN OPERATIONS ON VCR DECK (cont.)
XVC33UM_01.book Page 36 Monday, August 4, 2003 7:24 PM
Express Timer Programing
Example: To timer-record the program from 8:00 to 10:00 on 24th December, on channel 12.
A Select the VCR deck.On the unitPress VCR/DVD repeatedly so that the VCR indicator lights up.
On the RemotePress VCR so that the VCR indicator lights up.
B Access the Program screen.
C Enter the program start time.
D Enter the program stop time.Press STOP +/– to enter the time you want recording to stop.● Press and hold STOP +/– to move in 30-minute increments, or
press and release repeatedly to move 1 minute at a time.
E Enter the program date.Press DATE +/–. ● The current date appears on the TV screen. The date you enter
appears in its place.
Before performing Express Timer Programing:● Make sure that the unit’s built-in clock is set properly.● Insert a cassette with the safety tab in place. The unit will
come on automatically.● Turn on the TV and select the VCR channel (or AV mode).● Slide the TV/VCR/DVD switch to the right.
Press PROG.. (If you’re just starting out, “P1” appears.)
Press START +/– to enter the time you want recording to start.● Press and hold START +/– to
move in 30-minute increments, or press and release repeatedly to move 1 minute at a time.
Page 36 4 August 2003 6:42 pm

Masterpage:Right-No-Heading
EN 37
Filename [XVC33UM_07S-VHS.fm]
XVC33UM_01.book Page 37 Monday, August 4, 2003 7:24 PM
F Enter the channel position.Press CH +/–.
G Set the tape speed.Press SP/EP.
H Return to the normal screen.Press PROG. or OK. “PROGRAM COMPLETED” appears on the TV screen for about 5 seconds, then the normal screen appears. If “PROGRAM NOT COMPLETED PROGRAM OVERLAP” appears on the TV screen, see page 40.● Repeat steps B – H for each additional program.
I Engage the unit’s timer mode.Press TIMER. The unit turns off automatically and “#” appears on the front display panel.● To disengage the timer mode, press TIMER again.
To Timer-Record Weekly Or Daily Serials:— anytime during steps C through G, press WEEKLY (number key “9”) for weekly serials or DAILY (number key “8”) for daily serials (Monday – Friday). Either “WEEKLY” or “DAILY” appears on the TV screen. Pressing the button again makes the corresponding indication disappear.
NOTES:● You can program this unit to timer-record as many as 8
programs. If you try to program the unit to record a ninth, “PROGRAM FULL” appears on the TV screen. To record the extra program, you must first cancel any unnecessary programs. (� pg. 39)
● In case of a power failure after programing, the unit’s memory backup keeps your selections for approximately 3 minutes.
● Programs that start after midnight must have the next day’s date.
Cable Box or DBS Receiver UsersTo timer-record a satellite broadcast using Express Timer Programing:A Perform steps A – I. Enter “L-1” for the channel position
in step F.B Set the DBS receiver to the appropriate channel before
the selected program begins.C Leave the DBS receiver’s power on.
Page 37 4 August 2003 6:42 pm

Filename [XVC33UM_07S-VHS.fm]
Masterpage:Left+
38 EN OPERATIONS ON VCR DECK (cont.)
XVC33UM_01.book Page 38 Monday, August 4, 2003 7:24 PM
Check, cancel and change programs
A Disengage the timer mode.Press TIMER, then press POWER (1).
B Access the Program Check screen.
C Access the Program screen.
Press PROG. CHECK.
Press PROG. CHECK again to check more information. Each time you press PROG. CHECK, the next program’s information appears.
Page 38 4 August 2003 6:42 pm

Masterpage:Right-No-Heading
EN 39
Filename [XVC33UM_07S-VHS.fm]
XVC33UM_01.book Page 39 Monday, August 4, 2003 7:24 PM
To cancel or change a program
D Cancel or change a program.Press CANCEL to cancel a program. To change program settings, press the appropriate button: START +/–, STOP +/–, DATE +/–, CH +/–, DAILY (number key “8”), WEEKLY (number key “9”) and/or SP/EP.
E Return to the normal screen.Press PROG. CHECK as many times as necessary. If there are still some programs remaining, go on to step F.
F Return to the timer mode.Press TIMER.
Page 39 4 August 2003 6:42 pm
Filename [XVC33UM_07S-VHS.fm]
Masterpage:Left+
40 EN OPERATIONS ON VCR DECK (cont.)
XVC33UM_01.book Page 40 Monday, August 4, 2003 7:24 PM
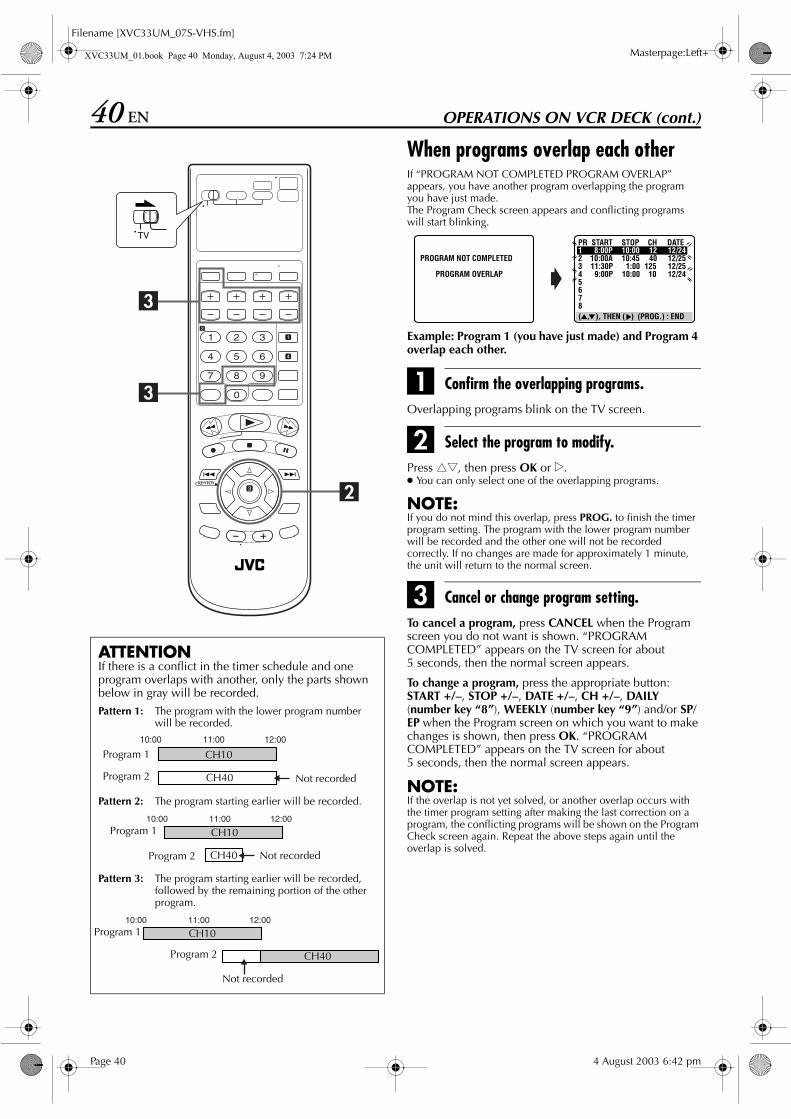
When programs overlap each otherIf “PROGRAM NOT COMPLETED PROGRAM OVERLAP” appears, you have another program overlapping the program you have just made.The Program Check screen appears and conflicting programs will start blinking.
Example: Program 1 (you have just made) and Program 4 overlap each other.
A Confirm the overlapping programs.Overlapping programs blink on the TV screen.
B Select the program to modify.Press rt, then press OK or e.● You can only select one of the overlapping programs.
NOTE:If you do not mind this overlap, press PROG. to finish the timer program setting. The program with the lower program number will be recorded and the other one will not be recorded correctly. If no changes are made for approximately 1 minute, the unit will return to the normal screen.
C Cancel or change program setting.To cancel a program, press CANCEL when the Program screen you do not want is shown. “PROGRAM COMPLETED” appears on the TV screen for about 5 seconds, then the normal screen appears.
To change a program, press the appropriate button: START +/–, STOP +/–, DATE +/–, CH +/–, DAILY (number key “8”), WEEKLY (number key “9”) and/or SP/EP when the Program screen on which you want to make changes is shown, then press OK. “PROGRAM COMPLETED” appears on the TV screen for about 5 seconds, then the normal screen appears.
NOTE:If the overlap is not yet solved, or another overlap occurs with the timer program setting after making the last correction on a program, the conflicting programs will be shown on the Program Check screen again. Repeat the above steps again until the overlap is solved.
ATTENTIONIf there is a conflict in the timer schedule and one program overlaps with another, only the parts shown below in gray will be recorded.Pattern 1: The program with the lower program number
will be recorded.
Pattern 2: The program starting earlier will be recorded.
Pattern 3: The program starting earlier will be recorded, followed by the remaining portion of the other program.
Program 1
Program 2
CH10
CH40 Not recorded
Not recorded
Program 1
Program 2
CH10
CH40
Not recorded
Program 1
Program 2
CH10
CH40
Page 40 4 August 2003 6:42 pm

Masterpage:Right-No-Heading
EN 41
Filename [XVC33UM_07S-VHS.fm]
XVC33UM_01.book Page 41 Monday, August 4, 2003 7:24 PM
Satellite Auto RecordingThis function allows you to automatically record a satellite program which is timer-programed on your external DBS receiver. Connect a DBS receiver to the unit’s AUDIO/VIDEO INPUT (L-1) connectors and program the timer on the DBS receiver. The unit starts or stops recording by the signals input from the DBS receiver. After recording, the unit’s power shuts off automatically.● You can also connect the cable box if it has a timer.
A Select the VCR deck.On the unitPress VCR/DVD repeatedly so that the VCR indicator lights up.
On the RemotePress VCR so that the VCR indicator lights up.
B Set the tape speed.Press SP/EP.
C Engage the Satellite Auto Recording mode.Press and hold REC LINK for about 2 seconds. The “N” and “#” indicators light up and the unit turns off automatically.
NOTES:● To disengage the Satellite Auto Recording mode, press REC LINK. The “N” indicator goes off.● If the unit’s power is off, it is not possible to engage the Satellite Auto Recording mode.● In step C, if the “N” indicator does not light but instead blinks quickly even though your DBS receiver’s power is off, Satellite Auto
Recording will not work properly with that DBS receiver*. If this is the case, perform “Express Timer Programing” (� pg. 36) to timer-record a satellite program.* Some DBS receivers output signals even if the power is off. Satellite Auto Recording is not possible with those DBS receivers.
● The “N” indicator blinks while Satellite Auto Recording is in progress.● For timer programing of the DBS receiver, refer to the instruction manual of the DBS receiver.● Satellite Auto Recording is not possible if your DBS receiver does not have a timer.● Pressing the unit’s POWER (1) button while Satellite Auto Recording is in progress turns off the unit’s power and disengages the
Satellite Auto Recording mode.● If there are more than one satellite programs you wish to record with Satellite Auto Recording, it is not possible to set different tape
speeds for each program.● Depending on the type of DBS receiver, the unit may not record a slight portion of the beginning of the program or may record
slightly longer than the actual length of the program. ● If you engage the Satellite Auto Recording mode when the DBS receiver’s power is on, the unit will not start Satellite Auto Recording
even though the “N” and “#” indicators blink. When the DBS receiver shuts off once and is turned back on again, the unit starts recording.
● You can also record a program from your cable system in the same way if the system has a timer.
“N” indicator
ATTENTION● Be sure not to turn on the DBS receiver before the program
is executed; otherwise, the unit will start recording when the DBS receiver’s power is turned on.
● If you have connected another appliance other than a DBS receiver to the AUDIO/VIDEO INPUT (L-1) connectors, be sure not to engage the Satellite Auto Recording mode; otherwise, the unit will start recording when the connected appliance’s power is turned on.
● Satellite Auto Recording and timer-recording cannot be done at the same time.
Before performing the following steps:● Make sure the DBS receiver is connected to the unit’s
AUDIO/VIDEO INPUT (L-1) connectors.● Program the timer on the DBS receiver.● Insert a cassette with the safety tab in place.● Slide the TV/VCR/DVD switch to the right.
Page 41 4 August 2003 6:42 pm

Filename [XVC33UM_08DVD.fm]
Masterpage:LeftXVC33UM_01.book Page 42 Monday, August 4, 2003 7:24 PM
42 EN OPERATIONS ON DVD DECK
Basic PlaybackTo play back a MP3/JPEG disc, see pages 62 – 67.
A Load the disc.A Press OPEN/CLOSE (x) on the DVD deck to open the
disc tray.● The unit’s power comes on automatically.B Place the disc in the disc tray. ● For details, refer to “Placing a Disc” (� pg. 7).C Press OPEN/CLOSE (x) on the DVD deck to close the
disc tray.● Pressing PLAY (4) also close the disc tray.● Playback begins automatically if the auto-playback DVD disc
is loaded. Although the VCR deck is selected, the DVD deck is selected automatically if the VCR deck is in stop mode.
B Select the DVD deck.On the unitPress VCR/DVD repeatedly so that the DVD indicator lights up.
On the RemotePress DVD so that the DVD indicator lights up.
C Start playback.Press PLAY (4).Example: DVD VIDEO
● It may take a few seconds to start playback.● If you load a DVD disc whose region code does not match the
DVD deck, “REGION CODE ERROR!” appears on the TV screen. For details, refer to “Region Number” (� pg. 5).
● With Video CD discs with PBC control or some DVD discs, the menu display may appear on the TV screen after starting playback. In this case, select an item which you want to play back from the menu. Otherwise, the playback cannot go forward. Refer to “Locating a desired scene using the menu of the Video CD with PBC” (� pg. 43) or “Locating a desired scene using the DVD menu” (� pg. 43).
D Pause playback.Press PAUSE (9).● To resume normal playback, press PLAY (4).
E Stop playback.Press STOP (8). Press OPEN/CLOSE (x) on the DVD deck to open the disc tray, then remove the disc.● Pressing PLAY (4) resume playback from the position where
you stop playback. For details, see “Resume Function” on page 45.
NOTE:When you press OPEN/CLOSE (x) while the unit is turned off, the unit’s power comes on and the disc tray opens automatically.
● Turn on the TV and select the VCR channel (or AV mode).
● Slide the TV/VCR/DVD switch to the right.
ATTENTION● You can not use the DVD deck when the VCR deck is in
the Satellite Auto Recording standby and recording mode.● You can use the DVD deck when the VCR deck is in the
timer standby mode.
Title number Chapter number
Elapsed time
Page 42 4 August 2003 6:47 pm

Masterpage:Right-No-Heading
EN 43
Filename [XVC33UM_08DVD.fm]
XVC33UM_01.book Page 43 Monday, August 4, 2003 7:24 PM
Playback Features
Playback Control (PBC) Function— Locating a desired scene using the menu of the Video CD with PBC
Some Video CD discs supports the PBC function. PBC is an abbreviation of “PlayBack Control.” A Video CD disc recorded with PBC has its own menus, such as a list of the songs of the disc. You can locate a specific scene by using the menu.
1 Access the PBC menu.
2 Start playback.Press the appropriate number keys.● The unit starts playback of the selected item.● When “NEXT” or “PREVIOUS” appears on the TV screen:
Pressing SKIP (6) advances to the next page.Pressing SKIP (2) returns to the previous page.
● You can return to the menu by pressing RETURN.● The method of the operation is different depending on the
disc.
NOTES:● If you want to playback a PBC-compatible Video CD disc
without activating the PBC function, start playback by using the number keys instead of the PLAY (4) button.
● To activate the PBC function when a PBC-compatible Video CD disc is being played back without the PBC function, press TOP MENU or MENU, or press STOP (8) (press twice when “RESUME” is set to “ON”) then press PLAY (4).
Locating a desired scene using the DVD menu
DVD VIDEO discs may have two types of the menus; top menu and disc menu.
Top menuDVD discs generally have their own menus which show the disc contents. These menus contain various items such as titles of a movie, names of songs, or artist information. You can locate a desired scene by using the top menu displayed on the TV screen. Press TOP MENU to access the top menu.
Disc menuDVD discs have the disc menu to select subtitle and audio language etc. for each title.Press MENU to access the disc menu.
1 Access the DVD menu.
2 Start playback.Press rt w e to select a desired item, then press OK.● It may be possible to select the desired item using the number
keys depending on the disc.
NOTES:● When “X” appears on the TV screen in step 1, the disc does
not have a top menu or disc menu.● Top menu or disc menu may not appear depending on the
discs even if it is recorded in DVD VIDEO format and finalized. In that case, press STOP (8) to display the total number of titles on a disc, then press the appropriate number keys to select the desired title.
● Turn on the TV and select the VCR channel (or AV mode).
● Slide the TV/VCR/DVD switch to the right.
In stop modePress PLAY (4).● Depending on a disc, PBC
menu may automatically appear on the TV screen by simply loading a disc on the unit.
During playbackPress RETURN.● “PBC” appears on the front
display panel.
Press TOP MENU or MENU.
Example:
Page 43 4 August 2003 6:47 pm
Filename [XVC33UM_08DVD.fm]
Masterpage:Left+
44 EN OPERATIONS ON DVD DECK (cont.)
XVC33UM_01.book Page 44 Monday, August 4, 2003 7:24 PM
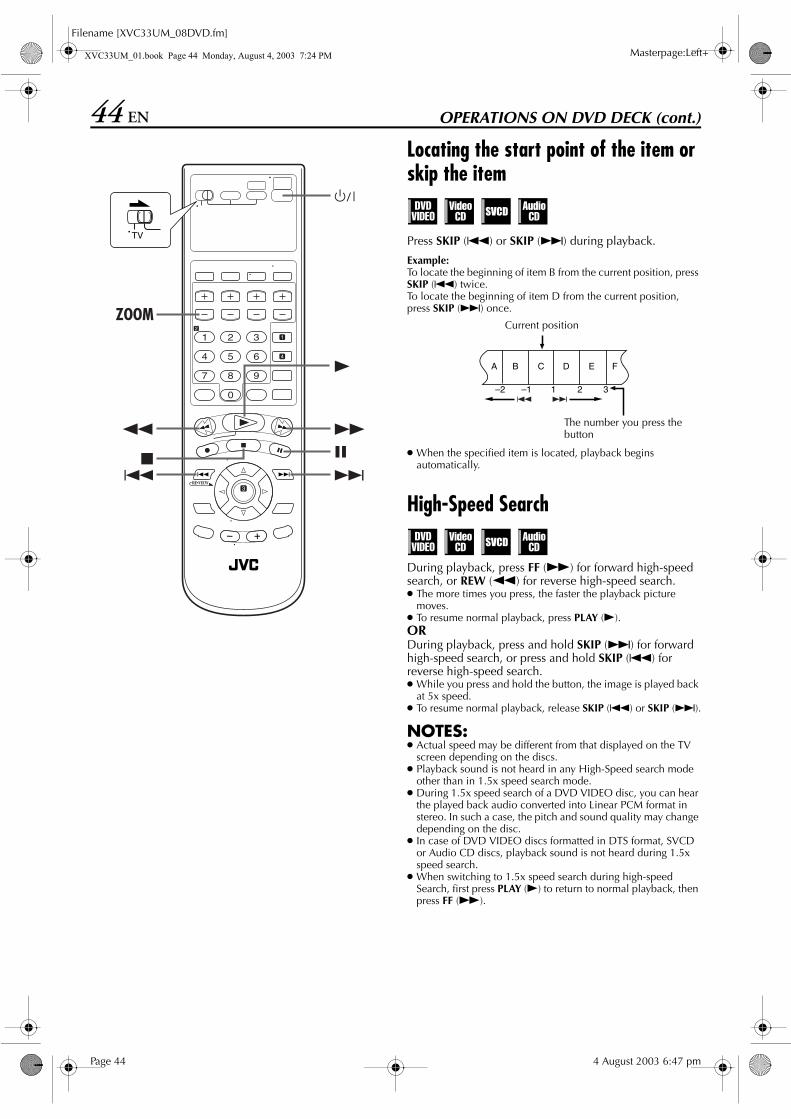
Locating the start point of the item or skip the item
Press SKIP (2) or SKIP (6) during playback.
Example:To locate the beginning of item B from the current position, press SKIP (2) twice.To locate the beginning of item D from the current position, press SKIP (6) once.
● When the specified item is located, playback begins automatically.
High-Speed Search
During playback, press FF (5) for forward high-speed search, or REW (3) for reverse high-speed search.● The more times you press, the faster the playback picture
moves.● To resume normal playback, press PLAY (4).ORDuring playback, press and hold SKIP (6) for forward high-speed search, or press and hold SKIP (2) for reverse high-speed search.● While you press and hold the button, the image is played back
at 5x speed.● To resume normal playback, release SKIP (2) or SKIP (6).
NOTES:● Actual speed may be different from that displayed on the TV
screen depending on the discs.● Playback sound is not heard in any High-Speed search mode
other than in 1.5x speed search mode.● During 1.5x speed search of a DVD VIDEO disc, you can hear
the played back audio converted into Linear PCM format in stereo. In such a case, the pitch and sound quality may change depending on the disc.
● In case of DVD VIDEO discs formatted in DTS format, SVCD or Audio CD discs, playback sound is not heard during 1.5x speed search.
● When switching to 1.5x speed search during high-speed Search, first press PLAY (4) to return to normal playback, then press FF (5).
Current position
The number you press the button
Page 44 4 August 2003 6:47 pm

Masterpage:Right-No-Heading
EN 45
Filename [XVC33UM_08DVD.fm]
XVC33UM_01.book Page 45 Monday, August 4, 2003 7:24 PM
Still Picture/Frame-By-Frame Playback
1 Pause during playback.Press PAUSE (9).
2 Activate frame-by-frame playback.Press PAUSE (9) to advance a still picture.● To resume normal playback, press PLAY (4).
Slow Motion
During playback, press PAUSE (9), then press REW (3) for reverse slow motion playback, or FF (5) for forward slow motion playback.● Each press of FF (5) changes the playback speed as follows:
1/32]1/16]1/4]1/2● Each press of REW (3) changes the playback speed as
follows (only for DVD VIDEO discs):–1/32]–1/16]–1/4]–1/2
● To resume normal playback, press PLAY (4).
NOTES:● Reverse slow motion playback is possible only with the DVD
VIDEO discs.● This function may not works for some Video CD or SVCD.
Resume Function
It is possible to memorize the position where you stop playback and resume playback from that position.● Be sure to set “RESUME” to “ON” or “DISC RESUME”.
(� pg. 81)
1 Memorize the resume point.Press STOP (8) during playback.● “RESUME STOP” appears on the front display panel.
● The unit enters Resume Stop mode and memorise the position where you stop playback as the resume point.
● The unit retains a memory of the resume points of the last 30 discs played back, even though they have been ejected if “RESUME” is set to “DISC RESUME”. (� pg. 81)
● To clear the resume point:When “RESUME” is set to “ON”:• Press STOP (8) in stop mode.• Press POWER (1) to turn off the unit.• Eject the disc.When “RESUME” is set to “DISC RESUME”:• Set “RESUME” to “OFF”. (� pg. 81)• Press STOP (8) in stop mode.
2 Resume playback.Press PLAY (4). The unit start playback from the resume point.● “RESUME PLAY” appears on the front display panel.
NOTES:● Resume Function does not work on the Audio CD. It also may
not work depending on the discs.● If you stop the playback of a disc for which an resume point
has already been memorized, the memory will be updated with the new resume point.
● After the unit has memorized the resume point for 30 discs, remembering a new resume point will cause the unit to delete the oldest memorized point. Stopping playback of a disc for which a resume point is already stored may change the order in which the points are stored. This may potentially change the order in which points are deleted.
● When the unit memorizes a resume point for a disc, it also remembers audio language, subtitle and angle settings.
● This function may not works for some Video CD or SVCD.
Zooming
Press ZOOM during playback or while paused.● Each press of ZOOM changes the magnification as follows:
1.8x]4x]8x]16x]32x]64x● When a 16:9 aspect picture source is displayed on a 4:3
aspect TV (conventional TV) in Letter Box conversion mode, the margins in black shown on top and bottom of the TV screen will be cropped by selecting 1.8x imagination. In such a case, note that both left and right side parts of the picture will also be cropped.
● While zoomed, the picture may look coarse or distorted.
Press rt w e to move the zoomed-in scene.
● To resume normal playback, press OK.
Current magnification
Zoomed-in area
Page 45 4 August 2003 6:47 pm

Filename [XVC33UM_08DVD.fm]
Masterpage:Left+
46 EN OPERATIONS ON DVD DECK (cont.)
XVC33UM_01.book Page 46 Monday, August 4, 2003 7:24 PM
3D Phonic
3D Phonic function allows you to get a simulated surround effect from your stereo system. You can enjoy the vertical surround sound with your 2-channel stereo system.
1 Access the selection menu.Press 3D-PHONIC during playback.● The current setting appears on the right bottom corner of the
TV screen.
2 Select the mode.
● Each time you press w e, the setting changes as follows:NONE]ACTION]DRAMA]THEATER](Back to the beginning)
● The selection menu disappears automatically if you do not change the selection for 10 seconds.
3 Select the effect level.Press rt to select the desired effect level. (level 1 to 5)● To resume normal playback, press 3D-PHONIC.
NOTES:● The 3D Phonic function works correctly only when playing
back a DVD VIDEO disc recorded in the Dolby Digital format. With other sources, you cannot get any effect if you activate 3D Phonic function.
● When playing back a DVD VIDEO disc recorded with the Dolby Digital that does not contain the rear signal, you cannot get a correct 3D Phonic sound even if you activate 3D Phonic function.
● The 3D Phonic function does not affect the Dolby Digital bitstream signal from the DIGITAL AUDIO OUT connector.
● When 3D Phonic function is activated, Analog Down Mix and D. Range Control functions are disabled. (� pg. 80)
Press w e repeatedly, then press OK.
Selected mode Effect level
NONE: No effectACTION: Suitable for action movies and sports
programs in which sounds dynamically move.
DRAMA: Provides the natural and warm sound. You can enjoy movies in a relaxed mood.
THEATER: You can enjoy sound effects like in a major theater.
Page 46 4 August 2003 6:47 pm

Masterpage:Right-No-Heading
EN 47
Filename [XVC33UM_08DVD.fm]
XVC33UM_01.book Page 47 Monday, August 4, 2003 7:24 PM
VFP function— Adjusting the picture quality
The VFP (Video Fine Processor) function enables you to adjust the picture character according to the type of programing, picture tone or personal preference.
NOTE:Before you start operation;The VFP setting screen disappears if no operations are done for more than about 10 seconds. If the setting screen disappears before you finish, start from step 1 again.
1 Access the VFP setting menu.
2 Select the VFP mode.Press w e repeatedly.● Each time you press w e, the VFP mode changes as follows:
NORMAL]CINEMA]USER 1]USER 2](Back to the beginning)
NOTE:You cannot adjust the parameters of “NORMAL” and “CINEMA”.
To adjust picture appearance manually
3 Access USER menu.
4 Select the parameter.Press rt repeatedly to select a parameter you want to adjust, then press OK.● Adjust gradually and confirm picture appearance results are as
preferred.
● VFP menu disappears and the following pop-up window appears on the TV screen.
5 Adjust the parameter.Press rt repeatedly to change the setting, then press OK.● The current VFP settings appear again.
6 Adjust the other parameters.Repeat steps 4 and 5 to adjust other parameters.
To return to the normal screenPress DVD PICTURE.
To activate your settingPress DVD PICTURE, then press w e repeatedly to select “USER 1” or “USER 2” that you have changed the parameters.
Press DVD PICTURE during playback.● The current setting appears on
the TV screen.
NORMAL: Select this normally.
CINEMA: Suitable for movie.
USER 1/USER 2:
You can adjust parameters that affect picture appearance and store settings. Go to step 3.
Press w e repeatedly to select “USER 1” or “USER 2”.
+0
NORMAL
GAMMA
BRIGHTNESS
CONTRAST
SATURATION
TINT
SHARPNESS
Y DELAY
+0
+0
+0
+0
+3
+0
+0
USER 1
GAMMA
BRIGHTNESS
CONTRAST
SATURATION
TINT
SHARPNESS
Y DELAY
+0
+0
+0
+0
+3
+0
GAMMA(–4 to +4):
Controls brightness of neutral tints while maintaining brightness of dark and bright portions.
BRIGHTNESS(–16 to +16):
Controls screen brightness.
CONTRAST(–16 to +16):
Controls screen contrast.
SATURATION(–16 to +16):
Controls screen color depth.
TINT(–16 to +16):
Controls screen tint.
SHARPNESS(+0 to +3):
Controls screen sharpness.
Y DELAY(–2 to +2):
Controls screen color gap.
+0GAMMA
+0GAMMA
Page 47 4 August 2003 6:47 pm
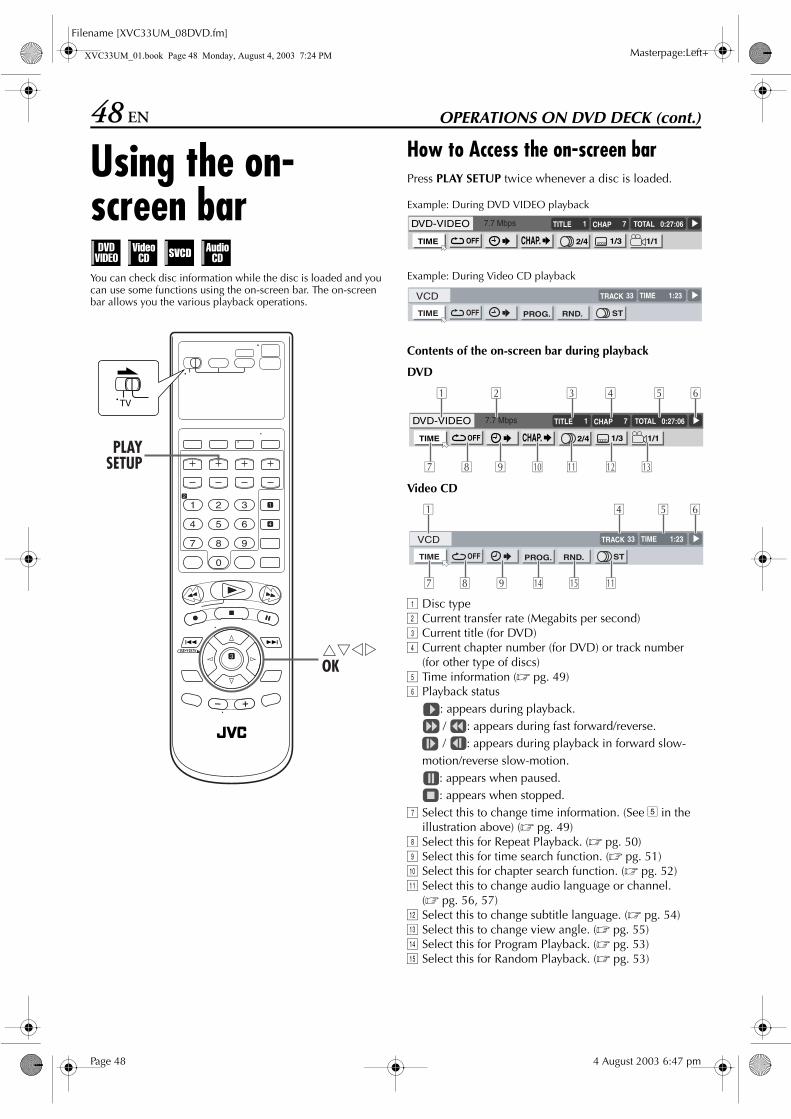
Filename [XVC33UM_08DVD.fm]
Masterpage:Left+
48 EN OPERATIONS ON DVD DECK (cont.)
XVC33UM_01.book Page 48 Monday, August 4, 2003 7:24 PM
Using the on-screen barYou can check disc information while the disc is loaded and you can use some functions using the on-screen bar. The on-screen bar allows you the various playback operations.
How to Access the on-screen barPress PLAY SETUP twice whenever a disc is loaded.
Example: During DVD VIDEO playback
Example: During Video CD playback
Contents of the on-screen bar during playback
DVD
Video CD
A Disc typeB Current transfer rate (Megabits per second)C Current title (for DVD)D Current chapter number (for DVD) or track number
(for other type of discs)E Time information (� pg. 49)F Playback status
: appears during playback. / : appears during fast forward/reverse. / : appears during playback in forward slow-
motion/reverse slow-motion.: appears when paused.: appears when stopped.
G Select this to change time information. (See 5 in the illustration above) (� pg. 49)
H Select this for Repeat Playback. (� pg. 50)I Select this for time search function. (� pg. 51)J Select this for chapter search function. (� pg. 52)K Select this to change audio language or channel.
(� pg. 56, 57)L Select this to change subtitle language. (� pg. 54)M Select this to change view angle. (� pg. 55)N Select this for Program Playback. (� pg. 53)O Select this for Random Playback. (� pg. 53)
Page 48 4 August 2003 6:47 pm

Masterpage:Right-No-Heading
EN 49
Filename [XVC33UM_08DVD.fm]
XVC33UM_01.book Page 49 Monday, August 4, 2003 7:24 PM
Basic operation on the on-screen barExample: When selecting the Repeat mode of DVD
During playback or while stopped
A Access the on-screen bar.Press PLAY SETUP twice. The on-screen bar appears on the TV screen.● The currently selected item is highlighted.
B Select menu item.Press w e to move � to , then press OK. The pop-up window appears under the selected item.● The current setting appears.
C Select the option.Press rt to select the desired option, then press OK.● Each time you press rt, the options change.
To clear the on-screen barPress PLAY SETUP.
NOTE:See the corresponding pages for details on each function.
Change the time information
You can change the time information in the on-screen bar on the TV screen and the front display panel of the unit.
During playback or while stopped
A Access the on-screen bar.Press PLAY SETUP twice. The on-screen bar appears on the TV screen.
B Select menu item.Press w e to move � to , then press OK.● Each time you press OK, the time information changes as
follows;
Example: During DVD playback
To clear the on-screen barPress PLAY SETUP.
NOTES:● While playing a Video CD, Audio CD or SVCD, the hour digit
indication does not appear.● While a DVD is stopped, “– – : – –” appears in the time
information display.
TIME: Elapsed playing time of current chapter/track
REM: Remaining time of current chapter/track
TOTAL: Elapsed time of title/disc
T. REM: Remaining time of title/disc
(Back to the beginning)
Page 49 4 August 2003 6:47 pm

Filename [XVC33UM_08DVD.fm]
Masterpage:Left+
50 EN OPERATIONS ON DVD DECK (cont.)
XVC33UM_01.book Page 50 Monday, August 4, 2003 7:24 PM
Repeat Playback
You can repeat playback as you like according to the type of disc.DVD VIDEO: during playbackAudio CD: during playback or in stop modeVideo CD/SVCD: in stop mode or during playback with PBC
disactivated
When using the on-screen bar
A Access the on-screen bar.Press PLAY SETUP twice. The on-screen bar appears on the TV screen.
B Select menu item.Press w e to move � to , then press OK.● The following pop-up window appears under the selected
item.
C Select the repeat mode.Press rt repeatedly to select the Repeat mode, then press OK.● The mode changes as follows:
DVD VIDEOCHAPTER]TITLE]A-B]OFF](Back to the beginning)
Video CD/SVCD/CDTRACK]ALL]A-B]OFF](Back to the beginning)
● “A-B” cannot be selected while stopped.
To clear the on-screen barPress PLAY SETUP.
To cancel Repeat PlaybackRepeat from step A, select “OFF” in step C, then press OK.
When using the REPEAT button:
A Access the repeat mode.Press REPEAT during playback of the item you want to repeat.● Repeat mode is displayed on the TV.
B Select the repeat mode.Press REPEAT repeatedly to select the desired repeat mode, then press OK.● To stop Repeat Playback, press STOP (8).● To cancel Repeat Playback, press REPEAT repeatedly until
“OFF” appears on the TV screen, then press OK.
NOTES:● Repeat Playback is not possible with a Video CD and SVCD
with PBC function.● Repeat Playback may not work properly depending on the
type of disc being used.● You cannot select A-B Repeat Playback by pressing REPEAT.
CHAPTER: The current chapter is played back repeatedly.
TITLE: The current title is played back repeatedly.
A-B: The desired part is played back repeatedly. (� pg. 51)
OFF: Each title and chapter is played back once.
TRACK: The current track is played back repeatedly.
ALL: All tracks are played back repeatedly.
A-B: The desired part is played back repeatedly. (� pg. 51)
OFF: Each track is played back once.
Page 50 4 August 2003 6:47 pm
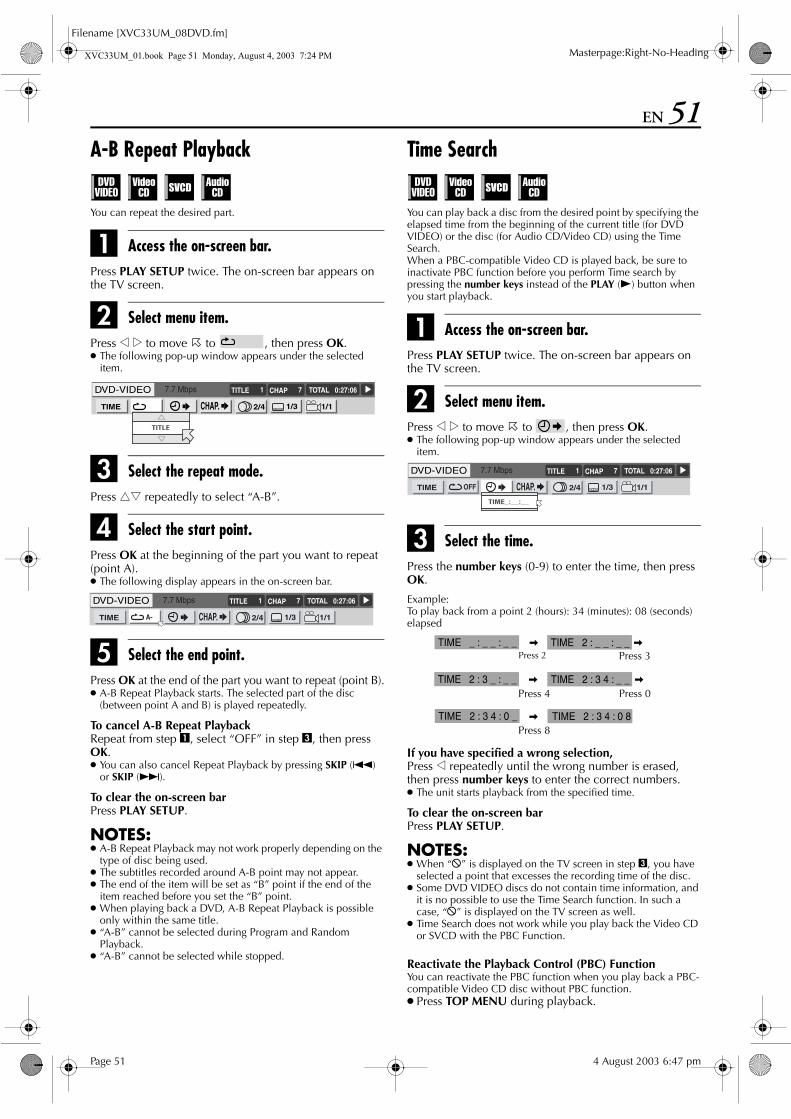
Masterpage:Right-No-Heading
EN 51
Filename [XVC33UM_08DVD.fm]
XVC33UM_01.book Page 51 Monday, August 4, 2003 7:24 PM
A-B Repeat Playback
You can repeat the desired part.
A Access the on-screen bar.Press PLAY SETUP twice. The on-screen bar appears on the TV screen.
B Select menu item.Press w e to move � to , then press OK.● The following pop-up window appears under the selected
item.
C Select the repeat mode.Press rt repeatedly to select “A-B”.
D Select the start point.Press OK at the beginning of the part you want to repeat (point A).● The following display appears in the on-screen bar.
E Select the end point.Press OK at the end of the part you want to repeat (point B).● A-B Repeat Playback starts. The selected part of the disc
(between point A and B) is played repeatedly.
To cancel A-B Repeat PlaybackRepeat from step A, select “OFF” in step C, then press OK.● You can also cancel Repeat Playback by pressing SKIP (2)
or SKIP (6).
To clear the on-screen barPress PLAY SETUP.
NOTES:● A-B Repeat Playback may not work properly depending on the
type of disc being used.● The subtitles recorded around A-B point may not appear.● The end of the item will be set as “B” point if the end of the
item reached before you set the “B” point.● When playing back a DVD, A-B Repeat Playback is possible
only within the same title.● “A-B” cannot be selected during Program and Random
Playback.● “A-B” cannot be selected while stopped.
Time Search
You can play back a disc from the desired point by specifying the elapsed time from the beginning of the current title (for DVD VIDEO) or the disc (for Audio CD/Video CD) using the Time Search.When a PBC-compatible Video CD is played back, be sure to inactivate PBC function before you perform Time search by pressing the number keys instead of the PLAY (4) button when you start playback.
A Access the on-screen bar.Press PLAY SETUP twice. The on-screen bar appears on the TV screen.
B Select menu item.Press w e to move � to , then press OK.● The following pop-up window appears under the selected
item.
C Select the time.Press the number keys (0-9) to enter the time, then press OK.
Example:To play back from a point 2 (hours): 34 (minutes): 08 (seconds) elapsed
If you have specified a wrong selection,Press w repeatedly until the wrong number is erased, then press number keys to enter the correct numbers.● The unit starts playback from the specified time.
To clear the on-screen barPress PLAY SETUP.
NOTES:● When “X” is displayed on the TV screen in step C, you have
selected a point that excesses the recording time of the disc.● Some DVD VIDEO discs do not contain time information, and
it is no possible to use the Time Search function. In such a case, “X” is displayed on the TV screen as well.
● Time Search does not work while you play back the Video CD or SVCD with the PBC Function.
Reactivate the Playback Control (PBC) FunctionYou can reactivate the PBC function when you play back a PBC-compatible Video CD disc without PBC function.● Press TOP MENU during playback.
TIME _ : _ _ : _ _ TIME _ : _ _ : _ _TIME 2 : _ _ : _ _
TIME _ : _ _ : _ _TIME 2 : 3 _ : _ _ TIME _ : _ _ : _ _TIME 2 : 3 4 : _ _
TIME _ : _ _ : _ _TIME 2 : 3 4 : 0 _ TIME _ : _ _ : _ _TIME 2 : 3 4 : 0 8
Press 2 Press 3
Press 4
Press 8
Press 0
Page 51 4 August 2003 6:47 pm

Filename [XVC33UM_08DVD.fm]
Masterpage:Left+
52 EN OPERATIONS ON DVD DECK (cont.)
XVC33UM_01.book Page 52 Monday, August 4, 2003 7:24 PM
Chapter Search
You can start playback the desired chapter using the on-screen bar.
A Access the on-screen bar.Press PLAY SETUP twice. The on-screen bar appears on the TV screen.
B Select menu item.Press w e to move � to , then press OK.● The following pop-up window appears under the selected
item.
C Select the chapter.Press the number keys (0-10) to enter the desired chapter number, then press OK.● The unit starts playback from the selected chapter.
If you have specified a wrong selectionEnter the appropriate number keys again.
To clear the on-screen barPress PLAY SETUP.
NOTES:● When “X” is displayed on the TV screen in step C, the
chapter you have selected is not contained in the disc, or chapter search does not work on the disc.
● Chapter Search starts automatically when you select the desired chapter in step C depending on the disc.
Examples:To select track 5, press the number key “5”.To select track 15, press the number key “1” and “5”.To select track 25, press number key “2” and “5”.● It is not possible to use the number key “+10”.
Page 52 4 August 2003 6:47 pm

Masterpage:Right-No-Heading
EN 53
Filename [XVC33UM_08DVD.fm]
XVC33UM_08DVD.fm Page 53 Friday, August 29, 2003 5:01 PM
Program Playback
You can play back up to 99 tracks in the desired order.
A Access the on-screen bar.Press PLAY SETUP twice in stop mode.
B Select the menu item.Press w e to move � to , then press OK.● The program table appears under the on-screen bar.
C Select the tracks in the desired order.
If you have specified a wrong selectionPress STOP (8). The last selection programed is erased.
D Start playback.Press PLAY (4). Playback starts in the selected order.● When all of the programed tracks have been played back,
Program Playback stops, but the programed information remains.
● To stop Program Playback, press STOP (8).● To clear all the programed tracks, press STOP (8) to stop
playback and press PLAY SETUP to clear the program table, then press STOP (8) again.
● During Program Playback, pressing SKIP (6) skip to the next selection of the program. Pressing SKIP (2) returns to the beginning of the current selection.
To clear the program tablePress PLAY SETUP.
NOTE:Program Playback is not possible depending on the type of disc.
Random Playback
You can play back all the tracks on the disc in random order.
A Access the on-screen bar.Press PLAY SETUP twice in stop mode.
B Select the menu item.Press w e to move � to , then press OK.● Playback starts in random order.
● To stop and quit Random Playback, press STOP (8).● To cancel Random playback, repeat step B during Random
Playback. Normal playback resumes at the current point.
To clear the on-screen barPress PLAY SETUP.
NOTES:● The same track will not be played back more than once during
Random Playback.● Random playback is canceled when all the tracks have been
played back.
Press the appropriate number keys to select the tracks.
Examples: ● To select track 5, press the number key “5”.● To select track 15, press the number key “+10” and “5”.● To select track 25, press number key “+10” twice, then
“5”.
Program time
Page 53 29 August 2003 5:01 pm

Filename [XVC33UM_08DVD.fm]
Masterpage:Left+
54 EN OPERATIONS ON DVD DECK (cont.)
XVC33UM_01.book Page 54 Monday, August 4, 2003 7:24 PM
Subtitle Selection
You can select subtitle language. ● During playback
When using the on-screen bar
A Access the on-screen bar.Press PLAY SETUP twice. The on-screen bar appears on the TV screen.
B Select menu item.Press w e to move � to , then press OK.● The following pop-up window appears under the selected
item.
Example (DVD): “ENGLISH” is selected out of 3 subtitle languages recorded.
C Select the subtitle language.Press rt repeatedly to select the desired subtitle language, then press OK.● Each time you press the button, the subtitle language changes.
To clear the on-screen barPress PLAY SETUP.
NOTES:● For DVD VIDEO
Some subtitle languages are abbreviated in the pop-up window. See “Language Code List” (� pg. 23).
● For SVCDSVCD can contain up to four subtitles. Pressing SUB TITLE changes the subtitles regardless of whether the subtitles are recorded or not. (Subtitles will not change if no subtitle is recorded.)
● When “X” appears on the TV screen in step C, subtitle language is not recorded.
When using the SUB TITLE button:
A Access the menu.Press SUB TITLE. ● The following pop-up window appears on the TV screen.
Example (DVD): “ENGLISH” is selected out of 3 subtitle languages recorded.
B Select the subtitle language.Press rt or SUB TITLE repeatedly to select the desired subtitle language, then press OK.● Each time you press the button, the subtitle language changes.● The pop-up window disappears if no operation is done for
about 5 seconds.
NOTE:When “X” appears on the TV screen in step B, subtitle language is not recorded.
Page 54 4 August 2003 6:47 pm

Masterpage:Right-No-Heading
EN 55
Filename [XVC33UM_08DVD.fm]
XVC33UM_01.book Page 55 Monday, August 4, 2003 7:24 PM
Angle Selection
You can enjoy a variety of scene angles if the DVD VIDEO disc contains “multi-angle” parts, where multiple cameras were used to shoot the same scene from different angles.If the disc contains “multi-angle” parts, “ ” appears on the TV screen at the beginning of the “multi-angle” part when “ON SCREEN GUIDE” is set to “ON”.● During playback
When using the on-screen bar
A Access the on-screen bar.Press PLAY SETUP twice. The on-screen bar appears on the TV screen.
B Select menu item.Press w e to move � to , then press OK.● The following pop-up window appears under the selected
item.
Example: The first view angle is selected out of 3 view angles recorded.
C Select the view angle.Press rt repeatedly to select the desired view angle, then press OK.● Each time you press the button, the angle of the scene
changes.
To clear the on-screen barPress PLAY SETUP.
NOTE:When “X” appears on the TV screen in step C, the current scene is not recorded from multiple angles.
When using the ANGLE button:
A Access the menu.Press ANGLE.● The following pop-up window appears on the TV screen.
Example:The first view angle is selected out of 3 view angles recorded.
B Select the view angle.Press rt or ANGLE repeatedly to select the desired view angle, then press OK.● Each time you press the button, the angle of the scene
changes.● The pop-up window disappears if no operation is done for
about 5 seconds.
Example:1/3]2/3]3/3](Back to the beginning)
1
1 1
1
Page 55 4 August 2003 6:47 pm

Filename [XVC33UM_08DVD.fm]
Masterpage:Left+
56 EN OPERATIONS ON DVD DECK (cont.)
XVC33UM_01.book Page 56 Monday, August 4, 2003 7:24 PM
Audio Language Selection
Some DVD discs contain the multiple audio.You can select the audio language of movies (DVD VIDEO).● During playback
When using the on-screen bar
A Access the on-screen bar.Press PLAY SETUP twice. The on-screen bar appears on the TV screen.
B Select menu item.Press w e to move � to , then press OK.● The following pop-up window appears under the selected
item.
Example: “ENGLISH” is selected out of 4 audio languages recorded.
C Select the audio language.Press rt repeatedly to select the desired audio language, then press OK.● Each time you press the button, the audio language changes.
To clear the on-screen barPress PLAY SETUP.
NOTES:● Some audio languages are abbreviated in the pop-up window.
See “Language Code List” (� pg. 23)● If “X” appears on the TV, the current scene does not contain
plural audio languages.
When using the A.MONITOR button:
A Access the menu.Press A.MONITOR.● The following pop-up window appears on the TV screen.
Example: “ENGLISH” is selected out of 3 audio languages recorded.
B Select the audio language.Press rt or A.MONITOR repeatedly to select the desired audio language, then press OK.● Each time you press the button, the audio language changes.● The pop-up window disappears if no operation is done for
about 5 seconds.
NOTE:Some audio languages are abbreviated in the pop-up window. See “Language Code List” (� pg. 23).
Page 56 4 August 2003 6:47 pm

Masterpage:Right-No-Heading
EN 57
Filename [XVC33UM_08DVD.fm]
XVC33UM_01.book Page 57 Monday, August 4, 2003 7:24 PM
Audio Channel Selection
When you play certain karaoke (DVD/Video CD/SVCD), you can enjoy karaoke by selecting the audio channel to play.● The sound of each audio channel depends on the contents of
the disc.● During playback
When using the on-screen bar
A Access the on-screen bar.Press PLAY SETUP twice. The on-screen bar appears on the TV screen.
B Select menu item.Press w e to move � to , then press OK.● The following pop-up window appears under the selected
item.
Example: “ST” (stereo) is selected.
C Select the audio channel.Press rt repeatedly to select the desired audio channel, then press OK.● Each time you press the button, the audio channel changes.
To clear the on-screen barPress PLAY SETUP.
When using the A.MONITOR button:
A Access the menu.Press A.MONITOR.● The following pop-up window appears on the TV screen.Example: “ST” (stereo) is selected out of 3 audio channels
recorded.
B Select the audio channel.Press rt or A.MONITOR repeatedly to select the desired audio channel, then press OK.● Each time you press the button, the audio channel changes.● The pop-up window disappears if no operation is done for
about 5 seconds.
For Video CDST]L]R](Back to the beginning)
For SVCDST 1]ST 2]L 1]R 1]L 2]R 2](Back to the beginning)
ST: To listen to normal stereo playback.
L: To listen to L (left) audio channel only.
R: To listen to R (right) audio channel only.
ST 1/ST 2: To listen to normal stereo playback of ST 1 or ST 2 channel.
L 1/L 2: To listen to the L (left) 1 or 2 audio channel.
R 1/R 2: To listen to the R (right) 1 or 2 audio channel.
Page 57 4 August 2003 6:47 pm

Filename [XVC33UM_08DVD.fm]
Masterpage:Left+
58 EN OPERATIONS ON DVD DECK (cont.)
XVC33UM_01.book Page 58 Monday, August 4, 2003 7:24 PM
Parental LockThis function restricts playback of DVD VIDEO discs which contain violent (and other) scenes according to the level set by the user. For example, if a movie which includes violent scenes supports the parental lock feature, such scenes which you do not want to let children view can be cut or replaced with other scenes.
To set Parental Lock for the first time
A Turn on the unit.Press POWER (1).
B Select the DVD deck.On the unitPress VCR/DVD repeatedly so that the DVD indicator lights up.
On the RemotePress DVD so that the DVD indicator lights up.
C Access the DVD Set Up menu.A Press SET UP MENU.B Press w e to select “ OTHERS”.
D Access the “PARENTAL LOCK“ menu.
E Access the country code menu.
F Select the country code.
G Select the Level.
● Turn on the TV and select the VCR channel (or AV mode).
● Slide the TV/VCR/DVD switch to the right.
Press rt repeatedly to move � to “PARENTAL LOCK“, then press OK.● The “PARENTAL LOCK“ sub-
menu appears on the TV screen.
● It is possible to access the “PARENTAL LOCK“ menu only in the stop mode when a DVD disc is loaded on the unit.
Press rt repeatedly to move � to “COUNTRY CODE“, then press OK.
Press rt repeatedly to move � to select the country code, then press OK.● See “Country/Area Code List
for Parental Lock” (� pg. 60).● The � moves to “SET LEVEL”.
Press OK, then press rt repeatedly to move � to select the level of restriction, then press OK.● The � moves to
“PASSWORD”.● The smaller the value of level
is, the more restrictive the Parental Lock level is.
● Select “NONE” to cancel this function.
USE TO SELECT. USE OK TO CONFIRM.TO EXIT, PRESS [SET UP MENU].OK
SELECT
US
PARENTAL LOCK
COUNTRY CODE
SET LEVEL
PASSWORD
NONE
_ _ _ _
EXIT
USE TO SELECT. USE OK TO CONFIRM.TO EXIT, PRESS [SET UP MENU].OK
SELECT
US
PARENTAL LOCK
COUNTRY CODE
SET LEVEL
PASSWORD
NONE
_ _ _ _
EXIT UZVA
UY
UM
VC
UG
US
USE TO SELECT. USE OK TO CONFIRM.TO EXIT, PRESS [SET UP MENU].OK
SELECT
US
PARENTAL LOCK
COUNTRY CODE
SET LEVEL
PASSWORD
NONE
_ _ _ _
EXIT
54
76
8NONE
3
Page 58 4 August 2003 6:47 pm

Masterpage:Right-No-Heading
EN 59
Filename [XVC33UM_08DVD.fm]
XVC33UM_01.book Page 59 Monday, August 4, 2003 7:24 PM
H Enter the password.
I Return to the OTHERS menu screen.Press OK.● The “ OTHERS” menu resumes.
To return to the normal screenPress SET UP MENU.
NOTE:Remember your password, or make a note of it.
To change the settingsYou can change the Parental lock settings later.
A Access the Parental Lock screen.A Press SET UP MENU.B Press w e to select “ OTHERS”.C Press rt repeatedly to move � to “PARENTAL
LOCK“, then press OK.● The “PARENTAL LOCK“ sub-menu appears on the TV screen.● You can only move � to “PASSWORD” or to “EXIT” before
you enter your password.
B Enter the password.
C Change the country code.Press rt to select the country code, then press OK.● See “Country/Area Code List for Parental Lock” (� pg. 60).● When you change the country code, you must select the level.
D Change the level.Press rt to select the desired level, then press OK.
E Enter your new password.Press the appropriate number keys to enter 4-digit password, then press OK.● The password entered in the this step becomes the new
password. If you do not change the password, enter the same password as in the step B.
● Even if you want to change only the country code and/or level, do not forget to enter the password after changing the country code and/or the level. Otherwise, the new country code and/or the level will not become effective.
F Return to the normal screen.Press SET UP MENU.
NOTES:● When you enter the wrong password more than 3 times in
step B on the left column, the arrow moves to “EXIT” automatically and rt does not work.
● If you forget your password, enter “8888” in step B.
To temporarily release the Parental LockWhen you set the parental level strictly, some discs may not be played back at all. When you insert such a disc and try to play back it, the following Parental Lock screen appears on the TV screen, asking you whether you want the Parental Lock to be temporarily released or not.
A Access the password screen.
B Enter the password.Press the appropriate number keys to enter 4-digit password, then press OK.● If you enter the wrong password, “WRONG! RETRY...” appears
on the TV screen. Enter the correct password.● If you enter the correct password, the Parental lock is released
and the unit starts playback.
NOTES:● When you enter the wrong password more than 3 times in
step B above, the arrow moves to “NOT RELEASE” automatically and rt do not work. In such a case, press OK, then press OPEN/CLOSE (x) to remove the disc.
● If you forget your password, enter “8888” in step B.
Press the number keys to enter a four-digit number as your password, then press OK.● The � moves to “EXIT”.
Press the appropriate number keys to enter 4-digit password, then press OK.If you enter the wrong password, “WRONG! RETRY...” appears at the bottom of the TV screen. Enter the correct password.
NEW PASSWORD? ••• PRESS 0 ~ 9 KEYTO EXIT, PRESS [SET UP MENU].OK
SELECT
US
PARENTAL LOCK
COUNTRY CODE
SET LEVEL
PASSWORD
4
_ _ _ _
EXIT
NEW PASSWORD? ••• PRESS 0 ~ 9 KEYTO EXIT, PRESS [SET UP MENU].OK
SELECT
US
PARENTAL LOCK
COUNTRY CODE
SET LEVEL
PASSWORD
4
_ _ _ _
EXIT
A Place the disc in the disc tray.
● If the disc rated higher than the selected level, the following screen appears.
B Press rt to move � to “TEMPORARY RELEASE”, then press OK.
● If you select “NOT RELEASE”, you cannot play back that disc.
PARENTAL LOCK
PASSWORD _ _ _ _
TEMPORARY RELEASE
PASSWORD? ••• PRESS 0 ~ 9 KEYOK
SELECT
NOT RELEASE
Page 59 4 August 2003 6:47 pm

Filename [XVC33UM_08DVD.fm]
Masterpage:Left+
60 EN OPERATIONS ON DVD DECK (cont.)
XVC33UM_01.book Page 60 Monday, August 4, 2003 7:24 PM
Country/Area Code List for Parental LockADAEAFAGAIALAMANAOAQARASATAUAWAZBABBBDBEBFBGBHBIBJBMBNBOBRBSBTBVBWBYBZCACCCFCGCHCICKCLCMCNCOCRCUCVCXCYCZDEDJDKDMDODZECEEEGEHER
AndorraUnited Arab EmiratesAfghanistanAntigua and BarbudaAnguillaAlbaniaArmeniaNetherlands AntillesAngolaAntarcticaArgentinaAmerican SamoaAustriaAustraliaArubaAzerbaijanBosnia and HerzegovinaBarbadosBangladeshBelgiumBurkina FasoBulgariaBahrainBurundiBeninBermudaBrunei DarussalamBoliviaBrazilBahamasBhutanBouvet IslandBotswanaBelarusBelizeCanadaCocos (Keeling) IslandsCentral African RepublicCongoSwitzerlandCôte d’IvoireCook IslandsChileCameroonChinaColombiaCosta RicaCubaCape VerdeChristmas IslandCyprusCzech RepublicGermanyDjiboutiDenmarkDominicaDominican RepublicAlgeriaEcuadorEstoniaEgyptWestern SaharaEritrea
ESETFIFJFKFMFOFRFXGAGBGDGEGFGHGIGLGMGNGPGQGRGSGTGUGWGYHKHMHNHRHTHUIDIEILINIOIQIRISITJMJOJPKEKGKHKIKMKNKPKRKWKYKZLALB
SpainEthiopiaFinlandFijiFalkland Islands (Malvinas)Micronesia (Federated States of)Faroe IslandsFranceFrance, MetropolitanGabonUnited KingdomGrenadaGeorgiaFrench GuianaGhanaGibraltarGreenlandGambiaGuineaGuadeloupeEquatorial GuineaGreeceSouth Georgia and the South Sandwich IslandsGuatemalaGuamGuinea-BissauGuyanaHong KongHeard Island and McDonald IslandsHondurasCroatiaHaitiHungaryIndonesiaIrelandIsraelIndiaBritish Indian Ocean TerritoryIraqIran (Islamic Republic of)IcelandItalyJamaicaJordanJapanKenyaKyrgyzstanCambodiaKiribatiComorosSaint Kitts and NevisKorea, Democratic People’s Republic ofKorea, Republic ofKuwaitCayman IslandsKazakhstanLao People’s Democratic RepublicLebanon
Page 60 4 August 2003 6:47 pm

Masterpage:Right-No-Heading
EN 61
Filename [XVC33UM_08DVD.fm]
XVC33UM_01.book Page 61 Monday, August 4, 2003 7:24 PM
LCLILKLRLSLTLULVLYMAMCMDMGMHMLMMMNMOMPMQMRMSMTMUMVMWMXMYMZNANCNENFNGNINLNONPNRNUNZOMPAPEPFPGPHPKPLPMPNPRPTPWPYQARERORURW
Saint LuciaLiechtensteinSri LankaLiberiaLesothoLithuaniaLuxembourgLatviaLibyan Arab JamahiriyaMoroccoMonacoMoldova, Republic ofMadagascarMarshall IslandsMaliMyanmarMongoliaMacauNorthern Mariana IslandsMartiniqueMauritaniaMontserratMaltaMauritiusMaldivesMalawiMexicoMalaysiaMozambiqueNamibiaNew CaledoniaNigerNorfolk IslandNigeriaNicaraguaNetherlandsNorwayNepalNauruNiueNew ZealandOmanPanamaPeruFrench PolynesiaPapua New GuineaPhilippinesPakistanPolandSaint Pierre and MiquelonPitcairnPuerto RicoPortugalPalauParaguayQatarRéunionRomaniaRussian FederationRwanda
SASBSCSDSESGSHSISJSKSLSMSNSOSRSTSVSYSZTCTDTFTGTHTJTKTMTNTOTPTRTTTVTWTZUAUGUMUSUYUZVAVCVEVGVIVNVUWFWSYEYTYUZAZMZRZW
Saudi ArabiaSolomon IslandsSeychellesSudanSwedenSingaporeSaint HelenaSloveniaSvalbard and Jan MayenSlovakiaSierra LeoneSan MarinoSenegalSomaliaSurinameSao Tome and PrincipeEl SalvadorSyrian Arab RepublicSwazilandTurks and Caicos IslandsChadFrench Southern TerritoriesTogoThailandTajikistanTokelauTurkmenistanTunisiaTongaEast TimorTurkeyTrinidad and TobagoTuvaluTaiwan, Province of ChinaTanzania, United Republic ofUkraineUgandaUnited States Minor Outlying IslandsUnited StatesUruguayUzbekistanVatican City State (Holy See)Saint Vincent and the GrenadinesVenezuelaVirgin Islands (British)Virgin Islands (U.S.)Viet NamVanuatuWallis and Futuna IslandsSamoaYemenMayotteYugoslaviaSouth AfricaZambiaZaireZimbabwe
Page 61 4 August 2003 6:47 pm

Filename [XVC33UM_08DVD.fm]
Masterpage:Left+
62 EN OPERATIONS ON DVD DECK (cont.)
XVC33UM_08DVD.fm Page 62 Wednesday, September 3, 2003 3:30 PM
About MP3 DiscThis unit can playback CD discs recorded by the MP3 format (we refer to those discs as MP3 discs in this manual).Operations for MP3 discs are similar to those for Audio CD discs, though there are some restrictions and differences.
What is MP3?MP3 is the abbreviation of “MPEG1 Audio Layer 3.” MPEG Audio is a compression specification that compresses the audio portion only. This image compression method is used in DVD or Video CD, etc. The audio data has been compressed into about 1/10.
On an MP3 disc, each material (song) is recorded on each Track (file), which usually belongs to a Group (folder).
This unit can recognize up to 99 Groups and up to 150 Tracks per Group.If a disc includes more than the Tracks above limit, the unit stops detecting Tracks when the number of detected Tracks reaches the limit and ignores the subsequent Tracks. The unit also ignores any non-MP3 file in the disc.
NOTES:● Because of the disc characteristics or recording condition,
some discs may not be played back or it takes time to start playback.
● The unit does not support “packet writing” discs.● If there are any Tracks (files) which are stored on a disc directly
and do not belong to any Group (directory), the unit recognized them as belonging to an independent Group.
● The unit plays back Groups/Tracks on an MP3 disc in the alphabetical order.
● For example, if there are three title Groups [one], [two] and [three] on a disc, the playback order is [one], [three] then [two]. Tracks in a Group are played back in the same way.
● Therefore, an MP3 disc on the market may be played back in the different order from the order printed on its sleeve.
MP3 control displayThe MP3 control display appears on the TV screen and playback starts when an MP3 disc is loaded.
* Elapsed playing time of current trackElapsed playing time is only shown during playback.
NOTES for making a private MP3 disc using a CD-R/CD-RW disc:● Select “ISO9660” as the disc format.● Finalize the disc.
Track A.mp3
Track B.mp3
Track C.mp3
Group 2
Group 4
Group 3
Group 1
Track D.mp3
Track E.mp3
Track F.mp3
MP3 disc
Total group number ondisc
Current track
Current group
Current track number
Total track numberon disc
Total track numberin current group
Current group number
*
Page 62 3 September 2003 3:29 pm

Masterpage:Right-No-Heading
EN 63
Filename [XVC33UM_08DVD.fm]
XVC33UM_01.book Page 63 Monday, August 4, 2003 7:24 PM
MP3 PlaybackYou can search and play back desired groups and tracks using the MP3 control display.
NOTES:● PLAY (4), STOP (8), PAUSE (9), SKIP (2) and SKIP (6)
buttons function the same as with Audio CD discs, however, REW (3) and FF (5) buttons do not function for MP3 playback.
● Resume playback, Program playback or Random playback also does not function for MP3 playback.
Using the MP3 control display
A Turn on the unit.Press POWER (1).
B Select the DVD deck.On the unitPress VCR/DVD repeatedly so that the DVD indicator lights up.
On the RemotePress DVD so that the DVD indicator lights up.
C Select the mode.Be sure to set “MP3/JPEG” to “MP3” before loading a disc. (� pg. 79)● You cannot access the DVD Set Up screen and “X” appears
on the TV screen if a disc is already placed.
D Load the disc.A Press OPEN/CLOSE (x) on the DVD deck to open the
disc tray.B Place the MP3 disc in the disc tray. ● For details, refer to “Placing a Disc” (� pg. 7).C Press OPEN/CLOSE (x) on the DVD deck to close the
disc tray.● The MP3 control display appears on the TV screen when an
MP3 disc is loaded. (� pg. 62)
E Select the group.Press w e to select the desired group.
F Start playback.Press rt to select the desired track, then press OK or PLAY (4).● You can skip a track across a group. Press SKIP (6) to skip to
the first track of the next group when the last track of the current group is selected.
G Pause playback.Press PAUSE (9).● To resume normal playback, press PLAY (4).
H Stop playback.Press STOP (8). Press OPEN/CLOSE (x) on the DVD deck to open the disc tray, then remove the disc.
● Turn on the TV and select the VCR channel (or AV mode).
● Slide the TV/VCR/DVD switch to the right.
Page 63 4 August 2003 6:47 pm

Filename [XVC33UM_08DVD.fm]
Masterpage:Left+
64 EN OPERATIONS ON DVD DECK (cont.)
XVC33UM_01.book Page 64 Monday, August 4, 2003 7:24 PM
Group/track selectionTo start playback by specifying the group/track numberA Press TITLE.B Press the number keys (0-10, +10) to enter the group
number.C Press the number keys (0-10, +10) to enter the track
number.
Example:To select 3: Press 3.To select 14: Press +10, then 4.To select 20: Press +10, then 10.
Or press +10 twice, then 0.To select 24: Press +10, +10, then 4.To select 110: Press +10 ten times, then 10.● The entered number appears in the track number indication
and playback starts from the track you have specified.
Repeat PlaybackYou can repeat playback of the current group, track or all groups.● While MP3 control display is on the TV:
A Access the repeat mode.Press PLAY SETUP during playback.● The current repeat mode is displayed on the MP3 control
display.
B Select the mode.Press rt to select the desired repeat mode, then press OK.● Each time you press REPEAT, the mode changes as follows:TRACK]GROUP]ALL]OFF (No indication)](Back to the beginning)
● To stop Repeat Playback, press STOP (8).● To cancel Repeat Playback, press REPEAT repeatedly until the
repeat mode display disappears on the TV screen.● You can also quit Repeat Playback in the following cases:
• Press OPEN/CLOSE (x) to open the disc tray.• Turn off the unit.
To return to the MP3 control displayPress STOP (8).
TRACK: The current track is played back repeatedly.
GROUP: All tracks of the current group are played back repeatedly.
ALL: All tracks are played back repeatedly.
OFF (no indication): Each track is played back once.
Page 64 4 August 2003 6:47 pm

Masterpage:Right-No-Heading
EN 65
Filename [XVC33UM_08DVD.fm]
XVC33UM_01.book Page 65 Monday, August 4, 2003 7:24 PM
About JPEG DiscThis unit can playback CD discs recorded by the JPEG format (we refer to those discs as JPEG discs in this manual).Operations for JPEG discs are similar to those for Audio CD discs, though there are some restrictions and differences.
What is JPEG?JPEG is the abbreviation of “Joint Photographic Expert Group.” JPEG is a still-picture data compression system.
On a JPEG disc, each still picture is recorded as a file, which usually belongs to a Group (folder).
This unit can recognize up to 99 Groups and up to 150 Files per Group.If a disc includes more than the Files above limit, the unit stops detecting Files when the number of detected Files reaches the limit and ignores the subsequent Files. The unit also ignores any non-JPEG file in the disc.
NOTES:● We recommend to record a file at 640 x 480 resolution. (If a
file has been recorded at a resolution of more than 640 x 480, it will take a longer time to be displayed.)
● This unit can only play back baseline JPEG files*. Progressive JPEG files* or lossless JPEG files* cannot be played back.* Baseline JPEG format: Used for digital cameras, web, etc.
Progressive JPEG format: Used for web.Lossless JPEG format: An old type and rarely used now.
● Some files on a JPEG disc may be played back distortedly.● Because of the disc characteristics or recording condition,
some discs may not be played back or it takes time to start playback.
● The unit does not support “packet writing” discs.● If there are any Files which are stored on a disc directly and do
not belong to any Group (directory), the unit recognized them as belonging to an independent Group.
● The unit plays back Groups/Files on an JPEG disc in the alphabetical order.
● For example, if there are three title Groups [one], [two] and [three] on a disc, the playback order is [one], [three] then [two]. Files in a Group are played back in the same way.
● Therefore, an JPEG disc on the market may be played back in the different order from the order printed on its sleeve.
JPEG control displayThe JPEG control display appears on the TV screen and playback starts when a JPEG disc is loaded.
NOTES for making a private JPEG disc using a CD-R/CD-RW disc:● Select “ISO9660” as the disc format.● Finalize the disc.
File A.jpg
File B.jpg
File C.jpg
Group 2
Group 4
Group 3
Group 1
File D.jpg
File E.jpg
File F.jpg
JPEG disc
Total group number ondisc
Current file
Current group
Current file number
Total file number ondisc
Total file number incurrent group
Current group number
Page 65 4 August 2003 6:47 pm

Filename [XVC33UM_08DVD.fm]
Masterpage:Left+
66 EN OPERATIONS ON DVD DECK (cont.)
XVC33UM_01.book Page 66 Monday, August 4, 2003 7:24 PM
JPEG PlaybackYou can search and play back desired groups and files using the JPEG control display.
NOTES:● PLAY (4), STOP (8), PAUSE (9), SKIP (2) and SKIP (6)
buttons function the same as with Audio CD discs, however, REW (3) and FF (5) buttons do not function for JPEG playback.
● Resume playback, Program playback or Random playback also does not function for JPEG playback.
Using the JPEG control display
A Turn on the unit.Press POWER (1).
B Select the DVD deck.On the unitPress VCR/DVD repeatedly so that the DVD indicator lights up.
On the RemotePress DVD so that the DVD indicator lights up.
C Select the mode.Be sure to set “MP3/JPEG” to “JPEG” before loading a disc. (� pg. 79)● You cannot access the DVD Set Up screen and “X” appears
on the TV screen if a disc is already placed.
D Load the disc.A Press OPEN/CLOSE (x) on the DVD deck to open the
disc tray.B Place the JPEG disc in the disc tray. ● For details, refer to “Placing a Disc” (� pg. 7).C Press OPEN/CLOSE (x) on the DVD deck to close the
disc tray.● The JPEG control display appears on the TV screen when a
JPEG disc is loaded. (� pg. 65)
E Select the group.Press w e to select the desired group.
F Start playback.Press rt to select the desired file, then press OK or PLAY (4).● You can skip a file across a group. Press SKIP (6) to skip to
the first file of the next group when the last file of the current group is selected.
The slide-show playback starts from the selected file.● After selecting a file, press PLAY (4) to starts slide-show
playback from the selected file, or press OK to show the selected file.
G Pause playback.Press PAUSE (9).● To resume normal playback, press PLAY (4).
H Stop playback.Press STOP (8). Press OPEN/CLOSE (x) on the DVD deck to open the disc tray, then remove the disc.
● Turn on the TV and select the VCR channel (or AV mode).
● Slide the TV/VCR/DVD switch to the right.
Page 66 4 August 2003 6:47 pm

Masterpage:Right-No-Heading
EN 67
Filename [XVC33UM_08DVD.fm]
XVC33UM_01.book Page 67 Monday, August 4, 2003 7:24 PM
Group/file selectionTo start slide-show playback by specifying the group/file numberA Press TITLE.B Press the number keys (0-10, +10) to enter the group
number.C Press the number keys (0-10, +10) to enter the file
number.
Example:To select 3: Press 3.To select 14: Press +10, then 4.To select 20: Press +10, then 10.
Or press +10 twice, then 0.To select 24: Press +10, +10, then 4.To select 110: Press +10 ten times, then 10.● The slide-show playback starts from the file you have
specified.● To display only the selected file, then press OK. To start slide-
show playback from that file, press OK again.
Repeat PlaybackYou can repeat playback of the current group, file or all groups.● While JPEG control display is on the TV:
A Access the repeat mode.Press PLAY SETUP while the JPEG Control screen is displayed.● The current repeat mode is displayed on the JPEG control
display.
B Select the mode.Press rt to select the desired repeat mode, then press OK.● Each time you press REPEAT, the mode changes as follows:GROUP]ALL]OFF (No indication)](Back to the beginning)
C Start playback.Press PLAY (4). ● To stop Repeat Playback, press STOP (8).● To cancel Repeat Playback, press REPEAT repeatedly until the
repeat mode display disappears on the TV screen.● You can also quit Repeat Playback in the following cases:
• Press OPEN/CLOSE (x) to open the disc tray.• Turn off the unit.
To return to the JPEG control displayPress STOP (8).
ZoomingPress ZOOM during playback.● When you want to zoom the picture during slide-show
playback, first press PAUSE (9), then press ZOOM.● For details, refer to “Zooming” (� pg. 45).
GROUP: All files of the current group are played back repeatedly.
ALL: All files are played back repeatedly.
OFF (No indication): Each file is played back once.
Page 67 4 August 2003 6:47 pm

Filename [XVC33UM_09Editing.fm]
Masterpage:Left0XVC33UM_01.book Page 68 Monday, August 4, 2003 7:24 PM
68 EN EDITING (VCR DECK)
Edit From A Camcorder
You can use a camcorder as the source player and your unit as the recording deck.
A Make connections.Connect the camcorder’s AUDIO OUT and VIDEO OUT connectors to the unit’s front panel AUDIO and VIDEO input connectors.● When using a monaural camcorder, connect its AUDIO OUT
connector to the AUDIO L input connector on your unit.● When a Master Edit Control-equipped JVC camcorder is used,
the camcorder is capable of controlling the unit. Refer to the camcorder’s instruction manual for operating procedure.
● You can also use the AUDIO/VIDEO INPUT connectors on the rear panel.
B Select the VCR deck.On the unitPress VCR/DVD repeatedly so that the VCR indicator lights up.
On the RemotePress VCR so that the VCR indicator lights up.
C Set the unit’s input mode.Press AUX (number key “0”) and/or CH to select “F-1” for the front AUDIO/VIDEO input connectors, “L-1” for the rear AUDIO/VIDEO INPUT connectors, depending on the connectors being used.
D Set the edit mode.See “PICTURE CONTROL” on page 76.
E Engage the Record Pause mode.Use PLAY (4), REW (3), or FF (5) to locate the point where you start recording, then press and hold PAUSE (9) and press REC (7) to engage the Record Pause mode.
F Start the camcorder.Engage the Play mode of the camcorder.
G Start the unit.Press PLAY (4) to engage the Record mode of the unit.
NOTES:● All necessary cables can be obtained from your dealer.● When you select “EDIT” to dub tapes in step D, be sure to
select “NORM” after you finish dubbing the tapes.
Recorder
To Audio/VIDEO Output connectors
Camcorder
AUDIO input
Player
VIDEO input
Audio/video cable(not supplied)
Mini-plug cable(not provided)(JVC camcorder only)
To PAUSE connector
To EDIT
Slide the TV/VCR/DVD switch to the right.
Page 68 4 August 2003 6:50 pm

Masterpage:Right-No-Heading
EN 69
Filename [XVC33UM_09Editing.fm]
XVC33UM_01.book Page 69 Monday, August 4, 2003 7:24 PM
Edit To Or From Another Video Recorder
You can use your unit as the source player or as the recording deck.
A Make connections.A When using your unit as the source player ...... connect its AUDIO/VIDEO OUTPUT connectors to the audio/video input connectors on another recorder.B When using your unit as the recording deck ...... connect its AUDIO/VIDEO INPUT connectors to the audio/video output connectors on another recorder.● When you use your unit as the recording deck, you can also
use the AUDIO/VIDEO input connectors on the front panel.
B Select the VCR deck.On the unitPress VCR/DVD repeatedly so that the VCR indicator lights up.
On the RemotePress VCR so that the VCR indicator lights up.
C Set the input mode of recording deck.With this video unit, press AUX (number key “0”) and/or CH to select “F-1” for the front AUDIO/VIDEO input connectors, “L-1” for the rear AUDIO/VIDEO INPUT connectors, depending on the connectors being used.● When using another recorder as the recording deck, refer to its
instruction manual.
D Set the edit mode.See “PICTURE CONTROL” on page 76.
E Engage the Record Pause mode of the recording deck.
Locate the point where you start recording, then engage the Record Pause mode.
F Start the source player.Engage the Play mode of the source player.
G Start the recording deck.Engage the Record mode of the recording deck.
NOTES:● All necessary cables can be obtained from your dealer.● When you select “EDIT” to dub tapes in step D, be sure to
select “NORM” after you finish dubbing the tapes.● When you use this unit as the source player for editing, be sure
to set “SUPERIMPOSE” to “OFF” before starting. (� pg. 76)
AALPTAL
PTA
AALPTAL
PTA
A
B
VCR channel or AV mode
Audio/video cable
Recorder
Your unit
Another recorder
PlayerTV receiver
Audio/video cable
VCR channel or AV mode
Your unit
Another recorder
Player
TV receiver Recorder
Audio/video cableAudio/video cable
Slide the TV/VCR/DVD switch to the right.
Page 69 4 August 2003 6:50 pm

Filename [XVC33UM_09Editing.fm]
Masterpage:Left+
70 EN EDITING (VCR DECK) (cont.)
XVC33UM_01.book Page 70 Monday, August 4, 2003 7:24 PM
Dubbing (from DVD to VCR)
You can dub selected scenes from the DVD disc to a cassette, starting and stopping wherever you wish.However, it is not possible to dub the copy-protected disc.In such case, “ERROR” appears on the front display panel.
A Load a cassette and place a disc.For the VCR deckInsert a cassette with the record safety tab intact.For the DVD deckA Press OPEN/CLOSE (x) on the DVD deck to open the
disc tray.B Place the disc in the disc tray. C Press OPEN/CLOSE (x) on the DVD deck to close the
disc tray.
B Prepare the VCR deck for dubbing.A Press VCR.B Press SP/EP to select recording speed.C Search for the point where you want to start dubbing
by pressing PLAY (4), FF (5) or REW (3) then press STOP (8).
C Prepare the DVD deck for dubbing.A Press DVD.B Search for the point where you want to start dubbing
by pressing PLAY (4), FF (5) or REW (3).C Press PAUSE (9) to pause playback a little before the
start point.
D Start dubbing.Press and hold REC (7), then press PLAY (4) on the Remote.● “DUB” lights on the front display panel.
E End dubbing.Press STOP (8).● Be sure to press STOP (8) while the VCR indicator lights up on
the unit.● If you press STOP (8) or EJECT (x) with the DVD deck
selected, the dubbing stopped, but the opening screen is also recorded.
NOTES:● You cannot start dubbing when the scan mode is set to the
progressive mode. Set it to the interlace mode. (� pg. 82)● Set “ON SCREEN GUIDE” to “OFF” (� pg. 81) if you do not
want to record the on-screen display for DVD discs during dubbing.
● There may be a discrepancy of several seconds between where you intend editing to start, and where it actually starts.
● The superimposed indication during the operation or dubbing is not recorded.
● Set “PICTURE CONTROL” to “EDIT”. (� pg. 76)
● Turn on the TV and select the VCR channel (or AV mode).
● Slide the TV/VCR/DVD switch to the right.
Page 70 4 August 2003 6:50 pm

Masterpage:Right
Filename [XVC33UM_09Editing.fm]
XVC33UM_01.book Page 71 Monday, August 4, 2003 7:24 PM
EN 71EDITING (DVD DECK)
Digital Audio Dubbing
You can dub selected audio from the DVD or Audio CD disc to a MD etc.However, it is not possible to dub the copy-protected disc.
Example: Dubbing to a MD
A Make connections.Connect the optical cable between the unit and the digital audio device.
B Place a disc and load a MD.For the DVD deckA Press OPEN/CLOSE (x) on the DVD deck to open the
disc tray.B Place the disc in the disc tray. C Press OPEN/CLOSE (x) on the DVD deck to close the
disc tray.
For the digital audio deviceInsert a MD.
C Prepare the DVD deck for dubbing.A Press DVD and select the audio to be dubbed.B Search for the point where you want to start dubbing
by pressing PLAY (4), FF (5) or REW (3) then press STOP (8).
C Press REW (3) a little, then press PLAY (4) to start playback.
D Press PAUSE (9) to pause playback a little before the start point.
D Prepare the audio device for dubbing.Select the input mode.
E Start dubbing.A Press PLAY (4) to start playback on the DVD deck.B Start recording on the audio device.
F End dubbing.Stop recording on the audio device. Then press STOP (8) to stop playback on the DVD deck.
NOTES:● There may be a discrepancy of several seconds between where
you intend editing to start, and where it actually starts.● You can also dub a Video CD or SVCD. Set “DIGITAL AUDIO
OUTPUT” to “PCM ONLY”. (� pg. 79)
● Turn on the TV and select the VCR channel (or AV mode).
● Slide the TV/VCR/DVD switch to the right.
Rear of unit
Note for connection:Remove the connector cover from the unit and remove the protection cap from the cable.
Digital audio device(MD deck etc.)
Optical cable(not supplied)
DIGITAL AUDIO OUT
Player
Recorder
Page 71 4 August 2003 6:50 pm

Filename [XVC33UM_09Editing.fm]
Masterpage:Left0XVC33UM_01.book Page 72 Monday, August 4, 2003 7:24 PM
72 EN REMOTE
Remote Control FunctionsRemote A/B/C/D Code SwitchingThe Remote is capable of controlling four JVC video units independently. Each of units can respond to one of four codes (A, B, C or D). The remote control is preset to send A code signals because your unit is initially set to respond to A code signals. You can easily modify your unit to respond to B, C or D code signals.
On the RemoteKeep pressing VCR down during steps A – B.
A Change the remote control code.Press the number key “1” for A, “2” for B, “3” for C or “4” for D.
B Set the remote control code.Press OK to set the code.
On the unit
C Turn off the unit.Press POWER (1).
D Display the code.Press PLAY (4) on the unit for over 5 seconds while the unit is turned off. The code currently set appears on the front display panel.● If the code displayed on the front display panel is different
from the code set on the Remote, go to step E.
E Change the unit’s code.Press STOP (8) on the Remote. The code currently set on the Remote will be applied to the unit.
NOTE:Once you unplug the end of the mains power cord from the mains, the remote control code is back to A.
Before performing the following steps:Slide the TV/VCR/DVD switch to the right.
Page 72 4 August 2003 6:50 pm

Masterpage:Right-No-Heading
EN 73
Filename [XVC33UM_09Editing.fm]
XVC33UM_01.book Page 73 Monday, August 4, 2003 7:24 PM
TV Multi-Brand Remote ControlYour Remote can operate the basic functions of your TV set. In addition to JVC TVs, other manufacturer’s TVs can also be controlled.
IMPORTANTAlthough the supplied remote control unit is compatible with JVC televisions, as well as many other models, it may not work with your TV, or in some instances, may have limited function capability.
A Set the TV brand code.Keep pressing VCR down during step A.Enter your TV’s brand code using the number keys, then press OK.Press POWER (1) on the unit’s Remote to turn on the TV and try operations (� step B).● Once you have set the remote control to operate the TV, you
do not have to repeat this step until you replace your Remote’s batteries.
● Some brands of TV have more than one code. If the TV does not function with one code, try entering another.
B Operate the TV.Press the corresponding button: POWER (1), TV/VCR, TV/VCR CH +/–, TV VOL+/– (Volume), MUTE (TV Muting), number keys.● For some brands of TV, you must press OK after having pressed
the number keys.
Before performing the following steps:● Turn off the TV using its Remote.● Slide the TV/VCR/DVD switch to the left.
BRAND NAME CODE
JVCHITACHIMAGNAVOXMITSUBISHIPANASONICRCASHARPSONYSAMSUNGSANYOSEARSTOSHIBAZENITH
01, 0310020304, 110506071213130809
Page 73 4 August 2003 6:50 pm

Filename [XVC33UM_09Editing.fm]
Masterpage:Left+
74 EN REMOTE (cont.)
XVC33UM_01.book Page 74 Monday, August 4, 2003 7:24 PM
Connecting To A Dolby Digital Decoder or An Amplifier With A Built-in DTS(DVD deck only)These instructions enable you to connect your unit to dolby digital decoder or amplifier with a built-in DTS.
Make connections.Connect the optical cable between the unit and the Dolby Digital decoder or amplifier with a built-in DTS.
NOTES:● For Dolby digital sound, set “DIGITAL AUDIO OUTPUT” to
“DOLBY DIGITAL/PCM”. (� pg. 79)● For DTS sound, set “DIGITAL AUDIO OUTPUT” to “STREAM/
PCM”. (� pg. 79)
CAUTIONS:● This unit has a dynamic range of more than 80 dB with regards
to its Hi-Fi audio capability. It is recommended that you check the maximum level if you are going to listen to the Hi-Fi audio signals through a stereo amplifier. A sudden surge in the input level to the speakers may damage them.
● Some speakers and televisions are specially shielded to prevent television interference. If both are of the non-shielded type, do not place the speakers adjacent to the TV set as this can adversely affect the video playback picture.
Back of unit
Note for connection:Remove the connector cover from the unit and remove the protection cap from the cable.
Optical cable(not supplied)
Dolby Digital decoder or amplifier with a built-in DTS
DIGITAL AUDIO OUT
To DIGITAL AUDIO input
Page 74 4 August 2003 6:50 pm

Masterpage:Right
Filename [XVC33UM_10Subsidiary.fm]
XVC33UM_01.book Page 75 Monday, August 4, 2003 7:24 PM
EN 75SUBSIDIARY SETTINGS
Mode Set(VCR deck)
You can change various mode settings on the Function Set screen by following the procedure described below.● For each mode setting, see pages 76 to 77.
A Turn on the unit.Press POWER (1).
B Select the VCR deck.On the unitPress VCR/DVD repeatedly so that the VCR indicator lights up.
On the RemotePress VCR so that the VCR indicator lights up.
C Access the Main Menu screen. Press SET UP MENU.
D Access the Function Set screen.
E Select the mode.Press rt to move the highlight bar (arrow) to the item you want to change.
F Select the mode setting.Press OK or e.
G Return to the normal screen.Press SET UP MENU.
● Turn on the TV and select the VCR channel (or AV mode).
● Slide the TV/VCR/DVD switch to the right.
Press rt to move the highlight bar (arrow) to “FUNCTION SET”, then press OK or e.
Page 75 4 August 2003 6:42 pm
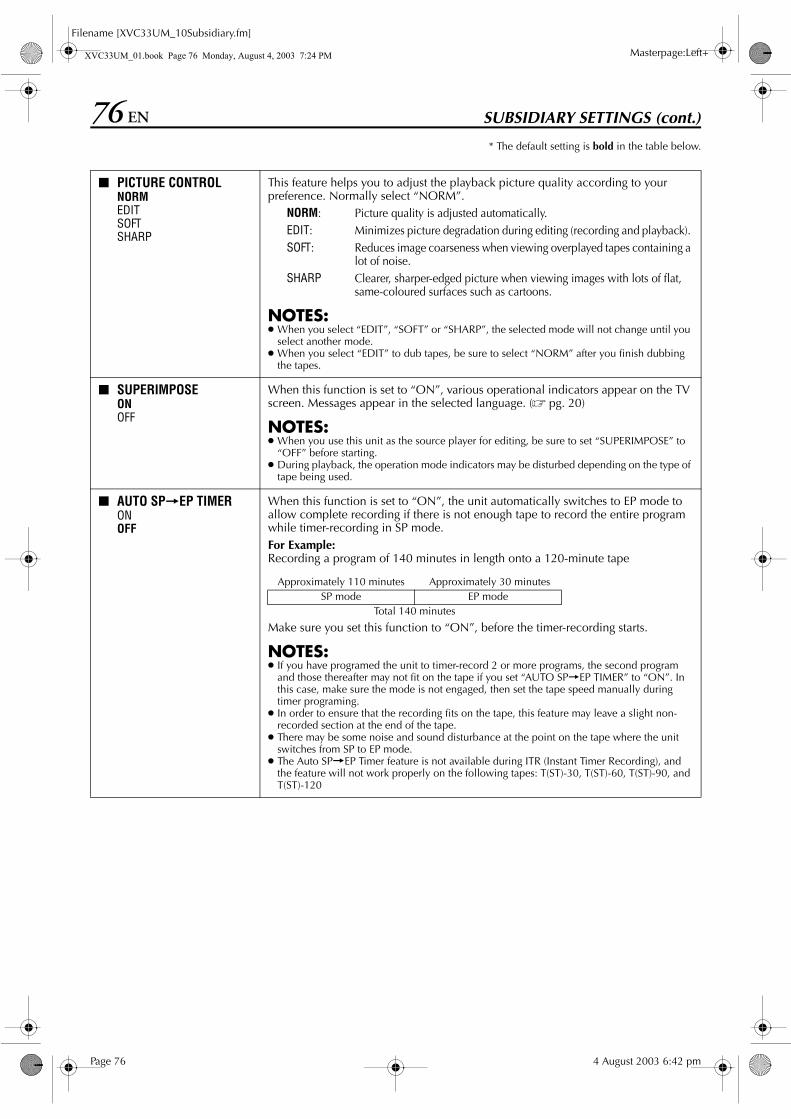
Filename [XVC33UM_10Subsidiary.fm]
Masterpage:Left+
76 EN SUBSIDIARY SETTINGS (cont.)
XVC33UM_01.book Page 76 Monday, August 4, 2003 7:24 PM
* The default setting is bold in the table below.
8 PICTURE CONTROLNORMEDITSOFTSHARP
This feature helps you to adjust the playback picture quality according to your preference. Normally select “NORM”.
NORM: Picture quality is adjusted automatically.EDIT: Minimizes picture degradation during editing (recording and playback). SOFT: Reduces image coarseness when viewing overplayed tapes containing a
lot of noise.SHARP Clearer, sharper-edged picture when viewing images with lots of flat,
same-coloured surfaces such as cartoons.
NOTES:● When you select “EDIT”, “SOFT” or “SHARP”, the selected mode will not change until you
select another mode.● When you select “EDIT” to dub tapes, be sure to select “NORM” after you finish dubbing
the tapes.
8 SUPERIMPOSEONOFF
When this function is set to “ON”, various operational indicators appear on the TV screen. Messages appear in the selected language. (� pg. 20)
NOTES:● When you use this unit as the source player for editing, be sure to set “SUPERIMPOSE” to
“OFF” before starting.● During playback, the operation mode indicators may be disturbed depending on the type of
tape being used.
8 AUTO SP]EP TIMERONOFF
When this function is set to “ON”, the unit automatically switches to EP mode to allow complete recording if there is not enough tape to record the entire program while timer-recording in SP mode.For Example:Recording a program of 140 minutes in length onto a 120-minute tape
Make sure you set this function to “ON”, before the timer-recording starts.
NOTES:● If you have programed the unit to timer-record 2 or more programs, the second program
and those thereafter may not fit on the tape if you set “AUTO SP]EP TIMER” to “ON”. In this case, make sure the mode is not engaged, then set the tape speed manually during timer programing.
● In order to ensure that the recording fits on the tape, this feature may leave a slight non-recorded section at the end of the tape.
● There may be some noise and sound disturbance at the point on the tape where the unit switches from SP to EP mode.
● The Auto SP]EP Timer feature is not available during ITR (Instant Timer Recording), and the feature will not work properly on the following tapes: T(ST)-30, T(ST)-60, T(ST)-90, and T(ST)-120
Total 140 minutes
Approximately 110 minutes Approximately 30 minutesSP mode EP mode
Page 76 4 August 2003 6:42 pm

Masterpage:Right-No-Heading
EN 77
Filename [XVC33UM_10Subsidiary.fm]
XVC33UM_01.book Page 77 Monday, August 4, 2003 7:24 PM
* The default setting is bold in the table below.
8 VIDEO STABILIZERONOFF
When this function is set to “ON”, you can automatically correct vertical vibration in the picture when playing back unstable recordings made on another recorder.
NOTES:● When you finish viewing a tape, be sure to set this function to “OFF”.● Regardless of the setting, this function has no effect during recording and during special
effects playback.● The on-screen display may jitter vertically when this function is set to “ON”.● To watch recordings with close-caption, set this function to “OFF”.
8 BLUE BACKONOFF
When this function is set to “ON”, the TV screen becomes all blue when receiving a channel not in use.
NOTE:When you want to receive an unstable channel with poor signals, set this function to “OFF”.
8 2ND AUDIO RECORDONOFF
● When this function is set to “ON”;If a SAP program is received, the SAP audio is recorded on both the normal and Hi-Fi tracks. The main audio is not recorded.If a non-SAP program is received, the main audio is recorded on both the Hi-Fi and normal tracks.● When this function is set to “OFF”, the SAP audio cannot be recorded.
NOTES:When the channel is changed on the unit;● The “STEREO” indicator appears on the screen for about 5 seconds if the program is a
stereo broadcast.● The “SAP” indicator appears on the screen for about 5 seconds if the program is a SAP
broadcast.● Both indicators appear when a stereo program is accompanied by SAP sound.
8 AUDIO MONITORHI-FIHI-FI LHI-FI RNORMMIX
This unit can record two sound tracks simultaneously (normal and Hi-Fi) on a Hi-Fi stereo tape. You can select the sound track(s) to listen to while playing back a Hi-Fi stereo tape. In addition, when playing back a prerecorded tape containing two separate audio programs on the Hi-Fi tracks, you can choose either one by selecting either “HI-FI L” or “HI-FI R”.
HI-FI: Normally select this. Hi-Fi sound is played back.HI-FI L: Sound on the left Hi-Fi channel is played back.HI-FI R: Sound on the right Hi-Fi channel is played back.NORM: Sound on the normal track is played back.MIX: Both sounds on the Hi-Fi track and normal track are mixed
and played back.
NOTES:● While playing back a monaural tape, sounds on the normal track will be heard
regardless of this setting.● You can also use the A.MONITOR button on the Remote to select the desired monitor
sound. (� pg. 32)
8 AUTO POWER OFF3HOFF
When this function is set to “3H”, the unit is turned off automatically if no operation is done within 3 hours. “AUTO POWER OFF IN 3 MIN” appears on the screen 3 minutes before the unit is turned off.
Page 77 4 August 2003 6:42 pm

Filename [XVC33UM_10Subsidiary.fm]
Masterpage:Left+
78 EN SUBSIDIARY SETTINGS (cont.)
XVC33UM_01.book Page 78 Monday, August 4, 2003 7:24 PM
Mode Set (DVD deck)
You can change various mode settings on the Mode Set screen by following the procedure described below.● For each mode setting, see pages 79 to 81.
● The procedure shows how to set “RESUME” to “ON” on the DVD Set Up menu screen as an example.
A Turn on the unit.Press POWER (1).
B Select the DVD deck.On the unitPress VCR/DVD repeatedly so that the DVD indicator lights up.
On the RemotePress DVD so that the DVD indicator lights up.
C Access the DVD Set Up menu screen.
LANGUAGE] PICTURE] AUDIO ] OTHERS ](Back to the beginning)
D Select the mode.Press rt to move � to “RESUME”, then press OK.
E Select the mode setting.Press rt to select “ON”, then press OK.
F Return to the normal screen.Press SET UP MENU.
● Turn on the TV and select the VCR channel (or AV mode).
● Slide the TV/VCR/DVD switch to the right.
LANGUAGE
MENU LANGUAGE (� pg. 22)AUDIO LANGUAGE (� pg. 22)SUBTITLE (� pg. 22)ON SCREEN LANGUAGE (� pg. 21)
PICTURE
MONITOR TYPE (� pg. 18, 79)PICTURE SOURCE (� pg. 79)SCREEN SAVER (� pg. 79)MP3/JPEG (� pg. 79)
AUDIO
DIGITAL AUDIO OUTPUT (� pg. 79)ANALOG DOWN MIX (� pg. 80)D. RANGE CONTROL (� pg. 80)OUTPUT LEVEL (� pg. 80)
OTHERSRESUME (� pg. 81)ON SCREEN GUIDE (� pg. 81)PARENTAL LOCK (� pg. 58)
A Press SET UP MENU.B Press w e to select
“ OTHERS”.● Each time you press the
button, the setup menus change as follows;
ON
OTHERS
RESUME
ON SCREEN GUIDE ON
USE TO SELECT, USE OK TO CONFIRM.TO EXIT, PRESS [SET UP MENU].OK
SELECT
PARENTAL LOCK
Page 78 4 August 2003 6:42 pm

Masterpage:Right-No-Heading
EN 79
Filename [XVC33UM_10Subsidiary.fm]
XVC33UM_01.book Page 79 Monday, August 4, 2003 7:24 PM
Picture Settings * The default setting is bold in the table below.
Audio Settings * The default setting is bold in the table below.
8 MONITOR TYPE16:9 NORMAL 16:9 AUTO 4:3 LB 4:3 PS
You can select the monitor type depending the TV used when you play back DVD VIDEO discs recorded for wide-screen TVs. For more details, refer to “Monitor Set (DVD deck)” (� pg. 18)
8 PICTURE SOURCEVIDEO (NORMAL)VIDEO (ACTIVE)FILMAUTO
You can obtain optimal picture quality by selecting whether the content on the disc is processed by field (video source) or by frame (film source).Normally set to “AUTO”.
VIDEO (NORMAL):Suitable for playing back a video source disc with relatively a few moments.
VIDEO (ACTIVE):Suitable for playing back a video source disc with relatively a lot of movements.
FILM: Suitable for playing back a film or progressive source disc.AUTO: Used to play back a disc containing both video and film
source materials. This unit recognizes the picture type (film or video source) of the current disc according to the disc information.
● If the playback picture is unclear or noisy, or the oblique lines of the picture are rough, try to change to other modes.
8 SCREEN SAVERONOFF
The TV screen may be burned out if a static picture is displayed for a long time. When this function is set to “ON”, the unit automatically activates the screen saver function if a static picture, such as an on-screen display or menu is displayed for over 5 minutes.
NOTE:This function is not available for Audio CDs and MP3 discs.
8 MP3/JPEGMP3JPEG
You can select files to play back, when both MP3 files and JPEG files are recorded on a disc.
MP3: Select this to play back MP3 files.JPEG: Select this to play back JPEG files.
NOTE:You cannot access the DVD Set Up screen and “X” appears on the TV screen if a disc is already placed.
8 DIGITAL AUDIO OUTPUTPCM ONLYDOLBY DIGITAL/PCMSTREAM/PCM
Set to the appropriate mode according to the type of the device connected to DIGITAL AUDIO OUT connector on the rear of unit.It is not necessary to set this mode when you connect no device to DIGITAL AUDIO OUTconnector.
PCM ONLY:Select this when you connect the unit’s DIGITAL AUDIO OUT connector to the linear PCM digital input connector of other audio device.
DOLBY DIGITAL/PCM:Select this when you connect the unit’s DIGITAL AUDIO OUT connector to the digital input connector of a Dolby Digital decoder or an amplifier with a built-in Dolby Digital decoder.
STREAM/PCM:Select this when you connect the unit’s DIGITAL AUDIO OUT connector to the digital input connector of an amplifier with a built-in DTS, Dolby Digital, or MPEG multichannel decoder.
Page 79 4 August 2003 6:42 pm

Filename [XVC33UM_10Subsidiary.fm]
Masterpage:Left+
80 EN SUBSIDIARY SETTINGS (cont.)
XVC33UM_01.book Page 80 Monday, August 4, 2003 7:24 PM
8 ANALOG DOWN MIXDOLBY SURROUNDSTEREO
Set to the appropriate mode according to your audio system when you play back a DVD VIDEO disc recorded with surround multichannel audio. This setting affects only the analogue audio output signal from the AUDIO OUTPUT connectors (DVD) when playing back a DVD VIDEO disc recorded with surround multichannel audio.
DOLBY SURROUND:
Select this when you enjoy multichannel surround audio by connecting the unit’s analogue AUDIO OUTPUT connector (DVD) to a surround decoder or an internal amplifier.
STEREO: Select this when you enjoy conventional 2-channel stereo audio by connecting the unit’s analogue AUDIO OUTPUT connectors (DVD) to a stereo amplifier/receiver or TV, or when you dub audio of a DVD VIDEO disc recorded with surround audio to your MD, cassette, etc.
NOTE:The “ANALOG DOWN MIX” function does not work when the 3D Phonic function is activated. (� pg. 46)
8 D. RANGE CONTROLWIDE RANGENORMALTV MODE
The dynamic range (the difference between the loudest sound and the quietest one) can be compressed during playback of a program encoded in Dolby Digital format.This function takes effect when a DVD VIDEO disc recorded in Dolby Digital format is played back at low or middle volume.
WIDE RANGE: Select this to inactivate this function when you enjoy wide dynamic range program.
NORMAL: Normally select this setting to activate this function.TV MODE: Select this when you hear the sound through the TV's
speaker(s).
NOTES:● This function works only when playing back a disc recorded with Dolby Digital format.
The setting is not effective for other discs.● This function does not work when the 3D Phonic function is activated. (� pg. 46)
8 OUTPUT LEVELSTANDARDLOW
You can lower the output level of analog audio to accommodate the unit to the connected A/V equipment.
STANDARD: Normally select this.LOW: The output level of analog audio is lowered.
Page 80 4 August 2003 6:42 pm
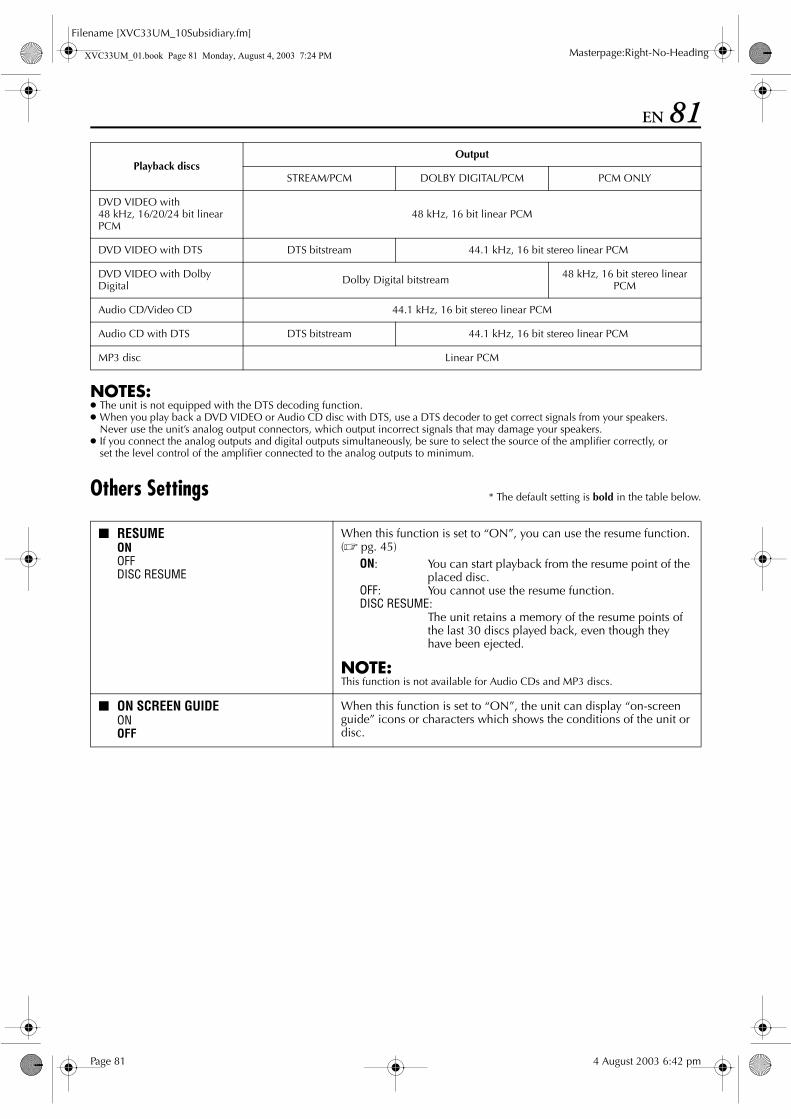
Masterpage:Right-No-Heading
EN 81
Filename [XVC33UM_10Subsidiary.fm]
XVC33UM_01.book Page 81 Monday, August 4, 2003 7:24 PM
Others Settings * The default setting is bold in the table below.
Playback discsOutput
STREAM/PCM DOLBY DIGITAL/PCM PCM ONLY
DVD VIDEO with48 kHz, 16/20/24 bit linear PCM
48 kHz, 16 bit linear PCM
DVD VIDEO with DTS DTS bitstream 44.1 kHz, 16 bit stereo linear PCM
DVD VIDEO with Dolby Digital Dolby Digital bitstream 48 kHz, 16 bit stereo linear
PCM
Audio CD/Video CD 44.1 kHz, 16 bit stereo linear PCM
Audio CD with DTS DTS bitstream 44.1 kHz, 16 bit stereo linear PCM
MP3 disc Linear PCM
NOTES:● The unit is not equipped with the DTS decoding function. ● When you play back a DVD VIDEO or Audio CD disc with DTS, use a DTS decoder to get correct signals from your speakers.
Never use the unit’s analog output connectors, which output incorrect signals that may damage your speakers.● If you connect the analog outputs and digital outputs simultaneously, be sure to select the source of the amplifier correctly, or
set the level control of the amplifier connected to the analog outputs to minimum.
8 RESUMEONOFFDISC RESUME
When this function is set to “ON”, you can use the resume function. (� pg. 45)
ON: You can start playback from the resume point of the placed disc.
OFF: You cannot use the resume function.DISC RESUME:
The unit retains a memory of the resume points of the last 30 discs played back, even though they have been ejected.
NOTE:This function is not available for Audio CDs and MP3 discs.
8 ON SCREEN GUIDEONOFF
When this function is set to “ON”, the unit can display “on-screen guide” icons or characters which shows the conditions of the unit or disc.
Page 81 4 August 2003 6:42 pm

Filename [XVC33UM_10Subsidiary.fm]
Masterpage:Left+
82 EN SUBSIDIARY SETTINGS (cont.)
XVC33UM_01.book Page 82 Monday, August 4, 2003 7:24 PM
Child Lock
You can disable the unit’s operation.
A Set the Child Lock.Press and hold POWER (1) on the Remote for more than 10 seconds while the unit is turned on. The unit turns off, and “CL“ appears on the front display panel.
● To release the child lock, press and hold POWER (1) on the Remote until the unit turns on.
NOTES:● When the child lock function is in use, keep the Remote out of
the children’s reach.● Timer recording programs will be performed even if the child
lock function activated.
Scan Mode Set(DVD deck)
This unit supports the progressive scan system (eg. 480p*) as well as the conventional interlaced scan system (eg. 480i*).If your TV equipped with component video connectors supports the progressive video input, you can enjoy a high quality picture by setting the progressive scan mode to active.● Refer also to the instruction manuals supplied with your TV.● If your TV equipped with component video connectors does
not support the progressive video input, do not change the scan mode to the “PROGRESSIVE”.
* 480p and 480i indicate the number of scanning lines and scanning format of an image signal.• 480p indicates 480 scanning lines with progressive format.• 480i indicates 480 scanning lines with interlaced format.
A Switch the mode.During playback or while stopped, press and hold PROGRESSIVE SCAN on the unit or DVD on the Remote for more than 3 seconds, to change the scan mode between Progressive and Interlace mode.
● Turn on the TV and select the VCR channel (or AV mode).
● Slide the TV/VCR/DVD switch to the right.● Turn on the TV and select the VCR channel (or AV
mode).● Slide the TV/VCR/DVD switch to the right.
Page 82 4 August 2003 6:42 pm

Masterpage:Right
Filename [XVC33UM_11Trouble.fm]
XVC33UM_01.book Page 83 Monday, August 4, 2003 7:24 PM
EN 83TROUBLESHOOTING
Before requesting service for a problem, use this chart and see if you can repair the trouble yourself. Small problems are often easily corrected, and this can save you the trouble of sending your unit off for repair.
POWER
TAPE TRANSPORT (VCR deck)
PLAYBACK (VCR deck)
SYMPTOM POSSIBLE CAUSE CORRECTIVE ACTION1. No power is supplied to the unit. ● The AC power cord is disconnected. Connect the AC power cord.
2. The Remote won’t function. ● The batteries are discharged. Replace the dead batteries with new ones.
SYMPTOM POSSIBLE CAUSE CORRECTIVE ACTION1. During recording, the tape does not
run. “�” lights up on the front display panel.
● The unit is in the Record Pause mode. Press PLAY (4) to resume recording.
2. The tape will not rewind or fast-forward.
● The tape is already fully rewound or fast-forwarded.
Check the cassette.
SYMPTOM POSSIBLE CAUSE CORRECTIVE ACTION1. The VCR deck can not be operated. ● The VCR deck is not selected. On the unit
Press VCR/DVD repeatedly so that the VCR indicator lights up.On the RemotePress VCR so that the VCR indicator lights up.
2. The playback picture does not appear while the tape is running.
● If you are using the RF connection,— the TV receiver’s channel selector is not set to the VCR channel.— the unit’s VCR channel has not been correctly set.
If you are using the RF connection,— set the TV receiver to the VCR channel.— perform “Set the VCR channel.” (� pg. 13).
● If you are using the AV, S-VIDEO* or Component Video* connection, the TV receiver is not set to the AV mode.
* (DVD deck only)
If you are using the AV or S-VIDEO*, Component Video* connection, set the TV to its AV mode.* (DVD deck only)
3. Noise appears during visual search. ● This is normal. —
4. Noise appears during normal playback.
● The automatic tracking mode is engaged.
Try manual tracking. (� pg. 32)
5. The playback picture is blurred or interrupted while TV broadcasts are clear or “USE CLEANING CASSETTE” message appears on the screen.
● The video heads may be dirty. Use a dry cleaning cassette ECL-3F, or consult your JVC dealer.
6. Breaks are noticeable in Hi-Fi soundtrack.
● The automatic tracking mode is engaged.
Try manual tracking. (� pg. 32)
Page 83 4 August 2003 6:50 pm

Filename [XVC33UM_11Trouble.fm]
Masterpage:Left+
84 EN TROUBLESHOOTING (cont.)
XVC33UM_01.book Page 84 Monday, August 4, 2003 7:24 PM
PLAYBACK (DVD deck)SYMPTOM POSSIBLE CAUSE CORRECTIVE ACTION
1. The button do not work. ● The operation is prohibited on the placed disc. —
2. The DVD deck can not be operated. ● The DVD deck is not selected. On the unitPress VCR/DVD repeatedly so that the DVD indicator lights up.On the RemotePress DVD so that the DVD indicator lights up.
3. “X” appears on the TV screen. ● The operation is prohibited on the placed disc. —
4. “REGION CODE ERROR!” appears on the TV screen.
● The disc’s region number does not match that of the unit.
Use the discs whose region number includes “ALL” or “4”. (� pg. 5)
5. The disc cannot be played back. ● The disc’s region number does not match that of the unit.
Use the discs whose region number includes “ALL” or “4”. (� pg. 5)
● This type of the disc cannot be played back.
See “Unplayable Discs” (� pg. 5).
● The disc is not placed properly. Remove the disc, then place the disc properly in the disc tray. (� pg. 7, “Placing a Disc”)
● The Parental Lock is engaged, and the placed disc is rated higher than the set level.
Release the Parental Lock temporarily (� pg. 59), or change the set level (� pg. 59).
6. The language is not played back as you set.
● The disc does not contain the language you set. —
7. Changing audio/subtitle language is not possible.
● The disc does not contain the audio/subtitle in the multiple languages.
With some discs, the language should be set on the top menu. (� pg. 43)
8. The subtitles do not appears on the TV screen.
● The disc does not contain the subtitles. —
● The subtitle display is set to off. Set the subtitles display to on. (� pg. 54)
● A-B Repeat Playback is in progress. (� pg. 51)
The subtitles recorded around A-B point may not appear.
9. Angle cannot be changed. ● The scene is not recorded from the multiple angles. —
Page 84 4 August 2003 6:50 pm

Masterpage:Right-No-Heading
EN 85
Filename [XVC33UM_11Trouble.fm]
XVC33UM_01.book Page 85 Monday, August 4, 2003 7:24 PM
MP3 Playback (DVD deck)
JPEG Playback (DVD deck)
RECORDING (VCR deck)
SYMPTOM POSSIBLE CAUSE CORRECTIVE ACTION1. A disc cannot be played. ● No MP3 files are recorded to the disc. Replace the disc.
● MP3 files do not have the correct file extension in their file names.
Add correct file extension (.mp3, .MP3 or any uppercase and lowercase combination such as “.Mp3”) to their file names.
● MP3 files are not recorded in a format compliant with ISO 9660 Level 1 or 2.
Replace the disc. (Record MP3 files using a compliant application.)
● The different types of files are recorded to the disc.
The disc which contains the different types of files may not be played because of its disc characteristics or recording conditions.
2. Not MP3 files but JPEG files are played.
● The MP3/JPEG setting is set to “JPEG”. When both MP3 files and JPEG files are recorded to a disc, set “MP3/JPEG” to “MP3” to play MP3 files. (� pg. 79)
3. The MP3 control display appears on the TV screen, but no operation can be performed.
● No MP3 files or JPEG files are recorded to the disc, or the disc is an unplayable disc (such as CD-ROM).
Replace the disc. (� pg. 7)
SYMPTOM POSSIBLE CAUSE CORRECTIVE ACTION1. A disc cannot be played. ● No JPEG files are recorded to the disc. Replace the disc.
● JPEG files do not have the correct file extension in their file names.
Add correct file extension (.jpg, .jpeg, .JPG, .JPEG or any uppercase and lowercase combination such as “.Jpg”) to their file names.
● JPEG files are not recorded in a format compliant with ISO 9660 Level 1 or 2.
Replace the disc. (Record JPEG files using a compliant application.)
2. Not JPEG files but MP3 files are played back.
● The MP3/JPEG setting is set to “MP3”. When both MP3 files and JPEG files are recorded to a disc, set “MP3/JPEG” to “JPEG” to play JPEG files. (� pg. 79)
SYMPTOM POSSIBLE CAUSE CORRECTIVE ACTION1. Recording cannot be started. ● There is no cassette loaded, or the
cassette loaded has had its record safety tab removed.
Insert a cassette, or using adhesive tape, cover the hole where the tab was removed.
2. TV broadcasts cannot be recorded. ● “F-1” or “L-1” has been selected as the input mode.
Set to the desired channel.
3. Tape-to-tape editing is not possible. ● The source (another video recorder, camcorder) has not been properly connected.
Confirm that the source is properly connected.
● All necessary power switches have not been turned on.
Confirm that all units’ power switches are turned on.
● The input mode is not correct. Set the input mode to “F-1” or “L-1”.
4. Camcorder recording is not possible. ● The camcorder has not been properly connected.
Confirm that the camcorder is properly connected.
● The input mode is not correct. Set the input mode to “F-1” or “L-1”.
5. “�” and “$” on the front display panel won’t stop blinking.
● The end of the tape was reached during recording.
The program may not have been recorded in its entirety. Next time make sure you have enough time on the tape to record the entire program.
Page 85 4 August 2003 6:50 pm

Filename [XVC33UM_11Trouble.fm]
Masterpage:Left+
86 EN TROUBLESHOOTING (cont.)
XVC33UM_01.book Page 86 Monday, August 4, 2003 7:24 PM
TIMER RECORDING (VCR deck)SYMPTOM POSSIBLE CAUSE CORRECTIVE ACTION
1. Timer recording won’t work. ● The clock and/or the timer have been set incorrectly.
Re-perform the clock and/or timer settings.
● The timer is not engaged. Press TIMER and confirm that “#” is displayed on the front display panel.
2. Timer programing is not possible. ● Timer recording is in progress. Timer programing can’t be performed while a timer recording is in progress. Wait until it finishes.
3. “#” on the front display panel won’t stop blinking.
● The timer is engaged but there’s no cassette loaded.
Load a cassette with the record safety tab intact.
4. “#”, “�” and “$” on the front display panel won’t stop blinking.
● The loaded cassette has had its record safety tab removed.
Remove the cassette and cover the hole with adhesive tape, or insert a cassette with the record safety tab intact.
● The end of the tape was reached during timer recording.
The program may not have been recorded in its entirety. Next time make sure you have enough time on the tape to record the entire program.
5. “#” blinks for 10 seconds and the Timer mode is disengaged.
● TIMER has been pressed when there are no programs in memory, or the timer record information has been programed incorrectly.
Check the programed data and re-program as necessary, then press TIMER again.
6. “�” and “$” on the front display panel won’t stop blinking.
● The end of the tape was reached during Instant Timer Recording.
The program may not have been recorded in its entirety. Next time make sure you have enough time on the tape to record the entire program.
7. “N”, “�” and “$” on the front display panel won’t stop blinking.
● The loaded cassette has had its record safety tab removed.
Remove the cassette and cover the hole with adhesive tape, or insert a cassette with the record safety tab intact.
● The end of the tape was reached during Satellite Auto Recording.
The program may not have been recorded in its entirety. Next time make sure you have enough time on the tape to record the entire program.
Page 86 4 August 2003 6:50 pm

Masterpage:Right-No-Heading
EN 87
Filename [XVC33UM_11Trouble.fm]
XVC33UM_01.book Page 87 Monday, August 4, 2003 7:24 PM
OTHER PROBLEMSSYMPTOM POSSIBLE CAUSE CORRECTIVE ACTION
1. The image of TV broadcast appears distorted on the TV screen.
● The unit leaves turned on and the DVD deck is selected.
Turn off the unit, or press VCR to select the VCR deck, then press TV/VCR so that the VCR indicator disappears from the front display panel.
2. Whistling or howling is heard from the TV during camcorder recording.
● The camcorder’s microphone is too close to the TV.
Position the camcorder so its microphone is away from the TV.
● The TV’s volume is too high. Turn the TV’s volume down.
3. When scanning channels, some of them are skipped over.
● Those channels have been designated to be skipped.
If you need the skipped channels, restore them. (� pg. 27)
4. The channel cannot be changed. ● Recording is in progress. Press PAUSE (9) to pause the recording, change channels, then press PLAY (4) to resume recording.
5. Channel settings that were made manually seem to have changed or disappeared.
● After the manual settings were made, Auto Channel Set was performed.
Perform manual setting again.
ATTENTIONThis unit contains microcomputers. External electronic noise or interference could cause malfunctioning. In such cases, switch the unit off and unplug the AC power cord. Then plug it in again and turn the unit on. Take out the cassette. After checking the cassette, operate the unit as usual.
Page 87 4 August 2003 6:50 pm
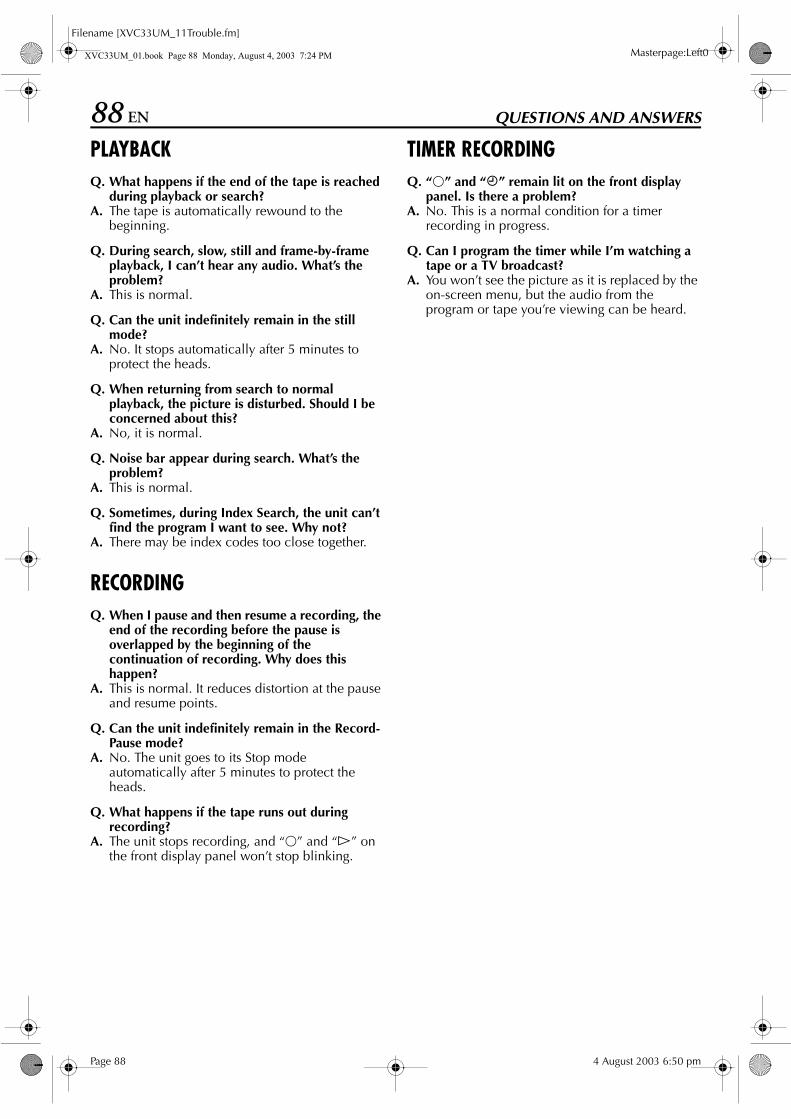
Filename [XVC33UM_11Trouble.fm]
Masterpage:Left0XVC33UM_01.book Page 88 Monday, August 4, 2003 7:24 PM
88 EN QUESTIONS AND ANSWERS
PLAYBACKQ. What happens if the end of the tape is reached
during playback or search?A. The tape is automatically rewound to the
beginning.
Q. During search, slow, still and frame-by-frame playback, I can’t hear any audio. What’s the problem?
A. This is normal.
Q. Can the unit indefinitely remain in the still mode?
A. No. It stops automatically after 5 minutes to protect the heads.
Q. When returning from search to normal playback, the picture is disturbed. Should I be concerned about this?
A. No, it is normal.
Q. Noise bar appear during search. What’s the problem?
A. This is normal.
Q. Sometimes, during Index Search, the unit can’t find the program I want to see. Why not?
A. There may be index codes too close together.
RECORDINGQ. When I pause and then resume a recording, the
end of the recording before the pause is overlapped by the beginning of the continuation of recording. Why does this happen?
A. This is normal. It reduces distortion at the pause and resume points.
Q. Can the unit indefinitely remain in the Record-Pause mode?
A. No. The unit goes to its Stop mode automatically after 5 minutes to protect the heads.
Q. What happens if the tape runs out during recording?
A. The unit stops recording, and “�” and “$” on the front display panel won’t stop blinking.
TIMER RECORDINGQ. “�” and “#” remain lit on the front display
panel. Is there a problem?A. No. This is a normal condition for a timer
recording in progress.
Q. Can I program the timer while I’m watching a tape or a TV broadcast?
A. You won’t see the picture as it is replaced by the on-screen menu, but the audio from the program or tape you’re viewing can be heard.
Page 88 4 August 2003 6:50 pm

Masterpage:Right0
Filename [XVC33UM_11Trouble.fm]
XVC33UM_11Trouble.fm Page 89 Wednesday, May 12, 2004 1:40 PM
EN 89SPECIFICATIONS
GENERALPower requirement : AC 110 – 220 Vd, 50 Hz/60 HzPower consumption
Power on : 25 WPower off : 4.9 W
TemperatureOperating : 5°C to 40°CStorage : –20°C to 60°C
Operating position : Horizontal onlyDimensions (WxHxD)
: 435 mm x 93 mm x 272 mm Weight : 4.4 kgFormat : VHS NTSC standardMaximum recording time
(SP) : 210 min. with ST-210 video cassette(EP) : 630 min. with ST-210 video cassette
VIDEO/AUDIO (VCR deck)Signal system : NTSC colour signal and EIA
monochrome signal, 525 lines/60 fields
Recording system : DA4 (Double Azimuth) head helical scan system
Signal-to-noise ratio: 45 dBHorizontal resolution
: 230 linesFrequency range : 70 Hz to 10,000 Hz (Normal audio)
20 Hz to 20,000 Hz (Hi-Fi audio)Input/Output : RCA connectors:
IN x 2, OUT x 1
VIDEO/AUDIO (DVD deck)Signal system : NTSCApplicable disc : DVD (12 cm, 8 cm)
CD (12 cm, 8 cm)Audio characteristics
DVD : 4 Hz – 22 KHzFrequency response
CD : 4 Hz – 20 KHzS/N Ratio : 90 dBHarmonic distortion
: 0.1 %Wow and flutter : Below Measurable LevelDynamic range : 90 dBOutput
Component-Y : (RCA) 1.0 Vp-p/75 ohmComponent-PB/PR
: (RCA) 0.7 Vp-p/75 ohmAudio : (RCA) 2 Vrms, 1 KohmDigital Audio : (COAXIAL) 0.5 Vp-p/75 ohm
(OPTICAL) –21 dBm to –15 dBm (peak)
TUNERTuning system : Frequency synthesized tunerChannel coverage
VHF : Channels 2 – 13UHF : Channels 14 – 69CATV : 113 Channels
RF output : Channel 3 or 4 (switchable; preset to Channel 3 when shipped) 75 ohms, unbalanced
TIMERClock reference : QuartzProgram capacity : 1-year programmable timer/
8 programsMemory backup time
: Approx. 3 minutes
ACCESSORIESProvided accessories
: RF cable, Infrared remote control unit, “AA” battery x 2,Conversion plug
Specifications shown are for SP mode unless otherwise specified.E.& O.E. Design and specifications subject to change without notice.
Page 89 12 May 2004 1:40 pm

Filename [XVC33UM_12IX.fm]
Masterpage:Left0XVC33UM_12IX.fm Page 90 Wednesday, August 6, 2003 5:11 PM
90 EN LIST OF TERMS
AA-B Repeat Playback ............................................ 51About Discs
JPEG .............................................................. 65MP3 .............................................................. 62Placing a Disc .................................................. 7Playable Discs .................................................. 5Region Number ................................................ 5Unplayable Discs .............................................. 5
Angle Selection .................................................... 55Audio Channel Selection ....................................... 57Audio Language Selection ..................................... 56Auto Channel Set ................................................. 26
CChapter Search .................................................... 52Check, cancel and change programs ....................... 38Child Lock .......................................................... 82Clock Set ............................................................ 24Component Video Connection ............................... 15Connecting To A Dolby Digital Decoder or
An Amplifier With A Built-in DTS ...................... 74
DDigital Audio Dubbing .......................................... 71Disc menu .......................................................... 43Dubbing (from DVD to VCR) ................................. 70
EEDITING (DVD DECK)
Digital Audio Dubbing ..................................... 71EDITING (VCR DECK)
Dubbing (from DVD to VCR) ............................ 70EDITING (VCR)
Edit From A Camcorder .................................... 68Edit To Or From Another Video Recorder ........... 69
Elapsed Recording Time Indication ......................... 35Express Timer Programing ..................................... 36
GGroup/file selection .............................................. 67Group/track selection ........................................... 64
HHigh-Speed (Turbo) Search .................................... 29High-Speed Search ............................................... 44
IINDEX .................................................................. 8Index Search ........................................................ 30Instant ReView ..................................................... 30Instant Timer Recording (ITR) ................................. 34
JJPEG control display ............................................. 65
LLanguage ............................................................ 20
Language Code List .......................................... 23Menu/Audio/Subtitle Language Set
(DVD deck only) ........................................ 22On-screen Language Set (DVD deck) ................. 21On-screen Language Set (VCR deck) .................. 20
Letter Box ............................................................ 19Locating the start point of the item or skip the item .... 44
MManual Channel Set .............................................. 27Manual Tracking .................................................. 32Mode Set (DVD deck)
ANALOG DOWN MIX ..................................... 80AUDIO LANGUAGE ....................................... 22D. RANGE CONTROL ..................................... 80DIGITAL AUDIO OUTPUT ............................... 79MENU LANGUAGE ......................................... 22MONITOR TYPE ....................................... 19, 79MP3/JPEG ...................................................... 79ON SCREEN GUIDE ........................................ 81ON SCREEN LANGUAGE ................................. 21OUTPUT LEVEL .............................................. 80PICTURE SOURCE .......................................... 79RESUME ........................................................ 81SCREEN SAVER ............................................... 79SUBTITLE ....................................................... 22
Mode Set (VCR deck)2ND AUDIO RECORD .................................... 77AUDIO MONITOR .......................................... 77AUTO POWER OFF ........................................ 77AUTO SP]EP TIMER ...................................... 76BLUE BACK .................................................... 77PICTURE CONTROL ........................................ 76SUPERIMPOSE ................................................ 76VIDEO STABILIZER ......................................... 77
Monitor Set (DVD deck)MONITOR TYPE ....................................... 19, 79
MP3 control display .............................................. 62
NNext Function Memory ......................................... 31
OOPERATIONS ON DVD DECK ........................ 42 – 67OPERATIONS ON VCR DECK ......................... 28 – 41
Page 90 August 6, 2003 5:11 pm

Masterpage:Right-NoTitle0
EN 91
Filename [XVC33UM_12IX.fm]
XVC33UM_01.book Page 91 Monday, August 4, 2003 7:24 PM
PPan&Scan ........................................................... 19Parental Lock
Country/Area Code List .................................... 60To change the settings ..................................... 59To set Parental Lock for the first time .................. 58To temporarily release the Parental Lock ............ 59
Playback (DVD deck) .................................... 42 – 53Playback (JPEG) ............................................ 66 – 67Playback (MP3) ............................................. 63 – 64Playback (VCR deck) ..................................... 28 – 32Playback Control (PBC) Function .......................43, 51Plug&Play Set ...................................................... 16Program Playback ................................................ 53
RRandom Playback ................................................ 53Record One Program While Watching Another ........ 34Recording .................................................... 33 – 35Recording Resume Function .................................. 33Region Number ..................................................... 5Remote Control Functions ..................................... 72Repeat Playback ................................. 31, 50, 64, 67Resume Function ................................................. 45
SSatellite Auto Recording ........................................ 41Scan Mode Set (DVD deck) ................................... 82Second Audio Recording ....................................... 35Skip Search ......................................................... 30Slow Motion ...................................................29, 45Soundtrack Selection ............................................ 32Still Picture/Frame-By-Frame Playback ...............29, 45Subtitle Selection ................................................. 54S-VIDEO Connection ............................................ 14
TTape Position Indicator .......................................... 11Tape Remaining Time ........................................... 35Time Search ......................................................... 51Timer Recording ............................................ 36 – 41Top menu ............................................................ 43Tuner Set ............................................................. 26
VVFP function ........................................................ 47
WWhen programs overlap each other ......................... 40
ZZooming ....................................................... 45, 67
3D Phonic ........................................................... 46
Page 91 August 4, 2003 6:52 pm

COPYRIGHT © 2004 VICTOR COMPANY OF JAPAN, LTD.
Filename [XVC33UM_13Cov4.fm]
EN
Page 92 May 10, 2004 6:45 pm
HR
-XV
C33U
M
Printed in Beijing0504-TY-ID-BJ1
XVC33UM_13Cov4.fm Page 92 Monday, May 10, 2004 6:45 PM