DVD/CD PLAYER Hi-Fi STEREO VIDEO CASSETTE RECORDER...
60
For model: HR-XVC1U DVD/CD PLAYER Hi-Fi STEREO VIDEO CASSETTE RECORDER USER'S GUIDE For Customer Use: POWER TV TV VOL 0
Transcript of DVD/CD PLAYER Hi-Fi STEREO VIDEO CASSETTE RECORDER...

For model:HR-XVC1U
DVD/CD PLAYER Hi-Fi STEREO
VIDEO CASSETTE RECORDER
USER'S GUIDE
For Customer Use:
Model No.
Serial No.
Enter below the Model No. and Serial No. which are located on the rear of cabinet.
Retain this information for future reference.
TV/VCR CH +
TV VCR DVDPOWER
DVD MENU MARKER RETURNOPEN/CLOSE
DISPLAY A.TRK C.RESET ZERO RETURN
SUB TITLE ANGLESEARCHMODE
SP/EP
PLAYMODE ZOOM TITLE REPEAT
A-B
TVPOWER
INPUT
TV VOL
0 TIMER TV/VCR
REWPLAY
FF
RECSTOP
PAUSE
SKIP/INDEX
SKIP/INDEX
TV/VCR CH Ð
SET SETENTER/SELECT
SET UPMENU
CANCEL
OSDA.MONITOR
SLOWSKIP
SEARCH
VCR/DVD/TV
2B00401CE Cover 4/6/2002, 15:071
MANUAL-02
LPT0719-001A

2
WARNING: TO REDUCE THE RISK OF FIRE OR ELECTRIC SHOCK, DO NOT EXPOSE THISAPPLIANCE TO RAIN OR MOISTURE.
CAUTION: TO PREVENT ELECTRIC SHOCK DO NOT USE THIS POLARIZED PLUG WITH ANEXTENSION CORD, RECEPTACLE OR OTHER OUTLET UNLESS THE BLADES CANBE FULLY INSERTED TO PREVENT BLADE EXPOSURE.
CAUTION:THIS DIGITAL VIDEO PLAYER EMPLOYS A LASER SYSTEM.
TO ENSURE PROPER USE OF THIS PRODUCT, PLEASE READ THIS USER'S GUIDE CAREFULLY ANDRETAIN FOR FUTURE REFERENCE. SHOULD THE UNIT REQUIRE MAINTENANCE, CONTACT A JVCAUTHORIZED SERVICE CENTER.
USE OF CONTROLS, ADJUSTMENTS OR THE PERFORMANCE OF PROCEDURES OTHER THAN THOSESPECIFIED HEREIN MAY RESULT IN HAZARDOUS RADIATION EXPOSURE.
TO PREVENT DIRECT EXPOSURE TO LASER BEAM, DO NOT TRY TO OPEN THE ENCLOSURE. VISIBLELASER RADIATION MAY BE PRESENT WHEN THE ENCLOSURE IS OPENED. DO NOT STARE INTOBEAM.
Location of the required MarkingThe rating sheet and the safety cautionare on the rear of the unit.
RISK OF ELECTRIC SHOCKDO NOT OPEN
CAUTION
The lightning flash with arrowheadsymbol, within an equilateral triangle isintended to alert the user to the presenceof uninsulated dangerous voltage withinthe product's enclosure that may be ofsufficient magnitude to constitute a riskof electric shock to persons.
The exclamation point within an equilateraltriangle is intended to alert the user tothe presence of important operating andmaintenance (servicing) instructions inthe literature accompanying the appliance.
CAUTION: TO REDUCE THE RISK OF ELECTRICSHOCK, DO NOT REMOVE COVER (ORBACK). NO USER-SERVICEABLEPARTS INSIDE. REFER SERVICING TOQUALIFIED SERVICE PERSONNEL.
CAUTION: Changes or modifications not expressly approved by the partly responsible for compliance withthe FCC Rules could void the user's authority to operate this equipment.
3
CH.
IN
OUT
ANT.
DIGITAL AUDIO AUDIO S-VIDEO COMPONENTDVD OUTPUT
L
R
VIDEOOPTICAL COAXIAL
AUDIOL
R
4
( )
TV( )
Y
PB/CB
PR/CR
CERTIFICATION: COMPLIES WITHFDA RADIATION PERFORMANCESTANDARDS, 21 CFR SUBCHAPTER J.
2B00401AE(02-05) 21/5/2002, 9:452

3
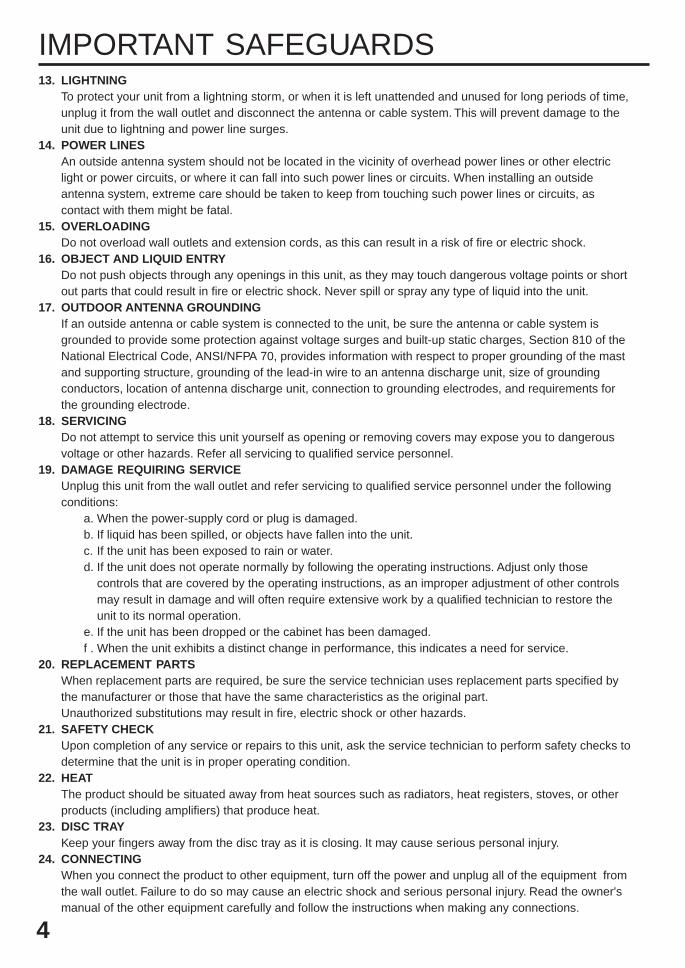
1. READ INSTRUCTIONSAll the safety and operating instructions should be read before the unit is operated.
2. RETAIN INSTRUCTIONSThe safety and operating instructions should be retained for future reference.
3. HEED WARNINGSAll warnings on the unit and in the operating instructions should be adhered to.
4. FOLLOW INSTRUCTIONSAll operating and use instructions should be followed.
5. CLEANINGUnplug this unit from the wall outlet before cleaning. Do not use liquid cleaners or aerosol cleaners.
Use a damp cloth for cleaning the exterior cabinet only.
6. ATTACHMENTSThe manufacturer of this unit does not make any recommendations for attachments, as they may cause
hazards.
7. WATER AND MOISTUREDo not use this unit near water. For example, near a bathtub, washbowl, kitchen sink, laundry tub, in a wet
basement, or near a swimming pool.
8. ACCESSORIESDo not place this unit on an unstable cart, stand, tripod, bracket, or table.
The unit may fall, causing serious injury, and serious damage to the unit.
An appliance and cart combination should be moved with care. Quick stops,excessive force, and uneven surfaces may cause the appliance and cart
combination to overturn.
9. VENTILATIONSlots and openings in the cabinet back or bottom are provided for ventilation,
to ensure reliable operation of the unit, and to protect it from overheating.
These openings must not be blocked or covered. The openings should never be blocked by placing the uniton a bed, sofa, rug, or other similar surface. This unit should never be placed near or over a radiator or heat
source. This unit should not be placed in a built-in installation such as a bookcase or rack unless proper
ventilation is provided and/or the manufacturer’s instructions have been adhered to.10. POWER SOURCES
This unit should be operated only from the type of power source indicated on the rating plate. If you are not
sure of the type of power supply to your home, consult your appliance dealer or local power company. Forunits intended to operate from battery power, or other sources, refer to the operating instructions.
11. GROUNDING OR POLARIZATIONThis unit is equipped with a polarized alternating-current line plug (a plug having one blade wider than theother). This plug will fit into the power outlet only one way. This is a safety feature. If you are unable to insert
the plug fully into the outlet, try reversing the plug. If the plug should still fail to fit, contact your electrician to
replace your obsolete outlet. Do not defeat the safety purpose of the polarized plug, if your unit is equippedwith a 3-wire grounding-type plug, a plug having a third (grounding) pin. This plug will only fit into a ground-
ing-type power outlet. This too, is a safety feature. If you are unable to insert the plug into the outlet,
contact your electrician to replace your obsolete outlet. Do not defeat the safety purpose of the grounding-type plug.
12. POWER-CORD PROTECTIONPower-supply cords should be routed so that they are not likely to be walked on or pinched by items placedupon or against them, paying particular attention to cords at plugs, convenience receptacles, and the point
where they exit from the appliance.
S3125A
PORTABLE CART WARNING(symbol provided by RETAC)
IMPORTANT SAFEGUARDS
2B00401AE(02-05) 21/5/2002, 9:453
4
13. LIGHTNINGTo protect your unit from a lightning storm, or when it is left unattended and unused for long periods of time,unplug it from the wall outlet and disconnect the antenna or cable system. This will prevent damage to theunit due to lightning and power line surges.
14. POWER LINESAn outside antenna system should not be located in the vicinity of overhead power lines or other electriclight or power circuits, or where it can fall into such power lines or circuits. When installing an outsideantenna system, extreme care should be taken to keep from touching such power lines or circuits, ascontact with them might be fatal.
15. OVERLOADINGDo not overload wall outlets and extension cords, as this can result in a risk of fire or electric shock.
16. OBJECT AND LIQUID ENTRYDo not push objects through any openings in this unit, as they may touch dangerous voltage points or shortout parts that could result in fire or electric shock. Never spill or spray any type of liquid into the unit.
17. OUTDOOR ANTENNA GROUNDINGIf an outside antenna or cable system is connected to the unit, be sure the antenna or cable system isgrounded to provide some protection against voltage surges and built-up static charges, Section 810 of theNational Electrical Code, ANSI/NFPA 70, provides information with respect to proper grounding of the mastand supporting structure, grounding of the lead-in wire to an antenna discharge unit, size of groundingconductors, location of antenna discharge unit, connection to grounding electrodes, and requirements forthe grounding electrode.
18. SERVICINGDo not attempt to service this unit yourself as opening or removing covers may expose you to dangerousvoltage or other hazards. Refer all servicing to qualified service personnel.
19. DAMAGE REQUIRING SERVICEUnplug this unit from the wall outlet and refer servicing to qualified service personnel under the followingconditions:
a. When the power-supply cord or plug is damaged.b. If liquid has been spilled, or objects have fallen into the unit.c. If the unit has been exposed to rain or water.d. If the unit does not operate normally by following the operating instructions. Adjust only those
controls that are covered by the operating instructions, as an improper adjustment of other controlsmay result in damage and will often require extensive work by a qualified technician to restore theunit to its normal operation.
e. If the unit has been dropped or the cabinet has been damaged.f . When the unit exhibits a distinct change in performance, this indicates a need for service.
20. REPLACEMENT PARTSWhen replacement parts are required, be sure the service technician uses replacement parts specified bythe manufacturer or those that have the same characteristics as the original part.Unauthorized substitutions may result in fire, electric shock or other hazards.
21. SAFETY CHECKUpon completion of any service or repairs to this unit, ask the service technician to perform safety checks todetermine that the unit is in proper operating condition.
22. HEATThe product should be situated away from heat sources such as radiators, heat registers, stoves, or otherproducts (including amplifiers) that produce heat.
23. DISC TRAYKeep your fingers away from the disc tray as it is closing. It may cause serious personal injury.
24. CONNECTINGWhen you connect the product to other equipment, turn off the power and unplug all of the equipment fromthe wall outlet. Failure to do so may cause an electric shock and serious personal injury. Read the owner'smanual of the other equipment carefully and follow the instructions when making any connections.
IMPORTANT SAFEGUARDS
2B00401AE(02-05) 21/5/2002, 9:454

5
EXAMPLE OF ANTENNA GROUNDING AS PER THENATIONAL ELECTRICAL CODE
CONDENSATIONMoisture will form in the operating section of the DVD/VCR if the player is brought from cool surroundings into awarm room or if the temperature of the room rises suddenly. And when this happens, DVD/VCR's performancewill be impaired.To prevent this, let the DVD/VCR stand in its new surroundings for about an hour before switching it on, ormake sure that the room temperature rises gradually.Condensation may also form during the summer if the DVD/VCR is exposed to the breeze from an airconditioner. In such cases, change the location of the DVD/VCR.
25. LASER BEAMDo not look into the opening of the disc tray or ventilation opening of the product to see the source of thelaser beam. It may cause sight damage.
26. DISCDo not use a cracked, deformed, or repaired disc. These discs are easily broken and may cause seriouspersonal injury and product malfunction.
27. NOTE TO CATV SYSTEM INSTALLERThis reminder is provided to call the CATV system installer’s attention to Article 820-40 of the NEC thatprovides guidelines for proper grounding and, in particular, specifies that the cable ground shall be con-nected to the grounding system of the building, as close to the point of cable entry as practical.
TO USE AC POWER SOURCEUse the AC polarized line cord provided for operation on AC. Insertthe AC cord plug into a standard 120V 60Hz polarized AC outlet.
NOTES:• Never connect the AC line cord plug to other than the specified
voltage (120V 60Hz). Use the attached power cord only.• If the polarized AC cord does not fit into a non-polarized AC
outlet, do not attempt to file or cut the blade. It is the user’sresponsibility to have an electrician replace the obsolete outlet.
• If you cause a static discharge when touching the unit and theunit fails to function, simply unplug the unit from the AC outletand plug it back in. The unit should return to normal operation.
Polarized AC Cord Plug(One blade is wider than the other.)
AC Outlet
Wider Holeand Blade
Power Source
ANTENNADISCHARGE UNIT(NEC SECTION 810-20)
ANTENNA LEAD IN WIRE
GROUNDING CONDUCTORS(NEC SECTION 810-21)
GROUND CLAMPS
POWER SERVICE GROUNDINGELECTRODE SYSTEM(NEC ART 250, PART H)
GROUND CLAMP
ELECTRIC SERVICEEQUIPMENT
NEC-NATIONAL ELECTRICAL CODE
S2898A
IMPORTANT SAFEGUARDS / Power Source
2B00401AE(02-05) 21/5/2002, 9:455

6
FeaturesDVD/CD Player/Video Cassette Recorder• DVD/CD player with Video Cassette Recorder - Unique space saving design combines a DVD/CD player and a Hi-Fi Video
cassette recorder. The DVD disc has much more capacity, but is the same size as the audio CD disc. Picture quality is higherthan Super VHS. Audio quality is higher than audio CD. The DVD PLAYER can play back video CDs and audio CDs.
• High Quality Picture - More than 500 lines(VCR mode: 230 lines) of Horizontal Resolution. It exceeds Super VHS (400lines) or Laser Disc (430 lines) in resolution.
VCR Section• Stereo/SAP Reception - This VCR is designed to receive stereo and separate audio program (SAP) broadcasts where
available.
• SQPB - Tapes recorded in the S-VHS system can be played back simply on this VCR.
• 4 Video Heads - Provides optimal picture quality for special effects playback.• 19µm HEAD - For superior picture quality even in EP mode, 19micron width technology helps to avoid crosstalk and
boost EP picture quality to near SP levels. With precision technology, ghosts and color beats are virtually eliminated.• Hi-Fi Stereo Sound - With a frequency response of 20 to 20,000 Hz and a dynamic range of better than 90dB, this
VCR provides a level of excellence that rivals compact discs.• Instant Timer Recording (ITR) - Simply by pressing the REC and PLAY buttons, the VCR can be programmed for up
to 5 hours of recording with an immediate start.• Skip Search - When the SKIP SEARCH button is pressed during playback, the VCR will automatically search forward
in 30 seconds increments to a maximum of 3 minutes with each press of the SKIP SEARCH button, and then return tonormal playback.
DVD Section• Compatible with a wide range of DVD audio outputs
Digital Audio Jack (Optical or Coaxial):• When a component with a built-in Dolby Digital decoder is connected, Dolby Digital sound can produce the effect of
being in a movie theater or a concert hall.• Surround standard different from Dolby Digital. This format is already in use in many theaters. By connecting this unit
to a DTS decoder or an AV amplifier with a built-in DTS decoder, the DTS audio of DVD discs recorded in this formatcan be enjoyed. However, audio will not be output from the analog audio output jacks.
• The MPEG audio of DVD discs recorded in this format can be enjoyed.• The Linear PCM sound of a 48 kHz/16 bit through 96 kHz/20 bit exceeds audio CD sound.
• Surround audio - This DVD equipped with a “SPATIALIZER N-2-2”. It can produce the effect of being in a cinema or aconcert hall.
• Multi-Language - Since this DVD matches with 124 language-subtitles/-soundtracks, you can enjoy selecting a favoriteone. (You can not select the language that is not recorded on the disc.)
• Multi-Angle - Pictures of Sports or a Live Concert are recorded with many cameras. When you play such a disc, youcan change the angles during playback. (If a Multi-Angle is not recorded on the disc, you can not change the angle.)
• Repeat Playback - You can repeat chapter, track, title, sides or material between two selected points.
• Program/Random Playback (CD) - You can play back tracks in programmed or random-selected sequences.
• Zoom - You can zoom in on the selected subject on the screen during playback.
• Video Aspect Ratio - You can change the aspect ratio of the screen for your monitor/television on a suitable disc.• Parental Control - You can limit the playback of scenes or sounds of adult DVD discs which have a parental level rating.
This product incorporates copyright protection technology that is protected by method claims of certain U.S. patentsand other intellectual property rights owned by Macrovision Corporation and other rights owners. Use of this copyrightprotection technology must be authorized by Macrovision Corporation or other rights owners and is intended for homeand other limited viewing uses only unless otherwise authorized by Macrovision Corporation or other rights owners.Reverse engineering or disassembly is prohibited.
Manufactured under license from Dolby Laboratories. “Dolby” and the double-D symbol are trademarks of DolbyLaboratories. Confidential unpublished works. © 1992-1997 Dolby Laboratories, Inc. All rights reserved.
“DTS” and “DTS Digital Out” are trademarks of Digital Theater Systems, Inc.
Certain audio features of this product manufactured under license from Desper Products,Inc. Spatializer and the circle- in - square device are trademarks owned by Desper Products,Inc.
Unauthorized recording of copyrighted television programs, films, video cassettes and other materials may infringe therights of copyright owners and be contrary to copyright laws.
*
*
*
*
*
2B00401AE(06-11) 21/5/2002, 9:456

7
Contents
Important safeguards ....................................... 3Power Source................................................... 5Features ........................................................... 6Contents ........................................................... 7Parts and functions .......................................... 8Display ............................................................. 9Remote control ............................................... 10Basic connections .......................................... 12CATV (CABLE TV) connections..................... 14Playback Connection ..................................... 16
Before using your unit
Recording a TV program ................................ 28Instant Timer Recording (ITR) ........................ 30Timer Recording ............................................. 31
Recording
Stereo Recording and Playback..................... 33Separate Audio Program (SAP) ..................... 33Duplicating a video tape ................................. 34Duplicating a disc material onto a video tape .... 34
Advanced Function of VCR section
Cassette tape Playback ................................. 25Special playback ............................................ 26ZERO RETURN function ................................ 27Video Index Search system ........................... 27
Tape Playback operation
Setting the Video Channel ............................. 18Setting the language ...................................... 18Tuner Setting .................................................. 19To ADD/DELETE channels............................. 20Noise elimination ............................................ 20Auto clock setting ........................................... 21Manual clock setting ....................................... 23Loading and Unloading a Cassette Tape ....... 24
Setting up the VCR section
Disc ................................................................ 35Setting setup language .................................. 36Playback procedure ....................................... 37Special playback ............................................ 38Zooming ......................................................... 39Locating Desired Scene ................................. 39Repeat playback ............................................ 40Program playback (CD) .................................. 41Random playback (CD) .................................. 41MP3 Playback ................................................ 42Marking Desired Scenes ................................ 43Changing soundtrack language ..................... 44Subtitles ......................................................... 44Changing angles ............................................ 45Title selection ................................................. 45DVD menu...................................................... 45
Disc Playback operation
Parental control .............................................. 46Temporary disabling of rating level by DVDdisc ................................................................. 47Setting menu language .................................. 48Setting subtitle language ................................ 49Setting audio soundtrack language ................ 50Setting surround sound .................................. 50Setting the aspect ratio of TV screen ............. 51Setting on Screen display .............................. 52Status display of Disc ..................................... 52Dynamic Range Control ................................. 53Language Code List ....................................... 54
Advanced Function of DVD section
Problems and troubleshooting ....................... 55Video head cleaning ....................................... 56Specifications ................................................. 57HOW TO LOCATE YOUR JVC SERVICECENTER ........................................................ 58LIMITED WARRANTY ................................... 59
Additional information
2B00401AE(06-11) 21/5/2002, 9:457

8
3
CH.
IN
OUT
ANT.
DIGITAL AUDIO AUDIO S-VIDEO COMPONENTDVD OUTPUT
L
R
VIDEOOPTICAL COAXIAL
AUDIOL
R
4
( )
TV( )
Y
PB/CB
PR/CR
POWERVIDEO (M) L - AUDIO - R VCR CH
VCR/DVD
EJECT OPEN/CLOSE
PLAY STOP
REW FF REC DVD
Parts and functionsFront
STOP button
Rear
AC power cord
PLAY button
OPEN/CLOSE button
Disc tray
POWERbutton
DVD/VCR common AUDIO (L/R)/VIDEO OUTjacks
3/4 Channel Selector SwitchDVD COAXIAL DIGITALAUDIO OUT jack
RF IN jack
CHANNEL +/– buttonsAUDIO (L/R)/
VIDEO IN jacks FF (Fast Forward) button
Remote sensor
EJECT button
VCR indicator
VCR/DVD mode selector button
Cassette Loading Slot
REW (Rewind) button REC button
DVD indicator
DVD OPTICALDIGITAL AUDIO
OUT jack
DVD AUDIO (L/R) OUT jacks
DVD S-VIDEO OUT jack DVD COMPONENT OUT jacks
RF OUT jack
2B00401AE(06-11) 21/5/2002, 9:458

9
No. Display Description
VCR mode1
2
3
4
5
6
7
1 2 3 4
7
6
5
Playback
Stop
Still picture
Frame advanced playback
Forward slowmotion
Fast Forward playback
Review playback
Skip chapter to forward
direction
Skip chapter to reverse
direction
Open or Close the tray
Auto resume
Direction button’s mark
A-B repeat
Subtitle language
Soundtrack language
Angle
Zoom
Parental level locked
Parental level unlocked
Screen size: Normal TV
Screen size: PAN SCAN
Screen size: WIDE
Shows Prohibited act
Output sound for Video-CD
A B
Explanation for On-Screen-Symbol:
Display
8
9
10
11
VCR
DVD
CD
PM
10 : 00
01 : 00
2
C036
L
TRK
REC
CH02
Playback (lights) / Auto resume (flashes)
Still picture
DVD disc is inserted.
CD is inserted.
Display for afternoon (lights out in the morning)
Clock display (colon[ : ] flashes)
Counter display by hour/minute at VCR/DVD / by minute/second at CD
Track number display for CD
TV channel display for VCR
CATV channel display
External input display
Timer recording display
Video tape is in the unit
Track display for CD
Normal recording display (flashes during Instant Timer Recording - ITR)
Note:Some discs may be displayed wrong or e.g. chapter number, playback time, etc. may not be displayed.
8910
11
Display window
2B00401AE(06-11) 21/5/2002, 9:459

10
TV/VCR/DVD switch Switch to operate TV or VCR or DVD 18,36POWER Power on/off 18DVD MENU Display menu of DVD software 45MARKER Locating desired scene 43RETURN Remove DVD set up menu 36,47OPEN/CLOSE Open or Close the tray 37DISPLAY Change the front Display mode 27A.TRK Digital AUTO TRACKING 26SUB TITLE Set Subtitle of a DVD disc 44C. RESET Reset the counter to 00:00 27ANGLE Change playback angle of a DVD disc 45ZERO RETURN Stop the tape when the counter reaches 00:00 27SEARCH MODE Index for DVD 39SP/EP Sets the tape speed for recording 28,30PLAY MODE Select playback mode 40,41ZOOM Zoom (DVD/VCD) 39TITLE Select title of a DVD disc 45REPEAT A-B Repeat playback between A and B (DVD/CD) 400-9 Direct channel selection of TV 20,28
Input setting 39,41Enter a password 46,47
TIMER Set the unit to start recording at a preset time. 31,32TV/VCR Switches between TV and VCR 18,29TV POWER Turn the connected TV on or off 10INPUT Switch the connected TV to external mode 10TV VOL +/– Adjust the connected TV’s volume 10REW Rewind/Review playback 25,26,38PLAY Playback 25,37FF Fast Forward/Forward search playback 25,26,38REC Recording 28,30,34STOP Stop 25,37PAUSE Still picture/Recording pause on/off 26,29,34,38SKIP / Skip chapter to forward or reverse direction 38INDEX / Search for the INDEX mark of a tape 27TV/VCR CH +/– Select channel of the connected TV or VCR
10,28,30,34 / Cursor buttonsSET –/+ Setting buttons 31,32
Manual tracking buttons in playback mode 26 / Cursor buttons - To move Up in the VCR menu
you press the . To move Down in the VCRmenu you press the .
ENTER Enter information in the menuSELECT Select option in the menuSET UP MENU Display menu of setup 18,19,36,48-52CANCEL Delete Timer program 32
Cancel input data in the setting mode 23,31,39,41OSD Display VCR or DVD operation status 29,52A.MONITOR Switches sound between mono and stereo 33
Change sound track language of DVD 44SLOW Slowmotion playback 26,38SKIP SEARCH Skip the unwanted short material of a tape 26
Remote controlPage
This Remote can control some functions (TVPOWER, NUMBER(0-9), INPUT, TV VOL +/–,TV CH +/– and ENTER) of a remotecontrollable JVC TV by slide TV/VCR/DVDswitch to TV.(The POWER button on the upper right is noteffective for the TV.)
JVC TV Remote Control
NOTE:It’s not possible to operate a unit notequipped with a remote sensor.This Remote can control a JVC TV only.When you operate the VCR or DVD, theTV/VCR/DVD switch must be slided toVCR/DVD again. Otherwise the DVD/VCR may not operate properly.Since this unit is combined type of DVDand VCR, the remote code of DVD isindividual. So please note that the DVD-keys on the RCU of the other JVCRECEIVER/TV is not effective for this unit.
•
••
•
TV/VCR CH +
TV VCR DVDPOWER
DVD MENU MARKER RETURN OPEN/CLOSE
DISPLAY A.TRK C.RESET ZERO RETURN
SUB TITLE ANGLE SEARCHMODE
SP/EPPLAYMODE ZOOM TITLE REPEAT
A-B
TVPOWER
INPUT
TV VOL
0 TIMER TV/VCR
REWPLAY
FF
RECSTOP PAUSE
SKIP/INDEX
SKIP/INDEX
TV/VCR CH —
SET SETENTER/SELECT
SET UP MENU CANCEL
OSDA.MONITOR
SLOW SKIP SEARCH
VCR/DVD/TV
2B00401BE(06-11) 22/5/2002, 17:2210

11
Inserting Batteries
1 2 3
Operation• Aim the remote control at the remote sensor and press control buttons
to operate.• Operate the remote control within 30° angle on either side of the remote
sensor, up to a distance of Approx. 5 meters.
Remote control
Replace the compartmentcover.
Install two "AA" batteries (supplied),paying attention to the polaritydiagram in the battery compartment.
Open the battery compart-ment cover in the direction ofthe arrow.
Approx. 5 meters
Battery precautionsThe precautions below should be followed when using batteries in this device:1.Use only the size and type of batteries specified.2.Be sure to follow the correct polarity when installing the batteries as indicated in the battery compartment.
Reversed batteries may cause damage to the device. To avoid a potential short circuit, insert the “–” end first.3.Do not mix different types of batteries together (e.g. Alkaline and Carbon-zinc) or old batteries with fresh ones.4. If the device is not to be used for a long period of time, remove the batteries to prevent damage or injury from
possible battery leakage.5. Do not try to recharge batteries not intended to be recharged; they can overheat and rupture. (Follow battery
manufacturer’s directions.)
• Press POWER to turn the DVD/VCR on or off.• Make sure TV/VCR/DVD switch is set to VCR/DVD.• Tap VCR CH + or VCR CH – to move through the channels one channel at a time.• The VCR CH +/– and SET +/– are also used to navigate on-screen menu system.• You can directly access specific channels using Number keys pad.• Each press of VCR or DVD, switches the screen between the VCR screen (VCR mode) and the DVD screen
(DVD mode).
Remote control basics
If you operate this DVD/VCR with another JVC’s VCR simultaneously arranging them side by side, the bothrecorders will react to this remote control. In this case, you can change the remote control and DVD/VCR to otherfrequency (“ ”). Then you can operate only this DVD/VCR with this changed remote control.When you purchased, the DVD/VCR and remote control have been set to the frequency-“ ”.
Change the custom code for remote control
Example: Change frequency to
Remote control:While holding VCR,press 2(code: b) ofNumber keys . (incase of code: A,press 1)
DVD/VCR:In the POWER off mode,press and hold PLAY formore than 5 seconds. “b”will appear on the displayand then disappear afterapprox. 4 seconds.
If the remote control has been set to b, the DVD/VCR also must be set to b. Otherwise, the DVD/VCR can not beoperated with this remote control.To reset to “A”, repeat above procedure. However press 1 instead of 2.
•
•
NOTES:
TV VCR DVDPOWER
DVD MENU MARKER RETURNOPEN/CLOSE
OPEN/CLOSE
PLAY STOP
REW FF REC DVD
SUB TITLE ANGLESEARCHMODE
SP/EP
PLAYMODE ZOOM TITLE REPEAT
A-B
TV
POWER
INPUT
TVVOL
0 TIMER TV/VCR
2B00401BE(06-11) 22/5/2002, 17:2211
12
OUT(TV)
IN(ANT.)
OUT(TV)
IN(ANT.)
OUT(TV)
IN(ANT.)
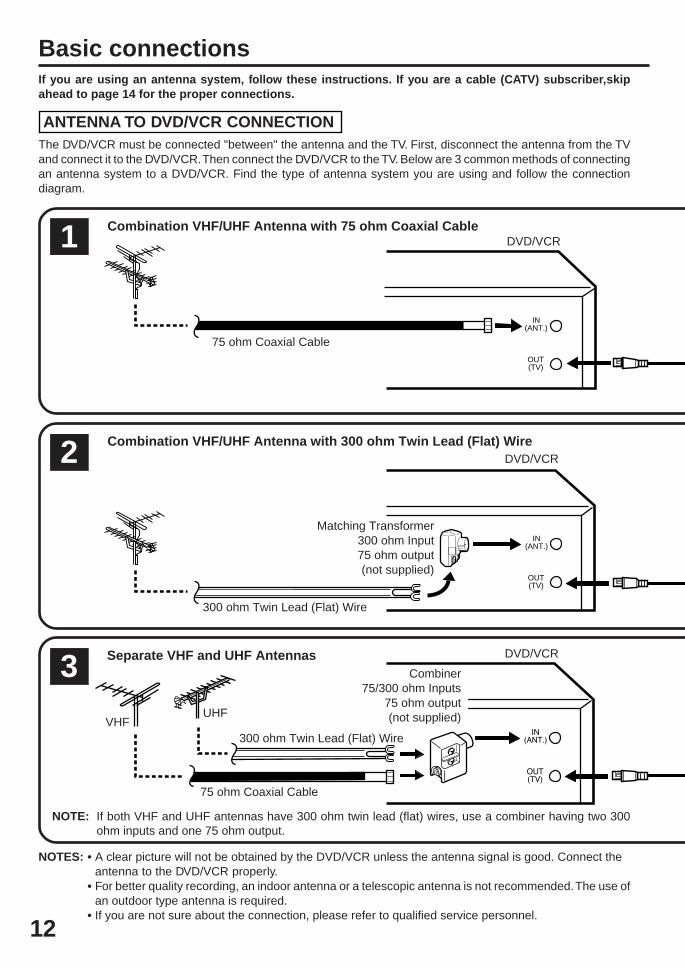
NOTES: • A clear picture will not be obtained by the DVD/VCR unless the antenna signal is good. Connect theantenna to the DVD/VCR properly.
• For better quality recording, an indoor antenna or a telescopic antenna is not recommended. The use ofan outdoor type antenna is required.
• If you are not sure about the connection, please refer to qualified service personnel.
If you are using an antenna system, follow these instructions. If you are a cable (CATV) subscriber, skipahead to page 14 for the proper connections.
ANTENNA TO DVD/VCR CONNECTIONThe DVD/VCR must be connected "between" the antenna and the TV. First, disconnect the antenna from the TVand connect it to the DVD/VCR. Then connect the DVD/VCR to the TV. Below are 3 common methods of connectingan antenna system to a DVD/VCR. Find the type of antenna system you are using and follow the connectiondiagram.
If both VHF and UHF antennas have 300 ohm twin lead (flat) wires, use a combiner having two 300ohm inputs and one 75 ohm output.
NOTE:
Basic connections
Combination VHF/UHF Antenna with 75 ohm Coaxial Cable
Combination VHF/UHF Antenna with 300 ohm Twin Lead (Flat) Wire
Separate VHF and UHF Antennas
1
2
3
DVD/VCR
VHFUHF
300 ohm Twin Lead (Flat) Wire
Matching Transformer 300 ohm Input75 ohm output(not supplied)
300 ohm Twin Lead (Flat) Wire
75 ohm Coaxial Cable
75 ohm Coaxial Cable
Combiner75/300 ohm Inputs
75 ohm output(not supplied)
DVD/VCR
DVD/VCR
2B00401AE(12-15) 21/5/2002, 9:4612

13
UHF
VHF
UHF
VHF
VHF/UHF IN
NOTE: If a VHF or UHF antenna isused, set the TV/CATVmenu option to the "TV"mode.
NOTE: If a VHF or UHF antenna isused, set the TV/CATVmenu option to the "TV"mode.
NOTE: If a VHF or UHF antenna isused, set the TV/CATVmenu option to the "TV"mode.
75 ohm Coaxial Cable (supplied)
Splitter75 ohm Input75/300 ohm outputs(not supplied)
Splitter75 ohm Input300 ohm outputs(not supplied)
TV with single 75 ohm VHF/UHFantenna input
TV with 300 ohm UHFand 75 ohm VHFantenna inputs
TV with 300 ohm UHF and 300 ohm VHFantenna inputs
DVD/VCR TO TV CONNECTIONAfter you have connected the antenna to the DVD/VCR, you must connect the DVD/VCR to the TV.Below are 3 common methods of connecting your DVD/VCR to a TV. Find the type of TV you are using and followthe connection diagram.
This DVD/VCR has a single 75 ohm output for connection to a TV. If your TV has separate VHF and UHF antennainputs (numbers 2 and 3 below), use a splitter to connect the DVD/VCR to the TV for VHF and UHF reception.
TV
TV
TV
75 ohm Coaxial Cable(supplied)
75 ohm Coaxial Cable(supplied)
Basic connections
2B00401AE(12-15) 21/5/2002, 9:4613

14
VHF/UHFIN (ANT)
OUT(TV)
IN(ANT.)
VHF/UHFIN (ANT)
OUT(TV)
IN(ANT.)
VHF/UHFIN (ANT)
OUT(TV)
IN(ANT.)
Many cable companies offer services permitting reception of extra channels including pay or subscription channels.This DVD/VCR has an extended tuning range and can be tuned to most cable channels without using a cablecompany supplied converter box, except for those channels which are intentionally scrambled. If you subscribe toa special channel which is scrambled, you must have a descrambler box for proper reception.
CATV (CABLE TV) connections
NOTE: Whenever a Converter/Descrambler box is placed before the DVD/VCR, you must tune the DVD/VCRto the output of the Converter/Descrambler box, usually channel 3 or 4.
ALLOWS: * Recording of nonscrambled channels.
* Use of the programmable timer.
* Recording of one channel while watching another.
ALLOWS: * Recording of channels through the converter box(scrambled and unscrambled).
* Using the programmable timer to record only thechannel selected at the converter box.
PREVENTS: * Recording one channel while watching another.* Using the DVD/VCR tuner to select channels.
1
2
DVD/VCR
Incoming Cable
TV
Converter/Descrambler
IncomingCable
TV
Incoming CableConverter/Descrambler
TV
3
ALLOWS: * Recording of nonscrambled channels.* Use of the programmable timer.* Recording an unscrambled channel while watching
any channel selected at the converter box.
PREVENTS: Recording scrambled channels.
To record from converter/descrambler,DVD/VCR tuner must be tuned to theconverter output channel, usuallychannel 3 or 4.
If you are playing a tape or using thetuner built into the DVD/VCR, theconverter must be set to the videochannel output of the DVD/VCR (either3 or 4).
NOTE:
NOTE:
DVD/VCR
DVD/VCR
2B00401AE(12-15) 21/5/2002, 9:4614

15
VHF/UHFIN (ANT)
A
B
OUT(TV)
IN(ANT.)
VHF/UHFIN (ANT)
A
B
OUT(TV)
IN(ANT.)
This DVD/VCR cannot receive scrambled programs since it does not contain a descrambler. In order to receive scrambledprograms, your existing descrambler must be used. Descrambler boxes are available from cable companies. Consultyour local cable company for more information concerning connection to their descrambler equipment. There are manyways to connect your DVD/VCR to a cable system. Below are six common methods of connection.
IMPORTANT: Make sure the TV/CATV menu option is set to the "CATV" mode.
IncomingCable
4
5
6
ALLOWS: * Recording of one channel while watching another.
* Using the programmable timer to record only the channel selected at the converter box.
* Recording of all channels through the converter box.
PREVENTS: * Watching scrambled channels while recording another channel.
* Using the DVD/VCR tuner to select channels.
DVD/VCR
Splitter
Converter/Descrambler
TV
DVD/VCR
Converter/Descrambler
A/B Switch
TV
IncomingCable
Splitter
ALLOWS: * Recording of nonscrambled channels.
* Recording of one channel while watching another.
* Watching premium channels through the converter while recording nonscrambled channels.
* Using the programmable timer.PREVENTS: Recording scrambled channels.
ALLOWS: * Recording of all channels through the converter box.* Recording a scrambled or unscrambled channel while watching another (scrambled or
unscrambled) channel.* Using the programmable timer to record only the channel selected at the converter box.
PREVENTS: Using the DVD/VCR tuner to select channels.
DVD/VCR
A/B Switch
SplitterTV
IncomingCable
Converter/Descrambler
Converter/Descrambler
A/B Switch
CATV (CABLE TV) connections
VHF/UHFIN (ANT)
A
BOUT(TV)
IN(ANT.)
2B00401AE(12-15) 21/5/2002, 9:4615

16
3
CH.
IN
OUT
ANT.
DIGITAL AUDIO AUDIO S-VIDEO COMPONENTDVD OUTPUT
L
R
VIDEOOPTICAL COAXIAL
AUDIOL
R
4
( )
TV( )
Y
PB/CB
PR/CR
3
CH.
IN
OUT
ANT.
DIGITAL AUDIO AUDIO S-VIDEO COMPONENTDVD OUTPUT
L
R
VIDEOOPTICAL COAXIAL
AUDIO
L
R
4
( )
TV( )
Y
PB/CB
PR/CR
3
CH.
IN
OUT
ANT.
DIGITAL AUDIO AUDIO S-VIDEO COMPONENTDVD OUTPUT
L
R
VIDEOOPTICAL COAXIAL
AUDIOL
R
4
( )
TV( )
Y
PB/CB
PR/CR
Playback Connection
To Audio (R) Input
To Audio (L) Input
To VideoInput
Audio (L) Output
Audio (R) Output
Video Output
DVD/VCR
TV
AUDIO/VIDEO Cord (supplied)
Connect to a TV with Audio/Video OutputUse the supplied AUDIO/VIDEO Cord.
Connect to a TV with S-Video OutputYou can use the following connection only for DVD/CD playback.
DVD/VCR
TV
S-Video Cord (not supplied)
To Audio (R) InputTo S-Video Input
To Audio (L) InputS-Video Output
AUDIO Cord (not supplied)
Audio (L) Output
Audio (R) Output
The exact arrangement you use to interconnect various video and audio components to the DVD/VCR is dependenton the model and features of each component. Check the Owner's Manual provided with each component for thelocation of video and audio inputs and outputs.
Connect to a BS TUNER
Audio (R) Output
Audio (L) Output
Video Output
DVD/VCR
TV
AUDIO/VIDEO Cord (supplied)
BS Tuner
SatelliteAntenna
To ANT. Input
75 ohm Coaxial Cable (not supplied)
ANT. Input
ANT. output
To ANT.Input
ANT.Output
75 ohm CoaxialCable (supplied)
VHF/UHFAntenna
2B00401AE(16-21) 21/5/2002, 9:4616

17
3
CH.
IN
OUT
ANT.
DIGITAL AUDIO AUDIO S-VIDEO COMPONENTDVD OUTPUT
L
R
VIDEOOPTICAL COAXIAL
AUDIOL
R
4
( )
TV( )
Y
PB/CB
PR/CR
3
CH.
IN
OUT
ANT.
DIGITAL AUDIO AUDIO S-VIDEO COMPONENTDVD OUTPUT
L
R
VIDEOOPTICAL COAXIAL
AUDIOL
R
4
( )
TV( )
Y
PB/CB
PR/CR
Connect to an AV Amplifier with built-in digital surroundIf you are using an Amplifier with a built-in digital surround as follows, you can enjoy the various audio systemssuch as Dolby Digital and DTS by using the Optical or Coaxial Digital Output.
Use this connection to connect an:• AV amplifier with built-in *Dolby Digital decoder• AV amplifier with built-in *DTS decoder
Playback ConnectionConnect to a Stereo Amplifier with Audio Output
NOTES:•
•
•
•
••
The OPTICAL, COAXIAL, AUDIO L/R, S-VIDEO and COMPONENT jacks are useful only for DVD section. TheVHS signal is output only from the composite jack(DVD/VCR VIDEO OUTPUT) and UHF/VHF OUT.When you make the connections above, do not set DOLBY DIGITAL to DOLBY DIGITAL or DTS to ON on the AVAmplifier. If you do, a loud noise will suddenly come out from the speakers, affecting your ears or causing thespeakers to be damaged.Caution for the optical digital audio output connector: Do not connect to an amplifier (with an optical digital inputconnector) which does not contain a Dolby Digital or DTS decoder. Otherwise, any attempt to play DVDs maycause such a high level of noise that it may be harmful to your ears and damage your speakers.DTS audio will be output only from the COAXIAL or OPTICAL output. To hear DTS audio, DTS-Decoder isnecessary.When playing DTS-encoded CDs, only noise will be heard from the speakers or analogue stereo outputs.Some DTS decoders which do not support DVD-DTS interface may not work properly with the unit.
Video cord (not supplied) To VideoInput
Coaxial digital cable(not supplied)
AV Amplifier withbuilt-in variousdecoder as above
DVD/VCR
TV
Connecting the optical digital cable
When you connect the optical digital cable (not supplied), remove the dust protection cap from the rear panel.When not using the optical digital cable, attach the dust protection cap to protect against dust.
If your TV has a COMPONENT VIDEO IN jack, you can connect the DVD/VCR to the TV with a COMPONENTcable (not supplied) as shown below. COMPONENT VIDEO output jack can send higher-quality video signal to aTV than S-Video output.
You may connect to an AV Amplifier with an Optical digital cable (not supplied) instead of a Coaxial digitalcable.
NOTE:You may connect to a TV with aComponent video cable(not supplied) orS-Video cable(not supplied) instead ofa video cable(not supplied).
To Audio (L) Input
ToComponentVideo Input
To Audio (R) Input
TV
AUDIO Cord (not supplied)
Stereo Amplifier
AUDIO/VIDEO Cord (supplied)
DVD/VCR
Audio (R) Output
COMPONENT VIDEO Cord (not supplied)To Component
Video Output
Audio (L) Output
Coaxial digitalAudio Output
To Audio/Video Output
To Audio/Video Input
Video Output
2B00401BE(16-21) 22/5/2002, 17:1617

18
Setting the Video Channel / Setting the language
To view playback of a recorded tape,or to watch a program selected bythe VCR's channel selector, the TVmust be set to channel 3 or 4 (videochannel).
NOTES:• If the unit does not operate properly,
or No key operation (by the unit and/or the remote control): Static electric-ity, etc., may affect the player's opera-tion. Disconnect the AC power cordonce, then connect it again.
• If no buttons are pressed for more than60 seconds,the MENU screen willreturn to normal TV operationautomatically.
• Both the VCR and the DVD have theirown menu options (See page 36).
1 Press POWER to turn on the DVD/VCR.
2 Slide TV/VCR/DVD switch to VCR/DVD. Then press VCR toselect the VCR mode. The VCR indicator on the front panelwill light.
You can choose from three different languages (English,French and Spanish) for the on-screen displays.
When a TV is connected with the 75 ohm coaxial cable only.
3 Set the 3/4 Channel selector switch on the rear panel to CH3 or 4.
4 Turn ON the TV and set to CH 3 or 4 to correspond with thechannel selected in step 3.
5 Press TV/VCR to select the VCR position.The VCR indicator will appear in the display.
6 Select any channel to receive a TV station in your area.The channel number will appear on the screen for about4 seconds.
For a push-button TV tunerIf CH 3 or 4 corresponding to the video channel cannot be tunedon your TV, proceed as follows: set the VCR 3/4 channel selectorand the TV to CH 3 or 4, play back a prerecorded tape and tunethe TV to receive a sharp color picture from the video cassetterecorder. Refer to your TV owner's manual for details.
Setting the Video Channel
Setting the language
3
Press SETUP MENU,If you use the unit for the first timeand press SETUP MENU, insteadof the main menu screen on theright the SYSTEM SET UP menuscreen in step 2 may appear.
Press or to select the desiredlanguage: English (ENGLISH),Spanish (ESPAÑOL) or French(FRANCAIS), then press ENTER.
1
2 Press or to select the“LANGUAGE” option, then pressENTER.
4 Press SETUP MENU until the MENU screen is cleared.
á+/-/ENTER/MENUñ
MENUTIMER REC SETAUTO REPEAT ON OFF
ON OFFSAPCH SET UPSYSTEM SET UP
⟨+/-/ENTER/MENU⟩
SYSTEM SET UPCLOCK SETLANGUAGE/IDIOMA/LANGUENO NOISE BACKGROUND
AUTO CLOCKSTANDARD TIME
ON OFFON OFF
DAYLIGHT SAVING TIME
TV/VCR CH +
TV VCR DVDPOWER
DVD MENU MARKER RETURN OPEN/CLOSE
DISPLAY A.TRK C.RESET ZERO RETURN
SUB TITLE ANGLE SEARCHMODE
SP/EPPLAYMODE ZOOM TITLE REPEAT
A-B
TVPOWER
INPUT
TV VOL
0 TIMER TV/VCR
REWPLAY
FF
RECSTOP PAUSE
SKIP/INDEX
SKIP/INDEX
TV/VCR CH —
SET SETENTER/SELECT
SET UP MENU CANCEL
OSDA.MONITOR
SLOW SKIP SEARCH
2B00401BE(16-21) 22/5/2002, 17:1618

19
3
Tuner SettingThis DVD/VCR is equipped with a channel memory feature which allows channels to skip up or down tothe next channel set into memory, skipping over unwanted channels. Before selecting channels, theymust be programmed into the DVD/VCR’s memory. In addition to normal VHF and UHF channels, this DVD/VCR can receive up to 113 Cable TV channels. To use this DVD/VCR with an antenna, set the TV/CATVmenu option to the TV mode. When shipped from the factory, this menu option is in the CATV mode.
Press SETUP MENU. The VCR menu screen will appear.Press or to select CH SET UP, then press ENTER.
Then press ENTER to select theTV or CATV mode. The arrowindicates the selected mode.
1
2 Press or to select the “TV/CATV” option.
4 Press SETUP MENU until the menu screen is cleared.
TV - VHF/UHF channelsCATV - CABLE TV channels
2
Setting channels automaticallyThe VCR can receive a maximum of 181 channels bypresetting the channels into memory.
Then press ENTER.The auto tuning will start. Thechannel display will count up andwhen finished, the screen returnsto normal.
1 Repeat above step 1 and press or to select AUTO CH
MEMORY.
TV/CATV Selection
Turn ON the TV and set it to the video input mode.Make sure TV/VCR/DVD switch has been slided to VCR/DVD.Then press VCR to select the VCR mode. (The VCR indicatorwill light.)
Preparation:••
⟨+/-/ENTER/MENU⟩
CH SET UP
TV CATVAUTO CH MEMORYADD/DELETE
⟨+/-/ENTER/MENU⟩
CH SET UP
TV CATVAUTO CH MEMORYADD/DELETE
⟨+/-/ENTER/MENU⟩
CH SET UP
TV CATVAUTO CH MEMORYADD/DELETE
CH 002
You can not select "CH SET UP" if youset the channel to "L".
NOTE:
TV/VCR CH +
TV VCR DVDPOWER
DVD MENU MARKER RETURN OPEN/CLOSE
DISPLAY A.TRK C.RESET ZERO RETURN
SUB TITLE ANGLE SEARCHMODE
SP/EPPLAYMODE ZOOM TITLE REPEAT
A-B
TVPOWER
INPUT
TV VOL
0 TIMER TV/VCR
REWPLAY
FF
RECSTOP PAUSE
SKIP/INDEX
SKIP/INDEX
TV/VCR CH —
SET SETENTER/SELECT
SET UP MENU CANCEL
OSDA.MONITOR
SLOW SKIP SEARCH
VCR/DVD/TV
2B00401AE(16-21) 21/5/2002, 9:4719

20
2
To ADD/DELETE channels / Noise eliminationTo ADD/DELETE channels
Repeat the step 1 on page 19.Then press or to select the“ADD/DELETE” option and pressENTER.
Press Number keys or /to select a channel numberyou want to add or delete.
1
To Add or Delete desired channels
1
To add channelsPress ENTER until “ADD”appears on the screen to setto add the unmemorizedchannel.
To delete channelsPress ENTER until “DELETE” appears on the screen toset to delete the channel from memory. The channelnumber will blink.
Repeat to to add or delete other channel.1
2
3 2
3 Press SETUP MENU until the menu screen is cleared.
Repeat the steps 1~2 on page 18 and press or to selectNO NOISE BACKGROUND.
1
2 Press ENTER to select the ONposition.
Noise elimination
You can add the channels you wantor delete the channels you do notwant manually.
When you don't want to receive a weak signal broadcast, theBlue back screen can be obtained by selecting the NO NOISEBACKGROUND "ON". When the unit is shipped from thefactory, the NO NOISE BACKGROUND is set to the "ON".
3 Press SETUP MENU until the menu screen is cleared.
Turn ON the TV and set it to the video input mode.Make sure TV/VCR/DVD switch has been slided to VCR/DVD.Then press VCR to select the VCR mode. (The VCR indicatorwill light.)
Preparation:••
⟨+/-/ENTER/MENU⟩
CH SET UP
TV CATVAUTO CH MEMORYADD/DELETE
⟨+/-/0-9/ENTER/MENU⟩
ADD CH 003
⟨+/-/ENTER/MENU⟩
SYSTEM SET UPCLOCK SETLANGUAGE/IDIOMA/LANGUENO NOISE BACKGROUND
AUTO CLOCKSTANDARD TIME
ON OFFON OFF
DAYLIGHT SAVING TIME
TV/VCR CH +
TV VCR DVDPOWER
DVD MENU MARKER RETURN OPEN/CLOSE
DISPLAY A.TRK C.RESET ZERO RETURN
SUB TITLE ANGLE SEARCHMODE
SP/EPPLAYMODE ZOOM TITLE REPEAT
A-B
TVPOWER
INPUT
TV VOL
0 TIMER TV/VCR
REWPLAY
FF
RECSTOP PAUSE
SKIP/INDEX
SKIP/INDEX
TV/VCR CH —
SET SETENTER/SELECT
SET UP MENU CANCEL
OSDA.MONITOR
SLOW SKIP SEARCH
VCR/DVD/TV
2B00401AE(16-21) 21/5/2002, 9:4720

21
Auto clock settingThe Auto Clock feature enables the automatic clock setting and updating, and also to set the Time Zoneand Daylight Saving Time by receiving XDS (Extended Data Service) information carried on the channelsignal.
Press SETUP MENU. The VCR menu screen will appear.Press or to select the SYSTEM SET UP menu, thenpress ENTER.
2 Press or to select the“STANDARD TIME” option, thenpress ENTER.
After Auto Clock setting, in some casethe clock may display the other timezone’s. You can correct the clock byselecting your Time Zone settingabove.When the clock is not set or you setthe clock manually, Time Zone settingis not available.
NOTES:
You must set the antenna connection before the AC cord plug isinserted into the AC outlet.Make sure the AUTO CH MEMORY (on P.19) is done.
1
Preparation:
Auto clock settingWAIT 30 MINUTES! when the power switch is off, after theconnections of the antenna and the power plug. Because the AutoClock setting feature is activate.After the clock is set automatically, you may have to set the TimeZone and Daylight Saving Time.Press POWER to turn on the DVD/VCR after the Auto Clock operationcompleted.
When shipped from factory, the AUTO CLOCK option is set to ON position.If you turn the DVD/VCR on during Auto Clock setting, the clock is not set.With cable box connection, if the Auto Clock Setting is unsuccessful,please select the PBS channel carrying the XDS information, thenturn the DVD/VCR off. After 30 minutes, turn the DVD/VCR on, andif the clock is not set automatically, set the clock manually. (See page 23)
•••
Canadian Viewers:Please see note regarding the Auto Clock Setting option on page 55.
3 Press or to select your TimeZone, then press the ENTER.
Time Zone setting (STANDARD TIME)
4 Press SETUP MENU until the MENU screen is cleared.
•
•
Turn ON the TV.When a TV is connected with an audio/video cable, select the videoinput mode on the TV.When a TV is connected only with an antenna cable, set to thevideo channel 3 or 4. Then select VCR position with TV/VCR.Make sure the VCR mode has been selected. (Is the VCR indicatorbeing light?) (see steps 1~2 on page 18)
Preparation:••
•
•
In the rare event that you live within broadcast range of twostations in two different time zones, the DVD/VCR may recognizethe wrong station for the AUTO CLOCK set.To correct the situation:
⟨+/-/ENTER/MENU⟩
SYSTEM SET UPCLOCK SETLANGUAGE/IDIOMA/LANGUENO NOISE BACKGROUND
AUTO CLOCKSTANDARD TIME
ON OFFON OFF
DAYLIGHT SAVING TIME
⟨+/-/ENTER/MENU⟩
STANDARD TIME
ATLANTICCENTRALPACIFIC
EASTERNMOUNTAINALASKA
HAWAIIAUTO
•
•
TV/VCR CH +
TV VCR DVDPOWER
DVD MENU MARKER RETURN OPEN/CLOSE
DISPLAY A.TRK C.RESET ZERO RETURN
SUB TITLE ANGLE SEARCHMODE
SP/EPPLAYMODE ZOOM TITLE REPEAT
A-B
TVPOWER
INPUT
TV VOL
0 TIMER TV/VCR
REWPLAY
FF
RECSTOP PAUSE
SKIP/INDEX
SKIP/INDEX
TV/VCR CH —
SET SETENTER/SELECT
SET UP MENU CANCEL
OSDA.MONITOR
SLOW SKIP SEARCH
VCR/DVD/TV
2B00401BE(16-21) 22/5/2002, 17:1621

22
Auto clock settingDaylight saving time setting
Repeat the step 1 on page 21 andpress or to select DAYLIGHTSAVING TIME, then press ENTER.
1
2 Press or to select one ofthe options, then press ENTER.
You can set the Daylight savingtime automatically or manually.
When you want to set the Daylight Saving Time manually, onthe first Sunday in April you set to “ON”, and on the lastSunday in October you set to “OFF”.
for manual setting(forward one hour)for manual setting(back one hour)for automatic setting(read XDS in the signal)
ON:
OFF:
AUTO:
When shipped from factory, the DAYLIGHT SAVING TIMEoption is set to AUTO position.When the clock is not set, Daylight Saving Time setting is notavailable.When there is no Daylight Saving Time in your area, alwaysselect OFF position in step 2.
•
•
•
NOTES:
Turn ON the TV.When a TV is connected with an audio/video cable, select thevideo input mode on the TV.When a TV is connected only with an antenna cable, set to thevideo channel 3 or 4. Then select VCR position with TV/VCR.Make sure TV/VCR/DVD switch has been slided to VCR/DVD.Then press VCR to select the VCR mode. (The VCR indicatorwill light.)
Preparation:••
•
•
⟨+/-/ENTER/MENU⟩
SYSTEM SET UPCLOCK SETLANGUAGE/IDIOMA/LANGUENO NOISE BACKGROUND
AUTO CLOCKSTANDARD TIME
ON OFFON OFF
DAYLIGHT SAVING TIME
⟨+/-/ENTER/MENU⟩
DAYLIGHT SAVING TIME
ON
OFF
AUTO
TV/VCR CH +
TV VCR DVDPOWER
DVD MENU MARKER RETURN OPEN/CLOSE
DISPLAY A.TRK C.RESET ZERO RETURN
SUB TITLE ANGLE SEARCHMODE
SP/EPPLAYMODE ZOOM TITLE REPEAT
A-B
TVPOWER
INPUT
TV VOL
0 TIMER TV/VCR
REWPLAY
FF
RECSTOP PAUSE
SKIP/INDEX
SKIP/INDEX
TV/VCR CH —
SET SETENTER/SELECT
SET UP MENU CANCEL
OSDA.MONITOR
SLOW SKIP SEARCH
VCR/DVD/TV
2B00401AE(22-27) 21/5/2002, 9:4722

23
4
Manual clock settingYou must set the date and timemanually for timer recordings andDaylight Saving Time if the AutoClock process did not set themcorrectly.
Press or to select theSYSTEM SET UP menu, thenpress ENTER.
Press or to set the month,then press ENTER button.
2
3 Press or to select the“CLOCK SET” option, then pressENTER.
After a power failure or disconnectionof the power, the timer settings will belost. In this case, reset the present time.
NOTE:
1 Press SETUP MENU. The VCR menu screen will appear.
5 Set the day, year and time as instep 4.
6 After setting the clock, date andtime starts functioningautomatically.
To make corrections any time during the processPress CANCEL repeatedly until the item you want to changeblinks, then press or .
Turn ON the TV and set to the video input mode.Make sure TV/VCR/DVD switch has been slided to VCR/DVD.Then press VCR to select the VCR mode. (The VCR indicatorwill light.)
Preparation:••
á+/-/ENTER/MENUñ
MENUTIMER REC SETAUTO REPEAT ON OFF
ON OFFSAPCH SET UPSYSTEM SET UP
⟨+/-/ENTER/MENU⟩
SYSTEM SET UPCLOCK SETLANGUAGE/IDIOMA/LANGUENO NOISE BACKGROUND
AUTO CLOCKSTANDARD TIME
ON OFFON OFF
DAYLIGHT SAVING TIME
EXAMPLE: Setting the clock to "8:30 AM" October, 26 (SAT), 2002.
á+/-/ENTER/CANCEL/MENUñ
MONTH
DAY
YEAR
TIME
10
1 (SUN)
2000
12 : 00AM
á+/–/ENTER/CANCEL/MENUñ
MONTH
DAY
YEAR
TIME
10
26 (SAT)
2002
8 : 30AM
8 : 30AM SAT
TV/VCR CH +
TV VCR DVDPOWER
DVD MENU MARKER RETURN OPEN/CLOSE
DISPLAY A.TRK C.RESET ZERO RETURN
SUB TITLE ANGLE SEARCHMODE
SP/EPPLAYMODE ZOOM TITLE REPEAT
A-B
TVPOWER
INPUT
TV VOL
0 TIMER TV/VCR
REWPLAY
FF
RECSTOP PAUSE
SKIP/INDEX
SKIP/INDEX
TV/VCR CH —
SET SETENTER/SELECT
SET UP MENU CANCEL
OSDA.MONITOR
SLOW SKIP SEARCH
VCR/DVD/TV
2B00401AE(22-27) 21/5/2002, 9:4723

24
Tape speed and maximum recording time
Video cassette tapeTape Speed
EP (Extended Play)
Loading and Unloading a Cassette Tape
To prevent accidental erasureRemove the erase prevention tab with a screwdriver. Cover the hole with a piece of adhesive tape.
To record again
Erase prevention tab
Screwdriver
Adhesive tape
Automatic tape ejectThis VCR will automatically rewind the tape when the tape has ended. And when the tape is rewinded to itsbeginning, the cassette tape will be ejected automatically.
Press EJECT on the unit. Remove the cassette tape.
LoadingPush the center of the tape until it is automaticallyinserted.
Insert the cassette tape with its labeled side facing upand the erase prevention tab positioned at your left. Aninverted cassette tape cannot be inserted.
Erase prevention tab
Automatic playbackWhen loading a cassette tape without an erase prevention tab, playback will start automatically.
Automatic power ONWhen you insert a cassette tape the VCR power will turn ON automatically.
Unloading
1 2
Use only video cassette tapes marked and .
T-160 T-120 T-90 T-60 T-30
2-2/3 hours 2 hours 1-1/2 hours 1 hour 30 minutes
8 hours 6 hours 4-1/2 hours 3 hours 1-1/2 hours
SP (Standard Play)
VCR
Cassettes marked “VHS” (or “S-VHS”) can be used with this video cassette recorder. However, S-VHS recordingis not possible with this model.This model is equipped with SQPB (S-VHS QUASI PLAYBACK) that makes it possible to play back S-VHSrecordings with regular VHS resolution.HQ VHS is compatible with existing VHS equipment.
•
•
•
2B00401AE(22-27) 21/5/2002, 9:4724

25
Cassette tape Playback
Load a prerecorded tape(When loading a cassette tapewithout the erase preventiontab, playback will start auto-matically).
1
2Press PLAY .Playback will start." " will appear on the screenfor about 4 seconds.
To start playback
Press STOP once.The tape will stop but remainfully loaded and ready to play." " will appear on the screenfor about 4 seconds.
To stop playback
To rewind the tape or forward it rapidly
Stop the playback or recording with STOP.
To rewind the tape:
Press REW.
To forward the tape:
Press FF.
To stop the tape-winding, press STOP. To switch to playbackdirectly (without STOP), press PLAY .
Forward/Reverse picture search modeWhen the tape is being winded, you can switch to picture searchmode (see next page). To do this, press REW or FF and hold itdown. The unit will resume the tape winding as soon as the buttonis released.
NOTES:• This VCR selects the playback tape
speed SP or EP automatically.• The Cassette tape and DVD disc can
be played back simultaneously. If youpress VCR or DVD, the tape playbackand DVD playback alternate with eachother on the screen.
Turn ON the TV and set to the video input mode.Make sure TV/VCR/DVD switch has been slided to VCR/DVD.Then press VCR to select the VCR mode. (The VCR indicatorwill light.)
Preparation:••
TV/VCR CH +
TV VCR DVDPOWER
DVD MENU MARKER RETURN OPEN/CLOSE
DISPLAY A.TRK C.RESET ZERO RETURN
SUB TITLE ANGLE SEARCHMODE
SP/EPPLAYMODE ZOOM TITLE REPEAT
A-B
TVPOWER
INPUT
TV VOL
0 TIMER TV/VCR
REWPLAY
FF
RECSTOP PAUSE
SKIP/INDEX
SKIP/INDEX
TV/VCR CH —
SET SETENTER/SELECT
SET UP MENU CANCEL
OSDA.MONITOR
SLOW SKIP SEARCH
VCR/DVD/TV
2B00401BE(22-27) 22/5/2002, 17:1525

26
Adjusting tracking condition
Special playback
Reverse picture search function
Picture Search
Press REW x 1 or x 2 during the playback.
Forward picture search function
Press FF x 1 or x 2 during the playback.
To return to playback: Press PLAY .
Still PicturePress PAUSE during playback. To resume normalplayback: Press PLAY .
Slow Motion
Whenever you insert a tape and start playback,automatic tracking starts working and continuouslyanalyzes the signal to enable optimum picture qualityduring playback.
During playback press SLOW.To return to playback: Press PLAY or SLOW.
Press PAUSE during playback.Press SLOW one by one: The picture advances frameby frame.To return to playback: Press PLAY or PAUSE.
Frame by Frame picture
Notes:• The audio output is muted during SPEED SEARCH,
STILL, FRAME ADVANCE and SLOW MOTION.• During picture search mode there will be noise bars
which are caused by the system.• The Special Playback will automatically change to
playback after approx. 5 minutes to protect the videotape against excessive wear.
Slow tracking and vertical lock adjustmentIf noise bars appear in the picture during slow motion,press the SET + or – to reduce the noise bars.If the still picture jitters excessively, press SET + or –to stabilize the still picture.
Automatic tracking adjustment
If automatic tracking cannot eliminate noises well duringplayback, press SET +/– to eliminate the noises.“MANUAL TR.” will appear. Press it briefly for a fineadjustment, or press and hold for a coarse adjustment.
Manual tracking adjustment
Repeat playbackThe entire video tape will be played until its end.Thetape will then automatically rewind to the beginning andthe playback will be repeated.
1 Press SETUP MENU. Press or to selectAUTO REPEAT.
3 Press SETUP MENU until the menu screen iscleared.if you press OSD, " " will appear on the screen.
Then press ENTER toselect [ON] or [OFF].If [ON] is selected, theplayback will berepeated endlessly.
4 To start the playback, press PLAY .The playback will be repeated endlessly.
2
To cancel repeat mode :Follow the above step 1, then press ENTER to selectthe OFF position. Press SETUP MENU to return tothe TV.
Press A.TRK to reactivate automatic tracking again.“AUTO TR.” will appear.
•
Skip SearchEach time you press SKIP SEARCH while a tape isplaying, the unit will fast-forward ahead 30 secondson the tape. You may press the button up to six timesin a row to move 180 seconds (three minutes) ahead.
1 press: 30 seconds of tape2 presses: 60 seconds of tape3 presses: 90 seconds of tape
For example:
á+/-/ENTER/MENUñ
MENUTIMER REC SETAUTO REPEAT ON OFF
ON OFFSAPCH SET UPSYSTEM SET UP
2B00401BE(22-27) 22/5/2002, 17:1526

27
+3
Press OSD.The counter display shows the taperunning time during playback orrecording.
ZERO RETURN function / Video Index Search systemZERO RETURN functionThis function makes tape-rewindingstop at the counter 00:00:00 positionautomatically.
NOTES for Counter Display:If you rewind the tape beyond “00:00:00”,a minus sign (“–”) will be displayed infront of the time counter.When you load a tape, the counter willreset to “00:00:00”.The counter does not function onnonrecorded (blank) sections of thetape. When you rewind, fast forward orplay tapes through blank sections, thecounter stops.
•
•
•
Press C. RESET at the desired tape po-sition. The counter display will be resetto the "00:00:00" position (e.g. thebegining of recording).
2
Press STOP when playback or recording is finished.Press ZERO RETURN.The tape will be rewinded or fast forwarded and automaticallystop at the ”00:00:00” position.
The DISPLAY-buttonPress DISPLAY . The clock and tape counteralternate with each other in the display.
1
3
Video Index Search systemThis function enables you to locate the beginning of anyrecording made on the VCR.
Recording an INDEX MARKThe Index Search function automaticallyrecords an INDEX mark on the tapewhenever a recording is initiated.
INDEX NO. (up to 9)
or is displayed
Index SearchPress INDEX or during stop or playmode.For Succeeding programs: Press INDEX .For Preceding programs: Press INDEX .(Additional press increases the INDEX NO.up to 9.)When the INDEX or is pressed, theunit starts searching the INDEX NO.selected and finds the portion, thenplayback starts automatically.To stop the Index Search, press STOP.
NOTES for Video Index Search system:When you record an INDEX mark atthe very beginning of the tape, themark may not be found.During INDEX search, the tape maystop and begin to play at a slightlydifferent location.INDEX may not function properly withold or worn out video tapes.INDEX marks may not be found if it isextremely close to the point where thesearch began.In recording, if you stop recordingtemporarily, the INDEX mark is notrecorded on the tape.
•
•
•
•
•
Turn ON the TV and set it to the video input mode.Make sure TV/VCR/DVD switch has been slided to VCR/DVD.Then press VCR to select the VCR mode. (The VCR indicatorwill light.)
Preparation:••
CH 0018 : 47AM MON
00 : 04 : 38 SP
STEREO SAP
CH 0018 : 47AM MON
00 : 00 : 00 SP
STEREO SAP
VCR
VCR
VCR
VCR
CH 001
INDEX
TV/VCR CH +
DVD MENU MARKER RETURN OPEN/CLOSE
DISPLAY A.TRK C.RESET ZERO RETURN
SUB TITLE ANGLE SEARCHMODE
SP/EPPLAYMODE ZOOM TITLE REPEAT
A-B
TVPOWER
INPUT
TV VOL
0 TIMER TV/VCR
REWPLAY
FF
RECSTOP PAUSE
SKIP/INDEX
SKIP/INDEX
TV/VCR CH —
SET SETENTER/SELECT
SET UP MENU CANCEL
OSDA.MONITOR
SLOW SKIP SEARCH
2B00401BE(22-27) 22/5/2002, 17:1527
28
3
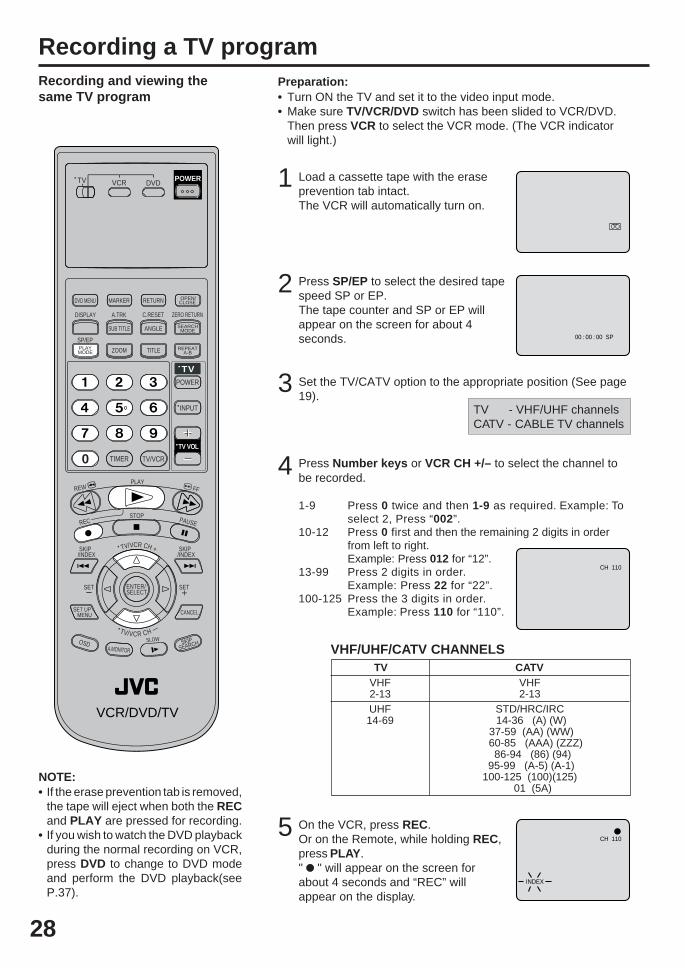
Recording a TV program
Load a cassette tape with the eraseprevention tab intact.The VCR will automatically turn on.
Set the TV/CATV option to the appropriate position (See page19).
1
2 Press SP/EP to select the desired tapespeed SP or EP.The tape counter and SP or EP willappear on the screen for about 4seconds.
4
TV - VHF/UHF channelsCATV - CABLE TV channels
Recording and viewing thesame TV program
Press Number keys or VCR CH +/– to select the channel tobe recorded.
VHF/UHF/CATV CHANNELSTV CATV
VHF2-13UHF14-69
VHF2-13
STD/HRC/IRC 14-36 (A) (W)
37-59 (AA) (WW) 60-85 (AAA) (ZZZ)
86-94 (86) (94) 95-99 (A-5) (A-1)100-125 (100)(125)
01 (5A)
5 On the VCR, press REC.Or on the Remote, while holding REC,press PLAY ." " will appear on the screen forabout 4 seconds and “REC” willappear on the display.
NOTE:If the erase prevention tab is removed,the tape will eject when both the RECand PLAY are pressed for recording.If you wish to watch the DVD playbackduring the normal recording on VCR,press DVD to change to DVD modeand perform the DVD playback(seeP.37).
•
•
Turn ON the TV and set it to the video input mode.Make sure TV/VCR/DVD switch has been slided to VCR/DVD.Then press VCR to select the VCR mode. (The VCR indicatorwill light.)
Preparation:••
00 : 00 : 00 SP
CH 110
CH 110
INDEX
1-9 Press 0 twice and then 1-9 as required. Example: Toselect 2, Press “002”.
10-12 Press 0 first and then the remaining 2 digits in orderfrom left to right.Example: Press 012 for “12”.
13-99 Press 2 digits in order.Example: Press 22 for “22”.
100-125 Press the 3 digits in order.Example: Press 110 for “110”.
TV/VCR CH +
TV VCR DVDPOWER
DVD MENU MARKER RETURN OPEN/CLOSE
DISPLAY A.TRK C.RESET ZERO RETURN
SUB TITLE ANGLE SEARCHMODE
SP/EPPLAYMODE ZOOM TITLE REPEAT
A-B
TVPOWER
INPUT
TV VOL
0 TIMER TV/VCR
REWPLAY
FF
RECSTOP PAUSE
SKIP/INDEX
SKIP/INDEX
TV/VCR CH —
SET SETENTER/SELECT
SET UP MENU CANCEL
OSDA.MONITOR
SLOW SKIP SEARCH
VCR/DVD/TV
2B00401AE(28-33) 21/5/2002, 9:4728

29
CH 1258 : 47AM MON
00 : 00 : 00 SP
STEREO SAP
CH 1258 : 30AM MON
00 : 00 : 00 SP
HI-FI
Recording a TV program
Press STOP to stop recording." " will appear on screen for about 4seconds.
To stop recording
Press PAUSE to avoid recording unwantedmaterial. Press again to continue therecording." " will appear on screen for about 4seconds.
To stop recording temporarily
NOTE:The pause function will be released after 5 minutes to prevent damageto the tape or the VCR. The VCR will change to the STOP mode.You can select a recording channel in the recording pause mode.
•
•
Auto Rewind featureThis VCR will automatically rewind thetape when the tape has ended (exceptduring ITR and TIMER REC). It will alsoeject the tape.
While the VCR is recording, press TV/VCR to select the TV position.The “VCR” will go off and recording will continue.Select the TV channel you want to watch by using the TV channelselector. If the connected TV is JVC’s, use TV CH +/– after slide TV/VCR/DVD switch to TV.
Recording one program while watching another
NOTE:Some CATV hookups do not permit viewing one channel whilerecording another. See pages 14,15.
To Display VCR operation StatusPress OSD. The clock, day of the week and more information will beindicated.
To cancel the display: Press OSD until all indicators disappear.
While watching TVDAY OF THE WEEK
CHANNEL
TAPE SPEED
REAL TIME COUNTER
CLOCK
STEREO ANDSEPARATE AUDIO
PROGRAM (SAP)
While operating a tape
OPERATINGMODE
TAPE INAUTO REPEAT
HI-FI STEREO
TV/VCR CH +
TV VCR DVDPOWER
DVD MENU MARKER RETURN OPEN/CLOSE
DISPLAY A.TRK C.RESET ZERO RETURN
SUB TITLE ANGLE SEARCHMODE
SP/EPPLAYMODE ZOOM TITLE REPEAT
A-B
TVPOWER
INPUT
TV VOL
0 TIMER TV/VCR
REWPLAY
FF
RECSTOP PAUSE
SKIP/INDEX
SKIP/INDEX
TV/VCR CH —
SET SETENTER/SELECT
SET UP MENU CANCEL
OSDA.MONITOR
SLOW SKIP SEARCH
VCR/DVD/TV
2B00401AE(28-33) 21/5/2002, 9:4729

30
3
Instant Timer Recording (ITR)
Load a cassette tape with the eraseprevention tab intact.The VCR will automatically turn on.
Set the TV/CATV option to the appropriate position (See page19).
1
2 Press SP/EP to select the desired tapespeed SP or EP.The tape counter and SP or EP willappear on the screen for about 4seconds.
4
TV - VHF/UHF channelsCATV - CABLE TV channels
The Instant Timer Recordingfeature provides a simple andconvenient way to make a timedrecording.
Press Number keys or VCR CH +/– toselect the channel to be recorded.
5
NOTE:If you wish to watch the DVD playbackduring the ITR, press DVD to change toDVD mode and perform the DVD play-back (see P.37).
Example: Instant Timer Recording for 30 minutes.
Press REC on the VCR or while holding REC, press PLAY onthe Remote to begin recording. Press REC on the VCR again tostop recording after 30 minutes. Each additional press of RECwill increase recording time as shown in the chart below, up to amaximum of 5 hours. The ITR and recording time will appear onthe screen for about 4 seconds. And, REC will keep blinking inthe display.
Press STOP or turn off the power." " will appear on screen for about 4seconds.
To cancel ITR
Press
once
twice
3 times
4 times
5 times
NORMAL REC
0:30
1:00
1:30
2:00
3:00
4:00
5:00
NORMAL REC
Recording time Press
6 times
7 times
8 times
9 times
Recording time
Turn ON the TV and set it to the video input mode.Make sure TV/VCR/DVD switch has been slided to VCR/DVD.Then press VCR to select the VCR mode. (The VCR indicatorwill light.)
Preparation:••
CH 110
CH 125
INDEX
ITR 0 : 30
00 : 00 : 00 SP
TV/VCR CH +
TV VCR DVDPOWER
DVD MENU MARKER RETURN OPEN/CLOSE
DISPLAY A.TRK C.RESET ZERO RETURN
SUB TITLE ANGLE SEARCHMODE
SP/EPPLAYMODE ZOOM TITLE REPEAT
A-B
TVPOWER
INPUT
TV VOL
0 TIMER TV/VCR
REWPLAY
FF
RECSTOP PAUSE
SKIP/INDEX
SKIP/INDEX
TV/VCR CH —
SET SETENTER/SELECT
SET UP MENU CANCEL
OSDA.MONITOR
SLOW SKIP SEARCH
VCR/DVD/TV
2B00401AE(28-33) 21/5/2002, 9:4730

31
3
Timer Recording
Press SETUP MENU. Select theTIMER REC SET option, then pressENTER.
Press SET + or – to select the date,then press ENTER.
1
2 Press SET + or – to select one of theprogram line, then press ENTER.
4
Make sure TV/VCR/DVD switch has been slided to VCR/DVD.Then press VCR to select the VCR mode.Load a cassette tape with the erase prevention tab intact.Press OSD to verify that the time and date are correct (see page29).
Preparation:•
••
Timer recording can be programmedon-screen with the remote control.The built-in timer allows automaticunattended recording of up to 8programs within 1 month.
Set the start time , end time , channeland tape speed as in step 3.
Example: Program a timer recording for the 26th day, channel 125(CATV), 11:00 - 11:30 PM on timer program number 1 (Tape speed: EP).
NOTES:Press CANCEL to move cursor backwardfor correction.To record from external source set thechannel to "L". "L" will appear next to CH125 (or 69).
•
•
5 To enter other programs, repeat step2 through 4.
• To return to the normal screen,press SETUP MENU twice.
6 Press TIMER. The clock symbol( ) will appear on the displayand the VCR stands by for recording. At the same time, VCRmode will change to DVD mode automatically. You can useDVD even if the VCR is in the Timer recording mode.If you do not use the DVD, turn the power off.The timer recording will start at 5 seconds before the time youpredetermined.
NOTES:If the clock symbol( ) does not appear on the display in spiteof the pressing of TIMER, the cassette may not have beenloaded yet. (see page 24)If the cassette is ejected in spite of the pressing of TIMER , theerase prevention tab of the cassette may have been removed.(see page 24)
•
•
NOTES:If the clock symbol( ) blinks when thetimer recording ended, the TV programhas not been completely recordedbecause of an insufficient tape supply.In this case, press TIMER to cancelthe timer program or press EJECT toremove the cassette tape.During timer recording standby mode,the VCR mode cannot be selected. Touse the VCR, press TIMER at first,then press VCR to change to VCRmode. After you use the VCR, pressTIMER again to put the VCR into timerrecording standby mode.If you press TIMER during timerrecording, the recording operation willbe interrupted. If you press TIMERagain within the programmed time, therecording operation will start again.After a power failure or disconnectionof the power plug, all programmedrecording settings and time displaywill be lost upon resumption of power.In this case, reset the clock (see pages21-23) and reprogram any timerrecordings.
•
•
•
•
á+/-/ENTER/MENUñ
MENUTIMER REC SETAUTO REPEAT ON OFF
ON OFFSAPCH SET UPSYSTEM SET UP
⟨+/-/ENTER/CANCEL/MENU⟩
DATE START END CH
— — — — — —— : — — — : — — — ——— — — — — —— : — — — : — — — ——
— — — — — —— : — — — : — — — ——— — — — — —— : — — — : — — — ——— — — — — —— : — — — : — — — ——— — — — — —— : — — — : — — — ——— — — — — —— : — — — : — — — ——— — — — — —— : — — — : — — — ——
——
——————
⟨+/-/ENTER/CANCEL/MENU⟩
DATE START END CH
— — — — — —— : — — — : — — — ——— : — — — : — — — ——
— — — — — —— : — — — : — — — ——— — — — — —— : — — — : — — — ——— — — — — —— : — — — : — — — ——— — — — — —— : — — — : — — — ——— — — — — —— : — — — : — — — ——— — — — — —— : — — — : — — — ——
——
——————
26(SU)
⟨+/-/ENTER/CANCEL/MENU⟩
DATE START END CH
— — — — — —— : — — — : — — — ——— — — — — —— : — — — : — — — ——— — — — — —— : — — — : — — — ——— — — — — —— : — — — : — — — ——— — — — — —— : — — — : — — — ——— — — — — —— : — — — : — — — ——— — — — — —— : — — — : — — — ——
———————
26(SU) 11:00PM 11:30PM125 EP
⟨+/-/ENTER/CANCEL/MENU⟩
DATE START END CH
— — — — — —— : — — — : — — — ——— — — — — —— : — — — : — — — ——— — — — — —— : — — — : — — — ——— — — — — —— : — — — : — — — ——— — — — — —— : — — — : — — — ——— — — — — —— : — — — : — — — ——— — — — — —— : — — — : — — — ——
———————
26(SU) 11:00PM 11:30PM125 EP
TV/VCR CH +
DVD MENU MARKER RETURN OPEN/CLOSE
DISPLAY A.TRK C.RESET ZERO RETURN
SUB TITLE ANGLE SEARCHMODE
SP/EPPLAYMODE ZOOM TITLE REPEAT
A-B
TVPOWER
INPUT
TV VOL
0 TIMER TV/VCR
REWPLAY
FF
RECSTOP PAUSE
SKIP/INDEX
SKIP/INDEX
TV/VCR CH —
SET SETENTER/SELECT
SET UP MENU CANCEL
OSDA.MONITOR
SLOW SKIP SEARCH
2B00401BE(28-33) 22/5/2002, 17:1431

32
Timer-RecordingTimer Recording Special caseWeekly (e.g. WKL-TU: each Tuesday) or daily (e.g.MO-SA: Monday to Saturday) Timer recording
Follow the procedure of timer recording on the previouspage. At picture 3 press SET + or – repeatedly until thedesired setting appears. Then press ENTER.
When you press SET – repeatedly, the indicator atDATE will change as follows, in this case the today isFriday.
In case Timer programs-overlap
Do not overlap timer programs as portions of theconflicting programs will be lost. The first recordingtime has priority over the next recording time as shownin the diagram below.
•
NOTES:The daily/weekly recording can be made continu-ously until the recording is canceled or the tapereaches the end.During timer recording the automatic rewindingmechanism does not function.
•
•
Confirmation / Cancellation of the TimerRecording
1
The current day (Friday) SU-SA (Sunday to Saturday)
MO-SA (Monday to Saturday)
MO-FR (Monday to Friday)
WKL-WE WKL-TH (Weekly Thursday)(Weekly Wednesday)
One month laterminus one day
8 : 00 11 : 009 : 00 10 : 00Program 1
Prog.1
Deleted Parts
Non Recorded Portion Parts
Prog.2 Prog.3
Program 2
Program 3
Recording Control Settings
NOTES:If there are other timer record programs remaining,TIMER must be pressed to reactivate the timer,otherwise the remaining timer record programs willbe ignored.You cannot confirm the Timer program during timerrecording operation.You can also correct the programmed setting inprogram confirm mode.At step 2 above, press ENTER to enter the programinput mode. Then press ENTER repeatedly until the
•
•
•
⟨+/-/ENTER/CANCEL/MENU⟩
DATE START END CH
— — — — — —— : — — — : — — — ——— : — — — : — — — ——
— — — — — —— : — — — : — — — ——— — — — — —— : — — — : — — — ——— — — — — —— : — — — : — — — ——— — — — — —— : — — — : — — — ——— — — — — —— : — — — : — — — ——— — — — — —— : — — — : — — — ——
——
——————
WKL-WE
If the Timer has been activated, press TIMER todeactivate the Timer. The clock symbol( ) willdisappear. Then press VCR to change to VCRmode.
2At picture 1 on theprevious page select theTIMER REC SET optionand press ENTER.Then the timer programlist as right will appear onthe screen.
To cancel Timer program:
4 Press SETUP MENU repeatedly until the TV-pictureappears.
3Press SET + or – toselect the unnecessaryprogram, then pressCANCEL to cancel theprogram.
To confirm Timer program:
⟨+/-/ENTER/CANCEL/MENU⟩
DATE START END CH
— — — — — —— : — — — : — — — ——— — — — — —— : — — — : — — — ——
— — — — — —— : — — — : — — — ——— — — — — —— : — — — : — — — ——— — — — — —— : — — — : — — — ——— — — — — —— : — — — : — — — ——— — — — — —— : — — — : — — — ——— — — — — —— : — — — : — — — ——
——
——————
⟨+/-/ENTER/CANCEL/MENU⟩
DATE START END CH
— — — — — —— : — — — : — — — ——— — — — — —— : — — — : — — — ——— — — — — —— : — — — : — — — ——— — — — — —— : — — — : — — — ——— — — — — —— : — — — : — — — ——— — — — — —— : — — — : — — — ——— — — — — —— : — — — : — — — ——
———————
26(SU) 11:00PM 11:30PM125 EP
⟨+/-/ENTER/CANCEL/MENU⟩
DATE START END CH
— — — — — —— : — — — : — — — ——— — — — — —— : — — — : — — — ——— — — — — —— : — — — : — — — ——— — — — — —— : — — — : — — — ——— — — — — —— : — — — : — — — ——— — — — — —— : — — — : — — — ——— — — — — —— : — — — : — — — ——
———————
26(SU) 11:00PM 11:30PM125 EP
item you wish to correctblinks. Then correct the datawith SET + or –.Then press SETUP MENUrepeatedly until the TV-picture appears.
2B00401BE(28-33) 22/5/2002, 17:1432
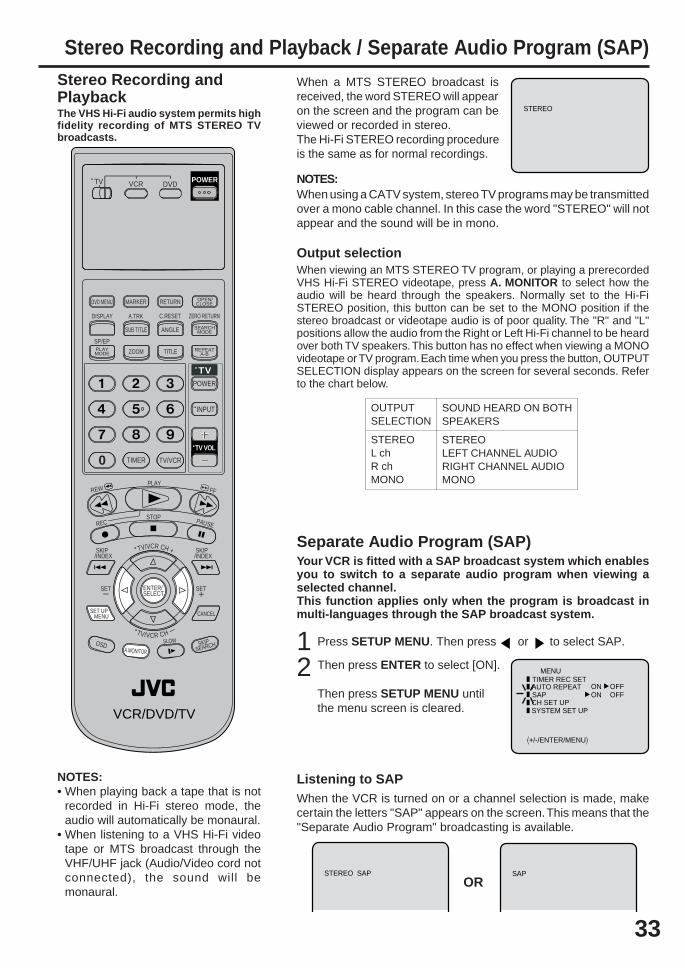
33
Stereo Recording and Playback / Separate Audio Program (SAP)When a MTS STEREO broadcast isreceived, the word STEREO will appearon the screen and the program can beviewed or recorded in stereo.The Hi-Fi STEREO recording procedureis the same as for normal recordings.
The VHS Hi-Fi audio system permits highfidelity recording of MTS STEREO TVbroadcasts.
NOTES:• When playing back a tape that is not
recorded in Hi-Fi stereo mode, theaudio will automatically be monaural.
• When listening to a VHS Hi-Fi videotape or MTS broadcast through theVHF/UHF jack (Audio/Video cord notconnected), the sound will bemonaural.
Stereo Recording andPlayback
NOTES:When using a CATV system, stereo TV programs may be transmittedover a mono cable channel. In this case the word "STEREO" will notappear and the sound will be in mono.
When viewing an MTS STEREO TV program, or playing a prerecordedVHS Hi-Fi STEREO videotape, press A. MONITOR to select how theaudio will be heard through the speakers. Normally set to the Hi-FiSTEREO position, this button can be set to the MONO position if thestereo broadcast or videotape audio is of poor quality. The "R" and "L"positions allow the audio from the Right or Left Hi-Fi channel to be heardover both TV speakers. This button has no effect when viewing a MONOvideotape or TV program. Each time when you press the button, OUTPUTSELECTION display appears on the screen for several seconds. Referto the chart below.
Output selection
OUTPUTSELECTION
STEREOL chR chMONO
SOUND HEARD ON BOTHSPEAKERS
STEREOLEFT CHANNEL AUDIORIGHT CHANNEL AUDIOMONO
Your VCR is fitted with a SAP broadcast system which enablesyou to switch to a separate audio program when viewing aselected channel.This function applies only when the program is broadcast inmulti-languages through the SAP broadcast system.
Separate Audio Program (SAP)
Press SETUP MENU. Then press or to select SAP.12 Then press ENTER to select [ON].
Then press SETUP MENU untilthe menu screen is cleared.
When the VCR is turned on or a channel selection is made, makecertain the letters "SAP" appears on the screen. This means that the"Separate Audio Program" broadcasting is available.
Listening to SAP
OR
STEREO
STEREO SAP SAP
á+/-/ENTER/MENUñ
MENUTIMER REC SETAUTO REPEAT ON OFF
ON OFFSAPCH SET UPSYSTEM SET UP
TV/VCR CH +
TV VCR DVDPOWER
DVD MENU MARKER RETURN OPEN/CLOSE
DISPLAY A.TRK C.RESET ZERO RETURN
SUB TITLE ANGLE SEARCHMODE
SP/EPPLAYMODE ZOOM TITLE REPEAT
A-B
TVPOWER
INPUT
TV VOL
0 TIMER TV/VCR
REWPLAY
FF
RECSTOP PAUSE
SKIP/INDEX
SKIP/INDEX
TV/VCR CH —
SET SETENTER/SELECT
SET UP MENU CANCEL
OSDA.MONITOR
SLOW SKIP SEARCH
VCR/DVD/TV
2B00401BE(28-33) 22/5/2002, 17:1433
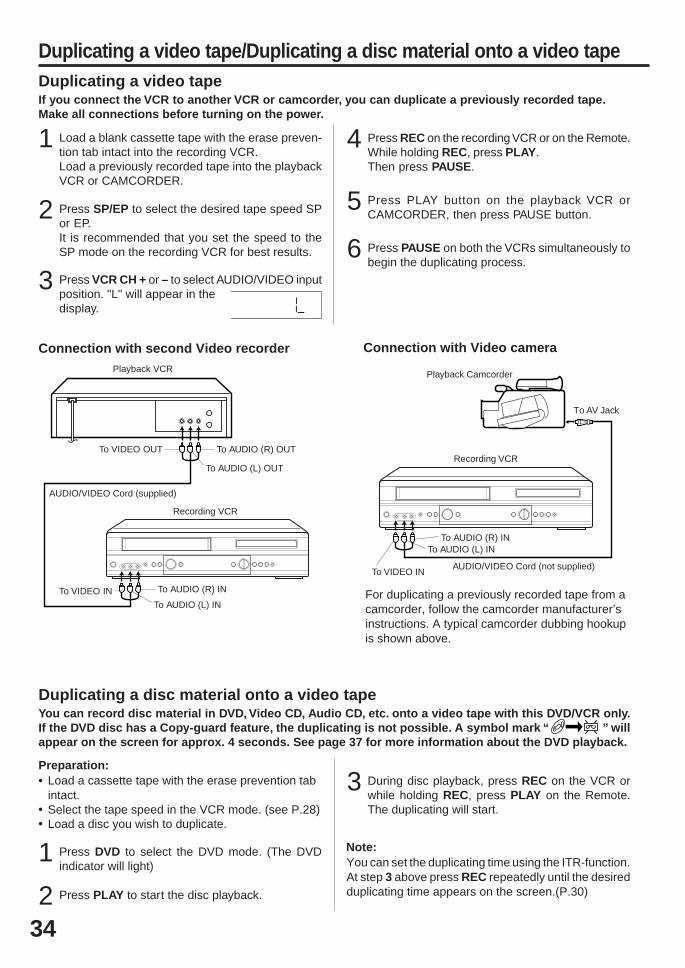
34
If you connect the VCR to another VCR or camcorder, you can duplicate a previously recorded tape.Make all connections before turning on the power.
Duplicating a video tape/Duplicating a disc material onto a video tape
Load a blank cassette tape with the erase preven-tion tab intact into the recording VCR.Load a previously recorded tape into the playbackVCR or CAMCORDER.
1
Press SP/EP to select the desired tape speed SPor EP.It is recommended that you set the speed to theSP mode on the recording VCR for best results.
2
Press VCR CH + or – to select AUDIO/VIDEO inputposition. "L" will appear in thedisplay.
3
Press REC on the recording VCR or on the Remote.While holding REC, press PLAY .Then press PAUSE.
4
Press PLAY button on the playback VCR orCAMCORDER, then press PAUSE button.
5
Press PAUSE on both the VCRs simultaneously tobegin the duplicating process.
6
For duplicating a previously recorded tape from acamcorder, follow the camcorder manufacturer’sinstructions. A typical camcorder dubbing hookupis shown above.
To AUDIO (L) IN
To AUDIO (L) OUT
AUDIO/VIDEO Cord (supplied)
Playback VCR
To VIDEO OUT To AUDIO (R) OUT
Recording VCR
To VIDEO IN To AUDIO (R) IN
AUDIO/VIDEO Cord (not supplied)
To AUDIO (R) INTo AUDIO (L) IN
To VIDEO IN
Recording VCR
To AV Jack
Playback Camcorder
Connection with second Video recorder Connection with Video camera
Duplicating a video tape
You can record disc material in DVD, Video CD, Audio CD, etc. onto a video tape with this DVD/VCR only.If the DVD disc has a Copy-guard feature, the duplicating is not possible. A symbol mark “ ” willappear on the screen for approx. 4 seconds. See page 37 for more information about the DVD playback.
Press DVD to select the DVD mode. (The DVDindicator will light)
1Press PLAY to start the disc playback.2
During disc playback, press REC on the VCR orwhile holding REC, press PLAY on the Remote.The duplicating will start.
3
Duplicating a disc material onto a video tape
Load a cassette tape with the erase prevention tabintact.Select the tape speed in the VCR mode. (see P.28)Load a disc you wish to duplicate.
Preparation:•
••
You can set the duplicating time using the ITR-function.At step 3 above press REC repeatedly until the desiredduplicating time appears on the screen.(P.30)
Note:
2B00401BE(34-39) 22/5/2002, 17:1434

35
DiscThis unit applies to DVD discs from Region 1 only.The loaded Disc (DVD, Video-CD, Audio-CD and MP3-CD) will be recognized automatically.The suitable Disc-formats are: DVD, CD-R and CD-RW.
Do not play DVD-ROM, DVD-Audio, CDV, CD-G or Photo CD to prevent accidental erasure of prerecorded material.
Some DVDs are played back with a Copy guard system. In case of a dubbing on video tape, strong disturbance mayoccur. This is not a defect of this DVD/VCR.
TitleWhen two or more movies are recorded on a disc,the disc is divided into two or more sections. Eachsection is called a “TITLE”.
ChapterThe titles can be subdivided into many sections.Each section is called a “CHAPTER”.
Video-CD/Audio-CD-TrackAn Video CD or Audio CD can contain several items.These are assigned to the tracks.
Removing Disc from CaseBe sure to hold the edge of disc. Do not touch the surface of the disc.Pick up the disc gently from the case.
• Do not scratch the disc.• Do not get dirt on the surface of the disc.• Do not stick a label or adhesive tape on the disc.• Do not drop or bend the disc.
Storing Disc• Store the disc in the case to avoid risk of scratches, dirt or damage.• Do not leave disc exposed to direct sunlight or in hot or humid places.
Cleaning DiscWipe the disc with a clean, dry cloth from center to edge.• Do not wipe the disc round.• Do not use liquid or aerosol cleaners.
CHAPTER 1
TITLE1 TITLE2
DVD DISC
CHAPTER 2 CHAPTER 2 CHAPTER 3CHAPTER 1
TRACK 1 TRACK 2 TRACK 3 TRACK 4 TRACK 5
CDVideo-CD/Audio-CD
2B00401AE(34-39) 21/5/2002, 9:4835

36
Language
OSD Language English EnglishFrancaisEspanol
Other
/Enter/Setup/Return
Picture ParentalSound
Language
OSD Language English
Other
/Enter/Setup/Return
Picture ParentalSound
4
Setting setup languageThe setup language can be selected.
Press and then press or to select desired language
(e.g. English), then pressENTER.
2 Press SETUP MENU in the stopmode. The SETUP MENU ofDVD will appear on the screen.
NOTE: To make the SETUP screen disappear, press SETUPMENU (or RETURN).
If the DVD/VCR does not operateproperly: Static electricity, etc., mayaffect the player's operation. Disconnectthe AC power cord once, then connectit again.
3 Press ENTER to select OSDLanguage.
Then press or to selectOther.
Language Other
/Enter/Setup/Return
Picture ParentalSound
1 Press DVD to select the DVDmode. (The DVD indicator willlight)“No Disc” will appear on thescreen. (If a DVD disc has alreadyloaded, the playback will startautomatically.)
Turn ON the TV and set it to the video input mode.Make sure TV/VCR/DVD switch has been slided to VCR/DVD.When using an amplifier, switch on the amplifier.
Preparation:•••
TV/VCR CH +
TV VCR DVDPOWER
DVD MENU MARKER RETURN OPEN/CLOSE
DISPLAY A.TRK C.RESET ZERO RETURN
SUB TITLE ANGLE SEARCHMODE
SP/EPPLAYMODE ZOOM TITLE REPEAT
A-B
TVPOWER
INPUT
TV VOL
0 TIMER TV/VCR
REWPLAY
FF
RECSTOP PAUSE
SKIP/INDEX
SKIP/INDEX
TV/VCR CH —
SET SETENTER/SELECT
SET UP MENU CANCEL
OSDA.MONITOR
SLOW SKIP SEARCH
VCR/DVD/TV
2B00401AE(34-39) 21/5/2002, 9:4836

37
4
Reading
Playback procedure
Press PLAY or OPEN/CLOSE.The disc tray closes automati-cally.On the screen, changes to“Reading” and then playback willcommence.
• A menu screen may appear onthe TV screen, if the disc hasa menu feature. In this case,
press , , , orENTER to operate a menufeature.
1 Press OPEN/CLOSE.The disc tray will open.
2 Place a disc onto the tray.Hold the disc, position it with theprinted label side up, align it withthe guides, and place it in itsproper position.
3
Press STOP to end playback.• The DVD/VCR memorizes the stopped point, depending on
the disc. “ ” appears on the screen for approx. 4 seconds.“ ” keep blinking in the display until the playback is stoppedcompletely. Press PLAY to resume playback (from the scenepoint).
• If you press STOP again(“ ” appears on the screen) or unloadthe disc, the DVD/VCR will clear the stopped point.
5 Then press OPEN/CLOSE.The disc tray opens.Remove the disc and press POWER.The disc tray closes automatically and DVD/VCR turns off.
•
•
Notes:If a non-compatible disc is loaded, "Incorrect Disc", "Region Code Error" or "Parental Error" will appear on the TVscreen according to the type of loaded disc. In this case, check your disc again (See pages 35 and 46).Some discs may take a minute or so to start playback.
•
•
•
•
A “Prohibition” symbol may appear at the upper left of the screen. This symbol means either the feature youtried is not available on the disc, or the DVD/VCR can not access the feature at this time. This does not indicatea problem with the DVD/VCR.When you set a single-faced disc label downwards (ie. the wrong way up) and press PLAY or OPEN/CLOSE,"Reading" will appear and remain on the screen for approx. 40 seconds and then it will change to "IncorrectDisc".Some playback operations of DVDs may be intentionally fixed by software producers. Since this DVD/VCR playsDVDs according to the disc contents the software producers designed, some playback features may not beavailable. Also refer to the instructions supplied with the DVDs.When playing DTS-encoded Audio CDs, excessive noise will be heard from the analog stereo outputs. To avoidpossible damage to the audio system, the consumer should take proper precautions when the analog stereooutputs of the DVD/VCR are connected to an amplification system.
Turn ON the TV and set it to the video input mode.Make sure TV/VCR/DVD switch has been slided to VCR/DVD.Then press DVD to select the DVD mode. (The DVD indicator will light.)
Preparation:••
TV/VCR CH +
TV VCR DVDPOWER
DVD MENU MARKER RETURN OPEN/CLOSE
DISPLAY A.TRK C.RESET ZERO RETURN
SUB TITLE ANGLE SEARCHMODE
SP/EPPLAYMODE ZOOM TITLE REPEAT
A-B
TVPOWER
INPUT
TV VOL
0 TIMER TV/VCR
REWPLAY
FF
RECSTOP PAUSE
SKIP/INDEX
SKIP/INDEX
TV/VCR CH —
SET SETENTER/SELECT
SET UP MENU CANCEL
OSDA.MONITOR
SLOW SKIP SEARCH
VCR/DVD/TV
2B00401BE(34-39) 22/5/2002, 17:1437

38
Special playback
Press FF during normal playback.Each press of FF will increase the speed of the search (x2), (x4), (x8), (x20).
• To resume normal playback, press PLAY .
Fast Forward Playback
Press REW during normal playback.Each press of REW will increase the speed of the search (x2),
(x4), (x8), (x20).
• To resume normal playback, press PLAY .
Review Playback
Press PAUSE during normalplayback.
Still Playback
To resume normal playback, pressPLAY.
Press PAUSE during still playback.One frame is advanced each timeyou press PAUSE.
Frame Advance
• To resume normal playback, press PLAY .• To resume the still playback, press PAUSE.
Press SLOW during normal playback or still playback.Each press of SLOW will change the speed of the slow x1/2, x1/4,x1/6, x1/7.
Slow-motion Playback
To resume normal playback, pressPLAY.
Locating a chapter or trackThe unit is capable of holding a still videoimage or On screen display image on yourtelevision screen indefinitely. If you leavethe still video image or On screen displayimage displayed on your TV for an ex-tended period of time, you risk permanentdamage to your television screen.Projection televisions are very susceptible.
Press SKIP ( ) Forward or SKIP ( ) Reverse during play-back to locate a chapter that you want to watch.Each time you press the button, a chapter or track is skipped.
Note:
Note: There may be a slight delay be-tween pressing the button and thefunction activation.
TV/VCR CH +
TV VCR DVDPOWER
DVD MENU MARKER RETURN OPEN/CLOSE
DISPLAY A.TRK C.RESET ZERO RETURN
SUB TITLE ANGLE SEARCHMODE
SP/EPPLAYMODE ZOOM TITLE REPEAT
A-B
TVPOWER
INPUT
TV VOL
0 TIMER TV/VCR
REWPLAY
FF
RECSTOP PAUSE
SKIP/INDEX
SKIP/INDEX
TV/VCR CH —
SET SETENTER/SELECT
SET UP MENU CANCEL
OSDA.MONITOR
SLOW SKIP SEARCH
VCR/DVD/TV
2B00401AE(34-39) 21/5/2002, 9:4838

39
1
Notes:• You can use the Pause, Slow, Search
or Skip feature in the zoom mode.• In case of the Video-CD playback with
PBC, the SEARCH MODE does notwork.
This unit will allow you to zoom in on the frame image. You canthen make selections by switching the position of the frame.
In the zoom mode press ZOOM repeatedly to return to a 1:1view ( Off).
1 Press ZOOM during playback.The center part of the image willbe zoomed in.Each press of ZOOM will changethe ZOOM 1(x 1.3), 2 (x 1.5) and 3 (x2.0).
2
3
Zooming
Press / or / to view a different part of the frame.You may move the frame from the center position to UP, DOWN,LEFT or RIGHT direction.
Use the title, chapter and time recorded on the disc tolocate the desired point to play back.
Press Number keys to change the number.
• If you input a wrong number, press CANCEL .• Refer to the package supplied with the disc to check the numbers.
1 Press SEARCH MODE duringplayback or stop mode.
3
Locating Desired Scene
Press ENTER.Playback starts.
4• When you change the title, playback starts from Chapter 1 of
the selected title.• Some discs may not work in the above operation.
2 Press or to select the “Time”, “Title” or “Chapter”.
To check the title, chapter and time, press OSD. (see page 52)
Zooming / Locating Desired Scene
Turn ON the TV and set it to the video input mode.Make sure TV/VCR/DVD switch has been slided to VCR/DVD.Then press DVD to select the DVD mode. (The DVD indicator will light.)
Preparation:••
Jump TimeTitleChapter
/Enter/0 9/Cancel/Jump
TV/VCR CH +
TV VCR DVDPOWER
DVD MENU MARKER RETURN OPEN/CLOSE
DISPLAY A.TRK C.RESET ZERO RETURN
SUB TITLE ANGLE SEARCHMODE
SP/EPPLAYMODE ZOOM TITLE REPEAT
A-B
TVPOWER
INPUT
TV VOL
0 TIMER TV/VCR
REWPLAY
FF
RECSTOP PAUSE
SKIP/INDEX
SKIP/INDEX
TV/VCR CH —
SET SETENTER/SELECT
SET UP MENU CANCEL
OSDA.MONITOR
SLOW SKIP SEARCH
VCR/DVD/TV
2B00401BE(34-39) 22/5/2002, 17:1439

40
RepeatPlay Mode Off
All::
/Enter/Play Mode
Chapter:Repeat/Enter/Play Mode
Notes:Some discs may not work with therepeat operation.In A-B repeat mode, subtitles nearpoint A or B may not appear.During the A-B Repeat Playback theANGLE feature will not operate.You may not be able to set A-B Re-peat, depending on the scenes of theDVD.A-B repeat does not work with an in-teractive DVD, MP3-CD and Video-CDwith PBC.
Repeat playback
Press PLAY to start Repeat playback.To resume normal playback, select Repeat Off.
Title, Chapter, Track Playback
A-B repeat playback allows you to repeat material between twoselected points.
1 Press REPEAT A-B duringplayback.The start point is selected.
2 Press REPEAT A-B again.The end point is selected.Playback starts at the point thatyou selected. Playback stops atthe end point, returns to Point Aautomatically, then starts again.
A-B Repeat Playback
CD
•
•
•
•
•
2 Press ENTER once or twice to select “Chapter” or “Title”.
In case of CD, at first press to select “Repeat” and then pressENTER once or twice to select “Track” or “All”.
DVD
Play Mode OffRepeat Off
/Enter/Play Mode
::
CD1 Press PLAY MODE during playback or stop mode.
DVD
3 Press PLAY MODE again to make the screen disappear.
••
To resume normal playback press REPEAT A-B again.“ Off” appears on the screen.
Turn ON the TV and set it to the video input mode.Make sure TV/VCR/DVD switch has been slided to VCR/DVD.Then press DVD to select the DVD mode. (The DVD indicator will light.)
Preparation:••
Off:Repeat/Enter/Play Mode
A B
A
TV/VCR CH +
TV VCR DVDPOWER
DVD MENU MARKER RETURN OPEN/CLOSE
DISPLAY A.TRK C.RESET ZERO RETURN
SUB TITLE ANGLE SEARCHMODE
SP/EPPLAYMODE ZOOM TITLE REPEAT
A-B
TVPOWER
INPUT
TV VOL
0 TIMER TV/VCR
REWPLAY
FF
RECSTOP PAUSE
SKIP/INDEX
SKIP/INDEX
TV/VCR CH —
SET SETENTER/SELECT
SET UP MENU CANCEL
OSDA.MONITOR
SLOW SKIP SEARCH
VCR/DVD/TV
2B00401BE(40-45) 22/5/2002, 17:0840

41
RepeatPlay Mode : Random
: Off/Enter/Play Mode
Program playback/Random playback (CD)
1 Press PLAY MODE in the stopmode.
2 Press ENTER repeatedly untilthe Program table as rightappears.
3 Example: In case you wish toprogram in order of 7, 3, 11:Enter as 7 , 3 , 11.
If you input a wrong number,press CANCEL .
4 Press / or / to select“Program Playback” and pressENTER. “Program Playback” willappear on the screen. Theprogram you selected will beginto playback in the order set.To return to normal playback, select“Play Mode: Off” at step 2 above.
You can arrange the order of tracks on the disc.Program playback
Play Mode OffRepeat Off
/Enter/Play Mode
::
Repeat123
456
789
101112
Clear Program Playback
Play Mode : Program: Off
/Enter/0 9/Cancel/Play Mode
Clear Program Playback
2 3 5 8 113 1 1 6 9 12
1 7 4 7 10Repeat : OffPlay Mode : Program
/Enter/0 9/Cancel/Play Mode
Program Playback
Turn ON the TV and set it to the video input mode.Make sure TV/VCR/DVD switch has been slided to VCR/DVD.Then press DVD to select the DVD mode. (The DVD indicator will light.)
Preparation:••
1 Press PLAY MODE in the stopmode.
Random playback
Play Mode OffRepeat Off
/Enter/Play Mode
::
2 Press / to select “Random”.
3 Press PLAY .“Random Play” will appear on the screen and Random Playbackwill start.
Notes:To cancel program play, select “Clear”at step 3 and press ENTER.The program is cancelled when youopen the disc tray or turn the power off.Random playback can not becombined with Repeat playback.
•
•
•
TV/VCR CH +
TV VCR DVDPOWER
DVD MENU MARKER RETURN OPEN/CLOSE
DISPLAY A.TRK C.RESET ZERO RETURN
SUB TITLE ANGLE SEARCHMODE
SP/EPPLAYMODE ZOOM TITLE REPEAT
A-B
TVPOWER
INPUT
TV VOL
0 TIMER TV/VCR
REWPLAY
FF
RECSTOP PAUSE
SKIP/INDEX
SKIP/INDEX
TV/VCR CH —
SET SETENTER/SELECT
SET UP MENU CANCEL
OSDA.MONITOR
SLOW SKIP SEARCH
VCR/DVD/TV
2B00401BE(40-45) 22/5/2002, 17:0841

42
4
3
MP3 PlaybackThis player can play back the MP3-datawhich has been recorded on CD-R or CD-RW. To produce the MP3-data, you need aWindows-PC with CD-ROM drive and a MP3-encoding Software (not supplied).The Apple-HFS-System can not be played.
Limitations on MP3 CD playback• MP3 CD is the disc that is standardized by
ISO9660, its file name must include 3-digitsextension letters, “mp3”.
• The directory and file names of the MP3CD must be correspond to the ISOstandardized files.
• This unit can read 200 files per disc. Ifone directory has more than 200 files, itreads up to 200 files, the remaining files willbe omitted.
• As for multi-session disc, only the firstsession can be played.
• If the CD has both audio tracks and MP3files, only audio tracks are played.
• It may take more than one minute for thisunit to read MP3 files depending on itsstructure.
• Music recorded by “Joliet RecordingSpecification” can be played back, the filename is displayed (within 17 letters) on thescreen Long file names will be condensed.
• The music files recorded by “HierarchicalFile System” (HFS) cannot be played.
A MP3 menu screen will appearon the TV screen.Press / or ENTER to selectfolder.
Press / or / or Number keys to select the desiredtrack, then press ENTER. Track is selected and playcommences.• In case the folder includes more than 11 tracks, press
or to display next track list.
Limitations on display• The maximum number for display is 17
letters. Available letters for display are thefollowing: capital or small alphabets of Athrough Z, numbers of 0 through 9, and _(under score).
• Other letters than those above are replacedin hyphen.
Notes on MP3 filesTo play back MP3 CD in the recorded order,1. Use MP3 software that records data
alphabetically or numerically.2. Name each file including two-digit or three-
digit number (e.g. "01" "02" or "001" "002").3. Refrain from making too many sub-folders.
CAUTION:• Some MP3 CDs can not be played back
depending on the recording conditions.• The CD-R/RW that has no music data or
non-MP3 files can not be played back.
5 Press STOP to end playback.• The unit records the stopped point. “ ” appears on the
screen. Press PLAY to resume playback (from the scenepoint).
• If you press STOP again or unload the disc, the unit willclear the stopped point.
6 Then press OPEN/CLOSE.The disc tray opens.Remove the disc and press POWER.The disc tray closes automatically and DVD/VCR turns off.
1 Press OPEN/CLOSE.The disc tray will open.Place a disc onto the tray.
2 Press PLAY or OPEN/CLOSE.The disc tray closes automatically.On the TV-screen, “Reading” andthen reading file number willappear. Reading will take as muchtime as the number of file.
MP3 CD Information
Notes:During MP3-Playback, you can not use SEARCH, A-BRepeat functions.You can use Repeat (Track or All), Random functions andProgram playback for MP3 CD Playback. (See page 40 and 41)
•
•
Turn ON the TV and set it to the video input mode.Make sure TV/VCR/DVD switch has been slided to VCR/DVD. Then press DVD to select the DVD mode. (The DVDindicator will light.)
Preparation:••
1
JazzTrack 1/12 01:28 Japan
/0-9/Enter/Play Mode
1234
5
Japan
Bay Bridge
CLOSE MY EYESDIVE TO BLUE
Honey
6789
10
BLUE EYES
Blurry Eyes
flowerLies and Truth
winter fall
Pops 1
Jazz
/0-9/Enter/Play Mode
1112
Mother
Hold Your Last
PopsTrack 1/12 01:28 Japan
1
JazzTrack 1/12 01:28 Japan
/0-9/Enter/Play Mode
12345
JapanBay BridgeCLOSE MY EYESDIVE TO BLUEHoney
6789
10
BLUE EYESBlurry EyesflowerLies and Truth-winter fall
Pops
ReadingMP3 15
2B00401BE(40-45) 22/5/2002, 17:0842
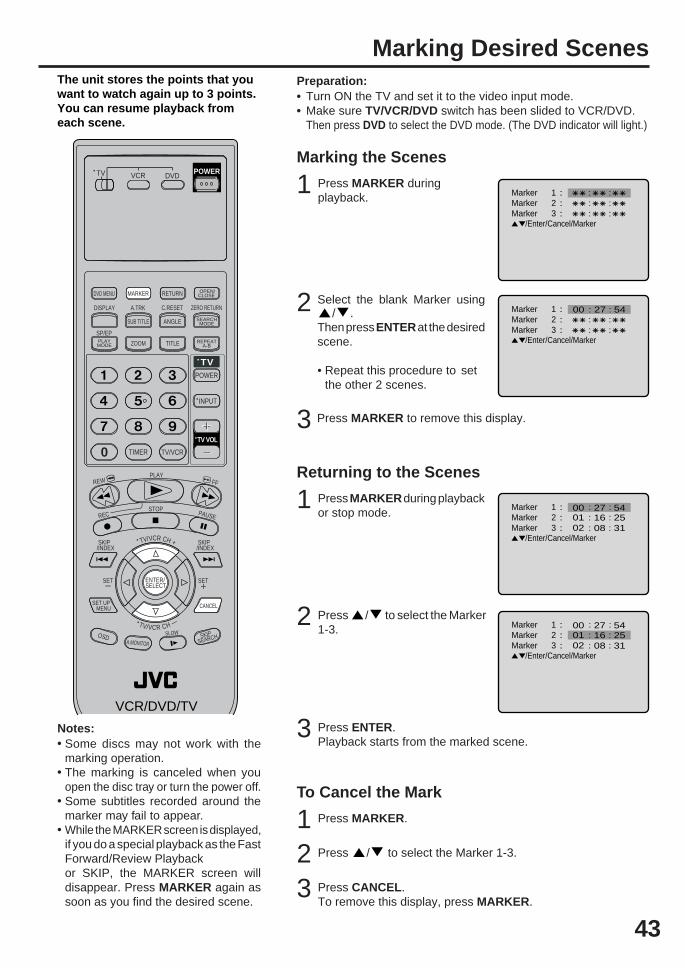
43
Marking Desired Scenes
1 Press MARKER duringplayback.
2 Select the blank Marker using/ .
Then press ENTER at the desiredscene.
• Repeat this procedure to setthe other 2 scenes.
3 Press MARKER to remove this display.
The unit stores the points that youwant to watch again up to 3 points.You can resume playback fromeach scene.
Marking the Scenes
Turn ON the TV and set it to the video input mode.Make sure TV/VCR/DVD switch has been slided to VCR/DVD.Then press DVD to select the DVD mode. (The DVD indicator will light.)
Preparation:••
1 Press MARKER during playbackor stop mode.
Returning to the Scenes
2 Press / to select the Marker1-3.
3 Press ENTER.Playback starts from the marked scene.
Notes:Some discs may not work with themarking operation.The marking is canceled when youopen the disc tray or turn the power off.Some subtitles recorded around themarker may fail to appear.While the MARKER screen is displayed,if you do a special playback as the FastForward/Review Playbackor SKIP, the MARKER screen willdisappear. Press MARKER again assoon as you find the desired scene.
•
•
•
• 1 Press MARKER .
To Cancel the Mark
2 Press / to select the Marker 1-3.
3 Press CANCEL .To remove this display, press MARKER .
Marker 2Marker 1
Marker 3/Enter/Cancel/Marker
Marker 2Marker 1
Marker 3/Enter/Cancel/Marker
2700 54
Marker 2Marker 1
Marker 3/Enter/Cancel/Marker
271608
542531
000102
Marker 2Marker 1
Marker 3/Enter/Cancel/Marker
271608
542531
000102
TV/VCR CH +
TV VCR DVDPOWER
DVD MENU MARKER RETURN OPEN/CLOSE
DISPLAY A.TRK C.RESET ZERO RETURN
SUB TITLE ANGLE SEARCHMODE
SP/EPPLAYMODE ZOOM TITLE REPEAT
A-B
TVPOWER
INPUT
TV VOL
0 TIMER TV/VCR
REWPLAY
FF
RECSTOP PAUSE
SKIP/INDEX
SKIP/INDEX
TV/VCR CH —
SET SETENTER/SELECT
SET UP MENU CANCEL
OSDA.MONITOR
SLOW SKIP SEARCH
VCR/DVD/TV
2B00401BE(40-45) 22/5/2002, 17:0843

44
Changing soundtrack language / Subtitles
1 Press A.MONITOR duringplayback.The current soundtrack languagewill appear.
2 Press A.MONITOR repeatedlyuntil the desired language isselected.The on-screen display willdisappear after a few seconds.
Changing soundtrack language
Turn ON the TV and set it to the video input mode.Make sure TV/VCR/DVD switch has been slided to VCR/DVD.Then press DVD to select the DVD mode. (The DVD indicator will light.)
Preparation:••
Press SUB TITLE during playbackuntil “OFF” appears.
Turning the Subtitles On and Off
Press SUB TITLE repeatedly duringplayback until your desired languageappears.The on-screen display will disappearafter a few seconds.
You can select the language when playing back a discrecorded with multi-lingual subtitles.
Changing the subtitle language
When playing back a disc recorded with subtitles, you can turnthe subtitles on or off.
You can select the language when you play a multilingual disc.
In case of VIDEO CD playback
Audio type changes as follows each time you press A.MONITOR.
2/8 Fra Dolby Digital
Spatializer Off
1/8 Eng Dolby Digital
Spatializer Off
Off
1/32 Eng
Notes:If the desired language is not heardafter pressing the button several times,the language is not recorded on the disc.Changing soundtrack or subtitlelanguage is cancelled when you openthe disc tray or turn the power off. Theinitial default language or availablelanguage will be heard and seen if thedisc is played back again.Depending on the DVD you may beunable to turn on, turn off, or change thesubtitles, even if they are recorded onthe disc. While playing the DVD, thesubtitle may change while opening orclosing the disc tray, or while changingthe title.In some cases, the subtitle language isnot changed to the selected oneimmediately.
•
•
•
•
LR L R
TV/VCR CH +
DVD MENU MARKER RETURN OPEN/CLOSE
DISPLAY A.TRK C.RESET ZERO RETURN
SUB TITLE ANGLE SEARCHMODE
SP/EPPLAYMODE ZOOM TITLE REPEAT
A-B
TVPOWER
INPUT
TV VOL
0 TIMER TV/VCR
REWPLAY
FF
RECSTOP PAUSE
SKIP/INDEX
SKIP/INDEX
TV/VCR CH —
SET SETENTER/SELECT
SET UP MENU CANCEL
OSDA.MONITOR
SLOW SKIP SEARCH
VCR/DVD/TV
2B00401BE(40-45) 22/5/2002, 17:0844
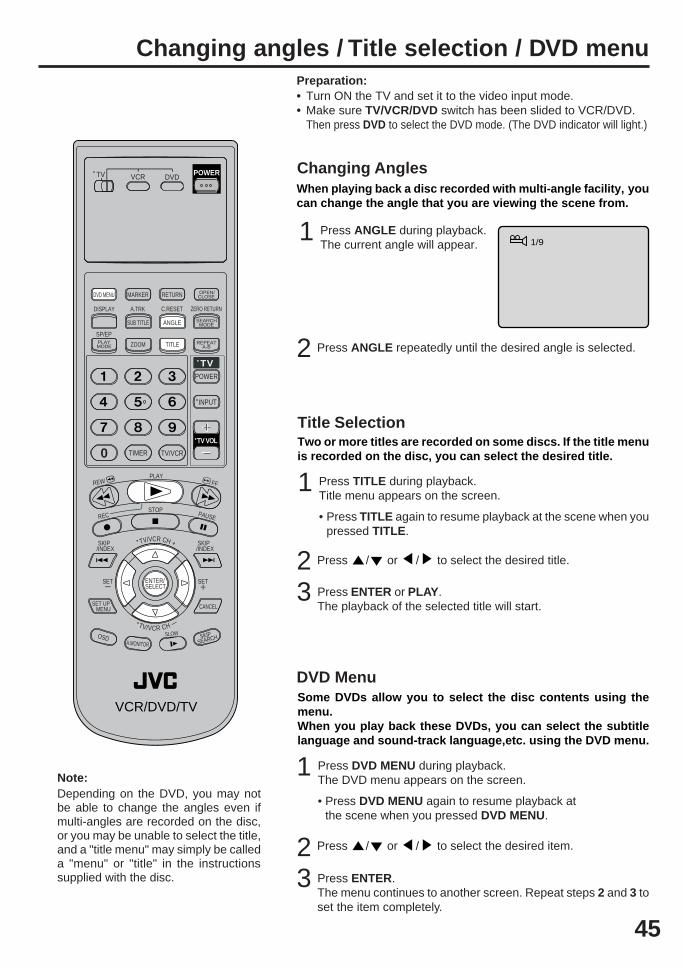
45
Changing angles / Title selection / DVD menu
When playing back a disc recorded with multi-angle facility, youcan change the angle that you are viewing the scene from.
1 Press ANGLE during playback.The current angle will appear.
2 Press ANGLE repeatedly until the desired angle is selected.
Changing Angles
Two or more titles are recorded on some discs. If the title menuis recorded on the disc, you can select the desired title.
Press ENTER or PLAY .The playback of the selected title will start.
1 Press TITLE during playback.Title menu appears on the screen.
• Press TITLE again to resume playback at the scene when youpressed TITLE.
2 Press / or / to select the desired title.
3
Title Selection
Some DVDs allow you to select the disc contents using themenu.When you play back these DVDs, you can select the subtitlelanguage and sound-track language,etc. using the DVD menu.
Press ENTER.The menu continues to another screen. Repeat steps 2 and 3 toset the item completely.
1 Press DVD MENU during playback.The DVD menu appears on the screen.
• Press DVD MENU again to resume playback atthe scene when you pressed DVD MENU.
2 Press / or / to select the desired item.
3
DVD Menu
Note:Depending on the DVD, you may notbe able to change the angles even ifmulti-angles are recorded on the disc,or you may be unable to select the title,and a "title menu" may simply be calleda "menu" or "title" in the instructionssupplied with the disc.
Turn ON the TV and set it to the video input mode.Make sure TV/VCR/DVD switch has been slided to VCR/DVD.Then press DVD to select the DVD mode. (The DVD indicator will light.)
Preparation:••
TV/VCR CH +
TV VCR DVDPOWER
DVD MENU MARKER RETURN OPEN/CLOSE
DISPLAY A.TRK C.RESET ZERO RETURN
SUB TITLE ANGLE SEARCHMODE
SP/EPPLAYMODE ZOOM TITLE REPEAT
A-B
TVPOWER
INPUT
TV VOL
0 TIMER TV/VCR
REWPLAY
FF
RECSTOP PAUSE
SKIP/INDEX
SKIP/INDEX
TV/VCR CH —
SET SETENTER/SELECT
SET UP MENU CANCEL
OSDA.MONITOR
SLOW SKIP SEARCH
VCR/DVD/TV
1/9
2B00401AE(40-45) 21/5/2002, 9:4945

46
Parental control
1 Press SETUP MENU in the stop mode.Press or to select “Parental”.Then press ENTER.
2 Press or to select “Parental Off”,then press ENTER until the level youdesire appears (e.g.: 1).
3 Press once to select “Password ”.
4 Press ENTER.1234 change to .
Parental control setting
Turn ON the TV and set to the video input mode.Make sure TV/VCR/DVD switch has been slided to VCR/DVD.Then press DVD to select the DVD mode. (The DVD indicator will light.)
Preparation:••
• If you input a wrong number, pressCANCEL .
• Be sure to remember this number!
Some discs are specified not suitablefor children. Such discs can beprevented from play back with theunit.
Level Off : The parental control setting does not function.Level 1 : DVD software for adults cannot be played back.Level 8 : All DVD software can be played back.
Select from level 1 to level 8.On a scale of 1-8, "1" is the most restrictive.
Then press Number keys to input a 4-digit password (e.g.: 1234). Password
Parental 11 2 3 4
0 9/Cancel/Enter/Setup/Return
Language Picture Parental OtherSound
PasswordParental 1
/Enter/Setup/Return
Language Picture Parental OtherSound
Language
PasswordParental
Picture Parental Other
Off
0 9/Cancel/Enter/Setup/Return
Sound
PasswordParental 1
0 9/Cancel/Enter/Setup/Return
Language Picture Parental OtherSound
5 To make SETUP screen disappear, press SETUP MENU.
1 Select “Password ” (step 1)and press Number keys to input your4-digit password.Then press ENTER.
To unlock the Parental Control Setting
2 If the input password was right, will appear.
You can move to “Parental 1”(e.g.) toinput the desired level or to cancelparental control.
PasswordParental 1
1 2 3 4
/Enter/Setup/Return0 9/Cancel
Language Picture Parental OtherSound
PasswordParental 1
0 9/Cancel/Enter/Setup/Return
Language Picture Parental OtherSound
Cancel the password so as to set the Parental level freely again,
Notes:If each setup (page 46~52) has beencompleted, the unit can always beworked under the same conditions(especially with DVD discs).Each setup will be retained in thememory if you turn the power off.Depending on the discs, the unit can-not limit playback.Some discs may not be encoded withspecific rating level information thoughits disc jacket says "adult". For thosediscs, the age restriction will not work.Do not forget the password. If you forgetthe password, contact customer service.
•
•
•
•
TV/VCR CH +
TV VCR DVDPOWER
DVD MENU MARKER RETURN OPEN/CLOSE
DISPLAY A.TRK C.RESET ZERO RETURN
SUB TITLE ANGLE SEARCHMODE
SP/EPPLAYMODE ZOOM TITLE REPEAT
A-B
TVPOWER
INPUT
TV VOL
0 TIMER TV/VCR
REWPLAY
FF
RECSTOP PAUSE
SKIP/INDEX
SKIP/INDEX
TV/VCR CH —
SET SETENTER/SELECT
SET UP MENU CANCEL
OSDA.MONITOR
SLOW SKIP SEARCH
2B00401BE(46-51) 22/5/2002, 18:3646

47
TV/VCR CH +
TV VCR DVDPOWER
DVD MENU MARKER RETURN OPEN/CLOSE
DISPLAY A.TRK C.RESET ZERO RETURN
SUB TITLE ANGLE SEARCHMODE
SP/EPPLAYMODE ZOOM TITLE REPEAT
A-B
TVPOWER
INPUT
TV VOL
0 TIMER TV/VCR
REWPLAY
FF
RECSTOP PAUSE
SKIP/INDEX
SKIP/INDEX
TV/VCR CH —
SET SETENTER/SELECT
SET UP MENU CANCEL
OSDA.MONITOR
SLOW SKIP SEARCH
VCR/DVD/TV
Temporary disabling of rating level by DVD disc
If you wish to cancel the set rating level temporarily, select“Parental Control Level” with or , then press ENTER. Ifthe 4-digits password at step 3 on page 46 has been set, thepassword entering screen will appear as shown in step 4 below.Alternatively, if the password has not been set, playback willcommence. If you don’t know (or have forgotten) the password,select “Cancel Picture”.The setting screen will disappear. Press OPEN/CLOSE toremove the disc.
1 Load a DVD disc and press PLAYor OPEN/CLOSE (see page 37).
2 If the DVD disc has been designed to temporarily cancel theRating level, the screen which follows the “Reading” screen willchange, depending on which disc is played. If you select “YES”with ENTER key, “Your disc exceeds the parental control level1.”(e.g.) screen will then appear.
3
Enter the password withNumber buttons (0-9) .Then press ENTER.
4
Playback will commence if the entered password was correct.5Note:This temporary cancellation of ratinglevel will be kept until the disc is ejected.When the disc is ejected, the originalrating level will be set againautomatically.
Depending on the DVD disc, thedisc may try to temporarily cancelthe rating level that you have set.It is up to you to decide whether tocancel the rating level or not.
If you interrupt the entering,press RETURN.
Turn ON the TV and set to the video input mode.Make sure TV/VCR/DVD switch has been slided to VCR/DVD.Then press DVD to select the DVD mode. (The DVD indicator will light.)
Preparation:••
Please enter the4 digit password
9/Cancel/ReturnEnter/0
Your disc exceedsthe parental control level 1.
Parental Control LevelCancel Picture
/Enter/Return
2B00401AE(46-51) 21/5/2002, 9:4947

48
Language Picture Parental OtherSoundMenuSubtitleAudio
EnglishAutomaticEnglish
EnglishFrancaisEspanolOther
/Enter/Setup/Return0 9/Cancel
Setting menu language
Press ENTER.Press or to select yourdesired language, then pressENTER.
1
2
3
To make SETUP screen disappear, press SETUP MENU.
OTHER: Other language can be selected (See the LanguageCode List on page 54).
English, Francais, EspanolThe selected language is the first-priority Menu language.
Press ENTER.Then press or to select“Menu”.
4
You can select the language of thedisc menu messages of DVDs. Turn ON the TV and set to the video input mode.
Make sure TV/VCR/DVD switch has been slided to VCR/DVD.Then press DVD to select the DVD mode. (The DVD indicator will light.)
Preparation:••
Press SETUP MENU in the stopmode.Press or to select“Language”.
TV/VCR CH +
TV VCR DVDPOWER
DVD MENU MARKER RETURN OPEN/CLOSE
DISPLAY A.TRK C.RESET ZERO RETURN
SUB TITLE ANGLE SEARCHMODE
SP/EPPLAYMODE ZOOM TITLE REPEAT
A-B
TVPOWER
INPUT
TV VOL
0 TIMER TV/VCR
REWPLAY
FF
RECSTOP PAUSE
SKIP/INDEX
SKIP/INDEX
TV/VCR CH —
SET SETENTER/SELECT
SET UP MENU CANCEL
OSDA.MONITOR
SLOW SKIP SEARCH
VCR/DVD/TV
/Enter/Setup/Return
Language Picture Parental OtherSound
Language Picture Parental OtherSound
MenuSubtitleAudio
EnglishAutomaticEnglish
/Enter/Setup/Return
2B00401BE(46-51) 22/5/2002, 18:3648

49
MenuSubtitleAudio
EnglishAutomaticEnglish
FrancaisEnglish
EspanolOther
AutomaticOff/Enter/Setup/Return
0 9/Cancel
Language Picture Parental OtherSound
MenuSubtitleAudio
EnglishAutomaticEnglish
/Enter/Setup/Return
Language Picture Parental OtherSound
If you want to select another language, enter the language code(see the language code list on page 54).
OTHER:
English, Francais, EspanolThe subtitle is displayed with the selected language if it isrecorded on the disc.
Setting subtitle language
Press ENTER.
Press or to select yourdesired language, then pressENTER.
1 Press SETUP MENU in the stopmode.Press or to select“Language”
2
3
To make SETUP screen disappear, press SETUP MENU.4
Note:If the selected language is not recordedon the disc, the first-priority language isselected.
The same subtitle language canalways be selected even if you replacethe disc or turn the power off.
Press ENTER.
Then press or to select“Subtitle”.
• The unit will automatically select the same language in theAUDIO setting.
• When the unit selects the same language as the AUDIO, thesubtitles will not appear during playback.
• When you do not use the same language as the AUDIO, thesubtitles will appear during playback.
AUTOMATIC:
Subtitles do not appear.Off:
Turn ON the TV and set to the video input mode.Make sure TV/VCR/DVD switch has been slided to VCR/DVD.Then press DVD to select the DVD mode. (The DVD indicator will light.)
Preparation:••
TV/VCR CH +
TV VCR DVDPOWER
DVD MENU MARKER RETURN OPEN/CLOSE
DISPLAY A.TRK C.RESET ZERO RETURN
SUB TITLE ANGLE SEARCHMODE
SP/EPPLAYMODE ZOOM TITLE REPEAT
A-B
TVPOWER
INPUT
TV VOL
0 TIMER TV/VCR
REWPLAY
FF
RECSTOP PAUSE
SKIP/INDEX
SKIP/INDEX
TV/VCR CH —
SET SETENTER/SELECT
SET UP MENU CANCEL
OSDA.MONITOR
SLOW SKIP SEARCH
VCR/DVD/TV
/Enter/Setup/Return
Language Picture Parental OtherSound
2B00401BE(46-51) 22/5/2002, 18:3649
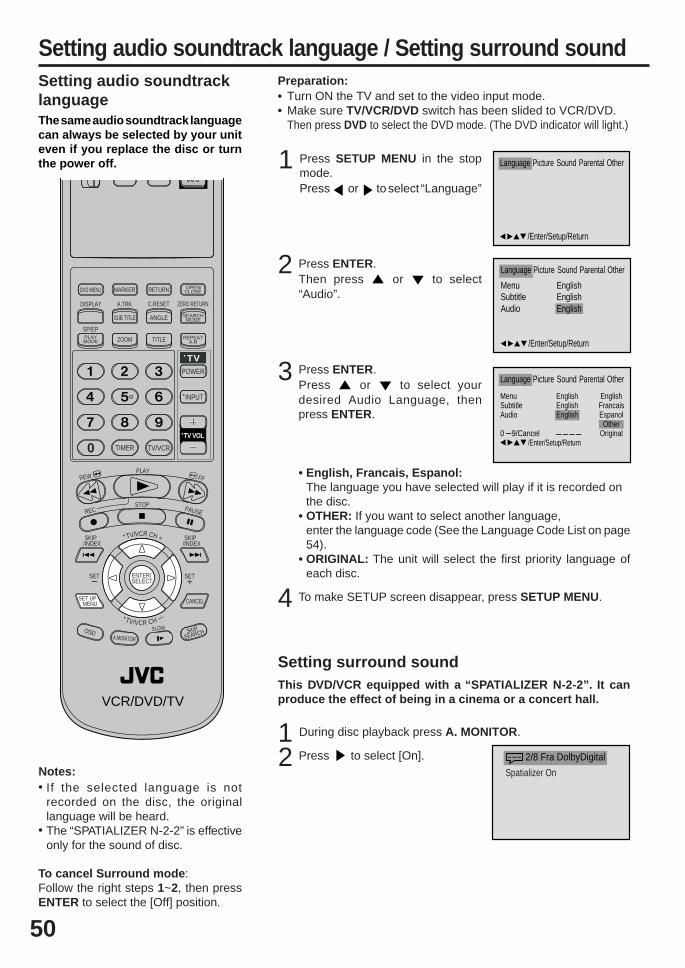
50
Language Picture Parental OtherSound
MenuSubtitleAudio
EnglishEnglishEnglish
/Enter/Setup/Return
Setting audio soundtrack language / Setting surround sound
Press ENTER.Press or to select yourdesired Audio Language, thenpress ENTER.
1 Press SETUP MENU in the stopmode.Press or to select “Language”
2
3
To make SETUP screen disappear, press SETUP MENU.4
Notes:If the selected language is notrecorded on the disc, the originallanguage will be heard.The “SPATIALIZER N-2-2” is effectiveonly for the sound of disc.
The same audio soundtrack languagecan always be selected by your uniteven if you replace the disc or turnthe power off.
• English, Francais, Espanol:The language you have selected will play if it is recorded onthe disc.
• OTHER: If you want to select another language,enter the language code (See the Language Code List on page54).
• ORIGINAL: The unit will select the first priority language ofeach disc.
Press ENTER.Then press or to select“Audio”.
MenuSubtitleAudio
EnglishEnglishEnglish
FrancaisEnglish
EspanolOther
Original0 9/Cancel/Enter/Setup/Return
Language Picture Parental OtherSound
Turn ON the TV and set to the video input mode.Make sure TV/VCR/DVD switch has been slided to VCR/DVD.Then press DVD to select the DVD mode. (The DVD indicator will light.)
Preparation:••
TV/VCR CH +
DVD MENU MARKER RETURN OPEN/CLOSE
DISPLAY A.TRK C.RESET ZERO RETURN
SUB TITLE ANGLE SEARCHMODE
SP/EPPLAYMODE ZOOM TITLE REPEAT
A-B
TVPOWER
INPUT
TV VOL
0 TIMER TV/VCR
REWPLAY
FF
RECSTOP PAUSE
SKIP/INDEX
SKIP/INDEX
TV/VCR CH —
SET SETENTER/SELECT
SET UP MENU CANCEL
OSDA.MONITOR
SLOW SKIP SEARCH
VCR/DVD/TV
/Enter/Setup/Return
Language Picture Parental OtherSound
Setting surround soundThis DVD/VCR equipped with a “SPATIALIZER N-2-2”. It canproduce the effect of being in a cinema or a concert hall.
1 During disc playback press A. MONITOR.
Press to select [On].2Spatializer On
2/8 Fra DolbyDigital
•
•
To cancel Surround mode :Follow the right steps 1~2, then pressENTER to select the [Off] position.
Setting audio soundtracklanguage
2B00401BE(46-51) 22/5/2002, 18:3650

51
Tv ScreenDisplay On
4:3
/Enter/Setup/Return
Language Picture Parental OtherSound
/Enter/Setup/Return
Language Picture Parental OtherSound
Setting the aspect ratio of TV screen
Press ENTER.Press or to select yourdesired screen type, then pressENTER.
1 Press SETUP MENU in the stopmode.Press or to select “Picture”.
2
3
To make SETUP screen disappear, press SETUP MENU.4Note:If the DVD disc is not formatted in the pan& scan style, it displays 4:3 style.
You can select the aspect ratio foryour TV.
4:3 NORMAL TVSelect this mode when connecting to a conventional TV. Whenplaying back a wide screen-DVD disc, it displays the wide picturewith black bands at the top and bottom of screen.
4:3 PAN SCANIt displays the wide picture on the whole screen with left andright edges automatically cut off.
16:9 WIDE SCREENSelect this mode when connecting to a wide-screen TV.A wide screen picture is displayed full size.
Press ENTER, then press or to select “Tv Screen”.
You have the following screen sizes to choose from:
Tv ScreenDisplay On
4:34:316:9
4:3
/Enter/Setup/Return
Language Picture Parental OtherSound
Turn ON the TV and set to the video input mode.Make sure TV/VCR/DVD switch has been slided to VCR/DVD.Then press DVD to select the DVD mode. (The DVD indicator will light.)
Preparation:••
TV/VCR CH +
TV VCR DVDPOWER
DVD MENU MARKER RETURN OPEN/CLOSE
DISPLAY A.TRK C.RESET ZERO RETURN
SUB TITLE ANGLE SEARCHMODE
SP/EPPLAYMODE ZOOM TITLE REPEAT
A-B
TVPOWER
INPUT
TV VOL
0 TIMER TV/VCR
REWPLAY
FF
RECSTOP PAUSE
SKIP/INDEX
SKIP/INDEX
TV/VCR CH —
SET SETENTER/SELECT
SET UP MENU CANCEL
OSDA.MONITOR
SLOW SKIP SEARCH
VCR/DVD/TV
2B00401BE(46-51) 22/5/2002, 18:3651

52
Setting on Screen display / Status display of Disc
Press ENTER to select “On” or“Off”.
1
2
3
To make SETUP screen disappear, press SETUP MENU.4
On screen display can be switched onor off when you press the buttons.
On: On screen displays appears when you press the anybuttons (factory setting).
Off: On screen displays do not appear when you press anybuttons except SETUP MENU, SEARCH MODE, PLAYMODE, MARKER and OSD.
Press ENTER, then press or to select “Display”.
00:34:56 01:12:33
Each press of OSD, the status display of the disc will appear on thescreen and change as follows.
DVD
AUDIOCD
Status display of Disc
Turn ON the TV and set to the video input mode.Make sure TV/VCR/DVD switch has been slided to VCR/DVD.Then press DVD to select the DVD mode. (The DVD indicator will light.)
Preparation:••
Press SETUP MENU in the stopmode.Press or to select “Picture”
00:34:56 01:12:331/9Title 1/99
1/81/32
Chapter 1/999Eng Dolby DigitalEng
VIDEOCD
34:56 71:33Track 11/99
00:12 04:32
Track Ð/Ð
PBC
To make status display disappear, press OSD again.
TV/VCR CH +
TV VCR DVDPOWER
DVD MENU MARKER RETURN OPEN/CLOSE
DISPLAY A.TRK C.RESET ZERO RETURN
SUB TITLE ANGLE SEARCHMODE
SP/EPPLAYMODE ZOOM TITLE REPEAT
A-B
TVPOWER
INPUT
TV VOL
0 TIMER TV/VCR
REWPLAY
FF
RECSTOP PAUSE
SKIP/INDEX
SKIP/INDEX
TV/VCR CH —
SET SETENTER/SELECT
SET UP MENU CANCEL
OSDA.MONITOR
SLOW SKIP SEARCH
VCR/DVD/TV
/Enter/Setup/Return
Language Picture Parental OtherSound
Tv ScreenDisplay Off
4:3
/Enter/Setup/Return
Language Picture Parental OtherSound
Tv ScreenDisplay On
4:3
/Enter/Setup/Return
Language Picture Parental OtherSound
When you playback the CD disc, the status display will appear onthe screen and continue displaying.
00:12 04:32
2B00401AE(52-60) 21/5/2002, 9:4952

53
DRC Std
/Enter/Setup/Return
Langue Image Son Parental Autres
/Enter/Setup/Return
Language Picture Parental OtherSound
DRC MaxStdMin
/Enter/Setup/Return
Language Picture Parental OtherSound
Std
Dynamic Range Control
Press or ENTER, thenpress or to selectdesired setting.
1 Press SETUP MENU in the stop mode.Press or to select“Sound”.
2
3
DRC (Dynamic Range Control) enablesyou to control the dynamic range soas to achieve a suitable sound foryour equipment.
Max: Full dynamic range is increased.Std: Full dynamic range is maintained.Min: Dynamic range is reduced.
Press or ENTER toselect “DRC”.
Notes:• This function works only during playback
of Dolby Digital recorded discs.• The level of Dynamic Range Reduction may
differ depending on DVD video disc.
Turn ON the TV and set to the video input mode.Make sure TV/VCR/DVD switch has been slided to VCR/DVD.Then press DVD to select the DVD mode. (The DVD indicator will light.)
Preparation:••
TV/VCR CH +
TV VCR DVDPOWER
DVD MENU MARKER RETURN OPEN/CLOSE
DISPLAY A.TRK C.RESET ZERO RETURN
SUB TITLE ANGLE SEARCHMODE
SP/EPPLAYMODE ZOOM TITLE REPEAT
A-B
TVPOWER
INPUT
TV VOL
0 TIMER TV/VCR
REWPLAY
FF
RECSTOP PAUSE
SKIP/INDEX
SKIP/INDEX
TV/VCR CH –
SET SETENTER/SELECT
SET UP MENU CANCEL
OSDA.MONITOR
SLOW SKIP SEARCH
VCR/DVD/TV
2B00401BE(52-60) 22/5/2002, 17:0653
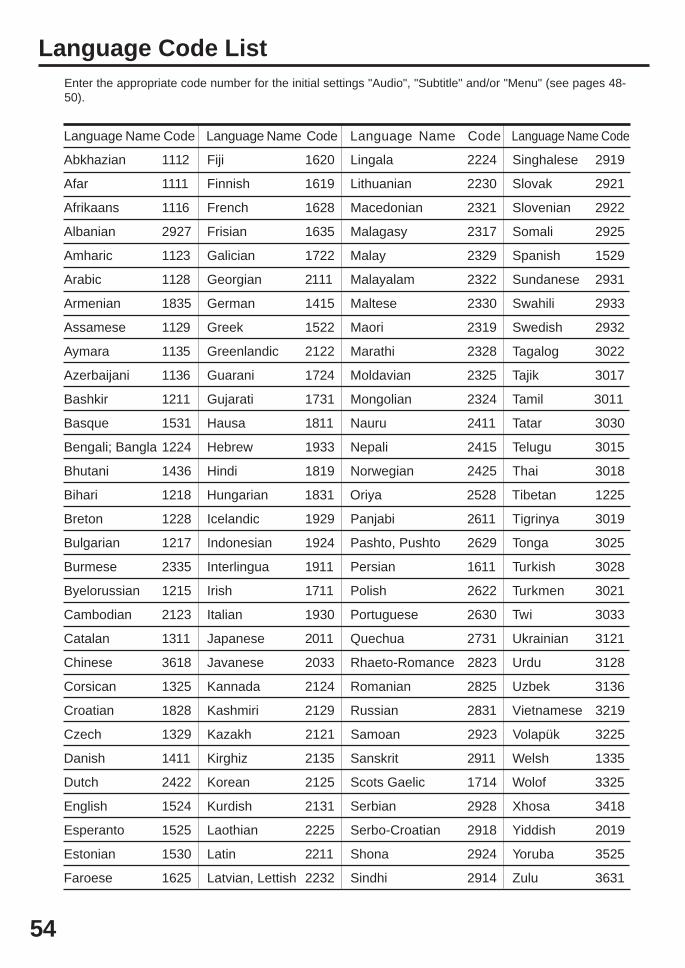
54
Language Code ListEnter the appropriate code number for the initial settings "Audio", "Subtitle" and/or "Menu" (see pages 48-50).
Abkhazian 1112 Fiji 1620 Lingala 2224 Singhalese 2919
Afar 1111 Finnish 1619 Lithuanian 2230 Slovak 2921
Afrikaans 1116 French 1628 Macedonian 2321 Slovenian 2922
Albanian 2927 Frisian 1635 Malagasy 2317 Somali 2925
Amharic 1123 Galician 1722 Malay 2329 Spanish 1529
Arabic 1128 Georgian 2111 Malayalam 2322 Sundanese 2931
Armenian 1835 German 1415 Maltese 2330 Swahili 2933
Assamese 1129 Greek 1522 Maori 2319 Swedish 2932
Aymara 1135 Greenlandic 2122 Marathi 2328 Tagalog 3022
Azerbaijani 1136 Guarani 1724 Moldavian 2325 Tajik 3017
Bashkir 1211 Gujarati 1731 Mongolian 2324 Tamil 3011
Basque 1531 Hausa 1811 Nauru 2411 Tatar 3030
Bengali; Bangla 1224 Hebrew 1933 Nepali 2415 Telugu 3015
Bhutani 1436 Hindi 1819 Norwegian 2425 Thai 3018
Bihari 1218 Hungarian 1831 Oriya 2528 Tibetan 1225
Breton 1228 Icelandic 1929 Panjabi 2611 Tigrinya 3019
Bulgarian 1217 Indonesian 1924 Pashto, Pushto 2629 Tonga 3025
Burmese 2335 Interlingua 1911 Persian 1611 Turkish 3028
Byelorussian 1215 Irish 1711 Polish 2622 Turkmen 3021
Cambodian 2123 Italian 1930 Portuguese 2630 Twi 3033
Catalan 1311 Japanese 2011 Quechua 2731 Ukrainian 3121
Chinese 3618 Javanese 2033 Rhaeto-Romance 2823 Urdu 3128
Corsican 1325 Kannada 2124 Romanian 2825 Uzbek 3136
Croatian 1828 Kashmiri 2129 Russian 2831 Vietnamese 3219
Czech 1329 Kazakh 2121 Samoan 2923 Volapük 3225
Danish 1411 Kirghiz 2135 Sanskrit 2911 Welsh 1335
Dutch 2422 Korean 2125 Scots Gaelic 1714 Wolof 3325
English 1524 Kurdish 2131 Serbian 2928 Xhosa 3418
Esperanto 1525 Laothian 2225 Serbo-Croatian 2918 Yiddish 2019
Estonian 1530 Latin 2211 Shona 2924 Yoruba 3525
Faroese 1625 Latvian, Lettish 2232 Sindhi 2914 Zulu 3631
Language Name Code Language Name Code Language Name Code Language Name Code
2B00401AE(52-60) 21/5/2002, 9:4954

55
SYMPTOMS POSSIBLE SOLUTIONS
•Make sure the power cord is plugged in.•Try another AC outlet.•Power is off, check fuse or circuit breaker.•Unplug unit, then plug it back in.•Select the DVD or VCR mode before operating.•Make sure TV/VCR/DVD switch has been slided to VCR/DVD.
DVD/VCR does not operate.
Problems and troubleshootingUse the following check list for troubleshooting when you have problems with your unit. Consult your localdealer or service outlet if problems persist.Be sure all connections are properly made when using with other units.
DVD/VCR
PAGE
5––5
18,3618,36
The remote control does notfunction.
• Aim the remote control at the remote sensor.• Operate within Approx. 5 Meters or reduce the light in the room.• Clear the path of the beam.• The batteries are weak. Replace the batteries.• Check the batteries are inserted correctly.• Check the frequency code is set correctly.
11
DVD
No picture.
• Antenna connection is not correct or antenna cable is disconnected.• The video channel is not in the correct position or the TV is not
set to the video channel 3 or 4.• Check the unit is connected correctly.• The video input selector of the TV is not set to VIDEO. Set to
VIDEO (or equivalent).• Channel is set to the external mode.
No sound.• Check the unit is connected correctly.• Check the input selector of the amplifier is set properly.• The unit is in the Special playback mode.
12~1518
12~17–
–
12~17–
26,38
•Select proper language in the menu options.Display is not shown in yourlanguage.
36
Playback doesn’t start.• No disc is inserted.• The disc may be dirty. Clean up the disc.• The unit cannot play DVD-ROMs, etc.
373535
No CATV reception•Check all CATV connections.•Station or CATV system problems, try another station. 14,15
Noise bars on screen.
• Tracking adjustment beyond range of automatic tracking circuit.Try Manual tracking adjustment.
• Video heads are dirty.• The tape is worn or damaged.
VCR
•The erase prevention tab of the video cassette is broken off.•The unit is in the external input mode.
TV recording does not work. 24,28
Timer recording does not work.• The time is not set correctly.• The recording start/end time is not set correctly.• The TIMER has not been pressed ( is not lit).
21,233131
26
56–
No POWER but a picture appearson the TV screen.
•During the Auto Clock operation, a video signal can be put out.Please set the clock with Manual clock setting or wait until theAuto Clock operation completed.
23
The DVD-keys on the RCU of theother JVC RECEIVER/TV is noteffective.
•This is not a defect. Since this unit is combined type of DVDand VCR, the remote code of DVD is individual. 10
2B00401BE(52-60) 22/5/2002, 17:0655

56
No subtitle• Some discs have no subtitles.• Subtitles are cleared. Press SUB TITLE.
Angle cannot be changed. • Multi-angles are not recorded on the DVD disc.
• The function is prohibited with the unit or the disc. appears on the screen.
49
45
–
SYMPTOMS POSSIBLE SOLUTIONS PAGE
Problems and troubleshooting / Video head cleaning
NOTES: • DO NOT ATTEMPT TO CLEAN THE VIDEO HEADS OR SERVICE THE UNIT BY REMOVING THEREAR COVER.
• Video heads may eventually wear out and should be replaced when they fail to produce clear pictures.• To help prevent video head clogging, use only good quality VHS tapes. Discard worn out tapes.
Video head cleaningVideo head cloggingThe video heads are the means by which the DVD/VCR readsthe picture from the tape during playback. In the unlikely eventthat the heads become dirty enough to be clogged, no picturewill be played back. This can easily be determined if, duringplayback of a known good tape, there is good sound, but nopicture (picture is extremely snowy). If this is the case, havethe DVD/VCR checked by qualified service personnel. Good Picture Snowy Picture
Auto Clock SettingNotes for Canadian customers regarding the clock feature of your DVD/VCR.
The XDS signals are carried only by certain broadcast television stations (for example, the signal is carried bymost Public Broadcasting Service stations). You must be able to receive a station carrying the XDS signal touse the Auto Clock Setting to set your DVD/VCR’s internal clock. If you live in an area that does not broadcastXDS signals, you must set the clock manually. Please see page 23 for instructions on how to manually set yourDVD/VCR’s clock.
Special note for residents of Newfoundland:The Auto Clock Setting cannot be used to set the DVD/VCR’s internal clock to Newfoundland time. The timezone command does not include a setting for the Newfoundland time zone. Trying to use the Auto Clock Settingin the Newfoundland time zone could result in an incorrect time setting or no setting at all. Please set your DVD/VCR’s clock using the Manual Clock Setting.
Notes
No 4:3 (16:9) picture • The setup does not match your TV.
No on-screen display • Select Display On.
51
52
No surround sound • The setup does not match your stereo system.
The unit or remote operation keyis not functioning.
• Turn off the unit and unplug the AC power cord for severalminutes, then replug it.
17
Playback does not start when thetitle is selected.
• Check the Parental setup.
Audio soundtrack and/or subtitlelanguage is not changed when youplay back a DVD.
• Multilingual language is not recorded on the DVD disc.
–
46
49,50
Stopping playback, search, slow-motion play, repeat play, or programplay, etc. cannot be performed.
• Some discs may not do some of the functions. –
2B00401BE(52-60) 22/5/2002, 17:0656

57
GENERALPower supply:Power consumption:
Weight:Dimensions:
Inputs/Outputs:Video:
Audio:
Antenna:Hi-Fi Frequency Response:Hi-Fi Dynamic Range:
VCR sectionVideo Head:Audio Track:Tuner:
RF Channel Output:F.FWD/REW Time:
DVD sectionSignal system:Applicable disc:Audio characteristics:Frequency response:S/N Ratio:Harmonic distortion:Wow and flutter:Dynamic range:Output:
Pickup:
ACCESSORIES:
AC 120V 60HzOperation: 20WStand by: 3W9.9lbs (4.5 kg)Width : 16-15/16 inches (430 mm)Height : 3-7/8 inches (99 mm)Depth : 12-1/4 inches (311 mm)
In: 1Vp-p/75 ohmOut: 1Vp-p/75 ohmIn: -8 dBm/50K ohmOut: -8 dBm/1K ohmUHF/VHF IN/OUT: 75 ohm coaxial20Hz to 20,000HzMore than 90dB
4 Rotary HeadsHi-Fi Sound - 2 Tracks / MONO Sound - 1 Track181 Channel Freq. SynthesizedVHF 2-13UHF 14-69CATV 14-36 (A)-(W)
37-59 (AA)-(WW)60-85 (AAA)-(ZZZ)86-94 (86)-(94)95-99 (A-5)-(A-1)100-125 (100)-(125)01 (5A)
Channel 3 or 4, SwitchableApprox. 1 minute 48 seconds (with T-120 Cassette Tape) (at+25°C)
NTSCDVD (12cm, 8cm), CD (12cm, 8cm)DVD: 4Hz - 22KHzCD: 4Hz - 20KHz90dB0.02%Below Measurable Level90dBVideo : (RCA) 1 Vp-p/75ohmAudio : (RCA) -8 dBm/1KohmDigital Audio : 0.5Vp-p 75 ohmCD : Wavelength: 775 - 805 nm
Maximum output power: 0.5 mWDVD : Wavelength: 640 - 660 nm
Maximum output power: 1.0 mW
Remote control x 1Batteries (2 x AA)75 ohm Coaxial Cable x 1AUDIO/VIDEO Cable x 1
Specifications
2B00401AE(52-60) 21/5/2002, 9:4957
58
HOW TO LOCATE YOUR JVC SERVICE CENTER
— JVC
TOLL FREE: 1-800-537-5722http://www.jvc.com
Dear Customer,In order to receive the most satisfaction from your purchase, please read the instruction booklet before operatingthe unit. In the event that repair is necessary, or for the address nearest your location within the ContinentalUnited States, please call 1-800-537-5722 for your nearest authorized servicer or visit our website atwww.JVC.com. Remember to retain your Bill of Sale for Warranty Service.
DIVISION OF JVC AMERICAS CORP.
Sophisticated electronic products may require occasional service. Just as quality is a keyword in the engineeringand production of the wide array of JVC products, service is the key to maintaining the high level performancefor which JVC is world famous. The JVC service and engineering organization stands behind our products.
NATIONAL HEADQUARTERSJVC SERVICE & ENGINEERING COMPANY OF AMERICA
DIVISION OF JVC AMERICAS CORP.10 New Maple Avenue
Pine Brook, NJ 07058-9641
JVC SERVICE & ENGINEERINGCOMPANY OF AMERICA
CAUTIONTo prevent electrical shock, do not open the cabinet.There are no user serviceable parts inside.Please refer to qualified service personnel for repairs.
ACCESSORIESTo purchase accessories for your JVC product, youmay contact your local JVC Dealer.From the 48 Continental United States call toll free:1-800-882-2345 or on the web at www.JVC.com
Don’t service the product yourself.
FOR SERVICING (Only in U.S.A.)
2B00401AE(52-60) 21/5/2002, 9:5058

59
LIMITED WARRANTY CONSUMER VIDEO 1-90JVC COMPANY OF AMERICA warrants this product and all parts thereof, except as set forth below ONLY TO THEORIGINAL PURCHASER AT RETAIL to be FREE FROM DEFECTIVE MATERIALS AND WORKMANSHIP from thedate of original retail purchase for the period as shown below. (“The Warranty Period”)
THIS LIMITED WARRANTY IS VALID ONLY IN THE FIFTY (50) UNITED STATES, THE DISTRICT OF COLUMBIA ANDIN COMMONWEALTH OF PUERTO RICO.
WHAT WE WILL DO:If this product is found to be defective, JVC will repair or replace defective parts at no charge to the original owner. Suchrepair and replacement services shall be rendered by JVC during normal business hours at JVC authorized servicecenters. Parts used for replacement are warranted only for the remainder of the Warranty Period. All products and partsthereof may be brought to a JVC authorized service center on a carry-in basis except for Television sets having a screensize 25 inches and above which are covered on an in-home basis.
WHAT YOU MUST DO FOR WARRANTY SERVICE:Return your product to a JVC authorized service center with a copy of your bill of sale. For your nearest JVC authorizedservice center, please call toll free: (800) 537-5722.If service is not available locally, box the product carefully, preferably in the original carton, and ship, insured, with a copyof your bill of sale plus a letter of explanation of the problem to the nearest JVC Factory Service Center, the name andlocation of which will be given to you by the toll-free number.If you have any questions concerning your JVC Product, please contact our Customer Relations Department.
WHAT IS NOT COVERED:This limited warranty provided by JVC does not cover:1. Products which have been subject to abuse, accident, alteration, modification, tampering, negligence, misuse, faulty
installation, lack of reasonable care, or if repaired or serviced by anyone other than a service facility authorized byJVC to render such service, or if affixed to any attachment not provided with the products, or if the model or serialnumber has been altered, tampered with, defaced or removed;
2. Initial installation and installation and removal for repair;3. Operational adjustments covered in the Owner’s Manual, normal maintenance, video and audio head cleaning;4. Damage that occurs in shipment, due to act of God, and cosmetic damage;5. Signal reception problems and failures due to line power surge;6. Video Pick-up Tubes/CCD Image Sensor, Cartridge, Stylus (Needle) are covered for 90 days from the date of purchase;7. Accessories;8. Batteries (except that Rechargeable Batteries are covered for 90 days from the date of purchase);
There are no other express warranties except as listed above.
THE DURATION OF ANY IMPLIED WARRANTIES INCLUDING THE IMPLIED WARRANTY OF MERCHANTABILITY,IS LIMITED TO THE DURATION OF THE EXPRESS WARRANTY HEREIN.
JVC SHALL NOT BE LIABLE FOR THE LOSS OF USE OF THE PRODUCT, INCONVENIENCE, LOSS OR ANY OTHERDAMAGES, WHETHER DIRECT, INCIDENTAL OR CONSEQUENTIAL (INCLUDING, WITHOUT LIMITATION, DAMAGETO TAPES, RECORDS OR DISCS) RESULTING FROM THE USE OF THIS PRODUCT, OR ARISING OUT OF ANYBREACH OF THIS WARRANTY. ALL EXPRESS AND IMPLIED WARRANTIES, INCLUDING THE WARRANTIES OFMERCHANTABILITY AND FITNESS FOR PARTICULAR PURPOSE, ARE LIMITED TO THE WARRANTY PERIODSET FORTH ABOVE.
Some states do not allow the exclusion of incidental or consequential damages or limitations on how long an impliedwarranty lasts, so these limitations or exclusions may not apply to you. This warranty gives you specific legal rights andyou may also have other rights which vary from state to state.
JVC COMPANY OF AMERICA 1700 Valley RoadDIVISION OF JVC AMERICAS CORP. Wayne, New Jersey 07470
WARRANTY (Only in U.S.A.)
REFURBISHED PRODUCTS CARRY A SEPARATE WARRANTY, THIS WARRANTY DOES NOT APPLY. FORDETAILS OF REFURBISHED PRODUCT WARRANTY, PLEASE REFER TO THE REFURBISHED PRODUCTWARRANTY INFORMATION PACKAGED WITH EACH REFURBISHED PRODUCT.
For customer use:Enter below the Model No. and Serial No. which is located either on the rear, bottom or side of thecabinet. Retain this information for future reference.
Model No.: Serial No.:
Purchase date: Name of dealer:
2B00401AE(52-60) 21/5/2002, 9:5059

60Printed in Thailand
2B00401C02/06
U
VICTOR COMPANY OF JAPAN, LIMITED
(HR-XVC1U(C)/M)
2B00401CE(52-60) 4/6/2002, 15:0460