DeploymentManager Ver6 - NEC€¦ · DeploymentManager Ver6.6 Tool Reference Guide ... (Windows...
229
DeploymentManager Ver6.6 Tool Reference Guide - First Edition - Rev.001
Transcript of DeploymentManager Ver6 - NEC€¦ · DeploymentManager Ver6.6 Tool Reference Guide ... (Windows...

DeploymentManager Ver6.6
Tool Reference Guide
- First Edition -
Rev.001

2
Contents Introduction ....................................................................................................................... 4
Target Audience and Purpose ............................................................................................................ 4 Document Structure ............................................................................................................................ 4 Documentation Guidelines for DeploymentManager Manual ............................................................. 4
1. Image Builder .............................................................................................................. 5 1.1. Connection Settings ............................................................................................................... 5 1.2. Creating a Floppy Disk Image ................................................................................................ 6 1.3. Registering an Operating System .......................................................................................... 8 1.4. Creating a Setup Parameter File .......................................................................................... 11
1.4.1. Creating a Disk Duplication Data File (Windows) ............................................................................ 11 1.4.1.1. Creating a Disk Duplication Data File (Windows Server 2003 R2/Windows XP or earlier) .............. 11 1.4.1.2. Creating a Disk Duplication Data File (Windows Server 2008/Windows Vista or Later) .................. 36 1.4.2. Batch Creation of Disk Duplication Data Files (Windows) ............................................................... 60 1.4.2.1. Windows Parameter File ................................................................................................................. 60 1.4.2.2. Windows Parameter File(Express) .................................................................................................. 68 1.4.3. Creating a Disk Duplication Data File (Linux) .................................................................................. 75 1.4.4. Batch Creation of Disk Duplication Data File (Linux) ....................................................................... 93 1.4.5. Creating a Parameter File for OS Clear Installation (Linux) ............................................................. 96 1.4.6. Batch Creation of Parameter File for OS Clear Installation (Linux) .................................................. 127
1.5. Package Registration/Modification ....................................................................................... 131 1.5.1. Create Windows Package ............................................................................................................... 133 1.5.2. Modify Windows Package ............................................................................................................... 149 1.5.3. Create Linux Package ..................................................................................................................... 150 1.5.4. Modify Linux Package ..................................................................................................................... 154 1.5.5. Exit Package Registration/Modification ........................................................................................... 155
1.6. Delete Registered Data ........................................................................................................ 156 1.7. Batch Registration ................................................................................................................ 158 1.8. Agreement Display Settings ................................................................................................. 159
2. PackageDescriber ..................................................................................................... 160 2.1. Initial settings: Set Environment ........................................................................................... 160 2.2. Create Package .................................................................................................................... 164
2.2.1. Basic Information ............................................................................................................................. 165 2.2.2. Execution Settings Information ........................................................................................................ 171 2.2.3. Applicable OS and Language Information ....................................................................................... 173 2.2.4. Dependency Information ................................................................................................................. 174 2.2.5. ID Information .................................................................................................................................. 186 2.2.6. Group Information ............................................................................................................................ 193
2.3. Modify/Delete Package ........................................................................................................ 194 2.4. Registration and Deletion on the Package Web Server ....................................................... 197 2.5. Online Update ...................................................................................................................... 199
3. Other Tools ................................................................................................................ 201 3.1. Port Opening Tool ................................................................................................................ 201
3.1.1. Port Number Setting ........................................................................................................................ 201 3.1.2. Executing the Tool on Each Machine .............................................................................................. 203
3.2. Disk Configuration Check Tool ............................................................................................. 204 3.3. Automatic Update Status Display Tool ................................................................................. 206
3.3.1. Client Setting Tool ........................................................................................................................... 207 3.3.2. About DeploymentManager ............................................................................................................. 207
3.4. Backup Image File Verification Tool ..................................................................................... 207 4. DPM Command Line .................................................................................................. 208
4.1. Operation from DPM Command Line ................................................................................... 208 4.1.1. Display Managed Machine List and Managed Machine Details ...................................................... 209 4.1.2. Display Scenario List ....................................................................................................................... 211 4.1.3. Power On......................................................................................................................................... 212

3
4.1.4. Shutdown ........................................................................................................................................ 213 4.1.5. Assign Scenario/Remove Scenario Assignment.............................................................................. 214 4.1.6. Execute Scenario ............................................................................................................................ 216 4.1.7. Interrupt Scenario Execution ........................................................................................................... 217 4.1.8. Display Scenario Execution Status .................................................................................................. 219 4.1.9. Status Clear ..................................................................................................................................... 219 4.1.10. Register Managed Machine ............................................................................................................. 220 4.1.11. Delete Managed Machine ................................................................................................................ 223 4.1.12. License Information Display............................................................................................................. 224 4.1.13. Edit MAC address and UUID for the managed machine ................................................................. 225 4.1.14. Help ................................................................................................................................................. 226
Appendix A Revision History ....................................................................................... 228

4
Introduction
Target Audience and Purpose "Tool Reference Guide" is targeted to system administrators who operate DeploymentManager (hereafter, DPM) and explains DPM operations on the screen, tools, maintenance-related information, and troubleshooting.
Document Structure ・ 1 Image Builder: Explains Image Builder, which is a tool for registering images. ・ 2 PackageDescriber: Explains PackageDescriber, which is a tool for creating packages and registering them
on the Package Web Server. ・ 3 Other Tools: Explains tools used by DPM. ・ 4 DPM Command Line: Explains command lines, which control the DPM. Appendix Appendix A Revision History
Documentation Guidelines for DeploymentManager Manual See "Documentation Guidelines" in First Step Guide.

5
1. Image Builder This chapter explains Image Builder to register an image.
1.1. Connection Settings Set when using Image Builder (Remote Console). When changing the managed server, which connects the image builder (remote console), change IP address and port you input at the time of startup by following below procedure. (1) Logon to the machine, which Remote Console is installed, by a user with administrator authority.
(2) From Start menu, select All Programs -> DeploymentManager -> Image Builder.
When you are logging on to the OS by the user except Administrator, execute it as an administrator. (3) Click Setting connection. The following screen appears.
(4) Enter the IP address and the port of DPM Server and click OK.
The connection setting is completed.
Note: The IP address of the Management Server, to which Image Builder (Remote Console) connects,
is the one specified in Management view -> DPM Server icon -> Detailed Setting -> General tab -> Server Information -> IP address.
The port of the Management Server, to which Image Builder (Remote Console) connects, is the port number set in the Management Server. You can check the port number set in the Management Server in the following file. <TFTP root folder>\Port.ini ・ Key name: FTUnicast ・ Default value:26508(It is 56023 when you upgraded DPM Server from the earlier version than
DPM Ver6.1.) The default TFTP root folder is C:\Program Files (x86)\NEC\DeploymentManager\PXE\Images.

6
1.2. Creating a Floppy Disk Image By using the Creating Floppy Disk Image function, you can register floppy disk images of BIOS updates, firmware updates and distribute the images via the network. You can also register, distribute, and execute floppy images of other application programs that start up from a floppy disk. However, the size of the programs should be up to the floppy disk capacity, 1.44MByte. The image is created using Image Builder. After the image is created, it is registered on DPM Server. (1) Prepare the floppy disk that automatically executes BIOS and firmware updates. In addition, insert the disk
into the floppy disk drive of the machine on which Image Builder is installed to register the image on DPM.
(2) Log on to the machine, on which Image Builder is installed, by a user with administrator authority. When you use Image Builder on the Management Server, log on by the user who installed DPM Server.
(3) From Start menu, select All Programs -> DeploymentManager -> Image Builder. When you are logging on to the OS by the user except Administrator, execute it as an administrator.
(4) Image Builder is launched. Click Creating Floppy Disk Image/Registering EFI application.
Note:
When you start Image Builder and select the menu item for the first time, the configuration seeking consent screen appears. Confirm the contents and click I Accept.

7
(5) The following screen appears. Select Creating Floppy Disk Image and click OK.
(6) The following screen appears. Enter image file name and click OK.
Creating Floppy Disk Image Image File Name Enter the image file name.
8 characters or less can be entered. Alphanumeric characters and the following symbols can be entered.
- . _ OK Saves the image file name and returns to the previous window. Cancel Returns to the previous window without saving the image file
name. (7) The confirmation screen appears. Confirm whether the floppy disk is inserted, and click OK. (8) The following screen appears. Click OK.
8
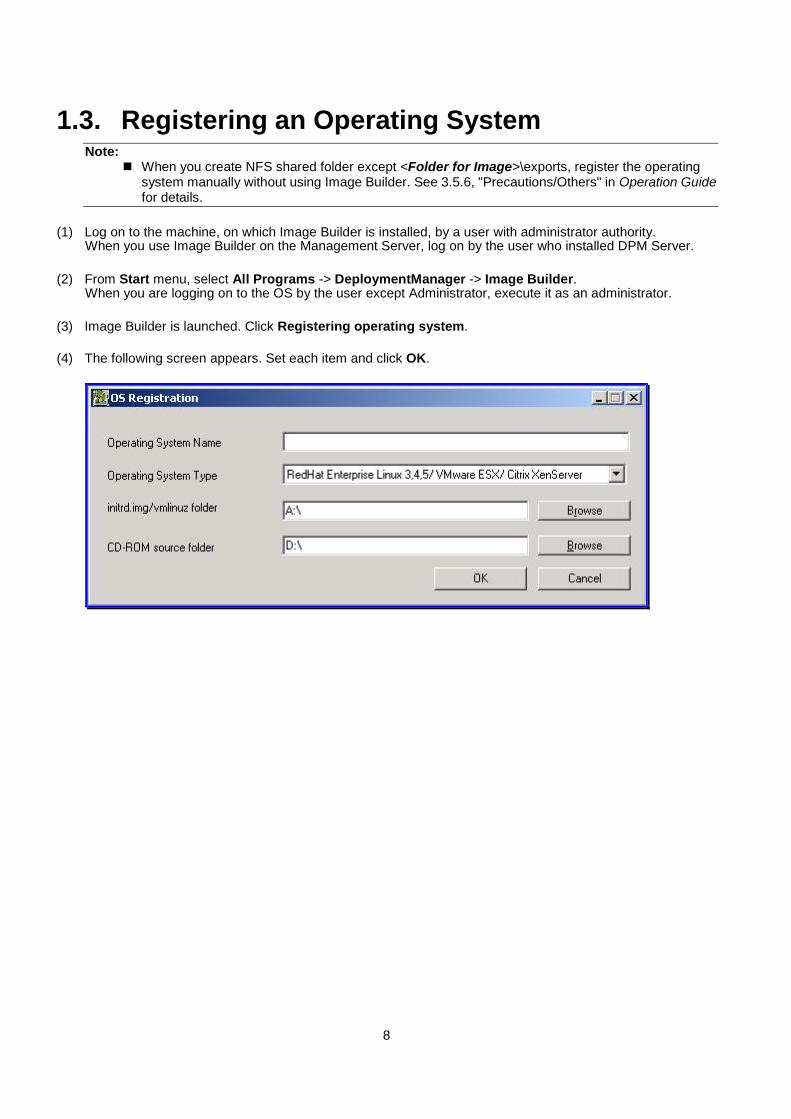
1.3. Registering an Operating System Note:
When you create NFS shared folder except <Folder for Image>\exports, register the operating system manually without using Image Builder. See 3.5.6, "Precautions/Others" in Operation Guide for details.
(1) Log on to the machine, on which Image Builder is installed, by a user with administrator authority.
When you use Image Builder on the Management Server, log on by the user who installed DPM Server.
(2) From Start menu, select All Programs -> DeploymentManager -> Image Builder. When you are logging on to the OS by the user except Administrator, execute it as an administrator.
(3) Image Builder is launched. Click Registering operating system. (4) The following screen appears. Set each item and click OK.

9
Registering operating system Operating System Name Enter the operating system name.
126 characters or less can be entered. The numeric characters and the following symbols can be used:
( ) - . _ Names such as "Linux", "Linux(gPXE)", "ks", "daemon", and "pxelinux.*" are reserved and cannot be registered.
Operating System Type Select the following operating systems from the list box. ・ RedHat Enterprise Linux 3,4,5/VMware ESX
/Citrix XenServer(*1) ・ Red Hat Enterprise Linux 6 ・ Red Hat Enterprise Linux 7
initrd.img/vmlinuz folder The floppy disk drive is displayed here. The default is "A:\". Click Browse and select the location of initrd.img/vmlinuz. For Red Hat Enterprise Linux 5, specify directly "images\pxeboot folder of the first installation CD". For Red Hat Enterprise Linux 6 or Red Hat Enterprise Linux 7, mount the ISO file for installation and select "images/pxeboot".
CD-ROM Source Folder
When "RedHat Enterprise Linux 3,4,5/VMware ESX/Citrix XenServer" in Operating System Type is selected, the CD-ROM Source Folder is displayed. Click Browse and select CD-ROM drive which stores OS.
Install ISO When "Red Hat Enterprise Linux 6" or "Red Hat Enterprise Linux 7" is selected in Operating System Type, Install ISO is displayed. Click Browse and select ISO file for installation.
OK The OS image is created with the settings on the Registering operating system screen before returning to the previous window.
Cancel The previous window is returned to without creating the OS image with the settings from the Registering operating system screen.
*1 Red Hat Enterprise Linux 3,4/Citrix Xen Server are not supported. Note:
For Red Hat Enterprise Linux 5 or earlier, to prepare a Linux image file, all under the source folder of the specified CD-ROM are copied as the image file. With Red Hat Enterprise Linux 5 or earlier, two or more CD-ROMs are involved and thus a message prompting you to copy the next CD-ROM will appear after the first CD-ROM is copied. Insert the CD-ROMs in order, and continue copying. When the overwrite confirmation dialog box appears during this time, select Yes or Yes to All, and proceed. For Red Hat Enterprise Linux 6 or later, copy the specified ISO file.

10
(5) Wait until the copy of the file of vmlinuz/initrd.img and CD is completed. For Red Hat Enterprise Linux6 or later, this is the end of the procedure.
For Red Hat Enterprise Linux5, the following screen appears. If there are any remaining Red Hat Enterprise Linux installation CDs to register, replace the CD and click Next. There are several Red Hat Enterprise Linux installation CDs.
(6) When the screen to confirm the replacing appears during copying, click Yes to All.

11
(7) When all CDs have been copied, the RedHat CD Image copy screen appears. Click Finish.
1.4. Creating a Setup Parameter File The setup parameter file is the file for execution of OS installation by disk duplication or OS clear installation. The managed machines are set using this file. We will describe the procedure for creating a separate setup parameter file for the managed machine, and a batch creation procedure.
1.4.1. Creating a Disk Duplication Data File (Windows) This section describes how to create a disk duplication data file for configuring individual machines when executing OS installation by disk duplication in Windows.
1.4.1.1. Creating a Disk Duplication Data File (Windows Server 2003 R2/Windows XP or earlier)
To create a disk duplication data file for Windows Server 2003/Windows Server 2003 R2/Windows XP, create the data file and then create the disk duplication data file based on that data file. See "1. Creating a Data File" through "2. Creating a Disk Duplication Data File." The various settings set in "1. Creating a Data File" become the default values in the disk duplication data file created in "2. Creating a Disk Duplication Data File." 1.Creating a Data File
Create one data file to create the disk duplication data file.
Note: The entry items vary depending on the type of Windows OS. Depending on the item, other entry items should be checked occasionally.
If any such messages appear on the screen, follow them.
(1) Log on to the machine, on which Image Builder is installed by a user with administrator authority. When you use Image Builder on the Management Server, log on by the user who installed DPM Server.
(2) From Start menu, select All Programs -> DeploymentManager -> Image Builder. When you are logging on to the OS by the user except Administrator, execute it as an administrator.
(3) Image Builder is started. Click Configure setup parameter file. (4) The following screen appears. Select Windows parameter file and click OK.

12
(5) The following screen appears. From the File menu, select Create New information files.

13
(6) The following screen appears. Set each item in the red box.
The following items do not need to be set. - Target machine - OS Installation path - System Partition

14
Basic Information OS type Select the install OS type.
- Windows XP Professional - Windows Server 2003 Standard Edition Select this when you use Windows Server 2003 Standard Edition/Windows Server 2003 R2 Standard Edition.
- Windows Server 2003 Enterprise Edition Select this when you use Windows Server 2003 Enterprise Edition/Windows Server 2003 R2 Enterprise Edition.
- Windows Server 2003 Standard x64 Edition Select this when you use Windows Server 2003 Standard x64 Edition/Windows Server 2003 R2 Standard x64 Edition.
- Windows Server 2003 Enterprise x64 Edition Select this when you use Windows Server 2003 Enterprise x64 Edition/Windows Server 2003 R2 Enterprise x64 Edition. (*1)
Activation If Windows XP or Windows Server 2003 is selected in OS type, the Activation setting becomes valid.
Retail Version or OEM Version other than NEC
Select this if you are using a retail version or OEM version other than NEC. (*2)
NEC OEM Version Select this if you are using NEC OEM version. (*2) *1
Activation is valid when you selected either of the following OS type. - Windows XP Professional - Windows Server 2003 Standard Edition - Windows Server 2003 Enterprise Edition - Windows Server 2003 Standard x64 Edition - Windows Server 2003 Enterprise x64 Edition Select Retail Version or OEM Version other than NEC or NEC OEM Version.
The setting data is not maintained if the OS type is changed. Make sure that each item is set correctly. The following is displayed in OS type. However, these are not supported.
- Windows 2000 Professional - Windows 2000 Server - Windows 2000 Advanced Server - Windows Server 2003 Datacenter Edition - Windows Server 2003 Datacenter x64 Edition
An activation (license authentication) request might appear during OS installation by disk duplication. If this happens, follow the license authentication procedure in accordance with the instructions on the screen.
*2 The data file cannot be created if NEC OEM Version is selected for the following OS media of NEC. If
OS installation by disk duplication is executed for these OS's, select Retail Version or OEM Version other than NEC and create the data file using the product key that came with the OS media or the hardware. - Windows XP Professional(no SP, SP1)(CD number:243-110442-007-A) - Windows XP Professional w/SP2(excluding 2006/06and after)(CD number:243-110442-007-C) - Windows Server 2003 Standard Edition(no SP)(CD number:243-110442-100-A/C) - Windows Server 2003 Enterprise Edition(no SP)(CD number:243-110442-101-A/B/C)

15
If NEC OEM was selected under Activation, the following screen appears, so insert the CD-ROM for
the OS into the CD-ROM drive and click OK.
(7) Click Next to display the following screen and then set each item.

16
User Information User Name
(Required) Enter the name of the user. 50 characters or less can be entered. Alphanumeric characters and symbols can be entered. The following symbols cannot be entered.
, Company name Enter the name of the company.
50 characters or less can be entered. Alphanumeric characters and symbols can be entered. The following symbol cannot be entered.
, This is optional.
Product-Key Enter the Windows OS product key. Enter it in the form "xxxxx-xxxxx-xxxxx-xxxxx-xxxxx". This does not need to be entered if NEC OEM Version is selected. In the case of a pre-installed machine, enter the product key on the sticker attached to the machine body. If the OS has been installed using a dedicated medium under a volume licensing contract with Microsoft, enter the product key that came with the medium.
TimeZone Set the time zone. Select the appropriate region in the list box. This is optional.

17
(8) Select Next to display the following screen. Set the each item in the red box.
The following items do not need to be set. ・ Client License Mode ・ Specify an Account ・ Network setup

18
Role of Computer Computer Name
(Required) Enter the machine name registered in DPM. 15 characters or less can be entered. Alphanumeric characters and symbols can be entered. The following symbols and space cannot be entered.
! " # $ % & ' ( ) * + , . / : ; < = > ? @ [ \ ] ^ ` { | } ~ In addition, you cannot register a machine name of only numbers. Make sure the name is not the same as that of any other machine or domain/workgroup.
Administrator Password Set the password for administrator authority. 14 characters or less can be entered. Alphanumeric characters and symbols can be entered. The following symbols and space cannot be entered.
" , This is optional. If you set a password, see also the password configuration policy of each OS.
Administrator Password again
Re-enter the password set in Administrator Password. When you set Administrator Password, entry this item is necessary.
MAC Address This is used during OS installation by disk duplication. This item cannot be set.
Domain Set the domain. Select Domain and enter the corresponding name. (*1) Alphanumeric characters and symbols can be entered. The following symbols and space cannot be used.
" * , . / : ; < > ? [ \ ] | Workgroup Set the workgroup. Select Workgroup and enter the
corresponding name. Alphanumeric characters and symbols can be entered. The following symbols and space cannot be used.
" * + , : ; < = > ? \ | *1 When setting Domain, follow the policy of the password setting for the domain controller.
There is a possibility that in the middle of disk duplication OS installation, the screen stops at login screen each time you log in, when setting is performed without following the policy. In this case, log in manually.
Do not omit the password. When you omit it, a scenario execution error occurs.

19
(9) Select Next to display the following screen. Entry this item is unnecessary for disk duplication OS
installation. Click Next.

20
(10) Click Next to display the following screen and set the NIC (LAN board). Set each item framed in red in the
below figure. Setting these items is required. However, setting the following items is not required. - Network Services - Network Client When the NIC Settings are made, the Protocol Setting, IP Address, DNS, and WINS can be set. These settings can be indicated directly to the NIC of the machine. If the NIC is indicated, however, the MAC address entry is required.

21
Network Setup NIC Settings
AutoDetect If the NIC is not specified, select "AutoDetect". If "AutoDetect" is added to the MAC addresses list of the NIC to be added, the numbers 1-4 are added to "AutoDetect". When executing OS installation by disk duplication by setting "AutoDetect", if there are two or more NICs, the arbitrary NIC is selected and the setting is done.
MAC Address If the NIC is specified, select MAC Address and enter the MAC address in the text box. Enter MAC address in the form "xx-xx-xx-xx-xx-xx". When executing OS installation by disk duplication setting MAC address, the settings are set for the specified MAC address. Set the setting of NIC with MAC address which is registered on DPM to enable network communication with DPM Server regardless of acquisition from static IP address or DHCP Server. If network communication is impossible, the scenario may not be completed.
Add Add any NIC's to the List of Added NIC MAC addresses. Select AutoDetect or enter MAC address and then click Add.
MAC addresses list of the NIC to be added
Displays a list of MAC address. Set one or more NIC's. Up to four items of AutoDetect and MAC addresses can be added in total.
Protocol setting Set the protocol for added NIC's. Click Protocol Setting. The following screen appears. See "Protocol setting" below for details.
When adding an Internet Protocol (TCP/IP), Internet Protocols (TCP/IP) equal to the number of NIC's added by selecting NIC Settings -> Add are added to the Protocol list to be added. The following is an example where two NIC's, 00-00-00-00-00-00 and AutoDetect1, have been added by selecting NIC Settings -> Add. Example)
Protocol list to be added ・ Internet Protocol (TCP/IP) 00-00-00-00-00-00 ・ Internet Protocol (TCP/IP) AutoDetect1
Delete To delete the added MAC address or AutoDetect, select it from the list and click Delete.

22
Protocol setting
This section describes the Protocol setting screen.
Note: When setting several NIC's (LAN boards), repeat steps 3) through 4).
1) In the Protocol Setting screen, select Internet Protocol (TCP/IP) from the Protocol list box, and click
Add.

23
Protocol Setting Protocol Set the protocol for the NIC.
The following protocols can be added. Note that the selectable items vary depending on the OS. - Internet protocol (TCP/IP)
(Required) - NWLINK IPX/SPX/NetBIOS-compatible transport protocol - Apple Talk protocol - Network monitor driver - NetBEUI protocol - DLC protocol - Streams environment
Protocol list to be added (Required)
Displays the list of added protocols. Select Protocol and click Add to add a protocol to the Protocol list to be added.
Details Detailed settings for the internet protocol (TCP/IP) for each NIC are set here. If you select Internet Protocol (TCP/IP) from the Protocol list to be added, you can click Details. Click Details to display the Internet Protocol (TCP/IP) and set each item. See the description below for details on the screen. This is optional.(*1)
Delete Deletes the added protocol. Select the protocol to delete from the Protocol list to be added and click Delete.
OK Saves the settings on the Protocol Setting screen and returns to the previous window.
Cancel Returns to the previous window without saving the settings in the Protocol Setting screen.
*1 When you do not set, Acquire Automatically is set as a default for all IP address, DNS, and WINS. The value of the scope ID is not reflected. Click OK in the Protocol Setting screen, click Next in the Network Settings screen, and go to (11) the Component Settings screen.
2) Internet Protocol (TCP/IP) is added to the Protocol list to be added. Select the protocol and click
Details.

24
3) The following screen appears. Select the IP Setting tab in the Settings Internet Protocol (TCP/IP)
screen and set each item.

25
Settings Internet Protocol (TCP/IP)
IP Setting Here you can set the IP address, subnet mask, gateway, and metrics. The settings differ depending on whether they are acquired automatically or set manually.
Acquire the IP address automatically
Selecting this option button causes the IP address to be acquired automatically. The default setting is Acquire the IP address automatically.
Use the following IP address
Selecting this option button enables setting of the IP address, subnet mask, gateway, and metric.
IP Address Add Clicking Add causes the following screen to be displayed, so enter
the IP address and subnet mask.
Enter these in the form "xxx xxx xxx xxx". If you click Add, IP address and subnet mask are added to the list of IP Address. Up to four IP addresses and subnet masks can be added for each NIC.
Edit Select the IP address/subnet mask to be edited from the list of the IP Address and click Edit. The TCP/IP Address screen appears. Edit the IP address/subnet mask.
Delete Select the IP address/subnet mask to be deleted from the list of the IP Address and click Delete. IP address/subnet mask will be deleted.

26
Default gateway
Add Clicking Add causes the following screen to be displayed, so enter the gateway and metric.
Enter Gateway in the form "xxx xxx xxx xxx". Enter numeric characters in Metric. This can be set in the range of "1-9999." The default value is "1." By clicking on Add, the gateway/metric will be added to the list of the Default Gateway. Up to four gateways and metrics can be added.
Edit Select the gateway/metric to be edited from the list of Default Gateway and click Edit. The TCP/IP gateway address screen appears. Edit the gateway/metric.
Delete Select the gateway/metric to be deleted from the list of the Default Gateway box and click Delete. The gateway/metric will be deleted.
Note:
When you select the Check the completion of a scenario by the communication with DPM Client checkbox (Web Console Management view -> DPM Server icon -> Detail setting in Configuration menu -> General tab), the completion of the scenario may not be detected if the managed machine cannot communicate with the Management Server by the set IP address. Set IP address by which the machine can communicate with the Management Server. When you clear the Check the completion of a scenario by the communication with DPM Client checkbox, the completion of the scenario can be detected regardless of whether the machine can communicate with the Management Server or not.

27
4) Set the items in the DNS/WINS tab on Settings Internet Protocol (TCP/IP) screen.

28
Settings Internet Protocol (TCP/IP) DNS/WINS The DNS and WINS settings are made here. The settings differ
depending on whether they are acquired automatically or set manually.
Acquire the address of DNS server automatically
Select this to acquire the address of the DNS server automatically. Select this if the managed machine is a DNS server. The default setting is Acquire the address of DNS server automatically.
Use the following address of DNS server
Select this to set the IP address of the DNS server.
DNS Server Address (the Order of Use) Add By clicking Add, the following screen appears. Enter the address of
the DNS server.
Enter these in the form "xxx xxx xxx xxx". If you click Add, IP address of the DNS server is added to the list of the DNS Server Address (the Order of Use). Up to four IP addresses of DNS server can be added.
Edit Select IP address of the DNS server to be edited from the list of the DNS Server Address (the Order of Use) and click Edit. The TCP/IP DNS Server screen appears. Edit IP address of the DNS server.
Delete Select IP address of the DNS server to be deleted from the list of the DNS Server Address (the Order of Use) and click Delete to delete IP address of the DNS server.
Acquire the address of WINS server automatically
Select this to acquire the address of the WINS server automatically. Select this if the managed machine is a WINS server. The default setting is Acquire the address of WINS server automatically.
Use the following address of WINS server
Select this to set the IP address of the WINS server.

29
WINS Server Address (the Order of Use)
Add Clicking Add causes the following screen to be displayed, so enter the address of the WINS server.
Enter these in the form "xxx xxx xxx xxx". If you click Add, the address of the WINS server will be added to the list of WINS Address (the Order of Use). Up to four WINS server addresses can be added.
Edit Select IP address of the WINS server to be edited from the list of the WINS Address (the Order of Use) and click Edit. The TCP/IP WINS server screen appears. Edit IP address of the WINS server.
Delete Select IP address of the WINS server to be deleted from the list of the WINS Address (the Order of Use) and click Delete to delete IP address of the WINS server.
30
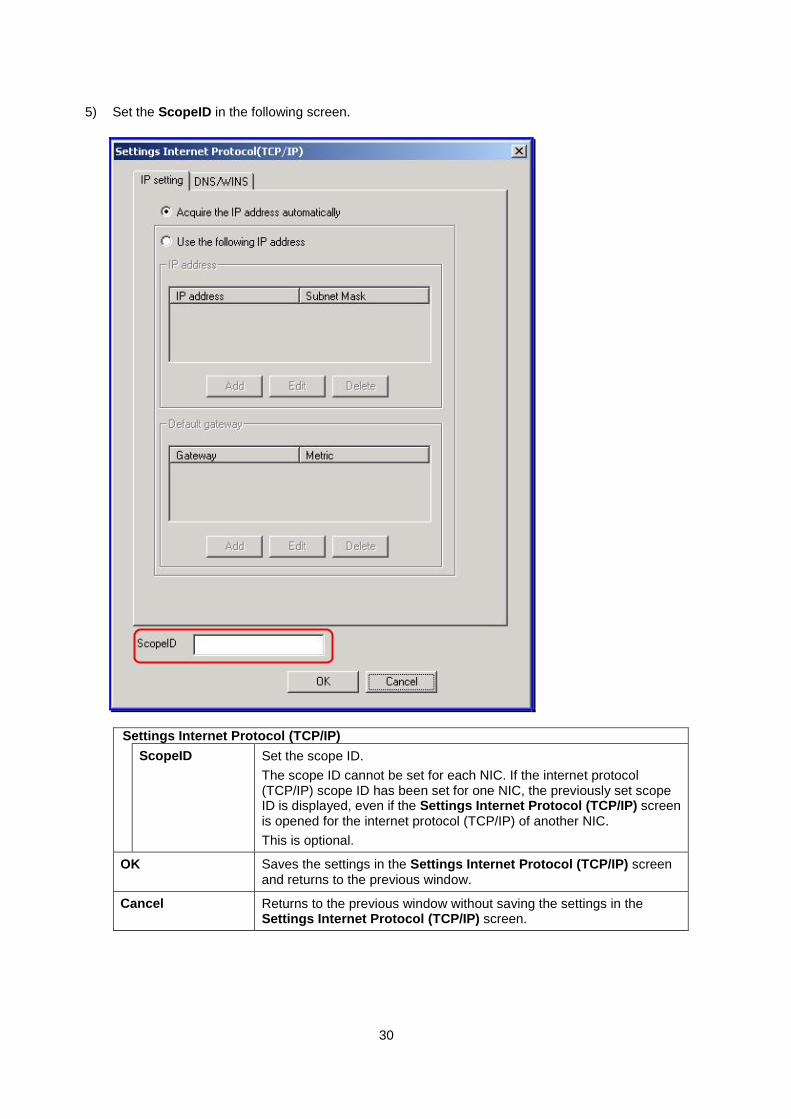
5) Set the ScopeID in the following screen.
Settings Internet Protocol (TCP/IP) ScopeID Set the scope ID.
The scope ID cannot be set for each NIC. If the internet protocol (TCP/IP) scope ID has been set for one NIC, the previously set scope ID is displayed, even if the Settings Internet Protocol (TCP/IP) screen is opened for the internet protocol (TCP/IP) of another NIC. This is optional.
OK Saves the settings in the Settings Internet Protocol (TCP/IP) screen and returns to the previous window.
Cancel Returns to the previous window without saving the settings in the Settings Internet Protocol (TCP/IP) screen.

31
(11) Select Next. The following screen appears. This does not need to be set for OS installation by disk duplication, so just click Finish.

32
(12) The following screen appears. Read this carefully and click I Accept.
(13) The following screen appears when you click I Accept. Click Browse, select a file name, and save the data file.

33
Specify a file File name Set the name of the data file that has been set and where it is
contained. You can select where to save it with the Browse button or enter the file path directly. 63 characters or less can be entered. However, the inhibited characters on Windows, the space and the following symbols cannot be entered.
, ; If you use the Browse button to set the folder to be saved and the file name, set the file name so that it is 254 characters or less, including the path.
OK Save the data file to the saving specified designated on the Specify a file screen.
Cancel Closes the window without saving the data file with the settings.
Creation of the data file is completed once the Create a Setup Parameter File screen appears.
2. Creating a Disk Duplication Data File The disk duplication data file is created based on the data file created in "1. Creating a Data File."
Note:
A disk duplication data file needs to be created for each machine to which the system will be deployed.
(1) Log on to the machine, on which Image Builder is installed, by a user with administrator authority.
When you use Image Builder on the Management Server, log on by the user who installed DPM Server.
(2) From Start menu, select All Programs -> DeploymentManager -> Image Builder. When you are logging on to the OS by the user except Administrator, execute it as an administrator.
(3) Image Builder is launched. Click Configure setup parameter file.
(4) The Select Parameters screen appears. Select Windows Parameter File and click OK. (5) The Create a Setup Parameter File screen appears. From the File menu, select Create New Disk copy
information File for 2003/2000/XP(P).
(6) The Open screen appears. Select the data file that you created in "1. Creating a Data File" of "1.4.1.1 Creating a Disk Duplication Data File (Windows Server 2003 R2/Windows XP or earlier)" to open the file.

34
(7) The following screen appears. Set the information required for the managed machine in which the setup is to
be performed and click OK. Set each tab in the red box. Setting the following tabs is not necessary. ・ Basic information ・ Display Setup ・ Setting the Components

35
Setup Information File (*1) Role of Computer ・ The entry of Computer Name is required.
The MAC address is automatically entered by entering the name of the machine registered to DPM and placing the cursor over the MAC Address field.
・ The following symbols cannot be used in the Administrator Password and the password for Specify an Account.
" , ・ For the MAC Address, enter the MAC address of the
machine in which OS installation by disk duplication is executed. Enter it in the form "xx-xx-xx-xx-xx-xx".
User Information ・ Setting User Name is necessary. ・ On the ProductKey, set the product key used on the
machine in which OS installation by disk duplication is executed.
Network Setup Set as necessary. Set the setting of NIC with MAC address which is registered on DPM to enable network communication with DPM Server regardless of acquisition from static IP address or DHCP Server. If network communication cannot be done normally, an executed scenario may not be completed.
*1 Items are set with the content of the data file that has been prepared. Change as needed.
(8) The Specify a file screen appears. Click OK.
Disk duplication data files(two files) are created as the following. ・ MAC address.inf ・ MAC address.bat
Note: The file is named after MAC address, which was entered automatically. The file name cannot be
modified. If the created disk duplication data files are unnecessary, delete them manually. (You cannot
delete them from Delete registered data in Image Builder.) If you click Cancel, the display returns to the previous window without saving the setting on the
Setup Information File screen. The default saved folder of disk duplication data files is
<Folder for Image(C:\Deploy)>\AnsFile\sysprep
Creation of disk duplication data files is completed.

36
1.4.1.2. Creating a Disk Duplication Data File (Windows Server 2008/Windows Vista or Later)
Create a disk duplication data file for Windows Server 2008/Windows Vista or later. The disk duplication data file for Windows Server 2008/Windows Vista or later includes the conventional Disk Duplication Data File (Windows Parameter File) used in the version earlier than DPM Ver6.0, and a Disk Duplication Data File (Windows parameter file(Express)) that enables rapid setup of machines.
Note: A disk duplication data file created using the Windows parameter file(Express) cannot be edited
in Image Builder by specifying the Windows parameter file. Furthermore, a disk duplication data file created using the Windows parameter file is uneditable in Image Builder by specifying the Windows parameter file(Express).
Items which cannot be entered in the Image Builder screens are not used in settings of this procedure (creating a disk duplication data file for Windows Server 2008/Windows Vista or later).
For Windows Server 2012/Windows 8 or later, only disk duplication data file(Windows parameter file(Express)) is supported.
1. Creating a Disk Duplication Data File (Windows parameter file(Express))
In creating a disk duplication data file (Windows parameter file(Express)), the procedure for creating a disk duplication data file that can set a machine up rapidly.
(1) Log on to the machine, on which Image Builder is installed, by a user with administrator authority.
When you use Image Builder on the Management Server, log on by the user who installed DPM Server.
(2) From Start menu, select All Programs -> DeploymentManager -> Image Builder. When you are logging on to the OS by the user except Administrator, execute it as an administrator.
(3) Image Builder is launched. Click Configure setup parameter file.
(4) The following screen appears. Select Windows parameter file(Express) and click OK.
37
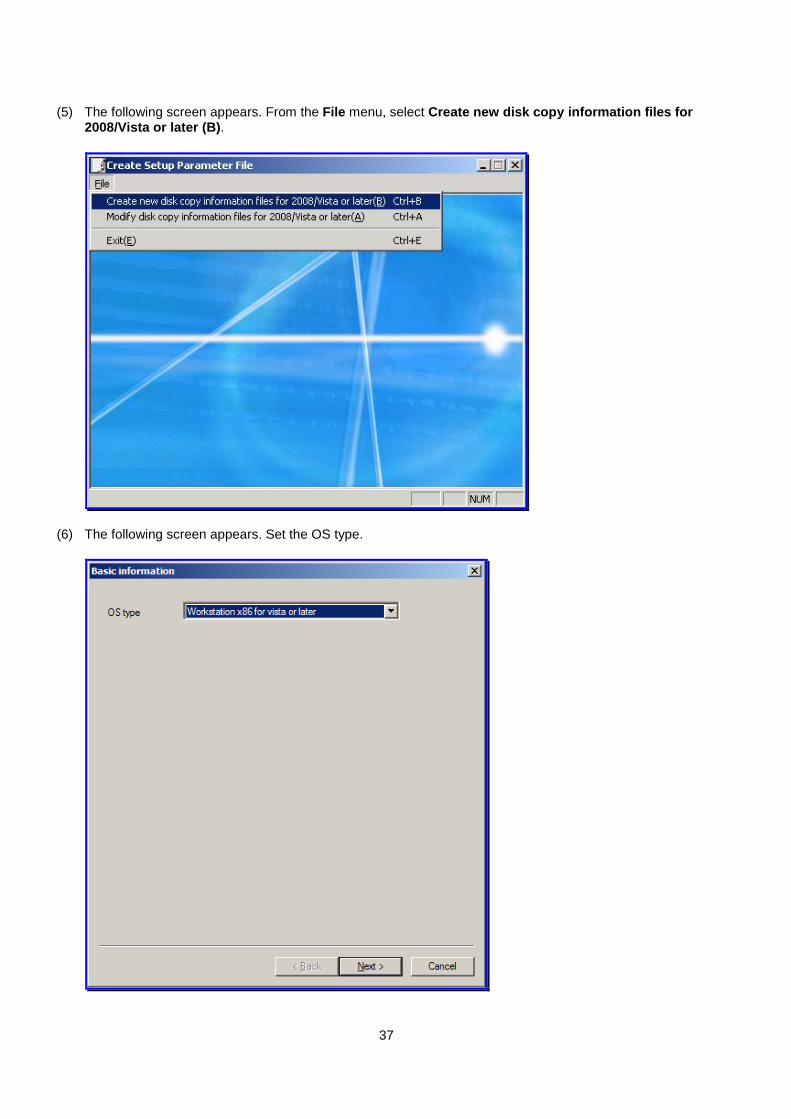
(5) The following screen appears. From the File menu, select Create new disk copy information files for
2008/Vista or later (B).
(6) The following screen appears. Set the OS type.

38
Basic Information OS type Select the OS to be installed.
・ Workstation x86 for vista or later When you use Windows Vista/Windows 7/Windows 8/Windows 8.1/Windows 10 of x86, select this.
・ Workstation x64 for vista or later When you use Windows 7/Windows 8/Windows 8.1/Windows 10 of x64, select this.
・ Server x86 for 2008 or later When you use Windows Server 2008 of x86, select this.
・ Server x64 for 2008 or later When you use Windows Server 2008/Windows Server 2008 R2/ Windows Server 2012/Windows Server 2012 R2/Windows Server 2016, select this. (*1)
*1 For Windows parameter file, select the corresponding OS or edition from the displayed list box. For Windows Server 2012/Windows 8 or later, only Windows parameter file(Express) is supported. The setting information is not maintained if the OS type is changed. Check that each item is set
correctly. An activation (license authentication) may be requested during OS installation by disk duplication. If
it is requested, follow the license authentication procedure in accordance with the instructions on the screen.
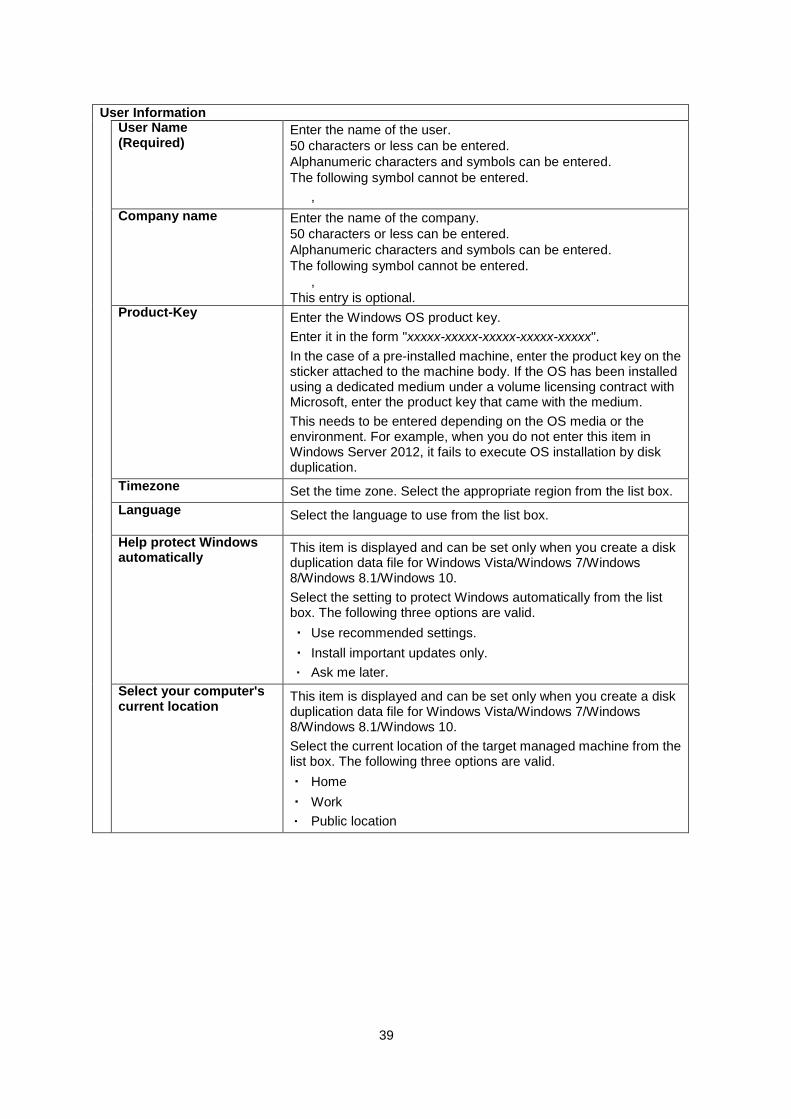
(7) After setting in the Basic Information screen, click Next. The following screen appears. And then set each
item.
39
User Information User Name
(Required) Enter the name of the user. 50 characters or less can be entered. Alphanumeric characters and symbols can be entered. The following symbol cannot be entered.
, Company name Enter the name of the company.
50 characters or less can be entered. Alphanumeric characters and symbols can be entered. The following symbol cannot be entered.
, This entry is optional.
Product-Key Enter the Windows OS product key. Enter it in the form "xxxxx-xxxxx-xxxxx-xxxxx-xxxxx". In the case of a pre-installed machine, enter the product key on the sticker attached to the machine body. If the OS has been installed using a dedicated medium under a volume licensing contract with Microsoft, enter the product key that came with the medium. This needs to be entered depending on the OS media or the environment. For example, when you do not enter this item in Windows Server 2012, it fails to execute OS installation by disk duplication.
Timezone Set the time zone. Select the appropriate region from the list box. Language Select the language to use from the list box.
Help protect Windows automatically
This item is displayed and can be set only when you create a disk duplication data file for Windows Vista/Windows 7/Windows 8/Windows 8.1/Windows 10. Select the setting to protect Windows automatically from the list box. The following three options are valid. ・ Use recommended settings. ・ Install important updates only. ・ Ask me later.
Select your computer's current location
This item is displayed and can be set only when you create a disk duplication data file for Windows Vista/Windows 7/Windows 8/Windows 8.1/Windows 10. Select the current location of the target managed machine from the list box. The following three options are valid. ・ Home ・ Work ・ Public location

40
(8) After setting the User Information screen, select Next. The following screen appears.
Set each item in the red box. Setting the following items is not necessary. ・ Client License Mode ・ Network setup

41
Role of Computer Computer Name
(Required) Enter the machine name registered in DPM. 15 characters or less can be entered. Alphanumeric characters and symbols can be entered. The following symbols and space cannot be entered.
! " # $ % & ' ( ) * + , . / : ; < = > ? @ [ \ ] ^ ` { | } ~ In addition, you cannot register a machine name made up only of numbers. Make sure the name is not the same as that of any other machine or domain/workgroup. If the name of a machine registered to DPM is used, the Management Server can automatically obtain the MAC address of the managed machine.
Administrator Password Set the password for administrator authority. For setting the password, see also the password configuration policy of each OS. The number of characters that can be entered depends on the OS. ・ For Windows Server 2008/Windows Server 2008 R2/Windows
Server 2012/Windows Server 2012 R2/Windows Server 2016: 3-63 characters can be entered. Both alphabet and numeric number are included.
・ For Windows Vista/Windows 7/Windows 8/Windows 8.1/Windows 10:
63 characters or less can be entered. Alphanumeric characters and symbols can be entered. The following symbol and space cannot be entered.
" When using Disk Duplication Data File(Windows parameter file) following symbol cannot be entered.
, This is optional.
Administrator Password again
Re-enter the password set in Administrator Password. Entry is required if Administrator Password is set.
MAC Address (Required)
If the NIC (LAN board) is specified, select MAC Address and enter the MAC address in the text box. Enter MAC Address in the form "xx-xx-xx-xx-xx-xx". Set the setting of NIC with MAC address which is registered on DPM to enable network communication with DPM Server regardless of acquisition from static IP address or DHCP Server. If network communication is impossible, an executed scenario may not be completed.
42
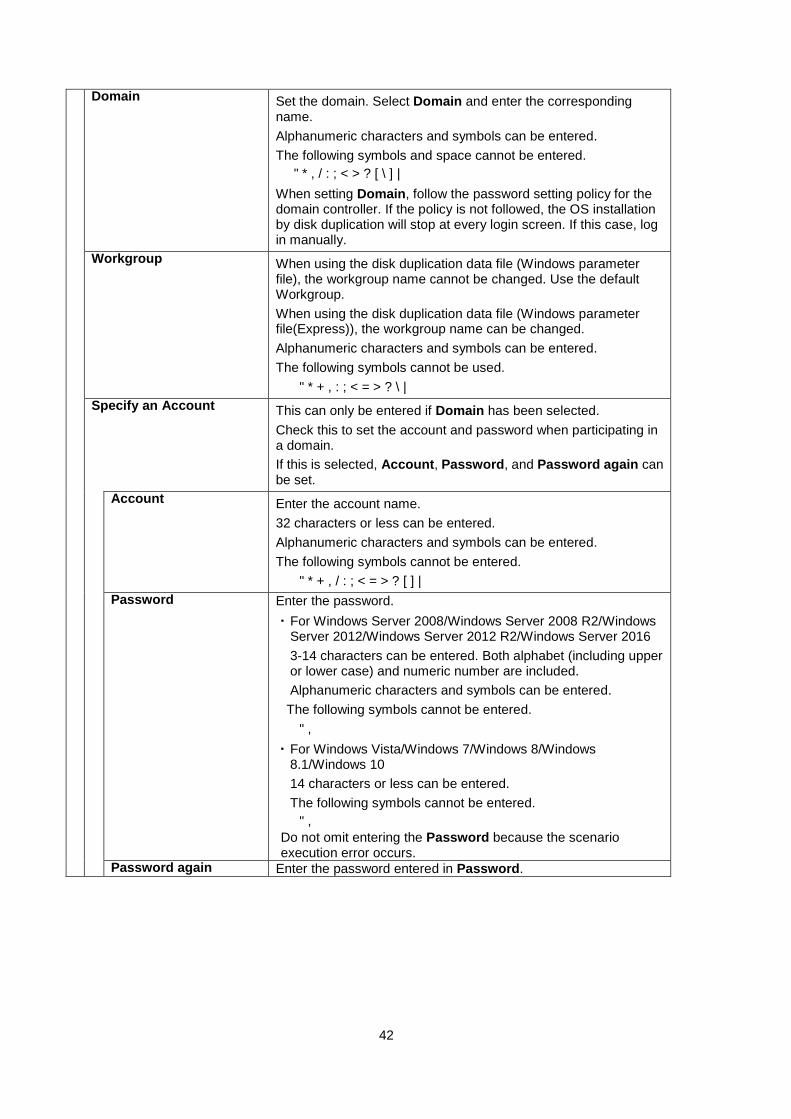
Domain Set the domain. Select Domain and enter the corresponding name. Alphanumeric characters and symbols can be entered. The following symbols and space cannot be entered.
" * , / : ; < > ? [ \ ] | When setting Domain, follow the password setting policy for the domain controller. If the policy is not followed, the OS installation by disk duplication will stop at every login screen. If this case, log in manually.
Workgroup When using the disk duplication data file (Windows parameter file), the workgroup name cannot be changed. Use the default Workgroup. When using the disk duplication data file (Windows parameter file(Express)), the workgroup name can be changed. Alphanumeric characters and symbols can be entered. The following symbols cannot be used.
" * + , : ; < = > ? \ |
Specify an Account This can only be entered if Domain has been selected. Check this to set the account and password when participating in a domain. If this is selected, Account, Password, and Password again can be set.
Account Enter the account name. 32 characters or less can be entered. Alphanumeric characters and symbols can be entered. The following symbols cannot be entered.
" * + , / : ; < = > ? [ ] | Password Enter the password.
・ For Windows Server 2008/Windows Server 2008 R2/Windows Server 2012/Windows Server 2012 R2/Windows Server 2016 3-14 characters can be entered. Both alphabet (including upper or lower case) and numeric number are included. Alphanumeric characters and symbols can be entered. The following symbols cannot be entered.
" , ・ For Windows Vista/Windows 7/Windows 8/Windows
8.1/Windows 10 14 characters or less can be entered. The following symbols cannot be entered.
" , Do not omit entering the Password because the scenario execution error occurs.
Password again Enter the password entered in Password.

43
(9) After setting the Role of Computer screen, click Next. The following screen appears. Set each item in the
red box in the screen below. The following items do not need to be set. ・ Network Services ・ Network Client The protocol can be set and the IP address, DNS, and WINS settings can be set for the NIC (LAN board). With these settings, the NIC of the computer can be specified directly. If you specify the NIC, entry of the MAC is required.

44
Network Setup NIC Setting
AutoDetect If the NIC is not specified, select AutoDetect. If AutoDetect is added to the MAC addresses list of the NIC to be added, the following numbers are added to AutoDetect. ・ Windows parameter file(Express): 1-8 ・ Windows parameter file: 1-4 When executing OS installation by disk duplication by setting "AutoDetect", an arbitrary NIC is selected and the setting is done.
MAC Address If the NIC is specified, select MAC Address and enter the MAC address in the text box. Enter MAC address in the form "xx-xx-xx-xx-xx-xx". If the data file is used in which the MAC address is set, the settings are made to the specified MAC address. Set the setting of NIC with MAC address which is registered on DPM to enable network communication with DPM Server regardless of acquisition from static IP address or DHCP Server. If network communication is impossible, an executed scenario may not be completed.
Add Adds a NIC. Select AutoDetect or enter MAC address and then click Add.
MAC Addresses list of the NIC to be added
Displays a list of added NIC MAC addresses. Click Add and add a MAC address to the list. Set one or more NIC's. The following total number of AutoDetect and MAC addresses can be added: ・ Windows parameter file(Express): up to 8 ・ Windows parameter file: up to 4 NIC not configured here is configured to obtain an IP address automatically using DHCP.
Protocol Setting Set the protocol for added NIC's. Click Protocol Setting. The following screen appears. See "Protocol Setting" below for details on this screen.
When adding an Internet Protocol (TCP/IP), Internet Protocols (TCP/IP) equal to the number of NIC's added by selecting NIC Settings -> Add are added to the Protocol List to be Added. The following is an example where two NIC's, 00-00-00-00-00-00 and AutoDetect1, have been added by selecting NIC Settings -> Add. Example)
Protocol list to be added. ・ Internet Protocol (TCP/IP) 00-00-00-00-00-00 ・ Internet Protocol (TCP/IP) AutoDetect1
Delete To delete an added MAC address or AutoDetect, select either from the list and click Delete.

45
Protocol Setting
This section describes the Protocol Setting screen.
1) In the Protocol Setting screen, select Internet Protocol (TCP/IP) or Internet Protocol (TCP/IPv6) from the Protocol list box, and click Add.
Note:
Set IP address(IPv4) necessarily for the LAN board which communicate with the Management Server.
Only in the case of Windows parameter file(Express), IPv6 address can be set.

46
Protocol Setting Protocol Set the protocol for the NIC.
The protocol, which can be added, is Internet Protocol (TCP/IP) or Internet Protocol (TCP/IPv6). The number of protocols that can be added depends on the disk duplication data file that was created. ・ Windows parameter file(Express): up to 16 ・ Windows parameter file: up to 4
Protocol list to be added (Required)
Displays the list of added protocols. Select Protocol and click Add to add a protocol to the Protocol List to be Added screen.
Details Set detailed settings for the protocol for each NIC. If you select Internet Protocol (TCP/IP) or Internet Protocol (TCP/IPv6) from the Protocol list to be added, you can click Details. Click Details to display the screen. Set each item, seeing the following description. This is optional. If you do not set NIC, all settings of IP address, DNS, and WINS are Acquire automatically by default. The value of the scope ID is not reflected. For the remaining settings, go to Step (10).
Delete Delete an added protocol. Select the protocol to delete from the Protocol list to be added and click Delete.
OK Saves the settings in the Protocol Setting screen and returns to the previous window.
Cancel Returns to the previous window without saving the settings in the Protocol Setting screen.
2) Add Internet Protocol (TCP/IP) or Internet Protocol (TCP/IPv6) to the Protocol list to be added and
click Details.
3) The screen for setting is displayed as the following. Set on the IP Settings tab. Note:
There is no area to enter the scope ID with the disk duplication data file (Windows parameter file(Express)).
When setting several NIC's (LAN boards), repeat Steps 3)-4).

47
In the case of Settings Internet Protocol(TCP/IP) screen

48
Settings Internet Protocol (TCP/IP) IP Setting Here you can set the IP address, subnet mask, gateway, and metrics. The
settings differ depending on whether they are acquired automatically or set manually.
Acquire the IP Address Automatically
If you select this option button, the IP address is acquired automatically. The option button is selected by default.
Use the following IP Address
Selecting this option button enables setting of the IP address, subnet mask, gateway, and metric.
IP address Add If you click Add, the following screen appears. Enter the IP address and
subnet mask.
Enter these in the form "xxx xxx xxx xxx". If you click Add in the TCP/IP address screen, the IP address and subnet mask are added to the list of IP address. The total number of IP addresses and subnet masks that can be set for each NIC are as follows: ・ Windows parameter file(Express): up to 16 ・ Windows parameter file: up to 4
Edit Select the IP address/subnet mask to be edited from the IP address group box and click Edit. The TCP/IP address screen appears. Edit the IP address/subnet mask.
Delete Select the IP address/subnet mask to be deleted from the IP address group box and click Delete. The IP address/subnet mask is deleted.
Default Gateway Add If you click Add, the following screen appears. So enter the gateway and
metric.
Enter these in the form "xxx xxx xxx xxx" in the Gateway. Enter numeric characters in Metric. This can be set in the range of "1-9999." The default value is "1." If you click Add, the gateway and metric are added to the list of Default gateway. The total number of gateways and metrics that can be added is as follows: ・ Windows parameter file(Express): up to 16 ・ Windows parameter file: up to 4
Edit Select the gateway/metric to be edited from the list of Default gateway and click Edit. The TCP/IP gateway address screen appears. Edit the gateway/metric.
Delete Select the gateway/metric to be deleted from the list of Default gateway and click Delete to delete the gateway/metric.

49
Note: When you select the Check the completion of a scenario by the communication with DPM
Client checkbox (Web Console Management view -> DPM Server icon -> Detail setting in Configuration menu -> General tab), the completion of the scenario may not be detected if the managed machine cannot communicate with the Management Server by the set IP address. Set IP address by which the machine can communicate with the Management Server. When you clear the Check the completion of a scenario by the communication with DPM Client checkbox, the completion of the scenario can be detected regardless of whether the machine can communicate with the Management Server or not.
In the case of Settings Internet Protocol(TCP/IPv6) screen
Settings Internet Protocol (TCP/IPv6) IP Setting You can set the IPv6 address, subnet prefix, gateway, and metrics. The
settings differ depending on whether they are obtained automatically or set manually.
Router Advertisement
If you select the Router Advertisement checkbox, the machine will receive Router Advertisement. This is not selected by default.
Acquire the IP Address Automatically
If you select this option button, the IPv6 address is obtained automatically. The option button is selected by default.
50
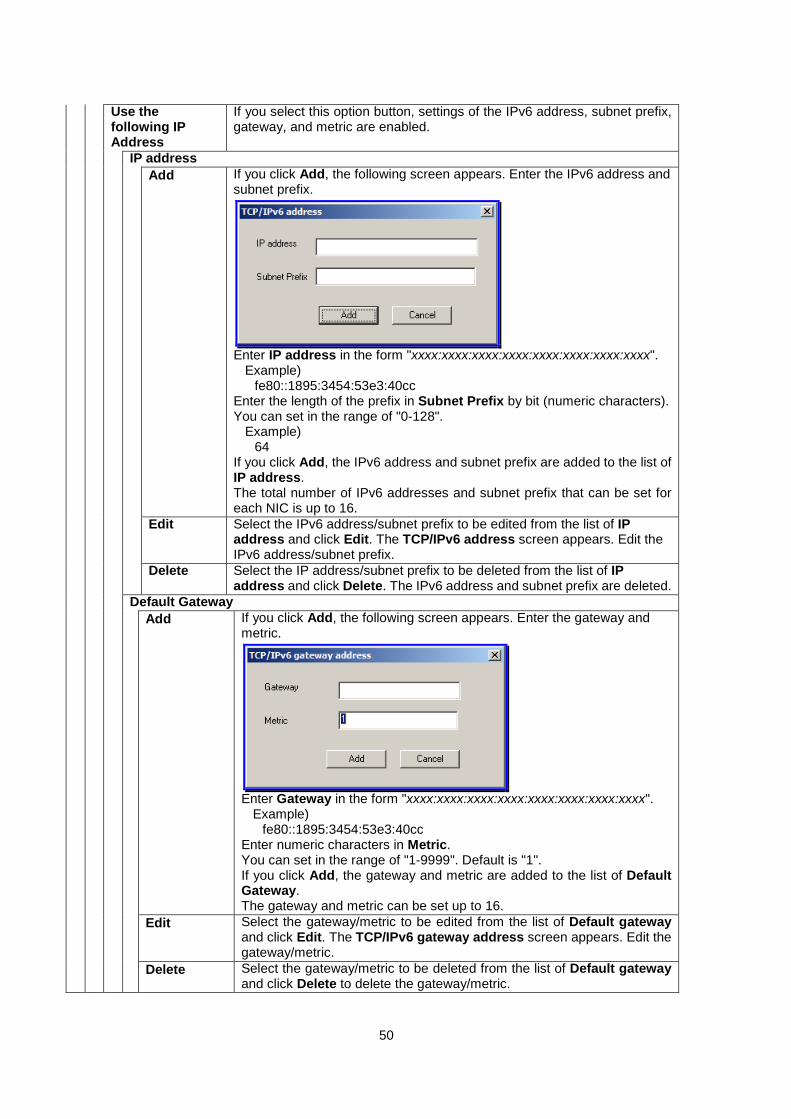
Use the
following IP Address
If you select this option button, settings of the IPv6 address, subnet prefix, gateway, and metric are enabled.
IP address Add If you click Add, the following screen appears. Enter the IPv6 address and
subnet prefix.
Enter IP address in the form "xxxx:xxxx:xxxx:xxxx:xxxx:xxxx:xxxx:xxxx".
Example) fe80::1895:3454:53e3:40cc
Enter the length of the prefix in Subnet Prefix by bit (numeric characters). You can set in the range of "0-128".
Example) 64
If you click Add, the IPv6 address and subnet prefix are added to the list of IP address. The total number of IPv6 addresses and subnet prefix that can be set for each NIC is up to 16.
Edit Select the IPv6 address/subnet prefix to be edited from the list of IP address and click Edit. The TCP/IPv6 address screen appears. Edit the IPv6 address/subnet prefix.
Delete Select the IP address/subnet prefix to be deleted from the list of IP address and click Delete. The IPv6 address and subnet prefix are deleted.
Default Gateway Add If you click Add, the following screen appears. Enter the gateway and
metric.
Enter Gateway in the form "xxxx:xxxx:xxxx:xxxx:xxxx:xxxx:xxxx:xxxx".
Example) fe80::1895:3454:53e3:40cc
Enter numeric characters in Metric. You can set in the range of "1-9999". Default is "1". If you click Add, the gateway and metric are added to the list of Default Gateway. The gateway and metric can be set up to 16.
Edit Select the gateway/metric to be edited from the list of Default gateway and click Edit. The TCP/IPv6 gateway address screen appears. Edit the gateway/metric.
Delete Select the gateway/metric to be deleted from the list of Default gateway and click Delete to delete the gateway/metric.

51
4) The screen for setting is displayed as the following. Set the DNS/WINS tab(DNS tab).
In the case of Settings Internet Protocol(TCP/IP) screen
52
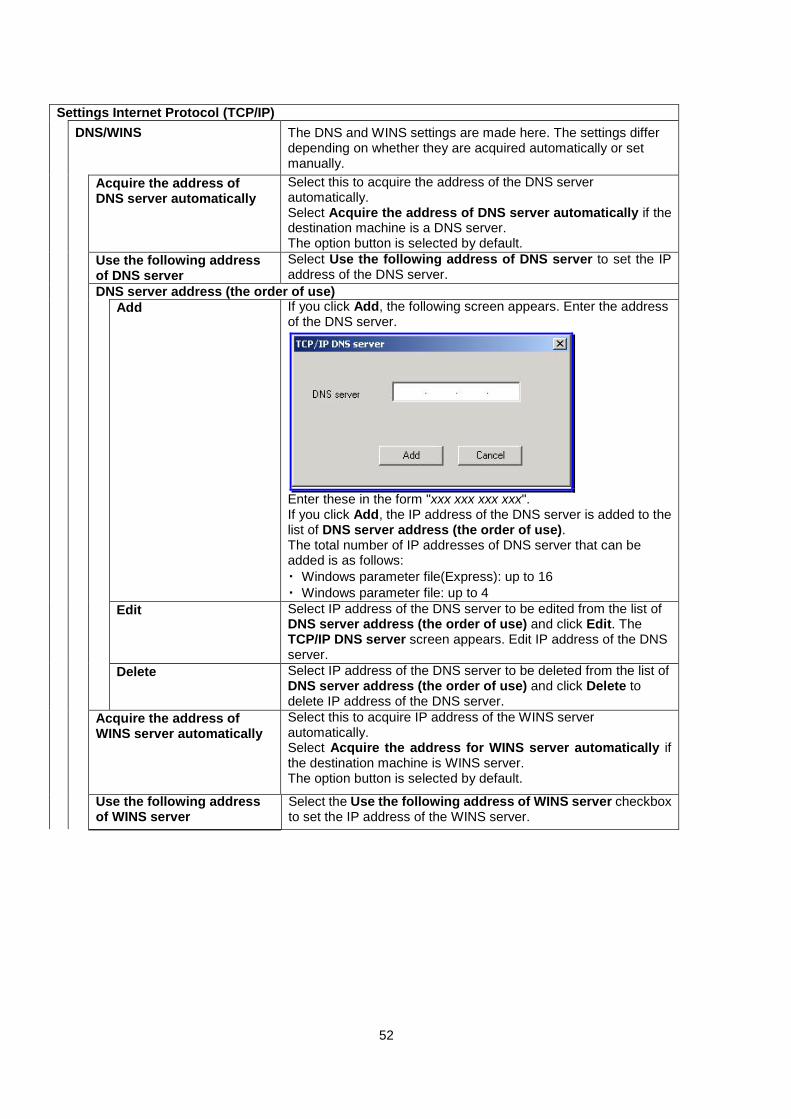
Settings Internet Protocol (TCP/IP) DNS/WINS The DNS and WINS settings are made here. The settings differ
depending on whether they are acquired automatically or set manually.
Acquire the address of DNS server automatically
Select this to acquire the address of the DNS server automatically. Select Acquire the address of DNS server automatically if the destination machine is a DNS server. The option button is selected by default.
Use the following address of DNS server
Select Use the following address of DNS server to set the IP address of the DNS server.
DNS server address (the order of use) Add If you click Add, the following screen appears. Enter the address
of the DNS server.
Enter these in the form "xxx xxx xxx xxx". If you click Add, the IP address of the DNS server is added to the list of DNS server address (the order of use). The total number of IP addresses of DNS server that can be added is as follows: ・ Windows parameter file(Express): up to 16 ・ Windows parameter file: up to 4
Edit Select IP address of the DNS server to be edited from the list of DNS server address (the order of use) and click Edit. The TCP/IP DNS server screen appears. Edit IP address of the DNS server.
Delete Select IP address of the DNS server to be deleted from the list of DNS server address (the order of use) and click Delete to delete IP address of the DNS server.
Acquire the address of WINS server automatically
Select this to acquire IP address of the WINS server automatically. Select Acquire the address for WINS server automatically if the destination machine is WINS server. The option button is selected by default.
Use the following address of WINS server
Select the Use the following address of WINS server checkbox to set the IP address of the WINS server.

53
WINS address (the order of use)
Add If you click Add, the following screen appears. So enter the address of WINS server.
Enter these in the form "xxx xxx xxx xxx". If you click Add, the IP address of the WINS server is added to the list of WINS address (the order of use). The total number of IP addresses of WINS server that can be added is as follows: ・Windows parameter file(Express): up to 16 ・Windows parameter file: up to 4
Edit Select IP address of the WINS server to be edited from the list of WINS address (the order of use) and click Edit. The TCP/IP WINS server screen appears. Edit the IP address of WINS server.
Delete Select IP address of the WINS server to be deleted from the list of WINS address (the order of use) and click Delete to delete IP address of the WINS server.
Note:
For Windows Server 2008 or Windows Vista, the WINS server address may not be set on the machine after the OS installation by disk duplication even if you specify it in the Windows parameter file (Express). Contact your sales or support representative for details.

54
In the case of Settings Internet Protocol(TCP/IPv6) screen
Settings Internet Protocol (TCP/IPv6) DNS The DNS settings can be set. The settings differ depending on
whether they are acquired automatically or set manually.
Acquire the address of DNS server automatically
Select this to acquire the address of the DNS server automatically. Select Acquire the address of DNS server automatically if the destination machine is DNS server. The option button is selected by default.
Use the following address of DNS server
Select Use the following address of DNS server to set IPv6 address of the DNS server.

55
DNS server address (the order of use)
Add If you click Add, the following screen appears. Enter IPv6 address of the DNS server.
Enter these in the form "xxxx:xxxx:xxxx:xxxx:xxxx:xxxx:xxxx:xxxx".
Example) fe80::1895:3454:53e3:40cc
If you click Add, IPv6 address of the DNS server is added to the list of DNS server address (the order of use). The total number of IPv6 addresses of the DNS server that can be added is up to 16.
Edit Select IPv6 address of the DNS server to be edited from the list of DNS server address (the order of use) and click Edit. The TCP/IPv6 DNS server screen appears. Edit IPv6 address of the DNS server.
Delete Select IPv6 address of the DNS server to be deleted from the list of DNS server address (the order of use) and click Delete to delete IPv6 address of the DNS server.

56
5) In the case of Disk Duplication Data File (Windows parameter file), set ScopeID on Settings Internet
Protocol (TCP/IP) screen.
Settings Internet Protocol (TCP/IP) Scope ID Set the scope ID.
The scope ID cannot be set for each NIC. If the internet protocol (TCP/IP) scope ID has been set for one NIC, the previously set scope ID is displayed, even if the Settings Internet Protocol (TCP/IP) screen is opened for the internet protocol (TCP/IP) of another NIC. This is optional.
OK Saves the setting of Settings Internet Protocol (TCP/IP) you set in 3)-5) and returns to the previous window.
Cancel Returns to the previous window without saving the settings of Settings Internet Protocol (TCP/IP) you set in 3)-5).

57
(10) In the case of the disk duplication data file (Windows parameter file(Express)), click Next after setting the
Network Setup screen. The following screen appears. Set the each item.
Command Information Command to be
executed at the end of disk copy
Displays the list of commands to be executed when OS installation by disk duplication is finished. Commands are executed in the displayed order(from the top).
Add If you click Add, the following screen appears. Enter the command to be executed.
1023 characters or less can be entered. Alphanumeric characters and symbols can be entered. 260 characters or less are recommended because the entered command is executed on the Windows OS. (Even if you enter 1023 characters, the command may not be executed by OS.)
Example) When you execute a command from the command prompt: cmd /c mkdir D:\DPM
Click Add to add the command to the list of Command to be executed at the end of disk copy. You can add the command up to 499.

58
Edit Select the command to be edited in the list of Command to be executed at the end of disk copy and click Edit. The Command detail screen appears. Edit the command.
Delete Select the command to be deleted in the list of Command to be executed at the end of disk copy and click Delete. The command is deleted.
Up Select the command whose order is to be changed in the list of Command to be executed at the end of disk copy and click Up. The command is moved up by one.
Down Select the command whose order is to be changed in the list of Command to be executed at the end of disk copy and click Down. The command is moved down by one.
(11) After setting in the Command information screen, click Finish.
In the case of the disk duplication data file (Windows parameter file), the Command information screen does not appear. After setting in the Network Setup screen, click Finish.
(12) The following screen appears. Check the content and click I Accept.
(13) The Specify a file screen appears. Click OK.
Disk duplication data files(three files) are created as the following. ・ MAC address.inf ・ MAC address.bat ・ MAC address.xml

59
Note:
The file is named after MAC address, which was entered automatically. The file name cannot be modified.
If the created disk duplication data files are unnecessary, delete them manually. (You cannot delete them from Delete registered data in Image Builder.)
The default saved folder of disk duplication data files is as the following. ・ In the case of the disk duplication data file (Windows parameter file(Express)):
<Folder for Image(C:\Deploy)>\AnsFile\ExpressSysprep ・ In the case of the disk duplication data file (Windows parameter file):
<Folder for Image(C:\Deploy)>\AnsFile\sysprep
2.Creating a Disk Duplication Data File (Windows Parameter File) This section describes the procedure for creating the disk duplication data file (Windows parameter file).
(1) Log on to the machine, on which Image Builder is installed, by a user with administrator authority.
When you use Image Builder on the Management Server, log on by the user who installed DPM Server.
(2) From Start menu, select All Programs -> DeploymentManager -> Image Builder. When you are logging on to the OS by the user except Administrator, execute it as an administrator.
(3) Image Builder is launched. Click Configure setup parameter file.
(4) The following screen appears. Select Windows Parameter File and click OK.

60
(5) The following screen appears. From the File menu, click Create new disk copy information files for
2008/Vista or later(B).
(6) The subsequent procedure is the same as the Windows parameter file(Express). See "1. Creating a Disk Duplication Data File (Windows parameter file(Express))."
1.4.2. Batch Creation of Disk Duplication Data Files (Windows) This section describes batch creation of disk duplication data files when executing OS installation by disk duplication on two or more managed machines (Windows OS).
1.4.2.1. Windows Parameter File This section describes batch creation of disk duplication data files (Windows parameter file). Prepare a disk duplication data file, which is the base for creating two or more disk duplication data files.
Note: For details on how to create a disk duplication data file, see Section 1.4.1, "Creating a Disk
Duplication Data File (Windows)."
(1) Log on to the machine, on which Image Builder is installed, by a user with administrator authority. When you use Image Builder on the Management Server, log on by the user who installed DPM Server.
(2) From Start menu, select All Programs -> DeploymentManager -> Image Builder. When you are logging on to the OS by the user except Administrator, execute it as an administrator.
(3) Image Builder is launched. Click Configure setup parameter file.
(4) The Select parameter screen appears. Select Windows parameter file and click OK.

61
(5) The Create Setup Parameter File screen appears. From the Option menu, select Creation of multiple
disk copy information files assistant -> Output disk duplication data file in CSV format (I). (6) The Open screen appears. Specify the prepared disk duplication data file and open it. (7) Specify the CSV file name to save and click OK. The CSV-format disk duplication data file is created and
stored in <Folder for Image>\AnsFile\Sysprep\csv.
Note: The CSV file created here is hereinafter described as "template file".
(8) Edit the template file created in (7). Open the CSV file created in (7) under <Folder for
Image>\AnsFile\Sysprep\csv. (9) Open and edit the created CSV-format template file under <Folder for Image>\AnsFile\Sysprep\csv.
Each line in the template file is as follows:
1) 1st line Name of the file that is the basis for the template file.
2) 2nd line Items in the disk duplication data file that can be specified during batch creation.
3) 3rd line Parameters specified by the file that is the basis for the template file.
4) 4th line and later Fill in the items corresponding to the 2nd line to perform batch creation. Each line corresponds to one disk duplication data file.
Note: Do not modify from the1st line to the 3rd line. Any modification will make batch creation using
the template file impossible.

62
See the table below for details on configuring the 4th line and later.
Note: If you edit the file as a text file, items are separated by commas ( , ). Let each item of the 4th
line and later correspond with that of the 2nd line. Do not include spaces before or after items when editing the 4th line and on in the CSV file. Do
not use commas ( , ) or double quotes ( " ) in the items. This might prevent successful creation of the disk duplication data file.
If the format for each item in the 4th line is not indicated in the table below, see Section 1.4.1, "Creating a Disk Duplication Data File (Windows)" and follow the description. If the format for each item is indicated in the table below. Each item is case-sensitive.
The DNS/WINS for each LAN board corresponds to the DNS/WINS set for each LAN board in the file, which is the basis for the template file. When creating the file that is the basis for the template file, the internet protocols (TCP/IP) equal to the number of LAN boards are added to the Protocol list to be added in the Protocol Setting screen. In the DNS/WINS settings, items line up as LAN board 1, LAN board 2, LAN board 3, and LAN board 4 from the above of the list.
Example) Protocol list to be added is as follows.
Apple Talk protocol Internet Protocol (TCP/IP) 00-00-00-00-00-00 Internet Protocol (TCP/IP) 00-00-00-00-00-11 Internet Protocol (TCP/IP) AutoDetect1 Internet Protocol (TCP/IP) AutoDetect2
LAN board 1 LAN board 2 LAN board 3 LAN board 4

63
Items in the 2nd line Explanation of input items in the
4th line and later When items in the 4th line and later is blank spaces, how to handle in the batch creation at Step (11).
Computer Name (Required)
Input the computer name. Error.
MAC Address (Displayed only for disk duplication data file.) (Required)
Input the MAC address of the machine.
Error.
User Name Input the user name. Same value as in parameter of 3rd line in template file.
Company name Input the company name. Same value as in parameter of 3rd line in template file.
Product Key Input product key for Retail Version or OEM Version other than NEC. For NEC OEM Version, NEC OEM is input (Enter a space between NEC and OEM). Note that if the product key in the 3rd line of the template file is not NEC OEM, an error will be returned during creation of a disk duplication information file.
Same value as in parameter of 3rd line in template file.
Administrator Password Input administrator password in plain text.
Same value as in parameter of 3rd line in template file.
Workgroup Input the workgroup name. Note that if Domain, Domain Account Name, or Domain Account Password is input when the workgroup is input, an error will be returned during creation of the disk duplication data file.
If Domain is not input, the same value as the parameter on the 3rd line of the template file is used.
Domain Input the domain name. However, when both a domain and workgroup are entered, an error will be returned during creation of a disk duplication data file.
If Workgroup is not input, the same value as the parameter on the 3rd line of the template file is used.
Domain's Account Name Input the domain's account name. Note that if Workgroup is input when the domain is input, an error will be returned during creation of a disk duplication data file.
If Workgroup, Domain, and Domain Account Name are not input, the same value as the parameter on the 3rd line of the template file is used.
Domain's Account Password
Input domain's account password in plain text. Note that if Workgroup is input when the domain is input, an error will be returned during creation of a disk duplication data file.
If Workgroup, Domain, Domain Account Name, and Domain Account Password are not input, the same value as the parameter on the 3rd line of the template file is used.
NIC1 Input the first LAN board If the NIC is specified, input the MAC address. If the NIC is not specified, input AutoDetect.
Set as AutoDetect1, and the IP address for NIC1 is Automatically Acquire IP Address. The values of IP address1 (NIC1)-Metric4 (NIC1) are not reflected.

64
Items in 2nd line Explanation of input items in the
4th line and later When items in the 4th line and later is blank spaces, how to handle in the batch creation at Step (11).
IP Address 1 (NIC1)
Input the first IP address in LAN board 1. DHCP is entered if automatically acquired.
Set to Acquire the address of DNS server automatically. The values of SubnetMask1 (NIC1)-SubnetMask4 (NIC1) are not reflected.
SubnetMask1 (NIC1)
Input the first subnet mask in LAN board 1.
Set to same value as the data in the file which is the basis of the template file only when IP address 1 (NIC1) has been input. No setting in all other cases.
IP Address 2 (NIC1) Input the second IP address in LAN board 1.
No setting.
SubnetMask2 (NIC1) Input the second subnet mask in LAN board 1.
Set to same value as the data in the file which is the basis of the template file only when IP address 2 (NIC1) has been input. No setting in all other cases.
IP Address 3 (NIC1) Input the third IP address in LAN board 1.
No setting.
SubnetMask3 (NIC1) Input the third subnet mask in LAN board 1.
Set to same value as the data in the file which is the basis of the template file only when IP address 3 (NIC1) has been input. No setting in all other cases.
IP Address 4 (NIC1) Input the fourth IP address in LAN board 1.
No setting.
SubnetMask4 (NIC1) Input the fourth subnet mask in LAN board 1.
Set to same value as the data in the file which is the basis of the template file only when IP address 4 (NIC1) has been input. No setting in all other cases.
Gateway1 (NIC1) Input the first gateway in LAN board 1. No setting. Metric1 (NIC1) Input the first metric in LAN board 1. Set to 1 only when Gateway1
(NIC1) has already been input. Gateway2 (NIC1) Input the second gateway in LAN
board 1. No setting.
Metric2 (NIC1) Input the second metric in LAN board 1.
Set to 1 only when Gateway2 (NIC1) has already been input.
Gateway3 (NIC1) Input the third gateway in LAN board 1.
No setting.
Metric3 (NIC1) Input the third metric in LAN board 1. Set to 1 only when Gateway3 (NIC1) has already been input.
Gateway4 (NIC1) Input the fourth gateway in LAN board 1.
No setting.

65
Items in 2nd line Explanation of input items in the
4th line and later When items in the 4th line and later is blank spaces, how to handle in the batch creation at Step (11).
Metric4(NIC1) Input the fourth metric in LAN board 1. Set to 1 only when Gateway4 (NIC1) has already been input.
NIC2 Input the MAC address of the second LAN board or AutoDetect.
No setting. The values of IP address 1 (NIC2)-Metric4 (NIC2) are not reflected.
IP Address 1 (NIC2) Input the first IP address of LAN board 2 if LAN board 2 has been set. DHCP is entered if automatically acquired.
Set to Automatically Acquire IP Address. The values of SubnetMask1 (NIC2)-SubnetMask4 (NIC2) are not reflected.
SubnetMask1(NIC2) Input the first subnet mask in LAN board 2.
Set to same value as the data in the file which is the basis of the template file only when IP address 1 (NIC2) has been input. No setting in all other cases.
IP Address 2 (NIC2) Input the second IP address in LAN board 2.
No setting.
SubnetMask2(NIC2) Input the second subnet mask in LAN board 2.
Set to same value as the data in the file which is the basis of the template file only when IP address 2 (NIC2) has been input. No setting in all other cases.
IP Address 3 (NIC2) Input the third IP address in LAN board 2.
No setting.
SubnetMask3(NIC2) Input the third subnet mask in LAN board 2.
Set to same value as the data in the file which is the basis of the template file only when IP address 3 (NIC2) has been input. No setting in all other cases.
IP Address 4 (NIC2) Input the fourth IP address in LAN board 2.
No setting.
SubnetMask4(NIC2) Input the fourth subnet mask in LAN board 2.
Set to same value as the data in the file which is the basis of the template file only when IP address 4 (NIC2) has been input. No setting in all other cases.
Gateway1(NIC2) Input the first gateway in LAN board 2. No setting. Metric1(NIC2) Input the first metric in LAN board 2. Set to 1 only when Gateway1
(NIC2) has already been input. Gateway2(NIC2) Input the second gateway in LAN
board 2. No setting.
Metric2(NIC2) Input the second metric in LAN board 2.
Set to 1 only when Gateway2 (NIC2) has already been input.
Gateway3(NIC2) Input the third gateway in LAN board 2.
No setting.
Metric3(NIC2) Input the third metric in LAN board 2. Set to 1 only when Gateway3 (NIC2) has already been input.

66
Items in 2nd line Explanation of input items in the
4th line and later When items in the 4th line and later is blank spaces, how to handle in the batch creation at Step (11).
Gateway4(NIC2) Input the fourth gateway in LAN board 2.
No setting.
Metric4(NIC2) Input the fourth metric in LAN board 2. Set to 1 only when Gateway4 (NIC2) has already been input.
NIC3 Input the MAC address of the third LAN board or AutoDetect.
No setting. The values of IP address 1 (NIC3)-Metric4 (NIC3) are not reflected.
IP address 1(NIC3) Input the first IP address of LAN board 3 if LAN board 3 has been set. DHCP is entered if automatically acquired.
Set to Automatically Acquire IP Address. The values of SubnetMask1 (NIC3)-SubnetMask4 (NIC3) are not reflected.
SubnetMask1 (NIC3)
Input the first subnet mask in LAN board 3.
Set to same value as the data in the file which is the basis of the template file only when IP address 1 (NIC3) has been input. No setting in all other cases.
IP address 2(NIC3) Input the second IP address in LAN board 3.
No setting.
SubnetMask2(NIC3) Input the second subnet mask in LAN board 3.
Set to same value as the data in the file which is the basis of the template file only when IP address 2 (NIC3) has been input. No setting in all other cases.
IP address 3(NIC3) Input the third IP address in LAN board 3.
No setting.
SubnetMask3(NIC3) Input the third subnet mask in LAN board 3.
Set to same value as the data in the file which is the basis of the template file only when IP address 3 (NIC3) has been input. No setting in all other cases.
IP address 4(NIC3) Input the fourth IP address in LAN board 3.
No setting.
SubnetMask4(NIC3) Input the fourth subnet mask in LAN board 3.
Set to same value as the data in the file which is the basis of the template file only when IP address 4 (NIC3) has been input. No setting in all other cases.
Gateway1(NIC3) Input the first gateway in LAN board 3. No setting. Metric1(NIC3) Input the first metric in LAN board 3. Set to 1 only when Gateway1
(NIC3) has already been input.
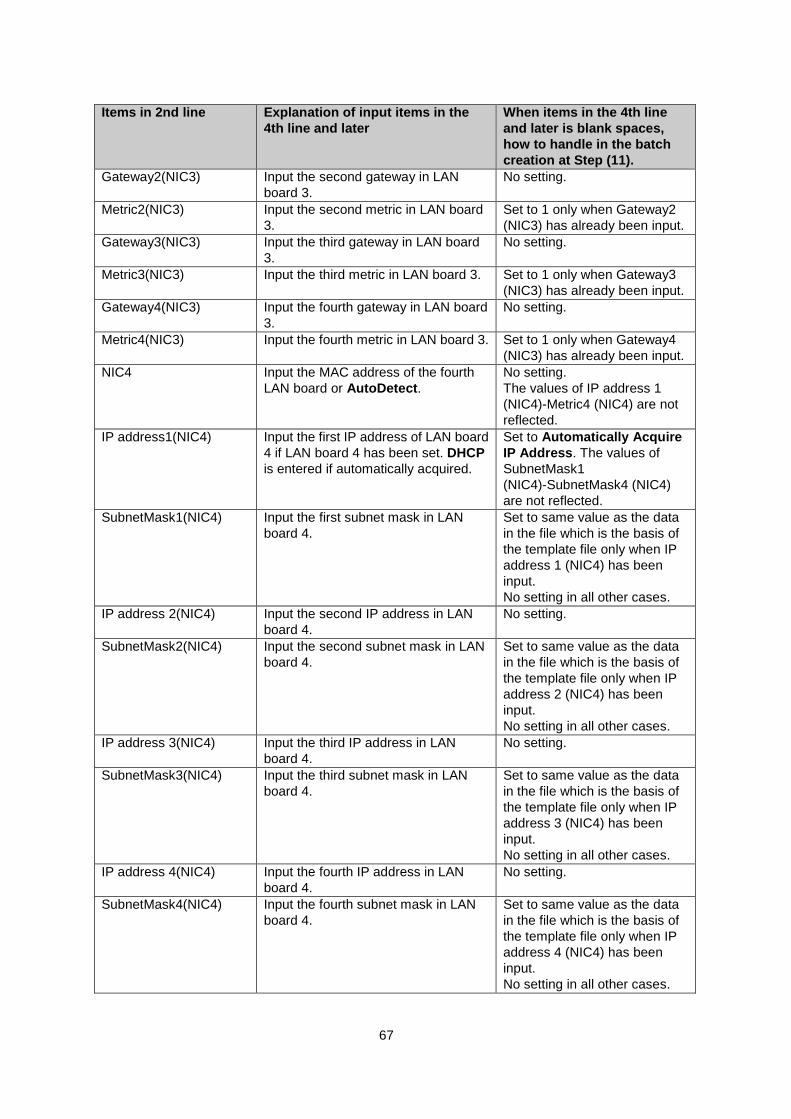
67
Items in 2nd line Explanation of input items in the
4th line and later When items in the 4th line and later is blank spaces, how to handle in the batch creation at Step (11).
Gateway2(NIC3) Input the second gateway in LAN board 3.
No setting.
Metric2(NIC3) Input the second metric in LAN board 3.
Set to 1 only when Gateway2 (NIC3) has already been input.
Gateway3(NIC3) Input the third gateway in LAN board 3.
No setting.
Metric3(NIC3) Input the third metric in LAN board 3. Set to 1 only when Gateway3 (NIC3) has already been input.
Gateway4(NIC3) Input the fourth gateway in LAN board 3.
No setting.
Metric4(NIC3) Input the fourth metric in LAN board 3. Set to 1 only when Gateway4 (NIC3) has already been input.
NIC4 Input the MAC address of the fourth LAN board or AutoDetect.
No setting. The values of IP address 1 (NIC4)-Metric4 (NIC4) are not reflected.
IP address1(NIC4) Input the first IP address of LAN board 4 if LAN board 4 has been set. DHCP is entered if automatically acquired.
Set to Automatically Acquire IP Address. The values of SubnetMask1 (NIC4)-SubnetMask4 (NIC4) are not reflected.
SubnetMask1(NIC4) Input the first subnet mask in LAN board 4.
Set to same value as the data in the file which is the basis of the template file only when IP address 1 (NIC4) has been input. No setting in all other cases.
IP address 2(NIC4) Input the second IP address in LAN board 4.
No setting.
SubnetMask2(NIC4) Input the second subnet mask in LAN board 4.
Set to same value as the data in the file which is the basis of the template file only when IP address 2 (NIC4) has been input. No setting in all other cases.
IP address 3(NIC4) Input the third IP address in LAN board 4.
No setting.
SubnetMask3(NIC4) Input the third subnet mask in LAN board 4.
Set to same value as the data in the file which is the basis of the template file only when IP address 3 (NIC4) has been input. No setting in all other cases.
IP address 4(NIC4) Input the fourth IP address in LAN board 4.
No setting.
SubnetMask4(NIC4) Input the fourth subnet mask in LAN board 4.
Set to same value as the data in the file which is the basis of the template file only when IP address 4 (NIC4) has been input. No setting in all other cases.

68
Items in 2nd line Explanation of input items in
the 4th line and later When items in the 4th line and later is blank spaces, how to handle in the batch creation at Step (11).
Gateway1(NIC4) Input the first gateway in LAN board 4.
No setting.
Metric1(NIC4) Input the first metric in LAN board 4.
Set to 1 only when Gateway1 (NIC4) has already been input.
Gateway2(NIC4) Input the second gateway in LAN board 4.
No setting.
Metric2(NIC4) Input the second metric in LAN board 4.
Set to 1 only when Gateway2 (NIC4) has already been input.
Gateway3(NIC4) Input the third gateway in LAN board 4.
No setting.
Metric3(NIC4) Input the third metric in LAN board 4.
Set to 1 only when Gateway3 (NIC4) has already been input.
Gateway4(NIC4) Input the fourth gateway in LAN board 4.
No setting.
Metric4(NIC4) Input the fourth metric in LAN board 4.
Set to 1 only when Gateway4 (NIC4) has already been input.
(10) Save the CSV file after editing it. (11) Select Creation of multiple disk copy information files assistant -> Create multiple disk duplication
data files in Option menu of the Create Setup Parameter File screen. (12) When the Open File screen appears, select the CSV file saved at Step (10). The Result of creating
multiple information files screen appears, showing the results of the creation. One disk duplication data file is created for each computer registered in the CSV file.
Note:
If "Data file creation failed" is displayed in the Batch Data File Creation Results screen, click Error Information. Detailed information about errors is displayed. Correct the CSV file accordingly and perform the operation again.
(13) Click OK. Batch creation of disk duplication data files is completed.
Note: If the created CSV files or disk duplication data files are unnecessary, delete them manually. (You
cannot delete them from Delete registered data in Image Builder.)
1.4.2.2. Windows Parameter File(Express) This section describes batch creation of disk duplication data files (Windows parameter file(Express)). Prepare a disk duplication data file (Windows parameter file(Express)) which is the base for creating two or more disk duplication data files (Windows parameter file(Express)).
Note: For details on how to create a disk duplication data file, see Section 1.4.1.2, "Creating a Disk
Duplication Data File (Windows Server 2008/Windows Vista or Later)."
(1) Log on to the machine, on which Image Builder is installed, by a user with administrator authority. When you use Image Builder on the Management Server, log on by the user who installed DPM Server.

69
(2) From Start menu, select All Programs -> DeploymentManager -> Image Builder.
When you are logging on to the OS by the user except Administrator, execute it as an administrator.
(3) Image Builder is launched. Click Configure setup parameter file.
(4) The Select parameter screen appears. Select Windows parameter file(Express) and click OK.
(5) The Create Setup Parameter File screen appears. From the Option menu, select Creation of multiple disk copy information files assistant -> Output disk duplication data file in CSV format (I).
(6) The Open screen appears. Specify the prepared disk duplication data file (Windows parameter
file(Express)) and open it. (7) Specify the CSV file name to save and click OK. The CSV-format disk duplication data file is created and
stored in <Folder for Image>\AnsFile\ExpressSysprep\csv.
Note: The CSV file created here is hereinafter described as "template file".
(8) Edit the template file created in (7). Open the CSV file created in (7) under <Folder for
Image>\AnsFile\ExpressSysprep\csv. (9) Open and edit the created CSV-format template file
under <Folder for Image>\AnsFile\ExpressSysprep\csv. Each line in the template file is as follows:
1) 1st line Name of the file that is the basis for the template file.
2) 2nd line Items in the disk duplication data file that can be specified during batch creation.
3) 3rd line Parameters specified by the file that is the basis for the template file.
4) 4th line and later Fill in the items corresponding to the 2nd line to perform batch creation. Each line corresponds to one disk duplication data file.
Note: Do not modify from the 1st line to the 3rd line. When you change the line, the batch
creation cannot be functioned. Also check if "," is not included in the parameter of the 3rd line.
See the table below for details on configuring the 4th line and later.

70
Note:
If you edit the file as a text file, items are separated by commas ( , ). Let each item of the 4th line and later correspond with that of the 2nd line.
Do not include spaces before or after items when editing the 4th line and on in the CSV file. Do not use commas ( , ) or double quotes ( " ) in the items. This might prevent successful creation of the disk duplication data file.
If the format for each item in the 4th line is not indicated in the table below, see Section 1.4.1.2, "Creating a Disk Duplication Data File (Windows Server 2008/Windows Vista or Later)" and follow the description. If the format for each item is indicated in the table below. Each item is case-sensitive.
Items in the 2nd line Explanation of input items in the
4th line and later When items in the 4th line and later is blank spaces, how to handle in the batch creation at Step (11).
Computer Name (Required)
Input the computer name. Error.
MAC Address (Displayed only for disk duplication data file.) (Required)
Input the MAC address of the machine.
Error.
User Name Input the user name. Same value as in parameter of 3rd line in template file.
Company name Input the company name. Same value as in parameter of 3rd line in template file.
Product Key Input product key. Same value as in parameter of 3rd line in template file.
Administrator Password Input administrator password in plain text.
Same value as in parameter of 3rd line in template file.
Workgroup Input the workgroup name. Note that if Domain, Domain Account Name, or Domain Account Password is input when the workgroup is input, an error will be returned during creation of the disk duplication data file.
If Domain is not input, the same value as the parameter on the 3rd line of the template file is used.
Domain Input the domain name. However, when both a domain and workgroup are entered, an error will be returned during creation of a disk duplication data file.
If Workgroup is not input, the same value as the parameter on the 3rd line of the template file is used.
Domain's Account Name Input the domain's account name. Note that if Workgroup is input when the domain is input, an error will be returned during creation of a disk duplication data file.
If Workgroup, Domain, and Domain Account Name are not input, the same value as the parameter on the 3rd line of the template file is used.
Domain's Account Password
Input domain's account password in plain text. Note that if Workgroup is input when the domain is input, an error will be returned during creation of a disk duplication data file.
If Workgroup, Domain, Domain Account Name, and Domain Account Password are not input, the same value as the parameter on the 3rd line of the template file is used.
NIC1 Input 1st LAN board. If the NIC is specified, input the MAC address. If the NIC is not specified, input "AutoDetect".
Set as AutoDetect1, and the IP address for NIC1 is " IP Address is automatically obtained ". The values of IP address1(NIC1)- IPv6DNS16(NIC1) are not reflected.

71
Items in 2nd line Explanation of input items in the
4th line and later When items in the 4th line and later is blank spaces, how to handle in the batch creation at Step (11).
IP Address1(NIC1) Input 1st IP address in LAN board 1. Input "DHCP" if automatically obtained.
Set to "IP address is automatically obtained". The values of SubnetMask1(NIC1) - SubnetMask16 (NIC1) are not reflected.
SubnetMask1 (NIC1)
Input 1st subnet mask in LAN board 1.
Set to same value as the data in the file, which is the basis of the template file only when IP address 1 (NIC1) is input. No setting in all other cases.
IP Address 2(NIC1) - IP Address 16(NIC1)
Input 2nd - 16th IP address in LAN board 1.
No setting.
SubnetMask2 (NIC1) - SubnetMask16 (NIC1)
Input 2nd - 16th subnet mask in LAN board 1.
Set to same value as the data in the file which is the basis of the template file only when corresponding IP address(NIC1) is input. No setting in all other cases.
Gateway1(NIC1) - Gateway16(NIC1)
Input 1st - 16th gateway in LAN board 1.
No setting.
Metric1(NIC1) - Metric16(NIC1)
Input 1st - 16th metric in LAN board 1.
Set to 1 only when corresponding Gateway(NIC1) is input.
DNS1(NIC1) Input 1st DNS address in LAN board 1. Input "DHCP" if automatically obtained.
No setting.
DNS2(NIC1) - DNS16(NIC1)
Input 2nd - 16th DNS address in LAN board 1.
No setting.
WINS1(NIC1) Input 1st WINS address in LAN board 1. Input "DHCP" if automatically obtained.
No setting.
WINS2(NIC1) - WINS16(NIC1)
Input 2nd - 16th WINS address in LAN board 1.
No setting.
EnableIPv6(NIC1) When IPv6 address of LAN board1 is used, input "YES". When IPv6 address is not used, input "NO". When "NO" is input, even if EnableRouterDiscovery(NIC1) -IPv6DNS16(NIC1) are specified, they are ignored.
Set to"IPv6 address is not used".
EnableRouterDiscovery(NIC1)
When Router Advertisement of LAN board1 is received, input "YES". When Router Advertisement is not received, input "NO".
Set to "Router Advertisement is not received".

72
Items in 2nd line Explanation of input items in the
4th line and later When items in the 4th line and later is blank spaces, how to handle in the batch creation at Step (11).
IPv6Address1 (NIC1)
Input 1st IPv6 address in LAN board 1. Input "DHCP" if automatically obtained.
Set to "IPv6 address is automatically obtained". The values of IPv6SubnetMask1 (NIC1) - IPv6SubnetMask16 (NIC1) are not reflected.
IPv6SubnetMask1 (NIC1)
Input 1st IPv6 subnet mask in LAN board 1.
Set to same value as the data in the file which is the basis of the template file only when IP address1(NIC1) is input. No setting in all other cases.
IPv6Address2 (NIC1) - IPv6Address16 (NIC1)
Input 2nd - 16th IPv6 address in LAN board 1.
No setting.
IPv6SubnetMask2 (NIC1) - IPv6SubnetMask16(NIC1)
Input 2nd - 16th IPv6 subnet mask in LAN board 1.
Set to same value as the data in the file which is the basis of the template file only when corresponding IPv6 address (NIC1) is input. No setting in all other cases.
Pv6Gateway1(NIC1) - IPv6Gateway16 (NIC1)
Input 1st - 16th IPv6 gateway in LAN board 1.
No setting.
IPv6Metric1(NIC1) - IPv6Metric16(NIC1)
Input 1st - 16th IPv6 metric in LAN board 1.
Set to 1 only when corresponding Gateway(NIC1) is input.
IPv6DNS1(NIC1) Input 1st IPv6 DNS address in LAN board 1. Input "DHCP" if automatically obtained.
No setting.
IPv6DNS2(NIC1) - IPv6DNS16(NIC1)
Input 2nd - 16th IPv6 DNS address in LAN board 1.
No setting.
NIC2 Input MAC address of 2nd LAN board or "AutoDetect".
No setting. The values of IP address1 (NIC2)- IPv6DNS16(NIC2) are not reflected.

73
Items in 2nd line Explanation of input items in the
4th line and later When items in the 4th line and later is blank spaces, how to handle in the batch creation at Step (11).
IP Address 2(NIC2) - IP Address 16(NIC2)
Input 2nd - 16th IP address in LAN board 2.
No setting.
SubnetMask2(NIC2) - SubnetMask16 (NIC2)
Input 2nd - 16th subnet mask in LAN board 2.
Set to same value as the data in the file, which is the basis of the template file only when corresponding IP address(NIC2) is input. No setting in all other cases.
Gateway1(NIC2) - Gateway16(NIC2)
Input 1st - 16th gateway in LAN board 2.
No setting.
Metric1(NIC2) - Metric16(NIC2)
Input 1st - 16th metric in LAN board 2.
Set to 1 only when corresponding Gateway(NIC2) is input.
DNS1(NIC2) Input 1st DNS address in LAN board 2. Input "DHCP" if automatically obtained.
No setting.
DNS2(NIC2) - DNS16(NIC2)
Input 2nd - 16th DNS address in LAN board 2.
No setting.
WINS1(NIC2) Input 1st WINS address in LAN board 2. Input "DHCP" if automatically obtained.
No setting.
WINS2(NIC2) - WINS16(NIC2)
Input 2nd - 16th WINS address in LAN board 2.
No setting.
EnableIPv6(NIC2) When IPv6 address of LAN board 2 is used, input "YES". When IPv6 address is not used, input "NO". When "NO" is input, even if EnableRouterDiscovery(NIC2) -IPv6DNS16(NIC2) are specified, they are ignored.
Set to"IPv6 address is not used".
EnableRouterDiscovery(NIC2)
When Router Advertisement of LAN board 2 is received, input "YES". When Router Advertisement is not received, input "NO".
Set to "Router Advertisement is not received".

74
Items in 2nd line Explanation of input items in the 4th
line and later When items in the 4th line and later is blank spaces, how to handle in the batch creation at Step (11).
IPv6Address1 (NIC2)
Input 1st IPv6 address in LAN board 2. Input "DHCP" if automatically obtained.
Set to "IPv6 address is automatically obtained". The values of IPv6SubnetMask1 (NIC2) - IPv6SubnetMask16 (NIC2) are not reflected.
IPv6SubnetMask1 (NIC2)
Input 1st IPv6 subnet mask in LAN board 2.
Set to same value as the data in the file which is the basis of the template file only when IP address1(NIC2) is input. No setting in all other cases.
IPv6Address2 (NIC2) - IPv6Address16 (NIC2)
Input 2nd - 16th IPv6 address in LAN board 2.
No setting.
IPv6SubnetMask2 (NIC2) - IPv6SubnetMask16 (NIC2)
Input 2nd - 16th IPv6 subnet mask in LAN board 2.
Set to same value as the data in the file which is the basis of the template file only when corresponding IPv6 address (NIC2) is input. No setting in all other cases.
IPv6Gateway1 (NIC2) - IPv6Gateway16 (NIC2)
Input 1st - 16th IPv6 gateway in LAN board 2.
No setting.
IPv6Metric1(NIC2) - IPv6Metric16(NIC2)
Input 1st - 16th IPv6 metric in LAN board 2.
Set to 1 only when corresponding Gateway(NIC2) is input.
IPv6DNS1(NIC2) Input 1st IPv6 DNS address in LAN board 2. Input "DHCP" if automatically obtained.
No setting.
IPv6DNS2(NIC2) - IPv6DNS16(NIC2)
Input 2nd - 16th IPv6 DNS address in LAN board 2.
No setting.
NIC3 - NIC8 Same description with NIC2. Input each item replacing with the above description.
Same description with NIC2. Enter each item replacing with the above description.
CMD1 - CMD499 Input the command, which is executed after completion of OS installation by disk duplication.
No setting.
(10) Save the CSV file after editing it. (11) Select Creation of multiple disk copy information files assistant -> Create multiple disk duplication
data files in Option menu of the Create Setup Parameter File screen. (12) When the Open File screen appears, select the CSV file saved at Step (10). The Result of creating
multiple information files screen appears, showing the results of the creation. One disk duplication data file is created for each computer registered in the CSV file.

75
Note: If "Data file creation failed" is displayed in the Batch Data File Creation Results screen, click Error
Information. Detailed information about errors is displayed. Correct the CSV file accordingly and perform the operation again.
(13) Click OK. Batch creation of disk duplication data files is completed.
Note: If the created CSV files or disk duplication data files (Windows parameter file(Express)) are
unnecessary, delete them manually. (You cannot delete them from Delete registered data in Image Builder.)
1.4.3. Creating a Disk Duplication Data File (Linux) This section describes how to create a disk duplication data file for configuring individual machines when executing OS installation by disk duplication on Linux. Create the disk duplication data file by Image Builder on the Management Server or Image Builder (Remote Console). 1. Creating a Disk Duplication Data File
This section describes how to create a new disk duplication data file. (1) Log on to the machine, on which Image Builder is installed, by a user with administrator authority.
When you use Image Builder on the Management Server, log on by the user who installed DPM Server.
(2) From Start menu, select All Programs -> DeploymentManager -> Image Builder. When you are logging on to the OS by the user except Administrator, execute it as an administrator.
(3) Image Builder is launched. Click Configure setup parameter file.
(4) The following screen appears. Select Linux disk copy parameter file and click OK.

76
(5) When this screen is launched for the first time, or the environment configuration data file "LinuxSysRep.cfg"
is not in the install directory, the following screen appears. Set the settings to match your environment.
LinuxOS Replicate Environment Set Install Directory Displays the folder where Image Builder has been
installed. This cannot be edited.
Work Directory Displays the working folder in offline mode. This can be entered only when "Offline Mode" is selected in Select Working Mode. 254 characters or less can be entered. Alphanumeric characters and symbols can be entered. The following symbols cannot be entered.
" ' * , ; < > ? @ [ ] | The default is [Install Directory\linux\offline].
Select Working Mode Select one of the following working modes. - Online mode - Offline mode The default is Online Mode.
Management Server The IP address of the Management Server that was set during installation of Image Builder is obtained from the registry data and displayed here.
Management Server Directory
Displays the folder name on the Management Server where the disk duplication data file is to be saved when in online mode. (Fixed data)
CANCEL Discards changes and closes the environment settings screen.
SAVE Saves the settings to the environment settings file [LinuxSysRep.cfg] and closes the environment settings screen.

77
A confirmation message appears when the environment data for installation directory and the IP address of the Management Server cannot be obtained from the registry or the .ini file. Click OK to close without launching the creation tool of the disk duplication data file.
Note: When creating a disk duplication data file, there are the following working modes:
- Online mode: Mode for normal use. - Offline mode: Mode for creating files on a local machine without sending files to the Management
Server. In this guide, the "Online Mode" is mainly explained.
Online Mode
The disk duplication data file (Linux duplication parameter file) is created and managed in the Folder for Images on the Management Server over the network.
Working Linux duplication parameter file
Temporary folder: <Installation folder>\linux\online (Default:C:\Program Files (x86)\NEC\DeploymentManager\linux\online)
Management Server
Read and save a file
Managed folder: <Folder for Image>\AnsFile\machineinf
Receive a file Send a file
Saved Linux duplication parameter file
Image Builder (Remote Console) Machine

78
Saved Linux duplication parameter file
Offline Mode
The disk duplication data file (Linux parameter file) is created and managed on the machine on which Image Builder is launched, using arbitrary folder as the working folder.
Note: The default working folder is <Installation directory>\linux\offline.
The working mode and working folder can be changed at any time.
Note: The disk duplication data file is created in the text file format for Linux. Note when you edit the file
using a text editor on a Windows machine or other application.
Managed folder: Arbitrary working folder Image Builder
(Remote Console) Machine
Read and save a file

79
(6) When the configuration is completed, click SAVE. (7) The following screen appears. Click Yes.
Note: If there is an error in the settings, an error message is displayed in red font and saving cannot
be performed. Correct the settings and re-save.
If you click CANCEL, the confirmation screen below is displayed. Clicking on Yes discards the settings and closes the screen.

80
(8) The following screen appears. Set settings to match your environment.
LinuxOS Replicate Parameter Making MAC Address
(Required) Enter the MAC address of the Ethernet device of the managed machine which is registered in DPM in 12 hexadecimal number. Example) "1A-2B-3C-4D-5E-6F", "1a-2b-3c-4d-5e-6f", and so on. When saving the file, the entered MAC address is used to create and save the disk duplication data file. The extension is .rep. Example) "1A2B3C4D5E6F.rep", "1a2b3c4d5e6f.rep",
and so on. Primary DNS This is for entering the IP address of the primary DNS
server as set in the managed machine. This entry is optional.
Secondary DNS This is for entering the IP address of the secondary DNS server as set in the managed machine. This entry is optional.

81
Note: Error message is displayed when the error is occurred during operation.
Network Information Settings ・ When a computer with two or more LAN boards (Ethernet devices) is used and IP addresses in the
same segment are assigned to the LAN boards, communication may fail if there are any LAN boards, which are not connected to LAN cables. It is recommended that the LAN boards that are not connected with a LAN cable should not have a static IP assigned, however be set with DHCP, or not set.
・ In an environment where the NetworkManager daemon is valid, the DNS settings set by the disk duplication data file will not be applied. If you perform DNS setting, please disable the NetworkManager daemon using the following procedure at the time of the master image creation. For detail, see "If the NetworkManager daemon is enabled, the DNS setting in the disk duplication data file is not reflected." in 3.4.1.3 Preparing for Creating the Master Image in Operation Guide.

82
Set TCP/IP network for Ethernet devices eth0 through eth6 in the managed machine.
1) Select the Ethernet device to be set, and click EDIT.

83
2) The following screen appears. Set settings to match your environment.

84
Network Data Set Device Name Displays the name of the Ethernet device to be edited.
Host Name Displays the host name. 255 characters or less can be entered. Alphanumeric characters and symbols can be entered. The following symbols and space cannot be entered.
" ' * , / : ; < > ? @ [ \ ] | Entry of eth0 is required.
IPv4 If you check IPv4 checkbox, you can set for IP address. You need to set for eth0 necessarily. This is selected by default.
Network Type Select and set the type of TCP/IP network from below. ・ DHCP: IP addresses are set dynamically by a DHCP
server. ・ Static IP: IP addresses are set manually.
The default value is DHCP. IP Address Set the IP address.
Entry is required only when Static IP has been selected as the network type. Example) "192.168.0.1" "192.168.100.150" and so on.
Network Mask Set the network mask. Entry is required only when Static IP has been selected as the network type. Example) "255.255.0.0", "255.255.255.0" and so on.
Gateway Enter the IP address of the gateway machine that corresponds to the IP address of the Ethernet device being set. This does not need to be entered even if either DHCP or Static IP has been selected as the network type. Example) "192.168.0.250" "192.168.100.200" and so on.
IPv6 If you check IPv6 checkbox, you can set for IPv6 address. This is supported only for Red Hat Enterprise Linux 5/5 AP/6/7. This is not selected by default.
Network Type Select the TCP/IP network type from the following. ・ RA: Configures IPv6 address by the Router
Advertisement. ・ DHCP: Configures IPv6 address dynamically by
DHCP server. ・ Fixed IPv6: Configures IPv6 address manually. The default is "RA".
IPv6 Address Set IPv6 address. This is required only when "Fixed IPv6" is selected in Network Type. Example)
fe80::1895:3454:53e3:40cc Prefix Set the prefix.
This is required only when "Fixed IPv6" is selected in Network Type. Example)
64 Gateway Set IPv6 address of the gateway machine for IPv6
address of the target ethernet device. You can enter only when "DHCP" or "Fixed IPv6" is selected in Network Type. This is optional. Example)
fe80::1895:3454:53e3:40cc

85
DNS Address Set IPv6 address of DNS server. This is optional. Example)
fe80::1895:3454:53e3:40cc CANCEL Closes the Network Data Set without saving the
Ethernet device settings. SAVE Saves the Ethernet device settings and closes the
Network Data Set.
Note: For a LAN board having a MAC address that is registered to the DPM, set the settings so that
network communication can be done, regardless of whether the address is a static IP address or is obtained from the DHCP server. If network communication cannot be done, an executed scenario may not be completed.
When you set the Gateway for Red Hat Enterprise Linux, set it on only either of eth0 - eth6. In the case of Red Hat Enterprise Linux 7 or later, the specific information is set by the order of
devices, which is displayed as the result of ip addr show command. In the case of SUSE Linux Enterprise, the only setting of the gateway for the Ethernet device
which is "eth0" is valid. For managed machines registered in DPM, assign a connectable IP address in the same segment. If an address, which is not connectable, is assigned, scenario execution may not be completed.

86
Note: If a setting is not correct, an error message is displayed in red at the bottom of the following screen
and saving cannot be performed.

87
Time Zone
Select the time zone to set for the managed machine from the time zone list in the red box. Set each item in the red box. The default is America/New_York.

88
Script Data
Set the Linux shell script to be executed after duplication is completed in the managed machine.
Script Data Enter the script data. 100 lines or less (256 characters or less per line) can be entered. Alphanumeric characters and symbols can be entered. The file cannot be read if the total of the entered data and the file that is read exceeds the above limit.
Read Displays the file selection dialogue screen, with the current work folder as the default folder. Select a file from among the file names to read the script data.
Clear Deletes all currently entered script data.

89
(9) Save the disk duplication data file as the MAC address name.
Working Mode: Online
Save the currently setting of Linux duplication parameters.
1) File menu -> click Save As MacAddress.
2) When the file save confirmation message is displayed for the disk duplication data file, check the name of the file to be saved and click Yes. The file is saved with the entered MAC address name under <Folder for Image>\AnsFile\machineinf> on the Management Server. The file name is "MACaddress.rep".
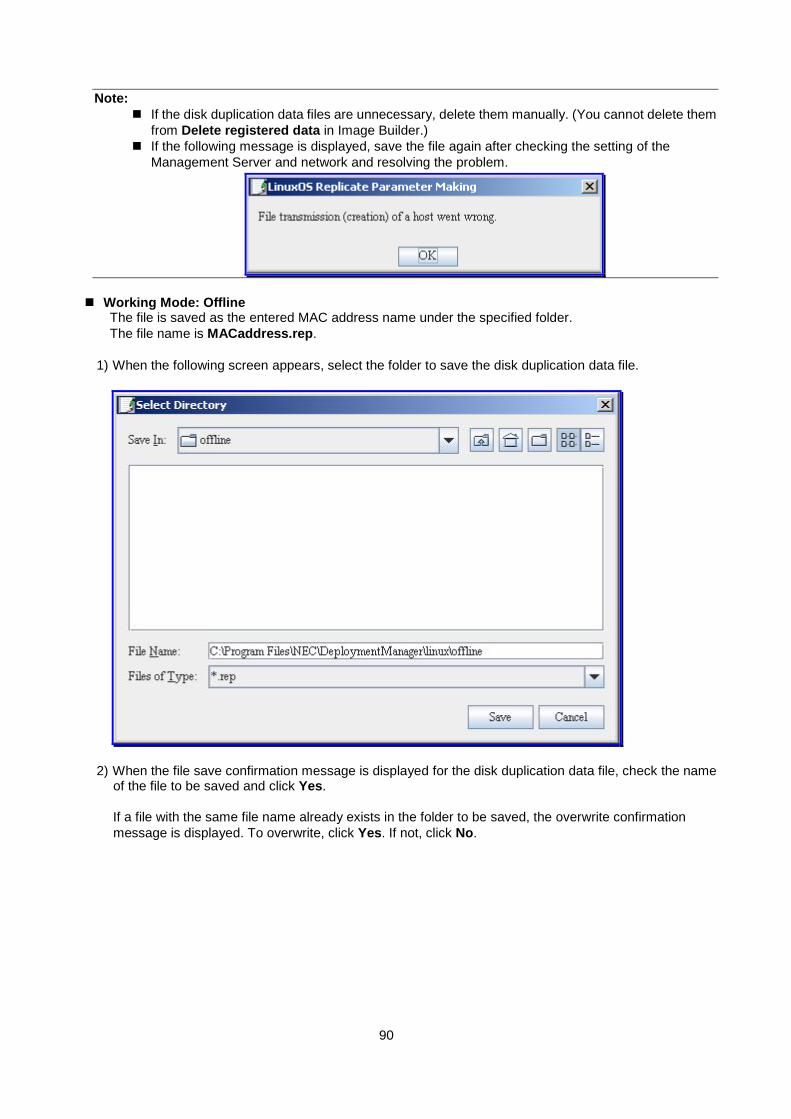
90
Note: If the disk duplication data files are unnecessary, delete them manually. (You cannot delete them
from Delete registered data in Image Builder.) If the following message is displayed, save the file again after checking the setting of the
Management Server and network and resolving the problem.
Working Mode: Offline
The file is saved as the entered MAC address name under the specified folder. The file name is MACaddress.rep.
1) When the following screen appears, select the folder to save the disk duplication data file.
2) When the file save confirmation message is displayed for the disk duplication data file, check the name of the file to be saved and click Yes.
If a file with the same file name already exists in the folder to be saved, the overwrite confirmation message is displayed. To overwrite, click Yes. If not, click No.

91
The following message is displayed when the file has successfully been saved to the selected folder.
Note: If the following message is displayed, check whether there is a problem in the folder to be
saved, and save it again.
2. Displaying Replicate Parameter
The parameters set during OS installation by disk duplication can be displayed as a list or printed in the output format of the disk duplication data file.
1) Open the File menu in the LinuxOS Replicate Parameter Making screen and click Display Replicate
Parameter. 2) When the LinuxOS Replicate Parameter List screen appears, click Print to print out the checklist.
Replicate Setting Parameter List Print Prints LinuxOS Replicate Parameter List.
Close Closes the currently displayed LinuxOS Replicate Parameter List screen.

92
Note: If there are any errors in the current setting, the following screen is displayed instead of the
LinuxOS Replicate Parameter List screen. Check the content displayed in the error list and correct any errors in the LinuxOS Replicate Parameter Making screen.

93
1.4.4. Batch Creation of Disk Duplication Data File (Linux) When executing OS installation by disk duplication on two or more Linux managed machines, create the disk duplication data file for each machine. This section describes batch creation of Linux disk duplication data files. Prepare the disk duplication data file, which is the base batch creation of data files.
Note:
See "1.4.3 Creating a Disk Duplication Data File (Linux)" for detail of creating the disk duplication data file.
(1) Log on to the machine, on which Image Builder is installed, by a user with administrator authority.
When you use Image Builder on the Management Server, log on by the user who installed DPM Server.
(2) From Start menu, select All Programs -> DeploymentManager -> Image Builder. When you are logging on to the OS by the user except Administrator, execute it as an administrator.
(3) Image Builder is launched. Click Configure setup parameter file.
(4) Select parameter screen appears. Select Linux disk copy parameter file and click OK. (5) Open the file created at 1.4.3 Creating a Disk Duplication Data File (Linux).
Click File ->Open from Linux OS Replicate Parameter Making screen and select to open MAC address.rep.
(6) The following screen appears.From the Replicate Parameter menu, select Make Replicate Parameter.

94
(7) The following screen appears. Set the red boxed items.
The disk duplication parameter data can be set for up to 100 Linux duplication machines. Enter the network data for Ethernet device "eth0" of the managed machine for duplication.
Replicate Parameter Extensive creation
Model Host The loaded disk duplication data file name is displayed.
Host Name (Required)
Set the host name for Ethernet device eth0. 255 characters or less can be entered.
MAC Address (Required)
Set the MAC address of the Ethernet device. Enter the address in 12 hexadecimal number format. Example) 1A-2B-3C-4D-5E-6F, 1a-2b-3c-4d-5e-6f When a file is saved, the Linux duplicate parameter file is created and saved by using the entered MAC address. The extension is ".rep." Example) 1A2B3C4D5E6F.rep or, 1a2b3c4d5e6f.rep
DHCP(0:ON) Select and set the type of TCP/IP network for Ethernet device eth0 from below. ・ DHCP: Enter 0 to have the DHCP server set the IP address
dynamically. (Required) ・ Static IP: Do not enter anything to have the IP address set manually.
IP Address Set the IP address for Ethernet device eth0. Example) 192.168.0.11, or 192.168.100.150, and so on. Entry is required only when the network type is Static IP.
Network mask
Set the network mask for the IP address of Ethernet device eth0. Example) 255.255.0.0, 255.255.255.0, and so on. Entry is required only when the network type is Static IP.
Gateway Enter the IP address of the gateway machine that corresponds to the IP address of Ethernet device eth0. Example) 192.168.0.250, 192.168.100.200, and so on. This does not need to be set, whether the network type is DHCP or Static IP, it is an optional input item.
DNS Address Enter the IP address of the primary DNS that corresponds to the IP address of the Ethernet device. Example) 192.168.0.250, 192.168.100.200, and so on. This does not need to be set, whether the network type is DHCP or Static IP.

95
(8) Click Save and save the settings. See the following table about operations of each button outlined in red.
Replicate Parameter Extensive creation Clear Clears all the content entered in the current screen.
Read Reads duplication parameter data saved in CSV file format and places it in the entry fields for Replicate Parameter Extensive creation. The file selection dialogue screen appears, with the CSV folder in the currently set working folder as the default folder. Select the file name and click Open.
Check Checks consistency by the content, which is currently input. If there is no errors, the following message dialogue screen appears.
If the setting is incorrect, the Replicate Parameter Error List screen appears. Check the content in the error list and correct errors on the Replicate Parameter Extensive creation screen.
Save Saves the input content in CSV file format. It is saved to the CSV folder in the currently set working folder. The default is <Installation folder>\linux\offline\CSV. Clicking Save brings up the Save as..." dialogue box. Enter the file name and save the file.

96
Extensive Creation
Performs an extensive creation of disk duplication data files by the currently input content. If extensive creation is completed successfully, the following screen appears. (*1)
If there is a problem of the duplication parameter, the Replicate Parameter Error List screen appears and files are not created. After checking the parameters and resolving problems, recreate files.
Exit Closes the Replicate Parameter Extensive creation screen and terminates batch creation of duplication parameters. To end, click Yes. Otherwise, click No.
*1 Working Mode: Online
The file is saved with the entered MAC address name under <Folder for Image>\AnsFile\machineinf> on the Management Server.
Working Mode: Offline The file is saved with the entered MAC address in the current working folder. The file name is MACaddress.rep.
Note:
If the created CSV files or disk duplication data files are unnecessary, delete them manually. (You cannot delete them from Delete registered data in Image Builder.)
1.4.5. Creating a Parameter File for OS Clear Installation (Linux) A Linux installation parameter file is a file that stores all of the items required during Linux installation setup in advance, enabling unattended OS installation. This section describes how to create a Linux installation parameter file. ・ Create Linux Installation Parameter file when installing Linux. ・ For a Linux installation parameter file that was created by Image Builder earlier than DPM Ver6.31, be sure to
read the Linux installation parameter file by Image Builder of this version and overwrite it. ・ The root password is "deploymgr" that is set with the Linux install parameter setting tool. Use the following
procedure if you change the password. - If the password is not encrypted:
Change the "rootpw" line of the Linux installation parameter file (cfg file) saved below.

97
<Folder for Image>:\exports\ks Example) rootpw -iscrypted **********... (encrypted password)
rootpw deploy
- If the password is encrypted: Set the password with the Linux standard kickstart file creation tool and create a kickstart parameter file. Copy the "rootpw" line in the created file to the "rootpw" line in Linux installation parameter file (cfg file), which was created using the Linux installation parameter setting tool, in the following folder. <Folder for Image>:\exports\ks Example) rootpw -iscrypted **********... (encrypted password)
rootpw --iscrypted XXXXXXXXXX... (encrypted password)
Note:
Do not use Linux OS installation parameter file which is not supported in this product. See Appendix A "Function Tables" in First Step Guide for details of the supported OS.
For notes when installing the NFS server on the machine except the Management Server, see Section 3.5.6, "Precautions/Others" in Operation Guide.
To create two or more Linux installation parameter files, see Section 1.4.6, "Batch Creation of Parameter File for OS Clear Installation (Linux)".
You can change the working mode and the working folder at any timing.
1. Creating Linux installation parameter file This section describes the procedure to create Linux install parameter file.
(1) Log on to the machine, on which Image Builder is installed, by a user with administrator authority.
When you use Image Builder on the Management Server, log on by the user who installed DPM Server.
(2) From Start menu, select All Programs -> DeploymentManager -> Image Builder. When you are logging on to the OS by the user except Administrator, execute it as an administrator.
(3) Image Builder is launched. Click Configure setup parameter file.
(4) The following screen appears. Select Linux parameter file and click OK.
(5) When this screen is launched for the first time, or the environment configuration data file "LinuxIParm.cfg" does not exist in the install directory, the following screen appears. Set to match with your environment.

98

99
LinuxOS Install Environment Set Install Directory Displays the folder where Image Builder has been installed.
This cannot be edited. Work Directory Displays the working folder for offline mode. This can be
entered only when "Offline mode" is selected in Select Working Mode. 254 characters or less can be entered. Alphanumeric characters and symbols can be entered. The following symbols cannot be entered.
" ' * , ; < > ? @ [ ] | Default is Install Directory\linux\offline
Select Working Mode Select one of the following working mode. ・ Online mode ・ Offline mode The default is Online Mode.
Management Server The IP address of the Management Server that was set during installation of Image Builder is obtained from the registry data and displayed here.
"ks" Server Directory Displays the folder name on the Management Server where the Linux setup parameter file is to be saved when in online mode. This cannot be edited.
"syslinux" Server Directory
Displays the folder name on the Management Server where the Linux boot parameter file is to be saved when in online mode. This cannot be edited.
CANCEL This discards changes and closes the environment settings screen. Click Yes or No when Cancel confirmation message is displayed preliminarily.
SAVE Saves the settings to the environment settings file LinuxIParm.cfg and closes the environment settings screen. Click Yes or No when Cancel confirmation message is displayed preliminarily.
When the environment information of the install directory and IP address of the Management Server cannot be obtained properly, the configuration tool for Linux install parameter does not start.
Note:
When you create the Linux installation parameter file, there are the following working modes: ・ Online mode: Mode for normal use. ・ Offline mode: Mode for setting up the NFS shared folder (exports) in locations except <Folder
for Image>\exports. This section mainly describes "online mode" which is normally used.
Online Mode
Select this mode when configuring NFS on the Management Server. The Linux installation parameter file is created and managed over the network in the Folder for Images on the Management Server.
Note:
The Linux installation parameter file is comprised of and managed by two files. ・ The Linux boot parameter file (no file extension) Example) nec_host ・ The Linux setup parameter file (extension ".cfg") Example) nec_host.cfg The root password is output to the file as "deploymgr".

100
Offline Mode Select this mode when configuring NFS server on the different server from the Management Server. The Linux installation parameter file is created and managed on the machine on which Image Builder is launched, using any working folders. Copy the created Linux installation parameter file manually to the NFS server.
(6) Once the setting is completed, click Save.
Managed folder: Arbitrary working folder (Default:C:\Program Files (x86)\NEC\DeploymentManager
\linux\offline) Image Builder (Remote Console) Machine
Saved Linux installation parameter file
Read and save a file
Temporary folder:<Installation folder>\linux\online (Default:C:\Program Files (x86)\NEC\DeploymentManager\linux\online)
Read and save a file
Managed directory :<Folder for Image>\AnsFile\ linux(Linux boot parameter file) :<Folder for Image>\exports\ks(Linux setup parameter file)
Image Builder (Remote Console) Machine
Receive a file Send a file
Saved Linux installation parameter file
Working Linux installation parameter file
Management Server
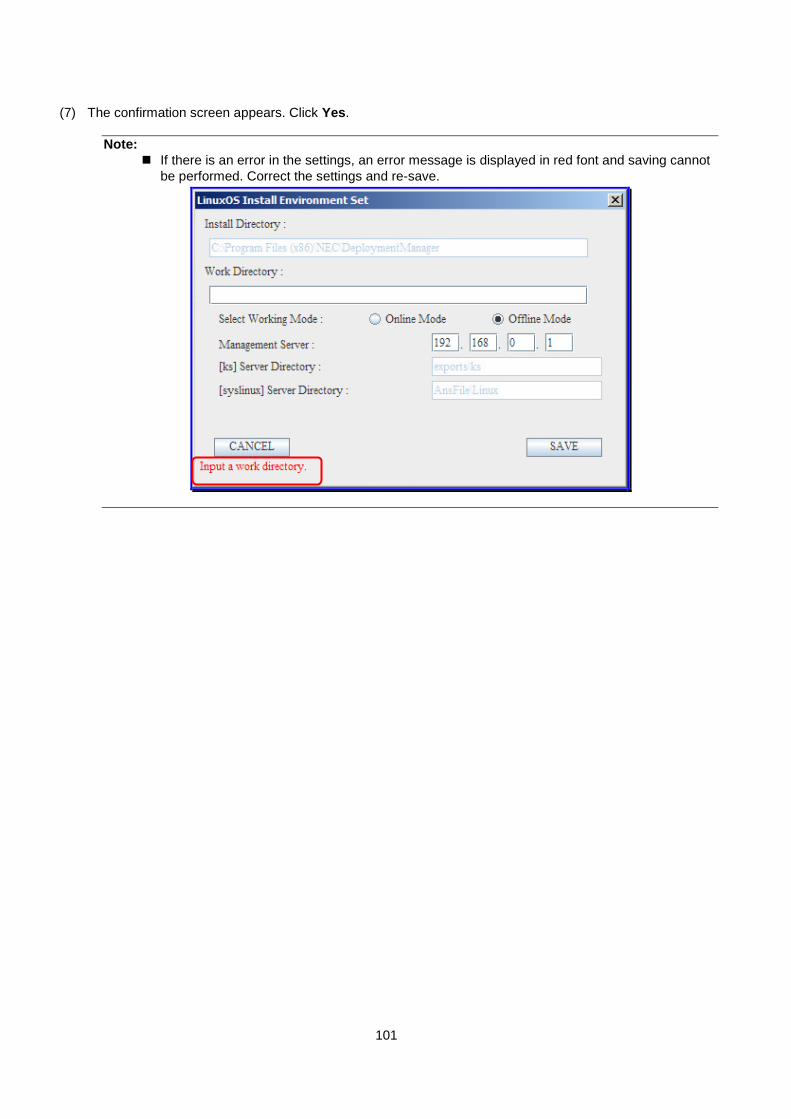
101
(7) The confirmation screen appears. Click Yes.
Note:
If there is an error in the settings, an error message is displayed in red font and saving cannot be performed. Correct the settings and re-save.

102
(8) The following screen appears. Set Linux parameter.
Linux install parameter is consists of 9 types of the information screens. Click each button and change the information screen to set items.

103
Note: If there are any problems or errors with the information entered into each of the information panels,
a red error message will be displayed at the bottom of each information panel.

104
Basic Configuration setting panel
Set the basic information for the Linux boot parameters and Linux setup parameters.

105
LinuxOS Install Parameter Making Basic Configuration
(Required) Install Linux
(Required) Select install OS type from the list box. The default is "Red Hat Enterprise Linux 5.1/5.1 AP." If the boot directory is not entered at the time the install OS is selected, the default value of the boot directory appropriate for the selected OS will be set as the boot directory. (*1)
UEFI When "Red Hat Enterprise Linux 6" or "Red Hat Enterprise Linux 7" is selected in Install Linux, this item is displayed. ・ When the managed machine is in UEFI mode
Check this checkbox. ・ When the managed machine is in BIOS mode.
Uncheck this checkbox. This checkbox is cleared by default,
Boot Directory (Required)
Select the boot directory or enter the boot directory for the install OS. 255 characters or less can be entered. Alphanumeric characters and symbols can be entered. The following symbols and space cannot be entered.
" ' * , ; < > ? @ [ ] | When you click "...", the following screen will be displayed. Then select it from boot directory list on the Management Server.
In the case of offline, you cannot use this screen. Entry of the boot directory name is required.
NFS Server (Required)
The NFS server IP address is set. Normally this is set as the same IP address as DPM Server. The default value is the IP address of the Management Server.
Install Device (Required)
In the case of the version earlier than Red Hat Enterprise Linux 6 or earlier, set the Ethernet device (the installation device which is used for the communication). The default value is "eth0". If you set a LAN board with a MAC address not registered with the Management Server, the scenario may not complete. In the case of Red Hat Enterprise Linux 7 or later, this item is not displayed.
Installation Number Displays when "Red Hat Enterprise Linux 5.1/5.1 AP" is selected in Install OS. Enter the install number of the Red Hat Enterprise Linux at the time of the product purchase. This entry is not required.

106
Install Language (Required)
Select the type of language used at the time of installation from the list. The default is "English". In the case of Red Hat Enterprise Linux 6, "English" is set regardless of the selected content. Unselectable for Red Hat Enterprise Linux 7, "English" is set constantly.
Keyboard (Required)
Select the type of keyboard used by the managed machine from the list. The default value is U.S.English. In the case of Red Hat Enterprise Linux 6, U.S.English is set regardless of the selected content.
Mouse (Required)
Select the type of mouse used by the managed machine for the install from the list. The default value is Generic Mouse (PS/2). If the mouse is not set correctly after an OS clean installation, assign "Probe For Mouse" to the mouse and automatically search for the mouse. This item will not be displayed for Red Hat Enterprise Linux 6 or Red Hat Enterprise Linux 7
3 Button Emulation If the mouse device uses a 3 button emulation function, check this checkbox. By default, the checkbox is not checked. This is optional. This item will not be displayed for Red Hat Enterprise Linux 6 or Red Hat Enterprise Linux 7.
Time Zone Select the time zone from the list box. The default is America/New_York. This entry is not required.
Support Language (Required)
Set the language environment from the list. To select two or more items, press the Ctrl key while selecting. The default value is "English". You cannot deselect "English". In the case of Red Hat Enterprise Linux 5/5 AP, all languages are set regardless of the selected content. In the case of Red Hat Enterprise Linux 6, "English" is set regardless of the selected content. In the case of Red Hat Enterprise Linux 7, this item is not displayed.
*1 You can select the install OS from the Linux OS listed below.
Install OS Boot Directory Default Value Supported Architecture
Red Hat Enterprise Linux 5.1/5.1 AP RedHatServer5.1 x86/x64 Red Hat Enterprise Linux 6 RedHatServer6 x86/x64 Red Hat Enterprise Linux 7 RedHatServer7 x64
Note:
For Red Hat Enterprise Linux 5.2 or later, select Red Hat Enterprise Linux5.1/5.1 AP. For Red Hat Enterprise Linux 6 or later, select the suitable OS for each version.

107
Boot Configuration
You can do settings related to the boot loader for the managed machine to install.

108
Boot Configuration
A new boot loader is installed
Select this to install a new boot loader. If you select A new boot is installed, the Boot Loader Options will be enabled. The default value is A new boot is installed.
A boot loader is not installed Select this not to install a boot loader. If installing Linux and A boot loader is not installed is selected, the scenario will complete successfully, however you cannot run Linux from the partition where Linux is installed.
Boot Loader Options Select boot loader option and a new boot loader will be installed.
GRUB is used as a boot loader
Set this to install the GRUB boot loader. The LILO package will be cancelled for Red Hat Enterprise Linux 5/5 AP. Select Use GRUB as a Boot Loader when installing Red Hat Enterprise Linux 5/5 AP. This is optional. In the case of Red Hat Enterprise Linux 7, this item is selected.
GRUB Option GRUB Password
This can be set when selecting GRUB is used as a boot loader. This is optional.
LILO is used as a boot loader
Set this to install the LILO boot loader. The default value is set as LILO is used as a boot loader. This item cannot be set for Red Hat Enterprise Linux 6 or Red Hat Enterprise Linux 7.
LILO Option Set the working mode for LILO boot loader. Select one of the checkboxes below. ・ Use linear mode ・ Force use LBA32 mode This is optional.
A boot loader is installed in a master boot record (MBR) / A boot loader is Installed on the head Sector of a boot partition (either of above is required)
Set the install destination for the boot loader. Select one of the following option buttons. ・ A boot loader is installed in a master boot record
(MBR) ・ A Boot loader is installed on the head sector of a
boot partition Select A boot loader is installed in a master boot record (MBR) when executing backup/restoring on the disk with boot loader installed. This item cannot be set for Red Hat Enterprise Linux 6.
Kernel Parameter Set the kernel parameters. 255 characters or less can be entered. Alphanumeric characters can be entered. This item cannot be set for Red Hat Enterprise Linux 6.

109
Partition Configuration
Set the environment used for the disk drive of the managed machine for install.
Note: You cannot set software RAID with this tool.
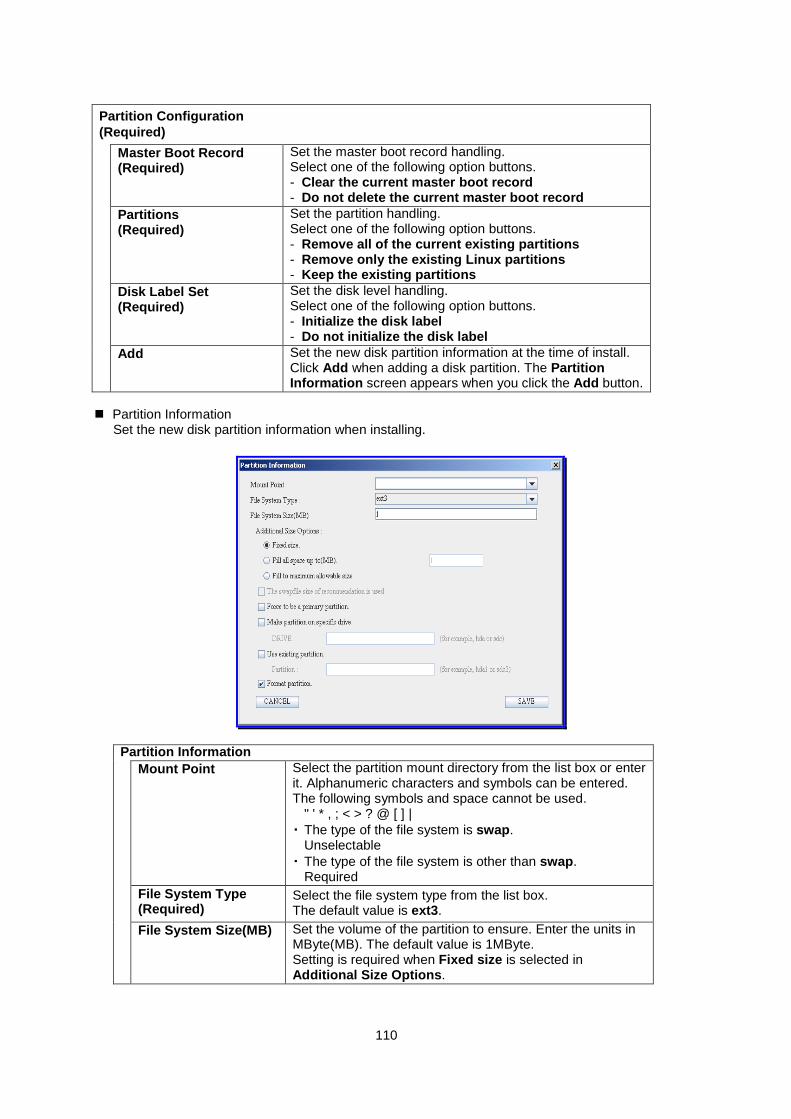
110
Partition Configuration (Required)
Master Boot Record (Required)
Set the master boot record handling. Select one of the following option buttons. - Clear the current master boot record - Do not delete the current master boot record
Partitions (Required)
Set the partition handling. Select one of the following option buttons. - Remove all of the current existing partitions - Remove only the existing Linux partitions - Keep the existing partitions
Disk Label Set (Required)
Set the disk level handling. Select one of the following option buttons. - Initialize the disk label - Do not initialize the disk label
Add Set the new disk partition information at the time of install. Click Add when adding a disk partition. The Partition Information screen appears when you click the Add button.
Partition Information
Set the new disk partition information when installing.
Partition Information Mount Point Select the partition mount directory from the list box or enter
it. Alphanumeric characters and symbols can be entered. The following symbols and space cannot be used.
" ' * , ; < > ? @ [ ] | ・ The type of the file system is swap.
Unselectable ・ The type of the file system is other than swap.
Required File System Type (Required)
Select the file system type from the list box. The default value is ext3.
File System Size(MB) Set the volume of the partition to ensure. Enter the units in MByte(MB). The default value is 1MByte. Setting is required when Fixed size is selected in Additional Size Options.

111
Additional Size Options (Required if selectable)
Set the volume of the partition. Select one of the following option buttons. ・ Fixed size ・ Fill all space up to(MB) ・ Fill to maximum allowable size If you select Fill all space up to(MB), enter the increased volume in MByte.
The swapfile size of recommendation is used
If you select "swap" in the file system type, you can check the checkbox. If you select this, the volume of the swap files system will be automatically set at the time of install.
Force to be a primary partition
The partition is forcibly allocated as the primary partition. It will end abnormally when this cannot be executed. This is optional.
Make partition on specific drive (Required)
Create a new partition. Enter the disk drive name to add a partition. Alphanumeric characters can be entered. For an IDE disk, set the first as hda and the second as hdb. For a SCSI disk, set the first one as sda.
Use existing partition Set the existing partition name. Following the partition setting, the partition is set up on the existing partition. Alphanumeric characters can be entered. For the first partition of the primary IDE disk, hda1 should be specified, and for the second partition of the secondary IDE disk, hdb2 should be specified. Also, for the first partition of the first SCSI disk, sda1 should be specified.
Format partition Format a partition. The default value is Format partition.
CANCEL Closes the screen without saving the specified partition information.
SAVE Saves the specified partition information and closes the screen. If there is an error with the specified partition information, the error list is displayed and it cannot be saved.

112
Partition Configuration (Edit, Delete)
Partition Configuration (Required) Edit Edit the disk partition.
Select the partition to be edited from the list and click Edit.
The following screen appears when you click Edit.
Delete Deletes the currently specified disk partition.
Select the partition to be deleted from the partition list and click Delete.
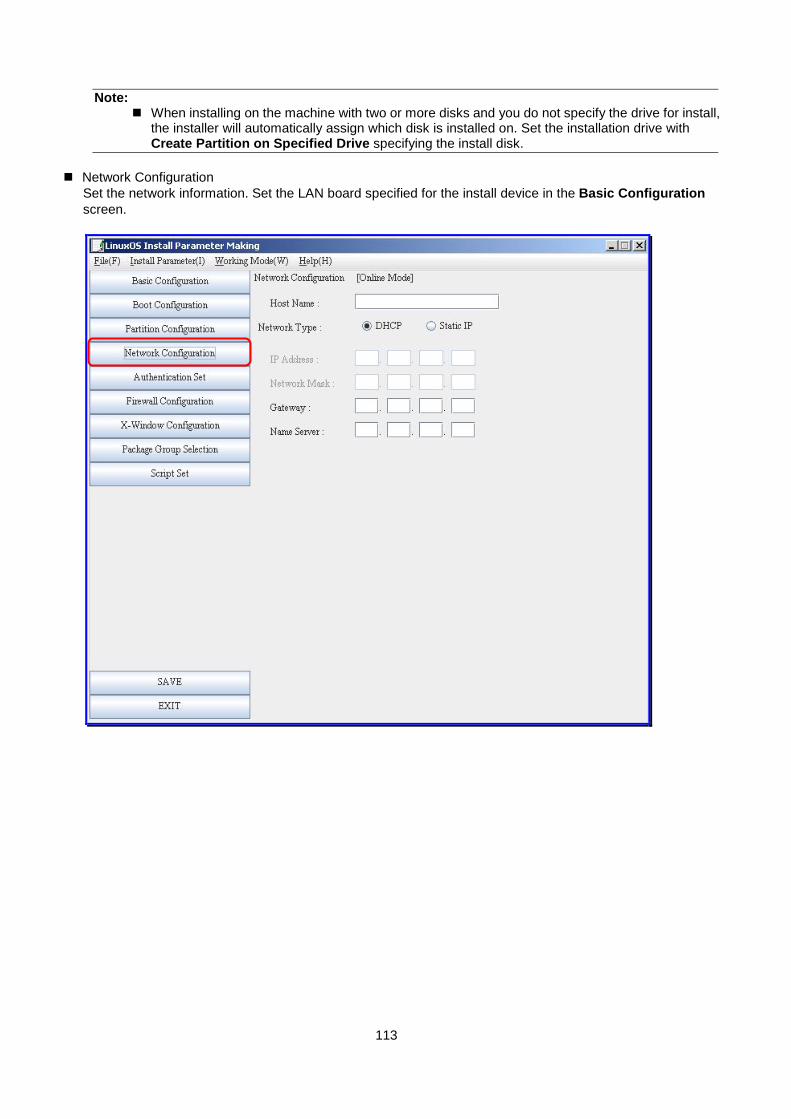
113
Note: When installing on the machine with two or more disks and you do not specify the drive for install,
the installer will automatically assign which disk is installed on. Set the installation drive with Create Partition on Specified Drive specifying the install disk.
Network Configuration
Set the network information. Set the LAN board specified for the install device in the Basic Configuration screen.

114
Network Configuration Host Name Enter the managed machine host name. 255 characters or less
can be entered. Alphanumeric characters and symbols can be entered. The following symbols and space cannot be entered.
" ' * , / : ; < > ? @ [ \ ] | Network Type Select and set the type of TCP/IP network from below.
・ DHCP: IP addresses are set dynamically by a DHCP server.
・ Static IP: IP addresses are set manually. The default value is DHCP.
IP Address Enter the IP address. Entry is required only when Static IP has been selected as the network type.
Network Mask Enter the netmask. Entry is required only when Static IP has been selected as the network type.
Gateway Enter the IP address of the gateway machine that corresponds to the IP address of the Ethernet device. This does not need to be entered, even if either DHCP or Static IP has been selected as the network type.
Name Server Enter the IP address for the DNS server. This does not need to be entered, even if either DHCP or Static IP has been selected as the network type.
Note:
Set the setting of LAN board with MAC address which is registered on DPM to enable network communication with DPM Server regardless of acquisition from static IP address or DHCP Server. When the network communication cannot be executed, there is a possibility that the scenario might not be completed when you execute scenario.

115
Authentication Set
Set the information for each authentication function used on the managed machine for install.

116
Authentication Set Authentication Select the user authentication procedure.
・ Use Shadow Password Select this to Use Shadow Password for the user password.
・ Use MD5. Select this to Use MD5 encryption for the user password. In the case of Red Hat Enterprise Linux 5/5 AP, select the Use Shadow Password.
Enable NIS Check the Enable NIS checkbox in the case of NIS (Network Information Service) authentication.
NIS Domain (Required)
Set the NIS domain name. 32 characters or less can be entered. Alphanumeric characters and symbols can be entered. The following symbols and space cannot be entered.
" ' * , / : ; < = > ? @ [ \ ] | Use broadcast to find NIS Server (Required)
Check the checkbox to use broadcast for NIS server search.
NIS Server (Required)
Enter the NIS server name. Alphanumeric characters and symbols can be entered. The following symbols and space cannot be entered.
" ' * , ; < = > ? @ [ ] | Enable LDAP Check the Enable LDAP checkbox in the case of LDAP
(Lightweight Directory Access Protocol). In the case of Red Hat Enterprise Linux 7, this item cannot be set.
LDAP Server (Required)
Set the LDAP server name. 32 characters or less can be entered. Alphanumeric characters and symbols can be entered. The following symbols and space cannot be entered.
" ' * , / : ; < = > ? @ [ \ ] | LDAP Database (Required)
Set the LDAP database name. 32 characters or less can be entered. Alphanumeric characters and symbols can be entered. The following symbols and space cannot be entered.
" ' * , / : ; < = > ? @ [ \ ] | Enable Kerberos 5 Authentication Check the Enable Kerberos 5 Authentication
checkbox in the case of Kerberos 5 Configuration. In the case of Red Hat Enterprise Linux 7, this item cannot be set.
Realm (Required) Set the realm name. 32 characters or less can be entered. Alphanumeric characters and symbols can be entered. The following symbols and space cannot be entered.
" ' * , / : ; < = > ? @ [ \ ] | Domain Controller (KDC) (Required)
Set the domain controller(KDC) name. 32 characters or less can be entered. Alphanumeric characters and symbols can be entered. The following symbols and space cannot be entered.
" ' * , / : ; < = > ? @ [ \ ] |

117
Master Server
(Required) Set the master server name. 32 characters or less can be entered. Alphanumeric characters and symbols can be entered. The following symbols and space cannot be entered.
" ' * , / : ; < = > ? @ [ \ ] | Specify KDC name where kadmind is running on the KDC belonging to the specified realm. This master server will become the KDC server that handles the changes in the user information and so on.
Enable HESIOD Check the Enable HESIOD checkbox in the case of HESIOD authentication. HESIOD authentication manages the user and group information by using DNS. In the case of Red Hat Enterprise Linux 7, this item cannot be set.
HESIOD LHS (Required)
In HESIOD LHS (Left-hand side), set to the LHS that is used at the time of the search for the user information and so on. 32 characters or less can be entered. Alphanumeric characters and symbols can be entered. The following symbols and space cannot be entered.
" ' * , / : ; < = > ? @ [ \ ] | HESIOD RHS (Required)
In HESIOD RHS (Right-hand side), set to the RHS that is used at the time of the search for the user information and so on. 32 characters or less can be entered. Alphanumeric characters and symbols can be entered. The following symbols and space cannot be entered.
" ' * , / : ; < = > ? @ [ \ ] | Enable SMB Check the Enable SMB checkbox when you execute SMB
authentication. ・ Red Hat Enterprise Linux 6
This setting is invalid. ・ Red Hat Enterprise Linux 7
This item cannot be set. SMB Server
(Required) Set the SMB server name. If there are two or more SMB servers, enter the server names, separated by commas. 32 characters or less can be entered. Alphanumeric characters and symbols can be entered. The following symbols and space cannot be entered.
" ' * , / : ; < = > ? @ [ \ ] | SMB Work Group (Required)
Set the SMB workgroup. 32 characters or less can be entered. Alphanumeric characters and symbols can be entered. The following symbols and space cannot be entered.
" ' * , / : ; < = > ? @ [ \ ] | Enable Name Switch Cash Domain(nscd)
Check the checkbox for NSCD authentication. You can cache the information of user and group and so on if you select the Enable Name Switch Cash Domain (nscd) checkbox. ・ For Red Hat Enterprise Linux 6
This setting is disabled. ・ For Red Hat Enterprise Linux 7
This item cannot be set.

118
Firewall Configuration This set the firewall environment information of the managed machine for install. This information cannot be set for Red Hat Enterprise Linux 6.
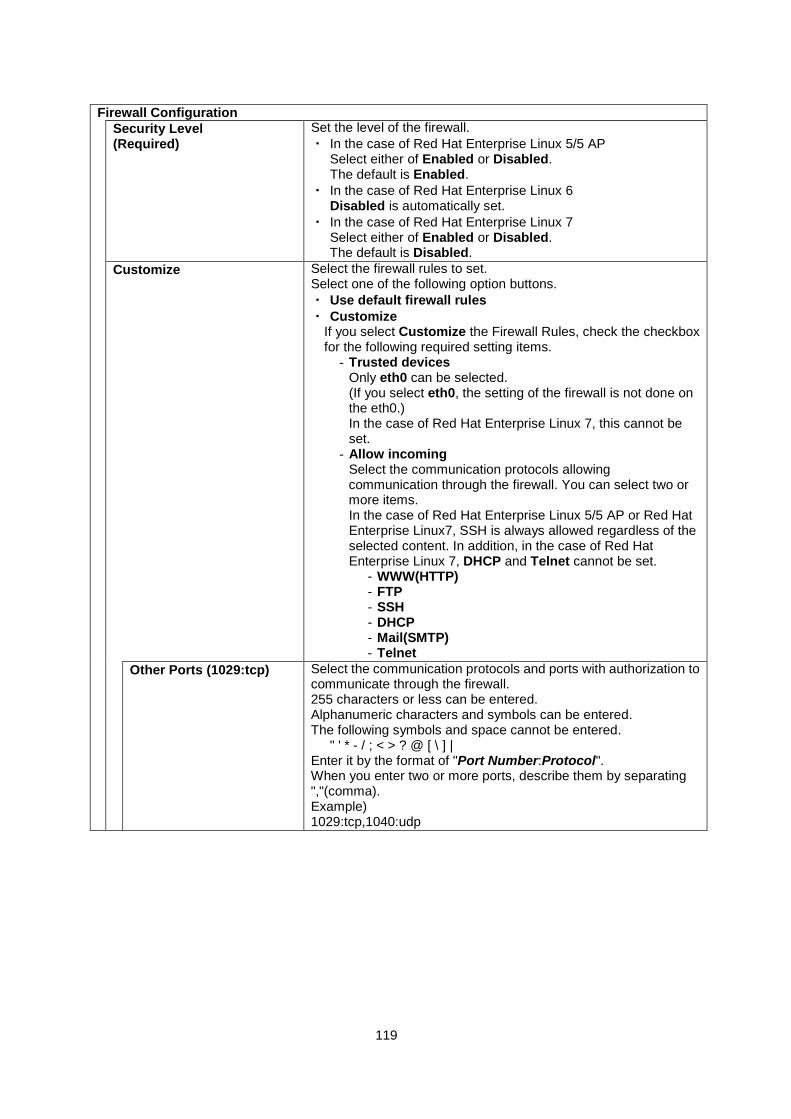
119
Firewall Configuration Security Level
(Required) Set the level of the firewall. ・ In the case of Red Hat Enterprise Linux 5/5 AP
Select either of Enabled or Disabled. The default is Enabled.
・ In the case of Red Hat Enterprise Linux 6 Disabled is automatically set.
・ In the case of Red Hat Enterprise Linux 7 Select either of Enabled or Disabled. The default is Disabled.
Customize Select the firewall rules to set. Select one of the following option buttons. ・ Use default firewall rules ・ Customize
If you select Customize the Firewall Rules, check the checkbox for the following required setting items.
- Trusted devices Only eth0 can be selected. (If you select eth0, the setting of the firewall is not done on the eth0.) In the case of Red Hat Enterprise Linux 7, this cannot be set.
- Allow incoming Select the communication protocols allowing communication through the firewall. You can select two or more items. In the case of Red Hat Enterprise Linux 5/5 AP or Red Hat Enterprise Linux7, SSH is always allowed regardless of the selected content. In addition, in the case of Red Hat Enterprise Linux 7, DHCP and Telnet cannot be set.
- WWW(HTTP) - FTP - SSH - DHCP - Mail(SMTP) - Telnet
Other Ports (1029:tcp) Select the communication protocols and ports with authorization to communicate through the firewall. 255 characters or less can be entered. Alphanumeric characters and symbols can be entered. The following symbols and space cannot be entered.
" ' * - / ; < > ? @ [ \ ] | Enter it by the format of "Port Number:Protocol". When you enter two or more ports, describe them by separating ","(comma). Example) 1029:tcp,1040:udp
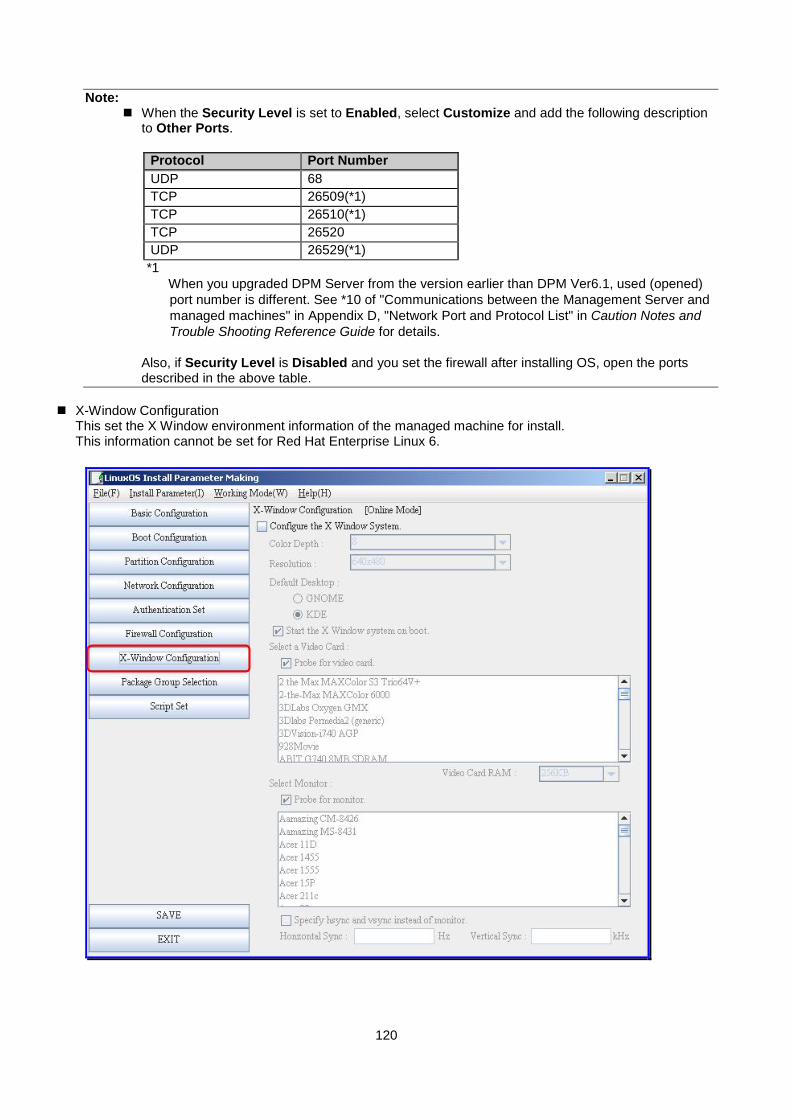
120
Note: When the Security Level is set to Enabled, select Customize and add the following description
to Other Ports.
Protocol Port Number UDP 68 TCP 26509(*1) TCP 26510(*1) TCP 26520 UDP 26529(*1)
*1 When you upgraded DPM Server from the version earlier than DPM Ver6.1, used (opened) port number is different. See *10 of "Communications between the Management Server and managed machines" in Appendix D, "Network Port and Protocol List" in Caution Notes and Trouble Shooting Reference Guide for details.
Also, if Security Level is Disabled and you set the firewall after installing OS, open the ports described in the above table.
X-Window Configuration
This set the X Window environment information of the managed machine for install. This information cannot be set for Red Hat Enterprise Linux 6.
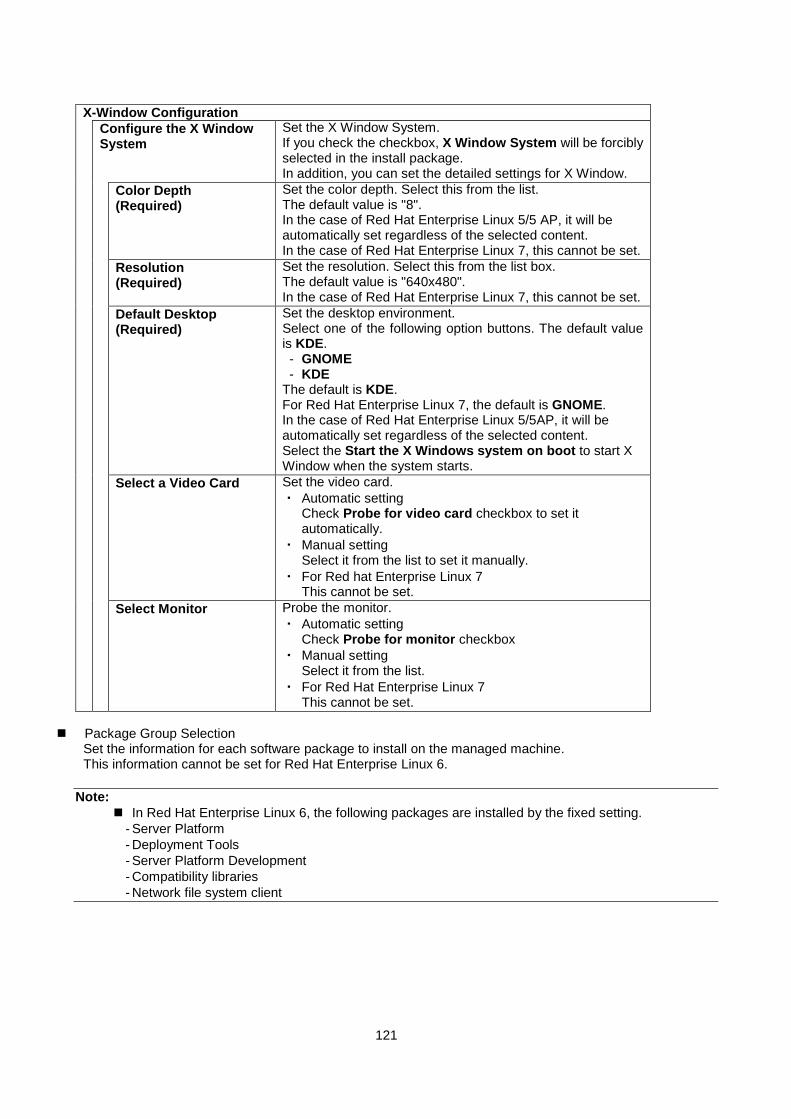
121
X-Window Configuration Configure the X Window
System Set the X Window System. If you check the checkbox, X Window System will be forcibly selected in the install package. In addition, you can set the detailed settings for X Window.
Color Depth (Required)
Set the color depth. Select this from the list. The default value is "8". In the case of Red Hat Enterprise Linux 5/5 AP, it will be automatically set regardless of the selected content. In the case of Red Hat Enterprise Linux 7, this cannot be set.
Resolution (Required)
Set the resolution. Select this from the list box. The default value is "640x480". In the case of Red Hat Enterprise Linux 7, this cannot be set.
Default Desktop (Required)
Set the desktop environment. Select one of the following option buttons. The default value is KDE. - GNOME - KDE
The default is KDE. For Red Hat Enterprise Linux 7, the default is GNOME. In the case of Red Hat Enterprise Linux 5/5AP, it will be automatically set regardless of the selected content. Select the Start the X Windows system on boot to start X Window when the system starts.
Select a Video Card
Set the video card. ・ Automatic setting
Check Probe for video card checkbox to set it automatically.
・ Manual setting Select it from the list to set it manually.
・ For Red hat Enterprise Linux 7 This cannot be set.
Select Monitor Probe the monitor. ・ Automatic setting
Check Probe for monitor checkbox ・ Manual setting
Select it from the list. ・ For Red Hat Enterprise Linux 7
This cannot be set. Package Group Selection
Set the information for each software package to install on the managed machine. This information cannot be set for Red Hat Enterprise Linux 6.
Note:
In Red Hat Enterprise Linux 6, the following packages are installed by the fixed setting. - Server Platform - Deployment Tools - Server Platform Development - Compatibility libraries - Network file system client

122
Package Group Selection The package Install Method Set the install procedure for the packages to be installed.
Select one of the following option buttons. - A package dependency is solved automatically - A package dependency is disregarded
In the case of Red Hat Enterprise Linux 6 or Red Hat Enterprise Linux 7, this cannot be set.
Install package group Set the package group to install during the installation. Select this from the list. You can select two or more items. The content of the list will change based on the content in the Install Linux in the Basic Configuration screen. In the case of Red Hat Enterprise Linux 7, select also the following items. - Base - Network File System Client - GNOME(or KDE)
Select either GNOME or KDE following the setting in the X-Window Configuration screen.

123
Note: If the managed machine is an x64 edition, /lib/libgcc_s.so.1 is required.
If /lib/libgcc_s.so.1 does not exist, multicast remote updates will not be possible. Please install /lib/libgcc_s.so.1 by one of the following procedures. 1) Select the "Compatibility Arch Support" package when doing an OS clear install. 2) Install libgcc-3.4.5-2.i386.rpm by unicast using a remote update after the OS clear install.
Script Set
Set the shell script after completion of OS installation on the managed machine.

124
Script Set Run outside of the chroot
environment Run outside the chroot environment. Normally, scripts are executed in the chroot environment. Check Run Outside the chroot Environment checkbox to run outside the chroot environment.
Use an interpreter Set the interpreter file name to use. Enter the interpreter file name to use when using an interpreter except the default shell interpreter. 255 characters or less can be entered. Alphanumeric characters and symbols can be entered. The following symbols and space cannot be entered.
" ' * , : ; < > ? @ [ \ ] | Example)
/usr/bin/python Input %post Script (Text box)
Set the Linux shell script you run after completion of OS installation is completed. 320 characters or less per line and 600 lines or less can be entered for scripts. An error will occur if the script that is read in includes a line with more than 320 characters, and the post script will not be read in. If there is a line that exceeds 320 characters, correct it so that the character count for a line does not exceed 320 characters by starting a new paragraph by inserting a "\" at the position to start a new paragraph. Example)
An example of modification is shown below. ("XXXX---YYY" is a line in a script.)
Before modification--------------------------------------------------
: XXXXXXXXXXXXXXXXXXXXXXXXXZZZZZZZZZZZZZZZ
: -------------------------------------------------------------
After modification------------------------------------------------------- :
XXXXXXXXXXXXXXXXXXXXXXXXX \ ZZZZZZZZZZZZZZZ
: -------------------------------------------------------------
READ The file is read in as script information. The file selection screen appears with the current working folder as the initial folder. Then open a file. When the file is read in, scripts for introduction and setup of DPM Client software are automatically set. When a file is read in, the file cannot be read in if the number of lines in the combination of complete input content and the file content exceeds 600 or if any line exceeds 320 characters.
CLEAR Deletes all currently entered script data.

125
(9) Save the Linux install parameter.
LinuxOS Install Parameter Making SAVE The detail settings of the install parameter are saved as
the Linux installation parameter file and it closes. EXIT Closes without saving the detail settings of the install
parameter. Working Mode: Online
The file is transmitted from the temporary working folder to the managed folder. The default folder is as follows: <Folder for Image>\AnsFile\linux (Linux boot parameter file) <Folder for Image>\exports\ks (Linux setup parameter file)
Working Mode: Offline
The folder that was specified in working folder appears, so specify the File Name and save. The default folder is as follows: C:\Program Files (x86)\NEC\DeploymentManager\linux\offline
The following screen will be displayed if it is saved properly.
(10) Click End on File menu.
(11) The following screen appears. Click Yes to end and click No to continue.
When you close, all screens will close and the Linux install parameter setting tool will close. Also, EXIT on the lower left of the main screen will also close the install parameter setting tool.
2. Display Settings Data Display the list or print the contents of the install parameter in Linux install parameter file format.
(1) In the File menu, click Display Install Parameter. (2) The currently set install parameter details will be displayed in a list in the Linux install parameter output
format. The currently set Linux install parameter details are displayed.

126
LinuxOS Install Parameter List PRINT Prints the details of LinuxOS Install Parameter List.
CLOSE Closes the currently displayed LinuxOS Install Parameter List.
Note:
The following screen from the previous item will be displayed if there is a error with the details of the currently set Linux install parameters. Correct any items displayed in the error list.

127
1.4.6. Batch Creation of Parameter File for OS Clear Installation (Linux) This section describes an explanation of the procedure for creating two or more Linux installation parameter files. Prepare the template Linux installation parameter file which is the base for two or more Linux installation parameter files.
Note:
Do not use an installation parameter file of Linux OS that is not supported by this product. See Appendix A, "Function Tables" in First Step Guide for details of the supported OS.
See Section 1.4.5, "Creating a Parameter File for OS Clear Installation (Linux)" about the procedure for creating a Linux installation parameter file.
(1) Log on to the machine, on which Image Builder is installed, by a user with administrator authority.
When you use Image Builder on the Management Server, log on by the user who installed DPM Server.
(2) From Start menu, select All Programs -> DeploymentManager -> Image Builder. When you are logging on to the OS by the user except Administrator, execute it as an administrator.
(3) Image Builder is launched. Click Configure setup parameter file. (4) The following screen appears. Select Linux parameter file and click OK.
(5) The LinuxOS Install Parameter Making is launched. From File menu, select Open. Select the setup parameter file in the Select Host Name screen and click SELECT.

128
(6) The Setup Parameter File will be read. From the Install Parameter menu, select Make Install Parameter.
(7) The details of the currently set Linux installation parameter file are checked, and the following screen appears. Then enter the Ethernet device eth0 network information for the managed machine for the Linux install.

129
Install Parameter Extensive creation
Model Host The name of the loaded Linux installation parameter file is displayed and set.
Host Name (Required)
Set the host name for Ethernet device eth0. 255 characters or less can be entered.
DHCP(0:ON) Select and set the type of TCP/IP network for Ethernet device eth0 from below. - DHCP: Enter 0 if the IP address is set dynamically with DHCP
server. (Required) - Static IP: Do not enter anything if the IP address is set manually.
IP Address Set the IP address for Ethernet device eth0. Entry is required when the network type is Static IP.
Network Mask Set the netmask value for the IP address of Ethernet device eth0. Entry is required when the network type is Static IP.
Gateway Enter the IP address of the gateway machine that corresponds to the IP address of Ethernet device eth0. This does not need to be set, whether the network type is DHCP or Static IP.
DNS Address Enter the IP address of the primary DNS that corresponds to the IP address of the Ethernet device. This does not need to be set, whether the network type is DHCP or Static IP.
CLEAR Clears all the content entered in the current screen. READ Reads install parameter data saved with CSV file format and
places it in the entry fields for install parameter batch creation. The file selection dialog screen appears, with the CSV folder in the currently set working folder as the default folder. Select the file name and click Open.
CHECK Performs a prior check of the consistency of the batch creation
install parameter information that is currently input. If there is no error, the following message dialogue screen appears.

130
SAVE The batch creation install parameter information file is saved with the CSV file format. It is saved to the CSV folder in the currently set work folder. The default is <Installation folder>\linux\offline\CSV. By clicking Save, the Save As New Name dialog box appears. Enter the file name and save the file.
Extensive Creation Performs a batch creation of Linux installation parameter files in accordance with the currently input batch creation install parameter data. If batch creation is completed successfully, the following screen appears.
- When the Working Mode is Online
The Linux boot parameter file is saved with the input host name and without an extension in the folder "<Folder for Image>\AnsFile\Linux" on the Management Server. The Linux setup parameter file is saved with the input host name and ".cfg" extension in the "<Folder for Image>\exports\ks" on the Management Server.
- When the Working Mode is Offline The Linux boot parameter file is saved with the input host name and without an extension in the currently set working folder. The Linux setup parameter file is saved with the input host name and with ".cfg" extension.
EXIT The currently displayed Install Parameter Extensive Creation dialog screen will close and the Install Parameter Extensive Creation operation will end.

131
Note: If the created CSV files are unnecessary, delete them manually. (You cannot delete them from
Delete registered data in Image Builder.) The following screen appears if there is a problem with the description of the Linux installation
parameter file when reading in the file. Confirm the content of the error and correct it.
You can create the installation parameter data for 100 or less machines at one time.
1.5. Package Registration/Modification Perform package registration/modification. Follow the steps below.
Use PackageDescriber when you create or modify a package, which includes the following setting. See Section 2, "PackageDescriber" about each setting. ・ When specifying the following in file conditions of the Dependency Information tab or file conditions of
the ID Information tab. - Specifying the path, which is described in the registry, in the file path - Specifying the file size - Specifying the update time
・ When specifying the following in file conditions or registry conditions of the Dependency Information tab.
- Exists(<) - Exists(<=) - Exists(>) - Exists(>=)
・ When specifying two or more conditions using "and" or "or" in the Dependency Information tab. ・ When specifying the following value type(ValueType) in registry conditions of the Dependency
Information tab or registry conditions of the ID Information tab. - REG_EXPAND_SZ - REG_MULTI_SZ
・ When specifying the path, which is described in the registry, in the file path of the ID Information tab. ・ When specifying the machine group, on which the package will be applied, in the Group Information
tab. Note:
When you register RUR(revision up release) module for Express 5800 Series as a package, register it after confirming the installation manual of RUR necessarily.

132
(1) Log on to the machine, on which Image Builder is installed, by a user with administrator authority.
When you use Image Builder on the Management Server, log on by the user who installed DPM Server.
(2) From Start menu, select All Programs -> DeploymentManager -> Image Builder. Execute as the administrator when you log on to OS by the user except Administrator.
(3) Image Builder is launched. Click Package registration/modification. (4) Package registration/modification screen appears. From File menu, select each menu to create or modify
the package.
When creating a Windows package -> Create Windows Package See Section 1.5.1, "Create Windows Package" for details.
When modifying a Windows package -> Modify Windows Package See Section 1.5.2, "Modify Windows Package" for details.
When creating a Linux package -> Create Linux Package See Section 1.5.3, "Create Linux Package" for details.
When modifying a Linux package -> Modify Linux Package See Section 1.5.4, "Modify Linux Package" for details.
133
1.5.1. Create Windows Package Explains the Basic, Execution Settings, Applicable OS and language, Dependency information and ID information tab settings. If you change Type on the Basic tab, the Urgency will change to default.
In addition, the Execution Settings tab settings will change to default. - When the type is changed to Service Pack
Urgency is changed to "Normal". In addition, the Restart after the installation and Apply independently checkboxes on the Execution Settings tab are automatically selected. If two or more folders have been added to the copied folder, all folder settings are deleted from the package.
- When the type is changed to HotFix Urgency is changed to "High". In addition, the Restart after the installation and Apply independently checkboxes on the Execution Settings tab are automatically cleared. If two or more folders have been added to the copied folder, all folder settings are deleted from the package.
- When the type is changed to Application Urgency is changed to "Normal". In addition, the Restart after the installation and Apply independently checkboxes on the Execution Settings tab are automatically cleared.
When you created the package specifying the bat file in the Execution Settings tab -> Execution File in Create Windows package screen in the version of DPM Ver3.8 or earlier, re-create the package in this version.
When you register the package of a service pack, which switches the firewall function from disabled to enabled(Windows XP SP2 and so on), most ports are blocked when applying the service pack and the Management Server cannot communicate with the managed machine. Therefore, a scenario execution error will occur. In this case, open the port that DPM uses by Port Opening Tool after removing the error. See Section 3.1, "Port Opening Tool" about Port Opening Tool.
When you register a service pack of SP2 or later as a package, there are some service packs, which cannot be directly applied to the environment that a service pack is not applied, by the specification of the service pack. About the specification of the service pack, see the site of Microsoft Corporation and so on.
Example) For Windows Server 2008 SP2, SP1 needs to be already applied as the condition that SP2 will be applied.(SP2 cannnot be directly applied to the environment without SP.) ・ When creating a package, specify the following in registry condition of Dependency
information tab. Key name: HKEY_LOCAL_MACHINE\SOFTWARE\Microsoft\Windows NT\CurrentVersion Name: CSDVersion Conditions: Exists
・ When a package is distributed by the automatic update function, if there are two or more packages of service packs on the Management Server, the package of the latest service pack will be distributed. As the above, the package will not be applied to the managed machine without SP by the specification of the service pack. If you apply SP2 to the managed machine without SP, distribute by either of the following.
- The package of SP2 is not registered. Distribute the required service pack(SP1) by the automatic update function. After that, register SP2.
- The package of SP2 is already registered. Distribute the required service pack(SP1) by the scenario. After that, SP2 will be distributed by the automatic update function.
Set each item on each tab in the Create Windows package screen.

134
Basic tab
Click Basic tab in the Create Windows package screen and set each item. The places (types) circled in red are settings that will vary depending on the selected type.
- When HotFix is selected in Type

135
Basic
Package ID (Required)
Enter the package ID. 63 characters or less can be entered. Alphanumeric characters and the following symbols can be entered.
- _ Company name Enter the name of the company that issued the package. 127
characters or less can be entered. Release Date Enter the package release date. Enter it in the YYYY/MM/DD format.
If you enter an invalid value, it will be ignored or automatically corrected.
Package summary Enter package summary information. 511 characters or less can be entered.
Type Select the "Service Pack", "Hotfix", or "Application" from the list box. The default is "HotFix".
Urgency Set the urgency (four types) of the package. The default is "High" when you select "HotFix". The default is "Normal" when you select "Service Pack" or "Application". (*1)
MS number Enter the MS (KB) number appended to the "Service Pack" or "HotFix" issued by Microsoft. 31 characters or less can be entered. Example) KB889293
Q819696 - For Microsoft HotFix
The value entered in the MS number column is compared with the MS number written in the registry (KBXXXXXX or QXXXXXX), and if two values match, it is judged that the HotFix has been applied. Enter the correct value, including the "KB" or "Q." If a value is not entered in the MS number column, the application status is judged by the registry and file information entered in ID Information. HotFix with no entry of MS number and ID Information is not automatically updated. Specify either one when specifying "Highest" or "High" urgency.
- For service pack You do not need to enter the MS number or the ID Information.
*1 The handling process will differ according to the type of urgency as shown in the table below.
Urgency Power Status of
Computer Sending Process
Highest Powered ON computer It will be immediately sent to a managed machine where it can be applied.
Powered OFF computer An automatic update notice is immediately issued, however if the power is off, automatic update cannot be executed. Next time the computer is started up, it is judged whether or not the package has been applied based on information set in the package, and only packages that have not been applied are distributed.
High Powered ON computer It will be sent at a time specified in advance on the Management Server side.
Powered OFF computer Automatic update is executed the next time the computer is started up. It determines whether or not the package has been applied based on information set in the package, and only packages that have not been applied are distributed.
Normal
Create a scenario on the Management Server, and distribute it manually. Low

136
- When Service Pack is selected for Type.
Basic
Major version/Minor version
Entry the major version and minor version is necessary when the created package is the service pack. Values that can be entered are as follows. Major version: 0-65535 Minor version: 0-65535 In the case of a Microsoft service pack, the numbers entered in the Major Version column and Minor Version column are compared with the service pack versions currently installed in the OS, and it is judged whether the service pack has been applied. Enter the correct numbers.
Note:
If an invalid value is entered for major version or minor version, it is corrected automatically. For the service pack, entry of the major version and the minor version is necessary.
See the following table. Example)
For Windows Server 2008
OS Category Service Pack Major Version Minor Version Windows Server 2008 SP1 1 0
SP2 2 0

137
- When Application is selected for Type.
Basic
Display name Enter the application display name. This will become the same as the value for the DisplayName saved in the registry Uninstall sub-key after the application is installed. 511 characters or less can be entered.
Display version Enter the application display version. This will become the same as the value for the DisplayVersion saved in the registry Uninstall sub-key after the application is installed. 127 characters or less can be entered.

138
Execution Settings tab
Click Execution Settings tab in the Create Windows package screen and set each item.
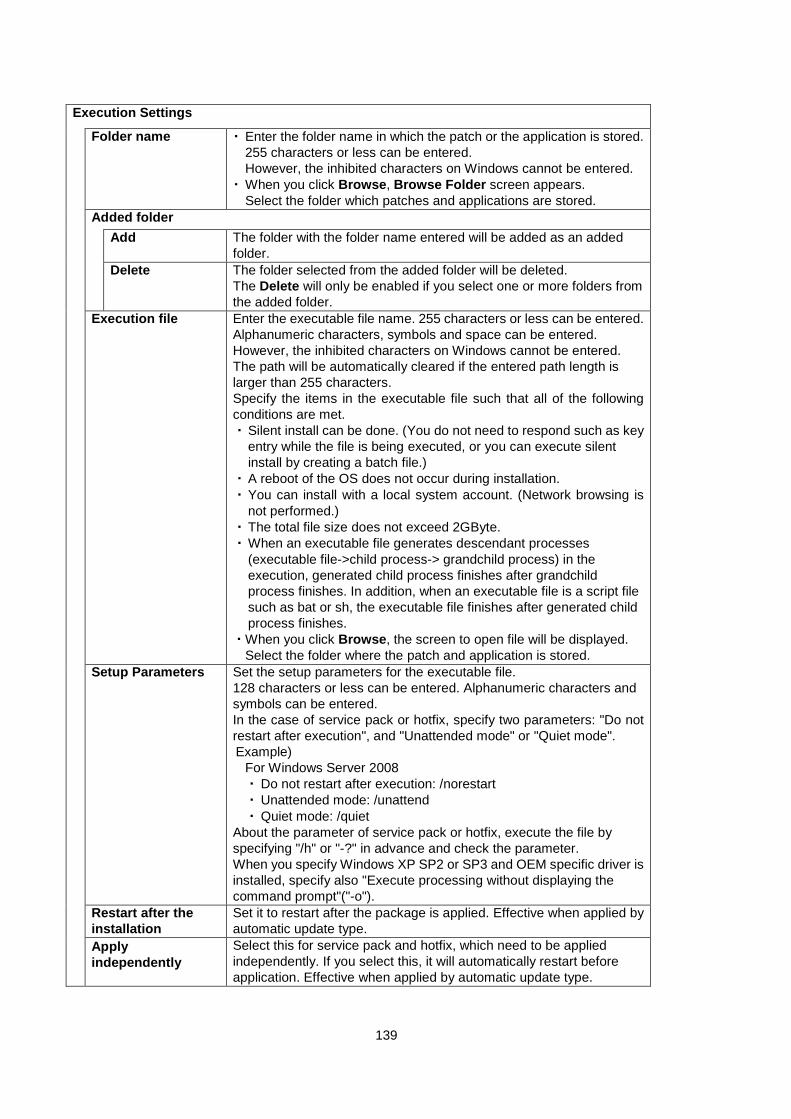
139
Execution Settings
Folder name ・ Enter the folder name in which the patch or the application is stored. 255 characters or less can be entered. However, the inhibited characters on Windows cannot be entered.
・ When you click Browse, Browse Folder screen appears. Select the folder which patches and applications are stored.
Added folder Add The folder with the folder name entered will be added as an added
folder. Delete The folder selected from the added folder will be deleted.
The Delete will only be enabled if you select one or more folders from the added folder.
Execution file Enter the executable file name. 255 characters or less can be entered. Alphanumeric characters, symbols and space can be entered. However, the inhibited characters on Windows cannot be entered. The path will be automatically cleared if the entered path length is larger than 255 characters. Specify the items in the executable file such that all of the following conditions are met. ・ Silent install can be done. (You do not need to respond such as key
entry while the file is being executed, or you can execute silent install by creating a batch file.)
・ A reboot of the OS does not occur during installation. ・ You can install with a local system account. (Network browsing is
not performed.) ・ The total file size does not exceed 2GByte. ・ When an executable file generates descendant processes
(executable file->child process-> grandchild process) in the execution, generated child process finishes after grandchild process finishes. In addition, when an executable file is a script file such as bat or sh, the executable file finishes after generated child process finishes.
・ When you click Browse, the screen to open file will be displayed. Select the folder where the patch and application is stored.
Setup Parameters Set the setup parameters for the executable file. 128 characters or less can be entered. Alphanumeric characters and symbols can be entered. In the case of service pack or hotfix, specify two parameters: "Do not restart after execution", and "Unattended mode" or "Quiet mode". Example)
For Windows Server 2008 ・ Do not restart after execution: /norestart ・ Unattended mode: /unattend ・ Quiet mode: /quiet
About the parameter of service pack or hotfix, execute the file by specifying "/h" or "-?" in advance and check the parameter. When you specify Windows XP SP2 or SP3 and OEM specific driver is installed, specify also "Execute processing without displaying the command prompt"("-o").
Restart after the installation
Set it to restart after the package is applied. Effective when applied by automatic update type.
Apply independently
Select this for service pack and hotfix, which need to be applied independently. If you select this, it will automatically restart before application. Effective when applied by automatic update type.

140
Note: The registered service pack/hotfix/Linux patch file/application is copied in the internal folder on
the Management Server. Therefore, the free space required for registration is twice as much as the space of required for the service pack/hotfix/Linux patch file/application to be registered.
The service packs/hotfix/Linux patch files/applications registered here are limited to those which are silently installed and do not require restart after installation. (For those that display a security warning screen due to digital signature information, a confirmation screen appears on the managed machine when it is applied, and installation cannot continue.) * Silent installation is the system does not require displaying the screen or input request after
starting installation. * When restart is necessary after installation in the case of service pack/HotFix, restart with the
following procedure. ・ Create images by checking Restart after the installation when you install by automatic
update. ・ Check Restart After Applying when you install by scenario.
A patch is registered in folder unit. Store only one patch in one folder.
Applicable OS and language tab Click Applicable OS and language tab in the Create Windows package screen and set each item.

141
Applicable OS and language OS Select the OS to which the package is to be applied.
Set the OS supported by the service pack/hotfix correctly. If you select All OS, all OSs except "Other OS" will be target.
Lang Select the language of the OS to which the package is to be applied.
Add Add the selected OS and Lang. Delete Delete the selected OS and Lang.
Base Service Pack Select a server pack that is required for applying the hotfix. Add Add the selected Base Service Pack.
Delete Delete the selected Base Service Pack. Absorbing Service Pack Select the next Server Pack. Use it combined with Base
Service Pack. Example)
If there is a Windows Server 2008 computer with SP1 applied; enter SP1 as the Base Service Pack, and SP2 as the Absorbing Service Pack. In this way, the conditions will be [this will apply to computers where SP1 is applied however, SP2 is not applied].
Add Add the selected Absorbing Service Pack. Delete Delete the selected Absorbing Service Pack.
Dependency Information tab
Click Dependency information tab in the Create Windows package screen and set each item.
The dependent information is checked when a package is applied. It will be applied only when dependent conditions are met. Specify the dependent conditions from the following 3 types. ・ Package dependency ・ File dependency ・ Registry dependency
Note:
If you are adding a composite of package dependency, file dependency, and registry dependency, it will only apply if all of the condition items have been met.
Example) If package dependency is A, file dependency information is B, and registry dependency is C. The composite application conditions are as follows.
Item Added
information Application conditions Composite
application condition
A 1 All of 1, 2 and 3 are applied. A is met and B is met and C is met.
2 3
B 1 Either Condition of 1 or 2 is met. 2
C 1 Either Condition of 1 or 2 is met. 2

142
Dependency information Check the package
dependency relationship The settings become valid when the Check for package dependency relationship checkbox is checked.
Required packages The package is applied only if the package it depends on has been installed. Check Required package checkbox and set. Required packages are selected from other packages registered by Image Builder or PackageDescriber. In addition, if two or more required packages have been added, the package will be applied if all required dependent packages have been applied. Example)
You cannot apply the cumulative security update for Internet Explorer if Internet Explorer is not installed. In this case, the required condition for applying the cumulative security update is Internet Explorer.

143
Add The following screen appears when you click Add.
The packages displayed on the above screen are those currently registered on the Management Server. Select a dependent package from the list and click Add.
Delete When you select a package from the dependent package list and click Delete, the dependent package is deleted.
Apply depending on the existence of any of the following files
It is determined if the package should be applied depending on whether a file exists or not by the dependent file information. If two or more files are added, it will be applied if at least one of them is met. Check Apply depending on existence of any of the following files checkbox.

144
Add When you click Add, the following screen appears. Add the package dependent information.
・ File path
Enter the dependent file path and file name. 259 characters or less can be entered. However, the inhibited characters on Windows cannot be entered.
・ File version Enter the file version. Enter in "x.x.x.x" format with 31 characters or less. Numeric characters and symbol (only ".") can be entered. If a file version is not entered, the existence of the file is the condition of the dependency. You can check the file version in the Version tab of the file property. You do not need to enter anything if there is not the Version tab in the property or if the File version item in the Version tab is blank.
・ Conditions - Exists:
The package will be applied if the entered file exists. - Does not exist:
The package will be applied if the entered file does not exist. Modify When you select a file and click Modify, the Modify file dependency
information screen appears. Delete When you select a file and click Delete, the dependent file is deleted.
Apply depending on the existence of any of the following registries
It is determined if the package should be applied depending on whether the registry exists or not by the dependent registry information. If two or more registry information is added, it will be applied if at least one of them is met. Check Apply depending on the existence of any of the following registries checkbox.
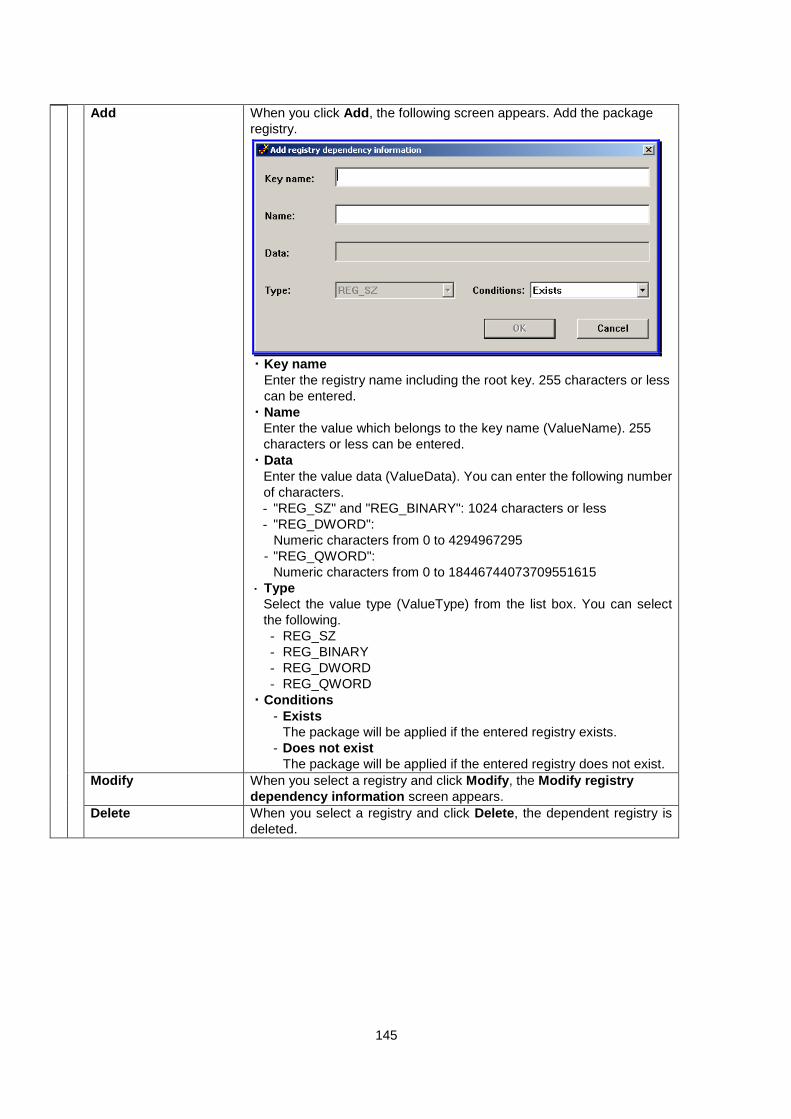
145
Add When you click Add, the following screen appears. Add the package
registry.
・ Key name
Enter the registry name including the root key. 255 characters or less can be entered.
・ Name Enter the value which belongs to the key name (ValueName). 255 characters or less can be entered.
・ Data Enter the value data (ValueData). You can enter the following number of characters. - "REG_SZ" and "REG_BINARY": 1024 characters or less - "REG_DWORD":
Numeric characters from 0 to 4294967295 - "REG_QWORD":
Numeric characters from 0 to 18446744073709551615 ・ Type
Select the value type (ValueType) from the list box. You can select the following.
- REG_SZ - REG_BINARY - REG_DWORD - REG_QWORD
・ Conditions - Exists
The package will be applied if the entered registry exists. - Does not exist
The package will be applied if the entered registry does not exist. Modify When you select a registry and click Modify, the Modify registry
dependency information screen appears. Delete When you select a registry and click Delete, the dependent registry is
deleted.

146
ID information tab
Click ID Information tab in the Create Windows package screen and set each item. It determines whether a package has been applied to a machine using the ID information. File and registry changes occurring due to the fact that a service pack/hotfix/Application was installed are entered as ID information. Example) Patch A is registered, and distributed to machines.
1) Before distribution: Which patches have been installed? How is the file information or the registry?
2) After distribution: When patch A is distributed, what will the files and registry change to? The package application status is determined based on the difference information obtained by comparing 1) and 2) above. If all entered file change information and registry change information are met, it is judged that the package was applied.
Note:
If the ID information is not entered when the package is registered, the package will become an unrecognized package and automatic update notice will not be sent. When either of MS number or the ID information is not entered when you register HotFix create and distribute scenario on the Management Server is necessary.
If the created package file is a service pack or hotfix issued by Microsoft, even if no ID information was entered, the MS number entered on the Basic tab is compared with the MS number (KBXXXXXX or QXXXXXX) written in the registry, and if two values match, it is judged that the package has been applied.
ID information needs to be entered in the case of applying a package that does not have an MS number or whose MS number cannot be identified, or a package that the information remains only in the registry and so on.
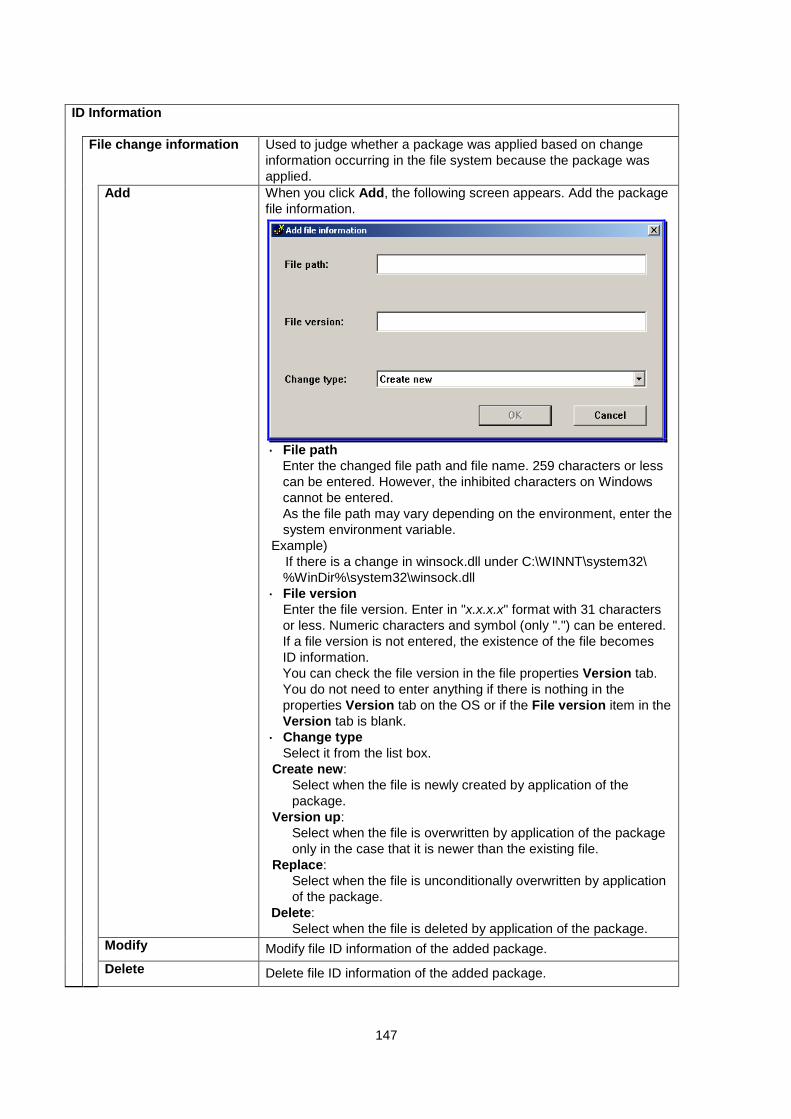
147
ID Information
File change information Used to judge whether a package was applied based on change information occurring in the file system because the package was applied.
Add When you click Add, the following screen appears. Add the package file information.
・ File path
Enter the changed file path and file name. 259 characters or less can be entered. However, the inhibited characters on Windows cannot be entered. As the file path may vary depending on the environment, enter the system environment variable.
Example) If there is a change in winsock.dll under C:\WINNT\system32\ %WinDir%\system32\winsock.dll
・ File version Enter the file version. Enter in "x.x.x.x" format with 31 characters or less. Numeric characters and symbol (only ".") can be entered. If a file version is not entered, the existence of the file becomes ID information. You can check the file version in the file properties Version tab. You do not need to enter anything if there is nothing in the properties Version tab on the OS or if the File version item in the Version tab is blank.
・ Change type Select it from the list box.
Create new: Select when the file is newly created by application of the package.
Version up: Select when the file is overwritten by application of the package only in the case that it is newer than the existing file.
Replace: Select when the file is unconditionally overwritten by application of the package.
Delete: Select when the file is deleted by application of the package.
Modify Modify file ID information of the added package. Delete Delete file ID information of the added package.

148
Registry change Used to judge whether a package was applied based on registry
information that was changed because the package was applied. Add When you click Add, the following screen appears.
・ Key name
Enter the registry name including the root key. ・ Name
Enter the value (ValueName) associated with the key name. ・ Type
Select the value Type (ValueType). ・ Data
Enter the value data (ValueData). The item will be enabled if you enter Name.
・ Change Select from the list box.
Create new: Select when the registry is newly created by application of the package.
Replace: Select when the registry is overwritten by application of the package. Delete: Select when the registry is deleted by application of the package.
Modify Modify registry information of the added package. Delete Delete registry information of the added package.
When you click OK after entering the required information, the package is created.
When you click Cancel, all entered information is discarded and the Create Windows package screen will close.
Input of the information required for Windows package creation is completed. Click OK on the Create Windows package screen to create the Windows package.
Note:
You can create packages sequentially. When you create packages sequentially, enter the next package information and click OK. To complete creating packages, click Finish. (Cancel will become Finish once you click OK.)

149
1.5.2. Modify Windows Package (1) When you select the Modify Windows package, the following screen appears.
(2) Select the package from the Select Windows Package screen, and click Modify. (3) The following screen appears. Modify items on each tab of the screen. The following items can be modified.
See Section 1.5.1, "Create Windows Package," regarding each tab of the screen. ・ You can modify items except Package ID and Type on the Basic tab. ・ You can modify items except Folder to be copied and Execution file on the Execution Settings tab. ・ You can modify all items on the Applicable OS and language tab. ・ You can modify all items on the Dependency information tab. ・ You can modify all items on the ID Information tab.

150
1.5.3. Create Linux Package If you select the Create Linux package menu item, the Create Linux package screen appears.
Basic tab
Click Basic tab in the Create Linux package screen and set each item.
Basic
Package ID (Required)
Enter the package ID. 63 characters or less can be entered. Alphanumeric characters and the following symbols can be entered.
- _ Company name Enter the name of the issuing source that issued the package.
127 characters or less can be entered. Release date Enter the package release date. The date is entered in the
YYYY/MM/DD format. Package summary Enter package summary information. 511 characters or less can
be entered. Type Select the Linux patch or application. Urgency Select the package urgency level. It cannot be changed. OK After all of the required items are correctly entered, OK will be
enabled. Creates Linux package with the set contents of Basic screen and returns to the previous window.
Cancel Returns to the previous window without creating Linux package with the set contents of Basic screen.

151
Execution Settings tab
Click Execution Settings tab in the Create Linux Package screen and set each item.
Execution Settings
Folder name Enter the folder in which the patch or the application is stored. 255 characters or less can be entered. However, the inhibited characters on Windows, the space and the following symbols cannot be entered.
$ & ' ( ) ; ` When you click Browse, Browse Folder screen appears. Select the folder which patches and applications are stored.
Added Folder Display the folder that was added. ・ Linux patch
You can add only one folder. ・ Application
Two or more folders can be added. Add The folder entered in the Folder Name text box will be added as an
added folder. Delete The folder selected from the added folder column will be deleted.
Delete will only be enabled if you select one or more folders from the added folder.

152
Execution File Enter the executable file. 255 characters or less can be entered. However, the inhibited character on Windows, the space and the following symbols.
$ & ' ( ) ; ` The path will be automatically cleared if the entered path length is larger than 255 characters. Specify the executable file that all of the following conditions are met. ・ Silent install can be done. (You do not need to respond such as
key entry while the file is being executed, or you can execute silent install by creating a batch file.)
・ A reboot of the OS does not occur during the install. ・ You can install with a local system account. (Network browsing is
not performed.) ・ The total file size does not exceed 2GByte. ・ When an executable file(setup.exe/update.exe and so on), which
installs the patch/application and so on, generates descendant processes(executable file->child process-> grandchild process) during the installation of the patch/application, generated child process finishes after grandchild process finishes. Also, when an executable file is a script file such as bat or sh, the executable file finishes after generated child process finishes. If a file path with "&" is entered, the executable file may not be applied properly.
・ When you click Browse, Browse Folder screen appears. Select the folder which patches and applications are stored.
Setup parameters Set the package setup parameters. Set two parameters from Do not Restart After Execution and Unattended Mode, or Quiet Mode. Alphanumeric characters, symbols and space can be entered. 128 characters or less can be entered.
Requires restarting after the installation
This item is invalid.
Requires apply independently
This item is invalid.
Note:
When you register an rpm package, set the options for the setup parameter with "-i" or "-U" and so on.
Do not output any messages on the console if you register a shell script. The scenario will fail if a message is output. If a message is required, it should be redirected to a log file, and unnecessary messages should be redirected to /dev/null and so on.
Example) When you saves a log dmesg >> /tmp/dmesg.log
Example) When you do not save messages /etc/rc.d/init.d/depagtd start > /dev/null
Set the code "0" when normal end for the shell script. Scenario execution error occurs when end code is other than "0" even with completion of script execution.

153
When registering an rpm package, the package with "-i" option may not be properly installed depending
on the package registered. The cause may be that there is a signature, or it may be an rpm with a dependency. In addition, it might fail if it has already installed.
Representative options are indicated below. Specify the setup parameters based on the content.
Options Sub-Options Contents -i Installs a new package. -U Upgrades the already installed packages. Installs when it
is not installed. The installed package is uninstalled if an earlier version exists.
-F Updates older packages only if an older package exists. -i --oldpackage Installs packages that are older than the already installed
packages. -i --replacefiles Installs the packages even if they replace files, which has
been installed in the already installed package. -i --replacepkgs Installs the packages even if some of them are already
installed. -i --force the same as the oldpackage, replacefiles, and
replacepkgs options together -i --nodeps Forcibly installs ignoring dependencies. -i --nosignature Dose not examine the package or header signature
when reading in.
Also, when you specify options with a normal output, the install can fail so do not specify. The display system options are shown below
-v, --verbose Displays more information. Normally, routine progress
messages are displayed. -vv Prints debugging information. -h, --hash The progress status is displayed using 50 hash marks "#"
as it is taken from the package archive. --percent The percentage is displayed as the file is taken from the
package archive. See the online help documents of the Linux you are using for option details.
Input of the information required for Linux package creation is completed. Click OK on the Create Linux Package screen to create the Linux package.
Note: You can create packages sequentially. When you create packages sequentially, enter the next
package information and click OK. To complete creating packages, click Finish. (The Cancel will become Finish once you click OK.)

154
1.5.4. Modify Linux Package (1) When you select the Modify Linux Package, the following screen appears.
(2) Select the package to modify from the Select Linux Package screen, and click Modify.

155
(3) The Modify Linux Package screen appears. Modify items on each tab of the screen. The following items
can be modified. See Section 1.5.3, "Create Linux Package" regarding each tab of the screen. ・ You can modify items except Package ID and Type and Urgency Level on the Basic tab ・ You can modify items except Folder to be copied and Execution file on the Execution Settings tab.
1.5.5. Exit Package Registration/Modification When you click Exit menu, the Package registration/modification screen closes. At this time, whether automatic update notification will be issued to the managed machine is decided based on the urgency level of the registered package. If the registered package has the Highest urgency level, automatic update notice will be issued to managed machines where the package is applicable and it will be promptly installed.
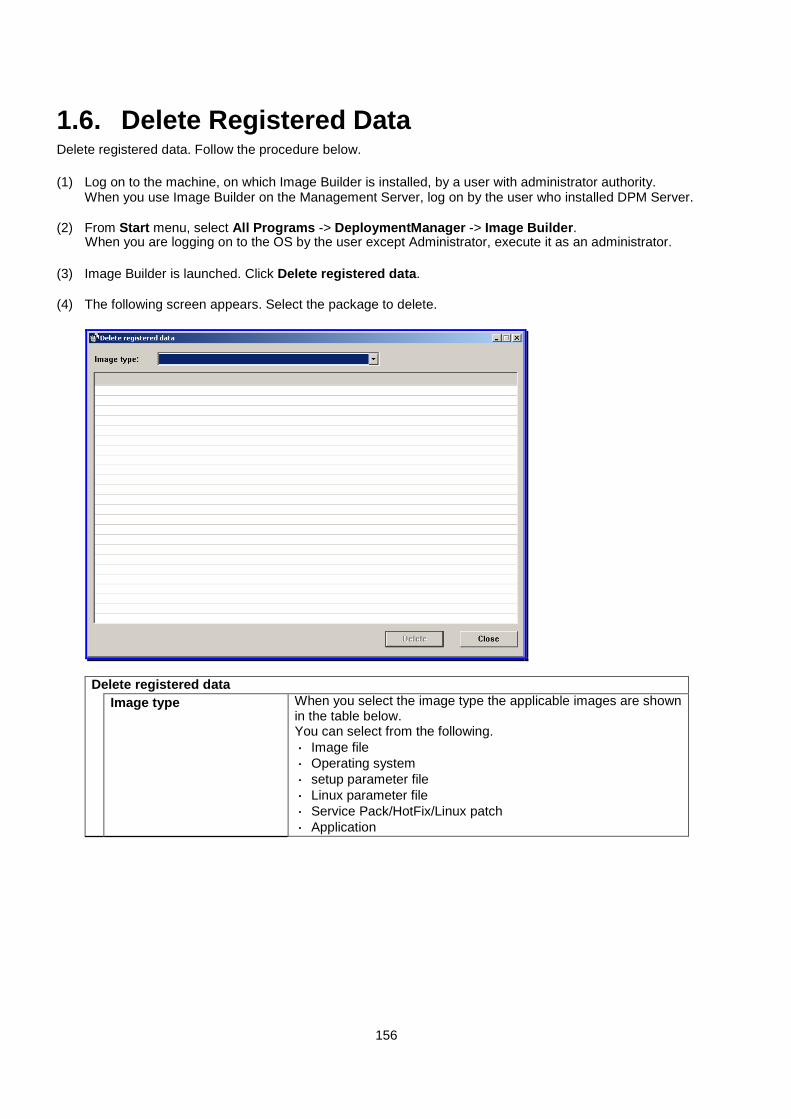
156
1.6. Delete Registered Data Delete registered data. Follow the procedure below. (1) Log on to the machine, on which Image Builder is installed, by a user with administrator authority.
When you use Image Builder on the Management Server, log on by the user who installed DPM Server.
(2) From Start menu, select All Programs -> DeploymentManager -> Image Builder. When you are logging on to the OS by the user except Administrator, execute it as an administrator.
(3) Image Builder is launched. Click Delete registered data.
(4) The following screen appears. Select the package to delete.
Delete registered data
Image type
When you select the image type the applicable images are shown in the table below. You can select from the following. ・ Image file ・ Operating system ・ setup parameter file ・ Linux parameter file ・ Service Pack/HotFix/Linux patch ・ Application

157
Delete Delete is enabled only if you select one of the image files from the
image type. You can select and delete two or more image files. A confirmation dialog box appears when you click Delete. If you click Yes, the image file is deleted and the following screen appears.
Close The Delete registered data screen closes.
Note:
You can temporarily delete the package registered by automatic download using the function to delete the registered data by Image Builder. However, if you do not delete the corresponding package from the Package Web Server, it will be downloaded again at the set time of the automatic download.
Use PackageDescriber to delete the package from the Package Web Server. See Section 2, "PackageDescriber" for details.
You cannot delete disk duplication data files or CSV files from Delete registered data. Delete them manually. See Section 1.4, "Creating a Setup Parameter File" about the saved folder of each file.
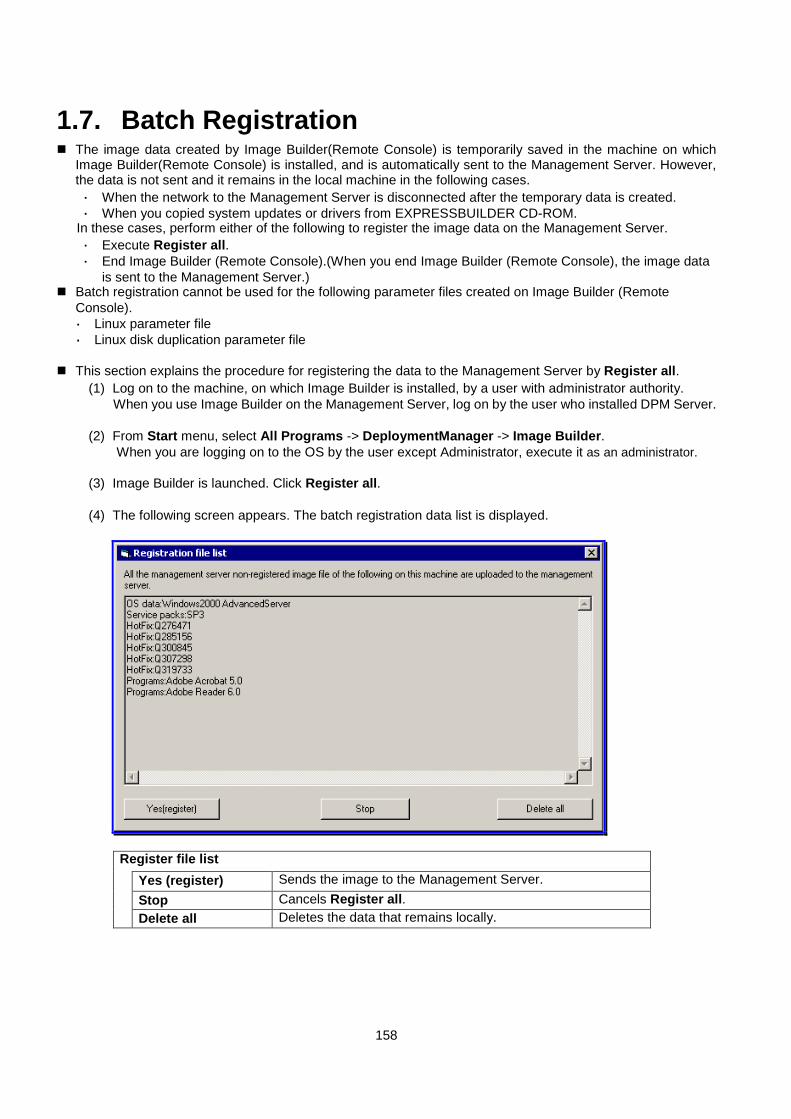
158
1.7. Batch Registration The image data created by Image Builder(Remote Console) is temporarily saved in the machine on which
Image Builder(Remote Console) is installed, and is automatically sent to the Management Server. However, the data is not sent and it remains in the local machine in the following cases. ・ When the network to the Management Server is disconnected after the temporary data is created. ・ When you copied system updates or drivers from EXPRESSBUILDER CD-ROM.
In these cases, perform either of the following to register the image data on the Management Server. ・ Execute Register all. ・ End Image Builder (Remote Console).(When you end Image Builder (Remote Console), the image data
is sent to the Management Server.) Batch registration cannot be used for the following parameter files created on Image Builder (Remote
Console). ・ Linux parameter file ・ Linux disk duplication parameter file
This section explains the procedure for registering the data to the Management Server by Register all.
(1) Log on to the machine, on which Image Builder is installed, by a user with administrator authority. When you use Image Builder on the Management Server, log on by the user who installed DPM Server.
(2) From Start menu, select All Programs -> DeploymentManager -> Image Builder. When you are logging on to the OS by the user except Administrator, execute it as an administrator.
(3) Image Builder is launched. Click Register all.
(4) The following screen appears. The batch registration data list is displayed.
Register file list Yes (register) Sends the image to the Management Server.
Stop Cancels Register all. Delete all Deletes the data that remains locally.

159
(5) Click Yes(register). Batch registration to the Management Server is completed.
Note:
If you register an offline utility from Image Builder(Remote Console), one group of utilities can be split into two or more files and uploaded. If the detail of the file is unknown, upload all at the time of Register all. (If there are identical files, overwrite them.)
1.8. Agreement Display Settings When registering an image file, if you check Do not show this screen again checkbox in the agreement screen and select I Accept, the agreement screen will not be displayed later. Select Agreement Redisplay (S) from the system menu to display the screen again. The screen will be displayed again when you register an image file.

160
2. PackageDescriber This chapter explains PackageDescriber, which is a tool to create packages and register them on the Package Web Server.
2.1. Initial settings: Set Environment PackageDescriber is used in the following applications.
・ Creation and modification of Windows package. ・ Registration and deletion of packages on the Package Web Server ・ Online update of OS definition file and language definition file
Note:
PackageDescriber is a package creation tool for Windows. Use Image Builder to register Linux packages.
Set the Package Web Server so that the Management Server can download packages stored in the Web
shared folder of the Package Web Server using HTTP. For the configuration, see Section 2.7.3. "Package Download Setting" in Web Console Reference Guide, and Appendix B, "Configuring the Package Web Server" in Installation Guide.
All created and modified packages are saved in the Temporary Folder of PackageDescriber. Register them to the Package Web Server as necessary.
When a package is registered in the Package Web Server from the Register in/Delete from the Package Web Server window, it will become downloadable to the Management Server.

161
The relationships among folders associated with PackageDescriber are illustrated in the diagram below.
Temporary save folder
Web shared folder
4) Package Web Server registration
5) Delete from Package Web Server
1) Create package 2) Modify package
3) Delete package
Recycle bin
Recycle bin
Package folder
PD running machine Package Web Server
Package ABC is described here as an example. 1) When you create the package, PackageDescriber copies the specified package ABC folder (file) to a
PackageDescriber Temporary Folder. 2) When you modify the package, PackageDescriber modifies the package ABC stored in the
PackageDescriber Temporary Folder. 3) When you delete the package, PackageDescriber deletes the package ABC from the
PackageDescriber Temporary Folder. 4) When you register the package ABC in the Package Web Server, PackageDescriber copies from the
PackageDescriber Temporary Folder to the Web shared folder. 5) When you delete the package ABC from the Package Web Server, PackageDescriber deletes the
package ABC from the Web shared folder. <<Initial Setting>> This section describes the initial setting of PackageDescriber. (1) Log on to the machine, on which PackageDescriber is installed, by a user with administrator authority.
(2) From Start menu, select All Programs -> DPM PackageDescriber.
(3) PackageDescriber is launched and the the following screen appears. Set each item.

162
If you do not set the Web shared folder, the Management Server cannot automatically download
packages. Also, the Web shared folder and the Temporary Folder cannot be omitted. Check that the read and write permission is set in Web shared folder. The registered package will be stored in the Web shared folder. Be sure to secure enough free space. If the shared folder of the network computer is specified as a Web shared folder, it is recommended
to assign a local drive to the shared folder in advance. If a drive is not assigned, the shared folder of the network computer may not be accessible.
If you change the Web shared folder, you need to re-register packages, which have been registered. The <PackageDescriber installation folder> cannot be specified as the Web shared folder. The Temporary Folder and the Web shared folder cannot be the same folder. Note the combination of the folder to store packages(normally the Temporary Folder) and the
package ID. On DPM, a folder with the name specified as the package ID is created in the folder where the package is saved, and the package is managed. If a folder of the same package ID already exists, the folder is deleted and the package is created. Therefore, do not specify a folder used for except saving the package, such as system folders, as the folder in which the package is saved.
The file cannot be specified in the Temporary Folder. The write permission is required for the folder specified as the Temporary Folder. If UAC is enabled, note the following.
・ Change the Temporary Folder from its initial setting, because even users with administrator authority do not have write permission for %ProgramFiles(x86)%.
・ If you install PackageDescriber again in an environment where PackageDescriber has been uninstalled, the Initial settings:Set Environment screen may not be displayed. In this case, change the setting from Settings menu -> Set Environment.
When you launch PackageDescriber initially after switching the UAC setting (enable/disable), set Web shared folder and Temporary Folder which was set before switching UAC.
You can change the setting on this screen from Settings menu -> Set Environment. You can set the folder to save when creating packages, in the Temporary Folder.
The default is "<PackageDescriber installation folder>\Packages".
(4) Click OK to save settings and close the Initial settings: Set Environment screen.
Note: It may take time to launch PackageDescriber If you have set the Web shared folder and Temporary Folder and click OK, information is written
in the PackSerFolder (Web shared folder) and PackageSavePath (Temporary folder) of <PackageDescriber installation folder>\PDconfig.
When you modify PDconfig directly, restart PackageDescriber. The settings will be reflected after restarting PackageDescriber.
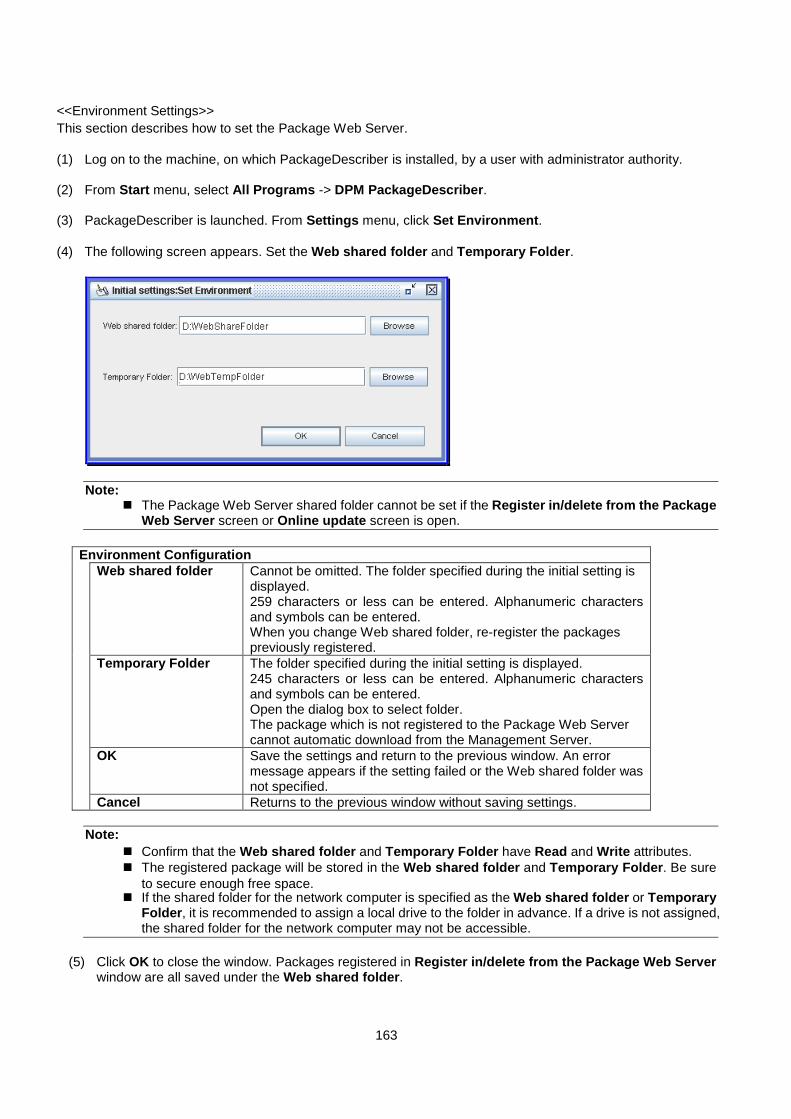
163
<<Environment Settings>> This section describes how to set the Package Web Server. (1) Log on to the machine, on which PackageDescriber is installed, by a user with administrator authority.
(2) From Start menu, select All Programs -> DPM PackageDescriber.
(3) PackageDescriber is launched. From Settings menu, click Set Environment.
(4) The following screen appears. Set the Web shared folder and Temporary Folder.
Note: The Package Web Server shared folder cannot be set if the Register in/delete from the Package
Web Server screen or Online update screen is open.
Environment Configuration Web shared folder Cannot be omitted. The folder specified during the initial setting is
displayed. 259 characters or less can be entered. Alphanumeric characters and symbols can be entered. When you change Web shared folder, re-register the packages previously registered.
Temporary Folder The folder specified during the initial setting is displayed. 245 characters or less can be entered. Alphanumeric characters and symbols can be entered. Open the dialog box to select folder. The package which is not registered to the Package Web Server cannot automatic download from the Management Server.
OK Save the settings and return to the previous window. An error message appears if the setting failed or the Web shared folder was not specified.
Cancel Returns to the previous window without saving settings.
Note: Confirm that the Web shared folder and Temporary Folder have Read and Write attributes. The registered package will be stored in the Web shared folder and Temporary Folder. Be sure
to secure enough free space. If the shared folder for the network computer is specified as the Web shared folder or Temporary
Folder, it is recommended to assign a local drive to the folder in advance. If a drive is not assigned, the shared folder for the network computer may not be accessible.
(5) Click OK to close the window. Packages registered in Register in/delete from the Package Web Server
window are all saved under the Web shared folder.

164
2.2. Create Package This section describes the procedure to create a package. If you register RUR(revision up release) module for Express 5800 Series as a package, register it after
confirming the installation manual of RUR necessarily. When you register the package of a service pack, which switches the firewall function from disabled to
enabled(Windows XP SP2 and so on), most ports are blocked when applying the service pack and the Management Server cannot communicate with the managed machine. Therefore, a scenario execution error will occur. In this case, open the port that DPM uses by Port Opening Tool after removing the error. See Section 3.1, "Port Opening Tool" about Port Opening Tool.
When you register a service pack of SP2 or later as a package, there are some service packs, which cannot be directly applied to the environment that a service pack is not applied, by the specification of the service pack. About the specification of the service pack, see the site of Microsoft Corporation and so on.
Example) For Windows Server 2008 SP2, SP1 needs to be already applied as the condition that SP2 will be applied.(SP2 cannnot be directly applied to the environment without SP.) ・ When creating a package, specify the following in registry condition of Dependency information
tab. Key name: HKEY_LOCAL_MACHINE\SOFTWARE\Microsoft\Windows NT\CurrentVersion Name: CSDVersion Conditions: Exists
・ When a package is distributed by the automatic update function, if there are two or more packages of service packs on the Management Server, the package of the latest service pack will be distributed. As the above, the package will not be applied to the managed machine without SP by the specification of the service pack. If you apply SP2 to the managed machine without SP, distribute by either of the following. - The package of SP2 is not registered.
Distribute the required service pack(SP1) by the automatic update function. After that, register SP2.
- The package of SP2 is already registered. Distribute the required service pack(SP1) by the scenario. After that, SP2 will be distributed by the automatic update function.
(1) Log on to the machine, on which PackageDescriber is installed, by a user with administrator authority.
(2) From Start menu, select All Programs -> DPM PackageDescriber.
(3) PackageDescriber is launched. From File menu, click Create package.
(4) Create package screen appears. Set each item
Note: About the description of each tab(Basic, Execution settings, Applicable OS and language,
Dependency Information, ID information, and Group Information), see from Section 2.2.1, "Basic Information," to Section 2.2.6, "Group Information."
If you click OK after entering required information, a package information file will be created. If you click Cancel, Create package screen will be closed without saving the setting.
165
2.2.1. Basic Information Set Basic tab. The setting items will be changed depending on the set value(type) in red frame.
Note: If the type has been changed, Urgency and Execution Settings information are changed to the
default. Confirm it again. ・ When the type is changed to Service Pack
Urgency is changed to Normal. Also, the Requires restarting after the installation and Requires applying independently checkboxes on the Execution settings tab are automatically checked. If two or more folders have been added to the folder to be copied, all folder settings are deleted from the package.
・ When the type is changed to HotFix Urgency is changed to High. Also, the Requires restarting after the installation and Requires applying independently checkboxes on the Execution Settings tab are automatically cleared. If two or more folders have been added to the folder to be copied, all folder settings are deleted from the package.
・ When the type is changed to Application Urgency is changed to Normal. Also, the Requires restarting after the installation and Requires applying independently checkboxes on the Execution settings tab are automatically cleared.

166
・ When HotFix is selected as the type
167
Basic Package ID
(Required) Enter the package ID. 63 characters or less can be entered. Alphanumeric characters and the following symbols can be entered. - (hyphen), _ (underscore) Do not include hexadecimal number characters (%0D, %0A, and so on) in the package ID. The package cannot be properly downloaded to the Management Server.
Company name Enter the name of the company from which patches and applications were issued. 127 characters or less can be entered. Alphanumeric characters and symbols can be entered.
Release date Enter the date when the patch or application was released. When you enter a date, use YYYY/MM/DD format. If an invalid value is entered, it will automatically become blank.
Package Summary Enter summary information of the package. 511 characters or less can be entered. Alphanumeric characters and symbols can be entered.
Type Select the package type. You can select from the following. ・ HotFix ・ Service Pack ・ Application The default is HotFix. When the type is changed, the screen switches in accordance with the changed type. (If the screen does not switch, change the type by using the mouse.) If you change the type, the contents of the Urgency and the Execution Settings are changed to the default.
Urgency Set the urgency of the package. You can select from the following four types. ・ Highest ・ High ・ Normal ・ Low The default is Normal, however it is High only if the type is HotFix. If a package is registered as an automatically updated package, set the urgency to highest or high. (*1)

168
MS number Enter the MS (KB) number pre-assigned to the service pack or HotFix
issued by Microsoft. 31 characters or less can be entered. Alphanumeric characters can be entered. Example) KB889293
Q819696 ・ If service pack was selected as the type, there is no need to enter
the MS number and ID information. ・ For Microsoft HotFix
The value entered in the MS number field is compared with the MS number written in the registry (KBXXXXXX or QXXXXXX), and if two values match, it is judged that the HotFix has been applied. Enter the correct value, including the "KB" or "Q." If a value is not entered in the MS number field, the applied status is judged by the information of registry, the files, and so on, entered in ID Information tab.
・ HotFix that does not write MS number in the registry The letters that cannot be entered by PackageDescriber are included in the MS number, entry ID information is required to execute automatic updates.
・ HotFix of Microsoft Hotfix with no entry of MS number and ID information is not the target of automatic update. When selecting the urgency Highest or High, make sure to enter at least one of these fields.
*1 The process will be different when the Management Server executes automatic download differs
depending on urgency type. See the following table.
Urgency Power Status of Computer
Process After Package Registration
Highest Power ON An automatic update notice is immediately issued.
Power OFF An automatic update notice is immediately issued, however if the power is off, automatic update cannot be executed. At the next startup of computers, it is judged whether or not the package has been applied based on information set in the package, and only packages that have not been applied are distributed.
High Power ON Automatic update is executed at the time specified by the Management Server.
Power OFF Automatic update is executed when the computer is started up next time. It is judged whether or not the package has been applied based on information set in the package, and only packages that have not been applied are distributed.
Normal
There is no distribution with the automatic update. Create a scenario on the Management Server, and distribute it manually.
Low
Other than urgency, setting the following items are necessary for automatic updates.
If they are not set, there will be no distribution with automatic updates even if urgency is Highest or High. Create a scenario on the Management Server, and distribute it. ・ HotFix:MS number (or ID information) ・ Service Pack:Major version and Minor version ・ Application:Display name and Display version (or ID information)
For a package with Highest urgency, an automatic update notice is issued to all computers whose operating systems are target OS of the package. However, automatic updates are not executed on computers whose power is off or whose automatic update notice is set to constantly off.
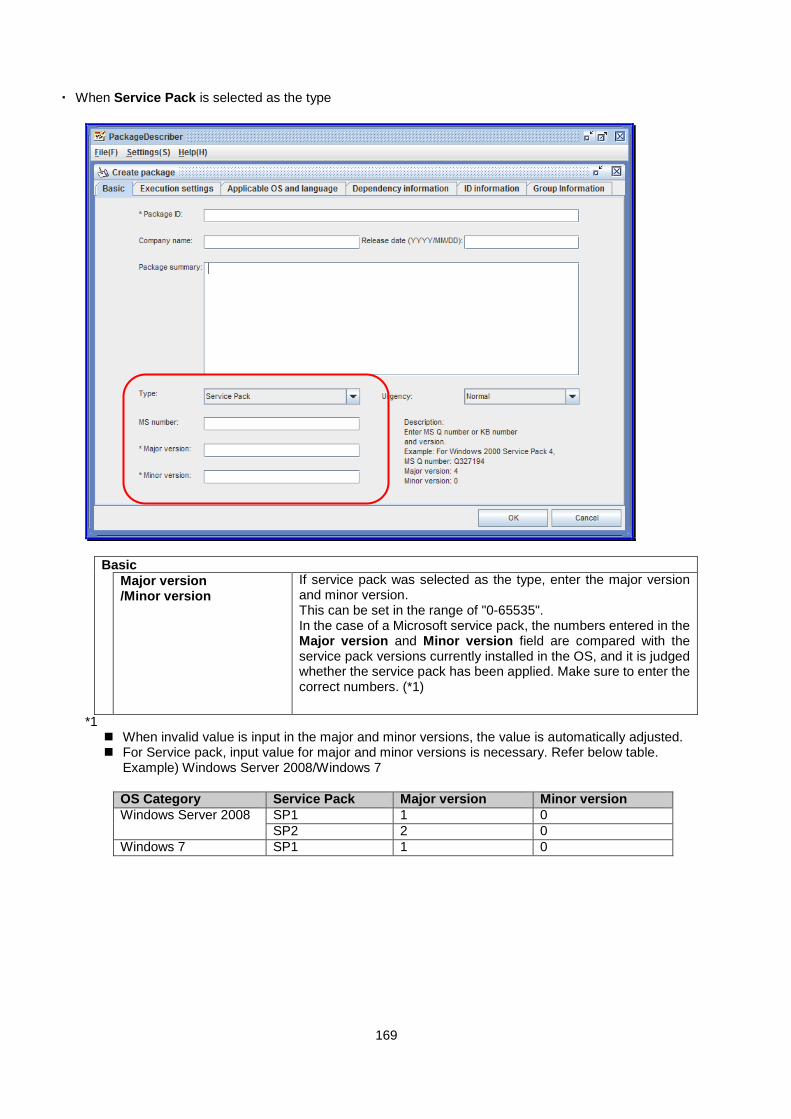
169
・ When Service Pack is selected as the type
Basic Major version
/Minor version If service pack was selected as the type, enter the major version and minor version. This can be set in the range of "0-65535". In the case of a Microsoft service pack, the numbers entered in the Major version and Minor version field are compared with the service pack versions currently installed in the OS, and it is judged whether the service pack has been applied. Make sure to enter the correct numbers. (*1)
*1 When invalid value is input in the major and minor versions, the value is automatically adjusted. For Service pack, input value for major and minor versions is necessary. Refer below table.
Example) Windows Server 2008/Windows 7
OS Category Service Pack Major version Minor version Windows Server 2008 SP1 1 0
SP2 2 0 Windows 7 SP1 1 0

170
・ When Application is selected as the type
Basic Display Name ・ If Application was selected as the type, enter the display name.
511 characters or less can be entered. In order to register as a target package of automatic update, enter the application name displayed in Programs and Features. (*1) For applications not displayed in Programs and Features even after being installed, enter the ID information. See Section 2.2.5, "ID Information" for details.
Display Version ・ If application was selected as the type, enter the Display version. Do not enter anything if the version number is not displayed in Programs and Features. In order to register as a target package of automatic update, enter the version displayed in Programs and Features. (*1) Do not enter anything if the version number is not displayed in Programs and Features. 126 characters or less can be entered.

171
*1
Example) Name and Version displayed in Programs and Features
2.2.2. Execution Settings Information Set Execution settings tab.

172
Execution settings Folder to be copied
Folder name
・ Specify the folder where the patch or application is stored. 255 characters or less can be entered. Alphanumeric characters and symbols can be entered. However, the inhibited characters on Windows cannot be entered.
・ Click Browse, and select the folder where the patch or application is stored.
Add Specify the Folder name and click Add to add it to the Added folder. Added folder Displays the added folders.
・ Service Pack or HotFix One folder can be added.
・ Application Two or more folders can be added.
Delete Click Delete, and delete the folder selected in Added folder. Install
Execution file (Required)
Enter the execution file name. 255 characters or less can be entered. Alphanumeric characters and symbols can be entered. Do not specify a file names that includes %xx. A file with such a file name cannot be properly downloaded to the Management Server. "xx" indicates hexadecimal number 0 ~ f. Example: file%9d.exe ・ For the Execution file, be sure to specify the one that all of the
following conditions are met. - Silent install can be done. (You do not need to respond such as key
entry while the file is being executed, or you can execute silent install by creating a batch file.)
- OS is not restarted during installation. - Installation is possible by Local System account. (The network is not
accessed.) - The total file size does not exceed 2GByte. - When an executable file generates descendant processes
(executable file->child process-> grandchild process) in the execution, generated child process finishes after grandchild process finishes. Also, when an executable file is a script file such as bat or sh, the executable file finishes after generated child process finishes.
・ Click Browse and select the execution file. Setup parameters Set the setup parameters for the executable file.
128 characters or less can be entered. Alphanumeric characters and symbols can be entered. In the case of service pack or hotfix, specify two parameters: "Do not restart after execution", and "Unattended mode" or "Quiet mode". Example)
For Windows Server 2008 ・ Do not restart after execution: /norestart ・ Unattended mode: /unattend ・ Quiet mode: /quiet
About the parameter of service pack or hotfix, execute the file by specifying "/h" or "-?" in advance and check the parameter. When you specify Windows XP SP2 or SP3 and OEM specific driver is installed, specify also "Execute processing without displaying the command prompt"("-o").
Requires restarting after the installation
Set this parameter to perform restart after the package is applied. Effective when applying by automatic update type.

173
Requires applying independently
Set for patches or applications which need to be applied independently (for example, service pack). When this checkbox is checked, restart is performed automatically before application. Effective when applied by automatic update type.
Note:
The registered service pack/hotfix/application is copied to an internal folder on the Management Server. The amount of free space required for registration is approximately twice of the amount of the service pack/hotfix/application to be registered.
The service packs/hotfixes/applications registered here are limited to those which are silently installed and do not require restart after installation. (For those that display a security warning screen due to digital signature information, a confirmation screen appears on the managed machine when it is applied, and installation cannot continue.)
* Silent installation is the system does not require displaying the screen or input request after starting installation.
* When restart is necessary after installation in the case of service pack/HotFix, restart with the following procedure.
・ Create images by checking Restart after the installation when you install by automatic update. ・ Check Restart After Applying when you install by scenario system.
A patch is registered in folder unit. Store only one patch in one folder.
2.2.3. Applicable OS and Language Information Set Applicable OS and language tab.

174
Applicable OS and language OS
(Required) Select the OS to which the package is to be applied. Select the OS to which the package corresponds. If All OS is selected, all OS except Other OS are the targets. Also, the package is applied to all machines without relating to OS information.
Language (Required)
Select the language of the OS to which the package is to be applied.
Add Add the selected OS and Language. Delete Delete the selected OS and Language. Base Service Pack Set the base service pack to which service
pack/hotfix/application can be applied. Add or delete the service pack using Add or Delete button.
Absorbing Service Pack Set the next service pack. Set this with the Base Service Pack. Add or delete the service pack using Add or Delete button. Example) If "Windows Server 2008 SP2" is selected as
Base Service Pack and "Windows Server 2008 SP3" is selected as Absorbing Service Pack, the package will be applied to the machine on which SP2 is applied and SP3 is not applied.
2.2.4. Dependency Information Set Dependency Information tab. When the package is applied, the dependency information is checked. The package is applied only when the dependency conditions are met. Specify the dependency condition from the following three types. ・ Package dependency ・ File dependency ・ Registry dependency
Note: If ">" is used in the registry dependency, it may not be applied properly.
If a combination of package dependency, file dependency and registry dependency has been
added, the package is applied only when the package dependencies are met and all the conditions set optionally in file dependency or registry dependency are met.
Example) If the package dependency is A, the file dependency is B and the registry dependency is C, then the composite application condition is as follows.
Item Additional information
Application conditions Composite application condition
A 1 All of 1, 2 and 3 are applied. A is met, and conditions set in B and C are all met
2 3
B 1 AND/OR can be set arbitrarily. Either condition of 1 or 2 is met. 2
C 1 2
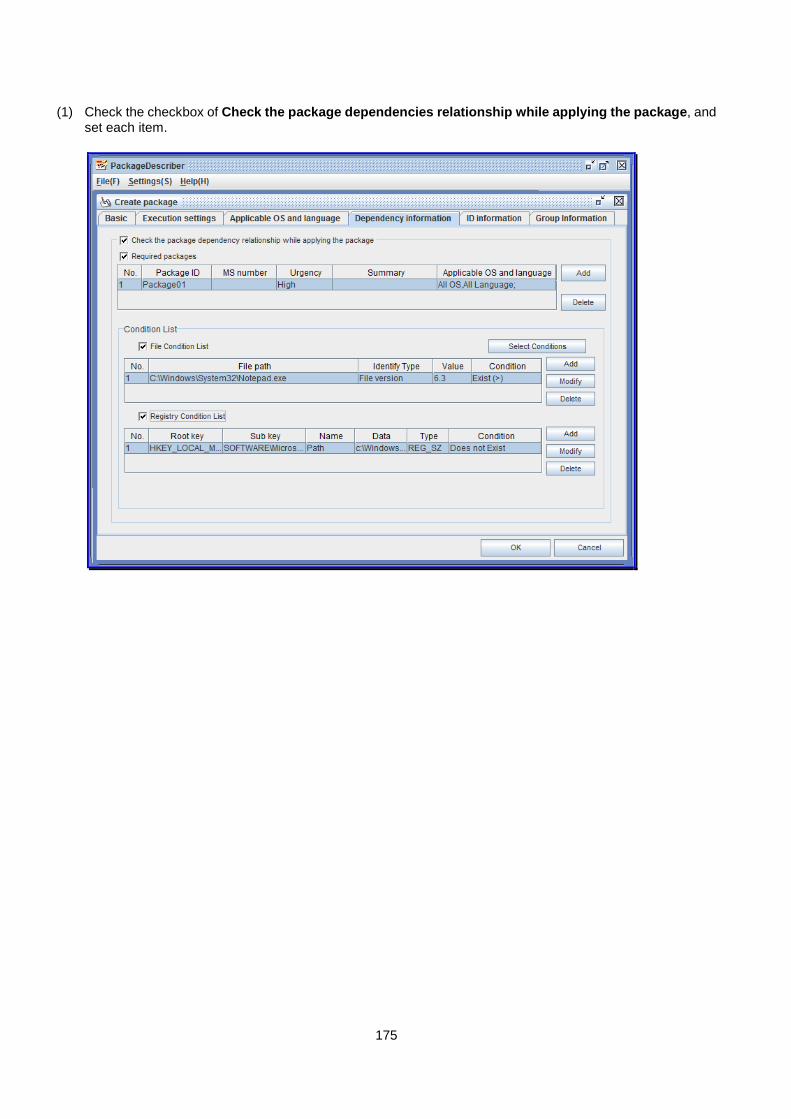
175
(1) Check the checkbox of Check the package dependencies relationship while applying the package, and
set each item.

176
Dependency information Check the package
dependency relationship while applying the package
The settings become valid when Check the package dependency relationship while applying the package checkbox is selected.
Required packages Can be applied only if the package it depends on has been installed. Dependent packages are selected from other packages registered in PackageDescriber. In addition, if two or more dependent packages have been added, the package will be applied if all dependent packages have been applied.
Add The following screen appears when you click Add.
The displayed packages are currently registered on the Package Web Server. Select a dependent package from the list and click Add.
Delete When you select a package from the dependent package list and click Delete, the dependent package is deleted.
Condition List File Condition List About the file condition, the package is applied depending on whether
either of files exists or not. To specify a file as a condition for applying package, check File Condition List checkbox. The dependency condition is judged only after Select Conditions is set. Only when the File Condition List and Registry Condition List are added, it will not be judged.

177
Add When you click Add, the following screen appears. Set each item and click OK.
・ File path
259 characters or less can be entered. Alphanumeric characters and symbols can be entered. However, the inhibited characters on Windows cannot be entered. Enter system environment variable because the file path depends on the environment. You can specify the path, which is registered in the registry, in the File path. Specify the full-path registry name in brackets ("{", "}"). Example)
When specifying EXCEL.EXE under C:\Program Files\Microsoft Office\Office Assume that the value of
HKEY_LOCAL_MACHINE\SOFTWARE\Microsoft\Office\9.0\Excel\InstallRoot\Path
is set as C:\Program Files\Microsoft Office\Office\. In this case, specify
{HKEY_LOCAL_MACHINE\SOFTWARE\Microsoft\Office\9.0\Excel\InstallRoot\Path}EXCEL.EXE
as the file path. ・ File version/File size/Update time
Select the item as the condition of dependency. You can select the item from the following. - File version - File size - Update time
・ Value Set the value following the item that you specified in the condition of dependency. - When you select File version
31 characters or less can be entered. Enter in "x.x.x.x" format. Numeric characters and symbol ("." only) can be entered. If you do not enter the file version, the condition depends on whether the file exists or not. The file version can be checked on the Version tab of file properties. If the Version tab does not exist, or if the File version on the Version tab is blank, you do not need to enter it.
- When you select File size Specify the file size by byte unit. Enter numeric characters from 0 to 4294967295(4GByte). If you do not enter the file size, the condition depends on whether the file exists or not. The file size can be checked on the General tab of file properties.

178
- When you select Update time
Enter in "YYYY/MM/DD" format. Numeric characters and the following symbols and space can be entered.
/ : When you do not enter update time, existence or non-existence of the file is dependent condition. Update time can be checked from General on the file properties. The time zone of the managed machine does not effect.
- Condition Select the applicable condition for the package. (*1)
Modify If you select a file and click Modify, the Modify file dependency information screen appears. Modify the setting
Delete If you select a file and click Delete, the dependent file is deleted. Registry Condition List
About the registry condition, a package is applied depending on whether either of registries exists or not. When you specify a registry as the condition of the dependency, check Registry Condition List checkbox.

179
Add If you click Add, the Add registry dependency information screen appears. Set each item and click OK.
・ Key name
Enter the registry key name including the root key. 255 characters or less can be entered. Alphanumeric characters and symbols can be entered.
・ Name Enter the value (ValueName) which belongs to the key name. 255 characters or less can be entered. Alphanumeric characters and symbols can be entered.
・ Data Enter the value data (ValueData). The number and the type of characters vary depending on the type selected in Type. - "REG_SZ": 1024 characters or less - "REG_BINARY": 1024 characters or less - "REG_DWORD": Numeric characters from 0 to 4294967295 - "REG_QWORD": Numeric characters from 0 to
18446744073709551615 - "REG_EXPAND_SZ": 1024 characters or less - "REG_MULTI_SZ": 1024 characters or less
・ Type Select the value type (ValueType). You can select from the following. - REG_SZ - REG_BINARY - REG_DWORD - REG_QWORD - REG_EXPAND_SZ - REG_MULTI_SZ
・ Condition Select the condition to apply the package. If you specify Exist, only the key name and name are compared. For REG_BINARY, only Does not exist, Exist and Exist (=) can be selected. (*2)
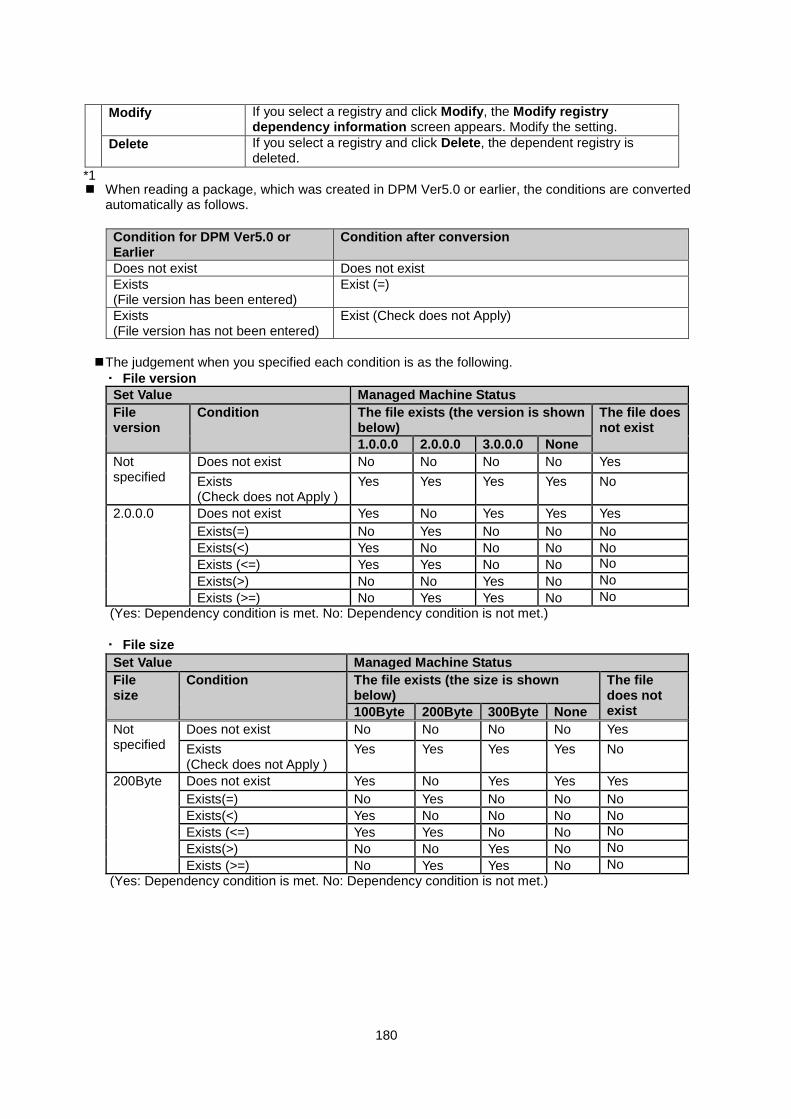
180
Modify If you select a registry and click Modify, the Modify registry
dependency information screen appears. Modify the setting. Delete If you select a registry and click Delete, the dependent registry is
deleted. *1 When reading a package, which was created in DPM Ver5.0 or earlier, the conditions are converted
automatically as follows.
Condition for DPM Ver5.0 or Earlier
Condition after conversion
Does not exist Does not exist Exists (File version has been entered)
Exist (=)
Exists (File version has not been entered)
Exist (Check does not Apply)
The judgement when you specified each condition is as the following. ・ File version
Set Value Managed Machine Status File version
Condition The file exists (the version is shown below)
The file does not exist
1.0.0.0 2.0.0.0 3.0.0.0 None Not specified
Does not exist No No No No Yes Exists (Check does not Apply )
Yes Yes Yes Yes No
2.0.0.0 Does not exist Yes No Yes Yes Yes Exists(=) No Yes No No No Exists(<) Yes No No No No Exists (<=) Yes Yes No No No Exists(>) No No Yes No No Exists (>=) No Yes Yes No No
(Yes: Dependency condition is met. No: Dependency condition is not met.) ・ File size
Set Value Managed Machine Status File size
Condition The file exists (the size is shown below)
The file does not exist 100Byte 200Byte 300Byte None
Not specified
Does not exist No No No No Yes Exists (Check does not Apply )
Yes Yes Yes Yes No
200Byte Does not exist Yes No Yes Yes Yes Exists(=) No Yes No No No Exists(<) Yes No No No No Exists (<=) Yes Yes No No No Exists(>) No No Yes No No Exists (>=) No Yes Yes No No
(Yes: Dependency condition is met. No: Dependency condition is not met.)

181
・ Update time
Set Value Managed Machine Status Update time Condition The file exists (the update time is shown
below) The file does not exist 2013/12/31
23:59 2014/01/01 00:00
2014/01/01 00:01
None
Not specified Does not exist No No No No Yes Exists (Check does not Apply )
Yes Yes Yes Yes No
2014/01/01 00:00
Does not exist Yes No Yes Yes Yes Exists(=) No Yes No No No Exists(<) Yes No No No No Exists (<=) Yes Yes No No No Exists(>) No No Yes No No Exists (>=) No Yes Yes No No
(Yes: Dependency condition is met. No: Dependency condition is not met.)
*2 Key name, Name and Data are not case-sensitive. Data comparison in REG_SZ, REG_EXPAND_SZ, or REG_MULTI_SZ is done by simple character
string. In the case of "9.0.0.0" and "10.0.0.0", "9.0.0.0" is judged greater. When you specify REG_MULTI_SZ, "\n" is entered if you press Enter key. When reading a package, which was created in DPM Ver5.0 or earlier, the conditions are displayed
as follows. Condition for DPM Ver5.0 or earlier Condition after conversion Does not exist Does not exist Exists (data has been entered)
Exist (=)
Exists (data has not been entered)
Exist
The operations when you specified each condition are as shown below.
1) Specify only Key name Set Value Managed Machine Status Condition Exists Does not exist Does not exist No Yes Exists Yes No (Yes: Dependency condition is met. No: Dependency condition is not met.)

182
2) Specify Name ・ REG_SZ Set Value Managed Machine Status Data Condition Name Exists Name does
not exist 1.0.0.0 2.0.0.0 3.0.0.0 Blank Blank Does not exist No No No No Yes
Exists Yes Yes Yes Yes No 2.0.0.0 Does not exist Yes No Yes Yes Yes
Exists (=) No Yes No No No Exists (<) Yes No No Yes No Exists (<=) Yes Yes No Yes No Exists (>) No No Yes No No Exists (>=) No Yes Yes No No
(Yes: Dependency condition is met. No: Dependency condition is not met.)
・ REG_BINARY Set Value Managed Machine Status Data Condition Name Exists Name does
not exist AA BB CC None Blank Does not exist No No No No Yes
Exists Yes Yes Yes Yes No BB Does not exist Yes No Yes Yes Yes
Exists (=) No Yes No No No (Yes: Dependency condition is met. No: Dependency condition is not met.)
・ REG_DWORD Set Value Managed Machine Status Data Condition Name Exists Name does not exist
1 2 3 Blank Does not exist No No No Yes
Exists Yes Yes Yes No 2 Does not exist Yes No Yes Yes
Exists (=) No Yes No No Exists (<) Yes No No No Exists (<=) Yes Yes No No Exists (>) No No Yes No Exists (>=) No Yes Yes No
(Yes: Dependency condition is met. No: Dependency condition is not met.)

183
・ REG_QWORD Set Value Managed Machine Status Data Condition Name Exists Name does not exist
1 2 3 Blank Does not exist No No No Yes
Exists Yes Yes Yes No 2 Does not exist Yes No Yes Yes
Exists (=) No Yes No No Exists (<) Yes No No No Exists (<=) Yes Yes No No Exists (>) No No Yes No Exists (>=) No Yes Yes No
(Yes: Dependency condition is met. No: Dependency condition is not met.)
・ REG_EXPAND_SZ Set Value Managed Machine Status Data Condition Name Exists Name does
not exist 1.0.0.0 2.0.0.0 3.0.0.0 Blank Blank Does not exist No No No No Yes
Exists Yes Yes Yes Yes No 2.0.0.0 Does not exist Yes No Yes Yes Yes
Exists (=) No Yes No No No Exists (<) Yes No No Yes No Exists (<=) Yes Yes No Yes No Exists (>) No No Yes No No Exists (>=) No Yes Yes No No
(Yes: Dependency condition is met. No: Dependency condition is not met.
・ REG_MULTI_SZ Set Value Managed Machine Status Data Condition Name Exists Name does
not exist 1.0.0.0 2.0.0.0 3.0.0.0 Blank Blank Does not exist No No No No Yes
Exists Yes Yes Yes Yes No 2.0.0.0 Does not exist Yes No Yes Yes Yes
Exists (=) No Yes No No No Exists (<) Yes No No Yes No Exists (<=) Yes Yes No Yes No Exists (>) No No Yes No No Exists (>=) No Yes Yes No No
(Yes: Dependency condition is met. No: Dependency condition is not met.)

184
(2) After configuring the File Condition List and Registry Condition List of the Condition List group box, click
Select Conditions and set the conditions.
Note: Conditions used in an AND/OR condition cannot be deleted. For the file condition below the deleting condition, if the registry condition is specified with AND, OR,
this condition cannot be deleted. Example)
When the third file condition is used AND, OR, the first and second file condition cannot be deleted.
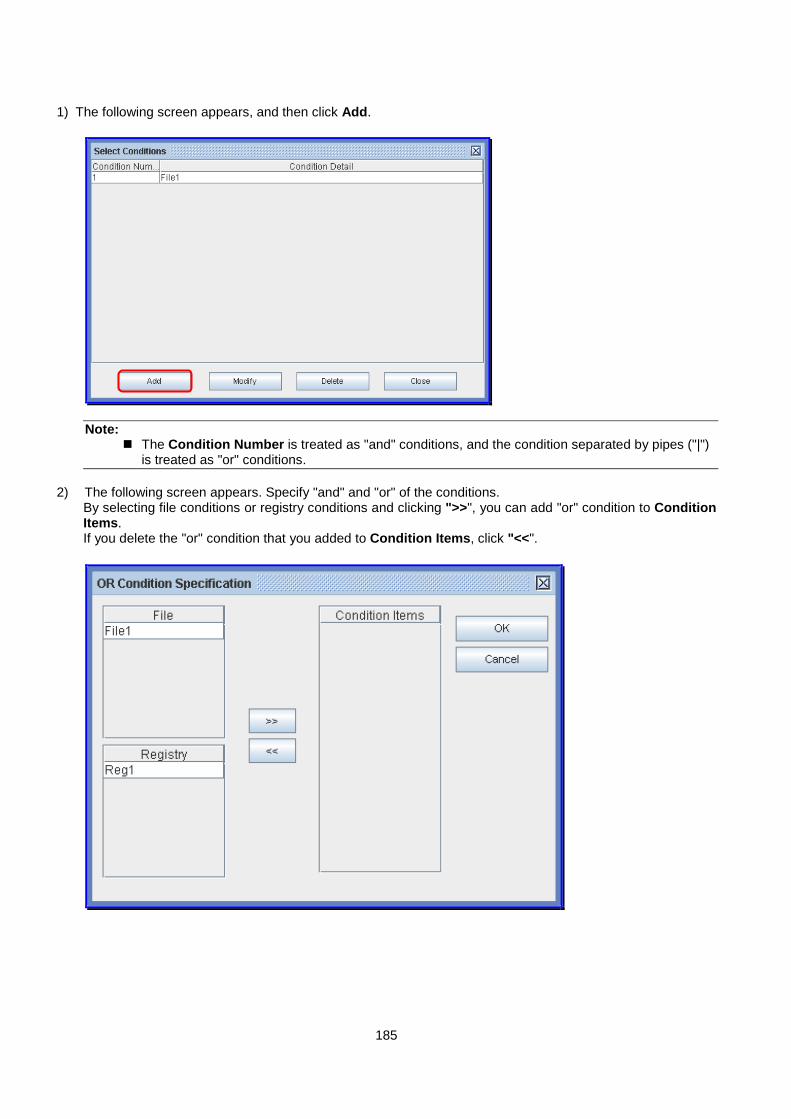
185
1) The following screen appears, and then click Add.
Note: The Condition Number is treated as "and" conditions, and the condition separated by pipes ("|")
is treated as "or" conditions.
2) The following screen appears. Specify "and" and "or" of the conditions. By selecting file conditions or registry conditions and clicking ">>", you can add "or" condition to Condition Items. If you delete the "or" condition that you added to Condition Items, click "<<".

186
2.2.5. ID Information Set ID Information tab. It is judged whether a package has been applied to a managed machine using the ID information. Enter changes in the file and registry, occurring by installing the package, as ID information. Example)
Package A is registered, and distributed to managed machines.
1) Before distribution : Which patches are installed currently? How is file information or the registry?
2) After distribution :By distributing package A, what are changed in files and registry?
Register the difference information obtained by comparing 1) and 2) as ID information. DPM judges the package applied status based on the ID information specified here. If all entered file change information and registry change information are met, it is judged that the package is already applied.
Note: When the created package file is a service pack or hotfix issued by Microsoft, even if ID information
was not entered, the MS number on the Basic tab is compared with the MS number written in the registry (KBXXXXXX or QXXXXXX), and if two values are matched, it is judged that the package is already applied.
When the created package is a service pack issued by Microsoft, even if no ID information was entered, the major version and minor version on the Basic tab are compared with the service pack version currently installed in the OS, and it is judged whether the service pack is already applied.
You need to enter ID information in the case of applying a package that does not have an MS number or cannot be identified by MS number, or a package that the information remains only in the registry and so on.

187
ID Information File change information Used to judge whether a package is already applied based on
information which is changed in the file system by applying the package.
Add When you click Add, the following screen appears. Add the file ID information of the package.
・ File path
Enter the changed file path and file name. 259 characters or less can be entered. Alphanumeric characters and symbols can be entered. However, the inhibited character on Windows cannot be entered. Enter system environment variable because the file path depends on the environment.
・ File version/File size/Update time Select the item as the condition of identification. You can select the item from the followings.
- File version - File size - Update time
・ Value Set the value following the item that you specified in the condition of identification.
- When you select File version 31 characters or less can be entered. Enter in "x.x.x.x" format. Numeric characters or symbol ("." only) can be entered. If you do not enter the file version, the condition depends on whether the file exists or not. The file version can be checked on the Version tab of file properties. If the Version tab does not exist, or if the File version on the Version tab is blank, you do not need to enter it.

188
- When you select File size Specify the file size by byte unit. Enter numeric characters from 0 to 4294967295(4GByte). If you do not enter the file size, the condition depends on whether the file exists or not. The file size can be checked on the General tab of file properties.
- When you select Update time Enter in "YYYY/MM/DD hh:mm" format. Numeric characters, following symbols, and space can be entered. / : If you do not enter the update time, the condition depends on whether the file exists or not. The update time can be checked on the General tab of file properties. The update time is not affected by the timezone on the managed machine.
・ Change type Set the change type. You can select from the following.
- Create new: Select when a new file is created by applying the package.
- Replace: Select when the file is replaced unconditionally by applying the package.
- Version up: Select when the file is replaced only when the file is newer than the existing file by applying the package.
- Delete: Select when the file is deleted by applying the package. (*1)
Modify When you select a file and click Modify, the Modify file information screen appears. Modify the settings.
Delete When you select a file and click Delete, the file is deleted. Registry change
information Used to judge whether a package is already applied based on registry information that is changed by applying the package.

189
Add If you click Add, the following screen appears. Add the registry ID information of the package.
・ Key name
Enter the registry key name including the root key. 255 characters or less can be entered. Alphanumeric characters and symbols can be entered.
・ Name Enter the value (ValueName) which belongs to the key name. 255 characters or less can be entered. Alphanumeric characters and symbols can be entered.
・ Data Enter the value data (ValueData). The number and the type of characters vary depending on the type selected in Type. - "REG_SZ": 1024 characters or less - "REG_BINARY": 1024 characters or less - "REG_DWORD": Numeric characters from 0 to
4294967295 - "REG_QWORD": Numeric characters from 0
to 18446744073709551615 - "REG_EXPAND_SZ": 1024 characters or less - "REG_MULTI_SZ": 1024 characters or less
・ Type Select the value type (ValueType). You can select from the following. - REG_SZ - REG_BINARY - REG_DWORD - REG_QWORD - REG_EXPAND_SZ - REG_MULTI_SZ
・ Change type Select the change type. You can select from the following. - Create new: Select when a new registry is created by
applying the package. - Replace: Select when the registry is replaced by
applying the package. - Delete: Select when the registry is deleted by applying
the package. (*2)
Modify Modify the added registry ID information of the package. Delete Delete the added registry ID information of the package.

190
*1 The judgment when you specified each condition is as the following.
・ File version Set Value Managed Machine Status File version
Condition The file exists (the version is shown below) The file does not exist 1.0.0.0 2.0.0.0 3.0.0.0 None
Unspecified Create new Yes Yes Yes Yes No Replace No No No Yes No Version up No No No Yes No Delete No No No No Yes
2.0.0.0 Create new Yes Yes Yes Yes No Replace No Yes No No No Version up No Yes Yes No No Delete No No No No Yes
(Yes: Identification condition is met. No: Identification condition is not met.)
・ File size Set Value Managed Machine Status File size
Condition The file exists (the size is shown below) The file does not exist 100Byte 200Byte 300Byte None
Unspecified Create new Yes Yes Yes Yes No Replace No No No Yes No Delete No No No No Yes
200Byte Create new Yes Yes Yes Yes No Replace No Yes No No No
Delete No No No No Yes (Yes: Identification condition is met. No: Identification condition is not met.)
・ Update time Set Value Managed Machine Status File size
Condition The file exists (the update time is shown below) The file does not exist
2013/12/31 23:59
2014/01/01 00:00
2014/01/01 00:01
None
Unspecified Create new Yes Yes Yes Yes No Replace No No No Yes No Delete No No No No Yes
2014/01/01 00:00
Create new Yes Yes Yes Yes No Replace No Yes No No No
Delete No No No No Yes (Yes: Identification condition is met. No: Identification condition is not met.)

191
*2 When you specify REG_MULTI_SZ, "\n" is entered if you press Enter key. The judgement when you specified each condition is as the following.
1) Specify only Key Name Set Value Managed Machine Status Condition Exists Does not exist Create new Yes No Delete No Yes
(Yes: Identification condition is met. No: Identification condition is not met.)
2) Specify Name ・ REG_SZ Set Value Managed Machine Status Data Condition Name exists Name does not
exist 1.0.0.0 2.0.0.0 3.0.0.0 Blank Blank Create new Yes Yes Yes Yes No
Replace No No No Yes No Delete No No No No Yes
2.0.0.0 Create new Yes Yes Yes Yes No Replace No Yes No No No Delete No No No No Yes
(Yes: Identification condition is met. No: Identification condition is not met.) ・ REG_BINARY
Set Value Managed Machine Status Data Condition Name exists Name
does not exist
AA BB CC None
Blank Create new Yes Yes Yes Yes No Replace No No No Yes No Delete No No No No Yes
BB Create new Yes Yes Yes Yes No Replace No Yes No No No Delete No No No No Yes
(Yes: Identification condition is met. No: Identification condition is not met.) ・ REG_DWORD Set Value Managed Machine Status Data Condition Name exists Name
does not exist 1 2 3 Blank Create new Yes Yes Yes No
Replace No No No No Delete No No No Yes
2 Create new Yes Yes Yes No Replace No Yes No No Delete No No No Yes
(Yes: Identification condition is met. No: Identification condition is not met.)

192
・ REG_QWORD
Set Value Managed Machine Status Data Condition Name exists Name
does not exist 1 2 3 Blank Create new Yes Yes Yes No
Replace No No No No Delete No No No Yes
2 Create new Yes Yes Yes No Replace No Yes No No Delete No No No Yes
(Yes: Identification condition is met. No: Identification condition is not met.)
・ REG_EXPAND_SZ Set Value Managed Machine Status Data Condition Name exists Name does not
exist 1.0.0.0 2.0.0.0 3.0.0.0 Blank Blank Create new Yes Yes Yes Yes No
Replace No No No Yes No Delete No No No No Yes
2.0.0.0 Create new Yes Yes Yes Yes No Replace No Yes No No No Delete No No No No Yes
(Yes: Identification condition is met. No: Identification condition is not met.)
・ REG_MULTI_SZ Set Value Managed Machine Status Data Condition Name exists Name does not
exist 1.0.0.0 2.0.0.0 3.0.0.0 Blank Blank Create new Yes Yes Yes Yes No
Replace No No No Yes No Delete No No No No Yes
2.0.0.0 Create new Yes Yes Yes Yes No Replace No Yes No No No Delete No No No No Yes
(Yes: Identification condition is met. No: Identification condition is not met.)

193
2.2.6. Group Information Set Group Information tab.
Group Information Apply to All Group
(*1) If you check Apply to All Group checkbox, the package will be applied to all machine group. By default, the checkbox is checked.
Unapplied Group Displays the list of machine groups to which the package will not be applied.(*2)
>> If you click >>,, the machine group which is selected in Unapplied Group will be moved to Applied Group.
<< If you click <<,, the machine group which is selected in Applied Group will be moved to Unapplied Group.
Applied Group Displays the list of machine groups to which the package will be applied.
*1 When Apply to All Group checkbox is not selected and there is not a machine group in Applied Group, the package will not be applied even if the urgency of the package is High or Highest and there is a managed machine which is matched with the condition on other tabs.
*2 Create the list of machine groups to be displayed by editing the following file. (In the environment that UAC is enabled, launch text editor by administrator authority, and edit and save the file.) <PackageDescriber installation folder>\group.txt ・ The format and description rule is as follows:
Enter one machine group(full path of the machine group) in one line and insert line feeds. (Describe in 1301Bytes or less.)

194
Example)
/Group01/Group11/ /Group01/Group12/ /Group02/Group21/ /Group02/Group22/ /Group02/Group23/
・ If you restart PackageDescriber, the content of "group.txt" will reflected in Unapplied Group.
2.3. Modify/Delete Package This section describes how to modify or delete a created package. (1) Log on to the machine, on which PackageDescriber is installed, by a user with administrator authority.
(2) From Start menu, select All Programs -> DPM PackageDescriber.
(3) PackageDescriber is launched. From File menu, click Modify/delete package.
(4) The following screen appears. Click Select Folder.
Note: The sort order of packages can be changed by clicking the name of each item on the Local
package list screen.

195
(5) The dialog box to select a folder appears. Select the folder of the package to modify or delete and click
Open.
(6) The packages in the folder specified on the Local package list screen are displayed. Select a package,
and modify or delete it. (7) In the case of modification, the following screen is opened after modification. Select the folder to save and
click Save.
Note: The package list initially displayed on the Local package list screen is the package list of the
folder specified as the Temporary folder. File Name and File Type: All files are displayed on the screen. Select a folder. When saving a folder in a folder except the Temporary folder, check those packages having the
same package ID does not exist in that folder so as not to accidentally overwrite backup packages.

196
(8) Select a package from the Local package list screen and perform modification or deletion.
Local package list Modify When you click Modify, the Modify package screen opens.
Delete When you click Delete, the selected package is deleted. Close When you click Close, the screen closes.
(9) Click Modify on the Local package list screen to display the following screen. Modify the items on the
Basic, Execution Settings, Applicable OS and language, Dependency information, ID information, and Group Information tabs.
Note: If you modify the package already added to the Package Web Server, click File menu
->Register in/Delete from the Package Web Server -> Register/Re-register. See Section 2.4, "Registration and Deletion on the Package Web Server," for details.
The Package ID and Type on the Basic tab cannot be modified. See Section 2.2.1, "Basic Information," through Section 2.2.6, "Group Information," for a description of each tab.

197
2.4. Registration and Deletion on the Package Web Server
This section describes how to register or delete a created package on the Package Web Server. Created packages can be automatically downloaded from the Management Server by registering them on the Package Web Server.
Note:
When registering a package on the Package Web Server, perform operations after stopping the HTTP service. Example)
・ World Wide Web Publishing Service(IIS) ・ Apache Tomcat
Packages not registered on the Package Web Server cannot be automatically downloaded from the Management Server.
(1) Log on to the machine, on which PackageDescriber is installed, by a user with administrator authority.
(2) From Start menu, select All Programs -> DPM PackageDescriber.
(3) PackageDescriber is launched. From File menu, click Register in/Delete from the Package Web Server.
(4) The following screen appears. Perform each operation.

198
Register in/Delete from the Package Web Server
Register/Re-regist
When you click Register/Re-register, the Local package list screen appears. See the procedure of Step (5) regarding the Local package list screen.
Delete The package is deleted from the Package Web Server. If you select the package to delete and click Delete, a confirmation screen appears. To delete, click Yes. If the package selected for deletion is dependent on another package, the following confirmation screen appears. To delete, click Yes. Otherwise, click No.
(5) When you click Register/Re-register, the following screen appears. Click Select Folder and select a
folder from Open dialog box, and register or re-register the package on the Package Web Server.

199
Local package list Select Folder The folder of the package you wish to register or re-register can be
selected and changed on the Local package list screen. See Section 2.3, "Modify/Delete Package," for details.
Add If you select the package you register and click Add, the package is copied to the Web Server folder and registered on the Package Web Server. It is also displayed on the Register in/Delete from the Package Web Server screen. When re-registering a package, if that package is dependent on another package, the following confirmation screen appears. To re-register, click Yes. Otherwise, click No.
An error message will be displayed if the selected package does not exist.
Cancel Returns to the previous window without saving the setting of the local package list.
2.5. Online Update When a new service pack is released for the OS that DPM supports (for example, when SP3 was released for Windows Server 2003), update OS definition file and language definition file and add information of the new service pack are necessary. PackageDescriber downloads the latest definition files from the DPM product site and updates them using the Online update function. By using this function, the correct information files can be created in patches and applications released in the future as well. The information for using this function (OS information URL column and Language information URL column) is currently blank. When this function becomes valid, the information will be provided on the product site. The following describes how to perform online updates.
(1) Log on to the machine, on which PackageDescriber is installed, by a user with administrator authority. (2) Select Start -> All Programs -> DPM PackageDescriber. (3) PackageDescriber is launched. From Help menu, click Online update.

200
(4) The following screen appears. Set each item and click Update.
The online update is started and the status and the result of the online update are displayed in the Description.
Online update OS information URL Enter the public URL of the OS definition file. There is no
need to change it from the default value. Language information URL Enter the public URL of the language definition file. There is
no need to change it from the default value. Proxy (checkbox) Check this checkbox when accessing the DPM website via
a proxy server. It does not have to be selected when connecting directly to the Internet.
Proxy Enter the address of the proxy server. 259 characters or less can be entered. When you check the checkbox of Proxy, entry of domain name or IP address is necessary.
Port Specify the port number of the proxy server. This can be set in the range of "1-65535".
Update Download and save files from the entered OS information URL and language information URL.
Save & Close Saves the OS information URL and language information URL to a file and Closes the screen.
Note:
If you do not know the proxy server and the port number, please contact the administrator.

201
3. Other Tools This chapter explains the tools used in DPM.
3.1. Port Opening Tool Port Opening Tool is a tool to open the ports or programs used by DPM when Windows Firewall is enabled. The ports or programs are opened automatically by this tool when installing DPM Server or DPM Client. Also, you can open the ports or programs by this tool after installing DPM Server or DPM Client. (when you switch the firewall function to enabled, and so on.)
3.1.1. Port Number Setting For Management Server and managed machines, see the corresponding part below about the setting of port numbers/programs when the firewall is enabled. ・ Management Server
If you operate DPM, enabling the firewall, the following ports or programs used by DPM are automatically opened.
<The ports, which are opened automatically> Item Protocol Port Number Ports used by DPM Server TCP apiserv.exe
UDP apiserv.exe TCP bkressvc.exe UDP bkressvc.exe TCP depssvc.exe UDP depssvc.exe TCP ftsvc.exe UDP ftsvc.exe TCP pxemtftp.exe UDP pxemtftp.exe TCP pxesvc.exe UDP pxesvc.exe TCP rupdssvc.exe UDP rupdssvc.exe TCP schwatch.exe UDP schwatch.exe
<The ports, which are not opened automatically> The following ports are not opened by Port Opening Tool automatically. Item Protocol Port Number Ports used by DPM Server TCP 80
Note:
When the port number is changed from 80(default), replace as necessary.

202
・ Managed machines
When you operate DPM, enabling the firewall on the managed machine, the following ports or programs used by DPM are automatically opened.
Item Protocol Port Number Check power status ICMP 8 (Echo incoming) Remote update Automatic update File distribution File execution File deletion Obtaining the information in File/Folder List screen
TCP rupdsvc.exe UDP rupdsvc.exe
Shutdown
TCP DepAgent.exe UDP DepAgent.exe
Note:
When the following services are stopped, ports or programs cannot be opened by Port Opening Tool. ・ Windows Firewall/Internet Connection Sharing (ICS) ・ Windows Firewall On Windows Server 2003 SP1/SP2 or Windows Server 2003 R2, these services are disabled by default. Execute Port Opening Tool after starting the services.
By the DPM remote update function, Port Opening Tool cannot be used on machines whose ports have not been opened.

203
3.1.2. Executing the Tool on Each Machine This section describes how to use Port Opening Tool on the Management Server and managed machines.
Note:
To execute Port Opening Tool, DPM Server needs to be installed in the Management Server and DPM Client needs to be installed in the managed machine.
(1) Insert the Installation media into the DVD drive of the machine on which you use Port Opening Tool.
(2) Start the command prompt and execute the command as follows.
- The Management Server D:\DPM\TOOLS\OPENPORT\DepOpnPt.exe -m
- The managed machine D:\DPM\TOOLS\OPENPORT\DepOpnPt.exe -c
(D: indicates the DVD drive.)
Note:
If "-s" is specified as a command option, it can be executed in silent mode without messages being displayed.
Example) In case of the managed machine D:\DPM\TOOLS\OPENPORT\DepOpnPt.exe -s -c
(D: Indicates the DVD drive.)
(3) A confirmation screen appears. Click OK to open ports.
Port opening is completed.

204
3.2. Disk Configuration Check Tool This section describes the disk configuration check. Specify the disk number or the partition number that you specify when executing backup or restoring, referring to the disk information(the disk number, the partition number, and so on) that you obtained by executing the disk configuration check scenario. You can check the disk information in the Disk Information(Disk Viewer) screen on the Web Console. (1) Assign the disk configuration check scenario(System_DiskProbe scenario in Built-in Scenarios scenario
group) to the managed machine. About assigning a scenario, see Section 3.8.3, "Assign Scenario" in Web Console Reference Guide.
Note:
You can create a disk configuration check scenario newly. See Section 3.13.4, "Backup/Restore Tab" in Web Console Reference Guide for details.
(2) Execute the disk configuration check scenario.
See Section 3.8.6, "Execute Scenario" in Web Console Reference Guide for details of executing a scenario, (3) Check the scenario execution result of the disk configuration check.
See Section 4.3, "Scenario Execution List" in Web Console Reference Guide for details of scenario execution result.
(4) Specify the disk number and the partition number, that you checked in Disk Information(Disk Viewer)
screen, in the backup or restore scenario.

205
Example)
When you specify the disk number and the partition number in the backup scenario.
Note: See Section 3.7.1.3, "Disk Information" and 3.13.4, "Backup/Restore Tab" in Web Console
Reference Guide for details of each screen,

206
3.3. Automatic Update Status Display Tool The Automatic Update Status Display Tool displays the automatic update status as an icon in the task tray of the managed machine.
Note: The Automatic Update Status Display Tool cannot be used for the following managed machines.
・ Remote Desktop of x64 Edition(Windows Server 2003/Windows XP only) ・ When the environment is Minimal Server Interface in Windows Server 2012 or later. ・ Linux OS
The icons displayed in the task tray are shown in the table below.
Icon Managed Machine Status Description
Ready This appears when automatic update and scenario execution are not being executed. (The icon at left also appears when there is a scenario execution error.
Automatically Updating This appears after automatic update begins, while the package to be applied is searched for and judged.
Transferring Automatic Update File
This appears when transferring an automatic update file to a managed machine.
Confirming Automatic Update User
This appears when the Run Immediately or Run at Next Start Up dialog box appears.
Waiting for Automatic Update Restart
This appears under any of the following conditions: ・ Waiting for restart after Execute At Next
Start Up is set ・ Waiting for restart after Cancel is clicked
in Restart dialog Applying an Automatic Update Package (Package ID)
This appears when applying an automatic update package. The package ID is also displayed.
Running Scenario This appears when a scenario is running.
Automatic Update Error This appears when an error has occurred in the automatic update.
Note:
A popup hint appears when you hover over an icon with the mouse pointer.
The menu of the Client Setting Tool and About DeploymentManager can be used by right-clicking an icon. See Section 3.3.1, "Client Setting Tool," through Section 3.3.2, "About DeploymentManager," regarding these menus.

207
3.3.1. Client Setting Tool Set display/non-display of the Automatic Update Status Display Tool. (1) Right-click the Automatic Update Status Display Tool icon. (2) Select Client Configuration from the displayed menu.
Alternatively, from Start menu, select All Programs -> DeploymentManager -> Client Setting Tool to display the Client Setting Tool.
(3) The following screen appears. Set whether or not to display the Client Automatic Update Status Display
Tool icon, and click OK.
3.3.2. About DeploymentManager If you right-click the Automatic Update Status Display Tool icon and select About DeploymentManager, the version of DPM Client is displayed.
3.4. Backup Image File Verification Tool The Backup Image File Verification Tool is for checking before restoring whether a backup file is incorrect and can be restored properly. This section describes how to use the Backup Image File Verification Tool. (1) From Start menu, select All Programs -> DeploymentManager -> Backup image file verification tool. (2) The following screen appears. Click Refer, select the backup file you check, and click Verify.
(3) Until checking of the backup file is completed, wait a moment. A dialog box appears. Click OK.

208
4. DPM Command Line This chapter explains DPM Command Line.
4.1. Operation from DPM Command Line By using DPM Command Line (dpmcmd.exe), you can view the information of the managed machine information, execute scenarios, and perform other tasks from the command line instead of the Web Console. Functions of DPM Command Line are described as follows. .
Command Function clilist Displays the managed machine list or managed machine details. snrlist Displays the scenario list. powon Powers on. shutdown Shuts down. assign Assigns a scenario or remove the scenario assignment. snrexec Executes a scenario. snrstop Interrupts the scenario execution. progress Displays the scenario execution status. stsclear Clears the status. cliadd Registers a managed machine. cliremove Deletes the managed machine. liclist Displays the license information. cliedit Edit MAC address and UUID for the managed machine ? Displays help.
Execution Procedure for DPM Command Line (1) Log on to the machine, on which DPM Server or DPM Command Line is installed, by an arbitrary user.
(2) Start the command prompt and go to the Folder where DPM Command Line is installed.
Furthermore, when you log on the OS by the user except Administrator, execute the command prompt as an administrator.
Note:
The default installation folder is as the following: C:\Program Files (x86)\NEC\DeploymentManager
(3) Execute the command.
See from Section 4.1.1, "Display Managed Machine List and Managed Machine Details" to Section 4.1.14, "Help" for details of each command,
209
Note:
Do not perform the following to stop the command forcibly during command execution because it may cause abnormal termination. ・ Press Ctrl + Break key ・ Close the command prompt ・ Log off ・ Shut down
To specify options, be careful about the following. ・ Specify the option by the following order listed in "Syntax" (from the left). ・ To specify input value which includes space, enclose the input value in double quotation
marks("). Option specification is case-insensitive. When the command execution is succeeded, the return value is "0".
When an error occurs, an error message appears. For details of the error information(the error message), contact your sales or support representative.
4.1.1. Display Managed Machine List and Managed Machine Details Displays a list of managed machines which are registered on DPM Server or details of the managed machine. ・ The list of managed machines displays the following information.
- Machine name (Identification name when the identification name is set) - MAC address - Status(scenario execution status, automatic update status, or power status) - Scenario(the name of the assigned scenario)
・ The detail of the managed machine displays the following information. - Machine name - Identification name - OS name - Service pack - Assigned scenario(the name of the assigned scenario) - Client status(scenario execution status, automatic update status, or power status) - UUID - MAC address - IP address(IPv4 address) - IPv6 address - Deploy-OS
Syntax ・ When you display the list of managed machines
dpmcmd.exe DPM Server [Management Server] clilist [/S] [/P Web Port] ・ When you display the detail information of the managed machine
dpmcmd.exe DPM Server [Management Server] clilist [/S] [/P Web Port] Managed Machine

210
Option
Option Explanation DPM Server Specify IP address of DPM Server or DNS name.
Required. Management Server Specify IP address of DPM Server(Management Server) or DNS name.
Specification is not required normally. This option helps to maintain the compatibility with old version(earlier than DPM Ver6.0).
clilist Specify this to display the list of managed machines which are registered on DPM Server or the detail information of the managed machine. Required.
/S Specify this to communicate by HTTPS. When you omit this option, the communication is done by HTTP.
/P Web port Specify http/https port(1-65535) which is used by DPM Server(IIS). When you omit this option, the following port is used. ・ When /S is specified: 443 ・ When /S is not specified: 80
Managed Machine Specify either of machine name, identification name, or MAC address of the managed machine, which is registered on DPM Server. Required when you display detail information of the managed machine. When you specify MAC address, enter it with "/M XX-XX-XX-XX-XX-XX" format. Also, when you specify the machine name, if two or more managed machines with the same machine name are registered, the corresponding machines are displayed.
Example) ・ When you display the list of managed machines
・ When you display the detail information of the managed machine

211
4.1.2. Display Scenario List Displays a list of scenarios which are registered on DPM Server The description of function which is specified on the scenario is as the following.
・ HW:HW image ・ OS:OS clear installation ・ SP: Service pack/HotFix/Linux patch file ・ PP: Application ・ BK: Backup ・ RS: Restore ・ DC: Disk configuration check
When above function is specified, "1" is displayed, When above function is not specified, "0" is displayed. Syntax
dpmcmd.exe DPM Server [Management Server] snrlist [/S] [/P Web Port]
Option Option Explanation DPM Server Specify IP address of DPM Server or DNS name.
Required. Management Server
Specify IP address of DPM Server(Management Server) or DNS name. Specification is not required normally. This option helps to maintain the compatibility with old version (earlier than DPM Ver6.0).
snrlist Specify this to display the list of scenarios which are registered on DPM Server. Required.
/S Specify this to communicate by HTTPS. When you omit this option, the communication is done by HTTP.
/P Web port Specify http/https port(1-65535) which is used by DPM Server(IIS). When you omit this option, the following port is used. ・ When /S is specified: 443 ・ When /S is not specified: 80
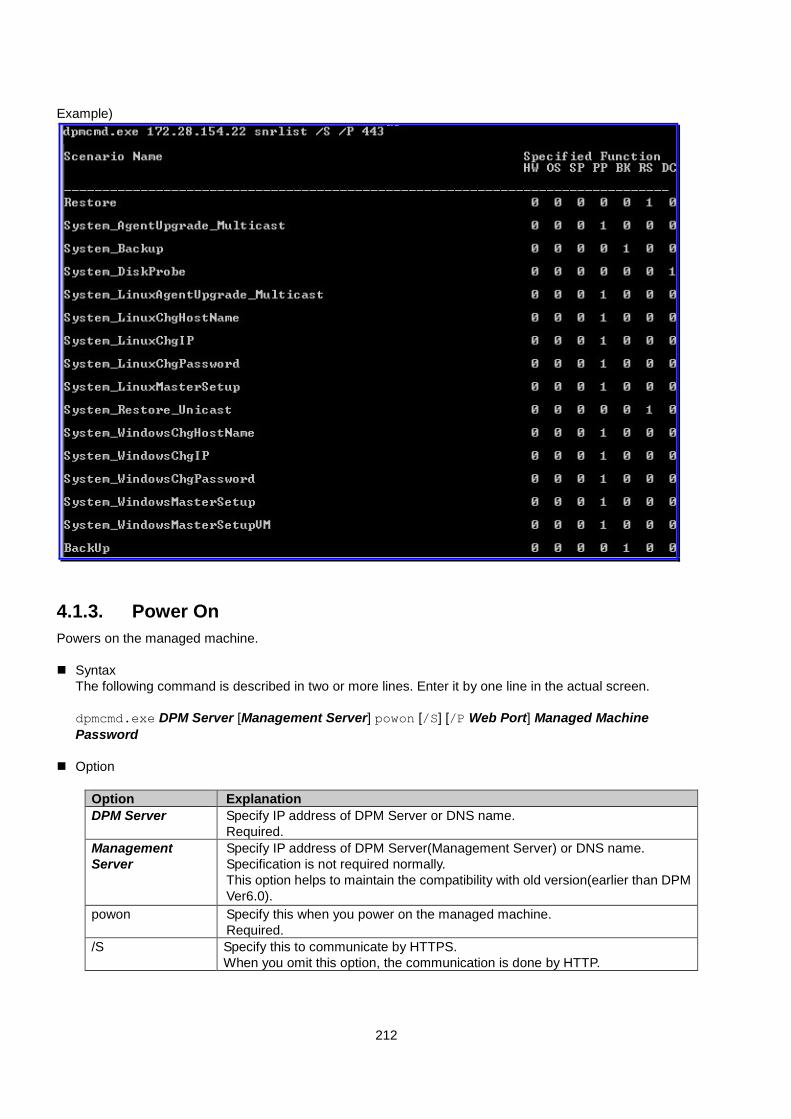
212
Example)
4.1.3. Power On Powers on the managed machine. Syntax
The following command is described in two or more lines. Enter it by one line in the actual screen. dpmcmd.exe DPM Server [Management Server] powon [/S] [/P Web Port] Managed Machine Password
Option
Option Explanation DPM Server Specify IP address of DPM Server or DNS name.
Required. Management Server
Specify IP address of DPM Server(Management Server) or DNS name. Specification is not required normally. This option helps to maintain the compatibility with old version(earlier than DPM Ver6.0).
powon Specify this when you power on the managed machine. Required.
/S Specify this to communicate by HTTPS. When you omit this option, the communication is done by HTTP.

213
/P Web port Specify http/https port(1-65535) which is used by DPM Server(IIS). When you omit this option, the following port is used. ・ When /S is specified: 443 ・ When /S is not specified: 80
Management Machine
Specify either of machine name, identification name, or MAC address of the managed machine, which is registered on DPM Server. Required. When you specify MAC address, enter it with "/M XX-XX-XX-XX-XX-XX" format. When the identification name of one managed machine is the same as the machine name of another managed machine, the command is executed for the managed machine that the identification name is matched. When there are two or more machines with the same machine name, the command cannot be executed. In this case, specify identification name or MAC address.
Password Specify the password of deployment_user which is registered on DPM Server. Required. Initial password is "dpmmgr".
Note:
The managed machine in the following statuses cannot be powered on. Re-execute power on after executing the status clear by seeing Section 4.1.9, "Status Clear." ・ Scenario Execution Stop ・ Scenario Execution Error ・ Remote Power ON Error
Example)
4.1.4. Shutdown Shuts down the managed machine. Syntax
The following command is described in two or more lines. Enter it in one line in the actual screen. dpmcmd.exe DPM Server [Management Server] shutdown [/S] [/P Web Port] Managed Machine Password
Option
Option Explanation DPM Server Specify IP address of DPM Server or DNS name.
Required. Management Server
Specify IP address of DPM Server(Management Server) or DNS name. Specification is not required normally. This option helps to maintain the compatibility with old version (earlier than DPM Ver6.0).
shutdown Specify this when you shut down the managed machine. Required
/S Specify this to communicate by HTTPS. When you omit this option, the communication is done by HTTP.
/P Web Port Specify http/https port(1-65535) which is used by DPM Server(IIS). When you omit this option, the following port is used. ・ When /S is specified: 443 ・ When /S is not specified: 80

214
Managed Machine
Specify either of machine name, identification name, or MAC address of the managed machine which is registered on DPM Server. Required. When you specify MAC address, enter it with "/M XX-XX-XX-XX-XX-XX" format. When the identification name of one managed machine is the same as the machine name of another managed machine, the command is executed for the managed machine that the identification name is matched. When there are two or more machines with the same machine name, the command cannot be executed. In this case, specify identification name or MAC address.
Password Specify the password of deployment_user which is registered on DPM Server. Required. Initial password is "dpmmgr".
Note:
The managed machine in the following statuses cannot be shut down. Re-execute shutdown on after executing the status clear by seeing Section 4.1.9, "Status Clear." ・ Scenario Execution Stop ・ Scenario Execution Error ・ Remote Power ON Error
In the case of "Scenario Executing", wait until the scenario completes and then execute shutdown.
On the Web Console, the power status of managed machines which is managed by DianaScope is on at the timing the machine is powered on. However, if a shutdown command is executed in the time after the machine is powered on and before OS is started up and DPM Client is started, an error occurs and the shutdown fails. Check that the managed machine's OS is running before executing this command.
Example)
4.1.5. Assign Scenario/Remove Scenario Assignment Assigns a scenario for the managed machine or removes the scenario assignment. Syntax
The following command is described in two or more lines. Enter it by one line in the actual screen. ・ When you assign a scenario:
dpmcmd.exe DPM Server [Management Server] assign [/S] [/P Web Port] /A Managed Machine Password Scenario Name
・ When you remove the scenario assignment: dpmcmd.exe DPM Server [Management Server] assign [/S] [/P Web Port] /U Managed Machine Password

215
Option
Option Explanation DPM Server Specify IP address of DPM Server or DNS name.
Required Management Server
Specify IP address of DPM Server(Management Server) or DNS name. Specification is not required normally. This option helps to maintain the compatibility with old version (earlier than DPM Ver6.0).
assign Specify this when you assign a scenario or remove the scenario assignment. Required.
/S Specify this to communicate by HTTPS. When you omit this option, the communication is done by HTTP.
/P Web Port Specify http/https port(1-65535) which is used by DPM Server(IIS). When you omit this option, the following port is used. ・ When /S is specified: 443 ・ When /S is not specified: 80
/A Required when you assign a scenario. /U Required when you remove the scenario assignment. Managed Machine
Specify either of machine name, identification name, or MAC address of the managed machine which is registered on DPM Server. Required. When you specify MAC address, enter with "/M XX-XX-XX-XX-XX-XX" format. When the identification name of one managed machine is the same as the machine name of another managed machine, the command is executed for the managed machine that the identification name is matched. When there are two or more machines have the same machine name, the command cannot be executed. In this case, specify identification name or MAC address.
Password
Specify the password of deployment_user which is registered on DPM Server. Required. Initial password is "dpmmgr".
Scenario Name Required when you assign a scenario. Specify the name of the scenario which is registered on DPM Server.
Note:
For managed machines in the following statuses, you cannot assign a scenario or you remove the scenario assignment. Re-execute this command after executing the status clear by seeing Section 4.1.9, "Status Clear." ・ Scenario Execution Stop ・ Scenario Execution Error ・ Remote Power ON Error
In the case of "Scenario Executing", wait until the scenario completes and then execute this command.
Example) ・ When you assign a scenario:
・ When you remove the scenario assignment:

216
4.1.6. Execute Scenario Execute a scenario which is assign to the managed machine. Syntax
The following command is described in two or more lines. Enter it by one line in the actual screen. dpmcmd.exe DPM Server [Management Server] snrexec [/S] [/P Web Port] [/W Wait Time] Managed Machine Password
Option
Option Explanation DPM Server Specify IP address of DPM Server or DNS name.
Required Management Server
Specify IP address of DPM Server(Management Server) or DNS name. Specification is not required normally. This option helps to maintain the compatibility with old version (earlier than DPM Ver6.0).
snrexec Specify this when you execute a scenario. Required.
/S Specify this to communicate by HTTPS. When you omit this option, the communication is done by HTTP.
/P Web Port Specify http/https port(1-65535) which is used by DPM Server(IIS). When you omit this option, the following port is used. ・ When /S is specified: 443 ・ When /S is not specified: 80
/W Wait Time Specify this when you wait for the scenario to be finished. When the scenario was completed or the scenario execution error occurred in the specified time or when the specified time passed, the command is ended. Even when the time passes, the scenario operates continuously. Specify from "0" to "360" minutes. When you specify "0", the command waits for the scenario to be finished. When you omit this option, the command is ended promptly without waiting for the scenario to be finished.
Managed Machine
Specify either of machine name, identification name, or MAC address of the managed machine which is registered on DPM Server. Required. When you specify MAC address, enter it with "/M XX-XX-XX-XX-XX-XX" format. When the identification name of one managed machine is the same as the machine name of another managed machine, the command is executed for the managed machine that the identification name is matched. When there are two or more machines with the same machine name, the command cannot be executed. In this case, specify identification name or MAC address.
Password
Specify the password of deployment_user which is registered on DPM Server. Required. Initial password is "dpmmgr".

217
Note: For managed machines in the following status, you cannot execute a scenario. Re-execute this
command after executing the status clear by seeing Section 4.1.9, "Status Clear." ・ Scenario Execution Stop ・ Scenario Execution Error ・ Remote Power ON Error In the case of "Scenario Executing", wait until the scenario completes and then execute this command.
Example)
4.1.7. Interrupt Scenario Execution Stops the scenario which is running on the managed machine. Syntax
The following command is described in two or more lines. Enter it by one line in the actual screen. dpmcmd.exe DPM Server [Management Server] snrstop [/S] [/P Web Port] Managed Machine Password

218
Option
Option Explanation DPM Server Specify IP address of DPM Server or DNS name.
Required Management Server
Specify IP address of DPM Server(Management Server) or DNS name. Specification is not required normally. This option helps to maintain the compatibility with old version (earlier than DPM Ver6.0).
snrstop Specify this when you stop the scenario execution. Required.
/S Specify this to communicate by HTTPS. When you omit this option, the communication is done by HTTP.
/P Web Port Specify http/https port(1-65535) which is used by DPM Server(IIS). When you omit this option, the following port is used. ・ When /S is specified: 443 ・ When /S is not specified: 80
Managed Machine
Specify either of machine name, identification name, or MAC address of the managed machine which is registered on DPM Server. Required. When you specify MAC address, enter with "/M XX-XX-XX-XX-XX-XX" format. When the identification name of one managed machine is the same as the machine name of another managed machine, the command is executed for the managed machine that the identification name is matched. When there are two or more machines with the same machine name, the command cannot be executed. In this case, specify identification name or MAC address.
Password
Specify the password of deployment_user which is registered on DPM Server. Required. Initial password is "dpmmgr".
Note:
The managed machine, for which you stopped the scenario execution, is powered off at the timing of PXE boot after running scenario is stopped.
When a scenario is executed on the managed machine over Machines For Simultaneous Execution, the processing of the scenario execution stop may be executed after the processing of the execution is started on the machine, depending on the timing.
For managed machines in the following statuses, you cannot stop the scenario execution. ・ Scenario Execution Stop ・ Scenario Execution Error ・ Remote Power ON Error
Example)

219
4.1.8. Display Scenario Execution Status Displays the scenario execution status. Syntax
dpmcmd.exe DPM Server [Management Server] progress [/S] [/P Web Port]
Option
Option Explanation DPM Server Specify IP address of DPM Server or DNS name.
Required Management Server
Specify IP address of DPM Server(Management Server) or DNS name. Specification is not required normally. This option helps to maintain the compatibility with old version (earlier than DPM Ver6.0).
progress Specify this when you display the scenario execution status. Required.
/S Specify this to communicate by HTTPS. When you omit this option, the communication is done by HTTP.
/P Web Port Specify http/https port(1-65535) which is used by DPM Server(IIS). When you omit this option, the following port is used. ・ When /S is specified: 443 ・ When /S is not specified: 80
Example)
4.1.9. Status Clear Clears the status of the managed machine when the status is either of the following.
・ Scenario Execution Stop ・ Scenario Execution Error ・ Remote Power ON Error
Syntax
dpmcmd.exe DPM Server [Management Server] stsclear [/S] [/P Web Port] Managed Machine
Option
Option Explanation DPM Server Specify IP address of DPM Server or DNS name.
Required Management Server
Specify IP address of DPM Server(Management Server) or DNS name. Specification is not required normally. This option helps to maintain the compatibility with old version (earlier than DPM Ver6.0).
stsclear Specify this when you clear the status of the managed machine. Required.
/S Specify this to communicate by HTTPS. When you omit this option, the communication is done by HTTP.

220
/P Web Port Specify http/https port(1-65535) which is used by DPM Server(IIS). When you omit this option, the following port is used. ・ When /S is specified: 443 ・ When /S is not specified: 80
Managed Machine
Specify either of machine name, identification name, or MAC address of the managed machine which is registered on DPM Server. Required. When you specify MAC address, enter it with "/M XX-XX-XX-XX-XX-XX" format. When the identification name of one managed machine is the same as the machine name of another managed machine, the command is executed for the managed machine that the identification name is matched. When there are two or more machines with the same machine name, the command cannot be executed. In this case, specify identification name or MAC address.
Example)
4.1.10. Register Managed Machine Registers a managed machine on DPM Server. When the machine group which the managed machine belongs does not exist, create the machine group automatically. Syntax
The following command is described in two or more lines. Enter it by one line in the actual screen. dpmcmd.exe DPM Server [Management Server] cliadd [/S] [/P Web Port] [/M MAC Address] [/NAME Machine Name] [/U UUID] [/I Identification Name] [/IP IP Address] [/D Deploy-OS ID] [/DNAME Deploy-OS Display Name] /G Path of Machine Group [/F] [/GW Default Gateway] [/MASK Subnet Mask] [/ASSIGN Scenario Name] Password
Option
Option Explanation DPM Server Specify IP address of DPM Server or DNS name.
Required Management Server
Specify IP address of DPM Server(Management Server) or DNS name. Specification is not required normally. This option helps to maintain the compatibility with old version (earlier than DPM Ver6.0).
cliadd Specify this when you register a managed machine on DPM Server. Required.
/S Specify this to communicate by HTTPS. When you omit this option, the communication is done by HTTP.
/P Web Port Specify http/https port(1-65535) which is used by DPM Server(IIS). When you omit this option, the following port is used. ・ When /S is specified: 443 ・ When /S is not specified: 80
/M MAC Address Specify MAC address of the managed machine to register on DPM Server. Hexadecimal number(0-9/a-f/A-F) can be entered. Enter it with "/M XX-XX-XX-XX-XX-XX" format. When you omit MAC address, you cannot omit UUID.

221
/NAME Machine Name
Specify the machine name of the managed machine which is registered on DPM Server. 63 characters or less can be entered. Alphanumeric characters and symbols can be entered. The following symbols and space cannot be entered.
! " # $ % & ' * + , . / : ; < = > ? @ [ \ ] ^ ` { | } ~ Also, you cannot register a machine name with only numbers. When OS is already installed on registered machine, specify the same name as the machine. When DPM Client is installed, the name is changed to the real machine name at the timing that the machine is powered on, even if the machine name, which was specified at this option, and real machine name were different.
/U UUID Specify UUID of the managed machine which is registered on DPM Server. Hexadecimal number(0-9/a-f/A-F) can be entered. Enter it with "/U XXXXXXXX-XXXX-XXXX-XXXX-XXXXXXXXXXXX" format. When you omit UUID, you cannot omit MAC address.
/I Identification Name
Specify the identification name of the managed machine which is registered on DPM Server. 63 characters or less can be entered. Alphanumeric characters and symbols can be entered. The following symbols and space cannot be entered.
! " # $ % & ' * + , . / : ; < = > ? @ [ \ ] ^ ` { | } ~ Also, you cannot register a identification name with only numbers. You cannot specify the same identification name under one DPM Server. When you specify the identification name which is already registered, an error occurs.
/IP IP Address Specify IP address of the managed machine which is registered on DPM Server. Numbers can be entered. Enter it with "/IP XXX.XXX.XXX.XXX" format. You cannot specify the same IP address under one DPM Server. When you specify IP address which is already registered, an error occurs. When there are two or more IP addresses on the managed machine, specify IP address which communicates with DPM Server. When you do not install DPM Client on the managed machine, you need to specify IP address.
/D Deploy-OS ID Specify the kernel ID of Deploy-OS which is used by the managed machine when backup, restore, or disk configuration check is executed. 256 characters or less can be entered. Alphanumeric characters and symbols can be entered. When you specify this option, specify this with "/DNAME Deploy-OS Display Name".
/DNAME Deploy-OS Display Name
Specify the displayed name of Deploy-OS kernel of which is used by the managed machine when backup, restore, or disk configuration check is executed. 256 characters or less can be entered. Alphanumeric characters and symbols can be entered. When you specify this option, specify this with "/D Deploy-OS ID".

222
/G Path of Machine Group
Specify the full path of the machine group to which the managed machine is registered. Required. The number of the layer of the group path is 20 or less. Specify "/"(slash) to separate the layer of the machine group. 64 characters or less can be entered as a group name for each layer. Alphanumeric characters and symbols can be entered. The following symbol cannot be entered.
; When there is not a group corresponding to the specified path, a machine group is created automatically. In DPM Ver6.02 or later, the destination method for the group is changed from the name of the machine group to which the machine is registered, to the path name of the group to which the machine is registered. Therefore, when you use a script file for DPM Command Line which was created in earlier than DPM Ver6.02, modify the file as the path name of the group is described. When you specify only the group name, the specification is recognized as the group directly under root. If the group is not found, a group is created under root. Also, when you specify a machine group including "(double quotation), describe "" and enclose the item with ".
Example) When the group name is /grou"p/, enter it as "/grou""p/".
/F Specify this when you set the gateway and the subnet mask of the machine group, which is created automatically. The configuration of the group, which is already created, is not changed. When you do not specify this, the setting, that the group is in the same network as DPM Server, is done for created group. Specify this with "/GW Default Gateway" and "/MASK Subnet Mask". When you specify only this option and omit "/GW Default Gateway" and "/MASK Subnet Mask", the configuration of the gateway and the netmask for created group is inherited from the parent group. When you specify the group directly under the root, the setting, that the group is in the same network as DPM Server, is done.
/GW Default Gateway
Specify this when you set the default gateway of the machine group which is created automatically. When /F is not specified, you do not need to specify this.
When the network setting of the group and DPM Server have the same subnet mask, you do not need to specify this.
/MASK Subnet Mask
Specify this when you set the subnet mask of the machine group which is created automatically. When /F is not specified, you do not need to specify this. When the network setting of the group and DPM Server have the same subnet mask, you do not need to specify this.
/ASSIGN Scenario Name
Specify the name of the scenario when you assign a scenario to the managed machine.
Password
Specify the password of deployment_user which is registered on DPM Server. Required. Initial password is "dpmmgr".
Example)
The following command is described in two or more lines. Enter it by one line in the actual screen.

223
4.1.11. Delete Managed Machine Deletes a managed machine on DPM Server. Syntax
The following command is described in two or more lines. Enter it by one line in the actual screen. dpmcmd.exe DPM Server [Management Server] cliremove [/S] [/P Web Port] Managed Machine Password
Option
Option Explanation DPM Server Specify IP address of DPM Server or DNS name.
Required Management Server
Specify IP address of DPM Server(Management Server) or DNS name. Specification is not required normally. This option helps to maintain the compatibility with old version (earlier than DPM Ver6.0).
cliremove Specify this when you delete a managed machine on DPM Server. Required.
/S Specify this to communicate by HTTPS. When you omit this option, the communication is done by HTTP.
/P Web Port Specify http/https port(1-65535) which is used by DPM Server(IIS). When you omit this option, the following port is used. ・ When /S is specified: 443 ・ When /S is not specified: 80
Managed Machine
Specify either of machine name, identification name, or MAC address of the managed machine which is registered on DPM Server. Required. When you specify MAC address, enter it with "/M XX-XX-XX-XX-XX-XX" format. When the identification name of one managed machine is the same as the machine name of another managed machine, the command is executed for the managed machine that the identification name is matched. When there are two or more machines with the same machine name, the command cannot be executed. In this case, specify identification name or MAC address.
Password
Specify the password of deployment_user which is registered on DPM Server. Required. Initial password is "dpmmgr".
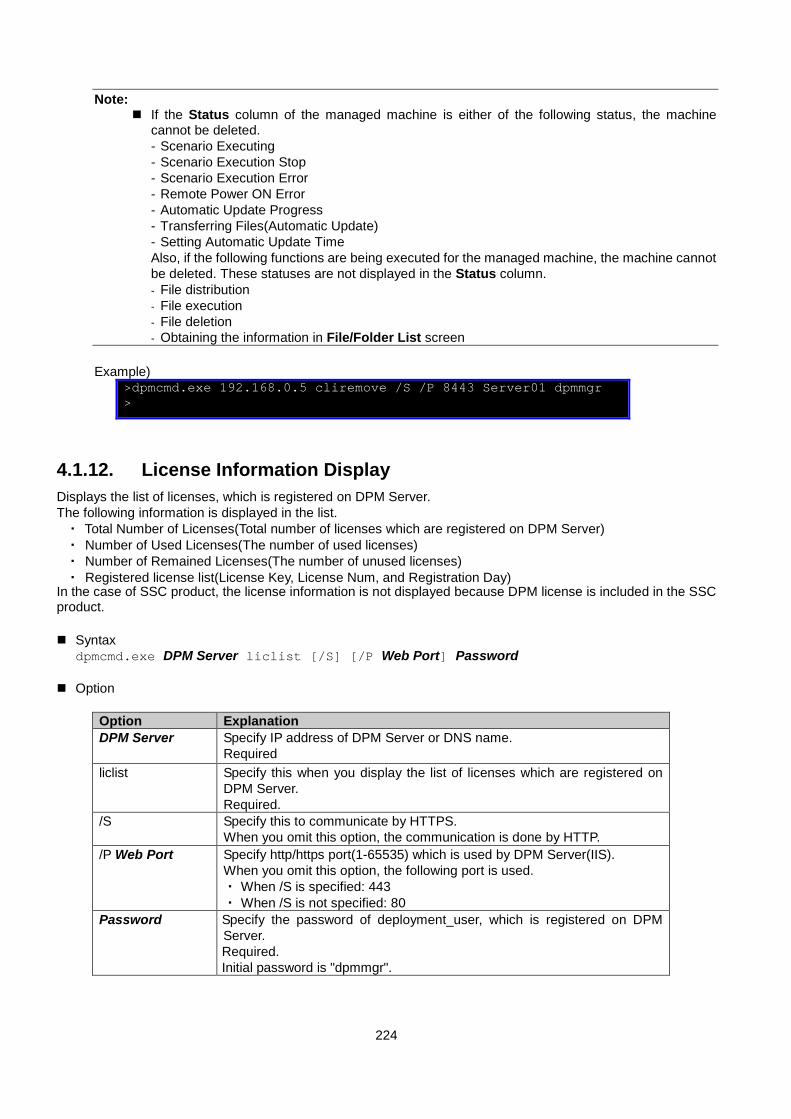
224
Note: If the Status column of the managed machine is either of the following status, the machine
cannot be deleted. - Scenario Executing - Scenario Execution Stop - Scenario Execution Error - Remote Power ON Error - Automatic Update Progress - Transferring Files(Automatic Update) - Setting Automatic Update Time Also, if the following functions are being executed for the managed machine, the machine cannot be deleted. These statuses are not displayed in the Status column. - File distribution - File execution - File deletion - Obtaining the information in File/Folder List screen
Example)
>dpmcmd.exe 192.168.0.5 cliremove /S /P 8443 Server01 dpmmgr >
4.1.12. License Information Display Displays the list of licenses, which is registered on DPM Server. The following information is displayed in the list. ・ Total Number of Licenses(Total number of licenses which are registered on DPM Server) ・ Number of Used Licenses(The number of used licenses) ・ Number of Remained Licenses(The number of unused licenses) ・ Registered license list(License Key, License Num, and Registration Day)
In the case of SSC product, the license information is not displayed because DPM license is included in the SSC product. Syntax
dpmcmd.exe DPM Server liclist [/S] [/P Web Port] Password
Option
Option Explanation DPM Server Specify IP address of DPM Server or DNS name.
Required liclist Specify this when you display the list of licenses which are registered on
DPM Server. Required.
/S Specify this to communicate by HTTPS. When you omit this option, the communication is done by HTTP.
/P Web Port Specify http/https port(1-65535) which is used by DPM Server(IIS). When you omit this option, the following port is used. ・ When /S is specified: 443 ・ When /S is not specified: 80
Password
Specify the password of deployment_user, which is registered on DPM Server. Required. Initial password is "dpmmgr".

225
Example)
dpmcmd.exe 192.168.0.5 liclist /S /P 8443 dpmmgr Total Number of Licenses :100 Number of Used Licenses :15 Number of Remained Licenses :85 Licenses List License Key License Num Registration Day XXX-XXXXXXXX-XXXXXXXX 100 14/10/21 >
4.1.13. Edit MAC address and UUID for the managed machine Edits MAC address and UUID for the managed machine. Editing methods are as follows.
- Add MAC address or UUID - Change MAC address or UUID - Delete MAC address or UUID
Syntax
The following command is described in two or more lines. Enter it by one line in the actual screen. Add MAC address of the managed machine dpmcmd.exe DPM Server cliedit /CT A [/S] [/P Web Port] /MU MAC address new MAC address [/T MAC address type] Password dpmcmd.exe DPM Server cliedit /CT A [/S] [/P Web Port] /MU UUID new MAC address [/T MAC address type] Password Add UUID of the managed machine dpmcmd.exe DPM Server cliedit /CT A [/S] [/P Web Port] /MU MAC address new UUID Password Change MAC address of the managed machine dpmcmd.exe DPM Server cliedit /CT U [/S] [/P Web Port] /MU old MAC address new MAC adders Password Change UUID of the managed machine dpmcmd.exe DPM Server cliedit /CT U [/S] [/P Web Port] /MU old UUID new UUID Password Delete MAC address of the managed machine dpmcmd.exe DPM Server cliedit /CT D [/S] [/P Web Port] /MU MAC address Password Delete UUID of the managed machine dpmcmd.exe DPM Server cliedit /CT D [/S] [/P Web Port] /MU UUID Password
Option Option Explanation DPM Server Specify IP address of DPM Server or DNS name.
Required cliedit Edit MAC address and UUID of the managed machine registered to DPM
Server. Required
/CT Specify the editing content execute for the managed machine. A: Add MAC address or UUID U: Update MAC address or UUID D: Delete MAC address or UUID Required
/S Specify this to communicate by HTTPS.

226
When you omit this option, the communication is done by HTTP. /P Web Port Specify http/https port(1-65535) which is used by DPM Server(IIS).
When you omit this option, the following port is used. ・ When /S is specified: 443 ・ When /S is not specified: 80
/MU Specify MAC address or UUID to edit. Required Hexadecimal number can be entered. (0 - 9/a - f/A - F). When you specify MAC address, enter it in the form "XX-XX-XX-XX-XX-XX". When you specify UUID, enter it in the form "XXXXXXXX-XXXX-XXXX-XXXX -XXXXXXXXXXXX".
/T When you add MAC address, specify the type of MAC address. P (Primary MAC address): MAC address of LAN board to connect with the
Management Server by WOL at the time of startup of the managed machine. C (Communication MAC address): MAC address of LAN board of the managed
machine communicates with the Management Server. G (Other MAC address): MAC address other than above.
When you omit, it deemed as the other address. Password Specify the password of deployment_user which is registered on DPM Server.
Required. Initial password is "dpmmgr".
Note:
If the Status column of the managed machine is either of the following status, the managed machine is uneditable.
- Scenario Executing - Scenario Execution Stop - Scenario Execution Error - Remote Power ON Error - Automatic Update Progress - Transferring Files(Automatic Update) - Setting Automatic Update Time Also, if the following functions are being executed for the managed machine, the managed machine is uneditable. These statuses are not displayed in the Status column. - File distribution - File execution - File deletion - Obtaining the information in File/Folder List screen
Example)
4.1.14. Help Displays the help of DPM Command Line. Syntax
・ When you display the help of DPM Command Line(the command list and the option list). dpmcmd.exe ?
・ When you display the help of each command.
dpmcmd.exe DPM Server [Management Server] Command ?

227
Option
Option Explanation DPM Server Specify IP address of DPM Server or DNS name.
Required Management Server
Specify IP address of DPM Server(Management Server) or DNS name. Specification is not required normally. This option helps to maintain the compatibility with old version (earlier than DPM Ver6.0).
Command Required when you display the detailed help of each command. ? Specify "?", "/?", or "/help".
Required when you display the help. Example) When indicating each command.

228
Appendix A Revision History First Edition(Rev.001)(2017.8): New

229
Copyright © NEC 2002-2017. All rights reserved.
Disclaimers All information disclosed in this document is protected by the copyrights of NEC. Copying or reproducing this document, in whole or in part, without the prior written approval of NEC is prohibited. The contents of this document are subject to change without notice. URL and the contents in URL in this document may be changed at any time without prior notice or explanation. NEC assumes no responsibility for any technical or editorial errors or omissions that may exist in this document. NEC does not guarantee the accuracy, usefulness, or completeness of the content or any other information provided in this document.
Trademarks and Copyrights SigmaSystemCenter, MasterScope, iStorage, ESMPRO and EXPRESSBUILDER are trademarks of NEC. The names of products and services contained on this document are trademarks or registered trademarks of respective companies. See "Trademarks and Copyrights" in First Step Guide for details.