DAZ 3D Carrara 8docs.daz3d.com/lib/exe/fetch.php/artzone/pub/faq/software_carrara/... · DAZ 3D...
152
Carrara 8 – Basic Users Guide DAZ 3D Carrara 8 Basic Users Guide Basic Users Guide Beta 0.2 June 17, 2010 Copyright DAZ 3D, 2010 Page 1
Transcript of DAZ 3D Carrara 8docs.daz3d.com/lib/exe/fetch.php/artzone/pub/faq/software_carrara/... · DAZ 3D...
Carrara 8 – Basic Users Guide
DAZ 3DCarrara 8Basic Users GuideBasic Users Guide
Beta 0.2June 17, 2010
Copyright DAZ 3D, 2010
Page 1
Carrara 8 – Basic Users Guide
DAZ 3DCarrara 8Carrara 8Basics GuideBasics Guide
Table of ContentsBasic Users Guide....................................................................................................................................................................... 1
Beta 0.2..................................................................................................................................................................................................1Carrara 8....................................................................................................................................................................................... 2Basics Guide................................................................................................................................................................................ 2Welcome to Carrara 8.................................................................................................................................................................. 8
What's New in This Version ................................................................................................................................ 9Carrara 8 Improvements................................................................................................................................ 9
Speed Optimizations..............................................................................................................................................................................9Lighting...................................................................................................................................................................................................9Modeling.................................................................................................................................................................................................9Rendering...............................................................................................................................................................................................9COLLADA and FBX.............................................................................................................................................................................10User Interface......................................................................................................................................................................................10
Carrara 7 improvements............................................................................................................................... 10UV's......................................................................................................................................................................................................103D Painting..........................................................................................................................................................................................10COLLADA............................................................................................................................................................................................10Animation.............................................................................................................................................................................................10OpenGL................................................................................................................................................................................................10Rendering.............................................................................................................................................................................................11DAZ Studio Integration.........................................................................................................................................................................11
Carrara Improvements.................................................................................................................................. 11General ................................................................................................................................................................................................11Animation ............................................................................................................................................................................................11Content Support ..................................................................................................................................................................................12Nature Modeling ..................................................................................................................................................................................12Vertex Modeling ..................................................................................................................................................................................12Shading and Lighting ..........................................................................................................................................................................13Rendering ...........................................................................................................................................................................................13Import/Export ......................................................................................................................................................................................13
Installation Instructions............................................................................................................................................................14Macintosh Installation ....................................................................................................................................... 14
System Requirements.................................................................................................................................. 14Installation Instructions................................................................................................................................. 14
Windows Installation ......................................................................................................................................... 14System Requirements.................................................................................................................................. 14Installation Instructions................................................................................................................................. 15
About Your Documentation ...................................................................................................................................................... 16Conventions ...................................................................................................................................................... 16Version Content ................................................................................................................................................ 16Technical Support ............................................................................................................................................. 16
Web Support ............................................................................................................................................... 16Phone Support ............................................................................................................................................ 16Creative Support ......................................................................................................................................... 16Using Tool Tips ............................................................................................................................................ 17
Carrara Overview ...................................................................................................................................................................... 18Creating Scenes ............................................................................................................................................... 18
Using the Scene Wizard .............................................................................................................................. 18Using the Landscape Wizard ...................................................................................................................... 19Creating an Empty Scene ........................................................................................................................... 20Opening an Existing File ............................................................................................................................. 20
Carrara’s Rooms ....................................................................................................................................................................... 20Assemble Room .......................................................................................................................................... 21
Page 2

Carrara 8 – Basic Users Guide
A Quick Tour.........................................................................................................................................................................................21Model Room ................................................................................................................................................ 22Storyboard Room ........................................................................................................................................ 23Texture Room .............................................................................................................................................. 24Render Room .............................................................................................................................................. 25
Carrara Interface Elements ...................................................................................................................................................... 26Carrara Menus .................................................................................................................................................. 27Carrara Tools .................................................................................................................................................... 27
Room Tools.................................................................................................................................................. 27Document Window ............................................................................................................................................ 28
Browser Tray ............................................................................................................................................... 29Using the Browser Tray.......................................................................................................................................................................29
Properties Tray ............................................................................................................................................ 29Sequencer Tray ........................................................................................................................................... 30The Interactive Renderer ............................................................................................................................. 30
Carrara Window Display Options....................................................................................................................... 30Setting Up Carrara .................................................................................................................................................................... 31
Setting Application Preferences ........................................................................................................................31Setting General Preferences ............................................................................................................................ 32Setting UI Effects Preferences ..........................................................................................................................32Changing Keyboard Shortcuts .......................................................................................................................... 33Imaging & Scratch Disk Preferences ................................................................................................................33General Scene Settings Preferences ................................................................................................................34Setting Units of Measurement........................................................................................................................... 34OpenGL Preferences ........................................................................................................................................ 35File Format Preferences ................................................................................................................................... 35Interface Settings Preferences ......................................................................................................................... 36User Interface Color Preferences .....................................................................................................................363D View Preferences ........................................................................................................................................ 373D View Color Preferences .............................................................................................................................. 37Modeling Room Preferences ............................................................................................................................ 38Shader Editor Preferences ............................................................................................................................... 38Shading Room Preferences .............................................................................................................................. 38Resetting Application Preferences ....................................................................................................................39
Adding Objects ......................................................................................................................................................................... 40Assemble Room Overview ............................................................................................................................... 40
Assemble Room Menu Commands and Tools ............................................................................................41Working with Common Tools ................................................................................................................................................... 42
Customizing Tool Locations .............................................................................................................................. 423D Object Manipulation Tools ........................................................................................................................... 43Camera Tools .................................................................................................................................................... 43
Track Tools................................................................................................................................................... 43Camera Rotation Tools................................................................................................................................. 44
2D View Tools ................................................................................................................................................... 44Test Render Tool ............................................................................................................................................... 442D Pan Tool ...................................................................................................................................................... 452D Zoom Tool ................................................................................................................................................... 45
The Document Window ............................................................................................................................................................46Displaying Multiple Camera Views .................................................................................................................... 47Using the Working Box ..................................................................................................................................... 49
Object Bounding Boxes and Projections .....................................................................................................49Choosing the Active Plane .......................................................................................................................... 49Changing the Working Box .......................................................................................................................... 50Aligning the Working Box............................................................................................................................. 50
Aligning to an Object............................................................................................................................................................................50Aligning to Specific Coordinates .........................................................................................................................................................51Returning to its Origin .........................................................................................................................................................................51
Changing the Grid ............................................................................................................................................. 52Showing and Hiding Grid Planes ................................................................................................................. 52
Page 3
Carrara 8 – Basic Users Guide
Setting up the Grid ...................................................................................................................................... 52Choosing a Preview Mode ................................................................................................................................ 53
Bounding Box .............................................................................................................................................. 53Wireframe .................................................................................................................................................... 53Flat .............................................................................................................................................................. 54Gouraud ...................................................................................................................................................... 54Textured ...................................................................................................................................................... 54
Using the Properties Tray ........................................................................................................................................................55Understanding the Properties Tray...............................................................................................................55Scene Manager............................................................................................................................................ 56
Scene Manager Tabs...........................................................................................................................................................................56Interactive Render Settings...................................................................................................................................................... 57Using the Sequencer Tray ........................................................................................................................................................59
Editing Your Scene's Contents .......................................................................................................................... 60Undoing Operations .......................................................................................................................................... 60Redoing Operations .......................................................................................................................................... 60Saving Your File ................................................................................................................................................ 61Closing Your File ............................................................................................................................................... 61
Using Content Files .................................................................................................................................................................. 62The Browser Tray ............................................................................................................................................. 62
Showing and Hiding the Browser ................................................................................................................62Choosing Your Display Mode ...................................................................................................................... 63Using the Browser File Menu ...................................................................................................................... 64Displaying Browser File Information ............................................................................................................64Deleting Browser Files ................................................................................................................................ 64Duplicating Browser Files ............................................................................................................................ 65Editing Browser Files ................................................................................................................................... 65Adding Browser Folders .............................................................................................................................. 65Removing Browser Folders ......................................................................................................................... 66Updating Browser Folders ........................................................................................................................... 66Resaving Browser Folders .......................................................................................................................... 66
Browser Tabs .................................................................................................................................................... 66Browser Tray: Scenes Tab .......................................................................................................................... 66Browser Tray: Objects Tab .......................................................................................................................... 67Browser Tray: Shaders Tab ......................................................................................................................... 68Browser Tray: Clip Tab ................................................................................................................................ 69Browser Tray: Misc Tab ............................................................................................................................... 69Browser Tray: Artwork Tab .......................................................................................................................... 70
Using DAZ and Poser Content..................................................................................................................................................71Adding Runtime Folders ................................................................................................................................... 71Using Content Runtime Folders ........................................................................................................................ 72Adding Content: Special Notes .........................................................................................................................72
Figures (Poseable Characters): ..........................................................................................................................................................73Adding Level of Detail ....................................................................................................................................... 74.......................................................................................................................................................................... 79LOD List ............................................................................................................................................................ 80Example Activity – Lighting Scenes................................................................................................................... 81
Environmental Primitives .........................................................................................................................................................82Creating Terrains .............................................................................................................................................. 83The Filter Layers List ........................................................................................................................................ 84The Terrain Properties ...................................................................................................................................... 85Terrain Editor..................................................................................................................................................... 85Creating a Custom Terrain ................................................................................................................................ 85
Painting a Terrain ........................................................................................................................................ 86Increasing and Decreasing Heights ....................................................................................................................................................86Adding Craters ....................................................................................................................................................................................87Simulating Erosion ..............................................................................................................................................................................87
Filter Reference ................................................................................................................................................ 87Generators ........................................................................................................................................................ 87
Page 4
Carrara 8 – Basic Users Guide
Filters ................................................................................................................................................................ 88Advanced Generators ................................................................................................................................. 89Terrain Shading ........................................................................................................................................... 89
About Terrain Layers ......................................................................................................................................... 89Distribution Types ............................................................................................................................................. 90
Bump Properties .......................................................................................................................................... 90Noise Properties .......................................................................................................................................... 90Altitude Properties ....................................................................................................................................... 91Slope Properties .......................................................................................................................................... 91Orientation Properties ................................................................................................................................. 91
Creating Plants ................................................................................................................................................. 93Basic Plant Editing ...................................................................................................................................... 94General Properties ...................................................................................................................................... 94Manipulation Mesh Settings ........................................................................................................................ 94Trunk Properties .......................................................................................................................................... 95Aspect of Trunk ........................................................................................................................................... 95Distribution of Main Branches ..................................................................................................................... 96Roots ........................................................................................................................................................... 96
Branch Properties ............................................................................................................................................. 97Affect all branches ....................................................................................................................................... 97Junctions’ smoothness ................................................................................................................................ 97
Leaf Properties ................................................................................................................................................. 97Leaves Distribution ...................................................................................................................................... 98Leaf Appearance ......................................................................................................................................... 98
Tree Shape Parameters .................................................................................................................................... 99Generation .................................................................................................................................................. 99Deformation ................................................................................................................................................. 99
Expert Plant Parameters ................................................................................................................................. 100Aspect of Branch ....................................................................................................................................... 100Distribution of Subbranches ...................................................................................................................... 101
Creating Clouds ...................................................................................................................................................................... 102Volumetric Clouds ........................................................................................................................................... 102Light to Use .................................................................................................................................................... 103The Shape Panel ............................................................................................................................................ 103
Basic Shape .............................................................................................................................................. 103Big Cumulus .............................................................................................................................................. 104Cumulus 1 and 2 Clouds ........................................................................................................................... 104General Properties Panel .......................................................................................................................... 105
The 3D Preview (Clouds) ................................................................................................................................ 105Volume Clouds ............................................................................................................................................... 105Old Volumetric Clouds..................................................................................................................................... 106
Tips ........................................................................................................................................................... 107Fire Primitive ................................................................................................................................................... 108
Creating Fountains ................................................................................................................................................................. 110Creating Fog ............................................................................................................................................................................ 112Creating Oceans ...................................................................................................................................................................... 114
Ocean Properties ............................................................................................................................................ 115Physics in Carrara............................................................................................................................................ 116
Setting Physics........................................................................................................................................... 117Density...............................................................................................................................................................................................117Bounce...............................................................................................................................................................................................117Collide With Other Objects.................................................................................................................................................................117Velocity...............................................................................................................................................................................................117Initial Angular Velocity........................................................................................................................................................................117
Calculating Physics.................................................................................................................................... 117Modifiers.......................................................................................................................................................... 118
Lighting..................................................................................................................................................................................... 119Import/Export .......................................................................................................................................................................... 120
Importing 3D Objects ...................................................................................................................................... 120
Page 5
Carrara 8 – Basic Users Guide
3DS Import................................................................................................................................................. 1213DMF Import.............................................................................................................................................. 121Biovision BVH Import................................................................................................................................. 122Collada Import............................................................................................................................................ 123DXF Import................................................................................................................................................. 123DirectX Import (Pro only) ........................................................................................................................... 124Filmbox FBX Import (Pro only) .................................................................................................................. 124
What is Imported in FBX?..................................................................................................................................................................124Takes .................................................................................................................................................................................................124Limitations .........................................................................................................................................................................................124Characters with Control Rigs ............................................................................................................................................................125
Lightwave (LWO Import) (Standard, Pro) ..................................................................................................125Wavefront OBJ Import ............................................................................................................................... 126Poser® Native Import ................................................................................................................................ 127
Importing Poser Cameras (CM2/CMZ) .............................................................................................................................................127Importing a Poser Character (CR2/CRZ) .........................................................................................................................................127Importing Options in the Properties Tray ..........................................................................................................................................129Conforming Clothing .........................................................................................................................................................................129Importing Poser Hair (HR2/HRZ) ......................................................................................................................................................129Importing Poser Lights (LT2/LTZ) .....................................................................................................................................................130Importing Poser Props (PP2/PPZ) ....................................................................................................................................................130Importing a Poser Scene (PZ3/PZZ) ................................................................................................................................................131
Realviz XML Import (Pro only) ................................................................................................................... 131SynthEyes™ Import (Pro only) .................................................................................................................. 132TrueSpace Import (Pro only) ..................................................................................................................... 132CAD Formats (Pro only) ............................................................................................................................ 132Other Formats ........................................................................................................................................... 133
Exporting 3D Objects ............................................................................................................................................................. 1343DS Export ..................................................................................................................................................... 1353DMF Export................................................................................................................................................... 135Adobe® After Effects® Export.........................................................................................................................136COLLADA Export ............................................................................................................................................ 136DXF Export ..................................................................................................................................................... 136DirectX Export................................................................................................................................................. 137Kaydara FBX Export........................................................................................................................................ 137Shockwave 3D Export .................................................................................................................................... 138VRML Export .................................................................................................................................................. 138Wavefront OBJ Export .................................................................................................................................... 139Viewpoint Experience Tech Export.................................................................................................................. 140Exporting a Scene .......................................................................................................................................... 140Previewing a Scene ........................................................................................................................................ 141VET Export Options ........................................................................................................................................ 141
General Settings ........................................................................................................................................ 141Rendering Settings .................................................................................................................................... 141Camera Settings ........................................................................................................................................ 141Texture Settings ........................................................................................................................................ 141Animation Settings .................................................................................................................................... 142Shadow Settings ....................................................................................................................................... 142LightMaps Settings .................................................................................................................................... 142HTML Settings ........................................................................................................................................... 142Getting Results with VET .......................................................................................................................... 143
Light Maps ........................................................................................................................................................................................143Maps (Texture, Bump, Transparency) ..............................................................................................................................................143Backdrop ...........................................................................................................................................................................................143Animation ..........................................................................................................................................................................................143Add Interactivity to Your Scene .........................................................................................................................................................143
VET Animators .......................................................................................................................................... 144VET Interactors ......................................................................................................................................... 144
New Interactor ...................................................................................................................................................................................145New Event .........................................................................................................................................................................................145Special Actions ..................................................................................................................................................................................146
Page 6
Carrara 8 – Basic Users Guide
Hot Spots ..........................................................................................................................................................................................146Current Limitations ............................................................................................................................................................................146
DAZ 3D
Page 7

Carrara 8 – Basic Users Guide
Welcome to Welcome to Carrara 8Carrara 8Welcome to DAZ 3D™ Carrara™, the latest 3D program for desktop artists and animators, Web designers, and multimedia producers. Carrara is ideal for creating 3D graphics for magazines, ads, Web sites, or almost any illustration that would benefit from the powerful 3D impact of realistic perspective and shading.
Carrara software’s powerful animation features let you create professional quality animations and models for video, multimedia, and the Internet. With Carrara software’s key-event, dynamic, and timeline-based animation, you can produce anything from flying logos to character animations. You can create broadcast quality output for square or non-square pixels, and output that is NTSC color safe.
Carrara offers a complete 3D graphic development environment in one package, allowing you to create a scene, model ob jects that populate it, and create environmental effects. You can then animate the results if desired and, finally, render the res ulting scene, using one application.
Carrara can also be an invaluable tool for interactive multimedia. It supports low-polygon modeling and popular formats such as GIF, JPEG, OBJ, 3DS, AVI, Quicklime, and sequenced movies.
Carrara software’s open architecture allows new functionality to be added through extensions. The easy-to-use interface is designed around the SmartFlow workflow, guiding you through the 3D creation process, yet allowing complete creative freedom.
Page 8
Carrara 8Carrara 8
Carrara 8 – Basic Users Guide
What's New in This Version Carrara adds a number of improvements that cover its whole range of use. Whatever you use Carrara to do, Carrara will help you do it better and faster. Here is quick description of some of those improvements:
CARRARA 8 IMPROVEMENTS Full 64-Bit Program: Carrara 8 Pro has full support for 64-bit operating systems on both Windows and Macintosh! Create scenes as large as your computer's memory can handle, and break through the 4GB limit of old 32-bit operating systems! Both the user interface and renderer are fully 64-bit, so you never have to worry about running out of memory in scene creation or rendering.
Speed Optimizations
Multi-Core Aware: More calculations than ever have been multi-threaded, from physics, to lighting, to rendering; so Carrara takes advantage of every bit of horsepower you can throw at it. In some cases, multi-core render times have reduced by more than 80%!
Network Render Optimizations: Carrara 8's network rendering engine has been fine-tuned for today's multi-core CPUs, so you can create personal “render farms” when creating movies and animations from Carrara. Use the spare hardware lying around your home or office, and put it to work with advanced batch rendering.
Bullet Physics Library: Carrara 8 contains the beta version of the Bullet physics library, an accelerated physics calculation engine. Now you can create huge physics simulations, and use the full power of your computer when creating complex physics-based animations.
Lighting
Negative Lights: Expand your lighting options with negative lights and advanced photometrics. Now you can place lights that remove light from a scene, giving you fine control for dramatic effects.
IES Lights: Download thousands of free IES light profiles directly from lighting manufacturer's websites, and use them as the mathematical model behind your area and spotlights. Now your lights can have the same realistic imperfections of real-world lightbulbs and other lighting sources.
Barn Doors: Use gels on lights, and create dramatic lighting effects such as window panes or venetian blinds casting shadows across your scenes.
God Rays: Cast light down from the heavens using Carrara's new god ray feature. Create dramatic and atmospheric effects with shafts of lights attenuating through the atmosphere with this powerful new enhancement.
Modeling
Edit Posed Meshes: Carrara 8 allows you to edit meshes in posed mode (in animation mode only). Now you can poses a figure with conforming clothing, and edit the clothing directly on the posed figure! Pull shirts open, simulate wrinkles, or deform the clothing to look like the clothes blowing in the wind.
Vegetation Improvements: Control the shape of your trees and vegetation like never before, add options, and control every aspect in Carrara's plant engine.
Rendering
Normal Maps: Use normal maps on your models for even greater detail and flexibility. Create detailed normal maps so your models look incredibly detailed – without sacrificing rendering time.
Page 9
Carrara 8 – Basic Users Guide
COLLADA and FBXImport and Export: Carrara 8 has many improvements in import and export of industry-standard Collada and FBX formats. Model and texture a character, rig them for animation, and export to game engines such as Unity 3D all in one application.
User Interface
Puppeteer: Use the puppeteer tool, as seen in DAZ Studio, to create custom animation scrub palettes for movement, morphs, positioning, or any other parameter-based attribute. Record your animation scrubs and play them back as fully-keyframed animations!
CARRARA 7 IMPROVEMENTS Vertex Modeling Updates: Vertex objects can now be modified while in the Model room without switching back and forth between rooms.
Content LOD Support: Adds the ability to load and use Level of Detail meshes and control which meshes are used based on distance from the camera.
UV'sUV UI Enhancements (Standard, Pro): The UV Editor has been expanded allowing editing of UVs in the main viewport.
UV Unfolding (Pro Only): Adds the ability to unfold UV maps when in the UV Editor.
UV Relax Seams (Standard, Pro): Adds the ability to relax UV seams when in the UV Editor.
3D Painting3D Painting (Pro Only): Provides the ability to paint directly on objects using color, shaders, and imported textures. Also includes real bumps and specularity display in OpenGL
COLLADACOLLADA Export: Provides export in the COLLADA file format to support the DAZ Studio COLLADA Exporter and further integration between Carrara and DAZ Studio. Currently only available for PCs.
COLLADA Import (Standard, Pro): Provides the ability to import files exported out in the COLLADA file format. Currently only available for PCs.
AnimationNon-Linear Animation Merge Tracks: Provides an improved interface to create groups of tracks then collapse or expand the tracks in those groups. Helps optimize the screen space so you can focus on your animation.
OpenGLSpecularity and Bump Display in OpenGL (Pro Only): When in OpenGL mode, specularity and bump can be seen in real time on the object when supported by the video card. Changes made to the texture for bump and specularity are updated in real time.
Larger OpenGL Texture Display: Improves Carrara’s rendering of textured objects in OpenGL by using higher texture resolutions when supported by the hardware.
Page 10
Carrara 8 – Basic Users Guide
RenderingRendering Optimizations for Transparency: Time consuming and complex transparency rendering operations have been optimized to provide better and faster results.
Multi-Pass Rendering (Pro Only): Adds multi-pass rendering to Carrara so that different components of the final render can be rendered out individually to separate images or layers.
DAZ Studio IntegrationDAZ Studio Content Support Improvements - Includes enhanced the handling of .DAZ scene files being loaded into Carrara 7.0. Requires DAZ Studio Build 2.3.3.138 or higher.
CARRARA IMPROVEMENTS
General New Unicode Support: Allows you to use just about any character set you want (Chinese, Japanese, French, and so on). This feature not only allows you to use these characters to name objects, but you can also use them in the Text modeler to create text in any language. Carrara also gives you the ability to add any character font to the user interface so that it supports your language.
Multiple Selections: Support has been extended so that you can simultaneously edit some properties of two or more selected objects in the properties panel. For example, you can hide several objects at the same time, or change the intensity of several lights together, increasing your productivity.
OpenGL Improvements: An improved engine that supports texture maps with alpha channels, and improved textured mode display. OpenGL performance has also been improved in the Vertex modeler to allow editing of larger meshes.
Animation New Euler Angles for Rotations: Until now, Carrara only supported Quaternion interpolation for rotation, which did not allow you to edit the three rotation angles independently. Carrara's new "Euler angle" interpolation mode adds even more control for character animation.
New Hair/Fur Modeling: This major new feature adds a completely new hair primitive and a powerful Hair modeler and simulator. You can apply hair to an object, brush it, and style it. The hair can also be shaded and have vari ous effects such as clumping or freezing.
New Hair Simulation: In addition to creating hair, another major new feature is the addition of hair simulation, which allows you to simulate the motion of the hair. Hairs interact with other objects and can have forces applied to them.
Rigid Body Simulation: Carrara's physics engine has been improved. Simulations now perform up to 10 times faster and are more stable. The workflow has been improved and includes a button that allows simulation on demand and avoids constant recalculation of the physics.
Non-Linear Animation: Another major new feature in Carrara, this new engine completes the Carrara animation toolset. Create clips of animation that you can reuse and combine on multiple tracks. Blend clips together, or use a single clip (such as a walk cycle clip) to build a longer animation (such as a character walking down a road). Create a walking character in one layer, and then add another separate layer that makes him wave. The two indi vidual animation layers are combined into one fluid animated result.
Page 11

Carrara 8 – Basic Users Guide
Content Support Figure Support: DAZ content is now fully supported in Carrara. This includes better support for skinning and morph targets. Manipulation is up to ten times faster. You can select a bone simply by clicking the geometry of the figure. Properties associated with a body part are displayed with its associated bone, and all parameters are sup ported.
Content Browser: You can now use a content browser to browse through and select DAZ content to add to your scene. Drag and drop figures, clothing, props, and poses into your scene and apply them to your figures.
Conforming: Conforming figures are now supported, including morph crosstalk.
Nature Modeling New Scene Scaling: You can now select the size of the scene when you create a new scene. Camera speed, the size of the working box, and the default size of the primitives are adjusted. This makes it easier to create large landscapes in real-world scale, and also increases realism with atmospheric effects such as clouds and atmospheric blues.
NOTE! The default measurement unit in Carrara is feet. If you want to work in inches, type "in" after you enter a numerical value of measurement.
New Landscape Wizard: Use the new landscape wizard to create many different landscapes. Combine terrains, shading, sky, and rendering presets. This wizard makes it easy to create a beautiful landscape scene that you can use as a starting point for your projects.
New Ocean Primitive: Allows you to realistically simulate the surface of the ocean. You can create still and animated oceans with high realism, with complete control over the size of the waves or the speed and direction of the wind.
New Terrain Features: To add even more detail on terrains, you can use the render time displacement features to apply a displacement shader to the surface. The displacement is calculated at render time, thereby allowing you to create incredibly detailed terrains without adding extra geometry that uses more memory.
Vertex Modeling New Displacement Modeling: This new modeler allows you to paint displacement on your objects, adding complex detail to your object without adding extra geometry.
New Symmetrical Modeling: This new feature allows you to edit both sides of a symmetrical object at the same time, and is ideal for character editing. Most of the modeling tools support this feature, thereby cutting your model ing time in half.
New Edge Extrusion: The Edge Extrusion tool lets you extrude corners of objects interactively.
New Figure Editing: You can now edit the mesh of an imported figure, as well as create new morph targets and full body morphs within the Vertex modeler.
Vertex modeler Optimizations: A number of optimizations improve performance on larger meshes. You'll see improvements when you move, scale, or rotate points. Other noticeable optimizations are in OpenGL redraw speed and subdivision surface updates.
Page 12
Carrara 8 – Basic Users Guide
Shading and Lighting New Transparency with Absorption: Transparencies now support realistic absorption functions. This feature is ideal for simulating shallow water.
New Single Scattering: This new feature is used to simulate light from small particles that are inside a medium. For example, you can use it to simulate steam in the atmosphere. It is an indirect lighting effect that can also be used to simulate water more accurately.
Rendering Blurry Reflections Optimized: Speed and quality of blurry reflections have been optimized when multiple blurry reflections are used, or when they are combined with soft shadows or raytraced depth of field.
Depth of Field Improvements: Speed and quality of raytraced depth of field is optimized when used in conjunction with multiple blurry reflections or soft shadows.
New Shadow Bias: A new parameter is included in raytraced shadows. It corrects self-shadowing effects due to the low resolution of an object. Shadows are now much cleaner.
Import/Export New DirectX Import/Export: Import and export geometry, materials, skinning, and animation in DirectX format.
New DAZ Studio Import: Import complex scenes from DAZ Studio into Carrara. You can then manipulate the figures and props directly within Carrara.
Discontinued Formats: Carrara no longer imports Amapi, DWG, OpenInventor/ VRML, or STL formats.
Page 13
Installation InstructionsInstallation Instructions
NOTE! See "Setting Imaging and Scratch Disk Preferences" for information on how Carrara uses the hard disk.
Macintosh Installation
SYSTEM REQUIREMENTS Carrara works on any Power Macintosh® with at least the following configuration: Mac®. Intel or Power Macintosh® 700 MHz (1 GHz or faster recommended). Mac®OS X 10.3.9 or above. 512 MB RAM minimum (1 GB recommended). OpenGL compatible graphics card. 300 MB free hard drive space for installation (500 recommended) 32-bit graphics color depth. CD-ROM drive.
NOTE! Will not function installed on a UNIX partition under Mac OS X.
INSTALLATION INSTRUCTIONS
Installing Carrara Software (Download version): 1. Turn off any virus protection and compression programs and close any other applications currently open. 2. Double-click on the installer icon you downloaded from your DAZ 3D account and follow the instructions on the
screen.
Installing Carrara Software (CD-ROM version): 1. Turn off any virus protection and compression programs and close any other applications currently open. 2. Insert the Carrara application CD-ROM into your CD-ROM drive. 3. Double-click the Installer icon from the CD-ROM and follow the instructions on the screen.
Windows Installation
SYSTEM REQUIREMENTS Carrara works on any PC-compatible computer with at least the following configuration: Pentium III processor, 700 MHz (1 GHz or faster recommended). Windows 2000® (Service Pack 2), Windows XP®, Windows Vista®. 512 MB RAM minimum (1 GB recommended). OpenGL compatible graphics card. 300 MB hard drive space for installation (500 recommended). 32-bit graphics color depth. CD-ROM drive.
NOTE! For information on how your Carrara software uses the hard disk see "Setting Imaging and Scratch Disk Preferences."
Carrara 8 – Basic Users Guide
INSTALLATION INSTRUCTIONS
Installing Carrara Software (Download version): 1. Turn off any virus protection and compression programs and close any other applications currently open. 2. Double-click on the installer icon you downloaded from your DAZ 3D account. 3. Follow the instructions on the screen. Click Next to confirm each option and move to the next screen. 4. After your software has finished installing, click Finish.
Installing Carrara software (CD-ROM version): 1. Insert the Carrara application CD-ROM into your CD-ROM drive and click the Install button. Windows locates the in
stallation program on the CD-ROM. 2. Follow the instructions on the screen. Click Next to confirm each option and move to the next screen. 3. After your software has finished installing, click Finish.
Page 15
About Your Documentation About Your Documentation This manual provides all the information you need to get the most out of Carrara. It will help you learn the application and serve as a reference as you attempt more sophisticated procedures and effects.
This guide assumes you are already familiar with basic Macintosh and Windows concepts—menus, dialogs, and mouse operations such as clicking and dragging. If you need more information on these subjects, or on the Macintosh Finder or the Windows Desktop, refer to the Apple Macintosh User’s Manual or the Microsoft Windows User’s Guide, respectively.
Computer graphics and 3D modeling use special terms usually explained where introduced. In addition, the Glossary gives concise definitions of many terms.
Conventions This guide is for both Macintosh and Windows. By convention, Macintosh commands precede Windows commands in the text.
For example: Command/Ctrl+I = MAC “Command-I” or WIN “Ctrl+I”For simplicity, the term folder refers to directories as well as folders. The Carrara interface for both platforms is identical unless otherwise specified.
Conventions used to identify tools and controls: • The convention for a menu follows the rule of the menu name > menu item. • The convention for a palette or tray is:
• palette name: button name• palette panel: palette item.
Version Content This manual contains features for all versions of Carrara: Standard, and Pro. Where a feature is available in both the Standard and Pro versions, or only the Pro version, that feature will have a note added to it.
Technical Support You will find the answers to most of your questions within the documentation. If you need further assistance, you can contact DAZ 3D’s Technical Support for Carrara in the following ways:
WEB SUPPORT Many of the answers to your questions are available 24 hours a day on our Web site:
• http://www.daz3d.com/support
In addition to frequently asked questions (FAQs), the Web site provides troubleshooting techniques, late breaking product news, and other resources to help you get the most out of your Carrara product.
PHONE SUPPORT Phone support is available to registered users of Carrara for questions about installation, configuration, or functionality. For more information about phone support, check our Web site at:
• http://www.daz3d.com/support
CREATIVE SUPPORT You can also refer to forums on the DAZ 3D Web site for questions about creative techniques, or visit:
Carrara 8 – Basic Users Guide
• http://www.daz3d.com/i.x/community/0/-/?
USING TOOL TIPS Carrara displays Tool Tips by default whenever you rest your cursor over an interface element.
To turn off Tool Tips: 1. Choose File > Preferences. 2. Choose General from the pop-up menu. 3. Uncheck the Show ToolTips option.
Page 17
Carrara Overview Carrara Overview This chapter introduces some of the major features and concepts of DAZ 3D Carrara. With Carrara, you can create dazzling 3D illustrations, animations, and Web output in six easy steps:
• Create a scene using object primitives. • Build true three-dimensional objects with easy-to-use, intuitive modeling tools. (Standard, Pro) • Apply colors and textures on your objects, giving them realistic properties such as transparency and reflection. • Light your scene to enhance realism and depth. • Create animations of your scene. • Render your scene, animation, or Web output with Carrara's powerful rendering engines to produce extraordinary,
photo-realistic illustrations or animations. Carrara combines power with an easy-to-use, intuitive user interface.
Creating Scenes A Carrara document is called a scene. A scene is the collection of objects, light sources, and cameras, saved together in a file. Each new scene has several windows associated with the different rooms. As you create your scene in Carrara, you'll work in the various rooms to create and place the various elements that you want to use. Before you can create a new 3D illustration, you must create a new document. A new document starts with a blank scene.
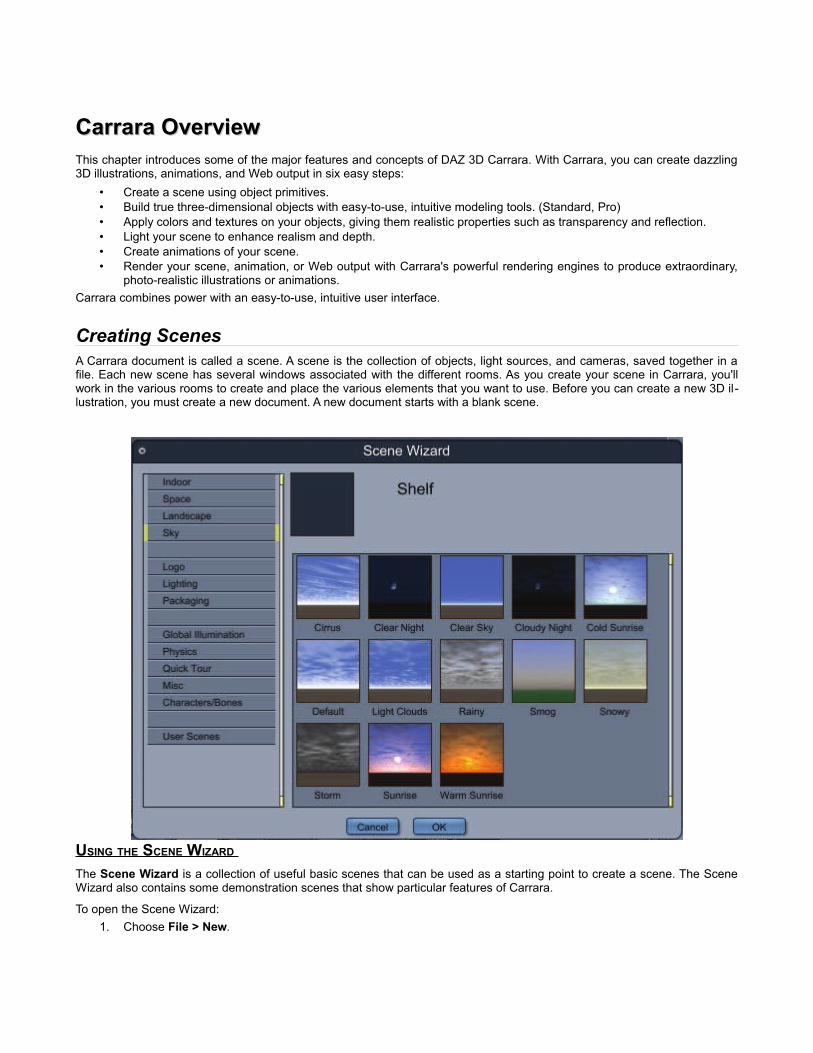
USING THE SCENE WIZARD The Scene Wizard is a collection of useful basic scenes that can be used as a starting point to create a scene. The Scene Wizard also contains some demonstration scenes that show particular features of Carrara.
To open the Scene Wizard: 1. Choose File > New.
Carrara 8 – Basic Users Guide
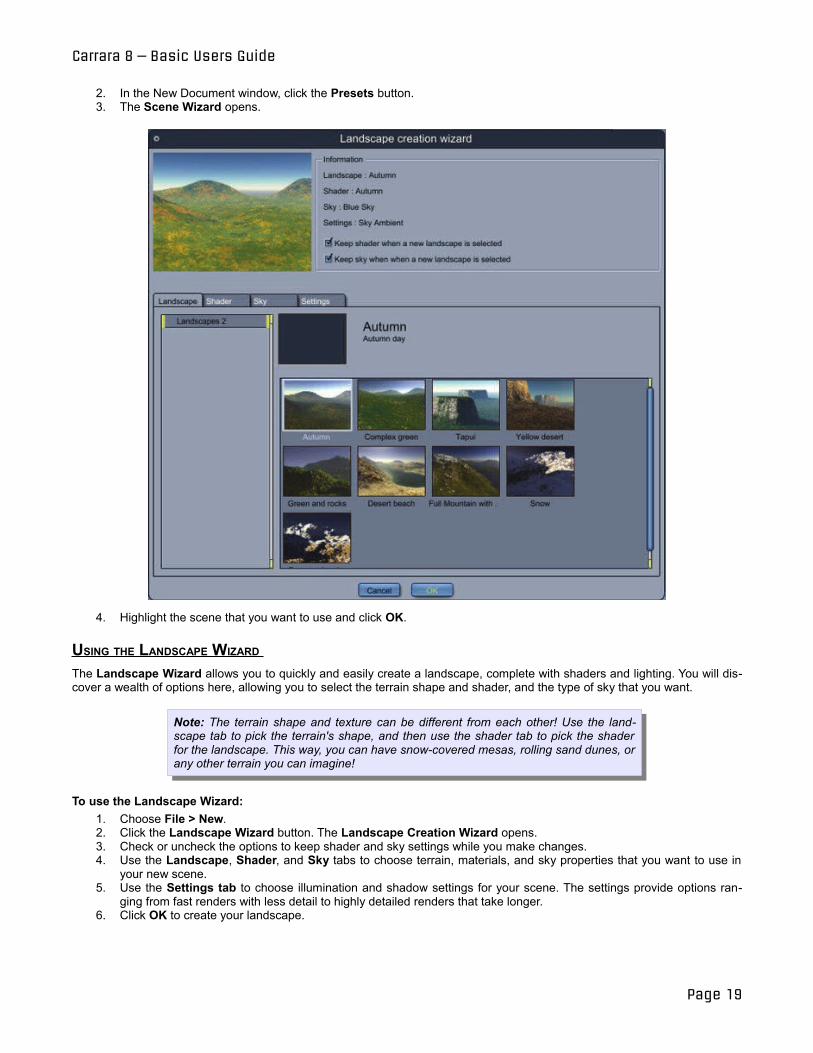
2. In the New Document window, click the Presets button. 3. The Scene Wizard opens.
4. Highlight the scene that you want to use and click OK.
USING THE LANDSCAPE WIZARD The Landscape Wizard allows you to quickly and easily create a landscape, complete with shaders and lighting. You will discover a wealth of options here, allowing you to select the terrain shape and shader, and the type of sky that you want.
Note: The terrain shape and texture can be different from each other! Use the landscape tab to pick the terrain's shape, and then use the shader tab to pick the shader for the landscape. This way, you can have snow-covered mesas, rolling sand dunes, or any other terrain you can imagine!
To use the Landscape Wizard: 1. Choose File > New. 2. Click the Landscape Wizard button. The Landscape Creation Wizard opens. 3. Check or uncheck the options to keep shader and sky settings while you make changes. 4. Use the Landscape, Shader, and Sky tabs to choose terrain, materials, and sky properties that you want to use in
your new scene. 5. Use the Settings tab to choose illumination and shadow settings for your scene. The settings provide options ran
ging from fast renders with less detail to highly detailed renders that take longer. 6. Click OK to create your landscape.
Page 19
Carrara 8 – Basic Users Guide
CREATING AN EMPTY SCENE When you create an empty scene in Carrara, the document window opens in the Assemble room, using your default work space setup. Your scene contains only one default light and a default camera.
To create an empty scene: 1. Choose File > New. The New Document dialog appears. 2. Select the size of the scene you want to create: Small (30 in), Medium (30 ft) or Large (3000 ft). 3. Select Empty Scene.
NOTE! The default measurement unit in Carrara is feet. If you want to work in inches, type “in” after you enter a numerical value of measurement.
OPENING AN EXISTING FILE You can open any file you created in Carrara, and can also open files saved in many other common 3D formats.
To open an existing file: 1. Choose File > Open. 2. The Open dialog will appear. 3. Locate the file and click Open.
Additional supported file types can be opened into the current scene file by choosing File > Open. To open other file types as a new document, refer to "Importing 3D Objects."
Carrara’s Rooms Carrara’s Rooms Carrara provides five different rooms for working on your scene. Each room in Carrara allows you to focus on designing a particular part of your scene. You don't need to use multiple software applications to create professional quality images or animations. Carrara allows you to seamlessly switch rooms as you work so that you have easy access to the tools you need while you create your scene.
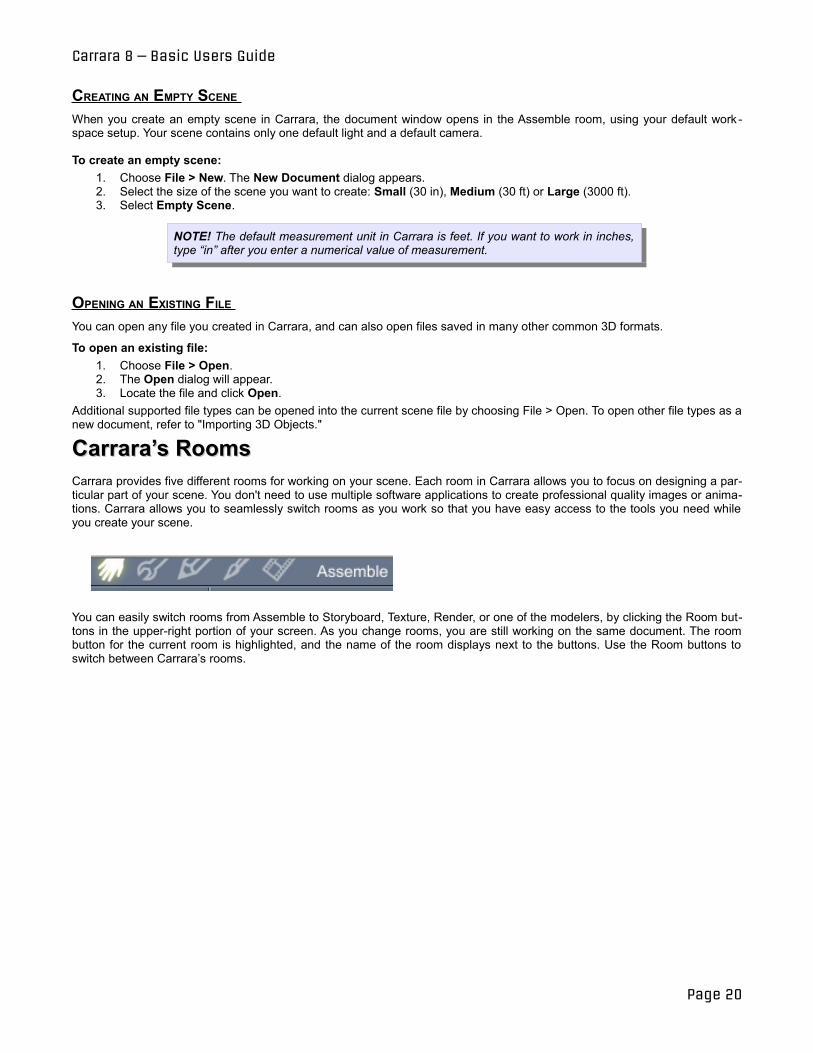
You can easily switch rooms from Assemble to Storyboard, Texture, Render, or one of the modelers, by clicking the Room buttons in the upper-right portion of your screen. As you change rooms, you are still working on the same document. The room button for the current room is highlighted, and the name of the room displays next to the buttons. Use the Room buttons to switch between Carrara’s rooms.
Page 20

Carrara 8 – Basic Users Guide
ASSEMBLE ROOM Carrara's main application workspace is designed to support your work flow. You can start by placing objects in your scene in a number of different ways:
Working in the Assemble Room:• Drag content from the Browser Tray into your scene. • Use the primitive modeling tools to add content to your scene • Create new, original models using Carrara’s different modelers (Standard, Pro)
At any time, you can position multiple light sources and cameras, and shift between cameras to gain different perspectives on your work.
Carrara supports multiple scene files, allowing you to easily cut and paste information between files.
For further information about the Assemble Room and its various controls, see "Assemble Room Overview."
A Quick TourTake a moment to look at the picture of Carrara's interface above.
Tools: The farthest left-hand strip to the right is the tools menu. These allow you to manipulate objects and the camera in your scene.
Top Menu: At the very top, starting with “File” is Carrara's top menu bar, used to access various menus and controls.
Primitive Tools: Below the top menu bar are the tools used to create primitives.
Properties Tray: The pair of right hand boxes is the properties tray. The top area of this box is the Object Manager, where you set the properties of the currently selected object. The bottom area of this box is the Scene Manager, where you select items
Page 21
Carrara 8 – Basic Users Guide
in your scene.
Object Browser/Sequencer Tray: The wide bottom-left box has two tabs that activate the sequencer tray (used for animation), and the object browser (used for selecting and dragging content into your scene).
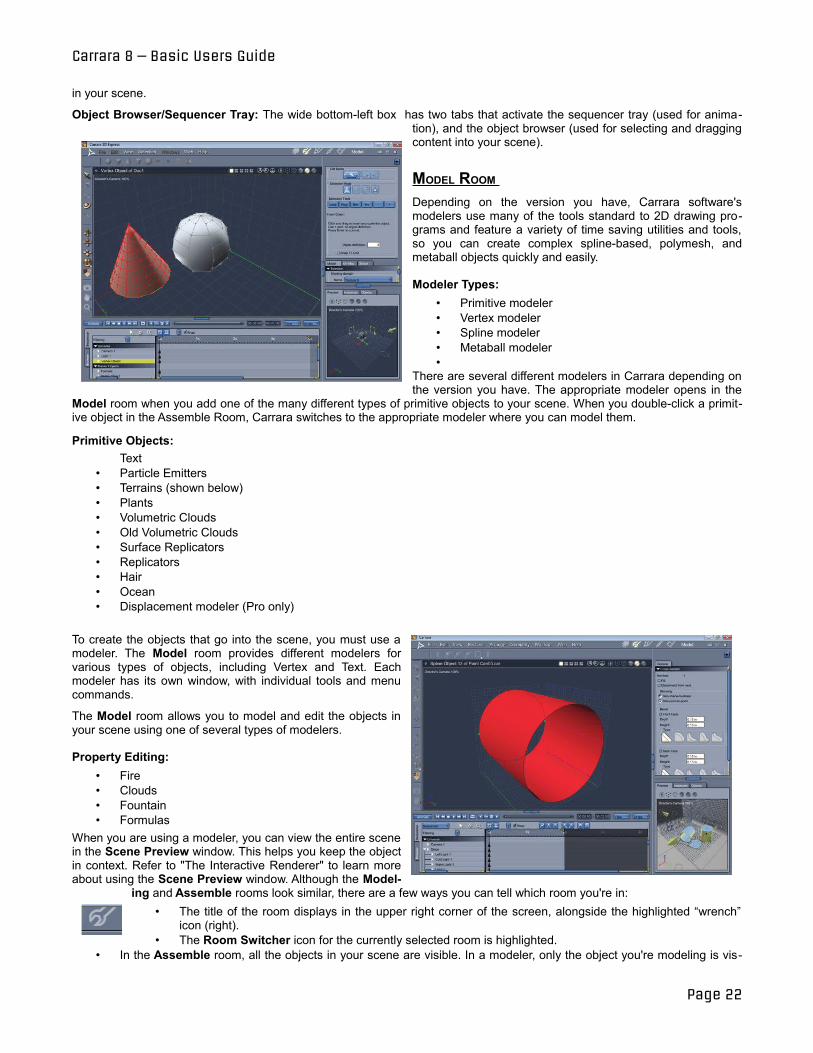
MODEL ROOM Depending on the version you have, Carrara software's modelers use many of the tools standard to 2D drawing programs and feature a variety of time saving utilities and tools, so you can create complex spline-based, polymesh, and metaball objects quickly and easily.
Modeler Types: • Primitive modeler • Vertex modeler • Spline modeler • Metaball modeler •
There are several different modelers in Carrara depending on the version you have. The appropriate modeler opens in the
Model room when you add one of the many different types of primitive objects to your scene. When you double-click a primitive object in the Assemble Room, Carrara switches to the appropriate modeler where you can model them.
Primitive Objects: Text
• Particle Emitters • Terrains (shown below) • Plants • Volumetric Clouds• Old Volumetric Clouds • Surface Replicators • Replicators • Hair • Ocean • Displacement modeler (Pro only)
To create the objects that go into the scene, you must use a modeler. The Model room provides different modelers for various types of objects, including Vertex and Text. Each modeler has its own window, with individual tools and menu commands.
The Model room allows you to model and edit the objects in your scene using one of several types of modelers.
Property Editing: • Fire • Clouds • Fountain • Formulas
When you are using a modeler, you can view the entire scene in the Scene Preview window. This helps you keep the object in context. Refer to "The Interactive Renderer" to learn more about using the Scene Preview window. Although the Model
ing and Assemble rooms look similar, there are a few ways you can tell which room you're in: • The title of the room displays in the upper right corner of the screen, alongside the highlighted “wrench”
icon (right).• The Room Switcher icon for the currently selected room is highlighted.
• In the Assemble room, all the objects in your scene are visible. In a modeler, only the object you're modeling is vis
Page 22
Carrara 8 – Basic Users Guide
ible. • Many of the tools in the Assemble room, such as the camera, lights, and environmental object tools, are not visible in
the modeling windows. To learn more about the modelers, refer to "Spline Modeling Overview," "Vertex Modeling Overview," and "Metaball Modeling."
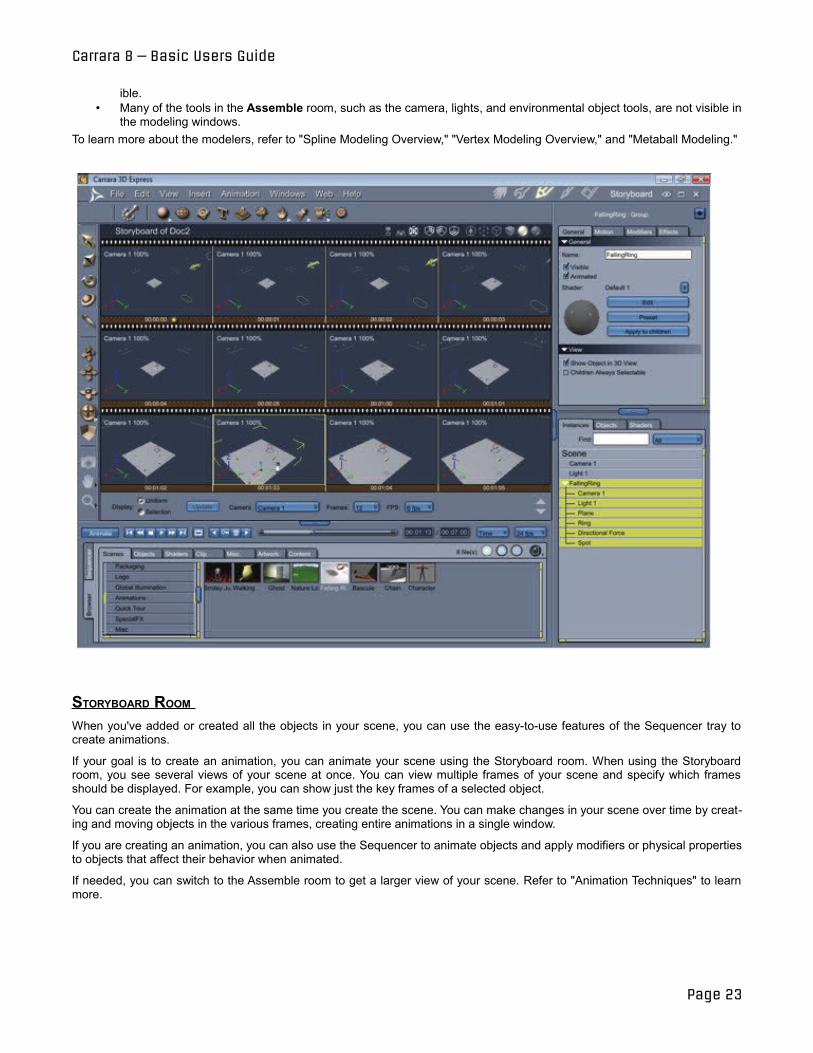
STORYBOARD ROOM When you've added or created all the objects in your scene, you can use the easy-to-use features of the Sequencer tray to create animations.
If your goal is to create an animation, you can animate your scene using the Storyboard room. When using the Storyboard room, you see several views of your scene at once. You can view multiple frames of your scene and specify which frames should be displayed. For example, you can show just the key frames of a selected object.
You can create the animation at the same time you create the scene. You can make changes in your scene over time by creating and moving objects in the various frames, creating entire animations in a single window.
If you are creating an animation, you can also use the Sequencer to animate objects and apply modifiers or physical properties to objects that affect their behavior when animated.
If needed, you can switch to the Assemble room to get a larger view of your scene. Refer to "Animation Techniques" to learn more.
Page 23

Carrara 8 – Basic Users Guide
TEXTURE ROOM After you add content, you can create or modify shaders to enhance the realism. Carrara features state-of the-art shading technology, which lets you apply colors and surface textures to your objects. You can apply shaders that emulate wood grain or marble, or customize effects like bump, transparency, and reflection.
The Texture room is where you create, edit, and apply shaders to all or part of an object. Use shaders to create almost any kind of surface you can imagine. Shaders define aspects of the surface of an object, such as the color, texture, reflectiveness, and transparency.
You can apply a Multi-Channel shader to an object or create a Layers List shader that combines several sub- shaders into one composite shader to create more complex effects. Each shader becomes a part of the scene and is referred to as a Master shader.
You can also see a preview of your scene while you are shading objects or creating a shader. To learn more about shaders, refer to "What are Shaders?."
Page 24
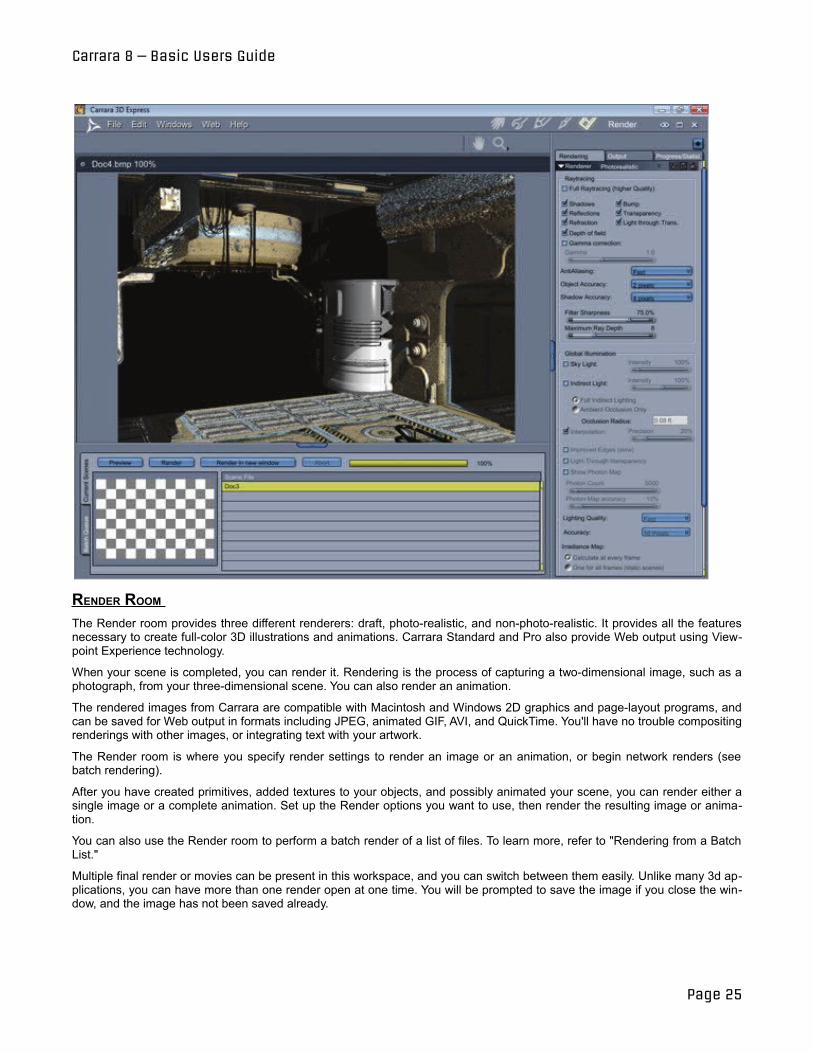
Carrara 8 – Basic Users Guide
RENDER ROOM The Render room provides three different renderers: draft, photo-realistic, and non-photo-realistic. It provides all the features necessary to create full-color 3D illustrations and animations. Carrara Standard and Pro also provide Web output using Viewpoint Experience technology.
When your scene is completed, you can render it. Rendering is the process of capturing a two-dimensional image, such as a photograph, from your three-dimensional scene. You can also render an animation.
The rendered images from Carrara are compatible with Macintosh and Windows 2D graphics and page-layout programs, and can be saved for Web output in formats including JPEG, animated GIF, AVI, and QuickTime. You'll have no trouble compositing renderings with other images, or integrating text with your artwork.
The Render room is where you specify render settings to render an image or an animation, or begin network renders (see batch rendering).
After you have created primitives, added textures to your objects, and possibly animated your scene, you can render either a single image or a complete animation. Set up the Render options you want to use, then render the resulting image or animation.
You can also use the Render room to perform a batch render of a list of files. To learn more, refer to "Rendering from a Batch List."
Multiple final render or movies can be present in this workspace, and you can switch between them easily. Unlike many 3d applications, you can have more than one render open at one time. You will be prompted to save the image if you close the window, and the image has not been saved already.
Page 25
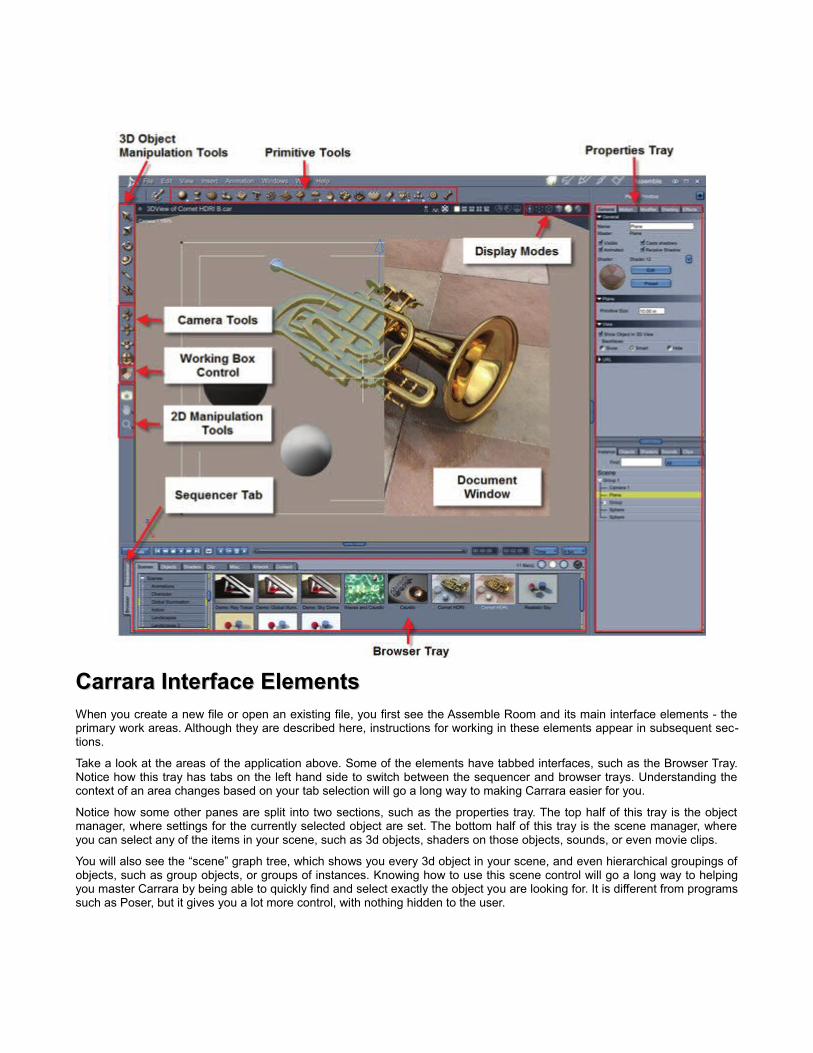
Carrara Interface Elements Carrara Interface Elements When you create a new file or open an existing file, you first see the Assemble Room and its main interface elements - the primary work areas. Although they are described here, instructions for working in these elements appear in subsequent sections.
Take a look at the areas of the application above. Some of the elements have tabbed interfaces, such as the Browser Tray. Notice how this tray has tabs on the left hand side to switch between the sequencer and browser trays. Understanding the context of an area changes based on your tab selection will go a long way to making Carrara easier for you.
Notice how some other panes are split into two sections, such as the properties tray. The top half of this tray is the object manager, where settings for the currently selected object are set. The bottom half of this tray is the scene manager, where you can select any of the items in your scene, such as 3d objects, shaders on those objects, sounds, or even movie clips.
You will also see the “scene” graph tree, which shows you every 3d object in your scene, and even hierarchical groupings of objects, such as group objects, or groups of instances. Knowing how to use this scene control will go a long way to helping you master Carrara by being able to quickly find and select exactly the object you are looking for. It is different from programs such as Poser, but it gives you a lot more control, with nothing hidden to the user.
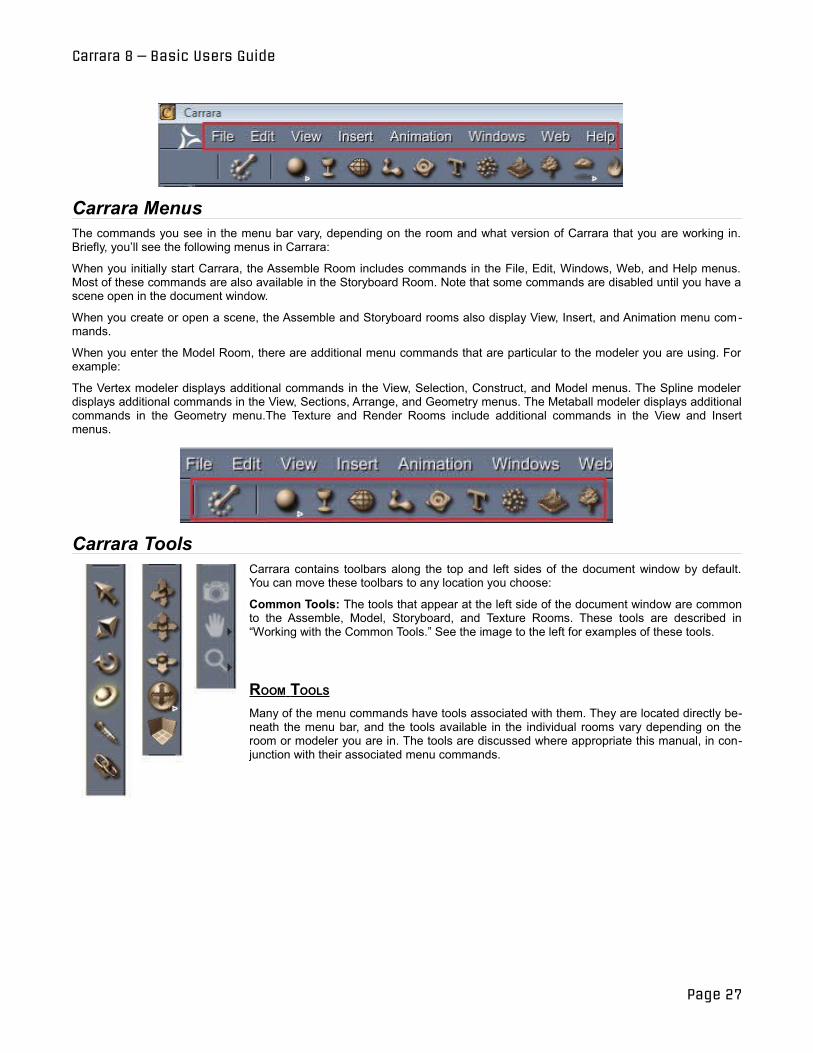
Carrara 8 – Basic Users Guide
Carrara Menus The commands you see in the menu bar vary, depending on the room and what version of Carrara that you are working in. Briefly, you’ll see the following menus in Carrara:
When you initially start Carrara, the Assemble Room includes commands in the File, Edit, Windows, Web, and Help menus. Most of these commands are also available in the Storyboard Room. Note that some commands are disabled until you have a scene open in the document window.
When you create or open a scene, the Assemble and Storyboard rooms also display View, Insert, and Animation menu commands.
When you enter the Model Room, there are additional menu commands that are particular to the modeler you are using. For example:
The Vertex modeler displays additional commands in the View, Selection, Construct, and Model menus. The Spline modeler displays additional commands in the View, Sections, Arrange, and Geometry menus. The Metaball modeler displays additional commands in the Geometry menu.The Texture and Render Rooms include additional commands in the View and Insert menus.
Carrara Tools Carrara contains toolbars along the top and left sides of the document window by default. You can move these toolbars to any location you choose:
Common Tools: The tools that appear at the left side of the document window are common to the Assemble, Model, Storyboard, and Texture Rooms. These tools are described in “Working with the Common Tools.” See the image to the left for examples of these tools.
ROOM TOOLS Many of the menu commands have tools associated with them. They are located directly beneath the menu bar, and the tools available in the individual rooms vary depending on the room or modeler you are in. The tools are discussed where appropriate this manual, in conjunction with their associated menu commands.
Page 27

Carrara 8 – Basic Users Guide
Document Window The document window shows a view of the 3D workspace. The 3D workspace itself is also called the Universe. In the Assemble room, the document window shows where objects, lights, and cameras are arranged to create a scene.
Down the left side you will find the 3D Object Manipulation Tools, Camera Tools, Working Box Control, and 2D Manipulation Tools. This area is reserved for manipulation controls for objects, the camera, or the working box.
Along the top, you will find the Main Menu, Primitive Creation Tools, and the Room Selection buttons. It you want to create objects, use commands, or change rooms, you should be focusing along the top of the application.
Inside the document window, you will find the 3d viewport, and also the display mode buttons along the top right border of the window. Here you can set the view to texture mode, wireframe, or any other standard mode. You can also find view controls that split the viewport here. These buttons are difficult to find when you are just starting out, but they are invaluable when you want to speed up your display, or get another perspective on your work.
The browser tray and sequencer are located along the bottom, and this lets you toggle between your animation timeline and your installed content. You often don't need to see both at once, so this is a tabbed interface. Finally, the properties tray is the pane on the right. If you need to select objects, explore your scene hierarchy, or set any object's settings, navigate here.
Page 28
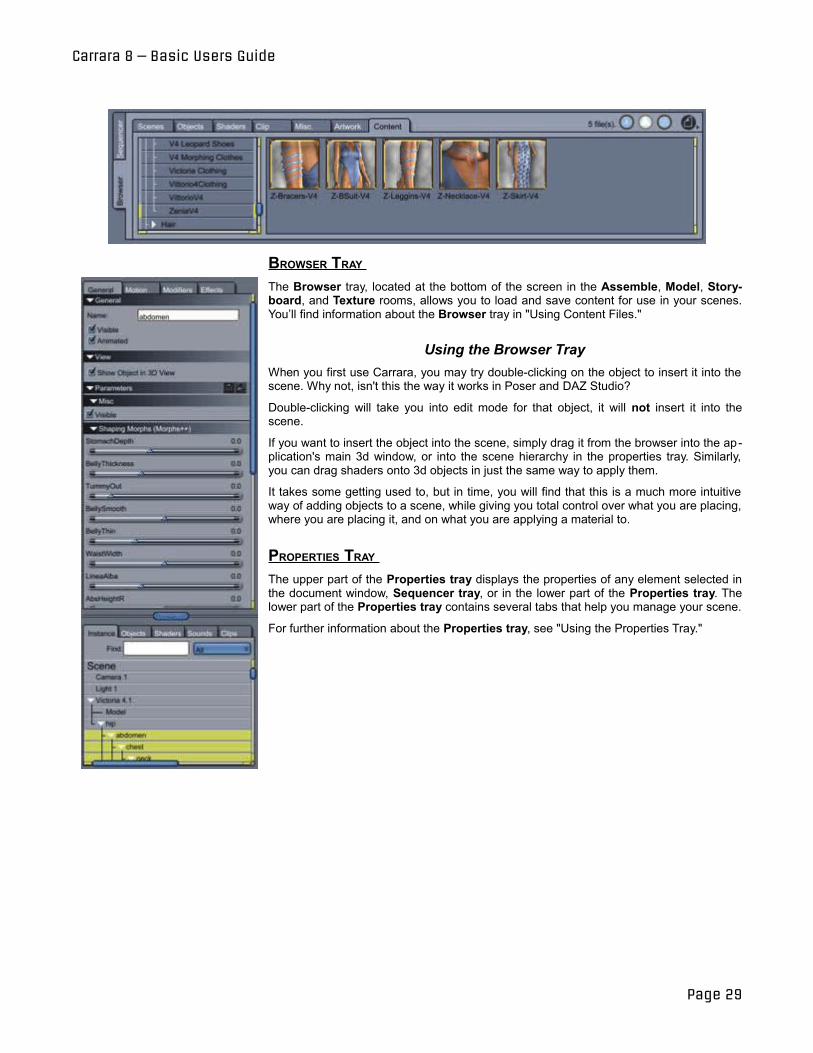
Carrara 8 – Basic Users Guide
BROWSER TRAY The Browser tray, located at the bottom of the screen in the Assemble, Model, Storyboard, and Texture rooms, allows you to load and save content for use in your scenes. You’ll find information about the Browser tray in "Using Content Files."
Using the Browser TrayWhen you first use Carrara, you may try double-clicking on the object to insert it into the scene. Why not, isn't this the way it works in Poser and DAZ Studio?
Double-clicking will take you into edit mode for that object, it will not insert it into the scene.
If you want to insert the object into the scene, simply drag it from the browser into the application's main 3d window, or into the scene hierarchy in the properties tray. Similarly, you can drag shaders onto 3d objects in just the same way to apply them.
It takes some getting used to, but in time, you will find that this is a much more intuitive way of adding objects to a scene, while giving you total control over what you are placing, where you are placing it, and on what you are applying a material to.
PROPERTIES TRAY The upper part of the Properties tray displays the properties of any element selected in the document window, Sequencer tray, or in the lower part of the Properties tray. The lower part of the Properties tray contains several tabs that help you manage your scene.
For further information about the Properties tray, see "Using the Properties Tray."
Page 29
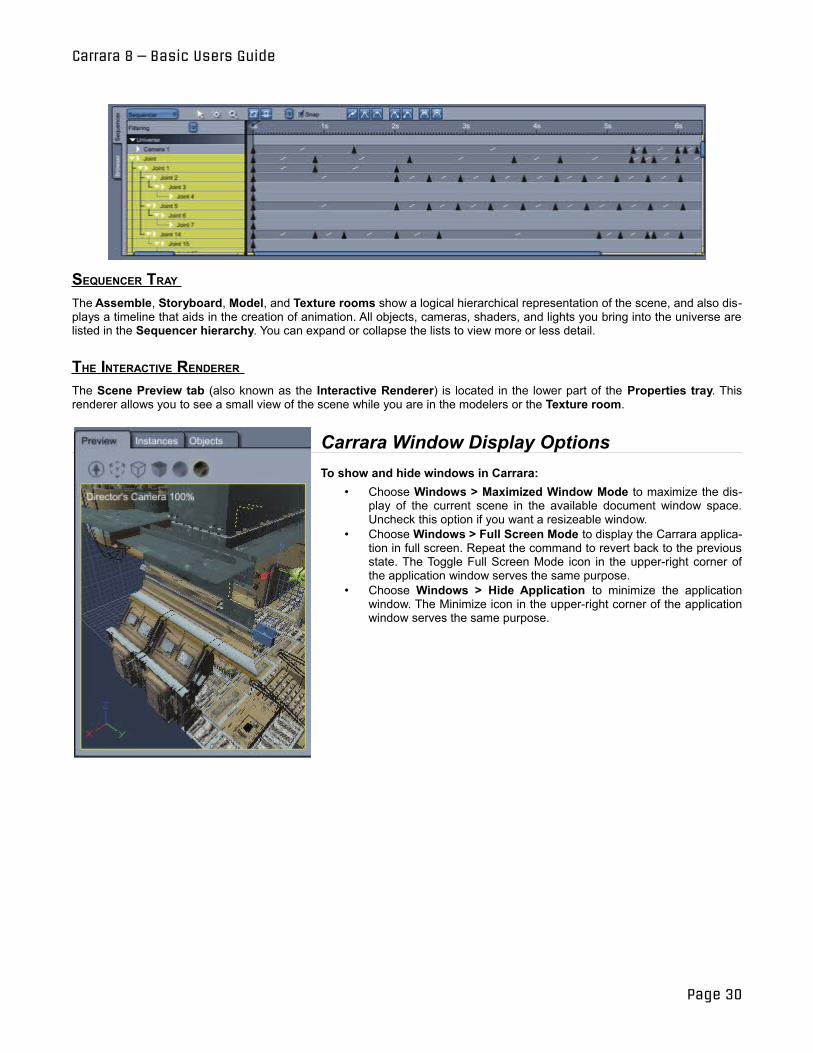
Carrara 8 – Basic Users Guide
SEQUENCER TRAY The Assemble, Storyboard, Model, and Texture rooms show a logical hierarchical representation of the scene, and also displays a timeline that aids in the creation of animation. All objects, cameras, shaders, and lights you bring into the universe are listed in the Sequencer hierarchy. You can expand or collapse the lists to view more or less detail.
THE INTERACTIVE RENDERER The Scene Preview tab (also known as the Interactive Renderer) is located in the lower part of the Properties tray. This renderer allows you to see a small view of the scene while you are in the modelers or the Texture room.
Carrara Window Display OptionsTo show and hide windows in Carrara:
• Choose Windows > Maximized Window Mode to maximize the display of the current scene in the available document window space. Uncheck this option if you want a resizeable window.
• Choose Windows > Full Screen Mode to display the Carrara application in full screen. Repeat the command to revert back to the previous state. The Toggle Full Screen Mode icon in the upper-right corner of the application window serves the same purpose.
• Choose Windows > Hide Application to minimize the application window. The Minimize icon in the upper-right corner of the application window serves the same purpose.
Page 30

Carrara 8 – Basic Users Guide
Setting Up Carrara Setting Up Carrara You can specify several settings that affect the way Carrara works. For example, you can set up application preferences, change the 3D preview settings, or modify your workspace. Carrara software's Preferences let you customize many of the application's default settings. This section describes only the preferences that affect the entire application.
Setting Application Preferences To set application launch preferences:
1. Choose File > Preferences. 2. Choose Application from the pop-up menu. 3. Check or uncheck the options that you want to apply
when Carrara starts: • New Document on Launch: Check this option
to automatically create a new document when you start Carrara.
• Skip New Document Dialog: Check this option to prevent the New Document dialog from appearing when Carrara starts.
• Check DAZ 3D News: When checked, displays news from DAZ 3D when you launch Carrara.
• Don’t Show the Same News Twice: When checked, does not display news that was previously displayed when launching Carrara.
• Check for Updates: Check this option to search for Carrara updates and receive notification when updates are available.
• Don’t Show the Same Update Twice: Check this option to prevent repeated notification of the same update. • Skip Tips at Startup: Check this option to prevent the Tips window from opening when you start up Carrara. • Maximum Undo Levels: Enter the number of undo levels that you want to store.
Page 31

Carrara 8 – Basic Users Guide
Setting General Preferences To set general application preferences:
1. Choose File > Preferences. 2. Choose General from the pop-up menu. 3. Check or uncheck the options that you want
to apply: • Show Clock: When checked, displays the
current time in the main toolbar area. • Show ToolTips: When checked, displays a
brief description of the current tool when you hover the mouse over it.
• Toolbar Hot Keys are Sticky: When checked, a tool remains selected after you release the shortcut keys that activate the tool.
• Full Screen Mode: Displays Carrara in full screen mode.
• Graphics Tablets Compatibility Mode: Check this option if you are using Carrara with a graphics tablet.
• Language: Select the language (English or French) that will be used in the Carrara application.
• Multiple Monitor Settings: If you are using multiple monitors, click the monitor icons to select or deselect the monitors that you want to use with Carrara. Monitors that are used are colored gray.
• Split Big Screens in Two: Some combinations of Windows and video cards do not allow you to use dual monitor setups that behave like a single big monitor. If you check this option, you can still use Carrara in dual monitor mode.
Setting UI Effects Preferences To set user interface effects:
1. Choose File > Preferences. 2. Choose UI Effects from the pop-up menu. 3. Check or uncheck the options that you want to apply: • UI Animations: When checked, displays animated
UI windows where applicable. • Desktop Pattern and Gradient: Toggles the display
of patterns or gradients that are applied to the desktop.
• Dim Desktop for Dialogs: Check this option to dim the user interface in the background while dialogs are opened.
Page 32
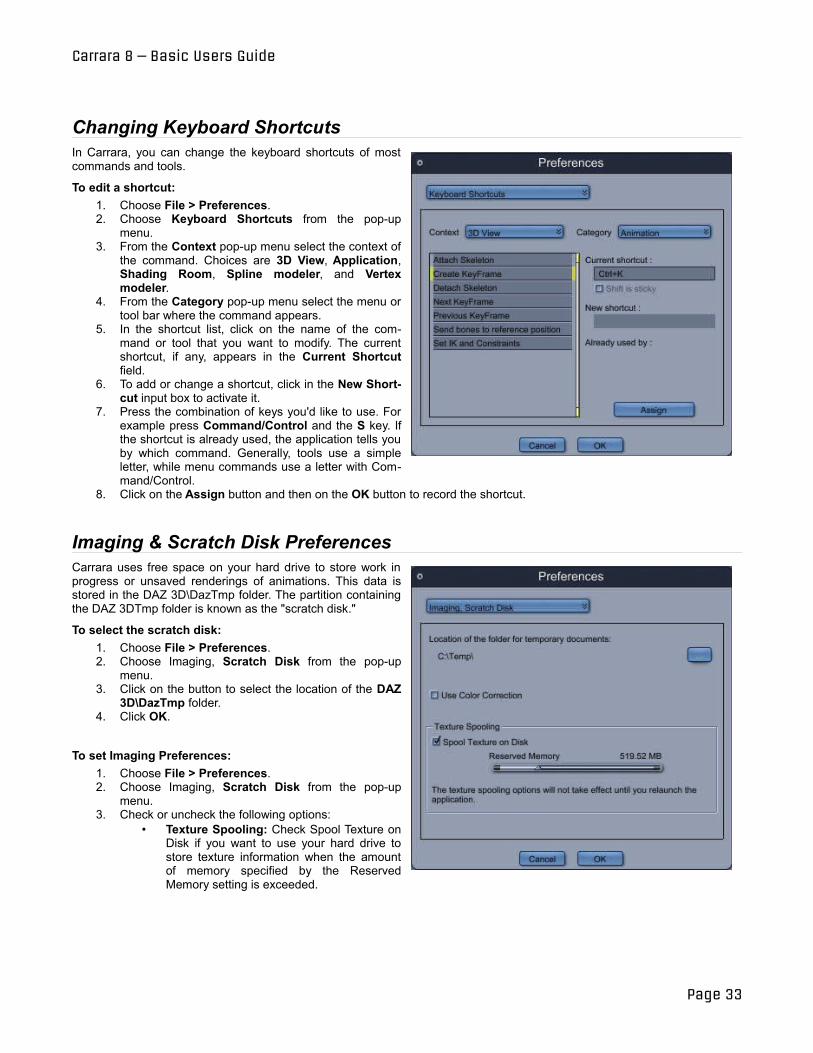
Carrara 8 – Basic Users Guide
Changing Keyboard Shortcuts In Carrara, you can change the keyboard shortcuts of most commands and tools.
To edit a shortcut: 1. Choose File > Preferences. 2. Choose Keyboard Shortcuts from the pop-up
menu. 3. From the Context pop-up menu select the context of
the command. Choices are 3D View, Application, Shading Room, Spline modeler, and Vertex modeler.
4. From the Category pop-up menu select the menu or tool bar where the command appears.
5. In the shortcut list, click on the name of the command or tool that you want to modify. The current shortcut, if any, appears in the Current Shortcut field.
6. To add or change a shortcut, click in the New Shortcut input box to activate it.
7. Press the combination of keys you'd like to use. For example press Command/Control and the S key. If the shortcut is already used, the application tells you by which command. Generally, tools use a simple letter, while menu commands use a letter with Command/Control.
8. Click on the Assign button and then on the OK button to record the shortcut.
Imaging & Scratch Disk Preferences Carrara uses free space on your hard drive to store work in progress or unsaved renderings of animations. This data is stored in the DAZ 3D\DazTmp folder. The partition containing the DAZ 3DTmp folder is known as the "scratch disk."
To select the scratch disk: 1. Choose File > Preferences. 2. Choose Imaging, Scratch Disk from the pop-up
menu. 3. Click on the button to select the location of the DAZ
3D\DazTmp folder. 4. Click OK.
To set Imaging Preferences: 1. Choose File > Preferences. 2. Choose Imaging, Scratch Disk from the pop-up
menu. 3. Check or uncheck the following options:
• Texture Spooling: Check Spool Texture on Disk if you want to use your hard drive to store texture information when the amount of memory specified by the Reserved Memory setting is exceeded.
Page 33
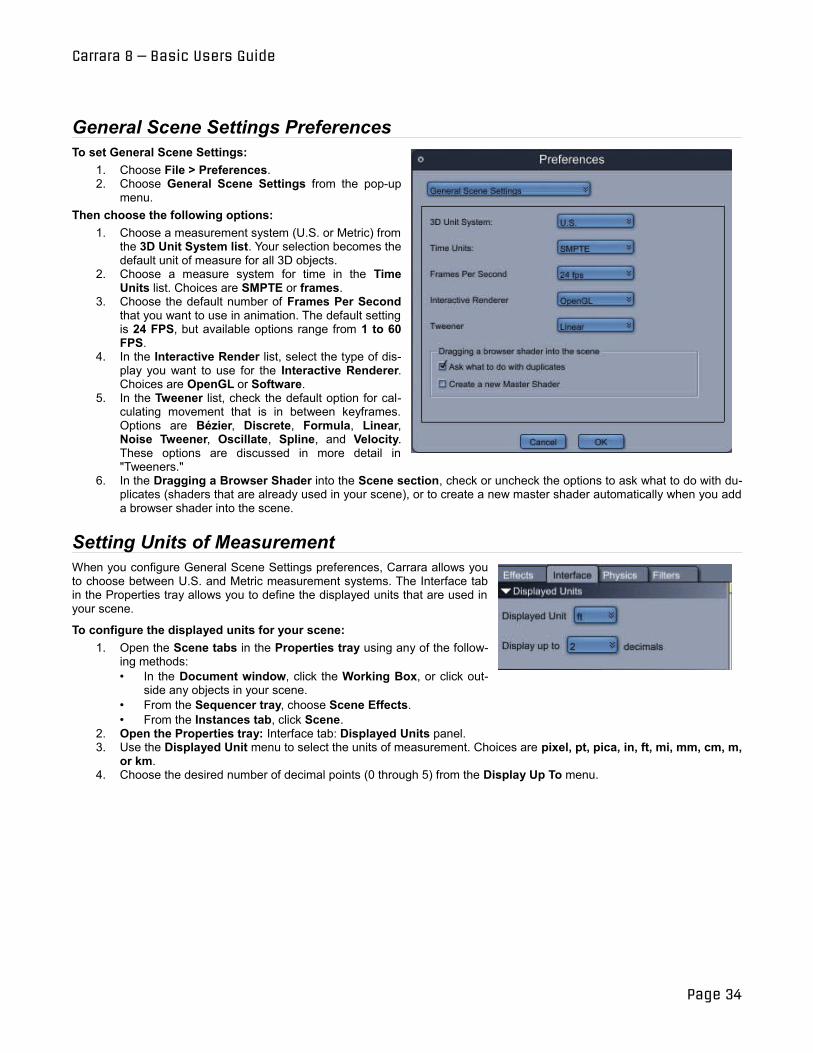
Carrara 8 – Basic Users Guide
General Scene Settings Preferences To set General Scene Settings:
1. Choose File > Preferences. 2. Choose General Scene Settings from the pop-up
menu. Then choose the following options:
1. Choose a measurement system (U.S. or Metric) from the 3D Unit System list. Your selection becomes the default unit of measure for all 3D objects.
2. Choose a measure system for time in the Time Units list. Choices are SMPTE or frames.
3. Choose the default number of Frames Per Second that you want to use in animation. The default setting is 24 FPS, but available options range from 1 to 60 FPS.
4. In the Interactive Render list, select the type of display you want to use for the Interactive Renderer. Choices are OpenGL or Software.
5. In the Tweener list, check the default option for calculating movement that is in between keyframes. Options are Bézier, Discrete, Formula, Linear, Noise Tweener, Oscillate, Spline, and Velocity. These options are discussed in more detail in "Tweeners."
6. In the Dragging a Browser Shader into the Scene section, check or uncheck the options to ask what to do with duplicates (shaders that are already used in your scene), or to create a new master shader automatically when you add a browser shader into the scene.
Setting Units of MeasurementWhen you configure General Scene Settings preferences, Carrara allows you to choose between U.S. and Metric measurement systems. The Interface tab in the Properties tray allows you to define the displayed units that are used in your scene.
To configure the displayed units for your scene: 1. Open the Scene tabs in the Properties tray using any of the follow
ing methods: • In the Document window, click the Working Box, or click out
side any objects in your scene. • From the Sequencer tray, choose Scene Effects. • From the Instances tab, click Scene.
2. Open the Properties tray: Interface tab: Displayed Units panel. 3. Use the Displayed Unit menu to select the units of measurement. Choices are pixel, pt, pica, in, ft, mi, mm, cm, m,
or km. 4. Choose the desired number of decimal points (0 through 5) from the Display Up To menu.
Page 34
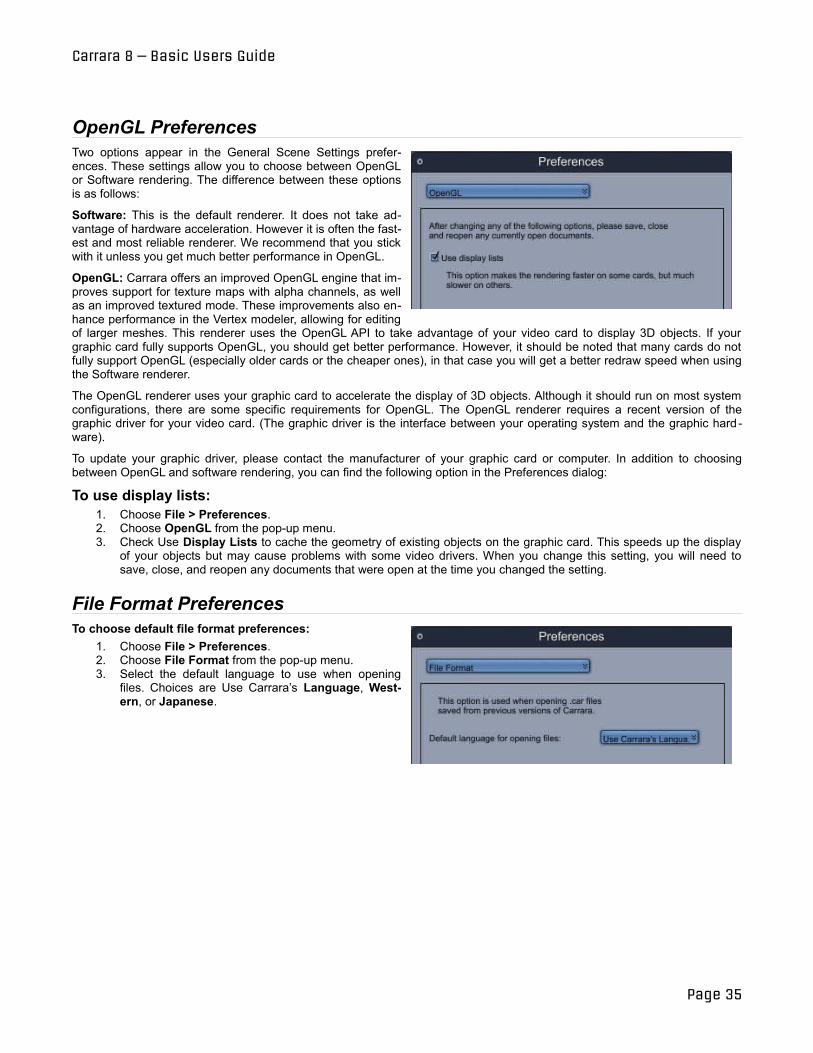
Carrara 8 – Basic Users Guide
OpenGL Preferences Two options appear in the General Scene Settings preferences. These settings allow you to choose between OpenGL or Software rendering. The difference between these options is as follows:
Software: This is the default renderer. It does not take advantage of hardware acceleration. However it is often the fastest and most reliable renderer. We recommend that you stick with it unless you get much better performance in OpenGL.
OpenGL: Carrara offers an improved OpenGL engine that improves support for texture maps with alpha channels, as well as an improved textured mode. These improvements also enhance performance in the Vertex modeler, allowing for editing of larger meshes. This renderer uses the OpenGL API to take advantage of your video card to display 3D objects. If your graphic card fully supports OpenGL, you should get better performance. However, it should be noted that many cards do not fully support OpenGL (especially older cards or the cheaper ones), in that case you will get a better redraw speed when using the Software renderer.
The OpenGL renderer uses your graphic card to accelerate the display of 3D objects. Although it should run on most system configurations, there are some specific requirements for OpenGL. The OpenGL renderer requires a recent version of the graphic driver for your video card. (The graphic driver is the interface between your operating system and the graphic hard ware).
To update your graphic driver, please contact the manufacturer of your graphic card or computer. In addition to choosing between OpenGL and software rendering, you can find the following option in the Preferences dialog:
To use display lists: 1. Choose File > Preferences. 2. Choose OpenGL from the pop-up menu. 3. Check Use Display Lists to cache the geometry of existing objects on the graphic card. This speeds up the display
of your objects but may cause problems with some video drivers. When you change this setting, you will need to save, close, and reopen any documents that were open at the time you changed the setting.
File Format Preferences To choose default file format preferences:
1. Choose File > Preferences. 2. Choose File Format from the pop-up menu. 3. Select the default language to use when opening
files. Choices are Use Carrara’s Language, Western, or Japanese.
Page 35
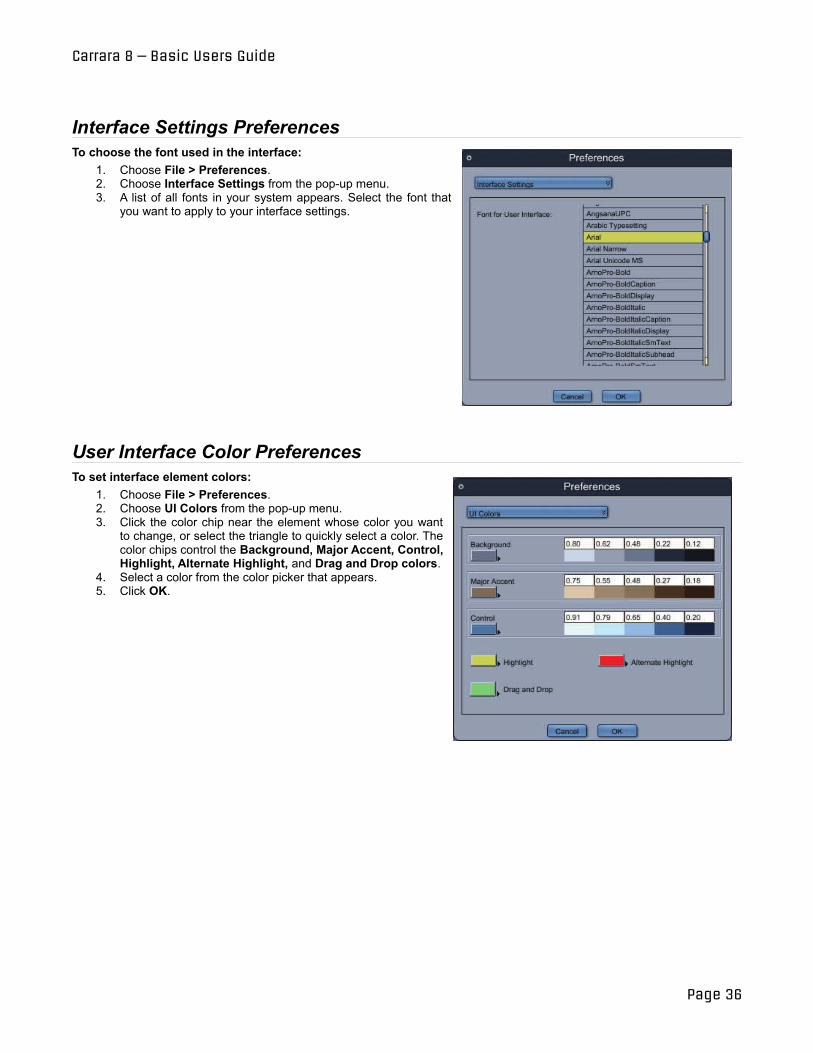
Carrara 8 – Basic Users Guide
Interface Settings Preferences To choose the font used in the interface:
1. Choose File > Preferences. 2. Choose Interface Settings from the pop-up menu. 3. A list of all fonts in your system appears. Select the font that
you want to apply to your interface settings.
User Interface Color Preferences To set interface element colors:
1. Choose File > Preferences. 2. Choose UI Colors from the pop-up menu. 3. Click the color chip near the element whose color you want
to change, or select the triangle to quickly select a color. The color chips control the Background, Major Accent, Control, Highlight, Alternate Highlight, and Drag and Drop colors.
4. Select a color from the color picker that appears. 5. Click OK.
Page 36
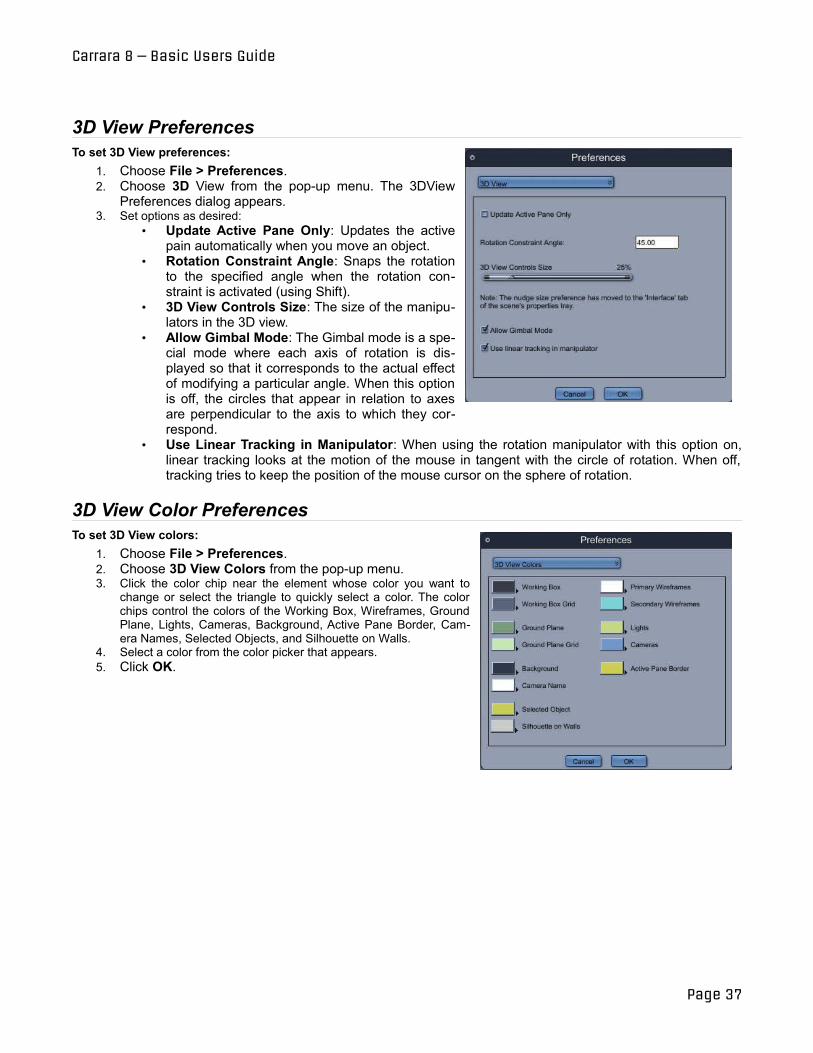
Carrara 8 – Basic Users Guide
3D View Preferences To set 3D View preferences:
1. Choose File > Preferences. 2. Choose 3D View from the pop-up menu. The 3DView
Preferences dialog appears. 3. Set options as desired:
• Update Active Pane Only: Updates the active pain automatically when you move an object.
• Rotation Constraint Angle: Snaps the rotation to the specified angle when the rotation constraint is activated (using Shift).
• 3D View Controls Size: The size of the manipulators in the 3D view.
• Allow Gimbal Mode: The Gimbal mode is a special mode where each axis of rotation is displayed so that it corresponds to the actual effect of modifying a particular angle. When this option is off, the circles that appear in relation to axes are perpendicular to the axis to which they correspond.
• Use Linear Tracking in Manipulator: When using the rotation manipulator with this option on, linear tracking looks at the motion of the mouse in tangent with the circle of rotation. When off, tracking tries to keep the position of the mouse cursor on the sphere of rotation.
3D View Color Preferences To set 3D View colors:
1. Choose File > Preferences. 2. Choose 3D View Colors from the pop-up menu. 3. Click the color chip near the element whose color you want to
change or select the triangle to quickly select a color. The color chips control the colors of the Working Box, Wireframes, Ground Plane, Lights, Cameras, Background, Active Pane Border, Camera Names, Selected Objects, and Silhouette on Walls.
4. Select a color from the color picker that appears. 5. Click OK.
Page 37
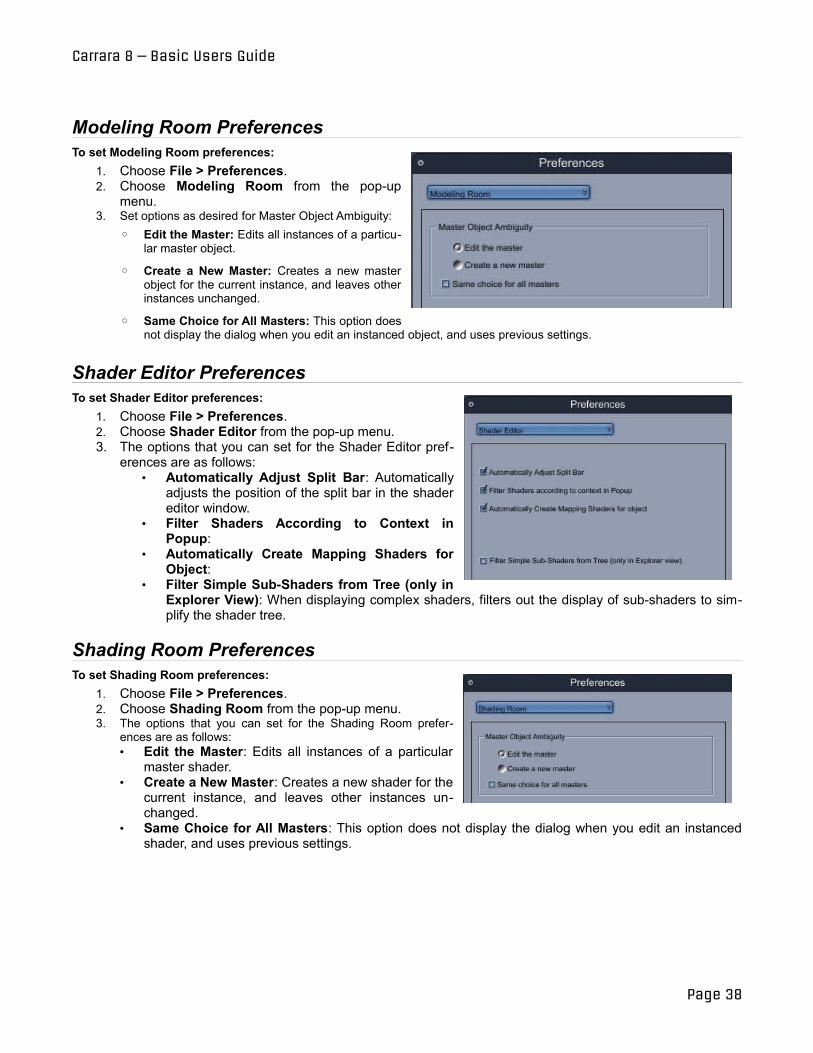
Carrara 8 – Basic Users Guide
Modeling Room Preferences To set Modeling Room preferences:
1. Choose File > Preferences. 2. Choose Modeling Room from the pop-up
menu. 3. Set options as desired for Master Object Ambiguity:
◦ Edit the Master: Edits all instances of a particular master object.
◦ Create a New Master: Creates a new master object for the current instance, and leaves other instances unchanged.
◦ Same Choice for All Masters: This option does not display the dialog when you edit an instanced object, and uses previous settings.
Shader Editor Preferences To set Shader Editor preferences:
1. Choose File > Preferences. 2. Choose Shader Editor from the pop-up menu. 3. The options that you can set for the Shader Editor pref
erences are as follows: • Automatically Adjust Split Bar: Automatically
adjusts the position of the split bar in the shader editor window.
• Filter Shaders According to Context in Popup:
• Automatically Create Mapping Shaders for Object:
• Filter Simple Sub-Shaders from Tree (only in Explorer View): When displaying complex shaders, filters out the display of sub-shaders to simplify the shader tree.
Shading Room Preferences To set Shading Room preferences:
1. Choose File > Preferences. 2. Choose Shading Room from the pop-up menu. 3. The options that you can set for the Shading Room prefer
ences are as follows: • Edit the Master: Edits all instances of a particular
master shader. • Create a New Master: Creates a new shader for the
current instance, and leaves other instances unchanged.
• Same Choice for All Masters: This option does not display the dialog when you edit an instanced shader, and uses previous settings.
Page 38
Carrara 8 – Basic Users Guide
Resetting Application Preferences You can reset the preferences of the application to their default values by using the File > Reset Preferences command. This will exit the application and the default preferences will be used the next time it is launched.
Page 39
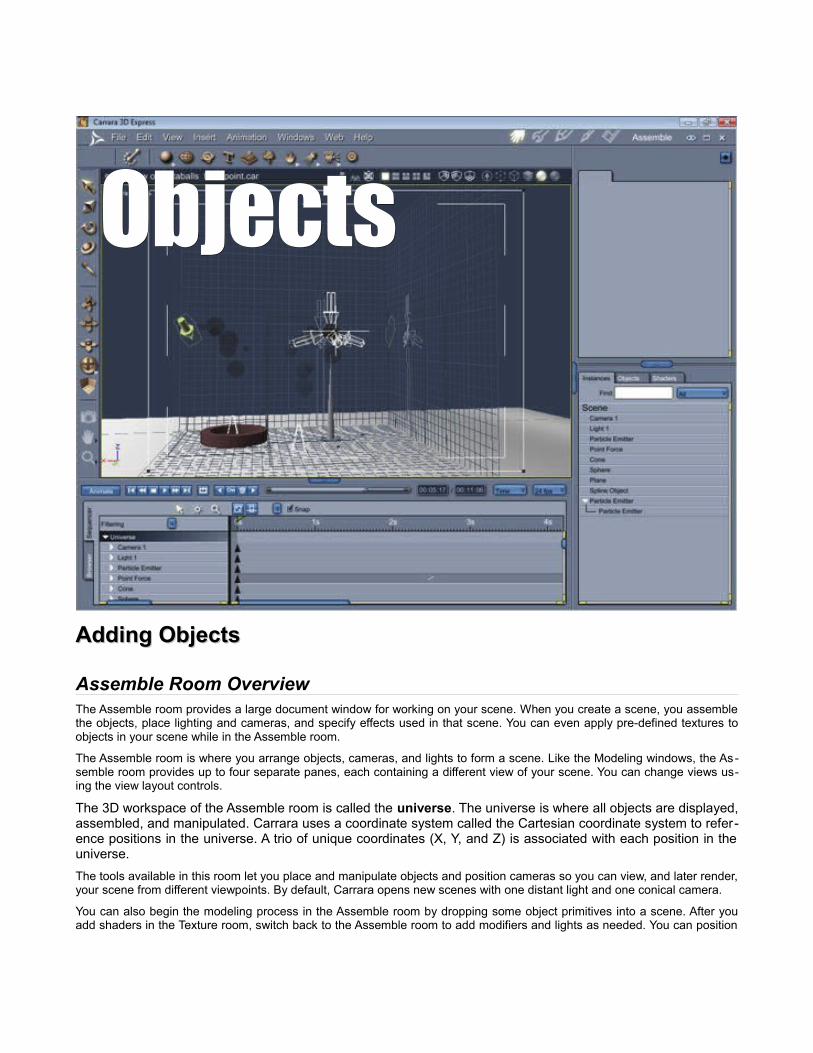
Adding Objects Adding Objects
Assemble Room Overview The Assemble room provides a large document window for working on your scene. When you create a scene, you assemble the objects, place lighting and cameras, and specify effects used in that scene. You can even apply pre-defined textures to objects in your scene while in the Assemble room.
The Assemble room is where you arrange objects, cameras, and lights to form a scene. Like the Modeling windows, the As semble room provides up to four separate panes, each containing a different view of your scene. You can change views using the view layout controls.
The 3D workspace of the Assemble room is called the universe. The universe is where all objects are displayed, assembled, and manipulated. Carrara uses a coordinate system called the Cartesian coordinate system to reference positions in the universe. A trio of unique coordinates (X, Y, and Z) is associated with each position in the universe. The tools available in this room let you place and manipulate objects and position cameras so you can view, and later render, your scene from different viewpoints. By default, Carrara opens new scenes with one distant light and one conical camera.
You can also begin the modeling process in the Assemble room by dropping some object primitives into a scene. After you add shaders in the Texture room, switch back to the Assemble room to add modifiers and lights as needed. You can position
ObjectsObjects
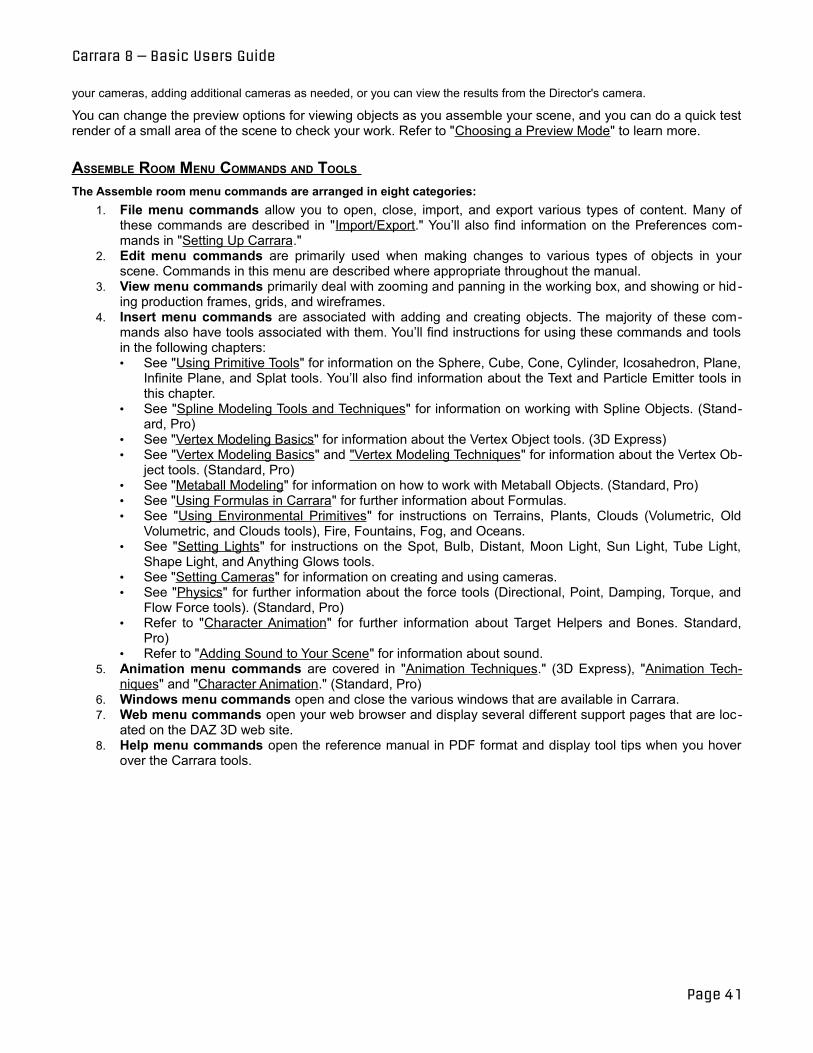
Carrara 8 – Basic Users Guide
your cameras, adding additional cameras as needed, or you can view the results from the Director's camera.
You can change the preview options for viewing objects as you assemble your scene, and you can do a quick test render of a small area of the scene to check your work. Refer to "Choosing a Preview Mode" to learn more.
ASSEMBLE ROOM MENU COMMANDS AND TOOLS The Assemble room menu commands are arranged in eight categories:
1. File menu commands allow you to open, close, import, and export various types of content. Many of these commands are described in "Import/Export." You’ll also find information on the Preferences commands in "Setting Up Carrara."
2. Edit menu commands are primarily used when making changes to various types of objects in your scene. Commands in this menu are described where appropriate throughout the manual.
3. View menu commands primarily deal with zooming and panning in the working box, and showing or hid ing production frames, grids, and wireframes.
4. Insert menu commands are associated with adding and creating objects. The majority of these commands also have tools associated with them. You’ll find instructions for using these commands and tools in the following chapters: • See "Using Primitive Tools" for information on the Sphere, Cube, Cone, Cylinder, Icosahedron, Plane,
Infinite Plane, and Splat tools. You’ll also find information about the Text and Particle Emitter tools in this chapter.
• See "Spline Modeling Tools and Techniques" for information on working with Spline Objects. (Standard, Pro)
• See "Vertex Modeling Basics" for information about the Vertex Object tools. (3D Express) • See "Vertex Modeling Basics" and "Vertex Modeling Techniques" for information about the Vertex Ob
ject tools. (Standard, Pro) • See "Metaball Modeling" for information on how to work with Metaball Objects. (Standard, Pro) • See "Using Formulas in Carrara" for further information about Formulas. • See "Using Environmental Primitives" for instructions on Terrains, Plants, Clouds (Volumetric, Old
Volumetric, and Clouds tools), Fire, Fountains, Fog, and Oceans. • See "Setting Lights" for instructions on the Spot, Bulb, Distant, Moon Light, Sun Light, Tube Light,
Shape Light, and Anything Glows tools. • See "Setting Cameras" for information on creating and using cameras. • See "Physics" for further information about the force tools (Directional, Point, Damping, Torque, and
Flow Force tools). (Standard, Pro) • Refer to "Character Animation" for further information about Target Helpers and Bones. Standard,
Pro) • Refer to "Adding Sound to Your Scene" for information about sound.
5. Animation menu commands are covered in "Animation Techniques." (3D Express), "Animation Techniques" and "Character Animation." (Standard, Pro)
6. Windows menu commands open and close the various windows that are available in Carrara. 7. Web menu commands open your web browser and display several different support pages that are loc
ated on the DAZ 3D web site. 8. Help menu commands open the reference manual in PDF format and display tool tips when you hover
over the Carrara tools.
Page 41
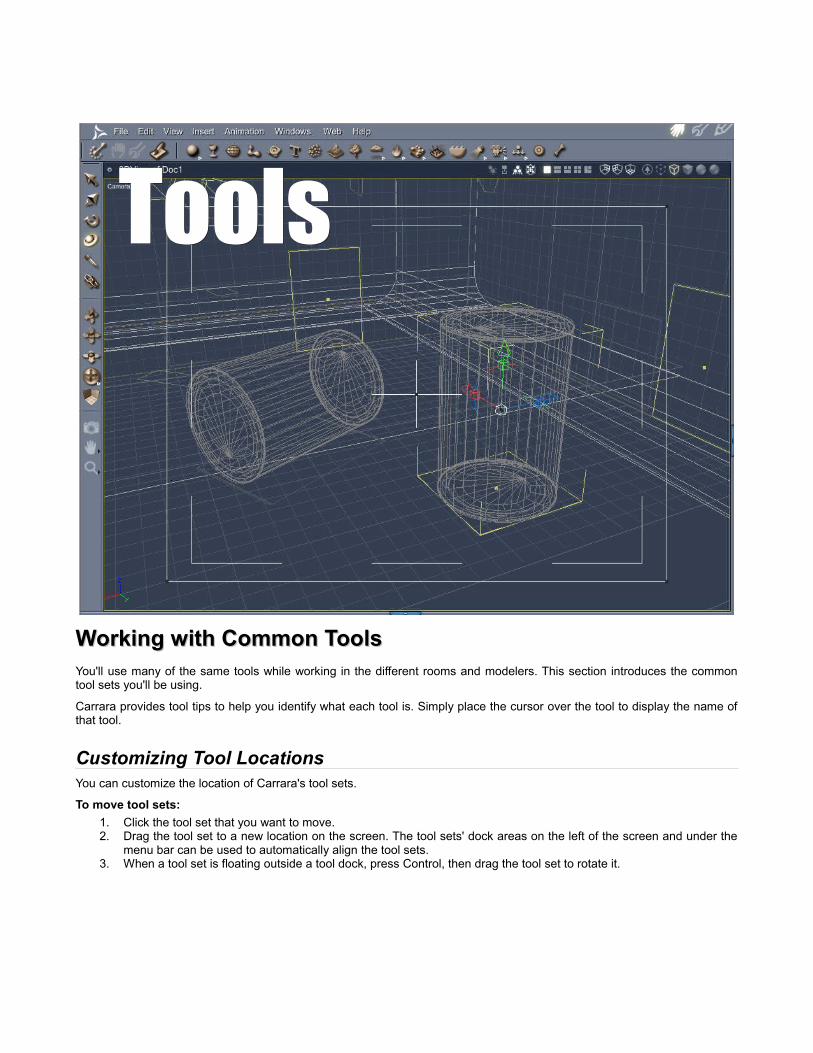
Working with Common Tools Working with Common Tools You'll use many of the same tools while working in the different rooms and modelers. This section introduces the common tool sets you'll be using.
Carrara provides tool tips to help you identify what each tool is. Simply place the cursor over the tool to display the name of that tool.
Customizing Tool Locations You can customize the location of Carrara's tool sets.
To move tool sets: 1. Click the tool set that you want to move. 2. Drag the tool set to a new location on the screen. The tool sets' dock areas on the left of the screen and under the
menu bar can be used to automatically align the tool sets. 3. When a tool set is floating outside a tool dock, press Control, then drag the tool set to rotate it.
ToolsTools
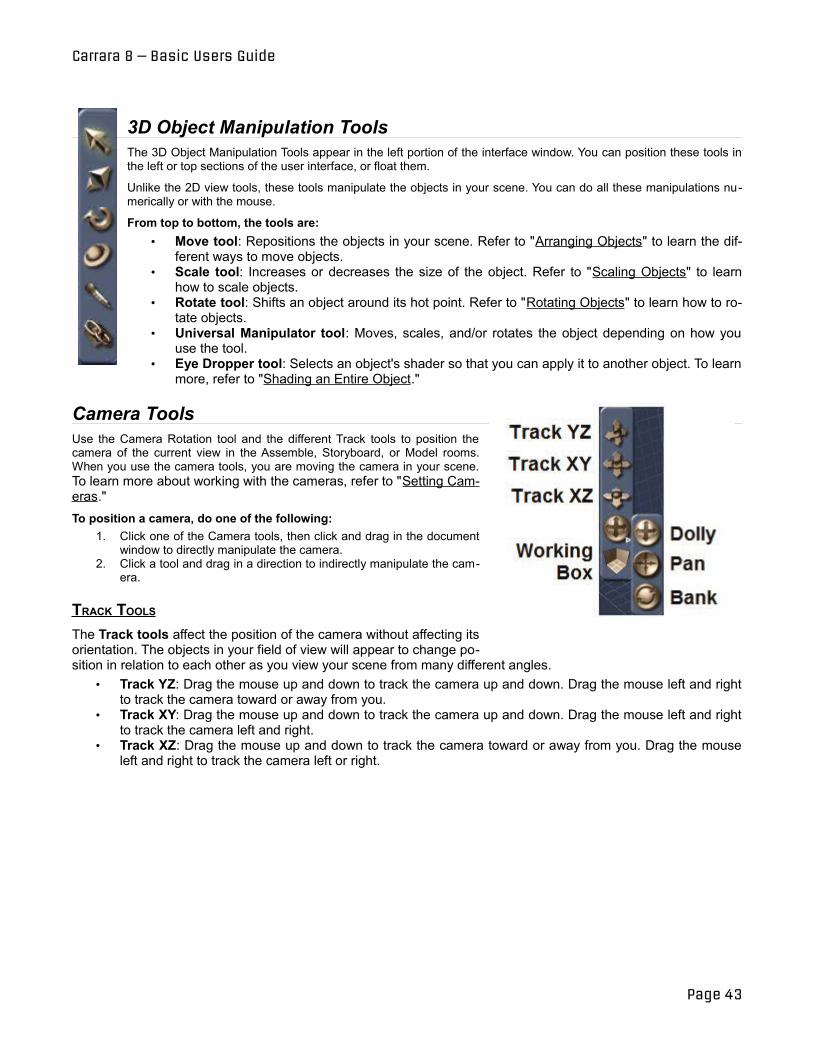
Carrara 8 – Basic Users Guide
3D Object Manipulation Tools The 3D Object Manipulation Tools appear in the left portion of the interface window. You can position these tools in the left or top sections of the user interface, or float them.
Unlike the 2D view tools, these tools manipulate the objects in your scene. You can do all these manipulations numerically or with the mouse.
From top to bottom, the tools are: • Move tool: Repositions the objects in your scene. Refer to "Arranging Objects" to learn the dif
ferent ways to move objects. • Scale tool: Increases or decreases the size of the object. Refer to "Scaling Objects" to learn
how to scale objects. • Rotate tool: Shifts an object around its hot point. Refer to "Rotating Objects" to learn how to ro
tate objects. • Universal Manipulator tool: Moves, scales, and/or rotates the object depending on how you
use the tool. • Eye Dropper tool: Selects an object's shader so that you can apply it to another object. To learn
more, refer to "Shading an Entire Object."
Camera Tools Use the Camera Rotation tool and the different Track tools to position the camera of the current view in the Assemble, Storyboard, or Model rooms. When you use the camera tools, you are moving the camera in your scene. To learn more about working with the cameras, refer to "Setting Cameras." To position a camera, do one of the following:
1. Click one of the Camera tools, then click and drag in the document window to directly manipulate the camera.
2. Click a tool and drag in a direction to indirectly manipulate the camera.
TRACK TOOLS The Track tools affect the position of the camera without affecting its orientation. The objects in your field of view will appear to change position in relation to each other as you view your scene from many different angles.
• Track YZ: Drag the mouse up and down to track the camera up and down. Drag the mouse left and right to track the camera toward or away from you.
• Track XY: Drag the mouse up and down to track the camera up and down. Drag the mouse left and right to track the camera left and right.
• Track XZ: Drag the mouse up and down to track the camera toward or away from you. Drag the mouse left and right to track the camera left or right.
Page 43
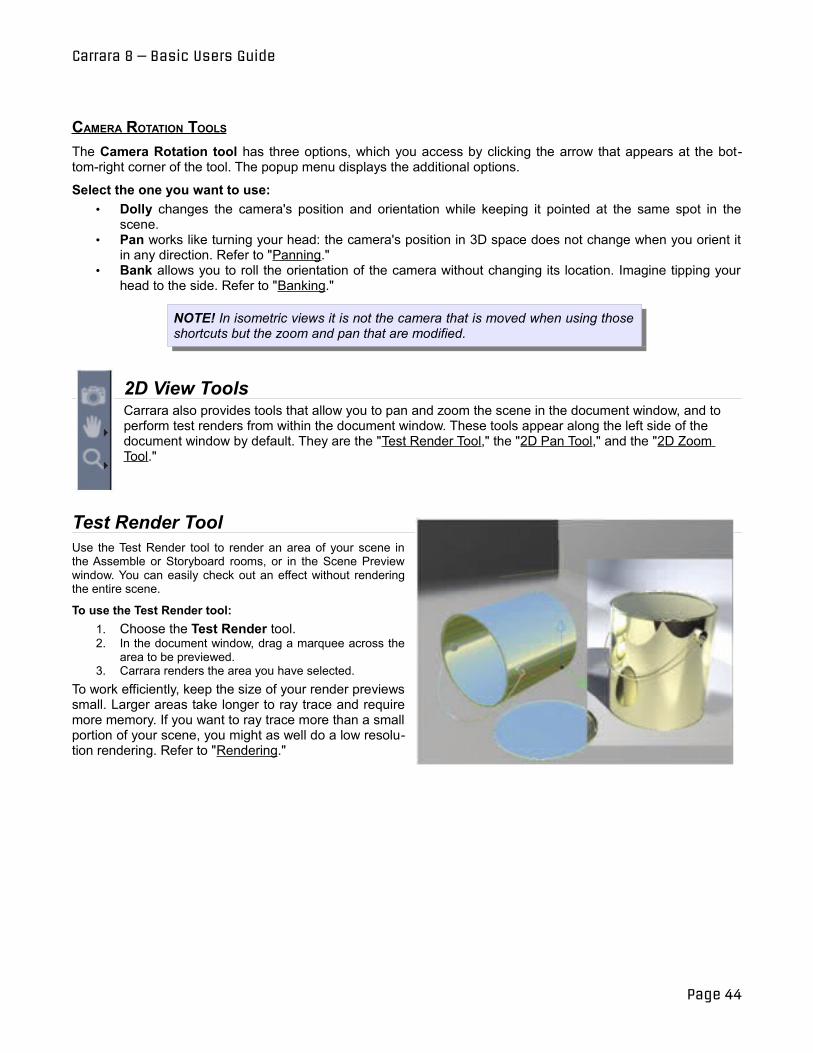
Carrara 8 – Basic Users Guide
CAMERA ROTATION TOOLS The Camera Rotation tool has three options, which you access by clicking the arrow that appears at the bottom-right corner of the tool. The popup menu displays the additional options.
Select the one you want to use: • Dolly changes the camera's position and orientation while keeping it pointed at the same spot in the
scene.• Pan works like turning your head: the camera's position in 3D space does not change when you orient it
in any direction. Refer to "Panning." • Bank allows you to roll the orientation of the camera without changing its location. Imagine tipping your
head to the side. Refer to "Banking."
NOTE! In isometric views it is not the camera that is moved when using those shortcuts but the zoom and pan that are modified.
2D View Tools Carrara also provides tools that allow you to pan and zoom the scene in the document window, and to perform test renders from within the document window. These tools appear along the left side of the document window by default. They are the "Test Render Tool," the "2D Pan Tool," and the "2D Zoom Tool."
Test Render Tool Use the Test Render tool to render an area of your scene in the Assemble or Storyboard rooms, or in the Scene Preview window. You can easily check out an effect without rendering the entire scene.
To use the Test Render tool: 1. Choose the Test Render tool. 2. In the document window, drag a marquee across the
area to be previewed. 3. Carrara renders the area you have selected.
To work efficiently, keep the size of your render previews small. Larger areas take longer to ray trace and require more memory. If you want to ray trace more than a small portion of your scene, you might as well do a low resolution rendering. Refer to "Rendering."
Page 44
Carrara 8 – Basic Users Guide
2D Pan Tool If your scene is too large to fit within the document window, you can use the 2D Pan tool to reposition the view of the camera like a flat image. Drag the tool up, down, right, or left to reposition the scene in the document window.
To move an area of the scene in the document window: 1. Click the 2D Pan tool. 2. Drag the cursor in the direction you want to move the view of the scene.
NOTE! To reset the 2D pan, use the View >Reset 2D Pan command, or click the arrow at the right of the 2D Pan tool and choose Reset 2D Pan.
2D Zoom Tool As you create your 3D artwork, your scene can quickly become too large to see the entire scene in the Assemble room. The 2D Zoom tool allows you to zoom out to view your entire scene, if necessary. You can also use it to enlarge areas to precisely edit objects.
To zoom in to an area of your scene: 1. Click the 2D Zoom tool. 2. Click on a point in your scene to enlarge. The scene is magnified. You can also drag a marquee around an area to
magnify it. To zoom out of an area:
1. Click the Zoom tool. 2. Hold down Option/Alt and click an area.
You can also zoom in or out of your scene to a selection, a specified percentage, or preset percentage
To zoom in or out to a selection, object, or fixed percentage, use one of the following methods: 1. Choose View > Zoom, and choose a zoom option from the popup menu. 2. Click the arrow at the right of the Zoom tool and choose a zoom option from the popup menu.
• Zoom to Selection: Choose this option to zoom into the objects that you have selected. • Zoom to: Choose this option to enter a new zoom percentage of your choosing. • Fixed percentages: Allows you to zoom in to 25%, 50%, 75%, 100%, 200%, 300%, 400%, 500%,
or 600%.
Page 45
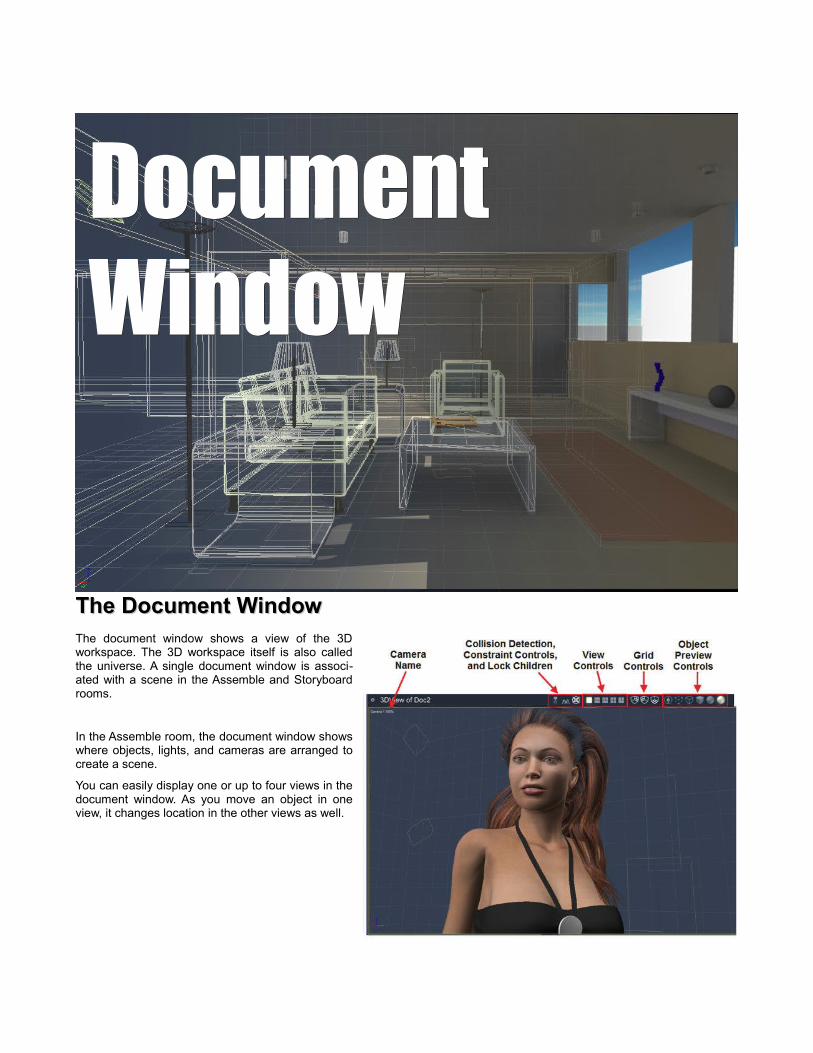
The Document Window The Document Window The document window shows a view of the 3D workspace. The 3D workspace itself is also called the universe. A single document window is associated with a scene in the Assemble and Storyboard rooms.
In the Assemble room, the document window shows where objects, lights, and cameras are arranged to create a scene.
You can easily display one or up to four views in the document window. As you move an object in one view, it changes location in the other views as well.
DocumentDocumentWindowWindow

Carrara 8 – Basic Users Guide
Displaying Multiple Camera Views The top bar of the document window contains several controls that allow you to view the items in your scene in many ways. They are broken down into four types of controls:
The View controls allow you to display up to four different camera views in your document window. Options from left to right are:
• One View: Displays one camera view in the document window. By default, the Camera 1 view is used.
• Two Views Horizontal: Displays two different views stacked one on top of the other. By default, the views are Camera 1 and Top.
Page 47
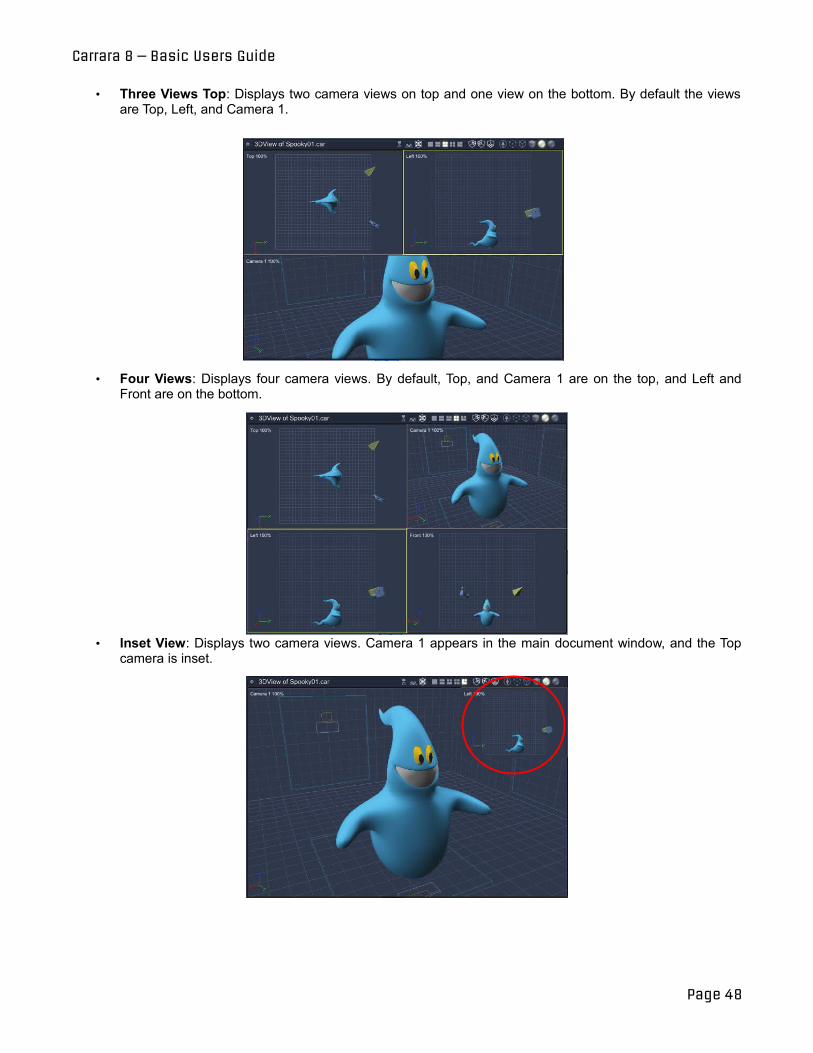
Carrara 8 – Basic Users Guide
• Three Views Top: Displays two camera views on top and one view on the bottom. By default the views are Top, Left, and Camera 1.
• Four Views: Displays four camera views. By default, Top, and Camera 1 are on the top, and Left and Front are on the bottom.
• Inset View: Displays two camera views. Camera 1 appears in the main document window, and the Top camera is inset.
Page 48
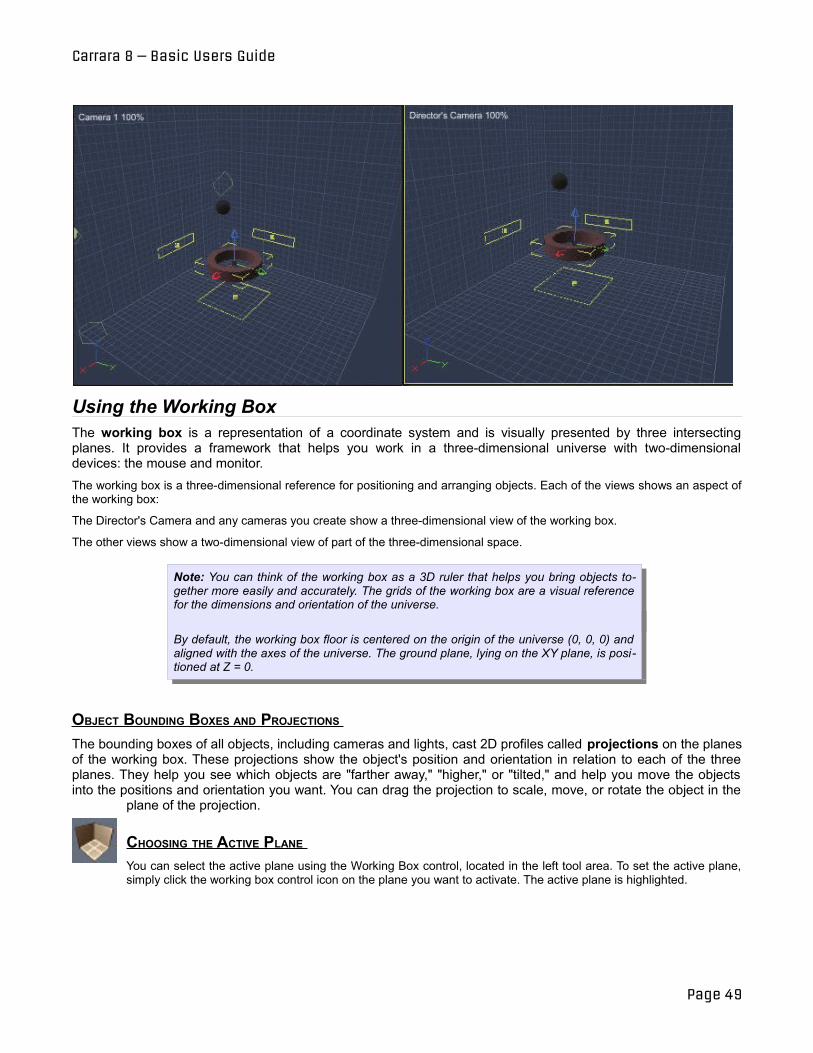
Carrara 8 – Basic Users Guide
Using the Working Box The working box is a representation of a coordinate system and is visually presented by three intersecting planes. It provides a framework that helps you work in a three-dimensional universe with two-dimensional devices: the mouse and monitor. The working box is a three-dimensional reference for positioning and arranging objects. Each of the views shows an aspect of the working box:
The Director's Camera and any cameras you create show a three-dimensional view of the working box.
The other views show a two-dimensional view of part of the three-dimensional space.
Note: You can think of the working box as a 3D ruler that helps you bring objects together more easily and accurately. The grids of the working box are a visual reference for the dimensions and orientation of the universe.
By default, the working box floor is centered on the origin of the universe (0, 0, 0) and aligned with the axes of the universe. The ground plane, lying on the XY plane, is positioned at Z = 0.
OBJECT BOUNDING BOXES AND PROJECTIONS The bounding boxes of all objects, including cameras and lights, cast 2D profiles called projections on the planes of the working box. These projections show the object's position and orientation in relation to each of the three planes. They help you see which objects are "farther away," "higher," or "tilted," and help you move the objects into the positions and orientation you want. You can drag the projection to scale, move, or rotate the object in the
plane of the projection.
CHOOSING THE ACTIVE PLANE You can select the active plane using the Working Box control, located in the left tool area. To set the active plane, simply click the working box control icon on the plane you want to activate. The active plane is highlighted.
Page 49
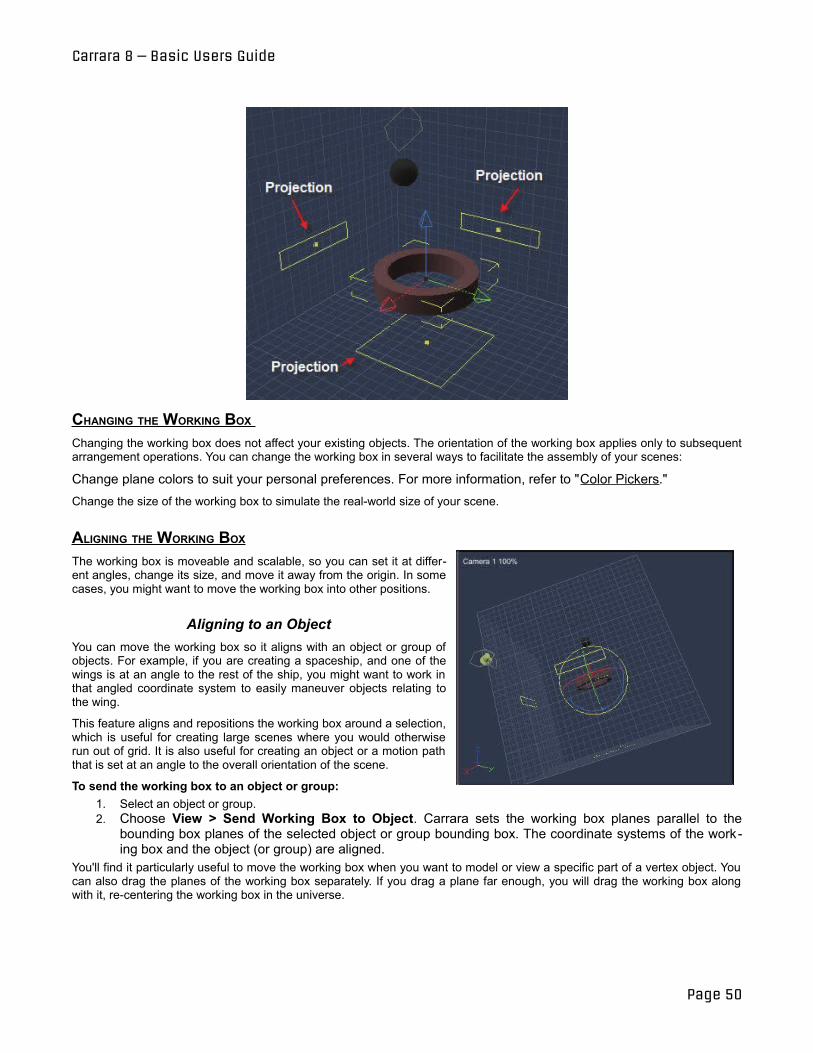
Carrara 8 – Basic Users Guide
CHANGING THE WORKING BOX Changing the working box does not affect your existing objects. The orientation of the working box applies only to subsequent arrangement operations. You can change the working box in several ways to facilitate the assembly of your scenes:
Change plane colors to suit your personal preferences. For more information, refer to "Color Pickers." Change the size of the working box to simulate the real-world size of your scene.
ALIGNING THE WORKING BOX The working box is moveable and scalable, so you can set it at different angles, change its size, and move it away from the origin. In some cases, you might want to move the working box into other positions.
Aligning to an ObjectYou can move the working box so it aligns with an object or group of objects. For example, if you are creating a spaceship, and one of the wings is at an angle to the rest of the ship, you might want to work in that angled coordinate system to easily maneuver objects relating to the wing.
This feature aligns and repositions the working box around a selection, which is useful for creating large scenes where you would otherwise run out of grid. It is also useful for creating an object or a motion path that is set at an angle to the overall orientation of the scene.
To send the working box to an object or group: 1. Select an object or group. 2. Choose View > Send Working Box to Object. Carrara sets the working box planes parallel to the
bounding box planes of the selected object or group bounding box. The coordinate systems of the working box and the object (or group) are aligned.
You'll find it particularly useful to move the working box when you want to model or view a specific part of a vertex object. You can also drag the planes of the working box separately. If you drag a plane far enough, you will drag the working box along with it, re-centering the working box in the universe.
Page 50
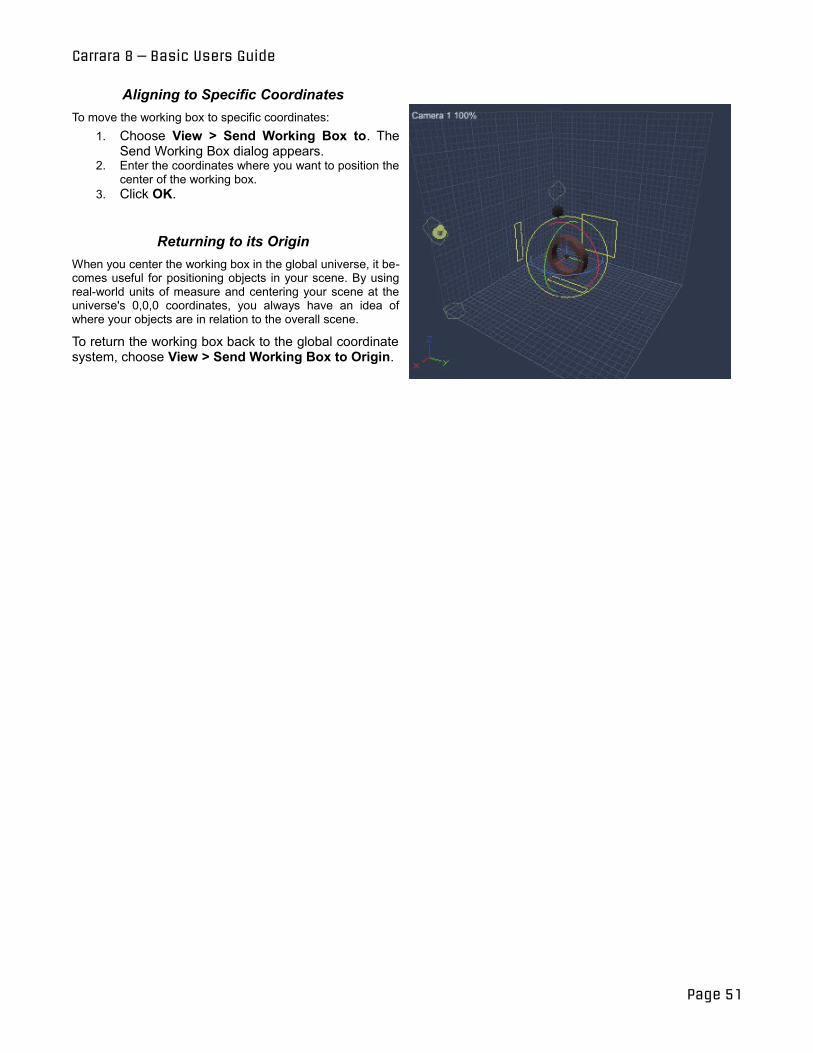
Carrara 8 – Basic Users Guide
Aligning to Specific Coordinates To move the working box to specific coordinates:
1. Choose View > Send Working Box to. The Send Working Box dialog appears.
2. Enter the coordinates where you want to position the center of the working box.
3. Click OK.
Returning to its Origin When you center the working box in the global universe, it becomes useful for positioning objects in your scene. By using real-world units of measure and centering your scene at the universe's 0,0,0 coordinates, you always have an idea of where your objects are in relation to the overall scene.
To return the working box back to the global coordinate system, choose View > Send Working Box to Origin.
Page 51
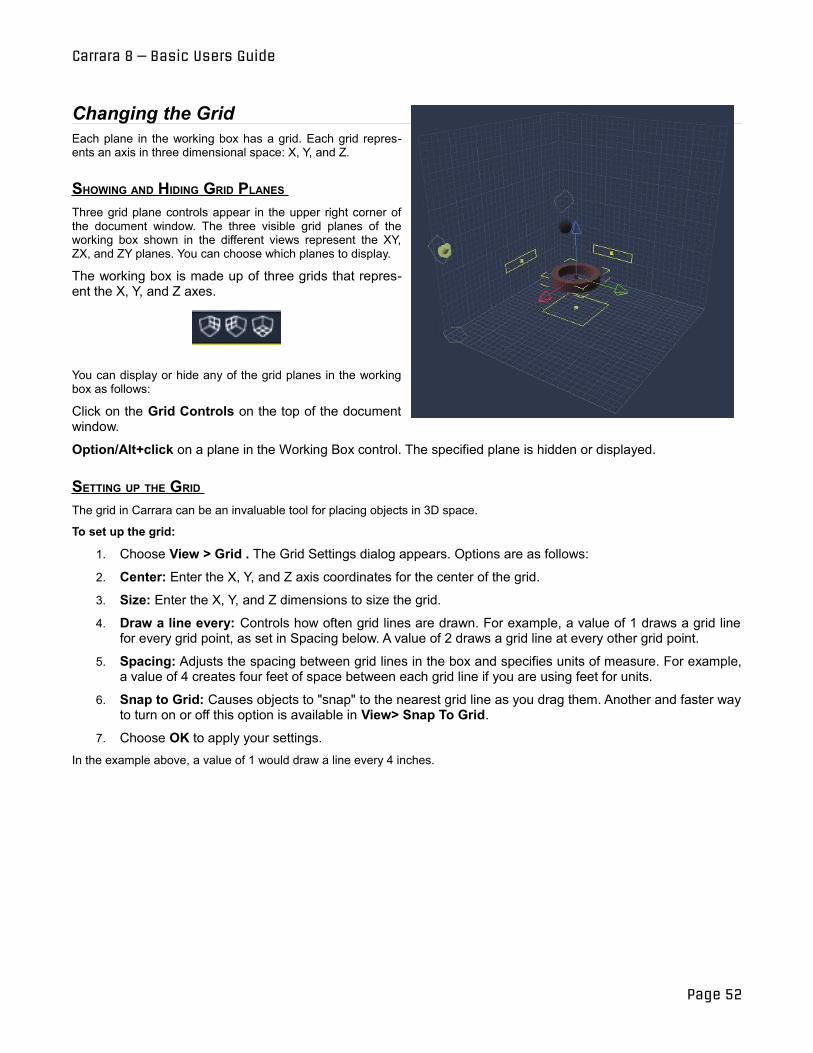
Carrara 8 – Basic Users Guide
Changing the Grid Each plane in the working box has a grid. Each grid represents an axis in three dimensional space: X, Y, and Z.
SHOWING AND HIDING GRID PLANES Three grid plane controls appear in the upper right corner of the document window. The three visible grid planes of the working box shown in the different views represent the XY, ZX, and ZY planes. You can choose which planes to display.
The working box is made up of three grids that represent the X, Y, and Z axes.
You can display or hide any of the grid planes in the working box as follows:
Click on the Grid Controls on the top of the document window.
Option/Alt+click on a plane in the Working Box control. The specified plane is hidden or displayed.
SETTING UP THE GRID The grid in Carrara can be an invaluable tool for placing objects in 3D space.
To set up the grid:
1. Choose View > Grid . The Grid Settings dialog appears. Options are as follows:
2. Center: Enter the X, Y, and Z axis coordinates for the center of the grid.
3. Size: Enter the X, Y, and Z dimensions to size the grid.
4. Draw a line every: Controls how often grid lines are drawn. For example, a value of 1 draws a grid line for every grid point, as set in Spacing below. A value of 2 draws a grid line at every other grid point.
5. Spacing: Adjusts the spacing between grid lines in the box and specifies units of measure. For example, a value of 4 creates four feet of space between each grid line if you are using feet for units.
6. Snap to Grid: Causes objects to "snap" to the nearest grid line as you drag them. Another and faster way to turn on or off this option is available in View> Snap To Grid.
7. Choose OK to apply your settings. In the example above, a value of 1 would draw a line every 4 inches.
Page 52
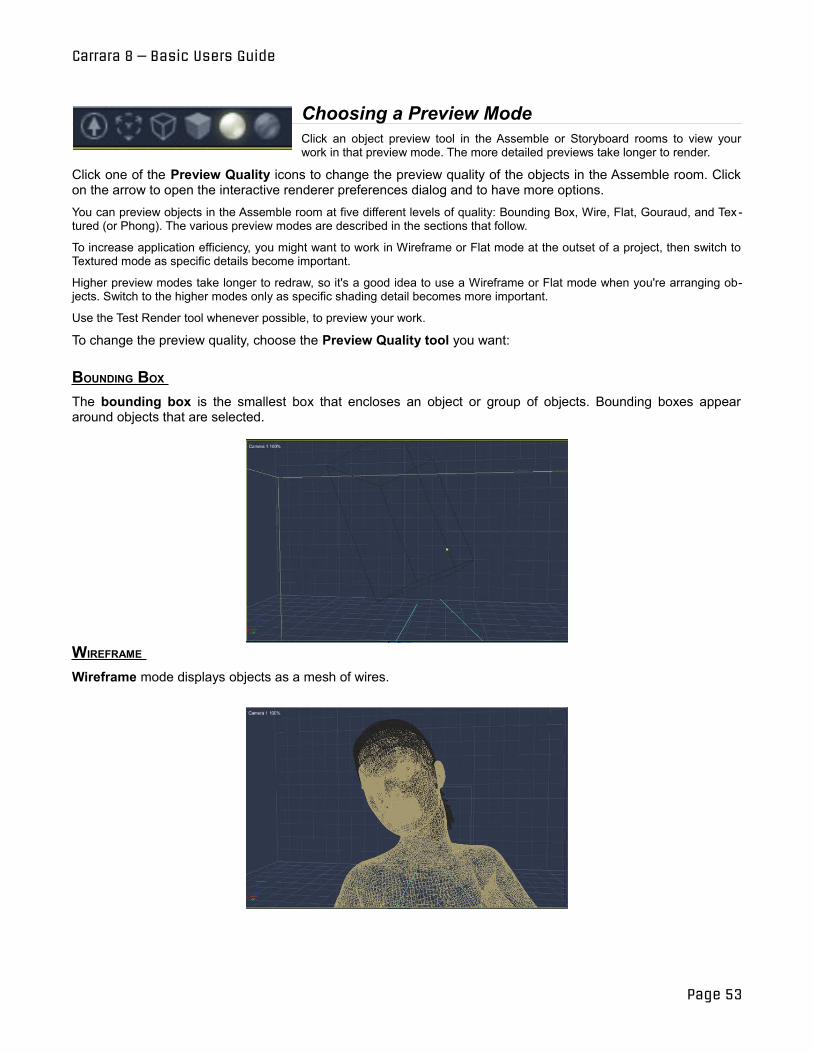
Carrara 8 – Basic Users Guide
Choosing a Preview Mode Click an object preview tool in the Assemble or Storyboard rooms to view your work in that preview mode. The more detailed previews take longer to render.
Click one of the Preview Quality icons to change the preview quality of the objects in the Assemble room. Click on the arrow to open the interactive renderer preferences dialog and to have more options. You can preview objects in the Assemble room at five different levels of quality: Bounding Box, Wire, Flat, Gouraud, and Tex tured (or Phong). The various preview modes are described in the sections that follow.
To increase application efficiency, you might want to work in Wireframe or Flat mode at the outset of a project, then switch to Textured mode as specific details become important.
Higher preview modes take longer to redraw, so it's a good idea to use a Wireframe or Flat mode when you're arranging objects. Switch to the higher modes only as specific shading detail becomes more important.
Use the Test Render tool whenever possible, to preview your work.
To change the preview quality, choose the Preview Quality tool you want:
BOUNDING BOX The bounding box is the smallest box that encloses an object or group of objects. Bounding boxes appear around objects that are selected.
WIREFRAME Wireframe mode displays objects as a mesh of wires.
Page 53
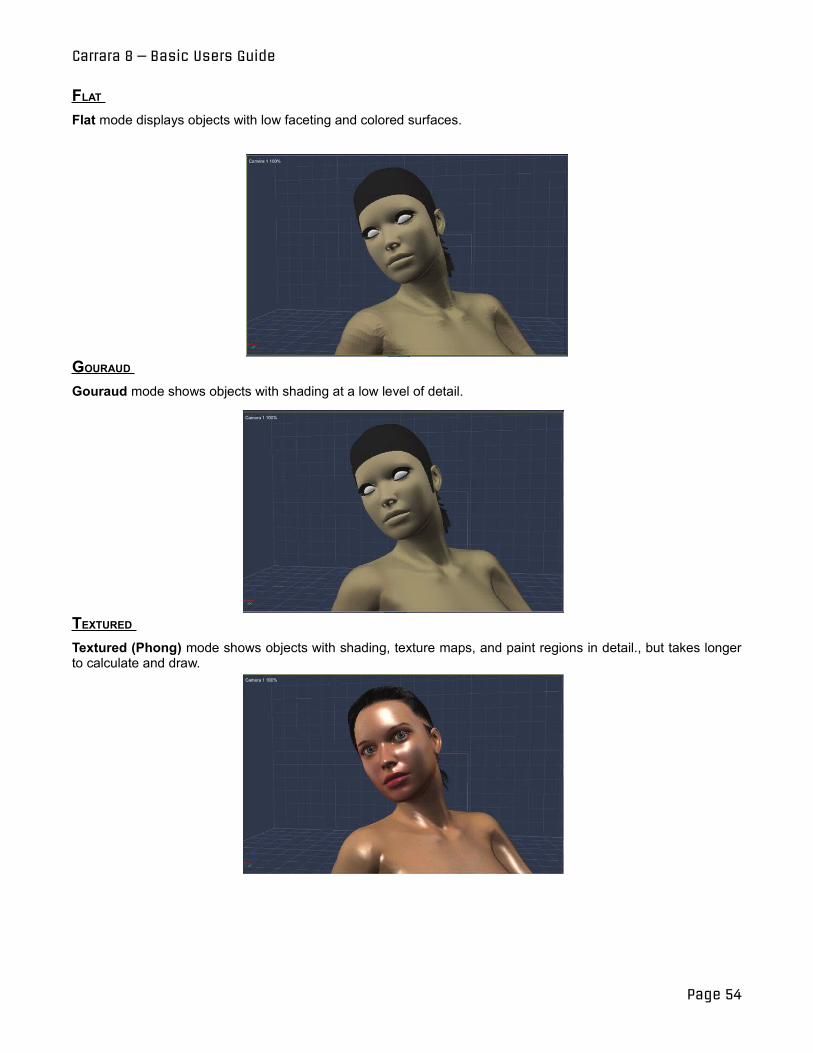
Carrara 8 – Basic Users Guide
FLAT Flat mode displays objects with low faceting and colored surfaces.
GOURAUD Gouraud mode shows objects with shading at a low level of detail.
TEXTURED Textured (Phong) mode shows objects with shading, texture maps, and paint regions in detail., but takes longer to calculate and draw.
Page 54
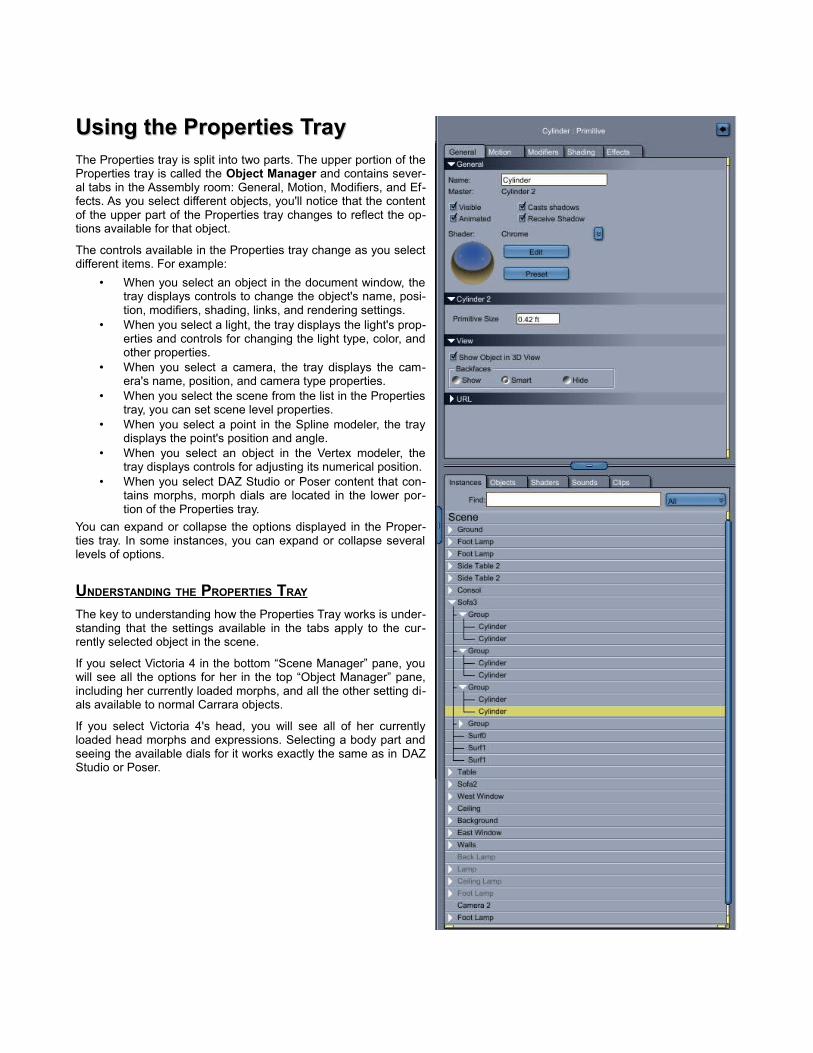
Using the Properties Tray Using the Properties Tray The Properties tray is split into two parts. The upper portion of the Properties tray is called the Object Manager and contains several tabs in the Assembly room: General, Motion, Modifiers, and Effects. As you select different objects, you'll notice that the content of the upper part of the Properties tray changes to reflect the options available for that object.
The controls available in the Properties tray change as you select different items. For example:
• When you select an object in the document window, the tray displays controls to change the object's name, position, modifiers, shading, links, and rendering settings.
• When you select a light, the tray displays the light's properties and controls for changing the light type, color, and other properties.
• When you select a camera, the tray displays the camera's name, position, and camera type properties.
• When you select the scene from the list in the Properties tray, you can set scene level properties.
• When you select a point in the Spline modeler, the tray displays the point's position and angle.
• When you select an object in the Vertex modeler, the tray displays controls for adjusting its numerical position.
• When you select DAZ Studio or Poser content that contains morphs, morph dials are located in the lower portion of the Properties tray.
You can expand or collapse the options displayed in the Properties tray. In some instances, you can expand or collapse several levels of options.
UNDERSTANDING THE PROPERTIES TRAY The key to understanding how the Properties Tray works is understanding that the settings available in the tabs apply to the currently selected object in the scene.
If you select Victoria 4 in the bottom “Scene Manager” pane, you will see all the options for her in the top “Object Manager” pane, including her currently loaded morphs, and all the other setting dials available to normal Carrara objects.
If you select Victoria 4's head, you will see all of her currently loaded head morphs and expressions. Selecting a body part and seeing the available dials for it works exactly the same as in DAZ Studio or Poser.

Carrara 8 – Basic Users Guide
SCENE MANAGER The lower part of the Properties tray is called the Scene Manager and contains several tabs that help you manage your scene. The Instances tab shows the same hierarchy as in the sequencer. When you are working with complex scenes, you might find it easier to select small or hidden objects in the Hierarchy list, rather than in the document window.
To use the Scene Manager:
Use one of the following methods to show the Scene Manager: 1. Choose Windows > Properties. 2. Click the handle for the Properties tray and drag it open. 3. Do a short click on the Properties tray handle.
To switch categories in the Scene Manager, click on the tabs to switch between the different property options: General, Motion, Modifiers, or Effects.
1. Click the arrow to the left of a section name to expand or collapse the contents of that section. The arrow points down to show a section has been expanded, or sideways to show that the section has been collapsed.
2. If needed, drag the scroll bar up or down to scroll the contents of the tray.
3. In some sections, you can click the downward-pointing double arrow next to a section name to display a list of choices.
4. The currently selected choice displays to the left of the double arrow.
5. If you have selected Modifiers, click the + or - sign to add or remove modifiers.
6. Once you have added modifiers, you can expand or collapse each one.
To close the tray, use one of the following methods: • Choose Windows > Properties. • Drag the Properties tray shut. • Do a short click on the handle.
Helpful Hint: Think of the Scene Manager as your “one stop shop” when navigating your scene. In especially complex scenes with thousands of objects, you will find this hierarchical menu invaluable to selecting and organizing all of your items in your scene.
Page 56
Scene Manager TabsThe tabs in the Scene Manager allow you to select or browse through the objects in your scene:
Instances: Click the Instances tab in the Scene Manager to display the hierarchy of all the instances in your scene. The first line, labeled Scene, displays properties for the entire scene.
Objects: The Objects tab displays previews of the Master Objects. You can edit the name of the object if desired. For more information about the Master Objects, refer to "Working with Master Objects." Shaders: The Shaders tab displays previews of the Master Shaders in the scene file.
Sounds: The Sounds tab displays the list of the Master Sounds in the scene file.
Clips: The Clips tab displays a list of the non-linear animation clips in your scene.
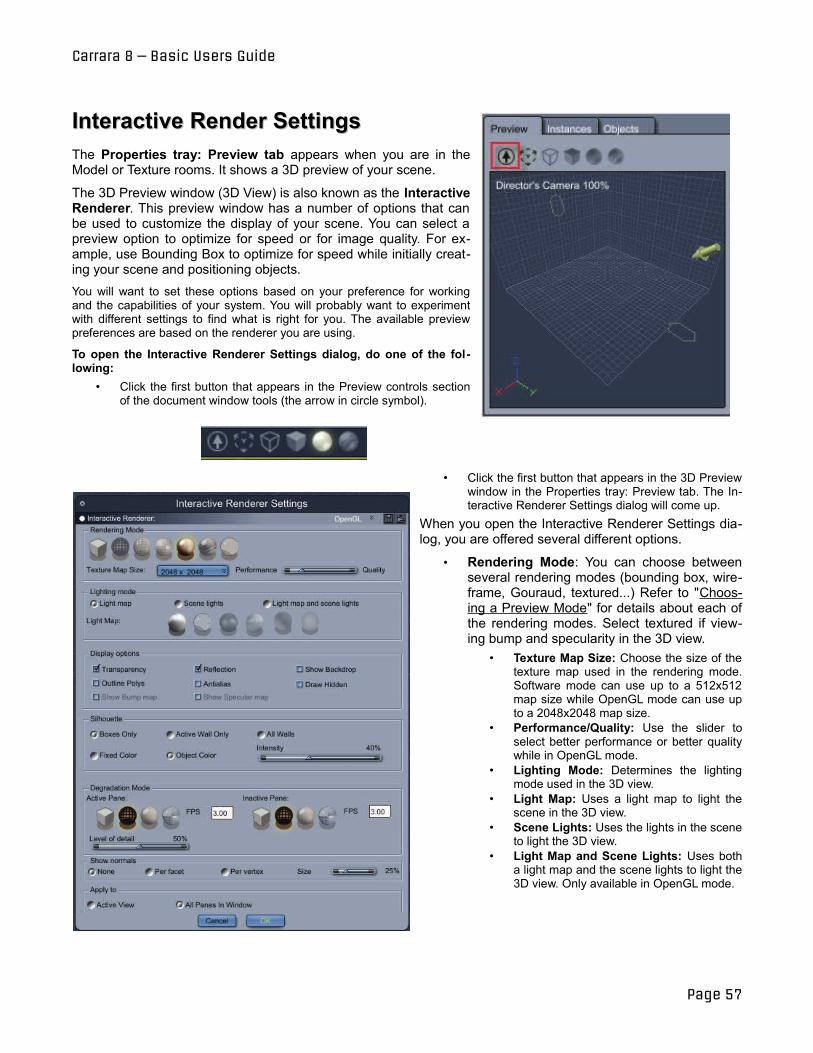
Carrara 8 – Basic Users Guide
Interactive Render SettingsInteractive Render SettingsThe Properties tray: Preview tab appears when you are in the Model or Texture rooms. It shows a 3D preview of your scene.
The 3D Preview window (3D View) is also known as the Interactive Renderer. This preview window has a number of options that can be used to customize the display of your scene. You can select a preview option to optimize for speed or for image quality. For example, use Bounding Box to optimize for speed while initially creating your scene and positioning objects. You will want to set these options based on your preference for working and the capabilities of your system. You will probably want to experiment with different settings to find what is right for you. The available preview preferences are based on the renderer you are using.
To open the Interactive Renderer Settings dialog, do one of the following:
• Click the first button that appears in the Preview controls section of the document window tools (the arrow in circle symbol).
• Click the first button that appears in the 3D Preview window in the Properties tray: Preview tab. The Interactive Renderer Settings dialog will come up.
When you open the Interactive Renderer Settings dialog, you are offered several different options.
• Rendering Mode: You can choose between several rendering modes (bounding box, wireframe, Gouraud, textured...) Refer to "Choosing a Preview Mode" for details about each of the rendering modes. Select textured if viewing bump and specularity in the 3D view.
• Texture Map Size: Choose the size of the texture map used in the rendering mode. Software mode can use up to a 512x512 map size while OpenGL mode can use up to a 2048x2048 map size.
• Performance/Quality: Use the slider to select better performance or better quality while in OpenGL mode.
• Lighting Mode: Determines the lighting mode used in the 3D view.
• Light Map: Uses a light map to light the scene in the 3D view.
• Scene Lights: Uses the lights in the scene to light the 3D view.
• Light Map and Scene Lights: Uses both a light map and the scene lights to light the 3D view. Only available in OpenGL mode.
Page 57
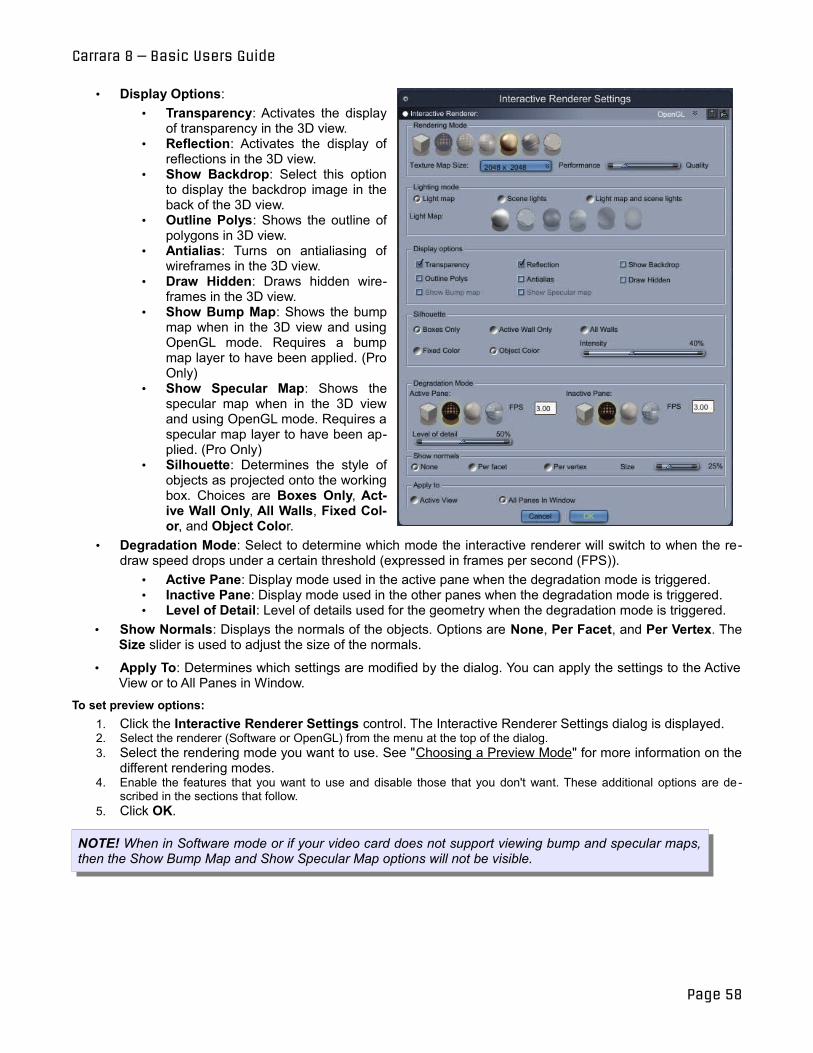
Carrara 8 – Basic Users Guide
• Display Options: • Transparency: Activates the display
of transparency in the 3D view. • Reflection: Activates the display of
reflections in the 3D view. • Show Backdrop: Select this option
to display the backdrop image in the back of the 3D view.
• Outline Polys: Shows the outline of polygons in 3D view.
• Antialias: Turns on antialiasing of wireframes in the 3D view.
• Draw Hidden: Draws hidden wireframes in the 3D view.
• Show Bump Map: Shows the bump map when in the 3D view and using OpenGL mode. Requires a bump map layer to have been applied. (Pro Only)
• Show Specular Map: Shows the specular map when in the 3D view and using OpenGL mode. Requires a specular map layer to have been applied. (Pro Only)
• Silhouette: Determines the style of objects as projected onto the working box. Choices are Boxes Only, Active Wall Only, All Walls, Fixed Color, and Object Color.
• Degradation Mode: Select to determine which mode the interactive renderer will switch to when the redraw speed drops under a certain threshold (expressed in frames per second (FPS)).
• Active Pane: Display mode used in the active pane when the degradation mode is triggered. • Inactive Pane: Display mode used in the other panes when the degradation mode is triggered. • Level of Detail: Level of details used for the geometry when the degradation mode is triggered.
• Show Normals: Displays the normals of the objects. Options are None, Per Facet, and Per Vertex. The Size slider is used to adjust the size of the normals.
• Apply To: Determines which settings are modified by the dialog. You can apply the settings to the Active View or to All Panes in Window.
To set preview options: 1. Click the Interactive Renderer Settings control. The Interactive Renderer Settings dialog is displayed. 2. Select the renderer (Software or OpenGL) from the menu at the top of the dialog. 3. Select the rendering mode you want to use. See "Choosing a Preview Mode" for more information on the
different rendering modes. 4. Enable the features that you want to use and disable those that you don't want. These additional options are de
scribed in the sections that follow. 5. Click OK.
NOTE! When in Software mode or if your video card does not support viewing bump and specular maps, then the Show Bump Map and Show Specular Map options will not be visible.
Page 58
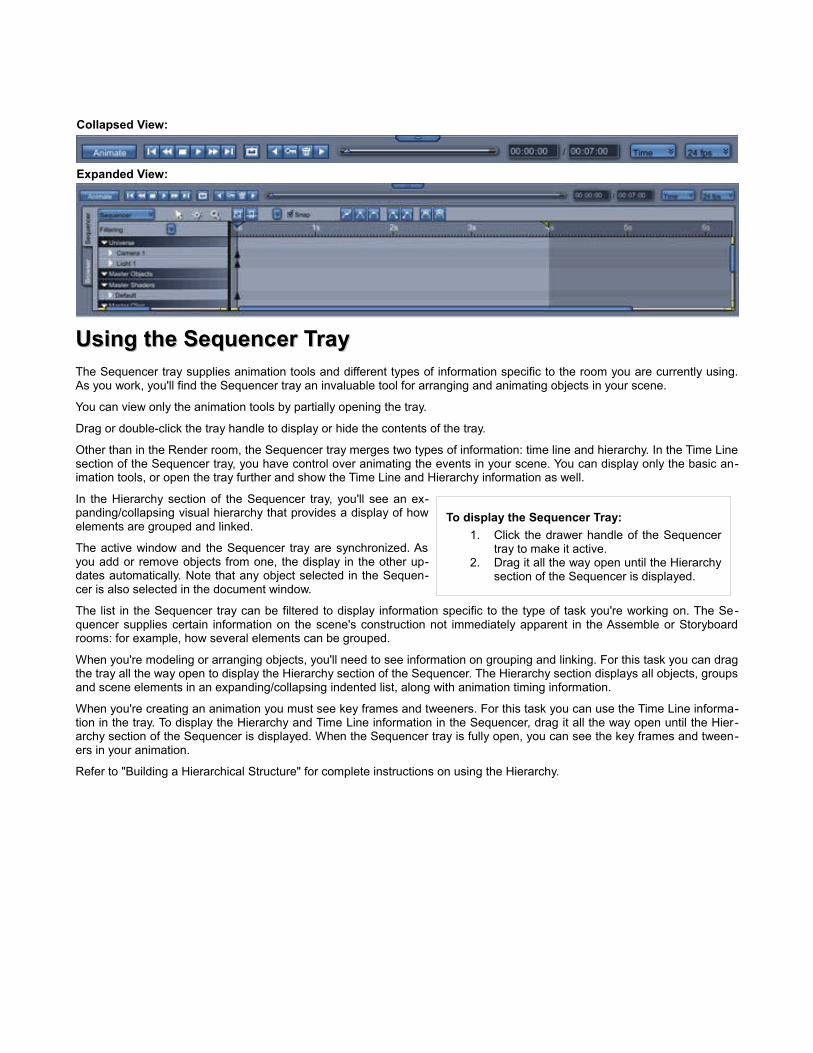
Using the Sequencer Tray Using the Sequencer Tray The Sequencer tray supplies animation tools and different types of information specific to the room you are currently using. As you work, you'll find the Sequencer tray an invaluable tool for arranging and animating objects in your scene.
You can view only the animation tools by partially opening the tray.
Drag or double-click the tray handle to display or hide the contents of the tray.
Other than in the Render room, the Sequencer tray merges two types of information: time line and hierarchy. In the Time Line section of the Sequencer tray, you have control over animating the events in your scene. You can display only the basic animation tools, or open the tray further and show the Time Line and Hierarchy information as well.
In the Hierarchy section of the Sequencer tray, you'll see an expanding/collapsing visual hierarchy that provides a display of how elements are grouped and linked.
The active window and the Sequencer tray are synchronized. As you add or remove objects from one, the display in the other updates automatically. Note that any object selected in the Sequencer is also selected in the document window.
The list in the Sequencer tray can be filtered to display information specific to the type of task you're working on. The Sequencer supplies certain information on the scene's construction not immediately apparent in the Assemble or Storyboard rooms: for example, how several elements can be grouped.
When you're modeling or arranging objects, you'll need to see information on grouping and linking. For this task you can drag the tray all the way open to display the Hierarchy section of the Sequencer. The Hierarchy section displays all objects, groups and scene elements in an expanding/collapsing indented list, along with animation timing information.
When you're creating an animation you must see key frames and tweeners. For this task you can use the Time Line information in the tray. To display the Hierarchy and Time Line information in the Sequencer, drag it all the way open until the Hierarchy section of the Sequencer is displayed. When the Sequencer tray is fully open, you can see the key frames and tweeners in your animation.
Refer to "Building a Hierarchical Structure" for complete instructions on using the Hierarchy.
Expanded View:
Collapsed View:
To display the Sequencer Tray: 1. Click the drawer handle of the Sequencer
tray to make it active. 2. Drag it all the way open until the Hierarchy
section of the Sequencer is displayed.
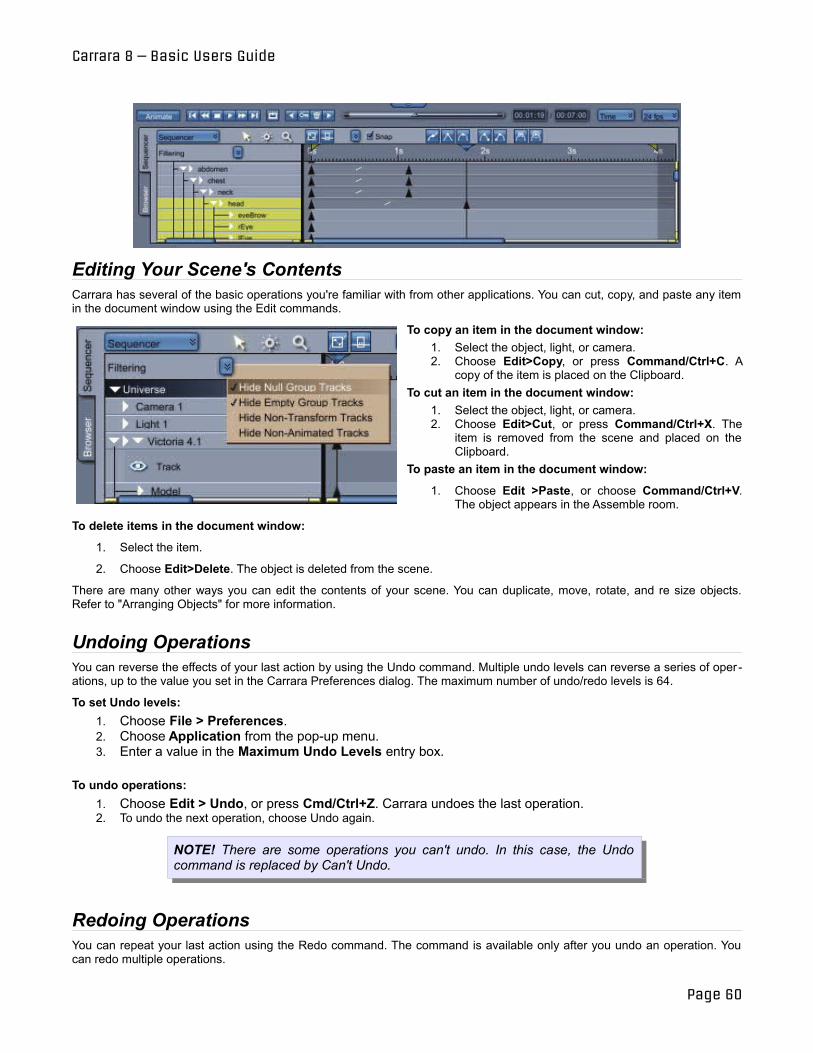
Carrara 8 – Basic Users Guide
Editing Your Scene's Contents Carrara has several of the basic operations you're familiar with from other applications. You can cut, copy, and paste any item in the document window using the Edit commands.
To copy an item in the document window: 1. Select the object, light, or camera. 2. Choose Edit>Copy, or press Command/Ctrl+C. A
copy of the item is placed on the Clipboard. To cut an item in the document window:
1. Select the object, light, or camera. 2. Choose Edit>Cut, or press Command/Ctrl+X. The
item is removed from the scene and placed on the Clipboard.
To paste an item in the document window:
1. Choose Edit >Paste, or choose Command/Ctrl+V. The object appears in the Assemble room.
To delete items in the document window:
1. Select the item.
2. Choose Edit>Delete. The object is deleted from the scene.
There are many other ways you can edit the contents of your scene. You can duplicate, move, rotate, and re size objects. Refer to "Arranging Objects" for more information.
Undoing Operations You can reverse the effects of your last action by using the Undo command. Multiple undo levels can reverse a series of oper ations, up to the value you set in the Carrara Preferences dialog. The maximum number of undo/redo levels is 64.
To set Undo levels: 1. Choose File > Preferences. 2. Choose Application from the pop-up menu. 3. Enter a value in the Maximum Undo Levels entry box.
To undo operations: 1. Choose Edit > Undo, or press Cmd/Ctrl+Z. Carrara undoes the last operation. 2. To undo the next operation, choose Undo again.
NOTE! There are some operations you can't undo. In this case, the Undo command is replaced by Can't Undo.
Redoing Operations You can repeat your last action using the Redo command. The command is available only after you undo an operation. You can redo multiple operations.
Page 60

Carrara 8 – Basic Users Guide
To repeat an operation:
1. Choose Edit>Redo, or press Cmd/Ctrl+Y. Carrara repeats the last action.
Saving Your File To save your scene:
1. Choose File>Save, or Cmd/Ctrl+S. 2. Choose a location for your file. 3. Enter a name for the file in the File name entry box. 4. Choose a file type from the Format/Save as type pop-up menu and click Save.
To save your scene under a different name: 1. Choose File>Save As, or press Cmd/ Ctrl+Shift+S. 2. Select a location for the file. 3. Enter a new name for the file in the File name entry box and click Save.
Closing Your File When you're done editing a scene file you can close it.
To close a file: 1. Choose File > Close. 2. If you have any changes, click Yes to save them or No to discard them.
Page 61
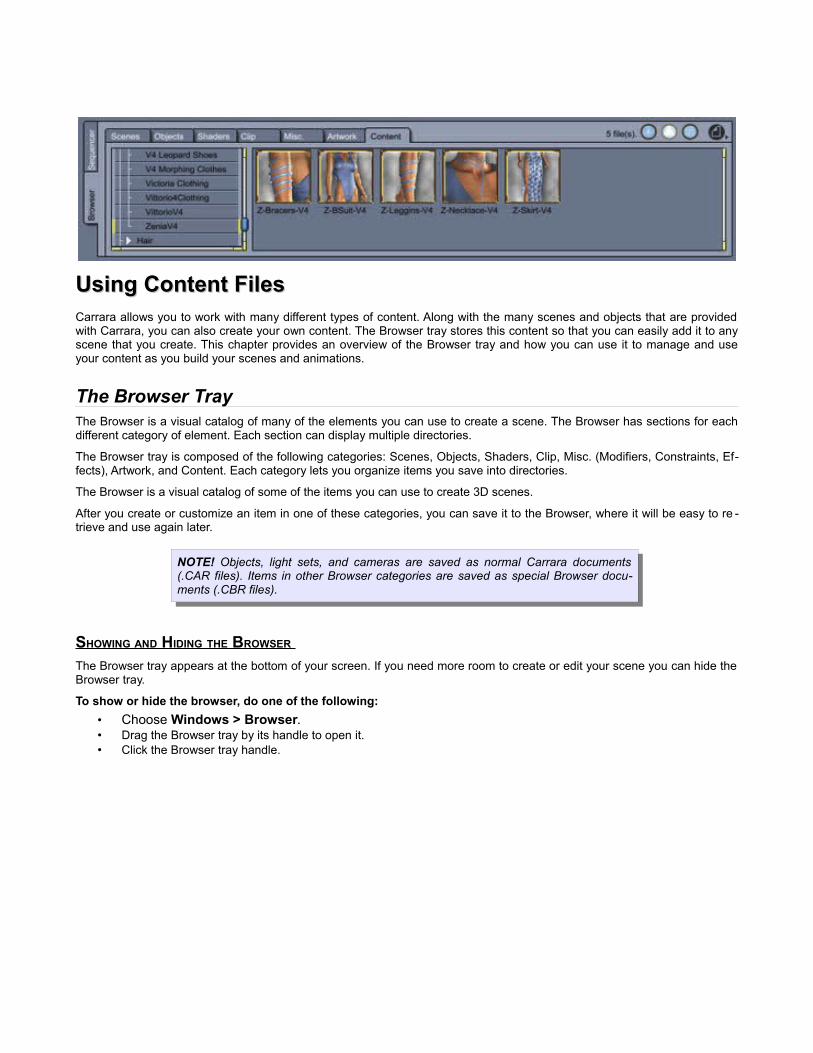
Using Content Files Using Content Files Carrara allows you to work with many different types of content. Along with the many scenes and objects that are provided with Carrara, you can also create your own content. The Browser tray stores this content so that you can easily add it to any scene that you create. This chapter provides an overview of the Browser tray and how you can use it to manage and use your content as you build your scenes and animations.
The Browser Tray The Browser is a visual catalog of many of the elements you can use to create a scene. The Browser has sections for each different category of element. Each section can display multiple directories.
The Browser tray is composed of the following categories: Scenes, Objects, Shaders, Clip, Misc. (Modifiers, Constraints, Effects), Artwork, and Content. Each category lets you organize items you save into directories.
The Browser is a visual catalog of some of the items you can use to create 3D scenes.
After you create or customize an item in one of these categories, you can save it to the Browser, where it will be easy to re trieve and use again later.
NOTE! Objects, light sets, and cameras are saved as normal Carrara documents (.CAR files). Items in other Browser categories are saved as special Browser documents (.CBR files).
SHOWING AND HIDING THE BROWSER The Browser tray appears at the bottom of your screen. If you need more room to create or edit your scene you can hide the Browser tray.
To show or hide the browser, do one of the following: • Choose Windows > Browser. • Drag the Browser tray by its handle to open it. • Click the Browser tray handle.
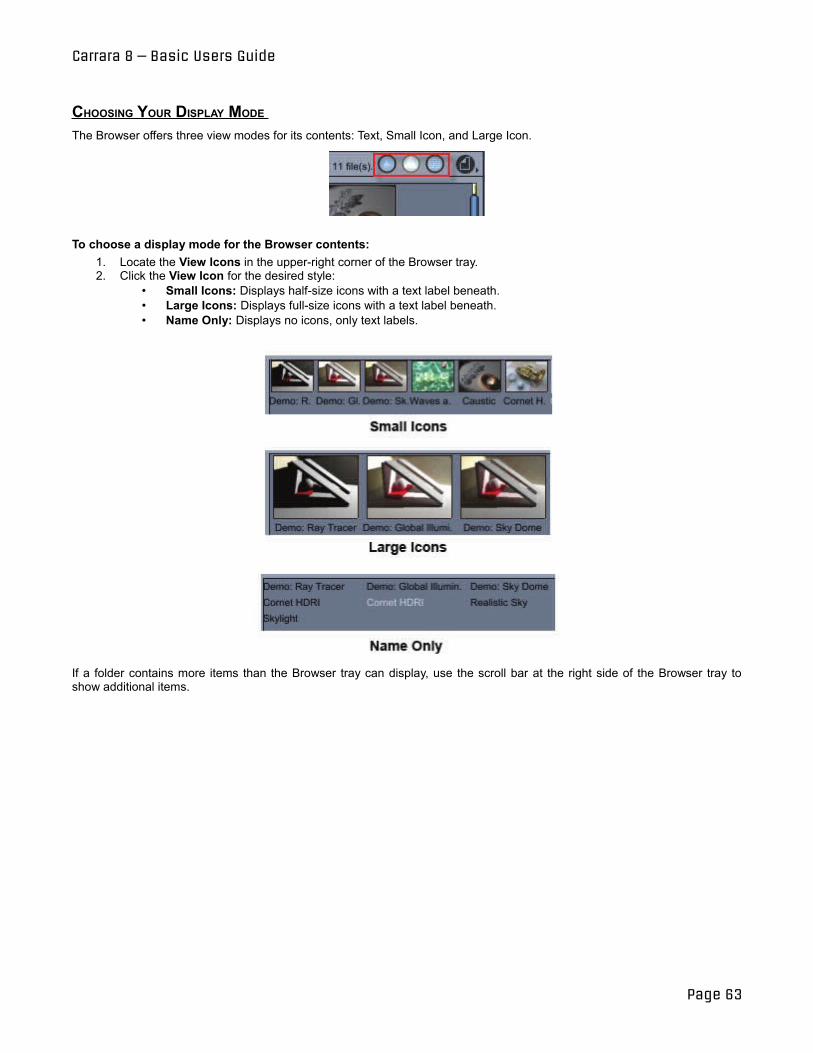
Carrara 8 – Basic Users Guide
CHOOSING YOUR DISPLAY MODE The Browser offers three view modes for its contents: Text, Small Icon, and Large Icon.
To choose a display mode for the Browser contents: 1. Locate the View Icons in the upper-right corner of the Browser tray. 2. Click the View Icon for the desired style:
• Small Icons: Displays half-size icons with a text label beneath. • Large Icons: Displays full-size icons with a text label beneath. • Name Only: Displays no icons, only text labels.
If a folder contains more items than the Browser tray can display, use the scroll bar at the right side of the Browser tray to show additional items.
Page 63
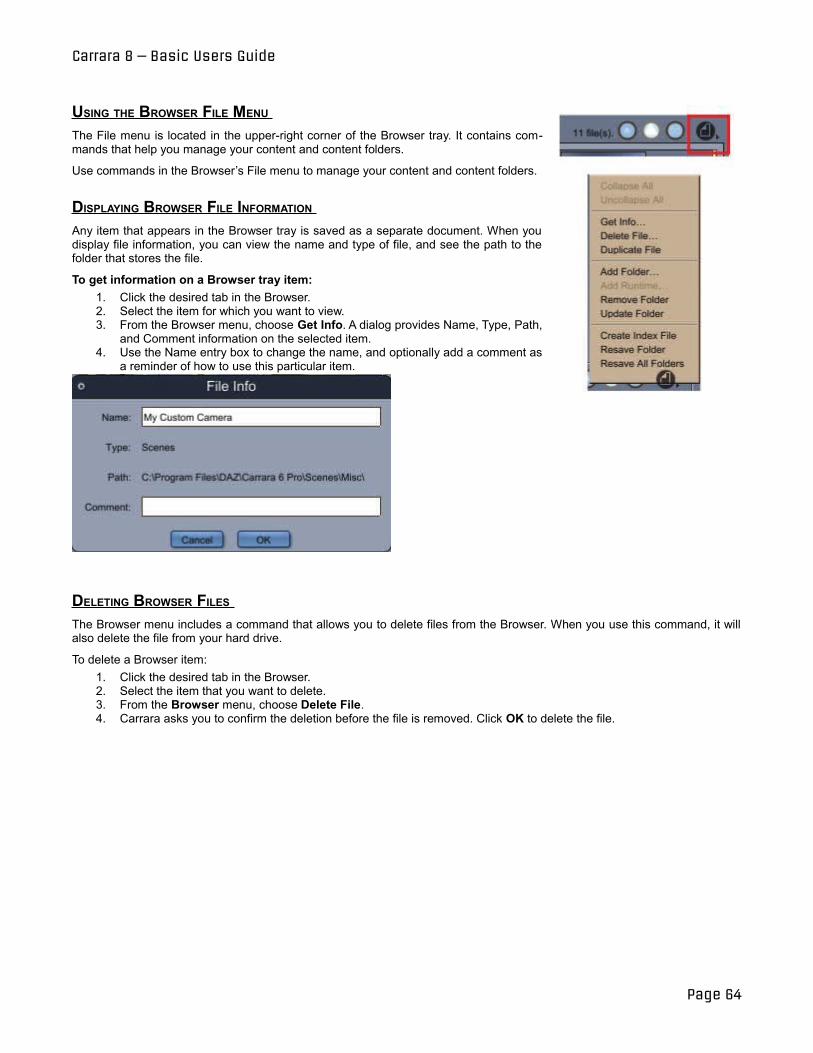
Carrara 8 – Basic Users Guide
USING THE BROWSER FILE MENU The File menu is located in the upper-right corner of the Browser tray. It contains commands that help you manage your content and content folders.
Use commands in the Browser’s File menu to manage your content and content folders.
DISPLAYING BROWSER FILE INFORMATION Any item that appears in the Browser tray is saved as a separate document. When you display file information, you can view the name and type of file, and see the path to the folder that stores the file.
To get information on a Browser tray item: 1. Click the desired tab in the Browser. 2. Select the item for which you want to view. 3. From the Browser menu, choose Get Info. A dialog provides Name, Type, Path,
and Comment information on the selected item. 4. Use the Name entry box to change the name, and optionally add a comment as
a reminder of how to use this particular item.
DELETING BROWSER FILES The Browser menu includes a command that allows you to delete files from the Browser. When you use this command, it will also delete the file from your hard drive.
To delete a Browser item: 1. Click the desired tab in the Browser. 2. Select the item that you want to delete. 3. From the Browser menu, choose Delete File. 4. Carrara asks you to confirm the deletion before the file is removed. Click OK to delete the file.
Page 64
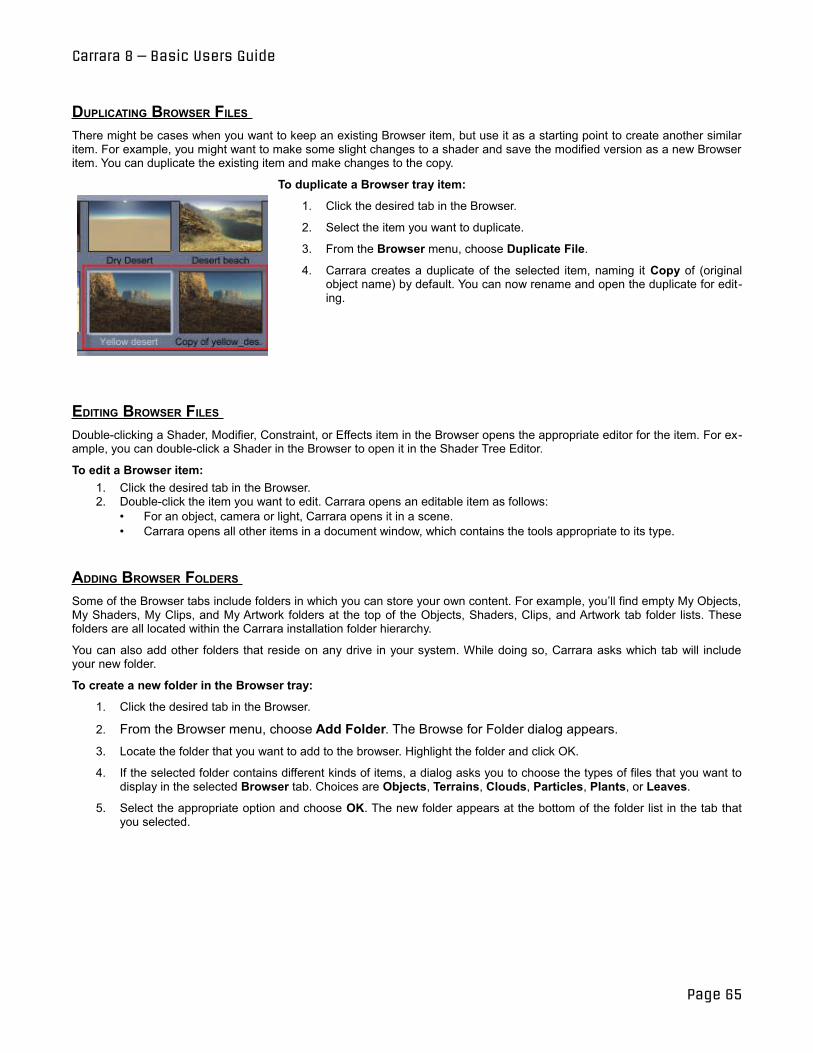
Carrara 8 – Basic Users Guide
DUPLICATING BROWSER FILES There might be cases when you want to keep an existing Browser item, but use it as a starting point to create another similar item. For example, you might want to make some slight changes to a shader and save the modified version as a new Browser item. You can duplicate the existing item and make changes to the copy.
To duplicate a Browser tray item:
1. Click the desired tab in the Browser.
2. Select the item you want to duplicate.
3. From the Browser menu, choose Duplicate File.
4. Carrara creates a duplicate of the selected item, naming it Copy of (original object name) by default. You can now rename and open the duplicate for editing.
EDITING BROWSER FILES Double-clicking a Shader, Modifier, Constraint, or Effects item in the Browser opens the appropriate editor for the item. For example, you can double-click a Shader in the Browser to open it in the Shader Tree Editor.
To edit a Browser item: 1. Click the desired tab in the Browser. 2. Double-click the item you want to edit. Carrara opens an editable item as follows:
• For an object, camera or light, Carrara opens it in a scene. • Carrara opens all other items in a document window, which contains the tools appropriate to its type.
ADDING BROWSER FOLDERS Some of the Browser tabs include folders in which you can store your own content. For example, you’ll find empty My Objects, My Shaders, My Clips, and My Artwork folders at the top of the Objects, Shaders, Clips, and Artwork tab folder lists. These folders are all located within the Carrara installation folder hierarchy.
You can also add other folders that reside on any drive in your system. While doing so, Carrara asks which tab will include your new folder.
To create a new folder in the Browser tray:
1. Click the desired tab in the Browser.
2. From the Browser menu, choose Add Folder. The Browse for Folder dialog appears. 3. Locate the folder that you want to add to the browser. Highlight the folder and click OK.
4. If the selected folder contains different kinds of items, a dialog asks you to choose the types of files that you want to display in the selected Browser tab. Choices are Objects, Terrains, Clouds, Particles, Plants, or Leaves.
5. Select the appropriate option and choose OK. The new folder appears at the bottom of the folder list in the tab that you selected.
Page 65
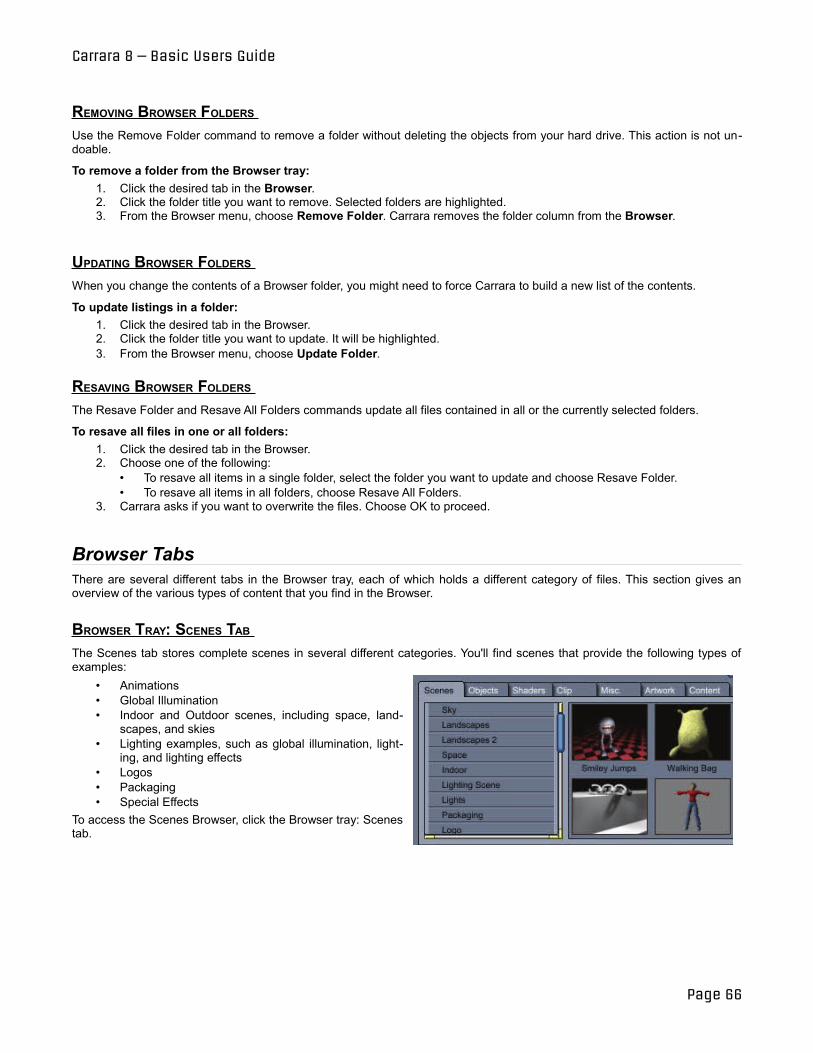
Carrara 8 – Basic Users Guide
REMOVING BROWSER FOLDERS Use the Remove Folder command to remove a folder without deleting the objects from your hard drive. This action is not undoable.
To remove a folder from the Browser tray: 1. Click the desired tab in the Browser. 2. Click the folder title you want to remove. Selected folders are highlighted. 3. From the Browser menu, choose Remove Folder. Carrara removes the folder column from the Browser.
UPDATING BROWSER FOLDERS When you change the contents of a Browser folder, you might need to force Carrara to build a new list of the contents.
To update listings in a folder: 1. Click the desired tab in the Browser. 2. Click the folder title you want to update. It will be highlighted. 3. From the Browser menu, choose Update Folder.
RESAVING BROWSER FOLDERS The Resave Folder and Resave All Folders commands update all files contained in all or the currently selected folders.
To resave all files in one or all folders: 1. Click the desired tab in the Browser. 2. Choose one of the following:
• To resave all items in a single folder, select the folder you want to update and choose Resave Folder. • To resave all items in all folders, choose Resave All Folders.
3. Carrara asks if you want to overwrite the files. Choose OK to proceed.
Browser Tabs There are several different tabs in the Browser tray, each of which holds a different category of files. This section gives an overview of the various types of content that you find in the Browser.
BROWSER TRAY: SCENES TAB The Scenes tab stores complete scenes in several different categories. You'll find scenes that provide the following types of examples:
• Animations • Global Illumination • Indoor and Outdoor scenes, including space, land
scapes, and skies • Lighting examples, such as global illumination, light
ing, and lighting effects • Logos • Packaging • Special Effects
To access the Scenes Browser, click the Browser tray: Scenes tab.
Page 66

Carrara 8 – Basic Users Guide
To load a scene from the Browser tray: 1. Click the Scenes tab in the Browser tray. 2. Navigate through the category list until you find the scene you want to open. 3. Double-click the desired Small, Large, or Name Only preview in the browser tray. The scene opens in the document
window. To save a scene to the Scene category in the Browser:
1. Make sure the scene you want to save is open. 2. Choose File > Save As. The Save As dialog appears. 3. Select one of the Scenes subfolders in your Carrara installation folder. For example, if you want to save an animation,
choose the Scenes: Animation subfolder, in which existing animation scenes appear. 4. Click the Options checkbox. 5. Click Save. The Carrara Export dialog appears. 6. Choose where you would like to save your texture
maps. The options are: • Save all internally: Saves all textures internally
with the file. • Use local settings: Uses the settings of each in
dividual texture to determine whether they should be stored inside or outside the file.
• Save all externally: Saves all textures in separate files.
7. Enable the Save Scene Preview option to generate a thumbnail for the Browser tray.
8. Check or uncheck the Compress File option as need to save a compressed or uncompressed version of the file.
9. Click OK. Your scene is saved with a .car file extension.
BROWSER TRAY: OBJECTS TAB The Objects browser stores items that you can add to a scene that is already opened in your document window. There are a wide variety of objects arranged in many different folders, including, but not limited to, the following:
• Nature objects such as Deserts, Plains, Mountains, Oceans, Plants, Leaves, and Clouds. • Particle objects. • Basic and Advanced modeled objects created with Carrara's modeling tools. • Formulas • Hair • Manmade objects such as Art, Buildings, Cities, Communication devices, and other household and industrial items • Fashion accessories such as jewelry, belts, earrings, and more • Transportation vehicles (land, sea, and air)
To access the Objects Browser, click the Browser tray: Objects tab.
Page 67
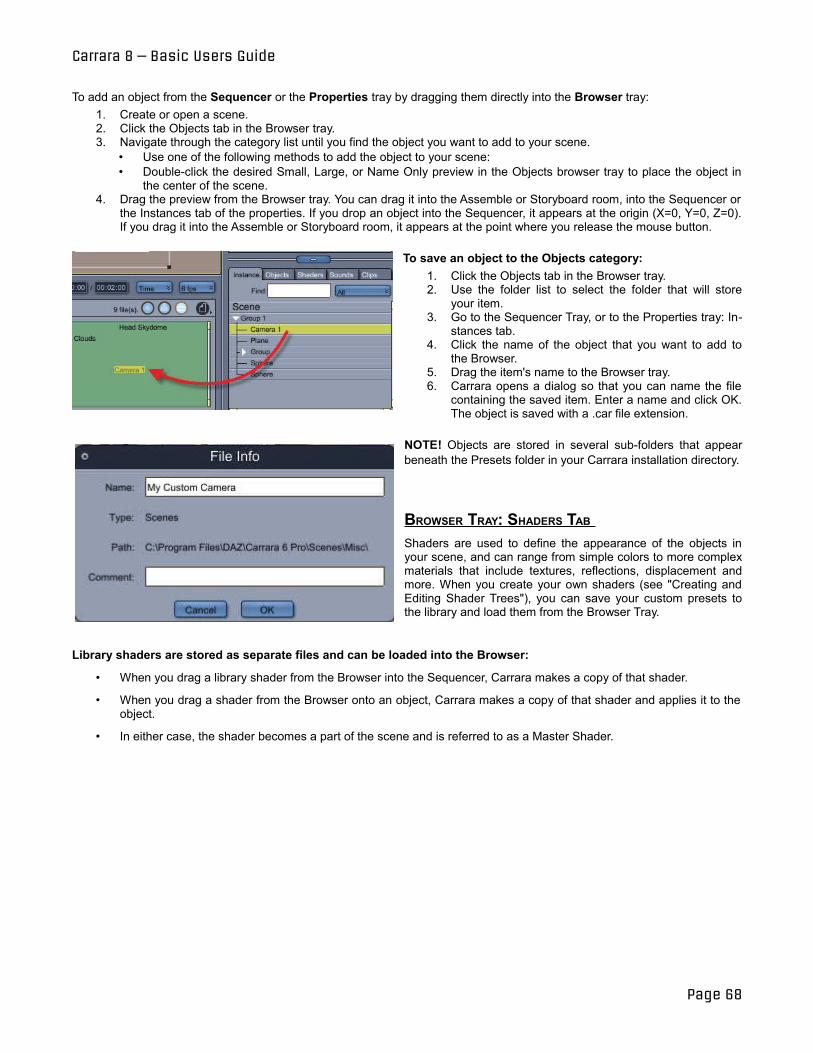
Carrara 8 – Basic Users Guide
To add an object from the Sequencer or the Properties tray by dragging them directly into the Browser tray:1. Create or open a scene. 2. Click the Objects tab in the Browser tray. 3. Navigate through the category list until you find the object you want to add to your scene.
• Use one of the following methods to add the object to your scene: • Double-click the desired Small, Large, or Name Only preview in the Objects browser tray to place the object in
the center of the scene. 4. Drag the preview from the Browser tray. You can drag it into the Assemble or Storyboard room, into the Sequencer or
the Instances tab of the properties. If you drop an object into the Sequencer, it appears at the origin (X=0, Y=0, Z=0). If you drag it into the Assemble or Storyboard room, it appears at the point where you release the mouse button.
To save an object to the Objects category: 1. Click the Objects tab in the Browser tray. 2. Use the folder list to select the folder that will store
your item. 3. Go to the Sequencer Tray, or to the Properties tray: In
stances tab. 4. Click the name of the object that you want to add to
the Browser. 5. Drag the item's name to the Browser tray. 6. Carrara opens a dialog so that you can name the file
containing the saved item. Enter a name and click OK. The object is saved with a .car file extension.
NOTE! Objects are stored in several sub-folders that appear beneath the Presets folder in your Carrara installation directory.
BROWSER TRAY: SHADERS TAB Shaders are used to define the appearance of the objects in your scene, and can range from simple colors to more complex materials that include textures, reflections, displacement and more. When you create your own shaders (see "Creating and Editing Shader Trees"), you can save your custom presets to the library and load them from the Browser Tray.
Library shaders are stored as separate files and can be loaded into the Browser:
• When you drag a library shader from the Browser into the Sequencer, Carrara makes a copy of that shader.
• When you drag a shader from the Browser onto an object, Carrara makes a copy of that shader and applies it to the object.
• In either case, the shader becomes a part of the scene and is referred to as a Master Shader.
Page 68
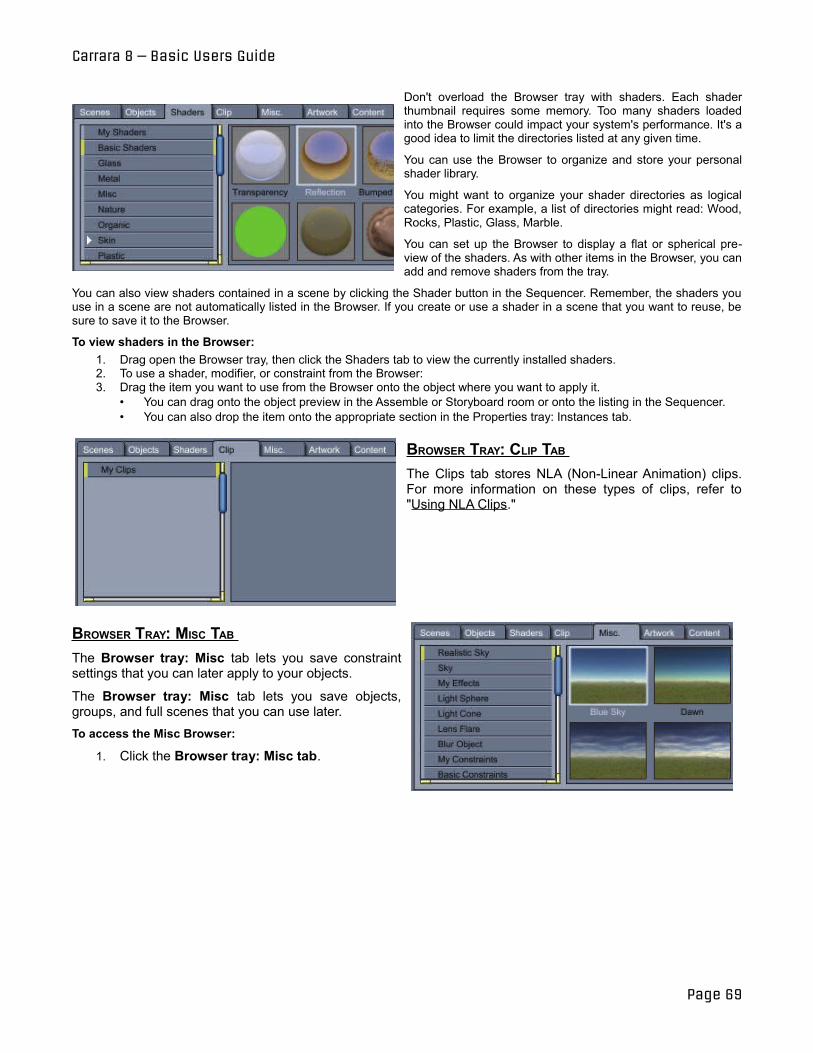
Carrara 8 – Basic Users Guide
Don't overload the Browser tray with shaders. Each shader thumbnail requires some memory. Too many shaders loaded into the Browser could impact your system's performance. It's a good idea to limit the directories listed at any given time.
You can use the Browser to organize and store your personal shader library.
You might want to organize your shader directories as logical categories. For example, a list of directories might read: Wood, Rocks, Plastic, Glass, Marble.
You can set up the Browser to display a flat or spherical preview of the shaders. As with other items in the Browser, you can add and remove shaders from the tray.
You can also view shaders contained in a scene by clicking the Shader button in the Sequencer. Remember, the shaders you use in a scene are not automatically listed in the Browser. If you create or use a shader in a scene that you want to reuse, be sure to save it to the Browser.
To view shaders in the Browser: 1. Drag open the Browser tray, then click the Shaders tab to view the currently installed shaders. 2. To use a shader, modifier, or constraint from the Browser: 3. Drag the item you want to use from the Browser onto the object where you want to apply it.
• You can drag onto the object preview in the Assemble or Storyboard room or onto the listing in the Sequencer. • You can also drop the item onto the appropriate section in the Properties tray: Instances tab.
BROWSER TRAY: CLIP TAB The Clips tab stores NLA (Non-Linear Animation) clips. For more information on these types of clips, refer to "Using NLA Clips."
BROWSER TRAY: MISC TAB The Browser tray: Misc tab lets you save constraint settings that you can later apply to your objects.
The Browser tray: Misc tab lets you save objects, groups, and full scenes that you can use later. To access the Misc Browser:
1. Click the Browser tray: Misc tab.
Page 69

Carrara 8 – Basic Users Guide
BROWSER TRAY: ARTWORK TAB The Artwork tab allows you to store your renders in the browser. After you render an image, save it to a folder of your choice. Use controls in the Browser menu to add the folder to the Artwork tab. Then save your images to the designated folder.
Page 70
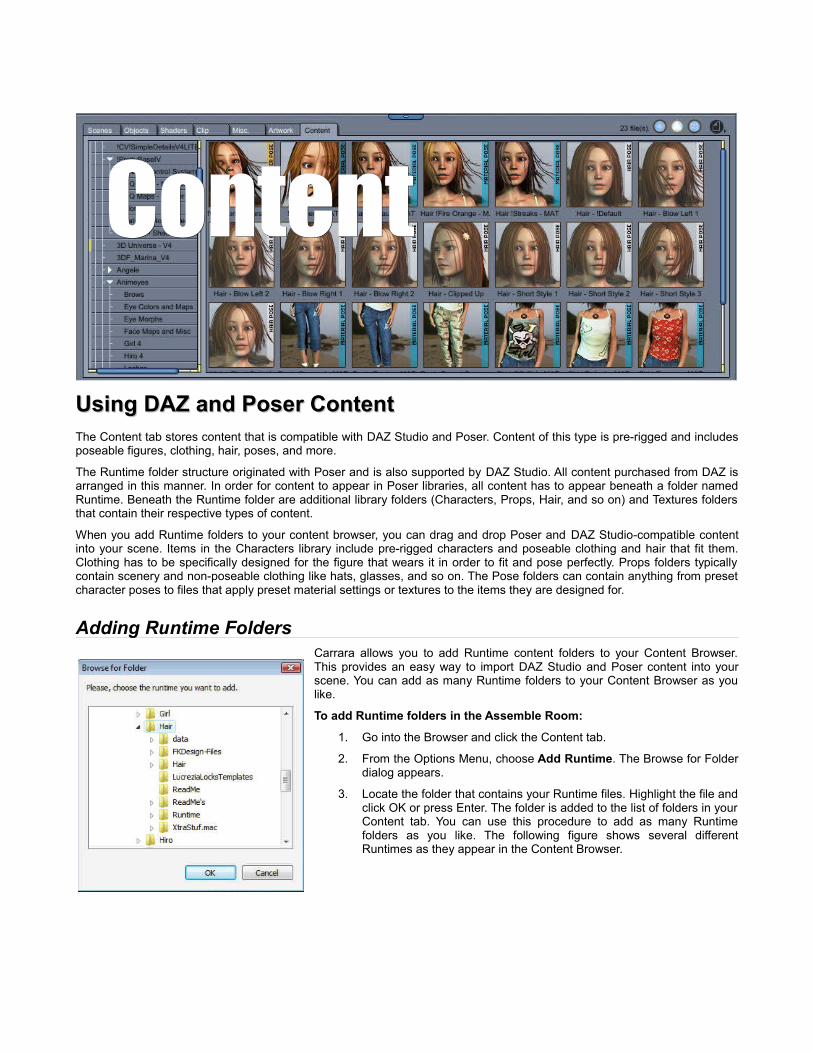
Using DAZ and Poser ContentUsing DAZ and Poser ContentThe Content tab stores content that is compatible with DAZ Studio and Poser. Content of this type is pre-rigged and includes poseable figures, clothing, hair, poses, and more.
The Runtime folder structure originated with Poser and is also supported by DAZ Studio. All content purchased from DAZ is arranged in this manner. In order for content to appear in Poser libraries, all content has to appear beneath a folder named Runtime. Beneath the Runtime folder are additional library folders (Characters, Props, Hair, and so on) and Textures folders that contain their respective types of content.
When you add Runtime folders to your content browser, you can drag and drop Poser and DAZ Studio-compatible content into your scene. Items in the Characters library include pre-rigged characters and poseable clothing and hair that fit them. Clothing has to be specifically designed for the figure that wears it in order to fit and pose perfectly. Props folders typically contain scenery and non-poseable clothing like hats, glasses, and so on. The Pose folders can contain anything from preset character poses to files that apply preset material settings or textures to the items they are designed for.
Adding Runtime Folders Carrara allows you to add Runtime content folders to your Content Browser. This provides an easy way to import DAZ Studio and Poser content into your scene. You can add as many Runtime folders to your Content Browser as you like.
To add Runtime folders in the Assemble Room:
1. Go into the Browser and click the Content tab.
2. From the Options Menu, choose Add Runtime. The Browse for Folder dialog appears.
3. Locate the folder that contains your Runtime files. Highlight the file and click OK or press Enter. The folder is added to the list of folders in your Content tab. You can use this procedure to add as many Runtime folders as you like. The following figure shows several different Runtimes as they appear in the Content Browser.
ContentContent
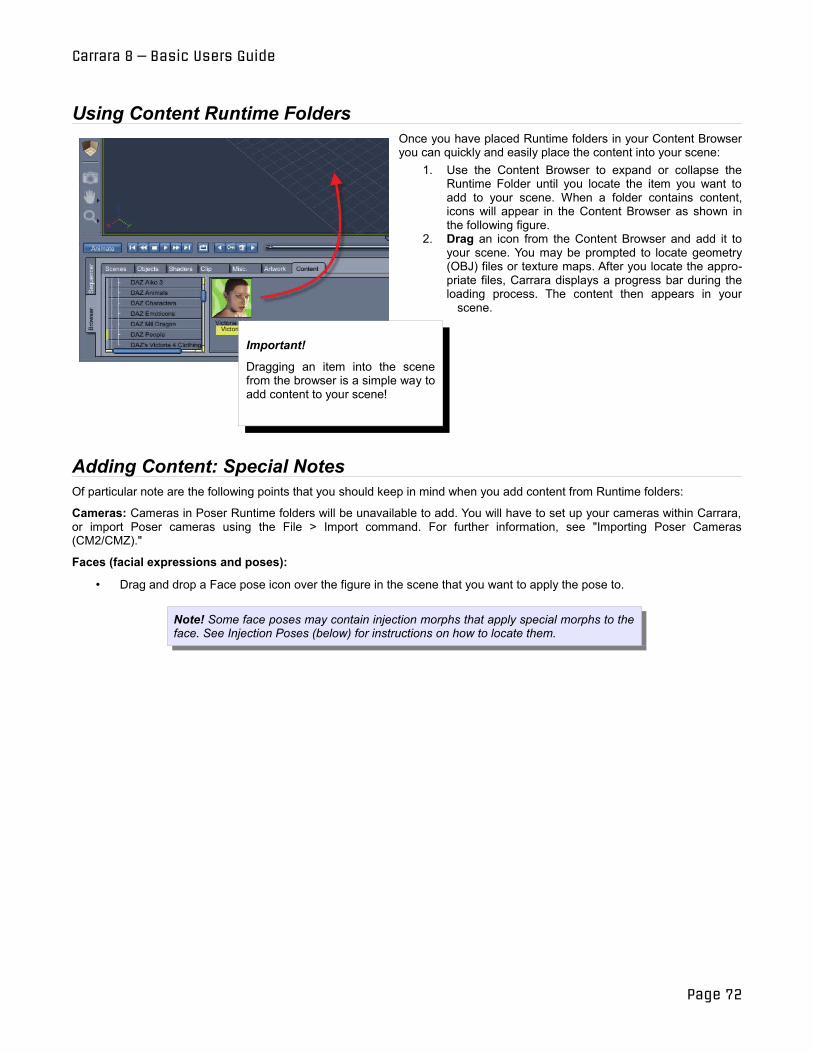
Carrara 8 – Basic Users Guide
Using Content Runtime Folders Once you have placed Runtime folders in your Content Browser you can quickly and easily place the content into your scene:
1. Use the Content Browser to expand or collapse the Runtime Folder until you locate the item you want to add to your scene. When a folder contains content, icons will appear in the Content Browser as shown in the following figure.
2. Drag an icon from the Content Browser and add it to your scene. You may be prompted to locate geometry (OBJ) files or texture maps. After you locate the appropriate files, Carrara displays a progress bar during the loading process. The content then appears in your
scene.
Adding Content: Special Notes Of particular note are the following points that you should keep in mind when you add content from Runtime folders:
Cameras: Cameras in Poser Runtime folders will be unavailable to add. You will have to set up your cameras within Carrara, or import Poser cameras using the File > Import command. For further information, see "Importing Poser Cameras (CM2/CMZ)."
Faces (facial expressions and poses):
• Drag and drop a Face pose icon over the figure in the scene that you want to apply the pose to.
Note! Some face poses may contain injection morphs that apply special morphs to the face. See Injection Poses (below) for instructions on how to locate them.
Page 72
Important!
Dragging an item into the scene from the browser is a simple way to add content to your scene!
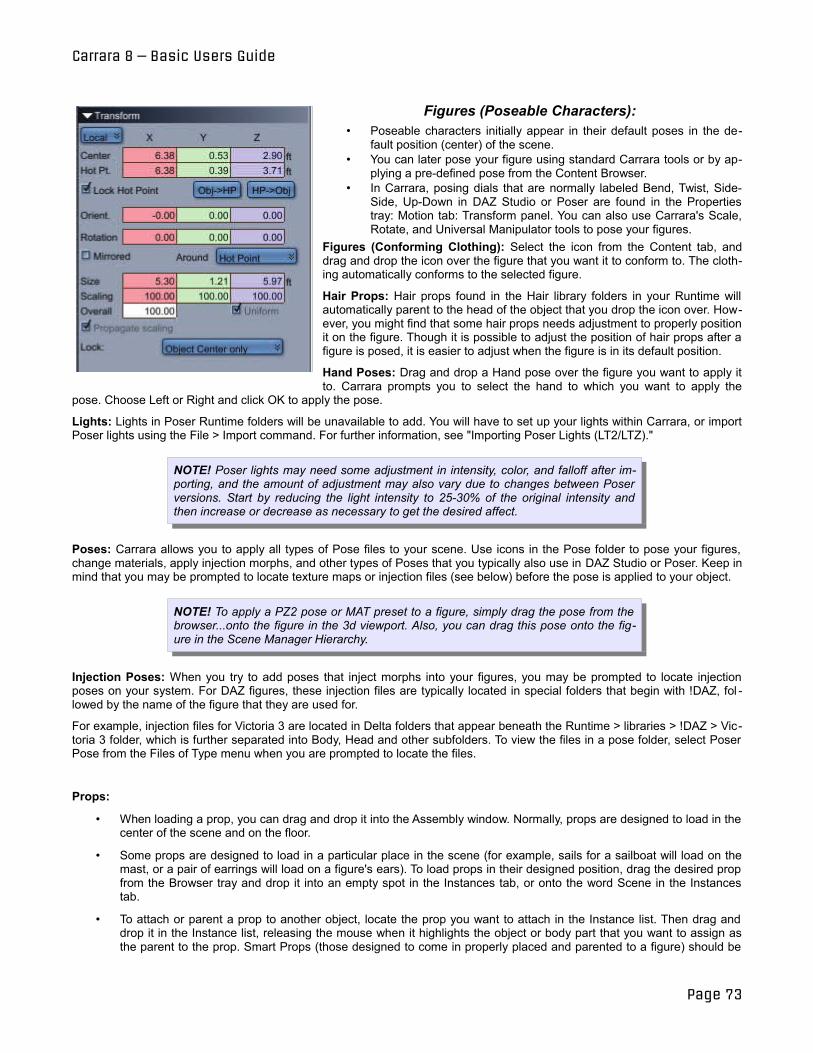
Carrara 8 – Basic Users Guide
Figures (Poseable Characters): • Poseable characters initially appear in their default poses in the de
fault position (center) of the scene. • You can later pose your figure using standard Carrara tools or by ap
plying a pre-defined pose from the Content Browser. • In Carrara, posing dials that are normally labeled Bend, Twist, Side-
Side, Up-Down in DAZ Studio or Poser are found in the Properties tray: Motion tab: Transform panel. You can also use Carrara's Scale, Rotate, and Universal Manipulator tools to pose your figures.
Figures (Conforming Clothing): Select the icon from the Content tab, and drag and drop the icon over the figure that you want it to conform to. The clothing automatically conforms to the selected figure.
Hair Props: Hair props found in the Hair library folders in your Runtime will automatically parent to the head of the object that you drop the icon over. However, you might find that some hair props needs adjustment to properly position it on the figure. Though it is possible to adjust the position of hair props after a figure is posed, it is easier to adjust when the figure is in its default position.
Hand Poses: Drag and drop a Hand pose over the figure you want to apply it to. Carrara prompts you to select the hand to which you want to apply the
pose. Choose Left or Right and click OK to apply the pose.
Lights: Lights in Poser Runtime folders will be unavailable to add. You will have to set up your lights within Carrara, or import Poser lights using the File > Import command. For further information, see "Importing Poser Lights (LT2/LTZ)."
NOTE! Poser lights may need some adjustment in intensity, color, and falloff after importing, and the amount of adjustment may also vary due to changes between Poser versions. Start by reducing the light intensity to 25-30% of the original intensity and then increase or decrease as necessary to get the desired affect.
Poses: Carrara allows you to apply all types of Pose files to your scene. Use icons in the Pose folder to pose your figures, change materials, apply injection morphs, and other types of Poses that you typically also use in DAZ Studio or Poser. Keep in mind that you may be prompted to locate texture maps or injection files (see below) before the pose is applied to your object.
NOTE! To apply a PZ2 pose or MAT preset to a figure, simply drag the pose from the browser...onto the figure in the 3d viewport. Also, you can drag this pose onto the figure in the Scene Manager Hierarchy.
Injection Poses: When you try to add poses that inject morphs into your figures, you may be prompted to locate injection poses on your system. For DAZ figures, these injection files are typically located in special folders that begin with !DAZ, fol lowed by the name of the figure that they are used for.
For example, injection files for Victoria 3 are located in Delta folders that appear beneath the Runtime > libraries > !DAZ > Victoria 3 folder, which is further separated into Body, Head and other subfolders. To view the files in a pose folder, select Poser Pose from the Files of Type menu when you are prompted to locate the files.
Props:
• When loading a prop, you can drag and drop it into the Assembly window. Normally, props are designed to load in the center of the scene and on the floor.
• Some props are designed to load in a particular place in the scene (for example, sails for a sailboat will load on the mast, or a pair of earrings will load on a figure's ears). To load props in their designed position, drag the desired prop from the Browser tray and drop it into an empty spot in the Instances tab, or onto the word Scene in the Instances tab.
• To attach or parent a prop to another object, locate the prop you want to attach in the Instance list. Then drag and drop it in the Instance list, releasing the mouse when it highlights the object or body part that you want to assign as the parent to the prop. Smart Props (those designed to come in properly placed and parented to a figure) should be
Page 73
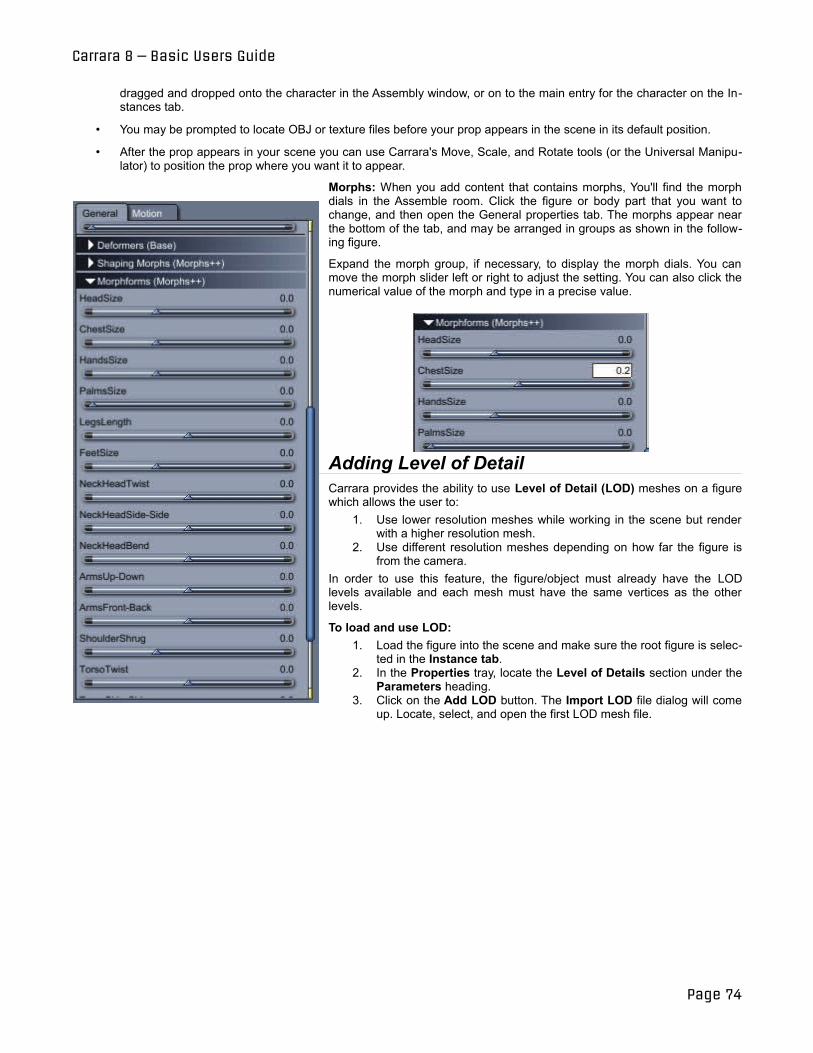
Carrara 8 – Basic Users Guide
dragged and dropped onto the character in the Assembly window, or on to the main entry for the character on the Instances tab.
• You may be prompted to locate OBJ or texture files before your prop appears in the scene in its default position.
• After the prop appears in your scene you can use Carrara's Move, Scale, and Rotate tools (or the Universal Manipulator) to position the prop where you want it to appear.
Morphs: When you add content that contains morphs, You'll find the morph dials in the Assemble room. Click the figure or body part that you want to change, and then open the General properties tab. The morphs appear near the bottom of the tab, and may be arranged in groups as shown in the following figure.
Expand the morph group, if necessary, to display the morph dials. You can move the morph slider left or right to adjust the setting. You can also click the numerical value of the morph and type in a precise value.
Adding Level of Detail Carrara provides the ability to use Level of Detail (LOD) meshes on a figure which allows the user to:
1. Use lower resolution meshes while working in the scene but render with a higher resolution mesh.
2. Use different resolution meshes depending on how far the figure is from the camera.
In order to use this feature, the figure/object must already have the LOD levels available and each mesh must have the same vertices as the other levels.
To load and use LOD: 1. Load the figure into the scene and make sure the root figure is selec
ted in the Instance tab. 2. In the Properties tray, locate the Level of Details section under the
Parameters heading. 3. Click on the Add LOD button. The Import LOD file dialog will come
up. Locate, select, and open the first LOD mesh file.
Page 74
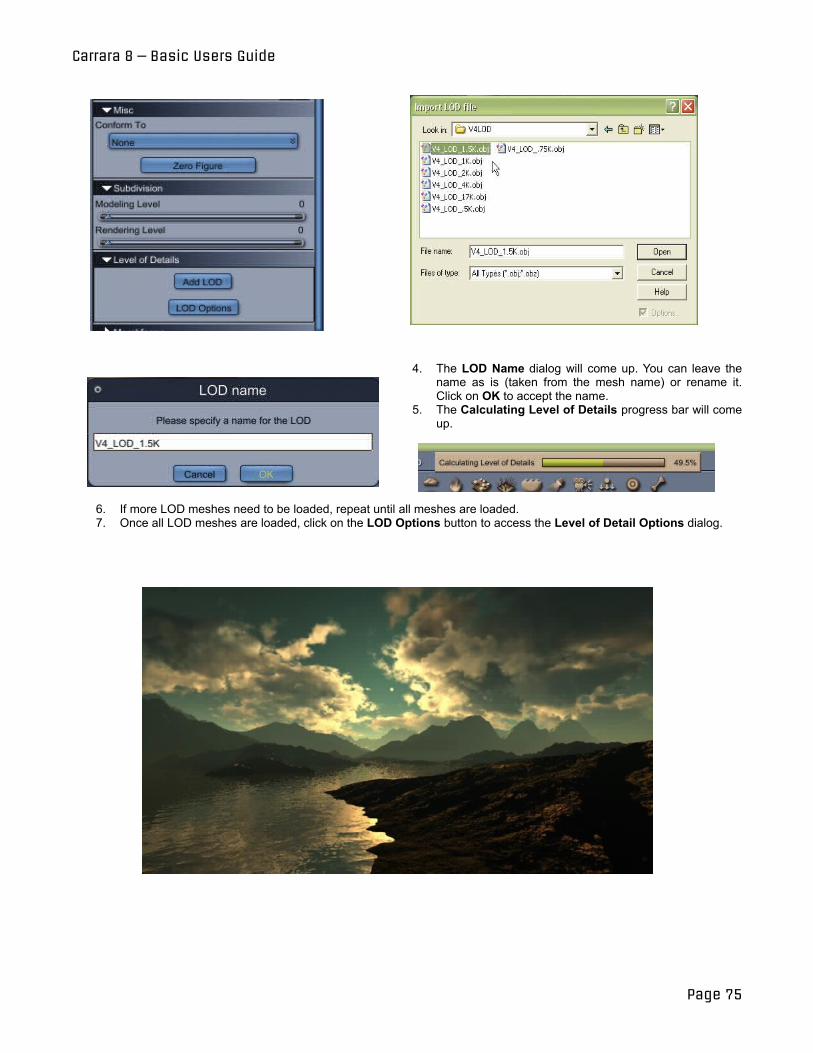
Carrara 8 – Basic Users Guide
4. The LOD Name dialog will come up. You can leave the name as is (taken from the mesh name) or rename it. Click on OK to accept the name.
5. The Calculating Level of Details progress bar will come up.
6. If more LOD meshes need to be loaded, repeat until all meshes are loaded. 7. Once all LOD meshes are loaded, click on the LOD Options button to access the Level of Detail Options dialog.
Page 75
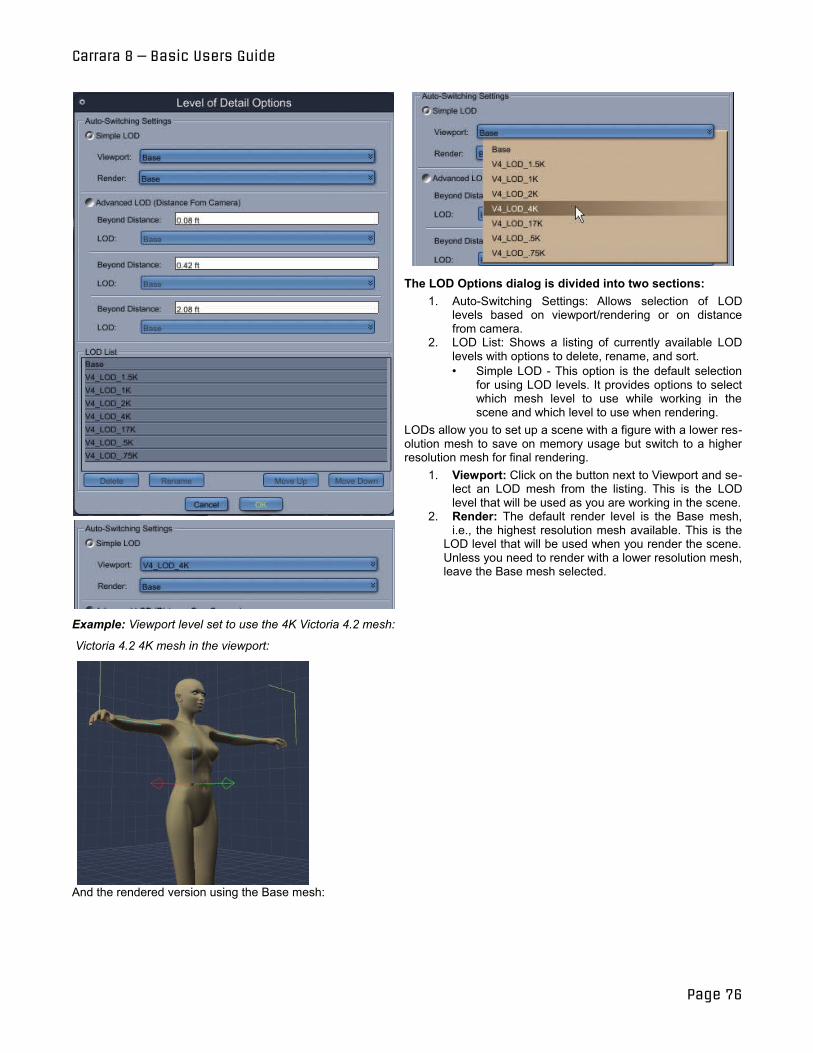
Carrara 8 – Basic Users Guide
The LOD Options dialog is divided into two sections: 1. Auto-Switching Settings: Allows selection of LOD
levels based on viewport/rendering or on distance from camera.
2. LOD List: Shows a listing of currently available LOD levels with options to delete, rename, and sort. • Simple LOD - This option is the default selection
for using LOD levels. It provides options to select which mesh level to use while working in the scene and which level to use when rendering.
LODs allow you to set up a scene with a figure with a lower resolution mesh to save on memory usage but switch to a higher resolution mesh for final rendering.
1. Viewport: Click on the button next to Viewport and select an LOD mesh from the listing. This is the LOD level that will be used as you are working in the scene.
2. Render: The default render level is the Base mesh, i.e., the highest resolution mesh available. This is the
LOD level that will be used when you render the scene. Unless you need to render with a lower resolution mesh, leave the Base mesh selected.
Example: Viewport level set to use the 4K Victoria 4.2 mesh:
Victoria 4.2 4K mesh in the viewport:
And the rendered version using the Base mesh:
Page 76
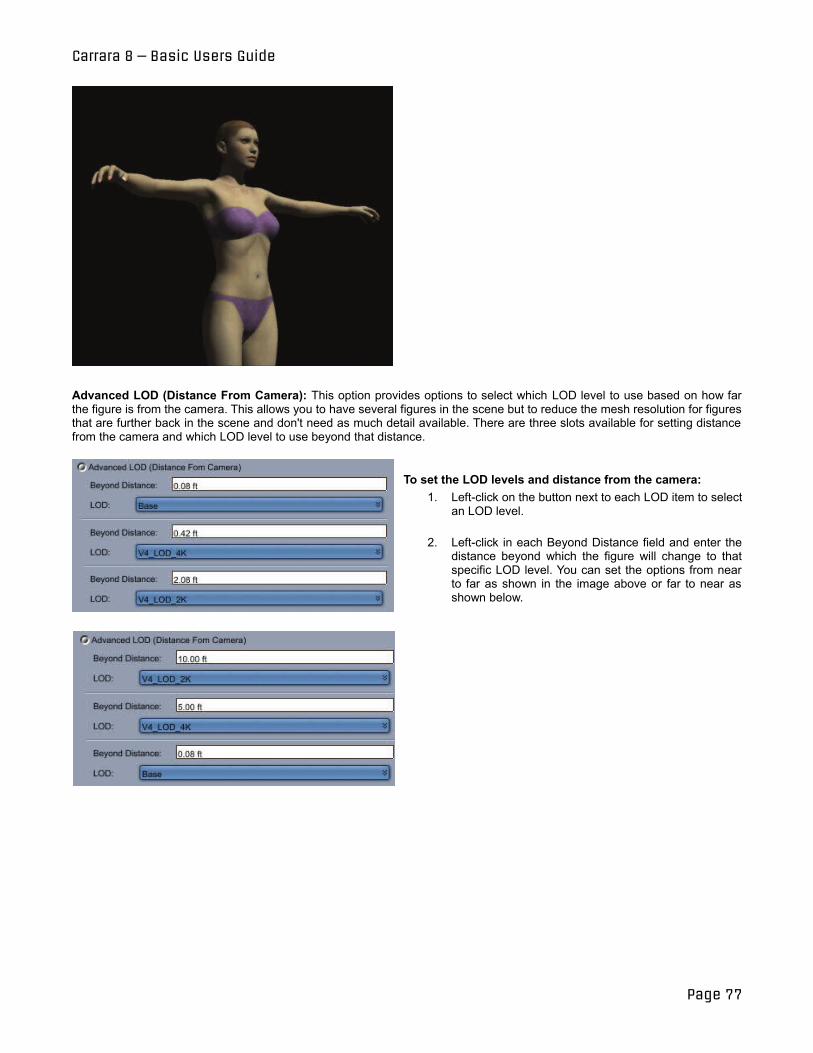
Carrara 8 – Basic Users Guide
Advanced LOD (Distance From Camera): This option provides options to select which LOD level to use based on how far the figure is from the camera. This allows you to have several figures in the scene but to reduce the mesh resolution for figures that are further back in the scene and don't need as much detail available. There are three slots available for setting distance from the camera and which LOD level to use beyond that distance.
To set the LOD levels and distance from the camera: 1. Left-click on the button next to each LOD item to select
an LOD level.
2. Left-click in each Beyond Distance field and enter the distance beyond which the figure will change to that specific LOD level. You can set the options from near to far as shown in the image above or far to near as shown below.
Page 77
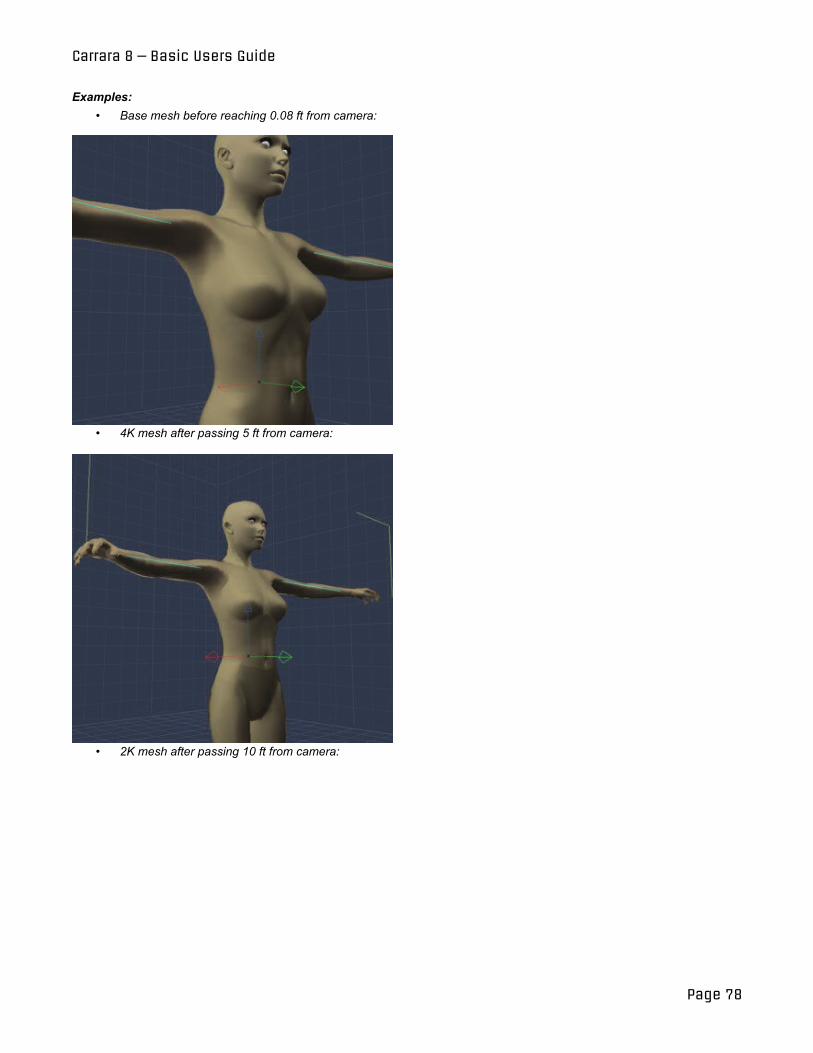
Carrara 8 – Basic Users Guide
Examples: • Base mesh before reaching 0.08 ft from camera:
• 4K mesh after passing 5 ft from camera:
• 2K mesh after passing 10 ft from camera:
Page 78
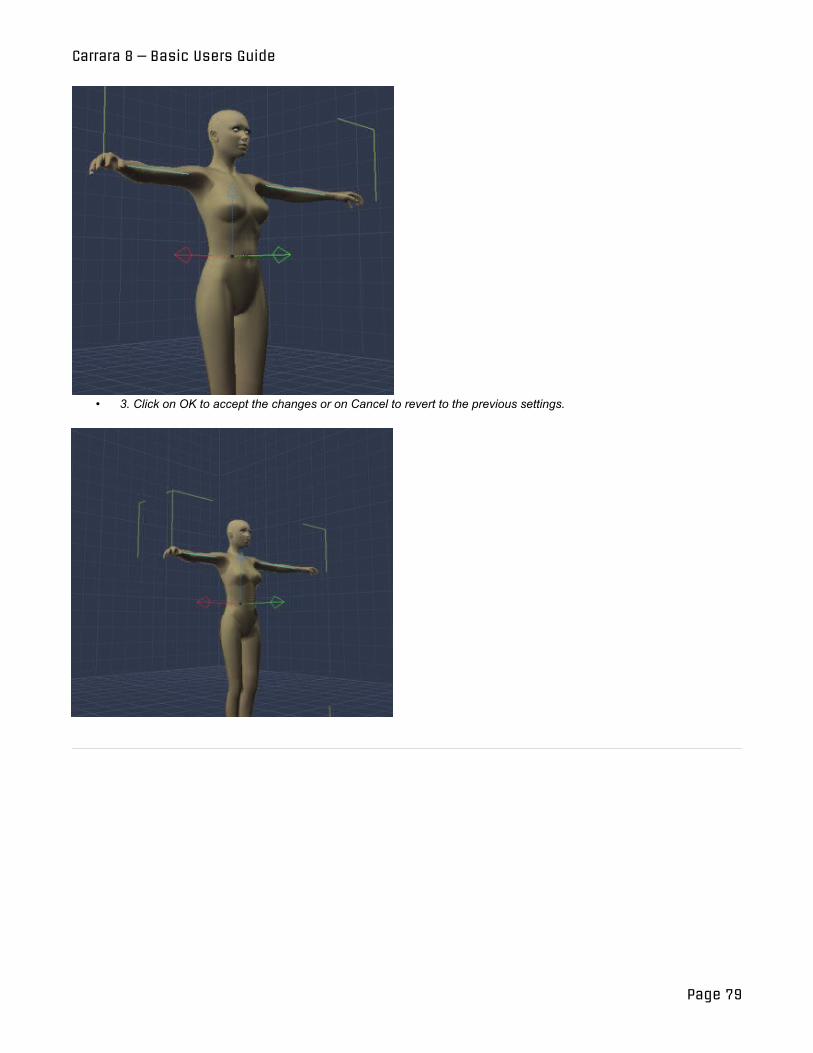
Carrara 8 – Basic Users Guide
• 3. Click on OK to accept the changes or on Cancel to revert to the previous settings.
Page 79
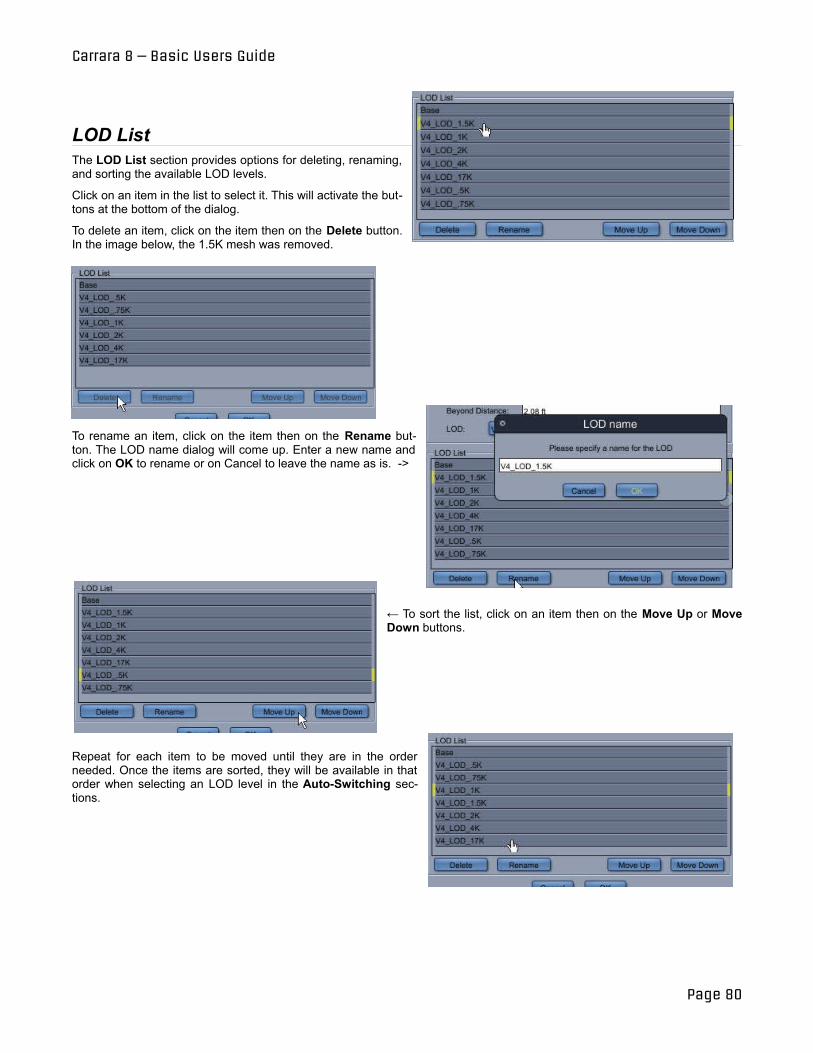
Carrara 8 – Basic Users Guide
LOD List The LOD List section provides options for deleting, renaming, and sorting the available LOD levels.
Click on an item in the list to select it. This will activate the buttons at the bottom of the dialog.
To delete an item, click on the item then on the Delete button. In the image below, the 1.5K mesh was removed.
To rename an item, click on the item then on the Rename button. The LOD name dialog will come up. Enter a new name and click on OK to rename or on Cancel to leave the name as is. ->
← To sort the list, click on an item then on the Move Up or Move Down buttons.
Repeat for each item to be moved until they are in the order needed. Once the items are sorted, they will be available in that order when selecting an LOD level in the Auto-Switching sections.
Page 80
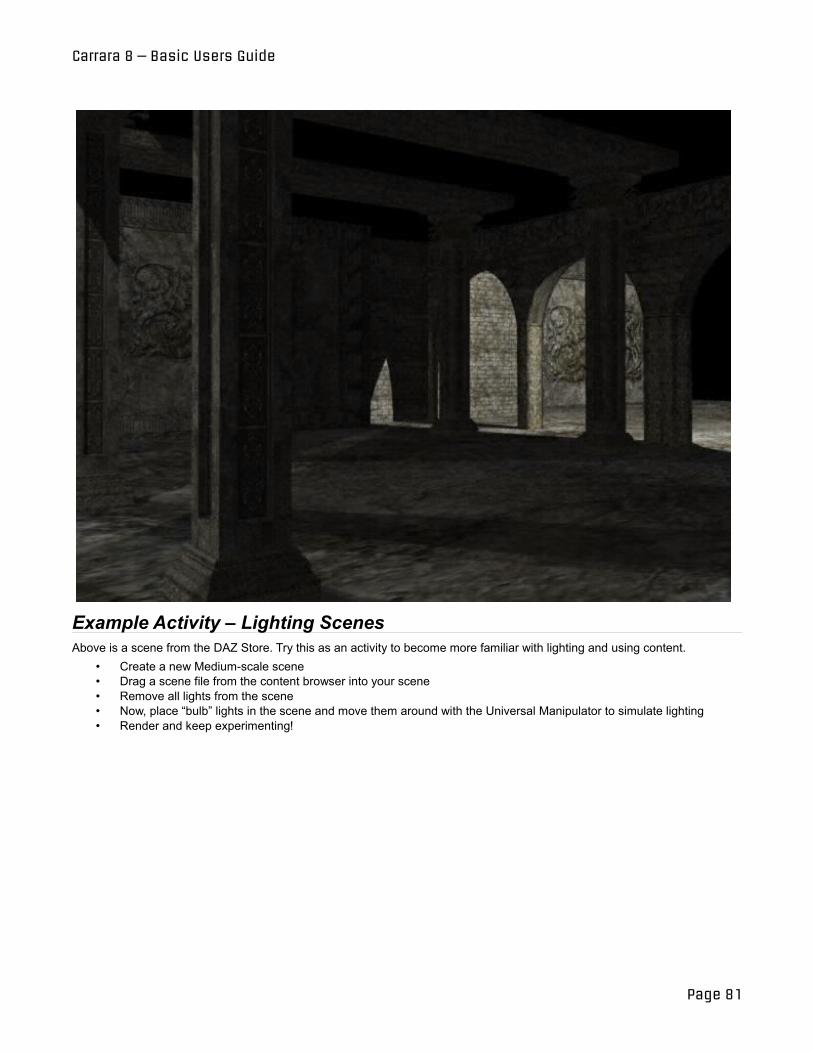
Carrara 8 – Basic Users Guide
Example Activity – Lighting ScenesAbove is a scene from the DAZ Store. Try this as an activity to become more familiar with lighting and using content.
• Create a new Medium-scale scene• Drag a scene file from the content browser into your scene• Remove all lights from the scene• Now, place “bulb” lights in the scene and move them around with the Universal Manipulator to simulate lighting• Render and keep experimenting!
Page 81
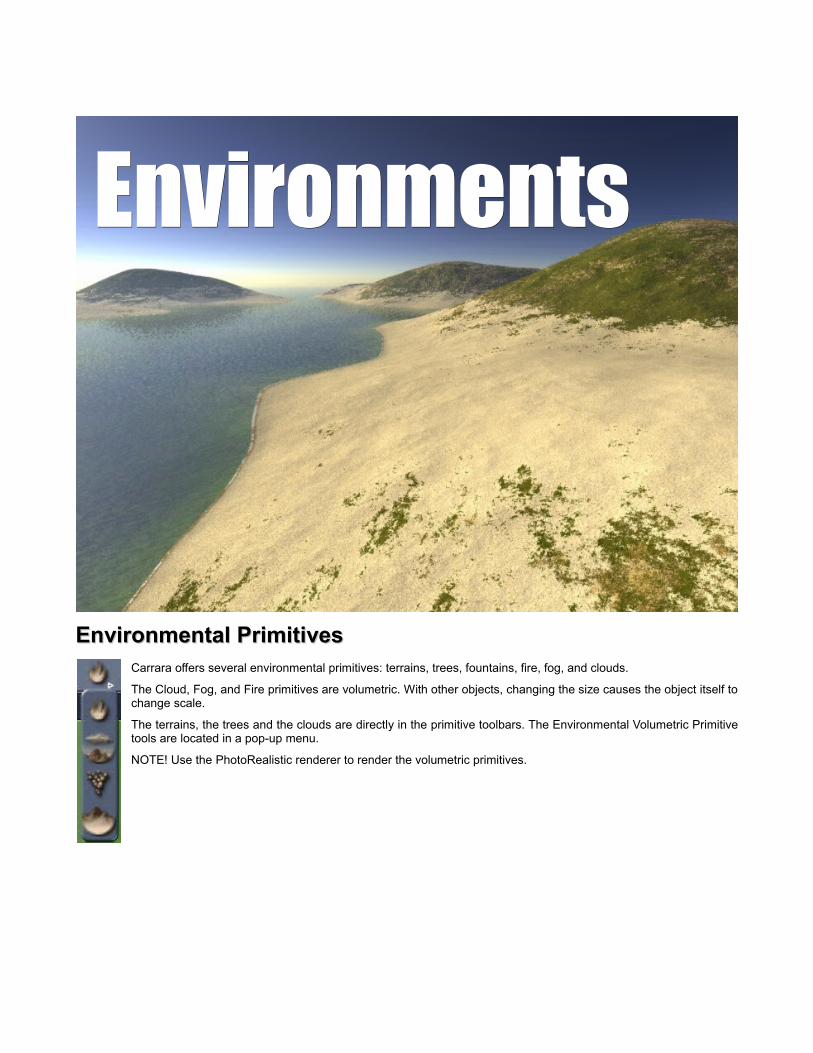
Environmental Primitives Environmental Primitives Carrara offers several environmental primitives: terrains, trees, fountains, fire, fog, and clouds.
The Cloud, Fog, and Fire primitives are volumetric. With other objects, changing the size causes the object itself to change scale.
The terrains, the trees and the clouds are directly in the primitive toolbars. The Environmental Volumetric Primitive tools are located in a pop-up menu.
NOTE! Use the PhotoRealistic renderer to render the volumetric primitives.
EnvironmentsEnvironments
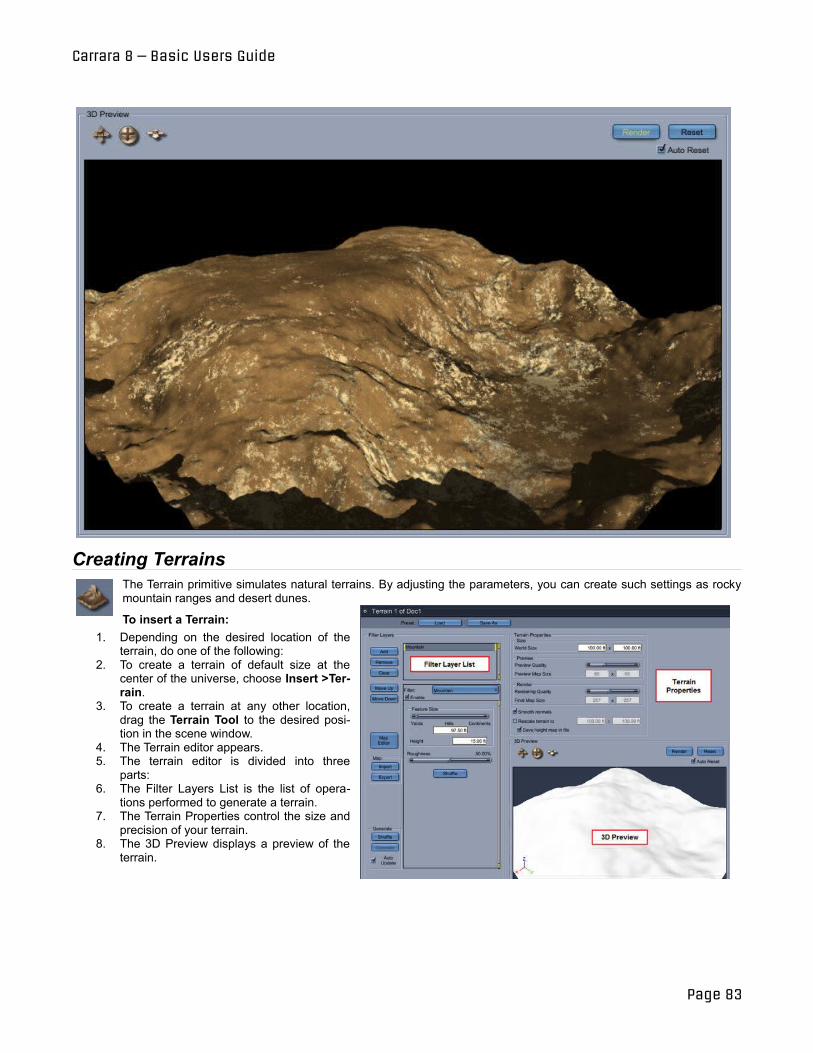
Carrara 8 – Basic Users Guide
Creating Terrains The Terrain primitive simulates natural terrains. By adjusting the parameters, you can create such settings as rocky mountain ranges and desert dunes.
To insert a Terrain: 1. Depending on the desired location of the
terrain, do one of the following: 2. To create a terrain of default size at the
center of the universe, choose Insert >Terrain.
3. To create a terrain at any other location, drag the Terrain Tool to the desired position in the scene window.
4. The Terrain editor appears. 5. The terrain editor is divided into three
parts: 6. The Filter Layers List is the list of opera
tions performed to generate a terrain. 7. The Terrain Properties control the size and
precision of your terrain. 8. The 3D Preview displays a preview of the
terrain.
Page 83
TerrainsTerrains
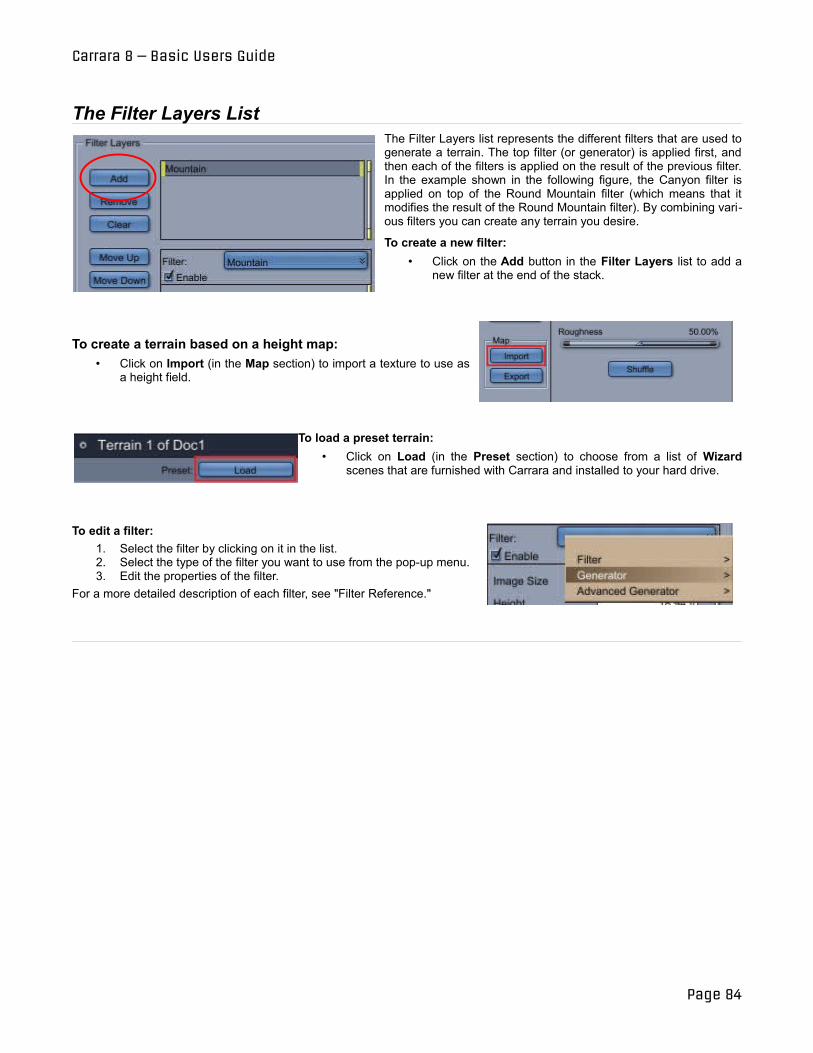
Carrara 8 – Basic Users Guide
The Filter Layers List The Filter Layers list represents the different filters that are used to generate a terrain. The top filter (or generator) is applied first, and then each of the filters is applied on the result of the previous filter. In the example shown in the following figure, the Canyon filter is applied on top of the Round Mountain filter (which means that it modifies the result of the Round Mountain filter). By combining various filters you can create any terrain you desire.
To create a new filter: • Click on the Add button in the Filter Layers list to add a
new filter at the end of the stack.
To create a terrain based on a height map: • Click on Import (in the Map section) to import a texture to use as
a height field.
To load a preset terrain: • Click on Load (in the Preset section) to choose from a list of Wizard
scenes that are furnished with Carrara and installed to your hard drive.
To edit a filter: 1. Select the filter by clicking on it in the list. 2. Select the type of the filter you want to use from the pop-up menu. 3. Edit the properties of the filter.
For a more detailed description of each filter, see "Filter Reference."
Page 84

Carrara 8 – Basic Users Guide
The Terrain Properties The Terrain Properties control the size and precision of your terrain.
The properties are: • World Size: The reference size of your terrain for the fil
ters. This is not the size of the terrain in your scene. • Preview Quality: Adjust the slider to view less or more
detail in the 3D Preview. • Preview Map Size: Enter the desired dimensions for the
preview map. Higher values provide more detail, and lower values use less resources.
• Rendering Quality: Adjust the slider to view less or more detail in the rendered image in the 3D preview window.
• Final Map Size: Enter the desired dimensions for the map used for the final render. Higher values provide more de
tail, and lower values use less resources. • Rescale terrain to: To change the size of the scene, check this option and enter the desired dimensions in the size
fields. • Save height map in file: Ensures that the terrain is stored in the file. This avoids recalculating the terrain every time
you load the file. However, be careful, as this option can generate large files.
Terrain EditorThe 3D preview allows you to view the terrain as it is edited. You can move and rotate the point of view using the camera tools. The Render button will raytrace the preview to create a more realistic preview of your terrain.
The preview is usually updated each time your modify your terrain. However, for complex filters, calculating the preview after each change can be too slow. In that case, uncheck Auto-Update and use the Generate button to update the preview.
Creating a Custom Terrain Sometimes it is more convenient to edit the terrain directly. For example, you may want to make a mountain a little lower or place a valley in the middle of your terrain.
To do so, click on the Map Editor button. It converts the current filter list to a static height field and opens a new editor. Note that once you have edited a terrain manually, you cannot modify the filter parameters further. You can however apply new filters on top of your terrain.
Page 85
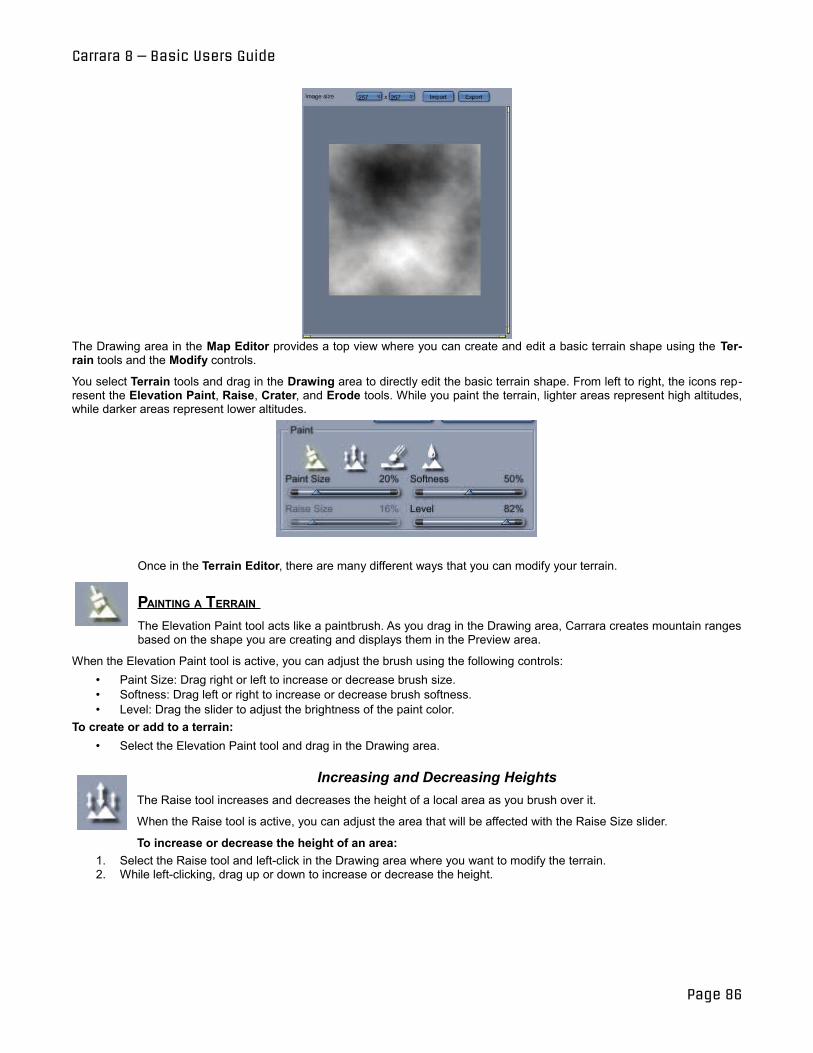
Carrara 8 – Basic Users Guide
The Drawing area in the Map Editor provides a top view where you can create and edit a basic terrain shape using the Terrain tools and the Modify controls.
You select Terrain tools and drag in the Drawing area to directly edit the basic terrain shape. From left to right, the icons represent the Elevation Paint, Raise, Crater, and Erode tools. While you paint the terrain, lighter areas represent high altitudes, while darker areas represent lower altitudes.
Once in the Terrain Editor, there are many different ways that you can modify your terrain.
PAINTING A TERRAIN The Elevation Paint tool acts like a paintbrush. As you drag in the Drawing area, Carrara creates mountain ranges based on the shape you are creating and displays them in the Preview area.
When the Elevation Paint tool is active, you can adjust the brush using the following controls: • Paint Size: Drag right or left to increase or decrease brush size. • Softness: Drag left or right to increase or decrease brush softness. • Level: Drag the slider to adjust the brightness of the paint color.
To create or add to a terrain: • Select the Elevation Paint tool and drag in the Drawing area.
Increasing and Decreasing Heights The Raise tool increases and decreases the height of a local area as you brush over it.
When the Raise tool is active, you can adjust the area that will be affected with the Raise Size slider.
To increase or decrease the height of an area: 1. Select the Raise tool and left-click in the Drawing area where you want to modify the terrain. 2. While left-clicking, drag up or down to increase or decrease the height.
Page 86
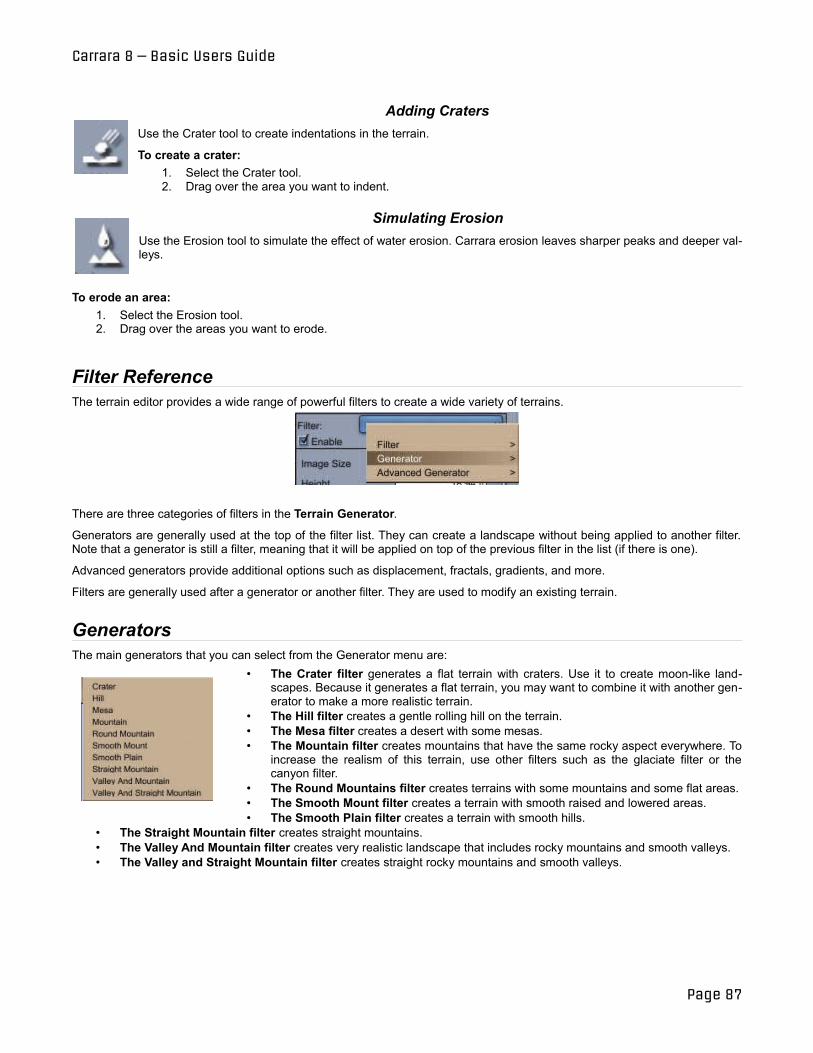
Carrara 8 – Basic Users Guide
Adding Craters Use the Crater tool to create indentations in the terrain.
To create a crater: 1. Select the Crater tool. 2. Drag over the area you want to indent.
Simulating Erosion Use the Erosion tool to simulate the effect of water erosion. Carrara erosion leaves sharper peaks and deeper valleys.
To erode an area: 1. Select the Erosion tool. 2. Drag over the areas you want to erode.
Filter Reference The terrain editor provides a wide range of powerful filters to create a wide variety of terrains.
There are three categories of filters in the Terrain Generator.
Generators are generally used at the top of the filter list. They can create a landscape without being applied to another filter. Note that a generator is still a filter, meaning that it will be applied on top of the previous filter in the list (if there is one).
Advanced generators provide additional options such as displacement, fractals, gradients, and more.
Filters are generally used after a generator or another filter. They are used to modify an existing terrain.
Generators The main generators that you can select from the Generator menu are:
• The Crater filter generates a flat terrain with craters. Use it to create moon-like landscapes. Because it generates a flat terrain, you may want to combine it with another generator to make a more realistic terrain.
• The Hill filter creates a gentle rolling hill on the terrain. • The Mesa filter creates a desert with some mesas. • The Mountain filter creates mountains that have the same rocky aspect everywhere. To
increase the realism of this terrain, use other filters such as the glaciate filter or the canyon filter.
• The Round Mountains filter creates terrains with some mountains and some flat areas. • The Smooth Mount filter creates a terrain with smooth raised and lowered areas. • The Smooth Plain filter creates a terrain with smooth hills.
• The Straight Mountain filter creates straight mountains. • The Valley And Mountain filter creates very realistic landscape that includes rocky mountains and smooth valleys. • The Valley and Straight Mountain filter creates straight rocky mountains and smooth valleys.
Page 87
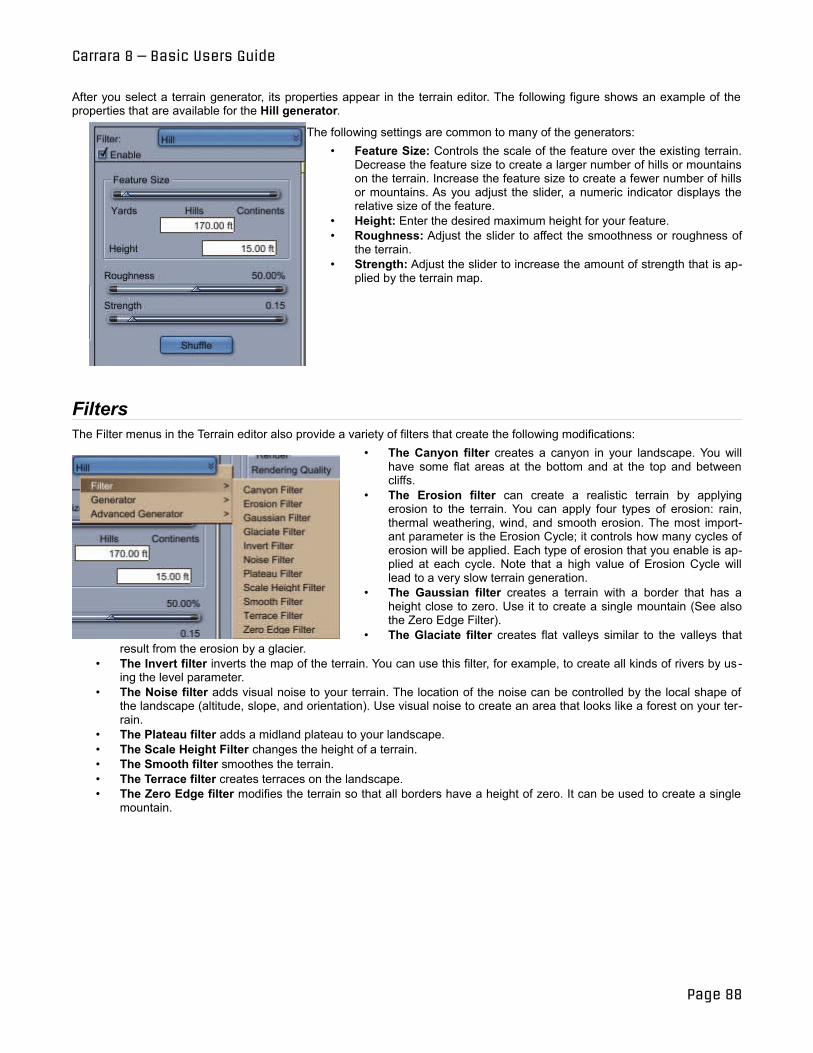
Carrara 8 – Basic Users Guide
After you select a terrain generator, its properties appear in the terrain editor. The following figure shows an example of the properties that are available for the Hill generator.
The following settings are common to many of the generators: • Feature Size: Controls the scale of the feature over the existing terrain.
Decrease the feature size to create a larger number of hills or mountains on the terrain. Increase the feature size to create a fewer number of hills or mountains. As you adjust the slider, a numeric indicator displays the relative size of the feature.
• Height: Enter the desired maximum height for your feature. • Roughness: Adjust the slider to affect the smoothness or roughness of
the terrain. • Strength: Adjust the slider to increase the amount of strength that is ap
plied by the terrain map.
Filters The Filter menus in the Terrain editor also provide a variety of filters that create the following modifications:
• The Canyon filter creates a canyon in your landscape. You will have some flat areas at the bottom and at the top and between cliffs.
• The Erosion filter can create a realistic terrain by applying erosion to the terrain. You can apply four types of erosion: rain, thermal weathering, wind, and smooth erosion. The most important parameter is the Erosion Cycle; it controls how many cycles of erosion will be applied. Each type of erosion that you enable is applied at each cycle. Note that a high value of Erosion Cycle will lead to a very slow terrain generation.
• The Gaussian filter creates a terrain with a border that has a height close to zero. Use it to create a single mountain (See also the Zero Edge Filter).
• The Glaciate filter creates flat valleys similar to the valleys that result from the erosion by a glacier.
• The Invert filter inverts the map of the terrain. You can use this filter, for example, to create all kinds of rivers by us ing the level parameter.
• The Noise filter adds visual noise to your terrain. The location of the noise can be controlled by the local shape of the landscape (altitude, slope, and orientation). Use visual noise to create an area that looks like a forest on your terrain.
• The Plateau filter adds a midland plateau to your landscape. • The Scale Height Filter changes the height of a terrain. • The Smooth filter smoothes the terrain. • The Terrace filter creates terraces on the landscape. • The Zero Edge filter modifies the terrain so that all borders have a height of zero. It can be used to create a single
mountain.
Page 88
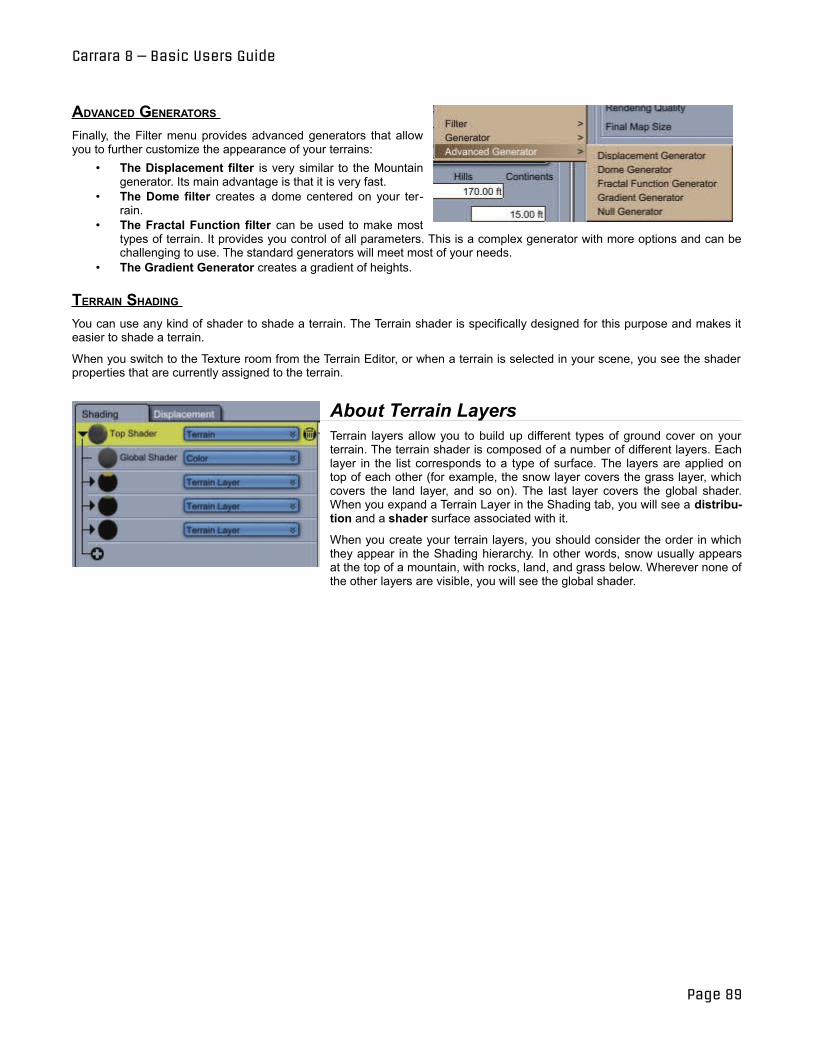
Carrara 8 – Basic Users Guide
ADVANCED GENERATORS Finally, the Filter menu provides advanced generators that allow you to further customize the appearance of your terrains:
• The Displacement filter is very similar to the Mountain generator. Its main advantage is that it is very fast.
• The Dome filter creates a dome centered on your terrain.
• The Fractal Function filter can be used to make most types of terrain. It provides you control of all parameters. This is a complex generator with more options and can be challenging to use. The standard generators will meet most of your needs.
• The Gradient Generator creates a gradient of heights.
TERRAIN SHADING You can use any kind of shader to shade a terrain. The Terrain shader is specifically designed for this purpose and makes it easier to shade a terrain.
When you switch to the Texture room from the Terrain Editor, or when a terrain is selected in your scene, you see the shader properties that are currently assigned to the terrain.
About Terrain Layers Terrain layers allow you to build up different types of ground cover on your terrain. The terrain shader is composed of a number of different layers. Each layer in the list corresponds to a type of surface. The layers are applied on top of each other (for example, the snow layer covers the grass layer, which covers the land layer, and so on). The last layer covers the global shader. When you expand a Terrain Layer in the Shading tab, you will see a distribution and a shader surface associated with it.
When you create your terrain layers, you should consider the order in which they appear in the Shading hierarchy. In other words, snow usually appears at the top of a mountain, with rocks, land, and grass below. Wherever none of the other layers are visible, you will see the global shader.
Page 89
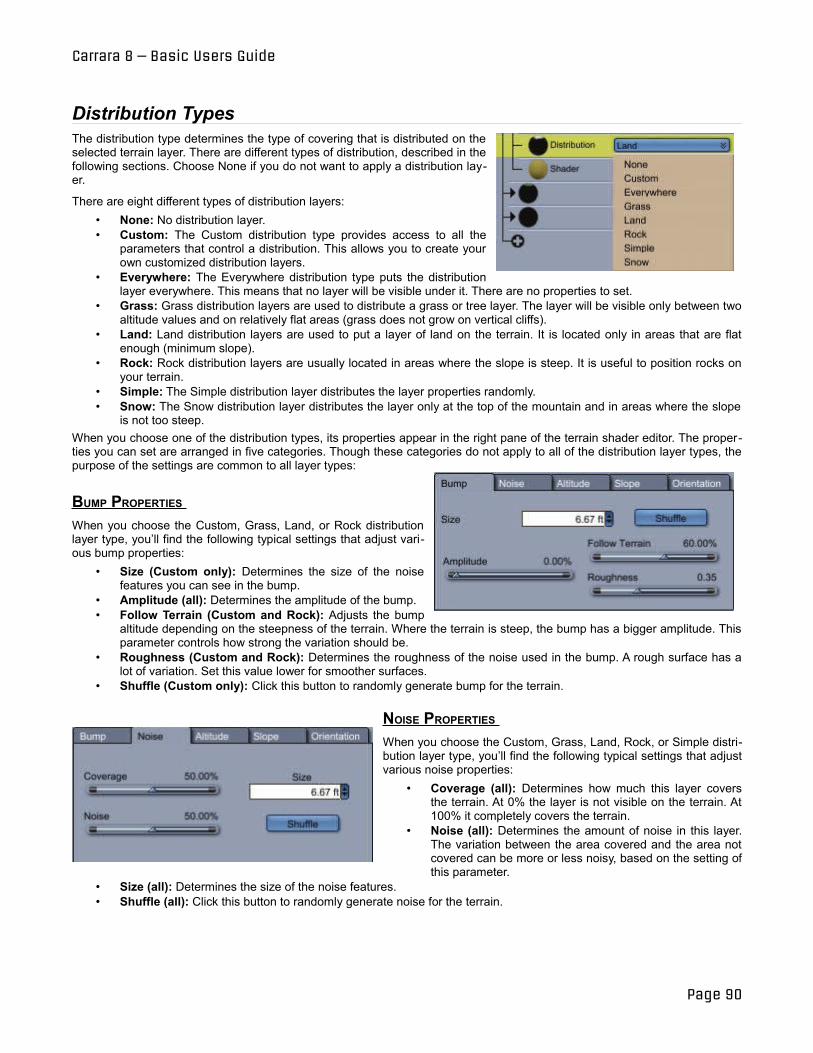
Carrara 8 – Basic Users Guide
Distribution Types The distribution type determines the type of covering that is distributed on the selected terrain layer. There are different types of distribution, described in the following sections. Choose None if you do not want to apply a distribution layer.
There are eight different types of distribution layers: • None: No distribution layer. • Custom: The Custom distribution type provides access to all the
parameters that control a distribution. This allows you to create your own customized distribution layers.
• Everywhere: The Everywhere distribution type puts the distribution layer everywhere. This means that no layer will be visible under it. There are no properties to set.
• Grass: Grass distribution layers are used to distribute a grass or tree layer. The layer will be visible only between two altitude values and on relatively flat areas (grass does not grow on vertical cliffs).
• Land: Land distribution layers are used to put a layer of land on the terrain. It is located only in areas that are flat enough (minimum slope).
• Rock: Rock distribution layers are usually located in areas where the slope is steep. It is useful to position rocks on your terrain.
• Simple: The Simple distribution layer distributes the layer properties randomly. • Snow: The Snow distribution layer distributes the layer only at the top of the mountain and in areas where the slope
is not too steep. When you choose one of the distribution types, its properties appear in the right pane of the terrain shader editor. The properties you can set are arranged in five categories. Though these categories do not apply to all of the distribution layer types, the purpose of the settings are common to all layer types:
BUMP PROPERTIES When you choose the Custom, Grass, Land, or Rock distribution layer type, you’ll find the following typical settings that adjust various bump properties:
• Size (Custom only): Determines the size of the noise features you can see in the bump.
• Amplitude (all): Determines the amplitude of the bump. • Follow Terrain (Custom and Rock): Adjusts the bump
altitude depending on the steepness of the terrain. Where the terrain is steep, the bump has a bigger amplitude. This parameter controls how strong the variation should be.
• Roughness (Custom and Rock): Determines the roughness of the noise used in the bump. A rough surface has a lot of variation. Set this value lower for smoother surfaces.
• Shuffle (Custom only): Click this button to randomly generate bump for the terrain.
NOISE PROPERTIES When you choose the Custom, Grass, Land, Rock, or Simple distribution layer type, you’ll find the following typical settings that adjust various noise properties:
• Coverage (all): Determines how much this layer covers the terrain. At 0% the layer is not visible on the terrain. At 100% it completely covers the terrain.
• Noise (all): Determines the amount of noise in this layer. The variation between the area covered and the area not covered can be more or less noisy, based on the setting of this parameter.
• Size (all): Determines the size of the noise features. • Shuffle (all): Click this button to randomly generate noise for the terrain.
Page 90
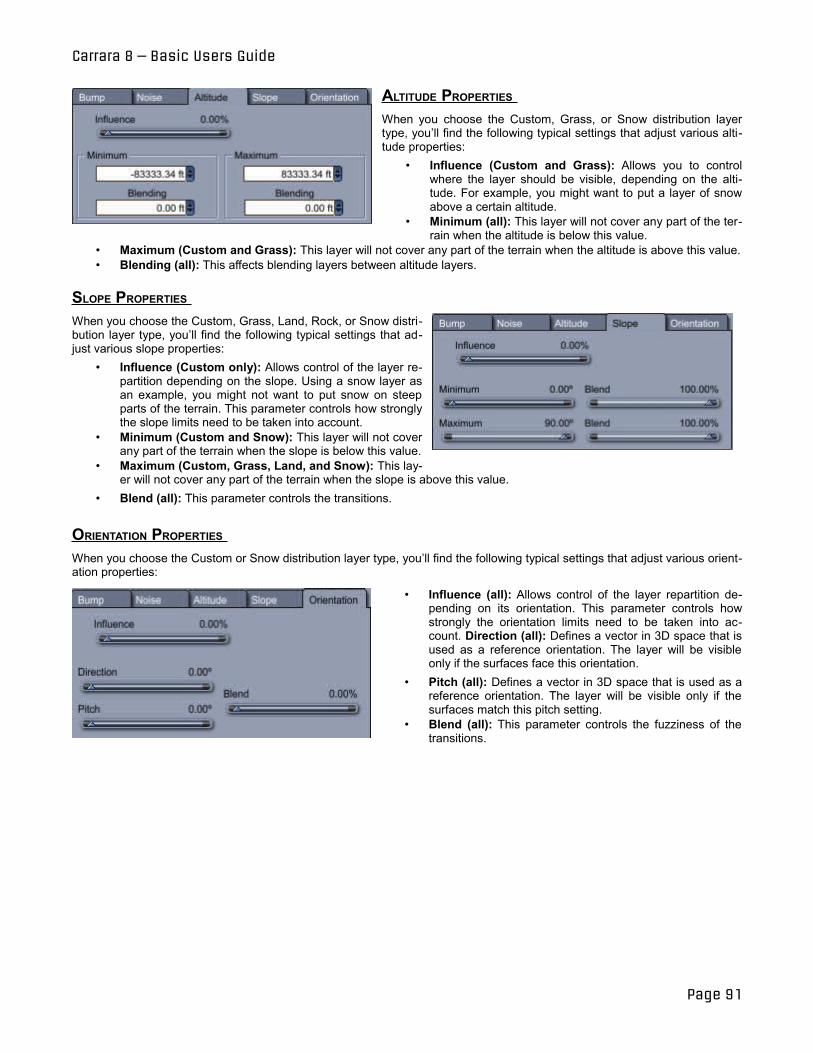
Carrara 8 – Basic Users Guide
ALTITUDE PROPERTIES When you choose the Custom, Grass, or Snow distribution layer type, you’ll find the following typical settings that adjust various altitude properties:
• Influence (Custom and Grass): Allows you to control where the layer should be visible, depending on the altitude. For example, you might want to put a layer of snow above a certain altitude.
• Minimum (all): This layer will not cover any part of the terrain when the altitude is below this value.
• Maximum (Custom and Grass): This layer will not cover any part of the terrain when the altitude is above this value. • Blending (all): This affects blending layers between altitude layers.
SLOPE PROPERTIES When you choose the Custom, Grass, Land, Rock, or Snow distribution layer type, you’ll find the following typical settings that adjust various slope properties:
• Influence (Custom only): Allows control of the layer repartition depending on the slope. Using a snow layer as an example, you might not want to put snow on steep parts of the terrain. This parameter controls how strongly the slope limits need to be taken into account.
• Minimum (Custom and Snow): This layer will not cover any part of the terrain when the slope is below this value.
• Maximum (Custom, Grass, Land, and Snow): This layer will not cover any part of the terrain when the slope is above this value.
• Blend (all): This parameter controls the transitions.
ORIENTATION PROPERTIES When you choose the Custom or Snow distribution layer type, you’ll find the following typical settings that adjust various orientation properties:
• Influence (all): Allows control of the layer repartition depending on its orientation. This parameter controls how strongly the orientation limits need to be taken into account. Direction (all): Defines a vector in 3D space that is used as a reference orientation. The layer will be visible only if the surfaces face this orientation.
• Pitch (all): Defines a vector in 3D space that is used as a reference orientation. The layer will be visible only if the surfaces match this pitch setting.
• Blend (all): This parameter controls the fuzziness of the transitions.
Page 91
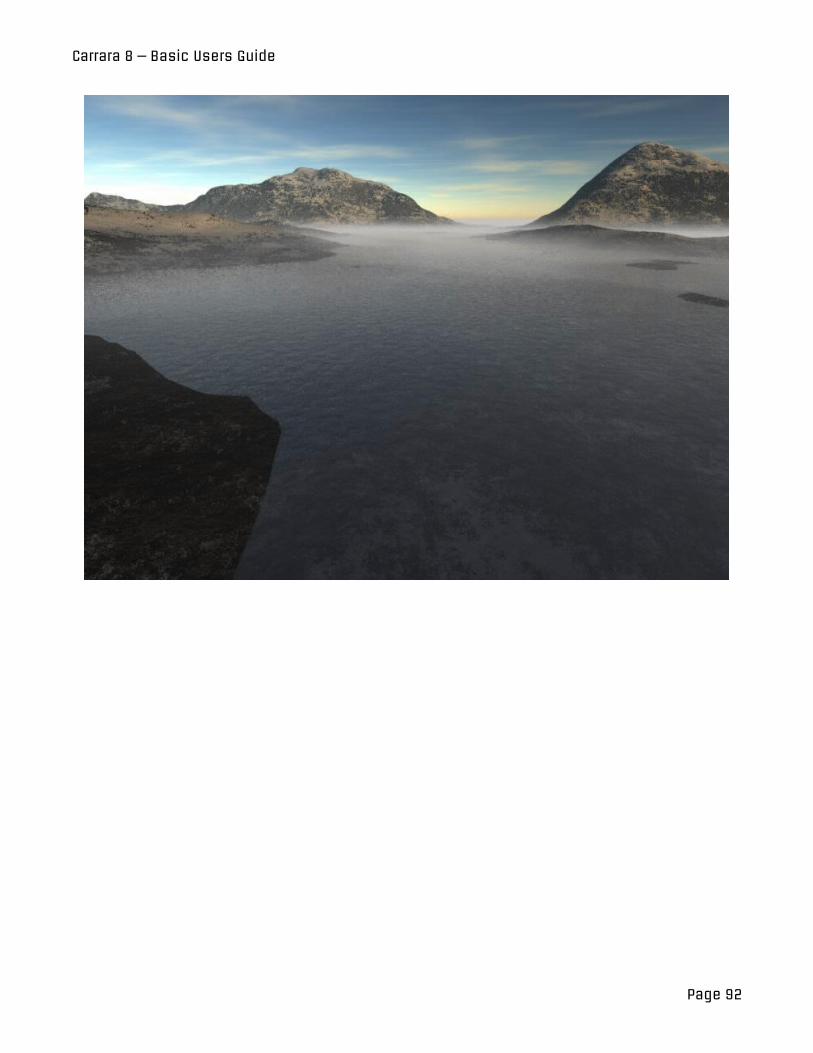
Carrara 8 – Basic Users Guide
Page 92
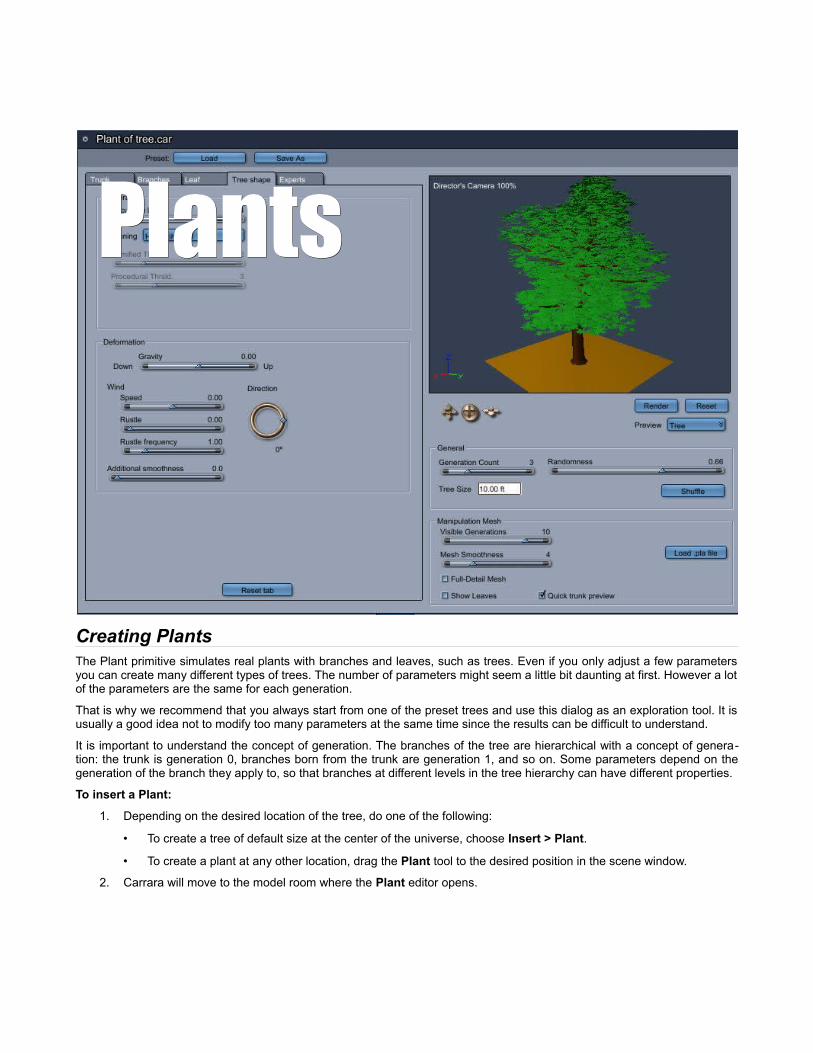
Creating Plants The Plant primitive simulates real plants with branches and leaves, such as trees. Even if you only adjust a few parameters you can create many different types of trees. The number of parameters might seem a little bit daunting at first. However a lot of the parameters are the same for each generation.
That is why we recommend that you always start from one of the preset trees and use this dialog as an exploration tool. It is usually a good idea not to modify too many parameters at the same time since the results can be difficult to understand.
It is important to understand the concept of generation. The branches of the tree are hierarchical with a concept of generation: the trunk is generation 0, branches born from the trunk are generation 1, and so on. Some parameters depend on the generation of the branch they apply to, so that branches at different levels in the tree hierarchy can have different properties.
To insert a Plant:
1. Depending on the desired location of the tree, do one of the following:
• To create a tree of default size at the center of the universe, choose Insert > Plant.
• To create a plant at any other location, drag the Plant tool to the desired position in the scene window.
2. Carrara will move to the model room where the Plant editor opens.
PlantsPlants
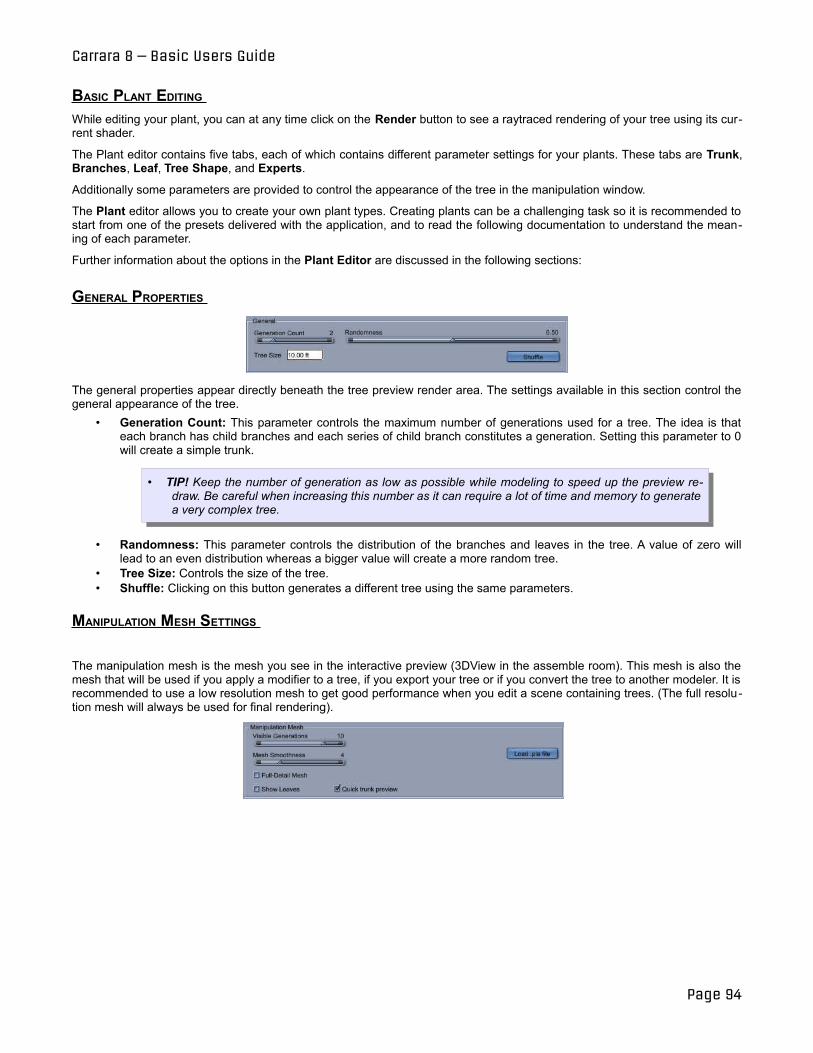
Carrara 8 – Basic Users Guide
BASIC PLANT EDITING While editing your plant, you can at any time click on the Render button to see a raytraced rendering of your tree using its current shader.
The Plant editor contains five tabs, each of which contains different parameter settings for your plants. These tabs are Trunk, Branches, Leaf, Tree Shape, and Experts.
Additionally some parameters are provided to control the appearance of the tree in the manipulation window.
The Plant editor allows you to create your own plant types. Creating plants can be a challenging task so it is recommended to start from one of the presets delivered with the application, and to read the following documentation to understand the meaning of each parameter.
Further information about the options in the Plant Editor are discussed in the following sections:
GENERAL PROPERTIES
The general properties appear directly beneath the tree preview render area. The settings available in this section control the general appearance of the tree.
• Generation Count: This parameter controls the maximum number of generations used for a tree. The idea is that each branch has child branches and each series of child branch constitutes a generation. Setting this parameter to 0 will create a simple trunk.
• TIP! Keep the number of generation as low as possible while modeling to speed up the preview redraw. Be careful when increasing this number as it can require a lot of time and memory to generate a very complex tree.
• Randomness: This parameter controls the distribution of the branches and leaves in the tree. A value of zero will lead to an even distribution whereas a bigger value will create a more random tree.
• Tree Size: Controls the size of the tree. • Shuffle: Clicking on this button generates a different tree using the same parameters.
MANIPULATION MESH SETTINGS
The manipulation mesh is the mesh you see in the interactive preview (3DView in the assemble room). This mesh is also the mesh that will be used if you apply a modifier to a tree, if you export your tree or if you convert the tree to another modeler. It is recommended to use a low resolution mesh to get good performance when you edit a scene containing trees. (The full resolution mesh will always be used for final rendering).
Page 94
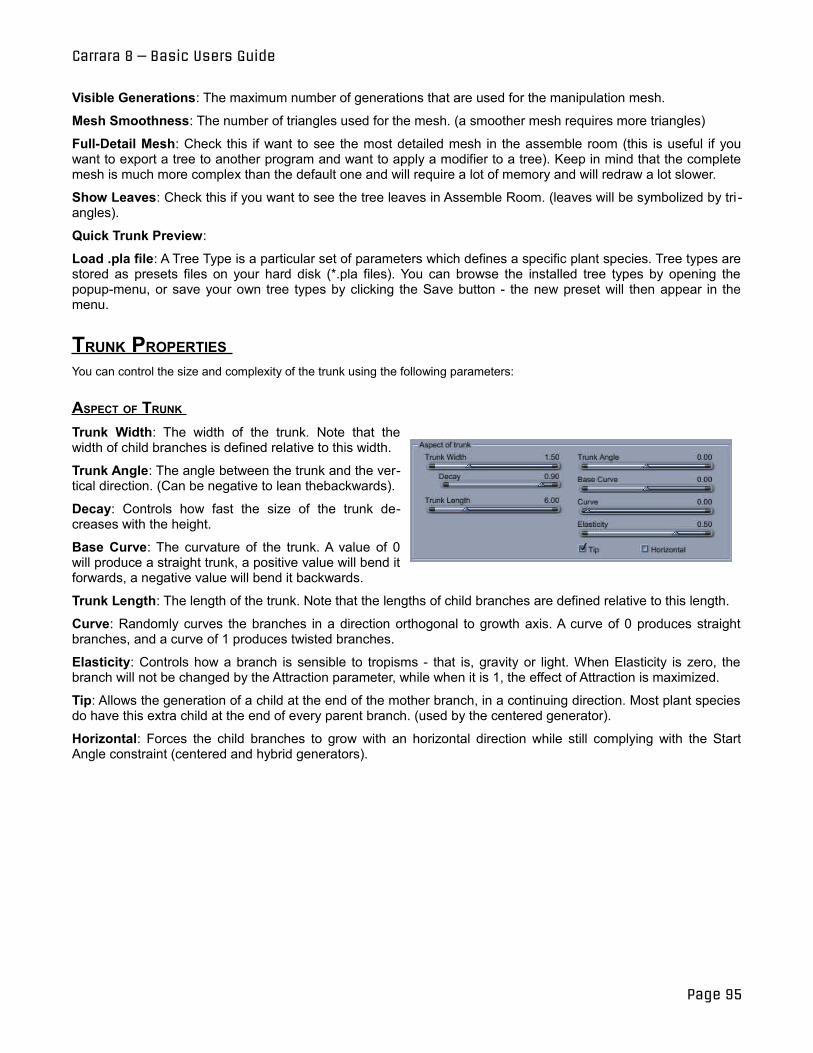
Carrara 8 – Basic Users Guide
Visible Generations: The maximum number of generations that are used for the manipulation mesh.
Mesh Smoothness: The number of triangles used for the mesh. (a smoother mesh requires more triangles)
Full-Detail Mesh: Check this if want to see the most detailed mesh in the assemble room (this is useful if you want to export a tree to another program and want to apply a modifier to a tree). Keep in mind that the complete mesh is much more complex than the default one and will require a lot of memory and will redraw a lot slower.
Show Leaves: Check this if you want to see the tree leaves in Assemble Room. (leaves will be symbolized by tri angles).
Quick Trunk Preview:
Load .pla file: A Tree Type is a particular set of parameters which defines a specific plant species. Tree types are stored as presets files on your hard disk (*.pla files). You can browse the installed tree types by opening the popup-menu, or save your own tree types by clicking the Save button - the new preset will then appear in the menu.
TRUNK PROPERTIES You can control the size and complexity of the trunk using the following parameters:
ASPECT OF TRUNK Trunk Width: The width of the trunk. Note that the width of child branches is defined relative to this width.
Trunk Angle: The angle between the trunk and the vertical direction. (Can be negative to lean thebackwards).
Decay: Controls how fast the size of the trunk decreases with the height.
Base Curve: The curvature of the trunk. A value of 0 will produce a straight trunk, a positive value will bend it forwards, a negative value will bend it backwards.
Trunk Length: The length of the trunk. Note that the lengths of child branches are defined relative to this length.
Curve: Randomly curves the branches in a direction orthogonal to growth axis. A curve of 0 produces straight branches, and a curve of 1 produces twisted branches.
Elasticity: Controls how a branch is sensible to tropisms - that is, gravity or light. When Elasticity is zero, the branch will not be changed by the Attraction parameter, while when it is 1, the effect of Attraction is maximized.
Tip: Allows the generation of a child at the end of the mother branch, in a continuing direction. Most plant species do have this extra child at the end of every parent branch. (used by the centered generator).
Horizontal: Forces the child branches to grow with an horizontal direction while still complying with the Start Angle constraint (centered and hybrid generators).
Page 95
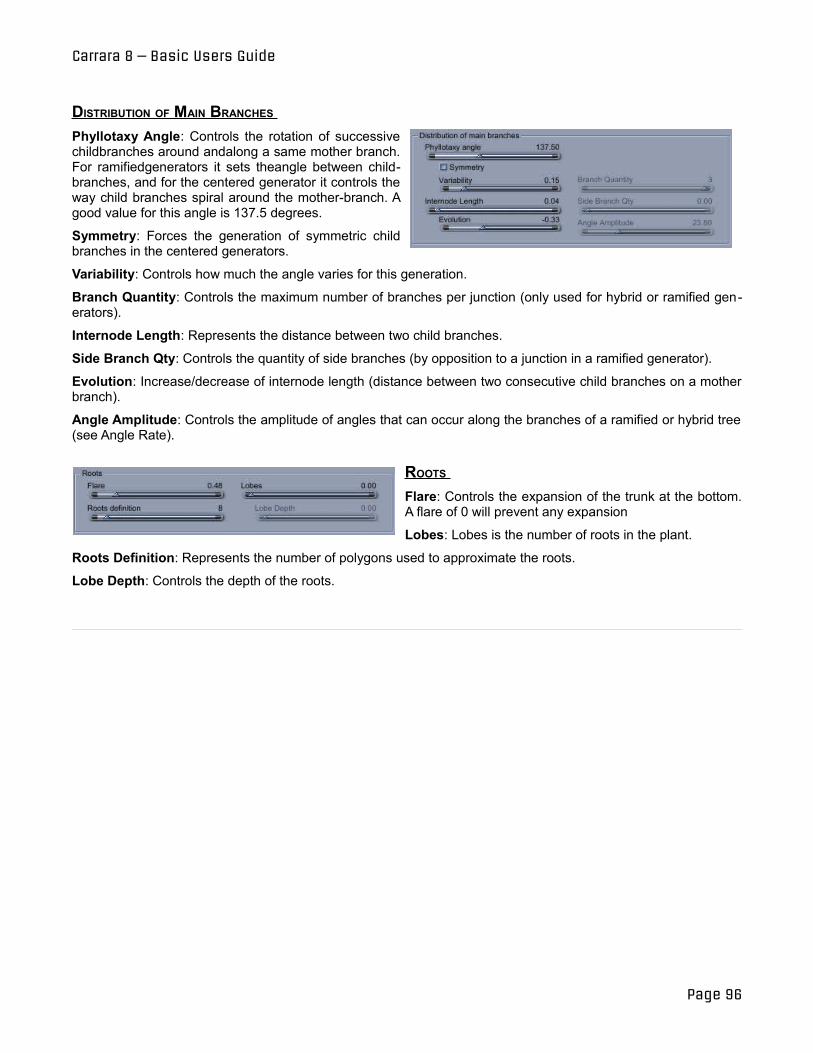
Carrara 8 – Basic Users Guide
DISTRIBUTION OF MAIN BRANCHES Phyllotaxy Angle: Controls the rotation of successive childbranches around andalong a same mother branch. For ramifiedgenerators it sets theangle between childbranches, and for the centered generator it controls the way child branches spiral around the mother-branch. A good value for this angle is 137.5 degrees.
Symmetry: Forces the generation of symmetric child branches in the centered generators.
Variability: Controls how much the angle varies for this generation.
Branch Quantity: Controls the maximum number of branches per junction (only used for hybrid or ramified generators).
Internode Length: Represents the distance between two child branches.
Side Branch Qty: Controls the quantity of side branches (by opposition to a junction in a ramified generator).
Evolution: Increase/decrease of internode length (distance between two consecutive child branches on a mother branch).
Angle Amplitude: Controls the amplitude of angles that can occur along the branches of a ramified or hybrid tree (see Angle Rate).
ROOTS Flare: Controls the expansion of the trunk at the bottom. A flare of 0 will prevent any expansion
Lobes: Lobes is the number of roots in the plant.
Roots Definition: Represents the number of polygons used to approximate the roots.
Lobe Depth: Controls the depth of the roots.
Page 96
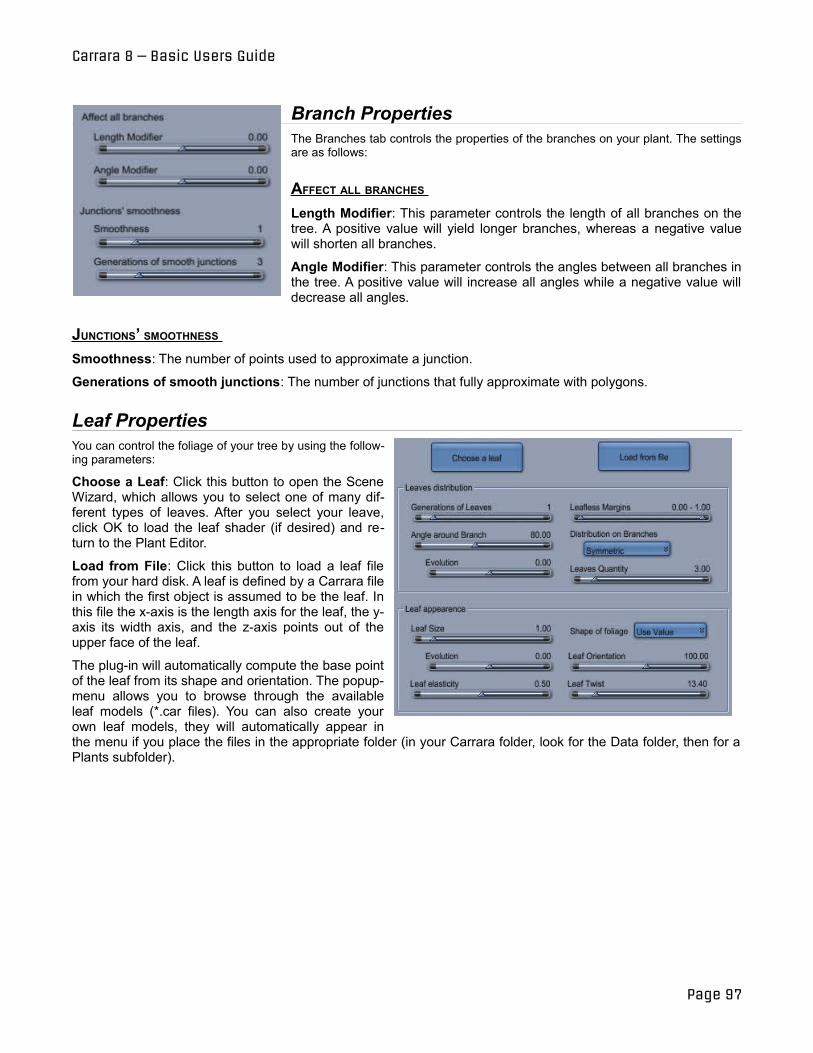
Carrara 8 – Basic Users Guide
Branch Properties The Branches tab controls the properties of the branches on your plant. The settings are as follows:
AFFECT ALL BRANCHES Length Modifier: This parameter controls the length of all branches on the tree. A positive value will yield longer branches, whereas a negative value will shorten all branches.
Angle Modifier: This parameter controls the angles between all branches in the tree. A positive value will increase all angles while a negative value will decrease all angles.
JUNCTIONS’ SMOOTHNESS Smoothness: The number of points used to approximate a junction.
Generations of smooth junctions: The number of junctions that fully approximate with polygons.
Leaf Properties You can control the foliage of your tree by using the following parameters:
Choose a Leaf: Click this button to open the Scene Wizard, which allows you to select one of many different types of leaves. After you select your leave, click OK to load the leaf shader (if desired) and return to the Plant Editor.
Load from File: Click this button to load a leaf file from your hard disk. A leaf is defined by a Carrara file in which the first object is assumed to be the leaf. In this file the x-axis is the length axis for the leaf, the y-axis its width axis, and the z-axis points out of the upper face of the leaf.
The plug-in will automatically compute the base point of the leaf from its shape and orientation. The popup-menu allows you to browse through the available leaf models (*.car files). You can also create your own leaf models, they will automatically appear in the menu if you place the files in the appropriate folder (in your Carrara folder, look for the Data folder, then for a Plants subfolder).
Page 97
Carrara 8 – Basic Users Guide
LEAVES DISTRIBUTION Settings in this section control the distribution of leaves on the tree.
Generations of Leaves: The number of generations of branches bearing leaves (usually one)
Leafless Margins: Determines the length at the beginning and end of a branch that remains without leaf ex pressed as percentages of the branch length. Since every branch grows, as a default behavior, a leaf at their end, you can use a non-null End Margin parameter to prevent branches from having a leaf at their ends.
Angle around Branch: Controls the increase/decrease of Leaf Angle (angle between leaf and bearing branch) along a branch.
Evolution: Controls the increase/decrease of the leaf size along a branch.
Leaves Quantity: The average number of leaves along a branch segment.
LEAF APPEARANCE Leaf Size: The size of the leaves.
Shape of foliage: Controls the shape of the foliage in changing the size of leaves along the branch - exactly the way the tree shape parameter changes the lengths of the branches along the trunk. A special mode, named "Use Value", selects no particular shape but rather uses the Size Evolution parameter to compute leaf sizes.
Evolution: Determines how the leaf size changes compared to the previous generation of branches.
Leaf Orientation: Controls the angle between the leaf and the vertical (an orientation of 0 makes the leaf point up, an orientation of 180 makes it point down).
Leaf elasticity: Controls the distribution of the leaves.
Leaf twist: The amplitude of random perturbations to leaf angle and leaf orientation, so the leaves on a branch do not share exactly the same orientation.
Leaf Angle: The angle between the branch and the main axis of the leaf. A low angle will make leaves point upwards, a big angle will make them bend downwards relatively to the branch they grow on.
Page 98
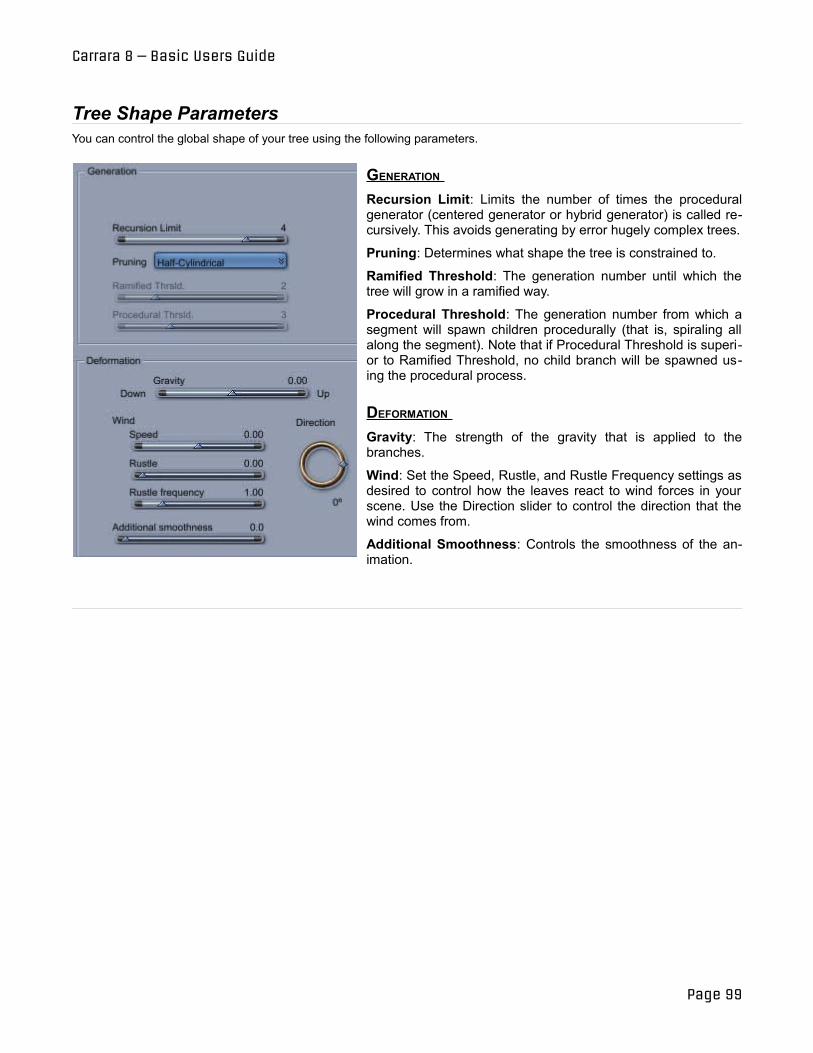
Carrara 8 – Basic Users Guide
Tree Shape Parameters You can control the global shape of your tree using the following parameters.
GENERATION Recursion Limit: Limits the number of times the procedural generator (centered generator or hybrid generator) is called recursively. This avoids generating by error hugely complex trees.
Pruning: Determines what shape the tree is constrained to.
Ramified Threshold: The generation number until which the tree will grow in a ramified way.
Procedural Threshold: The generation number from which a segment will spawn children procedurally (that is, spiraling all along the segment). Note that if Procedural Threshold is superior to Ramified Threshold, no child branch will be spawned using the procedural process.
DEFORMATION Gravity: The strength of the gravity that is applied to the branches.
Wind: Set the Speed, Rustle, and Rustle Frequency settings as desired to control how the leaves react to wind forces in your scene. Use the Direction slider to control the direction that the wind comes from.
Additional Smoothness: Controls the smoothness of the animation.
Page 99
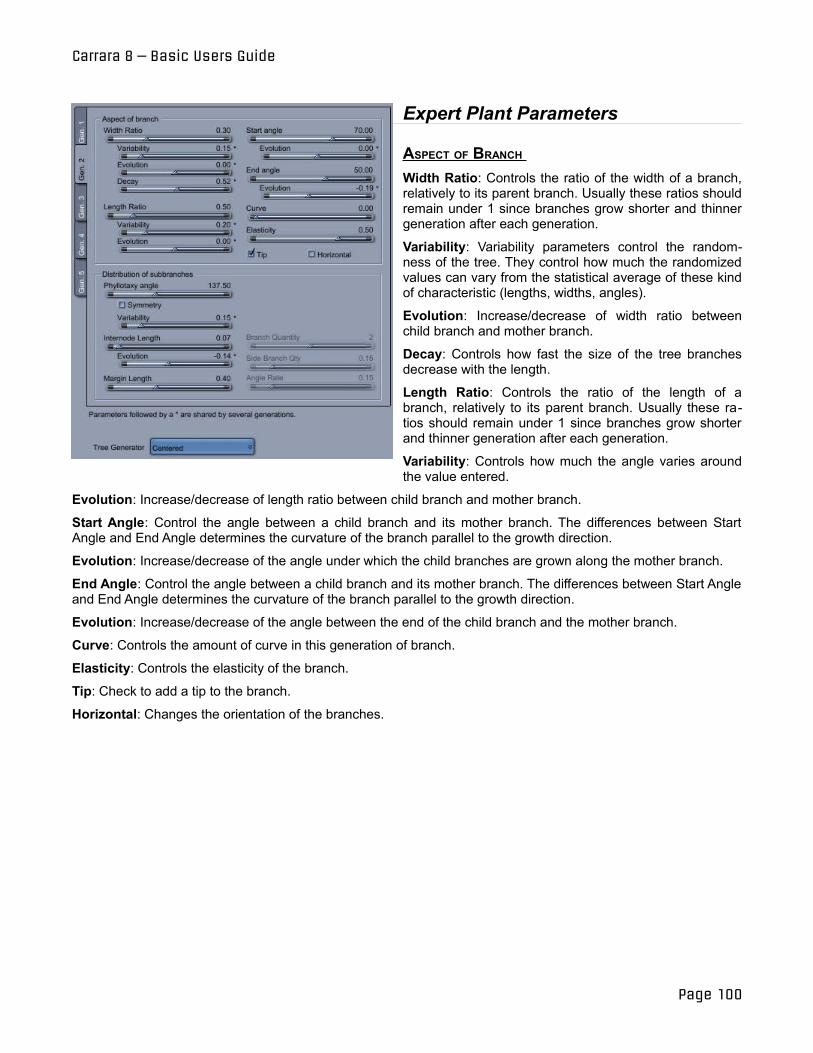
Carrara 8 – Basic Users Guide
Expert Plant Parameters
ASPECT OF BRANCH Width Ratio: Controls the ratio of the width of a branch, relatively to its parent branch. Usually these ratios should remain under 1 since branches grow shorter and thinner generation after each generation.
Variability: Variability parameters control the randomness of the tree. They control how much the randomized values can vary from the statistical average of these kind of characteristic (lengths, widths, angles).
Evolution: Increase/decrease of width ratio between child branch and mother branch.
Decay: Controls how fast the size of the tree branches decrease with the length.
Length Ratio: Controls the ratio of the length of a branch, relatively to its parent branch. Usually these ratios should remain under 1 since branches grow shorter and thinner generation after each generation.
Variability: Controls how much the angle varies around the value entered.
Evolution: Increase/decrease of length ratio between child branch and mother branch.
Start Angle: Control the angle between a child branch and its mother branch. The differences between Start Angle and End Angle determines the curvature of the branch parallel to the growth direction.
Evolution: Increase/decrease of the angle under which the child branches are grown along the mother branch.
End Angle: Control the angle between a child branch and its mother branch. The differences between Start Angle and End Angle determines the curvature of the branch parallel to the growth direction.
Evolution: Increase/decrease of the angle between the end of the child branch and the mother branch.
Curve: Controls the amount of curve in this generation of branch.
Elasticity: Controls the elasticity of the branch.
Tip: Check to add a tip to the branch.
Horizontal: Changes the orientation of the branches.
Page 100
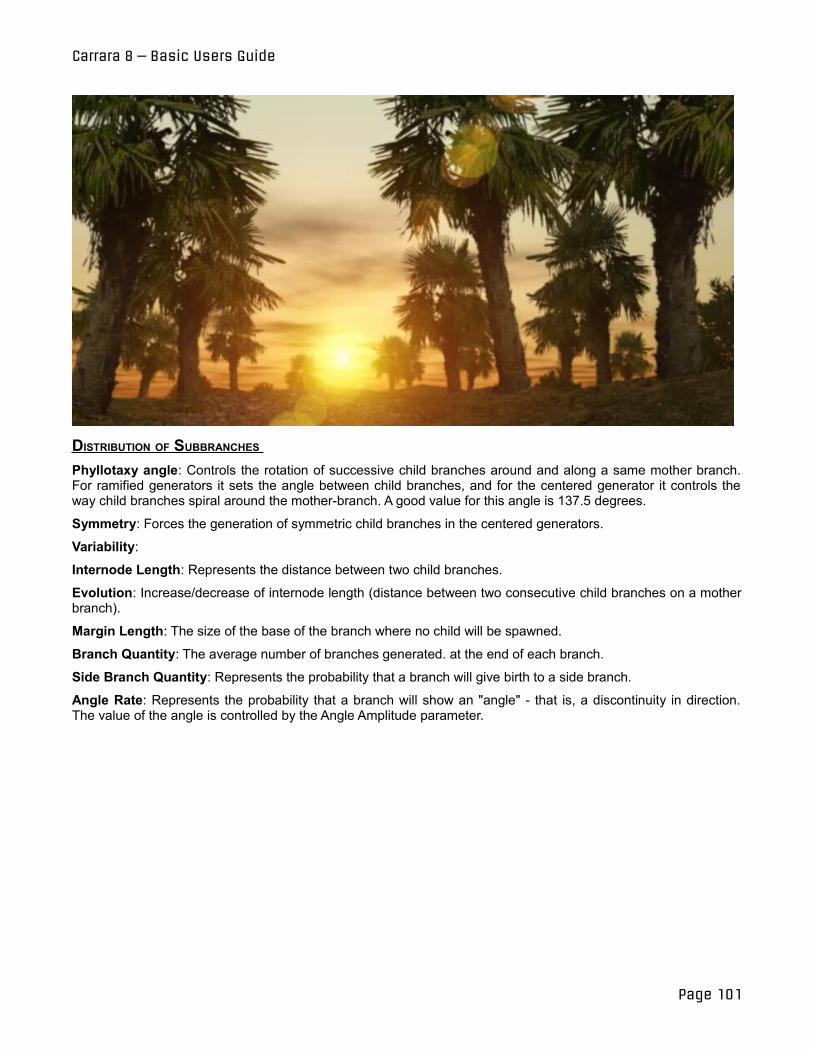
Carrara 8 – Basic Users Guide
DISTRIBUTION OF SUBBRANCHES Phyllotaxy angle: Controls the rotation of successive child branches around and along a same mother branch. For ramified generators it sets the angle between child branches, and for the centered generator it controls the way child branches spiral around the mother-branch. A good value for this angle is 137.5 degrees.
Symmetry: Forces the generation of symmetric child branches in the centered generators.
Variability:
Internode Length: Represents the distance between two child branches.
Evolution: Increase/decrease of internode length (distance between two consecutive child branches on a mother branch).
Margin Length: The size of the base of the branch where no child will be spawned.
Branch Quantity: The average number of branches generated. at the end of each branch.
Side Branch Quantity: Represents the probability that a branch will give birth to a side branch.
Angle Rate: Represents the probability that a branch will show an "angle" - that is, a discontinuity in direction. The value of the angle is controlled by the Angle Amplitude parameter.
Page 101
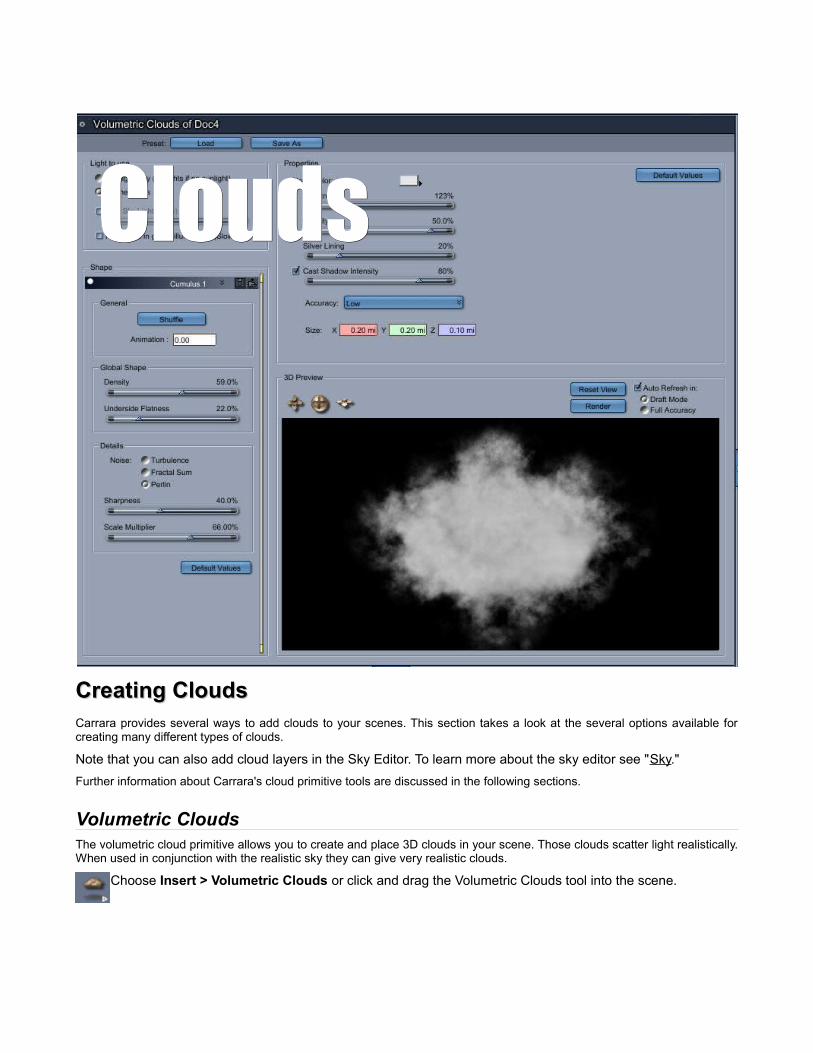
Creating Clouds Creating Clouds Carrara provides several ways to add clouds to your scenes. This section takes a look at the several options available for creating many different types of clouds.
Note that you can also add cloud layers in the Sky Editor. To learn more about the sky editor see "Sky." Further information about Carrara's cloud primitive tools are discussed in the following sections.
Volumetric Clouds The volumetric cloud primitive allows you to create and place 3D clouds in your scene. Those clouds scatter light realistically. When used in conjunction with the realistic sky they can give very realistic clouds.
Choose Insert > Volumetric Clouds or click and drag the Volumetric Clouds tool into the scene.
CloudsClouds
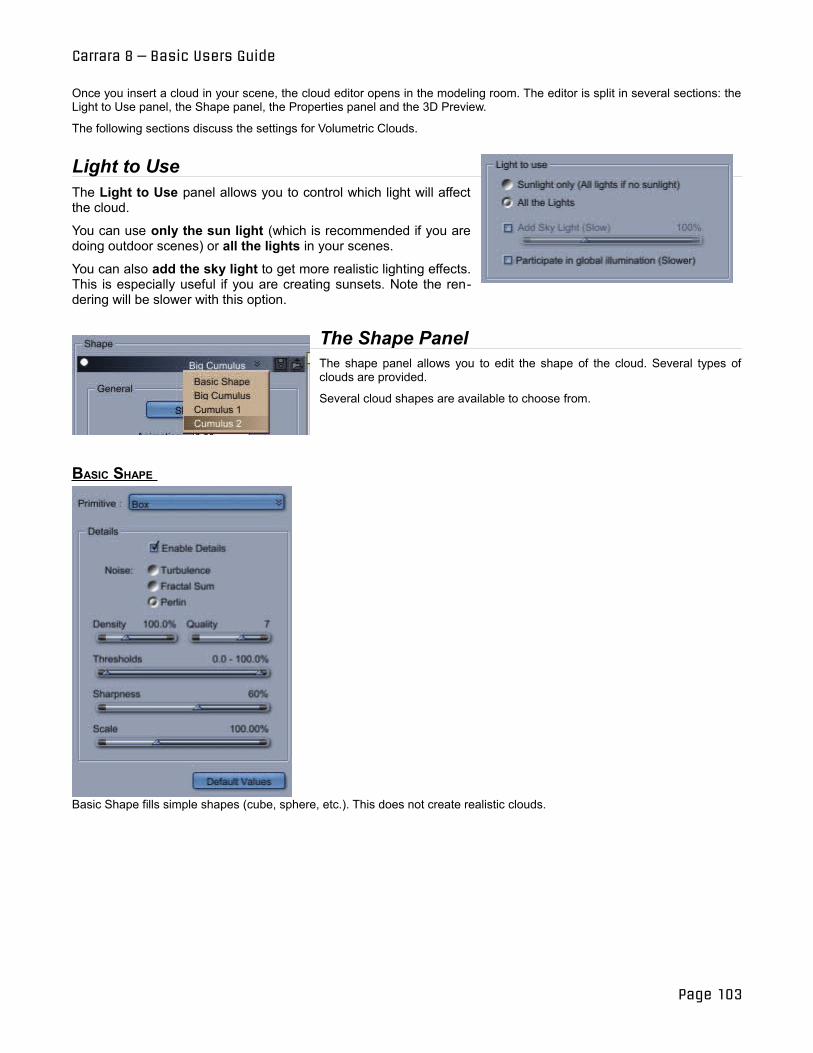
Carrara 8 – Basic Users Guide
Once you insert a cloud in your scene, the cloud editor opens in the modeling room. The editor is split in several sections: the Light to Use panel, the Shape panel, the Properties panel and the 3D Preview.
The following sections discuss the settings for Volumetric Clouds.
Light to Use The Light to Use panel allows you to control which light will affect the cloud.
You can use only the sun light (which is recommended if you are doing outdoor scenes) or all the lights in your scenes.
You can also add the sky light to get more realistic lighting effects. This is especially useful if you are creating sunsets. Note the rendering will be slower with this option.
The Shape Panel The shape panel allows you to edit the shape of the cloud. Several types of clouds are provided.
Several cloud shapes are available to choose from.
BASIC SHAPE
Basic Shape fills simple shapes (cube, sphere, etc.). This does not create realistic clouds.
Page 103

Carrara 8 – Basic Users Guide
BIG CUMULUS
Big Cumulus creates large clouds.
CUMULUS 1 AND 2 CLOUDS Cumulus 1 creates generic clouds. Cumulus 2 generates shapes that are less complex than cumulus 1. The settings are similar for both types:
Page 104
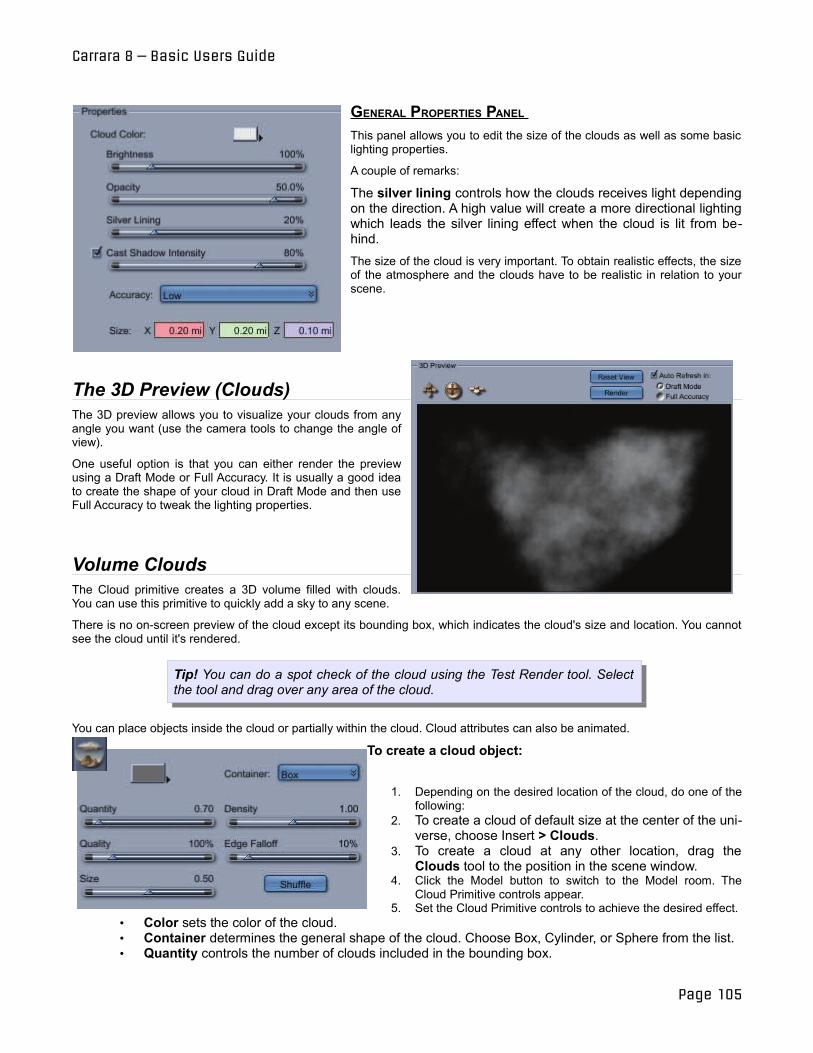
Carrara 8 – Basic Users Guide
GENERAL PROPERTIES PANEL This panel allows you to edit the size of the clouds as well as some basic lighting properties.
A couple of remarks:
The silver lining controls how the clouds receives light depending on the direction. A high value will create a more directional lighting which leads the silver lining effect when the cloud is lit from behind. The size of the cloud is very important. To obtain realistic effects, the size of the atmosphere and the clouds have to be realistic in relation to your scene.
The 3D Preview (Clouds) The 3D preview allows you to visualize your clouds from any angle you want (use the camera tools to change the angle of view).
One useful option is that you can either render the preview using a Draft Mode or Full Accuracy. It is usually a good idea to create the shape of your cloud in Draft Mode and then use Full Accuracy to tweak the lighting properties.
Volume Clouds The Cloud primitive creates a 3D volume filled with clouds. You can use this primitive to quickly add a sky to any scene.
There is no on-screen preview of the cloud except its bounding box, which indicates the cloud's size and location. You cannot see the cloud until it's rendered.
Tip! You can do a spot check of the cloud using the Test Render tool. Select the tool and drag over any area of the cloud.
You can place objects inside the cloud or partially within the cloud. Cloud attributes can also be animated.
To create a cloud object:
1. Depending on the desired location of the cloud, do one of the following:
2. To create a cloud of default size at the center of the universe, choose Insert > Clouds.
3. To create a cloud at any other location, drag the Clouds tool to the position in the scene window.
4. Click the Model button to switch to the Model room. The Cloud Primitive controls appear.
5. Set the Cloud Primitive controls to achieve the desired effect. • Color sets the color of the cloud. • Container determines the general shape of the cloud. Choose Box, Cylinder, or Sphere from the list. • Quantity controls the number of clouds included in the bounding box.
Page 105
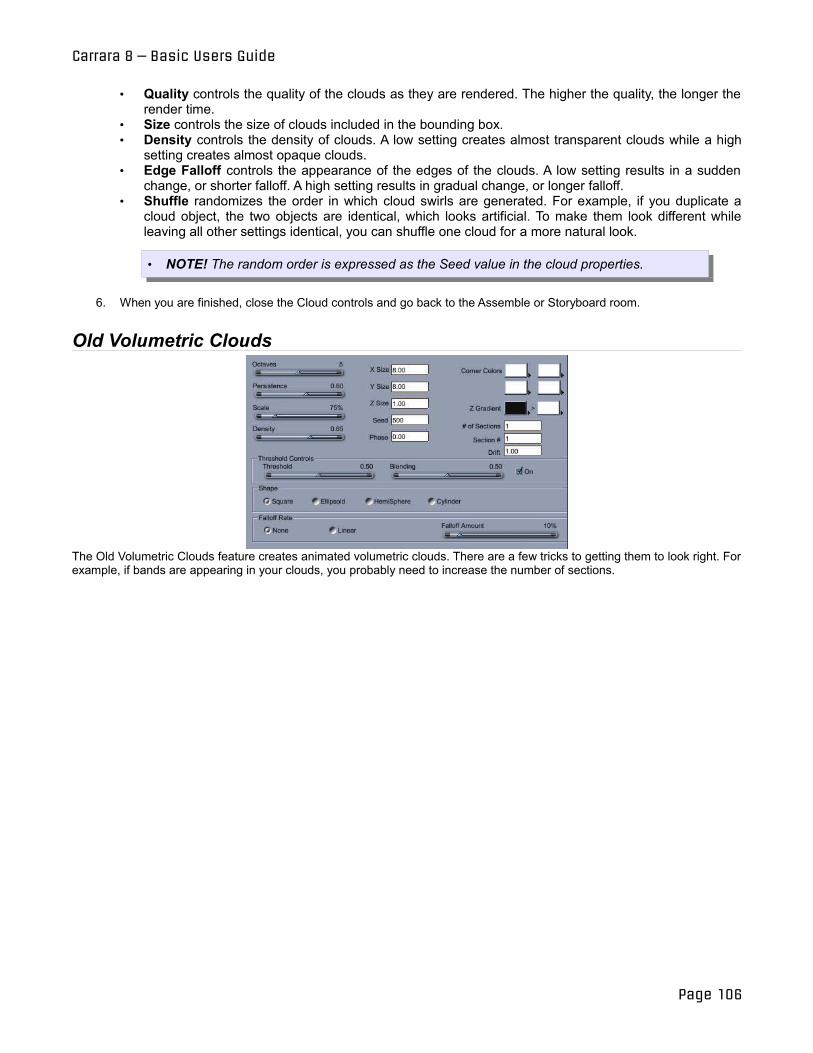
Carrara 8 – Basic Users Guide
• Quality controls the quality of the clouds as they are rendered. The higher the quality, the longer the render time.
• Size controls the size of clouds included in the bounding box. • Density controls the density of clouds. A low setting creates almost transparent clouds while a high
setting creates almost opaque clouds. • Edge Falloff controls the appearance of the edges of the clouds. A low setting results in a sudden
change, or shorter falloff. A high setting results in gradual change, or longer falloff. • Shuffle randomizes the order in which cloud swirls are generated. For example, if you duplicate a
cloud object, the two objects are identical, which looks artificial. To make them look different while leaving all other settings identical, you can shuffle one cloud for a more natural look.
• NOTE! The random order is expressed as the Seed value in the cloud properties.
6. When you are finished, close the Cloud controls and go back to the Assemble or Storyboard room.
Old Volumetric Clouds
The Old Volumetric Clouds feature creates animated volumetric clouds. There are a few tricks to getting them to look right. For example, if bands are appearing in your clouds, you probably need to increase the number of sections.
Page 106
Carrara 8 – Basic Users Guide
To create Old Volumetric Clouds: 1. Choose Insert > Old Volumetric Cloud and set the following options:
• Octaves: Increases the complexity of the clouds. Perlin noise algorithms are used to generate, among other things, clouds, marble, wood, and jitter effects. A universal parameter of Perlin noise is the octave parameter. Each successive octave of noise has a frequency twice that of the previous octave. Therefore, each time you increase the octave parameter, the Perlin Noise becomes more detailed and intricate.
• Persistence: Increases the granularity of the clouds. Another parameter that is common to Perlin noise, is persistence. This parameter defines the rate at which the amplitude decreases for each successive level of noise/order. Higher values of persistence lead to greater levels of noise for both regular and reverse Perlin noise.
• Scale: Scales the cloud.
• Density: Controls how dense the clouds are.
• Size Controls: These control the cloud's size in local coordinates. Increasing these will cause the cloud size to increase without stretching, as scaling it in the properties panel would do.
• Seed: This value "seeds" the random number generator.
• Phase: Controls the animation of the clouds. Start with a phase of 0, move the slider to the end of the animation, and set it to the final value. For slowly changing clouds, increase this by about 10 per second of your animation, and 100 per second for rapidly changing clouds.
• Color Controls: Change the color of the clouds at the corners, and the gradient from top to bottom.
• Section Controls: If your clouds look banded, you will need multiple sections. Alternatively, you can increase the sizes, then scale the cloud in the Properties panel. This may not always work.
• Drift: Set this to zero at the start of your animation, and a higher value at the end. This controls how far the cloud moves.
• Threshold Controls: These controls behave identically to the threshold controls in Noise Factory (see "Noise Factory"). The threshold is a middle value, that when enabled, any numbers falling below it will be set to 0, any above it to 1.
• Shape: Controls the basic shape of the cloud. Choices are Square, Ellipsoid, HemiSphere, and Cylinder.
• Falloff Rate: Higher values will cause the cloud to become increasingly less dense towards its boundary. Using the falloff controls can help reduce banding.
TIPS If the banding is not what you desire, do the following:
1. Get your cloud looking about how you want it to. (Ignore the banding). 2. Set all the animation parameters. 3. Change the number of sections to a higher value. If you are using a lot of falloff, you can keep this at 2 or 3. If you are
trying to make very large clouds, you may need as many as ten. 4. Exit the modeler, duplicate your object, edit it. 5. Choose Create New Master.6. Increase the section number. 7. Repeat steps 4 - 6 as necessary.
Page 107
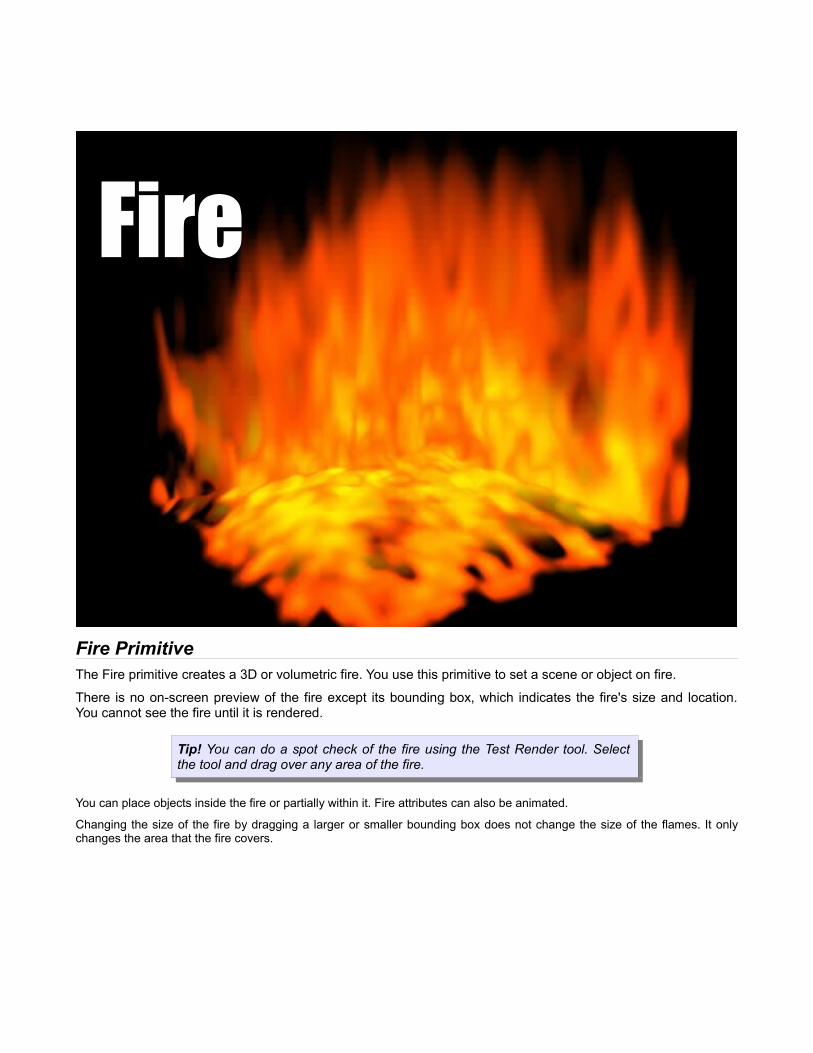
Fire Primitive The Fire primitive creates a 3D or volumetric fire. You use this primitive to set a scene or object on fire.
There is no on-screen preview of the fire except its bounding box, which indicates the fire's size and location. You cannot see the fire until it is rendered.
Tip! You can do a spot check of the fire using the Test Render tool. Select the tool and drag over any area of the fire.
You can place objects inside the fire or partially within it. Fire attributes can also be animated.
Changing the size of the fire by dragging a larger or smaller bounding box does not change the size of the flames. It only changes the area that the fire covers.
FireFire
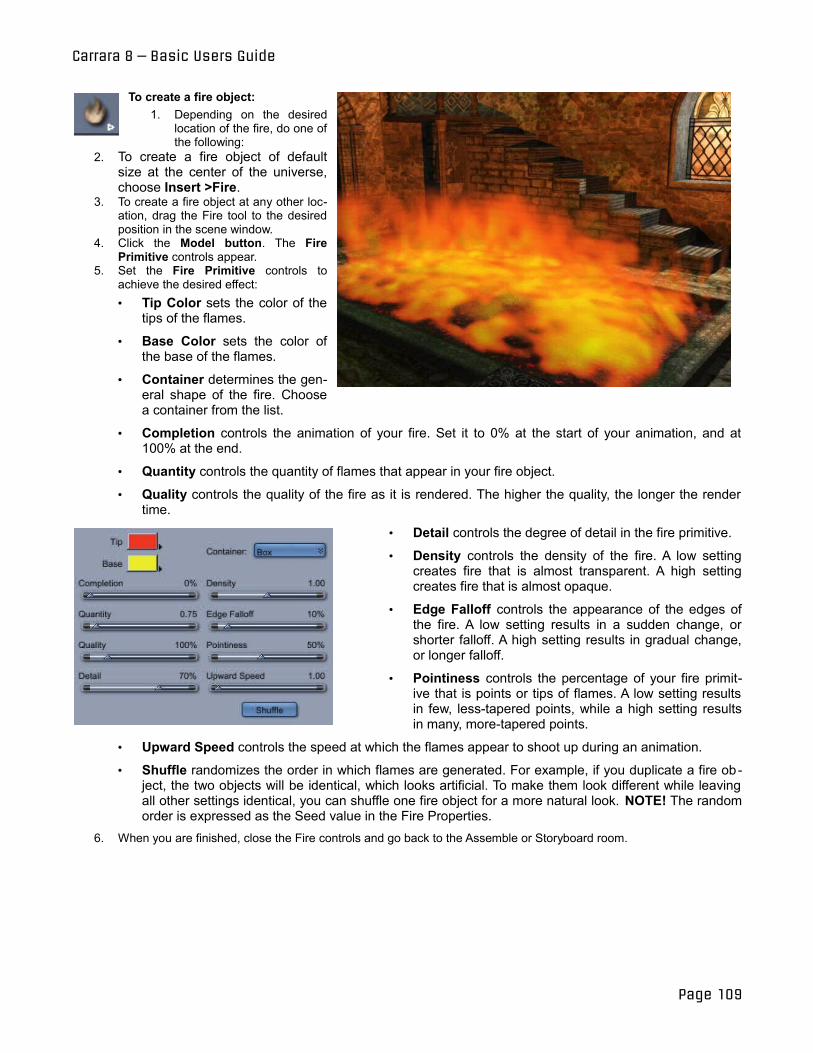
Carrara 8 – Basic Users Guide
To create a fire object: 1. Depending on the desired
location of the fire, do one of the following:
2. To create a fire object of default size at the center of the universe, choose Insert >Fire.
3. To create a fire object at any other location, drag the Fire tool to the desired position in the scene window.
4. Click the Model button. The Fire Primitive controls appear.
5. Set the Fire Primitive controls to achieve the desired effect:• Tip Color sets the color of the
tips of the flames.
• Base Color sets the color of the base of the flames.
• Container determines the general shape of the fire. Choose a container from the list.
• Completion controls the animation of your fire. Set it to 0% at the start of your animation, and at 100% at the end.
• Quantity controls the quantity of flames that appear in your fire object.
• Quality controls the quality of the fire as it is rendered. The higher the quality, the longer the render time.
• Detail controls the degree of detail in the fire primitive.
• Density controls the density of the fire. A low setting creates fire that is almost transparent. A high setting creates fire that is almost opaque.
• Edge Falloff controls the appearance of the edges of the fire. A low setting results in a sudden change, or shorter falloff. A high setting results in gradual change, or longer falloff.
• Pointiness controls the percentage of your fire primitive that is points or tips of flames. A low setting results in few, less-tapered points, while a high setting results in many, more-tapered points.
• Upward Speed controls the speed at which the flames appear to shoot up during an animation.
• Shuffle randomizes the order in which flames are generated. For example, if you duplicate a fire object, the two objects will be identical, which looks artificial. To make them look different while leaving all other settings identical, you can shuffle one fire object for a more natural look. NOTE! The random order is expressed as the Seed value in the Fire Properties.
6. When you are finished, close the Fire controls and go back to the Assemble or Storyboard room.
Page 109
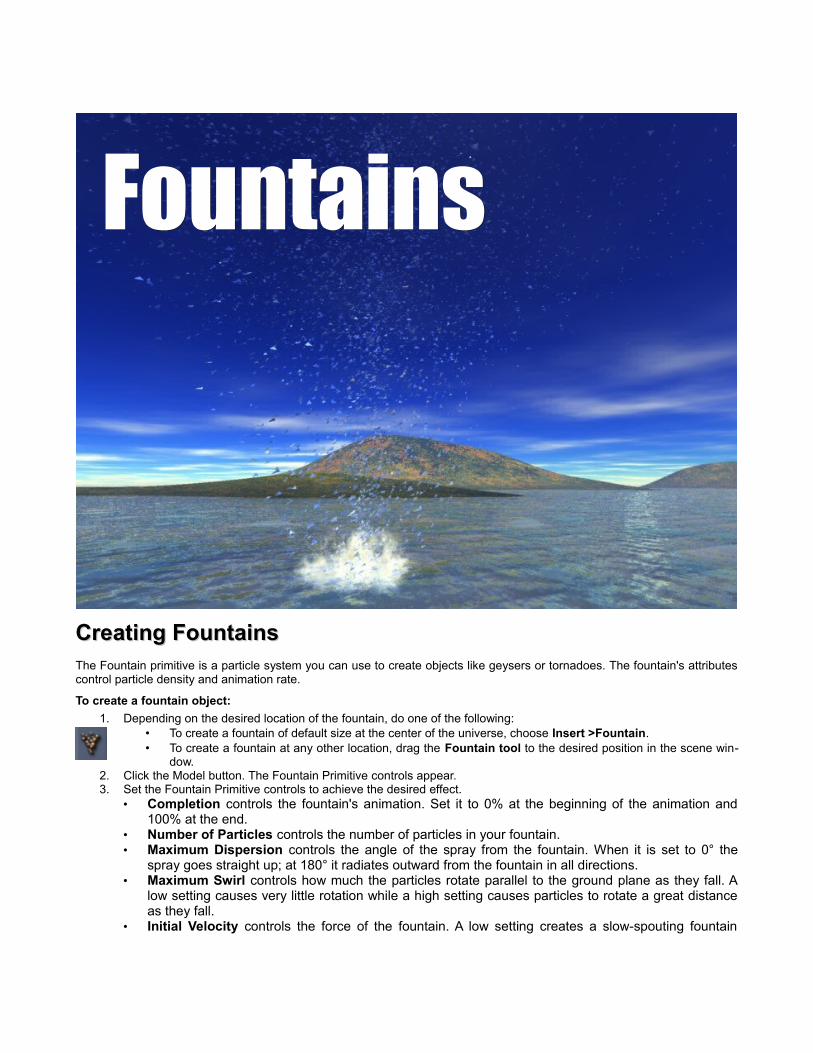
Creating Fountains Creating Fountains The Fountain primitive is a particle system you can use to create objects like geysers or tornadoes. The fountain's attributes control particle density and animation rate.
To create a fountain object: 1. Depending on the desired location of the fountain, do one of the following:
• To create a fountain of default size at the center of the universe, choose Insert >Fountain. • To create a fountain at any other location, drag the Fountain tool to the desired position in the scene win
dow. 2. Click the Model button. The Fountain Primitive controls appear. 3. Set the Fountain Primitive controls to achieve the desired effect.
• Completion controls the fountain's animation. Set it to 0% at the beginning of the animation and 100% at the end.
• Number of Particles controls the number of particles in your fountain. • Maximum Dispersion controls the angle of the spray from the fountain. When it is set to 0° the
spray goes straight up; at 180° it radiates outward from the fountain in all directions. • Maximum Swirl controls how much the particles rotate parallel to the ground plane as they fall. A
low setting causes very little rotation while a high setting causes particles to rotate a great distance as they fall.
• Initial Velocity controls the force of the fountain. A low setting creates a slow-spouting fountain
FountainsFountains
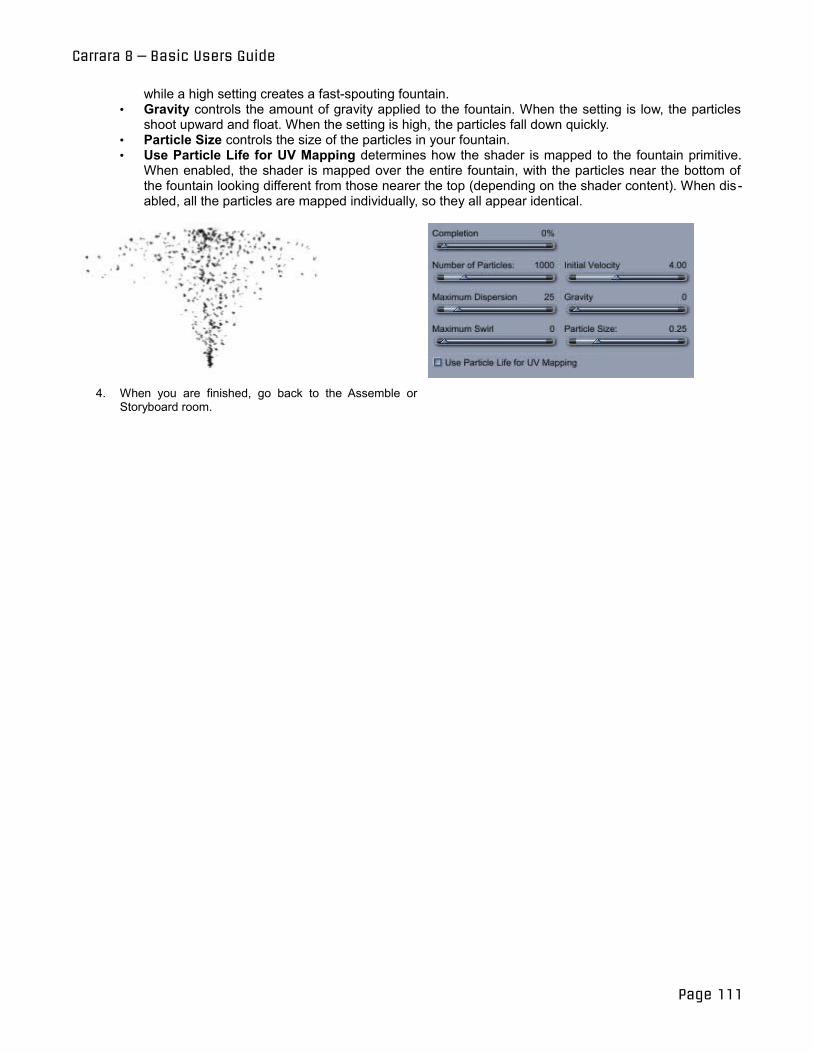
Carrara 8 – Basic Users Guide
while a high setting creates a fast-spouting fountain. • Gravity controls the amount of gravity applied to the fountain. When the setting is low, the particles
shoot upward and float. When the setting is high, the particles fall down quickly. • Particle Size controls the size of the particles in your fountain. • Use Particle Life for UV Mapping determines how the shader is mapped to the fountain primitive.
When enabled, the shader is mapped over the entire fountain, with the particles near the bottom of the fountain looking different from those nearer the top (depending on the shader content). When disabled, all the particles are mapped individually, so they all appear identical.
4. When you are finished, go back to the Assemble or Storyboard room.
Page 111
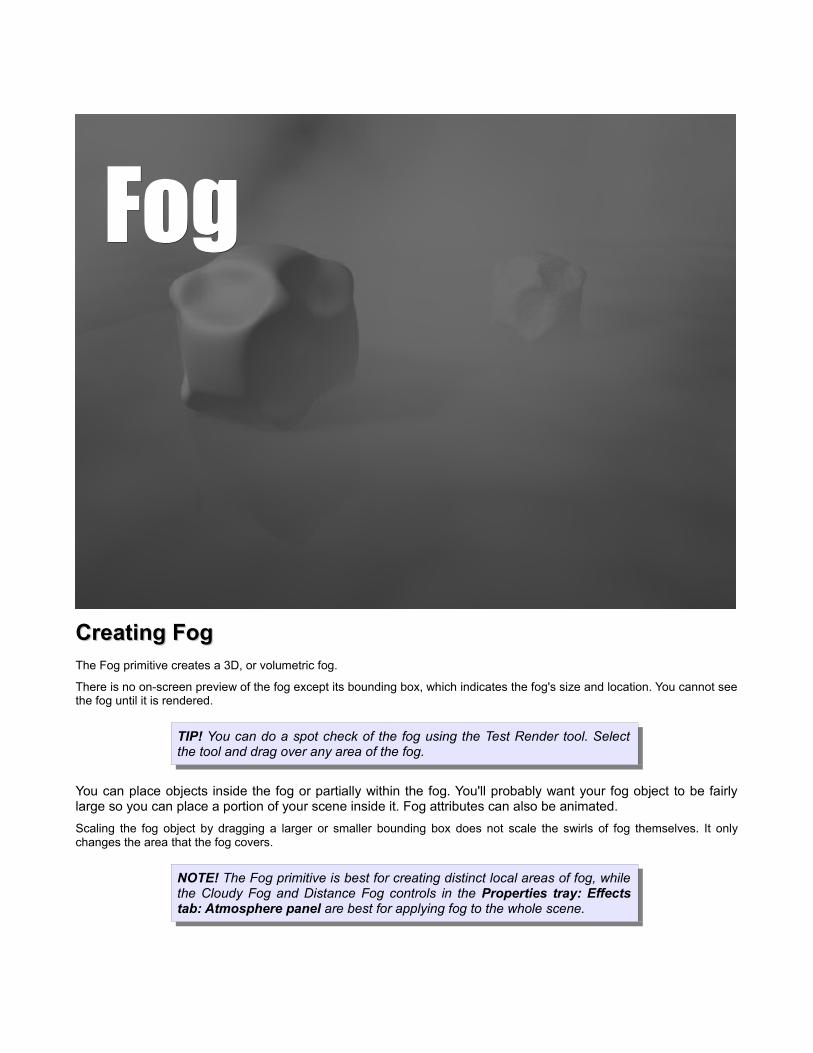
Creating Fog Creating Fog The Fog primitive creates a 3D, or volumetric fog.
There is no on-screen preview of the fog except its bounding box, which indicates the fog's size and location. You cannot see the fog until it is rendered.
TIP! You can do a spot check of the fog using the Test Render tool. Select the tool and drag over any area of the fog.
You can place objects inside the fog or partially within the fog. You'll probably want your fog object to be fairly large so you can place a portion of your scene inside it. Fog attributes can also be animated. Scaling the fog object by dragging a larger or smaller bounding box does not scale the swirls of fog themselves. It only changes the area that the fog covers.
NOTE! The Fog primitive is best for creating distinct local areas of fog, while the Cloudy Fog and Distance Fog controls in the Properties tray: Effects tab: Atmosphere panel are best for applying fog to the whole scene.
FogFog
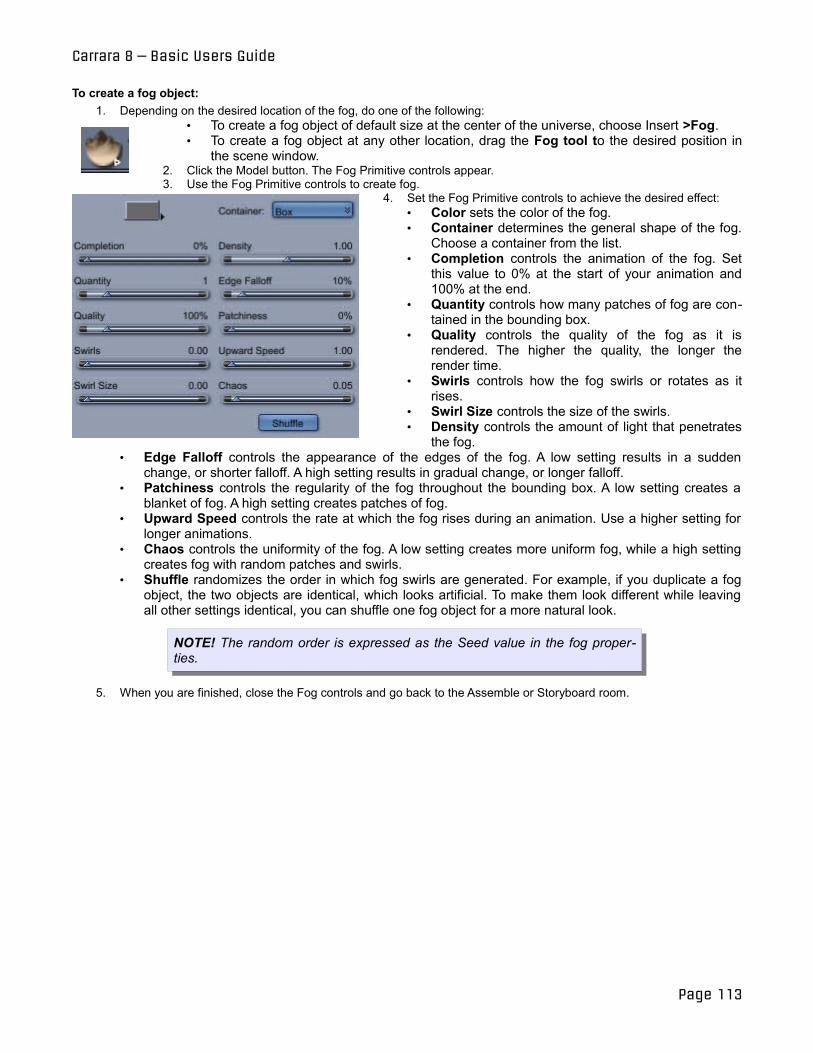
Carrara 8 – Basic Users Guide
To create a fog object: 1. Depending on the desired location of the fog, do one of the following:
• To create a fog object of default size at the center of the universe, choose Insert >Fog. • To create a fog object at any other location, drag the Fog tool to the desired position in
the scene window. 2. Click the Model button. The Fog Primitive controls appear. 3. Use the Fog Primitive controls to create fog.
4. Set the Fog Primitive controls to achieve the desired effect: • Color sets the color of the fog. • Container determines the general shape of the fog.
Choose a container from the list. • Completion controls the animation of the fog. Set
this value to 0% at the start of your animation and 100% at the end.
• Quantity controls how many patches of fog are contained in the bounding box.
• Quality controls the quality of the fog as it is rendered. The higher the quality, the longer the render time.
• Swirls controls how the fog swirls or rotates as it rises.
• Swirl Size controls the size of the swirls. • Density controls the amount of light that penetrates
the fog. • Edge Falloff controls the appearance of the edges of the fog. A low setting results in a sudden
change, or shorter falloff. A high setting results in gradual change, or longer falloff. • Patchiness controls the regularity of the fog throughout the bounding box. A low setting creates a
blanket of fog. A high setting creates patches of fog. • Upward Speed controls the rate at which the fog rises during an animation. Use a higher setting for
longer animations. • Chaos controls the uniformity of the fog. A low setting creates more uniform fog, while a high setting
creates fog with random patches and swirls. • Shuffle randomizes the order in which fog swirls are generated. For example, if you duplicate a fog
object, the two objects are identical, which looks artificial. To make them look different while leaving all other settings identical, you can shuffle one fog object for a more natural look.
NOTE! The random order is expressed as the Seed value in the fog properties.
5. When you are finished, close the Fog controls and go back to the Assemble or Storyboard room.
Page 113
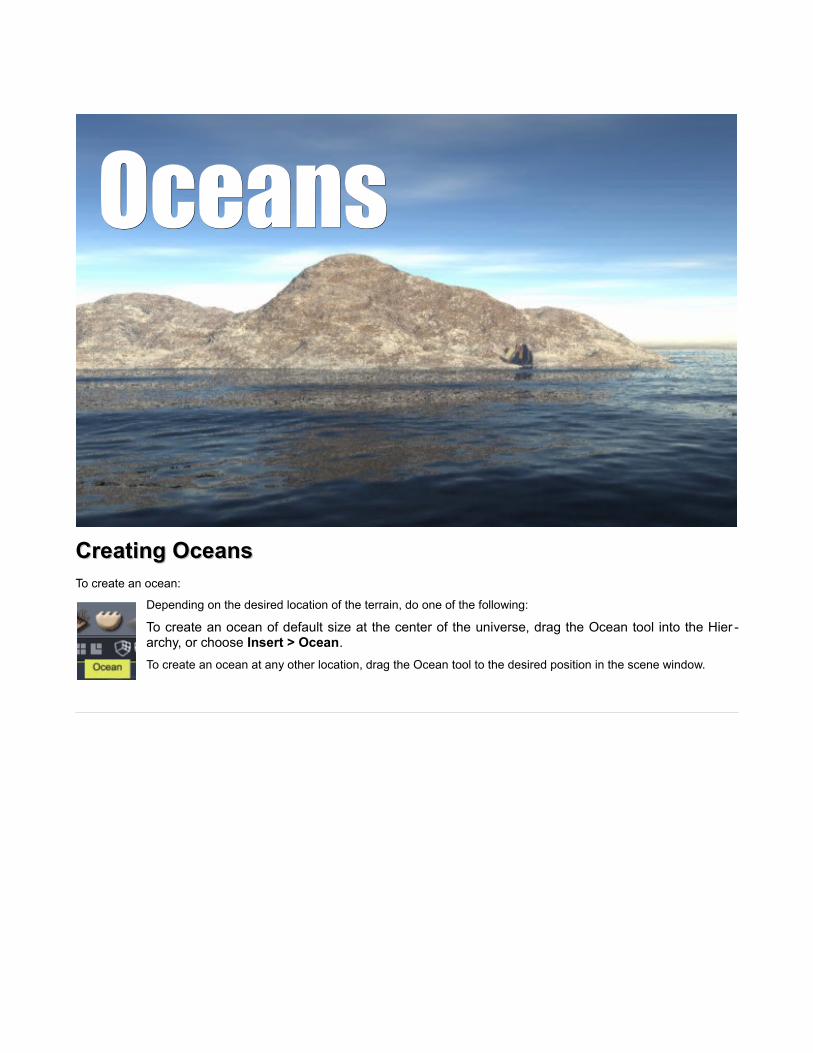
Creating Oceans Creating Oceans To create an ocean:
Depending on the desired location of the terrain, do one of the following:
To create an ocean of default size at the center of the universe, drag the Ocean tool into the Hier archy, or choose Insert > Ocean. To create an ocean at any other location, drag the Ocean tool to the desired position in the scene window.
OceansOceans
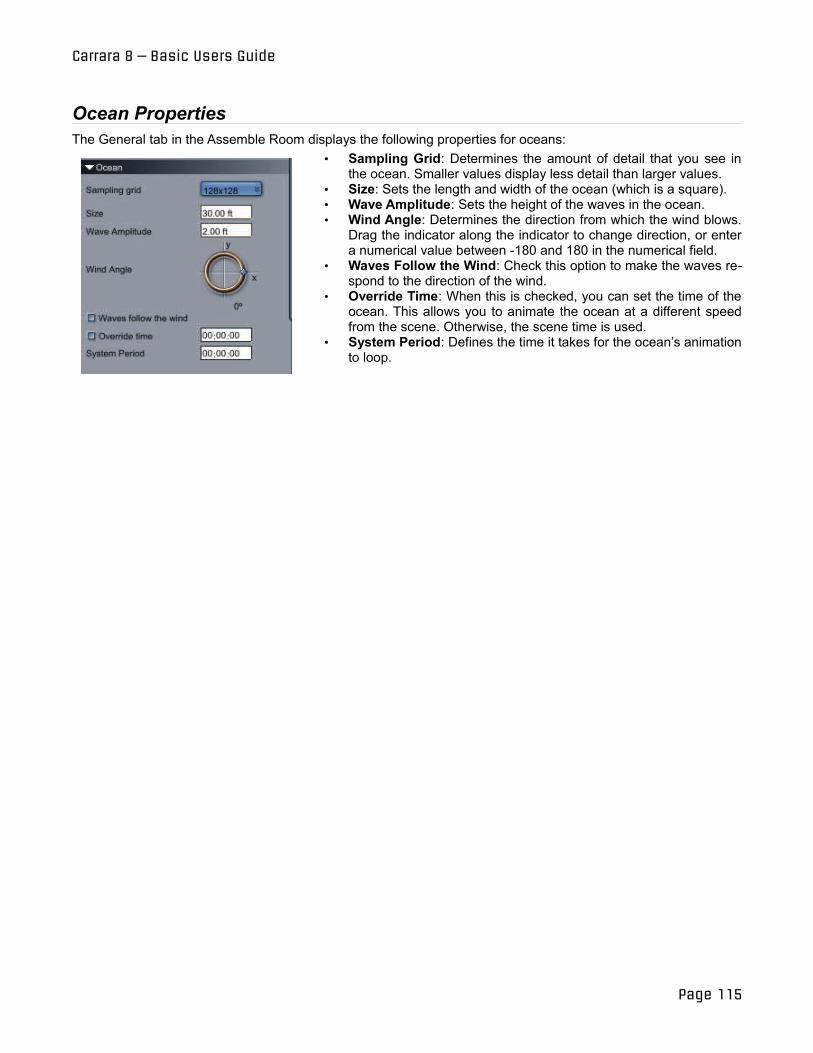
Carrara 8 – Basic Users Guide
Ocean Properties The General tab in the Assemble Room displays the following properties for oceans:
• Sampling Grid: Determines the amount of detail that you see in the ocean. Smaller values display less detail than larger values.
• Size: Sets the length and width of the ocean (which is a square). • Wave Amplitude: Sets the height of the waves in the ocean. • Wind Angle: Determines the direction from which the wind blows.
Drag the indicator along the indicator to change direction, or enter a numerical value between -180 and 180 in the numerical field.
• Waves Follow the Wind: Check this option to make the waves respond to the direction of the wind.
• Override Time: When this is checked, you can set the time of the ocean. This allows you to animate the ocean at a different speed from the scene. Otherwise, the scene time is used.
• System Period: Defines the time it takes for the ocean’s animation to loop.
Page 115
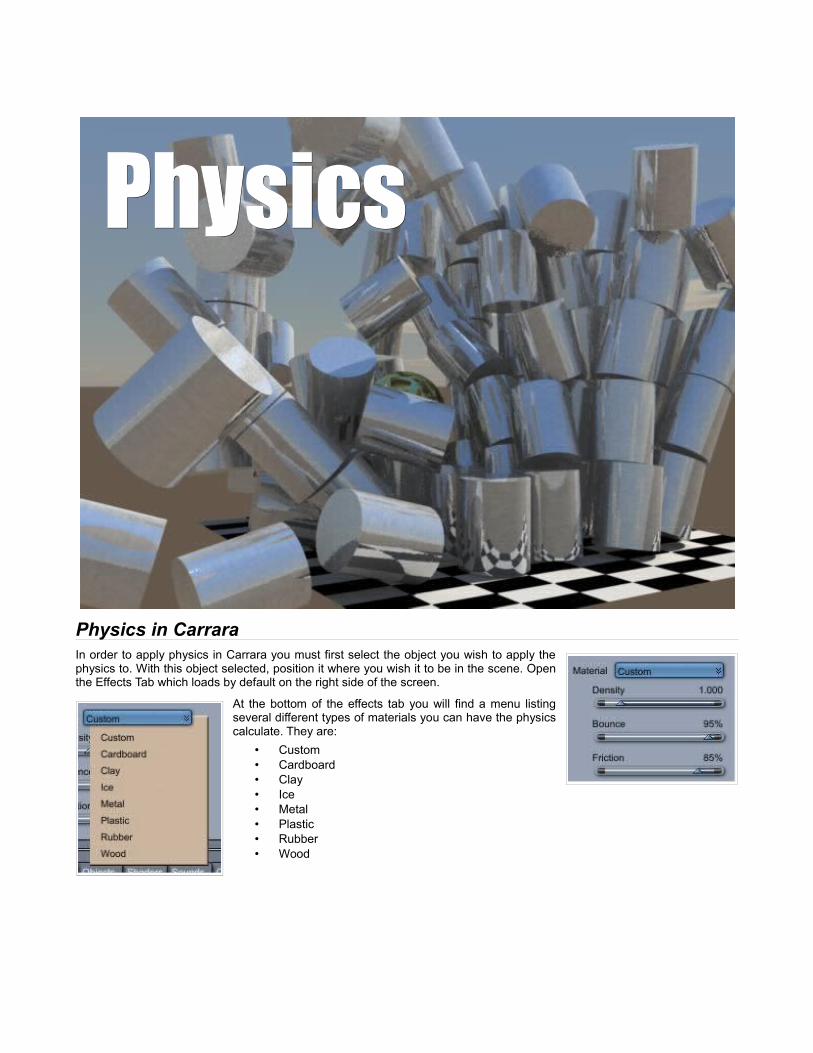
Physics in CarraraIn order to apply physics in Carrara you must first select the object you wish to apply the physics to. With this object selected, position it where you wish it to be in the scene. Open the Effects Tab which loads by default on the right side of the screen.
At the bottom of the effects tab you will find a menu listing several different types of materials you can have the physics calculate. They are:
• Custom• Cardboard• Clay• Ice• Metal• Plastic• Rubber• Wood
PhysicsPhysics
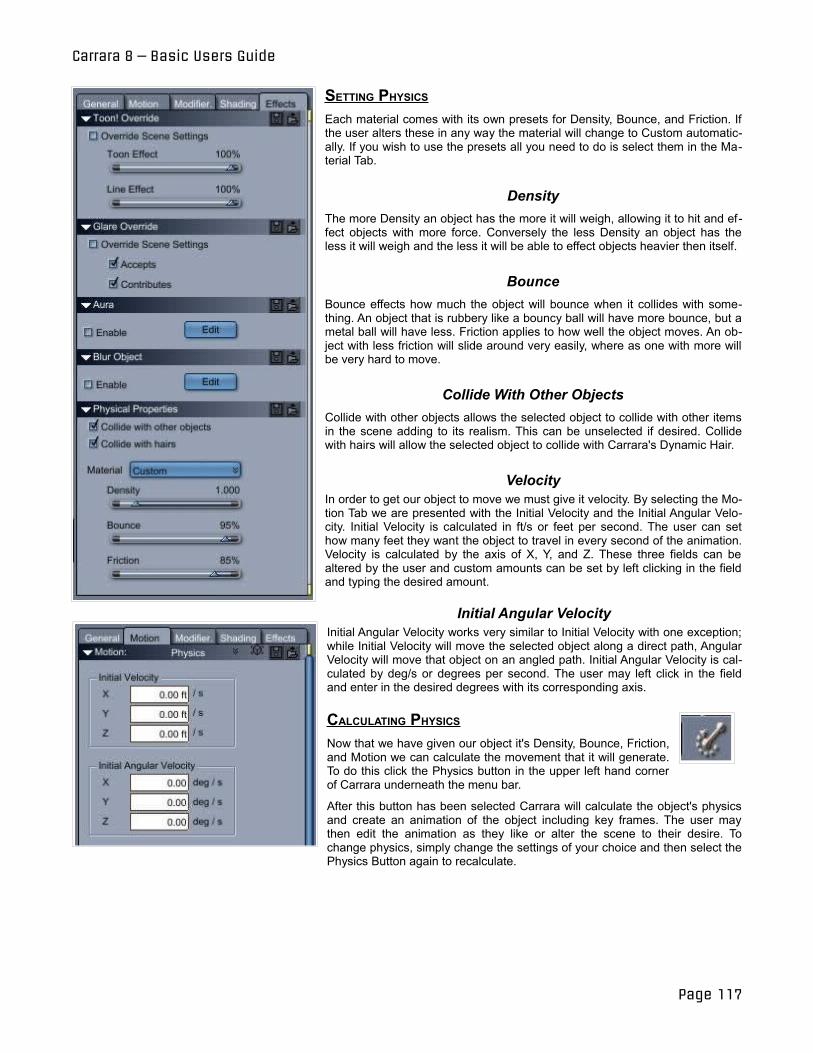
Carrara 8 – Basic Users Guide
SETTING PHYSICS Each material comes with its own presets for Density, Bounce, and Friction. If the user alters these in any way the material will change to Custom automatically. If you wish to use the presets all you need to do is select them in the Material Tab.
DensityThe more Density an object has the more it will weigh, allowing it to hit and effect objects with more force. Conversely the less Density an object has the less it will weigh and the less it will be able to effect objects heavier then itself.
BounceBounce effects how much the object will bounce when it collides with something. An object that is rubbery like a bouncy ball will have more bounce, but a metal ball will have less. Friction applies to how well the object moves. An object with less friction will slide around very easily, where as one with more will be very hard to move.
Collide With Other ObjectsCollide with other objects allows the selected object to collide with other items in the scene adding to its realism. This can be unselected if desired. Collide with hairs will allow the selected object to collide with Carrara's Dynamic Hair.
VelocityIn order to get our object to move we must give it velocity. By selecting the Motion Tab we are presented with the Initial Velocity and the Initial Angular Velocity. Initial Velocity is calculated in ft/s or feet per second. The user can set how many feet they want the object to travel in every second of the animation. Velocity is calculated by the axis of X, Y, and Z. These three fields can be altered by the user and custom amounts can be set by left clicking in the field and typing the desired amount.
Initial Angular VelocityInitial Angular Velocity works very similar to Initial Velocity with one exception; while Initial Velocity will move the selected object along a direct path, Angular Velocity will move that object on an angled path. Initial Angular Velocity is calculated by deg/s or degrees per second. The user may left click in the field and enter in the desired degrees with its corresponding axis.
CALCULATING PHYSICS Now that we have given our object it's Density, Bounce, Friction, and Motion we can calculate the movement that it will generate. To do this click the Physics button in the upper left hand corner of Carrara underneath the menu bar.
After this button has been selected Carrara will calculate the object's physics and create an animation of the object including key frames. The user may then edit the animation as they like or alter the scene to their desire. To change physics, simply change the settings of your choice and then select the Physics Button again to recalculate.
Page 117
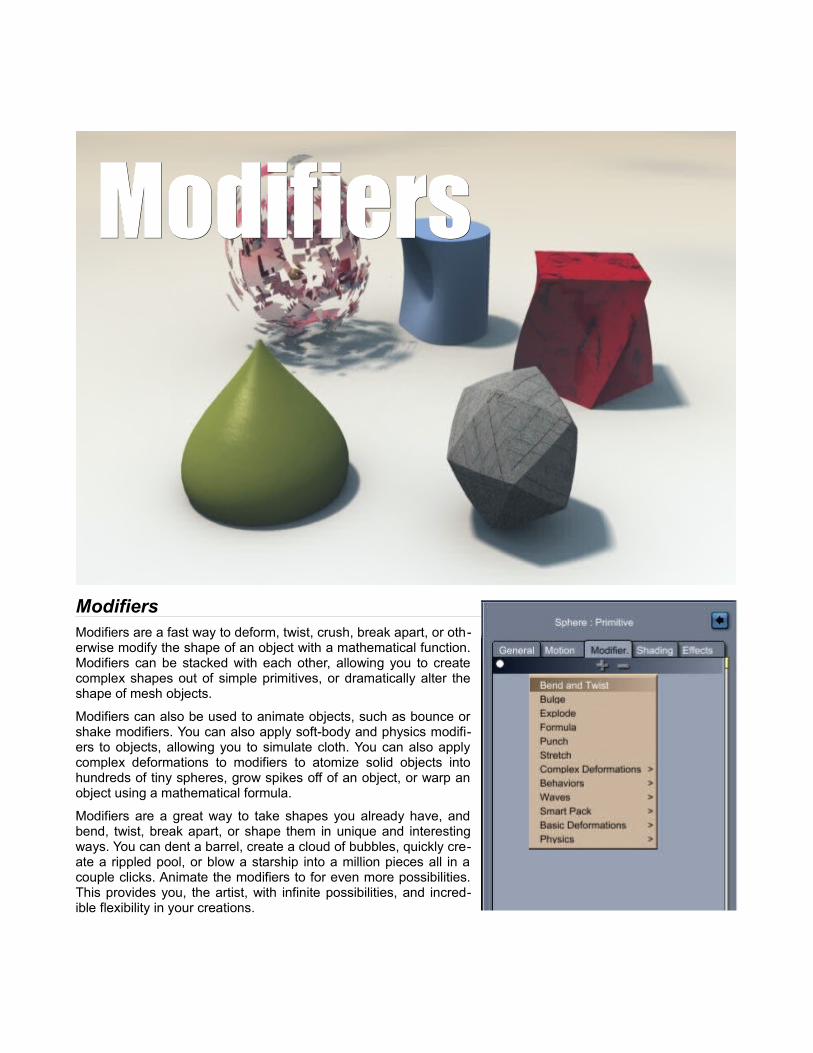
ModifiersModifiers are a fast way to deform, twist, crush, break apart, or otherwise modify the shape of an object with a mathematical function. Modifiers can be stacked with each other, allowing you to create complex shapes out of simple primitives, or dramatically alter the shape of mesh objects.
Modifiers can also be used to animate objects, such as bounce or shake modifiers. You can also apply soft-body and physics modifiers to objects, allowing you to simulate cloth. You can also apply complex deformations to modifiers to atomize solid objects into hundreds of tiny spheres, grow spikes off of an object, or warp an object using a mathematical formula.
Modifiers are a great way to take shapes you already have, and bend, twist, break apart, or shape them in unique and interesting ways. You can dent a barrel, create a cloud of bubbles, quickly create a rippled pool, or blow a starship into a million pieces all in a couple clicks. Animate the modifiers to for even more possibilities. This provides you, the artist, with infinite possibilities, and incredible flexibility in your creations.
ModifiersModifiers
LightingLightingTBA
LightingLighting

Import/Export Import/Export This chapter describes how you can import/export 3D objects and scenes from/to various file formats. It will show you how you can use Carrara to create content for the web and other applications.
Importing 3D Objects You may directly import 3D objects from other applications into Carrara using the File > Import or the File > Open commands. With Import, the object will be imported into the current scene. With Open, the file opens in a new document.
Note Most importers create compact Carrara objects that cannot be edited right away. To edit, select it, go to the modeling room, use the Edit menu: Convert to Other Modeler command, choose Vertex modeler.
ImportImport
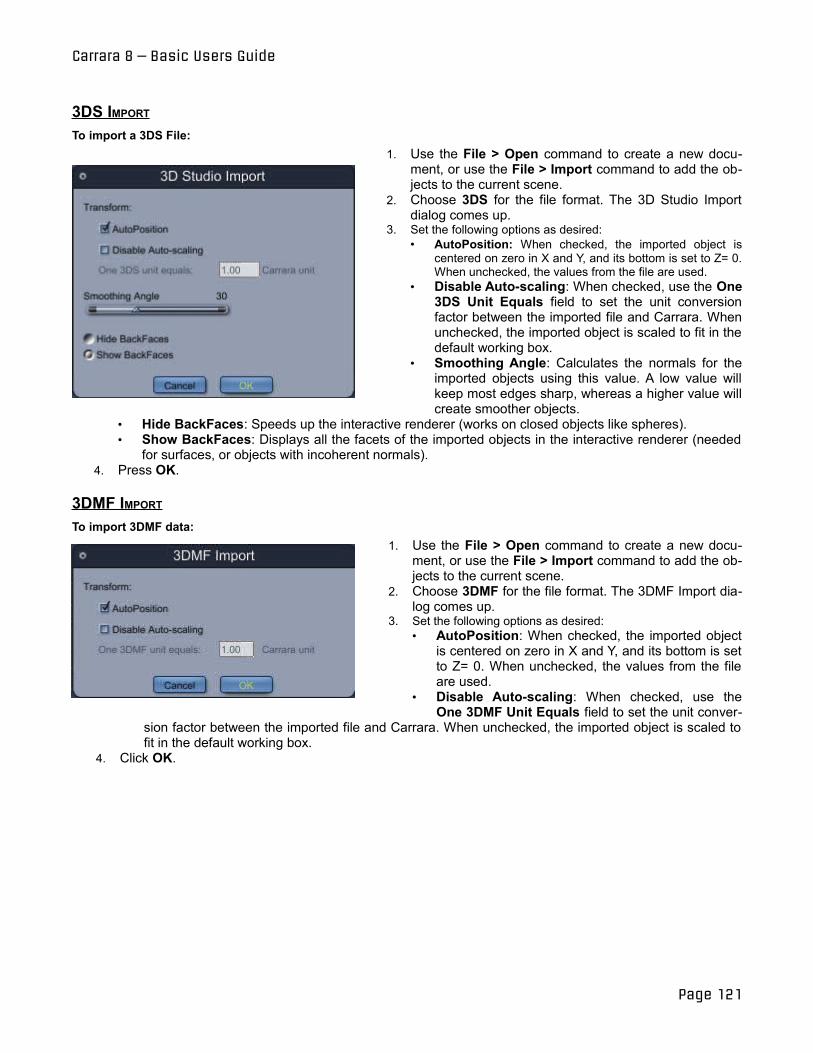
Carrara 8 – Basic Users Guide
3DS IMPORT To import a 3DS File:
1. Use the File > Open command to create a new document, or use the File > Import command to add the objects to the current scene.
2. Choose 3DS for the file format. The 3D Studio Import dialog comes up.
3. Set the following options as desired: • AutoPosition: When checked, the imported object is
centered on zero in X and Y, and its bottom is set to Z= 0. When unchecked, the values from the file are used.
• Disable Auto-scaling: When checked, use the One 3DS Unit Equals field to set the unit conversion factor between the imported file and Carrara. When unchecked, the imported object is scaled to fit in the default working box.
• Smoothing Angle: Calculates the normals for the imported objects using this value. A low value will keep most edges sharp, whereas a higher value will create smoother objects.
• Hide BackFaces: Speeds up the interactive renderer (works on closed objects like spheres). • Show BackFaces: Displays all the facets of the imported objects in the interactive renderer (needed
for surfaces, or objects with incoherent normals). 4. Press OK.
3DMF IMPORT To import 3DMF data:
1. Use the File > Open command to create a new document, or use the File > Import command to add the objects to the current scene.
2. Choose 3DMF for the file format. The 3DMF Import dialog comes up.
3. Set the following options as desired: • AutoPosition: When checked, the imported object
is centered on zero in X and Y, and its bottom is set to Z= 0. When unchecked, the values from the file are used.
• Disable Auto-scaling: When checked, use the One 3DMF Unit Equals field to set the unit conver
sion factor between the imported file and Carrara. When unchecked, the imported object is scaled to fit in the default working box.
4. Click OK.
Page 121
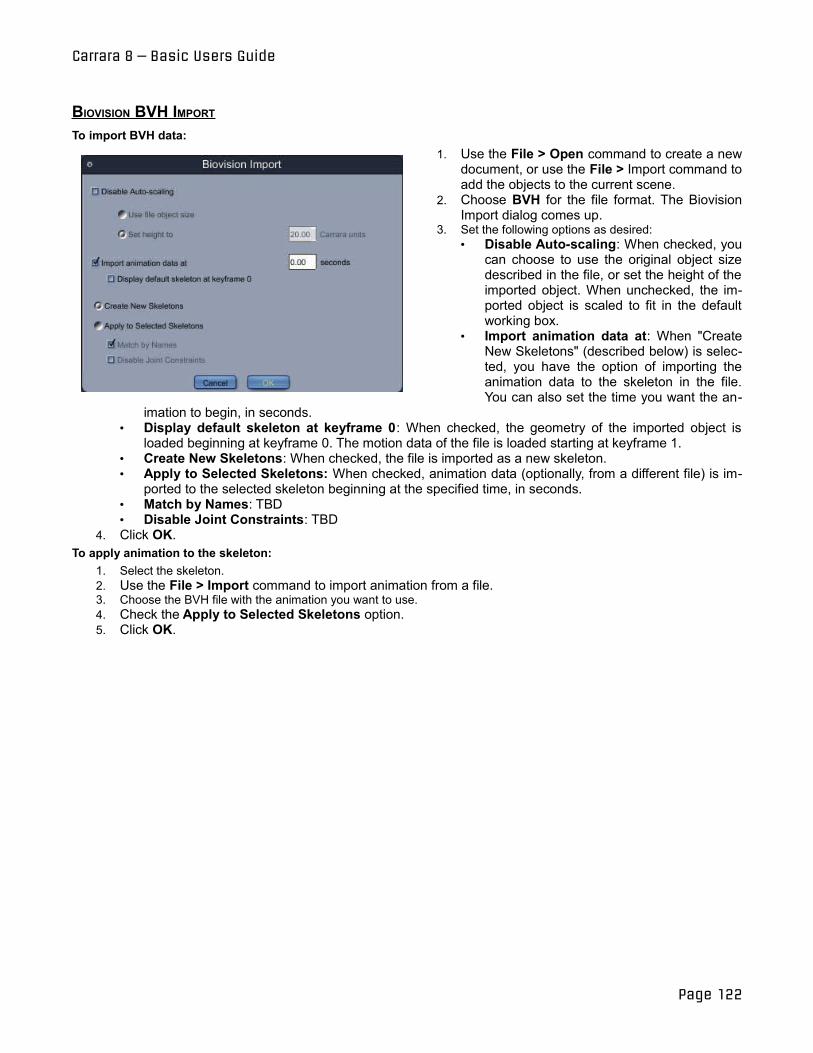
Carrara 8 – Basic Users Guide
BIOVISION BVH IMPORT To import BVH data:
1. Use the File > Open command to create a new document, or use the File > Import command to add the objects to the current scene.
2. Choose BVH for the file format. The Biovision Import dialog comes up.
3. Set the following options as desired: • Disable Auto-scaling: When checked, you
can choose to use the original object size described in the file, or set the height of the imported object. When unchecked, the imported object is scaled to fit in the default working box.
• Import animation data at: When "Create New Skeletons" (described below) is selected, you have the option of importing the animation data to the skeleton in the file. You can also set the time you want the an
imation to begin, in seconds. • Display default skeleton at keyframe 0: When checked, the geometry of the imported object is
loaded beginning at keyframe 0. The motion data of the file is loaded starting at keyframe 1. • Create New Skeletons: When checked, the file is imported as a new skeleton. • Apply to Selected Skeletons: When checked, animation data (optionally, from a different file) is im
ported to the selected skeleton beginning at the specified time, in seconds. • Match by Names: TBD • Disable Joint Constraints: TBD
4. Click OK. To apply animation to the skeleton:
1. Select the skeleton. 2. Use the File > Import command to import animation from a file. 3. Choose the BVH file with the animation you want to use. 4. Check the Apply to Selected Skeletons option. 5. Click OK.
Page 122
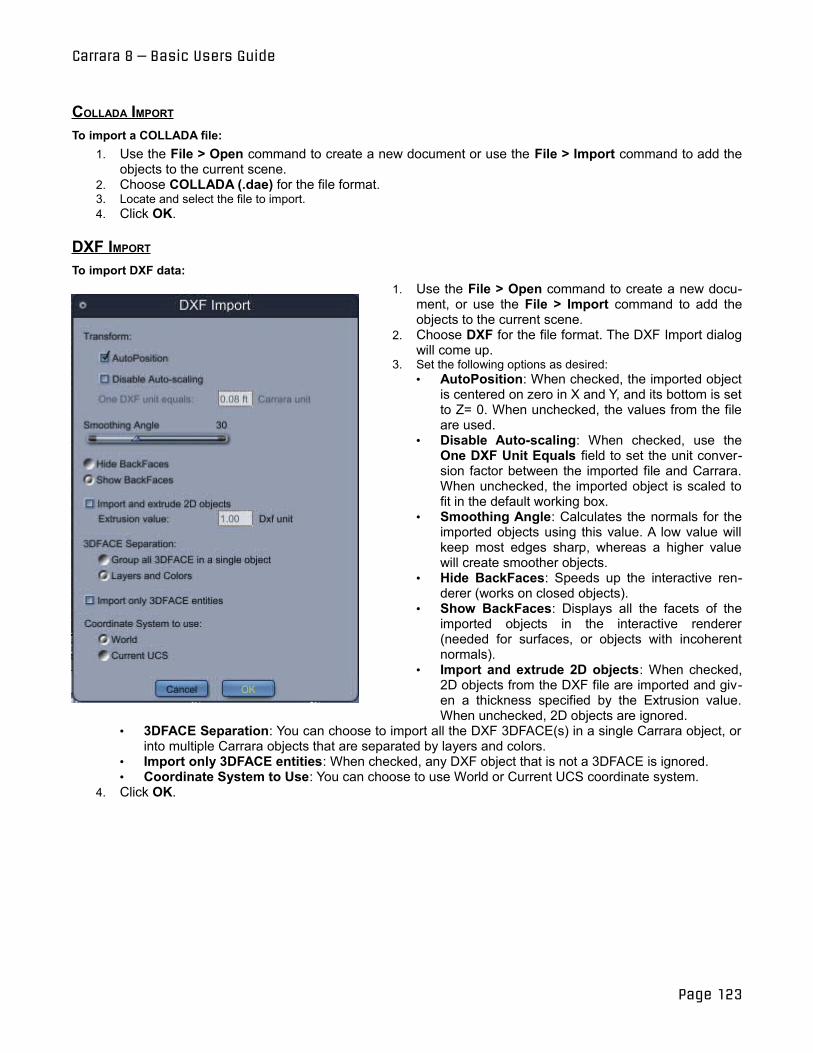
Carrara 8 – Basic Users Guide
COLLADA IMPORT To import a COLLADA file:
1. Use the File > Open command to create a new document or use the File > Import command to add the objects to the current scene.
2. Choose COLLADA (.dae) for the file format. 3. Locate and select the file to import. 4. Click OK.
DXF IMPORT To import DXF data:
1. Use the File > Open command to create a new document, or use the File > Import command to add the objects to the current scene.
2. Choose DXF for the file format. The DXF Import dialog will come up.
3. Set the following options as desired: • AutoPosition: When checked, the imported object
is centered on zero in X and Y, and its bottom is set to Z= 0. When unchecked, the values from the file are used.
• Disable Auto-scaling: When checked, use the One DXF Unit Equals field to set the unit conversion factor between the imported file and Carrara. When unchecked, the imported object is scaled to fit in the default working box.
• Smoothing Angle: Calculates the normals for the imported objects using this value. A low value will keep most edges sharp, whereas a higher value will create smoother objects.
• Hide BackFaces: Speeds up the interactive renderer (works on closed objects).
• Show BackFaces: Displays all the facets of the imported objects in the interactive renderer (needed for surfaces, or objects with incoherent normals).
• Import and extrude 2D objects: When checked, 2D objects from the DXF file are imported and given a thickness specified by the Extrusion value. When unchecked, 2D objects are ignored.
• 3DFACE Separation: You can choose to import all the DXF 3DFACE(s) in a single Carrara object, or into multiple Carrara objects that are separated by layers and colors.
• Import only 3DFACE entities: When checked, any DXF object that is not a 3DFACE is ignored. • Coordinate System to Use: You can choose to use World or Current UCS coordinate system.
4. Click OK.
Page 123
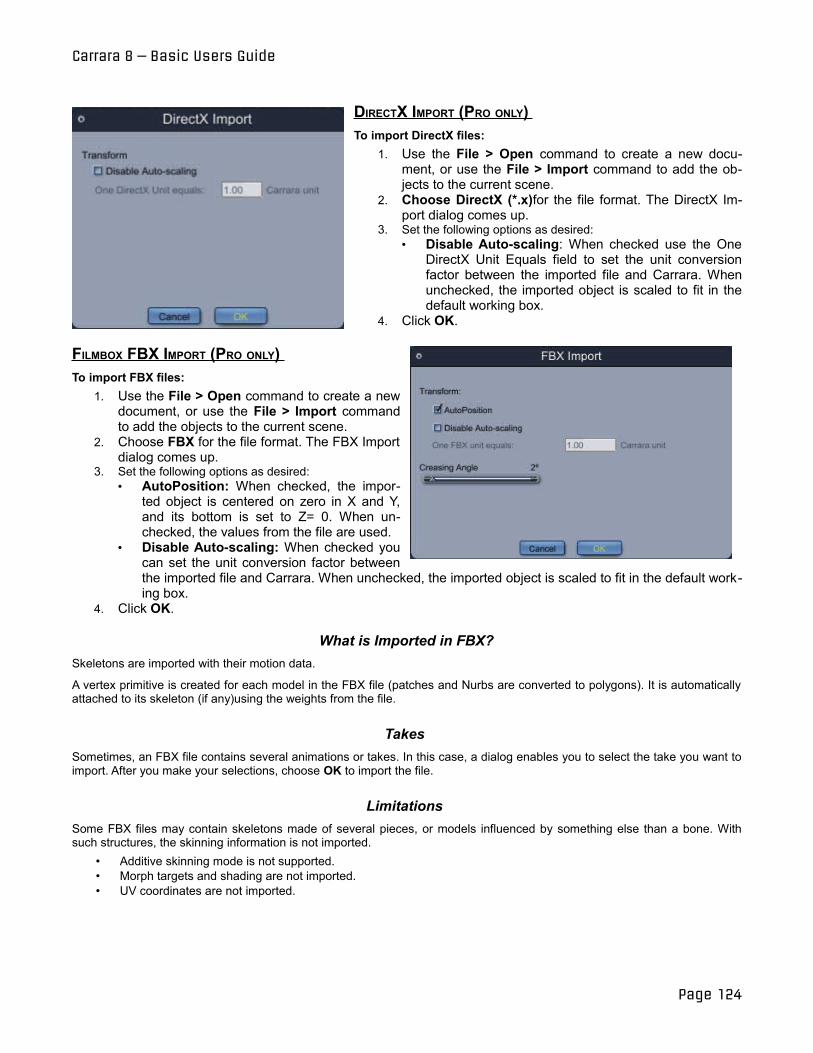
Carrara 8 – Basic Users Guide
DIRECTX IMPORT (PRO ONLY) To import DirectX files:
1. Use the File > Open command to create a new document, or use the File > Import command to add the objects to the current scene.
2. Choose DirectX (*.x)for the file format. The DirectX Import dialog comes up.
3. Set the following options as desired: • Disable Auto-scaling: When checked use the One
DirectX Unit Equals field to set the unit conversion factor between the imported file and Carrara. When unchecked, the imported object is scaled to fit in the default working box.
4. Click OK.
FILMBOX FBX IMPORT (PRO ONLY) To import FBX files:
1. Use the File > Open command to create a new document, or use the File > Import command to add the objects to the current scene.
2. Choose FBX for the file format. The FBX Import dialog comes up.
3. Set the following options as desired: • AutoPosition: When checked, the impor
ted object is centered on zero in X and Y, and its bottom is set to Z= 0. When unchecked, the values from the file are used.
• Disable Auto-scaling: When checked you can set the unit conversion factor between the imported file and Carrara. When unchecked, the imported object is scaled to fit in the default working box.
4. Click OK.
What is Imported in FBX?Skeletons are imported with their motion data.
A vertex primitive is created for each model in the FBX file (patches and Nurbs are converted to polygons). It is automatically attached to its skeleton (if any)using the weights from the file.
Takes Sometimes, an FBX file contains several animations or takes. In this case, a dialog enables you to select the take you want to import. After you make your selections, choose OK to import the file.
Limitations Some FBX files may contain skeletons made of several pieces, or models influenced by something else than a bone. With such structures, the skinning information is not imported.
• Additive skinning mode is not supported. • Morph targets and shading are not imported. • UV coordinates are not imported.
Page 124
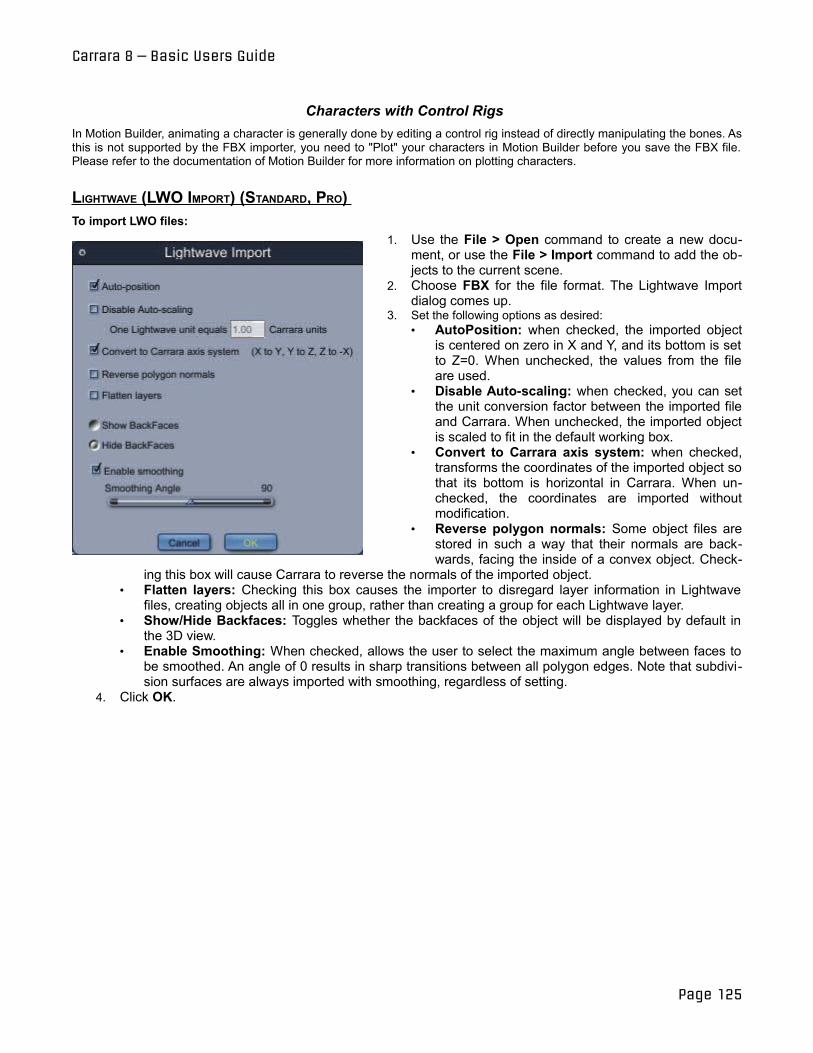
Carrara 8 – Basic Users Guide
Characters with Control Rigs In Motion Builder, animating a character is generally done by editing a control rig instead of directly manipulating the bones. As this is not supported by the FBX importer, you need to "Plot" your characters in Motion Builder before you save the FBX file. Please refer to the documentation of Motion Builder for more information on plotting characters.
LIGHTWAVE (LWO IMPORT) (STANDARD, PRO) To import LWO files:
1. Use the File > Open command to create a new document, or use the File > Import command to add the objects to the current scene.
2. Choose FBX for the file format. The Lightwave Import dialog comes up.
3. Set the following options as desired: • AutoPosition: when checked, the imported object
is centered on zero in X and Y, and its bottom is set to Z=0. When unchecked, the values from the file are used.
• Disable Auto-scaling: when checked, you can set the unit conversion factor between the imported file and Carrara. When unchecked, the imported object is scaled to fit in the default working box.
• Convert to Carrara axis system: when checked, transforms the coordinates of the imported object so that its bottom is horizontal in Carrara. When unchecked, the coordinates are imported without modification.
• Reverse polygon normals: Some object files are stored in such a way that their normals are backwards, facing the inside of a convex object. Check
ing this box will cause Carrara to reverse the normals of the imported object. • Flatten layers: Checking this box causes the importer to disregard layer information in Lightwave
files, creating objects all in one group, rather than creating a group for each Lightwave layer. • Show/Hide Backfaces: Toggles whether the backfaces of the object will be displayed by default in
the 3D view. • Enable Smoothing: When checked, allows the user to select the maximum angle between faces to
be smoothed. An angle of 0 results in sharp transitions between all polygon edges. Note that subdivision surfaces are always imported with smoothing, regardless of setting.
4. Click OK.
Page 125
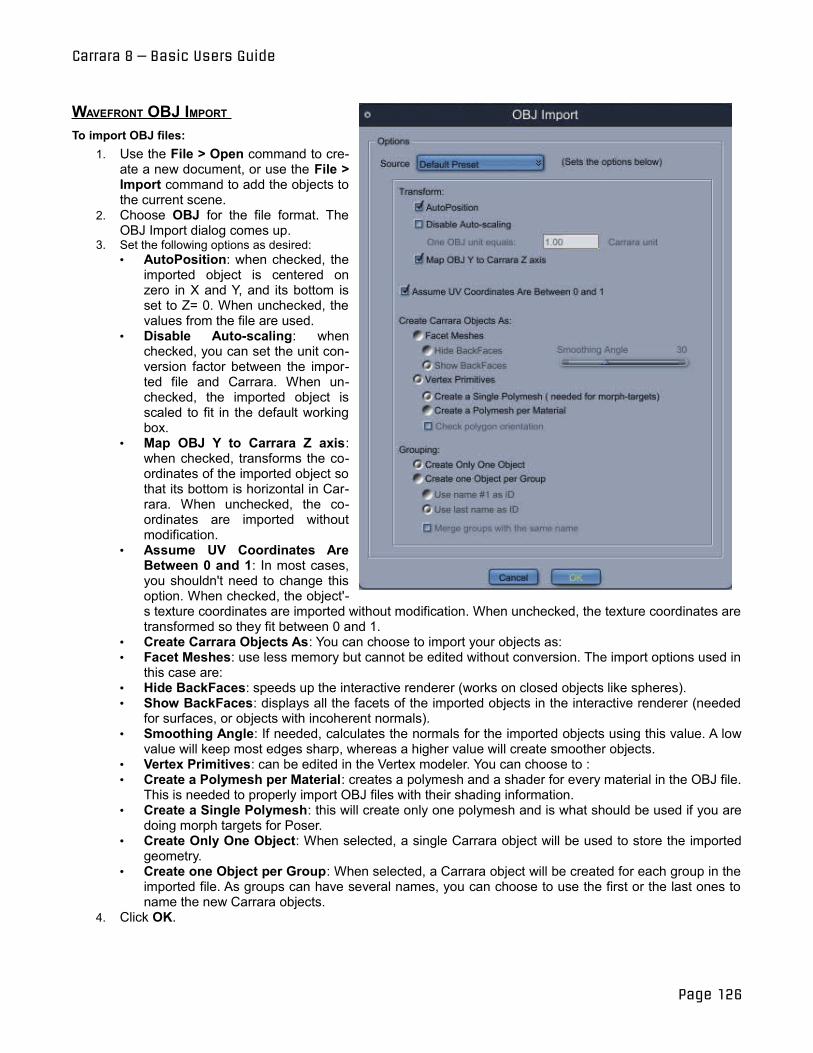
Carrara 8 – Basic Users Guide
WAVEFRONT OBJ IMPORT To import OBJ files:
1. Use the File > Open command to create a new document, or use the File > Import command to add the objects to the current scene.
2. Choose OBJ for the file format. The OBJ Import dialog comes up.
3. Set the following options as desired: • AutoPosition: when checked, the
imported object is centered on zero in X and Y, and its bottom is set to Z= 0. When unchecked, the values from the file are used.
• Disable Auto-scaling: when checked, you can set the unit conversion factor between the imported file and Carrara. When unchecked, the imported object is scaled to fit in the default working box.
• Map OBJ Y to Carrara Z axis: when checked, transforms the coordinates of the imported object so that its bottom is horizontal in Carrara. When unchecked, the coordinates are imported without modification.
• Assume UV Coordinates Are Between 0 and 1: In most cases, you shouldn't need to change this option. When checked, the object's texture coordinates are imported without modification. When unchecked, the texture coordinates are transformed so they fit between 0 and 1.
• Create Carrara Objects As: You can choose to import your objects as: • Facet Meshes: use less memory but cannot be edited without conversion. The import options used in
this case are: • Hide BackFaces: speeds up the interactive renderer (works on closed objects like spheres). • Show BackFaces: displays all the facets of the imported objects in the interactive renderer (needed
for surfaces, or objects with incoherent normals). • Smoothing Angle: If needed, calculates the normals for the imported objects using this value. A low
value will keep most edges sharp, whereas a higher value will create smoother objects. • Vertex Primitives: can be edited in the Vertex modeler. You can choose to : • Create a Polymesh per Material: creates a polymesh and a shader for every material in the OBJ file.
This is needed to properly import OBJ files with their shading information. • Create a Single Polymesh: this will create only one polymesh and is what should be used if you are
doing morph targets for Poser. • Create Only One Object: When selected, a single Carrara object will be used to store the imported
geometry. • Create one Object per Group: When selected, a Carrara object will be created for each group in the
imported file. As groups can have several names, you can choose to use the first or the last ones to name the new Carrara objects.
4. Click OK.
Page 126
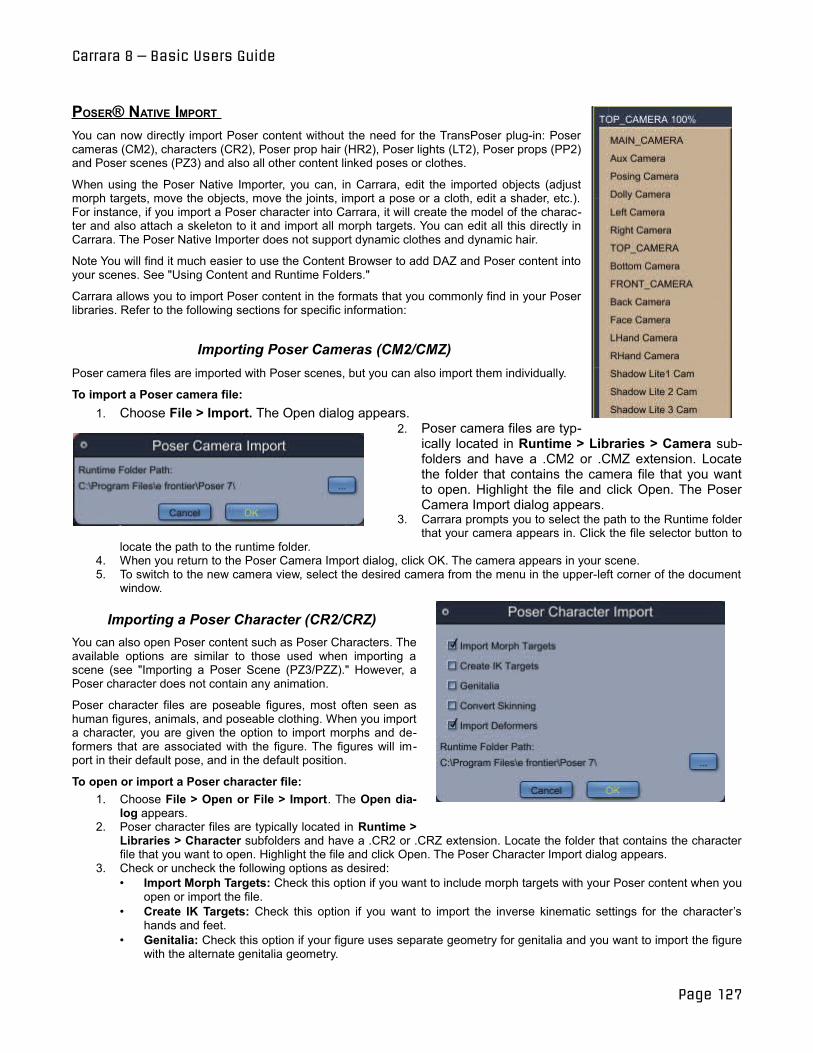
Carrara 8 – Basic Users Guide
POSER® NATIVE IMPORT You can now directly import Poser content without the need for the TransPoser plug-in: Poser cameras (CM2), characters (CR2), Poser prop hair (HR2), Poser lights (LT2), Poser props (PP2) and Poser scenes (PZ3) and also all other content linked poses or clothes.
When using the Poser Native Importer, you can, in Carrara, edit the imported objects (adjust morph targets, move the objects, move the joints, import a pose or a cloth, edit a shader, etc.). For instance, if you import a Poser character into Carrara, it will create the model of the character and also attach a skeleton to it and import all morph targets. You can edit all this directly in Carrara. The Poser Native Importer does not support dynamic clothes and dynamic hair.
Note You will find it much easier to use the Content Browser to add DAZ and Poser content into your scenes. See "Using Content and Runtime Folders."
Carrara allows you to import Poser content in the formats that you commonly find in your Poser libraries. Refer to the following sections for specific information:
Importing Poser Cameras (CM2/CMZ) Poser camera files are imported with Poser scenes, but you can also import them individually.
To import a Poser camera file: 1. Choose File > Import. The Open dialog appears.
2. Poser camera files are typically located in Runtime > Libraries > Camera subfolders and have a .CM2 or .CMZ extension. Locate the folder that contains the camera file that you want to open. Highlight the file and click Open. The Poser Camera Import dialog appears.
3. Carrara prompts you to select the path to the Runtime folder that your camera appears in. Click the file selector button to
locate the path to the runtime folder. 4. When you return to the Poser Camera Import dialog, click OK. The camera appears in your scene. 5. To switch to the new camera view, select the desired camera from the menu in the upper-left corner of the document
window.
Importing a Poser Character (CR2/CRZ) You can also open Poser content such as Poser Characters. The available options are similar to those used when importing a scene (see "Importing a Poser Scene (PZ3/PZZ)." However, a Poser character does not contain any animation.
Poser character files are poseable figures, most often seen as human figures, animals, and poseable clothing. When you import a character, you are given the option to import morphs and deformers that are associated with the figure. The figures will import in their default pose, and in the default position.
To open or import a Poser character file: 1. Choose File > Open or File > Import. The Open dia
log appears. 2. Poser character files are typically located in Runtime >
Libraries > Character subfolders and have a .CR2 or .CRZ extension. Locate the folder that contains the character file that you want to open. Highlight the file and click Open. The Poser Character Import dialog appears.
3. Check or uncheck the following options as desired: • Import Morph Targets: Check this option if you want to include morph targets with your Poser content when you
open or import the file. • Create IK Targets: Check this option if you want to import the inverse kinematic settings for the character’s
hands and feet. • Genitalia: Check this option if your figure uses separate geometry for genitalia and you want to import the figure
with the alternate genitalia geometry.
Page 127
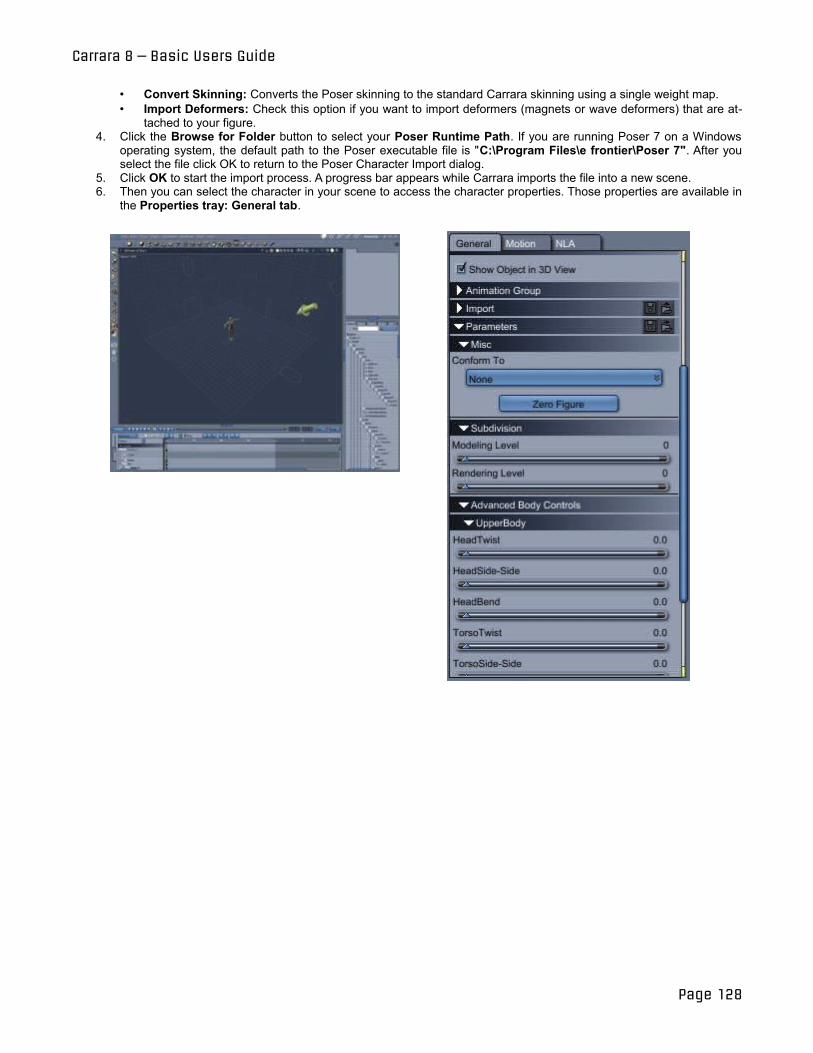
Carrara 8 – Basic Users Guide
• Convert Skinning: Converts the Poser skinning to the standard Carrara skinning using a single weight map. • Import Deformers: Check this option if you want to import deformers (magnets or wave deformers) that are at
tached to your figure. 4. Click the Browse for Folder button to select your Poser Runtime Path. If you are running Poser 7 on a Windows
operating system, the default path to the Poser executable file is "C:\Program Files\e frontier\Poser 7". After you select the file click OK to return to the Poser Character Import dialog.
5. Click OK to start the import process. A progress bar appears while Carrara imports the file into a new scene. 6. Then you can select the character in your scene to access the character properties. Those properties are available in
the Properties tray: General tab.
Page 128

Carrara 8 – Basic Users Guide
Importing Options in the Properties Tray Once you have imported a character, you can also use the Properties tray: General tab: Import panel to import poses, props, hair, clothing, and figures. With the main character selected, open the Properties tray: General tab: Import panel. There you will see four buttons:
• Poser import options in the Properties tray.• Preset (Pose, Material): Use this button to import pose files that
can be applied to the current figure. • Pose as Clip: Use this button to import an animated pose as an
NLA animation clip. • Prop (Prop, Hair): Use this button to import props or prop hair. • Figure (Clothing, Hair): Use this button to import conforming
clothing or hair.
Conforming Clothing Conforming clothing automatically follows a poseable figure, but you have to conform the clothing to the figure in order for this to happen. In some cases, the clothing conforms automatically. However, if you find that you need to manually conform it, you can find an option in the General tab to accomplish this.
After you load your clothing (which should be designed for the character you are conforming it to), open the Properties tray: General tab: Misc panel. A Conform To button appears there. Click the button and choose the desired character from the list.
TIP! You can remove conformed clothing using the Unconform button.
Importing Poser Hair (HR2/HRZ) Poser hair objects are prop files that are typically located in a Runtime > Libraries > Hair folder.
1. Choose File > Open or File > Import. The Open dialog appears. 2. Poser hair files are typically located in Runtime > Libraries > Hair subfolders and have a .HR2 or .HRZ
extension. Locate the folder that contains the hair file that you want to open. Highlight the file and click Open.
3. You may be prompted to locate the geometry file that is associated with the HR2 file. If so, a dialog will display the name of the OBJ file that it needs. The geometry files are typically located in a subfolder beneath the Runtime > Geometries folder, in a folder named by the content creator. Highlight the OBJ file and click Open. The hair appears in your scene.
4. In the Assemble tab, position the hair if necessary. Then go to the Instance list and locate the hair that you imported. Drag the hair upward until you locate the figure’s Head body part, and drop the hair onto the head. The hair will then attach to the head so that it moves along with the figure when you pose it.
Page 129
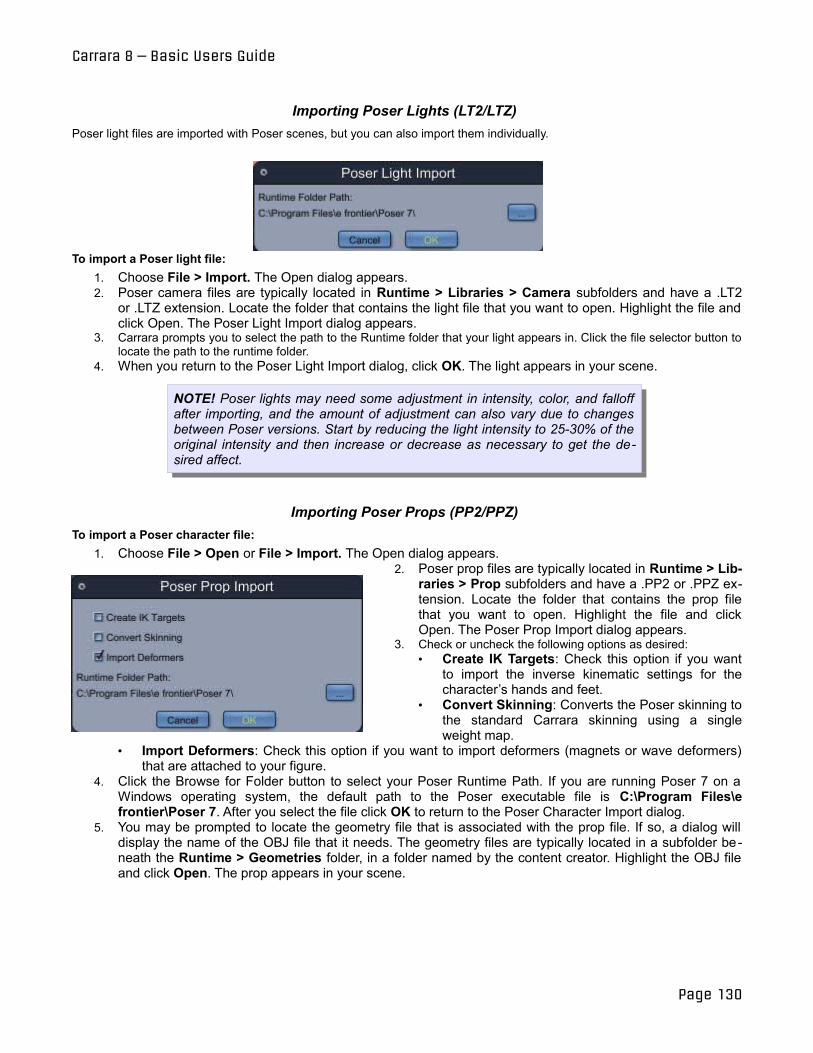
Carrara 8 – Basic Users Guide
Importing Poser Lights (LT2/LTZ) Poser light files are imported with Poser scenes, but you can also import them individually.
To import a Poser light file: 1. Choose File > Import. The Open dialog appears. 2. Poser camera files are typically located in Runtime > Libraries > Camera subfolders and have a .LT2
or .LTZ extension. Locate the folder that contains the light file that you want to open. Highlight the file and click Open. The Poser Light Import dialog appears.
3. Carrara prompts you to select the path to the Runtime folder that your light appears in. Click the file selector button to locate the path to the runtime folder.
4. When you return to the Poser Light Import dialog, click OK. The light appears in your scene.
NOTE! Poser lights may need some adjustment in intensity, color, and falloff after importing, and the amount of adjustment can also vary due to changes between Poser versions. Start by reducing the light intensity to 25-30% of the original intensity and then increase or decrease as necessary to get the desired affect.
Importing Poser Props (PP2/PPZ) To import a Poser character file:
1. Choose File > Open or File > Import. The Open dialog appears. 2. Poser prop files are typically located in Runtime > Lib
raries > Prop subfolders and have a .PP2 or .PPZ extension. Locate the folder that contains the prop file that you want to open. Highlight the file and click Open. The Poser Prop Import dialog appears.
3. Check or uncheck the following options as desired: • Create IK Targets: Check this option if you want
to import the inverse kinematic settings for the character’s hands and feet.
• Convert Skinning: Converts the Poser skinning to the standard Carrara skinning using a single weight map.
• Import Deformers: Check this option if you want to import deformers (magnets or wave deformers) that are attached to your figure.
4. Click the Browse for Folder button to select your Poser Runtime Path. If you are running Poser 7 on a Windows operating system, the default path to the Poser executable file is C:\Program Files\e frontier\Poser 7. After you select the file click OK to return to the Poser Character Import dialog.
5. You may be prompted to locate the geometry file that is associated with the prop file. If so, a dialog will display the name of the OBJ file that it needs. The geometry files are typically located in a subfolder beneath the Runtime > Geometries folder, in a folder named by the content creator. Highlight the OBJ file and click Open. The prop appears in your scene.
Page 130

Carrara 8 – Basic Users Guide
Importing a Poser Scene (PZ3/PZZ) Poser scene files can contain one or several characters, props, clothing, poses, and other content that is already posed. After you import a Poser scene into Carrara, you can add animation and other enhancements to the scene that you import. In addition, you can add and conform clothing, apply pose files, and make other scene changes by adding additional content in the Content Browser.
To import a Poser scene: 1. Choose File > Open or File > Import. The Open
dialog appears. 2. Locate the folder into which you saved your Poser scene
file. The file will have a PZ3 or PZZ extension. 3. Highlight the file and click Open. The Poser Scene Import
dialog appears. 4. Check or uncheck the following options as desired:
• Import Morph Targets: Check this option if you want to include morph targets with your Poser content when you open or import the file.
• Create IK Targets: Check this option if you want to import the inverse kinematic settings for the character’s hands and feet.
• Import Animation: Check this option if the Poser scene file contains an animation and you want to import all of the animation frames. If you uncheck this option, Carrara will only import the first frame.
• Genitalia: Check this option if your figure uses separate geometry for genitalia and you want to import the figure with the alternate genitalia geometry.
• Convert Skinning: Converts the Poser skinning to the standard Carrara skinning using a single weight map.
• Import Deformers: Check this option if you want to import deformers (magnets or wave deformers) that are attached to your figure.
5. Click the Browse for Folder button to select your Poser Runtime Path. If you are running Poser 7 on a Windows operating system, the default path to the Poser executable file is C:\Program Files\e frontier\Poser 7. After you select the file click OK to return to the Poser Character Import dialog.
6. Click Open to start the import process. A progress bar appears while Carrara imports the file into a new scene. 7. You may be prompted to locate files that Carrara cannot find. You are given the option to stop looking for these files
which will cause Carrara to import only the files that it was able to locate.
REALVIZ XML IMPORT (PRO ONLY) You can import Realviz XML data (RZML file format). This format is used to transfer camera motion data calculated from a movie in a match moving software. Note that only the motion of the camera, 3D trackers and basic geometry are imported.
To import a Realviz File: 1. Use the File > Open command to create a new document,
or use the File > Import command to add the objects to the current scene.
2. Choose Realviz for the file format. The Realviz XML Import dialog comes up.
3. Set the following options as desired: • Import Locators: when checked, the 3D trackers are
imported as target helper objects. • Locators size: determines the display size of the cre
ated helper objects. • Locators color: determines the display color of the
created helper objects. 4. Click OK.
Page 131

Carrara 8 – Basic Users Guide
SYNTHEYES™ IMPORT (PRO ONLY) You can import SynthEyes data (.syncar file format). This format is used to transfer camera motion data calculated by the SynthEyes match moving software.
Note that only the motion of the camera and 3D trackers are imported.
To download the latest Carrara export script for SynthEyes, please go to:• http://ssontech.com/
TRUESPACE IMPORT (PRO ONLY) To import trueSpace data (COB file format):
1. Use the File > Open command to create a new document, or use the File > Import command to add the objects to the current scene.
2. Choose COB for the file format. The TrueSpace Import dialog comes up. 3. Set the following options as desired:
• AutoPosition: when checked, the imported object is centered on zero in X and Y, and its bottom is set to Z = 0. When unchecked, the values from the file are used.
• Disable Auto-scaling: when checked, you can set the unit conversion factor between the imported file and Carrara. When unchecked, the imported object is scaled to fit in the default working box.
• Enable Smoothing: calculates the normals for the imported objects using the smoothing angle. A low value will keep most edges sharp, whereas a higher value will create smoother objects.
4. Click OK.
CAD FORMATS (PRO ONLY) Carrara also allows you to import the following CAD formats. The import options are similar for all of these formats:
• IGES (.igs, .iges) • OpenNurbs (.3dm) • SAT (.sat) • STEP (.stp, .step) • VDAFS (.vda, .vdafs)
Page 132
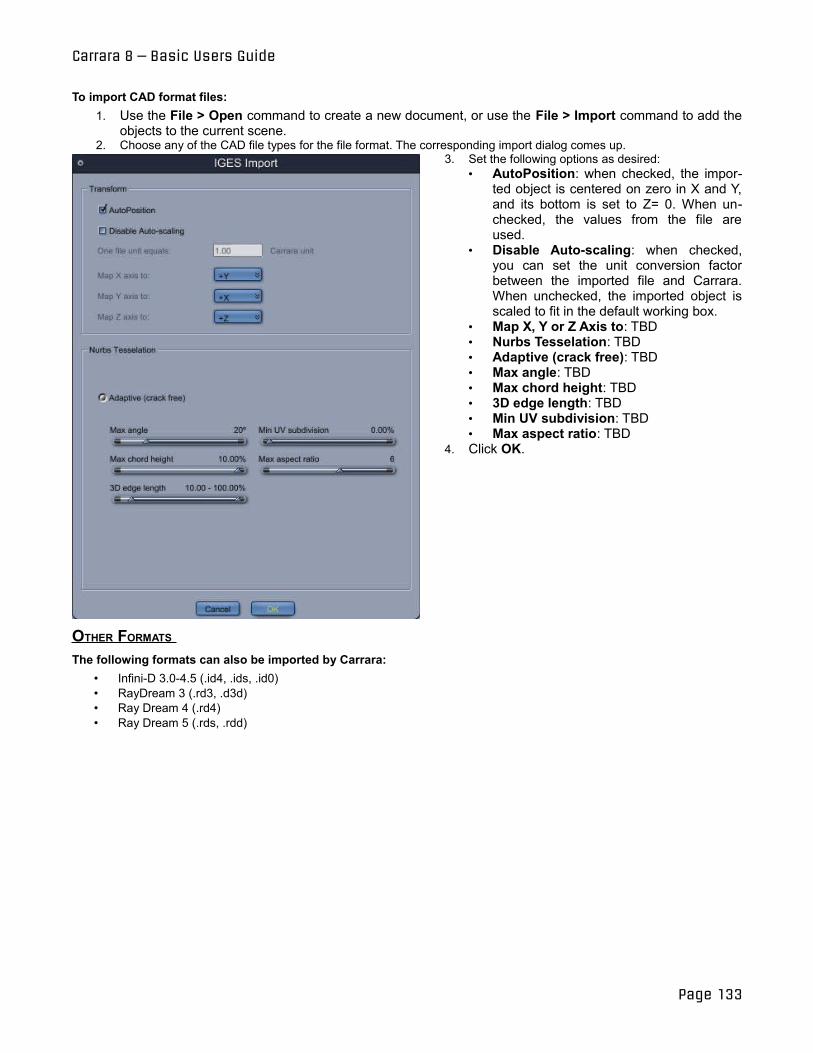
Carrara 8 – Basic Users Guide
To import CAD format files: 1. Use the File > Open command to create a new document, or use the File > Import command to add the
objects to the current scene. 2. Choose any of the CAD file types for the file format. The corresponding import dialog comes up.
3. Set the following options as desired: • AutoPosition: when checked, the impor
ted object is centered on zero in X and Y, and its bottom is set to Z= 0. When unchecked, the values from the file are used.
• Disable Auto-scaling: when checked, you can set the unit conversion factor between the imported file and Carrara. When unchecked, the imported object is scaled to fit in the default working box.
• Map X, Y or Z Axis to: TBD • Nurbs Tesselation: TBD • Adaptive (crack free): TBD • Max angle: TBD • Max chord height: TBD • 3D edge length: TBD • Min UV subdivision: TBD • Max aspect ratio: TBD
4. Click OK.
OTHER FORMATS The following formats can also be imported by Carrara:
• Infini-D 3.0-4.5 (.id4, .ids, .id0) • RayDream 3 (.rd3, .d3d) • Ray Dream 4 (.rd4) • Ray Dream 5 (.rds, .rdd)
Page 133
Exporting 3D Objects Exporting 3D Objects You can export 3D objects to a variety of different file formats using the File > Export or the File > Save As commands. When you use export, only the current selection is exported. When you choose Save As, the whole scene is exported. Exporting 3D objects allows you to interact with other 3D applications. It also allows you to create 3D content for the Web.
The following sections provide additional information on specific export file types.
ExportExport
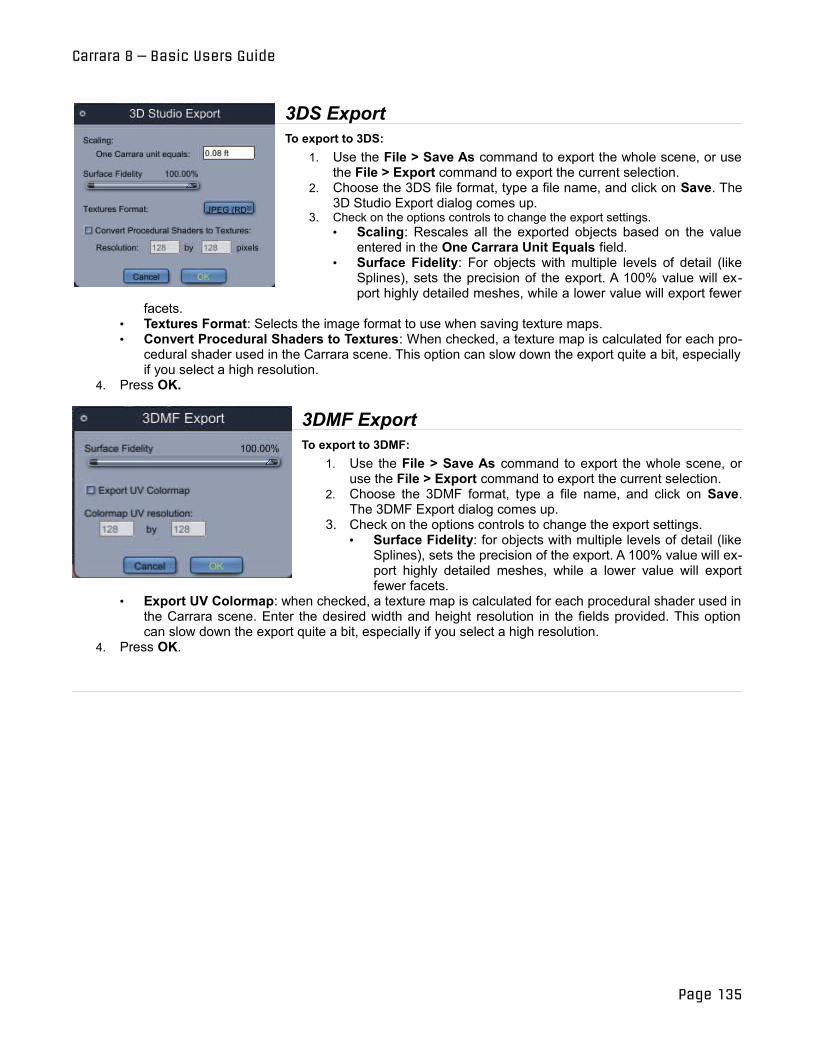
Carrara 8 – Basic Users Guide
3DS Export To export to 3DS:
1. Use the File > Save As command to export the whole scene, or use the File > Export command to export the current selection.
2. Choose the 3DS file format, type a file name, and click on Save. The 3D Studio Export dialog comes up.
3. Check on the options controls to change the export settings. • Scaling: Rescales all the exported objects based on the value
entered in the One Carrara Unit Equals field. • Surface Fidelity: For objects with multiple levels of detail (like
Splines), sets the precision of the export. A 100% value will export highly detailed meshes, while a lower value will export fewer
facets. • Textures Format: Selects the image format to use when saving texture maps. • Convert Procedural Shaders to Textures: When checked, a texture map is calculated for each pro
cedural shader used in the Carrara scene. This option can slow down the export quite a bit, especially if you select a high resolution.
4. Press OK.
3DMF ExportTo export to 3DMF:
1. Use the File > Save As command to export the whole scene, or use the File > Export command to export the current selection.
2. Choose the 3DMF format, type a file name, and click on Save. The 3DMF Export dialog comes up.
3. Check on the options controls to change the export settings. • Surface Fidelity: for objects with multiple levels of detail (like
Splines), sets the precision of the export. A 100% value will export highly detailed meshes, while a lower value will export fewer facets.
• Export UV Colormap: when checked, a texture map is calculated for each procedural shader used in the Carrara scene. Enter the desired width and height resolution in the fields provided. This option can slow down the export quite a bit, especially if you select a high resolution.
4. Press OK.
Page 135

Carrara 8 – Basic Users Guide
Adobe® After Effects® ExportThe After Effects® exporter saves the animation of cameras, lights (distant, bulb and spot), and planes into a ".cae" file. The generated file can then be imported into After Effects by using the Carrara plug-in for After Effects (5.5 and above on Windows, 6.5 and above on Mac OS X).
1. Use the File > Save As command to export the whole scene, or use the File > Export command to export the current selection.
2. Choose the After Effects (*.cae) format, type a file name, and click on Save. The AE Export dialog comes up.
3. Check on the options controls to export cameras, lights, and planes, and to filter keyframes (if desired).
4. Press OK.
COLLADA Export To export to COLLADA:
1. Use the File > Save As command to export the whole scene or use the File > Export command to export the current selection.
2. Choose the COLLADA (.dae) file format, type a file name, and click on Save. The DXF Export dialog comes up. • To export morphs as part of the COLLADA file, click in the radio
button next to Active Morphs. To not export morphs, click in the radio button next to No Morphs.
3. Press OK.
DXF Export To export to DXF:
1. Use the File > Save As command to export the whole scene, or use the File > Export command to export the current selection.
2. Choose the DXF file format, type a file name, and click on Save. The DXF Export dialog comes up.
3. Set the Surface Fidelity: for objects with multiple levels of detail (like Splines), sets the precision of the export. A 100% value will export highly detailed meshes, while a lower value will export fewer facets.
4. Press OK.
Page 136
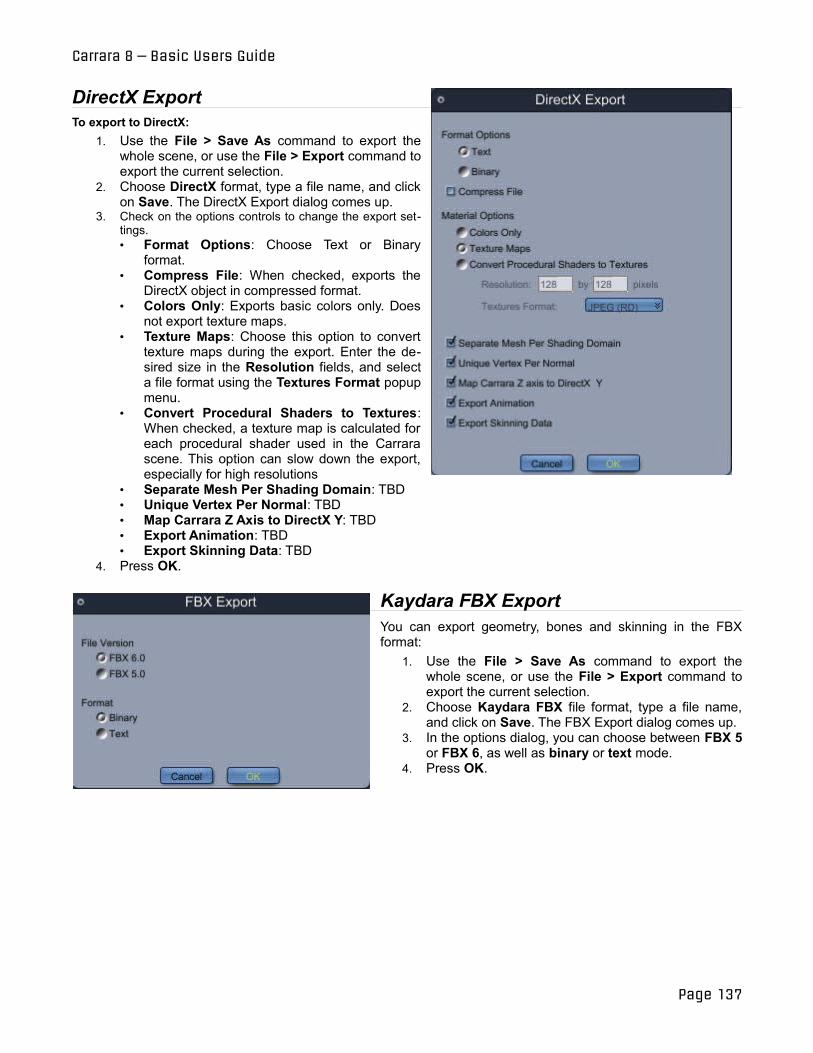
Carrara 8 – Basic Users Guide
DirectX ExportTo export to DirectX:
1. Use the File > Save As command to export the whole scene, or use the File > Export command to export the current selection.
2. Choose DirectX format, type a file name, and click on Save. The DirectX Export dialog comes up.
3. Check on the options controls to change the export settings. • Format Options: Choose Text or Binary
format. • Compress File: When checked, exports the
DirectX object in compressed format. • Colors Only: Exports basic colors only. Does
not export texture maps. • Texture Maps: Choose this option to convert
texture maps during the export. Enter the desired size in the Resolution fields, and select a file format using the Textures Format popup menu.
• Convert Procedural Shaders to Textures: When checked, a texture map is calculated for each procedural shader used in the Carrara scene. This option can slow down the export, especially for high resolutions
• Separate Mesh Per Shading Domain: TBD • Unique Vertex Per Normal: TBD • Map Carrara Z Axis to DirectX Y: TBD • Export Animation: TBD • Export Skinning Data: TBD
4. Press OK.
Kaydara FBX ExportYou can export geometry, bones and skinning in the FBX format:
1. Use the File > Save As command to export the whole scene, or use the File > Export command to export the current selection.
2. Choose Kaydara FBX file format, type a file name, and click on Save. The FBX Export dialog comes up.
3. In the options dialog, you can choose between FBX 5 or FBX 6, as well as binary or text mode.
4. Press OK.
Page 137
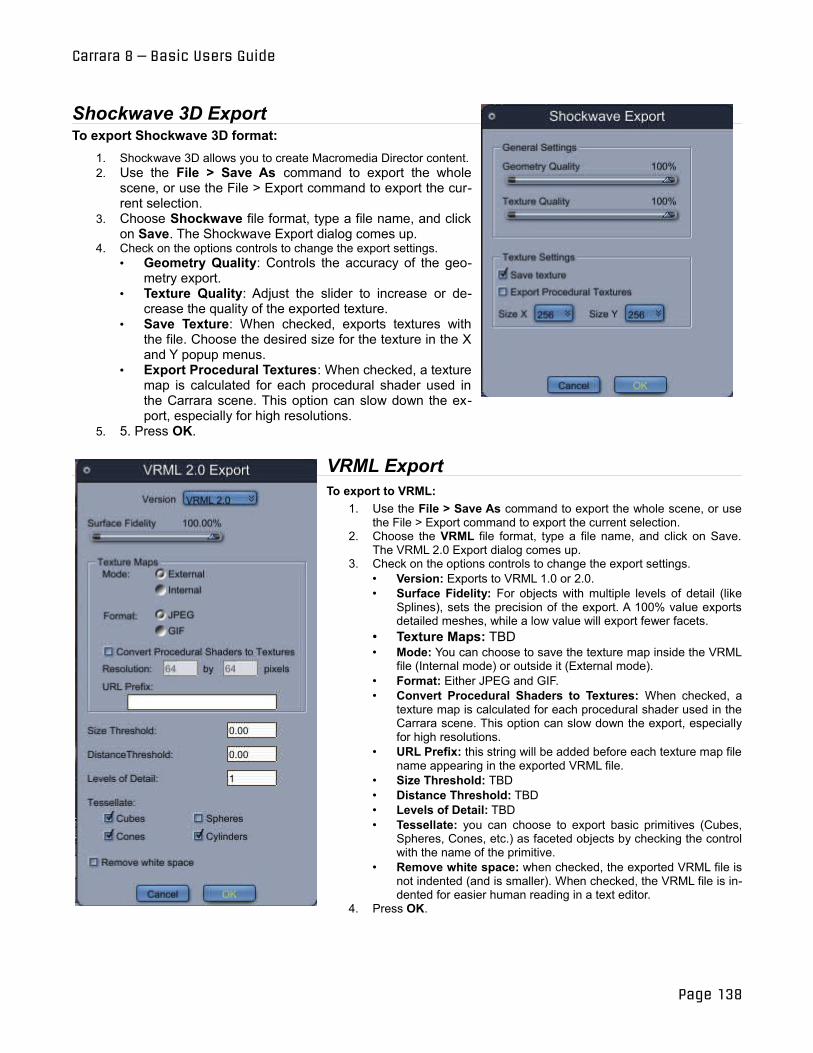
Carrara 8 – Basic Users Guide
Shockwave 3D Export To export Shockwave 3D format:
1. Shockwave 3D allows you to create Macromedia Director content. 2. Use the File > Save As command to export the whole
scene, or use the File > Export command to export the current selection.
3. Choose Shockwave file format, type a file name, and click on Save. The Shockwave Export dialog comes up.
4. Check on the options controls to change the export settings. • Geometry Quality: Controls the accuracy of the geo
metry export. • Texture Quality: Adjust the slider to increase or de
crease the quality of the exported texture. • Save Texture: When checked, exports textures with
the file. Choose the desired size for the texture in the X and Y popup menus.
• Export Procedural Textures: When checked, a texture map is calculated for each procedural shader used in the Carrara scene. This option can slow down the export, especially for high resolutions.
5. 5. Press OK.
VRML Export To export to VRML:
1. Use the File > Save As command to export the whole scene, or use the File > Export command to export the current selection.
2. Choose the VRML file format, type a file name, and click on Save. The VRML 2.0 Export dialog comes up.
3. Check on the options controls to change the export settings. • Version: Exports to VRML 1.0 or 2.0. • Surface Fidelity: For objects with multiple levels of detail (like
Splines), sets the precision of the export. A 100% value exports detailed meshes, while a low value will export fewer facets.
• Texture Maps: TBD• Mode: You can choose to save the texture map inside the VRML
file (Internal mode) or outside it (External mode). • Format: Either JPEG and GIF. • Convert Procedural Shaders to Textures: When checked, a
texture map is calculated for each procedural shader used in the Carrara scene. This option can slow down the export, especially for high resolutions.
• URL Prefix: this string will be added before each texture map file name appearing in the exported VRML file.
• Size Threshold: TBD • Distance Threshold: TBD • Levels of Detail: TBD • Tessellate: you can choose to export basic primitives (Cubes,
Spheres, Cones, etc.) as faceted objects by checking the control with the name of the primitive.
• Remove white space: when checked, the exported VRML file is not indented (and is smaller). When checked, the VRML file is indented for easier human reading in a text editor.
4. Press OK.
Page 138

Carrara 8 – Basic Users Guide
Wavefront OBJ Export To export to Wavefront (OBJ):
1. Use the File > Save As command to export the whole scene, or use the File > Export command to export the current selection.
2. Choose the OBJ file format, type a file name, and click on Save. The OBJ Export dialog comes up.
3. Check on the options controls to change the export settings. • Target: Select the target program for the export.
Based on the target selected, different export options may be unavailable (grayed out).
• Export Objects In Local Coordinates: when unchecked (default), the Carrara objects are exported with the positions and scaling they have in the scene. When checked, the geometry of Carrara's instances is exported without taking into account their scaling and position (useful for creating Poser morph targets).
• Map Carrara Z axis to OBJ Y: when checked, transforms the coordinates of Carrara objects so that their bottom (XY plane) is horizontal in the OBJ file. When unchecked, the coordinates are exported without modification.
• Export objects with Morphs and Skinning: TBD
• Export objects full path: TBD • Surface Fidelity: for objects with multiple levels
of detail (like Splines), sets the precision of the export. A 100% value will export highly detailed meshes, while a lower value will export fewer facets (and generate smaller OBJ files).
• Materials export: • None: when selected, no materials will be exported. • Colors only: when selected, only the color of the objects will be
exported. • Texture Maps: when selected, texture maps and object colors will
be exported. • Convert Procedural Shaders to Textures: when checked, a
texture map is calculated for each procedural shader used in the Carrara scene. This option can slow down the export quite a bit, especially if you select a high resolution.
• Textures Format: selects the format to use when saving texture maps.
• Write File Names As: sets how file references are written in the OBJ and MTL files (as file name only, full path, or relative path).
4. Press OK.
Page 139

Carrara 8 – Basic Users Guide
Viewpoint Experience Tech ExportYou can use Carrara to create 3D content for your web site using VET (Viewpoint Experience Technology). It’s as simple as exporting your scene. Carrara converts the geometry, lighting and materials of your objects to VET file format. It can also embed code in an HTML page using special tags.
You can also add interactivity to your scene using VET-dedicated tools in Carrara.
The following topics give more detail about Viewpoint Experience Technology export.
Exporting a Scene
To export a VET scene: 4. Choose File Menu> Save As and select VET as the type of the file to export. 5. If you selected the options checkbox in the file dialog, an option dialog will open and you can select the
options you want. Carrara will create three files: • filename.html which is the actual web page in which the scene will be embedded • filename.mtx which contains the XML code of your file. • filename.mts which contains the description of the 3D objects and materials.
6. Simply double-click on the HTML file and the scene will open in your web browser. For information on the many export options, see "Export Options."
Page 140
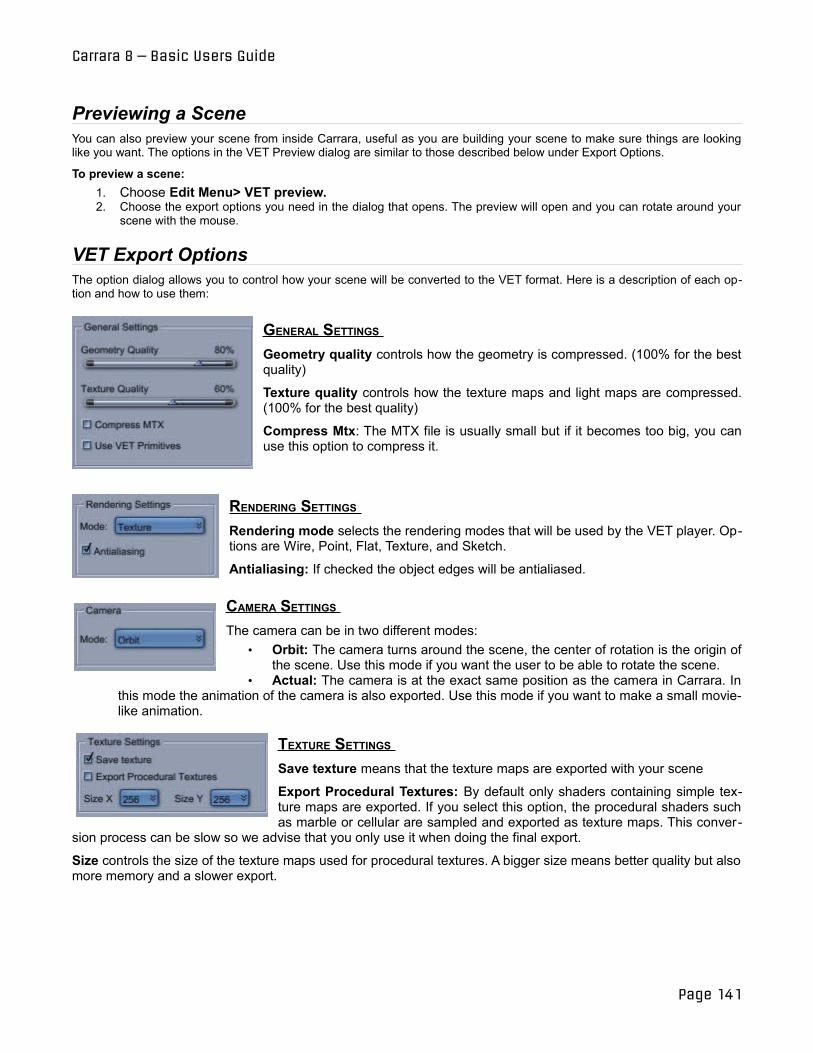
Carrara 8 – Basic Users Guide
Previewing a Scene You can also preview your scene from inside Carrara, useful as you are building your scene to make sure things are looking like you want. The options in the VET Preview dialog are similar to those described below under Export Options.
To preview a scene: 1. Choose Edit Menu> VET preview. 2. Choose the export options you need in the dialog that opens. The preview will open and you can rotate around your
scene with the mouse.
VET Export Options The option dialog allows you to control how your scene will be converted to the VET format. Here is a description of each option and how to use them:
GENERAL SETTINGS Geometry quality controls how the geometry is compressed. (100% for the best quality)
Texture quality controls how the texture maps and light maps are compressed. (100% for the best quality)
Compress Mtx: The MTX file is usually small but if it becomes too big, you can use this option to compress it.
RENDERING SETTINGS Rendering mode selects the rendering modes that will be used by the VET player. Options are Wire, Point, Flat, Texture, and Sketch.
Antialiasing: If checked the object edges will be antialiased.
CAMERA SETTINGS The camera can be in two different modes:
• Orbit: The camera turns around the scene, the center of rotation is the origin of the scene. Use this mode if you want the user to be able to rotate the scene.
• Actual: The camera is at the exact same position as the camera in Carrara. In this mode the animation of the camera is also exported. Use this mode if you want to make a small movie-like animation.
TEXTURE SETTINGS Save texture means that the texture maps are exported with your scene
Export Procedural Textures: By default only shaders containing simple texture maps are exported. If you select this option, the procedural shaders such as marble or cellular are sampled and exported as texture maps. This conver
sion process can be slow so we advise that you only use it when doing the final export.
Size controls the size of the texture maps used for procedural textures. A bigger size means better quality but also more memory and a slower export.
Page 141
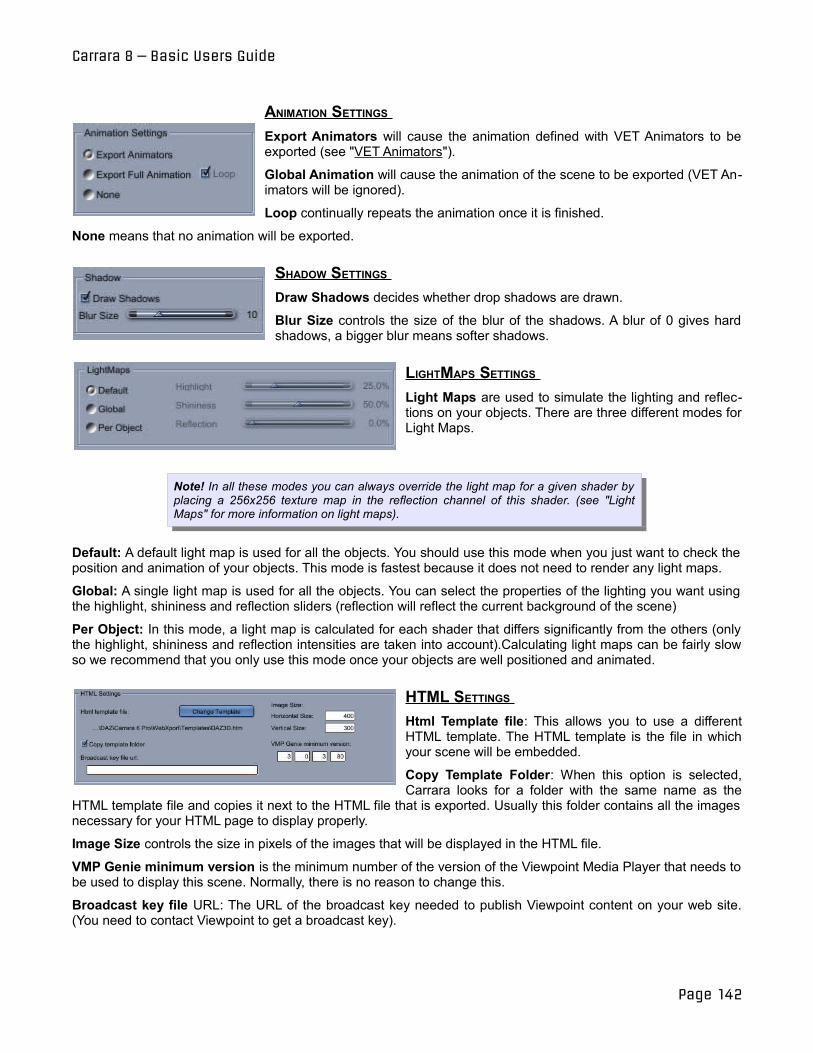
Carrara 8 – Basic Users Guide
ANIMATION SETTINGS Export Animators will cause the animation defined with VET Animators to be exported (see "VET Animators").
Global Animation will cause the animation of the scene to be exported (VET Animators will be ignored).
Loop continually repeats the animation once it is finished.
None means that no animation will be exported.
SHADOW SETTINGS Draw Shadows decides whether drop shadows are drawn.
Blur Size controls the size of the blur of the shadows. A blur of 0 gives hard shadows, a bigger blur means softer shadows.
LIGHTMAPS SETTINGS Light Maps are used to simulate the lighting and reflections on your objects. There are three different modes for Light Maps.
Note! In all these modes you can always override the light map for a given shader by placing a 256x256 texture map in the reflection channel of this shader. (see "Light Maps" for more information on light maps).
Default: A default light map is used for all the objects. You should use this mode when you just want to check the position and animation of your objects. This mode is fastest because it does not need to render any light maps.
Global: A single light map is used for all the objects. You can select the properties of the lighting you want using the highlight, shininess and reflection sliders (reflection will reflect the current background of the scene)
Per Object: In this mode, a light map is calculated for each shader that differs significantly from the others (only the highlight, shininess and reflection intensities are taken into account).Calculating light maps can be fairly slow so we recommend that you only use this mode once your objects are well positioned and animated.
HTML SETTINGS Html Template file: This allows you to use a different HTML template. The HTML template is the file in which your scene will be embedded.
Copy Template Folder: When this option is selected, Carrara looks for a folder with the same name as the
HTML template file and copies it next to the HTML file that is exported. Usually this folder contains all the images necessary for your HTML page to display properly.
Image Size controls the size in pixels of the images that will be displayed in the HTML file.
VMP Genie minimum version is the minimum number of the version of the Viewpoint Media Player that needs to be used to display this scene. Normally, there is no reason to change this.
Broadcast key file URL: The URL of the broadcast key needed to publish Viewpoint content on your web site. (You need to contact Viewpoint to get a broadcast key).
Page 142
Carrara 8 – Basic Users Guide
GETTING RESULTS WITH VET
Light Maps In the VET technology, lighting is simulated using a texture called light maps. Carrara automatically generates light maps that match the lighting of your scene. You can also override the light maps used for a given object.
To get good results, it is necessary to understand how light maps are built. Light maps can also allow you to simulate reflections (environment mapping).
How to create good light maps: • We recommend that you only use distant lights in your scenes because lights maps only simulate distant lights. How
ever, Carrara will also convert your other lights into light maps but the results may not be what you expect. • Objects that have the same shader or similar shading properties will use the same light maps. The properties that in
fluence the light maps are the following: shininess, highlight and reflection. To save memory, avoid using too many different shaders.
• Light maps will include a reflection of the background for objects where the reflection is not set to 0. • You will need to set a background on your scene so as to have reflections on your objects.
Setting your own light maps: • A light map is basically a 256 by 256 texture map. If you apply a texture map to the reflection channel of a shader, this
texture will be used as a light map. You can create new light maps easily with Carrara. You just need to render a sphere in 256x256 so that the edges of the sphere touch the edges of the image. Adding lights, a background, backdrops and changing the shader of the sphere will all affect the properties of the light map.
• It is very important that the texture is 256 by 256 pixels or it will not work.
Maps (Texture, Bump, Transparency) The texture maps, bump maps and transparency maps that you may assign to shaders in Carrara will be exported. There is nevertheless a few constrains to respect in order to make them correctly.
If you want to export a transparency map, the shader must also contain a texture map of the same dimensions. If the dimensions of the transparency map are different from the texture map ones, the transparency map will be ignored and the transparency of the material set to the first value encountered on the map.
A bump map can be exported with or without the existence of a texture map, but if there is one, its dimensions should be identical to the bump map's.
A texture map can be a traditional picture but it can also be a flash movie file (SWF files). However, flash movies cannot be displayed inside Carrara. The shader will appear to be white in Carrara but the flash movie will be visible in the preview or after exporting the VET file.
Backdrop The backdrop of a Carrara scene will also be exported. As for the texture maps, it is possible to assign a flash movie to the backdrop. The flash movie won't be visible inside Carrara but it will be in the preview or in the exported VET file.
Animation There are some limitations to the kind of animations that can be exported. Only key-frame based animations are properly exported. Only the animations using object transform, the color of a light map or the deformation applied to an object with the Morpher Deformer can be exported. You can move, rotate, scale objects in your scene. Any other kind of animation will not be exported correctly.
Add Interactivity to Your Scene Carrara gives you the possibility to add interactivity to your scene for the VET export. You can define interactions such as triggering an animation when clicking on an object or displaying two dimensional text when the cursor slides over an invisible hot spot. Two objects in Carrara can help you to define such interactions: the VET Animator object and the VET Interactor.
Page 143
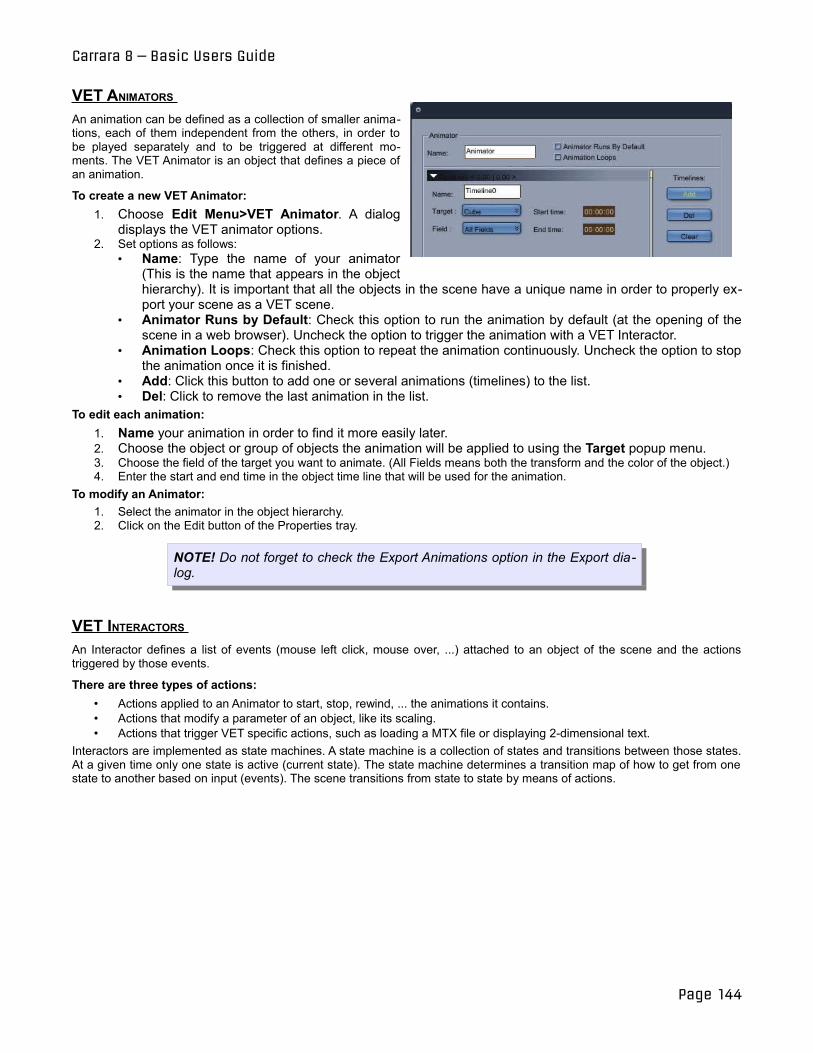
Carrara 8 – Basic Users Guide
VET ANIMATORS An animation can be defined as a collection of smaller animations, each of them independent from the others, in order to be played separately and to be triggered at different moments. The VET Animator is an object that defines a piece of an animation.
To create a new VET Animator: 1. Choose Edit Menu>VET Animator. A dialog
displays the VET animator options. 2. Set options as follows:
• Name: Type the name of your animator (This is the name that appears in the object hierarchy). It is important that all the objects in the scene have a unique name in order to properly export your scene as a VET scene.
• Animator Runs by Default: Check this option to run the animation by default (at the opening of the scene in a web browser). Uncheck the option to trigger the animation with a VET Interactor.
• Animation Loops: Check this option to repeat the animation continuously. Uncheck the option to stop the animation once it is finished.
• Add: Click this button to add one or several animations (timelines) to the list. • Del: Click to remove the last animation in the list.
To edit each animation: 1. Name your animation in order to find it more easily later. 2. Choose the object or group of objects the animation will be applied to using the Target popup menu. 3. Choose the field of the target you want to animate. (All Fields means both the transform and the color of the object.) 4. Enter the start and end time in the object time line that will be used for the animation.
To modify an Animator: 1. Select the animator in the object hierarchy. 2. Click on the Edit button of the Properties tray.
NOTE! Do not forget to check the Export Animations option in the Export dialog.
VET INTERACTORS An Interactor defines a list of events (mouse left click, mouse over, ...) attached to an object of the scene and the actions triggered by those events.
There are three types of actions: • Actions applied to an Animator to start, stop, rewind, ... the animations it contains. • Actions that modify a parameter of an object, like its scaling. • Actions that trigger VET specific actions, such as loading a MTX file or displaying 2-dimensional text.
Interactors are implemented as state machines. A state machine is a collection of states and transitions between those states. At a given time only one state is active (current state). The state machine determines a transition map of how to get from one state to another based on input (events). The scene transitions from state to state by means of actions.
Page 144
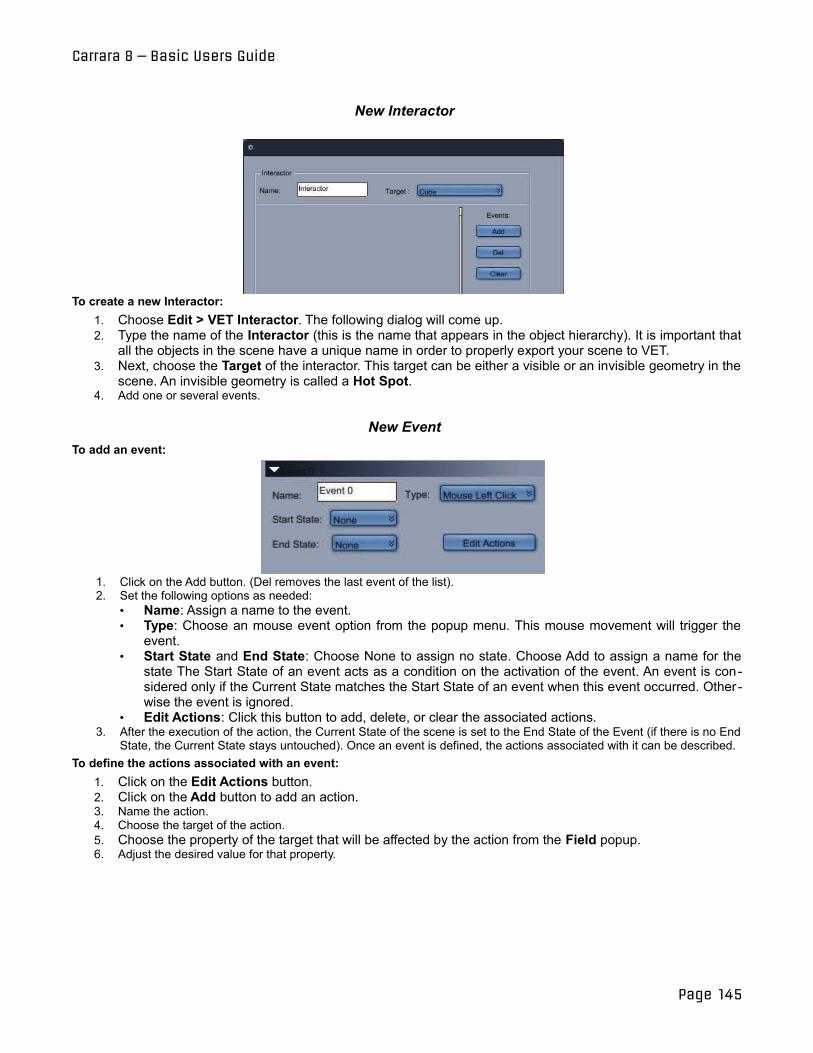
Carrara 8 – Basic Users Guide
New Interactor
To create a new Interactor: 1. Choose Edit > VET Interactor. The following dialog will come up. 2. Type the name of the Interactor (this is the name that appears in the object hierarchy). It is important that
all the objects in the scene have a unique name in order to properly export your scene to VET. 3. Next, choose the Target of the interactor. This target can be either a visible or an invisible geometry in the
scene. An invisible geometry is called a Hot Spot. 4. Add one or several events.
New Event To add an event:
1. Click on the Add button. (Del removes the last event of the list). 2. Set the following options as needed:
• Name: Assign a name to the event. • Type: Choose an mouse event option from the popup menu. This mouse movement will trigger the
event. • Start State and End State: Choose None to assign no state. Choose Add to assign a name for the
state The Start State of an event acts as a condition on the activation of the event. An event is considered only if the Current State matches the Start State of an event when this event occurred. Other wise the event is ignored.
• Edit Actions: Click this button to add, delete, or clear the associated actions. 3. After the execution of the action, the Current State of the scene is set to the End State of the Event (if there is no End
State, the Current State stays untouched). Once an event is defined, the actions associated with it can be described. To define the actions associated with an event:
1. Click on the Edit Actions button. 2. Click on the Add button to add an action. 3. Name the action. 4. Choose the target of the action. 5. Choose the property of the target that will be affected by the action from the Field popup. 6. Adjust the desired value for that property.
Page 145
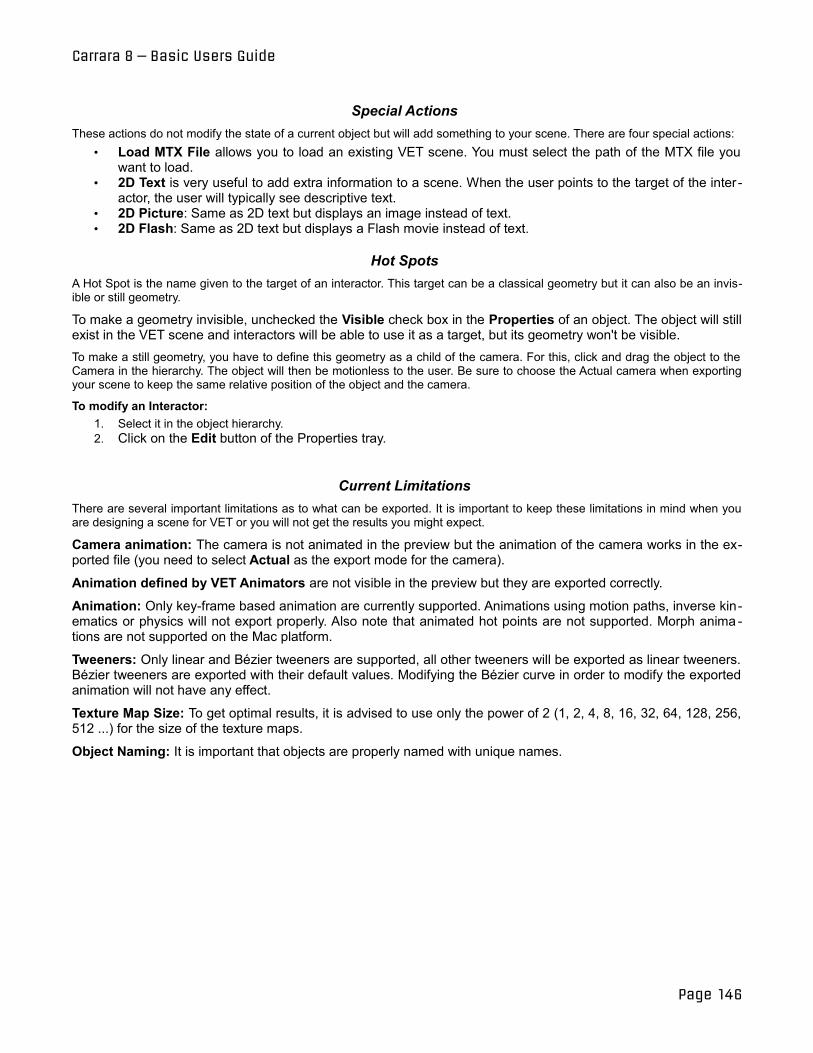
Carrara 8 – Basic Users Guide
Special Actions These actions do not modify the state of a current object but will add something to your scene. There are four special actions:
• Load MTX File allows you to load an existing VET scene. You must select the path of the MTX file you want to load.
• 2D Text is very useful to add extra information to a scene. When the user points to the target of the inter actor, the user will typically see descriptive text.
• 2D Picture: Same as 2D text but displays an image instead of text. • 2D Flash: Same as 2D text but displays a Flash movie instead of text.
Hot Spots A Hot Spot is the name given to the target of an interactor. This target can be a classical geometry but it can also be an invisible or still geometry.
To make a geometry invisible, unchecked the Visible check box in the Properties of an object. The object will still exist in the VET scene and interactors will be able to use it as a target, but its geometry won't be visible. To make a still geometry, you have to define this geometry as a child of the camera. For this, click and drag the object to the Camera in the hierarchy. The object will then be motionless to the user. Be sure to choose the Actual camera when exporting your scene to keep the same relative position of the object and the camera.
To modify an Interactor: 1. Select it in the object hierarchy. 2. Click on the Edit button of the Properties tray.
Current Limitations There are several important limitations as to what can be exported. It is important to keep these limitations in mind when you are designing a scene for VET or you will not get the results you might expect.
Camera animation: The camera is not animated in the preview but the animation of the camera works in the exported file (you need to select Actual as the export mode for the camera).
Animation defined by VET Animators are not visible in the preview but they are exported correctly.
Animation: Only key-frame based animation are currently supported. Animations using motion paths, inverse kinematics or physics will not export properly. Also note that animated hot points are not supported. Morph anima tions are not supported on the Mac platform.
Tweeners: Only linear and Bézier tweeners are supported, all other tweeners will be exported as linear tweeners. Bézier tweeners are exported with their default values. Modifying the Bézier curve in order to modify the exported animation will not have any effect.
Texture Map Size: To get optimal results, it is advised to use only the power of 2 (1, 2, 4, 8, 16, 32, 64, 128, 256, 512 ...) for the size of the texture maps.
Object Naming: It is important that objects are properly named with unique names.
Page 146

Carrara 8 – Basic Users Guide
Page 147
Carrara 8 – Basic Users Guide
Page 148
Carrara 8 – Basic Users Guide
LEFT OFF HERE
Page 149
Carrara 8 – Basic Users Guide
Page 150

Carrara 8 – Basic Users Guide
Page 151
Carrara 8 – Basic Users Guide
DOC END - Reserved
Page 152