

Coveo Platform7.0 - Sitecore Connector...
65
Coveo Platform 7.0 Sitecore Connector Guide
Transcript of Coveo Platform7.0 - Sitecore Connector...
Coveo Platform 7.0
Sitecore Connector Guide
Coveo Platform 7.0 | Sitecore Connector Guide
Notice
The content in this document represents the current view of Coveo as of the date of publication. Because Coveocontinually responds to changing market conditions, information in this document is subject to change withoutnotice. For the latest documentation, visit our website at www.coveo.com.
© Coveo Solutions Inc., 2013
Coveo is a trademark of Coveo Solutions Inc. This document is protected by intellectual property laws and issubject to all restrictions specified in the Coveo Customer Agreement.
Document part number: PM-121123-EN
Revision: D
Publication date: 2013-10-01
Publication date: 1/3/2019
4www.coveo.com ii
Coveo Platform 7.0 | Sitecore Connector Guide
Table of Contents
1. Sitecore Connector 1
1.1 Advantages Over the Legacy Connector 1
1.2 Features 1
2. Migrating from the Legacy to the New Sitecore Connector 3
3. Sitecore Connector Deployment Overview 5
4. Security Update for Sitecore and Sitecore Legacy Connectors 8
5. Sitecore Connector Requirements 10
6. Installing the CoveoWeb Service Plugin in Sitecore 11
7. Creating a Sitecore Device for the Coveo Crawler 14
8. Enabling Incremental Refresh on a Sitecore Database 17
9. Adding a User Identity 19
10. Configuring a Sitecore Security Provider 21
11. Adding Key Sitecore Connector Parameters 24
12. Configuring and Indexing a Sitecore Source 25
12.1 Creating and Using a Sitecore Mapping File 31
12.1.1 Standard Mapping File Schema 34
12.1.2 Finding the ID of a Sitecore Template Item 40
12.2 Creating and Using a Sitecore Configuration File 41
12.3 Modifying Hidden Sitecore Source Parameters 42
12.4 Adding an Explicit Connector Parameter 46
13. Integrating the Coveo .NET Search Interface in a Sitecore Website 49
14. Integrating the Coveo .NET Search in the Sitecore Content Editor 54
15. Resolving Slow Search Interface Loading in Sitecore 59
16. About Foreign Keys 60
4www.coveo.com iii
Coveo Platform 7.0 | Sitecore Connector Guide
1. Sitecore ConnectorCES 7.0.4863+ (September 2012)
The Sitecore connector allows Coveo administrators to bring the content of a Sitecore website into the unified indexso that it becomes easily searchable by end-users.
1.1 Advantages Over the Legacy ConnectorThe Sitecore connector documented in this section is a new re-engineered connector. The original Sitecoreconnector is now identified as the Sitecore legacy connector and is still available, but it is recommended to use thisnew connector (see "Migrating from the Legacy to the New Sitecore Connector" on page 3).
Advantages of the new Sitecore connector over the legacy connector
l Reduced load on the Sitecore server
Indexing processing is mostly performed CES rather than by Sitecore to significantly reduce the CPU loadon the Sitecore server.
l Enhanced security support
The connector efficiently and accurately indexes permissions associated with Sitecore items, following thecomplex Sitecore security model.
l Faster
Indexing of Sitecore content is significantly faster.
l Separate mapping and configuration files
The configuration and mapping parameters are defined in separate files allowing you to more efficiently setup indexing of Sitecore content. The Sitecore connector uses the standard mapping file (see "StandardMapping File Schema" on page 34).
l Simple configuration
You can get a full secured indexing of all content including referenced items and a nice Quick View bysetting only a few parameters (see "Sitecore Connector Deployment Overview" on page 5).
1.2 FeaturesSupported Sitecore content
l All the site items
l Referenced media library items
l Security elements
4www.coveo.com 1
Coveo Platform 7.0 | Sitecore Connector Guide
Site item metadata indexing
You can customize the metadata collected for all Sitecore items to allow you to create facets, custom fields,sorting, and group by, based on this metadata (see "Creating and Using a Sitecore Mapping File" on page 31).
Media library item indexing
The connector can index the complete media library of Sitecore including files such as images, PDF, and otherbinary documents (see "Include Media Library" on page 29).
Security
The connector uses a security provider to index the permissions associated with each Sitecore item so that insearch results, end-users only see Sitecore content to which they normally have access (see "Configuring aSitecore Security Provider" on page 21).
Incremental refresh
The connector periodically queries Sitecore for the latest changes, keeping the index content up-to-date (see"Enabling Incremental Refresh on a Sitecore Database" on page 17).
Multilanguage support for items
The connector can index the one or more language versions of an item (see "Languages (String)" on page 45).
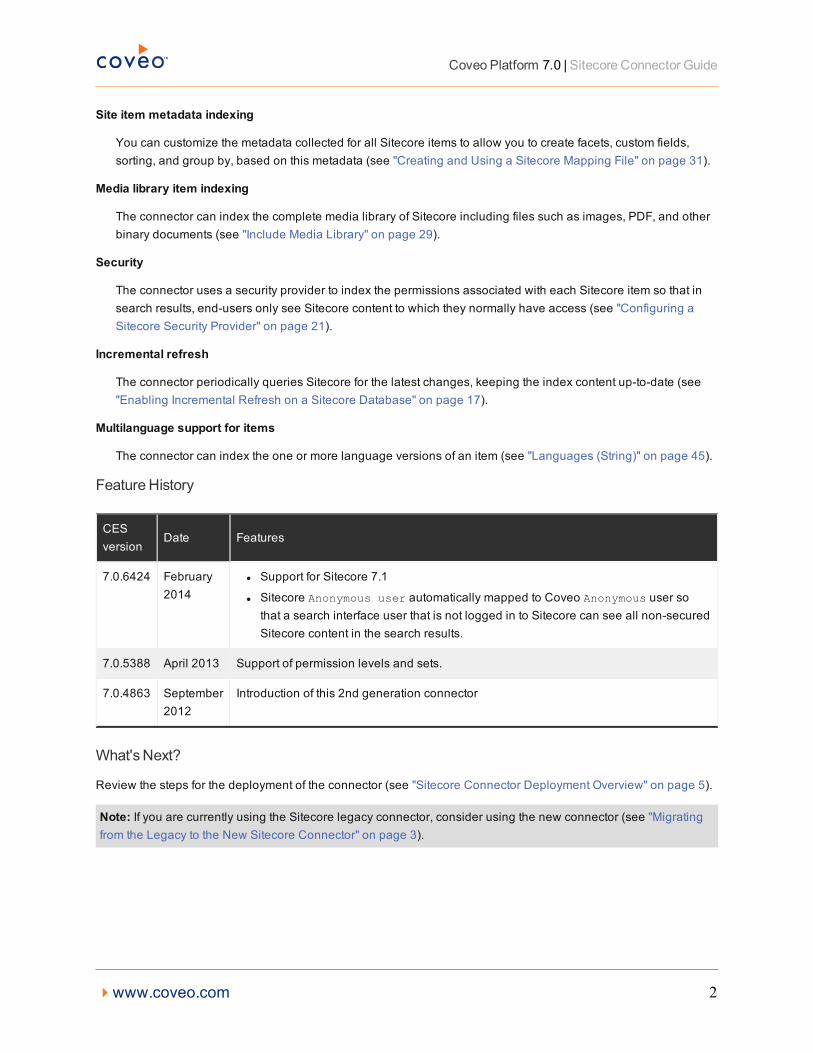
FeatureHistory
CESversion
Date Features
7.0.6424 February2014
l Support for Sitecore 7.1
l Sitecore Anonymous user automatically mapped to Coveo Anonymous user sothat a search interface user that is not logged in to Sitecore can see all non-securedSitecore content in the search results.
7.0.5388 April 2013 Support of permission levels and sets.
7.0.4863 September2012
Introduction of this 2nd generation connector
What'sNext?
Review the steps for the deployment of the connector (see "Sitecore Connector Deployment Overview" on page 5).
Note: If you are currently using the Sitecore legacy connector, consider using the new connector (see "Migratingfrom the Legacy to the New Sitecore Connector" on page 3).
4www.coveo.com 2
Coveo Platform 7.0 | Sitecore Connector Guide
2. Migrating from the Legacy to the NewSitecore ConnectorIf you have been indexing Sitecore content before September 2012, you are probably using what is now referred toas the Sitecore legacy connector. You may want to take advantage of the improvements with the new connector(see "Advantages Over the Legacy Connector" on page 1).
Note: If you want to index Sitecore 7 content, consider to rather use Coveo for Sitecore.
The main setup difference between the new and the legacy connectors is that the mapping file of the legacyconnector contains mapping and connector configuration while the new connector uses separate mapping andconfiguration files. The new connector also uses a different web service plugin. You can install both web serviceson the Sitecore server to use the two connectors concurrently while you configure and validate the source createdwith the new connector.
Tomigrate from the legacy to the new connector
1. Migrate the mapping content:
a. Review the content and format of your legacy mapping file.
b. Review the format of the mapping and configuration files of the new connector (see "Creating and Using aSitecore Mapping File" on page 31 and "Creating and Using a Sitecore Configuration File" on page 41).
c. Split the legacy mapping file content into a mapping and a configuration file.
Note: The mapping file of the new Sitecore connector does not allow to index metadata of referenced itemslike the mapping file of the legacy connector did.
Example: In the Nicam demo site (default demo website installed with Sitecore), a camera contains a fieldcalled Accessories. These accessories are built from different templates: Lenses, Flash, or OtherAccessories.
A mapping of the form <Accessories>%[Accessories.Title]</Accessories> to get the Title ofreferenced accessories is not possible with the new mapping file.
2. Plan your deployment on a production Coveo server:
a. Create a new collection that is not yet part of the scope of search interfaces available to end-users.
b. Create a test search hub with a search interface where you will see search results from the new source.
3. Follow the deployment steps to create a source in the new collection using the new connector (see "SitecoreConnector Deployment Overview" on page 5).
4. Using the test search hub, validate that the source correctly indexes Sitecore items and contains the fieldsneeded to produce rich search results, facets, search box query suggestions, etc.
5. Put the new source and search interface in production:
l In the scope of an existing search interface, add the new source and remove the legacy one.
OR
4www.coveo.com 3
Coveo Platform 7.0 | Sitecore Connector Guide
l In a production search hub, add a new search interface with the new source in the scope, and remove theold search interface with the legacy source.
6. Consider removing the legacy stuff:
a. Delete the legacy source.
b. If applicable, delete the original unused search interface.
c. On the Sitecore server, uninstall the legacy web service plugin.
4www.coveo.com 4

Coveo Platform 7.0 | Sitecore Connector Guide
3. Sitecore Connector Deployment OverviewThe following procedure outlines the steps to deploy the Coveo connector for Sitecore. The steps indicate the orderin which you must perform required and optional configuration tasks on both the Coveo and the Sitecore server.
To deploy the Sitecore connector
1. Validate that your environment meets the requirements (see "Sitecore Connector Requirements" on page 10).
2. In Sitecore:
a. Create the Sitecore crawling account fulfilling the following requirements:
l Sitecore account to be exclusively used by the Coveo connector.
l The account must have the Read permission for all the Sitecore content that you want to index. Thisaccount does not need to be a Sitecore administrator, but it is an easy way to do the job.
l The account password should never change.
Note: If the password of the account must regularly change, you will need to change it both inSitecore and in the Coveo user identity.
l Specify a user that is part of the same domain as the Sitecore site.
Note: By default, the connector uses the extranet\Anonymous Sitecore account to connect to, andretrieve content from Sitecore. The connector best practices require that you use an exclusive account.Furthermore, when your Sitecore site contains secured content, the extranet\Anonymous accountmight not have access to all Sitecore items.
b. On the Sitecore server, deploy the Coveo Web Service plugin that allows the Sitecore connector to retrieveinformation from Sitecore (see "Installing the Coveo Web Service Plugin in Sitecore" on page 11).
c. Create a device for the exclusive usage of the Coveo crawler
The Sitecore connector best practice is to create a custom device that renders HTML exclusively for theCoveo crawler (see "Creating a Sitecore Device for the Coveo Crawler" on page 14).
d. Optionally enable incremental refresh
The Sitecore connector supports incremental refresh to maintain the indexed Sitecore content up-to-datebetween index source refreshes or rebuilds. You must however configure the Sitecore database to allowincremental refresh (see "Enabling Incremental Refresh on a Sitecore Database" on page 17).
3. On the Coveo server:
a. Configure the user identity
Create a CES user identity that holds your Sitecore crawling account credentials (see "Adding a UserIdentity" on page 19).
b. Create a field set containing custom fields matching useful Sitecore metadata
4www.coveo.com 5
Coveo Platform 7.0 | Sitecore Connector Guide
When you want to be able to search for content from Sitecore metadata, display metadata content insearch results, or base a facet on a Sitecore metadata, you must:
i. Create a custom field set for your Sitecore source.
ii. For each of these Sitecore metadata, add custom fields to your new field set.
Note: You will assign the field set to your source later (see Configuring and Indexing a Sitecore Source).
c. CES 7.0.5639– (September 2013) Add hidden Sitecore connector parameters
You must manually add connector parameters needed for the Sitecore connector best practices (see"Adding Key Sitecore Connector Parameters" on page 24).
d. Optionally configure a security provider
When your site contains secured content, create a Sitecore security provider to allow the connector to getthe permissions associated with each Sitecore item (see "Configuring a Sitecore Security Provider" onpage 21). Skip this step when your Sitecore site contains only public content.
e. Configure and index the Sitecore source
The Coveo connector needs to know details about the Sitecore server to be able to index its content (see"Configuring and Indexing a Sitecore Source" on page 25).
4. Consider the following steps when you want to optimize the indexing of your Sitecore site:
a. Optionally create a mapping file
You can use a mapping file when you want to define the content of the HTML body or map metadatadifferently for specific templates (see "Creating and Using a Sitecore Mapping File" on page 31).
Note: By default the incremental refresh cannot detect that items for which only referenced item changedneed to be re-indexed. A full rebuild of the source however does can.
Example: A website page item in Sitecore includes a reference to the author item. You change thename of the author in this reference from ASmith to Arthur Smith. When only this referenced itemchanged in the page, by default the incremental refresh will not detect it, and therefore will not re-indexit.
When it is important to catch referenced item changes with an incremental refresh, you can use foreignkeys to link the appropriate fields and allow incremental refresh to detect and index affected items (see"About Foreign Keys" on page 60). You then also need to define these foreign key fields in the mappingfile (see Creating and Using a Sitecore Mapping File).
b. Optionally add advanced parameters
Advanced parameters are hidden by default, but they can allow you to further customize indexing of yourSitecore content (see "Modifying Hidden Sitecore Source Parameters" on page 42).
c. Optionally create a configuration file
4www.coveo.com 6
Coveo Platform 7.0 | Sitecore Connector Guide
When the Extract HTML Content source option is not selected, by default the connector indexes alltemplates, all binary data, but no referenced items. You can create and use a configuration file toaccurately identify the templates or binary data to ignore, or referenced items to include in the index foryour Sitecore website (see "Creating and Using a Sitecore Configuration File" on page 41).
5. Optionally integrate the Coveo search interfaces in a Sitecore website
You can integrate the Coveo .NET out-of-the-box search interfaces in a Sitecore website, to allow end-users touse Coveo search features directly in the website (see "Integrating the Coveo .NET Search Interface in aSitecore Website" on page 49).
6. Optionally integrate the Coveo search in the Sitecore Content Editor
You can integrate a Coveo .NET out-of-the-box search interface in the Sitecore Content Editor, to allow websitecontent contributors to use the Coveo search features to find information in the whole Sitecore content (see"Integrating the Coveo .NET Search in the Sitecore Content Editor" on page 54).
4www.coveo.com 7
Coveo Platform 7.0 | Sitecore Connector Guide
4. Security Update for Sitecore and Sitecore LegacyConnectorsCES 7.0.6684– (May 2014)
This topic describes how to resolve a security vulnerability in our Sitecore Connector plugin that could allow code toaccess Sitecore content that would otherwise be inaccessible.
CES 7.0.6767+ (June 2014) The monthly release includes the fix for this security vulnerability.
Prerequisites to apply the security update
Before you can apply this security update, if it is not already the case, your Coveo server must run either of thefollowing CES 6 or 7 monthly releases:
l CES 7.0.6684 May 2014
o 64-bit version download
o 32-bit version download
l CES 6.5.4898 Dec 2013
o 64-bit version download
o 32-bit version download
For help installing updates, contact Coveo Support.
To resolve the vulnerability
1. For CES 6.5 only, download and install the applicable security vulnerability hotfix for CES 6.5.4898 (Dec 2013):
l 64-bit version download
l 32-bit version download
2. Download the appropriate Sitecore package (ZIP file):
l For Sitecore 7.x and 6.x:
o Using the Sitecore Connector:
n 32-bit or 64-bit application pool for CES 7.0 or CES 6.5
o Using the Sitecore Legacy Connector:
n 32-bit application pool for CES 7.0 or CES 6.5
n 64-bit application pool for CES 7.0 or CES 6.5
l For Sitecore 5.3, using the Sitecore Legacy Connector:
4www.coveo.com 8
Coveo Platform 7.0 | Sitecore Connector Guide
o 32-bit application pool CES 7.0 or CES 6.5
o 64-bit application pool CES 7.0 or CES 6.5
3. Install the appropriate downloaded Sitecore package on your Sitecore server:
l For the Sitecore Connector, install the Coveo web service plugin in Sitecore.
l For the Sitecore Legacy Connector, install the Coveo Legacy web service plugin for Sitecore.
4www.coveo.com 9
Coveo Platform 7.0 | Sitecore Connector Guide
5. Sitecore Connector RequirementsYour environment must meet the following requirements to be able to use the Coveo connector for Sitecore:
l CES 7.0.4863+ (September 2012)
l Coveo license for the Sitecore connector
Your Coveo license must include support for the Sitecore connector to be able to use this connector.
l Sitecore
The Sitecore connector supports Sitecore version 6.0 to 6.6, and 7.0 to 7.2.
Notes:
o The Sitecore connector does not support Sitecore 7.5 and 8.0. You must rather use Coveo for Sitecore toindex Sitecore 7.5+ content
o CES 7.0.6424+ (February 2014) The Sitecore connector supports Sitecore 7.1.
What'sNext?
Configure a Sitecore crawling account (see Sitecore Connector Deployment Overview).
4www.coveo.com 10
Coveo Platform 7.0 | Sitecore Connector Guide
6. Installing the CoveoWeb Service Plugin in SitecoreThe Coveo Sitecore connector comes with a web service that you must upload and install on your Sitecore server.The Coveo connector needs this web service to securely and efficiently crawl the Sitecore content.
Important:When you upgrade CES on the Coveo Master server, you must perform this procedure to also upgradethe Coveo web service on your Sitecore server. The Sitecore connector will not work when an incompatibleversion of the plugin is installed on the Sitecore server.
To install theCoveoweb service plugin on your Sitecore server
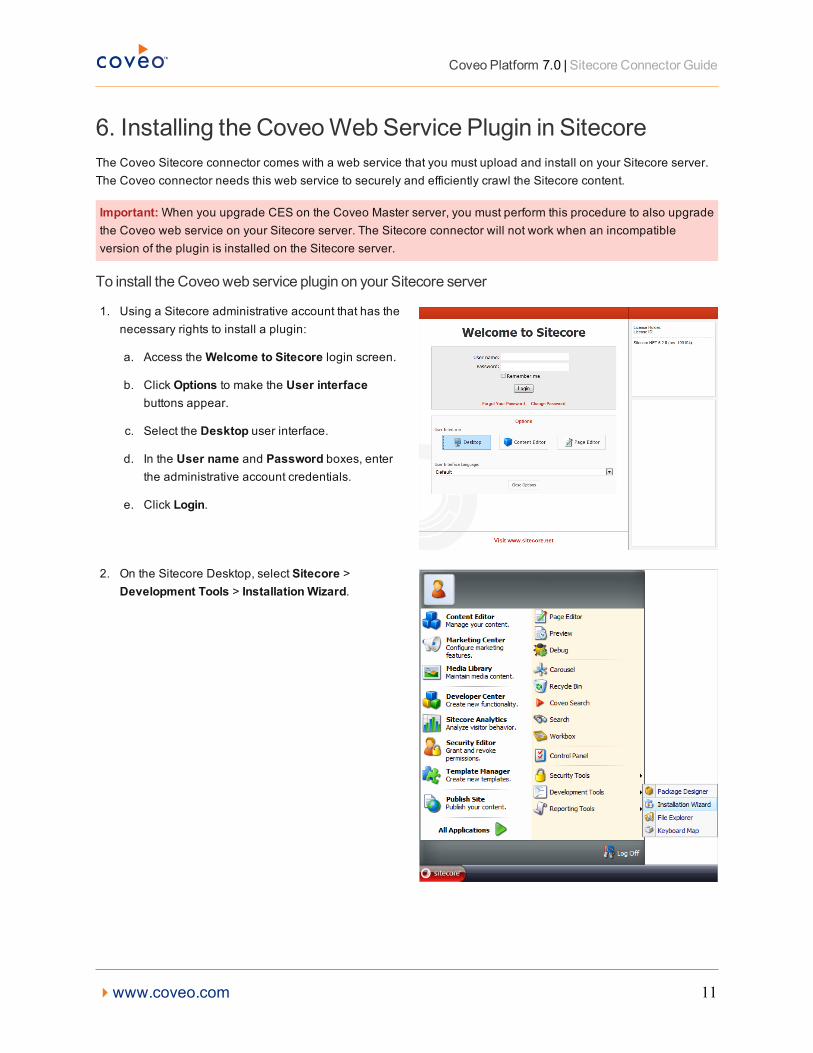
1. Using a Sitecore administrative account that has thenecessary rights to install a plugin:
a. Access theWelcome to Sitecore login screen.
b. Click Options to make the User interfacebuttons appear.
c. Select the Desktop user interface.
d. In the User name and Password boxes, enterthe administrative account credentials.
e. Click Login.
2. On the Sitecore Desktop, select Sitecore >Development Tools > Installation Wizard.
4www.coveo.com 11
Coveo Platform 7.0 | Sitecore Connector Guide
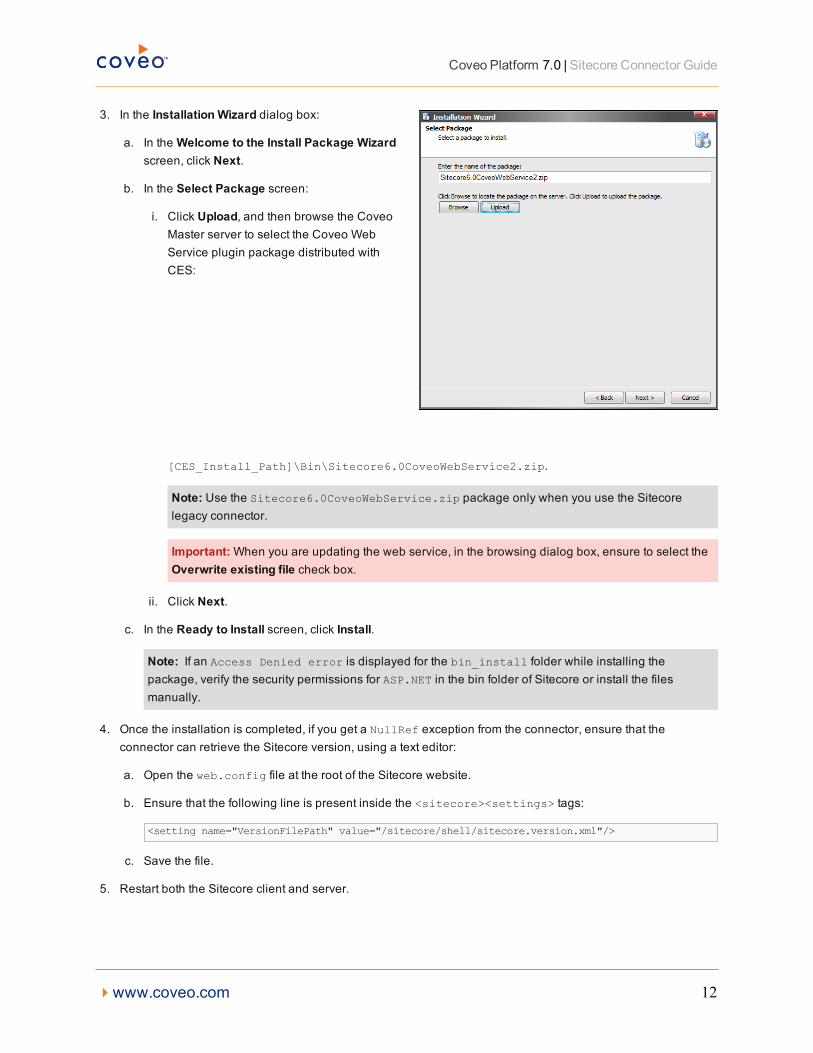
3. In the Installation Wizard dialog box:
a. In theWelcome to the Install Package Wizardscreen, click Next.
b. In the Select Package screen:
i. Click Upload, and then browse the CoveoMaster server to select the Coveo WebService plugin package distributed withCES:
[CES_Install_Path]\Bin\Sitecore6.0CoveoWebService2.zip.
Note: Use the Sitecore6.0CoveoWebService.zip package only when you use the Sitecorelegacy connector.
Important:When you are updating the web service, in the browsing dialog box, ensure to select theOverwrite existing file check box.
ii. Click Next.
c. In the Ready to Install screen, click Install.
Note: If an Access Denied error is displayed for the bin_install folder while installing thepackage, verify the security permissions for ASP.NET in the bin folder of Sitecore or install the filesmanually.
4. Once the installation is completed, if you get a NullRef exception from the connector, ensure that theconnector can retrieve the Sitecore version, using a text editor:
a. Open the web.config file at the root of the Sitecore website.
b. Ensure that the following line is present inside the <sitecore><settings> tags:
<setting name="VersionFilePath" value="/sitecore/shell/sitecore.version.xml"/>
c. Save the file.
5. Restart both the Sitecore client and server.
4www.coveo.com 12
Coveo Platform 7.0 | Sitecore Connector Guide
What'sNext?
When you want the connector to use incremental refresh to maintain the index up-to-date, configure Sitecore toallow it (see "Enabling Incremental Refresh on a Sitecore Database" on page 17).
4www.coveo.com 13
Coveo Platform 7.0 | Sitecore Connector Guide
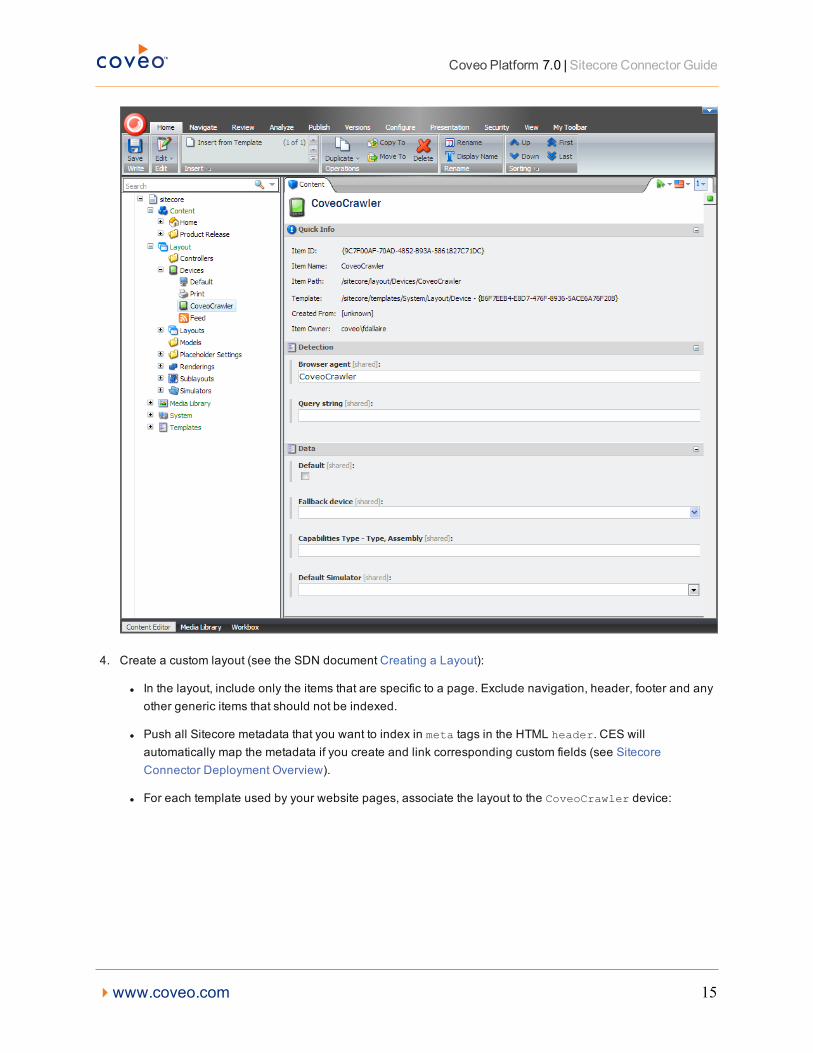
7. Creating a Sitecore Device for the Coveo CrawlerThe Coveo connector for Sitecore can crawl HTML pages rendered by Sitecore when its Extract HTML Contentoption is enabled (see Configuring and Indexing a Sitecore Source). Selecting this option is a Sitecore connectorbest practice because it allows the connector to effectively index rendered HTML content including all referenceditems and incorporate a nice HTML version of the page to be presented as a Quick View. The HTML rendered bySitecore for end-users however normally includes navigation items (such as a header, side panels, a footer...) thatshould not be indexed for each page.
The best practice to avoid indexing unwanted items is to create in Sitecore a device used exclusively by the Coveocrawler and assign to this device a layout that excludes site navigation and any other common items that you do notwant to index. This way, the Coveo crawler only sees and indexes the content specific to each page. The renderedHTML is also stored in the index and presented when end-users ask to see the Quick View of the document. Theprocedure below provides detailed steps.
To create aSitecore device for theCoveo crawler
1. Log in to the Sitecore Desktop user interface using an administrative account.
2. Under /sitecore/layout/Devices, create a device named CoveoCrawler.
3. In the CoveoCrawler page, under Detection, in the Browser agent box, enter a name of your choice such asCoveoCrawler.
Note: You will need to specify the same name later in the Crawler User Agent Sitecore source parameter(see Configuring and Indexing a Sitecore Source).
4www.coveo.com 14
Coveo Platform 7.0 | Sitecore Connector Guide
4. Create a custom layout (see the SDN document Creating a Layout):
l In the layout, include only the items that are specific to a page. Exclude navigation, header, footer and anyother generic items that should not be indexed.
l Push all Sitecore metadata that you want to index in meta tags in the HTML header. CES willautomatically map the metadata if you create and link corresponding custom fields (see SitecoreConnector Deployment Overview).
l For each template used by your website pages, associate the layout to the CoveoCrawler device:
4www.coveo.com 15
Coveo Platform 7.0 | Sitecore Connector Guide
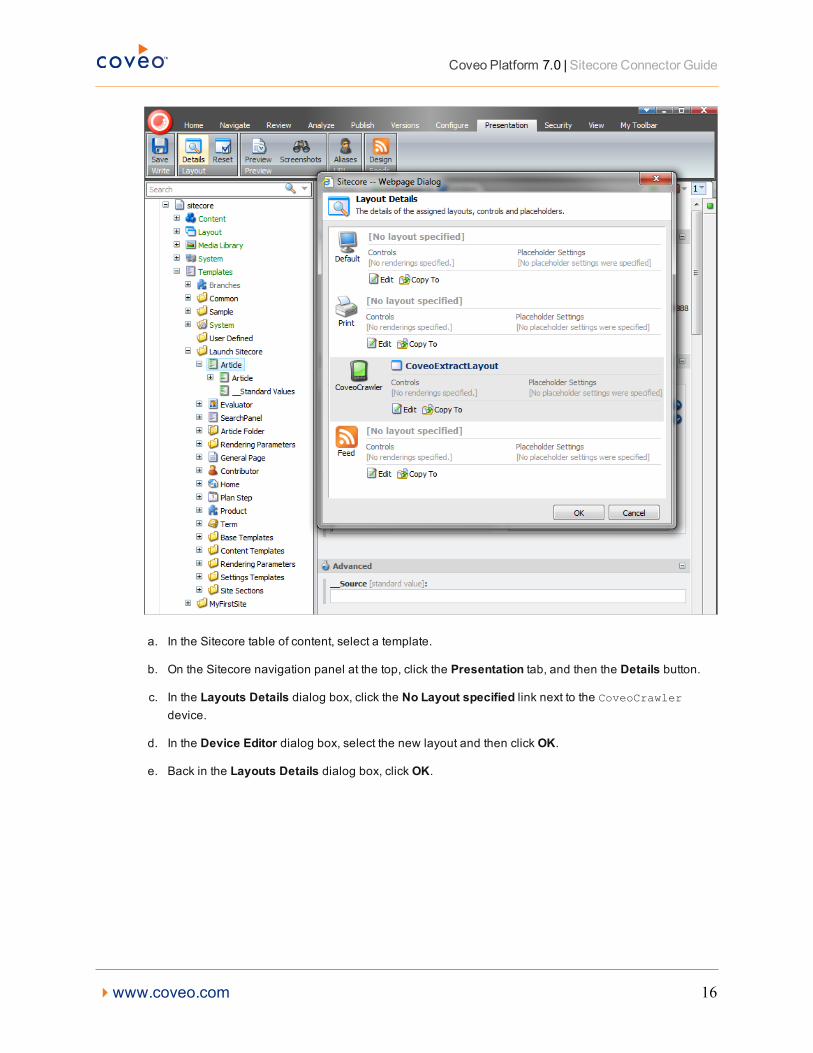
a. In the Sitecore table of content, select a template.
b. On the Sitecore navigation panel at the top, click the Presentation tab, and then the Details button.
c. In the Layouts Details dialog box, click the No Layout specified link next to the CoveoCrawlerdevice.
d. In the Device Editor dialog box, select the new layout and then click OK.
e. Back in the Layouts Details dialog box, click OK.
4www.coveo.com 16
Coveo Platform 7.0 | Sitecore Connector Guide
8. Enabling Incremental Refresh on a Sitecore DatabaseThe Coveo connector for Sitecore supports incremental refresh to allow your Sitecore source to remain up-to-dateas Sitecore content changes.
Incremental refresh uses the History Engine feature of Sitecore that tracks changes. When it is enabled in yourSitecore web.config file for the database that the connector source targets, modified items are logged by Sitecoreinto the dbo.History table with a timestamp. The event handler that comes with the Coveo web service pluginestablishes the link with the Sitecore History Engine.
To enable incremental refresh on aSitecore database
1. Using an administrator account, connect to the Sitecore server.
2. If not already done, install the Coveo web service plugin (see "Installing the Coveo Web Service Plugin inSitecore" on page 11).
3. Using a text editor:
a. Open the Sitecore web.config file.
Note: It is recommended to make a backup of the web.config file before editing it.
b. In the <database> section for the desired publishing target, add the Engines.HistoryEngine.Storagesection as shown in the following example.
Example:When your Sitecore source targets the site named website and the database serving this siteis named web:
<database id="web" singleInstance="true" type="Sitecore.Data.Database,…<Engines.HistoryEngine.Storage><obj type="Sitecore.Data.$(database).$(database)HistoryStorage, Sitecore.Kernel"><param connectionStringName="$(id)"/><EntryLifeTime>30.00:00:00</EntryLifeTime>
</obj></Engines.HistoryEngine.Storage>
…</database>
c. In the <events> tags with appropriate attribute names, add the <handler> tags as follows:
<event name="item:deleting"><handler
type="Coveo.Connectors.Sitecore2.SitecoreEventHandler.EventHandler,Coveo.Connectors.Sitecore2.SitecoreEventHandler" method="OnItemDeleting" /></event><event name="item:moving"><handler
type="Coveo.Connectors.Sitecore2.SitecoreEventHandler.EventHandler,Coveo.Connectors.Sitecore2.SitecoreEventHandler" method="OnItemMoving" /></event>
d. Save the file.
4www.coveo.com 17
Coveo Platform 7.0 | Sitecore Connector Guide
What'sNext?
Ensure that you also configured an incremental refresh schedule for your Sitecore source.
4www.coveo.com 18
Coveo Platform 7.0 | Sitecore Connector Guide
9. Adding a User IdentityA user identity is a set of credentials for a given repository or system that you enter once in CES and can thenassociate with one or more sources or security providers.
A user identity typically holds the credentials of an account that has read access to all the repository items that youwant to index. It is a best practice to create an account to be used exclusively by the Coveo processes and for whichthe password does not change. If the password of this account changes in the repository, you must also change it inthe CES user identity.
To add a user identity
1. On the Coveo server, access the Administration Tool.
2. In the Administration Tool, select Configuration > Security.
3. In the navigation panel on the left, click User Identities.
4. In the User Identities page, click Add.
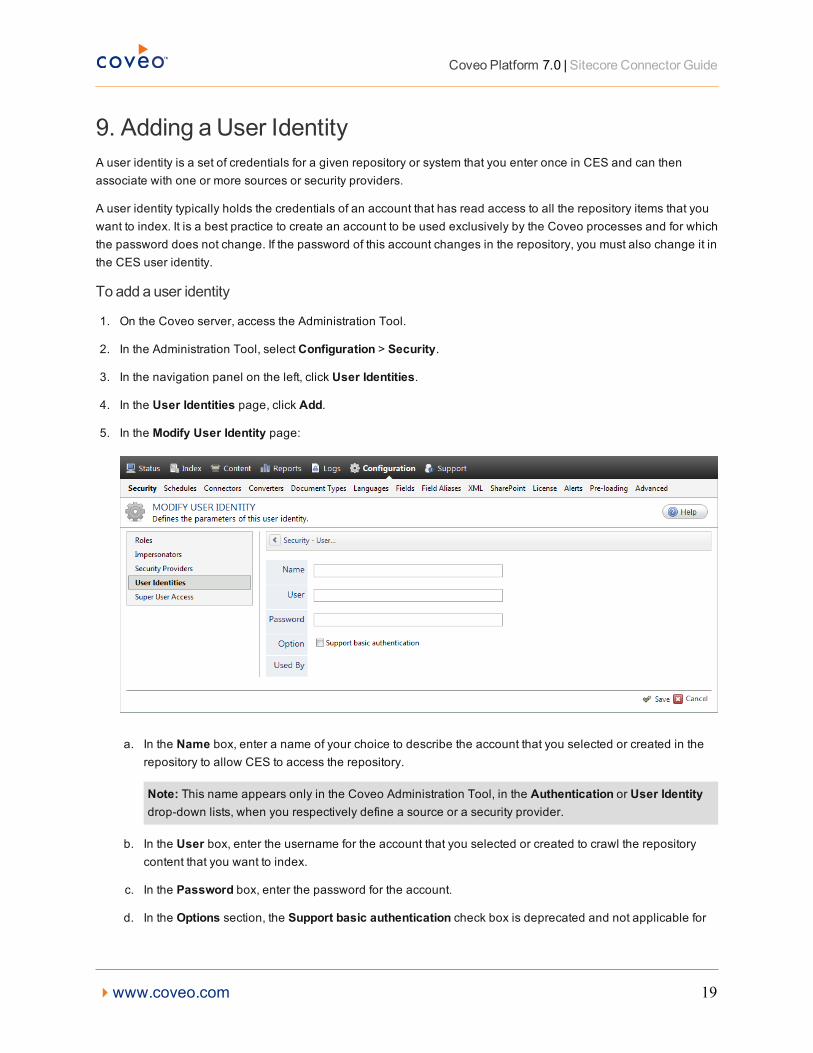
5. In the Modify User Identity page:
a. In the Name box, enter a name of your choice to describe the account that you selected or created in therepository to allow CES to access the repository.
Note: This name appears only in the Coveo Administration Tool, in the Authentication or User Identitydrop-down lists, when you respectively define a source or a security provider.
b. In the User box, enter the username for the account that you selected or created to crawl the repositorycontent that you want to index.
c. In the Password box, enter the password for the account.
d. In the Options section, the Support basic authentication check box is deprecated and not applicable for
4www.coveo.com 19

Coveo Platform 7.0 | Sitecore Connector Guide
most types of repositories. You should select it only when you need to allow CES to send the usernameand password as unencrypted text.
e. Click Save.
Important:When you use Firefox to access the Administration Tool and it proposes to remember thepassword for the user identity that you just created, select to never remember the password for this site toprevent issues with automatic filling of username and password fields within the Coveo AdministrationTool.
4www.coveo.com 20
Coveo Platform 7.0 | Sitecore Connector Guide
10. Configuring a Sitecore Security ProviderWhen a Sitecore instance includes secured content, the Sitecore connector needs a security provider to be able toresolve the permissions for each Sitecore item, and therefore fully support the Sitecore security model. This meansthat, in a Coveo search interface, a user searching for Sitecore content only sees the content to which he hasaccess in Sitecore.
When the Sitecore instance you want to index only offers public content, you do not need a security provider.
Note: You can get familiar with how Coveo components deal with permissions on documents both at indexingand query time.
To configure aSitecore security provider
1. On the Coveo server, access the Administration Tool.
2. Select Configuration > Security.
3. In the Security page, in the navigation panel on the left, click Security Providers.
4. In the Security Providers page, click Add to create a new security provider.
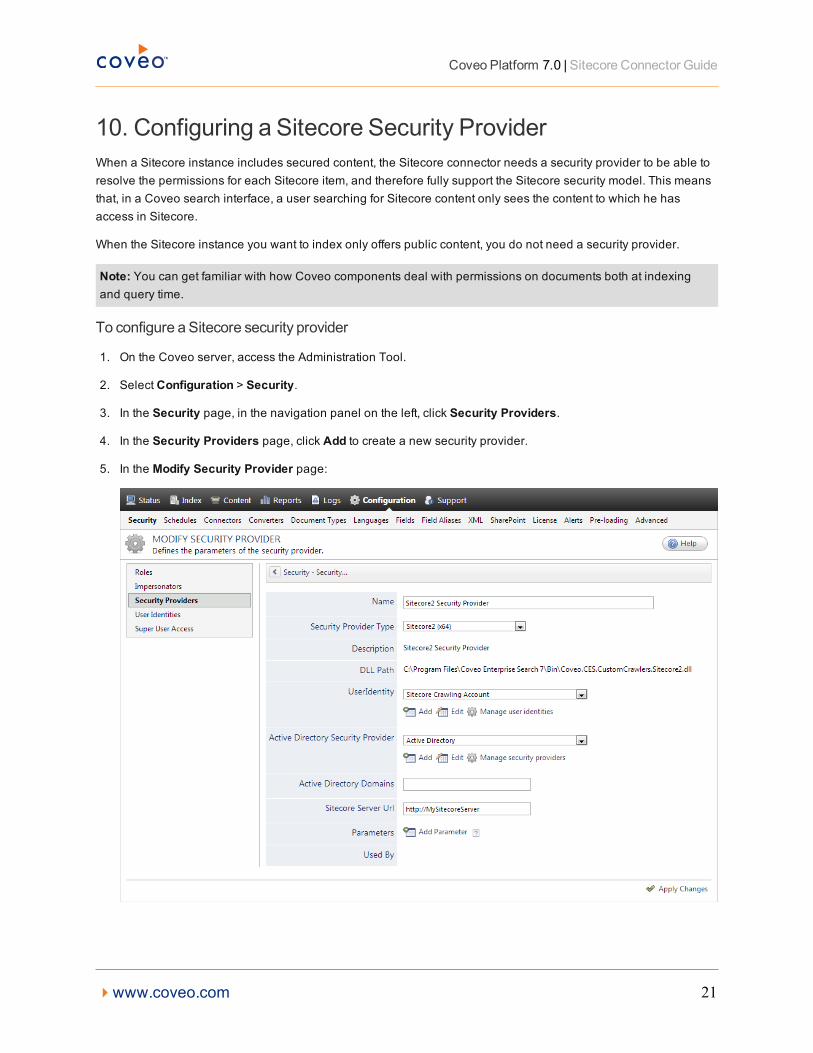
5. In the Modify Security Provider page:
4www.coveo.com 21

Coveo Platform 7.0 | Sitecore Connector Guide
a. In the Name box, enter a name to identify this security provider.
Note: You can configure the security provider to work with the new (Sitecore2) or legacy (Sitecore)connectors. It may be a good idea to indicate which connector is used in the name to prevent confusion.
Example: Sitecore2 Security Provider
b. In the Security Provider Type drop-down list, select Sitecore2.
c. In the User Identity section:
i. In the drop-down list, select the user identity that you selected or created previously.
ii. When needed, click Add, Edit, or Manage user identities respectively to create, modify, or manageuser identities.
d. In the Active Directory Security Provider drop-down list:
i. Select the appropriate security provider that this security provider uses to resolve and expand thegroups.
Note: CES comes with an Active Directory security provider that you can configure to connect to thedefault domain. When your environment contains more than one domain, you can select an ActiveDirectory security provider that you created for other domains.
ii. When an appropriate security provider is missing, click Add, Edit, or Manage security providersrespectively to create, modify, or manage security providers.
e. In the Active Directory Domains box, enter the name of the domains you want to use when resolvingusers. This parameter is optional and is used to map Sitecore users to Active Directory users. When youspecify domain names, the Sitecore domain name is replaced by this domain name to attempt to mapusers.
Example:When you specify the AD domain name prod, the user sitecore\user is mapped toprod\user.
f. In the Sitecore Server Url box, enter the address to your Sitecore server.
Note: Entering the wrong URL in the Sitecore Server Url box, like the one of your Coveo server ratherthan the one of your Sitecore server, can cause repetitive unanswered calls to this URL and make thisserver unresponsive.
g. In the Parameters section, click Add Parameters to specify other security provider parameter names andvalues that could help to troubleshoot security provider issues (see "Modifying Hidden Sitecore SourceParameters" on page 42).
4www.coveo.com 22
Coveo Platform 7.0 | Sitecore Connector Guide
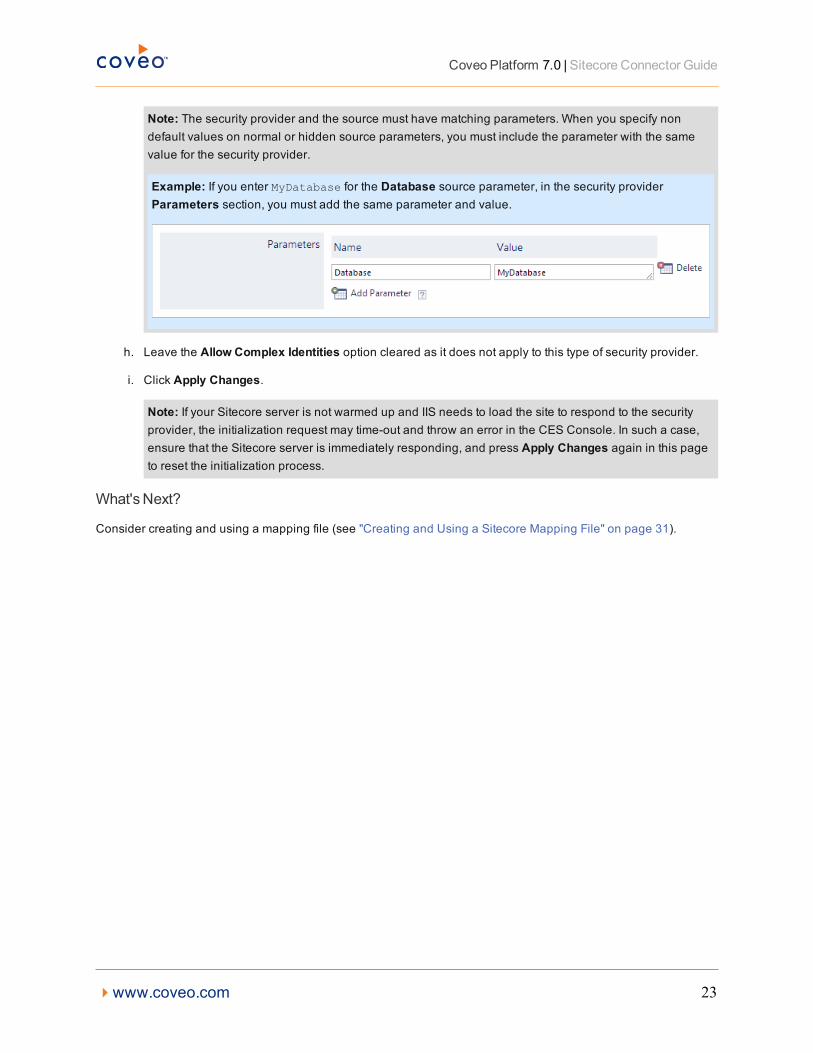
Note: The security provider and the source must have matching parameters. When you specify nondefault values on normal or hidden source parameters, you must include the parameter with the samevalue for the security provider.
Example: If you enter MyDatabase for the Database source parameter, in the security providerParameters section, you must add the same parameter and value.
h. Leave the Allow Complex Identities option cleared as it does not apply to this type of security provider.
i. Click Apply Changes.
Note: If your Sitecore server is not warmed up and IIS needs to load the site to respond to the securityprovider, the initialization request may time-out and throw an error in the CES Console. In such a case,ensure that the Sitecore server is immediately responding, and press Apply Changes again in this pageto reset the initialization process.
What'sNext?
Consider creating and using a mapping file (see "Creating and Using a Sitecore Mapping File" on page 31).
4www.coveo.com 23
Coveo Platform 7.0 | Sitecore Connector Guide
11. Adding Key Sitecore Connector ParametersCES 7.0.5639– (July 2013)
The Sitecore connector best practices involve using some hidden parameters. You can make these parametersappear with appropriate predefined values in the configuration page of all your Sitecore sources by adding them tothe connector configuration.
Tomake keySitecore connector parameters appear in the configuration page of all Sitecore sources
1. On the Coveo server, access the Administration Tool.
2. On the menu select Configuration > Connectors.
3. In the Connectors page, select Sitecore.
Note: CES 7.0.4863 to 7.0.5785 (July 2012 to August 2013) The Sitecore connector appeared in the list asSitecore2 while the Sitecore Legacy connector appeared as Sitecore.
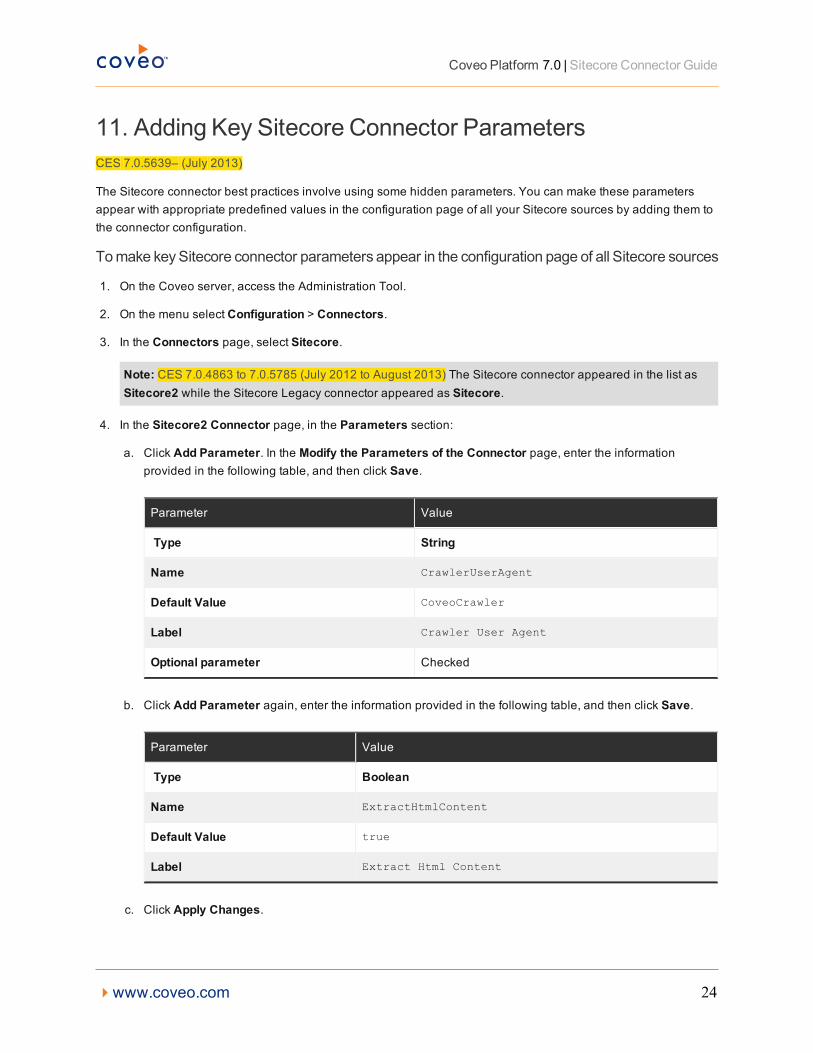
4. In the Sitecore2 Connector page, in the Parameters section:
a. Click Add Parameter. In the Modify the Parameters of the Connector page, enter the informationprovided in the following table, and then click Save.
Parameter Value
Type String
Name CrawlerUserAgent
Default Value CoveoCrawler
Label Crawler User Agent
Optional parameter Checked
b. Click Add Parameter again, enter the information provided in the following table, and then click Save.
Parameter Value
Type Boolean
Name ExtractHtmlContent
Default Value true
Label Extract Html Content
c. Click Apply Changes.
4www.coveo.com 24
Coveo Platform 7.0 | Sitecore Connector Guide
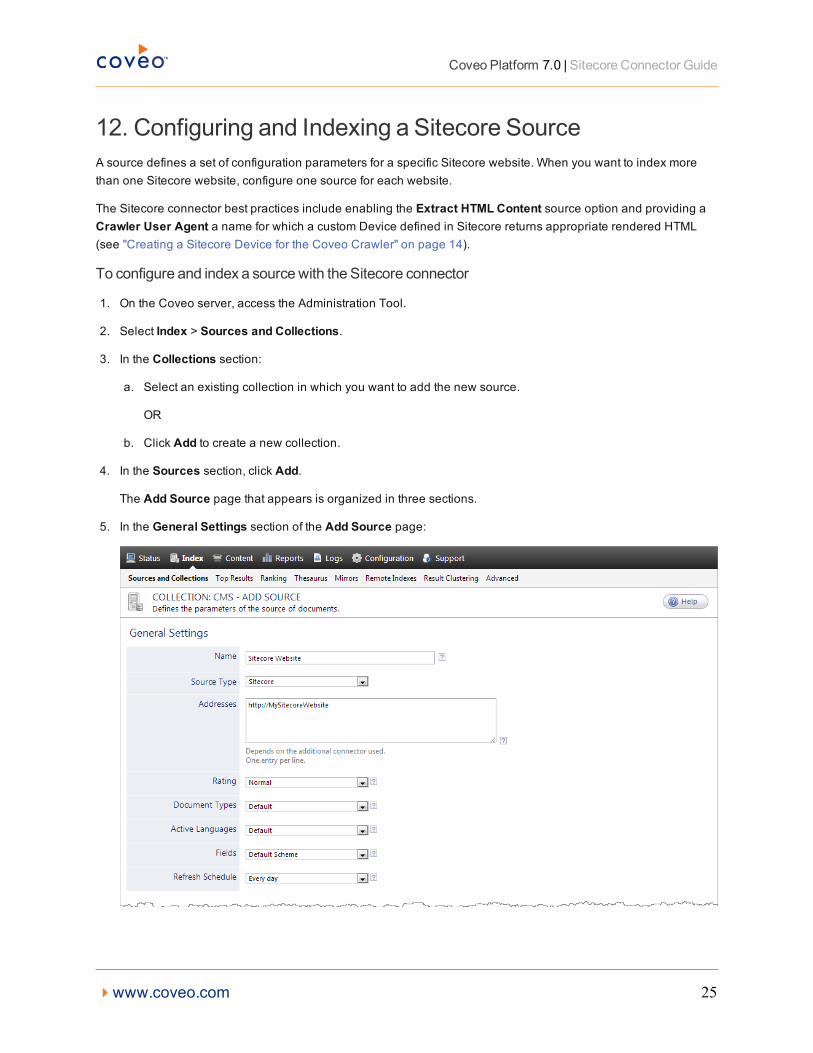
12. Configuring and Indexing a Sitecore SourceA source defines a set of configuration parameters for a specific Sitecore website. When you want to index morethan one Sitecore website, configure one source for each website.
The Sitecore connector best practices include enabling the Extract HTML Content source option and providing aCrawler User Agent a name for which a custom Device defined in Sitecore returns appropriate rendered HTML (see "Creating a Sitecore Device for the Coveo Crawler" on page 14).
To configure and index a sourcewith the Sitecore connector
1. On the Coveo server, access the Administration Tool.
2. Select Index > Sources and Collections.
3. In the Collections section:
a. Select an existing collection in which you want to add the new source.
OR
b. Click Add to create a new collection.
4. In the Sources section, click Add.
The Add Source page that appears is organized in three sections.
5. In the General Settings section of the Add Source page:
4www.coveo.com 25
Coveo Platform 7.0 | Sitecore Connector Guide
a. Enter the appropriate value for the following required parameters:
Name
Enter a descriptive name of your choice for the connector source.
Example: Sitecore Website
Source Type
The connector used by this source. In this case, select Sitecore.
Note: CES 7.0.4863 to 7.0.5785 (July 2012 to August 2013) The Sitecore connector appeared in thelist as Sitecore2 while the Sitecore Legacy connector appeared as Sitecore.
Addresses
Enter the address of the Sitecore server hosting the website to index using the following form:
https://sitecoreservername
Enter only one Sitecore server address. Create other sources for other servers. The connector supportsboth secured (https) and public (http) sites.
Important:While the value in the Addresses box points to your Sitecore server, the TargetSitehidden parameter by default specifies to index the website site hosted in this server. website is thedefault name for a site in Sitecore. When the site you want to index has a different name, like whenyour server hosts have more than one site, you must specify the site name in the TargetSite hiddenparameter both on the source and the security provider (see "TargetSite (String)" on page 45). Youcan also use the ContentStartPaths hidden parameter to restrict indexing to one or morebranches of the content tree (see "ContentStartPaths (String)" on page 43).
Tip: Once you indexed your Sitecore content, if you obtain clickable URIs containing http twice suchas http://http/www.MyServer.com, in the site definition of your Sitecore web.config file,ensure hostName does not contain http://. If you want to explicitly specify the protocol, use thescheme parameter (ex: <site name="WWWPortal" hostName="www.mysite.com"
scheme="http" rootPath="/sitecore/content/Home" startItem="/Portal"
contentStartItem="/Portal" />).
Fields
Select the custom field set that you created for your Sitecore metadata (see Sitecore ConnectorDeployment Overview).
Refresh Schedule
Select the time interval at which a full refresh of the source is automatically performed to keep the indexcontent up-to-date.
4www.coveo.com 26
Coveo Platform 7.0 | Sitecore Connector Guide
Notes:
l You must enable incremental refresh on your Sitecore server (see "Enabling IncrementalRefresh on a Sitecore Database" on page 17) and on your source to continuously maintain theindex up-to-date with your source.
l By default the incremental refresh does not detect that a page has changed when only one ormore of its referenced item have changed. Depending on the frequency at which referenced itemcan change in and the importance of catching these changes for your Sitecore instance, you canuse foreign keys to allow incremental refresh to catch these changes (see Sitecore ConnectorDeployment Overview).
b. Review the value for the following parameters that often do not need to be modified:
Rating
Change this value only when you want to globally change the rating associated with all items in thissource relative to the rating to other sources.
Example: If this source was for a legacy Sitecore site, you may want to set this parameter to Low, sothat in the search interface, results from this source appear later in the list compared to those fromother sources.
Document Types
If you defined custom document type sets, ensure to select the most appropriate for this source.
Active Languages
If you defined custom language sets, ensure to select the most appropriate for this source.
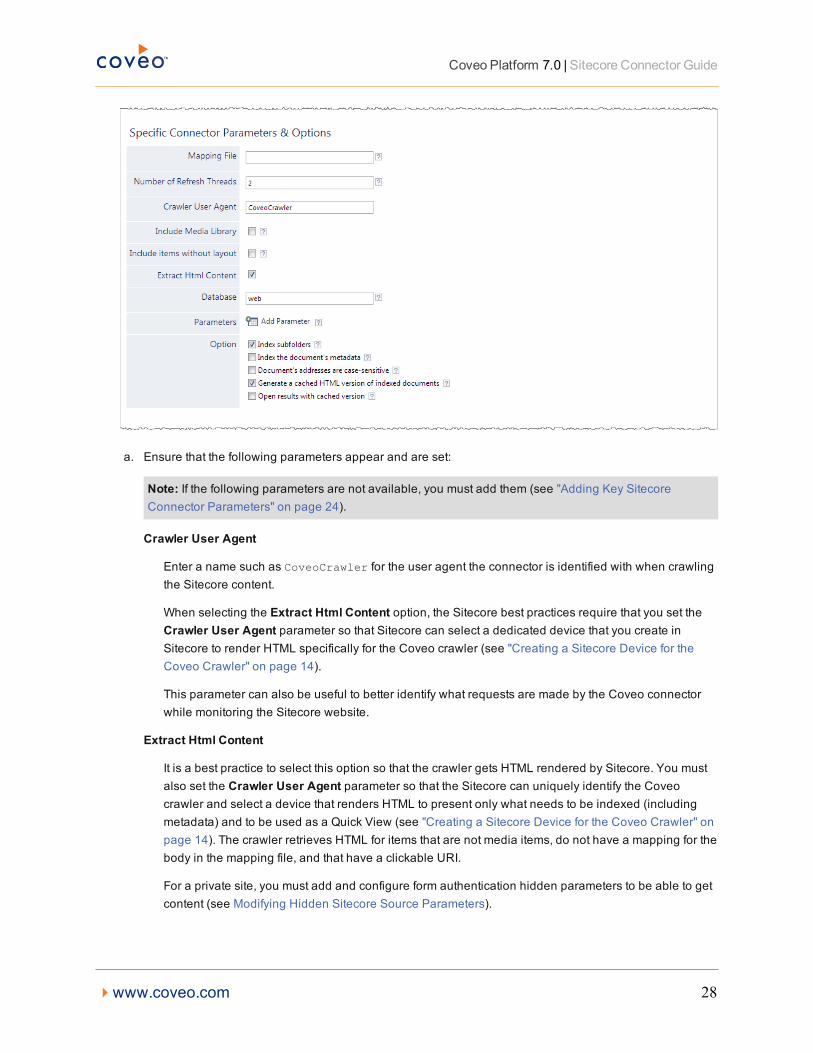
6. In the Specific Connector Parameters & Options section of the Add Source page:
4www.coveo.com 27
Coveo Platform 7.0 | Sitecore Connector Guide
a. Ensure that the following parameters appear and are set:
Note: If the following parameters are not available, you must add them (see "Adding Key SitecoreConnector Parameters" on page 24).
Crawler User Agent
Enter a name such as CoveoCrawler for the user agent the connector is identified with when crawlingthe Sitecore content.
When selecting the Extract Html Content option, the Sitecore best practices require that you set theCrawler User Agent parameter so that Sitecore can select a dedicated device that you create inSitecore to render HTML specifically for the Coveo crawler (see "Creating a Sitecore Device for theCoveo Crawler" on page 14).
This parameter can also be useful to better identify what requests are made by the Coveo connectorwhile monitoring the Sitecore website.
Extract Html Content
It is a best practice to select this option so that the crawler gets HTML rendered by Sitecore. You mustalso set the Crawler User Agent parameter so that the Sitecore can uniquely identify the Coveocrawler and select a device that renders HTML to present only what needs to be indexed (includingmetadata) and to be used as a Quick View (see "Creating a Sitecore Device for the Coveo Crawler" onpage 14). The crawler retrieves HTML for items that are not media items, do not have a mapping for thebody in the mapping file, and that have a clickable URI.
For a private site, you must add and configure form authentication hidden parameters to be able to getcontent (see Modifying Hidden Sitecore Source Parameters).
4www.coveo.com 28
Coveo Platform 7.0 | Sitecore Connector Guide
Important:When a mapping file is specified and items have an HTML body defined in the mappingfile, the crawler gets HTML from the mapping file body, not from the HTML rendered by Sitecore, evenwhen the Extract Html Content option is selected.
b. Review if you need to change the default values for the following parameters:
Mapping File
The path to the optional mapping file (see "Creating and Using a Sitecore Mapping File" on page 31).
Number of Refresh Threads
Determines the number of simultaneous downloads handled by the connector for this source. Thedefault value is 2.
Include Media Library
Select this check box to index all the content of the media library. By default, this check box is cleared.
Selecting this option has the same effect as adding /Sitecore/content/media library to theContentStartPaths advanced parameter (see "Modifying Hidden Sitecore Source Parameters" onpage 42).
Note: Referenced media items specified to be indexed in the configuration file are indexed evenwhen this check box is cleared (see "Creating and Using a Sitecore Configuration File" on page 41).
Include items without layout
By default, items with no layout cannot be directly found from a web browser and are therefore notindexed. Select this check box to index items that have no defined layout.
Database
The name of the Sitecore database to index. The default value is web. You can also enter master toindex the non-published content of the target site. When left blank, the default value corresponds to thedatabase defined in the TargetSite hidden parameter (see "TargetSite (String)" on page 45).
Note:When you specify a value other than the default and use a security provider, you click AddParameter to set the security provider Database parameter to the same value (see "Configuring aSitecore Security Provider" on page 21).
c. In the Parameters section, click Add Parameter to be able to change the default value of hiddenparameters (see "Modifying Hidden Sitecore Source Parameters" on page 42).
d. In the Option section, review the default value of the following check boxes:
Index Subfolders
Check to index all subfolders below the specified Sitecore server address. Selected by default.
Index the document's metadata
When selected, CES indexes all the document metadata, even metadata that are not associated with afield. The orphan metadata are added to the body of the document so that they can be searched using
4www.coveo.com 29
Coveo Platform 7.0 | Sitecore Connector Guide
free text queries.
When cleared (default), only the values of system and custom fields that have the Free Text Queriesattribute selected will be searchable without using a field query.
Example: A document has two metadata:
l LastEditedBy containing the value Hector Smith
l Department containing the value RH
In CES, the custom field CorpDepartment is bound to the metadata Department and its Free TextQueries attribute is selected.
When the Index the document's metadata option is cleared, searching for RH returns the documentbecause a field is indexing this value. Searching for hector does not return the document becauseno field is indexing this value.
When the Index the document's metadata option is selected, searching for hector also returns thedocument because CES indexed orphan metadata.
Generate a cached HTML version of indexed documents
When you select this check box (recommended), at indexing time, CES creates HTML versions ofindexed documents. In the search interfaces, users can then more rapidly review the content byclicking the Quick View link rather than opening the original document with the original application.Consider clearing this check box only if you do not want to use Quick View links or to save resourceswhen building the source.
Open results with cached version
Leave this check box cleared (recommended) so that in the search interfaces, the main search resultlink opens the original document with the original application. Consider selecting this check box onlywhen you do not want users to be able to open the original document but only see the HTML version ofthe document as a Quick View. In this case, you must also selectGenerate a cached HTML version ofindexed documents.
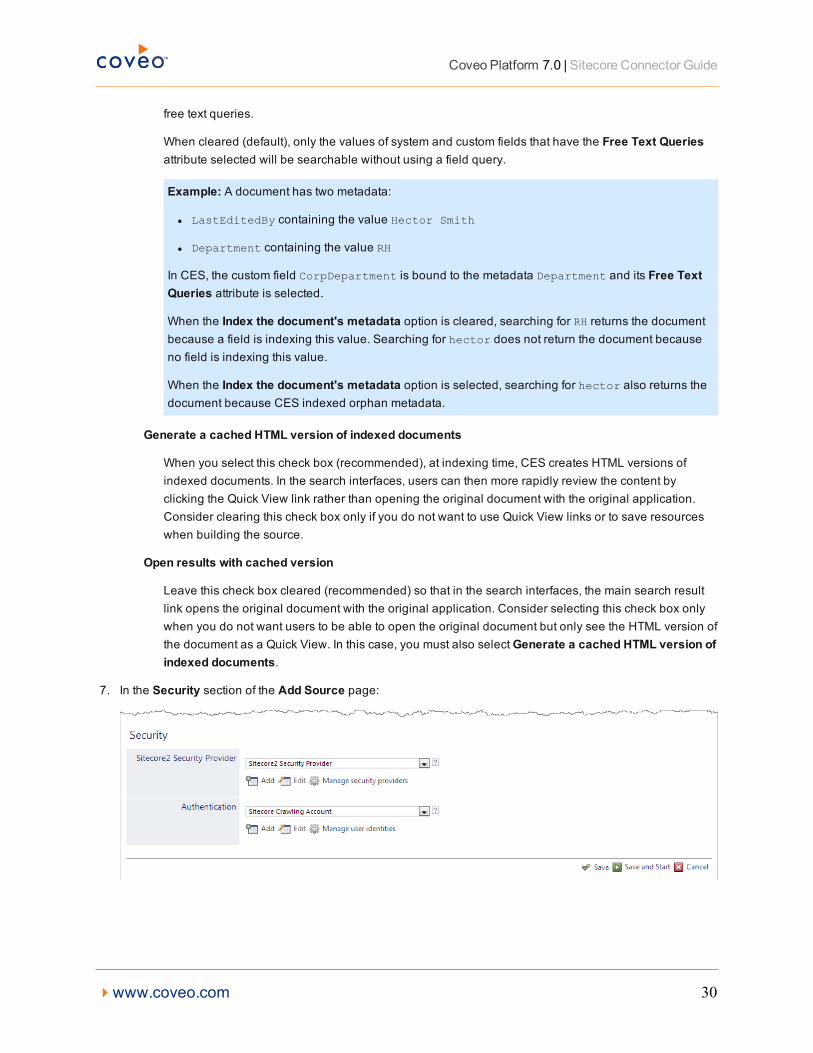
7. In the Security section of the Add Source page:
4www.coveo.com 30
Coveo Platform 7.0 | Sitecore Connector Guide
a. In the Sitecore2 Security Provider drop-down list, select the security provider that you created for thissource (see "Configuring a Sitecore Security Provider" on page 21).
b. In the Authentication drop-down list, select the user identity that you created for the Sitecore server.
Note:When Authentication is left to (none), the connector uses the extranet\Anonymous Sitecoreaccount by default to connect to, and retrieve content from Sitecore. The connector best practices requireto create and select an exclusive account. Furthermore, when your Sitecore site contains securedcontent, the extranet\Anonymous account might not have access to all Sitecore items.
c. Click Save and Start to save the source configuration and start indexing this source.
8. Validate that the source building process is executed without errors:
l In the navigation panel on the left, click Status, and then validate that the indexing proceeds withouterrors.
OR
l Open the CES Console to monitor the source building activities.
Note: In the CES Console, while your Sitecore source is indexed:
l It is normal to get error messages similar to the following one when crawling media library items whichhave no layouts. These messages will disappear if you clear the Include items without layout option.
Unable to get html content for uri http://SitecoreServer/en/sitecore/media
library.aspx (The remote server returned an error: (500) Internal Server Error.).
l On rebuilds, you may see messages that Sitecore files are Removed to indicate that they are filtered outby the crawler based on their type (typically because they hold no or not useful content) so they are neverindexed.
What'sNext?
When incremental refresh is enabled (see "Enabling Incremental Refresh on a Sitecore Database" on page 17), setan incremental refresh schedule for your source.
Consider modifying advanced source parameters (see "Modifying Hidden Sitecore Source Parameters" on page42).
12.1 Creating and Using a Sitecore Mapping FileBy default, the Sitecore connector uses a built-in mapping shown below to determine what metadata from youroriginal Sitecore documents are associated with fields for the documents in the Coveo index.
<?xml version="1.0" encoding="utf-8" ?><Mappings><Version>1</Version><Mapping type="versioneditem"><Title>%[Name]</Title><Body>%[Description]</Body><Fields><Field name="creationdate">%[Created]</Field><Field name="iscontentitem">%[IsContentItem]</Field>
4www.coveo.com 31

Coveo Platform 7.0 | Sitecore Connector Guide
<Field name="ishidden">%[Hidden]</Field><Field name="ismediaitem">%[IsMediaItem]</Field><Field name="isreadonly">%[ReadOnly]</Field><Field name="language">%[Language]</Field><Field name="languages">%[Languages]</Field><Field name="modificationdate">%[Updated]</Field><Field name="owner">%[CreatedBy]</Field><Field name="parentid">%[ParentID]</Field><Field name="revision">%[Revision]</Field><Field name="templateid">%[TemplateID]</Field><Field name="templatename">%[TemplateName]</Field><Field name="updatedby">%[UpdatedBy]</Field><Field name="version">%[Version]</Field><Field name="versions">%[Versions]</Field><Field name="workflowstate">%[WorkflowState]</Field>
</Fields></Mapping>
</Mappings>
Note: The built-in mapping includes only the standard Sitecore metadata, none of your Sitecore custom orbusiness metadata.
The connector however retrieves all metadata. If you create and assign to your Sitecore source a field set thatincludes custom fields for which the Metadata Name parameter exactly matches the Sitecore metadata names,they will be mapped automatically. It is therefore recommended to extend your Sitecore source field set to includematching fields for all useful metadata.
You can create and use a custom mapping file to tailor the mappings to your custom fields to specific templates.
To create and use a custommapping file
1. Using an administrator account, connect to the Coveo Master server.
2. Using a text editor:
a. Create an XML file respecting the mapping file schema (see "Standard Mapping File Schema" on page 34)as illustrated in the following commented example:
<?xml version="1.0" encoding="utf-8" ?><Mappings><!-- Review the XML Schema to view the available fields and attributes --><Version>1</Version><!-- Mandatory node to identify the mapping file version. Do not modify.
--><CommonMapping><!-- Optional. Any Mapping defined within this section applies to all
documents. --><Title>%[title]</Title>
<Fields><Field name="CustomCoveoField">%[SitecoreField]</Field>
</Fields><!-- Map a custom Coveo field to a Sitecore metadata. --></CommonMapping><Mapping type="versioneditem"><!-- Optional. This is a specific mapping. The fields and
elements described apply to items of type "versionitem" --><Body>
<![CDATA[<html>
<body style=\"font-family:'verdana`;font-size:10px\">%[Description]
</body></html>
]]></Body>
<PrintableUri>http://www.coveo.com</PrintableUri><Fields>
4www.coveo.com 32
Coveo Platform 7.0 | Sitecore Connector Guide
<Field name="field1">This is a custom field</Field></Fields>
</Mapping><DefaultMapping> <!-- Optional. The default mapping applies exclusively to all items that
are not mapped to a specific mapping --><ClickableUri>www.clickableuri.com</ClickableUri>
</DefaultMapping></Mappings>
Note: If you want to modify a versioneditem, you must create a CommonMapping, or create a Mappingfor each templateid in Sitecore and put the template GUID in the mapping type.
Important:When a mapping file is specified in a source and an HTML body is specified for some or allitems, the Extract Html Content option is not taken into account for these items. The crawler getsHTML from the mapping file body, not from the HTML rendered by Sitecore. You can use the mapping fileand the Extract Html Content option by removing the <body> section of the mapping file.
b. Specify field mappings in the following format:
<Field name="CoveoIndexFieldName">%[SiteCoreItemFieldName]</Field>
Example: The mapping <Field name="creationdate">%[Created]</Field> instructs theconnector to copy the value of the Created Sitecore metadata and paste it in the creationdate Coveoindex field for each indexed document.
Note: The value that you enter between %[...] must be the Sitecore field name as it appears in theSitecore item, not the Sitecore field information appearing in a template.
c. When you chose to use foreign keys to allow incremental refresh to detect referenced item changes (see"About Foreign Keys" on page 60), you must define the foreign key fields for the key and the value in themapping file.
Example: A Sitecore site presents music artists. The Artist item type is the only one containing both theartist ID and the artist name. All other item types (Song, Albums, Discography...) only contain the artist ID.For these item types, the artist name can be rendered by reference.
In the following mapping file excerpt for this site, a specific mapping is defined for the template of Artistitems (885063B0-3451-4B6C-98E3-5AB502C80B36) and the Sitecore ID metadata is mapped to theArtist index field to be used as the key field of the foreign key. Similarly, the Sitecore Name metadata ismapped to the ArtistName index field to be used as is the foreign key value field.
<Mapping type="885063B0-3451-4B6C-98E3-5AB502C80B36"><!-- Optional. Set foreign key fieldsfor the template of a given document type. --><Fields><Field name="Artist">%[ID]</Field><Field name="ArtistName">%[Name]</Field>
</Fields></Mapping>
Tip:When you want to restrict a <mapping> to a specific template, the GUID to use for the type attributecorrespond to the value of the Item ID parameter for the template in Sitecore (see "Finding the ID of aSitecore Template Item" on page 40).
d. Save the file using a name of your choice in the [Index_Path]\Config folder.
4www.coveo.com 33
Coveo Platform 7.0 | Sitecore Connector Guide
Example: C:\CES7\Config\MySitecoreMapping.xml
3. Instruct the connector to use this configuration file for a source by adding the path of the mapping file to theMapping File source parameter (see "Standard Mapping File Schema" on page 34).
What'sNext?
Ensure that the field set assigned to your Sitecore source contains the custom fields defined in your mapping file.
Consider creating and using a configuration file (see "Creating and Using a Sitecore Configuration File" on page41).
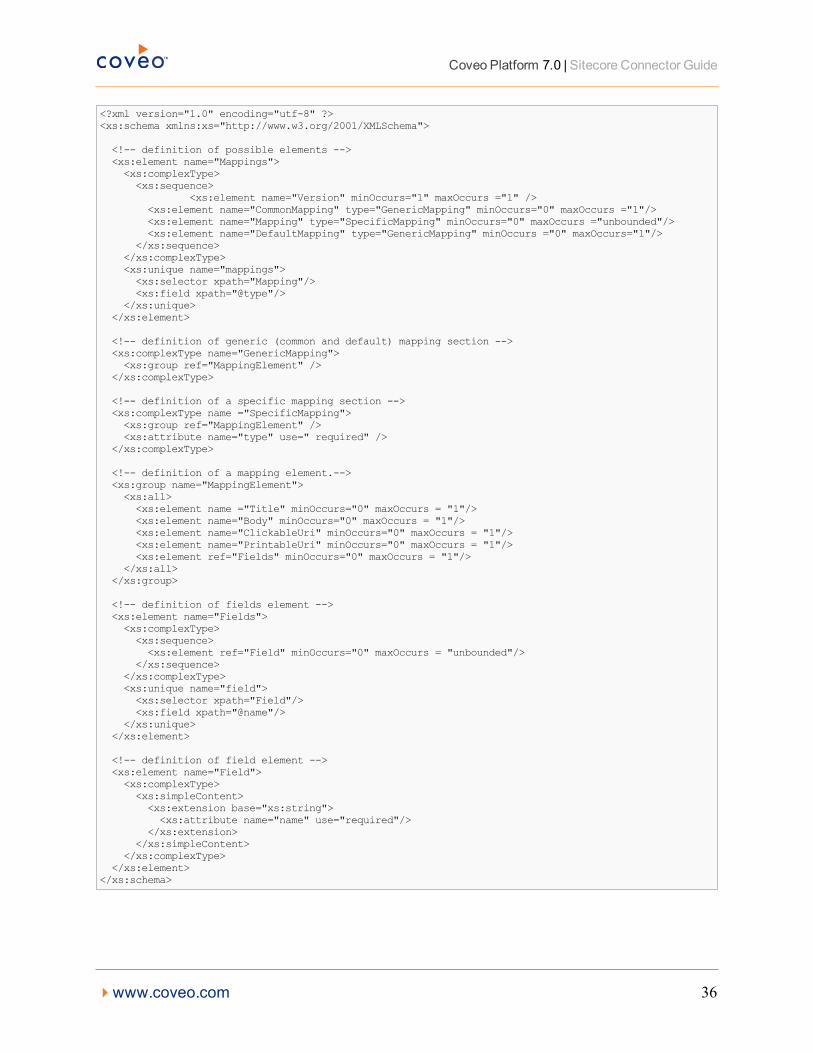
12.1.1 StandardMapping File Schema
A Coveo connector may need a mapping file to correctly copy the repository metadata values to appropriate indexfields. This topic describes the format of the standard mapping file by providing its XML schema definition. Refer tothis schema to review the possible content of the file and ensure that your mapping file is valid.
4www.coveo.com 34
Coveo Platform 7.0 | Sitecore Connector Guide
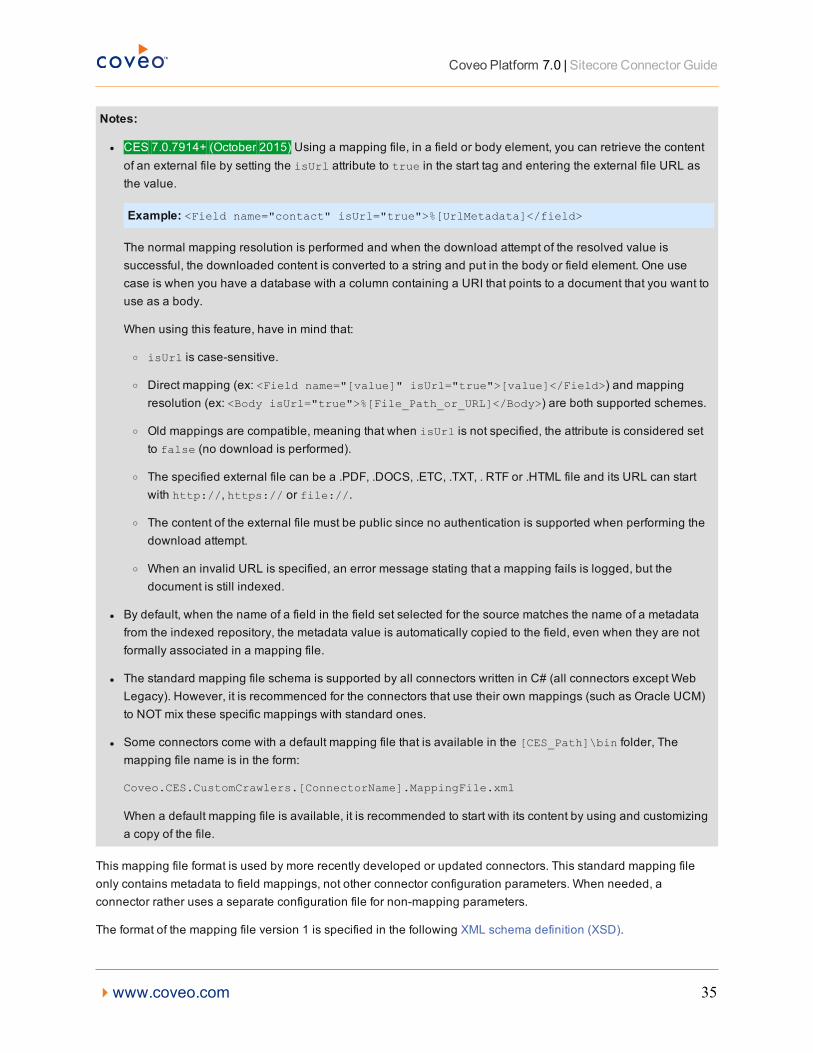
Notes:
l CES 7.0.7914+ (October 2015) Using a mapping file, in a field or body element, you can retrieve the contentof an external file by setting the isUrl attribute to true in the start tag and entering the external file URL asthe value.
Example: <Field name="contact" isUrl="true">%[UrlMetadata]</field>
The normal mapping resolution is performed and when the download attempt of the resolved value issuccessful, the downloaded content is converted to a string and put in the body or field element. One usecase is when you have a database with a column containing a URI that points to a document that you want touse as a body.
When using this feature, have in mind that:
o isUrl is case-sensitive.
o Direct mapping (ex: <Field name="[value]" isUrl="true">[value]</Field>) and mappingresolution (ex: <Body isUrl="true">%[File_Path_or_URL]</Body>) are both supported schemes.
o Old mappings are compatible, meaning that when isUrl is not specified, the attribute is considered setto false (no download is performed).
o The specified external file can be a .PDF, .DOCS, .ETC, .TXT, . RTF or .HTML file and its URL can startwith http://, https:// or file://.
o The content of the external file must be public since no authentication is supported when performing thedownload attempt.
o When an invalid URL is specified, an error message stating that a mapping fails is logged, but thedocument is still indexed.
l By default, when the name of a field in the field set selected for the source matches the name of a metadatafrom the indexed repository, the metadata value is automatically copied to the field, even when they are notformally associated in a mapping file.
l The standard mapping file schema is supported by all connectors written in C# (all connectors except WebLegacy). However, it is recommenced for the connectors that use their own mappings (such as Oracle UCM)to NOT mix these specific mappings with standard ones.
l Some connectors come with a default mapping file that is available in the [CES_Path]\bin folder, Themapping file name is in the form:
Coveo.CES.CustomCrawlers.[ConnectorName].MappingFile.xml
When a default mapping file is available, it is recommended to start with its content by using and customizinga copy of the file.
This mapping file format is used by more recently developed or updated connectors. This standard mapping fileonly contains metadata to field mappings, not other connector configuration parameters. When needed, aconnector rather uses a separate configuration file for non-mapping parameters.
The format of the mapping file version 1 is specified in the following XML schema definition (XSD).
4www.coveo.com 35
Coveo Platform 7.0 | Sitecore Connector Guide
<?xml version="1.0" encoding="utf-8" ?><xs:schema xmlns:xs="http://www.w3.org/2001/XMLSchema">
<!-- definition of possible elements --><xs:element name="Mappings"><xs:complexType><xs:sequence>
<xs:element name="Version" minOccurs="1" maxOccurs ="1" /><xs:element name="CommonMapping" type="GenericMapping" minOccurs="0" maxOccurs ="1"/><xs:element name="Mapping" type="SpecificMapping" minOccurs="0" maxOccurs ="unbounded"/><xs:element name="DefaultMapping" type="GenericMapping" minOccurs ="0" maxOccurs="1"/>
</xs:sequence></xs:complexType><xs:unique name="mappings"><xs:selector xpath="Mapping"/><xs:field xpath="@type"/>
</xs:unique></xs:element>
<!-- definition of generic (common and default) mapping section --><xs:complexType name="GenericMapping"><xs:group ref="MappingElement" />
</xs:complexType>
<!-- definition of a specific mapping section --><xs:complexType name ="SpecificMapping"><xs:group ref="MappingElement" /><xs:attribute name="type" use=" required" />
</xs:complexType>
<!-- definition of a mapping element.--><xs:group name="MappingElement"><xs:all><xs:element name ="Title" minOccurs="0" maxOccurs = "1"/><xs:element name="Body" minOccurs="0" maxOccurs = "1"/><xs:element name="ClickableUri" minOccurs="0" maxOccurs = "1"/><xs:element name="PrintableUri" minOccurs="0" maxOccurs = "1"/><xs:element ref="Fields" minOccurs="0" maxOccurs = "1"/>
</xs:all></xs:group>
<!-- definition of fields element --><xs:element name="Fields"><xs:complexType><xs:sequence><xs:element ref="Field" minOccurs="0" maxOccurs = "unbounded"/>
</xs:sequence></xs:complexType><xs:unique name="field"><xs:selector xpath="Field"/><xs:field xpath="@name"/>
</xs:unique></xs:element>
<!-- definition of field element --><xs:element name="Field"><xs:complexType><xs:simpleContent><xs:extension base="xs:string"><xs:attribute name="name" use="required"/>
</xs:extension></xs:simpleContent>
</xs:complexType></xs:element>
</xs:schema>
4www.coveo.com 36
Coveo Platform 7.0 | Sitecore Connector Guide
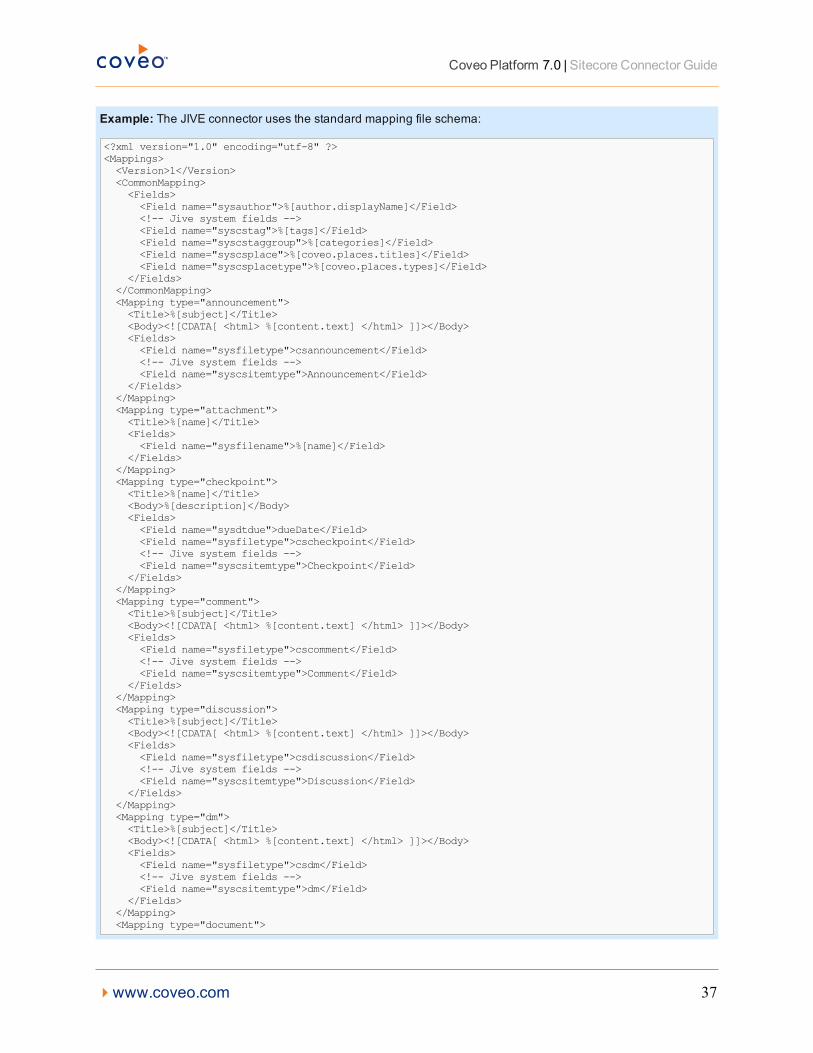
Example: The JIVE connector uses the standard mapping file schema:
<?xml version="1.0" encoding="utf-8" ?><Mappings><Version>1</Version><CommonMapping><Fields><Field name="sysauthor">%[author.displayName]</Field><!-- Jive system fields --><Field name="syscstag">%[tags]</Field><Field name="syscstaggroup">%[categories]</Field><Field name="syscsplace">%[coveo.places.titles]</Field><Field name="syscsplacetype">%[coveo.places.types]</Field>
</Fields></CommonMapping><Mapping type="announcement"><Title>%[subject]</Title><Body><![CDATA[ <html> %[content.text] </html> ]]></Body><Fields><Field name="sysfiletype">csannouncement</Field><!-- Jive system fields --><Field name="syscsitemtype">Announcement</Field>
</Fields></Mapping><Mapping type="attachment"><Title>%[name]</Title><Fields><Field name="sysfilename">%[name]</Field>
</Fields></Mapping><Mapping type="checkpoint"><Title>%[name]</Title><Body>%[description]</Body><Fields><Field name="sysdtdue">dueDate</Field><Field name="sysfiletype">cscheckpoint</Field><!-- Jive system fields --><Field name="syscsitemtype">Checkpoint</Field>
</Fields></Mapping><Mapping type="comment"><Title>%[subject]</Title><Body><![CDATA[ <html> %[content.text] </html> ]]></Body><Fields><Field name="sysfiletype">cscomment</Field><!-- Jive system fields --><Field name="syscsitemtype">Comment</Field>
</Fields></Mapping><Mapping type="discussion"><Title>%[subject]</Title><Body><![CDATA[ <html> %[content.text] </html> ]]></Body><Fields><Field name="sysfiletype">csdiscussion</Field><!-- Jive system fields --><Field name="syscsitemtype">Discussion</Field>
</Fields></Mapping><Mapping type="dm"><Title>%[subject]</Title><Body><![CDATA[ <html> %[content.text] </html> ]]></Body><Fields><Field name="sysfiletype">csdm</Field><!-- Jive system fields --><Field name="syscsitemtype">dm</Field>
</Fields></Mapping><Mapping type="document">
4www.coveo.com 37
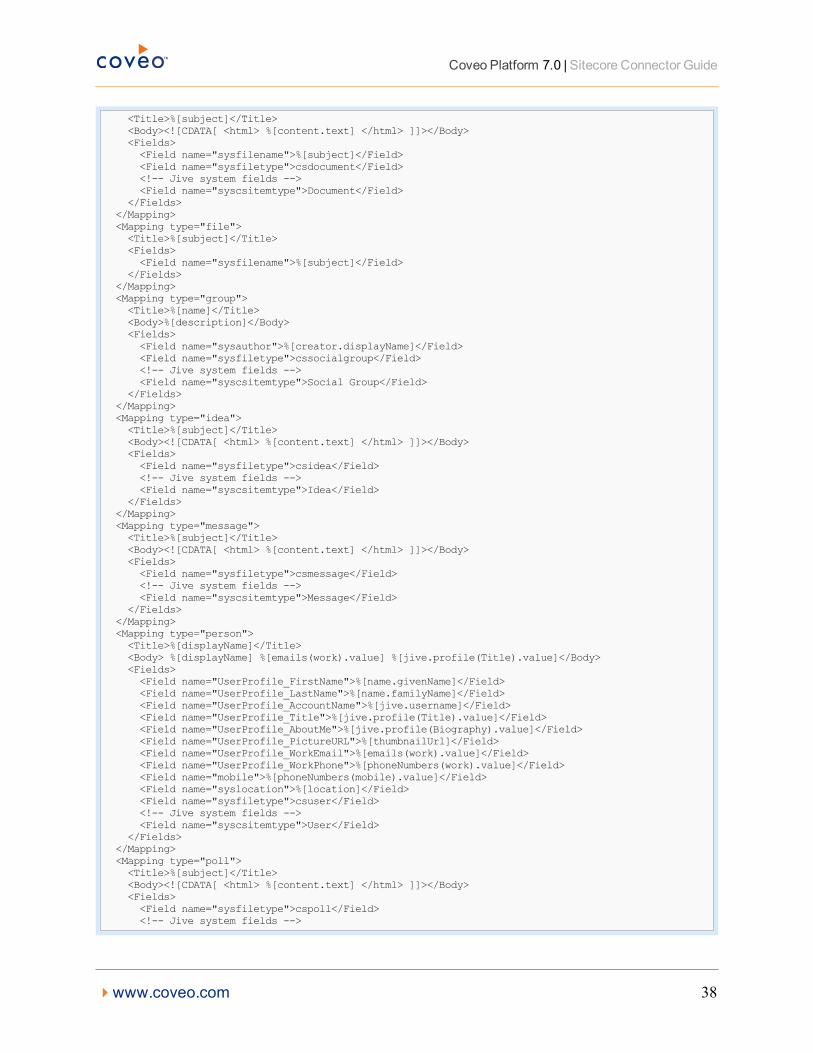
Coveo Platform 7.0 | Sitecore Connector Guide
<Title>%[subject]</Title><Body><![CDATA[ <html> %[content.text] </html> ]]></Body><Fields><Field name="sysfilename">%[subject]</Field><Field name="sysfiletype">csdocument</Field><!-- Jive system fields --><Field name="syscsitemtype">Document</Field>
</Fields></Mapping><Mapping type="file"><Title>%[subject]</Title><Fields><Field name="sysfilename">%[subject]</Field>
</Fields></Mapping><Mapping type="group"><Title>%[name]</Title><Body>%[description]</Body><Fields><Field name="sysauthor">%[creator.displayName]</Field><Field name="sysfiletype">cssocialgroup</Field><!-- Jive system fields --><Field name="syscsitemtype">Social Group</Field>
</Fields></Mapping><Mapping type="idea"><Title>%[subject]</Title><Body><![CDATA[ <html> %[content.text] </html> ]]></Body><Fields><Field name="sysfiletype">csidea</Field><!-- Jive system fields --><Field name="syscsitemtype">Idea</Field>
</Fields></Mapping><Mapping type="message"><Title>%[subject]</Title><Body><![CDATA[ <html> %[content.text] </html> ]]></Body><Fields><Field name="sysfiletype">csmessage</Field><!-- Jive system fields --><Field name="syscsitemtype">Message</Field>
</Fields></Mapping><Mapping type="person"><Title>%[displayName]</Title><Body> %[displayName] %[emails(work).value] %[jive.profile(Title).value]</Body><Fields><Field name="UserProfile_FirstName">%[name.givenName]</Field><Field name="UserProfile_LastName">%[name.familyName]</Field><Field name="UserProfile_AccountName">%[jive.username]</Field><Field name="UserProfile_Title">%[jive.profile(Title).value]</Field><Field name="UserProfile_AboutMe">%[jive.profile(Biography).value]</Field><Field name="UserProfile_PictureURL">%[thumbnailUrl]</Field><Field name="UserProfile_WorkEmail">%[emails(work).value]</Field><Field name="UserProfile_WorkPhone">%[phoneNumbers(work).value]</Field><Field name="mobile">%[phoneNumbers(mobile).value]</Field><Field name="syslocation">%[location]</Field><Field name="sysfiletype">csuser</Field><!-- Jive system fields --><Field name="syscsitemtype">User</Field>
</Fields></Mapping><Mapping type="poll"><Title>%[subject]</Title><Body><![CDATA[ <html> %[content.text] </html> ]]></Body><Fields><Field name="sysfiletype">cspoll</Field><!-- Jive system fields -->
4www.coveo.com 38
Coveo Platform 7.0 | Sitecore Connector Guide
<Field name="syscsitemtype">Poll</Field></Fields>
</Mapping><Mapping type="post"><Title>%[subject]</Title><Body><![CDATA[ <html> %[content.text] </html> ]]></Body><Fields><Field name="sysfiletype">csblogpost</Field><!-- Jive system fields --><Field name="syscsitemtype">Blog Post</Field>
</Fields></Mapping><Mapping type="project"><Title>%[name]</Title><Body>%[description]</Body><Fields><Field name="sysdtdue">dueDate</Field><Field name="sysauthor">%[creator.displayName]</Field><Field name="sysfiletype">csproject</Field><!-- Jive system fields --><Field name="syscsitemtype">Project</Field>
</Fields></Mapping><Mapping type="space"><Title>%[name]</Title><Body>%[description]</Body><Fields><Field name="sysfiletype">cscommunity</Field><!-- Jive system fields --><Field name="syscsitemtype">Community</Field>
</Fields></Mapping><Mapping type="systemblog"><Title>%[name]</Title><Body>%[description]</Body><Fields><Field name="sysfiletype">cssystemblog</Field><!-- Jive system fields --><Field name="syscsitemtype">System Blog</Field>
</Fields></Mapping><Mapping type="task"><Title>%[subject]</Title><Body><![CDATA[ <html> %[content.text] </html> ]]></Body><Fields><Field name="sysdtdue">dueDate</Field><Field name="sysfiletype">cstask</Field><!-- Jive system fields --><Field name="syscsitemtype">Task</Field><Field name="syscstaskassignedto">%[owner.extra.displayName]</Field>
</Fields></Mapping><Mapping type="update"><Title>%[subject]</Title><Body><![CDATA[ <html> %[content.text] </html> ]]></Body><Fields><Field name="sysfiletype">csupdate</Field><!-- Jive system fields --><Field name="syscsitemtype">Update</Field>
</Fields></Mapping><Mapping type="video"><Title>%[subject]</Title><Body><![CDATA[ <html> %[content.text] </html> ]]></Body><Fields><Field name="sysfiletype">csvideo</Field><!-- Jive system fields --><Field name="syscsitemtype">Video</Field>
4www.coveo.com 39
Coveo Platform 7.0 | Sitecore Connector Guide
</Fields></Mapping>
</Mappings>
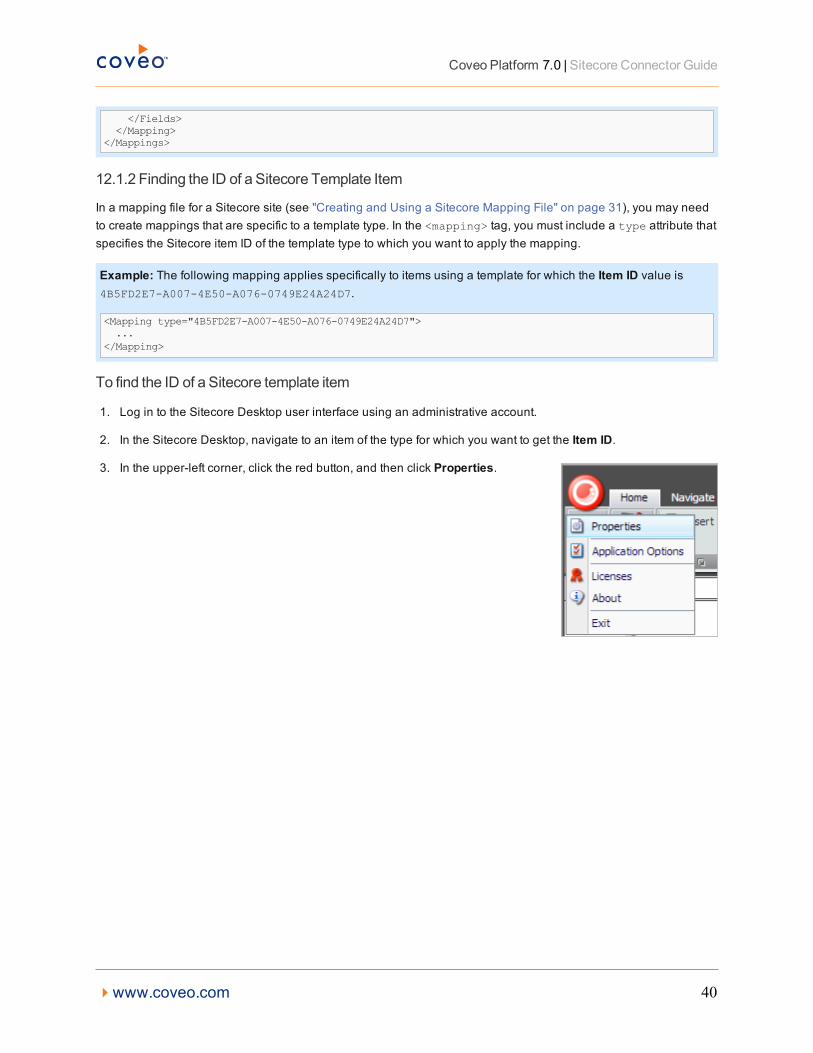
12.1.2 Finding the ID of a Sitecore Template Item
In a mapping file for a Sitecore site (see "Creating and Using a Sitecore Mapping File" on page 31), you may needto create mappings that are specific to a template type. In the <mapping> tag, you must include a type attribute thatspecifies the Sitecore item ID of the template type to which you want to apply the mapping.
Example: The following mapping applies specifically to items using a template for which the Item ID value is4B5FD2E7-A007-4E50-A076-0749E24A24D7.
<Mapping type="4B5FD2E7-A007-4E50-A076-0749E24A24D7">...
</Mapping>
To find the ID of a Sitecore template item
1. Log in to the Sitecore Desktop user interface using an administrative account.
2. In the Sitecore Desktop, navigate to an item of the type for which you want to get the Item ID.
3. In the upper-left corner, click the red button, and then click Properties.
4www.coveo.com 40
Coveo Platform 7.0 | Sitecore Connector Guide
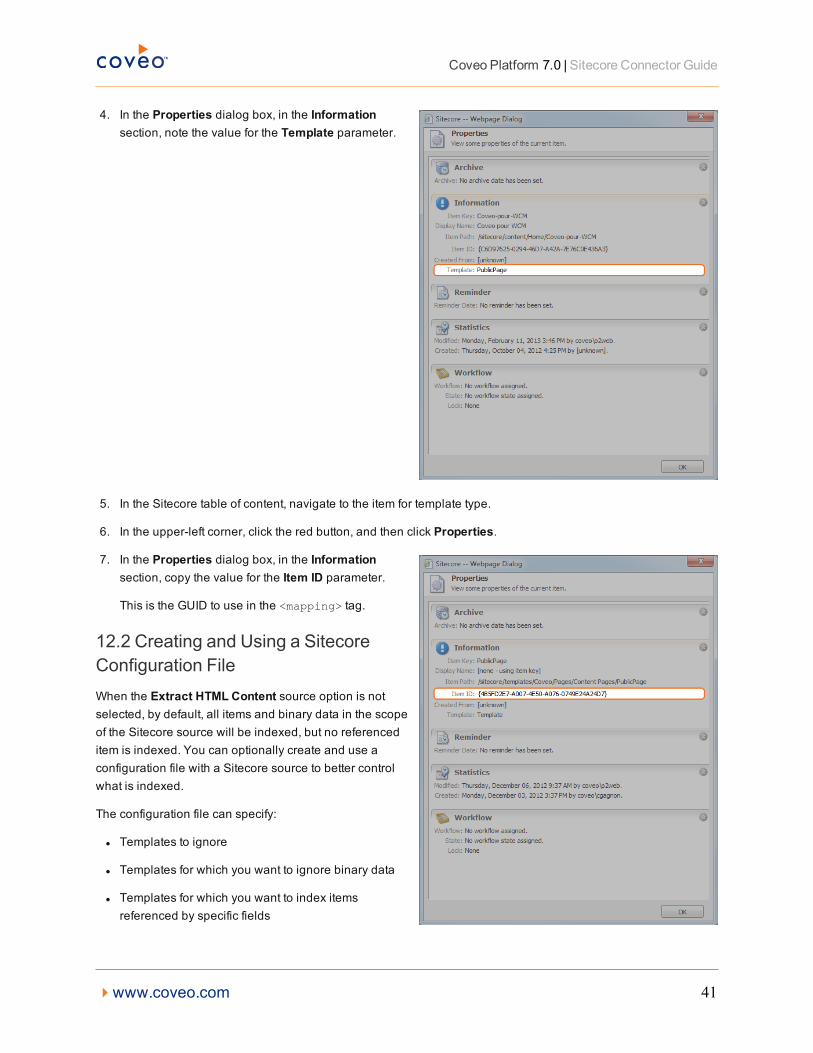
4. In the Properties dialog box, in the Informationsection, note the value for the Template parameter.
5. In the Sitecore table of content, navigate to the item for template type.
6. In the upper-left corner, click the red button, and then click Properties.
7. In the Properties dialog box, in the Informationsection, copy the value for the Item ID parameter.
This is the GUID to use in the <mapping> tag.
12.2 Creating and Using a SitecoreConfiguration FileWhen the Extract HTML Content source option is notselected, by default, all items and binary data in the scopeof the Sitecore source will be indexed, but no referenceditem is indexed. You can optionally create and use aconfiguration file with a Sitecore source to better controlwhat is indexed.
The configuration file can specify:
l Templates to ignore
l Templates for which you want to ignore binary data
l Templates for which you want to index itemsreferenced by specific fields
4www.coveo.com 41
Coveo Platform 7.0 | Sitecore Connector Guide
To create aSitecore configuration file
1. Using an administrator account, connect to the Coveo Master server.
2. Using a text editor:
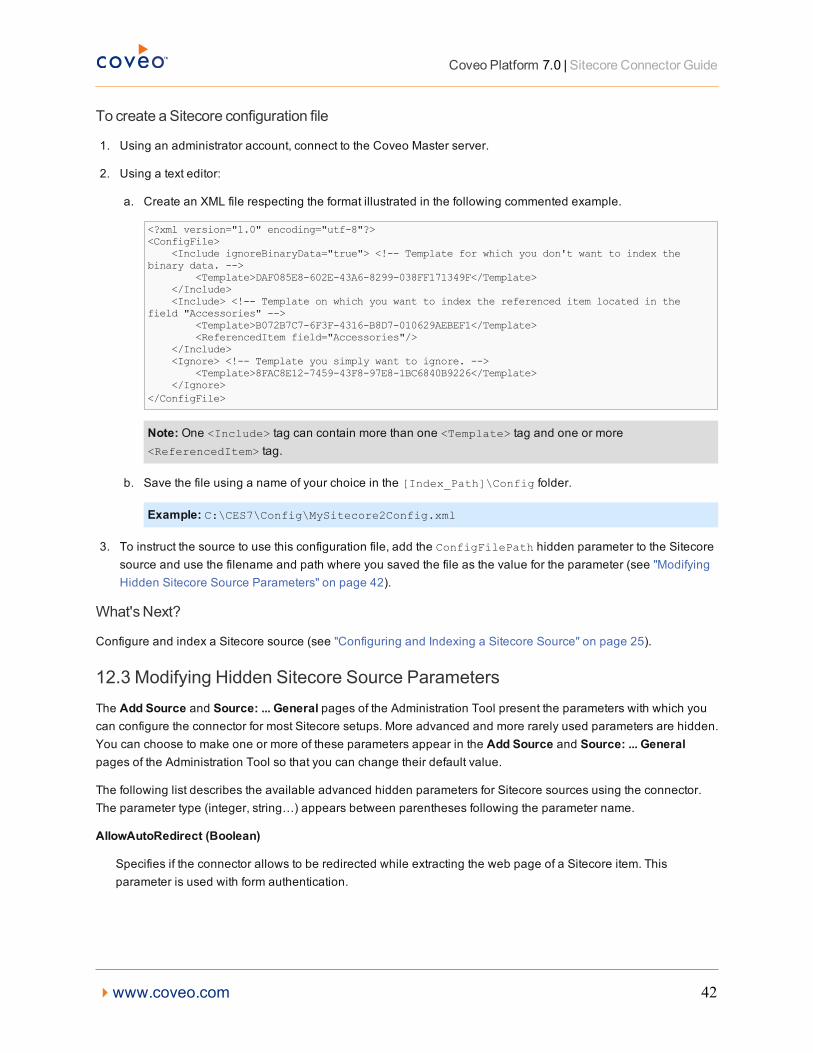
a. Create an XML file respecting the format illustrated in the following commented example.
<?xml version="1.0" encoding="utf-8"?><ConfigFile>
<Include ignoreBinaryData="true"> <!-- Template for which you don't want to index thebinary data. -->
<Template>DAF085E8-602E-43A6-8299-038FF171349F</Template></Include><Include> <!-- Template on which you want to index the referenced item located in the
field "Accessories" --><Template>B072B7C7-6F3F-4316-B8D7-010629AEBEF1</Template><ReferencedItem field="Accessories"/>
</Include><Ignore> <!-- Template you simply want to ignore. -->
<Template>8FAC8E12-7459-43F8-97E8-1BC6840B9226</Template></Ignore>
</ConfigFile>
Note: One <Include> tag can contain more than one <Template> tag and one or more<ReferencedItem> tag.
b. Save the file using a name of your choice in the [Index_Path]\Config folder.
Example: C:\CES7\Config\MySitecore2Config.xml
3. To instruct the source to use this configuration file, add the ConfigFilePath hidden parameter to the Sitecoresource and use the filename and path where you saved the file as the value for the parameter (see "ModifyingHidden Sitecore Source Parameters" on page 42).
What'sNext?
Configure and index a Sitecore source (see "Configuring and Indexing a Sitecore Source" on page 25).
12.3 Modifying Hidden Sitecore Source ParametersThe Add Source and Source: ... General pages of the Administration Tool present the parameters with which youcan configure the connector for most Sitecore setups. More advanced and more rarely used parameters are hidden.You can choose to make one or more of these parameters appear in the Add Source and Source: ... Generalpages of the Administration Tool so that you can change their default value.
The following list describes the available advanced hidden parameters for Sitecore sources using the connector.The parameter type (integer, string…) appears between parentheses following the parameter name.
AllowAutoRedirect (Boolean)
Specifies if the connector allows to be redirected while extracting the web page of a Sitecore item. Thisparameter is used with form authentication.
4www.coveo.com 42
Coveo Platform 7.0 | Sitecore Connector Guide
AnonymousUserNames (String)
Specifies a list of users (separated by a semicolon) that are considered anonymous users. The default value isextranet\anonymous. This is an important parameter to correctly compute permissions on Sitecore content. Ifother users in your installation count as anonymous, they need to be defined in this parameter.
AspNetStateTags (String)
Specifies the ASP.Net state tags that are used to extract a web page when forms authentication is used.
ConfigFilePath (String)
Specifies the path to a Sitecore connector configuration file, if one is to be used (see "Creating and Using aSitecore Configuration File" on page 41).
ContentStartPaths (String)
Specifies a list of relative Sitecore content URIs to restrain the crawling.
Example: To crawl only the content under the Nicam Products node on your Sitecore server, enter:Sitecore/Nicam/Products
You can specify one or more starting path by separating multiple root nodes with the ; character.
Example: /sitecore/content/home/MyNewRootNode;/sitecore/content/Resources
This parameter is empty by default to crawl from the root path.
Note: You can find the default root path in the Sitecore web.config file, by concatenating the rootPath andstartItem attributes for a target site.
CrawlerUserAgent (String) CES 7.0.5785+ (August 2013)
Specifies the name of the user agent with which the connector identifies itself when crawling the Sitecorecontent. The Sitecore best practice requires that you set this parameter so that Sitecore can select a dedicateddevice to use to render HTML for this identity (see "Creating a Sitecore Device for the Coveo Crawler" on page14). This parameter is also useful to better identify what requests are made by the Coveo connector whilemonitoring the Sitecore website.
EnableNTLMAuthentication (Boolean) CES 7.0.6547+ (March 2014)
Set this parameter to true only when extracting HTML content (Extract Html Content selected) and yourSitecore site is secured with the Active Directory Module. This instructs the Coveo connector to authenticateitself with the user identity defined on the source when it makes a web request to pull the HTML. Otherwise, theGET requests will return HTTP 401 Unauthorized errors. The user name in the user identity must be in thedomain\username form. If you get a connection error, ensure to use the same credentials for the user identityset in the security provider and the user name used to define the AD membership provider in the web.configfile. The default value is false.
ExtractHtmlContent (Boolean) CES 7.0.5556– (July 2013)
It is a best practice to select this option so that the crawler gets HTML rendered by Sitecore. You must also set
4www.coveo.com 43
Coveo Platform 7.0 | Sitecore Connector Guide
the Crawler User Agent parameter so that the Sitecore can uniquely identify the Coveo crawler (see "AddingKey Sitecore Connector Parameters" on page 24) and select a device that renders HTML to present only whatneeds to be indexed (including metadata) and to be used as a Quick View (see "Creating a Sitecore Device forthe Coveo Crawler" on page 14). The crawler retrieves the HTML for items that are not media items, do not havea mapping for the body in the mapping file, and that have a clickable URI.
For a private site, you must configure form authentication to be able to get content.
Notes:
l CES 7.0.5785+ (August 2013) The ExtractHtmlContent parameter is visible and selected by default.
l CES 7.0.5425– (May 2013) Form authentication was needed even for public sites.
FormsAuthLoginCommand (String)
Specifies the login command to use to perform form authentication.
FormsAuthLoginPage (String)
Specifies the URL of the login page to use to perform forms authentication.
FormsAuthPasswordControl (String)
Specifies the identifier of the control within the login page to enter the password to perform forms authentication.
FormsAuthUserControl (String)
Specifies the identifier of the control within the login page to enter the user name to perform formsauthentication.
Tip: You can get the ID by inspecting the corresponding input HTML tag from the source of the web pageusing your browser inspection features.
Some websites use dynamic content (AJAX) in which case the page source might not be enough to retrievethe control ID. You can then use an external web debugger such as Fiddler to find what are the values passedto the server when the login command is invoked.
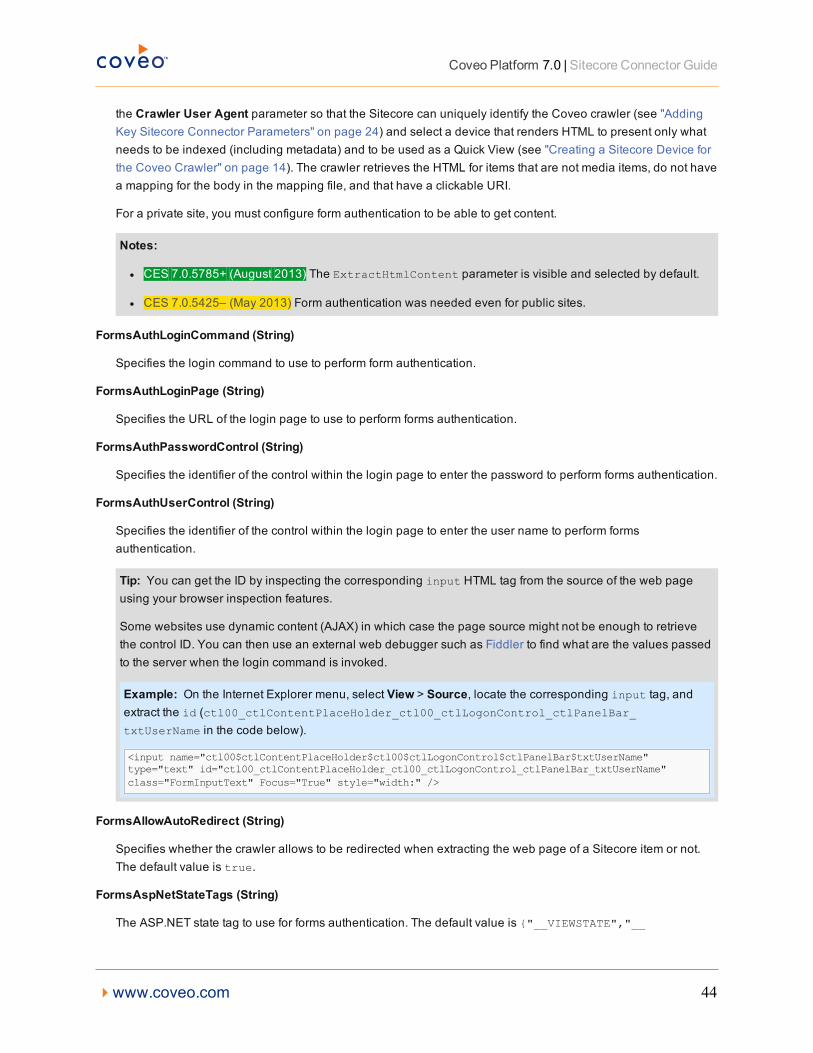
Example: On the Internet Explorer menu, select View > Source, locate the corresponding input tag, andextract the id (ctl00_ctlContentPlaceHolder_ctl00_ctlLogonControl_ctlPanelBar_txtUserName in the code below).
<input name="ctl00$ctlContentPlaceHolder$ctl00$ctlLogonControl$ctlPanelBar$txtUserName"type="text" id="ctl00_ctlContentPlaceHolder_ctl00_ctlLogonControl_ctlPanelBar_txtUserName"class="FormInputText" Focus="True" style="width:" />
FormsAllowAutoRedirect (String)
Specifies whether the crawler allows to be redirected when extracting the web page of a Sitecore item or not.The default value is true.
FormsAspNetStateTags (String)
The ASP.NET state tag to use for forms authentication. The default value is {"__VIEWSTATE","__
4www.coveo.com 44
Coveo Platform 7.0 | Sitecore Connector Guide
VIEWSTATEENCRYPTED","__EVENTVALIDATION","__EVENTTARGET","__EVENTARGUMENT"}.
IndexAllVersions (Boolean) - CrawlerIncludeAllVersions (Boolean) - Connector
When set to true, all the versions of each item will be indexed instead of only the most recent version.
Languages (String)
Specifies a list of semicolon (;) separated languages to index. You can specify the languages to crawl byentering one or more language codes. Enter the *wildcard character to index all languages. A document isindexed for each language. By default, when the box is empty, a single document is indexed using the defaultlanguage of the Target Site. If there is no language set on the site, English is used.
Example: en;fr-CA
NumberOfRefreshThreads (Integer)
Number of threads used for crawling. The default value is 2.
RetrieveSecurities (Boolean)
Specifies if the connector also retrieves the Sitecore permissions associated with each item when crawling. Thedefault value is false.
TargetSite (String)
Specifies the targeted Sitecore site to index. The default value is website. When the Sitecore website does notuse the default name (website), you must use this parameter and provide the appropriate name. You can getthe name of the site from the Sitecore web.config file.
Example: The following code shows an excerpt of a Sitecore web.config file defining five websites. All thewebsites hosted in a single Sitecore installation are defined under the <site> node and the string to enter inthe TargetSite parameter is the one of the name attribute.
<sites>...<site name="danish" hostName="da.printers" language="da-DK" virtualFolder="/"<site name="german" hostName="de.printers" language="de-DE" virtualFolder="/"<site name="english" hostName="en.printers" language="en" virtualFolder="/"<site name="british" hostName="gb.printers" language="en-GB" virtualFolder="/"<site name="website" virtualFolder="/" physicalFolder="/"...
</sites>
Timeout (Integer)
Modifies the time the connector waits for a content web service request to complete. Any value in seconds. Thedefault value is 100 seconds.
WebServiceLocation (String)
Specifies the last part of the URI that links to the web service. This string is appended to the Addresses sourceparameter. The default value is: /sitecoremodules/web/coveo/webservice/SitecoreWebService.asmx
Use the following procedure only when you want to modify one or more of the above hidden source parameters.
4www.coveo.com 45
Coveo Platform 7.0 | Sitecore Connector Guide
Tomodify hiddenSitecore source parameters
1. Refer to "Adding an Explicit Connector Parameter" on page 46 to add one or more Sitecore hidden sourceparameters.
2. For a new Sitecore source, access the Add Source page of the Administration Tool to modify the value of thenewly added advanced parameter:
a. Select Index > Sources and Collections.
b. Under Collections, select the collection in which you want to add the source.
c. Under Sources, click Add.
d. In the Add Source page, edit the newly added advanced parameter value.
3. For an existing Sitecore source, access the Source: ... General page of the Administration Tool to modify thevalue of the newly added advanced parameter:
a. Select Index > Sources and Collections.
b. Under Collections, select the collection containing the source you want to modify.
c. Under Sources, click the existing Sitecore source in which you want to modify the newly added advancedparameter.
d. In the Source: ... General page, edit the newly added advanced parameter value.
12.4 Adding an Explicit Connector ParameterConnector parameters applying to all sources indexed using this connector are called explicit parameters.
When you create or configure a source, the Coveo Enterprise Search (CES) 7.0 Administration Tool presentsparameters with which you can configure the connector for most setups. For many connectors, more advanced andmore rarely used parameters also exist but are hidden by default. CES then uses the default value associated witheach of these hidden parameters.
You can however choose to make one or more of these parameters appear in the Add Source and Source: ...General pages of the Administration Tool so that you can change their default value.
To add an explicit connector parameter
1. On the Coveo server, access the Administration Tool.
2. Select Configuration > Connectors.
3. In the list on the Connectors page, select the connector for which you want to show advanced hiddenparameters.
4. In the Parameters section of the selected connector page, click Add Parameter for each hidden parameterthat you want to modify.
Note: The Add Parameter button is present only when hidden parameters are available for the selectedconnector.
4www.coveo.com 46
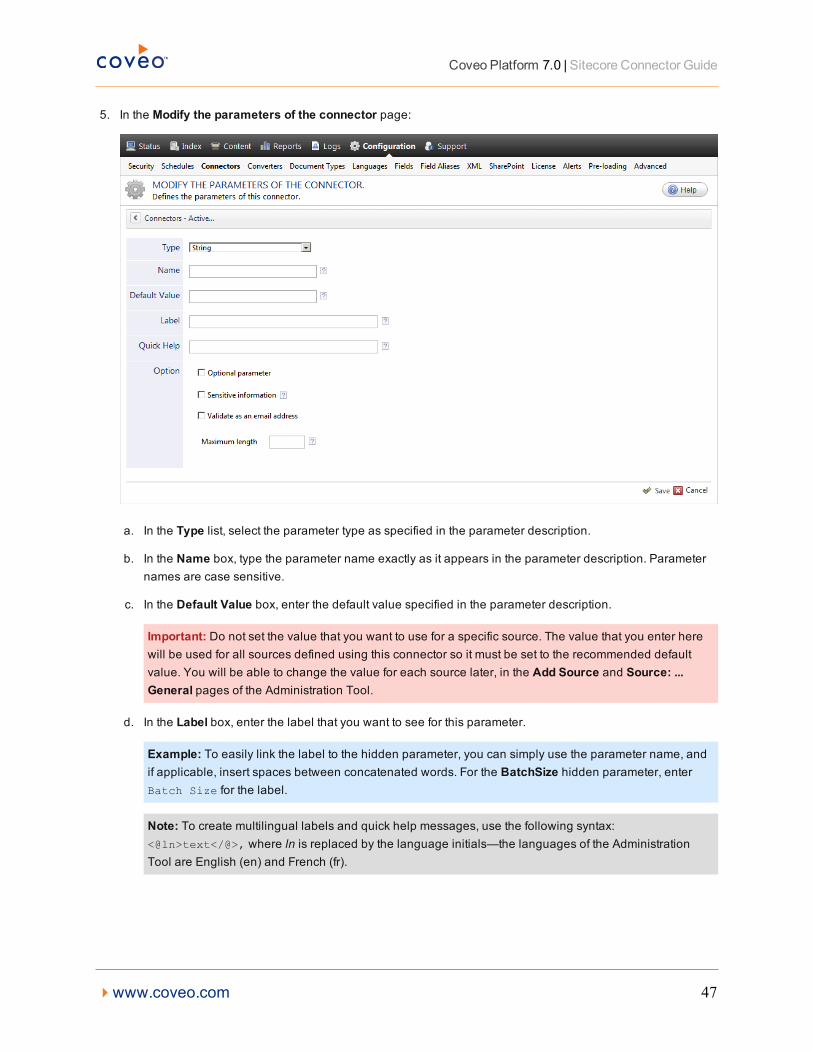
Coveo Platform 7.0 | Sitecore Connector Guide
5. In the Modify the parameters of the connector page:
a. In the Type list, select the parameter type as specified in the parameter description.
b. In the Name box, type the parameter name exactly as it appears in the parameter description. Parameternames are case sensitive.
c. In the Default Value box, enter the default value specified in the parameter description.
Important: Do not set the value that you want to use for a specific source. The value that you enter herewill be used for all sources defined using this connector so it must be set to the recommended defaultvalue. You will be able to change the value for each source later, in the Add Source and Source: ...General pages of the Administration Tool.
d. In the Label box, enter the label that you want to see for this parameter.
Example: To easily link the label to the hidden parameter, you can simply use the parameter name, andif applicable, insert spaces between concatenated words. For the BatchSize hidden parameter, enterBatch Size for the label.
Note: To create multilingual labels and quick help messages, use the following syntax:<@ln>text</@>, where ln is replaced by the language initials—the languages of the AdministrationTool are English (en) and French (fr).
4www.coveo.com 47
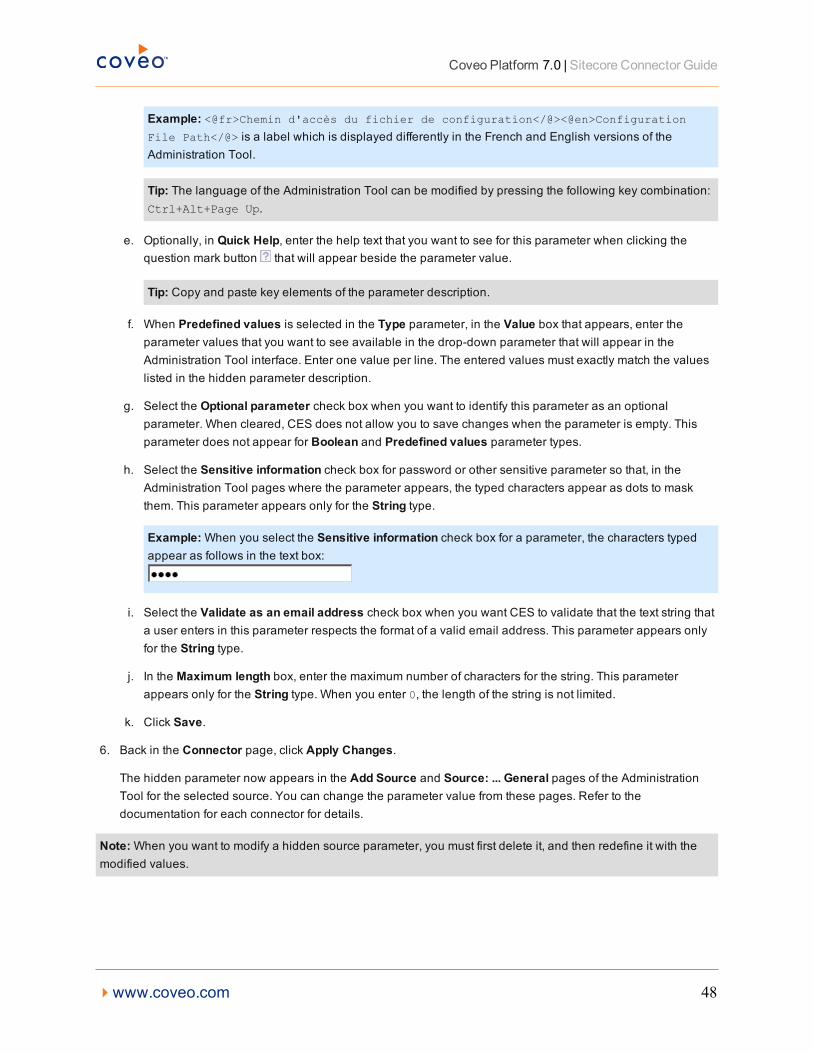
Coveo Platform 7.0 | Sitecore Connector Guide
Example: <@fr>Chemin d'accès du fichier de configuration</@><@en>Configuration
File Path</@> is a label which is displayed differently in the French and English versions of theAdministration Tool.
Tip: The language of the Administration Tool can be modified by pressing the following key combination:Ctrl+Alt+Page Up.
e. Optionally, in Quick Help, enter the help text that you want to see for this parameter when clicking thequestion mark button that will appear beside the parameter value.
Tip: Copy and paste key elements of the parameter description.
f. When Predefined values is selected in the Type parameter, in the Value box that appears, enter theparameter values that you want to see available in the drop-down parameter that will appear in theAdministration Tool interface. Enter one value per line. The entered values must exactly match the valueslisted in the hidden parameter description.
g. Select the Optional parameter check box when you want to identify this parameter as an optionalparameter. When cleared, CES does not allow you to save changes when the parameter is empty. Thisparameter does not appear for Boolean and Predefined values parameter types.
h. Select the Sensitive information check box for password or other sensitive parameter so that, in theAdministration Tool pages where the parameter appears, the typed characters appear as dots to maskthem. This parameter appears only for the String type.
Example:When you select the Sensitive information check box for a parameter, the characters typedappear as follows in the text box:
i. Select the Validate as an email address check box when you want CES to validate that the text string thata user enters in this parameter respects the format of a valid email address. This parameter appears onlyfor the String type.
j. In the Maximum length box, enter the maximum number of characters for the string. This parameterappears only for the String type. When you enter 0, the length of the string is not limited.
k. Click Save.
6. Back in the Connector page, click Apply Changes.
The hidden parameter now appears in the Add Source and Source: ... General pages of the AdministrationTool for the selected source. You can change the parameter value from these pages. Refer to thedocumentation for each connector for details.
Note:When you want to modify a hidden source parameter, you must first delete it, and then redefine it with themodified values.
4www.coveo.com 48
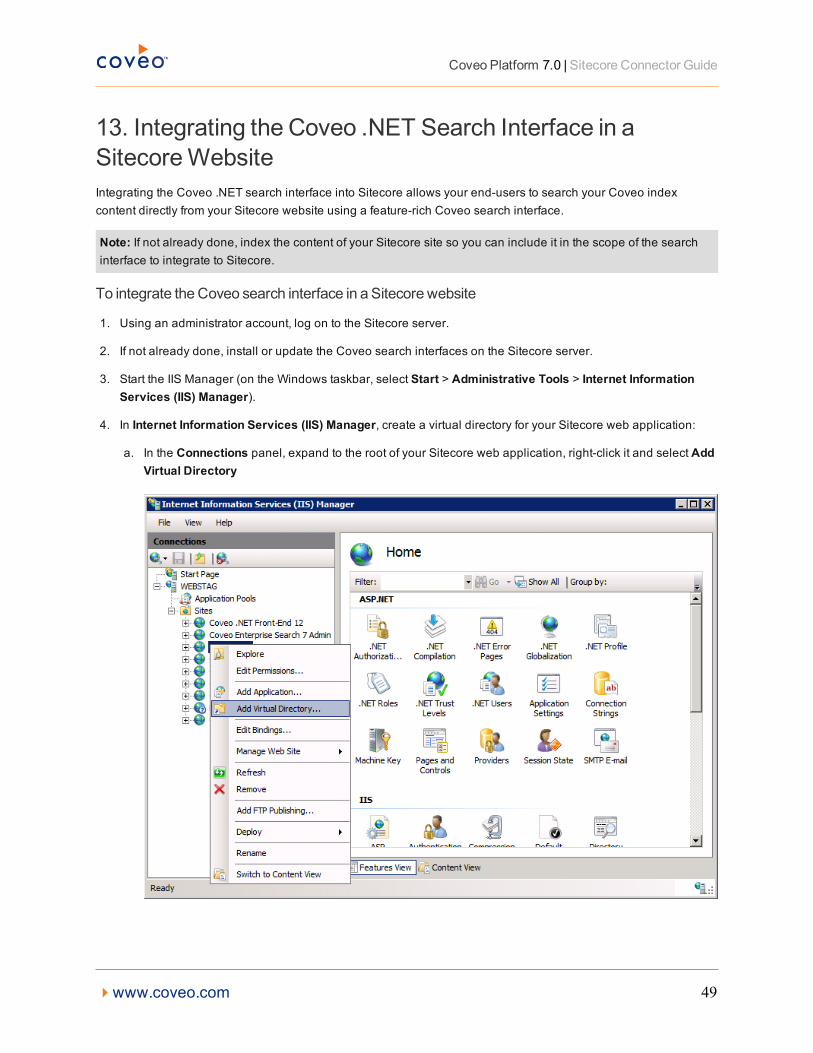
Coveo Platform 7.0 | Sitecore Connector Guide
13. Integrating the Coveo .NET Search Interface in aSitecoreWebsiteIntegrating the Coveo .NET search interface into Sitecore allows your end-users to search your Coveo indexcontent directly from your Sitecore website using a feature-rich Coveo search interface.
Note: If not already done, index the content of your Sitecore site so you can include it in the scope of the searchinterface to integrate to Sitecore.
To integrate theCoveo search interface in a Sitecorewebsite
1. Using an administrator account, log on to the Sitecore server.
2. If not already done, install or update the Coveo search interfaces on the Sitecore server.
3. Start the IIS Manager (on the Windows taskbar, select Start > Administrative Tools > Internet InformationServices (IIS) Manager).
4. In Internet Information Services (IIS) Manager, create a virtual directory for your Sitecore web application:
a. In the Connections panel, expand to the root of your Sitecore web application, right-click it and select AddVirtual Directory
4www.coveo.com 49
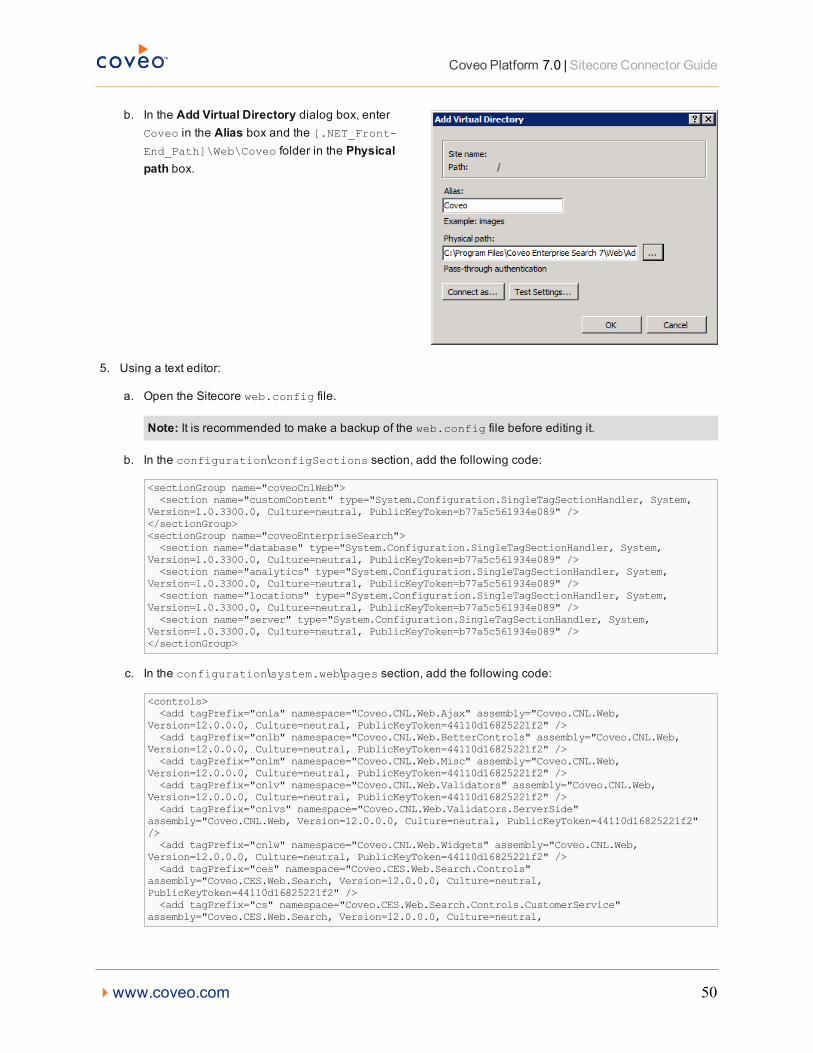
Coveo Platform 7.0 | Sitecore Connector Guide
b. In the Add Virtual Directory dialog box, enterCoveo in the Alias box and the [.NET_Front-End_Path]\Web\Coveo folder in the Physicalpath box.
5. Using a text editor:
a. Open the Sitecore web.config file.
Note: It is recommended to make a backup of the web.config file before editing it.
b. In the configuration\configSections section, add the following code:
<sectionGroup name="coveoCnlWeb"><section name="customContent" type="System.Configuration.SingleTagSectionHandler, System,
Version=1.0.3300.0, Culture=neutral, PublicKeyToken=b77a5c561934e089" /></sectionGroup><sectionGroup name="coveoEnterpriseSearch"><section name="database" type="System.Configuration.SingleTagSectionHandler, System,
Version=1.0.3300.0, Culture=neutral, PublicKeyToken=b77a5c561934e089" /><section name="analytics" type="System.Configuration.SingleTagSectionHandler, System,
Version=1.0.3300.0, Culture=neutral, PublicKeyToken=b77a5c561934e089" /><section name="locations" type="System.Configuration.SingleTagSectionHandler, System,
Version=1.0.3300.0, Culture=neutral, PublicKeyToken=b77a5c561934e089" /><section name="server" type="System.Configuration.SingleTagSectionHandler, System,
Version=1.0.3300.0, Culture=neutral, PublicKeyToken=b77a5c561934e089" /></sectionGroup>
c. In the configuration\system.web\pages section, add the following code:
<controls><add tagPrefix="cnla" namespace="Coveo.CNL.Web.Ajax" assembly="Coveo.CNL.Web,
Version=12.0.0.0, Culture=neutral, PublicKeyToken=44110d16825221f2" /><add tagPrefix="cnlb" namespace="Coveo.CNL.Web.BetterControls" assembly="Coveo.CNL.Web,
Version=12.0.0.0, Culture=neutral, PublicKeyToken=44110d16825221f2" /><add tagPrefix="cnlm" namespace="Coveo.CNL.Web.Misc" assembly="Coveo.CNL.Web,
Version=12.0.0.0, Culture=neutral, PublicKeyToken=44110d16825221f2" /><add tagPrefix="cnlv" namespace="Coveo.CNL.Web.Validators" assembly="Coveo.CNL.Web,
Version=12.0.0.0, Culture=neutral, PublicKeyToken=44110d16825221f2" /><add tagPrefix="cnlvs" namespace="Coveo.CNL.Web.Validators.ServerSide"
assembly="Coveo.CNL.Web, Version=12.0.0.0, Culture=neutral, PublicKeyToken=44110d16825221f2"/><add tagPrefix="cnlw" namespace="Coveo.CNL.Web.Widgets" assembly="Coveo.CNL.Web,
Version=12.0.0.0, Culture=neutral, PublicKeyToken=44110d16825221f2" /><add tagPrefix="ces" namespace="Coveo.CES.Web.Search.Controls"
assembly="Coveo.CES.Web.Search, Version=12.0.0.0, Culture=neutral,PublicKeyToken=44110d16825221f2" /><add tagPrefix="cs" namespace="Coveo.CES.Web.Search.Controls.CustomerService"
assembly="Coveo.CES.Web.Search, Version=12.0.0.0, Culture=neutral,
4www.coveo.com 50
Coveo Platform 7.0 | Sitecore Connector Guide
PublicKeyToken=44110d16825221f2" /></controls><namespaces><add namespace="Coveo.CES.Web.Search" /><add namespace="Coveo.CNL.Web" />
</namespaces>
d. In the configuration\system.web\compilation section, add the following code:
<assemblies><add assembly="Coveo.CNL, Version=12.0.0.0, Culture=neutral,
PublicKeyToken=44110d16825221f2" /><add assembly="Coveo.CNL.Web, Version=12.0.0.0, Culture=neutral,
PublicKeyToken=44110d16825221f2" /><add assembly="Coveo.CES.Common, Version=12.0.0.0, Culture=neutral,
PublicKeyToken=44110d16825221f2" /><add assembly="Coveo.CES.Web.Search, Version=12.0.0.0, Culture=neutral,
PublicKeyToken=44110d16825221f2" /></assemblies>
e. In the configuration section, add the following code:
<coveoCnlWeb><customContent uri="~/Coveo/" anonymousUri="~/Coveo/Anonymous/" />
</coveoCnlWeb><coveoEnterpriseSearch><server hostname="localhost" port="52800" servicesHostname="localhost" servicesPort="52810"
instance="default" mirrorName="default" sslCertificatePath="C:\Program Files\Coveo .NET Front-End 12\Web\certificate.p12" /><database enabled="false" connectionString="mongodb://localhost/databaseName" /><analytics enabled="false" connectionString="Data Source=yourServerName;Initial
Catalog=CoveoAnalytics;Integrated Security=SSPI;" /></coveoEnterpriseSearch>
f. Save the file.
6. Integrate the search interface in a Sitecore layout or sublayout:
l Add the following code at the appropriate location in the Sitecore .aspx layout or sublayout file in whichyou want to integrate the Coveo search interface control.
<%@ Register TagPrefix="ces" Namespace="Coveo.CES.Web.Search.Controls"Assembly="Coveo.CES.Web.Search, Version=12.0.0.0, Culture=neutral,PublicKeyToken=44110d16825221f2" %><%@ Assembly Name="Coveo.CNL, Version=12.0.0.0, Culture=neutral,PublicKeyToken=44110d16825221f2" %><%@ Assembly Name="Coveo.CNL.Web, Version=12.0.0.0, Culture=neutral,PublicKeyToken=44110d16825221f2" %>
<asp:Panel ID="pnResultsPanel" runat="server"><ces:SearchHub id="c" runat="server"/>
</asp:Panel>
OR
a. When you chose to index Sitecore security using a security provider, you must rather add the followingcode that includes a script to allow the search interface to display the search results corresponding to thecurrently logged on user.
Using the Sitecore API, the c_OverrideUser script retrieves the currently logged on user and passes thisuser to the Coveo search Interface.
4www.coveo.com 51
Coveo Platform 7.0 | Sitecore Connector Guide
Note: CES security elements are case sensitive. The Sitecore connector always indexes securityelements in lower-case. Ensure to provide a lower-case username for the security to be resolvedcorrectly.
<%@ Control Language="C#" AutoEventWireup="true" Inherits="layouts_PFCEnergy_CoveoSearchResults" Codebehind="CoveoSearchResults.ascx.cs" %><%@ Register TagPrefix="ces" Namespace="Coveo.CES.Web.Search.Controls"Assembly="Coveo.CES.Web.Search, Version=12.0.0.0, Culture=neutral,PublicKeyToken=44110d16825221f2" %><%@ Assembly Name="Coveo.CNL, Version=12.0.0.0, Culture=neutral,PublicKeyToken=44110d16825221f2" %><%@ Assembly Name="Coveo.CNL.Web, Version=12.0.0.0, Culture=neutral,PublicKeyToken=44110d16825221f2" %>
<script runat="server">void c_OverrideUser(object p_Sender, Coveo.CES.Web.Search.Controls.OverrideUserEventArgs p_Args){// The name of the security provider defined under the Admin Toolstring securityProviderName = "Sitecore Security Provider";Coveo.CES.Web.Search.Providers.ICESUserIdentityFactory factory =
Coveo.CES.Web.Search.Providers.SearchProviderFactory.CreateDefaultUserIdentityFactory();// Get the username from SitecoreAPIstring userName = Sitecore.Context.GetUserName().ToLower();// Add to the collection of identitiesCoveo.CES.Web.Search.Providers.IUserIdentity user = factory.CreateSecurityProviderUser
(userName, securityProviderName, false, null);p_Args.AdditionalIdentities.Add(user);
}</script>
<div id="contentMain"><asp:Panel ID="pnResultsPanel" runat="server"><ces:SearchHub id="c" runat="server" OnOverrideUser="c_OverrideUser"/>
</asp:Panel></div>
Note: OnOverrideUser event is not available for all Coveo search controls such as QuickSearch andSearchBox controls.
The search interface can target an explicit index source as shown in the following script.
<script runat="server">override void OnInit(EventArgs p_Args){
SearchBinding.MainSearchObject.SetupSearchBuilder += this.Search_SetupSearchBuilder;base.OnInit(p_Args);
}
void Search_SetupSearchBuilder(object p_Sender, SetupSearchBuilderEventArgs p_Args){
p_Args.Builder.AddConstantExpression("@Source=MySourceName");}</script>
7. Using a browser, access the modified page to view the search hub.
The Front-End Server Configuration first time setup page appears to allow you to complete the Coveo Front-End installation.
4www.coveo.com 52
Coveo Platform 7.0 | Sitecore Connector Guide
Tip: If you notice that some of Coveo images or JavaScript are missing because they do not load in the searchinterface, you can fix this problem with a simple edit of the Sitecore web.config file (not the Coveo web.configfile). In the file, locate the <setting name="IgnoreUrlPrefixes"...> tag and add the |/Coveo/ string to thevalue attribute.
Example:
<setting name="IgnoreUrlPrefixes"value="/sitecore/default.aspx|/trace.axd|/webresource.axd|/Coveo/"/>
What'sNext?
Consider also integrating the Coveo search in the Sitecore Content Editor (see "Integrating the Coveo .NET Searchin the Sitecore Content Editor" on page 54).
4www.coveo.com 53
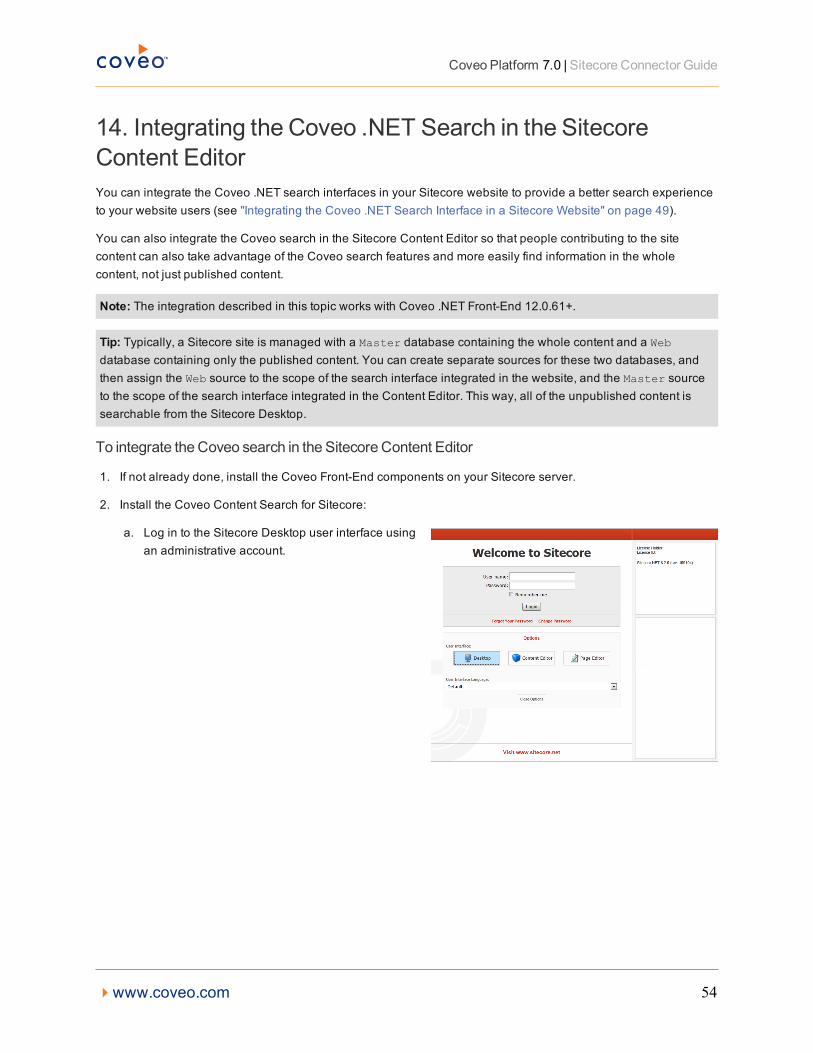
Coveo Platform 7.0 | Sitecore Connector Guide
14. Integrating the Coveo .NET Search in the SitecoreContent EditorYou can integrate the Coveo .NET search interfaces in your Sitecore website to provide a better search experienceto your website users (see "Integrating the Coveo .NET Search Interface in a Sitecore Website" on page 49).
You can also integrate the Coveo search in the Sitecore Content Editor so that people contributing to the sitecontent can also take advantage of the Coveo search features and more easily find information in the wholecontent, not just published content.
Note: The integration described in this topic works with Coveo .NET Front-End 12.0.61+.
Tip: Typically, a Sitecore site is managed with a Master database containing the whole content and a Webdatabase containing only the published content. You can create separate sources for these two databases, andthen assign the Web source to the scope of the search interface integrated in the website, and the Master sourceto the scope of the search interface integrated in the Content Editor. This way, all of the unpublished content issearchable from the Sitecore Desktop.
To integrate theCoveo search in the SitecoreContent Editor
1. If not already done, install the Coveo Front-End components on your Sitecore server.
2. Install the Coveo Content Search for Sitecore:
a. Log in to the Sitecore Desktop user interface usingan administrative account.
4www.coveo.com 54
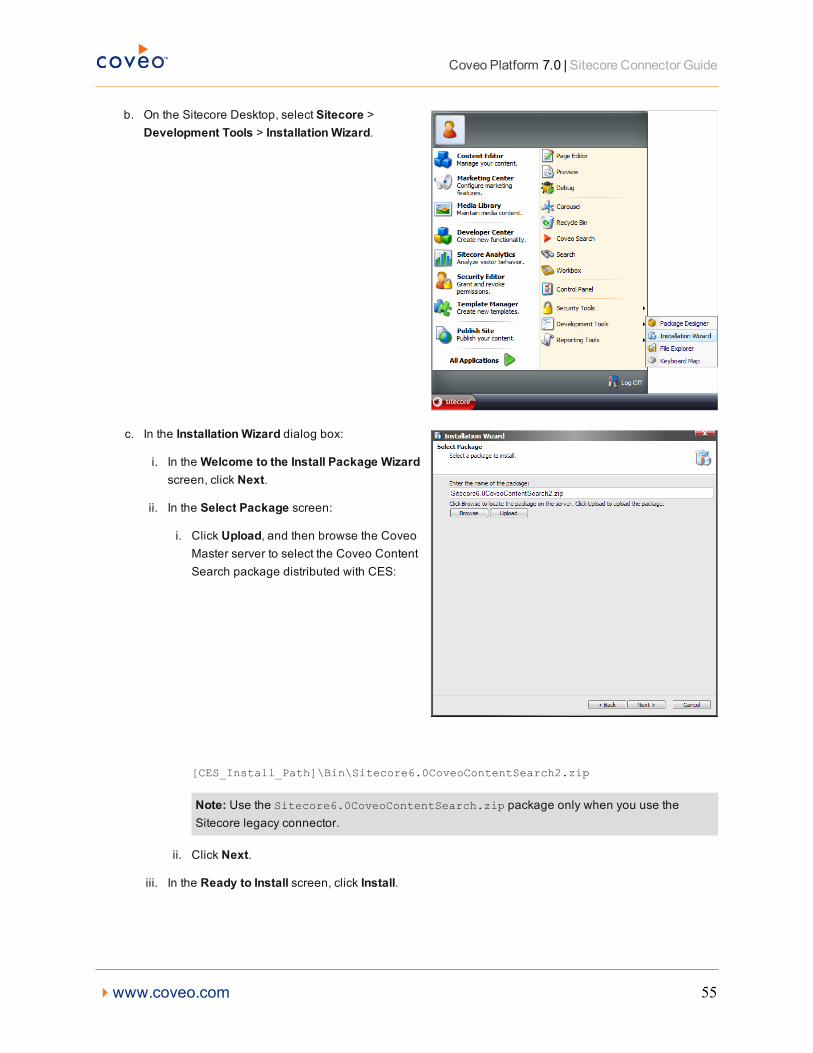
Coveo Platform 7.0 | Sitecore Connector Guide
b. On the Sitecore Desktop, select Sitecore >Development Tools > Installation Wizard.
c. In the Installation Wizard dialog box:
i. In theWelcome to the Install Package Wizardscreen, click Next.
ii. In the Select Package screen:
i. Click Upload, and then browse the CoveoMaster server to select the Coveo ContentSearch package distributed with CES:
[CES_Install_Path]\Bin\Sitecore6.0CoveoContentSearch2.zip
Note: Use the Sitecore6.0CoveoContentSearch.zip package only when you use theSitecore legacy connector.
ii. Click Next.
iii. In the Ready to Install screen, click Install.
4www.coveo.com 55
Coveo Platform 7.0 | Sitecore Connector Guide
Note: If an Access Denied error is displayed for the bin_install folder while installing thepackage, verify the security permissions for ASP.NET in the bin folder of Sitecore or install the filesmanually.
d. Select the Restart the Sitecore client option, and then click Finish.
3. Using an administrator account, connect to your Sitecore server.
4. Create the Coveo virtual directory:
a. Open IIS.
b. In IIS, locate and right-click the website that corresponds to your Sitecore instance, and then select Addvirtual directory.
c. In the Create Virtual Directory dialog box:
i. In the Alias box, enter Coveo.
ii. In the Physical path box, enter [.NET_Front-End_Path]\Web\Coveo, typically C:\ProgramFiles\Coveo .NET Front-End 12\Web\Coveo.
d. Close IIS.
5. Using a text editor, edit the Sitecore web.config file:
Example: For an instance named Sitecore, the file is located in theC:\inetpub\wwwroot\Sitecore\WebSite folder.
a. Copy the following code and paste it just before the </configSections> tag.
<sectionGroup name="coveoCnlWeb"><section name="customContent" type="System.Configuration.SingleTagSectionHandler, System,
Version=1.0.3300.0, Culture=neutral, PublicKeyToken=b77a5c561934e089" /></sectionGroup><sectionGroup name="coveoEnterpriseSearch"><section name="database" type="System.Configuration.SingleTagSectionHandler, System,
Version=1.0.3300.0, Culture=neutral, PublicKeyToken=b77a5c561934e089" /><section name="analytics" type="System.Configuration.SingleTagSectionHandler, System,
Version=1.0.3300.0, Culture=neutral, PublicKeyToken=b77a5c561934e089" /><section name="locations" type="System.Configuration.SingleTagSectionHandler, System,
Version=1.0.3300.0, Culture=neutral, PublicKeyToken=b77a5c561934e089" /><section name="server" type="System.Configuration.SingleTagSectionHandler, System,
Version=1.0.3300.0, Culture=neutral, PublicKeyToken=b77a5c561934e089" /></sectionGroup>
b. Copy the following code and paste it just before the </controls> tag, a child of the <pages> tag.
<add tagPrefix="cnla" namespace="Coveo.CNL.Web.Ajax" assembly="Coveo.CNL.Web,Version=12.0.0.0, Culture=neutral, PublicKeyToken=44110d16825221f2"/><add tagPrefix="cnlb" namespace="Coveo.CNL.Web.BetterControls" assembly="Coveo.CNL.Web,Version=12.0.0.0, Culture=neutral, PublicKeyToken=44110d16825221f2"/><add tagPrefix="cnlm" namespace="Coveo.CNL.Web.Misc" assembly="Coveo.CNL.Web,Version=12.0.0.0, Culture=neutral, PublicKeyToken=44110d16825221f2"/><add tagPrefix="cnlv" namespace="Coveo.CNL.Web.Validators" assembly="Coveo.CNL.Web,Version=12.0.0.0, Culture=neutral, PublicKeyToken=44110d16825221f2"/><add tagPrefix="cnlvs" namespace="Coveo.CNL.Web.Validators.ServerSide"assembly="Coveo.CNL.Web, Version=12.0.0.0, Culture=neutral, PublicKeyToken=44110d16825221f2"/>
4www.coveo.com 56
Coveo Platform 7.0 | Sitecore Connector Guide
<add tagPrefix="cnlw" namespace="Coveo.CNL.Web.Widgets" assembly="Coveo.CNL.Web,Version=12.0.0.0, Culture=neutral, PublicKeyToken=44110d16825221f2" /><add tagPrefix="ces" namespace="Coveo.CES.Web.Search.Controls" assembly="Coveo.CES.Web.Search,Version=12.0.0.0, Culture=neutral, PublicKeyToken=44110d16825221f2"/><add tagPrefix="cs" namespace="Coveo.CES.Web.Search.Controls.CustomerService"assembly="Coveo.CES.Web.Search, Version=12.0.0.0, Culture=neutral,PublicKeyToken=44110d16825221f2" />
c. Copy the following code and paste it just before the </namespace> tag, a child of the <namespaces> tag.
<add namespace="Coveo.CES.Web.Search"/><add namespace="Coveo.CES.Web.Search.Controls" /><add namespace="Coveo.CNL.Web" />
d. Copy the following code and paste it just before the </assemblies> tag, a child of the <compilation>tag.
<add assembly="Coveo.CNL, Version=12.0.0.0, Culture=neutral,PublicKeyToken=44110d16825221f2"/><add assembly="Coveo.CES.Common, Version=12.0.0.0, Culture=neutral,PublicKeyToken=44110d16825221f2" /><add assembly="Coveo.CNL.Web, Version=12.0.0.0, Culture=neutral,PublicKeyToken=44110d16825221f2"/><add assembly="Coveo.CES.Web.Search, Version=12.0.0.0, Culture=neutral,PublicKeyToken=44110d16825221f2"/>
e. Copy the following code and paste it at the end of the file, just before the </configuration> tag.
<coveoCnlWeb><customContent uri="~/Coveo/" anonymousUri="~/Coveo/Anonymous/"/>
</coveoCnlWeb><coveoEnterpriseSearch><server hostname="localhost" port="52800"/><database enabled="false" connectionString="mongodb://localhost/databaseName"/><analytics enabled="false" connectionString="Data Source=yourServerName;Initial
Catalog=CoveoAnalytics;Integrated Security=SSPI;"/></coveoEnterpriseSearch>
f. Save the file.
6. When CES and Sitecore are not installed on the same server, copy the index certificate file from the CoveoMaster server to the Sitecore server:
a. Using an administrator account, connect to the Coveo Master server.
b. Copy the index certificate file [Index_Path]\Config\Certificates\cert-iis.p12, typicallyC:\CES7\Config\Certificates\cert-iis.p12.
c. Paste the certificate file on the Sitecore server into the Sitecore instance website.
Example: For an instance named Sitecore, the default path isC:\inetpub\wwwroot\Sitecore\Website. You can also rename the certificate file such as ces-certificate.p12.
7. Configure the connection to the CES index. Using a text editor:
a. Open the Sitecore instance web.config file.
b. Under the <coveoEnterpriseSearch> tag, edit the <server> tag to include the following attributes:
4www.coveo.com 57

Coveo Platform 7.0 | Sitecore Connector Guide
l hostname=”MyCoveoMasterServerHostName” where you replaceMyCoveoMasterServerHostName with the name of your Coveo Master server or localhost whenCES and Sitecore are on the same machine.
l sslCertificatePath=”C:\inetpub\wwwroot\Sitecore\Website\ces-certificate.p12”,ensuring that the path points to your certificate file.
l port=”52800”, the default CES port number.
Example:When CES and Sitecore are on the same server.
<server hostname="localhost" port="52800" servicesHostname="localhost" servicesPort="52810"instance="default" mirrorName="default" sslCertificatePath="C:\Program Files\Coveo .NETFront-End 12\Web\ces-certificate.p12"/>
8. Configure the Sitecore source used by Coveo search:
a. Using a text editor, open the CoveoSearch.aspx file.
Example: For a Sitecore instance named Sitecore, the file is typically located in theC:\inetpub\wwwroot\Sitecore\Website\sitecore\shell\Applications\Coveo\ folder.
b. Locate the following code:
/* UNCOMMENT THIS SECTION BEFORE FIRST USE
p_Args.Builder.AddConstantExpression("@Source=MySourceName");
*/
and replace it with:
p_Args.Builder.AddConstantExpression("@Source=\”YOUR SITECORE SOURCE NAME HERE\”");
where you replace YOUR SITECORE SOURCE NAME HERE by the name of the source you created tocontain the whole Sitecore content, typically indexing the master database.
c. Save and close the file.
4www.coveo.com 58
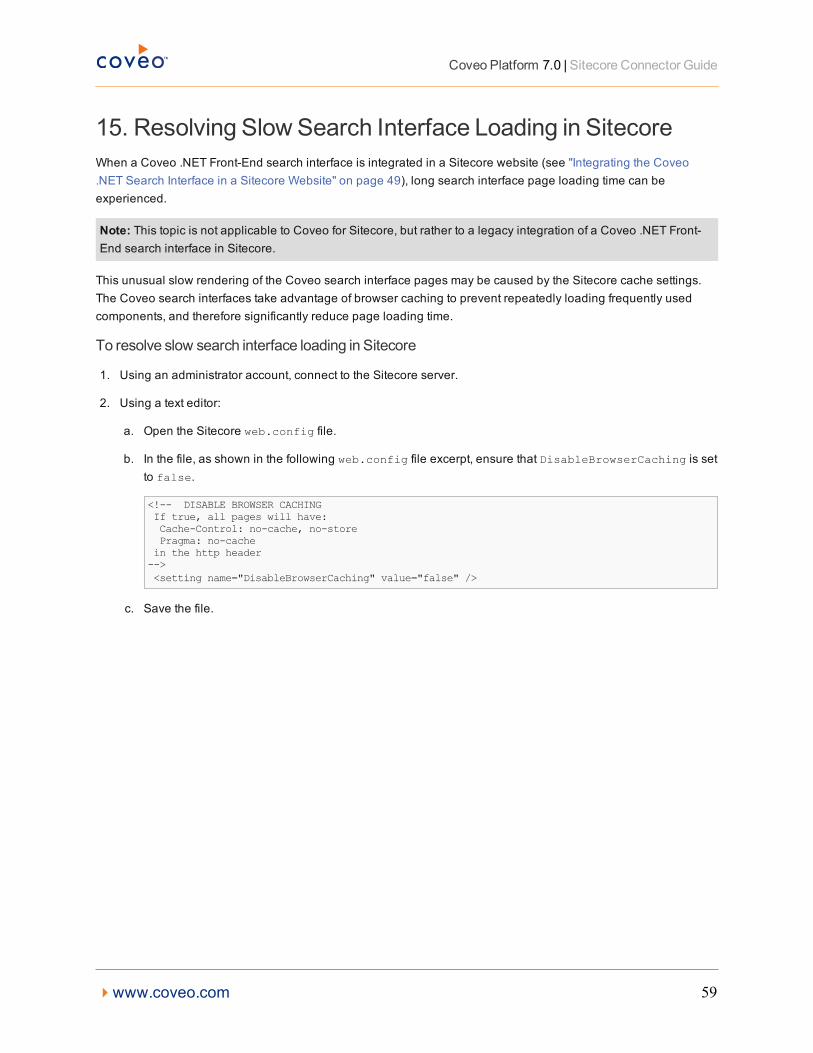
Coveo Platform 7.0 | Sitecore Connector Guide
15. Resolving Slow Search Interface Loading in SitecoreWhen a Coveo .NET Front-End search interface is integrated in a Sitecore website (see "Integrating the Coveo.NET Search Interface in a Sitecore Website" on page 49), long search interface page loading time can beexperienced.
Note: This topic is not applicable to Coveo for Sitecore, but rather to a legacy integration of a Coveo .NET Front-End search interface in Sitecore.
This unusual slow rendering of the Coveo search interface pages may be caused by the Sitecore cache settings.The Coveo search interfaces take advantage of browser caching to prevent repeatedly loading frequently usedcomponents, and therefore significantly reduce page loading time.
To resolve slow search interface loading in Sitecore
1. Using an administrator account, connect to the Sitecore server.
2. Using a text editor:
a. Open the Sitecore web.config file.
b. In the file, as shown in the following web.config file excerpt, ensure that DisableBrowserCaching is setto false.
<!-- DISABLE BROWSER CACHINGIf true, all pages will have:Cache-Control: no-cache, no-storePragma: no-cachein the http header--><setting name="DisableBrowserCaching" value="false" />
c. Save the file.
4www.coveo.com 59
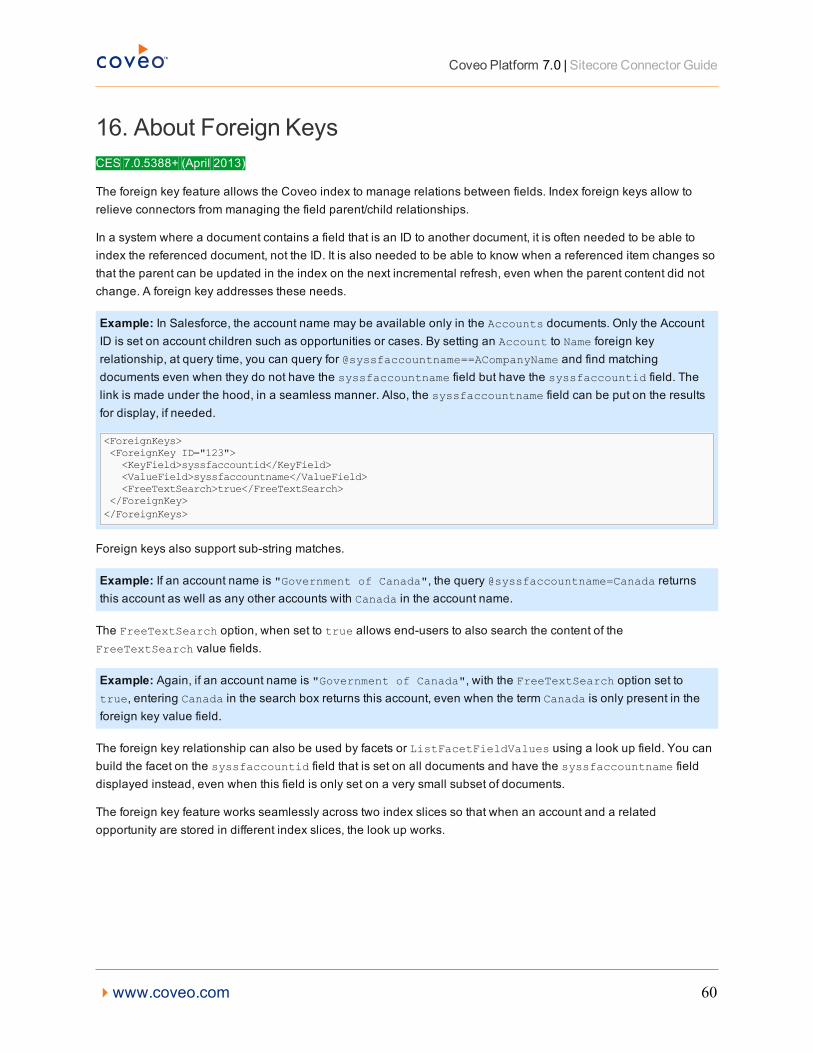
Coveo Platform 7.0 | Sitecore Connector Guide
16. About Foreign KeysCES 7.0.5388+ (April 2013)
The foreign key feature allows the Coveo index to manage relations between fields. Index foreign keys allow torelieve connectors from managing the field parent/child relationships.
In a system where a document contains a field that is an ID to another document, it is often needed to be able toindex the referenced document, not the ID. It is also needed to be able to know when a referenced item changes sothat the parent can be updated in the index on the next incremental refresh, even when the parent content did notchange. A foreign key addresses these needs.
Example: In Salesforce, the account name may be available only in the Accounts documents. Only the AccountID is set on account children such as opportunities or cases. By setting an Account to Name foreign keyrelationship, at query time, you can query for @syssfaccountname==ACompanyName and find matchingdocuments even when they do not have the syssfaccountname field but have the syssfaccountid field. Thelink is made under the hood, in a seamless manner. Also, the syssfaccountname field can be put on the resultsfor display, if needed.
<ForeignKeys><ForeignKey ID="123"><KeyField>syssfaccountid</KeyField><ValueField>syssfaccountname</ValueField><FreeTextSearch>true</FreeTextSearch>
</ForeignKey></ForeignKeys>
Foreign keys also support sub-string matches.
Example: If an account name is "Government of Canada", the query @syssfaccountname=Canada returnsthis account as well as any other accounts with Canada in the account name.
The FreeTextSearch option, when set to true allows end-users to also search the content of theFreeTextSearch value fields.
Example: Again, if an account name is "Government of Canada", with the FreeTextSearch option set totrue, entering Canada in the search box returns this account, even when the term Canada is only present in theforeign key value field.
The foreign key relationship can also be used by facets or ListFacetFieldValues using a look up field. You canbuild the facet on the syssfaccountid field that is set on all documents and have the syssfaccountname fielddisplayed instead, even when this field is only set on a very small subset of documents.
The foreign key feature works seamlessly across two index slices so that when an account and a relatedopportunity are stored in different index slices, the look up works.
4www.coveo.com 60
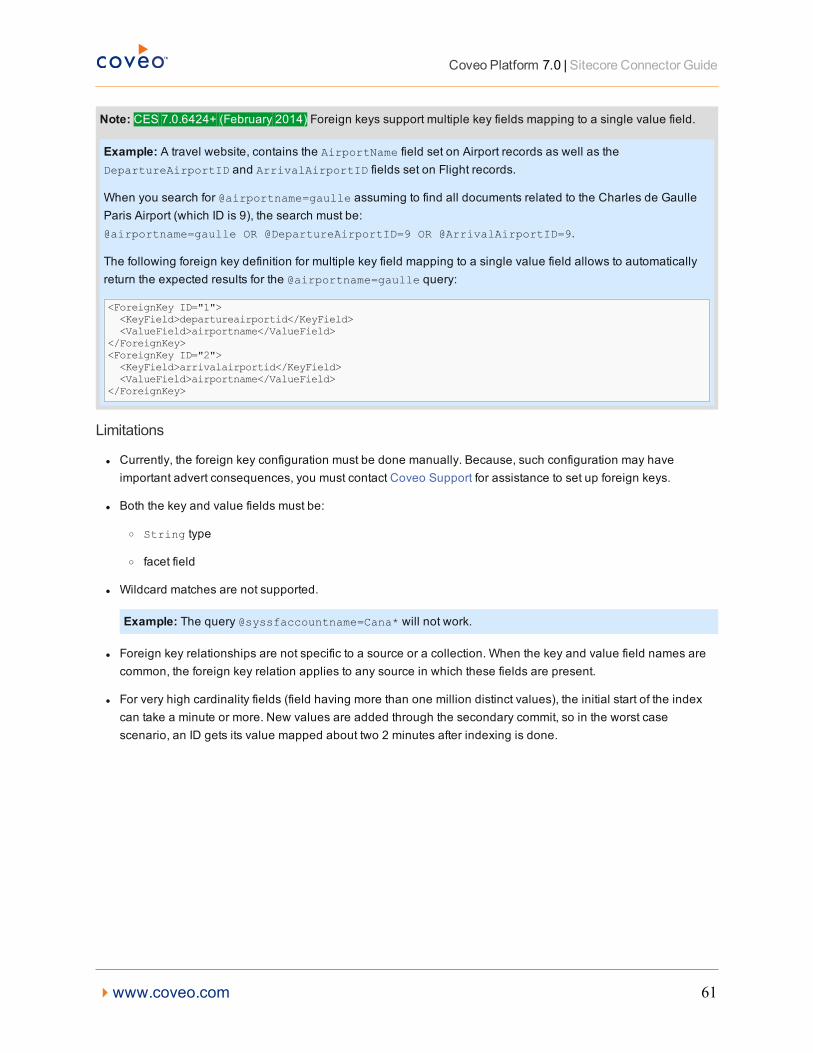
Coveo Platform 7.0 | Sitecore Connector Guide
Note: CES 7.0.6424+ (February 2014) Foreign keys support multiple key fields mapping to a single value field.
Example: A travel website, contains the AirportName field set on Airport records as well as theDepartureAirportID and ArrivalAirportID fields set on Flight records.
When you search for @airportname=gaulle assuming to find all documents related to the Charles de GaulleParis Airport (which ID is 9), the search must be:@airportname=gaulle OR @DepartureAirportID=9 OR @ArrivalAirportID=9.
The following foreign key definition for multiple key field mapping to a single value field allows to automaticallyreturn the expected results for the @airportname=gaulle query:
<ForeignKey ID="1"><KeyField>departureairportid</KeyField><ValueField>airportname</ValueField>
</ForeignKey><ForeignKey ID="2"><KeyField>arrivalairportid</KeyField><ValueField>airportname</ValueField>
</ForeignKey>
Limitations
l Currently, the foreign key configuration must be done manually. Because, such configuration may haveimportant advert consequences, you must contact Coveo Support for assistance to set up foreign keys.
l Both the key and value fields must be:
o String type
o facet field
l Wildcard matches are not supported.
Example: The query @syssfaccountname=Cana* will not work.
l Foreign key relationships are not specific to a source or a collection. When the key and value field names arecommon, the foreign key relation applies to any source in which these fields are present.
l For very high cardinality fields (field having more than one million distinct values), the initial start of the indexcan take a minute or more. New values are added through the secondary commit, so in the worst casescenario, an ID gets its value mapped about two 2 minutes after indexing is done.
4www.coveo.com 61


![Coveo Platform 7.0 - PTC Windchill Connector Guidedownload.coveo.com/onlinehelppdfs/CES70-PTCWindchillConnector… · Path]\Bin\Coveo.CES.CustomCrawlers.Windchill.FieldSet.xmldefaultXMLPTC](https://static.fdocuments.us/doc/165x107/5a7ece627f8b9a2e358ea5a0/coveo-platform-70-ptc-windchill-connector-pathbincoveocescustomcrawlerswindchillfieldsetxmldefaultxmlptc.jpg)