MX Component Version 2 Operating Manual - Mitsubishi Electric

JVC
COMPACT COMPONENT SYSTEM
MX-KC45Consists of CA-MXKC45 and SP-MXKC45
D©00
o_0
_o0Jvc
SP-MXKC45 CA-MXKC45 SP-MXKC45
DIGITAL AUDIO
/I/IP3/ IHV/I/IAI_LAY BACK
INSTRUCTIONS
For Customer Use:Enter below the Model No, and Serial No.which are located either on the rear, bot-tom or side of the cabinet, Retain thisinformation for future reference,
Model No,
Serial No,
LVT1521-001A[J]
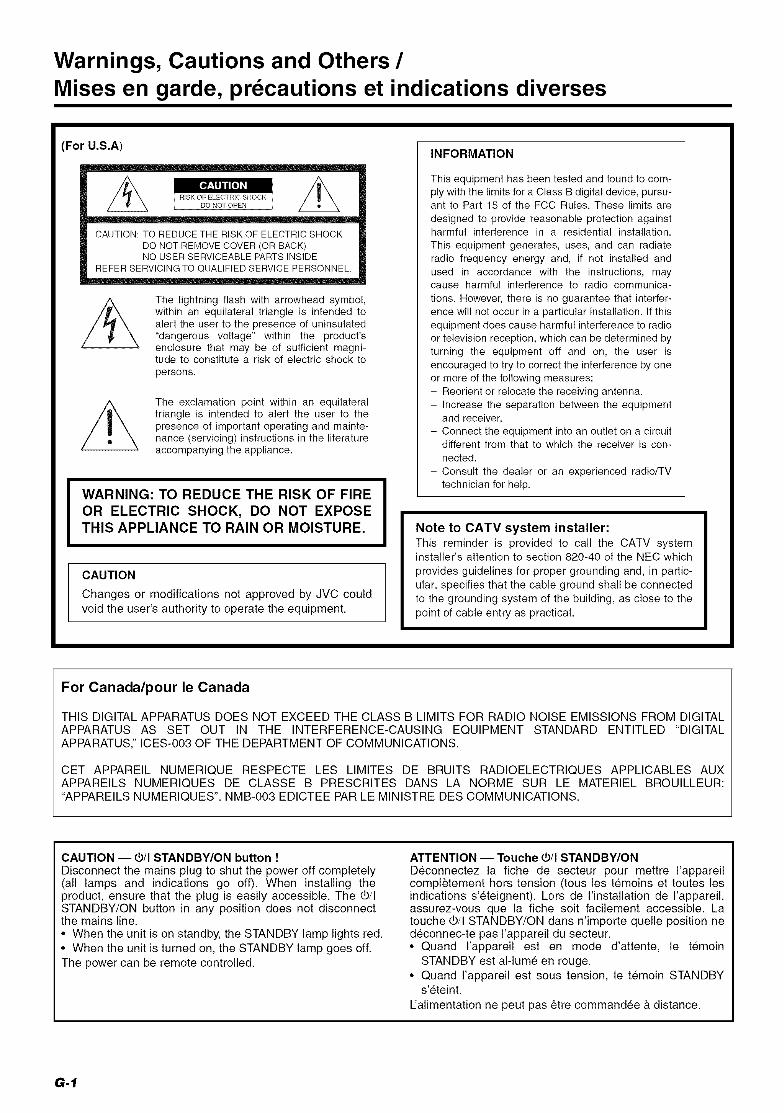
Warnings, Cautions and Others/Mises en garde, precautions et indications diverses
(For U.S.A)
CAUTION: TO REDUCE THE RISK OF ELECTRIC SHOCK
DO NOT REMOVE COVER (OR BACK)NO USER SERVICEABLE PARTS INSIDE
REFER SERVICING TO QUALIFIED SERVICE PERSONNEL.
The lightning flash with arrowhead symbol,within an equilateral triangle is intended toalert the user to the presence of uninsulated"dangerous voltage" within the product'senclosure that may be of sufficient magni-tude to constitute a risk of electric shock to
persons.
The exclamation point within an equilateraltriangle is intended to alert the user to thepresence of important operating and mainte-nance (servicing) instructions in the literatureaccompanying the appliance.
WARNING: TO REDUCE THE RISK OF FIRE
OR ELECTRIC SHOCK, DO NOT EXPOSETHIS APPLIANCE TO RAIN OR MOISTURE.
CAUTION
Changes or modifications not approved by JVC couldvoid the user's authority to operate the equipment.
INFORMATION
This equipment has been tested and found to com-ply with the limits for a Class B digital device, pursu-ant to Part 15 of the FCC Rules. These limits are
designed to provide reasonable protection againstharmful interference in a residential installation.
This equipment generates, uses, and can radiateradio frequency energy and, if not installed andused in accordance with the instructions, maycause harmful interference to radio communica-
tions. However, there is no guarantee that interfer-ence will not occur in a particular installation. If thisequipment does cause harmful interference to radioor television reception, which can be determined byturning the equipment off and on, the user isencouraged to try to correct the interference by oneor more of the following measures:- Reorient or relocate the receiving antenna.- Increase the separation between the equipment
and receiver.
- Connect the equipment into an outlet on a circuitdifferent from that to which the receiver is con-nected.
- Consult the dealer or an experienced radio/TVtechnician for help.
Note to CATV system installer:This reminder is provided to call the CATV systeminstaller's attention to section 820-40 of the NEC which
provides guidelines for proper grounding and, in partic-
ular, specifies that the cable ground shall be connectedto the grounding system of the building, as close to the
point of cable entry as practical.
For Canada/pour le Canada
THIS DIGITAL APPARATUS DOES NOT EXCEED THE CLASS B LIMITS FOR RADIO NOISE EMISSIONS FROM DIGITALAPPARATUS AS SET OUT IN THE INTERFERENCE-CAUSING EQUIPMENT STANDARD ENTITLED "DIGITALAPPARATUS," ICES-003 OF THE DEPARTMENT OF COMMUNICATIONS.
CET APPAREIL NUMERIQUE RESPECTE LES LIMITES DE BRUITS RADIOELECTRIQUES APPLICABLES AUXAPPAREILS NUMERIQUES DE CLASSE B PRESCRITES DANS LA NORME SUR LE MATERIEL BROUILLEUR:"APPAREILS NUMERIQUES", NMB-O03 EDICTEE PAR LE MINISTRE DES COMMUNICATIONS.
CAUTION -- _/I STANDBY/ON button !Disconnect the mains plug to shut the power off completely(all lamps and indications go off). When installing theproduct, ensure that the plug is easily accessible. The _/ISTANDBY/ON button in any position does not disconnectthe mains line.• When the unit is on standby, the STANDBY lamp lights red.• When the unit is turned on, the STANDBY lamp goes off.The power can be remote controlled.
ATTENTION -- Touche _/I STANDBY/ONDeconnectez la fiche de secteur pour mettre I'appareilcompletement hers tension (tousles temoins et toutes lesindications s'eteignent). Lors de I'installation de I'appareil,assurez-vous que la fiche soit facilement accessible. Latouche _/I STANDBY/ON darts n'importe quelle position nedeconnec-te pas I'appareil du secteur.• Quand I'appareil est en mode d'attente, le temoin
STANDBY est al-lume en rouge.• Quand I'appareil est sous tension, le temoin STANDBY
s'eteint.
L'alimentation ne peut pas 6tre commandee & distance.
G-1

IMPORTANT FOR LASER PRODUCTS / IMPORTANT POUR PRODUITS LASER
1. CLASS 1 LASER PRODUCT2. CAUTION: Do not open the top cover. There are no user serviceable parts inside the unit; leave all servicing to qualified ser-
vice personnel.3. CAUTION: VISIBLE AND/OR INVISIBLE CLASS 1M LASER RADIATION WHEN OPEN. DO NOT STARE INTO BEAM OR
VIEW DIRECTLY WITH OPTICAL INSTRUMENTS.4. REPRODUCTION OF LABEL: CAUTION LABEL, PLACED INSIDE THE UNIT.
1. PRODUIT LASER CLASSE 12. ATTENTION: N'ouvrez pas le couvercle superieur. II n'y a aucune piece reparable par I'utilisateur & I'interieur de
I'appareil; confiez toute reparation & un personnel qualifi&3. ATTENTION: RAYONNEMENT LASER VISIBLE ET/OU INVISIBLE DE CLASSE 1M UNE FOIS OUVERT. NE PAS
FIXER LE FAISCEAU NI REGARDER DIRECTEMENT AVEC DES INSTRUMENTS OPTIQUES.4. REPRODUCTION DE L'I_TIQUETTE: I_TIQUETTE DE PRE_CAUTION PLACI_E A L'INTERIEUR DE L'APPAREIL.
CAUTIONTo reduce the risk of electrical shocks, fire, etc.:1. Do not remove screws, covers or cabinet.2. Do not expose this appliance to rain or moisture.3. To prevent electric shock, match wide blade of plug
to wide slot, fully insert.
CAUTION1. Do not block the ventilation openings or holes.
(If the ventilation openings or holes are blocked by anewspaper or cloth, etc., the heat may not be able toget out.)
2. Do not place any naked flame sources, such as lightedcandles, on the apparatus.
3. When discarding batteries, environmental problemsmust be considered and local rules or laws governingthe disposal of these batteries must be followed strictly.
4. Do not expose this apparatus to rain, moisture, drippingor splashing and that no objects filled with liquids, suchas vases, shall be placed on the apparatus.
Caution: Proper Ventilation
To avoid risk of electric shock and fire, and to prevent damage, locate the ap-paratus as follows:1. Front:
No obstructions and open spacing.
2. Sides/Top/Back:No obstructions should be placed in the areas shown by the dimen-sions below.
3. Bottom:
Place on the level surface, Maintain an adequate air path for ventilation
by placing on a stand with a height of 10cm (315/16 in.) or more,
ATTENTIONAfin d'eviter tout risque d'electrocution, d'lncendie, etc.:1. Nepas enleverles vis ni lespanneauxet ne pasouvrir le coffretde
I'appareil.2. Nepas exposerI'appareil& la pluieni & I'humidit&3. Poureviter tout risque d'electrocution,faites correspondrela fiche
large de la prise b.lafente large puis inserez-lacompl_tement.
ATTENTION1. Ne bloquez pas les orifices ou les trous de ventilation.
(Si les orifices ou les trous de ventilation sont bloquespar un journal un tissu, etc., la chaleur pent ne pas 6treevacuee correctement de I'appareil.)
2. Ne placez aucune source de flamme nue, telle qu'unebougie, sur I'appareil.
3. Lors de la mise au rebut des piles, veuillez prendre en con-sideration les probl_mes de I'environnement et suivre stricte-ment les r_gles et, les lois localessur la raiseau rebutdes piles.
4. N'exposez pas cet appareil & la pluie, & I'humidit& a. unegouttement ou & des eclaboussures et ne placez pas desobjets remplis de liquide, tels qu'un vase, sur rappareil.
Attention: A_ration correcte
Pour pr#venir tout risque de d_charge _lectrique ou d'incendie et _viter toutedet6rioration, installez rappareil de la mani6re suivante:1. Avant:
Bien d_gag_ de tout objet.2. C6t6s/dessus/dessous:
Assurez-vous que rien ne bloque les espaces indiqu6s sur le schemaci-dessous.
3. gessous:
Posez I'appareil sur une surface plane et horizontale. Veillez & ce quesa ventilation correcte puisse se faire en le pla£ant sur un support d'aumoins dix centim6tres de hauteur.
Front view Side viewFace tScm Cot
(SW_6in)
15cm lcm lcm 15cm 15cm(515/16in) (7/16irl) (7/16in} (515/161n) (515/161n)
15cm(SW16in)
About the cooling fanA cooling fan is mounted on the rear panel of the unit to prevent abnormal temperature inside the unit, thus assuring normal operation ofthe unit. The cooling fan automatically starts rotating to intake external cool air when the volume is increased up to more than a certain level,
._ propos du ventilateur de refroidissementUn ventilateur de refroidissement se trouve sur le panneau arriere de rappareil afin d'6viter la creation d'une temperature anormale & rin-t_rieur de I'appareil et permettre ainsi un fonctionnement normal de I'appareil. Le ventilateur de refroidissement commence a tourner et
aspirer de rair frais automatiquement quand le volume est augment_ au-dessus d'un certain niveau.
[European Union only] G-2
Thank you for purchasing the JVC Compact Component System.
We hope it will be a valued addition to your home, giving you years of enjoyment.
Be sure to read this instruction manual carefully bet_re operating your new stereo system.
In it you will find all the information you need to set up and use the system.
If you have a query that is not answered by the manual, please contact your dealer.
Features
Here are some of the things that make your System both powerful and simple to use.
CIThe controls and operations have been redesigned to make them very easy to use, freeing you to just enjoy themusic.
• With JVC's COMPU PLAY you can turn on the System and automatically start the Radio, Cassette Deck, or
CD Player with a single touch.
CI The great SEA (Sound Effect Amplifier) effects Rock, Pop and Classics are provided.
CIThe Sound Turbo flmction provides emphasized rich sound.
CI A 45-station preset capability (30 FM and 15 AM) in addition to auto-seek and manual tuning.
CI CD changer function can operate 3 discs.
• Discs can be changed during play using the Carrousel tray (rotational tray).
CI Two Decks enabling tape dubbing.
CI Timer fimctions: Daily Timer, REC (Recording) Timer, and Sleep Timer.
CI You can connect various external units, such as an MD recorder.
CIThe CD Player can play back a CD-R and CD-RW.
How This Manual Is Organized
• Basic information that is the same t_r many different functions - e.g. setting the volume - is given in the section "Basic Operations",
and not repeated under each fimction.
• The names of buttons/controls and display messages are written in all capital letters: e.g. FM/AM, "NO DISC".
• If the button names on the Unit and the Remote Control are the same, the description on where the button is used will be omitted.
• System functions are written with an initial capital letter only: e.g. Normal Play.
Use the table of contents to look up specific information you require.
We have enjoyed making this manual for you, and hope it serves you in enjoying the many features built into your System.
IMPORTANT CAUTIONS
1 Installation of the System• Select a phtce which is level, dry and neither too hot nor too cokt. (Between 5%" and 35°C or 41°F and 95°F.)
• Leave sufficient distance between the System and a TV.
• Do not use the System in a place subject to vibrations.
2 Power cord
• Do not handle the pow, er cord with wet hands!
• Some power is always consumed as long as the power cord is connected to the wall outlet.
• When unplugging the System from the wall outlet, ahvays pull the plug, not the power cord.
3 Malfunctions, etc.• There are no user serviceable parts inside. In case of system failure, unplug the power cord and consult your dealer.
• Do not insert any metallic object into the System.
Introduction ................................................................................................................... 1Features .................................................................................................................................................... l
How This Manual Is Organized ............................................................................................................... 1IMPORTANT CAUTIONS ..................................................................................................................... 1
Table of Contents .......................................................................................................... 2
Getting Started .............................................................................................................. 3Accessories .............................................................................................................................................. 3
How To Put Batteries In the Remote Control .......................................................................................... 3
Using the Remote Control ....................................................................................................................... 3
Connecting the FM Antenna .................................................................................................................... 4
Connecting the AM Antenna ................................................................................................................... 5
Connecting the Speakers ......................................................................................................................... 5
Connecting External Equipment .............................................................................................................. 6
Connecting to the Wall Outlet ................................................................................................................. 6DEMO Mode ........................................................................................................................................... 6
COMPU Play ........................................................................................................................................... 6
Basic Operations ........................................................................................................... 7Turning the Power On and Off ................................................................................................................ 7
ECO Mode (ECO) ................................................................................................................................... 7
Adjusting the Volume .............................................................................................................................. 8
Fade-out Muting (FADE MUTING) ....................................................................................................... 8
Emphasizing the sound (SOUND TURBO) ............................................................................................ 8
Selecting the Sound Mode (SOUND MODE) ......................................................................................... 8
Entering the Number with the Remote Control (Numeric Keys) ............................................................ 8
Changing the Display .............................................................................................................................. 8
Using the Tuner ............................................................................................................. 9Tuning In a Station .................................................................................................................................. 9
Presetting Stations ................................................................................................................................. 10
To Change the FM Reception Mode ..................................................................................................... 10
Using the CD Player .................................................................................................... 11To Load CDs ......................................................................................................................................... 12
To Unload CDs ...................................................................................................................................... 12
Changing the MP3/WMA Playback Mode ............................................................................................ 12
Basics of Using the CD Player-Normal Play ......................................................................................... 13
Resume Play for Audio CD and MP3/WMA Disc ................................................................................ 14
Programming the Playing Order of the Tracks ...................................................................................... 14
Random Play .......................................................................................................................................... 15
Repeating Tracks ................................................................................................................................... 15
Tray Lock Function ............................................................................................................................... 15
Using the Cassette Deck (Listening to a Tape) ........................................................ 16Playing a Tape ....................................................................................................................................... 16
Using the Cassette Deck (Recording) ...................................................................... 17StandaN RecoNing ............................................................................................................................... 18
CD Synchro Recording .......................................................................................................................... 18
Tape to Tape Recording (DUBBING) ................................................................................................... 18
Using an External Equipment .................................................................................... 19Listening to the External Equipment ..................................................................................................... 19
Using the Timers ......................................................................................................... 20Setting the Clock ................................................................................................................................... 20
Fixing the Clock .................................................................................................................................... 20
Setting the Daily Timer ......................................................................................................................... 21
Setting the REC (RecoNing) Timer ...................................................................................................... 22
Setting the SLEEP Timer ...................................................................................................................... 24
Timer Priority ........................................................................................................................................ 24
Care And Maintenance ................................................................................................ 25
Troubleshooting .......................................................................................................... 26
Specifications ............................................................................................... Back cover
2
Accessories
Make sure that you have all of the t_llowing items, which are supplied with the System.
AM Loop Antenna (1)FM Wire Antenna (1)
Remote Control (1)
Batteries (2)
If any of these items are missing, contact your dealer immediately.
How To Put Batteries In the Remote Control
Match the polarity (+ and -) on the batteries with the + and - markings in the battery compartment.
R6P(S UM-3)/AA(15F)
_CAUTION:
• Handle batteries properly.
[71To avoid battery leakage or explosion:
• Remove batteries when the Remote Control will not be used for a long time.
• When you need to replace the batteries, replace both batteries at the same time with new ones.
• Do not use an old battery with a new one.
• Do not use different types of batteries together.
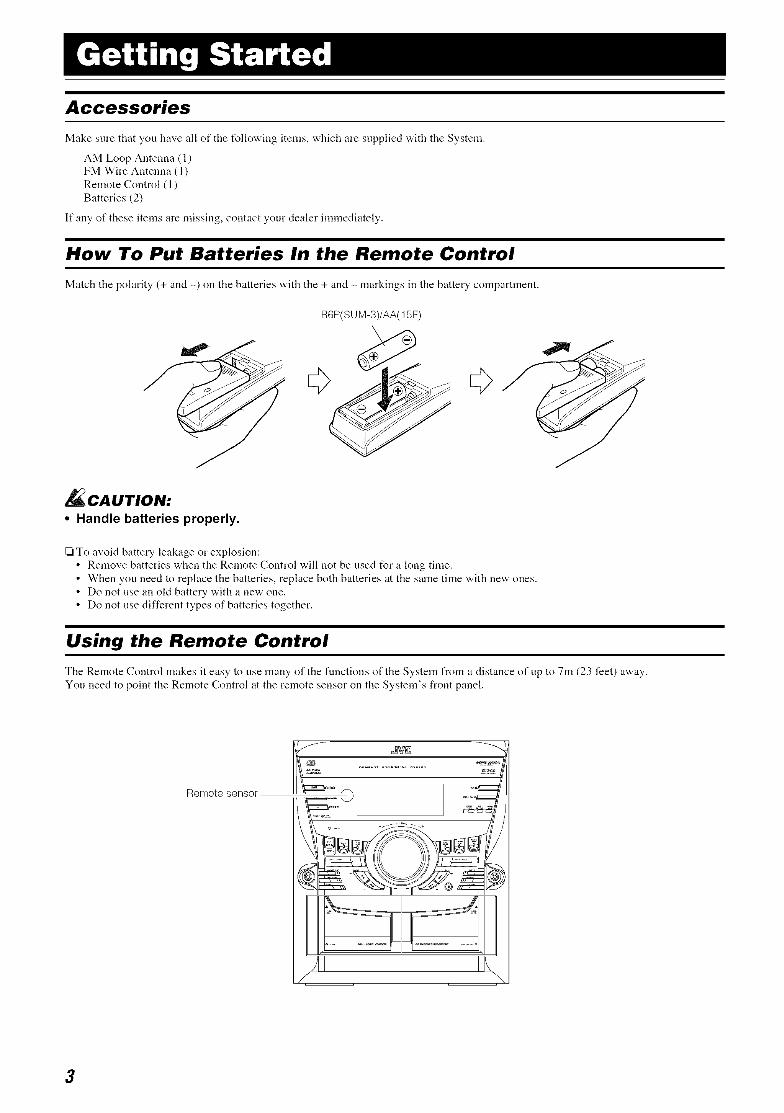
Using the Remote Control
The Remote Control makes it easy to use many of the fnnctions of the System from a distance of up to 7m (23 feet) away.
You need to point the Remote Control at the remote sensor on the System's front panel.
Remote sensor
3
Getting Started
_CAUTION:
• Make all connections before plugging the System into an AC power outlet.
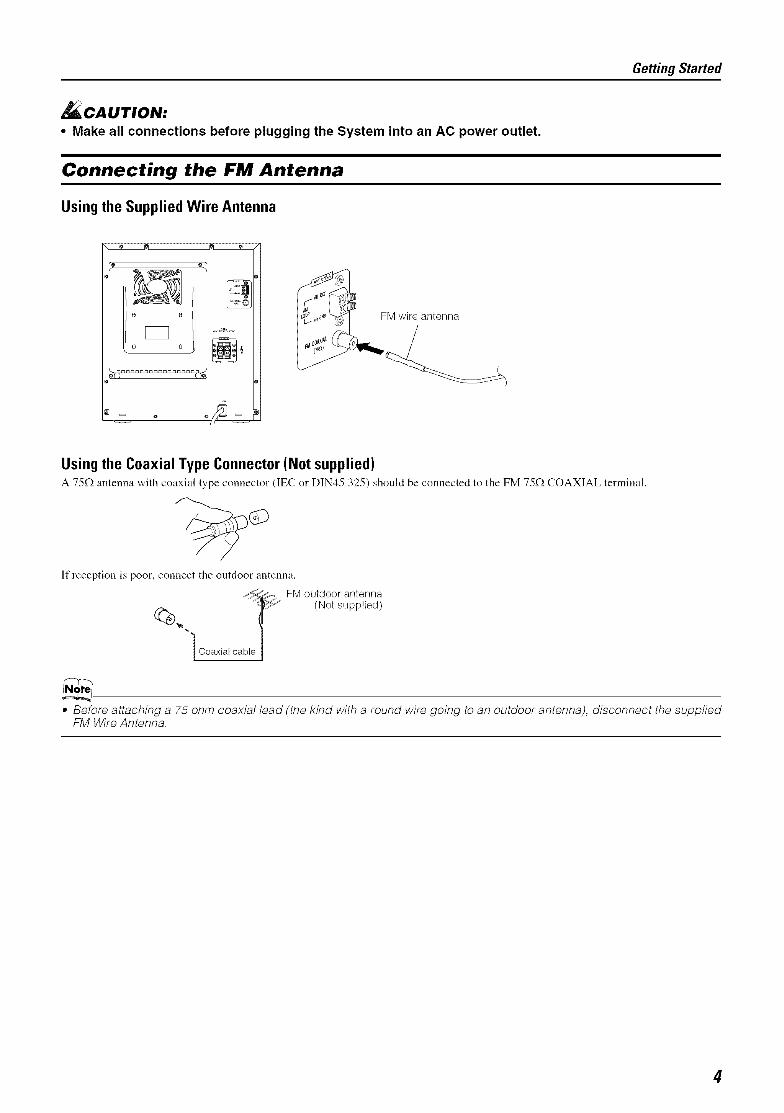
Connecting the FM Antenna
Using the Supplied Wire Antenna
Using the Coaxial Type Connector (Not supplied)A 75f2 :mtenn:t with coaxial type connector (]EC or DIN45 325) should be connected to the FM 75_(-:'COAXIAL terminal.
If reception is poor, connect the outdoor antenna.
• "2_ FM outdoor antenna
%_. _ (Not supplied)
Coaxial cable J
• Before attaching a 75 ohm coaxial lead (the kind with a round wire going to an outdoor antenna), disconnect the suppliedFM Wire Antenna.
4

Getting Started
Connecting the AM Antenna
Rear Panel of the Unit
}_i_\_ ,_,¸_
il
ii
AM loop antenna (Supplied)
AM antenna wire (not supplied)If reception is poor, connect the outside antenna.
Turn the loop until you
have the best reception.
Attach the AM loop to its base by snapping thetabs on the loop into the slot in the base.
• Even when connecting an outside AM antenna, keep the indoor AM loop connected.
_CAUTION:
• To avoid noise, keep antennas away from the System, the connecting cord and the AC power cord.
Connecting the Speakers
1. Open each of the terminals to connect the speaker wire leads.
2. Connect the speaker cords to the Speaker terminals of the Unit.
Connect the gray (+) and gray with black stripe ( ) cords of the right side speaker to the red (+) and black ( ) terminals marked RIGHTon the System.
Connect the gray (+) and gray with black stripe (-) cords of the left side speaker to the red (+) and black (-) terminals marked LEFT on
the System.3. Close each of the terminals.
Right side (rear view) Left side (rear view)
Gray Gray
f
CA UTIONS:
• A TV may display irregular colors if located near the speakers. If this happens, set the speakers awayfrom the TV.
• Use speakers with the correct impedance only. The correct impedance is indicated on the rear panel.
5
Getting Started
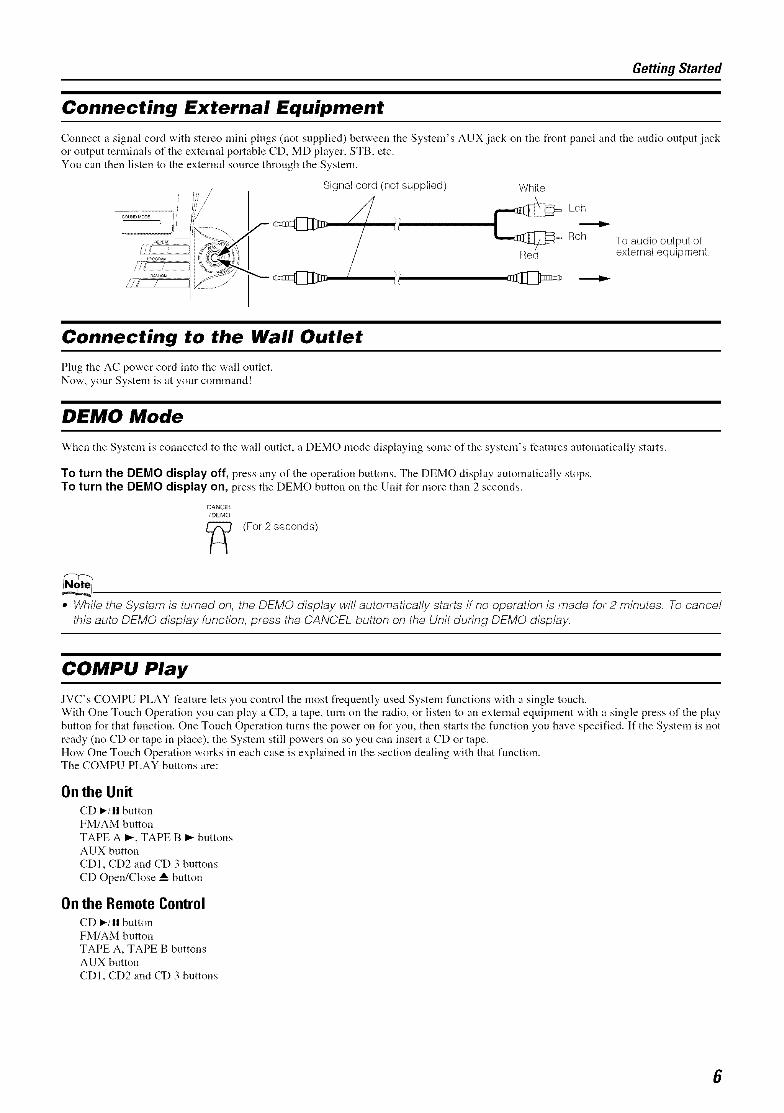
Connecting External Equipment
Connect a signal cord with stereo mini plugs (not supplied) between the System's AUX jack on the front panel and the audio output jackor output terminals of the external portable CD, MD player, STB, etc.You can then listen to the external source through the System.
Signal cord (not supplied) White
LchRch
RedTo audio output ofexternal equipment.
Connecting to the Wall Outlet
Plug the AC power cord into tile wall outlet.
Now, your System is at your command!
DEMO Mode
When the System is connected to the wall outlet, a DEMO mode displaying some of the system's features automatically starts.
To turn the DEMO display off, press any of the operation buttons. The DEMO display automatically stops.
To turn the DEMO display on, press the DEMO button on the Unit for more than 2 seconds.
CANCEL
/DEMO
(For 2 seconds)
• While the System is turned on, the DEMO display will automatically starts if no operation is made for 2 minutes. To cancel
this auto DEMO display function, press the CANCEL button on the Unit during DEMO display.
COMPU Play
JVC's COMPU PLAY feature lets you control the most frequently used System functions with a single touch.
With One Touch Operation you can play a CD, a tape, turn on the radio, or listen to an external equipment with a single press of the play
button for that function. One Touch Operation turns the power on for you, then starts the function you have specified. If the System is not
ready (no CD or tape in place), the System still powers on so you can insert a CD or tape.
How One Touch Operation works in each case is explained in the section dealing with that function.The COMPU PLAY buttons are:
Onthe UnitCD I_/n button
FM/AM button
TAPE A _, TAPE B _ buttons
AUX button
CDI, CD2 alrld CD 3 buttons
CD Open/Close _ button
Onthe Remote ControlCD I_/n button
FM/AM button
TAPE A, TAPE B buttonsAUX button
CDI, CD2 and CD 3 buttons
6
Display
SOUND MODE
VOLUME
Various informationI
I I
Sound Mode indicator
Level bar
I II
Status bar (Indicates various statuses.)
* When the System is in use, the display shows other items as well.For simplicity, we show here only the items described in this section.
Turning the Power On and Off
Turning the System On
1 Press the _/ISTANDBY/ON button.
STA_DBWON
O/I
or
,l
The display comes on and "POWER ON" is displayed once.
The STANDBY indicator goes ont.
The System comes on ready to continue in the mode it was in
when the pov,,er was last turned off.
Turning the System Off
1 Press the _/I STANDBY/ON button again.
{b/I
or
"GOOD BYE" is displayed and the display goes out, exceptt_r the clock display. The STANDBY indicator lights up. (Thedisplay is dimmed.)• Some power is always consumed even though power is
turned oft"(called Standby mode).• To switch off the System completely, unplug the AC power
cord from the wall outlet. When you unplug the AC powercord, the clock will be reset to AM 12:00 immediately.
ECO Mode (ECO)
The System has three energy modes; power on, power off (Stand-
by) and ECO. In ECO mode, the display goes off and the least
power is consumed.
To enter [=CO mode, press the ECO button on the Unit in Stand-
by mode (while the STANDBY indicator lights up). "ECO
MODE" appears on the display, then the display goes oft'. TheSTANDBY indicator remains lit.
To cancel ECO mode and turn on the power, press the dollSTANDBY/ON button on the Unit.
To cancel ECO mode and enter Standby mode, press the
ECO button again.
7
Basic Operations
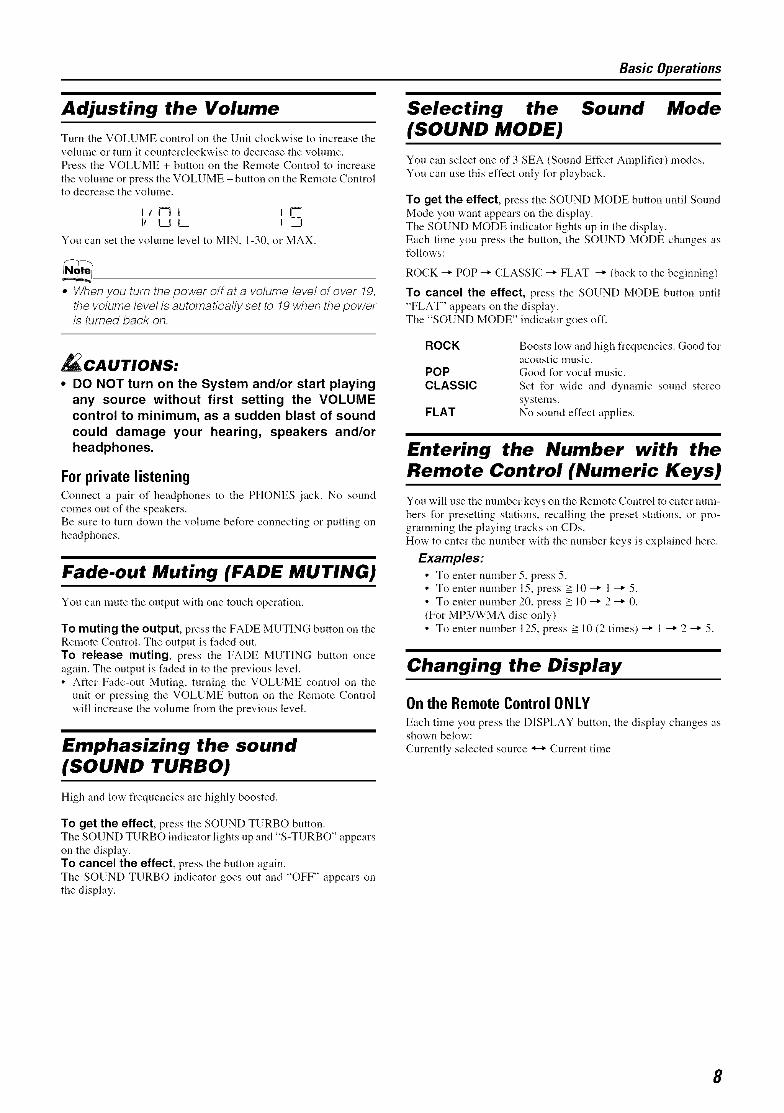
Adjusting the Volume
Turn the VOLUME control on the Unit clockwise to increase the
volume or turn it counterclockwise to decrease the vohnne.
Press the VOLUME + button on the Remote Control to increase
the volume or press the VOLUME - button on the Remote Controlto decrease the volume.
I € t--t t li-lt UL I --I
You can set the volume level to MIN, 1-30, or MAX.
• When you turn the power off at a volume level of over 19,the volume level is automatically set to 19 when the poweris turned back on.
CA UTIONS:
• DO NOT turn on the System and/or start playingany source without first setting the VOLUMEcontrol to minimum, as a sudden blast of soundcould damage your hearing, speakers and/orheadphones.
For private listeningConnect a pair of headphones to tile PHONES jack. No sound
comes out of the speakers.Be sure to turn clown the volume before connecting or putting on
headphones.
Fade.out Muting (FADE MUTING)
You can mute the output with one touch operation.
To muting the output, press the FADE MUTING button on the
Remote Control. The output is faded out.
To release muting, press the FADE MUTING button once
again. The output is faded in to the previous level.
• After Fade-out Muting, turning the VOLUME control on the
unit or pressing the VOLUME button on the Remote Control
will increase the vohnne from the previous level.
Emphasizing the sound(SOUND TURBO)
High and low' frequencies are highly boosted.
To get the effect, press the SOUND TURBO button.The SOUND TURBO indicator lights up and "S-TURBO" appears
on the display.
To cancel the effect, press the button again.
The SOUND TURBO indicator goes out and "OFF" appears onthe display.
Selecting the Sound Mode(SOUND MODE)
You can select one of 3 SEA (Sound Effect Amplifier) modes.
You can use this effect only for playback.
To get the effect, press the SOUND MODE button until Sound
Mode you want appears on the display.
The SOUND MODE indicator lights up in the display.
Each time you press the button, the SOUND MODE changes asfollows:
ROCK -_ POP -_ CLASSIC -_ FLAT _" (back to the beginning)
To cancel the effect, press the SOUND MODE button until
"FLAT" appears on the display.
The "SOUND MODE" indicator goes off.
ROCK
POPCLASSIC
FLAT
Boosts low and high frequencies. Good t_racoustic music.
Good for vocal music.
Set for wide and dynamic sound stereo
systems.No sound effect applies.
Entering the Number with theRemote Control (Numeric Keys)
You will use the nmnber keys on the Remote Control to enter num-
bers for presetting stations, recalling the preset stations, or pro-
gramming the playing tracks on CDs.
How to enter the number with the number keys is explained here.
Examples:
• To enter number 5, press 5.
• To enter number 15, press =>10 _" 1 _" 5.
• To enter nmnber 20, press _>-10 _" 2 _" 0.
(For MP3/WMA disc only)
• To enter number 125, press ->_10 (2 times) _" 1 -_ 2 _" 5.
Changing the Display
Onthe Remote Control ONLY
Each time you press the DISPLAY button, tile display changes asshown below:
Currently selected source _ Current time
8
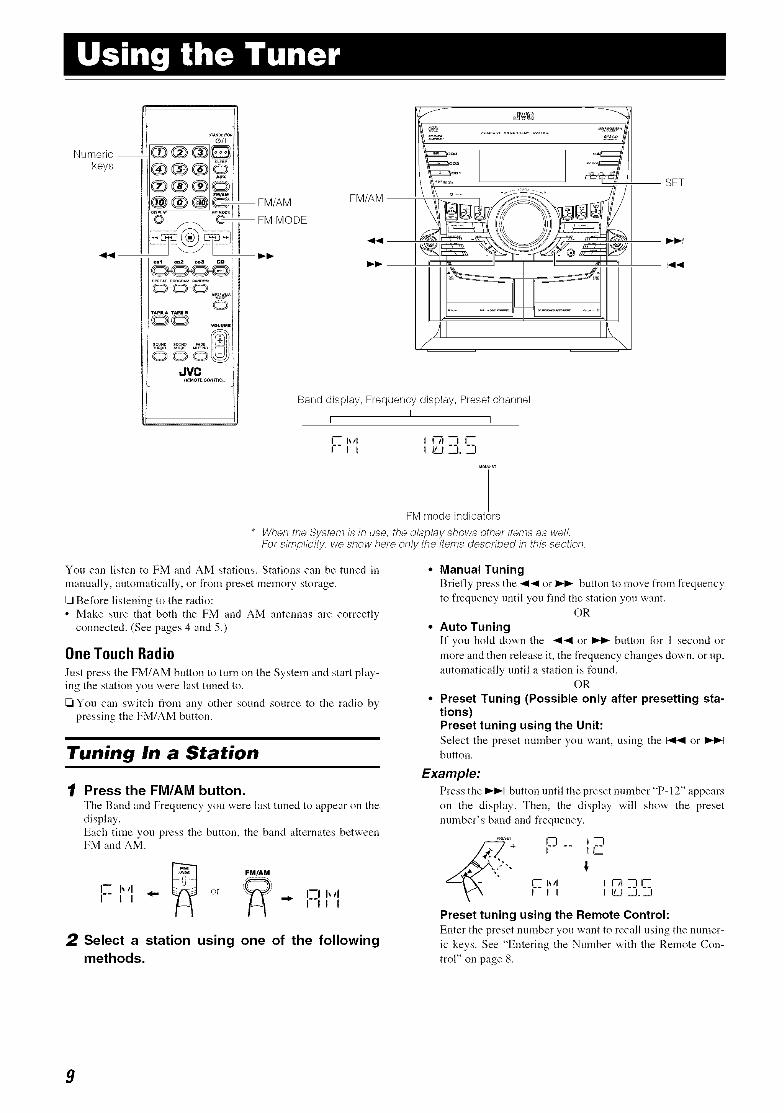
Numeric
keys
dD/I
® ® @]Qo®Q/ ®®®@
0
JVCR_MOf_eO__r_eL
FM/AM
FM MODE
FM/AM
Band display, Frequency display, Preset channelI
I I
I-- I__1 I IWI D I.--_
SET
FM mode indicators
* When the System is in use, the display shows other items as well.For simplicity, we show here only the items described in this section.
You can listen to FM and AM stations. Stations can be tuned in
manually, automatically, or from preset memory storage.
[21Before listening to the radio:
• Make snre that both the FM and AM antennas are correctly
connected. (See pages 4 and 5.)
One Touch Radio
Just press the FM/AM button to turn on the System and start play-
ing the station you were last tuned to.
[21You can switch from any other sound source to the radio by
pressing the FM/AM button.
Tuning In a Station
1 Press the FM/AM button.The Band and Frequency you were last tuned to appear on the
display.
Each time you press the button, the band alternates betweenFM and AM.
FM/Aff
[_ I_tl orI I _ ,._ I--i b!lI I--II I
2 Select a station using one of the followingmethods.
• Manual Tuning
Briefly press the 41< or I_1_ button to move from frequency
to frequency until you find the station yon want.
OR
• Auto TuningIt" you hold do'a,n the << or _ button for 1 second or
more and then release it, the t_equency changes down, or up,
automatically until a station is found.OR
• Preset Tuning (Possible only after presetting sta-
tions)Preset tuning using the Unit:
Select the preset nnmber you want, using the _ orbutton.
Example:Press the _ button until the preset mnnber "P- 12" appears
on the display. Then, the display will show the preset
number's band and frequency.
...... C'] I --I
+ I.... tl'"t-- h_1 I I-'_1"-1 I--F-t I I U --L-3
Preset tuning using the Remote Control:
Enter the preset nnmber you w:mt to recall using the numer-
ic keys. See "Entering the Number with the Remote Con-
trol" on page 8.
9
• tn AM broadcast, reception sensitivity will be changed byturning the AM loop antenna. Turn the AM loop antennafor best reception.
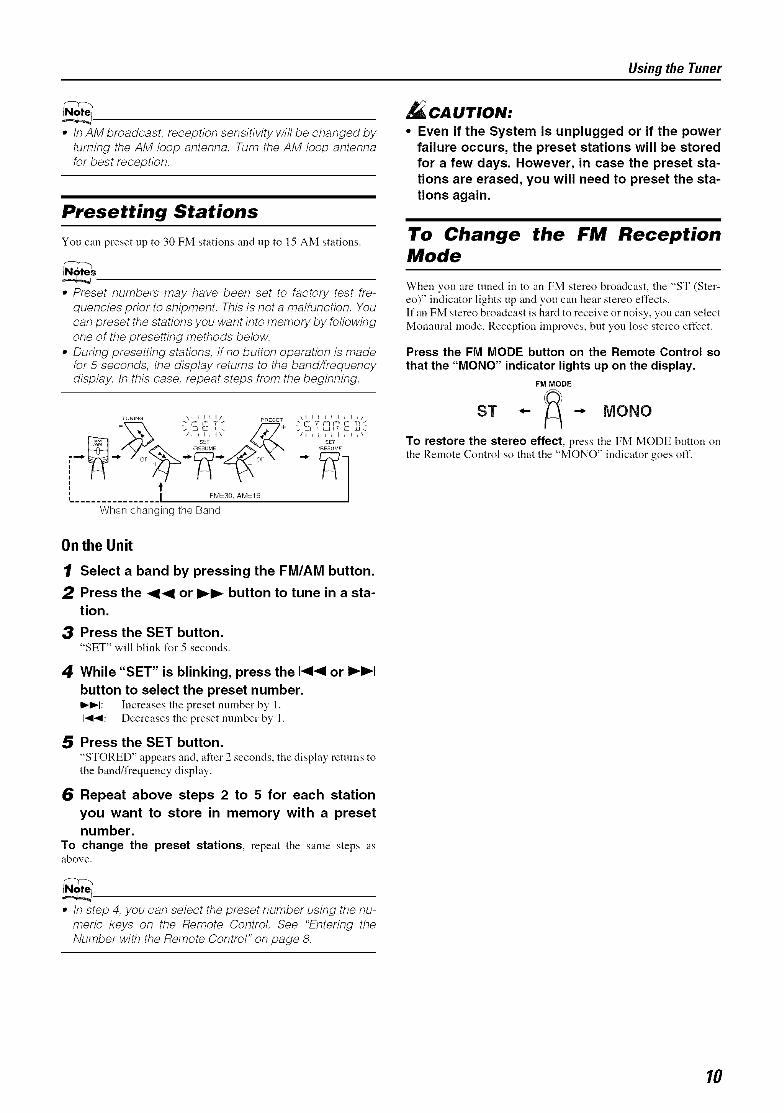
Presetting Stations
You can preset up to 30 FM stations and up to 15 AM stations.
° Preset numbers may have been set to factory test fre-quencies prior to shipment. This is not a malfunction. Youcan preset the stations you want into memory by followingone of the presetting methods below.
• During presetting stations, if no button operation is madefor 5 seconds, the display returns to the band/frequencydisplay, tn this case, repeat steps from the beginning.
TUNING \1 _ _ _ _/ PRESET \_ _ _ _ _ _ _ _ _/
tI FM=30, AM=15
When changing the Band
On the Unit
1 Select a band by pressing the FM/AM button.
2 Press the _1_1 or I_1_ button to tune in a sta-tion.
3 Press the SET button."SET" will blink for 5 seconds.
4 While "SET" is blinking, press the I_1_1 or I_1_1button to select the preset number.!_P-I: Increases the preset nrnnber by I.I-,I1_: Decreases the preset number by 1.
5 Press the SET button."STORED" appears and, after 2 seconds, tire display returns tothe band/frequency display.
6 Repeat above steps 2 to 5 for each station
you want to store in memory with a preset
number.
To change the preset stations, repeat tire same steps asabove.
Using the Tuner
CA UTION:
• Even if the System is unplugged or if the powerfailure occurs, the preset stations will be storedfor a few days. However, in case the preset sta-tions are erased, you will need to preset the sta-tions again.
To Change the FM ReceptionMode
When you are tuned in to an FM stereo broadcast, the "ST (Ster-eo)" indicator lights up and you can hear stereo effects.If an FM stereo broadcast is hard to receive or noisy, you can selectMonaural mode. Reception improves, but you lose stereo effect.
Press the FM MODE button on the Remote Control sothat the "MONO" indicator lights up on the display.
FM MODE
ST *- --, IVIONO
To restore the stereo effect, press tire FM MODE button onthe Remote Control so that the "MONO" indicator goes off.
• tn step 4, you can select the preset number using the nu-meric keys on the Remote Control. See "Entering theNumber with the Remote Control" on page 8.
10
Irk:_S1_. o..................... _;sT///II CDopen/I/ I1_.... o. ...."_ Close A
I/ _>,, %%oo, _ ] _/Jl CANCELNumeric II O _ @]Q It 17...... _ ......... --_//1_A SET/RESUME
key_ _ _ _ _ \ _1111 OO i,.,,,
li®®®@ i I EPEATI / Q CO) _ / _ _= , , IMbklIUUIVI
oo1_oo oo.,,,REPEAT' '_ ....... RANDOM I/'_ _1
PROGRAM I I _! I MPo3dTMATAP[ A TAPt l
_)0 Track number. Playing time._o_u., Program number, etc. WMA MP3 indicator
.......... 8_ _ I indicator_j_ _ Program indicator
TURBO MOD_ ___
O0 ill--] i--f'71. I II-i
JVC ILl --1"-1"-_1 Disc indicatorsI_EMOTEO0tlTROL
Random Repeatindicator indicator
* When the System is in use, the display shows other items as well.For simplicity, we show here only the items described in this section.
This unit has been designed to playback the following CDs:• Audio CD
• CD-R (CD-Recordable)• CD-RW (CD-ReWritable)
• MP3/WMA disc (MP3/WMA files recorded on a CD-R or CD-RW) *
x@x@
Only CDs bearing these marks can
be used with this System. However,
continued use of irregular shape
CDs (heart-shape, octagonal, etc.)
can damage the System.
When playing a CD-R or CD-RW• User-edited CD-Rs (CD-Recordable) and CD-RWs (CD-ReWri-
table) can be played back when they are already "finalized."• Before playing back CD-Rs or CD-RWs, read their instructions
or cautions carefully.• Some CD-Rs or CD-RWs nmy not be played back on this unit
because of their disc characteristics, damage or stain on them,or if the player's lens is dirty.
• CD-RWs may require a longer readout time since the reflect-ance of CD-RWs is lower than l\)r regular CDs.
*For MP3/WMA discs• This unit manages files and folders on MP3/WMA discs as
"tracks" and "albums."• Playback order of the MP3/WMA files (tracks) recorded on a
disc are determined by the writing (or encoding) application;therefore, playback order may be different from the one youhave intended while recording the files and the folders.
• This unit shows the file (track) names and ID3v2 tags (only"Title", "Artist" and "Album") on the display after starts play;however, there is a limitation on available characters and somefile names and ID3 tags are not shown correctly.
More about MP3/WMA discs
° MP3/WMA discs (either CD-R or CD-RW) require a longerreadout time. (It varies due to the complexity of the re-cording configuration.)
* When making an MP3/WMA disc, select tSO 9660 Level 1or Level 2 as the disc formal
* This unit does not support multisession recording., This unit can play MP3/WMA files only with the following
file extensions-- ".rap3" and ".wma"., Non-MP3/WMA files are ignored, tf non-MP3/WMA files
are recorded together with MP3/WMA files, this unit willtake a longer time to scan the disc. tt may also cause theunit to malfunction.
* Some MP3/WMA discs may not be played back becauseof their disc characteristics or recorded conditions.
Caution f_r DualDisc playbackThe Non-DVD side of a "DualDisc" does not comply with the"Compact Disc Digital Audio" standard. Therefore, the use ofNon-DVD side of a DualDisc on this product may not be recom-mended.
11

About Disc Indicator:
Disc Rotationindicator
The Disc indicator consists of the following three kinds of indica-tors:
Disc Number indicator: Lights all the time.
Selected Disc indicator:Lights for the currently selecteddisc number.
Disc Rotation indicator:Runs when the selected CD is
playing or paused. This indicator
goes out ifa CD is not loaded forthe selected disc number.
One Touch PlayTile po'a, er comes on, and operations are done automatically.
[21By pressing the CD _-/I| button, the System will come on, and if
a CD is loaded for the disc number that was lastly selected, it
will start playing from the first track.
[21By pressing the CD I-CD3 button, the System will come on, and
if a CD is already loaded for the selected disc number, it will
start play from the first track.
To Load CDs
1 Press the CD Open/Close A. button on the
Unit to open the tray.
2 Place one or two CDs, with its label side up,
onto the tray.Be sure that the CD is securely seated inside the recess on the
disc tray.
With the label side up
3 Press the DISC SKIP button on the Unit and
place the next CD.When you press tile bntton, tile tray turns for tile next CD.
4 Press the CD Open/Close A. button on theUnit.The tray is closed.
Using the CD Player
[21When you use an 8 cm (3") CD, place it on the inner circle of the
tray.
[2lYou can load CDs while listening to the other source or while
listening to the CD being played back.
[21When power is turned off with the tray opened, the tray is auto-
matically closed.
[21If the CD cannot be read correctly (because it is scratched, forexample), " NO DISC" appears on the display.
To Unload CDs
Take out the CD as shown below.
1 While the CD Player is stopped, press the CDOpen/Close A. button on the Unit to open the
tray.
2 Remove the CD, then press the DISC SKIPbutton on the Unit.Tile tray turns for the next CD.
3 Repeat step 2 to remove all the CDs.
4 Press the CD Open/Close A. button on the
Unit to close the tray.[21You can remove CDs while listening to the other source.
Tips:• Removing/changing the CDs during playbackWhile playing back a CD (e.g. CDI), you can remove or change
the other CDs (e.g. CD2 and CD3) by pressing the CD Open/Close
button. Alter removing or changing, press the same button to
close the tray.
Changing the MP3/WMA PlaybackMode
When playing an MP3/WMA disc, you can choose the playbackmode of the MP3/WMA disc as follows:
TRACK mode:
The unit recognizes only tracks (files). You can play an MP3/WMA disc like an Audio CD.
GROUP mode:
The unit recognizes tracks (files) and albums (folders) on an MP3/
WMA disc. You can play an MP3/WMA disc according to the way
how they are grouped.
On the Remote Control ONLY
Press MP3/WMA MODE before or during playingan MP3/WMA disc.
GROUP indicator appears when the M P3/WMAplayback mode is the GROUP mode.
IG_u_ gg2a
I-- I--II--II I I--I l--IL-tF_ U U F- U .,.-..
MP3/WMAMODE
• Each time you press the button, the MP3/WMA playback mode
changes between "GROUP" and "TRACK" alternately.
12
Using the CD Player
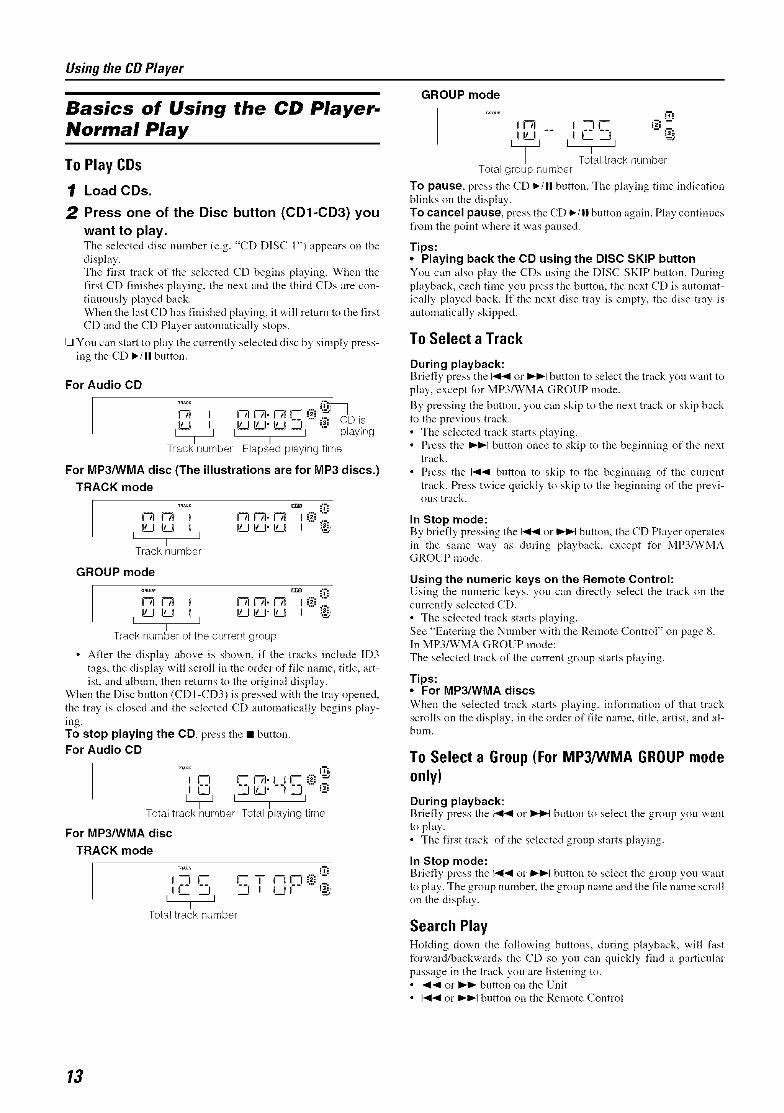
Basics of Using the CD Player.Normal Play
To Play CDs
1 Load CDs.
2 Press one of the Disc button (CD1-CD3) you
want to play.The selected disc number (e.g. "CD DISC" 1") appears on tile
display.
The first track of the selected CD begins playing. When the
first CD finishes playing, the next and the third CDs are con-
tinuously played back.
When the last CD has finished playing, it will return to the first
CD and the CD Player automatically stops.
You can start to play the currently selected disc by simply press-
ing the CD ,/11 button.
For Audio CD
i@i I 1-711-71.1-71I-- (._)i[_ CID is
Ll_tl II" tILJ'I" 1--Ill ='a'=lplayingTrack number Elapsed playing time
For MP3/WMA disc (The illustrations are for MP3 discs.)TRACK mode
1-71 t-7t t I-7ti-7i-l-7t I...==z'_'z":.i ILl ILl t i ILItLJ'ILI I
ITrack number
GROUP mode
...... ;11-71 t-7t t 1-71t-a.l-7t I...==r_'z"_.I ILl ILl t I IL_ttLJ-ILI I
ITrack number of the current group
• Alter the display above is shown, if the tracks include ID3
tags, the display will scroll in the order of file name, title, art-
ist, and album, then returns to the original display.When the Disc button (CDI-CD3) is pressed with the tray opened,
the tray is closed and the selected CD automatically begins play-
ing.
To stop playing the CD, press the • button.
For Audio CD
T_AeK
I t_ t-- I-TI.I tl-- "7._'=_=)L_j i "-t ILl. t__11 _i
Total track number Total pay ng t rne
For MP3/WMA disc
TRACK mode
I--I r- t-- T t--tl--I":z:
--I I I__II.....!
Total track number
GROUP mode
11-71 I --II-- 17; :::
Total track numberTotal group number
To pause, press the CD _-IIIbutton. The playing time indication
blinks on the display.
To cancel pause, press the CD _/11 button again. Play continues
from the point where it was paused.
Tips:• Playing back the CD using the DISC SKIP buttonYon can also play the CDs nsing the DISC SKIP button. Duringplayback, each time you press the button, the next CD is automat-ically played back. If the next disc tray is empty, the disc tray isautomatically skipped.
To Select a Track
During playback:Briefly press the I-,4_ or _P"-I button to select the track yon want to
play, except for MP3/WMA GROUP mode.
By pressing the button, you can skip to the next track or skip back
to the previous track.
• The selected track starts playing.
• Press the _ button once to skip to the beginning of the nexttrack.
• Press the I-,4_ bntton to skip to the beginning of the current
track. Press twice quickly to skip to the beginning of the previ-ous track.
In Stop mode:By briefly pressing the I-,941or _ button, the CD Player operates
in the same way as during playback, except for MP3/WMAGROUP mode.
Using the numeric keys on the Remote Control:Using the nnmeric keys, yon can directly select the track on the
currently selected CD.
• The selected track starts playing.
See "Entering the Number with the Remote Control" on page 8.In MP3/WMA GROUP ]node:
The selected track of the current group starts playing.
Tips:• For MP3/WMA discs
When the selected track starts playing, infornmtion of that track
scrolls on the display, in the order of file name, title, artist, and al-bum.
To Select a Group (For MP3/WMA GROUPmodeonly)
During playback:Briefly press the _ or _ button to select the group yon wantto play.• The first track of the selected group starts playing.
In Stop mode:Briefly press the _ or _ button to select the group yon want
to play. The group number, the group name and the file name scroll
on the display.
Search PlayHolding down the following buttons, during playback, will fast
forward/backwards the CD so you can quickly find a particular
passage in the track yon are listening to.• -ql_l or _1_ button on the Unit
• I-,_1 or _ button on the Remote Control
13
Using the CD Player
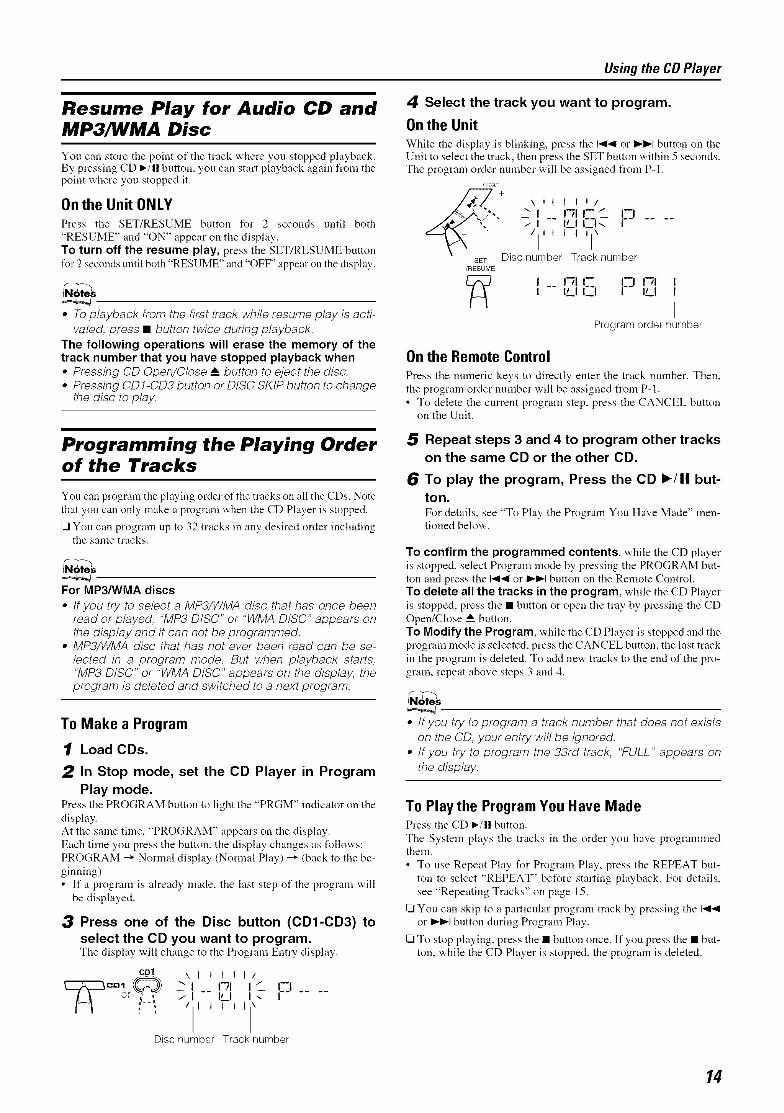
Resume Play for Audio CD andMP3/WMA Disc
You can store the point of the track where you stopped playback.By pressing CD _-/11 button, yon can start playback again from thepoint where yon stopped it.
Onthe Unit ONLYPress the SET/RESUME button for 2 seconds until both
"RESUME" and "ON" appear on the display.
To turn off the resume play, press the SET/RESUME buttonfor 2 seconds until both "RESUME" and "OFF" appear on the display.
° To playback from the first track while resume play is acti-
vated, press • button twice during playback.
The following operations will erase the memory of thetrack number that you have stopped playback when
• Pressing CD Open/Close A_ button to eject the disc.• Pressing CD1-CD3 button or DISC SKIP button to change
the disc to play.
Programming the Playing Orderof the Tracks
You can program tile playing order of the tracks on all the CDs. Note
that you can only make a program when the CD Player is stopped.
[3 You can program up to 32 tracks in any desired order inclndingthe same tracks.
For MP3/WMA discs
° tfyou try to select a MP3/WMA disc that has once been
read or played, "MP3 DISC" or "WMA DISC" appears onthe display and it can not be programmed.
• MP3/WMA disc that has not ever been read can be se-
lected in a program mode. But when playback starts,"MP3 DISC" or "WMA DISC" appears on the display, the
program is deleted and switched to a next program.
4 Select the track you want to program.
On the Unit
While the display is blinking, press the 141_l or I_l_l button on the
Unit to select the track, then press the SET button within 5 seconds.The program order nnmber will be assigned from P-I.
_,n s_r
\II I I Ii
.i lJ._lI--I--.I il I I I\
SET Disc number Track number/RESUME
I--,'71,- l.I i- tI_I I_I ILl I
IProgram order number
On the Remote Control
Press the nmneric keys to directly enter the track number. Then,
the program order number will be assigned from P-I.
• To delete the current program step, press the CANCEL buttonon the Unit.
5 Repeat steps 3 and 4 to program other trackson the same CD or the other CD.
6 To play the program, Press the CD I_/11 but-ton.For details, see "To Play the Program You Have Made" men-tioned below.
To confirm the programmed contents, while the CD player
is stopped, select Program mode by pressing the PROGRAM but-
ton and press the I-,I1_1or _ button on the Remote Control.
To delete all the tracks in the program, while the CD Playeris stopped, press the • button or open the tray by pressing the CD
Open/Close A button.
To Modify the Program, while the CD Player is stopped and the
program mode is selected, press the CANCEL button, the last track
in the program is deleted. To acid new tracks to the end of the pro-
gram, repeat above steps 3 and 4.
To Make a Program
1 Load CDs.
2 In Stop mode, set the CD Player in Program
Play mode.Press the PROGRAM button to light the "PRGM" indicator on the
display.
At the same time, "PROGRAM" appears on the display.
Each time you press the button, the display changes as t_llows:
PROGRAM _" Normal display (Normal Play) _" (back to the be-
ginning)
• If a program is already made, the last step of the program will
be displayed.
3 Press one of the Disc button (CD1-CD3) toselect the CD you want to program.The display v,.ill change to the Program Entry display.
CDI \ I I I ! I I
:I '::='or t -- ILl Ix ....
/ i I I i i\
Discnumber Track number
• tfyou try to program a track number that does not exists
on the CD, your entry will be ignored.° tfyou try to program the 33rd track, "FULL" appears on
the display.
To Play the Program You Have MadePress the CD _/11 button.
The System plays the tracks in the order you have programmedthem.
• To use Repeat Play for Program Play, press the REPEAT but-
ton to select "REPEAT" before starting playback. For details,
see "Repeating Tracks" on page 15.
[3You can skip to a particular program track by pressing the I-,II4or _ button during Program Play.
[3 To stop playing, press the • button once. If you press the • but-ton, while the CD Player is stopped, the program is deleted.
14
Using the CD Player
To Exit and Re-enter Program PlayThe program you have made is stored in nlemory. So, you can exit
Program Play temporarily or re-enter Program Play unless you de-
lete the program.
To exit the program mode once, press the • button to stopplaying. The "PRGM" indicator goes off and the Program mode
will be canceled. The program is stored in the memory.
To re-enter Program Play mode, press the PROGRAM but-
ton until the "PRGM" indicator lights up again.
• Tray will not open during the program playback.
Random Play
The tracks of the selected CD will play in no special order when
you use this mode.
1 In Stop mode, set the CD Player in Random
Play mode.Press tile RANDOM button to light tile "RNDM" and "1 DISC"indicator.
At the same time, "RANDOM" appears on the display.
Each time you press the button, the display changes as follows:
RANDOM _" Normal display (Normal Play) _" (back to the be-
ginning)
2 Press the CD I_/11 button.The tracks on selected CD are phtyed ill random order.
To stop playing, press the • button. The Random mode is can-celed and the "RNDM" and "1 DISC" indicator goes off.
To skip a track during playback, press the I_1_1button tojump to the next track in the random sequence.
• To use Repeat Play for Random Play, press the RANDOM but-
ton to display "REPEAT" and "IDISC" before starting play-
back. For details, see "Repeating Tracks" mentioned below.
Repeating Tracks
You can repeat all tracks or individual track, as many times as youlike.
Press the REPEAT button.
The Repeat indicator changes with each press of the button, as fol-lows:
REPEAT 1_" REPEAT IDISC _" REPEAT ALL _" Normal dis-
play(Normal Play) -_ (back to the beginning)
REPEAT 1 : Repeats one track.
REPEAT1DISC:Repeats all tracks on one CD. (Selectable in
Normal Play and Random Play)
REPEAT ALL: In Normal Play mode, repeats all the tracks onall the CDs.
In Program Play mode, the Repeat indicator changes with eachpress of the REPEAT button, as follows:
REPEAT "_* Blank display
It repeats all the tracks in the program.
To stop playing, press the • button. Changing the source to the
other (e.g. Tuner) will also stop playing. The Repeat mode is can-
celed and the Repeat indicator goes oft'.
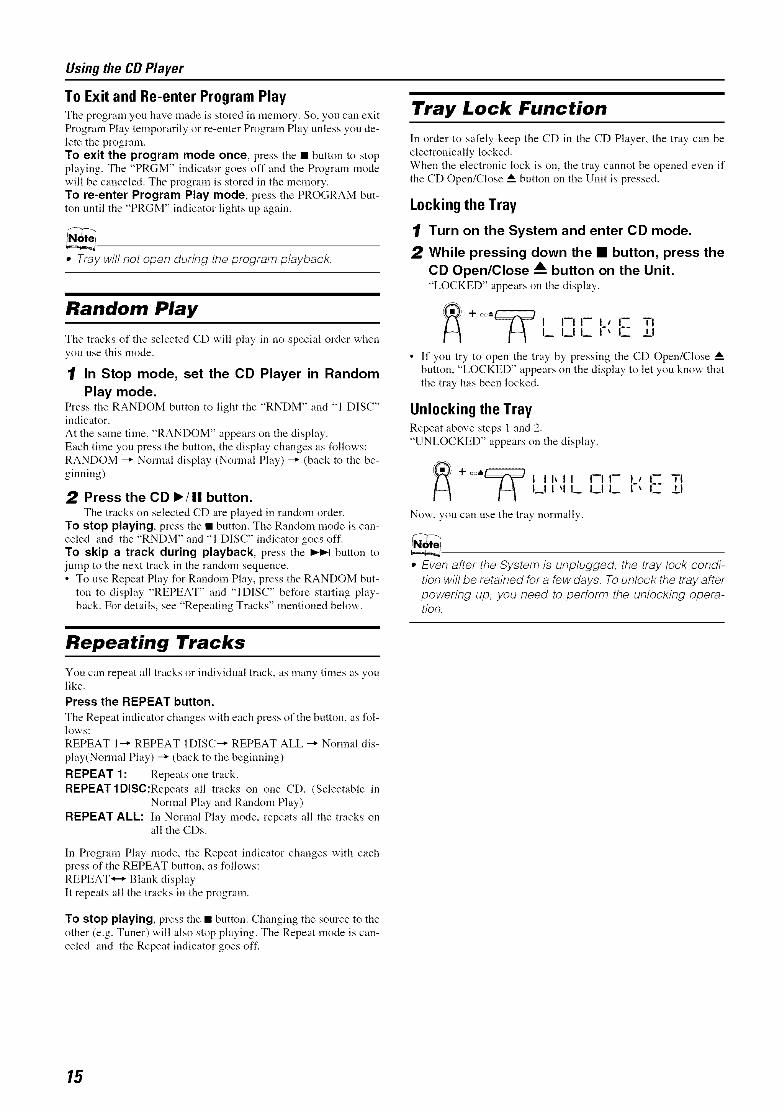
Tray Lock Function
In order to safely keep the CD in the CD Player, the tray can be
electronically locked.
When the electronic lock is on, the tray cannot be opened even if
the CD Open/Close __ button on the Unit is pressed.
Locking the Tray
1[ Turn on the System and enter CD mode.
2 While pressing down the • button, press theCD Open/Close A. button on the Unit."LOCKED" appears on the display.
_ +°°-*_/"_ I I--1 I-- I t I-- TI14 I__ I__1I__ I% I-- ±1
• If you try to open the tray by pressing the CD Open/Close
button, "LOCKED" appears on the display to let you know that
the tray has been locked.
Unlocking the TrayRepeat above steps 1 and 2.
"UNLOCKED" appears on the display.
I q I_ I_1 I_ I-- _1
Now, you can use the tray normally.
• Even after the System is unplugged, the tray lock condi-tion will be retained for a few days. To unlock the tray afterpowering up, you need to perform the unlocking opera-tion.
15
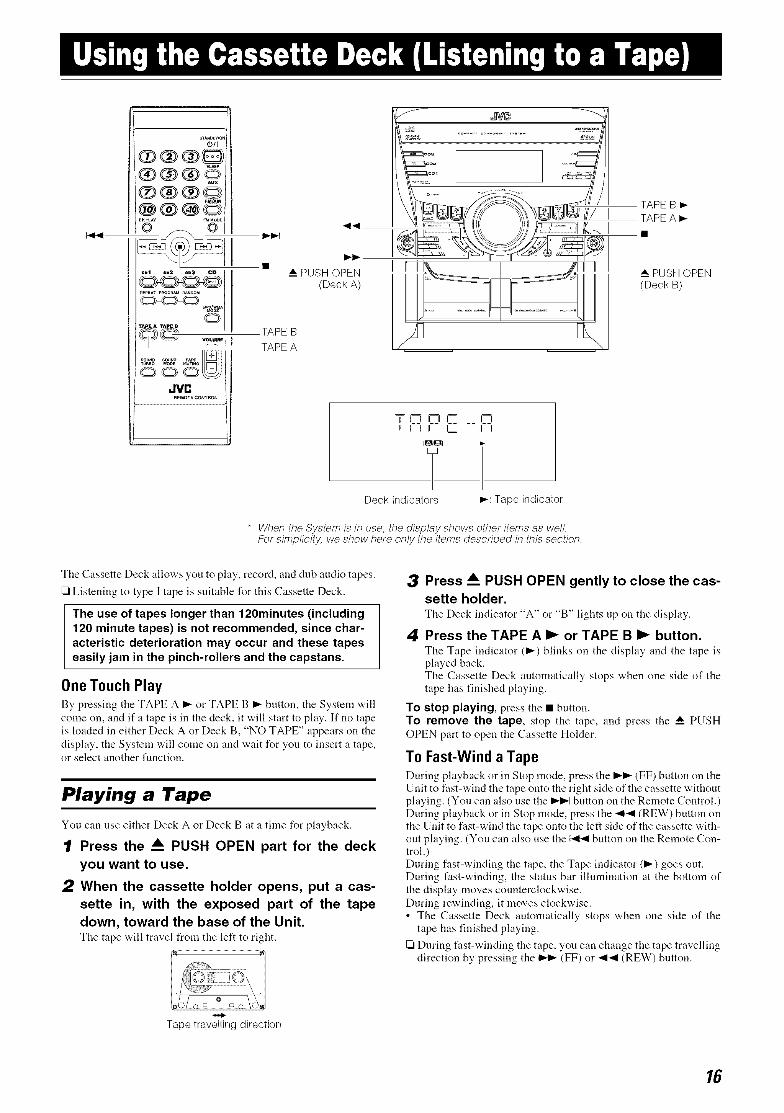
STA_D_YIOt
o@G
®®®©
TAP_ A TAPE •
REMOTECONTRO_ J
TAPE B
' TAPE A
44
A PUSH OPEN(Deck A)
Tnnl-I I II I_
YDeck indicators
I I
D,,-:Tape indicator
* When the System is in use, the display shows other items as well.For simplicity, we show here only the items described in this section.
TAPE B P,-
TAPE A
PUSH OPEN(Deck B)
The Cassette Deck allows you to play, record, and dub audio tapes.
[71Listening to type ] tape is suitable for this Cassette Deck.
The use of tapes longer than 120minutes (including120 minute tapes) is not recommended, since char-acteristic deterioration may occur and these tapeseasily jam in the pinch-rollers and the capstans.
One Touch PlayBy pressing tile TAPE A _ or TAPE B I_- button, tile System "a,ill
come on, and ifa tape is in the deck, it will start to play. If no tape
is loaded in either Deck A or Deck B, "NO TAPE" appears on the
display, the System will come on and wait for you to insert a tape,or select another function.
Playing a Tape
You can use either Deck A or Deck B at a time for playback.
1 Press the A. PUSH OPEN part for the deck
you want to use.
2 When the cassette holder opens, put a cas-sette in, with the exposed part of the tape
down, toward the base of the Unit.Tile tape w,ill travel from the left to right.
3 Press A. PUSH OPEN gently to close the cas-sette holder.The Deck indicator "A" or "B" lights up on tire display.
4 Press the TAPE A I_ or TAPE B I_ button.The Tape indicator (_) blinks on tile display and the tape is
played back.The Cassette Deck automatically stops when one side of the
tape has finished playing.
To stop playing, press the • button.
To remove the tape, stop the tape, and press the • PUSH
OPEN part to open the Cassette Holder.
To Fast-Wind a TapeDuring playback or in Stop mode, press tire I_1_ (FF) button on tire
Unit to fast-wind the tape onto the right side of the cassette withoutplaying. (You can also use the I_,,-I button on the Remote Control.)
During playback or in Stop mode, press the _1_1 (REW) button onthe Unit to fast-wind the tape onto the left side of the cassette with-
out playing. (You can also use the _ button on the Remote Con-trol.)
During fast-winding the tape, the Tape indicator (1_) goes out.During fast-winding, the status bar ilhnnination at the bottom of
the display moves counterclockwise.
During rewinding, it moves clockwise.
• The Cassette Deck automatically stops when one side of thetape has finished playing.
[71During fast-winding the tape, you can change the tape travellingdirection by pressing the _ (FF) or -_1_1(REW) button.
Tape travelling direction
16
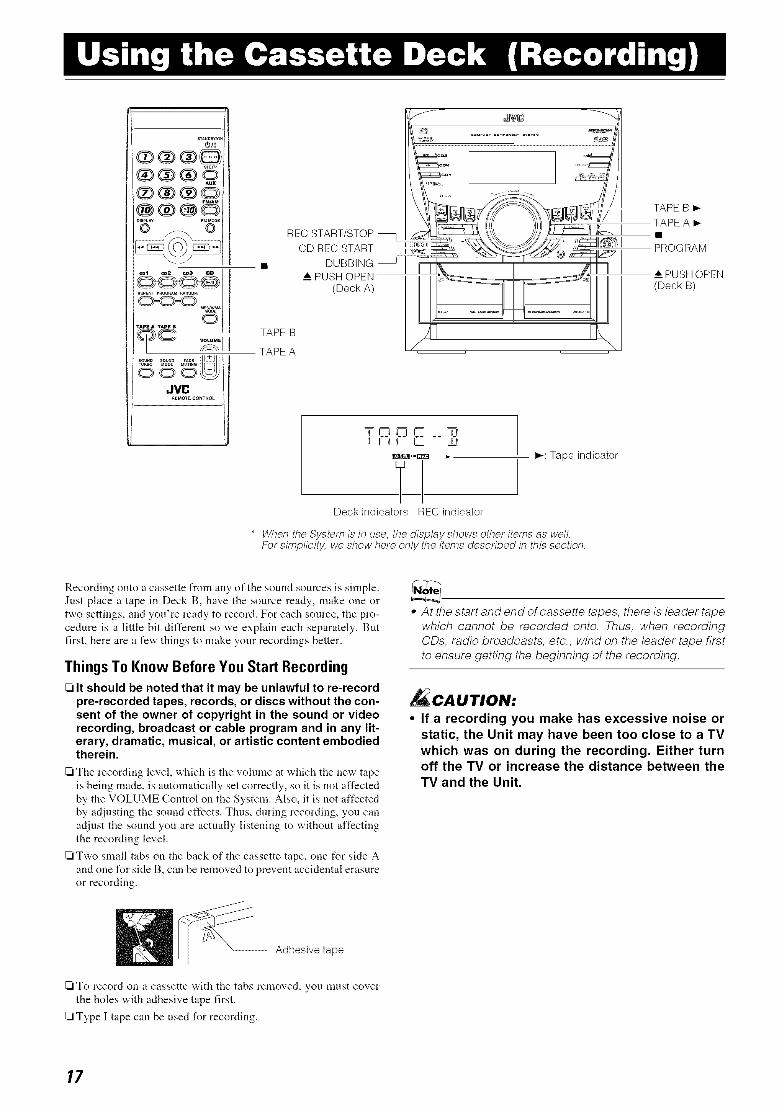
o@@Q_,ux
®®®©
!3 j__ ©
NTAP_A TApeS
O
vc0.......tt
REC START/STOP
CD REC START
• DUBBING [
" PUSH OPEN _ [_
(Dock A)
TAPE B
TAPE A _
TNAr 7-Ir-lr-i'- --_i
lDock indicators REC indicator
_: Tape indicator
* When the System is in use, the display shows other items as well.For simplicity, we show here only the items described in this section.
TAPE B
TAPE A
PROGRAM
A PUSHOPEN(Deck B)
Recording onto a cassette from any of the sound sources is simple.
Just place a tape in Deck B, have the source ready, make one or
two settings, and you're ready to record. For each source, the pro-
cedure is a little bit different so we explain each separately. But
first, here are a few things to make your recordings better.
Things To Know Before You Start Recording
_lt should be noted that it may be unlawful to re-recordpre-recorded tapes, records, or discs without the con-
sent of the owner of copyright in the sound or videorecording, broadcast or cable program and in any lit-erary, dramatic, musical, or artistic content embodiedtherein.
[21The recording level, which is the volume at which the new tape
is being made, is automatically set correctly, so it is not affected
by the VOLUME Control on the System. Also, it is not affected
by adjusting the sound effects. Thus, during recording, you can
adjust the sound you are actually listening to without affecting
the recording level.
_Two small tabs on the back of the cassette tape, one for side A
and one for side B, can be removed to prevent accidental erasure
or recording.
_ Adhesive tape
_To record on a cassette with the tabs removed, you nmst cover
the holes with adhesive tape first.
_Type I tape can be used for recording.
• At the start and end of cassette tapes, there is leader tape
which cannot be recorded onto. Thus, when recording
CDs, radio broadcasts, etc., wind on the leader tape first
to ensure getting the beginning of the recording.
_CAUTION:
• If a recording you make has excessive noise orstatic, the Unit may have been too close to a TVwhich was on during the recording. Either turnoff the TV or increase the distance between theTV and the Unit.
17
Using the Cassette Deck (Recording)
Standard Recording
To Record Any Sound Source to TapeFollow these steps to record from any sound source onto a tape inDeck B.
1 Insert a blank or erasable tape into the Deck
B and wind past the tape leader.
3 Press the CD REC START button on the Unit."CD REC" appears on the display and the "REC" indicatorlights up. Then, the System begins CD Synchro Recording andthe tracks on the CD are recorded on the tape.When recording of the tracks of all CDs is finished, the CDPlayer and Cassette Deck stop.• If the tab of the cassette tape on the Deck B is removed to
prevent erasure or recording, "NO REC" will appear on thedisplay.
• After the CD Player has played the entire CD or all the pro-granlmed tracks, the tape automatically stops.
To stop at any time during the recording process, pressthe • button. The CD Phtyer and Cassette Deck stop.
Tape travelling direction
2 Prepare the source, by, for example, tuning
in a radio station, loading CDs, or turning on
connected equipment,• For CD recording, see "CD Synchro Recording" mentioned
belo'_,.
• For dubbing, see "Tape to Tape Recording (DUBBING)"described below.
3 Press the REC START/STOP button on the
Unit.The "REC" indicator lights up and the System begins record-
ing.
The Tape indicator (_) blinks on the display.• If the tab of the cassette tape on the Deck B is removed to
prevent erasure or recording, "NO REC" will appear on the
display.
To stop during recording, press the REC START/STOP but-
ton on the Unit, or press the • button.
Recording an AM Station to Tape (Beat Cut)When recording an AM broadcast, beats may be produced which are
not heard when listening to the broadcast. If this happens, press theFM MODE button on the Remote Control to eliminate the beats.
1[ Set to AM station and start recording.
2 Press the FM MODE button on the RemoteControl to eliminate the beats.Each tilne you press tile button, tile display changes as shownbelow:
BEAT 1 _ BEAT 2
CD Synchro Recording
Everything on the CD goes onto tile tape in the order it is on the
CD, or according to the order you have set in a program.
1[ Prepare CDs. (See page 12.)Press the CD1-3 button (that you want to make recording), andthen press the • button.• If you want to record specific tracks only, you need to pro-
gram the tracks bel\_rehand. (See page 14.)
• If you want to record one CD only, you need to load one
CD only.
2 Insert a blank or erasable tape into the DeckB and wind past the tape leader,
• tf the CD REC START button is pressed when "RESUME"is displayed (see page 14), CD Synchro Recording will bestarted from the beginning of the first track.
• When making SLEEP timer settings while doing CD Syn-chro recording, set enough time to allow for the CD to fin-ish playing, otherwise the power will go off beforerecording is completed.
Tape to Tape Recording (DUB-BING)
Recording from one tape to another is called dubbing.You can dub tapes simply, with just a single button.
1[ Press the TAPE A _ button, and then press
the • button.
2 Insert the source cassette you want to copy
from into Deck A for playback.
3 Insert a blank or erasable cassette you want
to copy onto into Deck B for recording.
4 Press the DUBBING button on the Unit.
Deck A and Deck B will start simultaneously and tile "REC"indicator lights up.During dubbing, the Deck indicators "A" and "B" light up al-ternately.• If no tape is inserted into Deck A, "NO TAPE" "a,ill appear
on the display.• If no tape is inserted into Deck B, "NO TAPE" will appear
on the display.
To stop dubbing, press the REC START/STOP button on theUnit or the • button.
° During dubbing, you can hear sound effects through thespeakers or headphones. However, the sound is dubbedwithout sound effects.
18
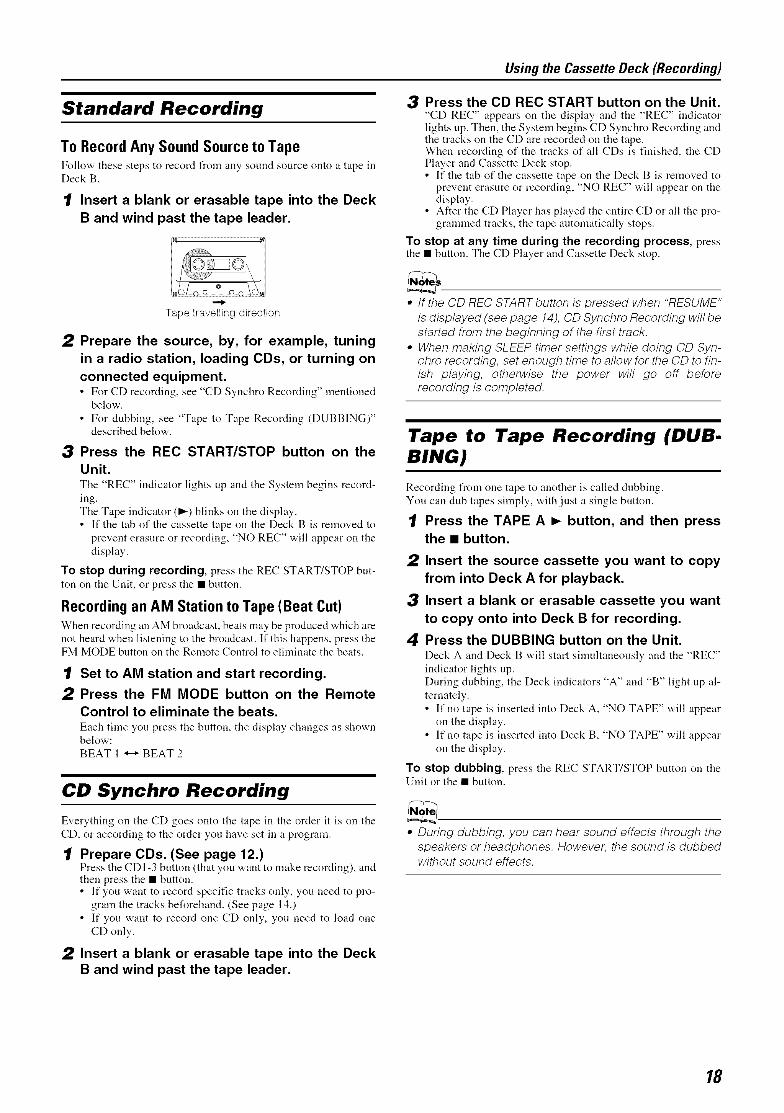
%_,0"Q@@Q,®®®©
2___¸_>_2_
MP_lw_
OTAPEA TAPSB
JVC
AUX
AUX
\
AUX jack
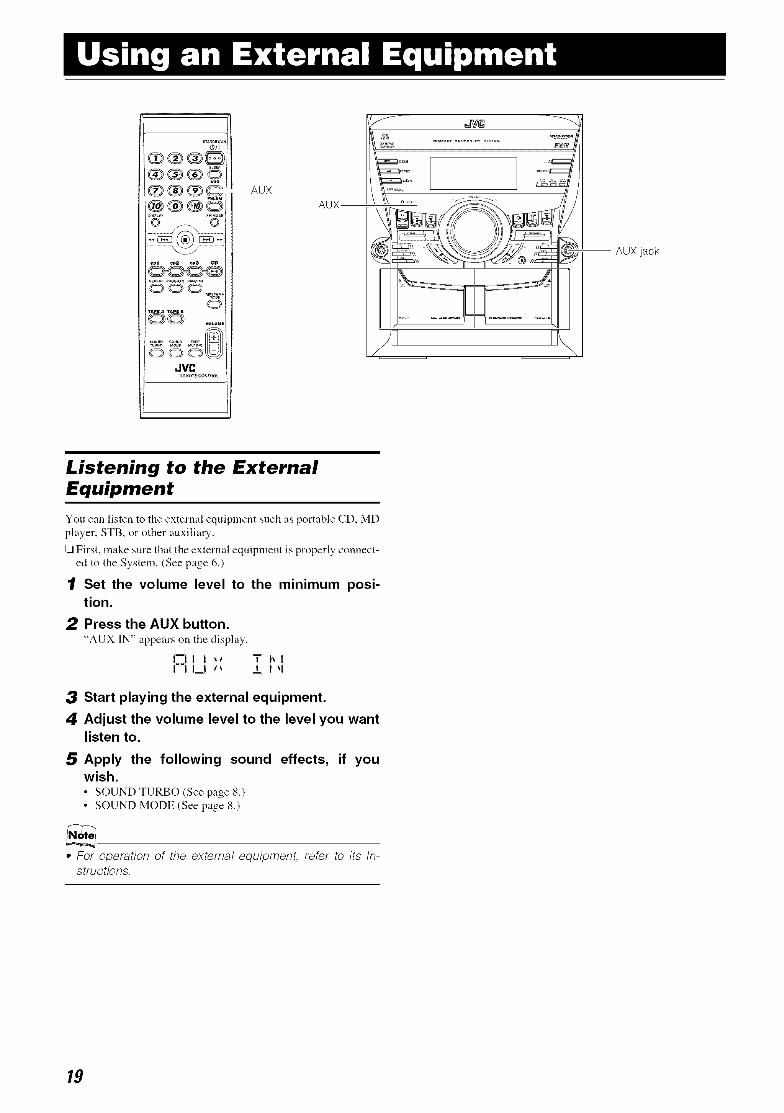
Listening to the ExternalEquipment
You can listen to the external equipment such as portable CD, MDplayer, STB, or other auxiliary.
[71First, make sure that the external eqnipnlent is properly connect-ed to the System. (See page 6.)
1 Set the volume level to the minimum posi-
tion.
2 Press the AUX button.
"AUX IN" appears on tile display.
I--II I _ T I_1I--I I_1 ,'_, £ I _,1
3 Start playing the external equipment.
4 Adjust the volume level to the level you wantlisten to.
5 Apply the following sound effects, if youwish.• SOUNDTURBO (See page 8.)• SOUND MODE (See page 8.)
• For operation of the external equipment, refer to its In-structions.
19
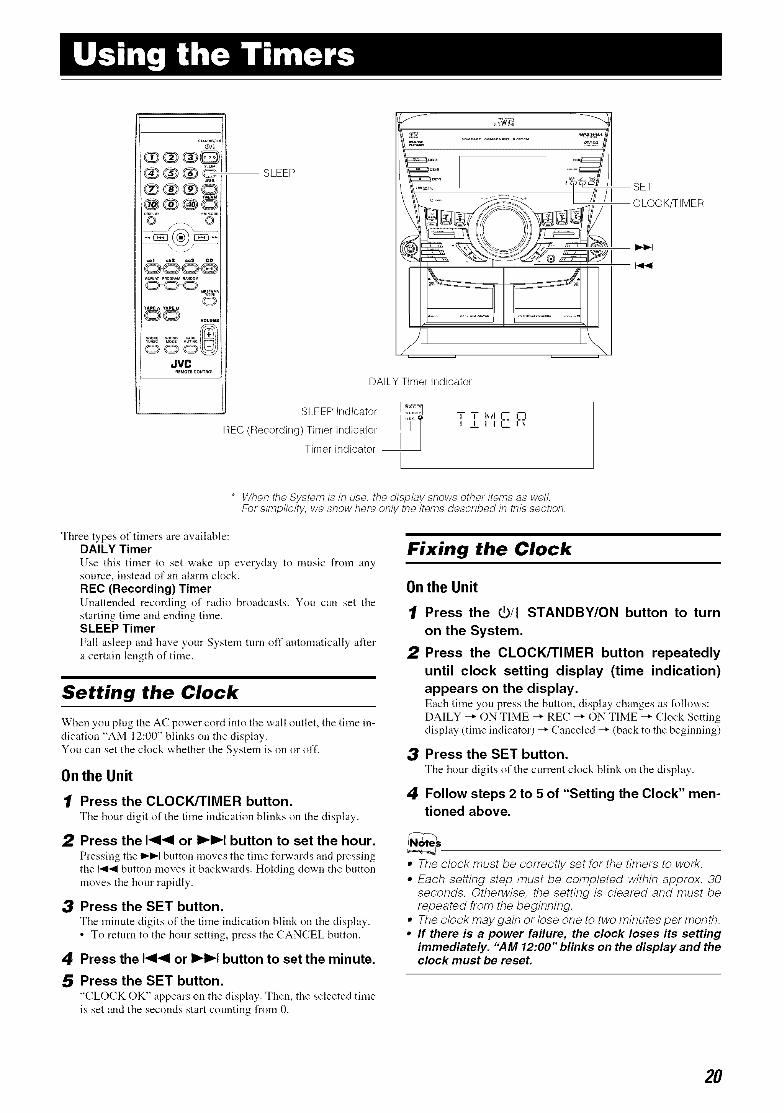
..4®®®@/I®®®@-
%@\ ./
6
JVC_T_ CONTROL
SLEEP
DAILY Timer indicator/
SLEEP indicator I:_ T T Iwl IK L--J
aT ' ' '''--''REC (Recording)Timer indicator
Timer indicator
* When the System is in use, the display shows other items as well.For simplicity, we show here only the items described in this section.
Three types of timers are available:DALLY Timer
Use this timer to set wake up everyday to music from anysource, instead of an alarm clock.
NEe (Recording) TimerUnattended recording of radio broadcasts. You can set the
starting time and ending time.SLEEP Timer
Fall asleep and have your System tllrn off alltomatically after
a certain length of time.
Setting the Clock
When you plug the AC power cord into the wall outlet, the time in-
dication "AM 12:00" blinks on the display.
You can set the clock whether the System is on or off.
Onthe Unit
I Press the CLOCK/TIMER button.Tile hour digit of the time iudication blinks on the display.
2 Press the I_1_1 or I,,-I,,-I button to set the hour.Pressing tile I_1 button moves tile time forv,.ards and pressing
the _ button moves it backwards. Holding down the button
moves the hour rapidly.
3 Press the SET button.Tile minute digits of tile time indication blink on tile display.
• To return to tile hour setting, press the CANCEL button.
4 Press the _ or _ button to set the minute.
5 Press the SET button."CLOCK OK" appears on tile display. Then, tile selected time
is set and the seconds start counting from 0.
Fixing the Clock
Onthe Unit
1
2
3
4
Press the @/I STANDBY/ON button to turn
on the System.
Press the CLOCK/TIMER button repeatedly
until clock setting display (time indication)appears on the display.Each time you press tile button, display changes as follov,.s:
DAILY _" ON TIME _" REC _" ON TIME _" Clock Setting
display (time indicator) _" Canceled _" (back to the beginning)
Press the SET button.Tile hour digits of tile current clock blink on tile display.
Follow steps 2 to 5 of "Setting the Clock" men-tioned above.
• The clock must be correctly set for the timers to work.• Each setting step must be completed within approx. 30
seconds. Otherwise, the setting is cleared and must berepeated from the beginning.
• The clock may gain or lose one to two minutes per month.• If there is a power failure, the clock loses its setting
immediately. "AM 12:00" blinks on the display and theclock must be reset.
20
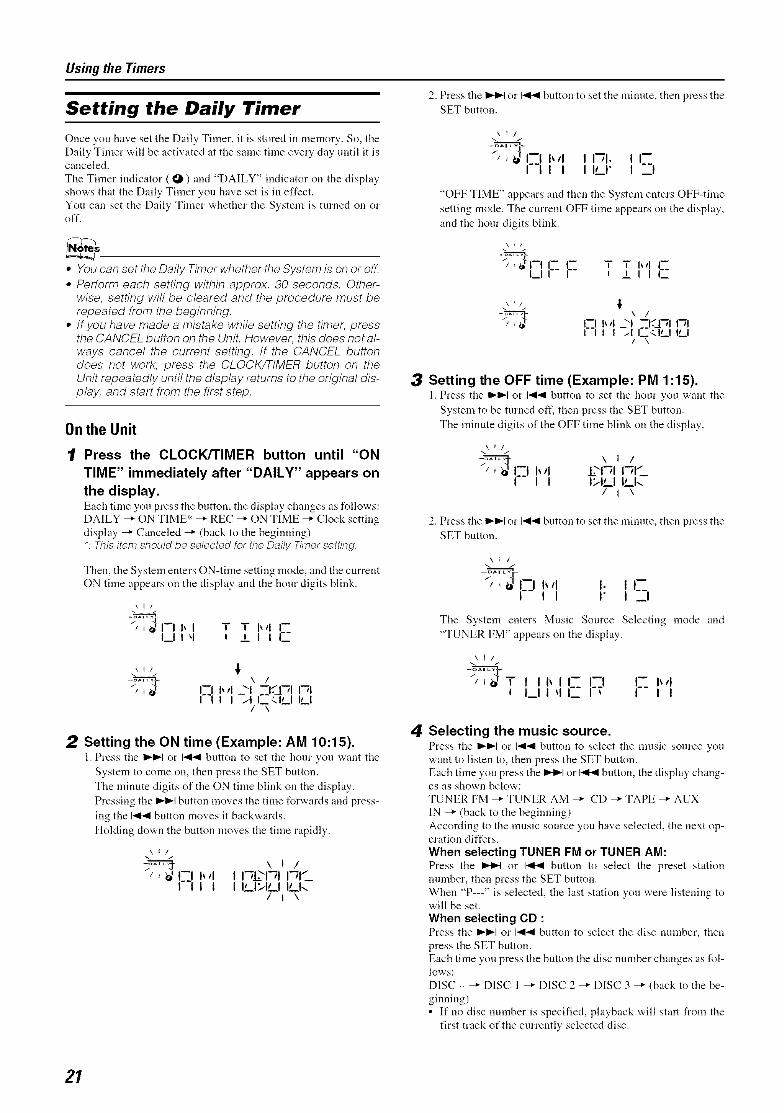
Using the Timers
Setting the Daily Timer
Once you have set the Daily Timer, it is stored in memory. So, the
Daily Timer will be activated at the same time every clay until it iscanceled.
The Timer indicator (O) and "DALLY" indicator on the display
shows that the Daily Timer yon have set is in effect.
You can set the Daily Timer whether the System is turned on oroft'.
• You can set the Daily Timer whether the System is or) or off.
• Perform each setting within approx. 30 seconds. Other-wise, setting will be cleared and the procedure must berepeated from the beginning.
• If you have made a mistake while setting the timer, pressthe CANCEL button on the UniL However, this does not al-ways cancel the current setting, tf the CANCEL buttondoes not work, press the CLOCK/TIMER button on theUnit repeatedly until the display returns to the original dis-play, and start from the first step.
Onthe Unit
1 Press the CLOCK/TIMER button until "ON
TIME" immediately after "DALLY" appears on
the display.Each time you press the button, the disphty changes as follox_.s:DAILY _" ON TIME* _" REC _" ON TIME _ Clock setting
display _ Canceled _ (back to the beginning)
*: This item should be selected for the Daily Timer setting.
Then, the System enters ON-time setting mode and the cnrrent
ON time appears on the display and the hour digits blink.
\1/
_Jl;rl-i b i T T btl I--I_11 q i i I I I_
\1/ ,!
% I_ I--II_II__I --K4"711-71I--II I -'IC<.ILI ILl
I \
2 Setting the ON time (Example: AM 10:15).1. Press tile I_1_1 or 14141button to set tile hour yon want the
System to come on, then press the SET button.
The minute digits of tile ON time blink oil ttle display.
Pressing the _ button moves the time forwards and press-
ing the I-,II4 button moves it backwards.
Holding clown the button moves the time rapidly.
\€/
--'oA,L'._ \ ! /
-- i i i,,__l>i,__l,ca/ I \
2. Press tile I,,-t_1or I-,II4 button to set the minute, then press theSET button.
\t/
b II I I-ii. l l---i-i, I l i,j- I -_-I"OFF TIME" appears and then the System enters OFF-time
setting mode. The current OFF time appears on the display,
and the hour digits blink.
\1/
"J'-'I-I = ' :"'Jl=I_1 t _11 _
I--I b tl _Xl --if-/-_l I-_1I--I I I /I I:.2(1" I I"1
/ \
3 Setting the OFF time (Example: PM 1:15).1. Press the _ or 14141button to set the hour you want the
System to be turned off. then press the SET button.
The minute digits of the OFF time blink on the display.
\t/\ J
"/ ) --I b _I I."I-/I I-ii"_I I I>ILI ILk
I i \
2. Press tile I,,-t_1or I-,II4 button to set the minute, then press theSET button.
\1/
s, Jl-i ),,i ). l): II I I" I _
The System enters Music Source Selecting mode and
"TUNER FM" appears on the display.
\t/
--OAI Ly
_T t Ibll-- I' I__11'1 122 I_ F_ b!1I
4 Selecting the music source.Press the I_1_1 or _ button to select the muszc source youwant to listen to, then press the SET button.
Each time you press the I,,I_1 or I-,II4 button, the display chang-es as shown below:
TUNER FM _ TUNER AM _" CD _" TAPE _" AUX
IN -_ (back to the beginning)
According to the music source you have selected, the next op-eration differs.
When selecting TUNER FM or TUNER AM:Press the I,,-t_1 or 1414 button to select the preset station
nmnber, then press the SET button.
When "P---" is selected, the last station you were listening towill be set.
When selecting CD :Press the l_l,,-I or 14141bntton to select tile disc mnnber, then
press the SET button.
Each time you press the button the disc number changes as fol-lows:
DISC - _ DISC 1 _" DISC 2 _" DISC 3 _" (back to the be-
ginning)
• If no disc number is specified, playback will start from the
first track of the currently selected disc.
21
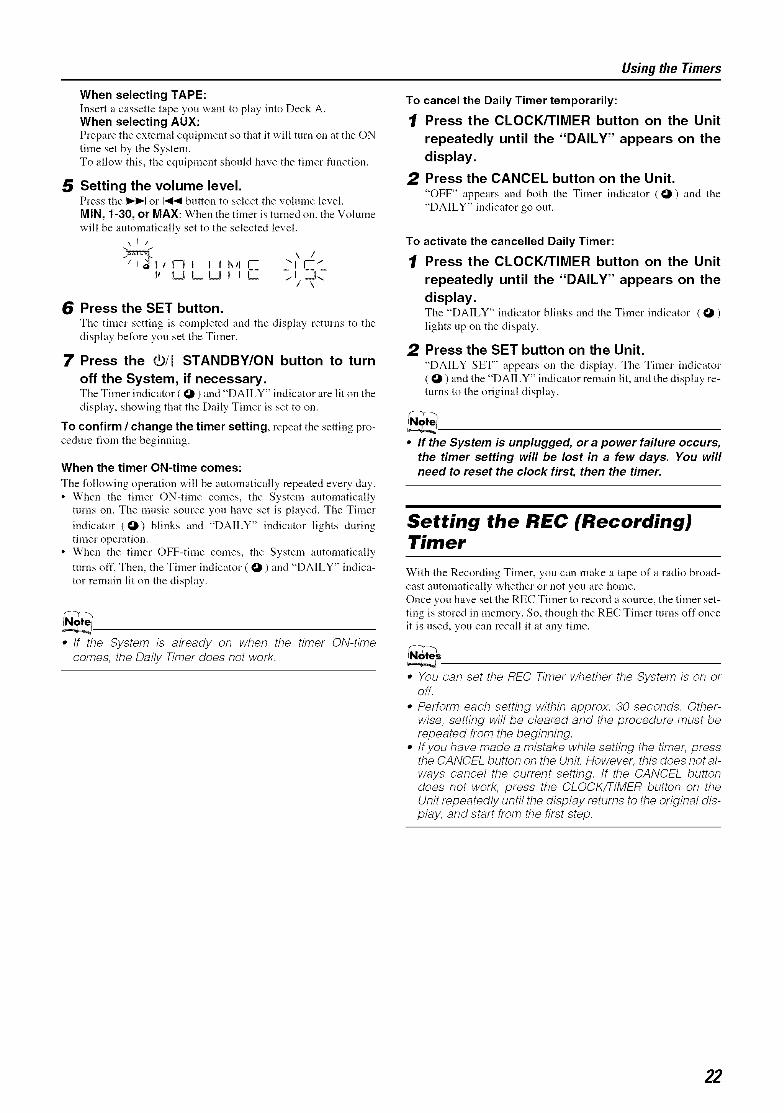
When selecting TAPE:Insert a cassette tape you want to play into Deck A.When selecting AUX:Prepare tile external equipment so that it will turn on at tile ONtime set by the System.To allow this, the equipment should have the timer flmction.
5 Setting the volume level.Press tile _ or I-,II4button to select tile volmne level.MIN, 1-30, or MAX: When the timer is turned on, the Volumewill be automatically set to the selected level.
\ i /J
_,rll i lh_, r 2' rCtI t__t L I__1 t I L _1 --Ix
/ \
6 Press the SET button.The timer setting is completed and tile display returns to thedisplay before you set the Timer.
7 Press the (b/lSTANDBY/ON button to turn
off the System, if necessary.The Timer indicator ( 0 ) and"DAILY" indicator are lit on tiledisplay, showing that the Daily Timer is set to on.
To confirm / change the timer setting, repeat the setting pro-cedure from the beginning.
When the timer ON-time comes:
The following operation will be automatically repeated every day.
• When the timer ON-time comes, the System automaticallyturns on. The music source you have set is played. The Timer
indicator (O) blinks and "DALLY" indicator lights during
timer operation.
• When the timer OFF-time comes, the System automatically
turns oft'. Then, the Timer indicator ( O ) and "DAILY" indica-
tor remain lit on the display.
• tf the System is already on when the timer ON-timecomes, the Daily Timer does not work.
Using the Timers
To cancel the Daily Timer temporarily:
1[ Press the CLOCK/TIMER button on the Unit
repeatedly until the "DAILY" appears on thedisplay.
2 Press the CANCEL button on the Unit."OFF" appears and both the Timer indicator (0) and the"DAILY" indicator go out.
To
1
2
activate the cancelled Daily Timer:
Press the CLOCK/TIMER button on the Unit
repeatedly until the "DAILY" appears on thedisplay.The "DAILY" indicator blinks and the Timer indicator ( 0 )lights up on the dispaly.
Press the SET button on the Unit."DAILY SET" appears on tile display. Tile Timer indicator( 0 ) and the "DAILY" indicator remain lit, and the display re-turns to the original display.
• If the System is unplugged, or a power failure occurs,the timer setting will be lost in a few days. You willneed to reset the clock first, then the timer.
Setting the REC (Recording)Timer
With the Recording Timer, you can make a tape of a radio broad-
cast automatically whether or not you are home.
Once you have set the REC Timer to record a source, the timer set-
ting is stored in memory. So, though the REC Timer turns off once
it is used, you can recall it at any time.
• You can set the REC Timer whether the System is on oroff.
• Perform each setting within approx. 30 seconds. Other-wise, setting will be cleared and the procedure must berepeated from the beginning.
• tfyou have made a mistake while setting the timer, pressthe CANCEL button on the UniL However, this does not al-ways cancel the current setting, tf the CANCEL buttondoes not work, press the CLOCK/TIMER button on theUnit repeatedly until the display returns to the original dis-play, and start from the first step.
22
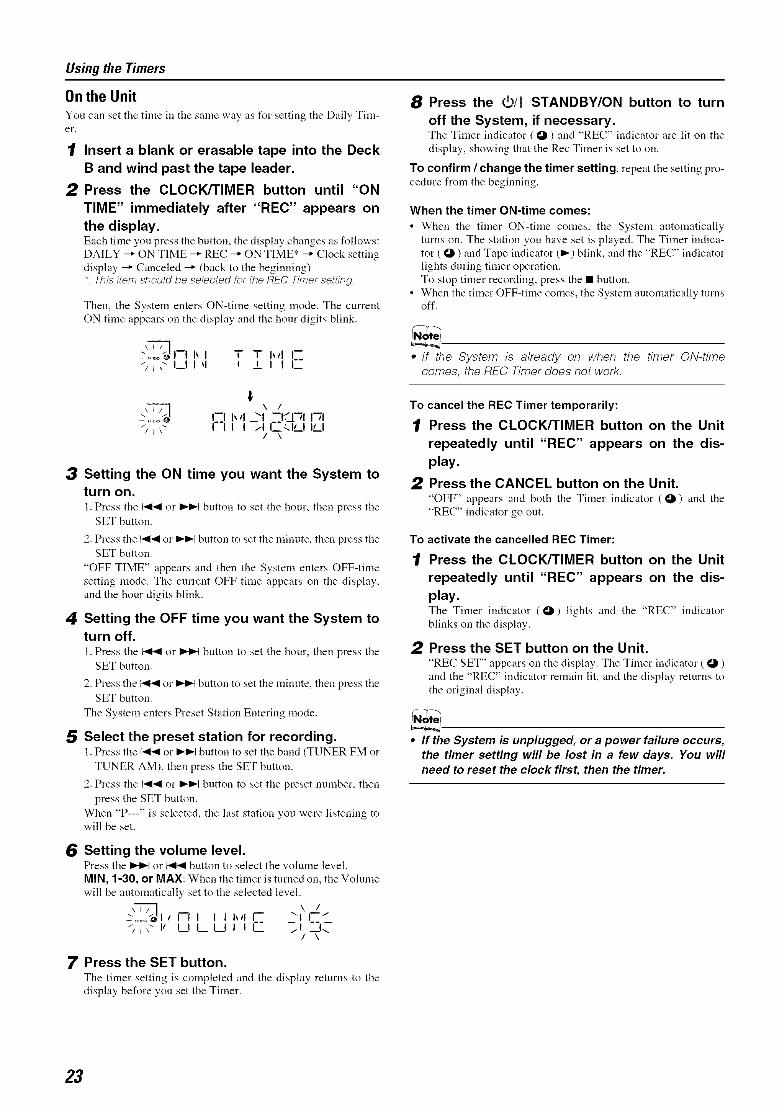
Using the Timers
Onthe Unit
You can set tile time in tile same way as t)r setting tile Daily Tin>er.
I Insert a blank or erasable tape into the Deck
B and wind past the tape leader.
2 Press the CLOCK/TIMER button until "ON
TIME" immediately after "REC" appears onthe display.Each time you press tile button, tile display changes as follows:
DAILY _" ON TIME --* REC _ ON TIME* _ Clock setting
display _ Canceled _ (back to the beginning)*: This item should be selected for the REC Timer setting.
Then, the System enters ON-time setting mode. The current
ON time appears on the display and the hour digits blink.
2,,_o_1--1 1_ I T T b_l I--_" I_1 I q t L I I I-"
2 ._o" I_--_1I__1..__1--I:'.J";l f'-iI"/_x" I'I I I M l:qlLl ILl/ \
3 Setting the ON time you want the System toturn on.I. Press tile _ or _ button to set tile hour, then press tile
SET button.
2. Press the _ or _ button to set the minute, then press the
SET button.
"OFF TIME" appears and then the System enters OFF-time
setting mode. The current OFF time appears on the display,
and the hour digits blink.
4 Setting the OFF time you want the System toturn off.I. Press tile _ or _ button to set tile hour, then press tile
SET button.
2. Press the _ or _ button to set the minute, then press the
SET button.
The System enters Preset Station Entering mode.
5 Select the preset station for recording.I. Press the 14_1 or I_1_1 button to set the band (TUNER FM or
TUNER AM), then press the SET button.
2. Press the 14_1 or I_1_1button to set the preset number, then
press the SET button.
When "P---" is selected, the last station you were listening towill be set.
6 Setting the volume level.Press the 1,,I,,-Ior _ button to select tile volume level.
MIN, 1-30, or MAX: When the timer is turned on, the Volume
will be automatically set to the selected level.
.,'-71/ -;,-!......_I ,'I--II I I hll I-- ...."i_\" 11 I__II__I__II I I-- /I __I\
/ \
7 Press the SET button.The timer setting is completed and the disphty returns to tile
display before you set the Timer.
8 Press the _/I STANDBY/ON button to turn
off the System, if necessary.The Timer indicator (I_) and "REC" indicator are lit on the
display, showing that the Rec Timer is set to on.
To confirm / change the timer setting, repeat the setting pro-
cedure from the beginning.
When the timer ON-time comes:
• When the timer ON-time comes, the System automatically
turns on. The station you have set is played. The Timer indica-
tor ( !_ ) and Tape indicator (1_) blink, and the "REC" indicator
lights during timer operation.
To stop timer recording, press the • button.
• When the timer OFF-time comes, the System automatically turnsoff.
,, tf the System is already on when the timer ON-time
comes, the REC Timer does not work.
To cancel the REC Timer temporarily:
1[ Press the CLOCK/TIMER button on the Unit
repeatedly until "REC" appears on the dis-play.
2 Press the CANCEL button on the Unit."OFF" appears and both the Timer indicator (O) and the
"REC" indicator go out.
To activate the cancelled REC Timer:
I Press the CLOCK/TIMER button on the Unit
repeatedly until "REC" appears on the dis-play.Tire Timer indicator (0) lights and tile "RE(.'" indicator
blinks on the display.
2 Press the SET button on the Unit."REC SET" appears on the disphty. The Timer indicator ( O )
and the "REC" indicator remain lit, and the display returns to
the original display.
• If the System is unplugged, or a power failure occurs,
the timer setting will be lost in a few days. You will
need to reset the clock first, then the timer.
23

Using the Timers
Setting the SLEEP Timer
Use the Sleep Timer to turn the System off after a certain number
of minutes when it is playing. By setting the Sleep Timer, you can
fall asleep to music and know that your System will turn offby it-
self rather than play all night.
• You can only set the Sleep Timer when the System is on.
Onthe Remote Control
1 During playback a source, press the SLEEPbutton.
Tile "SLEEP" indicator starts blinking on tile display.
2 Set the length of time you want the source toplay before shutting off.Each time you press the SLEEP button, the time length chang-es as follows:10 _ 20 _ 30 _" 60 _" 90 _" 120 _" OFF _" (back to thebeginning)
_' _-----I l--I-- CI I-- I'31\ --Il_ l--iC i F-IILl
3 Wait for 5 seconds.The "SLEEP" indicator stops blinking and remains lit, and tiledisplay returns to the original one before setting the SleepTimer.
The System is now set to tnm oft"alter tile number of minutesyou have set.
To Confirm the Sleep Time:When the SLEEP button on the Remote Control is pressed, the re-maining sleep time is displayed. Wait until the display returns tothe original display.
To Cancel the SLEEP Timer Setting:
Press tire SLEEP button until "OFF" appears on tire display.• Turning off the System also cancels the SLEEP Timer.
Timer Priority
Since REC Timer and DAILY Timer can be set independently, youmay wonder what happens if the settings overlap. Here are the pri-orities for REC Timer and DAILY Timer:
• Timer with the earlier time setting will have the priority.Timer will not operate when other Timer is operating.
• If other Timer is set to an exact same time as the REC Timer,tile REC Timer will have the priority.
[71REC Timer and DAILY Timer will not operate when SLEEPTimer is operating.
Example
ONREC Timer
DALLY Timer
Setting
OFF
iON l OFF
i
REC Timer
DALLY Timer
9:30PM 10:00PM 10:30PM 11:00PM
#Operation
ON OFF
9:30PM 10:30PM
Operates only in REC Timer mode.
• When the REC Timer or the DALLY Timer is operating,SLEEP Timer can not be set.
24
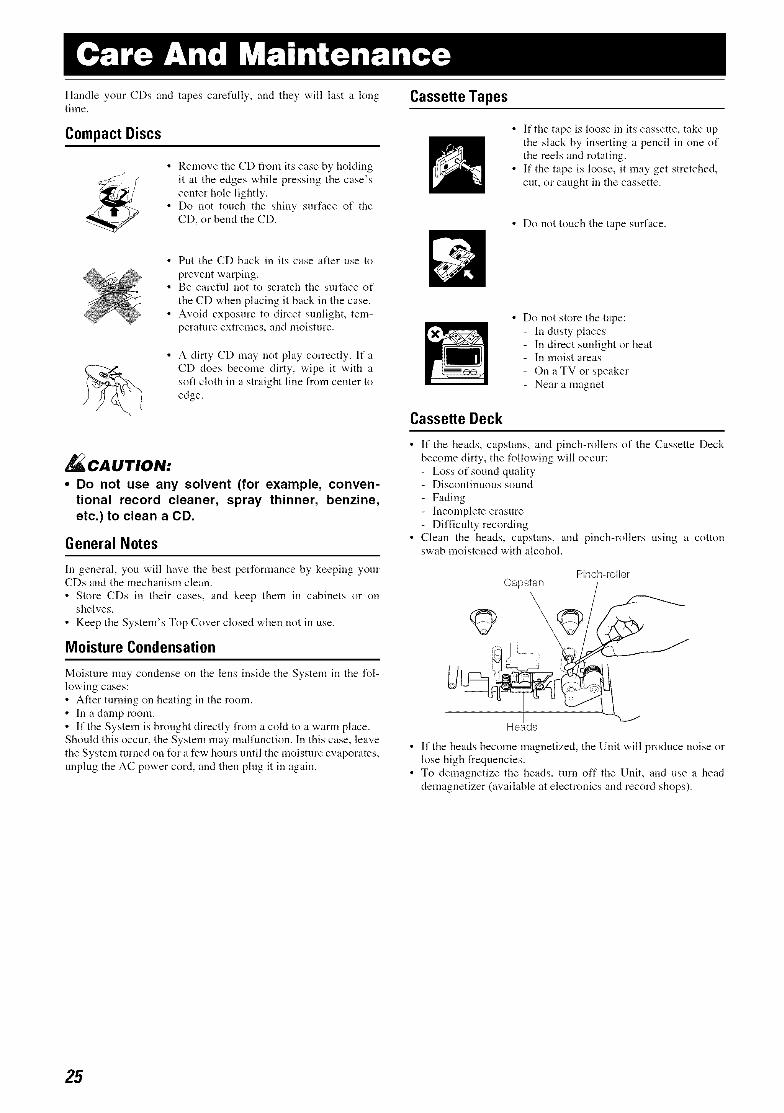
Handle your CDs and tapes carefully, and they will last a longtime.
Compact Discs
• Remove the CD from its case by holdingit at the edges while pressing the case'scenter hole lightly.
• Do not touch the shiny surface of theCD, or bend the CD.
CassetteTapes
• If the tape is loose in its cassette, take upthe slack by inserting a pencil in one ofthe reels and rotating.
• If the tape is loose, it may get stretched,cut, or caught in the cassette.
• Do not touch the tape surface.
• Put the CD back in its case after use to
prevent warping.• Be carefid not to scratch the surface of
the CD when placing it back in the case.
• Avoid exposure to direct sunlight, tem-
perature extremes, and moisture.
A dirty CD may not play correctly. If a
CD does become dirty, wipe it with a
soft cloth in a straight line from center to
edge.
_CAUTION:
• Do not use any solvent (for example, conven-tional record cleaner, spray thinner, benzine,etc.) to clean a CD.
General Notes
In general, you will have the best performance by keeping yourCDs and the mechanism clean.
• Store CDs in their cases, and keep them in cabinets or onshelves.
• Keep the System's Top Cover closed when not in use.
Moisture Condensation
Moisture may condense on the lens inside the System in the fol-
lowing cases:
• Alter turning on heating in the room.
• In a daulp roonl.
• If the System is brought directly from a cokt to a warm place.
Should this occur, the System may maffunction. In this case, leave
the System turned on for a few hours until the moisture evaporates,
unplug the AC power cord, and then plug it in again.
• Do not store the tape:
- In dusty places
- In direct sunlight or heat- In moist areas
- On a TV or speaker
- Near a magnet
Cassette Deck
• If the heads, capstans, and pinch-rollers of the Cassette Deck
become dirty, the t_llowing will occur:
- Loss of sound quality- Discontinuous sound
- Fading
- Incomplete erasure
- Difficulty recording
• Clean the heads, capstans, and pinch-rollers using a cottonswab moistened with alcohol.
Pinch-rollerCapstan
• If the heads become magnetized, the Unit will produce noise or
lose high frequencies.
• To demagnetize the heads, turn off the Unit, and use a head
demagnetizer (available at electronics and record shops).
25
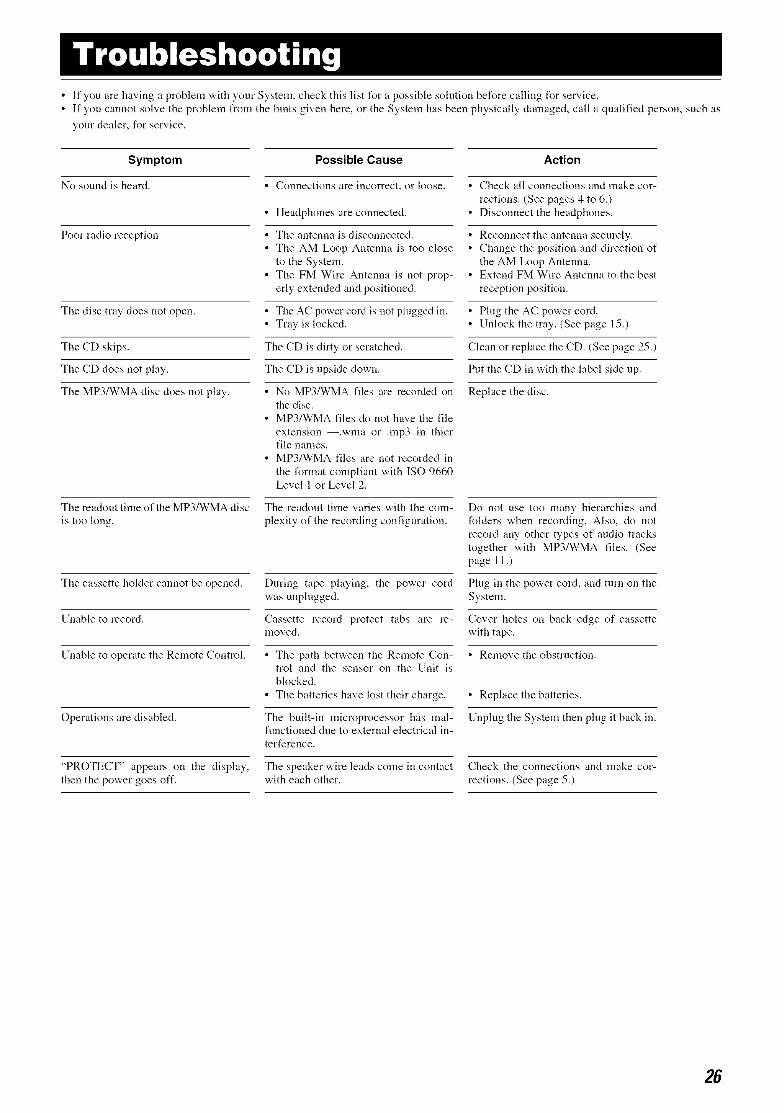
• If you are having a problem with your System, check this list tUr a possible solution before calling tUr service.
• If you cannot solve the problem from the hints given here, or the System has been physically damaged, call a qualified person, such as
your dealer, for service.
Symptom
No sound is heard.
Poor radio reception
The disc tray does not open.
The CD skips.
The CD does not play.
The MP3/WMA disc does not play.
The readout time of the MP3/WMA disc
is too long.
The cassette hokter cannot be opened.
Unable to record.
Unable to operate the Remote Control.
Operations are disabled.
"PROTECT" appears on the display,
then the power goes oft'.
Possible Cause
• Connections are incorrect, or loose.
• Headphones are connected.
• The antenna is disconnected.
• The AM Loop Antenna is too close
to the System.
• The FM Wire Antenna is not prop-
erly extended and positioned.
• The AC power cord is not plugged in.
• Tray is locked.
The CD is dirty or scratched.
The CD is upside down.
• No MP3/WMA files are recorded on
the disc.
• MP3/WMA files do not have the file
extension .wma or .mp3 in thierfile names.
• MP3/WMA files are not recorded in
the format compliant with ISO 9660Level 1 or Level 2.
The readout time varies with the com-
plexity of the recording configuration.
During tape playing, the power cordwas unplugged.
Cassette record protect tabs are re-moved.
• The path between the Remote Con-trol and the sensor on the Unit isblocked.
• The batteries have lost their charge.
The built-in microprocessor has mal-functioned due to external electrical in-terference.
The speaker wire leads come in contactwith each other.
Action
• Check all connections and make cor-
rections. (See pages 4 to 6.)• Disconnect the headphones.
• Reconnect the antenna securely.• Change the position and direction of
the AM Loop Antenna.• Extend FM Wire Antenna to the best
reception position.
• Plug the AC power cord.• Unlock the tray. (See page 15.)
Clean or replace the CD. (See page 25.)
Put the CD in with the label side up.
Replace the disc.
Do not use too many hierarchies and
folders when recording. Also, do not
record any other types of audio tracks
together with MP3/WMA files. (See
page 11.)
Plug in the power cord, and turn on the
System.
Cover holes on back edge of cassettewith tape.
• Remove the obstrnction.
• Replace the batteries.
Unplug the System then plug it back in.
Check the connections and make cor-
rections. (See page 5.)
26

TO OUR VALUED CUSTOMER
THANKYOU FOR PURCHASING THIS JVC PRODUCT.
WE WANT TO HELP YOU ACHIEVE A PERFECT EXPERIENCE.
NEED HELP ON HOWTO HOOK UP?NEED ASSISTANCE ON HOW TO OPERATE?NEED TO LOCATE A JVC SERVICE CENTER?
LiKE TO PURCHASE ACCESSORIES?
HERE TO HELP!
TOLL EE: 1(800)252-5722
http ://www.jvc.com
Remember to retain your Bill of Sale for Warranty Service.
Do not attempt to service the product yourself
Caution
To prevent electrical shock, do not open the cabinet.
There are no user serviceable parts inside.
Please refer to qualified service personnel for repairs.
BT-51001-6(0204)
******************************************************************************
* ® *
.* LIMITEDWARRANTY AUDIO.1 .**
* JVC COMPANY OF AMERICA (JVC) warrants this product and all parts thereof, except as set forth below ONLY ** TO THE ORIGINAL RETAIL PURCHASER to be FREE FROM DEFECTIVE MATERIALS AND WORKMANSHIP from *
* the date of original purchase for the period shown below. ("The Warranty Period") *
LABORPARTS 1 YR 1 YR *
* THIS LIMITED WARRANTY IS VALID ONLY IN THE FIFTY (50) UNITED STATES, THE DISTRICT OF COLUMBIA AND** IN THE COMMONWEALTH OF PUERTO RICO. *
, WHAT WE WILL DO: ,
* If this product is found to be defective within the warranty period, JVC will repair or replace defective parts with new or **.** rebuilt equivalents at no charge to the original owner. Such repair and replacement services shall be rendered by JVC ,
* during normal business hours at JVC authorized service centers. Parts used for replacement are warranted only for the _rremainder of the Warranty Period. All products may be brought to a JVC authorized service center on a carry-in basis. ,
* Color televisions with a screen size of 27" or greater qualify for in-home service. In such cases, a technician will come ** to your home and either repair the TV there or remove and return it if it cannot be repaired in your home. *
* WHAT YOU MUST DO FOR WARRANTY SERVICE: *
* Please do not return your product to the retailer *,* Instead, return your product to the JVC authorized service center nearest you. If shipping the product to the service _r* center, please be sure to package it carefully, preferably in the original packaging, and include a brief description of ,
the problem(s). Please call 1-800-252-5722 to locate the nearest JVC authorized service center. Service locations **, can also be obtained from our website http://www.ivc.com. If your product qualifies for in-home service, the service ,* representative will require clear access to the product. *
* If you have any questions concerning your JVC Product, please contact our Customer Relations Department at *.800-252-5722 .* *. WHAT IS NOT COVERED: ,* This limited warranty provided by JVC does not cover: *
1. Products which have been subject to abuse, accident, alteration, modification, tampering, negligence, misuse, faulty
installation, lack of reasonable care, or if repaired or serviced by anyone other than a service facility authorized by,- JVC to render such service, or if affixed to any attachment not provided with the products, or if the model or serial ,, number has been altered, tampered with, defaced or removed; ,
2. Initial installation, installation and removal from cabinets or mounting systems.,3. Operational adjustments covered in the Owner's Manual, normal maintenance, video and audio head cleaning; ,* 4. Damage that occurs in shipment, due to act of God, and cosmetic damage; *
5. Signal reception problems and failures due to line power surge;* 6. Video Pick-up Tubes/CCD Image Sensors are covered for 90 days from the date of purchase; ** 7. Accessories; *,8. Batteries (except that Rechargeable Batteries are covered for 90 days from the date of purchase); ,* 9. Products used for commercial purposes, including, but not limited to rental. *
, There are no express warranties except as listed above. ,
* THE DURATION OF ANY IMPLIED WARRANTIES, INCLUDING THE IMPLIED WARRANTY OF MERCHANTABILITY, ISLIMITED TO THE DURATION OF THE EXPRESS WARRANTY HEREIN. ,
* JVC SHALL NOT BE LIABLE FOR ANY LOSS OF USE OF THE PRODUCT, INCONVIENCE, OR ANY OTHER *,* DAMAGES, WHETHER DIRECT, INCIDENTAL OR CONSEQUENTAL (INCLUDING, WITHOUT LIMITATION,_- DAMAGE TO TAPES, RECORDS OR DISCS) RESULTING FROM THE USE OF THIS PRODUCT, OR ARISING OUT ,,.,,*OF ANY BREACH OF THIS WARRANTY. ALL EXPRESS AND IMPLIED WARRANTIES, INCLUDING THE _.*
WARRANTIES OF MERCHANTABILITY AND FITNESS FOR PARTICULAR PURPOSE, ARE LIMITED TO THE* WARRANTY PERIOD SET FORTH ABOVE. *
** Some states do not allow the exclusion of incidental or consequential damages or limitations on how long an _rimplied warranty lasts, so these limitations or exclusions may not apply to you. This warranty gives you specific ,
legal rights and you may also have other rights which vary from state to state.
. JVC COMPANY OF AMERICA 1700 Valley Road ,* DIVISION OF JVC AMERICAS CORP. Wayne, NJ 07470 *. http://www.jvc.com .
******************************************************************************
REFURBISHED PRODUCTS CARRY A SEPARATE WARRANTY, THIS WARRANTY DOES NOT APPLY. FOR DETAILOF REFURBISHED PRODUCT WARRANTY, PLEASE REFER TO THE REFURBISHED PRODUCT WARRANTYINFORMATION PACKAGED WITH EACH REFURBISHED PRODUCT.
For customer use:
Enter below the Model No. and Serial No. which is located either on the rear, bottom or side of the cabinet.Retain this information for future reference.
Model No. : Serial No. :
Purchase date : Name of dealer :

AmplifierOutput Power 200 W per channel, rain. RMS, driven into 6 f2 at ikHz, with no
more than 10% total harnaonic distortion
Input Sensitivity/Impedance (1 kHz)AUX IN
Speaker terminalsPhones
Cassette Deck SectionFrequency Response
Type I (NORMAL)Wow And Flutter
400 mV/50 kf26- 16f232 f_ - 1 kf_
17 mW/ch output into 32 f2
63 Hz- 12 500 Hz
0.15% (WRMS)
CD PlayerCD Capacity 3 CDs
Dynamic Range 85 dBSignal-To-Noise Ratio 85 dB
Wow And Flutter Unmeasurable
TunerFM Tuner
Tuning RangeAM Tuner
Tuning Range
UnitDimensions
Mass
Speaker Specifications (each unit)SP-MXKC45
TypeSpeaker Unit
Power Handling Capacityhnpedance
Frequency Range
Sound pressure levelDimensions
Mass
Accessories
Power SpecificationsPower RequirementsPower Consumption
87.5 MHz - 108.0 MHz
530kHz-I 710kHz
270 nun x 307 mmx 492mm (W/H/D)(10-11116" x 12-118" x 19-318")Approx. 9.3 kg (20.5 lbs)
3-way bass-reflex type
Woofer: 16 cm (6-5116") cone x 1Mid: 5cm (2") cone x 1Tweeter: 2 cm (13/16") dome x 1200 W
6f245 Hz - 22 000 Hz87 dB/W.m
220 mm x 324 mm x 238 ram(W/H/D)
(8-11/16" x 12-13/16" x 9-3/8")Approx. 3.6 kg (8 lbs)
AM Loop Antenna (1)FM Wire Antenna (1)
Remote Control (1)Batteries R6P (SUM-3)/AA (15F) (2)
AC 120 V %, 60 Hz180 W (power on mode)
23 W (in Standby mode)1 W (in ECO mode)
Design and _v)eclifications' am stfl)]ect ro change without notice.
X
0
ol
o0
"D
o.-Io0
"u0z111z-I
-I111
EN
© 2006 Victor Company of Japan, Limited
JVC0106NYMCREBET
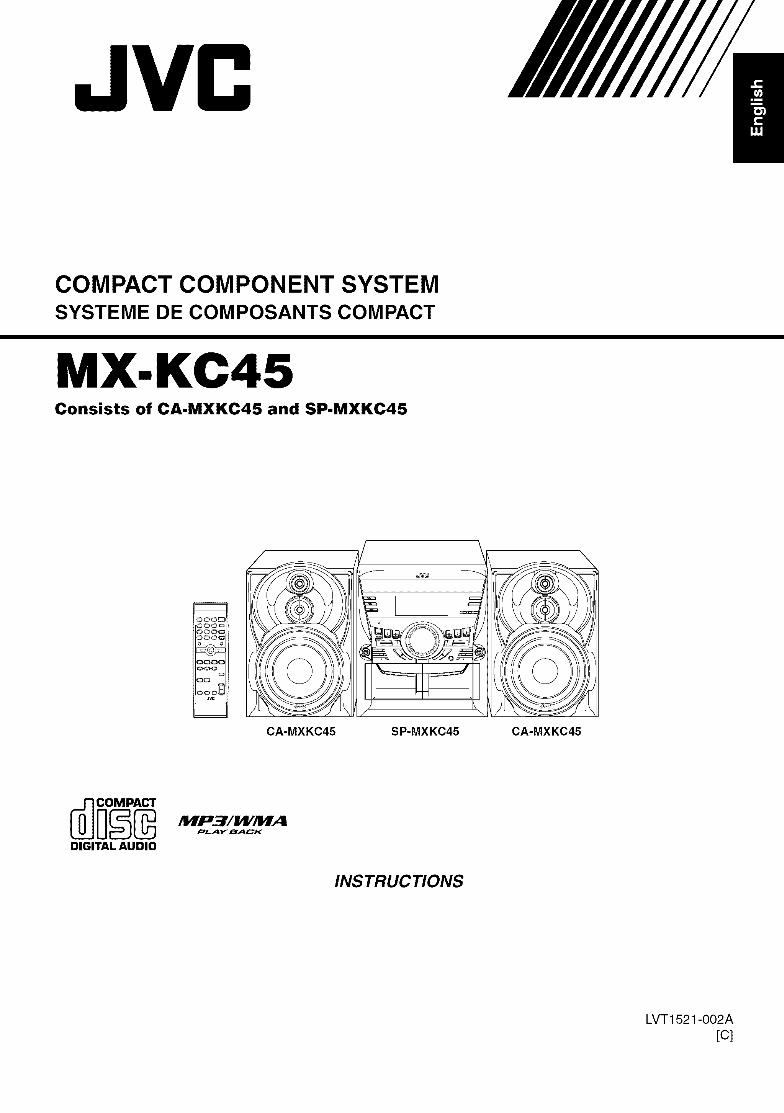
JVC !!!!!//////!COMPACT COMPONENT SYSTEMSYSTEME DE COMPOSANTS COMPACT
MX-KC45Consists of CA-MXKC45 and SP-MXKC45
m
OOOC©©Oc
©©OC
o-ooC
OO
Jw
CA-MXKC45 SP-MXKC45 CA-MXKC45
_ _ IWP3/ WIWAipl,_lty BACK
DIGITAL AUDIO
INSTRUCTIONS
LVT1521-002A[c]
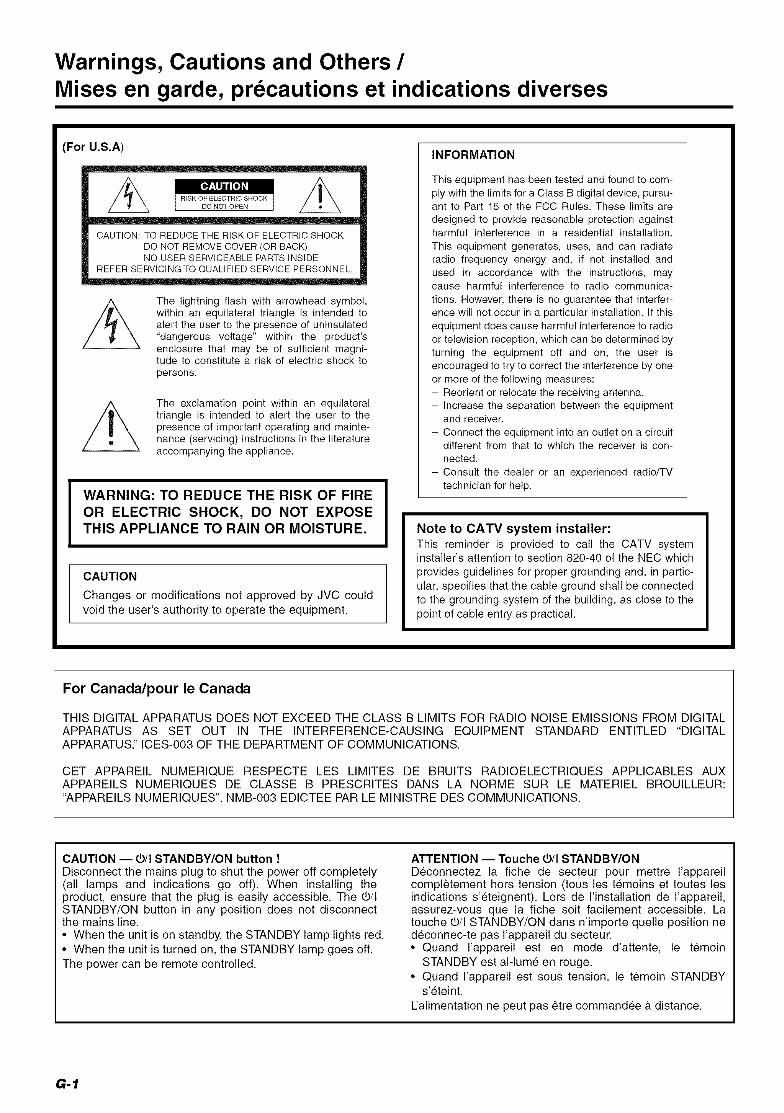
Warnings, Cautions and Others/Mises en garde, precautions et indications diverses
(For U.S.A)
CAUTION: TO REDUCETHE RISK OF ELECTRIC SHOCK
DO NOT REMOVE COVER (OR BACK)NO USER SERVICEABLE PARTS INSIDE
REFER SERVICING TO QUALIFIED SERVICE PERSONNEL.
The lightning flash with arrowhead symbol,within an equilateral triangle is intended toalert the user to the presence of uninsulated"dangerous voltage" within the product'senclosure that may be of sufficient magni-tude to constitute a risk of electric shock topersons.
The exclamation point within an equilateraltriangle is intended to alert the user to thepresence of important operating and mainte-nance (servicing) instructions in the literatureaccompanying the appliance.
WARNING: TO REDUCE THE RISK OF FIRE
OR ELECTRIC SHOCK, DO NOT EXPOSETHIS APPLIANCE TO RAIN OR MOISTURE.
CAUTION
Changes or modifications not approved by JVC couldvoid the user's authority to operate the equipment.
INFORMATION
This equipment has been tested and found to com-ply with the limits for a Class B digital device, pursu-ant to Part 15 of the FCC Rules. These limits are
designed to provide reasonable protection againstharmful interference in a residential installation.
This equipment generates, uses, and can radiateradio frequency energy and, if not installed andused in accordance with the instructions, maycause harmful interference to radio communica-
tions. However, there is no guarantee that interfer-ence will not occur in a particular installation. If thisequipment does cause harmful interference to radioor television reception, which can be determined byturning the equipment off and on, the user isencouraged to try to correct the interference by oneor more of the following measures:- Reorient or relocate the receiving antenna.- Increase the separation between the equipment
and receiver.
- Connect the equipment into an outlet on a circuitdifferent from that to which the receiver is con-nected.
- Consult the dealer or an experienced radio/TVtechnician for help.
Note to CATV system installer:
This reminder is provided to call the CATV systeminstaller's attention to section 820-40 of the NEC which
provides guidelines for proper grounding and, in partic-
ular, specifies that the cable ground shall be connectedto the grounding system of the building, as close to the
point of cable entry as practical.
For Canada/pour le Canada
THIS DIGITAL APPARATUS DOES NOT EXCEED THE CLASS B LIMITS FOR RADIO NOISE EMISSIONS FROM DIGITALAPPARATUS AS SET OUT IN THE INTERFERENCE-CAUSING EQUIPMENT STANDARD ENTITLED "DIGITALAPPARATUS," ICES-O03 OF THE DEPARTMENT OF COMMUNICATIONS.
CET APPAREIL NUMERIQUE RESPECTE LES LIMITES DE BRUITS RADIOELECTRIQUES APPLICABLES AUXAPPAREILS NUMERIQUES DE CLASSE B PRESCRITES DANS LA NORME SUR LE MATERIEL BROUILLEUR:"APPAREILS NUMERIQUES", NMB-O03 EDICTEE PAR LE MINISTRE DES COMMUNICATIONS.
CAUTION -- _/I STANDBY/ON button !Disconnect the mains plug to shut the power off completely(all lamps and indications go off). When installing theproduct, ensure that the plug is easily accessible. The _/ISTANDBY/ON button in any position does not disconnectthe mains line.• When the unit is on standby, the STANDBY lamp lights red.• When the unit is turned on, the STANDBY lamp goes off.The power can be remote controlled.
ATTENTION -- Touche _/I STANDBY/ONDeconnectez la fiche de secteur pour mettre I'appareilcompletement hers tension (tousles temoins et toutes lesindications s'eteignent). Lors de I'installation de rappareil,assurez-vous que la fiche soit facilement accessible. Latouche _/I STANDBY/ON clans n'importe quelle position nedeconnec-te pas rappareil du secteur.• Quand I'appareil est en mode d'attente, le temoin
STANDBY est al-lume en rouge.• Quand I'appareil est sous tension, le temoin STANDBY
s'eteint.
L'alimentation ne peut pas 6tre commandee & distance.
G-1
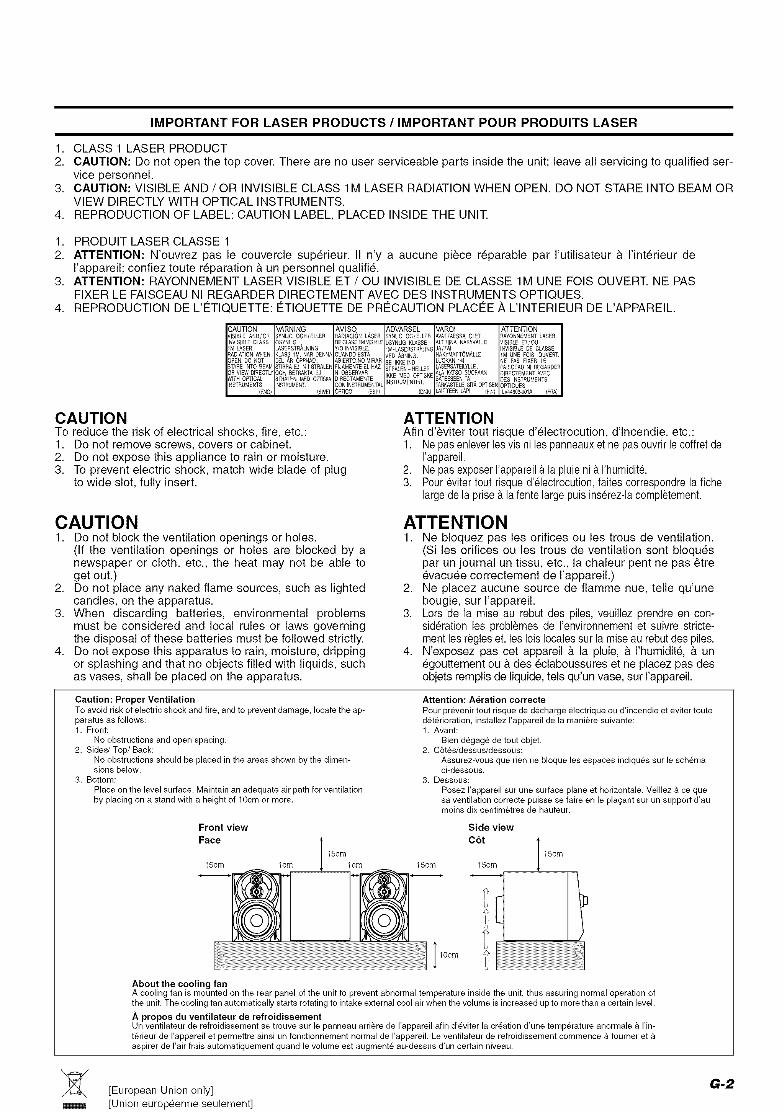
IMPORTANT FOR LASER PRODUCTS / IMPORTANT POUR PRODUITS LASER
1. CLASS 1 LASER PRODUCT2. CAUTION: Do not open the top cover. There are no user serviceable parts inside the unit; leave all servicing to qualified ser-
vice personnel.3. CAUTION: VISIBLE AND/OR INVISIBLE CLASS 1M LASER RADIATION WHEN OPEN. DO NOT STARE INTO BEAM OR
VIEW DIRECTLY WITH OPTICAL INSTRUMENTS.4. REPRODUCTION OF LABEL: CAUTION LABEL, PLACED INSIDE THE UNIT.
1. PRODUIT LASER CLASSE 1
2. ATTENTION: N'ouvrez pas le couvercle superieur. II n'y a aucune piece reparable par I'utilisateur & I'interieur deI'appareil; confiez toute reparation & un personnel qualifi&
3. ATTENTION: RAYONNEMENT LASER VISIBLE ET/OU INVISIBLE DE CLASSE 1M UNE FOIS OUVERT. NE PASFIXER LE FAISCEAU NI REGARDER DIRECTEMENT AVEC DES INSTRUMENTS OPTIQUES.
4. REPRODUCTION DE L'I_TIQUETTE: I_TIQUETTE DE PRE_CAUTION PLACI_E A L'INTERIEUR DE L'APPAREIL.
VARNING
ATTENTION I
OU:T _AYONNEME_TLASERNAKYVALLE VISIBLE ETiOU
INVISIBLED£ CLABSE
_OMALLE 1M UNE FOIS OUVERTNE PAS FIXER LEEILYLLE FAISCEAUNI REGARBER
KA_$OSUORAA_ DIRECTEMENTAVECDESINSTBUMEMTS)PTIQUESLV4460_OO1A {FRA)
CAUTIONTo reduce the risk of electrical shocks, fire, etc.:1. Do not remove screws, covers or cabinet.2. Do not expose this appliance to rain or moisture.3. To prevent electric shock, match wide blade of plug
to wide slot, fully insert.
ATTENTIONAfin d'eviter tout risque d'electrocution, d'lncendie, etc.:1. Nepasenlever les vis ni lespanneauxet ne pasouvrir le coffretde
I'appareil.2. Nepas exposerI'appareil& la pluieni & I'humidit&3. Poureviter tout risque d'electrocution,faites correspondre la fiche
large de la prise ala fente large puis inserez-lacompletement.
CAUTION1. Do not block the ventilation openings or holes.
(If the ventilation openings or holes are blocked by anewspaper or cloth, etc., the heat may not be able toget out.)
2. Do not place any naked flame sources, such as lightedcandles, on the apparatus.
3. When discarding batteries, environmental problemsmust be considered and local rules or laws governingthe disposal of these batteries must be followed strictly.
4. Do not expose this apparatus to rain, moisture, drippingor splashing and that no objects filled with liquids, suchas vases, shall be placed on the apparatus.
ATTENTION1. Ne bloquez pas les orifices ou les trous de ventilation.
(Si les orifices ou les trous de ventilation sont bloquespar un journal un tissu, etc., la chaleur pent ne pas 6treevacuee correctement de I'appareil.)
2. Ne placez aucune source de fiamme nue, telle qu'unebougie, sur I'appareil.
3. Lors de la mise au rebut des piles, veuillez prendre en con-sideration les probl6mes de I'environnement et suivre stricte-ment les r6gles et, les lois locales sur la miseau rebutdes piles.
4. N'exposez pas cet appareil & la pluie, & I'humidit& & unegouttement ou & des eclaboussures et ne placez pas desobjets remplis de liquide, tels qu'un vase, sur I'appareil.
Caution: Proper Ventilation
To avoid risk of electric shock and fire, and to prevent damage, locate the ap-paratus as follows:1. Front:
No obstructions and open spacing,2. Sides/Top/Back:
No obstructions should be placed in the areas shown by the dimen-sions below.
3. Bottom:
Place on the level surface. Maintain an adequate air path for ventilation
by placing on a stand with a height of 10cm or more,
Attention: Aeration correcte
Pour pr_venir tout risque de d_charge _lectrique ou d'incendie et _viter toutedet6rieration, installez rappareil de la mani6re suivante:1. Avant:
Bien d6gag_ de tout objet.2. C6t6s/dessus/dessous:
Assurez-vous que rien ne bloque les espaces indiqu6s sur le schemaci-desseus.
3. Dessous:
Posez I'appareil sur une surface plane et horizontale, Veillez & ce quesa ventilation correcte puisse se faire en le plagant sur un support d'aumoins dix centim6tres de hauteur.
Front view Side view
Face I C6t I15cm 15cm
15cm lcm lcm 15cm 15cm
10cm
About the cooling fanA cooling fan is mounted on the rear panel of the unit to prevent abnormal temperature inside the unit, thus assuring normal operation of
the unit, The cooling fan automatically starts rotating to intake external cool air when the volume is increased up to more than a certain level,
.,&.propos du ventilateur de refroidissementUn ventilateur de refroidissement se trouve sur le panneau arri_re de rappareil afin d'_viter la creation d'une temp6rature anormale & rin-
t6rieur de rappareil et permettre ainsi un fonctionnement normal de rappareil, Le ventilateur de refroidissement commence & tourner et &aspirer de I'air frais automatiquement quand le volume est augment_ au-dessus d'un certain niveau,
[European Union only][Union europ_enne seulement]
G-2
Thank you for purchasing the JVC Compact Component System.
We hope it will be a valued addition to your home, giving you years of enjoyment.
Be sure to read this instruction manual carefully before operating your new stereo system.
In it you will find all the information you need to set tip and use the system.
If you have a query that is not answered by the manual, please contact your dealer.
Features
Here are some of the things that make your System both powerfifl and simple to use.
El The controls and operations have been redesigned to make them very easy to use, treeing you to just enjoy thenltlSiC.
• With JVC's COMPU PLAY you can turn on the System and atttomatically start the Radio, Cassette Deck, or
CD Player with a single touch.
ElThe great SEA (Sound Effect Amplifier) effects Rock, Pop and Classics are provided.
ElThe Sound Turbo function provides emphasized rich sound.
El A 45-station preset capability (30 FM and 15 AM) in addition to attto-seek and manual tuning.
El CD changer fimction can operate 3 discs.
• Discs can be changed during play using the Carrousel tray (rotational tray).
El Two Decks enabling tape clubbing.
ElTimer functions; Daily Timer, REC (Recording) Timer, and Sleep Timer.
El You can connect various external units, such as an MD recorder.
El The CD Player can play back a CD-R and CD-RW.
How This Manual Is Organized
• Basic information that is the same for many different fimctions - e.g. setting the vohnne - is given in the section "Basic Operations",
and not repeated under each function.
• The nantes of buttons/controls and display messages are written in all capital letters: e.g. FM/AM, "NO DISC".
• If the button nantes on the Unit and the Remote Control are the same, the description on where the button is used will be omitted.• System functions are written with an initial capital letter only: e.g. Normal Play.
Use the table of contents to look up specific information you require.
We have enjoyed making this manual for you, and hope it serves you in enjoying the many features built into your System.
IMPORTANT CAUTIONS
1 Installation of the System• Select a place which is level, city and neither too hot nor too cold. (Betvveen 5%" and 35°C.)
• Leave sufficient distance between the System and a TV.• Do not use the System in a place subject to vibrations.
2 Power cord
• Do not handle the po'a, er cord "a,ith w,et hands!
• Some power is always consumed as long as the power cord is connected to the wall outlet.• When unplugging the System from the wall outlet, always pull the plug, not the power cord.
3 Malfunctions, etc.• There are no user serviceable parts inside. In case of system failure, unplug the power cord and consult your dealer.
• Do not insert any metallic object into the System.
Introduction ................................................................................................................... 1Features .................................................................................................................................................... l
How This Manual Is Organized ............................................................................................................... 1IMPORTANT CAUTIONS ..................................................................................................................... 1
Table of Contents .......................................................................................................... 2
Getting Started .............................................................................................................. aAccessories .............................................................................................................................................. 3
How To Put Batteries In the Remote Control .......................................................................................... 3
Using the Remote Control ....................................................................................................................... 3
Connecting the FM Antenna .................................................................................................................... 4
Connecting the AM Antenna ................................................................................................................... 5
Connecting the Speakers ......................................................................................................................... 5
Connecting External Equipment .............................................................................................................. 6
Connecting to the Wall Outlet ................................................................................................................. 6DEMO Mode ........................................................................................................................................... 6
COMPU Play ........................................................................................................................................... 6
Basic Operations ........................................................................................................... 7Turning the Power On and Off ................................................................................................................ 7
ECO Mode (ECO) ................................................................................................................................... 7
Adjusting the Volume .............................................................................................................................. 8
Fade-out Muting (FADE MUTING) ....................................................................................................... 8
Emphasizing the sound(SOUND TURBO) ............................................................................................. 8
Selecting the Sound Mode (SOUND MODE) ......................................................................................... 8
Entering the Number with the Remote Control (Numeric Keys) ............................................................ 8
Changing the Display .............................................................................................................................. 8
Using the Tuner ............................................................................................................. 9Tuning In a Station .................................................................................................................................. 9
Presetting Stations ................................................................................................................................. 10
To Change the FM Reception Mode ..................................................................................................... 10
Using the CD Player .................................................................................................... 11To Load CDs ......................................................................................................................................... 12
To Unload CDs ...................................................................................................................................... 12
Changing the MP3/WMA Playback Mode ............................................................................................ 12
Basics of Using the CD Player-Normal Play ......................................................................................... 13
Resume Play for Audio CD and MP3/WMA Disc ................................................................................ 14
Programming the Playing ONer of the Tracks ...................................................................................... 14
Random Play .......................................................................................................................................... 15
Repeating Tracks ................................................................................................................................... 15
Tray Lock Function ............................................................................................................................... 15
Using the Cassette Deck (Listening to a Tape) ........................................................ 16Playing a Tape ....................................................................................................................................... 16
Using the Cassette Deck (Recording) ...................................................................... 17'Standard Recording ............................................................................................................................... 18
CD Synchro Recording .......................................................................................................................... 18
Tape to Tape Recording (DUBBING) ................................................................................................... 18
Using an External Equipment .................................................................................... 19Listening to the External Equipment ..................................................................................................... 19
Using the Timers ......................................................................................................... 20Setting the Clock ................................................................................................................................... 20
Fixing the Clock .................................................................................................................................... 20
Setting the Daily Timer ......................................................................................................................... 21
Setting the REC (Recording) Timer ...................................................................................................... 22
Setting the SLEEP Timer ...................................................................................................................... 24
Timer Priority ........................................................................................................................................ 24
Care And Maintenance ................................................................................................ 25
Troubleshooting .......................................................................................................... 26
Specifications .............................................................................................................. 26
2
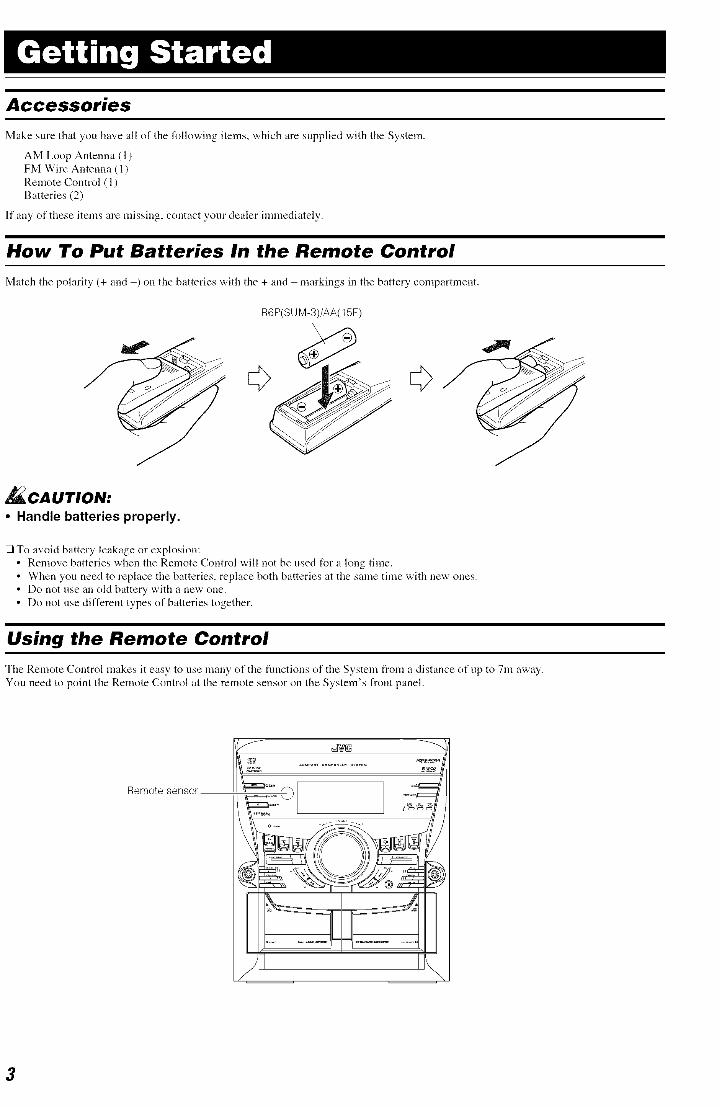
Accessories
Make sure that you have all of the following items, which are supplied with the System.
AM Loop Antenna (1)
FM Wire Antenna (1)
Remote Control (1)
Batteries (2)
If any of these items are missing, contact yonr dealer immediately.
How To Put Batteries In the Remote Control
Match the polarity (+ and -) on the batteries with the + and - markings in the battery compartment.
R6P(SUM-S)/AA(15F)
\
CA UTION:
• Handle batteries properly.
[71To avoid battery leakage or explosion:
• Remove batteries when the Remote Control will not be used for a long time.
• When you need to replace the batteries, replace both batteries at the same time with new ones.
• Do not use an old battery with a new one.
• Do not use different types of batteries together.
Using the Remote Control
The Remote Control makes it easy to use many of the functions of the System from a distance of up to 7m away.
You need to point the Remote Control at the remote sensor on the System's front panel.
Remote sensor
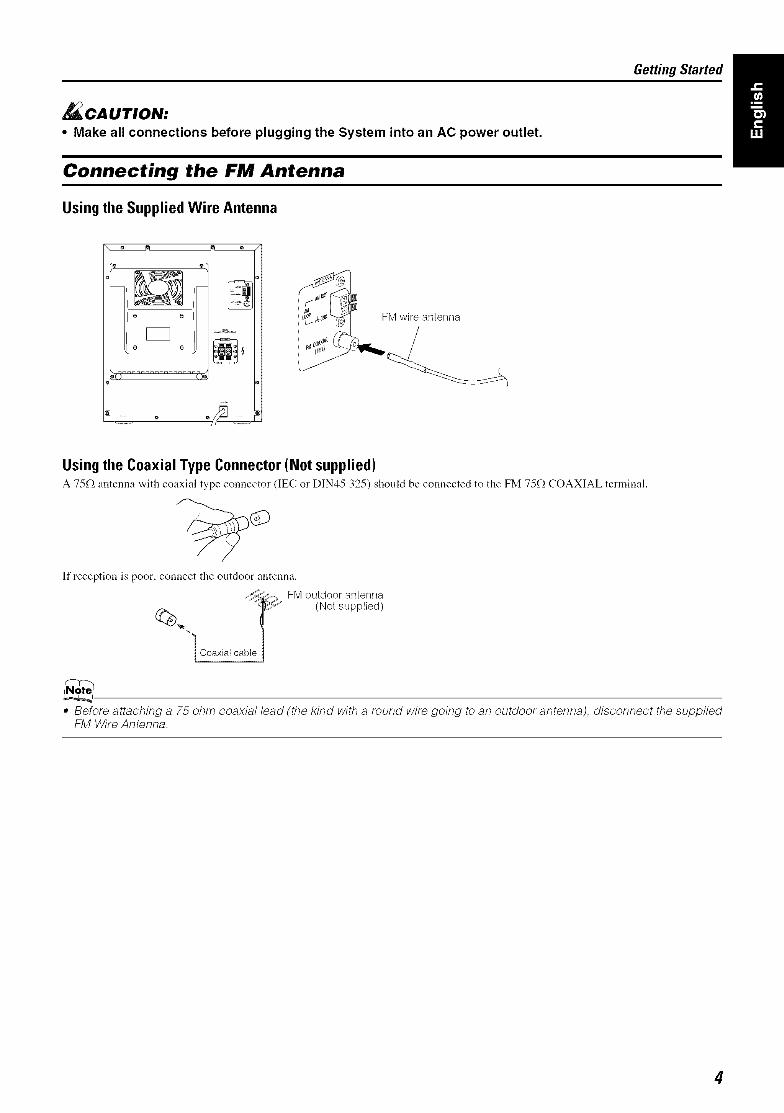
CA UTION:
• Make all connections before plugging the System into an AC power outlet.
Connecting the FM Antenna
Using the Supplied Wire Antenna
Getting Started
I_lI_:l_
\ ..................
Using the Coaxial Type Connector (Not supplied)A 75f2 antenna v,,'ith coaxial type connector (IEC or DIN45 325) shoukt be connected to tile FM 75f_ COAXIAL terminal.
If reception is poor, connect the outdoor antenna.
_, FM outdoor antenna
_ ,iI_ " (Not supplied)Coaxial cabl
• Before attaching a 75 ohm coaxial lead (the kind with a round wire going to an outdoor antenna), disconnect the suppliedFM Wire Antenna.
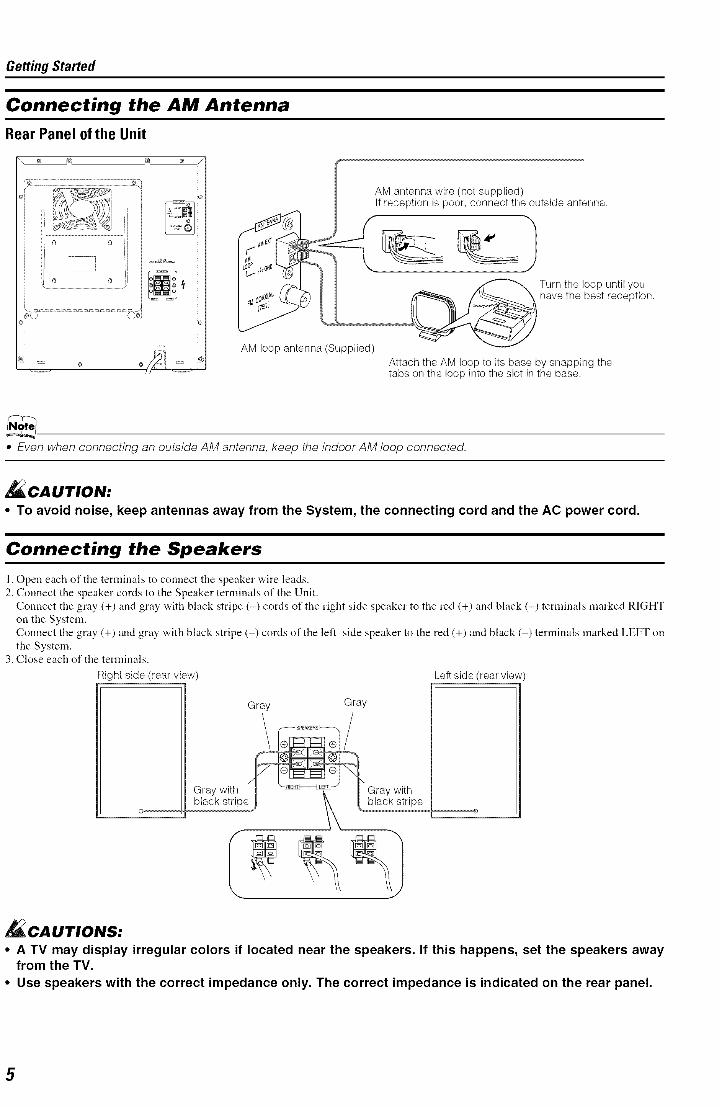
Getting Started
Connecting the AM Antenna
Rear Panel of the Unit
_' Lj_J 6 8
©
AM loop antenna (Supplied)
AM antenna wire (not supplied)If reception is poor, connect the outside antenna.
Turn the loop until youhave the best reception.
Attach the AM loop to its base by snapping thetabs on the loop into the slot in the base.
• Even when connecting an outside AM antenna, keep the indoor AM loop connected.
CA UTION:
• To avoid noise, keep antennas away from the System, the connecting cord and the AC power cord.
Connecting the Speakers
1. Open each of the terminals to connect the speaker wire leads.
2. Connect the speaker cords to the Speaker terminals of the Unit.
Connect the gray (+) and gray with black stripe (-) cords of the right side speaker to the red (+) and black (-) terminals marked RIGHT
on the System.
Connect the gray (+) and gray with black stripe ( ) cords of the left side speaker to the red (+) and black ( ) terminals marked LEFT on
the System.3. Close each of the terminals.
Right side (rear view) Left side (rear view)
Gray Gray
\
Gray with Gray withblack stripe black stripe
CA UTIONS:
• A TV may display irregular colors if located near the speakers. If this happens, set the speakers awayfrom the TV.
• Use speakers with the correct impedance only. The correct impedance is indicated on the rear panel.
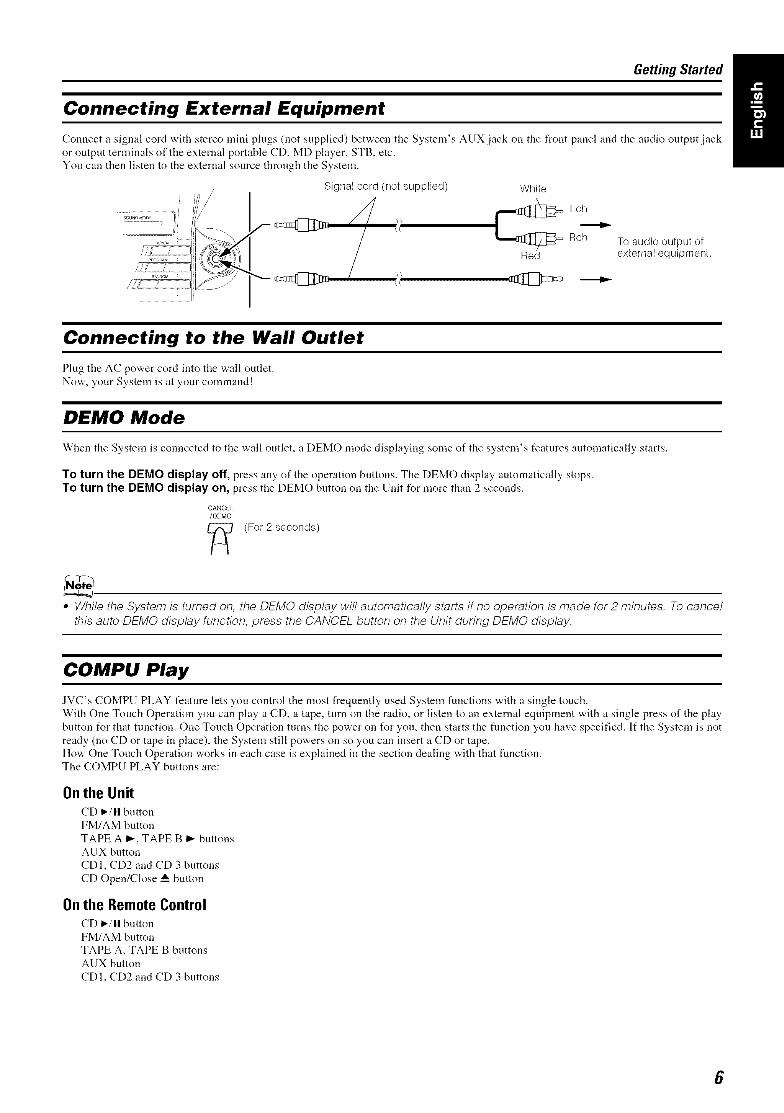
Getting Started
Connecting External Equipment
Connect a signal cord with stereo mini plugs (not supplied) between the System's AUX jack on the front panel and the audio output jackor output terminals of the external portable CD, MD player, STB, etc.You can then listen to the external source through the System.
Signal cord (not supplied) White
Lch
Rch To audio output ofRed external equipment.
!1
Connecting to the Wall Outlet
Plug the AC pov,,'er cord into the wall outlet.
Nov,,', your System is at your command!
DEMO Mode
When the System is connected to the wall outlet, a DEMO mode displaying some of the system's features autolnatically starts.
To turn the DEMO display off, press any of the operation buttons. The DEMO display automatically stops.
To turn the DEMO display on, press the DEMO button on the Unit for more than 2 seconds.
CANCEL
/DEMO
(For 2 seconds)
• While the System is turned on, the DEMO display will automatically starts if no operation is made for 2 minutes. To cancel
this auto DEMO display function, press the CANCEL button on the Unit during DEMO display.
COMPU Play
JVC's COMPU PLAY feature lets you control the most frequently used System functions with a single touch.
With One Touch Operation you can play a CD, a tape, turn on the radio, or listen to an external equipment with a single press of the play
button for that function. One Touch Operation turns the power on for you, then starts the function you have specified. If the System is not
ready (no CD or tape in place), the System still powers on so you can insert a CD or tape.
How One Touch Operation works in each case is explained in the section dealing with that function.The COMPU PLAY buttons are:
Onthe UnitCD _-/n buttonFM/AM button
TAPE A _, TAPE B _ buttons
AUX button
CDI, CD2 and CD 3 buttons
CD Open/Close _ button
Onthe Remote ControlCD _-/n buttonFM/AM button
TAPE A, TAPE B buttonsAUX button
CDI, CD2 and CD 3 buttons
6
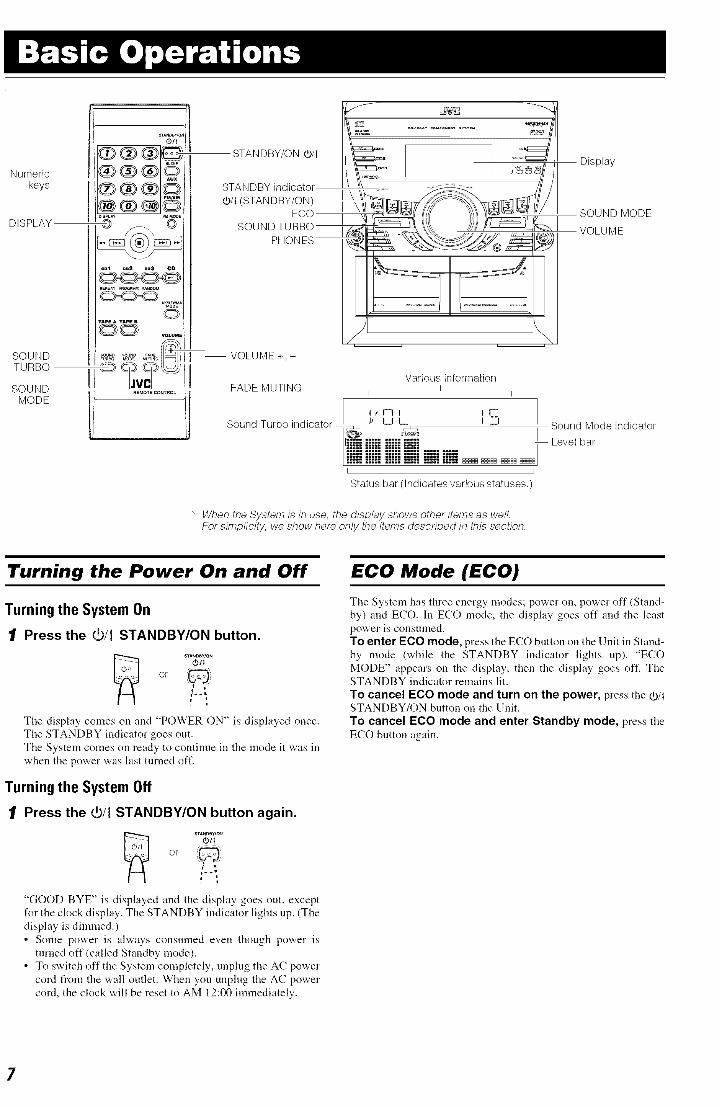
Numerickeys
DISPLAY
SOUNDTURBO
SOUNDMODE
4®®®1@®®®o®®®1o@ ® @l@_ISPLA_ FM_0_
MPa/w_¢
oTAPEA TtO_B
_S_"o,_ VOLUME +,
ji OD Various informationFADE MUTING i
REMOTE CONTROL
fill nd r_fnr 11/1tl-711__1I__ I1"--i"__'1
I
Sound Turbo .........g_; ::===:"g_JJJJJNJJJJJNii_iiiiEii_00_00_00_0
I II
Status bar (Indicates various statuses.)
STANOB ,ONO,, I@/I (STANDBY/ON)]" IIX_//
ECO ........SOUNOTU_oh ___1
PNONES
* When the System is in use, the display shows other items as well.For simplicity, we show here only the items described in this section.
Display
SOUND MODE
VOLUME
Sound Mode indicator
Level bar
Turning the Power On and Off
Turning the System On
1 Press the 00/{ STANDBY/ON button.
STA_DS¥/O_
or
The display comes on and "POWER ON" is displayed once.The STANDBY indicator goes out.The System comes on ready to continue in the mode it was inwhen the power was last turned off.
Turning the System Off
1 Press the _/I STANDBY/ON button again.
or
"GOOD BYE" is displayed and the display goes out, exceptfor the clock display. The STANDBY indicator lights up. (Thedisplay is dimmed.)• Some power is always consumed even though power is
turned off (called Standby mode).• To switch off the System completely, unplug the AC power
cord from the wall outlet. When you unplug the AC powercord, the clock will be reset to AM 12:00 immediately.
ECO Mode (ECO)
The System has three energy modes; power on, power off (Stand-
by) and ECO. In ECO mode, the display goes off and the least
power is consumed.
To enter ECO mode, press the ECO button on the Unit in Stand-
by mode (while the STANDBY indicator lights up). "ECOMODE" appears on the display, then the display goes oft'. TheSTANDBY indicator remains lit.
To cancel ECO mode and turn on the power, press the _/tSTANDBY/ON button on the Unit.
To cancel ECO mode and enter Standby mode, press the
ECO button again.
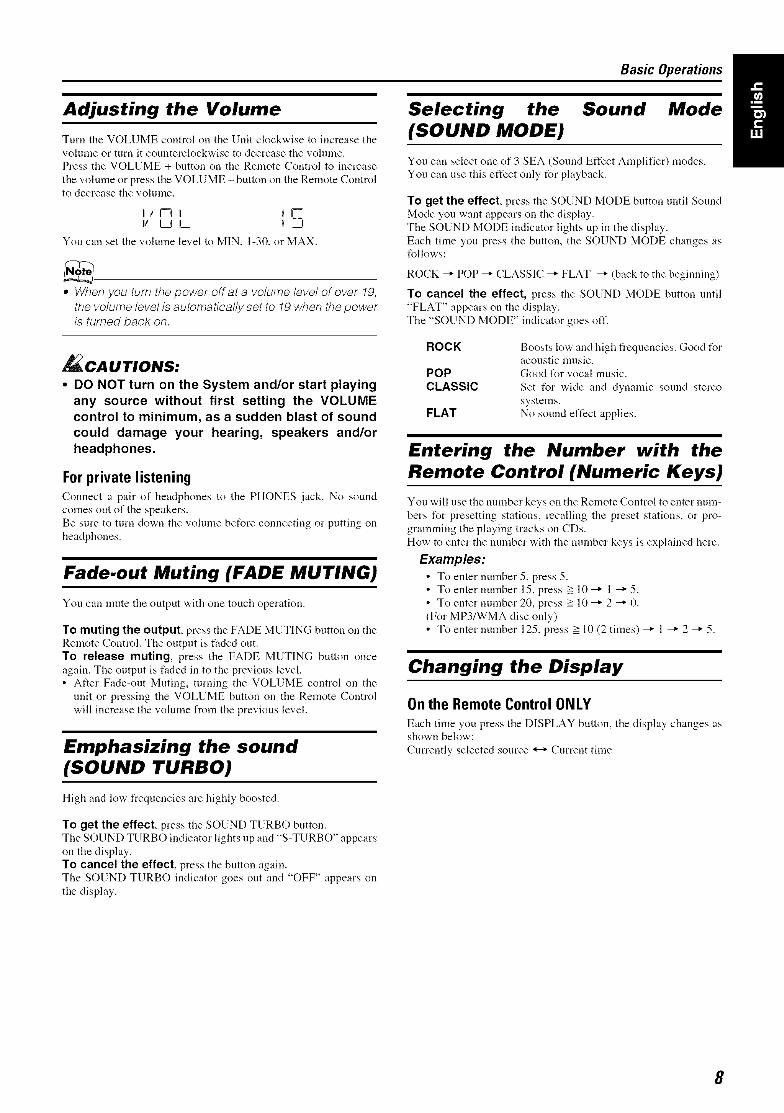
Adjusting the Volume
Turn the VOLUME control on the Unit clockwise to increase the
volume or turn it counterclockwise to decrease the vohnne.Press the VOLUME + button on the Remote Control to increase
the volume or press the VOLUME - button on the Remote Control
Basic Operations !
Selecting the Sound Mode(SOUND MODE)
You can select one of 3 SEA (Sound Effect Amplifier) modes.You can use this effect only for playback.
to decrease the volume.
I _ I--II II_I_ I_II_ I _I
You can set tile volume level to MIN, 1-30, or MAX.
• When you tum the power offat a volume level of over 19,
the volume level is automatically set to 19 when the poweris turned back on.
To get the effect, press the SOUND MODE button until Sound
Mode you want appears on the display.
The SOUND MODE indicator lights up in the display.
Each time you press the button, the SOUND MODE changes asfollows:
ROCK --* POP _ CLASSIC _" FLAT _" (back to the beginning)
To cancel the effect, press the SOUND MODE button until
"FLAT" appears on the display.
The "SOUND MODE" indicator goes off.
_CAUTIONS:
• DO NOT turn on the System and/or start playingany source without first setting the VOLUMEcontrol to minimum, as a sudden blast of soundcould damage your hearing, speakers and/orheadphones.
For private listeningConnect a pair of headphones to tile PHONES jack. No sound
comes out of the speakers.
Be sure to turn down the volume before connecting or putting on
headphones.
Fade.out Muting (FADE MUTING)
You can mute the output with one touch operation.
To muting the output, press the FADE MUTING button on the
Remote Control. The output is faded out.
To release muting, press the FADE MUTING button once
again. The output is faded in to the previous level.
• After Fade-out Muting, turning the VOLUME control on the
unit or pressing the VOLUME button on the Remote Control
will increase tile volume from the previous level.
Emphasizing the sound(SOUND TURBO)
High and low frequencies are highly boosted.
ROCK
POPCLASSIC
FLAT
Boosts low and high frequencies. Good foracoustic music.
Good for vocal music.
Set for wide and dynamic sound stereo
systems.
No sound effect applies.
Entering the Number with theRemote Control (Numeric Keys)
You will use the number keys on the Remote Control to enter nun>
bers t_r presetting stations, recalling the preset stations, or pro-
grannning the playing tracks on CDs.
How to enter the number with the number keys is explained here.
Examples:• To enter nmnber 5, press 5.• To enter number 15, press g 10 _" 1 _" 5.
• To enter number 20, press =>10 _" 2 _" 0.
(For MP3/WMA disc only)• To enter number 125, press =>10 (2 times) _" 1 _" 2 _" 5.
Changing the Display
On the Remote Control ONLY
Each time you press tile DISPLAY button, tile display changes asshown below:
Currently selected source _ Current time
To get the effect, press the SOUND TURBO button.The SOUND TURBO indicator lights tip and "S-TURBO" appearson the display.To cancel the effect, press the button again.The SOUND TURBO indicator goes out and "OFF" appears onthe display.
8
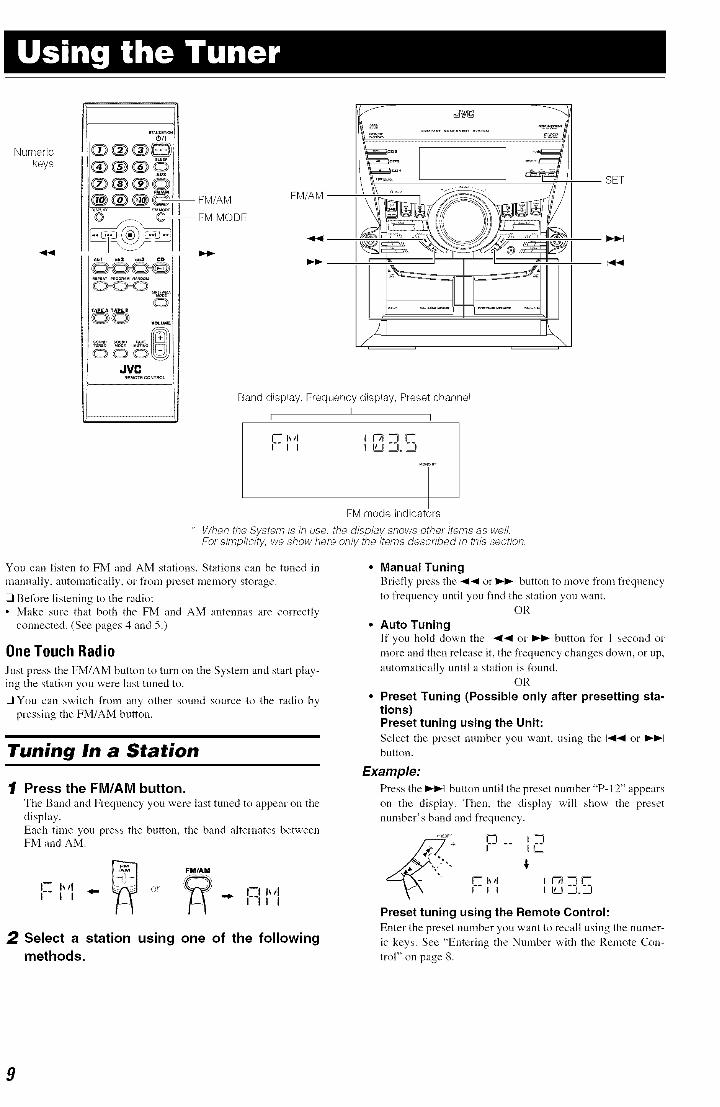
Numeric li
keys OOlO
_®@@;
_D_Ai,g A TAI'_ B
n_MOT_ eONT_L
FM/AM
FM MODE
FM/AM
Band display, Frequency display, Preset channelI
I I
SET
I-- I__1 I 1-71--I t--I"l I tU'3.'_'t
_o_osr
FM mode indicators
* When the System is in use, the display shows other items as well.For simplicity, we show here only the items described in this section.
You can listen to FM and AM stations. Stations can be tuned in
manually, automatically, or from preset memory storage.
[2::1Before listening to the radio:
• Make sure that both the FM and AM antennas are correctly
connected. (See pages 4 and 5.)
One Touch Radio
Just press the FM/AM button to turn on the System and start play-
ing the station you were last tuned to.
[::lYou can switch from any other sonnd source to the radio by
pressing the FM/AM button.
Tuning In a Station
1 Press the FM/AM button.The Band and Frequency you "a,ere last tuned to appear on the
display.
Each time you press the button, the band alternates betweenFM and AM.
!_--_b _1 or {_I I _- .,_ I--I1_1I I--II I
2 Select a station using one of the followingmethods.
• Manual Tuning
Briefly press the _1_1 or I_1_ button to move from frequency
to frequency until you find the station you want.OR
• Auto Tuning
If you hokl down the _1_1 or I_ button for l second or
more and then release it, the frequency changes down, or up,
automatically until a station is found.OR
• Preset Tuning (Possible only after presetting sta-tions)Preset tuning using the Unit:
Select the preset number you "_,ant, using the I-._1_ orbutton.
Example:Press the _ button until the preset number "P-I 2" appears
on the display. Then, the display will show the preset
number's band and freqnency.
.... N I--I
+ I ILI I I I I,'._1._11._1
Preset tuning using the Remote Control:
Enter the preset nnmber you want to recall using the numer-
ic keys. See "Entering the Number with the Remote Con-
trol" on page 8.
Using the Tuner
* tn AM broadcast, reception sensitivity will be changed byturning the AM loop antenna. Turn the AM loop antennafor best reception.
Presetting Stations
You can preset up to 30 FM stations and up to 15 AM stations.
• Preset numbers may have been set to factory test fre-quencies prior to shipment. This is not a malfunction. Youcan preset the stations you want into memory by followingone of the presetting methods below.
• During presetting stations, if no button operation is madefor 5 seconds, the display returns to the band/frequencydisplay. In this case, repeat steps from the beginning.
__r, 2 IZ C T _ + 2 IZ T I--t FZFC T_
tI,. ................ I FM=30, AM=15
When changing the Band
CA UTION:
• Even if the System is unplugged or if the powerfailure occurs, the preset stations will be storedfor a few days. However, in case the preset sta-tions are erased, you will need to preset the sta-tions again.
To Change the FM ReceptionMode
When you are tuned in to an FM stereo broadcast, the "ST (Ster-
eo)" indicator lights up and you can hear stereo effects.
If an FM stereo broadcast is hard to receive or noisy, you can select
Monaural mode. Reception improves, but you lose stereo effect.
Press the FM MODE button on the Remote Control sothat the "MONO" indicator lights up on the display.
FM MODE
ST *" "* MONO
To restore the stereo effect, press the FM MODE button onthe Remote Control so that the "MONO" indicator goes oft'.
On the Unit
1 Select a band by pressing the FM/AM button.
2 Press the <1<1 or I_1_ button to tune in a sta-tion.
3 Press the SET button."SET" will blink for 5 seconds.
4 While "SET" is blinking, press the I<1<1or I_1_1
button to select the preset number.I_1_1: Increases the preset nmnber by 1.I-,It_: Decreases the preset nmnber by 1.
5 Press the SET button."STORED" appears and, after 2 seconds, the disphty returns tothe band/frequency display.
6 Repeat above steps 2 to 5 for each station
you want to store in memory with a preset
number.
To change the preset stations, repeat the same steps asabove.
I
* tn step 4, you can select the preset number using the nu-meric keys on the Remote Control. See "Entering theNumber with the Remote Control" on page 8.
I0
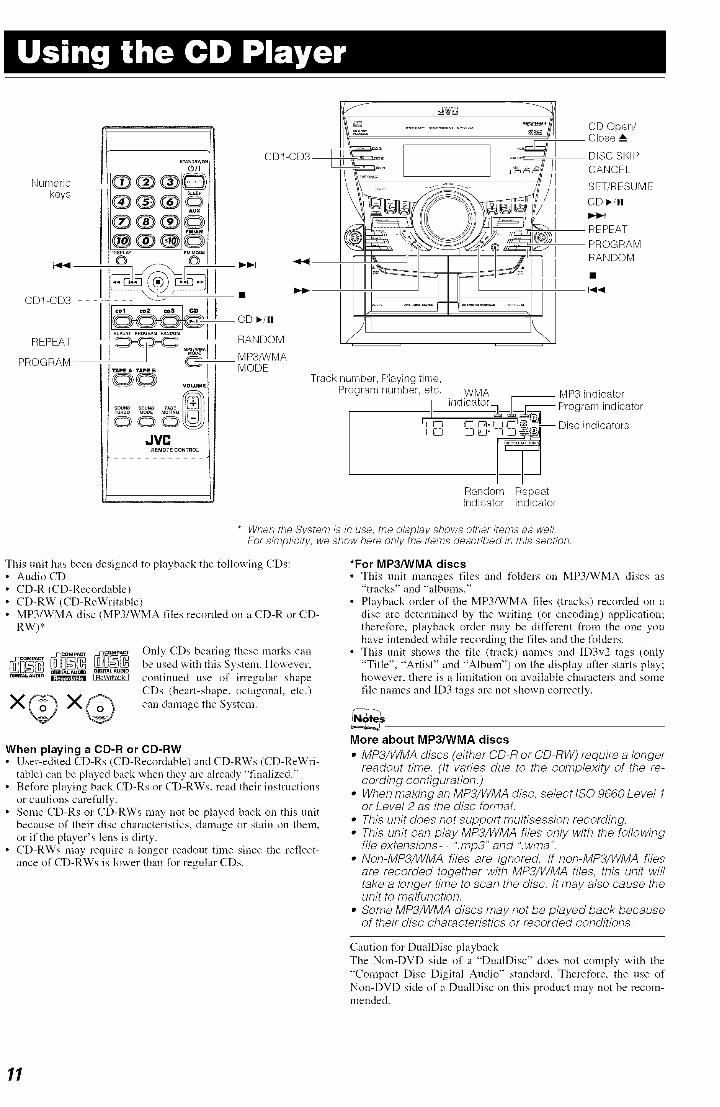
Numeric ®®@ Ikeys ' j ......... ///I®@®o i
_ ...... MODE Track number, Playing time,
oo'°°'°°°°"88 Pr°gramnumber'elc',niE3
,.Ivc_MOrE CONTROL
CD Open/Close A_
DISCSKIPCANCEL
SET/RESUMEOD I,./II
REPEATPROGRAMRANDOM
WMA _ MP3 indicator
indicator Program indicator
C i_i.LJ C'_-- Disc indicatorsjvJ. _J '_1
Random Repeatindicator indicator
* When the System is in use, the display shows other items as well.For simplicity, we show here only the items described in this section.
This unit has been designed to playback the tUllowing CDs:• Audio CD
• CD-R (CD-Recordable)
• CD-RW (CD-ReWritable)• MP3/WMA disc (MP3/WMA files recorded on a CD-R or CD-
RW) *
x@x@
Only CDs bearing these marks can
be used with tiffs System. However,
continued use of irregular shape
CDs (heart-shape, octagonal etc.)
can damage the Systeln.
When playing a CD-R or CD-RW• User-edited CD-Rs (CD-Recordable) and CD-RWs (CD-ReWri-
table) can be played back when they are already "finalized."• Before playing back CD-Rs or CD-RWs, read their instructions
or cautions carefidly.• Some CD-Rs or CD-RWs may not be played back on this unit
because of their disc characteristics, damage or stain on them,or if the player's lens is dirty.
• CD-RWs may require a longer readout time since the reflect-ance of CD-RWs is lower than t_r regular CDs.
*For MP3/WMA discs• This unit manages files and folders on MP3/WMA discs as
"tracks" and "albums."• Playback order of the MP3/WMA files (tracks) recorded on a
disc are determined by the writing (or encoding) application;therefore, playback order may be different from the one youhave intended while recording the files and the folders.
• This unit shows the file (track) names and ID3v2 tags (only"Title", "Artist" and "Album") on the display after starts play;however, there is a limitation on available characters and somefile names and ID3 tags are not shown correctly.
More about MP3/WMA discs
• MP3/WMA discs (either CD-R or CD-RW) require a longerreadout time. (It varies due to the complexity of the re-cording configuration.)
• When making an MP3/WMA disc, select ISO 9660 Level 1or Level 2 as the disc format.
• This unit does not support multisession recording.• This unit can play MP3/WMA files only with the following
file extensions-- ".rap3" and ".wma".• Non-MP3/WMA files are ignored, tf non-MP3/WMA files
are recorded together with MP3/WMA files, this unit willtake a longer time to scan the disc. It may also cause theunit to malfunction.
• Some MP3/WMA discs may not be played back becauseof their disc characteristics or recorded conditions.
Caution for DualDisc playbackThe Non-DVD side of a "DualDisc" does not comply with the"Compact Disc Digital Audio" standard. Therefore, the use ofNon-DVD side of a DualDisc on this product may not be recom-mended.
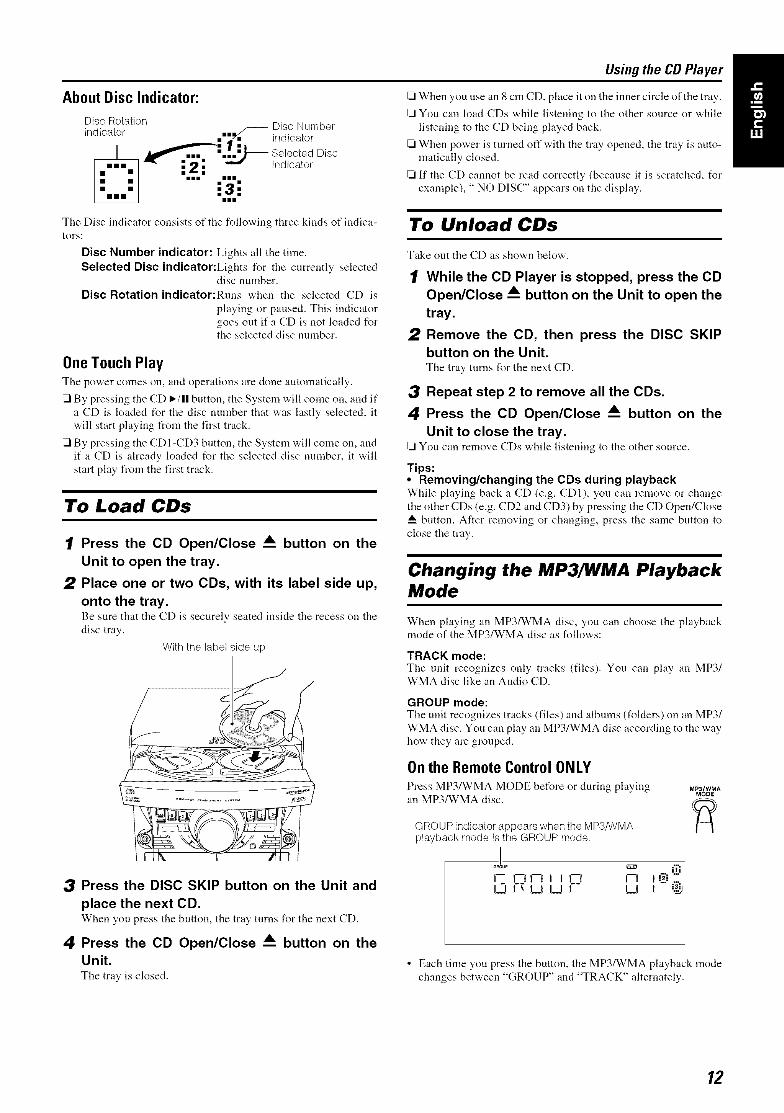
About Disc Indicator:
Disc Rotationindicator /_ Disc Number
.==_ indicatorI _ mzmn_'_m _m/
/ _ === =='-==J_ Selected Disc"_ -" _ -" _ indicator
"---'The Disc indicator consists of the following three kinds of indica-tors:
Disc Number indicator: Lights all the time.
Selected Disc indicator:Lights for the currently selecteddisc number.
Disc Rotation indicator:Runs when the selected CD is
playing or paused. This indicator
goes out ifa CD is not loaded forthe selected disc number.
One Touch PlayTile power comes on, and operations are done autonlatically.
[71By pressing the CD I_/11 button, the System will come on, and if
a CD is loaded for the disc number that was lastly selected, it
will start playing from the first track.
[71By pressing the CD I-CD3 button, the System will come on, and
if a CD is already loaded for the selected disc number, it will
start play from the first track.
To Load CDs
1 Press the CD Open/Close A. button on the
Unit to open the tray.
2 Place one or two CDs, with its label side up,
onto the tray.Be sure that tile CD is securely seated inside the recess on the
disc tray.
With the label side up
3 Press the DISC SKIP button on the Unit and
place the next CD.When you press tile button, tile tray turns for tile next CD.
4 Press the CD Open/Close A. button on theUnit.Tile tray is closed.
Using the CD Player
[71When you use an 8 cm CD, place it on tile inner circle of the tray.
[71You can load CDs while listening to the other source or while
listening to the CD being played back.
[71When power is turned off with the tray opened, the tray is auto-
matically closed.
[71If the CD cannot be read correctly (because it is scratched, for
example), " NO DISC" appears on the display.
To Unload CDs
Take out the CD as shown below.
1 While the CD Player is stopped, press the CD
Open/Close A. button on the Unit to open the
tray.
2 Remove the CD, then press the DISC SKIPbutton on the Unit.Tile tray turns for tile next CD.
3 Repeat step 2 to remove all the CDs.
4 Press the CD Open/Close A. button on the
Unit to close the tray,You can remove CDs while listening to tile other source.
Tips:• Removing/changing the CDs during playbackWhile playing back a CD (e.g. CDI), you can remove or changethe other CDs (e.g. CD2 and CD3) by pressing the CD Open/Close
button. Alter removing or changing, press the same button toclose the tray.
Changing the MP3/WMA PlaybackMode
When playing an MP3/WMA disc, you can choose the playbackmode of the MP3/WMA disc as follows:
TRACK mode:Tile unit recognizes only tracks (files). You cltn play an MP3/WMA disc like an Audio CD.
GROUP mode:
The unit recognizes tracks (files) and albmns (folders) on an MP3/
WMA disc. You can play an MP3/WMA disc according to the wayhow they are grouped.
On the Remote Control ONLY
Press MP3/WMA MODE before or during playingan MP3/WMA disc.
GROUP indicator appears when the M P3/WMAplayback mode is the GROUP mode.
IsRou_
I--2 L-TII--I I I L-71 I--II_I I_ I_I I_I I I_I
MP3/WMAMODE
• Each time you press the button, the MP3/WMA playback mode
changes between "GROUP" and "TRACK" alternately.
12
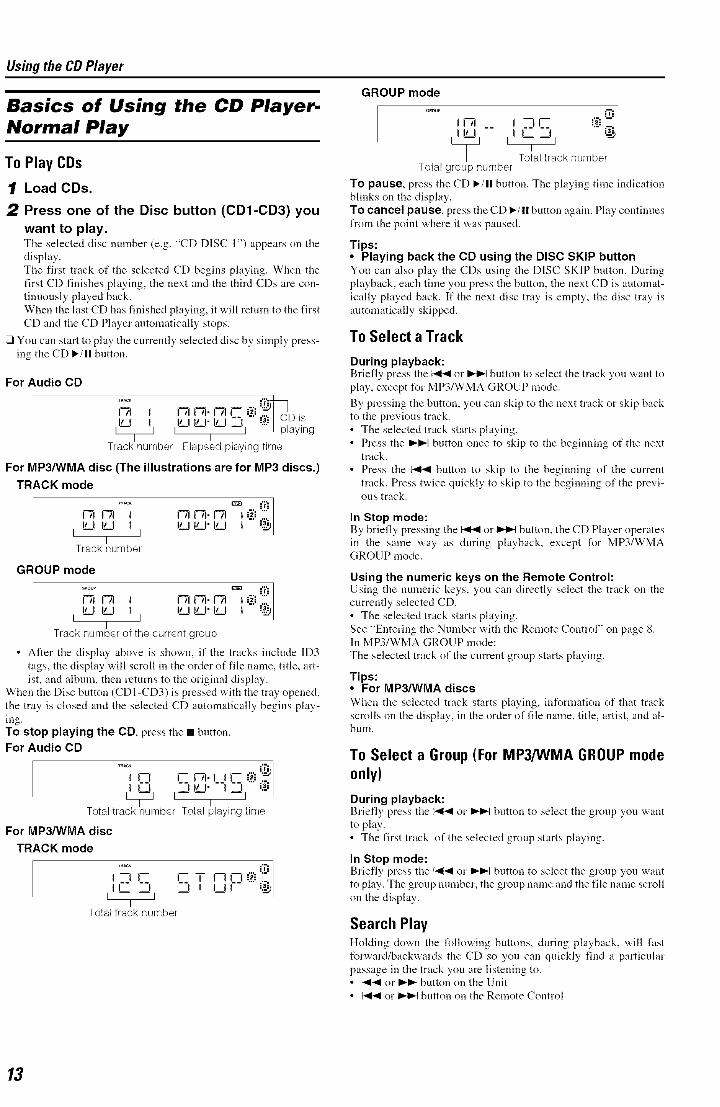
Using the CD Player
Basics of Using the CD Player.Normal Play
To Play CDs
1 Load CDs.
2 Press one of the Disc button (CD1-CD3) you
want to play.The selected disc number (e.g. "CD DIS(." 1") appears on thedisplay.
The first track of the selected CD begins playing. When the
first CD finishes playing, the next and the third CDs are con-tinuously played back.
When the last CD has finished playing, it will return to the first
CD and the CD Player atltomatically stops.
[71You can start to play the currently selected disc by simply press-
ing the CD I_/1! button.
For Audio CD
mACK .._ 1
rTt t I-TIt-7t.I-TIr _i _.m/'=_
i_ .... z'_ CD is5 I1" I t" t" I£-I --tl "" payngI
Track number Elapsed playing time
For MP3/WMA disc (The illustrations are for MP3 discs.)
TRACK mode
1"-7trTi I 1-71['71. 1-71 I i_)'--I I_.CtILl t I I___IIL_I'ILI t _"
ITrack number
GROUP mode
_ou_ c1_ i';'i
rTl rTl i 1-71l-Vl.1-71 iL_)['--._I ILl g_t t I I___ItL,.t'ILI I _"
ITrack number of the current group
• Alter the display above is shown, if the tracks include ID3tags, the display will scroll in the order of file name, title, art-ist, and album, then returns to the original display.
When the Disc button (CDI-CD3) is pressed with the tray opened,the tray is closed and the selected CD automatically begins play-ing.To stop playing the CD, press the • button.For Audio CD
I I-"jl 7 ra. i ii[ (._.__'n
L_j i--I_LI" I--Ii _'lTotal track number Total pay ng time
For MP3/WMA disc
TRACK mode
_ .. p."iII
t --I r r 3- rl t _1=.;.=.. I
2.1 _ LIr _lTotal track number
GROUP mode
ira __ i-if .._ITotal track number
Total group number
To pause, press the CD _/II button. The playing time indication
blinks on the display.
To cancel pause, press the CD I_/11 button again. Play continues
from the point where it was paused.
Tips:• Playing back the CD using the DISC SKIP button
You can also play the CDs using the DISC SKIP button. During
playback, each time you press the button, the next CD is automat-
ically played back. If the next disc tray is empty, the disc tray is
automatically skipped.
To Select a Track
During playback:Briefly press the _ or I,_Ibutton to select the track you want to
play, except for MP3/WMA GROUP mode.
By pressing the button, you can skip to the next track or skip back
to the previous track.
• The selected track starts playing.
• Press the I_1_1 button once to skip to the beginning of the nexttrack.
• Press the 1_1 button to skip to the beginning of the current
track. Press twice quickly to skip to the beginning of the previ-ous track.
In Stop mode:By briefly pressing the _ or I_D,-Ibutton, the CD Player operates
in the same way as during playback, except for MP3/WMAGROUP mode.
Using the numeric keys on the Remote Control:Using the numeric keys, you can directly select the track on the
currently selected CD.
• The selected track starts playing.
See "Entering the Number with the Remote Control" on page 8.In MP3/WMA GROUP mode:
The selected track of the current group starts playing.
Tips:• For MP3/WMA discs
When the selected track starts playing, information of that track
scrolls on the display, in the order of file name, title, artist, and al-bum.
To Select a Group (For MP3/WMA GROUP modeonly)
During playback:Briefly press the 141_Ior I_I_Ibutton to select the group you vvaIlt
to play.
• The first track of the selected group starts playing.
In Stop mode:Briefly press the I_1 or I_1_1button to select the group you wantto play. The group number, the group name and the file name scroll
on the display.
Search PlayHolding down the I\>llo'a, ing buttons, during playback, "a,ill fast
forward/backwards the CD so you can quickly find a particular
passage in the track you are listening to.• _1_1 or I_1_ button on the Unit
• I-.941or _ button on the Remote Control

Using the CD Player
Resume Play for Audio CD andMP3/WMA Disc
You can store the point of the track where you stopped playback.By pressing CD _/|1 button, you can start playback again from thepoint where you stopped it.
Onthe Unit ONLYPress the SET/RESUME button for 2 seconds until both
"RESUME" and "ON" appear on the display.To turn off the resume play, press the SET/RESUME buttonfor 2 seconds until both "RESUME" and "OFF" appear oil the display.
• To playback from the first track while resume play is acti-
vated, press • button twice during playback.
The following operations will erase the memory of thetrack number that you have stopped playback when• Pressing CD Open/Close A_ button to eject the disc.
• Pressing CD 1-CD3 button or DISC SKIP button to changethe disc to play.
Programming the Playing Orderof the Tracks
You cai1 program the playing order of the tracks on all the CDs. Note
that you can only make a program when the CD Player is stopped.
[71You can program up to 32 tracks in any desired order includingthe same tracks.
For MP3/WMA discs
° tfyou try to select a MP3/WMA disc that has once beenread or played, "MP3 DISC" or "WMA DISC" appears on
the display and it can not be programmed.• MP3/WMA disc that has not ever been read can be se-
lected in a program mode. But when playback starts,"MP3 DISC" or "WMA DISC" appears on the display, the
program is deleted and switched to a next program.
4 Select the track you want to program.
On the Unit
While the display is blinking, press the I-,<-,<or _1 button on theUnit to select the track, then press the SET button within 5 seconds.
The program order number will be assigned from P-I.
PnE_E_
\ If I ! I/" i_ I-il I--
"" t ---- ILl I.-_-I __1
/li i t t 'l"
SET Disc number Track number/RESUME
_7 I i_l I-- l=l f-iII -- ILl I--I ILl
Program order number
On the Remote Control
Press the nmneric keys to directly enter the track number. Then,
the program order nmnber will be assigned from P-I.
• To delete the current program step, press the CANCEL buttonon the Unit.
.5 Repeat steps 3 and 4 to program other trackson the same CD or the other CD.
6 To play the program, Press the CD I_/11 but-ton.For details, see "To Play ttle Program You Have Made" men-tioned below.
To confirm the programmed contents, while the CD player
is stopped, select Program mode by pressing the PROGRAM but-
ton and press the _ or I_,,-I button on the Remote Control.
To delete all the tracks in the program, while the CD Playeris stopped, press the • button or open the tray by pressing tile CD
Open/Close • button.
To Modify the Program, while the CD Player is stopped and the
program mode is selected, press the CANCEL button, the last track
in the program is deleted. To add new tracks to the end of the pro-
gram, repeat above steps 3 and 4.
To Make a Program
1 Load CDs.
2 In Stop mode, set the CD Player in Program
Play mode.Press the PROGRAM button to light the "PRGM" indicator on tile
display.
At the same time, "PROGRAM" appears on the display.
Each time you press the button, the display changes as follows:
PROGRAM _" Normal display (Normal Play) _" (back to the be-
ginning)
• If a program is already made, the last step of the program will
be displayed.
3 Press one of the Disc button (CD1-CD3) toselect the CD you want to program.Tile display will change to the Program Entry display.
CD1........ \ ! ! ! f f!
or i I#l I "-- ....
/ I I I i i\
Disc number Track number
° tfyou try to program a track number that does not existson the CD, your entry will be ignored.
• tf you try to program the 33rd track, "FULL" appears onthe display.
To Play the Program You Have MadePress the CD _-/n button.
The System plays the tracks in the order you have programmedthem.
• To use Repeat Play for Program Play, press the REPEAT but-
ton to select "REPEAT" before starting playback. For details,
see "Repeating Tracks" on page 15.
[71You can skip to a particular program track by pressing the
or _ button during Program Play.
[71To stop playing, press the • button once. If you press the • but-
ton, while the CD Player is stopped, the program is deleted.
14
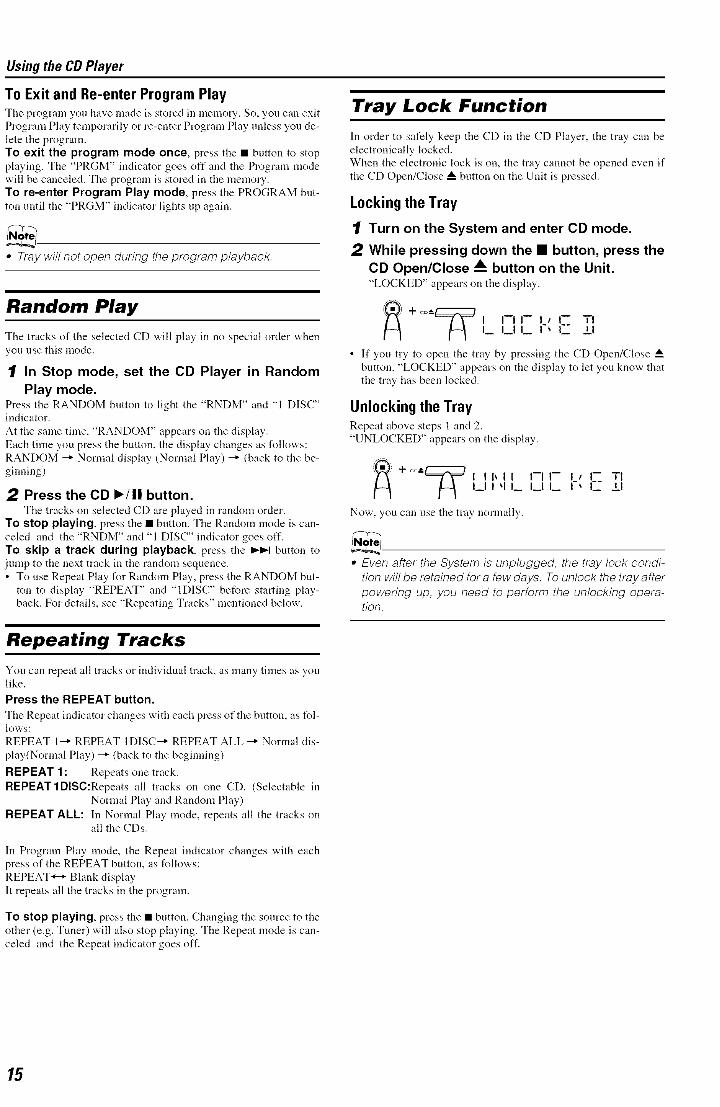
Using the CD Player
To Exit and Re-enter Program PlayTile program you have made is stored in menlory. So, you can exit
Program Play temporarily or re-enter Program Play unless you de-
lete the program.
To exit the program mode once, press the • button to stopplaying. The "PRGM" indicator goes off and the Program mode
will be canceled. The program is stored in the memory.
To re-enter Program Play mode, press the PROGRAM but-ton until the "PRGM" indicator lights up again.
• Tray will not open during the program playback.
Random Play
The tracks of the selected CD will play in no special order when
you use this mode.
1[ In Stop mode, set the CD Player in Random
Play mode.Press the RANDOM button to light the "RNDM" and "l DISC"indicator.
At the same time, "RANDOM" appears on the display.
Each time you press the button, the display changes as follows:
RANDOM -_ Normal display (Normal Play) _" (back to the be-
ginning)
2 Press the CD I_/11 button.The tracks on selected CD are played in random order.
To stop playing, press the • button. The Random mode is can-
celed and the "RNDM" and "1 DISC" indicator goes off.
To skip a track during playback, press the _1 button to
jump to the next track in the random sequence.
• To use Repeat Play l\)r Random Play, press the RANDOM but-
ton to display "REPEAT" and "IDISC" before starting play-
back. For details, see "Repeating Tracks" mentioned below.
Repeating Tracks
You can repeat all tracks or individual track, as many times as youlike.
Press the REPEAT button.
The Repeat indicator changes with each press of the button, as fol-lows:
REPEAT 1-_ REPEAT IDISC -_ REPEAT ALL _" Normal dis-
play(Normal Play) _ (back to the beginning)
REPEAT 1 : Repeats one track.
REPEAT IDISC:Repeats all tracks on one CD. (Selectable in
Normal Play and Random Play)
REPEAT ALL: In Normal Play mode, repeats all the tracks onall the CDs.
In Program Play mode, the Repeat indicator changes with each
press of the REPEAT button, as follows:
REPEAT "_* Blank display
It repeats all the tracks in the program.
To stop playing, press the • button. Changing the source to the
other (e.g. Tuner) will also stop playing. The Repeat mode is can-
celed and the Repeat indicator goes oft'.
Tray Lock Function
In order to safely keep the CD in the CD Player, the tray can be
electronically locked.
When the electronic lock is on, the tray cannot be opened even if
the CD Open/Close _A button on the Unit is pressed.
Locking the Tray
1[ Turn on the System and enter CD mode.
2 While pressing down the • button, press theCD Open/Close A. button on the Unit."LOCKED" appears on the display.
I_ __1 __ t-- &l
• It" you try to open the tray by pressing the CD Open/Close --_button, "LOCKED" appears on the display to let you know thatthe tray has been locked.
Unlocking the TrayRepeat above steps 1 and 2.
"UNLOCKED" appears on the display.
_: +_°-'_ I Ib II I--II-- II I-- TII__11 q I__ I__t I__ I-_ I_ ±1
Now, you can use the tray normally.
• Even after the System is unplugged, the tray lock condi-tion will be retained for a few days. To unlock the tray afterpowering up, you need to perform the unlocking opera-tion.

0/t
o@@Q®®®6
Aux
2Zps........._DO
dvc_EMOrE COnTrOL
i A PUSH OPEN
(Deck A)
TAPE BI TAPE A
Tnnl-1111 L
Deck indicators
l--It t
_: Tape indicator
* When the System is in use, the display shows other items as well.For simplicity, we show here only the items described in this section.
TAPE B P,-
TAPE A
A PUSH OPEN(Deck B)
//
The Cassette Deck allows you to play, record, and dub audio tapes.
[21Listening to type I tape is suitable for this Cassette Deck.
The use of tapes longer than 120minutes (including120 minute tapes) is not recommended, since char-acteristic deterioration may occur and these tapeseasily jam in the pinch-rollers and the capstans.
One Touch PlayBy pressing the TAPE A I_- or TAPE B I_ button, the System ,_,ill
come on, and ira tape is in the deck, it will start to play. If no tape
is loaded in either Deck A or Deck B, "NO TAPE" appears on the
display, the System will come on and wait for you to insert a tape,or select another function.
Playing a Tape
You can use either Deck A or Deck B at a time for playback.
1 Press the A. PUSH OPEN part for the deck
you want to use.
2 When the cassette holder opens, put a cas-sette in, with the exposed part of the tape
down, toward the base of the Unit.The tape "a,ill travel from the left to right.
3 Press A. PUSH OPEN gently to close the cas-sette holder.The Deck indicator "A" or "B" lights up on the display.
4 Press the TAPE A I_ or TAPE B I_ button.The Tape indicator (1_) blinks on the display and the tape is
played back.The Cassette Deck antomatically stops when one side of the
tape has finished playing.
To stop playing, press the • button.
To remove the tape, stop the tape, and press the _A PUSH
OPEN part to open the Cassette Holder.
To Fast-Wind a TapeDuring playback or in Stop mode, press the I_1_ (FF) button on the
Unit to fast-wind the tape onto the right side of the cassette withoutplaying. (You can also use the _ button on the Remote Control.)
During playback or in Stop mode, press the << (REW) button onthe Unit to fast-wind the tape onto the left side of the cassette with-
out playing. (You can also use the I-<14 button on the Remote Con-trol.)
Dnring fast-winding the tape, the Tape indicator (1_) goes out.During fast-winding, the status bar ilhnnination at the bottom of
the display moves counterclockwise.
During rewinding, it moves clockwise.
• The Cassette Deck automatically stops when one side of thetape has finished playing.
[21During fast-winding the tape, you can change the tape travellingdirection by pressing the I_1_ (FF) or << (REW) button.
Tape travelling direction
16

@/I
@@@G®®®©®®®©
© _ ©
TAPE B
TAPE A /
TAPE B
TAPE A
PROGRAM
_PUSHOPEN(Deck B)
T I--t I--I I-- itI III L I'I
Deck indicators RED indicator
_: Tape indicator
* When the System is in use, the display shows other items as well.For simplicity, we show here only the items described in this section.
Recording onto a cassette from any of the sound sources is simple.
Just place a tape in Deck B, have the source ready, make one or
two settings, and yoi£re ready to record. For each source, the pro-
cedure is a little bit different so we explain each separately. But
first, here are a few things to make your recordings better.
Things To Know Before You Start Recording
It may be unlawful to record or play back copyrightedmaterial without the consent of the copyright owner.
[21The recording level, which is the volume at "a,hich the new tape
is being made, is automatically set correctly, so it is not affected
by the VOLUME Control on the System. Also, it is not affected
by adjusting the sound effects. Thus, during recording, you can
adjust the sound you are actually listening to without affecting
the recording level.
_Two small tabs on the back of the cassette tape, one for side A
and one for side B, can be removed to prevent accidental erasure
or recording.
Adhesive tape
_To record on a cassette with the tabs removed, you nmst cover
the holes with adhesive tape first.
_Type I tape can be used for recording.
• At the start and end of cassette tapes, there is leader tapewhich cannot be recorded onto. Thus, when recordingCDs, radio broadcasts, etc., wind on the leader tape firstto ensure getting the beginning of the recording.
_CAUTION:
• If a recording you make has excessive noise orstatic, the Unit may have been too close to a TVwhich was on during the recording. Either turnoff the TV or increase the distance between theTV and the Unit.
Standard Recording
To Record Any Sound Source to TapeFollow these steps to record from any sound source onto a tape illDeck B.
1 Insert a blank or erasable tape into the Deck
B and wind past the tape leader.
Tape travelling direction
2 Prepare the source, by, for example, tuning
in a radio station, loading CDs, or turning onconnected equipment.• For CD recording, see "CD Syuchro Recording" mentioned
below.
• For dubbing, see "Tape to Tape Recording (DUBBING)"described below.
3 Press the REC START/STOP button on theUnit.The "REC" indicator lights up and tile System begins record-
ing.
The Tape indicator (1_) blinks on the display.
• If the tab of the cassette tape on the Deck B is removed to
prevent erasure or recording, "NO REC" will appear on the
display.
To stop during recording, press the REC START/STOP but-
ton on the Unit, or press the • button.
Recording an AM Station to Tape (Beat Cut)When recording an AM broadcast, beats may be produced which are
not heard when listening to the broadcast. If this happens, press theFM MODE button on the Remote Control to eliminate the beats.
/ Set to AM station and start recording.
2 Press the FM MODE button on the RemoteControl to eliminate the beats.Each time you press tile button, tile display changes as sho'wubelow:
BEAT 1 _ BEAT 2
CD Synchro Recording
Everything on the CD goes onto the tape in the order it is on the
CD, or according to the order you have set in a program.
/ Prepare CDs. (See page 12.)Press tile CD 1-3 button (that you waut to lnake recording), andthen press the • button.• If you want to record specific tracks only, you need to pro-
gram the tracks beforehand. (See page 14.)
• If you want to record one CD only, you need to load one
CD only.
2 Insert a blank or erasable tape into the DeckB and wind past the tape leader.
Using the Cassette Deck (Recording)
3 Press the CD REC START button on the Unit."CD REC" appears on the display and the "REC" indicatorlights up. Then, the Systenl begins CD Synchro Recording andthe tracks on the CD are recorded on the tape.When recording of the tracks of all CDs is finished, the CDPlayer and Cassette Deck stop.• If the tab of the cassette tape on the Deck B is renloved to
prevent erasure or recording, "NO REC" will appear on thedisplay.
• Alter the CD Player has played the entire CD or all the pro-grammed tracks, the tape automatically stops.
To stop at any time during the recording process, pressthe • button. The CD Player and Cassette Deck stop.
• tf the CD REC START button is pressed when "RESUME"is displayed (see page 14), CD Synchro Recording will be
started from the beginning of the first track.
• When making SLEEP timer settings while doing CD Syn-chro recording, set enough time to allow for the CD to fin-ish playing, otherwise the power will go off beforerecording is completed.
Tape to Tape Recording (DUB-BING)
Recording from one tape to another is called dubbing.
You can dub tapes simply, with just a single button.
1 Press the TAPE A _ button, and then pressthe • button.
2 Insert the source cassette you want to copy
from into Deck A for playback.
3 Insert a blank or erasable cassette you wantto copy onto into Deck B for recording.
4 Press the DUBBING button on the Unit.Deck A and Deck B will start sinmltaneously and the "REC"
indicator lights up.
During dubbing, the Deck indicators "A" and "B" light up al-
ternately.
• If no tape is inserted into Deck A, "NO TAPE" will appear
on the display.
• If no tape is inserted into Deck B, "NO TAPE" will appear
on the display.
To stop dubbing, press the REC START/STOP button on theUnit or the • button.
° During dubbing, you can hear sound effects through thespeakers or headphones. However, the sound is dubbedwithout sound effects.
I
18
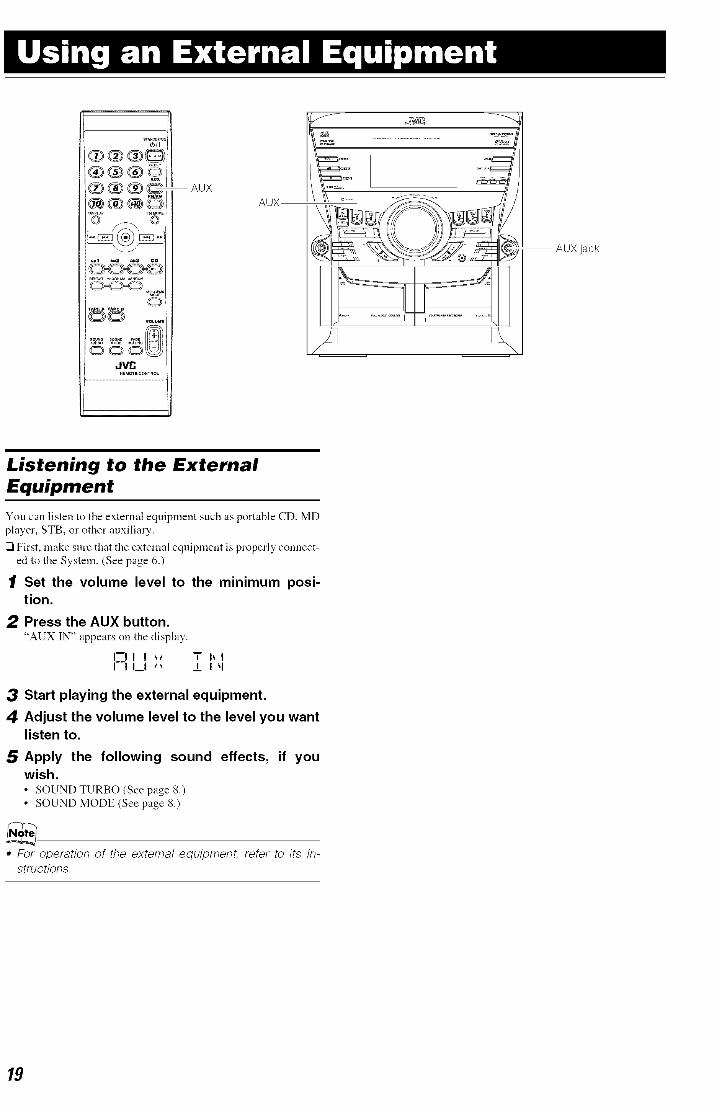
f mg],o_
//®®®©
/o o
N0J_A
AUX
AUX
AUX jack
Listening to the ExternalEquipment
Yon call listen to the external eqnipn]ent such as portable CD, MD
player, STB, or other auxiliary.
[21First, make sure that the external equipment is properly connect-
ed to the System. (See page 6.)
1 Set the volume level to the minimum posi-tion.
2 Press the AUX button."AUX IN" appears on the display.
I--II I _t T blI--I I_1 I_ I I "1
3 Start playing the external equipment.
4 Adjust the volume level to the level you wantlisten to.
5 Apply the following sound effects, if youwish.• SOUNDTURBO (See page 80• SOUND MODE (See page 8.)
• For operation of the external equipment, refer to its In-structions.
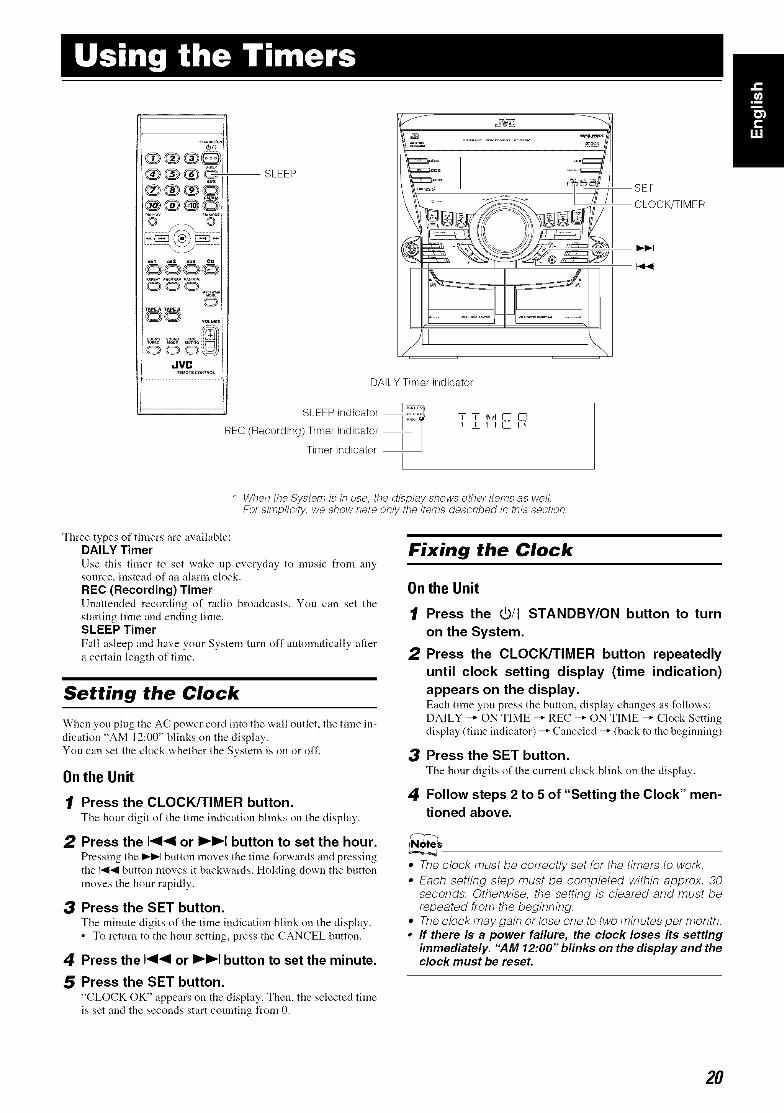
._/j/0N
0_3_®Q®®®0
© /_ ©
O)<o'_(O
0T_A TAPEa
<2_<23JVC
_EMorEeo_rR_
SLEEP
DAILY Timer indicator
SLEEP indicatorI
REC (Recording) Timer indicator J --
Timer indicator
__\
* When the System is in use, the display shows other items as well.For simplicity, we show here only the items described in this section.
Three types of timers are available:DALLY TimerUse this timer to set wake up everyday to music from anysonrce, instead of an alarm clock.REC (Recording) TimerUnattended recording of radio broadcasts. You can set thestarting time and ending time.SLEEP Timer
Fall asleep and have yol.lr System tnrn off automatically aftera certain length of time.
Setting the Clock
When you plug the AC power cord into the wall outlet, the time in-
dication "AM 12:00" blinks on the display.
Yon can set the clock whether the System is on or off.
On the Unit
1 Press the CLOCK/TIMER button.The hour digit of the time indication blinks on the display.
2 Press the I<1<1or I_1_1 button to set the hour.Pressing the I_1 button moves the time forwards and pressing
the _ button moves it back'a, ards. Holding down the button
moves the hour rapidly.
3 Press the SET button.The minute digits of the time indication blink on the display.
• To return to the hour setting, press the CANCEL bntton.
4 Press the _ or _ button to set the minute.
5 Press the SET button."CLOCK OK" appears on the display. Then, the selected time
is set and the seconds start counting from 0.
Fixing the Clock
On the Unit
1
2
3
4
Press the (3/I STANDBY/ON button to turn
on the System.
Press the CLOCK/TIMER button repeatedly
until clock setting display (time indication)appears on the display.Each time you press the bntton, display changes as follo'a,s:
DALLY _" ON TIME _" REC _" ON TIME _" Clock Setting
display (time indicator) _" Canceled _" (back to the beginning)
Press the SET button.The hour digits of the current clock blink on the display.
Follow steps 2 to 5 of "Setting the Clock" men-tioned above.
• The clock must be correctly set for the timers to work,• Each setting step must be completed within approx, 30
seconds, Otherwise, the setting is cleared and must berepeated from the beginning,
• The clock may gain or lose one to two minutes per month,• If there is a power failure, the clock loses its setting
immediately. "AM 12:00" blinks on the display and theclock must be reset.
20
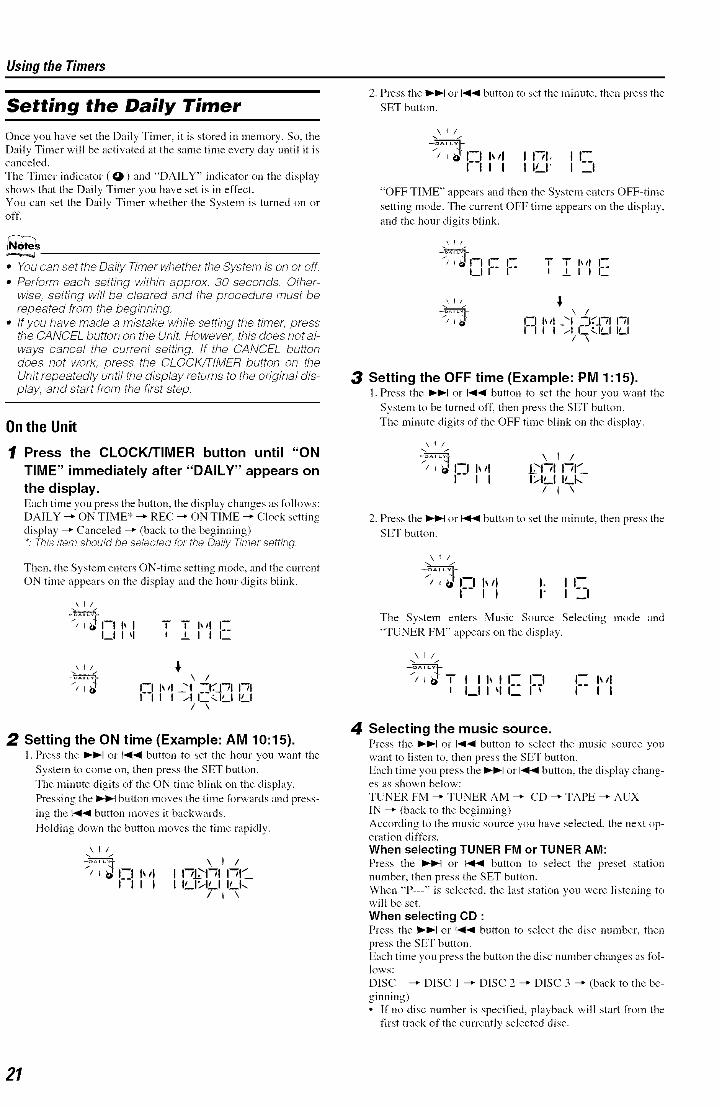
Using the Timers
Setting the Daily Timer
Once you have set the Daily Timer, it is stored in memory. So, the
Daily Timer will be activated at the same time every day until it iscanceled.
The Timer indicator (0) and "DALLY" indicator on the display
shows that the Daily Timer you have set is in effect.
You can set the Daily Timer whether the System is turned on oroft'.
• You can set the Daily Timer whether the System is on or off.
• Perform each setting within approx. 30 seconds. Other-wise, setting will be cleared and the procedure must berepeated from the beginning.
• tfyou have made a mistake while setting the timer, pressthe CANCEL button on the UniL However, this does not al-ways cancel the current setting. If the CANCEL buttondoes not work, press the CLOCK/TIMER button on theUnit repeatedly until the display returns to the original dis-play, and start from the first step.
Onthe Unit
1 Press the CLOCK/TIMER button until "ON
TIME" immediately after "DALLY" appears onthe display.Each time you press tile button, tile display changes as follows:
DALLY _" ON TIME* _" REC _" ON TIME _ Clock setting
display _" Canceled _" (back to the beginning)
*: This item should be selected for the Dally Timer setting.
Then, the System enters ON-time setting mode, and the current
ON time appears on the display and the hour digits blink.
\Ii
_;1-1--1 b II_1 I q
T T bd I_I iLl II-"
I / i\ /
I--I I_d "1 --.l__J'_l I-/II--I I I -/I 17£<.1_1 IL_I
/ \
2 Setting the ON time (Example: AM 10:15).1. Press tile _ or _ button to set tile hour you v,.ant the
System to coine on, then press the SET button.
The minute digits of the ON time blink on the display.
Pressing the i).il,q button moves the time forwards and press-
ing the _ button moves it backwards.
Holding down the button moves the time rapidly.
\!!
I \"% i _--_ I_ tl I I"IL_'I_I I_K_I I I I_I>LI ILk
i I \
2. Press the ll,,-I_lor 14141button to set the minute, then press the
SET button.
\!/
A,,2;IIi _--_bll Ii-_I. Ii--I I I ILl" I _.._I
"OFF TIME" appears and then the System enters OFF-time
setting mode. The current OFF time appears on the display,
and the hour digits blink.
\1/
' i""l =I_1 i _1 I _
CI b ,'I _1 -_.d*";I I_1I I I I M I---t.l,' I I,'1
/ \
3 Setting the OFF time (Example: PM 1:15).1. Press the I_i,,-I or I-<141button to set ttle hour you want tile
System to be turned oft'. then press the SET button.
The minute digits of the OFF time blink on the display.
\!l
b II L,\I-_II-iV"_'__II I I>11._1P_I-.
/iX
2. Press the I_i,,-I or I-<141button to set the minute, then press the
SET button.
\t!
_J*_'l_--_l b,l I. II--I I i I" I_I
The System enters Music Source Selecting mode and
"TUNER FM" appears on the display.
\t!
' '""- I--;' I- ""i I__11 q I-- I I
4 Selecting the music source.Press the I_1_1or 14141button to select the nmsic source you
want to listen to, then press the SET button.
Each time you press the I_i,,-I or I-<14 button, the display chang-es as shown below:
TUNER FM _" TUNER AM _" CD _" TAPE _" AUX
IN _" (back to the beginning)
According to the nmsic source you have selected, the next op-eration differs.
When selecting TUNER FM or TUNER AM:Press the _ or I<l<l button to select the preset station
number, then press the SET button.
When "P---" is selected, the last station you were listening towill be set.
When selecting CD :Press the _ or _ button to select the disc number, then
press the SET button.
Each time you press the button the disc number changes as fol-lows:
DISC _" DISC 1 _" DISC 2 _" DISC 3 _" (back to the be-
ginning)
• If no disc number is specified, playback will start from the
first track of the currently selected disc.

When selecting TAPE:Insert a cassette tape you want to phty into Deck A.
When selecting AUX:Prepare tile external equipment so that it v,,ill turn on at tile ON
time set by the System.
To allow this, the equipment shoukt have the timer function.
5 Setting the volume level.Press tile _ or I-.<4 button to select tile volume level.
MIN, 1-30, or MAX: When the timer is turned on, the Volume
will be automatically set to the selected level.
\ ! /
_1 / I--I I I I t',_'t t-- "1 II'"
v i_l L Lt I t F- _-2t/\----IC
6 Press the SET button.The timer setting is conlpleted and the disphty returns to the
display before you set the Timer.
7 Press the _/I STANDBY/ON button to turn
off the System, if necessary.The Timer indicator ( O ) and "DAILY" indicator are lit on the
display, showing that the Daily Timer is set to on.
To confirm / change the timer setting, repeat the setting pro-cednre from the beginning.
When the timer ON-time comes:
The following operation will be automatically repeated every clay.
• When the timer ON-time comes, the System automatically
turns on. The music source you have set is played. The Timer
indicator (lg_) blinks and "DAILY" indicator lights during
timer operation.
• When the timer OFF-time comes, the System automatically
turns off. Then, the Timer indicator ( 0 ) and "DALLY" indica-
tor remain lit on the display.
• tf the System is already on when the timer ON-time
comes, the Daily Timer does not work.
Using the Timers
To cancel the Daily Timer temporarily:
1[ Press the CLOCK/TIMER button on the Unit
repeatedly until the "DAILY" appears on thedisplay.
2 Press the CANCEL button on the Unit."OFF" appears and both the Timer indicator (0) and the
"DAILY" indicator go out.
To activate the cancelled Daily Timer:
1[ Press the CLOCK/TIMER button on the Unit
repeatedly until the "DAILY" appears on thedisplay.The "DAILY" indicator blinks and the Timer indicator (O)
lights up on the dispaly.
2 Press the SET button on the Unit."DAILY SET" appears ,an the disphty. The Tinier indicator
( 0 ) and the "DAILY" indicator remain lit, and the display re-
turns to the original display.
• ff the System is unplugged, or a power failure occurs,the timer setting will be lost in a few days. You willneed to reset the clock first, then the timer.
Setting the REC (Recording)Timer
With the Recording Timer, you can make a tape of a radio broad-
cast automatically whether or not you are home.
Once you have set the REC Timer to record a source, the timer set-
ting is stored in memory. So, though the REC Timer turns off once
it is used, you can recall it at any time.
• You can set the REC Timer whether the System is on oroff.
• Perform each setting within approx. 30 seconds. Other-wise, setting will be cleared and the procedure must berepeated from the beginning.
• tfyou have made a mistake while setting the timer, pressthe CANCEL button on the Unit. However, this does not al-ways cancel the current setting, tf the CANCEL buttondoes not work, press the CLOCK/TIMER button on theUnit repeatedly until the display returns to the original dis-play, and start from the first step.
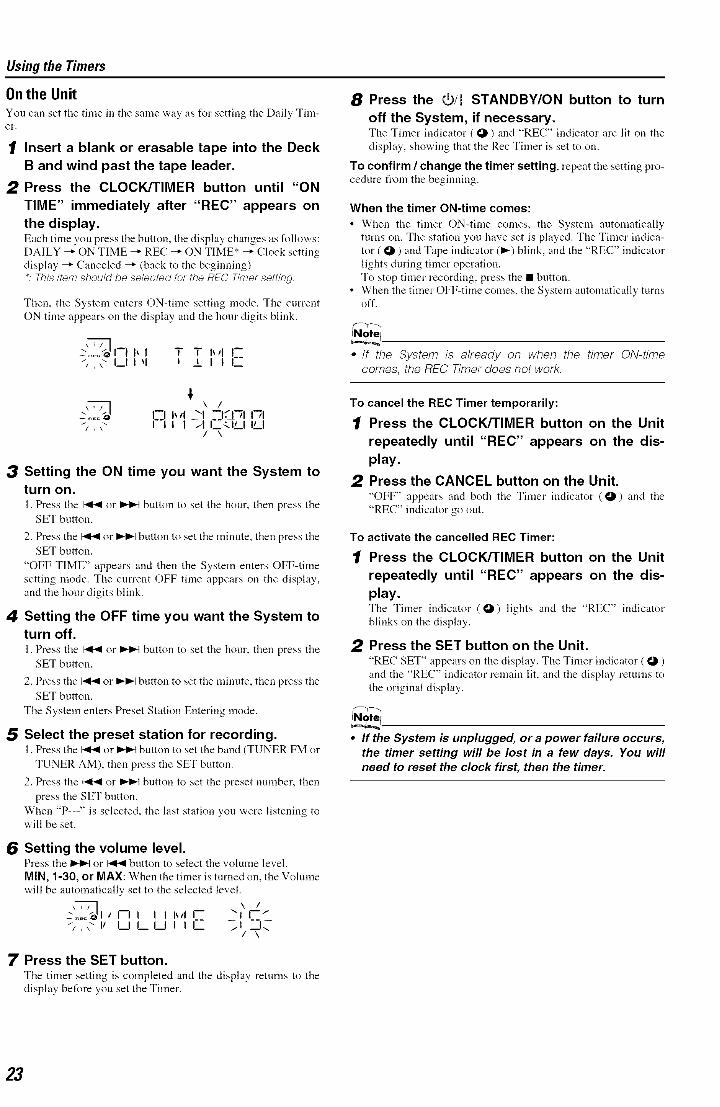
Using the Timers
Onthe Unit
You can set the time ill the same _,ay as for setting the Daily Tim-er.
1[ Insert a blank or erasable tape into the DeckB and wind past the tape leader.
2 Press the CLOCK/TIMER button until "ON
TIME" immediately after "REC" appears on
the display.Each time you press tile button, tile disphty changes as folh__ws:
DALLY _" ON TIME _" REC _ ON TIME* _ Clock setting
display _" Canceled -_ (back to the beginning)*: This item should be selected for the REC Timer setting.
Then, the System enters ON-time setting mode. The current
ON time appears on the display and the hour digits blink.
\f/"'_-"_ '--1 b 1 T T I_!l !--
"/ i'," I_1 I q i i I I I--
I\ /
.... o I--I I_!l __1 --_.J-31 1-71_/_ _" I--I I I il I_ILI ILl
/ \
3 Setting the ON time you want the System toturn on.I. Press the I-<t41or _ button to set the hour, then press the
SET button.
2. Press the I-<1_ or I_1_1button to set the minute, then press theSET button.
"OFF TIME" appears and then the System enters OFF-time
setting mode. The current OFF time appears on the display,
and the hour digits blink.
4 Setting the OFF time you want the System toturn off.I. Press the I-<t_I or _ button to set the hour, then press the
SET button.
2. Press the 1<41 or I_1_1button to set the minute, then press the
SET button.
The System enters Preset Station Entering mode.
5 Select the preset station for recording.1. Press the I_,_1 or _ button to set the band (TUNER FM or
TUNER AM), then press the SET button.
2. Press the _ or _ button to set the preset number, then
press the SET button.
When "P---" is selected, the last station you were listening towill be set.
6 Setting the volume level.Press ttre _ or I-,4_1button to select the volume level.
MIN, 1-30, or MAX: When the timer is turned on, the Volume
will be automatically set to the selected level.
_"_1,--._< I--I I I Ih,I I-- "t x I-_/
",i\" It El ELI I I I-- _i --IQ"/ \
7 Press the SET button.Ttre timer setting is completed and the disphly returns to the
display before you set the Timer.
8 Press the _/I STANDBY/ON button to turn
off the System, if necessary.The Timer indicator ( O ) and "REC" indicator are lit on the
display, showing that the Rec Timer is set to on.
To confirm / change the timer setting, repeat the setting pro-cedure from the beginning.
When the timer ON-time comes:
• When the timer ON-time comes, the System automatically
turns on. The station you have set is played. The Timer indica-
tor ( O ) and Tape indicator (1_) blink, and the "REC" indicator
lights during timer operation.
To stop timer recording, press the • button.
• When the timer OFF-time comes, the System antomatically turnsoff.
• tf the System is already on when the timer ON-timecomes, the REC Timer does not work.
To cancel the REC Timer temporarily:
1[ Press the CLOCK/TIMER button on the Unit
repeatedly until "REC" appears on the dis-play.
2 Press the CANCEL button on the Unit."OFF" appears and both the Timer indicator (O) and the
"REC" indicator go ont.
To
1[
2
activate the cancelled REC Timer:
Press the CLOCK/TIMER button on the Unit
repeatedly until "REC" appears on the dis-play.The Timer indicator (O) lights and the "REC" indicator
blinks on the display.
Press the SET button on the Unit."REC SET" appears on the display. The Timer indicator ( O )
and the "REC" indicator remain lit, and the display returns to
the original display.
• If the System is unplugged, or a power failure occurs,the timer setting will be lost in a few days. You willneed to reset the clock first, then the timer.

Using the Timers
Setting the SLEEP Timer
Use the Sleep Timer to turn the System off alter a certain number
of minutes when it is playing. By setting the Sleep Timer, you can
fall asleep to nmsic and know that your System will turn offby it-
self rather than play all night.
• You can only set the Sleep Timer when the System is on.
Onthe Remote Control
1 During playback a source, press the SLEEP
Timer Priority
Since REC Timer and DAILY Timer can be set independently, you
may wonder what happens if the settings overlap. Here are the pri-orities for RE(." Timer and DAILY Timer:
• Timer with the earlier time setting will have the priority.
Timer will not operate when other Timer is operating.• If other Timer is set to an exact same time as the REC Timer,
the REC Timer will have the priority.
[21REC Timer and DAILY Timer will not operate when SLEEP
Timer is operating.button.Tile "SLEEP" iMicator starts blinking on tile display.
2 Set the length of time you want the source to
play before shutting off.Each time you press tile SLEEP button, the time length chang-es as I_llows:
10 -_ 20 _" 30 _" 60 _" 90 -_ 120 _" OFF _" (back to the
beginning)
\ I / f
-<"% L el-,-cl=' c,'-,:,
Example
REC Timer
DALLY Timer
3 Wait for 5 seconds.Tire "SLEEP" indicator stops blinking and remains lit, and the
display returns to the original one bet_re setting the SleepTimer.
The System is now set to turn off alter the number of minutes
you have set.
To Confirm the Sleep Time:
When the SLEEP button on the Remote Control is pressed, the re-maining sleep time is displayed. Wait until the display returns tothe original display.
To Cancel the SLEEP Timer Setting:
Press tire SLEEP bntton until "OFF" appears on tire display.• Turning off the System also cancels the SLEEP Timer.
,, When the REC Timer or the DALLY Timer is operating,SLEEP Timer can not be set.
REC Timer
DALLY Timer
Setting
ON OFF
I I: ON : OFF
Ji l!li
9:30PM 10:00PM 10:30PM 11:00PM
tPOperation
ON OFF
i
i
9:30PM 10:30PM
Operates only in REC Timer mode.
//

Handle your CDs and tapes carefldly, and they will last a longtime.
Compact Discs
• Remove the CD from its case by holdingit at the edges while pressing the case'scenter hole lightly.
• Do not touch the shiny surface of theCD, or bend the CD.
CassetteTapes
• If the tape is loose in its cassette, take upthe slack by inserting a pencil in one ofthe reels and rotating.
• If the tape is loose, it may get stretched,cut, or caught in the cassette.
• Do not touch the tape surface.
• Put the CD back in its case after use to
prevent warping.• Be careful not to scratch the surface of
the CD when placing it back in the case.
• Avoid exposure to direct sunlight, tem-
perature extremes, and moisture.
A dirty CD may not play correctly. If a
CD does become dirty, wipe it with a
soft cloth in a straight line from center to
edge.
_CAUTION:
• Do not use any solvent (for example, conven-tional record cleaner, spray thinner, benzine,etc.) to clean a CD.
General Notes
In general, you will have the best performance by keeping yourCDs and the mechanism clean.
• Store CDs in their cases, and keep them in cabinets or onshelves.
• Keep the System's Top Cover closed when not in use.
Moisture Condensation
Moisture may condense on the lens inside the System in the fol-lowing cases:• After turning on heating in the room.• In a damp room.• If the System is brought directly from a cold to a warm place.Should this occur, the System may malfunction. In this case, leavethe System turned on t_r a few hours until the moisture evaporates,unplug the AC power cord, and then plug it in again.
• Do not store the tape:- In dusty places- In direct sunlight or heat- In moist areas
- On a TV or speaker- Near a magnet
Cassette Deck
• If the heads, capstans, and pinch-rollers of the Cassette Deckbecome dirty, the following will occur:- Loss of sound quality- Discontinuous sound- Fading- Incomplete erasure- Difficulty recording
• Clean the heads, capstans, and pinch-rollers using a cottonswab moistened with alcohol.
Pinch-rollerCapstan /
• If the heads become magnetized, the Unit will produce noise orlose high lYequencles.
• To demagnetize the heads, turn off the Unit, and use a headdemagnetizer (available at electronics and record shops).
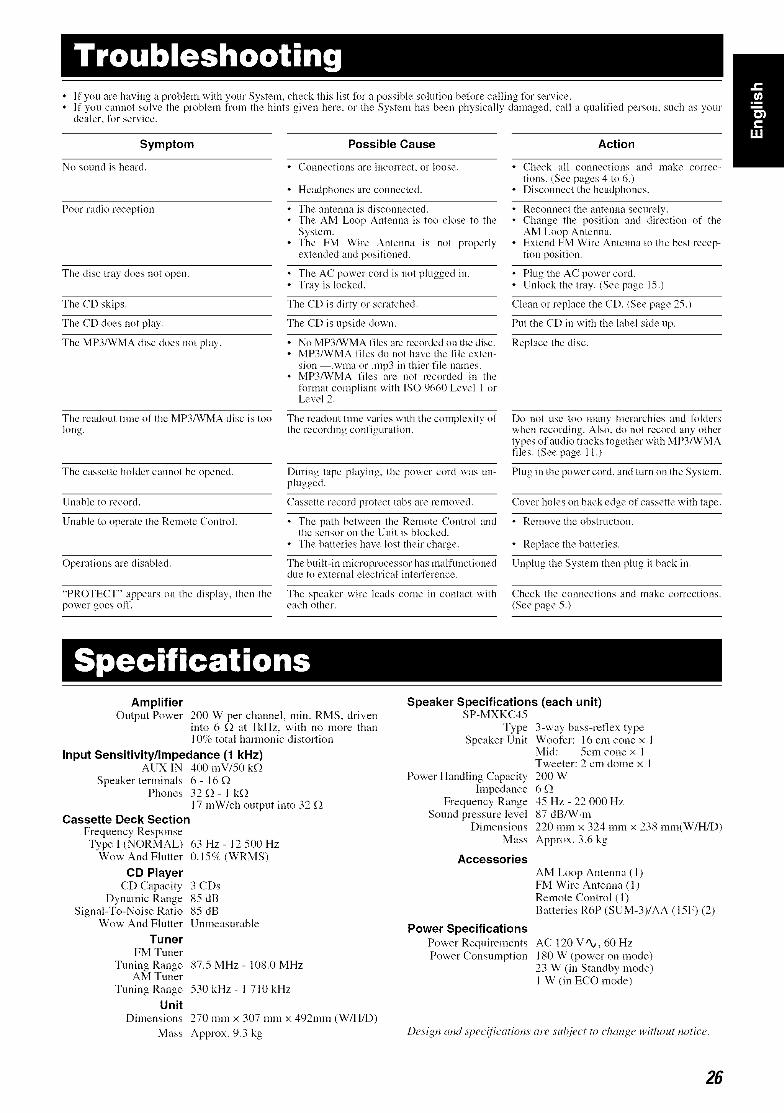
• _fyouarehavingapr_b_emwithyourSystem`checkthis_ist_rapossib_es_uti_be_reca_i_gR)rservice.• If you cannot solve tile problem from the hints given here, or the System has been physically damaged, call a qualified person, such as your
dealer, for service.
Symptom
No sound is heard.
Poor radio reception
The disc tray does not open.
The CD skips.
The CD does not pla?.
The MP3_VMA disc does not play.
The readout time of the MP3/WMA disc is too
long.
The cassette holder cannot be opened.
Unable to record.
Unable to operate the Remote Controh
Operations are disabled.
Possible Cause
• Connections are illCOITeCt, or loose.
• Headphones are connected.
• The antenna is disconnected.• Tile AM Loop Antenna is too close to the
System.• The FM Wire Antenna is not properly
extended and positioned.
• The AC power cord is not plugged in.• Tray is locked.
The CD is dirty or scratched.
The CD is upside down.
• No MP3/WMA files are recoNed on the disc.• MP3/WMA files do not have the file exten-
sion --.wma or .mp3 in thief file names.• MP3/WMA files are not recorded in the
format compliant with IS() 9660 Level 1orLevel 2.
The readout time varies with the complexity ofthe recording configuration.
During tape playing, the power cord was un-plugged.
Cassette record protect tabs are removed.
• The path between the Remote Control andthe sensor on the Unit is blocked.
• Tile batteries have lost their charge.
The builtqn microprocessor has malfunctioneddue to external electrical interference.
Action
• Check all connections mid make correc-tions. (See pages 4 to 6.)
• Disconnect the headphones.
• Reconnect tile antenna securely.• Change the position and direction of the
AM Loop Antenna.• Extend FM Wire Antemla to the best recep-
tion position.
• Plug the AC power cord.• Unlock the tray. (See page 15.)
(lean or replace the (D. (See page 25.)
Put the (D in with the label side up.
Replace the disc.
Do not use too many hierarchies and lolderswhen recording. Also, do not record any othertypes of audio tracks together with MP3/WMAfiles. (See page 11.)
Plug in the power cord. and turn on the System.
Cover holes on back edge of cassette with tape.
• Remove the obstruction.
• Replace the batteries.
Unphlg the System then plug it back in.
"PROTECT" appears on tile display, then the The speaker wire leads come in contact with Check the connections and make corrections.power goes olf. each other. (See page 5.)
AmplifierOutput Power 200 W per channel, nlin. RMS, driven
into 6 f.) at lkHz, with no more than10% total harmonic distortion
Input Sensitivity/Impedance (1 kHz)AUX IN 400 mV/50 kf.)
Speaker terminals 6 - 16 f.)Phones 32 f2 - 1 kf.)
17 mW/ch output into 32 f.)Cassette Deck Section
Frequency ResponseType I (NORMAL)
Wow And Flutter
CD PlayerCD Capacity
Dynanfic RangeSignal-To-Noise Ratio
Wow' And Flutter
TunerFM Tuner
Tuning RangeAM Tuner
Tuning RangeUnit
DimensionsMass
63 Hz- 12 500 Hz0.15% (WRMS)
3 CDs85 dB
85 dBUnmeasurable
87.5 MHz - 108.0 MHz
530 kHz - 1 710 kHz
270 mmx 307 mmx 492mm (W/H/D)
Approx. 9.3 kg
Speaker Specifications (each unit)SP-MXKC45
TypeSpeaker Unit
Power Handling Capacityhnpedance
Frequency RangeSound pressure level
DimensionsMass
3-way bass-reflex typeWoofer: 16 cm cone x 1Mid: 5cm cone x 1Tweeter: 2 cm dome x 1200 W6f245 Hz - 22 000 Hz87 dB/W.m220 mmx 324 mm x 238 ram(W/H/D)Approx. 3.6 kg
Accessories
Power SpecificationsPower Requirements
Power Consumption
AM Loop Antenna (l)FM Wire Antenna (1)
Remote Control (l)Batteries R6P (SUM-3)/AA (15F) (2)
AC 120 V %, 60 Hz
180 W (power on mode)23 W (in Standby mode)1 W (in ECO mode)
Desigtz and spec!fications are sul_ject to change without notice.
26

,x
0
olt
00 /
•"u /
,-I00
0zmz--I
-<
,-Im
JVC
_ EN, FR
© 2006 Victor Company of Japan, Limited0206NYMCREBET