Cleo 3780Plus For Windowsportal.cleo.com/support/byproduct/legacy/Cleo3780WinUsersGuide.pdf · Cleo...
193
Cleo 3780Plus For Windows User's Guide User's Guide User's Guide User's Guide Version 06010, July 2000
Transcript of Cleo 3780Plus For Windowsportal.cleo.com/support/byproduct/legacy/Cleo3780WinUsersGuide.pdf · Cleo...

Cleo 3780Plus
For Windows
User's GuideUser's GuideUser's GuideUser's Guide
Version 06010, July 2000
Cleo 3780Plus for Windows User's Guide
Release 06010 - July 2000
RESTRICTED RIGHTS Use, duplication, or disclosure by the Government is subject to restrictions as set forth in subparagraph (C)(1)(ii) of the Rights in Technical Data and Computer Software clause at DFARS 252.227-7013. Manufacturer is: Cleo Communications 4203 Galleria Drive, Rockford IL 61111 USA
Cleo Communications reserves the right to, without notice, modify or revise all or part of this document and/or change product features or specifications and shall not be responsible for any loss, cost or damage, including consequential damage, caused by reliance on these materials.
This document may not be reproduced, stored in a retrieval system or transmitted, in whole or in part, in any form or by any means (electronic, mechanical, photo-copied or otherwise) without the prior written permission of Cleo Communications.
1997-2002 Cleo Communications All rights reserved. Cleo, 3780Plus, and SYNCcable+ are registered trademarks of Cleo Communications. IBM is a registered trademark of International Business Machines Corporation. Windows, Windows 95, and Windows NT are trademarks of Microsoft Corporation. All other brands are trademarks or registered trademarks of their respective holders.
About Cleo Communications Cleo Communications provides reliable, secure data transfer products and services that enable users to easily establish and manage communications sessions, and easily integrate these solutions within their mission-critical e-business applications.
Cleo�s products have been proven in over 100,000 worldwide installations. Customers in the manufacturing, retail, healthcare, and financial services industries, among others, rely on our products and services to help them achieve complete automated point-to-point data transfer solutions.
For most applications, we adapt our core capabilities to deliver tailored communications solutions providing exceptional value to users. We have established OEM partnerships with leading vertical-market application solution providers, and we also work directly with many end-user organizations to meet their specific data transfer needs.
Our business partners and end-user customers prefer Cleo for our ability to provide the highest-quality communications products backed by superior service and support.
Cleo Technical Support Subscription Program An annual technical support subscription includes the following:
Technical Support via Telephone. Technical Support Analysts are available to assist with installation, testing and troubleshooting M-F from 8am-5pm CST. The technical support area operates on a callback basis. Please call our toll-free support line at 866-444-CLEO (866-444-2536) or outside the U.S., dial 01.815.654.8294. The next available Support Analyst will return your message.
Technical Support via E-mail and Fax. Questions and support requests sent to [email protected] (e-mail) or 1-815-654-8294 (fax) are entered in the same queue as telephone requests and will be returned by e-mail, fax or telephone per your request.
Free Software Upgrades and Sample Scripts. Enjoy 24 hour a day access to upgrades and new versions of your software, or access sample scripts that can simplify your scriptwriting when you have an exclusive, subscriber�s area password.
Standard Support Services (Available Without Subscription)
Subscriptions include the standard support services available:
Website Support. Cleo�s FAQ knowledge base includes detailed answers and technical bulletins on all software and hardware questions and is continually growing.
Automated Test Lines. Instructions for testing your Cleo installation using automated test lines are located in the �Readme.txt� file packaged with your software.
One-Year Hardware Warranty. All Cleo hardware is warranted for one year from date of purchase. In addition, users may purchase one additional piece of hardware (without software) for back-up purposes.
Table of Contents
Before You Begin .....................................................................................................................................................1
The Documentation......................................................................................................................................................................2
User's Guide..........................................................................................................................................................................2
Installation Guide..................................................................................................................................................................2
AllSync AT Command Set ...................................................................................................................................................2
Application Programmer's Interface .....................................................................................................................................2
Documentation Conventions........................................................................................................................................................3
Documentation Conventions........................................................................................................................................................3
A Brief History of 3780 ...............................................................................................................................................................4
3780 BSC Features ...............................................................................................................................................................4
What is Cleo 3780Plus? ...............................................................................................................................................................5
Features.................................................................................................................................................................................6
Specifications........................................................................................................................................................................7
Related Documentation................................................................................................................................................................8
Chapter 1: Configuration .........................................................................................................................................9
1.1 The Configurator Notebook.........................................................................................................................................10
1.2 Protocol Configuration ................................................................................................................................................12
1.3 Line Configuration.......................................................................................................................................................17
1.4 Startup Configuration ..................................................................................................................................................19
1.5 Software Configuration ...............................................................................................................................................21
1.5.1 General Variables...............................................................................................................................................21
1.5.2 Printing Variables...............................................................................................................................................22
1.5.3 Drag and Drop Settings ......................................................................................................................................22
1.6 Hardware Configuration ..............................................................................................................................................23
Chapter 2: Operation..............................................................................................................................................25
2.1 The 3780Plus Command Line .....................................................................................................................................26
Before You Begin
Cleo 3780Plus for Windows User's Guide 2
2.2 Starting 3780Plus.........................................................................................................................................................27
2.3 The 3780Plus Window ................................................................................................................................................28
2.3.1 Title Bar .....................................................................................................................................................................29
2.3.2 Menu Bar ...................................................................................................................................................................29
2.3.3 Speed Button Bar ......................................................................................................................................................30
2.3.4 Status Bar..................................................................................................................................................................31
2.4 Background Operation.................................................................................................................................................32
2.5 Drag and Drop .............................................................................................................................................................33
2.6 File Transfer Status......................................................................................................................................................34
Chapter 3: 3780Plus Menus...................................................................................................................................35
3.1 System - Run Jobs and Print ...............................................................................................................................................36
3.1.1 Run Job - Execute a Job/Script File ..........................................................................................................................36
3.1.2 Print Current Window - Print the Contents of the Current Window.........................................................................37
3.1.3 Printer Setup - Select and Configure the Default Printer ..........................................................................................37
3.1.4 Information - Current 3780Plus Information ............................................................................................................38
3.1.5 Exit - Exit 2780/3780 Communications....................................................................................................................38
3.2 Edit - Clipboard Access ......................................................................................................................................................39
3.2.1 Undo .........................................................................................................................................................................39
3.2.2 Cut.............................................................................................................................................................................39
3.2.3 Copy..........................................................................................................................................................................39
3.2.4 Paste..........................................................................................................................................................................39
3.2.5 Clear All....................................................................................................................................................................39
3.2.6 Delete ........................................................................................................................................................................39
3.2.7 Find ...........................................................................................................................................................................39
3.2.8 Replace .....................................................................................................................................................................39
3.2.9 Next...........................................................................................................................................................................39
3.3 Line - Connect/Disconnect Phone Line ..............................................................................................................................40
Before You Begin
Cleo 3780Plus for Windows User's Guide 3
3.3.1 Dial - Access the Dialing Directory..........................................................................................................................40
3.3.2 Hangup - Hangup the Phone Line.............................................................................................................................43
3.3.3 Answer - Answer the Phone Line .............................................................................................................................43
3.3.4 Data - Enter Data Mode ............................................................................................................................................43
3.4 Transmit - Send to the Host System....................................................................................................................................44
3.4.1 Send - Send File(s) in Scanned Mode .......................................................................................................................44
3.4.2 Binary - Send File(s) in Binary Mode.......................................................................................................................46
3.4.3 Text - Send File(s) in Text Mode..............................................................................................................................46
3.4.4 Key - Send a Message in Text Mode ........................................................................................................................47
3.4.5 Eot - Transmit an EOT..............................................................................................................................................47
3.5 Receive - Receive File(s) ....................................................................................................................................................48
3.5.1 To File - Receive File(s) to Disk...............................................................................................................................48
3.5.2 To Printer - Print Received File(s) ............................................................................................................................49
3.5.3 To Screen - Display Received File(s) to Screen .......................................................................................................50
3.6 Configuration - Display or Change Configuration..............................................................................................................51
3.6.1 Load - Load a Configuration File .............................................................................................................................51
3.6.2 Save - Save the Current Configuration .....................................................................................................................51
3.6.3 Save As - Save Current Configuration under a New Name ......................................................................................51
3.6.4 Edit - Edit the Current Configuration .......................................................................................................................51
3.6.5 Translation Tables - Load a Translation Table(s) .....................................................................................................52
3.7 Window - Display or Change Windows .............................................................................................................................53
3.7.1 Command Window - Toggle the Command Window ..............................................................................................53
3.7.2 Log Window - Toggle the Log Window...................................................................................................................53
3.7.3 Monitor Window - Toggle the Line Monitor Window .............................................................................................53
3.7.4 Recorder Window - Toggle Command Recorder Window.......................................................................................54
3.8 Help - Display Help Information ........................................................................................................................................56
3.8.1 Contents - Online 3780Plus Manual .........................................................................................................................56
3.8.2 Using Help - Help Information About Using Help ...................................................................................................56
Before You Begin
Cleo 3780Plus for Windows User's Guide 4
Chapter 4: 3780Plus Commands ..........................................................................................................................57
4.1 ALert - Flash Message on Screen ......................................................................................................................................59
4.2 ANswer - Automatic Answer..............................................................................................................................................60
4.3 ASk - Prompt User for Information ...................................................................................................................................61
4.4 AT - Send an 'AT' String to the Modem .............................................................................................................................62
4.5 AUtodial - Automatic Dial..................................................................................................................................................63
4.6 BInary - Transmit Binary File(s).........................................................................................................................................65
4.7 BRanch- Branch in Job/Script File Based on Condition .....................................................................................................67
4.7.1 BRanch ON|NOT status TO label.........................................................................................................................68
4.7.2 BRanch ON|NOT return_code TO label...............................................................................................................68
4.7.3 BRanch ON|NOT SIZE [<|=|>] file_size TO label .............................................................................................69
4.7.4 BRanch ON|NOT %COUNTERc|$COUNTERc <|=|> number TO label .............................................................69
4.7.5 BRanch ON|NOT %variable%|$variable <|=|> number TO label .......................................................................69
4.7.6 BRanch ON|NOT %variable%|$variable = string TO label.................................................................................70
4.7.7 BRanch ON TRUE TO label ................................................................................................................................70
4.7.8 BRanch Command Tips............................................................................................................................................71
4.8 COnfig - Display or Change Configuration ........................................................................................................................72
4.9 +COUNTER - Increment Counter ......................................................................................................................................74
4.10 -COUNTER - Decrement Counter....................................................................................................................................75
4.11 DAta - Data Mode.............................................................................................................................................................76
4.12 EOt - Transmit EOT (End Of Transmission) ....................................................................................................................77
4.13 EXecute - Execute Commands from a Job/Script File ......................................................................................................78
4.14 EXISTS - Check if File Exists ..........................................................................................................................................79
4.15 HAngup - Disconnect Phone Line ....................................................................................................................................80
4.16 HElp - Command and Configuration Help Information.....................................................................................................81
4.17 JOb - Record Commands or Scramble a Job/Script File ...................................................................................................82
4.18 KEy - Transmit a Keyboard Message ...............................................................................................................................84
4.19 LEt - Set User-Defined Variable.......................................................................................................................................86
Before You Begin
Cleo 3780Plus for Windows User's Guide 5
4.20 LIneup - Get Line Status ...................................................................................................................................................87
4.21 LOg - Open, Close, Display or Write to the Log File .......................................................................................................88
4.22 MOnitor - Open or Close a Serial Line Monitor ...............................................................................................................89
4.23 OPEN - Open a File to READ ..........................................................................................................................................90
4.24 PRint - Receive File(s) & Spool to Printer........................................................................................................................91
4.25 QUit - Exit 2780/3780.......................................................................................................................................................94
4.26 READ - Read a Line from READ File .............................................................................................................................96
4.27 REceive - Receive File(s)..................................................................................................................................................97
4.28 SAve - Save Current Configuration ..................................................................................................................................99
4.29 SCreen - Receive File(s) and Display on Screen ............................................................................................................100
4.30 SEnd - Transmit File(s)...................................................................................................................................................101
4.31 SLeep - Pause Specified Seconds ...................................................................................................................................103
4.32 STart - Display or Start Counter .....................................................................................................................................104
4.33 SYstem - Execute an Operation System Command or Application Program .......................................106
4.34 TAble - Display or Change Translation Table(s) ............................................................................................................107
4.35 TExt - Transmit Text File(s) ...........................................................................................................................................108
4.35.1 File Naming ..........................................................................................................................................................109
4.36 TOken - Enable, Disable, Display, or Set Token Variables ............................................................................................111
4.37 VOice - Disconnect Phone Line and Disable Autoanswer..............................................................................................113
4.38 WAitfor - Wait for Specified Time .................................................................................................................................114
4.39 XX - Post Current 3780Plus Information........................................................................................................................115
4.40 ## - Comment Line .........................................................................................................................................................116
Chapter 5: 3780Plus Tutorial ...............................................................................................................................117
5.1 Retail Sales........................................................................................................................................................................118
5.2 Remote Job Entry..............................................................................................................................................................119
5.3 Insurance Batch Transactions ...........................................................................................................................................120
5.4 Insurance Batch Transactions II -Tokens..........................................................................................................................123
Before You Begin
Cleo 3780Plus for Windows User's Guide 6
5.5 Insurance Batch Transactions III - Environment Variables..........................................................................................124
Appendix A: Modem Support..............................................................................................................................125
A.1 Internal Cleo Modems ...............................................................................................................................................126
A.2 External Autodial Modems........................................................................................................................................127
A.2.1 AT Command Set Modems....................................................................................................................................127
A.2.2 Motorola/UDS BSC Modems ................................................................................................................................129
A.2.3 Synchronous AutoDial Language (SADL) Modems .............................................................................................130
A.2.4 CCITT V.25bis Modems........................................................................................................................................131
A.3 External Non-Autodial Modems...............................................................................................................................132
A.4 Modem Eliminators ..................................................................................................................................................133
A.5 Null Modems ............................................................................................................................................................134
Appendix B: File Formats....................................................................................................................................135
B.1 Configuration File ............................................................................................................................................................136
B.2 Job/Script File ..................................................................................................................................................................137
B.3 Log File ............................................................................................................................................................................138
B.3.1 The Autodial Status Line........................................................................................................................................138
B.3.2 The Transmit/Receive Status Line .........................................................................................................................140
B.3.3 Status Messages .....................................................................................................................................................143
B.4 Monitor File......................................................................................................................................................................151
B.4.1 Using the Monitor ...................................................................................................................................................151
B.4.2 Sample Monitor......................................................................................................................................................152
B.5 Character Translation Files...............................................................................................................................................161
B.5.1 ASCII to EBCDIC Translation Table......................................................................................................................161
B.5.2 EBCDIC to ASCII Translation Table.....................................................................................................................162
B.6 Video Display File............................................................................................................................................................163
B.6.1 3780Plus File Names..............................................................................................................................................163
B.6.2 Modem Setup Strings .............................................................................................................................................163
Before You Begin
Cleo 3780Plus for Windows User's Guide 7
B.6.3 Modem Result Messages........................................................................................................................................163
B.7 Vertical Forms File...........................................................................................................................................................165
B.8 Initialization File ..............................................................................................................................................................167
B.8.1 api3780...................................................................................................................................................................167
B.8.2 StartUp ...................................................................................................................................................................168
B.8.3 3780Plus.................................................................................................................................................................169
B.8.4 Filenames ...............................................................................................................................................................170
B.8.5 Miscellaneous.........................................................................................................................................................172
B.8.6 Debug .....................................................................................................................................................................173
B.8.7 API3780 .................................................................................................................................................................173
Appendix C. Multipoint Operation and Device Selection .................................................................................174
C.1 Multipoint Operation.........................................................................................................................................................175
C.1.1 3780 Multipoint......................................................................................................................................................175
C.1.2 2780 Multipoint......................................................................................................................................................175
C.2 Device Selection...............................................................................................................................................................176
C.2.1 3780 Device Selection............................................................................................................................................176
C.2.2 2780 Device Selection............................................................................................................................................177
Appendix D: Glossary..........................................................................................................................................178
1
Before You Begin Before you get started, take a moment to read this section. It provides an overview of the following topics:
• The documentation
• Documentation conventions
• A brief history of 3780
• What is Cleo 3780Plus?
• Related documentation
Before You Begin
Cleo 3780Plus for Windows User's Guide 2
The Documentation
The 3780Plus manual is comprised of several sections.
User's Guide
The Cleo 3780Plus for Windows User's Guide provides background information on the 2780 and 3780 terminals and describes 3780Plus features, commands, menus, configuration options, job scripting language, diagnostic tools, and terms used throughout the manual.
Installation Guide
The Cleo 3780Plus for Windows Installation Guide section provides instructions on installing the hardware included with your 3780Plus package and installing Cleo 3780Plus to your hard disk and configuring your system for 3780Plus operation. It also describes any execution instructions not covered in the Cleo 3780Plus for Windows User's Guide and provides help for troubleshooting SYNCcable+ installation problems.
AllSync AT Command Set
The AllSync AT Command Set section describes the commands for autodialing, auto-answering, configuring, and operating the AllSync asynchronous modem. This section is included only with AllSync packages.
Application Programmer's Interface
The Cleo 3780Plus for Windows Application Programmer's Interface section contains the information you need to write application programs using 3780Plus's own Integrated Application Programmer's Interface. This section is provided as an add-on option only.
Before You Begin
Cleo 3780Plus for Windows User's Guide 3
Documentation Conventions
The following documentation conventions are used throughout this manual:
Italics Italicized words in this format identify the titles of manual sections.
bold Bold type is used for cross-references to other chapters within the manual or to other sections within a chapter.
italics Italicized words in this format represent substituted items. Substitute your own file name, device name, phone number, etc., for the italicized word. File names may optionally specify a disk drive and/or path name as follows: drive:/pathname/filename.
[ ] Brackets represent an optional parameter. Do not include the brackets when entering the option.
| Vertical bars separate menu and submenu selections. Select each menu option to access the desired function.
... An ellipsis following a menu option indicates that a dialog box requesting more information will appear when that option is selected.
KEYNAME A key name in this format, for example ENTER, refers to a specific key on your terminal's keyboard.
Some keyboard commands require that you press one key and hold it down while you press one or more other keys. These are called combination keystrokes. To indicate this, key names are shown together with a + sign between them (for example, CTRL+C). While holding down the first key, press the other key(s).
0xnn A number preceded by 0x (for example 0x20) indicates a hexadecimal value.

Before You Begin
Cleo 3780Plus for Windows User's Guide 4
A Brief History of 3780
The IBM 2780 Data Transmission Terminal was introduced in the late 1960's to enable large data processing consumers to consolidate data processing operations into one large mainframe. The 2780 terminal could be configured with the following peripheral devices: card reader, card punch, and printer. Files were transmitted to the host mainframe by means of the card reader, and received files were directed to the card punch or line printer.
The IBM 3780 Data Communications Terminal, an improved version of the 2780 terminal, was introduced in 1972. The 3780 terminal included a terminal console in addition to the card reader, card punch, and printer of 2780. The 3780 protocol also offered improved speed and flexibility over the 2780 protocol.
IBM's 2780 and 3780 binary synchronous protocols are fast and flexible means of transferring large amounts of data in a leased or public carrier data line environment. The 2780/3780 protocol provides extensive error checking to ensure error-free transmission and reception of data files.
3780 BSC Features
Transparency/Non-transparency - 2780/3780 may transmit and receive files in transparent or non-transparent mode. In transparent mode, files are normally transmitted and received "as is" with no character translation. This allows the full range of characters or data to be sent. In non-transparent mode, files are normally translated from the ASCII character set to the EBCDIC character set before transmission and reconverted to ASCII upon reception.
Point-to-point/Multipoint - 2780/3780 supports transmissions between two stations (point-to-point) or among multiple stations (multipoint) in a network arrangement. In multipoint mode, one processor is designated as primary and all network transactions occur through this node. Other terminals, designated as secondary, are assigned unique terminal addresses so that all data may be "routed" through the network to the appropriate device.
Space Compression (non-transparent 3780 only) - The 3780 protocol allows spaces to be removed before transmission and reinserted during reception for increased data throughput on the communications line.

Before You Begin
Cleo 3780Plus for Windows User's Guide 5
What is Cleo 3780Plus?
Cleo 3780Plus enables your computer to emulate (act like) an IBM 3780 or 2780 terminal. With 3780Plus, you can transmit files to and receive files from any other micro, mini, or mainframe computer that supports 3780/2780 bisynchronous protocol.
The 3780Plus program provides you with a menu of commands for making the connection, transmitting and receiving data, creating and executing job/script files, changing configuration parameters, and controlling and monitoring the transmission line, and executing other programs.
3780Plus allows you to transmit and receive files interactively or unattended. In interactive mode, you enter transmit commands for disk file transmission to occur. Between transmissions the line may be monitored for incoming files. These files are stored to disk, displayed on the screen, or printer as desired. A job recorder may be used to automatically save all your actions to a job/script file for later unattended execution. In unattended mode, all commands are read directly from a job file stored on disk, and no operator interaction is necessary.
3780Plus defaults to a standard 3780 configuration. This configuration may be modified interactively at operation time. You may create one or more custom configuration files which may be invoked either when 3780Plus is executed or by issuing the change configuration command within 3780Plus.
A log file allows you to track all your communications transactions. Log files contain the date and time, the commands executed, and the status of each command. A serial line monitor allows you to view or save to disk the 2780/3780 protocol characters and data files as they are sent and received. These are powerful diagnostic tools for isolating communications problems.
3780Plus allows you to integrate other Windows, Windows 95, Windows NT, or MS-DOS applications into unattended jobs/scripts.
Before You Begin
Cleo 3780Plus for Windows User's Guide 6
Features
• IBM 3780/2780 terminal emulation
• Full IBM binary synchronous protocol
• Transparent (binary) and non-transparent (text) file support
• Interactive or job/script file operation
• Automatic job (script) file creation
• On line diagnosis of communications problems
• Local printer support
• File naming
• Configurable ASCII/EBCDIC character translations
• Environment variable support
• Windows, Windows 95, Windows NT, and MS-DOS application program access
• Automatic dial support with Cleo internal modems and a wide variety of external modems
• Dial directory support with optional job script execution on connect
Before You Begin
Cleo 3780Plus for Windows User's Guide 7
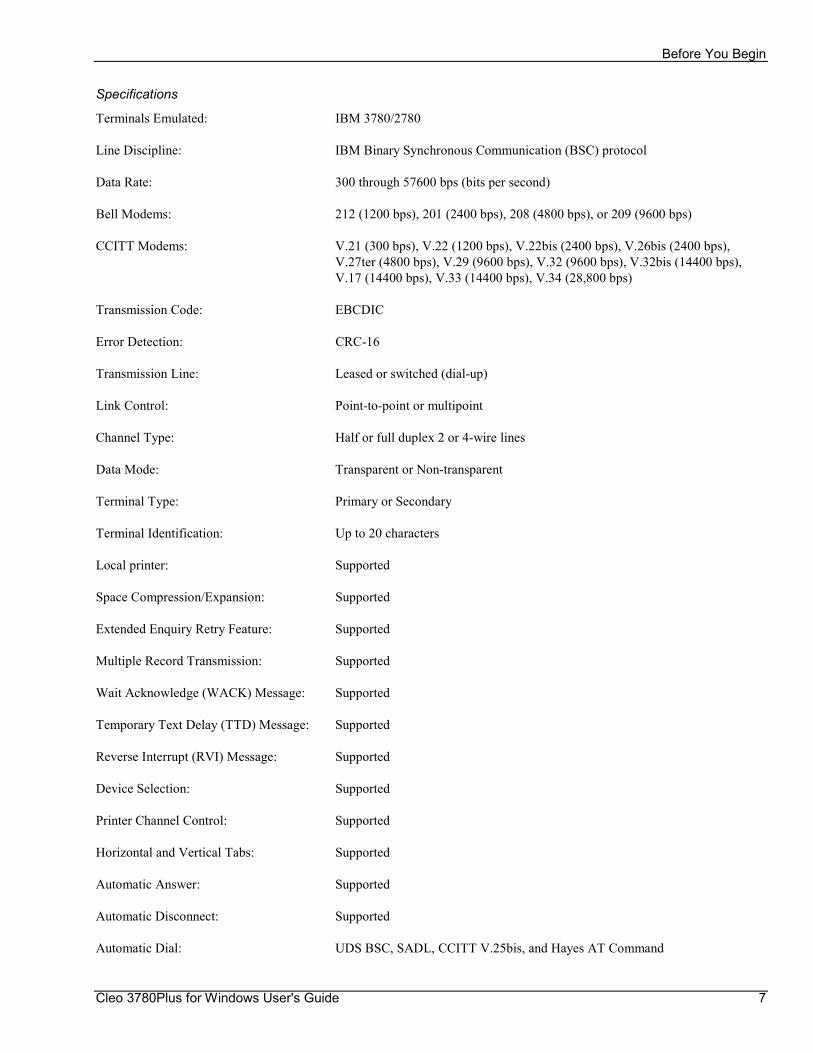
Specifications
Terminals Emulated: IBM 3780/2780
Line Discipline: IBM Binary Synchronous Communication (BSC) protocol
Data Rate: 300 through 57600 bps (bits per second)
Bell Modems: 212 (1200 bps), 201 (2400 bps), 208 (4800 bps), or 209 (9600 bps)
CCITT Modems: V.21 (300 bps), V.22 (1200 bps), V.22bis (2400 bps), V.26bis (2400 bps), V.27ter (4800 bps), V.29 (9600 bps), V.32 (9600 bps), V.32bis (14400 bps), V.17 (14400 bps), V.33 (14400 bps), V.34 (28,800 bps)
Transmission Code: EBCDIC
Error Detection: CRC-16
Transmission Line: Leased or switched (dial-up)
Link Control: Point-to-point or multipoint
Channel Type: Half or full duplex 2 or 4-wire lines
Data Mode: Transparent or Non-transparent
Terminal Type: Primary or Secondary
Terminal Identification: Up to 20 characters
Local printer: Supported
Space Compression/Expansion: Supported
Extended Enquiry Retry Feature: Supported
Multiple Record Transmission: Supported
Wait Acknowledge (WACK) Message: Supported
Temporary Text Delay (TTD) Message: Supported
Reverse Interrupt (RVI) Message: Supported
Device Selection: Supported
Printer Channel Control: Supported
Horizontal and Vertical Tabs: Supported
Automatic Answer: Supported
Automatic Disconnect: Supported
Automatic Dial: UDS BSC, SADL, CCITT V.25bis, and Hayes AT Command
Before You Begin
Cleo 3780Plus for Windows User's Guide 8
Related Documentation
This manual is not intended to provide a comprehensive discussion of 3780 BSC protocols. Table B.6 Protocol Characters in Appendix B. File Formats lists 2780/3780 protocol characters and a brief description of the function of each. If more detailed information is desired, the following references are recommended:
Component Information for the IBM 3780 Data Communications Terminal, GA27-3063-3.
2780 Data Transmission - Terminal Component Description, GA27-3005-3.
Cleo 3780Plus for Windows User's Guide 9
Chapter 1: Configuration This chapter describes the Cleo 3780Plus configurator notebook, the configuration settings and their effect on the operation of 3780Plus. The following information is covered:
• The configurator notebook
• Protocol configuration
• Line configuration
• Start up configuration
• Software configuration
• Hardware configuration
Chapter 1 - Configuration
Cleo 3780Plus for Windows User's Guide 10
1.1 The Configurator Notebook
The configurator notebook allows you to customize the 3780Plus configuration settings. This configurator notebook may be accessed from the 3780Plus Setup program (see the appropriate Installation Guide section for details), from the Configurator program button/icon, or from within 3780Plus with the Configuration|Edit option, the Windows|Command Window COnfig command, or the CFG speed button.
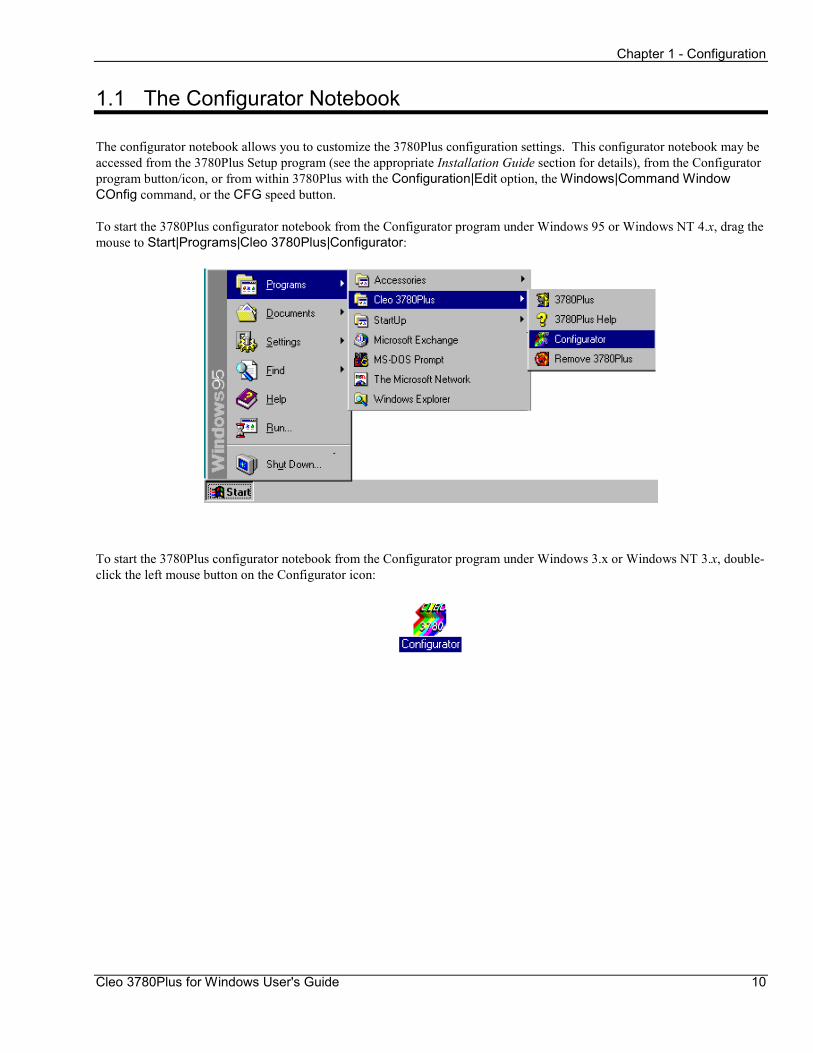
To start the 3780Plus configurator notebook from the Configurator program under Windows 95 or Windows NT 4.x, drag the mouse to Start|Programs|Cleo 3780Plus|Configurator:
To start the 3780Plus configurator notebook from the Configurator program under Windows 3.x or Windows NT 3.x, double-click the left mouse button on the Configurator icon:

Chapter 1 - Configuration
Cleo 3780Plus for Windows User's Guide 11
The following configurator notebook window is displayed:
The configurator notebook is divided into five tabbed groups: Protocol, Line, Startup, Software, and Hardware. A configuration group may be displayed by clicking the left mouse button on the corresponding tab. There are three ways to change configuration settings. On configuration settings with a down arrow, click the mouse on the setting to display a list of configuration options then click on the desired setting. On configuration settings with a check box button, click the mouse on the check box to toggle the option on or off. On configuration settings with plain boxes, click the mouse on the box, delete the current setting and type the new setting.
Settings may also be changed with the keyboard. To select the setting, press and hold the ALT key, then type the underscored letter of the desired setting. This toggles check box options on and off. On configuration options with a down arrow, the keyboard up and down arrows may be used to select setting choices. On configuration settings with plain boxes, simply type the new setting. The new settings are saved when you select another tab or exit the notebook.
If you have made changes that you do not want to save, the Revert button allows you to revert back to the original values for the current configuration group. Each group also has its own Defaults button to allow you to reset its configuration back to factory default values.
The notebook window normally has a control menu icon or box in the upper left corner. With Windows 95 or Windows NT 4.x, you can click the right mouse button on the Cleo 3780Plus Configurator heading bar to display the control menu. All five groups of configuration settings may: 1) revert to their original values by selecting Cancel and Exit from the Control menu; 2) reset to their factory default values by selecting Default All; or 3) be saved by selecting Save and Exit from the Control menu, by double clicking on the Control menu icon/box, or by clicking on the Windows Close button.
Configuration settings are saved to the 3780PLUS.INI initialization file to be used the next time 3780Plus is executed. For information on the initialization file format see B.8 Initialization File in Appendix B - File Formats. Protocol and line configuration settings may be saved to a separate configuration file and loaded at any time.
Chapter 1 - Configuration
Cleo 3780Plus for Windows User's Guide 12
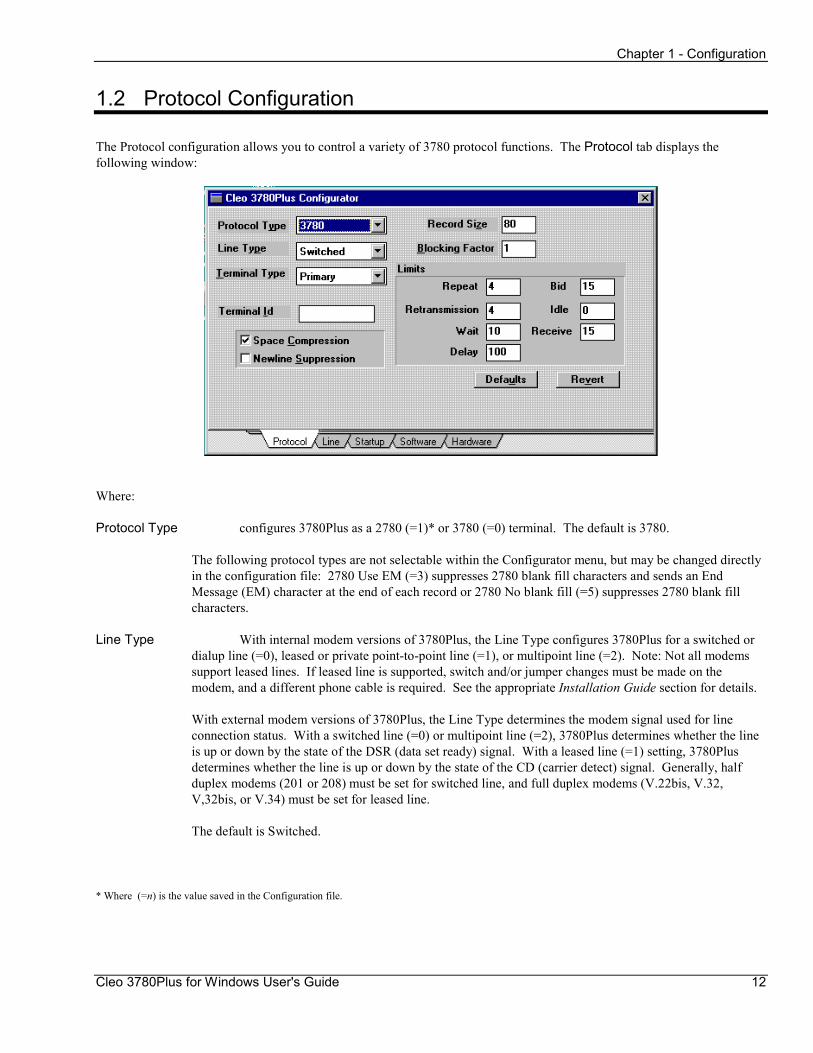
1.2 Protocol Configuration
The Protocol configuration allows you to control a variety of 3780 protocol functions. The Protocol tab displays the following window:
Where:
Protocol Type configures 3780Plus as a 2780 (=1)* or 3780 (=0) terminal. The default is 3780. The following protocol types are not selectable within the Configurator menu, but may be changed directly in the configuration file: 2780 Use EM (=3) suppresses 2780 blank fill characters and sends an End Message (EM) character at the end of each record or 2780 No blank fill (=5) suppresses 2780 blank fill characters.
Line Type With internal modem versions of 3780Plus, the Line Type configures 3780Plus for a switched or dialup line (=0), leased or private point-to-point line (=1), or multipoint line (=2). Note: Not all modems support leased lines. If leased line is supported, switch and/or jumper changes must be made on the modem, and a different phone cable is required. See the appropriate Installation Guide section for details. With external modem versions of 3780Plus, the Line Type determines the modem signal used for line connection status. With a switched line (=0) or multipoint line (=2), 3780Plus determines whether the line is up or down by the state of the DSR (data set ready) signal. With a leased line (=1) setting, 3780Plus determines whether the line is up or down by the state of the CD (carrier detect) signal. Generally, half duplex modems (201 or 208) must be set for switched line, and full duplex modems (V.22bis, V.32, V,32bis, or V.34) must be set for leased line. The default is Switched.
* Where (=n) is the value saved in the Configuration file.

Chapter 1 - Configuration
Cleo 3780Plus for Windows User's Guide 13
Terminal Type configures 3780Plus as a primary (=1) or a secondary (=2) terminal. A primary terminal will send line bid messages at one second intervals, while a secondary terminal will send line bid messages at three second intervals. By setting the terminal type to secondary, a CONTEN status is displayed when a line bid contention (i.e. both sides are trying to transmit at the same time) is encountered. The default is Primary.
Terminal Id is an optional ASCII string used to identify the terminal to the remote. It may be blank or 1 to 19 characters in length. The default is blank for no terminal id. On switched lines, the Terminal Id is used as a security mechanism to prevent unauthorized terminals from gaining access to host computers. This parameter is generally 5 characters in length of the form XXABC, where: XX = 2 identical ASCII characters ABC = 3 ASCII characters On multipoint lines, the Terminal Id defines the polling and selection addresses. It is 4 characters in length of the form XXxx, where: XX = 2 identical upper case letters xx = lower case of previous 2 letters See C.1 Multipoint Operation in Appendix C - Multipoint Operation and Device Selection for details.
Space Compression allows two or more consecutive spaces to be removed from transmitted text files and key messages. Space Compression may be on (=1) or off (=0). The default is on. Space Compression is valid only on 3780 non-transparent (text) transmissions. Space Compression is ignored for transparent (binary) and 2780 transmissions. Note: Space compression sequences are automatically expanded when non-transparent (text) files are received. To translate incoming space compression characters through the translation table instead of automatically expanding them, add the UseCompress=YES parameter to the 3780PLUS.INI file (under the [API3780] heading) and set Space Compression to off.
New Line Suppression affects non-transparent (text) file reception only. New Line Suppression may be on (=1) or off (=0). The default is off. With New Line Suppression off, any record separators received in non-transparent (text) files will be translated to carriage return and line feed characters (CR/LF). With New Line Suppression ON, any record separators received are ignored; this effectively removes all CR/LF or NL characters from the received file.
Record Size is the transmitting record's maximum size. Since the original IBM 2780 equipment has 80 column card reader input, this value is usually 80 characters. The minimum value is 1, the maximum value is 2048, and the default value is 80. In most cases host computers are limited to 512 character blocks. Note: 3780Plus will automatically receive blocks that contain up to 4048 characters. For 2780 text (non-transparent) files, lines shorter than the Record Size are padded with spaces to the Record Size length before transmission. For 3780 text (non-transparent) files, record sizes will be equal to the number of characters per line (minus spaces if Space Compression is enabled). If the line length is longer than the Record Size or the files do not have imbedded CR/LFs (carriage return and linefeed characters), a record separator will be inserted at the set Record Size.

Chapter 1 - Configuration
Cleo 3780Plus for Windows User's Guide 14
Blocking Factor is the number of records to be transmitted per block. The Blocking Factor multiplied by the Record Size is equal to the maximum number of characters to be transmitted in each block. The Blocking Factor is generally 1 for 3780 and 2 for 2780. The Blocking Factor for binary (transparent) transmissions is always 1. The Blocking Factor for text (non-transparent) transmissions must create a transmission block of less than 2048. Note: In most cases host computers are limited to 512 character blocks. 3780Plus will automatically receive blocks that contain up to 4048 characters. Special cases: A Blocking Factor of 1 for 3780 text transmissions packs as many non-Space Compressed records as possible into a block of "Record Size" length; a Blocking Factor of 0 for 3780 text transmissions packs as many Space Compressed (if Space Compression is ON) records as possible into a block of "Record Size" length.
Repeat Limit sets the maximum number of consecutive times that an enquiry (ENQ) message will be sent as a repeat message without an appropriate response. When the limit expires, transmission aborts. The minimum value is 3, the maximum value is 255, and the default value is 4. The Repeat Limit is similar to the Bid Limit. The Repeat Limit, however, occurs only after the remote computer has responded to at least one initial line bid (ENQ). When the Repeat Limit is reached, the status message REPEAT is displayed and the transmit command is aborted.
Retransmission Limit sets the maximum number of consecutive times that a negative acknowledge (NAK) may be sent or received before transmission is aborted. A negative acknowledge means the block was received in error. The minimum value is 4, the maximum value is 255, and the default value is 4. When the Retransmission Limit is reached, the status message RETRAN is displayed and the transmit or receive command is aborted.
Wait Limit sets the maximum number of consecutive times that a wait message (WACK) will be received before transmission is aborted. A WACK means that the remote system received the last block correctly but needs more time to free up buffers, etc. Receiving a WACK causes 3780Plus to wait and re-bid (ENQ) the line. When the appropriate ACK is received, the transmission resumes. The minimum value is 10, the maximum value is 255, and the default value is 10. A value of -1 allows an unlimited number of wait messages to be received. When the Wait Limit is reached, the status message WAIT is displayed and the transmit command is aborted.
Delay Limit sets the maximum number of consecutive times that a delay message (TTD) will be received before transmission is aborted. A TTD means the remote computer is busy and is holding the line open in order to queue up more data to send. The minimum value is 10, the maximum value is 255, and the default value is 100. A value of -1 allows an unlimited number of delay messages to be received. When the Delay Limit is reached, the status message DELAY is displayed and the receive command is aborted.

Chapter 1 - Configuration
Cleo 3780Plus for Windows User's Guide 15
Bid Limit sets the maximum number of consecutive times that an enquiry (ENQ) message will be sent as a line bid without receiving acknowledgment. The minimum value is 3, the maximum value is 255, and the default value is 15. A value of -1 allows an unlimited number of enquiries to be sent. This keeps 3780Plus continuously open to transmissions and is useful in leased or private line configurations. When the Bid Limit is reached, the status message BIDLMT is displayed and the transmit command is aborted.
Idle Limit specifies how long, in seconds, 3780Plus will wait before disconnecting the communication line when no data is transmitted or received. Valid Idle Limits are: no idle timeout (=0), 30 seconds (=1), 60 seconds (=2), 90 seconds (=3), 120 seconds (=4), 150 seconds (=5), 180 seconds (=6), 210 seconds (=7), 240 seconds (=8), and 270 seconds (=9). The default is 0 or no idle timeout. The value specified with configurator is rounded to the nearest 30 second interval. In order for the Idle Limit to take effect, set the Idle Limit to a lower timeout value than the Receive Limit timeout and/or the Bid Limit and Repeat Limit timeouts.
When the Idle Limit is reached during transmission or reception, the status message IDLE is displayed and the transmit or receive command is aborted.
Receive Limit sets the maximum number of consecutive times a receive timeout may occur in receive mode before the transmission is aborted. A receive timeout occurs after 3780Plus has waited 4 seconds without receiving data from the remote terminal. This limit prevents 3780Plus from hanging when the remote terminal does not begin transmission or does not respond during a transmission. The minimum value is 3, the maximum value is 255, and the default is 15. A value of -1 allows an unlimited number of timeouts to occur. When the Receive Limit is reached after a file has started, the status message RECEIV is displayed and the receive is aborted. Within a job file, when the Receive Limit is reached before a file is received, the status message NODATA is displayed and the receive command is aborted.

Chapter 1 - Configuration
Cleo 3780Plus for Windows User's Guide 16
Table 1.1 below lists the protocol configuration settings with their default values and range limits.
____________________________________________________________________________________________________
PARAMETER DEFAULT LOW HIGH Protocol Type 3780 (0) 3780 (0) 2780 (1) Line Type Switched (0) Switched (0) Multipoint (2) Terminal Type Primary (1) Primary (1) Secondary (2) Terminal Id (none) (none) 19 char Space Compression ON (1) OFF (0) ON (1) New Line Suppression OFF (0) OFF (0) ON (1) Record Size 80 1 2048 Blocking Factor 1 0 2048 Repeat Limit 4 3 255 Retransmission Limit 4 4 255 Wait Limit 10 10 (-1)* 255 Delay Limit 100 10 (-1)* 255 Bid Limit 15 3 (-1)* 255 Idle Limit No timeout (0) No timeout (0) 270 seconds (9) Receive Limit 15 3 (-1)* 255
* A value of -1 allows an unlimited number of messages to be sent or received. ____________________________________________________________________________________________________
TABLE 1.1 PROTOCOL CONFIGURATION PARAMETERS
The last configuration settings are saved for the next execution of 3780Plus.
After modifying the protocol parameters, you may save the new configuration (including the line parameters) to a file by selecting the Configuration|Save or Configuration|Save As option from within 3780Plus. Entering a valid filename causes the modified configuration to be written to the new configuration file. Entering the filename default.cfg allows this new configuration to become the 3780Plus default.
Configuration files may also be created and/or modified with a standard text editor. See B.1 Configuration File in Appendix B - File Formats for the configuration file layout.
Any of the following methods may be used to load these configuration files for subsequent 3780Plus executions:
• Include the configuration file name as an argument when 3780Plus is executed: 3780Plus -C FILE.CFG
• Set the Startup|Configuration File Name option from the Setup program or the Configurator program.
• Drag and drop the configuration file name on the 3780Plus icon.
• Enter the filename with the Configuration|Load option within 3780Plus.
• Use the COnfig command with a filename as an argument: CONFIG FILE.CFG from the Windows|Command Window option or within a job/script file.
Chapter 1 - Configuration
Cleo 3780Plus for Windows User's Guide 17
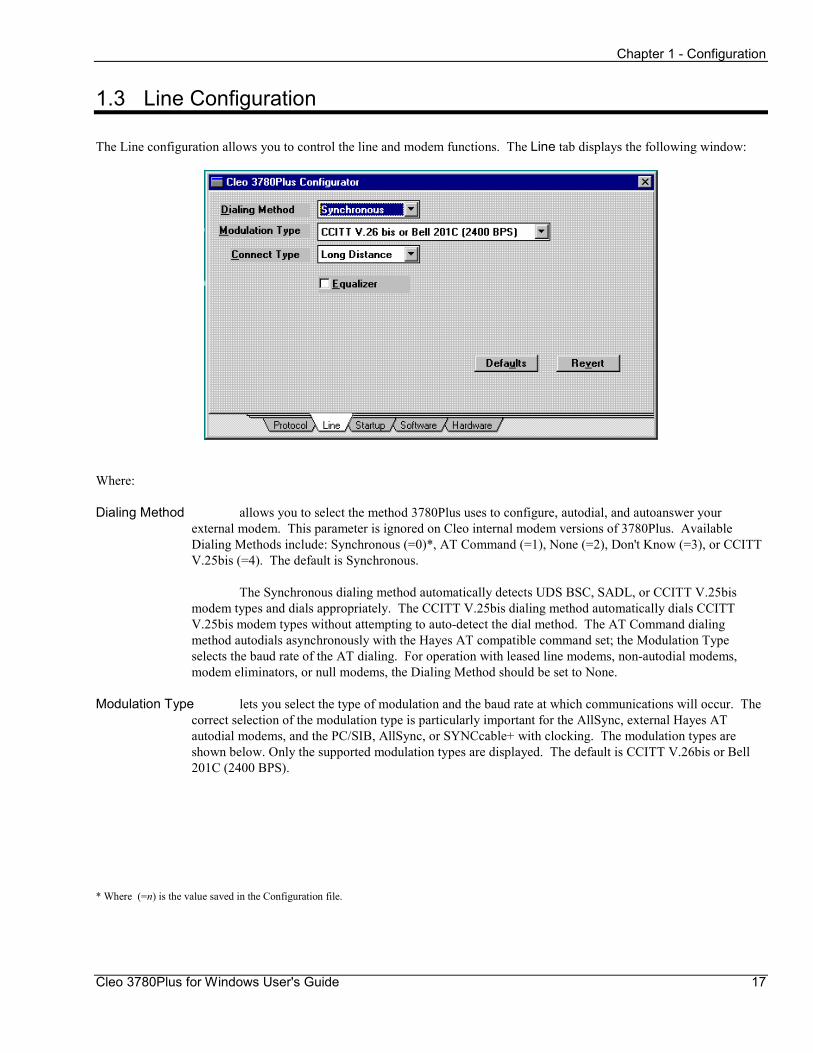
1.3 Line Configuration
The Line configuration allows you to control the line and modem functions. The Line tab displays the following window:
Where:
Dialing Method allows you to select the method 3780Plus uses to configure, autodial, and autoanswer your external modem. This parameter is ignored on Cleo internal modem versions of 3780Plus. Available Dialing Methods include: Synchronous (=0)*, AT Command (=1), None (=2), Don't Know (=3), or CCITT V.25bis (=4). The default is Synchronous.
The Synchronous dialing method automatically detects UDS BSC, SADL, or CCITT V.25bis modem types and dials appropriately. The CCITT V.25bis dialing method automatically dials CCITT V.25bis modem types without attempting to auto-detect the dial method. The AT Command dialing method autodials asynchronously with the Hayes AT compatible command set; the Modulation Type selects the baud rate of the AT dialing. For operation with leased line modems, non-autodial modems, modem eliminators, or null modems, the Dialing Method should be set to None.
Modulation Type lets you select the type of modulation and the baud rate at which communications will occur. The correct selection of the modulation type is particularly important for the AllSync, external Hayes AT autodial modems, and the PC/SIB, AllSync, or SYNCcable+ with clocking. The modulation types are shown below. Only the supported modulation types are displayed. The default is CCITT V.26bis or Bell 201C (2400 BPS).
* Where (=n) is the value saved in the Configuration file.
Chapter 1 - Configuration
Cleo 3780Plus for Windows User's Guide 18
Available Modulation Types include: Other Modulation (=0) CCITT V.26bis or Bell 201C (2400 BPS) (=1) CCITT V.26bis fallback (1200 BPS) (=2) CCITT V.22bis (2400 BPS) (=3) CCITT V.22 (1200 BPS) (=4) Bell 212 (1200 BPS) (=5) Bell 208 (4800 BPS) (=6) Bell 209 (9600 BPS) (=7) CCITT V.29 (9600 BPS) (=8) CCITT V.32 (9600/4800 BPS) (=9) 19,200 BPS (=10) Bell 202S/V.23 (1200 BPS) (=11) CCITT V.27ter (4800 BPS) (=12) CCITT V.33 or V.17 (14400 BPS) (=13) CCITT V.32bis(14400 BPS) (=14) 38,400 BPS (=15)
AllSync may only be run as one of the modem types listed on the gold sticker on the end bracket of the board.
Connect Type sets the time delay between the modem's reception of the Request To Send signal and its response with a Clear To Send signal. This delay is normally set for Long Distance (=0) for a 150 ms RTS/CTS delay , but may be set for Local (=1) for a short distance transmission 25 ms delay, or Satellite (=2) for a satellite transmission 600 ms delay. The Connect Type is valid only on Cleo internal modems. For external modems, check your modem manual for instructions on setting this parameter. This parameter corresponds to the RTS/CTS Delay.
Equalizer is valid only on select Cleo internal modems. Signals may optionally be passed through an equalizer to compensate for line noise. The equalizer may be turned on (=1) or off (=0). The default is off.
Table 1.2 below lists the line configuration settings with their default values and range limits.
____________________________________________________________________________________________________
PARAMETER DEFAULT LOW HIGH Dialing Method Sync (0) Sync (0) V.25bis (4) Modulation Type Bell 201 (1) Other (0) 38,400 bps (15) RTS/CTS Delay 150ms (0) 150ms (0) 600ms (2) Equalizer OFF (0) OFF (0) ON (1) ____________________________________________________________________________________________________
TABLE 1.2 LINE CONFIGURATION PARAMETERS
After modifying the line parameters, you may save the new configuration (including the protocol parameters) by selecting the Configuration|Save or Configuration|Save As option from within 3780Plus. Entering a valid filename causes the modified configuration to be written to the new configuration file. Entering the filename default.cfg allows this new configuration to become the 3780Plus default.
The last configuration settings are saved for the next execution of 3780Plus.
Configuration files may also be created and/or modified with a standard text editor. See B.1 Configuration File in Appendix B - File Formats for the configuration file layout.
Chapter 1 - Configuration
Cleo 3780Plus for Windows User's Guide 19
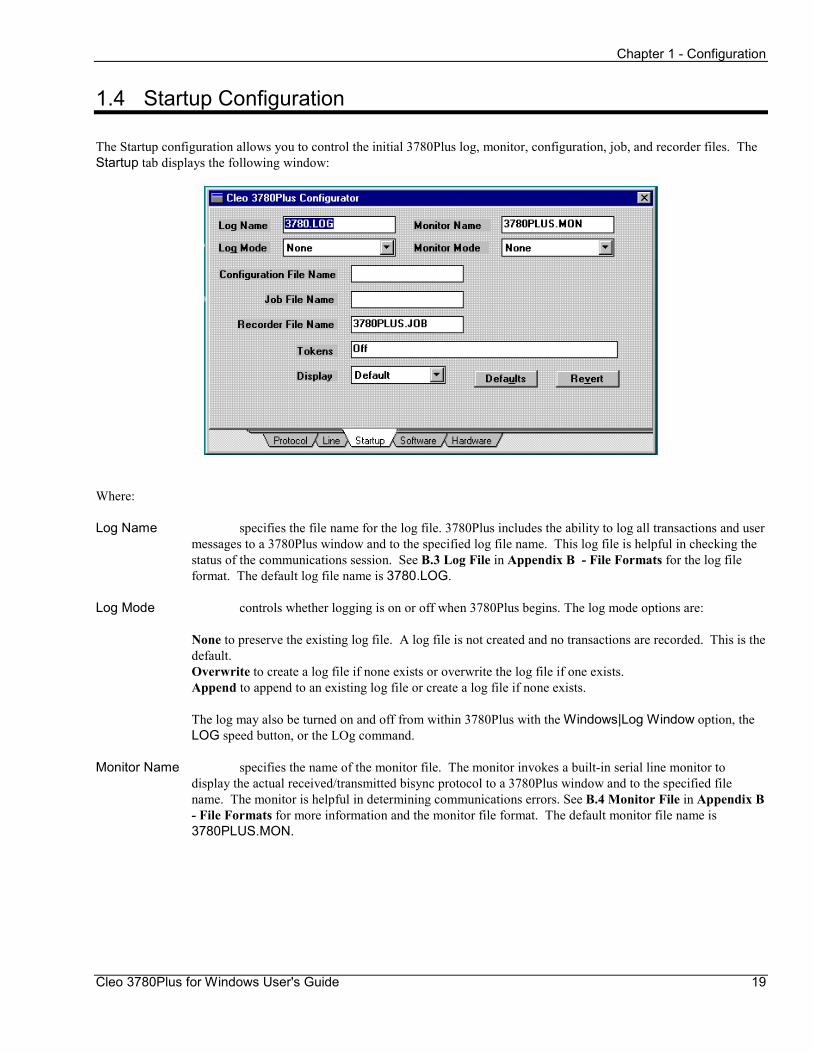
1.4 Startup Configuration
The Startup configuration allows you to control the initial 3780Plus log, monitor, configuration, job, and recorder files. The Startup tab displays the following window:
Where:
Log Name specifies the file name for the log file. 3780Plus includes the ability to log all transactions and user messages to a 3780Plus window and to the specified log file name. This log file is helpful in checking the status of the communications session. See B.3 Log File in Appendix B - File Formats for the log file format. The default log file name is 3780.LOG.
Log Mode controls whether logging is on or off when 3780Plus begins. The log mode options are: None to preserve the existing log file. A log file is not created and no transactions are recorded. This is the default. Overwrite to create a log file if none exists or overwrite the log file if one exists. Append to append to an existing log file or create a log file if none exists. The log may also be turned on and off from within 3780Plus with the Windows|Log Window option, the LOG speed button, or the LOg command.
Monitor Name specifies the name of the monitor file. The monitor invokes a built-in serial line monitor to display the actual received/transmitted bisync protocol to a 3780Plus window and to the specified file name. The monitor is helpful in determining communications errors. See B.4 Monitor File in Appendix B - File Formats for more information and the monitor file format. The default monitor file name is 3780PLUS.MON.
Chapter 1 - Configuration
Cleo 3780Plus for Windows User's Guide 20
Monitor Mode controls whether the line monitor is on or off when 3780Plus begins. The monitor mode options are: None to preserve the existing monitor file. A monitor file is not created and no transactions are recorded. This is the default. Overwrite to create a monitor file if none exists or overwrite the monitor file if one exists. Append to append to an existing monitor file or create a monitor file if none exists. The monitor may also be turned on and off from within 3780Plus with the Windows|Monitor Window option, the MON speed button, or the MOnitor command.
Configuration File Name allows you to specify a custom protocol and line configuration file. There is no default Configuration File Name. The -C ConfigFile command line option overrides this configuration file. If no -C ConfigFile command line option or Configuration File Name is specified, the default configuration is taken from the default.cfg file. If the default.cfg file does not exist, 3780Plus runs with the configuration parameters from the last 3780Plus execution. A configuration file may also be loaded from within 3780Plus with the Configuration|Load option or with the COnfig filename command.
Job File Name allows you to specify a job/script file to run automatically upon 3780Plus execution. This job file may run a series of 3780Plus commands without operator intervention. There is no default Job File Name. The -J JobFile command line option overrides this job file. A job file may also be run from within 3780Plus with the System|Run Job option, the JOB speed button, or with the EXecute filename command.
Recorder File Name specifies the name of the recorder job file. The recorder saves all 3780Plus actions as they are executed to the specified file name. This recorder job file is helpful in rerunning the same communications session multiple times. Job file control may be added to this file. See the job script commands in Chapter 4 - 3780Plus Commands for more information and B.2 Job/Script File in Appendix B - File Formats for the job file format. The default recorder file name is 3780PLUS.JOB.
Tokens allows you to enable token, environment, and counter variable processing, and/or to set token variable(s). Up to 19 tokens may be supplied. The default is OFF to disable token, environment, and counter variable processing. Tokens may also be enabled, disabled, set, and/or changed with the TOken command or with the EXecute command. Environment and counter variable processing may also be enabled or disabled with the TOken command. See 4.23 TOken - Enable, Disable, Display or Set Token Variables in Chapter 4 - 3780Plus Commands for details.
Display controls how 3780Plus is displayed on startup. The Display Mode options are: Default to display the 3780Plus window in the standard Windows format. This is the default. Maximize to display the 3780Plus window as a full screen. Minimize to display the 3780Plus icon.
Chapter 1 - Configuration
Cleo 3780Plus for Windows User's Guide 21
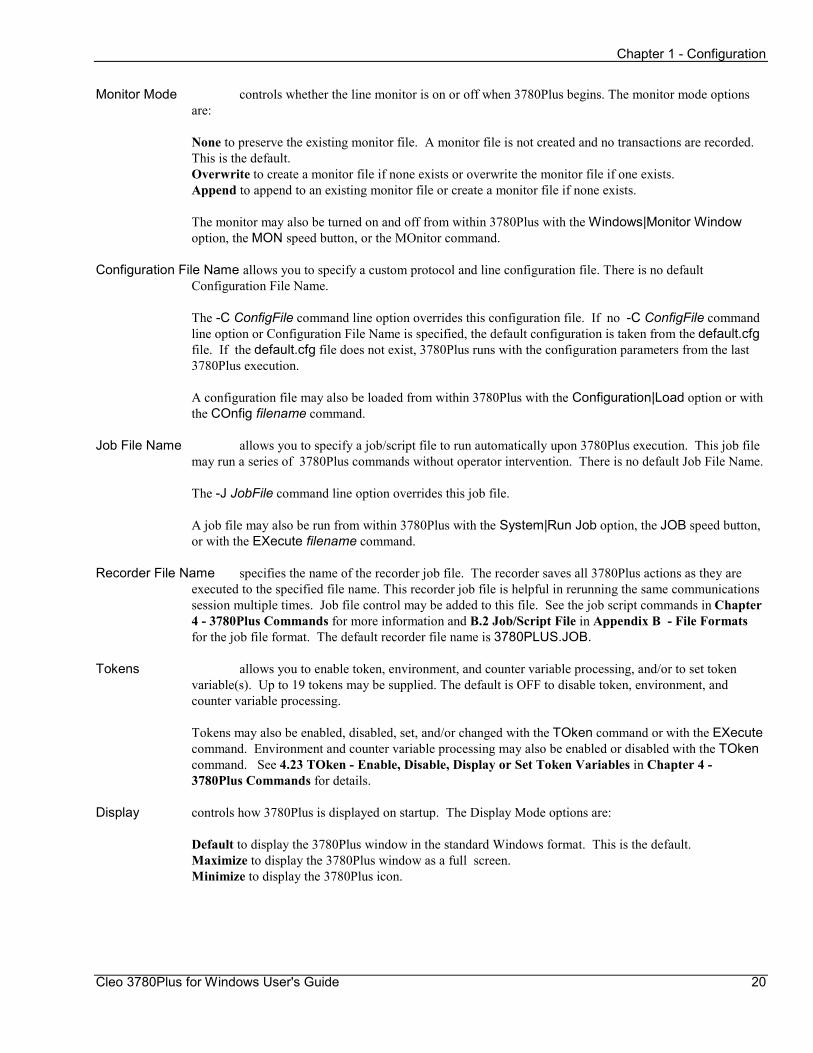
1.5 Software Configuration
The Software configuration allows you to control drag and drop settings, print spooling, and general elements of 3780Plus operation. The Software tab displays the following window:
1.5.1 General Variables
The General Variables allow you to control auto-receive mode and 3780Plus screen display options. Where:
Always On Top keeps the 3780Plus icon from being covered by another program's window. This is helpful for drag and drop operation. You can maximize File Manager making it full screen and still have access to the 3780Plus icon for file drops. The default is off.
Silent Mode suppresses all status, error, and information dialogs from being displayed. This is useful when you are working in another application and 3780Plus is running a job/script file or is in auto receive mode as an icon. When files are transmitted or received, 3780Plus normally creates a file transfer status window over the current window. You can suppress the status window with silent mode. The default is off.
Auto Receive continually checks for the presence of incoming data. When data arrives, 3780Plus enters receive mode to save the incoming file. This option may denigrate the performance of Windows on your system. Turn this option off to improve performance. Auto receive is disabled during job file execution. The default is on.
Chapter 1 - Configuration
Cleo 3780Plus for Windows User's Guide 22
1.5.2 Printing Variables
The Printing Variables allow you to control print spooling options. Where:
Spool Print Files spools all incoming print files to the Windows printer. When off, the files are saved to disk and not printed. The default is off.
Remove Spooled Files deletes spooled files after they are printed. When off, the files are saved to disk and not deleted after printing. The default is off.
Association Ext is the file name extension associated with the editor used to spool your print files. Files are, by default, spooled to the printer via the Notepad editor. The default file extension for Notepad is .TXT. To change the editor, simply change the Association Ext. For example, to spool print files via the WORD editor, change the Association Ext to .DOC.
1.5.3 Drag and Drop Settings
3780Plus may be configured to differentiate job, configuration, and transmit dropped files. For instance, if you drop a job file on the 3780Plus icon, 3780Plus can automatically run the job. If you drop a configuration file on the 3780Plus icon, 3780Plus can automatically load the configuration. See your Windows User�s Guide for a description of the drag and drop feature.
Check Dropped File Extension checks the extensions of files that are dropped on the 3780Plus icon against the Job File Extension
and the Configuration File Extension. Job files are executed, configuration files are loaded, and all other files are transmitted. If off, all dropped files are transmitted. The default is on.
Job File Extension is the default job/script file extension. When checking dropped file extensions, a file with this extension will be executed as a job file. The default is .JOB.
Config File Extension is the default configuration file extension. When checking dropped file extensions, a file with this extension will be treated as a configuration file and 3780Plus will load this configuration. The default is .CFG.
Default Send Mode is the mode to use to transmit dropped files. The choices are Scan, Binary, or Text. In scan mode, each dropped file is first scanned to search for binary data. If present, the file is sent in binary mode, otherwise it is sent in text mode. The default mode is Scan.
Chapter 1 - Configuration
Cleo 3780Plus for Windows User's Guide 23
1.6 Hardware Configuration
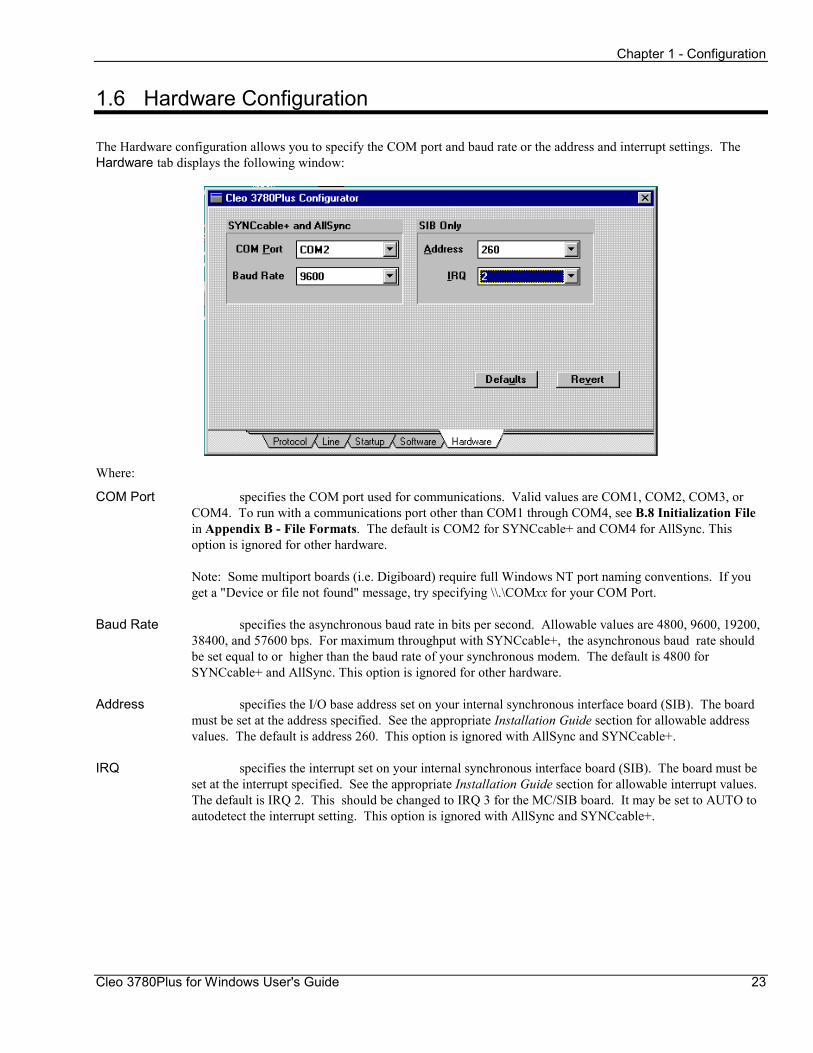
The Hardware configuration allows you to specify the COM port and baud rate or the address and interrupt settings. The Hardware tab displays the following window:
Where:
COM Port specifies the COM port used for communications. Valid values are COM1, COM2, COM3, or COM4. To run with a communications port other than COM1 through COM4, see B.8 Initialization File in Appendix B - File Formats. The default is COM2 for SYNCcable+ and COM4 for AllSync. This option is ignored for other hardware. Note: Some multiport boards (i.e. Digiboard) require full Windows NT port naming conventions. If you get a "Device or file not found" message, try specifying \\.\COMxx for your COM Port.
Baud Rate specifies the asynchronous baud rate in bits per second. Allowable values are 4800, 9600, 19200, 38400, and 57600 bps. For maximum throughput with SYNCcable+, the asynchronous baud rate should be set equal to or higher than the baud rate of your synchronous modem. The default is 4800 for SYNCcable+ and AllSync. This option is ignored for other hardware.
Address specifies the I/O base address set on your internal synchronous interface board (SIB). The board must be set at the address specified. See the appropriate Installation Guide section for allowable address values. The default is address 260. This option is ignored with AllSync and SYNCcable+.
IRQ specifies the interrupt set on your internal synchronous interface board (SIB). The board must be set at the interrupt specified. See the appropriate Installation Guide section for allowable interrupt values. The default is IRQ 2. This should be changed to IRQ 3 for the MC/SIB board. It may be set to AUTO to autodetect the interrupt setting. This option is ignored with AllSync and SYNCcable+.

Chapter 1 - Configuration
Cleo 3780Plus for Windows User's Guide 24
Cleo 3780Plus for Windows User's Guide 25
Chapter 2: Operation This chapter describes how to start a 2780/3780 emulation session, the Cleo 3780Plus window, and some 3780Plus basics. The following topics are covered:
• The 3780Plus command line
• Starting 3780Plus
• The 3780Plus window
• Background operation
• Drag and drop
• File transfer status
Prior to executing 3780Plus, read through the appropriate Installation Guide section for instructions on the setup and installation of your Cleo supplied hardware and software. 3780Plus will abort with an error message if the required hardware is not installed.

Chapter 2 - Operation
Cleo 3780Plus for Windows User's Guide 26
2.1 The 3780Plus Command Line
Custom configuration and job files may be specified by 3780Plus command line options. Command line options take precedence over startup options specified in the configurator. To specify a command line option under Windows 95 or Windows NT 4.x, create a shortcut icon, single-click the right mouse button on the shortcut icon and select Properties, in the Shortcut tab add your option(s) to the end of the Target file name. Under Windows 3.x and Windows NT 3.x, single-click the left mouse button on the 3780Plus program icon, select File|Properties from the Control menu, then append your option(s) to the end of the Command Line. Command line options are:
[-C] cfgfile is an option to select a custom configuration file. This allows you to run with settings other than the default protocol and line configuration parameters. For instance, the file 2780.CFG included on your 3780Plus diskette may be used to run the default 2780 configuration with the command line option: -C 2780.CFG or 2780.CFG. The -C is optional for configuration file names which end in the Config File Extension. You may create or modify configuration files within 3780Plus with the Configuration|Edit then Configuration|Save or Configuration|Save As options, or the COnfig command. Note: If no -C cfgfile option is specified, the default configuration is taken from the Startup|Configuration File Name option. If no Configuration File Name is specified, the default configuration is taken from the default.cfg file. If default.cfg does not exist, the configuration is taken from the last 3780Plus execution.
[-J] jobfile is an option to execute a custom job/script file. This allows you to run a series of 3780Plus commands without operator intervention. For instance, a user-created job file may be used to automatically call the host site with the command line option: -J HOST.JOB or HOST.JOB. The -J is optional for job file names which end in the Job File Extension. You may create custom job files from within 3780Plus with the Window|Recorder Window option or the JOb command. Or you may create a job file with a standard text editor.
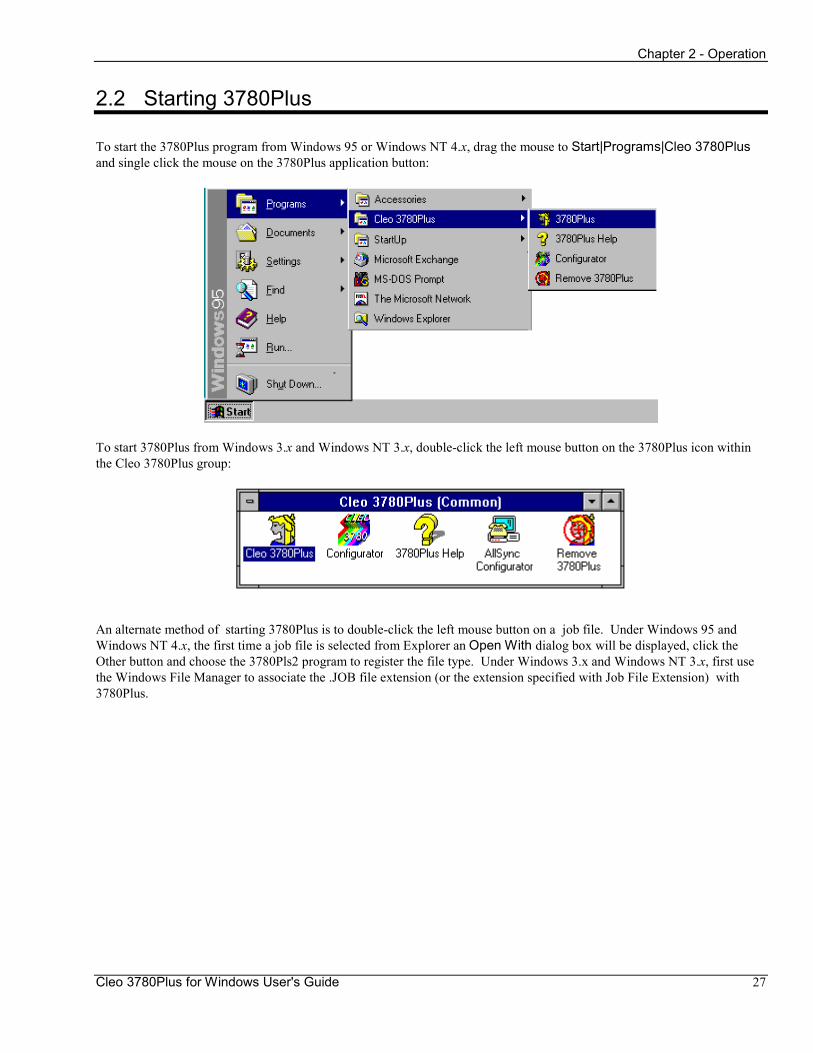
Chapter 2 - Operation
Cleo 3780Plus for Windows User's Guide 27
2.2 Starting 3780Plus
To start the 3780Plus program from Windows 95 or Windows NT 4.x, drag the mouse to Start|Programs|Cleo 3780Plus and single click the mouse on the 3780Plus application button:
To start 3780Plus from Windows 3.x and Windows NT 3.x, double-click the left mouse button on the 3780Plus icon within the Cleo 3780Plus group:
An alternate method of starting 3780Plus is to double-click the left mouse button on a job file. Under Windows 95 and Windows NT 4.x, the first time a job file is selected from Explorer an Open With dialog box will be displayed, click the Other button and choose the 3780Pls2 program to register the file type. Under Windows 3.x and Windows NT 3.x, first use the Windows File Manager to associate the .JOB file extension (or the extension specified with Job File Extension) with 3780Plus.
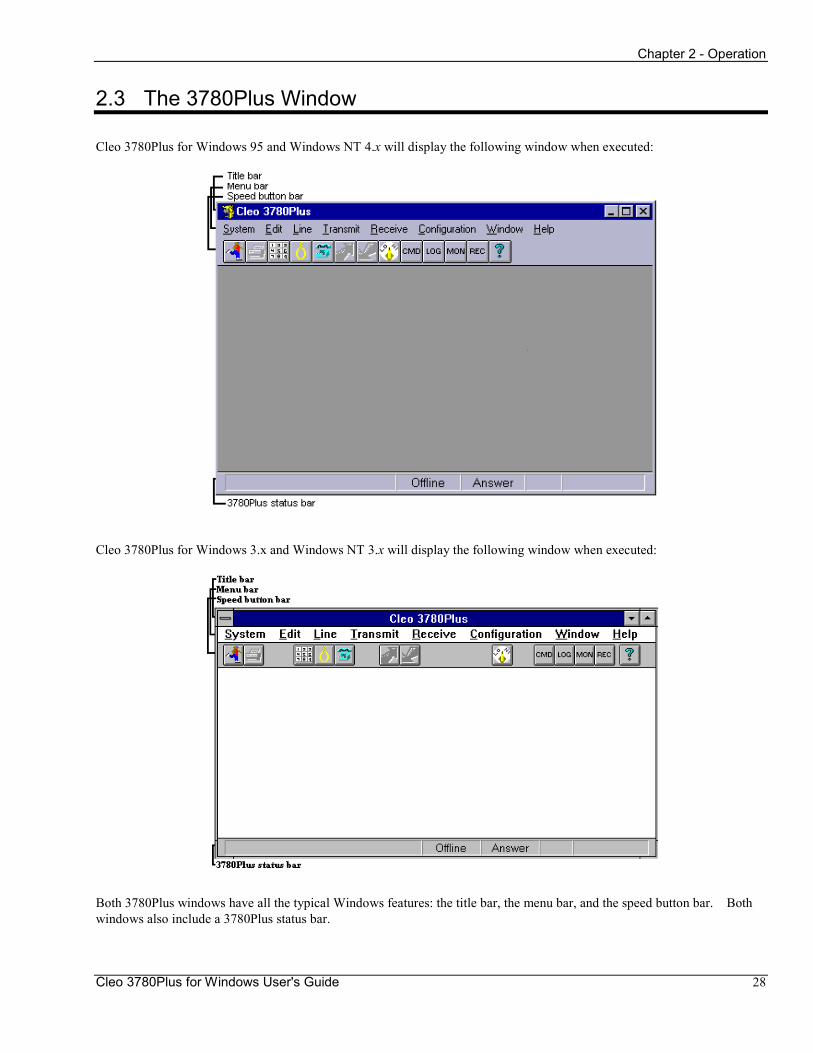
Chapter 2 - Operation
Cleo 3780Plus for Windows User's Guide 28
2.3 The 3780Plus Window
Cleo 3780Plus for Windows 95 and Windows NT 4.x will display the following window when executed:
Cleo 3780Plus for Windows 3.x and Windows NT 3.x will display the following window when executed:
Both 3780Plus windows have all the typical Windows features: the title bar, the menu bar, and the speed button bar. Both windows also include a 3780Plus status bar.
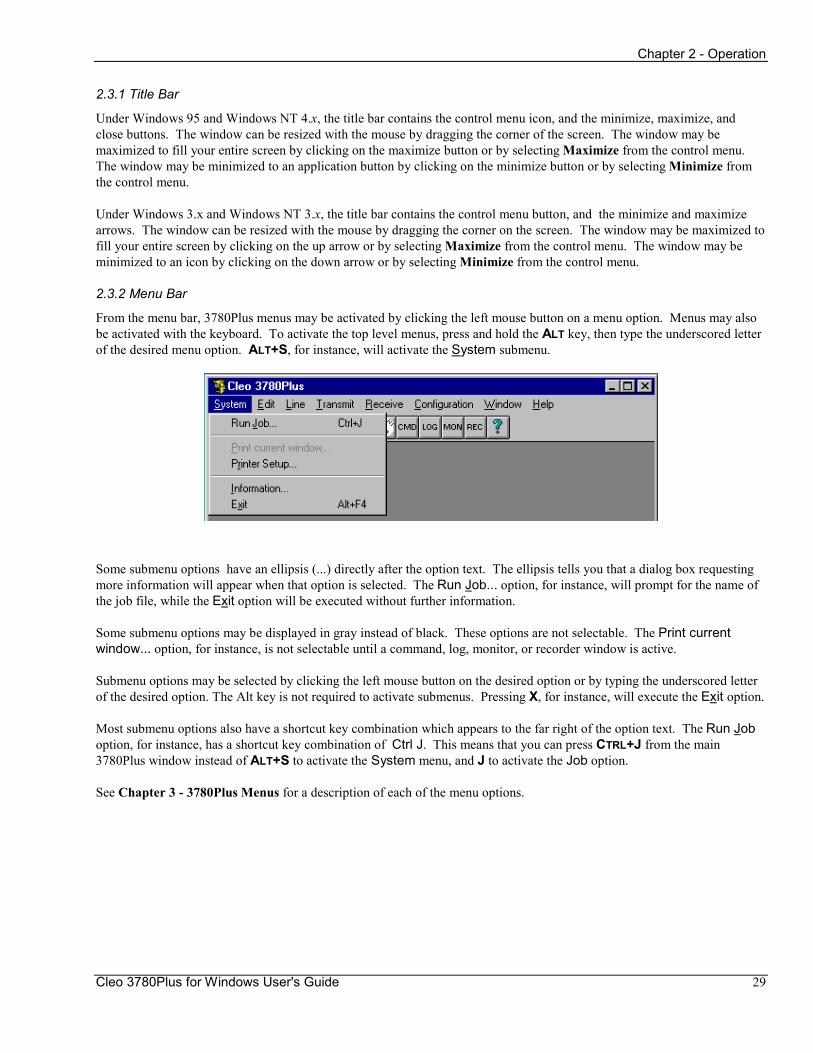
Chapter 2 - Operation
Cleo 3780Plus for Windows User's Guide 29
2.3.1 Title Bar
Under Windows 95 and Windows NT 4.x, the title bar contains the control menu icon, and the minimize, maximize, and close buttons. The window can be resized with the mouse by dragging the corner of the screen. The window may be maximized to fill your entire screen by clicking on the maximize button or by selecting Maximize from the control menu. The window may be minimized to an application button by clicking on the minimize button or by selecting Minimize from the control menu.
Under Windows 3.x and Windows NT 3.x, the title bar contains the control menu button, and the minimize and maximize arrows. The window can be resized with the mouse by dragging the corner on the screen. The window may be maximized to fill your entire screen by clicking on the up arrow or by selecting Maximize from the control menu. The window may be minimized to an icon by clicking on the down arrow or by selecting Minimize from the control menu.
2.3.2 Menu Bar
From the menu bar, 3780Plus menus may be activated by clicking the left mouse button on a menu option. Menus may also be activated with the keyboard. To activate the top level menus, press and hold the ALT key, then type the underscored letter of the desired menu option. ALT+S, for instance, will activate the System submenu.
Some submenu options have an ellipsis (...) directly after the option text. The ellipsis tells you that a dialog box requesting more information will appear when that option is selected. The Run Job... option, for instance, will prompt for the name of the job file, while the Exit option will be executed without further information.
Some submenu options may be displayed in gray instead of black. These options are not selectable. The Print current window... option, for instance, is not selectable until a command, log, monitor, or recorder window is active.
Submenu options may be selected by clicking the left mouse button on the desired option or by typing the underscored letter of the desired option. The Alt key is not required to activate submenus. Pressing X, for instance, will execute the Exit option.
Most submenu options also have a shortcut key combination which appears to the far right of the option text. The Run Job option, for instance, has a shortcut key combination of Ctrl J. This means that you can press CTRL+J from the main 3780Plus window instead of ALT+S to activate the System menu, and J to activate the Job option.
See Chapter 3 - 3780Plus Menus for a description of each of the menu options.
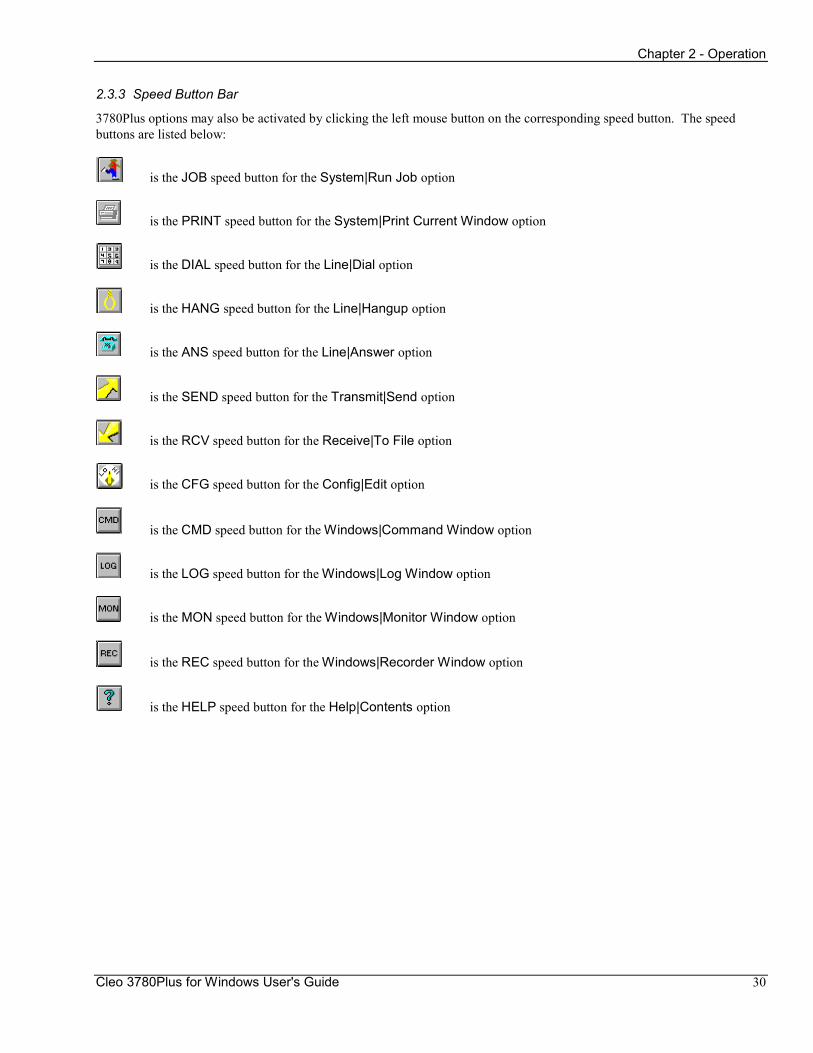
Chapter 2 - Operation
Cleo 3780Plus for Windows User's Guide 30
2.3.3 Speed Button Bar
3780Plus options may also be activated by clicking the left mouse button on the corresponding speed button. The speed buttons are listed below:
is the JOB speed button for the System|Run Job option
is the PRINT speed button for the System|Print Current Window option
is the DIAL speed button for the Line|Dial option
is the HANG speed button for the Line|Hangup option
is the ANS speed button for the Line|Answer option
is the SEND speed button for the Transmit|Send option
is the RCV speed button for the Receive|To File option
is the CFG speed button for the Config|Edit option
is the CMD speed button for the Windows|Command Window option
is the LOG speed button for the Windows|Log Window option
is the MON speed button for the Windows|Monitor Window option
is the REC speed button for the Windows|Recorder Window option
is the HELP speed button for the Help|Contents option
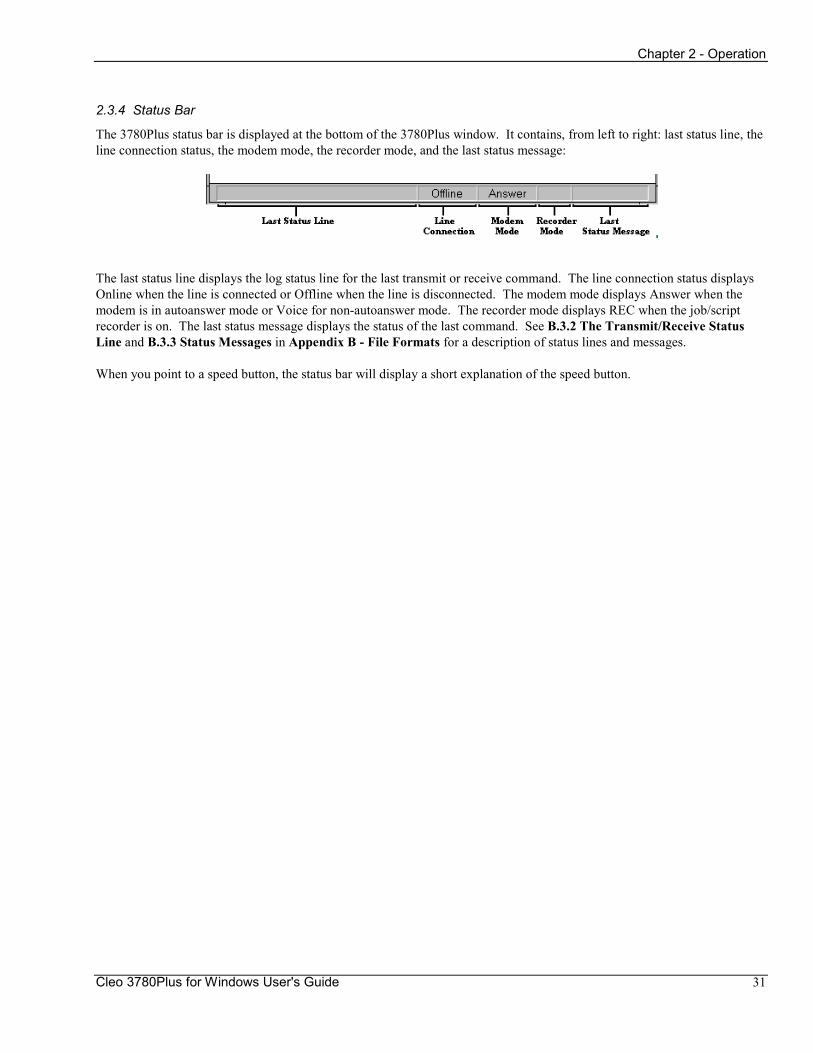
Chapter 2 - Operation
Cleo 3780Plus for Windows User's Guide 31
2.3.4 Status Bar
The 3780Plus status bar is displayed at the bottom of the 3780Plus window. It contains, from left to right: last status line, the line connection status, the modem mode, the recorder mode, and the last status message:
The last status line displays the log status line for the last transmit or receive command. The line connection status displays Online when the line is connected or Offline when the line is disconnected. The modem mode displays Answer when the modem is in autoanswer mode or Voice for non-autoanswer mode. The recorder mode displays REC when the job/script recorder is on. The last status message displays the status of the last command. See B.3.2 The Transmit/Receive Status Line and B.3.3 Status Messages in Appendix B - File Formats for a description of status lines and messages.
When you point to a speed button, the status bar will display a short explanation of the speed button.
Chapter 2 - Operation
Cleo 3780Plus for Windows User's Guide 32
2.4 Background Operation
3780Plus may be run minimized in the background. This allows you to run job files automatically, 'drag and drop' job, configuration, or transmit files, or simply stay in autoanswer and/or autoreceive mode while performing other tasks.
To minimize the 3780Plus program on startup, set the Configurator Startup|Display to Minimized. To minimize the 3780Plus window from within 3780Plus, press the minimize button/ down arrow in the upper right corner or select Minimize from the Control menu icon/box.
Chapter 2 - Operation
Cleo 3780Plus for Windows User's Guide 33
2.5 Drag and Drop
3780Plus for Windows supports the 'drag and drop' protocol as a dropped file client. Using My Computer, Explorer, File Manager, or a similar drop file server, you can select files and drop them on the 3780Plus program icon when the software is running. 3780Plus will transmit the dropped file(s), load the new configuration file, or run the job/script file automatically. If multiple files are dropped simultaneously, configuration files (files with a .CFG extension) will be loaded first, next job files (files with a .JOB extension) will run, then remaining files will be transmitted.
Check your Microsoft Windows User's Guide for more information on dropping files. See 1.5.3 Drag and Drop Settings in Chapter 1 - Configuration for information on configuration parameters that effect drag and drop operation.
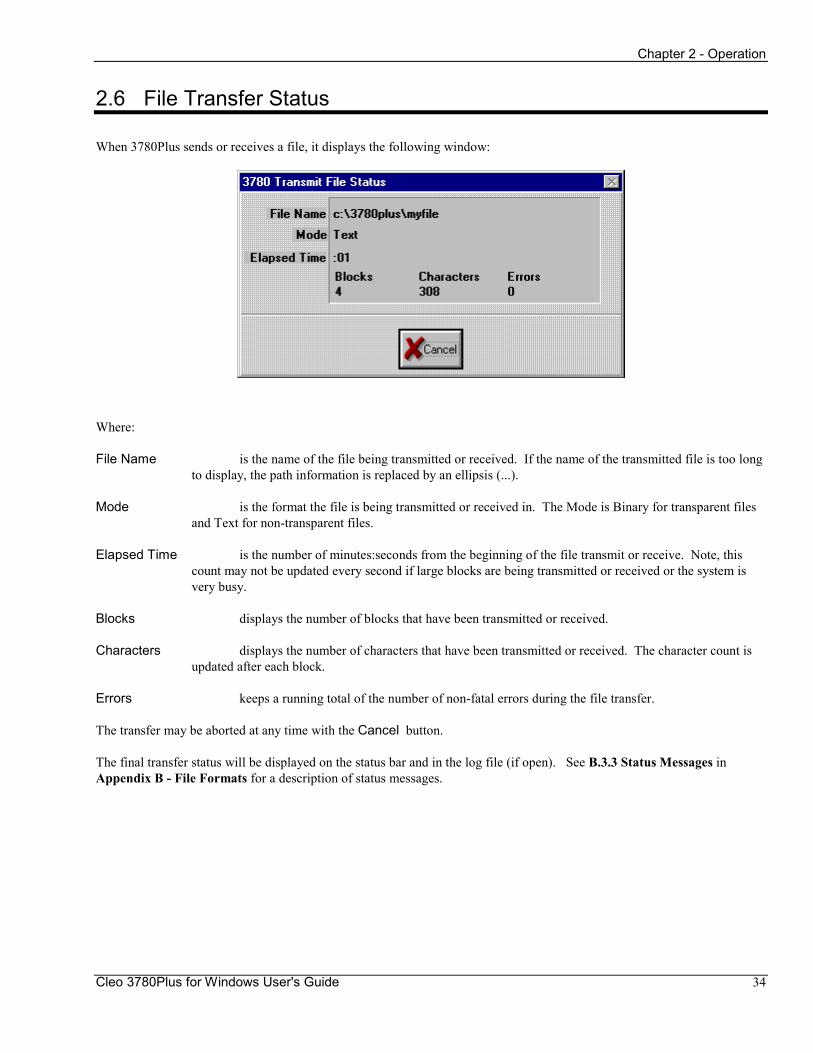
Chapter 2 - Operation
Cleo 3780Plus for Windows User's Guide 34
2.6 File Transfer Status
When 3780Plus sends or receives a file, it displays the following window:
Where:
File Name is the name of the file being transmitted or received. If the name of the transmitted file is too long to display, the path information is replaced by an ellipsis (...).
Mode is the format the file is being transmitted or received in. The Mode is Binary for transparent files and Text for non-transparent files.
Elapsed Time is the number of minutes:seconds from the beginning of the file transmit or receive. Note, this count may not be updated every second if large blocks are being transmitted or received or the system is very busy.
Blocks displays the number of blocks that have been transmitted or received.
Characters displays the number of characters that have been transmitted or received. The character count is updated after each block.
Errors keeps a running total of the number of non-fatal errors during the file transfer.
The transfer may be aborted at any time with the Cancel button.
The final transfer status will be displayed on the status bar and in the log file (if open). See B.3.3 Status Messages in Appendix B - File Formats for a description of status messages.
Cleo 3780Plus for Windows User's Guide 3-35
Chapter 3: 3780Plus Menus This chapter describes each of the Cleo 3780Plus pull-down menus in detail. The following menus are covered in this chapter:
• File - Run jobs and setup printer
• Edit - Edit a file
• Line - Connect/disconnect the phone line
• Transmit - Transmit files and messages
• Receive - Receive files
• Configuration - Display or change 3780Plus configuration
• Window - Display or change windows
• Help - Display help information
The 3780Plus commands used to control job/script files are described in Chapter 4 - 3780Plus Commands.
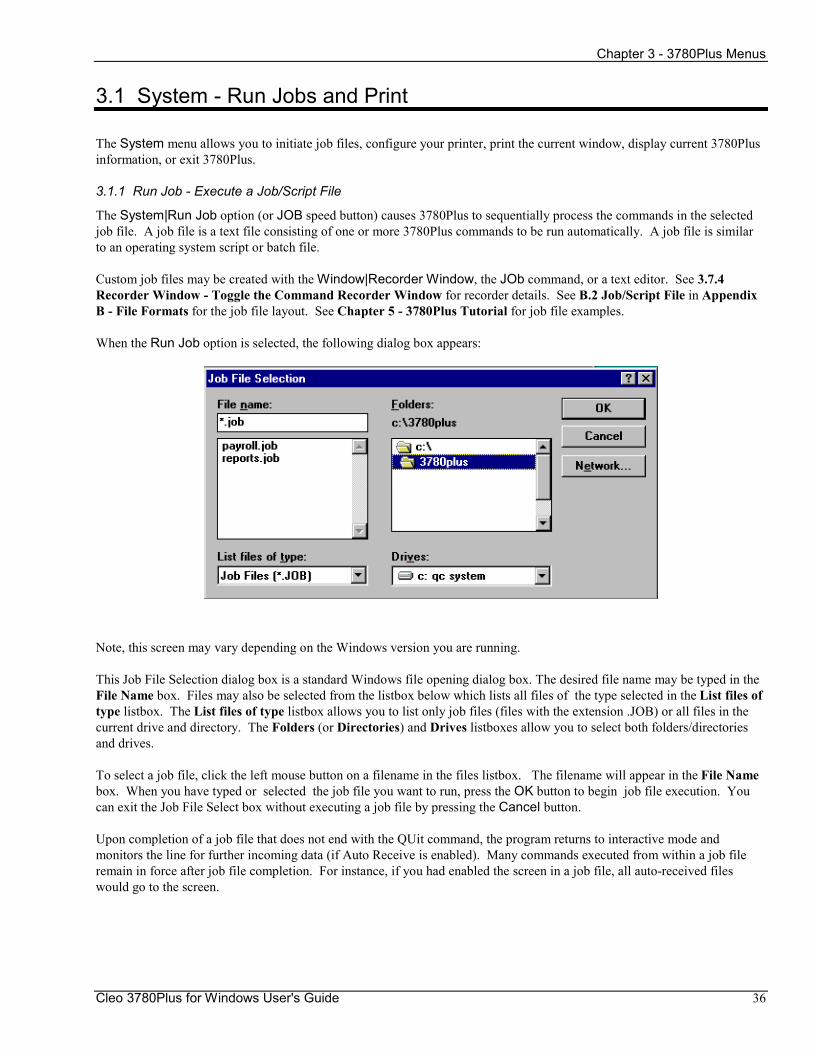
Chapter 3 - 3780Plus Menus
Cleo 3780Plus for Windows User's Guide 36
3.1 System - Run Jobs and Print
The System menu allows you to initiate job files, configure your printer, print the current window, display current 3780Plus information, or exit 3780Plus.
3.1.1 Run Job - Execute a Job/Script File
The System|Run Job option (or JOB speed button) causes 3780Plus to sequentially process the commands in the selected job file. A job file is a text file consisting of one or more 3780Plus commands to be run automatically. A job file is similar to an operating system script or batch file.
Custom job files may be created with the Window|Recorder Window, the JOb command, or a text editor. See 3.7.4 Recorder Window - Toggle the Command Recorder Window for recorder details. See B.2 Job/Script File in Appendix B - File Formats for the job file layout. See Chapter 5 - 3780Plus Tutorial for job file examples.
When the Run Job option is selected, the following dialog box appears:
Note, this screen may vary depending on the Windows version you are running.
This Job File Selection dialog box is a standard Windows file opening dialog box. The desired file name may be typed in the File Name box. Files may also be selected from the listbox below which lists all files of the type selected in the List files of type listbox. The List files of type listbox allows you to list only job files (files with the extension .JOB) or all files in the current drive and directory. The Folders (or Directories) and Drives listboxes allow you to select both folders/directories and drives.
To select a job file, click the left mouse button on a filename in the files listbox. The filename will appear in the File Name box. When you have typed or selected the job file you want to run, press the OK button to begin job file execution. You can exit the Job File Select box without executing a job file by pressing the Cancel button.
Upon completion of a job file that does not end with the QUit command, the program returns to interactive mode and monitors the line for further incoming data (if Auto Receive is enabled). Many commands executed from within a job file remain in force after job file completion. For instance, if you had enabled the screen in a job file, all auto-received files would go to the screen.
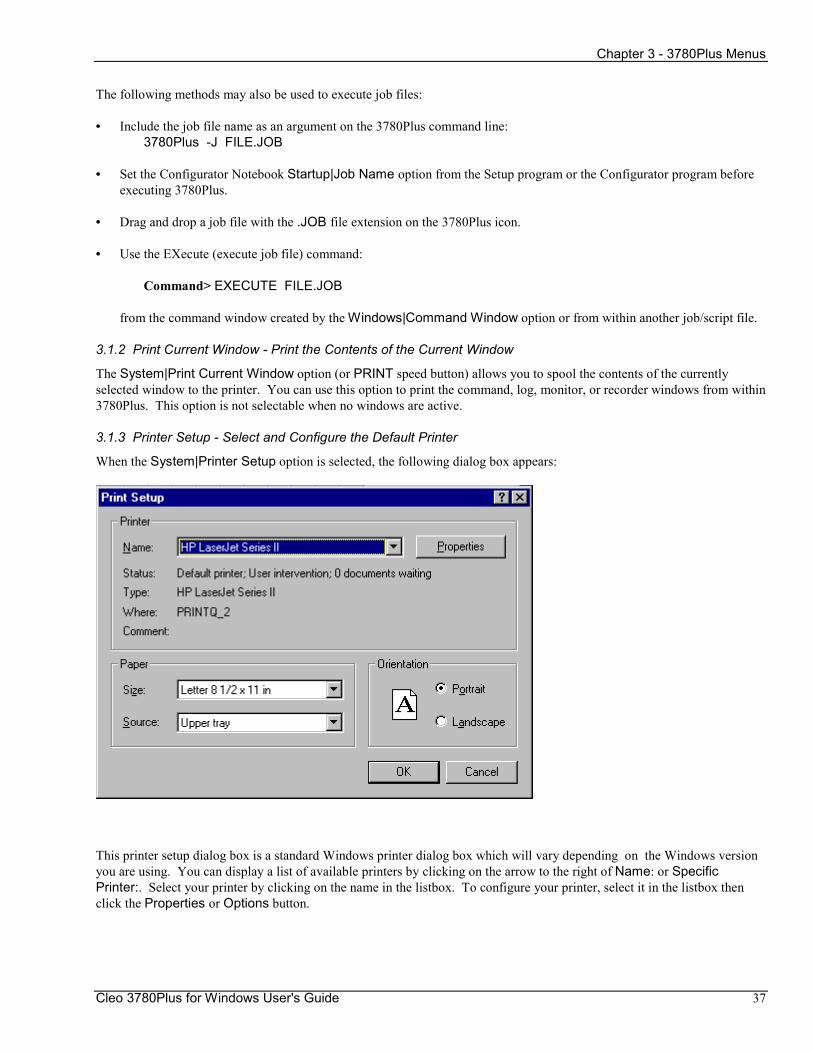
Chapter 3 - 3780Plus Menus
Cleo 3780Plus for Windows User's Guide 37
The following methods may also be used to execute job files:
• Include the job file name as an argument on the 3780Plus command line: 3780Plus -J FILE.JOB
• Set the Configurator Notebook Startup|Job Name option from the Setup program or the Configurator program before executing 3780Plus.
• Drag and drop a job file with the .JOB file extension on the 3780Plus icon.
• Use the EXecute (execute job file) command: Command> EXECUTE FILE.JOB from the command window created by the Windows|Command Window option or from within another job/script file.
3.1.2 Print Current Window - Print the Contents of the Current Window
The System|Print Current Window option (or PRINT speed button) allows you to spool the contents of the currently selected window to the printer. You can use this option to print the command, log, monitor, or recorder windows from within 3780Plus. This option is not selectable when no windows are active.
3.1.3 Printer Setup - Select and Configure the Default Printer
When the System|Printer Setup option is selected, the following dialog box appears:
This printer setup dialog box is a standard Windows printer dialog box which will vary depending on the Windows version you are using. You can display a list of available printers by clicking on the arrow to the right of Name: or Specific Printer:. Select your printer by clicking on the name in the listbox. To configure your printer, select it in the listbox then click the Properties or Options button.

Chapter 3 - 3780Plus Menus
Cleo 3780Plus for Windows User's Guide 38
3.1.4 Information - Current 3780Plus Information
The System|Information option displays the current 3780Plus version numbers, configuration and translation table files, hardware configuration, modem dialing method, etc. The System|Information screen includes a Copy button to copy the current 3780Plus information to the Windows clipboard. From the clipboard, you can save the information to a file or print it.
3.1.5 Exit - Exit 2780/3780 Communications
The System|Exit option allows a graceful exit from 2780/3780 communications. Exit causes a log off message to be posted to the log file (if open). All pending files are closed including the monitor file, the log file, the receive file, and the print file. If the modem is online, Exit will prompt to hangup the line before exiting.
Chapter 3 - 3780Plus Menus
Cleo 3780Plus for Windows User's Guide 39
3.2 Edit - Clipboard Access
The Edit menu allows you to cut, copy, and paste information within files. Each window within 3780Plus is a small editor. Like most Windows programs, 3780Plus allows you to transfer text data to and from the clipboard. You can, for instance, copy information from your log file into your word processor or vice versa.
To select text within a 3780Plus window: Using the Mouse 1. Position the cursor at the beginning of the desired text. 2. Press and hold the left mouse button. 3. Drag the mouse to the end of the text. 4. Release the mouse button. Using the Keyboard 1. Position the cursor at the beginning of the desired text 2. Hold down the shift key. 3. Move the cursor to the end of the text. 4. Release the shift key.
3.2.1 Undo
The Edit|Undo option undoes the last edit command, i.e. the text is returned to the state is was before the last edit command was executed.
3.2.2 Cut
The Edit|Cut option transfers the selected text to the clipboard and removes the selected text from the window.
3.2.3 Copy
The Edit|Copy option transfers the selected text to the clipboard but does not remove the selected text from the window.
3.2.4 Paste
The Edit|Paste option copies the contents of the clipboard to the current cursor location in the current window.
3.2.5 Clear All
The Edit|Clear All option deletes all the text in the current window.
3.2.6 Delete
The Edit|Delete option deletes the selected text.
3.2.7 Find
The Edit|Find option searches for the specified characters in the current window.
3.2.8 Replace
The Edit|Replace option searches for the specified characters in the current window and replaces it with other characters.
3.2.9 Next
The Edit|Next option searches for the next occurrence of the characters specified by the last Find command.

Chapter 3 - 3780Plus Menus
Cleo 3780Plus for Windows User's Guide 40
3.3 Line - Connect/Disconnect Phone Line
The Line menu allows you to dial, answer, or hang up your modem.
3.3.1 Dial - Access the Dialing Directory
The Line|Dial option (or DIAL speed button) allows you to add to, delete from, or modify an entry in a customized dialing directory. It allows you to manually dial phone numbers not in the dialing directory, or automatically dial a number from the dialing directory.
When the Dial option is selected, the following window appears:
To automatically dial a phone number from the dialing directory, either single click the left mouse button on the directory entry then press the Ok button, or double click the left mouse button on the directory entry.
While 3780Plus is dialing, the following window will display:
The dial may be aborted at any time with the Cancel button.
On external modems, the modem initialization and dialing type are selected with the Configuration Dial Method parameter. The speed at which the modem initialization and dial string are sent is selected with the Configuration Modulation parameter. The signal 3780Plus uses to detect a connection is selected with the Configuration Line Type parameter. Locate your modem type in Appendix A - Modem Support for configuration parameter requirements.
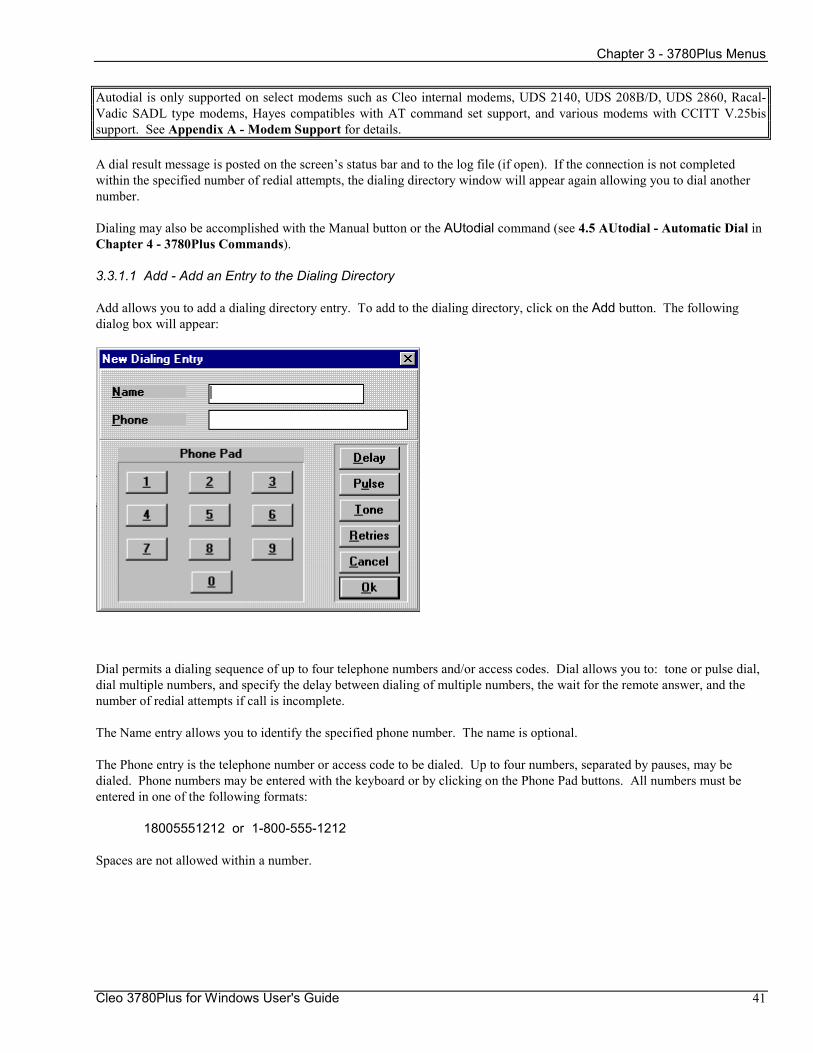
Chapter 3 - 3780Plus Menus
Cleo 3780Plus for Windows User's Guide 41
Autodial is only supported on select modems such as Cleo internal modems, UDS 2140, UDS 208B/D, UDS 2860, Racal-Vadic SADL type modems, Hayes compatibles with AT command set support, and various modems with CCITT V.25bis support. See Appendix A - Modem Support for details.
A dial result message is posted on the screen�s status bar and to the log file (if open). If the connection is not completed within the specified number of redial attempts, the dialing directory window will appear again allowing you to dial another number.
Dialing may also be accomplished with the Manual button or the AUtodial command (see 4.5 AUtodial - Automatic Dial in Chapter 4 - 3780Plus Commands).
3.3.1.1 Add - Add an Entry to the Dialing Directory
Add allows you to add a dialing directory entry. To add to the dialing directory, click on the Add button. The following dialog box will appear:
Dial permits a dialing sequence of up to four telephone numbers and/or access codes. Dial allows you to: tone or pulse dial, dial multiple numbers, and specify the delay between dialing of multiple numbers, the wait for the remote answer, and the number of redial attempts if call is incomplete.
The Name entry allows you to identify the specified phone number. The name is optional.
The Phone entry is the telephone number or access code to be dialed. Up to four numbers, separated by pauses, may be dialed. Phone numbers may be entered with the keyboard or by clicking on the Phone Pad buttons. All numbers must be entered in one of the following formats: 18005551212 or 1-800-555-1212 Spaces are not allowed within a number.

Chapter 3 - 3780Plus Menus
Cleo 3780Plus for Windows User's Guide 42
The Dial options are:
Delay is an option to specify a five second time delay. This corresponds to the AUtodial Txx option. The delay time may be lengthened via the keyboard. Valid entries for xx are 1 to 99. The final delay is optional and specifies the time to wait for the remote answer back tone. If the final Txx option is not specified, the answer back tone detect period is 30 seconds.
Pulse is an option to pulse dial. The default is tone dial. This corresponds to the AUtodial P option.
Tone is an option to tone dial. This is the default.
Retries is an option to specify three redial attempts. This option corresponds to the Rxx option. The number of redial attempts may be changed via the keyboard. Valid entries for xx are 1 to 31,000 or -1 for 31,000. After the final number is dialed, 3780Plus monitors the line for about 30 seconds to detect an answer back tone from the remote modem. If the answer back tone is detected, communications are enabled, otherwise the auto dial sequence will be repeated according to the number of attempts specified by the Rxx option. When the Rxx option is omitted, Dial defaults to three redial attempts.
Example: Name Ford Motors Phone P 1-800-555-1212 R10
Pulse dialing (P) is used to dial the phone number (1-800-555-1212) up to 10 times (R10). Example: Name Ford Motors from PBX Phone 9 T5 18005551212 T10 3978110 R4
Tone dialing is used. A PBX access code (9) is dialed, a 5 second pause occurs (T5); the telephone number (18005551212) is dialed, a 10 second pause occurs (T10); an access code (3978110) is dialed. This sequence may be repeated up to 4 times (R4) in attempt to complete the telephone connection. A message will be displayed indicating the connection status.
3.3.1.2 Delete - Delete a Dialing Directory Entry
Delete allows you to remove entries from the dialing directory. To remove selected entries, click the left mouse button on the directory entry then click the Delete button. You will be prompted to verify the deletion.
3.3.1.3 Edit - Edit a Dialing Directory Entry
Edit allows you to modify entries in the dialing directory. To make modifications to selected entries, click the left mouse button on the directory entry then click the Edit button. A window similar to the Add window will appear.
3.3.1.4 Manual - Manual Dial a Phone Number
Manual allows you to dial a phone number not in the dialing directory. To dial a new phone number, click the Manual button. A window similar to the Add window will appear. Because it will not be entered into the dialing directory, it will not have a Name entry.
Chapter 3 - 3780Plus Menus
Cleo 3780Plus for Windows User's Guide 43
3.3.2 Hangup - Hangup the Phone Line
The Line|Hangup option (or HANG speed button) causes the 3780Plus program to disconnect the current phone line connection and disable autoanswering. The modem mode on the 3780Plus status bar will display Voice.
The Hangup option transmits the 3780 hangup message (DLE EOT) then hangs up the phone line. Note: If the hangup message (DLE EOT) is received by 3780Plus during the communications process, 3780Plus will drop the phone line for one second then return to the answer mode for further transactions.
Hangup may also be accomplished with the VOice command (see 4.37 VOice - Disconnect Phone Line and Disable Autoanswer in Chapter 4 - 3780Plus Commands).
3.3.3 Answer - Answer the Phone Line
The Line|Answer option (or ANS speed button) disconnects the current phone line connection and initializes the modem for autoanswering. The modem mode on the 3780Plus status bar will display Answer.
On external modems, the modem initialization type is selected with the Configuration Dial Method parameter. The speed at which the modem initialization string is sent is selected with the Configuration Modulation parameter. The signal 3780Plus uses to detect a connection is selected with the Configuration Line Type parameter. Locate your modem type in Appendix A - Modem Support for configuration parameter requirements.
Answer may also be accomplished with the ANswer command (see 4.2 ANswer - Automatic Answer in Chapter 4 - 3780Plus Commands).
3.3.4 Data - Enter Data Mode
The Line|Data option causes the local modem to be enabled and the handset to be excluded, so that data transfer may occur. On an external modem, the Data Terminal Ready (DTR) signal is raised. No protocol is sent on the line in response to this command.
Data may also be accomplished with the DAta command (see 4.11 DAta - Data Mode in Chapter 4 - 3780Plus Commands).
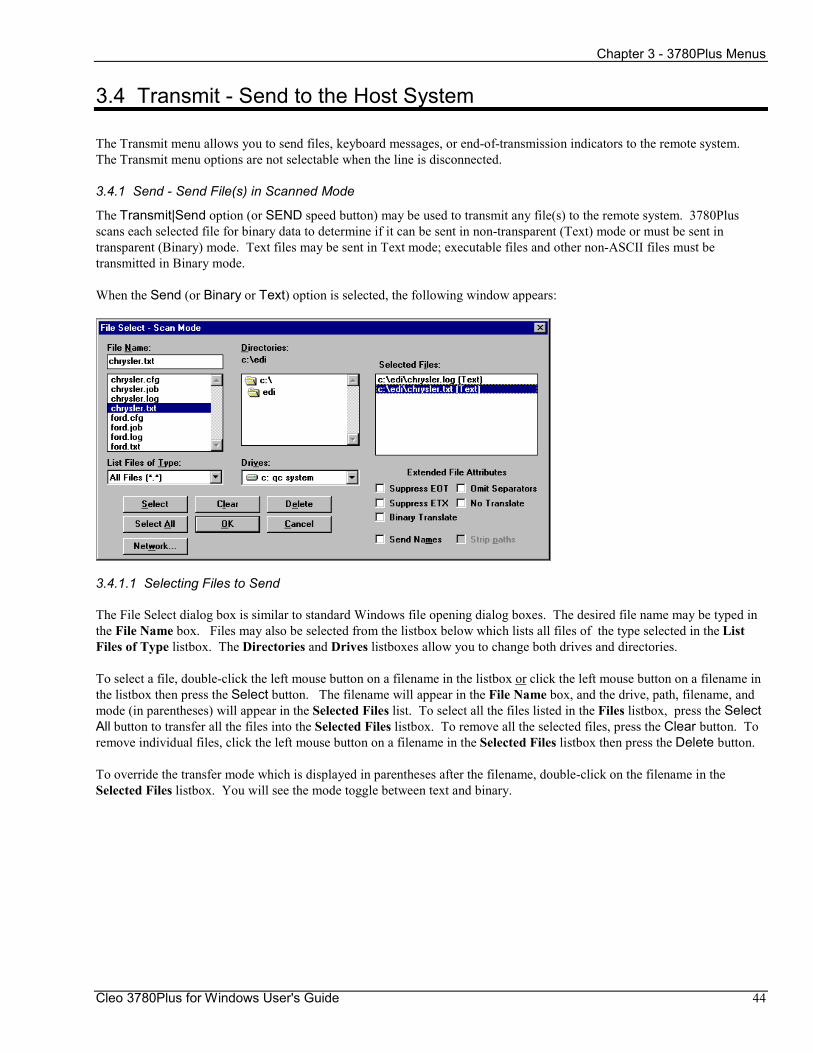
Chapter 3 - 3780Plus Menus
Cleo 3780Plus for Windows User's Guide 44
3.4 Transmit - Send to the Host System
The Transmit menu allows you to send files, keyboard messages, or end-of-transmission indicators to the remote system. The Transmit menu options are not selectable when the line is disconnected.
3.4.1 Send - Send File(s) in Scanned Mode
The Transmit|Send option (or SEND speed button) may be used to transmit any file(s) to the remote system. 3780Plus scans each selected file for binary data to determine if it can be sent in non-transparent (Text) mode or must be sent in transparent (Binary) mode. Text files may be sent in Text mode; executable files and other non-ASCII files must be transmitted in Binary mode.
When the Send (or Binary or Text) option is selected, the following window appears:
3.4.1.1 Selecting Files to Send
The File Select dialog box is similar to standard Windows file opening dialog boxes. The desired file name may be typed in the File Name box. Files may also be selected from the listbox below which lists all files of the type selected in the List Files of Type listbox. The Directories and Drives listboxes allow you to change both drives and directories.
To select a file, double-click the left mouse button on a filename in the listbox or click the left mouse button on a filename in the listbox then press the Select button. The filename will appear in the File Name box, and the drive, path, filename, and mode (in parentheses) will appear in the Selected Files list. To select all the files listed in the Files listbox, press the Select All button to transfer all the files into the Selected Files listbox. To remove all the selected files, press the Clear button. To remove individual files, click the left mouse button on a filename in the Selected Files listbox then press the Delete button.
To override the transfer mode which is displayed in parentheses after the filename, double-click on the filename in the Selected Files listbox. You will see the mode toggle between text and binary.
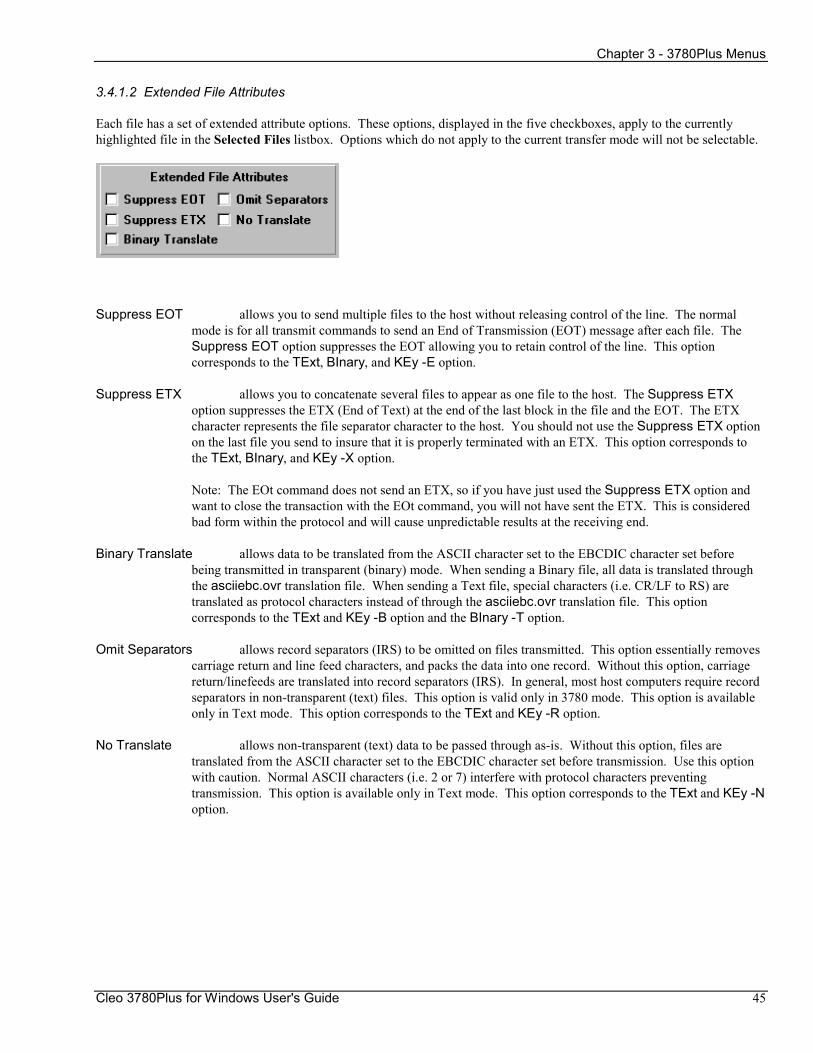
Chapter 3 - 3780Plus Menus
Cleo 3780Plus for Windows User's Guide 45
3.4.1.2 Extended File Attributes
Each file has a set of extended attribute options. These options, displayed in the five checkboxes, apply to the currently highlighted file in the Selected Files listbox. Options which do not apply to the current transfer mode will not be selectable.
Suppress EOT allows you to send multiple files to the host without releasing control of the line. The normal mode is for all transmit commands to send an End of Transmission (EOT) message after each file. The Suppress EOT option suppresses the EOT allowing you to retain control of the line. This option corresponds to the TExt, BInary, and KEy -E option.
Suppress ETX allows you to concatenate several files to appear as one file to the host. The Suppress ETX option suppresses the ETX (End of Text) at the end of the last block in the file and the EOT. The ETX character represents the file separator character to the host. You should not use the Suppress ETX option on the last file you send to insure that it is properly terminated with an ETX. This option corresponds to the TExt, BInary, and KEy -X option. Note: The EOt command does not send an ETX, so if you have just used the Suppress ETX option and want to close the transaction with the EOt command, you will not have sent the ETX. This is considered bad form within the protocol and will cause unpredictable results at the receiving end.
Binary Translate allows data to be translated from the ASCII character set to the EBCDIC character set before being transmitted in transparent (binary) mode. When sending a Binary file, all data is translated through the asciiebc.ovr translation file. When sending a Text file, special characters (i.e. CR/LF to RS) are translated as protocol characters instead of through the asciiebc.ovr translation file. This option corresponds to the TExt and KEy -B option and the BInary -T option.
Omit Separators allows record separators (IRS) to be omitted on files transmitted. This option essentially removes carriage return and line feed characters, and packs the data into one record. Without this option, carriage return/linefeeds are translated into record separators (IRS). In general, most host computers require record separators in non-transparent (text) files. This option is valid only in 3780 mode. This option is available only in Text mode. This option corresponds to the TExt and KEy -R option.
No Translate allows non-transparent (text) data to be passed through as-is. Without this option, files are translated from the ASCII character set to the EBCDIC character set before transmission. Use this option with caution. Normal ASCII characters (i.e. 2 or 7) interfere with protocol characters preventing transmission. This option is available only in Text mode. This option corresponds to the TExt and KEy -N option.
Chapter 3 - 3780Plus Menus
Cleo 3780Plus for Windows User's Guide 46
3.4.1.3 Remote File Naming
3780Plus supports remote file naming when communicating with another installation running 3780Plus. This remote name, the same name as the original, is assigned to the file received by the remote processor overriding any filename given in the remote receive command. If the screen or printer was enabled at the receiving end, however, the files would be directed to the screen or the default printer name and would not be saved to the specified filenames.
To transmit file names, select the Send Names checkbox. To send the file names without the drive and path information, select the Strip Paths checkbox. The remote naming feature applies to all files in the queue.
Remote filenaming is a 3780Plus function and not an IBM 2780/3780 function and, therefore, will not work when sending to mainframes or other 3780 packages.
3.4.1.4 Sending Files
After you have typed the file to send or queued the files to send in the Selected Files listbox, click the Ok button to transmit the file(s). You can exit the File Select box without sending the files by pressing the Cancel button.
A Transmit File Status box is displayed on the screen during transmission. See 2.6 File Transfer Status in Chapter 2 - Operation for details. The transmission may be aborted at any time with the Cancel button. After the file is transmitted, a status message is posted to the screen and a status line is posted to the log file (if open) giving a completion status message for the transmission including the number of data blocks sent (see B.3.3 - Status Messages in Appendix B - File Formats).
Note that if one of a group of selected files is terminated by anything other than a NRMEOF (normal end of file) status, you will be prompted to cancel the remaining transfers.
3.4.2 Binary - Send File(s) in Binary Mode
The Transmit|Binary option may be used to transmit any files to the remote system in transparent mode. These files are normally transmitted "as is" to avoid interference with protocol characters. Executable files and other non-ASCII files must be transmitted with the Binary option.
See 3.4.1 Send - Send File(s) in Scanned Mode above for details.
The Binary option may also be executed with the BInary command (see 4.6 BInary - Transmit Binary File(s) in Chapter 4 - 3780Plus Commands). See also 2.5 Drag and Drop in Chapter 2 - Operation and 1.5.3 Drag and Drop Settings in Chapter 1 - Configuration for more information.
3.4.3 Text - Send File(s) in Text Mode
The Transmit|Text option may be used to transmit files to the remote system. These files are normally translated from the ASCII character set to the EBCDIC character set then sent in non-transparent mode. This is the most commonly used method of transmission.
Word processors create documents that appear to be ASCII files, and the temptation is to transmit these files using the Text option. However, some word processing packages change the high bit on each character, specifying a command to the word processor. If you suspect this is the case with your word processor, send document files using the Binary option.
See 3.4.1 Send - Send File(s) in Scanned Mode above for details.
The Text option may also be executed with the TExt command (see 4.35 TExt - Transmit Text File(s) in Chapter 4 - 3780Plus Commands). Also see sections 2.5 Drag and Drop in Chapter 2 - Operation and 1.5.3 Drag and Drop Settings in Chapter 1 - Configuration for more information.
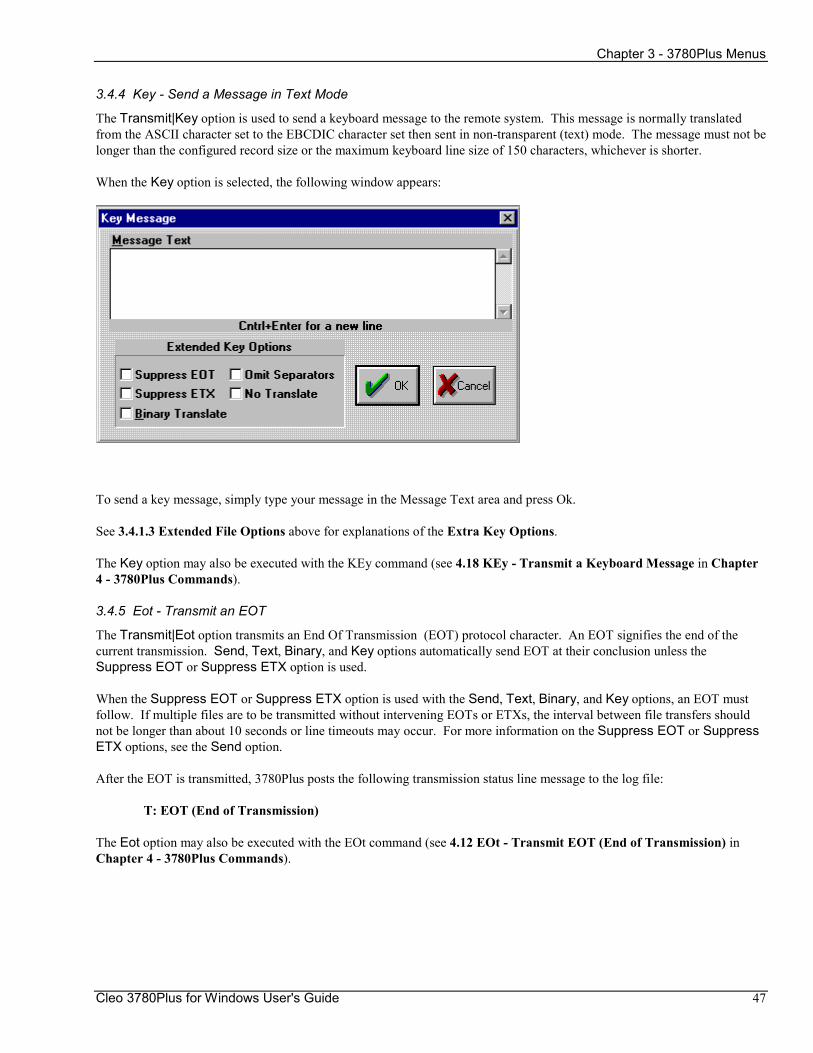
Chapter 3 - 3780Plus Menus
Cleo 3780Plus for Windows User's Guide 47
3.4.4 Key - Send a Message in Text Mode
The Transmit|Key option is used to send a keyboard message to the remote system. This message is normally translated from the ASCII character set to the EBCDIC character set then sent in non-transparent (text) mode. The message must not be longer than the configured record size or the maximum keyboard line size of 150 characters, whichever is shorter.
When the Key option is selected, the following window appears:
To send a key message, simply type your message in the Message Text area and press Ok.
See 3.4.1.3 Extended File Options above for explanations of the Extra Key Options.
The Key option may also be executed with the KEy command (see 4.18 KEy - Transmit a Keyboard Message in Chapter 4 - 3780Plus Commands).
3.4.5 Eot - Transmit an EOT
The Transmit|Eot option transmits an End Of Transmission (EOT) protocol character. An EOT signifies the end of the current transmission. Send, Text, Binary, and Key options automatically send EOT at their conclusion unless the Suppress EOT or Suppress ETX option is used.
When the Suppress EOT or Suppress ETX option is used with the Send, Text, Binary, and Key options, an EOT must follow. If multiple files are to be transmitted without intervening EOTs or ETXs, the interval between file transfers should not be longer than about 10 seconds or line timeouts may occur. For more information on the Suppress EOT or Suppress ETX options, see the Send option.
After the EOT is transmitted, 3780Plus posts the following transmission status line message to the log file:
T: EOT (End of Transmission)
The Eot option may also be executed with the EOt command (see 4.12 EOt - Transmit EOT (End of Transmission) in Chapter 4 - 3780Plus Commands).
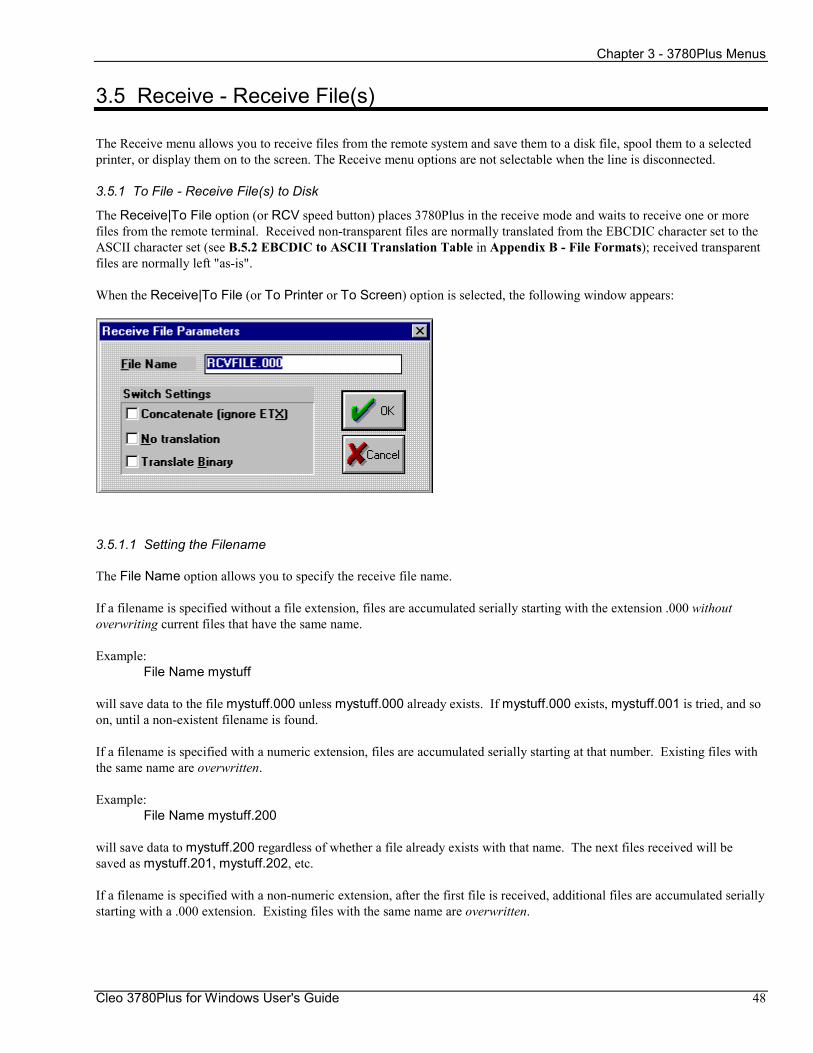
Chapter 3 - 3780Plus Menus
Cleo 3780Plus for Windows User's Guide 48
3.5 Receive - Receive File(s)
The Receive menu allows you to receive files from the remote system and save them to a disk file, spool them to a selected printer, or display them on to the screen. The Receive menu options are not selectable when the line is disconnected.
3.5.1 To File - Receive File(s) to Disk
The Receive|To File option (or RCV speed button) places 3780Plus in the receive mode and waits to receive one or more files from the remote terminal. Received non-transparent files are normally translated from the EBCDIC character set to the ASCII character set (see B.5.2 EBCDIC to ASCII Translation Table in Appendix B - File Formats); received transparent files are normally left "as-is".
When the Receive|To File (or To Printer or To Screen) option is selected, the following window appears:
3.5.1.1 Setting the Filename
The File Name option allows you to specify the receive file name.
If a filename is specified without a file extension, files are accumulated serially starting with the extension .000 without overwriting current files that have the same name.
Example: File Name mystuff
will save data to the file mystuff.000 unless mystuff.000 already exists. If mystuff.000 exists, mystuff.001 is tried, and so on, until a non-existent filename is found. If a filename is specified with a numeric extension, files are accumulated serially starting at that number. Existing files with the same name are overwritten.
Example: File Name mystuff.200
will save data to mystuff.200 regardless of whether a file already exists with that name. The next files received will be saved as mystuff.201, mystuff.202, etc. If a filename is specified with a non-numeric extension, after the first file is received, additional files are accumulated serially starting with a .000 extension. Existing files with the same name are overwritten.
Chapter 3 - 3780Plus Menus
Cleo 3780Plus for Windows User's Guide 49
Example: File Name mystuff.new
will save data to mystuff.new regardless of whether a file already exists with that name. The next files received will be saved as mystuff.000, mystuff.001, etc.
If auto-receive mode is enabled and no filename has been specified since 3780Plus logon, all received files are accumulated serially as RCVFILE.000, RCVFILE.001, etc. Note: The default file name may be changed (see B.8 Initialization File in Appendix B - File Formats).
3.5.1.2 Switch Settings
The switch setting options, displayed in the three checkboxes, apply to all the files received until an End Of Transmission (EOT) is received.
The Receive options are:
Concatenate (Ignore ETX) allows you to concatenate several incoming files to appear as one file. This option ignores incoming ETX characters. The ETX character normally represents a file separator. This option corresponds to the REceive -X option.
No Translation allows non-transparent (text) data to be passed through as-is. Without this option, incoming non-transparent files are translated from the EBCDIC character set to the ASCII character set. This option corresponds to the REceive -N option.
Translate Binary allows transparent (binary) data to be translated from the EBCDIC character set to the ASCII character set upon reception. Without this option, incoming transparent files are passed through as-is. This option corresponds to the REceive -T option. If your receive file is not readable and your log status line begins with RB:, your host may be sending a transparent EBCDIC file. Try receiving again with the Translate Binary option.
3.5.1.3 Receiving File(s)
A Receive File Status box is displayed on the screen during reception. See 2.6 File Transfer Status in Chapter 2 - Operation for details. The receive may be aborted at any time with the Cancel button. After each file is received, a status line is posted, giving a completion status message for the received file including the number of data blocks received. (See B.3.3 - Status Messages in Appendix B - File Formats).
3780Plus continues to receive files and write them to disk until an End of Transmission (EOT) character is received from the remote or some type of error occurred. In Auto Receive mode, the To File option is in effect until another receive mode is entered with a To Printer, To Screen, or another To File option.
The To File option may also be executed with the REceive command (see 4.27 REceive - Receive File(s) in Chapter 4 - 3780Plus Commands).
3.5.2 To Printer - Print Received File(s)
The Receive|To Printer option places 3780Plus in receive mode and waits to receive one or more files from the remote terminal. This is equivalent to the To File option, except that printer tab and escape sequences are translated by 3780Plus to the appropriate action (see Table 4.1 Printer Escape Sequence Translations in Chapter 4 - 3780Plus Commands) and files may be automatically spooled to the printer (see 1.5.2 Printing Variables in Chapter 1 - Configuration). Received non-transparent files are normally translated from the EBCDIC character set to the ASCII character set; received transparent files are normally left "as-is".

Chapter 3 - 3780Plus Menus
Cleo 3780Plus for Windows User's Guide 50
The To Print File Name is described in 3.5.1.1 Setting the Filename above. If no Print filename has been specified, all received print files are accumulated serially as PRINT.000, PRINT.001, etc. Note: The default file name PRINT may be changed (see B.8 Initialization File in Appendix B - File Formats).
If files with printer device selection codes (see C.2 Device Selection in Appendix C - Multipoint Operation and Device Selection) are received while 3780Plus is not in the print receive mode, the files will be automatically saved to the default printer filename. This function may be overridden with the 3780Plus DeviceSelect option (see B.8 Initialization File in Appendix B - File Formats for details).
The To Printer options are described in 3.5.1.2 Switch Settings above.
A Receive File Status box is displayed on the screen during reception. See 2.6 File Transfer Status in Chapter 2 - Operation for details. The receive may be aborted at any time with the Cancel button. After each file is received, a status line is posted, giving a completion status message for the received file including the number of data blocks received. (See B.3.3 - Status Messages in Appendix B - File Formats).
3780Plus continues to receive files and write them to disk until an End of Transmission (EOT) character is received from the remote or some type of error occurred. In Auto Receive mode, the To Printer option is in effect until another receive mode is entered with a To File, To Screen, or another To Printer option.
When the Spool Print Files option is enabled, 3780Plus creates temporary files (with a file prefix of $SPnnnn and an extension specified by Association Ext). If files have not finished printing before 3780Plus exits, the temporary files will not be removed.
The To Printer option may also be executed with the PRint command (see 4.24 PRint - Receive File(s) & Spool to Printer in Chapter 4 - 3780Plus Commands).
3.5.3 To Screen - Display Received File(s) to Screen
The Receive|To Screen option places 3780Plus in receive mode and waits to receive one or more files from the remote terminal. This is equivalent to the To File and To Print options except a file name is not specified and messages are directed to the Screen Window instead of to the printer or disk drive. Received non-transparent files are normally translated from the EBCDIC character set to the ASCII character set; received transparent files are normally saved to disk "as-is" and not displayed.
If a binary (transparent) file is received, it is not displayed on the screen but saved to disk under the last receive file name. This avoids problems displaying non-ASCII characters.
The To Screen options are described in 3.5.1.2 Switch Settings above.
After the file is received, a status line is posted to the log file (if open) giving a completion status message for the reception including the number of data blocks received (see B.3.3 - Status Messages in Appendix B - File Formats).
3780Plus continues to receive files and display them in the Screen Window until the Screen window is closed.
The To Screen option may also be executed with the SCreen command (see 4.29 SCreen - Receive File(s) and Display on Screen in Chapter 4 - 3780Plus Commands).
Chapter 3 - 3780Plus Menus
Cleo 3780Plus for Windows User's Guide 51
3.6 Configuration - Display or Change Configuration
The Configuration option provides an easy method of viewing or changing the 3780Plus configuration.
3.6.1 Load - Load a Configuration File
The Configuration|Load option brings up a standard file selection dialog box to allow you to select a new configuration file. This Configuration File Select dialog box is a standard Windows file opening dialog box. The desired file name may be typed in the File Name box. A file may also be selected from the listbox below which lists all files of the type selected in the List Files of Type listbox. The List Files of Type listbox allows you to list only configuration files (files with the extension .CFG) or all files in the current drive and directory. The Folders/Directories and Drives listboxes allow you to change both folders or directories and drives.
To select a configuration file, click the left mouse button on a filename in the files listbox. The filename will appear in the File Name box. When you have typed or selected a configuration file, press the OK button to load the protocol and line configuration parameters from the new file. You can exit the Configuration File Select box without loading a configuration file by pressing the Cancel button.
3.6.2 Save - Save the Current Configuration
The Configuration|Save option allows you to update the current configuration file with new protocol and line settings. To modify an existing configuration file, first Load the configuration file to be changed, then Edit the protocol and/or line settings, then Save.
The following methods may be used to load these configuration files for subsequent 3780Plus executions:
• Include the configuration file name as an argument when 3780Plus is executed: 3780Plus -C FILE.CFG
• Set the Startup|Config File Name option from the Setup program or the Configurator program before executing 3780Plus.
• Drag and drop the configuration file name on the 3780Plus icon.
• Enter the filename with the Configuration|Load option within 3780Plus.
• Use the COnfig command with a filename as an argument from the Windows|Command Window option or within a job/script file: CONFIG FILE.CFG
3.6.3 Save As - Save Current Configuration under a New Name
The Configuration|Save As option brings up a standard file selection dialog box to allow you to write the current configuration to a new file. This Configuration File Select dialog box is a standard Windows file opening dialog box. The desired file name may be typed in the File Name box. The listbox below lists all current files of the type selected in the List Files of Type listbox. The List Files of Type listbox allows you to list only configuration files (files with the extension .CFG) or all files in the current drive and directory. The Folders/Directories and Drives listboxes allow you to change both folders or directories and drives.
When you have typed a configuration file, press the OK button to save the current protocol and line configuration parameters to the new file. You can exit the Configuration File Select box without saving a configuration file by pressing the Cancel button.
3.6.4 Edit - Edit the Current Configuration
The Configuration|Edit option (or CFG speed button) brings up the 3780Plus configurator notebook allowing you to change the current configuration settings. See Chapter 1 - Configuration for more details on the configurator notebook.
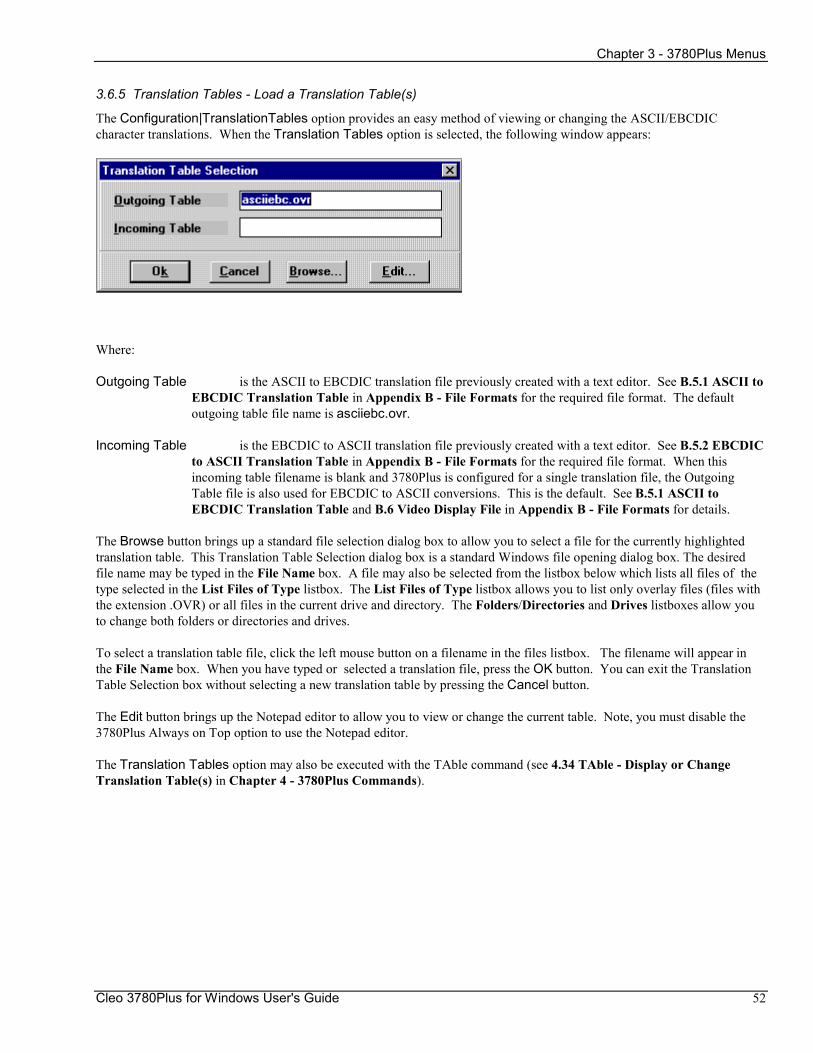
Chapter 3 - 3780Plus Menus
Cleo 3780Plus for Windows User's Guide 52
3.6.5 Translation Tables - Load a Translation Table(s)
The Configuration|TranslationTables option provides an easy method of viewing or changing the ASCII/EBCDIC character translations. When the Translation Tables option is selected, the following window appears:
Where:
Outgoing Table is the ASCII to EBCDIC translation file previously created with a text editor. See B.5.1 ASCII to EBCDIC Translation Table in Appendix B - File Formats for the required file format. The default outgoing table file name is asciiebc.ovr.
Incoming Table is the EBCDIC to ASCII translation file previously created with a text editor. See B.5.2 EBCDIC to ASCII Translation Table in Appendix B - File Formats for the required file format. When this incoming table filename is blank and 3780Plus is configured for a single translation file, the Outgoing Table file is also used for EBCDIC to ASCII conversions. This is the default. See B.5.1 ASCII to EBCDIC Translation Table and B.6 Video Display File in Appendix B - File Formats for details.
The Browse button brings up a standard file selection dialog box to allow you to select a file for the currently highlighted translation table. This Translation Table Selection dialog box is a standard Windows file opening dialog box. The desired file name may be typed in the File Name box. A file may also be selected from the listbox below which lists all files of the type selected in the List Files of Type listbox. The List Files of Type listbox allows you to list only overlay files (files with the extension .OVR) or all files in the current drive and directory. The Folders/Directories and Drives listboxes allow you to change both folders or directories and drives.
To select a translation table file, click the left mouse button on a filename in the files listbox. The filename will appear in the File Name box. When you have typed or selected a translation file, press the OK button. You can exit the Translation Table Selection box without selecting a new translation table by pressing the Cancel button.
The Edit button brings up the Notepad editor to allow you to view or change the current table. Note, you must disable the 3780Plus Always on Top option to use the Notepad editor.
The Translation Tables option may also be executed with the TAble command (see 4.34 TAble - Display or Change Translation Table(s) in Chapter 4 - 3780Plus Commands).
Chapter 3 - 3780Plus Menus
Cleo 3780Plus for Windows User's Guide 53
3.7 Window - Display or Change Windows
The Window option allows you to toggle the 3780Plus command, log, monitor, and job recorder windows on and off and change the way they display. You may use the up arrow to view prior data in the window while 3780Plus is idle, but because of a limited buffer size, beginning data may no longer be displayable. Any of these windows may be moved, minimized, or maximized through the Control menu icon/box in the upper left corner or the minimize and maximize buttons in the upper right corner.
3.7.1 Command Window - Toggle the Command Window
The Window|Command Window option (or CMD speed button) allows you to enter 3780Plus commands interactively. This allows backward compatibility with other 3780Plus packages. The 3780Plus commands are described in Chapter 4 - 3780Plus Commands.
3.7.2 Log Window - Toggle the Log Window
The Window|Log Window option (or LOG speed button) allows you to toggle the state of the 3780Plus log. This allows parts of job files (for example, password transmissions) to be protected while other parts are logged. If the log is enabled, 3780Plus directs the log messages to the Log Window and to the log file.
The log may also be initialized with the Startup|Log Mode option from the Setup program or the Configurator program before executing 3780Plus. The log file is specified with the Startup|Log Name option from the Setup program or the Configurator program before executing 3780Plus. The default name is 3780.LOG.
The Log Window option may also be executed with the LOg command (see 4.21 LOg - Open, Close, Display, or Write to the Log File in Chapter 4 - 3780Plus Commands).
3.7.3 Monitor Window - Toggle the Line Monitor Window
The Window|Monitor Window option (or MON speed button) allows you to toggle the state of the built-in serial line monitor. This line monitor displays the actual received/transmitted bisync protocol to the Monitor Window and to the monitor file. The monitor is helpful for determining communication errors.
Directing protocol information to a disk file consumes a lot of disk space. It is not unusual for the monitor file size to be four times as large as the data received or transmitted. Sending a 100K file may actually create a 500K monitor file.
The monitor may be initialized with the Startup|Monitor Mode option from the Setup program or the Configurator program before executing 3780Plus. The monitor file name is specified with the Startup|Monitor Name option
See B.4 Monitor File in Appendix B - File Formats for examples and a table of protocol characters.
The Monitor Window option may also be executed with the MOnitor command (see 4.22 MOnitor - Open or Close a Serial Line Monitor in Chapter 4 - 3780Plus Commands).
Chapter 3 - 3780Plus Menus
Cleo 3780Plus for Windows User's Guide 54
3.7.4 Recorder Window - Toggle Command Recorder Window
The Window|Recorder Window option (or REC speed button) allows you to record all the 3780Plus actions to create a job file. A job file is an ASCII file consisting of one or more 3780Plus commands to be run automatically. A job file is similar to an operating system script or batch file. The job file name is specified in the Startup|Recorder File Name option from the Setup program or the Configurator program before executing 3780Plus. If the job file exists, the recorder appends new commands to the end of the file.
Executed 3780Plus menu options will be entered into the specified job file as 3780Plus commands (see Chapter 4 - 3780Plus Commands). To end the job file, toggle the Recorder Window off.
Job files may also be create with the JOb command (see 4.17 JOb - Record Commands or Scramble a Job/Script File in Chapter 4 - 3780Plus Commands) or created and/or modified with a standard text editor. See B.2 Job/Script File in Appendix B - File Formats for the job file layout. See Chapter 5 - 3780Plus Tutorial for job file examples.
Any of the following methods may be used to execute these job files:
• Include the job file name as an argument when 3780Plus is executed: 3780Plus -J FILE.JOB
• Set the Startup|Job Name option from the Setup program or the Configurator program before executing 3780Plus.
• Drag and drop the job file on the 3780Plus icon.
• Enter the job file name with the System|Run Job option.
• Use the EXecute (execute job file) command: Command> EXECUTE FILE.JOB from the Windows|Command Window option or from within another job/script file.
3.7.5 Cascade - Cascade All 3780Plus Windows
The Window|Arrange|Cascade option allows you to arrange all the 3780Plus command, log, monitor, and recorder windows in a cascaded format where each window is the same size descending from the upper left corner of the 3780Plus main window. This is the default window arrangement.
3.7.6 Tile Vertically - Tile All 3780Plus Windows Vertically
The Window|Arrange|Tile Vertically option allows you to arrange all the 3780Plus command, log, monitor, and recorder windows in a vertically tiled format so each is visible and none are overlapping.
3.7.7 Tile Horizontally - Tile All 3780Plus Windows Horizontally
The Window|Arrange|Tile Horizontally option allows you to arrange all the 3780Plus command, log, monitor, and recorder windows in a horizontally tiled format so each is visible and none are overlapping.
Chapter 3 - 3780Plus Menus
Cleo 3780Plus for Windows User's Guide 55
3.7.8 Arrange Icons - Line Up All 3780Plus Window Icons
The 3780Plus command, log, monitor, and recorder windows can be minimized (made into icons) and remain active. These icons can be dragged anywhere within the 3780Plus main window. The Window|Arrange|Arrange Icons option gathers up these icons and places them in a line at the bottom of the 3780Plus main window.
3.7.9 Close All - Close All 3780Plus Windows
The Window|Arrange|Close All option closes all the 3780Plus command, log, monitor, and recorder windows.
3.7.10 Desktop - Save/Restore the Desktop Layout
THE DESKTOP FEATURE IS NOT SUPPORTED AT THIS TIME!!!
Chapter 3 - 3780Plus Menus
Cleo 3780Plus for Windows User's Guide 56
3.8 Help - Display Help Information
The Help option provides an online 3780Plus manual and information about the current 3780Plus execution. 3780Plus� Help is in the standard Windows Help format. Click on any underlined topic to view information on that topic. Or press the TAB key to select the topic and then press ENTER to view. If you are unfamiliar with Help, the Help|Using help option displays more information on using Help.
3.8.1 Contents - Online 3780Plus Manual
The Help|Contents option (or HELP speed button) displays the Cleo 3780Plus for Windows User�s Guide table of contents. From this table of contents, you can access any part of the 3780Plus manual.
3.8.2 Using Help - Help Information About Using Help
The Help|Contents option and HELP speed button allow you to access information from the 3780Plus for Windows User's Guide directly from 3780Plus. Click on any underlined topic to view information on that topic. Or press the TAB key to select the topic and then press ENTER to view. If you are unfamiliar with Help, the Help|Using help option displays more information on using Help.
Cleo 3780Plus for Windows User's Guide 4-57
Chapter 4: 3780Plus Commands This chapter describes each of the 3780Plus commands in detail. These commands may be executed interactively from the 3780Plus Window|Command Window menu or may be executed automatically with the System|Run Job menu option, the JOB speed button, the EXecute command, or the JOBFILE=JobFile parameter in the 3780Plus.ini file or the -J JOBFILE option on the 3780Plus command line. See Chapter 5 - 3780Plus Tutorial for additional examples. The following commands, listed in alphabetical order, are covered in this chapter:
Making and Breaking the Connection: • AUtodial - Automatic dial • ANswer - Automatic answer • HAngup* - Disconnect phone line • VOice - Disconnect phone line & disable autoanswer • DAta - Data mode • AT - Send an 'AT' string to the modem • LIneup* - Get line status File Transfers: • SEnd* - Transmit file(s) • BInary - Transmit binary file(s) • TExt - Transmit text file(s) • KEy - Transmit a keyboard message • EOt - Transmit EOT (End of Transmission) • REceive - Receive file(s) • SCreen - Receive file(s) and display on screen • PRint - Receive file(s) and spool to printer Configuration: • COnfig - Display or change configuration • SAve* - Save the current configuration • TAble - Display or change translation table(s) Diagnostics: • LOg - Display or write to the log file • MOnitor - Monitor the line • HElp - Command and configuration help information • XX - Post Current 3780Plus Information Automating Sessions with Job Scripts: • JOb - Record commands to a job/script file • EXecute - Execute commands from a job/script file • BRanch - Branch in job/script file based on condition • ## - Job/script comment line Tokens, Variables, and Counters: • TOken - Enable, disable, display, or set token variables • LEt* - Set a user variable • STart - Display or initialize counter • +COUNTER - Increment counter • -COUNTER - Decrement counter
Chapter 4 - 3780Plus Commands
Cleo 3780Plus for Windows User's Guide 58
File Control: • EXISTS* - Check if file exists • OPEN* - Open a READ or WRITE file • READ* - Read a line from READ file User Interface and Screen Display: • ALert* - Flash message on screen • ASk* - Prompt user for information Miscellaneous: • SYstem - Execute an application program • WAitfor - Wait until specified time • SLeep - Pause specified seconds • QUit - Exit 2780/3780 * The commands marked by an asterisk are only supported by 3780Plus for Windows versions; they are not
currently available in 3780Plus for other platforms. If you are writing job/script files that you are planning to use on other platforms, please avoid using these commands.
Most 3780Plus commands may be executed by entering the first two letters of the desired command. Commands in all caps must be typed in full.
Chapter 4 - 3780Plus Commands
Cleo 3780Plus for Windows User's Guide 59
4.1 ALert - Flash Message on Screen
The ALert command allows you to display a user message on the screen. The ALert command line format is:
ALert "message" [timeout]
where:
message is the message to display. This message may be no longer than 80 characters in length.
timeout is the length of time (in seconds) to wait for a keystroke from the user. The range is 1 to 60 seconds or -1 for no timeout. If no timeout is specified, the default is 60 seconds. The user may abort the message with any keystroke.
After displaying the message, 3780Plus will wait for the specified timeout or a keystroke from the user before continuing.
Example: ALERT "COMMUNICATIONS ERROR"
displays the following message:
COMMUNICATIONS ERROR * Any key continues! *
at the bottom of the screen informing the user there has been an error in communications.
The status of the ALert command will not be displayed but may be used for branching (see 4.7.1 BRanch ON|NOT status TO label). The ALert command will return an OK status if a key is hit during the message display. If no keystroke is received within the timeout period, ALert will return a NODATA status. If there is an error in the format of the ALert command (for instance if the message is not enclosed in quotes), a FAIL status is returned and no message is displayed.
ALert is only supported by 3780Plus for Windows versions; it is not currently available in 3780Plus for other platforms. If you are writing job/script files that you are planning to use on other platforms, please avoid using this command.
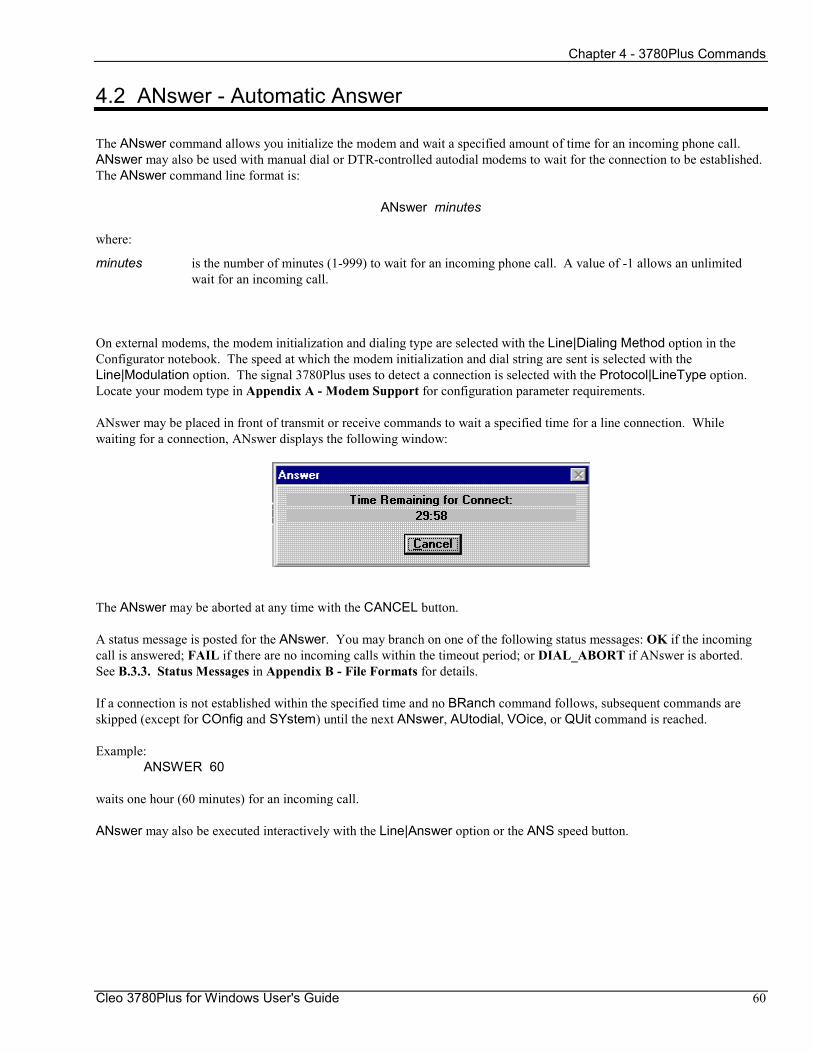
Chapter 4 - 3780Plus Commands
Cleo 3780Plus for Windows User's Guide 60
4.2 ANswer - Automatic Answer
The ANswer command allows you initialize the modem and wait a specified amount of time for an incoming phone call. ANswer may also be used with manual dial or DTR-controlled autodial modems to wait for the connection to be established. The ANswer command line format is:
ANswer minutes
where:
minutes is the number of minutes (1-999) to wait for an incoming phone call. A value of -1 allows an unlimited wait for an incoming call.
On external modems, the modem initialization and dialing type are selected with the Line|Dialing Method option in the Configurator notebook. The speed at which the modem initialization and dial string are sent is selected with the Line|Modulation option. The signal 3780Plus uses to detect a connection is selected with the Protocol|LineType option. Locate your modem type in Appendix A - Modem Support for configuration parameter requirements.
ANswer may be placed in front of transmit or receive commands to wait a specified time for a line connection. While waiting for a connection, ANswer displays the following window:
The ANswer may be aborted at any time with the CANCEL button.
A status message is posted for the ANswer. You may branch on one of the following status messages: OK if the incoming call is answered; FAIL if there are no incoming calls within the timeout period; or DIAL_ABORT if ANswer is aborted. See B.3.3. Status Messages in Appendix B - File Formats for details.
If a connection is not established within the specified time and no BRanch command follows, subsequent commands are skipped (except for COnfig and SYstem) until the next ANswer, AUtodial, VOice, or QUit command is reached.
Example: ANSWER 60
waits one hour (60 minutes) for an incoming call.
ANswer may also be executed interactively with the Line|Answer option or the ANS speed button.

Chapter 4 - 3780Plus Commands
Cleo 3780Plus for Windows User's Guide 61
4.3 ASk - Prompt User for Information
The ASk command allows you to prompt the user for information which may be used to control job/script file operation. The ASk command line format is:
ASk ["prompt"] reply [timeout]
where:
prompt is the optional message prompt to display on the screen. This message must be enclosed in quotes.
reply is the user-defined variable in which to store the response from the user.
timeout is the length of time (in seconds) to wait for a reply from the user. The range is 1 to 255 seconds or -1 for no timeout. The default is -1 for no timeout.
ASk displays the specified prompt on the screen and waits for the user to type a response followed by an ENTER (or RETURN) key. ASk replies may be accessed with %reply% or $reply. Note: Tokens must be on (see 4.36 TOken - Enable, Disable, Display, or Set Token Variables) to access the reply variable.
Example: ASK "Enter the file name to send" SendName SEND $SendName
displays the following:
Enter the file name to send:
allowing the user to interactively specify the file to send.
The status of the ASk command will not be displayed but may be used for branching (see 4.7.1 BRanch ON|NOT status TO label). The ASk command will return an OK status if a response is received from the user. If no response is received within the timeout period, ASk will return a NODATA status. If the user aborts the ASk command with the Cancel button, ASk will return an ABORT status.
ASk is only supported by 3780Plus for Windows versions; it is not currently available in 3780Plus for other platforms. If you are writing job/script files that you are planning to use on other platforms, please avoid using this command.
Chapter 4 - 3780Plus Commands
Cleo 3780Plus for Windows User's Guide 62
4.4 AT - Send an 'AT' String to the Modem
The AT command allows you to send an AT command string to configure the attached AT command compatible modem. This string may consist of a single or multiple AT commands. The AT command line format is:
AT ATcommands
where:
AT is the "attention" command for AT compatible modems. This should precede all AT commands.
commands is the AT command or series of commands to send to the modem. The following special characters may be used within the AT string: the tilde (~) causes a 1/2 second pause; the caret-M (^M) causes a carriage return to be sent to the modem. See your modem manual for more information on AT commands.
The Line|Dialing Method option in the Configurator notebook must be set to AT Command. The Line|Modulation option controls the speed that the AT string is sent (see 1.3 Line Configuration in Chapter 1 - Configuration).
Example: AT ATX4
sends the ATX4 command to the attached modem to configure it to return result codes/messages from the extended result set 4. This allows the modem to return busy, no dial tone, and connection speed messages for automatic dialing and answering. A modem result message is posted for the AT command. You may branch on this result message or one of the following status messages: OK if the command is accepted; or FAIL if the command is rejected (the modem returned an ERROR result message or didn�t reply). See B.3.3 Status Messages in Appendix B - File Formats for details.
The AT command is only supported on AT command compatible modems.
Chapter 4 - 3780Plus Commands
Cleo 3780Plus for Windows User's Guide 63
4.5 AUtodial - Automatic Dial
The AUtodial command provides automatic dialing to establish the modem line connection with a remote system. AUtodial permits a dialing sequence of up to four telephone numbers and/or access codes. AUtodial allows you to: tone or pulse dial, dial multiple numbers, and specify the delay between dialing of multiple numbers, the wait for the remote answer, and the number of redial attempts if call is incomplete. The AUtodial command line format is:
AUtodial [P] telephone# [Txx telephone#...] [Txx] [Rxx]
where:
P is an option to pulse dial. The default is tone dial.
telephone# is the telephone number or access code to be dialed. Up to four numbers may be dialed. Each additional number in a multi-number sequence must be preceded by the Txx option. All numbers must be entered in one of the following formats: 18005551212 or 1-800-555-1212 Spaces are not allowed within a number.
Txx specifies a time delay in seconds. The Txx option must be included before each additional telephone number dialed in a multi-number sequence. Valid entries for xx are 1 to 99. The final Txx is optional and specifies the time to wait for the remote answer back tone. If the final Txx option is not specified, the default answer back tone detect period is 30 seconds.
Rxx specifies the number of redial attempts. Valid entries for xx are 1 to 31,000 or -1 for 31,000. After the final number is dialed, 3780Plus monitors the line for about 30 seconds to detect an answer back tone from the remote modem. If the answer back tone is detected, communications are enabled, otherwise the auto dial sequence will be repeated according to the number of attempts specified by the Rxx option. When the Rxx option is omitted, AUtodial defaults to three redial attempts.
On external modems, the modem initialization and dialing type are selected with the Line|Dialing Method option in the Configurator notebook. The speed at which the modem initialization and dial string are sent is selected with the Line|Modulation option. The signal 3780Plus uses to detect a connection is selected with the Protocol|LineType option. Locate your modem type in Appendix A - Modem Support for configuration parameter requirements.
Example: AUTODIAL P 1-800-555-1212 R10
Pulse dialing (P) is used to dial the phone number (1-800-555-1212) up to 10 times (R10). Example: AUTODIAL 9 T5 18005551212 T10 3978110 R4
Tone dialing is used. A PBX access code (9) is dialed, a 5 second pause occurs (T5); the telephone number (18005551212) is dialed, a 10 second pause occurs (T10); an access code (3978110) is dialed. This sequence may be repeated up to 4 times (R4) in attempt to complete the telephone connection.
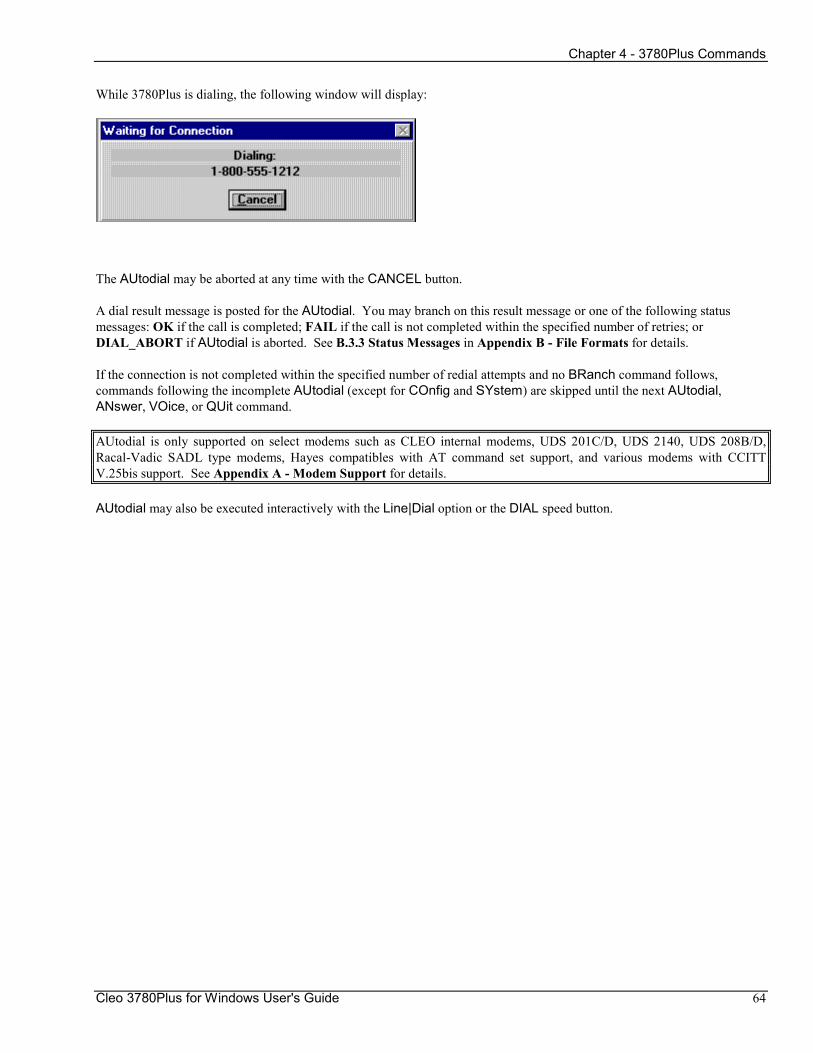
Chapter 4 - 3780Plus Commands
Cleo 3780Plus for Windows User's Guide 64
While 3780Plus is dialing, the following window will display:
The AUtodial may be aborted at any time with the CANCEL button.
A dial result message is posted for the AUtodial. You may branch on this result message or one of the following status messages: OK if the call is completed; FAIL if the call is not completed within the specified number of retries; or DIAL_ABORT if AUtodial is aborted. See B.3.3 Status Messages in Appendix B - File Formats for details.
If the connection is not completed within the specified number of redial attempts and no BRanch command follows, commands following the incomplete AUtodial (except for COnfig and SYstem) are skipped until the next AUtodial, ANswer, VOice, or QUit command.
AUtodial is only supported on select modems such as CLEO internal modems, UDS 201C/D, UDS 2140, UDS 208B/D, Racal-Vadic SADL type modems, Hayes compatibles with AT command set support, and various modems with CCITT V.25bis support. See Appendix A - Modem Support for details.
AUtodial may also be executed interactively with the Line|Dial option or the DIAL speed button.
Chapter 4 - 3780Plus Commands
Cleo 3780Plus for Windows User's Guide 65
4.6 BInary - Transmit Binary File(s)
The BInary command may be used to transmit any file to the remote system in transparent mode. These files are normally transmitted "as is" to avoid interference with protocol characters. Executable files and other non-ASCII files must be transmitted with the BInary command. The BInary command line format is:
BInary filename [RemoteFilename] [-E|-T|-X]
where:
filename is the file or files to be sent to the remote system. Wildcards and/or drives and paths may be used within file names. Note that if one of a group of transmitted files specified by a wildcard is terminated by anything other than a NRMEOF (normal end of file) status, the remaining specified files are not sent and the command is aborted.
RemoteFilename is an optional remote file name. This should be used only in a 3780Plus to 3780Plus connection. This filename is assigned to the file received by the remote processor. See 4.35.1 File Naming for details.
-E allows you to send multiple files to the host without releasing the line. The normal mode is for all transmit commands to send an EOT after each file. The -E option suppresses the EOT allowing you to retain control of the line.
-T allows data to be translated from the ASCII character set to the EBCDIC character set before being transmitted. All data is translated through the asciiebc.ovr translation file.
-X allows you to concatenate several files to appear as one file to the host. The -X option suppresses the ETX (End of Text) at the end of the last block in the file and the EOT. The ETX character represents the file separator character to the host. You should not use the -X option on the last file you send to insure that it is properly terminated with an ETX. Note: The EOt command does not send an ETX, so if you have just used the -X option and want to close the transaction with the EOt command, you will not have sent the ETX. This is considered bad form within the protocol and will cause unpredictable results at the receiving end.
Multiple options may be specified together. In this case only one dash (-) should precede all options.
Example: BINARY *.HLP
sends all files with the .HLP extension.
Example: BINARY C:\MYFILES\MY.EXE /usr/YOUR.EXE
would send the file C:\MYFILES\MY.EXE with the file name /usr/YOUR.EXE. This would save the MY.EXE file on a remote UNIX system as YOUR.EXE in the /usr directory.
Example: BINARY FILE1 -TE BINARY FILE2 -T
As in all transmit commands, this command automatically sends an EOT at its conclusion unless the -E or -X option is included at the end of the command line (See EOt).
Chapter 4 - 3780Plus Commands
Cleo 3780Plus for Windows User's Guide 66
A File Transfer Status window is displayed on the screen during transmission. See 2.6 File Transfer Status in Chapter 2 - Operation for details. The transmission may be aborted at any time with the CANCEL button.
After the file is transmitted, a status message is posted to the screen and a status line is posted to the log file (if open) giving a completion status for the transmission including the number of data blocks sent. See B.3.2 The Transmit/Receive Status Line in Appendix B - File Formats for details. If the transmission was successful, a NRMEOF (Normal End of File) status message will display. See Table B.3 Transmit Completion Status Messages in Appendix B - File Formats for a complete list and B.3.3 Status Messages for a complete description of each status message.
In a job/script file, you may branch on any of the status messages listed in Table B.3. Note, if a wildcard is used to transmit multiple files, you may branch only on the status of the last file transmitted.
If the line is down when the BInary command is executed and no branch command follows, 3780Plus will wait until a connection is made before continuing.
BInary may also be executed interactively with the Transmit|Binary or Transmit|Send option or the SEND speed button, or in the background with drag and drop.
Chapter 4 - 3780Plus Commands
Cleo 3780Plus for Windows User's Guide 67
4.7 BRanch- Branch in Job/Script File Based on Condition
The BRanch command allows you to make decisions within a job file based on the status of the communications session. The format of the BRanch command is:
BRanch ON|NOT status TO label or
BRanch ON|NOT return_code TO label or
BRanch ON|NOT SIZE [<|=|>] file_size TO label or
BRanch ON|NOT %COUNTERc|$COUNTERc <|=|> number TO label or
BRanch ON|NOT %variable%|$variable <|=|> number TO label or
BRanch ON|NOT %variable%|$variable = string TO label or
BRanch ON TRUE TO label where:
ON branches on a true condition;
NOT branches on a false condition;
status is the latest status message from a 3780Plus command;
return_code is the return code from the command executed by SYstem;
file_size is the size of last received file as saved to disk;
c is the COUNTER number (1, 2, or 3);
number is the numeric value to be compared to the contents of COUNTERc or a token or variable;
variable is the token, environment variable, or user-defined variable to be compared.
string is the string to be compared to the specified token or variable.
label is the numeric label of the command to jump to. Note: This is not a physical line number but a pre-appended number; valid values for label are 1 to 9999.
See 4.17 Job - Record Commands or Scramble a Job/Script File for details on recording job files. It is a good idea to add BRanch commands to recorded job files to allow better control when communications errors occur.
The BRanch command is valid only from within 3780Plus job files. It is not valid in the interactive mode.
Chapter 4 - 3780Plus Commands
Cleo 3780Plus for Windows User's Guide 68
4.7.1 BRanch ON|NOT status TO label
BRanch allows you to jump to a label in the job file based on a true or false test against the status message. The status message represents the result of the latest 3780Plus command executed. See B.3.3 Status Messages in Appendix B - File Formats for command status return codes. Example: AUTODIAL 397-8110 R10 BRANCH ON FAIL TO 999 TEXT account.* BRANCH ON NRMEOF TO 100 KEY * Error sending files * 100 RECEIVE newcust.fil BRANCH ON NRMEOF TO 200 KEY * Error receiving file * 200 VOICE 999 AUTODIAL 397-8111 R10 :
In this example, 3780Plus attempts to call the phone number 397-8110. If this call fails to make a connection after 10 retries, the number 397-8111 would be dialed (BRANCH ON FAIL TO 999). If, on the other hand, the connection was completed, all files starting with account would be transmitted. If the files were transmitted correctly (BRANCH ON NRMEOF TO 100), a file would be received to newcust.fil, otherwise a key message would be sent informing the remote that the files were sent incorrectly. If newcust.fil was received incorrectly, a key message would be sent informing the remote that the file was not received properly. The line would then be disconnected and 3780Plus would attempt to call the phone number 397-8111 and continue.
4.7.2 BRanch ON|NOT return_code TO label
BRanch allows you to jump to a label in the job file based on the return code (exit code) from a program executed with the SYstem command. If a job file contains a SYstem command followed by a BRanch command, the program return code is displayed on the screen and posted to the log file. The program return code is then used by the BRanch command to test against the value in the return_code field.
Example: ANSWER 720 RECEIVE SIGNON.NEW SYSTEM CHEKFILE BRANCH ON 5 TO 200 TEXT NEWS VOICE QUIT 200 KEY *** YOUR SIGNON HAS BEEN REJECTED *** VOICE QUIT
After the file SIGNON.NEW is received, the SYstem command loads and executes the program CHEKFILE. CHEKFILE would check the contents of SIGNON.NEW and exit with a return code of 0 if it is accepted and 5 if it is rejected. If CHEKFILE exited with a return code of 5, 3780Plus would send a "signon rejected" message, hang up the line, and quit. Otherwise, it would send a NEWS file, hang up the line, and quit.
The return code is the integer value returned by the WAIT call (0x4D). The low 8 bits are the exit code of the application program and the high 8 bits indicate the termination value. (See your OS Technical Manual for information on the Call 0x4D function).

Chapter 4 - 3780Plus Commands
Cleo 3780Plus for Windows User's Guide 69
4.7.3 BRanch ON|NOT SIZE [<|=|>] file_size TO label
BRanch allows you to jump to a label in the job file based on the size of the latest received file. If the <, >, or = is omitted, a BRANCH ON will cause a branch if the received file is greater than or equal to size file_size; a BRANCH NOT will cause a branch if the received file is less than size file_size.
Example: 10 RECEIVE newfile BRANCH ON SIZE 84 TO 10 TEXT signoff
In this example, 3780Plus would keep receiving files until it received a file with 83 or fewer characters. This would happen if only one 80 character record was received (80 chars + CR + LF + EOF). It would then send a file containing the signoff message.
4.7.4 BRanch ON|NOT %COUNTERc|$COUNTERc <|=|> number TO label
BRanch allows you to jump to a label in the job file based on the contents of the specified counter.
Example: TOken ON STart COUNTER1=0 10 RECEIVE newfile +COUNTER1 BRANCH ON %COUNTER1 < 5 TO 10 TEXT signoff
In this example, 3780Plus would receive five (5) files, newfile.000 through newfile.004. It would then send a file containing the signoff message. Note: The TOken ON command was used to enable the counter variable (%COUNTER1); it may have also been enabled with the Startup|Token option from the Setup program or the Configurator program, or with any form of the TOken command (except the TOken OFF command).
4.7.5 BRanch ON|NOT %variable%|$variable <|=|> number TO label
BRanch allows you to jump to a label in the job file based on a true or false test of a token, environment variable, or user-defined variable against the specified number. The number may be another token, environment variable, user-defined variable, or counter. Example: BRANCH NOT $SENDREPORT = YES TO 100 AUTODIAL Headquarters SEND MonthEnd.report HANGUP 100 QUIT This job file could be run automatically every day to determine if the reports should be sent. If the environment variable SENDREPORTS is set to YES, a month end report would be send to headquarters, otherwise 3780Plus will quit.
Chapter 4 - 3780Plus Commands
Cleo 3780Plus for Windows User's Guide 70
4.7.5.1 Token Variables
Token variables are similar to MS-DOS replaceable parameters or UNIX positional parameters. The first token may be accessed with %1 or $1, the second with %2 or $2, and so on. Tokens are set with the TOken command or the TOKENS=TokenList command line option. These tokens may be used anywhere within 3780Plus, except as command names or labels. See 4.36 Token - Enable, Disable, Display, or Set Token Variables for details.
4.7.5.2 Environment Variables
Environment variables (also referred to as named variables or shell variables) are defined in the operating system. Environment variables allow you to pass values (such as paths, filenames, phone numbers, etc.) from the operating system or another program into 3780Plus. These environment variables may be used anywhere within 3780Plus, except as command names or labels. See your operating system manual for information on setting environment variables. See 4.36 Token - Enable, Disable, Display, or Set Token Variables for an example using environment variables.
4.7.5.3 User-defined Variables
User-defined variables may be created to pass values (such as paths, filenames, phone numbers, etc.) within or between 3780Plus job/script files. User-defined variables may have any name except configuration parameter names (SPEED, PROTOCOL, FILENAMES, DISPLAY, etc.). See 4.19 LEt - Set User-Defined Variable for an example of using user-defined variables.
4.7.6 BRanch ON|NOT %variable%|$variable = string TO label
BRanch allows you to jump to a label in the job file based on a true or false test of a token, environment variable, or user-defined variable against the specified string. The string may be another configuration parameter, token, environment variable, or user-defined variable. See 4.7.5 BRanch ON|NOT %variable%|$variable <|=|> number TO label for a description of each variable type. Example: ASK �Enter employee name:� EmployeeName BRANCH ON $EmployeeName = Alex TO 100 BRANCH ON $EmployeeName = Kim TO 101 BRANCH ON $EmployeeName = Mike TO 102 : The above example checks the response from the user and branches to different locations in the job file based on the response.
4.7.7 BRanch ON TRUE TO label
TRUE is a special status that allows you to branch unconditionally to a job label.
Example: BRANCH ON TRUE TO 123
will always branch to the line labeled 123 regardless of the latest status return code.
Chapter 4 - 3780Plus Commands
Cleo 3780Plus for Windows User's Guide 71
4.7.8 BRanch Command Tips
BRanch commands may be stacked within a job file for multiple branch conditions.
Example: ANSWER 15 BRANCH NOT OK TO 345 123 RECEIVE file.000 BRANCH ON LINDWN TO 345 BRANCH NOT NRMEOF TO 123 345 VOICE QUIT
This job file will wait 15 minutes for an incoming call. If a call is answered within this time, the REceive command is executed; otherwise, the VOice and QUit commands are processed. The first BRanch after the REceive command tests for a LINDWN condition and branches to VOice and QUit if the line is down. Note: Not all modems detect a line down condition; do not use this sequence with a modem that does not have line down detection. The following BRanch statement checks for not NRMEOF and tries to REceive again if the file was received with some type of error. Note that specifying the file extension causes file.000 to be overwritten each time this command is executed.
If the REceive filename is specified without an extension, extension numbering would start at .000. If .000 already existed, 3780Plus would search for the first extension number that does not exist. This distinction is useful for a command sequence such as:
478 RECEIVE goodfile BRANCH ON NRMEOF TO 478
which would accumulate received files until some type of error occurred.
Careful construction of your job file is necessary when using the log option of 3780Plus. A loop such as:
44 RECEIVE file.dat BRANCH NOT NRMEOF TO 44
may cause problems for the log file. If the line were to drop, a LINDWN, HANGUP, IDLE, NODATA, or RECEIV status would be returned, and the branch would be taken. Since a line down condition is likely to persist for some time and the REceive and BRanch commands are recorded continuously in the log file, disk space is rapidly used up. For a modem with line down detection, a better scheme is:
22 ANSWER 15 44 RECEIVE file.dat BRANCH ON LINDWN TO 22 BRANCH ON HANGUP TO 22 BRANCH NOT NRMEOF TO 44
In the above sequence, the REceive executes only when the line is known to be active. For a modem without line down detection, a better scheme would be:
22 ANSWER 15 44 RECEIVE file.dat BRANCH ON HANGUP TO 22 BRANCH ON IDLE TO 22 BRANCH ON NODATA TO 22 BRANCH ON RECEIV TO 22 BRANCH NOT NRMEOF TO 44
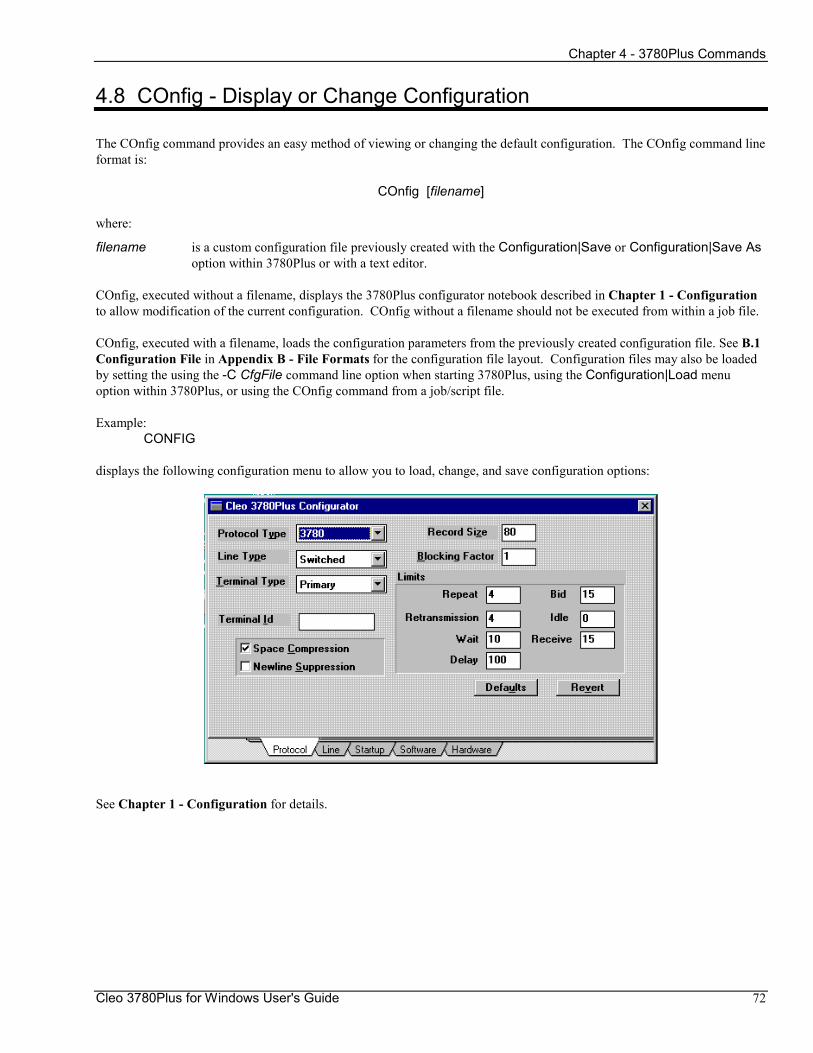
Chapter 4 - 3780Plus Commands
Cleo 3780Plus for Windows User's Guide 72
4.8 COnfig - Display or Change Configuration
The COnfig command provides an easy method of viewing or changing the default configuration. The COnfig command line format is:
COnfig [filename]
where:
filename is a custom configuration file previously created with the Configuration|Save or Configuration|Save As option within 3780Plus or with a text editor.
COnfig, executed without a filename, displays the 3780Plus configurator notebook described in Chapter 1 - Configuration to allow modification of the current configuration. COnfig without a filename should not be executed from within a job file.
COnfig, executed with a filename, loads the configuration parameters from the previously created configuration file. See B.1 Configuration File in Appendix B - File Formats for the configuration file layout. Configuration files may also be loaded by setting the using the -C CfgFile command line option when starting 3780Plus, using the Configuration|Load menu option within 3780Plus, or using the COnfig command from a job/script file.
Example: CONFIG
displays the following configuration menu to allow you to load, change, and save configuration options:
See Chapter 1 - Configuration for details.
Chapter 4 - 3780Plus Commands
Cleo 3780Plus for Windows User's Guide 73
Example: CONFIG CHICAGO.CFG
loads the configuration parameters listed in the file CHICAGO.CFG.
The status of the COnfig command will not be displayed but may be used for branching (see 4.7.1 BRanch ON|NOT status TO label). The COnfig command will return an OK status if the configuration file loads properly. If there is an error in the specified configuration file, COnfig will return an ERROR status. If the specified file cannot be opened, COnfig will return a NOFILE status.
Configuration files may also be created and/or modified with a standard text editor. See B.1 Configuration File in Appendix B - File Formats for the configuration file layout.
COnfig may also be executed interactively with the Configuration|Edit option or the CFG speed button or in the background with drag and drop.
Chapter 4 - 3780Plus Commands
Cleo 3780Plus for Windows User's Guide 74
4.9 +COUNTER - Increment Counter
The +COUNTER command increments one of three counters. The format of the +COUNTER command is:
+COUNTERc where:
c is the number of the counter (1 through 3).
Example: START COUNTER1=1 10 RECEIVE newfile%COUNTER1. +COUNTER1 BRANCH NOT %COUNTER1 = 11 TO 10 KEY DONE
3780Plus would receive 10 files: newfile1 through newfile10. It would then send a DONE message.
The +COUNTER command always returns an OK status.
See also 4.10 -COUNTER - Decrement Counter, 4.32 STart - Display or Start Counter, and 4.7.4 BRanch ON|NOT %COUNTERc|$COUNTERc <|=|> number TO label.
This command may not be shortened to two characters in length. The full command must be specified.

Chapter 4 - 3780Plus Commands
Cleo 3780Plus for Windows User's Guide 75
4.10 -COUNTER - Decrement Counter
The -COUNTER command decrements one of three counters. The format of the -COUNTER command is:
-COUNTERc where:
c is the number of the counter (1 through 3).
Example: START COUNTER2=10 10 SEND file%COUNTER2.new -COUNTER2 BRANCH ON %COUNTER2 > 5 TO 10 KEY DONE
3780Plus would send five files: file10.new, file9.new, file8.new, file7.new, and file6.new. It would then send a DONE message.
The -COUNTER command always returns an OK status.
See also 4.9 +COUNTER - Increment Counter, 4.32 STart - Display or Start Counter, and 4.7.4 BRanch ON|NOT %COUNTERc|$COUNTERc <|=|> number TO label.
This command may not be shortened to two characters in length. The full command must be specified.

Chapter 4 - 3780Plus Commands
Cleo 3780Plus for Windows User's Guide 76
4.11 DAta - Data Mode
The DAta command causes the local modem to be enabled and the handset to be excluded, so that data transfer may occur. On an external modem, the Data Terminal Ready (DTR) signal is raised. No protocol is sent on the line in response to this command. The DATA command has no options; the DATA command line format is:
DAta
You must use the DAta command before transmitting or receiving data for the following conditions:
• your machine does not detect the line connection status • your Line Type is set to Switched Line and the Data Set Ready (DSR) signal on the port is low even when you are
connected • your Line Type is set to Leased Line and the Data Carrier Detect (CD) signal on the port is low even when you are
connected • you are directly connected to another local machine which doesn�t connect the DSR or CD signal
If the DAta command is not used, you will receive a LINDWN status and 3780Plus will not attempt file transfers when the DSR or CD signal is low.
Example: DATA SEND MyFile
which would unconditionally send the file MyFile even if DSR or CD was low on the port.
The DATA command will always return an OK status.
DAta may also be executed interactively with the Line|Data option.
Chapter 4 - 3780Plus Commands
Cleo 3780Plus for Windows User's Guide 77
4.12 EOt - Transmit EOT (End Of Transmission)
The EOt command transmits an End of Transmission (EOT) protocol character. An EOT signifies the end of the current transmission. TExt, BInary, and KEy commands automatically send EOT at their conclusion unless the -E or -X option is included at the end of the command line. The EOt command has no options; the EOt command line format is:
EOt
Example: KEY HELLO HOST -E TEXT JUNK.TXT -E EOT
When the -E or -X option is used with the TExt, BInary, or KEy commands, an EOT must follow. If multiple files are to be transmitted without intervening EOTs or ETXs (as in the case above), the interval between file transfers should not be longer than about 10 seconds or line timeouts may occur. For more information on the -X and -E options, see the Text, BInary, or KEy command. The -E option should be followed by an EOT command or another Text, BInary, or KEy command without the -E option.
After the EOT is transmitted, 3780Plus posts the following transmission status line message:
T: EOT (End of Transmission)
EOt may also be executed interactively with the Transmit|Eot option.
Chapter 4 - 3780Plus Commands
Cleo 3780Plus for Windows User's Guide 78
4.13 EXecute - Execute Commands from a Job/Script File
The EXecute command causes 3780Plus to sequentially process the commands in the specified job file. Job files may be executed from within other job files. The EXecute command could even be used to execute a job file sent from the remote site to automate updates, perform remote system diagnostics, remotely run software, etc. The EXecute command line format is:
EXecute JobFileName [token [token]...]
where:
JobFileName is a custom job (or script) file previously created with the Window|Recorder Window, the REC speed button, or a standard text editor.
token is an optional token for job file parameter substitution. Up to 19 tokens may be supplied. Tokens may also be set/changed with the TOken command (see TOken).
During job file execution, the job file status is displayed on the status line. See 2.3.4 Status Bar in Chapter 2 - Operation for details.
Upon completion of a job file that does not end with the QUit command, the program returns to monitoring the line for further incoming data. Many commands executed from within a job file remain in force after job file completion. For instance, if you had enabled the screen in a job file, all received files would go to the screen until reset by selecting the printer or the disk.
The EXecute command may be included in a job file. This causes a new job file to be loaded and executed. Note: 3780Plus does not return to the original job file upon completion of a nested job file.
The BRanch command provides an alternative to nested job files. Instead of EXecuting other job files from within a job file, one large job file may be created and the BRanch command used to move within that job file to achieve the same effect. See BRanch for details.
The status of the EXecute command will not be displayed but may be used for branching (see 4.7.1 BRanch ON|NOT status TO label). The EXecute command returns a NOFILE status if the job file could not be found/opened. A DSKERR status is returned if the job file could not be unscrambled.
EXecute may also be executed interactively with the System|Run Job option or the JOB speed button or in the background with drag and drop.
Chapter 4 - 3780Plus Commands
Cleo 3780Plus for Windows User's Guide 79
4.14 EXISTS - Check if File Exists
The EXISTS command causes 3780Plus to check if the specified file exists. The EXISTS command line format is:
EXISTS filename
where:
filename is the file to check.
Example: 100 EXISTS SendFile BRANCH ON NOFILE TO 200 TEXT SendFile 200 RECEIVE RecFile BRANCH ON TRUE TO 100
In the example above, 3780Plus would send the SendFile file only if there is a file ready to send. This job file would keep 3780Plus in receive mode unless there is a file to send.
The status of the EXISTS command will not be displayed but may be used for branching (see 4.7.1 BRanch ON|NOT status TO label). The EXISTS command returns OK if the file exists or NOFILE if the file does not exist.
EXISTS is only supported by 3780Plus for Windows versions; it is not currently available in 3780Plus for other platforms. If you are writing job/script files that you are planning to use on other platforms, please avoid using this command.
This command may not be shortened to two characters in length. The full command must be specified.
Chapter 4 - 3780Plus Commands
Cleo 3780Plus for Windows User's Guide 80
4.15 HAngup - Disconnect Phone Line
The HAngup command causes the 3780Plus program to disconnect the current phone line connection. Note: the modem will remain in autoanswer mode after a HAngup command; to disconnect and disable autoanswer, use the VOice command. The HAngup command has no options; the HAngup command line format is:
HAngup
The HAngup command transmits the 3780 hangup message (DLE EOT), hangs up the phone line, then returns the command prompt indicating that 3780Plus is ready to accept another command.
Example: KEY LOGIN CHICAGO BRANCH ON NRMEOF TO 1 HANGUP QUIT 1 �.
The above job file would disconnect the line and quit if the login message could not be sent.
The HANGUP command does not change the current status.
The VOice command may also be used to disconnect the phone line. The VOice command also disables autoanswer. See 4.37 VOice - Disconnect Phone Line and Disable Autoanswer.
If the hangup message (DLE EOT) is received by 3780Plus during the communications process, 3780Plus will drop the phone line for one second then return to the answer mode for further transactions. HAngup is only supported by 3780Plus for Windows versions; it is not currently available in 3780Plus for other platforms. If you are writing job/script files that you are planning to use on other platforms, please avoid using this command.
HAngup may also be executed interactively with the Line|Hangup option or the HANG speed button.
Chapter 4 - 3780Plus Commands
Cleo 3780Plus for Windows User's Guide 81
4.16 HElp - Command and Configuration Help Information
The HElp command displays a Windows-compliant help menu of 3780Plus commands, parameters, options, etc. The HElp command has no options; the HElp command line format is:
HElp
The HElp command allows you to access information from the 3780Plus for Windows User's Guide directly from 3780Plus. Click on any underlined topic to view information on that topic. Or press the TAB key to select the topic and then press ENTER to view. If you are unfamiliar with Help, the Help|Using help option displays more information on using Help.
The HElp command does not change the current status.
HElp may also be executed interactively with the Help|Contents menu option or the HELP speed button.
The HElp command may not be included in a job file.
Chapter 4 - 3780Plus Commands
Cleo 3780Plus for Windows User's Guide 82
4.17 JOb - Record Commands or Scramble a Job/Script File
The JOb command allows you to record all the 3780Plus actions to create a job file or to scramble an existing job file to protect phone numbers, passwords, etc. A job file is a disk file consisting of one or more 3780Plus commands to be run automatically. A job file is similar to an operating system script or batch file. The JOb command line format is:
JOb [filename] [-O|-A] or
JOb old_job_file scrambled_file
where:
filename is the job (or script) file to be created. The default filename is specified in the Startup|Recorder File Name option in the Configurator notebook.
-O is an option to overwrite an existing job file with the same name.
-A is an option to append to an existing job file with the same name. This is the default.
old_job_file is the existing job file to be scrambled. Note, this file is not deleted when the scrambled job file is created. It is a good idea to save this file (unscrambled) somewhere apart from the 3780Plus files; the scrambled file cannot be unscrambled.
scrambled_file is the scrambled job file to be created.
During scrambled job file execution, you may want to set StartUp|Display Mode menu option in the Configurator menu to Silent or Status to stop the job file screen display and/or turn the log file off during sensitive transactions.
If the job file recorder is off, entering JOb saves all 3780Plus menu options to the Recorder Window and to the job file. When the job file recorder is on, entering the JOb command without a filename turns the recorder off.
Example: JOB BBS.JOB -O
starts the job/script file recorder to record all your actions to the file BBS.JOB.
Example: JOB BBS.JOB SCRAMBLE.JOB SYSTEM DELETE BBS.JOB
scrambles the existing BBS.JOB job/script file and saves it to the SCRAMBLE.JOB file, then deletes the original BBS.JOB file.
The status of the JOb command will not be displayed but may be used for branching (see 4.7.1 BRanch ON|NOT status TO label). JOb returns an OK status if the recorder file opened successfully. If there is an error opening the recorder file, a DSKERR status is returned.
See B.2 Job/Script File in Appendix B - File Formats for examples. Job files created with the JOb command may later be modified with a text editor to add job control commands such as BRanch.
The StartUp|Recorder Mode in the Configurator notebook may also be used to start 3780Plus with the recorder on.
Chapter 4 - 3780Plus Commands
Cleo 3780Plus for Windows User's Guide 83
The following methods may be used to execute job files:
• Include the job file name as an argument when 3780Plus is executed: 3780Plus -J JOBFILE
• Set the Startup|Job Name option in the Configurator notebook.
• Drag and drop the job file on the 3780Plus icon.
• Use the System|Job option or the JOB speed button from within 3780Plus.
• Use the EXecute (execute job file) command: EXECUTE JOBFILE from the Windows|Command Window option or from within another job/script file.
Job files may also be created with the Window|Recorder Window option, the REC speed button, or a text editor. See 3.7.4 Recorder Window - Toggle the Command Recorder Window for recorder details. See B.2 Job/Script File in Appendix B - File Formats for the job file layout. See Chapter 5 - 3780Plus Tutorial for job file examples. The JOb command may not be included in a job file.
The JOb command may not be included in a job file.
Chapter 4 - 3780Plus Commands
Cleo 3780Plus for Windows User's Guide 84
4.18 KEy - Transmit a Keyboard Message
The KEy command is used to send a keyboard message to the remote system. This message is normally translated from the ASCII character set to the EBCDIC character set then sent in non-transparent mode. The KEy command line format is:
KEy message [-B|-E|-N|-R|-X]
where:
message is the message to be sent to the remote system. The message must not be longer than the configured record size or the maximum keyboard line size of 150 characters, whichever is shorter.
-B allows data to be translated from the ASCII character set to the EBCDIC character set before being transmitted in transparent (binary) mode. Without this option, files are transmitted in non-transparent (text) mode.
-E allows you to send multiple files to the host without releasing the line. The normal mode is for all transmit commands to send an EOT after each file. The -E option suppresses the EOT, allowing you to retain control of the line.
-N allows non-transparent (text) data to be passed through as-is. Without this option, files are translated from the ASCII character set to the EBCDIC character set before transmission. Use this option with caution. Normal ASCII characters (i.e. 2 and 7) interfere with protocol characters preventing transmission.
-R allows record separators (IRS) to be omitted on transmitted files. This option essentially removes carriage return, line feed, and new line characters, and packs the data into one record. Without this option, carriage return/linefeeds are translated into record separators (IRS). In general, most host computers require record separators in non-transparent (text) files. This option is valid only in 3780 mode.
-X allows you to concatenate several messages and/or files to appear as one file to the host. The -X option suppresses the ETX (End of Text) at the end of the last block in the file and the EOT. The ETX character represents the file separator character to the host. You should not use the -X option on the last file you send to insure that it is properly terminated with an ETX. Note: The EOt command does not send an ETX, so if you have just used the -X option and want to close the transaction with the EOt command, you will not have sent the ETX. This is considered bad form within the protocol and will cause unpredictable results at the receiving end.
Multiple options may be specified together. In this case only one dash (-) should precede all options.
Example: KEY SIGNON CLEO -RE KEY SEND PRINTER FILES -R
As in all transmit commands, this command automatically sends an EOT at its conclusion unless the -E or -X option is included at the end of the command line.
A File Transfer Status window is displayed on the screen during transmission. See 2.6 File Transfer Status in Chapter 2 - Operation for details. The transmission may be aborted at any time with the CANCEL button.
Chapter 4 - 3780Plus Commands
Cleo 3780Plus for Windows User's Guide 85
After each message is transmitted, a status line is posted to the log and monitor files, if open, giving a completion status message for the transmission and the number of data blocks sent. See B.3.2 The Transmit/Receive Status Line in Appendix B - File Formats for details. If the transmission was successful, a NRMEOF (Normal End of File) status message will display. See Table B.3 Transmit Completion Status Messages in Appendix B. File Formats for a complete list and B.3.3 Status Messages for a complete description of each status message.
In a job/script file, you may branch on any of the following status messages: OK if the transmission is successful; FAIL if the transmission fails; or any of the status messages listed in Table B.3.
If the line is down when the KEy command is executed and no branch command follows, 3780Plus will wait until a connection is made before continuing.
KEy may also be executed interactively with the Transmit|Key option.
Chapter 4 - 3780Plus Commands
Cleo 3780Plus for Windows User's Guide 86
4.19 LEt - Set User-Defined Variable
The LEt command allows you to set or change user-defined variables. The LEt command line format is:
LEt user _variable=setting
where:
user _variable is the name of the user-defined variable. User-defined variables may have any name.
setting is the new variable setting. This setting may be a string or a number.
Example: LET MyFileName=file.new : SEND $MyFileName
transmits the file file.new. MyFileName is a user-defined variable.
The status of the LEt command will not be displayed but may be used for branching (see 4.7.1 BRanch ON|NOT status TO label). LEt returns an OK status if the parameter is accepted or FAIL status if the parameter could not be set.
LEt is only supported by 3780Plus for Windows versions; it is not currently available in 3780Plus for other platforms. If you are writing job/script files that you are planning to use on other platforms, please avoid using this command.
Chapter 4 - 3780Plus Commands
Cleo 3780Plus for Windows User's Guide 87
4.20 LIneup - Get Line Status
The LIneup command checks the status of the line connection and allows you to control job script execution based on its condition. The LIneup command has no options; the LIneup command line format is:
LIneup
The status of the LIneup command will not be displayed but may be used for branching (see 4.7.1 BRanch ON|NOT status TO label). If the line is connected, a CONNECT status message is returned. If the line is disconnected, a LINDWN status message is returned.
Example: LINEUP BRANCH ON CONNECT TO 999 AUTODIAL 1-800-555-1212 999 TEXT signon :
The example above would automatically dial the host if the line was down. If the connection was established, it would send a signon message.
The interactive 3780Plus status line will also display an ONLINE or OFFLINE status.
LIneup is only supported by 3780Plus for Windows versions; it is not currently available in 3780Plus for other platforms. If you are writing job/script files that you are planning to use on other platforms, please avoid using this command.
Chapter 4 - 3780Plus Commands
Cleo 3780Plus for Windows User's Guide 88
4.21 LOg - Open, Close, Display or Write to the Log File
The LOg command allows the user to toggle the log file on or off or write a message to the log file. The log file allows you to track all your communications transactions. Log files contain the date and time, the commands executed, and the status of each command. This may be used to review communications sessions or as a powerful diagnostic tool for tracing problems. The LOg command line format is:
LOg [message] or
LOg [filename.LOG] [-O|-A|-M]
where:
message is an optional message to be written to the log file. This message may be used, for example, to describe actions in the job file. The message must not be longer than 150 characters.
filename is the log file to be created or appended. This log file name must have a .LOG extension, i.e. CHICAGO.LOG. If no filename is specified, the last specified log file name is used. The default filename is 3780.LOG.
-O is an option to overwrite an existing log file.
-A is an option to append to an existing log file. This is the default.
-M is an option to minimize the log window.
When the log is on, entering the LOg command without a message turns the log off. If the log is off, entering the LOg command, entered alone or with the -A or -O option, toggles the state of the logging option from off to append or overwrite. This allows parts of job files (for example, password transmissions) to be protected while other parts are logged. If the log is on, 3780Plus directs the log messages to the Log Window and to the log file.
Example: LOG ***COMMUNICATIONS WAS SUCCESSFULL***
writes the ***COMMUNICATIONS WAS SUCCESSFULL*** message to the current log file.
The status of the LOg command will not be displayed but may be used for branching (see 4.7.1 BRanch ON|NOT status TO label). LOg returns an OK status if the log command was successful or a DSKERR status if 3780Plus was unable to write to the log file.
See B.3 Log File in Appendix B - File Formats for a sample log file.
The log file may be initialized with the Startup|Log Mode option from the Configurator notebook. The default log file name may be changed with the Startup|Log Name option.
LOg may also be executed interactively with the Window|Log Window option or the LOG speed button.
Chapter 4 - 3780Plus Commands
Cleo 3780Plus for Windows User's Guide 89
4.22 MOnitor - Open or Close a Serial Line Monitor
The MOnitor command invokes a built-in serial line monitor to display the actual received/transmitted bisync protocol on the Monitor Window and to a file. The monitor is helpful for determining communication errors. The MOnitor command line format is:
MOnitor [filename] [-O|-A|-M]
where:
filename is the monitor file to be created or appended to. The default file name is the Startup|Monitor File Name option specified in the Configurator notebook. This file will contain the protocol characters. The filename specified should not be a printer or other slow device.
-O is an option to overwrite an existing monitor file of the same name. This is the default.
-A is an option to append to an existing monitor file of the same name.
-M is an option to minimize the monitor window.
When the monitor is on, entering the MOnitor command without a filename turns the monitor off. If the monitor is off, entering the MOnitor command directs the protocol characters to the Monitor Window and to the monitor file.
Directing protocol information to a disk file consumes a lot of disk space. It is not unusual for the protocol saved to be four times as large as the actual data received or transmitted. Receiving a 100K file may actually use 500K of disk space.
The status of the MOnitor command will not be displayed but may be used for branching (see 4.7.1 BRanch ON|NOT status TO label). MOnitor returns an OK status if the monitor command was successful or a DSKERR status if 3780Plus was unable to write to the monitor file.
If you encounter a 3780Plus error status message, check B.3.3 Status Messages in Appendix B - File Formats for possible actions before using the monitor. If you are getting a NRMEOF status but are receiving or transmitting data that you think should be different, use the monitor command to determine exactly what is being sent and received. For transmit problems, for instance, use the MOnitor command before the transmit command to save the monitor to a file and once again after the transmit command to turn the monitor off.
Example: MONITOR SIGNON.MON
TEXT SIGNON MONITOR
This will create a monitor file with the name SIGNON.MON. This monitor file may be viewed with a text editor or printed. See B.4 Monitor File in Appendix B - File Formats for examples, a table of protocol characters, and a table of ASCII characters. If necessary, a printout of your monitor file may be E-MAIL'd or faxed to Cleo's Technical Support department.
MOnitor may also be controlled interactively with the Window|Monitor Window option or the MON speed button. The StartUp|Monitor Mode menu option in the Configurator notebook may also be used to start 3780Plus with the monitor enabled.
Chapter 4 - 3780Plus Commands
Cleo 3780Plus for Windows User's Guide 90
4.23 OPEN - Open a File to READ
The OPEN command allows you to open a file to read with the READ command. The OPEN command line format is:
OPEN filename
where:
filename is the file to read with the READ command.
The status of the OPEN command will not be displayed but may be used for branching (see 4.7.1 BRanch ON|NOT status TO label). If the file could not be opened, a NOFILE status is returned, otherwise an OK status is returned.
See 4.26 READ - Read a Line from READ File for an example.
OPEN is only supported by 3780Plus for Windows versions; it is not currently available in 3780Plus for other platforms. If you are writing job/script files that you are planning to use on other platforms, please avoid using this command.
This command may not be shortened to two characters in length. The full command must be specified.
Chapter 4 - 3780Plus Commands
Cleo 3780Plus for Windows User's Guide 91
4.24 PRint - Receive File(s) & Spool to Printer
The PRint command places 3780Plus in receive mode and waits to receive one or more files from the remote terminal. This command is equivalent to the REceive command, except that printer tab and escape sequences are translated by 3780Plus to the appropriate action and files may be automatically spooled to the printer. See 1.5.2 Printing Variables in Chapter 1 - Configuration for options that effect spooling. Received non-transparent files are normally translated from the EBCDIC character set to the ASCII character set; received transparent files are normally left "as-is". The PRint command line format is:
PRint [filename [-N|-T|-X]]
where:
filename is the receive file to be saved. If no filename has been specified since 3780Plus logon, all received print files are accumulated serially as PRINT.000, PRINT.001, etc. Note: The default file name PRINT may be changed (see B.8 Initialization File in Appendix B - File Formats). If a filename is specified without a file extension, files are accumulated serially starting at .000 without overwriting current files that have the same name. Example: PRint prtstuff will save data to the file prtstuff.000 unless prtstuff.000 already exists. If prtstuff.000 exists, prtstuff.001 is tried, and so on, until a non-existent filename is found. If a filename is specified with a numeric extension, files are accumulated serially starting at that number. Existing files with the same name are overwritten. Example: PRint prtstuff.011 will save data to prtstuff.011 regardless of whether a file already exists with that name. The next files received will be saved as prtstuff.012, prtstuff.013, etc. If a filename is specified with a non-numeric extension, after the first file is received, additional files are accumulated serially starting with a .000 extension. Existing files with the same name are overwritten. Example: PRint prtstuff.new will save data to prtstuff.new regardless of whether a file already exists with that name. The next files received will be saved as prtstuff.000, prtstuff.001, etc.
-N allows non-transparent (text) data to be passed through as-is. Without this option, files are translated from the EBCDIC character set to the ASCII character set upon reception. This option is valid only until an EOT is received from the remote system.
Chapter 4 - 3780Plus Commands
Cleo 3780Plus for Windows User's Guide 92
-T allows transparent (binary) data to be translated from the EBCDIC character set to the ASCII character set upon reception. Without this option, files are passed through as-is. This option is valid only until an EOT is received from the remote system. This option is similar to the 3780Plus -T command line option with the following exception: PRint -T converts protocol characters (i.e. IRS, IUS, IGS, DC1, DC2, and DC3) to their appropriate functions; 3780Plus -T translates these characters through the EBCDIC to ASCII translation tables. If your print file is not readable and your print status line begins with PB:, your host may be sending a transparent EBCDIC file. Try receiving the file with the PRint -T option.
-X allows you to concatenate several incoming files to appear as one file. The -X option ignores incoming ETX characters. The ETX character normally represents a file separator. An incoming EOT character will terminate the file.
3780Plus translates received escape sequences to the actions listed in Table 4.1. The specified action is postponed until a new line (NL) or record separator (RS) character is received. 3780Plus translates received vertical tab and form feed characters to the actions listed in Table 4.1. The specified action is performed immediately.
____________________________________________________________________________________________________
ESCAPE SEQUENCE CARRIAGE OPERATION CHAR HEX ACTION CHAR HEX ESC / 27 61 Single space CR/LF 0D 0A ESC S 27 E2 Double space CR/LF/CR/LF 0D 0A 0D 0A ESC T 27 E3 Triple space CR/LF/CR/LF/CR/LF 0D 0A 0D 0A 0D 0A ESC M 27 D4 Space suppress CR1 0D1 ESC A 27 C1 Skip to channel 1 FF2 0C2 ESC B 27 C2 Skip to channel 2 2 2 ESC C 27 C3 Skip to channel 3 2 2 ESC D 27 C4 Skip to channel 4 2 2 ESC E 27 C5 Skip to channel 5 2 2 ESC F 27 C6 Skip to channel 6 2 2 ESC G 27 C7 Skip to channel 7 2 2 ESC H 27 C8 Skip to channel 8 2 2 ESC I 27 C9 Skip to channel 9 2 2 ESC J 27 D1 Skip to channel 10 2 2 ESC K 27 D2 Skip to channel 11 2 2 ESC L 27 D3 Skip to channel 12 2 2 FF 0C Skip to channel 1 FF2 0C2 VT 0B Skip to channel 2 2 2 1 The 3780Plus command line option -N may be used to suppress this CR character. 2 The actual carriage operation depends on settings in the "channel.ovr" file. See B.7 Vertical Forms File in Appendix B - File Formats for details. ____________________________________________________________________________________________________
TABLE 4.1 PRINTER ESCAPE SEQUENCE TRANSLATIONS
Chapter 4 - 3780Plus Commands
Cleo 3780Plus for Windows User's Guide 93
Printer files are sent to print via the Notepad editor. This default editor may be changed with the Printer|Association Extension option in the Configurator menus. See 1.5.2 Printing Variables in Chapter 1 - Configuration. Print files may optionally be deleted after printing with the Printer|Remove Spooled Files option in the Configurator menus.
Example: PRINT PRTFILE Files are accumulated serially as PRTFILE.000, PRTFILE.001, etc., until no more files are received. The received files are then spooled to the printer.
Multiple options may be specified together. In this case only one dash (-) should precede all options.
Example: PRINT PRTFILE -XN
Files are accumulated until no more files are received then they are saved as a single PRTFILE.000 file without translation. The received file is then spooled to the printer.
A File Transfer Status window is displayed on the screen during reception. See 2.6 File Transfer Status in Chapter 2 - Operation for details. The receive may be aborted at any time with the CANCEL button.
After each file is received, a status line is posted to the log and monitor files, if open, giving a completion status message for the receive and the number of data blocks received. See B.3.2 The Transmit/Receive Status Line in Appendix B - File Formats for details. If the receive was successful, a NRMEOF (Normal End of File) status message will display. See Table B.2 Receive Completion Status Messages in Appendix B. File Formats for a complete list and B.3.3 Status Messages for a complete description of each status message.
3780Plus continues to receive files and write them to disk until (1) an EOT (end of transmission) is received from the remote, or (2) the receive mode is exited with the Cancel button, (3) the receive timeout has expired or (4) an error has occurred. Note that if one of a group of receive files is terminated abnormally, the remaining files are not received.
In a job/script file, you may branch on one of the following status messages: OK if the receive is successful; FAIL if the receive fails; or any of the status messages listed in Table B.2. Note, if multiple files are received, you may branch only on the status of the last file received.
If the line is down when the PRint command is executed and no branch command follows, 3780Plus will wait until a connection is made before continuing. If files with printer device selection codes (see C.2 Device Selection in Appendix C - Multipoint Operation and Device Selection) are received while 3780Plus is not in the print receive mode, the files will be automatically saved to the default printer filename. This function may be overridden with the DeviceSelect setting in the 3780PLUS.INI file (see B.8 Initialization File in Appendix B - File Formats for details). When the Spool Print Files option is enabled, 3780Plus creates temporary files (with a file prefix of $SPnnnn and an extension specified by Association Ext). If files have not finished printing before 3780Plus exits, the temporary files will not be removed.
PRint may also be executed interactively with the Receive|To Printer option or the PRINT speed button.
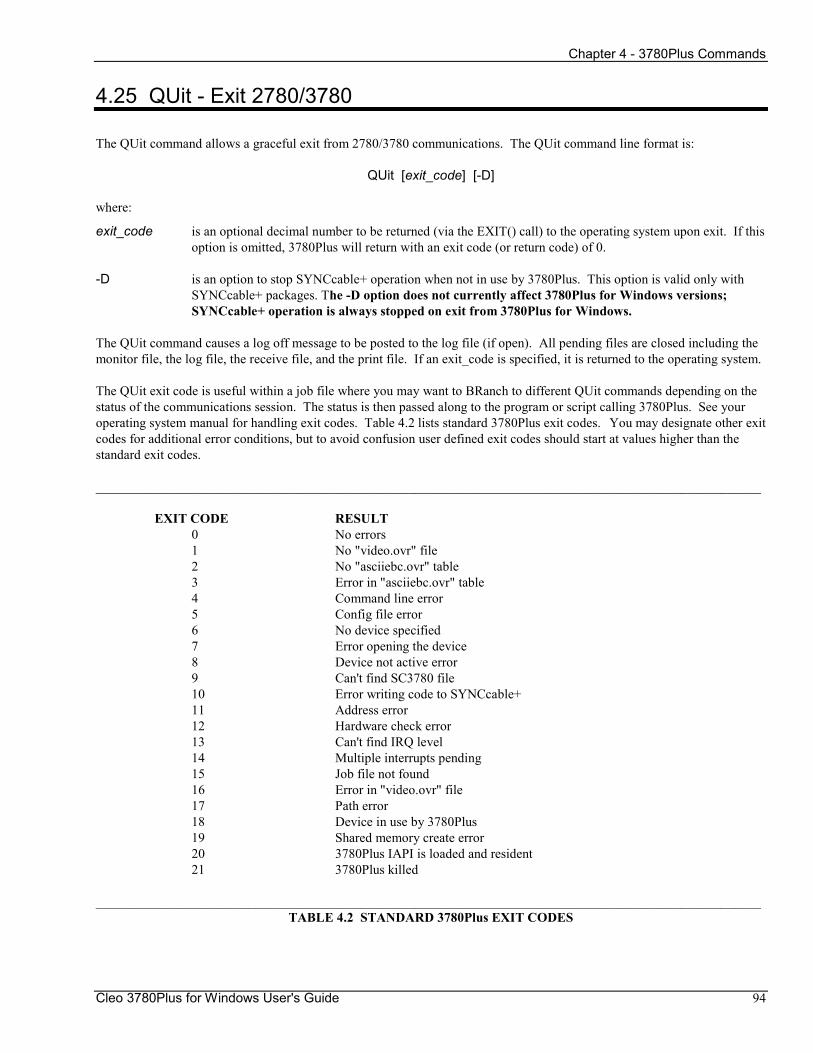
Chapter 4 - 3780Plus Commands
Cleo 3780Plus for Windows User's Guide 94
4.25 QUit - Exit 2780/3780
The QUit command allows a graceful exit from 2780/3780 communications. The QUit command line format is:
QUit [exit_code] [-D]
where:
exit_code is an optional decimal number to be returned (via the EXIT() call) to the operating system upon exit. If this option is omitted, 3780Plus will return with an exit code (or return code) of 0.
-D is an option to stop SYNCcable+ operation when not in use by 3780Plus. This option is valid only with SYNCcable+ packages. The -D option does not currently affect 3780Plus for Windows versions; SYNCcable+ operation is always stopped on exit from 3780Plus for Windows.
The QUit command causes a log off message to be posted to the log file (if open). All pending files are closed including the monitor file, the log file, the receive file, and the print file. If an exit_code is specified, it is returned to the operating system.
The QUit exit code is useful within a job file where you may want to BRanch to different QUit commands depending on the status of the communications session. The status is then passed along to the program or script calling 3780Plus. See your operating system manual for handling exit codes. Table 4.2 lists standard 3780Plus exit codes. You may designate other exit codes for additional error conditions, but to avoid confusion user defined exit codes should start at values higher than the standard exit codes.
____________________________________________________________________________________________________ EXIT CODE RESULT 0 No errors 1 No "video.ovr" file 2 No "asciiebc.ovr" table 3 Error in "asciiebc.ovr" table 4 Command line error 5 Config file error 6 No device specified 7 Error opening the device 8 Device not active error 9 Can't find SC3780 file 10 Error writing code to SYNCcable+ 11 Address error 12 Hardware check error 13 Can't find IRQ level 14 Multiple interrupts pending 15 Job file not found 16 Error in "video.ovr" file 17 Path error 18 Device in use by 3780Plus 19 Shared memory create error 20 3780Plus IAPI is loaded and resident 21 3780Plus killed
____________________________________________________________________________________________________ TABLE 4.2 STANDARD 3780Plus EXIT CODES
Chapter 4 - 3780Plus Commands
Cleo 3780Plus for Windows User's Guide 95
Example: BINARY FILE.NEW BRANCH NOT NRMEOF TO 10 RECEIVE QUIT 10 QUIT 100
transmits the FILE.NEW file. If the file is transmitted normally, 3780Plus will wait to receive a file then quit with a zero exit code; otherwise if there is an error in the transmission, 3780Plus will quit with an exit code of 100. The calling program or batch/script file could check for a non-zero exit code to determine if there were errors in communications.
QUit does not drop the modem/phone line and no protocol is sent on the line. To drop the line and disable autoanswer, use the VOice command before QUit.
QUit may also be executed interactively with the System|Exit option.
Chapter 4 - 3780Plus Commands
Cleo 3780Plus for Windows User's Guide 96
4.26 READ - Read a Line from READ File
The READ command reads a line of data from a file. This data may be used to control job/script file operation. For instance, you could read a file containing a list of filenames to send to the host. The READ command line format is:
READ line
where:
line is the variable in which to store the line of data read from the READ file.
READ reads the next line in the OPENed file and stores it in the specified variable. If a file is not open, a NOFILE status is returned; when there are no more lines in the READ file, a NODATA status is returned; otherwise an OK status is return.
READ variables may be accessed with the %variable% or $variable command. Note, tokens must be enabled to access variables.
Example: TOKEN ON RECEIVE File.List OPEN File.List 10 READ SendName BRANCH ON NODATA TO 20 TEXT %SendName% BRANCH ON TRUE TO 10 20 LOG ** ALL FILES HAVE BEEN SENT **
receives the File.List file containing a list of files, then sends the files listed in the File.List file back to the remote.
See also 4.23 OPEN - Open a File to READ.
READ is only supported by 3780Plus for Windows versions; it is not currently available in 3780Plus for other platforms. If you are writing job/script files that you are planning to use on other platforms, please avoid using this command.
This command may not be shortened to two characters in length. The full command must be specified.
Chapter 4 - 3780Plus Commands
Cleo 3780Plus for Windows User's Guide 97
4.27 REceive - Receive File(s)
The REceive command places 3780Plus in the receive mode and waits to receive one or more files from the remote terminal. Received non-transparent files are normally translated from the EBCDIC character set to the ASCII character set (see B.5.1 ASCII to EBCDIC Translation Table in Appendix B - File Formats); received transparent files are normally left "as-is". The REceive command line format is:
REceive [filename] [-N|-T|-X]
where:
filename is the optional receive file name. If no filename has been specified since 3780Plus logon, all received files are accumulated serially as RCVFILE.000, RCVFILE.001, etc. Note: The default file name RCVFILE may be changed (see B.8 Initialization File in Appendix B - File Formats). If a filename is specified without a file extension, files are accumulated serially starting at .000 without overwriting current files that have the same name. Example: RECEIVE mystuff will save data to the file mystuff.000 unless mystuff.000 already exists. If mystuff.000 exists, mystuff.001 is tried, and so on, until a non-existent filename is found. If a filename is specified with a numeric extension, files are accumulated serially starting at that number. Existing files with the same name are overwritten. Example: RECEIVE mystuff.200 will save data to mystuff.200 regardless of whether a file already exists with that name. The next files received will be saved as mystuff.201, mystuff.202, etc. If a filename is specified with a period and no extension or with a non-numeric extension, after the first file is received, additional files are accumulated serially starting with a .000 extension. Existing files with the same name are overwritten. Example: RECEIVE mystuff. will save data to mystuff regardless of whether a file already exists with that name. The next files received will be saved as mystuff.000, mystuff.001, etc.
-N allows non-transparent (text) data to be passed through as-is. Without this option, incoming non-transparent files are translated from the EBCDIC character set to the ASCII character set. This option is valid only until an EOT is received from the remote system.
Chapter 4 - 3780Plus Commands
Cleo 3780Plus for Windows User's Guide 98
-T allows transparent (binary) data to be translated from the EBCDIC character set to the ASCII character set upon reception. Without this option, incoming transparent files are passed through as-is. This option is valid only until an EOT is received from the remote system. If your receive file is not readable and your status line begins with RB:, your host may be sending a transparent EBCDIC file. Try receiving again the REceive -T option.
-X allows you to concatenate several incoming files to appear as one file. The -X option ignores incoming ETX characters. The ETX character normally represents a file separator. An incoming EOT character will terminate the file.
Example:
RECEIVE NEWFILE. -T
may be used to receive a file, translate it through the EBCDIC to ASCII translation tables, then save it to the file NEWFILE.
Multiple options may be specified together. In this case only one dash (-) should precede all options.
Example: RECEIVE RECVFILE -XN
may be used to receive multiple files (without intervening EOT's) and save them all as one file as-is without translation.
A File Transfer Status window is displayed on the screen during reception. See 2.6 File Transfer Status in Chapter 2 - Operation for details. The receive may be aborted at any time with the CANCEL button.
After each file is received, a status line is posted to the log and monitor files, if open, giving a completion status message for the receive and the number of data blocks received. See B.3.2 The Transmit/Receive Status Line in Appendix B - File Formats for details. If the receive was successful, a NRMEOF (Normal End of File) status message will display. See Table B.2 Receive Completion Status Messages in Appendix B - File Formats for a complete list and B.3.3 Status Messages for a complete description of each status message.
3780Plus continues to receive files and write them to disk until (1) an end of transmission is received from the remote, or (2) the receive mode is exited with the Cancel button, (3) the receive timeout has expired or (4) an error has occurred. Note that if one of a group of receive files is terminated abnormally, the remaining files are not received.
In a job/script file, you may branch on one of the following status messages: OK if the receive is successful; FAIL if the receive fails; or any of the status messages listed in Table B.2. Note, if multiple files are received, you may branch only on the status of the last file received; intermediate files always have a NRMEOF (Normal End Of File) status.
If the line is down when the REceive command is executed and no branch command follows, 3780Plus will wait until a connection is made before continuing.
REceive may also be executed interactively with the Receive|To File option or the RCV speed button.
Chapter 4 - 3780Plus Commands
Cleo 3780Plus for Windows User's Guide 99
4.28 SAve - Save Current Configuration
The SAve command saves the current configuration to a file. The SAve command line format is:
SAve [filename]
where:
filename is the configuration file to be created. If no filename is specified, the configuration is saved to DEFAULT.CFG.
Configuration files may also be created and/or modified with a standard text editor. See B.1 Configuration File in Appendix B - File Formats for the configuration file layout.
Example: SAVE LATEST.CFG
The current configuration is saved to the configuration file LATEST.CFG.
The status of the SAve command will not be displayed but may be used for branching (see 4.7.1 BRanch ON|NOT status TO label). SAve returns an OK status if the save command was successful or a DSKERR status if 3780Plus was unable to save to the configuration file.
These configuration files may be used during subsequent 3780Plus executions by including the configuration filename as an argument when executing 3780Plus or by executing the COnfig command with the filename as an argument:
3780Plus CONFIGFILE=LATEST.CFG or CONFIG LATEST.CFG
The configuration is read directly from the previously created file LATEST.CFG.
SAVE is only supported by 3780Plus for Windows versions; it is not currently available in 3780Plus for other platforms. If you are writing job/script files that you are planning to use on other platforms, please avoid using this command.
SAve may also be executed interactively with the Configuration|Save or Configuration|Save As menu option.
Chapter 4 - 3780Plus Commands
Cleo 3780Plus for Windows User's Guide 100
4.29 SCreen - Receive File(s) and Display on Screen
The SCreen command places 3780Plus in the receive mode and waits to receive one or more files from the remote terminal. The SCreen command operates in the same manner as the PRint and REceive commands except a file name is not specified and messages are directed to the Screen Window instead of to the printer or disk drive. Received non-transparent files are normally translated from the EBCDIC character set to the ASCII character set (see B.5.1 ASCII to EBCDIC Translation Table in Appendix B - File Formats). To avoid problems displaying non-ASCII characters, received non-translated transparent files are not displayed on the screen but saved to disk under the last receive file name. The SCreen command line format is:
SCreen [-N|-T|-X]
where:
-N allows non-transparent (text) data to be passed through as-is. Without this option, incoming non-transparent files are translated from the EBCDIC character set to the ASCII character set upon reception. This option is valid only until an EOT is received from the remote system.
-T allows transparent (binary) data to be translated from the EBCDIC character set to the ASCII character set upon reception. Without this option, incoming transparent files are passed through as-is. This option is valid only until an EOT is received from the remote system.
-X allows you to concatenate several incoming files to appear as one file. The -X option ignores incoming ETX characters. The ETX character normally represents a file separator. An incoming EOT character will terminate the file.
Multiple options may be specified together. In this case only one dash (-) should precede all options.
Example: SCREEN -XN
may be used to receive multiple files (without intervening EOT's) and save them all as one file as-is without translation.
After each file is received, a status line is posted to the log and monitor files, if open, giving a completion status message for the receive and the number of data blocks received. See B.3.2 The Transmit/Receive Status Line in Appendix B - File Formats for details. If the receive was successful, a NRMEOF (Normal End of File) status message will be returned. See Table B.2 Receive Completion Status Messages in Appendix B - File Formats for a complete list and B.3.3 Status Messages for a complete description of each status message.
3780Plus continues to receive files and write them to disk until (1) an end of transmission is received from the remote, or (2) the receive mode is exited with the Cancel button, (3) the receive time out has expired, or (4) an error has occurred. Note that if one of a group of receive files is terminated abnormally, the remaining files are not received.
In a job/script file, you may branch on one of the following status messages: OK if the receive is successful; FAIL if the receive fails; or any of the status messages listed in Table B.2. Note, if multiple files are received, you may branch only on the status of the last file received.
If the line is down when the SCreen command is executed and no branch command follows, 3780Plus will wait until a connection is made before continuing.
SCreen may also be executed interactively with the Receive|To Screen option.

Chapter 4 - 3780Plus Commands
Cleo 3780Plus for Windows User's Guide 101
4.30 SEnd - Transmit File(s)
The SEnd command may be used to transmit a file or files to the remote system. These files are first scanned for binary data. If binary data is present, the file is sent in binary mode (transparent mode with no translation). If no binary data is present, it is sent in text mode (non-transparent mode with translation from the ASCII character set to the EBCDIC character set). The SEnd command line format is:
SEnd filename [RemoteFilename] [-B|-E|-N|-R|-T|-X]
where:
filename is the file or files to be sent to the remote system. Wildcards may be used within file names. Example: SEND asciiebc.* Note that if one of a group of transmitted files specified by a wildcard is terminated by anything other than a NRMEOF (normal end of file) status, the remaining specified files are not sent and the command is aborted.
RemoteFilename is an optional remote file name. This should be used only in a 3780Plus to 3780Plus connection. This filename is assigned to the file received by the remote processor. See 4.35.1 File Naming for details.
-B option allows binary data to be translated from the ASCII character set to the EBCDIC character set before being transmitted in transparent (binary) mode. This differs from the BInary -T command because it translates special characters (i.e. CR/LF to RS).
-E allows you to send multiple files to the host without releasing the line. The normal mode is for all transmit commands to send an EOT after each file. The -E option suppresses the EOT allowing you to retain control of the line.
-N allows non-transparent (text) data to be passed through as-is. Without this option, text files are translated from the ASCII character set to the EBCDIC character set before transmission. Use this option with caution. Normal ASCII characters (i.e. 2 or 7) interfere with protocol characters preventing transmission.
-R allows record separators (IRS) to be omitted on transmitted text files. This option essentially removes carriage return, line feed, and new line characters, and packs the data into one record. Without this option, carriage return/linefeeds are translated into record separators (IRS). In general, most host computers require record separators in non-transparent (text) files. This option is valid only in 3780 mode.
-T allows transparent (binary) data to be translated from the ASCII character set to the EBCDIC character set before being transmitted. All data is translated through the asciiebc.ovr translation file. Without this option, binary files are sent as-is.
-X allows you to concatenate several files to appear as one file to the host. The -X option suppresses the ETX (End of Text) at the end of the last block in the file and the EOT. The ETX character represents the file separator character to the host. You should not use the -X option on the last file you send to insure that it is properly terminated with an ETX. Note: The EOt command does not send an ETX, so if you have just used the -X option and want to close the transaction with the EOt command, you will not have sent the ETX. This is considered bad form within the protocol and will cause unpredictable results at the receiving end.
Chapter 4 - 3780Plus Commands
Cleo 3780Plus for Windows User's Guide 102
Example: SEND APLUS.*
sends all files starting with the APLUS prefix.
Example: SEND C:\MYFILES\MY.EXE /usr/YOUR.EXE
would send the file C:\MYFILES\MY.EXE with the file name /usr/YOUR.EXE. This would save the MY.EXE file on a remote UNIX system as YOUR.EXE in the /usr directory. The remote filename should only be used with 3780Plus to 3780Plus connections.
Multiple options may be specified together. In this case only one dash (-) should precede all options.
Example: SEND SIGNON.FIL -RE SEND *.C -RE EOT
may be used to send the SIGNON.FIL file and all files ending with the .C extension without record separators or intervening EOT's; an EOT character is sent after all files have been sent.
A File Transfer Status window is displayed on the screen during transmission. See 2.6 File Transfer Status in Chapter 2 - Operation for details.
After each file is transmitted, a status line is posted to the log and monitor files, if open, giving a completion status message for the transmission and the number of data blocks sent. See B.3.2 The Transmit/Receive Status Line in Appendix B - File Formats for details. If the transmission was successful, a NRMEOF (Normal End of File) status message will display. See Table B.3 Transmit Completion Status Messages in Appendix B - File Formats for a complete list and B.3.3 Status Messages for a complete description of each status message.
In a job/script file, you may branch on one of the following status messages: OK if the transmission is successful; FAIL if the transmission fails; or any of the status messages listed in Table B.3. Note, if a wildcard is used to transmit multiple files, you may branch only on the status of the last file transmitted.
If the line is down when the SEnd command is executed and no branch command follows, 3780Plus will wait until a connection is made before continuing. SEND is only supported by 3780Plus for Windows versions; it is not currently available in 3780Plus for other platforms. If you are writing job/script files that you are planning to use on other platforms, please avoid using this command.
SEnd may also be executed interactively with the Transmit|Send option or the SEND speed button or in the background with drag and drop.
Chapter 4 - 3780Plus Commands
Cleo 3780Plus for Windows User's Guide 103
4.31 SLeep - Pause Specified Seconds
The SLeep command allows you to pause the specified amount of time. The format of the SLeep command is:
SLeep seconds where:
seconds is the number of seconds to pause before continuing with the next 3780Plus command.
Example: 1 AUTODIAL 397-8110 R1 BRANCH NOT BUSY TO 999 SLEEP 60 BRANCH ON TRUE TO 1 999 BRANCH ON FAIL TO 1 TEXT SIGNON
In the above sequence, if the remote modem is busy 3780Plus will wait one minute (60 seconds) before attempting to redial.
A sleep status window will appear allowing you to abort the wait with the Cancel button.
After a SLeep command, a status line is not posted but you may branch on one of the following status messages: OK if the pause is completed, ABORT if SLeep is aborted with the Cancel button, or FAIL if the seconds parameter is invalid. See B.3.3 Status Messages in Appendix B - File Formats for details.
See also 4.38 WAitfor - Wait for Specified Time.

Chapter 4 - 3780Plus Commands
Cleo 3780Plus for Windows User's Guide 104
4.32 STart - Display or Start Counter
The STart command displays the current counter values or initializes one of three counters. The format of the STart command is:
STart [[COUNTERc]=x] where:
c is the number of the counter (1 through 3).
x is the value used to initialize the specified counter. If this option is not specified, the counter is initialized to 1.
If the STart command is entered alone, 3780Plus displays the current values for each of the counters.
Counters may be used to count the number of repetitions of a function. The contents of a counter may be accessed when counter is preceded by a % or $ character. For example, the string %COUNTER1 or $COUNTER1 in any command is replaced with the current value of COUNTER1. Note: The Startup|Token option from the Setup program or the Configurator program, or any form of the TOken command (except the TOken OFF command) must be used to enable this counter variable.
Example: TOKEN ON START COUNTER1=1 10 RECEIVE newfile +COUNTER1 BRANCH ON %COUNTER1 < 4 TO 10 TEXT signoff
In the example above, 3780Plus would receive three (3) files, newfile.000 through newfile.002. It would then send a file containing the signoff message.
Example: TOKEN ON START COUNTER1=1 10 RECEIVE file$COUNTER1.new +COUNTER1 BRANCH ON $COUNTER1 < 4 TO 10 TEXT signoff
In the example above, 3780Plus would receive three (3) files: file1.new, file2.new, and file3.new. It would then send a file containing the signoff message.
Counters may also be used to access token variables when counter is preceded by the %% or $$ characters. For example, the string %%COUNTER1 or $$COUNTER1 in any command is replaced with the token for the current value of COUNTER1.
Chapter 4 - 3780Plus Commands
Cleo 3780Plus for Windows User's Guide 105
Example: TOKEN 1=one 2=two 3=three START COUNTER1=1 10 RECEIVE file$$COUNTER1.new +COUNTER1 BRANCH ON $COUNTER1 < 4 TO 10 TEXT signoff
In the example above, 3780Plus would receive three (3) files: fileone.new, filetwo.new, and filethree.new. It would then send a file containing the signoff message.
The STart command always returns an OK status.
See also 4.9 +COUNTER - Increment Counter, 4.10 -COUNTER - Decrement Counter, and 4.7.4 BRanch ON|NOT %COUNTERc%|$COUNTERc <|=|> number TO label.
Chapter 4 - 3780Plus Commands
Cleo 3780Plus for Windows User's Guide 106
4.33 SYstem - Execute an Operation System Command or Application Program
The SYstem command allows Windows or DOS commands or application programs to be executed from within 3780Plus. The SYstem command line format is:
SYstem program
where:
program is the Windows or DOS command or application program to be executed.
Communication line monitoring is halted during this process, so this command should be used only when there is no line activity. The SYstem command should be used with caution in job/script files, especially in cases where a response to a prompt is required.
Example: SYSTEM winmine
This command will execute the Windows Minesweeper game.
Example: SYSTEM \WINpath\DOSPRMPT.PIF /C dir or SYSTEM \DOSpath\COMMAND.COM /C dir
These commands will execute the DOS directory command. Note: DOS commands must specify the directory in which to find the Windows DOSPRMPT.PIF file or the DOS COMMAND.COM file.
Example: SYSTEM check.bat
This command will execute a DOS batch file named CHECK. Note: DOS applications must specify the extension (i.e. .COM, .EXE, .BAT).
To run DOS programs minimized under Windows 95 or NT 4.0, use the START /MIN command.
Example: SYSTEM \Windows\DOSPRMT.PIF START /MIN DIR PROGFILE
This command will execute the program PROGFILE in minimized mode.
SYstem returns the exit code from the command supplied to the operating system, allowing you to BRanch on this status. See 4.7.2 BRanch ON|NOT return_code TO label for details. To force Windows 95 or NT 4.0 to wait until the SYstem command has completed, use the START /W command.
Example: SYSTEM START /W PROGFILE
BRANCH ON 1 TO 100
This command will finish executing the program PROGFILE before returning to 3780Plus then branch on the exit code of the PROGFILE program.
SYstem should be used with caution, especially within a job/script file where a response to a prompt is required.
Chapter 4 - 3780Plus Commands
Cleo 3780Plus for Windows User's Guide 107
4.34 TAble - Display or Change Translation Table(s)
The TAble command provides an easy method of changing the ASCII/EBCDIC character translations. The TAble command line format is:
TAble OutFileName [InFileName]
where:
OutFileName is the ASCII to EBCDIC translation file previously created with a text editor. See B.5.1 ASCII to EBCDIC Translation Table in Appendix B - File Formats for the required file format.
InFileName is an optional EBCDIC to ASCII translation file previously created with a text editor. See B.4 ASCII/EBCDIC Translation File(s) in Appendix B - File Formats for the required file format.
TAble, when executed with two filenames, reads the translations found in the previously created files. Translations found in the first file are used for subsequent ASCII to EBCDIC conversions for outgoing data. Translations found in the second file are used for subsequent EBCDIC to ASCII conversions for incoming data.
Example: TABLE asciiebc.cap ebcascii.ovr
changes the outgoing translation table to convert all lowercase characters to uppercase characters before transmission. Incoming characters are translated normally.
TAble, when executed with a single filename, reads the translations found in the previously created file. These translations are used for subsequent ASCII to EBCDIC conversions. If 3780Plus is configured for a single translation file, this file is also used for EBCDIC to ASCII conversions. See B.5.1 ASCII to EBCDIC Translation Table and B.6 Video Display File in Appendix B - File Formats for details.
After a TAble OutFileName InFileName command, a status line is not posted but you may branch on one of the following status messages: OK if the translation table(s) loaded properly, FAIL if there was an error in the table(s), or NOFILE if the specified file(s) could not be found or opened. See B.3.3 Status Messages in Appendix B - File Formats for details.
TAble may also be executed interactively with the Configuration|Translation Tables option.
Chapter 4 - 3780Plus Commands
Cleo 3780Plus for Windows User's Guide 108
4.35 TExt - Transmit Text File(s)
The TExt command may be used to transmit a file to the remote system. These files are normally translated from the ASCII character set to the EBCDIC character set then sent in non-transparent mode. This is the most common method of transmission. The TExt command line format is:
TExt filename [RemoteFilename] [-B|-E|-N|-R|-X]
where:
filename is the file or files to be sent to the remote system. Wildcards may be used within file names. Example: TEXT asciiebc.* Note that if one of a group of transmitted files specified by a wildcard is terminated by anything other than a NRMEOF (normal end of file) status, the remaining specified files are not sent and the command is aborted.
RemoteFilename is an optional remote file name. This should be used only in a 3780Plus to 3780Plus connection. This filename is assigned to the file received by the remote processor. See 4.35.1 File Naming for details.
-B option allows data to be translated from the ASCII character set to the EBCDIC character set before being transmitted in transparent (binary) mode. This differs from the BInary -T command because it translates special characters (i.e. CR/LF to RS).
-E allows you to send multiple files to the host without releasing the line. The normal mode is for all transmit commands to send an EOT after each file. The -E option suppresses the EOT allowing you to retain control of the line.
-N allows non-transparent (text) data to be passed through as-is. Without this option, files are translated from the ASCII character set to the EBCDIC character set before transmission. Use this option with caution. Normal ASCII characters (i.e. 2 or 7) interfere with protocol characters preventing transmission.
-R allows record separators (IRS) to be omitted on files transmitted. This option essentially removes carriage return, line feed, and new line characters, and packs the data into one record. Without this option, carriage return/linefeeds are translated into record separators (IRS). In general, most host computers require record separators in non-transparent (text) files. This option is valid only in 3780 mode.
-X allows you to concatenate several files to appear as one file to the host. The -X option suppresses the ETX (End of Text) at the end of the last block in the file and the EOT. The ETX character represents the file separator character to the host. You should not use the -X option on the last file you send to insure that it is properly terminated with an ETX. Note: The EOt command does not send an ETX, so if you have just used the -X option and want to close the transaction with the EOt command, you will not have sent the ETX. This is considered bad form within the protocol and will cause unpredictable results at the receiving end.
Example: TEXT *.HLP
sends all files with the .HLP extension.
Chapter 4 - 3780Plus Commands
Cleo 3780Plus for Windows User's Guide 109
Example: TEXT C:\MYFILES\MY.TXT /usr/YOUR.TXT
would send the file C:\MYFILES\MY.TXT with the file name /usr/YOUR.TXT. This would save the MY.TXT file on a remote UNIX system as YOUR.TXT in the /usr directory. The remote filename should only be used in 3780Plus to 3780Plus connections.
Multiple options may be specified together. In this case only one dash (-) should precede all options.
Example: TEXT SIGNON.FIL -RE TEXT *.C -R
Word processors create documents that appear to be ASCII files, and the temptation is to transmit these files using the TExt command. However, some word processing packages change the high bit on each character, specifying a command to the word processor. If you suspect this is the case with your word processor, send document files using the BInary command.
A File Transfer Status window is displayed on the screen during transmission. See 2.6 File Transfer Status in Chapter 2 - Operation for details.
After each file is transmitted, a status line is posted to the log and monitor files, if open, giving a completion status message for the transmission and the number of data blocks sent. See B.3.2 The Transmit/Receive Status Line in Appendix B - File Formats for details. If the transmission was successful, a NRMEOF (Normal End of File) status message will display. See Table B.3 Transmit Completion Status Messages in Appendix B - File Formats for a complete list and B.3.3 Status Messages for a complete description of each status message.
In a job/script file, you may branch on one of the following status messages: OK if the transmission is successful; FAIL if the transmission fails; or any of the status messages listed in Table B.3. Note, if a wildcard is used to transmit multiple files, you may branch only on the status of the last file transmitted.
If the line is down when the TExt command is executed and no branch command follows, 3780Plus will wait until a connection is made before continuing.
4.35.1 File Naming
In a 3780Plus to 3780Plus connection only, an optional destination filename may be specified as the second file name of a TExt, BInary, or SEND command. This filename is assigned to the file received by the remote processor.
Remote filenaming is a 3780Plus function and not an IBM 2780/3780 function and, therefore, will not work when sending to mainframes or other 3780 packages.
Example: TEXT A:MY.TXT YOUR.TXT BINARY /USER/MY.EXE YOUR.EXE
In this example, the receiving computer would name the received files YOUR.TXT and YOUR.EXE, overriding any filename given in the remote REceive command. If the screen or printer was enabled at the receiving end, however, the files would be directed to the screen or the default printer name and would not be saved to the specified filenames.
Remote filenaming supports wildcards. The remote name, however, must be specified with the same name as the original.
Chapter 4 - 3780Plus Commands
Cleo 3780Plus for Windows User's Guide 110
Example: SEND *.C *.C
This will send any files with the extension .C to the remote terminal and give them the same name as the original files.
If you do not specify the remote name to be the same as the original, you will receive the message:
# Wild card file parameters must match to use remote file naming.
The 3780Plus file naming convention is:
:FILEIDfilename<0x00><CR><LF>
If the above sequence appears anywhere within a file, the string after :FILEID is the filename under which received data is stored. This record, up to and including the <CR><LF>, is then discarded.
When 3780Plus for Windows receives remote filenames, existing files with the same name will not be overwritten. If the incoming filename already exists, the file will be saved to the default REceive filename.
TExt may also be executed interactively with the Transmit|Text or Transmit|Send option or the SEND speed button or in the background with drag and drop.

Chapter 4 - 3780Plus Commands
Cleo 3780Plus for Windows User's Guide 111
4.36 TOken - Enable, Disable, Display, or Set Token Variables
The TOken command enables, disables, displays, changes, or adds to the current token values. The format of the TOken command is:
TOken [ON|OFF] or
TOken [token [token...]] or
TOken [x=token [x=token...]] where:
ON is an option to enable token, variable, and counter processing. Token, variable, and counter processing may also be enabled with any form of the TOken command (except TOken OFF) or the Startup|Token option from the Configurator menu.
OFF is an option to disable token, variable, and counter processing. Disabling this processing allows you to send files and/or keyboard messages containing the $ and % characters. Token, variable, and counter processing is disabled by default.
token is an optional variable for parameter substitution. Up to 19 tokens may be supplied.
x is the number of the token to be added or changed. x may be a value between 1 and 19 inclusive.
If the TOken command is entered without options, 3780Plus displays the current status of the token/variable/counter processing and values for each of the tokens.
Tokens are similar to MS-DOS replaceable parameters or UNIX/XENIX positional parameters. The first token may be accessed with %1 or $1, the second with %2 or $2, and so on. These tokens may be used anywhere within 3780Plus, except as command names or labels.
Example: TOKEN file1 file2 file3 TEXT $1 $2 RECEIVE %3
would result in:
TEXT file1 file2 RECEIVE file3
which would send file1 to the remote 3780Plus as file2 and save the received file as file3.
Tokens may be used in combination with environment variables (also referred to as named variables, user-defined variables, or shell variables) or user-defined variables. These environment variables may be accessed with the %variable% or $variable command.

Chapter 4 - 3780Plus Commands
Cleo 3780Plus for Windows User's Guide 112
For example, if TEMP=C:\windows\temp in the environment, the following commands:
TOKEN 5=file5 6=file6 7=file7 TEXT $TEMP\$5 $6 RECEIVE %TEMP%\%7
would result in:
TEXT C:\windows\temp\file5 file6 RECEIVE C:\windows\temp\file7
which would send C:\windows\temp\file5 to the remote as file6 and save the received file as C:\windows\temp\file7. See your operating system manual for information on setting environment variables. See 4.7.5.1 Token Variables, 4.7.5.2 Environment Variables, and 4.7.5.3 User-defined Variables for a description of each variable type.
Tokens may also be set/changed with the EXecute command (see 4.13 EXecute - Execute Commands from a Job/Script File).
Chapter 4 - 3780Plus Commands
Cleo 3780Plus for Windows User's Guide 113
4.37 VOice - Disconnect Phone Line and Disable Autoanswer
The VOice command causes the 3780Plus program to disconnect the current phone line connection and disable autoanswering. The modem mode on the 3780Plus status bar will display Voice. The VOice command has no options; the VOice command line format is:
VOICE
The VOice command transmits the 3780 hangup message (DLE EOT), hangs up the phone line, then returns the command prompt indicating that 3780Plus is ready to accept another command.
If the hangup message (DLE EOT) is received by 3780Plus during the communications process, 3780Plus will drop the phone line for one second then return to the answer mode for further transactions.
Example: TEXT LOGIN BRANCH ON OK TO 1 VOICE QUIT
The above job file would disconnect the line if the login message was not sent normally.
VOice may also be executed interactively with the Line|Hangup option or the HANG speed button. The Line|Hangup option or the HANG speed button, however, do not disable autoanswer.
Chapter 4 - 3780Plus Commands
Cleo 3780Plus for Windows User's Guide 114
4.38 WAitfor - Wait for Specified Time
The WAitfor command allows you wait until the specified time to continue in the job file. This command is helpful to schedule communications for certain times, for instance when the phone rates are lower. The format of the WAitfor command is:
WAitfor [+]hh:mm
where:
+ is an option to wait the specified amount of time before continuing. Example: WAITFOR +1:00 will wait one hour before continuing. Without this option, WAitfor waits until the specified time. Example: WAITFOR 1:00 will wait until 1:00 a.m. before continuing.
hh is the hour in military time. For example: 1 p.m. is hour 13, 2 p.m. is hour 14, etc.
mm is the minutes.
Example: WAIT 22:00 AUTODIAL 1-800-555-1212
waits until 10:00 p.m. to dial the host and begin communications.
The WAitfor command returns the status message OK if the wait is completed, ABORT if wait is aborted, or FAIL if the time is invalid.
See also 4.31 SLeep - Pause Specified Seconds.
Chapter 4 - 3780Plus Commands
Cleo 3780Plus for Windows User's Guide 115
4.39 XX - Post Current 3780Plus Information
The XX command writes current 3780Plus information such as the 3780Plus version, the current configuration settings to the log file (if open). The XX command has no options; the XX command line format is:
XX The XX command posts a message similar to:
32-Bit API Doorway R.09055 3780Plus (R. 07297) under WINDOWS NT or 95 with the IAPI available. Using video file 'video.ovr'. Using '.\3780Plus.ini'. Working Directory: C:\3780PLUS. ASCII <-> EBCDIC Table is: asciiebc.ovr. CONFIGURATION: DEFAULT Protocol Type = 3780 Line Type = Switched (DSR) Terminal Type = Primary Terminal Identification = NULL Transmission Data Block Format Modem Hardware Parameters Record Size = 80 Blocking Factor = 1 Modulation Type: Space Compression = ON Bell 201 (2400 BPS) New Line Suppression = OFF Dialing Method: Synchronous Protocol Line Parameters Repeat Limit = 4 Retransmission Limit = 4 Wait Limit = 10 Delay Limit = 100 Bid Limit = 15 Idle Timeout = OFF Receive Limit = 15 The Configuration File is: DEFAULT. Totals (Read Status): NAKs 0 TTDs 0 RVIs 0 Timeouts 0 Re-ACKs 0 RX 0 Totals (Write Status): NAKs 0 WACKs 0 Bad ACKs 0 Timeouts 0 Re-ENQs 0 TX 0 Modem dialing method - UDS. SYNCcable (9600). . .

Chapter 4 - 3780Plus Commands
Cleo 3780Plus for Windows User's Guide 116
4.40 ## - Comment Line
The ## command allows you to add comments to job files. The format of the ## command is:
## [comment] where:
comment is an optional statement that describes job file functions. This comment may be up to 80 characters in length.
Example: ## This job file receives stock reports from Chicago office.
The above comment is used to describe the contents of the job file.
Comment lines are not written to the log file. To write a comment to the log file, use the LOg message command.
The ## command is available only from within 3780Plus job files. It is not available for use in the interactive mode.
Cleo 3780Plus for Windows User's Guide 117
Chapter 5: 3780Plus Tutorial This chapter contains several examples of hypothetical 3780Plus sessions. The examples are set up as job/script files which could be run unattended by setting the Startup|Job Name from the Setup program or the Configurator program prior to starting 3780Plus, or by using the System|Run Job command within 3780Plus. These commands (without the BRanch commands) could also be entered interactively from the Windows|Command Window. Where applicable, both sides of the communication session are shown. This chapter contains the following examples:
• Retail sales
• Remote job entry
• Insurance batch transactions
A section discussing the session follows each example.
These examples demonstrate some of the flexibility inherent in 3780Plus. A series of commands can be entered interactively or from a job file to handle almost any of your data communication needs.
For more detailed information on the 3780Plus commands, see Chapter 4 - 3780Plus Commands.
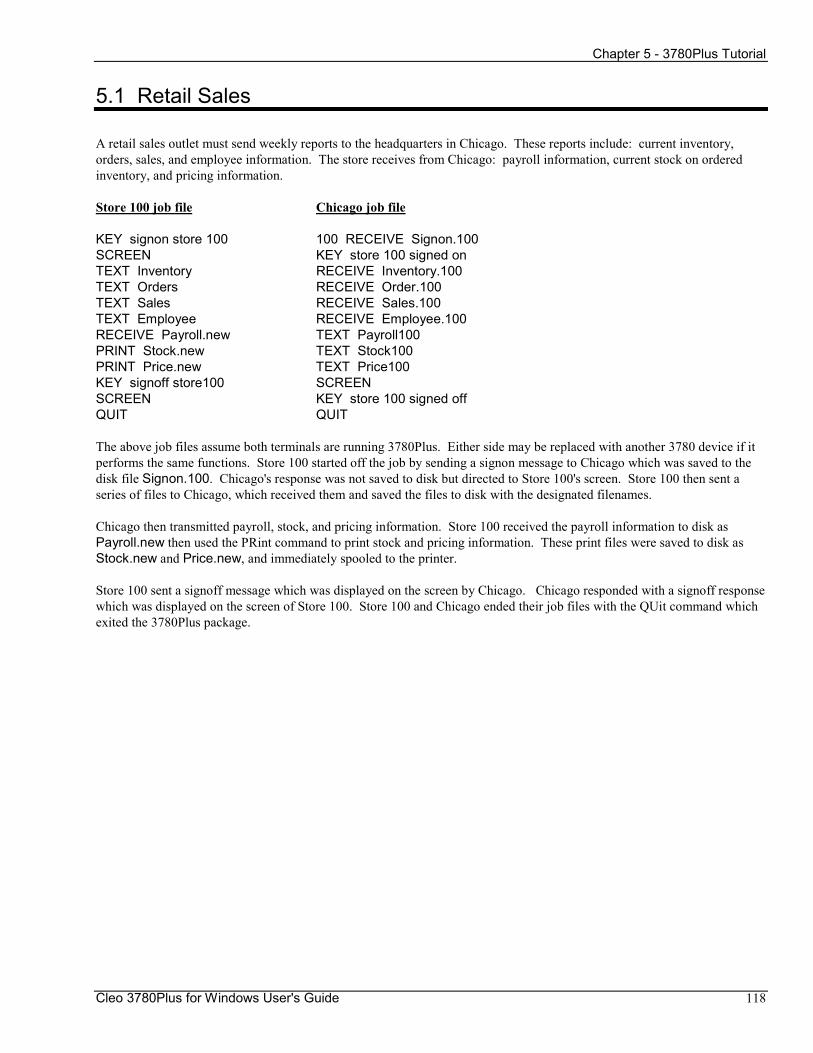
Chapter 5 - 3780Plus Tutorial
Cleo 3780Plus for Windows User's Guide 118
5.1 Retail Sales
A retail sales outlet must send weekly reports to the headquarters in Chicago. These reports include: current inventory, orders, sales, and employee information. The store receives from Chicago: payroll information, current stock on ordered inventory, and pricing information.
Store 100 job file Chicago job file
KEY signon store 100 100 RECEIVE Signon.100 SCREEN KEY store 100 signed on TEXT Inventory RECEIVE Inventory.100 TEXT Orders RECEIVE Order.100 TEXT Sales RECEIVE Sales.100 TEXT Employee RECEIVE Employee.100 RECEIVE Payroll.new TEXT Payroll100 PRINT Stock.new TEXT Stock100 PRINT Price.new TEXT Price100 KEY signoff store100 SCREEN SCREEN KEY store 100 signed off QUIT QUIT
The above job files assume both terminals are running 3780Plus. Either side may be replaced with another 3780 device if it performs the same functions. Store 100 started off the job by sending a signon message to Chicago which was saved to the disk file Signon.100. Chicago's response was not saved to disk but directed to Store 100's screen. Store 100 then sent a series of files to Chicago, which received them and saved the files to disk with the designated filenames.
Chicago then transmitted payroll, stock, and pricing information. Store 100 received the payroll information to disk as Payroll.new then used the PRint command to print stock and pricing information. These print files were saved to disk as Stock.new and Price.new, and immediately spooled to the printer.
Store 100 sent a signoff message which was displayed on the screen by Chicago. Chicago responded with a signoff response which was displayed on the screen of Store 100. Store 100 and Chicago ended their job files with the QUit command which exited the 3780Plus package.
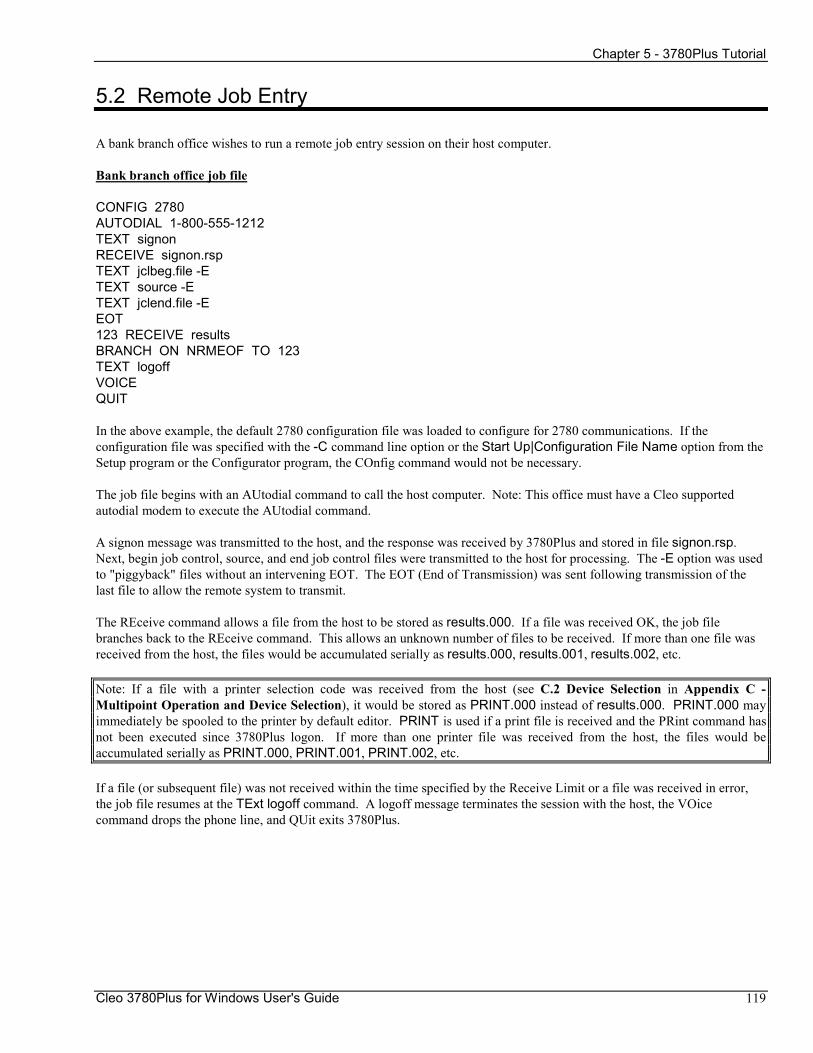
Chapter 5 - 3780Plus Tutorial
Cleo 3780Plus for Windows User's Guide 119
5.2 Remote Job Entry
A bank branch office wishes to run a remote job entry session on their host computer.
Bank branch office job file
CONFIG 2780 AUTODIAL 1-800-555-1212 TEXT signon RECEIVE signon.rsp TEXT jclbeg.file -E TEXT source -E TEXT jclend.file -E EOT 123 RECEIVE results BRANCH ON NRMEOF TO 123 TEXT logoff VOICE QUIT
In the above example, the default 2780 configuration file was loaded to configure for 2780 communications. If the configuration file was specified with the -C command line option or the Start Up|Configuration File Name option from the Setup program or the Configurator program, the COnfig command would not be necessary.
The job file begins with an AUtodial command to call the host computer. Note: This office must have a Cleo supported autodial modem to execute the AUtodial command.
A signon message was transmitted to the host, and the response was received by 3780Plus and stored in file signon.rsp. Next, begin job control, source, and end job control files were transmitted to the host for processing. The -E option was used to "piggyback" files without an intervening EOT. The EOT (End of Transmission) was sent following transmission of the last file to allow the remote system to transmit.
The REceive command allows a file from the host to be stored as results.000. If a file was received OK, the job file branches back to the REceive command. This allows an unknown number of files to be received. If more than one file was received from the host, the files would be accumulated serially as results.000, results.001, results.002, etc.
Note: If a file with a printer selection code was received from the host (see C.2 Device Selection in Appendix C - Multipoint Operation and Device Selection), it would be stored as PRINT.000 instead of results.000. PRINT.000 may immediately be spooled to the printer by default editor. PRINT is used if a print file is received and the PRint command has not been executed since 3780Plus logon. If more than one printer file was received from the host, the files would be accumulated serially as PRINT.000, PRINT.001, PRINT.002, etc.
If a file (or subsequent file) was not received within the time specified by the Receive Limit or a file was received in error, the job file resumes at the TExt logoff command. A logoff message terminates the session with the host, the VOice command drops the phone line, and QUit exits 3780Plus.
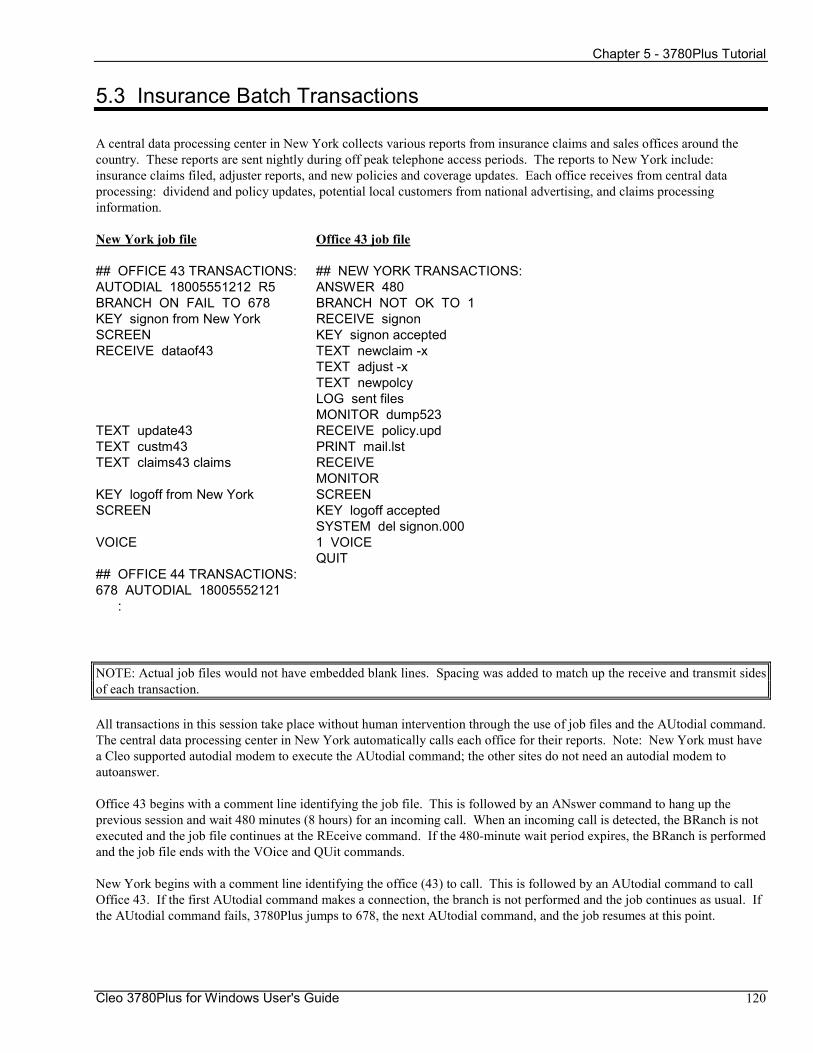
Chapter 5 - 3780Plus Tutorial
Cleo 3780Plus for Windows User's Guide 120
5.3 Insurance Batch Transactions
A central data processing center in New York collects various reports from insurance claims and sales offices around the country. These reports are sent nightly during off peak telephone access periods. The reports to New York include: insurance claims filed, adjuster reports, and new policies and coverage updates. Each office receives from central data processing: dividend and policy updates, potential local customers from national advertising, and claims processing information.
New York job file Office 43 job file
## OFFICE 43 TRANSACTIONS: ## NEW YORK TRANSACTIONS: AUTODIAL 18005551212 R5 ANSWER 480 BRANCH ON FAIL TO 678 BRANCH NOT OK TO 1 KEY signon from New York RECEIVE signon SCREEN KEY signon accepted RECEIVE dataof43 TEXT newclaim -x TEXT adjust -x TEXT newpolcy LOG sent files MONITOR dump523 TEXT update43 RECEIVE policy.upd TEXT custm43 PRINT mail.lst TEXT claims43 claims RECEIVE MONITOR KEY logoff from New York SCREEN SCREEN KEY logoff accepted SYSTEM del signon.000 VOICE 1 VOICE QUIT ## OFFICE 44 TRANSACTIONS: 678 AUTODIAL 18005552121 :
NOTE: Actual job files would not have embedded blank lines. Spacing was added to match up the receive and transmit sides of each transaction.
All transactions in this session take place without human intervention through the use of job files and the AUtodial command. The central data processing center in New York automatically calls each office for their reports. Note: New York must have a Cleo supported autodial modem to execute the AUtodial command; the other sites do not need an autodial modem to autoanswer.
Office 43 begins with a comment line identifying the job file. This is followed by an ANswer command to hang up the previous session and wait 480 minutes (8 hours) for an incoming call. When an incoming call is detected, the BRanch is not executed and the job file continues at the REceive command. If the 480-minute wait period expires, the BRanch is performed and the job file ends with the VOice and QUit commands.
New York begins with a comment line identifying the office (43) to call. This is followed by an AUtodial command to call Office 43. If the first AUtodial command makes a connection, the branch is not performed and the job continues as usual. If the AUtodial command fails, 3780Plus jumps to 678, the next AUtodial command, and the job resumes at this point.

Chapter 5 - 3780Plus Tutorial
Cleo 3780Plus for Windows User's Guide 121
New York's signon message is saved to disk at Office 43 as signon.000. Office 43's signon response is displayed on New York's screen. Office 43 then transmits three text files to New York which are saved as one file dataof43.000. This example of "piggybacking" illustrates that only an End of Text (ETX) terminates a file and an End of Transmission (EOT) terminates a REceive command in a job file. The -X option makes all three files look like one file to New York. If the -X option was omitted from the TEXT newclaim -X command, New York, upon receiving TEXT's automatic ETX and EOT, would have continued with the next command in its job file (i.e. TEXT update43). Note: The TEXT newpolcy command automatically sends an ETX and EOT.
The message "sent files" is posted to the log file. A monitor file with the filename dump523 is created with the MOnitor command. Dump523 will store all protocol and data sent or received until closed by the MOnitor command later in the job file.
New York now transmits policy updates which are saved to disk by Office 43 as policy.upd. New York next transmits a customer mailing list which is saved to disk by Office 43 as print file mail.lst. Note that no command option was specified after the filename in the PRint command, so printer spooling will not occur. The PRint command without a command option functions almost identically to the REceive command. One important difference is that printer escape sequences are translated to the appropriate action when received with the PRint command, while the escape sequences are saved to disk with the REceive command.
New York now transmits a claims file which is saved to disk by Office 43 as claims. Notice that a receive filename was not specified after the REceive command. Even if a filename had been specified, the file would have been saved as claims because a transmit filename overrides a receive filename. (See 4.35.1 File Naming in Chapter 4 - 3780Plus Commands).
The MOnitor command in Office 43's job file closes the file dump523 which contains the protocol and data received at Office 43 since the command was invoked. The monitor file is very useful for diagnostic purposes, but it consumes a large amount of disk space. The MOnitor command should be used only when you suspect protocol problems.
To end the session, logoff sequences are exchanged and displayed on the respective screens. On Office 43, the SYstem command is used to execute the DOS command to delete the signon file received to disk earlier in the session. New York and Office 43's VOice commands exchange the 3780 hangup message (DLE EOT) and drop the line. The QUit command causes Office 43 to exit 3780Plus. New York is now ready to call the next office (identified by the comment line) using the AUtodial command and continue with transactions to Office 44.

Chapter 5 - 3780Plus Tutorial
Cleo 3780Plus for Windows User's Guide 122

Chapter 5 - 3780Plus Tutorial
Cleo 3780Plus for Windows User's Guide 123
5.4 Insurance Batch Transactions II -Tokens
The previous insurance transactions may be accomplished with a shorter job file in the New York office. This job file could run against the same Office 43 job file in the prior example. This New York job file takes advantage of 3780Plus' token variable support. Tokens may be used to pass information into the job file from the 3780Plus command line. In this case the information passed is the office number and the phone number of the office to call. The batch or script file used to start New York's job file would look like this:
3780Plus -J REPORTS.JOB -K 43 18005551212 3780Plus -J REPORTS.JOB -K 44 18005552121 :
New York job file (REPORTS.JOB) Resulting New York job file
## ALL OFFICE TRANSACTIONS: ## ALL OFFICE TRANSACTIONS: AUTODIAL %2 R5 AUTODIAL 18005551212 R5 BRANCH ON FAIL TO 678 BRANCH ON FAIL TO 678 KEY signon from New York KEY signon from New York SCREEN SCREEN RECEIVE dataof%1 RECEIVE dataof43 TEXT update%1 TEXT update43 TEXT custm%1 TEXT custm43 TEXT claims%1 claims TEXT claims43 claims KEY logoff from New York KEY logoff from New York SCREEN SCREEN VOICE VOICE QUIT QUIT
In this example, the 3780Plus -K command line option is followed by token #1, the office number, and token #2, the phone number of the office to dial. In the first 3780Plus execution, the %2 in the AUTODIAL %2 R5 job file command is replaced by the second token (18005551212) resulting in the command AUTODIAL 18005551212 R5. The %1 in the RECEIVE dataof%1, TEXT update%1, TEXT custm%1, and TEXT claims%1 claims commands are replaced by the first token (43). The Resulting New York job file above shows the results of executing the first 3780Plus command line above; note that this result is identical to the original New York job file.
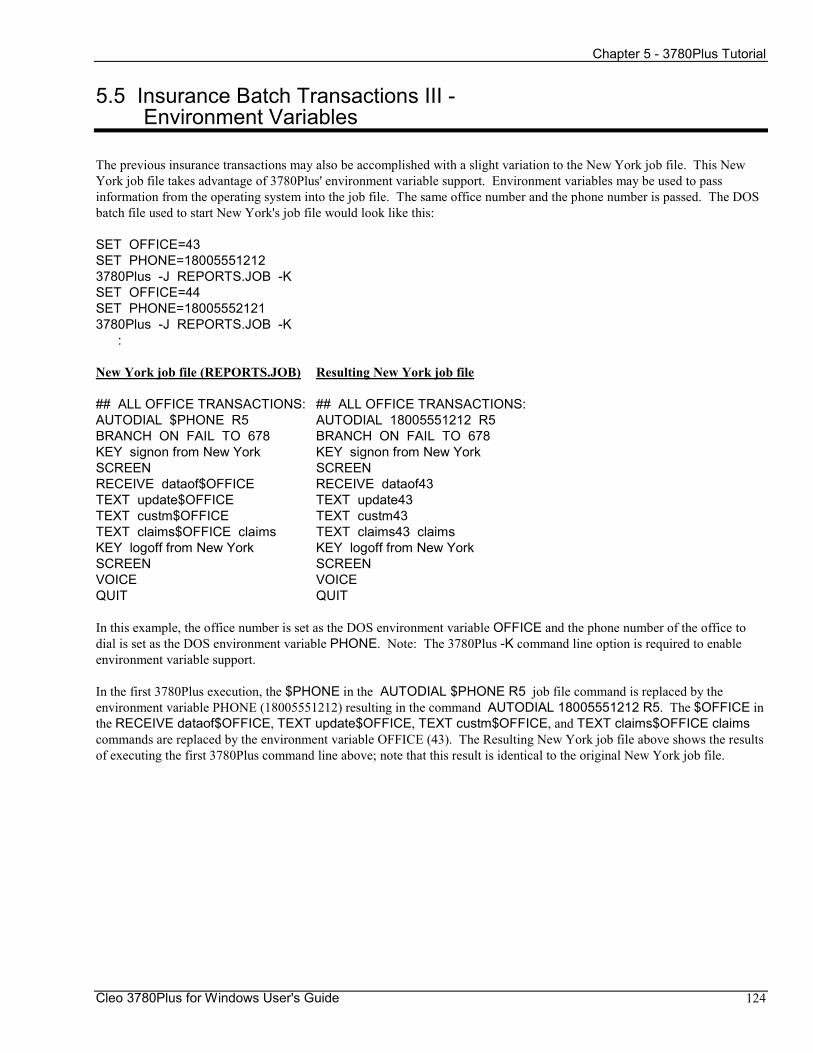
Chapter 5 - 3780Plus Tutorial
Cleo 3780Plus for Windows User's Guide 124
5.5 Insurance Batch Transactions III - Environment Variables
The previous insurance transactions may also be accomplished with a slight variation to the New York job file. This New York job file takes advantage of 3780Plus' environment variable support. Environment variables may be used to pass information from the operating system into the job file. The same office number and the phone number is passed. The DOS batch file used to start New York's job file would look like this:
SET OFFICE=43 SET PHONE=18005551212 3780Plus -J REPORTS.JOB -K SET OFFICE=44 SET PHONE=18005552121 3780Plus -J REPORTS.JOB -K :
New York job file (REPORTS.JOB) Resulting New York job file
## ALL OFFICE TRANSACTIONS: ## ALL OFFICE TRANSACTIONS: AUTODIAL $PHONE R5 AUTODIAL 18005551212 R5 BRANCH ON FAIL TO 678 BRANCH ON FAIL TO 678 KEY signon from New York KEY signon from New York SCREEN SCREEN RECEIVE dataof$OFFICE RECEIVE dataof43 TEXT update$OFFICE TEXT update43 TEXT custm$OFFICE TEXT custm43 TEXT claims$OFFICE claims TEXT claims43 claims KEY logoff from New York KEY logoff from New York SCREEN SCREEN VOICE VOICE QUIT QUIT
In this example, the office number is set as the DOS environment variable OFFICE and the phone number of the office to dial is set as the DOS environment variable PHONE. Note: The 3780Plus -K command line option is required to enable environment variable support.
In the first 3780Plus execution, the $PHONE in the AUTODIAL $PHONE R5 job file command is replaced by the environment variable PHONE (18005551212) resulting in the command AUTODIAL 18005551212 R5. The $OFFICE in the RECEIVE dataof$OFFICE, TEXT update$OFFICE, TEXT custm$OFFICE, and TEXT claims$OFFICE claims commands are replaced by the environment variable OFFICE (43). The Resulting New York job file above shows the results of executing the first 3780Plus command line above; note that this result is identical to the original New York job file.

Cleo 3780Plus for Windows User's Guide 125
Appendix A: Modem Support 3780Plus must connect to another 3780 device via modems (one for each 3780 device), a modem eliminator, or a null modem. This appendix contains information on the following modem types:
• Internal modems
• External autodial modems
• External non-autodial modems
• Modem eliminators
• Null modems
For information on the Dial option, see 3.3.1 Dial - Access the Dialing Directory in Chapter 3 - 3780Plus Menus. For information on the AUtodial command, see 4.2 AUtodial - Automatic Dial in Chapter 4 - 3780Plus Commands. For more detailed information on the Configuration option, see Chapter 1 - Configuration and 4.5 COnfig - Display or Change Configuration in Chapter 4 - 3780Plus Commands.
Appendix A - Modem Support
Cleo 3780Plus for Windows User's Guide 126
A.1 Internal Cleo Modems
3780Plus operates on a variety of internal modems (i.e. modems that are installed inside your computer). All internal modems support automatic dialing and automatic answering.
The following 3780Plus configuration parameters must be set:
Protocol|Line Type = Switched Line1 Line|Modulation = modem type required2
See the appropriate Installation Guide section for more information on individual internal modems.
1 This is the default setting for all internal modems. Some internal modems may be configured to operate on a leased line. To run on a leased line, the Line Type setting should be changed to Leased Line. Switch and/or jumper changes must be made on the modem, and a different phone cable is required. See the appropriate Installation Guide section for details.
2 This setting is ignored on modems that only support one synchronous modem type.

Appendix A - Modem Support
Cleo 3780Plus for Windows User's Guide 127
A.2 External Autodial Modems
3780Plus operates with a variety of external modems (i.e. modems outside your computer). 3780Plus may use any of the following methods to automatically dial your modem.
A.2.1 AT Command Set Modems
3780Plus supports the AT command set to configure and autodial a wide variety of modems. AT commands are sent asynchronously to the Hayes compatible modem. Once the connection is made, communication changes from asynchronous to synchronous.
The following 3780Plus configuration parameters must be set:
Protocol|Line Type = Leased Line Line|Modulation = modem type required1 Line|Dialing Method = AT Command.
Supported AT command modems include:
• Hayes SmartModem 2400 (CCITT V.22bis)
• Racal-Vadic 2400PA (CCITT V.22bis)
• MultiTech Multimodem224 (CCITT V.22bis)
• Hayes V-Series ULTRA SmartModem 9600 (CCITT V.32)
• MultiTech MultiModemV32 (CCITT V.32)
• UDS V.32 (CCITT V.32)
• UDS V.32E (CCITT V.32)
• USRobotics Courier V.32 (CCITT V.32)
• Motorola UDS FasTalk II (CCITT V.32bis)
• Penril Alliance V.32/14.4M (CCITT V.32bis)
• UDS V.3229 (CCITT V.32bis)
• UDS FasTalk 32bx (CCITT V.32bis)
• Motorola V.3400 (CCITT V.34)
• Motorola V.34R (CCITT V.34)
1 For external V.34 28,800 bps modems, set the Modulation type to 38,400 BPS.
Appendix A - Modem Support
Cleo 3780Plus for Windows User's Guide 128
The following AT commands are issued by the 3780Plus autodial:
V Return numeric result codes Q Return result codes/messages E Disable echo back S8=5 Pause 5 seconds &C1 Carrier Detect (CD) follows line &D1 Switch to command mode when DTR drops M1 Speaker on until line connect &M1 Change to synchronous mode when carrier detected S7=xx Wait xx seconds for call to complete1 S0=1 Autoanswer on the first ring S0=0 Disable autoanswer DT or DP Tone dial a number or Pulse dial a number1
1 The appropriate commands are sent according to the autodial command given by the user.
3780Plus sends the command ATVQE, then the modem setup string. The modem setup string may be controlled by message #132 of the video.ovr file. An alternate setup string may be sent by inserting the new sequence between the ^B and ^C characters in message #132. The default modem setup string is:
AT S8=5&C1&D1M1&M1
Additional AT modem setup string(s) may be sent with 3780Plus AT ATxx command. For instance, to configure the Hayes Ultra 96 modem to connect at the maximum line speed of 2400, use the command AT ATS37=6. Note: The modem will only accept AT strings when it is off-line.
On autodial, 3780Plus sends the command ATS7=xx where xx is taken from the final Txx option of the Dial option or the AUtodial command (the default is 30).
The dial result messages may be modified with message #150 of the video.ovr file. See B.3.3 Status Messages in Appendix B - File Formats for details.
Note: The autodial pause time (Txx) is rounded to the next five (5) second interval. To pause less than five seconds, set S8= to the required pause time and use a pause time of T5.
Appendix A - Modem Support
Cleo 3780Plus for Windows User's Guide 129
A.2.2 Motorola/UDS BSC Modems
3780Plus supports the 3780 BSC protocol to autodial the Motorola/Universal Data Systems bisynchronous 3780 autodial modems. Note: See A.2.1 AT Command Set Modems for information on dialing the Motorola/UDS V.32, V.32E, V.34R, and V.3400 modems.
The following 3780Plus configuration parameters must be set:
Protocol|Line Type = Switched Line Line|Modulation = (any) Line|Dialing Method = Synchronous
Supported UDS BSC modems include:
• UDS 201C/D (Bell 201)
• UDS 2140 (Bell 201)
• UDS 208B/D (Bell 208)
• UDS 2860 (Bell 208 or Bell 201)
UDS 201C/D: The following default settings must be changed for 3780Plus to run properly: DSR In Dial Mode (S2-6) must be changed to "Normal" (OFF); and No Activity Abort (S2-7) must be changed to "Normal" (OFF).
UDS 208B/D: The following default settings must be changed for 3780Plus to run properly: DSR Follows RTS (E23/Spare) must be changed to "Disabled"; Line Current Disconnect (S3-2) should be changed to "Enabled" (ON); DSR In Dial Mode (S3-3) must be changed to "Normal" (OFF); and Autodialer (S3-6) must be changed to "Enabled" (ON).
NOTE: The final Txx option of the Dial option or the AUtodial command is invalid with these UDS modems. The default answer back tone detect period is 60 seconds.
Appendix A - Modem Support
Cleo 3780Plus for Windows User's Guide 130
A.2.3 Synchronous AutoDial Language (SADL) Modems
3780Plus supports Racal-Vadic's Synchronous AutoDial Language (SADL). Bisynchronous SADL is used to configure and autodial these modems.
The following 3780Plus configuration parameters must be set:
Protocol|Line Type = Switched Line Line|Modulation = (any) Line|Dialing Method = Synchronous
Supported SADL modems include:
• Racal-Vadic 4850PA (Bell 208)
• Okidata CLD4800A/B (Bell 208)
• Racal-Vadic 9650PA (CCITT V.29)
3780Plus changes several of the programmable options of the modem. These options are listed in Table A.1 below.
____________________________________________________________________________________________________ OPTION DEFAULT CLEO SETTING #1. Standard Options ENABLED/1 DISABLED/2 #2. DSR Control CSI/1 NORMAL/3 #3. CXR Control CSI/1 CSI/1 #4. Autoanswer ENABLED/1 ENABED/1 #5. Dial Mode AUTOSELECT/1 TONE/2 or PULSE/3* #6. Blind Dialing DISABLED/1 ENABLED/2 #7. Slave Clock NOT USED/1 NOT USED/1 #8. Answer Delay FIRST RING/1 FIRST RING/1 #9. Loss of Carrier Detect NOT USED/1 NOT USED/1 #10. Failed Call Timer 60 SECONDS/1 30 SECONDS/2 or 60 SECONDS/1*
*These values are set according to the autodial command given by the user. ____________________________________________________________________________________________________
TABLE A.1 SADL PROGRAMMABLE OPTIONS
The modem setup string is controlled by message #131 of the video.ovr file. An alternate setup string may be sent by modifying the sequence between the ^B and ^C characters in message #131. The default modem setup string is:
O2311221112
3780Plus changes these parameters for each separate autodial sequence. You should note that there are many more options that may be changed. We have left these options unchanged so that you may set them according to your specific situation. The following options, for instance, will significantly impact the performance of your communication session:
OPTION RECOMMENDED SETTING #16. Satellite Option Must be ENABLED if you are on a satellite link. #17. Clear to Send Delay Should be long if you are using long distance communications. #20. Line Current Disconnect Should be ENABLED so software can sense when the line goes down.
Appendix A - Modem Support
Cleo 3780Plus for Windows User's Guide 131
A.2.4 CCITT V.25bis Modems
3780Plus supports a simplified CCITT V.25bis command set. The synchronous V.25bis Call Request Number (CRN) or Call Request Number with Identification (CRI) command is used to communicate with various V.25bis compatible modems. The default is CRN. The CRI command is used if the phone number contains a semicolon (;) character followed by an identification code. For example: 1-800-555-1212;123.
The following 3780Plus configuration parameters must be set:
Protocol|Line Type = Switched Line or Leased Line1 Line|Modulation = (any) Line|Dialing Method = Synchronous or V.25bis
Supported V.25bis modems include:
• Codex 2264 (CCITT V.32)
• Racal-Vadic 9642PA (CCITT V.32 and Bell 208)
• UDS 9648T (CCITT V.29)
NOTES:
(1) The V.25bis dial string is sent out as synchronous, 7 bit, odd parity ASCII data;
(2) The modem must be configured to provide CTS when it is off line.
(3) 3780Plus uses the V.25bis standard < (less than) character to pause during dialing. This pause character may be changed (see B.5 Video Display File in Appendix B - File Formats).
1 In general, Bell modems (except Bell 212) will require Switched Line settings and CCITT modems (except CCITT V.29) will require Leased Line settings.
Appendix A - Modem Support
Cleo 3780Plus for Windows User's Guide 132
A.3 External Non-Autodial Modems
3780Plus will function with modems that do not support the autodial methods previously described. These modems may establish a connection to the remote site in one of five ways:
• Leased line
• Autoanswer an incoming call (see 4.1 ANswer - Automatic Answer in Chapter 4 - 3780Plus Commands for details)
• Manually dial with a phone handset
• Manually dial through the modem front panel
• DTR-controlled dial
The following 3780Plus configuration parameters must be set:
Protocol|Line Type = Switched Line or Leased Line1 Line|Modulation = (any) Line|Dialing Method = None
1 In general, Bell modems (except Bell 212) will require Switched Line settings and CCITT modems (except CCITT V.29) will require Leased Line settings.
Appendix A - Modem Support
Cleo 3780Plus for Windows User's Guide 133
A.4 Modem Eliminators
For direct connection from 3780Plus to another local 3780 machine, a modem eliminator may be used to connect the two devices and provide clocking. A modem eliminator eliminates the need for two modems and a phone line when connecting two local machines.
The following 3780Plus configuration parameters must be set:
Protocol|Line Type = Switched Line Line|Modulation = (any) Line|Dialing Method = None
A modem eliminator usually contains a switch setting to control the communications speed. The selectable speeds may range from 1200 bps (or below) to 38,400 bps (or above). The speed should not be set over 19,200 bps or communications errors may result.
A modem eliminator normally has two 25 pin ports. 3780Plus will connect to one port; the other 3780 device will connect to the other port.

Appendix A - Modem Support
Cleo 3780Plus for Windows User's Guide 134
A.5 Null Modems
For direct connection between 3780Plus and another local 3780 device, a null modem cable may be used to connect the two devices. This eliminates the need for modems or a modem eliminator when connecting two local machines. With a null modem cable, however, one of the 3780 devices must provide clocking. Cleo's SYNCcable+, PC/SIB, AllSync, or PC/201/V.22bis may optionally provide clocking.
To provide clocking, the following 3780Plus configuration parameters must be set:
Protocol|Line Type = Switched Line Line|Modulation = speed required (except other) Line|Dialing Method = None
The 3780PLUS.INI Clocks=ON option must be used to enable the clocking. See B.8 Initialization File in Appendix B - File Formats for details. The modulation parameter will then select the clock speed.
A null modem cable with the pinouts provided in the Appendix C - Modem Interface Cables in the Installation Guide section may be used to connect SYNCcable+, PC/SIB, or AllSync to another local machine running 3780.

Cleo 3780Plus for Windows User's Guide 135
Appendix B: File Formats Cleo 3780Plus accesses and creates various files in the course of operation. This appendix contains information on the format of the following files:
• Configuration file
• Job/Script file
• Log file
• Monitor file
• Character translation files
• Video display file
• Vertical forms file
• Initialization file
Appendix B - File Formats
Cleo 3780Plus for Windows User's Guide 136
B.1 Configuration File
3780Plus allows you to run with custom protocol and line configuration files. These configuration files may be loaded with any of the following methods:
• Creating a DEFAULT.CFG file
• Using the -C cfgfile command line option
• Setting the Startup|Configuration File Name option from the Setup program or the Configurator program before executing 3780Plus
• Using the Configuration|Load menu option from within 3780Plus
• Using the COnfig cfgfile command from the Command Window or from a job file within 3780Plus
You can create these custom configuration files using the Configuration|Edit and Configuration|Save or Configuration|Save As menu options or with a standard text editor. See 3.6 Configuration - Display or Change Configuration in Chapter 3 - 3780Plus Menus. See Chapter 1 - Configuration for a description and a range for each parameter.
The following example shows the format for a configuration file:
80 transmission record size 4 repeat limit 4 retransmission limit 10 wait limit 100 delay limit 0 line type 1 terminal type 15 bid limit 0 idle limit in 30 second intervals 15 receive limit 1 space compression 1 transmission blocking factor 0 protocol type terminal id 0 RTS/CTS delay 1 modulation type 0 equalizer 0 new line suppression 0 dialing method
Note: The configuration file would not include the explanation to the right of each parameter.

Appendix B - File Formats
Cleo 3780Plus for Windows User's Guide 137
B.2 Job/Script File
3780Plus allows you to run custom job files. These job files may be executed with any of the following methods:
• Using the -J jobfile command line option
• Setting the Startup|Job Name option from the Setup program or the Configurator program before executing 3780Plus
• Using the System|Run Job menu option or JOB speed button from within 3780Plus
• Using the EXecute jobfile command from the Command Window or from another job file within 3780Plus
You can create custom job files for 3780Plus by using the Window|Recorder Window menu option (see 3.7.4 Recorder Window - Toggle the Command Recorder Window in Chapter 3 - 3780Plus Menus), the JOb command, or a standard text editor.
The following example shows the format for a job file:
## JOB FILE 4/1/94 CONFIG CFGFILE change configuration AUTODIAL 397-8110 dial remote site KEY **SIGNON** send sign-on message SCREEN receive sign-on response to screen TEXT TXFILE.TXT transmit non-transparent text file BINARY BIFILE.COM transmit transparent binary file RECEIVE RCVFILE receive file to disk PRINT PRTFILE receive print file to disk KEY **SIGNOFF** send sign-off message SCREEN receive sign-off response to screen VOICE hang-up phone line QUIT exit 3780Plus
The first line in the above example is a comment line. Comment lines begin with the characters ## and may be placed anywhere in a job file. The following lines contain 3780Plus commands. Each 3780Plus command must be on a separate line. Most commands may be shortened to the first two characters, i.e. CONFIG CFGFILE and CO CFGFILE are identical to 3780Plus. See Chapter 5 - 3780Plus Tutorial for more job file examples.
Note: The job file would not include the explanations to the right of each command.

Appendix B - File Formats
Cleo 3780Plus for Windows User's Guide 138
B.3 Log File
3780Plus has the ability to log all transactions and messages to the log file listed in Startup|Log Name (the default is 3780.LOG). The Startup|Log Mode option from the Setup or Configurator program allows you to select how the log file is used: Log Mode=OVERWRITE overwrites the existing log file; Log Mode=APPEND appends to the existing log file; or Log Mode=NONE does not update the existing log file.
The following example shows the format of the log file:
17:25:00 ********** 3780 LOGON ********** TUE JANUARY 25, 1994 17:25:03 Command> AUTODIAL 397-8110 17:25:14 DIAL: CONNECT_9600 :Connect Code=12 Telephone connection complete 17:25:15 Command> KEY /*SIGNON JCL INFO 17:25:17 TT: KEY :NRMEOF :1 blocks 17:25:23 Command> TEXT CLEO.EDI 17:27:50 TT: CLEO.EDI :NRMEOF :8 blocks 17:27:59 Command> KEY /*SIGNOFF 17:28:01 TT: KEY :NRMEOF :1 blocks 17:28:03 Command> VOICE 17:28:37 Command> QUIT 17:28:39 ********* 3780 LOGOFF ********* TUE JANUARY 25, 1994
The first and last lines contain the time and date of the start and finish of 3780Plus execution. The lines in between contain the time, commands executed, and status of the commands. The status lines are described on the following pages.
B.3.1 The Autodial Status Line
After an autodial command is completed, a status line is posted on the screen and in the log and monitor files (if open). The status line format is:
DIAL : connect_msg : Connect Code = connect_code
where:
connect_msg is the connection status of the last dial (see Table B.1). Connection messages may be defined/changed in the video.ovr file. See B.5.3 Modem Result Messages for details.
connect_code is the connection code returned by the attached AT command modem. This portion of the status line is not valid on a non-AT command modem.
For example, the following status line: DIAL : CONNECT_9600 : Connect Code = 18 would be posted after autodialing a CCITT V.32 AT command modem which connected at 9600 baud.
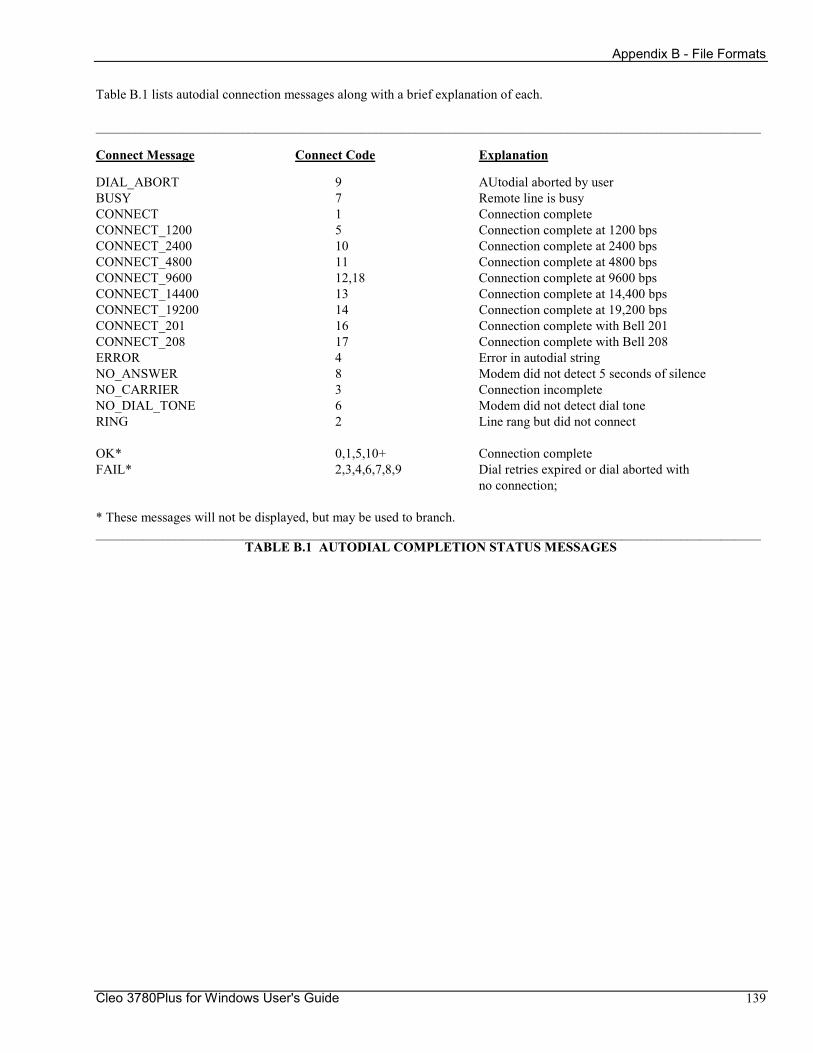
Appendix B - File Formats
Cleo 3780Plus for Windows User's Guide 139
Table B.1 lists autodial connection messages along with a brief explanation of each.
____________________________________________________________________________________________________
Connect Message Connect Code Explanation DIAL_ABORT 9 AUtodial aborted by user BUSY 7 Remote line is busy CONNECT 1 Connection complete CONNECT_1200 5 Connection complete at 1200 bps CONNECT_2400 10 Connection complete at 2400 bps CONNECT_4800 11 Connection complete at 4800 bps CONNECT_9600 12,18 Connection complete at 9600 bps CONNECT_14400 13 Connection complete at 14,400 bps CONNECT_19200 14 Connection complete at 19,200 bps CONNECT_201 16 Connection complete with Bell 201 CONNECT_208 17 Connection complete with Bell 208 ERROR 4 Error in autodial string NO_ANSWER 8 Modem did not detect 5 seconds of silence NO_CARRIER 3 Connection incomplete NO_DIAL_TONE 6 Modem did not detect dial tone RING 2 Line rang but did not connect OK* 0,1,5,10+ Connection complete FAIL* 2,3,4,6,7,8,9 Dial retries expired or dial aborted with no connection; * These messages will not be displayed, but may be used to branch. ____________________________________________________________________________________________________
TABLE B.1 AUTODIAL COMPLETION STATUS MESSAGES
Appendix B - File Formats
Cleo 3780Plus for Windows User's Guide 140
B.3.2 The Transmit/Receive Status Line
After each file transmission or reception, a status line will be posted on the screen and in the log and monitor files (if open). The status line format is:
mode : filename : status : blkcnt blocks
where:
mode TT is for transmit text or binary file with translation TB is for transmit binary file with no translation TN is for transmit text file with no translation TX is for transmit binary file with translation RT is for receive text file with translation RB is for receive binary file with no translation RN is for receive text file with no translation RX is for receive binary file with translation PT is for receive text print file with translation PB is for receive binary print file with no translation PN is for receive text print file with no translation PX is for receive binary print file with translation T is for transmit EOT
filename is the name of the file transmitted or received KEY is for keyboard messages EOT is for End of Transmission (to Screen) is for files received to screen
status is the receive or transmit completion status message (see Tables B.2 and B.3)
blkcnt is number of data blocks sent or received
For example, the following status line: TT : LETTER.TXT : NRMEOF : 20 blocks would be posted after the Transmit|Text option or the TExt command transmits the file LETTER.TXT without errors in 20 blocks of data.
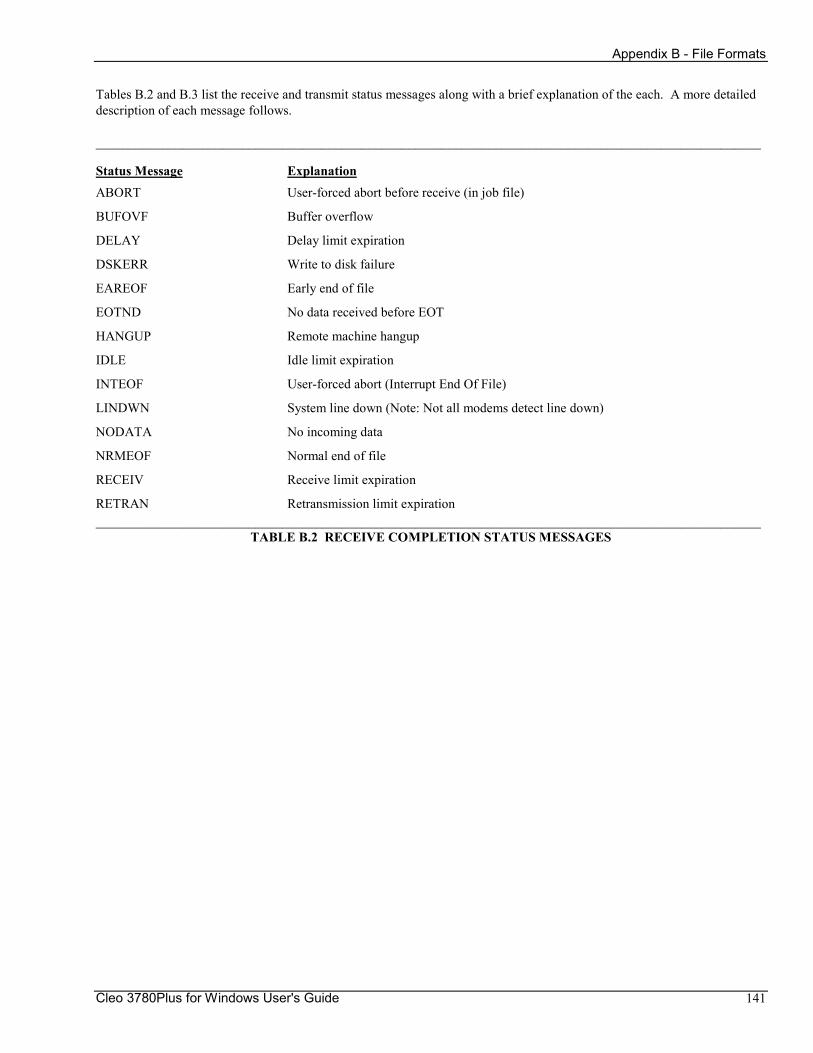
Appendix B - File Formats
Cleo 3780Plus for Windows User's Guide 141
Tables B.2 and B.3 list the receive and transmit status messages along with a brief explanation of the each. A more detailed description of each message follows.
____________________________________________________________________________________________________
Status Message Explanation ABORT User-forced abort before receive (in job file)
BUFOVF Buffer overflow
DELAY Delay limit expiration
DSKERR Write to disk failure
EAREOF Early end of file
EOTND No data received before EOT
HANGUP Remote machine hangup
IDLE Idle limit expiration
INTEOF User-forced abort (Interrupt End Of File)
LINDWN System line down (Note: Not all modems detect line down)
NODATA No incoming data
NRMEOF Normal end of file
RECEIV Receive limit expiration
RETRAN Retransmission limit expiration ____________________________________________________________________________________________________
TABLE B.2 RECEIVE COMPLETION STATUS MESSAGES
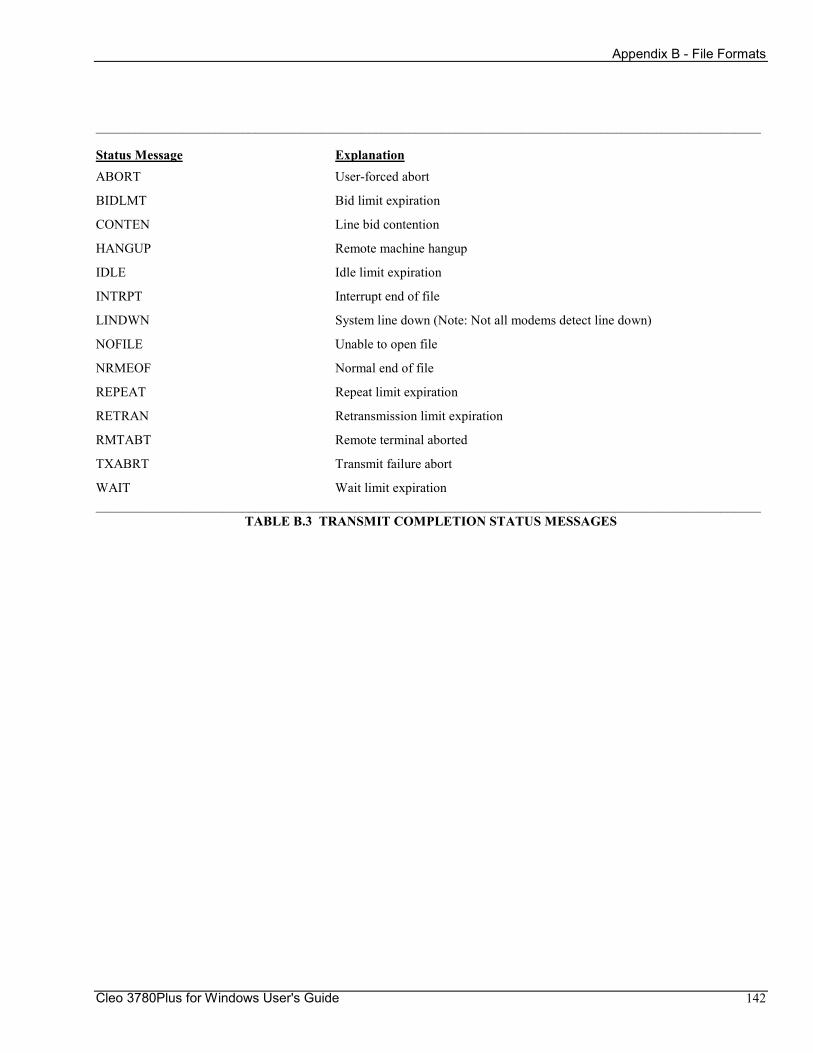
Appendix B - File Formats
Cleo 3780Plus for Windows User's Guide 142
____________________________________________________________________________________________________
Status Message Explanation ABORT User-forced abort
BIDLMT Bid limit expiration
CONTEN Line bid contention
HANGUP Remote machine hangup
IDLE Idle limit expiration
INTRPT Interrupt end of file
LINDWN System line down (Note: Not all modems detect line down)
NOFILE Unable to open file
NRMEOF Normal end of file
REPEAT Repeat limit expiration
RETRAN Retransmission limit expiration
RMTABT Remote terminal aborted
TXABRT Transmit failure abort
WAIT Wait limit expiration ____________________________________________________________________________________________________
TABLE B.3 TRANSMIT COMPLETION STATUS MESSAGES
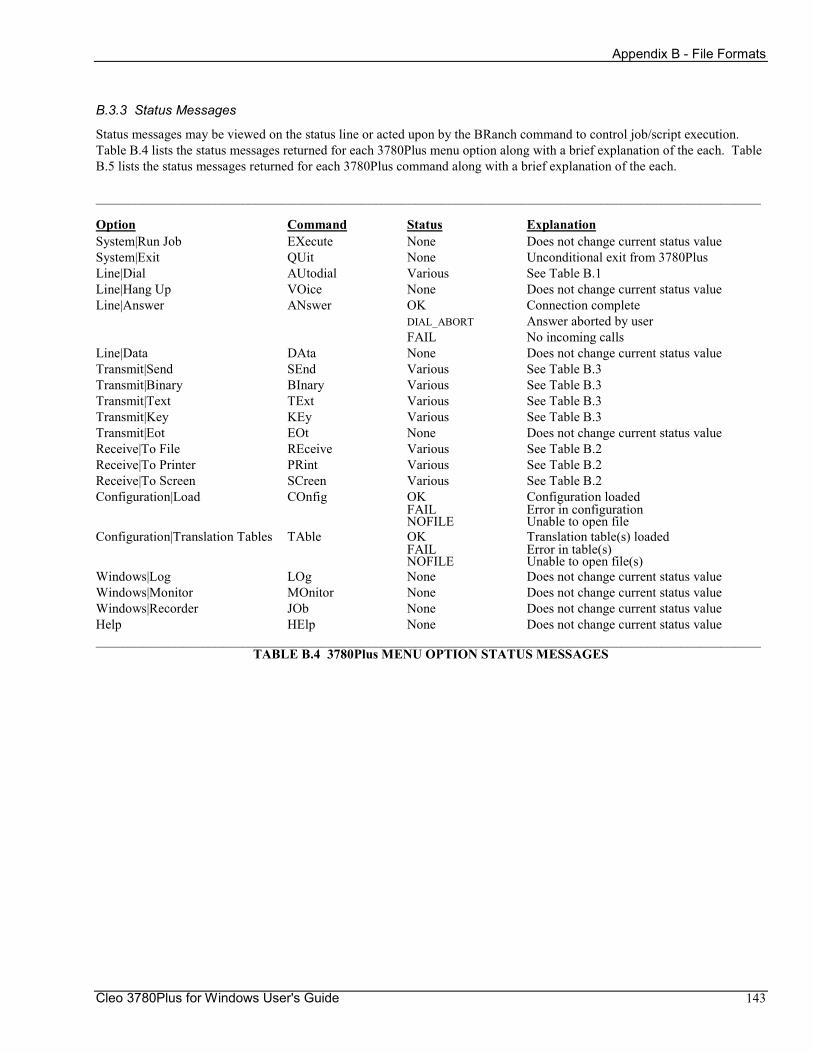
Appendix B - File Formats
Cleo 3780Plus for Windows User's Guide 143
B.3.3 Status Messages
Status messages may be viewed on the status line or acted upon by the BRanch command to control job/script execution. Table B.4 lists the status messages returned for each 3780Plus menu option along with a brief explanation of the each. Table B.5 lists the status messages returned for each 3780Plus command along with a brief explanation of the each.
____________________________________________________________________________________________________
Option Command Status Explanation System|Run Job EXecute None Does not change current status value System|Exit QUit None Unconditional exit from 3780Plus Line|Dial AUtodial Various See Table B.1 Line|Hang Up VOice None Does not change current status value Line|Answer ANswer OK Connection complete DIAL_ABORT Answer aborted by user FAIL No incoming calls Line|Data DAta None Does not change current status value Transmit|Send SEnd Various See Table B.3 Transmit|Binary BInary Various See Table B.3 Transmit|Text TExt Various See Table B.3 Transmit|Key KEy Various See Table B.3 Transmit|Eot EOt None Does not change current status value Receive|To File REceive Various See Table B.2 Receive|To Printer PRint Various See Table B.2 Receive|To Screen SCreen Various See Table B.2 Configuration|Load COnfig OK Configuration loaded FAIL Error in configuration NOFILE Unable to open file Configuration|Translation Tables TAble OK Translation table(s) loaded FAIL Error in table(s) NOFILE Unable to open file(s) Windows|Log LOg None Does not change current status value Windows|Monitor MOnitor None Does not change current status value Windows|Recorder JOb None Does not change current status value Help HElp None Does not change current status value ____________________________________________________________________________________________________
TABLE B.4 3780Plus MENU OPTION STATUS MESSAGES
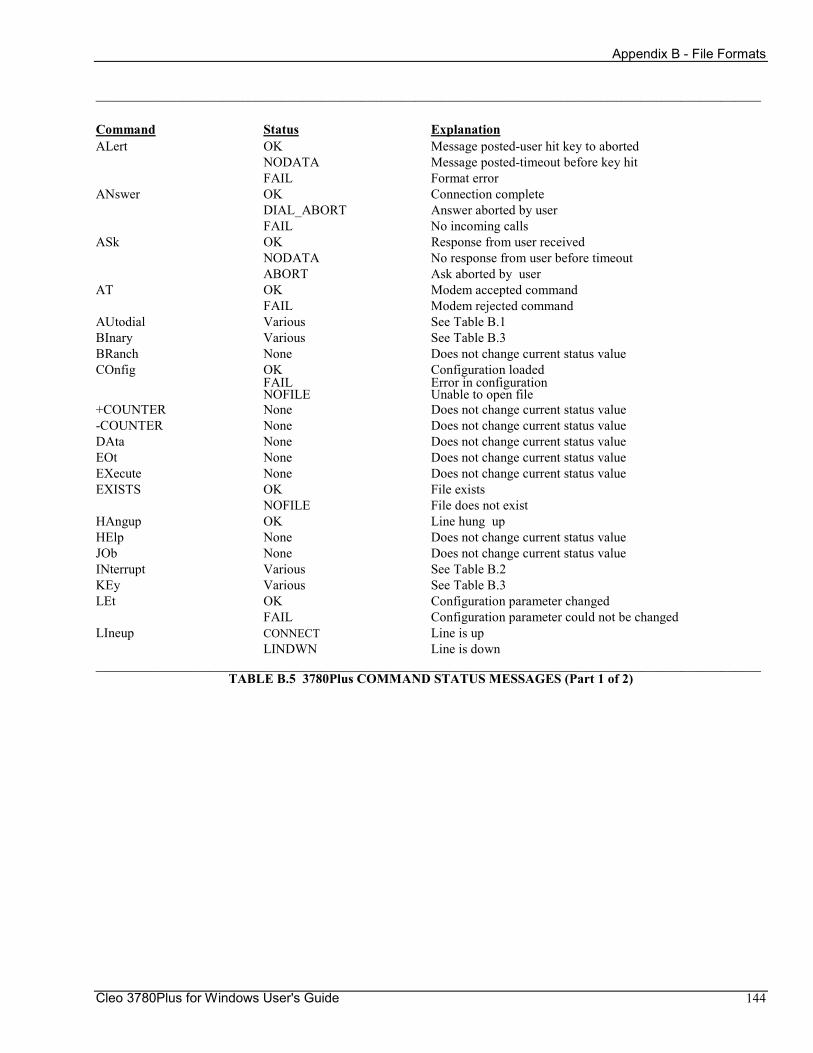
Appendix B - File Formats
Cleo 3780Plus for Windows User's Guide 144
____________________________________________________________________________________________________
Command Status Explanation ALert OK Message posted-user hit key to aborted NODATA Message posted-timeout before key hit FAIL Format error ANswer OK Connection complete DIAL_ABORT Answer aborted by user FAIL No incoming calls ASk OK Response from user received NODATA No response from user before timeout ABORT Ask aborted by user AT OK Modem accepted command FAIL Modem rejected command AUtodial Various See Table B.1 BInary Various See Table B.3 BRanch None Does not change current status value COnfig OK Configuration loaded FAIL Error in configuration NOFILE Unable to open file +COUNTER None Does not change current status value -COUNTER None Does not change current status value DAta None Does not change current status value EOt None Does not change current status value EXecute None Does not change current status value EXISTS OK File exists NOFILE File does not exist HAngup OK Line hung up HElp None Does not change current status value JOb None Does not change current status value INterrupt Various See Table B.2 KEy Various See Table B.3 LEt OK Configuration parameter changed FAIL Configuration parameter could not be changed LIneup CONNECT Line is up LINDWN Line is down ____________________________________________________________________________________________________
TABLE B.5 3780Plus COMMAND STATUS MESSAGES (Part 1 of 2)
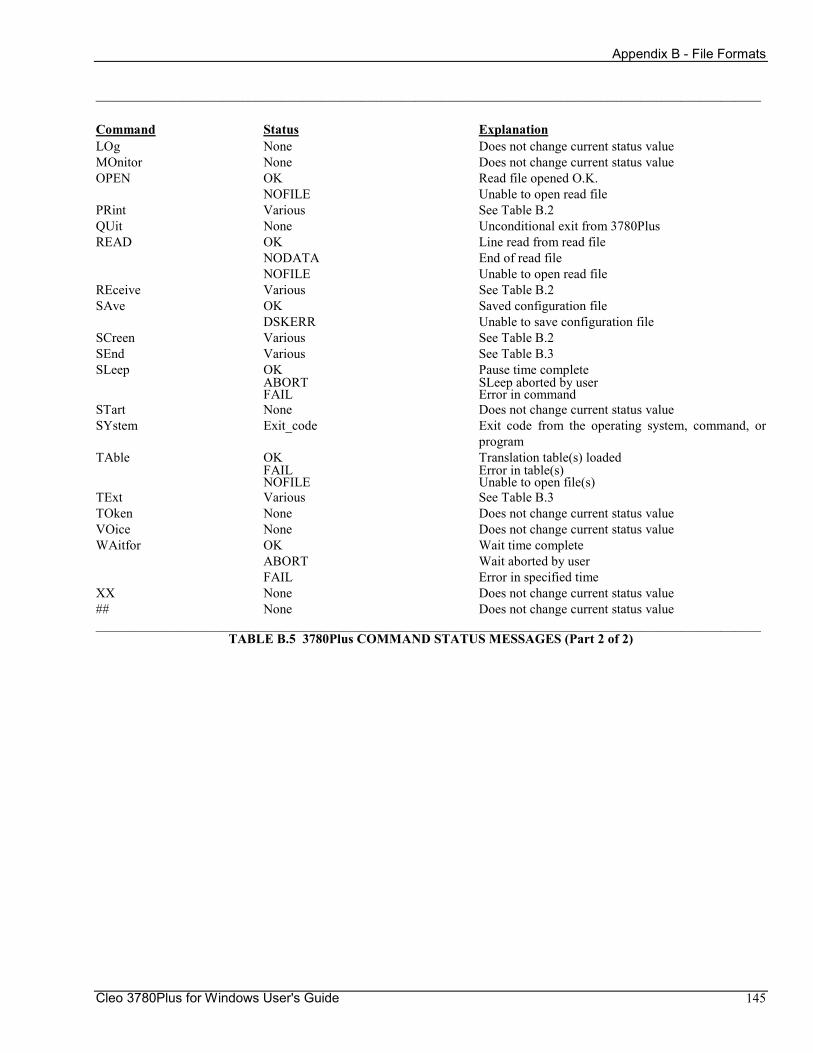
Appendix B - File Formats
Cleo 3780Plus for Windows User's Guide 145
____________________________________________________________________________________________________
Command Status Explanation LOg None Does not change current status value MOnitor None Does not change current status value OPEN OK Read file opened O.K. NOFILE Unable to open read file PRint Various See Table B.2 QUit None Unconditional exit from 3780Plus READ OK Line read from read file NODATA End of read file NOFILE Unable to open read file REceive Various See Table B.2 SAve OK Saved configuration file DSKERR Unable to save configuration file SCreen Various See Table B.2 SEnd Various See Table B.3 SLeep OK Pause time complete ABORT SLeep aborted by user FAIL Error in command STart None Does not change current status value SYstem Exit_code Exit code from the operating system, command, or program TAble OK Translation table(s) loaded FAIL Error in table(s) NOFILE Unable to open file(s) TExt Various See Table B.3 TOken None Does not change current status value VOice None Does not change current status value WAitfor OK Wait time complete ABORT Wait aborted by user FAIL Error in specified time XX None Does not change current status value ## None Does not change current status value ____________________________________________________________________________________________________
TABLE B.5 3780Plus COMMAND STATUS MESSAGES (Part 2 of 2)
Appendix B - File Formats
Cleo 3780Plus for Windows User's Guide 146
Each of the transmit and receive status messages is described below along with suggested corrective actions.
ABORT The ABORT status is generated in the receive mode by hitting the ABORT button before 3780Plus has received a bid (ENQ). It is generated in the transmit mode by hitting the ABORT button at any time during the transmission process. Note, hitting the ABORT button during the reception of a file causes an INTEOF status.
BIDLMT The BIDLMT status is generated by the expiration of the BID LIMIT parameter set by the Configuration command. If there is no response to an initial line bid (ENQ) after 1 second (or 3 seconds if LINE TYPE is secondary), a BID timeout occurs. When the number of consecutive BID timeouts exceeds the BID LIMIT parameter, the BIDLMT status is returned. Corrective Action: The BID LIMIT may be set to a higher value using the Protocol|Bid option. If the BIDLMT status still occurs, check the following: * the modem types and baud rates are the same for the local and remote computers; * you have an active telephone connection (on 3780Plus implementations that do not support line down detection); * both sides are not trying to send at the same time (look at the monitor file); * there is no address or interrupt conflict on internal board versions; * the modem's RTS-to-CTS delay is set to 150ms for long distance for 201 or 208 connections; * the remote computer appears to be receiving the line bids (ENQ).
BUFOVF The BUFOVF status is posted when the incoming data is too large to fit in the communications buffer. 3780Plus will accept a maximum block size of 4048 characters. Corrective Action: Have the remote send fewer characters per block.
CONTEN The CONTEN status indicates that the remote site is bidding for the line at the same time 3780Plus is bidding for the line. In other words, both computers are trying to transmit at the same time. This status occurs only when 3780Plus is configured as a secondary terminal, i.e. the Protocol|Terminal Type is set to Secondary. Corrective Action: Use a receive command to receive before sending.
DELAY The DELAY status indicates that the DELAY LIMIT configuration parameter has been exceeded. A delay is the reception of a Temporary Text Delay (TTD) sequence from the remote computer. A TTD is the reception of a ENQ STX (3780) or ENQ IUS (2780). Corrective Action: Set the DELAY LIMIT parameter to a higher number using the Protocol|Delay option. TTDs indicate that the remote computer is holding the line open. The remote computer may be busy and holding the line by sending TTDs in order to queue up more data to send.
Appendix B - File Formats
Cleo 3780Plus for Windows User's Guide 147
DSKERR The DSKERR status indicates a write to disk failure. DSKERR may also occur when the specified file exists and is write protected. Corrective Action: 3780Plus attempts to write to the disk multiple times when an error is detected to insure against inaccurate or transient error returns. DSKERR may occur when the disk is full. If there seems to be enough space and you get this message, examine your disk for problems.
EAREOF The EAREOF status is generated when an End of Transmission (EOT) character was received before 3780Plus completely received the file. A file is considered to be complete upon reception of an End of Text (ETX) character. Corrective Action: If this error occurs frequently, save a monitor file to disk so you can look at the protocol (See Windows|Monitor Window option or MOnitor command). This status may indicate line problems if the EOT appears to be received in error. A "correct" EOT appears in the monitor file as: <SY SY ET or <ET An EOT appearing in a received block at the end of a string of characters indicates unstable line conditions. This situation occurs most frequently on noisy phone lines when receiving a non-transparent (text) file. Some hosts do not send an ETX at the end of data, so the file you received may, in fact, be complete.
EOTND The EOTND status is generated by the following protocol sequence: <SY SY EQ <- Remote Computer >SY SY DL A0 PD PD <SY SY ET <- Remote Computer In the above sequence, no data is received even though the remote computer requested the line. The final End of Transmission (EOT) indicates that the line is available to either side. Corrective Action: There is no way to avoid this status. Some hosts send this sequence to hold the line open while they queue up data to send. If you suspect this is the case, you can follow your receive command with a BRANCH ON EOTND TO label command to receive again.
HANGUP The HANGUP status is posted when a DLE EOT sequence is received during the transmission or reception of data. This indicates that the remote computer will be hanging up the phone line. Corrective Action: If you think the communication session is incomplete, contact the host site to find out why they disconnected.
Appendix B - File Formats
Cleo 3780Plus for Windows User's Guide 148
IDLE The IDLE status is posted when the IDLE LIMIT configuration parameter has expired. The IDLE LIMIT parameter is used to hang up the communications line after no communications activity has occurred for the specified period of time. Corrective Action: You control the time out period. If the IDLE message occurs earlier than you expect, you may wish to set the IDLE LIMIT value higher or to disable the IDLE LIMIT altogether by setting the value to 0 with the Protocol|Idle option.
INTEOF The INTEOF status results from hitting the ABORT button during the reception of a file. Pressing the ABORT button causes a Reverse Interrupt (RVI) to be sent to the remote computer. The remote computer should respond with an End Of Transmission (EOT) causing the INTEOF status. The INTEOF status can also be generated by using the INterrupt command.
INTRPT The INTRPT status is generated when a Reverse Interrupt (RVI) is received during transmission of a file. An RVI indicates that the remote computer wants control of the line to send something. Note: Receiving an RVI in response to the last block of data will post an NRMEOF status. Corrective Action: If the RVI is unexpected, use a receive option or command to receive the file from the host. This file may contain a description of the error encountered. If it does not, contact your host.
LINDWN The LINDWN status is generated when 3780Plus senses that the communications line has gone down. On an external modem, if the Configuration Line Type is set to Switched Line, a low Data Set Ready (DSR) pin will cause a LINDWN status; if the Configuration Line Type is set to Leased Line, a low Carrier Detect (CD) pin will cause a LINDWN status. Note: Not all 3780Plus hardware is able to determine the state of the DSR and CD pins. Corrective Action: If the LINDWN status is received during or immediately following the transmission of a signon file, check the format of your file. Signon files generally need to be in capital letters, spaced correctly, and padded with spaces to 80 characters. If you are running in interactive mode, try creating a job file; most hosts have a short receive timeout period before disconnecting. If these measures fail, contact your host for more information.
NODATA The NODATA status is posted when the RECEIVE LIMIT configuration parameter has expired. A RECEIVE timeout occurs when 3780Plus waits 4 seconds and does not get a bid (ENQ) from the remote computer. When the number of consecutive RECEIVE timeouts exceeds the RECEIVE LIMIT parameter, the NODATA status is returned. Corrective Action: The RECEIVE LIMIT may be set to a higher value using the Protocol|Receive option. Verify that the remote will be transmitting at this point.
NOFILE The NOFILE status is posted when the file to be sent cannot be found or opened. Corrective Action: Specify the complete path name for the file you wish to send. Make sure you have the correct privileges or authority to access the file.
Appendix B - File Formats
Cleo 3780Plus for Windows User's Guide 149
NRMEOF The NRMEOF status is posted for a Normal End of File condition. This means that the data was received or transmitted in good form within the protocol.
RECEIV The RECEIV status is posted when the RECEIVE LIMIT configuration parameter has expired. A RECEIVE timeout occurs when 3780Plus waits 4 seconds and receives no information from the remote computer. When the number of consecutive RECEIVE timeouts exceeds the RECEIVE LIMIT parameter, the RECEIV status is returned. Note that this condition is very similar to the NODATA status except that the RECEIV condition will only occur after the remote computer has sent at least one initial line bid (ENQ). Corrective Action: The RECEIVE LIMIT may be set to a higher value using the Protocol|Receive option. If this status occurs frequently after receiving a varying number of blocks, check your phone line for excessive noise.
REPEAT The REPEAT status is generated by the expiration of the REPEAT LIMIT configuration parameter. If there is no response to a line bid (ENQ) after 4 seconds, a REPEAT timeout occurs. When the number of consecutive REPEAT timeouts exceeds the REPEAT LIMIT parameter, the REPEAT status is returned. Note that this condition is very similar to the BIDLMT status except that the REPEAT condition will only occur after the remote computer has responded to at least one initial line bid (ENQ). Corrective Action: The REPEAT LIMIT may be set to a higher value using the Protocol|Repeat option. If the REPEAT message re-occurs, make sure that you have an active telephone connection on those versions of 3780Plus which do not support line down detection.
RETRAN The RETRAN status is posted by the expiration of the RETRANSMISSION LIMIT configuration parameter. The RETRANSMISSION LIMIT is the number of consecutive times that a Negative Acknowledge (NAK) may be sent or received before this limit is exceeded. A NAK means that the last block was not received correctly. A NAK causes the last block to be resent. Corrective Action: The RETRANSMISSION LIMIT may be set to a higher value using the Protocol|Retransmission option. For transmissions, reduce the Protocol|Record Size and Protocol|Blocking Factor; smaller blocks have a better chance of transmitting on a noisy phone line. If the RETRANSMISSION LIMIT is set reasonably high (greater than 20) and the RETRAN message still appears, check your phone line for excessive noise.
RMTABT The RMTABT status is generated when an End Of Transmission (EOT) character is received during the transmission of a file. In general this would indicate something is wrong on the remote computer as it is attempting to gain control of the line. The remote may be expecting to send a file, not receive one. Corrective Action: If this status re-occurs, contact your host site to find out why the host is sending the EOT at an unexpected time.
Appendix B - File Formats
Cleo 3780Plus for Windows User's Guide 150
TXABRT The TXABRT status results from an unrecoverable hardware condition where data cannot physically be transmitted to the remote computer. Corrective Action: This status should rarely occur. If it persists, call the CLEO technical support line.
WAIT The WAIT status is caused by the expiration of the WAIT LIMIT configuration parameter. A WAIT timeout is caused by receiving a Wait ACKnowledge (WACK) message from the remote computer. When the number of consecutive WACKs exceeds the WAIT LIMIT, the WAIT status is posted. A wait acknowledge means that the remote system received the last block correctly but needs more time to free up buffers, etc. Receiving a WACK causes 3780Plus to wait and re-bid (ENQ) the line. When the appropriate ACK is received, the transmission resumes. Corrective Action: The WAIT LIMIT value may be increased using the Protocol|Wait option. If the condition persists, find out what is causing the sending of WACKs.

Appendix B - File Formats
Cleo 3780Plus for Windows User's Guide 151
B.4 Monitor File
3780Plus includes the ability to save all protocol characters and data to the monitor file listed in Startup|Monitor Name (the default is 3780PLUS.MON). This is helpful in determining communication problems. The Startup|Monitor Mode option from the Setup or Configurator program allows you to select how the monitor file is used: Monitor Mode=OVERWRITE overwrites the existing monitor file; Monitor Mode=APPEND appends to the existing monitor file; or Monitor Mode=NONE does not update the existing monitor file.
To save the monitor data to a file, set the Startup|Monitor Mode option to OVERWRITE or APPEND from the Setup or Configurator program before executing 3780Plus, or use the Monitor Window menu option from within 3780Plus, or use the MOnitor filename command from the Windows|Command Window or from a job file within 3780Plus. See 3.7.3 Monitor Window - Toggle the Line Monitor Window in Chapter 3 - 3780Plus Menus for details on using the monitor window. See 4.13 MOnitor - Monitor the Line in Chapter 4 - 3780Plus Commands for details on executing the monitor command.
For more information on 2780/3780 protocol, the references noted in the Related Documentation portion of the Before You Begin section are recommended.
B.4.1 Using the Monitor
The 3780Plus Windows|Monitor Window option and MOnitor command invoke a built-in serial line monitor to display and save the actual received and transmitted bisync protocol characters. This serial line monitor is useful for determining communication problems. The monitor, however, should only be invoked to determine the cause of communications problems because it slows communications and consumes a lot of disk space.
If you encounter a status error message, check B.3.3 Status Messages for possible actions before using the monitor. If you are getting a NRMEOF status but are receiving or transmitting data that you think should be different, use the monitor command to determine exactly what is being sent and received. For transmit problems, for instance, use the monitor before the transmit command to save the monitor to a file and once again after the transmit command to turn the monitor off.
Example: MONITOR SIGNON.MON TEXT SIGNON MONITOR
will display the monitor data to the Monitor Window and create a monitor file with the name SIGNON.MON. If necessary, a printout of this file may be mailed or faxed to Cleo's Technical Support department.
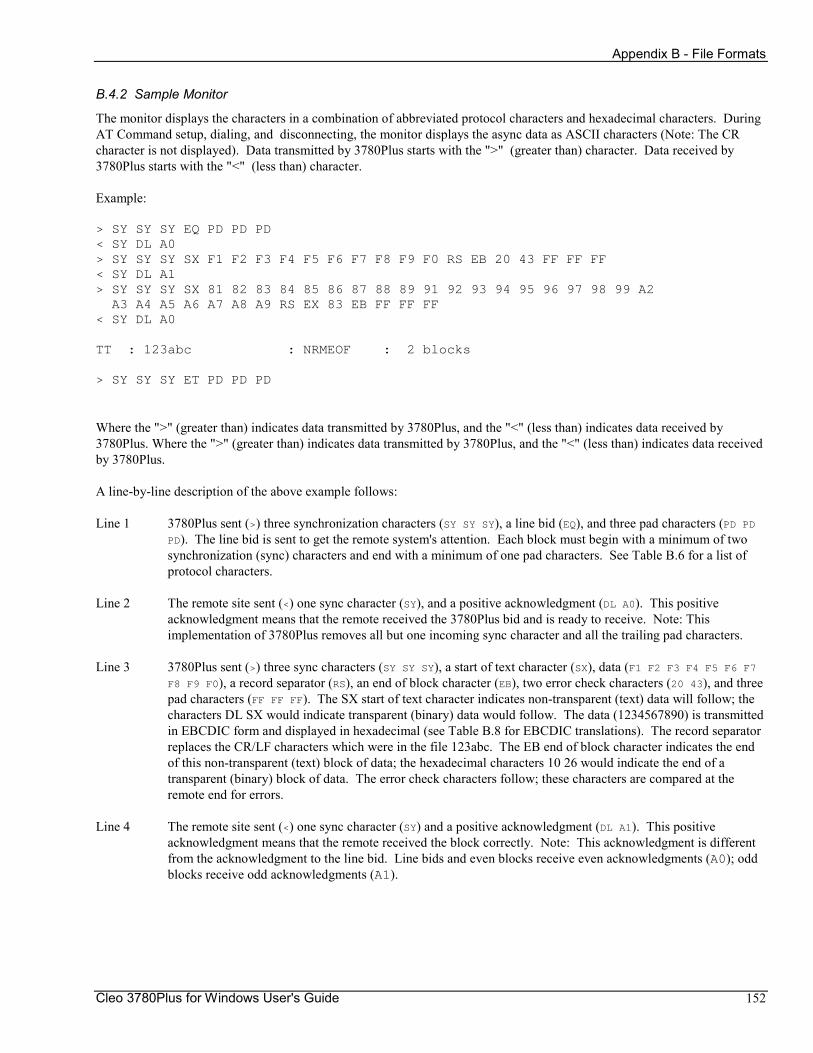
Appendix B - File Formats
Cleo 3780Plus for Windows User's Guide 152
B.4.2 Sample Monitor
The monitor displays the characters in a combination of abbreviated protocol characters and hexadecimal characters. During AT Command setup, dialing, and disconnecting, the monitor displays the async data as ASCII characters (Note: The CR character is not displayed). Data transmitted by 3780Plus starts with the ">" (greater than) character. Data received by 3780Plus starts with the "<" (less than) character.
Example:
> SY SY SY EQ PD PD PD< SY DL A0> SY SY SY SX F1 F2 F3 F4 F5 F6 F7 F8 F9 F0 RS EB 20 43 FF FF FF< SY DL A1> SY SY SY SX 81 82 83 84 85 86 87 88 89 91 92 93 94 95 96 97 98 99 A2
A3 A4 A5 A6 A7 A8 A9 RS EX 83 EB FF FF FF< SY DL A0
TT : 123abc : NRMEOF : 2 blocks
> SY SY SY ET PD PD PD
Where the ">" (greater than) indicates data transmitted by 3780Plus, and the "<" (less than) indicates data received by 3780Plus. Where the ">" (greater than) indicates data transmitted by 3780Plus, and the "<" (less than) indicates data received by 3780Plus.
A line-by-line description of the above example follows:
Line 1 3780Plus sent (>) three synchronization characters (SY SY SY), a line bid (EQ), and three pad characters (PD PD
PD). The line bid is sent to get the remote system's attention. Each block must begin with a minimum of two synchronization (sync) characters and end with a minimum of one pad characters. See Table B.6 for a list of protocol characters.
Line 2 The remote site sent (<) one sync character (SY), and a positive acknowledgment (DL A0). This positive acknowledgment means that the remote received the 3780Plus bid and is ready to receive. Note: This implementation of 3780Plus removes all but one incoming sync character and all the trailing pad characters.
Line 3 3780Plus sent (>) three sync characters (SY SY SY), a start of text character (SX), data (F1 F2 F3 F4 F5 F6 F7
F8 F9 F0), a record separator (RS), an end of block character (EB), two error check characters (20 43), and three pad characters (FF FF FF). The SX start of text character indicates non-transparent (text) data will follow; the characters DL SX would indicate transparent (binary) data would follow. The data (1234567890) is transmitted in EBCDIC form and displayed in hexadecimal (see Table B.8 for EBCDIC translations). The record separator replaces the CR/LF characters which were in the file 123abc. The EB end of block character indicates the end of this non-transparent (text) block of data; the hexadecimal characters 10 26 would indicate the end of a transparent (binary) block of data. The error check characters follow; these characters are compared at the remote end for errors.
Line 4 The remote site sent (<) one sync character (SY) and a positive acknowledgment (DL A1). This positive acknowledgment means that the remote received the block correctly. Note: This acknowledgment is different from the acknowledgment to the line bid. Line bids and even blocks receive even acknowledgments (A0); odd blocks receive odd acknowledgments (A1).

Appendix B - File Formats
Cleo 3780Plus for Windows User's Guide 153
Lines 5 & 6 3780Plus sent (>) three sync characters (SY SY SY), a start of text character (SX), data (81 82 83 84 85 86 87
88 89 91 92 93 94 95 96 97 98 99 A2 A3 A4 A5 A6 A7 A8 A9), a record separator (RS), an end of text character (EX), two error check characters (83 EB), and three pad characters (FF FF FF). This block is similar to Line 3 except for the data (abcdefghijklmnopqrstuvwxyz) and the EX end of text character which replaces the EB end of block character indicating the end of this file; the hexadecimal characters 10 03 would indicate the end of a transparent (binary) file.
Line 7 The remote site sent (<) one sync character (SY) and a positive acknowledgment (DL A0). This positive acknowledgment means that the remote received the second block correctly.
Line 8 3780Plus posts a status line message to indicate the outcome of the command: 3780Plus transmitted the text (TT) file 123abc (123abc) normally (NRMEOF) in 2 blocks (2 blocks).
Line 9 3780Plus sent (>) three sync characters (SY SY SY), an end of transmission character (ET), and three pad characters (FF FF FF). The end of transmission indicates that 3780Plus is finished sending and the line is released to allow the remote system to transmit.
Table B.6 lists the hexadecimal values and the 3780Plus abbreviated symbolic forms of 2780/3780 protocol characters. Tables B.7 and B.8 list the standard U.S. ASCII to EBCDIC and EBCDIC to ASCII translations for the data.
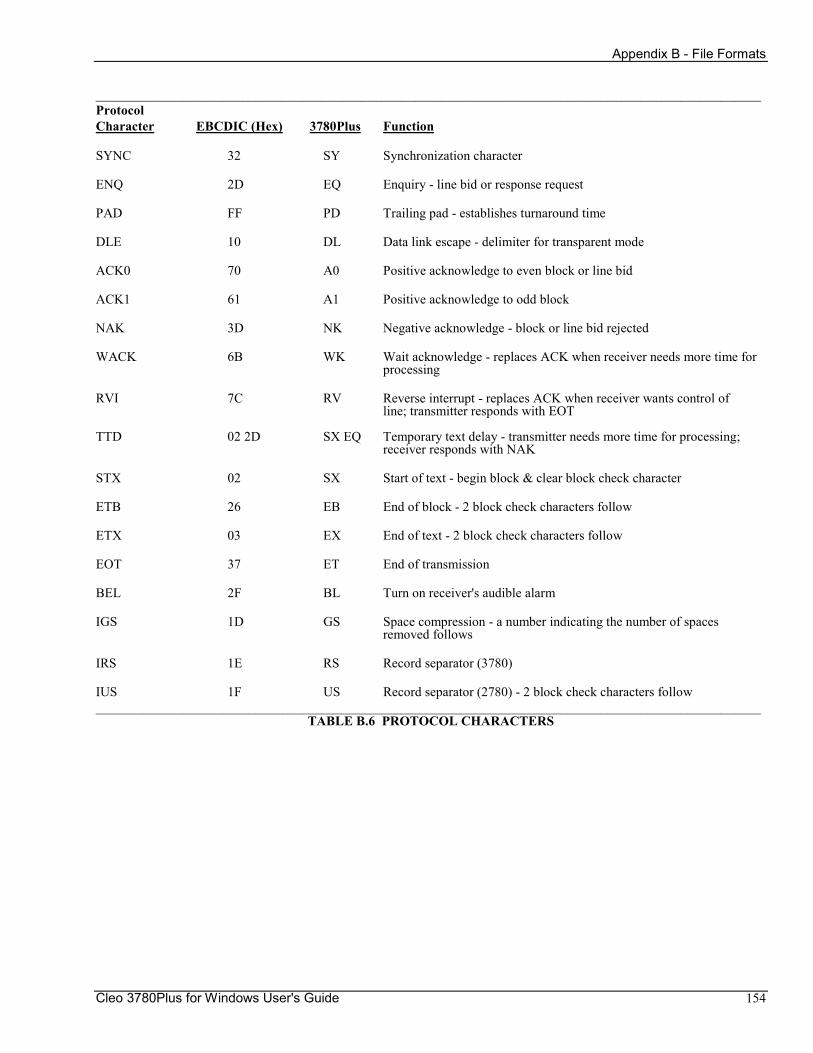
Appendix B - File Formats
Cleo 3780Plus for Windows User's Guide 154
____________________________________________________________________________________________________ Protocol Character EBCDIC (Hex) 3780Plus Function SYNC 32 SY Synchronization character ENQ 2D EQ Enquiry - line bid or response request PAD FF PD Trailing pad - establishes turnaround time DLE 10 DL Data link escape - delimiter for transparent mode ACK0 70 A0 Positive acknowledge to even block or line bid ACK1 61 A1 Positive acknowledge to odd block NAK 3D NK Negative acknowledge - block or line bid rejected WACK 6B WK Wait acknowledge - replaces ACK when receiver needs more time for processing RVI 7C RV Reverse interrupt - replaces ACK when receiver wants control of line; transmitter responds with EOT TTD 02 2D SX EQ Temporary text delay - transmitter needs more time for processing; receiver responds with NAK STX 02 SX Start of text - begin block & clear block check character ETB 26 EB End of block - 2 block check characters follow ETX 03 EX End of text - 2 block check characters follow EOT 37 ET End of transmission BEL 2F BL Turn on receiver's audible alarm IGS 1D GS Space compression - a number indicating the number of spaces removed follows IRS 1E RS Record separator (3780) IUS 1F US Record separator (2780) - 2 block check characters follow ____________________________________________________________________________________________________
TABLE B.6 PROTOCOL CHARACTERS
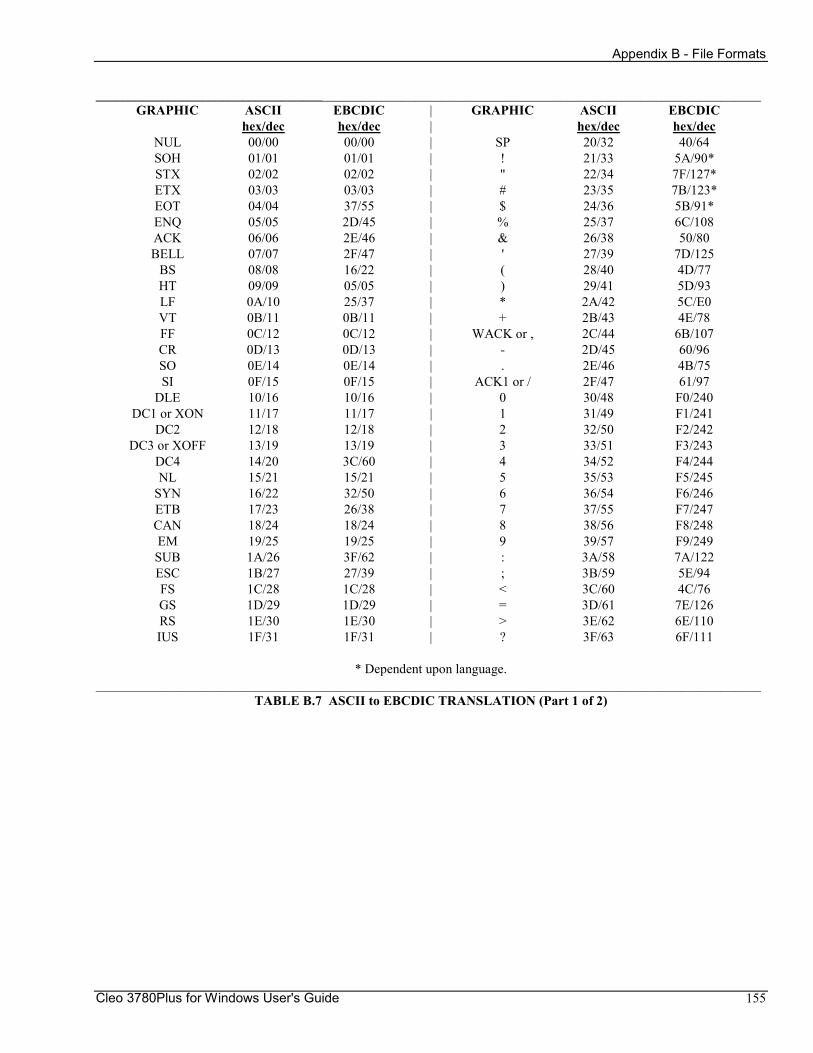
Appendix B - File Formats
Cleo 3780Plus for Windows User's Guide 155
____________________________________________________________________________________________________ GRAPHIC ASCII EBCDIC | GRAPHIC ASCII EBCDIC hex/dec hex/dec | hex/dec hex/dec NUL 00/00 00/00 | SP 20/32 40/64 SOH 01/01 01/01 | ! 21/33 5A/90* STX 02/02 02/02 | " 22/34 7F/127* ETX 03/03 03/03 | # 23/35 7B/123* EOT 04/04 37/55 | $ 24/36 5B/91* ENQ 05/05 2D/45 | % 25/37 6C/108 ACK 06/06 2E/46 | & 26/38 50/80 BELL 07/07 2F/47 | ' 27/39 7D/125 BS 08/08 16/22 | ( 28/40 4D/77 HT 09/09 05/05 | ) 29/41 5D/93 LF 0A/10 25/37 | * 2A/42 5C/E0 VT 0B/11 0B/11 | + 2B/43 4E/78 FF 0C/12 0C/12 | WACK or , 2C/44 6B/107 CR 0D/13 0D/13 | - 2D/45 60/96 SO 0E/14 0E/14 | . 2E/46 4B/75 SI 0F/15 0F/15 | ACK1 or / 2F/47 61/97 DLE 10/16 10/16 | 0 30/48 F0/240 DC1 or XON 11/17 11/17 | 1 31/49 F1/241 DC2 12/18 12/18 | 2 32/50 F2/242 DC3 or XOFF 13/19 13/19 | 3 33/51 F3/243 DC4 14/20 3C/60 | 4 34/52 F4/244 NL 15/21 15/21 | 5 35/53 F5/245 SYN 16/22 32/50 | 6 36/54 F6/246 ETB 17/23 26/38 | 7 37/55 F7/247 CAN 18/24 18/24 | 8 38/56 F8/248 EM 19/25 19/25 | 9 39/57 F9/249 SUB 1A/26 3F/62 | : 3A/58 7A/122 ESC 1B/27 27/39 | ; 3B/59 5E/94 FS 1C/28 1C/28 | < 3C/60 4C/76 GS 1D/29 1D/29 | = 3D/61 7E/126 RS 1E/30 1E/30 | > 3E/62 6E/110 IUS 1F/31 1F/31 | ? 3F/63 6F/111
* Dependent upon language.
____________________________________________________________________________________________________ TABLE B.7 ASCII to EBCDIC TRANSLATION (Part 1 of 2)
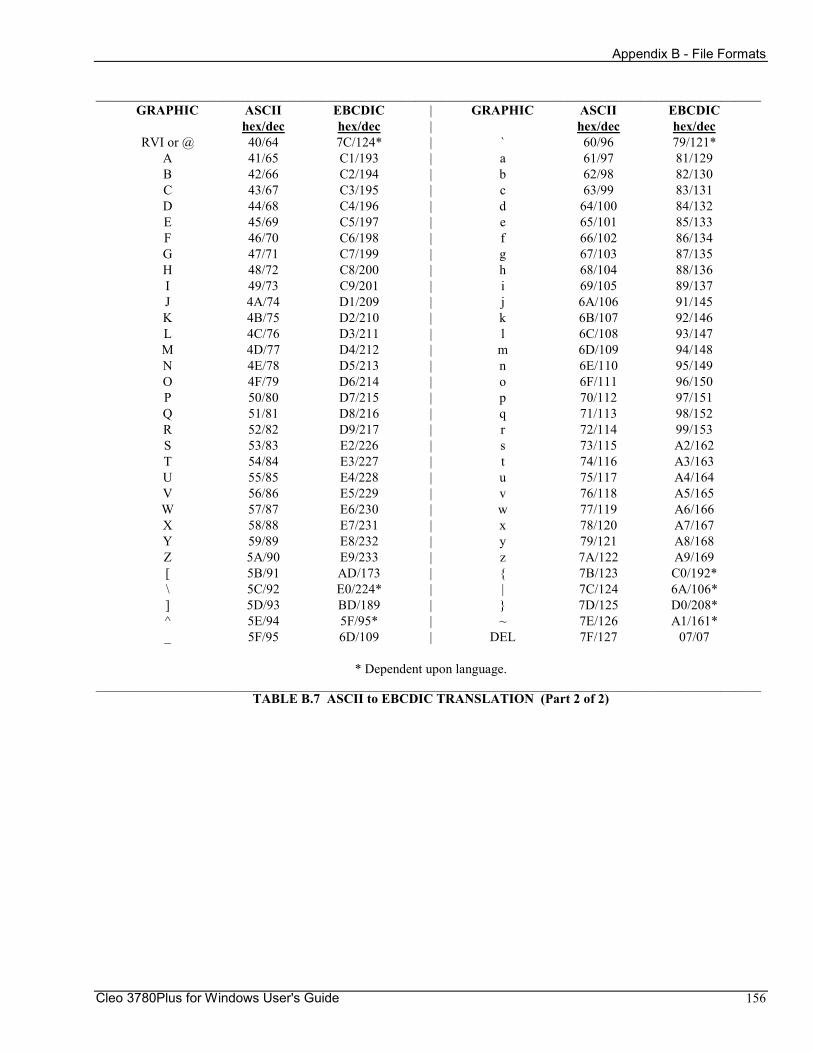
Appendix B - File Formats
Cleo 3780Plus for Windows User's Guide 156
____________________________________________________________________________________________________ GRAPHIC ASCII EBCDIC | GRAPHIC ASCII EBCDIC hex/dec hex/dec | hex/dec hex/dec RVI or @ 40/64 7C/124* | ` 60/96 79/121* A 41/65 C1/193 | a 61/97 81/129 B 42/66 C2/194 | b 62/98 82/130 C 43/67 C3/195 | c 63/99 83/131 D 44/68 C4/196 | d 64/100 84/132 E 45/69 C5/197 | e 65/101 85/133 F 46/70 C6/198 | f 66/102 86/134 G 47/71 C7/199 | g 67/103 87/135 H 48/72 C8/200 | h 68/104 88/136 I 49/73 C9/201 | i 69/105 89/137 J 4A/74 D1/209 | j 6A/106 91/145 K 4B/75 D2/210 | k 6B/107 92/146 L 4C/76 D3/211 | l 6C/108 93/147 M 4D/77 D4/212 | m 6D/109 94/148 N 4E/78 D5/213 | n 6E/110 95/149 O 4F/79 D6/214 | o 6F/111 96/150 P 50/80 D7/215 | p 70/112 97/151 Q 51/81 D8/216 | q 71/113 98/152 R 52/82 D9/217 | r 72/114 99/153 S 53/83 E2/226 | s 73/115 A2/162 T 54/84 E3/227 | t 74/116 A3/163 U 55/85 E4/228 | u 75/117 A4/164 V 56/86 E5/229 | v 76/118 A5/165 W 57/87 E6/230 | w 77/119 A6/166 X 58/88 E7/231 | x 78/120 A7/167 Y 59/89 E8/232 | y 79/121 A8/168 Z 5A/90 E9/233 | z 7A/122 A9/169 [ 5B/91 AD/173 | { 7B/123 C0/192* \ 5C/92 E0/224* | | 7C/124 6A/106* ] 5D/93 BD/189 | } 7D/125 D0/208* ^ 5E/94 5F/95* | ~ 7E/126 A1/161* _ 5F/95 6D/109 | DEL 7F/127 07/07
* Dependent upon language.
____________________________________________________________________________________________________ TABLE B.7 ASCII to EBCDIC TRANSLATION (Part 2 of 2)
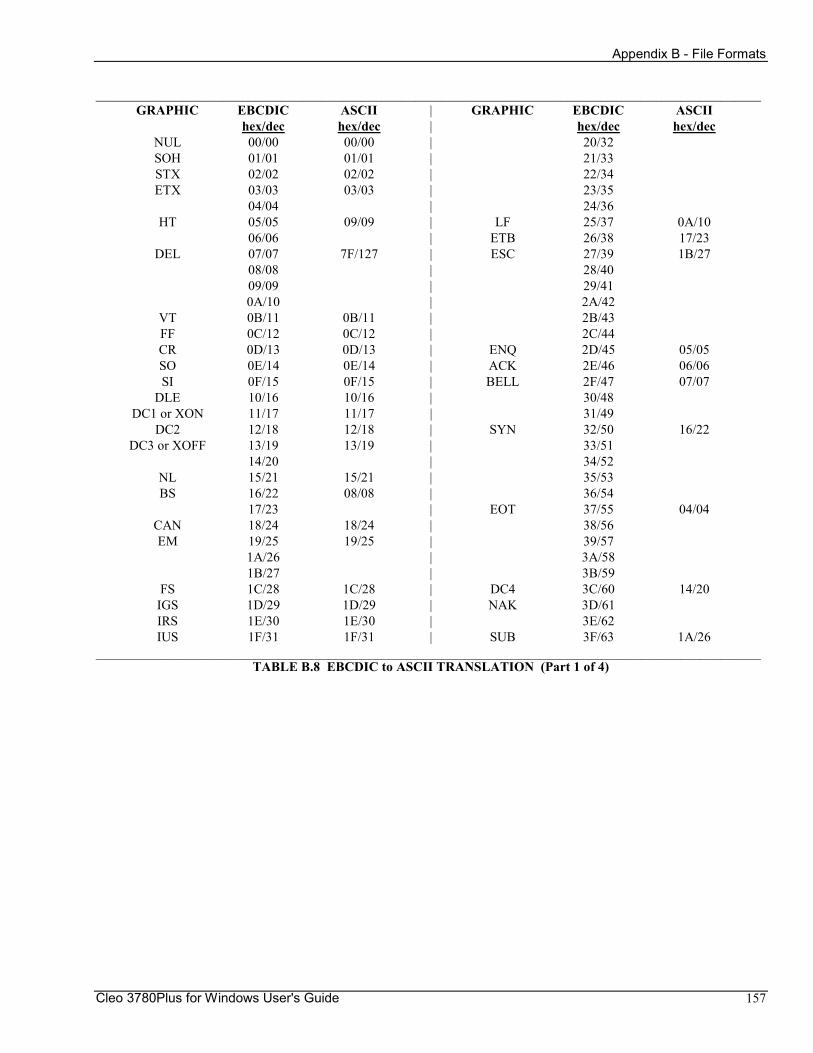
Appendix B - File Formats
Cleo 3780Plus for Windows User's Guide 157
____________________________________________________________________________________________________ GRAPHIC EBCDIC ASCII | GRAPHIC EBCDIC ASCII hex/dec hex/dec | hex/dec hex/dec NUL 00/00 00/00 | 20/32 SOH 01/01 01/01 | 21/33 STX 02/02 02/02 | 22/34 ETX 03/03 03/03 | 23/35 04/04 | 24/36 HT 05/05 09/09 | LF 25/37 0A/10 06/06 | ETB 26/38 17/23 DEL 07/07 7F/127 | ESC 27/39 1B/27 08/08 | 28/40 09/09 | 29/41 0A/10 | 2A/42 VT 0B/11 0B/11 | 2B/43 FF 0C/12 0C/12 | 2C/44 CR 0D/13 0D/13 | ENQ 2D/45 05/05 SO 0E/14 0E/14 | ACK 2E/46 06/06 SI 0F/15 0F/15 | BELL 2F/47 07/07 DLE 10/16 10/16 | 30/48 DC1 or XON 11/17 11/17 | 31/49 DC2 12/18 12/18 | SYN 32/50 16/22 DC3 or XOFF 13/19 13/19 | 33/51 14/20 | 34/52 NL 15/21 15/21 | 35/53 BS 16/22 08/08 | 36/54 17/23 | EOT 37/55 04/04 CAN 18/24 18/24 | 38/56 EM 19/25 19/25 | 39/57 1A/26 | 3A/58 1B/27 | 3B/59 FS 1C/28 1C/28 | DC4 3C/60 14/20 IGS 1D/29 1D/29 | NAK 3D/61 IRS 1E/30 1E/30 | 3E/62 IUS 1F/31 1F/31 | SUB 3F/63 1A/26 ____________________________________________________________________________________________________
TABLE B.8 EBCDIC to ASCII TRANSLATION (Part 1 of 4)
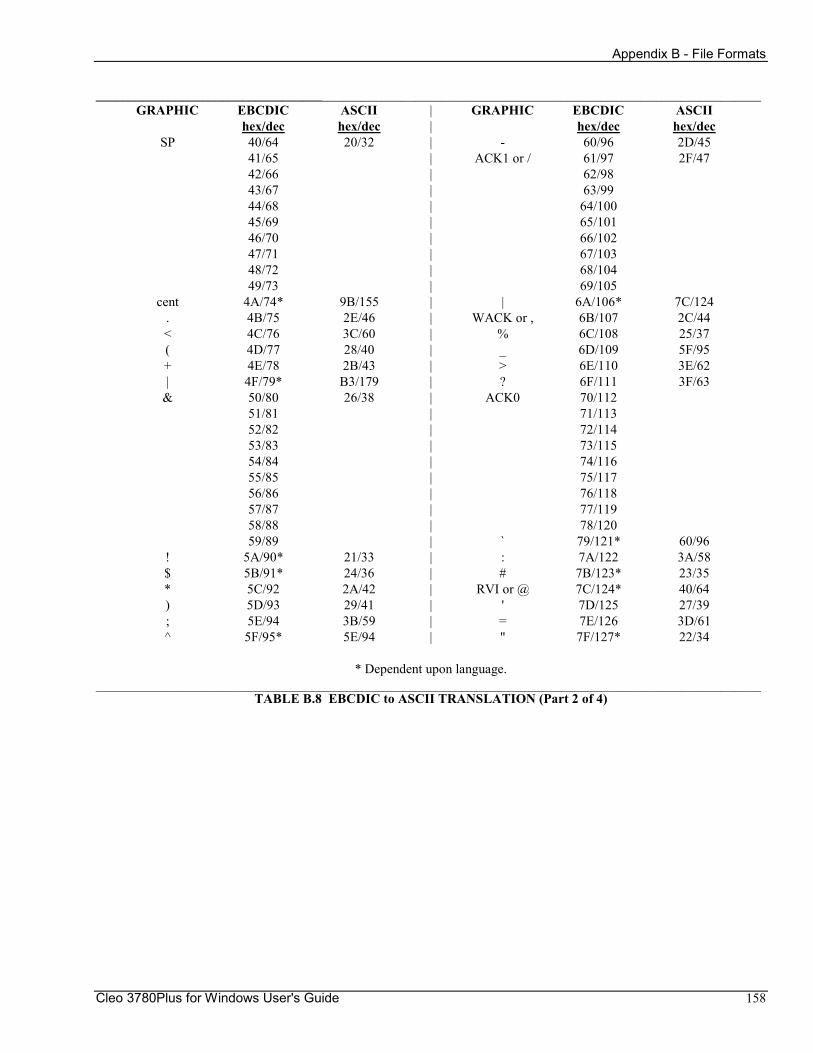
Appendix B - File Formats
Cleo 3780Plus for Windows User's Guide 158
____________________________________________________________________________________________________ GRAPHIC EBCDIC ASCII | GRAPHIC EBCDIC ASCII hex/dec hex/dec | hex/dec hex/dec SP 40/64 20/32 | - 60/96 2D/45 41/65 | ACK1 or / 61/97 2F/47 42/66 | 62/98 43/67 | 63/99 44/68 | 64/100 45/69 | 65/101 46/70 | 66/102 47/71 | 67/103 48/72 | 68/104 49/73 | 69/105 cent 4A/74* 9B/155 | | 6A/106* 7C/124 . 4B/75 2E/46 | WACK or , 6B/107 2C/44 < 4C/76 3C/60 | % 6C/108 25/37 ( 4D/77 28/40 | _ 6D/109 5F/95 + 4E/78 2B/43 | > 6E/110 3E/62 | 4F/79* B3/179 | ? 6F/111 3F/63 & 50/80 26/38 | ACK0 70/112 51/81 | 71/113 52/82 | 72/114 53/83 | 73/115 54/84 | 74/116 55/85 | 75/117 56/86 | 76/118 57/87 | 77/119 58/88 | 78/120 59/89 | ` 79/121* 60/96 ! 5A/90* 21/33 | : 7A/122 3A/58 $ 5B/91* 24/36 | # 7B/123* 23/35 * 5C/92 2A/42 | RVI or @ 7C/124* 40/64 ) 5D/93 29/41 | ' 7D/125 27/39 ; 5E/94 3B/59 | = 7E/126 3D/61 ^ 5F/95* 5E/94 | " 7F/127* 22/34
* Dependent upon language.
____________________________________________________________________________________________________ TABLE B.8 EBCDIC to ASCII TRANSLATION (Part 2 of 4)
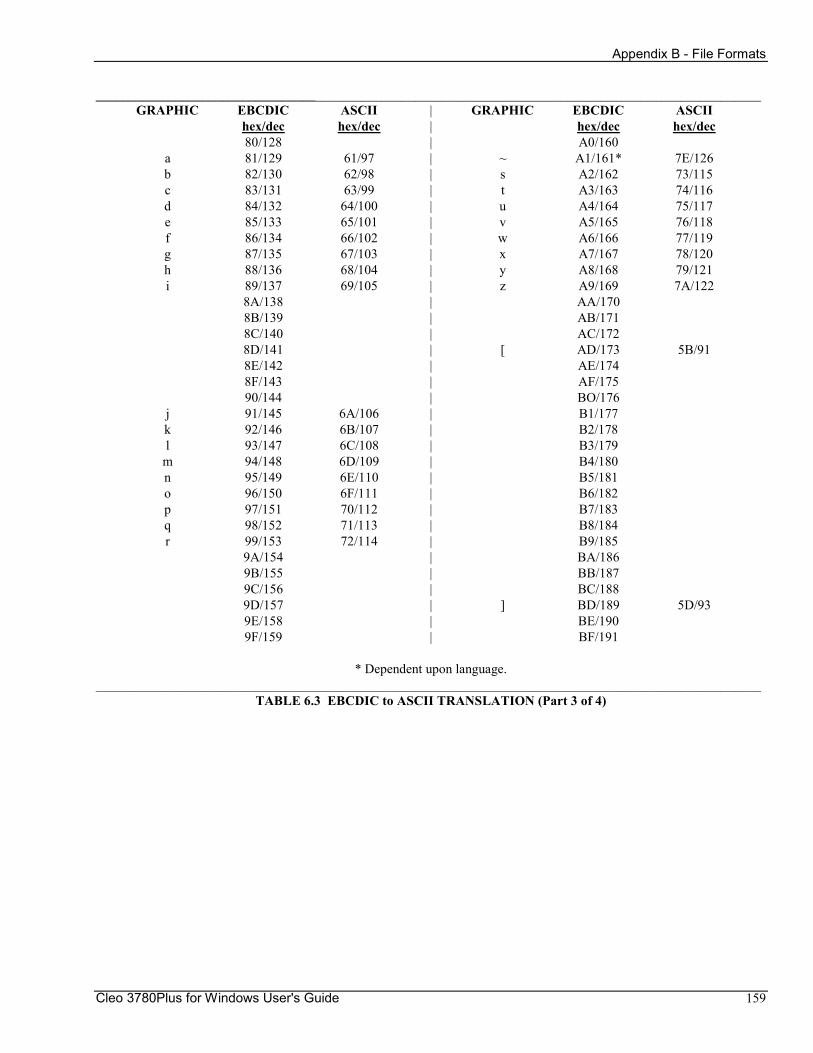
Appendix B - File Formats
Cleo 3780Plus for Windows User's Guide 159
____________________________________________________________________________________________________ GRAPHIC EBCDIC ASCII | GRAPHIC EBCDIC ASCII hex/dec hex/dec | hex/dec hex/dec 80/128 | A0/160 a 81/129 61/97 | ~ A1/161* 7E/126 b 82/130 62/98 | s A2/162 73/115 c 83/131 63/99 | t A3/163 74/116 d 84/132 64/100 | u A4/164 75/117 e 85/133 65/101 | v A5/165 76/118 f 86/134 66/102 | w A6/166 77/119 g 87/135 67/103 | x A7/167 78/120 h 88/136 68/104 | y A8/168 79/121 i 89/137 69/105 | z A9/169 7A/122 8A/138 | AA/170 8B/139 | AB/171 8C/140 | AC/172 8D/141 | [ AD/173 5B/91 8E/142 | AE/174 8F/143 | AF/175 90/144 | BO/176 j 91/145 6A/106 | B1/177 k 92/146 6B/107 | B2/178 l 93/147 6C/108 | B3/179 m 94/148 6D/109 | B4/180 n 95/149 6E/110 | B5/181 o 96/150 6F/111 | B6/182 p 97/151 70/112 | B7/183 q 98/152 71/113 | B8/184 r 99/153 72/114 | B9/185 9A/154 | BA/186 9B/155 | BB/187 9C/156 | BC/188 9D/157 | ] BD/189 5D/93 9E/158 | BE/190 9F/159 | BF/191
* Dependent upon language.
____________________________________________________________________________________________________ TABLE 6.3 EBCDIC to ASCII TRANSLATION (Part 3 of 4)
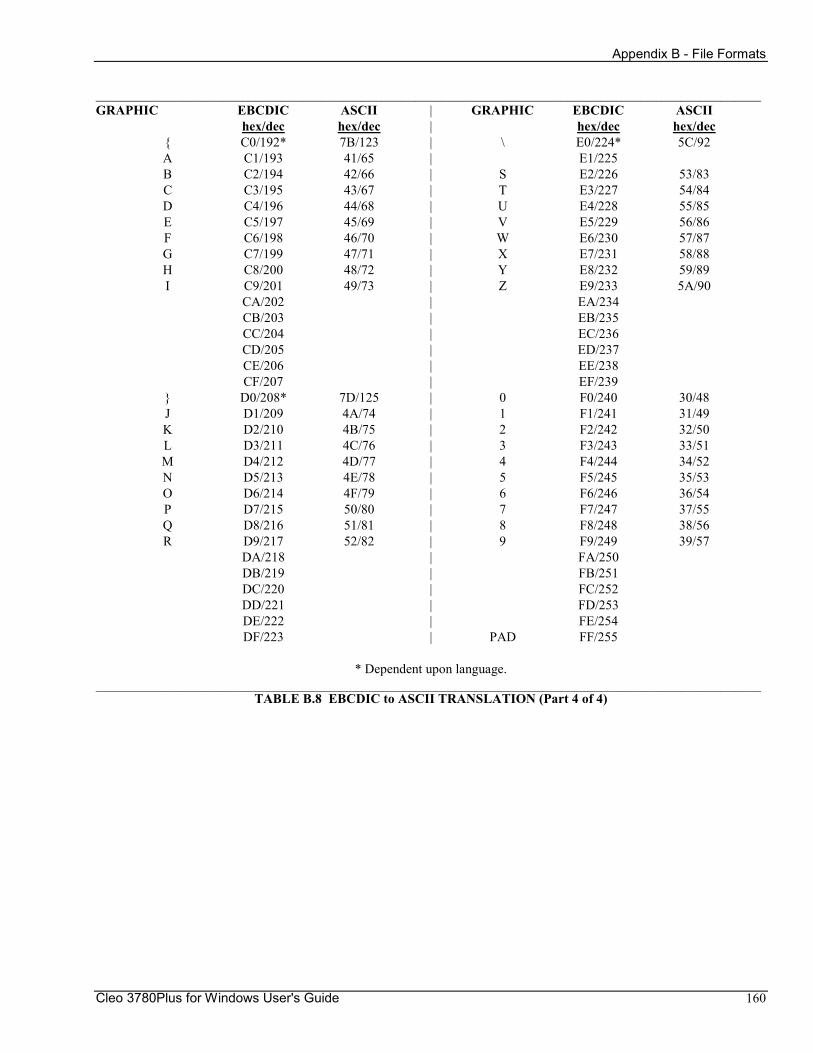
Appendix B - File Formats
Cleo 3780Plus for Windows User's Guide 160
____________________________________________________________________________________________________ GRAPHIC EBCDIC ASCII | GRAPHIC EBCDIC ASCII hex/dec hex/dec | hex/dec hex/dec { C0/192* 7B/123 | \ E0/224* 5C/92 A C1/193 41/65 | E1/225 B C2/194 42/66 | S E2/226 53/83 C C3/195 43/67 | T E3/227 54/84 D C4/196 44/68 | U E4/228 55/85 E C5/197 45/69 | V E5/229 56/86 F C6/198 46/70 | W E6/230 57/87 G C7/199 47/71 | X E7/231 58/88 H C8/200 48/72 | Y E8/232 59/89 I C9/201 49/73 | Z E9/233 5A/90 CA/202 | EA/234 CB/203 | EB/235 CC/204 | EC/236 CD/205 | ED/237 CE/206 | EE/238 CF/207 | EF/239 } D0/208* 7D/125 | 0 F0/240 30/48 J D1/209 4A/74 | 1 F1/241 31/49 K D2/210 4B/75 | 2 F2/242 32/50 L D3/211 4C/76 | 3 F3/243 33/51 M D4/212 4D/77 | 4 F4/244 34/52 N D5/213 4E/78 | 5 F5/245 35/53 O D6/214 4F/79 | 6 F6/246 36/54 P D7/215 50/80 | 7 F7/247 37/55 Q D8/216 51/81 | 8 F8/248 38/56 R D9/217 52/82 | 9 F9/249 39/57 DA/218 | FA/250 DB/219 | FB/251 DC/220 | FC/252 DD/221 | FD/253 DE/222 | FE/254 DF/223 | PAD FF/255
* Dependent upon language.
____________________________________________________________________________________________________ TABLE B.8 EBCDIC to ASCII TRANSLATION (Part 4 of 4)
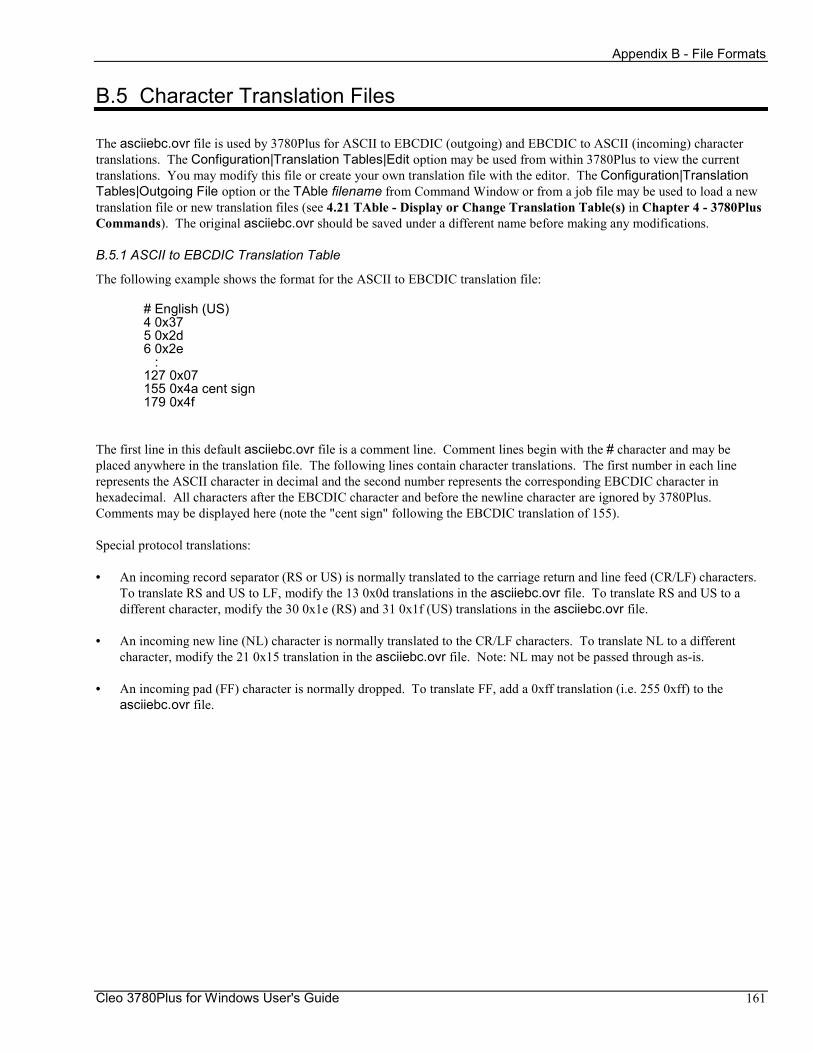
Appendix B - File Formats
Cleo 3780Plus for Windows User's Guide 161
B.5 Character Translation Files
The asciiebc.ovr file is used by 3780Plus for ASCII to EBCDIC (outgoing) and EBCDIC to ASCII (incoming) character translations. The Configuration|Translation Tables|Edit option may be used from within 3780Plus to view the current translations. You may modify this file or create your own translation file with the editor. The Configuration|Translation Tables|Outgoing File option or the TAble filename from Command Window or from a job file may be used to load a new translation file or new translation files (see 4.21 TAble - Display or Change Translation Table(s) in Chapter 4 - 3780Plus Commands). The original asciiebc.ovr should be saved under a different name before making any modifications.
B.5.1 ASCII to EBCDIC Translation Table
The following example shows the format for the ASCII to EBCDIC translation file:
# English (US) 4 0x37 5 0x2d 6 0x2e : 127 0x07 155 0x4a cent sign 179 0x4f
The first line in this default asciiebc.ovr file is a comment line. Comment lines begin with the # character and may be placed anywhere in the translation file. The following lines contain character translations. The first number in each line represents the ASCII character in decimal and the second number represents the corresponding EBCDIC character in hexadecimal. All characters after the EBCDIC character and before the newline character are ignored by 3780Plus. Comments may be displayed here (note the "cent sign" following the EBCDIC translation of 155).
Special protocol translations:
• An incoming record separator (RS or US) is normally translated to the carriage return and line feed (CR/LF) characters. To translate RS and US to LF, modify the 13 0x0d translations in the asciiebc.ovr file. To translate RS and US to a different character, modify the 30 0x1e (RS) and 31 0x1f (US) translations in the asciiebc.ovr file.
• An incoming new line (NL) character is normally translated to the CR/LF characters. To translate NL to a different character, modify the 21 0x15 translation in the asciiebc.ovr file. Note: NL may not be passed through as-is.
• An incoming pad (FF) character is normally dropped. To translate FF, add a 0xff translation (i.e. 255 0xff) to the asciiebc.ovr file.
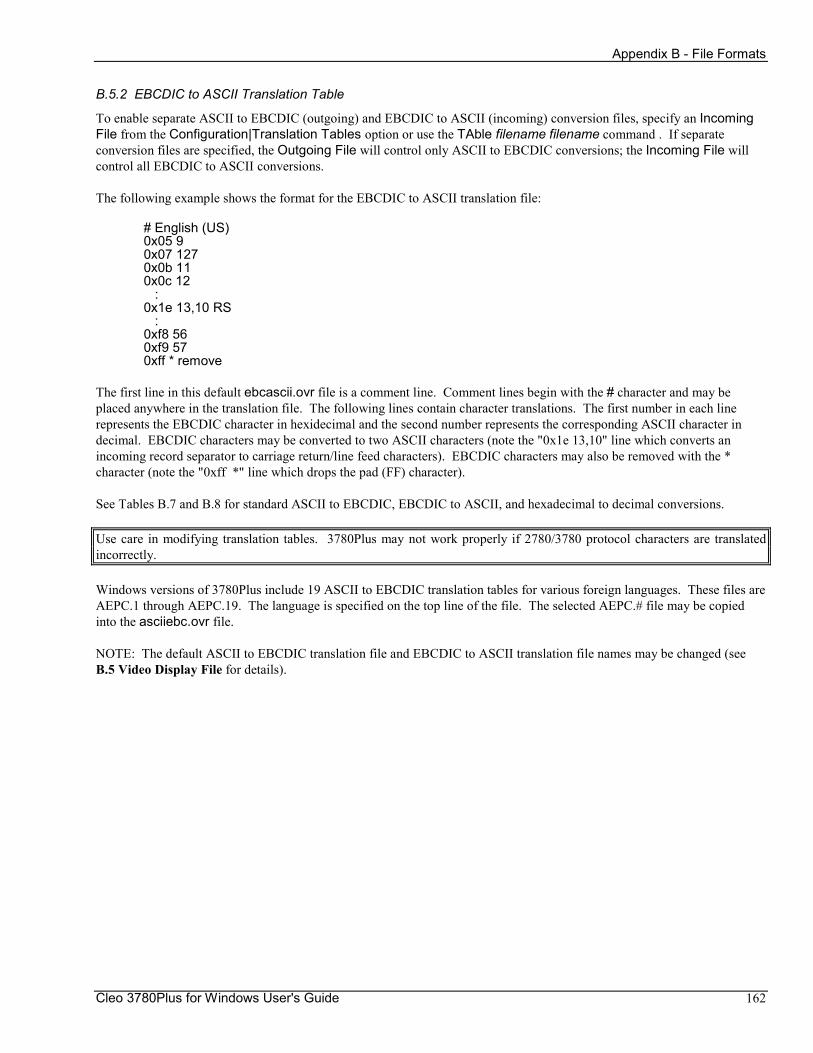
Appendix B - File Formats
Cleo 3780Plus for Windows User's Guide 162
B.5.2 EBCDIC to ASCII Translation Table
To enable separate ASCII to EBCDIC (outgoing) and EBCDIC to ASCII (incoming) conversion files, specify an Incoming File from the Configuration|Translation Tables option or use the TAble filename filename command . If separate conversion files are specified, the Outgoing File will control only ASCII to EBCDIC conversions; the Incoming File will control all EBCDIC to ASCII conversions.
The following example shows the format for the EBCDIC to ASCII translation file:
# English (US) 0x05 9 0x07 127 0x0b 11 0x0c 12 : 0x1e 13,10 RS : 0xf8 56 0xf9 57 0xff * remove
The first line in this default ebcascii.ovr file is a comment line. Comment lines begin with the # character and may be placed anywhere in the translation file. The following lines contain character translations. The first number in each line represents the EBCDIC character in hexidecimal and the second number represents the corresponding ASCII character in decimal. EBCDIC characters may be converted to two ASCII characters (note the "0x1e 13,10" line which converts an incoming record separator to carriage return/line feed characters). EBCDIC characters may also be removed with the * character (note the "0xff *" line which drops the pad (FF) character).
See Tables B.7 and B.8 for standard ASCII to EBCDIC, EBCDIC to ASCII, and hexadecimal to decimal conversions.
Use care in modifying translation tables. 3780Plus may not work properly if 2780/3780 protocol characters are translated incorrectly.
Windows versions of 3780Plus include 19 ASCII to EBCDIC translation tables for various foreign languages. These files are AEPC.1 through AEPC.19. The language is specified on the top line of the file. The selected AEPC.# file may be copied into the asciiebc.ovr file.
NOTE: The default ASCII to EBCDIC translation file and EBCDIC to ASCII translation file names may be changed (see B.5 Video Display File for details).
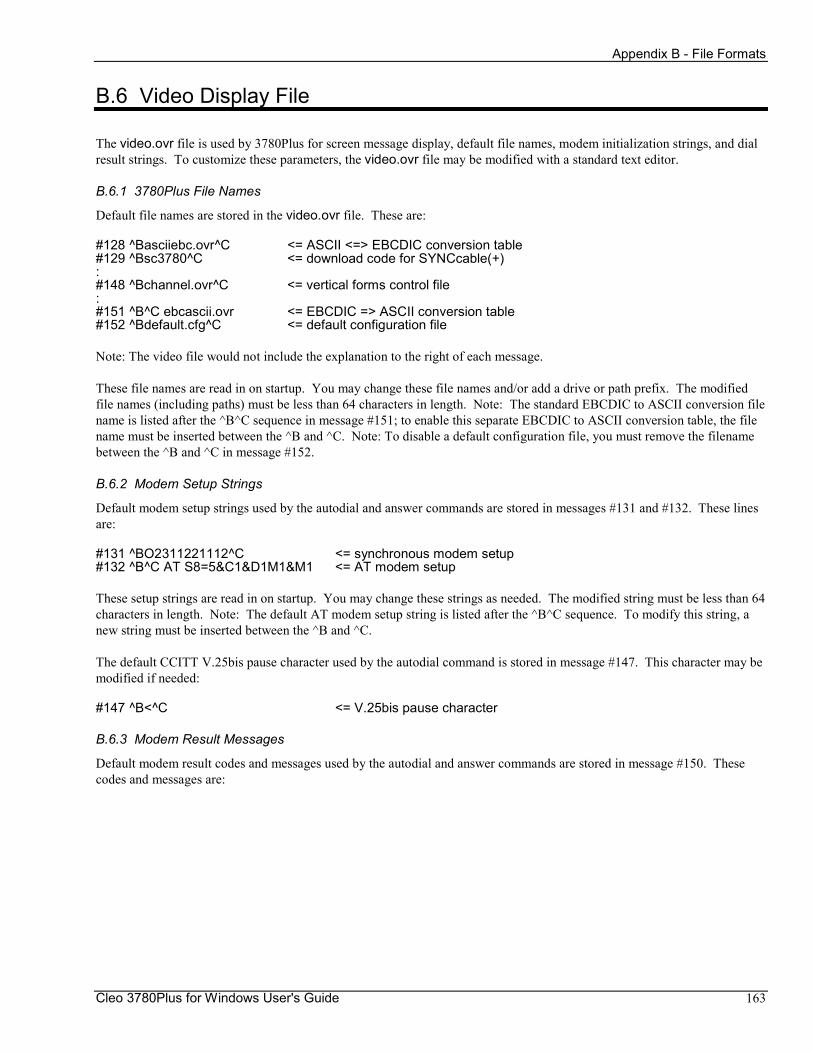
Appendix B - File Formats
Cleo 3780Plus for Windows User's Guide 163
B.6 Video Display File
The video.ovr file is used by 3780Plus for screen message display, default file names, modem initialization strings, and dial result strings. To customize these parameters, the video.ovr file may be modified with a standard text editor.
B.6.1 3780Plus File Names
Default file names are stored in the video.ovr file. These are:
#128 ^Basciiebc.ovr^C <= ASCII <=> EBCDIC conversion table #129 ^Bsc3780^C <= download code for SYNCcable(+) : #148 ^Bchannel.ovr^C <= vertical forms control file : #151 ^B^C ebcascii.ovr <= EBCDIC => ASCII conversion table #152 ^Bdefault.cfg^C <= default configuration file
Note: The video file would not include the explanation to the right of each message.
These file names are read in on startup. You may change these file names and/or add a drive or path prefix. The modified file names (including paths) must be less than 64 characters in length. Note: The standard EBCDIC to ASCII conversion file name is listed after the ^B^C sequence in message #151; to enable this separate EBCDIC to ASCII conversion table, the file name must be inserted between the ^B and ^C. Note: To disable a default configuration file, you must remove the filename between the ^B and ^C in message #152.
B.6.2 Modem Setup Strings
Default modem setup strings used by the autodial and answer commands are stored in messages #131 and #132. These lines are:
#131 ^BO2311221112^C <= synchronous modem setup #132 ^B^C AT S8=5&C1&D1M1&M1 <= AT modem setup
These setup strings are read in on startup. You may change these strings as needed. The modified string must be less than 64 characters in length. Note: The default AT modem setup string is listed after the ^B^C sequence. To modify this string, a new string must be inserted between the ^B and ^C.
The default CCITT V.25bis pause character used by the autodial command is stored in message #147. This character may be modified if needed:
#147 ^B<^C <= V.25bis pause character
B.6.3 Modem Result Messages
Default modem result codes and messages used by the autodial and answer commands are stored in message #150. These codes and messages are:
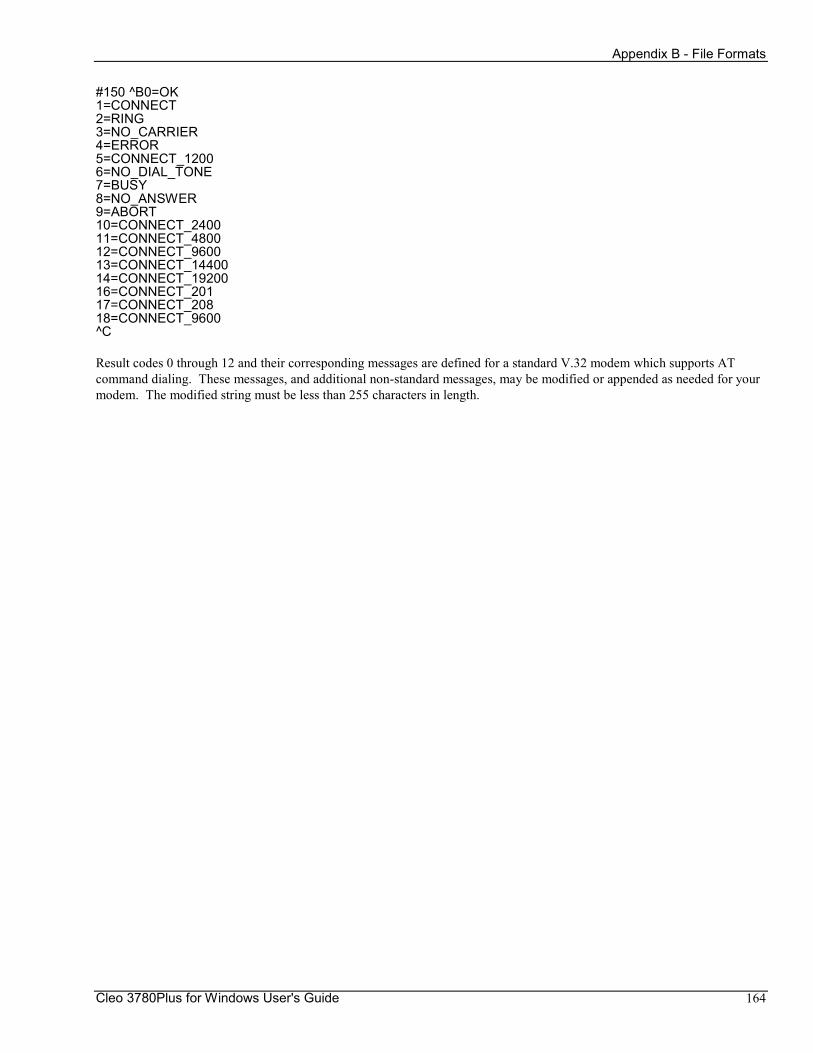
Appendix B - File Formats
Cleo 3780Plus for Windows User's Guide 164
#150 ^B0=OK 1=CONNECT 2=RING 3=NO_CARRIER 4=ERROR 5=CONNECT_1200 6=NO_DIAL_TONE 7=BUSY 8=NO_ANSWER 9=ABORT 10=CONNECT_2400 11=CONNECT_4800 12=CONNECT_9600 13=CONNECT_14400 14=CONNECT_19200 16=CONNECT_201 17=CONNECT_208 18=CONNECT_9600 ^C
Result codes 0 through 12 and their corresponding messages are defined for a standard V.32 modem which supports AT command dialing. These messages, and additional non-standard messages, may be modified or appended as needed for your modem. The modified string must be less than 255 characters in length.
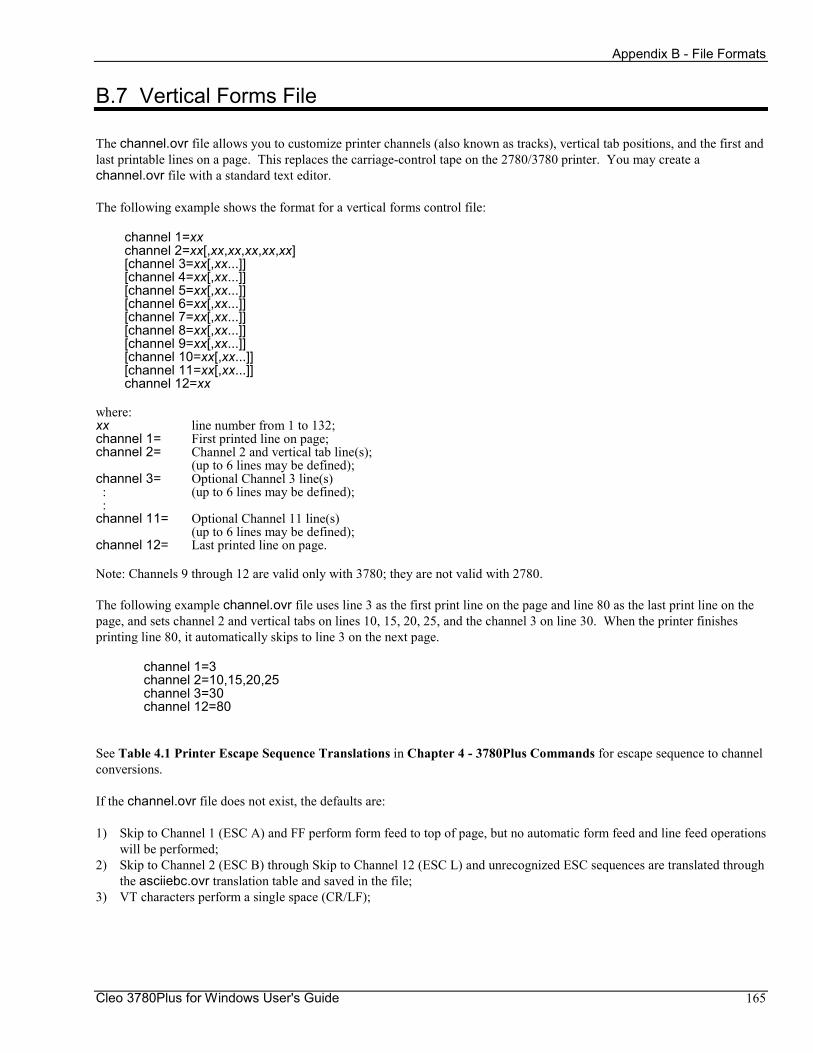
Appendix B - File Formats
Cleo 3780Plus for Windows User's Guide 165
B.7 Vertical Forms File
The channel.ovr file allows you to customize printer channels (also known as tracks), vertical tab positions, and the first and last printable lines on a page. This replaces the carriage-control tape on the 2780/3780 printer. You may create a channel.ovr file with a standard text editor.
The following example shows the format for a vertical forms control file:
channel 1=xx channel 2=xx[,xx,xx,xx,xx,xx] [channel 3=xx[,xx...]] [channel 4=xx[,xx...]] [channel 5=xx[,xx...]] [channel 6=xx[,xx...]] [channel 7=xx[,xx...]] [channel 8=xx[,xx...]] [channel 9=xx[,xx...]] [channel 10=xx[,xx...]] [channel 11=xx[,xx...]] channel 12=xx where: xx line number from 1 to 132; channel 1= First printed line on page; channel 2= Channel 2 and vertical tab line(s); (up to 6 lines may be defined); channel 3= Optional Channel 3 line(s) : (up to 6 lines may be defined); : channel 11= Optional Channel 11 line(s) (up to 6 lines may be defined); channel 12= Last printed line on page. Note: Channels 9 through 12 are valid only with 3780; they are not valid with 2780.
The following example channel.ovr file uses line 3 as the first print line on the page and line 80 as the last print line on the page, and sets channel 2 and vertical tabs on lines 10, 15, 20, 25, and the channel 3 on line 30. When the printer finishes printing line 80, it automatically skips to line 3 on the next page.
channel 1=3 channel 2=10,15,20,25 channel 3=30 channel 12=80 See Table 4.1 Printer Escape Sequence Translations in Chapter 4 - 3780Plus Commands for escape sequence to channel conversions.
If the channel.ovr file does not exist, the defaults are:
1) Skip to Channel 1 (ESC A) and FF perform form feed to top of page, but no automatic form feed and line feed operations will be performed;
2) Skip to Channel 2 (ESC B) through Skip to Channel 12 (ESC L) and unrecognized ESC sequences are translated through the asciiebc.ovr translation table and saved in the file;
3) VT characters perform a single space (CR/LF);
Appendix B - File Formats
Cleo 3780Plus for Windows User's Guide 166
If specific channels are not defined in the channel.ovr file, the defaults are:
1) If channel 1 is not defined, the default first line is 1; 2) If channel 2 is not defined, Skip to Channel 2 (ESC B) and VT perform single space (CR/LF); 3) If channels 3 through 12 are not defined, Skip to Channel 3 (ESC C) through Skip to Channel 12 (ESC L) perform a
single space (CR/LF); 4) If channel 12 is not defined, the default page length is line 66; 5) Unrecognized ESC sequences are dropped. Note: 3780Plus assumes the printer is at the top of form when the first printer file is received. Therefore, if ESC / is received as the first printer characters, 3780Plus will perform a Skip to Channel 1 but not a form feed.
Note: The default vertical forms file name may be changed (see B.5 Video Display File for details).
Appendix B - File Formats
Cleo 3780Plus for Windows User's Guide 167
B.8 Initialization File
The 3780PLUS.INI file is used for 3780Plus default options. This file is divided into sections based on option functions.
B.8.1 api3780
Device=device is a device specification for the COM port that SYNCcable+ will attach to or that AllSync is configured as. It is valid only with these two hardware types. This device is specified with the Hardware|COM Port option from the Setup program or the Configurator program before executing 3780Plus. This corresponds to the -D device command line option.
Address=address is used to specify the I/O address set on your internal communications card. See the appropriate Hardware Installation section for allowable address values. This address is specified with the Hardware|Address option from the Setup program or the Configurator program before executing 3780Plus. This corresponds to the -Aaddress command line option.
Interrupt=irq is used to specify the interrupt (IRQ) set on your internal communications card. See the appropriate Hardware Installation section for allowable interrupt values. This interrupt is specified with the Hardware|IRQ option from the Setup program or the Configurator program before executing 3780Plus. This corresponds to the -Iirq command line option.
Video=videofile is used to specify a different video display file. This file name may include a drive and/or path name. The default is VIDEO.OVR. This corresponds to the -V videofile command line option.
Baud=baud is an option to set the asynchronous baud rate on SYNCcable+. For example, Baud=9600 sets the COM port's async baud rate to 9600 bits per second. The allowable rates are 4800, 9600, 19200, and 38400 bps. For maximum throughput, the asynchronous baud rate should be set equal to or higher than the baud rate of your synchronous modem. The default is 4800 bps. It is valid only with SYNCcable+ hardware. This baud rate is specified with the Hardware|Baud Rate option from the Setup program or the Configurator program before executing 3780Plus. This corresponds to the -B baud command line option.
Clocks=ON|OFF is an option to enable clocking. Clocking allows you to connect directly to another local system without the use of modems or modem eliminators. The clock speed is selected with the configuration modulation parameter. The default is OFF to take clocking from an attached modem, modem eliminator, or other 3780 device. Clocks=ON corresponds to the -E command line option.
Filenames=ON|OFF is an option to disable incoming file names. This option is particularly important since existing files will otherwise be overwritten by incoming files named by a remote 3780Plus system. The default is ON to accept incoming filenames. Filenames=OFF corresponds to the -F command line option.
CarriageReturns=ON|OFF is an option to suppress the Carriage Return (CR) character during printer space suppress. This option affects only files directed specifically to the printer. The default is ON to convert RS characters to CR characters during printer space suppress. CarriageReturns=OFF corresponds to the -N command line option.
DeviceSelect=ON|OFF is an option to override host printer device selection to force incoming printer files to be saved to the default receive filename or screen. Printer control and escape sequences are translated through the ASCII/EBCDIC translation table, and files are not spooled to the printer. The default is ON to direct incoming printer files to the printer filename. DeviceSelect=OFF corresponds to the -R command line option.
Silent=ON|OFF is an option to suppress all status, error, and information dialogs from being displayed. The default is OFF to display screen messages. The silent mode is set with the Software|Silent Mode option from the Setup
Appendix B - File Formats
Cleo 3780Plus for Windows User's Guide 168
program or the Configurator program before executing 3780Plus. Silent=ON corresponds to the -S command line option.
PrintTranslate=ON|OFF is an option to translate transparent EBCDIC files from the host to ASCII for printing. The default is OFF to leave transparent files as-is. This option affects only files received with the Receive|To Printer option, the PRint command or files directed specifically to the printer. PrintTranslate=ON corresponds to the -T command line option.
UseCompress=NO|YES is an option to use the SpaceCompress setting to determine whether to uncompress incoming space compression characters (SpaceCompress=ON) or to translate them through the translation table (SpaceCompress=OFF). The default is NO to automatically uncompress incoming space compression characters. UseCompress=YES corresponds to the -W command line option.
APIDebug=OFF|ON is used to enable the API log file 3780SYS.LOG. APIDebug=ON logs all 3780Plus API commands.
B.8.2 StartUp
LogFile=logfile specifies the file name for the log file. The default log file name is 3780.LOG. The log file is set with the Startup|Log Name option from the Setup program or the Configurator program before executing 3780Plus.
LogMode= OVERWRITE|APPEND|NONE allows you to select how the log file is used:
OVERWRITE creates the log file if none exists or overwrites the log file if it does exist. This is the recommended option. This corresponds to the -LO command line option; APPEND creates the log file if none exists or appends to the log file if it does exist. This corresponds to the -LA command line option; NONE preserves the existing log file. A log file is not created and no transactions are recorded. This corresponds to -LN command line option. The log file mode is set with the Startup|Log Mode option from the Setup program or the Configurator program before executing 3780Plus.
MonitorFile=monitorfile specifies the name of the monitor file. The default monitor file name is 3780PLUS.MON. The monitor file is set with the Startup|Monitor Name option from the Setup program or the Configurator program before executing 3780Plus.
Appendix B - File Formats
Cleo 3780Plus for Windows User's Guide 169
MonMode= OVERWRITE|APPEND|NONE allows you to select how the monitor file is used:
OVERWRITE creates the monitor file if none exists or overwrites the monitor file if it does exist. APPEND creates the monitor file if none exists or appends to the monitor file if it does exist; NONE preserves the existing monitor file. A monitor file is not created and no transactions are recorded. The monitor file mode is set with the Startup|Monitor Mode option from the Setup program or the Configurator program before executing 3780Plus.
RecFile=jobfile specifies the name of the job recorder file. The default recorder file name is 3780PLUS.JOB. The recorder file is set with the Startup|Recorder File Name option from the Setup program or the Configurator program before executing 3780Plus.
ConfigFile=cfgfile is an option to select a custom protocol and line configuration file. The configuration file is set with the Startup|Configuration File Name option from the Setup program or the Configurator program before executing 3780Plus. This corresponds to the -C cfgfile command line option.
Note: If no ConfigFile=cfgfile option is specified, the default configuration is taken from the default.cfg file. If the default.cfg file does not exist, 3780Plus runs with the last 3780Plus configuration settings.
JobFile=jobfile is an option to execute a custom job file. The job file name is set with the Startup|Job File Name option from the Setup program or the Configurator program before executing 3780Plus. This corresponds to the -J jobfile command line option.
Tokens=OFF|ON|token(s)... is an option to enable token, environment, and counter variable processing, and/or to set token variable(s). Up to 19 tokens may be supplied. The default is OFF to disable token, environment, and counter variable processing. Tokens are set with the Startup|Tokens option from the Setup program or the Configurator program before executing 3780Plus. This corresponds to the -K [tokens] command line option.
B.8.3 3780Plus
SpoolerActive=ON|OFF is an option to spool all incoming print files to the default printer. The default is OFF. The spooler is set with the Software|Spool Print Files option from the Setup program or the Configurator program before executing 3780Plus.
DelSpoolFiles=ON|OFF is an option to delete all print files after spooling to the printer. The default is OFF. The delete spooler files is set with the Software|Remove Spooled Files option from the Setup program or the Configurator program before executing 3780Plus.
PrintExtension=.TXT is an option to specify the filename extension associated with the editor used to spool your print files. The default is .TXT for Notepad. The print extension is set with the Software|Association Ext option from the Setup program or the Configurator program before executing 3780Plus.
AutoReceive=ON|OFF is an option to continually check for the presence of incoming data to receive. The default is ON. The autoreceive is set with the Software|Auto Receive option from the Setup program or the Configurator program before executing 3780Plus.
StayOnTop=ON|OFF is an option to keep the 3780Plus icon from being covered by another program's window. The default is ON. The icon is controlled by the Software|Always on Top option from the Setup program or the Configurator program before executing 3780Plus.
Appendix B - File Formats
Cleo 3780Plus for Windows User's Guide 170
CheckDroppedExts=ON|OFF is an option to check the extensions of files that are dropped on the 3780Plus icon against the Job File Extension and the Configuration File Extension. The default is ON. The check is set with the Software|Check dropped file extensions option from the Setup program or the Configurator program before executing 3780Plus.
JobExtension=.JOB specifies the dropped job/script file extension. The default is .JOB. The job file extension is set with the Software|Job File Extension option from the Setup program or the Configurator program before executing 3780Plus.
CfgExtension=.CFG specifies the dropped configuration file extension. The default is .CFG. The configuration file extension is set with the Software|Config File Extension option from the Setup program or the Configurator program before executing 3780Plus.
DefSendMode= SCAN|BINARY|TEXT is the mode to use to transmit dropped files. The choices are TEXT, BINARY, or SCAN. The
default mode is SCAN. The send mode is set with the Software|Default Send Mode option from the Setup program or the Configurator program before executing 3780Plus.
B.8.4 Filenames
RecBaseName=rcvfile specifies the default receive file name. The default receive file name is RCVFILE.
PrnBaseName=print specifies the default print file name. The default print file name is PRINT.
ScrBaseName=screen specifies the default screen file name. The default screen file name is SCREEN.
Desktop=desktop.fil specifies the file name in which desktop information is saved. The default desktop file name is 3780PLUS.DSK.
Directory=dialing.dir specifies the file name in which the dialing directory information is saved. The default directory file name is DIALING.DIR.

Appendix B - File Formats
Cleo 3780Plus for Windows User's Guide 171
Appendix B - File Formats
Cleo 3780Plus for Windows User's Guide 172
The following parameters may be added to the 3780Plus for Windows 3780Plus.ini file. These parameters are undocumented.
B.8.5 Miscellaneous
Editor=editorname specifies the editor to use for the translation table edit. The default editor is Notepad.
DefaultSleep=seconds specifies the number of seconds to sleep if no sleep time has been specified with the Sleep command. The default sleep is 5 seconds.
HuntSeconds=seconds specifies the number of seconds between hunts (checks for incoming data) during autoreceive mode. The default hunt is every 4 seconds.
JobDropWeight=DropPriority specifies the priority of the dropped job files. The range is -2000 (high priority) to 0 (low priority). The default dropped job file priority is -2000 which means that if multiple files are dropped at one time, job files will be executed before configuration files are loaded and other files are transmitted.
CfgDropWeight=DropPriority specifies the priority of the dropped configuration files. The range is -2000 (high priority) to 0 (low priority). The default dropped configuration file priority is -1000 which means that if multiple files are dropped at one time, job files will be executed before configuration files are loaded and other files are transmitted.
Appendix B - File Formats
Cleo 3780Plus for Windows User's Guide 173
B.8.6 Debug
Level=0|1 is an option to turn program debuggers on. 1 (or anything non-zero) creates the files DEBUG.TXT and CALLBACK.TXT which can be read by Steve. The default is 0 to not create debug files.
B.8.7 API3780
SysLog= OVERWRITE|APPEND|NONE allows you to have the API3780.DLL write its own log file for debug purposes.
OVERWRITE and APPEND create or append to the file 3780SYS.LOG which can be read by Jeff Schneider. The default is NONE. The API LOG command opens this file in APPEND mode.

Cleo 3780Plus for Windows User's Guide 174
Appendix C. Multipoint Operation and Device Selection This appendix contains information on the following topics:
• Multipoint operation
• Device selection
Appendix C - Multipoint Operation and Device Selection
Cleo 3780Plus for Windows User's Guide 175
C.1 Multipoint Operation
3780Plus supports the IBM 2780/3780 multipoint option. In a multipoint configuration, the host mainframe is generally designated as the primary terminal, and all transmissions and receptions occur through this node. Other terminals on the multipoint line are designated as secondary terminals and are identified by unique addresses. The address for a secondary terminal may be assigned with the COnfig Terminal Identification parameter. See 4.8 COnfig - Display or Change Configuration in Chapter 4 - 3780Plus Commands and Chapter 1 - Configuration for more information on setting the Terminal ID.
C.1.1 3780 Multipoint
3780 multipoint operation requires a four character address (XXxx) for secondary terminal identification. The secondary terminal receives information when it is selected by the primary terminal and transmits information when it is polled by the primary terminal.
The selection sequence for 3780 multipoint is:
x x [device_select] ENQ
where:
x is a lower case alphabetic character identifying the secondary terminal that is to receive data.
device_select is an optional selection code representing the printer or punch to be selected (see Table C.1 3780 Device Selection Characters).
The polling sequence for 3780 multipoint is:
X X [device_select] ENQ
where:
X is an upper case alphabetic character identifying the secondary terminal that is to transmit data.
device_select is an optional selection code representing the reader to be polled (see Table C.1 3780 Device Selection Characters).
C.1.2 2780 Multipoint
2780 multipoint operation requires a single character address (upper or lower case) for secondary terminal identification. Both polling and selection sequences send this character followed by a device selection code indicating whether the terminal is being polled or selected:
x device_select ENQ
where:
x is the terminal address.
device_select is a selection code representing the printer or punch to be selected or the reader to be polled (see Table C.2 2780 Device Selection Characters).
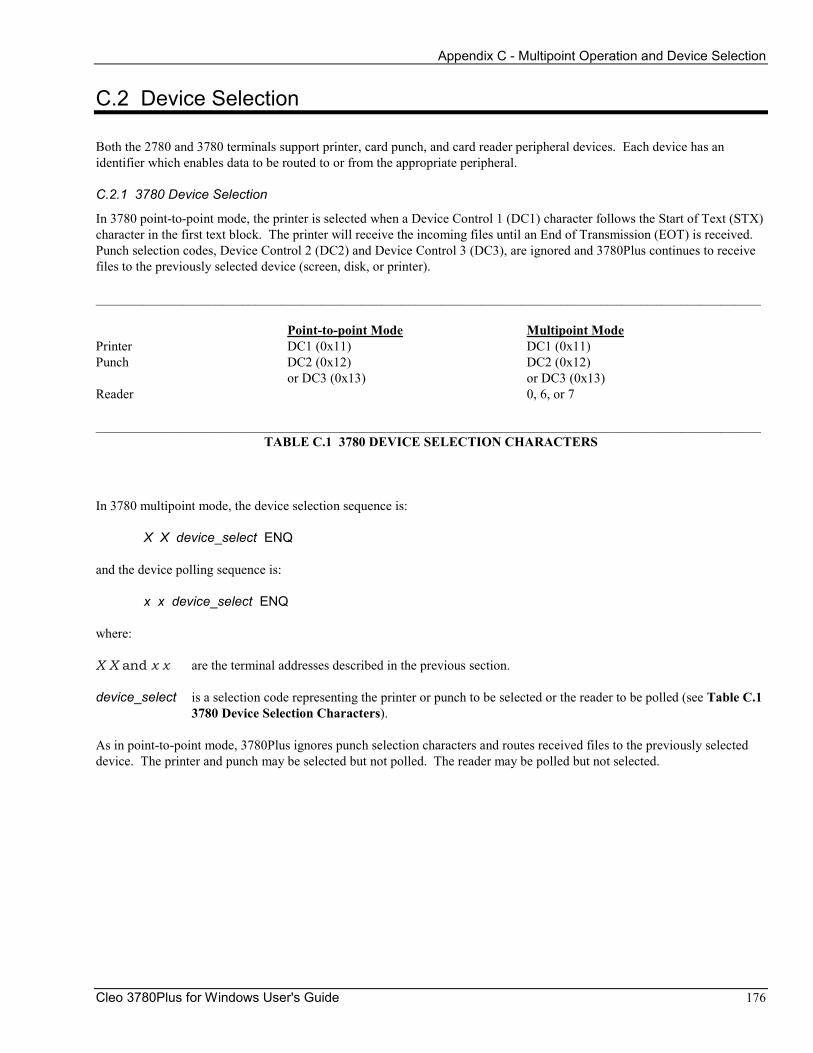
Appendix C - Multipoint Operation and Device Selection
Cleo 3780Plus for Windows User's Guide 176
C.2 Device Selection
Both the 2780 and 3780 terminals support printer, card punch, and card reader peripheral devices. Each device has an identifier which enables data to be routed to or from the appropriate peripheral.
C.2.1 3780 Device Selection
In 3780 point-to-point mode, the printer is selected when a Device Control 1 (DC1) character follows the Start of Text (STX) character in the first text block. The printer will receive the incoming files until an End of Transmission (EOT) is received. Punch selection codes, Device Control 2 (DC2) and Device Control 3 (DC3), are ignored and 3780Plus continues to receive files to the previously selected device (screen, disk, or printer).
____________________________________________________________________________________________________ Point-to-point Mode Multipoint Mode Printer DC1 (0x11) DC1 (0x11) Punch DC2 (0x12) DC2 (0x12) or DC3 (0x13) or DC3 (0x13) Reader 0, 6, or 7 ____________________________________________________________________________________________________
TABLE C.1 3780 DEVICE SELECTION CHARACTERS
In 3780 multipoint mode, the device selection sequence is:
X X device_select ENQ
and the device polling sequence is:
x x device_select ENQ
where:
X X and x x are the terminal addresses described in the previous section.
device_select is a selection code representing the printer or punch to be selected or the reader to be polled (see Table C.1 3780 Device Selection Characters).
As in point-to-point mode, 3780Plus ignores punch selection characters and routes received files to the previously selected device. The printer and punch may be selected but not polled. The reader may be polled but not selected.
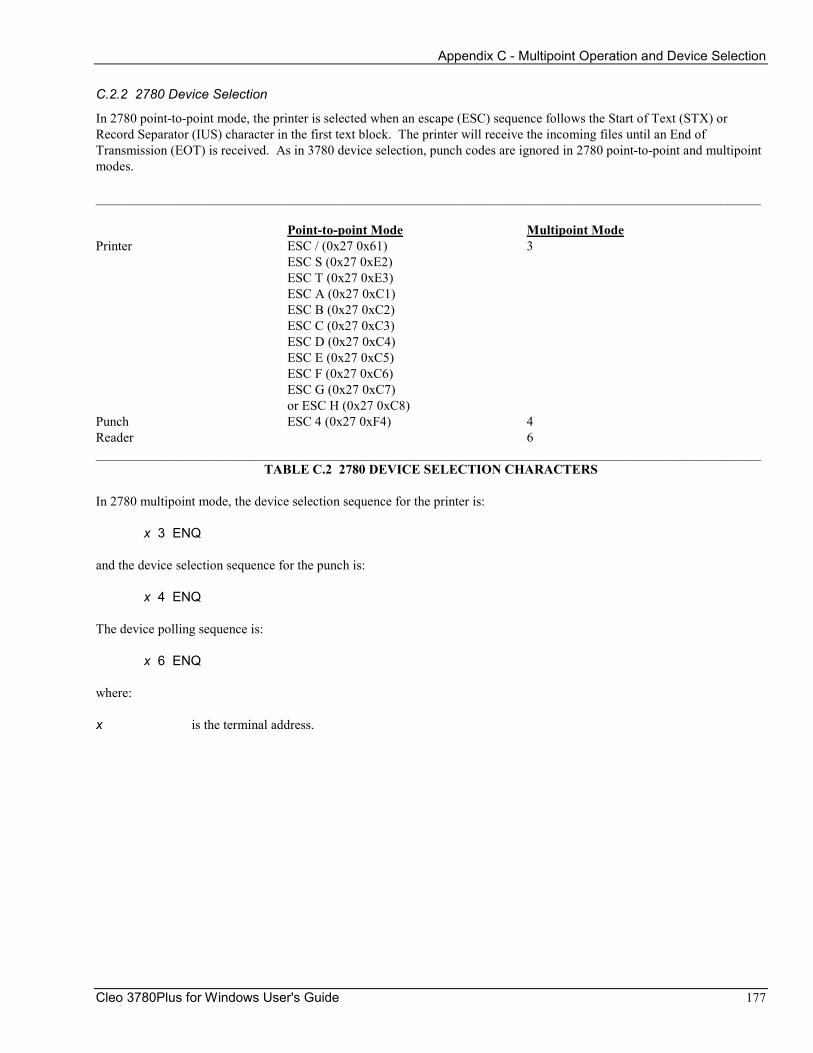
Appendix C - Multipoint Operation and Device Selection
Cleo 3780Plus for Windows User's Guide 177
C.2.2 2780 Device Selection
In 2780 point-to-point mode, the printer is selected when an escape (ESC) sequence follows the Start of Text (STX) or Record Separator (IUS) character in the first text block. The printer will receive the incoming files until an End of Transmission (EOT) is received. As in 3780 device selection, punch codes are ignored in 2780 point-to-point and multipoint modes.
____________________________________________________________________________________________________ Point-to-point Mode Multipoint Mode Printer ESC / (0x27 0x61) 3 ESC S (0x27 0xE2) ESC T (0x27 0xE3) ESC A (0x27 0xC1) ESC B (0x27 0xC2) ESC C (0x27 0xC3) ESC D (0x27 0xC4) ESC E (0x27 0xC5) ESC F (0x27 0xC6) ESC G (0x27 0xC7) or ESC H (0x27 0xC8) Punch ESC 4 (0x27 0xF4) 4 Reader 6 ____________________________________________________________________________________________________
TABLE C.2 2780 DEVICE SELECTION CHARACTERS In 2780 multipoint mode, the device selection sequence for the printer is:
x 3 ENQ
and the device selection sequence for the punch is:
x 4 ENQ
The device polling sequence is:
x 6 ENQ
where:
x is the terminal address.

Cleo 3780Plus for Windows User's Guide 178
Appendix D: Glossary This appendix contains definitions of terms used within this manual.
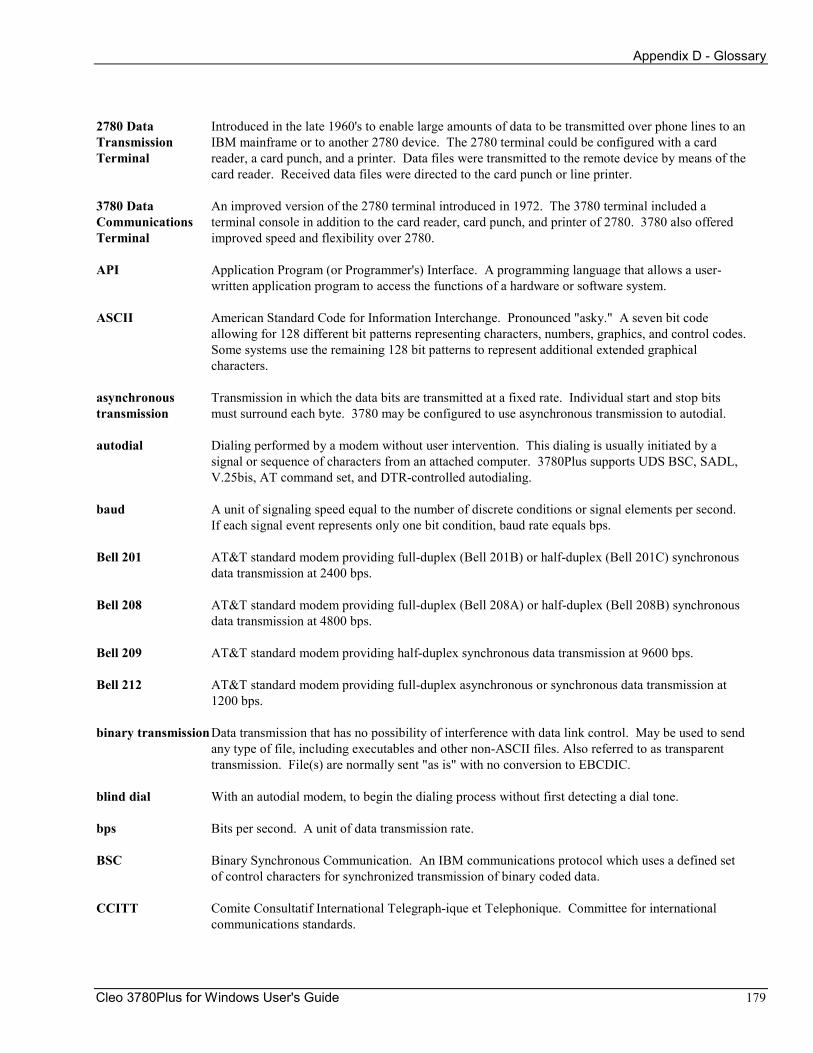
Appendix D - Glossary
Cleo 3780Plus for Windows User's Guide 179
2780 Data Transmission Terminal
Introduced in the late 1960's to enable large amounts of data to be transmitted over phone lines to an IBM mainframe or to another 2780 device. The 2780 terminal could be configured with a card reader, a card punch, and a printer. Data files were transmitted to the remote device by means of the card reader. Received data files were directed to the card punch or line printer.
3780 Data Communications Terminal
An improved version of the 2780 terminal introduced in 1972. The 3780 terminal included a terminal console in addition to the card reader, card punch, and printer of 2780. 3780 also offered improved speed and flexibility over 2780.
API Application Program (or Programmer's) Interface. A programming language that allows a user-written application program to access the functions of a hardware or software system.
ASCII American Standard Code for Information Interchange. Pronounced "asky." A seven bit code allowing for 128 different bit patterns representing characters, numbers, graphics, and control codes. Some systems use the remaining 128 bit patterns to represent additional extended graphical characters.
asynchronous transmission
Transmission in which the data bits are transmitted at a fixed rate. Individual start and stop bits must surround each byte. 3780 may be configured to use asynchronous transmission to autodial.
autodial Dialing performed by a modem without user intervention. This dialing is usually initiated by a signal or sequence of characters from an attached computer. 3780Plus supports UDS BSC, SADL, V.25bis, AT command set, and DTR-controlled autodialing.
baud A unit of signaling speed equal to the number of discrete conditions or signal elements per second. If each signal event represents only one bit condition, baud rate equals bps.
Bell 201 AT&T standard modem providing full-duplex (Bell 201B) or half-duplex (Bell 201C) synchronous data transmission at 2400 bps.
Bell 208 AT&T standard modem providing full-duplex (Bell 208A) or half-duplex (Bell 208B) synchronous data transmission at 4800 bps.
Bell 209 AT&T standard modem providing half-duplex synchronous data transmission at 9600 bps.
Bell 212 AT&T standard modem providing full-duplex asynchronous or synchronous data transmission at 1200 bps.
binary transmission
Data transmission that has no possibility of interference with data link control. May be used to send any type of file, including executables and other non-ASCII files. Also referred to as transparent transmission. File(s) are normally sent "as is" with no conversion to EBCDIC.
blind dial With an autodial modem, to begin the dialing process without first detecting a dial tone.
bps Bits per second. A unit of data transmission rate.
BSC Binary Synchronous Communication. An IBM communications protocol which uses a defined set of control characters for synchronized transmission of binary coded data.
CCITT Comite Consultatif International Telegraph-ique et Telephonique. Committee for international communications standards.

Appendix D - Glossary
Cleo 3780Plus for Windows User's Guide 180
CCITT V.22 International recommendation defining standards for modems providing full-duplex asynchronous or synchronous data transmission at 1200 bps.
CCITT V.22 bis International recommendation defining standards for modems providing full-duplex asynchronous or synchronous data transmission at 2400 bps.
CCITT V.24 International recommendation defining interchange circuits between data communications and data terminal equipment. Similar to EIA RS-232C.
CCITT V.25 bis International recommendation defining standards for establishing a connection between a serial automatic calling data station and an automatic answering data station on a switched phone line.
CCITT V.26 bis International recommendation defining standards for modems providing half-duplex synchronous data transmission at 2400 bps. Similar to Bell 201.
CCITT V.29 International recommendation defining standards for modems providing half-duplex synchronous data transmission at 9600 bps.
CCITT V.32 International recommendation defining standards for modems providing full-duplex asynchronous or synchronous data transmission at 9600 bps.
configuration file
File created and used by 3780Plus to modify default configuration parameters. Configuration parameters include: protocol type, line type, terminal type, terminal id, transmission record size, transmission blocking factor, space compression, new line suppression, repeat limit, retransmission limit, wait limit, delay limit, bid limit, idle limit, receive limit, modulation type, RTS/CTS delay, equalizer, and dialing method.
control character
A non-printing character designed to send a special signal (like a carriage return or line feed) to a remote device.
crc-16 16 bit cyclic redundancy check. An error detection scheme in which two eight bit byte checks are accumulated using the polynomial x16+x15+x2+1. Also referred to as the BCC (block check character).
DCE Data Communications Equipment. Equipment that establishes, maintains, and terminates a data transmission connection. Example: modem.
DTE Data Terminal Equipment. Equipment that transmits and/or receives data. Example: PC with synchronous interface card.
DTMF Dual-Tone Multi-Frequency. The method of dialing used by push-button phones which generate two output tones that represent each number.
EBCDIC Extended Binary Coded Decimal Interchange Code. An eight bit character code allowing for 256 different bit patterns. EBCDIC is used in IBM and IBM-compatible mainframe computer systems.
EIA Electronic Industries Association. A standards organization in the USA specializing in the electrical and functional characteristics of interface equipment.
emulate To imitate or act like. For example, 3780Plus running on an IBM PC emulates an IBM 3780 computer system.

Appendix D - Glossary
Cleo 3780Plus for Windows User's Guide 181
equalization A modem option which allows compensation for poor quality phone lines.
escape sequence An ESC control character followed by a limited number of other characters providing additional control functions.
file transfer The process of transmitting data files between computers.
full duplex The ability to transmit and receive data at the same time.
half duplex The ability to transmit or receive but not both at the same time.
interactive execution
In 3780Plus, entering one command at a time from within the 3780Plus program.
job file File of commands created and used by 3780Plus to enable unattended operation. See also Scripting Command Language.
leased line A telephone line reserved for the exclusive use of a leasing customer without interexchange switching arrangements (also called private, non-switched, or dedicated line).
log file File created by 3780Plus listing all 3780Plus transactions.
logon The process by which a user initiates contact with a computer system and identifies himself or herself as someone authorized to use the system.
modem Modulator-demodulator. A device used to convert digital electronic signals produced by the computer into audio signals that can be sent over a phone line and to convert audio signals back to digital signals.
monitor file File created by 3780Plus listing all protocol characters being transmitted and received.
multipoint line A single communications line interconnecting several stations. Use of this type of line usually requires a polling mechanism to address each terminal with a unique address code. Also referred to as a multidrop line.
non-transparent transmission
Data transmission that may interfere with data link control. Also referred to as text transmission. Usually used for transmitting text files with valid ASCII characters. File(s) are normally translated from the ASCII character set to the EBCDIC character set before transmission and reconverted to ASCII upon reception.
permissive phone line
A standard two-wire, half-duplex, dial-up telephone line with a maximum output level of -9 dBm.
piggybacking Transmitting consecutive files without an intervening EOT.
polling sequence A series of characters sent by the controlling (primary) computer on a multipoint line to request information from a secondary computer.
point-to-point line
A connection between two, and only two, terminals/computers.

Appendix D - Glossary
Cleo 3780Plus for Windows User's Guide 182
primary terminal
The computer (usually a host mainframe) controlling all computer transmissions and receptions on a multidrop line.
programmable phone line
A two-wire, half-duplex, dial-up telephone line with a maximum output level set externally by the phone company.
protocol A formal set of conventions governing the formatting and relative timing of message exchange between two communicating systems.
pulse dial The method of dialing used by rotary dial phones which open and close the local loop circuit at timed rates.
RJ-11 A four wire modular phone cable generally used on permissive (standard) phone lines. May end in a RJ-11 or RJ-45 connector. Note: the RJ-45 connector is larger than the RJ-11 connector.
RJ-45 An eight wire modular phone cable generally used on programmable and private phone lines.
RJE Remote Job Entry. Remote batch oriented access to the host computer through file transfer.
RS-232C EIA standard describing the signals, connectors, and pin locations for the interface between data terminal equipment (DTE) and data communications equipment (DCE).
Scripting Command Language
File of commands created and used by 3780Plus to enable unattended operation. See also Job File.
secondary terminal
A computer on a multidrop line identified by a unique address (terminal id).
selection sequence
A series of characters sent by the controlling (primary) computer on a multipoint line to select the secondary computer to receive data.
serial line monitor
A hardware or software device which captures and displays or saves all received and transmitted data on the communications line.
space compression/ expansion
Allows spaces to be removed before transmission and reinserted during reception for increased data throughput in non-transparent mode.
status line In 3780Plus, a line posted after each file is transmitted or received stating the file name, completion status code, and the number of data blocks processed.
switched line A common telephone line capable of completing a dialed, point-to-point connection between two stations (also called dial-up, public, or non-dedicated line).
synchronous transmission
Transmission in which both the data characters and the individual bits are transmitted at a fixed rate, with the transmitter and receiver being synchronized. This eliminates the need for individual start and stop bits surrounding each byte. 3780 uses synchronous transmission.
terminal id A unique address (usually 1 to 4 characters in length) which identifies a secondary terminal on a multipoint line.
Appendix D - Glossary
Cleo 3780Plus for Windows User's Guide 183
text transmission
Data transmission that may interfere with data link control. Also referred to as non-transparent transmission. Usually used for transmitting text files with valid ASCII characters. File(s) are normally translated from the ASCII character set to the EBCDIC character set before transmission and reconverted to ASCII upon reception.
tone dial The method of dialing used by push-button phones which generate two output tones that represent each number.
transparent transmission
Data transmission that has no possibility of interference with data link control. May be used to send any type of file, including executables and other non-ASCII files. Also referred to as binary transmission. File(s) are normally sent "as is" with no conversion to EBCDIC.
unattended execution
In 3780Plus, the execution of a job file to run 3780Plus commands without user intervention.