
Cleo Aportal.cleo.com/support/byproduct/legacy/CleoAplusUnixInstall.pdf · Data General AViiON...
104
Cleo A + Installation Guide November 2001
Transcript of Cleo Aportal.cleo.com/support/byproduct/legacy/CleoAplusUnixInstall.pdf · Data General AViiON...
Cleo A+
Installation Guide
November 2001

Cleo A+ Installation Guide Version 3.17- November 2001
RESTRICTED RIGHTS Use, duplication, or disclosure by the Government is subject to restrictions as set forth in subparagraph (C)(1)(ii) of the Rights in Technical Data and Computer Software clause at DFARS 252.227-7013. Manufacturer is: Cleo Communications 4203 Galleria Drive Rockford, IL 61111 USA
Cleo Communications reserves the right to, without notice, modify or revise all or part of this document and/or change product features or specifications and shall not be responsible for any loss, cost or damage, including consequential damage, caused by reliance on these materials.
This document may not be reproduced, stored in a retrieval system or transmitted, in whole or in part, in any form or by any means (electronic, mechanical, photo-copied or otherwise) without the prior written permission of Cleo Communications
2001 Cleo Communications All rights reserved.
Cleo, 3780Plus, and SYNCcable+ are registered trademarks of Cleo Communications A+ is a trademark of Cleo Communications All other brand names are trademarks or registered trademarks or their respective holders.

About Cleo Communications
Cleo Communications provides reliable, secure data transfer products and services that enable users to easily establish and manage communications sessions, and easily integrate these solutions within their mission-critical e-business applications.
Since Cleo’s founding in 1981, our products have been proven in over 100,000 installations worldwide. Customers in the manufacturing, retail, healthcare, and financial services industries, among others, rely on our products and services to help them achieve complete automated point-to-point data transfer solutions.
For most applications, we adapt our core capabilities to deliver tailored communications solutions providing exceptional value to users. Our products and services are available for resale by leading vertical-market application solution providers, and we also work directly with many end-user organizations to meet their specific data transfer needs.
Our business partners and end-user customers prefer Cleo for our ability to provide the highest-quality communications products backed by superior service and support.
Technical Support A technical support subscription may be purchased for Cleo A+. Please contact your Cleo Sales Representative for more information. Please complete registration of this product today online at www.cleo.com or by mail or fax 815.654.8294. If you have questions about installing and using A+ after reading through this manual, contact our Technical Support department toll-free between the hours of 8:00 A.M. and 5:00 P.M. (Central Time) at: 866-444-2536 or outside the US at 001-815-654-9887. Please have your A+ diskette or tape handy to supply your product information. You may also EMAIL your questions to [email protected]; please include the product information from your A+ diskette or tape.


Table of Contents
Before You Begin ..............................................................................................................i Data General AViiON (88K-based) and DG/UX ...............................................................1 DEC AXP/Alpha and Digital UNIX or OSF/1 ....................................................................5 DEC AXP/Alpha and OpenVMS........................................................................................8 DEC VAX and OpenVMS ..................................................................................................22 Hewlett Packard 9000 and HP-UX ...................................................................................36 IBM AT, PS/2, & Compatibles and MS-DOS ....................................................................40 IBM AT, PS/2, & Compatibles and UNIX or XENIX..........................................................43 IBM RS/6000 and AIX .......................................................................................................49 Sun and Solaris/SunOS ....................................................................................................51 Appendix A. File Formats ..................................................................................................55 Appendix B. Modem Support.............................................................................................89 Appendix C. Utility Programs.............................................................................................93
Notes:
Data General AViiON (Intel-based) and DG/UX..................... see IBM AT, PS/2 & Compatibles and UNIX or XENIX
IBM AT & Compatibles and Solaris x86.................................. see IBM AT, PS/2 & Compatibles and UNIX or XENIX


Cleo A+ Installation Guide i
Before You Begin
This Cleo A+ Installation Guide section is composed of a number of chapters, each dealing with installation of Cleo A+ on a particular computer system with a particular operating system. Use the table of contents to find the chapter for your computer and operating system.
Each of the following chapters describes the steps involved in installing the A+ software to your hard disk and configuring your system for A+ operation. The following information is covered:
• A+ Installation
• Port configuration
• Execution instructions not covered in the Cleo A+ User's Guide
• Multiple A+ sessions
Prior to executing A+, see your modem manual for instructions on the setup and installation of your communications hardware.
ii Cleo A+ Installation Guide
The Distribution Media
Cleo A+ is licensed to operate one concurrent session on a single CPU unless additional sessions are purchased. The files from the A+ CD, diskette, or tape may be copied to a hard disk for daily operation. A single copy may be made to serve only as a backup to the original. Any Cleo CD, diskette, or tape that is damaged or determined to be defective should be returned immediately to Interface Systems, Inc. for replacement.
Please use the provided registration card to register your product immediately. You may also register online at www.cleo.com

Cleo A+ Installation Guide 1
Data General AViiON (88K-based) and DG/UX
This chapter describes the steps involved in installing your Cleo A+ software and configuring your Data General AViiON 3000, 4000, 5000, or 6000 Series machine running DG/UX for A+ operation.
A+ Installation Cleo A+ is supplied on a QIC 120 cartridge tape. If requested, A+ may be supplied on a 3½" diskette. This tape or diskette, labeled Cleo A+ AViiON, contains one compressed file: CleoInstall.
To install A+, login to your system as root. Use the "cd" command to change to the directory where you wish to place the A+ files. If you are using A+ in conjunction with an EDI translator package, consult that software vendor’s installation instructions for the required directory. The following "tar" command will copy the CleoInstall file from your A+ tape or diskette to the current directory of your hard disk:
tar xv
Once the CleoInstall file is copied to your system, you must install A+ with the command:
./CleoInstall
If additional licenses are purchased at a later time, skip the steps above. Simply change to the original installation directory and run ./install to install additional A+ licenses.
If this is a new installation, the CleoInstall program will prompt for your A+ serial number. This serial number may be found on your A+ tape/disk or on your A+ registration card. The format of the serial number is APLnnnnnn-xxxxxxxx, where each n is a number from 0 to 9 and each x is a letter from a to z or A to Z. Note the letters are case sensitive.
If A+ is already installed on your system, the CleoInstall program will prompt you 1) to update your software, 2) to add a license, or 3) if a temporary license exists, to update to a permanent license. If you choose to add or update a license, you will be prompted for new A+ serial number. This serial number may be found on your new A+ tape/disk, on your new A+ registration card, or it may have been given to you by a Cleo representative. The format of the serial number is APLnnnnnn-xxxxxxxx, where each n is a number from 0 to 9 and each x is a letter from a to z or A to Z. Note the letters are case sensitive.
When CleoInstall finishes uncompressing its files, your current directory should contain the following 28 files:
A+ aserver.cfg strfuncs vt220.cmf A+.HLP carrier ti928.cmf vt320.cmf A+.INI getinfo tvi912.cmf vt52.cmf A+.TRF install tvi920.cmf wyse50.cmf CleoInstall palette.def tvi925.cmf wyse60.cmf ansi.cmf palette.ibm version xlatin.ovr aplusstat palette.iso vt100.cmf xlatout.ovr

2 Cleo A+ Installation Guide
Port Configuration The selected tty port should be configured as a terminal port, not as a modem port. This tty port must be disabled from logins and given read and write permissions.
To disable the tty port, edit the file /etc/inittab. This /etc/inittab file contains a list of the tty ports and their respective configurations. The format of inittab is:
id:rstate:action:process
The tty port you select for A+ must have the action field of the inittab script placed in an off mode. For example:
xx:2:off:/etc/getty ttyxx 9600
where xx is the tty port number. If it is necessary to make changes to the /etc/inittab file, you must restart your system to activate the change.
Some systems do not have /etc/inittab file control. To disable the tty port on these systems, you may use the sysadm program:
• Logon as root and type sysadm.
• From the first menu of sysadm, select: 5 device -> Manage devices and device queues
• From this menu, select: 4 Port -> Manage port monitors and port services
• From the port menu, select: 1 Terminal -> Streamlined port service management for terminals
• Then select: 5 Disable... Disable terminal(s)
• Type your tty device name.
Consult your system administrator's manual for details on sysadm.
The following command will give the tty port read and write permissions:
chmod +rw /dev/ttyxx
where xx is the tty port number selected earlier.
Cleo A+ Installation Guide 3
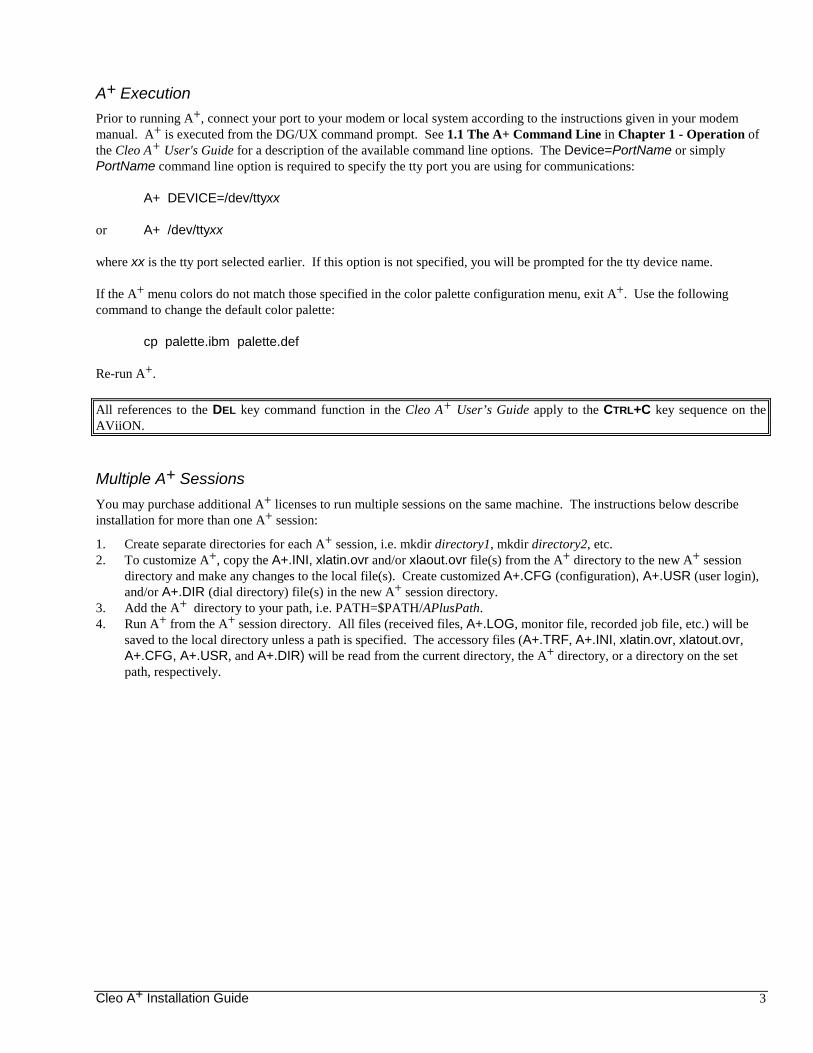
A+ Execution Prior to running A+, connect your port to your modem or local system according to the instructions given in your modem manual. A+ is executed from the DG/UX command prompt. See 1.1 The A+ Command Line in Chapter 1 - Operation of the Cleo A+ User's Guide for a description of the available command line options. The Device=PortName or simply PortName command line option is required to specify the tty port you are using for communications:
A+ DEVICE=/dev/ttyxx
or A+ /dev/ttyxx
where xx is the tty port selected earlier. If this option is not specified, you will be prompted for the tty device name.
If the A+ menu colors do not match those specified in the color palette configuration menu, exit A+. Use the following command to change the default color palette:
cp palette.ibm palette.def
Re-run A+. All references to the DEL key command function in the Cleo A+ User’s Guide apply to the CTRL+C key sequence on the AViiON.
Multiple A+ Sessions You may purchase additional A+ licenses to run multiple sessions on the same machine. The instructions below describe installation for more than one A+ session:
1. Create separate directories for each A+ session, i.e. mkdir directory1, mkdir directory2, etc. 2. To customize A+, copy the A+.INI, xlatin.ovr and/or xlaout.ovr file(s) from the A+ directory to the new A+ session
directory and make any changes to the local file(s). Create customized A+.CFG (configuration), A+.USR (user login), and/or A+.DIR (dial directory) file(s) in the new A+ session directory.
3. Add the A+ directory to your path, i.e. PATH=$PATH/APlusPath. 4. Run A+ from the A+ session directory. All files (received files, A+.LOG, monitor file, recorded job file, etc.) will be
saved to the local directory unless a path is specified. The accessory files (A+.TRF, A+.INI, xlatin.ovr, xlatout.ovr, A+.CFG, A+.USR, and A+.DIR) will be read from the current directory, the A+ directory, or a directory on the set path, respectively.

4 Cleo A+ Installation Guide
Cleo A+ Installation Guide 5
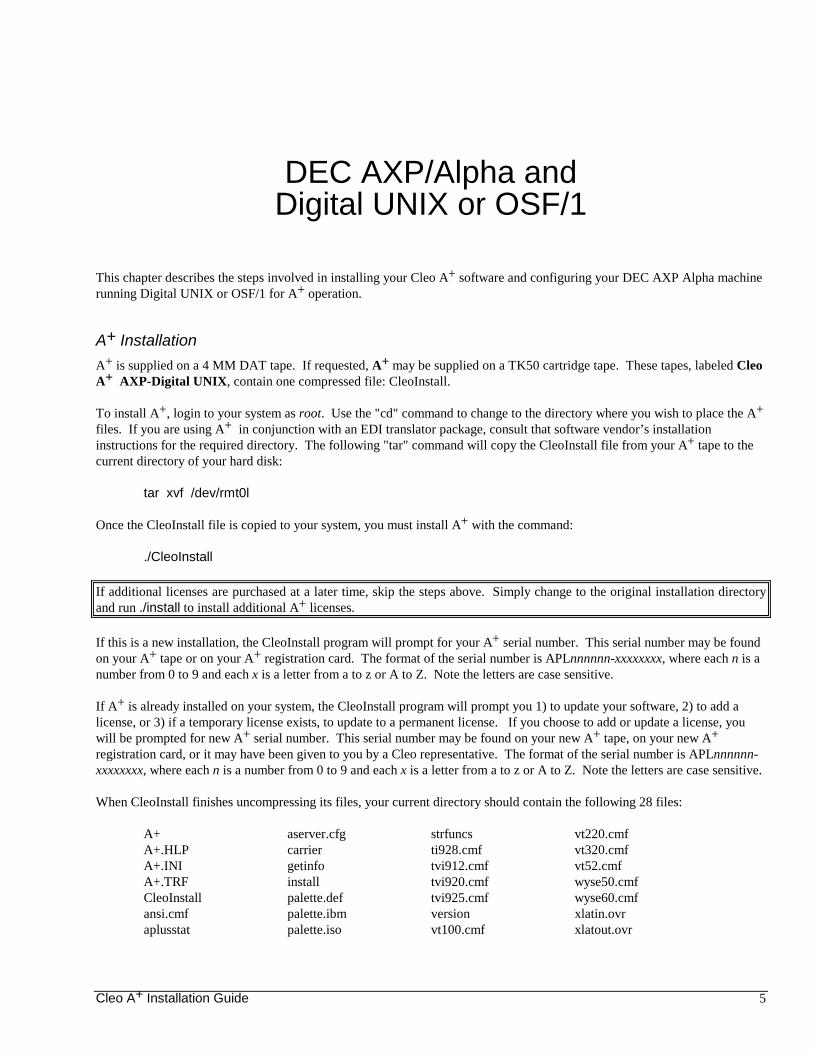
DEC AXP/Alpha and Digital UNIX or OSF/1
This chapter describes the steps involved in installing your Cleo A+ software and configuring your DEC AXP Alpha machine running Digital UNIX or OSF/1 for A+ operation.
A+ Installation A+ is supplied on a 4 MM DAT tape. If requested, A+ may be supplied on a TK50 cartridge tape. These tapes, labeled Cleo A+ AXP-Digital UNIX, contain one compressed file: CleoInstall.
To install A+, login to your system as root. Use the "cd" command to change to the directory where you wish to place the A+ files. If you are using A+ in conjunction with an EDI translator package, consult that software vendor’s installation instructions for the required directory. The following "tar" command will copy the CleoInstall file from your A+ tape to the current directory of your hard disk:
tar xvf /dev/rmt0l
Once the CleoInstall file is copied to your system, you must install A+ with the command:
./CleoInstall
If additional licenses are purchased at a later time, skip the steps above. Simply change to the original installation directory and run ./install to install additional A+ licenses.
If this is a new installation, the CleoInstall program will prompt for your A+ serial number. This serial number may be found on your A+ tape or on your A+ registration card. The format of the serial number is APLnnnnnn-xxxxxxxx, where each n is a number from 0 to 9 and each x is a letter from a to z or A to Z. Note the letters are case sensitive.
If A+ is already installed on your system, the CleoInstall program will prompt you 1) to update your software, 2) to add a license, or 3) if a temporary license exists, to update to a permanent license. If you choose to add or update a license, you will be prompted for new A+ serial number. This serial number may be found on your new A+ tape, on your new A+ registration card, or it may have been given to you by a Cleo representative. The format of the serial number is APLnnnnnn-xxxxxxxx, where each n is a number from 0 to 9 and each x is a letter from a to z or A to Z. Note the letters are case sensitive.
When CleoInstall finishes uncompressing its files, your current directory should contain the following 28 files:
A+ aserver.cfg strfuncs vt220.cmf A+.HLP carrier ti928.cmf vt320.cmf A+.INI getinfo tvi912.cmf vt52.cmf A+.TRF install tvi920.cmf wyse50.cmf CleoInstall palette.def tvi925.cmf wyse60.cmf ansi.cmf palette.ibm version xlatin.ovr aplusstat palette.iso vt100.cmf xlatout.ovr

6 Cleo A+ Installation Guide
Port Configuration The selected tty port should be configured as a terminal port. This tty port must be disabled from logins and given read and write permissions.
To disable the tty port, edit the file /etc/inittab. This /etc/inittab file contains a list of the tty ports and their respective configurations. If your tty port is not listed, see your Digital UNIX or OSF/1 manual for instructions on “Adding Terminals”. The format of the inittab script is:
id:rstate:action:process
The tty port you select must have the action field of the inittab script placed in an off mode. For example:
xx:2:off:/etc/getty ttyxx 9600
where xx is the tty port number. If it is necessary to make changes to the /etc/inittab file, you must restart your system to activate the change.
The following command will give the tty port read and write permissions:
chmod +rw /dev/ttyxx
where xx is the tty port number selected earlier.
DECserver User's Note A+ may be run on a DECserver (200, 500, etc.) serial port connected to the Alpha via DECNET. The server port parameters, however, must be modified for correct A+ operation. Some of these parameters include:
ACCESS REMOTE BREAK DISABLED MODEM DISABLED SPEED 9600 AUTOPROMPT DISABLED AUTOCONNECT DISABLED AUTOBAUD DISABLED FLOW CONTROL DISABLED
The proper server configuration is similar to that for a network printer.
Cleo A+ Installation Guide 7
A+ Execution Prior to running A+, connect your port to your modem or local system according to the instructions given in your modem manual. A+ is executed from the Digital UNIX or OSF/1 command prompt. See 1.1 The A+ Command Line in Chapter 1 - Operation of the Cleo A+ User's Guide for a description of the available command line options. The Device=PortName or PortName command line option is required to specify the tty port you are using for communications:
A+ DEVICE=/dev/ttyxx
or A+ /dev/ttyxx
where xx is the tty port selected earlier. If this option is not specified, you will be prompted for the tty device name.
If the A+ menu colors do not match those specified in the color palette configuration menu, exit A+. Use the following command to change the default color palette:
cp palette.ibm palette.def
Re-run A+.
The Line Status (online/offline) may not be reliable on AXP systems. All references to the DEL key shown in the Cleo A+ User’s Guide apply to the CTRL+C key sequence on the DEC AXP.
Multiple A+ Sessions You may purchase additional A+ licenses to run multiple sessions on the same machine. The instructions below describe installation for more than one A+ session:
1. Create separate directories for each A+ session, i.e. mkdir directory1, mkdir directory2, etc. 2. To customize A+, copy the A+.INI, xlatin.ovr and/or xlaout.ovr file(s) from the A+ directory to the new A+ session
directory and make any changes to the local file(s). Create customized A+.CFG (configuration), A+.USR (user login), and/or A+.DIR (dial directory) file(s) in the new A+ session directory.
3. Add the A+ directory to your path, i.e. PATH=$PATH/APlusPath. 4. Run A+ from the A+ session directory. All files (received files, A+.LOG, monitor file, recorded job file, etc.) will be
saved to the local directory unless a path is specified. The accessory files (A+.INI, xlatin.ovr, xlatout.ovr, A+.TRF, A+.CFG, A+.USR, and A+.DIR) will be read from the current directory, the A+ directory, or a directory on the set path, respectively.

8 Cleo A+ Installation Guide
DEC AXP/Alpha and OpenVMS
This chapter describes the steps involved in installing your Cleo A+ software and configuring your Digital Equipment AXP Alpha running OpenVMS for A+ operation.
A+ Installation Cleo A+ is supplied on a TK50 cartridge tape, a 4 MM DAT tape, or a TUN06 mag tape. These tapes are labeled Cleo A+ AXP-OpenVMS. The following instructions apply to all media types.
Log on to your system as USERP (you may be another user, but you must have at least SYSPRV, LOG_IO, PSWAPM, and ALTPRI privileges). The following commands will create a installation directory and copy installation files (APINSTALL.EXE, APEXTRACT.EXE, INSTALL_APLUS.COM) from the A+ tape into this installation directory:
create/directory [.APLUS] set default [.APLUS] mount /foreign tape_device backup tape_device:APLUS/save_set *
If additional licenses are purchased at a later time, skip the steps above. Simply change to the original installation directory and run @INSTALL_APLUS to install the new copies of A+.
Once the files are copied into the installation directory, run @INSTALL_APLUS. INSTALL_APLUS prompts for your A+ serial number. This serial number may be found on your A+ tape or on your A+ registration card. The format of the serial number is APLnnnnnn-xxxxxxxx, where each n is a number from 0 to 9 and each x is a letter from a to z or A to Z. Note: The serial number must be enclosed in quotes to allow lower case letters to be passed through the operating system. Install also prompts for your tape device name.
Next, install prompts for a Code directory name. The code directory contains all static A+ programs and files (*.EXE, *.COM, *.TRF, and *.HLP). The code directory may be the same as the installation directory. An example code directory name is SYS$SYSDEVICE:[AUSTIN.APLUS]. The following files are installed into the specified code directory:
APLUS[_XX].EXE COMDEP[_XX].EXE COMDAT[_XX].EXE COM_DEAD[_XX].EXE DBGAPLUS[_XX].EXE STRFUNCS.EXE REMMBX.EXE INSTALL.COM REMOVE.COM START_APLUS.COM STOP_APLUS.COM CLEORMS.EXE COBOLRMS.EXE CLEOCVT.EXE CLEO_TPLT.DEF CLEO_JOB_FORMAT.FDL CLEO_RCV_FORMAT.FDL APLUS.HLP APLUS.TRF QTEST.COM QTEST.JOB STARTQ.COM STOPQ.COM SUBQ.COM MESS_APLUS.LST VERSION APLUS_SYMLOG.COM
where XX is a number from 00-23 defining the A+ copy. The first license for A+, for instance, will install APLUS.EXE, the second license will install APLUS_00.EXE, the third APLUS_01.EXE, etc.

Cleo A+ Installation Guide 9
Next, install prompts for a Data directory name. The Data directory contains user-editable files which may be customized for each A+ copy (*.CMF, *.KMF. *.OVR, APLUS.CFG, and APLUS.INI). For a single A+ license, the Data directory may be the same as the installation and Code directory. For multiple licenses, the Data directory should change with each copy of A+. An example code directory name for APLUS is SYS$SYSDEVICE:[AUSTIN.APLUS.DATA], for APLUS_00 is SYS$SYSDEVICE:[AUSTIN.APLUS.DATA00] , for APLUS_01 is SYS$SYSDEVICE:[AUSTIN.APLUS.DATA01], etc. The following files are installed into the specified data directory:
ANSI.CMF ANSI.KMF VT52.CMF VT52.KMF VT100.CMF VT100.KMF VT220.CMF VT220.KMF VT320.CMF VT320.KMF XLATIN.OVR XLATOUT.OVR APLUS.CFG APLUS.INI
INSTALL_APLUS repeats until code and data directories for each A+ license have been named and the files and the commons have been installed.
Next, install prompts you to acquire the port(s) for each license. This installs the I/O process so everything is in place to run A+. If “Y” is entered, install prompts for an asynchronous port name (for example: _txa1 or _tta1) for that license. If “N” is entered, @START_APLUS can be run at a later time to acquire the port (see Acquiring and Releasing an A+ Port below for details).
Install creates an APLUS_SYMLOG.COM file to define symbols and logicals for the installed A+ code and data directories and A+ programs. You should move the appropriate symbol and logical definitions to your LOGIN.COM file(s). If you move the A+ code, data files, or utility programs, you must redefine the APLUSCODE (or APLCODE00, APLCODE01, etc.), APLUSDATA (or APLDATA00, APLDATA01, etc.), REMMBX, and STRFUNCS logical names.
A+ for the Alpha consists of the following three pieces of code: COMDAT.EXE - installed common COMDEP.EXE - detached I/O process APLUS.EXE - A+ process When you run INSTALL_APLUS (or INSTALL) the common is installed and when you acquire the port the I/O process is run as a detached process so when you use APLUS everything is in place.

10 Cleo A+ Installation Guide
Acquiring and Releasing an A+ Port The START_APLUS and STOP_APLUS command files allow you to acquire a port by starting the I/O process and releasing it again by stopping the I/O process to allow another process to use it. These command files may be used to specify the desired port at the time of A+ execution.
START_APLUS.COM acquires a port for A+ operation. The START_APLUS script command line format is:
@START_APLUS [ APLUS[_XX] PortName ]
where:
XX is an optional number from 00-23 defining the A+ copy in a multiple license installation. For instance, the first license for A+ will run as APLUS, the second license will run as APLUS_00, the third as APLUS_01, etc.
PortName is used to specify the communications port, for example _txa1 or _tta1.
If no command line options are specified you will be prompted for the APLUS name and the port name.
STOP_APLUS.COM releases the A+ port. The STOP_APLUS script command line format is:
@STOP_APLUS [ APLUS[_XX] ]
where:
XX is an optional number from 00-23 defining the A+ copy in a multiple license installation. For instance, the first license for A+ will run as APLUS, the second license will run as APLUS_00, the third as APLUS_01, etc.
If no command line option is specified you will be prompted for the APLUS name.
Cleo A+ Installation Guide 11
A+ Execution A+ is executed from the OpenVMS command prompt with the command:
APLUS
or
APLUS[_XX]
where:
XX is an optional number from 00-23 defining the A+ copy in a multiple license installation. For instance, the first license for A+ will run as APLUS, the second license will run as APLUS_00, the third as APLUS_01, etc.
A+ is installed as a foreign DCL command so that you may pass command arguments to it. See 1.1 The A+ Command Line in Chapter 1 - Operation of the Cleo A+ User's Guide for a description of the available command line options. Since the INSTALL_APLUS, INSTALL, or START_APLUS program file specifies the port, the Device=PortName command line option is not used.
You may use START_APLUS and STOP_APLUS within a script file to automatically acquire a port, run A+, and release the port. You could use these command files, for example, to create the following script which runs A+ on port tta1:
$ @START_APLUS APLUS _tta1 $ APLUS $ @STOP_APLUS APLUS

12 Cleo A+ Installation Guide
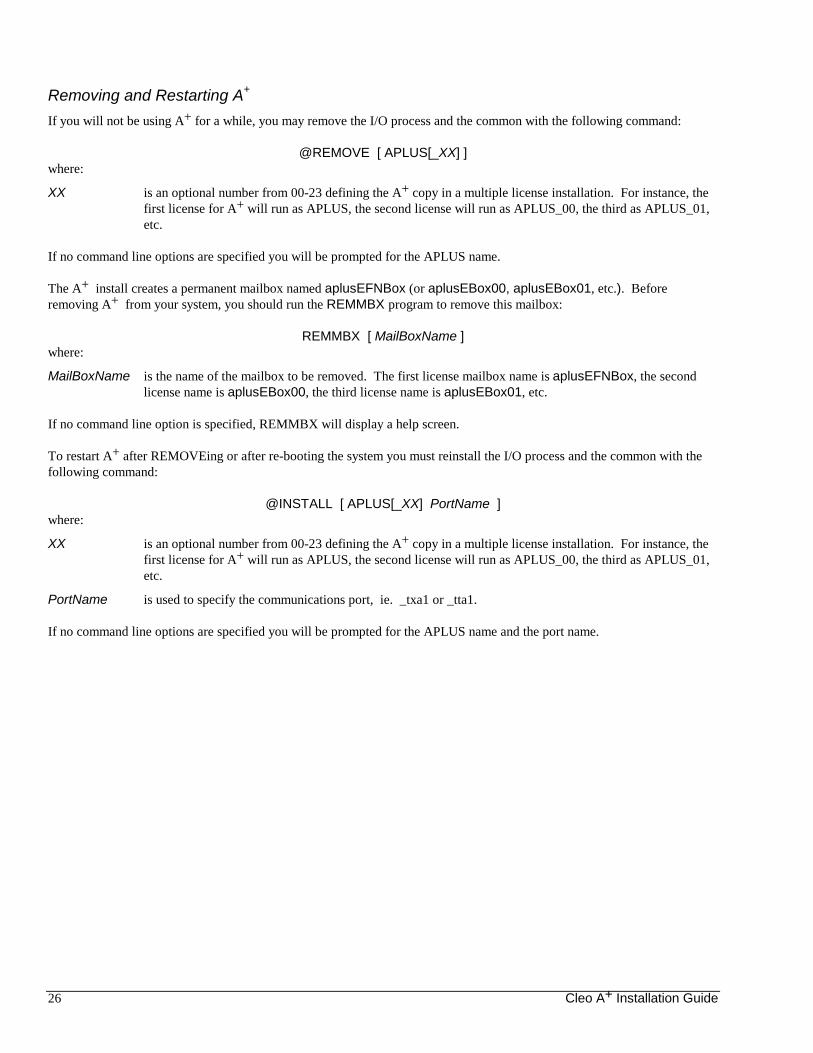
Removing and Restarting A+ If you will not be using A+ for a while, you may remove the I/O process and the common with the following command:
@REMOVE [ APLUS[_XX] ] where:
XX is an optional number from 00-23 defining the A+ copy in a multiple license installation. For instance, the first license for A+ will run as APLUS, the second license will run as APLUS_00, the third as APLUS_01, etc.
If no command line options are specified you will be prompted for the APLUS name.
The A+ install creates a permanent mailbox named aplusEFNBox (or aplusEBox00, aplusEBox01, etc.). Before removing A+ from your system, you should run the REMMBX program to remove this mailbox:
REMMBX [ MailBoxName ] where:
MailBoxName is the name of the mailbox to be removed. The first license mailbox name is aplusEFNBox, the second license name is aplusEBox00, the third license name is aplusEBox01, etc.
If no command line option is specified, REMMBX will display a help screen.
To restart A+ after REMOVEing or after re-booting the system you must reinstall the I/O process and the common with the following command:
@INSTALL [ APLUS[_XX] PortName ] where:
XX is an optional number from 00-23 defining the A+ copy in a multiple license installation. For instance, the first license for A+ will run as APLUS, the second license will run as APLUS_00, the third as APLUS_01, etc.
PortName is used to specify the communications port, ie. _txa1 or _tta1.
If no command line options are specified you will be prompted for the APLUS name and the port name.

Cleo A+ Installation Guide 13
DECserver User's Note A+ may be run on a DECserver (200, 500, etc.) serial port connected to the Alpha via DECNET. The server port parameters, however, must be modified for correct A+ operation. Some of these parameters include:
ACCESS REMOTE BREAK DISABLED MODEM DISABLED SPEED 9600 (or desired speed) AUTOPROMPT DISABLED AUTOCONNECT DISABLED AUTOBAUD DISABLED FLOW CONTROL DISABLED
The proper server configuration is similar to that for a network printer.
For operation with VMS versions earlier than 5.2, the speed cannot change. Use the SPEED=xxxx parameter to configure A+ to run at the configured port speed. Your modem must connect at that speed or be set to buffer data. The AUTOBAUD=OFF parameter must be set.
For operation with VMS 5.2 or later, the following command will set up the port to allow use of the different speeds:
define port xxx remote modification enabled
where xxx is the DECserver port name.

14 Cleo A+ Installation Guide
OpenVMS Notes The A+ User's Guide describes A+ for OpenVMS with the following exceptions:
1. All references to the A+ command shown in the Cleo A+ User's Guide apply to the APLUS command on Alpha with OpenVMS. All references to the A+.INI, A+.CFG, A+.LOG, A+.MON, and A+.DIR filenames apply to the APLUS.INI, APLUS.CFG, APLUS.LOG, APLUS.MON, and APLUS.FON filenames respectively.
2. All references to the DEL key shown in the Cleo A+ User's Guide apply to the CTRL+C key sequence on the Alpha with OpenVMS. All references to the ESC key shown in the Cleo A+ User's Guide apply to the CTRL+] key sequence on the Alpha with OpenVMS.
3. The default Upload Directory and Download Directory are blank to send and receive files from/to the data directory
4. The default Print Spooler for OpenVMS is print instead of lp.
5. The Alpha version only supports the following terminal types: VT52, VT100, VT220, VT230, and ANSI.
6. The vertical bar (|) is used to separate multiple commands with the Command key under OpenVMS.
7. The exit codes discussed in 4.15 QUit - Exit A+ in Chapter 4 - A+ Commands of the Cleo A+ User's Guide are in the VMS status code format: %FACILITY-L-IDENT, text The facility name and number are APLUS and 1000 respectively. The actual codes are assigned by the message compiler based on this input. A message code listing, MESS_APLUS.LST, is included for reference. You may use any simple exit codes with the QUit exit_code command. It is a good idea to use odd numbers for your exit codes, otherwise OpenVMS will interpret these as errors and publish irrelevant messages.
8. All references to the F1 key for Help shown in the Cleo A+ User's Guide apply to the PF1 or HELP key on DEC terminals.
9. To return to A+ from the Operating System Shell command, type “logout”.
10. The Configure Color Palette menu is not available under OpenVMS.
11. Errors detected by A+ are published to SYS$OUTPUT. Errors detected by the detached process are logged to the SYS$ERROR file in the A+ directory.
12. External commands under VMS/OpenVMS differ in the following ways: 1) A symbol must be created for external programs (i.e. STRFUNCS:== $SYS$DISK:[USER.APLUS]STRFUNCS.EXE; 2) The return value from the external program must return the required value plus one (i.e. if you want to check the A+ $STATUSN variable for a value of 3, your program must return 4) with the exception of ERROR which should return 10000; 3) External programs may create a temporary file named APLUSEXT.pid (where the pid is APLUS’s process id) which contains a string return value. This string may be accessed with the $CLEO_RSTRING variable within A+.
13. External protocols are not supported at this time.
14. The [Baud Rates] and [ACS Mapping] parameter sections of the APLUS.INI file are not supported at this time.
15. You may modify the provided command files (*.COM) to fit your needs. For instance, to eliminate install’s prompt for the port name, you could modify the START_APLUS.COM file to remove the “$ inquire cleoport...” line and replace the ‘cleoport’s with your port name.

Cleo A+ Installation Guide 15
16. Some third party controllers and some DECserver ports do not provide the DTR (Data Terminal Ready) signal. Normally modems default to ignore DTR but if your modem does not, you will have to configure it through the modem front panel setup or use another port or machine to configure your modem to ignore DTR with the AT&D0 command. Make sure your A+ modem initialization string does not contain &D1 or &D2.
17. Most DEC ports do not support RTS (Request to Send) or CTS (Clear to Send) signal control. The provided cable (see Table 3.1) does not supply these pins. Hardware Flow Control is not supported.
18. The provided cable (see Table 3.1) does not supply the CD (Carrier Detect) signal. Therefore the ONLINE/OFFLINE status on the bottom status line and the LINDWN status from a command is not a true line status. A+ will post OFFLINE/LINDWN until you make a connection with the Dial command key or with the AUtodial, ANswer or DAta command. A+ will then post ONLINE and never post LINDWN until you disconnect with the Hangup command key or use the HAngup or VOice command.
____________________________________________________________________________________________________ Alpha tty port Modem DB25S female DB25P male pin pin 2 ----------------------------------------------------------------2 3 ----------------------------------------------------------------3 6 -------------- | 7 ----------------------------------------------------------------7 20--------------------------------------------------------------- 20 ____________________________________________________________________________________________________
TABLE 3.1 DEC Alpha 25-PIN ADAPTER CABLE PINOUTS

16 Cleo A+ Installation Guide
A+ File Naming A+ transmit and receive file names are described in the Cleo A+ User's Guide. The use of OpenVMS logicals and version numbers expands the file naming options.
Transmit File Names The various transmit file naming methods are illustrated with the following examples. Each example sends the same file NAME.EXT in different ways.
SEND NAME.EXT Name Only. The latest version of NAME.EXT is transmitted from the default directory i.e. the directory you were in when you ran A+.
SEND $DISK1:[USER.APLUS]NAME.EXT Device and Path Specified. The latest version of NAME.EXT is transmitted from the device and path specified.
SEND $DISK1:[USER.APLUS]NAME.EXT;5 Version Specified. Version 5 of NAME.EXT is transmitted from the device and path specified. The version number is transmitted to the remote.
SEND SEND_PATH:NAME.EXT Logical for Path. The latest version of NAME.EXT is transmitted from the device and path specified by the logical SEND_PATH. Here the logical is defined as: DEFINE SEND_PATH $DISK1:[USER.APLUS]
SEND SEND_FILE Logical for Everything. The latest version of NAME.EXT is transmitted from the device and path specified by the logical SEND_FILE. Here the logical is defined as: DEFINE SEND_FILE $DISK1:[USER.APLUS]NAME.EXT Note: There is no default transmit file name.
Wild cards and remote file naming can be superimposed on any of the above examples, though when transmitting with wild cards, the file name may not include version numbers.

Cleo A+ Installation Guide 17
Receive File Names The various receive file naming methods are illustrated with the following examples. Each example receives the same file and names it in different ways.
RECEIVE Default Name. RCVFILE.000 (with XMODEM or ASCII) or the filename received from the remote (with YMODEM, ZMODEM, or KERMIT) is received in the default directory, i.e. the directory you were in when you ran A+. Subsequent files will be received as RCVFILE.001, RCVFILE.002, etc.
RECEIVE NAME Name Only. NAME.000 is received in the default directory. Subsequent files will be received as NAME.001, NAME.002, etc.
RECEIVE NAME.EXT Name and Extension. NAME.EXT;1 is received in the default directory. Subsequent files will be received as NAME.000;1, NAME.001;1. The OpenVMS version number is not incremented.
RECEIVE $DISK1:[USER.APLUS]NAME.EXT Device and Path Specified. The latest version of NAME.EXT is received to the device and path specified.
RECEIVE RE_PATH:NAME.EXT Logical for Path. The latest version of NAME.EXT is received to the device and path specified by the logical RE_PATH. Here the logical is defined as: DEFINE RE_PATH $DISK1:[USER.APLUS]
RECEIVE RE_FILE. Logical for Everything. The latest version of NAME.EXT is received to the device and path specified by the logical RE_FILE. Here the logical is defined as: DEFINE RE_FILE $DISK1:[USER.APLUS]NAME.EXT

18 Cleo A+ Installation Guide
OpenVMS File Structure Files received by A+ are saved in a sequential stream format. The CLEORMS and COBOLRMS utility programs and the CLEO_RCV_FORMAT.FDL file are provided to convert these stream format files to RMS format files. The utility program CLEOCVT is provided to convert any format files to any other format file. The CLEO_JOB_FORMAT.FDL file is provided to convert the output of any editor to the stream format required by A+ job and configuration files.
CLEORMS, COBOLRMS & CLEO_RCV_FORMAT.FDL CLEORMS and COBOLRMS are provided to convert stream format files to sequential RMS variable length and fixed length record format files. The format of the CLEORMS and COBOLRMS command lines are:
CLEORMS stream_file record_file [max_record_size] COBOLRMS stream_file record_file [max_record_size]
Where stream_file is the original file received by A+ and record_file is the new file in RMS format. For CLEORMS, if the stream file has separators then these will determine the record size; if the stream file does not have record separators then max_record_size will determine record size. For COBOLRMS, the max_record_size will always determine the record size; if the stream file has separators then the record will be blank filled from the end of record to the max_record_size; if the stream file does not have record separators then max_record_size will determine record size. The default for max_record_size is 80 bytes; the maximum is 255 bytes.
CLEORMS and COBOLRMS return the following status codes which may be tested in a command file via $status: $status = 1 - success $status = 101 - file name(s) missing $status = 103 - open fail on stream_file $status = 105 - open fail on record_file
The CLEO_RCV_FORMAT.FDL file is also provided to convert from stream format to RMS format. The conversion command is:
convert /fdl=cleo_rcv_format stream_file record_file
Where stream_file is the original file received by A+ and record_file is the new file in RMS format with a maximum of 255 byte records.
CLEOCVT The CLEOCVT program may be used to convert from any file format to any other file format. The format of the CLEOCVT program is:
CLEOCVT stream_file new_file [template_file] Where stream_file is the original file received by A+, new_file is the converted file in the format of the template file, and template_file is an existing file in the desired format. If a template file is not supplied, the default is CLEO_TPLT.DEF which is a backup file format. This may be used, for example, to convert a received backup file back to backup format so that it may be exploded back into the original file(s).

Cleo A+ Installation Guide 19
CLEO_JOB_FORMAT.FDL The CLEO_JOB_FORMAT.FDL file can be used to convert the output of any editor to the stream format required by A+ job and configuration files. The conversion command is:
convert /fdl=cleo_job_format record_file stream_file
Where record_file is the original file created with any DEC editor and stream_file is the new file in stream format.
Another method of creating a file in the stream format required by A+ is to use the A+ JOb command to create a one line job file, then edit it with any editor. The editors will not change the file type.
Debug Program A+ controls contention between multiple users, allowing only one user to access the same port at the same time. If A+ exits abnormally (for instance, with CTRL+Y), the ADBG program will clear contention allowing other users to access A+. To check A+ contention with ADBG run:
ADBG[_XX] -F0
It will return either APlus is in use or APlus is free. To clear contention if A+ is in use, run:
ADBG[_XX] -F1
where XX is a number from 00-23 defining the A+ copy in a multiple license installation. For instance, to check/clear the first license for A+ use ADBG, to check/clear the second license use ADBG_00, the third ADBG_01, etc.

20 Cleo A+ Installation Guide
Batch Example The A+ product is a well behaved OpenVMS application and as such can be run by any of the OpenVMS methods. The SUBQ.COM file demonstrates how to run A+ from a batch queue (i.e. in the background). The QTEST.COM file runs A+ using the QTEST.JOB job file.
A typical error encountered while running from a batch queue is:
'FILENAME' failed - return status 10772 %SYSTEM-F-EXBYTLM, exceeded byte count quota . Job terminated
This is (as it says) a OpenVMS quota problem. To solve:
* Be sure your queue manager has not been started with quotas lower than you, as a user, have. If it has, raise them.
* Raise your byte count quota via UAF BYTLM parameter. The A+ product was designed to require limited system resources. It will run interactively with BYTLM as low as 4096. Most modern OpenVMS users are at 8192 or better. The latter should be enough to run from batch in most cases.
Typical users will not need to start the queue manager or use a special APLUS queue. These will almost always be present on your system (SYS$BATCH is the default queue). If you would like to start and stop the queue manager and the APLUS batch queue, you may use the STARTQ.COM and STOPQ.COM files as an example.
You must have OPER and SYSNAM privileges to do most of the above.

Cleo A+ Installation Guide 21

22 Cleo A+ Installation Guide
DEC VAX and OpenVMS
This chapter describes the steps involved in installing your Cleo A+ software and configuring your Digital Equipment VAX or MicroVax running VMS or OpenVMS for A+ operation.
A+ Installation Cleo A+ is supplied on a TK50 cartridge tape, a 4 MM DAT tape, or a TUN06 mag tape. These tapes are labeled Cleo A+ VAX-OpenVMS. The following instructions apply to all media types.
Log on to your system as USERP (you may be another user, but you must have at least SYSPRV, LOG_IO, PSWAPM, and ALTPRI privileges). The following commands will create a installation directory and copy installation files (APINSTALL.EXE, APEXTRACT.EXE, INSTALL_APLUS.COM) from the A+ tape into this installation directory:
create/directory [.APLUS] set default [.APLUS] mount /foreign tape_device backup tape_device:APLUS/save_set *
If additional licenses are purchased at a later time, skip the steps above. Simply change to the original installation directory and run @INSTALL_APLUS to install the new copies of A+.
Once the files are copied into the installation directory, run @INSTALL_APLUS. INSTALL_APLUS prompts for your A+ serial number. This serial number may be found on your A+ tape or on your A+ registration card. The format of the serial number is APLnnnnnn-xxxxxxxx, where each n is a number from 0 to 9 and each x is a letter from a to z or A to Z. Note: The serial number must be enclosed in quotes to allow lower case letters to be passed through the operating system. Install also prompts for your tape device name.
Next, install prompts for a Code directory name. The code directory contains all static A+ programs and files (*.EXE, *.COM, and *.HLP). The code directory may be the same as the installation directory. An example code directory name is SYS$SYSDEVICE:[AUSTIN.APLUS]. The following files are installed into the specified code directory:
APLUS[_XX].EXE COMDEP[_XX].EXE COMDAT[_XX].EXE COM_DEAD[_XX].EXE DBGAPLUS[_XX].EXE STRFUNCS.EXE REMMBX.EXE INSTALL.COM REMOVE.COM START_APLUS.COM STOP_APLUS.COM CLEORMS.EXE COBOLRMS.EXE CLEOCVT.EXE CLEO_TPLT.DEF CLEO_JOB_FORMAT.FDL CLEO_RCV_FORMAT.FDL APLUS.HLP APLUS.TRF QTEST.COM QTEST.JOB STARTQ.COM STOPQ.COM SUBQ.COM MESS_APLUS.LST VERSION APLUS_SYMLOG.COM
where XX is a number from 00-23 defining the A+ copy. The first license for A+, for instance, will install APLUS.EXE, the second license will install APLUS_00.EXE, the third APLUS_01.EXE, etc.

Cleo A+ Installation Guide 23
Next, install prompts for a Data directory name. The Data directory contains user-editable files which may be customized for each A+ copy (*.CMF, *.KMF. *.OVR, APLUS.CFG, and APLUS.INI). For a single A+ license, the Data directory may be the same as the installation and Code directory. For multiple licenses, the Data directory should change with each copy of A+. An example code directory name for APLUS is SYS$SYSDEVICE:[AUSTIN.APLUS.DATA], for APLUS_00 is SYS$SYSDEVICE:[AUSTIN.APLUS.DATA00] , for APLUS_01 is SYS$SYSDEVICE:[AUSTIN.APLUS.DATA01], etc. The following files are installed into the specified data directory:
ANSI.CMF ANSI.KMF VT52.CMF VT52.KMF VT100.CMF VT100.KMF VT220.CMF VT220.KMF VT320.CMF VT320.KMF XLATIN.OVR XLATOUT.OVR APLUS.CFG APLUS.INI
INSTALL_APLUS repeats until code and data directories for each A+ license have been named and the files and the commons have been installed.
Next, install prompts you to acquire the port(s) for each license. This installs the I/O process so everything is in place to run A+. If “Y” is entered, install prompts for an asynchronous port name (for example: _txa1 or _tta1) for that license. If “N” is entered, @START_APLUS can be run at a later time to acquire the port (see Acquiring and Releasing an A+ Port below for details).
Install creates an APLUS_SYMLOG.COM file to define symbols and logicals for the installed A+ code and data directories and A+ programs. You should move the appropriate symbol and logical definitions to your LOGIN.COM file(s). If you move the A+ code, data files, or utility programs, you must redefine the APLUSCODE (or APLCODE00, APLCODE01, etc.), APLUSDATA (or APLDATA00, APLDATA01, etc.), REMMBX, and STRFUNCS logical names.
A+ for the VAX consists of the following three pieces of code: COMDAT.EXE - installed common COMDEP.EXE - detached I/O process APLUS.EXE - A+ process When you run INSTALL_APLUS (or INSTALL) the common is installed and when you acquire the port the I/O process is run as a detached process so when you use APLUS everything is in place.

24 Cleo A+ Installation Guide
Acquiring and Releasing an A+ Port The START_APLUS and STOP_APLUS command files allow you to acquire a port by starting the I/O process and releasing it again by stopping the I/O process to allow another process to use it. These command files may be used to specify the desired port at the time of A+ execution.
START_APLUS.COM acquires a port for A+ operation. The START_APLUS script command line format is:
@START_APLUS [ APLUS[_XX] PortName ]
where:
XX is an optional number from 00-23 defining the A+ copy in a multiple license installation. For instance, the first license for A+ will run as APLUS, the second license will run as APLUS_00, the third as APLUS_01, etc.
PortName is used to specify the communications port, for example _txa1 or _tta1.
If no command line options are specified you will be prompted for the APLUS name and the port name.
STOP_APLUS.COM releases the A+ port. The STOP_APLUS script command line format is:
@STOP_APLUS [ APLUS[_XX] ]
where:
XX is an optional number from 00-23 defining the A+ copy in a multiple license installation. For instance, the first license for A+ will run as APLUS, the second license will run as APLUS_00, the third as APLUS_01, etc.
If no command line option is specified you will be prompted for the APLUS name.

Cleo A+ Installation Guide 25
A+ Execution A+ is executed from the OpenVMS command prompt with the command:
APLUS
or
APLUS[_XX]
where:
XX is an optional number from 00-23 defining the A+ copy in a multiple license installation. For instance, the first license for A+ will run as APLUS, the second license will run as APLUS_00, the third as APLUS_01, etc.
A+ is installed as a foreign DCL command so that you may pass command arguments to it. See 1.1 The A+ Command Line in Chapter 1 - Operation of the Cleo A+ User's Guide for a description of the available command line options. Since the INSTALL_APLUS, INSTALL, or START_APLUS program file specifies the port, the Device=PortName command line option is not used.
You may use START_APLUS and STOP_APLUS within a script file to automatically acquire a port, run A+, and release the port. You could use these command files, for example, to create the following script which runs A+ on port tta1:
$ @START_APLUS APLUS _tta1 $ APLUS $ @STOP_APLUS APLUS
26 Cleo A+ Installation Guide
Removing and Restarting A+ If you will not be using A+ for a while, you may remove the I/O process and the common with the following command:
@REMOVE [ APLUS[_XX] ] where:
XX is an optional number from 00-23 defining the A+ copy in a multiple license installation. For instance, the first license for A+ will run as APLUS, the second license will run as APLUS_00, the third as APLUS_01, etc.
If no command line options are specified you will be prompted for the APLUS name.
The A+ install creates a permanent mailbox named aplusEFNBox (or aplusEBox00, aplusEBox01, etc.). Before removing A+ from your system, you should run the REMMBX program to remove this mailbox:
REMMBX [ MailBoxName ] where:
MailBoxName is the name of the mailbox to be removed. The first license mailbox name is aplusEFNBox, the second license name is aplusEBox00, the third license name is aplusEBox01, etc.
If no command line option is specified, REMMBX will display a help screen.
To restart A+ after REMOVEing or after re-booting the system you must reinstall the I/O process and the common with the following command:
@INSTALL [ APLUS[_XX] PortName ] where:
XX is an optional number from 00-23 defining the A+ copy in a multiple license installation. For instance, the first license for A+ will run as APLUS, the second license will run as APLUS_00, the third as APLUS_01, etc.
PortName is used to specify the communications port, ie. _txa1 or _tta1.
If no command line options are specified you will be prompted for the APLUS name and the port name.

Cleo A+ Installation Guide 27
DECserver User's Note A+ may be run on a DECserver (200, 500, etc.) serial port connected to the VAX via DECNET. The server port parameters, however, must be modified for correct A+ operation. Some of these parameters include:
ACCESS REMOTE BREAK DISABLED MODEM DISABLED SPEED 9600 (or desired speed) AUTOPROMPT DISABLED AUTOCONNECT DISABLED AUTOBAUD DISABLED FLOW CONTROL DISABLED
The proper server configuration is similar to that for a network printer.
For operation with VMS versions earlier than 5.2, the speed cannot change. Use the SPEED=xxxx parameter to configure A+ to run at the configured port speed. Your modem must connect at that speed or be set to buffer data. The AUTOBAUD=OFF parameter must be set.
For operation with VMS 5.2 or later, the following command will set up the port to allow use of the different speeds:
define port xxx remote modification enabled
where xxx is the DECserver port name.
28 Cleo A+ Installation Guide
OpenVMS Notes The A+ User's Guide describes A+ for OpenVMS with the following exceptions:
1. All references to the A+ command shown in the Cleo A+ User's Guide apply to the APLUS command on VAX with OpenVMS. All references to the A+.INI, A+.CFG, A+.LOG, A+.MON, and A+.DIR filenames apply to the APLUS.INI, APLUS.CFG, APLUS.LOG, APLUS.MON, and APLUS.FON filenames respectively.
2. All references to the DEL key shown in the Cleo A+ User's Guide apply to the CTRL+C key sequence on the VAX with OpenVMS. All references to the ESC key shown in the Cleo A+ User's Guide apply to the CTRL+] key sequence on the VAX with OpenVMS.
3. The default Upload Directory and Download Directory are blank to send and receive files from/to the data directory
4. The default Print Spooler for OpenVMS is print instead of lp.
5. The VAX version only supports the following terminal types: VT52, VT100, VT220, VT230, and ANSI.
6. The vertical bar (|) is used to separate multiple commands with the Command key under OpenVMS.
7. The exit codes discussed in 4.15 QUit - Exit A+ in Chapter 4 - A+ Commands of the Cleo A+ User's Guide are in the VMS status code format: %FACILITY-L-IDENT, text The facility name and number are APLUS and 1000 respectively. The actual codes are assigned by the message compiler based on this input. A message code listing, MESS_APLUS.LST, is included for reference. You may use any simple exit codes with the QUit exit_code command. It is a good idea to use odd numbers for your exit codes, otherwise OpenVMS will interpret these as errors and publish irrelevant messages.
8. All references to the F1 key for Help shown in the Cleo A+ User's Guide apply to the PF1 or HELP key on DEC terminals.
9. To return to A+ from the Operating System Shell command, type “logout”.
10. The Configure Color Palette menu is not available under OpenVMS.
11. Errors detected by A+ are published to SYS$OUTPUT. Errors detected by the detached process are logged to the SYS$ERROR file in the A+ directory.
12. External commands under VMS/OpenVMS differ in the following ways: 1) A symbol must be created for external programs (i.e. STRFUNCS:== $SYS$DISK:[USER.APLUS]STRFUNCS.EXE; 2) The return value from the external program must return the required value plus one (i.e. if you want to check the A+ $STATUSN variable for a value of 3, your program must return 4) with the exception of ERROR which should return 10000; 3) External programs may create a temporary file named APLUSEXT.pid (where the pid is APLUS’s process id) which contains a string return value. This string may be accessed with the $CLEO_RSTRING variable within A+.
13. External protocols are not supported at this time.
14. The [Baud Rates] and [ACS Mapping] parameter sections of the APLUS.INI file are not supported at this time.
15. You may modify the provided command files (*.COM) to fit your needs. For instance, to eliminate install’s prompt for the port name, you could modify the START_APLUS.COM file to remove the “$ inquire cleoport...” line and replace the ‘cleoport’s with your port name.

Cleo A+ Installation Guide 29
16. Some third party controllers and some DECserver ports do not provide the DTR (Data Terminal Ready) signal. Normally modems default to ignore DTR but if your modem does not, you will have to configure it through the modem front panel setup or use another port or machine to configure your modem to ignore DTR with the AT&D0 command. Make sure your A+ modem initialization string does not contain &D1 or &D2.
17. Most DEC ports do not support RTS (Request to Send) or CTS (Clear to Send) signal control. The provided cable (see Table 4.1) does not supply these pins. Hardware Flow Control is not supported.
18. The provided cable (see Table 4.1) does not supply the CD (Carrier Detect) signal. Therefore the ONLINE/OFFLINE status on the bottom status line and the LINDWN status from a command is not a true line status. A+ will post OFFLINE/LINDWN until you make a connection with the Dial command key or with the AUtodial, ANswer or DAta command. A+ will then post ONLINE and never post LINDWN until you disconnect with the Hangup command key or use the HAngup or VOice command.
____________________________________________________________________________________________________ VAX tty port Modem DB25S female DB25P male pin pin 2 ----------------------------------------------------------------2 3 ----------------------------------------------------------------3 6 -------------| 7 ----------------------------------------------------------------7 20--------------------------------------------------------------- 20 ____________________________________________________________________________________________________
TABLE 4.1 DEC VAX 25-PIN ADAPTER CABLE PINOUTS

30 Cleo A+ Installation Guide
A+ File Naming A+ transmit and receive file names are described in the Cleo A+ User's Guide. The use of OpenVMS logicals and version numbers expands the file naming options.
Transmit File Names The various transmit file naming methods are illustrated with the following examples. Each example sends the same file NAME.EXT in different ways.
SEND NAME.EXT Name Only. The latest version of NAME.EXT is transmitted from the default directory i.e. the directory you were in when you ran A+.
SEND $DISK1:[USER.APLUS]NAME.EXT Device and Path Specified. The latest version of NAME.EXT is transmitted from the device and path specified.
SEND $DISK1:[USER.APLUS]NAME.EXT;5 Version Specified. Version 5 of NAME.EXT is transmitted from the device and path specified. The version number is transmitted to the remote.
SEND SEND_PATH:NAME.EXT Logical for Path. The latest version of NAME.EXT is transmitted from the device and path specified by the logical SEND_PATH. Here the logical is defined as: DEFINE SEND_PATH $DISK1:[USER.APLUS]
SEND SEND_FILE Logical for Everything. The latest version of NAME.EXT is transmitted from the device and path specified by the logical SEND_FILE. Here the logical is defined as: DEFINE SEND_FILE $DISK1:[USER.APLUS]NAME.EXT Note: There is no default transmit file name.
Wild cards and remote file naming can be superimposed on any of the above examples, though when transmitting with wild cards, the file name may not include version numbers.

Cleo A+ Installation Guide 31
Receive File Names The various receive file naming methods are illustrated with the following examples. Each example receives the same file and names it in different ways.
RECEIVE Default Name. RCVFILE.000 (with XMODEM or ASCII) or the filename received from the remote (with YMODEM, ZMODEM, or KERMIT) is received in the default directory, i.e. the directory you were in when you ran A+. Subsequent files will be received as RCVFILE.001, RCVFILE.002, etc.
RECEIVE NAME Name Only. NAME.000 is received in the default directory. Subsequent files will be received as NAME.001, NAME.002, etc.
RECEIVE NAME.EXT Name and Extension. NAME.EXT;1 is received in the default directory. Subsequent files will be received as NAME.000;1, NAME.001;1. The OpenVMS version number is not incremented.
RECEIVE $DISK1:[USER.APLUS]NAME.EXT Device and Path Specified. The latest version of NAME.EXT is received to the device and path specified.
RECEIVE RE_PATH:NAME.EXT Logical for Path. The latest version of NAME.EXT is received to the device and path specified by the logical RE_PATH. Here the logical is defined as: DEFINE RE_PATH $DISK1:[USER.APLUS]
RECEIVE RE_FILE. Logical for Everything. The latest version of NAME.EXT is received to the device and path specified by the logical RE_FILE. Here the logical is defined as: DEFINE RE_FILE $DISK1:[USER.APLUS]NAME.EXT

32 Cleo A+ Installation Guide
OpenVMS File Structure Files received by A+ are saved in a sequential stream format. The CLEORMS and COBOLRMS utility programs and the CLEO_RCV_FORMAT.FDL file are provided to convert these stream format files to RMS format files. The utility program CLEOCVT is provided to convert any format files to any other format file. The CLEO_JOB_FORMAT.FDL file is provided to convert the output of any editor to the stream format required by A+ job and configuration files.
CLEORMS, COBOLRMS & CLEO_RCV_FORMAT.FDL CLEORMS and COBOLRMS are provided to convert stream format files to sequential RMS variable length and fixed length record format files. The format of the CLEORMS and COBOLRMS command lines are:
CLEORMS stream_file record_file [max_record_size] COBOLRMS stream_file record_file [max_record_size]
Where stream_file is the original file received by A+ and record_file is the new file in RMS format. For CLEORMS, if the stream file has separators then these will determine the record size; if the stream file does not have record separators then max_record_size will determine record size. For COBOLRMS, the max_record_size will always determine the record size; if the stream file has separators then the record will be blank filled from the end of record to the max_record_size; if the stream file does not have record separators then max_record_size will determine record size. The default for max_record_size is 80 bytes; the maximum is 255 bytes.
CLEORMS and COBOLRMS return the following status codes which may be tested in a command file via $status: $status = 1 - success $status = 101 - file name(s) missing $status = 103 - open fail on stream_file $status = 105 - open fail on record_file
The CLEO_RCV_FORMAT.FDL file is also provided to convert from stream format to RMS format. The conversion command is:
convert /fdl=cleo_rcv_format stream_file record_file
Where stream_file is the original file received by A+ and record_file is the new file in RMS format with a maximum of 255 byte records.
CLEOCVT The CLEOCVT program may be used to convert from any file format to any other file format. The format of the CLEOCVT program is:
CLEOCVT stream_file new_file [template_file] Where stream_file is the original file received by A+, new_file is the converted file in the format of the template file, and template_file is an existing file in the desired format. If a template file is not supplied, the default is CLEO_TPLT.DEF which is a backup file format. This may be used, for example, to convert a received backup file back to backup format so that it may be exploded back into the original file(s).
Cleo A+ Installation Guide 33
CLEO_JOB_FORMAT.FDL The CLEO_JOB_FORMAT.FDL file can be used to convert the output of any editor to the stream format required by A+ job and configuration files. The conversion command is:
convert /fdl=cleo_job_format record_file stream_file
Where record_file is the original file created with any DEC editor and stream_file is the new file in stream format.
Another method of creating a file in the stream format required by A+ is to use the A+ JOb command to create a one line job file, then edit it with any editor. The editors will not change the file type.
Debug Program A+ controls contention between multiple users, allowing only one user to access the same port at the same time. If A+ exits abnormally (for instance, with CTRL+Y), the ADBG program will clear contention allowing other users to access A+. To check A+ contention with ADBG run:
ADBG[_XX] -F0
It will return either APlus is in use or APlus is free. To clear contention if A+ is in use, run:
ADBG[_XX] -F1
where XX is a number from 00-23 defining the A+ copy in a multiple license installation. For instance, to check/clear the first license for A+ use ADBG, to check/clear the second license use ADBG_00, the third ADBG_01, etc.

34 Cleo A+ Installation Guide
Batch Example The A+ product is a well behaved OpenVMS application and as such can be run by any of the OpenVMS methods. The SUBQ.COM file demonstrates how to run A+ from a batch queue (i.e. in the background). The QTEST.COM file runs A+ using the QTEST.JOB job file.
A typical error encountered while running from a batch queue is:
'FILENAME' failed - return status 10772 %SYSTEM-F-EXBYTLM, exceeded byte count quota . Job terminated
This is (as it says) a OpenVMS quota problem. To solve:
* Be sure your queue manager has not been started with quotas lower than you, as a user, have. If it has, raise them.
* Raise your byte count quota via UAF BYTLM parameter. The A+ product was designed to require limited system resources. It will run interactively with BYTLM as low as 4096. Most modern OpenVMS users are at 8192 or better. The latter should be enough to run from batch in most cases.
Typical users will not need to start the queue manager or use a special APLUS queue. These will almost always be present on your system (SYS$BATCH is the default queue). If you would like to start and stop the queue manager and the APLUS batch queue, you may use the STARTQ.COM and STOPQ.COM files as an example.
You must have OPER and SYSNAM privileges to do most of the above.

Cleo A+ Installation Guide 35

36 Cleo A+ Installation Guide
Hewlett Packard 9000 and HP-UX
This chapter describes the steps involved in installing your Cleo A+ software and configuring your Hewlett Packard HP9000 Series 600, 700, 800, FX0, GX0, HX0, or IX0 machine running HP-UX for A+ operation.
A+ Installation Cleo A+ is supplied on a 4 MM DAT tape. If requested, A+ may be supplied on a cartridge tape. These tapes, labeled Cleo A+ HP9000, contains one compressed file: CleoInstall.
To install A+, login to your system as root. Use the "cd" command to change to the directory where you wish to place the A+ files. If you are using A+ in conjunction with an EDI translator package, consult that software vendor’s installation instructions for the required directory. The following "tar" command will copy the CleoInstall file from your A+ DAT tape to the current directory of your hard disk:
tar xvf /dev/rmt/0h
The following command should copy the CleoInstall file from your A+ cartridge tape to the current directory of your hard disk:
tar xvf /dev/rct
You may need a more complete path name for the cartridge tape. See your HP user’s guide for details.
Once the CleoInstall file is copied to your system, you must install A+ with the command:
./CleoInstall
If additional licenses are purchased at a later time, skip the steps above. Simply change to the original installation directory and run ./install to install additional A+ licenses.
If this is a new installation, the CleoInstall program will prompt for your A+ serial number. This serial number may be found on your A+ tape/disk or on your A+ registration card. The format of the serial number is APLnnnnnn-xxxxxxxx, where each n is a number from 0 to 9 and each x is a letter from a to z or A to Z. Note the letters are case sensitive.
If A+ is already installed on your system, the CleoInstall program will prompt you 1) to update your software, 2) to add a license, or 3) if a temporary license exists, to update to a permanent license. If you choose to add or update a license, you will be prompted for new A+ serial number. This serial number may be found on your new A+ tape/disk, on your new A+ registration card, or it may have been given to you by a Cleo representative. The format of the serial number is APLnnnnnn-xxxxxxxx, where each n is a number from 0 to 9 and each x is a letter from a to z or A to Z. Note the letters are case sensitive.
The CleoInstall program will then prompt for your operating system version.

Cleo A+ Installation Guide 37
When CleoInstall finishes uncompressing its files, your current directory should contain the following 28 files:
A+ aserver.cfg strfuncs vt220.cmf A+.HLP carrier ti928.cmf vt320.cmf A+.INI getinfo tvi912.cmf vt52.cmf A+.TRF install tvi920.cmf wyse50.cmf CleoInstall palette.def tvi925.cmf wyse60.cmf ansi.cmf palette.ibm version xlatin.ovr aplusstat palette.iso vt100.cmf xlatout.ovr
Port Configuration The selected tty port should be configured as a terminal port. This tty port must be disabled from logins and given read and write permissions.
To disabe the tty port, edit the file /etc/inittab. This /etc/inittab file contains a list of the tty ports and their respective configurations. The format of the inittab is:
id:rstate:action:process
The tty port you select must have the action field of the inittab script placed in an off mode. For example:
xx:2:off:/etc/getty ttyxx 9600
where xx is the tty port number. If it is necessary to make changes to the /etc/inittab file, you must restart your system to activate the change.
The following command will give the tty port read and write permissions:
chmod +rw /dev/ttyxx
where xx is the tty port number selected earlier.

38 Cleo A+ Installation Guide
A+ Execution Prior to running A+, connect your port to your modem or local system according to the instructions given in your modem manual. A+ is executed from the HP-UX command prompt. See 1.1 The A+ Command Line in Chapter 1 - Operation of the Cleo A+ User's Guide for a description of the available command line options. The Device=PortName or PortName command line option is required to specify the tty port you are using for communications:
A+ DEVICE=/dev/ttyxx
or A+ /dev/ttyxx
where xx is the tty port selected earlier. If this option is not specified, you will be prompted for the tty device name.
To speed file transfers on HP9000 systems with a slow screen display, use the Display=Minimal command line option, the Display=Minimal parameter in the configuration file, or the LEt Display=Minimal command within A+. For HP9000 ports that do not have DTR control, the ModemInit= string should be changed from &D1 to &D0 to force the modem to ignore DTR. The Line Status (online/offline) may not be reliable on HP9000 systems. All references to the DEL key shown in the Cleo A+ User’s Guide apply to the CTRL+C key sequence on the HP9000.
Multiple A+ Sessions You may purchase additional A+ licenses to run multiple sessions on the same machine. The instructions below describe installation for more than one A+ session:
1. Create separate directories for each A+ session, i.e. mkdir directory1, mkdir directory2, etc. 2. To customize A+, copy the A+.INI, xlatin.ovr and/or xlaout.ovr file(s) from the A+ directory to the new A+ session
directory and make any changes to the local file(s). Create customized A+.CFG (configuration), A+.USR (user login), and/or A+.DIR (dial directory) file(s) in the new A+ session directory.
3. Add the A+ directory to your path, i.e. PATH=$PATH/APlusPath. 4. Run A+ from the A+ session directory. All files (received files, A+.LOG, monitor file, recorded job file, etc.) will
be saved to the local directory unless a path is specified. The accessory files (A+.INI, xlatin.ovr, xlatout.ovr, A+.TRF, A+.CFG, A+.USR, and A+.DIR) will be read from the current directory, the A+ directory, or a directory on the set path, respectively.

Cleo A+ Installation Guide 39

Cleo A+ Installation Guide 40
IBM AT, PS/2, & Compatibles and MS-DOS
This chapter describes the steps involved in installing your Cleo A+ software and configuring your IBM AT or PS/2 compatible machine running MS-DOS 5.0 or greater for A+ operation.
A+ Installation Cleo A+ is supplied on a 3½" high density diskette. This diskette, labeled Cleo A+ for MS-DOS, contains 26 files:
APLUS.EXE APLUS.HLP APLUS.INI APLUS.TRF ACOMP.EXE ANSI.CMF ANSI.KMF
COMP.DLL CONFIG.EXE DPMI16BI.OVL PALETTE.DEF RTM.EXE STRFUNCS.EXE TEE.EXE
VERSION VT100.CMF VT100.KMF VT220.CMF VT220.KMF VT320.CMF VT320.KMF
WYSE50.CMF WYSE50.KMF WYSE60.CMF XLATIN.OVR XLATOUT.OVR
The "copy" command may be used to copy the files onto your hard disk. Use the "cd" command to change to the directory where you wish to place the A+ files. If you are using A+ in conjunction with an EDI translator package, consult that software vendor’s installation instructions for the required directory. The following command will copy the files from your A+ diskette in floppy drive A to the current directory of your hard disk:
COPY A:*.*
The full A+ installation requires approximately 800K of disk space.
MS-DOS Configuration Your AT or PS/2 should allow a minimum of 15 files to be opened during A+ execution. The DOS default number of open files is 8. To override this default, insert the following statement into the CONFIG.SYS file on your DOS system:
FILES=15
If it is necessary to make a change to the CONFIG.SYS file, you must reboot your system to activate the change.
All A+ protocol and data handling will function correctly with a minimum 1M of system memory. A+ uses 56K of main memory and uses and reserves memory above 640K.

Cleo A+ Installation Guide 41
A+ Execution Prior to running A+, connect your port to your modem or local system according to the instructions given in your modem manual. A+ is executed from the DOS command prompt. See 1.1 The A+ Command Line in Chapter 1 - Operation of the Cleo A+ User's Guide for a description of the available command line options. The Device=PortName or PortName command line option is required to specify the COM port you are using for communications:
APlus DEVICE=COMx or APlus COMx
where x is 1, 2, 3, or 4. If this option is not specified, you will be prompted for the device name.
To run on COM3 or greater on a PS/2 machine, you must modify the APLUS.INI file. See the description in the [Devices] parameter section of the APLUS.INI file.
There are no standards for additional COM ports. To run from a non-standard COM port, you must specify the address and interrupt for that port in the APLUS.INI file. For example:
COM5=0x04220, 10
See the manual accompanying your COM port for the correct port base address and interrupt settings.
DOS Notes The Cleo A+ User's Guide describes the A+ version for DOS with the following exceptions:
1. All references to the A+ command shown in the Cleo A+ User's Guide apply to the APLUS command with DOS. All references to the A+.INI, A+.CFG, A+.LOG, A+.MON, and A+.DIR filenames apply to the APLUS.INI, APLUS.CFG, APLUS.LOG, APLUS.MON, and APLUS.DIR filenames respectively.
2. The default Upload Directory and Download Directory are blank to send and receive files from/to the current directory.
3. The default Print Spooler for DOS is print instead of lp. Before using the PRint command, you must initialize the DOS printer. For example the DOS command: PRINT /D:LPT1 configures the DOS spooler to print to device LPT1. The INITPRN external command also configures the DOS spooler for LPT1.
4. The [Baud Rates] parameter section of the APLUS.INI file is not required for DOS.
5. The aserver and aplusstat programs are not supported under DOS.
6. The HOST= parameter and FTP and Telnet are not supported under DOS.
7. You must type exit to return from the DOS shell.
8. DOS does not support multiple A+ sessions.

42 Cleo A+ Installation Guide
Cleo A+ Installation Guide 43
IBM AT, PS/2, & Compatibles and UNIX or XENIX
This chapter describes the steps involved in installing your Cleo A+ software and configuring your IBM AT, PS/2, NCR 3000, UNISYS 6000/30-6X, Wyse 7000i, or compatible machine running AT&T UNIX, Interactive 386/ix, UnixWare, SCO UNIX, SCO OpenServer Release V, SCO XENIX (2.3.3 or greater), or compatible operating system for A+ operation.
A+ Installation Cleo A+ is supplied on a 3½" high density tar format diskette. This diskette, labeled Cleo A+ UNIX/XENIX, contains one compressed file: CleoInstall.
Separate installation instructions for UNIX and SCO UNIX/XENIX follow.
When CleoInstall finishes uncompressing its files, your current directory should contain the following 28 files:
A+ aserver.cfg strfuncs vt220.cmf A+.HLP carrier ti928.cmf vt320.cmf A+.INI getinfo tvi912.cmf vt52.cmf A+.TRF install tvi920.cmf wyse50.cmf CleoInstall palette.def tvi925.cmf wyse60.cmf ansi.cmf palette.ibm version xlatin.ovr aplusstat palette.iso vt100.cmf xlatout.ovr
UNIX Installation To install A+ on a UNIX system, login to your system as root. Use the "cd" command to change to the directory where you wish to place the A+ files. If you are using A+ in conjunction with an EDI translator package, consult that software vendor’s installation instructions for the required directory. The following command will copy the CleoInstall file from your 3½" A+ diskette in floppy drive 0 to the current directory of your hard disk:
tar xvf /dev/dsk/f0q18dt
Once the CleoInstall file is copied to your system, you must install A+ with the command:
./CleoInstall
If additional licenses are purchased at a later time, skip the steps above. Simply change to the original installation directory and run ./install to install additional A+ licenses.
If this is a new installation, the CleoInstall program will prompt for your A+ serial number. This serial number may be found on your A+ tape/disk or on your A+ registration card. The format of the serial number is APLnnnnnn-xxxxxxxx, where each n is a number from 0 to 9 and each x is a letter from a to z or A to Z. Note the letters are case sensitive.

44 Cleo A+ Installation Guide
If A+ is already installed on your system, the CleoInstall program will prompt you 1) to update your software, 2) to add a license, or 3) if a temporary license exists, to update to a permanent license. If you choose to add or update a license, you will be prompted for new A+ serial number. This serial number may be found on your new A+ tape/disk, on your new A+ registration card, or it may have been given to you by a Cleo representative. The format of the serial number is APLnnnnnn-xxxxxxxx, where each n is a number from 0 to 9 and each x is a letter from a to z or A to Z. Note the letters are case sensitive.
The CleoInstall program will then prompt for your operating system version.
UNIX Port Configuration The selected tty port should be configured as a terminal port. This tty port must be disabled from logins and given read and write permissions.
To disable the tty port, edit the file /etc/inittab. You may need to log in as root to modify this file. The /etc/inittab file contains a list of the tty ports and their respective configurations. The format of the inittab script is:
id:rstate:action:process
The tty port you select must have the action field of the inittab script placed in an off mode. For example:
xx:2:off:/etc/getty ttyxx 9600
where xx is the tty port number. If it is necessary to make changes to the /etc/inittab file, you must restart your system to activate the change.
Some UNIX systems do not have /etc/inittab file control. To disable the tty port on these systems, you may use the sysadm program instead of modifying the /etc/inittab file. An example follows:
• Logon as root and type sysadm.
• From the first menu of sysadm, select: 5 device -> Manage devices and device queues
• From this menu, select: 4 Port -> Manage port monitors and port services
• From the port menu, select: 1 Terminal -> Streamlined port service management for terminals
• Then select: 5 Disable... Disable terminal(s)
• Type your tty device name.
Consult your system administrator's manual for details on sysadm.
The following command will give the tty port read and write permissions:
chmod +rw /dev/ttyxx
where xx is the tty port number selected earlier.

Cleo A+ Installation Guide 45
SCO UNIX/XENIX Installation To install A+ to your SCO hard disk, login to your system as root. Use the "cd" command to change to the directory where you wish to place the A+ files. If you are using A+ in conjunction with an EDI translator package, consult that software vendor’s installation instructions for the required directory. The following command will copy the CleoInstall file from your 3½" A+ diskette in floppy drive 0 to the current directory of your hard disk:
tar xvf /dev/fd0135ds18
Once the files are copied to your system, you must install A+ with the command:
./CleoInstall
If additional licenses are purchased at a later time, skip the steps above. Simply change to the original installation directory and run ./install to install additional A+ licenses.
If this is a new installation, the CleoInstall program will prompt for your A+ serial number. This serial number may be found on your A+ tape/disk or on your A+ registration card. The format of the serial number is APLnnnnnn-xxxxxxxx, where each n is a number from 0 to 9 and each x is a letter from a to z or A to Z. Note the letters are case sensitive.
If A+ is already installed on your system, the CleoInstall program will prompt you 1) to update your software, 2) to add a license, or 3) if a temporary license exists, to update to a permanent license. If you choose to add or update a license, you will be prompted for new A+ serial number. This serial number may be found on your new A+ tape/disk, on your new A+ registration card, or it may have been given to you by a Cleo representative. The format of the serial number is APLnnnnnn-xxxxxxxx, where each n is a number from 0 to 9 and each x is a letter from a to z or A to Z. Note the letters are case sensitive.
The CleoInstall program will then prompt for your operating system version.
SCO XENIX/UNIX Port Configuration The selected tty port should be configured as a terminal port. Terminal port names normally contain a lower case letter, i.e. /dev/tty1a. The following commands will disable the tty port from logins and give it read and write permissions:
disable /dev/ttyxx chmod +rw /dev/ttyxx
where xx is the tty port number.

46 Cleo A+ Installation Guide
A+ Execution Prior to running A+, connect your port to your modem or local system according to the instructions given in your modem manual. A+ is executed from the UNIX or XENIX command prompt. See 1.1 The A+ Command Line in Chapter 1 - Operation of the Cleo A+ User's Guide for a description of the available command line options. The Device=PortName or PortName command line option is required to specify the tty port you are using for communications:
A+ DEVICE=/dev/ttyxx
or A+ /dev/ttyxx
where xx is the tty port selected earlier. If this option is not specified, you will be prompted for the tty device name.
If the A+ menu colors do not match those specified in the color palette configuration menu, exit A+. Use the following command to change the default color palette:
cp palette.ibm palette.def
Re-run A+.
The Line Status (online/offline) may not be reliable on UNIX 3.2.x or XENIX systems, or on some implementations of multiport cards.
Multiple A+ Sessions You may purchase additional A+ licenses to run multiple sessions on the same machine. The instructions below describe installation for more than one A+ session:
1. Create separate directories for each A+ session, i.e. mkdir directory1, mkdir directory2, etc. 2. To customize A+, copy the A+.INI, xlatin.ovr and/or xlaout.ovr file(s) from the A+ directory to the new A+ session
directory and make any changes to the local file(s). Create customized A+.CFG (configuration), A+.USR (user login), and/or A+.DIR (dial directory) file(s) in the new A+ session directory.
3. Add the A+ directory to your path, i.e. PATH=$PATH/APlusPath. 4. Run A+ from the A+ session directory. All files (received files, A+.LOG, monitor file, recorded job file, etc.) will
be saved to the local directory unless a path is specified. The accessory files (A+.INI, xlatin.ovr, xlatout.ovr, A+.TRF, A+.CFG, A+.USR, and A+.DIR) will be read from the current directory, the A+ directory, or a directory on the set path, respectively.

Cleo A+ Installation Guide 47

48 Cleo A+ Installation Guide
Cleo A+ Installation Guide 49
IBM RS/6000 and AIX
This chapter describes the steps involved in installing your Cleo A+ software and configuring your IBM RISC System/6000 machine running AIX for A+ operation.
A+ Installation Cleo A+ is supplied on a 3½" high density tar format diskette. On request, A+ may be supplied on a QIC 120 cartridge tape. This diskette or tape, labeled Cleo A+ RS/6000, contains one compressed file: CleoInstall.
To install A+, login to your system as root. Use the "cd" command to change to the directory where you wish to place the A+ files. If you are using A+ in conjunction with an EDI translator package, consult that software vendor’s installation instructions for the required directory. The following command will copy the CleoInstall file from your 3½" A+ diskette in floppy drive 0 to the current directory of your hard disk:
tar xvf /dev/fd0
The following command will copy the CleoInstall file from your A+ tape to the current directory of your hard disk:
tar xvf /dev/rmt
Once the CleoInstall file is copied to your system, you must install A+ with the command:
./CleoInstall
If additional licenses are purchased at a later time, skip the steps above. Simply change to the original installation directory and run ./install to install additional A+ licenses.
If this is a new installation, the CleoInstall program will prompt for your A+ serial number. This serial number may be found on your A+ tape/disk or on your A+ registration card. The format of the serial number is APLnnnnnn-xxxxxxxx, where each n is a number from 0 to 9 and each x is a letter from a to z or A to Z. Note the letters are case sensitive.
If A+ is already installed on your system, the CleoInstall program will prompt you 1) to update your software, 2) to add a license, or 3) if a temporary license exists, to update to a permanent license. If you choose to add or update a license, you will be prompted for new A+ serial number. This serial number may be found on your new A+ tape/disk, on your new A+ registration card, or it may have been given to you by a Cleo representative. The format of the serial number is APLnnnnnn-xxxxxxxx, where each n is a number from 0 to 9 and each x is a letter from a to z or A to Z. Note the letters are case sensitive.
When CleoInstall finishes uncompressing its files, your current directory should contain the following 28 files:
A+ aserver.cfg strfuncs vt220.cmf A+.HLP carrier ti928.cmf vt320.cmf A+.INI getinfo tvi912.cmf vt52.cmf A+.TRF install tvi920.cmf wyse50.cmf CleoInstall palette.def tvi925.cmf wyse60.cmf ansi.cmf palette.ibm version xlatin.ovr aplusstat palette.iso vt100.cmf xlatout.ovr

50 Cleo A+ Installation Guide
Port Configuration The selected tty port should be configured as a terminal port . The following commands will disable this tty port from logins and give it read and write permissions:
pdisable ttyx chmod +rw /dev/ttyx
where x is the tty port number. Note, these commands may need to be re-executed after a machine power on. You may use the smit command to make this process automatic. See your AIX documentation for details.
A+ Execution Prior to running A+, connect your RS/6000 port to your modem or local system according to the instructions given in your modem manual. A+ is executed from the AIX command prompt. See 1.1 The A+ Command Line in Chapter 1 - Operation of the Cleo A+ User's Guide for a description of the available command line options. The Device=PortName or PortName command line option is required to specify the tty port you are using for communications:
A+ DEVICE=/dev/ttyx
or A+ /dev/ttyx
where x is the tty port selected earlier. If this option is not specified, you will be prompted for the tty device name.
If the A+ menu colors do not match those specified in the color palette configuration menu, exit A+. Use the following command to change the default color palette:
cp palette.ibm palette.def
Re-run A+.
The Line Status (online/offline) may not be reliable on some implementations of multiport cards. All references to the DEL key shown in the Cleo A+ User’s Guide apply to the CTRL+C key sequence on the RS/6000.
Multiple A+ Sessions You may purchase additional A+ licenses to run multiple sessions on the same machine. The instructions below describe installation for more than one A+ session:
1. Create separate directories for each A+ session, i.e. mkdir directory1, mkdir directory2, etc. 2. To customize A+, copy the A+.INI, xlatin.ovr and/or xlaout.ovr file(s) from the A+ directory to the new A+ session
directory and make any changes to the local file(s). Create customized A+.CFG (configuration), A+.USR (user login), and/or A+.DIR (dial directory) file(s) in the new A+ session directory.
3. Add the A+ directory to your path, i.e. PATH=$PATH/APlusPath. 4. Run A+ from the A+ session directory. All files (received files, A+.LOG, monitor file, recorded job file, etc.) will
be saved to the local directory unless a path is specified. The accessory files (A+.INI, xlatin.ovr, xlatout.ovr, A+.TRF, A+.CFG, A+.USR, and A+.DIR) will be read from the current directory, the A+ directory, or a directory on the set path, respectively.

Cleo A+ Installation Guide 51
Sun and Solaris/SunOS
This chapter describes the steps involved in installing your Cleo A+ software and configuring your Sun SPARCclassic, SPARCstation, SPARCserver, SPARCsystem, or SPARCcenter machine running Solaris 2.x and SunOS 5.x for A+ operation.
A+ Installation Cleo A+ is supplied on a 3½" high density tar format diskette. On request, A+ may be supplied on a QIC 120 cartridge tape. This diskette or tape, labeled Cleo A+ SUN, contains one compressed file: CleoInstall.
To install A+, login to your system as root. Use the "cd" command to change to the directory where you wish to place the A+ files. If you are using A+ in conjunction with an EDI translator package, consult that software vendor’s installation instructions for the required directory. With SunOS V.5.3 and greater, the following commands will copy the CleoInstall file from your 3½" A+ diskette in floppy drive 0 to the current directory of your hard disk:
volcheck /dev/diskette tar xvf /vol/dev/diskette0/unlabeled
With earlier versions of SunOS, the following command will copy the CleoInstall file from your 3½" A+ diskette in floppy drive 0 to the current directory of your hard disk:
tar xvf /dev/fd0
Use one of the following commands to copy the CleoInstall file from your A+ tape to the current directory of your hard disk:
tar xvf /dev/st0 tar xvf /dev/st1
Once the CleoInstall file is copied to your system, you must install A+ with the command:
./CleoInstall
If additional licenses are purchased at a later time, skip the steps above. Simply change to the original installation directory and run ./install to install additional A+ licenses.
If this is a new installation, the CleoInstall program will prompt for your A+ serial number. This serial number may be found on your A+ tape/disk or on your A+ registration card. The format of the serial number is APLnnnnnn-xxxxxxxx, where each n is a number from 0 to 9 and each x is a letter from a to z or A to Z. Note the letters are case sensitive.
If A+ is already installed on your system, the CleoInstall program will prompt you 1) to update your software, 2) to add a license, or 3) if a temporary license exists, to update to a permanent license. If you choose to add or update a license, you will be prompted for new A+ serial number. This serial number may be found on your new A+ tape/disk, on your new A+ registration card, or it may have been given to you by a Cleo representative. The format of the serial number is APLnnnnnn-xxxxxxxx, where each n is a number from 0 to 9 and each x is a letter from a to z or A to Z. Note the letters are case sensitive.

52 Cleo A+ Installation Guide
When CleoInstall finishes uncompressing its files, your current directory should contain the following 28 files:
A+ aserver.cfg strfuncs vt220.cmf A+.HLP carrier ti928.cmf vt320.cmf A+.INI getinfo tvi912.cmf vt52.cmf A+.TRF install tvi920.cmf wyse50.cmf CleoInstall palette.def tvi925.cmf wyse60.cmf ansi.cmf palette.ibm version xlatin.ovr aplusstat palette.iso vt100.cmf xlatout.ovr
Port Configuration The selected tty port should be configured as a terminal port. It should also be disabled from logins and given read and write permissions.
Use the pmadm -l command to list all the port monitors:
pmadm -l
The format of the response is:
PMTAG PMTYPE SVCTAG FLGS ID <PMSPECIFIC> zsmon ttymon ttya ux root /dev/term/a I-/usr/bin/login-9600 ldterm,ttcompat ttya login: -tvi925 y # zsmon ttymon ttyb u root /dev/term/b I-/usr/bin/login-9600 ldterm,ttcompat ttyb login: -tvi925 y#
If there is an x in the FLGS column, the port is disabled. For example, the ttya port above is disabled.
Look for your tty port name in the SVCTAG column, then note the corresponding PMTAG entry. To disable your tty port, use the following pmadm command:
pmadm -d -p pmtag -s svctag
where pmtag is taken from the PMTAG column and svctag is the tty port number from the SVCTAG column.
Example: pmadm -d -p zsmon -s ttyb
would disable ttyb.
The following command will give this tty port read and write permissions:
chmod +rw /dev/ttyx
where x is the tty port number.

Cleo A+ Installation Guide 53
A+ Execution Prior to running A+, connect your SUN port to your modem or local system according to the instructions given in your modem manual. A+ is executed from the SunOS or Solaris command prompt. See 1.1 The A+ Command Line in Chapter 1 - Operation of the Cleo A+ User's Guide for a description of the available command line options. The Device=PortName or PortName command line option is required to specify the tty port you are using for communications:
A+ DEVICE=/dev/ttyx
or A+ /dev/ttyx
where x is the tty port selected earlier. If this option is not specified, you will be prompted for the tty device name.
If the A+ menu colors do not match those specified in the color palette configuration menu, exit A+. Use the following command to change the default color palette:
cp palette.ibm palette.def
Re-run A+.
The Line Status (online/offline) may not be reliable on some implementations of multiport cards. All references to the DEL key shown in the Cleo A+ User’s Guide apply to the CTRL+C key sequence on the Sun.
Multiple A+ Sessions You may purchase additional A+ licenses to run multiple sessions on the same machine. The instructions below describe installation for more than one A+ session:
1. Create separate directories for each A+ session, i.e. mkdir directory1, mkdir directory2, etc. 2. To customize A+, copy the A+.INI, xlatin.ovr and/or xlaout.ovr file(s) from the A+ directory to the new A+ session
directory and make any changes to the local file(s). Create customized A+.CFG (configuration), A+.USR (user login), and/or A+.DIR (dial directory) file(s) in the new A+ session directory.
3. Add the A+ directory to your path, i.e. PATH=$PATH/APlusPath. 4. Run A+ from the A+ session directory. All files (received files, A+.LOG, monitor file, recorded job file, etc.) will
be saved to the local directory unless a path is specified. The accessory files (A+.INI, xlatin.ovr, xlatout.ovr, A+.TRF, A+.CFG, A+.USR, and A+.DIR) will be read from the current directory, the A+ directory, or a directory on the set path, respectively.

54 Cleo A+ Installation Guide
Cleo A+ User's Guide 55
Appendix A. File Formats
A+ accesses and creates various files in the course of operation. This appendix contains information on the format of the following files:
• The configuration file
• The job/script file
• The log file
• The monitor file
• The character translation files
• The autodial directory file
• The terminal command map files
• The Cleo terminfo files
• The initialization file

56 Cleo A+ Installation Guide
A.1 The Configuration File
A+ allows you to run with custom configuration files using the CONFIGFILE=CfgFile command line option when starting A+ or using the Load Configuration File option from within A+. If the A+.CFG configuration file exists, this becomes the A+ default configuration.
The configuration file also allows you to automate A+ operation. For instance, if the configuration file contains a JOBFILE=JobFile parameter, the specified job/script file will be executed.
Configuration files may be created and/or modified with a standard text editor or from within A+ using the Configuration Menus command key. Parameters not specified in the configuration file are set according to the previous parameter settings, the A+.CFG file if it exists, or to A+'s internal defaults (see Table A.1). Therefore, to remove settings, you must specify the parameter with no setting, i.e. MODEMINIT= suppresses the Modem Initialization String.
Table A.1 lists the configuration file parameters with their default values and ranges. For a full discussion of these parameters, see Chapter 3 - Configuration Menus. ____________________________________________________________________________________________________ PARAMETER DEFAULT OPTIONS [Port] SPEED= 9600 300, 600, 1200, 2400, 4800, 9600, 19200, 38400, 57600, 115200 PARITY= NONE NONE, ODD, EVEN, MARK or SPACE DATA= 8 7 or 8 STOP= 1 1 or 2 FLOWCONTROL= NONE NONE, SOFTWARE, HARDWARE DEVICE= COM or tty port name or None HOST=* Host socket name or address number TTYFLAGS=* 0xFFFF 0x7F7F to fix DATA/PARITY/STOP FTPHOSTPORT=* 21 0 - 16383 TELNETHOSTPORT=*23 0 - 16383 [Modem] AUTOBAUD= ON OFF or ON DIALWAIT= 60 1 - 255 TIMES= 3 1 - 3100 MODEMINIT= AT&MX4V1QE S8=5&C1&D1M1S0=1 Modem configuration string DIALINIT= Modem configuration string * May be added to the configuration file. See description in following table. ____________________________________________________________________________________________________
TABLE A.1 CONFIGURATION PARAMETERS (1 of 4)

Cleo A+ Installation Guide 57
____________________________________________________________________________________________________ PARAMETER DEFAULT OPTIONS [Terminal Emulation] TERMINAL= vt100 vt100, vt320, wyse50, ansi, etc. LOCALECHO= OFF OFF or ON REMOTEECHO= OFF OFF or ON LINEWRAP= ON OFF or ON STATUSLINE= ON OFF or ON CRTRANSLATE= CR IGNORE, CR, CR/NL, NL ENTERTRANS= CR CR, CR/NL, NL DESTRUCTBS= OFF OFF or ON HANGUP= ON OFF or ON SHELLSUSPEND= ON OFF or ON COMMANDKEY= 1 ASCII decimal (1-26) key value ATTRIBUTES= ON OFF or ON KEYMAP=* vt100.kmf Key map filename TERMOWCHAR=* 255 Terminal overwrite character (0 - 255) TERMDELAY=* 0 Terminal delay (0 - 255) ACSCMAPPING=* Line graphics mapping [File Transfer] PROTOCOL= ZMODEM XMODEM, XMODEM1K, YMODEM, YMODEMG, ZMODEM, KERMIT, ASCII, ANSI, FTP, or EXTERNAL UPDIR= ./ (for UNIX) or blank (for VMS & DOS) Default upload (send) directory DOWNDIR= ./ (for UNIX) or blank (for VMS & DOS) Default download (receive) directory MAXERRORS= -1 10 - 255 or -1 BLOCKERRORS= 10 10 - 255 or -1 RECTIMEOUT= 10 5 - 255 STARTTIMEOUT= 60 5 - 255 DEFSENDMODE= BINARY BINARY, TEXT, or SCAN DEFRECEIVEMODE= BINARY BINARY or TEXT AUTORECEIVE= ON OFF or ON BATCHRECEIVE= OFF OFF or ON FILENAMES= YES YES,NO, or OVERWRITE COMPRESS= NO YES or NO ENCRYPT= NONE NONE or PGE PGEKEY=* PGE encryption key (1-50 characters) SPOOLER=* lp (for UNIX) or print (for DOS & VMS) Print spool command REMOTESIZE=* 0 TExt file size (-1 to 255) NAKEOT=* ON Send NAK to X/YMODEM EOT (ON or OFF) BLOCKFILL=* 0 X/YMODEM block fill char (0 - 255)
* May be added to the configuration file. See description in following table. ____________________________________________________________________________________________________
TABLE A.1 CONFIGURATION PARAMETERS (2 of 4)

58 Cleo A+ Installation Guide
____________________________________________________________________________________________________ PARAMETER DEFAULT OPTIONS [ASCII] ASCIIBLK= 0 0 - 255 LINEDELAY= 5 0 - 255 ASCIIEOF= 26 0 - 255 [ANSI] ANSIBLK= 128 0 - 255 ANSIDELAY= 5 0 - 255 ANSIEOB= 13 0 - 255 ANSIACK= 13 0 - 255 [KERMIT] KERMQCTL= 38 38 - 127 KERMQCH= 35 35 - 127 KERMPACKET= 1024 0 - 9024 KERMPADCH= 0 0 - 127 KERMNPADS= 0 0 - 127 KERMSTART= 1 0 - 64 KERMEOL= 13 13 - 64 KERMBLKCHK= CRC CRC, CHKSUM, CHKSUM2 KERMWINS= 6 0 - 31 KERMATTRS=* ON ON or OFF [ZMODEM] ZFRAME= 1024 128 - 32767 ZCRASH= OFF OFF, SIMPLE, CRC ZSENDWND= 0 0 - 32767 ZRECWND= 0 0 - 32767 [FTP] FTPUSER= user_name FTP user name FTPPASS= user_password Scrambled FTP password FTPLOPORT= 1024 0 - 61439 FTPHIPORT= 5999 0 - 61439 FTPHOSTPORT=* 21 0 - 16383
* May be added to the configuration file. See description in following table. ____________________________________________________________________________________________________
TABLE A.1 CONFIGURATION PARAMETERS (3 of 4)

Cleo A+ Installation Guide 59
____________________________________________________________________________________________________ PARAMETER DEFAULT OPTIONS [Start Up] LOGFILE= A+.LOG (APLUS.LOG for DOS/VMS) Log file name LOGMODE= NONE NONE, OVERWRITE, or APPEND MONITORFILE= A+.MON (APLUS.MON for DOS/VMS) Monitor file name MONITORMODE= NONE NONE, OVERWRITE, or APPEND RECORDERFILE= A+.JOB (APLUS.MON for DOS/VMS) Recorder job file name RECORDERMODE= NONE NONE, OVERWRITE, or APPEND JOBFILE= Job file name to be auto-executed TOKENS= ON ON, OFF, or token list DISPLAY= ALL ALL, SILENT, STATUS, JOB, or MINIMAL MONITORTYPE=* H H (Hex), C (Character), or S (Screen) [Color Palette] MAINF= WHITE BLACK, RED, GREEN, YELLOW, BLUE, MAGENTA, CYAN, WHITE MAINB= BLACK (see MainF=) STATUSF= CYAN (see MainF=) STATUSB= BLUE (see MainF=) MENUF= WHITE (see MainF=) MENUB= BLUE (see MainF=) MESSAGEF= BLACK (see MainF=) MESSAGEB= GREEN (see MainF=) HILITEF= MAGENTA (see MainF=) HILITEB= BLACK (see MainF=) MENUK= RED (see MainF=) MENUD= GREEN (see MainF=) HELPF= BLACK (see MainF=) HELPB= GREEN (see MainF=) MONITORF= RED (see MainF=) [Filenames] RECBASENAME=* RCVFILE Default receive file name PRNBASENAME=* PRINT Default print file name DIALDIR=* A+.DIR Autodial directory file name (APLUS.DIR for DOS & APLUS.FON for VMS) USERLIST=* A+.USR (APLUS.USR for DOS/VMS) LOGIN user list file name INTABLE=* xlatin.ovr Incoming translation table file name OUTTABLE=* xlatout.ovr Outgoing translation table file name [Miscellaneous] SYNCCABLE=* OFF Use SYNCcable+ (OFF or ON) HISTBUFF=* 6 # of chars job record saves for FInd USECASE=* YES Use upper/lower case (YES or NO) LOCKNAME=* LCK..%d Port lock file name LOCKDATA=* A Lock file contents (A, 1, 2, 4, or M##)
* May be added to the configuration file. See description following table. ____________________________________________________________________________________________________
TABLE A.1 CONFIGURATION PARAMETERS (4 of 4)

60 Cleo A+ Installation Guide
The following pages describe the non-standard configuration parameters. These parameters cannot be set from the configuration menus, but may be added to the configuration file using a standard text editor, may be specified on the A+ command line, or may be set within A+ using the LET command, i.e. LET ACSCMAPPING=vt100.
ACSCMAPPING=GraphicsMap is used to specify custom line graphics mapping for your terminal. This controls the characters used to draw A+’s menu and prompt boxes. See A.10.3 Line Graphics Mapping for a description of line graphics mapping. The default is the internal curses default. You may specify any terminal type defined in the [ACS Mapping] section of the A+.INI (or APLUS.INI for DOS/VMS) file.
BLOCKFILL=FillChar is used to specify the block fill character (in ASCII decimal) that is sent to the remote at the end of XMODEM and YMODEM file transfers. The minimum value is 0, the maximum value is 255, and the default is 0 for a null fill character. If you have problems sending the last block of data, try changing the BLOCKFILL to 26.
DIALDIR=DialDirectoryFile is used to specify the file containing the autodial directory. The default is A+.DIR (or APLUS.DIR for DOS or APLUS.FON for VMS). The filename may contain a path. See 2.1 A - Autodial Directory for details.
FTPHOSTPORT=HostNumber is used to specify the local host socket number for FTP communications. The minimum value is 0, the maximum value is 16383 and the default is 21. This value should rarely need to be changed.
HISTBUFF=#OfFindChars is used to specify the number of characters to save in the FInd command when recording a job file. During job file recording, every time you type, the last incoming characters (if there are any) are recorded with the FInd command. HISTBUFF controls how many of the last incoming characters are placed in the FInd command. For example, if the characters “User Login:“ appeared on your terminal and you typed “root”, the job recorder would save the commands: FIND “Login:” KEY root If you set HISTBUFF to 10, the job recorder would save the commands: FIND “ser Login:” KEY root The range is 1 to 60. The default is 6.
HOST=HostName is used to specify the local network, SLIP, or PPP host socket name or address number. The format of the host address is x.x.x.x, where each x may be 0 through 999.
INTABLE=InFileName is used to specify the file containing the incoming translation table. The default is xlatin.ovr. The filename may contain a path. See 4.58 Table - Display or Change Translation Table(s) in Chapter 4 - A+ Commands for details.
KERMATTRS=ON|OFF is an option to control whether or not Kermit transmits a file attribute block. This block contains the file type, file size, and file date. Some older versions of Kermit do not accept this file attribute block. The default is ON. You may prevent the file attribute block from being transmitted by setting the KERMATTRS to OFF.
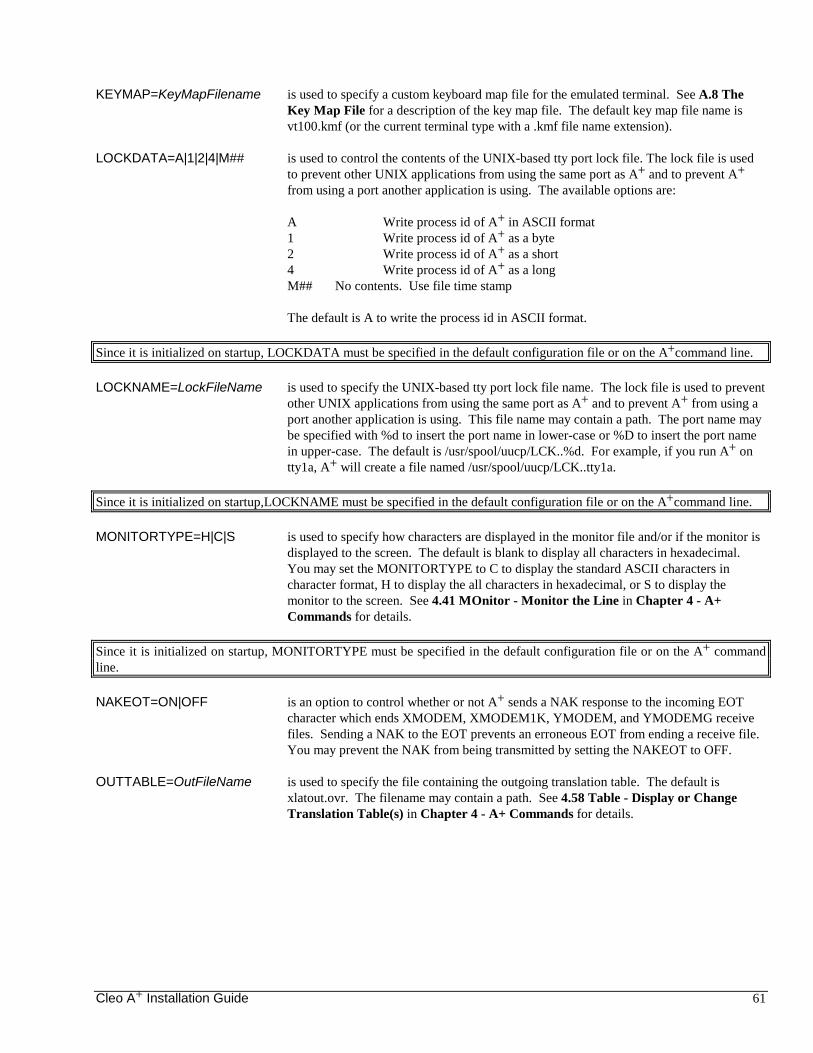
Cleo A+ Installation Guide 61
KEYMAP=KeyMapFilename is used to specify a custom keyboard map file for the emulated terminal. See A.8 The Key Map File for a description of the key map file. The default key map file name is vt100.kmf (or the current terminal type with a .kmf file name extension).
LOCKDATA=A|1|2|4|M## is used to control the contents of the UNIX-based tty port lock file. The lock file is used to prevent other UNIX applications from using the same port as A+ and to prevent A+ from using a port another application is using. The available options are: A Write process id of A+ in ASCII format 1 Write process id of A+ as a byte 2 Write process id of A+ as a short 4 Write process id of A+ as a long M## No contents. Use file time stamp The default is A to write the process id in ASCII format.
Since it is initialized on startup, LOCKDATA must be specified in the default configuration file or on the A+command line.
LOCKNAME=LockFileName is used to specify the UNIX-based tty port lock file name. The lock file is used to prevent other UNIX applications from using the same port as A+ and to prevent A+ from using a port another application is using. This file name may contain a path. The port name may be specified with %d to insert the port name in lower-case or %D to insert the port name in upper-case. The default is /usr/spool/uucp/LCK..%d. For example, if you run A+ on tty1a, A+ will create a file named /usr/spool/uucp/LCK..tty1a.
Since it is initialized on startup,LOCKNAME must be specified in the default configuration file or on the A+command line.
MONITORTYPE=H|C|S is used to specify how characters are displayed in the monitor file and/or if the monitor is displayed to the screen. The default is blank to display all characters in hexadecimal. You may set the MONITORTYPE to C to display the standard ASCII characters in character format, H to display the all characters in hexadecimal, or S to display the monitor to the screen. See 4.41 MOnitor - Monitor the Line in Chapter 4 - A+ Commands for details.
Since it is initialized on startup, MONITORTYPE must be specified in the default configuration file or on the A+ command line.
NAKEOT=ON|OFF is an option to control whether or not A+ sends a NAK response to the incoming EOT character which ends XMODEM, XMODEM1K, YMODEM, and YMODEMG receive files. Sending a NAK to the EOT prevents an erroneous EOT from ending a receive file. You may prevent the NAK from being transmitted by setting the NAKEOT to OFF.
OUTTABLE=OutFileName is used to specify the file containing the outgoing translation table. The default is xlatout.ovr. The filename may contain a path. See 4.58 Table - Display or Change Translation Table(s) in Chapter 4 - A+ Commands for details.

62 Cleo A+ Installation Guide
PGEKEY=Key is used to specify an encryption key (or password) for transferred files. For example: PGEKEY=secret. The PGE key may be from 1 to 50 characters in length. Setting PGEKEY= (without specifying a key) returns it to the default internal key. The ENCRYPT=PGE parameter must be used to enable file encryption. PGE encryption is a proprietary A+ file encryption method that uses an internal key to scramble and unscramble data.
PRNBASENAME=PrintFilename is used to specify the base PRint file name. This base filename is used to receive PRint files when no name is specified (ASCII, ANSI Clear, Xmodem) or when no PRint file name is specified and the incoming filename exists (Ymodem, Zmodem, Kermit, or FTP). A numeric extension is added to the base filename. The default is PRINT. The filename may contain a path. See 4.44 PRint - Receive File(s) & Spool to Printer in Chapter 4 - A+ Commands for details.
RECBASENAME=ReceiveFilename is used to specify the base REceive file name. This base filename is used to receive files when no name is specified (ASCII, ANSI Clear, Xmodem) or when no receive file name is specified and the incoming filename exists (Ymodem, Zmodem, Kermit, or FTP). A numeric extension is added to the base filename. The default is RCVFILE. The filename may contain a path. See 4.47 REceive - Receive File(s) in Chapter 4 - A+ Commands for details.
REMOTESIZE=FileSize is used to specify the file size that is sent to the remote during YMODEM, ZMODEM or Kermit text file transfers. Since A+ does not know the exact size of the file before transmission, a dummy file size is sent to the remote. This dummy file size may be -1 to 255. The default is 0. This will not normally need to be changed unless the remote size will not accept a 0 file size.
SPOOLER=PrintCommand is used to specify the print spooler command. The default for UNIX-based systems is lp. The default for DOS and VMS-based systems is PRINT. You may for instance specify SPOOLER=lp -r which will remove the file after spooling.
SYNCCABLE=OFF|ON is an option to allow you to run in SYNCcable+’s asynchronous passthru mode. This allows you to share a port and modem with Cleo 3780Plus. The default is OFF to run normally. If the SYNCCABLE option is set to ON, you must copy the sc3780 file from the 3780Plus directory to the A+ directory to allow A+ to load SYNCcable+ if needed.
SYNCCABLE= ON, if desired, must be specified in the default configuration file or on the A+ command line.
TELNETHOSTPORT=HostNumber is used to specify the local host socket number for Telnet communications. The minimum value is 0, the maximum value is 16383 and the default is 23. This value should rarely need to be changed.
TERMDELAY=Delay is used to specify a delay after sending attribute characters to a UNIX-based terminal. The range is 0 to 255. The default is 0. If your terminal displays unusual/unexpected characters, try setting a TERMDELAY to see if the problem goes away.

Cleo A+ Installation Guide 63
TERMOWCHAR=OverWriteChar is used to specify an overwrite character for UNIX-based terminal redraws. This character is sent to every position on the terminal to clear the screen before re-publishing the screen data. The valid range is 0 to 255. The default is 255.
TTYFLAGS=BytePattern is used to control the use of DATA, PARITY, or STOP settings during dialing, autoanswering, hanging up, and during file transfers. 0xFFFF allows A+ to change to DATA=8, PARITY=NONE, and STOP=1 settings when dialing, autoanswering, hanging up, and during non-Kermit file transfers. 0x7F7F forces A+ to use the set DATA, PARITY, and STOP settings all the time. Valid settings are 0xFFFF or 0x7F7F. The default is 0xFFFF.
USECASE=YES|NO is used to control whether or not the BRanch, IF, and FInd commands are upper/lower case specific. The default is YES to require an exact match. You may set USECASE to NO to allow the search or match to match on upper or lower case of the same characters.
USERLIST=LoginUsersFile is used to specify the file containing the LOGIN user list. The default is A+.USR (or APLUS.USR for DOS/VMS). The filename may contain a path. See 4.38 LOGIN - Allow Remote User to Login in Chapter 4 - A+ Commands for details.

64 Cleo A+ Installation Guide
A.2 The Job/Script File
A+ allows you to run custom job files using the JOBFILE=JobFile parameter when executing A+ or using the Job command key or EXecute jobfile command while in A+. You can create custom job files for A+ by using the Record command key (see 2.12 R - Job/Script Recorder Toggle in Chapter 2 - The Command Keys) or a standard text editor.
The following example shows the format for a job file:
## JOB FILECONFIG CFGFILE ## change configurationANSWER 10 ## answer the phone lineKEY **SIGNON** ## send sign-on messageTEXT TXFILE.TXT ## transmit fileRECEIVE RCVFILE ## receive file to diskPRINT PRTFILE ## receive and spool fileKEY **SIGNOFF** ## send sign-off messageVOICE ## hang-up phone lineQUIT ## exit A+
The first line in the above example is a comment line. Comment lines begin with the characters ## and may be placed anywhere in a job file. The following lines contain A+ commands. Each A+ command must be on a separate line. Most commands may be shortened to the first two characters, i.e. CONFIG CFGFILE and CO CFGFILE are identical to A+.
See Chapter 5 - A+ Tutorial for more job file examples.

Cleo A+ Installation Guide 65
A.3 The Log File
A+ has the ability to log all transactions and messages to the log file A+.LOG. The LOGMODE=OVERWRITE, LOGMODE=APPEND, or LOGMODE=NONE command line option allows you to select how the log file is used. See 1.1 The A+ Command Line in Chapter 1 - Operation for more details on the LOGMODE= command line option.
The following example shows the format of the log file A+.LOG:
17:25:00 ********* A+ LOGON ********* TUE OCTOBER 3, 1994 7:25:03 Command> AU 397-8110 DIAL: CONNECT_9600 : Connect Code = 18 7:25:15 Command> KE SIGNON ROCKFORD 7:25:17 TT: KEY :NRMEOF :1 blocks 17:25:23 Command> TE CLEO.MSG 17:27:50 TT: CLEO.MSG :NRMEOF :8 blocks 17:27:59 Command> KE SIGNOFF 17:28:01 TT: KEY :NRMEOF :1 blocks 17:28:03 Command> VO 17:28:37 Command> QU 17:28:39 ********* A+ LOGOFF ********* TUE OCTOBER 3, 1994
The first and last lines contain the time and date of the start and finish of A+ execution. The lines in between contain the time, commands executed, and status of the commands. The status lines are described below.
A.3.1 The Autodial/Autoanswer Status Line After an autodial command is completed, a status line will be posted to the log and monitor files (if open). The status line format is:
DIAL : connect_msg : Connect Code = connect_code
After an autoanswer is completed, a status line will be posted to the log and monitor files (if open). The status line format is:
ANSWER : connect_msg : Connect Code = connect_code
where:
connect_msg is the connection message returned by the attached AT command modem. If the modem returns a connect code instead of a connect message, the connect code will be displayed as the connect message.
connect_code is the connection code returned by the attached AT command modem. If the modem returns a connect message instead of a connect code, the connect code may display as -1.
For example, the following status line: DIAL : CONNECT_9600 : Connect Code = 18 would be posted after autodialing a CCITT V.32 AT command modem which connected at 9600 baud.
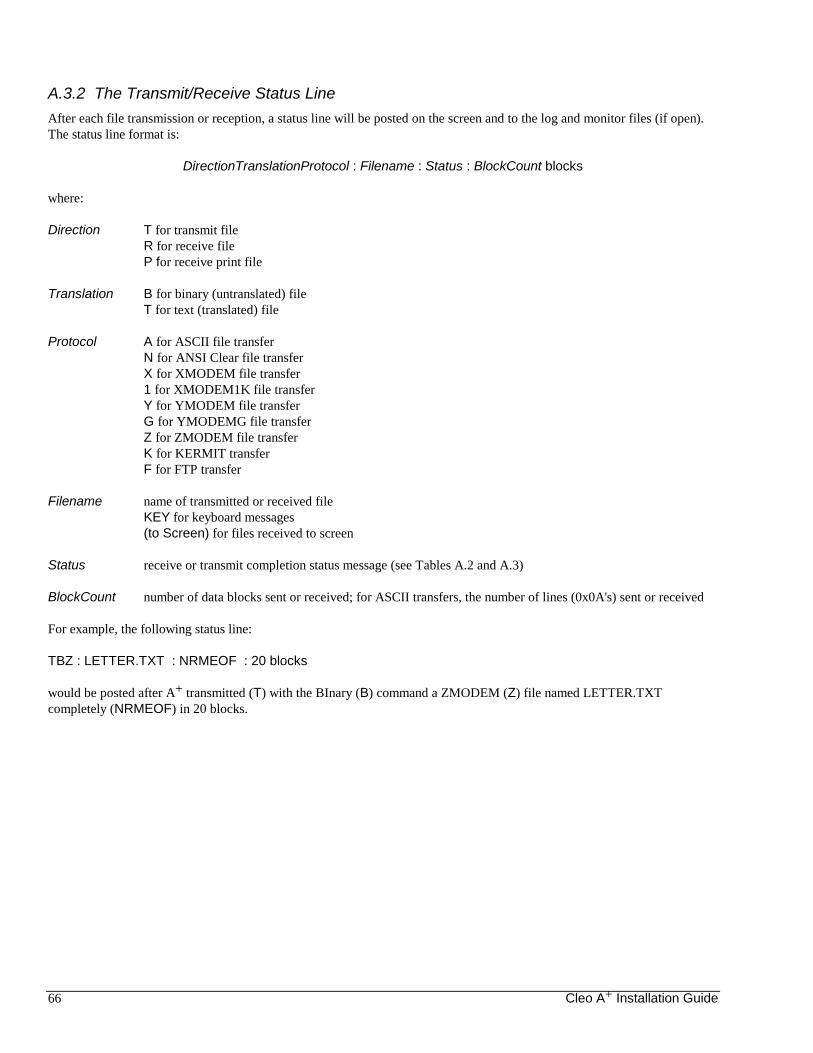
66 Cleo A+ Installation Guide
A.3.2 The Transmit/Receive Status Line After each file transmission or reception, a status line will be posted on the screen and to the log and monitor files (if open). The status line format is:
DirectionTranslationProtocol : Filename : Status : BlockCount blocks
where:
Direction T for transmit file R for receive file P for receive print file
Translation B for binary (untranslated) file T for text (translated) file
Protocol A for ASCII file transfer N for ANSI Clear file transfer X for XMODEM file transfer 1 for XMODEM1K file transfer Y for YMODEM file transfer G for YMODEMG file transfer Z for ZMODEM file transfer K for KERMIT transfer F for FTP transfer
Filename name of transmitted or received file KEY for keyboard messages (to Screen) for files received to screen
Status receive or transmit completion status message (see Tables A.2 and A.3)
BlockCount number of data blocks sent or received; for ASCII transfers, the number of lines (0x0A's) sent or received
For example, the following status line: TBZ : LETTER.TXT : NRMEOF : 20 blocks would be posted after A+ transmitted (T) with the BInary (B) command a ZMODEM (Z) file named LETTER.TXT completely (NRMEOF) in 20 blocks.

Cleo A+ Installation Guide 67
Tables A.2 and A.3 below list the receive and transmit status messages along with a brief explanation of the each. A more detailed description of each message may be found on the following pages.
____________________________________________________________________________________________________ Status Message Status Code* Explanation
ABORT 23 Keyboard-forced abort
BUFOVF 29 Buffer overflow
DSKERR 41 Write to disk failure
EAREOF 20 Early end of file
ERROR 4 ANSI Clear error
LINDWN 22 System line down
NODATA 24 No incoming data
NRMEOF 15 Normal end of file
RECEIV 33 Receive timeout expiration
REMOVE 54 Remote Kermit requested the file be removed
RETRAN 38 Maximum errors limit expiration
RMTABT 28 Remote terminal aborted
SKIP 44 A+ requested file be skipped
* Used by the QUit STATUS command and the API. ____________________________________________________________________________________________________
TABLE A.2 RECEIVE COMPLETION STATUS MESSAGES
____________________________________________________________________________________________________
Status Message Status Code* Explanation
ABORT 23 Keyboard-forced abort
BIDLMT 30 Remote not ready to receive
CONTEN 45 Line bid contention
ERROR 4 ANSI Clear error
LINDWN 22 System line down
NOFILE 26 Unable to open file
NRMEOF 15 Normal end of file
REPEAT 39 Receive timeout expiration
RETRAN 38 Maximum errors limit expiration
RMTABT 28 Remote terminal aborted
SKIP 44 Remote terminal requested file be skipped
* Used by the QUit STATUS command and the API. ____________________________________________________________________________________________________
TABLE A.3 TRANSMIT COMPLETION STATUS MESSAGES

68 Cleo A+ Installation Guide
A.3.3 Status Messages Status messages may be viewed or acted upon by the BRanch command to control job execution. The current status code is saved in the pre-defined variable STATUS which may be used anywhere in the job/script file. Table A.4 lists the status messages returned for each A+ command. ____________________________________________________________________________________________________
Command Status (Code*) Explanation ALert OK (46) Message posted - user keystroke aborted; NODATA (24) Message posted - no keystroke before timeout; FAIL (19) Format error; BKGRND (53) A+ is in background mode. ANswer OK (46) Connection complete; FAIL (19) No incoming calls; DIAL_ABORT (9) ANswer aborted by user; Various Result message/code from modem (see A.3.1 The Autodial/Autoanswer Status Line). ASk OK (46) Response from user received; NODATA (24) No response from user before timeout; ABORT (23) Ask aborted by user; BKGRND (53) A+ is in background mode. AT OK (46) Modem accepted command; FAIL (19) Modem rejected command. AUtodial OK (46) Connection complete; DIAL_ABORT (9) AUtodial aborted by user; FAIL (19) Dial retires expired, no connection; Various Result message from modem (see A.3.1 The Autodial/Autoanswer Status Line). BInary Various See Table A.3. BRanch None Does not change current status value. CHgpass OK (46) Password changed; FAIL (19) Error changing password; NODATA (24) No response from user before timeout; MATCH (27) New password is the same as old password. CLear OK (46) Screen cleared; BKGRND (53) A+ is in background mode. CLOSE OK (46) Closed file; NOFILE (26) Error closing file. COMBINE 0 COMPARE 0 Strings were equal; 2 String 2 > String 1; 1 String 1 > String 2. COnfig OK (46) Configuration loaded; ERROR (4) Error in configuration; NOFILE (26) Unable to open file. CONNECT OK (46) Connection complete; FAIL (19) Error making the connection. +COUNTER OK (46) Counter incremented. -COUNTER OK (46) Counter decremented. CUrsor OK (46) Cursor position set; FAIL (19) Cursor position out of range; BKGRND (53) A+ is in background mode. DAta OK (46) DTR raised. DELETE 0 File deleted; non-zero Error deleting file. DIsplay OK (46) Message displayed; FAIL (19) Format error; BKGRND (53) A+ is in background mode. ELSE none Does not change current status. ENDIF none Does not change current status. ENdmenu Number Integer response from user received; NODATA (24) No response from user before timeout; ABORT (23) User aborted with ESC key; BKGRND (53) A+ is in background mode. DSKERR (41) Unable to write log file. * Status codes are used by the QUit STATUS command and the API. ____________________________________________________________________________________________________
TABLE A.4 A+ COMMAND STATUS MESSAGES (Part 1 of 3)

Cleo A+ Installation Guide 69
____________________________________________________________________________________________________ Command Status (Code*) Explanation EXecute OK (46) Job file loaded; DSKERR (41) Unable to unscramble file; NOFILE (26) Unable to open file. EXISTS OK (46) File exists; NOFILE (26) File does not exist. FInd MATCH (27) String1 matched incoming data; MATCH2 (49) String2 matched incoming data; MATCH3 (50) String3 matched incoming data; MATCH4 (51) String4 matched incoming data; MATCH5 (52) String5 matched incoming data; NODATA (24) No data received before timeout; RECEIV (33) String not found before timeout; ABORT (23) FInd aborted by user. GEt OK (46) Response from user received; NODATA (24) No response from user before timeout. HAngup OK (46) Line hung up. HElp OK (46) Help menu displayed. IF none Does not change current status. JOb OK (46) Recorder file opened O.K.; DSKERR (41) Error opening recorder file. KEy Various See Table A.2. LEFT 0 LENGTH length Length of string. LEt OK (46) Configuration parameter changed; FAIL (19) Configuration parameter could not be changed. LIneup CONNECT (1) Line is up; LINDWN (22) Line is down. LOg OK (46) Log successful; LOGIN OK (46) User login and password matched; FAIL (19) Error in user login or password. MEnu OK (46) Menu heading displayed; FAIL (19) Format error. MID 0 MOnitor OK (46) Monitor successful; DSKERR (41) Unable to write monitor file; OPEN OK (46) Read file opened O.K.; NOFILE (26) Unable to open read file. OPtion OK (46) Menu option displayed; FAIL (19) Format error. PRint Various See Table A.2. QUit None Unconditional exit from A+. READ OK (46) Line read from read file; NODATA (24) End of read file. NOFILE (26) Unable to open read file. REceive Various See Table A.2. RETURN Various See Tables A.2 and A.3 exit_code Job specified return code. RIGHT 0 SAve OK (46) Saved configuration file; DSKERR (41) Unable to save configuration file. SCAN 0 BKGRND (53) A+ is in background mode. SCreen Various See Table A.2; BKGRND (53) A+ is in background mode. SEnd Various See Table A.3. SEARCH 0 Character/string not found; position First position of matched char/string. SLeep OK (46) Pause time complete; ABORT (23) SLeep aborted by user; FAIL (19) Error in command. STart OK (46) Start successful. SYstem exit_code Exit code from the operating system command or program. TAble OK (46) Translation table(s) loaded; FAIL (19) Error in table(s); NOFILE (26) Unable to open file(s). * Status codes are used by the QUit STATUS command and the API. ____________________________________________________________________________________________________
TABLE A.4 A+ COMMAND STATUS MESSAGES (Part 2 of 3)

70 Cleo A+ Installation Guide
____________________________________________________________________________________________________ Command Status (Code*) Explanation TExt Various See Table A.3. TOken OK (46) Token(s) set. VOice OK (46) Line disconnected. WAitfor OK (46) Wait time complete; ABORT (23) Wait aborted by user; FAIL (19) Error in specified time. WRITE OK (46) Wrote message to file; FAIL (19) Error writing to file. ## None Does not change current status value. * Status codes are used by the QUit STATUS command and the API. ____________________________________________________________________________________________________
TABLE A.4 A+ COMMAND STATUS MESSAGES (Part 3 of 3)
Each of the transmit and receive status messages are described below along with suggested corrective actions.
ABORT The ABORT status is generated in the receive (Download, REceive, PRint, or SCreen) mode or in the transmit (Upload, TExt, BInary, or KEy) mode by hitting the DELETE key at any time during the transmission process.
BIDLMT The BIDLMT status is generated when the remote computer is not ready to receive data within the time set by the STARTTIMEOUT=Seconds parameter. Corrective Action: The STARTTIMEOUT=Seconds parameter may be set to a higher value.
BKGRND The BKGRND status is generated when A+ is running in background mode and cannot display to the screen. Corrective Action: Do not use commands that display to screen when in running in background mode.
BUFOVF The BUFOVF status is generated when the incoming data is too large to fit in the communications buffer. Corrective Action: Have the remote send fewer characters per block. If the character count seems reasonable, check your phone line for excessive noise.
CONTEN The CONTEN status indicates that both computers are trying to transmit at the same time. The CONTEN status will only be posted for ZMODEM or KERMIT file transfers. Corrective Action: Use a receive command (Download, REceive, PRint, or SCreen) to receive before sending.
DSKERR The DSKERR status indicates a write to disk failure. Corrective Action: A+ attempts to write to the disk multiple times when an error is detected to insure against inaccurate or transient error returns. DSKERR may occur if the specified path is invalid, or if the specified file exists and is write protected, or when the disk is full. If there seems to be enough space and you get this message, examine your disk for problems.
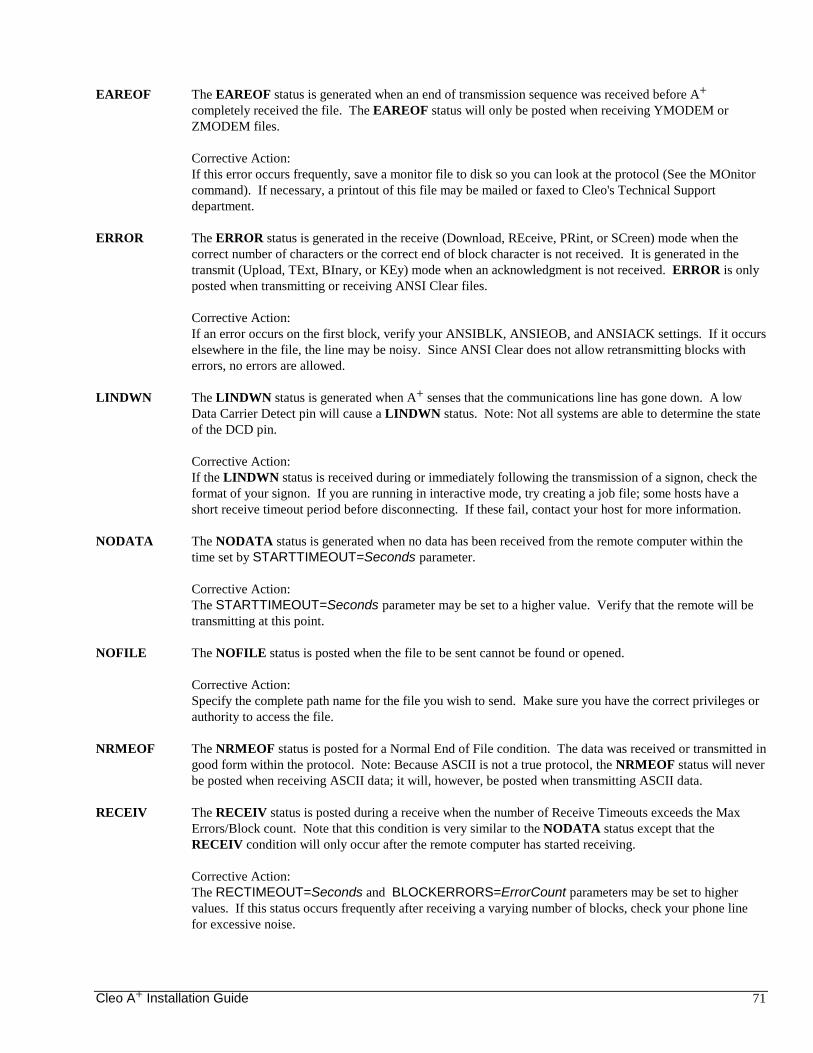
Cleo A+ Installation Guide 71
EAREOF The EAREOF status is generated when an end of transmission sequence was received before A+ completely received the file. The EAREOF status will only be posted when receiving YMODEM or ZMODEM files. Corrective Action: If this error occurs frequently, save a monitor file to disk so you can look at the protocol (See the MOnitor command). If necessary, a printout of this file may be mailed or faxed to Cleo's Technical Support department.
ERROR The ERROR status is generated in the receive (Download, REceive, PRint, or SCreen) mode when the correct number of characters or the correct end of block character is not received. It is generated in the transmit (Upload, TExt, BInary, or KEy) mode when an acknowledgment is not received. ERROR is only posted when transmitting or receiving ANSI Clear files. Corrective Action: If an error occurs on the first block, verify your ANSIBLK, ANSIEOB, and ANSIACK settings. If it occurs elsewhere in the file, the line may be noisy. Since ANSI Clear does not allow retransmitting blocks with errors, no errors are allowed.
LINDWN The LINDWN status is generated when A+ senses that the communications line has gone down. A low Data Carrier Detect pin will cause a LINDWN status. Note: Not all systems are able to determine the state of the DCD pin. Corrective Action: If the LINDWN status is received during or immediately following the transmission of a signon, check the format of your signon. If you are running in interactive mode, try creating a job file; some hosts have a short receive timeout period before disconnecting. If these fail, contact your host for more information.
NODATA The NODATA status is generated when no data has been received from the remote computer within the time set by STARTTIMEOUT=Seconds parameter. Corrective Action: The STARTTIMEOUT=Seconds parameter may be set to a higher value. Verify that the remote will be transmitting at this point.
NOFILE The NOFILE status is posted when the file to be sent cannot be found or opened. Corrective Action: Specify the complete path name for the file you wish to send. Make sure you have the correct privileges or authority to access the file.
NRMEOF The NRMEOF status is posted for a Normal End of File condition. The data was received or transmitted in good form within the protocol. Note: Because ASCII is not a true protocol, the NRMEOF status will never be posted when receiving ASCII data; it will, however, be posted when transmitting ASCII data.
RECEIV The RECEIV status is posted during a receive when the number of Receive Timeouts exceeds the Max Errors/Block count. Note that this condition is very similar to the NODATA status except that the RECEIV condition will only occur after the remote computer has started receiving. Corrective Action: The RECTIMEOUT=Seconds and BLOCKERRORS=ErrorCount parameters may be set to higher values. If this status occurs frequently after receiving a varying number of blocks, check your phone line for excessive noise.

72 Cleo A+ Installation Guide
REMOVE The REMOVE status is posted during a Kermit receive when a “discard file” message is received. The received file is deleted. Corrective Action: Check with the remote to find out why they are sending the “discard file” message. It may be because the file transmission had too many errors.
REPEAT The REPEAT status is posted during a transmit when the number of Receive Timeouts exceeds the Max Errors/Block count. Corrective Action: The RECTIMEOUT=Seconds and BLOCKERRORS=ErrorCount parameters may be set to a higher value. If this status occurs frequently after receiving a varying number of blocks, check your phone line for excessive noise.
RETRAN The RETRAN status is posted when the number of errors exceeds the Maximum Errors count. Corrective Action: The MAXERRORS=ErrorCount parameter may be set to a higher value. If this status occurs frequently after receiving a varying number of blocks, check your phone line for excessive noise.
RMTABT The RMTABT status is generated when a remote abort sequence is received during the transmission or reception of a file. In general this would indicate something is wrong on the remote computer as it is attempting to gain control of the line. The remote may be expecting to send a file, not receive one. Corrective Action: If this status re-occurs, contact your host site to find out why the host is sending the abort sequence at an unexpected time.
SKIP The SKIP status is generated when either A+ or the remote system requested that the ZMODEM file not be sent. Corrective Action: The skip request should only be sent when the incoming file is the same or older than an existing file with the same name. Contact your host site to find out if this is the reason the file is not being accepted.
TXABRT The TXABRT status is generated when data cannot be sent out the port or when the remote system sends a fatal error message. Corrective Action: On systems that do not detect line down, verify that the line is up and that the CTS (Clear To Send) signal is high. If this status occurs consistently, contact your host site to find out why the host is sending a fatal error.

Cleo A+ Installation Guide 73
A.4 The Monitor File
A+ includes the ability to save all protocol characters and data to a monitor or trace file. This is helpful in determining communication problems. The monitor, however, should only be invoked to determine the cause of communications problems because it slows communications and consumes a lot of disk space.
A.4.1 Terminal Emulation Mode The Monitor command key may be used to toggle the monitor on to save data to the A+.MON file. See 2.9 M - Monitor Toggle in Chapter 2 - The Command Keys for details on executing the Monitor function.
Monitor saves data as it comes in and goes out the port in hexadecimal format. Data transmitted by A+ starts with the ">" (greater than) character. Data received by A+ starts with the "<" (less than) character. The following example shows the format of the monitor file:
< 0D 45 4E 54 45 52 20 59 4F 55 52 20 49 4F 49 54 49 41 4C 53 3A > 44 4E 4A 0D < 45 4E 54 45 52 20 59 4F 55 52 20 50 41 53 53 57 4F 52 44 3A > 53 45 43 52 45 54 0D
A line-by-line description of the above example follows:
Lines 1 & 2 The remote site sent an "ENTER YOUR INITIALS:" prompt. See Table A.5 for hexadecimal to ASCII translations.
Line 2 A+ sent a "DNJ" response.
Line 3 The remote site sent an "ENTER YOUR PASSWORD:" prompt.
Lines 3 & 4 A+ sent a "SECRET" response.
Table A.5 lists the standard U.S. ASCII translations.
A.4.2 File Transfer Mode If you encounter an error status message in file transfer mode, check A.3.3 Status Messages for possible actions before using the monitor. If you are getting a NRMEOF status but are receiving or transmitting data that you think should be different, use the MOnitor command to determine exactly what is being sent and received. For transmit problems, for instance, use the MOnitor command before the transmit command to save the monitor to a file and once again after the transmit command to turn the monitor off. For example:
MONITOR SIGNON.MON SEND SIGNON MONITOR
This will create a monitor file with the name SIGNON.MON. This monitor file may later be displayed to the screen with the DOS command "TYPE SIGNON.MON" or UNIX command "cat SIGNON.MON", or it may be viewed with a text editor or printed. If necessary, a printout of this file may be mailed or faxed to Cleo's Technical Support department.

74 Cleo A+ Installation Guide
The monitor displays the characters in hexadecimal format. If the MOnitor -C option is specified, the characters 0x20 through 0x128 are displayed in ASCII format. Data transmitted by A+ starts with the ">" (greater than) character. Data received by A+ starts with the "<" (less than) character. Example:
< 15 > 01 01 FE 31 32 33 34 35 36 37 38 39 30 0D 0A 61 62 63 64 65 66 67 68 69 6A 6B 6C 6D 6E 6F 70 71 72 73 74 75 76 77 78 79 7A 0D 0A 00 00 00 00 00 00 00 00 00 00 00 00 00 00 00 00 00 00 00 00 00 00 00 00 00 00 00 00 00 00 00 00 00 00 00 00 00 00 00 00 00 00 00 00 00 00 00 00 00 00 00 00 00 00 00 00 00 00 00 00 00 00 00 00 00 00 00 00 00 00 00 00 00 4A < 06 > 04 < 06 TBX : 123abc : NRMEOF : 1 blocks
A line-by-line description of the above example follows:
Line 1 The remote site sent (<) a request to receive (15) an XMODEM file with checksum error checking.
Lines 2-7 A+ sent (>) a start of header character (01), the block number (01), the reverse block number (FE) (i.e. 255 minus the block number), the data (31 32 33 34 35 36 37 38 39 30 0D 0A 61 62 63 64 65 66 67 68
69 6A 6B 6C 6D 6E 6F 70 71 72 73 74 75 76 77 78 79 7A 0D 0A), null characters (00) to pad the block, and a checksum character (4A). The data is displayed in hexadecimal (see Table A.5 for ASCII translations). The error check character follows; this character is compared at the remote end for errors.
Line 8 The remote site sent (<) a positive acknowledgment (ACK) character (06). This positive acknowledgment means that the remote received the block correctly.
Line 9 A+ sent (>) an end of transmission (EOT) character (04). The end of transmission indicates that A+ is finished sending and the line is released to allow the remote system to transmit.
Line 10 The remote site sent (<) a positive acknowledgment (06). This positive acknowledgment means that the remote received the EOT.
Line 11 A+ posts a status line message to indicate the outcome of the command: A+ transmitted the binary XMODEM (TBX) file 123abc (123abc) normally (NRMEOF) in 1 block (1 blocks).
Table A.5 lists the standard U.S. ASCII translations for the data.

Cleo A+ Installation Guide 75
___________________________________________________________________________________________________
GRAPHIC ASCII CONTROL | GRAPHIC ASCII hex/dec char | hex/dec NUL 00/00 ^@ | SP 20/32 SOH 01/01 ^A | ! 21/33 STX 02/02 ^B | " 22/34 ETX 03/03 ^C | # 23/35 EOT 04/04 ^D | $ 24/36 ENQ 05/05 ^E | % 25/37 ACK 06/06 ^F | & 26/38 BELL 07/07 ^G | ' 27/39 BS 08/08 ^H | ( 28/40 HT 09/09 ^I | ) 29/41 NL(LF) 0A/10 ^J | * 2A/42 VT 0B/11 ^K | + 2B/43 FF 0C/12 ^L | , 2C/44 CR 0D/13 ^M | - 2D/45 SO 0E/14 ^N | . 2E/46 SI 0F/15 ^O | / 2F/47 DLE 10/16 ^P | 0 30/48 DC1 or XON 11/17 ^Q | 1 31/49 DC2 12/18 ^R | 2 32/50 DC3 or XOFF 13/19 ^S | 3 33/51 DC4 14/20 ^T | 4 34/52 NAK or NL 15/21 ^U | 5 35/53 SYN 16/22 ^V | 6 36/54 ETB 17/23 ^W | 7 37/55 CAN 18/24 ^X | 8 38/56 EM 19/25 ^Y | 9 39/57 SUB 1A/26 ^Z | : 3A/58 ESC 1B/27 | ; 3B/59 FS 1C/28 | < 3C/60 GS 1D/29 | = 3D/61 RS 1E/30 | > 3E/62 IUS 1F/31 | ? 3F/63 ____________________________________________________________________________________________________
TABLE A.5 ASCII TRANSLATIONS (Part 1 of 2)

76 Cleo A+ Installation Guide
____________________________________________________________________________________________________
GRAPHIC ASCII | GRAPHIC ASCII hex/dec | hex/dec @ 40/64 | ` 60/96 A 41/65 | a 61/97 B 42/66 | b 62/98 C 43/67 | c 63/99 D 44/68 | d 64/100 E 45/69 | e 65/101 F 46/70 | f 66/102 G 47/71 | g 67/103 H 48/72 | h 68/104 I 49/73 | i 69/105 J 4A/74 | j 6A/106 K 4B/75 | k 6B/107 L 4C/76 | l 6C/108 M 4D/77 | m 6D/109 N 4E/78 | n 6E/110 O 4F/79 | o 6F/111 P 50/80 | p 70/112 Q 51/81 | q 71/113 R 52/82 | r 72/114 S 53/83 | s 73/115 T 54/84 | t 74/116 U 55/85 | u 75/117 V 56/86 | v 76/118 W 57/87 | w 77/119 X 58/88 | x 78/120 Y 59/89 | y 79/121 Z 5A/90 | z 7A/122 [ 5B/91 | { 7B/123 \ 5C/92 | | 7C/124 ] 5D/93 | } 7D/125 ^ 5E/94 | ~ 7E/126 _ 5F/95 | DEL 7F/127 ____________________________________________________________________________________________________
TABLE A.5 ASCII TRANSLATIONS (Part 2 of 2)

Cleo A+ Installation Guide 77
A.5 The Character Translation Files
Incoming files may optionally be translated upon reception and outgoing files may optionally be translated before transmission. The provided xlatout.ovr and xlatin.ovr files contain standard translation tables. The TAble filename [filename] command may be used to load custom translation file(s).
Character translation tables do not control outgoing and incoming character translations for terminal emulation mode. All typed characters are transmitted as-is and all incoming characters are displayed as-is.
A.5.1 XLATOUT.OVR Translation Table If the xlatout.ovr file exists, it may optionally be used for outgoing file transfer character translations. The TExt command, the SEnd or KEy command (with the -T option or DEFSENDMODE=Text or Scan), or the Upload command key (with the DEFSENDMODE=Text or Scan) will translate files before being transmitted.
If the xlatout.ovr file exists but the xlatin.ovr file does not exist, the xlatout.ovr file may optionally be used for incoming and outgoing file transfer character translations. The REceive, PRint, or SCreen command (with the -T option or DEFRECEIVEMODE=Text) or the Download command key (with DEFRECEIVEMODE=Text) translates received data before being saved to disk, printed, or displayed; the TExt command, the SEnd or KEy command (with the -T option or DEFSENDMODE=Text or Scan), or the Upload command key (with the DEFSENDMODE=Text or Scan) will translate files before being transmitted.
You may modify the default xlatout.ovr file or create your own translation file with an ordinary text editor. The original xlatout.ovr should be saved under a different name before making any modifications. The following example shows the format for the outgoing character translation file:
# US 0 0 1 1 : 10 13,10 convert outgoing NL to CR/NL 11 11 : 255 255
The first line in this xlatout.ovr file is a comment line. Comment lines begin with the # character and may be placed anywhere in the translation file. The following lines contain character translations. The first number in each line represents the original character in decimal and the second number represents the character to be sent in decimal. Characters may be converted to two characters (note the 10 13,10 line which converts a new line to carriage return/new line characters). Characters may also be removed with the * character. If a single translation file is being used, the first number also represents the original incoming character and the second number represents the character to be saved/displayed. All characters after the second or third character and before the newline character are ignored by A+. Comments may be displayed here (note the convert outgoing NL to CR/NL line).

78 Cleo A+ Installation Guide
A.5.2 XLATIN.OVR Translation Table If the xlatin.ovr file exists, it may optionally be used for incoming file transfer character translations. The REceive, PRint, or SCreen command (with the -T option or DEFRECEIVEMODE=Text) or the Download command key (with DEFRECEIVEMODE=Text) translates received data before being saved to disk, printed, or displayed.
You may modify the default xlatin.ovr file or create your own translation file with an ordinary text editor. The original xlatin.ovr should be saved under a different name before making any modifications. The following example shows the format for the incoming character translation file:
# US 13 * drop incoming CRs 16 16 17 17 18 18 : 225 225
The first line in this xlatin.ovr file is a comment line. Comment lines begin with the # character and may be placed anywhere in the translation file. The following lines contain character translations. The first number in each line represents the original incoming character in decimal and the second number represents the character to be saved/displayed in decimal. Incoming characters may be converted to two characters. Incoming characters may also be removed with the * character (note the 13 * line which drops the incoming carriage return characters). All characters after the second or third character and before the newline character are ignored by A+. Comments may be displayed here (note the drop incoming CRs line).
See Table A.5 for standard character conversions.
Use care in modifying translation tables. A+ may not work properly if protocol characters (for example, the ESC character) are translated incorrectly.

Cleo A+ Installation Guide 79
A.6 The Autodial Directory File
The Autodial Directory function displays a custom dialing directory to allow you to select the host you need to dial. The A+.DIR file may be created or modified with the Autodial Directory Add option or with a standard text editor. This file has the following format, with each field separated by a colon:
RemoteName:Phone#:Speed:Parity:Data:Stop:TerminalType:LinkedScript
where:
RemoteName identifies the remote site to be dialed. This may be any name or number up to 15 characters in length.
Phone# specifies the phone number of the host to dial. All numbers must be entered in one of the following formats: 18005551212 or 1(800)555-1212 or 1-800-555-1212 Hyphens (-) and parentheses may be used to make the string readable; spaces, however, are not allowed within a number. The phone number may be up to 30 characters in length. A+ permits dialing of a sequence of telephone numbers and/or access codes. Pauses between numbers are normally specified with the comma (,) character. For example: 9,18005551212,,,3978110 dials a PBX access code (9), pauses 2 seconds (,), dials the telephone number (18005551212), pauses 6 seconds (,,,), then dials a long distance access code (3978110).
Speed specifies the speed used to talk to the COM/tty port and the modem. Valid speeds are 300, 1200, 2400, 4800, 9600, 19200, or 38400 bits per second (bps).
If you connect at a rate different than the specified speed, you will need to change the SPEED=PortSpeed parameter setting after connection. If, however, the AUTOBAUD=ON parameter is set, the speed will automatically change to the modem speed indicated by the "CONNECT baudrate" dial result message. See 3.4.1 Autobaud Enable for details.
Parity specifies the parity used to talk to the COM/tty port. Valid parities are NONE, ODD, EVEN, MARK and SPACE. Parity is normally set to NONE with 8 bit data. With 7 bit data, parity is normally set to either ODD or EVEN.
Data specifies the number of data bits used per byte. A byte is normally composed of 8 bits. All 8 bits may be used for data, or only 7 bits may be used for data with the eighth bit reserved for parity or ignored.
Stop specifies the number of stop bits used per byte. Asynchronous communications always sends one start bit to signify the beginning of a byte of data; either 1 or 2 stop bits may be sent following the data byte to signify the end of the data. The default number of stop bits is 1.
TerminalType specifies the terminal type to emulate. Supported terminal types include: vt100 to emulate a DEC VT100 terminal, vt320 to emulate a DEC VT320 terminal, and wyse50 to emulate a WYSE 50 terminal. If you are running under a UNIX-based operating system (i.e., UNIX, XENIX, or AIX), the terminal type may be any supported by the terminfo database. The default terminal type is vt100.
LinkedScript specifies an optional job/script file to be executed upon connection. A job/script file may be used to automate the communications with the remote site.
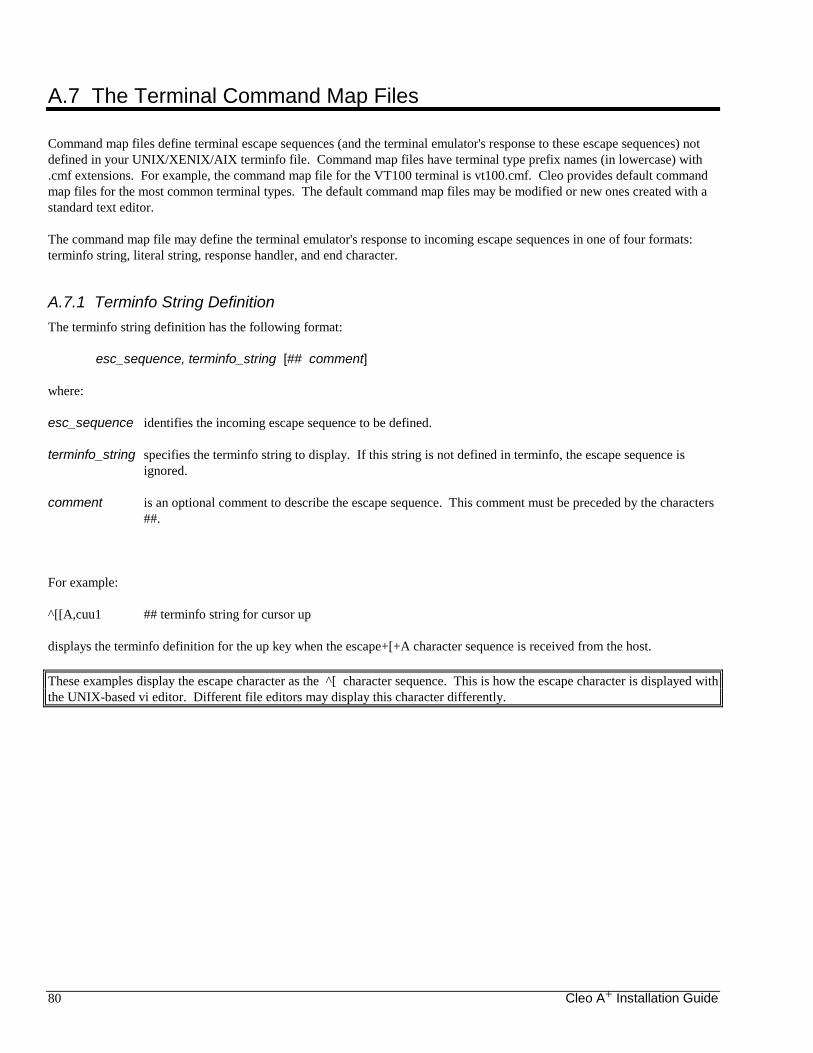
80 Cleo A+ Installation Guide
A.7 The Terminal Command Map Files
Command map files define terminal escape sequences (and the terminal emulator's response to these escape sequences) not defined in your UNIX/XENIX/AIX terminfo file. Command map files have terminal type prefix names (in lowercase) with .cmf extensions. For example, the command map file for the VT100 terminal is vt100.cmf. Cleo provides default command map files for the most common terminal types. The default command map files may be modified or new ones created with a standard text editor.
The command map file may define the terminal emulator's response to incoming escape sequences in one of four formats: terminfo string, literal string, response handler, and end character.
A.7.1 Terminfo String Definition The terminfo string definition has the following format:
esc_sequence, terminfo_string [## comment]
where:
esc_sequence identifies the incoming escape sequence to be defined.
terminfo_string specifies the terminfo string to display. If this string is not defined in terminfo, the escape sequence is ignored.
comment is an optional comment to describe the escape sequence. This comment must be preceded by the characters ##.
For example:
^[[A,cuu1 ## terminfo string for cursor up
displays the terminfo definition for the up key when the escape+[+A character sequence is received from the host.
These examples display the escape character as the ^[ character sequence. This is how the escape character is displayed with the UNIX-based vi editor. Different file editors may display this character differently.
Cleo A+ Installation Guide 81
A.7.2 Literal String Definition The literal string definition has the following format:
esc_sequence, "literal_string" [## comment]
where:
esc_sequence identifies the incoming escape sequence to be defined.
literal_string specifies the string to return to the host. This format is used to respond to terminal ID requests or equipment checks. The string must be enclosed in double quotes.
comment is an optional comment to describe the escape sequence. This comment must be preceded by the characters ##.
For example:
^[[Z,"^[0;1c" ## literal string for terminal id response
sends the escape+0+;+1+c character sequence to the host when the escape+[+Z character sequence is received from the host.
A.7.3 Response Handler Definition The response handler definition has the following format:
esc_sequence, function_index, escape_id, #trail_chars [## comment]
where:
esc_sequence identifies the incoming escape sequence to be defined. This escape sequence may be a literal sequence or it may be a sequence beginning with escape or escape+[ and ending with the following character.
function_index specifies the A+'s internally defined string to display. Any escape sequence defined to a function index of 0 will be ignored. Zero is the only function index a user should define.
escape_id specifies the A+'s function index. This allows A+ to support terminals that have different escape sequences that perform the same function.
#trail_chars specifies the number of characters to be read following the specified escape sequence. This allows A+ to support terminals whose parameters trail the defined escape sequence (such as the VT52). For terminals whose parameters precede the specified escape ending (such as the VT100), this field is always 0.
comment is an optional comment to describe the escape sequence. This comment must be preceded by the characters ##.
For example:
^[H, 0, 0, 0 ## A+ response handler to ignore escape sequence
configures A+ to ignore all sequences starting with the escape character and ending with H character (i.e. escape+H or escape+X+Y+Z+H or escape+1+H...).

82 Cleo A+ Installation Guide
A.7.4 End Character Definition The ending character definition has the following format:
esc_sequence, -1, function_index, escape_id, end_char [## comment]
where:
esc_sequence identifies the incoming escape sequence to be defined.
function_index specifies the A+'s internally defined string to display. Any escape sequence defined to a function index of 0 will be ignored. Zero is the only function index a user should define.
escape_id specifies the A+'s function index. This allows A+ to support terminals that have different escape sequences that perform the same function.
end_char specifies the ending character (in decimal ASCII) of the escape sequence. This allows A+ to support terminals whose parameters are of variable length but all end in a known character (such as the WYSE 50 function keys which all end in the DEL character).
comment is an optional comment to describe the escape sequence. This comment must be preceded by the characters ##.
For example:
^[a, -1, 0, 0, 69 ## End character to ignore escape sequence
configures A+ to ignore all sequences starting with the escape+a characters and ending with the E (ASCII 69) character (i.e. escape+a+E or escape+a+X+Y+Z+E or escape+a+1+E...).

Cleo A+ Installation Guide 83
A.8 The Key Map File
The Configure Emulator Key Maps option allows you to create a custom keyboard map for the emulated terminal. This allows you access to all the functions of the emulated terminal’s keyboard on a local keyboard that doesn’t contain the same keys.
Custom keyboard mapping is saved in a .kmf file for the emulated terminal type, i.e. vt100.kmf, wyse50.kmf, vt320.kmf, etc. The .kmf file contains the character codes for the function keys on a terminal. The format of the .kmf file is:
EscapeSequence, KeyCode ## Function Performed
For example:
^[[B,258 # Down Arrow Key ^[[A,259 # Up Arrow Key
This line contains the escape character sent when the emulated key is pressed, followed by a comma (,), followed by the key code of the key pressed, followed by a pound sign (#), followed by an asterisk (*) if the key is not the default, followed by a comment describing the keyboard function.
You may place the .kmf in a local directory or copy it to a different name and modify the KEYMAP=KeyMapFilename parameter for the new filename. You should not put .kmf files in a common directory for use by everyone unless everyone has the same keyboard and requires the same keyboard layout.

84 Cleo A+ Installation Guide
A.9 The Cleo Terminfo Files
A+ uses the UNIX-based terminfo files to define terminal key and escape sequence processing. If the operating system supplied terminfo files are incorrect (i.e. they do not perform the function required by A+), A+ may access a customized terminfo file. Customized Cleo terminfo files have terminfo type names (in lowercase) with cleo_ prefixes. For example, the Cleo terminfo file for the VT100 terminal is cleo_vt100. This file must be placed in the /usr/lib/terminfo/c subdirectory. Cleo may provide default terminfo files for the most common terminal types. You may also use the UNIX-based commands infocmp (to regenerate a source file from your original terminfo file) and tic (to recompile the source file after copying to the correct directory and making the required changes). See your operating system manuals for details.
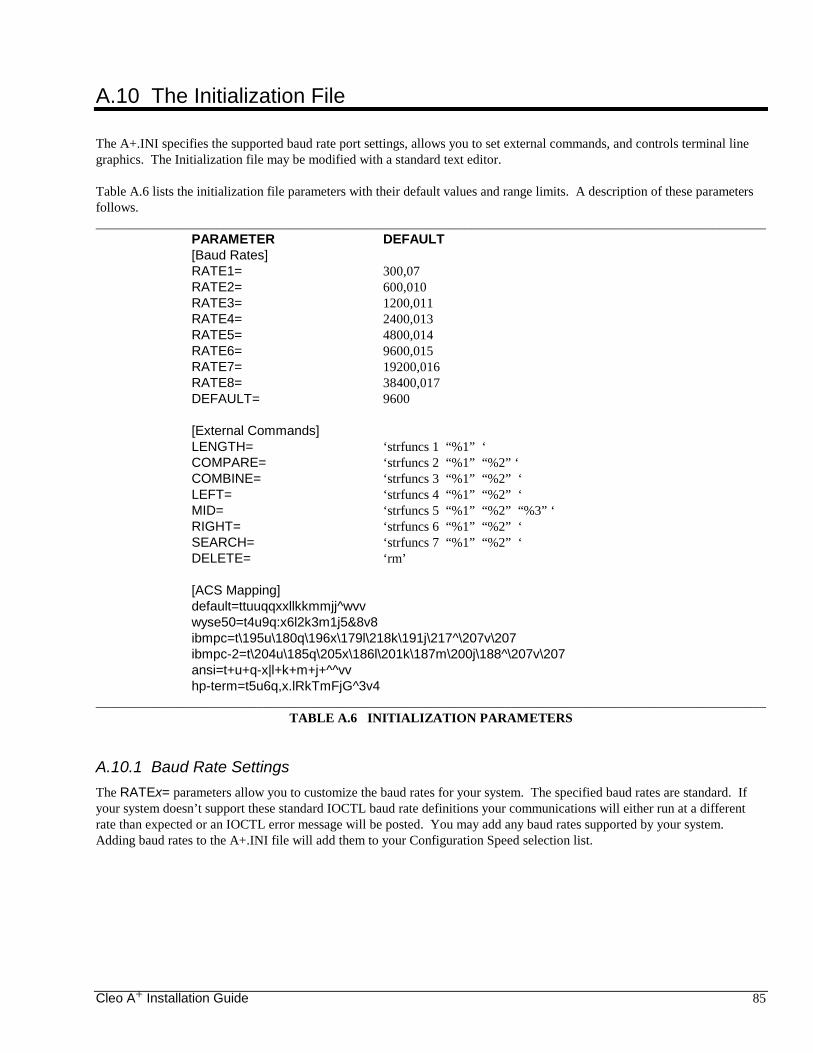
Cleo A+ Installation Guide 85
A.10 The Initialization File
The A+.INI specifies the supported baud rate port settings, allows you to set external commands, and controls terminal line graphics. The Initialization file may be modified with a standard text editor.
Table A.6 lists the initialization file parameters with their default values and range limits. A description of these parameters follows. ____________________________________________________________________________________________________ PARAMETER DEFAULT [Baud Rates] RATE1= 300,07 RATE2= 600,010 RATE3= 1200,011 RATE4= 2400,013 RATE5= 4800,014 RATE6= 9600,015 RATE7= 19200,016 RATE8= 38400,017 DEFAULT= 9600 [External Commands] LENGTH= ‘strfuncs 1 “%1” ‘ COMPARE= ‘strfuncs 2 “%1” “%2” ‘ COMBINE= ‘strfuncs 3 “%1” “%2” ‘ LEFT= ‘strfuncs 4 “%1” “%2” ‘ MID= ‘strfuncs 5 “%1” “%2” “%3” ‘ RIGHT= ‘strfuncs 6 “%1” “%2” ‘ SEARCH= ‘strfuncs 7 “%1” “%2” ‘ DELETE= ‘rm’ [ACS Mapping] default=ttuuqqxxllkkmmjj^wvv wyse50=t4u9q:x6l2k3m1j5&8v8 ibmpc=t\195u\180q\196x\179l\218k\191j\217^\207v\207 ibmpc-2=t\204u\185q\205x\186l\201k\187m\200j\188^\207v\207 ansi=t+u+q-x|l+k+m+j+^^vv hp-term=t5u6q,x.lRkTmFjG^3v4 ____________________________________________________________________________________________________
TABLE A.6 INITIALIZATION PARAMETERS
A.10.1 Baud Rate Settings The RATEx= parameters allow you to customize the baud rates for your system. The specified baud rates are standard. If your system doesn’t support these standard IOCTL baud rate definitions your communications will either run at a different rate than expected or an IOCTL error message will be posted. You may add any baud rates supported by your system. Adding baud rates to the A+.INI file will add them to your Configuration Speed selection list.

86 Cleo A+ Installation Guide
The IOCTL baud rate definition may be specified in octal (prefix the number with zero), decimal (no prefix), or hexadecimal (prefix the number with 0x). The baud rate definitions are found in a terminal information file:
Standard: /usr/include/sys/termio.h. RS/6000: /usr/include/termios.h. SUN: /usr/sys/termios.h.
See your system manual for the location of your terminal information file. For systems with add on terminal ports, refer to your terminal port manual for IOCTL baud rate definitions or call Cleo's support department to see if we have definitions for your system/port.
For example, the following lines may be added to the A+.INI file for an IBM 386/486 running SCO UNIX with DigiBoard's DigiCHANNEL PC/Xe or Comtrol's RocketPort 4J multiport serial board:
RATE9=57600,01 RATE10=115200,03
(Note, to run the higher baud rates on the DigiCHANNEL PC/Xe you must issue the following command: ditty /dev/ttyxx fastbaud)
Or, the following lines may replace the current rates in the A+.INI file for the RS/6000 running AIX with a Central Data scsiTerminalServer model st-1800 port:
RATE1=4800,0x9 RATE2=9600, 0xa RATE3=19200,0xb RATE4=38400,0xc RATE5=57600,0xd RATE6=115200,0xf
Note, because this Central Data port redefines all the baud rates, the baud rates 4800, 9600, 19200, and 38400 must be defined in addition to 57600 and 115200.

Cleo A+ Installation Guide 87
A.10.2 External Commands A+ allows you to create your own commands. These user-defined external commands may be used like any other A+ command. The external command line format is:
NewCommand=‘UserProgram [%1 [%2 [%3]...]]’ [-D] [-F FileName]
where:
NewCommand is the new user-defined A+ command.
UserProgram is the application program or operating system command to be executed. The application program or command may include command line parameters including environment variables. The entire program command line, including positional parameters, must be enclosed in single quotes.
%X is a positional parameter replacement. On execution, %1 will be replaced with the first command line parameter supplied with the external command. %2 will be replaced with the second command line parameter supplied with the external command. %3 will be replaced with the third command line parameter supplied with the external command. Up to nineteen positional parameters may be specified. The positional parameter may be enclosed in double quotes (i.e. “%1”) to allow substituted variable strings to contain spaces. If no %X positional parameters are specified, all command line parameters supplied with the external command are added to the end of the application program or operating system command line.
-D is an option to display the program’s output (stdout) on the screen. The default is to suppress the program’s screen output.
-F FileName is an option to save the program’s output (stdout) to a file. The default is to create a temporary file in the current Download (Receive) Directory. If no path name is specified, the default path is the current Download (Receive) Directory.
The program or command exit code is saved in the STATUSN pre-defined variable. The program or command’s first line (up to 255 characters in length) of output (stdout) is saved in the CLEO_RSTRING pre-defined variable.
The DELETE command is an example of a external command. Under UNIX, its entry in A+.INI is:
[External Commands] DELETE=‘rm’
If you execute the DELETE OldFile command from within A+, UNIX will execute the rm OldFile command to delete the file. External commands make it easy to allow the exact same job file to run on different operating system platforms. To perform the same function under Windows, for example, you could replace the above external command with:
DELETE=‘\WINDOWS\DOSPRMPT.PIF /C DEL’
Another example of an external command is:
DIR=‘ls -als %1’ -D -F DirectoryListing
If you execute the DIR * command from within A+, UNIX will execute the ls -als * command to display a directory listing on the screen (-D) and save it to the file DirectoryListing (-F DirectoryListing).
External commands create a temporary file in the A+ directory. You must have write permissions for the A+ directory to use external commands.

88 Cleo A+ Installation Guide
A.10.3 Line Graphics Mapping A+ allows you control the line graphics characters used in A+’s menu and prompt boxes. Since there is no standard to map graphics characters to standard ASCII characters, terminfo defines these characters in the acsc= string. A+’s [ACS Mapping] section contains line graphics mapping definitions with the same format as terminfo’s acsc= string. You may redefine these line graphics characters for your terminal. For each glyph, the default vt100 character is listed then the character used by your terminal for that glyph. See your terminal manual for the characters used for each glyph.
____________________________________________________________________________________________________ YOUR VT100 TERMINAL GLYPH NAME CHAR CHAR left tee t right tee u horizontal line q vertical line x upper left corner l upper right corner k lower left corner m lower right corner j top tee ^ bottom tee v ____________________________________________________________________________________________________
TABLE A.7 LINE GRAPHICS MAPPINGS

Cleo A+ Installation Guide 89
Appendix B. Modem Support
A+ must connect to another asynchronous device via modems (one for each device) or a null modem. This appendix contains information on the following modem types:
• AT command set modems
• Non-autodial modems
• Null modems
For information on the Autodial Directory option, see 2.1 A - Autodial Directory in Chapter 2 - The Command Keys. For information on the AUtodial command, see 4.5 AUtodial - Automatic Dial in Chapter 4 - A+ Commands. For more detailed information on the Configuration Menu, see Chapter 3 - Configuration Menus.

90 Cleo A+ Installation Guide
B.1 AT Command Set Modems
A+ supports the AT command set to configure and autodial a wide variety of modems. AT commands are sent asynchronously to the AT compatible modem.
The following A+ Configuration parameters are normally required to autodial: Speed (BPS) = speed required Data Bits = 8 Parity = NONE Stop Bits = 1
The default Modem Initialization String issues the following commands:
&M Dial and communicate asynchronously X4 Return extended result codes/messages V1 Return result messages Q Return result codes/messages E Disable echo back S8=5 Pause 5 seconds1 &C1 Carrier Detect (CD) follows line &D1 Switch to command mode when DTR drops M1 Speaker on until line connect S0=1 Autoanswer on the first ring2
You may need to send additional modem setup strings for various reasons, including:
• If you will be connecting at 14,400 bps or 28,800 bps, your modem must be configured for a constant port (DTE) speed and enable flow control. Speed should be set to 19200 or 38400 bps, AutoBaud Enable must be OFF, and Flow Control must be enabled.
• If your modem is configured for error correction (MNP or V.42bis), you must be configured to run at a constant port (DTE) speed that is faster than the modem connection (DCE) speed and enable flow control. AutoBaud Enable must be OFF and Flow Control must be enabled.
Additional modem setup strings may be sent by adding to the default Modem Initialization String Modem (MODEMINIT=), setting the Dial Initialization String (DIALINIT=), or using the AT ATString command. See your modem manual for information on the required AT command(s).
The autodial sends out the Dial Initialization String (DIALINIT=), then issues the following commands:
H0 Hang up the line S7=xx Wait xx seconds for call to complete DT or DP Tone dial a number or Pulse dial a number
The ATS7=xx command is taken from the final Txx option of the AUtodial command or from the Wait for Connect (DIALWAIT=) parameter. The ATDP command to pulse dial is taken from the P option of the AUtodial command; the default is DT to tone dial.
1 The autodial pause time (Txx) is rounded to the next five (5) second interval. To pause less than five seconds, set "S8=" to the required pause time and use a pause time of T5. 2 To disable autoanswer, you may change S0=1 to S0=0.

Cleo A+ Installation Guide 91
B.2 Non-Autodial Modems
A+ will function with modems that do not support the autodial methods previously described. These modems may establish a connection to the remote site in one of five ways:
• Leased line
• Autoanswer an incoming call (see 4.2 ANswer - Automatic Answer in Chapter 4 - A+ Commands for details)
• Manually dial a phone handset
• Manually dial through the modem front panel
• DTR-controlled dial
The default Modem Initialization String should be removed or changed, depending on the modem type and function.
92 Cleo A+ Installation Guide
B.3 Null Modems
For direct connection between A+ and another local device, a null modem cable may be used to connect the two devices. This eliminates the need for modems when connecting two local machines.
The default Modem Initialization String should be removed (i.e. set to MODEMINIT=) if you are directly connected to the other device.
If the Carrier Detect (CD) signal is not high, you may use the DAta command to force the line high.

Cleo A+ Installation Guide 93
Appendix C. Utility Programs
The A+ diskette/tape contains two utility programs. The aserver program allows a remote user logged into your UNIX-based system to initiate file transfers to the remote system. The aplusstat program displays information about A+ licensing and lists the A+ programs currently running. This appendix contains information on the following utility programs:
• Async server (aserver)
• A+ statistics (aplusstat)
94 Cleo A+ Installation Guide
C.1 Async Server (aserver)
UNIX-based systems allow remote users to login to the system. The aserver program allows these remote users to transfer files between the two machines. The command line used to execute aserver is:
aserver PortName [/e]
where:
PortName is used to specify the communications port the remote user is logged into. The who operating system command displays a list of logged on users and their corresponding port names.
/e is an option to echo typed characters to the screen. This option should be used unless the remote communication software is configured to display all typed characters.
The aserver program displays an A+ => command prompt. A+ commands may be entered at the command prompt. For file transfers the most commonly used commands are LEt PROTOCOL=ProtocolType, SEnd (or BInary), and REceive. The EXecute command may be used to automate all transfers. See Chapter 4 - A+ Commands for details on the commands.
For example, if Alex dialed and logged into an SCO UNIX system, the who command might list Alex tty1a. At the SCO UNIX prompt, he could start the aserver program with the command aserver /dev/tty1a. Once the A+ => command prompt appeared, he could transfer file(s) from the SCO system to his own system with the command SEnd filename or transfer file(s) from his system to the SCO system with the command REceive filename.

Cleo A+ Installation Guide 95
C.2 A+ Statistics (aplusstat)
The aplusstat program displays information about A+ licensing and lists the A+ programs currently running. This program is available only on UNIX-based systems. The aplustat program may, for example, display:
Interface Systems, Inc. A+ runtime status program Serial # Installed Licenses Active PIDs APL123456 08/01/96 14:14 1 1 2013 APL654321 09/17/96 08:05 5 0
where:
Serial # displays the currently installed A+ serial numbers.
Installed displays the date and time that A+ was installed.
Licenses displays the number of A+ copies that may run simultaneously.
Active displays the number of A+ copies that are currently running.
PIDs displays the UNIX process IDs for the A+ copies that are currently running. The PIDs may also be displayed with the UNIX ps -ef command.

96 Cleo A+ Installation Guide


![[MS-VUVP]: VT-UTF8 and VT100+ Protocols€¦ · The VT-UTF8 and VT100+ Protocols are used for point-to-point serial communication for terminal control and headless server configuration.](https://static.fdocuments.us/doc/165x107/60242e61e393985d3f6eb66b/ms-vuvp-vt-utf8-and-vt100-protocols-the-vt-utf8-and-vt100-protocols-are-used.jpg)