CA ArcotID® OTP - CA Support Online - CA Technologies RiskMinder 3 1-ENU/Bookshelf... · Contact...
46
Desktop Client Installation and Deployment Guide r2.1 CA ArcotID® OTP
Transcript of CA ArcotID® OTP - CA Support Online - CA Technologies RiskMinder 3 1-ENU/Bookshelf... · Contact...

Desktop Client Installation and Deployment Guide
r2.1
CA ArcotID® OTP

This Documentation, which includes embedded help systems and electronically distributed materials, (hereinafter referred to as the “Documentation”) is for your informational purposes only and is subject to change or withdrawal by CA at any time.
This Documentation may not be copied, transferred, reproduced, disclosed, modified or duplicated, in whole or in part, without the prior written consent of CA. This Documentation is confidential and proprietary information of CA and may not be disclosed by you or used for any purpose other than as may be permitted in (i) a separate agreement between you and CA governing your use of the CA software to which the Documentation relates; or (ii) a separate confidentiality agreement between you and CA.
Notwithstanding the foregoing, if you are a licensed user of the software product(s) addressed in the Documentation, you may print or otherwise make available a reasonable number of copies of the Documentation for internal use by you and your employees in connection with that software, provided that all CA copyright notices and legends are affixed to each reproduced copy.
The right to print or otherwise make available copies of the Documentation is limited to the period during which the applicable license for such software remains in full force and effect. Should the license terminate for any reason, it is your responsibility to certify in writing to CA that all copies and partial copies of the Documentation have been returned to CA or destroyed.
TO THE EXTENT PERMITTED BY APPLICABLE LAW, CA PROVIDES THIS DOCUMENTATION “AS IS” WITHOUT WARRANTY OF ANY KIND, INCLUDING WITHOUT LIMITATION, ANY IMPLIED WARRANTIES OF MERCHANTABILITY, FITNESS FOR A PARTICULAR PURPOSE, OR NONINFRINGEMENT. IN NO EVENT WILL CA BE LIABLE TO YOU OR ANY THIRD PARTY FOR ANY LOSS OR DAMAGE, DIRECT OR INDIRECT, FROM THE USE OF THIS DOCUMENTATION, INCLUDING WITHOUT LIMITATION, LOST PROFITS, LOST INVESTMENT, BUSINESS INTERRUPTION, GOODWILL, OR LOST DATA, EVEN IF CA IS EXPRESSLY ADVISED IN ADVANCE OF THE POSSIBILITY OF SUCH LOSS OR DAMAGE.
The use of any software product referenced in the Documentation is governed by the applicable license agreement and such license agreement is not modified in any way by the terms of this notice.
The manufacturer of this Documentation is CA.
Provided with “Restricted Rights.” Use, duplication or disclosure by the United States Government is subject to the restrictions set forth in FAR Sections 12.212, 52.227-14, and 52.227-19(c)(1) - (2) and DFARS Section 252.227-7014(b)(3), as applicable, or their successors.
Copyright © 2013 CA. All rights reserved. All trademarks, trade names, service marks, and logos referenced herein belong to their respective companies.

Contact CA Technologies
Contact CA Support
For your convenience, CA Technologies provides one site where you can access the information that you need for your Home Office, Small Business, and Enterprise CA Technologies products. At http://ca.com/support, you can access the following resources:
■ Online and telephone contact information for technical assistance and customer services
■ Information about user communities and forums
■ Product and documentation downloads
■ CA Support policies and guidelines
■ Other helpful resources appropriate for your product
Providing Feedback About Product Documentation
If you have comments or questions about CA Technologies product documentation, you can send a message to [email protected].
To provide feedback about CA Technologies product documentation, complete our short customer survey which is available on the CA Support website at http://ca.com/docs.


Contents 5
Contents
Chapter 1: Introduction 7
What’s New in Release 2.1 ........................................................................................................................................... 7
Preparing to Install ArcotID OTP Desktop Client .......................................................................................................... 8
Software Requirements ........................................................................................................................................ 8
Adding JSONP Support .......................................................................................................................................... 9
Chapter 2: Installing ArcotID OTP Desktop Client 11
Installing ArcotID OTP Desktop Client ........................................................................................................................ 11
On Microsoft Windows ....................................................................................................................................... 11
On Ubuntu Linux ................................................................................................................................................. 13
On Apple Macintosh............................................................................................................................................ 14
Performing the Silent Mode Installation .................................................................................................................... 16
Silent Installation on Microsoft Windows ........................................................................................................... 17
Silent Installation on Ubuntu Linux ..................................................................................................................... 18
Silent Installation on Apple Macintosh ............................................................................................................... 19
Directory Structure ..................................................................................................................................................... 19
Chapter 3: User Self-Service Operations Using the ArcotID OTP Desktop Client 21
Adding New User Accounts ........................................................................................................................................ 21
Generating Passcodes ................................................................................................................................................ 22
Generating Passcodes by Using Different Modes ...................................................................................................... 23
Editing User Accounts ................................................................................................................................................ 24
Deleting User Accounts .............................................................................................................................................. 24
Chapter 4: Using Advanced Features 27
Managing External Programs ..................................................................................................................................... 27
Configuring External Programs ........................................................................................................................... 27
Security Considerations ...................................................................................................................................... 31
Using External Programs ..................................................................................................................................... 32
Reading Remote Server Updates ............................................................................................................................... 33
Return Data Format ............................................................................................................................................ 33
Invoking External Programs From Your Code ............................................................................................................. 35
Accessing the AuthMinder Plug-In ...................................................................................................................... 36
Obtaining the External Programs ........................................................................................................................ 36

6 Desktop Client Installation and Deployment Guide
Invoking an External Program ............................................................................................................................. 36
AuthMinder Plug-In Files ............................................................................................................................................ 37
Default Location for Shared Files ........................................................................................................................ 37
Shared Files ......................................................................................................................................................... 38
Location for User-Specific Files ........................................................................................................................... 38
User-Specific Files ............................................................................................................................................... 38
Default Location for Storing Device-Specific Credentials .................................................................................... 39
Chapter 5: Uninstalling the ArcotID OTP Desktop Client 41
Uninstalling on Microsoft Windows ........................................................................................................................... 41
Uninstalling on Ubuntu Linux ..................................................................................................................................... 41
Uninstalling on Apple Macintosh ............................................................................................................................... 42
Appendix A: Customizing the Installer 43
Setting Up the Provisioning URL................................................................................................................................. 43
Multi-Byte Character Support .................................................................................................................................... 43
Encoding Settings into the Installer File Name........................................................................................................... 44
Chapter 1: Introduction 7
Chapter 1: Introduction
The ArcotID OTP Desktop Client is software that enables users to use ArcotID OTP credentials. The users can generate all purpose secure software passcodes using the ArcotID OTP Desktop Client, and then use the generated passcodes for authentication. ArcotID OTP credentials are compliant to OATH standards and support both counter-based (HOTP) and time-based (TOTP). ArcotID OTP also supports the Transaction Signing feature in the Sign mode of passcode generation. This feature conforms to the OATH Challenge-Response Algorithm (OCRA) defined by RFC 6287.
To generate the passcode, the user has to first add the account and set the password or the PIN for the ArcotID OTP credential using the ArcotID OTP Desktop Client. A user can have one or multiple accounts corresponding to the applications that they have access to. See "User Self-Service Operations Using the ArcotID OTP Desktop Client" (see page 21) for more information on using the ArcotID OTP Desktop Client.
Note: In this guide, the words device and desktop have been used to mean the computer that is running an operating system supported by the ArcotID OTP Desktop Client. To get a better understanding of how to integrate the SDK with your client application, see the sample application shipped with the client package described in this guide.
This guide provides information about installing, deploying and using CA ArcotID OTP Desktop Client (later referred to as ArcotID OTP Desktop Client). This guide is intended for administrators, system operators, and other users.
Note: CA ArcotID OTP Desktop Client still contains the terms Arcot, WebFort and ArcotOTP in some of its code objects and other artifacts. Therefore, you will find occurrences of Arcot, WebFort and ArcotOTP in all CA ArcotID OTP Desktop Client documentation. In addition, some of the topics in this guide do not follow the standard formatting guidelines. These inconsistencies will be fixed in a future release.
What’s New in Release 2.1
The ArcotID OTP Desktop Client now supports storage of the ArcotID OTP credential in a central location on a device so that the credential can be used for device authentication. Any user who logs in to the device has access to this shared credential and can use it for device authentication.
The device-specific credentials are stored in a file called keys.dat. This file is stored in a location that can be accessed by all users. See Default Location for Storing Device-Specific Credentials (see page 39) for information about the file locations.

Preparing to Install ArcotID OTP Desktop Client
8 Desktop Client Installation and Deployment Guide
Preparing to Install ArcotID OTP Desktop Client
This section lists the software requirements needed to install ArcotID OTP Desktop Client and the configurations that must be performed in the middleware to use ArcotID OTP Desktop Client. This section covers the following topics:
■ Software Requirements (see page 8)
■ Adding JSONP Support (see page 9)
Software Requirements
The following table lists the combinations of operating systems and web browsers that are supported by ArcotID OTP Desktop Client.
Operating System Web Browser
Apple Macintosh OS X10.6 or higher
■ Apple Safari 5.0.5 or later
■ Google Chrome 18.0 or later
■ Mozilla Firefox 12.0 or later
Microsoft Windows XP Service Pack 3
■ Internet Explorer 8.0 or later
■ Mozilla Firefox 12.0 or later
■ Google Chrome 18.0 or later
■ Apple Safari 5.0.5 or later
Microsoft Windows 7.0
■ Internet Explorer 9.0 (32-bit) or later
■ Mozilla Firefox 12.0 or later
■ Google Chrome 18.0 or later
Ubuntu Linux 10.04 or later ■ Mozilla Firefox 12.0 or later
Preparing to Install ArcotID OTP Desktop Client
Chapter 1: Introduction 9
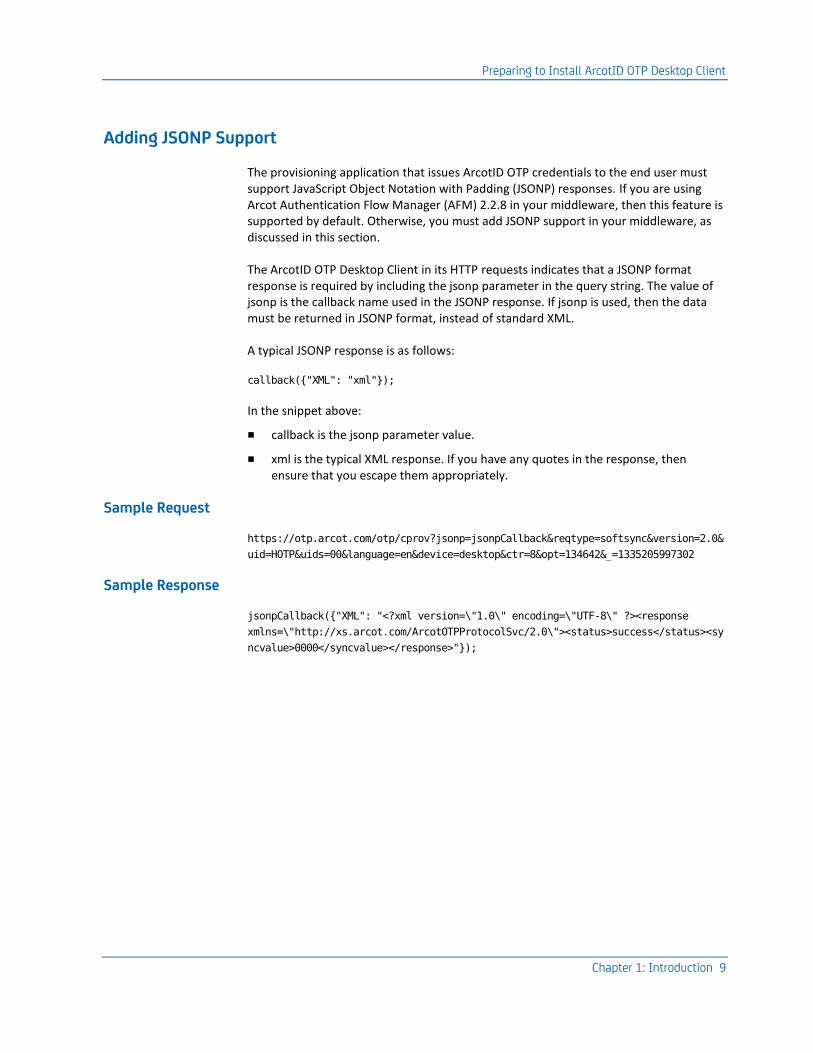
Adding JSONP Support
The provisioning application that issues ArcotID OTP credentials to the end user must support JavaScript Object Notation with Padding (JSONP) responses. If you are using Arcot Authentication Flow Manager (AFM) 2.2.8 in your middleware, then this feature is supported by default. Otherwise, you must add JSONP support in your middleware, as discussed in this section.
The ArcotID OTP Desktop Client in its HTTP requests indicates that a JSONP format response is required by including the jsonp parameter in the query string. The value of jsonp is the callback name used in the JSONP response. If jsonp is used, then the data must be returned in JSONP format, instead of standard XML.
A typical JSONP response is as follows:
callback({"XML": "xml"});
In the snippet above:
■ callback is the jsonp parameter value.
■ xml is the typical XML response. If you have any quotes in the response, then ensure that you escape them appropriately.
Sample Request
https://otp.arcot.com/otp/cprov?jsonp=jsonpCallback&reqtype=softsync&version=2.0&
uid=HOTP&uids=00&language=en&device=desktop&ctr=8&opt=134642&_=1335205997302
Sample Response
jsonpCallback({"XML": "<?xml version=\"1.0\" encoding=\"UTF-8\" ?><response
xmlns=\"http://xs.arcot.com/ArcotOTPProtocolSvc/2.0\"><status>success</status><sy
ncvalue>0000</syncvalue></response>"});


Chapter 2: Installing ArcotID OTP Desktop Client 11
Chapter 2: Installing ArcotID OTP Desktop Client
This chapter guides you through the steps for installing ArcotID OTP Desktop Client on the supported platforms.
Note: Before proceeding with the installation, ensure that your system meets the prerequisite software described in "Introduction" (see page 7).
■ Installing ArcotID OTP Desktop Client (see page 11)
■ Performing the Silent Mode Installation (see page 16)
■ Directory Structure (see page 19)
Installing ArcotID OTP Desktop Client
This section provides the steps for installing ArcotID OTP Desktop Client on the following supported platforms:
■ On Microsoft Windows (see page 11)
■ On Ubuntu Linux (see page 13)
■ On Apple Macintosh (see page 14)
On Microsoft Windows
Note: The Shared ArcotID feature is available only if the installation is performed from an administrator account. Installation performed from a standard user account will not show the option for enabling this feature.
To install ArcotID OTP Desktop Client on Microsoft Windows:
1. Extract the contents of the OTPDesktop-Web-2.1-package.zip file to a temporary location. For example, <%System_Drive%>/temp.
2. Navigate to <%System_Drive%>/temp directory where the OTPDesktop-Web-2.1-windows-installer.exe file is available.
Installing ArcotID OTP Desktop Client
12 Desktop Client Installation and Deployment Guide
3. Double-click the OTPDesktop-Web-2.1-windows-installer.exe installer file.
Note: If you have not logged in using the Administrator Account, then a warning message appears indicating that the software application will be available for the logged in account only. Click Yes to continue.
The Welcome screen appears.
4. Click Next to proceed.
The License Agreement screen appears.
5. Read the license agreement carefully, select the I accept the agreement option, and click Next to accept the agreement.
The Installation Directory screen appears.
6. As directed on the screen, you can either:
■ Accept the default directory displayed by the installer. The default location where the client is installed depends on the account that you use to run the installer.
■ For an Administrator Account, the client is installed in %PROGRAMFILES%\CA\arcot.
■ For a Non-Administrator Account, the client is installed in %USERPROFILE%\CA\arcot.
or
■ Click the Browse Folder icon to navigate to and specify a different directory.
Note: The installation directory name that you specify must not contain any spaces. Else, the installer might not function as intended.
7. Click Next to install in the specified directory.
The Shared ArcotID Support screen appears.
8. Click Yes if you want to use the Shared ArcotID feature or click No to return to the install screen, and then click Next to continue.
The Ready to Install screen appears.
9. Click Next to begin the installation.
The Installing screen appears. This might take a few seconds. The Finish screen appears after the installation is complete.
10. Select View Readme File to view the Read Me file and click Finish to exit the installer.
Installing ArcotID OTP Desktop Client
Chapter 2: Installing ArcotID OTP Desktop Client 13
On Ubuntu Linux
Note: The Shared ArcotID feature is available only if the installation is performed from an administrator account. Installation performed from a standard user account will not show the option for enabling this feature.
To install ArcotID OTP Desktop Client on Ubuntu Linux:
1. Extract the contents of the OTPDesktop-Web-2.1-package.zip file to a temporary location. For example, /tmp.
2. Open a command-line session.
3. Change your working directory to the location where you extracted the OTPDesktop-Web-1.0.4-package.zip file, for example, /tmp.
■ (For 32-bit) OTPDesktop-Web-2.1-linux-installer.run
■ (For 64-bit) OTPDesktop-Web-2.1-linux-x64-installer.run
4. Ensure that you have the permissions that are required to run the installer. If not, you must run the following command:
■ (For 32-bit) chmod a=rx OTPDesktop-Web-2.1-linux-installer.run
■ (For 64-bit) chmod a=rx OTPDesktop-Web-2.1-linux-x64-installer.run
5. Run the installer by typing the following command and then pressing Enter:
■ (For 32-bit) ./OTPDesktop-Web-2.1-linux-installer.run
■ (For 64-bit) ./OTPDesktop-Web-2.1-linux-x64-installer.run
Note: If you have not logged in using the Administrator Account, then a warning message appears indicating that the software application will be available for the logged in account only.
6. Click Yes to continue with the installation for the current account or click No to exit the installer.
The Welcome screen appears.
7. Click Forward to continue.
The License Agreement screen appears.
8. Read the license agreement carefully, select the I accept the agreement option, and click Forward to accept the agreement.
The screen to specify the install location appears.
Installing ArcotID OTP Desktop Client
14 Desktop Client Installation and Deployment Guide
9. As directed on the screen, you can either:
■ Specify the absolute path of the directory where you want to install the ArcotID OTP Desktop Client and click Forward to continue.
Note: The installation directory name that you specify must not contain any spaces. Else, the installer might not function as intended.
or
■ Click Forward to accept the default directory displayed by the installer. The default location where the client is installed depends on the account that you use to run the installer.
■ For an Administrator Account, the client is installed in /usr/lib/CA/arcot.
■ For a Non-Administrator Account, the client is installed in <login_account>/CA/arcot.
The Ready to Install screen appears.
10. Click Yes if you want to use the Shared ArcotID feature or click No to return to the install screen, and then click Next to continue.
The Ready to Install screen appears.
11. Click Forward to continue with the installation.
The installer displays the screen to confirm that the ArcotID OTP Desktop Client has been successfully installed.
12. Select View Readme File to view the Read Me file and click Finish to exit the installer.
On Apple Macintosh
Note: The Shared ArcotID feature is available only if the installation is performed from an administrator account. Installation performed from a standard user account will not show the option for enabling this feature.
To install ArcotID OTP Desktop Client on Apple Macintosh:
1. Extract the contents of the OTPDesktop-Web-2.1-package.zip file to a temporary location.
2. Navigate to the location where you have unzipped the OTPDesktop-Web-2.1-package.zip file.
3. Untar the OTPDesktop-Web-2.1-osx-installer.tar file.

Installing ArcotID OTP Desktop Client
Chapter 2: Installing ArcotID OTP Desktop Client 15
4. If you are performing the installation as an administrator, then run the following command to start the installer:
sudo
OTPDesktop-Web-2.1-osx-installer.app/Contents/MacOS/installbuil
der.sh
The Welcome screen appears.
5. If you are not using an administrator account to perform the installation, then:
a. Ensure that you have the permissions that are required to run the installer file, OTPDesktop-Web-2.1-osx-installer.app. If not, you must run the following command:
chmod –R a=rx OTPDesktop-Web-2.1-osx-installer.app
b. Double-click the OTPDesktop-Web-2.1-osx-installer.app file.
Note: If you have not logged in using the Administrator Account, then a warning message appears indicating that the software application will be available for the logged in account only. Click Yes to continue.
The Welcome screen appears.
6. Click Next to proceed.
The License Agreement screen appears.
7. Read the license agreement carefully, select the I accept the agreement option, and click Next to accept the agreement.
The Installation Directory screen appears.
8. As directed on the screen, you can either:
■ Accept the default directory displayed by the installer. The default location where the client is installed depends on the account that you use to run the installer.
■ For an Administrator Account, the client is installed in /Applications/CA/arcot.
■ For a Non-Administrator Account, the client is installed in <login_account>/Library/CA/arcot.
or
■ Click the Browse Folder icon to navigate to and specify a different directory.
Note: The installation directory name that you specify must not contain any spaces. Else, the installer might not function as intended.
9. Click Next to install in the specified directory.
The Shared ArcotID Support screen appears.
10. Click Yes if you want to use the Shared ArcotID feature or click No to return to the install screen, and then click Next to continue.
The Ready to Install screen appears.

Performing the Silent Mode Installation
16 Desktop Client Installation and Deployment Guide
11. Click Next to begin the installation.
The Installing screen appears. This might take a few seconds. After some time the Finish screen appears.
12. Select View Readme File to view the Read Me file and click Finish to exit the installer.
Performing the Silent Mode Installation
The ArcotID OTP Desktop Client installer can be run in the silent mode, which does not require any user interaction to install the application. To run the installer in the silent mode, you must invoke the installer from the command line interface.
The following table lists the options that you must use to run the ArcotID OTP Desktop Client in the silent mode:
Command Mandatory/ Optional
Description
--mode unattended Mandatory This option runs the installer in the silent mode. The installer Graphical User Interface (GUI) is not displayed to the user.
Usage:
OTPDesktop-Web-2.1-windows-installer.exe --mode unattended
--installdir <install_location> Optional This option specifies the location where the ArcotID OTP Desktop Client has to be installed.
This is an optional parameter. If you do not specify this option, the client is installed in the default location. See "Directory Structure" (see page 19) for the default installation directory.
Usage:
OTPDesktop-Web-2.1-windows-installer.exe --mode unattended --installdir <installation directory>

Performing the Silent Mode Installation
Chapter 2: Installing ArcotID OTP Desktop Client 17
Command Mandatory/ Optional
Description
--unattendedmodeui <value> Optional This option controls whether a minimal progress window should be displayed during the silent mode installation. The value attribute determines whether the progress window is displayed or not. The possible values are:
■ none: Indicates that the installation is completely in silent-mode and the installer GUI is not displayed during installation.
■ minimal: Indicates that the minimal progress window is displayed during installation.
Usage:
OTPDesktop-Web-2.1-windows-installer.exe --mode unattended --unattendedmodeui minimal
--sharedArcotID <value> Optional This option controls the installation of the Shared ArcotID feature during silent mode installation. If you want to enable this feature, set the value of this option to true. Otherwise, set the value to false.
Usage:
OTPDesktop-Web-2.1-windows-installer.exe --mode unattended --sharedArcotID true
Silent Installation on Microsoft Windows
To perform the silent mode installation on Microsoft Windows:
1. Extract the contents of the OTPDesktop-Web-2.1-package.zip file to a temporary location. For example, <%System_Drive%>/temp.
2. Open the command prompt window.
3. Change your working directory to <%System_Drive%>/temp where the OTPDesktop-Web-2.1-windows-installer.exe file is available.
Performing the Silent Mode Installation
18 Desktop Client Installation and Deployment Guide
4. At the prompt, enter the following command:
OTPDesktop-Web-2.1-windows-installer.exe --mode unattended
--installdir <install_location>
Note: If you are using a Microsoft Windows version that is User Account Control (UAC)-enabled, then it is strongly recommended that you use the Administrator account to run the silent-mode installation. Otherwise, you will see the following error:
Do you want to allow the following program to make changes to this computer?
The preceding command installs the ArcotID OTP Desktop Client in the specified location. See the table in Performing the Silent Mode Installation (see page 16) for information on additional silent mode install options.
Silent Installation on Ubuntu Linux
To perform silent mode installation on Ubuntu Linux:
1. Extract the contents of the OTPDesktop-Web-2.1-package.zip file to a temporary location. For example, /tmp.
2. Open a command-line session.
3. Change your working directory to /tmp where the following Ubuntu Linux installer files are available:
■ (For 32-bit) OTPDesktop-Web-2.1-linux-installer.run
■ (For 64-bit) OTPDesktop-Web-2.1-linux-x64-installer.run
4. Ensure that you have the permissions that are required to run the installer. If not, you must run the following command:
■ (For 32-bit) chmod a=rx OTPDesktop-Web-2.1-linux-installer.run
■ (For 64-bit) chmod a=rx OTPDesktop-Web-2.1-linux-x64-installer.run
5. At the prompt, enter the following command:
OTPDesktop-Web-2.1.0.4-linux-installer.run --mode unattended
--installdir <install_location>
The preceding command installs the ArcotID OTP Desktop Client in the specified location. See the table in Performing the Silent Mode Installation (see page 16) for information on additional options.

Directory Structure
Chapter 2: Installing ArcotID OTP Desktop Client 19
Silent Installation on Apple Macintosh
To perform silent mode installation on Apple Macintosh:
1. Extract the contents of the OTPDesktop-Web-2.1-package.zip file to a temporary location.
2. Start the Terminal application.
3. Navigate to the location where you have unzipped the OTPDesktop-Web-2.1-package.zip file.
4. Untar the OTPDesktop-Web-2.1-osx-installer.tar file.
5. Ensure that you have the permissions that are required to run the installer file, OTPDesktop-Web-2.1-osx-installer.app. If not, you must run the following command:
chmod –R a=rx OTPDesktop-Web-2.1-osx-installer.app
6. If you want to run the installation as an administrator, enter the following command:
sudo
OTPDesktop-Web-2.1-osx-installer.app/Contents/MacOS/installbuil
der.sh --mode unattended --installdir <install_location>
If you want to run the installation as a user (not an administrator), enter the following command:
OTPDesktop-Web-2.1-osx-installer.app/Contents/MacOS/installbuil
der.sh --mode unattended --installdir <install_location>
The preceding command installs the ArcotID OTP Desktop Client in the specified location. See the table in Performing the Silent Mode Installation (see page 16) for information on additional options.
Directory Structure
The following table lists the location of the files that are installed by ArcotID OTP Desktop Client:
Operating System and Installation Type
Default Directory Directory and Files
On Microsoft Windows using Administrator account
%PROGRAMFILES%\CA\arcot
■ OTPDesktop Contains the files required to launch the ArcotID OTP Desktop Client Web application.

Directory Structure
20 Desktop Client Installation and Deployment Guide
Operating System and Installation Type
Default Directory Directory and Files
On Microsoft Windows using Non-Administrator account
%USERPROFILE%\CA\arcot
■ Plugins Contains the following files:
■ domains.txt and hosts.txt: Files that contain the data supplied during installation.
■ npAuthMinder.dll: The AuthMinder plug-in library file.
■ broker.exe: The broker image used by External Programs.
■ installation properties: Contains the client version information.
■ uninstall.exe: File for uninstalling the ArcotID OTP Desktop Client.
On Ubuntu Linux using Administrator account
/usr/lib/CA/arcot
On Ubuntu Linux using Non-Administrator account
<login_account>/CA/arcot
On Apple Macintosh using Administrator account
/Applications/CA/arcot
On Apple Macintosh using Non-Administrator account
<login_account>/Library/CA/arcot

Chapter 3: User Self-Service Operations Using the ArcotID OTP Desktop Client 21
Chapter 3: User Self-Service Operations Using the ArcotID OTP Desktop Client
The ArcotID OTP Desktop Client enables end users to create new user accounts, edit their accounts, and generate passcodes. This chapter explains the operations that users can perform when ArcotID OTP Desktop Client is installed on their system:
■ Adding New User Accounts (see page 21)
■ Generating Passcodes (see page 22)
■ Generating Passcodes by Using Different Modes (see page 23)
■ Editing User Accounts (see page 24)
■ Deleting User Accounts (see page 24)
Adding New User Accounts
To access the applications or resources that are protected by using ArcotID OTP credentials, the accounts must first be created for the users in the application. The application must then communicate the user account information to the users. The users will use this information to add their accounts using ArcotID OTP Desktop Client. After successfully adding the accounts, the users can then generate the passcode using the ArcotID OTP Desktop Client and use this passcode to authenticate to the protected applications.
A user can have multiple accounts, which indicates that the user has access to multiple protected resources. For example, a user JSmith can have access to MyBank.com and Acme.com applications, and use the same ArcotID OTP Desktop Client to maintain both the accounts.
Important! Adding an account is an online process, which means that the user must be connected to the Internet to add a new account.
The user must perform the following steps to add a new account:
1. Ensure that they are connected to the Internet.
2. Launch the ArcotID OTP Desktop Client application by using any of the following methods:
■ Navigate to Start, Programs, CA ArcotID OTP Desktop Client, and then CA OTP.
or
■ Double-click the CA OTP shortcut that is placed on the desktop.
The Web browser opens the Accounts screen to add new accounts.

Generating Passcodes
22 Desktop Client Installation and Deployment Guide
3. Click the Add button in the top-right corner to add a new account.
The Add Account screen opens.
4. Enter the following information in this screen:
Note: The user must have received this information from the protected application that they will be accessing.
■ Server URL: The URL where the protected resource is available.
■ User Identifier: The unique name using which the account has been created in the application.
■ Activation Code: The activation code that is received from the application.
5. Click Save.
Based on the configuration, the screen to set the password or PIN for the ArcotID OTP opens.
6. Enter the new password or the PIN for the ArcotID OTP credential that is used to generate passcodes in the Enter PIN and Confirm PIN fields.
7. Click OK.
The Success screen opens.
8. Click OK.
The Account screen with the newly added account opens.
The ArcotID OTP credential is now downloaded and locked to the user’s system. This indicates that the credential will not work if it is copied to another system.
Generating Passcodes
To access the protected resource, the user must generate a passcode by using ArcotID OTP Desktop Client and use this generated passcode for authenticating to the protected resource.
The user must perform the following steps to generate passcodes:
1. Launch the ArcotID OTP Desktop Client application by using any of the following methods:
■ Navigates to Start, Programs, CA ArcotID OTP Desktop Client, and then CA OTP.
or
■ Double-clicks the CA OTP shortcut that is placed on the desktop.
The Web browser opens the Accounts screen.

Generating Passcodes by Using Different Modes
Chapter 3: User Self-Service Operations Using the ArcotID OTP Desktop Client 23
2. Click the account for which the passcode has to be generated.
The passcode generator screen opens.
3. Enter the ArcotID OTP PIN in the PIN field.
4. Click Generate Passcode.
The ArcotID OTP Desktop Client generates the passcode.
5. Save the passcode and click Done to return to the passcode generator screen.
Generating Passcodes by Using Different Modes
The ArcotID OTP Desktop Client supports different modes for generating passcodes, which depends on the type of authentication. For example, you can generate the passcodes for plain authentication or for signing the challenge.
The user has to perform the following steps to generate the passcode for different modes:
1. Launch the ArcotID OTP Desktop Client application by using any of the following methods:
■ Navigate to Start, Programs, CA ArcotID OTP Desktop Client, CA OTP.
or
■ Double-click the CA OTP shortcut that is placed on the desktop.
The Web browser open the Accounts screen.
2. Click the account for which the passcode has to be generated.
The passcode generator screen opens.
3. Click the Mode button in the top-right corner.
Based on the ArcotID OTP type, the Mode Selection screen opens.
4. Click the mode that you want to use for generating the passcode:
■ Identify: This mode is used for generating the passcode that will be used for plain password authentication.
■ Sign: This mode is used for generating the passcode that will be used for signing the challenge in the challenge-response-based authentication.
The passcode generator screen opens.
5. Enter the ArcotID OTP PIN in the PIN field.
6. (Applicable for Sign mode only) Enter the authentication challenge in the Challenge field.

Editing User Accounts
24 Desktop Client Installation and Deployment Guide
7. Click Generate Passcode to generate a passcode for the selected mode.
The ArcotID OTP Desktop Client generates the passcode.
8. Save the passcode and click Done to return to the passcode generator screen.
Editing User Accounts
The user must perform the following steps to update the account name:
1. Launch the ArcotID OTP Desktop Client application by using any of the following methods:
■ Navigate to Start, Programs, CA ArcotID OTP Desktop Client, and then CA OTP.
or
■ Double-click the CA OTP shortcut that is placed on the desktop.
The Web browser opens the Accounts screen.
2. Click the account that has to be edited.
The passcode generator screen opens.
3. Click the Settings button in the top-right corner.
The screen displays the account details.
4. Enter a new name for the account in the Display Name field.
5. Click Save to save the new changes.
If the account is saved successfully, then the "Account settings saved" message appears.
6. Click OK to return to the passcode generator screen.
Deleting User Accounts
The user must perform the following steps to delete the accounts that they are not using any longer:
1. Launch the ArcotID OTP Desktop Client application by using any of the following methods:
■ Navigate to Start, Programs, CA ArcotID OTP Desktop Client, and then CA OTP.
or
■ Double-click the CA OTP shortcut that is placed on the desktop.
The Web browser opens the Accounts screen.
Deleting User Accounts
Chapter 3: User Self-Service Operations Using the ArcotID OTP Desktop Client 25
2. Click Delete in the top-right corner.
The Delete Accounts screen opens.
3. Select the check box corresponding to the account that they want to delete. User can select multiple accounts.
4. Click Delete to delete the selected accounts.
The Confirm screen appears and prompts the user to confirm the account deletion.
5. Click OK to delete the account.
The Accounts screen opens.

Chapter 4: Using Advanced Features 27
Chapter 4: Using Advanced Features
The ArcotID OTP Desktop Client ships with the Authminder plug-in component that enables you extend the capabilities of ArcotID OTP Desktop Client. This chapter explains the additional features that you can build into ArcotID OTP Desktop Client using this plug-in:
■ Managing External Programs (see page 27)
■ Reading Remote Server Updates (see page 33)
■ Invoking External Programs From Your Code (see page 35)
■ AuthMinder Plug-In Files (see page 37)
Managing External Programs
External Programs is a feature that enables you to build custom functionality and integrate them with ArcotID OTP Desktop Client. These programs can be invoked through the user interface (UI) of ArcotID OTP Desktop Client. For example, you can build the VPN login flow by forwarding the passcode generated by ArcotID OTP Desktop Client to the VPN Client, which then authenticates the users based on the passcode forwarded.
Management of the External Programs includes:
■ Configuring External Programs (see page 27)
■ Security Considerations (see page 31)
■ Using External Programs (see page 32)
Configuring External Programs
You must perform the following operations to integrate ArcotID OTP Desktop Client with External Programs:
■ Setting Up the XML File (see page 28)
■ Creating the Script File (see page 30)
■ Script File Example (see page 31)

Managing External Programs
28 Desktop Client Installation and Deployment Guide
Setting Up the XML File
The External Programs, which are available to the users through their ArcotID OTP Desktop Client must be defined in the ExternalPrograms.xml file. This file contains the declaration of External Programs and the configuration settings that must be applied to the External Programs.
The ArcotID OTP Desktop Client provides a default ExternalProgramsSample.xml file located in the directory that contains the shared files listed in the "Default Location for Shared Files (see page 37)" section. You can use this default file as a template to define the External Programs that you plan to implement.
Important! After you change or modify the ExternalPrograms.xml file, you must restart the browser for the changes to take effect.
For the ArcotID OTP Desktop Client to read the External Programs, the elements of the External Program must be defined in the specific sections of the ExternalPrograms.xml file. For example, the name of the External Program must be defined using the <name> XML tag, and it must be within a <program> section. The following table lists the sections that you must use to define the External Programs:
XML Tags Parent Tag Required? Description
<programs> NA Mandatory Specifies the root element and contains zero or more External Programs (<program>).
<program> <programs> Mandatory Contains the definition of an External Program.
<name> <program> Mandatory Specifies the name by which the External Program is identified. This name appears on the OTP Generator screen.
<file> <program> Mandatory Specifies the name of the script file. See "Creating the Script File" (see page 30) for more information.
Note: Do not include the path of the file.
<hidden> <program> Optional Controls whether the window is visible or hidden.
By default, this value is set to FALSE, which means the script is rendered using the UI.
Note: This command is always run from a terminal window.
Managing External Programs
Chapter 4: Using Advanced Features 29
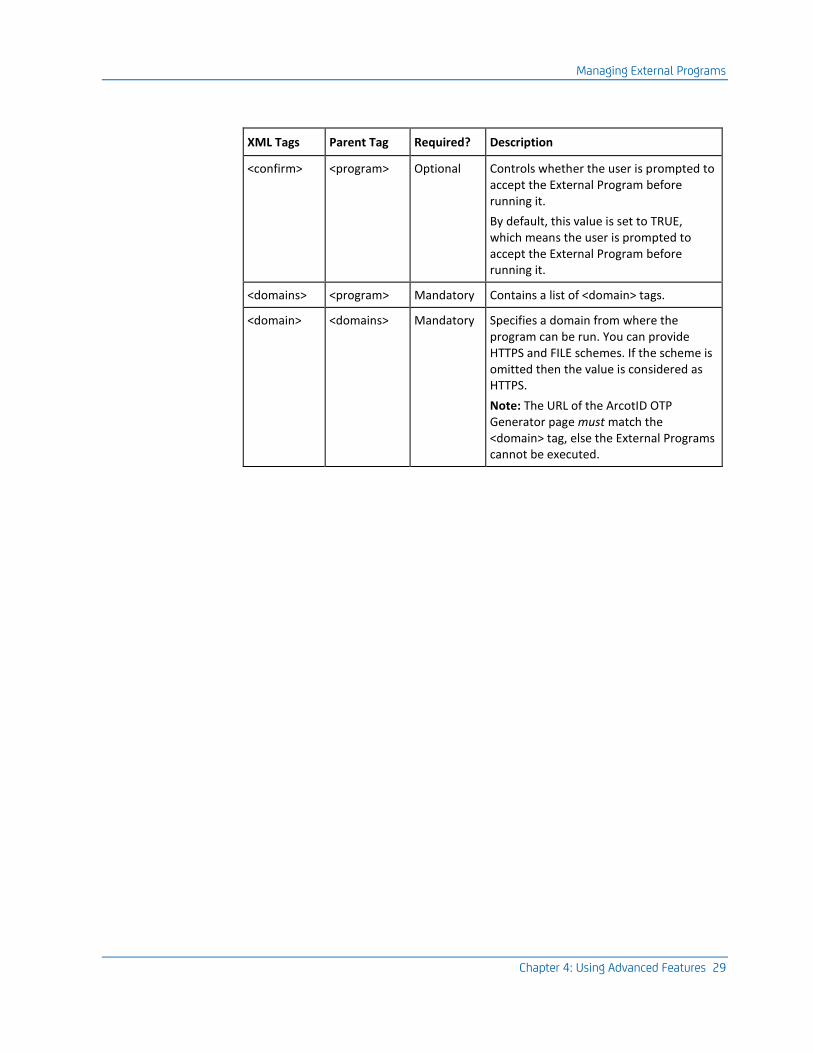
XML Tags Parent Tag Required? Description
<confirm> <program> Optional Controls whether the user is prompted to accept the External Program before running it.
By default, this value is set to TRUE, which means the user is prompted to accept the External Program before running it.
<domains> <program> Mandatory Contains a list of <domain> tags.
<domain> <domains> Mandatory Specifies a domain from where the program can be run. You can provide HTTPS and FILE schemes. If the scheme is omitted then the value is considered as HTTPS.
Note: The URL of the ArcotID OTP Generator page must match the <domain> tag, else the External Programs cannot be executed.

Managing External Programs
30 Desktop Client Installation and Deployment Guide
Creating the Script File
The script file defines an External Program that can be executed by using ArcotID OTP Desktop Client. You must include these files in the directory where the ExternalPrograms.xml file is located.
The script file is defined with the .bat extension on Microsoft Windows and as a shell script on Apple Macintosh and Ubuntu Linux. The ArcotID OTP Desktop Client provides a sample script (ExternalProgramsSample), and it is available in the directory that contains the shared files.
When you invoke the script file, it is passed as the environment variables, as discussed in the following table:
Environment Variable Dependent XML tag in the externalprogram.xml file
Description
CA_AUTH_CONFIRM <confirm> Prompts the user to accept the External Programs before they run them. If CA_AUTH_CONFIRM is defined, then CA_AUTH_PROP_confirm is used to define the confirmation string.
The CA_AUTH_CONFIRM variable is set if the <confirm> value in the externalprograms.xml file is set to TRUE.
CA_AUTH_HIDDEN <hidden> Used if the script is executed in the hidden mode without the GUI or a display window.
CA_AUTH_PROGRAM <file> Defines the file name of the script that contains the External Program to be invoked.
CA_AUTH_PROP_account
NA Defines the name of the ArcotID OTP account that must be used to invoke External Programs.
CA_AUTH_PROP_cmdname
<name> Defines the name of the External Program to be invoked.
CA_AUTH_PROP_confirm
NA Defines the confirmation message that is displayed to the user if CA_AUTH_CONFIRM variable is TRUE.
Managing External Programs
Chapter 4: Using Advanced Features 31
Environment Variable Dependent XML tag in the externalprogram.xml file
Description
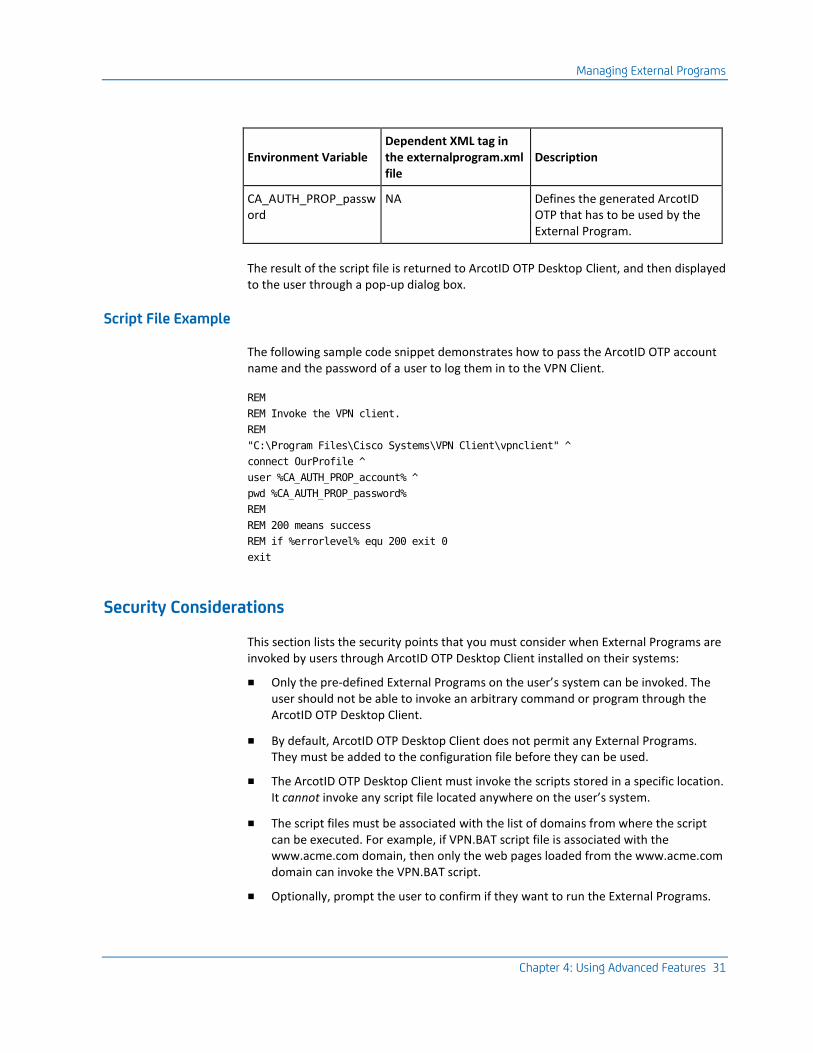
CA_AUTH_PROP_password
NA Defines the generated ArcotID OTP that has to be used by the External Program.
The result of the script file is returned to ArcotID OTP Desktop Client, and then displayed to the user through a pop-up dialog box.
Script File Example
The following sample code snippet demonstrates how to pass the ArcotID OTP account name and the password of a user to log them in to the VPN Client.
REM
REM Invoke the VPN client.
REM
"C:\Program Files\Cisco Systems\VPN Client\vpnclient" ^
connect OurProfile ^
user %CA_AUTH_PROP_account% ^
pwd %CA_AUTH_PROP_password%
REM
REM 200 means success
REM if %errorlevel% equ 200 exit 0
exit
Security Considerations
This section lists the security points that you must consider when External Programs are invoked by users through ArcotID OTP Desktop Client installed on their systems:
■ Only the pre-defined External Programs on the user’s system can be invoked. The user should not be able to invoke an arbitrary command or program through the ArcotID OTP Desktop Client.
■ By default, ArcotID OTP Desktop Client does not permit any External Programs. They must be added to the configuration file before they can be used.
■ The ArcotID OTP Desktop Client must invoke the scripts stored in a specific location. It cannot invoke any script file located anywhere on the user’s system.
■ The script files must be associated with the list of domains from where the script can be executed. For example, if VPN.BAT script file is associated with the www.acme.com domain, then only the web pages loaded from the www.acme.com domain can invoke the VPN.BAT script.
■ Optionally, prompt the user to confirm if they want to run the External Programs.

Managing External Programs
32 Desktop Client Installation and Deployment Guide
■ (For Microsoft Windows Vista and Later Versions Only) If Internet Explorer is used to run the External Programs, then External Programs will run in Low Integrity mode. Therefore, a broker mechanism is used to enable External Programs to run in normal medium integrity mode.
See http://msdn.microsoft.com/en-us/library/bb250462%28v=vs.85%29.aspx for more information.
Using External Programs
The AuthMinder plug-in component of ArcotID OTP Desktop Client provides the External Programs functionality. Therefore, to use External Programs, the AuthMinder plug-in must be successfully installed on the end user’s system.
The External Programs are available to your users through ArcotID OTP Desktop Client. To access the External Programs, the users have to click the External Programs buttons that are displayed on the Generator screen after the Generate Passcode button. The text labels used for the External Programs buttons are derived from <name> tags in the ExternalPrograms.xml file.

Reading Remote Server Updates
Chapter 4: Using Advanced Features 33
Reading Remote Server Updates
The list of authorized domains that the AuthMinder plug-in must contact to are defined during the installation. If this list changes, then the AuthMinder plug-in must update the list for the current environment by contacting the remote servers.
It also fetches the version information of the ArcotID OTP Desktop Client and the AuthMinder plug-in from the remote servers. This information is used by the ArcotID OTP Desktop Client to inform users about the latest updates.
The remote servers that the AuthMinder plug-in can contact are configured in the hosts.dat file. See the table in the "Shared Files (see page 38)" section for the location of the hosts.dat file. The hosts.dat file contains a one-line entry per remote server, as follows:
serverURL filename
In the preceding entry:
■ serverURL: Specifies the partial or the complete URL of the host from where the remote data has to be obtained. If you specify the partial URL, such as www.remoteserver.com, then the URL is resolved to https://remoteserver.com/aid/authdomain.txt to create an absolute URL.
Note: It is mandatory that you specify the server name. Other objects of the URL are optional.
■ filename: Specifies the file name in which the data received from serverURL is recorded. The file is always stored in the User Data Area, therefore you must specify only the file name and not the complete path. See the "Location for User-Specific Files (see page 38)" section for the default location of the User Data Area.
Return Data Format
This section discusses the formats in which the remote servers return data to the AuthMinder plug-in. The AuthMinder plug-in supports the return data in the following two formats:
■ Version 1.0 (see page 34)
■ Version 1.1 (see page 35)

Reading Remote Server Updates
34 Desktop Client Installation and Deployment Guide
Version 1.0
The following code snippet provides the format for Version 1.0:
dataFormatVersion contentRevison updateFrequency
domain1
domain2
-
-
domainN
The following are the parameters used in the preceding code:
■ dataFormatVersion: Specifies the version number of the data format. This value is 1.0.
■ contentRevision: Specifies the revision number of the content. When the AuthMinder plug-in receives the data, it compares this revision number with the revision number of the data that is already stored on the system for the specified remote server. If the revision number of the latest data is higher, then the data is written to the system.
■ updateFrequency: Specifies the time interval (in seconds) at which the AuthMinder plug-in must contact the remote server to download the data.
After the data is downloaded to the system, the updateFrequency parameter is replaced with nextUpdateTime. The nextUpdateTime parameter specifies the time (in seconds) when the next update must be performed. It is derived by adding updateFrequency to the current time.
■ domain<n>: Specifies the authorized domains.
Version 1.0 Example
1.0 3 259200
domain1.com
domain2.com
Invoking External Programs From Your Code
Chapter 4: Using Advanced Features 35
Version 1.1
The following code snippet provides the format for Version 1.1:
dataFormatVersion contentRevison updateFrequency
pluginVersion pluginURL
clientVersion clientURL
domain1
domain2
-
-
domainN
The data format for the version 1.1 is same as 1.0, except for the dataFormatVersion, which is 1.1 and for the following additional parameters:
■ pluginVersion: Specifies the version number of the latest AuthMinder plug-in that is available for download. If the updates are not available, then the pluginVersion is 0.
■ pluginURL: Specifies the URL from where the latest AuthMinder plug-in can be downloaded. If there are no updates, then the pluginURL parameter is ignored.
■ clientVersion: Specifies the version number of the latest ArcotID OTP Desktop Client that is available for download.
■ clientURL: Specifies the URL from where the latest ArcotID OTP Desktop Client can be downloaded. If there are no updates, then the clientURL parameter is ignored.
Version 1.1 Example
1.1 5 259200
1.3.2 http://somehost.com/newPlugin.html
1.3.6 http://somehost.com/newClient.html
domain1.com
domain3.com
Invoking External Programs From Your Code
This section provides the commands that you must use to access the plug-in and invoke the External Programs.
Where are these commands/APIs listed or explained?
Invoking External Programs From Your Code
36 Desktop Client Installation and Deployment Guide
Accessing the AuthMinder Plug-In
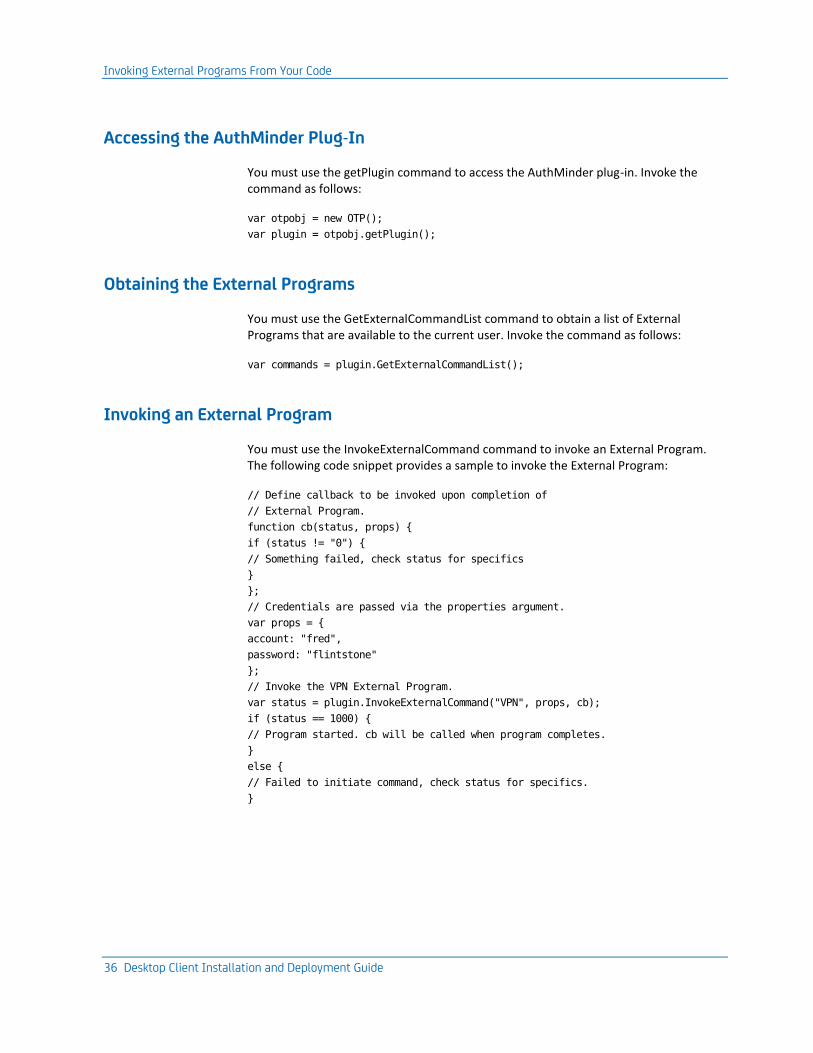
You must use the getPlugin command to access the AuthMinder plug-in. Invoke the command as follows:
var otpobj = new OTP();
var plugin = otpobj.getPlugin();
Obtaining the External Programs
You must use the GetExternalCommandList command to obtain a list of External Programs that are available to the current user. Invoke the command as follows:
var commands = plugin.GetExternalCommandList();
Invoking an External Program
You must use the InvokeExternalCommand command to invoke an External Program. The following code snippet provides a sample to invoke the External Program:
// Define callback to be invoked upon completion of
// External Program.
function cb(status, props) {
if (status != "0") {
// Something failed, check status for specifics
}
};
// Credentials are passed via the properties argument.
var props = {
account: "fred",
password: "flintstone"
};
// Invoke the VPN External Program.
var status = plugin.InvokeExternalCommand("VPN", props, cb);
if (status == 1000) {
// Program started. cb will be called when program completes.
}
else {
// Failed to initiate command, check status for specifics.
}

AuthMinder Plug-In Files
Chapter 4: Using Advanced Features 37
AuthMinder Plug-In Files
The files that are used for invoking and using the AuthMinder plug-in can be broadly classified into two categories based on access rights and usage. Some files are shared across users and some are user-specific files.
■ Default Location for Shared Files (see page 37)
■ Shared Files (see page 38)
■ Location for User-Specific Files (see page 38)
■ User-Specific Files (see page 38)
Default Location for Shared Files
The following table lists the default location for the shared files that are used by the AuthMinder plug-in.
Operating System
Installation Type External Programs Folders
Microsoft Windows Vista and later
Using Administrator Account
%PROGRAMDATA%\CA\arcot
Microsoft Windows Vista and later
Using Non-Administrator Account
%USERPROFILE%\AppData\LocalLow\CA\arcot
Microsoft Windows XP and earlier
Using Administrator Account
%ALLUSERSPROFILE%\Application Data\CA\arcot
Microsoft Windows XP and earlier
Using Non-Administrator Account
%USERPROFILE%\Local Settings\Application Data\CA\arcot
Apple Macintosh and Ubuntu Linux
Using Administrator Account
/usr/lib/CA/arcot
Apple Macintosh and Ubuntu Linux
Using Non-Administrator Account
~/CA/arcot

AuthMinder Plug-In Files
38 Desktop Client Installation and Deployment Guide
Shared Files
The following table lists the files that are shared across users:
File Description
domains.dat Defines the list of domains that the AuthMinder plug-in can access.
(For Microsoft Windows) ExternalProgramsSample.bat
(For Apple Macintosh and Ubuntu Linux) ExternalProgramsSample.sh
A sample template file that demonstrates invoking External Programs through ArcotID OTP Desktop Client.
ExternalProgramsSample.xml A sample template file that demonstrates External Program declaration.
hosts.dat Defines the list of remote servers, which the AuthMinder plug-in contacts to fetch the updates.
Location for User-Specific Files
The following table lists the location for the user-specific files that are used by the AuthMinder plug-in:
Operating System External Programs Folders
Microsoft Windows Vista and later
%USERPROFILE%\AppData\LocalLow\CA\arcot
Microsoft Windows XP and earlier
%USERPROFILE%\Local Settings\Application Data\CA\arcot
Apple Macintosh and Linux
~/CA/arcot
User-Specific Files
The following table lists the files that are specific to a user:
File Description
keys.dat This file is the data store for the AuthMinder plug-in Application Programming Interface (API). The data that is accessed by the AuthMinder plug-in API is sourced from this file.
AuthMinder Plug-In Files
Chapter 4: Using Advanced Features 39
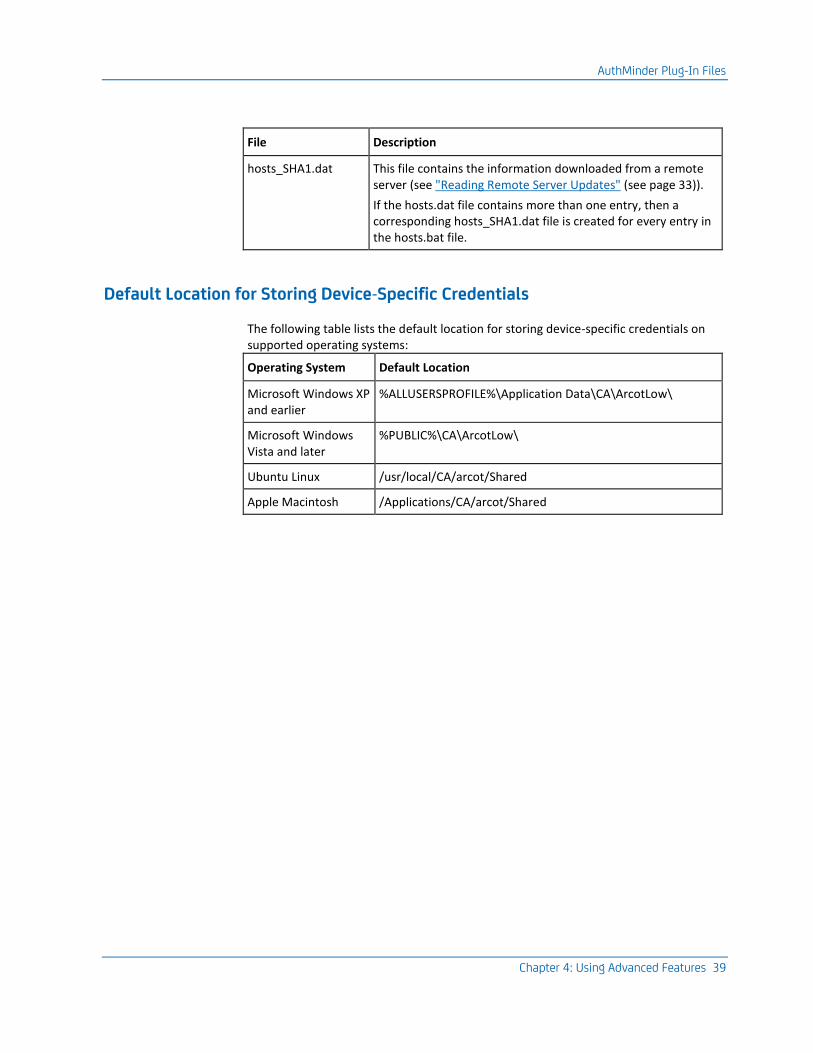
File Description
hosts_SHA1.dat This file contains the information downloaded from a remote server (see "Reading Remote Server Updates" (see page 33)).
If the hosts.dat file contains more than one entry, then a corresponding hosts_SHA1.dat file is created for every entry in the hosts.bat file.
Default Location for Storing Device-Specific Credentials
The following table lists the default location for storing device-specific credentials on supported operating systems:
Operating System Default Location
Microsoft Windows XP and earlier
%ALLUSERSPROFILE%\Application Data\CA\ArcotLow\
Microsoft Windows Vista and later
%PUBLIC%\CA\ArcotLow\
Ubuntu Linux /usr/local/CA/arcot/Shared
Apple Macintosh /Applications/CA/arcot/Shared


Chapter 5: Uninstalling the ArcotID OTP Desktop Client 41
Chapter 5: Uninstalling the ArcotID OTP Desktop Client
This chapter guides you through the steps for uninstalling ArcotID OTP Desktop Client. The chapter covers the following sections:
■ Uninstalling on Microsoft Windows (see page 41)
■ Uninstalling on Ubuntu Linux (see page 41)
■ Uninstalling on Apple Macintosh (see page 42)
Uninstalling on Microsoft Windows
To uninstall ArcotID OTP Desktop Client on Microsoft Windows:
1. Access the uninstaller file by using any of the following methods:
■ Navigate to Start, Programs, CA ArcotID OTP Desktop Client, and then Uninstall CA ArcotID OTP Desktop Client.
or
■ Based on the operating system version that you are using, navigate to the install location. See Directory Structure (see page 19) for more information on the default install location.
The pop-up dialog appears to confirm uninstallation.
2. Click Yes to proceed with the uninstallation.
After successful uninstallation, the "Uninstallation completed" message appears.
Uninstalling on Ubuntu Linux
To uninstall ArcotID OTP Desktop Client on Ubuntu Linux:
1. Change your working directory to the location where you have installed ArcotID OTP Desktop Client. See Directory Structure (see page 19) for more information on the default install location.
2. At the prompt, enter the following command:
./uninstall
The installer prompts you to confirm the uninstallation.
3. Click Yes to continue with the uninstallation.
After successful uninstallation, the "Uninstallation completed" message appears.

Uninstalling on Apple Macintosh
42 Desktop Client Installation and Deployment Guide
Uninstalling on Apple Macintosh
To uninstall ArcotID OTP Desktop Client on Microsoft Windows:
1. Navigate to the install location where you have installed ArcotID OTP Desktop Client. See Directory Structure (see page 19) for more information on the default install location.
2. Double-click the uninstaller.
The pop-up dialog appears to confirm uninstallation.
3. Click Yes to proceed with the uninstallation.
After successful uninstallation, the "Uninstallation completed" message appears.
Chapter 5: Uninstalling the ArcotID OTP Desktop Client 43
Appendix A: Customizing the Installer
This chapter discusses the installer features that you can customize based on your requirement. It includes the following topics:
■ Setting Up the Provisioning URL (see page 43)
■ Multi-Byte Character Support (see page 43)
■ Encoding Settings into the Installer File Name (see page 44)
Setting Up the Provisioning URL
The provisioning URL is where the ArcotID OTP authentication service is hosted. The user must specify this URL while adding ArcotID OTP accounts. The user authentication requests are processed based on the URL that is configured for a specific account.
It is strongly recommended that you consider the following points while setting up the provisioning URL:
■ The provisioning URL must be in HTTPS scheme format.
■ To avoid users typing the provisioning URL path, it is recommended to include /otp/cprov in the URL.
If the preceding points are not considered while setting up the provisioning URL, then the following processing is performed on the provisioning URL that you specify:
■ If the URL scheme is not specified, then the default HTTPS value is applied to the URL.
■ If the server name is followed by at least one forward slash (/), then the URL is used as-is. Else, the /otp/cprov string is appended. For example, if the user enters www.foo.com as the provisioning server URL, then the https://www.foo.com/otp/cprov URL is used as the actual provisioning server URL.
Multi-Byte Character Support
The ArcotID OTP Desktop Client supports UTF-8, which is the variable width 8-bit encoding format of the universal Unicode encoding scheme. However, to run the ArcotID OTP Desktop Client in the UTF-8 mode, the middleware applications that interact with the ArcotID OTP Desktop Client must also support UTF-8 in the provisioning protocol messages.

Encoding Settings into the Installer File Name
44 Desktop Client Installation and Deployment Guide
The ArcotID OTP Desktop Client does the URL encoding of the Unicode characters when it sends the provisioning request to middleware applications, for example, Authentication Flow Manager, and the application must respond with the correct response, as follows:
■ The server must include charset=UTF-8 in the Content type header if the XML content is UTF-8 encoded.
■ Use of encoding=UTF-8 attribute in the XML header is optional, the ArcotID OTP Desktop Client ignores this attribute.
■ The UTF-8 encoding in the XML must be a true UTF-8 encoding. For example, %C3%A9 is two bytes and not six.
Encoding Settings into the Installer File Name
Some of the ArcotID OTP Desktop Client settings and the AuthMinder plug-in component settings are customer-specific and can vary from customer to customer. For example, the AuthMinder plug-in requires a list of domains that are allowed to use its features. For example, the permitted domain list for ABCCorp might include the www.abccorp.com domain and the list for ACME might include the www.acme.com domain. To handle such settings, ArcotID OTP Desktop Client enables you to create customized properties or settings and ship them with the ArcotID OTP Desktop Client to your end users.
However, if the installer file is digitally signed, then the content cannot be modified, which is the case with the Microsoft Windows ArcotID OTP Desktop Client installer. To resolve such problems, you can encode such settings in the installer file name. During installation, the installer decodes these settings and saves them to the configuration files.
You can customize the following settings into the installer file name:
■ The authorized domain list containing the set of domains, which are allowed to use the AuthMinder plug-in for storing the credentials.
■ The remote server, which is used to update the authorized domain list and to obtain the information about new versions of the ArcotID OTP Desktop Client and AuthMinder plug-in.
The setting that you want to encode must be appended to the file name as a name-value pair in the base-64 encoded format. Each name-value pair is separated using the underscore character to enable the installer to locate and parse them.
Encoding Settings into the Installer File Name
Chapter 5: Uninstalling the ArcotID OTP Desktop Client 45
The format of each name-value pair must be as follows:
_name_b64value_
The following steps describe the process of appending the name-value pairs to the installer file name:
1. Convert the value into the base-64 encoded format. You can use any open source encoders, such as http://www.motobit.com/util/base64-decoder-encoder.asp to perform this operation. For example, if you want to append a setting named foo with the value bar, then convert bar into the base-64 encoded format, which will be YmFy.
2. Construct the name-value pair. For example, _foo_YmFy_.
3. Append the installer file name with the name-value pair. For example, if you append _foo_YmFy_ to the Microsoft Windows installer file name, then the file will be OTPDesktop-Web-1.0.4-windows-installer_foo_YmFy_.exe.
Note: If you plan to encode multiple settings, then you must concatenate the base-64 encoded name-value pairs.
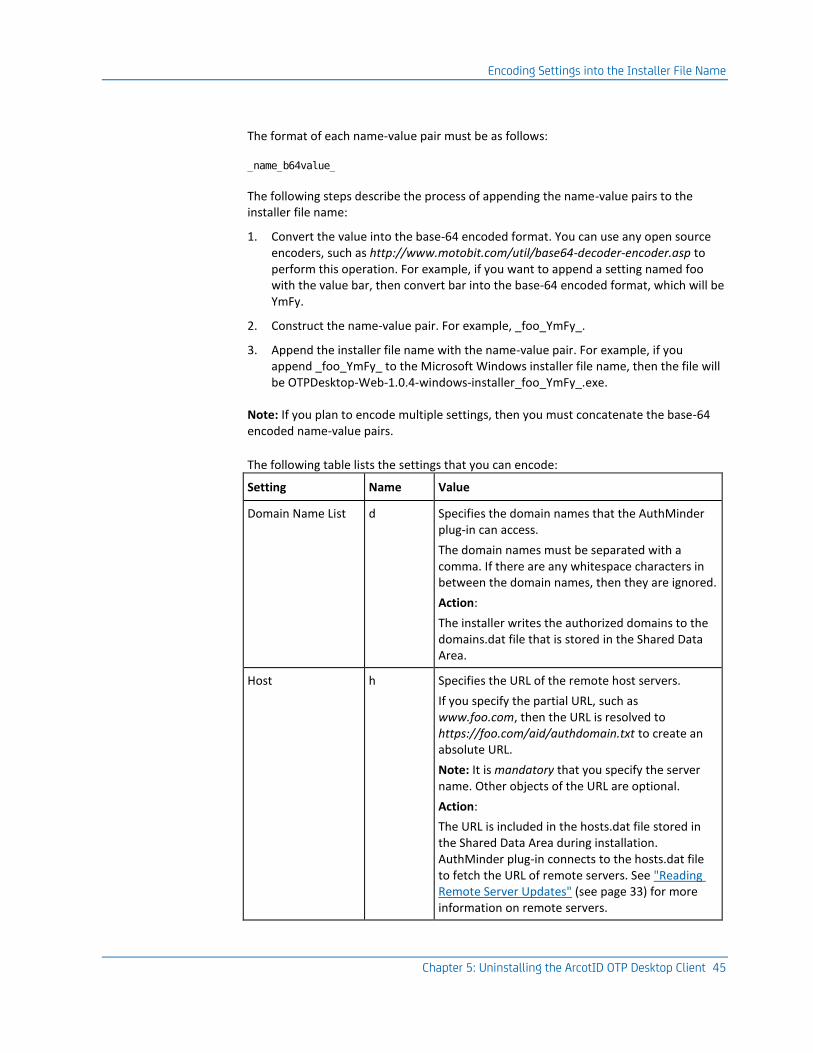
The following table lists the settings that you can encode:
Setting Name Value
Domain Name List d Specifies the domain names that the AuthMinder plug-in can access.
The domain names must be separated with a comma. If there are any whitespace characters in between the domain names, then they are ignored.
Action:
The installer writes the authorized domains to the domains.dat file that is stored in the Shared Data Area.
Host h Specifies the URL of the remote host servers.
If you specify the partial URL, such as www.foo.com, then the URL is resolved to https://foo.com/aid/authdomain.txt to create an absolute URL.
Note: It is mandatory that you specify the server name. Other objects of the URL are optional.
Action:
The URL is included in the hosts.dat file stored in the Shared Data Area during installation. AuthMinder plug-in connects to the hosts.dat file to fetch the URL of remote servers. See "Reading Remote Server Updates" (see page 33) for more information on remote servers.

Encoding Settings into the Installer File Name
46 Desktop Client Installation and Deployment Guide