By Rob West. Contents About appendicitis History of appendectomy Patient presentation Workup...
24
By Rob West
-
Upload
roger-mccarthy -
Category
Documents
-
view
217 -
download
3
Transcript of By Rob West. Contents About appendicitis History of appendectomy Patient presentation Workup...
By Rob West
Contents About appendicitis History of appendectomy Patient presentation Workup and diagnosis Treatment methods/Pre-op Advantages of Laparoscopic method Contraindications for laparoscopic method OR setup Instruments used Port placement Anatomy Procedure overview Procedure key steps Complications Post-op
The vast majority of appendectomies are due to appendicitis.
Characterized by inflammation in the appendix Caused by blockage of the appendix from fecal
impaction or lymphoid hyperplasia. Crohn’s and IBS also increase risk of appendicitis
Inflammation compromises blood flow to appendix tissue death rupture
Rupture bowel contents (including flora) spill into abdominopelvic cavity; peritonitis, potentially fatal
Because rupture can occur within 72 hours of onset, appendicitis is a MEDICAL EMERGENCY. A rapid response is CRITICAL
The first recorded successful removal of an appendix was in 1735 by Claudius Aymand, but it was done during a hernia operation.
Early cases of appendicitis were described as “iliac passion”. The disease was poorly understood, and the appendix was not implicated until the 1800’s
Boston surgeon Reginald Fitz published a paper in 1886 establishing a link between appendicular inflammation and iliac passion (he was the first to call this pathology “appendicitis.”) A German physician named Matterstock published similar findings in Europe around that time.
American Dr. Thomas Morton performed the first appendectomy for appendicitis successfully in 1887
First performed laparoscopically by German OB/GYN Kurt Semm in 1981
Laparoscopic procedure was rejected originally as “unethical,” but quickly became mainstream
First, vague pain around navel With time, increases in intensity and sharpness Pain migrates to RLQ (McBurney’s Point)
Nausea/Vomiting Severe abdominal pain Fever Reduced appetite Constipation or diarrhea “Rebound tenderness”
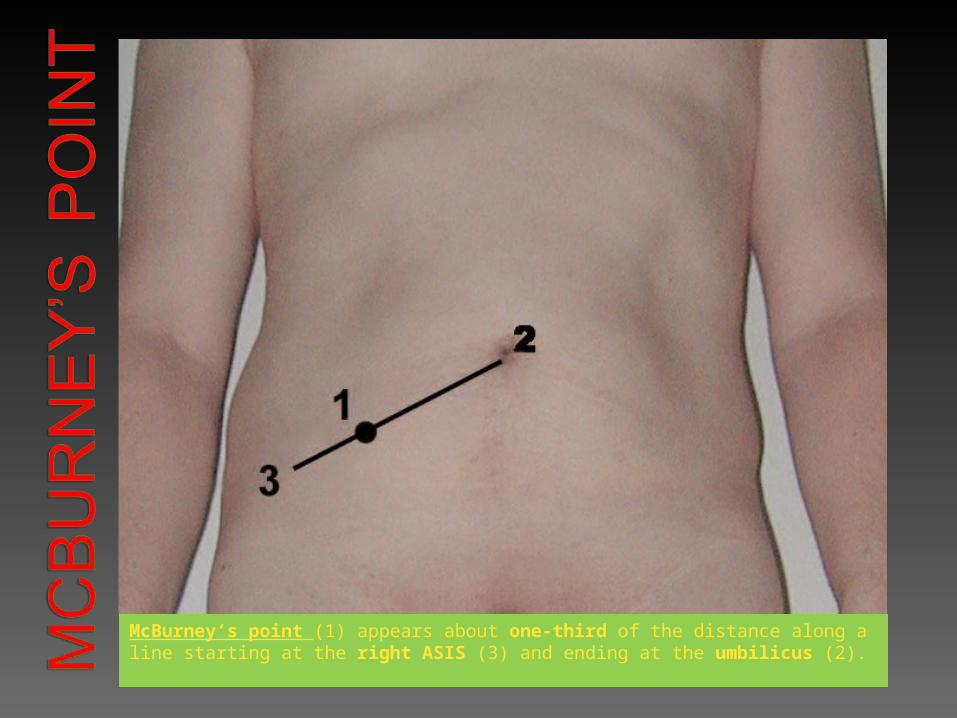
McBurney’s point (1) appears about one-third of the distance along a line starting at the right ASIS (3) and ending at the umbilicus (2).
Physical Exam: along with HPI often sufficient to diagnose appendicitis
CT scan or Ultrasound: Other diseases can present with similar
symptoms (e.g. hernia, diverticulitis, hepatitis, some gynecological diseases). Imaging appendix can help determine if it is inflamed.
Urine test might rule out UTI, which can present similarly
As many as 20% of appendectomies may involve removal of a healthy appendix
Though mild cases can be treated with antibiotics, many surgeons prefer to err on the side of caution and perform the surgery to avoid rupture.
Determine how long it has been since patient has eaten; instruct patient to fast
Patient is administered antibiotics to prevent peritonitis and other infections
Patient is sedated and given an IV drip to hydrate
Shorter hospital stay Fater recovery time Lest post-operative pain Fewer post-operative complications Minimal scarring
Cardiac diseases/COPD: pneumoperitoneum induced by insufflation may cause arrhythmias or make breathing too difficult for patients with these conditions.
Obesity
Previous abdominal surgeries
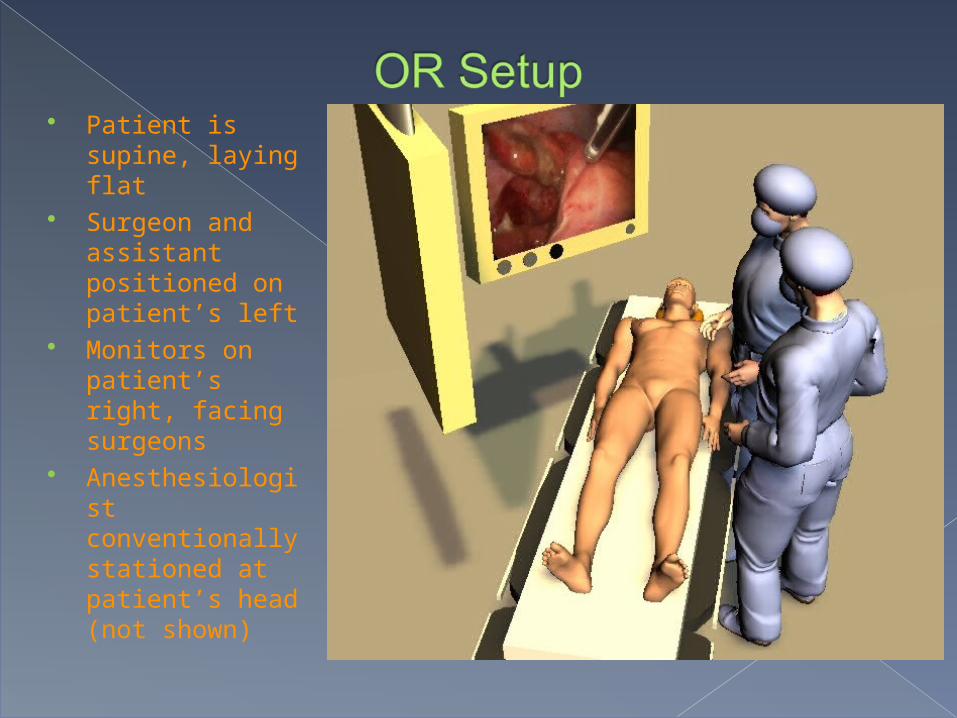
Patient is supine, laying flat
Surgeon and assistant positioned on patient’s left
Monitors on patient’s right, facing surgeons
Anesthesiologist conventionally stationed at patient’s head (not shown)

Atraumatic grasper
Laparoscopic scissors Dissector Endo GIA (or stapler, or endoloop ligature
applicator) Suction/irrigation device Extraction tube Extraction bag Zero-degree scope 3 Trocars (two 5mm and one 10mm) Alternately, electrocautery tools may also be
used
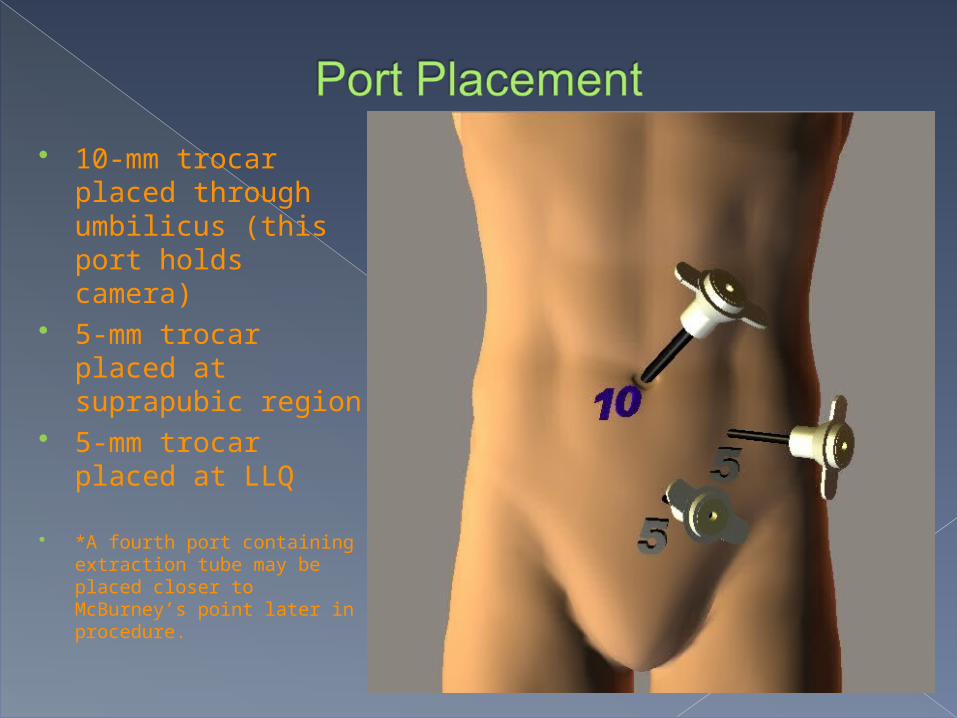
10-mm trocar placed through umbilicus (this port holds camera)
5-mm trocar placed at suprapubic region
5-mm trocar placed at LLQ
*A fourth port containing extraction tube may be placed closer to McBurney’s point later in procedure.
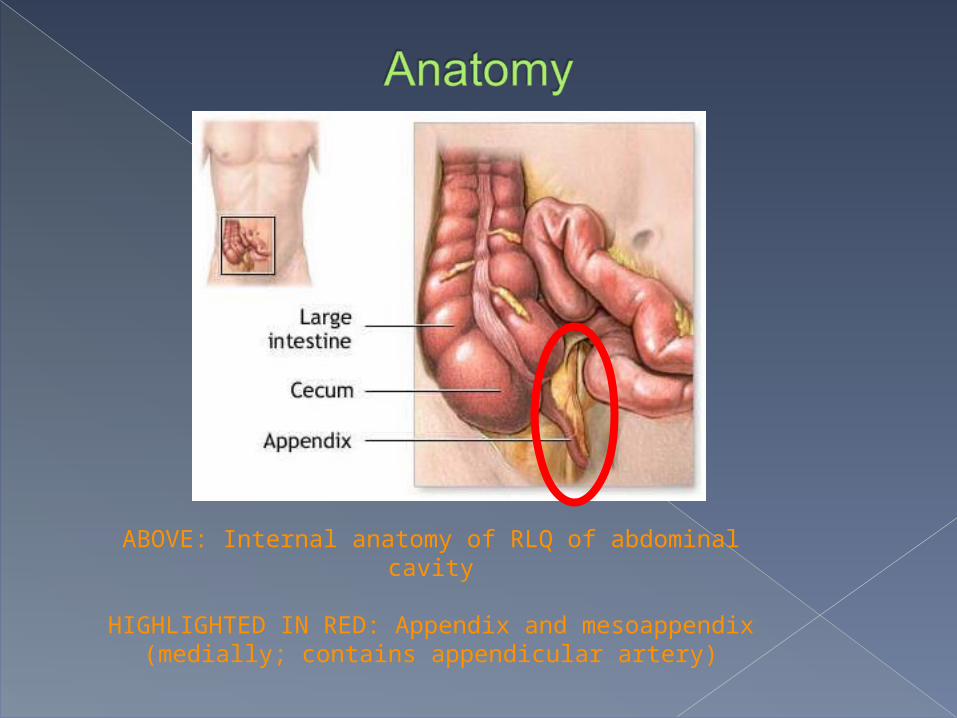
ABOVE: Internal anatomy of RLQ of abdominal cavity
HIGHLIGHTED IN RED: Appendix and mesoappendix (medially; contains appendicular artery)
Ports placed at umbilicus, suprapubis, LLQ Inspect abdominal cavity and located ileocecal junction Retract bowel to expose appendix Separate mesoappendix to locate appendicular artery Divide appendix Divide appendicular artery Extract appendix Irrigate thoroughly Final inspection of abdominal cavity

Step 1: Port placement A 10-mm trocar is placed at the umbilicus, and the abdominal cavity is insufflated to a pressure of 15 mmHg. The camera is also inserted through this larger trocar. A 5-mm trocar is placed at the suprapubis, and a second 5-mm trocar is placed at the LLQ. (Placement of the third port may vary by surgeon preference or as case dictates but LLQ is standard placement)
Step 2: Inspect abdominal cavity The area is inspected to orient the surgeon to the position of the appendix. Inspection will also alert surgeon to any anatomic variation or pathological conditions that may be relevant (e.g. peritonitis).
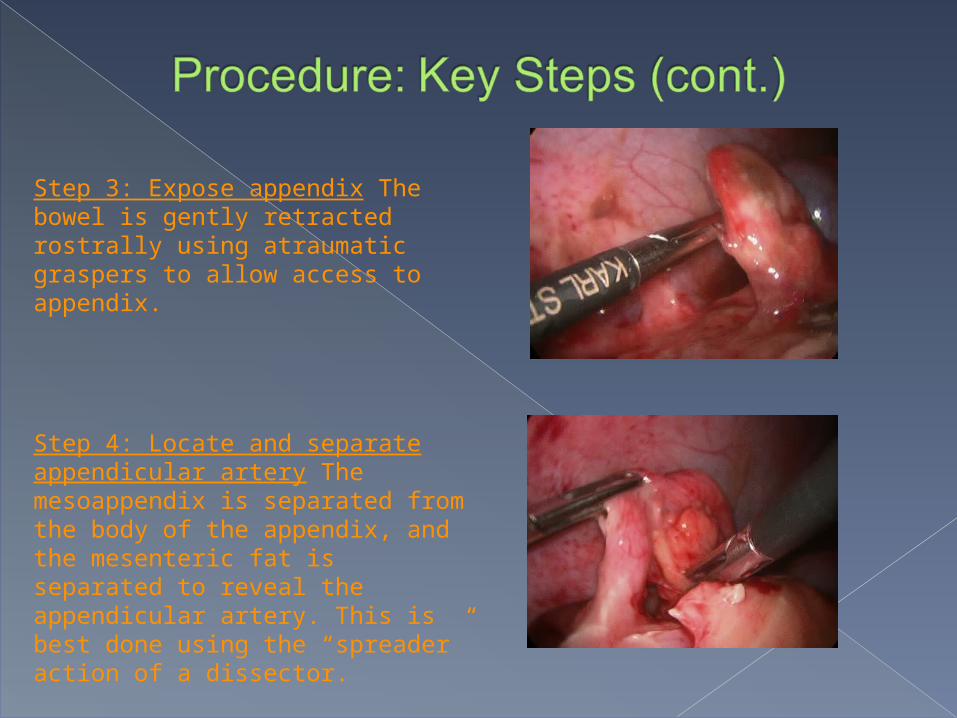
Step 3: Expose appendix The bowel is gently retracted rostrally using atraumatic graspers to allow access to appendix.
Step 4: Locate and separate appendicular artery The mesoappendix is separated from the body of the appendix, and the mesenteric fat is separated to reveal the appendicular artery. This is best done using the “spreader” action of a dissector.

Step 5: Divide appendix from cecum Using an endoloop, two loops are placed proximal to the cecum, and a third loop is placed 1-2 cm distally to these. The appendix is then divided between the two proximal and 3rd distal loops using scissors or cautery. Staples may be substituted for loops. UK surgeons tend to use the Endo GIA tool, which simultaneously seals and cuts, eliminating the need for loops or staples.
Step 6: Divide appendicular artery The artery is divided using the Endo GIA or the endoloop method described above (two ligatures proximally, one distally).
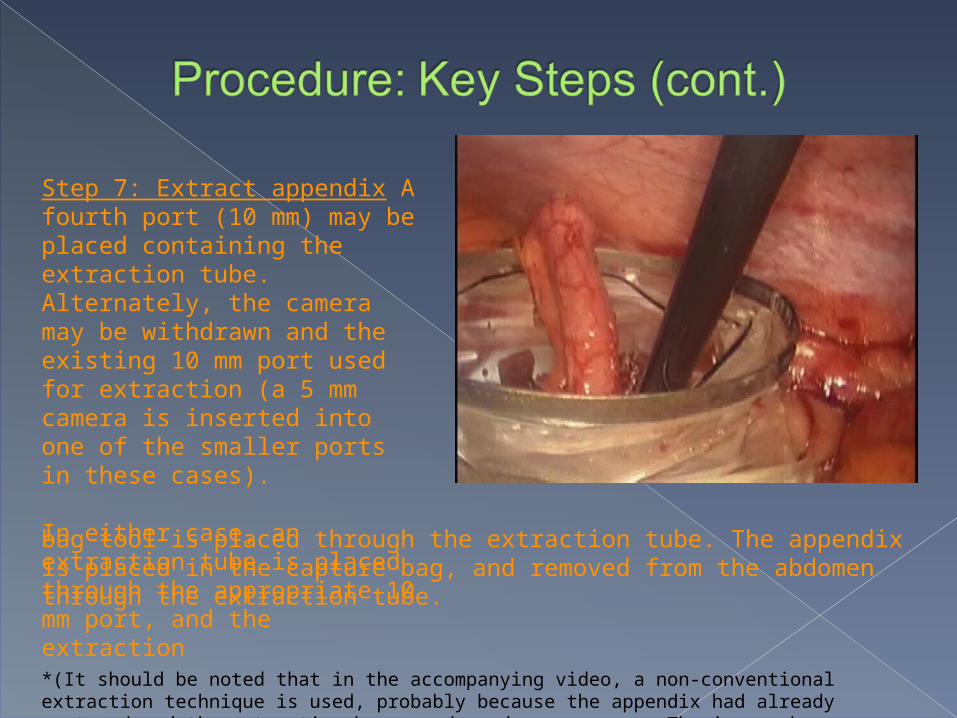
Step 7: Extract appendix A fourth port (10 mm) may be placed containing the extraction tube. Alternately, the camera may be withdrawn and the existing 10 mm port used for extraction (a 5 mm camera is inserted into one of the smaller ports in these cases).
In either case, an extraction tube is placed through the appropriate 10 mm port, and the extraction
bag tool is placed through the extraction tube. The appendix is placed in the capture bag, and removed from the abdomen through the extraction tube.
*(It should be noted that in the accompanying video, a non-conventional extraction technique is used, probably because the appendix had already ruptured and the extraction bag was deemed unnecessary. The image above comes from a different case.)

Step 8: Irrigate The abdominal cavity should be irrigated thoroughly with sterile saline and suctioned clean several times. In the event of a rupture, great care should be taken to ensure all pus or other infectious fluids have been removed.
Step 9: Final inspection The abdominal and pelvic cavities are inspected one final time for any signs of infection, errors, or other potential complications of which the surgeon might need to be aware. This can often be done simultaneously with irrigation.
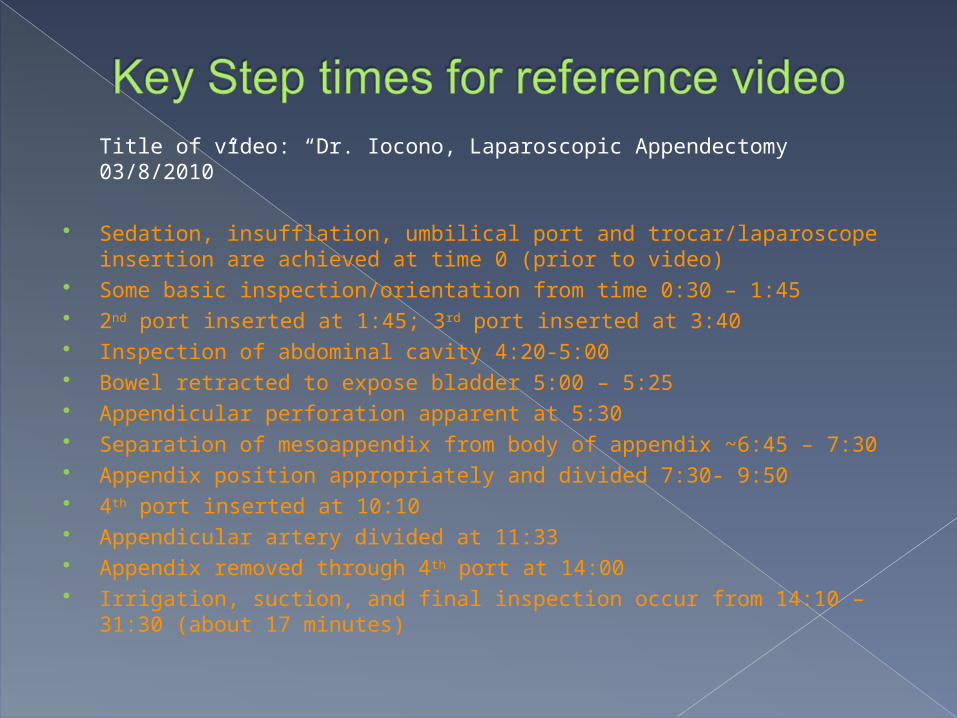
Title of video: “Dr. Iocono, Laparoscopic Appendectomy 03/8/2010”
Sedation, insufflation, umbilical port and trocar/laparoscope insertion are achieved at time 0 (prior to video)
Some basic inspection/orientation from time 0:30 – 1:45 2nd port inserted at 1:45; 3rd port inserted at 3:40 Inspection of abdominal cavity 4:20-5:00 Bowel retracted to expose bladder 5:00 – 5:25 Appendicular perforation apparent at 5:30 Separation of mesoappendix from body of appendix ~6:45 – 7:30 Appendix position appropriately and divided 7:30- 9:50 4th port inserted at 10:10 Appendicular artery divided at 11:33 Appendix removed through 4th port at 14:00 Irrigation, suction, and final inspection occur from 14:10 – 31:30
(about 17 minutes)

Rupture: more advanced inflammation is more susceptible to rupture during the procedure. A rupture during the procedure warrants extra care in irrigation, and extra care in inspecting for pus and signs of peritonitis before closing. A pre-operative rupture may warrant more aggressive post-operative antibiotic course.
Intra-abdominal abcess: drained surgically or with CT-guided needle
Adhesions
Wound-site infection
Hospital stay time 24-48 hours Patient can walk around usually after 12 hours Antibiotics Pain management Resume normal activities within 2 weeks
Mohan, V., M.D. (2010, March 1). Appendicitis. Retrieved from http://www.webmd.com/digestive-disorders/digestive-diseases-appendicitis
Hunter, Any. (2008, June 4). How Your appendix works. Retrieved from http://health.howstuffworks.com/appendix1.htm
Navez, B. (2001, April). Laparoscopic appendectomy. Retrieved from http://chapters.websurg.com/technique/index.php?full=1&doi=ot02en213
McCarthy, Arthur C., MD, History of Appendicitis Vermiformis, its diseases and treatment. 1927, University of Louisvillehttp://www.innominatesociety.com/Articles/History%20of%20Appendicitis.htm
Bhattacharya K., Kurt Semm: A laparoscopic crusader. J Min Access Surg
[serial online] 2007 [cited 2010 Apr 9];3:35-6. Available from: http://www.journalofmas.com/text.asp?2007/3/1/35/30686
![The current management of acute uncomplicated appendicitishub.hku.hk/bitstream/10722/251485/1/content.pdf · of acute uncomplicated appendicitis with promising re-sults [6–8]. Appendectomy,](https://static.fdocuments.us/doc/165x107/5c9dec6588c993d8368bb27a/the-current-management-of-acute-uncomplicated-of-acute-uncomplicated-appendicitis.jpg)


![Laparoscopic or Open Appendectomy for Pediatric …lup.lub.lu.se/search/ws/files/4196774/8611175.pdffor identifying appendicitis [3]. The standard treatment for appendicitis remains](https://static.fdocuments.us/doc/165x107/5feea6f7a3df2365dc7c3e90/laparoscopic-or-open-appendectomy-for-pediatric-luplublusesearchwsfiles4196774.jpg)
![Laparoscopy in management of appendicitis in high …...[6]. Appendicitis is usually treated with surgery, although management purely with antibiotics has been investigated [7]. Appendectomy](https://static.fdocuments.us/doc/165x107/5f2092f324ea6e434c6dff60/laparoscopy-in-management-of-appendicitis-in-high-6-appendicitis-is-usually.jpg)