Basic tutorial 1
25
Quick Start Tutorial 1: Building a Form
-
Upload
gowtham-chandrasekaran -
Category
Documents
-
view
226 -
download
0
Transcript of Basic tutorial 1
8/7/2019 Basic tutorial 1
http://slidepdf.com/reader/full/basic-tutorial-1 1/24
Quick Start Tutorial 1: Building a Form
8/7/2019 Basic tutorial 1
http://slidepdf.com/reader/full/basic-tutorial-1 2/24
Q U I C K S T A R T T U T O R I A L 1 : B U I L D I N G A F O R M
Page 2 of 24
Copyright © 2011 Cordys B.V. All rights reserved.
The information in this document is confidential, constitutes the intellectual and proprietary property of CordysB.V., and is protected by intellectual property laws and international intellectual property treaties.
Cordys and the Cordys logo are the registered trademarks of Cordys B.V. All other trademarks mentioned hereinmaybe/are the trademarks or registered trademarks of their respective owners and should be noted as such. No part of this document may be reproduced or transmitted in any form or by any means, electronic ormechanical, for any purpose, without the express written permission of Cordys B.V. The information contained inthis document is subject to change without notice. Cordys B.V. does not warrant that the information contained inthis document is error free.
8/7/2019 Basic tutorial 1
http://slidepdf.com/reader/full/basic-tutorial-1 3/24
Q U I C K S T A R T T U T O R I A L 1 : B U I L D I N G A F O R M
Page 3 of 24
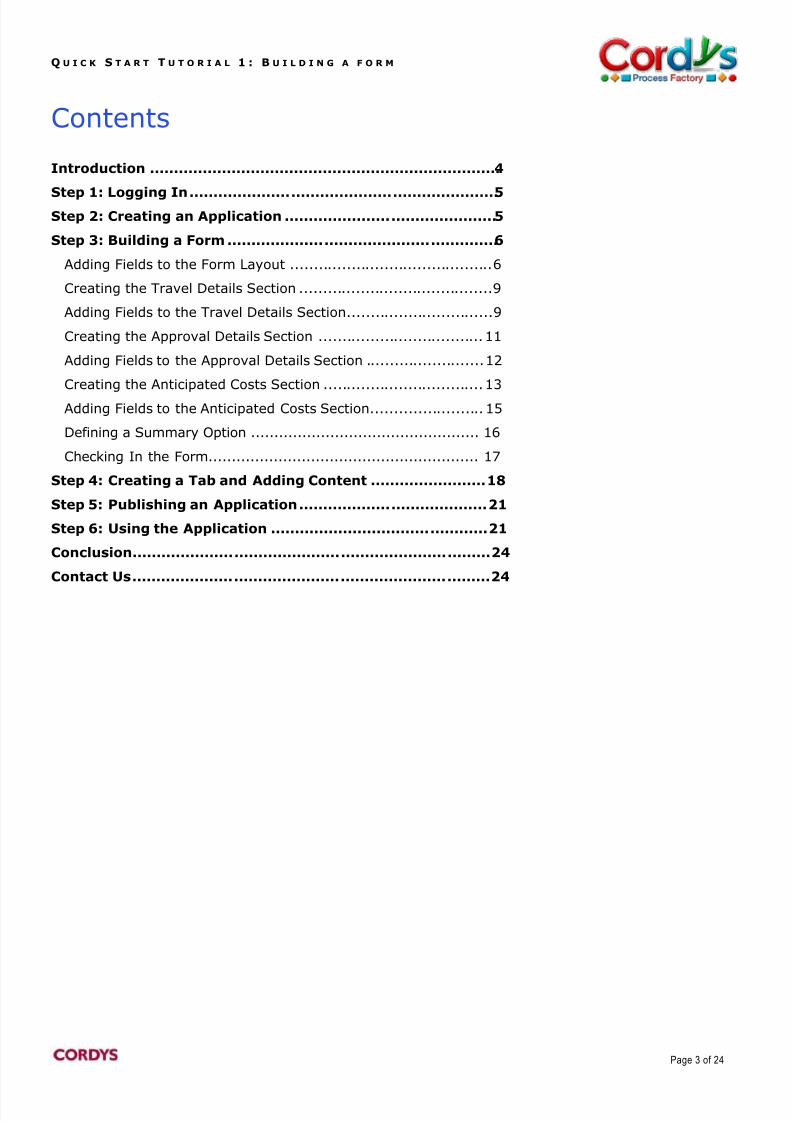
Contents
Introduction .........................................................................4 Step 1: Logging In ................................................................5 Step 2: Creating an Application ............................................5 Step 3: Building a Form ........................................................6
Adding Fields to the Form Layout ........................................... 6 Creating the Travel Details Section ......................................... 9 Adding Fields to the Travel Details Section ............................... 9 Creating the Approval Details Section ................................... 11 Adding Fields to the Approval Details Section ......................... 12 Creating the Anticipated Costs Section .................................. 13 Adding Fields to the Anticipated Costs Section........................ 15 Defining a Summary Option ................................................. 16 Checking In the Form.......................................................... 17
Step 4: Creating a Tab and Adding Content ........................ 18 Step 5: Publishing an Application ....................................... 21 Step 6: Using the Application ............................................. 21 Conclusion .......................................................................... 24 Contact Us .......................................................................... 24
8/7/2019 Basic tutorial 1
http://slidepdf.com/reader/full/basic-tutorial-1 4/24
Q U I C K S T A R T T U T O R I A L 1 : B U I L D I N G A F O R M
Page 4 of 24
IntroductionThis is the first in a series of Quick Start Tutorials designed to guide you through building anapplication using Composer, a mashup tool from Cordys Process Factory. The tutorials build oneach other and are designed to be completed in sequence. The final result is a single application that
demonstrates much of the core functionality of Composer.In these tutorials, you will build a simple approval process where a user submits a travel request form,which requires approval from his or her manager.
This first tutorial covers creating an application and building a simple form that captures user details,
travel details, and anticipated travel costs. It will also capture the manager‟s approval details. Afteryou build the form, you can publish the application and see a working form.
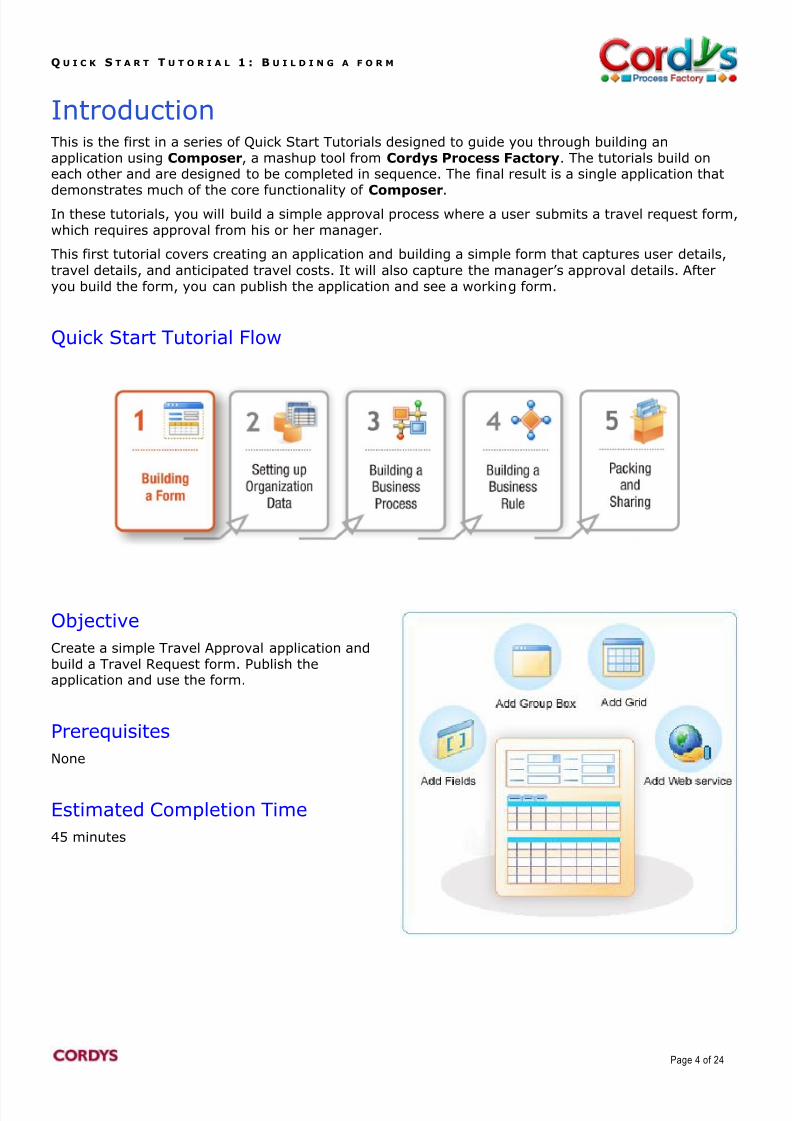
Quick Start Tutorial Flow
Objective
Create a simple Travel Approval application andbuild a Travel Request form. Publish theapplication and use the form.
Prerequisites
None
Estimated Completion Time
45 minutes
8/7/2019 Basic tutorial 1
http://slidepdf.com/reader/full/basic-tutorial-1 5/24
Q U I C K S T A R T T U T O R I A L 1 : B U I L D I N G A F O R M
Page 5 of 24
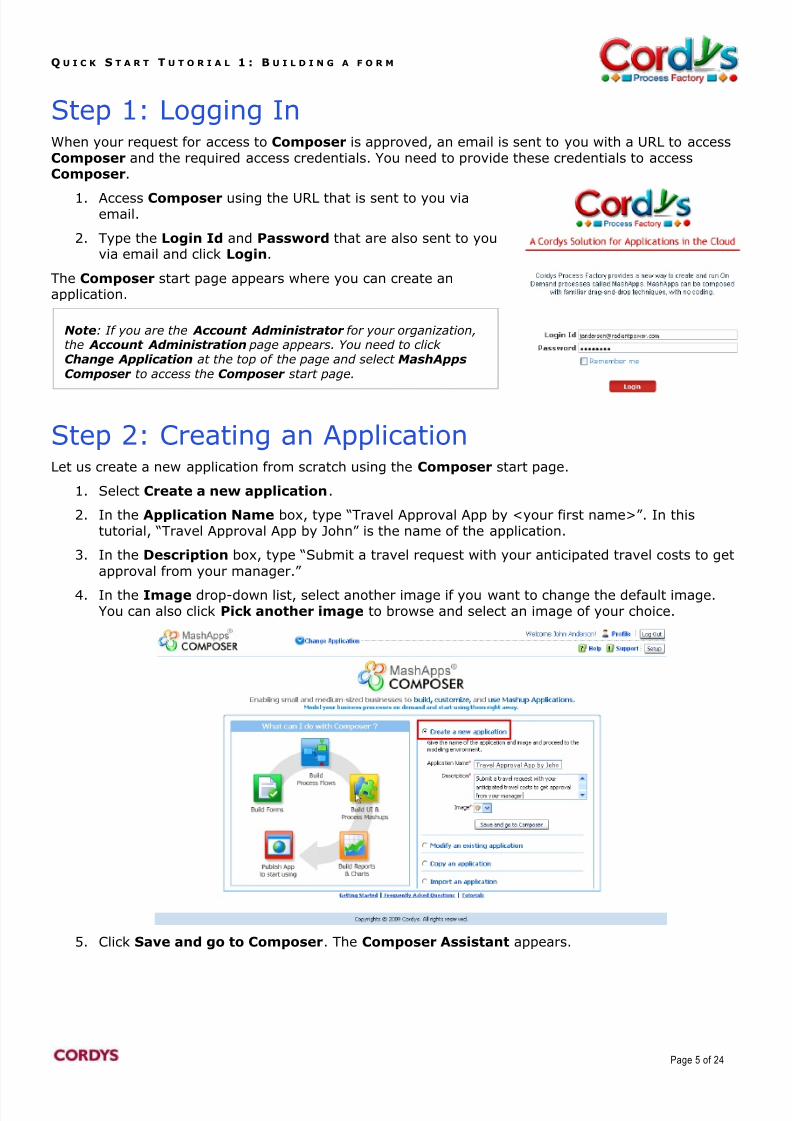
Step 1: Logging InWhen your request for access to Composer is approved, an email is sent to you with a URL to accessComposer and the required access credentials. You need to provide these credentials to accessComposer.
1. Access Composer using the URL that is sent to you viaemail.
2. Type the Login Id and Password that are also sent to youvia email and click Login.
The Composer start page appears where you can create anapplication.
Step 2: Creating an ApplicationLet us create a new application from scratch using the Composer start page.
1. Select Create a new application.
2. In the Application Name box, type “Travel Approval App by <your first name>”. In thistutorial, “Travel Approval App by John” is the name of the application.
3. In the Description box, type “Submit a travel request with your anticipated travel costs to get
approval from your manager.”
4. In the Image drop-down list, select another image if you want to change the default image.You can also click Pick another image to browse and select an image of your choice.
5. Click Save and go to Composer. The Composer Assistant appears.
Note: If you are the Account Administrator for your organization,the Account Administration page appears. You need to click Change Application at the top of the page and select MashApps
Composer to access the Composer start page.
8/7/2019 Basic tutorial 1
http://slidepdf.com/reader/full/basic-tutorial-1 6/24
Q U I C K S T A R T T U T O R I A L 1 : B U I L D I N G A F O R M
Page 6 of 24
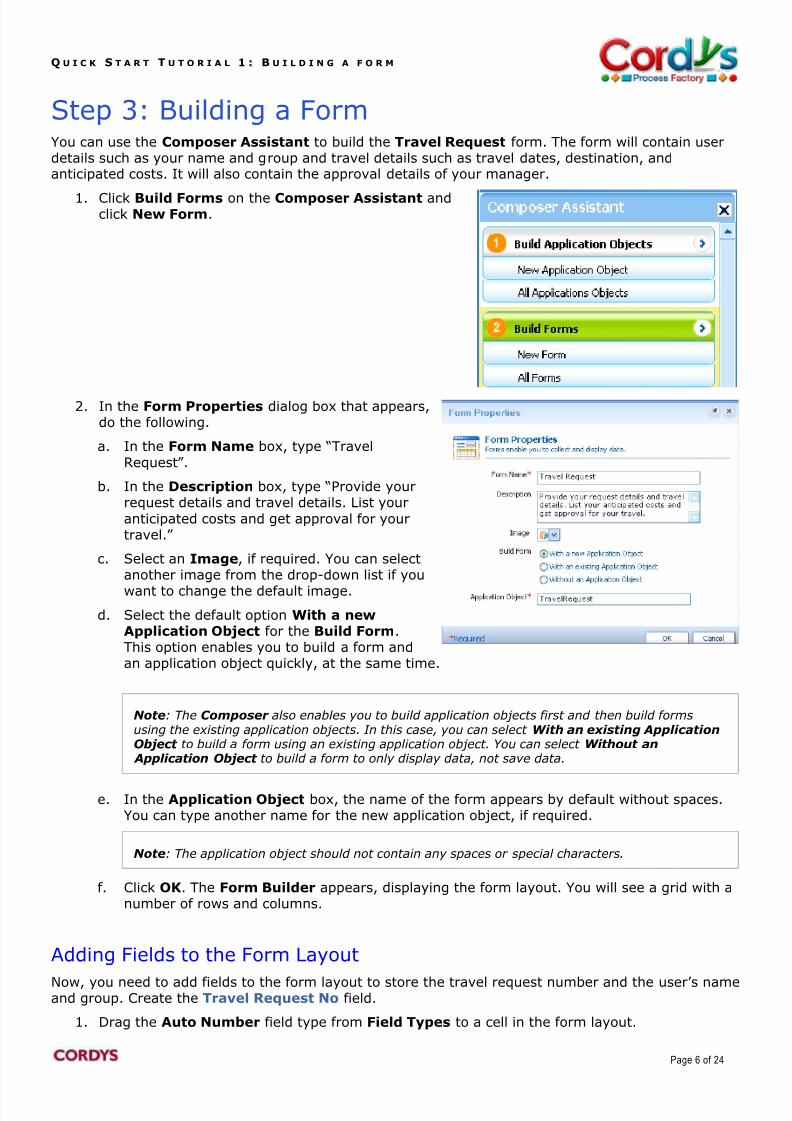
Step 3: Building a FormYou can use the Composer Assistant to build the Travel Request form. The form will contain userdetails such as your name and group and travel details such as travel dates, destination, andanticipated costs. It will also contain the approval details of your manager.
1. Click Build Forms on the Composer Assistant andclick New Form.
2. In the Form Properties dialog box that appears,do the following.
a. In the Form Name box, type “Travel
Request”.
b. In the Description box, type “Provide yourrequest details and travel details. List your
anticipated costs and get approval for yourtravel.”
c. Select an Image, if required. You can selectanother image from the drop-down list if you
want to change the default image.
d. Select the default option With a newApplication Object for the Build Form.This option enables you to build a form andan application object quickly, at the same time.
e. In the Application Object box, the name of the form appears by default without spaces.You can type another name for the new application object, if required.
f. Click OK. The Form Builder appears, displaying the form layout. You will see a grid with anumber of rows and columns.
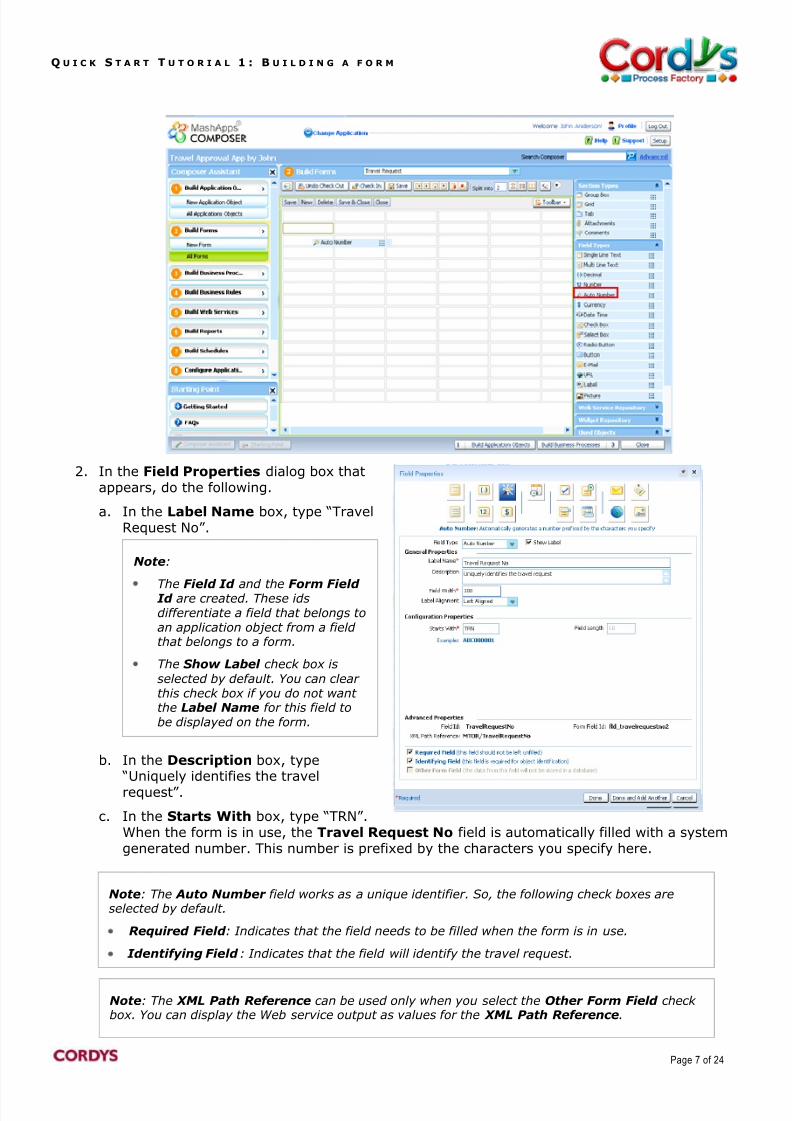
Adding Fields to the Form Layout
Now, you need to add fields to the form layout to store the travel request number and the user‟s nameand group. Create the Travel Request No field.
1. Drag the Auto Number field type from Field Types to a cell in the form layout.
Note: The Composer also enables you to build application objects first and then build formsusing the existing application objects. In this case, you can select With an existing ApplicationObject to build a form using an existing application object. You can select Without an
Application Object to build a form to only display data, not save data.
Note: The application object should not contain any spaces or special characters.
8/7/2019 Basic tutorial 1
http://slidepdf.com/reader/full/basic-tutorial-1 7/24
Q U I C K S T A R T T U T O R I A L 1 : B U I L D I N G A F O R M
Page 7 of 24
2. In the Field Properties dialog box thatappears, do the following.
a. In the Label Name box, type “TravelRequest No”.
b. In the Description box, type “Uniquely identifies the travelrequest”.
c. In the Starts With box, type “TRN”.When the form is in use, the Travel Request No field is automatically filled with a systemgenerated number. This number is prefixed by the characters you specify here.
Note:
The Field Id and the Form Field Id are created. These idsdifferentiate a field that belongs toan application object from a field that belongs to a form.
The Show Label check box is
selected by default. You can clear this check box if you do not want the Label Name for this field tobe displayed on the form.
Note: The Auto Number field works as a unique identifier. So, the following check boxes areselected by default.
Required Field : Indicates that the field needs to be filled when the form is in use.
Identifying Field : Indicates that the field will identify the travel request.
Note: The XML Path Reference can be used only when you select the Other Form Field check box. You can display the Web service output as values for the XML Path Reference.
8/7/2019 Basic tutorial 1
http://slidepdf.com/reader/full/basic-tutorial-1 8/24
Q U I C K S T A R T T U T O R I A L 1 : B U I L D I N G A F O R M
Page 8 of 24
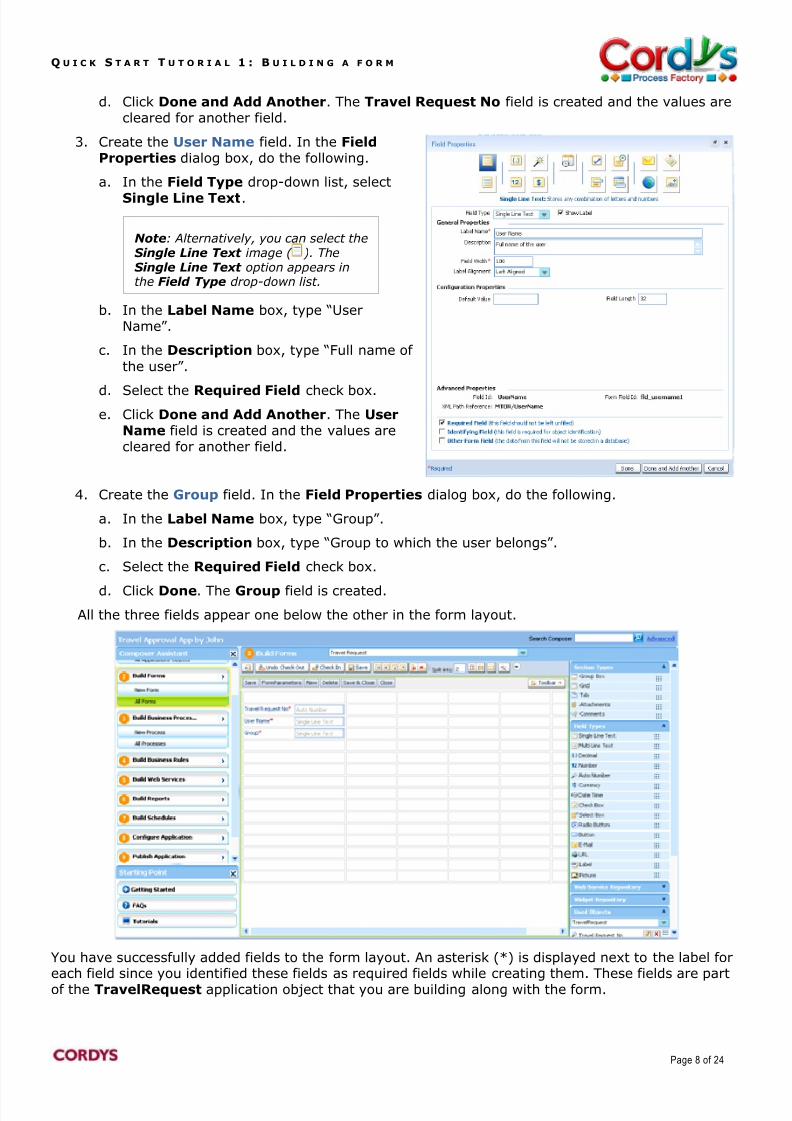
d. Click Done and Add Another. The Travel Request No field is created and the values arecleared for another field.
3. Create the User Name field. In the FieldProperties dialog box, do the following.
a. In the Field Type drop-down list, select
Single Line Text.
b. In the Label Name box, type “UserName”.
c. In the Description box, type “Full name of
the user”.
d. Select the Required Field check box.e. Click Done and Add Another. The User
Name field is created and the values arecleared for another field.
4. Create the Group field. In the Field Properties dialog box, do the following.
a. In the Label Name box, type “Group”.
b. In the Description box, type “Group to which the user belongs”.
c. Select the Required Field check box.
d. Click Done. The Group field is created.
All the three fields appear one below the other in the form layout.
You have successfully added fields to the form layout. An asterisk (*) is displayed next to the label foreach field since you identified these fields as required fields while creating them. These fields are partof the TravelRequest application object that you are building along with the form.
Note: Alternatively, you can select theSingle Line Text image ( ). TheSingle Line Text option appears inthe Field Type drop-down list.
8/7/2019 Basic tutorial 1
http://slidepdf.com/reader/full/basic-tutorial-1 9/24
Q U I C K S T A R T T U T O R I A L 1 : B U I L D I N G A F O R M
Page 9 of 24
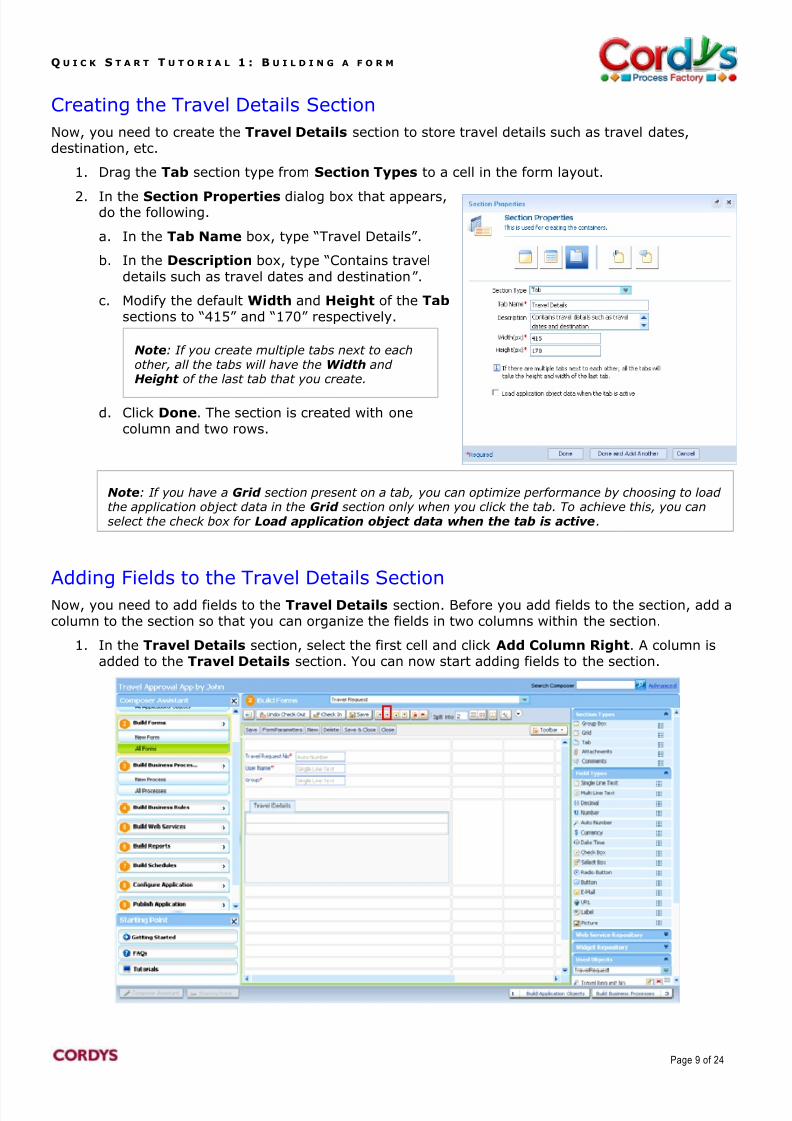
Creating the Travel Details Section
Now, you need to create the Travel Details section to store travel details such as travel dates,destination, etc.
1. Drag the Tab section type from Section Types to a cell in the form layout.
2. In the Section Properties dialog box that appears,do the following.
a. In the Tab Name box, type “Travel Details”.
b. In the Description box, type “Contains travel
details such as travel dates and destination” .
c. Modify the default Width and Height of the Tab sections to “415” and “170” respectively.
d. Click Done. The section is created with onecolumn and two rows.
Adding Fields to the Travel Details Section
Now, you need to add fields to the Travel Details section. Before you add fields to the section, add acolumn to the section so that you can organize the fields in two columns within the section.
1. In the Travel Details section, select the first cell and click Add Column Right. A column isadded to the Travel Details section. You can now start adding fields to the section.
Note: If you create multiple tabs next to eachother, all the tabs will have the Width and Height of the last tab that you create.
Note: If you have a Grid section present on a tab, you can optimize performance by choosing to load the application object data in the Grid section only when you click the tab. To achieve this, you canselect the check box for Load application object data when the tab is active.
8/7/2019 Basic tutorial 1
http://slidepdf.com/reader/full/basic-tutorial-1 10/24
Q U I C K S T A R T T U T O R I A L 1 : B U I L D I N G A F O R M
Page 10 of 24
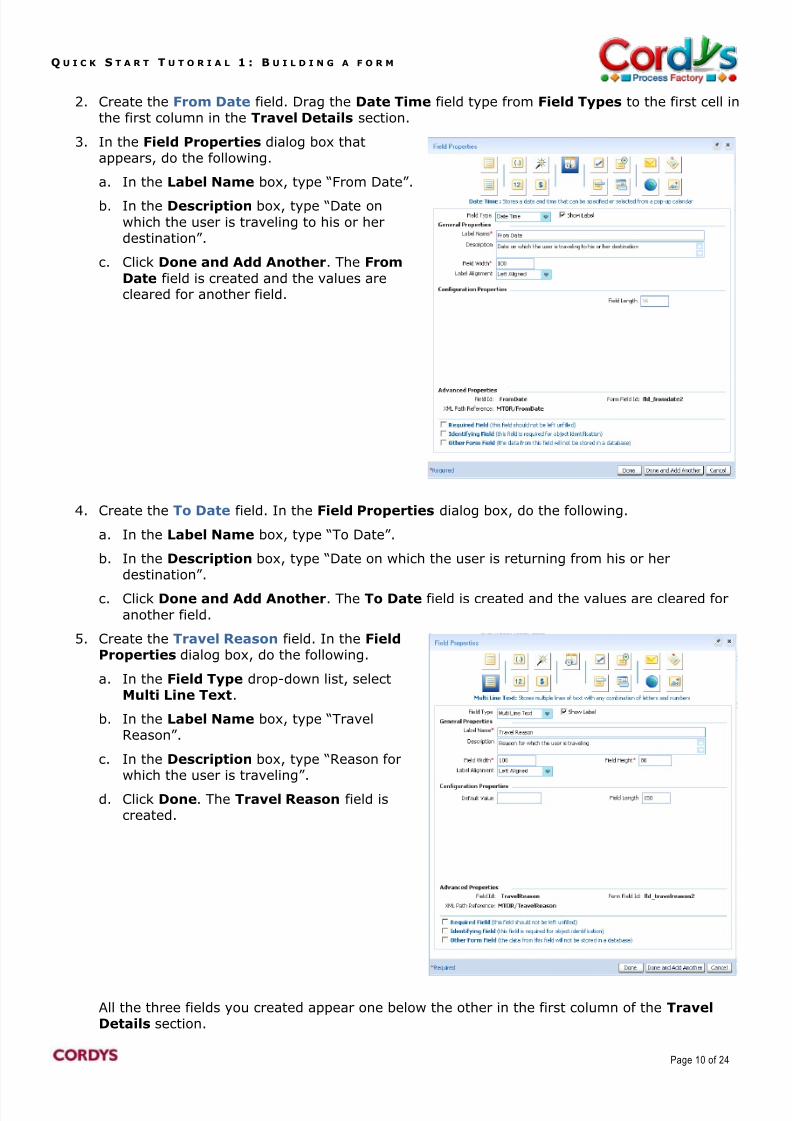
2. Create the From Date field. Drag the Date Time field type from Field Types to the first cell inthe first column in the Travel Details section.
3. In the Field Properties dialog box thatappears, do the following.
a. In the Label Name box, type “From Date”.
b. In the Description box, type “Date on
which the user is traveling to his or herdestination” .
c. Click Done and Add Another. The From
Date field is created and the values arecleared for another field.
4. Create the To Date field. In the Field Properties dialog box, do the following.
a. In the Label Name box, type “To Date”.
b. In the Description box, type “Date on which the user is returning from his or herdestination”.
c. Click Done and Add Another. The To Date field is created and the values are cleared for
another field.
5. Create the Travel Reason field. In the FieldProperties dialog box, do the following.
a. In the Field Type drop-down list, selectMulti Line Text.
b. In the Label Name box, type “TravelReason”.
c. In the Description box, type “Reason forwhich the user is traveling”.
d. Click Done. The Travel Reason field iscreated.
All the three fields you created appear one below the other in the first column of the TravelDetails section.
8/7/2019 Basic tutorial 1
http://slidepdf.com/reader/full/basic-tutorial-1 11/24
Q U I C K S T A R T T U T O R I A L 1 : B U I L D I N G A F O R M
Page 11 of 24
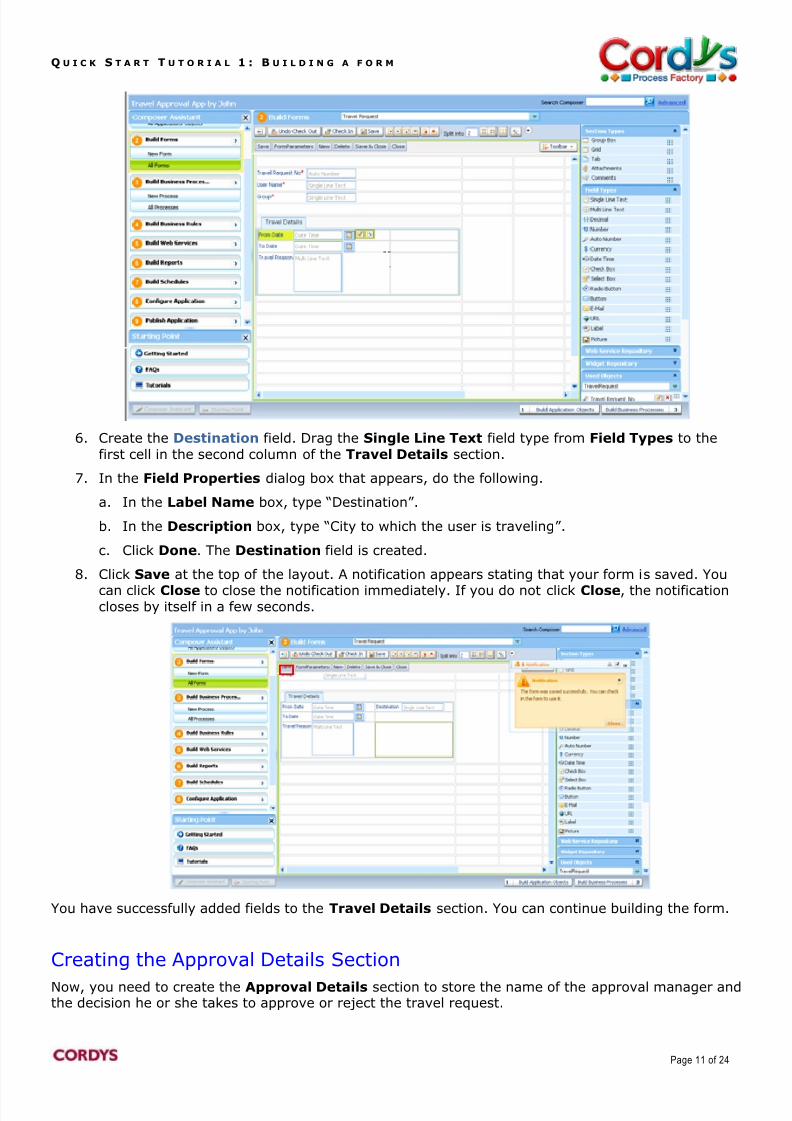
6. Create the Destination field. Drag the Single Line Text field type from Field Types to the
first cell in the second column of the Travel Details section.
7. In the Field Properties dialog box that appears, do the following.
a. In the Label Name box, type “Destination”.
b. In the Description box, type “City to which the user is traveling”.
c. Click Done. The Destination field is created.
8. Click Save at the top of the layout. A notification appears stating that your form is saved. You
can click Close to close the notification immediately. If you do not click Close, the notificationcloses by itself in a few seconds.
You have successfully added fields to the Travel Details section. You can continue building the form.
Creating the Approval Details Section
Now, you need to create the Approval Details section to store the name of the approval manager andthe decision he or she takes to approve or reject the travel request.

8/7/2019 Basic tutorial 1
http://slidepdf.com/reader/full/basic-tutorial-1 12/24
Q U I C K S T A R T T U T O R I A L 1 : B U I L D I N G A F O R M
Page 12 of 24
1. Drag the Tab section type from Section Types to the immediate right of the Travel Details section and drop it when you see a red line.
2. In the Section Properties dialog box that appears, do the following.
a. In the Tab Name box, type “Approval Details”.
b.
In the Description box, type “Contains the name of the manager and the approvaldecision” .
c. Click Done. The section is created.
Adding Fields to the Approval Details Section
Now, you need to add fields to the Approval Details section. You can organize the fields in a singlecolumn.
1. Create the Manager field. Drag the Single Line Text field type from Field Types to the firstcell in the Approval Details section.
2. In the Field Properties dialog box that appears, do the following.
a. In the Label Name box, type “Manager”.
b. In the Description box, type “Manager who will approve the travel request”.
c. Click Done and Add Another. The Manager field is created and the values are cleared foranother field.
3. Create the Manager Decision field. In the Field Properties dialog box, do the following.
a. In the Field Type drop-down list, select Select Box.
b. In the Label Name box, type “Manager Decision”.
c. In the Description box, type “Approval decision of the manager”.
d. Provide the Select Box Values. In the Display Value box, type “Approved”. The value thatyou typed in the Display Value box appears in the Database Value box also.
e. Click New Value ( ) to add another value for the Select Box. Two boxes appear for you totype the Display Value and the Database Value respectively.
Note: The Database Value helps in uniquely identifying a select box value.
8/7/2019 Basic tutorial 1
http://slidepdf.com/reader/full/basic-tutorial-1 13/24
Q U I C K S T A R T T U T O R I A L 1 : B U I L D I N G A F O R M
Page 13 of 24
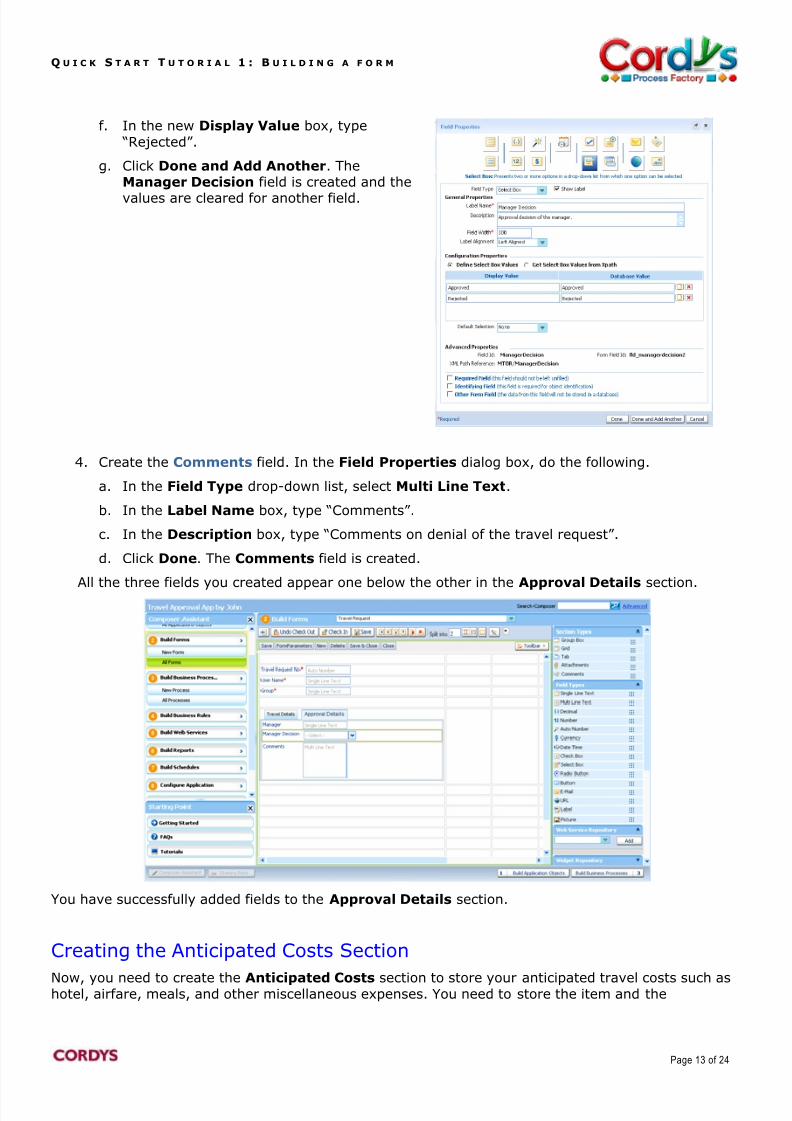
f. In the new Display Value box, type
“Rejected”.
g. Click Done and Add Another. TheManager Decision field is created and the
values are cleared for another field.
4. Create the Comments field. In the Field Properties dialog box, do the following.
a. In the Field Type drop-down list, select Multi Line Text.
b. In the Label Name box, type “Comments”.
c. In the Description box, type “Comments on denial of the travel request”.
d. Click Done. The Comments field is created.
All the three fields you created appear one below the other in the Approval Details section.
You have successfully added fields to the Approval Details section.
Creating the Anticipated Costs Section
Now, you need to create the Anticipated Costs section to store your anticipated travel costs such ashotel, airfare, meals, and other miscellaneous expenses. You need to store the item and the
8/7/2019 Basic tutorial 1
http://slidepdf.com/reader/full/basic-tutorial-1 14/24
Q U I C K S T A R T T U T O R I A L 1 : B U I L D I N G A F O R M
Page 14 of 24
anticipated cost of each item. When such multiple details are required to be stored, you can create aGrid section.
When you create a Grid section in a form with a new application object, a new application object iscreated for the Grid section also. In this tutorial, an application object called AnticipatedCosts iscreated for the Grid section.
A relation is automatically formed between the AnticipatedCosts application object and the mainapplication object that is being built for the form, TravelRequest. When such a relation isautomatically formed, the main application object for the form becomes an Associated Object for theapplication object for the Grid section. In this tutorial, the Travel Request application object is an
Associated Object for the Anticipated Costs application object.
Also, a Conditional Relation is formed by default between the Travel Request and the AnticipatedCosts application objects, making the Anticipated Costs application object dependent on the TravelRequest application object.
Do the following to create the Anticipated Costs section.
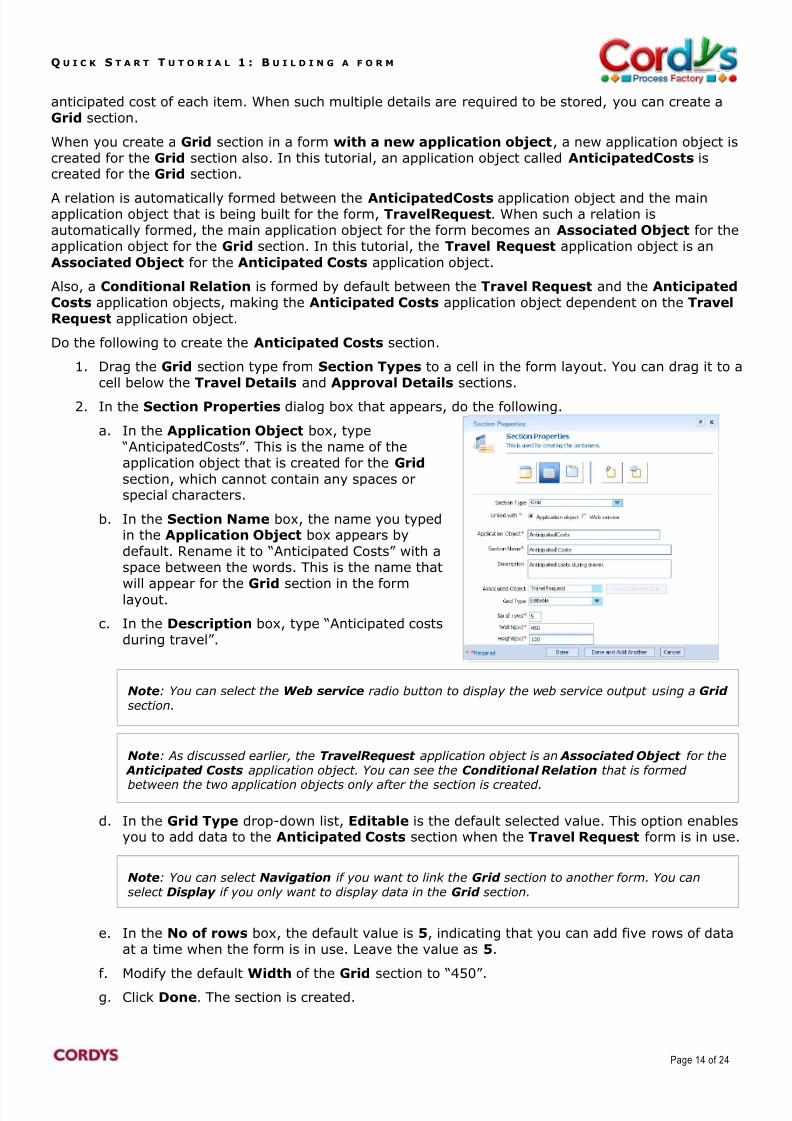
1. Drag the Grid section type from Section Types to a cell in the form layout. You can drag it to acell below the Travel Details and Approval Details sections.
2. In the Section Properties dialog box that appears, do the following.
a. In the Application Object box, type “AnticipatedCosts”. This is the name of theapplication object that is created for the Grid
section, which cannot contain any spaces orspecial characters.
b. In the Section Name box, the name you typedin the Application Object box appears by
default. Rename it to “Anticipated Costs” with aspace between the words. This is the name that
will appear for the Grid section in the formlayout.
c. In the Description box, type “Anticipated costsduring travel” .
d. In the Grid Type drop-down list, Editable is the default selected value. This option enablesyou to add data to the Anticipated Costs section when the Travel Request form is in use.
e. In the No of rows box, the default value is 5, indicating that you can add five rows of dataat a time when the form is in use. Leave the value as 5.
f. Modify the default Width of the Grid section to “450”.
g. Click Done. The section is created.
Note: As discussed earlier, the TravelRequest application object is an Associated Object for the Anticipated Costs application object. You can see the Conditional Relation that is formed
between the two application objects only after the section is created.
Note: You can select Navigation if you want to link the Grid section to another form. You canselect Display if you only want to display data in the Grid section.
Note: You can select the Web service radio button to display the web service output using a Grid section.
8/7/2019 Basic tutorial 1
http://slidepdf.com/reader/full/basic-tutorial-1 15/24
Q U I C K S T A R T T U T O R I A L 1 : B U I L D I N G A F O R M
Page 15 of 24
The AnticipatedCosts application object is created for the Grid section. You can view theapplication object in Used Objects, which lists all the application objects that are used in aform.
Adding Fields to the Anticipated Costs Section
Now, you need to add fields to the Anticipated Costs section.
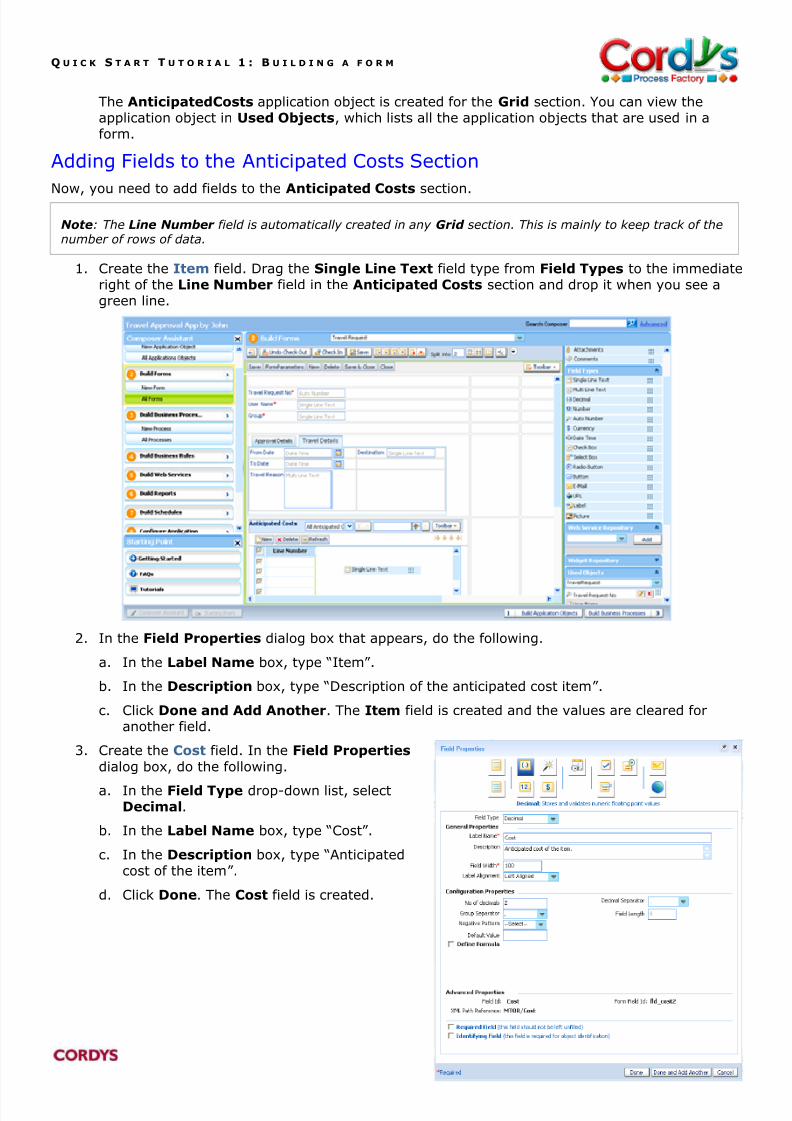
1. Create the Item field. Drag the Single Line Text field type from Field Types to the immediateright of the Line Number field in the Anticipated Costs section and drop it when you see agreen line.
2. In the Field Properties dialog box that appears, do the following.
a. In the Label Name box, type “Item”.
b. In the Description box, type “Description of the anticipated cost item”.
c. Click Done and Add Another. The Item field is created and the values are cleared foranother field.
3. Create the Cost field. In the Field Properties
dialog box, do the following.
a. In the Field Type drop-down list, selectDecimal.
b. In the Label Name box, type “Cost”.
c. In the Description box, type “Anticipatedcost of the item”.
d. Click Done. The Cost field is created.
Note: The Line Number field is automatically created in any Grid section. This is mainly to keep track of thenumber of rows of data.
8/7/2019 Basic tutorial 1
http://slidepdf.com/reader/full/basic-tutorial-1 16/24
8/7/2019 Basic tutorial 1
http://slidepdf.com/reader/full/basic-tutorial-1 17/24
Q U I C K S T A R T T U T O R I A L 1 : B U I L D I N G A F O R M
Page 17 of 24
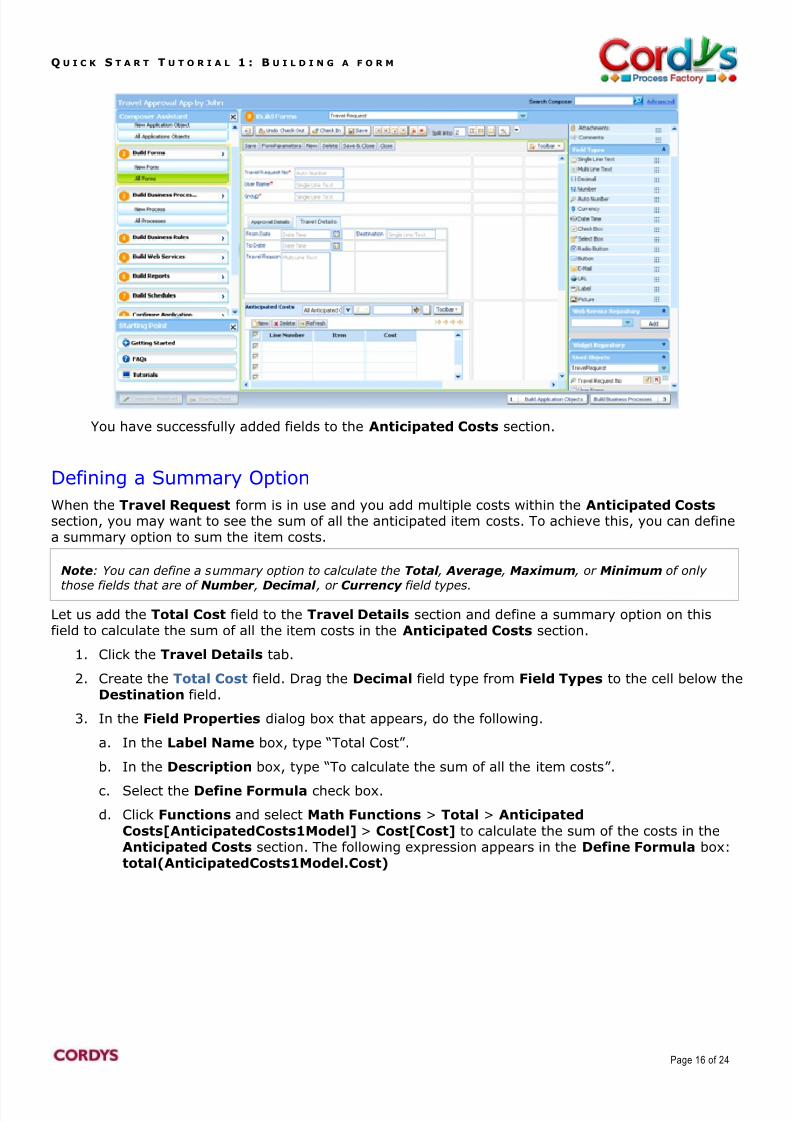
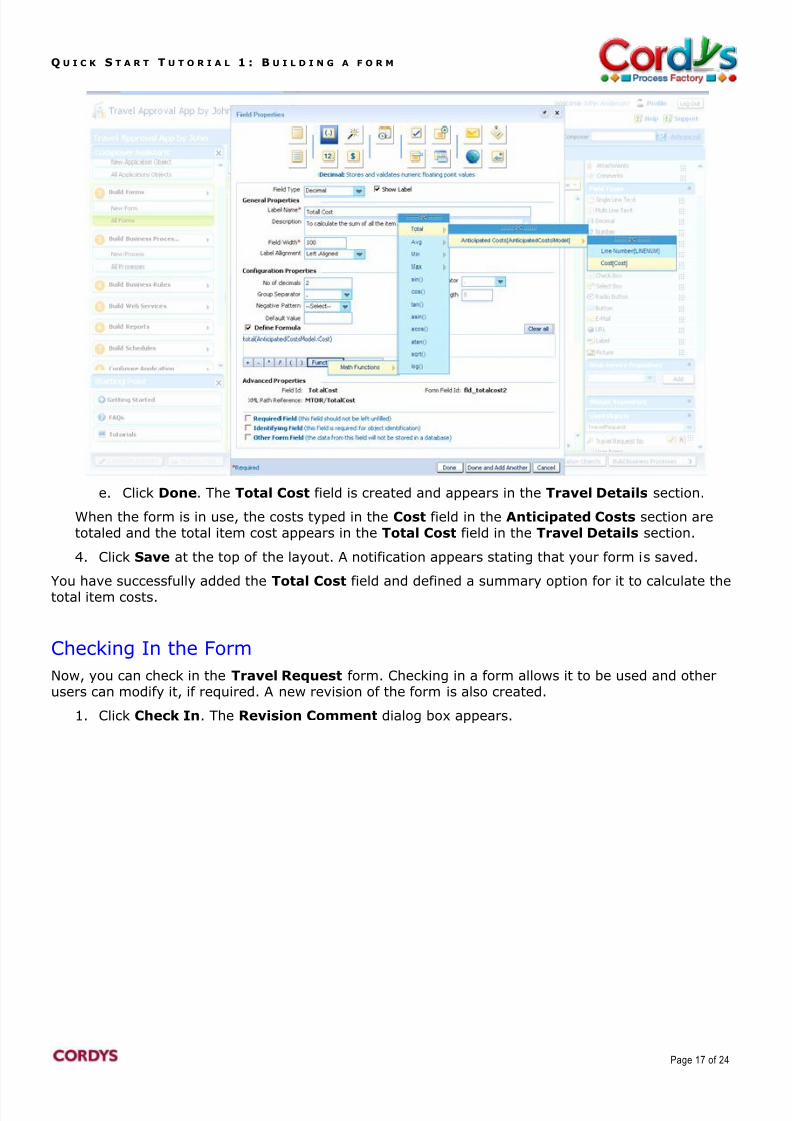
e. Click Done. The Total Cost field is created and appears in the Travel Details section.
When the form is in use, the costs typed in the Cost field in the Anticipated Costs section aretotaled and the total item cost appears in the Total Cost field in the Travel Details section.
4. Click Save at the top of the layout. A notification appears stating that your form is saved.
You have successfully added the Total Cost field and defined a summary option for it to calculate thetotal item costs.
Checking In the Form
Now, you can check in the Travel Request form. Checking in a form allows it to be used and otherusers can modify it, if required. A new revision of the form is also created.
1. Click Check In. The Revision Comment dialog box appears.

8/7/2019 Basic tutorial 1
http://slidepdf.com/reader/full/basic-tutorial-1 18/24
Q U I C K S T A R T T U T O R I A L 1 : B U I L D I N G A F O R M
Page 18 of 24
2. In the Comment box, type “Created a travel request form”. This is optional.
3. Click OK. A notification appears stating that your form is checked in.
Step 4: Creating a Tab and Adding ContentAfter building and checking in the form, you need to make the form accessible. You need to create an
application tab and add the form to it.
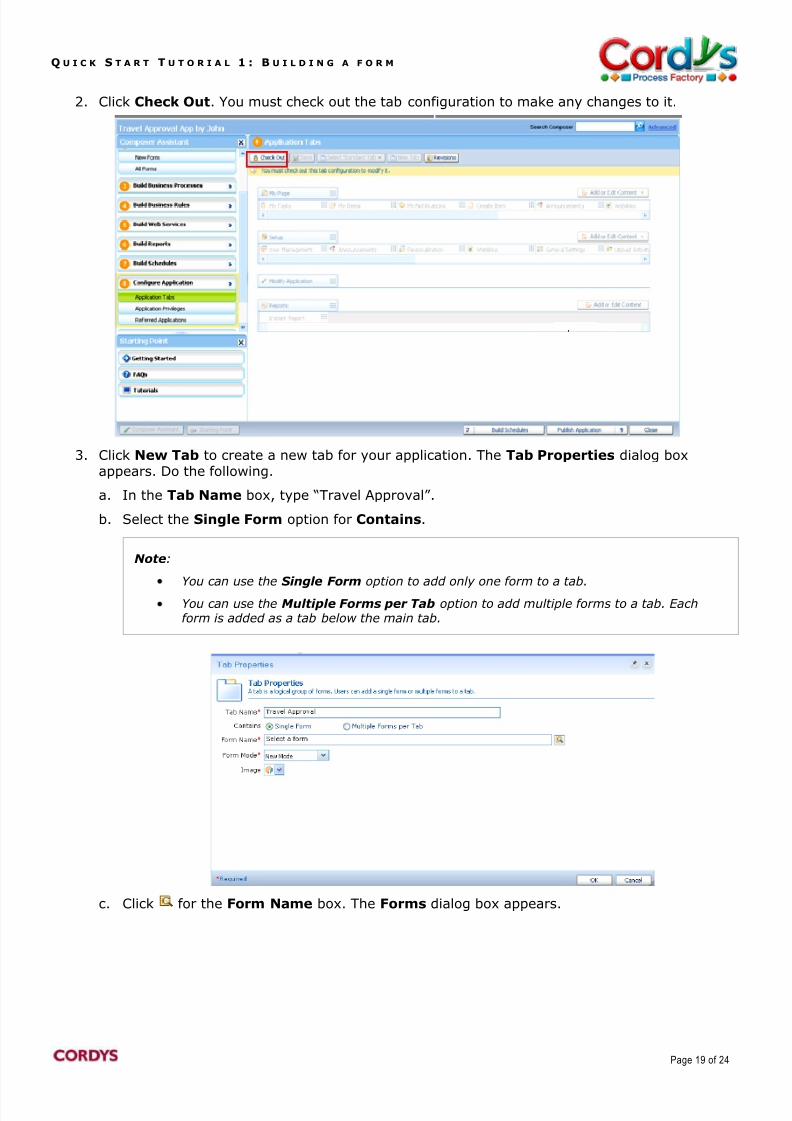
1. Click Configure Application on the Composer Assistant andclick Application Tabs. The Application Tabs page appears.
8/7/2019 Basic tutorial 1
http://slidepdf.com/reader/full/basic-tutorial-1 19/24
Q U I C K S T A R T T U T O R I A L 1 : B U I L D I N G A F O R M
Page 19 of 24
2. Click Check Out. You must check out the tab configuration to make any changes to it.
3. Click New Tab to create a new tab for your application. The Tab Properties dialog boxappears. Do the following.
a. In the Tab Name box, type “Travel Approval”.
b. Select the Single Form option for Contains.
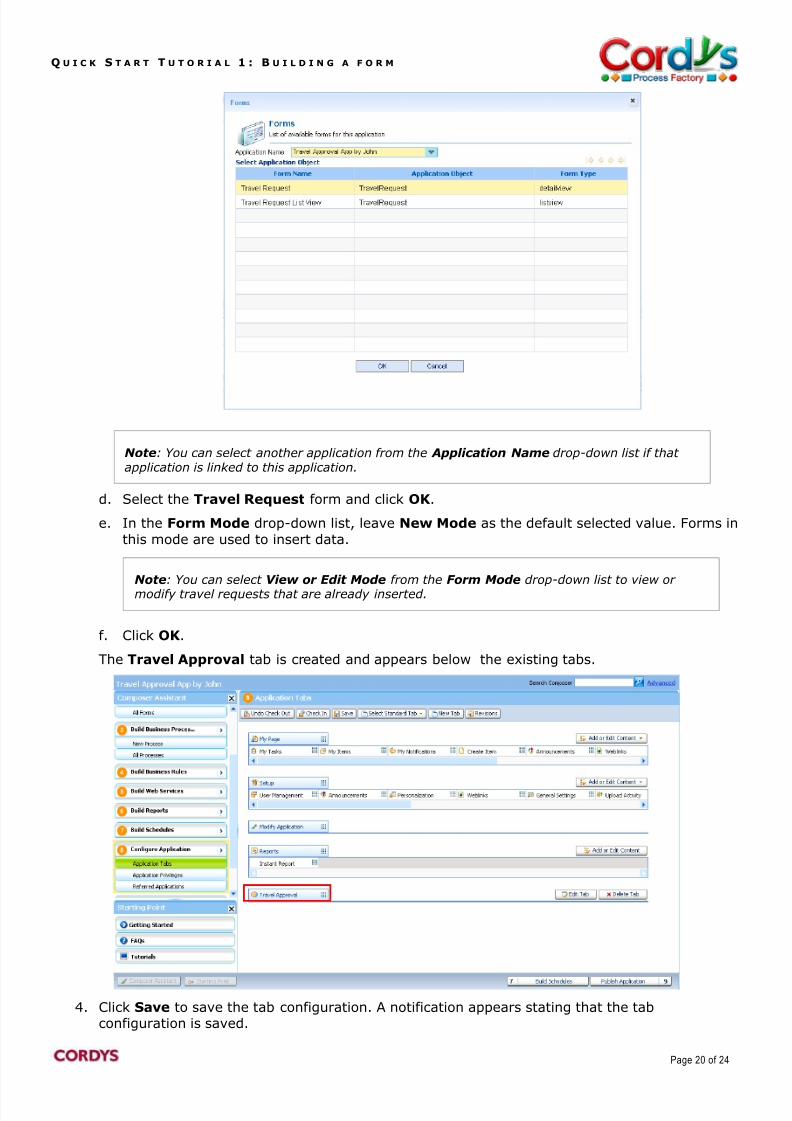
c. Click for the Form Name box. The Forms dialog box appears.
Note:
You can use the Single Form option to add only one form to a tab.
You can use the Multiple Forms per Tab option to add multiple forms to a tab. Eachform is added as a tab below the main tab.
8/7/2019 Basic tutorial 1
http://slidepdf.com/reader/full/basic-tutorial-1 20/24
Q U I C K S T A R T T U T O R I A L 1 : B U I L D I N G A F O R M
Page 20 of 24
d. Select the Travel Request form and click OK.
e. In the Form Mode drop-down list, leave New Mode as the default selected value. Forms in
this mode are used to insert data.
f. Click OK.
The Travel Approval tab is created and appears below the existing tabs.
4. Click Save to save the tab configuration. A notification appears stating that the tabconfiguration is saved.
Note: You can select View or Edit Mode from the Form Mode drop-down list to view or
modify travel requests that are already inserted.
Note: You can select another application from the Application Name drop-down list if that application is linked to this application.

8/7/2019 Basic tutorial 1
http://slidepdf.com/reader/full/basic-tutorial-1 21/24
Q U I C K S T A R T T U T O R I A L 1 : B U I L D I N G A F O R M
Page 21 of 24
5. Click Check In. The Revision Comment dialog box appears.
6. In the Comment box, type “Added the Travel Request form to the Travel Approval tab” . This is
optional. Click OK. A notification appears stating that the tab configuration was checked insuccessfully.
You have created an application tab and added a form to it successfully.
Step 5: Publishing an ApplicationWhen you complete building an application, you can publish the application. Publishing makes the
application available in the list of applications available to you. You can click Change Application toselect the application and then proceed with setup activities for the application and the remainingcomposing steps.
1. Click Publish Application on the Composer Assistant. The Publish Application page
appears, displaying the components of the application under Application Summary.
2. Click Publish Application. The application is published.
Step 6: Using the ApplicationNow that you have added the Travel Request form to a tab and published the Travel Approval App
by John application, you can access the form easily through the tab.
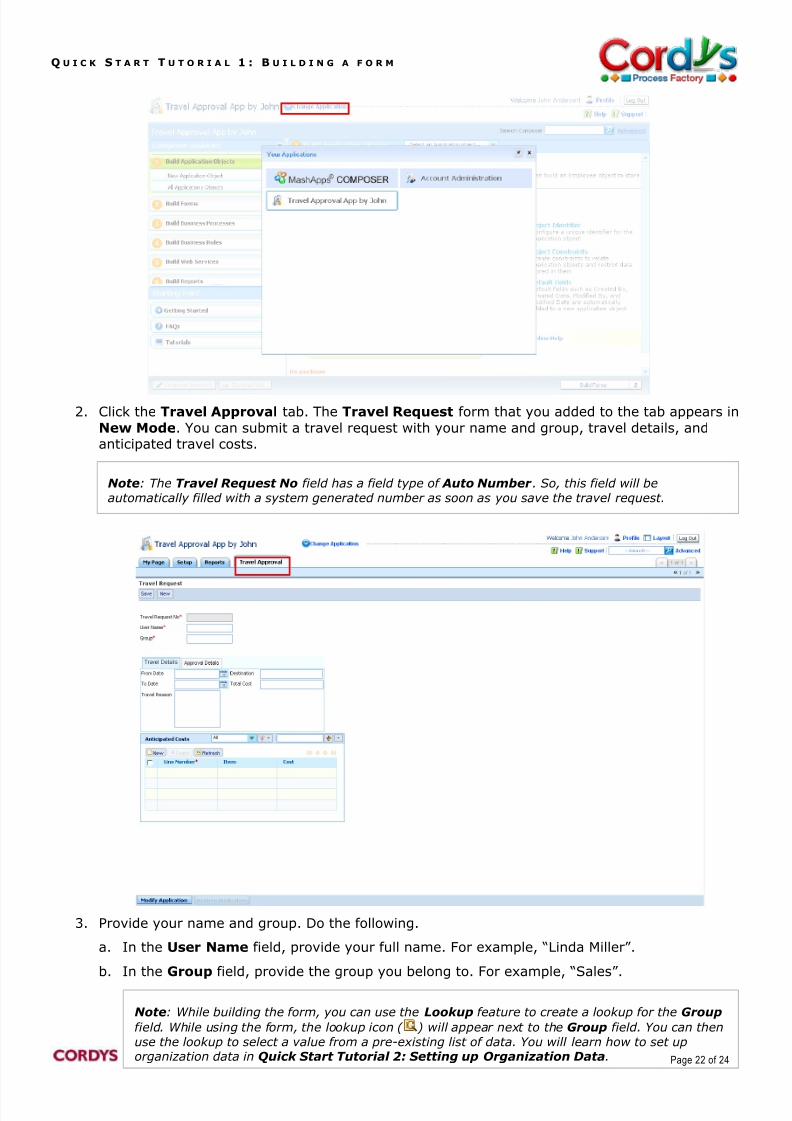
1. Click Change Application above the Composer Assistant and select Travel Approval Appby John. The application appears.
Note:
If you add a new form to a published application, you need not publish the application again. After youbuild the form, check it in, and add it to an application tab, the form is automatically available for use.
After you publish an application, you can click Send to Production to make the application production- ready. Then, users can add production data.
8/7/2019 Basic tutorial 1
http://slidepdf.com/reader/full/basic-tutorial-1 22/24
Q U I C K S T A R T T U T O R I A L 1 : B U I L D I N G A F O R M
Page 22 of 24
2. Click the Travel Approval tab. The Travel Request form that you added to the tab appears in
New Mode. You can submit a travel request with your name and group, travel details, andanticipated travel costs.
3. Provide your name and group. Do the following.
a. In the User Name field, provide your full name. For example, “Linda Miller” .
b. In the Group field, provide the group you belong to. For example, “Sales” .
Note: The Travel Request No field has a field type of Auto Number . So, this field will be
automatically filled with a system generated number as soon as you save the travel request.
Note: While building the form, you can use the Lookup feature to create a lookup for the Group
field. While using the form, the lookup icon ( ) will appear next to the Group field. You can then
use the lookup to select a value from a pre-existing list of data. You will learn how to set uporganization data in Quick Start Tutorial 2: Setting up Organization Data.
8/7/2019 Basic tutorial 1
http://slidepdf.com/reader/full/basic-tutorial-1 23/24
Q U I C K S T A R T T U T O R I A L 1 : B U I L D I N G A F O R M
Page 23 of 24
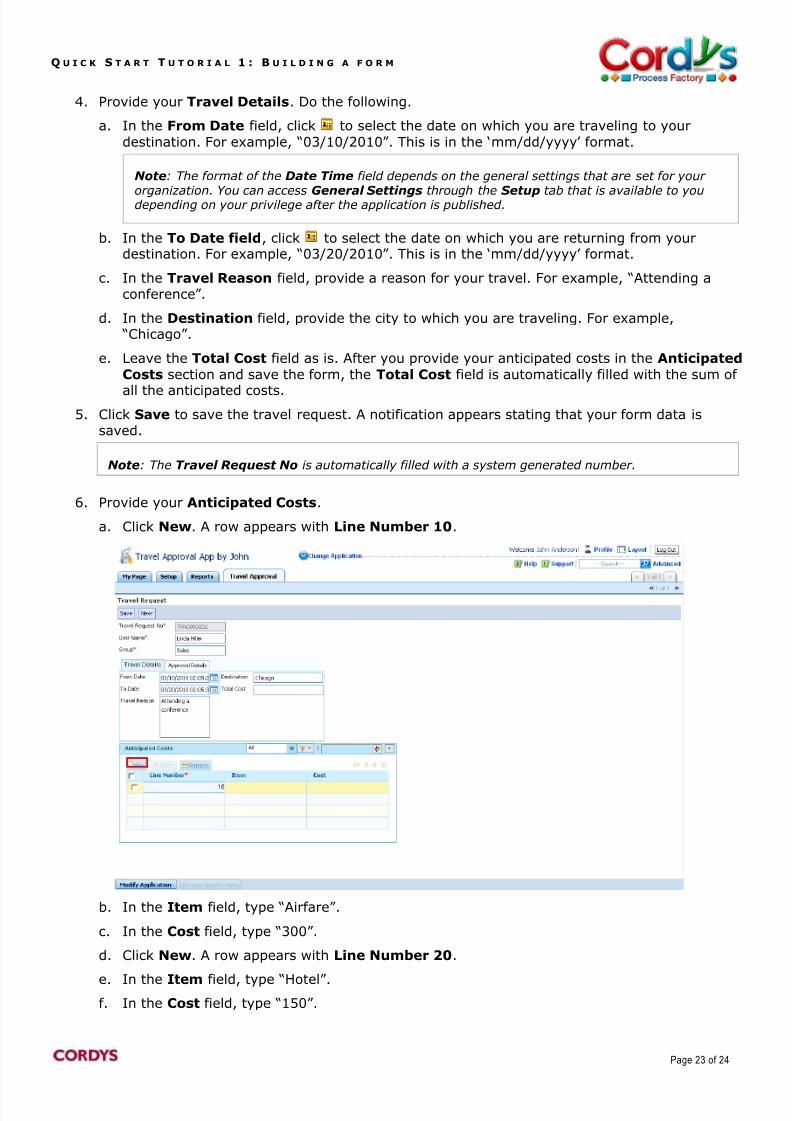
4. Provide your Travel Details. Do the following.
a. In the From Date field, click to select the date on which you are traveling to your
destination. For example, “03/10/2010”. This is in the „mm/dd/yyyy‟ format.
b. In the To Date field, click to select the date on which you are returning from yourdestination. For example, “03/20/2010”. This is in the „mm /dd/yyyy‟ format.
c. In the Travel Reason field, provide a reason for your travel. For example, “Attending aconference” .
d. In the Destination field, provide the city to which you are traveling. For example, “Chicago”.
e. Leave the Total Cost field as is. After you provide your anticipated costs in the Anticipated
Costs section and save the form, the Total Cost field is automatically filled with the sum of
all the anticipated costs.5. Click Save to save the travel request. A notification appears stating that your form data is
saved.
6. Provide your Anticipated Costs.
a. Click New. A row appears with Line Number 10.
b. In the Item field, type “Airfare”.
c. In the Cost field, type “300”.
d. Click New. A row appears with Line Number 20.
e. In the Item field, type “Hotel”. f. In the Cost field, type “150”.
Note: The format of the Date Time field depends on the general settings that are set for your
organization. You can access General Settings through the Setup tab that is available to youdepending on your privilege after the application is published.
Note: The Travel Request No is automatically filled with a system generated number.
8/7/2019 Basic tutorial 1
http://slidepdf.com/reader/full/basic-tutorial-1 24/24
Q U I C K S T A R T T U T O R I A L 1 : B U I L D I N G A F O R M
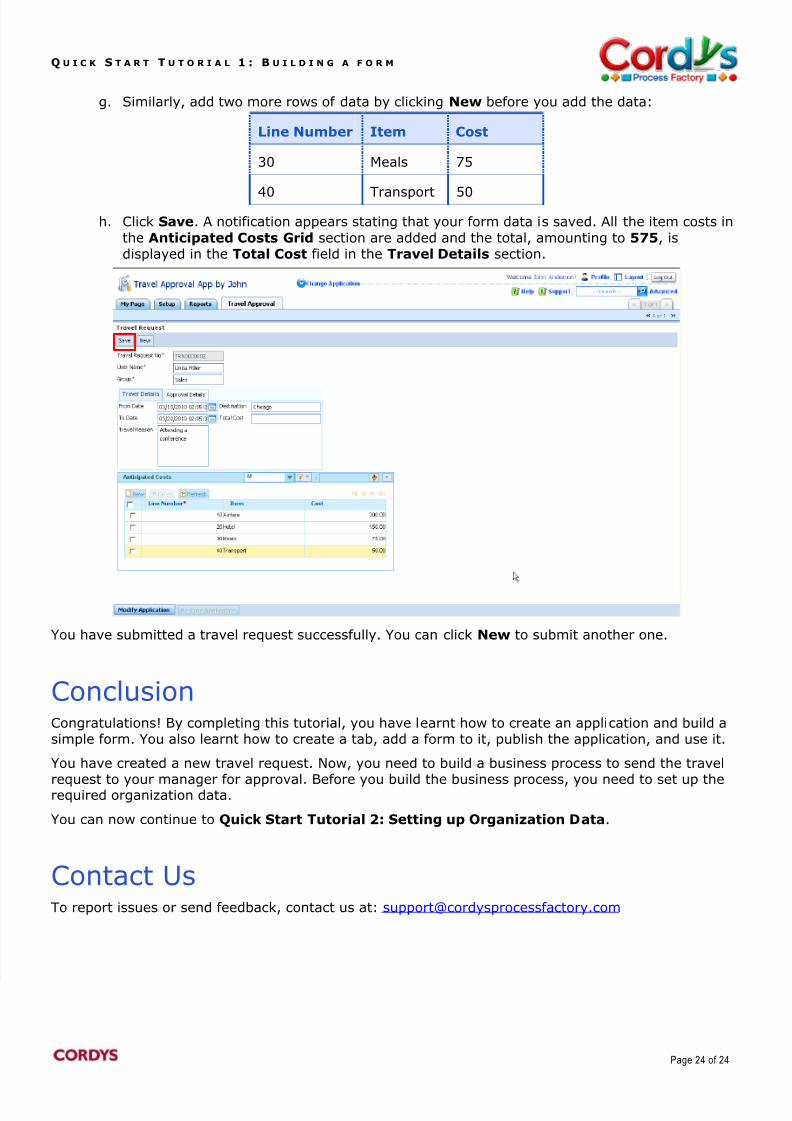
g. Similarly, add two more rows of data by clicking New before you add the data:
Line Number Item Cost
30 Meals 75
40 Transport 50
h. Click Save. A notification appears stating that your form data is saved. All the item costs in
the Anticipated Costs Grid section are added and the total, amounting to 575, isdisplayed in the Total Cost field in the Travel Details section.
You have submitted a travel request successfully. You can click New to submit another one.
ConclusionCongratulations! By completing this tutorial, you have learnt how to create an application and build asimple form. You also learnt how to create a tab, add a form to it, publish the application, and use it.
You have created a new travel request. Now, you need to build a business process to send the travelrequest to your manager for approval. Before you build the business process, you need to set up therequired organization data.
You can now continue to Quick Start Tutorial 2: Setting up Organization Data.
Contact UsTo report issues or send feedback, contact us at: [email protected]