Axxess Desktop SoftPhone User Guide - voipinfo.net SoftPhone User Guide.pdf · Feature Key...
118
User Guide Desktop SoftPhone
Transcript of Axxess Desktop SoftPhone User Guide - voipinfo.net SoftPhone User Guide.pdf · Feature Key...

User GuideDesktop SoftPhone

Notice
This Axxess Desktop SoftPhone user guide is released by INTER-TEL, INC. as a guide forsystem users and trainers. It provides information necessary to properly install, program,and use the application.
The contents of this guide, which reflect current INTER-TEL standards, are subject torevision or change without notice. Software packages released after the publication of thisguide will be documented in addenda to the guide or succeeding issues of the guide.
If additional information is required, please contact your service representative.
For sales, service, or technical support, contact your local authorized Inter-Tel dealer.
If you have any questions or comments regarding this manual or other technical documentation, contact
Inter-Tel’s Technical Publications Department at: [email protected]

Axxess Deskt
GETTING STARTED . . . . . . . . . . . . . . . . . . . . . . . . . . . . . . . . . . . . . . . 1System Requirements . . . . . . . . . . . . . . . . . . . . . . . . . . . . . . . . . . . . . . . . 1
Hardware . . . . . . . . . . . . . . . . . . . . . . . . . . . . . . . . . . . . . . . . . . . . . . 1Software . . . . . . . . . . . . . . . . . . . . . . . . . . . . . . . . . . . . . . . . . . . . . . . 2
Software Installation . . . . . . . . . . . . . . . . . . . . . . . . . . . . . . . . . . . . . . . . . 3Installing the Desktop SoftPhone . . . . . . . . . . . . . . . . . . . . . . . . . . . . 3Starting the Desktop Softphone . . . . . . . . . . . . . . . . . . . . . . . . . . . . . 6
About Desktop SoftPhone . . . . . . . . . . . . . . . . . . . . . . . . . . . . . . . . . . . . . 7The Desktop SoftPhone . . . . . . . . . . . . . . . . . . . . . . . . . . . . . . . . . . . 8Feature Key Functions . . . . . . . . . . . . . . . . . . . . . . . . . . . . . . . . . . . . 9LCD Display Menu Keys . . . . . . . . . . . . . . . . . . . . . . . . . . . . . . . . . 10Shortcut Keys . . . . . . . . . . . . . . . . . . . . . . . . . . . . . . . . . . . . . . . . . . 11
About Voice Mail . . . . . . . . . . . . . . . . . . . . . . . . . . . . . . . . . . . . . . . . . . . 12What You See and Hear . . . . . . . . . . . . . . . . . . . . . . . . . . . . . . . . . . . . . . 13What the Administrators Can Do for You . . . . . . . . . . . . . . . . . . . . . . . 14
USING DESKTOP SOFTPHONE . . . . . . . . . . . . . . . . . . . . . . . . . . . . . 15Customizing Phone Settings . . . . . . . . . . . . . . . . . . . . . . . . . . . . . . . . . 17
Always On Top . . . . . . . . . . . . . . . . . . . . . . . . . . . . . . . . . . . . . . . . . 17Three Dimension (3D) Buttons. . . . . . . . . . . . . . . . . . . . . . . . . . . . . 18Numeric Keypad. . . . . . . . . . . . . . . . . . . . . . . . . . . . . . . . . . . . . . . . 18Restore Program When Call Rings . . . . . . . . . . . . . . . . . . . . . . . . . 19Call List. . . . . . . . . . . . . . . . . . . . . . . . . . . . . . . . . . . . . . . . . . . . . . . 20Number of Customized Keys . . . . . . . . . . . . . . . . . . . . . . . . . . . . . . 21Override Trunk Name. . . . . . . . . . . . . . . . . . . . . . . . . . . . . . . . . . . . 22TCP/IP Settings . . . . . . . . . . . . . . . . . . . . . . . . . . . . . . . . . . . . . . . . 22Caller ID . . . . . . . . . . . . . . . . . . . . . . . . . . . . . . . . . . . . . . . . . . . . . . 23View Call Log . . . . . . . . . . . . . . . . . . . . . . . . . . . . . . . . . . . . . . . . . . 24Key Font . . . . . . . . . . . . . . . . . . . . . . . . . . . . . . . . . . . . . . . . . . . . . . 25Background Color. . . . . . . . . . . . . . . . . . . . . . . . . . . . . . . . . . . . . . . 26Currency Character . . . . . . . . . . . . . . . . . . . . . . . . . . . . . . . . . . . . . 27Resync Programmable Keys . . . . . . . . . . . . . . . . . . . . . . . . . . . . . . 28
Customizing Feature Keys . . . . . . . . . . . . . . . . . . . . . . . . . . . . . . . . . . . 29Program . . . . . . . . . . . . . . . . . . . . . . . . . . . . . . . . . . . . . . . . . . . . . . 29Set Text . . . . . . . . . . . . . . . . . . . . . . . . . . . . . . . . . . . . . . . . . . . . . . 31Set Color . . . . . . . . . . . . . . . . . . . . . . . . . . . . . . . . . . . . . . . . . . . . . 31Review . . . . . . . . . . . . . . . . . . . . . . . . . . . . . . . . . . . . . . . . . . . . . . . 32Reverse Text Color . . . . . . . . . . . . . . . . . . . . . . . . . . . . . . . . . . . . . 32Cancel . . . . . . . . . . . . . . . . . . . . . . . . . . . . . . . . . . . . . . . . . . . . . . . 32
HANDLING CALLS . . . . . . . . . . . . . . . . . . . . . . . . . . . . . . . . . . . . . . . 33Initializing Your Mailbox . . . . . . . . . . . . . . . . . . . . . . . . . . . . . . . . . . . . . . 33
iiiop SoftPhone User Guide
GETTIN
G STA
RTED
TRO
UB
LESHO
OTIN
G
INDEX
USIN
G SO
FTPHO
NE
Table of Contents
CONTENTS PAGE
iv
CONTENTS PAGE
Making and Receiving Calls . . . . . . . . . . . . . . . . . . . . . . . . . . . . . . . . . .34Intercom Calls . . . . . . . . . . . . . . . . . . . . . . . . . . . . . . . . . . . . . . . . . 34Outside Calls . . . . . . . . . . . . . . . . . . . . . . . . . . . . . . . . . . . . . . . . . . 36Emergency Calls . . . . . . . . . . . . . . . . . . . . . . . . . . . . . . . . . . . . . . . 37Call Waiting . . . . . . . . . . . . . . . . . . . . . . . . . . . . . . . . . . . . . . . . . . . 37
Placing Calls On Hold . . . . . . . . . . . . . . . . . . . . . . . . . . . . . . . . . . . . . . . 38Placing Conference Calls . . . . . . . . . . . . . . . . . . . . . . . . . . . . . . . . . . . . 39Transferring Calls . . . . . . . . . . . . . . . . . . . . . . . . . . . . . . . . . . . . . . . . . . 40
To Another Extension. . . . . . . . . . . . . . . . . . . . . . . . . . . . . . . . . . . . 40To Voice Mail . . . . . . . . . . . . . . . . . . . . . . . . . . . . . . . . . . . . . . . . . . 40To an Outside Number . . . . . . . . . . . . . . . . . . . . . . . . . . . . . . . . . . . 41To Pick Up (Reverse Transfer) a Call . . . . . . . . . . . . . . . . . . . . . . . 41
Forwarding Calls . . . . . . . . . . . . . . . . . . . . . . . . . . . . . . . . . . . . . . . . . . . 42Manual Call Forwarding . . . . . . . . . . . . . . . . . . . . . . . . . . . . . . . . . . 42Automatic System Forwarding . . . . . . . . . . . . . . . . . . . . . . . . . . . . . 43Redirect Calls . . . . . . . . . . . . . . . . . . . . . . . . . . . . . . . . . . . . . . . . . . 43
Redialing a Number . . . . . . . . . . . . . . . . . . . . . . . . . . . . . . . . . . . . . . . . . 44Displaying Information on Your Phone . . . . . . . . . . . . . . . . . . . . . . . . . 45
Date, Time, Name, and Extension Number . . . . . . . . . . . . . . . . . . . 45Outside Party’s Name/Number. . . . . . . . . . . . . . . . . . . . . . . . . . . . . 45
Using the Message Key . . . . . . . . . . . . . . . . . . . . . . . . . . . . . . . . . . . . . . 46Leaving Messages . . . . . . . . . . . . . . . . . . . . . . . . . . . . . . . . . . . . . . 46Retrieving Messages . . . . . . . . . . . . . . . . . . . . . . . . . . . . . . . . . . . . 47
Accessing Your Mailbox . . . . . . . . . . . . . . . . . . . . . . . . . . . . . . . . . . . . . 48Using Voice Mail Messages . . . . . . . . . . . . . . . . . . . . . . . . . . . . . . . . . . . 49
Listening to Messages . . . . . . . . . . . . . . . . . . . . . . . . . . . . . . . . . . . 49Undeleting Messages. . . . . . . . . . . . . . . . . . . . . . . . . . . . . . . . . . . . 51Sending Messages. . . . . . . . . . . . . . . . . . . . . . . . . . . . . . . . . . . . . . 52Canceling Unheard Messages . . . . . . . . . . . . . . . . . . . . . . . . . . . . . 53
Using Do-Not-Disturb Mode . . . . . . . . . . . . . . . . . . . . . . . . . . . . . . . . . .54Reminder Messages . . . . . . . . . . . . . . . . . . . . . . . . . . . . . . . . . . . . . . . . 56Setting Preferences . . . . . . . . . . . . . . . . . . . . . . . . . . . . . . . . . . . . . . . . . 58
Phone Configuration. . . . . . . . . . . . . . . . . . . . . . . . . . . . . . . . . . . . . 58Voice Mail Options . . . . . . . . . . . . . . . . . . . . . . . . . . . . . . . . . . . . . . 61
Speed dialing . . . . . . . . . . . . . . . . . . . . . . . . . . . . . . . . . . . . . . . . . . . . . . 68Station Speed Dial . . . . . . . . . . . . . . . . . . . . . . . . . . . . . . . . . . . . . . 68System Speed Dial . . . . . . . . . . . . . . . . . . . . . . . . . . . . . . . . . . . . . . 69
Using Record-A-Call . . . . . . . . . . . . . . . . . . . . . . . . . . . . . . . . . . . . . . . . 70Paging . . . . . . . . . . . . . . . . . . . . . . . . . . . . . . . . . . . . . . . . . . . . . . . . . . . . 71
Making Pages. . . . . . . . . . . . . . . . . . . . . . . . . . . . . . . . . . . . . . . . . . 71Enabling Paging . . . . . . . . . . . . . . . . . . . . . . . . . . . . . . . . . . . . . . . . 71
Performing a “Hookflash” During a Call . . . . . . . . . . . . . . . . . . . . . . . . 72
Axxess Desktop SoftPhone User Guide
CONTENTS PAGE
Axxess Deskt
Programming Your Feature Keys . . . . . . . . . . . . . . . . . . . . . . . . . . . . . . 73Programming Secondary Extension Keys . . . . . . . . . . . . . . . . . . . . . . . 74Using Account Codes . . . . . . . . . . . . . . . . . . . . . . . . . . . . . . . . . . . . . . . 75Screening Calls . . . . . . . . . . . . . . . . . . . . . . . . . . . . . . . . . . . . . . . . . . . . 76Using the Directories . . . . . . . . . . . . . . . . . . . . . . . . . . . . . . . . . . . . . . . . 76
Phone Directory . . . . . . . . . . . . . . . . . . . . . . . . . . . . . . . . . . . . . . . . 76Voice Mail Directory . . . . . . . . . . . . . . . . . . . . . . . . . . . . . . . . . . . . . . . . . 77Programming Remote Feature Access . . . . . . . . . . . . . . . . . . . . . . . . . 78
Remote Access Password . . . . . . . . . . . . . . . . . . . . . . . . . . . . . . . . 78Remote Feature Access. . . . . . . . . . . . . . . . . . . . . . . . . . . . . . . . . . 78
Requesting Agent Help . . . . . . . . . . . . . . . . . . . . . . . . . . . . . . . . . . . . . . 80Working in Hunt Groups . . . . . . . . . . . . . . . . . . . . . . . . . . . . . . . . . . . . . 81
Hunt Group Calls Enabled/Disabled. . . . . . . . . . . . . . . . . . . . . . . . . 81ACD Hunt Groups . . . . . . . . . . . . . . . . . . . . . . . . . . . . . . . . . . . . . . 81
TROUBLESHOOTING . . . . . . . . . . . . . . . . . . . . . . . . . . . . . . . . . . . . . 85DTI Connection Issues . . . . . . . . . . . . . . . . . . . . . . . . . . . . . . . . . . . . . . . 85CP Server Connection Issues . . . . . . . . . . . . . . . . . . . . . . . . . . . . . . . . . 88Frequently Asked Questions (FAQ) . . . . . . . . . . . . . . . . . . . . . . . . . . . . 92
INDEX . . . . . . . . . . . . . . . . . . . . . . . . . . . . . . . . . . . . . . . . . . . . . . . . . . 95
DEFAULT FEATURE CODES . . . . . . . . . . . . . . . . . . . . . . . . . . . . . . . 99
vop SoftPhone User Guide
Limited Warranty
vi
Inter-Tel warrants that its products will, if delivered to the end-user in undamagedcondition, be free from defects in material and workmanship under normal use andservice for the period set forth on the current warranty periods as published in the USPrice List from time to time and substantially in conformance with the documentation(functional and operating specifications) that Inter-Tel publishes regarding same (end-user reference and operating manuals and guides relating to the program). Inter-Teldoes not, however, warrant that the functions contained in the software program willsatisfy Dealer's particular purpose and/or requirements or that the operation of theprogram will be uninterrupted or error free.
Inter-Tel shall incur no liability under this warranty and this warranty is voidable byInter-Tel (a) if the product is used other than under normal use, with certified repairand maintenance service and under proper environmental conditions, (b) if the prod-uct is subject to abuse, misuse, neglect, flooding, lightning, power surges, third-partyerror or omission, acts of God, damage or accident, (c) if the product is modified oraltered (unless expressly authorized in writing by Inter-Tel), (d) if the product isinstalled or used in combination or in assembly with products not supplied or autho-rized by Inter-Tel and/or which are not compatible with or are of inferior quality,design or performance to Inter-Tel or Inter-Tel supplied products so as to cause a dim-inution or degradation in functionality, (e) if there is a failure to follow specificrestrictions in operating instructions or (f) if payment for product has not been timelymade.
The sole obligation of Inter-Tel and the exclusive remedy and recourse of Dealerunder this warranty, or any other legal obligation, with respect to product, includinghardware, firmware, and software media, is for Inter-Tel, at its election, to eitherrepair and/or replace the allegedly defective or missing product(s) or component(s)and return (prepaid) same (if necessary), or grant a reimbursement credit with respectto the product or component in the amount of the sales price to the Dealer. Withregard to a software program design defect, however, to the extent it prevents the pro-gram from providing functionality and/or operating as intended by Inter-Tel, is serviceaffecting, and prevents beneficial use of the product, Inter-Tel does undertake to useits best efforts to devise a suitable corrective solution to the problem within a reason-able period of time; should said action, however, not substantially resolve the prob-lem, then Inter-Tel reserves the right to substitute a new release (“stream”) of softwareas soon as it is generally made available by Inter-Tel. The above, with regard to a soft-ware design defect, likewise, constitutes the sole obligation of Inter-Tel and exclusiveremedy of Dealer hereunder.
Axxess Desktop SoftPhone User Guide

Axxess Deskt
The responsibility of Inter-Tel to honor the express limited warranty stated above alsoshall be predicated on receiving timely written notice of the alleged defect(s) with asmuch specificity as is known within thirty (30) calendar days of the malfunction or bythe expiration of the warranty period (plus thirty [30] calendar days), whicheveroccurs first. Inter-Tel shall further have the right to inspect and test the product todetermine, in its reasonable discretion, if the alleged malfunction is actually due todefects in material or workmanship. Unless waived by Inter-Tel, Dealer agrees toreturn (prepaid) the allegedly defective product or component to Inter-Tel for inspec-tion and/or testing, and, if appropriate, for repair and/or replacement.
NOTE: THE ABOVE EXPRESS LIMITED WARRANTY IS IN LIEU OF ALL OTHER WARRAN-TIES, EXPRESS OR IMPLIED, FROM INTER-TEL, INC., OR INTER-TEL INTEGRATED SYS-TEMS INC., AND THERE ARE NO OTHER WARRANTIES WHICH EXTEND BEYOND THEFACE OF THIS WARRANTY. ALL OTHER WARRANTIES WHATSOEVER, INCLUDING THEIMPLIED WARRANTY OF MERCHANTABILITY AND THE IMPLIED WARRANTY OF FITNESSFOR A PARTICULAR PURPOSE RELATING TO USE OR PERFORMANCE OF THE PRODUCT,INCLUDING ITS PARTS, ARE HEREBY EXCLUDED AND DISCLAIMED.
IN NO EVENT SHALL INTER-TEL, INC., UNDER ANY CIRCUMSTANCES, BE LIABLE FORNOR SHALL A PURCHASER (DIRECTLY OR INDIRECTLY) BE ENTITLED TO ANY SPECIAL,CONSEQUENTIAL, INCIDENTAL, INDIRECT, PUNITIVE OR EXEMPLARY DAMAGES AS ARESULT OF THE SALE OR LEASE OF PRODUCT INCLUDING BUT NOT LIMITED TO FAIL-URE TO TIMELY DELIVER THE PRODUCT OR FAILURE OF PRODUCT TO ACHIEVE CER-TAIN FUNCTIONALITY, OR ARISING OUT OF THE USE OR INABILITY TO USE THEPRODUCT, IN WHOLE OR IN PART AND INCLUDING BUT NOT LIMITED TO LOSS OFPROFIT, LOSS OF USE, DAMAGE TO BUSINESS OR DAMAGE TO BUSINESS RELATIONSEVEN IF NOTIFIED OF THE POSSIBILITY OF SUCH DAMAGES. INTER-TEL SHALL NOT BELIABLE FOR PERSONAL INJURY OR PROPERTY DAMAGE UNLESS CAUSED SOLELY BYINTER-TEL’S NEGLIGENCE.
CAUTION
For complete information on returning equipment, refer to the current Inter-TelRepair and Return Policy (document part no. 835.1065). This document includesspecific information on the following subjects: warranty, procedures to followwhen returning equipment, equipment damaged in shipment, insurance, repairpolicy, and advance replacement policy.
viiop SoftPhone User Guide
Software License Agreement
viii
THE FOLLOWING IS A SITE LICENSE AGREEMENT RELATING TO THEINTER-TEL SOFTWARE. PLEASE CAREFULLY READ ALL OF THE TERMSAND CONDITIONS BEFORE PROCEEDING. THE SOFTWARE REFERENCEDHEREIN IS LICENSED IN ACCORDANCE WITH THE FOLLOWING TERMSAND CONDITIONS. IF YOU DO NOT ACCEPT SUCH TERMS AND CONDI-TIONS YOU WILL NOT BE PERMITTED TO USE THE SOFTWARE. IF YOUACCESS OR USE SUCH SOFTWARE IN CONTRAVENTION OF THE TERMSAND PROVISIONS OF THIS AGREEMENT, YOU WILL BE SUBJECT TOPROSECUTION TO THE FULLEST EXTENT PERMITTED BY LAW.
Definitions:
“You” means, and “Yours” refers to the original end user purchaser of the Inter-TelSoftware Programs. “Computer” means a computer consisting of a single central pro-cessing unit, one keyboard and one video display terminal. “Inter-Tel Hardware Sys-tem” means any proprietary system distributed by Inter-Tel Integrated Systems(hereinafter “Company” or “Inter-Tel”) that operates by means of the Software.“Authorized Dealer” means an individual or entity currently authorized in writing byagreement and in good standing with Inter-Tel entitling the dealer to sell or license thespecific Software covered by this license. “Software” means: the computer programsaccompanying this License (including, but not limited to, codes, techniques, softwaretools, formats, designs, methods, processes, know-how and ideas) and any and allcopies, modifications, upgrades, enhancements and new releases thereof made oracquired by You and any and all manuals and other printed materials accompanyingthis License or the Software.
License:
(a) Inter-Tel Integrated Systems, Inc. (“Inter-Tel”) grants You a non-exclusive,non-transferable license to install and use the enclosed Inter-Tel Software andaccompanying documentation on any one standalone personal computer orInter-Tel Hardware System (whichever applies). You assume the entire respon-sibility for the selection and installation of the enclosed Software program(s)in order to achieve desired results. You agree that you are licensing the Pro-gram for its end use only and not for resale or redistribution. You must be anAuthorized Dealer of the specific Inter-Tel products covered by this license.You will be liable for theft and infringement under applicable patent, copyrightand trademark laws of the United States for unauthorized use of the Softwarecovered by this license.
Inter-Tel reserves all rights in and to all patents, copyrights, trademarks, maskworks and any other proprietary rights contained or embodied in the Software.
Axxess Desktop SoftPhone User Guide
Axxess Deskt
(b) You may make one (1) copy of the Inter-Tel Software program(s) contained ondiskette(s) for back-up purposes only, provided that You reproduce and placethe Inter-Tel copyright notice on the backup copy. You may make one (1) copyof the Software program(s) onto one (1) hard drive. You may not copy theInter-Tel Software program(s) contained on any media other than diskette; e.g.,hard disk drive, ROMs, PALs, Software Protection Key, etc.
(c) You are hereby notified that contained third-party suppliers and vendors arethird-party beneficiaries to this Agreement to the extent that the Software con-tains software, programming and other materials provided by such third-partysuppliers and vendors. Such provisions are made expressly for the benefit ofand are enforceable by such third-party suppliers and vendors in addition toInter-Tel.
(d) You hereby acknowledge and agree that the license granted in this agreementis a site license. I.e., the software may only be installed at the initial end usersite licensed for this software and at no other site without the express writtenconsent and relicensing by Inter-Tel Integrated Systems, Inc. You acknowledgeand agree that you have the responsibility to sublicense the end user of thesoftware with an agreement in writing containing the statement that “the soft-ware licensed hereby may only be installed at the initial end user site licensedfor this software and at no other site without the express written consent andrelicensing by Inter-Tel Integrated Systems, Inc.” It is the specific intent of thissite licensing agreement to (1) prohibit the improper copying and/or the multi-ple use of this software at other than a designated initial licensed site, and to(2) prohibit the right of resale and/or relicensing of the software without theexpress written consent of Inter-Tel. You agree that your failure to properlysublicense the software to an end user will subject you to responsibility for thelosses occasioned to Inter-Tel.
Non-Permitted Uses:
(a) You may not use the enclosed program(s) on more than one standalone per-sonal computer or Inter-Tel Hardware System at a time and may not load theSoftware onto any file server or network.
(b) You may not sublicense, assign or transfer Your rights under the Agreementwithout the prior written permission of Inter-Tel.
(c) You may not use, copy, alter or transfer, electronically or otherwise, the Inter-Tel Software (program(s) or documentation) except as expressly allowed inthis Agreement.
(d) You may not translate, reverse engineer, disassemble or decompile the Inter-Tel Software.
(e) You agree that you are licensing the Program for its end use only and not forresale or redistribution.
ixop SoftPhone User Guide
x
Term:
This Agreement is effective from Your date of purchase and shall remain in forceuntil terminated. You may terminate the Agreement by returning to Inter-Tel the origi-nal diskette(s), ROMs, PALs, or other applicable software media and all copies of theInter-Tel software program(s). The Agreement is also terminated if You fail to complywith any term or condition of this Agreement. You agree to return to Inter-Tel theoriginal diskette(s) and other applicable software media and all copies of the Inter-TelSoftware program(s) upon such termination. The Company may immediately termi-nate this license upon notice to you, whereupon you shall immediately destroy allcopies of the Program.
Warranty:
(a) Inter-Tel warrants to You that the diskette(s), and/or other applicable softwaremedia on which the Inter-Tel Software program(s) are furnished are not defec-tive under normal use for a period of ninety (90) days from the date of pur-chase, as evidenced by a copy of Your sales receipt.
(b) Inter-Tel and its third-party suppliers and vendors’ liability and Your exclusiveremedy shall be the replacement of any diskette(s) and/or other applicable soft-ware media that do not meet the warranty and which are returned to Inter-Telor an authorized dealer together with a copy of Your paid receipt. THEABOVE IS THE ONLY WARRANTY OF ANY KIND. ALL OTHER WAR-RANTIES EITHER EXPRESS OR IMPLIED, INCLUDING, BUT NOT LIM-ITED TO, THE IMPLIED WARRANTIES OF MERCHANTABILITY ANDFITNESS FOR A PARTICULAR USE ARE HEREBY DISCLAIMED. Thiswarranty gives You specific legal rights and You may also have other rightswhich may vary from state to state.
You acknowledge that the Program, including the related documentation and any newreleases, modifications and enhancements thereto, belongs to the Company, and thatthe Company retains all right, title and interest in and to the Program. You furtheracknowledge that the Program and information relating thereto constitute valuabletrade secrets of the Company. You agree to comply with the terms and conditions ofthis Agreement and agree to treat the Program as the confidential and proprietaryinformation of the Company.
You shall be solely responsible for the supervision, management and control of youruse of the Program and related products and documentation. You hereby indemnifyand hold harmless the Company and its affiliates (the Indemnified Parties) against anyloss, liability, damages, costs or expenses suffered or incurred by the Indemnified Par-ties at any time as a result, of any claim, action or proceeding arising out of or relatingto your use, operation or implementation of the Program. For purposes of this Agree-ment, affiliate means any Company division or subsidiary or any other affiliatedentity involved in the manufacture or wholesale distribution of Company products.
Axxess Desktop SoftPhone User Guide

Axxess Deskt
The Indemnified Parties shall not be responsible, and you shall have no recourseagainst the Indemnified Parties, for any loss, liability, damages, costs or expenseswhich may be suffered or incurred at any time by you as a result of your reliance uponor use of the Program, or as a result of any claim, action or proceeding against youarising out of or relating to the use of the Program, or as a result of your defense ofany such claim, action or proceeding.
Limits Of Liability:
In no event shall Inter-Tel or its third-party suppliers and vendors be liable for anylosses (whether in tort, contract or otherwise) incurred in connection with the pur-chase, sale, possession, operation, or use of the Software (separately or in combina-tion with other products) including, but not limited to loss of time, loss of anticipatedprofits, loss of data, loss of information, loss of business, loss of revenue, loss ofgoodwill or loss of anticipated savings or other business losses, losses relating to rout-ing or programming errors, unauthorized use or access of all intrastate, interstate, andinternational long distance services, or such access or use by voice mail, DISA, autoattendant, or 800 or 900 services by end-users or unrelated third parties, losses relatedto the use of copyrighted music with Inter-Tel Software, and to the extent such limita-tion is permitted by applicable law, losses and damages resulting from physical injuryto tangible property or death or injury of any person whether arising from Inter-Tel’snegligence, breach of contract or otherwise. IN NO EVENT SHALL INTER-TEL ORITS THIRD-PARTY SUPPLIERS AND VENDORS BE LIABLE FOR ANY INCI-DENTAL OR CONSEQUENTIAL DAMAGES, DIRECTLY OR INDIRECTLYARISING FROM USE OR INABILITY TO USE THE SOFTWARE, SEPARATELYOR IN COMBINATION WITH OTHER PRODUCTS. IN NO EVENT SHALL THETOTAL LIABILITY OF INTER-TEL DAMAGES EXCEED THE AMOUNT PAIDBY YOU FOR THE SOFTWARE.
Entire Agreement:
This Agreement constitutes the entire agreement between You and Inter-Tel andsupersedes any and all prior agreements between Inter-Tel and You with regard to theInter-Tel Software. No amendment, modification or waiver of this Agreement will bevalid unless set forth in a written instrument signed by the party to be bound thereby.This Agreement shall be governed by the laws of the State of Arizona. No failure ordelay on the part of Inter-Tel to enforce its rights hereunder shall operate as a waiverof any right.
This Agreement and any disputes arising hereunder shall be governed by the laws ofthe State of Arizona, United States of America, without regard to conflicts of lawsprinciples. The parties hereby expressly exclude the application of the U.N. Conven-tion on Contracts for the International Sale of Goods to the Agreement.
xiop SoftPhone User Guide

xii
Government Restricted Rights:
The Software is provided with restricted rights. Use, duplication or disclosure by thegovernment is subjected to restrictions set forth in subparagraph c (1) (ii) of theRights in Technical Data and Computer Software clause at DFARS 252.227-7013(Oct. 1988) and FAR 52.227-14 and 52.227-19 (June 1987). Contractor is Inter-TelIntegrated Systems, Inc., Chandler, Arizona 85226.
Inter-Tel Integrated Systems, Inc.Chandler, AZ 85226Revision D
Axxess Desktop SoftPhone User Guide
Getting Started
Axxess Deskt
GETTIN
G STA
RTED
Thank you for purchasing the Axxess Desktop SoftPhone software package. TheDesktop SoftPhone allows you to make phone calls through the Desktop Interface onyour computer.
NOTE: Because the Axxess telephone system is very flexible and programmable, theprocedures for using the features might vary slightly from the descriptions in this guide.If so, your trainer or System Administrator can tell you how your system differs and howto use the feature.
SYSTEM REQUIREMENTS
The Desktop SoftPhone is a very flexible, programmable software application thatshould be installed on a PC that meets the minimum requirements specified in the fol-lowing sections.Hardware
• IBM-compatible PC • 200 MHz or faster microprocessor • Monitor (set at 800 x 600 or higher resolution)NOTE: If you try to run the program with 640 x 480 resolution, an error messageappears and the Desktop SoftPhone will shut down. To use the Desktop SoftPhonewith 60 Direct Station Selection (DSS) keys, the resolution must be 1152 x 864 orhigher. If the resolution is too low, the 60 DSS option will be grayed out.
• Mouse • 32 Megabytes (MB) of RAM • 20 MB available hard disk space • CD-ROM drive or 3.5-inch (1.44MB) double-sided, high-density floppy disk
drive • An Executive or Standard Display Phone with a Personal Computer Data Port
Module (PCDPM) or an AgentSet
NOTE: If using a Call Processing (CP) Server (previously called the NT-basedCPU) via Desktop OAI sockets, a PCDPM is not required. In this case, a Basic Dig-ital Phone can also be used.
• TCP/IP • One available parallel or USB port (for security key)
1op SoftPhone User Guide
2
• Software security key
Software
• Microsoft Windows 95, 98, NT, ME, or 2000 • Inter-Tel Axxess System version 3.0 or later with Desktop OAI • Axxess Desktop SoftPhone software • Desktop Interface (DTI) Server (included with the Axxess Desktop SoftPhonesoftware) • Java Runtime Environment (JRE) version 1.3.1 (included with the Axxess Desk-
top SoftPhone software)
Axxess Desktop SoftPhone User Guide
SOFTWARE INSTALLATION
Axxess Deskt
GETTIN
G STA
RTED
Software Security Key: The software license for Desktop SoftPhone is controlled bythe use of a software security key. Before installing the Desktop SoftPhone, you mustinstall a software security key. This security key is a small device that must beattached to your PC’s parallel or USB port to fully enable the Desktop SoftPhone soft-ware. Without the security key, the software will not work. To install the security key:Attach the appropriate end of the device to a parallel or USB port on your PC.
NOTE: The security key does not affect the functionality of the parallel port itself. Anydevice that you would normally connect to the parallel port can also be connectedthrough the security key.
Installing the Desktop SoftPhone
The Desktop SoftPhone software allows you to install Desktop SoftPhone, DTIServer, and JRE version 1.3.1.NOTE: The following instructions assume that Windows 95, 98, NT, ME, or 2000 isinstalled on your PC and that you are familiar with Windows procedures.
To install the Desktop SoftPhone: 1. Before you begin, make sure you know:
• The extension you wish to control. • The IP address and port of the connection to the CP Server, if using a TCP/IP
connection. • The keyset extension password.
2. Insert the Desktop SoftPhone software CD-ROM into its drive. 3. Run Setup.exe. Follow the instructions on the window. 4. At the Welcome window, click Next to continue.
3op SoftPhone User Guide
4
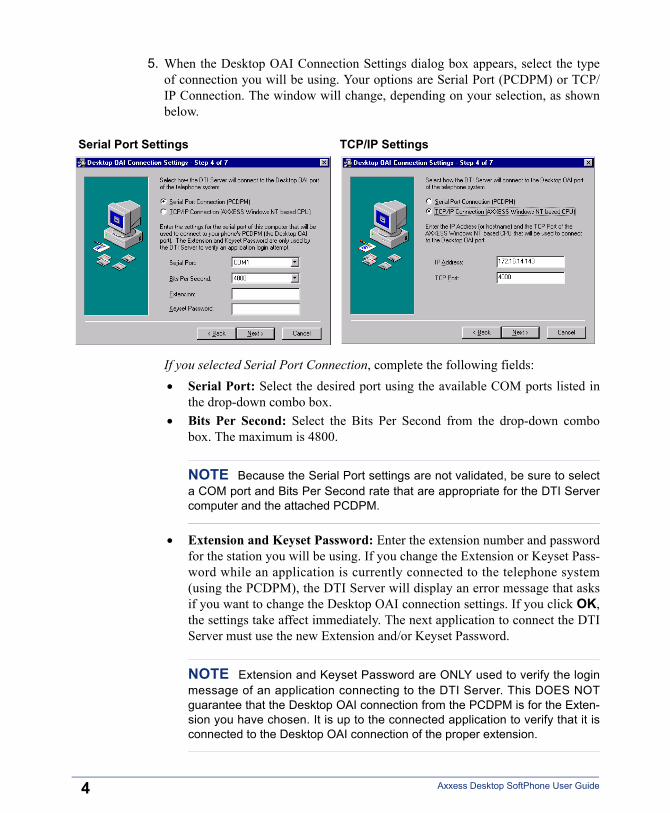
5. When the Desktop OAI Connection Settings dialog box appears, select the typeof connection you will be using. Your options are Serial Port (PCDPM) or TCP/IP Connection. The window will change, depending on your selection, as shownbelow.
Serial Port Settings TCP/IP Settings
If you selected Serial Port Connection, complete the following fields: • Serial Port: Select the desired port using the available COM ports listed in
the drop-down combo box. • Bits Per Second: Select the Bits Per Second from the drop-down combo
box. The maximum is 4800.
NOTE Because the Serial Port settings are not validated, be sure to selecta COM port and Bits Per Second rate that are appropriate for the DTI Servercomputer and the attached PCDPM.
• Extension and Keyset Password: Enter the extension number and passwordfor the station you will be using. If you change the Extension or Keyset Pass-word while an application is currently connected to the telephone system(using the PCDPM), the DTI Server will display an error message that asksif you want to change the Desktop OAI connection settings. If you click OK,the settings take affect immediately. The next application to connect the DTIServer must use the new Extension and/or Keyset Password.
NOTE Extension and Keyset Password are ONLY used to verify the loginmessage of an application connecting to the DTI Server. This DOES NOTguarantee that the Desktop OAI connection from the PCDPM is for the Exten-sion you have chosen. It is up to the connected application to verify that it isconnected to the Desktop OAI connection of the proper extension.
Axxess Desktop SoftPhone User Guide
Axxess Deskt
GETTIN
G STA
RTED
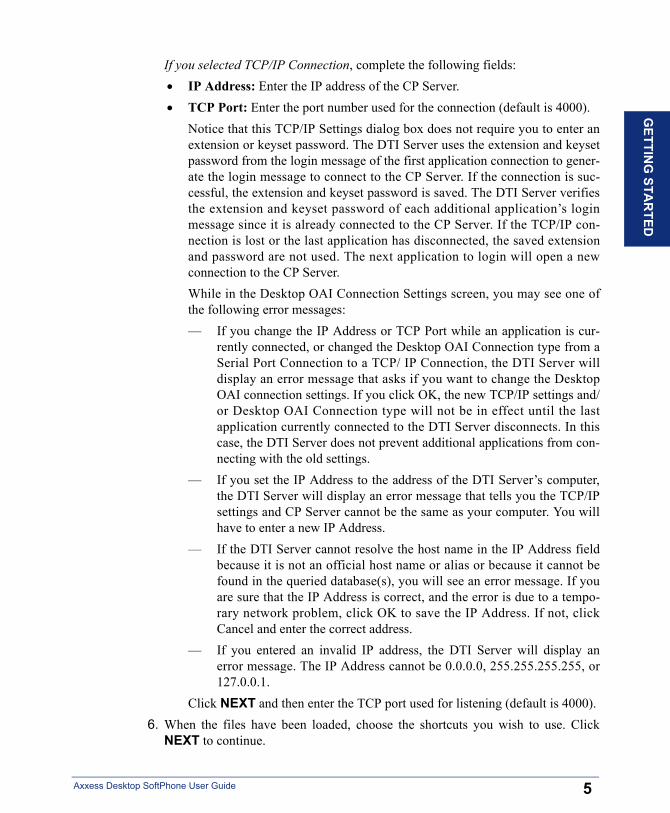
If you selected TCP/IP Connection, complete the following fields: • IP Address: Enter the IP address of the CP Server. • TCP Port: Enter the port number used for the connection (default is 4000).
Notice that this TCP/IP Settings dialog box does not require you to enter anextension or keyset password. The DTI Server uses the extension and keysetpassword from the login message of the first application connection to gener-ate the login message to connect to the CP Server. If the connection is suc-cessful, the extension and keyset password is saved. The DTI Server verifiesthe extension and keyset password of each additional application’s loginmessage since it is already connected to the CP Server. If the TCP/IP con-nection is lost or the last application has disconnected, the saved extensionand password are not used. The next application to login will open a newconnection to the CP Server.While in the Desktop OAI Connection Settings screen, you may see one ofthe following error messages:— If you change the IP Address or TCP Port while an application is cur-
rently connected, or changed the Desktop OAI Connection type from aSerial Port Connection to a TCP/ IP Connection, the DTI Server willdisplay an error message that asks if you want to change the DesktopOAI connection settings. If you click OK, the new TCP/IP settings and/or Desktop OAI Connection type will not be in effect until the lastapplication currently connected to the DTI Server disconnects. In thiscase, the DTI Server does not prevent additional applications from con-necting with the old settings.
— If you set the IP Address to the address of the DTI Server’s computer,the DTI Server will display an error message that tells you the TCP/IPsettings and CP Server cannot be the same as your computer. You willhave to enter a new IP Address.
— If the DTI Server cannot resolve the host name in the IP Address fieldbecause it is not an official host name or alias or because it cannot befound in the queried database(s), you will see an error message. If youare sure that the IP Address is correct, and the error is due to a tempo-rary network problem, click OK to save the IP Address. If not, clickCancel and enter the correct address.
— If you entered an invalid IP address, the DTI Server will display anerror message. The IP Address cannot be 0.0.0.0, 255.255.255.255, or127.0.0.1.
Click NEXT and then enter the TCP port used for listening (default is 4000). 6. When the files have been loaded, choose the shortcuts you wish to use. Click
NEXT to continue.
5op SoftPhone User Guide
6
7. When the installation completes, click Finish. 8. Click Exit Installation and remove the CD-ROM from the drive. 9. Restart the computer.
Starting the Desktop Softphone
To start the Desktop Software: 1. Select Start - Programs - DTI Server to start the DTI Server. 2. Select Start - Programs - Axxess Desktop SoftPhone to start the DesktopSoftPhone.
NOTE: If the settings were not configured properly, an error message appears. Tochange the settings, right-click on the Desktop SoftPhone and select TCP/IP Setting.Then, re-enter the correct settings. When finished, click Connect to reconnect.
Axxess Desktop SoftPhone User Guide
ABOUT DESKTOP SOFTPHONE
Axxess Deskt
GETTIN
G STA
RTED
The Desktop SoftPhone allows you to make phone calls through the Desktop Inter-face on your computer.
NOTE: Because the Axxess telephone system is very flexible and programmable, theprocedures for using the features might vary slightly from the descriptions in this guide.If so, your trainer or System Administrator can tell you how your system differs and howto use the feature.
The Desktop SoftPhone graphical user interface (GUI) looks like an Axxess Execu-tive Display Phone installed directly on the Axxess System. The Desktop SoftPhoneis shown on the next page. The Desktop SoftPhone has the following features:• Feature keys: Provide quick access to various phone and voice mail features.
(See page 9 for details.)• Liquid Crystal Display (LCD) Menu Keys: Allow you to scroll through dis-
plays and make selections based on the active feature. (See page 10 for details.)• Shortcut Keys: Provide useful shortcut keys on the PC keyboard that function
exactly same as the keys on the Desktop SoftPhone display. (See page 11 fordetails.)
7op SoftPhone User Guide
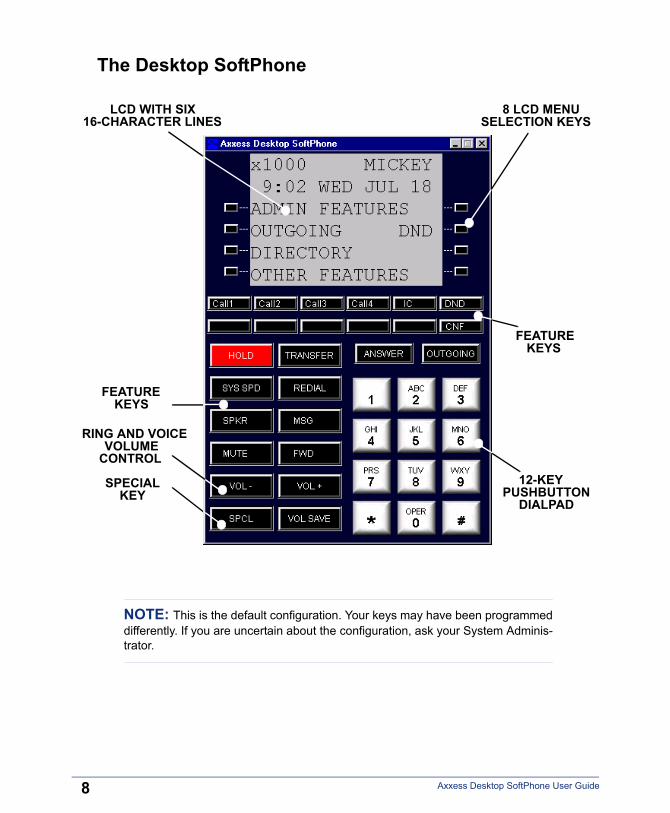
The Desktop SoftPhone
LCD WITH SIX16-CHARACTER LINES
8 LCD MENUSELECTION KEYS
FEATUREKEYS
12-KEYPUSHBUTTON
DIALPAD
RING AND VOICEVOLUME
CONTROL
FEATUREKEYS
SPECIALKEY
NOTE: This is the default configuration. Your keys may have been programmeddifferently. If you are uncertain about the configuration, ask your System Adminis-trator.
8
Axxess Desktop SoftPhone User Guide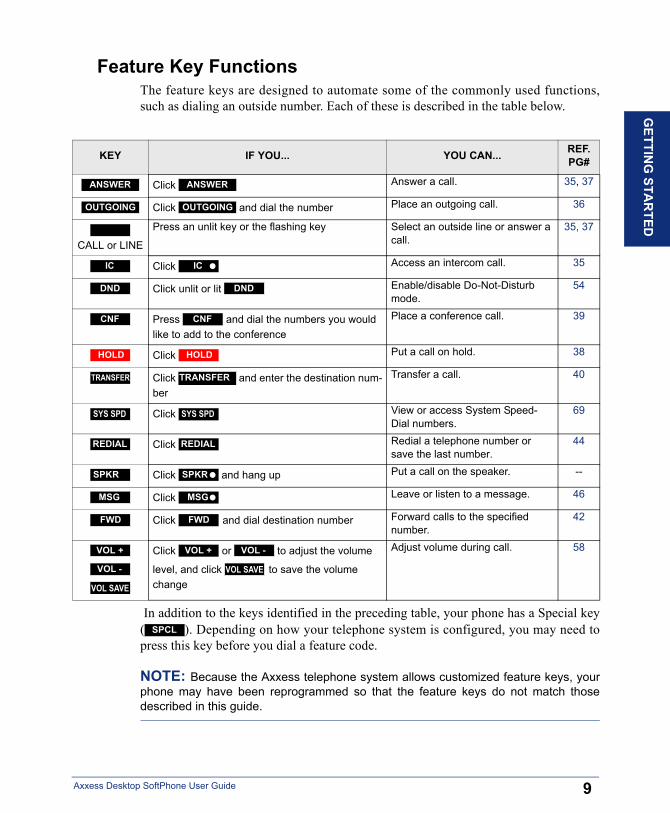
Feature Key Functions
Axxess Deskt
G
The feature keys are designed to automate some of the commonly used functions,such as dialing an outside number. Each of these is described in the table below.
ETTING
STAR
TED
KEY IF YOU... YOU CAN... REF. PG#
Click Answer a call. 35, 37
Click and dial the number Place an outgoing call. 36
CALL or LINE
Press an unlit key or the flashing key Select an outside line or answer a call.
35, 37
Click Access an intercom call. 35
Click unlit or lit Enable/disable Do-Not-Disturb mode.
54
Press and dial the numbers you would like to add to the conference
Place a conference call. 39
Click Put a call on hold. 38
Click and enter the destination num-ber
Transfer a call. 40
Click View or access System Speed-Dial numbers.
69
Click Redial a telephone number or save the last number.
44
Click and hang up Put a call on the speaker. --
Click Leave or listen to a message. 46
Click and dial destination number Forward calls to the specified number.
42
Click or to adjust the volume
level, and click to save the volume change
Adjust volume during call. 58
ANSWER ANSWER
OUTGOING OUTGOING
IC IC
DND DND
CNF CNF
HOLD HOLD
TRANSFER TRANSFER
SYS SPD SYS SPD
REDIAL REDIAL
SPKR SPKR
MSG MSG
FWD FWD
VOL +
VOL -
VOL SAVE
VOL + VOL -
VOL SAVE
In addition to the keys identified in the preceding table, your phone has a Special key( ). Depending on how your telephone system is configured, you may need topress this key before you dial a feature code.
NOTE: Because the Axxess telephone system allows customized feature keys, yourphone may have been reprogrammed so that the feature keys do not match thosedescribed in this guide.
SPCL
9op SoftPhone User Guide
LCD Display Menu Keys
10
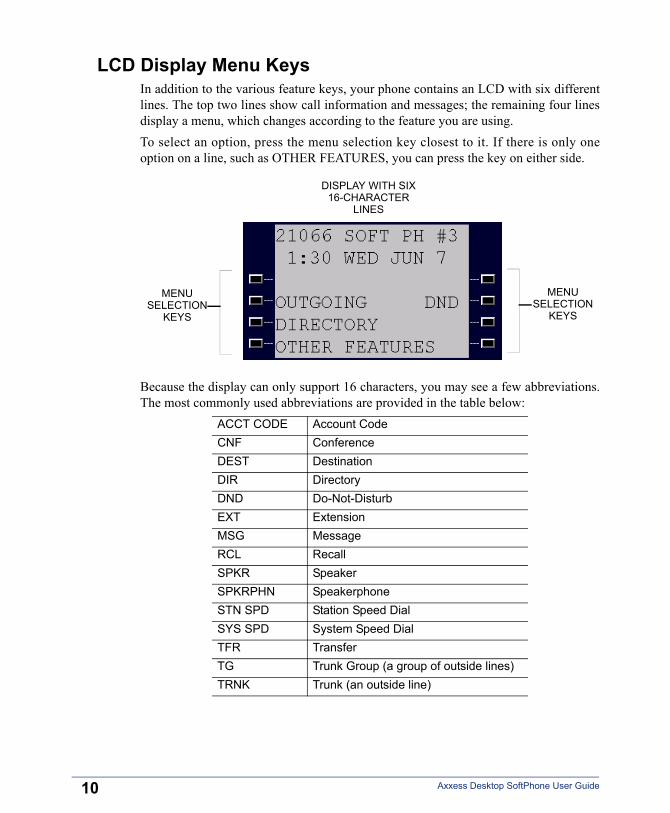
In addition to the various feature keys, your phone contains an LCD with six differentlines. The top two lines show call information and messages; the remaining four linesdisplay a menu, which changes according to the feature you are using. To select an option, press the menu selection key closest to it. If there is only oneoption on a line, such as OTHER FEATURES, you can press the key on either side.
Because the display can only support 16 characters, you may see a few abbreviations.The most commonly used abbreviations are provided in the table below:
ACCT CODE Account CodeCNF ConferenceDEST DestinationDIR DirectoryDND Do-Not-DisturbEXT ExtensionMSG MessageRCL RecallSPKR SpeakerSPKRPHN SpeakerphoneSTN SPD Station Speed DialSYS SPD System Speed DialTFR TransferTG Trunk Group (a group of outside lines)TRNK Trunk (an outside line)
DISPLAY WITH SIX16-CHARACTER
LINES
MENUSELECTION
KEYS
MENUSELECTION
KEYS
Axxess Desktop SoftPhone User Guide
Shortcut Keys
Axxess Deskt
GETTIN
G STA
RTED
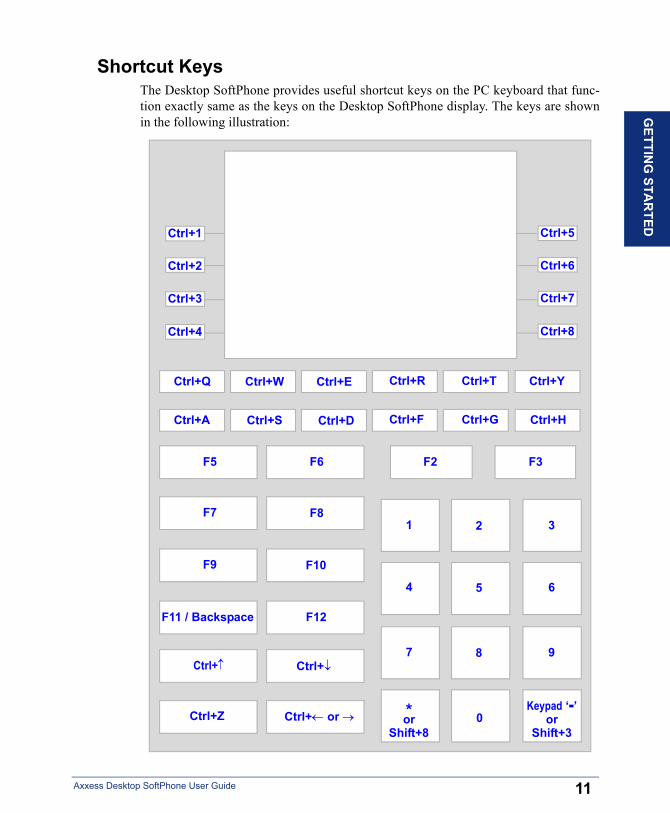
The Desktop SoftPhone provides useful shortcut keys on the PC keyboard that func-tion exactly same as the keys on the Desktop SoftPhone display. The keys are shownin the following illustration:
Ctrl+1
Ctrl+2
Ctrl+3
Ctrl+4
Ctrl+Q Ctrl+W Ctrl+E Ctrl+R Ctrl+T Ctrl+Y
Ctrl+A Ctrl+S Ctrl+D Ctrl+F Ctrl+G Ctrl+H
F5
F7
F9
F2
Ctrl+↑
Ctrl+Z
F6
F8
F10
F12
Ctrl+↓
Ctrl+← or →
F3
F11 / Backspace
1
4
7
*
2
5
8
3
6
9
0Keypad ‘-’
orShift+3
orShift+8
Ctrl+5
Ctrl+6
Ctrl+7
Ctrl+8
11op SoftPhone User Guide
ABOUT VOICE MAIL
12
Voice mail is an application that is part of the Inter-Tel Voice Processor. With thevoice mail application, you and other callers can send and receive recorded messagesfrom any station or touchtone telephone. To use this and other features, each user (youincluded) is assigned a “voice mailbox,” which usually corresponds to a valid exten-sion number. You can, however, have an “unassociated” mailbox that does not corre-spond to an extension. Unassociated mailboxes are typically used for agents or otherpersonnel who don’t have a permanent office.With your voice mailbox, you can use personal or system greetings to let callers knowif you are out of town, on a call, etc. (see page 49). If a caller reaches your voice mail-box, they can leave a message, hang up, or access an attendant.In addition, the Voice Mail Administrator can program “group lists” of mailboxes.With these lists, you can send a message to a group of people by entering one numberinstead of everyone’s individual mailbox number.
NOTE: You cannot delete messages that are sent using group lists (see page 53).
Axxess Desktop SoftPhone User Guide
WHAT YOU SEE AND HEAR
Axxess Deskt
GETTIN
G STA
RTED
As you can see, your Desktop SoftPhone and Axxess system come equipped with alot of “bells and whistles.” To help you understand what everything means, it is rec-ommended that you read the following information before you use your phone. • Your telephone system may be programmed for one or two dial tones. Systems
with two dial tones have one for intercom calls and one for outside calls. • Many features “time out” if you wait too long before performing the next step. If
this happens, you must hang up and start again. • If you hear four fast tones or repeating fast tones, you have pressed an invalid key
combination, tried to select a restricted line, a restricted or invalid number, tooslowly between digits, or waited too long before performing the next step. Hangup and try again.
• Desktop SoftPhones have red and green lamps in the feature keys. Green indi-cates a call is ringing, holding, or active on your phone. Red means the call is onanother phone. If the keys only light red, either your phone does not have thegreen lamps, or the system may not be programmed to support the two lamp col-ors.
NOTE: Your phone may be programmed to always use red lamps for calls ringingdirectly to your phone. If you are uncertain about the configuration, ask your Sys-tem Administrator.
13op SoftPhone User Guide
WHAT THE ADMINISTRATORS CAN DO FOR YOU
14
The administrators are the people to whom you should turn if you have any problemswith your phone and/or voice mail. They have access to advanced programming fea-tures and can reset certain settings associated with your phone.The types of administrators that can help you with your phone/voice mail are as fol-lows:• System Administrator: Performs certain telephone system functions, including:
— Setting the date and time
— Programming System Speed-Dial numbers
— Making database changes, such as programming usernames, toll restriction,DND messages, and extension numbers
• Voice Mail Administrator: Performs tasks associated with the voice mail sys-tem, including:— Recording a broadcast message that is sent to all mailboxes at once
— Performing mailbox maintenance (such as changing your password)
— Customizing voice mail prompts
NOTE: Because the Axxess telephone system is very flexible and programmable, theprocedures for using the features might vary slightly from the descriptions in this guide.If so, your trainer or System Administrator can tell you how your system differs and howto use the features.
If you are a System Administrator or if you need additional information not available in thisguide, refer to the Inter-Tel Axxess Administrator’s Guide (part number 550.8001).
Axxess Desktop SoftPhone User Guide
Using Desktop SoftPhone
Axxess Deskt
USIN
G SO
FTPHO
NE
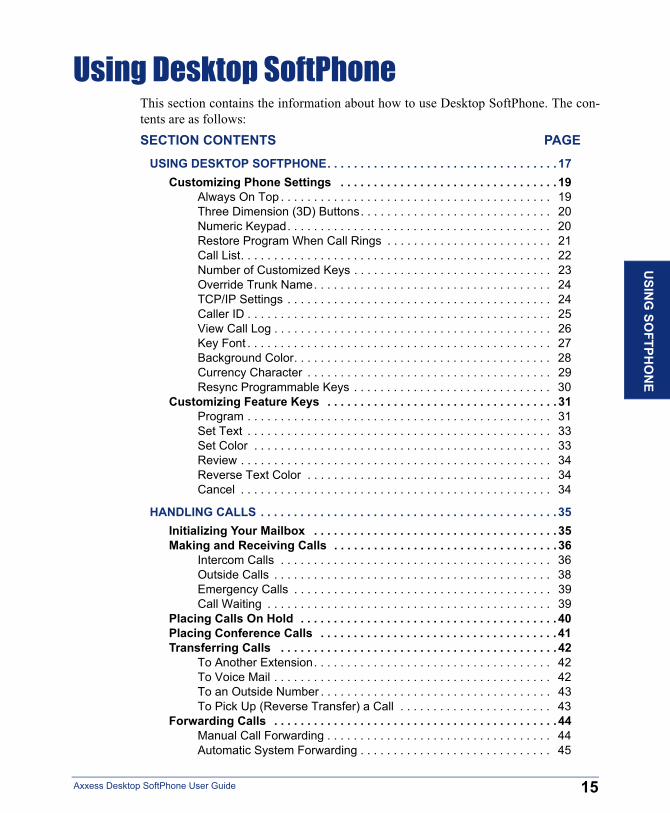
This section contains the information about how to use Desktop SoftPhone. The con-tents are as follows:SECTION CONTENTS PAGE
USING DESKTOP SOFTPHONE. . . . . . . . . . . . . . . . . . . . . . . . . . . . . . . . . . . 17Customizing Phone Settings . . . . . . . . . . . . . . . . . . . . . . . . . . . . . . . . . 19
Always On Top . . . . . . . . . . . . . . . . . . . . . . . . . . . . . . . . . . . . . . . . . 19Three Dimension (3D) Buttons. . . . . . . . . . . . . . . . . . . . . . . . . . . . . 20Numeric Keypad. . . . . . . . . . . . . . . . . . . . . . . . . . . . . . . . . . . . . . . . 20Restore Program When Call Rings . . . . . . . . . . . . . . . . . . . . . . . . . 21Call List. . . . . . . . . . . . . . . . . . . . . . . . . . . . . . . . . . . . . . . . . . . . . . . 22Number of Customized Keys . . . . . . . . . . . . . . . . . . . . . . . . . . . . . . 23Override Trunk Name. . . . . . . . . . . . . . . . . . . . . . . . . . . . . . . . . . . . 24TCP/IP Settings . . . . . . . . . . . . . . . . . . . . . . . . . . . . . . . . . . . . . . . . 24Caller ID . . . . . . . . . . . . . . . . . . . . . . . . . . . . . . . . . . . . . . . . . . . . . . 25View Call Log . . . . . . . . . . . . . . . . . . . . . . . . . . . . . . . . . . . . . . . . . . 26Key Font . . . . . . . . . . . . . . . . . . . . . . . . . . . . . . . . . . . . . . . . . . . . . . 27Background Color. . . . . . . . . . . . . . . . . . . . . . . . . . . . . . . . . . . . . . . 28Currency Character . . . . . . . . . . . . . . . . . . . . . . . . . . . . . . . . . . . . . 29Resync Programmable Keys . . . . . . . . . . . . . . . . . . . . . . . . . . . . . . 30
Customizing Feature Keys . . . . . . . . . . . . . . . . . . . . . . . . . . . . . . . . . . . 31Program . . . . . . . . . . . . . . . . . . . . . . . . . . . . . . . . . . . . . . . . . . . . . . 31Set Text . . . . . . . . . . . . . . . . . . . . . . . . . . . . . . . . . . . . . . . . . . . . . . 33Set Color . . . . . . . . . . . . . . . . . . . . . . . . . . . . . . . . . . . . . . . . . . . . . 33Review . . . . . . . . . . . . . . . . . . . . . . . . . . . . . . . . . . . . . . . . . . . . . . . 34Reverse Text Color . . . . . . . . . . . . . . . . . . . . . . . . . . . . . . . . . . . . . 34Cancel . . . . . . . . . . . . . . . . . . . . . . . . . . . . . . . . . . . . . . . . . . . . . . . 34
HANDLING CALLS . . . . . . . . . . . . . . . . . . . . . . . . . . . . . . . . . . . . . . . . . . . . . 35Initializing Your Mailbox . . . . . . . . . . . . . . . . . . . . . . . . . . . . . . . . . . . . . 35Making and Receiving Calls . . . . . . . . . . . . . . . . . . . . . . . . . . . . . . . . . .36
Intercom Calls . . . . . . . . . . . . . . . . . . . . . . . . . . . . . . . . . . . . . . . . . 36Outside Calls . . . . . . . . . . . . . . . . . . . . . . . . . . . . . . . . . . . . . . . . . . 38Emergency Calls . . . . . . . . . . . . . . . . . . . . . . . . . . . . . . . . . . . . . . . 39Call Waiting . . . . . . . . . . . . . . . . . . . . . . . . . . . . . . . . . . . . . . . . . . . 39
Placing Calls On Hold . . . . . . . . . . . . . . . . . . . . . . . . . . . . . . . . . . . . . . . 40Placing Conference Calls . . . . . . . . . . . . . . . . . . . . . . . . . . . . . . . . . . . . 41Transferring Calls . . . . . . . . . . . . . . . . . . . . . . . . . . . . . . . . . . . . . . . . . . 42
To Another Extension. . . . . . . . . . . . . . . . . . . . . . . . . . . . . . . . . . . . 42To Voice Mail . . . . . . . . . . . . . . . . . . . . . . . . . . . . . . . . . . . . . . . . . . 42To an Outside Number . . . . . . . . . . . . . . . . . . . . . . . . . . . . . . . . . . . 43To Pick Up (Reverse Transfer) a Call . . . . . . . . . . . . . . . . . . . . . . . 43
Forwarding Calls . . . . . . . . . . . . . . . . . . . . . . . . . . . . . . . . . . . . . . . . . . . 44Manual Call Forwarding . . . . . . . . . . . . . . . . . . . . . . . . . . . . . . . . . . 44Automatic System Forwarding . . . . . . . . . . . . . . . . . . . . . . . . . . . . . 45
15op SoftPhone User Guide
16
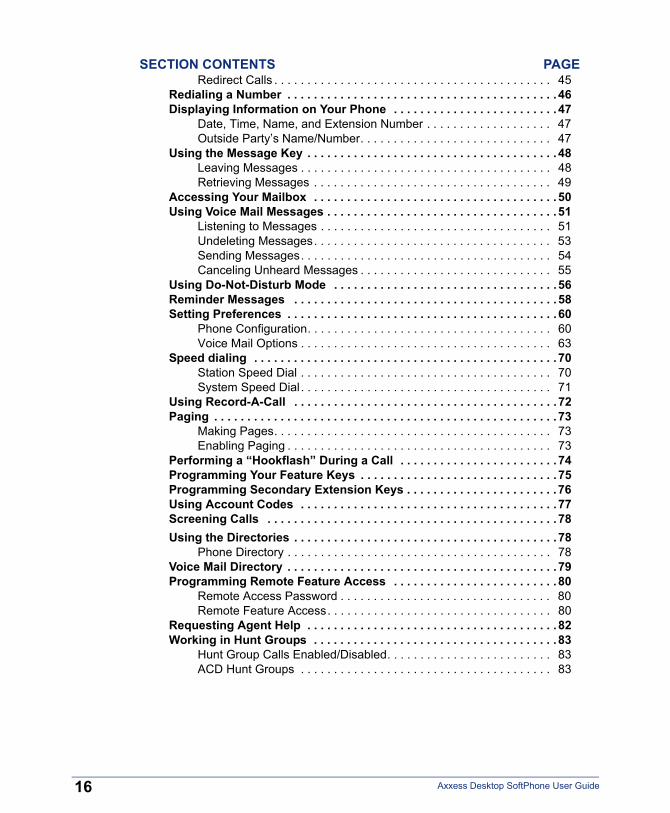
SECTION CONTENTS PAGERedirect Calls . . . . . . . . . . . . . . . . . . . . . . . . . . . . . . . . . . . . . . . . . . 45
Redialing a Number . . . . . . . . . . . . . . . . . . . . . . . . . . . . . . . . . . . . . . . . . 46Displaying Information on Your Phone . . . . . . . . . . . . . . . . . . . . . . . . . 47
Date, Time, Name, and Extension Number . . . . . . . . . . . . . . . . . . . 47Outside Party’s Name/Number. . . . . . . . . . . . . . . . . . . . . . . . . . . . . 47
Using the Message Key . . . . . . . . . . . . . . . . . . . . . . . . . . . . . . . . . . . . . . 48Leaving Messages . . . . . . . . . . . . . . . . . . . . . . . . . . . . . . . . . . . . . . 48Retrieving Messages . . . . . . . . . . . . . . . . . . . . . . . . . . . . . . . . . . . . 49
Accessing Your Mailbox . . . . . . . . . . . . . . . . . . . . . . . . . . . . . . . . . . . . . 50Using Voice Mail Messages . . . . . . . . . . . . . . . . . . . . . . . . . . . . . . . . . . . 51
Listening to Messages . . . . . . . . . . . . . . . . . . . . . . . . . . . . . . . . . . . 51Undeleting Messages. . . . . . . . . . . . . . . . . . . . . . . . . . . . . . . . . . . . 53Sending Messages. . . . . . . . . . . . . . . . . . . . . . . . . . . . . . . . . . . . . . 54Canceling Unheard Messages . . . . . . . . . . . . . . . . . . . . . . . . . . . . . 55
Using Do-Not-Disturb Mode . . . . . . . . . . . . . . . . . . . . . . . . . . . . . . . . . .56Reminder Messages . . . . . . . . . . . . . . . . . . . . . . . . . . . . . . . . . . . . . . . . 58Setting Preferences . . . . . . . . . . . . . . . . . . . . . . . . . . . . . . . . . . . . . . . . . 60
Phone Configuration. . . . . . . . . . . . . . . . . . . . . . . . . . . . . . . . . . . . . 60Voice Mail Options . . . . . . . . . . . . . . . . . . . . . . . . . . . . . . . . . . . . . . 63
Speed dialing . . . . . . . . . . . . . . . . . . . . . . . . . . . . . . . . . . . . . . . . . . . . . . 70Station Speed Dial . . . . . . . . . . . . . . . . . . . . . . . . . . . . . . . . . . . . . . 70System Speed Dial . . . . . . . . . . . . . . . . . . . . . . . . . . . . . . . . . . . . . . 71
Using Record-A-Call . . . . . . . . . . . . . . . . . . . . . . . . . . . . . . . . . . . . . . . . 72Paging . . . . . . . . . . . . . . . . . . . . . . . . . . . . . . . . . . . . . . . . . . . . . . . . . . . . 73
Making Pages. . . . . . . . . . . . . . . . . . . . . . . . . . . . . . . . . . . . . . . . . . 73Enabling Paging . . . . . . . . . . . . . . . . . . . . . . . . . . . . . . . . . . . . . . . . 73
Performing a “Hookflash” During a Call . . . . . . . . . . . . . . . . . . . . . . . . 74Programming Your Feature Keys . . . . . . . . . . . . . . . . . . . . . . . . . . . . . . 75Programming Secondary Extension Keys . . . . . . . . . . . . . . . . . . . . . . . 76Using Account Codes . . . . . . . . . . . . . . . . . . . . . . . . . . . . . . . . . . . . . . . 77Screening Calls . . . . . . . . . . . . . . . . . . . . . . . . . . . . . . . . . . . . . . . . . . . . 78Using the Directories . . . . . . . . . . . . . . . . . . . . . . . . . . . . . . . . . . . . . . . . 78
Phone Directory . . . . . . . . . . . . . . . . . . . . . . . . . . . . . . . . . . . . . . . . 78Voice Mail Directory . . . . . . . . . . . . . . . . . . . . . . . . . . . . . . . . . . . . . . . . . 79Programming Remote Feature Access . . . . . . . . . . . . . . . . . . . . . . . . . 80
Remote Access Password . . . . . . . . . . . . . . . . . . . . . . . . . . . . . . . . 80Remote Feature Access. . . . . . . . . . . . . . . . . . . . . . . . . . . . . . . . . . 80
Requesting Agent Help . . . . . . . . . . . . . . . . . . . . . . . . . . . . . . . . . . . . . . 82Working in Hunt Groups . . . . . . . . . . . . . . . . . . . . . . . . . . . . . . . . . . . . . 83
Hunt Group Calls Enabled/Disabled. . . . . . . . . . . . . . . . . . . . . . . . . 83ACD Hunt Groups . . . . . . . . . . . . . . . . . . . . . . . . . . . . . . . . . . . . . . 83
Axxess Desktop SoftPhone User Guide
CUSTOMIZING PHONE SETTINGS
Axxess Deskt
USIN
G SO
FTPHO
NE
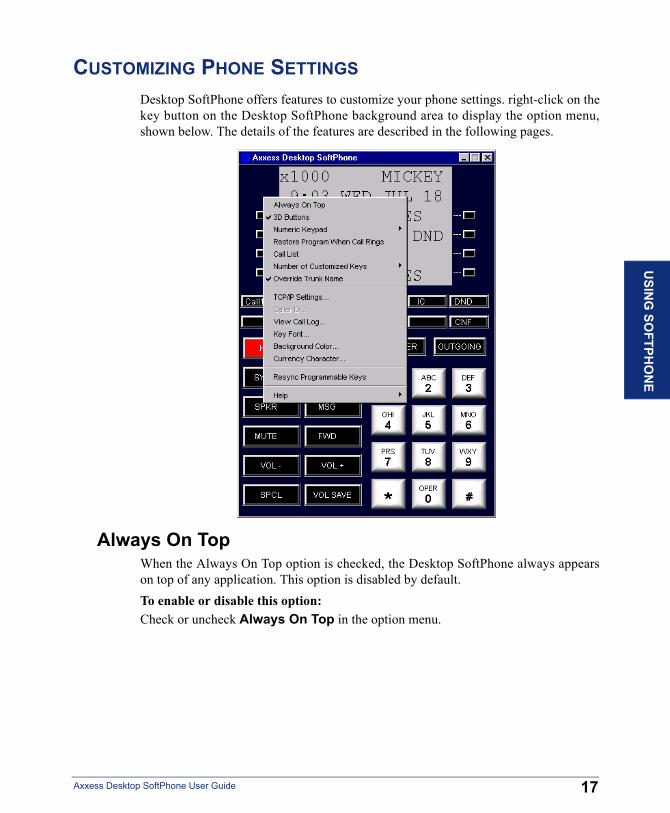
Desktop SoftPhone offers features to customize your phone settings. right-click on thekey button on the Desktop SoftPhone background area to display the option menu,shown below. The details of the features are described in the following pages.
Always On Top
When the Always On Top option is checked, the Desktop SoftPhone always appearson top of any application. This option is disabled by default. To enable or disable this option: Check or uncheck Always On Top in the option menu.17op SoftPhone User Guide
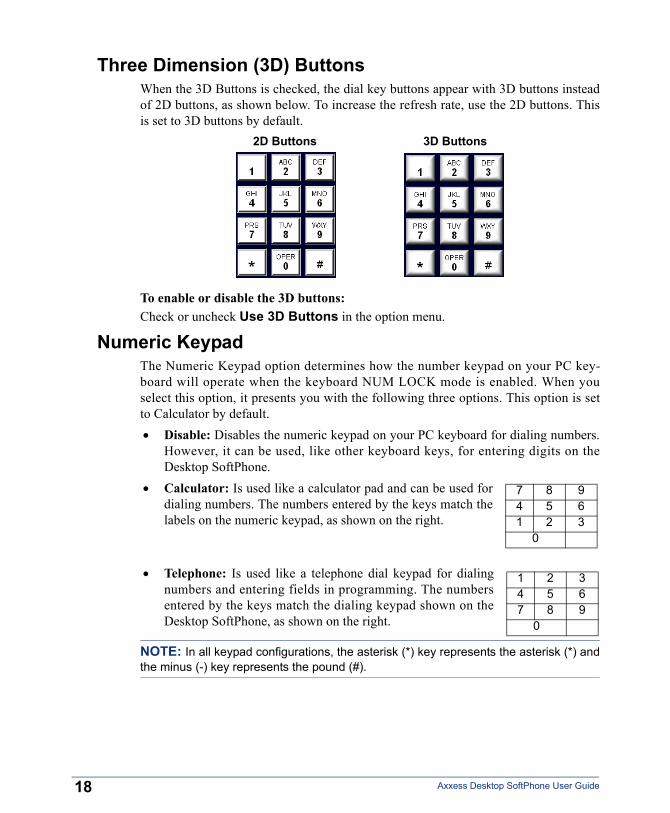
Three Dimension (3D) Buttons
18
When the 3D Buttons is checked, the dial key buttons appear with 3D buttons insteadof 2D buttons, as shown below. To increase the refresh rate, use the 2D buttons. Thisis set to 3D buttons by default.
To enable or disable the 3D buttons: Check or uncheck Use 3D Buttons in the option menu.
2D Buttons 3D Buttons
Numeric Keypad
The Numeric Keypad option determines how the number keypad on your PC key-board will operate when the keyboard NUM LOCK mode is enabled. When youselect this option, it presents you with the following three options. This option is setto Calculator by default. • Disable: Disables the numeric keypad on your PC keyboard for dialing numbers.However, it can be used, like other keyboard keys, for entering digits on theDesktop SoftPhone.
• Calculator: Is used like a calculator pad and can be used fordialing numbers. The numbers entered by the keys match thelabels on the numeric keypad, as shown on the right.
• Telephone: Is used like a telephone dial keypad for dialingnumbers and entering fields in programming. The numbersentered by the keys match the dialing keypad shown on theDesktop SoftPhone, as shown on the right.
NOTE: In all keypad configurations, the asterisk (*) key represents the asterisk (*) andthe minus (-) key represents the pound (#).
7 8 94 5 61 2 3
0
1 2 34 5 67 8 9
0
Axxess Deskt
o p SoftPhone User Guide
Restore Program When Call Rings
Axxess Deskt
If the Restore Program When Call Rings option is checked and the Desktop Soft-Phone is minimized, when you receive an incoming call or a reminder message, theDesktop SoftPhone maximizes the phone display and pops up on the desktop. Bydefault, this option is disabled.To enable or disable this option: Check or uncheck Restore Program When Call Rings in the option menu.
19op SoftPhone User Guide
USIN
G SO
FTPHO
NE
Call List
20
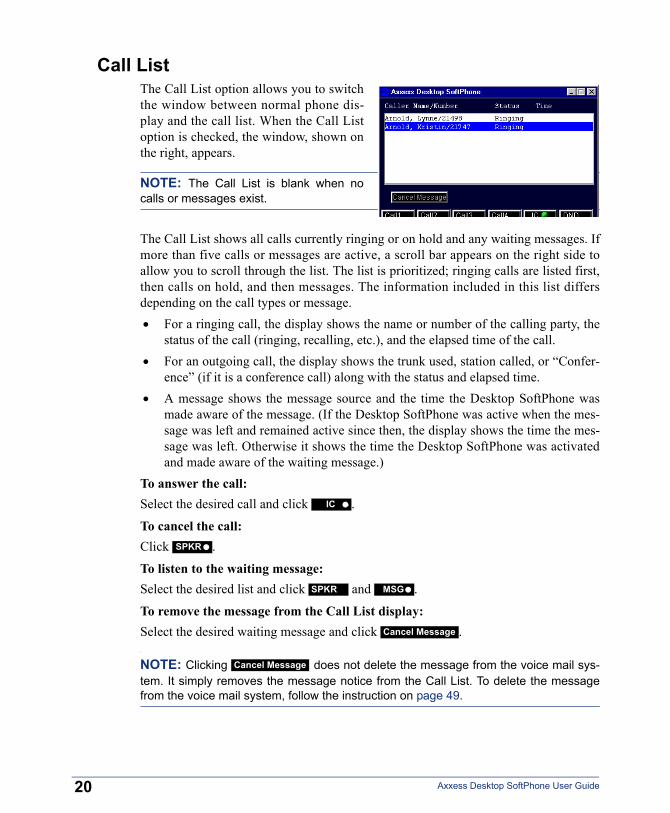
The Call List option allows you to switchthe window between normal phone dis-play and the call list. When the Call Listoption is checked, the window, shown onthe right, appears.
NOTE: The Call List is blank when nocalls or messages exist.
The Call List shows all calls currently ringing or on hold and any waiting messages. Ifmore than five calls or messages are active, a scroll bar appears on the right side toallow you to scroll through the list. The list is prioritized; ringing calls are listed first,then calls on hold, and then messages. The information included in this list differsdepending on the call types or message. • For a ringing call, the display shows the name or number of the calling party, the
status of the call (ringing, recalling, etc.), and the elapsed time of the call. • For an outgoing call, the display shows the trunk used, station called, or “Confer-
ence” (if it is a conference call) along with the status and elapsed time. • A message shows the message source and the time the Desktop SoftPhone was
made aware of the message. (If the Desktop SoftPhone was active when the mes-sage was left and remained active since then, the display shows the time the mes-sage was left. Otherwise it shows the time the Desktop SoftPhone was activatedand made aware of the waiting message.)
To answer the call:Select the desired call and click .
To cancel the call:Click .
To listen to the waiting message:Select the desired list and click and .
To remove the message from the Call List display:Select the desired waiting message and click .
NOTE: Clicking does not delete the message from the voice mail sys-tem. It simply removes the message notice from the Call List. To delete the messagefrom the voice mail system, follow the instruction on page 49.
IC
SPKR
SPKR MSG
Cancel Message
Cancel Message
Axxess Desktop SoftPhone User Guide
Number of Customized Keys
Axxess Deskt
USIN
G SO
FTPHO
NE
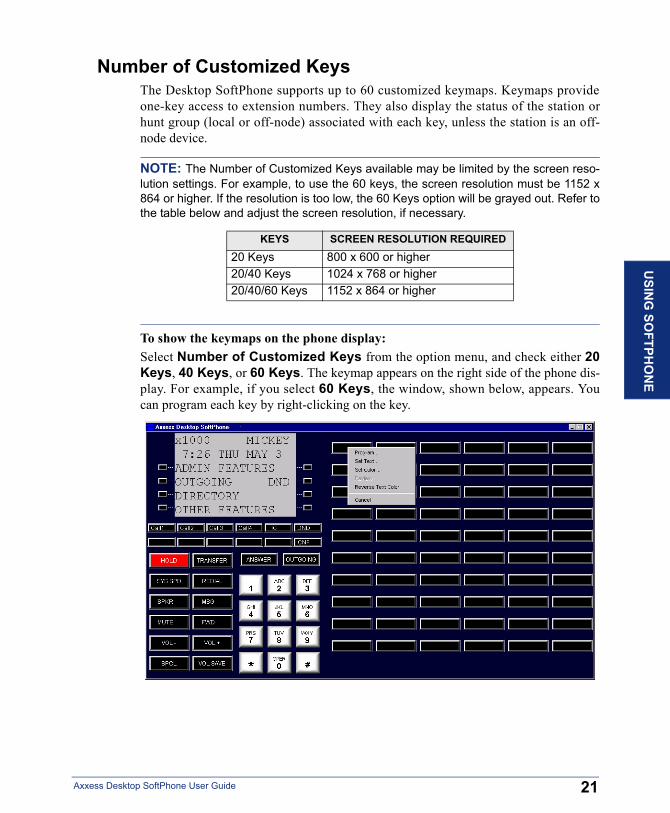
The Desktop SoftPhone supports up to 60 customized keymaps. Keymaps provideone-key access to extension numbers. They also display the status of the station orhunt group (local or off-node) associated with each key, unless the station is an off-node device.
NOTE: The Number of Customized Keys available may be limited by the screen reso-lution settings. For example, to use the 60 keys, the screen resolution must be 1152 x864 or higher. If the resolution is too low, the 60 Keys option will be grayed out. Refer tothe table below and adjust the screen resolution, if necessary.
To show the keymaps on the phone display:Select Number of Customized Keys from the option menu, and check either 20Keys, 40 Keys, or 60 Keys. The keymap appears on the right side of the phone dis-play. For example, if you select 60 Keys, the window, shown below, appears. Youcan program each key by right-clicking on the key.
KEYS SCREEN RESOLUTION REQUIRED20 Keys 800 x 600 or higher20/40 Keys 1024 x 768 or higher20/40/60 Keys 1152 x 864 or higher
op SoftPhone User G
21uide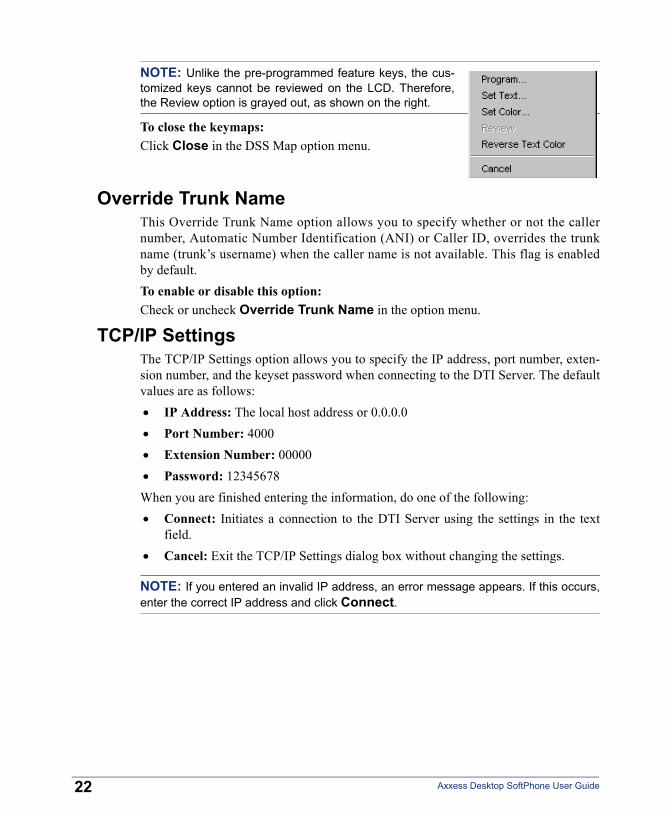
22
NOTE: Unlike the pre-programmed feature keys, the cus-tomized keys cannot be reviewed on the LCD. Therefore,the Review option is grayed out, as shown on the right.
To close the keymaps:Click Close in the DSS Map option menu.
Override Trunk Name
This Override Trunk Name option allows you to specify whether or not the callernumber, Automatic Number Identification (ANI) or Caller ID, overrides the trunkname (trunk’s username) when the caller name is not available. This flag is enabledby default.To enable or disable this option: Check or uncheck Override Trunk Name in the option menu.TCP/IP Settings
The TCP/IP Settings option allows you to specify the IP address, port number, exten-sion number, and the keyset password when connecting to the DTI Server. The defaultvalues are as follows: • IP Address: The local host address or 0.0.0.0 • Port Number: 4000 • Extension Number: 00000 • Password: 12345678When you are finished entering the information, do one of the following: • Connect: Initiates a connection to the DTI Server using the settings in the textfield. • Cancel: Exit the TCP/IP Settings dialog box without changing the settings.
NOTE: If you entered an invalid IP address, an error message appears. If this occurs,enter the correct IP address and click Connect.
Axxess Desktop SoftPhone User Guide

Caller ID
Axxess Deskt
USIN
G SO
FTPHO
NE
During an active outside call, you can set the Caller ID option to identify the caller’sname and/or telephone number. A record of the call will be stored in your Call Log(see next page) with the new information. If you transfer the call to another station,the new caller ID will appear on that phone’s display and will be recorded in the Sta-tion Message Detail Recording (SMDR) records. For example, if the Desktop SoftPhone received an outside call for which the caller’snumber is known, but not the name, it attempts to locate a name from the Call Log. Ifthe number is found in the Call Log, the name associated with the call appears in theName box in the Set Caller ID dialog box, shown below. If a name already exists for acall, you can change it using this feature, if desired.
NOTE: If the number has more than one associated name in the Call Log, the mostrecent name is used.
To enter or change a Caller ID: 1. While on a call, select Caller ID. The following dialog box appears.
2. Enter the new name and/or number in the appropriate text boxes. Each box cancontain up to 16 characters.
3. Click OK to save the new name and/or number or Cancel to exit without chang-ing the settings.
23op SoftPhone User Guide

View Call Log
24
When the Call Log option is checked, the Call Log dialog box, shown below, appears.It provides you with a visual record of up to 500 calls placed from your phone whilethe Desktop SoftPhone was active (including those placed using only the phone with-out the Desktop SoftPhone).
If there are more than eight calls in the log, a scroll bar appears on the right side of thelist box. The most recent call is highlighted when the window is opened. The log shows the name and/or number (if known), call start time, call duration (foroutside calls), and call type (outside, intercom, or conference). If a call record includes a number, you can redial that number directly from the CallLog window. You can dial the number using one of these three methods: • Highlight it and click Call. • Select the entry by double-clicking the mouse. • Press Alt+N and scroll to the desired entry using the arrow keys, then press
Alt+C.When you are finished using the Call Log, click Close to exit.
NOTE: If you hear reorder tones when attempting to return a call to a local number, thehome area code may not be programmed properly in Axxess Database ProgrammingConsult your System Administrate to verify the home area code.
Axxess Desktop SoftPhone User Guide
Key Font
Axxess Deskt
USIN
G SO
FTPHO
NE
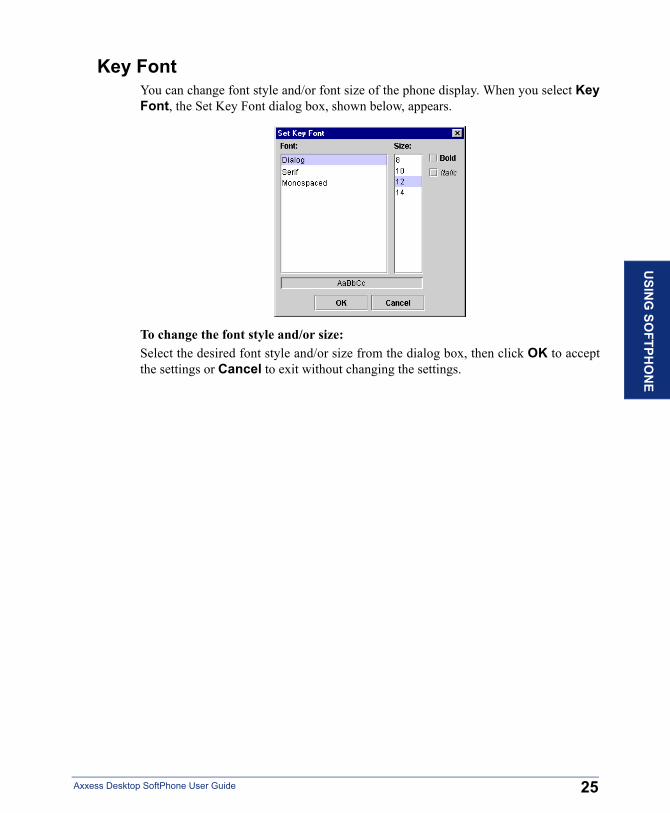
You can change font style and/or font size of the phone display. When you select KeyFont, the Set Key Font dialog box, shown below, appears.
To change the font style and/or size: Select the desired font style and/or size from the dialog box, then click OK to acceptthe settings or Cancel to exit without changing the settings.
25op SoftPhone User Guide
Background Color
26
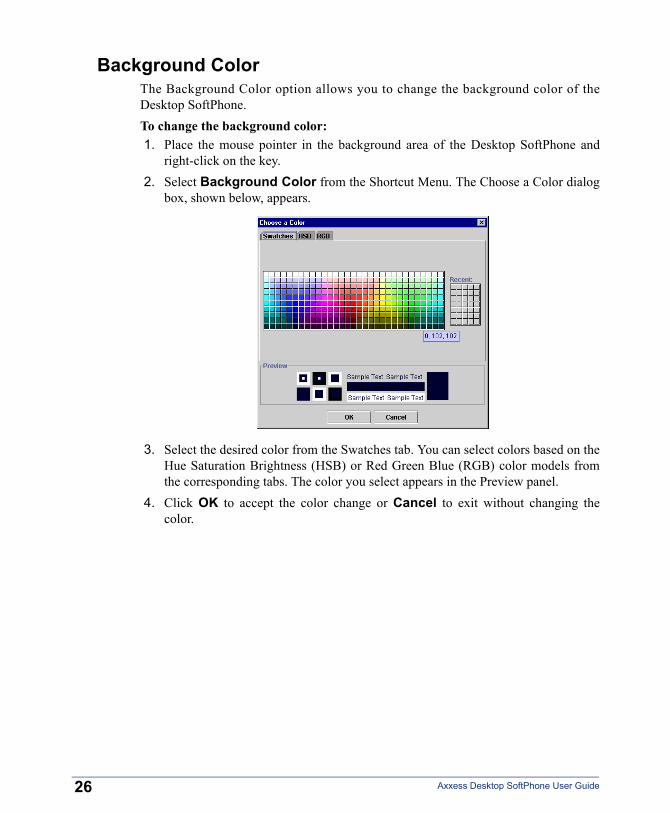
The Background Color option allows you to change the background color of theDesktop SoftPhone.To change the background color: 1. Place the mouse pointer in the background area of the Desktop SoftPhone and
right-click on the key. 2. Select Background Color from the Shortcut Menu. The Choose a Color dialog
box, shown below, appears.
3. Select the desired color from the Swatches tab. You can select colors based on theHue Saturation Brightness (HSB) or Red Green Blue (RGB) color models fromthe corresponding tabs. The color you select appears in the Preview panel.
4. Click OK to accept the color change or Cancel to exit without changing thecolor.
Axxess Desktop SoftPhone User Guide
Currency Character
Axxess Deskt
USIN
G SO
FTPHO
NE
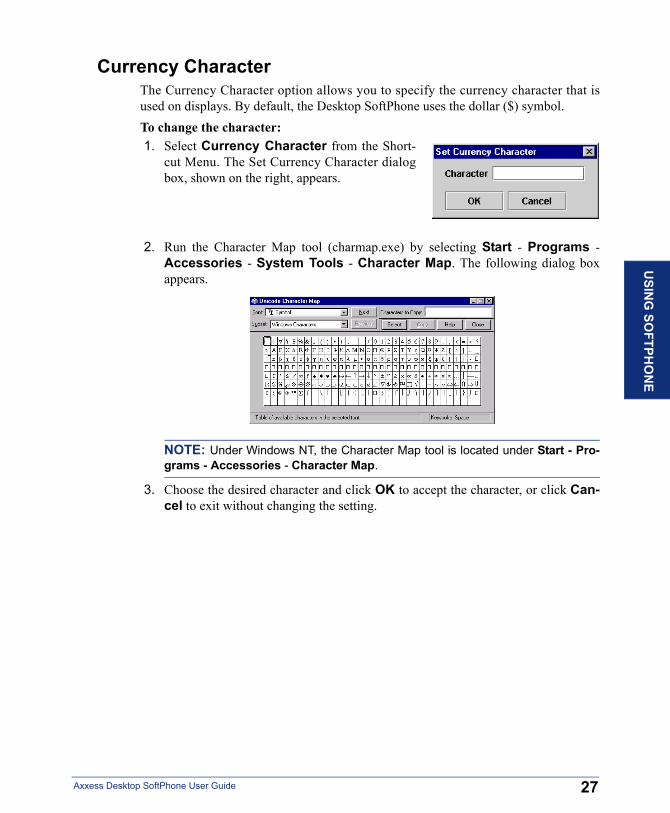
The Currency Character option allows you to specify the currency character that isused on displays. By default, the Desktop SoftPhone uses the dollar ($) symbol. To change the character: 1. Select Currency Character from the Short-
cut Menu. The Set Currency Character dialogbox, shown on the right, appears.
2. Run the Character Map tool (charmap.exe) by selecting Start - Programs -Accessories - System Tools - Character Map. The following dialog boxappears.
NOTE: Under Windows NT, the Character Map tool is located under Start - Pro-grams - Accessories - Character Map.
3. Choose the desired character and click OK to accept the character, or click Can-cel to exit without changing the setting.
27op SoftPhone User Guide
Resync Programmable Keys
28
When you log on to the Desktop SoftPhone using a new extension number, theResync Programmable Keys option allows you to synchronize the previous exten-sion’s key settings to the new extension’s programmable keys.
NOTE: The Resync Programmable Keys option applies to the keys that require onlyone step to operate them, such as an extension number, Headset On/Off feature, etc.You cannot use this option for the keys that require more than two steps to operatethem, such as the Station Speed Dial feature, Page Zone feature, etc. These featuresrequire you to enter the feature code followed by additional number(s), such as aspeed-dial bin, page zone, etc. If you have such keys programmed on your DesktopSoftPhone, the Resync Programmable Keys option will not resync their settings.
To resync programmable keys:Right-click on the mouse and select Resync Programmable Keys from the drop-down menu. The system will automatically resync the programmable keys.
NOTE: The Resync Programmable Keys option does not update the label names onthe keys. You must manually reprogram the text for the labels. See page 31 for instruc-tion on how to reprogram labels.
Axxess Desktop SoftPhone User Guide
CUSTOMIZING FEATURE KEYS
Axxess Deskt
USIN
G SO
FTPHO
NE
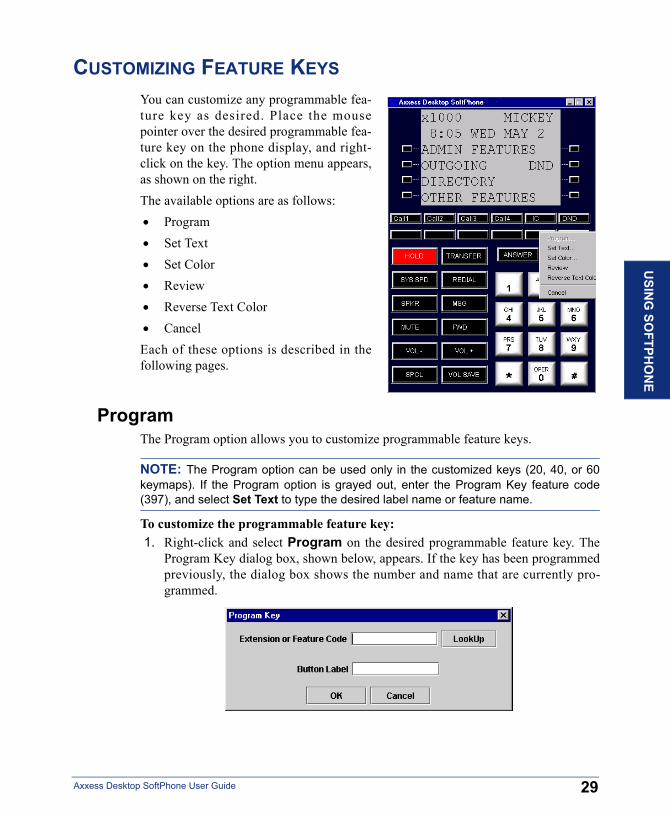
You can customize any programmable fea-ture key as desired. Place the mousepointer over the desired programmable fea-ture key on the phone display, and right-click on the key. The option menu appears,as shown on the right. The available options are as follows: • Program • Set Text • Set Color • Review • Reverse Text Color • CancelEach of these options is described in thefollowing pages.
Program
The Program option allows you to customize programmable feature keys.NOTE: The Program option can be used only in the customized keys (20, 40, or 60keymaps). If the Program option is grayed out, enter the Program Key feature code(397), and select Set Text to type the desired label name or feature name.
To customize the programmable feature key: 1. Right-click and select Program on the desired programmable feature key. The
Program Key dialog box, shown below, appears. If the key has been programmedpreviously, the dialog box shows the number and name that are currently pro-grammed.
29op SoftPhone User Guide
30
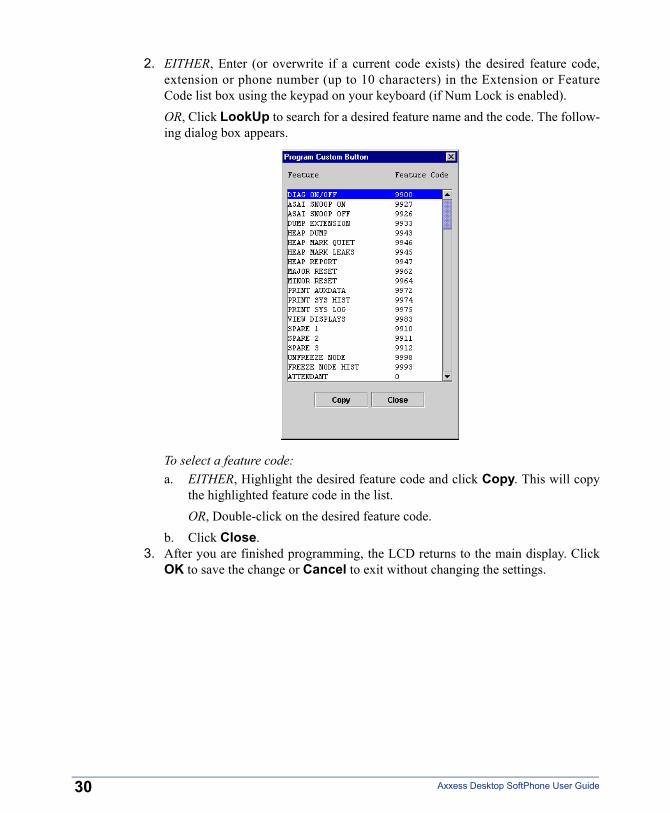
2. EITHER, Enter (or overwrite if a current code exists) the desired feature code,extension or phone number (up to 10 characters) in the Extension or FeatureCode list box using the keypad on your keyboard (if Num Lock is enabled). OR, Click LookUp to search for a desired feature name and the code. The follow-ing dialog box appears.
To select a feature code:a. EITHER, Highlight the desired feature code and click Copy. This will copy
the highlighted feature code in the list. OR, Double-click on the desired feature code.
b. Click Close. 3. After you are finished programming, the LCD returns to the main display. Click
OK to save the change or Cancel to exit without changing the settings.
Axxess Desktop SoftPhone User Guide
Set Text
Axxess Deskt
U
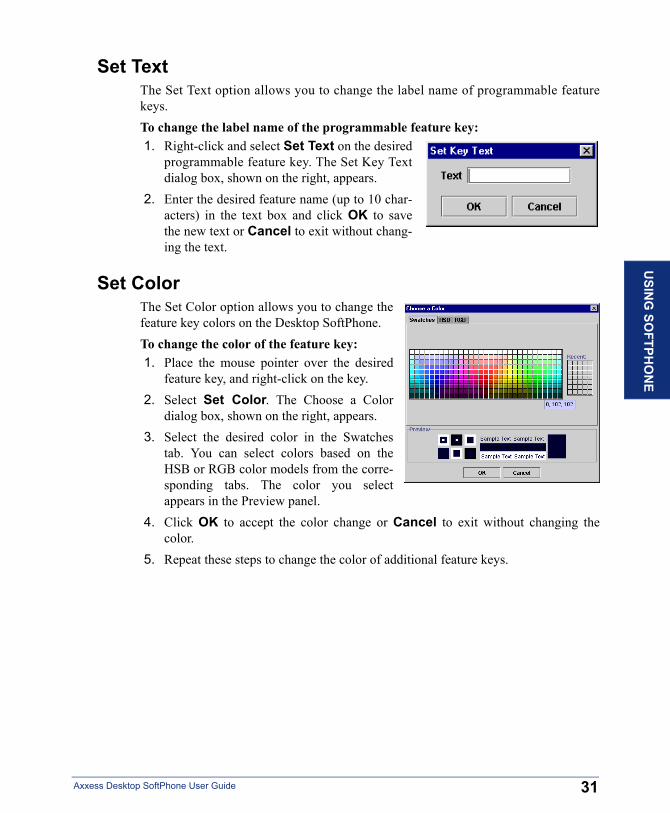
The Set Text option allows you to change the label name of programmable featurekeys. To change the label name of the programmable feature key: 1. Right-click and select Set Text on the desired
programmable feature key. The Set Key Textdialog box, shown on the right, appears.
2. Enter the desired feature name (up to 10 char-acters) in the text box and click OK to savethe new text or Cancel to exit without chang-ing the text.
SING
Set Color
SOFTPH
ON
E
The Set Color option allows you to change thefeature key colors on the Desktop SoftPhone.To change the color of the feature key: 1. Place the mouse pointer over the desired
feature key, and right-click on the key. 2. Select Set Color. The Choose a Color
dialog box, shown on the right, appears. 3. Select the desired color in the Swatches
tab. You can select colors based on theHSB or RGB color models from the corre-sponding tabs. The color you selectappears in the Preview panel.
4. Click OK to accept the color change or Cancel to exit without changing thecolor.
5. Repeat these steps to change the color of additional feature keys.
31op SoftPhone User Guide

Review
32
The Review option allows you to review the feature name currently programmed on afeature key.To review the feature key:Right-click and select Review on the desired programmable feature key. The featurename currently programmed on the key appears on the LCD.
Reverse Text Color
The Reverse Text Color option allows you to reverse the text color of the feature key.To reverse the text color of the feature key:Right-click and select Reverse Text Color on the desired programmable featurekey.Cancel
To close the Shortcut Menu:Select Cancel.Axxess Desktop SoftPhone User Guide
Handling CallsINITIALIZING YOUR MAILBOX
Axxess Deskt
USIN
G SO
FTPHO
NE
The first thing you should do is initialize your mailbox. This allows you to: • Change the default password number to a personal password. • Record a name to identify yourself in the company directory. • Listen to the voice mail introduction.To initialize your mailbox: 1. Dial the voice mail extension number. (You hear the main menu.)
NOTE: If you don’t know what the voice mail extension number is, check with yourSystem Administrator.
2. Press to identify yourself as a subscriber.
3. Enter your mailbox number and default password.
NOTE: Your mailbox number is your default password.
4. If you want a password, enter a new password using digits 0-9 (up to 12 digits).Then click or press the minus (-) key. Voice mail plays back your password.
5. If you do not want to use a password, just click or press the minus (-) key.
6. Click or press the minus (-) key to accept the entry or press to re-enteryour password. The system prompts you to record your directory name.
7. After the tone, record your first and last name. When finished, click or pressthe minus (-) key.
8. Do one of the following: • Click or press the minus (-) key again to accept the name. • Press to replay the name you just recorded. • Press to add to your name. • Press to erase and re-record your name.
The system then plays a prompt that introduces you to the basic voice mail features.You can skip this introduction by clicking or pressing the minus (-) key, if desired.
#
#
# 3
#
#
1
2
3
#
33op SoftPhone User Guide
MAKING AND RECEIVING CALLS
34
Making and receiving calls is the basic purpose of any phone. With your DesktopSoftPhone, you can make/receive intercom and outside calls and make emergencycalls.
Intercom Calls
Your extension number allows other people to place intercom calls to you, withoutdialing any extra codes. And, because every phone in your phone system is assignedan extension number, you can call other people in your system quickly and easily.NOTE: Ask your System Administrator for a list of extensions.
Placing Intercom CallsTo place an intercom call: 1. Click and wait for a dial tone.
2. On the Desktop SoftPhone’s dialpad, click the desired number. OR enter the dialnumbers using the keypad on your keyboard (if Num Lock is enabled). The LCDdisplays the digits as they are entered.
If there is no answer or the phone is busy when you place an intercom call, youcan do any of the following: • To leave a message: Click or the LEAVE MESSAGE menu key. Then
click to hang up or wait for their message center to answer. (See page 46for more message options.)
• To leave voice mail: Click the LEAVE VOICE MAIL menu key to call thephone’s mailbox. This option appears only if the called phone has a voice mail.
If the phone is busy when you place an intercom call, you can do any of the fol-lowing: • To stay on the line and wait for the phone to become available: Do not hang up.
After a system timer expires, you hear music until the phone is available. (Youcannot do this if the called phone is in DND mode.)
• To request a callback (queue on to the phone): Click the QUEUE menu key.Then click to hang up. When the phone is available, your phone will ring.(To cancel the queue request before the callback, press .)
SPKR
MSGSPKR
SPKR6
Axxess Desktop SoftPhone User Guide
Axxess Deskt
USIN
G SO
FTPHO
Receiving Intercom CallsTo receive an intercom call that comes in through your speaker or headset:Start talking through your microphone. To receive a ringing (non-handsfree) intercom call:Click or .
To disable your phone’s handsfree answering feature and make all incoming callsring until you answer them:Enter on the keyboard or on the keypad display. (Repeat this step if youwant to turn this feature on again.)Instead of answering a ringing call, you can click one of the following menu keys: • SEND TO V-MAIL: Sends the call directly to your voice mail mailbox. You will
not see this option if you do not have a mailbox. • IC CALL TO DND: Places your phone in DND mode and blocks the call. (See
page 78 for more information about DND mode.) • SEND TO DEST: Redirects the call to the intercom or outside number that you
enter. (See page 43 for more information about the Redirect Call feature).
SPKR ANSWER
3 1 9
35op SoftPhone User Guide
NE
Outside Calls
36
With outside calls, you can talk to people who aren’t members of your phone system.When you make an outside call, however, you must dial any area codes or long dis-tance digits that your telephone company requires.
Placing Outside CallsTo place an outside call: 1. Click or press on the keypad.
2. Enter the desired number.
NOTE: If you see a request for an account code and hear a single beep, you mustdial an account code before you can place your call (see page 75).
3. When finished with the call, click to hang up.
Depending on how your system is programmed, you may be able to use one of thefollowing methods to select an outgoing line, instead of pressing the OUTGOINGkey: • Enter the Outgoing Call feature code (default is 8). • Click an unlit CALL key, if you have one. • Click an unlit LINE key, if you have one. • Enter a Select Line Group feature code (defaults are 92001-92208 but may differ
depending on the software version). • Enter the Automatic Route Selection (ARS) feature code (default is 92000 but
may differ depending on the software version).To request a callback (queue on to the line) if all outgoing lines are busy when youtry to call out:Click the QUEUE menu key when you hear busy signals, and click to hangup. When the line is available, your phone rings.To cancel the queue request before your phone rings:Press . When entering the number, you can click one of the following menu keys: • OUTSIDE DIR: Selects the speed-dial directory. (See page 76). • STN SPEED DIAL: Selects the Station Speed-Dial feature. (See page 43.) • SYS SPEED DIAL: Selects the System Speed-Dial feature. (See page 43.) • REDIAL: Redials the last outside number you dialed. (See page 44.)
OUTGOING 8
SPKR
SPKR
6
Axxess Desktop SoftPhone User Guide
Axxess Deskt
USIN
G SO
Receiving Outside CallsTo receive an outside call:EITHER, Start talking through your microphone.
OR, Click or the ANSWER menu key.
Depending on how your system is programmed, you may be able to use one of thefollowing methods instead of pressing : • Click the flashing CALL key, if you have one. • Click the flashing LINE key, if you have one.Instead of answering a ringing call, you can press one of the following menu keys: • SEND TO V-MAIL: Sends the call directly to your voice mailbox. You will not
see this option if you do not have a mailbox. • SEND TO DEST: Redirects the call to the intercom or outside number that you
entered. (See page 43 for more information about the Redirect Call feature).
ANSWER
ANSWER
FTP
Emergency Calls
HO
NE
With the Axxess phone system, you do not have to access an outside line (click) to dial an emergency number.
To make an emergency call:Enter . A call is automatically placed to the preset emergency number.
OUTGOING
9 1 1
Call Waiting
If you receive a call while you are already on another call, you will hear a “call wait-ing” tone and/or you will see a display.To respond to a waiting call (you hear a single tone and a key is flashing):End your current call, place it on hold, and/or use one of the following menu keys: • ANSWER: Answers the ringing call. If you did not place the current call onhold, it is disconnected. • SEND TO V-MAIL: Sends the call directly to your voice mailbox without inter-
rupting the current call. (You will not see this option if you do not have a mail-box.)
• IC CALL TO DND: Places your phone in DND mode and blocks the call with-out interrupting the current call. (See page 78 for more information about DNDmode.)
37op SoftPhone User Guide
PLACING CALLS ON HOLD
38
You can place calls on hold in one of two ways: individual or system. • Individual Hold places the call on hold at one phone. It can then be directly
picked up at that phone or it can be picked up at another phone using the CallPickup (Reverse Transfer) feature (see page 41).
• System Hold places the call on hold in the system. You can then pick up the callat any phone that has a flashing key for the call, including the phone that placed iton hold.
NOTE: You cannot place intercom calls on system hold.
To place a call on Individual Hold: 1. Click or the HOLD menu key.
2. Click to hang up or place another call.
3. To return to the call, click the flashing key.To place an outside call on System Hold: 1. Click and enter .
2. Click to hang up or place another call.
To return to a call that is on hold:Click the flashing key.
HOLD
SPKR
SPCL 3 3 5
SPKR
Axxess Desktop SoftPhone User Guide
PLACING CONFERENCE CALLS
Axxess Deskt
USIN
G SO
FTPHO
NE
With the Conference feature, you can establish a conference call with up to threeintercom and/or outside parties (four, including you).To place a conference call: 1. While on the first call, click or the CNF menu key to put the call on hold.
2. Place another intercom or outside call.
3. Click or CNF to place the call on hold. (If necessary, repeat this step toplace one more call on hold.)
4. Click or the CONNECT TO CONFERENCE menu key to join all ofthe calls together in the conference.
During the conference call, you can do the following: • To place the conference on hold: Click the HOLD menu key. This places the con-
ference on hold without disconnecting the parties. To return to the conference,click .
• To drop out of the conference: Click . Then click to hang up. Thisremoves your phone from the conference, but leaves the other parties connected.
• To add additional parties to the conference: Do the following:a. Click the ADD PARTY menu key. This leaves the conference parties con-
nected.b. Place a call to the party to be added to the conference.
c. EITHER, Click twice.
OR, Click once and then click CONNECT TO CONFERENCE toput yourself and the new party into the conference.
• To end the conference and place all parties on individual hold: Click andthen click to place all of the parties on individual hold. You can thenspeak to one party at a time by clicking or a flashing key.
• To mute your microphone: Click or the MUTE menu key. This turns yourmicrophone on or off during the conference. You can hear the conferenced par-ties, but they cannot hear you.
• To transfer the conference to another extension or to voice mail: Click orthe TRANSFER CNF menu key and enter the desired extension number. Thenclick to hang up when you are ready to complete the transfer.
CNF
CNF
CNF
CNF
CNF SPKR
CNF
CNF
CNF
HOLD
HOLD
MUTE
TRANSFER
SPKR
39op SoftPhone User Guide
TRANSFERRING CALLS
40
Although transferring calls is considered a basic function of a phone,your DesktopSoftPhone has many advanced options for this feature. With your phone, you cantransfer to another extension, voice mail, or even an outside line.
To Another Extension
1. EITHER, Click or the TRANSFER menu key.OR, Press the TRANSFER TO HOLD menu key to place the call on hold at theother phone.
2. Enter the desired extension number or click the IC DIRECTORY menu key tolook up the number. To transfer to your message center, click the MESSAGE CENTER menu key.
3. Wait for an answer, announce the call, and then click to hang up to com-plete the transfer. If the number is busy, there is no answer, or the transfer is refused, click the flash-ing key to return to the caller.
NOTE: If you are receiving a transferred call and the Transfer-To-Connect option isenabled for your phone, you are automatically connected to the transferred caller oncethe transferring party hangs up. If this option is disabled, you must press a CALL keyto answer the transferred call.
TRANSFER
SPKR
To Voice Mail
1. Click or the TRANSFER menu key.2. Click the VOICE MAIL menu key.
3. EITHER, Enter the desired mailbox number and then click to hang up tocomplete the transfer.
OR, Click to hang up to send the call to the voice mail menu (so that thecaller can select the mailbox number).
TRANSFER
SPKR
SPKR
Axxess Desktop SoftPhone User Guide
To an Outside Number
Axxess Deskt
1. Click or the TRANSFER menu key.
2. Select an outgoing line by clicking the OUTSIDE PHONE menu key. 3. Enter the desired telephone number.
4. Wait for an answer, announce the call, and then click to hang up to com-plete the transfer.If the number is busy, there is no answer, or the transfer is refused, click the flash-ing key to return to the caller.
TRANSFER
SPKR
To Pick Up (Reverse Transfer) a Call
USIN
G S
1. Press .
2. Enter the extension or hunt group number where the call is ringing or holding.(See page 81 for more information about hunt groups.)
4
41op SoftPhone User Guide
OFTPH
ON
E
FORWARDING CALLS
42
With the Forwarding feature, you can have calls follow you (e.g., forwarded to a cellphone), or you can redirect calls to a voice mail or other extension.
Manual Call Forwarding
Manual call forwarding allows you to send incoming calls to another extension num-ber. You can even forward calls to outside numbers, if your phone is programmed toallow this.To forward calls: 1. Click and then click one of the following menu keys:• ALL: All incoming calls are forwarded without ringing at your phone. • NO ANSWER: All incoming calls are forwarded if they are not answered
before a timer expires.
NOTE: Only the installer or System Administrator can adjust this timer.
• BUSY: When your phone is busy, all incoming calls are forwarded withoutringing at your phone.
• NO ANSWER/BUSY: All incoming calls are forwarded if your phone isbusy or if you do not answer, as described above.
2. Do one of the following: • To forward to an outside telephone number:
a. Click the OUTSIDE PHONE menu key.b. Enter a telephone number or click the OUTSIDE DIR menu key to look
up and select a number. (See page 76 for more information ondirectories.)
• To forward to an extension number: Enter the extension number. OR, clickthe IC DIRECTORY menu key to look up and select a number.
• To forward to your voice mailbox: Click the VOICE MAIL menu key. • To forward to your message center: Click the MESSAGE CENTER menu
key.To cancel any call forward request:Click and the FWD OFF menu key.
FWD
FWD
Axxess Desktop SoftPhone User Guide
Automatic System Forwarding
Axxess Deskt
Automatic System Forwarding allows your System Administrator to route calls basedon the type of call and the status of your telephone. Although you cannot program thepath of a system forward, you can enable or disable this feature on your phone.To enable or disable System Forwarding:Enter .3 5 4
Redirect Calls
USIN
G SO
FTPHO
NE
NOTE: This feature is available only on systems with software versions 5.3 and later.
The Redirect Call feature allows you to forward any call that is ringing on your phonewithout having to answer the call.
NOTE: You cannot redirect calls to an extension that is in DND or to a restricted out-side number.
To redirect a call to an extension number: 1. EITHER, Click and enter .
OR, Click the SEND TO DEST menu key. 2. Enter the extension number or click the IC DIRECTORY menu key to look up
and select a number.To redirect a call to an outside telephone number: 1. EITHER, Click and enter .
OR, Click the SEND TO DEST menu key. 2. EITHER, Click the OUTSIDE CALL menu key and enter the telephone number.
OR, Use a speed-dial number (see page 76).
SPCL 3 3 1
SPCL 3 3 1
43op SoftPhone User Guide
REDIALING A NUMBER
44
Although most phones redial the last number dialed, your System Administrator canprogram your phone to redial the last number saved. To use the Last Number Dialed feature (if enabled):EITHER, Click . A line is selected automatically, and the number is dialed.
OR, Click the OUTGOING or OUTSIDE CALL menu key and then the REDIALmenu key. The number is dialed.To use the Last Number Saved feature (if enabled): • To save the last number dialed: While the phone is idle or while listening to inter-
com dial tone, click .
• To redial the saved number: While on a call or after selecting a line, click. A line is selected automatically, and the number is dialed.
REDIAL
REDIAL
REDIAL
Axxess Desktop SoftPhone User Guide
DISPLAYING INFORMATION ON YOUR PHONE
Axxess Deskt
Your Desktop SoftPhone has two lines of display where you can view information,such as the date and time or the outside party’s name/number.
Date, Time, Name, and Extension Number
You can temporarily display the system date and time, your username, and yourextension number at any time.To show the date and time display (while on a call, in DND, etc.):Click and enter .SPCL 3 0 0U
Outside Party’s Name/Number
SING
SOFTPH
ON
E
NOTE: This feature is available only in software versions 4.4 and later.
If you are currently connected to an outside caller with Caller ID, you can togglebetween displaying the caller’s name and number.To show the outside party’s name:Click and enter .
NOTE: If there is no outside party name available, the display shows CANNOTACCESS FEATURE.
SPCL 3 7 9
45op SoftPhone User Guide
USING THE MESSAGE KEY
46
In today’s busy world, it’s almost guaranteed that you will call someone that is onanother call, does not answer, or is in DND. But, with the key, you can let theother person know you called. When you leave a message, you can: • Have the called party return your call. When the party you called responds to
the message indication, a call is automatically placed to your phone. • Leave a message with the called party’s message center (which can be a per-
son or voice mail). When the party you called responds to the message, a call isautomatically placed to his or her message center instead of your phone.
To indicate that a message is waiting, your phone’s key flashes, and the dis-play shows the number of waiting messages.
MSG
MSG
Leaving Messages
To leave a message while on an intercom call: 1. Click or the LEAVE MESSAGE menu key.2. Click to hang up or wait for the message center to answer.
To leave a message without placing an intercom call: 1. Click and then the LEAVE MESSAGE menu key.
2. Enter the desired extension number.To cancel a message that you left at another phone: 1. Click and then the CANCEL MESSAGE menu key.
2. Enter the extension number of the phone where you left the message.
MSG
SPKR
MSG
MSG
Axxess Desktop SoftPhone User Guide
Retrieving Messages
Axxess Deskt
USIN
G SO
F
To retrieve a message (Message key is flashing):Click . A call is automatically placed to the phone or message center that leftthe message. (See the following section for information about accessing your mail-box.)To select the message you want to answer first: 1. Click the VIEW MESSAGE menu key to view the waiting message. If more
than one message is waiting, scroll to the desired message using the PREVIOUSor NEXT menu key.
2. Click the REPLY menu key to respond to the desired message.To cancel a waiting message: 1. Click or the VIEW MESSAGE menu key to view the message to be can-
celed.
2. Click or the DELETE menu key to cancel the displayed message.
MSG
MSG
47op SoftPhone User Guide
TPHO
NE
ACCESSING YOUR MAILBOX
48
If you have a message waiting in your mailbox, you must access your voice mailboxto retrieve it.
TIP: Generally speaking, clicking during any voice mail operation will advance youto the next step. For example, when leaving a voice mail message for another voicemail user, you can click to skip the person’s introductory message and proceeddirectly to the recording phase. Similarly, while listening to messages, you can click to skip the system-generated voice prompts and proceed directly to the playbackphase. You can also click to cancel or return to the previous menu at any menulevel.
When you access your mailbox, the system may play one of the following messages: • Mailbox almost full or full: If your mailbox is full, no new messages can be
received until you delete waiting or saved messages. • Message count: The system tells you how many messages are waiting to be
heard, if any, and how many are priority messages. • Remote Messaging: The system will indicate whether primary or alternate
Remote Messaging is selected when the Remote Messaging feature is enabled(see page 66). It will also alert you if a programming error has been detected and/or if it encountered busy system resources when attempting to place a RemoteMessaging call.
NOTE: All of the menu options used for voice mail features are presented as numericentries in the following instructions. You can, however, access these options using themenu selection keys beside the display.
To access your mailbox: 1. Enter the voice mail extension number. (You hear the main menu.)
2. During or after the greeting, click or press the asterisk (*) key on the keypadto identify yourself as a subscriber.
3. Enter your mailbox number and your personal password (if programmed). Thenclick or press the minus (-) key.
NOTE: If you do not have a password, click or press the minus (-) key. Seepage 63 for information on programming passwords.
#
##
#
#
Axxess Desktop SoftPhone User Guide
USING VOICE MAIL MESSAGES
Axxess Deskt
Once you’ve accessed your mailbox, the system will tell you how many new andsaved messages you have. You can then listen to messages, delete messages, savemessages, etc.
Listening to Messages
USIN
G SO
FTPHO
NE
To listen to messages: 1. Access your mailbox as described on page 48.
2. EITHER, Press to listen to your new messages.
OR, Press to listen to your saved messages.
3. While you are listening to a message, you can use the following options: • Click or press the minus (-) key to skip to the end of the recording. • Press to back up. • Press to pause. Then press any key to continue. • Press to skip ahead. • Press to lower the volume. • Press to play the message envelope. • Press to raise the volume. • Press to save the new message in your mailbox. • Press to delete the message from your mailbox.
4. When the message has finished playing, you have the following options: • Press to replay the message from the beginning. • Press to reply to the message. If you are using version 5.1 or later soft-
ware, you have the following options (earlier versions only leave voice mailmessages):
— Press , or click the LEAVE VOICE MAIL menu key, to leave avoice mail message for the caller. If the caller had a mailbox number, it will ask you to verify the destina-tion by clicking or pressing the minus (-) key.
If the number was not associated with a mailbox, it will ask you toenter a mailbox number.
If the message was from an outside caller, you cannot leave a voicemail message.
1
3
#
1
2
3
4
5
6
7
9
1
2
1
#
49op SoftPhone User Guide
50
— Press or click the RETURN CALL menu key to make a return call.Your call will be transferred automatically to the caller’s extension ortelephone number, if available. If the extension number is not available, you will have the option ofleaving voice mail.
If the telephone number is not available, you cannot reply to the mes-sage.
• Press to forward a copy of the message to another subscriber. If you wantto include introductory comments, press and record an introduction. Ifnot, click or press the minus (-) key to forward the message without anintroduction.
• Press to listen to the previous message. • Press to play the introductory message envelope (see page 63 for infor-
mation on envelope options). • Press to listen to the next message. • Press to save the new message in your mailbox. • Press to delete the message from your mailbox.
5. Click to hang up.
2
31
#
4
5
6
7
9
MSG
Axxess Desktop SoftPhone User Guide
Undeleting Messages
Axxess Deskt
USIN
G SO
FTPHO
NE
NOTE: This feature is available only in software versions 5.1 and later.
If you accidently delete a voice mail message, you can retrieve it within a specifictime frame (programmed by your System Administrator). Any retrieved messages arethen restored to your saved-message queue. Messages that are not undeleted withinthe programmed time (up to 24 hours) are automatically erased. To recover deleted messages: 1. Access your mailbox as described on page 48.
2. Press for Message Options.
3. Press to access undelete options. Your options are:
• Press to listen to your deleted messages and choose which ones to deleteor recover. After each message you can:
— Press to replay the message.
— Press to reply to the message.
— Press to forward the message to another mailbox.
— Press to listen to the previous message.
— Press to play the message envelope.
— Press to listen to the next message.
— Press to recover the message.
— Press to purge the message from your mailbox. • Press to recover all of your deleted messages and store them as saved
messages. • Press to erase all of your deleted messages.
4. Click to hang up.
5
2
1
1
2
3
4
5
6
7
9
2
3
MSG
51op SoftPhone User Guide
Sending Messages
52
To send a message: 1. Access your mailbox as described on page 48.
2. Press .
3. Enter the desired mailbox number or group list number.
4. Click or press the minus (-) key to accept the subscriber’s name.
5. Record your message after the tone. While recording, you have the followingoptions: • Press to pause while recording. Then press any key to continue. • Press to erase and re-record your message.
6. When finished recording, hang up or press to access the following options.
• Press to send the message and return to the voice mail options. • Press to replay your message. • Press to add to your message. • Press to erase and re-record your message. • Press to use the special delivery options. You can then use one or more
of the following options:— Press to mark the message “private.” (This prevents the recipient
from forwarding it to other subscribers.)— Press to mark the message “certified.” (When the recipient listens to
the message, you will receive a receipt notice.)— Press to mark the message “priority.” (This will place your message
ahead of all other waiting messages in the receiving mailbox.)— Press to cancel delivery options.
— Click to deliver the message. (If you want to mark the message certi-fied, private, and/or priority, you must do so before completing thisstep.) You may choose either of the following options:
• Click or press the minus (-) key and enter another mailbox num-ber to send the message to another destination.
• Click to exit and return to voice mail options
7. Click to hang up.
2
#
2
3
#
#
1
2
3
9
1
2
3
#
#
MSG
Axxess Desktop SoftPhone User Guide
Canceling Unheard Messages
Axxess Deskt
USIN
G SO
FTPHO
NE
NOTE: This feature is available only in software versions 5.1 and later.
You can cancel unretrieved messages that you have sent to individuals, but not mes-sages that you sent to group lists. To cancel unheard messages: 1. Access your mailbox as described on page 48.
2. While listening to the voice mail main menu, press or click the MESSAGEOPTIONS menu key.
3. Press .
4. When prompted, enter the number of the mailbox containing the unheard mes-sage.
5. Click or press the minus (-) key to confirm the mailbox you are selecting.Voice mail will tell you how many messages you have waiting at the mailbox andplay them for you. After each message, you can: • Press to replay the message. • Press to add to the message. • Press to forward the message to another mailbox. • Press to listen to the previous message. • Press to play the message envelope. • Press to listen to the next message. • Press to save the message in your mailbox. • Press to delete the message.
6. Click to hang up.
5
1
#
1
2
3
4
5
6
7
9
MSG
53op SoftPhone User Guide
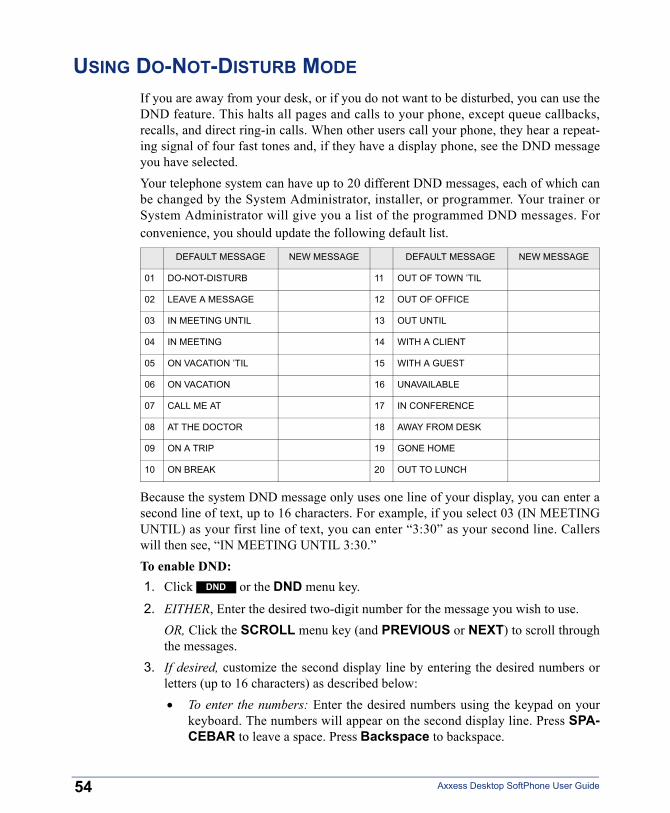
USING DO-NOT-DISTURB MODE
54
If you are away from your desk, or if you do not want to be disturbed, you can use theDND feature. This halts all pages and calls to your phone, except queue callbacks,recalls, and direct ring-in calls. When other users call your phone, they hear a repeat-ing signal of four fast tones and, if they have a display phone, see the DND messageyou have selected. Your telephone system can have up to 20 different DND messages, each of which canbe changed by the System Administrator, installer, or programmer. Your trainer orSystem Administrator will give you a list of the programmed DND messages. Forconvenience, you should update the following default list.
Because the system DND message only uses one line of your display, you can enter asecond line of text, up to 16 characters. For example, if you select 03 (IN MEETINGUNTIL) as your first line of text, you can enter “3:30” as your second line. Callerswill then see, “IN MEETING UNTIL 3:30.”To enable DND: 1. Click or the DND menu key.
2. EITHER, Enter the desired two-digit number for the message you wish to use. OR, Click the SCROLL menu key (and PREVIOUS or NEXT) to scroll throughthe messages.
3. If desired, customize the second display line by entering the desired numbers orletters (up to 16 characters) as described below: • To enter the numbers: Enter the desired numbers using the keypad on your
keyboard. The numbers will appear on the second display line. Press SPA-CEBAR to leave a space. Press Backspace to backspace.
DEFAULT MESSAGE NEW MESSAGE DEFAULT MESSAGE NEW MESSAGE
01 DO-NOT-DISTURB 11 OUT OF TOWN ’TIL
02 LEAVE A MESSAGE 12 OUT OF OFFICE
03 IN MEETING UNTIL 13 OUT UNTIL
04 IN MEETING 14 WITH A CLIENT
05 ON VACATION ’TIL 15 WITH A GUEST
06 ON VACATION 16 UNAVAILABLE
07 CALL ME AT 17 IN CONFERENCE
08 AT THE DOCTOR 18 AWAY FROM DESK
09 ON A TRIP 19 GONE HOME
10 ON BREAK 20 OUT TO LUNCH
DND
Axxess Desktop SoftPhone User Guide
Axxess Deskt
• To enter the letters or numbers: Click the USE ALPHA MODE menu keyor . Then, enter the desired letters or numbers using the keyboard.Press SPACEBAR to leave a space. Press BACKSPACE to backspace.
NOTE: To enter slash (/) or pound (#) key, use the keypad keys on the keyboardor the dialpad keys on the Desktop SoftPhone.
4. Click .
To cancel DND:Click .
MSG
SPKR
DND
55op SoftPhone User Guide
USIN
G SO
FTPHO
NE
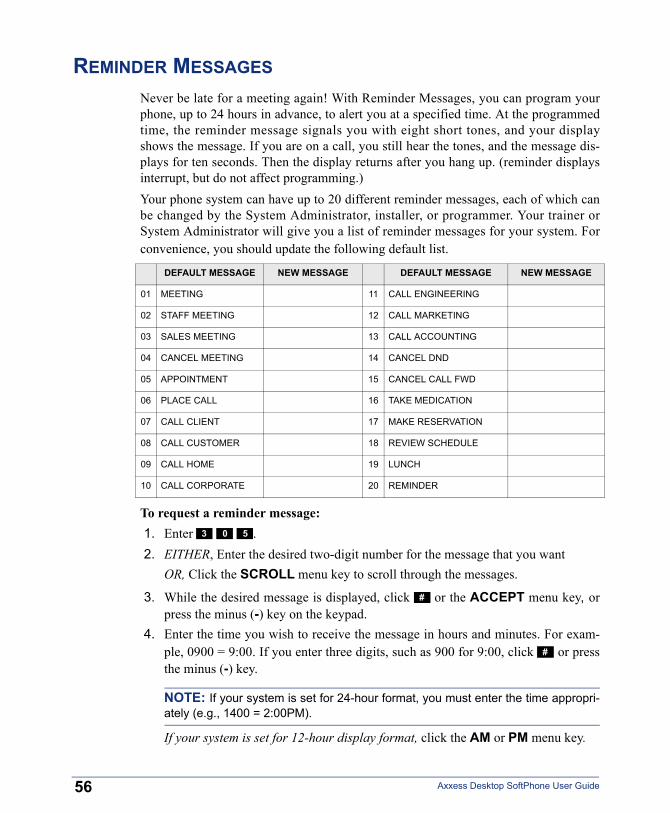
REMINDER MESSAGES
56
Never be late for a meeting again! With Reminder Messages, you can program yourphone, up to 24 hours in advance, to alert you at a specified time. At the programmedtime, the reminder message signals you with eight short tones, and your displayshows the message. If you are on a call, you still hear the tones, and the message dis-plays for ten seconds. Then the display returns after you hang up. (reminder displaysinterrupt, but do not affect programming.)Your phone system can have up to 20 different reminder messages, each of which canbe changed by the System Administrator, installer, or programmer. Your trainer orSystem Administrator will give you a list of reminder messages for your system. Forconvenience, you should update the following default list.
To request a reminder message: 1. Enter . 2. EITHER, Enter the desired two-digit number for the message that you want
OR, Click the SCROLL menu key to scroll through the messages.
3. While the desired message is displayed, click or the ACCEPT menu key, orpress the minus (-) key on the keypad.
4. Enter the time you wish to receive the message in hours and minutes. For exam-ple, 0900 = 9:00. If you enter three digits, such as 900 for 9:00, click or pressthe minus (-) key.
NOTE: If your system is set for 24-hour format, you must enter the time appropri-ately (e.g., 1400 = 2:00PM).
If your system is set for 12-hour display format, click the AM or PM menu key.
DEFAULT MESSAGE NEW MESSAGE DEFAULT MESSAGE NEW MESSAGE
01 MEETING 11 CALL ENGINEERING
02 STAFF MEETING 12 CALL MARKETING
03 SALES MEETING 13 CALL ACCOUNTING
04 CANCEL MEETING 14 CANCEL DND
05 APPOINTMENT 15 CANCEL CALL FWD
06 PLACE CALL 16 TAKE MEDICATION
07 CALL CLIENT 17 MAKE RESERVATION
08 CALL CUSTOMER 18 REVIEW SCHEDULE
09 CALL HOME 19 LUNCH
10 CALL CORPORATE 20 REMINDER
3 0 5
#
#
Axxess Desktop SoftPhone User Guide

Axxess Deskt
To cancel all reminder message requests before they signal you:Enter .
To clear a received reminder message (you hear eight short tones and see areminder message display):Click or press the asterisk (*) key on the keypad.
3 0 6
57op SoftPhone User Guide
USIN
G SO
FTPHO
NE

SETTING PREFERENCES
58
Your phone and voice mailbox are automatically set to specific defaults. You can,however, configure many of these settings at any time.
Phone Configuration
Customizable features on your phone include changing volume levels, enabling back-ground music, selecting a ring tone, and others.Changing Volume LevelsThe phone has eight volume settings: handset intercom, handset outside call, speaker-phone intercom, speakerphone outside call, background music, ringing, handset inter-com dial tone, and speakerphone intercom dial tone.
NOTE: To change each of these levels, you must be using that feature. For example, ifyou want to change the speakerphone level for an intercom call, you must be on ahandsfree intercom call.
To change and save a volume level: 1. Click or to adjust the volume level.
2. Click to save the changes.
VOL + VOL -
VOL SAVE
Axxess Desktop SoftPhone User Guide
Axxess Deskt
USIN
G SO
FTPHO
NE
Selecting a Ring ToneThe ability to change your ring tone is helpful in close-quartered environments. Ifyour ring tone is unique, you can quickly identify when a call is ringing on yourphone.To select the type of ring tone for your phone:1. With the handset in the cradle, dial .2. Do one of the following to select your ring tone:
• Press or the RINGER OFF menu key for no ringing. • Press the PREVIOUS or NEXT menu key to scroll to the desired tone. • Dial 1-9 to select a specific tone.
3. When you hear the tone you want, you can do any of the following: • Press . • Press the ACCEPT menu key. • Press . • Lift and replace the handset.
Enabling Background MusicIf your telephone system is equipped with a music source, you can listen to musicthrough your speaker. To enable or disable background music:Enter .
NOTE: Using background music on a Desktop SoftPhone consumes as much band-width as a telephone call to the device. If your site has limited bandwidth, do not enablebackground music.
Changing KeymapsKeymaps identify where feature keys appear on your phone. While all phones are pro-grammed with a standard keymap, some phones have alternate keymaps (ask yourSystem Administrator). If you have an alternate keymap, you can switch between thekeymaps by dialing a specific feature code.To switch between keymaps when your phone is idle:Enter .
To switch between keymaps during a call:Click and enter .
3 9 8
0
#
SPKR
3 1 3
3 9 9
SPCL 3 9 9
59op SoftPhone User Guide
60
Enabling Automatic Call AnswerThe Automatic Call Answer feature determines whether or not you are automaticallyconnected to a caller when you click . If this feature is enabled, you are auto-matically connected when you click . If it is disabled, you must first click
and then press the flashing key.To enable/disable this feature for ringing outside calls:Enter .To enable/disable this feature for ringing intercom calls:Enter .
Changing the LanguageWhen your phone system is installed, the System Administrator can choose two offour different languages (American English, British English, Japanese, or Spanish) asthe primary and secondary languages. You can then change the voice mail prompts onyour phone by toggling between the primary and secondary languages. For example,if the system’s primary language is American English, and your phone is programmedfor the primary language, your voice mail prompts are played in American English(unless changed, as outlined below). If the secondary language is Japanese, and yourphone is programmed for the secondary language, your voice mail prompts are playedin Japanese.
NOTE: You can only use the secondary language voice mail prompts if they areloaded on the system. By default, all phones are set for the primary language. See yourSystem Administrator to determine which languages are programmed for your phonesystem.
To change the assigned language for your phone:Enter to change between your system’s primary and secondary languages,as desired. Your display shows the current language.
SPKRSPKR
SPKR
3 6 0
3 6 1
3 0 1
Axxess Desktop SoftPhone User Guide

Axxess Deskt
Returning to Default OperationYou can return your phone to default levels at any time. This feature returns volumeto default levels; cancels DND, manual call forwarding, background music, and queuerequests; and restores handsfree mode, pages, hunt group calls, and system forward-ing all at once.To return your phone to default:Enter .3 9 4
Voice Mail Options
USIN
G SO
FTPHO
NE
Your voice mailbox contains personal options that allow you to customize your per-sonal greetings, directory name, password, etc.
NOTE: You cannot change your personal options until you have initialized your mail-box (see page 33).
Recording Your Personal Greetings You can store two different personal greetings in your voice mailbox: a primary andan alternate. You can then select which greeting you want played when a callerreaches your voice mailbox. Because the purpose of this greeting is to tell callers whythey have reached your voice mailbox, you should include the following information: • Whether or not you are in the office and where you can be reached • When you will be returning calls
• For callers who do not wish to leave a message, how to exit voice mail (press to return to the operator.)
The following are some sample greetings to help you plan your message: • Primary Greeting: Hello, this is __________. I am either on another line or
away from my desk and cannot take your call at this time. If you need to speak tosomeone immediately, please dial zero now. Otherwise, please leave a detailedmessage, and I will return your call as soon as possible. Thank you.
• Alternate Greeting: Hello, this is __________. I will be away from the officefrom day/date until day/date. If you need to speak to someone immediately,please dial zero now. Otherwise, please leave a detailed message, and I willreturn your call when I return. Thank you.
0
61op SoftPhone User Guide
62
To change your personal greeting: 1. Access your mailbox as described on page 48.
2. Press to select the Personal Options Menu.
3. Press .
4. Do one of the following:
• Press to record and/or enable your primary greeting. • Press to record and/or enable your alternate greeting. • Press to enable the system default mailbox greeting.
5. If you pressed , continue to the next step.
6. If you pressed or , the current greeting is played (if one exists). You canthen do one of the following:
• Click or press the minus (-) key to accept the greeting. • Press to replay the greeting. • Press to add to the greeting. • Press to erase and re-record the greeting. • Press to exit without changing your greeting.
7. Click to hang up.
Recording Your Voice Mail Directory NameYour recorded name is used to identify you in the voice mail directory and to verifyyour mailbox number when messages are addressed to you.To change your directory name: 1. Access your mailbox as described on page 48.
2. Press to select the Personal Options Menu.
3. Press . Your current name is played. (Press to replay your recorded name.)
4. Press to erase and re-record your name.
5. When you hear a tone, record your first and last name, then click or press theminus (-) key.
6. Do one of the following: • Click or press the minus (-) key again to accept your recorded name. • Press to replay your recorded name. • Press to add to your name. • Press to erase and re-record your name.
7. Click to hang up.
4
1
1
2
3
3
1 2
#
1
2
3
SPKR
4
2 1
3
#
#
1
2
3
SPKR
Axxess Desktop SoftPhone User Guide
Axxess Deskt
USIN
G SO
FTPHO
NE
Changing Your Mailbox PasswordYour password prevents unauthorized access to your mailbox.To change your password: 1. Access your mailbox as described on page 48.
2. Press to select the Personal Options Menu.
3. Press .
4. If you want a password, enter a new password, using up to 12 digits.If you do not want to use a password, skip this step.
5. Click or press the minus (-) key. Voice mail plays back your password if youentered one.
6. Click or press the minus (-) key to accept the password as entered or press to erase and re-enter your password.
7. Click to hang up.
Changing the Voice Mail Message EnvelopeWhen you receive a voice mail message, voice mail plays the message in an “enve-lope” that can include the time and date the message was left, the source of the mes-sage, and/or the message length. By default, the envelope contains all of thisinformation, but you can change your envelope, as described below.To change and save your message envelope: 1. Access your mailbox as described on page 48.
2. Press to select the Personal Options Menu.
3. Press to select the Message Envelope Options Menu. You can then do any ofthe following: • Press to enable or disable the time/date option. • Press to enable or disable the message source option. • Press to enable or disable the message length option. • Press to enable all options and return to the Personal Options Menu. • Press to disable the entire envelope and return to the Personal Options
Menu. • Press or to return to the Personal Options Menu.
4. Click to hang up.
4
3
#
# 3
SPKR
4
4
1
2
3
4
5
#
SPKR
63op SoftPhone User Guide
64
Changing the Call Screening Transfer Method
NOTE: The Call Screening feature is available only if it is enabled for your mailbox(ask your System Administrator).
Depending on the transfer method you select, transferred calls from voice mail maybe unannounced (as usual), or one of the following may occur: • “Announce Only” Calls: Before voice mail transfers a call to you, a prompt asks
the caller to record his or her name. When you answer, you hear “You have a callfrom (caller’s name).”
• “Screened” Calls: Before voice mail transfers a call to you, a prompt asks thecaller to record his or her name. When you answer, you hear “You have a callfrom (caller’s name).” You can choose whether or not to accept the call (Seepage 76.)
To change your transfer method (if allowed): 1. Access your mailbox as described on page 48.
2. Press to select the Personal Options Menu.
3. Press for More Options. (If using version 5.0 or earlier software, skip thisstep.)
4. Press . The system tells you what your current transfer method is. You canthen select the desired transfer method, as follows: • Press to select unannounced transfers. • Press to select screened transfers. • Press to select announce only transfers. • Press to return to the Personal Options Menu without making changes.
5. Click to hang up.
4
9
5
1
2
3
SPKR
Axxess Desktop SoftPhone User Guide
Axxess Deskt
USIN
G SO
FTPHO
NE
Programming a Fax Destination
NOTE: This feature is available only in software versions 5.1 and later.
With the Inter-Tel Voice Processor, callers can use your mailbox to send you a fax. Touse this feature, you must specify the destination fax number.To change your fax destination number: 1. Access your mailbox as described on page 48.
2. Press to select the Personal Options Menu.
3. Press for More Options.
4. Press .
5. Enter the number of your fax destination, followed by or the minus (-) key.
6. EITHER, Click or press the minus (-) key to accept the number.
OR, Press to erase the number and re-enter it. 7. Click to hang up.
Changing the Message Search Order
NOTE: This feature is available only in software versions 5.2 and later.
When more than one message is left in your voice mailbox, you can change the orderin which you retrieve your messages, based on the date and time they were received.To change the listening order of your messages: 1. Access your mailbox as described on page 48.
2. Press to select the Personal Options Menu.
3. Press for More Options.
4. Press for the Message Search Order.
5. Press to change the search order for new messages or press to change thesearch order for saved messages. You have the following options: • Press to retrieve the earliest-received messages first (First In/First Out). • Press to retrieve the latest-received messages first (Last In/First Out). • Press to return to the Personal Options Menu without making changes.
6. Click to hang up.
4
9
1
#
#
3
SPKR
4
9
2
1 2
1
2
SPKR
65op SoftPhone User Guide

66
Programming Remote Messaging
NOTE: Your installer or System Administrator must enable this feature on your voicemailbox.
With Remote Messaging, you can program the Voice Processor (voice mail) to callyou when your mailbox receives new messages. Using a “cascade” (a series of up tonine telephone numbers), voice mail will call each number until it successfully con-nects to a device (e.g., pager, answering machine, etc.).Because your mailbox can have a primary and an alternate cascade of numbers, youcan program a cascade to be used during specific days and times. For example, if youwant to be paged when you receive a message from 5-10 PM on weekdays, you canset up a primary cascade. If you also want to receive pages for messages marked “pri-ority” on the weekends, you could set your alternate cascade for all day on Saturdaysand Sundays.
NOTE: If for some reason voice mail is not able to use your remote notification, yourmailbox will receive a message stating that notification could not be completed.
Axxess Desktop SoftPhone User Guide
Axxess Deskt
USIN
G SO
FTPHO
NE
To set up remote messaging: 1. Access your mailbox as described on page 48.
2. Press to select the Personal Options Menu. (If using version 5.0 or earliersoftware, skip this step.)
3. Press .
NOTE: This option is not available if you do not have Remote Messaging enabled.
4. Press to set up a primary cascade or press to set up an alternate cascade. Aprompt tells you what the cascade’s current status is.
5. Do one of the following: • To program a cascade level: Press and enter the number of the level you
wish to program (1-9). You then have the following options:— To enable or disable the cascade level: Press . (You cannot enable the
level until a notification number is programmed.)— To set up or change an extension or telephone number: Press . Then
press for an extension number or for an outside number. Thenenter the number.
— To set up or change a pager number: Press . Then enter the number.
• To set up time of day for notification: Press . Then enter the time youwant the message notification to start and stop. Enter the times with two dig-its for the hour and two digits for the minutes (e.g., 0915 = 9:15). If enteringthe time in 12-hour format, you are prompted to press for AM or press
for PM.
NOTE: For 24-hour notification, program the starting and ending times to bethe same.
• To set up the days of the week for notification: Press . Then select oneof the following: — Press for Monday-Friday.— Press for all days.— Press to select individual days. You are prompted to press digits 1-7
which correspond to the days Sunday through Saturday. • To select all or priority-only message notification: Press . Then press
for all messages or for priority messages only.
6. Either select another option, as described above, or press or press the minus (-) key to save the settings and exit.
4
5
1 2
1
1
21 2
3
2
1
2
3
1
2
3
41 2
#
67op SoftPhone User Guide
SPEED DIALING
68
Speed dialing allows you (and your System Administrator) to store frequently dialednumbers for easy dialing. Each number is stored on your phone (Station Speed Dial)or in the phone system (System Speed Dial) and is identified by a location number.Once programmed, you can quickly dial these numbers by entering a feature code anddialing the desired location number. Because the Inter-Tel Axxess system supportsboth station and System Speed-Dial numbers, you can have access to over 1000stored numbers.
Station Speed Dial
You can store up to ten personal speed-dial numbers and associated names in StationSpeed-Dial locations 0-9. If you have programmable feature keys, you can also createStation Speed-Dial keys for one-touch speed dialing (see page 74).Storing Station Speed-Dial NumbersTo program your Station Speed-Dial locations: 1. Enter .
2. Enter the location code 0-9 to be programmed OR click a Station Speed-Dial keythat you want to program (if you have one).
3. Enter the desired name for the speed-dial number to be programmed as describedbelow:To enter the letters or numbers:Enter the desired letters or numbers (up to 16 characters) using the keyboard.Press SPACEBAR to leave a space. Press BACKSPACE to backspace.
NOTE: To enter slash (/) or pound (#) key, use the keypad keys on the keyboardor the dialpad keys on the Desktop SoftPhone.
4. Click the ACCEPT menu key to save the name. 5. Enter the extension number or telephone number to be stored. Press SPACE-
BAR to leave a space. Press BACKSPACE to backspace.To enter the numbers:Enter the desired numbers using the keyboard. Press SPACEBAR to leave aspace. Press BACKSPACE to backspace.
TIP: To dial outside telephone numbers without first selecting an outgoing line,enter a line access code (such as the Outgoing Call code “8”) before the outsidetelephone number.
6. Click the ACCEPT menu key to save the number.
3 8 3
Axxess Desktop SoftPhone User Guide
Axxess Deskt
USIN
G SO
FTPHO
NE
To view how your Station Speed-Dial keys are programmed: 1. Enter .
2. Click the Station Speed-Dial key. The name and number will be displayed.
3. Click to exit.
To erase a Station Speed-Dial name and/or number: 1. Enter .
2. Enter the desired location code 0-9 or click the desired Station Speed-Dial key. 3. Press BACKSPACE repeatedly until the name is erased.
4. Click or the ACCEPT menu key, or press the minus (-) key on the keypad tocontinue.
5. Press BACKSPACE repeatedly until the number is erased.
6. Click or the ACCEPT menu key, or press the minus (-) key to exit.
Dialing Station Speed-Dial NumbersTo dial a Station Speed-Dial number:If necessary, select an outgoing line. You have the following options:
• To use a location number: Enter and then the desired Station Speed-Dial location number (0-9).
• To use a Station Speed-Dial key: Click the desired Station Speed-Dial key.
3 9 6
SPKR
3 8 3
#
#
3 8 2
System Speed Dial
Your System Administrator can store up to 1000 speed-dial numbers in SystemSpeed-Dial locations 000-999.To view and/or dial System Speed-Dial numbers: 1. Click OR enter .2. Enter the location code (000-999) for the desired number.
3. Click or the ACCEPT menu key, or press the minus (-) key on the keypad todial the displayed number.
SYS SPD 3 8 1
#
69op SoftPhone User Guide
USING RECORD-A-CALL
70
If your telephone system is equipped with an Axxess Voice Processor (voice mail),you may have access to the Record-A-Call feature. If so, you can record an ongoingcall as a mailbox message. You can then retrieve the message, just as you would anyother mailbox message.To use the Record-A-Call feature while on a call: 1. EITHER, Click and enter .
OR, Click the RECORD-A-CALL menu key. 2. If required, enter the desired mailbox number. (Your phone may be programmed
to select the mailbox, or you may be required to dial it.)You hear a confirmation tone when the Record-A-Call feature is activated.To turn off Record-A-Call:EITHER, Click and enter .OR, Click the CANCEL RECORDING menu key.OR, Click to hang up.
SPCL 3 8 5
SPCL 3 8 5
SPKR
Axxess Desktop SoftPhone User Guide

PAGING
Axxess Deskt
USIN
G SO
FTPHO
The Paging feature allows you to make an announcement through phone speakers orexternal speakers (if your system is equipped with external paging equipment). Toprevent announcements from transmitting through every phone in the system, this fea-ture uses Page Zones. Each zone contains a different combination of extensions andexternal paging equipment, and is programmed by your System Administrator. Askyour trainer or System Administrator how the zones are programmed, and list themhere for your convenience:
NOTE: Using paging on an Desktop SoftPhone consumes as much bandwidth as atelephone call to the device. If your site has limited bandwidth, limit pages.
0 _______________________ 5 _______________________ 1 _______________________ 6 _______________________ 2 _______________________ 7 _______________________ 3 _______________________ 8 _______________________ 4 _______________________ 9 _______________________
NE
Making PagesTo make pages: 1. Press .
2. Enter the desired zone number (0-9). 3. After the tone, make your announcement.
4. Click to hang up.
7
SPKR
Enabling Paging
You can enable or disable page receiving for your phone by using the Page Remove/Replace feature code. If your phone is assigned to more than one Page Zone, all zonesare removed or replaced at once (you cannot turn off individual zones).To turn paging on and off for your phone:Enter .3 2 5op SoftPhone User G
71uide
PERFORMING A “HOOKFLASH” DURING A CALL
72
Certain telephone service companies may require a timed hookflash (a quick hang upand release).To generate a hookflash while using a line:EITHER, Click the FLASH menu key. If the FLASH menu key is not visible, pressMORE until you see FLASH.
OR, Click and enter . SPCL 3 3 0
Axxess Desktop SoftPhone User Guide

PROGRAMMING YOUR FEATURE KEYS
Axxess Deskt
USIN
G SO
FTPHO
NE
Depending on how your system is programmed, some of your feature keys may be“user-programmable.” If so, you can program them with any of the feature codeslisted in the back of this user guide or with extension numbers. In addition, you cancombine the feature key and Station Speed-Dial functions to program a feature key todial an outside number.
NOTE: You cannot program secondary extension keys as feature keys (see Program-ming Secondary Extension Keys on page 74).
To program a user-programmable feature key: 1. Enter .
2. Click the feature key you want to program. 3. Enter the feature code or extension number you want to store under that key.
(Refer to the back of this guide for default feature codes.)To return all feature keys to their original default values:Enter .
To display the current feature key values: 1. Enter .
2. Click the feature key(s) you want displayed.
3. Click to hang up.
3 9 7
3 9 5
3 9 6
SPKR
73op SoftPhone User Guide
PROGRAMMING SECONDARY EXTENSION KEYS
74
With the Secondary Extension Appearances feature, you can program various keys onyour phone to indicate the call activity at a different extension (primary phone). Inaddition to being able to see when a call is ringing, answered, or on hold, you can useyour secondary extension key to answer a call that is ringing at the primary phone.Your phone may also be programmed to automatically ring when a given number ofcalls are waiting at the primary phone (ask your System Administrator).There are two possible types of secondary extension keys: programmable and non-programmable. If you have a non-programmable secondary extension key, only theSystem Administrator can change the associated extension. If you have a programma-ble key, you can change the extension, as described below.
NOTE: You can only assign the extension for a secondary extension key. You cannotcreate or change the secondary extension key (e.g., make it a feature key).
To display the current secondary extension key assignment(s): 1. Enter .
2. Click the secondary extension key(s) you want displayed.To assign a primary phone to a secondary extension key (if enabled): 1. Enter .
2. Click the secondary extension key and enter the desired extension number.Once programmed, you can use your secondary key as follows: • You can press your flashing secondary extension key to answer a call that is ring-
ing or holding on any CALL key at the primary phone. • You can press your unlit secondary extension key to place an intercom call to the
primary phone.
NOTE: If the secondary key is flashing (i.e., a call is ringing at the primary phone), youcan click or press the minus (-) key before pressing the flashing key to place anintercom call to the primary phone without answering the call. Or, you can just dial theprimary phone’s extension number.
To transfer a call back to the extension after you have answered it on your phone: • To transfer to hold: Press the secondary extension key, announce the call (if
desired), and then click to hang up. • To transfer to ring: Press and then the secondary extension key. You can
announce the call, if desired, before hanging up to complete the transfer.
3 9 6
3 9 7
#
SPKR
TRANSFER
Axxess Desktop SoftPhone User Guide
USING ACCOUNT CODES
Axxess Deskt
USIN
G SO
FTPHO
NE
If your telephone system is programmed to use the Station Message Detail Recording(SMDR) feature, you might be required to enter account codes when you place a call.These codes add information to phone record reports that the system will periodicallyprint.There are three types of account codes: • Standard account codes are automatically entered into the SMDR report when-
ever you place a call. • Forced account codes must be dialed before you can place an outside call. • Optional account codes can be entered at any time during a call.
NOTE: Your System Administrator can tell you which types of account codes are usedon your telephone system.
To enter an optional account code: 1. Click and enter .
2. Enter the optional account code. If the account code is not immediately accepted,click or press the minus (-) key.
To set an account code for all calls placed from your phone:Enter and then the account code. If the account code is not immediatelyaccepted, click or press the minus (-) key. This code will be used for all calls madefrom your phone until it is disabled.To disable the code: Enter again and then click or press the minus (-) key.
SPCL 3 9 0
#
3 9 1
#
3 9 1 #
75op SoftPhone User Guide
SCREENING CALLS
76
NOTE: This feature is available only if your telephone system is equipped with anAxxess Voice Processor (voice mail).
If your voice mailbox is programmed correctly, you can screen calls that are trans-ferred from voice mail. This allows you to accept and/or refuse specific calls.Depending on the transfer method you use, calls from voice mail may be unan-nounced, announce only, or screened calls (see page 64 for details).If your voice mailbox is programmed for screened calls, you have the followingoptions when you receive a transfer: • Click the ACCEPT menu key or , or press the minus (-) key to accept the call. • Click the REPLAY menu key or to replay the announcement. • Click the SEND TO V-MAIL menu key or to send the call to voice mail. • Click the FORWARD menu key or and then enter the extension number to
forward the call to another extension. • Click the REFUSE menu key or to refuse the call.
#
1
2
3
USING THE DIRECTORIES
With directories, you can use your phone keypad to find names and numbers. You canthen use the directory information to make calls, access features, or leave voice mailmessages.Phone Directory
The phone directory contains a list of the extension numbers, system speed-dial num-bers, feature codes, and their associated names. To search for an item, you can enterthe full or partial name. The system will then find the closest match. Once the correctmatch is displayed on your phone, you can dial the number or press a key to accessthat extension or feature.To perform a directory search: 1. If your phone is idle, click the DIRECTORY menu key, then click the menu keyfor the desired directory (IC DIRECTORY, OUTSIDE DIR, or FEATURE DIR).If placing a call, choose between OUTSIDE DIR or IC DIRECTORY.
2. Enter letters or numbers (up to 10 characters) using the keyboard. 3. Click the SEARCH menu key to begin the search. If desired, you can use
SCROLL to move alphabetically through the directory. 4. Click the CALL or ACCEPT menu key to dial a number or feature code while it
is displayed.
Axxess Desktop SoftPhone User Guide
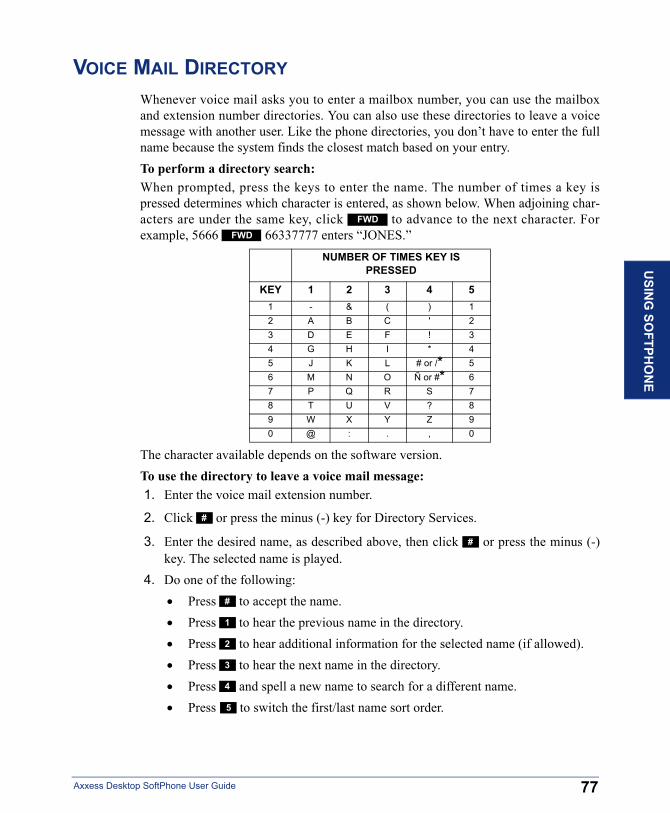
VOICE MAIL DIRECTORY
Axxess Deskt
USIN
G SO
FTPHO
NE
Whenever voice mail asks you to enter a mailbox number, you can use the mailboxand extension number directories. You can also use these directories to leave a voicemessage with another user. Like the phone directories, you don’t have to enter the fullname because the system finds the closest match based on your entry.To perform a directory search:When prompted, press the keys to enter the name. The number of times a key ispressed determines which character is entered, as shown below. When adjoining char-acters are under the same key, click to advance to the next character. Forexample, 5666 66337777 enters “JONES.”
The character available depends on the software version.To use the directory to leave a voice mail message: 1. Enter the voice mail extension number.
2. Click or press the minus (-) key for Directory Services.
3. Enter the desired name, as described above, then click or press the minus (-)key. The selected name is played.
4. Do one of the following: • Press to accept the name. • Press to hear the previous name in the directory. • Press to hear additional information for the selected name (if allowed). • Press to hear the next name in the directory. • Press and spell a new name to search for a different name. • Press to switch the first/last name sort order.
NUMBER OF TIMES KEY IS PRESSED
KEY 1 2 3 4 51 - & ( ) 12 A B C ' 23 D E F ! 34 G H I * 45 J K L # or /* 56 M N O Ñ or #* 67 P Q R S 78 T U V ? 89 W X Y Z 90 @ : . , 0
FWDFWD
#
#
#
1
2
3
4
5
77op SoftPhone User Guide

PROGRAMMING REMOTE FEATURE ACCESS
78
If you are away from your desk and forgot to put your phone in DND, don’t worry.With the Remote Feature Access, you can place your phone in DND or forward callsfrom any other phone on the system. And, if you have a special dial-up line, you canaccess your phone features from an outside line.
Remote Access Password
Before you use Remote Feature Access, you should program a password, as describedbelow.To change the password from your phone: 1. Enter .2. Enter your current password, followed by .
NOTE: Your extension number is your password at default.
3. Enter the new password followed by . You hear a confirmation tone.
4. Enter the new password again for verification followed by . You hear a confir-mation tone.
To change the station password using remote programming, see the following section.
3 9 2
#
#
#
Remote Feature Access
To access your phone from another phone: 1. EITHER, Call your Direct Inward System Access (DISA) number (provided byyour System Administrator). If required, enter your password. OR, Use any phone on the system.
2. Enter .
3. Enter your extension number.
4. Enter your password followed by . You can now use any of the following fea-tures.To change the station password using Remote Programming:a. Enter .
b. Enter the new password, followed by .
c. Enter the new password again for verification, followed by .To turn on DND:a. Enter .
b. Enter message number (01-20) and the optional second-line message text.To turn off DND: Enter .
3 5 9
#
3 9 2
#
#
3 7 0
3 7 1
Axxess Desktop SoftPhone User Guide
Axxess Deskt
U
To turn on Call Forward:a. Enter one of the following Call Forward feature codes.
All Calls.......................
If No Answer ................
If Busy.........................
If No Answer or Busy ..... b. Enter an extension number or enter an outside line access code followed by a
telephone number.To turn off Call Forward: Enter .
5. Hang up.
3 5 5
3 5 6
3 5 7
3 5 8
3 5 5
79op SoftPhone User Guide
SING
SOFTPH
ON
E
REQUESTING AGENT HELP
80
Your telephone system may be programmed to support the Agent Help feature, whichallows you to request help from a designated “Agent Help Extension” (usually yoursupervisor) during a call. When your request call rings at the Agent Help Extension,the supervisor can choose to join the call or reject the request.If the Agent Help Extension is a digital phone, the phone’s microphone is automati-cally muted so that the supervisor cannot be heard unless he or she presses . Ifthe Agent Help Extension is a single-line phone, however, the supervisor can beheard as soon as the conference is established. In either case, the supervisor can hearall other parties on the call.To use the Agent Help feature while on a call: 1. Click and enter . If you hear repeating tones, the Agent Help
feature is not available at your phone, you already have four parties in your call,not enough system circuits are currently available, or the Agent Help Extension isin DND.
2. Dial the Agent Help Extension number, if required. (Your phone may be pro-grammed to automatically dial the number, or you may be required to dial it.)If the Agent Help Extension accepts the call, you hear the Agent Help tone, if it isenabled, and the supervisor can monitor or join your call.If the Agent Help Extension rejects the call, you hear a confirmation tone, and thedisplay shows AGENT HELP REJECTED.
To respond to an Agent Help request at a display phone:When you receive an Agent Help request, your display shows <name> REQUESTSHELP. You can do one of the following: • To accept the call: Answer as usual. Your microphone is muted and you cannot
be heard by either party unless you press . • To reject the call: Press the REJECT HELP menu key.
MUTE
SPKR 3 7 5
MUTE
Axxess Desktop SoftPhone User Guide
WORKING IN HUNT GROUPS
Axxess Deskt
Your system may be programmed with “hunt groups.” Hunt groups are groups ofphones that share a common extension number in addition to having individual exten-sion numbers. This allows someone to call anyone in the group (using the commonextension) or a specific member (using the individual extension). The members ofthese groups and the common extension(s) are programmed by your System Adminis-trator.
Hunt Group Calls Enabled/Disabled
USIN
G
If you are a member of a hunt group, you can enable or halt hunt group calls to yourextension.To turn on or off hunt group calls:Enter .3 2 4
SOF
ACD Hunt Groups
TPHO
NE
Some hunt groups use a special feature called Automatic Call Distribution (ACD) thatdistributes the hunt group calls equally among the available members. These huntgroup members are referred to as “agents,” who log in to the ACD hunt group toreceive calls and log out to halt ACD hunt group calls.
Distributing CallsCalls are distributed through an ACD hunt group based on Agent IDs or extensions,as described below. • Agent IDs: If the hunt group is programmed to use ACD Agent IDs, each agent
is assigned an Agent ID number to enter during the login procedure (described onthe next page). The hunt group calls are routed to logged-in agents, according totheir Agent ID number instead of their extension number. Because the Agent IDis not associated with any extension, the agent can use any phone in the system tolog in.
• Members: If the hunt group is not programmed to use Agent IDs, it will have apre-programmed list of phones and will send calls to the phones where agents arelogged in.
81op SoftPhone User Guide
82
Logging In and Out of ACD Hunt GroupsAgents can log in to and out of the ACD hunt group at any time. While logged in, theagent receives calls through the ACD hunt group. When the agent is logged out, callsto that ACD hunt group bypass the agent.To log in to all of your ACD hunt groups at once using the ACD Agent Login/Logout feature code: Enter and enter your Agent ID, if necessary. The display shows AGENTLOGGED IN TO ALL ACDS, and you hear a confirmation tone.
NOTE: This feature code acts as a toggle. If you were already logged in, the displayshows AGENT LOGGED OUT OF ALL ACDS, and you hear a confirmation tone.
To log in to one or more hunt groups using the ACD Agent Login feature code: 1. Enter . The display shows AGENT LOGIN ACD NUMBER.
2. EITHER, Enter the desired ACD hunt group number.OR, Click or press the minus (-) key to log in to all of your ACD hunt groupsat once. The display shows AGENT LOGIN AGENT ID. If you entered an invalid hunt group number, the display shows NOT AN ACDHUNT GROUP, and you hear repeating tones.
3. Do one of the following: • To log into ACD hunt group(s) using Agent IDs: Enter your Agent ID.
The display shows AGENT LOGGED INTO ALL ACDS. You are loggedinto the ACD hunt group(s) that you requested that use the Agent ID youentered in this step.
NOTE: If another Agent ID is already logged in at this phone, you hearrepeating tones, and the display shows DIFFERENT AGENT ID ALREADYUSED. You must have the other agent log out before you can use that phone.
• To log into ACD hunt group(s) that do not use Agent IDs: Click orpress the minus (-) key. The display shows AGENT LOGGED INTO ALLACDS. You are logged into the ACD hunt group(s) that you requested thatdo not use Agent IDs.
If you were already logged in, the display shows ALREADY LOGGED INTO<hunt group>.If you are not a member of the entered hunt group, the display shows NOT ANAGENT IN THIS HUNT GROUP, and you hear repeating tones. Start over.
4. Click to hang up. Repeat this procedure to log into additional ACDgroups, if necessary.
3 2 8
3 2 6
#
#
SPKR
Axxess Desktop SoftPhone User Guide
Axxess Deskt
USIN
G SO
FTPHO
NE
When you log in to a group, you may be automatically connected to a call after youhear a short ring burst. If the ACD Agent ID Automatic Connect option is enabled foryour hunt group and you are using a headset, you will be automatically connected. Ifthis option is not enabled for your hunt group, the call will ring until you answer it oruntil it times out to another extension.
NOTE: Even if the ACD Agent ID Automatic Connect option is enabled, the first callyou receive (after you log in or remove your phone from DND while logged in) will ringuntil you answer it. You will, however, be automatically connected to subsequent calls.
To log out of one or more ACD hunt group: 1. EITHER, Enter to log out of all of your ACD hunt groups at once. The
display shows AGENT LOGGED OUT OF ALL ACDS and you hear a confir-mation tone.
OR, Enter . One of the following displays will appear:
• If you were logged in to only one hunt group, the display shows AGENTLOGGED OUT OF <hunt group>. The procedure is complete.
• If you were logged in to more than one hunt group, the display showsAGENT LOGOUT ACD NUMBER. Dial the extension number of thedesired ACD hunt group.
• If you were not logged in to any hunt group, the display shows NOTLOGGED INTO ANY ACD GROUP.
2. Click to hang up.
Ending an ACD Hunt Group CallEach time you end an ACD hunt group call, a wrap-up timer is started. Until thistimer expires, you will not receive another call through any ACD hunt group. Youcan, however, end the wrap-up session before this timer expires, as described below.To terminate the ACD Agent wrap-up period before the timer expires:Enter .
NOTE: If you were not logged in to an ACD hunt group, the display shows CANNOTACCESS RESERVED FEATURE
3 2 8
3 2 7
SPKR
3 2 9
83op SoftPhone User Guide

84
Axxess Desktop SoftPhone User Guide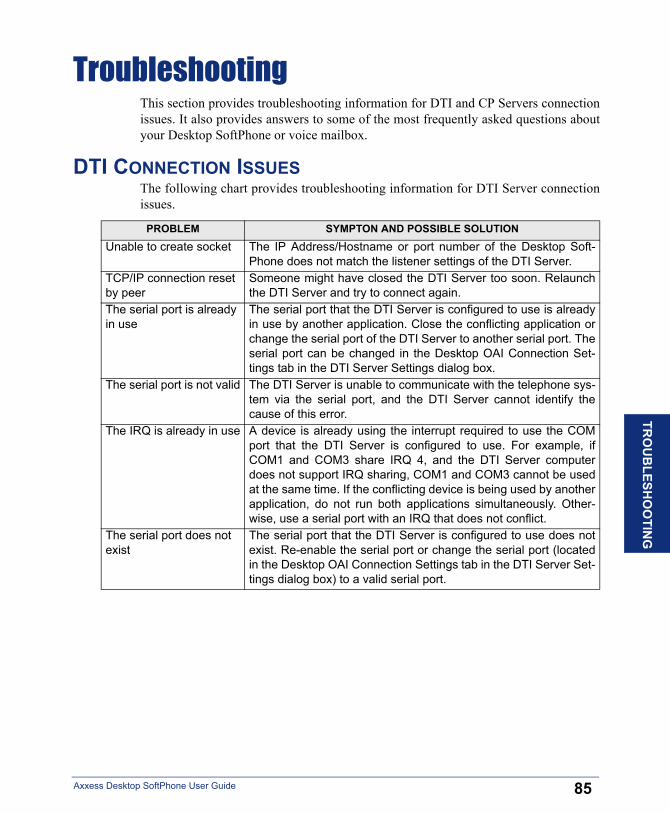
Troubleshooting
This section provides troubleshooting information for DTI and CP Servers connectionissues. It also provides answers to some of the most frequently asked questions aboutyour Desktop SoftPhone or voice mailbox.DTI CONNECTION ISSUESThe following chart provides troubleshooting information for DTI Server connection
issues.TRO
UB
LESHO
OTIN
G
85Axxess Desktop SoftPhone User Guide
PROBLEM SYMPTON AND POSSIBLE SOLUTIONUnable to create socket The IP Address/Hostname or port number of the Desktop Soft-
Phone does not match the listener settings of the DTI Server. TCP/IP connection reset by peer
Someone might have closed the DTI Server too soon. Relaunchthe DTI Server and try to connect again.
The serial port is already in use
The serial port that the DTI Server is configured to use is alreadyin use by another application. Close the conflicting application orchange the serial port of the DTI Server to another serial port. Theserial port can be changed in the Desktop OAI Connection Set-tings tab in the DTI Server Settings dialog box.
The serial port is not valid The DTI Server is unable to communicate with the telephone sys-tem via the serial port, and the DTI Server cannot identify thecause of this error.
The IRQ is already in use A device is already using the interrupt required to use the COMport that the DTI Server is configured to use. For example, ifCOM1 and COM3 share IRQ 4, and the DTI Server computerdoes not support IRQ sharing, COM1 and COM3 cannot be usedat the same time. If the conflicting device is being used by anotherapplication, do not run both applications simultaneously. Other-wise, use a serial port with an IRQ that does not conflict.
The serial port does not exist
The serial port that the DTI Server is configured to use does notexist. Re-enable the serial port or change the serial port (locatedin the Desktop OAI Connection Settings tab in the DTI Server Set-tings dialog box) to a valid serial port.
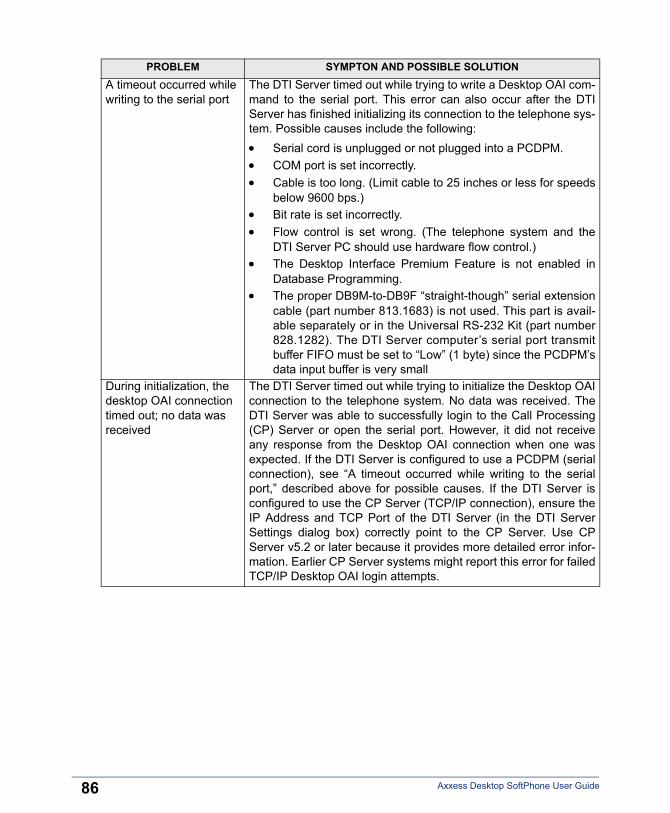
86 Axxess Desktop SoftPhone User Guide
A timeout occurred while writing to the serial port
The DTI Server timed out while trying to write a Desktop OAI com-mand to the serial port. This error can also occur after the DTIServer has finished initializing its connection to the telephone sys-tem. Possible causes include the following:• Serial cord is unplugged or not plugged into a PCDPM.• COM port is set incorrectly.• Cable is too long. (Limit cable to 25 inches or less for speeds
below 9600 bps.)• Bit rate is set incorrectly.• Flow control is set wrong. (The telephone system and the
DTI Server PC should use hardware flow control.)• The Desktop Interface Premium Feature is not enabled in
Database Programming.• The proper DB9M-to-DB9F “straight-though” serial extension
cable (part number 813.1683) is not used. This part is avail-able separately or in the Universal RS-232 Kit (part number828.1282). The DTI Server computer’s serial port transmitbuffer FIFO must be set to “Low” (1 byte) since the PCDPM’sdata input buffer is very small
During initialization, the desktop OAI connection timed out; no data was received
The DTI Server timed out while trying to initialize the Desktop OAIconnection to the telephone system. No data was received. TheDTI Server was able to successfully login to the Call Processing(CP) Server or open the serial port. However, it did not receiveany response from the Desktop OAI connection when one wasexpected. If the DTI Server is configured to use a PCDPM (serialconnection), see “A timeout occurred while writing to the serialport,” described above for possible causes. If the DTI Server isconfigured to use the CP Server (TCP/IP connection), ensure theIP Address and TCP Port of the DTI Server (in the DTI ServerSettings dialog box) correctly point to the CP Server. Use CPServer v5.2 or later because it provides more detailed error infor-mation. Earlier CP Server systems might report this error for failedTCP/IP Desktop OAI login attempts.
PROBLEM SYMPTON AND POSSIBLE SOLUTION
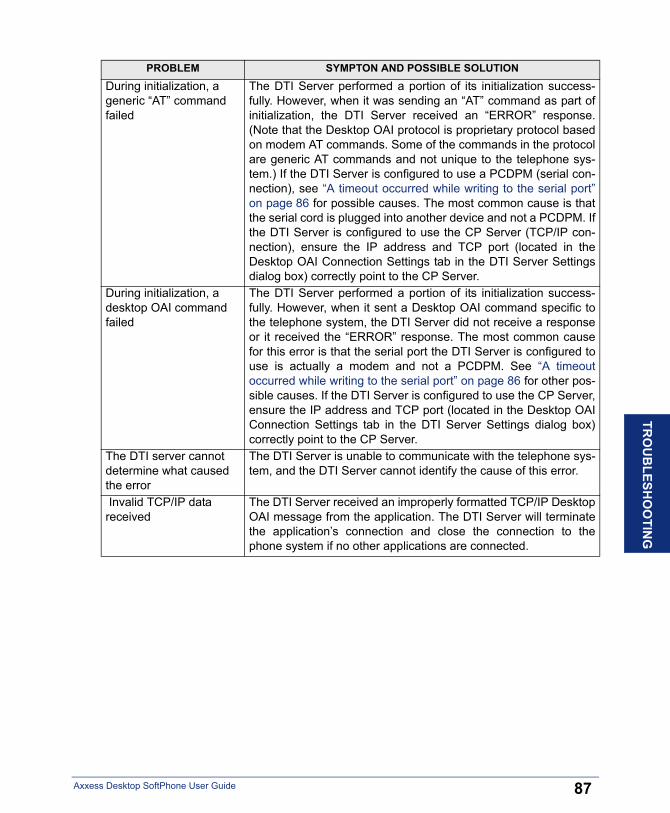
TRO
UB
LESHO
OTIN
G
During initialization, a generic “AT” command failed
The DTI Server performed a portion of its initialization success-fully. However, when it was sending an “AT” command as part ofinitialization, the DTI Server received an “ERROR” response.(Note that the Desktop OAI protocol is proprietary protocol basedon modem AT commands. Some of the commands in the protocolare generic AT commands and not unique to the telephone sys-tem.) If the DTI Server is configured to use a PCDPM (serial con-nection), see “A timeout occurred while writing to the serial port”on page 86 for possible causes. The most common cause is thatthe serial cord is plugged into another device and not a PCDPM. Ifthe DTI Server is configured to use the CP Server (TCP/IP con-nection), ensure the IP address and TCP port (located in theDesktop OAI Connection Settings tab in the DTI Server Settingsdialog box) correctly point to the CP Server.
During initialization, a desktop OAI command failed
The DTI Server performed a portion of its initialization success-fully. However, when it sent a Desktop OAI command specific tothe telephone system, the DTI Server did not receive a responseor it received the “ERROR” response. The most common causefor this error is that the serial port the DTI Server is configured touse is actually a modem and not a PCDPM. See “A timeoutoccurred while writing to the serial port” on page 86 for other pos-sible causes. If the DTI Server is configured to use the CP Server,ensure the IP address and TCP port (located in the Desktop OAIConnection Settings tab in the DTI Server Settings dialog box)correctly point to the CP Server.
The DTI server cannot determine what caused the error
The DTI Server is unable to communicate with the telephone sys-tem, and the DTI Server cannot identify the cause of this error.
Invalid TCP/IP data received
The DTI Server received an improperly formatted TCP/IP DesktopOAI message from the application. The DTI Server will terminatethe application’s connection and close the connection to thephone system if no other applications are connected.
PROBLEM SYMPTON AND POSSIBLE SOLUTION
Axxess Deskt
87op SoftPhone User Guide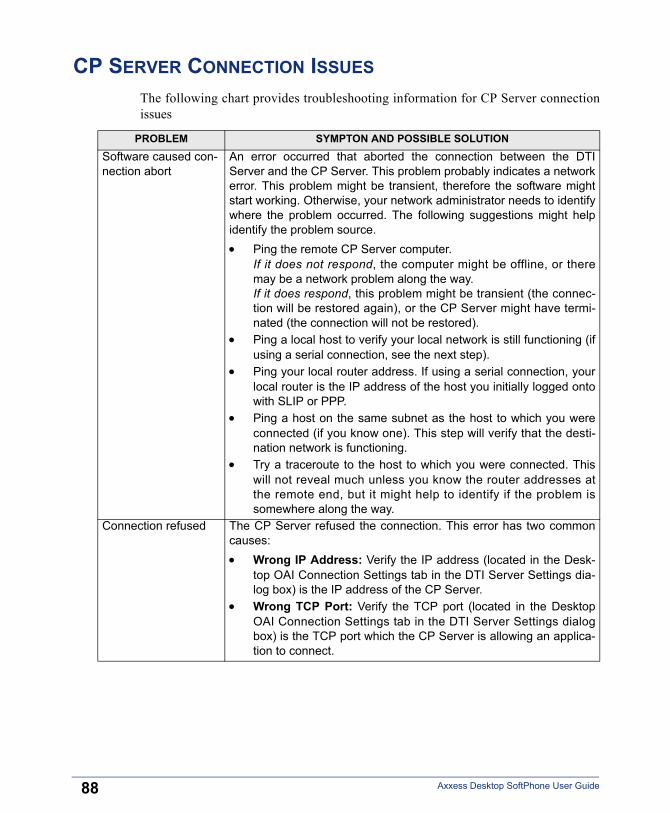
CP SERVER CONNECTION ISSUES
The following chart provides troubleshooting information for CP Server connectionissues88 Axxess Desktop SoftPhone User Guide
PROBLEM SYMPTON AND POSSIBLE SOLUTIONSoftware caused con-nection abort
An error occurred that aborted the connection between the DTIServer and the CP Server. This problem probably indicates a networkerror. This problem might be transient, therefore the software mightstart working. Otherwise, your network administrator needs to identifywhere the problem occurred. The following suggestions might helpidentify the problem source.• Ping the remote CP Server computer.
If it does not respond, the computer might be offline, or theremay be a network problem along the way. If it does respond, this problem might be transient (the connec-tion will be restored again), or the CP Server might have termi-nated (the connection will not be restored).
• Ping a local host to verify your local network is still functioning (ifusing a serial connection, see the next step).
• Ping your local router address. If using a serial connection, yourlocal router is the IP address of the host you initially logged ontowith SLIP or PPP.
• Ping a host on the same subnet as the host to which you wereconnected (if you know one). This step will verify that the desti-nation network is functioning.
• Try a traceroute to the host to which you were connected. Thiswill not reveal much unless you know the router addresses atthe remote end, but it might help to identify if the problem issomewhere along the way.
Connection refused The CP Server refused the connection. This error has two commoncauses:• Wrong IP Address: Verify the IP address (located in the Desk-
top OAI Connection Settings tab in the DTI Server Settings dia-log box) is the IP address of the CP Server.
• Wrong TCP Port: Verify the TCP port (located in the DesktopOAI Connection Settings tab in the DTI Server Settings dialogbox) is the TCP port which the CP Server is allowing an applica-tion to connect.
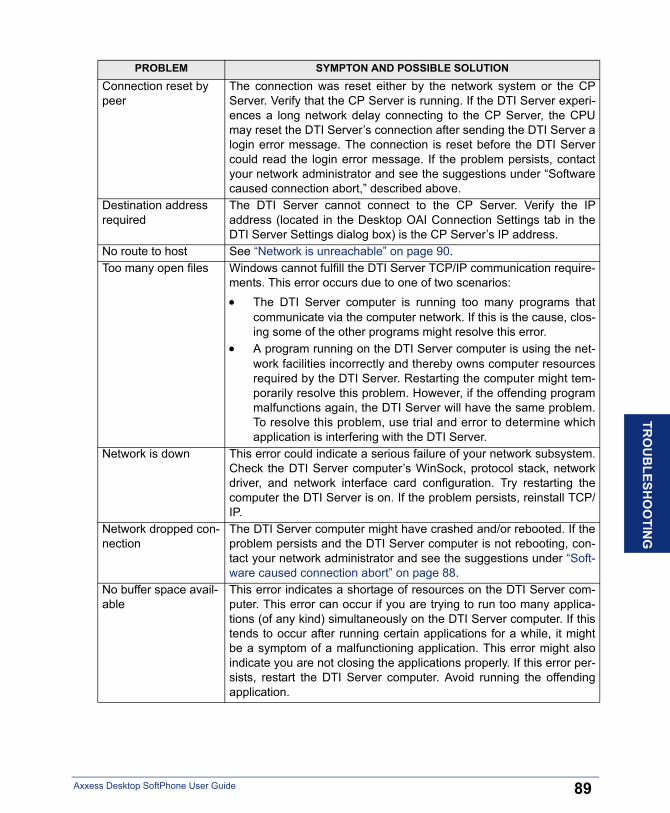
TRO
UB
LESHO
OTIN
G
89Axxess Desktop SoftPhone User Guide
Connection reset by peer
The connection was reset either by the network system or the CPServer. Verify that the CP Server is running. If the DTI Server experi-ences a long network delay connecting to the CP Server, the CPUmay reset the DTI Server’s connection after sending the DTI Server alogin error message. The connection is reset before the DTI Servercould read the login error message. If the problem persists, contactyour network administrator and see the suggestions under “Softwarecaused connection abort,” described above.
Destination address required
The DTI Server cannot connect to the CP Server. Verify the IPaddress (located in the Desktop OAI Connection Settings tab in theDTI Server Settings dialog box) is the CP Server’s IP address.
No route to host See “Network is unreachable” on page 90.Too many open files Windows cannot fulfill the DTI Server TCP/IP communication require-
ments. This error occurs due to one of two scenarios:• The DTI Server computer is running too many programs that
communicate via the computer network. If this is the cause, clos-ing some of the other programs might resolve this error.
• A program running on the DTI Server computer is using the net-work facilities incorrectly and thereby owns computer resourcesrequired by the DTI Server. Restarting the computer might tem-porarily resolve this problem. However, if the offending programmalfunctions again, the DTI Server will have the same problem.To resolve this problem, use trial and error to determine whichapplication is interfering with the DTI Server.
Network is down This error could indicate a serious failure of your network subsystem.Check the DTI Server computer’s WinSock, protocol stack, networkdriver, and network interface card configuration. Try restarting thecomputer the DTI Server is on. If the problem persists, reinstall TCP/IP.
Network dropped con-nection
The DTI Server computer might have crashed and/or rebooted. If theproblem persists and the DTI Server computer is not rebooting, con-tact your network administrator and see the suggestions under “Soft-ware caused connection abort” on page 88.
No buffer space avail-able
This error indicates a shortage of resources on the DTI Server com-puter. This error can occur if you are trying to run too many applica-tions (of any kind) simultaneously on the DTI Server computer. If thistends to occur after running certain applications for a while, it mightbe a symptom of a malfunctioning application. This error might alsoindicate you are not closing the applications properly. If this error per-sists, restart the DTI Server computer. Avoid running the offendingapplication.
PROBLEM SYMPTON AND POSSIBLE SOLUTION
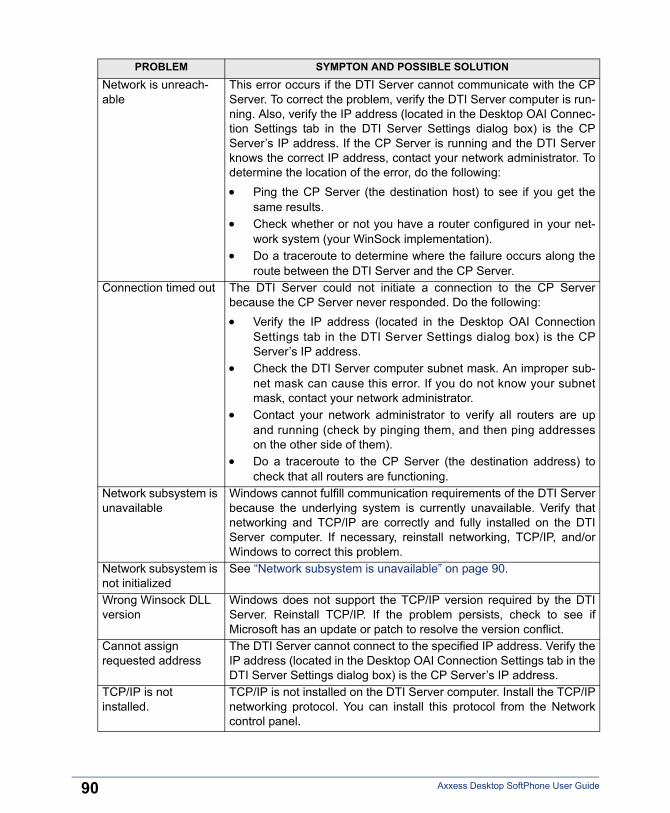
90 Axxess Desktop SoftPhone User Guide
Network is unreach-able
This error occurs if the DTI Server cannot communicate with the CPServer. To correct the problem, verify the DTI Server computer is run-ning. Also, verify the IP address (located in the Desktop OAI Connec-tion Settings tab in the DTI Server Settings dialog box) is the CPServer’s IP address. If the CP Server is running and the DTI Serverknows the correct IP address, contact your network administrator. Todetermine the location of the error, do the following:• Ping the CP Server (the destination host) to see if you get the
same results.• Check whether or not you have a router configured in your net-
work system (your WinSock implementation).• Do a traceroute to determine where the failure occurs along the
route between the DTI Server and the CP Server.Connection timed out The DTI Server could not initiate a connection to the CP Server
because the CP Server never responded. Do the following: • Verify the IP address (located in the Desktop OAI Connection
Settings tab in the DTI Server Settings dialog box) is the CPServer’s IP address.
• Check the DTI Server computer subnet mask. An improper sub-net mask can cause this error. If you do not know your subnetmask, contact your network administrator.
• Contact your network administrator to verify all routers are upand running (check by pinging them, and then ping addresseson the other side of them).
• Do a traceroute to the CP Server (the destination address) tocheck that all routers are functioning.
Network subsystem is unavailable
Windows cannot fulfill communication requirements of the DTI Serverbecause the underlying system is currently unavailable. Verify thatnetworking and TCP/IP are correctly and fully installed on the DTIServer computer. If necessary, reinstall networking, TCP/IP, and/orWindows to correct this problem.
Network subsystem is not initialized
See “Network subsystem is unavailable” on page 90.
Wrong Winsock DLL version
Windows does not support the TCP/IP version required by the DTIServer. Reinstall TCP/IP. If the problem persists, check to see ifMicrosoft has an update or patch to resolve the version conflict.
Cannot assign requested address
The DTI Server cannot connect to the specified IP address. Verify theIP address (located in the Desktop OAI Connection Settings tab in theDTI Server Settings dialog box) is the CP Server’s IP address.
TCP/IP is not installed.
TCP/IP is not installed on the DTI Server computer. Install the TCP/IPnetworking protocol. You can install this protocol from the Networkcontrol panel.
PROBLEM SYMPTON AND POSSIBLE SOLUTION
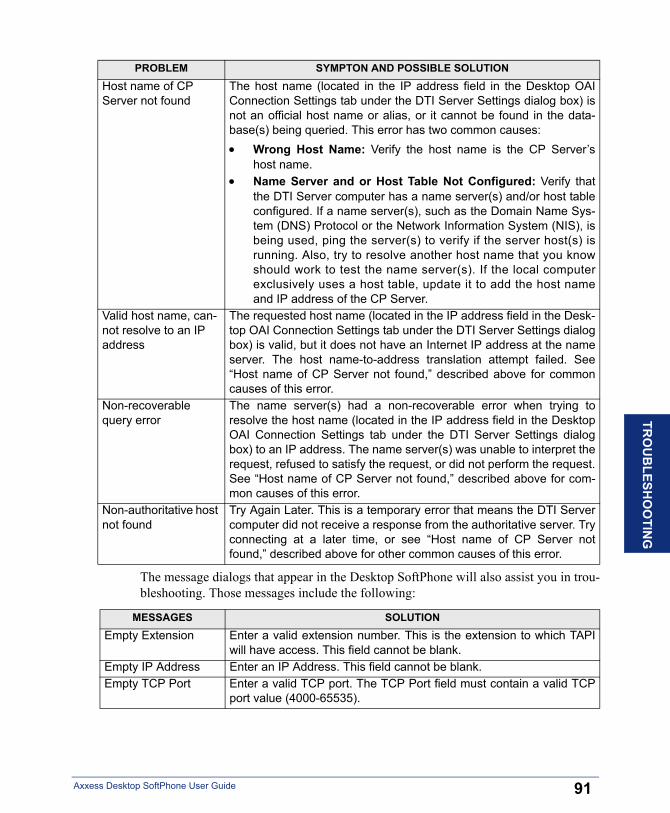
TRO
UB
LESHO
OTIN
G
Host name of CP Server not found
The host name (located in the IP address field in the Desktop OAIConnection Settings tab under the DTI Server Settings dialog box) isnot an official host name or alias, or it cannot be found in the data-base(s) being queried. This error has two common causes:• Wrong Host Name: Verify the host name is the CP Server’s
host name.• Name Server and or Host Table Not Configured: Verify that
the DTI Server computer has a name server(s) and/or host tableconfigured. If a name server(s), such as the Domain Name Sys-tem (DNS) Protocol or the Network Information System (NIS), isbeing used, ping the server(s) to verify if the server host(s) isrunning. Also, try to resolve another host name that you knowshould work to test the name server(s). If the local computerexclusively uses a host table, update it to add the host nameand IP address of the CP Server.
Valid host name, can-not resolve to an IP address
The requested host name (located in the IP address field in the Desk-top OAI Connection Settings tab under the DTI Server Settings dialogbox) is valid, but it does not have an Internet IP address at the nameserver. The host name-to-address translation attempt failed. See“Host name of CP Server not found,” described above for commoncauses of this error.
Non-recoverable query error
The name server(s) had a non-recoverable error when trying toresolve the host name (located in the IP address field in the DesktopOAI Connection Settings tab under the DTI Server Settings dialogbox) to an IP address. The name server(s) was unable to interpret therequest, refused to satisfy the request, or did not perform the request.See “Host name of CP Server not found,” described above for com-mon causes of this error.
Non-authoritative host not found
Try Again Later. This is a temporary error that means the DTI Servercomputer did not receive a response from the authoritative server. Tryconnecting at a later time, or see “Host name of CP Server notfound,” described above for other common causes of this error.
PROBLEM SYMPTON AND POSSIBLE SOLUTION
Axxess Deskt
The message dialogs that appear in the Desktop SoftPhone will also assist you in trou-bleshooting. Those messages include the following:
MESSAGES SOLUTIONEmpty Extension Enter a valid extension number. This is the extension to which TAPI
will have access. This field cannot be blank.Empty IP Address Enter an IP Address. This field cannot be blank.Empty TCP Port Enter a valid TCP port. The TCP Port field must contain a valid TCP
port value (4000-65535).
91op SoftPhone User Guide
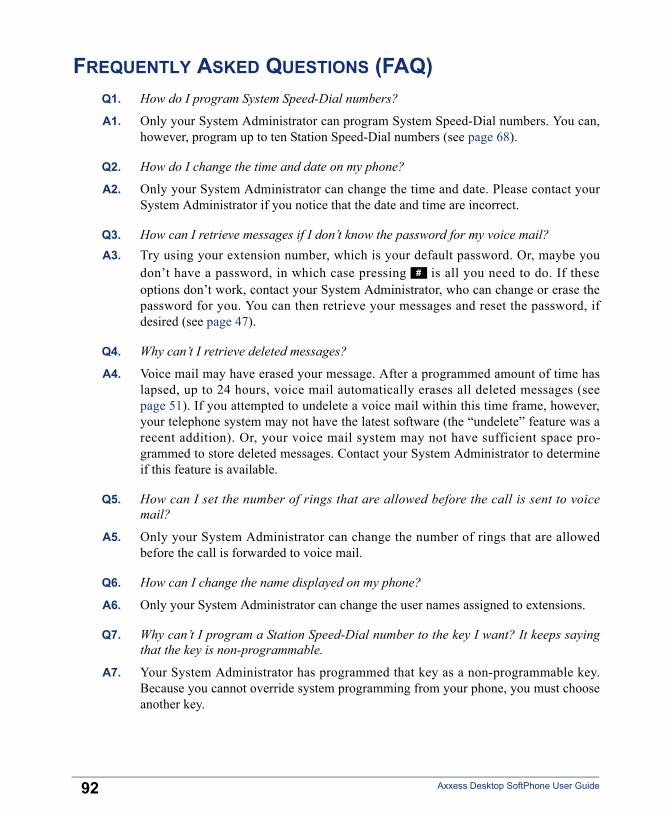
FREQUENTLY ASKED QUESTIONS (FAQ)
Q1.92
How do I program System Speed-Dial numbers?
A1.
Only your System Administrator can program System Speed-Dial numbers. You can,however, program up to ten Station Speed-Dial numbers (see page 68).Q2.
How do I change the time and date on my phone?A2.
Only your System Administrator can change the time and date. Please contact yourSystem Administrator if you notice that the date and time are incorrect.Q3.
How can I retrieve messages if I don’t know the password for my voice mail? A3. Try using your extension number, which is your default password. Or, maybe youdon’t have a password, in which case pressing is all you need to do. If theseoptions don’t work, contact your System Administrator, who can change or erase thepassword for you. You can then retrieve your messages and reset the password, ifdesired (see page 47).
#
Q4.
Why can’t I retrieve deleted messages?A4.
Voice mail may have erased your message. After a programmed amount of time haslapsed, up to 24 hours, voice mail automatically erases all deleted messages (seepage 51). If you attempted to undelete a voice mail within this time frame, however,your telephone system may not have the latest software (the “undelete” feature was arecent addition). Or, your voice mail system may not have sufficient space pro-grammed to store deleted messages. Contact your System Administrator to determineif this feature is available.Q5.
How can I set the number of rings that are allowed before the call is sent to voicemail?A5.
Only your System Administrator can change the number of rings that are allowedbefore the call is forwarded to voice mail.Q6.
How can I change the name displayed on my phone?A6.
Only your System Administrator can change the user names assigned to extensions.Q7.
Why can’t I program a Station Speed-Dial number to the key I want? It keeps sayingthat the key is non-programmable.A7.
Your System Administrator has programmed that key as a non-programmable key.Because you cannot override system programming from your phone, you must chooseanother key.Axxess Desktop SoftPhone User Guide

Q8.
Axxess Deskt
Why can’t I use one of the features described in this guide?
A8.
There are a few reasons why you might not be able to access the feature. Some possi-ble reasons include: • Your system software version may not support the feature (this guide covers allversions). • Your System Administrator may not have enabled the feature for your phone. • Your System Administrator may have programmed your phone to block the fea-
ture.
Q9. If I need further assistance, how do I get technical support?A9.
First, contact your System Administrator if you have a question that is not covered inthis user guide. If you need further assistance, contact your local authorized Inter-Teldealer. All Inter-Tel sales, service, and support is handled at the local level.93op SoftPhone User Guide
TRO
UB
LESHO
OTIN
G

94 Axxess Desktop SoftPhone User Guide
IND
EX
IndexSymbols
3D Buttons 18
AAbout 12
Desktop SoftPhone 1Voice Processing Unit 12your phone system 12
Account Codes 75ACD Hunt Groups 81Adjusting Your Phone’s Viewing Angle 33Administrators 14Agent Help 80Agent IDs 81Alternate Greeting 61Always On Top 17Answering Calls 37Automatic System Forwarding 43
BBackground Color 26Background Music 59
CCall List 20Call Screening Transfer Method 64Call Waiting 37Callbacks 34, 36Caller ID 23Calls
answering 37ending ACD 83receiving 37returning to a held caller 38waiting for called phone 34
Cancel 32Canceling
messages 47unheard messages 53
Cascade Levels 67Changing
call screening transfer method 64fax destination number 65
Axxess Desktop SoftPhone User Guide
keymaps 59language 60message search order 65voice mail message envelope 63
Currency Character 27Customizing
feature keys 29phone settings 17
DDate, Time, Name, and Extension Number 45Default Feature Codes 99Defaults 61Delivery Options 52Dial Tones 13Dialing Speed-Dial Numbers 69Directories
outside 36phone 76search 77
Disablingautomatic call answer 60background music 59handsfree 35hunt group calls 81paging 71record-a-call 70system forwarding 43
Displayingdate, time, and extension number 45information on your phone 45outside party’s name 45secondary extension keys 74speed-dial numbers 69
Distributing Calls 81DTI Connection Status 85
EEmergency Calls 37Enabling
automatic call answer 60background music 59handsfree 35hunt group calls 81paging 71record-a-call 70system forwarding 43
Ending an ACD Hunt Group Call 83Entering Account Codes 75
95
FFax Destination Number 65Feature Key Functions 9Features
agent help 80handsfree 35hold 38last number dialed/saved 44record-a-call 70
Forced Account Codes 75Forwarding Calls 42
GGreen Lamps 13Greetings 61
HHandling Calls 33Handsfree Mode 35Hardware 1Hunt Group Calls Enabled/Disabled 81Hunt Groups 82
IIndividual Hold 38Initializing Your Mailbox 33Intercom Calls 34
KKey Font 25Keymaps 59Keys
lamps 13message 46secondary extension 74
LLamps 13Language 60Last Number Dialed/Saved 44LCD Display Menu Keys 10Leaving Messages 46Liquid Crystal Display (LCD) 10Listening to Messages 49Logging In and Out of ACD Hunt Groups 82
96
MMaking an Emergency Call 37Making and Receiving Calls 34Making Pages 71Manual Call Forwarding 42Members, Hunt Group 81Message
envelope 63notification 67search order 65
Messagesusing reminder 56
Multilingual Capability 60
NNotification Days and Times 67Number of Customized Keys 21Numeric Keypad 18
OOutside
directory 36party’s name/number 45
Override Trunk Name 22
PPaging 78Parking 34, 36Performing
a “hookflash” during a call 72a directory search 77
Phone Configuration 58Phone Directory 76Picking Up (Reverse Transfer) a Call from AnotherExtension 41Placing
calls on hold 38conference calls 76intercom calls 34outside calls 36
Primary Greeting 61Primary Language 60Program 29Programming
cascade levels 67fax destination 65notification days and times 67
Axxess Desktop SoftPhone User Guide
IND
EX
remote feature access 78remote messaging 66secondary extension keys 74station speed-dial numbers 68
QQueueing on the Line 36
RReceiving
intercom calls 35outside calls 37
Record-A-Call 70Recording
personal greetings 61voice mail directory name 62
Red Lamps 13Redialing a Number 44Redirect Calls 43Redirecting Calls 43Reminder Messages 56, 78Remote Access Password 78Remote Feature Access 78Remote Messaging 63Requesting a Callback 34, 36Requesting Agent Help 80Restore Program When Call Rings 19Resync Programmable Keys 28Returning
to a held call 38to default operation 59
Returning Your Phone to Default 61Reverse Text Color 32Review 32
SSearch Order 65Searching in the Directories 77Secondary Extension Appearances 74Secondary Extension Keys 74Secondary Language 60Selecting a Ring Tone 59Sending
calls to voice mail 37messages 52
Sending Messages 52Set Color 31Set Text 31
Axxess Desktop SoftPhone User Guide
Setting Preferences 58Setting User Preferences 74Shortcut Keys 11SMDR (Station Message Detail Recording) 75Software 2Speed Dialing
station speed dial 68system speed dial 68
Standard Account Codes 75Station Message Detail Recording (SMDR) 75Station Speed Dial 68Switching Keymaps 59System Administrator 14System Hold 38System Speed Dial 69
TTCP/IP Settings 22, 28Terminating the ACD Agent Call 83The Desktop SoftPhone 8Three Dimension (3D) Buttons 18Timers 13To Pick Up (Reverse Transfer) A Call From Another Exten-sion 41Tones, Dial 13Transferring
back to the primary phone 74Troubleshooting 85
UUndeleting Messages 51Undeleting Voice Mail Messages 50, 51Using
account codes 61defaults 61Desktop SoftPhone 15Record-A-Call 78remote feature access 78secondary extension keys 74the directories 76voice mail messages 49
VView Call Log 24Viewing Speed-Dial Numbers 69Voice Mail 14
administrator 14delivery options 52
97
message envelope 63
Voice Mail Options 61
Voice Processing Unit 12
Voice Processor 12
Volume Levels 58
98
WWaiting for Called Phone 34What the Administrators Can Do for You 14What You See and Hear 13Working in Hunt Groups 81Wrap-Up Timer 83
Axxess Desktop SoftPhone User Guide
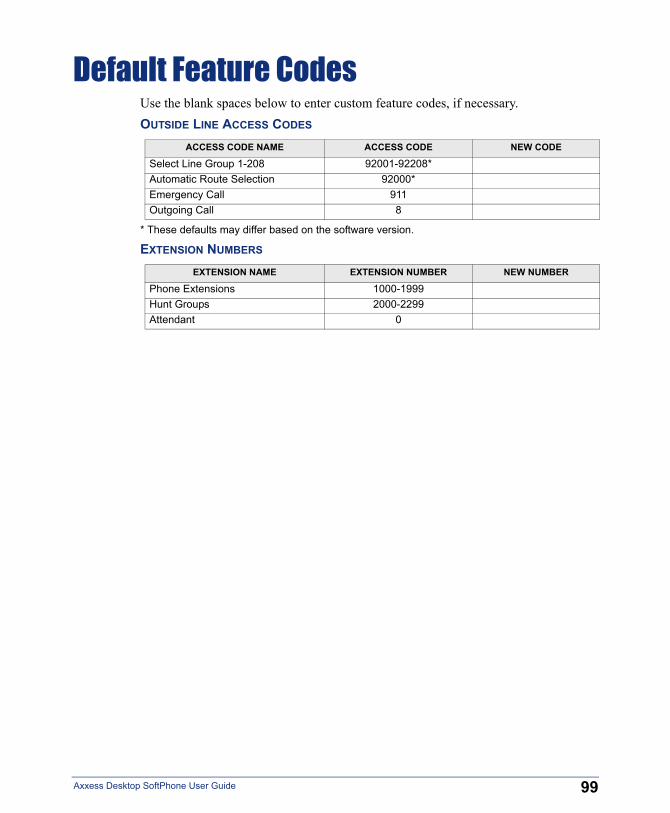
Default Feature Codes
Axxess Deskt
Use the blank spaces below to enter custom feature codes, if necessary.OUTSIDE LINE ACCESS CODES
* These defaults may differ based on the software version.
EXTENSION NUMBERS
ACCESS CODE NAME ACCESS CODE NEW CODE
Select Line Group 1-208 92001-92208*Automatic Route Selection 92000*Emergency Call 911Outgoing Call 8
EXTENSION NAME EXTENSION NUMBER NEW NUMBER
Phone Extensions 1000-1999Hunt Groups 2000-2299Attendant 0
99op SoftPhone User Guide
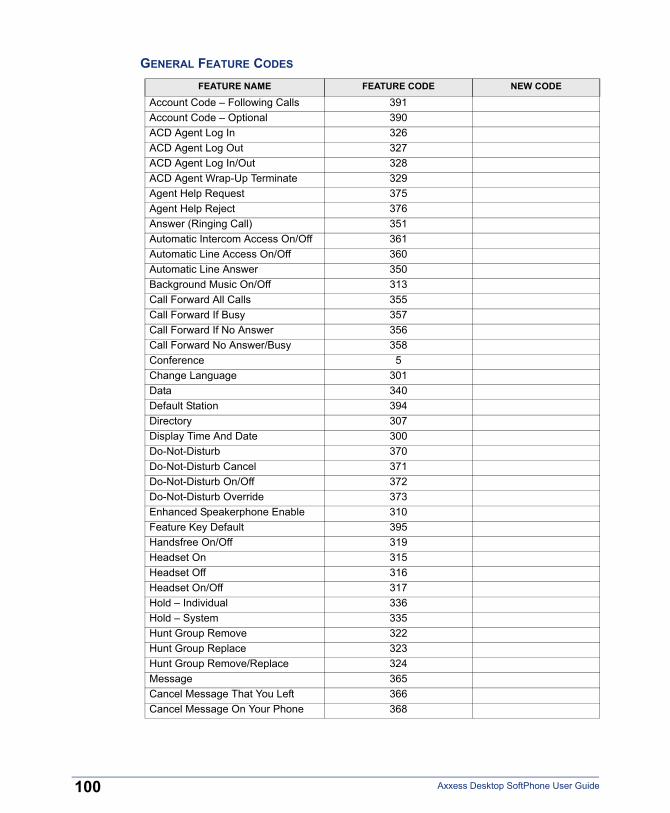
100
GENERAL FEATURE CODES
FEATURE NAME FEATURE CODE NEW CODE
Account Code – Following Calls 391Account Code – Optional 390ACD Agent Log In 326ACD Agent Log Out 327ACD Agent Log In/Out 328ACD Agent Wrap-Up Terminate 329Agent Help Request 375Agent Help Reject 376Answer (Ringing Call) 351Automatic Intercom Access On/Off 361Automatic Line Access On/Off 360Automatic Line Answer 350Background Music On/Off 313Call Forward All Calls 355Call Forward If Busy 357Call Forward If No Answer 356Call Forward No Answer/Busy 358Conference 5Change Language 301Data 340Default Station 394Directory 307Display Time And Date 300Do-Not-Disturb 370Do-Not-Disturb Cancel 371Do-Not-Disturb On/Off 372Do-Not-Disturb Override 373Enhanced Speakerphone Enable 310Feature Key Default 395Handsfree On/Off 319Headset On 315Headset Off 316Headset On/Off 317Hold – Individual 336Hold – System 335Hunt Group Remove 322Hunt Group Replace 323Hunt Group Remove/Replace 324Message 365Cancel Message That You Left 366Cancel Message On Your Phone 368
Axxess Desktop SoftPhone User Guide
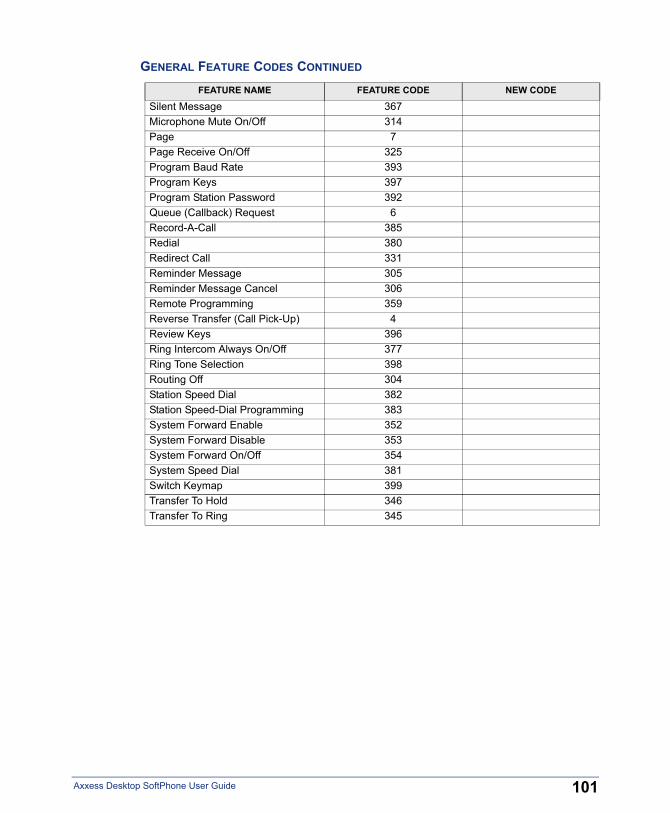
Axxess Deskt
GENERAL FEATURE CODES CONTINUED
FEATURE NAME FEATURE CODE NEW CODE
Silent Message 367Microphone Mute On/Off 314Page 7Page Receive On/Off 325Program Baud Rate 393Program Keys 397Program Station Password 392Queue (Callback) Request 6Record-A-Call 385Redial 380Redirect Call 331Reminder Message 305Reminder Message Cancel 306Remote Programming 359Reverse Transfer (Call Pick-Up) 4Review Keys 396Ring Intercom Always On/Off 377Ring Tone Selection 398Routing Off 304Station Speed Dial 382Station Speed-Dial Programming 383System Forward Enable 352System Forward Disable 353System Forward On/Off 354System Speed Dial 381Switch Keymap 399Transfer To Hold 346Transfer To Ring 345
101op SoftPhone User Guide

102
Axxess Desktop SoftPhone User Guide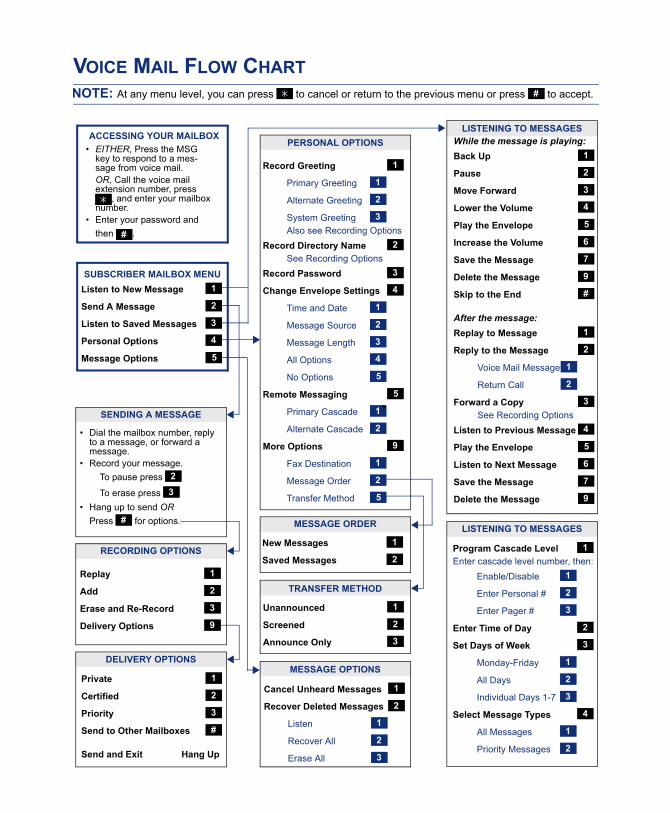
VOICE MAIL FLOW CHART
ACCESSING YOUR MAILBOX• EITHER, Press the MSG
key to respond to a mes-sage from voice mail.OR, Call the voice mail extension number, press
, and enter your mailbox number.
• Enter your password and then .#
SUBSCRIBER MAILBOX MENUListen to New Message
Send A Message
Listen to Saved Messages
Personal Options
Message Options
1
2
3
4
5
• Dial the mailbox number, reply to a message, or forward a message.
• Record your message. To pause press
To erase press • Hang up to send OR
Press for options.
23
#
Replay
Add
Erase and Re-Record
Delivery Options
1
2
3
9
Private
Certified
Priority
Send to Other Mailboxes
Send and Exit Hang Up
1
2
3
#
Record Greeting
Primary Greeting
Alternate Greeting
System GreetingAlso see Recording Options
Record Directory NameSee Recording Options
Record Password
Change Envelope Settings
Time and Date
Message Source
Message Length
All Options
No Options
Remote Messaging
Primary Cascade
Alternate Cascade
More Options
Fax Destination
Message Order
Transfer Method
1
1
2
3
2
3
4
1
2
3
4
5
5
1
2
9
1
2
5
Unannounced
Screened
Announce Only
1
2
3
Cancel Unheard Messages
Recover Deleted Messages
Listen
Recover All
Erase All
1
2
1
2
3
Program Cascade LevelEnter cascade level number, then:
Enable/Disable
Enter Personal #
Enter Pager #
Enter Time of Day
Set Days of Week
Monday-Friday
All Days
Individual Days 1-7
Select Message Types
All Messages
Priority Messages
1
1
2
3
2
3
1
2
3
4
1
2
New Messages
Saved Messages
1
2
While the message is playing:Back Up
Pause
Move Forward
Lower the Volume
Play the Envelope
Increase the Volume
Save the Message
Delete the Message
Skip to the End
After the message:Replay to Message
Reply to the Message
Voice Mail Message
Return Call
Forward a CopySee Recording Options
Listen to Previous Message
Play the Envelope
Listen to Next Message
Save the Message
Delete the Message
1
2
3
4
5
6
7
9
#
1
2
1
2
3
4
5
6
7
9
LISTENING TO MESSAGES
LISTENING TO MESSAGES
PERSONAL OPTIONS
MESSAGE ORDER
TRANSFER METHOD
MESSAGE OPTIONS
SENDING A MESSAGE
RECORDING OPTIONS
DELIVERY OPTIONS
NOTE: At any menu level, you can press to cancel or return to the previous menu or press to accept.#

Part No. 835.2409-2Issue 1, November 2002A946/351:A