
Autodesk University: AutoCADLT Tipps und Tricks mit Kate
18
AutoCAD LT ® Tips and Tricks Kate Morrical – Autodesk, Inc. AC5143 Are you ready to get the most out of your AutoCAD LT? Maybe you are already using AutoCAD LT 2012, but have not had time to learn about all the new features. Or maybe you are a year or two back, and you want to see what has been added and improved that will make it worth the upgrade. Join this virtual class from the comfort of your own desk to see the latest new features in AutoCAD LT 2012, as well as highlights from previous versions. You will see that a lot of the work lately has been focused on making things easier and more intuitive to use. After this class, you will be able to put your new knowledge to work right away! Learning Objectives At the end of this class, you will be able to: Get answers to your AutoCAD LT questions List the benefits of new features in AutoCAD LT 2012 Understand the place of AutoCAD LT in the Autodesk ® product line Implement tips and tricks for improving productivity About the Speaker As a Technical Marketing Manager at Autodesk, Kate works closely with the AutoCAD Product Development & Marketing teams and with AutoCAD users through discussion groups, her blog, and events such as Autodesk University and AUGI CAD Camps. She has over 10 years of experience with Autodesk products, starting with AutoCAD R14, and has been blogging about AutoCAD LT since April 2007. Kate is a licensed professional engineer in Maryland, and was employed as an engineer and CAD Manager for a 30-person office of a structural engineering firm before joining Autodesk. [email protected]
-
Upload
mcd-media-consulting -
Category
Documents
-
view
224 -
download
0
description
This is a Autodesk Univsersity Handout that we provide you in our partnership with the Autodesk University team. We hope you like the material that Kate Morrical provided
Transcript of Autodesk University: AutoCADLT Tipps und Tricks mit Kate

AutoCAD LT® Tips and Tricks
Kate Morrical – Autodesk, Inc.
AC5143 Are you ready to get the most out of your AutoCAD LT? Maybe you are already using
AutoCAD LT 2012, but have not had time to learn about all the new features. Or maybe you are a year or two back, and you want to see what has been added and improved that will make it worth the upgrade. Join this virtual class from the comfort of your own desk to see the latest new features in AutoCAD LT 2012, as well as highlights from previous versions. You will see that a lot of the work lately has been focused on making things easier and more intuitive to use. After this class, you will be able to put your new knowledge to work right away!
Learning Objectives At the end of this class, you will be able to:
Get answers to your AutoCAD LT questions List the benefits of new features in AutoCAD LT 2012 Understand the place of AutoCAD LT in the Autodesk® product line Implement tips and tricks for improving productivity
About the Speaker As a Technical Marketing Manager at Autodesk, Kate works closely with the AutoCAD Product Development & Marketing teams and with AutoCAD users through discussion groups, her blog, and events such as Autodesk University and AUGI CAD Camps. She has over 10 years of experience with Autodesk products, starting with AutoCAD R14, and has been blogging about AutoCAD LT since April 2007. Kate is a licensed professional engineer in Maryland, and was employed as an engineer and CAD Manager for a 30-person office of a structural engineering firm before joining Autodesk.
AutoCAD LT® Tips and Tricks
2
Introduction This class is designed to help you get the most out of your AutoCAD LT software. From big features like associative arrays to small ones like mtext background masks, you’ll see how implementing new tools can improve your productivity. It also provides an introduction to AutoCAD LT for Mac, the newest member of the AutoCAD family.
User Interaction There have been a few changes made to the look & feel of AutoCAD LT this year, to improve the way you interact with the program.
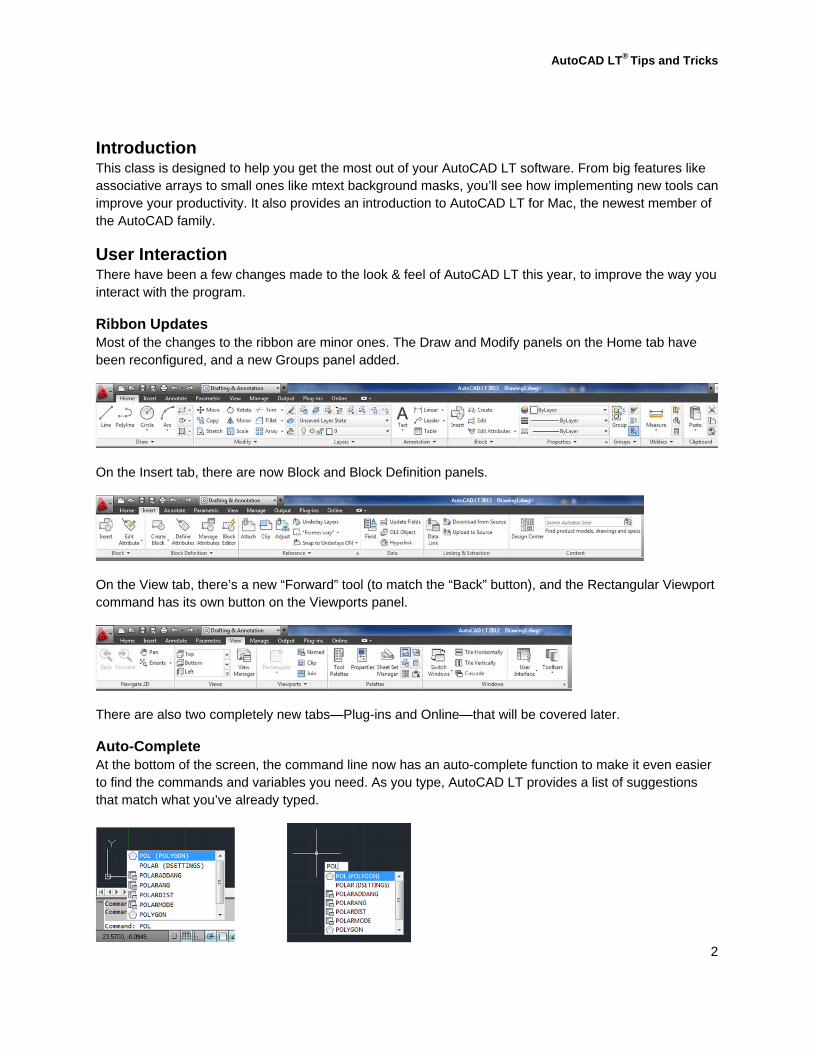
Ribbon Updates Most of the changes to the ribbon are minor ones. The Draw and Modify panels on the Home tab have been reconfigured, and a new Groups panel added.
On the Insert tab, there are now Block and Block Definition panels.
On the View tab, there’s a new “Forward” tool (to match the “Back” button), and the Rectangular Viewport command has its own button on the Viewports panel.
There are also two completely new tabs—Plug-ins and Online—that will be covered later.
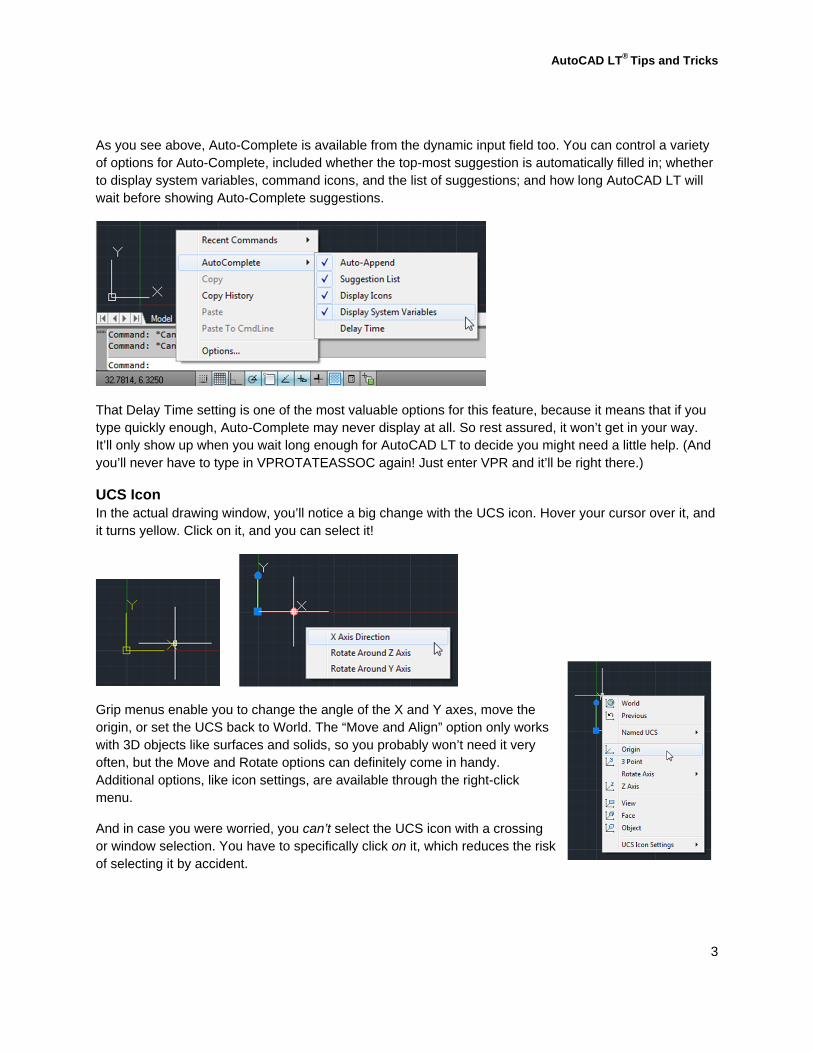
Auto-Complete At the bottom of the screen, the command line now has an auto-complete function to make it even easier to find the commands and variables you need. As you type, AutoCAD LT provides a list of suggestions that match what you’ve already typed.
AutoCAD LT® Tips and Tricks
3
As you see above, Auto-Complete is available from the dynamic input field too. You can control a variety of options for Auto-Complete, included whether the top-most suggestion is automatically filled in; whether to display system variables, command icons, and the list of suggestions; and how long AutoCAD LT will wait before showing Auto-Complete suggestions.
That Delay Time setting is one of the most valuable options for this feature, because it means that if you type quickly enough, Auto-Complete may never display at all. So rest assured, it won’t get in your way. It’ll only show up when you wait long enough for AutoCAD LT to decide you might need a little help. (And you’ll never have to type in VPROTATEASSOC again! Just enter VPR and it’ll be right there.)
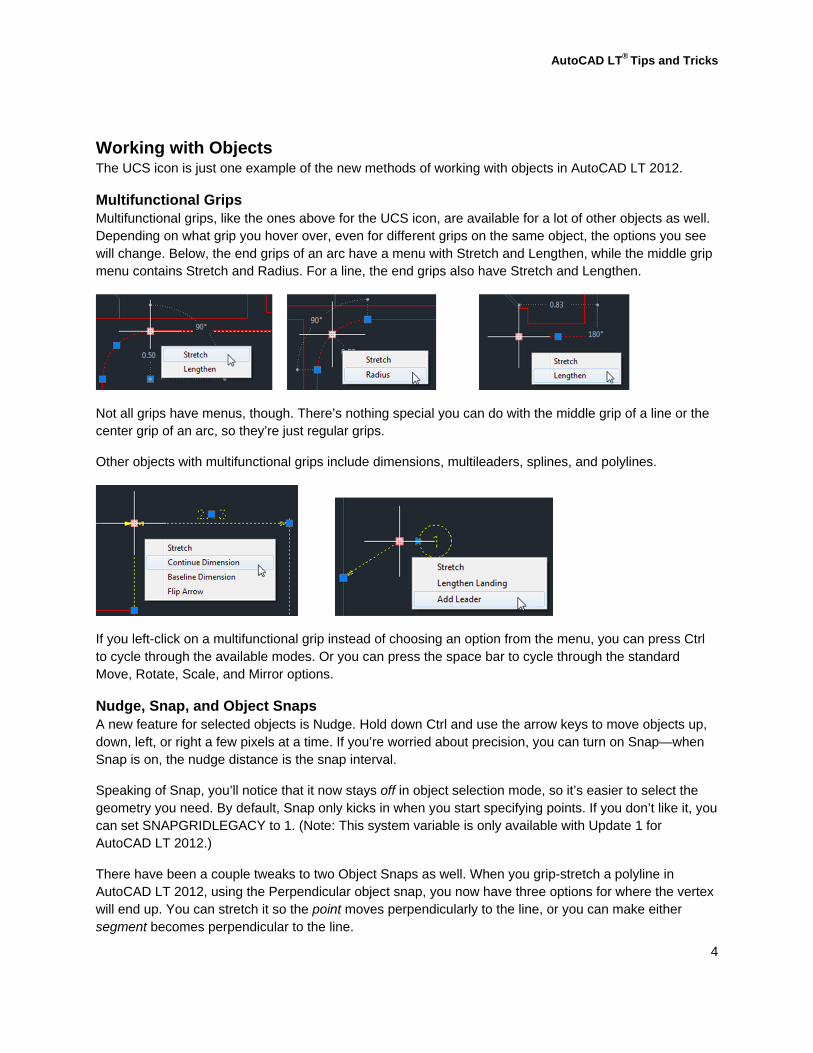
UCS Icon In the actual drawing window, you’ll notice a big change with the UCS icon. Hover your cursor over it, and it turns yellow. Click on it, and you can select it!
Grip menus enable you to change the angle of the X and Y axes, move the origin, or set the UCS back to World. The “Move and Align” option only works with 3D objects like surfaces and solids, so you probably won’t need it very often, but the Move and Rotate options can definitely come in handy. Additional options, like icon settings, are available through the right-click menu.
And in case you were worried, you can’t select the UCS icon with a crossing or window selection. You have to specifically click on it, which reduces the risk of selecting it by accident.
AutoCAD LT® Tips and Tricks
4
Working with Objects The UCS icon is just one example of the new methods of working with objects in AutoCAD LT 2012.
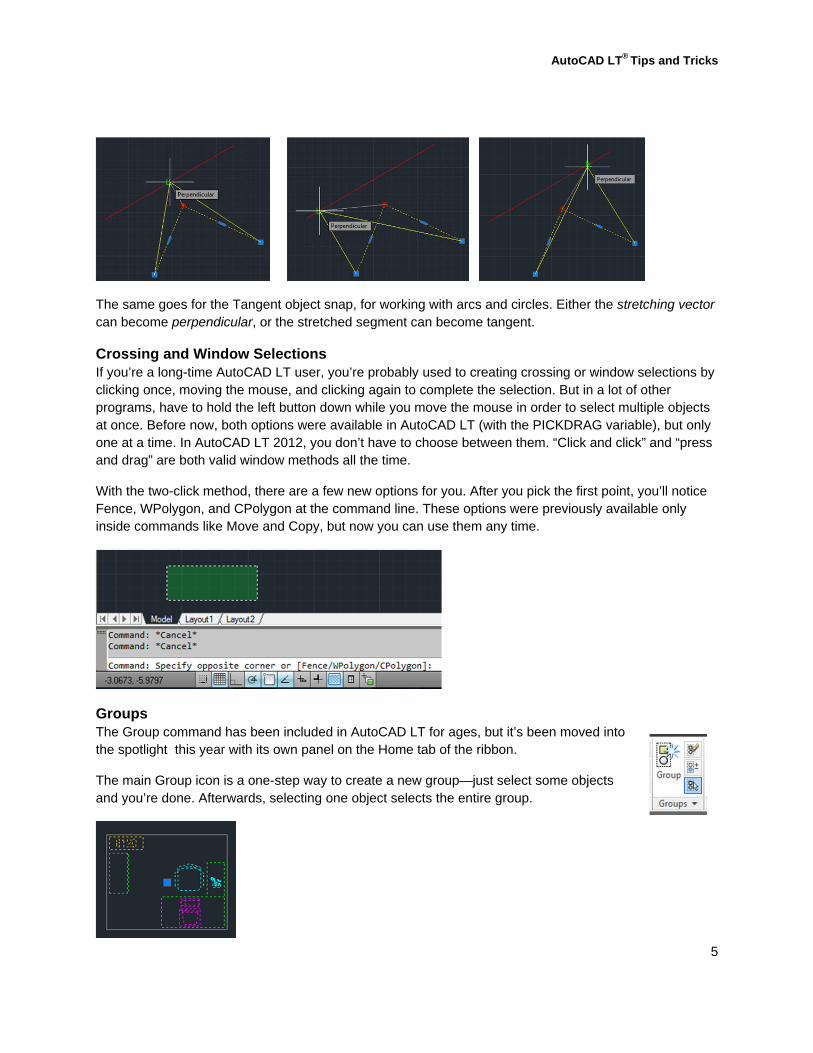
Multifunctional Grips Multifunctional grips, like the ones above for the UCS icon, are available for a lot of other objects as well. Depending on what grip you hover over, even for different grips on the same object, the options you see will change. Below, the end grips of an arc have a menu with Stretch and Lengthen, while the middle grip menu contains Stretch and Radius. For a line, the end grips also have Stretch and Lengthen.
Not all grips have menus, though. There’s nothing special you can do with the middle grip of a line or the center grip of an arc, so they’re just regular grips.
Other objects with multifunctional grips include dimensions, multileaders, splines, and polylines.
If you left-click on a multifunctional grip instead of choosing an option from the menu, you can press Ctrl to cycle through the available modes. Or you can press the space bar to cycle through the standard Move, Rotate, Scale, and Mirror options.
Nudge, Snap, and Object Snaps A new feature for selected objects is Nudge. Hold down Ctrl and use the arrow keys to move objects up, down, left, or right a few pixels at a time. If you’re worried about precision, you can turn on Snap—when Snap is on, the nudge distance is the snap interval.
Speaking of Snap, you’ll notice that it now stays off in object selection mode, so it’s easier to select the geometry you need. By default, Snap only kicks in when you start specifying points. If you don’t like it, you can set SNAPGRIDLEGACY to 1. (Note: This system variable is only available with Update 1 for AutoCAD LT 2012.)
There have been a couple tweaks to two Object Snaps as well. When you grip-stretch a polyline in AutoCAD LT 2012, using the Perpendicular object snap, you now have three options for where the vertex will end up. You can stretch it so the point moves perpendicularly to the line, or you can make either segment becomes perpendicular to the line.
AutoCAD LT® Tips and Tricks
5
The same goes for the Tangent object snap, for working with arcs and circles. Either the stretching vector can become perpendicular, or the stretched segment can become tangent.
Crossing and Window Selections If you’re a long-time AutoCAD LT user, you’re probably used to creating crossing or window selections by clicking once, moving the mouse, and clicking again to complete the selection. But in a lot of other programs, have to hold the left button down while you move the mouse in order to select multiple objects at once. Before now, both options were available in AutoCAD LT (with the PICKDRAG variable), but only one at a time. In AutoCAD LT 2012, you don’t have to choose between them. “Click and click” and “press and drag” are both valid window methods all the time.
With the two-click method, there are a few new options for you. After you pick the first point, you’ll notice Fence, WPolygon, and CPolygon at the command line. These options were previously available only inside commands like Move and Copy, but now you can use them any time.
Groups The Group command has been included in AutoCAD LT for ages, but it’s been moved into the spotlight this year with its own panel on the Home tab of the ribbon.
The main Group icon is a one-step way to create a new group—just select some objects and you’re done. Afterwards, selecting one object selects the entire group.
AutoCAD LT® Tips and Tricks
6
You’re no longer prompted for a name for the group, but you can still access that option from the dynamic input or command line.
With the other three icons on the main portion of the panel, you can ungroup objects, add or remove objects from the group, and turn group selection on or off. When group selection is off, the group definition still exists, but you can select and modify individual objects as if the group wasn’t there.
On the expanded portion of the Groups panel, you can launch the Group Manager, but basically everything that’s in there is already on the ribbon. You can also control the display of the group bounding box, which is the light gray rectangle in the image above. When the bounding box is on, you can only manipulate the group as a whole. When it’s off, you see object grips for every object in the group instead of just the single center grip. That way you can grip-edit individual items within the group, or use commands like Move and Rotate on the entire group.
Quick Properties Double-clicking on many objects now brings up Quick Properties instead of the Properties palette. When you press Esc to clear your selection, Quick Properties will close. If you turn Quick Properties on from the status bar, it will show up after single-clicking on an object, like it did before. The Quick Properties palette has also been revamped to show you more of the properties you need right away; if something’s missing, you can either add it through the CUI or simply bring up the full Properties palette.
Content, Communication, and Collaboration No one gets to work in a vacuum. No matter how small your company or how big your project, chances are you need to draw on your own past work or deal with files from other people.
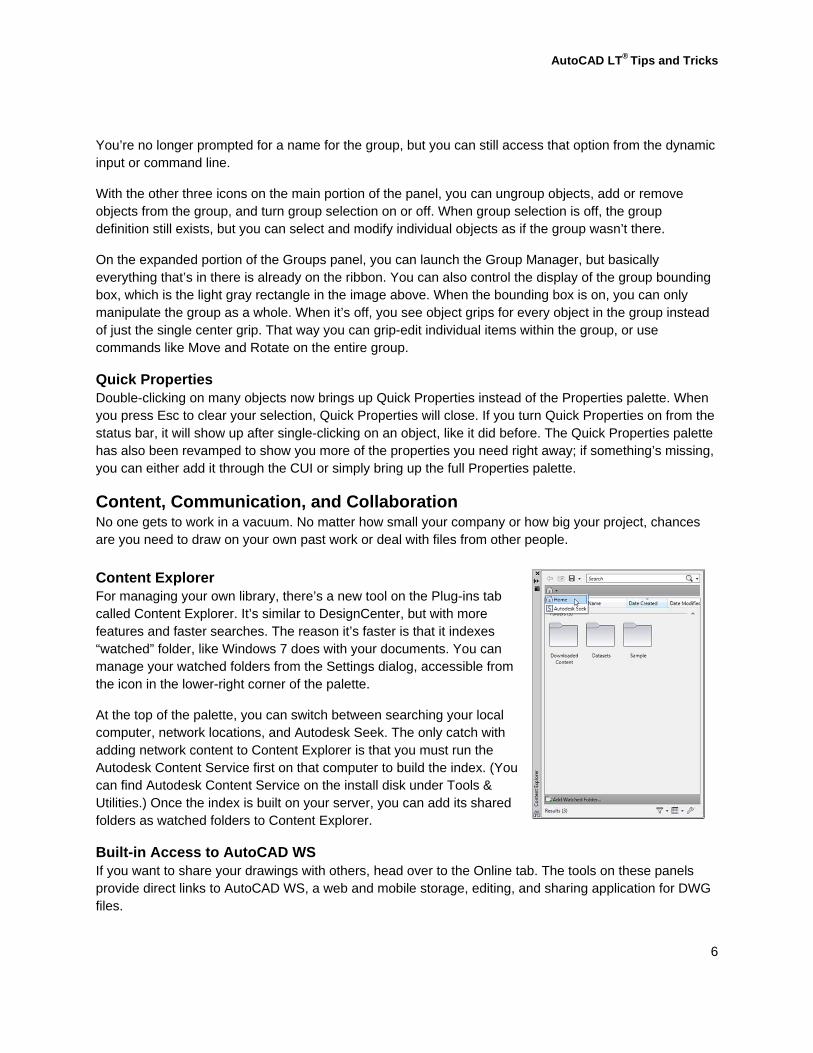
Content Explorer For managing your own library, there’s a new tool on the Plug-ins tab called Content Explorer. It’s similar to DesignCenter, but with more features and faster searches. The reason it’s faster is that it indexes “watched” folder, like Windows 7 does with your documents. You can manage your watched folders from the Settings dialog, accessible from the icon in the lower-right corner of the palette.
At the top of the palette, you can switch between searching your local computer, network locations, and Autodesk Seek. The only catch with adding network content to Content Explorer is that you must run the Autodesk Content Service first on that computer to build the index. (You can find Autodesk Content Service on the install disk under Tools & Utilities.) Once the index is built on your server, you can add its shared folders as watched folders to Content Explorer.
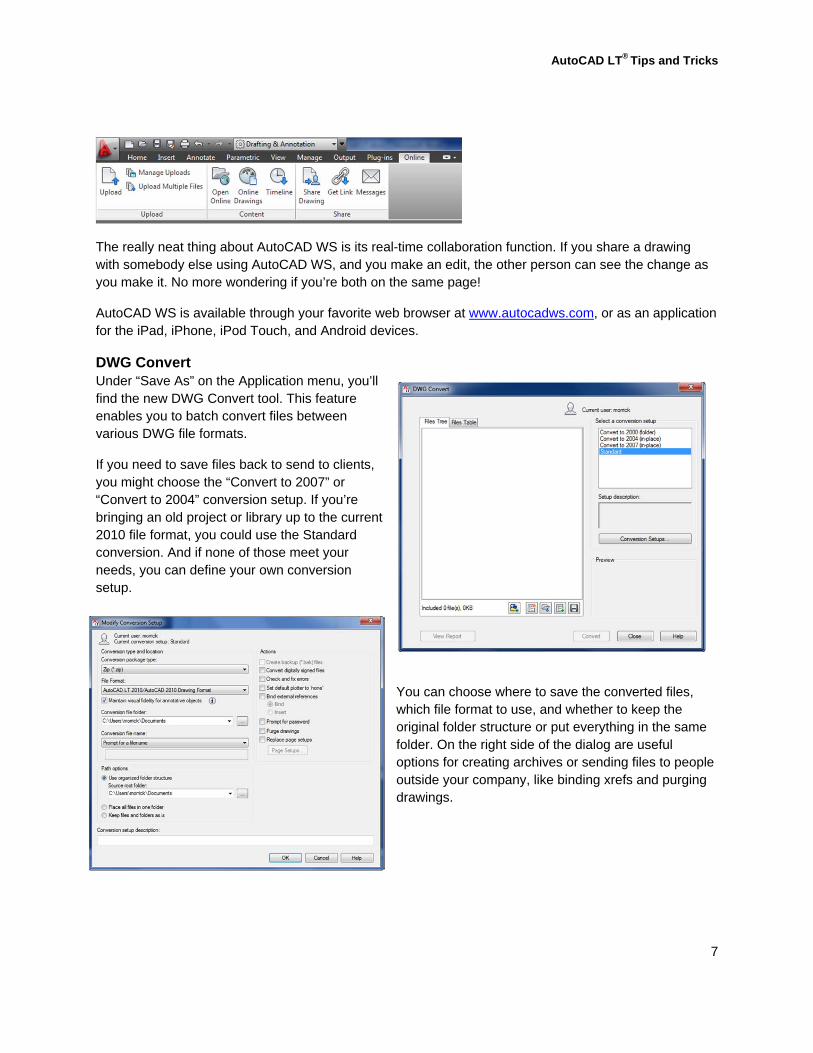
Built-in Access to AutoCAD WS If you want to share your drawings with others, head over to the Online tab. The tools on these panels provide direct links to AutoCAD WS, a web and mobile storage, editing, and sharing application for DWG files.
AutoCAD LT® Tips and Tricks
7
The really neat thing about AutoCAD WS is its real-time collaboration function. If you share a drawing with somebody else using AutoCAD WS, and you make an edit, the other person can see the change as you make it. No more wondering if you’re both on the same page!
AutoCAD WS is available through your favorite web browser at www.autocadws.com, or as an application for the iPad, iPhone, iPod Touch, and Android devices.
DWG Convert Under “Save As” on the Application menu, you’ll find the new DWG Convert tool. This feature enables you to batch convert files between various DWG file formats.
If you need to save files back to send to clients, you might choose the “Convert to 2007” or “Convert to 2004” conversion setup. If you’re bringing an old project or library up to the current 2010 file format, you could use the Standard conversion. And if none of those meet your needs, you can define your own conversion setup.
You can choose where to save the converted files, which file format to use, and whether to keep the original folder structure or put everything in the same folder. On the right side of the dialog are useful options for creating archives or sending files to people outside your company, like binding xrefs and purging drawings.
AutoCAD LT® Tips and Tricks
8
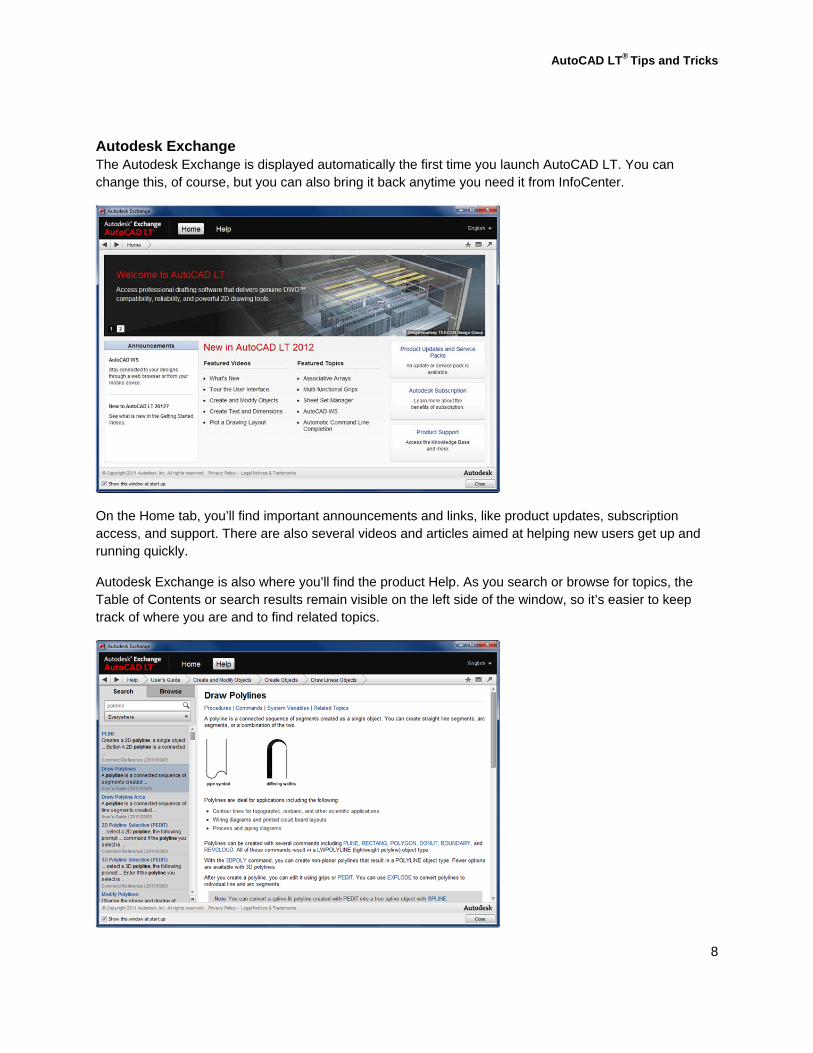
Autodesk Exchange The Autodesk Exchange is displayed automatically the first time you launch AutoCAD LT. You can change this, of course, but you can also bring it back anytime you need it from InfoCenter.
On the Home tab, you’ll find important announcements and links, like product updates, subscription access, and support. There are also several videos and articles aimed at helping new users get up and running quickly.
Autodesk Exchange is also where you’ll find the product Help. As you search or browse for topics, the Table of Contents or search results remain visible on the left side of the window, so it’s easier to keep track of where you are and to find related topics.
AutoCAD LT® Tips and Tricks
9
Sheet Set Manager The Sheet Set Manager, a feature of AutoCAD® software for several years, is now supported in AutoCAD LT 2012. There’s not enough space in this handout to tell you all about it—it’s been a subject of several Autodesk University classes all by itself—but the basic idea is that you can use the Sheet Set Manager to organize and publish your drawing set. You can coordinate layout views, populate title blocks and plot stamps with project information, create drawings lists, and more.
File References Two last notes on communication. DGN interoperability has been improved this year, so complex linetypes are now maintained during import and export from DGN V8. Also, more raster image types are now supported as image attachments:
Type Description Extension
DDS Microsoft DirectDraw Surface .dds
DOQ USGS Digital Orthophoto Quads .doq
ECW Enhanced Compression Wavelet .ecw
HDR High Dynamic Range image .hdr
JPEG2000 Wavelet‐based compression standard created by the Joint Photographics Expert Group
.jp2, .j2k
MrSID Multiresolution Seamless Image Database .sid
NITF National Imagery Transmission Format .nitf
OpenEXR Industrial Light & Magic HDR image .sid
PSD Adobe® Photoshop® document .psd
Even advanced format like satellites and elevations will display properly, thanks to the AutoCAD® Raster Design object enabler that’s included with your AutoCAD LT 2012 installation.
Associative Arrays You’ve probably used the Array command countless times to create rectangular and circular patterns of objects. But it’s been improved almost beyond recognition in AutoCAD LT 2012.
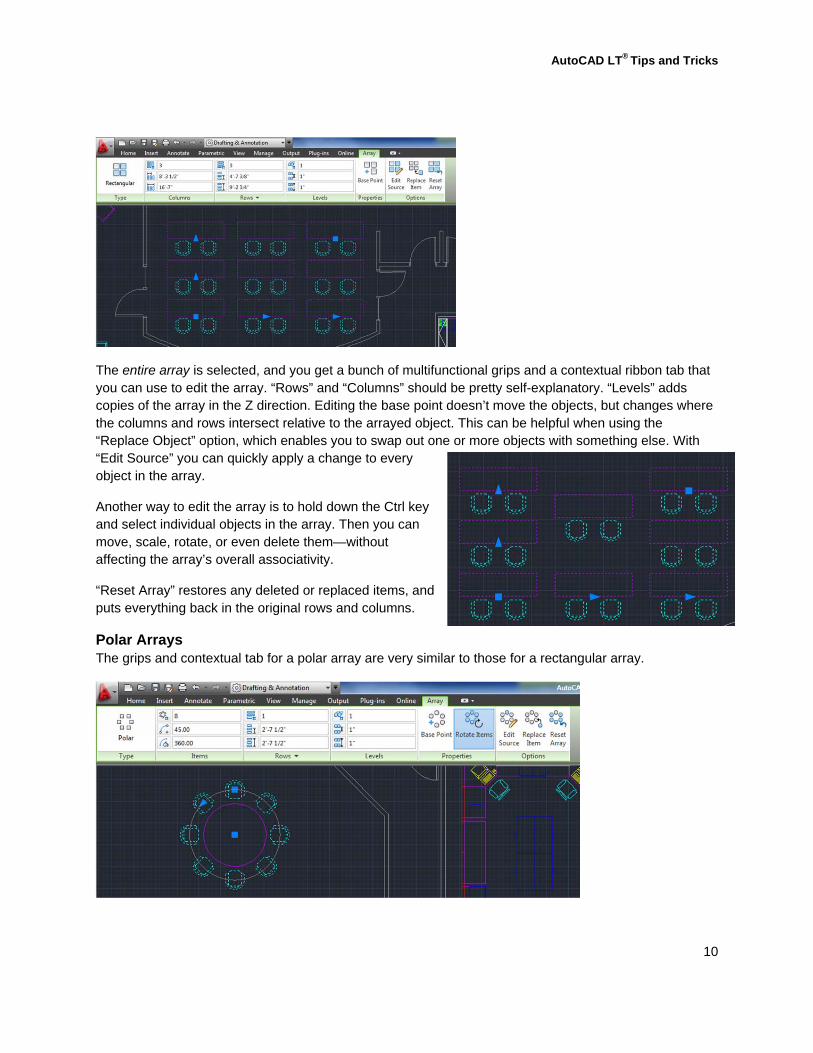
The first change you’ll notice in the Array command is that after you start it, there’s no dialog box! Instead, you’re given a “select objects” prompt. After that, you can choose your array type: Rectangular, Path, or Polar.
Rectangular Arrays With a rectangular array, you can use your mouse to specify the number of rows and columns, then set the spacing and press Enter to accept the array. But the real power of the arrays becomes clear when you select an object in the completed array.
AutoCAD LT® Tips and Tricks
10
The entire array is selected, and you get a bunch of multifunctional grips and a contextual ribbon tab that you can use to edit the array. “Rows” and “Columns” should be pretty self-explanatory. “Levels” adds copies of the array in the Z direction. Editing the base point doesn’t move the objects, but changes where the columns and rows intersect relative to the arrayed object. This can be helpful when using the “Replace Object” option, which enables you to swap out one or more objects with something else. With “Edit Source” you can quickly apply a change to every object in the array.
Another way to edit the array is to hold down the Ctrl key and select individual objects in the array. Then you can move, scale, rotate, or even delete them—without affecting the array’s overall associativity.
“Reset Array” restores any deleted or replaced items, and puts everything back in the original rows and columns.
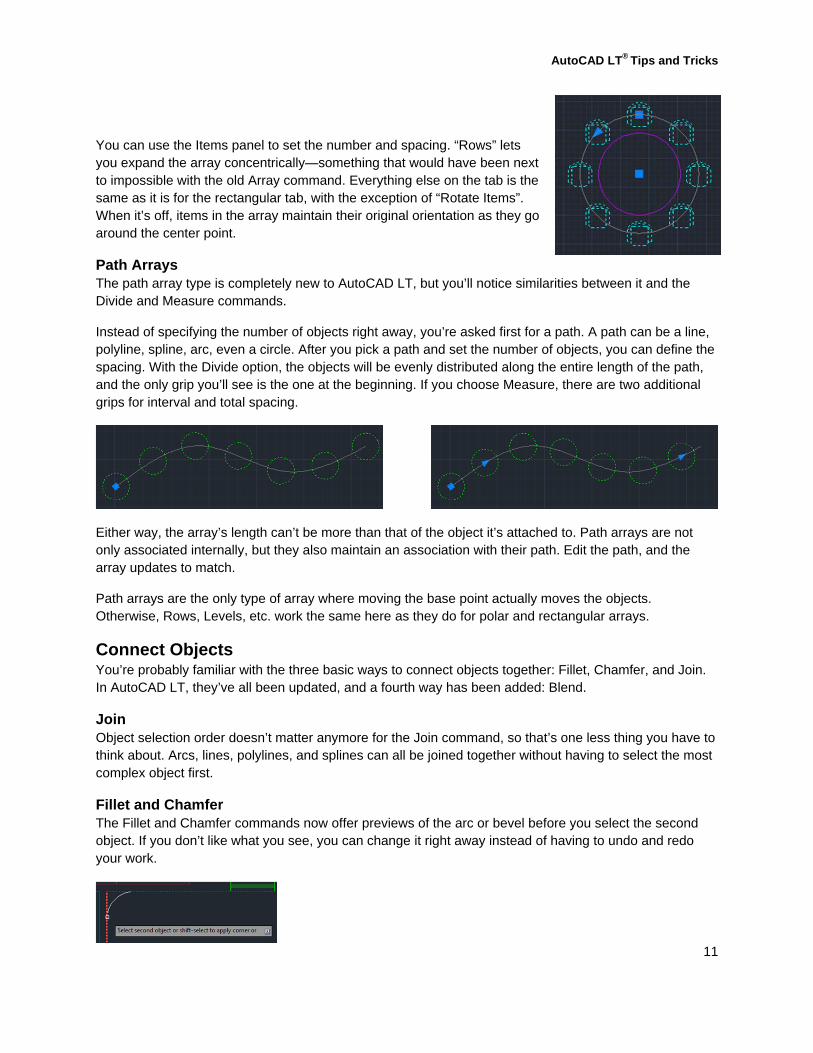
Polar Arrays The grips and contextual tab for a polar array are very similar to those for a rectangular array.
AutoCAD LT® Tips and Tricks
11
You can use the Items panel to set the number and spacing. “Rows” lets you expand the array concentrically—something that would have been next to impossible with the old Array command. Everything else on the tab is the same as it is for the rectangular tab, with the exception of “Rotate Items”. When it’s off, items in the array maintain their original orientation as they go around the center point.
Path Arrays The path array type is completely new to AutoCAD LT, but you’ll notice similarities between it and the Divide and Measure commands.
Instead of specifying the number of objects right away, you’re asked first for a path. A path can be a line, polyline, spline, arc, even a circle. After you pick a path and set the number of objects, you can define the spacing. With the Divide option, the objects will be evenly distributed along the entire length of the path, and the only grip you’ll see is the one at the beginning. If you choose Measure, there are two additional grips for interval and total spacing.
Either way, the array’s length can’t be more than that of the object it’s attached to. Path arrays are not only associated internally, but they also maintain an association with their path. Edit the path, and the array updates to match.
Path arrays are the only type of array where moving the base point actually moves the objects. Otherwise, Rows, Levels, etc. work the same here as they do for polar and rectangular arrays.
Connect Objects You’re probably familiar with the three basic ways to connect objects together: Fillet, Chamfer, and Join. In AutoCAD LT, they’ve all been updated, and a fourth way has been added: Blend.
Join Object selection order doesn’t matter anymore for the Join command, so that’s one less thing you have to think about. Arcs, lines, polylines, and splines can all be joined together without having to select the most complex object first.
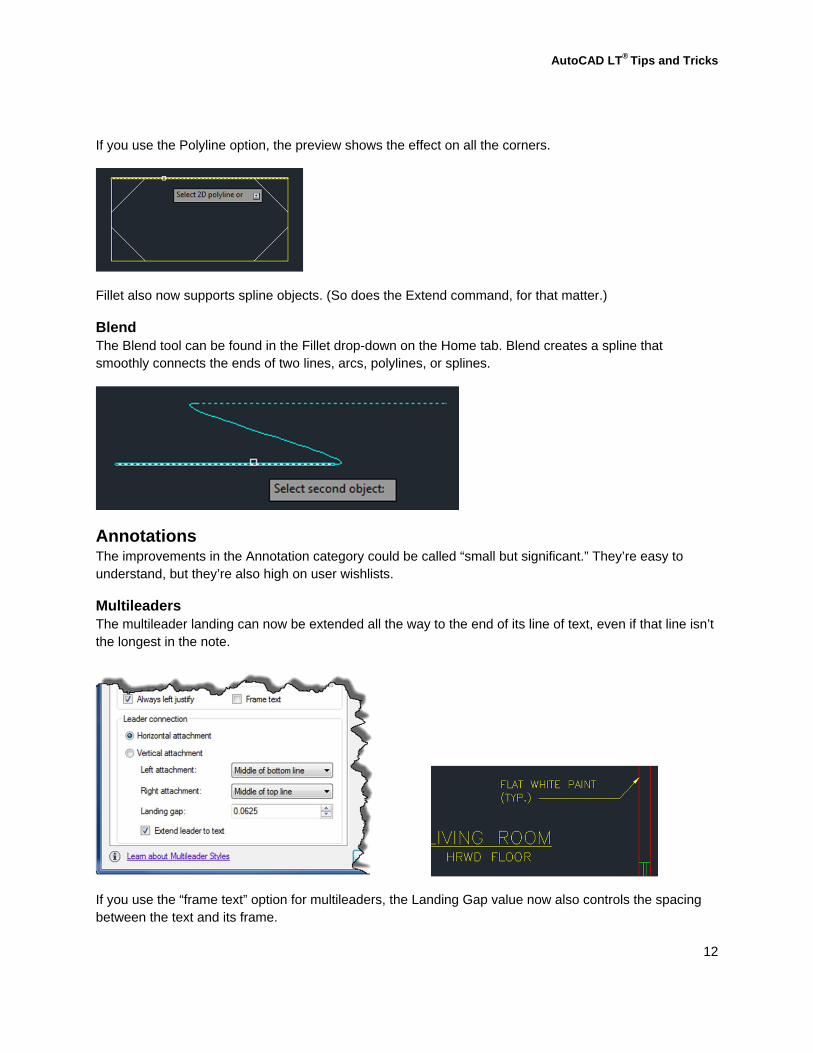
Fillet and Chamfer The Fillet and Chamfer commands now offer previews of the arc or bevel before you select the second object. If you don’t like what you see, you can change it right away instead of having to undo and redo your work.
AutoCAD LT® Tips and Tricks
12
If you use the Polyline option, the preview shows the effect on all the corners.
Fillet also now supports spline objects. (So does the Extend command, for that matter.)
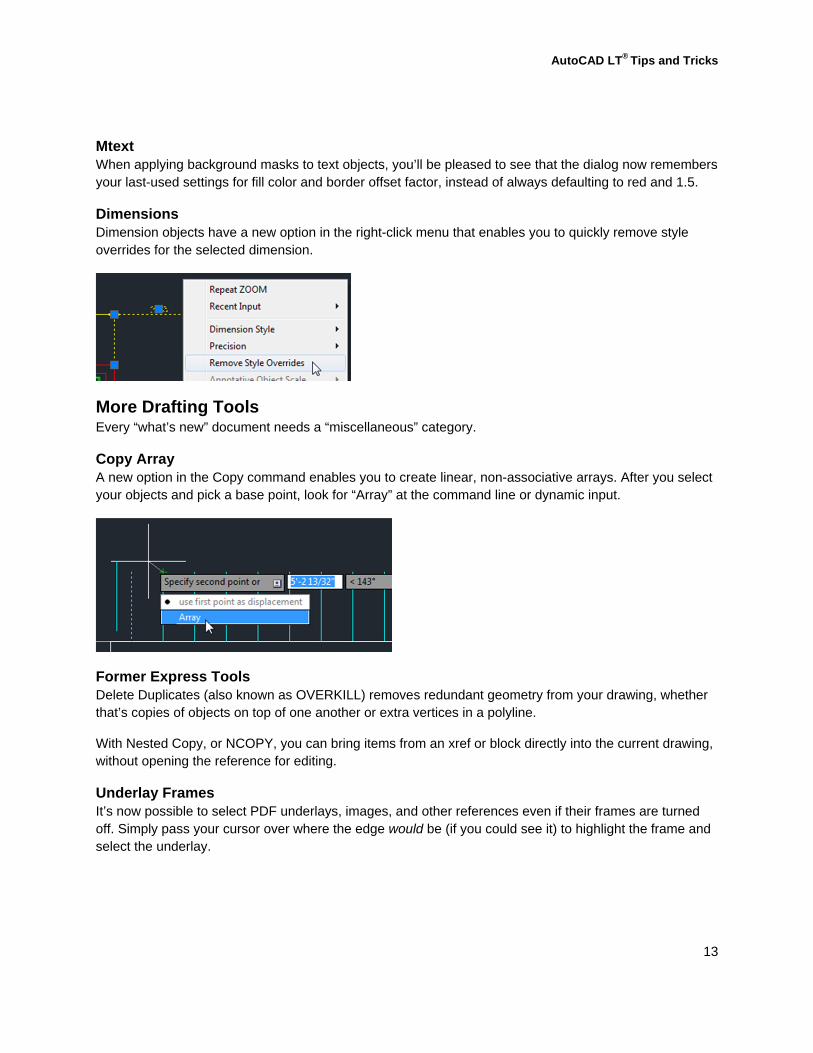
Blend The Blend tool can be found in the Fillet drop-down on the Home tab. Blend creates a spline that smoothly connects the ends of two lines, arcs, polylines, or splines.
Annotations The improvements in the Annotation category could be called “small but significant.” They’re easy to understand, but they’re also high on user wishlists.
Multileaders The multileader landing can now be extended all the way to the end of its line of text, even if that line isn’t the longest in the note.
If you use the “frame text” option for multileaders, the Landing Gap value now also controls the spacing between the text and its frame.
AutoCAD LT® Tips and Tricks
13
Mtext When applying background masks to text objects, you’ll be pleased to see that the dialog now remembers your last-used settings for fill color and border offset factor, instead of always defaulting to red and 1.5.
Dimensions Dimension objects have a new option in the right-click menu that enables you to quickly remove style overrides for the selected dimension.
More Drafting Tools Every “what’s new” document needs a “miscellaneous” category.
Copy Array A new option in the Copy command enables you to create linear, non-associative arrays. After you select your objects and pick a base point, look for “Array” at the command line or dynamic input.
Former Express Tools Delete Duplicates (also known as OVERKILL) removes redundant geometry from your drawing, whether that’s copies of objects on top of one another or extra vertices in a polyline.
With Nested Copy, or NCOPY, you can bring items from an xref or block directly into the current drawing, without opening the reference for editing.
Underlay Frames It’s now possible to select PDF underlays, images, and other references even if their frames are turned off. Simply pass your cursor over where the edge would be (if you could see it) to highlight the frame and select the underlay.
AutoCAD LT® Tips and Tricks
14
Installation, Migration, and Customization Here are a few things to make it easier to install, migrate settings, and customize your AutoCAD LT.
Installation Dialog The installation dialogs have been simplified to provide you with a better install experience. The first screen contains options for regular installations, creating a deployment (an installation image that can be used on multiple computers), and installing tools and utilities.
On the product selection page, you can see what you’ve already installed and what’s still available.
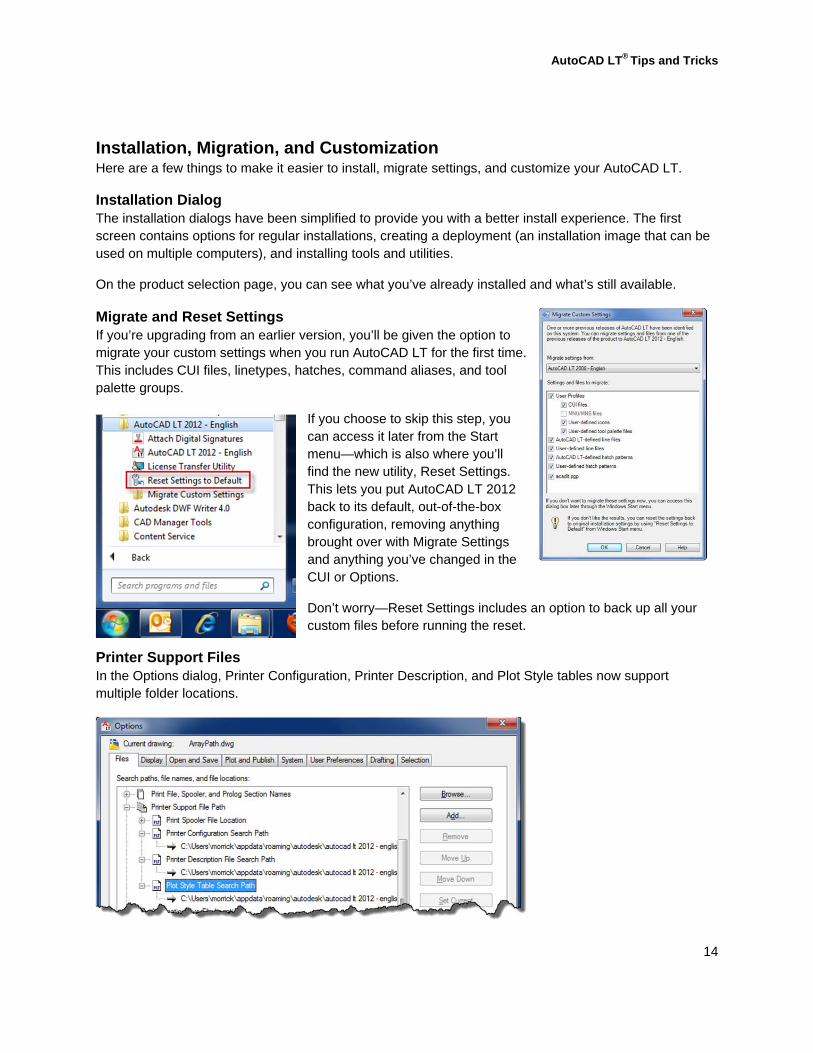
Migrate and Reset Settings If you’re upgrading from an earlier version, you’ll be given the option to migrate your custom settings when you run AutoCAD LT for the first time. This includes CUI files, linetypes, hatches, command aliases, and tool palette groups.
If you choose to skip this step, you can access it later from the Start menu—which is also where you’ll find the new utility, Reset Settings. This lets you put AutoCAD LT 2012 back to its default, out-of-the-box configuration, removing anything brought over with Migrate Settings and anything you’ve changed in the CUI or Options.
Don’t worry—Reset Settings includes an option to back up all your custom files before running the reset.
Printer Support Files In the Options dialog, Printer Configuration, Printer Description, and Plot Style tables now support multiple folder locations.
AutoCAD LT® Tips and Tricks
15
If you’ve wanted to organize your files into sub-folders, maybe by printer, by client, or by plotting standards, now you can. AutoCAD LT will look in all these locations for the necessary files.
Performance Improvements You may notice improved performance of AutoCAD LT 2012 on 64-bit Windows 7 systems as compared to earlier versions. AutoCAD LT 2012 supports hardware acceleration, meaning it can take full advantage of the capabilities of your graphics card. You could see faster start-up times and quicker switching between ribbon tabs.
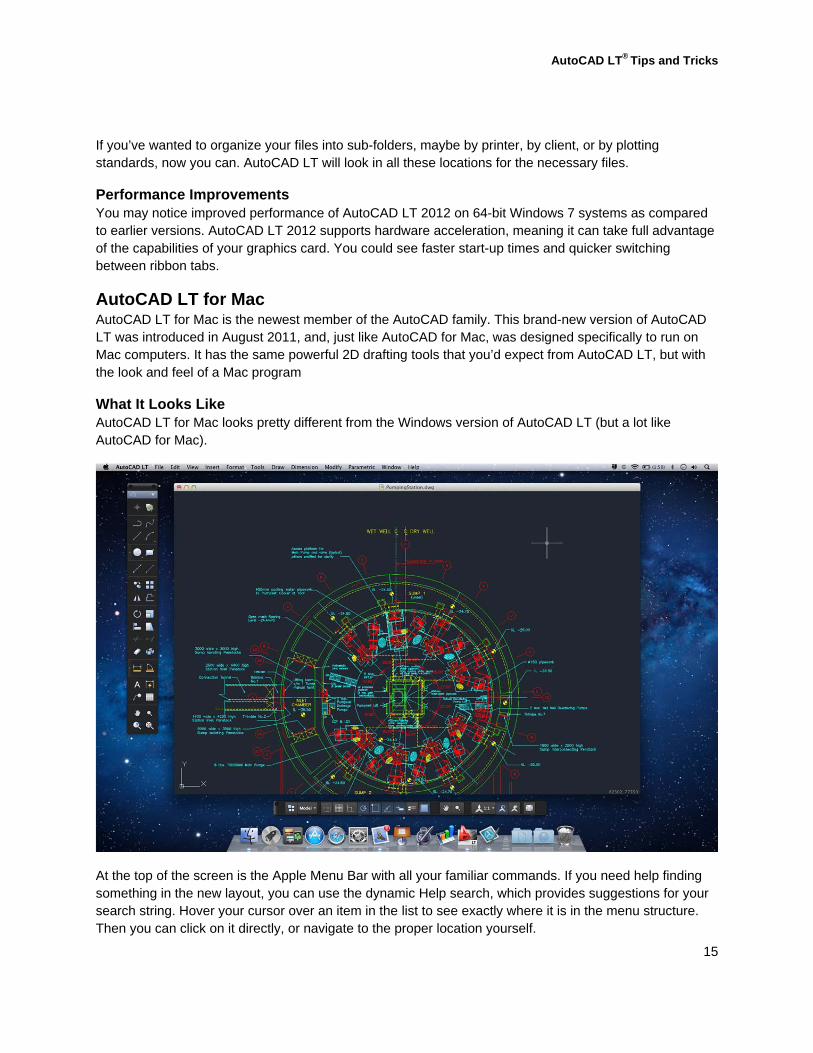
AutoCAD LT for Mac AutoCAD LT for Mac is the newest member of the AutoCAD family. This brand-new version of AutoCAD LT was introduced in August 2011, and, just like AutoCAD for Mac, was designed specifically to run on Mac computers. It has the same powerful 2D drafting tools that you’d expect from AutoCAD LT, but with the look and feel of a Mac program
What It Looks Like AutoCAD LT for Mac looks pretty different from the Windows version of AutoCAD LT (but a lot like AutoCAD for Mac).
At the top of the screen is the Apple Menu Bar with all your familiar commands. If you need help finding something in the new layout, you can use the dynamic Help search, which provides suggestions for your search string. Hover your cursor over an item in the list to see exactly where it is in the menu structure. Then you can click on it directly, or navigate to the proper location yourself.
AutoCAD LT® Tips and Tricks
16
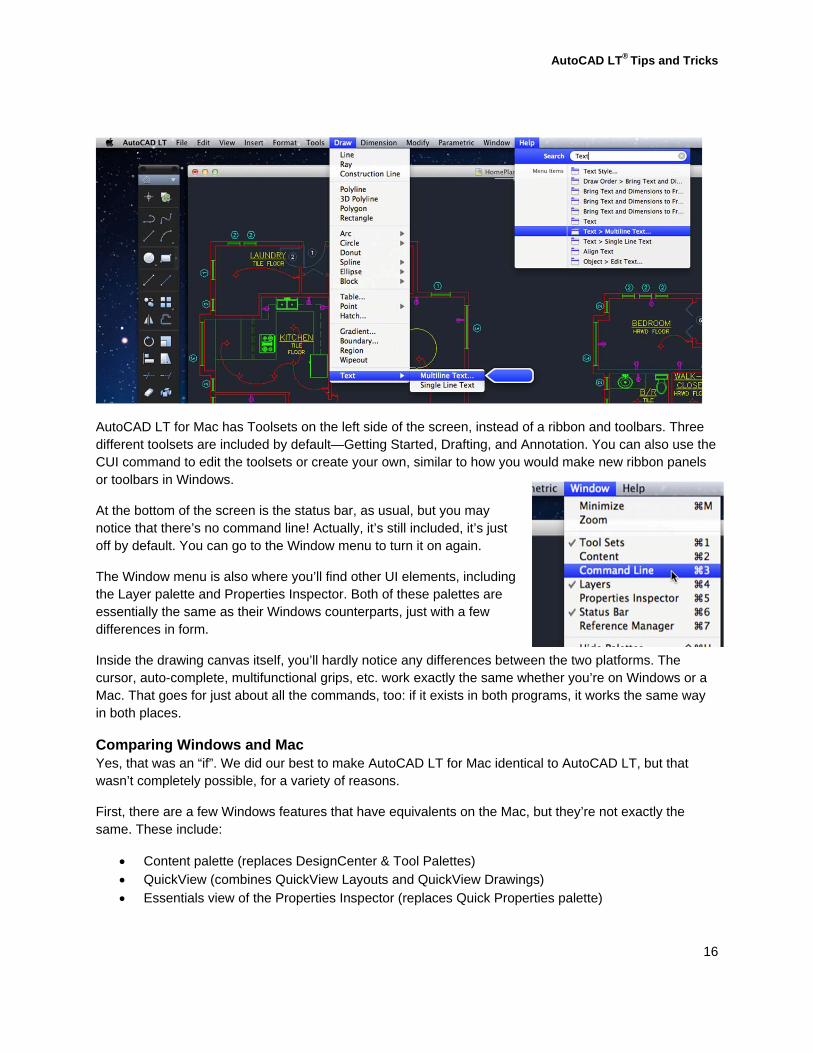
AutoCAD LT for Mac has Toolsets on the left side of the screen, instead of a ribbon and toolbars. Three different toolsets are included by default—Getting Started, Drafting, and Annotation. You can also use the CUI command to edit the toolsets or create your own, similar to how you would make new ribbon panels or toolbars in Windows.
At the bottom of the screen is the status bar, as usual, but you may notice that there’s no command line! Actually, it’s still included, it’s just off by default. You can go to the Window menu to turn it on again.
The Window menu is also where you’ll find other UI elements, including the Layer palette and Properties Inspector. Both of these palettes are essentially the same as their Windows counterparts, just with a few differences in form.
Inside the drawing canvas itself, you’ll hardly notice any differences between the two platforms. The cursor, auto-complete, multifunctional grips, etc. work exactly the same whether you’re on Windows or a Mac. That goes for just about all the commands, too: if it exists in both programs, it works the same way in both places.
Comparing Windows and Mac Yes, that was an “if”. We did our best to make AutoCAD LT for Mac identical to AutoCAD LT, but that wasn’t completely possible, for a variety of reasons.
First, there are a few Windows features that have equivalents on the Mac, but they’re not exactly the same. These include:
Content palette (replaces DesignCenter & Tool Palettes) QuickView (combines QuickView Layouts and QuickView Drawings) Essentials view of the Properties Inspector (replaces Quick Properties palette)
AutoCAD LT® Tips and Tricks
17
Second, there are some features that just haven’t made their way over to the Mac yet. They’re under consideration for future releases, but they’re not here now. These include:
PDF Underlay Sheet Set Manager Dynamic Block editing (you can use them, just not create or modify)
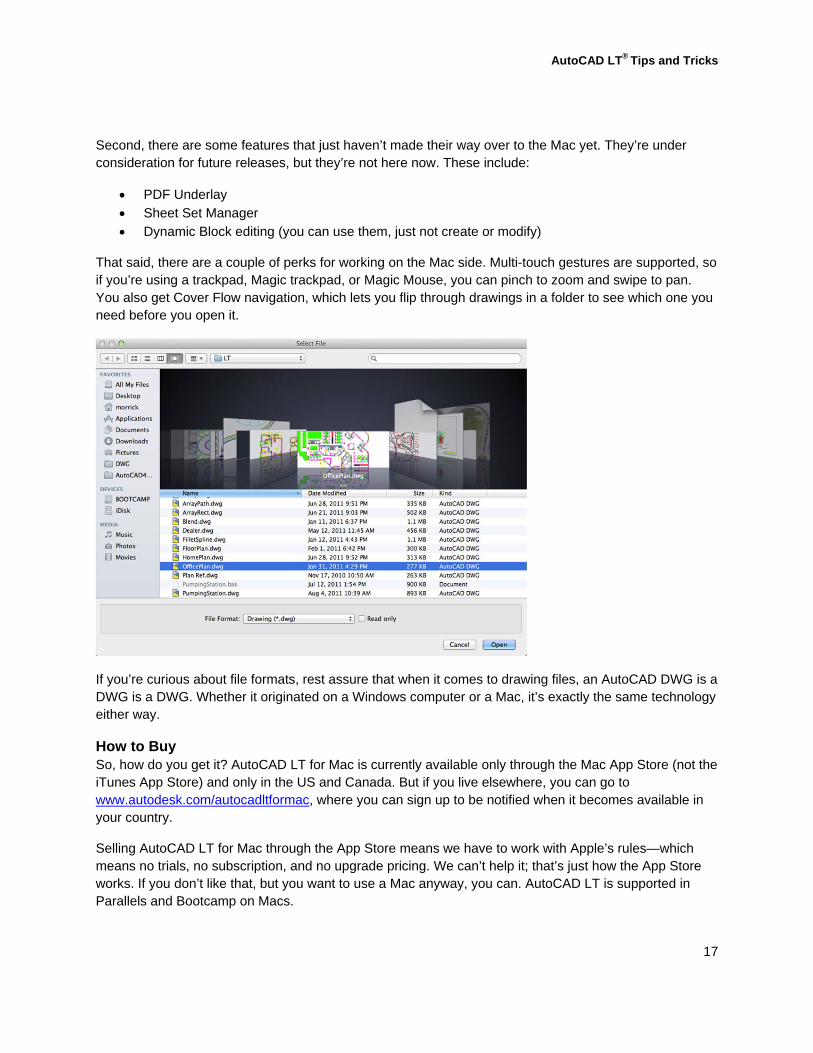
That said, there are a couple of perks for working on the Mac side. Multi-touch gestures are supported, so if you’re using a trackpad, Magic trackpad, or Magic Mouse, you can pinch to zoom and swipe to pan. You also get Cover Flow navigation, which lets you flip through drawings in a folder to see which one you need before you open it.
If you’re curious about file formats, rest assure that when it comes to drawing files, an AutoCAD DWG is a DWG is a DWG. Whether it originated on a Windows computer or a Mac, it’s exactly the same technology either way.
How to Buy So, how do you get it? AutoCAD LT for Mac is currently available only through the Mac App Store (not the iTunes App Store) and only in the US and Canada. But if you live elsewhere, you can go to www.autodesk.com/autocadltformac, where you can sign up to be notified when it becomes available in your country.
Selling AutoCAD LT for Mac through the App Store means we have to work with Apple’s rules—which means no trials, no subscription, and no upgrade pricing. We can’t help it; that’s just how the App Store works. If you don’t like that, but you want to use a Mac anyway, you can. AutoCAD LT is supported in Parallels and Bootcamp on Macs.

AutoCAD LT® Tips and Tricks
18
And if you really want the native Mac application, but are hesitating about the lack of the trial, you can always use the free 30-day trial of AutoCAD for Mac. Just be sure you read the comparison matrix between AutoCAD for Mac and AutoCAD LT for Mac before you buy. But if you’re already familiar with what features are AutoCAD-only, there won’t be any surprises. Like its Windows counterpart, AutoCAD LT for Mac does not have 3D modeling, customization, parametrics, that sort of thing.
Conclusion Now you’ve seen the latest and greatest of what’s new in AutoCAD LT 2012. So, where do you go from here? If you want more information, there are plenty of places to get it. There’s the website, www.autodesk.com/autocad-lt. You can watch demo videos on YouTube (www.youtube.com/autodesk and www.youtube.com/autocadexchange), and subscribe to my blog, LT Unlimited (http://ltunlimited.typepad.com) for all the latest AutoCAD LT tips, tricks, and news.
Thanks for attending AU Virtual!