AtHoc IP Phone Gateway Setup and Operation Guide · The following changes have been made to this...
18
IP Phone Gateway Setup and Operation Guide: For Avaya and Cisco UCM Blast Version 7.0.0.1 April 2017
Transcript of AtHoc IP Phone Gateway Setup and Operation Guide · The following changes have been made to this...

IP Phone Gateway Setup and Operation Guide:For Avaya and Cisco UCM Blast Version 7.0.0.1 April 2017

Copyright © 2010–2017 AtHoc Inc., a Division of BlackBerry Limited. All Rights Reserved.This document may not be copied, disclosed, transferred, or modified without the prior written consent of , Inc. While all content is believed to be correct at the time of publication, it is provided as general purpose information. The content is subject to change without notice and is provided “as is” and with no expressed or implied warranties whatsoever, including, but not limited to, a warranty for accuracy made by . The software described in this document is provided under written license only, contains valuable trade secrets and pro-prietary information, and is protected by the copyright laws of the United States and other countries. Unau-thorized use of software or its documentation can result in civil damages and criminal prosecution.
TrademarksTrademarks, including but not limited to ATHOC, EMBLEM Design, ATHOC & Design and the PURPLE GLOBE Design are the trademarks or registered trademarks of BlackBerry Limited, its subsidiaries and/or affiliates, used under license, and the exclusive rights to such trademarks are expressly reserved. All other trademarks are the property of their respective owners. Users are not permitted to use these marks without the prior written consent of AtHoc or such third party which may own the mark.
This product includes software developed by Microsoft (http://www.microsoft.com).
This product includes software developed by Intel (http://www.intel.com).
This product includes software developed by BroadCom (http://www.broadcom.com).
All other trademarks mentioned in this document are the property of their respective owners.
PatentsThis product includes technology protected under patents and pending patents.
Contact InformationAtHoc Inc., a Division of BlackBerry Limited
2988 Campus Drive, Suite 100
San Mateo, CA 94403
Tel: 1-650-685-3000
Email: [email protected]
Web: http://www.athoc.com

Changes to This DocumentThe following changes have been made to this document:
Release Date Change
7.0.0.1 April 2017 Updated for BlackBerry AtHoc rebranding.
6.1.8.87 CP1 December 2016 Initial version.

ContentsCHAPTER 1: IP PHONE BLAST OVERVIEW 1CHAPTER 2: IP PHONE CONFIGURATION STEPS 2CHAPTER 3: CREATE USERS AND ASSOCIATE THEM WITH IP PHONES 5CHAPTER 4: VERIFY THE INSTALLATION AND CONFIGURATION 6APPENDIX A: CISCO UCM IP PHONE SPECIFICS 7
How It Works 8Performance Considerations 9Cisco Supported IP Phones 10
APPENDIX B: AVAYA IP PHONE SPECIFICS 11AtHoc Blast System 11System Requirements 12Avaya Supported IP Phones 13
i

Chapter 1: IP Phone Blast OverviewAtHoc release 87 CP1 contains a gateway called Cisco UCM Blast which can also serve Avaya phones. Because of this duality, the gateway has been renamed in the current release to IP Phone Blast. Depending on whether an Avaya or Cisco UCM device is being used by a VPS/organization, Administrators can rename the gateway to match the device type. The device then becomes a part of the IP Phone Gateway group in BlackBerry AtHoc.
IP Phone Blast Integration Guide
1

Chapter 2: IP Phone Configuration StepsTo configure the IP Phone Blast solution, complete the following steps:
1. Access the IPPhoneBlast.xml file. For release 87 CP1, it is a hotfix in the packages folder within the GA folder. For later versions, it will be in the default product installation location: /AtHocENS/ServerObjects/utils/AddOnModules/Packages/IPPhoneBlast
2. Enable the IP Phone Blast gateway by double-clicking the device configuration support tool located at:/AtHocENS/ServerObjects/tools/AtHoc.Applications.Tools.InstallPackage
3. On the Configure Device Support screen that opens, select the IP Phone Blast option and click Enable.
4. Log in to BlackBerry AtHoc as an Administrator and click the (Settings) icon to go to the Settings screen.
5. In the Devices region, click the IP Phone Blast gateway to open the configuration screen.
6. Configure the gateway: a. Enter a Notification Delivery Server address.
b. Enter a username.
c. Enter a password.
d. Set the Debug Trace radio button to No.
e. Click Save.
Chapter 2: IP Phone Configuration Steps
2

7. Back on the Settings screen, click the Devices link in the Devices region.
8. On the Device Manager screen, double-click the UCM Cisco IP Phone row.
9. Rename the device. To list the device as a Cisco system, enter Cisco IP Phone in the Name and Common Name fields.
For an Avaya system, change the fields to Avaya IP Phone.
IP Phone Blast Integration Guide
3

The name you give the device will appear on the Select Personal Devices tab on the New Alert and Edit Alert screens when Operators are creating or editing alerts. If it's a Cisco IP Phone, it will appear under IP Phone Blast as shown below.
If it's an Avaya IP Phone, it will appear under IP Phone Blast as shown below.
Chapter 2: IP Phone Configuration Steps
4

Chapter 3: Create Users and Associate them with IP PhonesEvery IP phone needs to be associated with a user. To create users in BlackBerry AtHoc, perform the following steps:
1. In the Navigation bar, click the Users button.
2. Click the Users link.
The Users screen opens.
3. At the top of the screen, click the New button.
The New User screen opens.
4. Enter a Username. You can use DN or any other name you want.
5. (Optional) Enter a first name, last name, and display name for the user.
6. In the Online numbers region, enter the DN number for the user's IP Phone display. Regardless of whether you are associating the user with a Cisco IP phone or an Avaya IP phone, the field name is always Cisco IP Phone Display, as shown below.
7. Click Save to create the user.
IP Phone Blast Integration Guide
5

Chapter 4: Verify the Installation and ConfigurationNote: Because the following instructions are applicable to both Cisco Blast IP phones and Avaya
IP phones, the generic term IP Phone is used throughout the steps.After installing and configuring the IP Phone Display gateway in BlackBerry AtHoc, you should verify that everything is working correctly by completing the following steps:
1. Open BlackBerry AtHoc.
2. In the Navigation bar, click the Alerts button and then the New Alert link.
3. Click the Create a Blank Alert link at the top of the screen.
4. On the New Alert screen, complete the Content section, making sure to include an alert title and at least some text in the alert body field.
5. In the Target Users section, click each tab to select the targeting criteria you want to use for the alert: By Groups, By Users, By Location, and/or By Advanced Query.
6. Click the Select Personal Devices tab.
7. Scroll down the list and select the IP Phone Display checkbox.
8. Click the Options link at the top of the Personal Devices section.
9. On the Personal Devices Options screen that appears, click the IP Phone Display tab if it is not already selected.
10. In the Alert Image field, select the Image radio button and then choose an image from the dropdown list.
11. Because this is only a verification test, it does not matter which image you select.
12. In the Ringtone field, select the Use Ringtone radio button and then select one of the ring-tone options from the dropdown list.
13. Because this is only a verification test, it does not matter which ringtone you select.
14. In the Audio Broadcast field, select the Alert - Title and Body option.
15. If you want to check that the rebroadcast feature is configured correctly, select the Replay audio broadcast message checkbox and then enter the number of times you want the alert to be replayed.
16. Click Apply.
17. When you have finished creating the alert, click the Publish button at the top of the screen.
18. When the alert appears on your IP phone, verify that it displays the image you selected in Step 10, plays the ringtone you selected in Step 11, and broadcasts the alert title and body text you entered in Step 4 above.
19. If you selected the Replay audio broadcast message checkbox in Step 13, verify that the alert plays the number of times that you designated.
Chapter 4: Verify the Installation and Configuration
6

Appendix A: Cisco UCM IP Phone SpecificsIP Phone Blast is used for displaying alert messages on a Cisco IP phone's display panel by using the phone's internal HTTP server. These messages include optional images, response options, streamed audio, and designated ringtones.
Refer to Appendix A, Add Custom Ringtones, for instructions on how to install custom ringtones on a Cisco IP phone.
IP Phone Blast allows users to send an audio-visual notification to Cisco IP phones by leveraging installed ringtones as well as audio multi-cast streaming. If an alert containing a visual component is sent, the visual component appears first when the alert is received, as shown in the example on the right.
After the recipient presses the Next option or if no visual com-ponent is included in the alert, the alert title and alert body text appear on the phone.
IP Phone Blast Integration Guide
7

If the alert requires a response, the recipient can press the Response option on the screen to view a list of response options.
After selecting a response option from the list, the screen displays a "Response sent" confirmation message.
How It Works
On idle when there is no alertWhen there is no active alert, the NDS regularly requests from the CUCM the list of all active phones in the enterprise and their IPs. The NDS will then cache this information so that it can be used in real time when an alert becomes active, without having to rely on the CUCM at that point.
During an alertThe following process is carried out when an alert is generated:
1. IWS pushes to the NDS the list of end users to activate along with their DNs.
2. The NDS finds the IP of the phone for every DN and sends the IP phones a command to activ-ate.
3. The IP phone uses the authentication enterprise parameter of the CUCM to authenticate the request.
4. Seeing that the Authenticator is the NDS, the IP phone requests (unless it already has it) the SSL certificate of the NDS from the CUCM server to ensure that it is calling the correct server.
5. After the IP phone gets the SSL Cert of the NDS, it invokes the authentication function on the NDS.
6. After authentication is complete, the command is executed by the phone. If the command requires the display of text on the screen, the IP phone will go back to NDS to retrieve that text.
7. If audio is requested to be sent, the NDS also immediately starts streaming the audio on multi-
Appendix A: Cisco UCM IP Phone Specifics
8

cast for the IP phones to play.
Performance ConsiderationsThe solution was tested under ideal conditions: in a clean lab environment where NDS was used only to serve Blast and the network topology was simple. The following performance statistics were recorded:
Number of phones Time until 75% of the phones start playing the message
1000 6 seconds
5000 10 seconds
10000 15 seconds
Based on this data, then, in an environment with 1000 phones, at least 750 phones (75%) will start playing the audio alert and displaying the alert text on screen within at most 6 seconds. In an envir-onment with 5000 phones, at least 3750 (75%) will start playing the audio alert and displaying the alert text within at most 10 seconds. And in an environment with 10,000 phones, 7500 of them will start playing the audio and displaying the text within at most 15 seconds.
Note that results might vary due to factors such as network usage and CPU usage of NDS for other tasks or plugins, so the performance statistics listed above should be viewed as guidelines, not as guarantees.
IP Phone Blast Integration Guide
9

Cisco Supported IP PhonesThe following phones were tested with the solution. Other phones that are API Compliant will work as well.
Phone Model Phone Model
Cisco 7902 Cisco 7961
Cisco 7905 Cisco 7961G-GE
Cisco 7906 Cisco 7962
Cisco 7910 Cisco 7965
Cisco 7911 Cisco 7970
Cisco 7912 Cisco 7971
Cisco 7920 Cisco 7975
Cisco 7921 Cisco 8811
Cisco 7925 Cisco 8831
Cisco 7926 Cisco 8841
Cisco 7931 Cisco 8851
Cisco 7937 Conference Station Cisco 8861
Cisco 7940 Cisco 8941
Cisco 7941 Cisco 8945
Cisco 7941G-GE Cisco 8961
Cisco 7942 Cisco 9951
Cisco 7945 Cisco 9971
Cisco 7960
Appendix A: Cisco UCM IP Phone Specifics
10
Appendix B: Avaya IP Phone Specifics
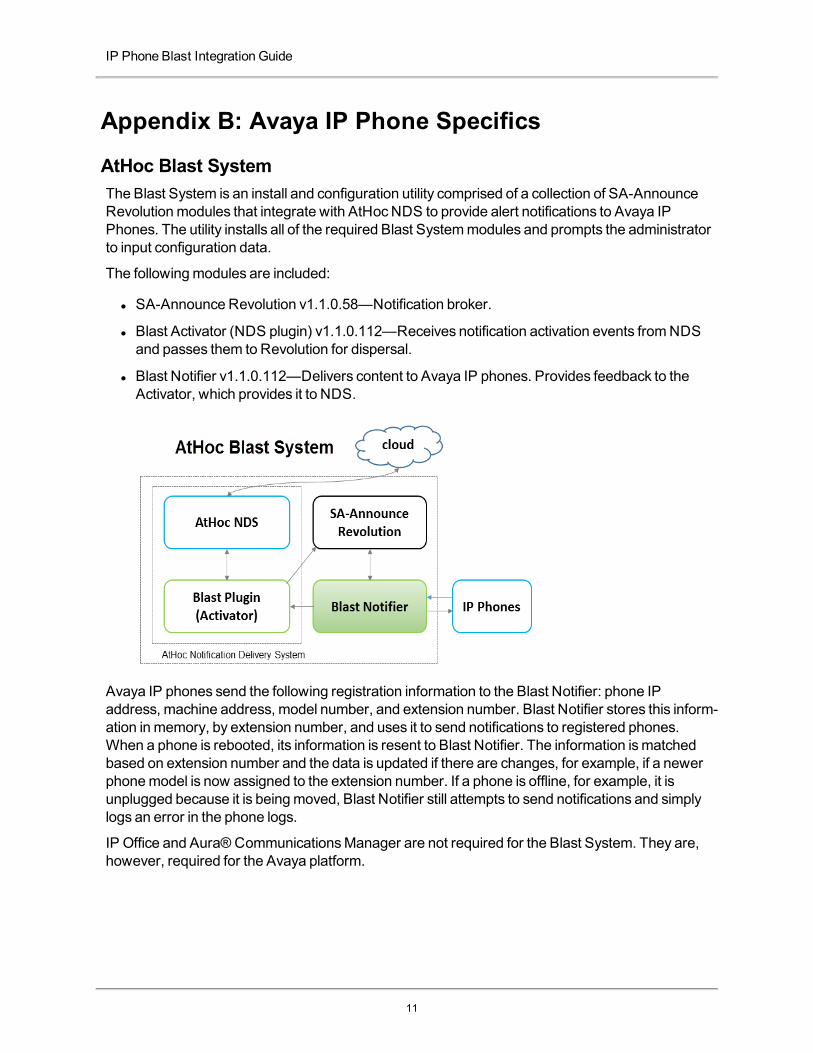
AtHoc Blast SystemThe Blast System is an install and configuration utility comprised of a collection of SA-Announce Revolution modules that integrate with AtHoc NDS to provide alert notifications to Avaya IP Phones. The utility installs all of the required Blast System modules and prompts the administrator to input configuration data.
The following modules are included:
l SA-Announce Revolution v1.1.0.58—Notification broker.
l Blast Activator (NDS plugin) v1.1.0.112—Receives notification activation events from NDS and passes them to Revolution for dispersal.
l Blast Notifier v1.1.0.112—Delivers content to Avaya IP phones. Provides feedback to the Activator, which provides it to NDS.
Avaya IP phones send the following registration information to the Blast Notifier: phone IP address, machine address, model number, and extension number. Blast Notifier stores this inform-ation in memory, by extension number, and uses it to send notifications to registered phones. When a phone is rebooted, its information is resent to Blast Notifier. The information is matched based on extension number and the data is updated if there are changes, for example, if a newer phone model is now assigned to the extension number. If a phone is offline, for example, it is unplugged because it is being moved, Blast Notifier still attempts to send notifications and simply logs an error in the phone logs.
IP Office and Aura® Communications Manager are not required for the Blast System. They are, however, required for the Avaya platform.
IP Phone Blast Integration Guide
11

System RequirementsSystem
Requirement Description
AtHoc NDS v2.8.5 or greater
If necessary, upgrade your NDS before proceeding.
Windows 2008 R2, 2012, and 2012 R2
Supported Windows servers.
Note: A number of Windows roles and features are required. These are automatically configured by the Blast System utility.
.NET Frame-work 4.5.1
Windows 2008 R2: If .NET 4.5.1 is not already installed, the Blast System utility attempts to install it.
Windows 2012: This server comes with .NET 4.5 installed. If you have not upgraded to .NET 4.5.1, the Blast System attempts to install it.
Note: If an Internet connection is not available, the utility aborts the Blast System installation. You must then manually install .NET 4.5.1. Download URL: <Microsoft .NET 4.5.1 full installer>.
Windows 2012 R2: This server comes with .NET 4.5.1 already installed.
Server 106.6MB free space for installation
8 GB memory
2 CPU cores
Single multicast IP address to endpoints for the text-to-speech functionality. This IP address is provided by your IT department.
Default Ports Avaya phone registration and communication with SA Revolution occurs on = port 8008.
Avaya phone communication = port 80.
Ports are configurable.
Default Pro-tocols
RTP and HTTP
Voice Stream-ing
RTP via multicast over UDP
PerformanceLoad / per sync of registered IP phones.
Registrations Seconds
1000 2
2000 4
4000 7.7
8000 16.3
50,000 102
Appendix B: Avaya IP Phone Specifics
12

IP phones begin displaying text and playing notification audio after 75% of phones have responded to the activation command. The following table outlines some possible scenarios.
Number of Phones to Register 75% Registered Seconds Until Notification
Begins
1000 750 6
5000 3750 10
10,000 7500 15
So, for an environment with 1000 phones, after 750 (75%) have responded to the activation com-mand, text begins displaying and notification audio begins playing on all phones.
CaveatsResults may vary depending on network usage and CPU usage of NDS other tasks and plugins. Therefore, the above performance statistics should be viewed as guidelines.
Avaya Supported IP PhonesAvaya IP Phone Model
9670G Blast supports the following notification functionality: l Send text notifications and response options
l Send audio beep
l Send image in JPG format to models that support images
l Convert text-to-speech, which uses multicast audio streaming
9650C
9641G
9640G
9630G
9621G
9620L/C
9611G
9610
9608
Caveats
l Per the Avaya Developer documents, supported phones must be running H.323 Software Release 3.0 or later in order to support multicast audio streaming. 9601 SIP only does not sup-port H.323 v 3.0, and therefore does not support text-to-speech.
l Avaya IP phones do not support multiple DNs.
l Avaya IP phones only support JPG image files.
l The AtHoc Blast Activator sends a stop command to IP phones in accordance with the defined alert duration. However, this command is only capable of stopping an audio stream, which is only used with text-to-speech functionality. The Avaya API does not have a command to tell the phones to exit the browser or set the screen to a different mode. The end user must manually clear the screen.
IP Phone Blast Integration Guide
13

l IP phones register to the System when they boot up; registration does not go through Avaya’s Call Manager.
Appendix B: Avaya IP Phone Specifics
14