Are You suprised - Berklee College of...
45
MP212 Principles of Audio Technology II Lab #4 – Synchronization Version 3.1, 11/28/13 – revised by AR http://classes.berklee.edu/mpe
Transcript of Are You suprised - Berklee College of...
MP212Principles of Audio Technology II
Lab #4 – Synchronization
Version 3.1, 11/28/13 – revised by AR
Copyright © 2008 – Berklee College of Music. All rights reserved.
Acrobat Reader 6.0 or higher required
http://classes.berklee.edu/mpe

MP212 Lab #4 – SynchronizationTeam: #1 #2 #3
In this Lab, you will mix a multimedia project with audio coming from many different sources. You will receive audio files from recordings from multiple studios, plus a Quicktime movie copy of an animated short film. Your job as a team is to bring all these assets to your Pro Tools session, align them to video and mix the multiple audio tracks with video. Then, bounce to a QuickTime movie your mix and the original video. You will accomplish all of this, following step-by-step instructions here.Please, keep at hand the M27 Studio Digital Connections chart. It will help you find sends and returns needed to perform the in-structions of this lab.The assets will be found on the Resource Library, hard drive on the Mac computer at M27, as well as on a couple of X48 sessions (projects). This semester, the Resource Library drive is not ready yet for this lab, so you will receive the assets on a DVD-R.AssetsIn this Lab, you will load music and sound effects from two X48 projects and data files from the Resource Library drive (or a DVD-R from Studio office) into ProTools, and align them to picture us-ing video from a Quicktime movie you will also import into your session.
The materials for this Lab consist of a Data DVD-R, and two X48 projects, named “MP212 Lab #4 sound fx” and “MP212 Lab #4 ambient”. The DVD-r copies are kept in the Studio Office. The X48 projects (sessions) are saved on the internal hard drive of the X48 machine in M27 studio.
Berklee College of Music MP212 Lab # 4 SynchronizationPage 2 of 35

The sound effects are laid out on tracks 1-8 of the first X48 ses-sion, named MP212 Lab4- sound fx” (4 stereo tracks). There are four separate audio tracks - sound effects (SFX). Your job is to load them all into ProTools. The beginning of each stem has a “2-pop” (tone) to help you with future steps. The length of the whole video is around 2:30. Keep that in mind when transferring audio from this or the next X48 project to Pro Tools.
DM2000 Setup1. Begin by setting the DM2000 to a “default” state. First, hit the
Input Patch button in the display access area, and find the Li-brary page. From there, recall Library setting #0. This will reset the input patching in the DM2000.
2. Do the same thing for the Output Patch settings. Find the Li-brary page, and recall Library setting #0.
3. Next, recall mix Scene Library #0, which will reset all of the DM2000 faders, EQ’s, etc.
4. Check that Fader Mode is set to fader, NOT Aux.
Master Word ClockWe will set the Word Clock different on different stages of the lab. We will use the X48 as the master when we start transferring au-dio from it. We will switch to the Big Ben as the master when we end working with video, since we want to relate the Word Clock to video and set the Big Ben and PT clock sources to video.We’ll set the Pro Tools system clocking once we open the applica-tion. X48 as Word Clock Master:
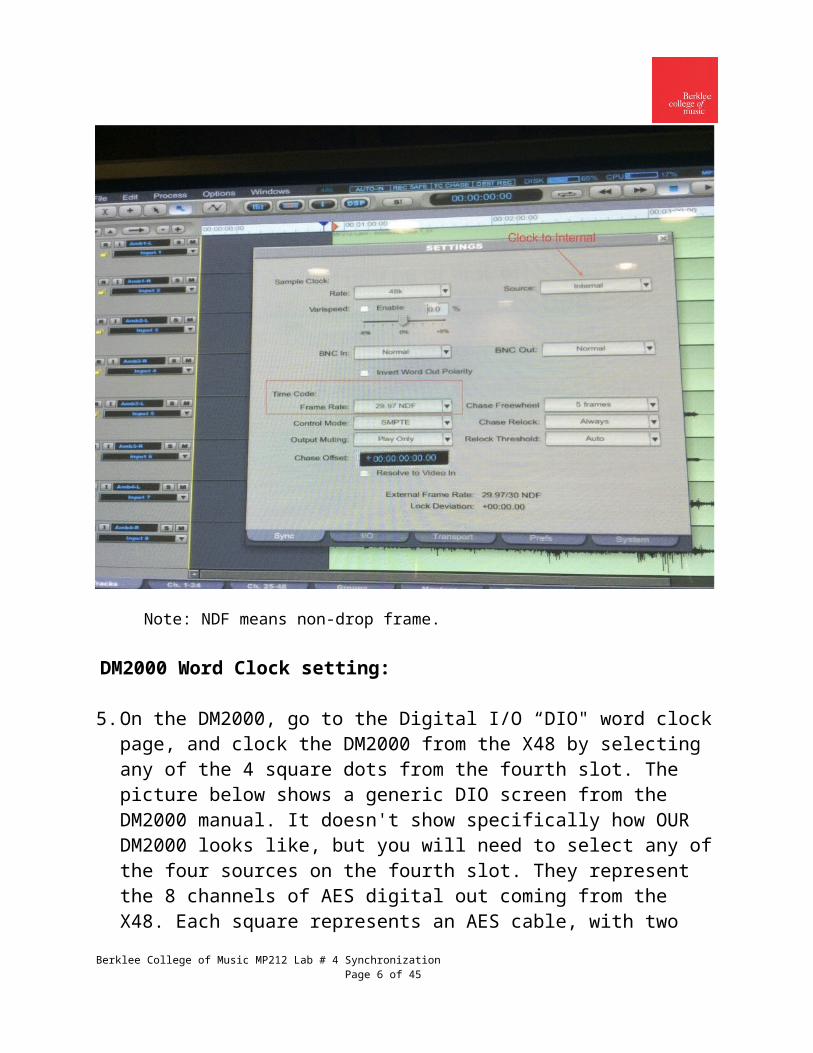
We will need to set the X48 to Internal WC on the Settings window when we are transferring audio from it to Pro Tools, and we will also need to set the SMPTE time code framerate to 29.97 non-drop, as shown in the following picture:
Berklee College of Music MP212 Lab # 4 SynchronizationPage 3 of 35

Note: NDF means non-drop frame.
DM2000 Word Clock setting:
5. On the DM2000, go to the Digital I/O “DIO" word clock page, and clock the DM2000 from the X48 by selecting any of the 4 square dots from the fourth slot. The picture below shows a generic DIO screen from the DM2000 manual. It doesn't show specifically how OUR DM2000 looks like, but you will need to select any of the four sources on the fourth slot. They represent the 8 channels of AES digital out coming from the X48. Each square represents an AES cable, with two channels of digital audio. AES signals carry word clock embedded. We are taking the clock from any of the AES digital outs from the X48 to the DM2000. The picture below shows a selection on the second slot (highlighted in black. You will select any source on the fourth slot.
Berklee College of Music MP212 Lab # 4 SynchronizationPage 4 of 35

Any of the fourth slot can be selected.
Setting Up Pro Tools6. Make a new session, setting the sample rate to 48k and bit
depth to 24 bits.
Set Pro Tools to external clock from any of the AES inputs it receives from the DM2000 (you did all of this in Lab #2). This is a reminder:7. Set Pro Tools to External WC from the first HD I/O. There is a
BNC WC connection from the DM2000 WC out to the first HD I/O WC-in in this studio. In order to do this: Open Session Setup, under Setup windows Select the first HD I/O from a list of three options (Sync HD, HD I/O 1 and HD I/O2) on
Clock Source (see picture below) Select Word Clock (External) under Clock Reference Be sure that the Timecode Rate is set to 29.97 non-drop (it will show only as 29.97, as
shown on the picture below)
Berklee College of Music MP212 Lab # 4 SynchronizationPage 5 of 35
8. Set the session start time to 00:59:30:00, since the video pro-gram starts at 01:00:00:00. This is NOT showing yet on the pic-ture above.
9. Go to Setups/Hardware or Setups/ IO, and note which HD I/O in-puts are set to all digital. We usually use inputs 9 and above for digital (AES) inputs and outputs in this studio, but don’t take it for granted. You need to check and reset if needed the I/O setup to the studio you are working before you move on.
Berklee College of Music MP212 Lab # 4 SynchronizationPage 6 of 35

SOUND FX AUDIO FILES TRANSFER
First, some preparation
On the X48:
10.Open the project named “MP212 Lab #4 sound fx” in the X48 internal hard drive. In order to do that, you will need to go to File, then Open then select the folder named “MP212 Lab #4 sound fx” on the internal drive of the X48.
Once opened you will see the 8 tracks of sound fx, as shown on the next picture. If the X48 window doesn’t show the audio files yet, it may be because you are seeing a time code position of 00:00:00:00 and the session starts around 01:00:00:00. If that’s the case write a time closer to 01:00:00:00 on the time scale in the upper side Berklee College of Music MP212 Lab # 4 Synchronization
Page 7 of 35

of the screen
The program starts at tc=01:00:00:00. This matches the timecode on the Quicktime movie.
On the DM2000:
11. Bring up the faders on the DM2000 that correspond to the X48 tracks 1-8 digital returns to 0dB. This en-sures the console will not adjust the digital data but merely serve as a pass-thru to PT. Take the X48 tracks out of the DM2000’s Stereo Mix buss, and route them into ProTools via the DM2000’s Busses 1-8. This is a good moment to experi-ment with the use of Fader Groups from the DM2000.
Note: You already did this in Lab#1, removing ST and routing one by one each of the DM2000 channels to bus 1, the next to bus 2, etc., up to bus 8. You are doing this on the third layer of the DM2000, first 8 channels (49 to 57)
Berklee College of Music MP212 Lab # 4 SynchronizationPage 8 of 35

12. The DM2000 busses will feed PT digitally on inputs 9 through16. You can confirm this path in the “I/O…” settings under the Setup menu. (The busses were normalled to these digital inputs when you recalled the DM2000 output patch library).
13. In the Control Room section of the DM2000, choose ST to listen to the 2-mix.
In Pro Tool:
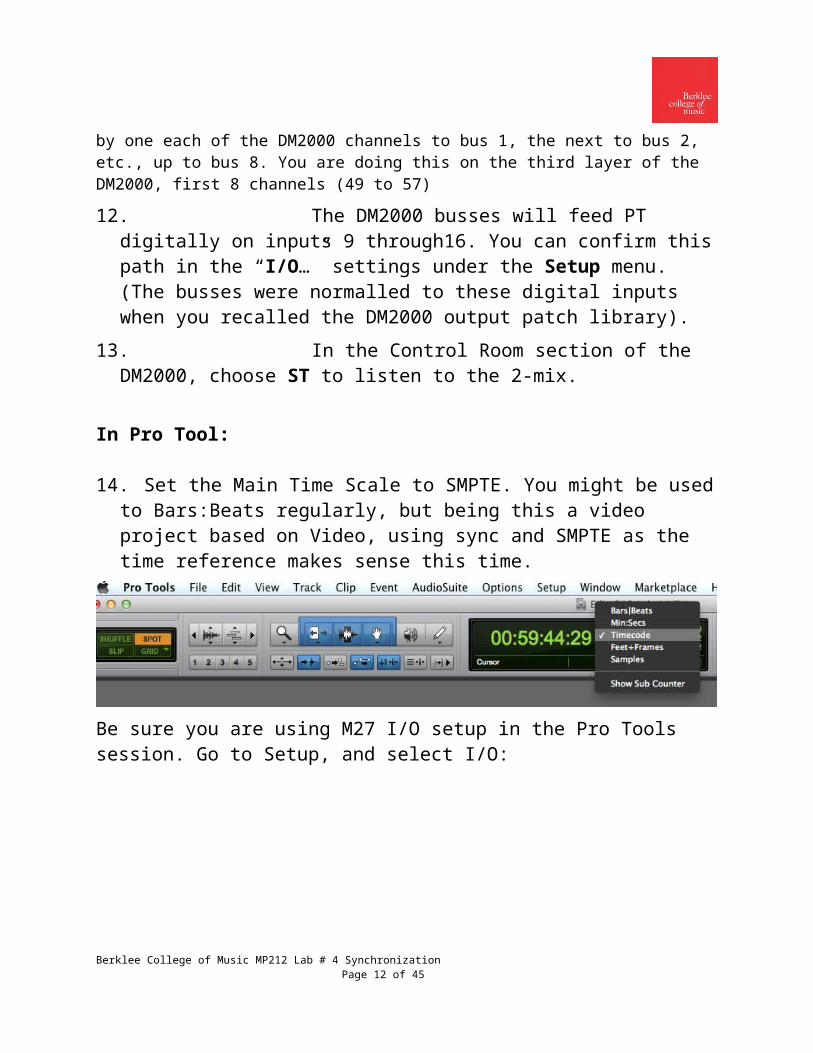
14.Set the Main Time Scale to SMPTE. You might be used to Bars:Beats regularly, but being this a video project based on Video, using sync and SMPTE as the time reference makes sense this time.
Be sure you are using M27 I/O setup in the Pro Tools session. Go to Setup, and select I/O:
Then Import the corresponding Studio Setup for your room:
Berklee College of Music MP212 Lab # 4 SynchronizationPage 9 of 35

15.Label each track according to the names from the X48 track names. Also set the output of the tracks to the first set of digital outputs that start at 9 (9 to 16 as well).
Note: It may feel strange to start routing tracks from 9 and above, but this is because the first 8 ins and outs in Pro Tools are analog, and we are using digital inputs and outputs, which start from 9.
Berklee College of Music MP212 Lab # 4 SynchronizationPage 10 of 35

Don’t forget to rename the tracks before you record!
Loading the first stem (SFX) – X48 chasing Pro Tools16. SMPTE LTC patching: Patch on the ana-
log patchbay, from the Pro Tools SMPTE (or TC) OUT to X48 SMPTE (or TC) IN. You are going to slave the X48 to Pro Tools in this pass. Remember we are now talking about slaving time po-sition, not the same as speed (word clock).
Berklee College of Music MP212 Lab # 4 SynchronizationPage 11 of 35
17. Set the X48 session to TC Chase. It is on the center top screen of the X48 main window. Once you click on the TC Chase box, it will be highlighted, showing it is waiting for incoming SMPTE TC to chase.
18.Set Pro Tools to GenLTC (Time code Generation). It means that everytime you press play in Pro Tools, it will send SPMTE TC (in LTC format) through the time code audio output of the Sync HD interface. (You already patched from this output to the X48 TC input)
19. Put the ProTools tracks in record ready and input monitoring, and play the X48 session. If everything is fine, you should see audio running from the X48 through the DM2000 into ProTools, and out of ProTools back into the DM2000 for monitoring. Remember, you should rename the tracks from “Audio 1, Audio 2, etc. to something that make sense to you. It could be SFX1-L, SFX1-R, SFX2-L, and so on.
20.Set your monitoring from the new Pro Tools tracks in the DM2000. Remember you muted stereo out from the X48 tracks by taking them out of the Stereo Mix buss and assigning them to the corresponding busses 1 through 8 (this was done in step 13). Now you need to locate the returns of the new Pro Tools tracks and monitor from them. These tracks will be feeding the Stereo Mix bus and not any of the 8 busses. Remember the concept of “confidence monitoring”?
Berklee College of Music MP212 Lab # 4 SynchronizationPage 12 of 35

21. Set the starting of playback on the Pro Tools session to 15 seconds or more before the program starts. You will need some time for the time code synchronization to be established.
22. Hit record on the ProTools transport and then play. ProTools should start recording, and the X48 should start chasing PT in a few seconds after you pressed play in PT. You should be recording the X48 tracks into ProTools (if the cor-responding tracks are record enabled).
23. At the end of the spot let the both PT and the X48 run for another 5 seconds or so, and then hit STOP.
24. Unselect TC Chase in the X48; set off from record enable your audio tracks in Pro Tools. Then playback the audio in Pro Tools to make sure it’s ok.
Berklee College of Music MP212 Lab # 4 SynchronizationPage 13 of 35

SOUND FX STEM 2 TRANSFER (Ambient Fx) – TC Offset is neededThis time you will use the X48 as the TC master and Pro Tools as the slave, but there was an error on the studio where the second set of audio files (Ambient tracks) was recorded. They thought the program started at 1 minute, instead of 1 hour.Since the video program starts at a timecode address of 01:00:00:00, yet the audio on the 2nd X48 session starts at a time-code address of 00:01:00:00, you’ll have to set an offset. The off-set is calculated as the difference in TC between the slave and the master. In this case, since Pro Tools is the timecode master and the X48 is the timecode slave, the offset is calculated as 01:00:00:00 (the video program start time), minus 00:01:00:00 (the X48 start time) or +00:59:00:00.25.Close the previous X48 session (“MP212 Lab4 sound fx”) if you didn’t do it
before
26.Open the project named “MP212 Lab #4 ambient” in the X48 internal hard drive. In order to do that, you will need to go to File, then Open then select the folder named “MP212 Lab #4 ambient” on the internal drive of the X48.
27. SMPTE LTC patching: Patch on the ana-log patchbay, from the X48 SMPTE (or TC) OUT to Pro Tools SMPTE (or TC) IN. You are going to slave the Pro Tools to the X48 in this pass.
28. SMPTE offset: Generally, you set the off-set on the slave machine, which is Pro Tools in this second pass.
29. We are setting an OFFSET for ProTools, so it can record the incoming audio from X48, which is linked to a wrong TC. 1 minute, instead of 1 hour.
30.Set TC offset to 00:59:00:00 in the Session Setup window in Pro Tools, as shown in the picture after the next step.
Berklee College of Music MP212 Lab # 4 SynchronizationPage 14 of 35

31. In the Pro Tools Session Setup window we also need to change from generating sync (Gen LTC) to receiv-ing it. We need to go to ONLINE mode (CMD-J, or Operations/Online). It should now be ready to chase the timecode coming from the X48.
32.In order to protect this setting from SMPTE failures, like SMPTE dropouts on tape, failing connections etc., you can set freewheel in Pro Tools according to what do you want it to do in case SMPTE is interrupted. In our case we want Pro Tools to continue play back (or recording) after syncing to SMPTE if the time code stops being received. Go to Setup > Session > Time Code settings and under Freewheel, select Jam Sync. This is set on the Session Setup window:
Berklee College of Music MP212 Lab # 4 SynchronizationPage 15 of 35

Note: SYNC HD can either generate or read time code. It can’t do both simul-taneously. That’s why you should check the box GenLTC when you are gen-erating time code, and un-check it, so you can select Online Mode when you want to read or receive time code. Having “Gen LTC” enabled will produce SMPTE output through the Sync HD card every time you press Play, based on the SMPTE ruler of your session. Being on Online Mode will make Pro Tools to chase the incoming time code, connected to the TC LTC input on the back of the Sync HD interface. (You connected to it through the analog patch bay in step # 28)
33. Create 8 new tracks and route them as in-puts 17-24 and output 17-24. This is similar to what you did with the first sound fx tracks, but this time you are adding the second stem (ambient tracks) from the second X48 session. The last PT session screenshot shown two steps above also shows these new tracks, with proper naming like Amb1, Amb2, etc. Feel free to use other names that make sense for your team.
34.Set the new 8 tracks in record enable mode. Press the REC switch, BUT NOT PLAY in Pro Tools. Pro Tools is waiting for incoming time code to chase it.
35. Hit play on the X48 transport. Be sure to set the starting spot at least 15 seconds before the beginning of the audio files content on the X48 session.
36. PT was already in Online Mode, as de-scribed in step 33. And, since you had set the offset to 00:59:00:00, the X48 and Pro Tools will play (and record on the new tracks) in sync with the previous stem and eventually with the picture.
37.As we did before, stop the recording process a few seconds after the last audio was played back from the X48. Remember, the video program you are working with has a length of approximately two and a half minutes.
38. On playback, the two-pops should sync perfectly between all the 16 audio tracks.
Berklee College of Music MP212 Lab # 4 SynchronizationPage 16 of 35

Loading the other two groups of audio files, plus the videoThere are two other sets of stems to load from the DATA DVD-R, (in the future from the Resource Library drive), as well as the Quicktime movie.
39.First, transfer all these assets from the DVD-R to the Media drive, to the folder where you created your PT session. You better create a new folder inside your team’s folder and name it “DVD assets”, or something similar, that make sense to your team.
40. The dialogue tracks are stored as BWF (Broadcast Wave File) files and should be imported to new tracks by dragging and dropping from the finder or using the import audio to track command. They are inside the folder named “Dialog Files”
Berklee College of Music MP212 Lab # 4 SynchronizationPage 17 of 35
41. The two dialogue tracks will need to be synced manually. Find the sync 2-pop in each stem and line them up with the first two stems you recorded, since they are already at the correct location. Then use SPOT mode to type in the correct timecode address for the sync point (2 seconds be-fore 01:00:00:00). Note: If you group both audio tracks, you can apply all the following setps at
once to both tracks. In order to set a sync point in a region you need to work in SLIP mode first,
until you place your locator exactly where you want the Sync Point be for the region (the beginning of the 2-pop in this case) and hit Command Key
Berklee College of Music MP212 Lab # 4 SynchronizationPage 18 of 35

(Apple) + comma (or choose Region > Identify Sync Point). Once you have created a Sync Point it will show as a small green down arrow, at the bottom of your region, wherever you marked the SYNC point. They are useful for SPOT locations for audio clips.
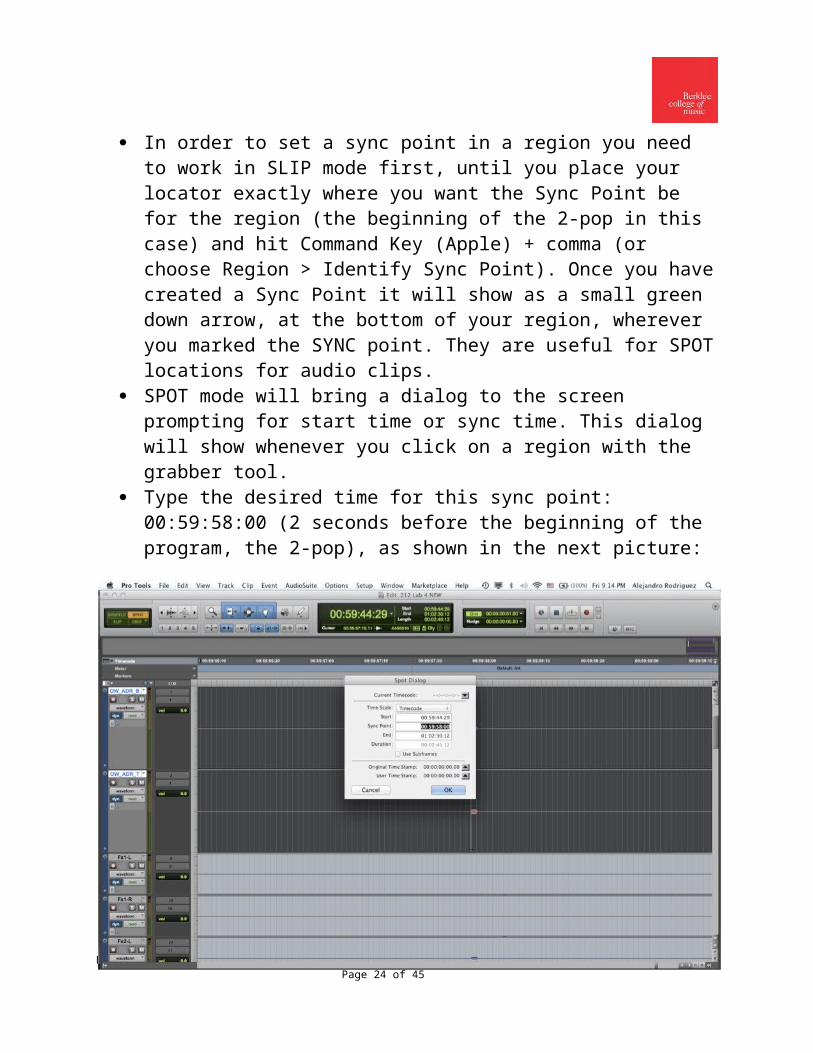
SPOT mode will bring a dialog to the screen prompting for start time or sync time. This dialog will show whenever you click on a region with the grabber tool.
Type the desired time for this sync point: 00:59:58:00 (2 seconds before the beginning of the program, the 2-pop), as shown in the next picture:
Importing from a Metadata File
42. The music tracks are available as an AAF file. You can import this by using the Import Session DATA com-mand from the File menu. Similar to the OMF import in Lab #3.
Berklee College of Music MP212 Lab # 4 SynchronizationPage 19 of 35

43.Then look for the AAF file inside the AAF Files folder:
44.Select Import on the Main Playlist option, in order to have the audio files in the corresponding PT Audio Files folder, instead of the embedded audio files inside the AAF file; and select "Maintain absolute time code values" under Time code mapping options in order to keep the 01:00:00:00 starting time. All the necessary settings from the Import session data dialog are shown in the next
Berklee College of Music MP212 Lab # 4 SynchronizationPage 20 of 35

picture:
Once the music tracks are imported, your PT session will have 23 new audio tracks, named A1 to A23. Since we only have 24 digital outs from Pro Tools to the DM2000, we will need to distribute the outputs of these music tracks on the remaining 8 digital outs available (we used 16 already with the initial 16 tracks we Berklee College of Music MP212 Lab # 4 Synchronization
Page 21 of 35

recorded before). You can start by routing all of them to a new stereo output, that you will need to create in the I/O setup, since you only had mono ins and outs available until now.
45. Open the I/O setup dialog in Pro Tools, go to Outputs, and create a new Stereo output, then set its outputs to 25-26 on the second HD I/O. These two outputs correspond with faders 17 and 18 on the second layer of the DM2000 (channels 43 and 44 on the DM2000).
46.Hard pan those channels on the console, set the faders at unity gain, and then set some mixing levels inside Pro Tools for those music tracks, most of them are stereo stems of different music sound sources (strings, horns, percussion, etc.). You will go back to proper mixing them, with the rest of the audio tracks later on, once you have also imported the video file.
Working with video. Importing the Quicktime MovieFirst, resetting WC. This time we want to use Video Sync (house sync, or blackburst) as the speed reference for out clock settings.You should clock the DM2000 to the Apogee Big-Ben. Since this is a Video-based project the Big Ben sample rate should be set to 48kHz. Although no video machine will be used in this Lab, this word clock setting will help you recreate a session when video machines are part of the system.The Big Ben should also be following Video Reference. Note: it indicates NTSC video sync once locked. M27 has a Horita BlackBurst generator constantly sending house sync (blackburst) signal, which is permanently connected to the video input of the Pro Tools Sync HD interface, as well as the video input of the Apogee Big Ben.
47.Set the Big Ben to Video: Go to the Big Ben screen and select 48 kHz as its sample rate, and Video as the source. Remember you change parameters on the Big Ben finding the parameter to change first, with the left-right arrow switches, once the parameter is blinking; then you change it using the Up-Down arrow switches. One more time you are setting the Bog Ben to 48 kHz and Video source. No external connections or patching are needed, since this house sync connection is permanently wired in the studio.
Berklee College of Music MP212 Lab # 4 SynchronizationPage 22 of 35

48. On the DM2000, go to the Digital I/O “DIO" word clock page, and clock the DM2000 from the Big Ben via the DM2000’s word clock input (WC IN). The DM2000 does not have a Video Clock input, so we are using the Big Ben to create a WC reference based on our House Sync.
49.Set the DM2000 to external clock coming from the Big Ben by selecting WC IN. You can do that on the DIO page, as you learned in previous labs:
WC IN
You will find a Quicktime movie named “OddWorld TC-2pop only.mov” as part of the data DVD-R that you previously transferred to the Media drive. You need to import it and spot it in your session.
50.Import the Quicktime movie by choosing File > Import > Movie and selecting the corresponding asset. Remember, you already transferred this video file to your own folder in the Media drive. When prompted select the location point (starting of the session, song start, spot or selection).
51.The Quicktime movie will be imported with audio. Two new tracks will be created as a result of this import: one video track and two mono audio tracks or a stereo audio track. You can group them (the video and the accompanying audio tracks) and either use the video screen or the audio tracks to find the 2-
Berklee College of Music MP212 Lab # 4 SynchronizationPage 23 of 35
pop and then set a Sync Point at it, as explained above.
52.Once the Sync Point is created you can spot your video/audio grouped tracks by working in Spot Mode, then clicking with the Grab tool on the region (audio or video, since they are grouped) and then selecting the corresponding SMPTE time code: 00:59:58:00 (2 seconds before the starting of the program).
53.This is how the video screen should look like when you find the 2-pop screen:
54.This is how the audio tracks should look like when you find the 2-pop sound and you set the sync point:
Berklee College of Music MP212 Lab # 4 SynchronizationPage 24 of 35

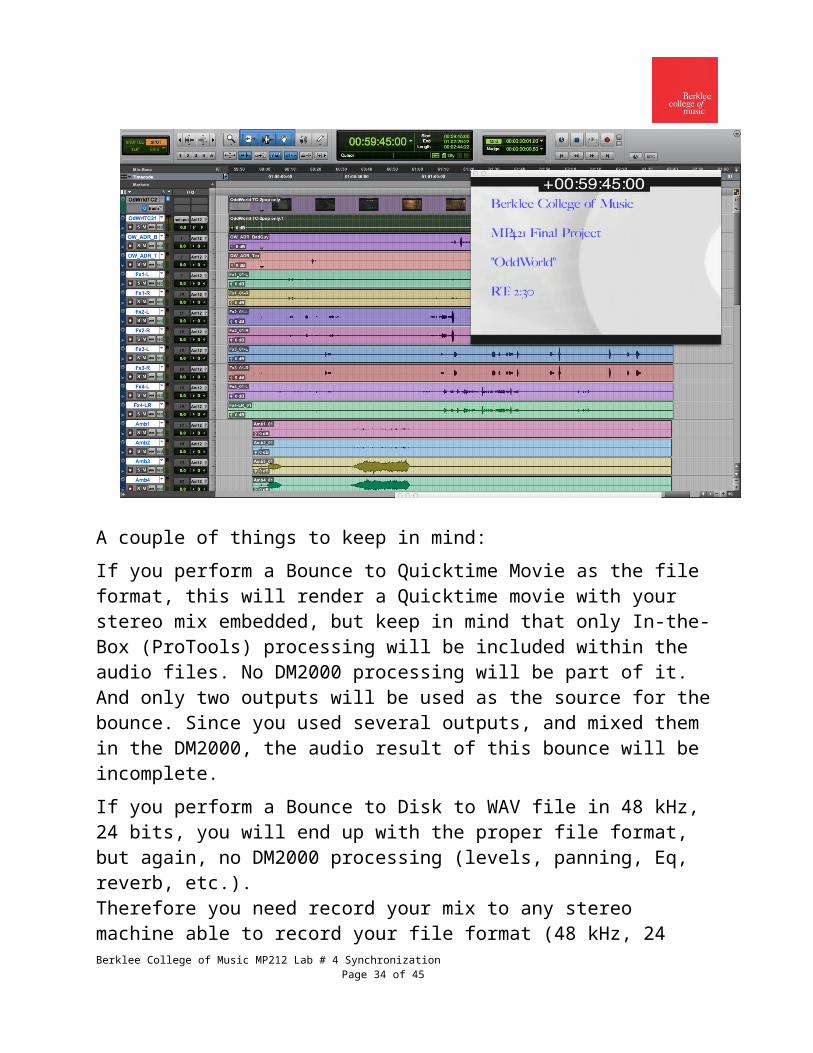
Another way of importing the video and spotting it correctly is if you know the starting timecode of the Quicktime movie. The starting time in this case is 00:59:45:00.
55.You should check all you audio files and the video are aligned and the 2-pop is at the same SMPTE timecode: 00:59:58:00 and the program start is at 01:00:00:00
Mixing the Spot
The DM2000 is already set up to monitor the output of Pro-Tools. You might need to readjust the outputs of the new audio tracks in order to have all of them going through digital outputs from Pro Tools to the DM2000. Some premixing inside Pro Tools will be needed. Mix the spot combining processing power be-tween your ProTools session, adding whatever plug-ins and au-tomation you like, and being able to work with video all the time (from the Quicktime Movie imported to your session), and using also level, panning, EQ, dynamic processing and/or addi-tional Fx (reverb, delay, chorus, etc.) from the DM2000, as well as from Pro Tools.
Berklee College of Music MP212 Lab # 4 SynchronizationPage 25 of 35

This will be a different type of mixing than what you’ve been used to do before, since video is commanding you to make decisions in terms of levels, panning, use of Fx., etc. Have fun and be creative!In order to watch the movie while mixing, you will need to bring the Video Window to your screen. Since you are not using the X48 any more, you may want to switch the second monitor screen in the room, which is usually set for the X48 as the secondary screen monitor for Pro Tools. Otherwise bring the Video window to the main Pro Tools screen and set it at a side that lets you work with the rest of the Pro Tools environment. In order to bring the video window to your screen, you can go to Window/Video, or simply use the shortcut “Command+9” (9 on the numeric keypad)
A couple of things to keep in mind:If you perform a Bounce to Quicktime Movie as the file format, this will render a Quicktime movie with your stereo mix embedded, but keep in mind that only In-the-Box (ProTools) processing will be included within the audio files. No DM2000 processing will be part of it. And only two outputs will be used as the source for the bounce. Since you used several outputs, and mixed them in the DM2000, the Berklee College of Music MP212 Lab # 4 Synchronization
Page 26 of 35

audio result of this bounce will be incomplete.If you perform a Bounce to Disk to WAV file in 48 kHz, 24 bits, you will end up with the proper file format, but again, no DM2000 processing (levels, panning, Eq, reverb, etc.).Therefore you need record your mix to any stereo machine able to record your file format (48 kHz, 24 bits). The best solution in this case is to mix back to Pro Tools in order to have a 48 kHz, 24 bit Final Mix, including the DM2000 processing. Recorded back to Pro Tools.You will need to use the digital patch bay to connect from the AES DM2000 Stereo Bus Out to the AES Enclosed PT in. The patch points are labeled ST OUT and ProTools IN. They are XLR male and female connectors respectively. Again, they are on the Digital patch bay.56. In order to have access to the AES En-
closed inputs you need to change the default hardware setting. Go to Hardware Setup > select the HD I/O #1 as the peripheral (upper left side of the window) > select Main > under Main change the default input Analog 7-8 to AES Encl. Rename the inputs 7-8 as AES-Encl. L and R or 1 and 2 in the I/O setup.
Note: We can use any pair of inputs not being used yet. We selected 7-8, because we knew it was not being used.If the I/O setup you are using is already using AES Enclosed simultaneously with Analog 1-2 and AES (Encl), a “plus” symbol (+) will show next to “Analog 1-2” on the top-left side of the Input window (I/O setup). You will need to free the AES (Encl) use by clicking on “Analog 1-2” and selecting “Analog 1-2” inside the pop-up dialog. The dialog will show with both “Analog 1-2” and AES/EBU (Encl). By clicking on only “Analog 1-2” you are removing AES enclosed, freeing it for using it on other inputs, like 7-8, for instance, as shown below.
Berklee College of Music MP212 Lab # 4 SynchronizationPage 27 of 35

57. Create a new stereo path and for visual easiness, place it next to the inputs 7 and 8. Rename it appro-priately “AES encl”, as shown in the next picture:
Berklee College of Music MP212 Lab # 4 SynchronizationPage 28 of 35
Berklee College of Music MP212 Lab # 4 SynchronizationPage 29 of 35

Prepare for confidence monitoring of your final mix being recorded to Pro Tools: In order to do that you will need to route the output of the track to the master section of the DM2000 in order to listen to the track that is being recorded, in confidence monitoring, and you will need to patch on the digital patch-bay accordingly, as explained and shown in the next two steps.
58. Now go to the I/O setup output, and cre-ate a new stereo output, similarly, place it close to 7 and 8 mono outs, rename the output appropriately (“AES encl”) and route it to this output, as shown in the next picture:
Berklee College of Music MP212 Lab # 4 SynchronizationPage 30 of 35

Berklee College of Music MP212 Lab # 4 SynchronizationPage 31 of 35

59. Go to the digital patch-bay and connect from DM2K D1 out to Pro Tools in (that is the AES enclosed in-put you prepared before) and from Pro Tools out (AES enclosed again) to DM2K D1 in, as shown in the next picture:
60. Create a new stereo audio track, name it properly (Final Mix), select the corresponding AES Enclosed in-puts and select two analog outputs not being used in your mix, for instance analog out 7 & 8, or any of the internal bus outputs in Pro Tools. These tracks cannot be heard while mixing, be-cause that will create a feedback.
61. Make the two new tracks in Pro Tools record enable (be sure they are routed to the outputs not being used in your mix) and start recording, starting the playback of your session before the 2-pop, and stopping a few seconds after the end of the video. Don’t forget to name the tracks.
Berklee College of Music MP212 Lab # 4 SynchronizationPage 32 of 35

62.Go to the DM2000 master section, de-select ST and select D1 as your monitoring source. This will guarantee that you will monitor what you are recording to the final mix new stereo track in Pro Tools, and NOT your mix sent to it. This is confidence monitoring. Listening to your destination, not the source.
Final Delivery63. Submit your Final Mix audio files (dual
mono, or stereo interleaved, 48 kHz, 24 bits) result of you last step in a data CD-R. This is your Final Mix, the way you are go-ing to submit it to the video editing facility. Be sure to include the 2-pop audio as part of it.
64.Perform a Bounce to Quicktime Movie, selecting your video file in the session (this in order to limit the bounce to the length of the video file), and soloing the final mix tracks (these will include the DM2000 processing, because they were recorded from the Console Stereo Output back to Pro Tools onto the new two tracks. You have to select output 7 & 8, which you had renamed “AES-encl”.
65.In order to listen in confidence monitoring your bounce process, you will continue listening through D1 input on the master section of the console.
Berklee College of Music MP212 Lab # 4 SynchronizationPage 33 of 35
66. When you are done, save your session and quit ProTools. Back up your session by burning a copy of it into an optical media (blank CD-R or DVD-R), saving to your exter-nal hard drive, or whichever option you have available.
67. If you want to create a sound reference, you can record a second CD-R (audio CD on the HHB CD recorder.
An interesting note here is that HHB BurnIt will perform a sample rate conversion. You will send 48 kHz, it will convert it to 44.1 kHz to be recorded as a Red Book Audio CD. You will need to apply dither, though, coming out of the DM2000
68. On or before the due date, submit a manila envelope with a detailed Session Report (appx 1-2 pages) from each Lab partner, and any other paperwork you generated dur-ing this Lab, properly labeled, and a CD-R (or DVD-R) with all the data produced by this lab:
Your ProTools session Final mix audio files (2 dual mono, or a stereo interleaved, 24
bits, 48 kHz) The Quicktime Movie result of your Bounce to Quicktime movie, with a stereo
audio track embedded on it, result of your final mix (step 58).
Berklee College of Music MP212 Lab # 4 SynchronizationPage 34 of 35

Each team can submit everything in a single envelope. All these above mentioned common materials, plus individual write-ups.Tip: If you are running out of time for doing a good mix during lab time (which is very likely to happen, due to the complexity of this lab), you can split the work to do parts of it at home. Jobs to be distributed could be: sound fx mix, music mix, voices’ mix, Final Mix based on these stems (sound fx, music and voices). The per-son doing the final Mix can then do the bounces, one of the Final Mix to 24 bits audio files, and the other bounce to Quicktime Movie. In order to create these partial mixes (stems), you will need to solo only the tracks you are going to mix (or mute the ones you are not working with), check the correct output when prompted in the bounce to disk dialog, and keep in mind to start the bounce before the 2-pop and finish a few seconds after the end of the program. These stems will produce either dual mono audio files or stereo interleaved audio files (both cases 48 kHz, 24 bits). You need to send those files to the final mixing engineer member of your team.
Berklee College of Music MP212 Lab # 4 SynchronizationPage 35 of 35