81526 PKN-4110 english page 3-1 - Instant Pendant Lights · This warranty does not cover products...
6
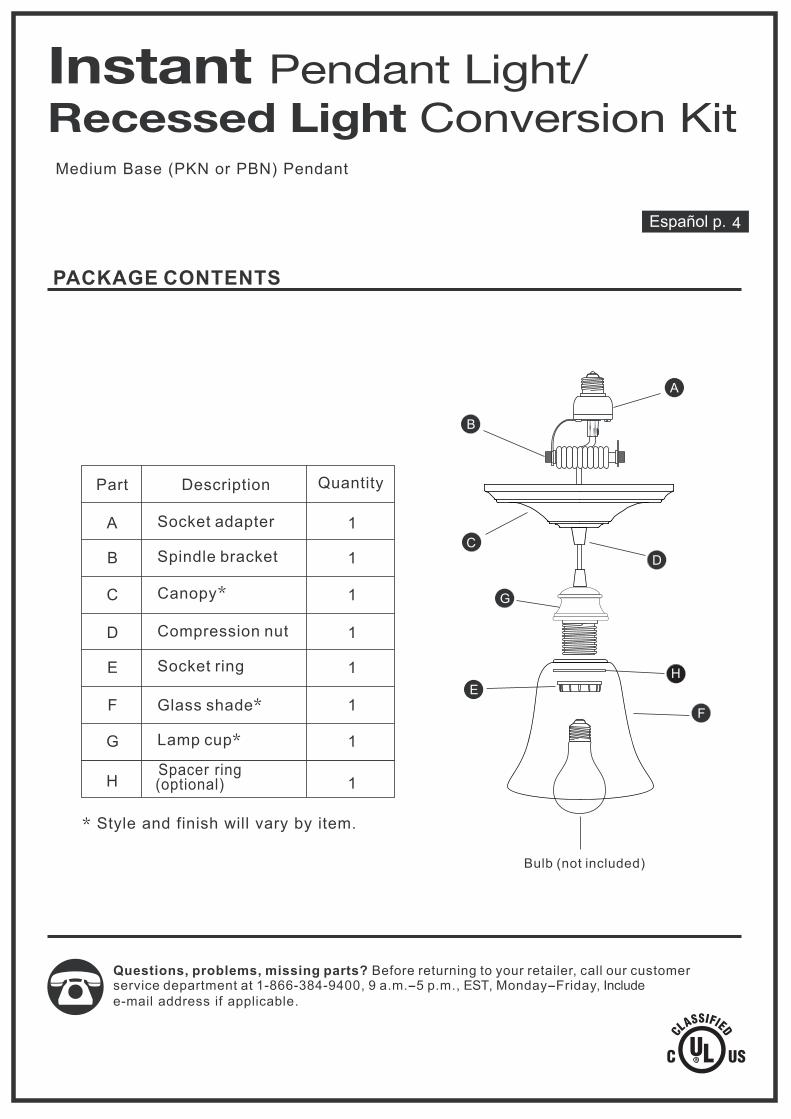
Questions, problems, missing parts? Before returning to your retailer, call our customer service department at 1-866-384-9400, 9 a.m.--5 p.m., EST, Monday--Friday, Include e-mail address if applicable. Part Description Quantity Medium Base (PKN or PBN) Pendant PACKAGE CONTENTS A 1 B C D E F G 1 1 1 1 1 1 Socket adapter Spindle bracket Canopy Compression nut Socket ring Glass shade Style and finish will vary by item. Lamp cup 4 H 1 Spacer ring (optional) C G E Bulb (not included) A B F D H Instant Pendant Light/ Recessed Light Conversion Kit
Transcript of 81526 PKN-4110 english page 3-1 - Instant Pendant Lights · This warranty does not cover products...
Questions, problems, missing parts? Before returning to your retailer, call our customerservice department at 1-866-384-9400, 9 a.m.--5 p.m., EST, Monday--Friday, Include e-mail address if applicable.
Part Description Quantity
Medium Base (PKN or PBN) Pendant
PACKAGE CONTENTS
A 1
B
C
D
E
F
G
1
1
1
1
1
1
Socket adapter
Spindle bracket
Canopy
Compression nut
Socket ring
Glass shade
Style and finish will vary by item.
Lamp cup
4
H 1Spacer ring (optional)
C
G
E
Bulb (not included)
A
B
F
D
H
Instant Pendant Light/Recessed Light Conversion Kit

Adjust excess cord by wrapping it around spindle bracket (B)just below the socket adapter (A). Position the last wrapso the cord will hang in the center of your recessed lightfixture.
1.
ASSEMBLY INSTRUCTIONS
A
B
Recessedlight socket
2.Screw the adapter (A) into the light bulb socket in yourrecessed light fixture.
3.After finger loosening the compression nut (D) by turning itcounter-clockwise, slide the canopy (C) up the cord andagainst the ceiling.
Before beginning assembly of product, make sure all parts are present. Compare parts with packagecontents list and diagram above. If any part is missing or damaged, do not attempt to assemble theproduct. Contact customer service for replacement parts.
Estimated Assembly Time: 10-15 minutesHelpful Tools:
PREPARATION
HELPFUL HINT: If the canopy does not sit tight against theceiling, loosen the compression nut (D). GENTLY pull down onthe cord to flex the spring arm (B), then slide the canopy (C),back up and re-tighten.
4.To hold the canopy in place against the ceiling, finger tightenthe compression nut (D) by turning it clockwise.
Ceiling
CAUTION: Do not over-tighten the compression nut (D).
Do not over-tighten as it may result inbreaking the glass shade.
CAUTION:
2
A
Fig.1
Fig.2
5.Attach glass shade (F) to the lamp cup (G), add spacer ring (H) if necessary, and then screw on the socket ring (E) clockwise until tight. Spacer ring (H) is only needed if glass shade (F) is loose when using just the socket ring (E).
CeilingRecessedlight fixture
C D Fig.3
Bulb (not included)
F
HG
E
Fig.5
B
C D Fig.4
Shut off light and let bulb and glass shade cool if necessary. Wipe glass shade with soft cloth or householdglass cleaner. Do not use abrasive cleaners. For replacement bulbs, use 75 watt maximum, Type A orsuitable medium base bulb (not included) including CFL bulbs.
CARE AND MAINTENANCE
3
The manufacturer warrants against defects in materials and workmanship for one (1) year from the date of purchase to the original purchaser. If within this period the product is found to be defective, take a copy of the bill of sale as a proof of purchase and the product in its original packaging to the place of purchase. This warranty does not cover products becoming damaged or defective caused by abuse, misuse, accidents, faulty installation, improper handling and/or maintenance, or repairs not carried out by the manufacturer. Items which are not covered by warranty are those considered as parts which are prone to failure due to general wear and tear (for example, lamps, fuses, glass materials). There will be no obligations or liability on the part of the manufacturer for consequential damages arising from the use of the product or any indirect damages with respect to loss of property, revenue, or costs for removal, installation or re-installation. As some states do not allow exclusions of limitations on an implied warranty, the above exclusions and limitations may not apply. This warranty gives you specific rights and you may also have other rights which may vary from state to state.
WARRANTY
Printed in China
Bulb is burned outPower is offBad switch
Replace light bulb (not included)Make sure power supply is onTest or replace switch
Bulb will not light
Loosen the compression nut (D) and GENTLYpull down on the cord to flex the spring arm (B),then slide the canopy (C) back up and re-tighten
Canopy does not fit tightagainst the ceiling Cord has stretched out
Problem Possible Cause Corrective Action
TROUBLESHOOTING
3U.S. Patent No. 7,311,425
www.WorthHP.com
WARNINGS AND CAUTIONSWARNING
CAUTION
Risk of fire or electrical shock. Do not alter, relocate, or remove wiring, lampholders, ballasts, or any otherelectrical component.Risk of fire or electrical shock. Install this kit only in the luminaries that have the construction features anddimensions shown in the photographs and/or drawings.
Do not make or alter any open holes in an enclosure of wiring or electrical components during kit installation.
A 1
B
C
D
E
F
G
1
1
1
1
1
1
H 1
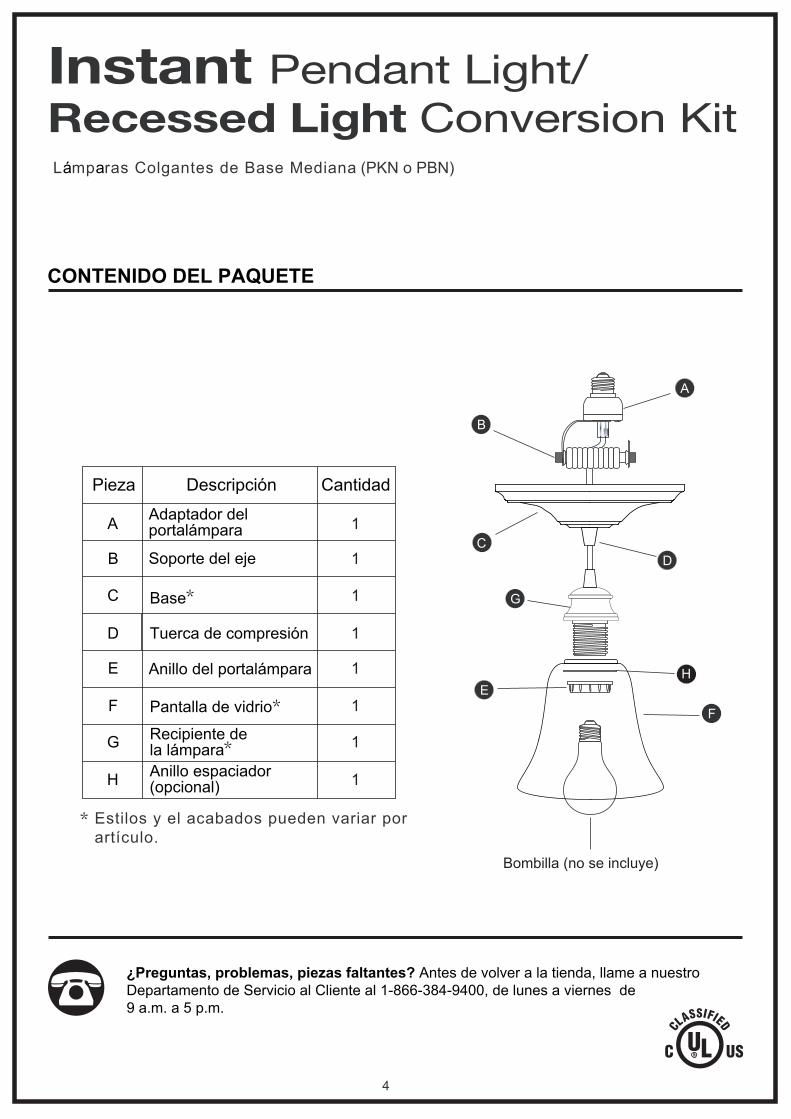
¿Preguntas, problemas, piezas faltantes? Antes de volver a la tienda, llame a nuestroDepartamento de Servicio al Cliente al 1-866-384-9400, de lunes a viernes de9 a.m. a 5 p.m.
Descripción
CONTENIDO DEL PAQUETE
CantidadPieza
Adaptador delportalámpara
Soporte del eje
Base
Tuerca de compresión
Anillo del portalámpara
Pantalla de vidrio
Recipiente dela lámparaAnillo espaciador (opcional)
Lámparas Colgantes de Base Mediana (PKN o PBN)
Estilos y el acabados pueden variar por artículo.
Bombilla (no se incluye)
C
G
E
A
B
F
D
H
Instant Pendant Light/Recessed Light Conversion Kit
4

.
5
INSTRUCCIONES DE ENSAMBLAJE
Tiempo estimado de ensamblaje: de 10a 15 minutos.Herramientas útiles:
Antes de comenzar a ensamblar el producto, asegúrese de tener todas las piezas. Compare las piezas con la lista del contenido del paquete y el diagrama anterior. No ensamble el producto si falta alguna pieza o si están dañadas. Póngase en contacto con el Departamento de Servicio al Cliente para obtener piezas de repuesto.
PREPARACIÓN
1. Ajuste el cordón sobrante enroscándolo alrededor del soporte del eje (B) justo sobre el adaptador del portalámpara (A). Coloque la última envoltura de modo que el cordón cuelgue en el centro de su lámpara de luces empotradas.
2. Atornille el adaptador (A) al portalámpara de la bombilla en su lámpara de luces empotradas.
3. Luego fije a mano soltando la tuerca de compresión (D) girándola en dirección contraria a las manecillas del relój, deslice la base (C) hacia arriba del cordón y en contra del techo.
PRECAUCIÓN: No apriete demasiado la tuerca de compresión (D).
Para sostener la base en su lugar en contra del techo, ajuste a mano la tuerca de compresión (D) girándola en dirección contraria a las manecillas del reloj.
4.
CONSEJO ÚTIL: Si la base no queda firme contra del techo, afloje la tuerca de compresión (D). CON CUIDADO, presione hacia abajo el cordón para flexionar el brazo con resorte (B), luego deslice la base (C), retroceda y vuelva a ajustar.
PRECAUCIÓN: No apriete demasiado ya que puede romperse la pantalla de vidrio.
5. Fijar la pantalla de vidrio (F) al recipiente de la lámpara (G), coloque el anillo espaciador (H) de ser necesario y atornille el anillo del portalámpara (E) en el sentido de las agujas del reloj hasta que esté apretado. El anillo espaciador (H) es necesario sólo si la pantalla de vidrio (F) queda suelta al usar únicamente el anillo del portalámpara (E). Fig.5
Portalámparaspara luces empotradas
Techo
Lámpara de lucesempotradas Techo
Bombilla (no se incluye)
A
B
A
Fig.1
Fig.2
C D Fig.3
F
HG
E
B
C D Fig.4

6
CUIDADO Y MANTENIMIENTOApague la luz y deje enfriar la bombilla y la pantalla de vidrio si fuera necesario. Limpie la pantalla de vidrio con un paño suave o con un limpiador de vidrio doméstico no abrasivo. No use limpiadores abrasivos. Para reemplazar las bombillas, utilice una bombilla tipo A de un máximo de 75 vatios o bombillas de base mediana adecuadas (no se incluyen) se incluyen bombillas fluorescentes compactas.
SOLUCIÓN DE PROBLEMAS
Problema
La base no se ajusta firmemente contra el techoLa bombilla no enciende
El cordón está estirado
La bombilla está quemada.No hay alimentación.Interruptor incorrecto.
Causas posibles Acción correctivaAfloje la tuerca de compresión (D) y CON CUIDADO, presione hacia abajo el cordón para flexionar el brazo con resorte (B), luego deslice la base (C), retroceda y vuelva a ajustar.
Remplace la bombilla (no se incluye).Compruebe si hay suministro de electricidad.Pruebe o remplace el interruptor.
GARANTÍALe fabricant garantit ses produits contre les défauts de matériaux ou de fabrication pour une périodede un (1) an à compter de la date d'achat initiale. Si un produit présente des défauts de matériaux oude fabrication durant cette période, retournez-le au détaillant dans son emballage d’origineaccompagné d’une copie de votre reçu comme preuve d’achat. Cette garantie ne s'applique pas auxproduits endommagés ou défectueux en raison d’un usage abusif ou inapproprié, de dommagesaccidentels, d’une installation incorrecte, d'une manipulation ou d’un entretien inadéquat ou deréparations qui n’ont pas été effectuées par le fabricant. La garantie ne couvre pas les pièces qui sontsusceptibles de présenter une défectuosité à la suite de l'usure normale (notamment, les ampoules,les fusibles et les pièces en verre). Le fabricant n’est pas responsable des dommages consécutifs àl’utilisation du produit ni des dommages indirects ayant trait à des pertes matérielles ou à des pertesde revenu, ou aux coûts liés au retrait, à l’installation ou à la réinstallation du produit. Certains Étatsou certaines provinces ne permettent pas l’exclusion ou la limitation d’une garantie implicite, de sorteque les limitations et les exclusions mentionnées ci-dessus pourraient ne pas s’appliquer dans votrecas. La présente garantie vous offre des droits particuliers. Il est possible que vous disposiez égalementd’autres droits qui varient d’un État ou d’une province à l’autre.
Impreso en ChinaPatente de EE.UU. No. 7,311,425
ADVERTENCIAS Y PRECAUCIONESADVERTENCIA• Riesgo de incendio y descarga eléctrica. No modifique, reubique o retire los cables, los portalámparas, los balastros o cualquier otro componente eléctrico.• Riesgo de incendio y descarga eléctrica. Instale este kit únicamente en las luminarias que cuentan con las características de construcción y las dimensiones que se muestran en las fotografías y/o dibujos.PRECAUCIÓN• No haga o modifique ningún orificio abierto en la valla de cableado o en los componentes eléctricos durante la instalación de lámpara colgante.
www.WorthHP.com

![[3] silabus pkn](https://static.fdocuments.us/doc/165x107/58efd52a1a28ab30708b464f/3-silabus-pkn-58fb864508c9d.jpg)