100W SPRAY GUN - Free Instruction · PDF file100W SPRAY GUN ENB558SRG Read all safety warnings...
28
Original Instructions_MNL_ENB558SRG_GB_V05_140102 ENB558SRG 100W SPRAY GUN Barcode: 5052931280056 WARNING! Read the instructions before using the product!
Transcript of 100W SPRAY GUN - Free Instruction · PDF file100W SPRAY GUN ENB558SRG Read all safety warnings...

Orig
inal
Inst
ruct
ions
_MN
L_EN
B558
SRG
_GB
_V05
_140
102
ENB558SRG
100W SPRAY GUN
Barcode: 5052931280056
WARNING! Read the instructions before using the product!
! 1.000

100W SPRAY GUN ENB558SRG
Read all safety warnings and all instructions before use. Failure to follow the warnings and instructions may result in electric shock, fire and/or serious injury.Save all warnings and instructions for future reference.

ENB558SRG by ENERGERGBIE
01
13131721232425
In more detail... Product functionsOperationCare and maintenanceTrouble shootingRecycling and disposalGuaranteeEC declaration of conformity
12
03
040510
Getting started...Your productTechnical and legal informationBefore you start
These instructions are for your safety. Please read through them thoroughly before use and retain them for future reference.
Let’sget started…

ENB558SRG by ENERGER
Get
ting
star
ted.
..
GB
02
Your product
Your product
IE
1. Retaining nut2. Container3. Spray gun trigger4. Spray volume control knob5. Handle6. Needle7. Viscosity cup
! 1.000
1
2
3
4
5
67

03
ENB558SRG by ENERGERG
ettin
g st
arte
d...
GB Technical and legalinformation
Technical specifications
GeneralMax. viscosity Rated voltage Rated input power Protection class: Container capacityweight:IP degree:
> : 30 DIN-s: 220-240V~ 50Hz: 100W : ll: 800mL: 1.65kg: IP20
>>
IE
>
The sound values have been determined according to noise test code given in EN 60745-1, using the basic standards EN ISO 11201 and EN ISO 3744.
The sound intensity level for the operator may exceed 85 dB(A) and ear protection measures are necessary.
The declared vibration value has been measured in accordance with a standard test method (according to EN 60745-1) and may be used for comparing one product with another. The declared vibration value may also be used in a preliminary assessment of exposure.
WARNING! Depending on the actual use of the product the vibration values can differ from the declared total. Adopt proper measures to protect yourself against vibration exposures. Take the whole work process including times the product is running under no load or switched off into consideration. Proper measures include among others regular maintenance and care of the product and accessories, keeping hands warm, periodical breaks and proper planning of work processes.
>
Sound level according to EN ISO 4871Sound pressure level L > pA : 87.6 dB(A)Sound power level L > WA : 100.6 dB(A)Uncertainty K > pA , KWA : 3 dB(A)
>>

ENB558SRG by ENERGER
Get
ting
star
ted.
..
GB
04
Technical and legalinformation
Symbols
IE
V~ Volt, (alternating voltage)
W Watt
Hz Hertz
kW Kilowatt
yyWxx Manufacturing date code; year of manufacturing (20yy) and week of manufacturing (Wxx)
SN Serial number
On the product, the rating label and within these instructions you will find among others the following symbols and abbreviations. Familiarise yourself with them to reduce hazards like personal injuries and damage to property.
Caution / Warning. Read the instruction manual.
Wear hearing protection.
Wear respiratory protection.
kg Kilogram
l/min Litres per minute
dB(A) Decibel (A-rated)
m/s² Metres per second squared
Wear eye protection.
Wear protective gloves.
The product complies with the applicable European directives and an evaluation method of conformity for these directives was done.
This product is of protection class II. That means it is equipped with enhanced or double insulation.
WEEE symbol. Waste electrical products should not be disposed of with household waste. Please recycle where facilities exist. Check with your Local Authority or local store for recycling advice.

1. This product and its accessories are not intended for use by persons (including children) with reduced physical, sensory or mental capabilities, or lack of experience and knowledge, unless they have been given supervision or instruction concerning use of the product by a person responsible for their safety.2. Children should be supervised to ensure that they do not play with the product.
General power tool safety warnings
Work area safety1. Keep work area clean and well lit. Cluttered or dark areas invite accidents.2. Do not operate power tools in explosive atmospheres, such as in the presence of flammable liquids, gases or dust. Power tools create sparks which may ignite the dust or fumes.3. Keep children and bystanders away while operating a power tool this product. Distractions can cause you to lose control.
Electrical safety1. Power tool plugs must match the outlet. Never modify the plug in any way. Do not use any adapter plugs with earthed (grounded) power tools. Unmodified plugs and matching outlets will reduce risk of electric shock.2. Avoid body contact with earthed or grounded surfaces, such as pipes, radiators, ranges and refrigerators. There is an increased risk of electric shock if your body is earthed or grounded.3. Do not expose power tools to rain or wet conditions. Water entering a power tool will increase the risk of electric shock.4. Do not abuse the cord. Never use the cord for carrying, pulling or unplugging the power tool. Keep cord away from heat, oil, sharp edges or moving parts. Damaged or entangled cords increase the risk of electric shock.5. When operating a power tool outdoors, use an extension cord suitable for outdoor use. Use of a cord suitable for outdoor use reduces the risk of electric shock.
Safety warnings
WARNING! Read all safety warnings and all instructions. Failure to follow the warnings and instructions may result in electric shock, fire and/or serious injury. Save all warnings andinstructions for future reference.The term "power tool" in the warnings refers to your mains-operated (corded) power tool or battery-operated (cordless) power tool.
05
ENB558SRG by ENERGERG
ettin
g st
arte
d...
GB Technical and legalinformationIE

6. If operating a power tool in a damp location is unavoidable, use a residual current device (RCD) protected supply. Use of an RCD reduces the risk of electric shock.
Personal safety1. Stay alert, watch what you are doing and use common sense when operating a power tool. Do not use a power tool while you are tired or under the influence of drugs, alcohol or medication. A moment of inattention while operating power tools may result in serious personal injury.2. Use personal protective equipment. Always wear eye protection. Protective equipment such as dust mask, non-skid safety shoes, hard hat, or hearing protection used for appropriate conditions will reduce personal injuries.3. Prevent unintentional starting. Ensure the switch is in the off-position before connecting to power source and/or battery pack, picking up or carrying the tool. Carrying power tools with your finger on the switch or energising power tools that have the switch on invites accidents.4. Remove any adjusting key or wrench before turning the power tool on. A wrench or a key left attached to a rotating part of the power tool may result in personal injury.5. Do not overreach. Keep proper footing and balance at all times. This enables better control of the power tool in unexpected situations.6. Dress properly. Do not wear loose clothing or jewellery. Keep your hair, clothing and gloves away from moving parts. Loose clothes, jewellery or long hair can be caught in moving parts.7. If devices are provided for the connection of dust extraction and collection facilities, ensure these are connected and properly used. Use of dust collection can reduce dust-related hazards.
Power tool use and care1. Do not force the power tool. Use the correct power tool for your application. The correct power tool will do the job better and safer at the rate for which it was designed.2. Do not use the power tool if the switch does not turn it on and off. Any power tool that cannot be controlled with the switch is dangerous and must be repaired.3. Disconnect the plug from the power source and/or the battery pack from the power tool before making any adjustments, changing accessories, or storing power tools. Such preventive safety measures reduce the risk of starting the power tool accidentally.4. Store idle power tools out of the reach of children and do not allow persons unfamiliar with the power tool or these instructions to operate the power tool. Power tools are dangerous in the hands of untrained users.
ENB558SRG by ENERGER
Get
ting
star
ted.
..
GB
06
Technical and legalinformation IE

07
ENB558SRG by ENERGERG
ettin
g st
arte
d...
GB Technical and legalinformation
Safety warnings
IE
5. Maintain power tools. Check for misalignment or binding of moving parts, breakage of parts and any other condition that may affect the power tool’s operation. If damaged, have the power tool repaired before use. Many accidents are caused by poorly maintained power tools.6. Keep cutting tools sharp and clean. Properly maintained cutting tools with sharp cutting edges are less likely to bind and are easier to control.7. Use the power tool, accessories and tool bits etc. in accordance with these instructions, taking into account the working conditions and the work to be performed. Use of the power tool for operations different from those intended could result in a hazardous situation.
ServiceHave your power tools serviced by a qualified repair person using only identical replacement parts. This will ensure that safety of the power tool is maintained.
Spray gun safety instructions1. Do not use the product for spraying flammable materials.2. Be aware of any hazards presented by the material being sprayed. Consult the markings on the container or the information supplied by the manufacturer of the material to be sprayed.3. Do not spray any material where the hazard is not known.4. Use appropriate personal protective equipment, such as dust mask, safety goggles, protective gloves and ear protection.5. Do not clean the product with flammable solvents.6. Never use highly flammable or corrosive liquids. Only use paints and solvents with a flash-point above 21°C. Ask a professional for advice.7. Never point the product toward open flames! 8. Do not allow children to play with the product. Never work near children or animals. 9. Never manipulate the product and always use the safety and/or protective guards on the product to avoid risks. 10. Risk of injury: Do not direct the product towards people or animals. 11. Never smoke during the paint process.12. Always ensure sufficient circulation of fresh air.13. Never use paint containing lead. 14. Before any work (such as transport, construction, conversion, cleaning or maintenance) and when the product is not being used, disconnect it from the power supply and empty the paint container!

ENB558SRG by ENERGER
Get
ting
star
ted.
..
GB
08
Technical and legalinformation IE
Vibration and noise reductionTo reduce the impact of noise and vibration emission, limit the time of operation, use low-vibration and low-noise operating modes as well as wear personal protective equipment.Take the following points into account to minimize the vibration and noiseexposure risks:1. Only use the product as intended by its design and these instructions.2. Ensure that the product is in good condition and well maintained.3. Use correct cutting attachments for the product and ensure they in good condition.4. Keep tight grip on the handles/grip surface.5. Maintain this product in accordance with these instructions and keep it well lubricated (where appropriate).6. Plan your work schedule to spread any high vibration tool use across a longer period of time.The European Physical Agents (Vibration) Directive has been brought in to help reduce hand arm vibration syndrome injuries to users of product’s with vibration emission. The directive requires manufacturers and suppliers to provide indicative vibration test results to enable users to make informed decisions as to the period of time a product can be used safely on a daily basis and the choice of tool. Further Advice can be found at www.hse.gov.uk.
EmergencyFamiliarise yourself with the use of this product by means of this instruction manual. Memorise the safety directions and follow them to theletter. This will help to prevent risks and hazards.1. Always be alert when using this product, so that you can recognise and handle risks early. Fast intervention can prevent serious injury and damage to property.2. Switch off and disconnect from the power supply if there are malfunctions. Have the garden power tool checked by a qualified professional and repaired, if necessary, before you operate it again.
Skin contact
Eye contact
Swallowing
Inhalation
Measures to take in the event of contact with chemicalsclean with plenty of water and soap, consult a doctor ifnecessaryrinse with plenty of water, consult a doctor
do not vomit, consult a doctor
fresh air, consult a doctor if necessary

09
ENB558SRG by ENERGERG
ettin
g st
arte
d...
GB Technical and legalinformationIE
Residual risksEven if you are operating this product in accordance with all the safety requirements, potential risks of injury and damage remain. The following dangers can arise in connection with the structure and design of this product:1. Health defects resulting from vibration emission if the product is being used over long periods of time or not adequately managed and properly maintained.2. Injuries and damage to property due popped out accessories.3. Risk of bursting.
Safety warnings
WARNING! This product produces an electromagnetic field during operation! This field may under some circumstances interfere with active or passive medical implants! To reduce the risk of serious or fatal injury, we recommend persons with medical implants to consult their doctor and the medical implant manufacturer before operating this product!

ENB558SRG by ENERGER
Get
ting
star
ted.
..
GB
10
Before you startIE
1 Unpack all parts and lay them on a flat, stable surface.2. Remove all packing materials and shipping devices if applicable.3. Make sure the delivery contents are complete and free of any damage. If you find that parts are missing or show damage do not use the product but contact your dealer. Using an incomplete or damaged product represents a hazard to people and property.4. Ensure that you have all the accessories and tools needed for assembly and operation. This also includes suitable personal protective equipment.
(items not supplied)Paint and thinnerBrush
You will need
(items supplied)Needle (6)Viscosity cup (7)
Unpacking
Assembly
WARNING! The product must be fully assembled before operation! Do not use a product that is only partly assembled or assembled with damaged parts!Follow the assembly instructions step-by-step and use the pictures provided as a visual guide to easily assemble the product!Do not connect the product to power supply before it is completely assembled!
NOTE: Take care of small parts that are removed during assembly or when making adjustments. Keep them secure to avoid loss.
11
ENB558SRG by ENERGERG
ettin
g st
arte
d...
GB Before you startIE
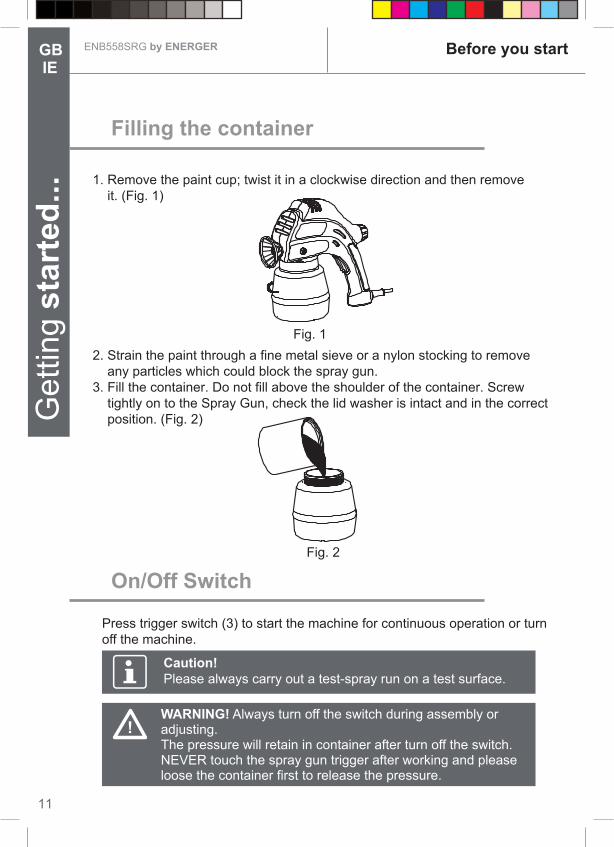
1. Remove the paint cup; twist it in a clockwise direction and then remove it. (Fig. 1)
2. Strain the paint through a fine metal sieve or a nylon stocking to remove any particles which could block the spray gun.3. Fill the container. Do not fill above the shoulder of the container. Screw tightly on to the Spray Gun, check the lid washer is intact and in the correct position. (Fig. 2)
Filling the container
!1 . 0 0 0
Fig. 1
! 1. 0 0 0
!1.000
Fig. 2
Press trigger switch (3) to start the machine for continuous operation or turn off the machine.
On/Off Switch
Caution! Please always carry out a test-spray run on a test surface.
WARNING! Always turn off the switch during assembly or adjusting.The pressure will retain in container after turn off the switch. NEVER touch the spray gun trigger after working and please loose the container first to release the pressure.

ENB558SRG by ENERGER
In m
ore
deta
il…
GBIE
In more detail…
12
21
23
17
13
13Product functions
Care and maintenance
Troubleshooting
Recycling and disposal
Guarantee
Operation
24
EC declaration of conformity 25

13
ENB558SRG by ENERGERIn
mor
e de
tail…
GBIE
Product functions / Operation
Intended use
> This electric spray gun ENB558SRG is designated with a rated input of 100 Watts.> This spray gun is ideal for refinishing a wide variety of purposes. The intended use includes the mechanical spraying of liquid, paste or powdery substances such as paints containing solvents or water-based paints on components, surfaces, etc.> The product may not be used for processing emulsion and latex paints or chlorinated solutions.> For safety reasons it is essential to read the entire instruction manual before first operation and to observe all the instructions therein.> This product is intended for private domestic use only, not for any commercial trade use. It must not be used for any purposes other than those described.
1. Check the product, the power cord and plug as well as accessories for damage before each use. Do not use the product if it is damaged or shows wear.2. Double check that the accessories are properly fixed.3. Always hold the product by its handle. Keep the handle and surfaces clean and dry to ensure safe support.4. Release the trigger immediately if you are disturbed while working with it and when other people enter the working area.5. Switch the product off immediately if you are disturbed while working by other people entering the working area. Always let the product come to complete stop before putting it down.6. Do not overwork yourself. Take regular breaks to ensure concentrated work and full control over the product.
WARNING! In some countries regulations define at what time of the day and on what special days products are allowed to be used and what restrictions apply! Ask your community for detailed information and observe the regulations in order to preserve a peaceful neighbourhood and avoid committing administrative offences! (not applicable for UK)
General operation

Please keep the spray gun move smoothly, do not spray on one point for long time.If want to achieve the thick painting on the surface, please spray one thinner layer first, after the thinner layer complete dry, spray one time again. Do not try to spray thick painting on the surface by one time, which can cause the painting sagging.
Sprayer controls
Spray pressure adjusting and selection of spray nozzle
1. The working pressure can be set by adjusting the spray volume control knob. (4) To increase the painting quantity, please select the working pressure carefully during working. Lower the working pressure, bigger the spots of mist. (Fig. 3)
For painting material has bigger viscosity, please select higher working pressure.For roughly painting surface, please select lower working pressure and bigger diameter of spray nozzle.To make smoothly painted surface, the use need select higher working pressure and smaller diameter of spray nozzle.
If the spots of mist are too small, the user may also reduce the working distance.
! 1.000
Fig. 3
4
In m
ore
deta
il…
14
ENB558SRG by ENERGER
In m
ore
deta
il…
GBIE
Operation

Get
ting
star
ted.
..
15
ENB558SRG by ENERGERIn
mor
e de
tail…
GBIE
Operation
Hold the Spray Gun about 250mm to 300mm from the surface. Paint will begin to run on the surface if you are holding the gun too close or moving the gun too slowly. Excessive paint will result in runs and insufficient paint will result in a thin, dusted finish. (Fig. 4)
Holding the Spray gun
Each pass of the Spray Gun needs to overlap the previous by approximately 1/3. A cross pattern is recommended. Start with horizontal passes and finish with light vertical passes. When spraying a long job such as a fence, it is best to work in sections of approximately one meter. Ensure sufficient overlap when starting a new section. (Fig. 5)
Overlapping
!1.000
Fig. 4
Fig. 5

Caution! Do not thin beyond paint manufacturer’s recommendation.
Please always cover off the vicinity of the spray surface thoroughly and generously.When spraying in enclosures, surfaces not covered can become contaminated.
The spray surface must be clean, dry and grease-free.If necessary, roughen smooth surfaces and then remove the sanding dust.
Preparing the Spray Surface
Measure the viscosity of the paint. (Fig. 6)
To determine this first thoroughly stir the paint. Dip the viscosity cup into the paint and fill just below the cups rim. Raise the cup and measure the time taken for the paint to run out .This will give a D.I.N. The maximum viscosity for this product is max 30 seconds ( for 0.8 mm nozzle).
Thinning the paintIf the D.I.N. is less than 30 seconds no thinning is required. If D.I.N. is more than 30 (for 0.8 mm nozzle) seconds thin the paint to reach 30 (for 0.8 mm nozzle) D.I.N. Thin by adding the correct thinner, a small amount at a time. Check manufacturer’s instructions to ensure you are using the correct thinner and that the paint can be thinned. Stir paint thoroughly before and after thinning.
Selecting the spray material
Fig. 6 In m
ore
deta
il…
16
ENB558SRG by ENERGER
In m
ore
deta
il…
GBIE
Operation
17
ENB558SRG by ENERGERIn
mor
e de
tail…
GBIE
Operation / Care and maintenance
Diluting Spray Material
When diluting, pay attention that the spray material and the diluting agent correspond.Lumps can develop that can lead to clogging of the spray gun.
Recommended dilutionundiluted
undiluted
At least 10 % diluted
200 300 400 500
20 30 40 50
Spray material Recommended
For spray material that needs to be diluted, proceed as follows:– Take the measuring cup.– Stir the spray material thoroughly.– Fill a sufficient quantity of spray material into the spray-material container. – Dilute the spray material by 10 % with paint thinner. Examples:
– Stir the spray material thoroughly.– Carry out a test-spray run on a test surface.
Spray materialWood preservatives, strippers, oils, finishes
Disinfectants, plant protectantsSolvent or water-dilutable paints, primers, automobile spray paint, thick-coat finishes
Amount of spray material [ml]
Paint thinner [ml]
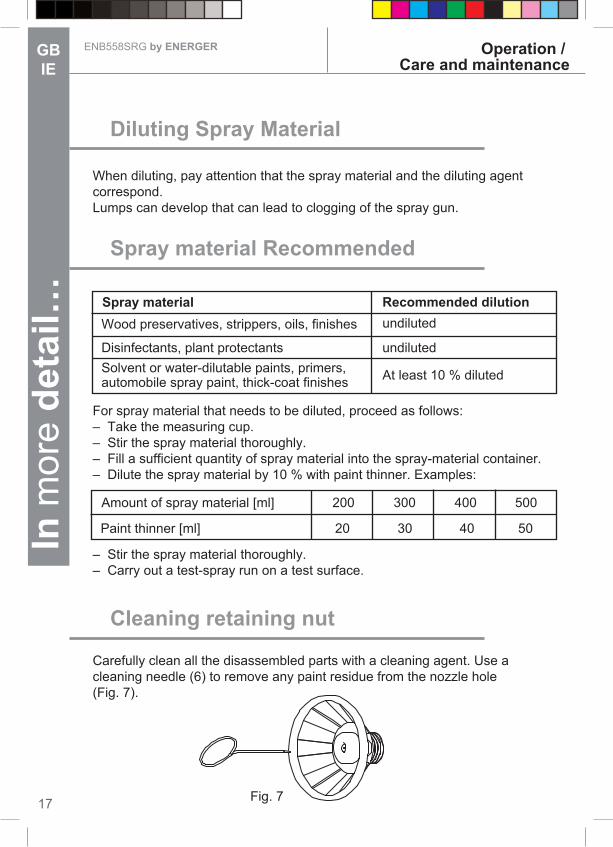
Cleaning retaining nut
Carefully clean all the disassembled parts with a cleaning agent. Use a cleaning needle (6) to remove any paint residue from the nozzle hole (Fig. 7).
Fig. 7

1. Keep the product clean. Remove debris from it after each use and before storage.2. Regular and proper cleaning will help ensure safe use and prolong the life of the product.3. Inspect the product before each use for worn and damaged parts. Do not operate it if you find broken and worn parts.
The golden rules for care
Only perform repairs and maintenance work WARNING!according to these instructions! All further works must be performed by a qualified specialist!
General cleaning
1. Clean the product immediately after each use. If the product clogs up, take steps as described below.2. Release the trigger (15) and switch off the product.3. Clean all the paint passages and the nozzle after each use with a slightly damp cloth and a little soap. Use the brush (not supplied) for hard to reach places.4. Empty all paint from the cup (18) by pouring it into another container. Thoroughly clean the cup (18) with a suitable cleaning agent, which does not contain oil.5. Fill cleaning agent into the cup (18), switch on the product and spray it through the spray head (20) until the cleaning agent exits as a clear, transparent mist.
Always switch the product off, disconnect the WARNING!product from the power supply and let the product cool down before performing inspection, maintenance and cleaning work!
Never use metal or other objects that could WARNING!damage the holes in the nozzle and cap. Never immerse the product completely in solvent or other liquids.NOTE: Do not use chemical, alkaline, abrasive or other aggressive detergents or disinfectants to clean this product asthey might be harmful to its surfaces.
18
ENB558SRG by ENERGER
In m
ore
deta
il…
GBIE
Care and maintenance

19
ENB558SRG by ENERGERIn
mor
e de
tail…
GBIE
Care and maintenance
Power cord
If the power cord is damaged, it must be replaced by the manufacturer, its service agent or similarly qualified persons in order to avoid a safetyhazard.
UK plug
If you need to replace the fitted plug, then follow the instructions below. IMPORTANT: The wires in the mains lead are coloured in accordance with the following code: Blue – Neutral Brown – LiveAs the colours of the wire in the mains lead of this product may notcorrespond with the coloured marking identifying the terminals in your plug, proceed as follows. The wire, which is coloured blue, must be connected to the terminal, which is marked with N or coloured black. The wire, which is coloured brown, must be connected to the terminal, which is marked L or coloured red.
Only fit an approved 5 Amp BS 1363 or BS 1363/ A plug and thecorrectly rated fuse.If in doubt, consult a qualified electrician.
WARNING! Never connect live or neutral wires to the earth terminal of the plug.
5 AMP fuseapproved toBS 1362
Brown L(Live)
Cable gripOuter sleevefirmly clamped
ConnectBlue toN(Neutral)
NOTE: If a moulded plug is fitted and has to be removed take great care in disposing of the plug and severed cable, it must be destroyed to prevent engaging into a socket.
>

Check for any damage and wear. Repair damages in accordance with this instruction manual or take it to an authorised service centre before using the product again.This product does not contain any parts that can be repaired by the consumer. Contact an authorised service centre or a qualified person to have it checked and repaired.
Repair
1. Store the machine, operating instructions and where necessary the accessories in the original packaging. In this way you will always have all the information and parts ready to hand.2. Pack the device well or use the original packaging in order to avoid transit damage.3. Always keep the machine in dry place.
Storage
Before and after each use, check the product and accessories (such as application tools) for wear and damage. If required, exchange them for new ones as described in this instruction manual. Observe the technical requirements.
Maintenance
20
ENB558SRG by ENERGER
In m
ore
deta
il…
GBIE
Care and maintenance

21
MRM45 by MacAllister In
mor
e de
tail…
GBIE
Troubleshooting
Troubleshooting
Suspected malfunctions are often due to causes that the user can fix themselves. Therefore, check the product using this section. In most cases the problem can be solved quickly.
WARNING! Only perform the steps described within these instructions! All further inspection, maintenance and repair work must be performed by an authorised service centre or a similarly qualified specialist if you cannot solve the problem yourself!
Problem Possible cause Solution
Product does not start
1. Not connected to power supply 2. Power cord or plug is defect3. Other electrical defect to the product
1. Connect to power supply2. Check by a specialist electrician3. Check by a specialist electrician
Product does not reach full power
1. Extension cord not suitable for operation with this product2. Power source (e.g. generator) has too low a voltage
1. Use a suitable extension cord2. Connect to another power source
Excessive vibration/noise
1. Screw and nuts loosened
1. Check screws and nuts for tightness and re-tighten as necessary
Fluttering or spitting
1. Not enough paint in the cup2. Container tipped too far3. Spray nozzle loose, worn or damaged4. Dry, worn or damaged needle
1. Add paint 2. Hold more upright3. Tighten or replace spray nozzle4. Lubricate or replace needle
Paint pattern curvy
1. Spray nozzle worn or loose2. Spray head plugged up
1. Tighten spray nozzle or replace2. Clean or replace spray head

Problem Possible cause Solution
Irregular paint pattern
1. Spray head plugged up2. Spray nozzle dirty or worn
1. Clean or replace spray head2. Clean or replace spray nozzle
Paint pattern centre narrow
1. Not enough paint in the cup or viscosity too low2. Fluid output
1. Refill paint, mix viscosity according to manufacturer recommendation2. Adjust fluid output
Uneven paint pattern
1. Viscosity too high2. Fluid output
1. Mix viscosity according to manufacturer recommendation2. Adjust fluid output
22
ENB558SRG by ENERGER
In m
ore
deta
il…
GBIE
Troubleshooting

23
ENB558SRG by ENERGERIn
mor
e de
tail…
GBIE
Recycling and disposal
Recycling and disposal
The product comes in a package that protects it against damage during shipping. Keep the package until you are sure that all parts have been delivered and the product is function properly. Recycle the package afterwards.
Old products are potentially recyclable under WEEE and do not, therefore, belong in your household rubbish. You are requested to assist us and our contribution to saving resources and protecting the environment by handing in this appliance at an equipped collection centre (if there is one available).
Dispose of paint and thinning agent in closed containers at a suitably authorized disposal company. Take account of national and local disposal regulations.

24
ENB558SRG by ENERGER
In m
ore
deta
il…
GBIE
Recycling and disposal
Guarantee
This ENERGER product carries a guarantee of 12months.
If your product develops a fault within this period, you should, in the first instance contact the retailer where the item was purchased.
This guarantee specifically excludes losses caused due to:> Fair wear and tear> Misuse or abuse> Lack of routine maintenance> Failure of consumable items> Accidental damage> Cosmetic damage> Failure to follow manufacturer’s guidelines> Loss of use of the goods This guarantee does not affect your statutory rights.
This guarantee is only valid in the UK. For any enquiries relating to the guarantee please refer to your retailer.

100W SPRAY GUN ENB558SRG
Declaration of Conformity
Low voltage directive 2006/95/ECEMC directive 2004/108/EC
EN 55014-1 / A2:2011EN 55014-2 / A2:2008
EN 61000-3-2 / A2:2009EN 61000-3-3 :2008
EN 50580 : 2012EN 60745-1 / A11:2010
Powersmith Ltd., BA22 8RT
Authorised Signatory and technical file holder
100W SPRAY GUNENB558SRG
We, Importer
Declare that the product
Complies with the following Directives:
2011/65/EU Restrictions of the Use of Certain Hazardous Substances in Electrical and Electronic Equipment
2002/96/EC and 2003/108/EC Waste Electrical and Electronic Equipment (WEEE)
Date: 17/12/13
Signature:
Name: Peter Harries
Powersmith Ltd. Trade House , Mead Avenue , BA22 8RTQuality Manager 2013
Standards and technical specifications referred to:
25
GBIE
EC Machinery Directive 2006/42/EC

Titan Power Tools (UK) LtdTrade House, Mead Avenue, BA22 8RT
GB


![GPG Gravity Spray Gun gpg.pdfThe GPG spray gun is a professional quality spray gun designed to comply with all global legislations. Trigger 12 bar [175 psi] ... Never use 1,1,1-Trichloroethane,](https://static.fdocuments.us/doc/165x107/610bfed5e0aa09342647c21f/gpg-gravity-spray-gun-gpgpdf-the-gpg-spray-gun-is-a-professional-quality-spray.jpg)