1 Match the background colours - Lingnan Universitycptra.ln.edu.hk/~bus206/photoshop.pdf · Task 1...
10
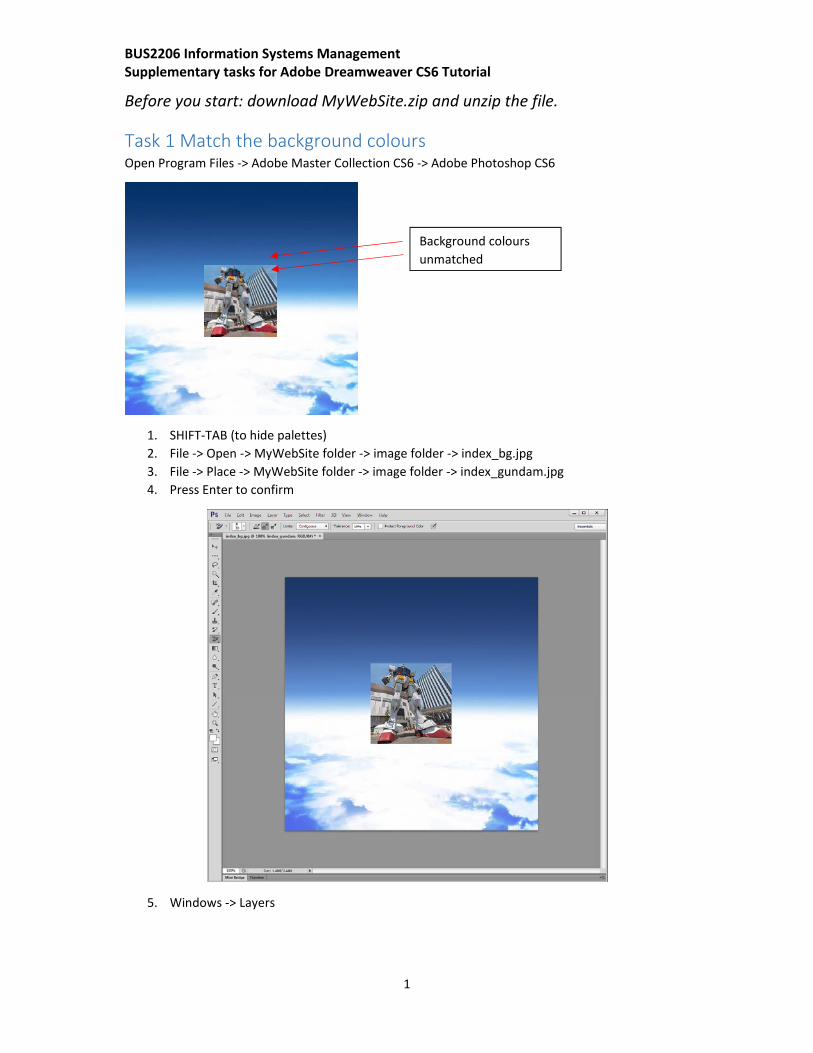
BUS2206 Information Systems Management Supplementary tasks for Adobe Dreamweaver CS6 Tutorial 1 Before you start: download MyWebSite.zip and unzip the file. Task 1 Match the background colours Open Program Files ‐> Adobe Master Collection CS6 ‐> Adobe Photoshop CS6 1. SHIFT‐TAB (to hide palettes) 2. File ‐> Open ‐> MyWebSite folder ‐> image folder ‐> index_bg.jpg 3. File ‐> Place ‐> MyWebSite folder ‐> image folder ‐> index_gundam.jpg 4. Press Enter to confirm 5. Windows ‐> Layers Background colours unmatched
Transcript of 1 Match the background colours - Lingnan Universitycptra.ln.edu.hk/~bus206/photoshop.pdf · Task 1...
BUS2206 Information Systems Management Supplementary tasks for Adobe Dreamweaver CS6 Tutorial
1
Before you start: download MyWebSite.zip and unzip the file.
Task 1 Match the background colours Open Program Files ‐> Adobe Master Collection CS6 ‐> Adobe Photoshop CS6
1. SHIFT‐TAB (to hide palettes)
2. File ‐> Open ‐> MyWebSite folder ‐> image folder ‐> index_bg.jpg
3. File ‐> Place ‐> MyWebSite folder ‐> image folder ‐> index_gundam.jpg
4. Press Enter to confirm
5. Windows ‐> Layers
Background colours
unmatched

BUS2206 Information Systems Management Supplementary tasks for Adobe Dreamweaver CS6 Tutorial
2
6. Right‐click index_gundam layer on Layers palette ‐> Rasterize Layer
7. CTRL‐click the thumbnail of the index_gundam layer (to select the gundam picture)
CTRL‐click

BUS2206 Information Systems Management Supplementary tasks for Adobe Dreamweaver CS6 Tutorial
3
8. Image ‐> Crop, then Select ‐> Deselect
9. Press E to select the Eraser Tool, then press SHIFT‐E to select Background Eraser Tool
10. On Options Bar, set Size to 30px, Hardness to 0%, select Sample: Once, select Limits:
Contiguous, Tolerance: 19%
11. Apply the Background Eraser Tool to the sky area in the Gundam picture. (Keep pressing the
left mouse button when applying).
12. File ‐> Save As ‐> index_gundam ‐> choose Format: JPEG ‐> OK to confirm
13. File ‐> Close All ‐> No (do not save)

BUS2206 Information Systems Management Supplementary tasks for Adobe Dreamweaver CS6 Tutorial
4
Task 2 Animate the shop logo using GIF 1. File ‐> Open ‐> MyWebSite folder ‐> image folder ‐> logo.jpg
2. SHIFT‐TAB (to hide palettes)
3. View ‐> Fit on Screen
4. Press W to select the Magic Wand
5. On the Options Bar, change Tolerance: 50
6. Click the letter T in the centre
7. Image ‐> Adjustments ‐> Hue/Saturation
8. Move the Hue and Saturation sliders to pick a different colour. Click Ok to confirm
9. File ‐> Save as ‐> logo1.jpg. Click OK to confirm
10. Repeat above steps 7‐9 to create logo2.jpg, logo3.jpg, etc. with different colours. 11. File ‐> Close All 12. File ‐> Scripts ‐> Load Files into Stack, Browse to select all logo files

BUS2206 Information Systems Management Supplementary tasks for Adobe Dreamweaver CS6 Tutorial
5
13. Window ‐> Timeline
14. Select Create Frame Animation at the bottom menu. Click Create Frame Animation button.
15. Select Make Frames from Layers from the Timeline menu.

BUS2206 Information Systems Management Supplementary tasks for Adobe Dreamweaver CS6 Tutorial
6
16. Change the frame interval for each frame. Change Once to Forever (bottom menu bar).
17. File ‐> Save for Web, press Preview button for a preview.
18. Press Save button and enter the filename (logo.gif). Use this file on your web site.
19. File ‐> Close All
BUS2206 Information Systems Management Supplementary tasks for Adobe Dreamweaver CS6 Tutorial
7
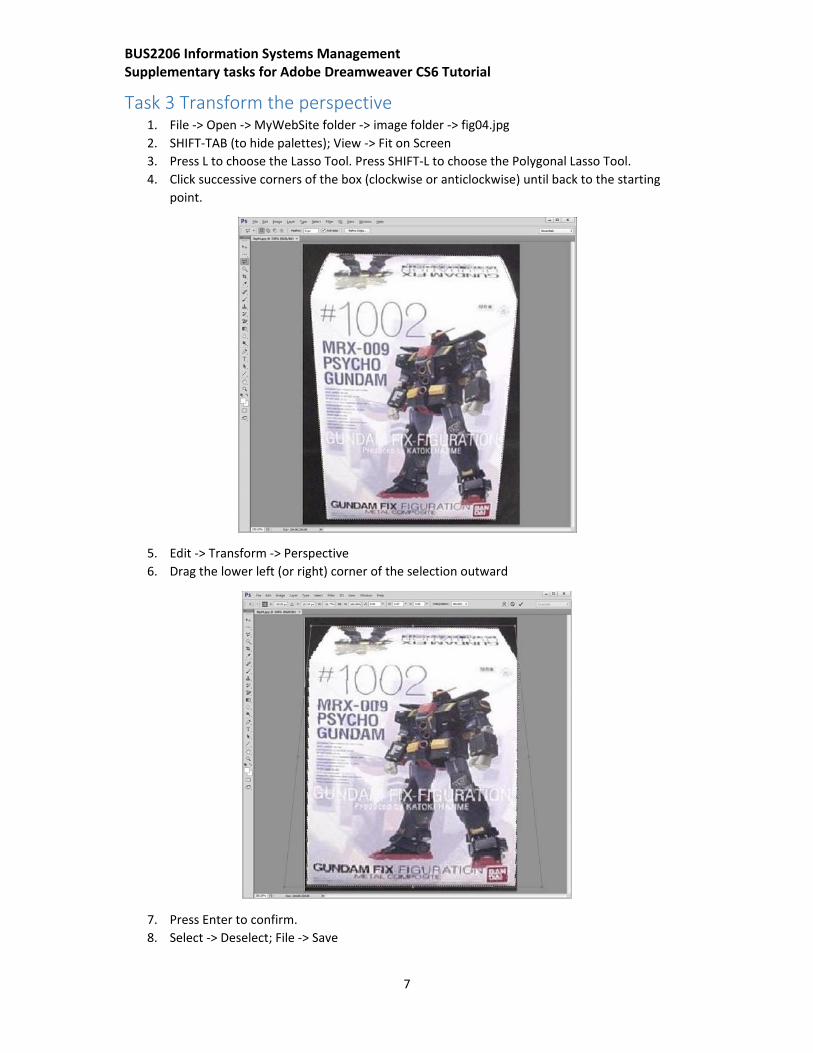
Task 3 Transform the perspective 1. File ‐> Open ‐> MyWebSite folder ‐> image folder ‐> fig04.jpg
2. SHIFT‐TAB (to hide palettes); View ‐> Fit on Screen
3. Press L to choose the Lasso Tool. Press SHIFT‐L to choose the Polygonal Lasso Tool.
4. Click successive corners of the box (clockwise or anticlockwise) until back to the starting
point.
5. Edit ‐> Transform ‐> Perspective
6. Drag the lower left (or right) corner of the selection outward
7. Press Enter to confirm.
8. Select ‐> Deselect; File ‐> Save

BUS2206 Information Systems Management Supplementary tasks for Adobe Dreamweaver CS6 Tutorial
8
Task 4 Cosmetic Make‐up 1. File ‐> Open ‐> MyWebSite folder ‐> image folder ‐> fig05_big.jpg
2. SHIFT‐TAB (to hide palettes)
3. Press Z for Zoom tool. Zoom in the face.
4. Window ‐> History
5. Filter ‐> Blur ‐> Gaussian Blur ‐> Set Radius: 4.0 Pixels. Ok to confirm.
6. On History palette, right‐click Gaussian Blur, select New Snapshot. Enter Name: Blur
7. Select fig05_big.jpg on history palette (back to original image).
RIGHT‐click
BUS2206 Information Systems Management Supplementary tasks for Adobe Dreamweaver CS6 Tutorial
9
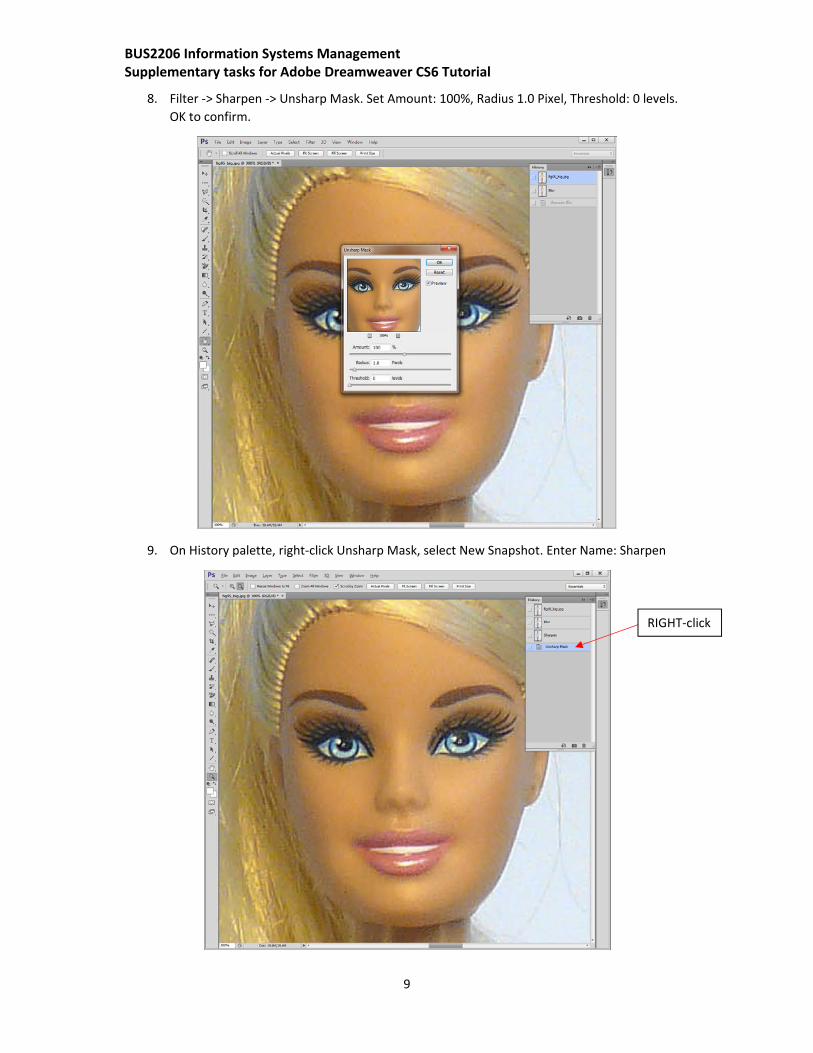
8. Filter ‐> Sharpen ‐> Unsharp Mask. Set Amount: 100%, Radius 1.0 Pixel, Threshold: 0 levels.
OK to confirm.
9. On History palette, right‐click Unsharp Mask, select New Snapshot. Enter Name: Sharpen
RIGHT‐click

BUS2206 Information Systems Management Supplementary tasks for Adobe Dreamweaver CS6 Tutorial
10
10. Select fig05_big.jpg on history palette (back to original image).
11. Press Y to select History Brush Tool
12. Click the checkbox next to Blur Snapshot on the History palette. 13. Choose Size: 10px, Hardness: 0%, Mode: Darken on the Options Bar
14. With the History Brush Tool, brush over the lower lip to remove the reflection.
15. Click the checkbox next to Sharpen Snapshot on the History palette.
16. Choose Size: 30px, Hardness: 0%, Mode: Normal on the Options Bar 17. With the History Brush Tool, brush over both eyes.
18. Image ‐> Image Size, enter Width: 436, OK to confirm
19. File ‐> Save As, enter file name: fig05, OK to confirm overwrite existing file
*** The End ***