


Languages
Pages
Legal


TECHNIQUES FOR MOLECULAR ANALYSIS
Imaging the live plant cell
Sidney L. Shaw*
Department of Biology, Indiana University, Bloomington, IN 47405, USA
Received 20 June 2005; revised 18 November 2005; accepted 21 November 2005.
*For correspondence (tel þ1 812 856 5001; e-mail [email protected]).
Summary
Observing a biological event as it unfolds in the living cell provides unique insight into the nature of the
phenomenon under study. Capturing live cell data differs from imaging fixed preparations because living plants
respond to the intense light used in the imaging process. In addition, live plant cells are inherently thick
specimens containing colored and fluorescent molecules often removedwhen the plant is fixed and sectioned.
For fixed cells, the straightforwardgoal is tomaximize contrast and resolution. For live cell imaging,maximizing
contrast and resolutionwill probably damage the specimenor rapidly bleach the probe. Therefore, the goals are
different. Live cell imaging seeks a balance between image quality and the information content that comeswith
increasing contrast and resolution. That ‘lousy’ live cell imagemay contain all the information needed to answer
the question being posed –provided the investigator properly framed the question and imaged the cells
appropriately. Successful data collection from live cells requires developing a specimen-mounting protocol,
careful selection and alignment of microscope components, and a clear understanding of how the microscope
systemgenerates contrast and resolution. This paper discusses general aspects ofmodern live cell imaging and
the special considerations for imaging live plant specimens.
Keywords: live cell imaging, microscopy, digital imaging, confocal microscopy.
Introduction
Video microscopy changed our view of the cell dramatically
(Allen and Allen, 1981; Allen et al., 1981; Inoue, 1981).
Watching still images of mitosis, cell division and other
cytoplasmic arrangements come to life as a movie revealed
the importance of position and timing in understanding
cellular mechanisms. Genetically encoded optical probes
(Chalfie et al., 1994) have similarly changed our scientific
viewpoint by moving our notions of protein localization
beyond those formed from static immunofluorescence
images (Weber and Osborn, 1985). Visualizing the in vivo
movement of proteins has provided temporal and spatial
context for protein function, often illuminating critical
aspects of the mechanism under study.
Imaging live cells brings with it new opportunities and
technical challenges. The inner workings of the plant cell
stream, diffuse and deform with apparent enthusiasm. And
unlike cultured animal cells, the thickness of a typical plant
cell exceeds the focal depth of a high magnification lens by
20–100 times. Therefore, capturing information about pro-
tein or organelle localizations throughout the cell requires
trade-offs between data acquisition speed, contrast and
resolution. Commercial imaging devices now collect
enough data, fast enough, for limited 3D –time-lapse
experiments, although the software for quantitative evalu-
ation lags far behind (Thomann et al., 2003).
Observing where proteins localize is great, but in the live
cell, we also want to know when the protein is active.
Fluorescence resonance energy transfer (FRET) and fluores-
cence lifetime imaging (FLIM) techniques give us a chance to
ask questions about in vivo binding events and protein
activity, moving beyond the ‘guilt by association’ arguments
relating localization to function. The practical application of
FRET and other fluorescence technologies must involve an
understanding that the cell wall and plastids fluoresce over a
broad and seemingly unpredictable range of colors, and
contain crystalline elements that interact with light.
Finally, proteins are only part of story. Visualizing what is
not directly encoded by the genome (e.g. lipids, metabolites,
ª 2006 The Author 573Journal compilation ª 2006 Blackwell Publishing Ltd
The Plant Journal (2006) 45, 573–598 doi: 10.1111/j.1365-313X.2006.02653.x

extracellular matrix polymers) is becoming increasingly
important for understanding cellular mechanisms. All of
these technologies are predicated on the investigator sol-
ving the problem of how to image their specimen in the
living state.
The goal of this paper is to provide information about
collecting image data from living plant cells. Despite the best
efforts of most manufacturers, the microscope is not yet
available in kit formwith simple instructionsabouthow toget
live cell data. Most investigators have a compound micro-
scopeor access to amore elaborate system in adepartmental
facility. Acquiring live cell data from that device requires
evaluating the equipment and creating a strategy for preser-
ving the biological process while capturing the needed
information. The first section of this paper outlines several
methods for mounting and culturing plant specimens on the
microscope stage. The following three sections develop
general background information about how contrast and
resolution relate to the elements of the imaging system.
Section 5 surveys microscopy techniques for quantifying
molecular distributions or activities within cells. The final
section describes how to set up and evaluate themicroscope
for live cell data collection.
Before you start
Most imaging projects begin with the goal of protein local-
ization. The common post-genomic plan is to make the GFP
fusion(s), transform plants, and ask, ‘Is the protein where it is
supposed to be?’ After some squinting and looking around,
a decision is made about the localization and images are
taken to support that decision. Later, looking over the data,
questions arise, such as ‘Why is it also there?’, ‘How much
does the mutant really differ from wild-type?’, ‘Hmm.
Expression artifact?’, ‘Is this development/cell cycle/time of
day dependent?’, or a personal favorite ‘What organelle is
that?’. The weight of our collective observations shows that
most proteins lead a complex lifestyle. They localize to
multiple places, often perform multiple tasks, and develop
bad habits when improperly expressed. Thus, even accom-
plishing the apparently modest goal of determining whether
the protein localizes to an hypothesized location is seldom
straightforward.
Relating a carefully made observation from the micro-
scope has a well-deserved place in science. It is, however, no
substitute for an experimental test of hypotheses. Images,
especially really compelling ones that reinforce your ideas,
too often guide our thinking about biological mechanisms.
Science requires a systematic test of a hypothesis, showing
a pattern of observations that either support or refute the
hypothesis.
With that in mind, the first stage in planning any experi-
ment is to clearly state the hypothesis. ‘Where is my
protein?’ is not actually a hypothesis. Proposing that the
protein localizes to the nuclear envelope for example is a
better start because the proposal can be tested quantita-
tively against the established properties of other proteins
(Cyr et al., 2006). My point is that the burden of proof for
image-based data lies not simply in stating that ‘it’ was
observed x times out of n trials. Rather, the burden lies in
demonstrating with what accuracy ‘it’ is identified, and with
what precision you can discriminate between control and
experimental conditions.
1. Developing culture conditions for live cell imaging
The first task in live cell imaging is culturing the specimen
on the microscope stage. Plants sense light fluence,
frequency and polarity, temperature changes, touch,
osmolarity, humidity, electric fields and gravity, amongst
other variables (see Buchanan et al., 2000). Plants also
have strong circadian cycles of physiological behavior and
gene expression. Most environmental stimuli have short-
term consequences and longer-term effects as the plant
regains equilibrium with its environment. For example,
even small osmotic changes can stimulate an efflux of
peroxide radicals (Park et al., 2000), influencing growth
behavior, increasing autofluorescence, and inducing later
gene expression. The practical solution to reducing
experimental variation is to establish a defined protocol for
your experimental system, where specimen recovery time
has been characterized and controls have been run to
demonstrate that the biology of interest is not compro-
mised by the culturing conditions or the imaging process.
Designing a protocol will include media selection, creating
an imaging chamber, and specimen mounting.
Selecting and characterizing a culture medium
Imaging subcellular structures nearly always requires that
the specimen be submerged in liquid medium. Lenses de-
signed for high-resolution imaging rely on the optical
properties of the liquid to conduct light into the microscope.
The simple rule for wet mounting specimens is to use the
same medium for growth and imaging whenever possible.
Defined plant growth and culture media [e.g. Murashige and
Skoog (MS), Schenk and Hildebrandt (HS), Gamborg’s B-5,
etc.] typically have a good osmotic balance but may be
unsuitable for specific imaging experiments dependent
upon supplier, batch and amendments. The major consid-
erations are the presence of colored or fluorescent compo-
nents, light-sensitive chemicals, and additions that alter the
refractive index. If liquid media cannot be used, be keenly
aware that the imaging process will heat and dehydrate the
specimen.
Scan the liquid medium in both a spectrofluorometer
and a scanning spectrometer from 400 to 650 nm wave-
lengths. The spectra should be absent of peaks and not
574 Sidney L. Shaw
ª 2006 The AuthorJournal compilation ª 2006 Blackwell Publishing Ltd, The Plant Journal, (2006), 45, 573–598

significantly high in background when compared to tap
water. If peaks appear within the excitation or emission
range, this can degrade image quality. Peaks appear due
to added hormones, vitamins, fertilizers and buffer
impurities amongst other factors. If it is biologically
reasonable to remove the component from the medium,
eliminate it.
Many plant hormones, media additions and small mole-
cule drugs convert to another compound when exposed to
strong irradiance, especially light below 400 nm wave-
length. Photo-conversion of media components can lead to
unexpected, time-dependent effects.
Sugars, or other higher molecular weight compounds, at
>5% w/v, may alter the refractive index. Keep this in mind
when choosing an objective lens and immersion medium
(see below). When complexmedia cannot be used, plain MS
medium (Murashige and Skoog, 1962), 0.5· MS or artificial
pond water (APW: 0.1 M NaCl, 0.1 M KCl and 0.1 M CaCl2) are
good starts.
Low melting point agarose and other gelling agents for
embedding tissue culture cells (Damm et al., 1989) are
somewhat destructive to contrast-generating techniques,
such as differential interference contrast (DIC), and often
contain light-absorbing or fluorescent compounds that
interfere with fluorescence imaging. Scanning a dilute
solution of the medium, as noted above, is recommended
before use. If the gelling agent differs from that used in
culture, it is important to demonstrate that the agent does
not cause a biological response that will influence your
experiments.
Specimen mounting and perfusion
The complexity of the specimen mount depends upon spe-
cimen type and experimental needs (Figure 1). For short-
term experiments (<30 min), a 60 · 50 mmglass number 1.5
thickness coverslip, with a ring of vacuum grease forming a
bath, serves as an excellent ‘culture system’. The vacuum
grease should form a wall at least 2 mm high and trace an
outline large enough to accommodate the specimen. A
minimum of 0.5 ml liquid should be used to avoid rapid
changes in buffer concentration due to evaporation. Drying
down 500 ll of 10 lg ml)1 poly-L-lysine on a glass surface,
prior to specimen transfer into the bath, will adhere tissue
culture cells, but does not hold larger specimens. Placing a
second coverslip over a larger specimen will hold it in place,
provided a good seal ismadewith the ring of grease forming
the bath. A second method for holding specimens, use-
ful when an open bath is necessary, is to use a rectangular
strip of coverslip (5 · 22 mm cut with a diamond scribe)
attached with vacuum grease, to span the plant axis and act
as a specimen clamp (Figure 1a). For small plants (e.g.
Arabidopsis seedlings), tissue culture cells and excised
embryos, a chamber can be formed using double-sided
adhesive tape (approximately 60 lm per layer) as a spacer
between coverslips, or a coverslip and a glass slide (Fig-
ure 1b). Medium can be drawn through this chamber by
addition at one side and wicking with a tissue at the other.
Obviously, crushing the plant in any of these chambers is a
stress inducer.
Longer duration experiments benefit greatly from med-
ium replacement. Media exchange prevents the local eleva-
tion of gases, hormones, ions and secondary metabolites
that influence specimen stress levels. Manual exchange with
a pipette physically disturbs the specimen and can be
stressful if significant evaporation occurs between addi-
tions. Constant perfusion can be accomplished by gravity
flow, peristaltic pump, or most effectively, through use of a
syringe pump. Coupling two syringe pumps to the chamber
through a simple manifold provides constant, reproducible
flow with the option of creating gradients or introducing
media amendments in a controlled manner. Liquid outflow
depends upon chamber design, but is usually accomplished
by gravity flow, vacuum line or a peristaltic pump. The
experimental protocol and chamber volume will dictate the
minimum flow rate, while the maximum flow rate should
not physically disturb the specimen. Introducing a known
volume and concentration of dye at the chamber inlet and
imaging the change in dye intensity as it passes through the
(a)
(b)
(c)
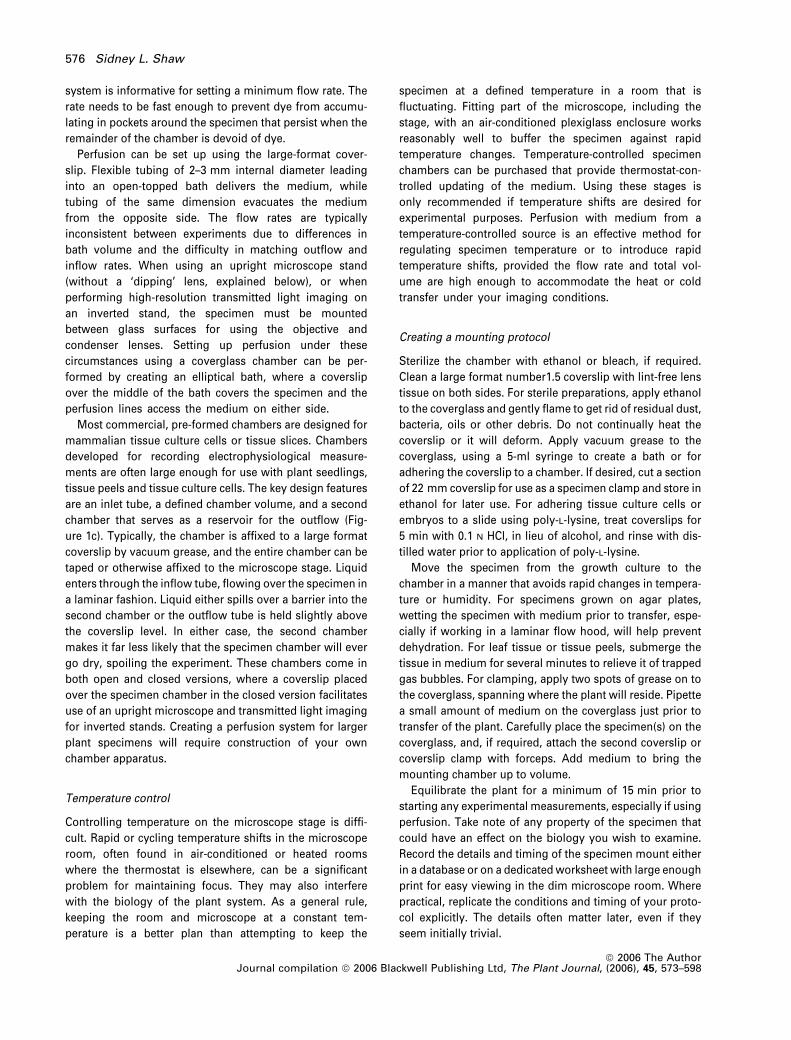
Figure 1. Imaging chambers and mounts.
(a) A large format glass coverslip with a ring of vacuum grease used as an
imaging chamber. Clamping the specimen with a rectangular piece of
coverglass and vacuum grease prevents specimen drift in the open chamber.
(b) Strips of double-sided adhesive tape, applied in two layers to either side of
a glass slide, create a flow chamber with a glass coverslip.
(c) Perfusion chambers made from machined plastic have a specimen
chamber and a separate chamber for media outflow. Seedlings are shown
for illustration, but leaf tissue, root explants and tissue culture cells can be
mounted in a similar manner.
Imaging the live plant cell 575
ª 2006 The AuthorJournal compilation ª 2006 Blackwell Publishing Ltd, The Plant Journal, (2006), 45, 573–598
system is informative for setting a minimum flow rate. The
rate needs to be fast enough to prevent dye from accumu-
lating in pockets around the specimen that persist when the
remainder of the chamber is devoid of dye.
Perfusion can be set up using the large-format cover-
slip. Flexible tubing of 2–3 mm internal diameter leading
into an open-topped bath delivers the medium, while
tubing of the same dimension evacuates the medium
from the opposite side. The flow rates are typically
inconsistent between experiments due to differences in
bath volume and the difficulty in matching outflow and
inflow rates. When using an upright microscope stand
(without a ‘dipping’ lens, explained below), or when
performing high-resolution transmitted light imaging on
an inverted stand, the specimen must be mounted
between glass surfaces for using the objective and
condenser lenses. Setting up perfusion under these
circumstances using a coverglass chamber can be per-
formed by creating an elliptical bath, where a coverslip
over the middle of the bath covers the specimen and the
perfusion lines access the medium on either side.
Most commercial, pre-formed chambers are designed for
mammalian tissue culture cells or tissue slices. Chambers
developed for recording electrophysiological measure-
ments are often large enough for use with plant seedlings,
tissue peels and tissue culture cells. The key design features
are an inlet tube, a defined chamber volume, and a second
chamber that serves as a reservoir for the outflow (Fig-
ure 1c). Typically, the chamber is affixed to a large format
coverslip by vacuum grease, and the entire chamber can be
taped or otherwise affixed to the microscope stage. Liquid
enters through the inflow tube, flowing over the specimen in
a laminar fashion. Liquid either spills over a barrier into the
second chamber or the outflow tube is held slightly above
the coverslip level. In either case, the second chamber
makes it far less likely that the specimen chamber will ever
go dry, spoiling the experiment. These chambers come in
both open and closed versions, where a coverslip placed
over the specimen chamber in the closed version facilitates
use of an upright microscope and transmitted light imaging
for inverted stands. Creating a perfusion system for larger
plant specimens will require construction of your own
chamber apparatus.
Temperature control
Controlling temperature on the microscope stage is diffi-
cult. Rapid or cycling temperature shifts in the microscope
room, often found in air-conditioned or heated rooms
where the thermostat is elsewhere, can be a significant
problem for maintaining focus. They may also interfere
with the biology of the plant system. As a general rule,
keeping the room and microscope at a constant tem-
perature is a better plan than attempting to keep the
specimen at a defined temperature in a room that is
fluctuating. Fitting part of the microscope, including the
stage, with an air-conditioned plexiglass enclosure works
reasonably well to buffer the specimen against rapid
temperature changes. Temperature-controlled specimen
chambers can be purchased that provide thermostat-con-
trolled updating of the medium. Using these stages is
only recommended if temperature shifts are desired for
experimental purposes. Perfusion with medium from a
temperature-controlled source is an effective method for
regulating specimen temperature or to introduce rapid
temperature shifts, provided the flow rate and total vol-
ume are high enough to accommodate the heat or cold
transfer under your imaging conditions.
Creating a mounting protocol
Sterilize the chamber with ethanol or bleach, if required.
Clean a large format number1.5 coverslip with lint-free lens
tissue on both sides. For sterile preparations, apply ethanol
to the coverglass and gently flame to get rid of residual dust,
bacteria, oils or other debris. Do not continually heat the
coverslip or it will deform. Apply vacuum grease to the
coverglass, using a 5-ml syringe to create a bath or for
adhering the coverslip to a chamber. If desired, cut a section
of 22 mm coverslip for use as a specimen clamp and store in
ethanol for later use. For adhering tissue culture cells or
embryos to a slide using poly-L-lysine, treat coverslips for
5 min with 0.1 N HCl, in lieu of alcohol, and rinse with dis-
tilled water prior to application of poly-L-lysine.
Move the specimen from the growth culture to the
chamber in a manner that avoids rapid changes in tempera-
ture or humidity. For specimens grown on agar plates,
wetting the specimen with medium prior to transfer, espe-
cially if working in a laminar flow hood, will help prevent
dehydration. For leaf tissue or tissue peels, submerge the
tissue in medium for several minutes to relieve it of trapped
gas bubbles. For clamping, apply two spots of grease on to
the coverglass, spanning where the plant will reside. Pipette
a small amount of medium on the coverglass just prior to
transfer of the plant. Carefully place the specimen(s) on the
coverglass, and, if required, attach the second coverslip or
coverslip clamp with forceps. Add medium to bring the
mounting chamber up to volume.
Equilibrate the plant for a minimum of 15 min prior to
starting any experimental measurements, especially if using
perfusion. Take note of any property of the specimen that
could have an effect on the biology you wish to examine.
Record the details and timing of the specimen mount either
in a database or on a dedicated worksheet with large enough
print for easy viewing in the dim microscope room. Where
practical, replicate the conditions and timing of your proto-
col explicitly. The details often matter later, even if they
seem initially trivial.
576 Sidney L. Shaw
ª 2006 The AuthorJournal compilation ª 2006 Blackwell Publishing Ltd, The Plant Journal, (2006), 45, 573–598

2. Capturing information in a digital image
The one inescapable rule for imaging live cells is that you
must limit the radiation (light) used to illuminate the speci-
men. Unlike fixedmaterial, the massive photon flux used for
fluorescenceandbrightfield imagingwill affect thebiologyof
the specimen, especially a plant cell attuned to light collec-
tion. Evolution has not developed an effective protection
against light flux that is 100 to 10 000 times greater than
normal terrestrial levels. Plants contain an extraordinary
number of molecules that absorb, redirect, or serve to inter-
pret incident light. Activating or damaging these molecules
can affect physiological processes as well as initiate stress
responses in the plant, feeding back directly on the biology
under study. Beyond the intrinsic biological issues, high light
exposure photobleaches the dyes and fluorescent proteins
used for contrast generation. Photobleaching ruins the signal
and introduces free radicals into the cell (Bensasson et al.,
1993; Dixit and Cyr, 2003). Hence, the amount of illumination
used to create an image must be balanced against specimen
damage and signal loss over the duration of the experiment.
Accomplishing that goal requires an understanding of what
constitutes an image and how the elements of different
microscope systems contribute to image formation.
The good image
We begin by defining an image as a distribution of intensi-
ties and a feature as a subset of image intensities that forms
a pattern. A feature may be simple, like a spot, or complex,
like the collection of spots that make up a recognizable face.
Our confidence in the feature’s identity is based upon how
well the pattern in the image matches our criteria for an
object pattern, and the uniqueness of the pattern within the
image. Finding a spot, for example, requires detecting an
intensity difference against a background. Finding a specific
spot, in a field of spots, calls for more information about
relative intensity or position. Finally, identifying a feature
with the complexity of a face requires finding subtle inten-
sity changes, grouped into a spatially related context. The
important point is that features of different complexity re-
quire different amounts of information for identification. The
goal in imaging a fixed specimen is to maximize the infor-
mation content in the image. In contrast, a good live cell
image contains just enough information to confidently
identify the feature of interest. Collecting more information
can unnecessarily damage the specimen or probe.
The imaging system uses light to convert a molecular
distribution (the specimen) into a representative intensity
distribution (the image). In that sense, any measurable
difference in image intensity, informs us about the speci-
men. When probing the specimen with light, the physics of
light capture by lenses and the damaging effects of irradi-
ation fundamentally limit the quantity of light used for
image formation and the spatial dimensions over which
intensity differences can be discriminated. In other words,
the optical system puts an upper bound on the amount of
information that can be collected from the specimen
(Figure 2a). The image detector further limits information
collection based on the amount of space and intensity that
are grouped together to create each pixel value (Figure 2b).
For example, a 10 · 10 array of pixels obviously has limited
information capacity. A 1000 · 1000 pixel array of the same
physical size captures much more spatial information, but
each array element collects only 1/10 000th as much light, a
massive difference in light sensitivity. Creating the best
representation of the specimen, while not damaging the
specimen in the process, therefore requires knowledge of
the optical limits of the microscope and the compromises
available when using electronic image detectors.
Our confidence in the attribution of feature identity relies
upon the principles of measurement. As an abstracted
example, let’s say 50 people measure the same pencil using
plastic rulers. The pooled measurement values form a
distribution, where the mean value represents the best
approximation of pencil length and the spread of the
distribution helps us understand how much confidence to
have in that averaged value. We are more likely to believe an
average from 50 tightly grouped values than an average
from fivemeasurements that are broadly spread. The spread
of the data, representing the precision of the measurements,
is important because a broad, highly asymmetric or multi-
modal distribution would lower our confidence or suggest a
measurement error. The estimate accuracy, how close it
comes to the true length value, depends upon how many
measurements we take and measurement biases, such as
differences in the plastic rulers, participant’s attention span,
or if some people used the pencil to record their measure-
ments.
Each image in an imaging experiment constitutes a
measurement, where the information in the image contri-
butes to the confidence level in your final stated result. Live
cell images are often grainy, fuzzy, ill-composed shots that
represent the maximum amount of information extractable
from the specimen under experimental conditions. Synony-
mous with the example above, confidence in your claim of
feature identity relies on showing many examples of the
feature, evaluating the range of feature variance, and
demonstrating that the feature does not differ from a
positive control. In summary, even if the image is lacking
in aesthetic appeal, it is a good image if it contains the
information required to detect a feature and further your test
of hypotheses.
Contrast and resolution
Live cell imaging involves finding a balance between image
quality and limiting the damage to specimen or probe.
Imaging the live plant cell 577
ª 2006 The AuthorJournal compilation ª 2006 Blackwell Publishing Ltd, The Plant Journal, (2006), 45, 573–598

Making a good compromise requires a practical under-
standing of image quality. To begin, we need to relate the
representative units used for describing image quality (pix-
els and gray levels) to the physical units of specimen
measurement (nanometers and photon flux). Ideally, every
pixel value in the image would represent the exact photon
count coming from a precisely defined area of the specimen,
independent from all its neighboring pixels. That is simply
not the case. Gray level values and the stated degree to
which the picture elements (pixels) define an object’s mor-
phology are relative estimators. This relationship is most
commonly explained using the concepts of contrast and
resolution.
Estimating light intensity
Opening the camera shutter allows light energy to collect in
the pixel elements of the electronic detector. If we kept track
of the accumulated photon to electron conversions (photo-
electrons) over time, it would reveal a Poisson distribution of
events. In other words, photon emission has the funda-
mental property of being stochastic with respect to time.
Independent of the photoelectrons (signal), spurious elec-
trons also accumulate randomly in the detector (noise). The
stochastic nature of both these events has a defining influ-
ence on our ability to put an exact value on light intensity
(Figure 3a). If an image is taken with no light provided to the
detector, the signal-independent electrons collect and form
a distribution, characterized by a mean value and a standard
deviation. The mean represents a background and the
standard deviation describes the uncertainty, or system
noise, imparted to the signal value. When light is applied,
photoelectrons and signal-independent electrons are col-
lected but cannot be distinguished from each other. The
background value, calculated from a dark image, is often
subtracted from every pixel value in the image, but the
uncertainty due to the noise (estimated as the standard
deviation of the averaged background) cannot be subtracted
away. Each detector element contains signal and noise
electrons that are converted to an intensity/pixel/gray level
value, where the number of electrons converted to each
pixel level can be any integer value, including 1.
Let us be clear that each pixel value is only a statistical
estimate of the photon flux associated with an area of the
specimen. Since relative intensity levels constitute the data
we want, it is important to know how much confidence to
Inte
nsity
leve
ls
Resolution19 13 9 5 1
250
100
50
25
5
Dyn
amic
ran
gePixel size
1 2 4 8 12
2
4
8
16
32
Optical system Detector system(a) (b)
Figure 2. Collecting specimen information is limited first by the optical system and then by the detector.
A human face is used for illustration to more easily relate information content to image quality. The optical system determines the quantity of light available for
contrast generation and the physical resolution limit (a). As light intensity increases (a, bottom to top), the photon counting noise becomes less apparent. As optical
resolution increases (a, left to right), the general features of a face appear followed by more specific features including a nose, mouth and locks of hair. With more
information, we gain confidence in estimating age, sex, mood, number of teeth, and any unique features of the individual. Note how the intensity and resolution
work together. Resolution was decremented using Gaussian kernels of the size marked on the vertical axis and noise was added as a square root function of scaled
intensity. The detector system takes the information captured by the optical system [upper right in (a) to bottom left of (b)], and samples the data into discrete light
levels (b, bottom to top) and spatial elements (b, left to right). As the pixel size increases (b, left to right), feature details are lost until we are no longer certain it is a
face. Similarly, as the number of gray levels used to capture the optical signal decreases (b, bottom to top), shading is lost and only highly contrasted features
remain. Again, note that the two factors work together in providing information. For live cell imaging, the amount of information collected should be proportional to
the amount required for verifying your hypothesis (e.g. this is a face, this is an old face, this is a happy face).
578 Sidney L. Shaw
ª 2006 The AuthorJournal compilation ª 2006 Blackwell Publishing Ltd, The Plant Journal, (2006), 45, 573–598

have in the intensity estimates. Since each pixel value is a
single measurement of a Poisson process, the odds of that
single pixel value representing the long-term average pho-
ton flux are grossly approximated by a normal (Gaussian)
distribution, with the first standard deviation equal to the
square root of the pixel value. That square root relationship
is important. It defines the maximum confidence we could
have in any single measurement of photon flux, even if we
eliminated all of the electronic noise in the system.
The over-arching point is that when we want to quantify
the amount of light originating within an area of the
specimen, we can only estimate that value, and our confid-
ence in the estimate depends upon the magnitude of the
signal and the noise in the measurement system. For that
reason, a common means of specifying data quality from a
detector is the signal to noise ratio (SNR). A SNR of 2.7:1 has
been suggested as a lower limit for detecting signal over
noise (Colarusso and Spring, 2003). For example, let us
consider two consecutive exposures, one with the shutter
closed and the other with the shutter open. Evaluating the
dark image, the average pixel value is 50, with a standard
deviation of 7. Looking at the specimen image, we find a
pixel with a value of 114, well above the background. The
signal is the proposed number of photoelectron conver-
sions, calculated as the pixel value minus the background
(114 ) 50 ¼ 64). The total noise equals the system noise,
measured above as 7 (and also estimated as the square root
of 50), added in quadrature to the photon counting noise,
which is equal to the square root of 64. Simply dividing the
signal (64) by the noise [(72 þ 82)0.5 ¼ 10.6] yields an SNR for
the pixel value of about 6. When the pixel values fall below
73, where the SNR approaches 2.7, the odds that the value is
related to statistical fluctuation, instead of signal, are
uncomfortably high. As a rule of thumb, each SNR unit
roughly equates to one standard deviation from the mean
signal value, and 2.7 standard deviations implies a reason-
able confidence for detecting signal.
Intensity values are almost always created from multiple
(photo)electrons (Figure 3a),meaning that the distribution of
pixel values no longer forms a Poisson distribution with the
standard deviation (noise estimate) equal to the square root
of the mean. Therefore, a measured standard deviation is a
safer estimator for noise. For live cell work, and especially
live plant cells, there is nearly always light collected that is
unrelated to the feature of interest (autofluorescence, etc.).
As more unwanted light is added to the image from
autofluorescence, internal reflections or out-of-focus ele-
ments, the feature becomes more difficult to identify.
In practice, the unwanted light and electronic noise are
estimated together by calculating the average value and
standard deviation from an area near the specimen instead
of from a frame taken with no light to the camera. That
background can change from image to image and should be
taken from enough pixels (>36) to create a robust estimate
for the mean and standard deviation. The signal is generally
calculated as the average of a few closely associated pixels
minus the previously calculated background value. The
noise approximation is created as above, by adding the
noise components in quadrature, using the square root of
the signal value for the noise estimate when necessary. The
final SNR now takes into consideration the effect of the
unwanted light. If stray light increased the background value
in the above example from 50 to 500, it would no longer be
possible to detect the signal of interest (64) because the
noise [(500 þ 64)0.5 ¼ 24] has increased the level of uncer-
tainty for the pixel intensity (SNR <2.7).
Increasing confidence in an intensity estimate is achieved
through data pooling or averaging. Obviously, using the
averaged value of 50 pixels to represent a claim is a much
stronger argument than claiming that a single pixel accu-
rately represents the specimen intensity. Summing or
averaging a block of pixels together increases confidence
at the expense of spatial resolution. Averaging sequential
frames together increases confidence at the expense of
temporal resolution. The increase in SNR from spatial or
1000
800
600
400
200
0
1000 25 50 12575 150
3000
2500
2000
1500
1000
500
0
System noiseelectrons
Photo-electrons
Totalelectrons
8e/level
1e/level
2e/level
4e/level
Electronsconverted togray levels
Counts accumulatingin the detector
(a)
(b)
Occ
uran
ce in
10
000
tria
ls
Figure 3. Signal and noise electrons appear randomly with respect to time.
(a) A simulated distribution of the counts collected in a single detector
element over 10 000 exposures. The signal-independent electrons, repre-
senting dark current and read-out noise, form a distribution of system noise
with an average of 16 and a standard deviation of 4. The distribution of
photoelectrons forms a similar distribution with an average of 100 and
standard deviation of 10. The detector element records the combined
photoelectrons þ noise electrons distribution with an average of 10 and a
standard deviation between 10 and 11. (b) Conversion to a gray level using 1,
2, 4 or 8 electrons per gray level. Increasing the number of electrons per gray
level lowers sensitivity but increases confidence in the intensity value.
Imaging the live plant cell 579
ª 2006 The AuthorJournal compilation ª 2006 Blackwell Publishing Ltd, The Plant Journal, (2006), 45, 573–598

temporal averaging is generally proportional to the square
root of the number of pixels averaged. Therefore, provided
the signal is constant and the noise is random, averaging
four frames reduces noise by a factor of 2, while averaging
16 pixels reduces the noise by a factor of 4.
Using more than one electron for each gray level increa-
ses confidence in the intensity value at the expense of
sensitivity. A detector with perfect collection efficiency and
�4 electrons noise would report 100 photons as 99–101 less
than 10% of the time, but taken four electrons at a time, a
value of 24–26 is reported about 40% of the time (after
background subtraction).
Relating intensity to contrast
Contrast is a relative value and generally refers to black
(absence of signal) and white (saturating signal) and the
intervening shades of gray. When we view a linear gradient
of eight monochromatic intensity steps from black to white,
the transitions appear distinct (Figure 4a). As additional
shades of gray are added between black and white, our
confidence in finding the individual contrast steps falters.
We can no longer determine when one shade stops and
another starts because the noise generated by our optic and
neural processes matches the difference in the intensity
step. The number of resolvable steps between black and
white defines a contrast range and therefore the number of
possible information units available from intensity. The
contrast range is determined by the saturation point of the
imaging system and the noise associated with each signal
intensity.
A typical imaging device has a much larger available
contrast range than the light-adapted human eye. Where the
Obj
ectiv
e nu
mer
ical
ape
rtur
e
Relative intensity
1.4
1.2
1.0
0.8
0.6
Signal/noise
Res
cale
d co
ntra
st le
vels
100 50 25 10 5 2.5
(a)
(b)
(c)
Spe
cim
en r
elat
ive
inte
nsity
1
2
3
5
10
Samples per RU
15.6 9.5 4.7 2.3 1.5
1 2 10 20 50
0%10
0%
Figure 4. Contrast and spatial resolution.
(a) A linear contrast scale of 8, 16, 32 and 64 steps from no signal (0%) to
saturation (100%) has been replicated with a progressive increase in signal-
dependent noise. The transitions between steps become increasingly more
difficult to identify as the noise level increases. For each panel, signal-
dependent noise was added and the intensity was rescaled from the new
maximum to zero as if sampled by a noiseless detector.
(b) Spatial resolution is affected by both the lens numerical aperture and the
recorded intensity. Spacing of the six points in the first column of each panel
represent the resolution limits specified by the five numerical apertures listed
on the vertical axis. Points in the first row are spaced just below the resolution
limit for a 1.4 NA lens, while points in the remaining rows are at the resolution
limit for the five numerical apertures listed. Each image in the first column
simulates the use of a different NA lens on the same points. As NA increases,
the photons are concentrated into a smaller, brighter spot. As the relative
number of photons emitted per point increases, indicated on the horizontal
axis, resolving the individual spots becomes easier. Background represents
random electron noise.
(c) The relationship between spatial sampling and signal collection. For each
panel in the first column, proportionately more simulated photons were
collected with the same read-out noise and a 1.4 NA objective lens. The upper
left panel represents an SNR of 2. As fewer pixels are used to image the same
area, the signal per pixel increases while resolution is lost. When too few
pixels are used to sample the resolution unit (RU), points often blur together
or form new patterns through a process termed aliasing.
580 Sidney L. Shaw
ª 2006 The AuthorJournal compilation ª 2006 Blackwell Publishing Ltd, The Plant Journal, (2006), 45, 573–598

human eye has problems accurately determining more than
about 100 shades of gray, scientific-grade CCD cameras can
often resolve thousands of shades of gray between satura-
tion and the absence of a signal. Contrast adjustments are
often made after the image is taken, by scaling the relative
pixel values, using a look-up table (LUT) and software.
Scaling the image intensity values to accommodate normal
human vision helps us in our visual interpretation of the
data, but it does not improve the SNR of the data.
For example, if a monochrome image has 1000 contrast
levels and the feature we are looking for is in the brighter
portion of the image, it may appear washed out and difficult
to identify. This occurs because the 1000 gray levels in the
image have been compressed to less than 256 values for
presentation on the computer monitor and your eyes can
only discern a fraction of that contrast range. If the feature
intensity spans 50 contrast steps in the original image
between values 900 and 950, it might appear as only 5 or 10
steps on themonitor and look like an igloo in a snowstorm to
our eyes. By setting all values in the image below 750 to 0
(black), and rescaling the values between 750 and 1000 to be
displayed from 0 to 250 (black to white) on the monitor, the
effective contrast will be larger over the contrast range of our
feature of interest. We will be better able to identify the
feature because the contrast range is better scaled for
human perception. If, however, the feature intensity only
spans five contrast steps out of 1000 in the original image,
scaling the contrast is not going to help in resolving the
feature identity.
From the above discussion, we can now put the concept of
contrast into perspective with regard to image quality. I have
defined contrast as a relative measure of intensity and a
contrast range as the number of contrast steps that can be
differentiated in the image. Deciding whether two pixels or
regions of intensity constitute different contrast or intensity
levels boils down to a question of statistical confidence. For
example, given the noise properties of the image, could you
pick one region as being different from the other more than
say 15 times out of 20? This is directly analogous to treating
one value as signal and the other as noise, and asking if
there is reasonable evidence that the SNR exceeds 2.7. The
general goal for live cell imaging is not to get the maximum
number of possible contrast steps (the highest ‘quality’
image), but rather to capture enough contrast to confidently
identify the feature of interest without damaging the speci-
men or probe.
Resolving objects in space
Spatial resolution is defined by the ability to identify an
intensity difference between two points (Jonkman et al.,
2003). If we imagine two equally bright points moving to-
gether in tiny increments, the points are still resolved when
the intensity difference in the space between them is greater
than that expected for the noise (Figure 4b). That minimum
resolvable distance, the resolution limit, is ultimately
determined by the physical properties of light and the
objective lens. If fluorophores, for example, are concentra-
ted into a progressively smaller area, the resulting spot size
stops shrinking in the microscope when it reaches a diam-
eter just larger than the resolution limit of the lens. The
spot size is limited by the diffraction properties of the
objective lens. The same two points, at the same magnifi-
cation, appear larger using a low-resolution lens and smaller
for a high-resolution lens (Figure 4b). Hence, two points
spaced the same distance apart are more likely to be
resolved, by the above criteria, with the high-resolution lens.
By extension, an edge or a line in a high-resolution system
becomes softened in a low-resolution system. As the resol-
ving power increases, spatial variations in contrast become
more distinct.
Capturing the available optical resolution in an image is
limited by the spatial sampling rate of the detector
(Figure 4c). Lets say the physical resolution limit of the
optical system is 1 lm and we find two spots placed 3 lmapart. If the spots appear 30 pixels apart in the image, we
should see two peaks and a valley, provided we can
confidently detect the intensity peaks. If the peaks are imaged
only two pixels apart, it becomes nearly impossible to say
that the difference in intensity in the intervening pixel is due
to a real intensity difference, and not noise. The resolution is
under-sampled in the image, and information was lost. If we
image two points that are placed 0.25 lm apart, using the
sameoptical system, andmagnify the image so that 30 pixels
span the area, there is still no way to resolve the points in the
image. The over-sampling will not compensate for a lack of
resolution in the original image (Stelzer, 1997).
For live cell work, I suggest a sampling rate of 3–8 pixels
per resolution unit to collect the majority of the resolved
information. The often-suggested Nyquist sampling limit of
two pixels per resolution unit is misrepresented for imaging.
Nyquist demonstrated that 2.3 discrete samples per mini-
mum frequency component could be used to recapitulate
the information in the signal waveform, provided that the
correct basis function was employed in the reconstruction
(see Young, 1989). Camera-based imaging systems, and
most point-scanning systems, use a square grid (Cartesian)
pixel array. The signal is integrated between points rather
than sampled at discrete points, resulting in bleedthrough or
non-independence in sampling for optically resolved points
if there are too few pixels. Resolving feature elements in the
image that are not parallel or perpendicular to the pixel array
requires more sampling, because the pixel centers are
proportionately further apart in the Cartesian array. Lastly,
pixel intensities are nearly always reproduced as raw values
without correction for sampling density or any underlying
wavelength or pattern. Magnifying the image to the detector
such that only two pixels cover each resolved distance will
Imaging the live plant cell 581
ª 2006 The AuthorJournal compilation ª 2006 Blackwell Publishing Ltd, The Plant Journal, (2006), 45, 573–598

not capture all of the available information from the optical
system.
Having a resolution limit implies that the distance
between two points cannot be measured if it lies below the
resolution limit. For example, reporting two features as
being 0.25 lm apart, using a lens with a 1 lm resolution
limit, is highly suspect. However, a distance between two
spots further apart than the resolution limit can bemeasured
with accuracy greater than the resolution limit. The center of
a single, luminous point can be estimated to within 10 nm,
dependent upon sampling and SNR (Ober et al., 2004).
Therefore, the distance between any two luminous points,
when more than the resolution limit, can be measured to an
accuracy in the tens of nanometers (Inoue, 1989).
Resolution and contrast are interdependent
Contrast and resolution are inextricably linked in the image
(Figures 2a and 4b). Resolution is literally defined by the
ability to demonstrate contrast between two points. Obvi-
ously, generating contrast is required for capturing resolu-
tion in the imaging system. Similarly, as optical resolution is
changed, the signal intensity per pixel, and thus the uncer-
tainty level in feature identity, will change. The crucial idea is
that resolution and contrast must be considered depend-
ently whenmatching the information content of the image to
the requirements for feature identification in the live cell
image.
3. Modern imaging systems
Collecting enough light from the specimen and getting light
to interfere in an informative manner provides the contrast
and resolution needed for feature detection. Biological
materials are mostly transparent to light, having few chro-
matic features or large changes in refractive index for pro-
ducing contrast. Therefore, many techniques have been
invented to enhance the limited contrast available from the
specimen or to add contrasting features, such as fluores-
cence. Before deciding what technique to use for your
experiment, there are several general aspects of the imaging
system to consider. These include the microscope body
style, the objective lens, the illumination system and the
image detector.
Microscope body style
Most live cell imaging systems use a fixed stagemicroscope,
more commonly foundwith invertedmicroscopes. The fixed
stage provides a stable platform for perfusion and micro-
manipulation equipment, and gross focusing does not dis-
turb the specimen. The inverted microscope has the
advantage that open chambers can be used with the speci-
men flattened against the bottom coverglass. The upright
microscope handles immersion lenses better than inverted
body styles and has a direct port to the image detector,
avoiding minor light losses through side ports. Newer
frames often includemotorized focusing, filter changing and
objective selection. While automation brings convenience,
there is nothing inherently better about the optical per-
formance of an automated microscope. Instrumentation for
maintaining focus, either laser-based or mechanical, can be
extremely valuable for time-lapse applications and requires
a motorized focus.
Most microscopes designed for live cell imaging sit on a
vibration isolation table. Isolation from mechanical distur-
bance is essential for micro-manipulation, but more import-
antly, it greatly improves image resolution. Vibration from
centrifuges, elevators, autoclaves, and the compressors in
freezers and refrigerators blurs the image as it is recorded.
The objective lens
The most important tool for your work is the objective lens.
Lens selection begins with identifying three parameters: the
numerical aperture (NA), the working distance and the
magnification. The NA is the most valuable feature because
it determines the lateral and axial resolution limits and the
amount of light collected (i.e. the available resolution and
contrast). Objective NA ranges from 0.1 up to 1.4, or slightly
beyond, where higher NA reflects higher resolving power.
High-NA lenses (>1.0) have a short working distance, or
maximum focal distance from the coverslip, and require an
immersion medium, such as water or oil, between lens and
coverglass. Working distance is often overlooked in lens
selection, but becomes very important for plant work due to
the thickness of live specimens. Magnification determines
how large the specimen will appear, but might better be
thought of as determining how much of the specimen area
will be viewable in the microscope. Generally, magnification
increases with NA and decreases with greater working dis-
tance.
Microscopes designed since the mid-1990s use infinity-
corrected optics, replacing the fixed path length for older
objective lenses. The infinity-corrected lenses generally
have better light transmission, more working distance, and
are not compatible with older microscopes because of the
requirement for a tube lens elsewhere in the microscope
stand. Objective lenses are corrected to focus red and green
(achromat) or red, green and blue (apochromat) to the same
image plane. In an achromat, and even some apochromat
lenses, the axial focus position for blue and ultra-violet light
is different from green and red light, even in lenses where
differently colored objects co-align in the lateral field. This
causes serious problems when determining the relative
positions or intensities of two probes or when ratio-imaging.
In addition to chromatic correction, spherical aberrations in
the lens can be corrected to achieve a flat visual field (plan).
582 Sidney L. Shaw
ª 2006 The AuthorJournal compilation ª 2006 Blackwell Publishing Ltd, The Plant Journal, (2006), 45, 573–598

Microscope manufacturers supply a variety of lenses with
nearly the same NA, magnification and working distance.
Generally, these lens designs trade light transmission
efficiency for better correction or preservation of light
polarization. The additional glass elements needed for
correcting chromatic and spherical aberrations tend to lower
transmission efficiency. Lenses made for fluorescence micr-
oscopy (e.g. Fluar, Fluor) transmit more light over a broader
spectral range than other lenses, but are often poorly
corrected for spherical and chromatic aberration. The abso-
lute light transmission efficiency of a lens tends to be a
closely guarded secret. Lenses made for DIC and polarized
light microscopy may be highly corrected, but less efficient
for light transmission. Polarized light objectives use strain-
free glass components that preserve light polarization.
Phase contrast objectives have a dark ring inside that only
has a slight effect on transmission efficiency. The standard
or fluorescence lenses are the best choices for live-plant
work, unless high-resolution DIC or polarization is required
for the experiment.
Objective lenses are designed to work with coverslips of a
specific thickness, usually marked on the side of the
objective lens. Nearly all microscopes made for the life
sciences have lenses corrected for a number 1.5 coverslip.
Using a number 1 or 2 coverslip with these objective lenses
markedly degrades image quality. Lenses originally
designed for electrophysiology studies, often called dipping
lenses, do not require a coverslip at all. These lenses have a
ceramic head and dip directly into the bath medium while
working with a live specimen.
Oil immersion lenses are designed for imaging specimens
tightly pressed to the coverslip. If liquid medium appears
between the specimen and coverslip, or if imaging through
more than a 20 lm of cell volume, the light-focusing
properties of the oil immersion lens begin to falter, and in
the worst case, add noise (improperly focused light) to the
image. This is very often the case for live plant specimens.
Water and glycerin immersion lenses were developed for
these conditions because the immersion medium better
matches the imaging medium and cytosol. Even though the
NAwill only reach about 1.2–1.3, instead of 1.4 for oil lenses,
the SNR and resolution for the image may be significantly
improved under live-cell imaging conditions. Flat-field cor-
rection is sometimes poor, but a typical confocal microscope
or imaging camera only captures less than the middle two-
thirds of the field of view, wheremost lenses have a flat field,
regardless of correction. If the culture medium contains
enough highmolecular weightmaterial to alter the refractive
index, try using the medium between the coverslip and
water immersion lens, adjusting the correction collar as
explained below.
Prioritize the selection of the objective lens in the follow-
ing way. Find the highest NA lens that still permits adequate
working distance for focusing through the features of
interest in the specimen. Choose the lens magnification that
will project only the part of the specimen you want to image
into the detector. Matching the magnification to the detector
will be discussed below. If the specimen is in direct contact
with the coverslip, an oil immersion lens will probably
provide the best light collection ability. If there is liquid
between the specimen and coverslip, or if you are focusing
through a lot of cell volume, both the conventional and
‘dipping’ water immersion lenses may offer better contrast,
and near comparable resolution. If the objective lens has a
correction collar for adjusting to different coverslip thick-
nesses and immersion media, it is imperative that you
determine the optimum setting (explained below). Micros-
copy applications requiring short (<380 nm) or long wave-
length excitation (infra-red in two-photon excitation) or
polarized light require specialized objective lenses where
the optical materials will not interfere with the illumination
energy.
The illumination system
The illumination system contains a light source, shutters for
exposure timing, and filters for selecting both light intensity
and wavelength. The goal for specimen illumination is to
generate a temporally constant, spatially uniform field of
known spectrum for a precise amount of time. Light sources
for brightfield microscopy include Tungsten/halogen lamps
and light-emitting diodes (LED). Newly introduced LED
sources provide a more constant spectrum over their
intensity range and generate less heat. Fluorescence micro-
scopy requires more intense illumination, typically provided
by plasma arc lamps or a scanned laser beam. Plasma arc
lamps, with mercury or xenon as the vapor source, yield
enough light that a narrowwavelength band can be selected
with a filter for fluorescence excitation. The output from a
xenon source is relatively stable and contains a smooth
spectrum of wavelengths, both important for quantitative
applications such as ratio imaging (see below). Mercury arc
lamps are very intense, but show flicker as they age and
have an irregular spectrum containing sharp output peaks
(see Cyr et al., 2006).
Laser light has special properties harnessed for specific
applications. A laser produces one or more monochromatic
outputs, often called lines, concentrated in a small diameter
(usually 0.5–3 mm) beam. The majority of lasers in imaging
systems are either gas filled tubes (e.g. krypton/argon or
helium/neon mixtures) or solid-state diodes. Diode lasers
have a potentially longer lifetime with less upkeep, although
the power and beam quality are often worse than for gas
tube lasers. Laser beams remain collimated over long
distances, fanning out less over distance than light collected
from a lamp and collimated with a lens. Laser power is
specified in watts (J sec)1) where specimen illumination is
typically in microwatts. The power can be propagated as a
Imaging the live plant cell 583
ª 2006 The AuthorJournal compilation ª 2006 Blackwell Publishing Ltd, The Plant Journal, (2006), 45, 573–598

continuous wave or concentrated in time as pulses. The
stable, well-focused light from a continuous wave laser is an
excellent excitation source when scanned in the confocal
microscope. However, lasers are rarely used for widefield
fluorescence for several reasons. Expanding the beam to fill
the field of view reduces the intensity to below what is
required for fluorescence excitation, unless you have an
extremely high-powered (expensive) laser. As well, the
coherent (in-phase) light from strong lasers imposes limita-
tions on diffraction and interferes with itself in a microscope
setting, resulting in randomly speckled illumination pat-
terns. Pulsed lasers carry a tremendous amount of peak
power, and are used for such applications as multi-photon
excitation and fluorescence lifetime imaging (covered
below).
Microscopes developed for live cell imaging need shutters
for the illumination system to limit specimen exposure.
Mechanically operated shutters, precisely timed to the
exposure, are the best tools for limiting specimen illumin-
ation time. Be aware that some microscope systems that
have not been optimized for live cell work will inadvertently
leave the shutter open until the image has been transferred
from the detector to a computer. An additional 0.5 sec of
illumination time per exposure can be disastrous for time-
lapse experiments.
Filters condition the illumination for light frequency
(wavelength/color) and for intensity before reaching the
specimen. The intensity of non-laser-based illumination
should be handled with optical density filters, where poss-
ible, and not through changing the electrical power driving
the lamp. Optical density filters are typically metal-coated
glass or quartz that attenuate the light without dramatically
altering the color spectrum. White balance filters, excellent
for photographic films, are less useful for digital applica-
tions, but green band-pass filters for brightfield illumination
will improve resolution by limiting the effects of chromatic
aberration in the lenses.
For live cell work, the most critical filter is an infra-red or
‘heat cut’ filter installed between the lamp and the specimen
in both brightfield and fluorescence illumination pathways.
Mercury, xenon and halogen lamps produce enough infra-
red to damage the specimen, and, in many cases, the infra-
red is not blocked by the fluorescence filter cube. Laser
illumination for confocal microscopy does not require this
filter, but locating the specimen using unfiltered brightfield
or fluorescence illumination on the same microscope can
damage the specimen.
Filters for selecting a wavelength or bandwidth of light
for fluorescence excitation are most often made of dichroic
material and are mounted in a filter wheel or directly into a
filter cube. Illumination at any wavelength in an excitation
spectrum results in emission over the entire emission
spectrum. Therefore, a narrow (approximately 10 nm)
band-pass excitation filter is strongly recommended
for live cell imaging in plant cells to reduce the back-
ground autofluorescence and limit excitation of endog-
enous fluorophores and sensory molecules. The wide-
band-pass filters and short-pass filters in the excitation
path of many pre-packaged filter cubes were not designed
for plant work because they increase the background
fluorescence.
Filters and dichroic mirrors for selecting emission band-
width are often overlooked when trying to improve the SNR
in the imaging system. The dichroic mirror need only have a
sharp cut-off between the excitation and emission peaks and
minimal attenuation of transmission in the spectral region of
interest. Selecting an emission filter requires more thought
for both widefield and confocal applications. As the filter
encompasses more of the emission spectrum for the fluor-
ophore of interest, the signal will increase for that fluoro-
phore. The signal will also increase for background
fluorophores, often crippling the SNR for the experiment.
Selecting the correct emission filter requires finding an
acceptable balance. If it is possible to obtain an emission
spectrum from your sample, with and without the intro-
duced fluorophore, it is valuable in selecting the appropriate
band pass filter. Independent of passed bandwidth, the
transmission efficiency should be as close to 100% for the
entire selected range as possible.
Special filter sets having multiple pass bands, for two- or
three-color applications, do not pass as much light as single-
pass filters made for the same wavelengths. In order to
separate the wavelengths on themonochrome detector, one
or more of the light paths will have to be handled separately
in the system. You will collect more light by having
independent, single-pass filters for excitation and emission,
arranged in filter wheels, but this will be traded against the
increased likelihood of image misalignment and independ-
ent flat field corrections for the two colors. Choosing the best
method for multi-color imaging will depend upon the
experimental requirements.
The detector
Live cell imaging relies heavily on electronic array detec-
tors, such as CCD cameras, and high-gain point source
detectors, such as photo-multiplier tubes (PMT). Although
differing in detail, both the digital camera and PMT are
analog sensors built on a common principle. Photons
impinging on a substrate are converted to electrons and
read out as an analog current or voltage stream. Digitizing
the signal, by serially approximating the number of elec-
trons in the stream at specific times, creates a relative
measure of light intensity, free from the progressive
accumulation of noise inherent in storing analog data. By
correlating the sampling time with the position of the array
element or the scanned beam, the intensity values are
spatially correlated to recreate the image. User-definable
584 Sidney L. Shaw
ª 2006 The AuthorJournal compilation ª 2006 Blackwell Publishing Ltd, The Plant Journal, (2006), 45, 573–598

detector settings typically include the exposure time, read-
out rate, gain and offset levels, and delimiting a portion of
the array or scan area for read-out.
Signal generation occurs when photons strike the sub-
strate material on the detector. The exposure time and
illumination intensity determine the number of photons
generated for image formation. The efficiency of photon to
electron conversion is governed by the fraction of the
detector surface that can sense photons, called the fill factor,
and the substrate’s physical quantum efficiency. The detec-
tor material inevitably generates a number of spurious
electrons, ominously termed ‘dark current’. Cooling the
detector material, often to )30 or )70�C, suppresses the dark
current.
The signal and dark current electrons are read out to an
analog to digital converter (ADC). The faster the read-out
rate, the higher the ‘read-out noise,’ either from thermally
generated electrons or from small timing errors. Together,
the dark current and read-out noise constitute the principle
noise sources in the image recording process, beyond the
statistical nature of photon counting (shot noise). Many CCD
cameras permit selection of a read-out amplifier speed,
specified in Hz (bits per second), trading faster frame rates
for a SNR loss. Similarly, the scanning speed of the beam,
relative to the sampling time of the PMT, can sometimes be
changed to increase the signal being read out to the ADC in
confocal scanning microscopy.
The ADC samples the sensor read-out over a tightly
controlled time interval, synchronized with the read-out
amplifier. This is where the photoelectrons and noise
electrons from the detector are converted to a gray level or
intensity value. The ADC has an input range that limits the
total number of electrons before saturation (white), and a set
number of electrons that are required for creating a gray
level. Dividing the input range by the number of electrons
used per gray level yields the system dynamic range,
typically specified in bits (i.e. 12 bits ¼ 212 gray lev-
els ¼ 4096:1 SNR ¼ �72 decibels). A detector with �4
electrons system noise, probably uses at least four electrons
for each gray level and would require an input range of
(4 · 212), i.e. 16 384, electrons to be digitized to 12-bit
resolution. Note that for some sensors with 12-bit (4096),
14-bit (16 384) or even 16-bit (65 500) ADCs, the image
detector material may not produce enough electrons to fill
the entire ADC input range under all circumstances. The
importance of having the ADC bit depth is to capture real
differences in signal intensity (i.e. contrast), even if it is
captured within a smaller number of gray levels than are
available to the sensor.
Setting the gain and offset parameters, together with the
read-out amplifiers, allows you tomatch the incoming signal
to the input range of the ADC (see Sluder and Hinchcliffe,
1998). For example, let us say that two adjacent array
elements collected 101 and 109 electrons, respectively. If the
ADC has an 8-bit dynamic range, and an input range of 2560
electrons, then 10 electrons are required for each gray level.
With no electronic gain, the adjacent values would be
converted to 10 and 10 for the image. If the detector noise
happened to be only �2 electrons, we might expect that
counts of 101 and 109 should be differentiable. Applying a
gain of 5, a multiplicative process, yields 505 and 545
electrons respectively, now sampled to values of 50 and 54
by the ADC for the image. Thus, the gain amplifier has
increased the difference in detector value such that it is
captured by the ADC. As a gain factor of 5 would push any
detector value greater than approximately 500 out of the
ADC input range, the offset control can be used to subtract
electrons prior to ADC entry. Subtracting 400 electrons in the
example above leaves 105 and 145 electrons, sampled to
values of 10 and 14 in the resulting image. In practice, the
gain amplifier introduces noise in proportion to the gain
factor, limiting the effective multiplier.
Set the detector to collect light from the smallest
possible area of the specimen that still contains the
information required for feature identification and context.
Imaging a larger area increases specimen exposure to
illumination and lengthens the image read-out time. For
CCD cameras, read-out area is set in the software control-
ling the camera. Matching the resolution of the lens to the
sensor resolution also needs to be taken into account and
will be discussed later. Scanning microscopies also allow
software-selectable areas for image acquisition, cleverly
disguised as a zoom function. Be acutely aware of the
interplay between the zoom and the spatial sampling rate,
often recalculated by the microscope software. If selecting
a smaller area to image does not change the number of
samples (pixels) proportionately, then the goal of shorten-
ing the illumination and read-out time has not been
achieved. You must reset the image size with the sampling
rate, keeping in mind the resolution limits of the lens
discussed below.
Implementations of modern image detectors
While the same basic principles apply to most detectors,
implementations differ markedly. The key design feature of
the CCD is that it stores electrons during exposure, without
building up substantial noise, providing exceptional dy-
namic range (Berland et al., 1998). The exposure time and
read-out rate are the critical parameters. CCD sensor ele-
ments act like photoelectron collecting buckets (Aikens
et al., 1989), starting with zero electrons and filling to a de-
fined saturation point, termed the electron well depth. For
most CCD cameras, the well depth is matched to the ADC
input range, precluding the need for user-controllable gain
and offset parameters. Selectable read-out amplifier speeds
allow trade-offs between SNR andmaximum frame rate. The
other virtues of the CCD are the high quantum efficiency, up
Imaging the live plant cell 585
ª 2006 The AuthorJournal compilation ª 2006 Blackwell Publishing Ltd, The Plant Journal, (2006), 45, 573–598

to approximately 90% in some cameras, and excellent re-
sponse linearity, where the output signal is tightly correlated
with photon counts over the entire dynamic range. The
advantages of the CCD camera are exploited in three ways.
First, long exposures can be used to collect light from aweak
signal source for detection. Second, the dynamic range
permits local contrast differences within bright and dim
features to be captured in the same image. Finally, the re-
sponse linearity simplifies the background subtraction and
calculations required for quantitative applications.
Traditionally, a ‘video’ camera denoted a vacuum tube
camera, and a ‘digital’ or ‘scientific’ camera referred to a CCD
device.Whilemost video cameras now use solid-state chips,
an important difference persists with the jargon. Typical
video cameras, engineered to output 30 frames per second,
sacrifice sensitivity and resolution for cost and speed. A
video camera can be used for brightfield work, but quanti-
fying relative differences in intensity may be stymied by
auto-gain or gamma-correction circuits, and, in some cases,
the image suffers from geometrical distortions due to non-
square pixel dimensions.
Color CCD cameras collect the red, green and blue (RGB)
parts of the spectrum into separate images and blend them
after exposure to simulate color vision. Video rate cameras
use a color mask printed over the CCD chip, lowering the
resolution by a factor >3 for even the best cameras. Better
color cameras either take three consecutive images, using a
filter wheel to select color bandwidth, or have three CCD
chips and a means for dividing the incoming light into red,
green and blue for simultaneous acquisition. Except in very
specialized circumstances, the lack of acquisition speed,
sensitivity, dynamic range and resolution for a color camera
make imaging live cells extremely difficult. Notable excep-
tions are newly designed multi-chip cameras used in ratio-
imaging and FRET applications (Nagai et al., 2004).
The PMT, and related devices, have mediocre quantum
efficiency, up to 40% in the best cases, and generate a
large number of spurious electrons (noise) compared to a
CCD (Sandison et al., 1994). The PMT does not typically
store charge, but rather uses high gain and variable offset
controls to boost signal above noise. The principal advant-
age of the PMT is its ability to measure the rapidly
changing intensity of a point source, such as the specimen
fluorescence resulting from a scanned laser beam. For
each successful photoelectron conversion in the substrate,
the PMT amplifies the signal into many hundreds or
thousands of electrons before ADC sampling. Rapid
sampling, usually on a microsecond scale, lessens the
effect of dark current build-up, and applying a massive
gain to the signal before read-out reduces the impact of
read-out noise. Therefore, signal to noise ratios for PMT
systems are typically dominated by the photon counting
variance, the ‘shot’ noise, previously described. Taking
advantage of the gain and offset control for a PMT allows
extraction of meaningful dynamic range from laser scan-
ning confocal and multi-photon systems.
There are many other detectors that you may encounter.
Cameras using complementary metal oxide semiconductor
(CMOS) sensors have displaced many CCD technologies in
the consumer market, but the poor quantum efficiency
(approximately 25%) presently limits usefulness in low-light
applications for scientific work. Intensified CCD cameras
(ICCD) have an array of micro-PMTs, called a microchannel
plate (MCP), usually fused to the CCD chip. The MCP limits
spatial resolution and response linearity, but provides
excellent signal detection capabilities when high frame rates
are critical (Colarusso and Spring, 2003). Electron-multiply-
ing CCD cameras (EM-CCD) have a gain amplifier built into
the CCD chip, allowing multiplication of the signal electrons
prior to the addition of read-out noise. These cameras
provide all of the fundamental virtues of a standard scientific
CCD, with the additional property that fewer photoelectron
conversions need to take place before the ADC can convert
the signal to a usable dynamic range. Solid-state alternatives
to the PMT have been used for many years and include
specialized CCD units and avalanche photodiodes (APD).
4. Microscopy techniques
The live plant cell is a thick specimen. Out of focus infor-
mation blurs the image and the constant churning of the
cytoplasm places limitations on exposure times. Both
brightfield and fluorescence methods used in imaging plant
cells must take into account the sensitivity of plants to light
exposure and the problems associated with resolving fea-
tures more than 20–30 lm within the specimen. Brightfield
techniques are often less harmful to live cells, but methods
for observing specific proteins using trans-illumination have
not been widely developed for live cells. Generating a
high-contrast chromatic (color) or intensity difference in a
brightfield image is more difficult than identifying a lumin-
ous intensity change (e.g. fluorescence) against a dark
background. Therefore, brightfield methods find use in fol-
lowing organelles or cell-wide behaviors, and fluorescence
methods, including confocal techniques, are used for
following specific molecules.
Brightfield microscopy
Brightfield microscopy relies upon changes in light absorp-
tion, refractive index or color for generating contrast (see
Inoue, 1986). As light passes through the specimen, areas
that alter the direction, speed or spectrum of light generate
optical disparities (contrast) when the light is collected and
focused by the objective lens. Resolution in a brightfield
system depends on both the objective and condenser NA,
and an immersionmedium is often required on both sides of
the specimen. CCD cameras provide thewide dynamic range
586 Sidney L. Shaw
ª 2006 The AuthorJournal compilation ª 2006 Blackwell Publishing Ltd, The Plant Journal, (2006), 45, 573–598

and spatial resolution required to capture the information
present in a brightfield image. Background subtraction,
using averaged frames taken with no specimen in the light
path, increases contrast dramatically (Salmon et al., 1989).
Simple brightfield viewing, with properly adjusted Kohler
illumination (see below), provides information about the cell
outline, nuclear position and vacuolar boundary. Methods
that enhance contrast include differential interference con-
trast (Smith or Nomarski DIC), polarized light, phase con-
trast, Hoffman modulation contrast and darkfield
microscopy. Specimen thickness and the optical activity
(bi-refringence) of the cell wall limit the use of these
techniques in plants.
DIC microscopy uses plane-polarized light and additional
light-shearing prisms to exaggerate small differences in
specimen refractive index. Lipid bilayers, for example, show
up well in DIC because of the difference in refractive index
between aqueous and lipid phases of the cell. The bi-refrin-
gent cell wall reduces the contrast-generating power of the
technique, but a properly aligned system should permit
visualization of nuclear and vacuolar membranes, some
mitochondria, chloroplasts and condensed chromosomes in
epidermal cells. DIC is an important technique for plant work
because, in addition to the increased contrast, DIC decreases
the depth of focus, creating a thin optical section of the thick
specimen.
Polarized light microscopy is achieved by viewing the
specimen between crossed polarizing elements. Structures
within the cell with bi-refringent crystalline properties, such
as cell wall and starch granules, rotate the plane of light
polarization, appearing bright on a dark background. Phase-
contrast and Hoffman modulation will increase contrast for
plant protoplast and tissue culture cells, but typically result
in excessive ‘ringing’ around the cells in plant tissues.
Darkfield microscopy is also limited in use to physically
isolated cells. In darkfield microscopy, the condenser directs
light into the specimen at a steep angle, so that it misses the
objective lens, unless redirected by the specimen, resulting
in a dark background with bright specimen detail. The
thickness of plant tissues generally redirects most of the
light into the objective path, reducing the effectiveness of
the technique.
Widefield fluorescence microscopy
Widefield fluorescence imaging with a CCD camera and
shutters constitutes the simplest form of live cell fluoresence
work (see Stephens and Allan, 2003). Fluorescence micros-
copy uses epi-illumination (through the objective) and relies
upon interference filters for selecting a bandwidth of emis-
sion for detection (see Taylor and Salmon, 1989). The full-
aperture light collection maximizes recorded signal and
minimizes exposure time. The main drawback to widefield
imaging is that fluorescent objects and background, out of
the principle focal plane, contribute unwanted light that
obscures the feature of interest. Therefore, widefield ima-
ging works best when the feature of interest is large, like an
organelle, or punctate in nature. If the feature is easily
resolved, widefield is the best method for live cell work.
Computational methods for reducing the effect of out of
focus light, often called deconvolution or deblurring, work
better for fixed specimens than for live cells. The computa-
tions work best when used on a series of images taken from
above to below the feature of interest. The algorithms
require a high signal count (long exposure) and an optically
homogenous medium, often hard to achieve when imaging
live cells. Other commercially available methods using
structured illumination, usually a grid pattern, for producing
pseudo-confocal images suffer for the same reasons when
applied to living plant cells. Multiple, high dynamic range
images are required for the computations, slowing acquisi-
tion time and often resulting in excessive photodamage to
the specimen.
TIRF fluorescence microscopy
Total internal reflection (TIRF) microscopy requires that
light, usually from a laser source, enter the coverslip at a
shallow enough angle that it reflects off the internal glass
surfaces without exiting to the specimen (Axelrod et al.,
1983). This total internal reflection within the coverslip
creates an evanescent surface wave with enough power to
excite fluorophores within about 50–100 nm of the cover-
slip surface, dependent upon laser power. The extreme
limitation on excitation depth works wonders for single
molecules on coverslips or for adherent mammalian cells
but shows little promise for work on plant cells that
typically have cell walls >100 nm thick (frustrating personal
observation).
Scanning fluorescence microscopy
For scanning microscopy, a focused beam restricts the illu-
mination area, limiting excitation to a spot about the size of
the objective lens resolution limit. The resulting fluores-
cence emission returning to the detector can be spatially
filtered, using a confocal ‘pinhole’, to capture only the center
of the emitting spot. As the pinhole aperture is reduced, it
blocks more out of focus light from being detected but also
lowers the total signal (Sandison et al., 1994). While the
absolute signal value is less than for the widefield micro-
scope, rejecting the out of focus light increases the specific
SNR for the feature of interest. Most strikingly, the contri-
bution from above and below the plane of focus drops off
markedly, providing the ability to optically section the spe-
cimen. For thick plant cells, this capability makes scanning
confocal microscopy invaluable for imaging fluorescently
labeled structures. Multiple detectors are easily integrated
Imaging the live plant cell 587
ª 2006 The AuthorJournal compilation ª 2006 Blackwell Publishing Ltd, The Plant Journal, (2006), 45, 573–598

into scanning microscopes, making it possible to simulta-
neously, as opposed to sequentially, image multiple fluor-
escent colors.
The major disadvantage of conventional laser scanning
microscopy for imaging live plant cells is that the image
acquisition time is relatively slow, often several seconds per
image. There is also a tendency to over-irradiate the speci-
men. The dwell time of the beam at any sample positionmay
be only a few microseconds. The excitation energy must be
high enough to generate usable signal during that dwell
time, often leading to complete saturation of all fluorophores
in the spot. Under these conditions, photobleaching occurs,
and collecting images with a high intra-scenic dynamic
range (lots of gray levels) is challenging.
Multi-photon excitation microscopy, also called ‘two-
photon’ microscopy, uses a scanned beam of pulsed laser
light. If two photons of twice the excitation wavelength hit
the fluorophore, in the right time interval, a single excita-
tion event occurs. The push to develop multi-photon
microscopy stems from the following ideas. As most
specimens are transparent to infra-red light, excitation
should be less damaging to the biological specimen and
should penetrate deeper into tissues, providing extended
imaging depth with less phototoxicity (see Stutzmann and
Parker, 2005). Further, since the probability of excitation is
related to the square of the illumination intensity, excita-
tion occurs only in a very small focal volume. The small
excitation volume relaxes the requirement for the spatial
‘pinhole’ filtering of the emission used in confocal micros-
copy, and thus more signal is theoretically available from
two-photon excitation than from conventional confocal
microscopy. The technique shows great promise for plant
systems, although it has proven to be problem-laden in the
initial commercial applications (Feijo and Moreno, 2004).
Two-photon scanning microscopy has been used in living
plants to image weakly fluorescent features, several cell
layers into the specimen (Nakajima et al., 2001). Successful
application of the technique requires access, often difficult
given the expense and expertise required to run the pulsed
laser source, and practice in finding the correct wavelength
and power range to excite the specimen without rapidly
photobleaching the fluorophore.
Hybrid scanning techniques include confocal spinning
disk microscopy and line-scan confocal microscopy. Both
techniques were developed primarily for live cell imaging
where an increase in image acquisition speed is gained for
some loss of axial resolution. The spinning (Nipkow) disk
has spirally arranged pinholes (see Maddox et al., 2003) that
scan the entire image, acting as a multi-point confocal
system. The image is recorded using a CCD camera, not a
PMT, so using a spinning disk is similar to simple widefield
fluorescence imaging. The disadvantage of the spinning disk
is that the pinhole size is typically fixed, so the degree of
confocality is no longer user-controlled, and only a subset of
objective lenses (numerical apertures) will work well with
the disk (see Egner et al., 2002). When used with an EM-CCD
or ICCD camera, spinning disk systems are proving to be
very important tools for live cell work.
Confocal systems using a line to scan the specimen,
instead of a point, decrease the image acquisition time at
some expense to resolution. Unlike the spinning disk, the
degree of confocality can be user-controlled. Instead of a
PMT, line-scan confocals use a linear CCD element to record
intensity. Newly introduced line-scanning confocal devices
will be extremely useful in imaging the rapidly changing
cytosolic compartments within plant cells.
Special techniques in fluorescence imaging
Fluorescent molecules have several important properties
that can be measured to characterized biological activity or
the cellular environment. Fluorophores have a probability of
capturing a photon (extinction coefficient) and an associated
probability of releasing the energy as a photon (quantum
efficiency) or in some other form. The probability of
accepting a photon occurs over a limited bandwidth of
excitation energy (excitation spectrum) and the emission is
restricted to a lower energy, longer wavelength bandwidth
(emission spectrum). Losing the excited state electron
(photobleaching) blocks the fluorescent emission and neu-
ters the fluorophore except under special circumstances in
some fluorescent proteins (Lippincott-Schwartz and Patter-
son, 2003). The time between photon capture and fluores-
cence emission is random, showing an exponential
relationship with a characteristic half-time, specific for the
fluorophore (fluorescence lifetime). If the excitation energy
is plane-polarized, the emission will also be plane-polarized,
with the degree of emission polarization determined by the
amount of rotation the molecule underwent in the time
interval between accepting the excitation energy and emit-
ting the fluorescent photon. Each of the described properties
of the fluorophore is highly dependent upon the local
(solvent) environment. Small changes in ion concentration,
proximity to electron donors and acceptors, and even sol-
vent viscosity can have dramatic effects on fluorescence
intensity and lifetime. Creating fluorescent probes that are
sensitive to specific changes in the environment has allowed
the biologist to monitor in vivo events in real time.
Ratio-imaging intracellular intensity changes
Fluorescence ratio imaging was developed to quantitatively
assess changes in molecular environment within the cell
(see Gilroy, 1997). Ratio imaging deals with the inherent
problem of determining when an intensity difference is due
to a change in probe property and not a change in probe
distribution (see Dunn and Maxfield, 1998). Ratio imaging
works by having a probe that can be measured at two
588 Sidney L. Shaw
ª 2006 The AuthorJournal compilation ª 2006 Blackwell Publishing Ltd, The Plant Journal, (2006), 45, 573–598

wavelengths, where at least one wavelength is sensitive to
the environmental change you want to investigate. When,
for example, calcium ions bind to certain dyes, the primary
excitation peak shifts by >30 nm. Therefore, as calcium
binds, the apparent intensity of the dye decreases. If a sec-
ond image is taken, exciting the dye at the new maximum
excitation wavelength, the dye intensity appears to increase
with increasing calcium ion concentration. By dividing one
image by the other, the intensity changes become normal-
ized to the amount of dye at that position in the cell. In other
words, the change in intensity can be attributed to a change
in dye property and not dye distribution. Further, the amount
of ratio change can be calibrated to the change in calcium
ion concentration over a physiological range, so the fluor-
escence ratio can be converted to an intracellular calcium
ion concentration. If the environmental change alters the
emission or excitation spectrum of a single probe, the gain
in intensity in one channel is exaggerated by a loss of
intensity in the other. If using two probes, one sensitive and
one insensitive to the cellular change, it is advantageous to
have them coupled to a single carrier molecule, ensuring
that they represent exactly the same cellular volume.
Ratio imaging can be accomplished using two excitation
wavelengths, two emission wavelengths, or a combination
thereof, using confocal or widefield systems. New optical
instruments for simultaneously recording two-color chan-
nels on two sides of a CCD detector have increased ratio
acquisition time for dual emission probes in widefield
systems (Fehr et al., 2004). As well, some confocal and
multi-photon systems have a detector device that measures
a spectrum of emission wavelengths (Berg, 2004), greatly
improving the accuracy of the ratio measurements. Regard-
less of equipment, quantitative ratio imaging is a perilous
undertaking for the plant cell biologist. Getting non-genetic-
ally encoded probes into the cell often results in cell damage
from injection, retention of dye in the cell wall, or seques-
tration of dyes over time into unwanted places. Cytoplasmic
streaming rapidly mixes the probe, making the acquisition
of high dynamic range sequential images very challenging.
Patterned and time-dependent autofluorescence is nearly
always present unequally in the ratio pair. Finally, in vivo
calibration for ion or membrane potential measurements
can be extremely frustrating given the difficulty in introdu-
cing compounds into the cytoplasm that are not influenced
by the cell wall.
Advanced fluorescence techniques
FRET imaging uses the same equipment required for quan-
titative ratio imaging, with special attention paid to the
controls (Bhat et al., 2005; Hink et al., 2002). Non-radiative
energy transfer occurs between a donor and acceptor
molecule if they are spatially aligned and within a few
nanometers of each other. By excitation of the donor mole-
cule and image capture of both donor and acceptor emis-
sion, some account of the degree of energy transfer can be
taken, either through determining the amount of quenching
for the donor or the intensity from the acceptor. For exam-
ple, a protein labeled with cyan fluorescent protein (CFP)
yields a blue emission that will be lessened if a second
protein, fused to yellow fluorescent protein (YFP), binds in
such a way that FRET occurs between donor (CFP) and
acceptor (YFP). Any non-FRET-related bleedthrough of
fluorescence from donor channel to acceptor channel and
any non-uniform autofluorescence compromise the FRET
result in a non-linear fashion (Berney and Danuser, 2003).
When appropriately used, FRET imaging provides an intu-
itive means for assessing when and where proteins interact
in the cell or when a single protein is undergoing a large
conformational change.
Another powerful method for assessing changes in pro-
tein state involves bleaching the fluorophores within a
subdomain of the cell (Weiss, 2004). Provided the bleaching
does not damage the associated molecule under study,
kinetic analysis of fluorescence recovery provides informa-
tion about the rates of diffusion or binding within the live cell
(Elson and Qian, 1989; Wachsmuth et al., 2003). The idea is
that the molecules of interest, attached to the bleached
fluorochromes, are replaced through diffusion and through
association and dissociation with the pool of molecules
having attached, unbleached fluorophores. Fluorescence
recovery after photobleaching (FRAP) uses a laser or flash-
lamp to rapidly bleach a small area, and images are collected
at unit time intervals for measuring recovery. As discussed
for ratio imaging, the effect of cytoplasmic streaming must
be dealt with for cytoplasmic components because the
diffusion process is colluded with directional cytoplasmic
streaming in the plant cell. Fluorescence loss in photo-
bleaching (FLIP) uses a laser to bleach fluorophores in a
cellular compartment while intensity measurements are
made in associated compartments to evaluate intracellular
connectivity.
An adaptation of the confocal principle has also been
employed to estimate diffusion properties and binding
affinity within a cell. Fluorescence correlation spectroscopy
(FCS) takes a single spot within the cell and rapidly
samples the number of photons emitted from the mole-
cules in that spot (Goedhart et al., 1999). A diffusible
molecule wandering in and out of the confocal volume will
have a characteristic residence time. As diffusion becomes
restricted, for example by binding to a surface or larger
macromolecule, that time in and out of the volume will
change characteristically. An auto-regressive function is
applied to the time-resolved intensity data to determine
residence times in the confocal volume. Using this princi-
ple, confocal FCS permits estimation of diffusion rates and
binding constants within the live cell for extremely small
numbers of molecules.
Imaging the live plant cell 589
ª 2006 The AuthorJournal compilation ª 2006 Blackwell Publishing Ltd, The Plant Journal, (2006), 45, 573–598

A fluorescently labeled protein binding to a larger macro-
molecular complex in the cell undergoes a state change. As
the protein binds, its conformational state and degree of
rotational mobility are altered. In some cases, the change in
conformational state affects the fluorescence lifetime. Fluor-
escence lifetime imaging microscopy (FLIM) is accom-
plished using pulsed lasers with time-resolved photon
counting detectors or with phase-resolved techniques
(French et al., 1998; Immink et al., 2002). Binding the larger
complex may also alter rotational mobility, reflected in a
change in fluorescence polarization anisotropy. Polarization
anisotropy measurements involve quantitative ratio ima-
ging of polarized excitations using perpendicular and paral-
lel polarizers in the emission path (Axelrod, 1989; Axelrod
et al., 1983; see Lidke et al., 2003).
5. Acquiring data with the microscope
Successfully imaging live cells requires a working know-
ledge of the imaging system. Changing the microscope or
the detector settings changes the contrast and resolution. So
how do you know if that made the image better or worse?
Even if the image improves to your eyes, that doesn’t always
translate into better data collection. Computer monitors vary
and your eyes and brain make adjustments for missing
information in an image. In this section, two tools are
introduced for determining image quality, the line scan and
intensity histogram (Figure 5). The line scan tool plots the
intensity information from a transect of the image, allowing
you to visualize the relationship of signal to noise. The his-
togram tool displays image intensity values to graphically
illustrate the dynamic range present in the image. Three
prepared slides will also be introduced, and their use, in
conjunction with the software tools, to align and calibrate
the microscope for brightfield and fluorescence observa-
tions, will be described.
Alignment for brightfield microscopy
Nearly all modern microscopes are designed for Kohler
illumination (Keller, 1998), maximizing resolution and con-
trast through incoherent illumination with collimated light
rays. Place a slide on the stage and focus on the specimen
using a low power (10–20·) objective lens. Aligning for
Kohler illumination requires closing down the field aperture
between the condenser and lamp, using the condenser to
bring that aperture into focus, and then centering the
aperture with the condenser centering screws. When the iris
is opened to just fill the field of view with light, the micro-
scope is aligned for brightfield work. This alignment proce-
dure works because the microscope manufacturer placed
the aperture (field diaphragm iris) so that it is in focus when
the lamp is in focus. Re-align the microscope for each lens
before taking images. Note that a light diffuser, such as a
ground glass filter, must be placed in front of the lamp to
evenly illuminate the field.
The line scan tool, found in nearly all microscopy-related
software packages, can now be used with a stage micro-
meter slide to calibrate the pixels per micron and deter-
mine the sampling rate of the detector. Place the
micrometer slide on the stage and, if required, apply an
immersion medium between coverslip and lens. Focus on
the lines and take an image using the camera (or reflected
light and the PMT for confocal systems). Using the line
scan tool, draw a line over several of the stage micrometer
lines with the mouse and create an intensity graph. The
graph should show the intensity value at every pixel
position under the line. Divide the number of pixels
counted from the center of one black bar to the other into
the real bar distance (in micrometers) to calculate the
pixels per micron. Repeat the process several times,
moving or rotating the slide before each exposure. If the
software counts pixels, and not distance in pixel units, you
may find that the distance measured when the slide is 45�to the detector array is less than when the slide is 0� or
90�. This is obviously incorrect and the Cartesian (square
grid) nature of the distance measurements must be
accounted for when calibrating the system and using the
software. If there is an intermediate lens (e.g. optivar),
increasing the magnification by 1.5–2.5·, repeat the above
procedure to ensure the stated magnification change
occurs precisely as advertised. The calculated pixels per
micron can now be used for distance measurements and
for determining how much of the lens resolution is
captured by the detector.
Matching the detector sampling rate with lens resolution,
specified by the lens NA, involves a little mathematics and
adjusting the magnification to the detector. The commonly
accepted theoretical resolution limit for a lens, the Rayleigh
criterion, is calculated as (1.22 · light wavelength)/(objective
NA þ condensor NA) for brightfield systems and
(1.22 · light wavelength)/(objective NA · 2) for epifluores-
cence and confocal systems. For epifluorescence microsco-
py, the objective lens counts twice because it serves both as
condenser and collecting lens (see Parker, 2003). As a
suggested starting place, each resolution unit distance
should be covered by at least three and no more than eight
pixels. If the lens image is under-sampled in a camera-based
system, it can bemagnified using the intermediate lens or by
changing the projection lens to the detector, located in the
camera port, for one of higher power. If more than eight
pixels span the resolution unit, the CCD elements can
usually be blocked together, or binned, 2 · 2 as they are
being read out. Alternatively, a projection lens of lower
power can be used. For scanning microscopies that use a
PMT or similar device, the spatial sampling rate is deter-
mined by the beam scan rate, the imaged area, and the
number of samples per distance. For example, scanning a
590 Sidney L. Shaw
ª 2006 The AuthorJournal compilation ª 2006 Blackwell Publishing Ltd, The Plant Journal, (2006), 45, 573–598

100 lm line in 2 msec, taking 2 lsec samples, is equivalent
to imaging the same space with 1000 pixels or 10 pixels/lm.
Most laser scanning confocal software packages specify
permissible scan times that bracket the theoretical resolu-
tion limits for the lens. Regardless of system or what the
software tells you, work out the pixels per micron empiric-
ally with a micrometer slide and be certain that you are not
over- or under-sampling the lens resolution.
Micrometer slides serve additionally as brightfield con-
trast and resolution targets. Provided the bars are opaque,
the difference in average values between thewhite and black
regions provides a measurement of dynamic range. Increas-
ing the illumination increases the number of gray levels
between black and white until the white portion saturates
the detector. Using the line scan tool again, but drawing a
line across only two bars, note that the transition from black
1800
1600
1400
1200
1000
1800
1600
1400
1200
1000
200
150
100
50
0
80
60
40
20
0
100
12001150110010501000
5004003002001000
100806040200 18001600140012001000
Gra
y le
vels
Gra
y le
vels
Occ
uran
ces
Occ
uran
ces
Gray levels
Gray levels
Pixel position
Pixel position
(a) (b) Histogram
(c) Linescan
(d) (e) (f)
10 µm
5 µm
BackgroundMean = 1096
Noisestd. dev. = 16.4
background
noise
Signal
Suggestedsignal
threshold
Localbackground
values
Subregion histogram
Local estimates
Signal threshold
Figure 5. Histogram and line scan tools for determining background, noise and signal levels.
(a) One image from a time-lapsed series of live Arabidopsis cells expressing a GFP fusion protein (AtEb1-GFP) labeling polymerizing microtubule ends. The image
was taken with a 63 · 1.2 NA water-immersion objective lens and spinning disk confocal unit using a 512 · 512 pixel EM-CCD camera.
(b) Global background and noise estimates were made using a histogram of the pixel values from a featureless region (ellipse) in the image. The mean value
estimates background and the standard deviation estimates noise.
(c) A line scan across the image (dashed line in (a)) shows the pixel values at each position in the image. The estimated background (solid line) and noise (dashed
lines) are plotted with reference to the pixel values. Note that the plotted background value fits the line scan values for the right side of the image, but the background
in other regions of the image appears higher.
(d) To better approximate image properties for features of interest, a local estimate of background and noise is made from a sub-region of the image [corresponding
to box in (a)].
(e) A line scan [from dashed line in (d)] shows the pixel values for several of the fluorescent features of interest and for a region containing no features of interest
[gray bar in (d), gray background in (e)]. Local background and noise estimates, calculated as the mean and standard deviation of the first 40 pixels in the line scan,
are plotted in (e) with reference to the pixel values. In addition, a suggested minimum signal threshold value is plotted where signal exceeds background by >2.7
times the magnitude of the noise.
(f) The local background estimate approximates the distribution mode for a histogram of the pixel values for the entire image sub-region. Values above the
suggested minimum signal threshold (gray portion of histogram) are found in the distribution tail. Creating local estimates for signal, background and noise using
the line scan and histogram tools serves as a useful method for determining how to adjust the acquisition parameters at the beginning of an experiment.
Imaging the live plant cell 591
ª 2006 The AuthorJournal compilation ª 2006 Blackwell Publishing Ltd, The Plant Journal, (2006), 45, 573–598

to white occurs over several pixels and that the bars are not
uniformly dark. Even if the bar has a uniform molecular
thickness of opaque material, the physical properties of the
condenser and objective lens will blur the transition. For
higher NA lenses, closing the condenser iris, not the field
diaphragm iris, will alter the transition, even after adjusting
for the intensity change. As the iris is closed down, some
contrast is gained, while resolution is lost. Partially closing
the field diaphragm iris to just surround the image should
sharpen the transition from dark to light, because there is
now less stray light in the optical system.
The line scan tool is probably the best tool to start with
when trying to improve the quality of the image in a live cell
experiment (Figure 5). As you are adjusting the optical
system and detector controls, the line scan tool should be
used to report the effect of your adjustment. Regardless of
what a particular monitor might show in the microscope
room, the line scan tool does not lie. Drawing a line over the
specific feature of interest and plotting the intensity values
allows you see howmuch of the detector dynamic range you
are capturing and the separation of signal from background
and noise. If the difference between black and white is
increasing on the graph, you are increasing contrast. If the
transition between black and white is occurring over fewer
pixels, you are increasing resolution.
Alignment for fluorescence microscopy
The energy required for fluorescence excitation comes from
a small plasma arc or a small-aperture laser device. The
illumination pathway for the microscope magnifies the im-
age of that light source and projects it onto the specimen for
excitation. While the illumination will never be completely
uniform, the goal is to create as uniform an excitation as
possible.
Alignment for an arc lamp is a two-step process. The first
part is greatly facilitated if you focus on a piece of lens paper
or a business card placed on the stage using brightfield
trans-illumination. Align the condenser for Kohler illumin-
ation and then close the field diaphragm iris down so that
the condenser projects a small spot on to the paper. That
spot represents the optical axis of the microscope where the
fluorescence excitation needs to be projected. Remove the
objective lens from the nosepiece and open the shutter to
the fluorescence lamp, with fluorescence filters in place. Use
the collimating lens on the lamp housing to create an image
of the plasma arc on the paper. Most lamp housings have a
mirror that creates a second image of the arc. The goal now
is to create a focused image of both arcs using the
collimating lens and all of the knobs on the back, and
possibly the side, of the lamp housing. Knobs for the lamp
move both images while moving the mirror only moves one
image. Next, position the arcs so that they are overlapping
about 25% and centered on the bright spot projected from
the condenser. Place a neutral density filter into the fluor-
escence excitation path in order to see the trans-illuminated
spot. Defocusing the arc images with the collimating lens
should now allow you to produce an evenly illuminated field
on the lens tissue. Close the shutters for both trans- and epi-
illumination paths and replace the objective lens to com-
plete the first step.
The second step aligns the lamp with the detector. For
widefield and confocal fluorescence illumination, dilute a
fluorescent dye matching the excitation/emission spectrum
of interest into the imaging medium (500 pM–1 nM final
concentration). Centrifuge for 10 min in a microfuge before
applying 10 ll to a clean slide and adding a number 1.5
coverslip. Alternatively, plastic fluorescent slides are avail-
able from some microscope vendors. Take an image of the
slide and create an intensity graph from a diagonal transect
using the line scan tool. Typically, the intensity distribution is
not centered on the detector and falls to <80% of the
maximum at the corners. Continue to take images and
monitor the line scan tool graph as you adjust the collimating
lens and lamp housing to achieve as uniform a field as
possible. The corners may not reach more than 85% of the
intensity found in the image center. Some software packages
allow you to false-color the image with a pseudo-colored
LUT, making it easier to visually center the lamp with the
detector. Non-uniformity in point-scanning confocal micro-
scopes typically arises from amisalignment or mis-timing of
the scan beam. Save the image to use as a reference for
discussing the problem with the service representative.
System noise and response linearity
The dye slide can subsequently be used for estimating sys-
tem linearity, locating optical noise, characterizing the gain
and offset parameters, and for creating an intensity/shading
correction image. For CCD cameras, begin by taking expo-
sures of increasing duration (0.01, 0.05, 0.1, 0.5, 1.0, 5, 10 and
50 sec) with no light to the detector. Displaying the intensity
values from the 50 sec exposure as a histogram should re-
veal a bell-shaped curve. The average intensity value, usu-
ally the peak of the bell curve, represents a background and
the standard deviation represents the uncertainty or detector
noise. The average values for the shorter exposures should
remain initially constant and begin to increase as the time-
dependent dark current becomes significant relative to the
read-out noise. Outliers in the distribution will appear as a
result of pixels that consistently yield higher than normal
values (hot pixels) or from other phenomena such as cosmic
rays. If there is a gradient across the image or any other
patterned feature, light may be leaking to the camera or the
CCD chip may not be cooling correctly. Repeating the
exposure process while weakly exciting the dye slide (i.e.
using a neutral density filter) yields a measure of system
linearity. The average value for each frame should be a linear
592 Sidney L. Shaw
ª 2006 The AuthorJournal compilation ª 2006 Blackwell Publishing Ltd, The Plant Journal, (2006), 45, 573–598

function of the exposure time, with linearity improving after
subtracting the background values taken from the previous
exercise. Changing the gain, offset or the read-out amplifier
will change the relationship between exposure time and
average value.
For confocal users, exposures with no light to the speci-
men are less useful in estimating background as dark current
should not build up appreciably in the PMT. Understanding
response linearity and the role of the gain and offset controls
is, however, critical to using the device. Using a fast scan
speed and low (<3%) laser power, take several exposures,
increasing the gain by a unit interval (try 2% of total
allowable) each time. If the offset is used to bring the
digitized values close to zero for the first exposure,
increasing the gain should increase the average value by a
non-linear factor for each subsequent exposure. Further, the
noise (i.e. the standard deviation) also changes in magni-
tude. Keep this principle in mind when comparing the
intensity values from confocal images. If the laser power can
be incremented in small steps (1–5%), taking exposures with
increasing laser power should yield a grossly proportional
increase in average signal value, although the relationship
will probably not be linear. To estimate the linearity of the
system at one exposure setting, where gain, offset, scan
speed and area are left constant, the simplest method is to
create multiple slides using a serial dilution of the fluor-
escent dye.
Optical noise in the image
The microscope light path and detector surface are never
completely devoid of dust and debris that change the optical
path. This optical noise is easily discoveredwhen images are
taken from multiple regions of the dye slide. Optical noise
appears as local non-uniformities in the image intensity that
persist when the slide is moved. This optical noise will loc-
ally shade or alter the resolution of features within the im-
age. The major offender is usually the objective lens. Try
cleaning the objective lens (Inoue, 1986) with specialized
lens tissue (never use other lab wipes or non-optics-related
material) and an ammonia-based glass cleaner. Most fluor-
escence filters andmany other optical surfaces have delicate
coatings created to reduced reflection. These coatings can
be damaged by solvents or mechanical wiping and should
be cleaned professionally or with the advice of the manu-
facturer. Pressurized gas effectively clears dust from optics
but extreme care should be used in not pointing the air
stream directly at (90� to) the optic or in spraying the optical
component with liquid that would result in freezing con-
densate on the surface.
Multiple images of a dye slide, usually from multiple
positions on the slide, can be averaged together, normal-
ized, and divided into an image of the specimen to digitally
flatten the field and lessen the effects of optical noise and
uneven illumination (Model and Burkhardt, 2001). This
shading correction is extremely valuable when performing
quantitative tasks such as ratio-imaging or FRET imaging.
The fluorescent bead slide
A fluorescent particle smaller than the resolution limit of the
microscope creates a distinct, diffraction-dependent pattern
in the microscope. The fluorescent light emitted from a
particle of 100 nm diameter flares out over an area larger
than expected for the calculated magnification. This point-
spread function (PSF) describes the influence of the optical
system on a point source of light. The PSF is, in essence,
what happens to every point of light emitted from the spe-
cimen, and forms the building block for creating the inten-
sity patterns that constitute an image.
Using the idea that light energy travels as waves, a
theoretical PSF can be calculated mathematically from the
objective NA and light wavelength. The theoretical PSF
image is rotationally symmetric, having a strong central
peak and several smaller peaks spaced at intervals from
the main (Figure 6). The smaller peaks form concentric
circles, expanding out from the central peak on both sides
of the focal plane. The concentric rings diverge from the
focal plane as cones, creating a series of hourglass-
shaped patterns of increasing size when observed from
the side (Figure 6). The qualities of the PSF depend upon
lens type, lens alignment, lens cleanliness, correct cover-
slip thickness, correct immersion medium, proximity of
specimen to coverslip, and uniformity of illumination
intensity.
As we know what the PSF should look like in theory,
observing how the real PSF differs in practice informs us
about the optical system. Simple bead slides, made by
dispersing fluorescent latex particles in an imaging
medium, make an excellent tool. As plant cells are thick
specimens, coating the face of a slide and a coverslip with
poly-L-lysine before adding beads results in two spatially
distinct layers of immobilized particles when the slide is
assembled using a drop of medium. Focusing on well-
dispersed beads, the peak intensity should be comparable
across the field of view and the central intensity of the
beads should appear round and not elliptical. The next test
for the bead slide is to see whether concentric rings appear
on both sides of the primary focal plane. If not, be
absolutely certain that the coverglass number, usually
1.5, matches the number printed on the objective lens. If
the lens has a correction collar, use it to balance the
distribution of fluorescence above and below the primary
focal plane, making the rings as axially symmetric as
possible. The correction collar on the objective lens
permits compensation for coverslip thickness and for
differences in immersion media. If the slide has beads at
two levels, try and find a compromise adjustment for
Imaging the live plant cell 593
ª 2006 The AuthorJournal compilation ª 2006 Blackwell Publishing Ltd, The Plant Journal, (2006), 45, 573–598

beads at both depths. For lenses without a correction
collar, using an immersion medium or bath medium with a
different refractive index may be required to correct the
problem. If the problem persists, consult your microscope
dealer and ask whether the optics require adjustment.
Use double-labeled beads, or create two-color particles by
combining cationic and anionic beads of different colors, to
verify that the there is no lateral or axial chromatic shift in the
microscope. Lateral translation of the bead colors in one
direction most often results from misaligned fluorescence
filter sets. Axial misalignment is more difficult to remedy
because it is generally a property of the chromatic correc-
tions for that lens. Beads in the periphery of the field may
have an elliptical shape or have laterally asymmetric rings
around the central axis, exaggerated for one of two colors.
These asymmetries indicate the limits of the flat field
correction in the lens and should not be observed in the
portion of the image collected by the detector. Axial color
alignment can be checked by taking images in both color
channels for each step in a through-focus series. The
maximum bead intensity for both colors should appear at
the same focal position. If it is not, then the lens may not be
corrected well enough for chromatic aberrations for your
application.
Similar to the stagemicrometer slide usedwith brightfield
illumination, the bead slide serves as a test slide for
determining how the acquisition parameters affect image
quality in the fluorescence microscope. A line scan graph
through the bead center is a cross section of the PSF,
indicating peak signal as it falls off to noise. Taking
exposures of increasing duration, or with increasing excita-
tion intensity, will reveal the relative signal to noise capa-
bilities of the microscope and detector under all parameter
settings. For example, opening or closing the pinhole in a
laser scanning confocal microscope illustrates the relative
changes in light collection and PSF distribution. An excellent
exercise for acquainting yourself with a new system is to
lower the illumination energy to a minimum, and use the
detector parameters to maximize the SNR for two closely
spaced beads. If you can discover how to do this using the
bead slide, finding a good signal to noise compromise for
the live specimen is a much easier task.
The best advice that I can give anyone beginning a series
of live cell fluorescence experiments is to have a reference
bead slide for evaluating the condition of the microscope
before you begin each experiment, especially in a multi-user
environment. Taking a few images of the bead slide before
getting started can save time and data. If the peak bead
intensities and the average noise levels from the background
differ markedly from the last time you used the microscope,
better to find this out before starting your live cell experi-
ment, than after.
6. Determining the image acquisition parameters
Putting it all together to collect data requires planning and a
little experimentation. This final section describes steps to-
0 0.2 0.4 0.6 0.8 10.20.40.60.81Micrometers
(a) (a')
(b) (b')
(c)
(d)
(c')
Firstminima
Rings
Figure 6. Point spread function for a sub-resolution fluorescent bead.
A 100 lm diameter fluorescent latex bead was imaged with a 0.75 NA
objective lens. The correction collar was adjusted from under-corrected (a, a¢),to properly corrected (b, b¢), to over-corrected (c, c¢). A series of images was
taken for each setting, focusing through the bead at 0.5 lm intervals. Panels
(a–c) are forward projections from the series and panels (a¢–c¢) are side-on
projections of the data. Note the tightly confined spot, both axially and
laterally, for the projections in b and b¢. The improperly corrected lens yields
an axially asymmetric point spread function (a¢, c¢). (d) The theoretical PSF for
a 1.4 NA lens, illustrating the position of the diffraction rings and first minima.
The distance between the PSF peak and the first minimum is given by the
Rayleigh resolution criterion.
594 Sidney L. Shaw
ª 2006 The AuthorJournal compilation ª 2006 Blackwell Publishing Ltd, The Plant Journal, (2006), 45, 573–598

wards refining the acquisition parameters for an experi-
ment. Where possible, it is of great advantage to have a
duplicate or trial specimen that can be sacrificed to pre-tune
the acquisition parameters. Before getting started, check the
microscope with a bead slide or micrometer slide as dis-
cussed above. The objective lenses should be clean and the
light path free of optical noise. If a camera is used, determine
the spatial sampling rate (between 3 and 8) before starting
the experiment. If using a scanning system, determine how
to set scan rate and scan size to match the lens resolution.
Leave the gain, offset and any read-out amplifier at a mod-
erate setting, allowing for changes that increase or decrease
the sensitivity. These are your initial settings for working out
the experimental protocol.
Estimate the duration of the experiment
Estimate the amount of time the experiment will take,
beginning with specimen collection. This is especially
important when reserving time on a multi-user system. Al-
low time for chamber or perfusion set-up, equilibration in
liquid medium, and the actual imaging time. If imaging
multiple specimens, decide whether they should be taken
from the growth environment together, or should the set-up
time be staggered such that each specimen is imaged at the
same point in the experimental protocol.
Determine how much of the specimen area to image
Select enough specimen area to provide context for the
feature of interest and to account for some specimen drift
over the course of the experiment. Select the best magnifi-
cation for projecting the image to the detector and use either
the field diaphragm iris (for brightfield) or the fluorescence
illuminator iris (for widefield) to illuminate only that area for
imaging. In software, direct the detector to read out only the
portion of the frame that you need, reducing image read-out
or scan time.
Determine the time interval between image acquisitions
If the experiment requires time-lapsed exposures or taking
an axial series of images for 3D reconstruction, you need to
know the maximum interval between acquisitions to avoid
compromising the data analysis. For example, tracking a
mobile feature in the cytoplasm requires an acquisition rate
that captures small stops and starts during movement.
Creating a 3D image of that feature requires even more
images per time interval to ensure that the cellular motion
does not impact the feature morphology when the images
are combined for the 3D view. At this stage, ignore the ef-
fects of over-irradiation. The goal is to clearly demonstrate
that the data collection rate will allow you to make the
observations you need for publication.
Estimate the maximum exposure time
Creating images with a high SNR over a broad range of
intensities is generally easier if the exposure time can be
lengthened. Further, some evidence suggests that longer,
less intense exposures are less phototoxic to live cells than
short, bright exposures, even when the integrated light
intensity is equivalent (see Dixit and Cyr, 2003). Therefore, it
is advantageous to determine the longest possible exposure
time for a specimen that will not be affected by specimen
motion or other experimental factors. Again, ignore the ef-
fects of over-irradiation at this stage. For some experiments,
the maximum exposure time will equal the maximum
acquisition interval.
Determine the minimum required illumination intensity
Achieving the experimental goal requires that the SNR be
high enough to recognize the feature of interest over the
entire duration of the experiment. If the experiment only
requires a single time point, and specimen recovery is not an
issue, increase the illumination intensity until a maximum
SNR and dynamic range are reached for the detector. If
multiple time points are required, the excitation intensity
must be carefully chosen to maintain a usable SNR over the
duration of the experiment, taking the previously deter-
mined acquisition time and interval into consideration. If a
duplicate specimen is available, a time series of consecutive
frames can be taken to estimate the bleaching rate for the
illumination setting.
For brightfield imaging, the effects of irradiation level are
not always immediately observed, like the photobleaching
seen with fluorescence imaging. Find a minimum illumin-
ation level for creating an acceptable dynamic rangewith the
detector controls. If plastids stop moving or the cytoplasmic
streaming changes in velocity, lower the intensity and
consider using a color filter in the illumination path. For live
cell work, I recommend a green (540 nm) color filter to
reduce activation of blue, red and far red light receptors and
to minimize chromatic aberrations.
For fluorescence microscopy, photobleaching and expo-
sure time will limit the excitation intensity. Starting with the
maximum exposure time and minimum excitation energy,
increase the illumination until the feature of interest can be
resolved above noise. Now is the time to work with the
detector controls. This might include the read-out amplifier,
the gain and offset controls, or pinhole size for confocal
scanners. The SNR can be estimated using the line scan tools
and the dynamic range is illustrated with a histogram. Try to
maximize the number of gray levels above the noise floor
with the detector controls. Regardless of how the image
rescales for presentation on the monitor, it is the number of
intensity levels measured between background and peak
signal that determines the primary quality of the image data.
Imaging the live plant cell 595
ª 2006 The AuthorJournal compilation ª 2006 Blackwell Publishing Ltd, The Plant Journal, (2006), 45, 573–598

Balancing contrast, resolution and speed
What do you do when there is not enough information in the
images to confidently identify the feature of interest? In
practice, the signal might fade before taking a good picture
or the background/autofluorescence may be higher than the
signal. Generating contrast in a live plant cell is difficult
because of the high background and the light scattering
produced when focusing through a thick specimen. Under
these circumstances, many experiments simply cannot be
performed as planned. The signal or optical path difference
for the feature of interest is below the threshold of detection.
There is typically a moment of unease at this point
when trying to decide whether the specimen is really
useless or if something can be done with the microscope
to extract data for the experiment. Let us assume that you
have maximized your chances of collecting data by
choosing an optimized filter set and eliminating all
colored and fluorescent compounds from the specimen
imaging and growth medium. Further, the appropriate
lens and technique have been selected, keeping in mind
that widefield methods collect more signal but confocal
(and DIC) methods remove much of the out of focus
background. Lastly, you have used a bead or stage
micrometer slide to make certain that the microscope is
working properly and to assure yourself that you under-
stand how the individual microscope and detector con-
trols alter contrast and resolution.
The next step is to consider compromises in the acquisi-
tion parameters. The goal is to find a useful balance of
acquisition speed, resolution and contrast. Beginning with
acquisition speed, simply lengthening the exposure time
directly increases the signal, at some expense to temporal
resolution. If the time interval is not limiting for the
experiment, and images can be taken in fast enough
succession to prevent slurring, averaging frames together
increases SNR as a function of 1/square root of the number
of images. Temporal averaging techniques are commonly
used in confocal imaging; however, the relatively slow
acquisition times for laser scanning confocal images, com-
pounded by taking multiple images per time point, often
makes this impractical for live cells. If the specimen is
bleaching rapidly, lengthening the acquisition interval will
allow you to capture more information per image over the
allotted experiment time.
Averaging or summing multiple pixels in the same image
improves the SNR at the expense of spatial resolution.
Improvement in SNR from averaging follows the same
square root relationship as temporal binning above, but the
pixels often do not represent signal from the same source
(i.e. spatial resolution is lost and the image is blurred).
Summing a 2 · 2 or 3 · 3 block of pixels in a CCD detector
prior to read-out, a process termed binning, has the added
advantage that the read-out noise counts only once, while
the signal is increased as a multiple of the number of pixels
used.
Spatial resolution can also be sacrificed for increased light
capture by lowering themagnification to the detector. As the
number of pixels per specimen area decreases, the light
collected per pixel increases as a squared function. Thus, for
a small sacrifice of resolution, a large factor is gained for
improving the signal level. For live cell imaging, this is
probably the best means of increasing signal. When paired
with a change in read-out amplifier, pinhole aperture, or gain
and offset parameters, a higher specific SNR can usually be
achieved with some loss of resolution.
Increasing spatial resolution involves the opposite trade-
off. As more pixels are used to sample the feature, the
captured light per pixel drops sharply, requiring either a
longer exposure time, higher exposure intensity, opening
the confocal pinhole, or a sacrifice in detector SNR through
use of a higher gain mode. Contrast is rapidly lost and will
often erode resolution as the SNR drops.
Good luck with your experiments.
Materials
Simulated point spread functions and other image manipulationswere performed in MATLAB (The Mathworks, Natick, MA, USA).Bead images were taken using a Nikon TE200 microscope (NikonInstruments USA, Melville, NY, USA) and a Princeton InstrumentsPI1300 CCD camera (Roper Scientific, Trenton, NJ, USA) usingMetamorph software (Molecular Devices, Sunnyvale, CA, USA).Images of AtEb1-GFP expressing Arabidopsis (originally gifted fromJaideep Mathur, University of Guelph) were made using a Leica 63Æwater immersion objective lens (Leica Microsystems USA, Ban-nockburn, IL, USA) and a Yokogawa CSU-10 spinning disk confocalhead (Yokogawa Electric, Tokyo, Japan). An Cascade 512b EM-CCDcamera (Roper Scientific, Tuscan, AR, USA), controlled via Meta-morph software, was used to acquire 150 ms exposures using a16-bit read-out amplifier system.
Acknowledgements
The author wishes to thank Sharon Long for her support duringearly drafts of this manuscript. David Ehrhardt is thanked forinsight, critiques, inspiration and for involvement with the ima-ging of the AtEb1-GFP cells. I wish to specifically acknowledge theuse of the outstanding imaging facilities at the Carnegie Institutionof Washington, Department of Plant Biology. Thanks to AlanaO’Reilly for comments on the manuscript. The image of MadeleineShaw in Figure 2 is used with permission. Ted Salmon is thankedfor guidance and should not be held accountable for anythingwritten here.
References
Aikens, R.S., Agard, D.A. and Sedat, J.W. (1989) Solid-state imagersfor microscopy. Methods Cell Biol. 29, 291–313.
Allen, R.D. and Allen, N.S. (1981) Microscopy in the study ofprotoplasmic streaming and cell movement. Protoplasma, 109,209–216.
596 Sidney L. Shaw
ª 2006 The AuthorJournal compilation ª 2006 Blackwell Publishing Ltd, The Plant Journal, (2006), 45, 573–598

Allen, R.D., Allen, N.S. and Travis, J.L. (1981) Video-enhanced con-trast differential interference contrast microscopy. A newmethodcapable of analyzing microtubule related motility in the reticulo-podial network of Allogromia laticollaris. Cell Motil. 1, 291–302.
Axelrod, D. (1989) Fluorescence polarization microscopy. MethodsCell Biol. 30, 333–352.
Axelrod, D., Thompson, N.L. and Burghardt, T.P. (1983) Totalinternal reflection fluorescent microscopy. J. Microsc. 129, 19–28.
Bensasson, K.V., Land, E.J. and Truscott, T.G. (1993) Excited statesand free radicals in Biology and Medicine. Oxford: Oxford Uni-versity Press.
Berg, R.H. (2004) Evaluation of spectral imaging for plant cell ana-lysis. J. Microsc. 214, 174–181.
Berland, K., Jacobson, K. and French, T. (1998) Electronic camerasfor low-light microscopy. Methods Cell Biol. 56, 20–44.
Berney, C. and Danuser, G. (2003) FRET or no FRET: a quantitativecomparison. Biophys. J. 84, 3992–4010.
Bhat, R.A., Miklis, M., Schmelzer, E., Schulze-Lefert, P. and Panst-
ruga, R. (2005) Recruitment and interaction dynamics of plantpenetration resistance components in a plasma membranemicrodomain. Proc. Natl Acad. Sci. USA, 102, 3135–3140.
Buchanan, B.B., Gruissem, W. and Jones, R.L. (eds) (2000) Bio-chemistry and Molecular Biology of Plants. Rockville, MD:American Society of Plant Biologists.
Chalfie, M., Tu, Y., Euskirchen, G., Ward, W.W. and Prasher, D.C.
(1994) Green fluorescent protein as a marker for gene expression.Science, 263, 802–805.
Colarusso, P. and Spring, K.R. (2003) Imaging at low light levels withcooled and intensified charge-coupled device cameras. MethodsEnzymol. 360, 383–394.
Cyr, R., Dixit, R. and Gilroy, S. (2006) Live cell imaging using GFPs.Plant J. 45, 599–615.
Damm, B., Schmidt, R. and Willmitzer, L. (1989) Efficient transfor-mation of Arabidopsis thaliana using direct gene transfer toprotoplasts. Mol. Gen. Genet. 217, 6–12.
Dixit, R. and Cyr, R. (2003) Cell damage and reactive oxygen speciesproduction induced by fluorescence microscopy. Plant J. 36, 280–290.
Dunn, K. and Maxfield, F.R. (1998) Ratio imaging instrumentation.Methods Cell Biol. 56, 217–235.
Egner, A., Andresen, V. and Hell, S.W. (2002) Comparison of theaxial resolution of practical Nipkow-disk confocal fluorescencemicroscopy with that of multifocal multiphoton microscopy:theory and experiment. J. Microsc. 206, 24–32.
Elson, L.E. and Qian, H. (1989) Interpretation of fluorescence cor-relation spectroscopy and photobleaching recovery in terms ofmolecular interactions. Methods Cell Biol. 30, 307–332.
Fehr, M., Lalonde, S., Ehrhardt, D.W. and Frommer, W.B. (2004) Liveimaging of glucose homeostatsis in nuclei of COS-7 cells. J.Fluoresc. 14, 603–609.
Feijo, J.A. and Moreno, N. (2004) Imaging plant cells by two-photonexcitation. Protoplasma, 223, 1–32.
French, T., So, P.T., Dong, C.Y., Berland, K.M. and Gratton, E. (1998)Fluorescence lifetime imaging techniques for microscopy.Methods Cell Biol. 56, 277–304.
Gilroy, S. (1997) Fluorescence microscopy of living plant cells.Annu. Rev. Plant Mol. Biol. 48, 165–190.
Goedhart, J., Rohrig, H., Hink, M.A., van Hoek, A., Visser, A.J.,
Bisseling, T. and Gadella, T.W., Jr (1999) Nod factors integratespontaneously in biomembranes and transfer rapidly betweenmembranes and to root hairs, but transbilayer flip-flop does notoccur. Biochemistry, 38, 10898–18907.
Hink, M.A., Bisseling, T. and Visser, A.J. (2002) Imaging protein–protein interactions in living cells. Plant Mol. Biol. 50, 871–883.
Immink, R.G., Gadella, T.W., Jr, Ferrario, S., Busscher, M. and
Angenent, G.C. (2002) Analysis of MADS box protein–proteininteractions in living plant cells. Proc. Natl Acad. Sci. USA, 99,2416–2421.
Inoue, S. (1981) Video image processing greatly enhances contrastquality and speed in polarization based microscopy. J. Cell Biol.89, 346–356.
Inoue, S. (1986) Video Microscopy. New York: Plenum.Inoue, S. (1989) Imaging of unresolved objects, superresolution,
and precision of distance measurement with video microscopy.Methods Cell Biol. 30, 85–112.
Jonkman, J.E.N., Swoger, J., Kress, H., Rohrbach, A. and Stelzer,
E.H.K. (2003) Resolution in optical microscopy. Methods Enzy-mol. 360, 416–446.
Keller, H.E. (1998) Proper alignment of the microscope. MethodsCell Biol. 56, 136–140.
Lidke, D.S., Nagy, P., Barisas, B.G., Heintzmann, R., Post, J.N.,
Lidke, K.A., Clayton, A.H., Arndt-Jovin, D.J. and Jovin, T.M.
(2003) Imaging molecular interactions in cells by dynamic andstatic fluorescence anisotropy (rFLIM and emFRET). Biochem.Soc. Trans. 31, 1020–1027.
Lippincott-Schwartz, J. and Patterson, G.H. (2003) Developmentand use of fluorescent protein markers in living cells. Science,300, 87–91.
Maddox, P.S., Moree, B., Canman, J.C. and Salmon, E.D. (2003)Spinning disk confocal microscope system for rapid high-reso-lution, multimode, fluorescence speckle microscopy and greenfluorescent protein imaging in living cells. Methods Enzymol.360, 597–617.
Model, M.A. and Burkhardt, J.K. (2001) A standard for calibrationand shading correction of a fluorescence microscope. Cytometry,44, 309–316.
Murashige, T. and Skoog, F. (1962) A revised medium for rapidgrowth and bioassays with tobacco tissue cultures. Physiol. Plant.15, 473–478.
Nagai, T., Yamada, S., Tominaga, T., Ichikawa, M. and Miyawaki, A.
(2004) Expanded dynamic range of fluorescent indicators forCa(2þ) by circularly permuted yellow fluorescent proteins. Proc.Natl Acad. Sci. USA, 101, 10554–10559.
Nakajima, K., Sena, G., Nawy, T. and Benfey, P. (2001) Intercellularmovement of the putative transcription factor SHR in root pat-terning. Nature, 413, 307–311.
Ober, R.J., Ram, S. and Ward, E.S. (2004) Localization accuracy insingle molecule microscopy. Biophys. J. 86, 1185–1200.
Park, J., Choi, H.T., Lee, S., Lee, T., Yang, Z.B. and Lee, Y. (2000) Rac-related GTP-binding protein in elicitor-induced reactive oxygengeneration by suspension-cultured soybean cells. Plant Physiol.124, 725–732.
Parker, I. (2003) Photonics for biologists. Methods Enzymol. 360,345–382.
Salmon, E.D., Walker, R.A. and Pryer, N.K. (1989) Video-enhanceddifferential interference contrast light microscopy. Biotechniques,7, 624–633.
Sandison, D.R., Piston, D.W. and Webb, W.W. (1994) Backgroundrejection and optimization of signal to noise in confocalmicroscopy. In Three-Dimensional Confocal Microscopy: Vol-ume Investigation of Biological Specimens (Stevens, J.K.,Mills, L.R. and Trogadis, J.E., eds). Burlington, MA, USA:Academic Press, pp. 29–46.
Sluder, G. and Hinchcliffe, E.H. (1998) Video basics: use of cameraand monitor adjustments. Methods Cell Biol. 56, 1–17.
Stelzer, E.H.K. (1997) Contrast, resolution, pixilation, dynamic rangeand signal-to-noise ratio: fundamental limits to resolution influorescence light microscopy. J. Microsc. 189, 15–24.
Imaging the live plant cell 597
ª 2006 The AuthorJournal compilation ª 2006 Blackwell Publishing Ltd, The Plant Journal, (2006), 45, 573–598

Stephens, D.J. and Allan, V.J. (2003) Light microscopy techniquesfor live cell imaging. Science, 300, 82–86.
Stutzmann, G.E. and Parker, I. (2005) Dynamic multiphotonimaging: a live view from cells to systems. Physiology, 20,15–21.
Taylor, D.L. and Salmon, E.D. (1989) Basic fluorescencemicroscopy.Methods Cell Biol. 29, 207–237.
Thomann, D., Dorn, J., Sorger, P.K. and Danuser, G. (2003) Auto-matic fluorescent tag localization. II. Improvement in super-resolution by relative tracking. J. Microsc. 211, 230–248.
Wachsmuth, M., Weidemann, T., Muller, G., Hoffmann-Rohrer,
U.W., Knoch, T.A., Waldeck, W. and Langowski, J. (2003) Ana-lyzing intracellular binding and diffusion with continuous fluor-escence photobleaching. Biophys. J. 84, 3353–3363.
Weber, K. and Osborn, M. (1985) The molecules of the cell matrix.Sci. Am. 253, 110–120.
Weiss, M. (2004) Challenges and artifacts in quantitative photo-bleaching experiments. Traffic, 5, 662–671.
Young, I.T. (1989) Image fidelity: characterizing the imaging transferfunction. Methods Cell Biol. 30, 1–45.
598 Sidney L. Shaw
ª 2006 The AuthorJournal compilation ª 2006 Blackwell Publishing Ltd, The Plant Journal, (2006), 45, 573–598
Top Related