


Languages
Pages
Legal


Chapter 3The Site Security Design Process 3

Chapter 3The Site Security Design Process
Introduction 71
Overview of the Site Security Design Process 72
Phase 1Project Start 74
Site Security and Project Development 74
GSA Design Excellence Program 76
Risk Assessments and Security Recommendations 76
Communication and Information Sharing 78
Team Assembly and Responsibilities 78
Phase 2Multidisciplinary Assessment 80
Collaborative, Comprehensive Approach 80
Risk Assessment 83
Design Assessment 86
Phase 3Site Concept Investigation 90
Phase 4Site Concept Selection (Conceptual Strategy Plan) 95
Phase 5Design Studies for Project Areas 97
Phase 6Final Concept Development 100
Phase 7Final Design and Construction Documents 102
Phase 8Project Completion and Operations 102
Conclusion 102
GSA Site Security Design GuideGSA Site Security Design Guide
The Site Security Design Process
INTRODUCTION
Successful site security design is particularly process dependent because countermeasures can be resource intensive, controversial, or ancillary to a project’s original purpose. A careful and calculated process ensures that security concerns receive early and informed consideration and are integrated throughout planning, design, and construction. Such a process puts the Project Team in a strong position to achieve effective risk reduction while meeting budget, schedule, and public space design objectives.
Previous chapters discussed the underlying principles that guide every security design project and the elements and tools available to the designer. This chapter describes how to apply these principles and tools. A hypothetical test case illustrates the recommended process throughout the chapter.
This test case, “Building Renovation/Urban Location: Single Building,” involves typical issues and opportunities arising during the planned security renovation of a large mid-20th century era federal building, located on a compact downtown site, but the procedural steps addressing the conditions of this case are similar to any site security design project. Chapter 4 presents additional test cases of other federal building types.
The process discussion includes detailed descriptions of the unique nature of security decision-making, how security decisions fit into the capital funding process, the roles and responsibilities of Project Team members, and the principles that guide the entire site security design process.
Chapter 1 described the hallmarks that must form the foundation of a successful and well-balanced security project:
Strategic Reduction of Risk Comprehensive Site Design Collaborative Participation Long-Term Development Strategy
At every stage of the process, team members are expected to consider identified risks, operational requirements, and local impacts, to balance safety with cost, aesthetics, public use, and accessibility. Although each person on the Project Team brings unique technical skills, perspectives, and interests to the table, everyone should understand each of the hallmarks and their role in achieving them.
Creative problem solving —and successful projects—are the result when Project Team members share the responsibility to achieve each and every hallmark: when the blast expert understands how his or her recommendations affect comprehensive site design strategies, when the designer understands how his or her scheme supports long-term development of the area, and when the community stakeholder understands how his or her actions can support risk reduction at the federal facility.
GSA Site Security Design Guide Chapter 3 Process Introduction 71

OVERVIEW OF THE SITE SECURITY DESIGN PROCESS
Successful site security design comprises eight phases, each an important step toward a design that exceeds the hallmarks of a great project. These phases are summarized below:
1. Project Start focuses on the roles and responsibilities of the Project Team, communication and information sharing, and the decision-making process. The team begins this stage with a sound understanding of the completed risk assessment and its outputs.
2. Multidisciplinary Assessment involves the Project Team using the zone approach to assess existing conditions on-site, including security vulnerabilities, context, and design opportunities.
3. Site Concept Investigation involves the Project Team developing, studying, and refining multiple alternative concepts for the entire site, in response to their findings from the Multidisciplinary Assessment. For large projects, the team may hold a peer review at this stage to help evaluate the alternatives.
4. Site Concept Selection (Conceptual Strategy Plan) entails the Project Team forming a single alternative for the entire site, which comprises the best elements from the Site Concept Investigation. The team may hold a peer review in order to help select the site concept.
5. Design Studies for Project Areas involve the Project Team performing more detailed design work on key elements of the Site Concept, whether or not the entire Site Concept is implemented in a single project. The Design Studies begin the detailed design work that produces the final design of the immediate project.
6. Final Concept Development entails the Project Team developing a detailed Final Concept for the project that will proceed forward into construction. At this stage, as part of the Design Excellence process, the team makes its Final Concept presentation to the stakeholders.
7. Final Design and Construction Documents involve the Project Team developing Site Concepts and Design Studies, culminating in the completion of construction documents. The Project Team conducts any testing of security measures at this time. Team members review final drawings and specifications to ensure that agreed-upon security elements are properly represented in the Final Design.
8. Project Completion and Operations entails the Project Team remaining involved, as needed, to respond to unforeseen conditions during construction and to alter the project design if necessary. As the project is completed and put into use, building management and security operations must continually evaluate the function of the physical countermeasures over time and remain committed to the operational security measures that help to form the complete solution.
72 Chapter 3 Process Introduction GSA Site Security Design Guide
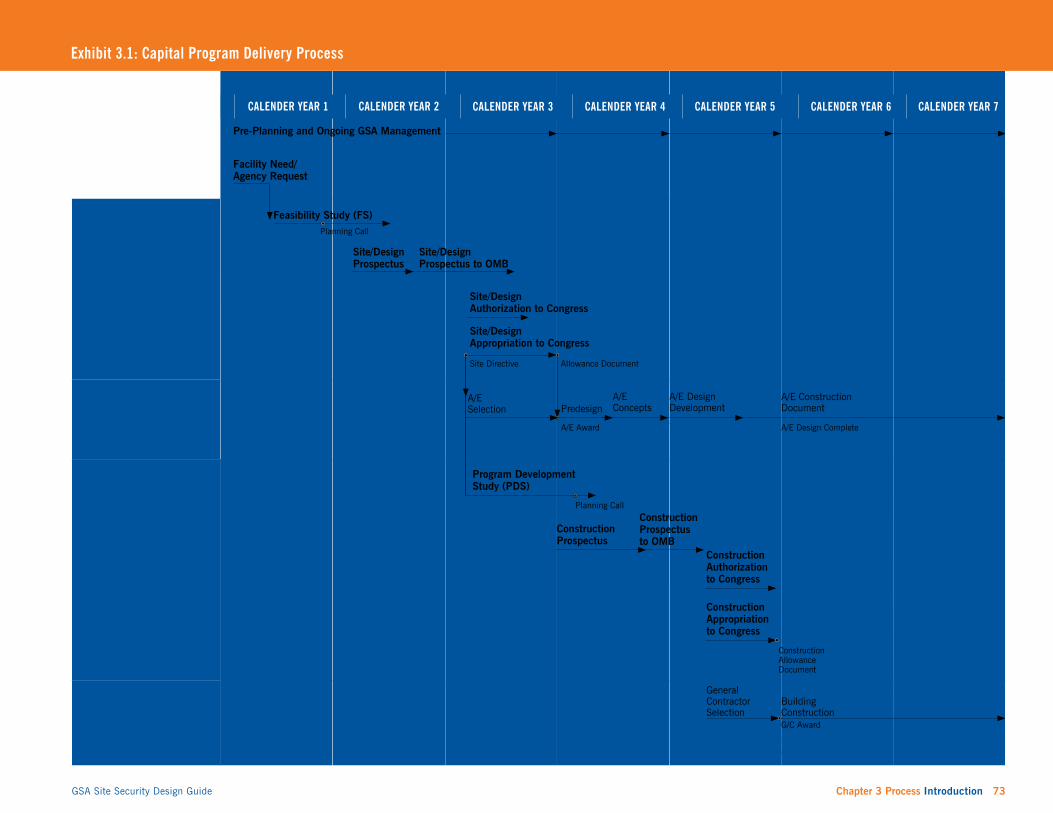
Exhibit 3.1: Capital Program Delivery Process
FISCAL YEAR 0 FISCAL YEAR 1 FISCAL YEAR 2 FISCAL YEAR 3 FISCAL YEAR 4 FISCAL YEAR 5 FISCAL YEAR 6+
CALENDER YEAR 1 CALENDER YEAR 2 CALENDER YEAR 3 CALENDER YEAR 4 CALENDER YEAR 5 CALENDER YEAR 6 CALENDER YEAR 7
Pre-Planning and Ongoing GSA Management
Facility Need/ � Agency Request
Feasibility Study (FS)
Site/Design Prospectus
Site/Design Prospectus to OMB
Site/Design Authorization to Congress
Site/Design Appropriation to Congress
Site Directive Allowance Document
Planning Call
Program Development Study (PDS)
Planning Call
Construction Prospectus
Construction Prospectus to OMB
Construction Authorization � to Congress
Construction Appropriation to Congress
Construction Allowance Document
General Contractor Selection
Building Construction
� � �
G/C Award
Security Charrette
Decision Support Tool
A/E Selection
A/E Concepts
A/E Construction DocumentPredesign
A/E Design Development
A/E Award A/E Design CompleteDecision Support Tool Security Specs + Details
Test Security Measures (if necessary)
Supply Security Equipment Construct Security
Operations & Maintenance
FEASIBILITY STUDY
DESIGN
PROGRAM DEVELOPMENT STUDY
CONSTRUCTION
Decision Support Tool
GSA Site Security Design Guide Chapter 3 Process Introduction 73

Phase 1 Project Start
It is important to lay a solid foundation for effective collaboration before the design starts. This step should begin with a sound understanding of team communication, roles and responsibilities, and the security decision process itself.
Key Points Within Phase 1: Project Start
Coordinate site security design with the existing project development
processes for large and small projects
Consider previous building risk assessments and recommendations within
the context of the present project and all objectives, including both secu
rity and design
Carefully choose team members based on project needs and promote
open channels of communication across specialties
SITE SECURITY AND PROJECT DEVELOPMENT
Developing site security within the context of GSA’s project development process requires an understanding of the capital funding process, the design and construction process, and the security and risk assessment process (see Exhibit 3.1).
This chapter applies to large, Prospectus-level capital projects (i.e., projects that must be authorized by Congress), as well as smaller projects that are authorized and funded locally. Regardless of size, it is critical that all projects establish a comprehensive planning approach that views the site, the building, and the neighborhood as fundamental parts of an integrated fabric.
Large, Prospectus-Level Projects Due to the federal funding process, large non-court projects work with design budgets, and court projects work with design and construction budgets, that the Project Team establishes in a Feasibility Study as early as two years before design begins. Construc- tion budgets for non-court projects are later scoped as part of a Program Development Study (PDS), while courthouse construction budgets are sometimes adjusted through special studies. In either case, the construction budget typically is set two or more years before construction begins.
The budgeting stages can be considered as an expanding cycle. Each considers similar aspects, but the amount of analysis and specificity increases as the project gets closer to construction.
Smaller, Non-Prospectus-Level Projects For smaller projects, on the other hand, GSA’s Regional Offices can scope and fund a project rather quickly, as part of the annual renovation budgeting process. Unlike Prospectus-level projects, the construction budget for smaller projects is generally finalized after design is complete.
One distinction between large and small projects is the effort to ensure effective, multidisciplinary input into the design process. Because budget parameters for large projects are set years before design and construction begin, Project Teams must make special efforts to include in-house design and security expertise at the budgeting stage, even before designers are hired. At the other end of the spectrum, because small projects can be shaped and changed so quickly, the Project Team must be careful to ensure that multidisciplinary input occurs at the very beginning and is maintained throughout the project’s development.
74 Chapter 3 Process Phase 1 GSA Site Security Design Guide

Site Security Design Process: Non-Prospectus-Level Project Timeline (9-15 months)
1. Project Start 2. Multidisciplinary Assessment
6–12 Weeks
3. Site Concept Investigation
4 Weeks
4. Site Concept Selection 4 Weeks
5. Design Studies for Project Areas
4 Weeks
6. Final Concept Development
4 Weeks
7. Final Design and Construction Documents
3–6 Months to bid package
8. Project Completion and Operations
Predesign, Site Analysis, Risk Assessment
Concept Design
Design Development, Construction Documents, Construction
Site Security Design Process: Prospectus-Level Project Timeline (6-7 years)
1. Project Start 2. Multidisciplinary Assessment
6–12 Weeks
Concept Design
3. Site Concept Investigation
4 Weeks
4. Site Concept Selection
4 Weeks
5. Design Studies for Project Areas
4 Weeks
6. Final Concept Development
8 Weeks
7. Final Design and Construction Documents
DD 9 Months, CDs 6 Months
8. Project Completion and Operations
Master Plan, Feasibility Study, Risk Assessment
Design Development, Construction Documents
Design Development, Construction Documents, Construction
“Project start” can occur
anytime during the 2- to
3-year time frame, although
important project scope,
strategy, and budget
decisions will be made
during planning and
pre-design activities.
Timeline can extend 2–3 years
Note: Security Charrette during Feasibility Study phase.
GSA Site Security Design Guide Chapter 3 Process Phase 1 75

For detailed guidance on Prospectus-level project development and funding, see GSA’s Project Planning Guide.
Designers on GSA projects must follow the standards dictated in GSA’s Facility Standards for the Public Buildings Service (P-100). This document is updated regularly and contains detailed design provisions that impact many aspects of site security projects.
Past risk assessments are never the final word in a site security project. GSA seeks to accommodate all project goals, but retains the right to not implement a recommended countermeasure when doing so would have a significant adverse impact. Such decisions require close consultation with the Department of Homeland Security (DHS).
Regardless of project size or budget, teams should consider aesthetic, functional, and security-related issues in the development process simultaneously. At a minimum, this comprehensiveness keeps security aligned with other project parameters.
There are quantitative reasons, as well. Security elements can represent a significant portion of a project’s budget. Leveraging their functionality with other goals is necessary to maximize the investment in a facility. Additionally, funding realities may call for phased implementation of security and other improvements over several smaller projects, perhaps over several years. A flexible approach is necessary to ensure that each phase accomplishes some of the major goals outlined for a site. All changes to the site must be implemented as part of a larger vision that supports its desired use and overall attractiveness.
GSA DESIGN EXCELLENCE PROGRAM
Through the Design Excellence program, GSA produces quality public buildings that reflect the dignity of the federal government. Design Excellence emphasizes the following goals, which have a significant positive impact on the success of site security design projects, both large and small:
Determine the best architect/engineer (A/E) selection for each project, maximize the potential for architectural design excellence, and provide peers of national renown to review project progression;
Ensure compliance with project budget and schedule mandates and the analysis of critical building systems; and
Support community development goals, effective sustainable design strategies, and current security standards.
The security and design needs of a project should be integrated into all Design Excellence activities, from selection of the A/E team through design charettes and peer reviews, to achieve the highest-quality outcome.
RISK ASSESSMENTS AND SECURITY RECOMMENDATIONS
DHS’s Federal Protective Service is responsible for conducting risk assessments of all federal buildings on a regular basis. DHS conducts its risk assessment based upon the actual or perceived threat to the building (the events that must be defended against), the vulnerability of that building (the susceptibility to the threat), the consequences if an event should occur, and the probability of that event based upon a variety of factors. Then, with stakeholder input, DHS provides a final report with recommended countermeasures.
Depending on the nature of the project, the detailed security analysis process may include representatives from the U.S. Marshals Service (for courthouses) and specialized security contractors to conduct more technical studies. GSA representatives and members of the Building Security Committee are also included in the process.
Since such important and influential security assessments are made before design begins, without reference to any information about the project, Project Teams should revisit such assessments in this phase and plan to update them in Phase 2: Multidisciplinary Assessment.
In doing so, Project Teams should remember that GSA reserves the right to not implement a recommended mandatory measure as per the GSA/DHS Memorandum of Agreement, June 2006. Such a decision would be made only after consultation with DHS and only after written notification to DHS of the final decision. The final authority in this case rests with the appropriate GSA Assistant Regional Administrator (ARA) for the Public Buildings Service. Ideally, and far more often, DHS and GSA can reach consensus regarding the appropriate countermeasure as part of an effective design process.
GSA has created a number of tools to help Project Teams navigate the tradeoffs inherent in site security design projects. The GSA Security Charrette (described in detail on page 85) is a new tool created to support the multidisciplinary approach envisioned in the ISC criteria. Recommended for initial use during the Feasibility Study, it can also culminate the Multidisciplinary Assessment phase. The ISC Implementation Checklist, the Decision Support Tool for
76 Chapter 3 Process Phase 1 GSA Site Security Design Guide

GSA Security Analysis Tools
GSA and its partner agencies have developed many tools and techniques
to support better security for GSA buildings, as well as the expertise
to apply these tools to GSA projects.
The following tools are available through GSA’s Office of the Chief Architect
to those involved with appropriate projects. The use of these tools requires
the input of security consultants, including representatives from DHS’s
Federal Protective Service (FPS) and blast consultants.
ISC Security Charrette Guide The ISC Security Charrette Guide is intended to assist GSA Project Managers and the Building Security Committee in
planning and conducting a Security Charrette. It is intended to be of greatest assistance for the Feasibility Study phase,
but is useful throughout the project development process.
ISC Security Design Criteria Implementation Checklist This checklist assists GSA Project Managers in the implementation of the Interagency Security Committee (ISC) Security
Design Criteria during the project planning and design phases of all new U.S. courthouses, new federal office buildings,
and major modernization projects.
Decision Support Tool for the ISC Security Design Criteria (DST-ISC) DST-ISC is a GSA computer program designed to aid decision-makers in the application of the ISC Security Design
Criteria. The program contains questions on target attractiveness, collateral damage, and impact of loss, which it
uses to determine the required Level of Protection of a facility. The DST-ISC encourages judgment calls and a strategic
approach to risk reduction, including acceptance of some risk in light of tradeoffs. It is important to note that the
DST-ISC does not replace or supersede the DHS-produced risk assessment, but is a tool by which GSA decision-makers
can evaluate countermeasures.
Computer Modeling of Hazards and Impacts GSA and its consultants employ a variety of proprietary computer programs to assist in security assessments and
countermeasure analysis. Two of the most prominent for GSA projects are WINGARD (WINdow Glazing Analysis
Response & Design) and STANDGARD (STANDard GSA Assessment Reporter & Database), which determine potential
hazards from explosions and assess vulnerability.
GSA Site Security Design Guide Chapter 3 Process Phase 1 77

Though sensitive information is a reality in site security projects, it should never pose a barrier to true collaboration. Most information designated “For Official Use Only” can be shared with project stakeholders. Indeed, such cooperation is essential where projects will significantly impact their surroundings.
The ISC Security Design Criteria Implementation Checklist (found in Table 2, Section 401000-A/E Selection Process of the ISC Security Design Criteria) is an excellent resource when developing a scope of work and selecting an A/E consultant. This tool is available from the Office of the Chief Architect.
the ISC Security Design Criteria (DST-ISC), and computer modeling tools are also available to support the process. The GSA Project Manager should become familiar with these tools and endorse their use by the Project Team.
COMMUNICATION AND INFORMATION SHARING
As asserted throughout this Guide, a collaborative process is fundamental to good decision-making. Of course, security experts, designers, and other stakeholders cannot provide meaningful input without comprehensive information sharing. Due to the sensitive nature of security assessments, however, this does not always happen.
While it may be inappropriate to share some sensitive security-related data with all parties, this should never get in the way of true collaboration. Information that is designated “Law Enforcement Sensitive,” for example, would be available only to those with the proper clearances. But on most federal projects, the information sufficient to weigh various alternatives would be designated “For Official Use Only (FOUO).” This information should be available to all of those involved in project decisions, including tenant agencies, consultants, and local officials.
In fact, the responsibility to share information with outside stakeholders increases where the envisioned countermeasures would have significant impacts on the surrounding neighborhood. For example, it is crucial to include outside stakeholders in discussions about setback distances, road closures, site amenities, and perimeter security. In these cases, sensitive building engineering studies or information about specific threats may be withheld, but the stakeholders must have enough information to understand the vulnerability that the team is addressing and the recommended countermeasures.
The GSA Project Manager must ensure that sensitive information is not released inappropriately, while supporting meaningful collaboration with effective information. This is necessary both to make good decisions and to gain buy-in on decisions that may be controversial.
TEAM ASSEMBLY AND RESPONSIBILITIES
Selecting the right team members and consultants based on a project’s scope of work and particular characteristics is key to a successful project. This requires some homework. Although the design community has focused attention on security for several years, there remains a relatively limited number of completed projects that illustrate best practices. As a result, most firms do not have the background needed to lead successful, well-balanced security projects. Project leaders must be selective to ensure that the chosen consultants possess the right expertise.
As shown in Project Start: Team Roles and Responsibilities, each team member brings a focused area of expertise to the project and accepts the corresponding responsibilities. Beyond the technical skills that each party contributes to the process, however, it is their participation in the rigorous, deliberative, design process with each other that yields the greatest value.
In order to deliver successful, holistic projects, each team member should share a sense of responsibility to meet each and every goal for the project. For example, blast experts should seek to provide a flexible range of alternatives that can support various site design concepts and daily use of the site. Designers should develop schemes that support a long-term vision for the site, beyond their immediate project. And local stakeholders who are responsible for neighborhood development should accept the need to reduce risk at the federal facility so that they can offer supportive solutions.
In light of this, it is important to remember that the Guide’s recommended security design process might be a new experience for most team members. Designers and local stakeholders are likely to have limited experience with federal security decision-making, while experienced security professionals may have limited experience making these decisions as part of a collaborative design process. For the Project Team leader, it is important to understand this and to lay out clear roles and responsibilities.
78 Chapter 3 Process Phase 1 GSA Site Security Design Guide

Project Start: Team Roles and Responsibilities
ROLES PRIMARY RESPONSIBILITIES
DHS Security Experts
Security Consultants
Building Security Committee (BSC)
Conduct building risk assessments for all GSA buildings, on a cyclical basis, prior to Project Starts.
Advise design teams on ISC criteria.
Perform technical blast, glass fragmentation, and progressive collapse analysis to support risk assessments
and analyses.
Conduct modeling and special studies, as needed, to support design efforts.
Provide technical expertise to prevent overscoping of countermeasures and unnecessary costs.
Represents each agency in a federal building.
Considers DHS risk assessments and has decision authority over “optional” countermeasures.
At this point in the project, the team is small. It will expand over time as the project develops. Keeping a clear record of project decisions will minimize unnecessary repetition of work between phases and as participants come and go over the life of the project.
GSA Project Manager Leads Feasibility Study and Program Development Study teams to set scope and budget for large projects.
Leads the Project Team (both GSA staff and contractors) for design and construction phase work.
GSA Property Manager Identifies general facility needs and functions, as well as maintenance and operations impacts of proposed
countermeasures.
Occasionally leads projects for small, temporary countermeasures.
GSA Subject Matter Experts (including Office of the Chief Architect staff)
Advise development of scope, project schedule, and budget.
Provide design expertise prior to procurement of consultants.
Design Firms Lead landscape, architectural, and urban design efforts to design effective, balanced countermeasures.
Lead efforts to develop the Multidimensional Assessment and Site Concept Plan early in the design process.
Local Stakeholders Identify neighborhood plans, opportunities, and concerns related to urban design and countermeasures.
Provide desired or required support for some countermeasures.
All Support the assessment and design evaluation.
Review the construction documents.
Collaborate and communicate.
GSA Site Security Design Guide Chapter 3 Process Phase 1 79

Collaborative, Comprehensive Multidisciplinary Approach
Key Points Within Phase 2: Multidisciplinary Assessment
Analyze security vulnerabilities, site context, and opportunities throughout
the entire site, using the zone approach to ensure a comprehensive view
Assess security needs while heeding design opportunities, assess design
needs while keeping in mind security opportunities; this is the foundation
of the Multidisciplinary Assessment
This phase is the most fundamental in shaping a creative, comprehensive, balanced design solution. And, it is often the longest.
Phase 2 Multidisciplinary Assessment
The Multidisciplinary Assessment phase has the most significant, lasting impact on the overall success of a site security design. It lays the foundation for the entire project, including both security strategies and all other potential site improvements that are necessary to create a high-quality public space. The activities that compose the Multidisciplinary Assessment begin during the Feasibility Study and Program Development Study (PDS) stages.
In this stage of a project, security experts complete their risk assessments as design experts and others complete their assessment of project opportunities and constraints. During this phase, all Project Team members frequently share and discuss their findings and progress both formally and informally.
This Guide emphasizes the importance of the Multidisciplinary Assessment because many types of expertise are required to fully understand existing conditions, constraints, and opportunities. Throughout this process, it is especially important that each team member shares the responsibility to meet all project goals, in all zones.
COLLABORATIVE, COMPREHENSIVE APPROACH
The zone approach provides a common framework to assess existing conditions, including security vulnerabilities, site context, and opportunities. As described in Chapter 2, Project Teams consider each site in terms of six different zones (see Diagram 3.1), each of which plays a particular role in overall security design. Solutions that consider the importance of each zone can meet the required level of protection creatively and comprehensively. Team members should keep in mind that a successful site security solution never exists solely in one zone and must function across all zones.
With Prospectus-level projects, there may be a significant amount of time between when the information used for the Multidisciplinary Assessment is collected and the start of design. Meanwhile, risk assessments are performed on a cyclical basis, independent of capital improvements. Similary, GSA portfolio evaluations, facility assessments, master plans, and other studies may be conducted independently of the site security project.
Project Teams must be vigilant to ensure that the information they use is complete and current. The benefits of previous assessments, whether of risk, facility condition, or other project aspects, should not be lost, but should be examined in the context of their purpose and date. All information should be assessed for current relevance as the project moves forward.
Team members on large projects should meet frequently during this stage to ensure adequate discussion across disciplines so that consultants are up to date and informed when they join the project and begin work. Project managers play an instrumental role in supporting such collaboration and sharing. Projects that fail to achieve
80 Chapter 3 Process Phase 2 GSA Site Security Design Guide

a comprehensive assessment risk incorrect scopes, insufficient budgets, and design solutions that lack imagination and innovation.
Smaller projects below Prospectus level may have an advantage in this regard. Their typically tight time frames ensure that the knowledge gained during a Multidimensional Assessment more easily stays with the project. Yet they present their own unique challenge to the goal of creating a comprehensively designed site.
Since this type of project typically deals with a smaller scope and, perhaps, a smaller portion of the site, Project Teams must ensure that the Multidimensional Assessment evaluates such a project in light of its impact on the entire site, and as one step toward a greater, holistic solution. Previous and future projects should build upon each other in an evolutionary way, developing a better facility according to a long-term vision. As Project Team members assess security and design, they must consider smaller projects as an integral part of a long-term development strategy.
ZONE 1 NEIGHBORHOOD
ZONE 2 STANDOFF PERIMETER
ZONE 3 SITE ACCESS AND PARKING
ZONE 4 SITE
ZONE 5 BUILDING ENVELOPE
ZONE 6 MANAGEMENT AND
BUILDING OPERATIONS
Whatever a project’s size, the Project Team must begin by looking at the many aspects that directly and indirectly impact overall design of site security. An example is shown in Diagram 3.2, in which the site’s existing conditions are analyzed and documented graphically on a site plan. This information is shared among the team members. To aid in visualizing the example, photographs of buildings of a similar scale and architectural style have also been provided (see page 82).
The activities in this phase include site visits, preparation and review of risk assessments, review of existing GSA studies and documents, and collection of information from other sources, as well as meetings with stakeholders to understand the broader opportunities and requirements for the project. This section provides a checklist to guide this assessment process (see page 87), plus a list of team roles and responsibilities (see page 89).
Diagram 3.1: Site Security Zones
FEDERALBUILDING
Teams should use the zone
approach discussed in Chapter 2 as
a framework for the Multidisciplinary
Assessment. Each zone may
contribute to overall site security,
while providing opportunities to
enhance the site’s function and
appearance.
OPTIMAL STANDOFF DISTANCE
GSA Site Security Design Guide Chapter 3 Process Phase 2 81
ALLE
Y
MIXED-USE OFFICE OFFICE BUILDING BUILDING BUILDING
AVEN
UE
A
BU
S ST
OP
2 SECOND STREET
GUARD HVAC VENTS
5 STAFF
RES
ERVE
D P
ARK
INGENTRY
FEDERAL RESERVE 1BUILDING
OFFICE BUILDING
EXISTING TOELEVATED
LOADINGFEDERAL DOCK
PLAZA
MAI
N
ENTR
Y
BUILDING 4
DESIGN STUDY PROJECT AREA
RES
ERVE
D P
ARK
ING
LIM
ITS
OF
GAR
AGE
BEL
OW
OFFICE BUILDING
DESIGN STUDY PROJECT AREA
PARK
TO PARKING
RAMP 3STREET-LEVEL PLAZA 50-FT. (15.24-m) STANDOFF
6 GUARD GUARD
FIRST STREET
OFFICE BUILDING
HOTEL MIXED-USE BUILDING
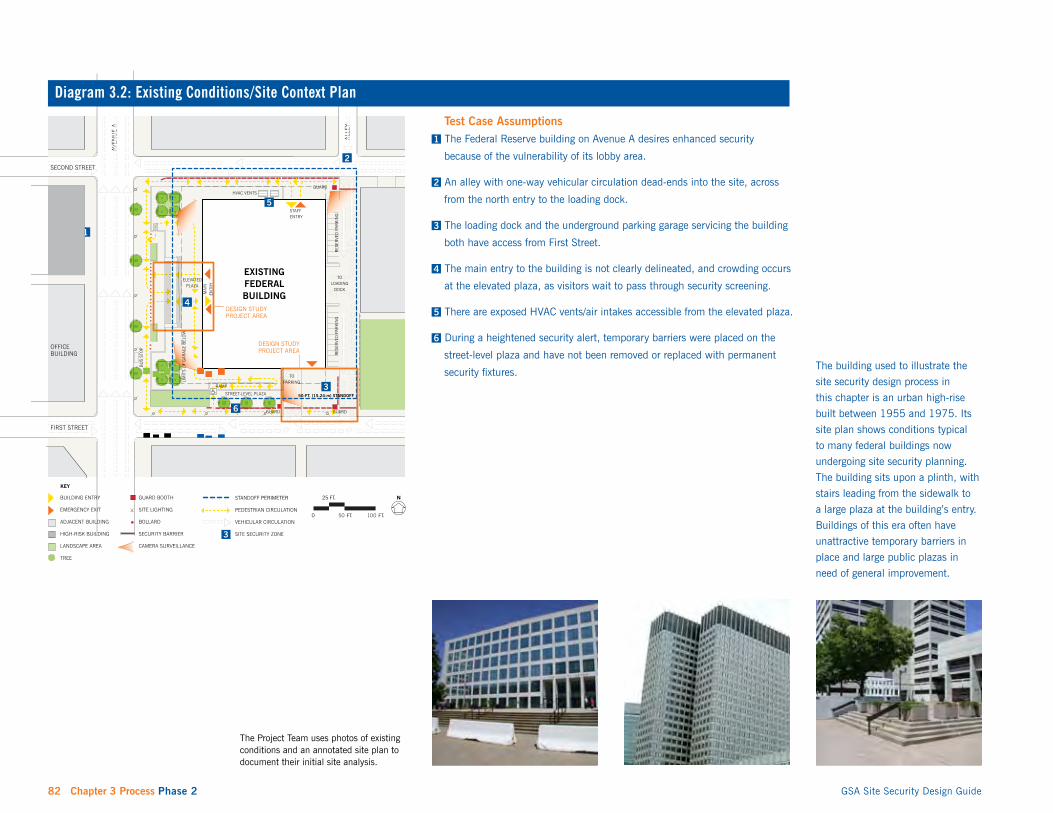
Diagram 3.2: Existing Conditions/Site Context Plan
Test Case Assumptions1 The Federal Reserve building on Avenue A desires enhanced security
because of the vulnerability of its lobby area.
2 An alley with one-way vehicular circulation dead-ends into the site, across
from the north entry to the loading dock.
3 The loading dock and the underground parking garage servicing the building
both have access from First Street.
4 The main entry to the building is not clearly delineated, and crowding occurs
at the elevated plaza, as visitors wait to pass through security screening.
5 There are exposed HVAC vents/air intakes accessible from the elevated plaza.25’ 100’25’ 100’
0 50’ 0 50’ 200’ 200’
10’ 50’10’ 50’
0 25’ 0 25’ 100’ 100’
6 During a heightened security alert, temporary barriers were placed on the
street-level plaza and have not been removed or replaced with permanent The building used to illustrate the
security fixtures.15’ 75’15’ 75’ site security design process in
0 35’ 0 35’ 150’ 150’
this chapter is an urban high-rise50’ 200’50’ 200’
0 100’ 0 100’ 400 400 built between 1955 and 1975. Its
N N N
KEY: KEYKEY:
BUILDING ENTRYBUILDING ENTRYBUILDING ENTRY
EMERGENCY EXITEMERGENCY EXITEMERGENCY EXIT
ADJACENT BUILDINGADJACENT BUILDINGADJACENT BUILDING
HIGH-RISK BUILDINGHIGH-RISK BUILDINGHIGH-RISK BUILDING
LANDSCAPE AREALANDSCAPE AREALANDSCAPE AREA
TREE TREETREE
site plan shows conditions typical
to many federal buildings now
undergoing site security planning.
The building sits upon a plinth, with
stairs leading from the sidewalk toGUGUARD BOOTHARD BOOTHGUARD BOOTH STANDOFF50 FT. STANDOFF PERIMETER50 FT. STANDOFF 25 FT.
SITE LIGHTINGSITE LIGHTING ATIONATIONSITE LIGHTING PEDESTRIAN CIRCULPEDESTRIAN CIRCULPEDESTRIAN CIRCUL ATION a large plaza at the building’s entry. 0 50 FT. 100 FT.
BOLLARD VEHICULAR CIRCULVEHICULAR CIRCULATIONATIONBOLLARD BOLLARD VEHICULAR CIRCULATION Buildings of this era often have SECURITY BARRIERSECURITY BARRIERSECURITY BARRIER 3 SITE SECURITY ZONESITE SECURITY ZONESITE SECURITY ZONE
unattractive temporary barriers inCAMERA SURVEILLANCECAMERA SURVEILLCAMERA SURVEILLANCE ANCE SITE SECURITY DESIGNSITE SECURITY DESIGNPROJECT AREAPROJECT AREA place and large public plazas in
need of general improvement.
N
The Project Team uses photos of existing conditions and an annotated site plan to document their initial site analysis.
82 Chapter 3 Process Phase 2 GSA Site Security Design Guide

RISK ASSESSMENT
A DHS physical security specialist performs the risk assessment and analyzes threats (actual or perceived), vulnerability of sites and buildings, consequences, and probability of occurrence. This risk assessment considers Design Basis Tactics and Levels of Protection in making recommendations for Design Criteria. Other stakeholders provide additional considerations and contribute to the definition of protective measures. The activities and the products of this process guide all subsequent site security design.
On some projects, especially smaller ones or modernization projects, a completed risk assessment may already be available; Project Teams should ensure that this assessment is current. For other projects, a new risk assessment is prepared or a completed risk assessment is updated. In every case, security experts in conjunction with the larger Project Team examine the risk assessment within the broader project context. In every case, the analysis of security issues must heed the latest ISC criteria.
There are three key outcomes of every DHS risk assessment:
1. Design Basis Tactics identify the specific acts and methods that the building and site’s countermeasures must protect against and form the basis for the site security design. The ISC criteria define the specific Design Basis Tactics for a particular building, as part of the overall risk assessment. Typical Design Basis Tactics may include an explosion of a defined intensity at a defined distance from the facility (impacting the building’s envelope and structural system) or a vehicle of a defined mass and speed that may be used to ram the facility (impacting the building’s perimeter barrier system).
2. Level of Protection defines the performance that each affected building system requires. These performance levels are defined as Minimum, Low, Medium, or High and pertain to all affected systems, including glass, structure, and other components. The required performance may vary from one system to another within the same building, based on the specifics of each building.
3. Design Criteria define the design direction that emerges, based on inputs from the risk assessment, consideration of the Design Basis Tactics, and the required Level of Protection. These Design Criteria are very cursory and defined without consideration of other factors, such as cost, impacts on their surroundings, or creative alternatives. It is the responsibility of the design team to consider the Design Criteria, understand the Design Basis Tactics and Levels of Protection that shaped them, and provide effective and balanced design solutions that respond to them.
Diagram 3.3: ISC Security Decision-Making Process
This flow chart illustrates the main inputs and outputs in the security decision-
making process, as outlined by the Interagency Security Committee. These
outputs serve as the basis for additional analyses by the Project Team and the
subsequent design of protective measures.
RISK ASSESSMENT DESIGN CRITERIA PROTECTIVE MEASURES
CONSEQUENCES
THREAT
ADDITIONAL CONSIDERATIONS
DESIGN BASIS TACTICS VULNERABILITY
LIKELIHOOD LEVEL OF PROTECTION
Teams must analyze all information through a multidisciplinary approach so that the interactions and impacts of various aspects of the project are well understood and addressed from the beginning. In past projects, separation of security specialists and designers during the assessment stages has resulted in less-than-ideal solutions, delays, or increased costs.
GSA Site Security Design Guide Chapter 3 Process Phase 2 83

The Security Charrette initiates the kind of well-informed discussion and give and take needed to develop a good solution that balances all of the competing facets of a project.
Risk assessments also include two types of recommendations for As a result, the perimeter barrier system could achieve the required protective measures: performance level of the bollard system with a less robust con
struction. This more creative approach offers more design options Optional Countermeasures. Actions that the risk assessment with significant opportunities to improve cost, compatibility, and
designates as “optional” are those addressing low or moderate effectiveness. risks where the ISC does not establish minimum performance requirements. These can be approved or rejected at the discretion The Security Charrette (described in detail on page 85) is an of the Building Security Committee (BSC), typically with each important step in developing such innovative solutions. This is agency housed within the building casting one vote. a recently developed process that is intended to support the
Mandatory Countermeasures. Where the risk assessment Multidisciplinary Approach envisioned in the ISC criteria. Some identifies high-risk conditions that must be addressed, it defines projects may warrant a standalone Security Charrette that is “mandatory” countermeasures. The DHS inspector briefs the devoted solely to security issues and countermeasures. This parties involved and offers a range of alternatives, where possible. standalone approach allows for candid discussion of the most The appropriate party, subject to funding availability, must take sensitive security issues and for highly technical engineering these recommended actions. To encourage resolution, DHS problem solving, which may not be appropriate for the entire tracks the status of mandatory measures until they are complete. Project Team. For less complex projects and issues, or at later
stages of design, the Security Charrette should be combined Understanding the relation between Design Basis Tactics and protec with a more comprehensive design workshop. tive countermeasures is crucial to creative problem solving. This is because design can be used not only to respond to the required Levels of Protection, but also to modify the Design Basis Tactics. In turn, this can open up new options to achieve the required performance.
For example, the Design Basis Tactics might assume that a vehicle of a certain size and speed has the potential to ram a perimeter barrier system. In response, the initial Design Criteria may recommend that the perimeter barrier be designed to allow no penetration into the site by that design basis vehicle. The design team could choose a perimeter barrier system to withstand a head-on strike by the design basis vehicle and ensure no penetration into the site. However, this response to the design basis vehicle’s mass and speed likely would require a very robust system, and site context, budget, or underlying conditions may make this solution undesirable for non-security reasons.
Alternately, the team may choose to design the site and its surroundings in such a way that addresses the underlying assumptions of the Design Basis Tactics and modifies the Design Criteria. The design could prevent the design basis vehicle from reaching the perimeter of the site or from reaching the design basis speed.
84 Chapter 3 Process Phase 2 GSA Site Security Design Guide

The Security Charrette
The ISC criteria direct that security decision-making should be
a multidisciplinary effort. The use of a Security Charrette, as part of the
Multidisciplinary Assessment, is a technique to encourage collaboration.
A Security Charrette brings together the Project Team in a structured forum
to develop reasonable, holistic, and conscientious security decisions. The
Security Charrette is appropriate for projects of all sizes. At a minimum,
it should first occur before a project budget is established (i.e., during the
Feasibility Study for large projects). Charrettes may be repeated at other
key stages in the project development, whenever important decisions arise.
The typical Security Charrette is a full one-day event, but complex projects
or issues may require more time.
In order to support a meaningful discussion of alternatives, the Charrette
makes use of already completed technical studies and special tools.
In addition to the DHS risk assessment, these may include other DHS
analyses, blast and related studies provided by contractors, and GSA’s
Decision Support Tool for the ISC Security Design Criteria (DST-ISC). During the Charrette, the Project Team considers study findings, reconciles
differences, and begins to form an overall security strategy for the site.
If at the time of the Security Charrette the Project Team has not yet
completed comprehensive design concepts, the findings from the Charrette
should be thought of as general directives and performance requirements.
Creative solutions and detailed alternatives analysis will occur during the
Site Concept Investigation Phase. As suggested above, additional Security
Charrettes may be held during this phase to aid in decision-making.
Regardless of the Security Charrette’s timing, the discussion should include
consideration of wider design issues and facility needs, beyond security
alone. It should incorporate information from the design assessment,
discussed later in this section, as much as possible.
This multidimensional aspect is what sets the Security Charrette apart
from the initial risk assessment and is why it is important to include
a broad range of participants. Among them should be the following
representatives:
GSA Project Manager
GSA Property Manager
GSA design resource (from OCA or GSA Regional Office)
GSA Regional Historic Preservation Officer (when applicable)
Design consultants (architect/landscape architect/engineer), if hired
at this stage
DHS representative
Building Security Committee members
Local law enforcement official
Local fire/HazMat official
Local building code official
Local city and neighborhood planners
Feasibility Study team members
Security/safety consultants, specialists, and engineers (if not included
on the Feasibility Study team), such as
Blast consultant
Security consultant
Cost estimator
Electronic security and communications specialist
Engineers: structural, mechanical, and electrical
Fire protection consultant
Chemical, biological, radiological (CBR) consultant
Recorder/DST-ISC operator
GSA Site Security Design Guide Chapter 3 Process Phase 2 85

Design Assessment DESIGN ASSESSMENT
During the Multidimensional Assessment, be sure to look at the site in relation to its neighborhood and the city as a whole.
GSA’s guide to public spaces, Achieving Great Federal Public Spaces: A Property Manager’s Guide, provides a comprehensive audit tool useful for site assessment at existing buildings.
Just as the security-focused aspects of the Multidisciplinary Assessment weigh the role of design, Project Teams must keep security functionality in mind as they assess the site’s everyday use and the facility’s relationship to its neighborhood.
In other words, though typically led by a design firm, the site and design components of the assessment receive input from the full Project Team and outside parties, including other federal agency partners, professional peers, security experts, and local officials. The team conducts a detailed site investigation of each zone to examine the full range of existing conditions and opportunities. They also review GSA P-100; ISC criteria; and other policies, guidance, and regulations and identify requirements relevant to the project.
The team researches potential site elements that may contribute to the security design or existing elements that can be enhanced or removed to achieve the desired level of security. They also look closely at neighborhood context, building styles, materials, and local plans so that security is well integrated into its surroundings. (See the Checklist for Site Security Design Issues on page 87.)
These early investigations identify opportunities for multifunctional security elements and site improvements that enhance both the use of the site and its security. For example, if the circulation routes into and out of the site are no longer sufficient to handle current traffic volumes, they might be rethought to achieve more efficient flow, while preventing direct vehicular approach. Or, plans for improved perimeter security measures might be advanced along with an effort to improve public space amenities.
In addition to identifying opportunities to advance security and urban design interests, the assessment must flesh out underlying conditions (such as subsurface characteristics) and other site constraints that will impact implementation.
At this stage, countermeasure decisions should still be “penciled in,” to allow flexibility and communication of internal and off-site tradeoffs as these initial ideas are shared with the entire Project
Team. This enables subsequent multidisciplinary discussion to focus on tentative ideas, with the understanding that they are still in flux and should change to best balance all goals for the site.
As various subteams complete each aspect of the Multidisciplinary Assessment, a workshop or series of meetings provide the setting for the entire Project Team to review all findings and discuss how these create opportunities and constraints for the project. These face-to-face meetings enable ideas to be developed, evaluated, and refined “live” with questions, explanations, and contributions from the full team. This discussion, with all parties at the same table cooperating, is the essential aspect of a successful Multidisciplinary Assessment phase. Its outcomes, which may be represented as in Diagram 3.4 (page 88), form the basis for concept design in Phase 3.
By the end of Multidisciplinary Assessment, all Project Team members have an understanding of both the security and design opportunities of the site, and these are inherently interwoven. The products of this phase, which carry forward into subsequent phases, include the following:
Risk Assessment: Design Basis Tactics Level of Protection Design Criteria Operational and Mandatory Countermeasures
Preliminary Budget, Including Security Line Items Project Schedule Analysis of Neighborhood Opportunities and Constraints Site Analysis Summarizing Opportunities and Constraints:
Utilities Plan Transportation and Circulation Plans Existing Topography, Vegetation, and Boundaries
Analysis of Existing Building and Structures Program of Requirements for New Construction
86 Chapter 3 Process Phase 2 GSA Site Security Design Guide

Checklist for Site Security Design Issues
The following represents a typical list of design issues
that are examined during the Multidisciplinary Assessment.
This list should be customized for each project:
Local Context Regional Context
Neighborhood Context
Architectural and Landscape Context
Local Planning Objectives: Land Use, Transportation, Parking, Regulatory Stakeholders
Public Space Use and Improvement Opportunities for Public Space
Links to Public Transportation
Climate/Topography/Orientation
Public Process/Input
Future Planned Developments
Site Historic Issues/Significance
Circulation (pedestrian and vehicular; on and around site)
Adjacent Building Programs and Configurations
Existing Site Conditions/Use
Underground Conditions/Utilities
Existing Site Elements (e.g., parking meters, bus stops, light poles)
Easements/Setbacks
Access and Approach Vulnerability
Environmental Conditions and Opportunities/Sustainability
Site Remediation Requirements: NEPA (National Environmental Policy Act) and CERCLA
(Comprehensive Environmental Response, Compensation, and Liability Act)
Room for Growth/Expansion Provision
Street Character/Features
Vehicular Loading/Parking
Building Historic Issues/Significance
Existing Structural System (existing building)
Building Mass/Program Requirements (new building)
Lines of Sight
Environmental Conditions and Opportunities/Sustainability
Vehicular Loading/Parking
GSA Site Security Design Guide Chapter 3 Process Phase 2 87

SECURITY BARRIER
A neighboring building with similar security concerns offers an oppor
Security and Site Design T
1
and perimeter security.
This example illustrates one way
to represent the outcomes of
Multidisciplinary Assessment so
that all Project Team members
understand the opportunities that
security and design present to
enhance both. While each project
may use a different method of
representation, any approach
should articulate the characteristics
of the site by zone and clearly
define security design topics for
further exploration. Here, the key
issues to be addressed in the
site security design are shared
security surveillance; loading
dock circulation; vulnerability of
underground parking; building
entry/queuing; HVAC protection;
opics
tunity for
partnership and sharing of security resources.
2 Direct run up to the entry point at the loading dock presents a risk; an
unauthorized vehicle could accelerate to a speed sufficient to force entry.
3 When parking is located under a building, that entry point is vulnerable.
4 Unmanaged queuing causes congestion and confusion that can make security
monitoring difficult and public space less safe.
5 Exposed HVAC vents or air intakes are vulnerable to airborne chemical,
biological, or radiological attack.
6 The temporary barriers at the street-level plaza are not rated to prohibit
vehicular approach and have negative off-site impacts on the streetscape and
adjacent local businesses.
GUARD BOOTH
SITE LIGHTING
BOLLARD
CAMERA SURVEILLANCE
BUILDING ENTRY
EMERGENCY EXIT
ADJACENT BUILDING
HIGH-RISK BUILDING
LANDSCAPE AREA
TREE
KEY
BUILDING ENTRY
EMERGENCY EXIT
SITE SECURITY DESIGN PROJECT AREA
ADJACENT BUILDING
HIGH-RISK BUILDING
LANDSCAPE AREA
TREE
SITE SECURITY ZONE
PEDESTRIAN CIRCULATION
50 FT. STANDOFF
VEHICULAR CIRCULATION
GUARD BOOTH
BOLLARD
SECURITY BARRIER
CAMERA SURVEILLANCE
SITE LIGHTING
KEY:
N
0 25’
10’ 50’
100’
035’ 35’
15’ 75’
150’
050’ 200’50’
25’ 100’
200’
0100’ 100’
50’ 200’
400
STANDOFF PERIMETER
PEDESTRIAN CIRCULATION
VEHICULAR CIRCULATION
SITE SECURITY ZONE
SITE SECURITY ASSESSMENT AREA
BUILDING ENTRY
EMERGENCY EXIT
SITE SECURITY DESIGNPROJECT AREA
ADJACENT BUILDING
HIGH-RISK BUILDING
LANDSCAPE AREA
TREE
SITE SECURITY ZONE
PEDESTRIAN CIRCULATION
50 FT. STANDOFF
VEHICULAR CIRCULATION
GUARD BOOTH
BOLLARD
SECURITY BARRIER
CAMERA SURVEILLANCE
SITE LIGHTING
KEY:
N
0 25’
10’ 50’
100’
0
15’ 75’
150’
0
25’ 100’
0
50’ 200’
400
3
100 FT.50 FT.
25 FT.
0
5
4
OFFICE
BUILDING
LOADING
EXISTING
BUILDING
3
2
1
6
DESIGN STUDY PROJECT AREA
DESIGN STUDY PROJECT AREA
BUILDING
OFFICE
FEDERAL RESERVE BUILDING
OFFICE BUILDING
MIXED-USE BUILDING
OFFICE BUILDING
SECOND STREET
HOTEL
BU
S ST
OP
STAFF ENTRY
PLAZA FEDERAL TO
DOCK
STREET-LEVEL PLAZA
RAMP
HVAC VENTS
LIM
ITS
OF
GAR
AGE
BEL
OW
GUARD GUARD
RES
ERVE
D P
ARK
ING
RES
ERVE
D P
ARK
ING
GUARD
TO PARKING
MAI
NEN
TRY
ELEVATED
OFFICE BUILDING
AVEN
UE
A
ALLE
Y
PARK
MIXED-USE BUILDING
50-FT. (15.24-m) STANDOFF
Diagram 3.4: Site Security Assessment Plan
N
N
88 Chapter 3 Process Phase 2 GSA Site Security Design Guide

Multidisciplinary Assessment: Team Roles and Responsibilities
ROLES RESPONSIBILITIES
Security Consultants Present building risk assessment to team
Participate in Security Charrettes and other analyses (e.g., blast, vector)
Establish Level of Protection (LOP)
Work with designers; stay creative, flexible
Designers Review existing conditions
Evaluate state-of-the-art, best practices
Create site program
Address sustainability, cultural, and historic issues
Participate in Security Charrettes
Collaborate closely with security consultants
Remain flexible and explore a variety of alternatives
Building Security Committee (BSC) Reviews potential security threats with security experts and designers
Represents tenant and provides feedback to tenant
Approaches risk management with balance and creativity
Defines appropriate risk management
Looks at cost impacts and benefits to all participants
GSA Project Manager Plans participation
Identifies issues and project requirements within schedule and budget
GSA Property Manager Represents operation and maintenance point of view
Advocates for sufficient budget
Recognizes broader opportunities for property
Consults with GSA Regional Historic Preservation Officer
Coordinates external design review
Local Stakeholders Provide local knowledge
Assist with consensus building, through a comprehensive approach and
interaction with the Project Team
Bring additional physical or operational resources to the solution
GSA Site Security Design Guide Chapter 3 Process Phase 2 89

Phase 3 Site Concept Investigation
Project Teams should always consider the costs and benefits of risk reduction as they review initial concepts.
The design process is an iterative cycle that posits and tests multiple concepts in order to develop the best approach. It must be dynamic and interactive to be successful.
Key Points Within Phase 3: Site Concept Investigation
Develop multiple concepts that comprehensively address site-wide
conditions, opportunities, and constraints identified in the Multidisci
plinary Assessment phase
Collaborate with project stakeholders and peers to examine these
concepts, their ability to mitigate risk, and their impact on context
During the Site Concept Investigation, the team develops, studies, and refines multiple concepts that explore a variety of options for the site design in response to the Multidisciplinary Assessment. As in Diagrams 3.5–3.7, each concept shows different strategies to meet the diverse needs of GSA, tenant agencies, and local stakeholders.
Project Team members discuss these concepts, their impacts, and their costs with GSA representatives, the BSC, security experts, other stakeholders, and peer reviewers. As these strategies are evaluated, Project Team members refine the best pieces and parts into new concepts. Project Team members may reevaluate their approach to security a number of times. In doing so, the team develops the most efficient and cost-effective approach to meet the needs of the project. Though the concepts become more refined and specific, they remain dedicated to the original site design strategy.
During this stage, fundamental strategies begin to take shape. For example, insufficient standoff distances may require significantly more hardening at a facility than would be required at a comparable facility where more standoff is available. It is important that
Project Teams discuss such matters and options with the blast and security consultants before and during concept development. Spending time and money at this stage can save millions later in the project.
The Project Team must continue to look at the site overall, to ensure that the final design supports comprehensive, long-term site goals. Even where the project itself consists only of a specific area within the site (e.g., a high-priority perimeter), the Project Team must continue to address all aspects of the site. The Project Team will focus on the specific project area only in the last phases of the site security design process, when designers prepare final design and construction documents.
Once the important elements and issues are captured, the design team moves into the next phase of design, incorporating the information gathered from the concept investigations into a single concept for the site.
90 Chapter 3 Process Phase 3 GSA Site Security Design Guide

Diagram 3.5: Site Concept Investigation/Scheme 1
30-FT.-HIGH WALL AROUND HVAC VENTS/AIR INTAKES
BOLLARDS ALONG CURB LINE
BUS STOP REMOVED FROM IN FRONT OF BUILDING
SHARED CAMERA SURVEILLANCE WITH FEDERAL RESERVE
BUILDING ACROSS THE STREET
NEW SECURITY PAVILION TO REGULATE ENTRY POINT
HARDENED SITE WALL
BOLLARDS ALONG BUILDING YARD LINE
VEHICLE INSPECTION POINT OUTSIDE THE 50-FT. STANDOFF TO SCREEN VEHICLES
RES
ERVE
D P
ARK
ING
50-FT. (15.24-m) STANDOFF
TO PARKING
TO LOADING
DOCK
HVAC VENTS
LIM
ITS
OF
GAR
AGE
BEL
OW
GUARD
RES
ERVE
D P
ARK
ING
OFFICE BUILDING
FEDERAL RESERVE BUILDING
OFFICE BUILDING
OFFICE BUILDING
MIXED-USE BUILDING
OFFICE BUILDING
PARK
MIXED-USE BUILDING OFFICE BUILDING HOTEL
AVEN
UE
A
FIRST STREET
SECOND STREET
SECONDARY PLAZA
GUARD
RAMP
EXISTING FEDERAL BUILDING
STREET CLOSURE TO ELIMINATE RISK OF AXIAL APPROACH
AUTOMATIC EXIT GATE
FENCE AT ADJACENT BUILDING
HARDENED WALL AT ADJACENT PARK
VEHICLE INSPECTION POINT OUTSIDE THE 50-FT. STANDOFF TO SCREEN SERVICE ENTRY
In Phase 3, the Project Team
designs three concepts (pages
91–93) addressing the site and
security needs of a single building
in an urban location. Each scheme
proposes different strategies, based
on the Multidisciplinary Assessment.
Stakeholders, team members,
and peers review and revise these
strategies, leading to a single
concept in Phase 4.
In the first scheme, the proposed
security improvements concentrate
on establishing a physical standoff
barrier at the perimeter of the site.
Bollards are suggested as a simple
off-the-shelf solution. A site wall is
proposed around HVAC vents/air
intakes. This scheme also proposes
a new security pavilion to regulate
entry, provides a queuing area, and
shares CCTV surveillance with the
Federal Reserve building across
Avenue A.
GSA Site Security Design Guide Chapter 3 Process Phase 3 91

Diagram 3.6: Site Concept Investigation/Scheme 2
ADJACENT BUILDING PROVIDES ADEQUATE STANDOFF
BOLLARDS AT STAFF ENTRY
CANOPY OVER QUEUING AREA
TRANSIT STOP/INFO CENTER CREATES MORE EYES ON THE STREET
RAMP SYSTEM ALLOWS UNIVERSAL ACCESS AND MANAGES QUEUING
NEW ENTRY STAIR AT CORNERS
SITE WALL AND PLANTING AROUND HVAC VENTS/AIR INTAKES
HARDENED PLANTER WALL
HARDENED SITE FURNITURE AND PLANTER WALLS AT ADJACENT PARK
VEHICLE INSPECTION POINT OUTSIDE THE 50-FT. STANDOFF TO SCREEN SERVICE ENTRY
SERVICE ENTRY/EXIT CLOSED
HARDENED SITE FURNITURE AND PLANTER WALLS
COMBINED GUARD BOOTH FACILITY
VEHICLE INSPECTION POINT OUTSIDE THE 50-FT. STANDOFF TO SCREEN VEHICLES
GUARD
RES
ERVE
D P
ARK
ING
50-FT. (15.24-m) STANDOFF
TO PARKING
TO LOADING
DOCK
HVAC VENTS
LIM
ITS
OF
GAR
AGE
BEL
OW
RES
ERVE
D P
ARK
ING
OFFICE BUILDING
FEDERAL RESERVE BUILDING
OFFICE BUILDING
OFFICE BUILDING
MIXED-USE BUILDING
OFFICE BUILDING
PARK
MIXED-USE BUILDING OFFICE BUILDING HOTEL
AVEN
UE
A
FIRST STREET
SECOND STREET
EXISTING FEDERAL BUILDING
RAM
P
The second scheme utilizes security
measures to improve the site’s
existing vehicular and pedestrian
circulation. Physical standoff barriers
are multifunctional, serving as site
landscape amenities and pedestrian
improvements. Structurally hardened
existing planter walls visually
integrate security measures with the
site’s landscape architecture. New
stairs at the street corners eliminate
the potential for a vehicle to climb
the wide, central stair. A landscaped
ramp system with a canopy cover for
weather protection provides universal
access and manages queuing in
an orderly and pleasant manner. In
addition, a combined guard booth
facility oversees the entrances to
both underground parking and the
loading dock.
92 Chapter 3 Process Phase 3 GSA Site Security Design Guide

Diagram 3.7: Site Concept Investigation/Scheme 3
AUTOMATIC EXIT GATE
HVAC VENTS/AIR INTAKES RAISED ABOVE 30 FEET
BOLLARDS AT NEW ENTRY STAIR
FENCE ALONG ADJACENT BUILDING AND PARK
GUARD ARM AT 50-FT. STANDOFF TO SCREEN SERVICE ENTRY
TO SCREEN VEHICLES
STAFF ENTRY CLOSED
DEPRESSED WATER BASIN
HARDENED PLANTER WALL
GARDEN WALK
GUARD ARM AT 50-FT. STANDOFF
NEW SECURITY PAVILION TO REGULATE ENTRY POINT
RETAIL FRONTAGE ALONG STREET EDGE WITH PLANTING
AT PLAZA LEVEL
HARDENED SITE WALL AT NEW RAMP
EXISTING FEDERAL BUILDING
OFFICE BUILDING
OFFICE BUILDING
OFFICE BUILDING
PARK
MIXED-USE BUILDINGHOTEL
OFFICE BUILDING
FEDERAL RESERVE BUILDING
MIXED-USE BUILDING
OFFICE BUILDING
AVEN
UE
A
FIRST STREET
SECOND STREET
RES
ERVE
D P
ARK
ING
50-FT. (15.24-m) STANDOFF
TO PARKING
TO LOADING
DOCK
LIM
ITS
OF
GAR
AGE
BEL
OW
RES
ERVE
D P
ARK
ING
WATER GARDEN
RAM
P
GUARD GUARD
HVAC VENTS
In the third scheme, a structure
at both the street and plaza levels
incorporates retail uses and a new
security pavilion, while providing
standoff. Retail at the edge of
the site provides neighborhood
amenities, such as shopping and
food service, while reducing the
impact on the streetscape of a
security setback. The retail structure
also includes CCTV to provide
surveillance around the building.
The security pavilion regulates
access to the relocated main
building entry. This scheme replaces
temporary barriers with a
water basin. This moat provides
a secure perimeter, while acting as
the centerpiece for a public water
garden at the sidewalk-level plaza.
GSA Site Security Design Guide Chapter 3 Process Phase 3 93

GSA’s Design Excellence program includes peer review during the Site Concept Investigation phase of the project. This offers an excellent opportunity to explore alternatives and gather feedback on how to integrate security requirements with other project needs.
Site Concept Investigation: Team Roles and Responsibilities
RESPONSIBILITIES
Critique concepts, introduce best practices, and provide information and
research as needed
Collaborate on solutions
Explore options (push the envelope) to find the best solution
Advocates creative and realistic solutions
Brings tenant point of view
Analyzes operational solutions to balance reduction of risk with cost
Reviews recommended changes
Ensures that designers and security experts provide creative input
Organizes peer reviews to help develop a single, focused concept from the
initial concepts
Review project, as required, and provide critique to help develop single,
focused concept from the initial concepts
Review project for Section 106 of the National Historic Preservation Act
(NHPA) compliance
Participate in concept review
ROLES
Security Consultants
Designers
Building Security Committee (BSC)
Project Manager
Other GSA Resources Center for Design Excellence (appropriate peers) Center for Historic Buildings
Stakeholders
94 Chapter 3 Process Phase 3 GSA Site Security Design Guide
Phase 4 Site Concept Selection (Conceptual Strategy Plan)
This phase should proceed seamlessly from the previous phase. Here, the design team develops a single alternative for the entire site, which comprises the best elements from the Site Concept Investigation.
Combine best results from site concept investigations into a “hybrid”
concept (a Conceptual Strategy Plan)
Key Points Within Phase 4: Site Concept Selection
Reach consensus on basic strategies for security countermeasures and
site improvements
Begin consideration of budget and phasing to bring the design into
built form
The selected Site Concept should be a hybrid, balanced solution that incorporates and refines the most appropriate strategies and design elements from the many site concept studies (see Diagram 3.8). It should consider the entire site to ensure that solutions contribute to its overall improvement. In subsequent stages the Project Team will focus only on the specific project areas defined by the scope.
On smaller projects, the preferred concept can be chosen through informal peer reviews with GSA Regional experts and informed discussions among Project Team members. On larger projects, it is helpful to hold a formal peer review with design peers selected through GSA’s Design Excellence program. They can provide an informed critique and foster discussion of costs and benefits.
Although the Project Team will still refine the selected concept further after this phase, at this point the team should reach consensus on the appropriate balance between security, aesthetics, and functionality. In addition, the team must agree on the fundamental strategy with regard to risk, including consensus about risk acceptance.
Remember that risk can be mitigated and managed, but it can never be eliminated. Since it is not always possible to reduce risk through physical solutions alone, a successful Site Concept may depend on operational strategies, as well. These strategies should be considered an integral part of the risk management strategy and should also be agreed upon at this stage.
Site Concept Selection: Team Roles and Responsibilities
ROLE RESPONSIBILITIES
All Team Members Collaborate to develop a Conceptual
Strategy Plan
Ensure that goals, requirements, and
hallmarks (including comprehensive
site design and long-term develop
ment strategy) are satisfied
GSA Site Security Design Guide Chapter 3 Process Phase 4 95

Diagram 3.8: Conceptual Strategy Plan
The Project Team combines the This concept reflects the specific The site security design elements
most successful elements of the expertise that each team member incorporated from the three
three site concept investigations in provided regarding the tradeoffs conceptual design schemes comprise
an overall Site Concept. In this case, inherent in each strategy. The the following:
the hybrid scheme balances security elements in the Site Concept
measures with site circulation achieve a balance of security, Zone 1: Operational improvements,
improvements through the use of multifunctionality, and appropri including a partnership with the
multifunctional landscape elements. ateness to site and budget. Federal Reserve building across
Avenue A, provide shared CCTV
surveillance.
SITE WALL AND PLANTING
NEW SECURITY PAVILION TO REGULATE ENTRY POINT
SHARED CAMERA SURVEILLANCE WITH BUILDING ACROSS THE STREET
NEW ENTRY STAIR AT CORNERS
VEHICLE INSPECTION POINT OUTSIDE THE 50-FT. STANDOFF TO SCREEN VEHICLES
COMBINED GUARD BOOTH FACILITY DEPRESSED WATER BASIN
HARDENED PLANTER WALL
AROUND HVAC VENTS/AIR INTAKES
RAMP SYSTEM ALLOWS UNIVERSAL ACCESS AND MANAGES QUEUING
HARDENED SITE WALL AT NEW RAMP AT ADJACENT PARK
STAFF ENTRY CLOSED
EXISTING FEDERAL BUILDING
OFFICE BUILDING
OFFICE BUILDING
OFFICE BUILDING
PARK
MIXED-USE BUILDINGHOTEL
OFFICE BUILDING
FEDERAL RESERVE BUILDING
MIXED-USE BUILDING
OFFICE BUILDING
AVEN
UE
A
FIRST STREET
SECOND STREET
RES
ERVE
D P
ARK
ING
50-FT. (15.24-m) STANDOFF
TO PARKING
TO LOADING
DOCK
LIM
ITS
OF
GAR
AGE
BEL
OW
RES
ERVE
D P
ARK
ING
RAM
P
GUARD
HVAC VENTS AUTOMATIC EXIT GATE
ADJACENT BUILDING PROVIDES ADEQUATE STANDOFF
EXISTING FENCE TO REMAIN
VEHICLE INPECTION POINT OUTSIDE THE 50-FT. STANDOFF TO SCREEN SERVICE ENTRY
96 Chapter 3 Process Phase 4
Zone 2: Structurally hardened planter
walls provide increased protection
from vehicles, while blending into
the site’s landscape architecture.
Physical standoff barriers function as
security elements, site amenities,
and streetscape improvements.
Zone 3: A combined guard booth
facility oversees the entrances to both
underground parking and the
loading dock simultaneously, reducing
the number of required guards.
Zone 4: Existing, wide central stairs
are divided and relocated to the street
corners; a new axially located
security pavilion regulates entry and
facilitates queuing; and a landscaped
ramp system provides universal access
and allows queuing in an orderly
and pleasant manner. In addition,
a depressed water basin increases
standoff, while providing a center
piece for a public water garden.
Zone 5: Plantings, grates, and
filters screen HVAC vents/air intakes,
thereby restricting access.
Zone 6: A strategic plan is developed
to replace temporary barriers that
were placed in haste and have
remained for years. The plan includes
the removal and disposal of the
temporary barriers and replacement
with multifunctional barriers. The
plan also establishes operations and
maintenance requirements for future
use of temporary barriers, if necessary.
GSA Site Security Design Guide
Phase 5 Design Studies for Project Areas
After reaching agreement on the preferred Site Concept, the design team continues with more detailed design work on key elements of the Site Concept. These may involve the more complex or high-priority areas of the overall site. Also, in cases where the entire site concept will not be implemented in a single project, these Design Studies may begin the detailed design work that the team will carry through to final design as part of the immediate project.
Perform a series of studies exploring different ways to achieve the goals of
the Conceptual Strategy Plan
Key Points Within Phase 5: Design Studies for Project Areas
Consider team expert input regarding the detailed approach for key areas
Revisit budget and schedule goals and long-term maintenance and operations
Using perspective sketches and renderings, the Design Studies further explore the ideas generated by the Conceptual Strategy Plan (see pages 98–99). The designers must test the Conceptual Strategy Plan against real site constraints and unseen obstacles, such as utility lines or underground vaults, which prevent barriers from attaining the structural foundations necessary to act as effective deterrents. Project Team members may contact additional consultants, such as structural engineers, to confirm site survey information and test assumptions.
The team reviews the Design Studies together and concentrates on important design details, with the larger site goals in mind. For example, in the Site Concept there may be a proposed perimeter wall along a portion of the site. During this stage, the security experts may comment on the likely performance of the proposed wall’s construction or anchoring. Urban designers or local officials
may advise on how the wall’s details would impact neighborhood design goals.
Project designers provide a range of input on these issues and more, including material choices and information about cost and constructability. Ideally, as part of the discussion, security experts suggest alternatives that meet their performance requirements, while responding to the urban designers’ concerns, and vice versa.
Larger strategy decisions are made during concept development in Phases 3 and 4, but this detailed design study phase is necessary to integrate countermeasures into the particular fabric of the site and its surroundings.
Design Studies for Project Areas: Team Roles and Responsibilities
ROLE RESPONSIBILITIES
All Team Members Ensure that the design meets site
security hallmarks
Obtain consensus from all
stakeholders on a realistic approach
to budget, schedule, maintenance,
and operations considerations
GSA Site Security Design Guide Chapter 3 Process Phase 5 97

Elevation View
FEDERAL BUILDING
LAY-BY SPACE FOR TRUCKS AWAITING
CLEARANCE
CONTROLLED COMBINED GUARD BOOTH CONTROLLED ENTRY ENTRY TO MONITORS ENTRY TO TO LOADING DOCK
UNDERGROUND BOTH PARKING GARAGE PARKING AND LOADING DOCK
Existing Conditions Plan
FEDERAL BUILDING
TOUNDERGROUND
PARKING
TO L
OAD
ING
DO
CK
50-FT. STANDOFF PERIMETER
GUARD ARM
TEMPORARY GUARD BOOTH BARRIER
Design Solution Plan
FEDERAL BUILDING
TO L
OAD
ING
DO
CK
TO UNDERGROUND
PARKING
50-FT. STANDOFF
EXIT PERIMETER
LAY-BY SPACE
SECTION CUT
GUARD BOOTH INSPECTION AREA HYDRAULIC BARRIER
GUARD ARM
HARDENED SITE WALL
Zone 3: Site Access and Parking The concept of combining three
guard booths into one saves on
operational and staffing costs, while
centralizing security oversight.
The placement of the guard booth
supports clear views of all vehicles
entering the loading dock, as well
as the underground parking entrance
off First Street.
Project Area Design Studies: Zone 3
Security Design Problem Regulation of vehicular access to the site requires a combination of security
elements to stop and screen cars and trucks prior to passing inside the
perimeter. Ideally, access to on-site parking should be separated from service
access because the screening process is different for each. A tenant with
daily access requires a lower level of screening than a delivery truck. Multiple
entry points require high operational overhead in terms of facilities and
staffing. When parking is located underneath the building, that entry point is
particularly vulnerable. An explosive-laden vehicle could penetrate the standoff
perimeter and gain access to areas beneath the building.
Proposed Security Design Solution To reduce operational costs and consolidate security oversight, a shared guard
booth regulates access to both the underground parking garage and the loading
dock. Guard arms designed as vehicular barriers control entry prior to security
screening. Hydraulic barriers prevent a vehicle from backing into the street in
the event that it needs to be detained. If possible, vehicles should be stopped
outside the 50-foot standoff perimeter for inspection. Due to the constraints
of this site and the space required for a truck to pull off the street completely to
avoid stopping traffic, the guard arm at the loading dock is located slightly
within the standoff perimeter. A lay-by space enables trucks that are waiting for
security clearance to pull to the side, allowing other vehicles to pass.
98 Chapter 3 Process Phase 5 GSA Site Security Design Guide

Bird’s-Eye View
PLANTING AND SEATING AT PLAZA LEVEL
FEDERAL BUILDING
NEW SECURITY PAVILION
COLLAPSIBLE STAIR
RAMP SYSTEM
HARDENED SITE WALL
Design Solution Plan
50-FT. STANDOFF PERIMETER
CCTV CAMERAS MONITOR THE PLAZA AND THE STREET
NEW SECURITY PAVILION
MAIN FEDERAL BUILDING ENTRY
COLLAPSIBLE STAIR
NEW RAMPS
HARDENED SITE WALL
Existing Conditions Plan
50-FT. STANDOFF PERIMETER
EXISTING ENTRY STAIR
FEDERAL BUILDING MAIN ENTRY
QUEUING OCCURS OUTSIDE MAIN ENTRY
BOLLARDS
Project Area Design Studies: Zone 4
Security Design Problem Existing buildings often have main building entries and lobbies that were not
designed for current security processes and equipment and are difficult to
reconfigure. A typical modernist building with a curtain wall façade may have
multiple main doors and few visual cues to direct visitors to the appropriate
entry for screening. This can cause confusion, especially if the building has a
high degree of public use. Crowding may occur as visitors wait to be processed
through the security checkpoint. If not properly controlled, queuing can create
disorder and make security oversight more difficult.
Proposed Security Design Solution A security pavilion outside the main building provides the additional space
required to accommodate the security equipment and guards needed to screen
visitors prior to entry. The pavilion clearly delineates the “front door” to the
building and provides cover for visitors waiting for entry. Due to the size of the
pavilion, the elevated plaza is reconfigured. The main approach is rebuilt to
incorporate a new collapsible stair and accessible ramps. The collapsible stair
incorporates a compressible fill that supports pedestrian traffic, but will fail
under the weight of a vehicle. A reinforced knee wall built into the stair prevents
further approach. The ramps, which provide universal access, also offer
additional area for queuing overflow. The walls alongside the ramps guide
queues and offer room to sit and wait. The elevated plaza provides open space
for casual seating and a large area for public programs or demonstrations.
Zone 4: Site Hardened site walls and ramps
create an invisible perimeter barrier
and generous standoff distance.
The ramps provide universal access
to the main entry. The security
pavilion on the plaza level offers a
comfortable enclosed queuing area,
while positioning visitor security
inspection outside the building
envelope (Zone 5). The centrally
located pavilion complements the
existing building’s design. Shade
trees in hardened planters provide
pleasant seating areas on the plaza.
GSA Site Security Design Guide Chapter 3 Process Phase 5 99

Phase 6 Final Concept Development
At this stage, the team completes the detailed final concept for the project that proceeds forward into construction. Note that if the entire Site Concept from Phase 4 will not be implemented ROLE RESPONSIBILITIES as part of the immediate project, this Final Concept Development All Team Members Collaborate to develop Final Concept may concentrate on only the portions of the project that will move
Final Concept Development: Team Roles and Responsibilities
Finalize concept budgets forward into planned construction.
Address issues of phasing
(if necessary) As part of GSA’s Design Excellence process, at the conclusion of this stage the team makes its final concept presentation to stakeholders.
Key Points Within Phase 6: Final Concept Development
Complete Final Concept for planned project
Develop implementation and phasing plan (if necessary)
The team chooses the products, materials, and methods of implementation for the entire project scope, beyond the special areas that might have received more detailed design study in the previous phase. The Final Concept Plan should be true to the overall Site Concept (Conceptual Strategy Plan) from Phase 4 and responsive to the input received during the detailed Project Area Design Studies in Phase 5 (see Diagram 3.9).
If the project is to be implemented in phases, the timing must be finalized for the most efficient use of materials and labor. Similarly, if the project is a renovation of an existing building, the Project Team must analyze the logistics of working on and around an occupied building.
100 Chapter 3 Process Phase 6 GSA Site Security Design Guide

ARD BOOTH
SECURITY BARRIER
SITE LIGHTING
Diagram 3.9: Final Concept Plan
Security and Site Design Solutions
ALLE
Y
MIXED-USE OFFICE OFFICE BUILDING BUILDING BUILDING 1 Cameras mounted on the façade of the Federal Reserve building monitor
AVEN
UE
A
BU
S ST
OP
RAM
P R
AMP
2 activity in front of the existing federal building, while cameras placed at key After the site security design
concepts have been examined in
detail, the team refines, integrates,
or redevelops the best concepts and
creates a Final Concept Plan. The
Final Concept Plan is a package
of plans, sections, elevations, and
details for the proposed design.
The plan may be constructed in its
entirety or divided into phases.
SECOND STREET locations on the elevated plaza monitor activity along Avenue A to create
shared surveillance of the street. HVAC VENTS 5
2 Traffic into the loading dock area is limited to entry from First Street, and anELEVATED1
RES
ERVE
D P
ARK
ING
PLAZAFEDERAL RESERVE automatic security gate regulates egress onto Second Street. The risk of axial BUILDING
25’ 100’25’ 100’
0 50’ 0 50’ 200’ 200’
OFFICE 10’ BUILDING50’10’ 50’
0 25’ 0 25’ 100’ 100’
OFFICE BUILDING approach from the alley into the standoff perimeter is deemed negligible.
TOEXISTING 3 A sensitively designed guard booth efficiently controls access to both theFEDERAL LOADINGSECURITY
DOCK PAVILION
BUILDING garage and the loading dock and adds “eyes on the street” to the rear of the
MAI
N
ENTR
Y
4
building, adjacent to the park.
4 A security pavilion at the plaza level creates space outside the existing federal
DESIGN STUDYPROJECT AREA
RES
ERVE
D P
ARK
ING
LIM
ITS
OF
GAR
AGE
BEL
OW
DESIGN STUDY PROJECT AREA building to screen visitors and manage queuing.PARK
TO PARKING 5 Planting areas, grates, and filters protect the HVAC vents/air intakes from
3 50-FT. (15.24-m) STANDOFF unregulated access.WATER
GARDEN GUARD
6 6 The temporary barriers are removed and replaced by security elements, such
as site walls and a moat that is also a water garden at the street-level plaza.
Multipurpose features minimize risk and improve the quality of public space.MIXED-USE
HOTEL BUILDING
Key elements in the Final Concept Plan include surveillance cameras operated in conjunction with a neighboring federal building, a custom-designed guardbooth, hardened site furniture, and anew security pavilion. The solution isintegrated into the site and compatible with the building’s architecture.
STANDOFF50 FT. STANDOFF PERIMETER 25 FT50 FT. STANDOFF .
ATIONATIONPEDESTRIAN CIRCULPEDESTRIAN CIRCULPEDESTRIAN CIRCUL ATION 0 50 FT. 100 FT.
VEHICULAR CIRCULVEHICULAR CIRCULATIONATIONVEHICULAR CIRCULATION
3 SITE SECURITY ZONESITE SECURITY ZONESITE SECURITY ZONE
SITE SECURITY DESIGNSITE SECURITY DESIGNPROJECT AREA
ANCE PROJECT AREA
N
15’ 75’15’ 75’
0 35’ 0 35’ 150’ 150’
50’ 200’50’ 200’
0 100’ 0 100’ 400 400
FIRST STREET
N N N
OFFICE BUILDING
KEY: KEYKEY:
BUILDING ENTRYBUILDING ENTRYBUILDING ENTRY
EMERGENCY EXITEMERGENCY EXITEMERGENCY EXIT
ADJACENT BUILDINGADJACENT BUILDINGADJACENT BUILDING
HIGH-RISK BUILDINGHIGH-RISK BUILDINGHIGH-RISK BUILDING
LANDSCAPE AREALANDSCAPE AREALANDSCAPE AREA
TREE TREETREE
GUGUARD BOOTHGUARD BOOTH
SITE LIGHTINGSITE LIGHTING
BOLLARDBOLLARD BOLLARD
SECURITY BARRIERSECURITY BARRIER
CAMERA SURVEILLANCECAMERA SURVEILLCAMERA SURVEILLANCE
GSA Site Security Design Guide Chapter 3 Process Phase 6 101

Project Teams must incorporate careful review at this phase to ensure that security design features are not inadvertently modified as the team finalizes the project details. Likewise, teams must ensure that significant site amenities or finishes are not stripped out of the project while fine-tuning the construction documents and budget.
Phase 7 Final Design and Construction Documents
After the team reaches consensus on the design studies, final concepts, and implementation strategies, the process moves into the Final Design and Construction Documents phase.
Key Points Within Phase 7: Final Design and Construction Documents
Continue collaboration during this phase to ensure that the design and
specifications stay consistent with concepts, materials, and budgets
Coordinate site security elements with other aspects of the project
In this design-intensive stage, designers play the lead role. Other team members play an important role in reviewing drawings and specifications to ensure that agreed-upon elements are properly represented in the Final Design.
The development of design and construction documents may not require as much team involvement as other phases of the project. This may make coordination more challenging, as not every team member is needed at every meeting.
Final Design and Construction Documents: Team Roles and Responsibilities
ROLE RESPONSIBILITIES
All Team Members Collaborate to develop Final Design
and Construction Documents
Ensure that all elements of the
Final Concept are represented in
Construction Documents
Finalize budgets and schedules to
prepare for construction
Address issues of phasing
(if necessary)
Phase 8 Project Completion and Operations
Once construction begins, the Project Team should stay involved, as needed, to respond to unforeseen conditions during construction and alter the project design to respond to such conditions. Moreover, as the project is completed and put into use, building management and security operations must continually evaluate the function of the physical countermeasures over time and remain committed to the operational security measures that help to form the complete solution.
Key Points Within Phase 8: Project Completion and Operations
Collaborate to resolve last-minute concerns during construction
Sustain commitment to security operations and maintenance after completion
Project Completion and Operations: Team Roles and Responsibilities
ROLE RESPONSIBILITIES
All Team Members Collaborate to resolve any final issues
Maintain commitment to
comprehensive site security plan
throughout its working life
CONCLUSION
A successful site security design process carries a project from initial conception to final completion, incorporating the elements and hallmarks described in the Guide thus far. This integration is the subject of the following chapter, in which illustrative test cases portray successful implementation in five realistic scenarios.
102 Chapter 3 Process Phases 7 and 8 GSA Site Security Design Guide
Top Related