ZEB Locate - GeoSLAM
22
Version 1.3 Page 1 ZEB Locate User Guide May 2020 V1.3
Transcript of ZEB Locate - GeoSLAM

Version 1.3 Page 1
ZEB Locate User Guide
May 2020
V1.3

Version 1.3 Page 2
Contents Introduction ...................................................................................................................................... 4
How Zeb Locate Works ................................................................................................................. 4
1. Capture Data ........................................................................................................................... 5
Assemble Backpack ................................................................................................................... 5
A. Zeb Horizon to ZEB Locate .............................................................................................. 5
B. Zeb Discovery to Zeb Locate............................................................................................ 6
Select Catalyst Service ............................................................................................................. 6
A. Catalyst Precision Subscription........................................................................................ 7
B. Catalyst on Demand .......................................................................................................... 7
Android App Download and Configuration ............................................................................. 7
Downloads ................................................................................................................................... 7
Trimble Mobile Manager ........................................................................................................... 8
Android Location Settings ......................................................................................................... 9
GeoSLAM GPS Logger .apk .................................................................................................. 10
Mobile Scanning with Zeb Locate .......................................................................................... 11
Order of Operations ................................................................................................................. 11
Using other GNSS receivers .................................................................................................. 14
2. Copy Data to Computer ....................................................................................................... 14
Software and Licensing ........................................................................................................... 14
Data Transfer ............................................................................................................................ 14
3. Process Data in HUB ........................................................................................................... 14
4. Process Data in Locate ....................................................................................................... 15
A. System Settings ................................................................................................................ 15
B. Calibration ......................................................................................................................... 15
C. Process .............................................................................................................................. 17
5. Georeferenced Pointcloud .................................................................................................. 21
Contact ........................................................................................................................... 22

Version 1.3 Page 3
Figure 1: ZEB Locate Workflow ......................................................................................................... 4
Figure 2: Assembled ZEB Locate. ..................................................................................................... 5
Figure 3: Backpack frame with V- mounts. ...................................................................................... 5
Figure 4: 5/8" adapter for the backpack and GNSS antenna. ....................................................... 6
Figure 5: NCTech camera on the top of the backpack’s post. ...................................................... 6
Figure 6: Trimble Catalyst subscription options. ............................................................................. 6
Figure 7: Trimble Catalyst ................................................................................................................... 7
Figure 8: App download. ..................................................................................................................... 7
Figure 9: Position Source .................................................................................................................... 8
Figure 10: GNSS configuration .......................................................................................................... 8
Figure 11: Application Settings .......................................................................................................... 8
Figure 12: Android Location Settings ................................................................................................ 9
Figure 13: GeoSLAM GPS Logger Settings .................................................................................. 10
Figure 14: Accuracy difference in recorded Catalyst CSV file .................................................... 10
Figure 15: Android home screen Trimble Mobile Manager … Connected .......................... 11
Figure 16:TMM GNSS Configuration .............................................................................................. 12
Figure 17: Status Page ...................................................................................................................... 12
Figure 18: ZEB Locate capture around the building with the indoor scan. ............................... 13
Figure 19: geoslam_locate app ........................................................................................................ 13
Figure 20: ZEB Locate Processor GPS Data type ........................................................................ 14
Figure 21: Horizon data download................................................................................................... 14
Figure 22: Pointcloud export from HUB .......................................................................................... 15
Figure 23: System Settings ............................................................................................................... 15
Figure 24: ZEB Locate Lever Arms with Catalyst ......................................................................... 16
Figure 25: DA1 antenna phase center offset ................................................................................. 16
Figure 26: GPS Accuracy Plot.......................................................................................................... 17
Figure 27: GPS Trajectory Accuracy with applied filter ................................................................ 18
Figure 28: Process Trajectory data ................................................................................................. 18
Figure 29: Trajectory Registration ................................................................................................... 19
Figure 30: Process Pointcloud data ................................................................................................ 19
Figure 31: ZEB Locate pointcloud processing ............................................................................... 20
Figure 32: ZEB Locate Processor georeferencing ........................................................................ 20
Figure 33: ZEB Locate Processor message .................................................................................. 20
Figure 34: Processed trajectory plot................................................................................................ 21

Version 1.3 Page 4
Introduction ZEB Locate is an add on to the existing backpack mounted ZEB Horizon and has been
developed and tested on the Trimble DA1 antenna. However, other GNSS receivers are
supported as well.
This user guide uses the Trimble DA1 antenna, which requires a subscription to the Trimble
Correction Hub (both to be purchased independently of GeoSLAM). GNSS data is logged to
an Android device via USB connector.
Catalyst subscription level “Precision” provides accuracy level of 1 – 2cm. Positional accuracy is displayed in the Catalyst Mobile manager app on Android device.
How Zeb Locate Works The workflow below (Figure 1) describes ZEB Locate operation in five steps.
Step 1. Data capture Step 2. Copy data to computer Step 3. Process SLAM data in GeoSLAM
HUB
Step 4. Process SLAM data and GPS
data in ZEB Locate Processor
Step 5. Georeferenced pointcloud
1. Backpack
Assembly
2. Select Catalyst
Service
3. App Configuration
4. Scanning
5. Other GNSS
receivers
1. Software
2. Licensing
3. Data Transfer
1. Pointcloud and
Trajectory export
1. System Settings
2. Calibration
3. Process 1. Results
Figure 1: ZEB Locate Workflow

Version 1.3 Page 5
1. Capture Data This section describes how to prepare hardware, configure the software and scan with ZEB
Locate system.
Assemble Backpack GeoSLAM Zeb Locate solution contains ZEB Horizon, backpack frame, ZEB Locate Processor and our data logging app for Catalyst data capture. If users have ZEB Discovery, the same backpack can be used for Locate by simply swapping the camera with GNSS antenna.
A. Zeb Horizon to ZEB Locate To assemble backpack:
• Loosen clamp levers on backpack harness frame by pulling
outwards.
• Insert backpack pole assembly into clamp.
• Tighten clamp levers by pushing inwards.
• Attach Scanner and Datalogger onto harness using V-lock
mechanism and connect with the provided Horizon’s cable (Figure 3).
• Attach battery
• Screw Trimble Catalyst DA1 antenna on the top of the
post’s 5/8" thread adapter.
There is an optional magnetic mount for your phone that can be
placed on the backpack post. Figure 2 shows the assembled ZEB
Locate.
The cables and connections should be kept neat and away from sensors to avoid getting
caught or tangled.
The Trimble Catalyst has a hardwired micro-USB out as its main cable and comes with USB-
C adapter. There is a second micro-USB port at the bottom of the DA1 antenna for external
power.
Figure 3: Backpack frame with V- mounts.
Figure 2: Assembled ZEB Locate.
Version 1.3 Page 6
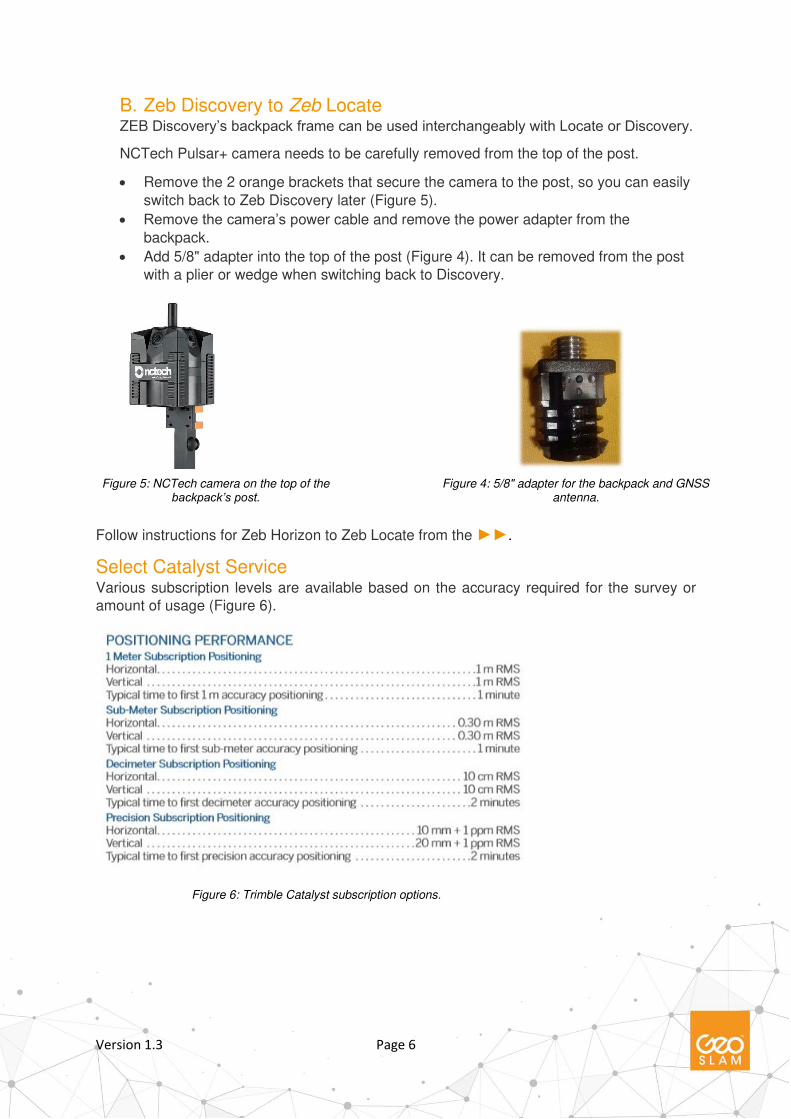
B. Zeb Discovery to Zeb Locate ZEB Discovery’s backpack frame can be used interchangeably with Locate or Discovery.
NCTech Pulsar+ camera needs to be carefully removed from the top of the post.
• Remove the 2 orange brackets that secure the camera to the post, so you can easily
switch back to Zeb Discovery later (Figure 5).
• Remove the camera’s power cable and remove the power adapter from the
backpack.
• Add 5/8" adapter into the top of the post (Figure 4). It can be removed from the post
with a plier or wedge when switching back to Discovery.
Follow instructions for Zeb Horizon to Zeb Locate from the ►►.
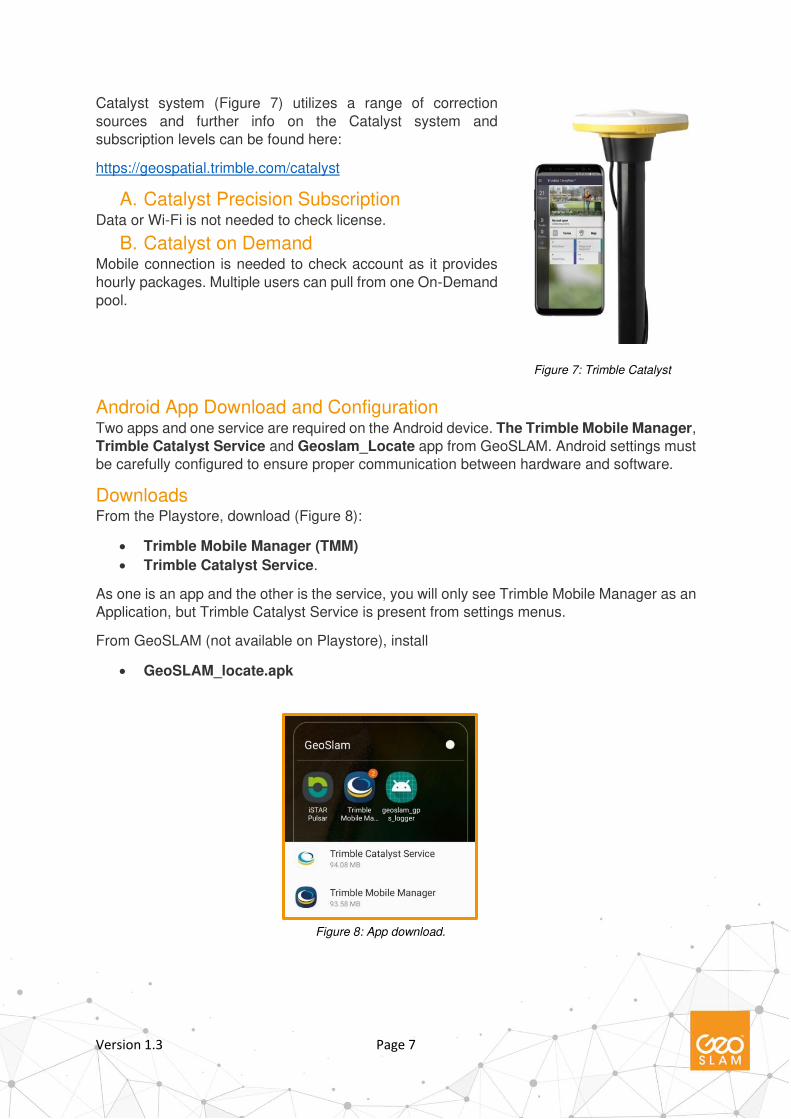
Select Catalyst Service Various subscription levels are available based on the accuracy required for the survey or
amount of usage (Figure 6).
Figure 6: Trimble Catalyst subscription options.
Figure 4: 5/8" adapter for the backpack and GNSS antenna.
Figure 5: NCTech camera on the top of the backpack’s post.
Version 1.3 Page 7
Catalyst system (Figure 7) utilizes a range of correction
sources and further info on the Catalyst system and
subscription levels can be found here:
https://geospatial.trimble.com/catalyst
A. Catalyst Precision Subscription Data or Wi-Fi is not needed to check license.
B. Catalyst on Demand Mobile connection is needed to check account as it provides
hourly packages. Multiple users can pull from one On-Demand
pool.
Android App Download and Configuration Two apps and one service are required on the Android device. The Trimble Mobile Manager,
Trimble Catalyst Service and Geoslam_Locate app from GeoSLAM. Android settings must
be carefully configured to ensure proper communication between hardware and software.
Downloads From the Playstore, download (Figure 8):
• Trimble Mobile Manager (TMM)
• Trimble Catalyst Service.
As one is an app and the other is the service, you will only see Trimble Mobile Manager as an
Application, but Trimble Catalyst Service is present from settings menus.
From GeoSLAM (not available on Playstore), install
• GeoSLAM_locate.apk
Figure 7: Trimble Catalyst
Figure 8: App download.

Version 1.3 Page 8
Trimble Mobile Manager Combined with the Catalyst service, this application handles
your subscription, provides read outs of GNSS status, and
communicates the signal readouts to your android device in
your assigned format.
Home Page: Landing page for TMM app. This page provides
accuracy read, overview of account status, and the toggles to
connect to Catalyst. If you are using on demand, this is where
you can start a session.
Position Source: Receiver type is assigned in here, as well as
a read of device compatibility and status (Figure 9). Keep
software up to date.
Status: This page provides greater detail of location and
accuracy, as well as information on satellites and stations that
are helping to find your position.
GNSS Configuration: Corrections and outputs are controlled
in this menu. Select Reference Frame WGS84 and EGM96
for Geoid (Figure 10).
Catalyst: Checks Status of Receiver.
Hardware Licenses: Checks Trimble Account for subscription
info.
Application Settings: Select metres for units. Share location
MUST be enabled in order to correct location to stream to
Geoslam_locate app (Figure 11).
For this to work properly, you may need to enable ‘Mock Location’ found within the Android Developer mode. You will also want to assure that TMM is the only location
source.
Figure 9: Position Source
Figure 10: GNSS configuration
Figure 11: Application Settings

Version 1.3 Page 9
Android Location Settings To enable Developer Options, open the Settings screen, scroll to the bottom, and tap About
phone. Find build number at the bottom of the About screen and:
• Tap the “Build number” field seven times to enable developer options. • Switch Developer options on.
• Scroll down and set Trimble Mobile Manager as the mock location app.
• Additionally, force full GNSS.
• Exit Developer Options.
Search for location in settings. Location needs to be on, but all location services within need
to be off or disabled; Wi-Fi and BT Accuracy improvements should be disabled (Figure 12).
Figure 12: Android Location Settings

Version 1.3 Page 10
GeoSLAM GPS Logger .apk Functions: Our GPS logger is essentially a virtual controller with 3 functions:
• Start logging
• Stop logging
• Generate CSV file
Start and stop functions are available in the app interface. The .csv that is produced named
name ‘catalyst_#############’ can be found in the android files at
PC\SamsungGalaxyS7\Phone\Android\data\com.geoslam.trimble_catayst_logger_acc\files
Settings and Configuration: The app functions require permission to utilize location and file
storage. To assure that the correct location source is being written without interruption or
default to the android device location, allow for background data and background activity
(Figure 13).
Logged accuracy precision can be checked by examining the recorded CSV. If GPS is
recorded from the phone instead of the Catalyst, the accuracy of the collected data will be low
(Figure 14).
High accuracy. GPS used from Catalyst.
Low accuracy. GPS erroneously drawn from
phone location.
Figure 13: GeoSLAM GPS Logger Settings
Figure 14: Accuracy difference in recorded Catalyst CSV file. First file shows low accuracies as phone GPS was used instead of Catalysts (second file)
Version 1.3 Page 11
Mobile Scanning with Zeb Locate ZEB Locate like other ZEB family products keeps the core value of simplicity for data capture
and processing.
Order of Operations The Zeb Horizon scanner functions the same as listed in the User Guide and Quick Start
Guide. Zeb Locate procedures are carried out alongside the standard scan process.
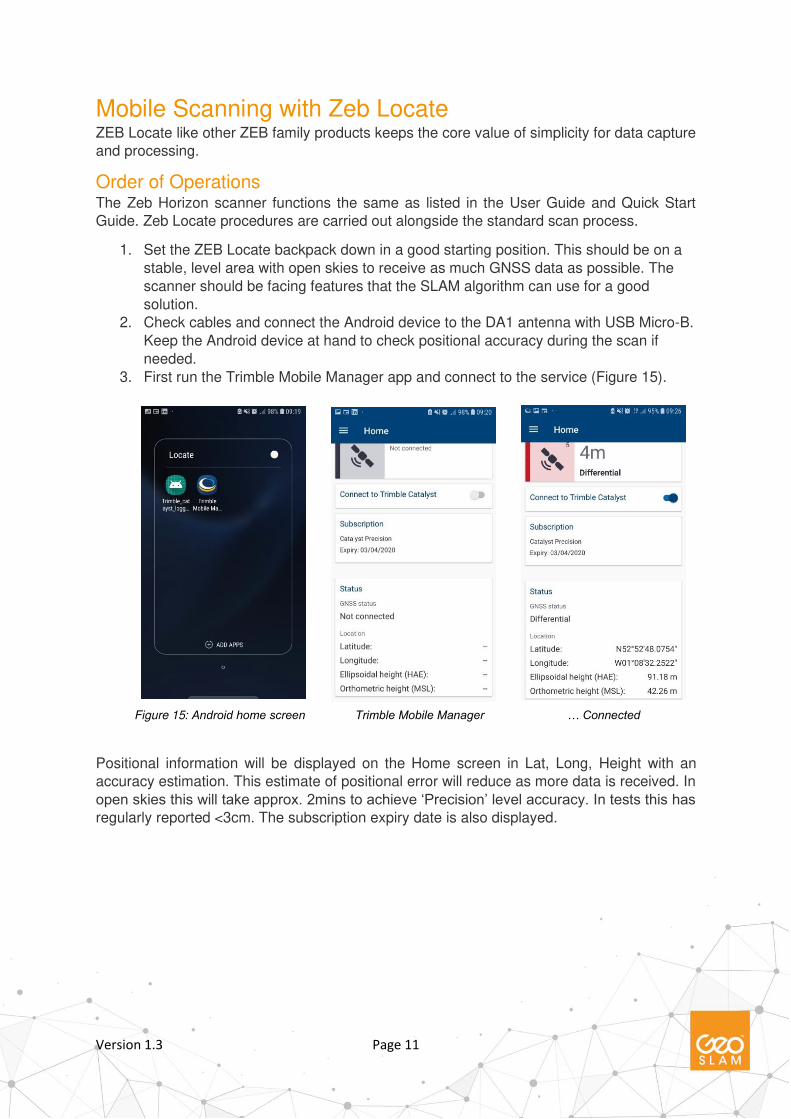
1. Set the ZEB Locate backpack down in a good starting position. This should be on a
stable, level area with open skies to receive as much GNSS data as possible. The
scanner should be facing features that the SLAM algorithm can use for a good
solution.
2. Check cables and connect the Android device to the DA1 antenna with USB Micro-B.
Keep the Android device at hand to check positional accuracy during the scan if
needed.
3. First run the Trimble Mobile Manager app and connect to the service (Figure 15).
Positional information will be displayed on the Home screen in Lat, Long, Height with an
accuracy estimation. This estimate of positional error will reduce as more data is received. In
open skies this will take approx. 2mins to achieve ‘Precision’ level accuracy. In tests this has regularly reported <3cm. The subscription expiry date is also displayed.
Figure 15: Android home screen Trimble Mobile Manager … Connected

Version 1.3 Page 12
• The Settings button will allow for a configuration check which should read as follows:
Figure 16:TMM GNSS Configuration
• Check that the Ref Frame is WGS84 with the EGM’96 geoid (Figure 16).
• The Status page has further information about horizontal and vertical precision
(Figure 17):
4. Do not move the system until a good positional accuracy is reported.
5. Once this has been achieved start the ZEB Horizon scanner as for normal operations.
ZEB Locate utilizes our SLAM algorithm and users need to follow Horizon’s best capture practice. ZEB Locate will allow you to capture GNSS restricted environments
(mind antenna height) and georeference the pointcloud data without decreasing
pointcloud accuracy in those places. A sufficient outdoor, good GNSS capture is
required to georeferenced such data correctly.
Figure 17: Status Page

Version 1.3 Page 13
6. When the ZEB Horizon scanner is running (scanner head rotating) and we have a
good GNSS positional ‘fix’ start data logging in the GeoSLAM GPS Logger (Trimble Catalyst Logger) app (Figure 19). Minimum ZEB Locate recording is 60s. First
60s of any project also need highly accurate GNSS data (< 0.1m).
• Only positional info is displayed here in Lat, Long decimal degrees.
7. After the scan return to start position for a closed loop survey. This should be an
open sky area and set the ZEB Locate down on a stable, level surface.
8. After a few seconds stop the ZEB Horizon scan as normal with FNC button and then
stop GNSS logging in the GeoSLAM GPS Logger app.
9. Download GeoSLAM scanner data as normal from the data logger via USB.
10. Download Catalyst data from internal Android device memory > This PC\Samsung
Galaxy> S7\Phone\Android\data\com.geoslam.trimble_catayst_logger_acc\files
Files named ‘catalyst_#############’ > Time/Heading/Lat/Long/Elevation/Accuracy
CSV.
Figure 19: geoslam_locate app
Figure 18: ZEB Locate capture around the building with the indoor scan.

Version 1.3 Page 14
Using other GNSS receivers ZEB Locate support variety of GNSS receivers. ZEB Locate Processor accepts 1Hz of GPS
data in the following format (Figure 20):
• Trimble Catalyst – CSV format with time, lat, long, elevation, accuracy
• NMEA with GGA and GST strings
• NMEA GGA string
Figure 20: ZEB Locate Processor GPS Data type
When using other GNSS receivers that Catalyst, they need to be configured to one of the
formats above.
2. Copy Data to Computer Import data to your workstation that runs GeoSLAM HUB software.
Software and Licensing The Zeb Locate Solution includes
• GeoSLAM Hub
• Zeb Locate Processor
Follow the installation instructions found in the HUB User
Manual and follow the ZEB Locate installer wizard. After
installation, ZEB Locate Processor will ask you to import
calibration XML file. This file contains lever arm offsets and it is
delivered with the software. Users can also define the offsets
manually.
ZEB Locate activation will be added to your existing GeoSLAM
HUB license. Contact [email protected] with your HUB
activation key in order to enable ZEB Locate Processor. Once
activated, refresh entitlements in HUB.
Data Transfer Download .geoslam file from Data Logger via USB (Figure 21).
Transfer .csv from Android to PC without altering formatting.
3. Process Data in HUB Horizon data can be dragged and dropped into HUB for SLAM processing. Consider adjusting
processing settings if necessary. Once processed two files are required for ZEB Locate
Processor:
Figure 21: Horizon data download.

Version 1.3 Page 15
• Pointcloud Trajectory. From HUB Export > Trajectories > trajectories with quaternions
(TXT)
• Pointcloud (LAS or LAZ). Consider smoothing and spatial decimation (Figure 22).
Figure 22: Pointcloud export from HUB
4. Process Data in Locate ZEB Locate Processor aligns Horizon’s trajectory with GNSS trajectory and transforms the
pointcloud into georeferenced LAZ.
A. System Settings • Select correct GPS data type format
• Select required coordinate system
• Save changes
B. Calibration The CALIBRATION tab contains XYZ Lever Arm between Horizon and the top of the backpack
post. Those Factory Defaults are also saved with the provided XML file that users can load
during the software installation (Figure 24).
Figure 23: System Settings

Version 1.3 Page 16
Catalyst DA1 antenna phase center offset is already taken into account during data logging
(Figure 25).
For any other Locate installation, please contact [email protected] for correct Lever Arm
measurements.
Antenna height and offset to the ZEB Horizon scanner are accounted for in the ZEB Locate
Processor.
Figure 24: ZEB Locate Lever Arms with Catalyst
Figure 25: DA1 antenna phase center offset

Version 1.3 Page 17
C. Process ZEB Locate Processor requires the following data:
1. ZEB Trajectory (txt file with quaternions exported from GeoSLAM HUB).
▪ Example 2020-03-12_13-22-44_results_traj.txt
2. GPS Trajectory (Catalyst CSV, NMEA GGA & GST or GGA only).
3. Point Cloud (*.las or *.laz file exported from GeoSLAM HUB)
To process the data, load in GPS trajectory and Plot GPS Accuracy Plot (Figure 26).
Figure 26: GPS Accuracy Plot
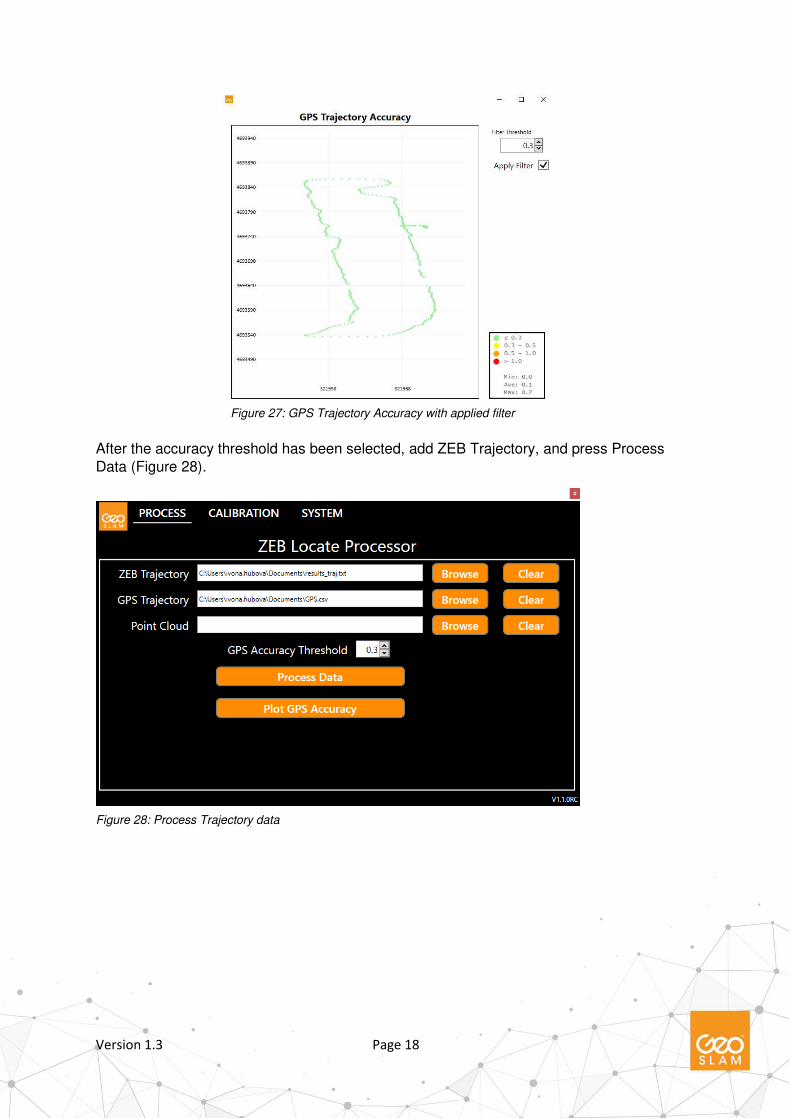
Filter Threshold can be adjusted based on the plotted results. “Apply Filter” option will remove
the data below the specified threshold. GPS Accuracy Threshold will help to exclude poor
GPS data from processing (Figure 27).
Version 1.3 Page 18
After the accuracy threshold has been selected, add ZEB Trajectory, and press Process
Data (Figure 28).
Figure 27: GPS Trajectory Accuracy with applied filter
Figure 28: Process Trajectory data

Version 1.3 Page 19
GPS and ZEB Horizon trajectory should be well aligned (Figure 29).
Trajectory Registration will show RMS error. If satisfied with results, add pointcloud data and
hit the ‘Process Data’ button again and the software will begin the georeferencing alignment
(Figure 30).
Figure 30: Process Pointcloud data
Figure 29: Trajectory Registration

Version 1.3 Page 20
The process runs through three main stages (Figure 31).
The process automatically registers the scan data to the GPS data (Figure 32).
When the process is complete you will see this message:
Figure 33: ZEB Locate Processor message
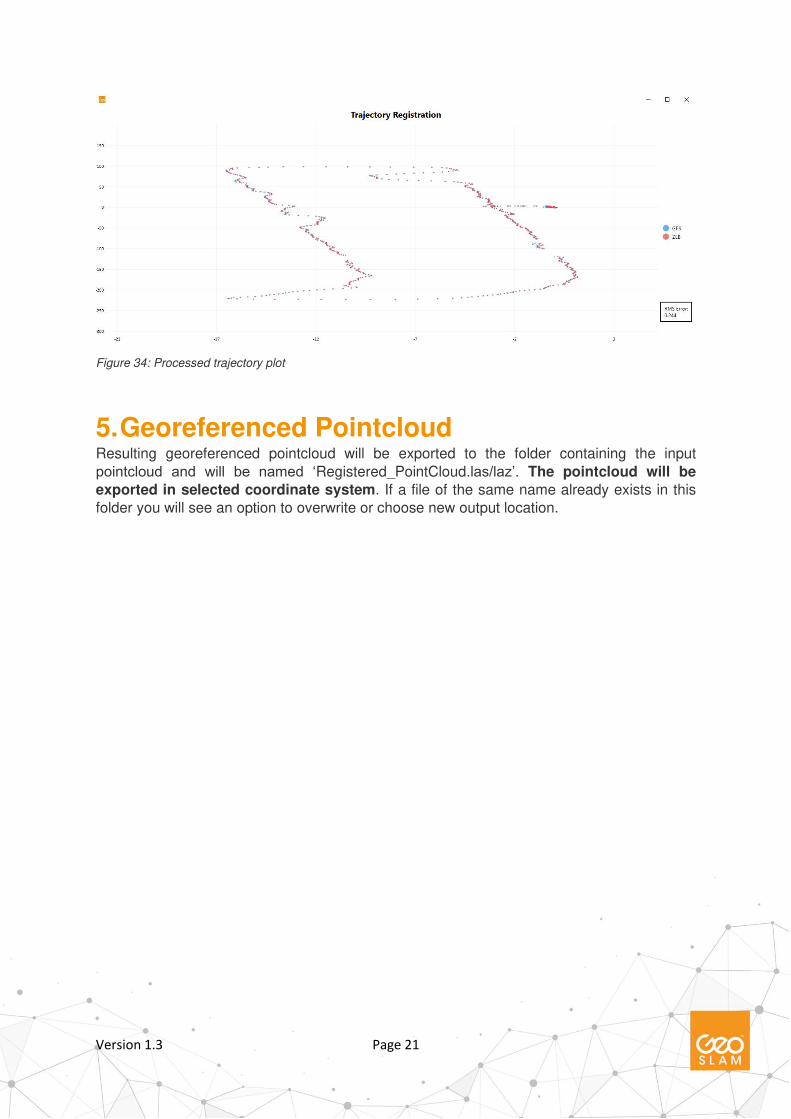
And after clicking OK a plot showing the positional difference between the SLAM trajectory
calculated in GeoSLAM HUB and the GNSS positions will be displayed (Figure 34).
Figure 31: ZEB Locate pointcloud processing
Input trajectories Coarse georeferencing Fine georeferencing
ZEB trajectory and GPS
trajectory will have a
similar shape.
Coarse georeferencing
brings two trajectories
closer together.
Fine georeferencing aligns
trajectories. This
transformation is applied to
pointcloud data.
Figure 32: ZEB Locate Processor georeferencing
Version 1.3 Page 21
Figure 34: Processed trajectory plot
5. Georeferenced Pointcloud Resulting georeferenced pointcloud will be exported to the folder containing the input
pointcloud and will be named ‘Registered_PointCloud.las/laz’. The pointcloud will be
exported in selected coordinate system. If a file of the same name already exists in this
folder you will see an option to overwrite or choose new output location.