z Camcorder eTech DIG 600XS Quick and Detailed User Guide English
59
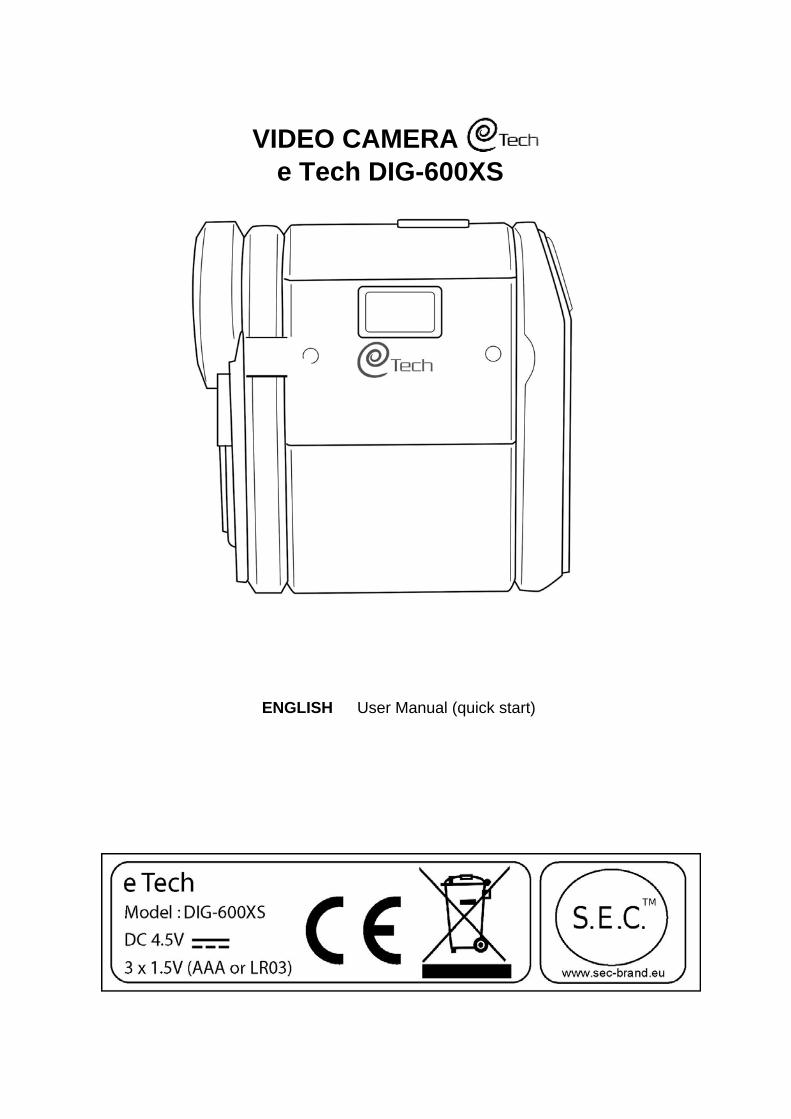
VIDEO CAMERA ENGLISH User Manual (quick start) e Tech DIG-600XS
description
z Camcorder eTech DIG 600XS Quick and Detailed User Guide English
Transcript of z Camcorder eTech DIG 600XS Quick and Detailed User Guide English
VIDEO CAMERA
ENGLISH User Manual (quick start)
e Tech DIG-600XS

CAMESCOPE NUMÉRIQUE / WEBCAM / PHOTOSCOPE DIGITAL CAMCORDER / WEBCAM / DIGITAL CAMERA http://www.enchr.fr/detail/837/832544 (vente occasion enchères) • Neuf dans son emballage • Camescope numérique E TECH DIG-600 XS. Le pack comprend : 1 camescope numérique, 1 logiciel photo et vidéo, 1 Câble USB, 1 pochette, 1 Sangle • Le tout dans son emballage neuf • Jusqu'à 2 millions de pixels en mode photo (4 M de px en interpolation) • Des photos de grande qualité • Compact : il tient dans la main et vous suit partout • Simple d'utilisation : d'un seul geste, vous accédez aux 3 fonctions du camescope • 3 FONCTIONS : camescope, appareil photo numérique, webcam • C'est votre compagnon numérique idéal • Caractéristiques : fonction vidéo : format et résolution vidéo AVI (480 x 368 pixels), à 20 images/seconde. Lecteur de cartes mémoire SD ou MMC jusqu'à 2 Go toutes marques. Prise USB. Écran LCD. Fonction photo : résolution de 2 ou 1.3 millions de pixels, interpolable à 3 ou 4 millions de pixels. Fonction webcam : compatible MSN messenger, Skype, Yahoo Messenger... Compatible Windows 98 SE, ME, 2000, XP ou XP Service Pack 2, Vista. Dimensions 9.6 x 9.4 x 4.2 cm. Alimentation : 3 piles alcalines type AAA LR3 de 1.5 volt ou regargeables, non fournies. Mise à prix très basse. Valeur 700 €.
e Tech DIG-600XS

Enregistré à partir de : http://www.etech-camera.com/detail_NL.html
Videocamera DIG-600XS À cette page hollandaise, téléchargement des guides – ET DU DRIVER :
http://www.etech-camera.com/Driver/setup.exe
- Klik op om de handleidingen op het scherm te lezen
- Klik op om de handleidingen en de driver op uw PC te downloaden
Lezen Downloaden
Gedetailleerde Handleiding
Vragen / Oplossingen
Gebruiksaanwijzing (Snelstartgids)
Handleiding Ulead®
Drijvers (driver)
Opmerking:Als u de programma's Adobe Acrobat Reader of WinZip niet op uw PC geïnstalleerd heeft,kunt u de gebruiksaanwijzingen noch online, noch op uw PC bekijken. U kunt dezeprogramma's downloaden door respectievelijk te klikken op : - Adobe Acrobat Reader : http://www.adobe.com/products/acrobat/readstep2_allversions.html- Evaluation of WinZip : http://www.winzip.com/downwz.htm
* De handleiding Ulead® is in de gekozen taal niet beschikbaar. Op deze pagina heeft utoegang tot de Engelse versie. Er is ook een versie in het Frans, Duits, Spaans enItaliaans beschikbaar vanaf de pagina's van elk van deze talen.

1
2
3
4
5
6
7
8
9
10
11
12
13
14
Pictogrammes Pictograms
1 14
2
3 15
4
(clignotant) (flashing)
5PC
16 FULL
6 17
7 18 Ud
8 19 PC
9 20
10 21
11 22
12 23
13 24
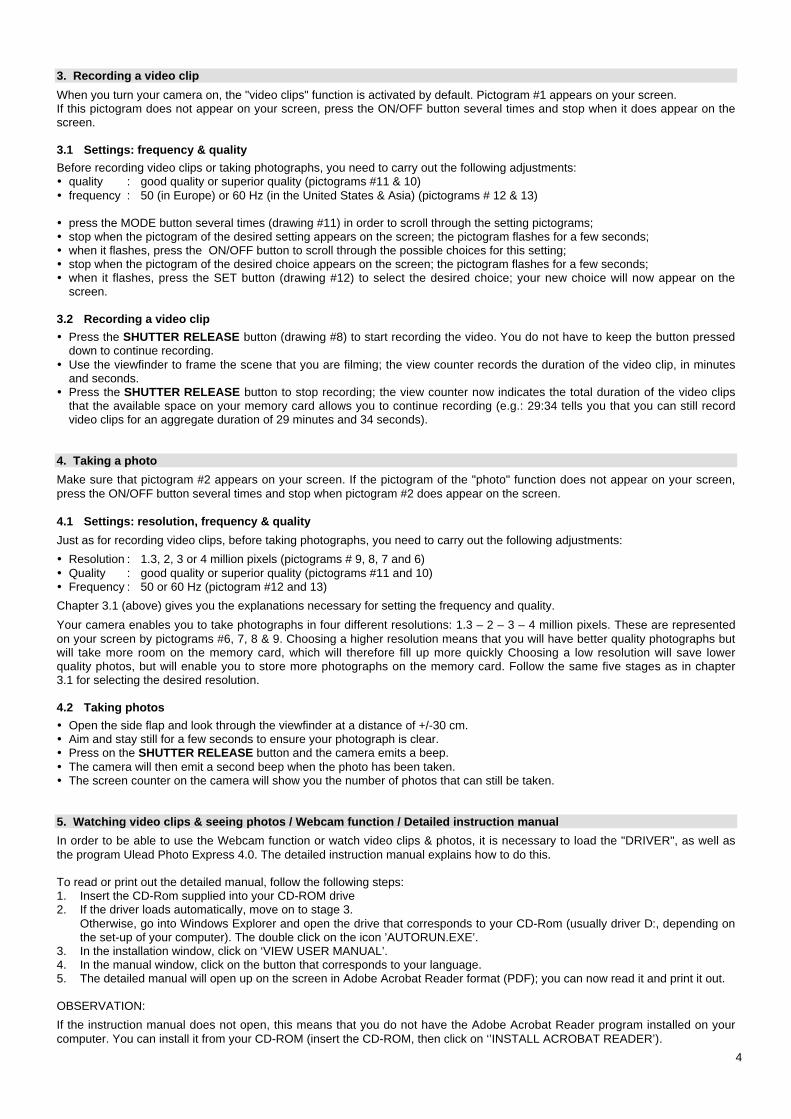
1. Introduction
This manual is a quick start guide. We do however recommend that you read the detailed instruction manual which is available:
on your CD-ROM (see chapter 5 below) on our website www.etech-camera.com (on line)
You can read and download the detailed manual on the site; the latest update will always be available there. You can also usethe site to download the "DRIVER".
1.1 The video camera
1 Battery compartment2 Lens3 Pilot lamp4 Microphone5 Memory card slot
6 Lens cap7 Viewfinder8 Shutter release button9 Screen10 ON/OFF button
11 Mode Button12 Set Button13 USB socket14 USB socket cover
1.2 The pictograms
1 Video mode2 Photo mode3 Sequence mode4 Self timer mode5 Web cam mode6 4 million pixels7 3 million pixels8 2 million pixels9 1.3 million pixels10 Quality : superior11 Quality : good12 Frequency : 50 Hz13 Frequency : 60 Hz14 The camera contains a memory card
15 The camera does not contain a memory card16 The memory card is full17 The camera is connected to a computer via a USB
cable – without memory card18 The camera is connected to a computer via a USB
cable – with a memory card (as a mass storagedevice)
19 The camera is connected to a computer via a USBcable – in PC Cam mode
20 The batteries are charged21 The batteries are not fully charged22 The batteries need to be charged or replaced23 Delete the last take24 Delete all takes
2. Preparing the camera
The box contains the following items: the video camera, the strap, the pouch, the USB cable and the CD-ROM.Before using your camera, please insert the batteries and memory cards and attach the strap.
2.1 Batteries
open the battery compartment (drawing #1) located underneath the camera by sliding the cover down with your thumb Insert 3 UM4 AAA LR03 1.5 Volt batteries or NiMH 900 Milli Amp rechargeable batteries, making sure that the + and - polarity
is respected as indicated on the underside of the battery compartment. then insert the memory card (see below)
2.2 Memory card
The memory card is inserted inside the battery compartment. The capacity of the memory card is compatible with this videocamera is respectively 8 MB, 16 MB, 32 MB, 64 MB, 128 MB, 256 MB, 512 MB, 1 GB (normal, high & ultra high speed) and 2GB (normal speed only).Before inserting a memory card into the camera, it is wise to save any data that are already stored on your card from a previoususe by copying them onto your PC, and ensuring that there is enough available space on your memory card. Insert the card carefully but firmly into the slot (drawing #5) until you hear a click, which indicates that the card is locked,
ensuring that the gold contacts at the end of the card on the side away from the batteries. Close the cover
2.3 Strap
Thread the strap through the rings on the right hand side of the camera, with its rear facing you.
2.4 Turning the camera on
Press the ON/OFF button (drawing #10) for a few seconds. The screen comes on and the camera emits three short beeps.
2.5 Turning the camera off
Press the ON/OFF button for 4 seconds to turn the camera off. The camera will turn off automatically if you do not use it for 60seconds, in order to save battery power. The screen turns off and the camera emits three short beeps.
3
3. Recording a video clip
When you turn your camera on, the "video clips" function is activated by default. Pictogram #1 appears on your screen.If this pictogram does not appear on your screen, press the ON/OFF button several times and stop when it does appear on thescreen.
3.1 Settings: frequency & quality
Before recording video clips or taking photographs, you need to carry out the following adjustments: quality : good quality or superior quality (pictograms #11 & 10) frequency : 50 (in Europe) or 60 Hz (in the United States & Asia) (pictograms # 12 & 13)
press the MODE button several times (drawing #11) in order to scroll through the setting pictograms; stop when the pictogram of the desired setting appears on the screen; the pictogram flashes for a few seconds; when it flashes, press the ON/OFF button to scroll through the possible choices for this setting; stop when the pictogram of the desired choice appears on the screen; the pictogram flashes for a few seconds; when it flashes, press the SET button (drawing #12) to select the desired choice; your new choice will now appear on the
screen.
3.2 Recording a video clip
Press the SHUTTER RELEASE button (drawing #8) to start recording the video. You do not have to keep the button presseddown to continue recording.
Use the viewfinder to frame the scene that you are filming; the view counter records the duration of the video clip, in minutesand seconds.
Press the SHUTTER RELEASE button to stop recording; the view counter now indicates the total duration of the video clipsthat the available space on your memory card allows you to continue recording (e.g.: 29:34 tells you that you can still recordvideo clips for an aggregate duration of 29 minutes and 34 seconds).
4. Taking a photo
Make sure that pictogram #2 appears on your screen. If the pictogram of the "photo" function does not appear on your screen,press the ON/OFF button several times and stop when pictogram #2 does appear on the screen.
4.1 Settings: resolution, frequency & quality
Just as for recording video clips, before taking photographs, you need to carry out the following adjustments:
Resolution : 1.3, 2, 3 or 4 million pixels (pictograms # 9, 8, 7 and 6) Quality : good quality or superior quality (pictograms #11 and 10) Frequency : 50 or 60 Hz (pictogram #12 and 13)
Chapter 3.1 (above) gives you the explanations necessary for setting the frequency and quality.
Your camera enables you to take photographs in four different resolutions: 1.3 – 2 – 3 – 4 million pixels. These are representedon your screen by pictograms #6, 7, 8 & 9. Choosing a higher resolution means that you will have better quality photographs butwill take more room on the memory card, which will therefore fill up more quickly Choosing a low resolution will save lowerquality photos, but will enable you to store more photographs on the memory card. Follow the same five stages as in chapter3.1 for selecting the desired resolution.
4.2 Taking photos
Open the side flap and look through the viewfinder at a distance of +/-30 cm. Aim and stay still for a few seconds to ensure your photograph is clear. Press on the SHUTTER RELEASE button and the camera emits a beep. The camera will then emit a second beep when the photo has been taken. The screen counter on the camera will show you the number of photos that can still be taken.
5. Watching video clips & seeing photos / Webcam function / Detailed instruction manual
In order to be able to use the Webcam function or watch video clips & photos, it is necessary to load the "DRIVER", as well asthe program Ulead Photo Express 4.0. The detailed instruction manual explains how to do this.
To read or print out the detailed manual, follow the following steps:1. Insert the CD-Rom supplied into your CD-ROM drive2. If the driver loads automatically, move on to stage 3.
Otherwise, go into Windows Explorer and open the drive that corresponds to your CD-Rom (usually driver D:, depending onthe set-up of your computer). The double click on the icon ’AUTORUN.EXE’.
3. In the installation window, click on ‘VIEW USER MANUAL’.4. In the manual window, click on the button that corresponds to your language.5. The detailed manual will open up on the screen in Adobe Acrobat Reader format (PDF); you can now read it and print it out.
OBSERVATION:
If the instruction manual does not open, this means that you do not have the Adobe Acrobat Reader program installed on yourcomputer. You can install it from your CD-ROM (insert the CD-ROM, then click on ‘’INSTALL ACROBAT READER’).
4
VIDEO CAMERA e Tech DIG-600XS
1. Notice ......................................................................................................................................... 2-4 1.1 Minimum Computer Configuration Requirements ................................................................2 1.2 Necessary Operating System...............................................................................................2 1.3 Technical Specifications................................................................................................... 2-3 1.4 Conditions for Use................................................................................................................3 1.5 Additional Accessories ..................................................................................................... 3-4
2. Contents of the Package................................................................................................................5
3. Main Functions and Characteristics of the Device.........................................................................5
4. Presentation of the Device.............................................................................................................6
5. Preparing the Device for Use..................................................................................................... 7-8 5.1 Attaching the Strap...............................................................................................................7 5.2 Attaching the Lens Cap ........................................................................................................7 5.3 Inserting the Batteries ..........................................................................................................7 5.4 Inserting the SD or MMC Memory Card...............................................................................8
6. Using the Device...................................................................................................................... 9-12 6.1 Putting the Device into Operation ........................................................................................9 6.2 Reading & Using the Screen.......................................................................................... 9-12 6.3 Turning off the Device .................................................................................................... 9-12
7. Video Clip Function................................................................................................................ 13-14 7.1 Duration & Sound for the Video Clips ................................................................................13 7.2 Adjustments to the Frequency & Quality............................................................................13 7.3 Recording Your Video Clip .................................................................................................14 7.4 Deleting Your Video Clips ..................................................................................................14
8. Photo Function....................................................................................................................... 15-16 8.1 Adjustments: Resolution, Frequency & Quality..................................................................15 8.2 Taking Your Photos............................................................................................................15 8.3 Taking Photos in Sequence Mode .....................................................................................16 8.4 Taking Photos in Self-Timer Mode.....................................................................................16 8.5 Deleting Your Video Clips ..................................................................................................16
9. Connecting the Device to Your Computer ............................................................................. 17-21 9.1 Using the Installation Driver ......................................................................................... 17-20 9.2 Connecting the Device to Your Computer..........................................................................21
10. Webcam Function .................................................................................................................. 22-32 10.1 Installing the Webcam........................................................................................................22 10.2 Example with MSN Messenger® ................................................................................. 22-26 10.3 Use of the PC-Cam Function ....................................................................................... 26-32
11. Transferring and Saving Your Video Clips and Photos on the Computer ............................. 33-34 11.1 For Windows® XP users .....................................................................................................33 11.2 For Windows® 98SE / ME / 2000 users..............................................................................34 11.3 Transferring and Saving Your Photos ................................................................................34
12. Installation of the Ulead Photo Express 4.0........................................................................... 34-40
13. Viewing Your Video Clips and Your Photos........................................................................... 41-44 13.1 Viewing Your Video Clips ...................................................................................................41 13.2 Viewing Your Photos .................................................................................................... 42-44
14. Interpolating Your Photos ..................................................................................................... 44-48
15. Manipulating Your Photos............................................................................................................49
16. Printing Your Photos .............................................................................................................. 49-52
17. Deleting Video Clips and/or Photos on Your PC .........................................................................53
18. Protection de l’environnement – Directive 2002/96/CE ...............................................................53
19. Descriptive Plate ..........................................................................................................................53
detailed instructions manual
1. Notice
Please make sure to read this manual thoroughly in order to ensure that you are able to receive the maximum benefit from the functions which your device has.
• Before using your video camera or taking video clips or photographs, please take a sample of
video clips or photographs in order to verify that your equipment is functioning properly. We are not responsible for any loss resulting from a defect in the video camera.
• If you use your device where there is a field of static electricity, this can shut down your device or stop PC Cam. Re-start the device, and your device will function again.
• The different installation screens which will display on your PC’s screen (at the time when you install the programmes supplied on your CD-ROM) will be in the same language as your Windows®. On the other hand, the screens depicted in this instruction manual are in English.
• All of the explanations in this manual are based on Windows® XP. For versions 98SE, ME and 2000, the installation procedures are significantly different. Because Windows® Vista is too recent a version of Windows®, information related to this version were not yet available at the time that this manual was created.
1.1 Minimum Computer Configuration Requirements
For Windows®: • 486 66 MHz processor or equivalent • 64 MB read-write memory (RAM) • 100 to 150 MB space available on the hard disk • USB 1.1 port • CD-Rom reader • Monitor: minimum indicator resolution of 800 x 600 pixels • Indicator: 15/16 bit minimum colour graphics capacity; 24 preferred
For the software image processing software Ulead® Photo Express 4.0:
• Pentium 166 or equivalent • 64 MB of read-write memory (RAM) • 250 MB space available on the hard disk • Microsoft Internet Explorer 5.0 (5.5 preferred)
1.2 Necessary Operating System
• A computer using Windows® 98SE, ME, 2000, XP ou Vista • This device is not compatible with the Windows® NT system
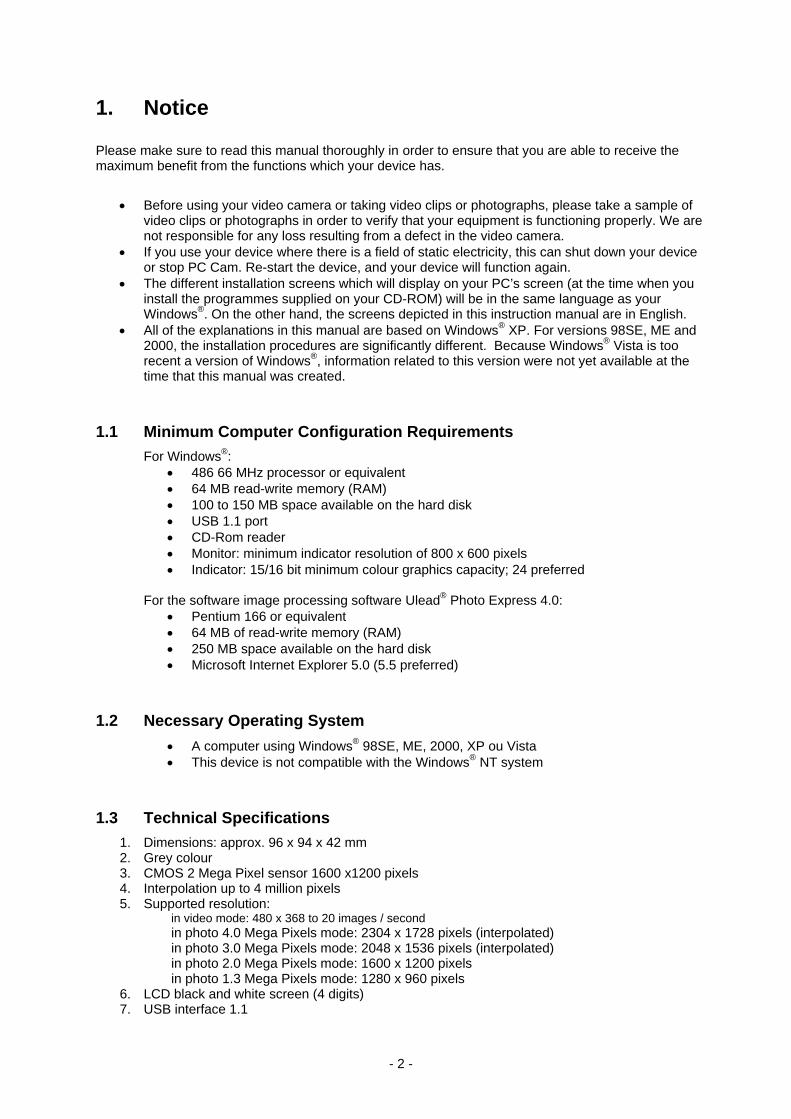
1.3 Technical Specifications
1. Dimensions: approx. 96 x 94 x 42 mm 2. Grey colour 3. CMOS 2 Mega Pixel sensor 1600 x1200 pixels 4. Interpolation up to 4 million pixels
5. Supported resolution: in video mode: 480 x 368 to 20 images / second in photo 4.0 Mega Pixels mode: 2304 x 1728 pixels (interpolated) in photo 3.0 Mega Pixels mode: 2048 x 1536 pixels (interpolated) in photo 2.0 Mega Pixels mode: 1600 x 1200 pixels in photo 1.3 Mega Pixels mode: 1280 x 960 pixels
6. LCD black and white screen (4 digits) 7. USB interface 1.1
- 2 -

8. Internal SDRAM storage of 8 MB: • authorizing the functioning of the camera • not authorizing photo or video recording
9. External storage: Secure Digital (SD) or Multi Media Card (MMC), with a maximum size to date of 2 GB normal speed (not provided ) 1
10. Focal distance of the lens: 8.35 mm 11. Lens aperture: F 3.0 12. Automatic white balance 13. 3 Alkaline batteries made by the requisite manufacturer, type UM4 AAA LR03, 1.5 Volts or
rechargeable batteries type NiMH, 900 mAh (not provided) 2
1 Memory cards with 2 GB high speed memory & ultra are not supported. 2 Using batteries can be dangerous; please refer to the manufacturer’s notice.
1.4 Conditions for Use
Keep your device away from damp or dusty areas. Make sure not to expose it to direct sunlight, a radiator, or other extreme sources of heat. Do not let it be jostled or shaken too violently.
If the lens or the viewfinder seems dirty, gently clean these areas with a lens brush or a dry, soft tissue.
Never touch the lens with your fingers. Do not open the device casing and do not attempt to make repairs yourself. Doing so could lead to electric shock. Never open the battery compartment when the camera is under operation.
1.5 Additional Accessories
Batteries: Not included.
Type or format: 3 AAA LR03. 1.5 Volt batteries
We advise you to use brand-name alkaline batteries or rechargeable NiMH with 900 mA.
Memory card: Not included.
Type: SD & MMC compatible up to 2 GB (normal speed).
The capacity of memory cards compatible with this video camera is, respectively, 8 MB, 16 MB, 32 MB, 64 MB, 128 MB, 256 MB, 512 MB,1 GB (normal, high & ultra high speed) and 2 GB (normal speed only).
These types of SD & MMC memory cards, the ones on the market which are the most used, are sold by all specialized retailers. The most common brands are:
Toshiba, Panasonic, ScanDisk, Kingston & Olympus.
The length of the video clips and the number of photos which the device can memorize with these cards vary depending on:
• the memory capacity of the card used (from 8 MB to 2 GB) • the resolution selected (1.3, 2, 3 or 4 mega pixels) • the quality selected (good or superior) • the environment in which the shot is taken (brightness, lighting, interior or exterior).
- 3 -

Number of minutes of video clips and number of photos which the video camera can memorize on an SD or MMC 8 MB to 2 GB card (in a non-compressed format):
1 GB 2 GB
Resolut8 16 32 64 128 256 512
1.3 Meg
2 Mega
3 Mega
4 Mega
480 x 3
1 for To Interpoand 3 msoftwa
Capacity & SpeedSD & MMC 1
ion MB MB MB MB MB MB MB normal
high & ultra
normal high & ultra
a Pixel photos: 30 70 140 280 560 1125 2250 4500 4500 9000 0
Pixel photos: 20 45 90 180 375 750 1500 3000 3000 6000 0
Pixel photos: 15 30 70 140 280 560 1125 2250 2250 4500 0
Pixel photos: 10 20 45 90 180 375 750 1500 1500 3000 0
68 video clips 0:28 0:56 1:52 3:45 7:30 15 30 60 60 120 0
shiba , Panasonic, ScanDisk, Kingston, & Olympus brand cards
lation at 3 and 4 mega pixels can be done automatically by the device; photos taken in 1.3, 2 ega pixels can likewise be interpolated after they have been loaded onto the PC using Ulead
re.
- 4 -

2. Contents of the Package
Video camera
Strap
USB cable
Pouch
1) Detailed instruction manual 2) Installation driver 3) Ulead® Software for processing images
and interpolation at 4.0M pixels 4) Webcam driver
Quick Start Instruction Manual
On-line manual
3. Main Functions and Characteristics of the Device This 3-in-1 device allows you to record video clips, take photos inside or outside, and also functions in webcam mode to communicate via the Internet.
video
photo
webcam
- 5 -
4. Presentation of the Device
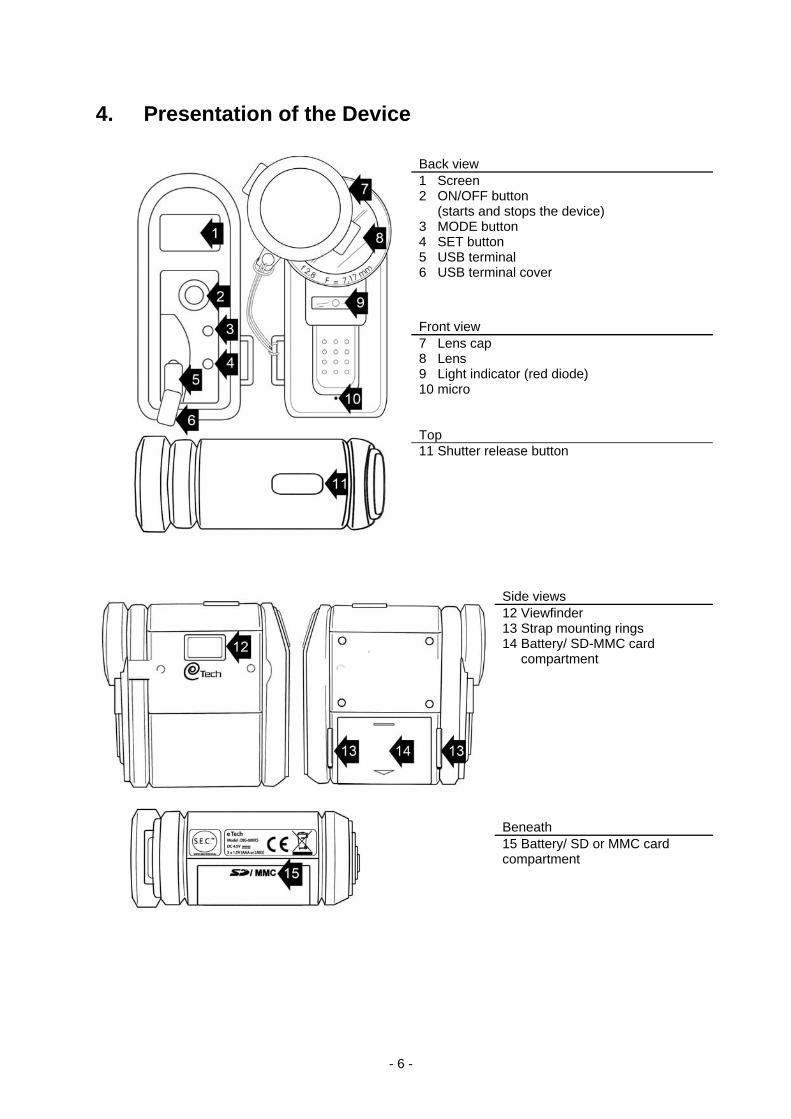
Back view 1 Screen 2 ON/OFF button (starts and stops the device) 3 MODE button 4 SET button 5 USB terminal 6 USB terminal cover
Front view 7 Lens cap 8 Lens 9 Light indicator (red diode) 10 micro Top
11 Shutter release button
Side views 12 Viewfinder 13 Strap mounting rings 14 Battery/ SD-MMC card compartment Beneath
15 Battery/ SD or MMC card compartment
- 6 -
5. Preparing the Device for Use
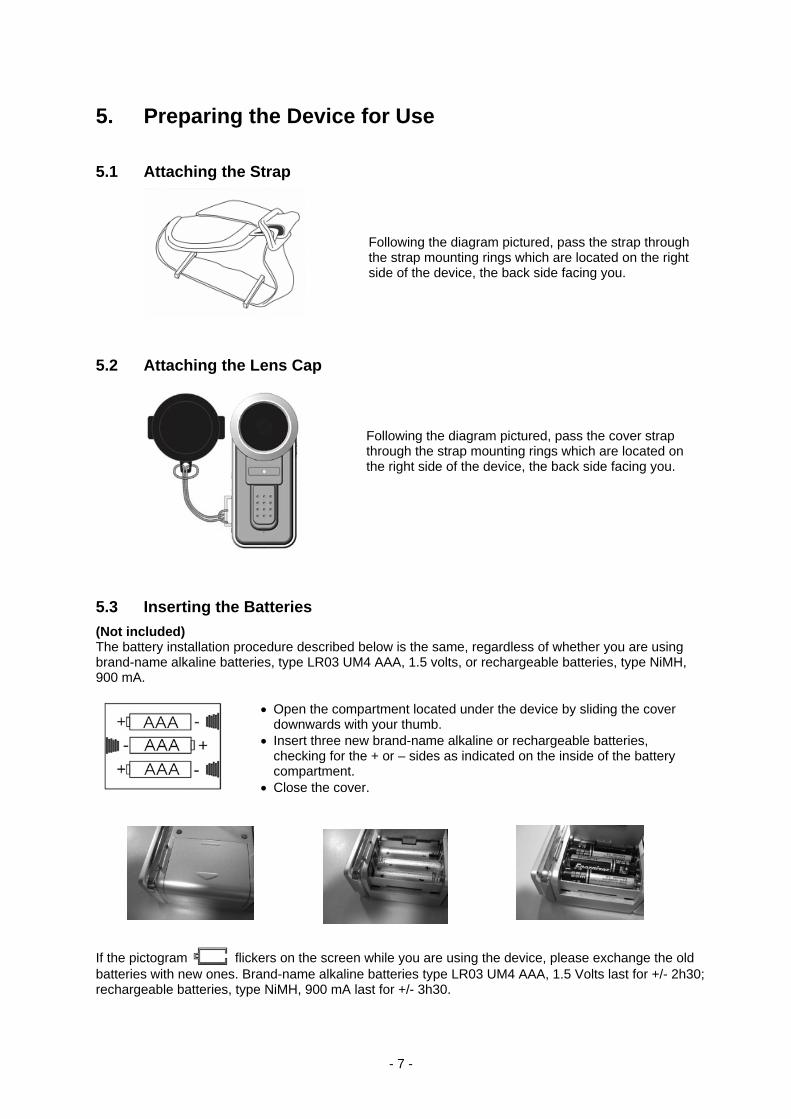
5.1 Attaching the Strap
Following the diagram pictured, pass the strap through the strap mounting rings which are located on the right side of the device, the back side facing you.
5.2 Attaching the Lens Cap
Following the diagram pictured, pass the cover strap through the strap mounting rings which are located on the right side of the device, the back side facing you.
5.3 Inserting the Batteries
(Not included) The battery installation procedure described below is the same, regardless of whether you are using brand-name alkaline batteries, type LR03 UM4 AAA, 1.5 volts, or rechargeable batteries, type NiMH, 900 mA.
• Open the compartment located under the device by sliding the cover downwards with your thumb.
• Insert three new brand-name alkaline or rechargeable batteries, checking for the + or – sides as indicated on the inside of the battery compartment.
• Close the cover.
If the pictogram flickers on the screen while you are using the device, please exchange the old batteries with new ones. Brand-name alkaline batteries type LR03 UM4 AAA, 1.5 Volts last for +/- 2h30; rechargeable batteries, type NiMH, 900 mA last for +/- 3h30.
- 7 -
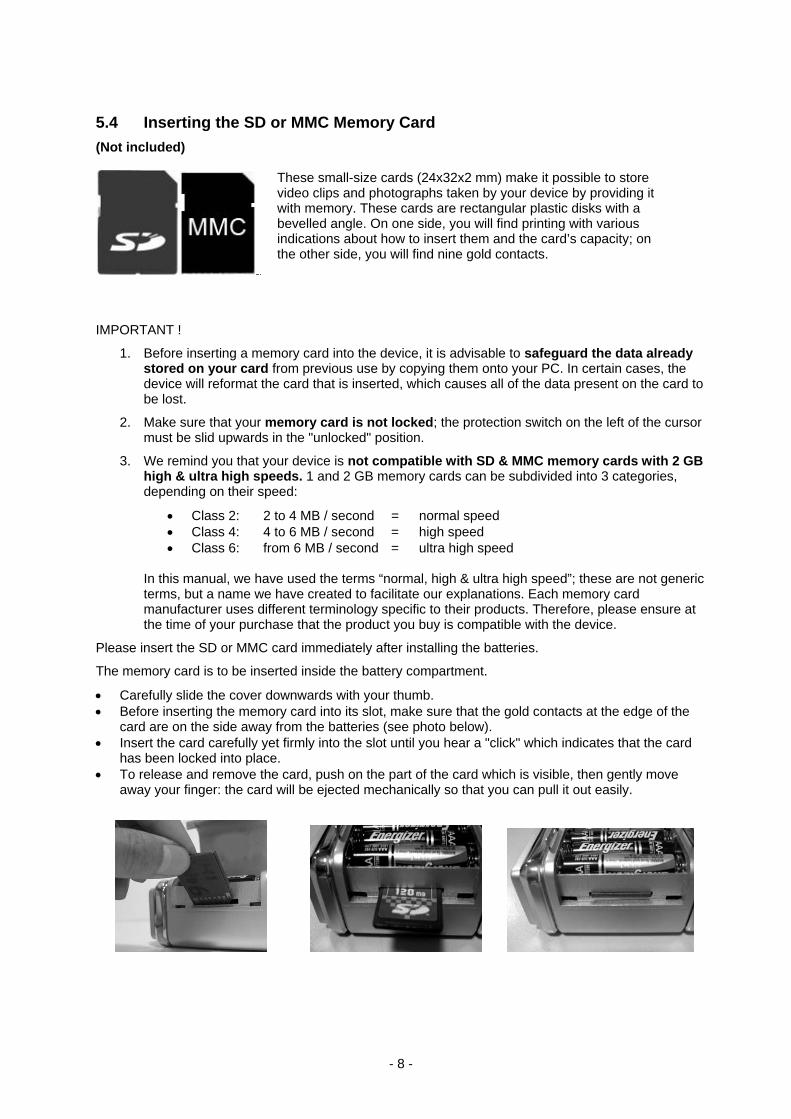
5.4 Inserting the SD or MMC Memory Card
(Not included)
These small-size cards (24x32x2 mm) make it possible to store video clips and photographs taken by your device by providing it with memory. These cards are rectangular plastic disks with a bevelled angle. On one side, you will find printing with various indications about how to insert them and the card’s capacity; on the other side, you will find nine gold contacts.
IMPORTANT !
1. Before inserting a memory card into the device, it is advisable to safeguard the data already stored on your card from previous use by copying them onto your PC. In certain cases, the device will reformat the card that is inserted, which causes all of the data present on the card to be lost.
2. Make sure that your memory card is not locked; the protection switch on the left of the cursor must be slid upwards in the "unlocked" position.
3. We remind you that your device is not compatible with SD & MMC memory cards with 2 GB high & ultra high speeds. 1 and 2 GB memory cards can be subdivided into 3 categories, depending on their speed:
• Class 2: 2 to 4 MB / second = normal speed • Class 4: 4 to 6 MB / second = high speed • Class 6: from 6 MB / second = ultra high speed
In this manual, we have used the terms “normal, high & ultra high speed”; these are not generic terms, but a name we have created to facilitate our explanations. Each memory card manufacturer uses different terminology specific to their products. Therefore, please ensure at the time of your purchase that the product you buy is compatible with the device.
Please insert the SD or MMC card immediately after installing the batteries.
The memory card is to be inserted inside the battery compartment.
• Carefully slide the cover downwards with your thumb. • Before inserting the memory card into its slot, make sure that the gold contacts at the edge of the
card are on the side away from the batteries (see photo below). • Insert the card carefully yet firmly into the slot until you hear a "click" which indicates that the card
has been locked into place. • To release and remove the card, push on the part of the card which is visible, then gently move
away your finger: the card will be ejected mechanically so that you can pull it out easily.
- 8 -

6. Using the Device
6.1 Putting the Device into Operation
Press the ON/OFF operation button for a few seconds. The screen will light up and the device will emit 3 short beeps.
6.2 Reading & Using the Screen
The different functions, adjustments, and indicators can be accessed by using the ON/OFF, MODE and SET buttons and will display on the screen. The functions, adjustments, & indicators are only accessible once the device is on.
FUNCTIONS
You can select from among 3 functions (video, photo, or webcam), which translate to 5 modes of use for the device:
• video • individual photos • sequence photos • self-timer photos • webcam
To choose video mode, press the ON/OFF button several times and stop when the video mode pictogram shows up on your screen. When you turn on your device, the “video” mode is the default setting. To choose photo mode, press the ON/OFF button several times and stop when the desired photo mode pictogram shows up on your screen. To choose webcam mode, you must first install the programmes provided on your CD-ROM and establish a connection between the video camera to your PC using your USB cable; we describe this mode later on in Chapter 9, "Connecting the Device to the Computer” and Chapter 10, “Webcam Function”. The following table shows the 5 modes for the device.
Modes Pictograms Activation
Video mode:
ON/OFF button
Photo mode
ON/OFF button
Sequence photos
ON/OFF button
Self-timer mode
ON/OFF button
Webcam mode PC USB connection &
SHUTTER RELEASE button
The active mode pictogram will always appear on the screen.
- 9 -

ADJUSTMENTS
Your device allows you to make 3 types of adjustments:
• resolution : 1.3, 2, 3 or 4 million pixels • quality : good or superior quality • frequency : 50 or 60 Hz
The following table shows the 3 types of adjustment for the device.
Adjustments Pictograms Selection Activation
4 million pixels MODE & ON/OFF & SET buttons
3 million pixels MODE & ON/OFF & SET buttons
2 million pixels MODE & ON/OFF & SET buttons
Resolution
1.3 million pixels MODE & ON/OFF & SET buttons
Superior MODE & ON/OFF & SET buttons
Photo quality
Good MODE & ON/OFF & SET buttons
50 Hz MODE & ON/OFF & SET buttons
Frequency
60 Hz MODE & ON/OFF & SET buttons
To make resolution, quality, and frequency adjustments,
• step 1: press the MODE button several times to pass through the pictograms for the different adjustments that are possible (summarized in the table above entitled "Adjustments");
• step 2: stop once the pictogram for the adjustment you want appears on the screen; the pictogram will flicker for a few seconds;
• step 3: as it flickers, press the ON/OFF button to pass through the different possible choices for this adjustment (see the table above entitled “Selection”);
• step 4: stop once the pictogram for the adjustment you want appears on the screen; the pictogram will flicker for a few seconds;
• step 5: as it flickers, press the SET button to make your choice; your new selection will now appear on the screen.
If you would like to change this adjustment again, start back at step 1. After a few seconds, the “adjustment” mode will stop automatically, and the screen will show:
• the selected photo resolution: 1.3, 2, 3 or 4 mega pixels • the frequency: 50 or 60 Hz • the quality: good or superior
The pictograms depicting these adjustments will remain displayed on your screen. Note: When you turn off the device, its memory will retain the adjustments which you have made;
they will thus be preserved for the next time you use the device.
- 10 -

DELETION Your device allows you to make 2 types of deletions:
• delete the last take (video clip or photo) • delete all of the takes (video clip or photo)
IMPORTANT ! We do not advise deleting video clips and/or photos in your device using the method described below. You can't see your takes with the video camera, so you run the risk of deleting clips or photos which you don’t want to erase. Therefore, it is advisable to delete your video clips and/or photos on your computer after you have transferred them from your video camera. Please refer to Chapter 17, where we will describe the procedure. Otherwise, proceed as follows. The following table shows the 2 types of deletion procedures for the device.
Deletion Pictogram Activation
Delete the last take
MODE & SET buttons
Delete all takes
MODE & SET buttons
To delete the last take (most recent video clip or most recent photo), follow the procedure below:
• press the MODE button several times in a row until you see the pictogram for deleting the most recent video clip or most recent photo taken.
• press on the SET button to delete this most recent take. In order to delete all takes (all of the video clips and all of the photos), follow the procedure below:
• press the MODE button several times in a row until you see the pictogram for deleting all of the video clips and all of the photos.
• press the SET button to delete all of the photo/video files that are recorded on the card The deletion pictograms only appear on the screen during the deletion process.
- 11 -

INDICATORS
Your device’s screen shows 3 types of indicators; these indicators indicate:
• the presence of a memory card; • a PC connection; • the battery usage level.
The following table shows the different pictograms for the indicators and what they signify.
INDICATORS Pictograms What it indicates
the device contains a memory card
(blinking)the device does not contain a memory card
Memory card: FULL the memory card is full
the device is connected to a computer by a USB cable – without a memory card
Ud
the device is connected to a computer by a USB cable – with a memory card (in mass storage)
Connection to a PC;
PC
the device is connected to a computer by a USB cable – in PC Cam
the batteries are charged
the batteries are not fully charged Battery usage level
the batteries must be charged or replaced
The indicators automatically show up on the screen as necessary. However, the battery use level indicator is always on the screen.
6.3 Turning off the Device
Press the ON/OFF button for 4 seconds in order to turn off the device.
In order to conserve battery power, the device will automatically turn off if you don’t use it for 60 seconds.
The screen will go dark and the device will emit 3 short beeps.
- 12 -

7. Video Clip Function
7.1 Duration & Sound for the Video Clips
Your device allows you to make video clip recordings. The time is only limited by the space that is still available on your SD or MMC memory card.
Depending on the capacity of the memory card used, it is possible to record a total of 28 seconds (8 MB card) to 120 minutes (normal speed 2 GB card) of video (as one or multiple sequences).
The table under Chapter 1.5 shows the average durations of video clips for the memory card used.
Your device allows you to record video clips with sound, since it is equipped with a microphone on the front side.
Your device’s microphone will capture sounds from 10-12 metres away; but a conversation will only be clearly audible if the video camera is no more than +/-6 metres from the people being filmed.
7.2 Adjustments to the Frequency & Quality
Before recording video clips or taking photos, first you must make an initial check that you have made the two adjustments to the device which will influence the quality of your takes.
• quality : good or superior quality • Frequency : 50 or 60 Hz
Chapter 6.2 describes how to choose or modify the frequency and the quality of your video clips. Notes:
• The resolution used by the video function is fixed and cannot be modified (480 x 368 to 20
images / second); in video mode, your screen will continuously display the
pictogram, which represents this video resolution; • The resolution used by the photo function, however, can be modified; Chapter 8.1
describes how to make such adjustments. What Quality Should I Choose?
Your device allows you to choose different qualities for the video clips and photos that you take: • good • superior
Changing the quality will affect the file size and the definition of the video clips and photos. If you would prefer that your takes have better quality rather than save space, choose "superior" quality.
What Frequency Should I Choose?
Your device allows you to choose from two different frequencies for the video clips and photos that you take:
• 50 Hz • 60 Hz
Usually, 50 Hz is used throughout Europe. This adjustment does not have an affect on image brightness.
- 13 -

7.3 Recording Your Video Clip
When you turn on your device, the “video clip” mode is the default setting. The pictogram will
appear on your screen.
If the pictogram for the “video clip” function doesn’t appear on your screen, press the ON/OFF button
several times, then stop when the pictogram appears on your screen.
• Press on the SHUTTER RELEASE button to begin recording a video. It is not necessary to
keep pressing the button in order to keep recording. • As you film, frame the scene with the viewfinder; the frame counter will time the duration of the
video clip in minutes and seconds. • Press the SHUTTER RELEASE button again to stop the recording; the frame counter will now
indicate the total video clip time which the available space remaining on your memory card will allow you to record (example: 29:34 indicates that you can still record a total of 29 minutes, 34 seconds worth of video clips).
The indicator light will flicker as you record a video clip.
7.4 Deleting Your Video Clips
Please refer to Chapter 6.2 above, “Reading and Using the Screen”.
- 14 -

8. Photo Function
Ensure that the pictogram appears on your screen. If the pictogram for the “photo” function doesn’t appear on your screen, press the ON/OFF button several times,
then stop when the pictogram appears on the screen. When the pictogram for the “photo” function isn’t visible on the screen, you cannot make the necessary
adjustments or take photos.
8.1 Adjustments: Resolution, Frequency & Quality
As when recording video clips, before you take any photos, first you must make sure that you have made all of the adjustments to the device which will affect the quality of your photos.
• Resolution : 1.32, 3, 4 or million pixels • Quality : good or superior quality • Frequency : 50 or 60 Hz
Chapter 6.2 describes how to choose or modify the frequency and the quality of your photos. What Frequency & Quality Should I Choose?
Chapter 7.2 provides you with explanations to help answer this question. What Resolution Should I Choose?
Your device allows you to choose from four different resolutions for the photos you take: • 1.3 million pixels • 2 million pixels • 3 million pixels • 4 million pixels
The original resolutions are 1.3 and 2 million pixels; the digital sensor of your device will thus capture up to 2 million pixels for each photo that you take.
Resolutions of 3 and 4 million pixels are interpolated resolutions; your device’s integrated circuit will thus interpolate the photos which you take, increasing the number of pixels for your photo.
• Choosing an elevated resolution will make it possible to ensure higher-quality photos, but will take up more space on your memory card, which will then fill up more quickly.
• Choosing a lower resolution will save your photos at a lower quality, but will allow you to store a greater number of photos on your memory card.
8.2 Taking Your Photos
• Open the slide flap and look through the viewfinder, looking at a distance of +/- 30 cm. • Aim and remain still for a few seconds in order to get a clear photo. • Press on the SHUTTER RELEASE button and the device will emit a sound signal. • The device will emit a second sound signal once your photo has been taken. • The meter on the screen will make changes to show the number of photos which you can still take.
- 15 -

8.3 Taking Photos in Sequence Mode
In sequence mode, the device takes 3 photos in succession with 1-2 second intervals between each photo. The red indicator light will remain lit during the three shots.
• Press the MODE button several times in a row in order to get the sequence pictogram. • Press the SHUTTER RELEASE button to take a series of sequence photos. Note: The sequence mode only functions at resolutions of 1.3 and 2 million pixels; we advise you to choose the 1.3 million pixel resolution, which allows for a shorter interval between each photo (+/- 1 second).
8.4 Taking Photos in Self-Timer Mode
• Press the MODE button several times in a row in order to get the self-timer pictogram.
• Press the SHUTTER RELEASE button. • The device will count up to 10 seconds, emitting a series of sound signals (beeps) and light signals
(red indicator). • When the countdown is finished, the device will automatically take the photo.
8.5 Deleting Your Photos
Please refer to Chapter 6.2 above, “Reading and Using the Screen”.
- 16 -

9. Connecting the Device to Your Computer IMPORTANT!
There are two function modes possible for your device when it is connected to a PC by a USB cable:
• “digital camera,” which corresponds to the webcam mode function. • “peripheral mass storage,” which corresponds to the photo and video clip device function.
When you connect your device to the computer, the default setting will be “mass storage” so you can transfer and save your video clips and photos.
Notes:
• When the device is connected to the computer, the buttons are deactivated. • The supply is provided by the USB cable, and the batteries are not required for operation.
9.1 Using the Installation Driver
It is necessary to install the driver on the CD-ROM.
Without the driver, the device will not be able to communicate with your computer for the transfer of video clips and photographs (Windows® 98) and can also not be used as a webcam (all Windows® versions).
REMINDER!
The different installation screens which will show up on your PC screen will be in the same language as the one you use for Windows. However, the screens depicted in this instruction manual are in English.
Follow the instructions below; please note that the screens depicted may vary slightly for Windows® 98SE, ME et 2000 users.
1. Insert the CD-ROM provided into the drive 2. If the driver launches automatically, go to step 3.
Otherwise, go to Windows Explorer and open the driver for your CD-ROM (usually driver D:, depending on your computer’s configuration). Then double-click on the icon ‘AUTORUN.EXE’.
- 17 -
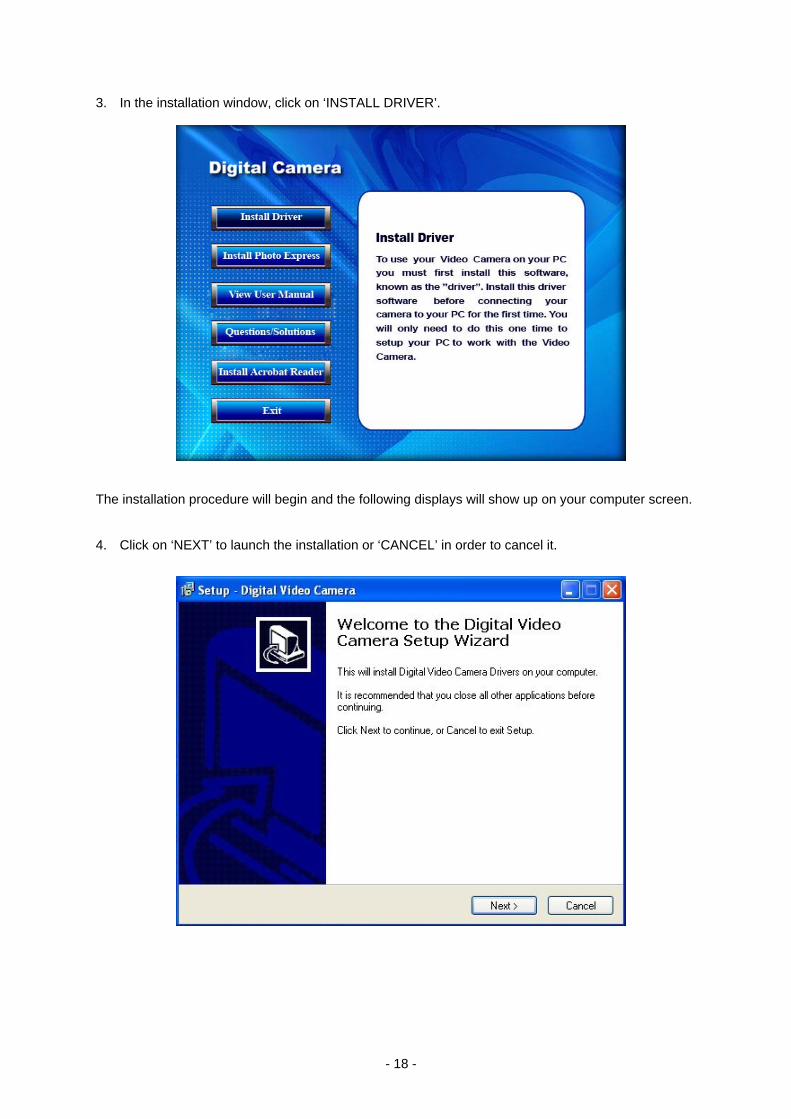
3. In the installation window, click on ‘INSTALL DRIVER’.
The installation procedure will begin and the following displays will show up on your computer screen. 4. Click on ‘NEXT’ to launch the installation or ‘CANCEL’ in order to cancel it.
- 18 -

5. Choose the component you want to install for your version of Windows®.
Then click on ‘NEXT’.
6. Be sure that the Windows® version selected in the display above appears in the display.
If it does, click on ‘INSTALL’; otherwise, click on ‘BACK’ or ‘CANCEL’ in order to cancel the installation.
- 19 -

Then the installation will begin. Please wait for a few moments as Windows® copies the files to be installed. During this installation step, no action is required on your part.
7. Now the installation is finished. You may now restart your computer to activate the driver. You may
restart immediately by choosing ‘YES, RESTART MY COMPUTER NOW’ or you may restart later on if you like. Please note that you cannot use the webcam function or video/photo transfer for your device until your computer has been restarted.
Click on ‘FINISH’ to validate your choice and to exit from the installation windows.
You have now finished installing the driver.
- 20 -

9.2 Connecting the Device to Your Computer
To connect your camera to the computer using the USB cord (see Chapter 2 of the manual,
"Contents of the Package,” plug the smaller metallic end of the USB cord into the site reserved for this
purpose on your device ( ) and plug the other end into your computer's USB port.
As we have already indicated, you can hook up your device in two different ways:
1. Mass storage (for looking at photos and saving or transferring them)
2. Webcam (for recording clips directly onto the computer or to communicate over the internet using visual media)
To connect using the Webcam mode, please refer to Chapter 10, “Webcam Function”.
To connect using the Mass storage mode, please refer to Chapter 11, “Transferring and Saving Your Photos”.
- 21 -

10. Webcam Function You may use this device as a webcam. Several types of software, such as MSN Messenger, Skype, Yahoo Messenger, etc., can be used for this function.
The visual displays will vary greatly depending on the software you use.
10.1 Installing the Webcam
PLEASE NOTE!
To use this device as a webcam, first install the driver provided on the CD-ROM (see Chapter 9.1, “Using the DRIVER”. Make sure that the device is off, then follow the steps below:
• Connect your USB cable to your computer without connecting it to your video camera. • Press the “Shutter Release” button on your video camera, and keep pressing it as you insert
the other end of the USB cable into your computer.
On the LCD screen of your video camera, you will see the letters ‘PC’ with the pictogram that corresponds to the USB connection.
PC This means that your device is in webcam mode
10.2 Example with MSN Messenger®
• Launch your computer’s Windows® MSN Messenger® software. • Log in, • GB to the ‘TOOLS’ menu, then ‘AUDIO TUNING WIZARD’
- 22 -
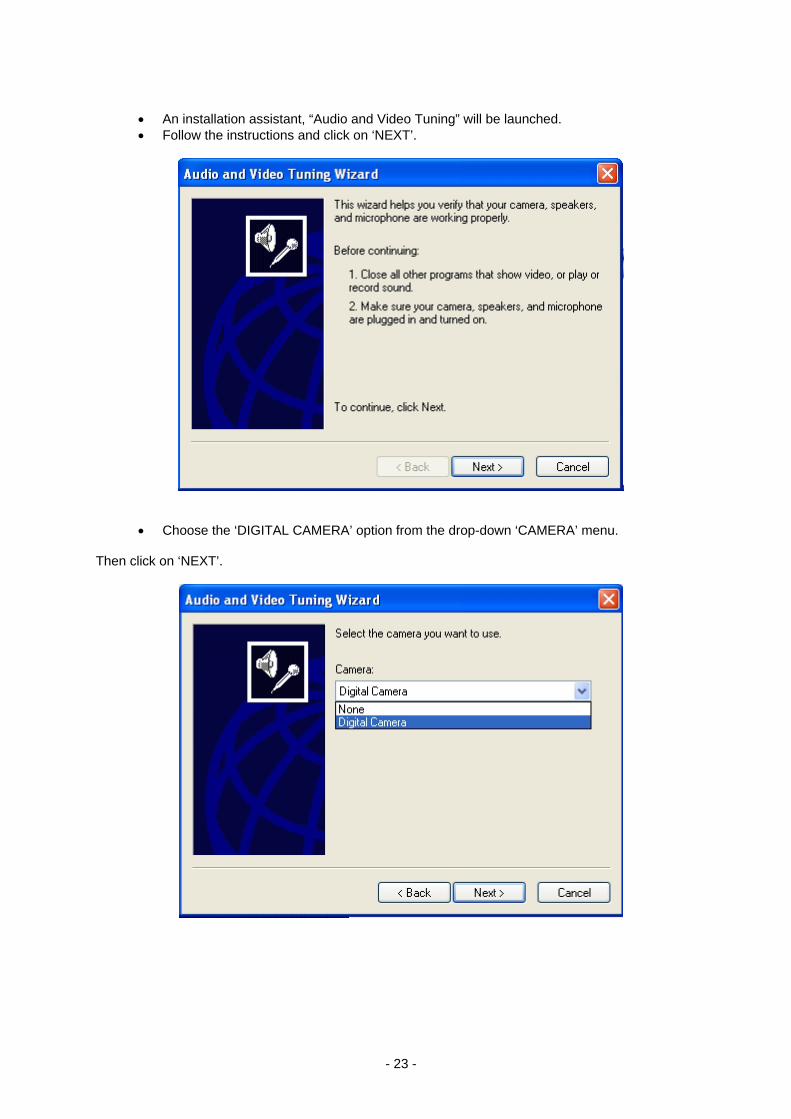
• An installation assistant, “Audio and Video Tuning” will be launched. • Follow the instructions and click on ‘NEXT’.
• Choose the ‘DIGITAL CAMERA’ option from the drop-down ‘CAMERA’ menu. Then click on ‘NEXT’.
- 23 -

You will then see a preview window (no action is required); this window shows you the images which your video camera is currently registering. Then click on ‘NEXT’.
• Carefully read the instructions for tuning the audio elements. Click on ‘NEXT’.
- 24 -

The camera does not permit the use of its incorporated microphone for the webcam function. You will thus have to choose the microphone and speakers or earphones which are to be used. Click in the ‘MICROPHONE’ and ‘SPEAKERS’ boxes to make your choices. Your Windows® programme will have already inserted the microphone and speakers by default.
• The assistant will now ask you to adjust the speakers and microphone. Proceed by following the instructions, then click on ‘NEXT’.
- 25 -

Proceed by following the instructions, then click on ‘NEXT’.
Once your adjustments have been made, click on ‘FINISH’ to end the multimedia tools configuration session.
• Invite somebody to converse with you. In order for this person to see you, you will need to click on the icon depicting a camera.
- 26 -
10.3 Use of the PC-Cam Function
10.3.1 General Information
• The webcam function just allows you to converse (in video) with somebody that you choose. • The 'PC CAM’ software supplied with the installation driver allows you to also record your
video sequences directly on the computer using the USB cable (without using the memory card, as you need to do with video clips).
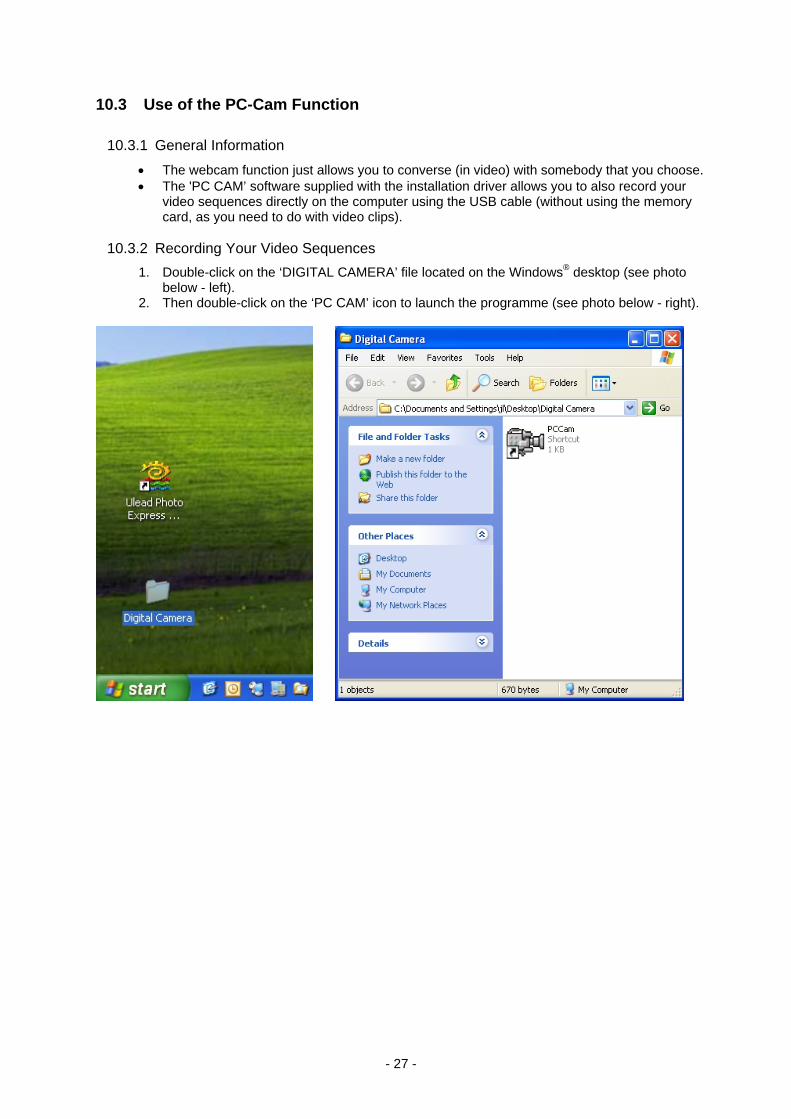
10.3.2 Recording Your Video Sequences
1. Double-click on the ‘DIGITAL CAMERA’ file located on the Windows® desktop (see photo below - left).
2. Then double-click on the ‘PC CAM’ icon to launch the programme (see photo below - right).
- 27 -

3. Click on the ‘OPTIONS’ menu. Click on ‘PREVIEW’ to see the image appear.
- 28 -

4. Click on the ‘CAPTURE’ menu. Click on the ‘MASTER STREAM’, menu, then on the ‘VIDEO’ menu
5. To name the recording, click on the ‘FILE’ menu, then on ‘SET CAPTURE FILE’.
- 29 -

6. Locate where you want to save your video file and give it a name, being sure to provide the extension (file type) .avi at the end of the name, then click on ‘OPEN’.
7. The following dialogue window will open and ask you to enter the maximum size for the video file you are creating. You can choose to not limit the size (and thus the duration) of your recording by clicking on ‘CANCEL’.
- 30 -
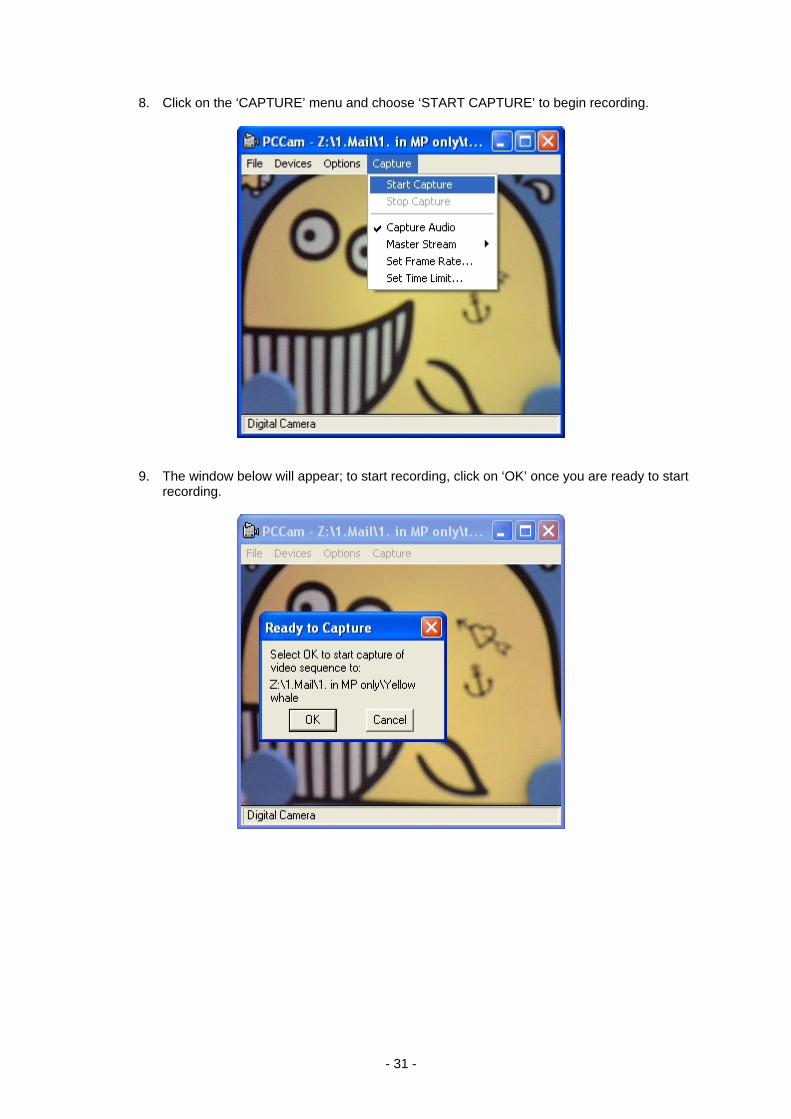
8. Click on the ‘CAPTURE’ menu and choose ‘START CAPTURE’ to begin recording.
9. The window below will appear; to start recording, click on ‘OK’ once you are ready to start
recording.
- 31 -
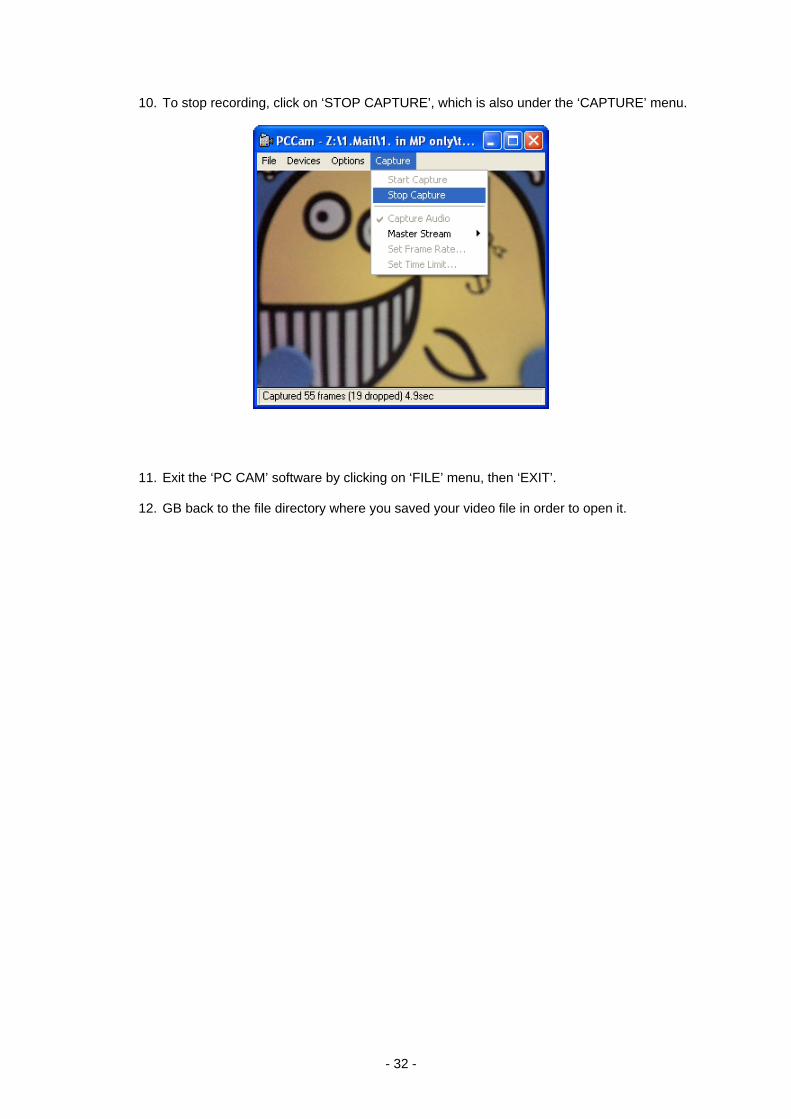
10. To stop recording, click on ‘STOP CAPTURE’, which is also under the ‘CAPTURE’ menu.
11. Exit the ‘PC CAM’ software by clicking on ‘FILE’ menu, then ‘EXIT’. 12. GB back to the file directory where you saved your video file in order to open it.
- 32 -

11. Transferring and Saving Your Photos on the Computer
11.1 For Windows® XP users
• After having connected your camera to the computer, a window entitled ‘REMOVABLE DISK’ will appear on your computer screen. The “removable disk” indicates the SD or MMC memory card inserted into your device.
• Make the selection ‘OPEN FOLDER TO VIEW FILES USING WINDOWS EXPLORER’ from the window’s scroll-down menu
• Click on ‘OK’.
• Then double-click on the ‘DCIM’ file, then on ‘100JLCAM’ and the photo/video files will show up on the screen.
- 33 -

11.2 For Windows® 98SE / ME / 2000 users
• Then double-click on the My Computer icon on your Windows® desktop Double-Click on the new icon “Removable disk” which shows up on the screen. The “Removable disk ” indicates the SD or MMC memory card inserted into your device.
• Double-click on the ‘DCIM’ file, then on ‘100JLCAM’ and the photo/video files will show up on the screen.
The procedure described above can vary greatly depending on your version of Windows; the driver which your device uses will, however, remain accessible using Windows Explorer.
11.3 Transferring and Saving Your Photos
To transfer your photos onto your computer, use the Windows® “Drag-Drop” or “Copy/Paste” function to move your photos to a folder of your choice on your hard disk ("My Pictures," for example).
Now you can erase photos stored on the SD or MMC memory card by deleting the files from the ‘100JLCAM’ folder. This will allow you to free up space on your memory card.
12. Installation of the Ulead Photo Express 4.0 1. Insert the CD-ROM provided into your computer 2. If the CD-ROM launches automatically, proceed to step 3. Otherwise, go to Windows Explorer and open the driver for your CD-ROM (usually driver D:,
depending on your computer’s configuration) . Then, double-click on the ‘Autorun.exe’ icon.
- 34 -

3. In the installation window, click on ‘INSTALL PHOTO EXPRESS’.
4. Choose the language you would like for the installation and use of the programme and click on ‘OK’.
The computer will then prepare for the different programme installation steps.
- 35 -

5. In the welcome window, click on ‘NEXT’.
6. Read the license agreement terms, then click on ‘YES’ to accept and proceed with the installation;
otherwise, click on ‘NO’ to cancel the process.
- 36 -

7. Enter your name and your company’s (or household’s) name. Please note that these two fields
must be filled in for the installation to continue. Then, click on ‘NEXT’.
8. Please indicate where you would like the programme to be installed. Click on ‘BROWSE’ to indicate
a location other than the default one which has been selected, then click on ‘NEXT’.
- 37 -
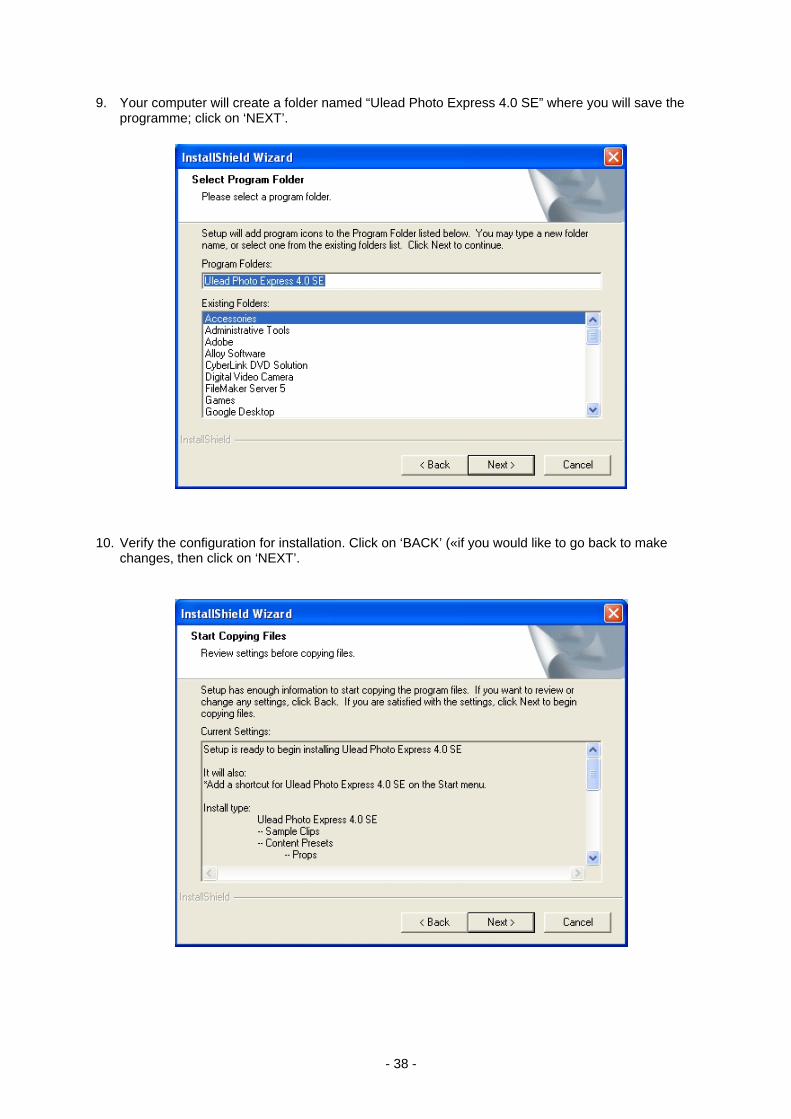
9. Your computer will create a folder named “Ulead Photo Express 4.0 SE” where you will save the programme; click on ‘NEXT’.
10. Verify the configuration for installation. Click on ‘BACK’ («if you would like to go back to make
changes, then click on ‘NEXT’.
- 38 -

The computer will take a few moments to copy the files and install the programme. The progress bar will allow you to ensure that it is proceeding properly.
11. Now the installation is finished. Click on ‘FINISH’ to end the installation process.
- 39 -
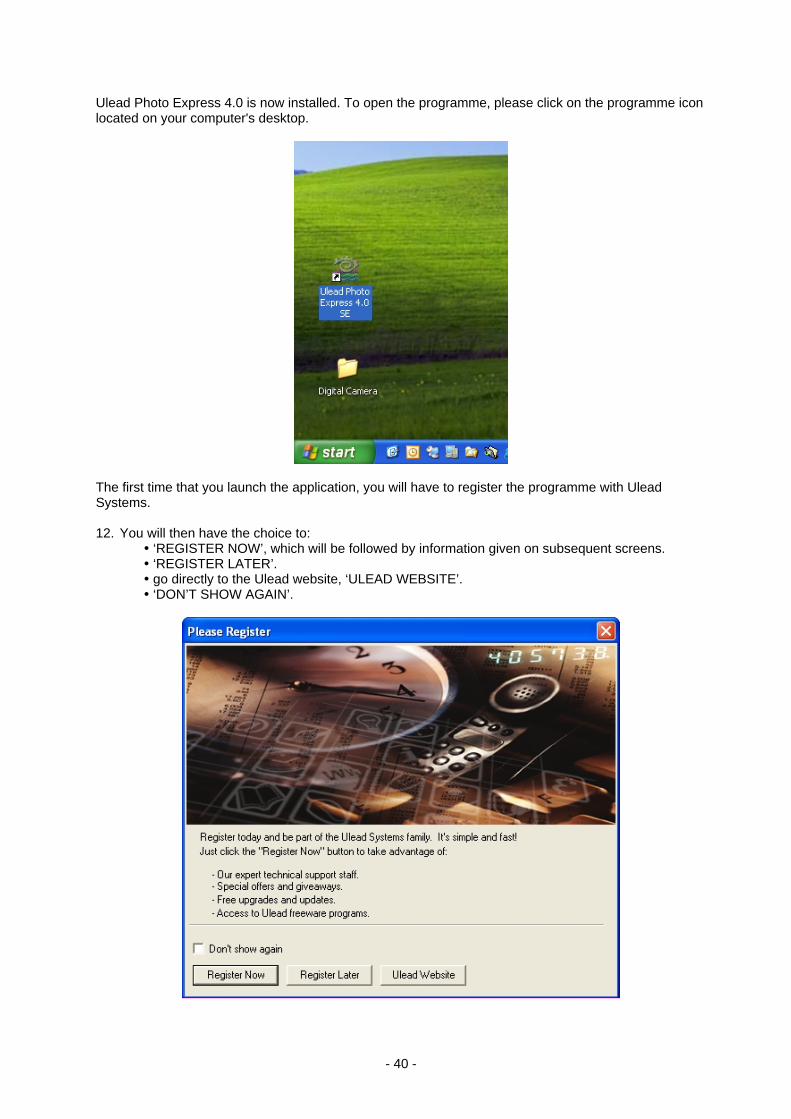
Ulead Photo Express 4.0 is now installed. To open the programme, please click on the programme icon located on your computer's desktop.
The first time that you launch the application, you will have to register the programme with Ulead Systems. 12. You will then have the choice to:
‘REGISTER NOW’, which will be followed by information given on subsequent screens. ‘REGISTER LATER’. go directly to the Ulead website, ‘ULEAD WEBSITE’. ‘DON’T SHOW AGAIN’.
- 40 -

13. Viewing Your Video Clips and Your Photos
13.1 Viewing Your Video Clips
1. To open the Ulead programme, please click on the programme icon located on your computer's
desktop. 2. Choose ‘BROWSE’ from the menu which appears.
3. The contents of the SD/MMC card will appear on the screen as you click on the driver which corresponds to your video camera; then double-click on the video clip you want to open.
A new window will open where your video clip will launch.
- 41 -

13.2 Viewing Your Photos
IMPORTANT ! If the following procedure to open picture files does not function, this is usually due to the configuration of your PC. In that case, please open your pictures by following the method described under 13.1 “Viewing your Video Clips” : click on the driver which corresponds to your video camera, then double-click on the picture you want to open. 1. To open the Ulead programme, please click on the programme icon located on your computer's
desktop. 2. Click on ‘BROWSE’ and choose ‘PHOTO’ from the menu which appears.
3. Click on ‘GET PHOTO’ and choose the source of your photo/video.
- 42 -
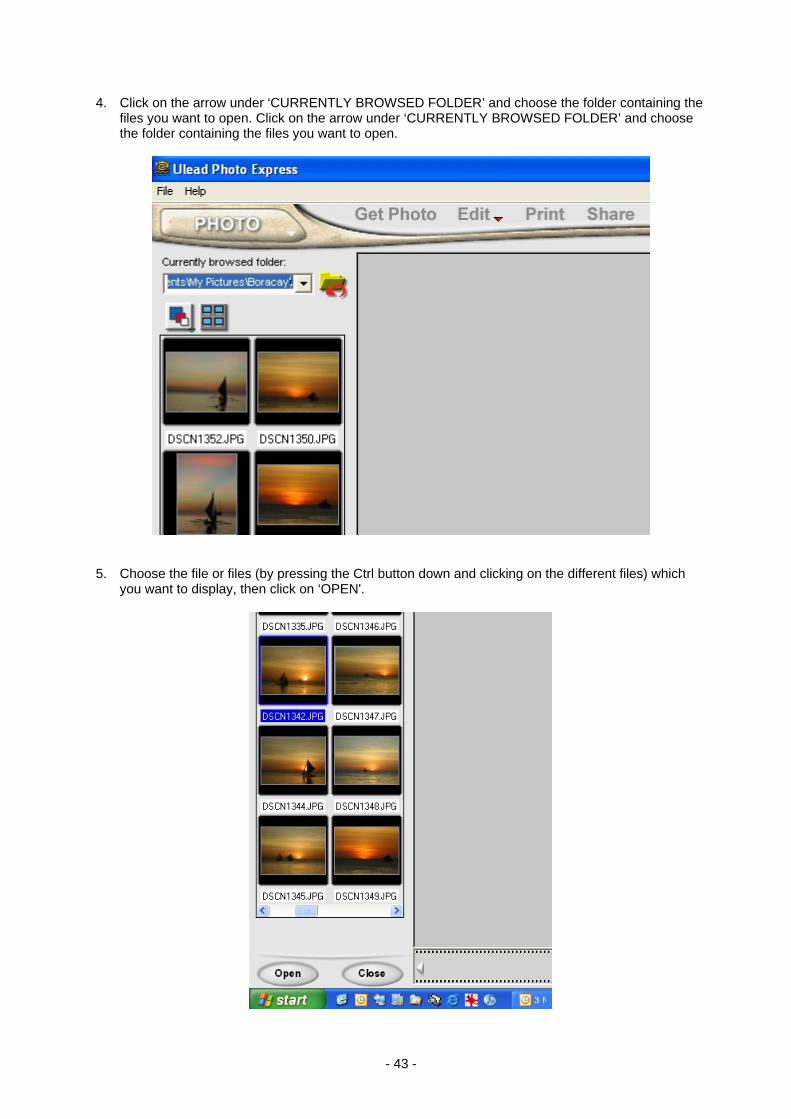
4. Click on the arrow under ‘CURRENTLY BROWSED FOLDER’ and choose the folder containing the files you want to open. Click on the arrow under ‘CURRENTLY BROWSED FOLDER’ and choose the folder containing the files you want to open.
5. Choose the file or files (by pressing the Ctrl button down and clicking on the different files) which
you want to display, then click on ‘OPEN'.
- 43 -

The photo/video file will now appear on the screen.
14. Interpolating Your Photos Remember that your camera allows you to choose from among the following resolution types:
• 1.3 million pixels (original resolution) • 2 million pixels (original resolution) • 3 million pixels (interpolated resolution) • 4 million pixels (interpolated resolution)
After you have transferred your photos to your PC, you can still interpolate your photos taken at resolutions of 1.3, 2 and 3 million pixels. Interpolation allows you to increase the number of pixels in a photo, which enhances the printing quality of your photo. You can thus only interpolate in order to obtain a number of pixels that is higher than the one you selected when you took the photo. Please refer to the following table:
Interpolation Resolution
1.3 2.0 3.0 4.0
1.3 / YES YES YES 2.0 / / YES YES 3.0 / / / YES 4.0 / / / /
You can, for example, interpolate the photos you have taken that are 1.3 to 2 million pixels. However, you cannot interpolate the photos you have taken that are 3 to 2 million pixels.
- 44 -

Before interpolating your photos, please view the photo(s) which you want to edit (see paragraph 13). 1. In the menu ‘EDIT | ADJUST’, select ‘RESIZE’.
2. Choose ‘Pixels’ as a size unit.
- 45 -
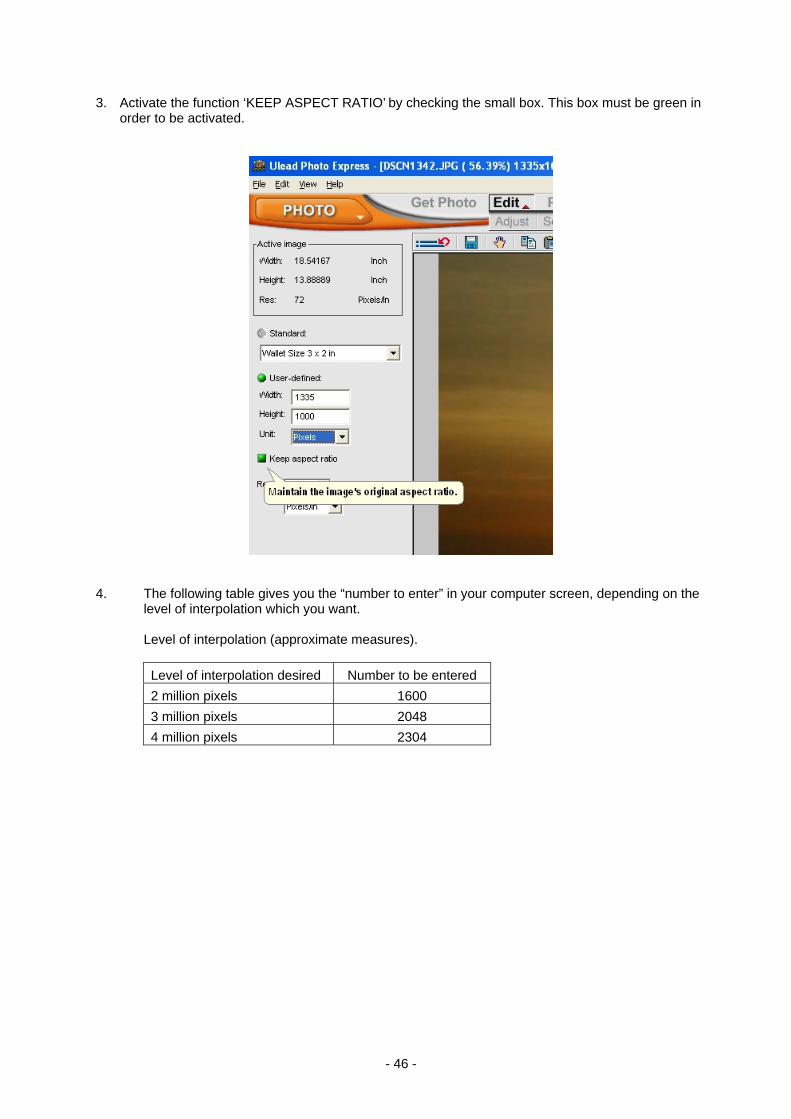
3. Activate the function ‘KEEP ASPECT RATIO’ by checking the small box. This box must be green in order to be activated.
4. The following table gives you the “number to enter” in your computer screen, depending on the
level of interpolation which you want.
Level of interpolation (approximate measures).
Level of interpolation desired Number to be entered
2 million pixels 1600
3 million pixels 2048
4 million pixels 2304
- 46 -

Insert this number into the ‘WIDTH’ field or ‘HEIGHT’ as follows: • if the value in the 'WIDTH’ box is higher than the value in the ‘HEIGHT’ box, replace it
with the number indicated in the preceding table; • if the value in the ‘HEIGHT’ box is higher than the value in the ‘WIDTH’ box, replace it
with the number indicated in the preceding table;
5. Click on ‘APPLY’ to confirm your changes.
- 47 -

6. To save your changed photo, click on the ‘FILE’ menu, then choose ‘SAVE AS’.
7. In the ‘SAVE AS’ window, indicate the location on your hard drive where you would like to save
your photo. Give your photo a name under ‘FILE NAME’, then click on ‘SAVE’.
- 48 -

15. Manipulating Your Photos First, view or open the photo(s) that you'd like to manipulate (see Chapter 13) after having launched the programme Ulead. Choose the photo which you would like to edit so that a large image of it appears on your screen. Now you can use a multitude of tools to modify your photo as you like. In order to make full use of the possibilities offered by this software, consult the manual for the Ulead programme, which is available:
• on-line: in the ‘Help’ menu for the Ulead programme, choose ‘Ulead Photo Express Help’; • on your CD-ROM: insert your CD-ROM, and, using Windows Explorer, access the directory
‘PE4 \ Manual’ in the driver which your CD-ROM uses (usually driver D:, depending on how your computer is configured), then choose the directory which corresponds to your language, then double-click on the file: pe4_manual.pdf
If your computer cannot open the file, then double-click on the programme ‘ar405fre.exe’, which is located in the same directory as the ‘Acrobat’ installer. Then open the manual. PLEASE NOTE! The Ulead programme is just for editing photos, and does not contain tools which allow you to edit video clips.
16. Printing Your Photos Now you can print your photos. First, open the photos which you would like to print (see Chapter 13 “Viewing Your Photos”). 1. From the ‘PRINT’ menu, choose the format in which you would like to print.
- 49 -

2. Choose from among the different printing formats, choose the printer, and then click on ‘NEXT’.
3. Read the instructions, then click on ‘NEXT’.
- 50 -
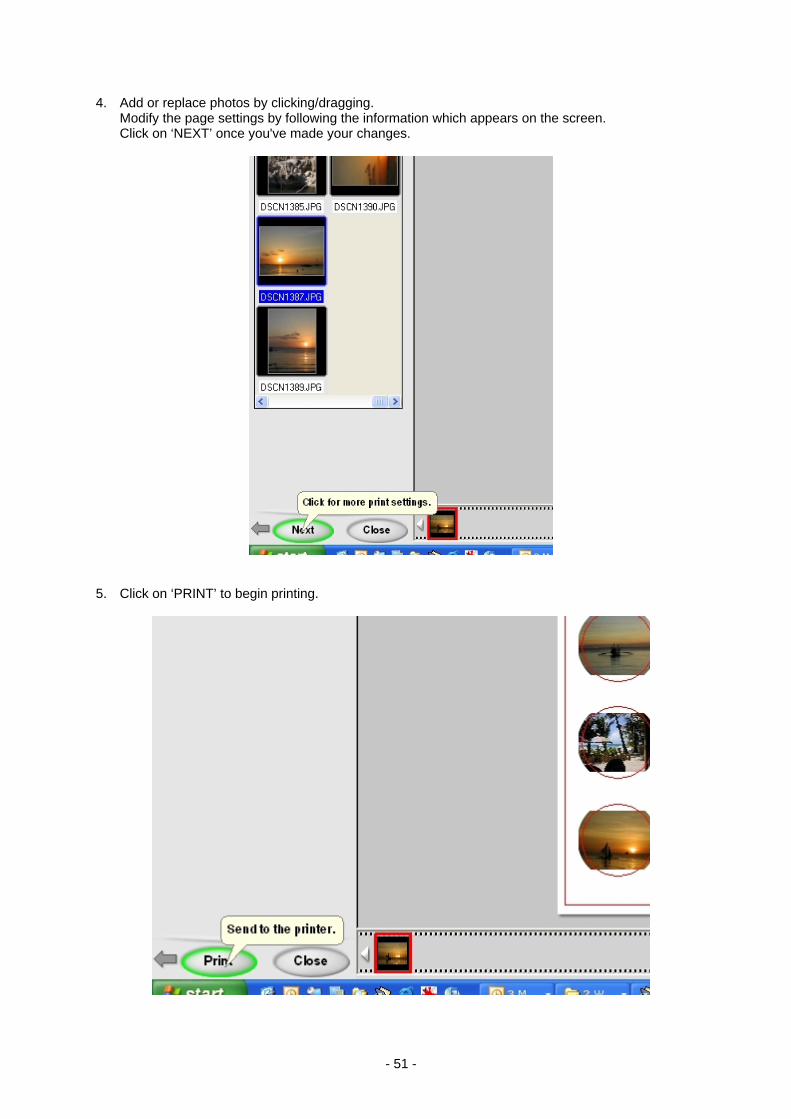
4. Add or replace photos by clicking/dragging. Modify the page settings by following the information which appears on the screen. Click on ‘NEXT’ once you've made your changes.
5. Click on ‘PRINT’ to begin printing.
- 51 -

Printing is in progress; no action is required from you.
6. Click on ‘CLOSE’ to leave the printing session.
- 52 -
17. Deleting Video Clips and/or Photos on Your PC Transfer your photo/video files as explained in Chapter 11. After the transfer, make sure that the photos are in the directory which you have chosen. How to delete photos stored on your memory card?
• Connect your video camera to your PC with the USB cable • Open Windows Explorer on your computer • Open the driver which corresponds to your camera’s SD memory card • Open the DCIM directories, then 100JLCAM. • Choose the files, then delete them by pressing the ‘DELETE’ button on your keyboard.
How to delete photos stored on your computer?
• Connect your video camera to your PC with the USB cable • Open Windows Explorer on your computer • Open the directory where you transferred your video clips and photos from your video
camera • Choose the files you don’t want, then delete them by pressing the ‘DELETE’ button on your
keyboard. Depending on the version of Windows® that you have, you may be able to preview the photos directly in Windows® Explorer. In the ‘VIEW’ menu, choose ‘THUMBNAILS’ in order to make it easier to choose which photos to delete.
18. Environment protection – Directive 2002/96/CE
Disposal of Old Electrical & Electronic Equipment (Applicable in the European Union and other European countries with separate collection systems) This symbol on the product or on its packaging indicates that this product shall not be treated as household waste. Instead it shall be handed over to the applicable collection point for the recycling of electrical and electronic equipment. By ensuring this product is disposed of correctly, you will help prevent potential negative consequences for the environment and human health, which could otherwise be caused by inappropriate waste handling of this product. The recycling of materials will help to conserve natural resources. For more detailed information about recycling of this product, please contact your local city office, your household waste disposal service or the shop where you purchased the product.
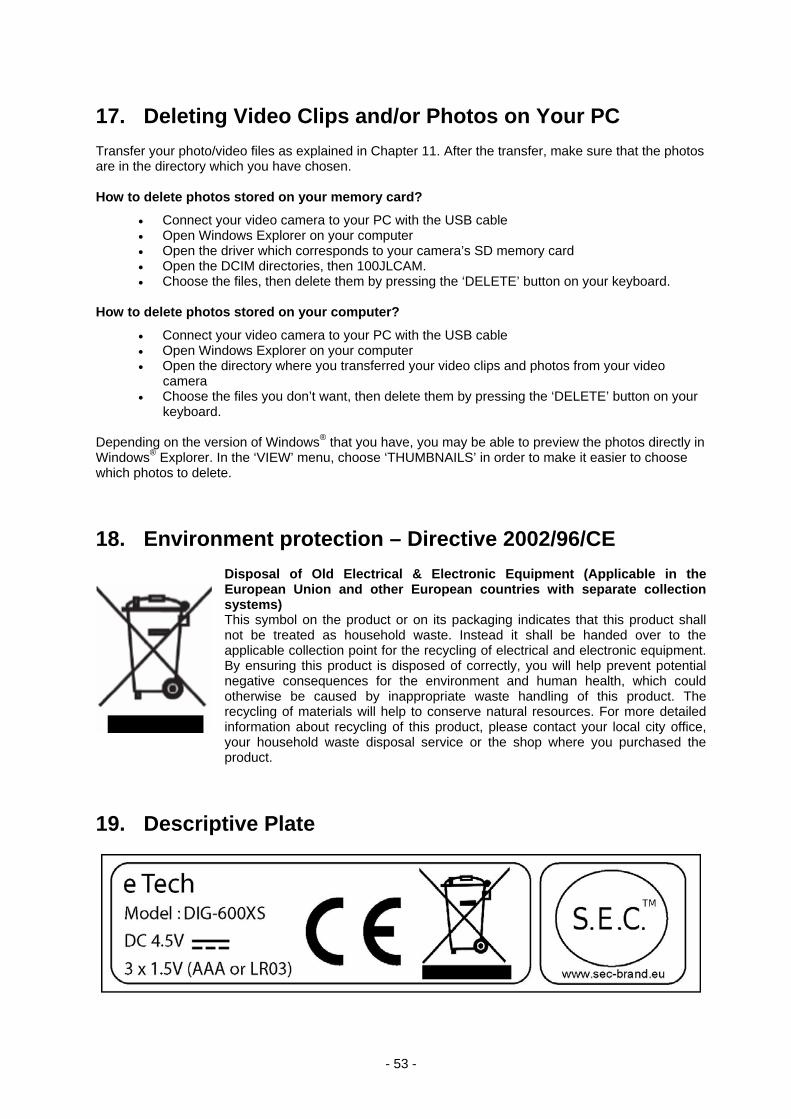
19. Descriptive Plate
- 53 -