
Yamaha RX-7 Owner's Manual - polynominal.com · When you’re ready, input the bass drum sound...
56
Transcript of Yamaha RX-7 Owner's Manual - polynominal.com · When you’re ready, input the bass drum sound...

INTRODUCTION
Congratulations on your purchase of the Yamaha RX7 Digital Rhythm Programmer!
You now own one of the most sophisticated musical accompaniment systems available - for that is what the RX7really is. Much more than a mere drum machine, this microcomputer-controlled marvel lets you create complexand convincing accompaniment arrangements consisting not only of percussion sounds, but superbly realistic bass,guitar, brass and even “rap screams” as well. One hundred (!) digitally recorded voices are yours for the choosing.We wish you years of enjoyment with your new RX7, the ultimate rhythm ( + bass + backing + melody) programmer.
About this Manual
Despite its large variety of features, the RX7 is very easy to use. Reading this manual thoroughly while actuallyoperating the RX7 will enable you to take full advantage of its many functions in no time.Unfold the convenient back cover fold-out page. Its illustrations will help you quickly locate the controls andconnection terminals.
After you know about which PRECAUTIONS to take, GETTING ACQUAINTED will introduce you to some of thefantastic sounds available on the RX7 and show you how to program a simple rhythm right away.BASIC CONCEPTS AND FEATURES then gives you all the information you need in order to understand the functionalstructure of the RX7, so you can use it most effectively - and some hints on how to approach programming. Thissection will also help you make the most of the detailed explanations of each and every function that follow.
PRECAUTIONS
Your new RX7 is a fine musical instrument - and should be treated as such. Though it is ruggedly constructed andoffers the reliability of solid-state circuitry, handle it with care and common sense. Keep the following points inmind, and your RX7 will give you years of reliable service.
• Location
Avoid exposure to direct sunlight or other sources of heat. Vibration, excessive dust, cold, low or high humiditycan also cause malfunction.
• Relocation
When moving the RX7, unplug the AC adapter and all other connecting cables to prevent damage to cords andjacks.
• Handling
Avoid rough handling. Don’t drop the RX7 as this can damage the internal circuitry. Applying excessive force toterminals or controls may lead to malfunctions. Always remove plugs from jacks or other terminals by grippingthem directly, not by pulling the cord.
• AC Power Connection
Connect only to a power supply conforming to the specifications shown on the AC adapter.
Disconnect the RX7 from the AC outlet when not using it for an extended period of time. Electrical storms (lightning)can give rise to power surges, damaging digital circuitry even if power is turned off.
• CleaningClean the exterior with a soft, dry cloth. Using chemical solvents will damage the finish.
• Interference Through Electromagnetic Fields
Do not use your RX7 close to television sets, radio receivers or other equipment generating electromagnetic fields.This could cause both malfunctions of the RX7 digital circuitry as well as interference noise in the other appliance.
• Service and Modifications
The RX7 contains no user serviceable parts. Opening it or tampering with it in any way can lead to electrical shockas well as damage and will void the product warranty. Refer all servicing to qualified YAMAHA personnel.

CONTENTS
GETTING ACQUAINTED WITH THE RX7 ... 1
BASIC CONNECTIONS ............................ 1POWER ................................................. 1AUDIO .................................................. 1
• Stereo Sound System........................... 1• Mono Sound System............................ 1• Headphones ...................................... 1
POWER UP................................................ 1
VOLUME .................................................... 1
DEMONSTRATION PERFORMANCES... 1
BASIC RHYTHM PROGRAMMING............ 1CLICK (METRONOME) ........................ 1RECORDING ........................................ 1
BASIC CONCEPTS AND FEATURES ....... 3
VOICES AND SEQUENCES ...................... 3VOICES ................................................. 3SEQUENCES-PATTERNS,SONGS AND CHAINS .......................... 4CONTROLS - FUNCTIONAL GROUPS .... 4WRITING ON THE RX7 ...................... 5
• Real Time vs. Step Write ....................... 5• Instrument Keys vs. MIDI Keyboard ...... 5
EDITING ................................................ 5AN EFFECTIVE APPROACH TO
PROGRAMMING ................................. 6• How to Use This Manual ..................... 6• Create Your Own Drum Set ................. 6• Write Patterns and Songs.................... 6• Add Finishing Touches: Editing ........... 6• Save Your Sequences........................ 6
SOUND DATA AND MEMORYCONFIGURATION ...................................... 7
PATTERNS ...................................................... 8
PATTERN SELECTION ............................. 8
PATTERN PLAYBACK .............................. 8
TEMPO...................................................... 9
CL ICK......................................................... 9
QUANTIZE ................................................ 9REAL TIME WRITE................................ 9STEP WRITE .......................................... 10
REAL TIME WRITE.................................. 10TIME SIGNATURE ANDPATTERN LENGTH ................................. 10WRITING A PATTERN............................ 10
• Writing with the Instrument Keys.......... 10• Writing with a MIDI Keyboard............. 11
DAMP ................................................... 11QUANTIZE EXAMPLE ............................ 11
STEP WRITE............................................... 12
SWING ........................................................ 13
PATTERN/VOICE CLEAR ........................ 13
PATTERN COPY/APPEND ........................ 14
EDIT PATTERN ........................................... 15
SONGS ......................................................... 16
SONG SELECTION.................................... 16
SONG PLAYBACK .................................... 16
REPEAT PLAYBACK ................................ 17
EDIT SONG ................................................ 17
INSERT....................................................... 17
DELETE ...................................................... 17
REPEAT COMMANDS .............................. 18
PART COPY ............................................... 18
TEMPO CHANGE COMMANDS................ 19
VOLUME CHANGE COMMANDS............ 19
SONG COPY............................................. 20
SONG CLEAR............................................. 20
JOBS ............................................................ 20
JOB#01: MARK/PART SEARCH.............. 20
JOB#02: MARK SET ................................ 21
JOB#03: SONG NAME.............................. 21
JOB#04: INITIAL TEMPO.......................... 21

CHAINS ............................................................. 23
JOB#01: CHAIN PLAYBACK..................... 23
JOB#02: CHAIN EDIT ................................ 23
JOB#03: CHAIN NAME .............................. 23
JOB#04: CHAIN CLEAR............................ 24
EDIT VOICE .................................................... 25
JOB#01: VOICE SELECT .......................... 25
JOB#02: PITCH ........................................... 26
JOB#03: DECAY ......................................... 26
JOB#04: BEND............................................ 26
JOB#05: VOICE LEVEL ............................. 26
JOB#06: PAN.............................................. 27
JOB#07: VOICE STORE........................... 27
JOB#08: VOICE INITIALIZE....................... 27
JOB#09: EDIT RECALL ............................. 27
JOB#10: LFO ............................................. 28
JOB#11: POLY .......................................... 28
JOB#12: EFFECT....................................... 28
KEY ASSIGN .................................................. 30
JOB#01: VOICE ASSIGN............................ 30
JOB#02: PARAMETER ASSIGN .............. 30
JOB#03: MULTI VOICE.............................. 31
JOB#04: MULTI STEP ............................... 31
JOB#05: ACCENT LEVEL........................ 32
JOB#06: FOOT SWITCH ASSIGN........... 32
JOB#07: KEY DATA SAVE ....................... 33
JOB#08: KEY DATA LOAD ....................... 33
M I D I ..................................................................34
JOB#01: CHANNEL MESSAGE............... 34
JOB#02: RECEIVE CHANNEL................. 34
JOB#03: TRANSMIT CHANNEL.............. 35
JOB#04: NOTE NUMBER ASSIGN......... 35
JOB#05: NOTE INITIALIZE ....................... 36
JOB#06: PITCH BEND RANGE ............... 36
JOB#07: DEVICE NUMBER..................... 36
JOB#08: BULK REQUEST....................... 36
JOB#09: BULK TRANSMIT....................... 36
SYNC ............................................................. 38
UTILITY ......................................................... 39
JOB#01: REMAINING PATTERNMEMORY................................................... 39
JOB#02: REMAINING SONGMEMORY..................................................... 39
JOB#03: MEMORY PROTECT................ 39
JOB#04: VOICE CHANGE......................... 39
JOB#05: ALL PATTERNS CLEAR ........... 39
JOB#06: ALL SONGS CLEAR.................. 40
JOB#07: DEMO DATA LOAD .................. 40
CASSETTE/CARTRIDGE .............................. 41
JOB#01-05: SAVE DATA......................... 42
JOB#11-15: LOAD DATA....................... 43
JOB#21-25: VERIFY DATA..................... 44
JOB#30: FORMAT CARTRIDGE ............. 45
ERROR MESSAGES ...................................... 46
SPECIFICATIONS ........................................ 48
MIDI IMPLEMENTATION CHART ........... 49
“DRUM SET” CHART ................................... 50
CONTROL & REAR PANEL ....................... 51
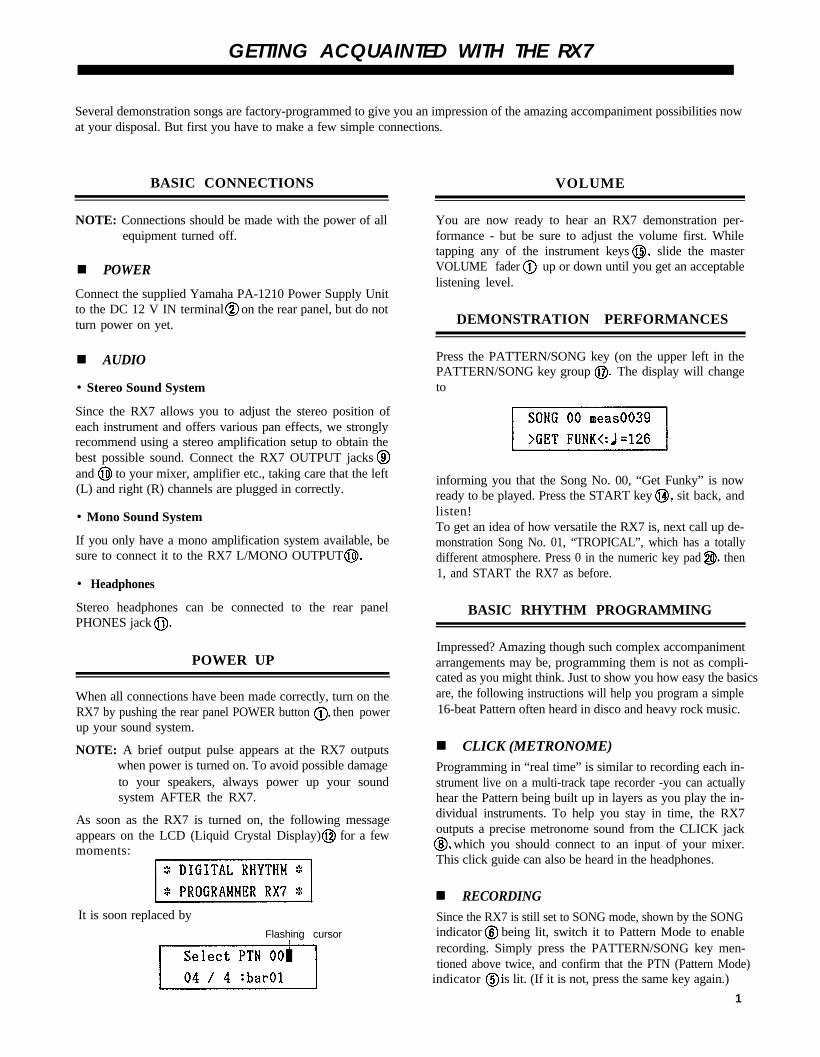
GETTING ACQUAINTED WITH THE RX7
Several demonstration songs are factory-programmed to give you an impression of the amazing accompaniment possibilities nowat your disposal. But first you have to make a few simple connections.
BASIC CONNECTIONS
NOTE: Connections should be made with the power of allequipment turned off.
n n POWER
Connect the supplied Yamaha PA-1210 Power Supply Unitto the DC 12 V IN terminal on the rear panel, but do notturn power on yet.
n n AUDIO
• Stereo Sound System
Since the RX7 allows you to adjust the stereo position ofeach instrument and offers various pan effects, we stronglyrecommend using a stereo amplification setup to obtain thebest possible sound. Connect the RX7 OUTPUT jacksand to your mixer, amplifier etc., taking care that the left(L) and right (R) channels are plugged in correctly.
• Mono Sound System
If you only have a mono amplification system available, besure to connect it to the RX7 L/MONO OUTPUT
• Headphones
Stereo headphones can be connected to the rear panelPHONES jack
POWER UP
When all connections have been made correctly, turn on theRX7 by pushing the rear panel POWER button then powerup your sound system.
NOTE: A brief output pulse appears at the RX7 outputswhen power is turned on. To avoid possible damageto your speakers, always power up your soundsystem AFTER the RX7.
As soon as the RX7 is turned on, the following messageappears on the LCD (Liquid Crystal Display) for a fewmoments:
It is soon replaced by
Flashing cursor
VOLUME
You are now ready to hear an RX7 demonstration per-formance - but be sure to adjust the volume first. Whiletapping any of the instrument keys slide the masterVOLUME fader up or down until you get an acceptablelistening level.
DEMONSTRATION PERFORMANCES
Press the PATTERN/SONG key (on the upper left in thePATTERN/SONG key group The display will changeto
informing you that the Song No. 00, “Get Funky” is nowready to be played. Press the START key sit back, andlisten!To get an idea of how versatile the RX7 is, next call up de-monstration Song No. 01, “TROPICAL”, which has a totallydifferent atmosphere. Press 0 in the numeric key pad then1, and START the RX7 as before.
BASIC RHYTHM PROGRAMMING
Impressed? Amazing though such complex accompanimentarrangements may be, programming them is not as compli-cated as you might think. Just to show you how easy the basicsare, the following instructions will help you program a simple16-beat Pattern often heard in disco and heavy rock music.
n n CLICK (METRONOME)Programming in “real time” is similar to recording each in-strument live on a multi-track tape recorder -you can actuallyhear the Pattern being built up in layers as you play the in-dividual instruments. To help you stay in time, the RX7outputs a precise metronome sound from the CLICK jack
which you should connect to an input of your mixer.This click guide can also be heard in the headphones.
n n RECORDINGSince the RX7 is still set to SONG mode, shown by the SONGindicator being lit, switch it to Pattern Mode to enablerecording. Simply press the PATTERN/SONG key men-tioned above twice, and confirm that the PTN (Pattern Mode)
indicator is lit. (If it is not, press the same key again.)
1

Next, tap the REAL TIME WRITE/EDIT SONG key nextto PATTERN/SONG. The following display appears,
Real Write PTN0004 / 4 :bar01
showing you that Real (Time) Write (recording) of PatternNo. 00 is now possible.
In musical notation, the rhythm Pattern you are going to inputlooks like this:
Accent
Hi HatSD (Snare Drum)BD (Bass Drum)
Press START and listen to the metronome click, whose vo-lume you can adjust with the CLICK fader Reduce thespeed with the TEMPO slider until it is slow enough foryou to follow easily, then listen to it for a while until youget a feel for the beat.
When you’re ready, input the bass drum sound first by tappingthe BD instrument key (marked M) in time with the metro-nome beat, one tap for each click. Stop after four beats andnotice how you can now hear the BD sound in time (we hope!)with the metronome click.
Now for the snare drum. This time, tap the SD key (markedN) only every second beat (click), paying attention to thebeginning of the Pattern (bar), which is indicated by the highmetronome sound. Let the Pattern repeat a few times untilyou feel the tempo again, and input the first SD sound ona beginning (high) click, the other one on the third beat.
Next, the fast hi-hat part. This would normally be the mostdifficult, except that the RX7 Quantize feature (explainedlater) makes sure that it is actually the easiest to record. Fornow, remember that the default Quantize setting is 1/16. Thismeans that up to 16 notes can be recorded per measure foreach voice. Therefore, you can’t make a mistake with thehi-hat part (which consists of 16 sixteenth notes) even if youtry. To prove this, tap the HI HAT key (marked T) as fastas you can, totally out of time, then listen. The result willalways be hi-hat sounds with ultra-precise timing!
As a finishing touch, add the hi-hat accents. To do so, keepACCENT 2 depressed while tapping HI HAT in the samerhythm as you first did the BD, i.e. on every metronome beat.
This completes programming of a popular, basic 16-beatrhythm Pattern. Press STOP/CONTINUE to exit from theReal Time Write mode, then listen to your new Patternwithout the metronome click by pressing START. Basically,that’s all there is to creating your own rhythms with the RX7!
2
NOTE: Since this was the very first time you tried pro-gramming the RX7, you may have made a fewmistakes. Due to the default quantize setting yourbass drum may be out of time, or the snare in awrong position - but don’t worry. The RX7 offersyou a whole host of possibilities for correcting suchmistakes, one example of which you already noticedwhen writing the hi-hat part. Even if you are notat all sure of your sense of rhythm, the RX7 willhelp you program sophisticated patterns.

BASIC CONCEPTS AND FEATURES
The RX7 has so many features, it may seem a bit intimidating at first. On the other hand, when you hear the demonstration programs,you will no doubt want to learn how to create complex accompaniment arrangements like that for your own music.
As with any instrument, a certain amount of practice (and theoretical knowledge) is necessary to enable freedom of expression.However, once you understand the basic ideas, you will find it very easy to write sophisticated and highly realistic rhythm ar-rangements with the RX7.
This section first introduces the major features, functions and possibilities of the RX7. The final chapter, AN EFFECTIVE AP-PROACH TO WRITING, then tells you how to make use of them while referring to the appropriate sections in this Manual.
VOICES AND SEQUENCES than any conventional drum machine, letting you add realismand excitement.
The most basic distinction to make is between functions re-lating to “voices” (= the instrument sounds themselves) andthose dealing with “sequences” (= rhythmical combinationsof notes).
The RX7 was conceived not only as a rhythm programmer,but also as an advanced MIDI sound source which can beplayed/programmed via MIDI keyboards and/or sequencersas well as with its own keys. As such, it offers you muchmore sound control over a far greater variety of instruments
At the same time. the RX7 gives you complete freedom incombining these voices to form sequences. Even the finestnuances of each single note in a rhythm pattern can be in-dividually adjusted.
n n VOICES
In the tradition of Yamaha’s DX7 synthesizers, the 100 in-dividual RX7 sounds are referred to as “voices” (used syn-onymously with “instruments” in this manual). Each voicehas a number for easy access.
VOICE LIST
Voice No. Type
00 - 08 Bass Drums09 - 18 Snare Drums19-20 Rim Shots21-37 Toms38 - 40 FM Percussion41-44 Hi hats (open/closed)45 - 48 Cymbals49 - 52 Basses53 - 56 Guitars*57 - 59 DX7 Voices60 Brass61 Hand Claps62 Timpani63 Cowbell64 Tambourine65 Shaker66 - 68 Congas69 - 70 Bongos
Voice No. Type71 -72 Timbales73 - 74 Agogos75 Cuica76 Castanet77 Whistle78 Claves79 Bell Tree80 Vibra Slap81 Steel Drum82 Glass Crash83 Gunshot84 Door Slam85 Camera Shutter86 Punch87 Car Door Shutting88 - 93 Human voices94 - 99 Reversed sounds
The following abbreviations are used for voice names on theLCD:
BD = Bass Drum, E. = Electric, F. = Fusion, H = High,H. = Heavy, HH = Hi hat, HO = High Open, HM =High Mute, J. = Jazz, L = Low, P. = Processed, prc =percussion, Rvs = Reverse, SD = Snare Drum
Ex.: H. BD 1 = Heavy Bass Drum*: D.GtrS = Distorted Guitar Single Note
D.Gtr5 = Distorted Guitar Open FifthsGtrCutD = Guitar Cut/DownstrokeGtrCutU = Guitar Cut/Upstroke
You have total control over the level (volume), pitch, pan(stereo position) and decay (length) of each voice, as wellas over effects including delay, detune, distortion, pitch bend,vibrato, panned stereo echoes, etc..
Any voice can be assigned to and played by any Instrumentkey on the RX7. You can create your own key layouts (“drumsets”) and have the RX7 memorize up to five of them.
Initially, the following voices are assigned to the Instrumentkeys 15:
(Four other preset layouts are available.)
3
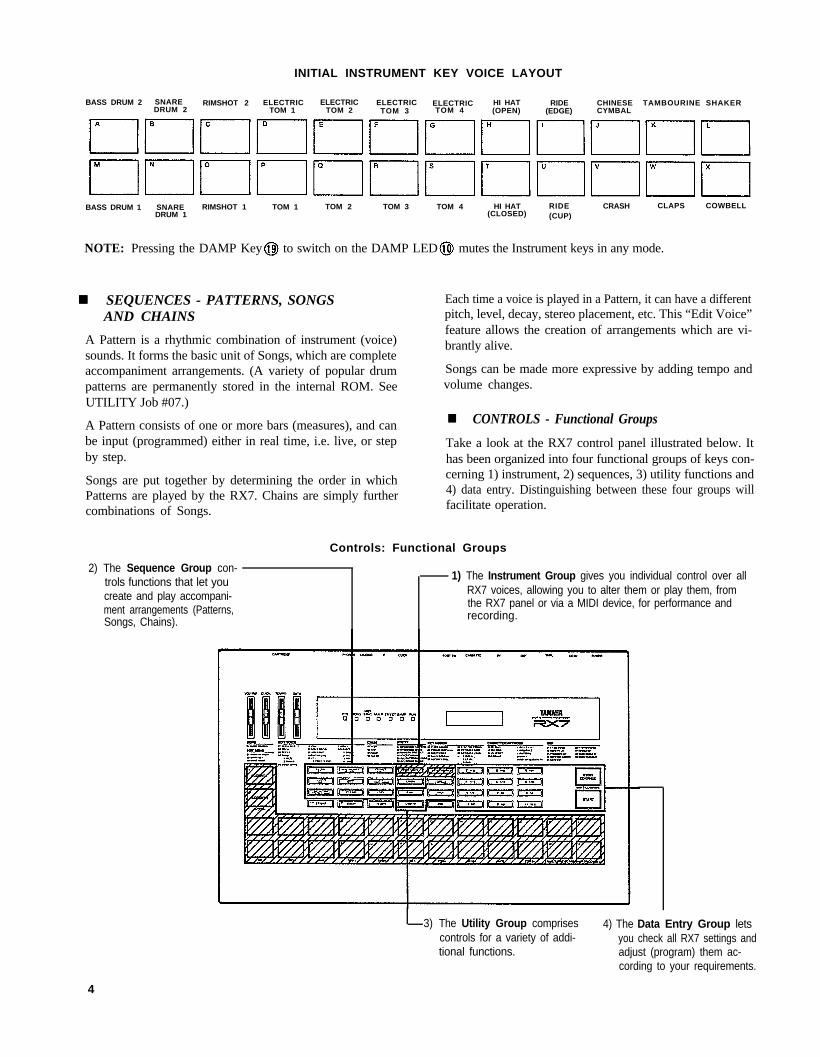
INITIAL INSTRUMENT KEY VOICE LAYOUT
BASS DRUM 2 SNARE ELECTRIC ELECTRIC ELECTRICDRUM 2
RIMSHOT 2TOM 1
ELECTRICTOM 2 TOM 3 TOM 4
HI HAT RIDE(OPEN) (EDGE)
CHINESE TAMBOURINE SHAKERCYMBAL
BASS DRUM 1 SNARE RIMSHOT 1 TOM 1 TOM 2 TOM 3 TOM 4 HI HAT RIDE CRASH CLAPS COWBELLDRUM 1 (CLOSED) (CUP)
NOTE: Pressing the DAMP Key to switch on the DAMP LED mutes the Instrument keys in any mode.
n n SEQUENCES - PATTERNS, SONGS Each time a voice is played in a Pattern, it can have a differentAND CHAINS pitch, level, decay, stereo placement, etc. This “Edit Voice”
A Pattern is a rhythmic combination of instrument (voice)sounds. It forms the basic unit of Songs, which are completeaccompaniment arrangements. (A variety of popular drumpatterns are permanently stored in the internal ROM. SeeUTILITY Job #07.)
A Pattern consists of one or more bars (measures), and canbe input (programmed) either in real time, i.e. live, or stepby step.
Songs are put together by determining the order in whichPatterns are played by the RX7. Chains are simply furthercombinations of Songs.
feature allows the creation of arrangements which are vi-brantly alive.
Songs can be made more expressive by adding tempo andvolume changes.
n n CONTROLS - Functional Groups
Take a look at the RX7 control panel illustrated below. Ithas been organized into four functional groups of keys con-cerning 1) instrument, 2) sequences, 3) utility functions and4) data entry. Distinguishing between these four groups willfacilitate operation.
Controls: Functional Groups
2) The Sequence Group con-trols functions that let youcreate and play accompani-ment arrangements (Patterns,Songs, Chains).
1) The Instrument Group gives you individual control over allRX7 voices, allowing you to alter them or play them, fromthe RX7 panel or via a MIDI device, for performance andrecording.
4
3) The Utility Group comprises 4) The Data Entry Group letscontrols for a variety of addi- you check all RX7 settings andtional functions. adjust (program) them ac-
cording to your requirements.

To keep the front panel compact, most keys have been givenmore than one function, so the order in which they are pressedis important. Always watch the messages on the LCD displayfor guidance. In many cases, dialog-type programming ispossible, with the LCD asking you questions you can answerby pressing YES, NO or numeric keys.
You can exit from a function mode by pressing a differentfunction key (or in some cases, STOP/CONTINUE).
1) Instrument GroupConsists of the assignable Instrument keys used forplaying and programming, KEY ASSIGN which deter-mines the voice layout, and EDIT VOICE with whichyou can adjust a large number of voice parameters ac-cording to your requirements.The MIDI key is used to access important functionswhen controlling RX7 voices from external MIDIequipment.
2) Sequence GroupThe nine keys grouped together on the upper left all havetwo distinct functions, depending on whether Patternor Song mode is selected. Pattern functions are writtenon the top part of the key, Song functions on the lowerone.
3) Utility GroupUTILITY functions let you check remaining Pattern andSong memory space, clear all Patterns or Songs, turnMemory protection on and off, and exchange voices inexisting Patterns. Saving data to (or loading it from)RAM cartridges and tape cassettes and controlling MIDIcommunication with external equipment is accomplishedwith the other three keys in this group.
* Except for SYNC and JOB itself, all keys in the groupnumbered on the fold-out illustration of the controlpanel access functions in conjunction with the JOB key(as do SONG and EDIT SONG for certain operations).All Jobs and their numbers are listed on the control panelJob Menu for easy reference.
4) Data Entry GroupActual programming, i.e. parameter selection and valueinput, is performed mainly with these keys and the DATAentry slider Values that can currently be input areindicated by a flashing cursor.The - l/NO and + l/YES keys answer questions andshift to lower/higher values. Keeping them depressedusually speeds up this shift.In general, the numeric keys select Job numbers or pa-rameters and input values. Also note the fractions printedon them. These refer to musical time.ACCENT 2 moves the cursor between multiple param-eters during data entry displays. Certain inputs are fi-nalized by pressing ENTER.Depending on the current function, SHIFT/COMPARElets you compare altered data with the previous settingor input lower case letters for Song and Mark names.
n n WRITING ON THE RX7
Three distinct ways of writing (= programming, recording)Patterns are possible on the RX7: 1) in real time with theInstrument keys, 2) in real time using a MIDI keyboard, and3) step by step with the Instrument keys. All three pro-gramming methods have their advantages for different ap-plications, and you will soon discover your personal prefer-ences.
• Real Time Write vs. Step Write
In general, the Real Time Write mode is ideal for creatingPatterns according to hearing and rhythmic feeling, for youcan listen the Pattern being built up layer by layer as youadd the notes of different instruments.
On the other hand, Step Write mode is suitable for userswith less confidence in their sense of rhythm, when inputtingdata from Pattern books or for difficult (fast, complex,off-beat) sections.
Of course, you can use both modes in combination, for in-stance creating the basic rhythm with Real Time Write andadding finishing touches with Step Write.
• Instrument Keys vs. MIDI Keyboard
During Real Time Write, you also have the choice of writingwith the RX7 Instrument keys or a connected MIDI key-board. Particularly for bass lines, melodic sequences (toms,bongos, guitar, brass) or passages calling for the expressiveuse of different volumes (dynamics), playing voices from avelocity-sensitive MIDI keyboard can make writing muchfaster and easier.
Basic rhythm programming is usually simpler with a suitableInstrument key layout. Dynamics, for instance, can be addedlater with Edit Pattern.
n n EDITING
With the RX7, it is very easy to correct or alter Patterns inalmost any conceivable way AFTER they have been written.Such operations are referred to as “editing”. Possibilitiesinclude:
a) Overdubbing - addition of new notes/instruments toan existing Pattern.
b) Clear - deletion of single notes or entire voices from aPattern.
c) Voice Change - exchanging of any voice with anotherin existing Patterns.
d) Edit Voice - overall alteration of voice parameters(pitch, pan, level, etc.) and effects.
e) Edit Pattern - alteration of voice parameters for indi-vidual notes in a Pattern.
5

nn AN EFFECTIVE APPROACH TOPROGRAMMING
How to Use This Manual
The following sections of this Manual provide a detailed,systematic guide to all RX7 operations. You can locate thedesired function by first having a look at the CONTENTS,then reading the relevant OVERVIEW (at the beginning ofeach section) and finally the FUNCTION explanation.
To help you get started, a possible approach to programmingis shown here together with references to the necessary op-erations. It is also a good idea to study the demonstrationSongs, using the EDIT PATTERN function, to see how theseprofessional arrangements are structured.
• • Create Your Own Drum Set
The first thing to decide on is which of the 100 voices youwant to use for your accompaniment arrangement.
You can listen to various voices using KEY ASSIGN Job#01, hitting any desired Instrument key while selecting voiceswith Data Entry Group keys or the DATA slider. In theprocess, you can create your own drum set with the mostsuitable layout.
If you want to record bass lines, chords or other patternsnecessitating several pitches/versions of the same instrument,use KEY ASSIGN Job #03 to assign a single voice to theupper row of Instrument keys (A ~ L). Then access Job #04(plus, if necessary, Job #02) to alter the pitch/level/pan/etc.settings of each upper row key, thus obtaining an extra“keyboard” dedicated to a single voice.
You can save all such key assignment data with KEY ASSIGNJob #07.
If you have a MIDI synthesizer etc. at your disposal, youmay prefer to play single voices from a keyboard, assigningthem with MIDI Job #02.
Even if you should decide after writing that you want to usedifferent instruments after all, UTILITY Job #04 lets youexchange voices in completed Patterns.
• Write Patterns and Songs
With your new “drum set”, you can start recording your firstPatterns in real time or step by step. In many cases, you willwant to combine several, often very similar, versions of thesame basic Pattern for a Song. Instead of programming eachone separately, it saves a lot of time to COPY the basic Patternand then add new instruments/notes, use CLEAR to deleteunnecessary notes or voices, exchange instruments withUTILITY job #04, and so on.
After you have written some Patterns, you can begin com-bining them to form a Song with EDIT SONG. With INSERTand DELETE, you can add or erase Patterns any time, makingit is very easy to correct the Song configuration as you goalong. REPEAT saves entering the same Patterns over andover again.
6
Songs become much more expressive with TEMPOCHANGES (accelerando/ritardando) and VOLUMECHANGES (crescendo/ decrescendo), which are best inputwhen the Song is more or less complete.
• Add Finishing Touches: Editing
Once you have written a Song (or some Patterns), you canoften enhance the musical impression by changing the overallsetting of one instrument or the other with EDIT VOICE,for instance raising/lowering levels or adding exciting specialeffects.
For alterations of single notes within the musical context ofa Pattern, use EDIT PATTERN. This allows you to, forexample, lengthen the decay of a voice or to create stereomovement, giving you limitless expressive possibilities.
Intelligent use of these two functions will let you achieveperfectly balanced arrangements (and many effects) that werepreviously possible only through professional-quality mixingof multiple instrument outputs.
• Save Your Sequences
When you satisfied with your Patterns/Songs (or when youwant to postpone editing to the next session), you can saveboth sequence and/or voice data either to an optional RAM4CARTRIDGE, a CASSETTE tape, or to MIDI devices whichprovide bulk data storage via disk, such as the Yamaha MIDIData Filer MDF1 or a DX7 II FD synthesizer (using MIDIJob #09).

SOUND DATA AND MEMORYCONFIGURATION
7

PATTERNS
OVERVIEW
In the Pattern mode, you can
* Select any Pattern and play it (or a specified succession of Patterns) at the desired tempo.
* Record (write) up to 100 Patterns and store them in the RX7’s internal memory.
* Erase (clear) a Pattern, or a single voice within a Pattern.
* Copy or append Patterns.
* Edit Patterns by adjusting the pitch, level, pan, decay and effect on/off settings for each note.
* Check which voices/parameters were used in any Pattern.When power is turned on, the RX7 is automatically set for Pattern Selection, i.e. it is in Pattern Mode.
* To use Pattern functions, always enter Pattern Mode first.The PATTERN/SONG key switches the RX7 between Pattern and Song Mode, indicated by the LEDs PTN and SONGTo enter Pattern Mode from any other mode, press this key until the PTN LED lights.
PATTERN SELECTION
FUNCTION Selects a Pattern for playback, writing, over-dubbing, clearing or editing.
Currently selected Pattern number C u r s o r
Time signature Bar count
The RX7 can store up to 100 Patterns in memory locationsnumbered 00 through 99. (The remaining Pattern memoryspace can be checked with UTILITY Job #01.) A “w” onthe display next to the cursor indicates a Pattern locationalready containing data. Such Patterns can be played, over-dubbed (additional notes recorded “on top” of them), copiedor deleted (cleared).
Pattern locations without the w-mark are empty, i.e. theycontain no data yet. Select such numbers when you want tocreate (write) a new Pattern.
OPERATION Patterns can be selected using the - 1/NOand + 1/YES keys or the numeric key pad.
1. - 1/NO and + 1/YES KEYS
Convenient for selecting Patterns adjacent or nearby to theone currently displayed, or to locate empty patterns.
- 1/NO selects the next lower, + 1/YES the next higherPattern number. Holding down either key rapidly scrollsthrough the numbers in the respective direction.
2. NUMERIC KEYS
Convenient for selecting Patterns with far higher or lowernumbers than the present one.
8
Enter the two-digit Pattern number directly with the numerickeys. Numbers below 10 must be preceded by a zero. Forexample, to select Pattern 2, enter “0” then “2”.
PATTERN PLAYBACK
FUNCTION Continuous playback of selected Patterns untilstopped.
OPERATION1.
2.
3.
4.
5.
After selecting the desired Pattern, press START orSTOP/CONTINUE The RUN LED will light,and the display will change to
Next Pattern number orprompt to enter one
Current Pattern number
Current time signature Current bar
The prompt mark “**” means you can specify the nextPattern to be played right after the present one, usingeither of the methods described under Pattern Selection.As long as the prompt is displayed, the current Patternwill be repeated.
To stop playback, press STOP/CONTINUE. The RUNLED will go out.
To restart playback from where it was stopped, pressSTOP/CONTINUE again. Pressing START instead re-commences playback from the beginning of the Pattern.
After having stopped playback, you can revert to theProgram Selection display directly by pressing - l/NO.+ l/YES or a numeric key.
TEMPO
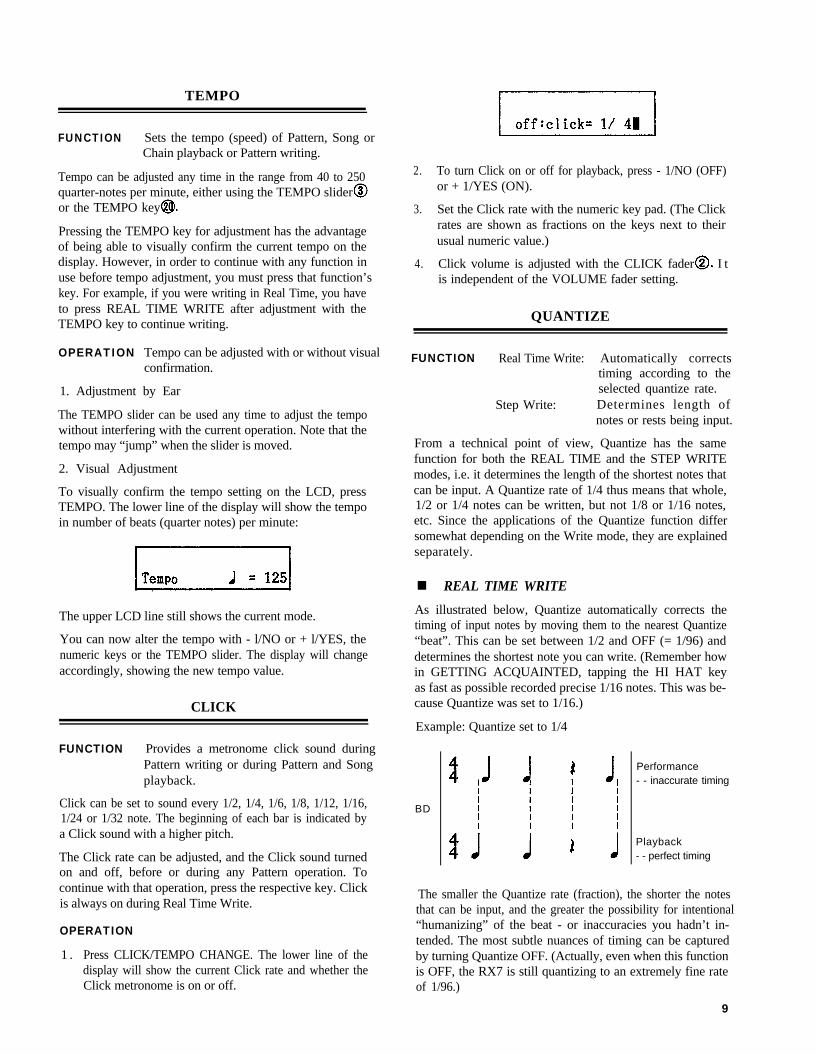
FUNCTION Sets the tempo (speed) of Pattern, Song orChain playback or Pattern writing.
Tempo can be adjusted any time in the range from 40 to 250quarter-notes per minute, either using the TEMPO slideror the TEMPO key
Pressing the TEMPO key for adjustment has the advantageof being able to visually confirm the current tempo on thedisplay. However, in order to continue with any function inuse before tempo adjustment, you must press that function’skey. For example, if you were writing in Real Time, you haveto press REAL TIME WRITE after adjustment with theTEMPO key to continue writing.
OPERATION Tempo can be adjusted with or without visualconfirmation.
1. Adjustment by Ear
The TEMPO slider can be used any time to adjust the tempowithout interfering with the current operation. Note that thetempo may “jump” when the slider is moved.
2. Visual Adjustment
To visually confirm the tempo setting on the LCD, pressTEMPO. The lower line of the display will show the tempoin number of beats (quarter notes) per minute:
The upper LCD line still shows the current mode.
You can now alter the tempo with - l/NO or + l/YES, thenumeric keys or the TEMPO slider. The display will changeaccordingly, showing the new tempo value.
CLICK
FUNCTION Provides a metronome click sound duringPattern writing or during Pattern and Songplayback.
Click can be set to sound every 1/2, 1/4, 1/6, 1/8, 1/12, 1/16,1/24 or 1/32 note. The beginning of each bar is indicated bya Click sound with a higher pitch.
The Click rate can be adjusted, and the Click sound turnedon and off, before or during any Pattern operation. Tocontinue with that operation, press the respective key. Clickis always on during Real Time Write.
OPERATION1 . Press CLICK/TEMPO CHANGE. The lower line of the
display will show the current Click rate and whether theClick metronome is on or off.
2. To turn Click on or off for playback, press - 1/NO (OFF)or + 1/YES (ON).
3. Set the Click rate with the numeric key pad. (The Clickrates are shown as fractions on the keys next to theirusual numeric value.)
4. Click volume is adjusted with the CLICK fader I tis independent of the VOLUME fader setting.
QUANTIZE
FUNCTION Real Time Write: Automatically correctstiming according to theselected quantize rate.
Step Write: Determines length ofnotes or rests being input.
From a technical point of view, Quantize has the samefunction for both the REAL TIME and the STEP WRITEmodes, i.e. it determines the length of the shortest notes thatcan be input. A Quantize rate of 1/4 thus means that whole,1/2 or 1/4 notes can be written, but not 1/8 or 1/16 notes,etc. Since the applications of the Quantize function differsomewhat depending on the Write mode, they are explainedseparately.
n n REAL TIME WRITE
As illustrated below, Quantize automatically corrects thetiming of input notes by moving them to the nearest Quantize“beat”. This can be set between 1/2 and OFF (= 1/96) anddetermines the shortest note you can write. (Remember howin GETTING ACQUAINTED, tapping the HI HAT keyas fast as possible recorded precise 1/16 notes. This was be-cause Quantize was set to 1/16.)
Example: Quantize set to 1/4
BD
Performance- - inaccurate timing
Playback- - perfect timing
The smaller the Quantize rate (fraction), the shorter the notesthat can be input, and the greater the possibility for intentional“humanizing” of the beat - or inaccuracies you hadn’t in-tended. The most subtle nuances of timing can be capturedby turning Quantize OFF. (Actually, even when this functionis OFF, the RX7 is still quantizing to an extremely fine rateof 1/96.)
9

The ideal Quantize rate for Real Time Write will depend onyour ability to keep precise time. If you are very confidentof your sense of rhythm, you might want to keep QuantizeOFF all the time. On the other hand, Quantize will allowgreater precision if you are not such a sharp “drummer” yet.
A concrete example for Real Time Write Quantize is givenin the Real Time Write chapter below.
n n STEP WRITEIn the Step Write mode, Quantize determines the “steplength”, that is to say the length of notes or rests being input.Since Quantize settings are an integral part of the Step Writeprocess, they are explained together with other Step Writeoperations.
OPERATION Quantize can be set/adjusted before or duringPattern writing.
1. Press QUANTIZE/DELETE to display
Quantize rate
Quantize= 1/16
Swing off
(See SWING chapter)
2. The Quantize rate is set with the numeric keys, similarto setting Click: The fractions on these keys indicate therespective Quantize rate, which covers the range from1/2 to 1/48. Pressing numeric key 9/OFF turns Quantizeoff.
3. As with Tempo and Click, Quantize can be set at anytime, and it is necessary to revert to a previous functionafter Quantize rate adjustment by pressing the corre-sponding key. Real Write PTN00
06 / 8 :bar04
REAL TIME WRITE
FUNCTION Create, overdub or alter a Pattern by playingthe voices live (in real time).
To create a new Pattern from scratch, you must first specifythe time signature and length of the Pattern in bars.
This is not possible with existing Patterns you want to overdubor change, since their time signature and length are alreadyfixed. (However, you can append Patterns to each other usingCOPY, thus creating longer ones.)
* You can exit from Real Time Write mode any time bypressing STOP/CONTINUE.
OPERATION
n n TIME SIGNATURE AND PATTERN LENGTH
1. Making sure the PTN LED is lit and the Pattern locationyou wish to write to is selected, press REAL TIME
10
WRITE. If the location is empty, the following displaywill appear:
Time signature Pattern length
This shows the “default” setting: time signature = 4/4,pattern length = 1 bar. The cursor indicates that youcan change these values as required.
NOTE: Should the LCD show the message “MemoryProtected”, you must first turn off the MemoryProtect function with UTILITY JOB #03.
* If an existing Pattern was selected, the cursor will notappear, and you can start to write over (overdub) or alterthe Pattern immediately by pressing START.
2. Should you not want to use the default setting of commontime and one-bar length, set the time signature numeratorby entering a two-digit number (ex: 3 --> 03) in the rangefrom 01 to 99.
3. To set the denominator, move the cursor to the rightusing ACCENT 2 and enter a value with the numerickeys. The fractions from 1/2 to 1/32 printed on the keysare valid. (1/48 can NOT be used.)
4. Finally, input Pattern length by again moving the cursorto the right and entering a two-digit number in the rangefrom 01 to 99.
Example: Time signature 6/8, Pattern length 4 bars
* These settings are not memorized until you actually record(write) sounds. You can therefore alter them, moving thecursor with ACCENT 2, until you have input the firstnote.
n n WRITING A PATTERN
• Writing with the Instrument Keys
Assuming that Quantize (see example further below), timesignature and Pattern length have been set accordingly,
1. Press START.The RUN LED will light up, and you will hear themetronome Click guide. If the Pattern is longer thanone bar, the LCD will indicate the current bar numberas the RX7 cycles through the Pattern.
2. Adjust Tempo and Click if necessary. Once you get thefeeling for the tempo and beat, you can begin writingany time (usually on the first beat of the first bar).
3. Input (write) the desired voices by tapping the Instrumentkeys with the correct timing. Notes/instruments can beadded as the Pattern recycles, thus building up the Patternin layers.
a) You can input one instrument at a time or several sim-ultaneously.
* If you want to use voices currently not assigned to anyinstrument keys, use KEY ASSIGN JOB #0l prior towriting.
b) Adjust the Quantize rate depending on the instrumentpart if this makes precise writing easier.
c) To accent beats, hold down one of the green ACCENTkeys while tapping an Instrument key.
d) Mistakes can be erased as you go along by holding theCLEAR key and tapping the respective Instrument keyin time with the note you want to delete.
* The chapter below on PATTERN/VOICE CLEAR tellsyou how to erase whole instrument passages or Patterns.
e) As already shown in GETTING ACQUAINTED, ac-cents can be overdubbed.
4. To stop recording, press STOP/CONTINUE.The RUN LED will go out, Pattern Selection mode isentered and you can now play your Pattern by pressingSTART. To add or delete notes, stop playback andre-enter Real Time Write (or Step Write) mode.
• Writing with a MIDI Keyboard
Programming is basically the same, with the added advantagesof being able to input
a ) subtle dynamics (expressive volume changes) in real time(if the keyboard is velocity sensitive),
b) a larger variety of voices than is possible with a singleInstrument key layout
c) melodic lines and chords more easily than with the RX7Instrument keys.
First, you must use MIDI Jobs #02 and #04 to assign theRX7 voices to the connected MIDI keyboard as desired.Then all you have to do is play during Real Time Write.
* Both the RX7 Instrument keys and several MIDI key-boards can be used simultaneously for programming andplaying.
n n DAMP
Using this key during Real Time Write can add particularrealism by damping sustained sounds such as cymbals. Thisfunction is especially easy to operate from a MIDI keyboard.
When writing with the Instrument keys, DAMP can onlybe used AFTER a Pattern has been programmed. Select therespective Pattern, then enter Real Time Write mode andpress DAMP. (The DAMP LED lights up.) You can now
damp any recorded voice by pressing its Instrument key ex-actly when you want the sound to STOP.
If you have a MIDI keyboard available, damping is possibleDURING the initial Real Time programming of Patterns.Just press DAMP, causing the DAMP LED to light. Anysounds played on the MIDI keyboard will now sound onlyas long as the key is pressed. As soon as you release the key,the sound will be damped immediately.
* As long as the DAMP LED is lit, all RX7 Instrument keysare damped and cannot be used to play any voices.
* Since the damping point is always moved to the nearestQuantize division, the effect of the Damp function is in-fluenced by the Quantize rate. (In some cases, there willbe no damping effect at all.) Quantize is therefore bestturned off when using the Damp function.
n n QUANTIZE EXAMPLE
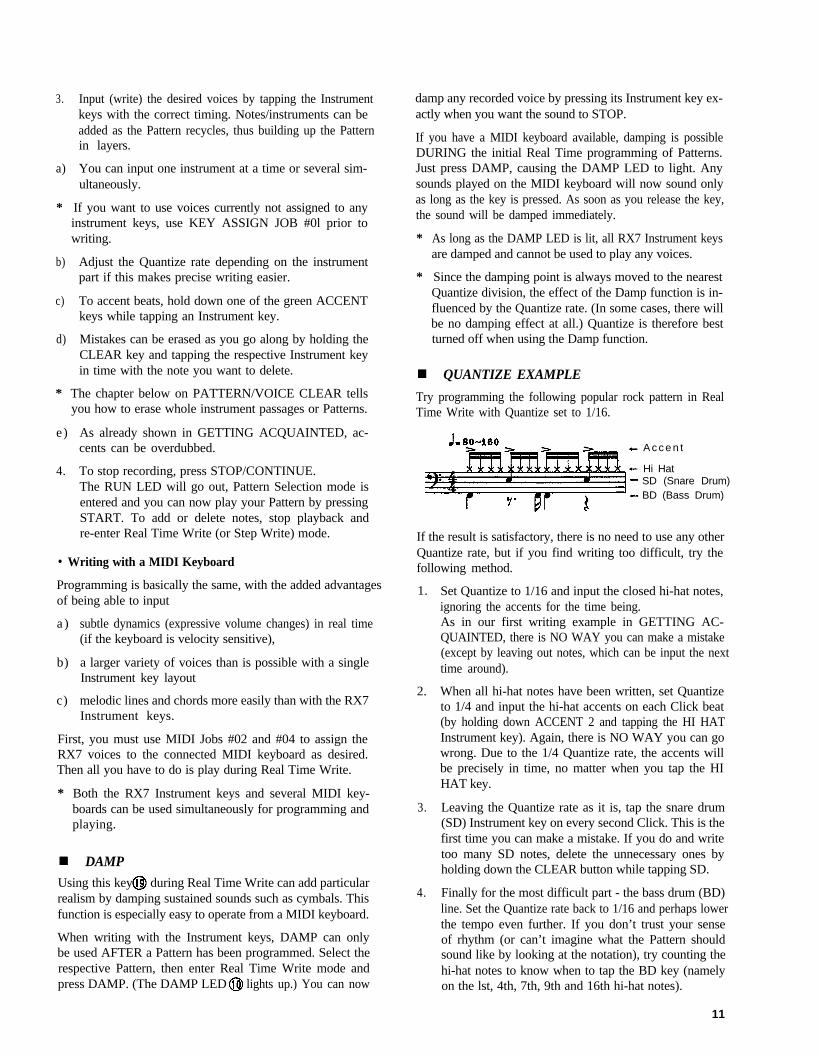
Try programming the following popular rock pattern in RealTime Write with Quantize set to 1/16.
A c c e n t
Hi HatSD (Snare Drum)BD (Bass Drum)
If the result is satisfactory, there is no need to use any otherQuantize rate, but if you find writing too difficult, try thefollowing method.
1. Set Quantize to 1/16 and input the closed hi-hat notes,ignoring the accents for the time being.As in our first writing example in GETTING AC-QUAINTED, there is NO WAY you can make a mistake(except by leaving out notes, which can be input the nexttime around).
2. When all hi-hat notes have been written, set Quantizeto 1/4 and input the hi-hat accents on each Click beat(by holding down ACCENT 2 and tapping the HI HATInstrument key). Again, there is NO WAY you can gowrong. Due to the 1/4 Quantize rate, the accents willbe precisely in time, no matter when you tap the HIHAT key.
3. Leaving the Quantize rate as it is, tap the snare drum(SD) Instrument key on every second Click. This is thefirst time you can make a mistake. If you do and writetoo many SD notes, delete the unnecessary ones byholding down the CLEAR button while tapping SD.
4. Finally for the most difficult part - the bass drum (BD)line. Set the Quantize rate back to 1/16 and perhaps lowerthe tempo even further. If you don’t trust your senseof rhythm (or can’t imagine what the Pattern shouldsound like by looking at the notation), try counting thehi-hat notes to know when to tap the BD key (namelyon the lst, 4th, 7th, 9th and 16th hi-hat notes).
11

5. If even this fails and you still can’t write the BD line inReal Time, all is not lost - you can do it with Step Write.
beatHI-HAT QUANTIZE
1/16
SD
B D
STEPWRITE
FUNCTION Create or alter a Pattern step by step.
In this mode, you can take your time entering one note afterthe other.
The length of each step or beat (= the length of input notesand rests) is adjusted by pressing QUANTIZE and then se-lecting the desired fraction (e.g. quarter note, eighth note)with the numeric keys. As shown by the example illustratedbelow, intelligent use of Quantize can substantially speed upStep Writing.
* To input notes longer than the current Quantize rate, youmust combine a note with the necessary number of “blank”steps, input with + l/YES.For instance, to input quarter notes when Quantize is 1/16,you must tap the desired Instrument key once and thenpress + l/YES three times (since 1/4 = 4 x 1/16).
Ex.: Program the following Pattern with Step Write
Hi Hat-Quantize 1/16SD-Quantize 1/8BD-Quantize 1/4
Written in the form of a rhythm diagram, the Pattern lookslike this. (The white dots indicate notes, entered by tappingan Instrument key, while black dots show rests or blank steps,entered by pressing + l/YES.)
On the other hand, setting a high Quantize rate allows youto create subtle timing variations for added realism. Rockdrummers, for instance, often achieve an exciting feeling oftension by slightly delaying their off-beat on the snare drum.This is easy to do with Step Write.
In the following example, the SD is entered using a Quantizerate of 1/96 (= OFF). To obtain the desired delay, input theSD notes one step later than the 2nd (beat 25) and 4th (beat73) quarter notes, i.e. on beats 26 and 74.
Hi-HATQuantize 1/8
SDQuantize 1/96 (OFF)
* You can exit from Step Write mode any time by pressingSTOP/CONTINUE.
* Memory Protection (UTILITY Job #03) must be off whenusing Step Write.
OPERATION
bea tHI-HAT QUANTIZE
1/16
bea tS D QUANTIZE
1 / 8
• TIME SIGNATURE AND PATTERN LENGTH
These settings are basically the same as for Real Time Write.Making sure the PTN LED is lit and the Pattern locationyou wish to write to is selected, press STEP WRITE. If thelocation is empty, the following display will appear:
bea tBD QUANTIZE
1/4
– Rests– Notes– Hi-Hat OPEN (other HI-HAT notes
CLOSED)
The most suitable Quantize rates for Step Write are indicatedon the right of each instrument part. Just to show how se-lection of the appropriate Quantize rate saves time, look howmany times you would have to press + l/YES to enter blanksteps (rests) if you left Quantize at 1/16 for input of the snaredrum (SD) and bass drum (BD) as well.
12
Time signature Pattern length
If necessary, adjust these values as explained under Real TimeWrite.
• WRITING A PATTERN
1. Set the Quantize rate according to the instrument partyou want to enter, then press STEP WRITE.
2. Press START.

Step Write PTN10
bar01 : beat001
Current bar Current beat (step)
3. Input (write) the desired voice by tapping its Instrumentkey. Rests or blank steps are input by pressing + l/YES.Voices can be heard when input and during successivecycles.
* Pressing - l/NO lets you revert to lower bar numbers.
* With Step Write, only one note can be input at a time.Additional notes on the same beat are entered duringsuccessive runs through the Pattern.
4. Input successive “layers” of sounds as the Pattern con-tinues its cycles, if necessary adjusting the Quantize ratefor various instruments.
Swing Rate = off* To accent beats, hold down one of the green ACCENT
keys while tapping an Instrument key.
* Mistakes can be erased as you go along by holding theCLEAR key and tapping the respective Instrument keyon the beat of the note you want to delete.
5. To stop writing, press STOP/CONTINUE.Pattern Selection mode is entered and you can now playyour Pattern by pressing START.If you want to make changes, stop the Pattern and re-enter Step Write (or Real Time Write) mode.
SWING
FUNCTION Creates a jazz swing “feel” when writingPatterns in Real Time.
This function can only be used with a Quantize rate of 1/8or 1/16.
If the length of a quarter note is taken to be l00%, theoff-beats of a bar will normally occur at 50%. By delayingthis off-beat by a certain amount, a swing feel is obtained.
Five swing rates with differing delays are available, from 54%for a very subtle effect to 71% for a very pronounced swing.
ON OFF ONBEAT BEAT BEAT
SWING: OFF
SWING=71%
A setting of 67% creates a triplet-type shuffle effect.
SWING=67%
OPERATION1. In Pattern Mode, before or during Real Time Write,
press SWING.
2. Select the swing rate with the + l/YES and - l/NO keys.Swing Rates: off, 54%, 58%, 63%, 67%, 71%.
* When Quantize is set to l/16, only swing rates 58% and67% can be used.
* Whether or not Swing is turned on can be checked bypressing QUANTIZE.
PATTERN/VOICE CLEAR
FUNCTION Deletes entire Patterns, or erases specifiedvoices from a Pattern.
When you are not happy with a Pattern (or need more memoryspace), you can clear (delete) it instantly with this function.
It is also possible to erase any instrument voice from withina Pattern. This is practical both for correcting mistakes andfor re-arranging Patterns, using only certain instrument partsto create variations or totally new Patterns. (If you want tokeep the existing pattern, you must first copy it to a differentlocation using PATTERN COPY before starting to arrangeit.)
* All 100 Patterns can be cleared simultaneously withUTILITY JOB #05.
OPERATION1. Making sure Memory Protect is off, select the Pattern
you want to delete (or from which you want to erasean instrument), then press CLEAR.
Clear PTN 07
1:PTN, 2:Voice ?
13
• CLEARING ENTIRE PATTERNS
2 . Press numeric key 1 to specify Pattern Clear. The displaywill ask you to confirm:
Are you sure?
3. a) If you are, press + l/YES.The message “completed!” will appear for a second,then the display reverts to Pattern Selection.
b) If you want to cancel Clear operation, press - l/NOinstead.
* If the selected Pattern location was empty in the firstplace, “completed!” will not be displayed.
• CLEARING VOICES
2. Press numeric key 2 to specify Voice Clear. The displaywill ask you to
Select Voice
3. Specify the voice you want to erase by tapping the re-spective Instrument key. The selected voice is shownon the LCD.
Clear PTN 07
clear 47-Crash
4. Press +/YES if you want to erase the displayed instru-ment. The display will ask
Are you sure?
3 . a) If you are, press + l/YES.The message “completed!” will appear for a second,then the display reverts to Pattern Selection.
b) If you want to cancel the Clear operation, press- l/NO instead.
PATTERN COPY/APPEND
FUNCTION Copy a Pattern to another memory location,or append one Pattern to another.
COPY: Copying is useful when you want to to createa new version of an existing Pattern whileretaining the original one, or if you want toorganize Patterns in a particular memory lo-cation order.
14
APPEND: With this function, you can create new, largerPatterns by joining existing ones, appendingone Pattern to the end of the other.
* Only Patterns with the same time signature can be joined.
OPERATION
• PATTERN COPY
1. Making sure Memory Protect is off, select the Patternyou want to copy, then press COPY.
Copy PTN 27
l:Copy, 2:Append?
2. Select Copy with numeric key 1.
3. Enter the memory location you want to copy to with thenumeric keys.
* Should you decide to change the Pattern to be copied atthis stage, move the cursor between the lower and upperdisplay lines with ACCENT 2 and input a different Patternnumber with the numeric keys.
4. Press ENTER (START).
a) If the selected destination was empty, the display willfirst show “completed”, then the number of the Patternjust copied.
b) Should the selected destination already contain data, thedisplay will ask:
Rewrite PTN 78 ?
Pressing + l/YES will copy to the displayed patternlocation, erasing its present data in the process.If you want to copy to an empty destination instead,press - l/NO and repeat the Copy procedure.
• PATTERN APPEND
1. Select the Pattern you want to append, then press COPY.
Copy PTN 78
1:Copy, 2:Append?
2. Select Append with numeric key 2.

3. Enter the Pattern you want to append the selected Patternto, using the numeric keys.
* The cursor can be moved between the lower and upperdisplay lines with ACCENT 2.
4. Press ENTER (START).The message "completed!" will be displayed.
EDIT PATTERN
FUNCTION To check Pattern contents and/or alter thepitch, level, decay and pan parameters of eachnote.
One of the most versatile and creative functions of the RX7,Edit Pattern lets you step through a Pattern note by note,altering parameter settings and turning Effect on or off foreach individual note as you go. You can check/change thenotes of all instruments, or just of a selected single instrument.
Subtle alterations in the parameter settings can add "human"nuances for uncanny realism, making RX7 Patterns practi-cally indistinguishable from live drum sounds. Besides, EditPattern can be used e.g. for effects such as fade-out (bygradually decreasing levels) or automatic stereo panning (byaltering pan settings of successive notes).
* The parameter adjustments made in the Edit Pattern modeaffect individual NOTES of a specific Pattern ONLY, andnot the corresponding VOICE as a whole.The basic parameter settings are all determined by EditVoice. Therefore, Edit Pattern settings are always dis-played as RELATIVE values (offsets, indicated by + or-). These displayed values are relative to the basic EditVoice values. Alterations made with Edit Voice thereforeaffect all Edit Pattern settings for that instrument equally.
OPERATION1. Select the Pattern you wish to edit, then press EDIT
PATTERN.
2. Press START.
(You can always revert to All Instruments mode by pressingEDIT PATTERN). The display will change to
* Should the display show "—" as the parameter value, thisindicates that the selected voice is not used in this Pattern.
* "dmp" displayed as parameter value means that the cor-responding Instrument key was pressed during Real TimeWrite while DAMP was on. No sound will be heard forthis note.
* If you want to select an instrument currently not playedby the Instrument keys, assign it using KEY ASSIGN Job#01.
* The clock number indicates on which l/96th beat the notesounds (1/96 being the the highest Quantize rate).
* The instrument note number shows which note within thevoice's part (first, second, third,...) is currently displayed.
Pressing the + 1/YES key to shift to the next note soundsthe note that was displayed.Press - 1/NO to step backwards through the Pattern.
3. Use the numeric keys as follows to select the parameteryou want to check or edit.
1: pitch 2: level 3: pan4: decay 5: effect (on/off only)
* For an explanation of "decay" and "effect", see the cor-responding chapters in the Edit Voice section.
4. You have two options concerning how to adjust thedisplayed parameter:
a) Leaving the cursor where it is (allowing you to switchbetween notes with + 1/YES and - 1/NO), you can alterthe value with the DATA slider.
b) You can move the cursor to the lower line by pressingACCENT 2 and adjust the value with the + 1/YES and- 1/NO keys and DATA slider.(In either case, pressing numeric keys switches betweenparameters.)As soon as a value is altered, it will start to blink.
5. To input the value, press ENTER.The display will stop blinking, and you can now hearthe alteration when cycling through the Pattern again(or after backing up with - 1/NO).
6. To exit Edit Pattern any time, press STOP/CONTINUE.
The above display shows the All Instruments mode, in whichyou can step through all notes in the Pattern using + 1/YES.
Single Instrument mode lets you limit display to notes of acertain voice, which is selected by tapping its Instrument key.
15

SONGS
OVERVIEW
In the Song Mode, you can
* Select any Song and play it at the desired tempo, starting at any specified Part.
* Assemble (edit) up to 20 Songs consisting of 999 Parts each and store them in the internal memory.
* Insert repeats, tempo changes (accelerando, ritardando), and volume changes (crescendo, decrescendo) in a Song.
* Set a search mark in a Song for instant location and playback/editing.
* Copy a Song or part of a Song.
* Erase (clear) a Song or part of a Song.
On the RX7, a "Song" means a combination of Patterns ("Parts") making up a complete accompaniment for a piece of music.In GETTING ACQUAINTED, you got to know two examples, and more can be heard by using UTILITY Job #07, "load de-monstration Songs". After having created the necessary rhythm Patterns, you can connect them in a natural manner with the Songfunctions, complete with tempo and volume changes.
A Part can contain not only a Pattern, but other data such as a Repeat Command or Tempo Change.
, the four functions Mark Search and Set, Song* While most Song functions are accessed directly with the Pattem/Song keysName and Initial Tempo are called up by a Job number according to the menu above ACCENT 1.
* To use Song functions, first make sure that the SONG LED is lit, showing that the RX7 is in Song Mode.
* The PATTERN/SONG key switches the RX7 between Pattern and Song Mode. To enter Song Mode press this key until theSONG LED lights.
* Remaining Song memory space can be checked with UTILITY Job #02.
SONG SELECTION SONG PLAYBACK
FUNCTION Selects a Song for playback, editing, etc.
This function is always selected when Song mode is entered.
The RX7 can store up to 20 Songs in memory locationsnumbered 00 through 19. Besides the Song number and name,the Song Selection display shows its number of measures(bars) and initial tempo. If no data has been entered yet, thedisplay looks like this:
FUNCTION Playback of selected Song.
OPERATION1. After selecting the desired Song, press START
STOP/CONTINUE
will light, and the display will change to#04 is only effective if START is used.) The RUN LED
or(The initial tempo set with Job
OPERATION A Song is always selected directly by enteringits two-digit number with the numeric keys.
The display continues to change, showing the current positionin the Song and its Part content, until playback stops at theend of the Song.
* If you wish to begin playback from a Part other than thefirst one, select that Part with the - 1/NO and + 1/YESkeys. (Holding these keys down allows rapid selection.)Press STOP/CONTINUE to start.
2. To stop playback any time, press STOP/CONTINUE.The RUN LED will go out, and the first measure appearsagain on the LCD.
16

3. To restart playback from where it was stopped, pressSTOP/CONTINUE again. Pressing START instead re-commences playback from the beginning of the Song.
4. After having stopped playback, you can select any otherSong with the numeric keys.
* Tempo adjustments can be made as explained for Patterns.
* Click can be used but must be set in the Pattern Mode.
REPEAT PLAYBACK
In order to make room for the inserted Part in an existingsong, the RX7 shifts all subsequent Parts forward. Example:To insert a Part consisting of Pattern 99 between Parts 02and 03, select Part 03 for insertion.
BEFORE INSERTING
FUNCTION Continuously repeat a selected Song.
OPERATION1. After selecting the desired Song, or during playback of
that Song, press the SWING/REPEAT button. Thedisplay will show
2. You can now turn the repeat function on and off withthe - 1/NO and + 1/YES keys.
EDIT SONG
FUNCTION Create or alter Songs by combining Patterns.
OPERATION1. Select the desired Song number (memory location) and
press REAL TIME WRITE/EDIT SONG.
AFTER INSERTING
OPERATION1. Select the Part of the Song where you wish to insert a
new Part and press STEP WRITE/INSERT. The promptmark “**” will appear, asking you to input the contentsof the inserted Part.
2. Input either a Pattern or any other of the possibilities -a repeat symbol, a tempo or volume change commandor a search mark.To cancel data entry, press - 1/NO.
DELETE
2. Input the number of the Pattern you want to use forPart 1 with the numeric keys.
3. Switch to the next Part (and then forward/backwardbetween Parts as necessary) with the - 1/NO and+ 1/YES keys.
4. Input the contents of the following Parts - i.e. a Pattern,a repeat symbol, a tempo or volume change commandor a search mark.
Other practical Edit Song functions you can now use areInsert, Delete and Pattern Copy.
INSERT
FUNCTION Erase Parts of a Song.
Delete is complementary to Insert - all Parts after the deletedPart are moved backwards.
OPERATION1. Select the Part of the Song you wish to delete and press
QUANTIZE/DELETE. The display will ask you toconfirm:
FUNCTION Insert new Parts in a Song.2. Press + 1/YES to confirm.
The display will show the contents of the "next" Part,which now has the number of the deleted Part.To cancel delete operation instead, press - 1/NO.
17
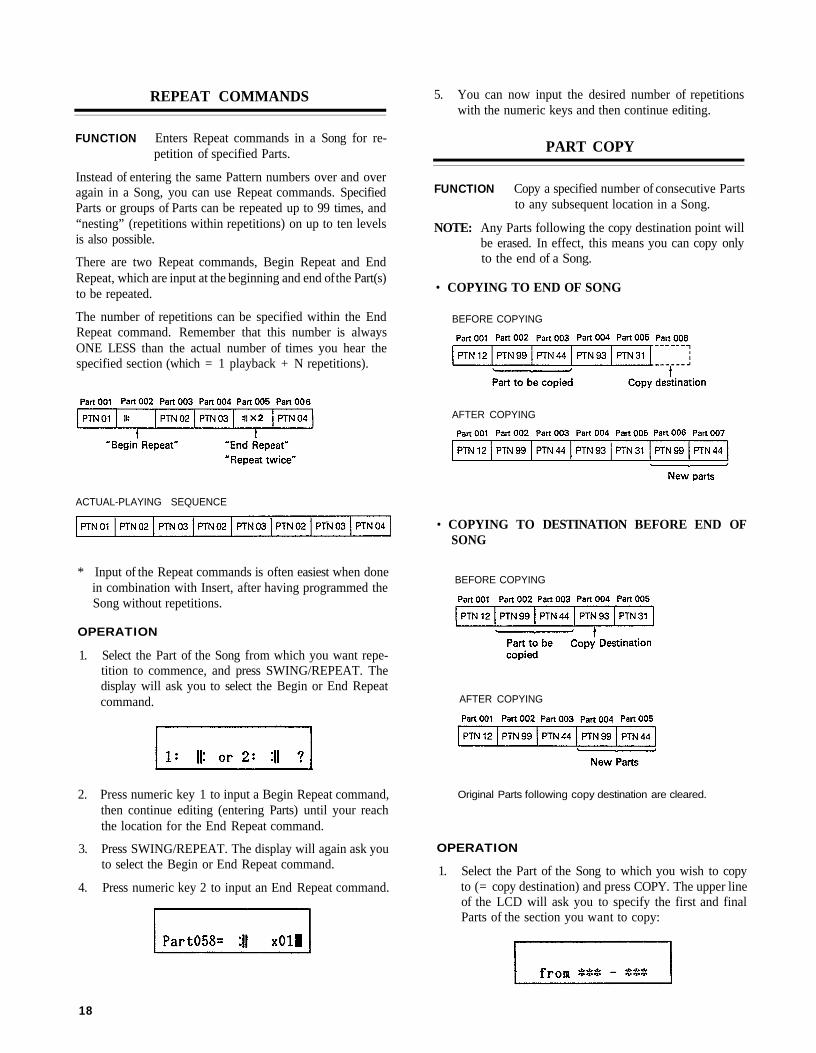
REPEAT COMMANDS
FUNCTION Enters Repeat commands in a Song for re-petition of specified Parts.
Instead of entering the same Pattern numbers over and overagain in a Song, you can use Repeat commands. SpecifiedParts or groups of Parts can be repeated up to 99 times, and“nesting” (repetitions within repetitions) on up to ten levelsis also possible.
There are two Repeat commands, Begin Repeat and EndRepeat, which are input at the beginning and end of the Part(s)to be repeated.
The number of repetitions can be specified within the EndRepeat command. Remember that this number is alwaysONE LESS than the actual number of times you hear thespecified section (which = 1 playback + N repetitions).
5. You can now input the desired number of repetitionswith the numeric keys and then continue editing.
PART COPY
FUNCTION Copy a specified number of consecutive Partsto any subsequent location in a Song.
NOTE: Any Parts following the copy destination point willbe erased. In effect, this means you can copy onlyto the end of a Song.
• COPYING TO END OF SONG
BEFORE COPYING
AFTER COPYING
ACTUAL-PLAYING SEQUENCE
• COPYING TO DESTINATION BEFORE END OFSONG
* Input of the Repeat commands is often easiest when donein combination with Insert, after having programmed theSong without repetitions.
OPERATION1. Select the Part of the Song from which you want repe-
tition to commence, and press SWING/REPEAT. Thedisplay will ask you to select the Begin or End Repeatcommand.
BEFORE COPYING
AFTER COPYING
2. Press numeric key 1 to input a Begin Repeat command,then continue editing (entering Parts) until your reachthe location for the End Repeat command.
3. Press SWING/REPEAT. The display will again ask youto select the Begin or End Repeat command.
4. Press numeric key 2 to input an End Repeat command.
Original Parts following copy destination are cleared.
OPERATION1. Select the Part of the Song to which you wish to copy
to (= copy destination) and press COPY. The upper lineof the LCD will ask you to specify the first and finalParts of the section you want to copy:
18

2. Enter the three-digit numbers of the first and final Partsof the section to be copied, then press + 1/YES or EN-TER to complete data input.Copying is completed, and the LCD will display thenumber of the empty Part location now following theend of the copied section.
* Should you make a mistake in specifying the section tobe copied, one of the following error messages will appearand copying will be canceled.
a) If the number of the first copied Part is larger than thatof the final one, or a copy section is specified that includesthe destination Part, the LCD will show:
b) Should you specify a Part for copying that does not exist,the LCD will show:
2. Press numeric key 1 to select accelerando, key 2 for ri-tardando.
Accelerando:
Ritardando:
TEMPO CHANGE COMMANDS
FUNCTION Enters Tempo Change commands in a Songto make it gradually slower or faster.
Natural, gradual changes in tempo - accelerando (increase)or ritardando (decrease) - can be created with these com-mands. Both the value (in quarter notes/minute) and theduration (in quarter notes) of the tempo change can be spe-cified.
By entering a Tempo Change command within a repeatedsection, you can cause accelerando or ritardando over longerpassages than the 99 quarter notes which normally is the limitfor a single tempo change.
* It is generally easiest to input tempo changes after havingcompleted a song, by using Insert.
NOTE: Unless you balance accelerandi with ritardandi, yourSong will end in a different tempo than it startedwith. If you have not set an initial tempo for theSong and start to play it again immediately, it willcommence at this previous final tempo. It is there-fore recommended that you use Job #04 to specifyan initial tempo.
OPERATION1. Select the Part of the Song from which you want the
tempo to start changing, and press CLICK/TEMPOCHANGE. The display will ask you to selectAccel(erando) or Rit(ardando).
3. Input the value of the tempo change (i.e. by how muchyou want the tempo to increase/decrease) as the nu-merator and the duration of the tempo change as thedenominator of the fraction shown on the LCD, usingACCENT 2 to switch between the two.Say you want the tempo to increase by 15 quarter notesper minute over 4 measures. This means you have to settempo change (accelerando) to +15/16, because 4measures correspond to 16 quarter notes.Instantaneous tempo changes can be achieved by settingthe denominator to 0.
VOLUME CHANGE COMMANDS
FUNCTION Enters Volume Change commands at any lo-cation in a Song, to raise or lower level.
Any volume change within the voice level limits (0 ~ 63) ispossible. By entering several Volume Change commands insubsequent Parts or using them in repeated sections, gradualvolume changes can be achieved (e.g. for climaxes, fade-inor fade-out).
OPERATION1. Select the Part of the Song where you want the volume
to change, and press EDIT PATTERN/VOLUMECHANGE. The display will ask you to select Up(ward)or Down(ward) change.
19

2. Press numeric key 1 to select Up or key 2 for Down.
3. Input the degree (value) of volume change with the nu-meric keys.
SONG COPY
FUNCTION Copy entire Songs to another location. Usefulwhen you want to alter a Song while retainingthe original version.
OPERATION1. Select the SONG you want to copy and press COPY.
The LCD will ask you to input the copy destinationnumber (new Song location).
2. Enter the destination number with the numeric keys, thenpress + 1/YES to copy.The message “completed!” shows that copying has beencarried out.
* Should you decide to copy a different Song after havingspecified the copy destination, move the cursor to theupper LCD line with ACCENT 2 and enter a differentSong number.
* If the specified copy destination already contains a Song,this Song will be erased to make room for the new Song.To avoid mistakes, the LCD asks
if the copy destination is occupied. You can now cancelSong Copy with the - 1/NO key or execute copying withthe + 1/YES key.
SONG CLEAR
2. Press + 1/YES. The LCD will ask
3. Press + 1/YES to confirm (or - 1/NO to cancel SongClear).After displaying the message “completed!”, the LCDwill show the cleared Song location.
JOBS
The Song functions listed on the extreme left of the frontpanel Job Menu under SONG and EDIT SONG are selectedby entering the respective Job number, i.e. by pressing JOBand then inputting a two-digit number with the numeric keys.
Except for Job #01, Mark Search, which is also available inSong Selection mode, these Jobs can only be accessed duringEdit Song mode.
JOB #01: MARK/PART SEARCH
FUNCTION Instantly locate a specified point in a Song.A very useful feature both for playback andediting, this lets you instantly locate any Partin a Song or a location marked according toJob #02.
OPERATION1. Select Job #01.
The lower line of the display will ask you to input thePattern or Mark you want to locate.
2. a: PART SEARCHIf you are looking for a certain Part, enter itsthree-digit number with the numeric keys. As soonas the first digit is input, the display will change to
FUNCTION Erase entire Songs.
* It is also possible to clear all 20 Songs simultaneouslywith UTILITY Job #06.
OPERATION1. Select the Song you want to erase and press CLEAR.
20
After all three digits have been entered correctly,the Part you were looking for will appear on thedisplay.
Should you make a mistake during number entry(for instance forgetting to start with a zero fornumbers under 100), the display will show
If this occurs, select Job #01 again and carefullyenter the right number.
2. b: MARK SEARCHIf you are looking for a certain Mark previouslyinput with Job #02, enter the Mark's name usingthe alphabet keys (= Instrument keys) and numerickeys as explained for Job #02 below.After the entire Mark name has been entered cor-rectly, the marked location you were looking forwill appear on the display.If you have made a mistake during Mark name entry,the LCD will show
If this happens, select Job #01 again and carefullyenter the correct Mark name.
JOB #02: MARK SET
Lower case letters can be input by holding downSHIFT/COMPARE while pressing a letter key.
The cursor is moved backward and forward with the - 1/NOand +1/YES keys.
* Note that Mark names can not begin with a numeral.
3. When you have completed name input, press ENTER.The display will change to
indicating that a Marker with the displayed name hasbeen entered in the indicated Part location.
JOB #03: SONG NAME
FUNCTION Name or rename a Song.
OPERATION1. Making sure that the Song you want to name is selected
and Edit Song mode entered, access Job #03.The lower line of the display will ask you to input theSong name.
FUNCTION Name a specific point in a Song for later in-stantaneous location.
Any point in a Song can be given a name consisting of upto six characters (letters and numerals). This “Mark” is usefulboth for making the structure of the Song clearer (by enteringnames such as “INTRO” or “1.MELO”) as well as for laterinstant location at any time using Job #01 explained above.
A Mark is also counted as a Part.
OPERATION1. Making sure that the Edit Song mode is entered, select
Job #02.The lower line of the display will ask you to input theMark you want to name.
2. Input a name of up to six characters using the Instrumentkeys and numeric keys.
* In addition to the Instrument keys, ACCENT 1 and 2 areused to input Y and Z. EFFECT enters a space, andDAMP a period.
2. Input a Song name of up to eight characters as explainedabove for Mark name entry.
* Unlike Mark names, Song names may begin with a nu-meral.
3. When you have completed input of the Song name, pressENTER.The LCD will revert to normal Edit Song display, indi-cating that the Song name has been entered.
* This function can also be used to rename Songs, i.e. altertheir present name.The Song's current name will be displayed when the SongName Job is called up, and can then be changed in thesame way as entering a new name.
JOB #04: INITIAL TEMPO
FUNCTION Set the initial tempo of a Song.
Allows you to determine the tempo with which a Song willalways start during playback. (Tempo changes within theSong remain valid).
Tempo can still be altered manually at any time.
21
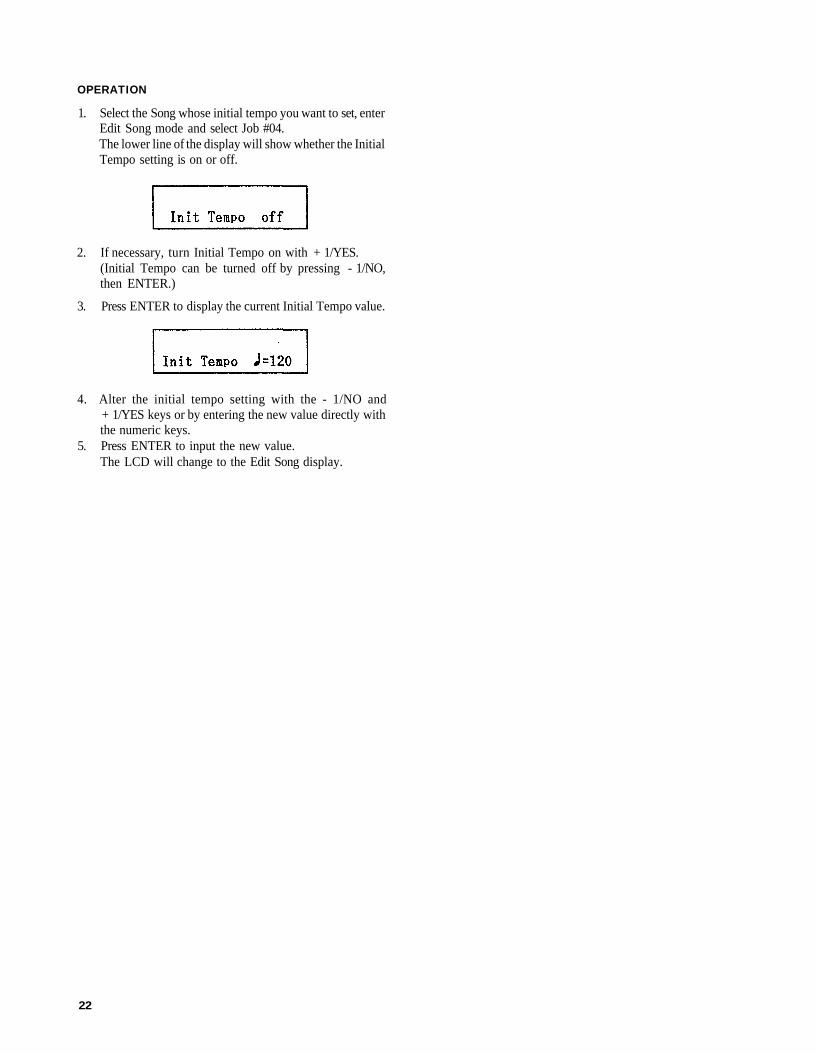
OPERATION1. Select the Song whose initial tempo you want to set, enter
Edit Song mode and select Job #04.The lower line of the display will show whether the InitialTempo setting is on or off.
2. If necessary, turn Initial Tempo on with + 1/YES.(Initial Tempo can be turned off by pressing - 1/NO,then ENTER.)
3. Press ENTER to display the current Initial Tempo value.
4. Alter the initial tempo setting with the - 1/NO and+ 1/YES keys or by entering the new value directly withthe numeric keys.
5. Press ENTER to input the new value.The LCD will change to the Edit Song display.
22

CHAINS
OVERVIEW
The Chain Mode lets you
* Create a maximum of 3 Chains consisting of up to 90 Songs (Steps).
* Select a Chain and play it at the desired tempo.
* Erase (clear ) a Chain. On the RX7, the word “Chain” refers to a combination of Songs, ordered as “Steps ” within the Chain.You can thus create accompaniment sequence s for whole groups of Songs, either for live performance or recording.
* To use Chain functions, always enter Chain Playback Mode first by pressin g CHAIN. Select other Jobs by then pressing Joband entering the Job number.
JOB 01: CHAIN PLAYBACK JOB #02: CHAIN EDIT
FUNCTION Playback of selected Chain.
OPERATION1. After pressing CHAIN, select the desired Chain with
numeric keys 0, 1 or 2.
2. Pres s START or STOP/CONTINUE The RUNLED will light, and the display will change to
FUNCTION Combining Songs to form a new Chain, oraltering existing Chains.
Creating a Chain from Songs (Steps) is basically the sameas creating a Song out of Patterns and other Parts. MaximumStep number is 90.
OPERATION1. After pressing CHAIN, select the desired Chain with
numeric keys 0, 1 or 2, then access Job #02.
The display continues to change, showing the currentposition in the Chain and the current Song (Step) untilplayback stops at th e end of the Chain.
3. To stop playback at any time, press STOP/CONTINUE.The RUN LED will go out, and the first measure appearsagain on the LCD.
4. To restart playback from where it was stopped, pressSTOP/CONTINUE again. Pressing START instead re-commences playback from the beginning of the Chain.
5. After having stopped playback, you can select anotherChain with numeric keys 0 to 2.
* Tempo adjustments can be made as explained for Patterns.
* Click can be used but must be set in th e Pattern Mode.
(If you are altering an existing Chain, the first Songnumber will appear in place of the prompt marks “**”.)
2. Select the Song to be used for Step 1 by entering itslocation with the numeric keys.
3. Pres s + 1/YES to input the selected Song and switch tothe next Step.(The - 1/NO and + 1/YES keys can be used to switchbetween existing Steps.)Continue this process until you have programmed theentire Chain.
* The INSERT and DELETE keys can be used as duringEdit Song.
JOB #03: CHAIN NAME
FUNCTION Naming or renaming Chains.
OPERATION1. Either call up the Chain Playback display or select Job
#03.
23

2. Input a Chain name of up to eight characters as explainedabove for Mark name entry.Pressing ENTER afte r writing the Chain name returnsyou to the Chain Playback display .
JOB #04: CHAIN CLEAR
FUNCTION Erasing entire Chains .
OPERATION1. Select the Chain you want to eras e and enter Job #04.
2. Press + 1/YES. The LCD will ask
3. Press + 1/YES to confirm (or - 1/NO to cancel ChainClear).After displaying the message “completed!”, the LCDwill show the cleared Chain location.
24
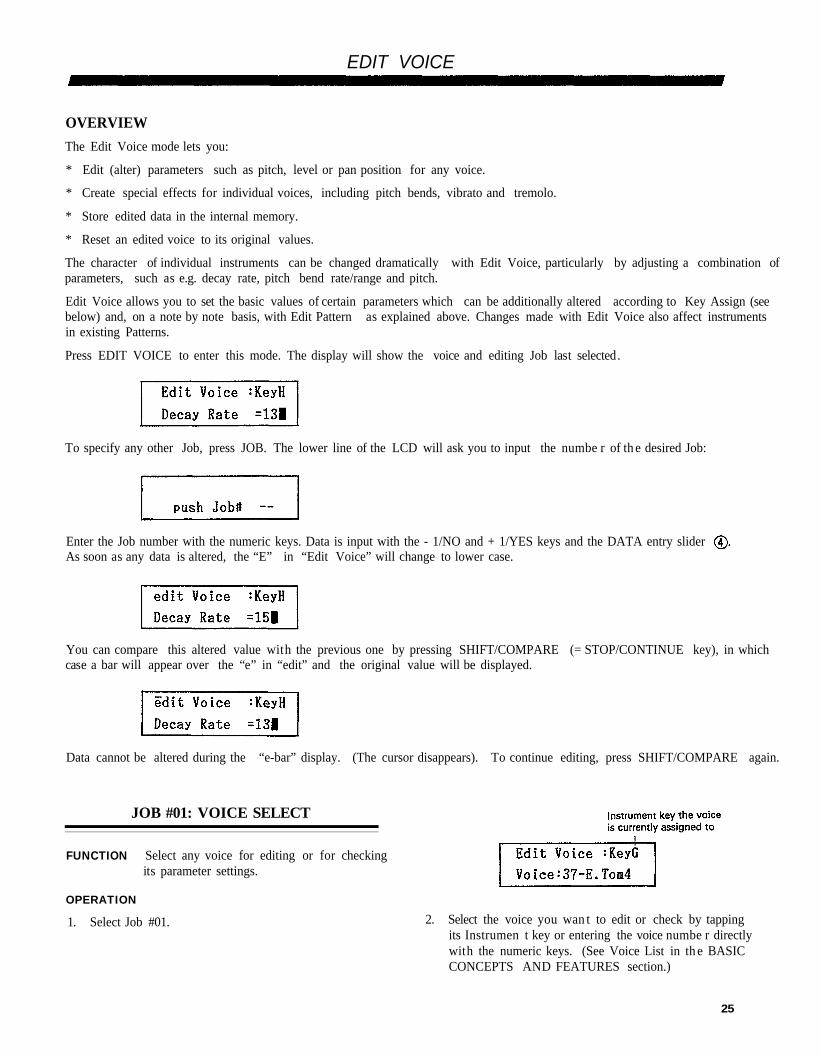
EDIT VOICE
OVERVIEW
The Edit Voice mode lets you:
* Edit (alter) parameters such as pitch, level or pan position for any voice.
* Create special effects for individual voices, including pitch bends, vibrato and tremolo.
* Store edited data in the internal memory.
* Reset an edited voice to its original values.
The character of individual instruments can be changed dramatically with Edit Voice, particularly by adjusting a combination ofparameters, such as e.g. decay rate, pitch bend rate/range and pitch.
Edit Voice allows you to set the basic values of certain parameters which can be additionally altered according to Key Assign (seebelow) and, on a note by note basis, with Edit Pattern as explained above. Changes made with Edit Voice also affect instrumentsin existing Patterns.
Press EDIT VOICE to enter this mode. The display will show the voice and editing Job last selected.
To specify any other Job, press JOB. The lower line of the LCD will ask you to input the numbe r of th e desired Job:
Enter the Job number with the numeric keys. Data is input with the - 1/NO and + 1/YES keys and the DATA entry sliderAs soon as any data is altered, the “E” in “Edit Voice” will change to lower case.
You can compare this altered value with the previous one by pressing SHIFT/COMPARE (= STOP/CONTINUE key), in whichcase a bar will appear over the “e” in “edit” and the original value will be displayed.
Data cannot be altered during the “e-bar” display. (The cursor disappears). To continue editing, press SHIFT/COMPARE again.
JOB #01: VOICE SELECT
FUNCTION Select any voice for editing or for checkingits parameter settings.
OPERATION1. Select Job #01. 2. Select the voice you wan t to edit or check by tapping
its Instrumen t key or entering the voice numbe r directlywith the numeric keys. (See Voice List in th e BASICCONCEPTS AND FEATURES section.)
25

* Selecting a voice currently not assigned to any Instrumentkey displays “key-” on the upper right. Such voices maybe edited, bu t you can only hear the results if you playthe corresponding key on a connected and appropriatelyassigned MIDI keyboard.
3. Continue by selecting one of the following editing Jobs.
NOTE: Edited values have to be stored (Job #07) to becomepermanent. If you have edited a voice but do notperform Voice Store, the first “e” of “edit Voice”will remain lower case, and all edited values willby lost if a different voice is selected (or the sameone specified again) with Job #01.Therefore, pay attention if you enter Voice Selectmode and the first “e” of “edit Voice” is lower case.(Lost data can be retrieved from the edit recall buffe rwith Job #09.)
JOB #02: PITCH
FUNCTION Sets basic pitch of selected voice.
• Range: -3600 ~ +2400 cent (in 10-cent steps)(= -3 to +2 octaves)(100 cent = 1 semitone)
OPERATION1. Select Job #02. The lower display line will show
2. To adjust the pitch upward or downward in semitone(100 cent) steps, use the DATA slider or -1/NO and+ 1/YES keys.For finer adjustments in 10-cent steps, hold down thenumeric key 0 and press - 1/NO or + 1/YES.
JOB #03: DECAY
FUNCTION Sets basic decay rate of selected voice.
• Range : Decay Rate = 01 ~ 31
Think of the “decay” of a sound as the speed with which itdies out. The faster the decay (= the HIGHER the DecayRate value), the SHORTER the sound. The slower the decay( = the lower the Decay Rate value), the longer the sound.
Try changing the Decay Rates of various voices to get a feelingfor the influence of this setting on the sound characteristics .
* The Decay Rate setting has no effect on “reverse” voices.
OPERATION1. Select Job #03. The lower display line will show
2:
2. To lengthe n or shorte n th e decay (= lower or raise th eDecay Rat e value) , use the - 1/NO and + 1/YES keysor DATA slider.
JOB #04: BEND
FUNCTION Sets bend parameters of selected voice.
• Range: Bend Rat e = 0 ~ 60Bend Range = -60 ~ +60
The expression “bend ” as used for th e RX7 r efers to linearpitch bend effects which automatically raise or lower the pitchof a note while it is being played.
Two parameters can be adjusted - Bend Rate, which deter-mines th e speed of th e pitch bend, and Bend Range, whichdetermines how great the change in pitch will be.
OPERATION1. Select Job #04. The lower display line will show either
of the following display types. To switch between them.press numeric key 1 ( Rate) or 2 ( Range).
1:
The Bend Rate can be set between 0 and 60 (unit: 10 centper 10 microseconds). Increasing this value speeds up thepitch bend effect.
The Bend Range can be set between - 60 and + 60 (unit:100 cent = 1 semitone). Raising this value increases th e pitchdifference between the beginning and the end of the bendeffect.
JOB #05: VOICE LEVEL
FUNCTION Sets basic volume of selected voice.
• Range: Voice Level = 0 ~ 63
OPERATION1. Select Job #05. The lower display line will show
26

2. Adjust the volume (= level) with the DATA slider or- 1/NO and + 1/YES keys.
JOB #06: PAN
FUNCTION Sets basic pan position of selected voice.
• Range: 0 (full left) to 15 (full right)
OPERATION1. Select Job #06. The lower display line shows
The basic pan position of the selected voice can be confirmedvisually with the above graphic display.
2. Adjust the pan position with the - 1/NO and + 1/YESkeys or DATA slider.
* The pan position affects the maximum polyphonic numberthat can be set with Job #011. Higher polyphonic numberscan be set when pan is full left, full right or exactly centered,than with other stereo positions.
JOB #07: VOICE STORE
FUNCTION Saves all edited data of currently selected voicein the internal memory.
Unless the edited data of a voice is stored with this function,it will be cleared as soon as a different voice is selected forediting.
Storing Edit Voice settings with this function makes thempermanent. However, voices can be restored to their original(factory) settings with Job #08, Voice Initialize.
OPERATION1. Select Job #07. The lower display line asks you
3. Confirm by pressing + 1/YES, or press - 1/NO to cancel.
4. If you chose YES, the message
will appear, and the “e” in “edit Voice” on the upperLCD line will change to a capital “E”, indicating thatanother voice can now be selected for editing.
JOB #08: VOICE INITIALIZE
FUNCTION Restores edited voices to their original pa-rameter settings.
OPERATION1. Select Job #08. The lower display line asks you
2. If you do not want to initialize, press - 1/NO. Otherwisepress + 1/YES. The display will ask you to confirm:
3. Press + 1/YES (or - 1/NO to cancel).The message “completed!” is displayed.
* Though the voice has now been initialized, the initial valuesare still not saved - indicated by the “e” in “edit Voice”remaining lower case. Unless you store these initial valueswith Job “07”, the settings will revert to the altered onesprior to Voice Initialize as soon as you select another voicefor editing.
JOB #09: EDIT RECALL
2. If you made a mistake and do not want to store, press- 1/NO. Otherwise press + 1/YES. The display will ask
FUNCTION Recalls edited parameter settings that havebeen mistakenly erased.
As explained under Voice Store, the edited data of a voiceis lost as soon as a different voice is selected with Job #01,unless it has been stored. Should you forget this and switchto a different voice before saving data you are currently ed-iting, the data of the last voice edited can be recalled withthis function.
27
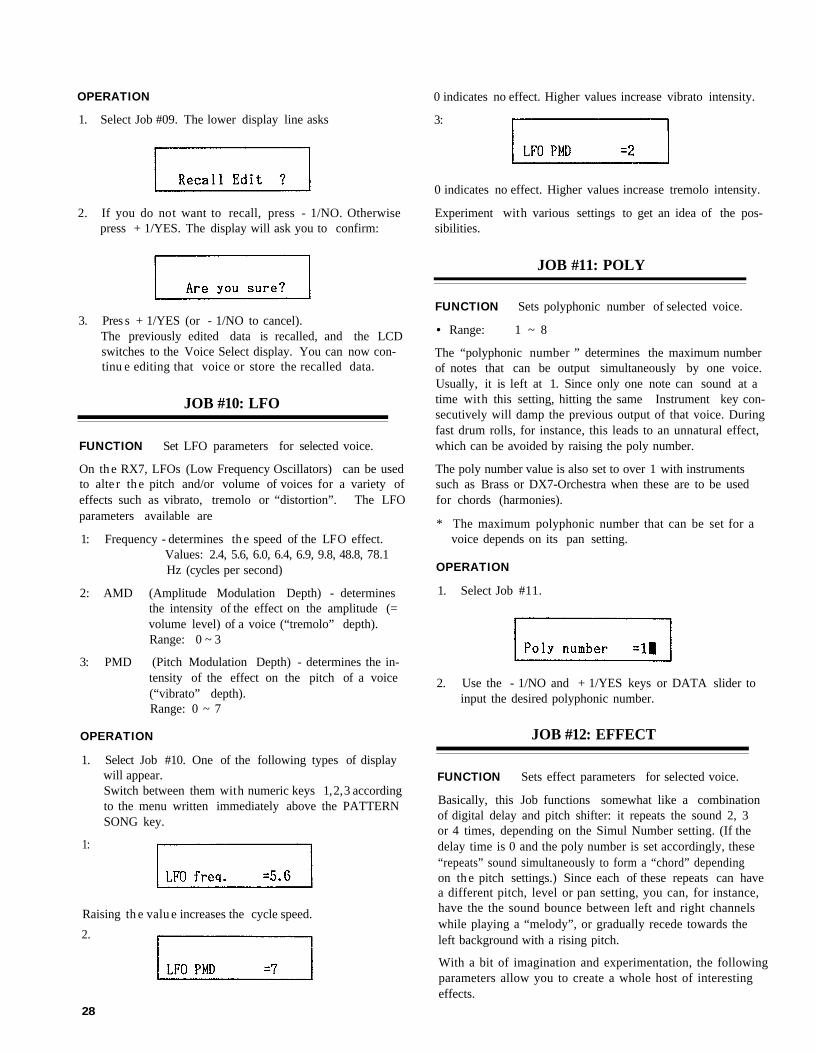
OPERATION1. Select Job #09. The lower display line asks
2. If you do not want to recall, press - 1/NO. Otherwisepress + 1/YES. The display will ask you to confirm:
3. Pres s + 1/YES (or - 1/NO to cancel).The previously edited data is recalled, and the LCDswitches to the Voice Select display. You can now con-tinu e editing that voice or store the recalled data.
JOB #10: LFO
FUNCTION Set LFO parameters for selected voice.
On th e RX7, LFOs (Low Frequency Oscillators) can be usedto alte r th e pitch and/or volume of voices for a variety ofeffects such as vibrato, tremolo or “distortion”. The LFOparameters available are
1: Frequency - determines th e speed of the LFO effect.Values: 2.4, 5.6, 6.0, 6.4, 6.9, 9.8, 48.8, 78.1Hz (cycles per second)
2: AMD (Amplitude Modulation Depth) - determinesthe intensity of the effect on the amplitude (=volume level) of a voice (“tremolo” depth).Range: 0 ~ 3
3: PMD (Pitch Modulation Depth) - determines the in-tensity of the effect on the pitch of a voice(“vibrato” depth).Range: 0 ~ 7
OPERATION1. Select Job #10. One of the following types of display
will appear.Switch between them with numeric keys 1, 2, 3 accordingto the menu written immediately above the PATTERNSONG key.
1:
Raising th e valu e increases the cycle speed.
2.
0 indicates no effect. Higher values increase vibrato intensity.
3:
0 indicates no effect. Higher values increase tremolo intensity.
Experiment with various settings to get an idea of the pos-sibilities.
JOB #11: POLY
FUNCTION Sets polyphonic number of selected voice.
• Range: 1 ~ 8
The “polyphonic number ” determines the maximum numberof notes that can be output simultaneously by one voice.Usually, it is left at 1. Since only one note can sound at atime with this setting, hitting the same Instrument key con-secutively will damp the previous output of that voice. Duringfast drum rolls, for instance, this leads to an unnatural effect,which can be avoided by raising the poly number.
The poly number value is also set to over 1 with instrumentssuch as Brass or DX7-Orchestra when these are to be usedfor chords (harmonies).
* The maximum polyphonic number that can be set for avoice depends on its pan setting.
OPERATION1. Select Job #11.
2. Use the - 1/NO and + 1/YES keys or DATA slider toinput the desired polyphonic number.
JOB #12: EFFECT
FUNCTION Sets effect parameters for selected voice.
Basically, this Job functions somewhat like a combinationof digital delay and pitch shifter: it repeats the sound 2, 3or 4 times, depending on the Simul Number setting. (If thedelay time is 0 and the poly number is set accordingly, these“repeats” sound simultaneously to form a “chord” dependingon th e pitch settings.) Since each of these repeats can havea different pitch, level or pan setting, you can, for instance,have the the sound bounce between left and right channelswhile playing a “melody”, or gradually recede towards theleft background with a rising pitch.
With a bit of imagination and experimentation, the followingparameters allow you to create a whole host of interestingeffects.
28

Parameter
1: Simul number
2: Delay time
3: Pitch
4: Level
5: Pan
Range
2 ~ 4
0 ~ 5 0
-600 ~ +600
-63 ~ +63
-14 ~ +14
Function
Determines number of “repeats”.
Time between repeats (in units of 10 milliseconds).
Pitch difference between the individual repeatsounds and the original sound (in units of 10 cent).
Volume difference between the individual repeatsounds and the original sound.
Difference between the pan positions of the indi-vidual repeat sounds and the original sound.
The parameters are selected with the corresponding numerickeys 1 through 5. To switch between parameter value displaysfor the individual repeat sounds (2nd, 3rd and 4thpitch/level/pan), press the corresponding numeric keys 3through 5.
* Effects can be switched on and off for all voices with theEFFECT key The EFFECT LED lights up whenEffect is on.However, the EFFECT key does not turn off effects forvoices that are already programmed in Patterns.
* Effects can be turned on and off within programmedPatterns using Edit Pattern.
OPERATION1. Select Job #12, then the desired effect parameter using
numeric key
1:
2:
3:
4:
5:
To switch between, say, 4th and 2nd pitch, press numerickey 3. Use the - 1/NO and + 1/YES keys or DATA sliderto input data.
29

KEY ASSIGN
OVERVIEW
The Key Assign mode lets you:
* Assign any voice to any Instrument key.* Assign one voice to the whole upper row of Instrument keys.* Alter the pitch, level, pan and decay of voices for each Instrument key.
* Adjust the accent levels for each Voice.* Assign a function to a connected foot switch.* Save all Key Assign data to one of four internal memory locations.* Load Key Assign data from memories.
NOTE: The “Drum Set” Chart at the end of this manual will help you remember your Key Assign settings. Copy it and enterthe data for your individual “drum sets”.
Press KEY ASSIGN to enter this mode. The display will show the Job selected last. To specify any other Job, press JOB. Thelower line of the LCD will ask you to input the number of the desired Job:
Enter the Job number with the numeric keys.Data is input via the - 1/NO and + 1/YES keys and the DATA entry slider
JOB #01: VOICE ASSIGN JOB #02: PARAMETER ASSIGN
FUNCTION To assign any voice to any Instrument keys.
OPERATION1. Select Job #01.
2. Select the desired Instrument key by tapping it. (Thisalso lets you check which voices are currently assignedto which keys.)
3. Use the - 1/NO and + 1/YES keys and/or the DATAentry slider to select the voice you want to assign to thekey, or input the voice number directly, referring to theVoice List in the BASIC CONCEPTS AND FEATURESsection.
* The voice is assigned as soon as it appears on the LCD.Note that all data settings previously made for the selectedInstrument key according to the following Job #02 arethereby erased.
FUNCTION To alter the pitch, level, pan and/or decayof voices assigned to specific Instrument keys.
Note the difference to alterations made with EDIT VOICE:The Parameter Assign changes ONLY affect the voice as itis played by the selected Instrument key, while the Edit Voicechanges affect that voice in all cases (i.e. also in existingpatterns or as played by external MIDI devices). Therefore,similar to Edit Pattern, the values set with Parameter Assignare displayed for each Instrument key as offsets relative tothe basic Edit Voice value.
OPERATION1. Select Job #02.
The upper line of the LCD displays the previously se-lected key and its assigned voice.
2. Select the desired Instrument key by tapping it.
3. The lower line of the LCD will show any one of the fourparameters listed further below, its key value and offsetto the basic Edit Voice value. Parameters are selectedwith numeric keys 1 through 4 according to the menumarked “*”, printed immediately above numeric key 7.
30
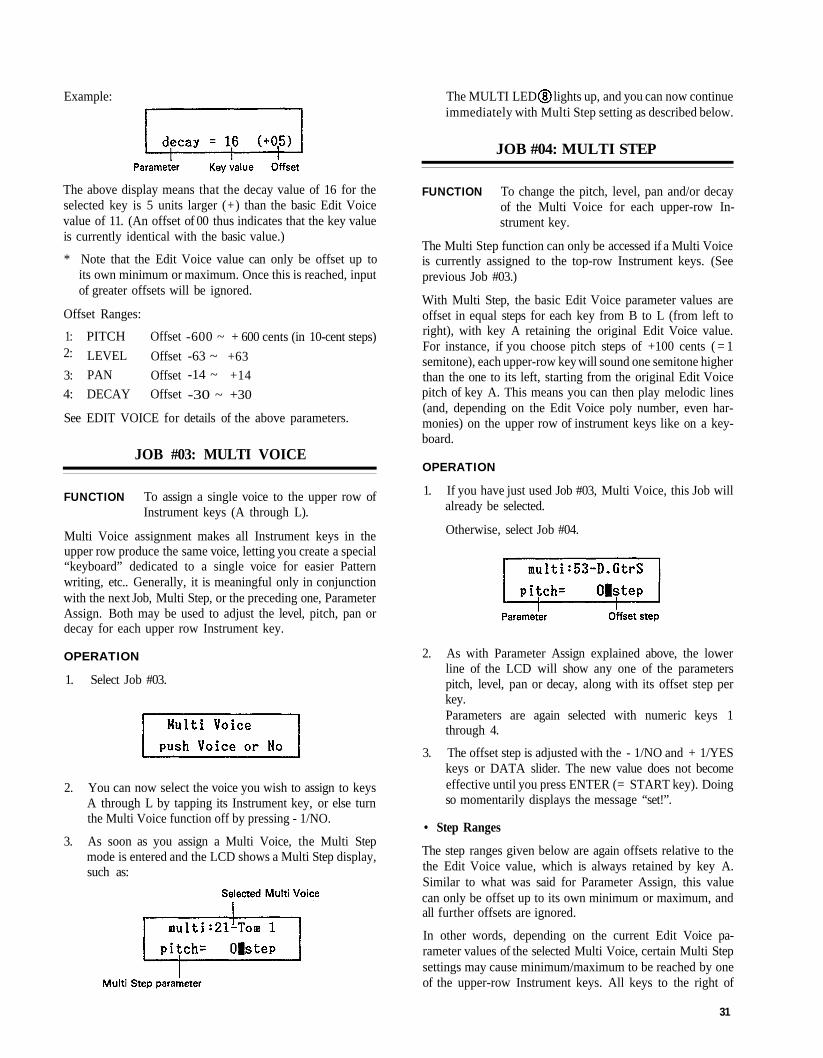
Example: The MULTI LED lights up, and you can now continueimmediately with Multi Step setting as described below.
JOB #04: MULTI STEP
The above display means that the decay value of 16 for theselected key is 5 units larger (+) than the basic Edit Voicevalue of 11. (An offset of 00 thus indicates that the key valueis currently identical with the basic value.)
* Note that the Edit Voice value can only be offset up toits own minimum or maximum. Once this is reached, inputof greater offsets will be ignored.
Offset Ranges:
1:2:
3:
4:
PITCH
LEVEL
PAN
DECAY
Offset
Offset
Offset
Offset
-600 ~
-63 ~
-14 ~
-30 ~
+ 600 cents (in 10-cent steps)
+63
+14
+30
See EDIT VOICE for details of the above parameters.
JOB #03: MULTI VOICE
FUNCTION To assign a single voice to the upper row ofInstrument keys (A through L).
Multi Voice assignment makes all Instrument keys in theupper row produce the same voice, letting you create a special“keyboard” dedicated to a single voice for easier Patternwriting, etc.. Generally, it is meaningful only in conjunctionwith the next Job, Multi Step, or the preceding one, ParameterAssign. Both may be used to adjust the level, pitch, pan ordecay for each upper row Instrument key.
OPERATION1. Select Job #03.
2. You can now select the voice you wish to assign to keysA through L by tapping its Instrument key, or else turnthe Multi Voice function off by pressing - 1/NO.
3. As soon as you assign a Multi Voice, the Multi Stepmode is entered and the LCD shows a Multi Step display,such as:
FUNCTION To change the pitch, level, pan and/or decayof the Multi Voice for each upper-row In-strument key.
The Multi Step function can only be accessed if a Multi Voiceis currently assigned to the top-row Instrument keys. (Seeprevious Job #03.)
With Multi Step, the basic Edit Voice parameter values areoffset in equal steps for each key from B to L (from left toright), with key A retaining the original Edit Voice value.For instance, if you choose pitch steps of +100 cents ( = 1semitone), each upper-row key will sound one semitone higherthan the one to its left, starting from the original Edit Voicepitch of key A. This means you can then play melodic lines(and, depending on the Edit Voice poly number, even har-monies) on the upper row of instrument keys like on a key-board.
OPERATION1. If you have just used Job #03, Multi Voice, this Job will
already be selected.
Otherwise, select Job #04.
2. As with Parameter Assign explained above, the lowerline of the LCD will show any one of the parameterspitch, level, pan or decay, along with its offset step perkey.Parameters are again selected with numeric keys 1through 4.
3. The offset step is adjusted with the - 1/NO and + 1/YESkeys or DATA slider. The new value does not becomeeffective until you press ENTER (= START key). Doingso momentarily displays the message “set!”.
• Step Ranges
The step ranges given below are again offsets relative to thethe Edit Voice value, which is always retained by key A.Similar to what was said for Parameter Assign, this valuecan only be offset up to its own minimum or maximum, andall further offsets are ignored.
In other words, depending on the current Edit Voice pa-rameter values of the selected Multi Voice, certain Multi Stepsettings may cause minimum/maximum to be reached by oneof the upper-row Instrument keys. All keys to the right of
31
that key will then sound the same, since they are“overstepping” the minimum/maximum Edit Voice value.If this happens, you may want to alter the respective EditVoice parameter value.
1: PITCH Step -200 ~ +200 cents (in 10-cent steps),i.e. up to +/- 1 whole tone.
Setting positive values, e.g. +100 (= 1 semitone), createsa scale of notes that get higher towards the right, likeon a piano. Negative values like - 200 (= 1 whole tone)cause the notes to become lower towards Instrumentkey L (opposite of a normal keyboard).
2: LEVEL Step -10 ~ +10Positive step values make upper Instrument keys soundlouder towards the right, while negative step values lowerthe volume in that direction.
3: PAN Step -5 ~ +5The further the Instrument key pressed is located towardsthe right, the more the pan position of the sound is movedtowards the right channel (positive step values) or to-wards the left channel (negative step values).
4: DECAY Step -10 ~ +10Positive step values make the Multi Voice decay shortertowards Instrument key L, while negative ones causelonger decay in that direction.
* Individual settings for all four parameters can be usedsimultaneously. Note, however, that you will no longerbe able to check the Step value on the display once youswitch parameters with the numeric keys. (After switching,the step is always displayed as “0”, regardless of the actualsetting.)
* Once you have made Multi Step settings and exited fromthis Job, further alterations of these values must be madeby accessing this Job #04 directly and NOT by first se-lecting Job #03, Multi Voice. Doing so would erase allcurrent Multi Step settings.
* Parameter Assign can be used instead of or in additionto Multi Step to alter the parameter values individuallyfor each Instrument key.As an example, this allows you to create any kind ofpersonal “keyboard” with the keys A through L, for in-stance representing a major or minor scale.
JOB #05: ACCENT LEVEL
2. Select the voice whose Accent you wish to program withits Instrument key.(All current Accent levels can be checked by pressingvarious Instrument keys in succession.)
3. To switch between Accent 1 and 2, press the corre-sponding ACCENT button.
4. Input the Accent value with the - 1/NO and + 1/YESkeys or the DATA slider.
* The Accent values are again offsets which are added toor subtracted from the Edit Voice level. Though theirtheoretical range is from -63 to +63, Accents are alsolimited by the maximum/minimum voice level value. If avoice's level is already set to, say, 60 (i.e. 3 below themaximum level setting of 63), all Accent 2 values over 3(i.e. from +3 to +63) give the same effect, namely ofraising that voice's level to 63 when the ACCENT 2 ispressed.
JOB #06: FOOT SWITCH ASSIGN
FUNCTION Assigns the function of any front panel keyto a connected foot switch.
Applications for this function are entirely up to your imag-ination. You could assign the voice of a specific Instrumentkey, for instance the Bass Drum of key A, and “play” theBD with an optional foot switch. Or you could use the footswitch to add Accents, or assign it to + 1/YES to shift up avariety of settings, for example selecting the next Pattern tobe played, etc., etc..
Default setting is START/STOP, with which a connected footswitch functions as a combination of the START andSTOP/CONTINUE keys.
OPERATION1. Select Job #06. The display will ask
FUNCTION Programming the volume changes achievedwith ACCENT 1/2 for individual voices.
The green keys ACCENT 1 and ACCENT 2 are generallyused to accentuate voices on certain beats by raising their levelto a degree that can be programmed with this function.Negative values can also be set for interesting effects.
OPERATION1. Select Job #05.
32
2. Press + 1/YES.The display will show the function currently assignedto the foot switch.
3. Tap any key on the front panel whose function you wouldlike to assign to the foot switch.

The name of the function/key will show on the LCD (ifa key has several functions, only one is displayed). Thecursor disappears, indicating that assignment is com-pleted.
Example:
3. The message
shows that the Key Data has been loaded.
* If + 1/YES is pressed again, the Instrument keys are resetto the voices prior to Key Data load.
JOB #07: KEY DATA SAVE
FUNCTION Saves the current Instrument key layout andother Key Assign settings to the internalmemory of the RX7.
OPERATION1. Select Job #07. The display will show
2. You can now choose to which Key Data number from1 to 4 you want to save the current Instrument key as-signment (layout) data.Hit the respective numeric key and then press + 1/YES.
3. The message
will appear, showing that the layout data has been savedto the specified number.
JOB #08: KEY DATA LOAD
FUNCTION Loads Key Data (voice layouts etc.) to theInstrument keys.
OPERATION1. Select Job #08. The display will show
2. Input the desired Key Data parameter number with therespective numeric key and and press + 1/YES.
* Data numbers 1 through 4 correspond to the Key Datasaved with Job #07, while numbers 5 through 9 call uplayouts that are permanently stored in the RX7 memory.
33
MIDI
OVERVIEW
The variety of applications for these functions is enormous, letting you use the RX7 as a state-of-the-art MIDI sound source andcontroller. For examples, they allow you to:
* Play any or all RX7 voices from up to 16 external keyboards and/or sequencers by assigning MIDI note numbers to each RX7instrument and MIDI channels to as many as 16 of them.
* Use single RX7 voices as sound sources for external keyboards or sequencers, allowing you e.g. to play scales and chords withthese voices from synthesizer keyboards.
* Instantly and remotely select up to 16 different RX7 voices for playing from an external keyboard simply by switching MIDIchannels.
* Use a synthesizer's pitch bend wheel to control pitch bend effects for RX7 voices.
* Play external MIDI sources from the RX7 Instrument keys according MIDI note data output by the RX7 on up to 16 MIDIchannels.
* Use the RX7 as a sequencer.
* Transmit or receive bulk data.
To be able to make full use of the information given in this section, you will have to have a basic understanding of the MIDI standard.A guide called “The MIDI Book” is available from your Yamaha dealer. Consult this or other publications for more details onMIDI.
The rear panel MIDI IN terminal must be connected to the external device's MIDI OUT for external MIDI control of theRX7. If you want to control other MIDI equipment from the RX7, connect MIDI OUT to the other device's MIDI IN terminal.
To use the MIDI functions, press MIDI. The upper line of the LCD will display
JOB #01: CHANNEL MESSAGE
FUNCTION Enables or disables reception/transmissionof MIDI Channel Messages.
Unless this function is ON, no communication is possiblebetween the RX7 and connected MIDI devices (i.e. the RX7can neither control, nor be controlled by, external MIDIequipment).
* Even if this function is ON, communication is not possibleunless the RX7 MIDI channels and those of the connecteddevices are set to match. (See Jobs #02 and #03 below.)
OPERATION1. Making sure that “MIDI Information” is displayed,
select Job #01.The lower line of the display will show whether MIDIChannel Message transmission/reception is currentlypossible or not.
2. Switch this function on or off using the - 1/NO and+ 1/YES keys or the DATA slider.
JOB #02: RECEIVE CHANNEL
FUNCTION Allows selection of channels for MIDI datareception and the type of note number controlfor that channel.
With this function, any individual MIDI channel can beturned on or off for reception.
In addition, you can specify the type of note number controlfor each channel:
“p” indicates that note numbersreceived on this MIDI channelcontrol the pitch of the RX7 voiceassigned to that channel. In other
Pitch assignment (p)
34
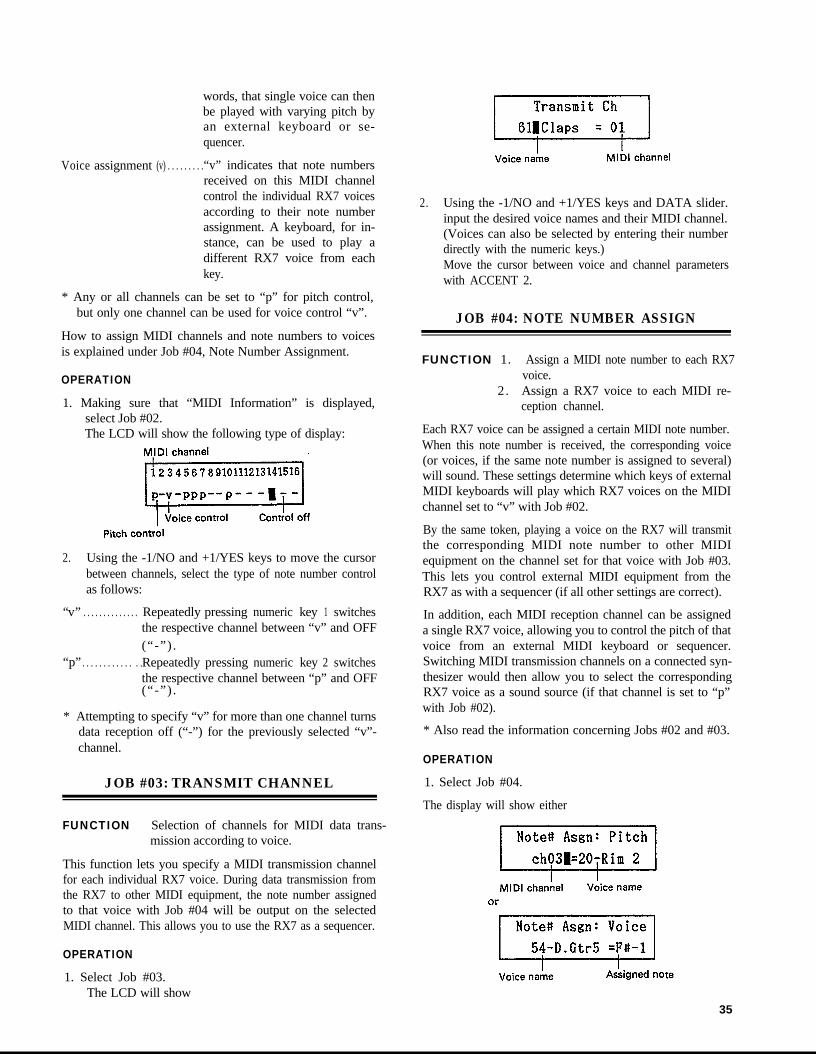
words, that single voice can thenbe played with varying pitch byan external keyboard or se-quencer.
Voice assignment (v) . . . . . . . . .“v” indicates that note numbersreceived on this MIDI channelcontrol the individual RX7 voicesaccording to their note numberassignment. A keyboard, for in-stance, can be used to play adifferent RX7 voice from eachkey.
* Any or all channels can be set to “p” for pitch control,but only one channel can be used for voice control “v”.
How to assign MIDI channels and note numbers to voicesis explained under Job #04, Note Number Assignment.
OPERATION1. Making sure that “MIDI Information” is displayed,
select Job #02.The LCD will show the following type of display:
2. Using the -1/NO and +1/YES keys to move the cursorbetween channels, select the type of note number controlas follows:
“v” . . . . . . . . . . . . . . Repeatedly pressing numeric key 1 switchesthe respective channel between “v” and OFF(“-”) .
“p” . . . . . . . . . . . . . . Repeatedly pressing numeric key 2 switchesthe respective channel between “p” and OFF(“-”) .
* Attempting to specify “v” for more than one channel turnsdata reception off (“-”) for the previously selected “v”-channel.
JOB #03: TRANSMIT CHANNEL
FUNCTION Selection of channels for MIDI data trans-mission according to voice.
This function lets you specify a MIDI transmission channelfor each individual RX7 voice. During data transmission fromthe RX7 to other MIDI equipment, the note number assignedto that voice with Job #04 will be output on the selectedMIDI channel. This allows you to use the RX7 as a sequencer.
OPERATION1. Select Job #03.
The LCD will show
2. Using the -1/NO and +1/YES keys and DATA slider.input the desired voice names and their MIDI channel.(Voices can also be selected by entering their numberdirectly with the numeric keys.)Move the cursor between voice and channel parameterswith ACCENT 2.
JOB #04: NOTE NUMBER ASSIGN
FUNCTION 1. Assign a MIDI note number to each RX7voice.
2 . Assign a RX7 voice to each MIDI re-ception channel.
Each RX7 voice can be assigned a certain MIDI note number.When this note number is received, the corresponding voice(or voices, if the same note number is assigned to several)will sound. These settings determine which keys of externalMIDI keyboards will play which RX7 voices on the MIDIchannel set to “v” with Job #02.
By the same token, playing a voice on the RX7 will transmitthe corresponding MIDI note number to other MIDIequipment on the channel set for that voice with Job #03.This lets you control external MIDI equipment from theRX7 as with a sequencer (if all other settings are correct).
In addition, each MIDI reception channel can be assigneda single RX7 voice, allowing you to control the pitch of thatvoice from an external MIDI keyboard or sequencer.Switching MIDI transmission channels on a connected syn-thesizer would then allow you to select the correspondingRX7 voice as a sound source (if that channel is set to “p”with Job #02).
* Also read the information concerning Jobs #02 and #03.
OPERATION1. Select Job #04.
The display will show either
35
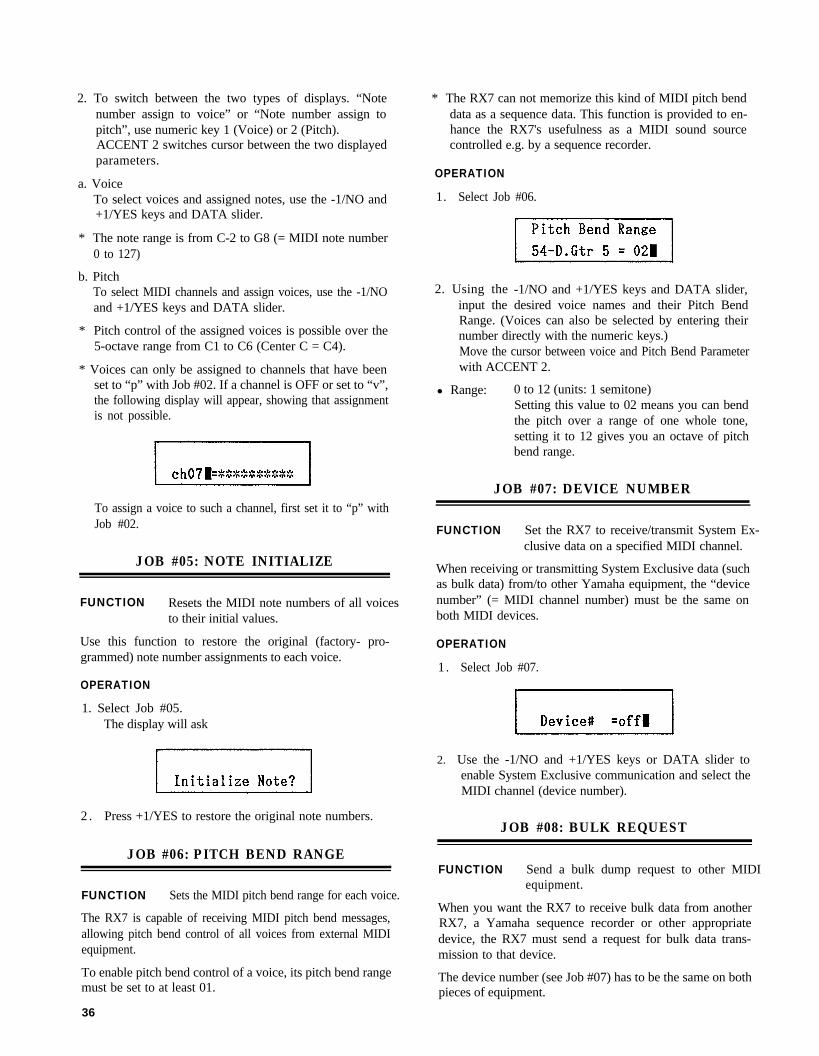
2. To switch between the two types of displays. “Notenumber assign to voice” or “Note number assign topitch”, use numeric key 1 (Voice) or 2 (Pitch).ACCENT 2 switches cursor between the two displayedparameters.
a. VoiceTo select voices and assigned notes, use the -1/NO and+1/YES keys and DATA slider.
* The note range is from C-2 to G8 (= MIDI note number0 to 127)
b. PitchTo select MIDI channels and assign voices, use the -1/NOand +1/YES keys and DATA slider.
* Pitch control of the assigned voices is possible over the5-octave range from C1 to C6 (Center C = C4).
* Voices can only be assigned to channels that have beenset to “p” with Job #02. If a channel is OFF or set to “v”,the following display will appear, showing that assignmentis not possible.
To assign a voice to such a channel, first set it to “p” withJob #02.
JOB #05: NOTE INITIALIZE
FUNCTION Resets the MIDI note numbers of all voicesto their initial values.
Use this function to restore the original (factory- pro-grammed) note number assignments to each voice.
OPERATION1. Select Job #05.
The display will ask
2 . Press +1/YES to restore the original note numbers.
JOB #06: PITCH BEND RANGE
FUNCTION Sets the MIDI pitch bend range for each voice.
The RX7 is capable of receiving MIDI pitch bend messages,allowing pitch bend control of all voices from external MIDIequipment.
To enable pitch bend control of a voice, its pitch bend rangemust be set to at least 01.
36
* The RX7 can not memorize this kind of MIDI pitch benddata as a sequence data. This function is provided to en-hance the RX7's usefulness as a MIDI sound sourcecontrolled e.g. by a sequence recorder.
OPERATION1. Select Job #06.
2. Using the -1/NO and +1/YES keys and DATA slider,input the desired voice names and their Pitch BendRange. (Voices can also be selected by entering theirnumber directly with the numeric keys.)Move the cursor between voice and Pitch Bend Parameterwith ACCENT 2.
l Range: 0 to 12 (units: 1 semitone)Setting this value to 02 means you can bendthe pitch over a range of one whole tone,setting it to 12 gives you an octave of pitchbend range.
JOB #07: DEVICE NUMBER
FUNCTION Set the RX7 to receive/transmit System Ex-clusive data on a specified MIDI channel.
When receiving or transmitting System Exclusive data (suchas bulk data) from/to other Yamaha equipment, the “devicenumber” (= MIDI channel number) must be the same onboth MIDI devices.
OPERATION1. Select Job #07.
2. Use the -1/NO and +1/YES keys or DATA slider toenable System Exclusive communication and select theMIDI channel (device number).
JOB #08: BULK REQUEST
FUNCTION Send a bulk dump request to other MIDIequipment.
When you want the RX7 to receive bulk data from anotherRX7, a Yamaha sequence recorder or other appropriatedevice, the RX7 must send a request for bulk data trans-mission to that device.
The device number (see Job #07) has to be the same on bothpieces of equipment.
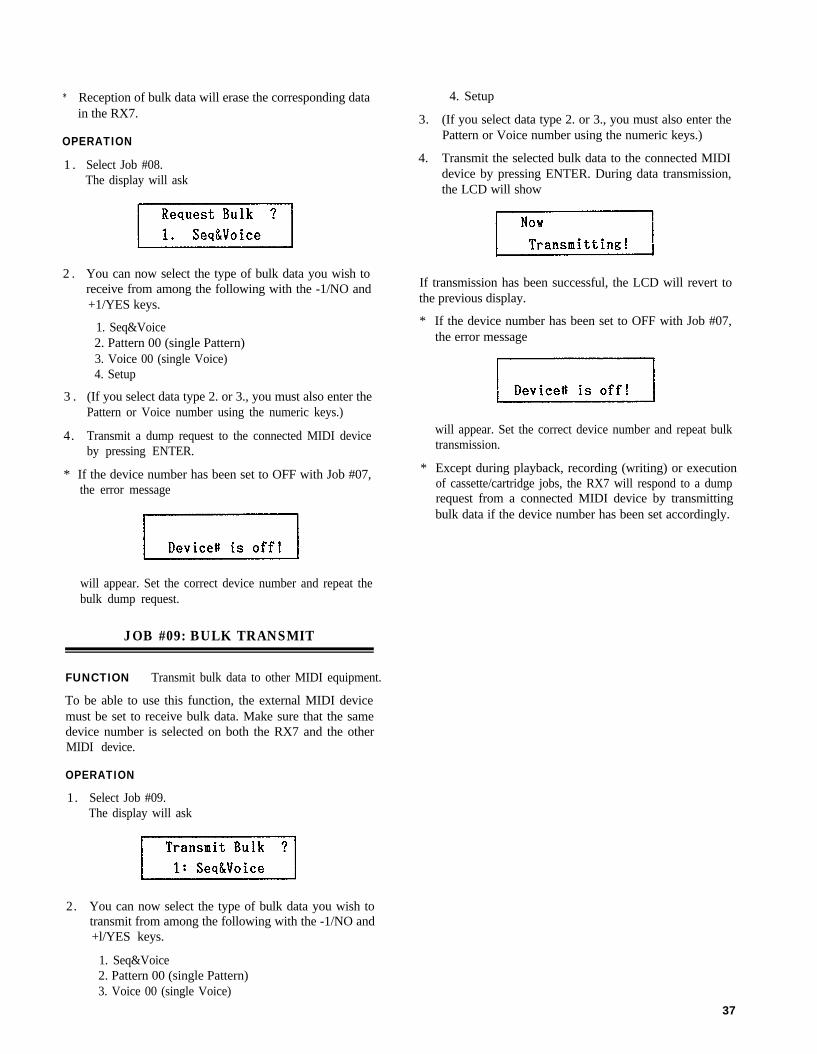
* Reception of bulk data will erase the corresponding datain the RX7.
OPERATION1 . Select Job #08.
The display will ask
2 . You can now select the type of bulk data you wish toreceive from among the following with the -1/NO and+1/YES keys.
1. Seq&Voice2. Pattern 00 (single Pattern)3. Voice 00 (single Voice)4. Setup
3 . (If you select data type 2. or 3., you must also enter thePattern or Voice number using the numeric keys.)
4. Transmit a dump request to the connected MIDI deviceby pressing ENTER.
* If the device number has been set to OFF with Job #07,the error message
will appear. Set the correct device number and repeat thebulk dump request.
JOB #09: BULK TRANSMIT
FUNCTION Transmit bulk data to other MIDI equipment.
To be able to use this function, the external MIDI devicemust be set to receive bulk data. Make sure that the samedevice number is selected on both the RX7 and the otherMIDI device.
OPERATION1. Select Job #09.
The display will ask
4. Setup
3. (If you select data type 2. or 3., you must also enter thePattern or Voice number using the numeric keys.)
4. Transmit the selected bulk data to the connected MIDIdevice by pressing ENTER. During data transmission,the LCD will show
If transmission has been successful, the LCD will revert tothe previous display.
* If the device number has been set to OFF with Job #07,the error message
will appear. Set the correct device number and repeat bulktransmission.
* Except during playback, recording (writing) or executionof cassette/cartridge jobs, the RX7 will respond to a dumprequest from a connected MIDI device by transmittingbulk data if the device number has been set accordingly.
2. You can now select the type of bulk data you wish totransmit from among the following with the -1/NO and+l/YES keys.
1. Seq&Voice2. Pattern 00 (single Pattern)3. Voice 00 (single Voice)
37
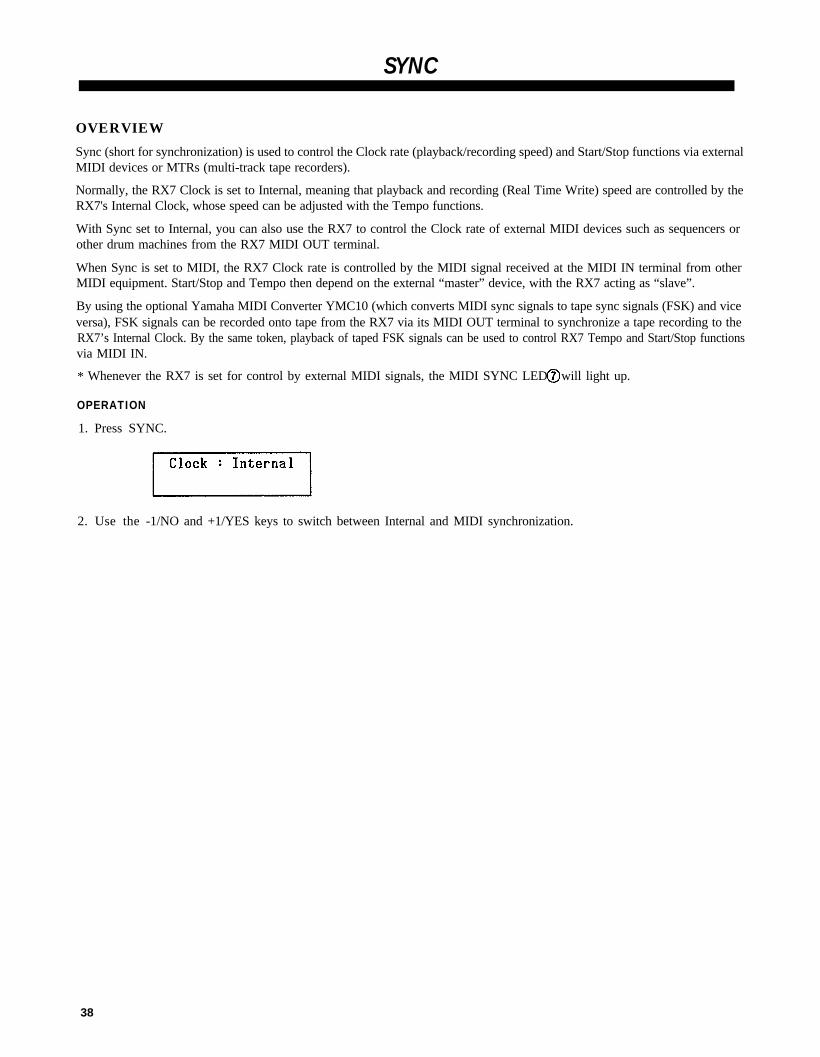
SYNC
OVERVIEW
Sync (short for synchronization) is used to control the Clock rate (playback/recording speed) and Start/Stop functions via externalMIDI devices or MTRs (multi-track tape recorders).
Normally, the RX7 Clock is set to Internal, meaning that playback and recording (Real Time Write) speed are controlled by theRX7's Internal Clock, whose speed can be adjusted with the Tempo functions.
With Sync set to Internal, you can also use the RX7 to control the Clock rate of external MIDI devices such as sequencers orother drum machines from the RX7 MIDI OUT terminal.
When Sync is set to MIDI, the RX7 Clock rate is controlled by the MIDI signal received at the MIDI IN terminal from otherMIDI equipment. Start/Stop and Tempo then depend on the external “master” device, with the RX7 acting as “slave”.
By using the optional Yamaha MIDI Converter YMC10 (which converts MIDI sync signals to tape sync signals (FSK) and viceversa), FSK signals can be recorded onto tape from the RX7 via its MIDI OUT terminal to synchronize a tape recording to theRX7’s Internal Clock. By the same token, playback of taped FSK signals can be used to control RX7 Tempo and Start/Stop functionsvia MIDI IN.
* Whenever the RX7 is set for control by external MIDI signals, the MIDI SYNC LED will light up.
OPERATION1. Press SYNC.
2. Use the -1/NO and +1/YES keys to switch between Internal and MIDI synchronization.
38

UTILITY
OVERVIEW
The UTILITY KEY accesses a number of different functions which let you
* Display remaining Pattern and Song memory.
* Turn Memory Protection on and off.
* Change voices in existing Patterns.
* Clear all Songs or Patterns.
* Load internal ROM demonstration data.
JOB #01: REMAINING PATTERN MEMORY
FUNCTION Displays remaining Pattern memory in %.
OPERATION Select Job #01.
JOB #02: REMAINING SONG MEMORY
FUNCTION Displays remaining Song memory in %.
OPERATION Select Job #02.
JOB #03: MEMORY PROTECT
FUNCTION Turns Memory Protection on or off. Unlessediting data, leave Memory Protection on toavoid inadvertent erasure of previous settings.
OPERATION1. Select Job #03.2. Turn Memory Protect off with -1/NO and on with
+1/YES.
JOB #04: VOICE CHANGE
FUNCTION Exchanges voices in one or all Patterns.
This is a very helpful function when you want to try outdifferent voice combinations for Patterns after having pro-grammed them.
* If you only want to change voices in a single Pattern, itmust be selected before using this Job.
JOB #05: ALL PATTERNS CLEAR
OPERATION1. Select Job #04.
The display will ask:
2. Input your choice of single or all Patterns with numerickey 1 or 2.
3. Switching between the upper and lower display line withACCENT 2, select the instruments you want to exchangewith the numeric keys or -1/NO and +1/YES.
4. Press ENTER.
5. Confirm by pressing +1/YES.
* Memory Protection must be off for this function.
FUNCTION Erases all Patterns from the RX7 memory.
OPERATION1. Select Job #05.
2. Press +l/YES.
39
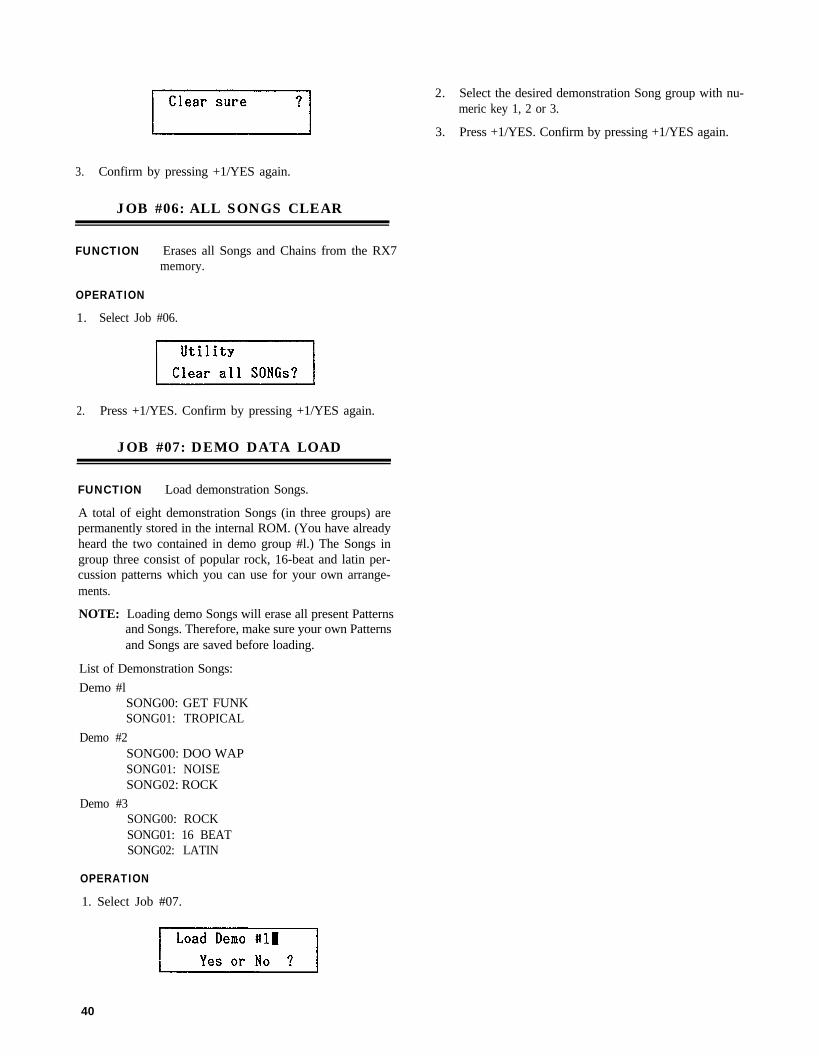
3. Confirm by pressing +1/YES again.
JOB #06: ALL SONGS CLEAR
FUNCTION Erases all Songs and Chains from the RX7memory.
OPERATION1. Select Job #06.
2. Press +1/YES. Confirm by pressing +1/YES again.
JOB #07: DEMO DATA LOAD
FUNCTION Load demonstration Songs.
A total of eight demonstration Songs (in three groups) arepermanently stored in the internal ROM. (You have alreadyheard the two contained in demo group #l.) The Songs ingroup three consist of popular rock, 16-beat and latin per-cussion patterns which you can use for your own arrange-ments.
NOTE: Loading demo Songs will erase all present Patternsand Songs. Therefore, make sure your own Patternsand Songs are saved before loading.
List of Demonstration Songs:
Demo #lSONG00: GET FUNKSONG01: TROPICAL
Demo #2SONG00: DOO WAPSONG01: NOISESONG02: ROCK
Demo #3SONG00: ROCKSONG01: 16 BEATSONG02: LATIN
OPERATION1. Select Job #07.
40
2. Select the desired demonstration Song group with nu-meric key 1, 2 or 3.
3. Press +1/YES. Confirm by pressing +1/YES again.
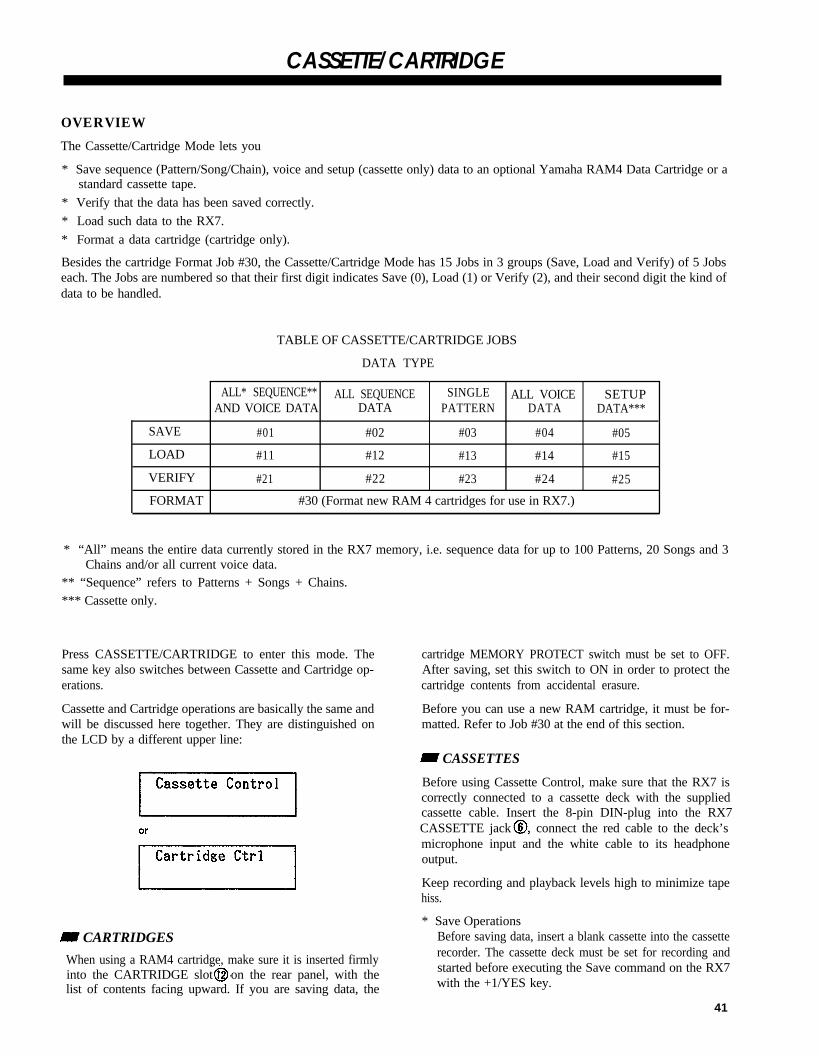
CASSETTE/CARTRIDGE
OVERVIEW
The Cassette/Cartridge Mode lets you
* Save sequence (Pattern/Song/Chain), voice and setup (cassette only) data to an optional Yamaha RAM4 Data Cartridge or astandard cassette tape.
* Verify that the data has been saved correctly.
* Load such data to the RX7.
* Format a data cartridge (cartridge only).
Besides the cartridge Format Job #30, the Cassette/Cartridge Mode has 15 Jobs in 3 groups (Save, Load and Verify) of 5 Jobseach. The Jobs are numbered so that their first digit indicates Save (0), Load (1) or Verify (2), and their second digit the kind ofdata to be handled.
TABLE OF CASSETTE/CARTRIDGE JOBS
DATA TYPE
ALL* SEQUENCE** ALL SEQUENCE SINGLE ALL VOICE SETUPAND VOICE DATA DATA PATTERN DATA DATA***
SAVE #01 #02 #03 #04 #05
LOAD #11 #12 #13 #14 #15
VERIFY #21 #22 #23 #24 #25
FORMAT #30 (Format new RAM 4 cartridges for use in RX7.)
* “All” means the entire data currently stored in the RX7 memory, i.e. sequence data for up to 100 Patterns, 20 Songs and 3Chains and/or all current voice data.
** “Sequence” refers to Patterns + Songs + Chains.*** Cassette only.
Press CASSETTE/CARTRIDGE to enter this mode. Thesame key also switches between Cassette and Cartridge op-erations.
Cassette and Cartridge operations are basically the same andwill be discussed here together. They are distinguished onthe LCD by a different upper line:
CARTRIDGES
When using a RAM4 cartridge, make sure it is inserted firmlyinto the CARTRIDGE slot on the rear panel, with thelist of contents facing upward. If you are saving data, the
cartridge MEMORY PROTECT switch must be set to OFF.After saving, set this switch to ON in order to protect thecartridge contents from accidental erasure.
Before you can use a new RAM cartridge, it must be for-matted. Refer to Job #30 at the end of this section.
CASSETTES
Before using Cassette Control, make sure that the RX7 iscorrectly connected to a cassette deck with the suppliedcassette cable. Insert the 8-pin DIN-plug into the RX7CASSETTE jack , connect the red cable to the deck’smicrophone input and the white cable to its headphoneoutput.
Keep recording and playback levels high to minimize tapehiss.
* Save OperationsBefore saving data, insert a blank cassette into the cassetterecorder. The cassette deck must be set for recording andstarted before executing the Save command on the RX7with the +1/YES key.
41

* Load and Verify OperationsFor Load and Verify operations, make sure the requireddata cassette is inserted into the deck and rewound to thebeginning of the recorded data. Playback must be startedprior to RX7 command execution. The upper left-handpart of the LCD will begin to blink as soon as the header(beginning of data on cassette) is found.
* InterruptPressing STOP/CONTINUE during a Cassette Save, Loador Verify operation interrupts it and displays
then
It is recommended to Verify data after saving, particularlyin the case of cassettes, to make sure that it has beenmemorized properly. (The Verify function compares thesaved data with the original data.)
JOBS #01 - #05: SAVE DATA
FUNCTION Saves various kinds of data onto cartridge/cassette.
Refer to the CASSETTE/CARTRIDGE Menu on the RX7front panel and the TABLE OF CASSETTE/CARTRIDGEJOBS above to determine the appropriate Job number forthe type of data to be saved.
Since saving single Patterns to a cartridge or cassette (Job#03) necessitates slightly different procedures, these are ex-plained separately below.
* When you perform a Save operation for any kind of dataexcept single Patterns to a cartridge already containingthat kind of data, the previous data will be erased.
* Setup data, which can be saved on cassette only, includesthe following data:
* The 5 sets of Key Data currently stored in the RX7* The accent levels of all voices* The MIDI transmit/receive channels, note numbers
and pitch bend ranges of all voices.
GENERAL SAVE OPERATION
1. Select the desired Job #01, #02, #04 or #05.The display will ask you to confirm your choice of datatype.
2. Press +1/YES if you want to save the displayed data.The LCD will ask for confirmation:
42
3. Press +1/YES again to confirm.The display will show
indicating that the data has been saved.
* It is now a good idea to verify.
SAVING SINGLE PATTERNS TO A CARTRIDGE
1. Select Job #03 in Cartridge Mode.The display will ask you to confirm:
2. Press +1/YES. The display will change to
3. You can now specify the number of the Pattern to besaved as well as the desired destination in the RAMcartridge.(Use ACCENT 2 to switch between them.)
* If the specified cartridge destination already contains data,it will be erased by when you execute Save.
4. Press +1/YES.The LCD will ask you to confirm.
5. Press +1/YES again.The display will show “executing”, then “completed”.
SAVING SINGLE PATTERNS TO A CASSETTE
1 . Select Job #03 in Cassette Mode.The display will ask you to input the PTN number.

2. Enter the Pattern number directly with the numeric keys.
3. Press +1/YES. The display will show “executing”, then“completed”.
JOBS #11 - #15: LOAD DATA
FUNCTION Loads various kinds of data from a cartridgeor cassette.
Refer to the CASSETTE/CARTRIDGE Menu on the RX7front panel and the TABLE OF CASSETTE/CARTRIDGEJOBS above to determine the appropriate Job number forthe type of data to be loaded.
Since loading single Patterns from a cartridge or cassette (Job#13) necessitates slightly different procedures, these are ex-plained separately below.
The Load operations correspond to the Save operations ex-plained above.
GENERAL LOAD OPERATION
1. Select the desired Job #11, #12, #14 or #15.The display will ask you to confirm your choice of datatype.
2. Press +1/YES if you want to load the displayed data.The LCD will ask for confirmation:
3. Press +1/YES again to confirm.The display will show
then
indicating that the data has been loaded to the RX7.
LOADING SINGLE PATTERNS FROMA CARTRIDGE
1 . Select Job #13 in Cartridge Mode.The display will ask you to confirm:
2. Press +1/YES. The display will change to
3. You can now specify the cartridge location you wish toload from as well as the Pattern number you want to loadit to. (Use ACCENT 2 to switch between them.)
* If the specified Pattern number already contains data, itwill be erased when you execute Load.
4. Press +1/YES.The LCD will ask you to confirm.
5. Press +1/YES again.The display will show “executing”, then “completed”.
LOADING SINGLE PATTERNS FROMA CASSETTE
1. First select the Pattern location you wish to load cassettedata to (in Pattern Select mode).
2. Select Job #13 in Cassette Mode.The display will ask you to input the PTN number.
3. Enter the Pattern number directly with the numeric keys,then press +1/YES. The display will ask you to confirm:
4. Press +1/YES again. The display will show “executing”,then “completed”.
43

JOBS #21 - #25: VERIFY DATA
FUNCTION Verifies whether data has been saved correctlyto a cartridge or cassette.
Refer to the CASSETTE/CARTRIDGE Menu on the RX7front panel and the TABLE OF CASSETTE/CARTRIDGEJOBS above to determine the appropriate Job number forthe type of data to be verified.
The operations for verifying single Patterns saved to a car-tridge or cassette (Job #13) are slightly different and thereforeexplained separately below.
The Verify operations are exactly complementary to the Saveoperations explained above.
GENERAL VERIFY OPERATION
1 . Select the desired Job #21, #22, #24 or #25.The display will ask you to confirm your choice of datatype.
2. Press +1/YES if you want to verify the displayed data.The LCD will ask for confirmation:
3. Press +1/YES again to confirm.The display will show
then
indicating that the data has been verified.
VERIFYING SINGLE PATTERNS SAVEDTO A CARTRIDGE
1. Select Job #23 in Cartridge Mode.The display will ask you to confirm:
2. Press +1/YES. The display will change to
44
3. You can now specify the Pattern number and cartridgelocation you want to verify. (Use ACCENT 2 to switchbetween them.)
4. Press +1/YES.The LCD will ask you to confirm.
5. Press +1/YES again.If the data has been saved properly, the display will show
* If data has not been saved correctly, an error messagewill appear instead. Refer to the section ERROR MES-SAGES.
VERIFYING SINGLE PATTERNS SAVEDTO A CASSETTE
1. Select Job #23 in Cassette Mode.The display will ask you to input the PTN number.
2. Enter the Pattern number directly with the numeric keys,then press +1/YES. The display will ask you to confirm:
3. Press +1/YES again. The display will show
After verification, the display will show the followingmessage if the data has been saved properly:

* If data has not been saved correctly, an error messagewill appear instead. Refer to the section ERROR MES-SAGES.
JOB #30: FORMAT CARTRIDGE
FUNCTION Formats a RAM4 Data Cartridge for use withthe RX7.
Any new RAM4 Data Cartridge (or one that has been pre-viously used with other equipment) has to be formatted withthis Job before it can used with the RX7.
Make sure that the cartridge is inserted correctly, with theMEMORY PROTECT switch set to OFF.
* Formatting a cartridge which already contains data willcompletely erase all such data.
OPERATION1. In Cartridge Control mode, select Job #30.
The display will ask
2. Press +1/YES.The display will ask you to confirm:
3. If you are, press +1/YES again.After “executing”, the LCD will display
* If formatting was not carried out successfully, the message
will appear. In this case, repeat formatting.
45

ERROR MESSAGES
You have probably already encountered some of the error messages mentioned in preceding sections. In general, the RX7 willdisplay an error message if:
* An operating mistake has been made.
* Memory or other limits have been reached.
* Malfunctions have occurred (due to faulty connections, etc.)
Error messages always appear on the lower line of the LCD. The following list is for your reference.
GENERAL ERROR MESSAGES
MESSAGE CAUSE REMEDY
checksum error !During a Receive Bulk operation (MIDI JOB #09), Check that the MIDI cable is not faulty, and repeatthere was a break in transmission, due to faulty cable the operation. Also read the PRECAUTIONS sectionor electrical interference. of this manual for advice on electrical interference.
Using the Part Copy function (Edit Song Mode) you Enter correct Part numbers.
illegal input! entered a part number that does not appear in theSong, or the second Part number you entered waslower than the first Part number.
The sequence memory (Pattern, Song or Chain) is Save the data presently in the RX7 to cartridge orfull.
memory full!!cassette, and clear (erase) data to make room in thememory. Patterns, Songs and Chains can be clearedindividually, or you can clear all Patterns or all Songs(UTILITY MODE JOBS #05 and #06 respectively).
You have tried to clear or rewrite voice or sequenceMemory Protected
Turn the RX7’s Memory Protect OFF using UTILITYdata (by entering or loading new data) and the JOB #03. Then carry out the data operation again.Memory Protect function is turned on.
The RX7’s MIDI Buffer is full, because too much Press any key to clear the LCD. Send less dense data,data has been sent too rapidly from an external de- or send at a slower tempo.vice.
MIDI BUFFER FULL The MIDI Buffer is a kind of “waiting room” forMIDI data, where data is held for minute periodsof time (of the order of .0003 seconds for one Byte)while it is being processed by the RX7.
You have turned on power to a connected MIDI Press any key to clear the LCD, and continue normal
MIDI DATA ERROR!device, which sends a non-standard signal to the operation.RX7. Technically, this is called a “framing” erroror an “overrun” error.
no data!You have tried to use the Edit Pattern function toedit a Pattern that does not contain data.
not found!
1. You have used the Search Mark function and 1. Enter the correct Mark name.entered the name of a Mark that has not been 2. Enter the correct Part number.set in the Song.
2. You have used the Search Part or Copy Partfunction and entered a Part number that is higherthan the total number of Parts in the Song.
1. You have tried to insert a Part in a Song that Edit two or more Songs, each of which forms aalready contains 999 Parts. section of the long Song you were trying to create.
too large PART! 2. You are trying to use the Copy Part function with Then use the Chain Edit Mode to combine thesethe result that the new Song will have more than Songs into a continuous sequence.999 Parts.
46

MESSAGE
too large PTN!
wrong signature!
CAUSE
1. A Pattern contains the maximum amount of data,and you are trying to write more data into it.
2. You are trying to append a Pattern to anotherPattern, and the two Patterns combined containmore than the maximum amount of data.
1. You have tried to append two Patterns whichhave different time signatures.
2. You have tried to append two Patterns which,when combined, total more than 100 bars inlength.
CARTRIDGE MODE ERROR MESSAGES
MESSAGE
Cartrg not ready
Cartrg other type
Cartrg protected
Format conflict!
no data!
Verify error!
Format error!
CAUSE
You have entered the Cartridge Mode, but you havenot inserted a RAM4 Cartridge into the RX7.
You have entered the Cartridge Mode, but the RX7’sSequence Data Cartridge slot contains the wrongtype of cartridge.
You have tried to save data, or execute the Formatoperation, with the Memory Protect turned ON onyour RAM4 Cartridge.
You have entered the Cartridge Mode, but the RX7’sSequence Data Cartridge slot contains a cartridgewith a different format.
You have tried to save, load or verify a Patterncontaining no data.
You have tried to verify cartridge data, but the RX7contains different data than that contained in theRAM4 cartridge.
Formatting was not successful.
REMEDY
Write two or more shorter Patterns, each of whichforms a section of the long Pattern you were tryingto create. Then use the Edit Song Mode to combinethese Patterns into a continuous sequence.
1. Write a new Pattern which will have a time sig-nature equivalent to the two original Patternscombined. For example, if you had wanted toappend a 4/4 Pattern with a 3/4 Pattern, writea new 7/4 Pattern (3/4 + 4/4 = 7/4).
2. Rewrite the same two Patterns using longer bars,then append them. For example, if the twoPatterns each contained 52 bars of 4/4 time (total104 bars), rewrite them as Patterns containing26 bars of 8/4 time (total 52 bars), which canthen be appended.
REMEDY
Insert a RAM4 Cartridge, then enter the CartridgeMode again.
Remove the wrong cartridge, then insert a RAM4Cartridge, then enter the Cartridge Mode again.
Remove the RAM4 Cartridge and turn its MemoryProtect OFF by flicking the switch on the undersideof the cartridge. Then insert the cartridge and enterthe required Job number once more.
1. Remove the cartridge and insert a RAM4 car-tridge that has been formatted for use with theRX7.
2. Remove the cartridge and insert a RAM4 Car-tridge that has not been formatted, then enterthe Cartridge and execute the Format operation(JOB #30).
3. If the data contained in the cartridge is notneeded, make sure its Memory Protect is OFF,and format it for use with the RX7. (CARTRIDGEJOB #30).
1. Save the data again, then execute the Verifyoperation once more.
2. In the case of verifying a single Pattern, executethe verify operation again, making sure you haveentered the correct Pattern numbers.
Repeat formatting
47
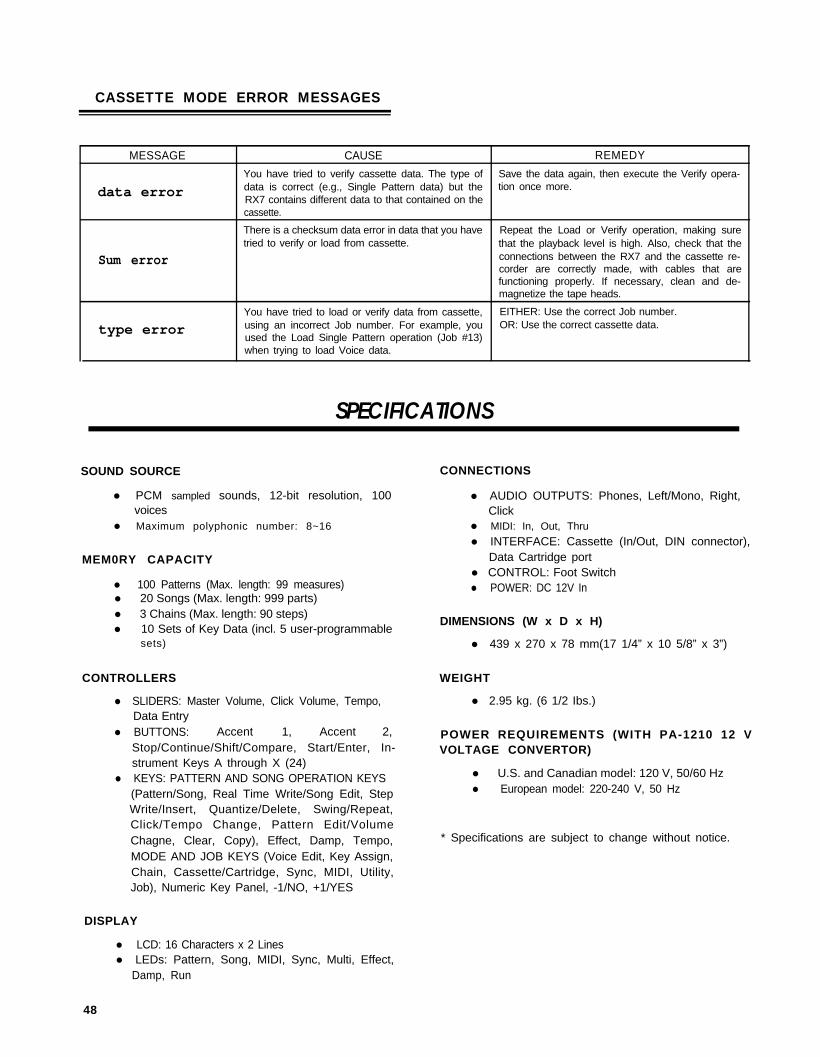
CASSETTE MODE ERROR MESSAGES
MESSAGE
data error
CAUSE REMEDY
You have tried to verify cassette data. The type of Save the data again, then execute the Verify opera-data is correct (e.g., Single Pattern data) but the tion once more.RX7 contains different data to that contained on thecassette.
Sum error
There is a checksum data error in data that you have Repeat the Load or Verify operation, making suretried to verify or load from cassette. that the playback level is high. Also, check that the
connections between the RX7 and the cassette re-corder are correctly made, with cables that arefunctioning properly. If necessary, clean and de-magnetize the tape heads.
type error
You have tried to load or verify data from cassette, EITHER: Use the correct Job number.using an incorrect Job number. For example, you OR: Use the correct cassette data.used the Load Single Pattern operation (Job #13)when trying to load Voice data.
SPECIFICATIONS
SOUND SOURCE CONNECTIONS
l PCM sampled sounds, 12-bit resolution, 100voices
l Maximum polyphonic number: 8~16
MEM0RY CAPACITY
l 100 Patterns (Max. length: 99 measures)l 20 Songs (Max. length: 999 parts)l 3 Chains (Max. length: 90 steps)l 10 Sets of Key Data (incl. 5 user-programmable
sets)
CONTROLLERS
l SLIDERS: Master Volume, Click Volume, Tempo,Data Entry
l BUTTONS: Accent 1, Accent 2,Stop/Continue/Shift/Compare, Start/Enter, In-strument Keys A through X (24)
l KEYS: PATTERN AND SONG OPERATION KEYS(Pattern/Song, Real Time Write/Song Edit, StepWrite/Insert, Quantize/Delete, Swing/Repeat,Click/Tempo Change, Pattern Edit/VolumeChagne, Clear, Copy), Effect, Damp, Tempo,MODE AND JOB KEYS (Voice Edit, Key Assign,Chain, Cassette/Cartridge, Sync, MIDI, Utility,Job), Numeric Key Panel, -1/NO, +1/YES
DISPLAY
l LCD: 16 Characters x 2 Linesl LEDs: Pattern, Song, MIDI, Sync, Multi, Effect,
Damp, Run
48
l AUDIO OUTPUTS: Phones, Left/Mono, Right,Click
l MIDI: In, Out, Thru
l INTERFACE: Cassette (In/Out, DIN connector),Data Cartridge port
l CONTROL: Foot Switchl POWER: DC 12V In
DIMENSIONS (W x D x H)
l 439 x 270 x 78 mm(17 1/4” x 10 5/8” x 3”)
WEIGHT
l 2.95 kg. (6 1/2 Ibs.)
POWER REQUIREMENTS (WITH PA-1210 12 VVOLTAGE CONVERTOR)
l U.S. and Canadian model: 120 V, 50/60 Hzl European model: 220-240 V, 50 Hz
* Specifications are subject to change without notice.
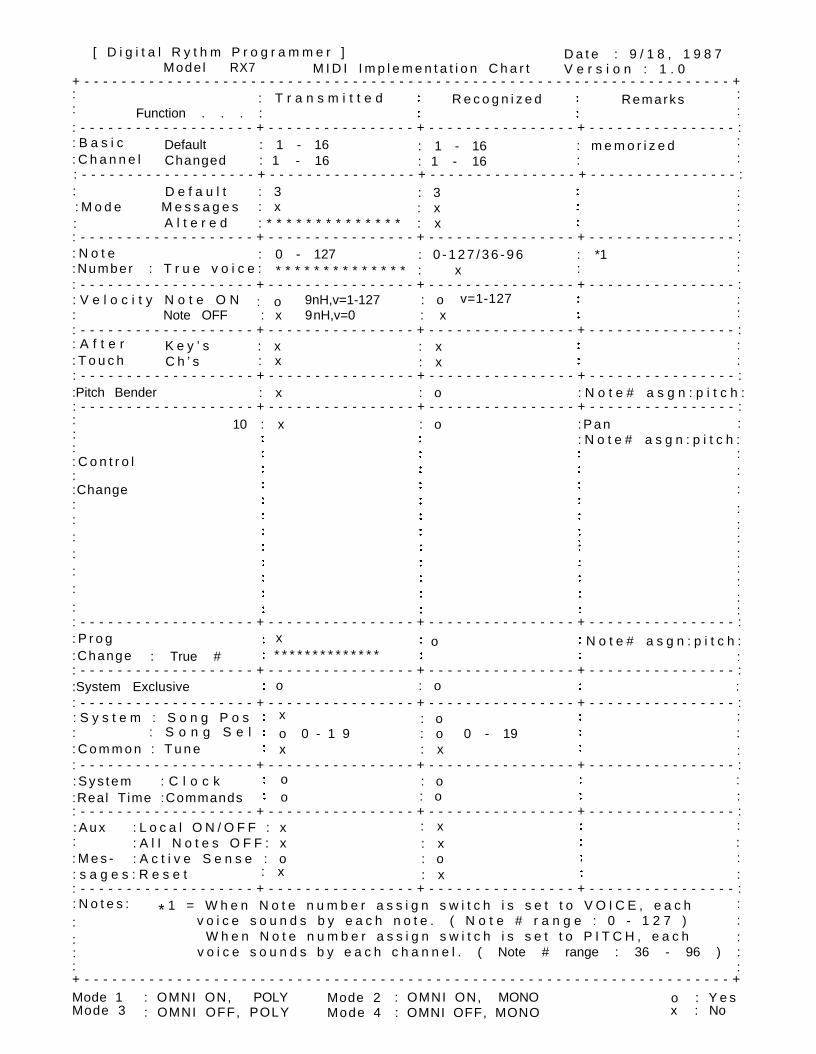
::
:
:
::
: o
:
:
:
: - - - - - - - - - - - - - - - - - - - + - - - - - - - - - - - - - - - - + - - - - - - - - - - - - - - - - + - - - - - - - - - - - - - - - - :: P r o g x
* * * * * * * * * * * * * *o N o t e # a s g n : p i t c h :
:Change : True #: - - - - - - - - - - - - - - - - - - - + - - - - - - - - - - - - - - - - + - - - - - - - - - - - - - - - - + - - - - - - - - - - - - - - - - ::System Exclusive o : o :: - - - - - - - - - - - - - - - - - - - + - - - - - - - - - - - - - - - - + - - - - - - - - - - - - - - - - + - - - - - - - - - - - - - - - - :: S y s t e m : S o n g P o s x : o :: : S o n g S e l o 0 - 1 9 : o 0 - 19: C o m m o n : T u n e x : x: - - - - - - - - - - - - - - - - - - - + - - - - - - - - - - - - - - - - + - - - - - - - - - - - - - - - - + - - - - - - - - - - - - - - - - :: S y s t e m : C l o c k o : o ::Real T ime :Commands o : o
:
: - - - - - - - - - - - - - - - - - - - + - - - - - - - - - - - - - - - - + - - - - - - - - - - - - - - - - + - - - - - - - - - - - - - - - - :: A u x : L o c a l O N / O F F : x : x
:
:
: : A l I N o t e s O F F : x : x
:
:
:
::: M e s - : A c t i v e S e n s e : o : o
:
:
: s a g e s : R e s e t : x : x: - - - - - - - - - - - - - - - - - - - + - - - - - - - - - - - - - - - - + - - - - - - - - - - - - - - - - + - - - - - - - - - - - - - - - - :: N o t e s : * 1 = W h e n N o t e n u m b e r a s s i g n s w i t c h i s s e t t o V O I C E , e a c h
:
:
v o i c e s o u n d s b y e a c h n o t e . ( N o t e # r a n g e : 0 - 1 2 7 ):
:W h e n N o t e n u m b e r a s s i g n s w i t c h i s s e t t o P I T C H , e a c h:
: v o i c e s o u n d s b y e a c h c h a n n e l . ( Note # range : 36 - 96 ) :
:
:
:
D e f a u l t : 3 : 3
:
: M o d e M e s s a g e s : x : x:
A l t e r e d : * * * * * * * * * * * * * * : x
:
:: - - - - - - - - - - - - - - - - - - - + - - - - - - - - - - - - - - - - + - - - - - - - - - - - - - - - - + - - - - - - - - - - - - - - - - :: N o t e : 0 - 127 : 0 - 1 2 7 / 3 6 - 9 6 : *1
::Number : T r u e v o i c e : * * * * * * * * * * * * * * : x :: - - - - - - - - - - - - - - - - - - - + - - - - - - - - - - - - - - - - + - - - - - - - - - - - - - - - - + - - - - - - - - - - - - - - - - :: V e l o c i t y N o t e O N 9nH,v=1-127 : o v=1-127
Note OFF : x 9nH,v=0 : x: - - - - - - - - - - - - - - - - - - - + - - - - - - - - - - - - - - - - + - - - - - - - - - - - - - - - - + - - - - - - - - - - - - - - - - :: A f t e r K e y ’ s : x : x :: T o u c h C h ’ s : x : x :: - - - - - - - - - - - - - - - - - - - + - - - - - - - - - - - - - - - - + - - - - - - - - - - - - - - - - + - - - - - - - - - - - - - - - - ::Pitch Bender : x : o : N o t e # a s g n : p i t c h :: - - - - - - - - - - - - - - - - - - - + - - - - - - - - - - - - - - - - + - - - - - - - - - - - - - - - - + - - - - - - - - - - - - - - - - :: 10 : x : o : P a n :: : N o t e # a s g n : p i t c h ::
:
:
: C o n t r o l
:
:
:
:
:
:
:
:
:
:Change
:
:
:
:
:
[ D i g i t a l R y t h m P r o g r a m m e r ] D a t e : 9 / 1 8 , 1 9 8 7Mode l RX7 M I D I I m p l e m e n t a t i o n C h a r t V e r s i o n : 1 . 0
+ - - - - - - - - - - - - - - - - - - - - - - - - - - - - - - - - - - - - - - - - - - - - - - - - - - - - - - - - - - - - - - - - - - - - - - +: T r a n s m i t t e d R e c o g n i z e d Remarks
Function . . . :: - - - - - - - - - - - - - - - - - - - + - - - - - - - - - - - - - - - - + - - - - - - - - - - - - - - - - + - - - - - - - - - - - - - - - - :: B a s i c Default : 1 - 16 : 1 - 16 : m e m o r i z e d: C h a n n e l Changed : 1 - 16 : 1 - 16 :: - - - - - - - - - - - - - - - - - - - + - - - - - - - - - - - - - - - - + - - - - - - - - - - - - - - - - + - - - - - - - - - - - - - - - - :
:+ - - - - - - - - - - - - - - - - - - - - - - - - - - - - - - - - - - - - - - - - - - - - - - - - - - - - - - - - - - - - - - - - - - - - - - +Mode 1 : OMNI ON, POLY Mode 2 : OMNI ON, MONO
:
o : Y e sMode 3 : OMNI OFF, POLY Mode 4 : OMNI OFF, MONO x : No
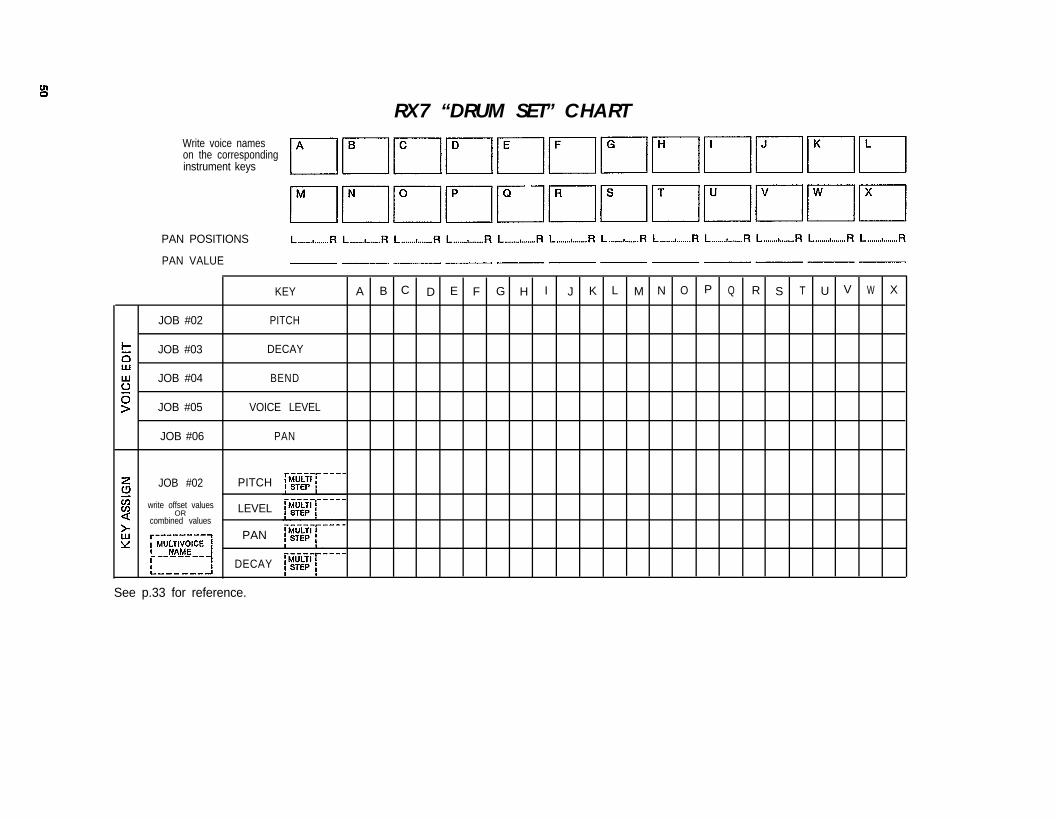
RX7 “DRUM SET” CHARTWrite voice nameson the correspondinginstrument keys
PAN POSITIONS
PAN VALUE
A B C D E F G H I J K L M N O P Q R S T U V W X
JOB #02
JOB #03
JOB #04
JOB #05
JOB #06
KEY
PITCH
DECAY
BEND
VOICE LEVEL
PAN
PITCH
LEVEL
PAN
DECAY
See p.33 for reference.
JOB #02
write offset valuesOR
combined values
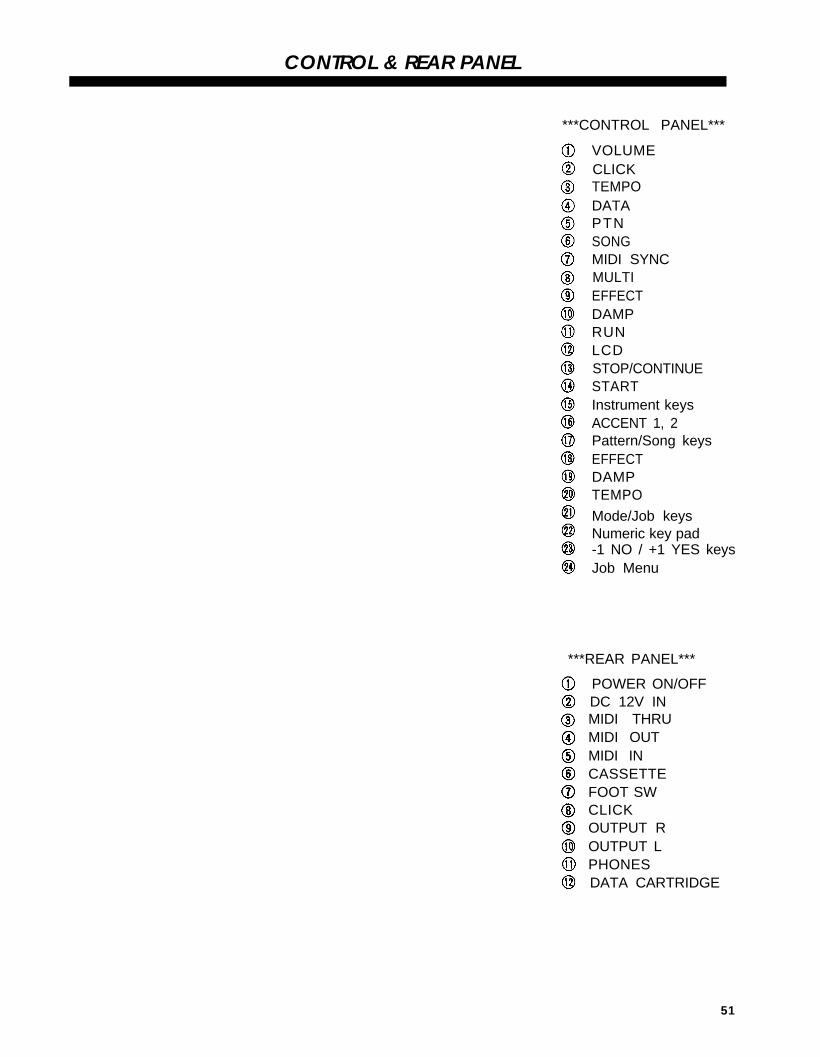
CONTROL & REAR PANEL
***CONTROL PANEL***
VOLUMECLICKTEMPODATA
EFFECT
PTNSONG
DAMP
MIDI SYNC
TEMPO
MULTIEFFECT
Mode/Job keys
DAMP
Numeric key pad
RUN
-1 NO / +1 YES keys
LCDSTOP/CONTINUESTARTInstrument keysACCENT 1, 2Pattern/Song keys
Job Menu
***REAR PANEL***
POWER ON/OFFDC 12V INMIDI THRUMIDI OUTMIDI INCASSETTEFOOT SWCLICKOUTPUT ROUTPUT LPHONESDATA CARTRIDGE
51


![Inês Gonçalves Tavares · Inês Gonçalves Tavares [Nome completo do autor] harvesting mechanism: Photophysics and [Nome completo do autor] [Nome completo do autor] [Nome completo](https://static.fdocuments.us/doc/165x107/60a09a816ad9f34daf682432/ins-gonalves-tavares-ins-gonalves-tavares-nome-completo-do-autor-harvesting.jpg)


![Service Charters [Nome del progetto] [Nome del relatore]](https://static.fdocuments.us/doc/165x107/56649e2f5503460f94b1fe07/service-charters-nome-del-progetto-nome-del-relatore.jpg)


![[Nome completo do autor] [Habilitações Académicas] [Nome ... · Diogo Rodrigues Francisco Sabino [Nome completo do autor] [Nome completo do autor] [Nome completo do autor] Hydrogels](https://static.fdocuments.us/doc/165x107/60e4508f8c055874545babee/nome-completo-do-autor-habilitaes-acadmicas-nome-diogo-rodrigues.jpg)

