Installation steps about window server 2003 and windows XP in virtualbox

. . .
. .
. .
. . . . . . . . . . . . . . . . . . . . . . . . . . . .XTOOLS X WINDOW SERVER USER’S GUIDE
E x t e n d i n g y o u r A q u a D e s k t o p
1123 Chapala Street .
Santa Barbara, CA 93101
PH: 805.963.6983 • FAX: 805.962.8202
[email protected] • www.tenon.com

Copyright ©2001-2003 Tenon Intersystems.All Rights Reserved.Printed in USA.
Tenon, Xtools and the Tenon Logo are trademarks of Tenon Intersystems.X Window System and X11 are registered trademarks of MIT.Apple, Macintosh and Mac OS X are registered trademarks, and Finder is
a trademark od Apple Computer, Inc.UNIX is a registered trademark in the United Stated and other countried,
licensed exclusively through X/Open Company limited.All other product names are trademarks of their respective holders.
6/2001
. . .TA B L E O F C O N T E N T S
. .
. .
. . . . . . . . . . . . . . . . . . . . . . . . . . . .TABLE OF CONTENTS
Table of Contents. . . . . . . . . . . . . . . . . . . . . . . . . . . . 1Introduction . . . . . . . . . . . . . . . . . . . . . . . . . . . . . . . . 5
About Xtools . . . . . . . . . . . . . . . . . . . . . . . . . . . . . . . . . 5Xtools Server Architecture . . . . . . . . . . . . . . . . . . . . . . . . 6What features are included in Xtools? . . . . . . . . . . . . . . . 7
About the X Window System . . . . . . . . . . . . . . . . . . . . 7About XFree86 . . . . . . . . . . . . . . . . . . . . . . . . . . . . . . . . . 8
Getting Started . . . . . . . . . . . . . . . . . . . . . . . . . . . . . 9System Requirements . . . . . . . . . . . . . . . . . . . . . . . . . . 9Installation . . . . . . . . . . . . . . . . . . . . . . . . . . . . . . . . . . . 9
Downloading Xtools . . . . . . . . . . . . . . . . . . . . . . . . . . . . 9The Xtools Installer Package . . . . . . . . . . . . . . . . . . . . . 10
Adding Xtools to your Dock . . . . . . . . . . . . . . . . . . . . 13A First Look at Xtools . . . . . . . . . . . . . . . . . . . . . . . . . 13
Entering Your License Number . . . . . . . . . . . . . . . . . . . 13Xtools’ Menus . . . . . . . . . . . . . . . . . . . . . . . . . . . . . . . . 15Quitting Xtools . . . . . . . . . . . . . . . . . . . . . . . . . . . . . . . . 16
Preferences at a Glance . . . . . . . . . . . . . . . . . . . . . 17The Display Tab . . . . . . . . . . . . . . . . . . . . . . . . . . . . . 18The Server Tab . . . . . . . . . . . . . . . . . . . . . . . . . . . . . . 19The Input Tab . . . . . . . . . . . . . . . . . . . . . . . . . . . . . . . 20The Clients Tab . . . . . . . . . . . . . . . . . . . . . . . . . . . . . . 21The License Tab . . . . . . . . . . . . . . . . . . . . . . . . . . . . . 22
Xtools X Window Server User’s Manual 1

TA B L E O F C O N T E N T SContents
Using X11 Clients . . . . . . . . . . . . . . . . . . . . . . . . . . 23Getting Started With X11 Clients . . . . . . . . . . . . . . . . 23
Using Xtools’ Clients Menu . . . . . . . . . . . . . . . . . . . . . . 23Xtools’ Preferences: The Client Tab . . . . . . . . . . . . . . 23Adding Order to your Clients Menu . . . . . . . . . . . . . . . 24Adding a local X client . . . . . . . . . . . . . . . . . . . . . . . . . 25Editing or Removing a Local X11 Client . . . . . . . . . . . . 26Adding a Remote Client . . . . . . . . . . . . . . . . . . . . . . . . . 26
Making Remote Connections . . . . . . . . . . . . . . . . . . . 27Using Secure Shell . . . . . . . . . . . . . . . . . . . . . . . . . . . . . . . . 27
Locating Your SSH Commands . . . . . . . . . . . . . . . . . . . 28Xtools’ SSH Agent . . . . . . . . . . . . . . . . . . . . . . . . . . . . . 28Make Entering Your Passphrase Easy . . . . . . . . . . . . . 29Setting your Hostname . . . . . . . . . . . . . . . . . . . . . . . . . . 29
Using xhost . . . . . . . . . . . . . . . . . . . . . . . . . . . . . . . . . . . . . 30Executing xhost From the Command Line . . . . . . . . . . . 30The DISPLAY operative . . . . . . . . . . . . . . . . . . . . . . . . . 31
Window Managers . . . . . . . . . . . . . . . . . . . . . . . . . 33Xtools’ Window Managers . . . . . . . . . . . . . . . . . . . . . 33
What is a Window Manager? . . . . . . . . . . . . . . . . . . . . 33Xtools Aqua-style Manager . . . . . . . . . . . . . . . . . . . . . . 33Navigating the X11 Desktop with mwm and twm . . . . . 35Using the Mouse . . . . . . . . . . . . . . . . . . . . . . . . . . . . . . 35Pointer Shapes . . . . . . . . . . . . . . . . . . . . . . . . . . . . . . . . 35Selecting a Window . . . . . . . . . . . . . . . . . . . . . . . . . . . . 35Using mwm and twm with Xtools . . . . . . . . . . . . . . . . . . 36Selecting Your Window Manager . . . . . . . . . . . . . . . . . 36Exiting a Window Manager . . . . . . . . . . . . . . . . . . . . . . 38The Motif Window Manager . . . . . . . . . . . . . . . . . . . . . 38Navigating the Motif Desktop . . . . . . . . . . . . . . . . . . . . 38The Motif Window Menu . . . . . . . . . . . . . . . . . . . . . . . . 38Summary of Window Menu Functions . . . . . . . . . . . . . . 39Other Motif Title Bar Buttons . . . . . . . . . . . . . . . . . . . . 39
2 Xtools X Window Server User’s Guide

. . .TA B L E O F C O N T E N T S
. .Tab Window Manager . . . . . . . . . . . . . . . . . . . . . . . . . . 40Navigating The twm Desktop . . . . . . . . . . . . . . . . . . . . . 41The twm Root Menu . . . . . . . . . . . . . . . . . . . . . . . . . . . . 41Summary of twm Root Menu Functions . . . . . . . . . . . . . 41twm Title Bar Buttons . . . . . . . . . . . . . . . . . . . . . . . . . . 42
Advanced Features . . . . . . . . . . . . . . . . . . . . . . . . . 43Installing Fonts . . . . . . . . . . . . . . . . . . . . . . . . . . . . . . 43Using Xtools as a Font Server . . . . . . . . . . . . . . . . . . . 44Connecting to a Font Server . . . . . . . . . . . . . . . . . . . . 46Setting up the Root User . . . . . . . . . . . . . . . . . . . . . . . 48X Display Manager (xdm) . . . . . . . . . . . . . . . . . . . . . . 49
Configuring Xtools to start xdm . . . . . . . . . . . . . . . . . . . 49Uninstalling xtools . . . . . . . . . . . . . . . . . . . . . . . . . . . . 51Keyboard Mapping . . . . . . . . . . . . . . . . . . . . . . . . . . . 52
Via Command Line . . . . . . . . . . . . . . . . . . . . . . . . . . . . 52Via Text File . . . . . . . . . . . . . . . . . . . . . . . . . . . . . . . . . . 53Finding a Keysym . . . . . . . . . . . . . . . . . . . . . . . . . . . . . 54Automating the task . . . . . . . . . . . . . . . . . . . . . . . . . . . . 55
OpenGL . . . . . . . . . . . . . . . . . . . . . . . . . . . . . . . . . . . . 57X11 Development . . . . . . . . . . . . . . . . . . . . . . . . . . 59
Installing The Development Tools . . . . . . . . . . . . . . . 59Porting X Applications To Mac OS X . . . . . . . . . . . . . 59
Some Important Issues . . . . . . . . . . . . . . . . . . . . . . . . . . 60Running "configure" . . . . . . . . . . . . . . . . . . . . . . . . . . . 61Compiler Issues . . . . . . . . . . . . . . . . . . . . . . . . . . . . . . . 61Building Shared Libraries . . . . . . . . . . . . . . . . . . . . . . . 61
X11 Header Files . . . . . . . . . . . . . . . . . . . . . . . . . . . . . 63Linking To The X11 Libraries . . . . . . . . . . . . . . . . . . . 64Example X11 Makefile . . . . . . . . . . . . . . . . . . . . . . . . 64
Appendix A . . . . . . . . . . . . . . . . . . . . . . . . . . . . . . . 69
Xtools X Window Server User’s Manual 3

TA B L E O F C O N T E N T SContents
Getting Help . . . . . . . . . . . . . . . . . . . . . . . . . . . . . . . . . . . . . 69Tenon Website . . . . . . . . . . . . . . . . . . . . . . . . . . . . . . . . 69The Xtools Bulletin Board . . . . . . . . . . . . . . . . . . . . . . . 69E-mail Technical Support . . . . . . . . . . . . . . . . . . . . . . . 69Call us . . . . . . . . . . . . . . . . . . . . . . . . . . . . . . . . . . . . . . 69
Appendix B . . . . . . . . . . . . . . . . . . . . . . . . . . . . . . . 71Setting Up the ssh Environment on Your Local Machine . . 71A Quick-Start Guide . . . . . . . . . . . . . . . . . . . . . . . . . . . . . . . 71
Testing remote clients under Xtools . . . . . . . . . . . . . . . 72Make it easy to use . . . . . . . . . . . . . . . . . . . . . . . . . . . . . 72ssh-agent and the ssh-add command . . . . . . . . . . . . . . . 73
Appendix C . . . . . . . . . . . . . . . . . . . . . . . . . . . . . . . 75Setting up a .tcshrc file for your ssh commands. . . . . . . . . . 75Introduction to .cshrc Configuration Files . . . . . . . . . . . . . . 75
4 Xtools X Window Server User’s Guide

. .
. . . . . . . . . . . . . . . . . . . . . . . . . . . .INTRODUCTION TO XTOOLS 1
. . . . . . . . . . . . . . . . . . . . . . . . . . . . . . . . . . . . . . . . . . . . . . . . . . . . . . .A B O U T X T O O L SApple is entering the new millennium with a new operating system. Apple’s new
operating system is a feature-rich, elegant OS, in the true Apple tradition, but with the added strength of pre-emptive multitasking and protected memory. The foundation of the new OS is derived from the thirty-year old UNIX that was born at Bell Labs in the early ‘70s.
In the early ‘80s, MIT researchers extended UNIX by standardizing the way graphical applications wrote to the display, enabling software developers to write their graphical interfaces once, knowing that their applications would easily display on a wide range of graphical devices, supported by many different operating systems. This method of sending graphical output to the computer screen was called X and for more than a decade UNIX systems have routinely included this X protocol, known as the X Window System™, as part of the operating system.
Interestingly, despite its UNIX heritage, when Apple’s new operating system, called Mac OS X™ (pronounced ‘ten’) was introduced, it did not include the X (pronounced ‘X’) protocol. Tenon’s Xtools™ was designed to fill that gap.
Xtools is an implementation of MIT’s X Window System designed specifically for Apple’s OS X operating system. Xtools is a Cocoa application, built from-the-ground- up to take advantage of Apple’s new CoreGraphics and Quartz display engine. In order to enable OS X users to retain the beautiful Aqua desktop, while still benefiting from the unique aspects of Xtools, Xtools supports rootless X Windows on the Aqua desktop.
Xtools is primarily used by enterprise and academic users who are accustomed to accessing various applications on remote machines (e.g. SGI, HP, DEC, etc.). Their desktop platform of choice is Apple’s Aqua OS X and Xtools lets them seamlessly use native Macintosh applications side-by-side with remote scientific and engineering applications. Consumers who want access to the hundreds of open source X games are also Xtools users.
Xtools lets users display remote graphical applications on the Aqua desktop. In addition to displaying remote applications alongside of Macintosh applications, Xtools also provides a full-screen X display, with a variety of display and window managers, giving users an alternative desktop environment. In addition, Xtools contains all the
Xtools X Window Server User’s Guide About Xtools 5

I N T R O D U C T I O N T O X T O O L SAbout Xtools1
libraries necessary to enable remote X applications to be ‘ported’ to Mac OS X. So, with Xtools, not only can remote X applications be displayed on the Aqua desktop, but, if desired, X applications can also be made to execute locally under OS X.
XTOOLS SERVER ARCHITECTURE
Xtools uses a modern multi-threaded architecture to take advantage of multi-processor machines. The DISPLAY mechanisms are loosely connected to the underlying X11 engine, resulting in faster response times for user interaction and better integration into the Macintosh user experience.
An X11 window manager(e.g. twm, mwm) is optional and can be replaced by an Aqua-controlled window style.
Clients connect to the X11 server using TCP/IP sockets, either from the local machine or the network. Encrypted connections via ssh are also supported.
Figure 1: - Xtools Architecture.
6 About Xtools Xtools X Window Server User’s Guide
. . .I N T R O D U C T I O N T O X T O O L S
About the X Window System
. .WHAT FEATURES ARE INCLUDED IN XTOOLS?
• X11R6.4, based on XFree86.
• Hardware accelerated OpenGL.
• Rootless X windows on the Aqua desktop.
• Full-screen, dedicated rooted X display.
• Multiple screen support.
• Copy and paste from X windows.
• 3-button mouse support.
• Full suite of X11 programming libraries.
• Full suite of X11 display libraries and X extensions.
• Secure Shell for launching X applications.
• Multiple Window Managers, including a Motif Window Manager.
• Almost 1000 fonts, including CDE fonts.
• Full color support, including True Color, Color Database, Pseudo Color and Visuals.
• Optimized for Velocity Engine and Multiple Processors.
• Multithreaded, Cocoa application using Quartz APIs.
. . . . . . . . . . . . . . . . . . . . . . . . . . . . . . . . . . . . . . . . . . . . . . . . . . . . . . .A B O U T T H E X W I N D O W S Y S T E MThe X Window System, or X, is a network-transparent graphics window system
developed at the Massachusetts Institute of Technology. X is based on a client/server model, where an application program (the ‘client’) communicates information to a display program (the ‘server’), which then outputs the information to a bitmapped screen. The server directs user input, typically from a keyboard or mouse, to the client program for interpretation1. X allows multiple clients to run simultaneously, each
1. Note that in the case of X, the standard client/server terminology has been reversed, something that causes lots of confusion. So while Xtools is an X Window Server, it is actually a software application that runs on your Aqua desktop -- the client machine.
Xtools X Window Server User’s Manual About the X Window System 7

I N T R O D U C T I O N T O X T O O L SAbout the X Window System1
displayed in a separate, overlapping ‘window’ on the server. Using the mouse and keyboard, the user controls the size, appearance and location of each window on the X desktop. Because of X’s portability and the availability of MIT’s sample implementation, X has become an industry standard.
X has been criticized for its bandwidth-consuming protocol design, for its somewhat difficult-to-learn interface, and for its myriad of open source GUIs. See for example, The X-Window Disaster1 from Don Hopkins’ UNIX Hater’s Handbook. But even Don ends this scathing condemnation of X with:
"Nobody really wants to run X; what they want is a way to run several applications at the same time using
a large screen. If you want to run UNIX, it’s either X or a dumb character-based terminal."
X, itself, is a relatively simple specification. Over the years, many different desktop environments (e.g. GNOME, KDE) and window environments (e.g., Enlightenment, WindowMaker, twm) have been developed to augment X, each with their own themes and configuration modes. Xtools includes some of the more popular X display environments and the open-ness of Xtools let’s you easily add your favorite window manager.
ABOUT XFREE86XFree86 is a freely available implementation of X that runs on UNIX platforms. It
is supported by the XFree86 Project, Inc. (http://www.xfree86.org). XFree86 implements X11R6.4 and like all open-source projects is updated frequently.
There is a freely downloadable version of XFree86 for Darwin, the open source kernel that is the foundation of Mac OS X. Xtools inherits the clean, fast, and stable code base from XFree86. All X applications that run on Darwin with XFree86 will also run on OS X with Xtools. Likewise, Xtools X applications for OS X will run on Darwin.
1. This chapter is available online at: http://www.art.net/-hopkins/Don/unix-haters/x-windows/disaster.html
8 About the X Window System Xtools X Window Server User’s Guide
. .
. . . . . . . . . . . . . . . . . . . . . . . . . . . .GETTING STARTED 2
. . . . . . . . . . . . . . . . . . . . . . . . . . . . . . . . . . . . . . . . . . . . . . . . . . . . . . .S Y S T E M R E Q U I R E M E N T SXtools will run on any Mac OS X capable computer; you can determine whether or
not your computer is Mac OS X compatible by visiting Apple’s site:
http://www.apple.com/macosx/requirements/
Xtools also requires:
• at least 128M RAM.
• an Apple-supplied ixMicro, ATI, or NVidia video card.
• at least 80M of available disk space.
. . . . . . . . . . . . . . . . . . . . . . . . . . . . . . . . . . . . . . . . . . . . . . . . . . . . . . .I N S T A L L A T I O N
DOWNLOADING XTOOLS
You can install from the Xtools CD or by using the downloadable Xtools package on Tenon’s web site:
http://www.tenon.com/products/xtools/1
If you have difficulty downloading Xtools from our server, or if you prefer, you can also obtain the Xtools installer from Apple's web site2.
Before you can download the Xtools package from our web site, you must first complete our download request form. The information on this form is used for internal
1. The Xtools installer download is approximately 21M. You should also check this page for updates to the Xtools package.
2. In order to download from Apple’s site, you must first sign up for an Apple iTools account (if you don't already have one), then log in to your account and mount and open your iDisk. The path to the Xtools installer is:
Software/Mac OS X Software/Software Library/Utilities/Xtools.dmg You must open the .dmg file in OS X with disk copy, which will mount an Xtools disk image. Inside the
image, there will be an Xtools package installer. From that point, the installation instructions are the same as if you had downloaded the package from our web site.
Xtools X Window Server User’s Guide System Requirements 9

G E T T I N G ST A R T E DInstallation2
purposes. Your information will not be shared with anyone outside of Tenon Intersystems. Once the form is complete, click 'submit' and you will be taken to our Xtools download page. Double click on the most current Xtools installer to begin downloading1.
When the download is complete, a compressed archive will appear on your desktop (or in your designated download folder). If you do not see the package right away, click once on the desktop and it should appear2. Double click the archive to decompress the Xtools installer3.
Figure 2: - The Xtools Install Package
THE XTOOLS INSTALLER PACKAGE
You should now have a disk image on your desktop named 'Xtools', or if you are installing from a CD, these instructions refer to the top level of the CD.
1. The download is the full Xtools product, with a built-in temporary license. Instructions for entering your permanent license are covered on page 2-5 of this manual.
2. There is a possibility that when your download is complete Internet Explorer will attempt to launch your Classic environment to run Stuffit Expander. To avoid errors that may occur during decompression, cancel Classic's launch.
3. To Decompress the package, double click the Xtools.dmg.gz file’s icon to launch OS X's version of Stuffit Expander. Alternatly, you can manually open Stuffit Expander by locating it in your Utilities folder (System Disk/Applications/Utilities) and double clicking its icon. You can then select 'File : Expand' and choose the Xtools.dmg.gz file from the desktop. Once the package is decompressed, double click the resulting Disk image file to mount it on your desktop.
10 Installation Xtools X Window Server User’s Guide

. . .G E T T I N G ST A R T E D
Installation
. .Inside the 'Xtools' image or CD is a text file with Xtools release notes, the Xtools install package, the Xtools SSH package, and a folder with some double click-able X11 applications. We recommend looking through the release notes before you install.
To install the Xtools software, double click the Xtools.pkg file’s icon. An installation window will come up asking you for authorization. At the bottom of the window, there is a button with a picture of a lock on it with the caption: "Click the lock to make changes". Click that button and it will prompt you to enter your user name and password. Enter this information and click 'ok1'.
Figure 3: - Entering Your Administrator Password.
Once you enter your administration information, you can continue installing the Xtools software by clicking 'continue' in the 'Welcome to Xtools' window.
The next step is to select the volume you'd like Xtools to be installed on to. Xtools needs to be installed onto the same drive as your OS X System. If you have multiple drives or multiple partitions, make sure you select the drive that OS X is currently running on. Select the drive's icon and click 'continue'.
1. You must enter the user name and password of an account with administrator privileges in order to install this software. If you don't have administrator access to your system, you will need the user name and password of whomever does. By default, OS X will log in the original user created when the system was first set up. This user is automatically given administrator privileges.
Xtools X Window Server User’s Manual Installation 11

G E T T I N G ST A R T E DInstallation2
The next window asks you what type of installation you'd like to perform. At this time, you must choose the default1 'easy install' which will install all the files your system needs to run Xtools, this also includes the Xtools man pages (X Window command help system), OpenMotif System (an X Window Manager, desktop GUI, and Motif libraries), and the X11 Development Files (to use if you will be using Xtools as a software development environment). The Secure Shell (for encrypted remote connections)package is contained in a seperate installer. If you are using Apple’s SSH that is now included with Mac OS X, you probably won’t need to use our SSH installer, and you can disreguard this package.
Figure 4: - Xtools Installation Screen.
You can now click 'Install' to install the Xtools package.
When Xtools is finished installing, you should get a message telling you the installation was successful. You can then click 'close' to exit the installer.
You are now ready to start using Xtools.
1. Due to problems with Apple’s installer software, there are currently no custom installation options. You must perform the “easy install.” This will be changed in a later update.
12 Installation Xtools X Window Server User’s Guide

. . .G E T T I N G ST A R T E D
Adding Xtools to your Dock
. .. . . . . . . . . . . . . . . . . . . . . . . . . . . . . . . . . . . . . . . . . . . . . . . . . . . . . . .A D D I N G X T O O L S T O Y O U R D O C KFor quick and convenient access to your applications, you can add them to OS X’s
dock. Adding an application to the dock is similar to putting an alias to one of your Mac OS classic applications on your classic desktop.
To add Xtools to your dock, simply locate the Xtools application in the Applications folder of your OS X system disk, drag its icon over the dock and let go, you will see the other icons on the dock move over to make room for the new icon1.
Figure 5: - Adding Xtools to Your Dock.
You can place the icons in any order you like by dragging them to different locations in the dock, and you can remove the Xtools icon from the dock by dragging its icon to your desktop.
. . . . . . . . . . . . . . . . . . . . . . . . . . . . . . . . . . . . . . . . . . . . . . . . . . . . . . .A F I R S T L O O K A T X T O O L STo launch Xtools, double click its icon. (If you are launching Xtools from the
dock, you will only need to click once).
Xtools will display a progress bar as it is starting up. When it is finished, the first thing you will notice is the only thing that appears to be different from your OS X desktop is the menubar across the top of the screen2.
ENTERING YOUR LICENSE NUMBER3
The first thing you will want to do if you have already purchased your copy of Xtools, is to enter your permanent license number. Xtools comes with a built-in fourteen day full license, if you elect to
1. The Xtools application will still be located in your Applications folder; by dragging it to the dock, you are just creating a link to that application. The Xtools application can be moved anywhere on your system disk.
2. By default, Xtools launches in rootless mode, this allows for the simultaneous execution of both X-and Aqua-based applications. We will explore this further in the next chapter.
3. Side Image: Figure 6: - The Xtools Menu.
Xtools X Window Server User’s Manual Adding Xtools to your Dock 13

G E T T I N G ST A R T E DA First Look at Xtools2
wait until this license expires, you will be prompted to enter your license number upon launching Xtools on the fifteenth day or thereafter. If a valid license number is not entered at that time, Xtools will automatically quit. You can resume using Xtools upon obtaining and entering a valid license number from Tenon. It will not be necessary to re-install Xtools.
To enter your registration number, go to the Xtools menu and choose “license...” This will automatically open your preferences panels to the License section. Click the “Edit Registration” button and a sheet will pull down like the image below. Enter your license number in this text field.
Figure 7: - Entering Your Xtools License Number.
When you are finished, click ‘’Accept’ to activate your license and continue using Xtools.
14 A First Look at Xtools Xtools X Window Server User’s Guide

. . .G E T T I N G ST A R T E D
A First Look at Xtools
. .XTOOLS’ MENUS
By default, when you launch Xtools for the first time and subsequent times in rootless mode, the display will consist solely of the menu bar across the top of your screen. You can use the following diagram as a road map to the items within these menus:
Figure 8: - Road Map to Xtools Menus.
For more information, as well as specific instructions for using the items in the Xtools, Applications, and Edit menus, please refer to the following chapters.
Xtools X Window Server User’s Manual A First Look at Xtools 15

G E T T I N G ST A R T E DA First Look at Xtools2
QUITTING XTOOLS
You can quit Xtools like just about any other Macintosh application, by selecting the ‘Quit’ option from the ‘Xtools’ menu, or holding the command (apple) key and typing a “Q”1. If you have no applications running, Xtools will quit uneventfully. If you are quitting Xtools while you have any X clients2 running, Xtools will bring up a message telling you how many clients are running and ask for confirmation before quitting.
Figure 9: - Quitting Xtools.
1. Xtools has an option for setting the a key to act as the “meta” key for X applications. If this option is enabled and you set it to use the Apple key, menu shortcuts will be disabled, therefore, <command+q> will not exit the program and you will have to select the option from the Xtools menu.
2. Applications and X utility programs are referred to as ‘clients’ this will be discussed in depth in chapter four.
16 A First Look at Xtools Xtools X Window Server User’s Guide

. .
. . . . . . . . . . . . . . . . . . . . . . . . . . . .PREFERENCES AT A GLANCE 3
All of the options for set up and configuration through the Xtools GUI is contained in the preferences panels. This chapter will give you an idea of where things are located in Xtools. Those aspects of the Xtools preferences which require more in depth explanation are covered in detail in other chapters. The following sections will serve as a quick reference and will also refer you to the appropriate section of this document for more information.
To open Xtools’ preferences, choose "Preferences" from the Xtools menu. This will open a window with 5 tabs across the top, from left to right, they are: Display, Server, Input, Clients, and License1.
1. If any of these tabs are missing or in a different order, then you are probably using an outdated version of the Xtools software. Visit the Tenon site for an updated version.
Xtools X Window Server User’s Guide 17

P R E F E R E N C E S A T A G L A N C EThe Display Tab3
. . . . . . . . . . . . . . . . . . . . . . . . . . . . . . . . . . . . . . . . . . . . . . . . . . . . . . .T H E D I S P L A Y T A B
Figure 10: - The Xtools Display Preferences.
The Display tab contains all the options for selecting a Window manager and choosing between a rootless display or a rooted display. You can add window managers to the default list or edit the pre-existing window managers here. This is also where you can designate whether you want Xtools to be displayed on the second screen only in a dual monitor system. Note the text beside the list of available window managers: "The Aqua Style Manager can only be used in rootless mode." The Aqua Style Manager option will be grayed out if you choose the Dedicated Full Screen option. Window Manager options are grey out when they are active X windows programs running.
18 The Display Tab Xtools X Window Server User’s Guide
. . .P R E F E R E N C E S A T A G L A N C E
The Server Tab
. .. . . . . . . . . . . . . . . . . . . . . . . . . . . . . . . . . . . . . . . . . . . . . . . . . . . . . . .T H E S E R V E R T A B
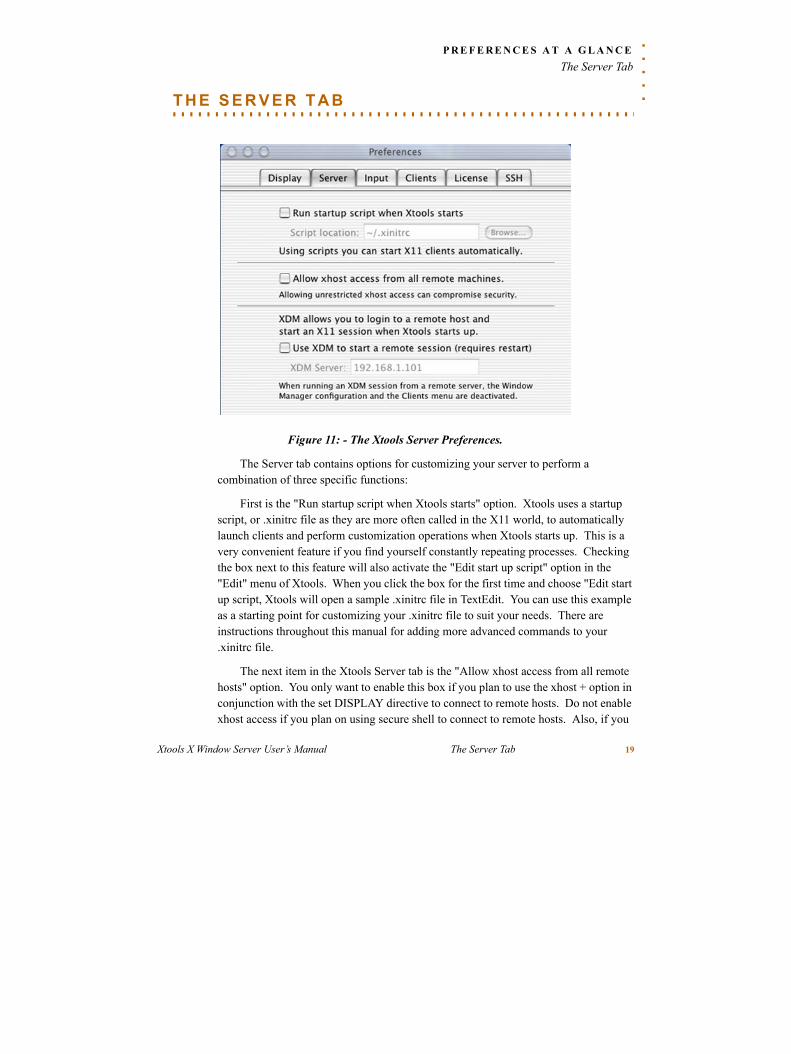
Figure 11: - The Xtools Server Preferences.
The Server tab contains options for customizing your server to perform a combination of three specific functions:
First is the "Run startup script when Xtools starts" option. Xtools uses a startup script, or .xinitrc file as they are more often called in the X11 world, to automatically launch clients and perform customization operations when Xtools starts up. This is a very convenient feature if you find yourself constantly repeating processes. Checking the box next to this feature will also activate the "Edit start up script" option in the "Edit" menu of Xtools. When you click the box for the first time and choose "Edit start up script, Xtools will open a sample .xinitrc file in TextEdit. You can use this example as a starting point for customizing your .xinitrc file to suit your needs. There are instructions throughout this manual for adding more advanced commands to your .xinitrc file.
The next item in the Xtools Server tab is the "Allow xhost access from all remote hosts" option. You only want to enable this box if you plan to use the xhost + option in conjunction with the set DISPLAY directive to connect to remote hosts. Do not enable xhost access if you plan on using secure shell to connect to remote hosts. Also, if you
Xtools X Window Server User’s Manual The Server Tab 19

P R E F E R E N C E S A T A G L A N C EThe Input Tab3
plan on restricting xhost access to specific machines, you will need to execute the xhost + command manually from the command line. Please refer to chapter four for more information on remote operations.
Finally, the last item in the Server tab is the option to use XDM to start a remote session. When you click the check box here, you will also need to enter the full name of a valid XDM server. You cannot run XDM without a valid XDM server or Xtools will not start up properly and you will be forced to restart Xtools. Please refer to chapter six of this manual for more information on setting up XDM.
. . . . . . . . . . . . . . . . . . . . . . . . . . . . . . . . . . . . . . . . . . . . . . . . . . . . . . .T H E I N P U T T A B
Figure 12: - The Xtools Input Preferences.
The Input tab is fairly simple. This is where you choose which keys on your keyboard you would like to use for 3 button mouse emulation and to set a meta key. If you are using a Mac OS X compatible mouse, you will probably not need to set keys for mouse button emulation and can turn this feature off. The default keys for mouse button emulation are the 1, 2 and 3 keys on your number pad. The default meta key is the "option" key on your apple keyboard.
20 The Input Tab Xtools X Window Server User’s Guide

. . .P R E F E R E N C E S A T A G L A N C E
The Clients Tab
. .. . . . . . . . . . . . . . . . . . . . . . . . . . . . . . . . . . . . . . . . . . . . . . . . . . . . . . .T H E C L I E N T S T A B
Figure 13: - The Xtools Clients Prefereces
The Clients tab is used to customize your clients menu. Here is where you add clients, rearrange their order, delete and edit existing clients. There is also an option for storing clients in an X11 application folder (foot note 1).
Please refer to chapter four for more information about adding and configuring Xtools clients.
1. This feature has yet to be fully implemented.
Xtools X Window Server User’s Manual The Clients Tab 21
P R E F E R E N C E S A T A G L A N C EThe License Tab3
. . . . . . . . . . . . . . . . . . . . . . . . . . . . . . . . . . . . . . . . . . . . . . . . . . . . . . .T H E L I C E N S E T A B
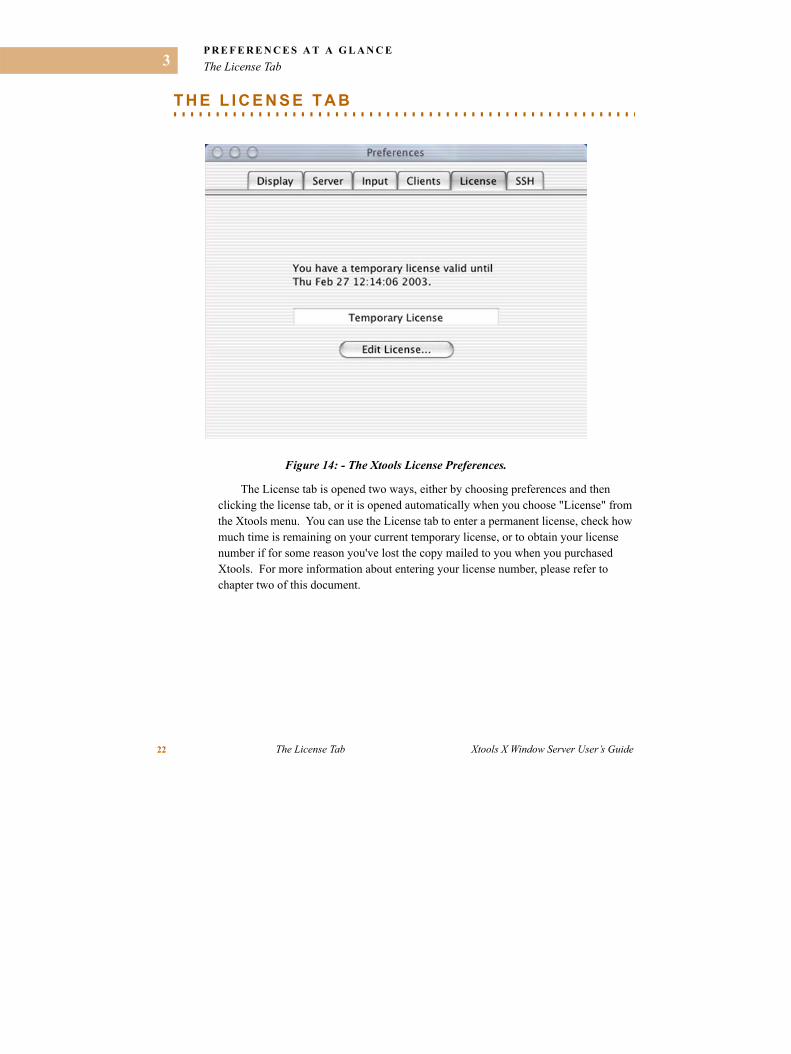
Figure 14: - The Xtools License Preferences.
The License tab is opened two ways, either by choosing preferences and then clicking the license tab, or it is opened automatically when you choose "License" from the Xtools menu. You can use the License tab to enter a permanent license, check how much time is remaining on your current temporary license, or to obtain your license number if for some reason you've lost the copy mailed to you when you purchased Xtools. For more information about entering your license number, please refer to chapter two of this document.
22 The License Tab Xtools X Window Server User’s Guide

. .
. . . . . . . . . . . . . . . . . . . . . . . . . . . .USING X11 CLIENTS 4
. . . . . . . . . . . . . . . . . . . . . . . . . . . . . . . . . . . . . . . . . . . . . . . . . . . . . . .G E T T I N G S T A R T E D W I T H X 1 1 C L I E N T SAt this point Xtools is up and running and you are ready to get down to business. If
you have experience working with other implementations of the X Window System, you may find you use it to run remote clients more than you use it for running clients on your local machine. Whether running clients remotely, or locally, Xtools is designed to make launching them fairly straightforward.
USING XTOOLS’ CLIENTS MENU
You can use the Xtools “clients” menu to set up X11 applications that you useoften so that they can be launched quickly. This may be more convenient than openingan xterm window and manually starting your X11 clients.
You can try this out by selecting “xclock”from the “Clients” menu. Notice that itlaunches without entering anything from acommand line. Close xclock’s window byclicking the box in the upper left hand corner.Now, in the same way, open an xterm window.In your xterm, type: “./xclock”. The xclockclient is then launched again, this time withoutusing the “clients” menu.
Figure 15: - The Xtools Client Menu.
The method you use for launching X11 applications is completely up to you, someusers find it convenient to list the clients they use most often in the “ Clients” menu anduse the command line for those that are used less frequently.
XTOOLS’ PREFERENCES: THE CLIENT TAB
Most of Xtools’ configuration options are located in the Xtools preferences. Youcan add or edit the clients in your “clients” menu in the preference’s as well. The clientpreferences can be located two ways:
1 From the “Xtools” menu choose “Preferences”. When the preferences panel opens, select the “Clients” tab.
Xtools X Window Server User’s Guide Getting Started With X11 Clients 23

U S I N G X 11 C L I E N T SGetting Started With X11 Clients4
2 By selecting “configure” or “add” client(s) from the “Clients” menu. If you choose “add”, the panel is brought up with a sheet over it prompting you to enter information about a new client. If it is not your intention to add a client, click “cancel” on the sheet, and that will bring you back to the main “Clients” preference tab.
ADDING ORDER TO YOUR CLIENTS MENU Open the “clients” tab of your Xtools preferences. The box on the left contains the
default X11 applications as well as any you may have added. When you add an application to this list, Xtools puts it at the bottom of the list. Since entering your applications in the order you think you will want them in can be time consuming and frustrating, Xtools allows you to drag the items in this list into any order. To do so, just click on an application and hold down your mouse button. Then drag the mouse to anywhere else in the window. You will see a black line appear between the applications as your mouse passes over them. Release the mouse button when the black line appears in the location you want to place your X11 application.
Figure 16: - The Xtools Preferences: Clients Tab.
24 Getting Started With X11 Clients Xtools X Window Server User’s Guide

. . .U S I N G X 11 C L I E N T S
Getting Started With X11 Clients
. .ADDING A LOCAL X CLIENT
While still in the “clients” tab of your Xtools preferences, click the button labeled “Add...”. A sheet will come down on top of your preferences panel labeled “X11 Client Configuration” like so:
Figure 17: - Adding a Client to the Xtools Clients Menu.
By default, Xtools names new applications “New Client”, but you can change this to whatever you like. For this example, let’s add the xteddy application to our client list. Type “Xteddy” in the Name field. Now, if you know the path to your X11 client, you can just type it in, otherwise, go to the terminal and locate the application. In this case, xteddy is located in “/usr/local/bin/” so type “/usr/local/bin/xteddy” in the path field. There is also an “Options” field. You can use this field to enter any information you’d type in with the command to launch the client in a terminal window, for example the command:
xset root -solid red
This command sets your rooted background color to red withno pattern. In this case, the “root -solid red” part would be added tothe “options” field of your new client, while “/usr/local/bin/xset”would be placed in the “path” field. Since there are no options toadd to xteddy, you can leave this field blank.
Figure 18: - Xteddy.
Xtools X Window Server User’s Guide Getting Started With X11 Clients 25

U S I N G X 11 C L I E N T SGetting Started With X11 Clients4
Since xteddy is a local application (located on the hard drive of the machine you are currently working on) we won’t need to bother with the remote client section just yet. We will talk about that in the up coming section on running remote clients.
Click the “ok” button. Xteddy is now in your list of clients, you can drag it to your preferred location within the list. When you are finished, close the preferences panel. You can now go to your “clients” menu and launch xteddy. If you did it right, a little brown bear will appear on your screen and your cursor will change into a heart.
EDITING OR REMOVING A LOCAL X11 CLIENT
Editing an existing client isn’t much different from creating a new one, the only thing that you need to do differently is highlight the client that you wish to edit and click the “Edit...” button. You can then make any changes to the current entries for that client. Make sure you click OK when you are finished.
To remove a client from the client menu, highlight its name in the clients tab of your Xtools preferences, hold down the <apple> key and press the <delete> key. This will not delete the client from your machine, it will simple remove the reference to it in your Xtools “clients” menu. Alternatively, you can select the item you’d like to remove and choose “Delete” from Xtools’ “Edit” menu.
ADDING A REMOTE CLIENT
Setting up the remote client’s preferences is the same as setting up a local client’s preferences with the addition of specifying a login and host name.
Open your Xtools preferences to the “clients” tab again and click the “Add...” button. This time, you will have to choose your own remote client to add, as instructions for the path/file/options will be different for each user. After entering your desired client name, put in the path to the application on the remote machine. If you are unsure of its location on the remote machine, open a new xterm and telnet or SSH into the machine and locate it as you would on your local machine.1
Now click the button labeled “This is a remote host” enter the host’s name and your login in the fields labeled accordingly.
The last option in that sheet is the “Use Secure Shell” option. We recommend that you make all of your remote client connections using SSH with Xtools. The next section will explain how to set up and use secure shell, and the section after that will cover making connections using xhost and the set DISPLAY directive in case you are
1. If you don’t know how to telnet into the remote machine, type “man telnet” in your xterm and read the manual page.
26 Getting Started With X11 Clients Xtools X Window Server User’s Guide

. . .U S I N G X 11 C L I E N T S
Making Remote Connections
. .unable to use secure shell. If you plan on using SSH, click the box and go on to the instructions for setting up secure shell connections, if you plan on using xhost, make sure the SSH box is unchecked. You can then skip the next sub-section and read about the set DISPLAY directive.
. . . . . . . . . . . . . . . . . . . . . . . . . . . . . . . . . . . . . . . . . . . . . . . . . . . . . . .M A K I N G R E M O T E C O N N E C T I O N S
Using Secure Shel lSecure shell (SSH) is used for encrypted secure connections between machines on
a network that might not otherwise be secure. When you connect to a server using SSH you have to prove your identity to the remote server. The most convenient way to do this with Xtools is to use RSA based authentication.
You will need to enable X11Forward in SSH Configuration in Preferences panel.
The following section about RSA based authentication is an excerpt from the BSD man pages:
“[RSA based authentication] is based on public-key cryptography: there are cryptosystems where encryption and decryption are done using separate keys, and it is not possible to derive the decryption key from the encryption key. RSA is one such system. The idea is that each user creates a public/private key pair or authentication
Xtools X Window Server User’s Guide Making Remote Connections 27

U S I N G X 11 C L I E N T SMaking Remote Connections4
purposes. The server knows the public key, and only the user knows the private key. The file:
$HOME/ .ssh/authorized_keys
lists the public keys that are permitted for logging in. When the user logs in, the ssh program tells the server which key pair it would like to use for authentication. The server checks if this key is permitted, and if so, sends the user (actually the ssh program running on behalf of the user) a challenge, a random number, encrypted by the user’s public key. The challenge can only be decrypted using the proper private key. The user’s client then decrypts the challenge using the private key, proving that he/she knows the private key but without disclosing it to the server.
ssh implements the RSA authentication protocol automatically. The user creates his/her RSA key pair by running ssh-keygen(1). This stores the private key in $HOME/ .ssh/identity and the public key in $HOME/ .ssh/identity.pub in the user’s home directory. The user should then copy the identity.pub to $HOME/ .ssh/authorized_keys in his/her home directory on the remote machine (the authorized_keys file corresponds to the conventional $HOME/ .rhosts file, and has on key per line, though the lines can be very long). After this, the user can log in without giving the password. RSA authentication is much more secure than rhosts authentication.
The most convenient way to use RSA authentication may be with and authentication agent. [we’ll discuss ssh-agents later in the chapter]
If other authentication methods fail, ssh prompts the user for a password. The password is sent to the remote host for checking; however, since all communications are encrypted, the password cannot be seen by someone listening on the network.”
You can read the full document by typing the following in your terminal window:
...]Stephie% /usr/local/man/man ssh-keygen
If you have ssh set up to require a password with login, you won’t be able to use the clients menu to launch those clients, you will need to go through the command line, because there will be no prompt available to enter your password. This is why it is highly recommended that you set up SSH to use the RSA keys with a passphrase you can enter for verification1.
1. Refer to Appendix B for a quick-start guide to setting up your ssh environment.
28 Making Remote Connections Xtools X Window Server User’s Guide

. . .U S I N G X 11 C L I E N T S
Making Remote Connections
. .LOCATING YOUR SSH COMMANDS
Unless you’ve moved them elsewhere1, your SSH commands are probably located in your /usr/local/bin folder (this can vary depending on your SSH installation):
/usr/local/bin/ssh-keygen
/usr/local/bin/ssh-add
/usr/local/bin/ssh
/usr/local/bin/ssh-agent
XTOOLS’ SSH AGENT
Xtools starts up the ssh-agent when it is launched, so you will not need to call that command unless you are making some changes.
MAKE ENTERING YOUR PASSPHRASE EASY
You may find it convenient to create a menu item for a local client that executes /usr/local/bin/ssh-add. Name it something like “Load ssh-key” and when you launch it, it will bring up a nice dialog box for entering your passkey, rather than the command line means of entry.
SETTING YOUR HOSTNAME
While configuring SSH, you may find that it is inconvenient to have your hostname set as “localhost”. If your host name is listed as localhost while creating SSH keys, the key will contain:
<user>@localhost
rather than the proper:
<user>@<hostname>.<domain>
Example:
In this case, you have two options. One, you can type in:
1. Refer to Appendix C for instructions for simplifying your paths.
Xtools X Window Server User’s Guide Making Remote Connections 29
U S I N G X 11 C L I E N T SMaking Remote Connections4
...]Stephie% hostname <full DNS host name of computer>
For example:
...]Stephie% hostname grape.tenon.com
or you can edit your hostconfig file in your /etc directory by changing the “HOSTNAME” entry from -AUTOMATIC- to <full DNS host name of computer>
For example: HOSTNAME = grape.tenon.com
Be sure to save the file after making these changes.
Using xhostIf you want to use xhost and the set DISPLAY operative for remote connections,
you will need to first allow xhost access from remote hosts. You can enable this by opening your preferences panel to the “server” tab and clicking the box in front of “Allow xhost access from all remote machines.” You will see a warning underneath that that allowing this access is unsecure. If you are working on an intranet or on something that doesn’t require a high-level of security, this may be a viable way of transferring data for you. If you are working on something that requires a high-level of security,you may want to consider using secure shell. You can disable xhost access at anytime by un-checking the box in the preferences
30 Making Remote Connections Xtools X Window Server User’s Guide

. . .U S I N G X 11 C L I E N T S
Making Remote Connections
. .
Figure 19: - Allowing xhost Access.
EXECUTING XHOST FROM THE COMMAND LINE
One other option is to manually call xhost from the command line. If you do this, you can restrict which computers can access your Xtools server. You can restrict which machines can connect in two ways. If you’d like to give access to only certain machines, simply add their IP addresses after the + like so:
...] Stephie% ./xhost + 192.83.246.255
Now only the machine with this IP address (192.83.246.255) can connect to your server.
If you’d like to deny access to certain machines, you can list their IP addresses after a (-) sign instead of a plus like so:
...] Stephie% ./xhost - 192.83.246.255
Now any machine with except the one with this IP address (192.83.246.255) can connect to your server.
Xtools X Window Server User’s Guide Making Remote Connections 31

U S I N G X 11 C L I E N T SMaking Remote Connections4
You can also use xhost (-) to disable xhost access when you are finished using it by entering the command with no IP addresses following the (-):
...] Stephie% ./xhost -
If you forget to set your xhost before attempting to run a remote client, you will get an authorization error similar to the following:
Figure 20: - Authorization Error when Connecting to a Remote host.
THE DISPLAY OPERATIVE
After you have xhost set with the access privileges you desire, you need to log into the remote host and set its DISPLAY location. This will allow the clients you run on a remote machine to be displayed on your local display. You can do this in two ways. If you have access to the remote machine, you can physically go to the machine, open a terminal window and type the command:
...] Stephie% set DISPLAY = [IP address of Xtools machine]:0
You will want to leave out the [ ]’s. You also have the option of telneting into the machine from your Xtools machine and setting the display from your Xtools xterm window with the same command.
Depending on what shell you are using, the syntax for changing the display variable may be different. The syntax above works with Xtools’ default TC shell. If you were using the BASH shell, the syntax would be:
...] Stephie% export DISPLAY= “[IP address of Xtools machine]”:0.0
You will want to leave out the [ ]’s again, and the (“ ”)’s are optional. If you are using a shell other than the standard TC shell or BASH, you may need to do a little
32 Making Remote Connections Xtools X Window Server User’s Guide

. . .U S I N G X 11 C L I E N T S
Making Remote Connections
. .research or contact your system administrator to get the proper syntax for setting your DISPLAY variable.
When you are finished using the remote host, you will want to set the display back to that host just as you set it to display on your local machine, by using the following command:
...] Stephie% set DISPLAY = localhost:0
This will tell the remote machine that you no longer want to display clients on your local machine.
Xtools X Window Server User’s Guide Making Remote Connections 33

U S I N G X 11 C L I E N T SMaking Remote Connections4
34 Making Remote Connections Xtools X Window Server User’s Guide

. .
. . . . . . . . . . . . . . . . . . . . . . . . . . . .WINDOW MANAGERS 5
. . . . . . . . . . . . . . . . . . . . . . . . . . . . . . . . . . . . . . . . . . . . . . . . . . . . . . .X T O O L S ’ W I N D O W M A N A G E R S
WHAT IS A WINDOW MANAGER?Window managers are applications that control the look and feel of your X11
desktop. They draw the windows on your screen, along with icons, menus, menu bars, etc. Window managers also make sure your keystrokes and mouse clicks take place at the correct location in the proper window. They control how windows are resized or moved, which windows are active or hidden and other functions dealing with how objects are displayed on your screen.
XTOOLS AQUA-STYLE MANAGER
By default, Xtools runs with a rootless Aqua-style manager. In this case, rootless means that when Xtools is launched, it doesn’t take over and cover your whole screen; in fact, the only thing displayed upon opening Xtools is the menu bar across the top of the screen. This is useful because it allows you to easily access your OS X desktop as well as other applications you may have running in OS X. The fact that Xtools’ rootless window manager is Aqua-like adds continuity to your user experience by displaying windows that look and perform just like the windows in any other Mac OS X Aqua application1.
1. When running in rootless mode, the dock will prevent windows from being displayed below the top of the dock line.
Xtools X Window Server User’s Guide Xtools’ Window Managers 33

W I N D O W M A N A G E R SXtools’ Window Managers5
Figure 21: - Rootless Aqua-style Manager.
On the rootless desktop, you also have the option of copying and pasting between Xtools applications and Mac OS X applications1. Minimizing an X11 application window in this rootless Aqua “theme” will send it to the dock, as if it were any other Aqua application.
Xtools also includes two standard X Window System window managers and a dedicated full-screen X Window desktop for those users who would rather have a more ‘X11’-like Windowing environment2. The two window managers included with Xtools are twm(Tab Window Manager, a.k.a. Tom’s Window Manager) and mwm(Motif Window Manager). The following sections will assist you in using these included window managers.
1. You can copy and paste between Aqua and X11 apps regardless of windows mode.2. You must use a window manager, i.e. mwm or twm, with the dedicated X11 desktop; the default Aqua-
style manager does not run on a dedicated screen.
34 Xtools’ Window Managers Xtools X Window Server User’s Guide

. . .W I N D O W M A N A G E R S
Xtools’ Window Managers
. .NAVIGATING THE X11 DESKTOP WITH MWM AND TWM.This section contains a brief discussion of basic mouse and window operations
applicable to any window manager, and then shows you how to navigate the Motif and Tab desktops. Tab Window Manager and Motif Window Manager contain sophisticated point-and-click desktop operations that are important to explore.
USING THE MOUSE
As you move the mouse, the pointer on your X11 desktop (the cursor) moves correspondingly.
Whenever this section tells you to “point to” something, it simply means move the mouse until the pointer on your screen is positioned over the “something”.
POINTER SHAPES. The location of the pointer can cause the shape of the pointer to change. For
example, when the pointer is directly over the root window (the backdrop behind all windows), the pointer has an arrow shape. When you point to the inside of a terminal window, the pointer changes to an “I” shape. Different pointer shapes are shown in the picture below:
Figure 22: - X11 Window Manager Pointers.
SELECTING A WINDOW
Before a window can receive keyboard input, it must be selected as the active window. To select a window, point to any part of the window and click the select button on the mouse. The select button is your mouse button, or the left button on a three-button mouse.
A window frame changes appearance when the window is active. When you type, the characters appear in the active window.
Keyboard input is directed to the window containing the cursor. If no window is active or if the cursor is on the X11 desktop, everything you type is lost. If the cursor is not in the window to which you want input directed, input will be lost or transmitted to another window containing the cursor.
Xtools X Window Server User’s Guide Xtools’ Window Managers 35

W I N D O W M A N A G E R SXtools’ Window Managers5
USING MWM AND TWM WITH XTOOLS
In Xtools, you can work with twm and mwm in either rootless or dedicated mode. In rootless mode, twm or mwm will take over the look of your windows and cursors, but will leave your Aqua desktop visible in the background.
Figure 23: - Rootless Motif Window Manager
In dedicated mode, Xtools will create its own desktop which will fill your screen1. If you switch to a different application while in full-screen mode, it will automatically hide Xtools so you can use your Aqua desktop and any other OS X applications.
SELECTING YOUR WINDOW MANAGER
1 Go to your Xtools menu and open Xtools' preferences.
2 From the preferences panel, click on the “Display” tab.
1. When running in full-screen mode, the dock should be hidden to give you a more X11 like appearance.
36 Xtools’ Window Managers Xtools X Window Server User’s Guide
. . .W I N D O W M A N A G E R S
Xtools’ Window Managers
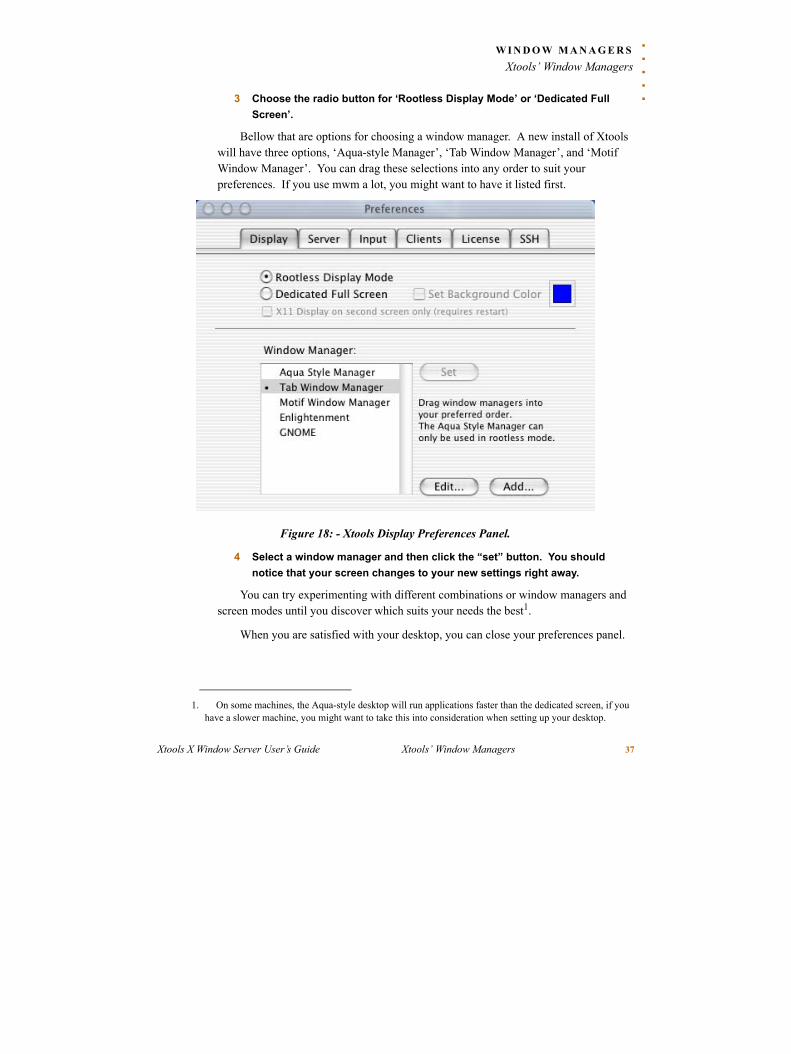
. .3 Choose the radio button for ‘Rootless Display Mode’ or ‘Dedicated Full Screen’.
Bellow that are options for choosing a window manager. A new install of Xtools will have three options, ‘Aqua-style Manager’, ‘Tab Window Manager’, and ‘Motif Window Manager’. You can drag these selections into any order to suit your preferences. If you use mwm a lot, you might want to have it listed first.
Figure 18: - Xtools Display Preferences Panel.
4 Select a window manager and then click the “set” button. You should notice that your screen changes to your new settings right away.
You can try experimenting with different combinations or window managers and screen modes until you discover which suits your needs the best1.
When you are satisfied with your desktop, you can close your preferences panel.
1. On some machines, the Aqua-style desktop will run applications faster than the dedicated screen, if you have a slower machine, you might want to take this into consideration when setting up your desktop.
Xtools X Window Server User’s Guide Xtools’ Window Managers 37

W I N D O W M A N A G E R SXtools’ Window Managers5
EXITING A WINDOW MANAGER
You can exit mwm or twm by selecting “Aqua-style Manager” and “Rootless Display Mode” from your preferences panel.
THE MOTIF WINDOW MANAGER
mwm is a popular window manager for many UNIX platforms. It follows the standards set by the Open Software Foundation for using a consistent style for attributes such as menus, windows, menus and scroll bars. This makes using X11 easier, because you aren’t constantly learning new interfaces each time you encounter a new application.
NAVIGATING THE MOTIF DESKTOP
Launch Xtools, and run mwm in full-screen mode. Using the third mouse button, click once on the X11 desktop to display the mwm root menu, select the “New Window” menu item, and start an xterm client. NOTE: For information on the third mouse button, see section “[TBA] Mouse Button Mapping”. This will create an mwm xterm window.
THE MOTIF WINDOW MENU
In mwm the window menu is attached to a button inthe upper left-hand corner of the window. Use the menubutton in the upper left corner of each window to displaythe window menu. To display the mwm window menu,point to the menu button and then press and hold theselect (mouse) button. The menu is displayed as long asyou hold the button down — don’t release the button yet(see below).
Figure 24: - The Motif Window Menu.
Step 1 — Choose a Function from the Menu
While continuing to hold down the mouse select button, drag the pointer down the menu. As the pointer moves, it highlights a button for each available selection. Drag the pointer until you highlight the “Maximize” function. Release the mouse button.
The “Maximize” function causes the window to expand to fill the entire screen.
Step 2 — Restore the Window to its Original Size
Display the window menu again. Drag the pointer down the menu until you highlight the “Restore” selection. Release the mouse button. The window is restored to its original size.
38 Xtools’ Window Managers Xtools X Window Server User’s Guide

. . .W I N D O W M A N A G E R S
Xtools’ Window Managers
. .SUMMARY OF WINDOW MENU FUNCTIONS
When a menu function is meaningless, its name is displayed in a light shade of gray and cannot be selected.
OTHER MOTIF TITLE BAR BUTTONS
The mwm “Maximize” and “Minimize” menu functions also haveanalogs in the title bar of every mwm menu. Two buttons are displayed inthe upper right-hand corner of each mwm window. The left-most of thetwo buttons performs a minimize function. The right-most of the twobuttons performs a maximize function. Rather than choosing the“Maximize” and “Restore” functions in the previous example, you couldhave used the “Maximize” button in the upper right corner of the xterm window,immediately to the right of the “Minimize” button.
To do this ... Choose ...
Restore a window from an icon or after maximizing Restore
Change the location of the window Move
Change the size of the window Size
Shrink the window to its icon representation Minimize
Enlarge the window to cover the entire root window Maximize
Send a window to the back or bottom of the window stack, the position closest to the root window
Lower
Immediately stop the window and make it disappear Close
Xtools X Window Server User’s Guide Xtools’ Window Managers 39

W I N D O W M A N A G E R SXtools’ Window Managers5
TAB WINDOW MANAGER
The Tab (also known as Tom’s) Window Manager is pretty basic. It is available on a lot of UNIX implementations, and for a time, was the default window manager, but is gradually loosing some of its popularity to mwm and other window managers.
Figure 25: - The Tab Window Manager
40 Xtools’ Window Managers Xtools X Window Server User’s Guide

. . .W I N D O W M A N A G E R S
Xtools’ Window Managers
. .NAVIGATING THE TWM DESKTOP
Launch Xtools, and run twm in full-screen mode. Click and hold the select (mouse) button once on the X11 desktop to display the twm root menu, and scroll down to select the “Xterm” menu item, and start an xterm client. This will create a twm xterm window.
THE TWM ROOT MENU
In twm the root menu is the menu we just displayed by clicking once on the desktop. The twm root menu contains all the commands for manipulating windows and clients on your twm desktop.
Step 1 — Choose a Function from the Menu
Click and hold the select (mouse) button once on your X11 desktop and while continuing to hold down the mouse select button, drag the pointer down the twm menu. As the pointer moves, it highlights a button for each available selection. Drag the pointer until you highlight the “Iconify” function. Release the mouse button.
Figure 26: - The twm Root Menu
Your mouse will then turn into a little black circle. Click once on any open window. The “Iconify” function causes the window to turn into a little icon at the bottom of your screen.
Step 2 — Restore the Window to its Original Size
Double click on the icon created in Step 1. The window is restored to its original size.
SUMMARY OF TWM ROOT MENU FUNCTIONS
To do this ... Choose ...
Shrink the window to its icon representation Iconify
Change the size of a window Resize
Move a window Move
Send a window to the back or bottom of the window stack, the position closest to the root window
Lower
Xtools X Window Server User’s Guide Xtools’ Window Managers 41

W I N D O W M A N A G E R SXtools’ Window Managers5
TWM TITLE BAR BUTTONS
The twm “Maximize” and “Minimize” menu functions also have analogs in the title bar of every twm menu. A round button is displayed in the upper left-hand corner of each twm window. This button performs a minimize function. The square button on the right-hand side of the twm window performs a maximize function. Rather than choosing the “Iconify” and “Resize” functions in the twm root menu, you can use these window buttons.
Bring a window to the front or top of the window stack, the position furthest from the root window
Raise
Make a window the active window Focus
Deactivate a window Unfocus
Show a list of all open windows/icons Show Iconmgr
Hide a list of all open windows/icons Hide Iconmgr
Open an Xterm window Xterm
Immediately close an active window/client/process Kill
Delete something in a window Delete
Restart the X11 server Restart
Exit twm Exit
To do this ... Choose ...
42 Xtools’ Window Managers Xtools X Window Server User’s Guide

. .
. . . . . . . . . . . . . . . . . . . . . . . . . . . .ADVANCED FEATURES 6
This section describes a variety of features that users who are experienced with the X11 system may wish to use in order to set up their envirnoment properly. Many of these features require editing the Xtools start up script and/or setting up and editing a .tcshrc file. Users who are new to the X Window System may want to wait until they are aquainted with the graphical features of Xtools before using these advanced features.
. . . . . . . . . . . . . . . . . . . . . . . . . . . . . . . . . . . . . . . . . . . . . . . . . . . . . . .I N S T A L L I N G F O N T S
Copy the font from it's current location, whether it be a local or remote location, into a directory in your X11 fonts directory. If you like, instead of copying it directly into an existing folder, you can create a new one:
cp [font name] /usr/X11R6/lib/X11/fonts/[destination directory]
Figure 27: - Example of adding fonts to your font path.
Once the files are copied over you will need to add them to your fontpath by adding the following two lines to your .xinitrc file:
xset fp+ directory
Xtools X Window Server User’s Guide Installing Fonts 43

A D V A N C E D F E A T U R E SUsing Xtools as a Font Server6
And then have Xtools re-scan for available fonts with the command:
xset fp rehash
If you'd rather, you can define your fontpath in a .tcshrc file as per the instructions in Appendix C.
You can also call the two commands directly on the command line in an xterm. If you choose to do it this way, the changes will be lost when you close Xtools and you will need to repeat them each time you open Xtools.
Either way, save the file (.xinitrc or .tcshrc) and use the "mkfontdir" command to create the .dir files for the new fonts.
mkfontdir [directory names]
For more information about mkfontdir, refer to it's man page.
If you've set your font path using either the .tcshrc or .xinitrc files, you will need to restart Xtools for the changes to take effect. If you've set your font path through the command line, the fonts should be available to you immediately.
. . . . . . . . . . . . . . . . . . . . . . . . . . . . . . . . . . . . . . . . . . . . . . . . . . . . . . .U S I N G X T O O L S A S A F O N T S E R V E R
The xfs program is a font server that runs on your Xtools system and provides fonts to other network based X terminals and servers.
xfs has many configuration options, which are described in detail in the xfs man page. In most environments, xfs will run using the default configuration.
Perform the following steps to run the font server:
1. As the root user, start the xfs program:
/usr/X11R6/bin/xfs &
44 Using Xtools as a Font Server Xtools X Window Server User’s Guide

. . .A D V A N C E D F E A T U R E S
Using Xtools as a Font Server
. .2. To start the font server automatically when Xtools boots, add an entry to your .xinitrc (startup script) file:
Figure 28: - Example of launching a font server when Xtools starts up.
Put this function near the top of your .xinitrc file:
SConsoleMessage()
{
local Message="$*"
>/dev/console echo "${Message}"
}
This function will allow you to print messages to the OS X console. You can leave it out if you do not want to print messages to the console. In this instance, we will be using this function to display the message "Launching Font Server..." when Xtools starts up. You can follow the syntax described below to display other messages as you add things to your .xinitrc file. (NOTE: leave this text out of the .xinitrc file, only type in the BOLD text.)
Xtools X Window Server User’s Guide Using Xtools as a Font Server 45

A D V A N C E D F E A T U R E SConnecting to a Font Server6
Now add the following to your .xinitrc file as well:
if [ -x /usr/X11R6/bin/xfs ]; then
SConsoleMessage "Launching Font Server..."
/usr/X11R6/bin/xfs &
fi
If you look at the second line, you will see how we use the SConsoleMessage function to print to the console. If we wanted to have the console output say "Welcome to Xtools", the syntax would be:
SConsoleMessage "Welcome to Xtools"
If you have decided that you don't want to print console messages, leave the second line of the above code out of your .xinitrc file.
By default, xfs listens on TCP port 7100 for remote font service requests. For compatibility with X11R6-based X terminals and servers requesting font service, you may optionally start xfs to listen on TCP port 7000:
/usr/X11R6/bin/xfs -port 7000 &
When you are finished, save your .xinitrc file and restart Xtools for the changes to take effect.
. . . . . . . . . . . . . . . . . . . . . . . . . . . . . . . . . . . . . . . . . . . . . . . . . . . . . . .C O N N E C T I N G T O A F O N T S E R V E R
If you need access to fonts that are located on another machine that is running a font server, you can do one of two things to access them:
46 Connecting to a Font Server Xtools X Window Server User’s Guide

. . .A D V A N C E D F E A T U R E S
Connecting to a Font Server
. .1. Add the following line to your .xinitrc file:
xset fp+ tcp/[hostname]:[port number of the remote font server]
e.g. xset fp+ tcp/grape.tenon.com:7100
2. Add "tcp/[hostname]:[port number of the remote font server]"
to the font path specified in your .tcshrc file. Xtools will also allow you to specify a font path on the command line. If you need help setting up a .tcshrc file, please refer to appendix C.
Figure 29: - Example of adding a font server to your font path.
Xtools X Window Server User’s Guide Connecting to a Font Server 47

A D V A N C E D F E A T U R E SSetting up the Root User6
Once you set this up, you will need to restart Xtools if you added the commands to either of your configuration files, or if you typed the commands into the command line, simply type in the following command:
xset fp rehash
for Xtools to reload the fonts. Remember, if you typed in the commands through the command line, the changes will disappear when you quit Xtools.
Also, to find out what port your font server is running on, you can use the command:
ps ax|grep xfs
. . . . . . . . . . . . . . . . . . . . . . . . . . . . . . . . . . . . . . . . . . . . . . . . . . . . . . .S E T T I N G U P T H E R O O T U S E R
Xtools uses the Mac OS X system root account. You do not necessarily need to enable the root user or be logged in as root in order to issue commands as root. The command "sudo" will allow you to issue commands as a root user without having to switch logins. You can only execute this command as an Admin user though, so make sure the account you log in as to use Xtools has administrator privileges.
Example of sudo command:
sudo rm -r Xtools.app
Would remove the Xtools application. Some software applications require you to have access to the root user, but most of the time, you will probably only need to use the root user, or sudo commands in order to change permissions or otherwise alter files that do not belong to the user you are logged in with.
48 Setting up the Root User Xtools X Window Server User’s Guide

. . .A D V A N C E D F E A T U R E S
X Display Manager (xdm)
. .If you would rather just enable the root user in Mac OS X (by default, the root user is not activated), we have provided step by step instructions on our website.
http://www.tenon.com/support/itools-osx/root/rootuser.html
For more information about the sudo command and the Mac OS X root user, please visit Apple's web site:
www.apple.com
. . . . . . . . . . . . . . . . . . . . . . . . . . . . . . . . . . . . . . . . . . . . . . . . . . . . . . .X D I S P L A Y M A N A G E R ( X D M )
The xdm program manages a collection of X displays, which may be on the local host or remote servers. The design of xdm was guided by the needs of X terminals as well as the X Consortium standard XDMCP, the X Display Manager Control Protocol. xdm provides services similar to those provided by init, getty, and login on character terminals-- prompting for login name and password, authenticating the user, and running a "session". When your Xtools system is configured to run Xtools with xdm, you will be presented with a friendly, uniform entry into the X Window System.
xdm has many configuration options which are described in detail in the xdm manual page. This section will concentrate on configuring Xtools to be controlled by xdm.
CONFIGURING XTOOLS TO START XDM.Because of Mac OS X's built in login screen, Xtools will only allow you to run a
remote xdm session. This is because Xtools assumes the user has logged in to the OS X machine and been allowed access to Xtools prior to launching the application, a second login in this case is redundant.
To use xdm with Xtools, you need to enable the option in Xtools' preferences:
1. Open Xtools' preferences panel by choosing "File >> Preferences." In the preferences window, click on the "Server" tab at the top of the window.
2. At the bottom of the "Server" preferences window is a check box that says "Use XDM to start a remote session (requires restart)". Check this box and enter the remote server's IP address or DNS name in the box below it.
Xtools X Window Server User’s Guide X Display Manager (xdm) 49

A D V A N C E D F E A T U R E SX Display Manager (xdm)6
Figure 30: - Connecting to a remote host through XDM.
You should also notice a message below this text field that says "When running an XDM session from a remote server, the Window Manager configuration and the Clients menu are deactivated." This is because you will be using the remote server's configuration for those items. You cannot run xdm and use local X11 apps concurrantly.
3. When you have filled in all the required information, close your Xtools preferences.
4. Restart Xtools. Changes will only take place once you quit and relaunch Xtools.
Caution: If you enter an invalid server name, Xtools will not start up properly, you will be forced to re-enter the information and restart Xtools again.
50 X Display Manager (xdm) Xtools X Window Server User’s Guide

. . .A D V A N C E D F E A T U R E S
Uninstalling xtools
. .Once you have restarted Xtools with the correct server information, Xtools will present you with a login window for security authentication. The name of the remote host machine will appear in the window title.
Figure 31: - The XDM Login Window.
Enter your user name and password for the remote host. This will complete your connection to the remote machine, you can now continue with your XDM session. When you are finished, if you'd like to go back to using Xtools without XDM, simply open your preferences and uncheck the XDM box. You will once again need to restart Xtools for the changes to take place.
More information about using xdm is available in the xdm manual pages, if you've never used xdm before, we recommend reading through them.
. . . . . . . . . . . . . . . . . . . . . . . . . . . . . . . . . . . . . . . . . . . . . . . . . . . . . . .U N I N S T A L L I N G X T O O L SThe following commands, when issued from the Mac OS X terminal.app will
remove the Xtools application and accompanying files from your computer:
sudo rm -rf /usr/X11R6
sudo rm -rf /Applications/Xtools.app
sudo rm -rf /Library/Receipts/Xtools*
We caution you to be careful when using the sudo rm commands, as once something is deleted in this manner, it can not be retrieved.
Xtools X Window Server User’s Guide Uninstalling xtools 51

A D V A N C E D F E A T U R E SKeyboard Mapping6
. . . . . . . . . . . . . . . . . . . . . . . . . . . . . . . . . . . . . . . . . . . . . . . . . . . . . . .K E Y B O A R D M A P P I N GBy default, Xtools is designed to use the default keyboard mapping that exists
within OS X. For the most part, this default functionality should operate properly with local and remote X11 applications. Certain conditions may arise that warrant a change in this default behavior. For instance, if you find your self constantly hitting the caps lock key while entering file paths into your xterm, or you wish to switch between your U.S. keyboard mapping and a Japanese layout, X11 provides you with a relatively quick and painless way of doing so with the xmodmap command.
There are two ways of using xmodmap, by typing commands in a terminal window, or loading a keymap file. If you are simply changing one or two keys, it may be easier to just enter the commands into your terminal window. If on the other hand, you are entering a whole new keyboard mapping, you may want to save the mapping into a text file and load it into Xtools with the xmodmap command. The following will cover both techniques.
VIA COMMAND LINE:Let's say that I am using an application that is case sensitive, and at no point will I
want to activate the caps lock key, because everything I type in is to be lowercase and hitting caps lock will waste valuable time back tracking. Using xmodmap, I can disable the caps lock key with one simple command:
% xmodmap -e "keysym Caps_Lock ="
the -e option tells xmodmap that what follows is an expression, and "keysym Caps_Lock =" is the expression. Normally, if you were altering a key, you'd reassign it to another character, digit or symbol, and that symbol would follow the "=" sign. In this case, we want the caps lock key to do nothing when pressed, so we leave the right hand side of the expression blank. The descriptor "keysym" precedes all xmodmap expressions. For more information about keysyms, refer to the "Keyboard" section of the X manual page.
52 Keyboard Mapping Xtools X Window Server User’s Guide

. . .A D V A N C E D F E A T U R E S
Keyboard Mapping
. .Here is one more example of using xmodmap to alter the behavior of the keyboard:
% xmodmap -e "keysym Delete = Backspace"
In this case, the delete key is re-mapped to a Backspace. In some applications, the functionality of the delete and backspace keys is different, making a change necessary.
VIA TEXT FILE:The other way you can alter the keyboard mapping is with the use of a keymap
file. This file should be created or copied to your /usr/X11R6/xinit folder, and is most often, but not necessarily named .xmodmaprc. We say not necessarily, because it will work regardless of its name, although it is good to stick with convention.
The following, when added to a text file and invoked by xmodmap will swap your caps lock and control keys:
remove Lock = Caps_Lock
remove Control = Control_L
keysym Control_L = Caps_Lock
keysym Caps_Lock = Control_L
add Lock = Caps_Lock
add Control = Control_L
Paste this in to your .xmodmaprc file and save it. You can now apply it with the following command:
% xmodmap .xmodmaprc
Although this doesn't seem very useful on a Macintosh keyboard, it is a nice example of what xmodmap can do.
Xtools X Window Server User’s Guide Keyboard Mapping 53

A D V A N C E D F E A T U R E SKeyboard Mapping6
You can completely remap your entire keyboard to work with any foreign language fonts or set ups necessary. Frequently, you can download pre made keymap files from the internet which saves a lot of time.
FINDING A KEYSYM:If you are unsure what the keysym for a particular key is, you can figure it out
using the xev command. The xev command actually outputs all of your mouse and keyboard inputs to the terminal in the following format:
KeyPress event, serial 13, synthetic NO, window 0x2c00001,
root 0x29, subw 0x0, time 3380287211, (34,118), root:(284,168),
state 0x0, keycode 22 (keysym 0xffff, Delete), same_screen YES,
XLookupString gives 1 characters: "
Figure 32: - The xev command.
If you notice where it says "keycode 22", the information immediately following gives the keysym for a press of the Delete key, in this case, the hex formatted sym is "0xffff" and the plain text is just "Delete". You will notice, this is the keysym we used
54 Keyboard Mapping Xtools X Window Server User’s Guide

. . .A D V A N C E D F E A T U R E S
Keyboard Mapping
. .in the example where we swapped Delete with Backspace. Most keysyms have an intuitive English definition. For more information about keysyms, refer to the "Keyboard" section of the X manual page.
To use xev, just type the xev command into an xterm window:
%xev
A small window with a square in it will appear. Typing or clicking in this box will return the output mentioned above. When you are through using xev, simply choose "close" from the xev drop down menu or click the “Close window” button.
AUTOMATING THE TASK:You will notice with either of the above methods that when you quit and restart
Xtools, the changes aren't permanent. In order to make the keymap changes every time you start up Xtools, you will need to add the commands to your .xinitrc file.
Open your .xinitrc file by choosing "Edit Startup Script" from the "Edit" menu.
If you haven't already, put this function near the top of your .xinitrc file:
SConsoleMessage()
{
local Message="$*"
>/dev/console echo "${Message}"
}
This function will allow you to print messages to the OS X console, you can leave it out if you do not want to print messages to the console. In this instance, we will be using this function to display the message "Setting Keyboard layout..." when Xtools starts up. You can follow the syntax described below to display other messages as you add things to your .xinitrc file. (NOTE: leave this text out of the .xinitrc file, only type in the BOLD text. If you previously added this function while setting up a font server, do not add it again.)
Xtools X Window Server User’s Guide Keyboard Mapping 55

A D V A N C E D F E A T U R E SKeyboard Mapping6
Now add the above to your .xinitrc file as well:
SConsoleMessage "Setting Keyboard Layout..."
xmodmap .xmodmaprc
If you look at the first line, you will see how we use the SConsoleMessage function to print to the console. If we wanted to have the console output say "Welcome to Xtools", the syntax would be:
SConsoleMessage "Welcome to Xtools"
If you have decided that you don't want to print console messages, leave the first line of the above code out of your .xinitrc file. The second line contains the actual command to activate the keyboard mapping. You can replace "xmodmap .xmodmaprc" with what ever xmodmap command you like. For instance, if you wanted to follow the first example for disabling the caps lock key, you'd add
SConsoleMessage "Setting Keyboard Layout..."
xmodmap -e "keysym Caps_Lock ="
instead of the above.
When you are finished editing your .xinitrc file, make sure to save it and restart Xtools. If you open your Mac OS X console during start up, you should see the commands you just entered being executed.
If at any time you want Xtools to stop executing these commands on start up, simply delete them from your .xinitrc file and restart Xtools.
56 Keyboard Mapping Xtools X Window Server User’s Guide

. . .A D V A N C E D F E A T U R E S
OpenGL
. .. . . . . . . . . . . . . . . . . . . . . . . . . . . . . . . . . . . . . . . . . . . . . . . . . . . . . . .O P E N G L
OpenGL by Silicon graphics is the premier 3D graphics library that allows software developers the ability to develop high quality, interactive graphics application. OpenGL is an operating system independent, industry standard interface for three-dimensional color graphics programming. It is typically used in engineering, visualization, simulation, and other graphics intensive applications. It is the how of 3D publishing.
OpenGL provides a wide range of graphics functions: from rendering a simple geometric point, line, or filled polygon, to texture mapping NURBS curved surfaces.
The OpenGL functions described are provided on every OpenGL implementation to make application written with OpenGL easily portable between platforms. All licensed OpenGL implementations are required to pass the Conformance Tests, and come from a single specification and language binding document.
OpenGL can perform a wide range of functions that will enhance the development of all graphics software. These functions are provided on every OpenGL implementation to make application written with OpenGL easily portable between platforms:
Geometric primitives(points, lines and polygons)ShadingRGBA and other index modeTexture mappingViewing and modeling transformationsLightingZ Bufferings Atmospheric Effects (fog, smoke, haze)AntialiasingPixel Operations (Storing, transforming, mapping zooming)Stencil PlanesDisplay list or immediate modeAccumulation BufferAlpha Blending(transparency)Polynomial Evaluatorsraster primitives(bitmaps and pixel rectangles)Feedback, Selection and picking.
Xtools X Window Server User’s Guide OpenGL 57

A D V A N C E D F E A T U R E SOpenGL6
Figure 33: - Xtools running multiple OpenGL applications.
Xtools allows you to create, modify, compile and run X Window based OpenGL applications by seamlessly meshing with Apple's OpenGL implementation. Because Apple's OpenGL implementation currently supports hardware acceleration on systems with RAGE II, RAGE Pro, RAGE 128 and Radeon video cards, Xtools provides graphics acceleration for those machines as well. Included in the default Xtools installation are all of the OpenGL libraries and header files needed to create or port your favorite X11 OpenGL applications. Please refer to our chapter on development for more information about porting applications with Xtools. If you'd like to learn more about OpenGL, please refer to Apple's site:
http://www.apple.com/opengl/
58 OpenGL Xtools X Window Server User’s Guide

. .
. . . . . . . . . . . . . . . . . . . . . . . . . . . .X11 DEVELOPMENT 7
The standard Xtools software distribution contains all of the header files and libraries necessary to develop software for the X Window System. OpenGL libraries are included, as well as the Tk (Toolkit) widget set, note that X11 development will not be possible without installing the full suite of Mac OS X development tools that are provided by Apple.
While this document is not intended to be an in-depth X11 development tutorial, it will describe what needs to be done in order to properly compile your own X client applications and/or port x client applications to Mac OS X.
. . . . . . . . . . . . . . . . . . . . . . . . . . . . . . . . . . . . . . . . . . . . . . . . . . . . . . .I N S T A L L I N G T H E D E V E L O P M E N T T O O L S
The Mac OS X operating system is bundled with a CD-ROM containing a full suite of GNU development tools. You will most likely want to install all of the available developer tools packages. However, in order to save more disk space, you may want to forgo installing the sources package. Unless you plan on sifting through examples in the source code that gets installed, you will not need this.
. . . . . . . . . . . . . . . . . . . . . . . . . . . . . . . . . . . . . . . . . . . . . . . . . . . . . . .P O R T I N G X A P P L I C A T I O N S T O M A C O S X
A lot of the available Open source X applications will compile "out of the box" for Mac OS X with little or no modifications to the source code. Occasionally you will have to edit the Makefiles for these projects and edit some compiler or linking flags.
Xtools X Window Server User’s Guide Installing The Development Tools 59

X 11 D E V E L O P M E N TPorting X Applications To Mac OS X7
Figure 34: - Compiling an X11 Client.
SOME IMPORTANT ISSUES
One major issue with porting UNIX applications to the Darwin (Mac OS X) platform, is that Darwin does not support the "UNIX standard" API for using dynamic library loading in applications. If you are attempting to compile an application that requires this feature, you may receive some errors during running the "configure" script (described below), or during the actual compilation of the program.
While running the "configure" script, you may receive an error complaining that it could not find the file "dlfcn.h". Also, during compilation, you may get an error from the linker that says it could not find "-ldl", the dynamic linker library.
Fortunately, a wrapper library has been written to provide this functionality for Mac OS X. It's called dlcompat and can be downloaded from the following URL:
http://fink.sourceforge.net/files/dlcompat-20010123.tar.gz
This library was written by Christoph Pfisterer. Upon compiling and installing this library, you will have the necessary components to compile UNIX applications that require this API for dynamic loading.
60 Porting X Applications To Mac OS X Xtools X Window Server User’s Guide

. . .X 11 D E V E L O P M E N T
Porting X Applications To Mac OS X
. .RUNNING "CONFIGURE"Pretty much all Open source X applications will include a script called
"configure", which will automatically determine some aspects of your system setup which are necessary to successfully compile the application. Many applications are not yet able to automatically detect the Darwin platform during "configure". The host type triple for Mac OS X is powerpc-apple-darwin1.3. On some occasions you may pass this to "configure" with the argument "--host=powerpc-apple-darwin1.3". The safest way to accomplish this is to copy the files "config.guess" and "config.sub", located in /usr/libexec, to the same directory where your "configure" script is found.
COMPILER ISSUES
The compiler included with the Mac OS X Development Tools is an Apple modified GCC compiler, version 2.95.2. Most of the compiler remains unchanged from the standard GCC implementation, however Apple has modified it to be able to compile Objective-C source code. Interestingly, two pre-processors exist with this particular version of GCC; the standard pre-processor implementation, and Apple's version of the pre-processor, which handles pre-compiled headers.
The default pre-processor used by the compiler is Apple's version, which does seem to have problems with some code and will not be able to process some macros. In this case, you can tell the compiler to use the standard pre-processor by giving it the "-traditional-cpp" flag.
BUILDING SHARED LIBRARIES
Most open source packages do not automatically know how to build shared libraries out of the box on Darwin. This is do to the fact that Darwin does not use the "UNIX standard" API for dynamic library loading in applications.
Xtools X Window Server User’s Guide Porting X Applications To Mac OS X 61

X 11 D E V E L O P M E N TPorting X Applications To Mac OS X7
In order to create shared libraries on Mac OS X; you will need to use the utility called "libtool" that is included with the Mac OS X Development Tools supplied by apple. This utility is located in the /usr/bin directory. You will most likely have to edit the Makefile that is created inside the source tree directory and add an entry similar to the following:
libsomething.so: $(OBJECTS)
/usr/bin/libtool -dynamic -undefined suppress -o $@ $(OBJECTS) -lcc_dynamic
The above statement creates a target called "libsomething.so", and depends on $(OBJECTS). The $(OBJECTS) variable may be called something else in the Makefile, like $(OBJS). You will need to find the target for the static library and use the variable specified there.
You will also need to add some arguments to the compiler flags variable in the Makefile, usually called CFLAGS. This variable will almost always usually be set to at least:
CFLAGS="-Wall -O2"
You append the following arguments so that it looks like this:
CFLAGS="-Wall -O2 -dynamic -fPIC"
Of course, if your CFLAGS variable contains other flags, you will need to preserve those as well. These flags tell the compiler to create object files which are capable of being used in shared libraries.
You can now make the library by invoking the make command with your new target as the argument (like "make libsomething.so"). This will create a shared library file in the current directory. You will need to manually install the library into one of the standard directories, such as /usr/lib or /usr/local/lib.
62 Porting X Applications To Mac OS X Xtools X Window Server User’s Guide

. . .X 11 D E V E L O P M E N T
X11 Header Files
. .. . . . . . . . . . . . . . . . . . . . . . . . . . . . . . . . . . . . . . . . . . . . . . . . . . . . . . .X 1 1 H E A D E R F I L E S
All of the X11 header files should be located in /usr/X11R6/include. These headers provide all of the function prototypes and variables necessary for development. In order to utilize these functions and variables, you will need to add the proper #include directives to your source files. For example:
#include <X11/X.h>
#include <X11/xpm.h>
You will also need to make sure that the X11 include directory is added to the include path when you compile your programs. The compiler will look the -I flag in the command argument, which is then followed directly by the directory where you want the compiler to look for the files. This can be done in your Makefiles by defining a variable such as INCLUDES like below:
INCLUDES= -I/usr/X11R6/include
The compiler requires this option in order to properly locate the include files. Some optional X or X related libraries that you install on your own (such as GTK+) may install include files in /usr/local/include, in which case you would have to append this directory as well in order to use those files:
INCLUDES= -I/usr/X11R6/include -I/usr/local/include
All of these options can also be passed as compiler options via the terminal if you are not using Makefiles for your applications.
Xtools X Window Server User’s Guide X11 Header Files 63

X 11 D E V E L O P M E N TLinking To The X11 Libraries7
. . . . . . . . . . . . . . . . . . . . . . . . . . . . . . . . . . . . . . . . . . . . . . . . . . . . . . .L I N K I N G T O T H E X 1 1 L I B R A R I E S
Now that you are including the X11 header files, and telling your compiler where to find them, you need to tell your compiler how to link against the X11 libraries. Just like with the include files, you need to tell the compiler which directory to find the X libraries. The standard location for the X11 libraries is /usr/X11R6/lib. You can pass this to the compiler with the -L option, followed directly by the directory in which it should look for the libraries. This can also be set in a Makefile by creating a variable such as LIBS. For example:
LIBS= -L/usr/X11R6/lib
Now that the compiler knows where to find the libraries, you need to tell it which libraries to actually link to. This is done with the -l argument, followed directly by the name of the library which to link to. For example, to tell the compiler to link to libX11.a, you would give add -lX11 to the compiler's linking options. This can also be set in a Makefile by creating a variable such as LDFLAGS:
LDFLAGS= -lX11
. . . . . . . . . . . . . . . . . . . . . . . . . . . . . . . . . . . . . . . . . . . . . . . . . . . . . . .E X A M P L E X 1 1 M A K E F I L E
The following section presents an example Makefile for a theoretical X application, and then dissects and explains the relevant X11 portions. This section assumes that the reader has basic knowledge of how to create their own Makefiles. The comment sections of the Makefile will explain in detail, each variable:
64 Linking To The X11 Libraries Xtools X Window Server User’s Guide

. . .X 11 D E V E L O P M E N T
Example X11 Makefile
. .# Example Makefile For An X11 Application
# The compiler command. This can either be 'cc' or 'gcc' on your system. The
# Apple default install names it 'cc'.
CC = cc
# Compiler flags. This is where you would place any optimizer options, etc. If you
# find that the pre-processor is having trouble with certain Macros, such as in the
# GTK+ libraries, you will have to add '-traditional-cpp' to this line. Also, this is
# where you would add -fPIC and -dynamic if you were creating dynamic
# libraries. Check the documentation for the compiler for more useful options.
CFLAGS = -O2
# Now we tell the compiler where it can find the include files. By default, it looks
# in /usr/include. Any extra libraries you install yourself will more then likely
# place the headers in /usr/local/include. The standard location for X headers is in
# /usr/X11R6/include. If you find the compiler is still unable to find a particular
# header file, you may need to add additional paths to this variable.
INCLUDES = -I/usr/local/include -I/usr/X11R6/include
# The next variable is set in order to tell the linker where to find the necessary
# libraries that it needs to link to, as well as to which libraries it will actually link
# in. The options that are specified below with -L are paths to where the linker
# needs to look, and the options set with -l are the library names. When specifying
# library names, you do no need to add the prefix 'lib', or the extension. For
Xtools X Window Server User’s Guide Example X11 Makefile 65

X 11 D E V E L O P M E N TExample X11 Makefile7
# example, to link libgtk.a, you only need to give '-lgtk' to the linker. For dynamic
# libraries, the linker looks for libraries with a .dylib extension.
LIBS = -L/usr/local/lib -L/usr/X11R6/lib -lX11 -lXext -lXpm
# Now that we have specified all of the necessary variables, we need to setup our
# targets.
# The 'all' target is what 'make' looks to build by default. This isn't a necessary
# target, however. We are telling 'make' that by telling it to build 'all', we want it to
# build the target 'xsample'.
all: xsample
# Once 'make' finds that it has to build 'xsample', it will then look for the 'xsample'
# target in the makefile. The 'xsample' target we have specified is dependant on the
# file 'xsample.c' to be residing in the current directory. If 'make' cannot findthe
# source file, then it will error out to the terminal. Upon verifying that the source
# sample exists, it will execute the command(s) we specify for our target.
xsample: xsample.c
$(CC) -o xsample xsample.c $(CFLAGS) $(INCLUDES) $(LIBS)
66 Example X11 Makefile Xtools X Window Server User’s Guide

. . .X 11 D E V E L O P M E N T
Example X11 Makefile
. .# When executing the specified commands, 'make' automatically fills in the
# variables with what is specified elsewhere in the Makefile. The 'xsample' target
# above, when executed by 'make', will actually look like this in the terminal:
# cc -o xsample xsample.c -O2 -I/usr/local/include
# -I/usr/X11R6/include -L/usr/local/lib -L/usr/X11R6/lib -lX11 -lXext
# -lXpm
# End
Xtools X Window Server User’s Guide Example X11 Makefile 67

X 11 D E V E L O P M E N TExample X11 Makefile7
68 Example X11 Makefile Xtools X Window Server User’s Guide

. .
. . . . . . . . . . . . . . . . . . . . . . . . . . . .APPENDIX A A
Gett ing Help:If you encounter a problem, or would like more information about some particular X11 client, etc, there are several resources for you to to get help:
TENON WEBSITE:We often list updates, ported applications, new documentation, Xtools news and other useful information on our site. You can access it at:
http://www.tenon.com
THE XTOOLS BULLETIN BOARD:We have set up an online bulletin board for all of our Xtools users to share information, report bugs, ask questions and generally help each other out. You can access it by clicking the link on our Xtools products page, or go there directly with the following URL:
http://www.tenon.com/cgi-bin/BBoard/Ultimate.cgi
E-MAIL TECHNICAL SUPPORT:Our technical support staff responds to e-mail very quickly:
CALL US:If you have a support contract when you bought Xtools and are having a problem, you can call us to ask questions:
(805) 963 - 6983 (8am - 5pm PST)
Xtools X Window Server User’s Guide 69

A P P E N D I X AA
70 Xtools X Window Server User’s Guide

. .
. . . . . . . . . . . . . . . . . . . . . . . . . . . .APPENDIX B B
Sett ing Up the ssh Envi ronment on Your Local Machine:
A Quick-Star t Guide.
Important Note: The instructions in this document follow the proceedure for creating an SSH1 key. If you need to create an SSH2 key, the proceedure is the same, but the commands you use are different. Please refer to the SSH manpages for the proper commands to use for creating SSH2 keys.
Background: We have two machines, one is our local machine, we call it "HERE". The other is a remote machine called "AWAY". There is one user "HANS" on "HERE", and another user "DIETER" on the remote machine "AWAY".
Now HANS@HERE (this is the syntax used by ssh) wants to run remote X11 client applications on AWAY as the user DIETER (a.k.a. DIETER@AWAY).
Step 1: HANS is logged in on HERE. To log in via ssh to AWAY using the DIETER account, the command is:
/usr/local/bin/ssh DIETER@AWAY
This will most likely ask for the password of DIETER on AWAY, and on the first run it will also ask if AWAY should be added to the list of trusted hosts (make sure you type out the word "yes", not just the letter "y").
After typing in the right password for DIETER, HANS has access to a shell on AWAY.
Success in the first step, but we want to make this whole process more convenient in the future.
Step 2: In this step, HANS@HERE creates an RSA key and allows use of it to DIETER@AWAY.
In a shell on HERE, HANS issues the:
/usr/local/bin/ssh-keygen
command. This will create two files identity and identity.pub in a hidden subfolder named .ssh of HANS' home folder. When asked for a passphrase, HANS just hits return, so this key will not be password protected.
Xtools X Window Server User’s Guide 71

A P P E N D I X BB
To make this key usable to DIETER@AWAY (so logging in to AWAY as DIETER is easier for HANS@HERE), the file identity.pub must be copied over to AWAY and be added to the authorized_keys file in the .ssh folder in DIETER's home folder. The .ssh folder may not yet exist, and the authorized_keys may not yet exist - well, just create them.
(Hint: running ssh-keygen on AWAY will create the .ssh folder with the right permissions.)
Step 3: Test it: HANS runs this command from HERE:
/usr/local/bin/ssh DIETER@AWAY
and is logged in immediately. No password was asked. If HANS had decided to protect the RSA key by a passphrase during creation, ssh would have asked for this passphrase, but not for the password of DIETER@AWAY. So even if DIETER changes the password on AWAY, HANS would still be able to log in as long as the RSA public key remains in the authorized_keys file.
STEP 4: TESTING REMOTE CLIENTS UNDER XTOOLS
HANS starts up Xtools on HERE. Since Netscape hasn't been ported to MacOS X yet, HANS needs to run it from AWAY, which is another type of unix system and has Netscape installed in /usr/bin/netscape. DIETER has allowed access to AWAY, so this should work.
HANS opens an xterm, makes sure the DISPLAY variable is set [set DISPLAY=localhost:0.0] (this is a must for X11 forwarding to work) and types in:
/usr/local/bin/ssh -X DIETER@AWAY /usr/bin/netscape
The -X option turns on X11 forwarding. Instead of opening a shell on AWAY, the executable given as the last parameter is executed. Netscape opens on HERE's Xtools desktop.
STEP 5: MAKE IT EASY TO USE
Now that HANS knows everything works fine, Netscape can be added as a client to the Clients menu of Xtools.
(Refer to Chapter 3 of this document for instructions for adding clients to your Clients menu)
72 Xtools X Window Server User’s Guide

. . .A P P E N D I X B
. .STEP 6: WHAT WE DIDN'T COVER: SSH-AGENT AND THE SSH-ADD COMMAND.When RSA codes are protected by passphrases, ssh is unable to ask for them when running a remote client from inside Xtools. However, ssh-agent can do that by starting up a little X11 password type-in program. Xtools starts ssh-agent automatically, and all you have to do is add your RSA key to the agent's key list. Open xterm, type in the command:
/usr/local/bin/ssh-add
(unless you’ve added /usr/local/bin to your path, then you will only need to type: ssh-add) and it will ask you for the passphrase. From now on, the passphrase is known and no longer needed to run remote clients that use this RSA key, until you close Xtools. (The command will need to be executed each time Xtools is launched. You may find it convinent to add a client to your Clients menu called “load ssh Key” with the path to this command.)
Xtools X Window Server User’s Guide 73

A P P E N D I X BB
74 Xtools X Window Server User’s Guide

. .
. . . . . . . . . . . . . . . . . . . . . . . . . . . .APPENDIX C C
Sett ing up a . tcshrc f i le for your ssh commands:
Int roduct ion to .cshrc Conf igurat ion Fi les .
The first thing that you might discover when attempting to set up ssh is that if you open a new xterm and enter any of the ssh commands, including those for the ssh manual pages, you’ll get an error telling you “no such file or directory”. This is because the ssh commands aren’t located in your default (/usr/X11R6/bin/) directory nor are the man pages included in any of the directories with your other manual pages. The ssh commands are instead installed into your /usr/local/bin/ directory, while the accompaying man pages fall into your /usr/local/man directory, and there are four ways to go about using them.
First is the easiest way. You can cd to your /usr/local/bin/ directory and execute all ssh commands from there, and then switch to your /usr/local/man/ directory to read the manual pages. I’m sure you’ll find this fairly inconvinent, as you will be switching between those two directories as well as your default or home directories often.
The second way is a lot of typing. You can stay in your default or home directory and type the full path name along with each ssh command like so:
...] Stephie% /usr/local/bin/ssh-keygen
...] Stephie% /usr/local/bin/ssh-agent
...] Stephie% /usr/local/man/man ssh-agent
...] Stephie% /usr/local/man/man ssh-keygen
...etc
Also not exactly convinent and cumbersome to type.
Xtools X Window Server User’s Guide 75
A P P E N D I X CC
The third method is a temporary fix. In an xterm, you can set up your environment to allow you to just type in the commands without changing directories or paths. To do this, type the following two commands into an xterm window:
...] Stephie% setenv PATH “$PATH”:/usr/local/bin
...] Stephie% setenv MANPATH “/Users/<the name of account you are currently logged in as>/man:/usr/local/share/man:/usr/share/man:/usr/local/man”
For example, if I were logged in as user “Stephie”, the command I’d type for the MANPATH would be:
...] Stephie% setenv MANPATH “/Users/Stephie/man:/usr/local/share/man:/usr/share/man:/usr/local/man”
(The above is all one line, don’t put a carriage return between MANPATH and the “)
The first command tells your X Server to add /usr/local/bin to the list of places it checks for commands that are unknown to it; this is where it will look when you type in an ssh command. The second command sets the path to your ssh man pages, by appending /usr/local/man to the default man path. When you close the xterm window, or switch to a new one, it will “loose” these commands, and you will need to type them in again everytime you open a new xterm. This is better than the first two options, but still not exactly optimal.
The fourth way is the most convinent and is also permanent (it can actually be undone/edited later if you like). This involves creating a configuration file and saving it in your home directory.
You will want to be in your home directory when making this file. To get to your home directory, type:
...] Stephie% cd ~
and hit return. You’ll know if you’re in your home directory if your prompt looks like this:
[hostname.domain:~] <username> %
76 Xtools X Window Server User’s Guide

. . .A P P E N D I X C
. .Now, to create a new textfile through the xterm, we will use the command line text editing tool, vi. (you can use your prefered text editor if you like, i.e. xemacs, textedit. We are using vi for simplicity’s sake, because everyone has it installed by default). At the same time we launch vi, we will need to tell it through the command line to create a new file named .tcshrc. We need to do this because vi has no graphical user interface with nice menus to pull down to select new files, as you’ll see in a moment. In your xterm, type:
...] Stephie% vi .tcshrc
vi will open in your terminal which will now look like the window below:
Figure 35: - New vi Window.
vi has some cryptic commands for editing and maneuvering through documents, as well as saving and quitting. We are going to cover just a few in this section. You may want to take a look at the man page for vi ( ...] Stephie% man vi ) to get a complete set of commands and more information.
To start adding text to your new vi document, you will need to switch from command mode to edit mode. To do this, type a lowercase letter “a”. Case is important in vi. You can now type in the following two lines:
setenv PATH “$PATH”:/usr/local/bin
setenv MANPATH “/Users/<the name of the account you are currently logged in as>/man:/usr/local/share/man:/usr/share/man:/usr/local/man”
(The above is all one line, don’t put a line return between MANPATH and the “)
For example if I were logged in as user Stephie, I’d enter:
Xtools X Window Server User’s Guide 77

A P P E N D I X CC
setenv PATH “$PATH”:/usr/local/bin
setenv MANPATH “/Users/Stephie/man:/usr/local/share/man:/usr/share/man:/usr/local/man”
When you are finished typing, press the <escape> key. This will return you to non-editing mode.
You now need to give vi the command to save changes and quit. To do so, type the following:
ZZ
Remember, vi is case sensitive. You should now have a command line prompt back. To check that your file saved, do a long file listing of all files including those that may be hidden (your .tcshrc file will be hidden) by typing:
...]Stephie % ls -al
-l means give a long list with details about the files and directories
-a means show hidden files
You should see your .tcshrc file in the listing, if not, go back through the instructions and figure out where you went wrong.
Now that you have your settings, it’s time to implement them. Xtools won’t automatically read the file and start using the information contained within. After you make the file, you will have to do one of two things, either restart Xtools, or type the following command in your xterm:
...]Stephie % source .tcshrc
Test that you entered the information properly by typing:
...] Stephie% man ssh
You should get the listing of the ssh man page, if not, go back and open the .tcshrc file with vi again and see where you went wrong.
Now everytime you launch Xtools, it will know where to look for your ssh commands and manual pages. There are other things you can add to your .tcshrc file to tweak your Xtools set up, you may want to do a little online research to see what else you can add.
78 Xtools X Window Server User’s Guide

. . .
. .I N D E X
. .
. . . . . . . . . . . . . . . . . . . . . . . . . . . .INDEX
AAdvanced Features. . . . . . . . . . 43Aqua Style Manager . . . . . 18, 37
CClients
Connecting to . . . . . . . . . . . . 6Clients Menu . . . . . . . . . . . . . . 21
Removing . . . . . . . . . . . . . . 26Clients Tab . . . . . . . . . . . . . . . . 21Configuration Files . . . . . . . . . 75Console . . . . . . . . . . . . . . . . . . 56
DDedicated Screen . . . . . . . . 36, 37Development:
See X11 Development.Development Tools
Installing . . . . . . . . . . . . . . 59DISPLAY Operative . . . . . . . . 31Display Tab . . . . . . . . . . . . . . . 18
FFont Server. . . . . . . . . . . . . . . . 44
Connecting to . . . . . . . . . . . 46Fontpath . . . . . . . . . . . . . . . 43-47Fonts
Copying . . . . . . . . . . . . . . . 43Installing. . . . . . . . . . . . . . . 43
HHelp
Contact Information . . . . . . 69Hostname
Setting. . . . . . . . . . . . . . . . . 29
IInput Tab . . . . . . . . . . . . . . . . . 20Installation . . . . . . . . . . . . . . . . . 9
Xtools Installer Package . . 10
KKeyboard Input. . . . . . . . . . . . . 35Keyboard Mapping. . . . . . . . . . 52
Finding a Keysym. . . . . . . . 54Via Text File . . . . . . . . . . . . 53Automating . . . . . . . . . . . . . 55Via Command Line . . . . . . . 52
Keysyms . . . . . . . . . . . . . . . . . . 54
Xtools X Window Server User’s Guide 79

I N D E XI n d e x
LLicense . . . . . . . . . . . . . . . . . . .13
Entering . . . . . . . . . . . . . . .22Expired, what to do. . . . . . .14Obtaining . . . . . . . . . . . . . .22
License Tab. . . . . . . . . . . . . . . .22
MMenus . . . . . . . . . . . . . . . . . . . .15Menus(cont.)
Clients . . . . . . . . . . . . . . . . .21Edit . . . . . . . . . . . . . . . . . . .19
Meta Key . . . . . . . . . . . . . . . . .20mkfontdir. . . . . . . . . . . . . . . . .44Motif Title Bar . . . . . . . . . . . . .39Motif Window Manager . . . . . .37
(see also mwm)Motif Window Menu . . . . . . . .38Mouse, using. . . . . . . . . . . . . . .35Mouse Emulation . . . . . . . . . . .20mwm. . . . . . . . . . . . . . .34, 36, 38
Navigating. . . . . . . . . . . . . .38
NNavigating the X11 Desktop . .35
OOpenGL . . . . . . . . . . . . . . . . . .57
Hardware Support . . . . . . .58
PPointer Shapes . . . . . . . . . . . . . 35Porting Applications . . . . . . . . 59
Compiler Issues . . . . . . . . 61Important Issues. . . . . . . . . 60Running "configure" . . . . . 61Shared Libraries . . . . . . . . 61
Preferences. . . . . . . . . . . . . . . . 17Clients tab . . . . . . . . . . . . . 21Display. . . . . . . . . . . . . . . . 18Input Tab . . . . . . . . . . . . . . 20License Tab . . . . . . . . . . . . 22Server Tab . . . . . . . . . . . . . 19
Print to OS X Console . . . . 45, 55
QQuitting . . . . . . . . . . . . . . . . . . 16
RRoot
Setting Up . . . . . . . . . . . . . 48Rootless Display Mode . . . 34-37RSA Based Authentication . . . 27
SServer Tab . . . . . . . . . . . . . . . . 19set DISPLAY . . . . . . . . . . 19, 30
Returning to Default . . . . . 32Secure shell. See SSHSSH
80 Xtools X Window Server User’s Guide

. . .I N D E X
. .commands . . . . . . . . . . . . . .28ssh . . . . . . . . . . . . . . . . .28ssh-add . . . . . . . . . . . . .28ssh-agent . . . . . . . . . . .28ssh-keygen . . . . . . . . . .28
Passphrase . . . . . . . . . . . . .29Quick Start . . . . . . . . . . . . .71.tcshrc Set Up . . . . . . . . . . .75Xtools’ SSH package . . . . .11
SSH Agent . . . . . . . . . . . . . . . .28Startup Script . . . . . . . . . . . . . .19sudo . . . . . . . . . . . . . . . . . . . . .48System Requirements . . . . . . . . .9
TTab Window Manager . . . . . . .37
see also twm..tcshrc . . . . . . . . . . . . . . . . . . . .75twm . . . . . . . . . . . . . . . . . . . 34-40
Navigating. . . . . . . . . . . . . .41Summary . . . . . . . . . . . . . . .41twm Root Menu . . . . . . . . . .41
twm Title Bar . . . . . . . . . . . . . .42
UUninstall . . . . . . . . . . . . . . . . . .51
WWindow Manager . . . . . . . . . 6,33
Aqua-Style . . . . . . . . . . . . . .33Dedicated Full Screen . . . .18
Description. . . . . . . . . . . . . 33Dual Monitor System . . . . . 18Exiting . . . . . . . . . . . . . . . . 38Rootless . . . . . . . . . . . . . . . 33Selecting. . . . . . . . . . . . .18,36
Window Menu FunctionsSummary . . . . . . . . . . . . . . 39
Window Operations . . . . . . . . . 35Windows
Selecting. . . . . . . . . . . . . . . 35
XX Display Manager. See XDM.X Window System . . . . . . . . . . . 5
About . . . . . . . . . . . . . . . . . . 7X11 Development . . . . . . . . . . 59X11 Header Files . . . . . . . . . . . 63X11 Libraries . . . . . . . . . . . . . . 64X11 Makefile . . . . . . . . . . . . . . 64xdm . . . . . . . . . . . . . . . . . . .20,49
about . . . . . . . . . . . . . . . . . 49configuring. . . . . . . . . . . . . 49login window . . . . . . . . . . . 51
xev . . . . . . . . . . . . . . . . . . . . . . 55XFree86
about . . . . . . . . . . . . . . . . . . 8xfs. See Font Server.xhost
Access from Remote Hosts . 19Disabling . . . . . . . . . . . . . . 30Execute from Command Line30Security . . . . . . . . . . . . . . . 30Set Display . . . . . . . . . . . . . 31
Xtools X Window Server User’s Guide 81

I N D E XI n d e x
Using. . . . . . . . . . . . . . . . . .30.xinitrc . . . . . . . . . . . . . . . .19, 56
sample . . . . . . . . . . . . . . . . .19starting font server . . . . . . .45
xmodmap . . . . . . . . . . . . . .53, 56Xtools
About. . . . . . . . . . . . . . . . . . .5Adding to Your Dock . . . . .13Downloading. . . . . . . . . . . . .9Features . . . . . . . . . . . . . . . .7First Look . . . . . . . . . . . . . .13
82 Xtools X Window Server User’s Guide