WorkSampling Online Administrator User’s Guide · PDF filecontext of everyday ... region...
72
Work Sampling Online Administrator User’s Guide
Transcript of WorkSampling Online Administrator User’s Guide · PDF filecontext of everyday ... region...

Work Sampling Online Administrator User’s Guide

PsychCorp is an imprint of Pearson Clinical Assessment. NCS Pearson, Inc. 5601 Green Valley Drive Bloomington, MN 55437
Work Sampling Online™ and InvestiGator Club™
Administrator User’s Guide
For orders and inquiries: 800.627.7271 www.PearsonClinical.com
Copyright © 2017, 2013 NCS Pearson, Inc. All rights reserved. Portions of this work were previously published. Revised November 2017.
Warning: The material in this manual is protected by U.S. federal and international copyright laws. The qualified user who purchased Work Sampling is hereby granted nonexclusive, revocable permission to download the Work Sampling Online Administrator User’s Guide for their sole use and not for use by any unauthorized user. Reproduction of this material is otherwise prohibited.
The Work Sampling System is a registered trademark, and Pearson, the PSI logo, PsychCorp, Work Sampling, Work Sampling Online, Work Sampling for Head Start, and the Work Sampling for Head Start logo are trademarks, in the US and/or other countries, of Pearson Education, Inc., or its affiliates.
InvestiGator Club is a trademark of Rainbow, Inc.
ChildPlus is a registered trademark of Management Information Technology USA, Inc. Chrome is a trademark of Google, Inc. Excel and Internet Explorer are registered trademarks of Microsoft Corporation. Firefox is a registered trademark of the Mozilla Foundation. iPad is a registered trademark of Apple Inc.

Copyright © 2017 NCS Pearson, Inc. All rights reserved. Portions of this work were previously published.— page iii
Table of Contents New to this program? ........................................................................................................................................ 1
What is Work Sampling Online? ..................................................................................................................... 1
What is InvestiGator Club™? .......................................................................................................................... 1
Locations and Your License ............................................................................................................................ 1
If You Need Help ............................................................................................................................................. 4
Quickstart for Administrators ............................................................................................................................. 5
Common Page Elements .................................................................................................................................... 6
The Page Header ............................................................................................................................................ 6
The Navigation Menu ..................................................................................................................................... 6
Blue Arrow, Red Arrow ................................................................................................................................... 7
Alerts .............................................................................................................................................................. 7
The User Menu ............................................................................................................................................... 8
Location Drop-down Lists ............................................................................................................................... 9
Search Options ............................................................................................................................................. 10
The Administrator Home Page ......................................................................................................................... 12
The Dashboard Page .................................................................................................................................... 13
The Calendar Page........................................................................................................................................ 14
Setting Up and Managing Locations ................................................................................................................ 19
The Manage Locations Page ......................................................................................................................... 19
Setting Up and Managing Roles ....................................................................................................................... 24
About Roles and Permissions ....................................................................................................................... 24
The Manage Roles Page ............................................................................................................................... 26
Setting Up and Managing Users ....................................................................................................................... 27
The Manage Users Page ............................................................................................................................... 27
Setting Up and Managing Students ................................................................................................................. 36
The Manage Students Page .......................................................................................................................... 36
Archiving and Deleting Students .................................................................................................................. 42
Communicating With Users: Alerts .................................................................................................................. 45
The Manage Alerts Page .............................................................................................................................. 45
Monitoring the System: Reports ...................................................................................................................... 50
The Reports Page ......................................................................................................................................... 50
The Pending Summary Report ..................................................................................................................... 52
The Pending Checklist Report ...................................................................................................................... 53
The Unassigned Teachers Report ................................................................................................................. 54
The Class Size Report ................................................................................................................................... 55
User Export .................................................................................................................................................. 56
Copyright © 2017 NCS Pearson, Inc. All rights reserved. Portions of this work were previously published.— page iv
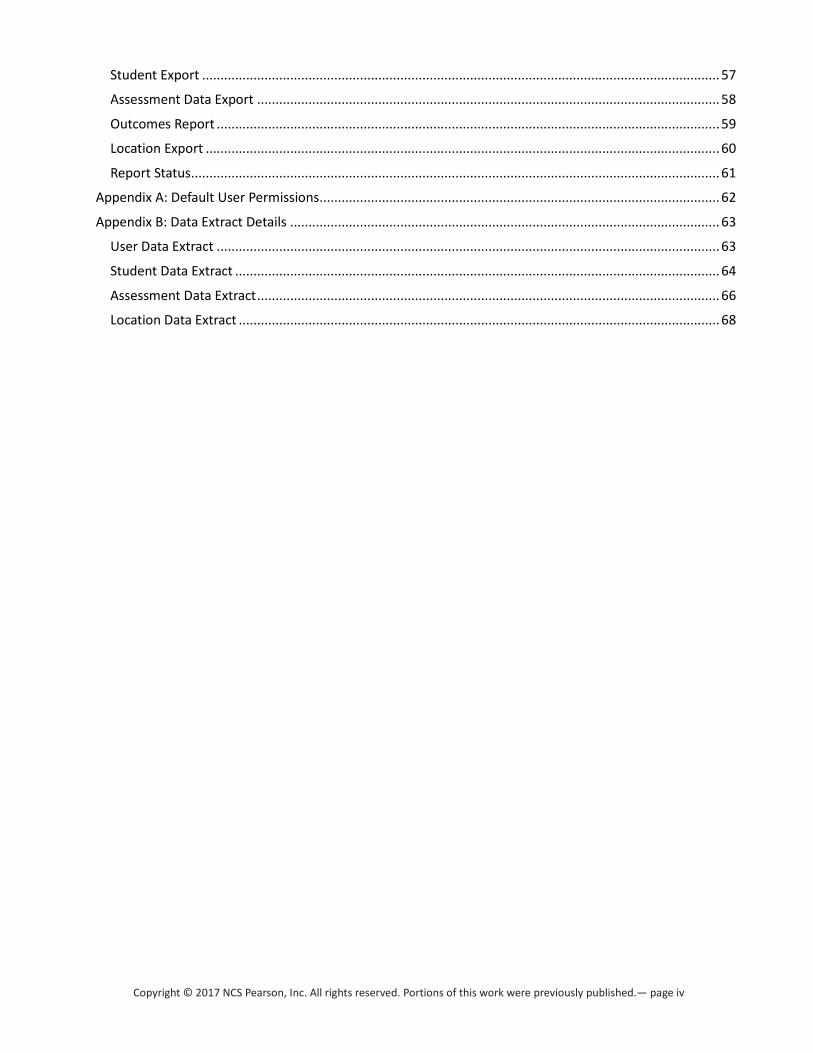
Student Export ............................................................................................................................................. 57
Assessment Data Export .............................................................................................................................. 58
Outcomes Report ......................................................................................................................................... 59
Location Export ............................................................................................................................................ 60
Report Status ................................................................................................................................................ 61
Appendix A: Default User Permissions ............................................................................................................. 62
Appendix B: Data Extract Details ..................................................................................................................... 63
User Data Extract ......................................................................................................................................... 63
Student Data Extract .................................................................................................................................... 64
Assessment Data Extract .............................................................................................................................. 66
Location Data Extract ................................................................................................................................... 68

Copyright © 2017 NCS Pearson, Inc. All rights reserved. Portions of this work were previously published.— page 1
New to this program? If you’re already familiar with Pearson's Work Sampling software and want to jump right in, skip to the Administrator Quick Start.
If this is your introduction to Work Sampling, don’t worry. Work Sampling Online has a simple mission: to ensure success for you, your users, and your students.
What is Work Sampling Online? Work Sampling Online (WSO for short) is a web-based application that offers easy, instant access to key elements of the Work Sampling System® (5th ed.) for Preschool to Grade 3, as well as Work Sampling® for Head Start. The Work Sampling Guidelines and Checklists are tools for authentic assessment within the context of everyday classroom activities: teachers use observations and work samples they collect during activities to assess each student’s learning and developmental progress in seven diverse domains of learning over multiple collection periods.
What is InvestiGator Club™? InvestiGator Club, an extension to Work Sampling Online, aids the Work Sampling System (5th ed.) process by providing Preschool 4 investigation kits that support a year-long lesson plan of 7–9 learning activities for each school day. Each activity is associated with one or more specific assessment indicators (i.e., developmentally appropriate skills, knowledge, and behavior), and make it easy to associate evidence and observations—such as written notes, photographs, scans of artwork, or audio or video recordings taken by teacher or parent—with one or more students.
Locations and Your License
Locations The concept of location within Work Sampling Online is an important one. Nearly every action you take in Work Sampling—setting up the system, creating user accounts, making teacher assignments, or producing reports—will first require you to specify a recipient of the action by specifying their location within your organizational hierarchy.
This may seem like odd phrasing, but in everyday conversation, answering the question “Where are you?” generally involves giving all or part of a geographical hierarchy as an answer: planet > continent > country > region > state > city > postal code > street name > house or building number > room or apartment number.
In the same way, within Work Sampling Online, your answer to the question “Where are they?” involves a hierarchy that ends with a classroom. If you’re not sure how your organization would map to the WSO hierarchy, start at the bottom.
Your Work Sampling Online system contains at least one class, because that’s where students and teachers are found.
Classes take place within a physical space—a daycare center, a classroom in a building. In Work Sampling, anything with a discrete address is called a site.

Copyright © 2017 NCS Pearson, Inc. All rights reserved. Portions of this work were previously published.— page 2
Usually a site hosts more than one class.
Multiple sites are grouped under a program. For Work Sampling Online purposes, a program is simply the level above a site, what the sites roll up to organizationally, be it a district, an agency, or something else.
Multiple programs are grouped under an organization. For Work Sampling Online purposes, an organization is simply the level above a program.

Copyright © 2017 NCS Pearson, Inc. All rights reserved. Portions of this work were previously published.— page 3
In Work Sampling Online, multiple organizations fall under a brand.
Your license All Users of the WSO system must be members of an active license, which is purchased through the Pearson Customer Service Department. Licenses are set up to reflect the multiple tiers or levels typically found your organization or program, and cover a set number of students (with an unlimited number of staff Users).
As shown below, a license can cover a group of organizations (referred to as Brand-level license), an entire state or grantee with multiple programs or agencies (an Organization-level license), an entire agency or district with multiple sites (a Program-level license) or a single site (a Site license).
Pearson defines the top level of your license; you create the infrastructure under that level. For example, if your license is an Organization-level license, you set up one or more programs under the organization, one or more sites under each program, and one or more classes at each site. At each level of the organization, you also add staff. Students are added at the site level.
Setting up your Work Sampling Online system is explained in detail starting with the section Setting Up and Managing Locations.

Copyright © 2017 NCS Pearson, Inc. All rights reserved. Portions of this work were previously published.— page 4
If You Need Help If at any time you have any questions, concerns, or suggestions for Work Sampling Online, please contact technical support at 1-800-874-0914 or via email at [email protected]. You can also access the Contact Us link available on every Help menu and at the bottom of the sign in page.
When contacting technical support, please be as specific as possible when asking a question or providing feedback. Always provide your license name (found on your Dashboard or User Profile page) and contact information, such as a return email address or phone number.
To prevent replies from technical support from winding up in your Spam or Junk mail folder, make sure to whitelist [email protected].
The Work Sampling Online team keeps program and center administrators informed of enhancements and new features, so ask an administrator for guidance or help, as well.
To contact Pearson about other products or services we provide, please visit www.PearsonClinical.com or call 1-800-627-7271.
This user’s guide was written from the standpoint of a default (i.e., not customized) installation of Work Sampling Online, using default permissions. Depending on your particular license level and how your permissions were set up, what you see and can do when you use WSO may differ from the examples in this manual.
Copyright © 2017 NCS Pearson, Inc. All rights reserved. Portions of this work were previously published.— page 5
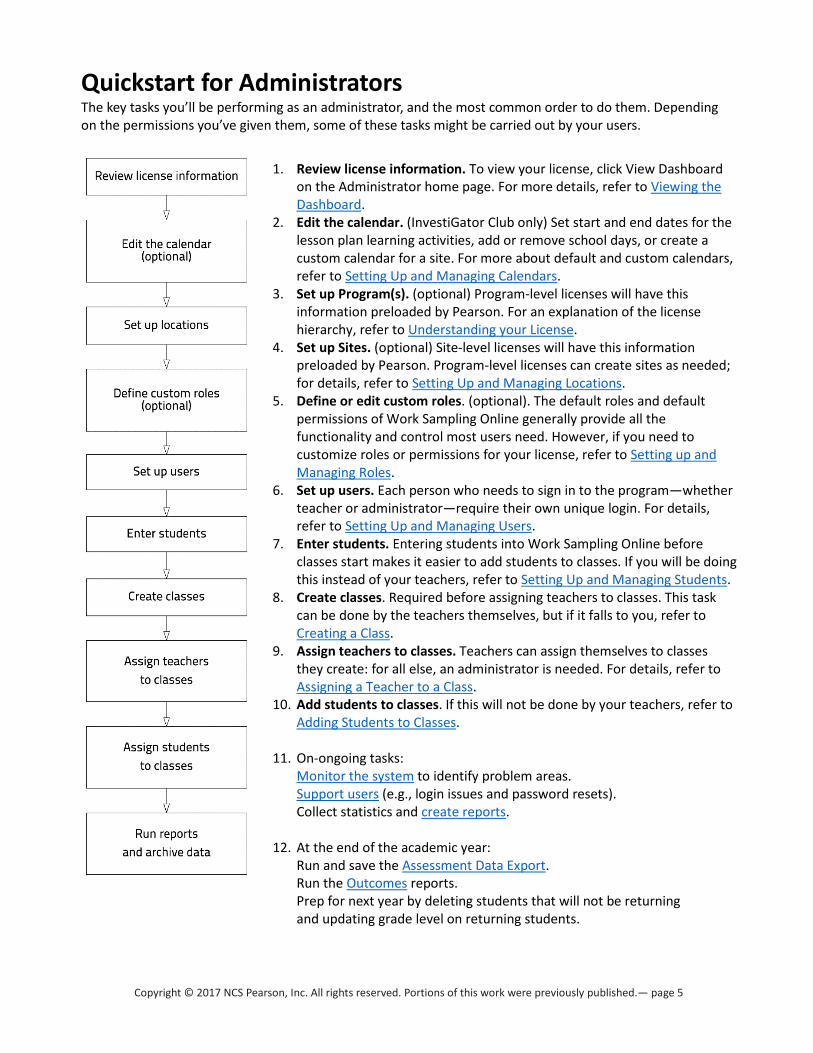
Quickstart for Administrators The key tasks you’ll be performing as an administrator, and the most common order to do them. Depending on the permissions you’ve given them, some of these tasks might be carried out by your users.
1. Review license information. To view your license, click View Dashboard on the Administrator home page. For more details, refer to Viewing the Dashboard.
2. Edit the calendar. (InvestiGator Club only) Set start and end dates for the lesson plan learning activities, add or remove school days, or create a custom calendar for a site. For more about default and custom calendars, refer to Setting Up and Managing Calendars.
3. Set up Program(s). (optional) Program-level licenses will have this information preloaded by Pearson. For an explanation of the license hierarchy, refer to Understanding your License.
4. Set up Sites. (optional) Site-level licenses will have this information preloaded by Pearson. Program-level licenses can create sites as needed; for details, refer to Setting Up and Managing Locations.
5. Define or edit custom roles. (optional). The default roles and default permissions of Work Sampling Online generally provide all the functionality and control most users need. However, if you need to customize roles or permissions for your license, refer to Setting up and Managing Roles.
6. Set up users. Each person who needs to sign in to the program—whether teacher or administrator—require their own unique login. For details, refer to Setting Up and Managing Users.
7. Enter students. Entering students into Work Sampling Online before classes start makes it easier to add students to classes. If you will be doing this instead of your teachers, refer to Setting Up and Managing Students.
8. Create classes. Required before assigning teachers to classes. This task can be done by the teachers themselves, but if it falls to you, refer to Creating a Class.
9. Assign teachers to classes. Teachers can assign themselves to classes they create: for all else, an administrator is needed. For details, refer to Assigning a Teacher to a Class.
10. Add students to classes. If this will not be done by your teachers, refer to Adding Students to Classes.
11. On-ongoing tasks:
Monitor the system to identify problem areas. Support users (e.g., login issues and password resets). Collect statistics and create reports.
12. At the end of the academic year:
Run and save the Assessment Data Export. Run the Outcomes reports. Prep for next year by deleting students that will not be returning and updating grade level on returning students.

Copyright © 2017 NCS Pearson, Inc. All rights reserved. Portions of this work were previously published.— page 6
Common Page Elements Certain elements appear on nearly every page of Work Sampling Online. Click or tap them to navigate, display or specify information, or search.
The Page Header
This page header picture shows both the red Teacher mode arrow and the blue Administrator mode arrow, but this is for illustrative purposes only. You will never see both arrows at the same time on a Work Sampling Online page.
The Navigation Menu
Displays the administrator home page. You can also access the home page by clicking the title bar of any page.
Manage Students Displays the Manage Students page.
Manage Users Displays the Manage Users Page.
Manage Locations Displays the Manage Locations page.
New Alert Displays the Create Alerts page.
Manage Alerts Displays the Manage Alerts page.
Manage Reports Displays the Reports page.
Resources Displays a list of manuals, renewal forms, and additional resources.

Copyright © 2017 NCS Pearson, Inc. All rights reserved. Portions of this work were previously published.— page 7
Blue Arrow, Red Arrow As an administrator, there are times when you may want to see what the teachers are seeing, perhaps to run certain reports or to troubleshoot user issues. Rather than set up a second user account for yourself, Work Sampling’s mode-switching feature enables you to move quickly between working as a teacher and working as an administrator.
At the top of every page, next to the location drop-downs, you will see either a blue arrow or a red arrow.
The blue arrow indicates that you are on the Administrator side of WSO. Click or tap the blue arrow to switch to the Teacher side and display the Teacher home page.
The red arrow indicates that you are on the Teacher side of WSO. Click or tap the red arrow to return to Administrator functions and display the Administrator home page.
Unless instructed otherwise, assume that all instructions in this manual refer to “blue arrow” Administrator functionality.
Alerts Alerts are messages that appear when you sign in. They remain until they expire or you delete them.
The number next to the red bell icon tells you how many alerts you have (both read and unread). If there is no number, you have no alerts.
Viewing your alerts
1. Click or tap the red bell. The Alerts list appears.
The dates under the title of each alert show how long the alert will be active.
The last line of the alert is the name of the sender.
To close the Alerts list, click or tap the bell.
Deleting an alert
1. Click or tap the red bell. The Alerts list appears.
2. Click or tap the X next to the alert you want to delete.

Copyright © 2017 NCS Pearson, Inc. All rights reserved. Portions of this work were previously published.— page 8
The User Menu The User menu is where you update your profile information, including your email address and password.
You also use the User menu to sign out of Work Sampling.
For security reasons, it is recommended that you always sign out of Work Sampling Online when you are not actively using the site.
Updating your user information
1. Click or tap your name or the User icon in the top right corner. The User menu displays.
2. From the User menu, click or tap Profile. The YOUR ACCOUNT popup appears.
3 Make the appropriate changes. You can change any of the fields with a white background.
• You cannot change your User Name, which is your Work Sampling sign in name.
4 Click or tap Save. The YOUR ACCOUNT popup closes.
Changing your password
1. Click or tap your name or the User icon in the top right corner. The User menu displays.
2. Select Profile. The YOUR ACCOUNT popup appears.
3. Click or tap Change Password. The Change Password area displays.
4. Enter your old password and new password, then confirm your new password.
Passwords must be at least 7 characters long and include at least 1 uppercase and 1 lowercase letter and 1 digit or special character. Previous passwords cannot be reused.
5. Click or tap Update Password.
6. Click or tap Save. The YOUR ACCOUNT popup closes.
Signing out of Work Sampling Online
1. Click or tap your name or the User icon in the upper right corner of the page.
2. From the User menu, click or tap Sign Out.
Closing your browser also signs you out of Work Sampling Online.

Copyright © 2017 NCS Pearson, Inc. All rights reserved. Portions of this work were previously published.— page 9
Location Drop-down Lists The drop-down lists in the upper left corner of every page display your location within Work Sampling Online.
Your location while in Administrator mode In Administrator mode, you will always see at least one drop down, for site selection.
If you have a program-level license, the Administrator dropdowns will look like the one shown below—although there will only be one program available for selection, and generally it will be automatically selected whenever you sign in.
Click the down arrow to make a new selection, or the X to clear the selection from that drop-down.
Your location while in Teacher mode In Teacher mode, site selection is on the left, and class selection on the right.
Normally, a teacher can only select classes to which they have been assigned. However, as an administrator, in Teacher mode you can act as any teacher in Work Sampling Online for the site you’ve selected, and therefore have access to all classes at that site.

Copyright © 2017 NCS Pearson, Inc. All rights reserved. Portions of this work were previously published.— page 10
Search Options You have two ways to search Work Sampling Online: a global search and a site search.
Global search
The global search is useful if your system has multiple programs or sites, and you don’t know the exact location within the WSO hierarchy of the person(s) or place(s) you’re searching for. Most often you’ll use the global search for users or students, but in this example we’ll use it to find locations with the word “lane” in their address.
1. Click or tap the magnifying glass to the right of whatever you’re searching for. In this case, since we’re searching for a location, click or tap the magnifying glass to the right of the location drop-downs.
A search bar displays below the dropdowns.
2. Click or tap the search bar. A text entry area displays.
Selections will be displayed which match the search information: Each search result displays its full organizational hierarchy.
In this case, the addresses of both these sites contains the word “Lane.”
3. Click or tap the location from the display. The site (and, if needed, the program and organization
name) will be chosen automatically in the location drop-downs.

Copyright © 2017 NCS Pearson, Inc. All rights reserved. Portions of this work were previously published.— page 11
This same procedure is used to perform global searches for students or users.
The drawback of a global search is that it generally takes longer than a search with a narrower scope.
Location Search Unlike a global search, a location search—available on many of the list-type pages in Work Sampling Online— narrows the search scope to the location specified on the drop-downs.
After specifying a location, enter the search term in the Search box.
Enter three or more characters into this box to restrict the list to items that have those characters somewhere in the data displayed on the list.

Copyright © 2017 NCS Pearson, Inc. All rights reserved. Portions of this work were previously published.— page 12
The Administrator Home Page The Administrator home page is your command center, enabling you to access all Work Sampling functions.
Accessing the Home page The Home page displays when you sign into Work Sampling Online. You can also return to the home page by clicking or tapping the Work Sampling title bar.
Home page functions In addition to the functions at the top of the page, from the Home page you can
• view and monitor your Work Sampling license • edit the calendar (InvestiGator Club only) • add and edit Work Sampling locations, roles, users, and students • view and edit class information • create and edit user alerts (if you have the requisite permissions) • view user alerts • monitor the progress of certain tasks, such the creation of reports for parent-teacher conferences • create data exports

Copyright © 2017 NCS Pearson, Inc. All rights reserved. Portions of this work were previously published.— page 13
The Dashboard Page The Dashboard page displays key information about your license.
Accessing the Dashboard
From the Administrator home page, click or tap Dashboard. The Dashboard page displays.
Dashboard functions The Dashboard displays the
• license name and expiration date. • number of active students allowed by your license. • number of archived students allowed by your license. • checklist status for a selected period.
To effectively monitor your student counts and checklist status, it is recommended that you view your Dashboard often.
Dashboard field descriptions.
Field Description / Notes License Name Needed when contacting technical support or when renewing your license
License Expiration
License expiration date
Period Make a select from the drop-down to control what displays on the pie charts
Active Students Used: Number of active students in your license Remaining: Number of students that could become active, either by being newly-entered into the system, or by being reactivated from an archived or deleted state.
Archived Student Count
Used: Number of students currently archived Remaining: Number of students that could be archived
Checklist Status Finalized: Number of students that have finalized checklists for the selected period Preliminary: Number of students that have preliminary checklists for the selected period Not Started: Number of students that do not have a checklist for the selected period
By selecting programs or sites in the location drop down on the Dashboard page, you can drill down for details about any specific location within your license.

Copyright © 2017 NCS Pearson, Inc. All rights reserved. Portions of this work were previously published.— page 14
The Calendar Page The Calendar controls when the 160 days—approximately 32 (five-day) weeks’-worth—of learning activities are available for classroom use at locations that have purchased InvestiGator Club.
For brevity, any weekday during the academic year on which the learning activities will not be/were not used is referred to as a holiday. In this context, holidays can include school closings due to inclement weather, scheduled staff development days, or day-long class field trips.
Accessing the Calendar From the Navigation menu, select Manage Calendar. The Calendar page displays.
Calendar page functions • Display the source of inherited calendar information. • Set a start date for InvestiGator Club lesson plan activities. • View default holidays. • Add or remove holidays. • Mark a weekend day as a working day.

Copyright © 2017 NCS Pearson, Inc. All rights reserved. Portions of this work were previously published.— page 15
Default calendars, custom calendars, and calendar inheritance A calendar inherits two things from the calendar “above” it in the location hierarchy:
• holidays • the Start Date for InvestiGator Club activities
The default calendar has US federal holidays pre-defined, but no Start Date.
Editing a calendar—by adding or editing the Start Date, or adding or removing holidays—creates a custom calendar for the current location. This custom calendar’s settings are inherited by any calendars created under it. For example, if you define a custom calendar at the program level, all calendars created for sites under that program inherits the program calendar’s settings.
If the calendar for the currently-selected location has no Start Date (either inherited or defined) the inheritance information in the lower left corner of the calendar displays a warning.
You must set a Start Date for the Work Sampling-InvestiGator Club integration to function properly!
Setting a start date The start date for the Work Sampling learning activities does not need to be the same as the start date of your academic year, especially if your school allocates a day or two for orientation and settling-in.
1. From the Calendar page, specify the calendar’s location from the drop-downs.
2. If needed, navigate to the correct month by clicking or tapping the arrows of the calendar icon.
3. Right click (or press and hold) the day you want to set as the start date. The menu displays.
4. Select Set as Lesson Plan Start Date. The calendar is marked with a small green circle in the upper right corner of the date, and all days earlier than the start date are tinted light gray and become non-interactive (display the symbol when moused over.)
The Lesson Plan End Date, 160 days after the Start Date, is set automatically.

Copyright © 2017 NCS Pearson, Inc. All rights reserved. Portions of this work were previously published.— page 16
Editing the start date To change the current start date:
1. Right click (or press) the current date. The menu appears.
2. Select Change Lesson Plan Start Date. A popup calendar appears.
3. Click or tap the date. The popup closes and your new Lesson Plan Start Date is set.
Deleting a custom start date To delete the start date on a custom calendar and use the default date from an inherited calendar:
1. Right click (or press) the current date. The menu appears.
2. Select Delete Lesson Plan Start Date. The custom Start date is deleted. The Start Date status displays at the bottom of the calendar as part of the inheritance information.

Copyright © 2017 NCS Pearson, Inc. All rights reserved. Portions of this work were previously published.— page 17
WARNING: If there is no Lesson Plan Start Date set at any level, the Work Sampling-InvestiGator Club integration will not function properly.
Adding or removing days
1. From the administrator home page, select the location of the calendar you want to edit.
2. From the Navigation menu, select Calendar. The Calendar page displays.
3. If needed, navigate to the correct month by clicking or tapping the calendar icon arrows.
4. Click or tap the day you want to change. Click or tap a second time to reverse the change.
Summary of calendar day states Click or tap the day to switch between states.
Active day to custom holiday
Default holiday to (active) working day
Weekend day to (active) working day

Copyright © 2017 NCS Pearson, Inc. All rights reserved. Portions of this work were previously published.— page 18
Editing the label If needed, you can edit the “Working Day” and “Holiday” default labels.
1. Right click (or press) the day you want to edit. The menu appears.
2. Select Edit. A popup appears with the date, two action buttons, and a text entry area.
3. Make the necessary changes.
• The label is limited to 20 characters.
4. Click or tap Update.
4. Click or tap Save. The popup closes and your changes are reflected on the calendar.
Copyright © 2017 NCS Pearson, Inc. All rights reserved. Portions of this work were previously published.— page 19
Setting Up and Managing Locations When preparing to set up your locations for Work Sampling, think about what you’ll need from the bottom up—because, paradoxically, you’ll be setting up locations from the top down!
You may want to refer to the WSO organizational hierarchy diagram.
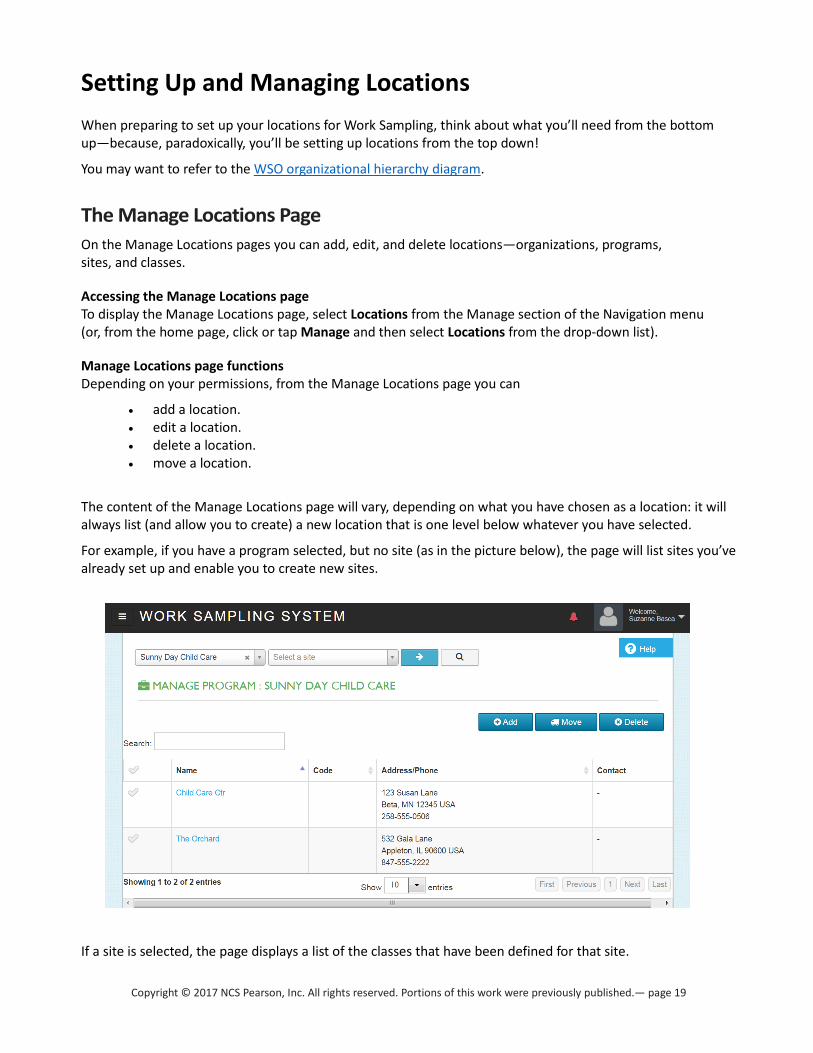
The Manage Locations Page On the Manage Locations pages you can add, edit, and delete locations—organizations, programs, sites, and classes.
Accessing the Manage Locations page To display the Manage Locations page, select Locations from the Manage section of the Navigation menu (or, from the home page, click or tap Manage and then select Locations from the drop-down list).
Manage Locations page functions Depending on your permissions, from the Manage Locations page you can
• add a location. • edit a location. • delete a location. • move a location.
The content of the Manage Locations page will vary, depending on what you have chosen as a location: it will always list (and allow you to create) a new location that is one level below whatever you have selected.
For example, if you have a program selected, but no site (as in the picture below), the page will list sites you’ve already set up and enable you to create new sites.
If a site is selected, the page displays a list of the classes that have been defined for that site.

Copyright © 2017 NCS Pearson, Inc. All rights reserved. Portions of this work were previously published.— page 20
The Add button enables you to create a new class.
The instructions in the remainder of this section focus on creating sites and classes, but the procedures also apply to creating and editing other types of WSO locations, such as programs and organizations.
Adding a site
1. If a site is selected on your Administrator mode location drop-down, de-select it.
2. From the Manage section of the Navigation menu, click or tap Locations. The Manage Programs page displays.
3. Click or tap Add. The ADD SITE popup appears.
4. Enter the site information. If you have not yet set up your users, there will not be any names to choose on the drop-down lists for primary and secondary contacts: you add these later, after the users are created. The “Used Active” and “Used Inactive” fields are gray, and will not contain any information at this point.
5. Click or tap Save. The ADD SITE popup closes and the new site displays on the list.
Adding a class to a site
1. From the Administrator mode home page, select the site in the location drop-down list.
2. From the Manage section of the Navigation menu, click or tap Locations. The Manage Classes page displays.
3. Click or tap Add. The ADD CLASS popup appears.
4. Enter the Class Name and Grade Level. Class names can only contain alphanumeric characters.
5. If the teacher for this class exists in the system, select their name from the Associated Teacher drop-down list. If the teacher has not yet been created (or has not yet been determined), leave the Teacher Name blank.

Copyright © 2017 NCS Pearson, Inc. All rights reserved. Portions of this work were previously published.— page 21
For teachers not yet assigned to a class, run the Unassigned Teachers report.
6. Click or tap Save. The ADD CLASS popup closes and the new class displays on the list.
Editing a site
1. If a site is selected on your Administrator mode location drop-down, de-select it.
2. From the Manage section of the Navigation menu, click or tap Locations. The Manage Programs page displays.
3. From the Manage Programs page, click or tap the name of the site you want to edit. The EDIT SITE popup appears.
2. Edit the site information.
The “Used Active” and “Used Inactive” fields are gray. They display, respectively, the number of active and archived students associated with the site. (This is the same information you would see if you looked at the site on your Dashboard.)
5. Click or tap Save. The EDIT SITE popup closes.
Editing a class
1. From the Administrator mode home page, select the site in the location drop-down list.
2. From the Manage section of the Navigation menu, click or tap Locations. The Manage Classes page displays.
3. From the Manage Classes page, click or tap the name of the class you want to edit. The EDIT CLASS popup appears.
4. Edit the class information.
5. Click or tap Save. The EDIT CLASS popup closes.
Deleting a location Deleting an organization, program, or site requires the Delete Locations permission. For more on permissions, refer to About Roles and Permissions.
Deleting a location is NOT reversible!
When you delete a location, all information associated with that location—classes, users, and students—is also deleted. The delete process presents a special popup informing you of this, and requiring additional confirmation to proceed.
If any of the information needs to be retained, it should be moved from the location prior to the delete. For example, if you are deleting a site, unassign students and teachers from classes at that location.

Copyright © 2017 NCS Pearson, Inc. All rights reserved. Portions of this work were previously published.— page 22
If the student and teacher information is also to be deleted, you can keep a record of the information by running the following reports before deleting the location (refer to the Reports section for instructions):
• Location Export • User Export • Student Export
To delete a site:
1. If a site is selected on your Administrator mode location drop-down, de-select it.
2. From the Manage section of the Navigation menu, click or tap Locations. The Manage Programs page displays.
3. From the Manage Programs page, click or tap the checkmark to the left of name of the site you want to delete. The Delete button enables.
4. Click or tap Delete. The DELETE SITE(S) popup appears.
5. Click or tap every checkbox. The Yes – Continue with Delete button enables.
You must put a checkmark in every box to complete the deletion. This is required because the delete is NOT reversible.
6. Click or tap Yes – Continue with Delete if you want to continue, or Cancel if you do not want to delete the site. The DELETE SITE(S) popup closes.
Deleting a class If the class to be deleted has students, you may want to do one of the following before deletion:
• Export the student data. • Remove the students from the class. • Transfer the students to a new class. • Archive the students, which also removes them from the class. Check your Dashboard before
archiving, as your license may have limits on the number of students that can be archived.
To delete a class:
1. From the Administrator mode home page, select the site in the location drop-down list.
2. From the Manage section of the Navigation menu, click or tap Locations. The Manage Classes page displays.
3. From the Manage Classes page, click or tap the checkmark to the left of the name of the class you want to delete. The Delete button enables.
4. Click or tap Delete. A confirmation popup appears.
5. Click or tap OK (or Cancel). The confirmation popup closes.

Copyright © 2017 NCS Pearson, Inc. All rights reserved. Portions of this work were previously published.— page 23
Moving a site between programs If your license is organization-level or above, sites can be moved between programs. Moving a site requires the Move Locations permission.
1. From Administrator mode (blue arrow), click or tap the arrow on the site drop-down. Select the top option, Select a site. The drop-down closes, and now looks like this:
2. From the Manage section of the Navigation menu, click or tap Locations. The Manage Program page
displays a list of your sites.
3. From the Manage Program page, click or tap the checkmark to the left of name of the site you want to move. The Move button enables.
4. Click or tap Move. The MOVE SITE popup appears.
• If you are working in a brand-level license and also want to move the site to a program in a different organization, select the organization in the MOVE SITE popup before Step 5.
5. Select the new program from the drop-down, then click or tap Save.
Moving a program between organizations If your license is brand-level, you can move programs between organizations. Moving a program requires the Move Locations permission.
1. From Administrator mode (blue arrow), click or tap the arrow on the site drop-down. Select the top option, Select a site. The drop-down closes, and now looks like this:
2. Click or tap the arrow on the program drop-down and select the top option, Select a program. The
drop-down closes, and now looks like this:
3. From the Manage section of the Navigation menu, click or tap Locations. The Manage Organization page displays a list of your programs.
4. Click or tap the checkmark to the left of name of the program you want to move. The Move button enables.
4. Click or tap Move. The MOVE PROGRAM popup appears.
5. Select the new organization from the drop-down, then click or tap Save.

Copyright © 2017 NCS Pearson, Inc. All rights reserved. Portions of this work were previously published.— page 24
Setting Up and Managing Roles
About Roles and Permissions Permissions define what a user can do in the Work Sampling Online system. If you have a permission, you can perform an action; if you do not have the permission, you cannot. Most of the functions on the various pages of Work Sampling Online (seen as “blue buttons” or menu commands that add, edit, remove, delete, assign, or transfer) are controlled by permissions.
Permissions are organized into roles. Every license has three default roles—Administrator, License Manager, and Teacher—that group together related permissions. For example, the Teacher role has permissions concerning classes and students.
Every user you create in WSO is assigned a role that controls what they can see and do.
• For a list of the permissions belonging to each default role, refer to Appendix A.
It is strongly recommended that you not rename or edit the default roles. If a custom set of permissions is needed, create a custom role instead.
The Administrator role By default, Administrators have the permissions needed to set up Work Sampling Online and keep it running smoothly. In addition to administrative permissions, they also have all permissions granted to teachers, which enable them when they switch to Teacher mode. (Refer to Blue arrow, red arrow.)
Administers are sometimes referred to by names that indicate what level of access they have in the “location hierarchy”: Brand Administrators oversee multiple organizations, Organization Administrators oversee multiple programs (e.g., agencies or districts), Program Administrators oversee multiple sites, and Site Administrators oversee a single site.
All Administrators may run aggregate reports on student performance for the site or sites they oversee.
The License Manager role The License manager is a special type of administrator.
When your license is created, Pearson assigns the License Manager role to the user who is the lead contact for your WSO license subscription. This License Manager is responsible for initializing and maintaining the subscription to the system.
There must always be at least one user with the License Manager role assigned. If you are a License Manager, be sure your staff has your contact information.
By default, the License Manager role has every permission in the system, and automatically receives new permissions as Pearson releases new functionality.

Copyright © 2017 NCS Pearson, Inc. All rights reserved. Portions of this work were previously published.— page 25
The Teacher role By default, the permissions of the Teacher role are focused on basic student and class management. They cannot create users.
Teachers are the only type of user that can be assigned to a class.
Custom roles Generally, the default roles of License Manager, Administrator, and Teacher (and their default permissions) are good to go as initially set up. However, if the default roles and permissions do not suit your needs, you can define a custom role.
Although all administrators can create custom roles, by default only license managers have the Assign Custom Role permission. For this reason—and since you can only grant permissions that you yourself have when creating a custom role—it may be expedient to have a license manager handle both the creation and assignment of custom roles.
For example, you may want to create a custom role for substitute teachers, with a subset of the default Teacher permissions. (A comparison of this custom role with the default Teacher role is shown below.)
Or you might want to create a custom role for administrative assistants or Help Desk personnel, with a subset of the default Administrator permissions.
For assistance with creating custom roles, please contact Pearson Technical Support at 1-800-874-0914 or via email at [email protected].

Copyright © 2017 NCS Pearson, Inc. All rights reserved. Portions of this work were previously published.— page 26
The Manage Roles Page The Manage Roles page lists all roles—default and custom—defined for your license.
Accessing the Manage Roles page To display the Manage Roles page, select Manage Roles from the Navigation menu or the Administrator home page.
Manage Roles page functions • Display each role’s type. • Display each role’s permissions. • Display the number of users assigned to each role. • Add, edit, or delete a custom role. • Search roles.
Adding a role
1. Select Manage Roles. The Manage Roles page displays.
2. Click or tap Add. The ADD ROLE/PERMISSIONS popup appears.
3. Enter the Role Name and select a Role Type (Teacher or Administrator) from the drop-down menu.
4. Check the boxes in front of each permission you want to provide to the new role.
5. Click Save.
Editing a role
1. Select Manage Roles. The Manage Roles page displays.
2. Click or tap the name of the role you want to edit. The EDIT ROLE/PERMISSIONS popup appears.
3. Make the necessary changes, clicking on the checkboxes to add or remove permissions.
4. Click Save.
Deleting a role You cannot delete the three default roles (License Manager, Administrator, and Teacher), but you can delete any custom roles that you have created by clicking the checkmark next to the role name and then clicking or tapping Remove.
Before removing a custom role, any users who have been assigned that role should be given a different role prior to removing the custom role.
• View the roles assigned to each user on the Manage Users page.
Searching roles Entering a word in the Search area restricts the roles displayed to those that include the word in their permissions or their name.

Copyright © 2017 NCS Pearson, Inc. All rights reserved. Portions of this work were previously published.— page 27
Setting Up and Managing Users Once you’ve added locations—and, optionally, defined the custom roles you want to use—you are ready to create users.
Remind your users to whitelist “[email protected]” so that Pearson account setup emails aren’t routed to spam or junk folders.
A few things to keep in mind about users:
• There is no anonymous access to Work Sampling Online—every user signs in with a unique username.
• When a user is created, you will categorize them as either a teacher, a license manager/administrator, or both. This category will control which roles are available to them.
• Users are associated with a specific location when created. Teachers are associated with sites; license managers and administrators can be associated with any location level.
• Even though administrators can use the red arrow to enter Teacher Mode and function as a teacher, only users specifically classified as teachers can be assigned to classes.
The Manage Users Page All user account tasks are carried out from the Manage Users page.
You cannot use the Manager Users page to edit your own user information, as your account will not be displayed on the list. You can use your User profile to edit information such as your email address, password, and name, but changing your role or permissions must be done by an administrative user with permissions equal to or higher than your own.
Accessing the Manage Users page To display the Manage Users page, select Users from the Manage section of the Navigation menu (or, from the home page, click or tap Manage and then select Users from the drop-down list).
Manage Users page functions • Search for a user. • Add a user. • Edit a user. • Assign a teacher to a class. • Transfer a user to a different location. • Assign a user to more than one location. • Designate a user as the primary contact for a site. • Assist users with password and sign in issues. • Export user information. • Suspend a user’s access to Work Sampling Online. • Delete a user from Work Sampling Online.

Copyright © 2017 NCS Pearson, Inc. All rights reserved. Portions of this work were previously published.— page 28
Searching for a user There are two options when searching for a user: search only the current location, or search your entire license. Searching a single location is much faster than a global search if your license is large with many programs and sites, but the global search is comprehensive.
Global Search:
1. To start the search, click or tap the “magnifying glass” to the right of Manage Users. A search bar displays.
2. Click or tap the search bar. A text entry area displays.
3. Enter at least 3 characters. When the search is complete, a list of users with those exact letters
anywhere in their first name, last name, username, email address, or role display.

Copyright © 2017 NCS Pearson, Inc. All rights reserved. Portions of this work were previously published.— page 29
The above picture shows that Rowan Michaels is associated with multiple sites. If two sets of letters are entered in the search bar, the application will do simultaneous "begins with" searches against the First Name and Last Name of all users, returning any matching results regardless of name order. For example: Entering row mic in the Search bar will find both Rowan Michaels and Michelle Rowland.
If you click or tap a user name from the global results list, that user’s location is chosen automatically in your location drop-downs, and the Manage Users page refreshes to display all users at that location.
Location Search:
To search among users at a particular location, enter at least three letters in the Search area on the Manage Users page to display only those users at the selected location whose name, username, email, or role contains those characters. (If you have too many results, add more letters to narrow the search.)

Copyright © 2017 NCS Pearson, Inc. All rights reserved. Portions of this work were previously published.— page 30
Adding a user A user created at the Site level can be
• a Teacher. • an Administrator. • both a Teacher and an Administrator (if the Administrator needs to be assigned to a class).
Users added at the Site level are deleted if the site is deleted.
A user created at the Program level (no site selected from the location drop-down) or the Organization level (neither program nor site selected) can be either an Administrator or a License Manager. Teachers cannot be created at the Program or Organization level.
1. Select the site in the location drop-down list. (If you are creating a program administrator, do not select a site.)
2. Select Manage Users. The Manage Users page displays.
3. Click or tap Add. A drop-down list displays.
4. Click or tap New. The ADD USER popup appears.
5. Enter the user’s User Name (which is what the user will use to sign into Work Sampling), First Name, Last Name, and Email address.
The User Name must be unique to Work Sampling Online as a whole; this sometimes means that users cannot have the exact username they requested.
6. Click or tap the Teacher or Administrator checkbox to specify whether the user is being set up as a Teacher or an Administrator. The choices you make here will control which roles are available to the user. If there is a checkmark in the Teacher checkbox, you will have the option of assigning the user the default Teacher role, or any Teacher-type custom role you have defined. (If you cannot select the Teacher option, you are creating the user at the program or organization level.) A checkmark in the Administrator checkbox gives you the option of assigning the user the default Administrator role, any Administrator-type custom role you have defined, or, if you have the Assign License Manager permission, the default License Manager role.
7. From the Assigned Role drop-down, select a role.
8. Click or tap Save.
Copyright © 2017 NCS Pearson, Inc. All rights reserved. Portions of this work were previously published.— page 31
Editing a user Editing a user—to change their contact information or role—is a straightforward process, but there are a few caveats.
* You cannot change a user’s User Name, because it is their Work Sampling sign-in name.
* You cannot use the Manage Users page to edit your own information, as your name does not display on the list. You can use your User profile to edit information such as your email address, password, and name, but changing your role or permissions must be done by an administrative user with permissions equal to or higher than your own.
Editing a user:
1. If necessary, search for the user by entering at least three characters of their name or email address in the Search box of the Manage Users page. The search begins as soon as the third character is entered.
2. Click or tap the name of the user you want to edit. The EDIT USER popup appears.
3. Make the necessary changes, clicking on the checkboxes to change the user’s category.
• If you are changing a Teacher user to an Administrator, de-select the teacher from all their classes before de-selecting the Teacher checkbox. If this is not possible, simply leave the Teacher checkmark and add a checkmark to Administrator.
4. Click Save.
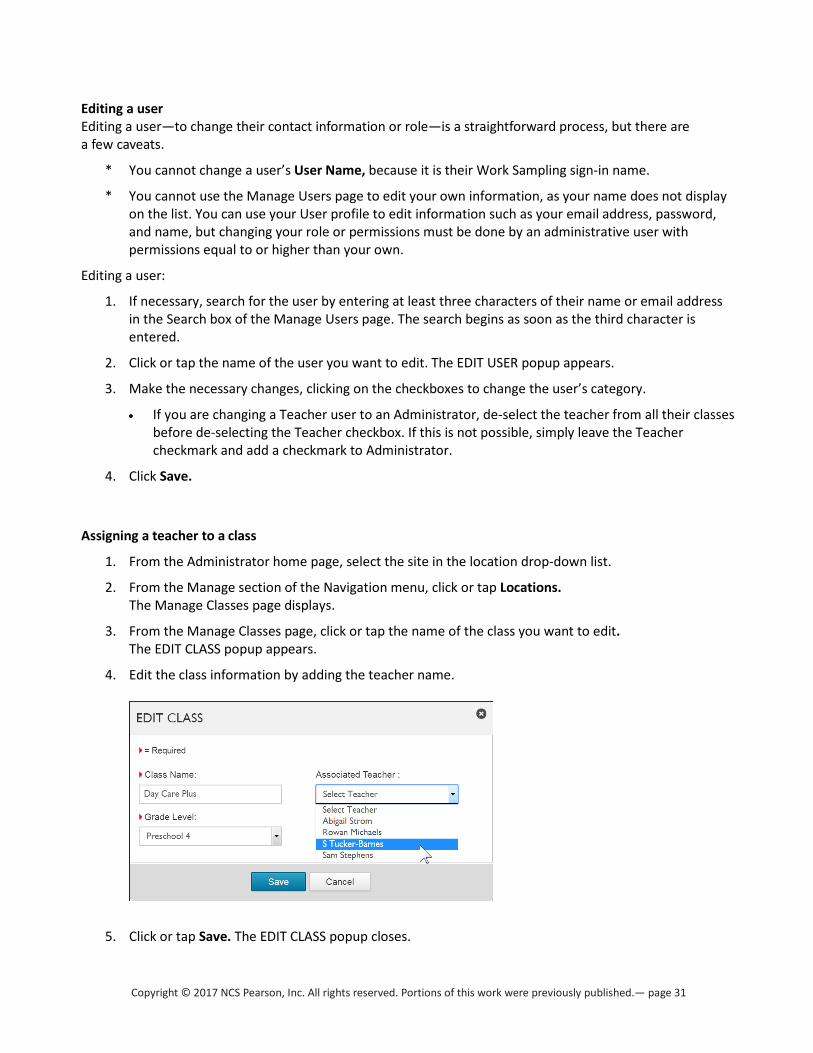
Assigning a teacher to a class
1. From the Administrator home page, select the site in the location drop-down list.
2. From the Manage section of the Navigation menu, click or tap Locations. The Manage Classes page displays.
3. From the Manage Classes page, click or tap the name of the class you want to edit. The EDIT CLASS popup appears.
4. Edit the class information by adding the teacher name.
5. Click or tap Save. The EDIT CLASS popup closes.

Copyright © 2017 NCS Pearson, Inc. All rights reserved. Portions of this work were previously published.— page 32
Note that even though an Administrator can temporarily function as a teacher (by clicking the blue arrow and switching to Teacher Mode), only Teacher users can be assigned to a class. If you need to assign an administrator to a class, edit the administrator’s account so that they are categorized as both an Administrator and a Teacher. Once this is done their name displays in the list of teachers in the EDIT CLASS popup.
Transferring a user to a different location Let’s say that a user was created at Location A, but you need to associate them with Location B instead.)
1. From the Manage Users page, select the user’s current location (Location A).
2. If necessary, search for the user by entering at least three characters of their name or email address in the Search box. The search begins as soon as the third character is entered.
3. Click or tap the checkmark to the left of the user name. The Manage Location drop-down becomes available.
4. Click or tap Manage Locations, then select Transfer. The TRANSFER USER popup appears.
5. Specify the location that the user should be transferred to. (In this case, Location B.)
6. Click or tap Add. The TRANSFER USER popup closes.
If you transfer a user to Location B by accident, select Location B from your drop-downs, then transfer them back to Location A. If you’re not sure where you transferred the user to, use the global search to find them.
Adding a user to more than one location, or adding users from more than one location If a user needs to be assigned to multiple locations, the user should NOT be added to WSO twice. Depending on your situation, there are ways to enable users to access more than one location while using only a single user name for sign in.
Situation 1: A user is on the Manage Users List for Location C, but needs to be assigned to locations D and E as well.
1. From the Manage Users page location drop-downs, select the user’s current location. (Location C)
2. If necessary, search for the user by entering all or part of their name or email address in the Search box. The search begins as soon as the third character is entered.
3. Click or tap the checkmark to the left of the user name. The Manage Location drop-down becomes available.
4. Click or tap Manage Locations, then select User Assignments. The ASSIGN TO LOCATION popup appears.
• ASSIGN TO LOCATION only shows locations that the user has not been assigned to. If there are no locations listed, the user has been assigned to all possible locations at that license level.
5. Click or tap the checkbox for the location(s) that the user should additionally be assigned to. (In this case, Locations D and E.)
6. Click or tap Add. The ASSIGN TO LOCATION popup closes. The user will now appear on the Manage Users list for all three locations (C, D, and E).

Copyright © 2017 NCS Pearson, Inc. All rights reserved. Portions of this work were previously published.— page 33
Situation 2: You need users from locations N and R to be assigned to Location M as well.
1. Select Location M from your drop-downs.
2. From the Manage Users page, click or tap Add and select Existing from the menu. An ADD USER popup of users not associated with Location M appears.
3. Select the checkbox for the user(s) you want to add to the current location.
4. Click or tap Add. The ADD USER popup closes, and the users you selected now display on the Manage Users list for Location M.
Removing assignments To remove all assignments from a user, display the Manage Users list for each location to be removed and delete the user from each. You will receive a warning before deleting the user from their last location, as this deletes the user from Work Sampling Online entirely.
If the user is a teacher, and you only want to remove them from a single assignment (without removing them from the site), go to the Manage Classes page. Click or tap the class name. The EDIT CLASS popup appears. From the Associated Teacher dropdown, choose Select Teacher, then Save.
Designating a user as the primary contact for a site Only an Administrator can be chosen as a Primary Contact.
1. From the Manage Users page, select the site in the location drop-down list.
2. If necessary, search for the user by entering all or part of their name or email address in the Search box. The search begins as soon as the third character is entered.
3. Click or tap the checkmark next to the user name. Primary Contact becomes available.
4. Click or tap Primary Contact. The user is promoted to the top of the list, and a small flag appears next to their name.
Once a Primary Contact is chosen, the only way to de-select them is to choose someone else.
Resetting a user password
Before resetting a user’s password, make sure that they have whitelisted ”[email protected]” so that the password reset email doesn’t wind up in a Spam or Junk folder.

Copyright © 2017 NCS Pearson, Inc. All rights reserved. Portions of this work were previously published.— page 34
1. From the Manage Users page’s location drop-downs, select the user’s current location.
2. If necessary, search for the user by entering all or part of their name or email address in the Search box. The search begins as soon as the third character is entered.
3. Click or tap the checkmark to the left of the user name. User Actions becomes available.
4. Click or tap User Actions, then select Reset Password. The user receives an email prompting them to create a new password. When you reset a user’s password it also automatically resets the user’s invalid login attempts.
Resetting sign in attempts To reset a user’s sign-in attempts without resetting their password:
1. From the Manage Users page’s location drop-downs, select the user’s current location.
2. If necessary, search for the user by entering all or part of their name or email address in the Search box. The search begins as soon as the third character is entered.
3. Click or tap the checkmark to the left of the user name. User Actions becomes available.
4. Click or tap User Actions, then select Reset Attempts. A popup asking you to confirm the reset appears.
5. Click or tap OK.
Exporting user information You can export the list of users on the Manage Users page as an Excel Spreadsheet or as a .CSV file.
The file contains the same columns as the Manage Users page, but does not display any special designators for locked users or the Primary Contact.
1. From the Manage Users page’s location drop-downs, select the user’s current location.
2. Before exporting, use the Search and/or sort functions to control what is displayed.
3. Click or tap Export, then select Excel or CSV. Depending on your browser settings, you may be prompted to choose the save location for the file, or it may download automatically.

Copyright © 2017 NCS Pearson, Inc. All rights reserved. Portions of this work were previously published.— page 35
Locking a user account
You can select multiple users to be locked.
1. From the Manage Users page’s location drop-downs, select the user’s current location.
2. Click or tap the checkmark to the left of the name of the user to be locked. User Actions becomes available.
3. Click or tap User Actions, then select Lock User. The user is sorted to the top of the list (above even the Primary Contact), and a small padlock appears next to their name.
To unlock a user, click or tap the checkmark next to their name, then select Unlock User from User Actions.
Deleting a user from the Work Sampling Online System
You can select multiple users to be deleted. Delete is not reversible.
1. From the Manage Users page’s location drop-downs, select the user’s current location.
2. Click or tap the checkmark to the left of the name(s) of the user(s) to be deleted. The User Actions drop-down becomes available.
3. Click or tap User Actions, then select Remove User. A confirmation popup appears.
4. Click or tap OK to proceed with the deletion, or Cancel to close the popup without removing the user(s).
Copyright © 2017 NCS Pearson, Inc. All rights reserved. Portions of this work were previously published.— page 36
Setting Up and Managing Students Students need to be entered in the WSO system before they can be assigned to a class. Students are added at the site level. By default, both Teachers and Administrators have permission to create classes, enter students into WSO, and assign students to classes.
The Manage Students Page Add students to Work Sampling Online at the Manage Students page..
Your license may have limits on the number of active students. To monitor this, check your Dashboard.
Accessing the Manage Students page From the Navigation menu, select Manage Students; or, from the home page, click or tap Manage, then Students.
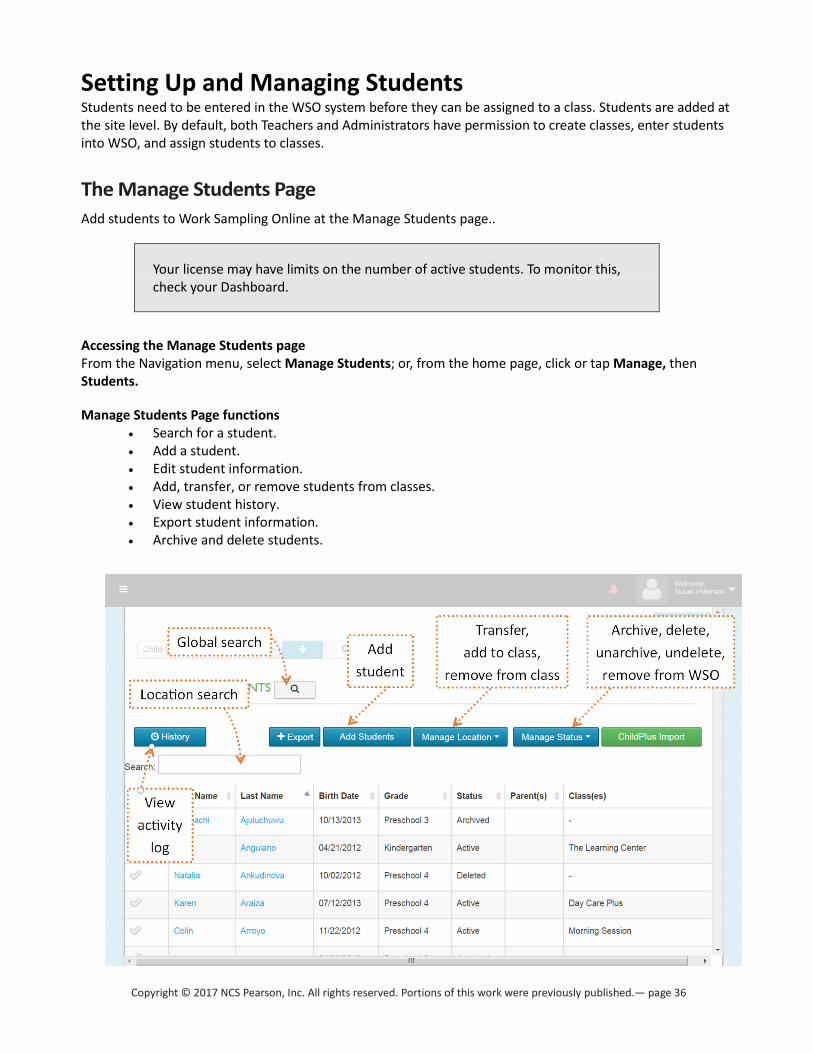
Manage Students Page functions • Search for a student. • Add a student. • Edit student information. • Add, transfer, or remove students from classes. • View student history. • Export student information. • Archive and delete students.

Copyright © 2017 NCS Pearson, Inc. All rights reserved. Portions of this work were previously published.— page 37
Searching for a student You have two options when searching for a student.
If you don’t know the student’s location (or if you want to make certain that the student hasn’t been entered twice), use the global search. The global search checks all locations in your license.
If you know the student’s location, use a location search.
Diacritical characters are taken into account for searches. For example, Luisa Roldán is found if you enter or dán or luisa, but not if you enter roldan.
Global search
1. From the Manage Students page, click or tap the “magnifying glass” to the right of Manage Students. A search bar displays.
2. Click or tap the search bar. A text entry area displays.
3. Enter at least 3 characters of the student’s name. A list of students with those exact letters anywhere in either their first name or their last name displays. If two sets of letters are entered into the search bar, the application runs simultaneous "begins with" searches against the First Name and Last Name of all students, returning any matching results regardless of name order. For example: If you entered jon all in the Search bar, both Jones, Allison and Allen, Jonathan would be considered matches.
In this example, three students were found. All three are under the Sunny Day Child Care Program: two at the Child Care Ctr, and one at The Orchard.
4. Click or tap the student name. The site is chosen automatically in your location drop-downs, and the Manage Students page refreshes to display the list of students at that location.

Copyright © 2017 NCS Pearson, Inc. All rights reserved. Portions of this work were previously published.— page 38
Location Search
1. On the Manage Students page, select the student’s location.
2. Click or tap the Search box, then enter at least three characters of the student’s first name, last name, date of birth, or any custom fields your WSO system is using. The Manage Students page refreshes to display only those students who contain those characters anywhere in their student information.
Adding a student
1. From the Manage Students page, select the site the student is to be added to in the location drop-down list.
2. Click or tap Add Students. The ADD STUDENT popup appears.
3. Enter the student’s First Name, Last Name, Gender, Grade, and Date of Birth.
• If a student’s name contains characters with diacritical marks, you can enter them; however, be aware that those characters will then need to be used in searches to retrieve the student.
• Even if your license has been configured to make entering a Last Name optional, it is strongly recommended that you enter a last name.
If you try to enter a new student with the same name as an existing student, you will receive a warning that you are about to create a potential duplicate. Proceed with caution!
4. Click or tap the check box if the student has an IEP (Individualized Education Program) or an IFSP (Individualized Family Service Plan).
5. Enter Middle Name, Language, and Ethnicity (optional), and any other custom fields.
6. Enter the email addresses of parents or guardians. (optional)
• Entering an email invites that person to sign up for Family Corner. Family Corner provides a way for parents and guardians to upload files that teachers may be able to use as work samples.
• A status of INVITED under an email indicates that an invitation was sent. A status of ACCEPTED indicates that an account for that email address has been registered. Once registered, the parent or guardian name appears in the Parent(s) column of the Manage Students list.
• For more details about Family Corner, refer to the section “Inviting parents and guardians to Family Corner” in the Work Sampling Online Teacher User’s Guide.
7. Click or tap Save. The ADD STUDENT popup closes.

Copyright © 2017 NCS Pearson, Inc. All rights reserved. Portions of this work were previously published.— page 39
Adding a Head Start student by importing ChildPlus® data Steps 1 through Step 5 are performed within ChildPlus’s import/export interface. Contact ChildPlus Support if you need assistance.
1. Select the 6501 report in ChildPlus.net.
2. Choose the Participants and Family option.
3. Click the Participants and Family Information tab.
4. Uncheck all the additional information choices.
• ChildPlus tracks much more information than WSO needs.
5. Choose the appropriate program and click Export to XML. The file is created.
The remaining steps are performed within Work Sampling Online. Contact Pearson Technical Support at [email protected] or call 800.874.0914 if you need assistance.
6. In Work Sampling Online, go to your User Profile and verify that your email is correct, as the validation responses to the import are sent to the email address used for the WSO system.
• If needed, whitelist “[email protected].”
7. From the Manage Students page, select the site from the location dropdown where you want the students from the ChildPlus file to be imported.
8. Click or tap ChildPlus Import. The CHILDPLUS IMPORT popup opens.
9. Click or tap Choose File, then select the ChildPlus data file to import (must be an .xml file). The name of the file appears to the right of Choose File.
10. Click or tap Validate. The CHILDPLUS IMPORT popup closes. A status message appears to let you know that validation is in process. A successful validation generates an email with the following:
• Percentage Valid: 100% • Percentage Invalid: 0.00% • Student record is: “Valid Data”
11. Once the file has been validated, repeat steps 5 through 7, then click or tap Import. When the import is complete, you receive a second email with the results.

Copyright © 2017 NCS Pearson, Inc. All rights reserved. Portions of this work were previously published.— page 40
Editing a student
1. From the Manage Students page, select the site in the location drop-down list.
2. If necessary, search for the student by entering all or part of their name in the Search box.
3. Click or tap the name of the student you want to edit. The EDIT STUDENT popup appears.
4. Make the necessary changes, then click or tap Save.
Adding a student to a class
Note: Multiple students can be added to a class at the same time.
1. From the Manage Students page, select the site in the location drop-down list.
2. If necessary, search for the student(s) by entering all or part of their name in the Search box.
3. Click or tap the checkmark next to the name of the student(s) you want to add to the class. Manage Locations becomes available.
4. Click or tap Manage Locations, then select Add to Class. The ADD TO CLASS popup appears.
5. Select the class, then click or tap Save. The ADD TO CLASS popup closes and the Manage Students list refreshes with the new class assignment information.
Transferring students Students can be transferred to a new site.
1. From the Manage Students page, select the site in the location drop-down list.
2. If necessary, search for students by entering all or part of their name or email address in the Search box. The search begins as soon as the third character is entered.
3. Click or tap the checkmark to the left of the name of each student you want to transfer. The Manage Location drop-down becomes available.
4. Click or tap Manage Locations, then select Transfer. The TRANSFER STUDENT(S) popup appears.
5. Specify the location that the student(s) should be transferred to. As soon as you select a site, the Transfer button enables. A student can be transferred to a different site and class, or they can be transferred to a site without being put in a class.
6. Click or tap Transfer. The TRANSFER STUDENT(S) popup closes.
Copyright © 2017 NCS Pearson, Inc. All rights reserved. Portions of this work were previously published.— page 41
Viewing student history The Student History is a log of activity involving the student since they were entered into WSO.
• You can view only one student history at a time.
1. From the Manage Students page, select the site in the location drop-down list.
2. If necessary, search for the student by entering all or part of their name or email address in the Search box. The search begins as soon as the third character is entered.
3. Click or tap the checkmark to the left of the name of the student whose history you want to view. The History button becomes available.
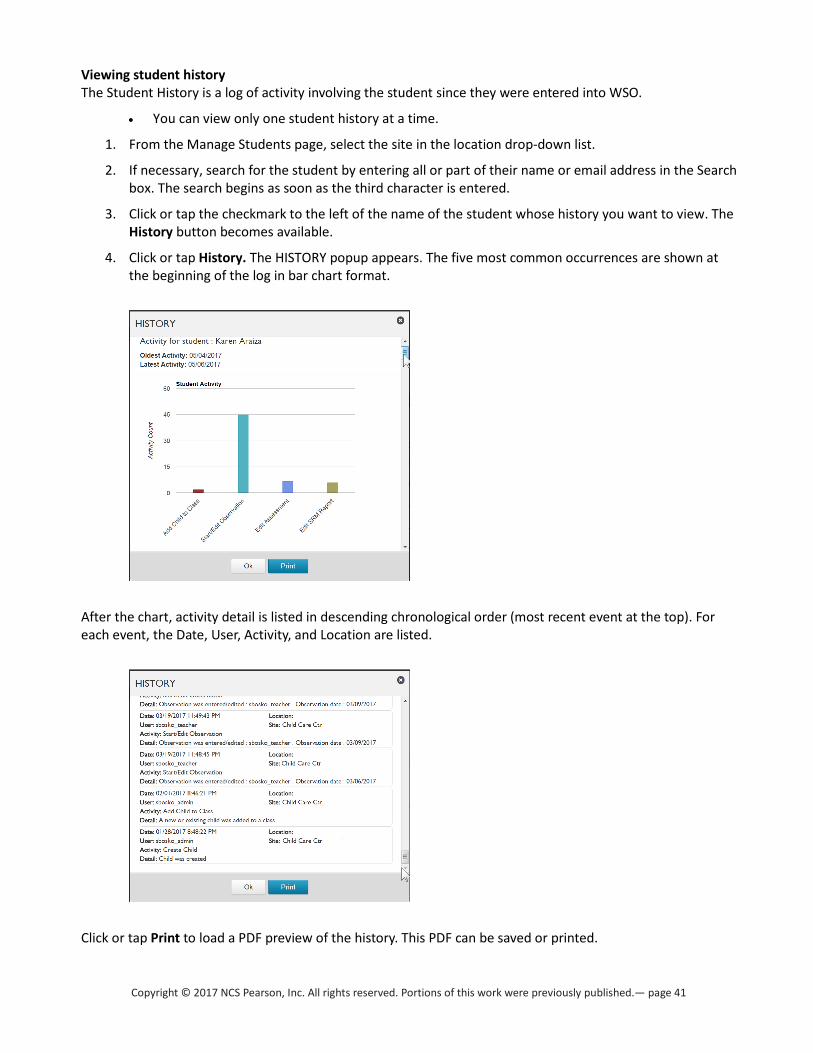
4. Click or tap History. The HISTORY popup appears. The five most common occurrences are shown at the beginning of the log in bar chart format.
After the chart, activity detail is listed in descending chronological order (most recent event at the top). For each event, the Date, User, Activity, and Location are listed.
Click or tap Print to load a PDF preview of the history. This PDF can be saved or printed.

Copyright © 2017 NCS Pearson, Inc. All rights reserved. Portions of this work were previously published.— page 42
Exporting student information You can export the list of students on the Manage Students page as an Excel Spreadsheet or as a .CSV file. The file contains the same columns as the Manage Students page.
1. From the Manage Students page, select the site in the location drop-down list.
2. Click or tap Export, then select Excel or CSV. Depending on your browser settings, you may be prompted to choose the save location for the file, or it may download automatically.
Removing students from a class
1. From the Manage Students page, select the site in the location drop-down list.
2. If necessary, search for students by entering all or part of their name or email address in the Search box. The search begins as soon as the third character is entered.
3. Click or tap the checkmark to the left of the name of each student you want to remove. The Manage Location drop-down becomes available.
4. Click or tap Manage Locations, then select Remove from Class. A confirmation popup appears.
5. Click or tap OK. The popup closes and the students are removed from the class list.
Archiving and Deleting Students
It is important to understand the differences between removing a student from a class, archiving a student, and the two types of delete.
Removing a student from a class simply takes them off the list for that particular class. They remain active in Work Sampling Online, and are displayed on the list of existing students. Removing a student will most often be used when a student has been assigned to a class by mistake, and needs to be transferred to another class.
Archiving takes a student off the class list and marks them as Archived. An archived student’s data is retained on the server until deleted and can be included in reports. Teachers might use the Archive option to temporarily take a student off their class list if the student will be absent for an extended time due to illness or family issues. Archived students can be re-assigned to their class by the teacher once they are unarchived and made Active. Archived students can also be added to a class by an administrator through Add to Class from the Manage Location drop-down; this action will change the student’s status from Archived to Active.
Delete not only removes a student from their classes but—unlike archiving—it also removes them from the list of existing students and excludes them from reports. Their name remains visible on the administrator’s Manage Students page for their location for two weeks.

Copyright © 2017 NCS Pearson, Inc. All rights reserved. Portions of this work were previously published.— page 43
The actual deletion is delayed for 14 days. If the delete is not reversed within that time, the student and their data are permanently erased from Work Sampling Online.
It is not possible to restore a deleted student or their data after the 14 days have passed.
As an administrator, you also have the option of an instant, irreversible delete through the Remove from System command.
Archiving student information
1. From the Manage Students page, select the student’s site in the location drop-down list.
2. If necessary, search for the student by entering all or part of their name or email address in the Search box. The search begins as soon as the third character is entered.
3. Click or tap the checkmark to the left of the student name. Manage Status becomes available.
4. Click or tap Manage Status, and then select Archive.
Your license may have limits on the total number of students that can be archived. To monitor this, check your Dashboard.
To unarchive a student, put a checkmark by their name on the Manage Students page, then click or tap Manage Status and select Unarchive.
Deleting students
1. From the Manage Students page, select the student’s site in the location drop-down list.
2. If necessary, search for the students by entering all or part of their name in the Search box.
3. Click or tap the checkmark to the left of the name of each student you want to delete. The Manage Status drop-down becomes available.
4. Click or tap Manage Status, then select Delete Student. A confirmation popup appears.
5. Click or tap OK to proceed with the deletion, or Cancel to close the popup without removing the students(s).
To undelete a student, put a checkmark by their name on the Manage Students page, then click or tap Manage Status and select Unarchive.
Copyright © 2017 NCS Pearson, Inc. All rights reserved. Portions of this work were previously published.— page 44
Removing a student account from Work Sampling Online
1. From the Manage Students page, select the student’s site in the location drop-down list.
2. If necessary, search for the students by entering all or part of their name or email address in the Search box. The search begins as soon as the third character is entered.
3. Click or tap the checkmark to the left of the name of each student you want to delete. The Manage Status drop-down becomes available.
4. Click or tap Manage Status, then select Remove from System. A confirmation popup appears.
5. Click or tap each checkbox if you want to proceed with the deletion, then click or tap OK. Click or tap Cancel to close the popup without removing the students(s).
Remove from System is instant and non-reversible! It should only be used when you are absolutely certain you will never need the student’s data.

Copyright © 2017 NCS Pearson, Inc. All rights reserved. Portions of this work were previously published.— page 45
Communicating With Users: Alerts Alerts are messages within the Work Sampling Online system, sent to selected users by administrators with the Manage Alerts permission. Alerts are brief, cannot be replied to, and have a limited duration. Most often, alerts are used to remind teachers of reporting deadlines or to offer usage tips.
By default, all license managers (but only license managers) have permission to create alerts. Your license may have restricted or expanded this default.
The Manage Alerts Page The Manage Alerts Page lists all alerts that have been sent, and displays information such as the effective dates of each alert, who sent it, how many users it was sent to, and how many users read it.
Accessing the Manage Alerts page To access the Manage Alerts page, select Manage Alerts from the Navigation menu or, from the home page, click or tap Manage Alerts.
Manage Alerts page functions Depending on your permissions, from this page you can
• search alerts. • view active and expired alerts. • create new alerts, including using a previous alert as a template for a new alert. • edit alerts. • delete alerts.

Copyright © 2017 NCS Pearson, Inc. All rights reserved. Portions of this work were previously published.— page 46
Searching alerts Enter a word in the Search area to display only those alerts with that word in their title.
Creating a new alert Creating an alert requires the Manage Alerts permission.
1. Select New Alert from the Navigation menu. The Create Alerts page displays. (Alternately, click or tap Create on the Manage Alerts page, or New Alert from your home page.) The Create Alerts page displays potential recipients for the alert, and notes their Role, Location(s), and level. (In the example below, they are all site-level users.) If a user is assigned to more than one location, their primary location is listed first.
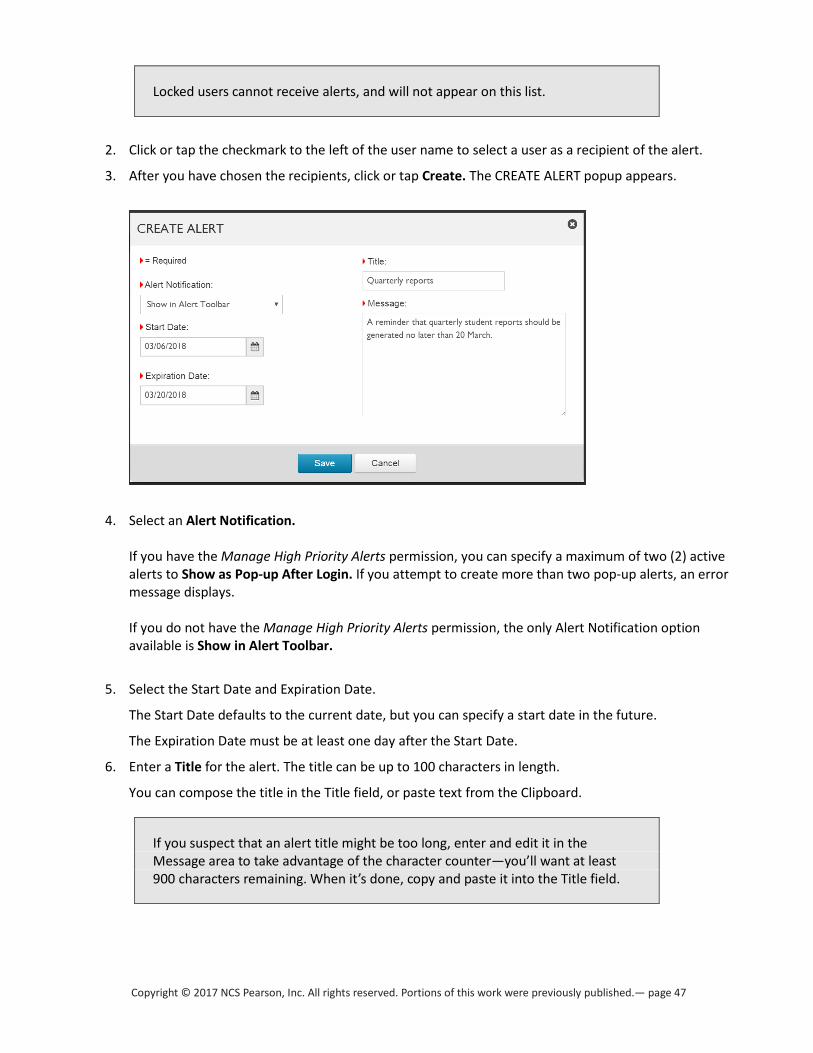
Copyright © 2017 NCS Pearson, Inc. All rights reserved. Portions of this work were previously published.— page 47
Locked users cannot receive alerts, and will not appear on this list.
2. Click or tap the checkmark to the left of the user name to select a user as a recipient of the alert.
3. After you have chosen the recipients, click or tap Create. The CREATE ALERT popup appears.
4. Select an Alert Notification. If you have the Manage High Priority Alerts permission, you can specify a maximum of two (2) active alerts to Show as Pop-up After Login. If you attempt to create more than two pop-up alerts, an error message displays. If you do not have the Manage High Priority Alerts permission, the only Alert Notification option available is Show in Alert Toolbar.
5. Select the Start Date and Expiration Date.
The Start Date defaults to the current date, but you can specify a start date in the future.
The Expiration Date must be at least one day after the Start Date.
6. Enter a Title for the alert. The title can be up to 100 characters in length.
You can compose the title in the Title field, or paste text from the Clipboard.
If you suspect that an alert title might be too long, enter and edit it in the Message area to take advantage of the character counter—you’ll want at least 900 characters remaining. When it’s done, copy and paste it into the Title field.

Copyright © 2017 NCS Pearson, Inc. All rights reserved. Portions of this work were previously published.— page 48
7. Enter the alert Message. The message can be up to 1000 characters in length. As with the Title field, you can paste text from the Clipboard.
If the text in the Message exceeds 1000 characters, the background of the entry area turns red.
8. When you are done composing the alert, click or tap Save. The alert is sent and the CREATE ALERT popup closes.
Cloning an existing alert A message, even an expired one, can be selected and then cloned. A choice of recipients makes it easy to generate follow-up messages to anyone who did not view the original message.
To clone an alert:
1. From the Manage Alerts page, click or tap the checkmark next to the message you want to clone. The Clone button becomes available.
2. Click or tap Clone. The CLONE MESSAGE popup appears.
3. Select a recipient option, then click or tap OK. A CREATE ALERT popup appears with the current date as a start date, and the same title and text as the source message.
4. Edit the cloned message as needed, then click or tap Save. The CREATE ALERT popup closes, and the alert is sent.
Editing alerts An active alert may be edited. (An alert that has expired cannot be edited, but it can be cloned for re-use.)
Editing an alert:
1. From the Manage Alerts page, click or tap the title of the alert you want to edit.
2. Make the necessary changes, then click or tap Save. If the alert is a “popup on login” alert, users will see the changes you have made when they next sign in. If the alert is an ”alert bar” alert, they will see the changes when they next click the red bell.

Copyright © 2017 NCS Pearson, Inc. All rights reserved. Portions of this work were previously published.— page 49
Removing alerts
1. From the Navigation menu, select Manage Alerts. The Manage Alerts page displays.
3. If necessary, search for the alert(s) by entering all or part of a title in the Search box. The search begins as soon as the third character is entered.
4. Click or tap the checkmark to the left of the title of each alert you want to delete. The Remove button becomes available.
5. Click or tap Remove. A confirmation popup appears.
6. Click or tap OK to proceed with the deletion, or Cancel to close the popup without deleting. The alert is removed from the Manage Alerts screen, and users no longer see that alert when they click the red bell.

Copyright © 2017 NCS Pearson, Inc. All rights reserved. Portions of this work were previously published.— page 50
Monitoring the System: Reports As an administrator, monitoring activity in the Work Sampling Online system is the second half of your job. (The first half is setting up the system.) It is your responsibility to keep teachers on track with their assessment and reporting tasks, to make sure that all resources are being utilized, and to gather the information your organization needs.
The Reports Page The Reports page display icons for various reports and data extract functions.
Accessing the Reports page To access the Reports page, select Manage Reports from the Administrator Navigation menu or home page.
Reports page functions • View administrative reports. • Generate export files. • Save reports and extracts as PDF or CSV files. • Check on the status of reports and extracts.
Accessing status reports Clicking or tapping an item in the STATUS REPORTS row displays a report. You have the option to Export the report in CSV (comma-separated values) or Microsoft Excel format, and, if you have the requisite permissions, to send an Alert about the report results to users who haven’t completed their certain tasks.
Generating data extracts Click or tap an item in the GROUP EXTRACTS AND REPORTS row to submit a request to the Work Sampling server for a data extract report to be run. When the report is complete, you receive an email directing you to the REPORT STATUS page, where you can view or download a file of the results.

Copyright © 2017 NCS Pearson, Inc. All rights reserved. Portions of this work were previously published.— page 51
Saving a status report as a CSV or Excel file
Click or tap Export, then select Excel or CSV.
Depending on your browser settings, you may be prompted to choose the save location for the file, or it may download automatically. CSV format files can be imported into most spreadsheet programs.
Checking the status of a data extract or report
From the Reports page, click or tap the REPORT STATUS link. The Report Status page displays. Yellow light: the report is in process.
Green light: the report is completed and data was found.
Red light: the report is completed but no data was found for the report type selected.
Refer to Report Status for more information on the Report Status page.
Email notification of a data extract or report completion The email you receive when a report you submitted to the Work Sampling server has been completed looks something like this:
The email only tells you that the report or extract has been completed, not whether data was found or not.
Downloading a data extract or report from the Report Status page You can check the status of an extract or report you are running in the Work Sampling server at any time, but as the file cannot be downloaded or viewed until it is complete, you might want to wait for email notification before you try to access it.
Once you receive the email:
1. From the Reports page, click or tap REPORT STATUS. The Report Status screen displays.
2. Click or tap the file’s Download link to save the extract or report.

Copyright © 2017 NCS Pearson, Inc. All rights reserved. Portions of this work were previously published.— page 52
The Pending Summary Report The Pending Summary report provides you with a list of teachers who have not yet started their Summary Reports for a particular reporting period.
Recommendation: Run this report one to two weeks prior to parent–teacher conferences to identify teachers who have not yet started their Summary Reports.
Generating a Pending Summary Report
1. From the drop-down location lists on the Manage Reports page, select the location you want to review.
• If you do not select a site, the report displays all locations.
2. Click or tap Pending Summary. The Pending Summary page displays.
3. Click or tap to select an Academic year and a Period from the drop-downs. The Pending Summary report displays, with a Pending Summary Count and a Student Count for all teachers on the list. By default, the teacher with the highest Pending Summary count will be displayed first. Click or tap the arrow to the right of a column name to sort by a different column (e.g., by Last name).
If a teacher is not listed on the Pending Summary report, it does not mean that they have completed their reports for the selected period, only that they have started them.
Sending a reminder If you are able to send alerts, you can send a message reminding teachers to work on their Summary Reports.
1. Select individual teacher(s) by clicking or tapping the checkmark in front of their name.
To select all teachers on the list, click or tap the checkmark at the top of the checkmark column.
2. Click or tap Create Alert. The CREATE ALERT popup appears.
3. Enter an Expiration date, Title, and Message, then click or tap Save. The popup closes and the alert is sent.
Exporting the list of pending checklists
Click or tap Export, then select Excel or CSV. Depending on your browser settings, you may be prompted to choose the save location for the file, or it may download automatically.

Copyright © 2017 NCS Pearson, Inc. All rights reserved. Portions of this work were previously published.— page 53
The Pending Checklist Report The Pending Checklist report provides a list of teachers who have not yet started their student checklists for a specified reporting period. The report includes all checklists (regardless of level) for all a teacher’s classes.
Recommendation: Run this report near the end of each reporting period, during the time teachers are expected to begin completing and finalizing their checklists.
Generating a Pending Checklist Report
1. From the drop-down location lists on the Manage Reports page, select the location you want to review.
• If you do not select a location, the report displays all locations.
2. Click or tap Pending Checklist. The Pending Checklist page displays.
3. Click or tap to select an Academic year from the drop-down.
4. Click or tap to select Period from the drop-down. The Pending Checklist report displays, with a Pending Checklist Count and a Student Count for all teachers on the list. By default, the teacher with the highest Pending Checklist count is displayed first. Click or tap the arrow to the right of a column name to sort by a different column (e.g., by Last name).
If a teacher is not listed on the Pending Checklist report, it does not mean that they have completed their checklists for the selected period, only that they have started them. Checklists that have been started and then cleared are not included in the Pending Checklist Count.
Sending a reminder If you are able to send alerts, you can send a message reminding teachers to work on their checklists.
1. Select individual teacher(s) by clicking or tapping the checkmark in front of their name.
To select all teachers on the list, click or tap the checkmark at the top of the checkmark column.
2. Click or tap Create Alert. The CREATE ALERT popup appears.
3. Enter an Expiration date, Title, and Message, and then click or tap Save. The popup closes and the alert is sent.
Exporting the list of pending checklists
Click or tap Export, then select Excel or CSV. Depending on your browser settings, you may be prompted to choose the save location for the file, or it may download automatically.

Copyright © 2017 NCS Pearson, Inc. All rights reserved. Portions of this work were previously published.— page 54
The Unassigned Teachers Report The Unassigned Teachers report identifies teachers who have yet to be assigned to a class.
Recommendation: Run the report at the beginning of each academic year to verify that all teachers have been assigned to classes.
Generating an Unassigned Teachers Report
1. From the drop-down location lists on the Manage Reports page, select the location you want to review.
2. Click or tap Unassigned Teachers. The Unassigned Teachers page displays.
• If you selected a site from the location drop-down, the Unassigned Teachers report shows teachers who have not yet been assigned any classes at that site.
• If you have a program-level license and did not select a site, the report displays all sites in the program.
• If you have an organization-level license and do not select a program, the report shows all sites for all programs in your license.
The Username Creation Date and Last Log-in Date information on the Unassigned Teachers page can also assist in identifying inactive accounts, or those teachers who might be having trouble signing in.
Sending a reminder If you are able to send alerts, send a message to the teachers on the list inquiring if they are still active at the selected site. You may also contact Site Administrators to remind them to assign their teachers to classes.
1. Select individual teacher(s) by clicking or tapping the checkmark in front of their name.
To select all teachers on the list, click or tap the checkmark at the top of the checkmark column.
2. Click or tap Create Alert. The CREATE ALERT popup appears.
3. Enter an Expiration date, Title, and Message, then click or tap Save. The popup closes and the alert is sent.
Exporting the list of unassigned teachers
Click or tap Export, then select Excel or CSV. Depending on your browser settings, you may be prompted to choose the save location for the file, or it may download automatically.
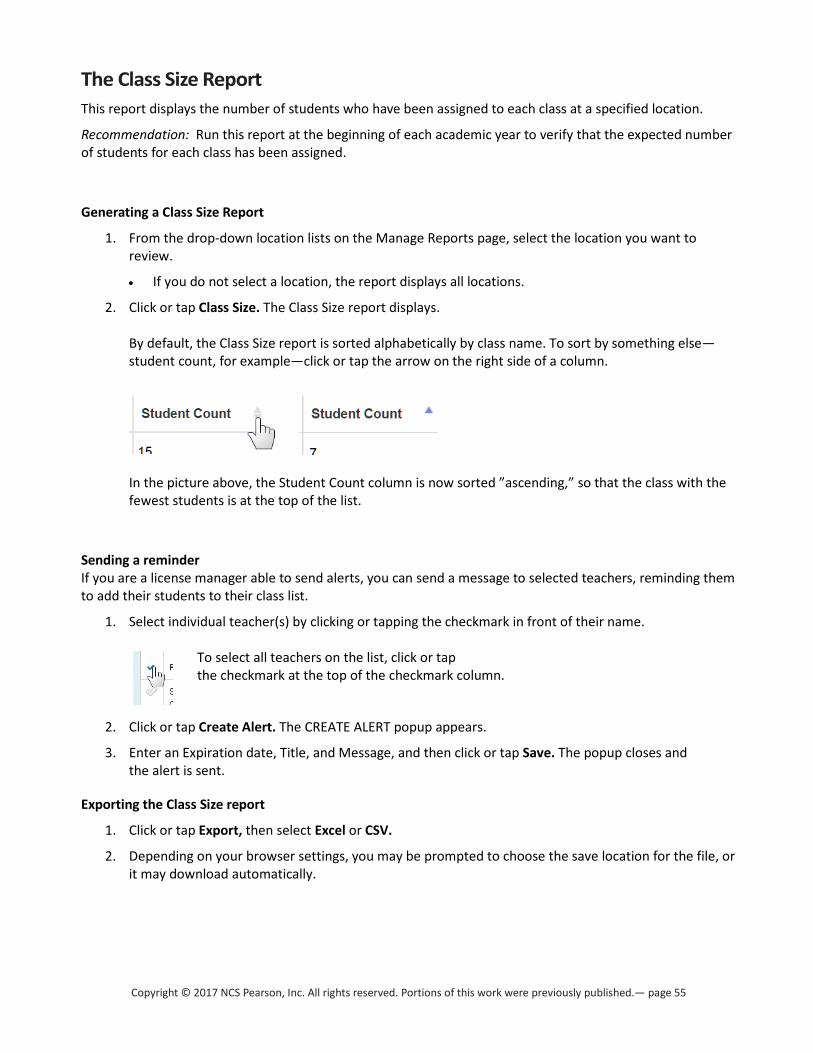
Copyright © 2017 NCS Pearson, Inc. All rights reserved. Portions of this work were previously published.— page 55
The Class Size Report This report displays the number of students who have been assigned to each class at a specified location.
Recommendation: Run this report at the beginning of each academic year to verify that the expected number of students for each class has been assigned.
Generating a Class Size Report
1. From the drop-down location lists on the Manage Reports page, select the location you want to review.
• If you do not select a location, the report displays all locations.
2. Click or tap Class Size. The Class Size report displays. By default, the Class Size report is sorted alphabetically by class name. To sort by something else—student count, for example—click or tap the arrow on the right side of a column.
In the picture above, the Student Count column is now sorted ”ascending,” so that the class with the fewest students is at the top of the list.
Sending a reminder If you are a license manager able to send alerts, you can send a message to selected teachers, reminding them to add their students to their class list.
1. Select individual teacher(s) by clicking or tapping the checkmark in front of their name.
To select all teachers on the list, click or tap the checkmark at the top of the checkmark column.
2. Click or tap Create Alert. The CREATE ALERT popup appears.
3. Enter an Expiration date, Title, and Message, and then click or tap Save. The popup closes and the alert is sent.
Exporting the Class Size report
1. Click or tap Export, then select Excel or CSV.
2. Depending on your browser settings, you may be prompted to choose the save location for the file, or it may download automatically.

Copyright © 2017 NCS Pearson, Inc. All rights reserved. Portions of this work were previously published.— page 56
User Export User Export is an extract of information about users in the license. The extract contains the user’s type (i.e., administrator or teacher), role, username, email address, user creation date, location, and the date and time they last signed in. (For full details, refer to Appendix B.)
This report may be used to
• determine the last time each user logged into the system. This information can then be used to contact selected users to determine if they are having a problem accessing the system.
• review the list of all users and their email addresses to ensure they have been entered correctly. • review the current assigned roles and update as needed.
Recommendation: Run this report at the beginning of each academic year to verify that the assigned roles are correct for each user.
Run this report after viewing the Pending Checklist Report to see if any of the teachers listed on that report are having a problem accessing the system.
Running User Export
1. From the drop-down location lists on the Manage Reports page, select the location you want to export.
• By default, the data extract includes only users specifically associated with the location chosen, and not any users that fall ”under” the chosen location in the hierarchy.
2. Click or tap User Export. The USER EXPORT OPTIONS popup appears.
3. If you want to include all user information within the license in the extract, check Include all users in all locations (Organization, Programs, and Sites) within this license.
4. Click or tap Export. A confirmation message displays when the WSO server receives the data extract request. You will receive an email confirmation when the data extract is complete.
The data file is automatically deleted from the server after 10 calendar days. You may want to note this date on your calendar.
To check the status of the data extract, refer to Checking the status of a data extract or report
To retrieve the data extract file, refer to Downloading a data export or report from the Report Status page

Copyright © 2017 NCS Pearson, Inc. All rights reserved. Portions of this work were previously published.— page 57
Student Export Student Export is an extract of all students at a selected location and their demographic information. The extract can also contain Classes, Teachers, percentage of completion for Checklists, Summary Reports, and Head Start Reports (if applicable), and assessment data information. (For full details, refer to Appendix B.)
Recommendation: Run the report periodically to ensure that students have not been entered more than once.
You can also use this export to track the completion percentage for checklists and summary reports, as well as see the number of observations entered for each student.
Running Student Export
1. From the drop-down location lists on the Manage Reports page, select the location you want to export.
• If you do not select a location, the export includes all locations.
2. Click or tap Student Export. The STUDENT EXPORT OPTIONS popup appears.
3. Check the checkboxes for the desired selections.
• The Include Assessment Data option results in a longer-than-usual data extraction process.
4. Click or tap Export. A confirmation message displays when the WSO server receives the data extract request. You will receive an email confirmation when the data extract is complete.
The data file is automatically deleted from the server after 10 calendar days. You may want to note this date on your calendar.
To check the status of the data extract, refer to Checking the status of a data extract or report
To retrieve the data extract file, refer to Downloading a data export or report from the Report Status page
Copyright © 2017 NCS Pearson, Inc. All rights reserved. Portions of this work were previously published.— page 58
Assessment Data Export Assessment Data Export extracts Student and Student assessment information for the current academic year. The extract includes location information, student information, checklist ratings for each requested period(s), and checklist state (Final or Preliminary). (For full details, refer to Appendix B.)
Recommendation: It is strongly recommended to run this export at the end of each period and at the end of the academic year, as student data (including data for all previous years) is not retained when a student is deleted from the system. Keep a copy of this data for your own permanent record, if applicable.
Running Assessment Data Export
1. From the drop-down location lists on the Manage Reports page, select the location you want to export.
• If you do not select a location, the export includes all locations.
2. Click or tap Assessment Data Export. The ASSESSMENT EXPORT OPTIONS popup appears.
3. Select the options you want.
4. Click or tap Export. A confirmation message displays when the WSO server receives the data extract request. You will receive an email confirmation when the data extract is complete.
The data file is automatically deleted from the server after 10 calendar days. You may want to note this date on your calendar.
To check the status of the data extract, refer to Checking the status of a data extract or report
To retrieve the data extract file, refer to Downloading a data export or report from the Report Status page

Copyright © 2017 NCS Pearson, Inc. All rights reserved. Portions of this work were previously published.— page 59
Outcomes Report The Outcomes report provides an aggregate summary of the ratings for all students at the selected location. This report can be used to determine where professional development is needed.
Outcomes reports may be generated by Domain, Area of Development, or Performance Indicator level. The report may be configured to include all domains or to include specific domains.
Outcomes reports may be disaggregated through demographic grouping, demographic filters, and site filters.
Demographic Grouping: group children based upon the demographic fields included in the license.
Demographic Filters: pinpoint specific groups of children to be included in the report and exclude all others. Demographic Grouping and Filters includes customized demographics that may be added to the license.
Site Filters: select which centers to include in the report, and which to exclude.
Recommendation: It is strongly recommended to run this export at the end of each period and at the end of the academic year, as student data (including data for all previous years) is not retained when a student is deleted from the system. Keep a permanent copy of this data for your record.
Running the Outcomes Export
1. From the drop-down location lists on the Manage Reports page, select the location you want to review.
• If you do not select a location, the report includes all locations.
2. Click or tap Outcomes Export. The OUTCOMES EXPORT OPTIONS popup appears.
3. Select the options you want.
4. Click or tap Submit. A confirmation message displays when the WSO server receives the request. You will receive an email confirmation when the report is complete.
The report is automatically deleted from the server after 10 calendar days. You may want to note this date on your calendar.
To check the status of the report, refer to Checking the status of a data extract or report
To retrieve the report, refer to Downloading a data extract or report from the Report Status page

Copyright © 2017 NCS Pearson, Inc. All rights reserved. Portions of this work were previously published.— page 60
Location Export The Location Export extracts information about locations in the license. (For full details, refer to Appendix B.)
For each location, the report includes the total number of
• users (License Managers, Administrators, and Teachers). • students (Active, Archived, and Deleted).
Optionally, the Include Assessment Data option can be selected to include the number of
• started checklists (broken out by period) • started Summary Reports (broken out by period) • observations (broken out by period)
Recommendation: Run the Location Export report to verify that all locations for the license have been entered and that Students, Administrators, and Teachers have been assigned to each location. If you choose the Include Assessment Data option, you can compare the task completion rate of the locations included on the report.
Running the Location Export
1. From the drop-down location lists on the Manage Reports page, select the location you want to export.
• If you do not select a location, the export includes all locations.
2. Click or tap Location Export. The LOCATION EXPORT OPTIONS popup appears.
3. Select the options you want.
• Selecting Include Assessment Data results in a longer-than-usual extraction process.
4. Click or tap Export. A confirmation message displays when the WSO server receives the data extract request. You will receive an email confirmation when the data extract is complete.
The data file is automatically deleted from the server after 10 calendar days. You may want to note this date on your calendar.
To check the status of the data extract, refer to Checking the status of a data extract or report
To retrieve the data extract file, refer to Downloading a data export or report from the Report Status page

Copyright © 2017 NCS Pearson, Inc. All rights reserved. Portions of this work were previously published.— page 61
Report Status The Report Status page displays the status of all data extracts and reports you have submitted to the Work Sampling Online servers.
Checking the status of a report
1. From the Administrator home page or Navigation menu, select Manage Reports. The Reports page displays.
2. Click or tap the REPORT STATUS link. The Report Status page displays.
The first column displays report progress. Click or tap Refresh to update status.
Yellow light: the report is in process.
Green light: the report is completed and data was found.
Red light: the report is completed but no data was found for the report type selected.
The selection criteria summarize the options that were chosen when the report was submitted. If a report has failed to return data, examining the criteria can help you understand why.
The Download link enables you to save a report in CSV format.

Copyright © 2017 NCS Pearson, Inc. All rights reserved. Portions of this work were previously published.— page 62
Appendix A: Default User Permissions Teacher Archive Child Assign Child to a Class Create Child Create Observation Delete Child
Edit Child Remove Child from Class Create Class Delete Class Edit Class
View Classes Family Corner Add Duplicate Student Reset User Password
Reset User Password enables the teacher to change their own password.
AdministratorArchive Child Assign Child to a Class Create Child Create Observation Delete Child Edit Child Remove Child from Class Remove [Student] from System Transfer Student View Child History Create Class Delete Class
Edit Class View Classes Family Corner Import Child Plus Data Define License Roles Create Location Edit Location Add Duplicate Student Add Existing User Assign Admin Role Assign Teacher Role Assign User Roles
Assign User to Location Clear Failed Attempts Create User Delete User Edit User Lock User Manage Calendar Reset User Password Transfer User Unlock User
Reset User Password enables the administrator to reset user passwords as well as change their own password.
License Manager Archive Child Assign Child to a Class Create Child Create Observation Delete Child Edit Child Remove Child from Class Remove [Student] from System Transfer Student View Child History Create Class Delete Class Edit Class View Classes
Family Corner Import Child Plus Data Define License Roles Create Location Delete Location Edit Location Move Location Add Duplicate Student Add Existing User Assign Admin Role Assign Custom Role Assign License Manager Assign Teacher Role Assign User Roles
Assign User to Location Clear Failed Attempts Create User Delete User Edit User Lock User Manage Calendar Manage Alerts Manage High Priority Alerts Reset User Password Transfer User Unlock User

Copyright © 2017 NCS Pearson, Inc. All rights reserved. Portions of this work were previously published.— page 63
Appendix B: Data Extract Details This appendix lists possible fields and field values. The fields and field values in your extracts may differ from what is listed here based on your license or the criteria you set when you requested the extract.
For example, Program information will not show up if you have a site license, or have requested a site-level extract.
User Data Extract Default Name: User Export_[License Name]_[date]_[time].
Column Name Description (possible values, format, notes) User name sign in name
First Name
Last Name
Email Address
Role License Manager Administrator Teacher [user-defined custom role]
Is Admin Y N
Is Teacher Y N
Last Login Date Date the user last logged in
Created By User who set up the user’s account For users created before July 2013, this value will be Pearson
Created Date Date the user name was created For users created before July 2013, this value will be Jan 2000
Brand Name Brand name, if applicable
Org Name Organization name, if applicable
Program Name Program name, if applicable
Site Name

Copyright © 2017 NCS Pearson, Inc. All rights reserved. Portions of this work were previously published.— page 64
Student Data Extract Default name: Student Export_[License Name]_[date]_[time].
Column Name Description (possible values, format, notes) Internal ID Pearson internal ID number
First Name
Middle Name
Last Name
Gender depending on license configuration 1 = Female 2 = Male or 1 = Male 2 = Female
Grade 10 = Preschool 3 12 = Preschool 4 13 = Kindergarten 14 = Grade 1 15 = Grade 2 16 = Grade 3 17 = Grade 4 18 = Grade 5 23 = Head Start 3 24 = Head Start 4
Birth Date
IEP/IFSP 0 = Student does not have an IEP/IFSP 1 = Student has an IEP/IFSP
Language 1 = English 2 = Spanish 99 = Other Note. Your values may vary depending on license configuration
Ethnicity 1 = American Indian, Alaskan Native 2 = Asian 3 = Black, African American 4 = Spanish/Latino 5 = White 99 = Other Note. Your values may vary depending on license configuration
Student State Active Inactive (archived) Deleted
Custom Student Demographics Additional custom student demographics are included depending on the license configuration
Column name Description (possible values, format, notes)
Brand Name Brand name, if applicable
Org Name Organization name, if applicable
Program Name Program name, if applicable
Site Name
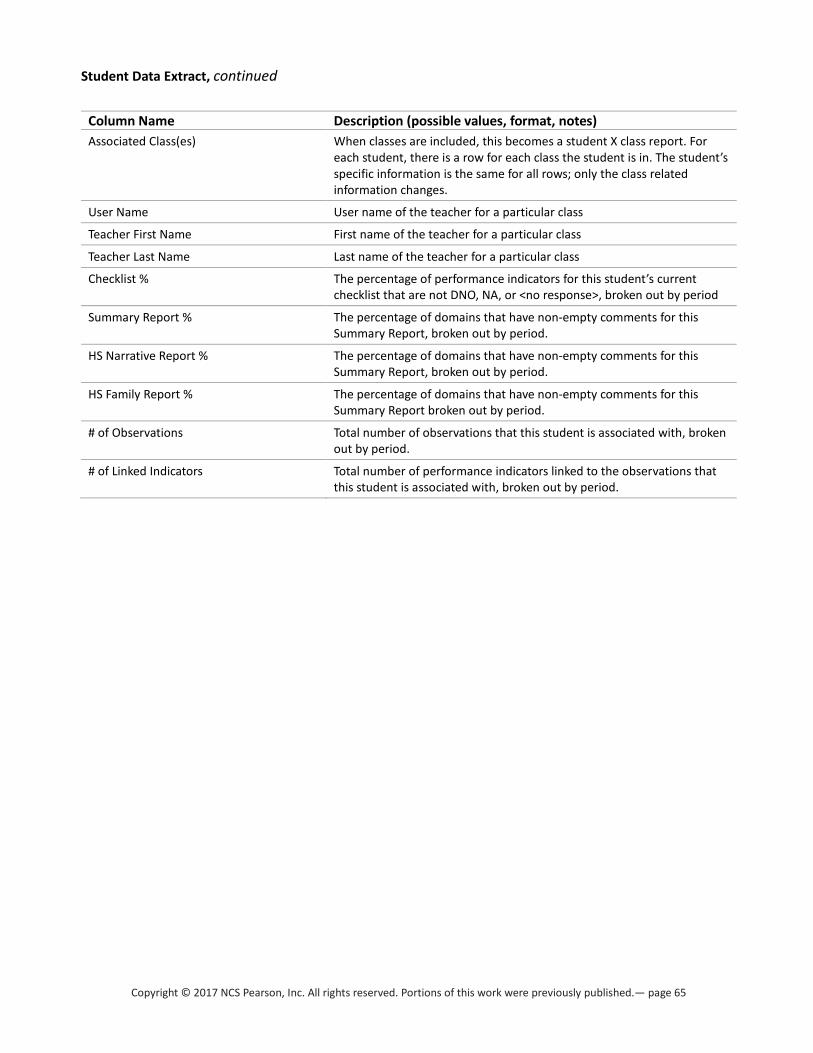
Copyright © 2017 NCS Pearson, Inc. All rights reserved. Portions of this work were previously published.— page 65
Student Data Extract, continued
Column Name Description (possible values, format, notes) Associated Class(es) When classes are included, this becomes a student X class report. For
each student, there is a row for each class the student is in. The student’s specific information is the same for all rows; only the class related information changes.
User Name User name of the teacher for a particular class
Teacher First Name First name of the teacher for a particular class
Teacher Last Name Last name of the teacher for a particular class
Checklist % The percentage of performance indicators for this student’s current checklist that are not DNO, NA, or <no response>, broken out by period
Summary Report % The percentage of domains that have non-empty comments for this Summary Report, broken out by period.
HS Narrative Report % The percentage of domains that have non-empty comments for this Summary Report, broken out by period.
HS Family Report % The percentage of domains that have non-empty comments for this Summary Report broken out by period.
# of Observations Total number of observations that this student is associated with, broken out by period.
# of Linked Indicators Total number of performance indicators linked to the observations that this student is associated with, broken out by period.
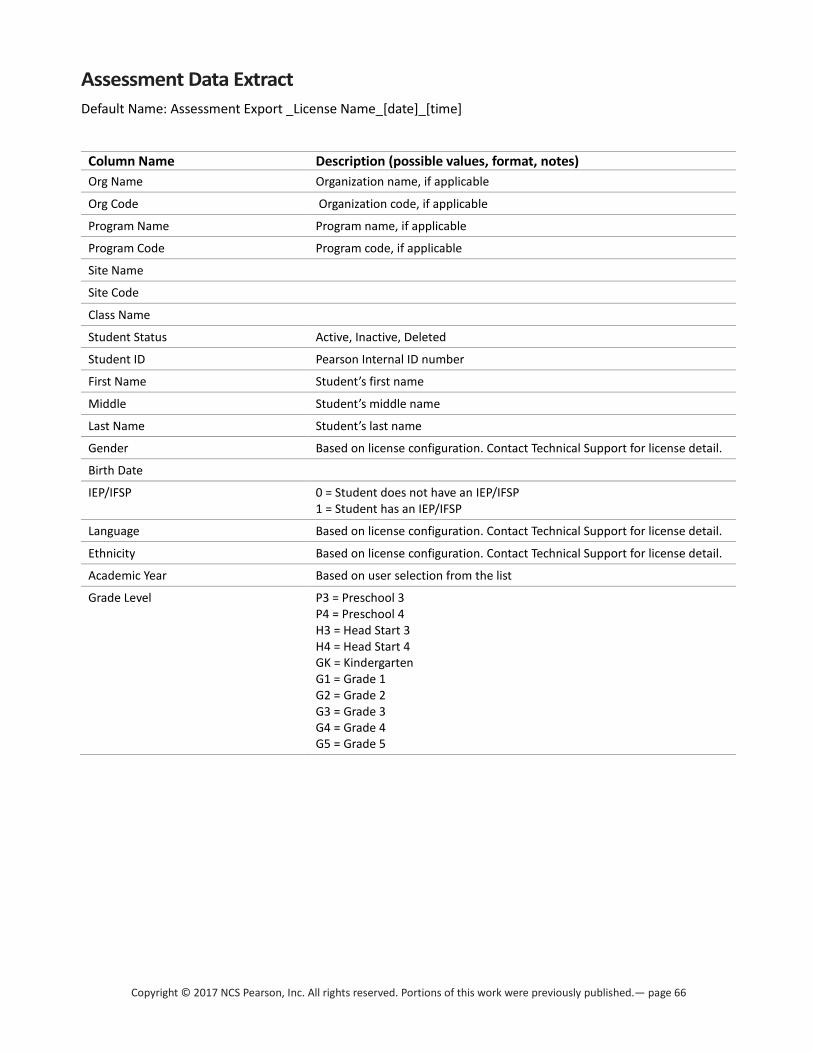
Copyright © 2017 NCS Pearson, Inc. All rights reserved. Portions of this work were previously published.— page 66
Assessment Data Extract Default Name: Assessment Export _License Name_[date]_[time]
Column Name Description (possible values, format, notes) Org Name Organization name, if applicable
Org Code Organization code, if applicable
Program Name Program name, if applicable
Program Code Program code, if applicable
Site Name
Site Code
Class Name
Student Status Active, Inactive, Deleted
Student ID Pearson Internal ID number
First Name Student’s first name
Middle Student’s middle name
Last Name Student’s last name
Gender Based on license configuration. Contact Technical Support for license detail.
Birth Date
IEP/IFSP 0 = Student does not have an IEP/IFSP 1 = Student has an IEP/IFSP
Language Based on license configuration. Contact Technical Support for license detail.
Ethnicity Based on license configuration. Contact Technical Support for license detail.
Academic Year Based on user selection from the list
Grade Level P3 = Preschool 3 P4 = Preschool 4 H3 = Head Start 3 H4 = Head Start 4 GK = Kindergarten G1 = Grade 1 G2 = Grade 2 G3 = Grade 3 G4 = Grade 4 G5 = Grade 5

Copyright © 2017 NCS Pearson, Inc. All rights reserved. Portions of this work were previously published.— page 67
Assessment Data Extract, continued
Column Name Description (possible values, format, notes) Assessment Data The columns are titled thus: [period#-[Domain#].[Functional Area#].[indicator#] The total number of columns of assessment data is equal to the number of periods included in the extract times the number of indicators in the checklist for the grade level.
Column heading examples: P1-I.A-1 represents the following: Period 1, first Domain, first Functional Area, first Indicator P3-IV.B-3 represents the following: Period 3, fourth Domain, second Functional Area, third Indicator. Assessment Data Values: 1 = Not Yet 2 = In Process 3 = Proficient 0 = Did Not Observe -1 = Not Applicable all other negative numeric values are representations of internal states that can be ignored
Creation Date Date the checklist was created
Mod Date Last date the checklist was last modified
Checklist State P = Preliminary F = Final

Copyright © 2017 NCS Pearson, Inc. All rights reserved. Portions of this work were previously published.— page 68
Location Data Extract Default Name: Location Export_[License Name]_[date]_[time]
Column Name Description (possible values, format, notes) Brand Name Brand name, if applicable
Org Name Organization name, if applicable
Program Name Program name, if applicable
Site Name
Location Level (Brand, Org, Program, Site) Based on license configuration
Location Address
Seats Purchased Active Number of student active seats purchased
Seats Purchased Archive Number of student archive seats purchased
Primary Contact User Name
Primary Contact First Name
Primary Contact Last Name
Primary Contact Email
Primary Contact Phone
Total Users Total number of Users (Administrators and Teachers)
Administrators Total number of Administrators
Teachers Total number of Teachers
Students Active Number of active students used
Students Inactive Number of inactive/archived students used
Students Deleted Number of students marked for deletion
Checklists Total number of started Checklists, broken out by period
Summary Reports Total number of started Summary Reports, broken out by period Note. The counts are not broken out by Summary Report type
Observations Total number of Observations, broken out by period


![MPIA 15 459 1133 - · Dst: Type: icmp time exceeded in-transit [tos OxcO] /-----, -----\ > > > > > > > > > ® . MPIA 15 459 11302/17/99 , !](https://static.fdocuments.us/doc/165x107/5ab91efd7f8b9ac10d8dd314/mpia-15-459-1133-type-icmp-time-exceeded-in-transit-tos-oxco-.jpg)