Wordpress and Flash 10x Cookbook - Packt Publishing _WordPress and... · YCB contract clients...
38
Wordpress and Flash 10x Cookbook Peter Spannagle Sarah Soward Chapter No.4 " Video Blogging + Flash Video Encoding, Skinning, and Components "
-
Upload
truonghanh -
Category
Documents
-
view
222 -
download
1
Transcript of Wordpress and Flash 10x Cookbook - Packt Publishing _WordPress and... · YCB contract clients...
Wordpress and Flash 10x Cookbook
Peter Spannagle Sarah Soward
Chapter No.4 " Video Blogging + Flash Video Encoding,
Skinning, and Components "
In this package, you will find: A Biography of the authors of the book
A preview chapter from the book, Chapter NO.4 " Video Blogging + Flash Video Encoding, Skinning, and Components "
A synopsis of the book’s content
Information on where to buy this book
About the Authors Peter Spannagle is a WordPress consultant, technology trainer, and Web 2.0 designer. His skills include client-side coding, graphic and web design, and SEO. He also offers online marketing, training, and support services. With twelve years experience as a technology contractor, he will help you meet your goals and strives to exceed your expectations. His professional experience includes working as the Manager of Marketing and Online Services for Youth Service California and as a Quality Rater for Google. He was also fortunate to work as part of the fabrication team for Sky Mirror (a thirty-ton stainless steel sculpture) designed by Anish Kapoor and built by Performance Structures, which debuted at the Rockefeller Center in 2006. YourCustomBlog.com (YCB) began in 2007 to provide quality WordPress consulting services in the San Francisco Bay Area. Over the past three years, YCB has grown to servicing clients around the country and around the world.
Buy Wordpress and Flash 10x Cookbook ebook with WordPress 2.8 Theme Design ebook and get 50% off both. Just enter woek160 in the 'Promotion Code' field and then click the “Add Promotion Code” button, the discount will be applied. This offer is valid till 31st May 2010. Grab your copy now!!!
For More Information: www.PacktPub.com/ wordpress-and-flash-10x-cookbook/book
YCB contract clients include: Singularity Hub, Sharam, The Hidden World of Girls (for the Kitchen Sisters, a segment on NPR Morning Edition), Street Soldiers Radio (on 106 KMEL San Francisco), Ustream.TV, Innovation Center Denmark (Silicon Valley), San Francisco Dream Wedding Giveaway, Legal Services for Children, The Children and Nature Network and the San Francisco Day School. Visit my website: http://yourcustomblog.com or contact me at: [email protected]
I would like to thank:
My co-author, Sarah Soward
My clients, for the opportunity to assist them
My family and friends
My mentors at UC Santa Cruz and UC Berkeley
The Bay Area Video Coalition
The Flow Yoga Teacher Training program and participants
D.K. Chakravarty, Ayurvedic chef
Numi Tea and Mama Buzz The Bolivarian Republic of Venezuela
Sarah Soward develops curriculum for and teaches the Adobe Creative Suite and design theory at the Bay Area Video Coalition ( http://www.bavc.org). She has over five years experience as a technology trainer and is Adobe Certified. She specializes in creating web and print collateral for small businesses and non-profits. She is the Art Director for The Pagan Alliance, a non-profit organization, and a working fi ne artist (oil painting and drawing). In addition to teaching Flash, she is also an expert in the use of Dreamweaver, Fireworks, Photoshop, Illustrator, and InDesign. You can reach her at sarahsoward.com and rhinotopia.com
My Flash experience and teaching experience have come from a variety of sources. I certainly could not have done any of this without Adobe and their wonderful resources for ActionScript and Flash CS4. On that note, thanks also to Abigail Rudner. She demystified ActionScript 2.0 for me when I was first learning Flash and made my SWF’s functional as well as fun. Rose Adare gets a huge thank you for putting me on this path with the Bay Area Video Coalition (BAVC) and technology training in general. She taught me how to teach. That skill is one of the most valuable pieces of my life. Thank you to BAVC for believing in me and keeping me and my quirky handouts around all these years. Of course, my profs @ The California College of the Arts get props.
Buy Wordpress and Flash 10x Cookbook ebook with WordPress 2.8 Theme Design ebook and get 50% off both. Just enter woek160 in the 'Promotion Code' field and then click the “Add Promotion Code” button, the discount will be applied. This offer is valid till 31st May 2010. Grab your copy now!!!
For More Information: www.PacktPub.com/ wordpress-and-flash-10x-cookbook/book
My Mom. I know it isn’t a complete sentence. It says all it needs to say: My Mom. It’s like stop(); can be this.stop(); but may not need all the extra characters to be just perfect even if it is more thorough. Happy expressions of gratitude go out to Chris O’Sullivan, Michele Jones, their living room floor, and gluten-free donuts. Kristie Bulleit Niemeier and her dissertation progress postings get a nod as well. Thanks to every client who ever insisted that I make something cool for them. Finally, thanks to the man who shared this project with me: Peter Spannagle. He makes a mean cup of tea.
Buy Wordpress and Flash 10x Cookbook ebook with WordPress 2.8 Theme Design ebook and get 50% off both. Just enter woek160 in the 'Promotion Code' field and then click the “Add Promotion Code” button, the discount will be applied. This offer is valid till 31st May 2010. Grab your copy now!!!
For More Information: www.PacktPub.com/ wordpress-and-flash-10x-cookbook/book
Wordpress and Flash 10x Cookbook This book helps you create a contemporary, functional, and memorable site. Detailed instructions are provided for each section. We show the big picture by providing context, best practices, and strategies. Learn how to work with XHTML in WordPress, confi gure WordPress for maximum SEO, edit theme template fi les, and back up your site. Our crash course in theme customization provides you with an introduction to CSS, WordPress theme hierarchy, and template tags. More than 7,000 plugins currently exist for WordPress. We provide you with a shortlist of essential tools for creating a dynamic and media-rich website or blog, and show you how to implement these tools on your site. The sections on Flash are intended to give you the option to create custom . swf fi les, giving you an alternative to plugins that already exist.
What This Book Covers Chapter 1 helps you develop a strategy to use Flash in your WordPress blog. Learn how to embed a .swf manually or by using a plugin. Chapter 2 demonstrates how to set up and work with WordPress, including creating posts and pages, and editing .php theme templates. We offer strategies for configuring WordPress and ways to extend the admin tools via plugins. By the end of the chapter, the user will be able to effectively use WordPress as a Content Management System (CMS) and in conjunction with Flash. Chapter 3 shows you ways to share individual images and collections of images as thumbnails, galleries, and slideshows—using WordPress or working in Flash. Chapter 4 shows you how to use video plugins, including video players, embed .flv and .swf files, and video blogging. Encoding through the use of the Flash Media Encoder for reduced file sizes and creation of .flv fi les is covered along with using Flash's default skinning options and editable video components.
Chapter 5 shows you how to work with audio in WordPress and in Flash. Topics covered include using a Flash audio player and creating a podcast as well as how to design your own unique audio player in Flash. Chapter 6 explores a broad range of applications including unique ways to display your tags, how to use fonts outside of the limited set of web-only fonts, quote rotators, ad management, scrolling RSS feed displays, and more.
Buy Wordpress and Flash 10x Cookbook ebook with WordPress 2.8 Theme Design ebook and get 50% off both. Just enter woek160 in the 'Promotion Code' field and then click the “Add Promotion Code” button, the discount will be applied. This offer is valid till 31st May 2010. Grab your copy now!!!
For More Information: www.PacktPub.com/ wordpress-and-flash-10x-cookbook/book
Chapter 7 presents an in-depth look at each of the three elements that WordPress themes are made up of: CSS stylesheets, template fi les, and template tags. We then apply this knowledge by customizing the default Kubrik theme. Chapter 8 covers creating your own Flash animations for your blog. The focus here is on animating in the Flash timeline and helping you with the fundamentals of Flash animation. Appendix A covers WordPress resources.
Appendix B covers Flash resources.
Appendix C covers shortcut keys.
Appendix D gives you a few tips on site planning.
Buy Wordpress and Flash 10x Cookbook ebook with WordPress 2.8 Theme Design ebook and get 50% off both. Just enter woek160 in the 'Promotion Code' field and then click the “Add Promotion Code” button, the discount will be applied. This offer is valid till 31st May 2010. Grab your copy now!!!
For More Information: www.PacktPub.com/ wordpress-and-flash-10x-cookbook/book
4Video Blogging +
Flash Video Encoding, Skinning, and Components
In this chapter, we will cover the following:
FLV Embed plugin
Video blogging using WebTV Plugin
Video blogging using Free WP Tube theme
Encoding with the Flash Media Encoder
Using preset skins
Hiding and Showing preset skins
Using Video Component buttons
Modifying Video Component buttons to customize your own skin
Buy Wordpress and Flash 10x Cookbook ebook with WordPress 2.8 Theme Design ebook and get 50% off both. Just enter woek160 in the 'Promotion Code' field and then click the “Add Promotion Code” button, the discount will be applied. This offer is valid till 31st May 2010. Grab your copy now!!!
For More Information: www.PacktPub.com/ wordpress-and-flash-10x-cookbook/book
Video Blogging + Flash Video Encoding, Skinning, and Components
98
IntroductionVideo is a major component of the Web today. Luckily, WordPress makes it easy to publish and share video. In this chapter, we will demonstrate ways of working with video in WordPress and in Flash. You will learn how to embed an .flv fi le, create an .xml video sitemap, and distribute your videos to sites such as YouTube and Blip. We will also show you how to set up Free WP Tube, a free video blogging theme that allows you to run a video web log (vlog).
Encoding through use of the Flash Media Encoder for reduced fi le sizes and creation of .flv is covered along with using Flash's default skinning options and editable Video components.
FLV Embed (Version 1.2.1) If you want to embed .flv fi les, use a Flash video player, and/or publish a video sitemap, this compact plugin does all three. The homepage is http://www.channel-ai.com/blog/plugins/flv-embed/.
FLV Embed uses standards compliant, valid XHTML, and JavaScript. It is based on the JW FLV Media Player, whose homepage is http://www.longtailvideo.com/players/jw-flv-player/
FLV Embed supports Google video sitemap generation, allowing you to describe, syndicate, and distribute your video content, facilitating indexing in Google video search.
If a user is missing Flash or has disabled JavaScript, he or she is provided unobtrusive and appropriate on-screen instructions to correct the problem.
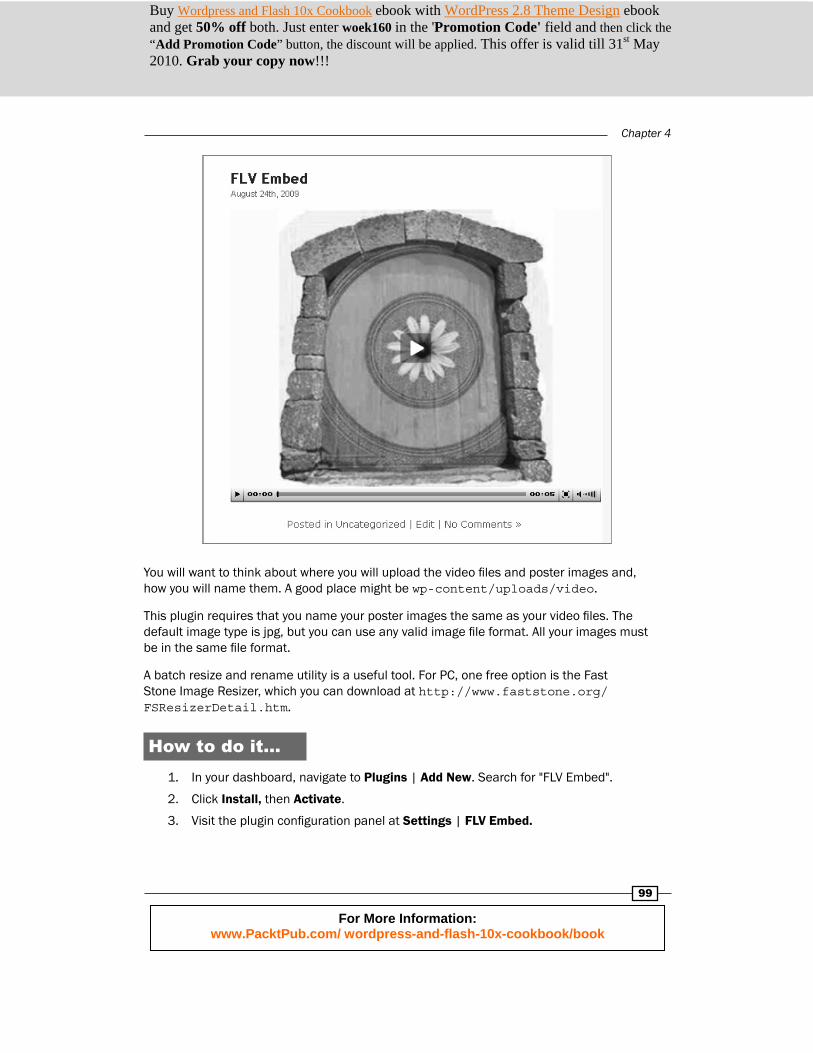
Getting ready When a page with video loads, the player displays either the fi rst frame of the video or a thumbnail (referred to as a poster image). The poster image is preferable, especially when a user is choosing between many videos—the fi rst frame of a video may not offer the most representative or compelling description. Your poster image can be a poster or any image you like. Here is an example of our fi nished product:
Buy Wordpress and Flash 10x Cookbook ebook with WordPress 2.8 Theme Design ebook and get 50% off both. Just enter woek160 in the 'Promotion Code' field and then click the “Add Promotion Code” button, the discount will be applied. This offer is valid till 31st May 2010. Grab your copy now!!!
For More Information: www.PacktPub.com/ wordpress-and-flash-10x-cookbook/book
Chapter 4
99
You will want to think about where you will upload the video fi les and poster images and, how you will name them. A good place might be wp-content/uploads/video.
This plugin requires that you name your poster images the same as your video fi les. The default image type is jpg, but you can use any valid image fi le format. All your images must be in the same fi le format.
A batch resize and rename utility is a useful tool. For PC, one free option is the Fast Stone Image Resizer, which you can download at http://www.faststone.org/FSResizerDetail.htm.
How to do it...1. In your dashboard, navigate to Plugins | Add New. Search for "FLV Embed".
2. Click Install, then Activate.
3. Visit the plugin confi guration panel at Settings | FLV Embed.
Buy Wordpress and Flash 10x Cookbook ebook with WordPress 2.8 Theme Design ebook and get 50% off both. Just enter woek160 in the 'Promotion Code' field and then click the “Add Promotion Code” button, the discount will be applied. This offer is valid till 31st May 2010. Grab your copy now!!!
For More Information: www.PacktPub.com/ wordpress-and-flash-10x-cookbook/book
Video Blogging + Flash Video Encoding, Skinning, and Components
100
4. In the Sitemap menu, check the fi rst box to Enable sitemap feature and automatic custom fi eld addition. FLV Embed will now be able to create your video sitemap by automatically adding a custom fi eld each time you use FLV Embed to insert a video.
5. In the Poster menu, check the box to Display poster image for embedded FLV movies.
6. For both of the fi elds, Path to poster directory and Path to FLV directory, we suggest you leave these blank, and instead use absolute URLs. If you do use relative (site-specifi c) URLs, keep in mind that a trailing slash is required. An example is /wp-content/uploads/videos/.
7. In the Player menu, you may want to change the colors or add your site logo as a linkable watermark to the video. Review all the Settings, and click Save Changes.
8. To embed an FLV fi le, use the following shortcode in HTML view: [flv:url width height]. For example, you could insert a YouTube video at 480 by 360 (using the absolute URL) like this:
[flv:http://youtube.com/watch?v=fLV3MB3DpWN 480 360]
A YouTube video cannot use a poster image because the fi le name of a jpg cannot contain a question mark.
9. You can also insert an FLV that you have uploaded (using the relative path) like this:
[flv:http://www.wordpressandflash.com/wp-content/uploads/video/swfobject_test.swf 480 360]
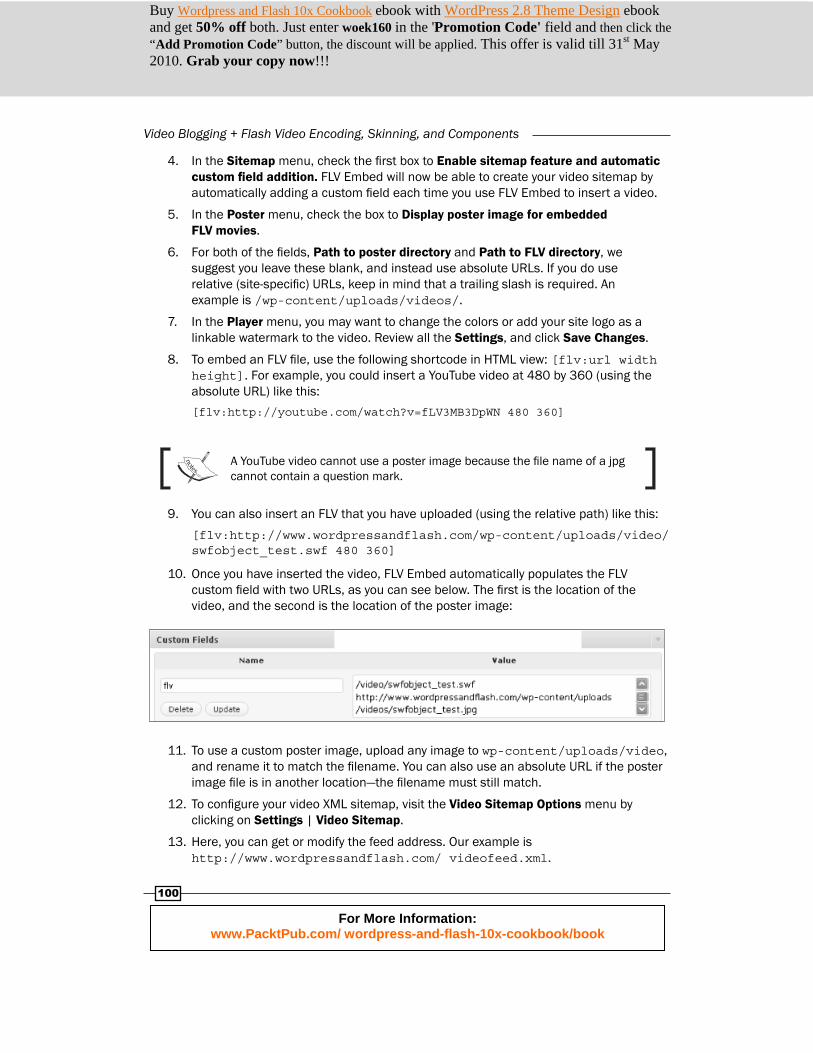
10. Once you have inserted the video, FLV Embed automatically populates the FLV custom fi eld with two URLs, as you can see below. The fi rst is the location of the video, and the second is the location of the poster image:
11. To use a custom poster image, upload any image to wp-content/uploads/video, and rename it to match the fi lename. You can also use an absolute URL if the poster image fi le is in another location—the fi lename must still match.
12. To confi gure your video XML sitemap, visit the Video Sitemap Options menu by clicking on Settings | Video Sitemap.
13. Here, you can get or modify the feed address. Our example is http://www.wordpressandflash.com/ videofeed.xml.
Buy Wordpress and Flash 10x Cookbook ebook with WordPress 2.8 Theme Design ebook and get 50% off both. Just enter woek160 in the 'Promotion Code' field and then click the “Add Promotion Code” button, the discount will be applied. This offer is valid till 31st May 2010. Grab your copy now!!!
For More Information: www.PacktPub.com/ wordpress-and-flash-10x-cookbook/book
Chapter 4
101
14. You can also adjust additional optional settings, and if you have made any changes to the settings or content and need to rebuild the sitemap or update your custom fi elds, you can do that here too.
How it works... The video sitemap is an extension of the XML sitemap we explored in Chapter 2. A video sitemap allows you to publish and syndicate online video content, including descriptive metadata to tag your content for Google Video search. Adding details, such as a title and description, makes it easier for users who are searching to fi nd a given piece of content. Your poster image will also be included as a clickable thumbnail image. The user will be directed to your website to see the video.
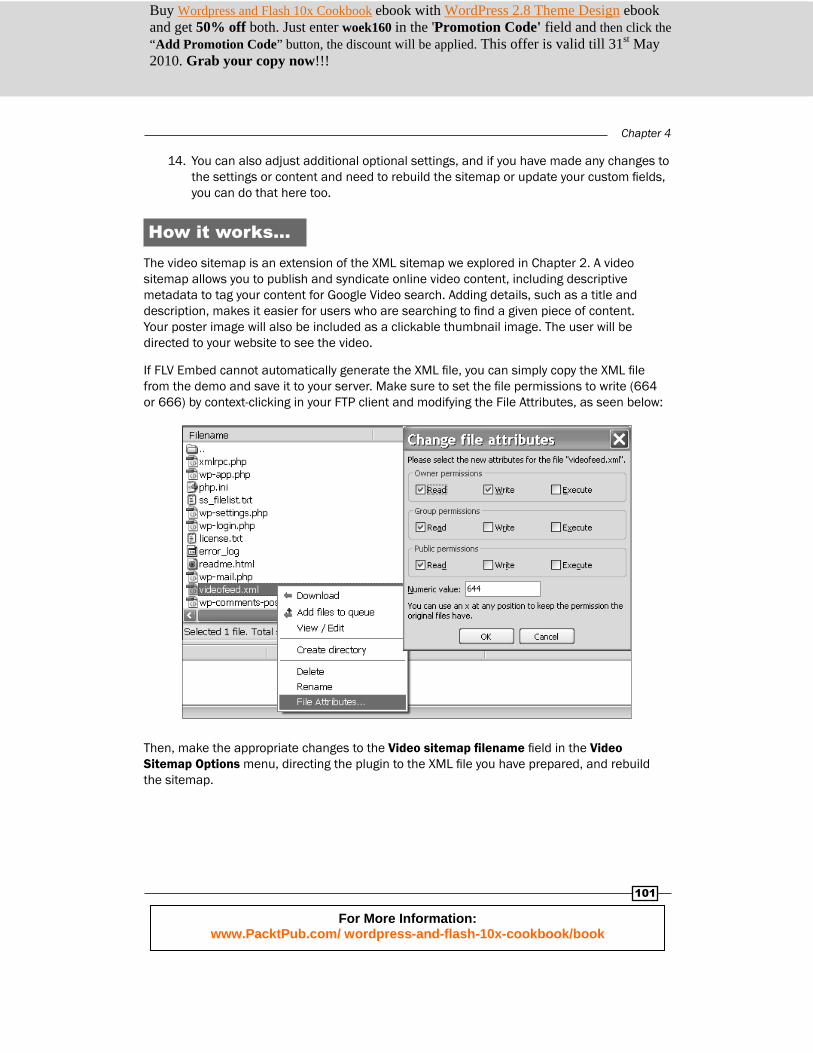
If FLV Embed cannot automatically generate the XML fi le, you can simply copy the XML fi le from the demo and save it to your server. Make sure to set the fi le permissions to write (664 or 666) by context-clicking in your FTP client and modifying the File Attributes, as seen below:
Then, make the appropriate changes to the Video sitemap fi lename fi eld in the Video Sitemap Options menu, directing the plugin to the XML fi le you have prepared, and rebuild the sitemap.
Buy Wordpress and Flash 10x Cookbook ebook with WordPress 2.8 Theme Design ebook and get 50% off both. Just enter woek160 in the 'Promotion Code' field and then click the “Add Promotion Code” button, the discount will be applied. This offer is valid till 31st May 2010. Grab your copy now!!!
For More Information: www.PacktPub.com/ wordpress-and-flash-10x-cookbook/book
Video Blogging + Flash Video Encoding, Skinning, and Components
102
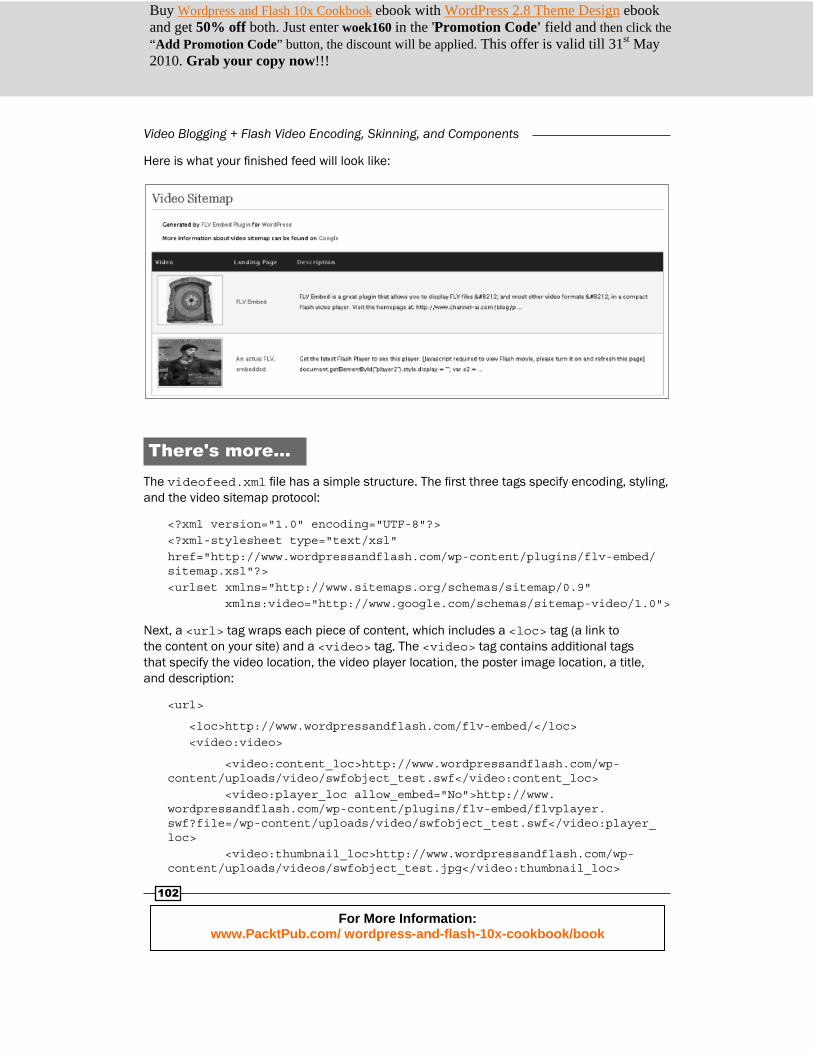
Here is what your fi nished feed will look like:
There's more...The videofeed.xml fi le has a simple structure. The fi rst three tags specify encoding, styling, and the video sitemap pr otocol:
<?xml version="1.0" encoding="UTF-8"?><?xml-stylesheet type="text/xsl" href="http://www.wordpressandflash.com/wp-content/plugins/flv-embed/sitemap.xsl"?><urlset xmlns="http://www.sitemaps.org/schemas/sitemap/0.9" xmlns:video="http://www.google.com/schemas/sitemap-video/1.0">
Next, a <url> tag wraps each piece of content, which includes a <loc> tag (a link to the content on your site) and a <video> tag. The <video> tag contains additional tags that specify the video location, the video player location, the poster image location, a title, and description:
<url>
<loc>http://www.wordpressandflash.com/flv-embed/</loc> <video:video>
<video:content_loc>http://www.wordpressandflash.com/wp-content/uploads/video/swfobject_test.swf</video:content_loc> <video:player_loc allow_embed="No">http://www.wordpressandflash.com/wp-content/plugins/flv-embed/flvplayer.swf?file=/wp-content/uploads/video/swfobject_test.swf</video:player_loc> <video:thumbnail_loc>http://www.wordpressandflash.com/wp-content/uploads/videos/swfobject_test.jpg</video:thumbna il_loc>
Buy Wordpress and Flash 10x Cookbook ebook with WordPress 2.8 Theme Design ebook and get 50% off both. Just enter woek160 in the 'Promotion Code' field and then click the “Add Promotion Code” button, the discount will be applied. This offer is valid till 31st May 2010. Grab your copy now!!!
For More Information: www.PacktPub.com/ wordpress-and-flash-10x-cookbook/book
Chapter 4
103
<video:title><![CDATA[FLV Embed]]></video:title> <video:description><![CDATA[FLV Embed is a great plugin that allows you to display FLV files — and most other video formats — in a compact Flash video player. Visit the homepage at: http://www.channel-ai.com/blog/plugins/flv-embed/. Check out the video sitemap!Get the latest Flash Player to see this player.[Javascript required to view Flash movie, please turn it [...]]]></video:description> </video:video></url></urlset>
With this info, you can manually create a .xml video feed for any site, without a plugin.
Commercial use?Commercial use does require a license. A free alternative for commercial use is the Hana FLV Player, whose homepage is http://www.neox.net/w/2008/05/25/hana-flv-player-wordpress-plugin/.
See also Chapter 2: Confi guring WP for maximum SEO
WebTV plugin (Version 0.6) The WebTV Plugin, by Edgar de León, helps you distribute your video content. When you publish video using the WebTV plugin, the video will not only be published on your site, but it will be uploaded to a confi gurable list of popular distribution channels, including YouTube, Blip, and Vimeo.
The English language support page is http://www.webstratega.com/webtv-wordpress-plugin-en/.
How to do it...1. In your dashboard, navigate to Plugins | Add New. Search for "WebTV."
2. Click Install, then Activate.
3. Visit the plugin confi guration panel at Settings | WebTV.
4. Here, you will enter the username and password for each video distribution channel you want to use: YouTube, Vimeo, and Blip.tv.
5. Click Save to save your changes.
Buy Wordpress and Flash 10x Cookbook ebook with WordPress 2.8 Theme Design ebook and get 50% off both. Just enter woek160 in the 'Promotion Code' field and then click the “Add Promotion Code” button, the discount will be applied. This offer is valid till 31st May 2010. Grab your copy now!!!
For More Information: www.PacktPub.com/ wordpress-and-flash-10x-cookbook/book
Video Blogging + Flash Video Encoding, Skinning, and Components
104
6. Create a new post by clicking Posts | Add New.
7. Give your post a title and put at least one word in the body. Under Publish (directly to the right of the title), click Save Draft.
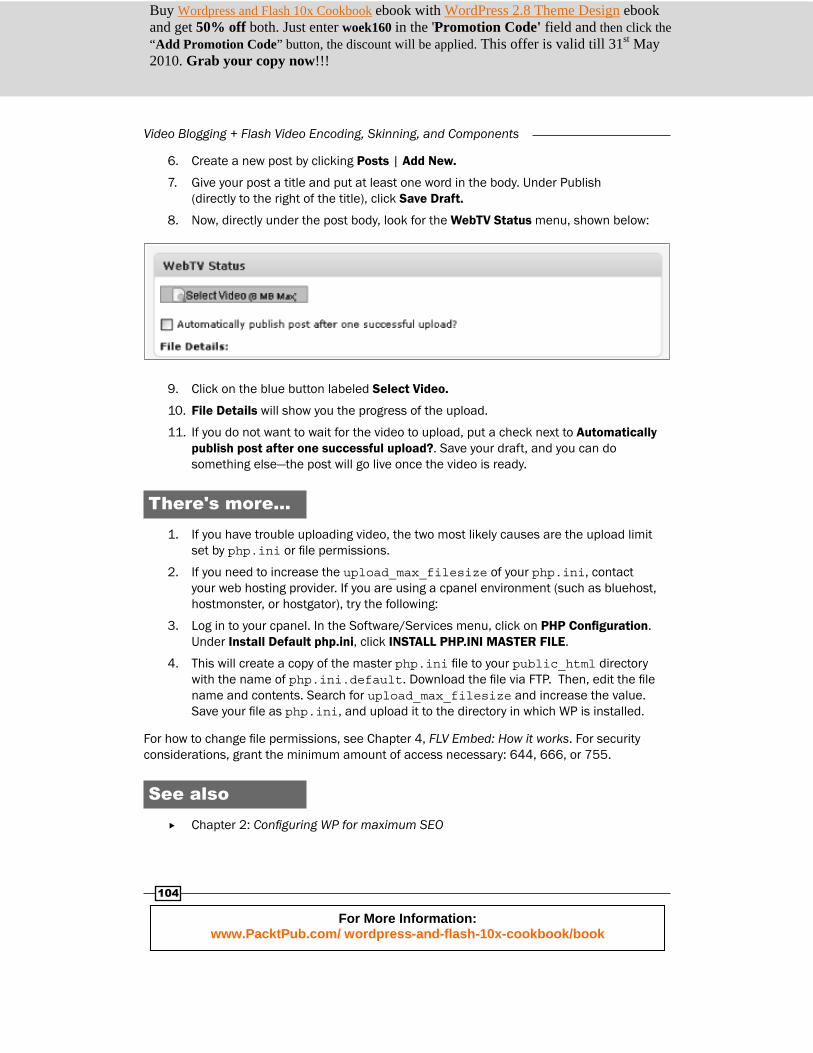
8. Now, directly under the post body, look for the WebTV Status menu, shown below:
9. Click on the blue button labeled Select Video.
10. File Details will show you the progress of the upload.
11. If you do not want to wait for the video to upload, put a check next to Automatically publish post after one successful upload?. Save your draft, and you can do something else—the post will go live once the video is ready.
There's more...1. If you have trouble uploading video, the two most likely causes are the upload limit
set by php.ini or fi le permissions.
2. If you need to increase the upload_max_filesize of your php.ini, contact your web hosting provider. If you are using a cpanel environment (such as bluehost, hostmonster, or hostgator), try the following:
3. Log in to your cpanel. In the Software/Services menu, click on PHP Confi guration. Under Install Default php.ini, click INSTALL PHP.INI MASTER FILE.
4. This will create a copy of the master php.ini fi le to your public_html directory with the name of php.ini.default. Download the fi le via FTP. Then, edit the fi le name and contents. Search for upload_max_filesize and increase the value. Save your fi le as php.ini, and upload it to the directory in which WP is installed.
For how to change fi le permissions, see Chapter 4, FLV Embed: How it works. For security considerations, grant the minimum amount of access necessary: 644, 666, or 755.
See also Chapter 2: Confi guring WP for maximum SEO
Buy Wordpress and Flash 10x Cookbook ebook with WordPress 2.8 Theme Design ebook and get 50% off both. Just enter woek160 in the 'Promotion Code' field and then click the “Add Promotion Code” button, the discount will be applied. This offer is valid till 31st May 2010. Grab your copy now!!!
For More Information: www.PacktPub.com/ wordpress-and-flash-10x-cookbook/book
Chapter 4
105
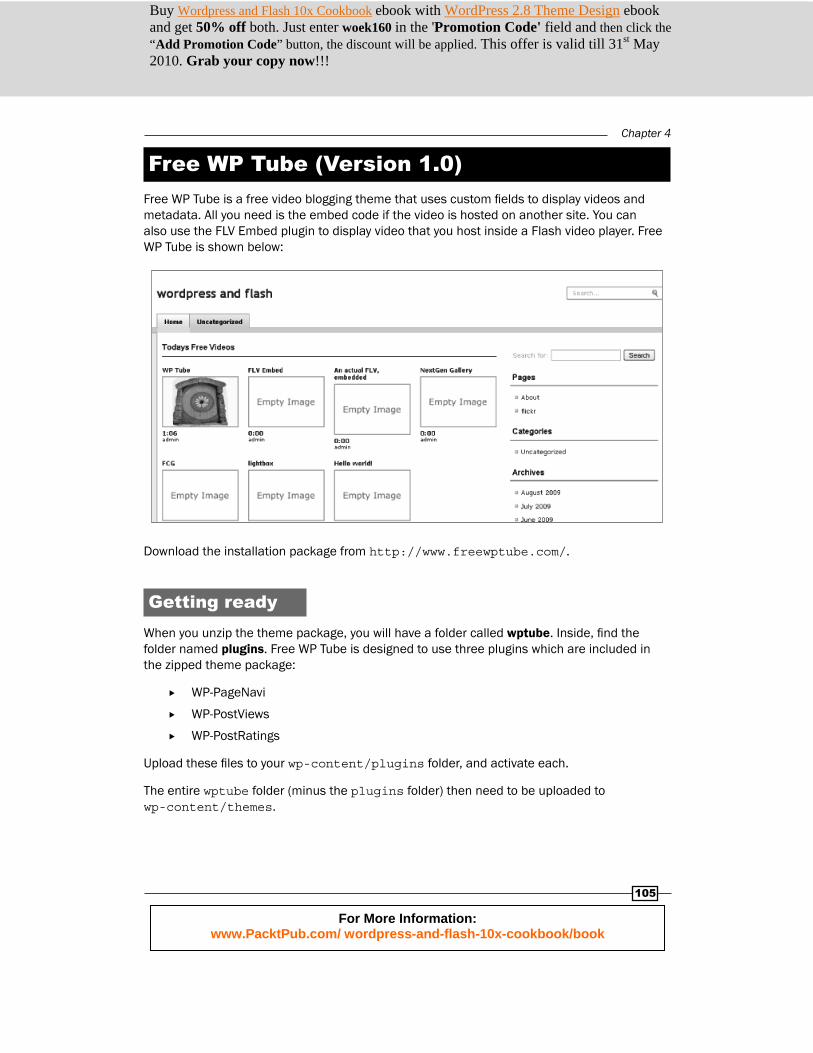
Free WP Tube (Version 1.0) Free WP Tube is a free video blogging theme that uses custom fi elds to display videos and metadata. All you need is the embed code if the video is hosted on another site. You can also use the FLV Embed plugin to display video that you host inside a Flash video player. Free WP Tube is shown below:
Download the installation package from http://www.freewptube.com/.
Getting readyWhen you unzip the theme package, you will have a folder called wptube. Inside, fi nd the folder named plugins. Free WP Tube is designed to use three plugins which are included in the zipped theme package:
WP-PageNavi
WP-PostViews
WP-PostRatings
Upload these fi les to your wp-content/plugins folder, and activate each.
The entire wptube folder (minus the plugins folder) then need to be uploaded to wp-content/themes.
Buy Wordpress and Flash 10x Cookbook ebook with WordPress 2.8 Theme Design ebook and get 50% off both. Just enter woek160 in the 'Promotion Code' field and then click the “Add Promotion Code” button, the discount will be applied. This offer is valid till 31st May 2010. Grab your copy now!!!
For More Information: www.PacktPub.com/ wordpress-and-flash-10x-cookbook/book
Video Blogging + Flash Video Encoding, Skinning, and Components
106
How to do it...1. Activate the theme by clicking on Appearance | Themes and choosing the WP
Tube theme.
2. Visit the theme confi guration page. Look for a new menu at the bottom of your dashboard sidebar called Tube Options. There is only one option: Show pages for menu? Here, you decide whether or not to display pages, in addition to categories, in the top menu navigation.
3. Add a new post by clicking Posts | Add New.
4. Give your post a title, and enter some text in the post body. Assign a category as usual.
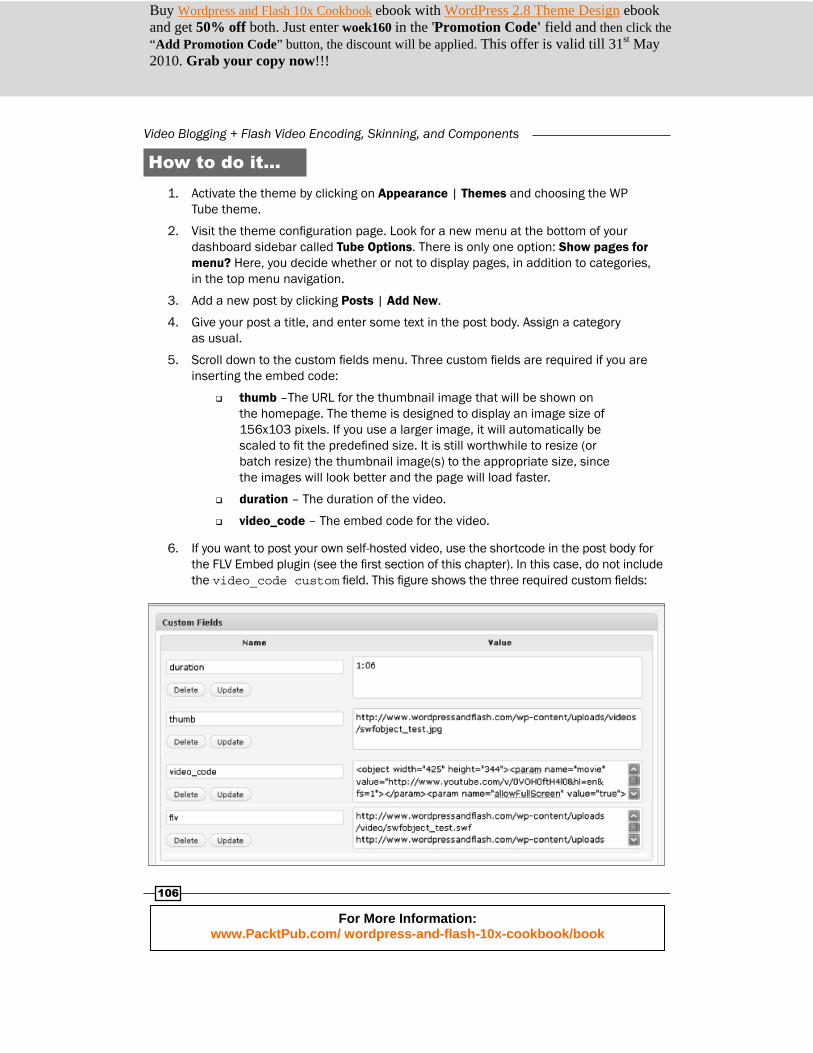
5. Scroll down to the custom fi elds menu. Three custom fi elds are required if you are inserting the embed code:
thumb –The URL for the thumbnail image that will be shown on the homepage. The theme is designed to display an image size of 156x103 pixels. If you use a larger image, it will automatically be scaled to fi t the predefi ned size. It is still worthwhile to resize (or batch resize) the thumbnail image(s) to the appropriate size, since the images will look better and the page will load faster.
duration – The duration of the video.
video_code – The embed code for the video.
6. If you want to post your own self-hosted video, use the shortcode in the post body for the FLV Embed plugin (see the fi rst section of this chapter). In this case, do not include the video_code custom fi eld. This fi gure shows the three required custom fi elds:
Buy Wordpress and Flash 10x Cookbook ebook with WordPress 2.8 Theme Design ebook and get 50% off both. Just enter woek160 in the 'Promotion Code' field and then click the “Add Promotion Code” button, the discount will be applied. This offer is valid till 31st May 2010. Grab your copy now!!!
For More Information: www.PacktPub.com/ wordpress-and-flash-10x-cookbook/book
Chapter 4
107
7. To control the number of videos displayed on the homepage, visit Settings | Reading, and enter your preferred number in the fi eld Blog pages show at most __ posts.
More infoAnother excellent and economical option for a video blogging is the eVid theme ($20) by Elegant themes: http://www.elegantthemes.com/.
See also FLV Embed
Encoding with the Adobe Media Encoder If you have a video fi le, such as an MOV or MP4 fi le that you want to display as a SWF on the Web, simply encode (or compress) the video fi le into an FLV. With Flash CS4, you use the Adobe Media Encoder to do this. It can be accessed directly or through Flash's import video function. If you are using an earlier version of Flash, encoding is still possible, and the process is similar.
Getting readyMake sure that you have a video fi le that is compatible with the Adobe Media Encoder. If you do not have a fi le to use, by all means, use the short.mov fi le in the Chapter 4 folder. This fi le is a clip of the full length summer.mp4 fi le from www.archive.org that is listed on that website as being in the Public Domain. Use the MOV fi le because it is a short fi le, so the time it takes the encoder to render the video will be shorter. This is good for the purposes of learning and practicing. Also, do not worry if you cannot hear any of the sounds. There is nothing wrong with the speakers on your computer. This fi le does not have audio.
Buy Wordpress and Flash 10x Cookbook ebook with WordPress 2.8 Theme Design ebook and get 50% off both. Just enter woek160 in the 'Promotion Code' field and then click the “Add Promotion Code” button, the discount will be applied. This offer is valid till 31st May 2010. Grab your copy now!!!
For More Information: www.PacktPub.com/ wordpress-and-flash-10x-cookbook/book
Video Blogging + Flash Video Encoding, Skinning, and Components
108
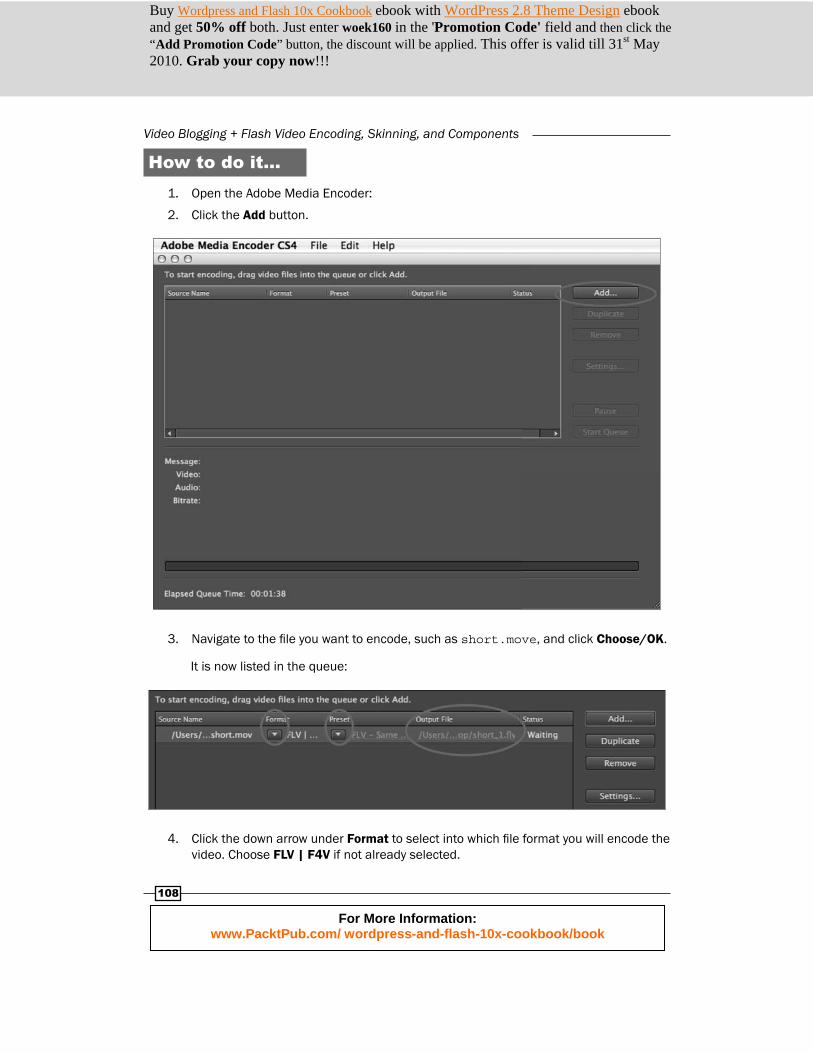
How to do it...1. Open the Adobe Media Encoder:
2. Click the Add button.
3. Navigate to the fi le you want to encode, such as short.move, and click Choose/OK.
It is now listed in the queue:
4. Click the down arrow under Format to select into which fi le format you will encode the video. Choose FLV | F4V if not already selected.
Buy Wordpress and Flash 10x Cookbook ebook with WordPress 2.8 Theme Design ebook and get 50% off both. Just enter woek160 in the 'Promotion Code' field and then click the “Add Promotion Code” button, the discount will be applied. This offer is valid till 31st May 2010. Grab your copy now!!!
For More Information: www.PacktPub.com/ wordpress-and-flash-10x-cookbook/book
Chapter 4
109
5. Click the down arrow under Preset to choose one of the preset export setting options. The default of FLV - Same As Source (Flash 8 and Higher) is generally fi ne. If you have fewer standard video needs, make a different choice based on your needs. Also, there is an option to Edit Export Settings as well as a Settings button if you want to make your own decisions. See the Edit Export Settings section for more on that.
6. Click on the fi le name under Output File to select the destination of your encoded fi le. You can also change the fi le name.
7. Click Start Queue, and the encoding process will begin. If you are encoding a long video, you might want to go take a walk or get a cup of tea. For short.mov, just sit tight. It should only take a minute or two to encode.
8. Once encoding is complete, the FLV is saved in the location you chose under the Output File section. There is also a check mark under the encoder's Status section. Now, you can do what you want with the fi le. For instance, you can take it into Flash and import it into an SWF.
How it works... The Adobe Media Encoder encodes the selected video fi le into the FLV format. It is similar to taking a Photoshop fi le or a TIFF and compressing either of them into a JPG. The process is simply more involved because the data is more complex.
There's more...The Adobe Media Encoder has many options and capabilities. Among these is a wealth of export settings that can be edited to suit your needs. Also available to you is the ability to not only encode multiple fi les in one sitting but also to duplicate and remove fi les in your queue.
Buy Wordpress and Flash 10x Cookbook ebook with WordPress 2.8 Theme Design ebook and get 50% off both. Just enter woek160 in the 'Promotion Code' field and then click the “Add Promotion Code” button, the discount will be applied. This offer is valid till 31st May 2010. Grab your copy now!!!
For More Information: www.PacktPub.com/ wordpress-and-flash-10x-cookbook/book
Video Blogging + Flash Video Encoding, Skinning, and Components
110
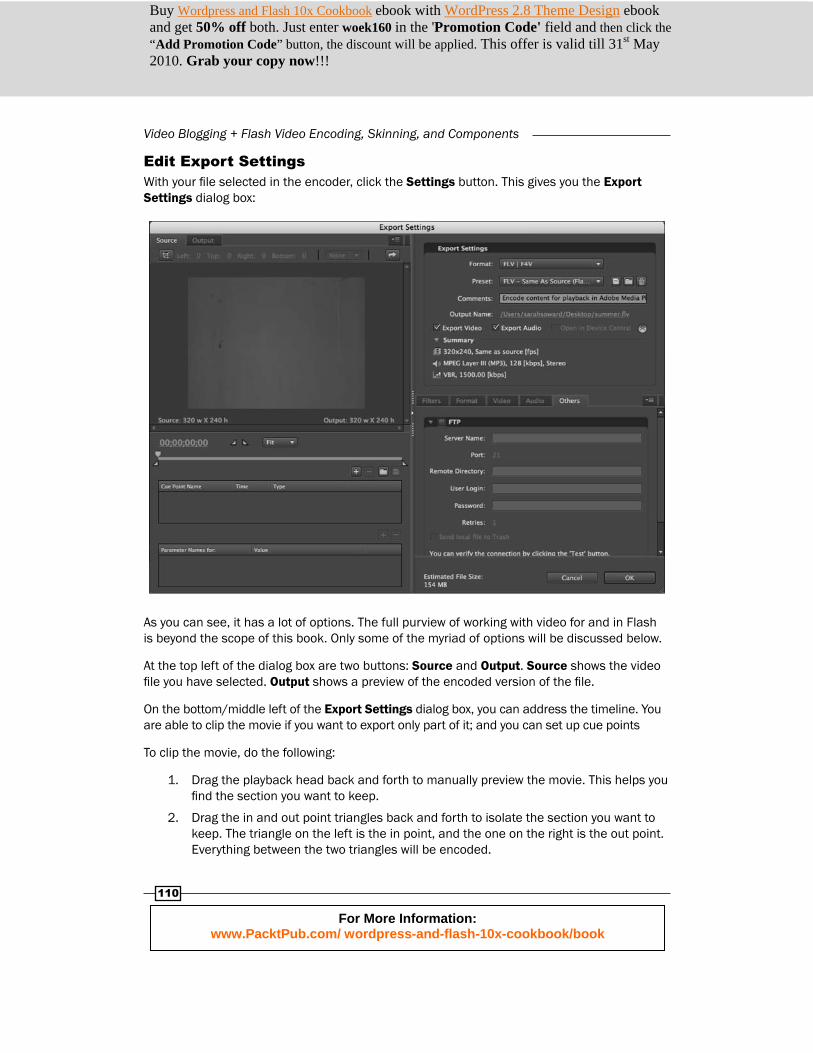
Edit Export Settings With your fi le selected in the encoder, click the Settings button. This gives you the Export Settings dialog box:
As you can see, it has a lot of options. The full purview of working with video for and in Flash is beyond the scope of this book. Only some of the myriad of options will be discussed below.
At the top left of the dialog box are two buttons: Source and Output. Source shows the video fi le you have selected. Output shows a preview of the encoded version of the fi le.
On the bottom/middle left of the Export Settings dialog box, you can address the timeline. You are able to clip the movie if you want to export only part of it; and you can set up cue points
To clip the movie, do the following:
1. Drag the playback head back and forth to manually preview the movie. This helps you fi nd the section you want to keep.
2. Drag the in and out point triangles back and forth to isolate the section you want to keep. The triangle on the left is the in point, and the one on the right is the out point. Everything between the two triangles will be encoded.
Buy Wordpress and Flash 10x Cookbook ebook with WordPress 2.8 Theme Design ebook and get 50% off both. Just enter woek160 in the 'Promotion Code' field and then click the “Add Promotion Code” button, the discount will be applied. This offer is valid till 31st May 2010. Grab your copy now!!!
For More Information: www.PacktPub.com/ wordpress-and-flash-10x-cookbook/book
Chapter 4
111
The timer keeps track of time in milliseconds.
3. The right side of the dialog box allows you to change the desired fi le format; save your own preset with the button that looks like a computer disk circa 1996. You can also change the fi le name of the encoded video and choose if you are exporting only video, only audio, or both.
The Summary section gives you just that, a summary of your choices thus far.
The bottom right section gives you options for putting on a blur fi lter under the Filter tab and changing the format as applicable under the Format tab.
The Video tab lets you choose which Codec to use to encode the video. On2 VP6 is usually the best choice. Stick with that one. It is more advanced, gives better quality, and allows you to encode an Alpha Channel if you have one to encode.
Alpha Channels, areas of transparency in video (i.e., green screen), cannot be set up in Flash. They must be set up in a video editing program such as Premiere Pro or Final Cut Pro. The encoder can only honor them, not generate them.
If you need to resize your video, check the box for Resize Video, and change the values as needed. If you want to constrain the proportions of your video, leave the chain whole.
Frame rate can also be changed here. Generally, it is in your best interest to leave the video set to the same frame rate it was shot in. Same as source is a good choice. For Bitrate Settings, the defaults are usually pretty good. If you want higher quality and can take the additional fi le size, you can change Encoding Passes to Two.
For Advanced Settings, you can change overall quality by selecting either Quality for Speed, Good, or Best. It all depends on your needs.
For Audio, if you have it incorporated into your video fi le, choose Stereo. It sounds better. The only reason to go with Mono is if you have little sound, if it is a video of a talking head, or if your fi le size needs to be as small as possible.
For Bitrate Settings for audio, 128 kb per second is good. Again, only turn this lower if the audio is overly simple, not important, or your fi le size dictates it. Faster bitrate/higher number gives you better quality sound.
When you are fi nished making changes, click OK. This gets you back to the encoder. Proceed from here as needed.
Buy Wordpress and Flash 10x Cookbook ebook with WordPress 2.8 Theme Design ebook and get 50% off both. Just enter woek160 in the 'Promotion Code' field and then click the “Add Promotion Code” button, the discount will be applied. This offer is valid till 31st May 2010. Grab your copy now!!!
For More Information: www.PacktPub.com/ wordpress-and-flash-10x-cookbook/book
Video Blogging + Flash Video Encoding, Skinning, and Components
112
Encoding multiple fi les at once This is a piece of cake. If you want to encode more than one fi le in a row, you absolutely can!
1. Click the Add button in the Adobe Media Encoder to add another fi le. In the Open dialog box, select the fi le—or Shift Click to select multiple fi les—and hit Open. Do this as many times as necessary to get all of the fi les you want to encode into your queue.
2. Once the fi les are in the queue, change the format, preset, and output fi le name as needed.
3. Click Start Queue. Flash starts at the top of the queue and works its way down one fi le at a time.
This is also useful if you want to encode the same fi le with different settings to compare the quality, etc. For this, select the fi le that you want to test, and click Duplicate as many times as you need. Change the Preset, or click Settings as needed for each copy of the fi le. When you are ready, click Start Queue.
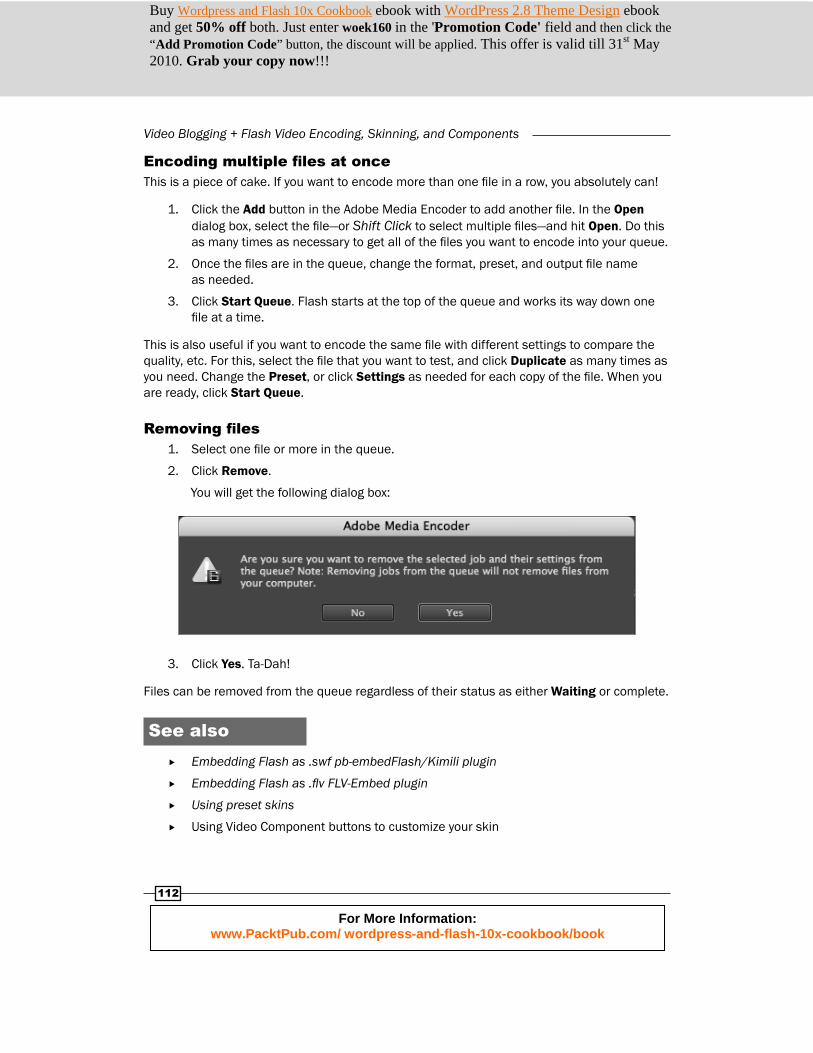
Removing fi les1. Select one fi le or more in the queue.
2. Click Remove.
You will get the following dialog box:
3. Click Yes. Ta-Dah!
Files can be removed from the queue regardless of their status as either Waiting or complete.
See also Embedding Flash as .swf pb-embedFlash/Kimili plugin
Embedding Flash as .fl v FLV-Embed plugin
Using preset skins
Using Video Component buttons to customize your skin
Buy Wordpress and Flash 10x Cookbook ebook with WordPress 2.8 Theme Design ebook and get 50% off both. Just enter woek160 in the 'Promotion Code' field and then click the “Add Promotion Code” button, the discount will be applied. This offer is valid till 31st May 2010. Grab your copy now!!!
For More Information: www.PacktPub.com/ wordpress-and-flash-10x-cookbook/book
Chapter 4
113
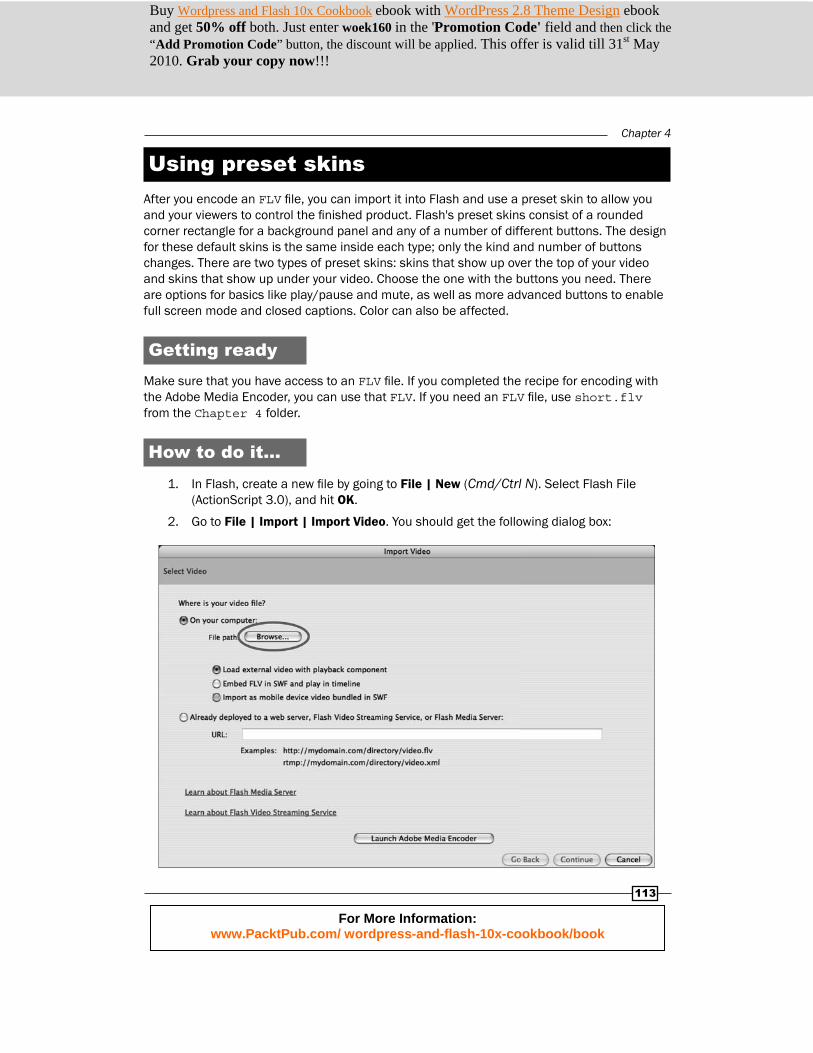
Using preset skinsAfter you encode an FLV fi le, you can import it into Flash and use a preset skin to allow you and your viewers to control the fi nished product. Flash's preset skins consist of a rounded corner rectangle for a background panel and any of a number of different buttons. The design for these default skins is the same inside each type; only the kind and number of buttons changes. There are two types of preset skins: skins that show up over the top of your video and skins that show up under your video. Choose the one with the buttons you need. There are options for basics like play/pause and mute, as well as more advanced buttons to enable full screen mode and closed captions. Color can also be affected.
Getting readyMake sure that you have access to an FLV fi le. If you completed the recipe for encoding with the Adobe Media Encoder, you can use that FLV. If you need an FLV fi le, use short.flv from the Chapter 4 folder.
How to do it...
1. In Flash, create a new fi le by going to File | New (Cmd/Ctrl N). Select Flash File (ActionScript 3.0), and hit OK.
2. Go to File | Import | Import Video. You should get the following dialog box:
Buy Wordpress and Flash 10x Cookbook ebook with WordPress 2.8 Theme Design ebook and get 50% off both. Just enter woek160 in the 'Promotion Code' field and then click the “Add Promotion Code” button, the discount will be applied. This offer is valid till 31st May 2010. Grab your copy now!!!
For More Information: www.PacktPub.com/ wordpress-and-flash-10x-cookbook/book
Video Blogging + Flash Video Encoding, Skinning, and Components
114
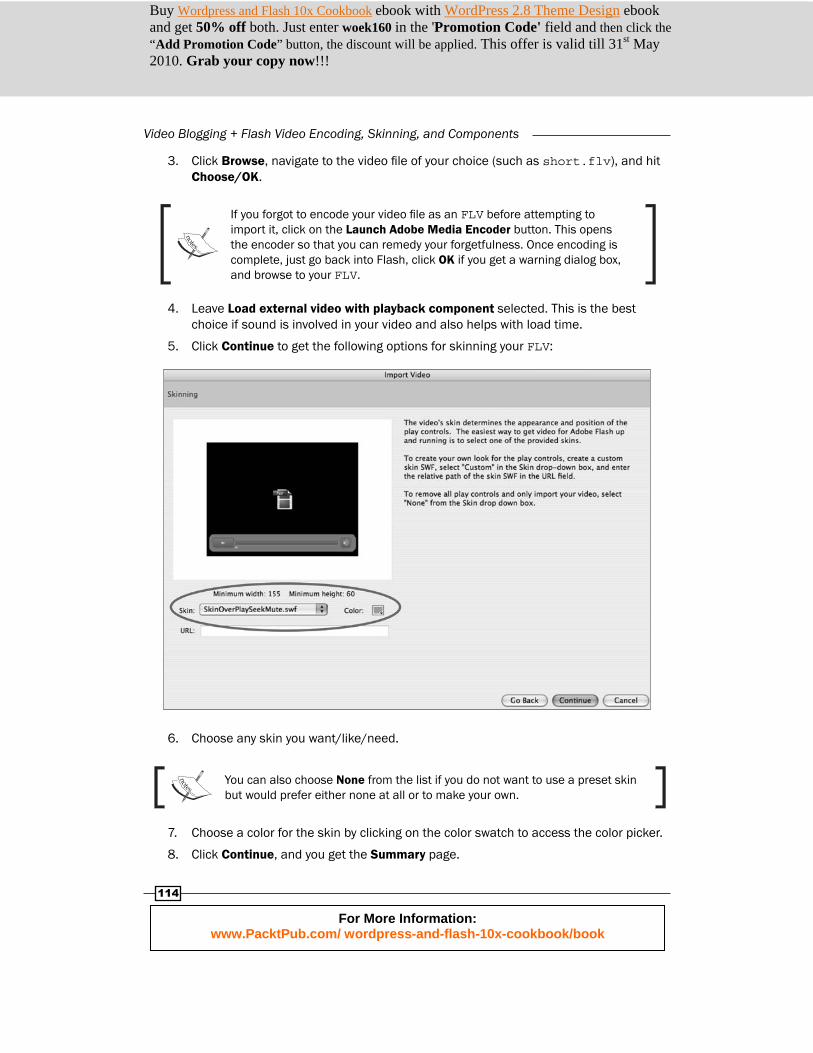
3. Click Browse, navigate to the video fi le of your choice (such as short.flv), and hit Choose/OK.
If you forgot to encode your video fi le as an FLV before attempting to import it, click on the Launch Adobe Media Encoder button. This opens the encoder so that you can remedy your forgetfulness. Once encoding is complete, just go back into Flash, click OK if you get a warning dialog box, and browse to your FLV.
4. Leave Load external video with playback component selected. This is the best choice if sound is involved in your video and also helps with load time.
5. Click Continue to get the following options for skinning your FLV:
6. Choose any skin you want/like/need.
You can also choose None from the list if you do not want to use a preset skin but would prefer either none at all or to make your own.
7. Choose a color for the skin by clicking on the color swatch to access the color picker.
8. Click Continue, and you get the Summary page.
Buy Wordpress and Flash 10x Cookbook ebook with WordPress 2.8 Theme Design ebook and get 50% off both. Just enter woek160 in the 'Promotion Code' field and then click the “Add Promotion Code” button, the discount will be applied. This offer is valid till 31st May 2010. Grab your copy now!!!
For More Information: www.PacktPub.com/ wordpress-and-flash-10x-cookbook/book
Chapter 4
115
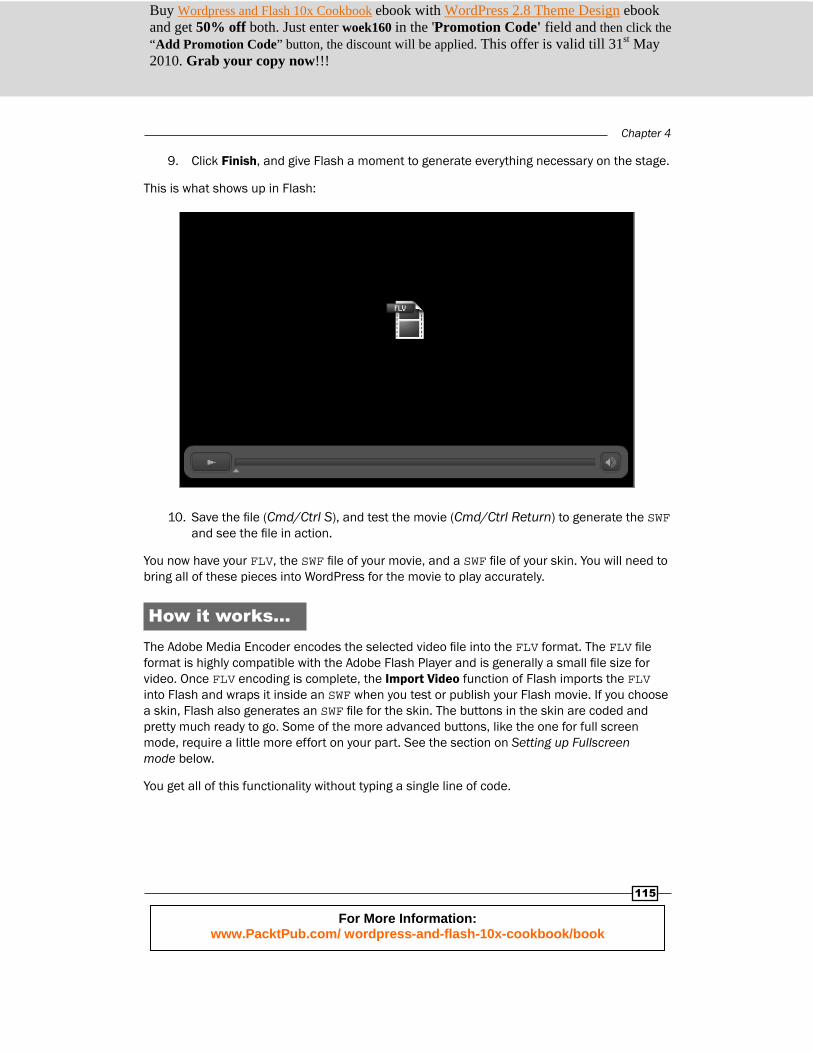
9. Click Finish, and give Flash a moment to generate everything necessary on the stage.
This is what shows up in Flash:
10. Save the fi le (Cmd/Ctrl S), and test the movie (Cmd/Ctrl Return) to generate the SWF and see the fi le in action.
You now have your FLV, the SWF fi le of your movie, and a SWF fi le of your skin. You will need to bring all of these pieces into WordPress for the movie to play accurately.
How it works... The Adobe Media Encoder encodes the selected video fi le into the FLV format. The FLV fi le format is highly compatible with the Adobe Flash Player and is generally a small fi le size for video. Once FLV encoding is complete, the Import Video function of Flash imports the FLV into Flash and wraps it inside an SWF when you test or publish your Flash movie. If you choose a skin, Flash also generates an SWF fi le for the skin. The buttons in the skin are coded and pretty much ready to go. Some of the more advanced buttons, like the one for full screen mode, require a little more effort on your part. See the section on Setting up Fullscreen mode below.
You get all of this functionality without typing a single line of code.
Buy Wordpress and Flash 10x Cookbook ebook with WordPress 2.8 Theme Design ebook and get 50% off both. Just enter woek160 in the 'Promotion Code' field and then click the “Add Promotion Code” button, the discount will be applied. This offer is valid till 31st May 2010. Grab your copy now!!!
For More Information: www.PacktPub.com/ wordpress-and-flash-10x-cookbook/book
Video Blogging + Flash Video Encoding, Skinning, and Components
116
There's more...The different buttons available in the preset skins have different capabilities. Choosing different buttons allows your viewer to interact with your movie to varying degrees. Some of the default settings for the movie can be changed using the Component Inspector panel. Below are a few suggestions for ways to edit the default settings.
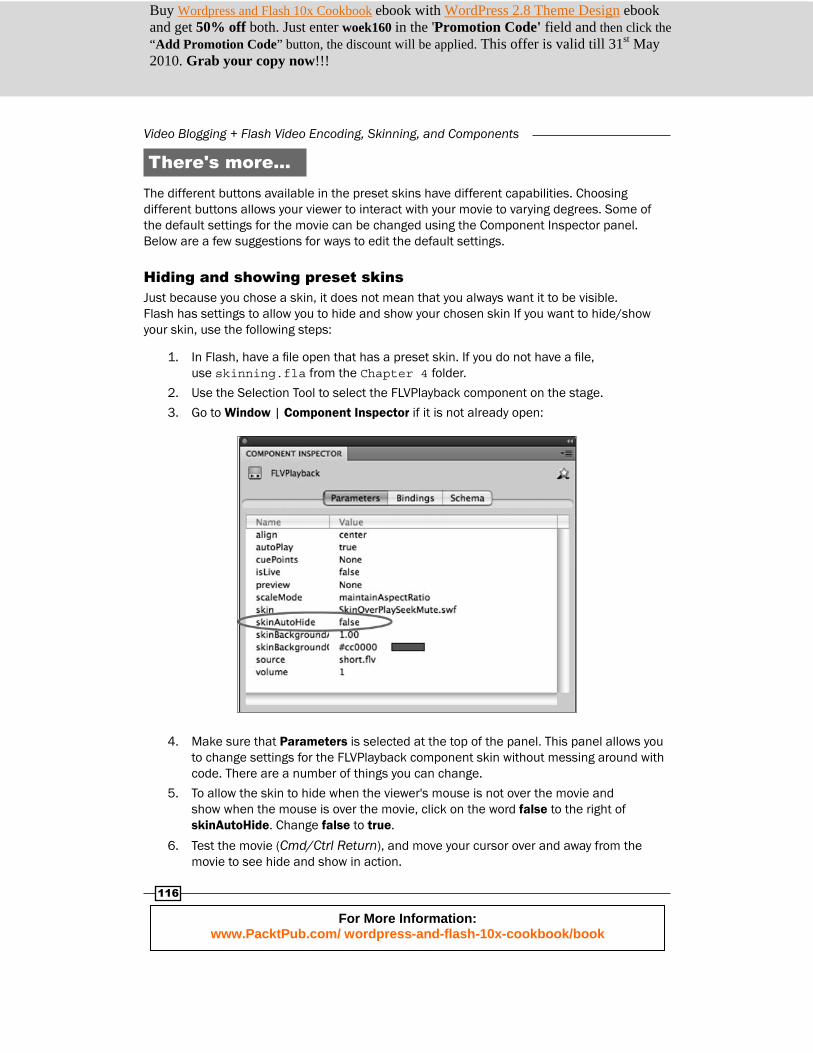
Hiding and showing preset skins Just because you chose a skin, it does not mean that you always want it to be visible. Flash has settings to allow you to hide and show your chosen skin If you want to hide/show your skin, use the following steps:
1. In Flash, have a fi le open that has a preset skin. If you do not have a fi le, use skinning.fla from the Chapter 4 folder.
2. Use the Selection Tool to select the FLVPlayback component on the stage.
3. Go to Window | Component Inspector if it is not already open:
4. Make sure that Parameters is selected at the top of the panel. This panel allows you to change settings for the FLVPlayback component skin without messing around with code. There are a number of things you can change.
5. To allow the skin to hide when the viewer's mouse is not over the movie and show when the mouse is over the movie, click on the word false to the right of skinAutoHide. Change false to true.
6. Test the movie (Cmd/Ctrl Return), and move your cursor over and away from the movie to see hide and show in action.
Buy Wordpress and Flash 10x Cookbook ebook with WordPress 2.8 Theme Design ebook and get 50% off both. Just enter woek160 in the 'Promotion Code' field and then click the “Add Promotion Code” button, the discount will be applied. This offer is valid till 31st May 2010. Grab your copy now!!!
For More Information: www.PacktPub.com/ wordpress-and-flash-10x-cookbook/book
Chapter 4
117
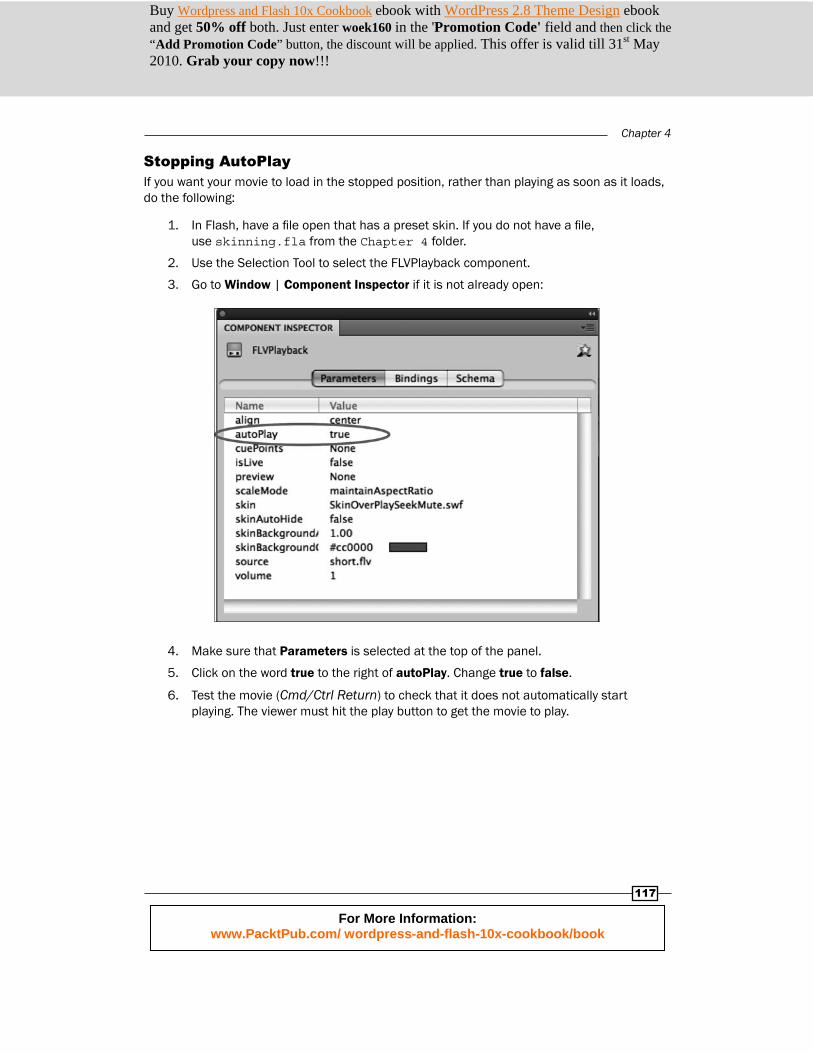
Stopping AutoPlay If you want your movie to load in the stopped position, rather than playing as soon as it loads, do the following:
1. In Flash, have a fi le open that has a preset skin. If you do not have a fi le, use skinning.fla from the Chapter 4 folder.
2. Use the Selection Tool to select the FLVPlayback component.
3. Go to Window | Component Inspector if it is not already open:
4. Make sure that Parameters is selected at the top of the panel.
5. Click on the word true to the right of autoPlay. Change true to false.
6. Test the movie (Cmd/Ctrl Return) to check that it does not automatically start playing. The viewer must hit the play button to get the movie to play.
Buy Wordpress and Flash 10x Cookbook ebook with WordPress 2.8 Theme Design ebook and get 50% off both. Just enter woek160 in the 'Promotion Code' field and then click the “Add Promotion Code” button, the discount will be applied. This offer is valid till 31st May 2010. Grab your copy now!!!
For More Information: www.PacktPub.com/ wordpress-and-flash-10x-cookbook/book
Video Blogging + Flash Video Encoding, Skinning, and Components
118
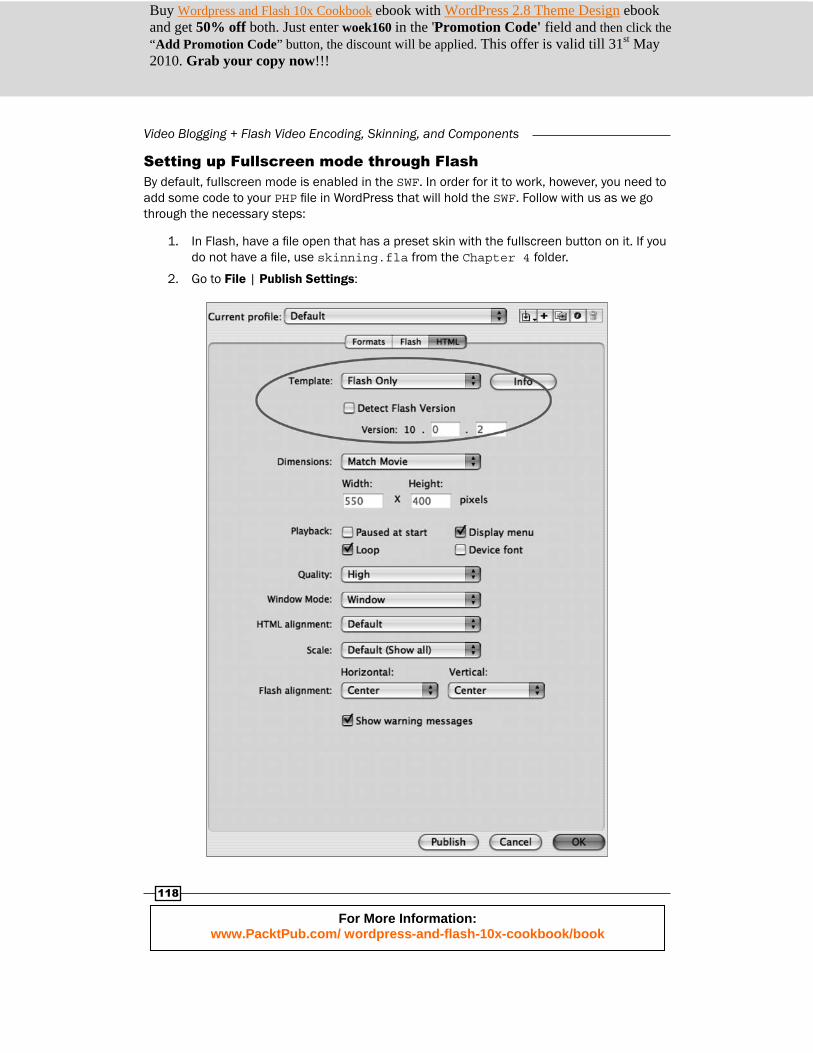
Setting up Fullscreen mode through Flash By default, fullscreen mode is enabled in the SWF. In order for it to work, however, you need to add some code to your PHP fi le in WordPress that will hold the SWF. Follow with us as we go through the necessary steps:
1. In Flash, have a fi le open that has a preset skin with the fullscreen button on it. If you do not have a fi le, use skinning.fla from the Chapter 4 folder.
2. Go to File | Publish Settings:
Buy Wordpress and Flash 10x Cookbook ebook with WordPress 2.8 Theme Design ebook and get 50% off both. Just enter woek160 in the 'Promotion Code' field and then click the “Add Promotion Code” button, the discount will be applied. This offer is valid till 31st May 2010. Grab your copy now!!!
For More Information: www.PacktPub.com/ wordpress-and-flash-10x-cookbook/book
Chapter 4
119
3. Select the HTML tab to see the settings.
4. For Template, select Flash Only - Allow Fullscreen Mode.
5. Check the box for Detect Flash Version; for Version, set it to at least 9.0.28. It can also be set to a later version of the Flash player.
6. Click Publish to generate the HTML page with the necessary code.
7. Preview this page in your browser by double clicking the HTML fi le. This is just to make sure it is working.
According to Adobe, you will need Flash Player version 9.0.28 or later for the fullscreen mode to work.
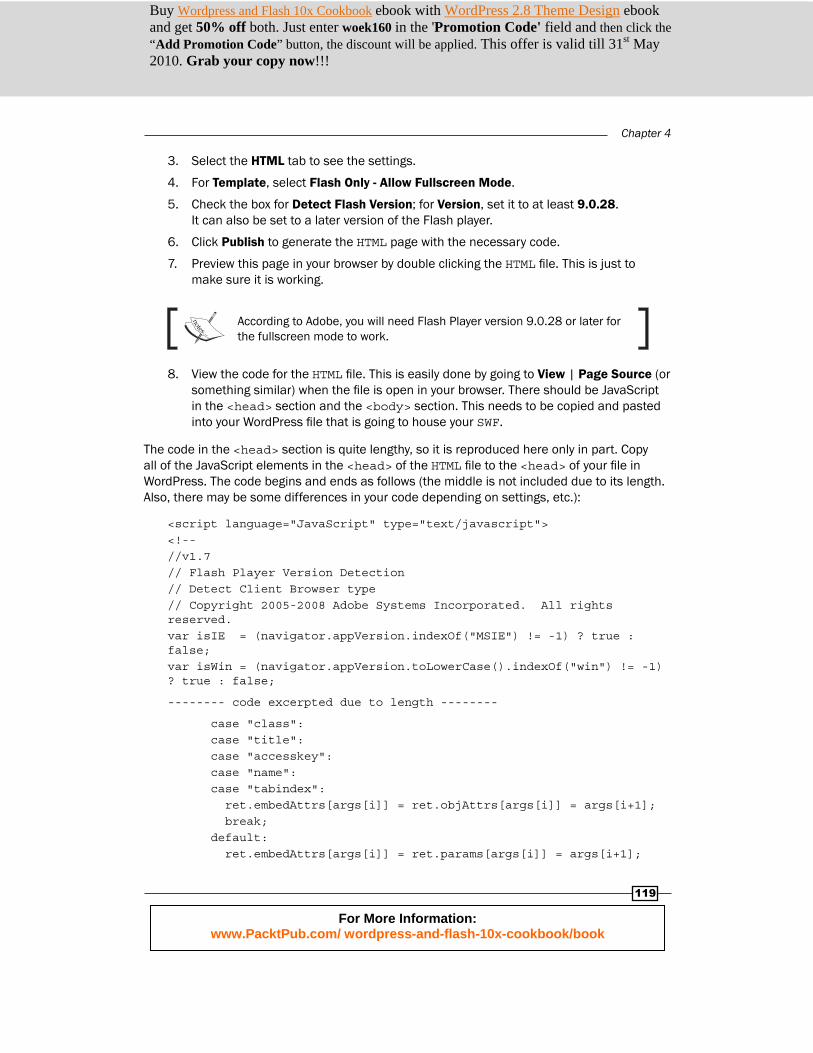
8. View the code for the HTML fi le. This is easily done by going to View | Page Source (or something similar) when the fi le is open in your browser. There should be JavaScript in the <head> section and the <body> section. This needs to be copied and pasted into your WordPress fi le that is going to house your SWF.
The code in the <head> section is quite lengthy, so it is reproduced here only in part. Copy all of the JavaScript elements in the <head> of the HTML fi le to the <head> of your fi le in WordPress. The code begins and ends as follows (the middle is not included due to its length. Also, there may be some differences in your code depending on settings, etc.):
<script language="JavaScript" type="text/javascript"><!--//v1.7// Flash Player Version Detection// Detect Client Browser type// Copyright 2005-2008 Adobe Systems Incorporated. All rights reserved.var isIE = (navigator.appVersion.indexOf("MSIE") != -1) ? true : false;var isWin = (navigator.appVersion.toLowerCase().indexOf("win") != -1) ? true : false;
-------- code excerpted due to length --------
case "class": case "title": case "accesskey": case "name": case "tabindex": ret.embedAttrs[args[i]] = ret.objAttrs[args[i]] = args[i+1]; break; default: ret.embedAttrs[args[i]] = ret.params[args[i]] = args[i+1];
Buy Wordpress and Flash 10x Cookbook ebook with WordPress 2.8 Theme Design ebook and get 50% off both. Just enter woek160 in the 'Promotion Code' field and then click the “Add Promotion Code” button, the discount will be applied. This offer is valid till 31st May 2010. Grab your copy now!!!
For More Information: www.PacktPub.com/ wordpress-and-flash-10x-cookbook/book
Video Blogging + Flash Video Encoding, Skinning, and Components
120
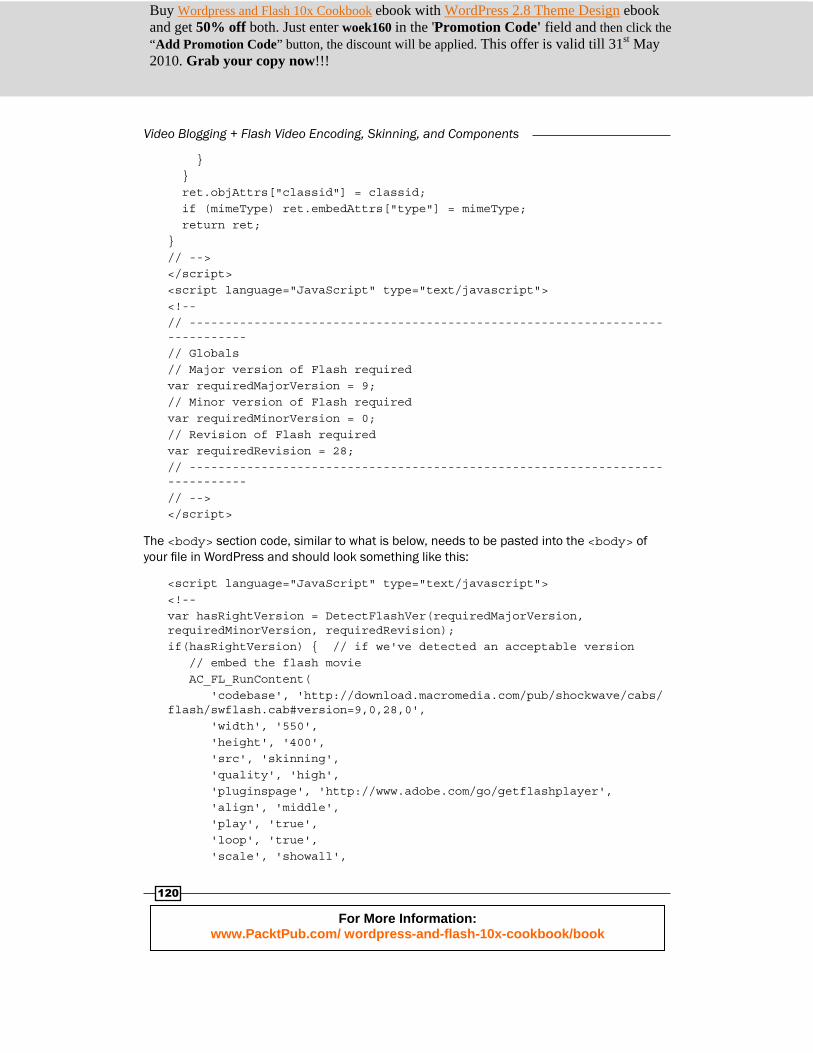
} } ret.objAttrs["classid"] = classid; if (mimeType) ret.embedAttrs["type"] = mimeType; return ret;}// --></script><script language="JavaScript" type="text/javascript"><!--// -----------------------------------------------------------------------------// Globals// Major version of Flash requiredvar requiredMajorVersion = 9;// Minor version of Flash requiredvar requiredMinorVersion = 0;// Revision of Flash requiredvar requiredRevision = 28;// -----------------------------------------------------------------------------// --></script>
The <body> section code, similar to what is below, needs to be pasted into the <body> of your fi le in WordPress and should look something like this:
<script language="JavaScript" type="text/javascript"><!--var hasRightVersion = DetectFlashVer(requiredMajorVersion, requiredMinorVersion, requiredRevision);if(hasRightVersion) { // if we've detected an acceptable version // embed the flash movie AC_FL_RunContent( 'codebase', 'http://download.macromedia.com/pub/shockwave/cabs/flash/swflash.cab#version=9,0,28,0', 'width', '550', 'height', '400', 'src', 'skinning', 'quality', 'high', 'pluginspage', 'http://www.adobe.com/go/getflashplayer', 'align', 'middle', 'play', 'true', 'loop', 'true', 'scale', 'showall',
Buy Wordpress and Flash 10x Cookbook ebook with WordPress 2.8 Theme Design ebook and get 50% off both. Just enter woek160 in the 'Promotion Code' field and then click the “Add Promotion Code” button, the discount will be applied. This offer is valid till 31st May 2010. Grab your copy now!!!
For More Information: www.PacktPub.com/ wordpress-and-flash-10x-cookbook/book

Chapter 4
121
'wmode', 'window', 'devicefont', 'false', 'id', 'skinning', 'bgcolor', '#ffffff', 'name', 'skinning', 'menu', 'true', 'allowFullScreen', 'true', 'allowScriptAccess','sameDomain', 'movie', 'skinning', 'salign', '' ); //end AC code} else { // flash is too old or we can't detect the plugin var alternateContent = 'Alternate HTML content should be placed here.' + 'This content requires the Adobe Flash Player.' + '<a href="http://www.adobe.com/go/getflashplayer/">Get Flash</a>'; document.write(alternateContent); // insert non-flash content}// --></script><noscript> // Provide alternate content for browsers that do not support scripting // or for those that have scripting disabled. Alternate HTML content should be placed here. This content requires the Adobe Flash Player. <a href="http://www.adobe.com/go/getflashplayer/">Get Flash</a>
</noscript>
Only incorporate the code inside the <script> </script> and <noscript> </noscript> tags for each sections. The two sections of code work together to allow fullscreen mode to function properly in different browsers.
See also Embedding Flash as .swf pb-embedFlash/Kimili plugin
Encoding with the Adobe Media Encoder
Using Video Component buttons to customize your skin
Buy Wordpress and Flash 10x Cookbook ebook with WordPress 2.8 Theme Design ebook and get 50% off both. Just enter woek160 in the 'Promotion Code' field and then click the “Add Promotion Code” button, the discount will be applied. This offer is valid till 31st May 2010. Grab your copy now!!!
For More Information: www.PacktPub.com/ wordpress-and-flash-10x-cookbook/book
Video Blogging + Flash Video Encoding, Skinning, and Components
122
Using Video Component buttons to customize your skin
It is possible that you might prefer to make a skin look the way you want it to look, rather than the way that Adobe designed it to look. There are ways to make this happen. In addition to the preset skins used in previous recipes, you can also use individual component buttons to customize your skin.
Getting readyMake sure that you have access to an FLV fi le. If you completed the recipe for Encoding with the Adobe Media Encoder, you can use that FLV. If you need an FLV fi le, use short.flv from the Chapter 4 folder.
How to do it...
1. In Flash, create a new fi le by going to File | New (Cmd/Ctrl N).
2. Select Flash File (ActionScript 3.0), and hit OK.
3. Go to File | Import | Import Video.
4. Click Browse, navigate to the video fi le of your choice (such as short.flv), and hit Choose/OK.
5. Leave Load external video with playback component selected. This is the best choice if sound is involved in your video and also helps with load time.
6. Click Continue, to get the options for skinning your FLV. For Skin, choose None.
7. Click Continue, and you get the summary page.
8. Click Finish, and give Flash a moment to import the fi le to the stage.
Buy Wordpress and Flash 10x Cookbook ebook with WordPress 2.8 Theme Design ebook and get 50% off both. Just enter woek160 in the 'Promotion Code' field and then click the “Add Promotion Code” button, the discount will be applied. This offer is valid till 31st May 2010. Grab your copy now!!!
For More Information: www.PacktPub.com/ wordpress-and-flash-10x-cookbook/book
Chapter 4
123
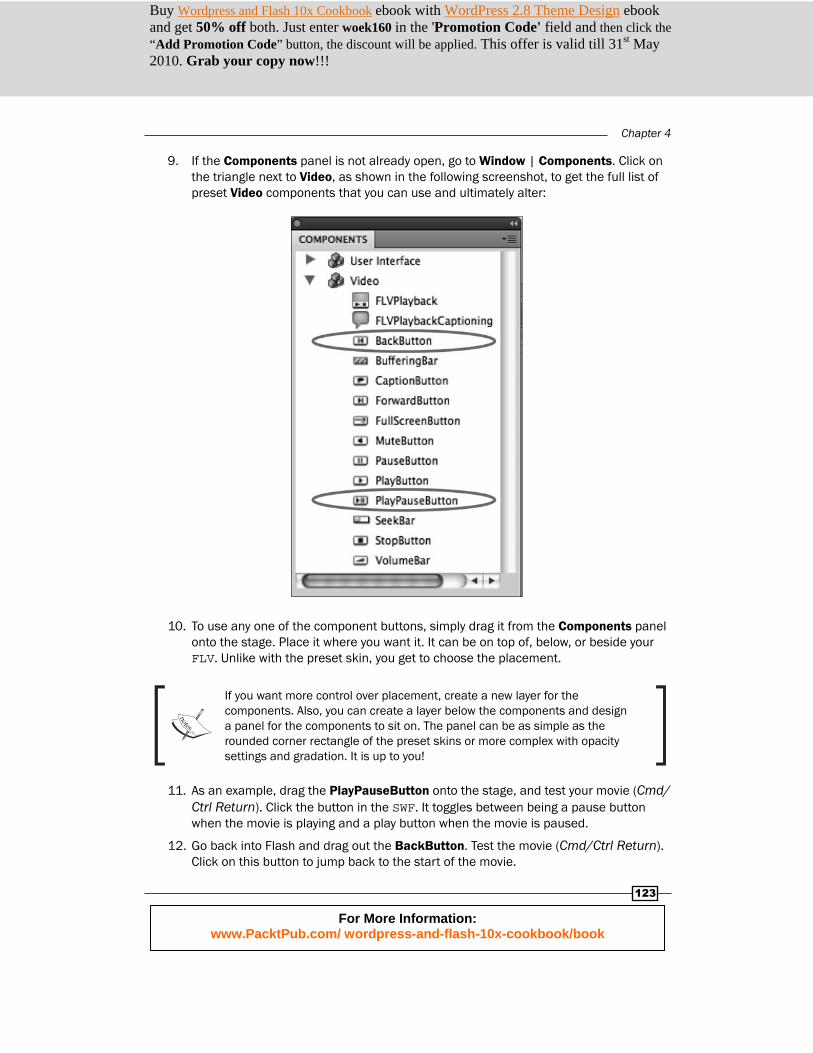
9. If the Components panel is not already open, go to Window | Components. Click on the triangle next to Video, as shown in the following screenshot, to get the full list of preset Video components that you can use and ultimately alter:
10. To use any one of the component buttons, simply drag it from the Components panel onto the stage. Place it where you want it. It can be on top of, below, or beside your FLV. Unlike with the preset skin, you get to choose the placement.
If you want more control over placement, create a new layer for the components. Also, you can create a layer below the components and design a panel for the components to sit on. The panel can be as simple as the rounded corner rectangle of the preset skins or more complex with opacity settings and gradation. It is up to you!
11. As an example, drag the PlayPauseButton onto the stage, and test your movie (Cmd/Ctrl Return). Click the button in the SWF. It toggles between being a pause button when the movie is playing and a play button when the movie is paused.
12. Go back into Flash and drag out the BackButton. Test the movie (Cmd/Ctrl Return). Click on this button to jump back to the start of the movie.
Buy Wordpress and Flash 10x Cookbook ebook with WordPress 2.8 Theme Design ebook and get 50% off both. Just enter woek160 in the 'Promotion Code' field and then click the “Add Promotion Code” button, the discount will be applied. This offer is valid till 31st May 2010. Grab your copy now!!!
For More Information: www.PacktPub.com/ wordpress-and-flash-10x-cookbook/book
Video Blogging + Flash Video Encoding, Skinning, and Components
124
How it works... These components are pre-coded and ready to go. All you have to do to get the video components to work is have one FLV on the stage for them to affect. The components take care of the rest themselves.
There's more...Want more diversity in your design? Check out the next section on editing the look of the component buttons.
Modifying Video Component buttons for further customization The components can be visually altered to make your FLV player even more individualized and unique.
Very simply, you can use the Transform Tool to change the size of the component. Just select a component with the Free Transform Tool, and drag the bounding box to make the component larger or smaller.
The components are movie clip symbols, so you can use the Properties panel to apply a Color Effect. Select the component(s) you want to change, choose a Style of Color Effect, and change the settings for that Color Effect. The selected component(s) will be affected.
Less simply, you can edit the parts of the component discretely. These are movie clip symbols. You can double click on the symbol instance on the stage or double click on the icon for the symbol in the Library to edit the symbol.
Do not delete the symbols that make up the component. This can break the component. If you do not want part of a component to be visible and if it is a symbol itself, then lower the opacity of that symbol instance. Do not delete the symbol instance(s) inside the component.
Buy Wordpress and Flash 10x Cookbook ebook with WordPress 2.8 Theme Design ebook and get 50% off both. Just enter woek160 in the 'Promotion Code' field and then click the “Add Promotion Code” button, the discount will be applied. This offer is valid till 31st May 2010. Grab your copy now!!!
For More Information: www.PacktPub.com/ wordpress-and-flash-10x-cookbook/book
Chapter 4
125
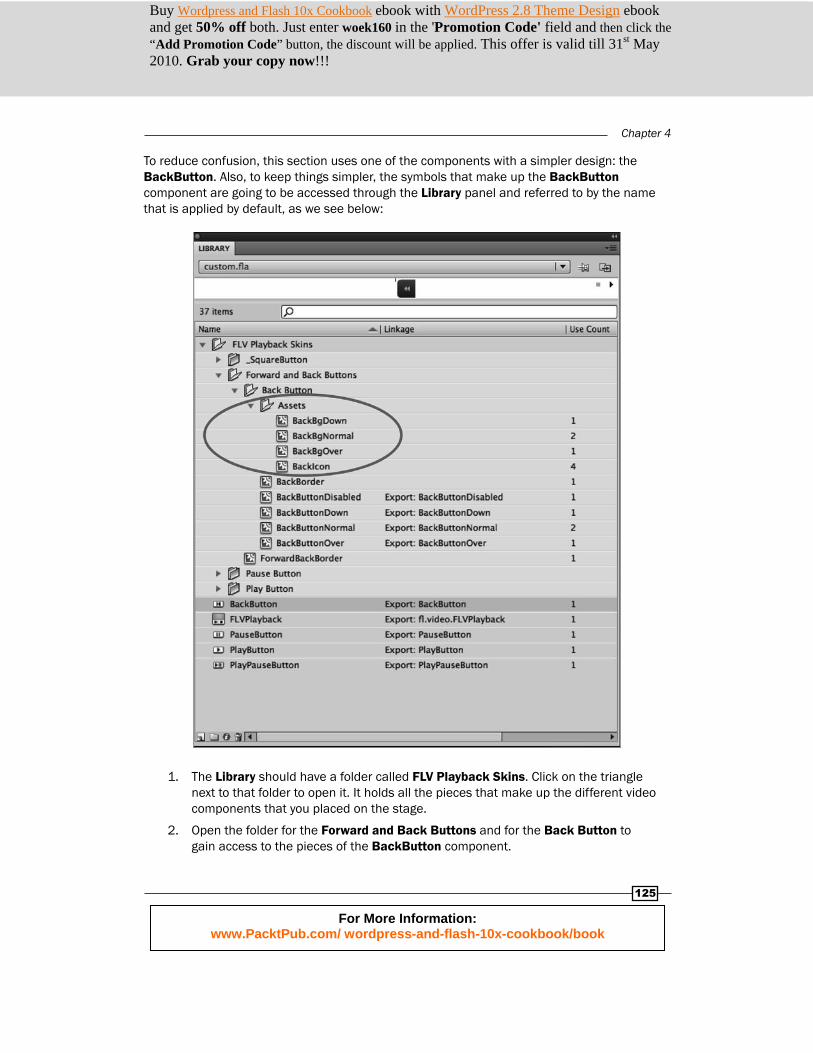
To reduce confusion, this section uses one of the components with a simpler design: the BackButton. Also, to keep things simpler, the symbols that make up the BackButton component are going to be accessed through the Library panel and referred to by the name that is applied by default, as we see below:
1. The Library should have a folder called FLV Playback Skins. Click on the triangle next to that folder to open it. It holds all the pieces that make up the different video components that you placed on the stage.
2. Open the folder for the Forward and Back Buttons and for the Back Button to gain access to the pieces of the BackButton component.
Buy Wordpress and Flash 10x Cookbook ebook with WordPress 2.8 Theme Design ebook and get 50% off both. Just enter woek160 in the 'Promotion Code' field and then click the “Add Promotion Code” button, the discount will be applied. This offer is valid till 31st May 2010. Grab your copy now!!!
For More Information: www.PacktPub.com/ wordpress-and-flash-10x-cookbook/book
Video Blogging + Flash Video Encoding, Skinning, and Components
126
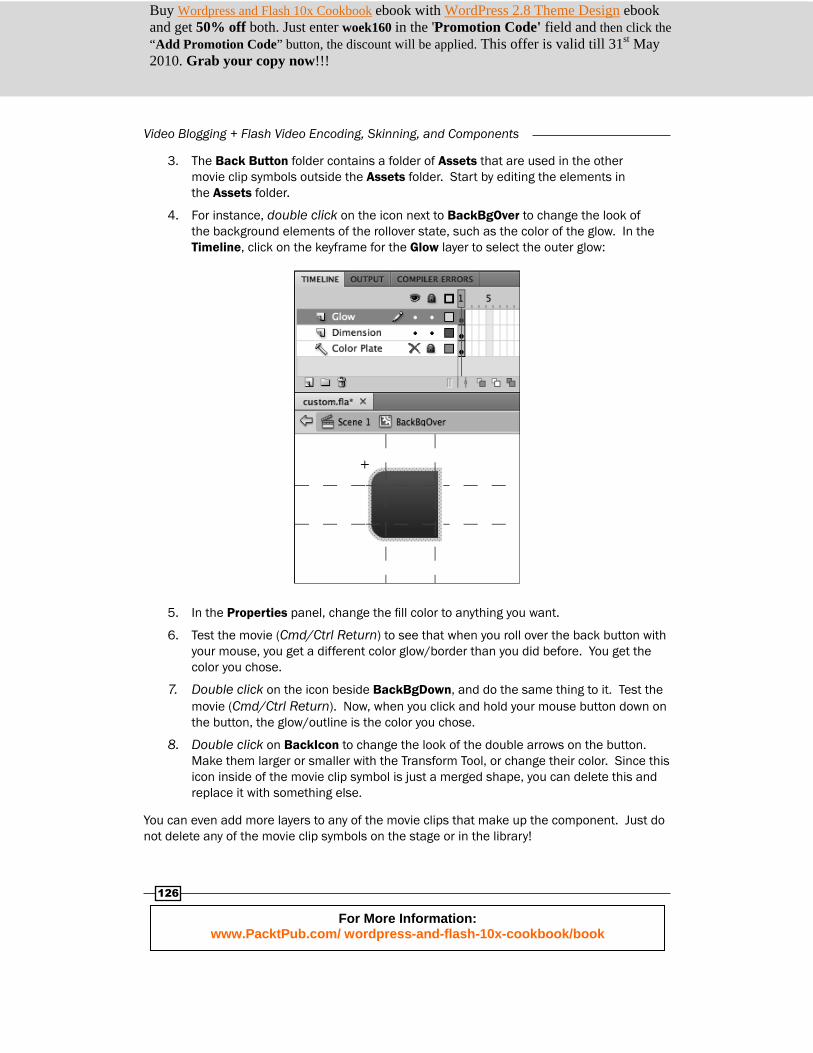
3. The Back Button folder contains a folder of Assets that are used in the other movie clip symbols outside the Assets folder. Start by editing the elements in the Assets folder.
4. For instance, double click on the icon next to BackBgOver to change the look of the background elements of the rollover state, such as the color of the glow. In the Timeline, click on the keyframe for the Glow layer to select the outer glow:
5. In the Properties panel, change the fi ll color to anything you want.
6. Test the movie (Cmd/Ctrl Return) to see that when you roll over the back button with your mouse, you get a different color glow/border than you did before. You get the color you chose.
7. Double click on the icon beside BackBgDown, and do the same thing to it. Test the movie (Cmd/Ctrl Return). Now, when you click and hold your mouse button down on the button, the glow/outline is the color you chose.
8. Double click on BackIcon to change the look of the double arrows on the button. Make them larger or smaller with the Transform Tool, or change their color. Since this icon inside of the movie clip symbol is just a merged shape, you can delete this and replace it with something else.
You can even add more layers to any of the movie clips that make up the component. Just do not delete any of the movie clip symbols on the stage or in the library!
Buy Wordpress and Flash 10x Cookbook ebook with WordPress 2.8 Theme Design ebook and get 50% off both. Just enter woek160 in the 'Promotion Code' field and then click the “Add Promotion Code” button, the discount will be applied. This offer is valid till 31st May 2010. Grab your copy now!!!
For More Information: www.PacktPub.com/ wordpress-and-flash-10x-cookbook/book
Chapter 4
127
See also Encoding with the Adobe Media Encoder
Using preset skins
Buy Wordpress and Flash 10x Cookbook ebook with WordPress 2.8 Theme Design ebook and get 50% off both. Just enter woek160 in the 'Promotion Code' field and then click the “Add Promotion Code” button, the discount will be applied. This offer is valid till 31st May 2010. Grab your copy now!!!
For More Information: www.PacktPub.com/ wordpress-and-flash-10x-cookbook/book
Where to buy this book You can buy Wordpress and Flash 10x Cookbook from the Packt Publishing website: https://www.packtpub.com/wordpress-and-flash-10x-cookbook/book.
Free shipping to the US, UK, Europe and selected Asian countries. For more information, please read our shipping policy.
Alternatively, you can buy the book from Amazon, BN.com, Computer Manuals and most internet book retailers.
www.PacktPub.com
Buy Wordpress and Flash 10x Cookbook ebook with WordPress 2.8 Theme Design ebook and get 50% off both. Just enter woek160 in the 'Promotion Code' field and then click the “Add Promotion Code” button, the discount will be applied. This offer is valid till 31st May 2010. Grab your copy now!!!
For More Information: www.PacktPub.com/ wordpress-and-flash-10x-cookbook/book


![League of 10x Only]](https://static.fdocuments.us/doc/165x107/577d2f661a28ab4e1eb19b84/league-of-10x-only.jpg)