What is Excel - George Mason Universitychem.gmu.edu/results/Tutorial.doc · Web viewA B C 1 3.50...
14
EXCEL TUTORIAL What is Excel? Microsoft Office 2000 Excel is an electronic spreadsheet program. It allows people, companies, businesses, etc. to organize numerical data, manipulate that data, and keep track of the data. It is an incredibly powerful program can handle the most basic budget to extremely advanced spreadsheets that incorporate programming languages such as Visual Basic. A worksheet is a table of numerical data that can be manipulated using a spreadsheet program. The terms worksheet and spreadsheet are often used interchangeably. Excel is usually referred to as the Spreadsheet Program. The documents created by Excel are called workbooks, which in turn may contain one to many worksheets. One page of one workbook that contains one table of numerical data can be termed as a worksheet. What is a worksheet? Most of the Excel screen is devoted to the display of the worksheet. The worksheet consists of a grid of rows and columns. The intersection of a row and column is a rectangular area called a cell. What is a workbook? A workbook can contain any number of worksheets. Open your Excel program. You should see a grid of blank rectangles. At the bottom you’ll see some tabs. Each of those tabs leads to one worksheet. Excel sets the default to three worksheets. You can add worksheets if you need more, or you can delete worksheets if you don’t want all of them. Columns, Rows and Cells The worksheet is made up of cells. There is a cell at the intersection of each row and column. A cell can contain a value, a formula, or a label. A label is simply a text entry (words, letters, or numbers such as years, that mean something) used to label or explain the contents of the worksheet. A value is a non-calculated number. It is often a number that will be used by a formula. You get the information for your values from another source. For example, if you are creating a budget worksheet to keep track of your spending, you would get your values from your checkbook and your bills. A formula will also return a value (the answer to the problem). However, we generally refer to that simply as a “formula cell.” 1
Transcript of What is Excel - George Mason Universitychem.gmu.edu/results/Tutorial.doc · Web viewA B C 1 3.50...

EXCEL TUTORIAL
What is Excel?
Microsoft Office 2000 Excel is an electronic spreadsheet program. It allows people, companies, businesses, etc. to organize numerical data, manipulate that data, and keep track of the data. It is an incredibly powerful program can handle the most basic budget to extremely advanced spreadsheets that incorporate programming languages such as Visual Basic.
A worksheet is a table of numerical data that can be manipulated using a spreadsheet program. The terms worksheet and spreadsheet are often used interchangeably. Excel is usually referred to as the Spreadsheet Program. The documents created by Excel are called workbooks, which in turn may contain one to many worksheets. One page of one workbook that contains one table of numerical data can be termed as a worksheet.
What is a worksheet?
Most of the Excel screen is devoted to the display of the worksheet. The worksheet consists of a grid of rows and columns. The intersection of a row and column is a rectangular area called a cell.
What is a workbook?
A workbook can contain any number of worksheets. Open your Excel program. You should see a grid of blank rectangles. At the bottom you’ll see some tabs. Each of those tabs leads to one worksheet. Excel sets the default to three worksheets. You can add worksheets if you need more, or you can delete worksheets if you don’t want all of them.
Columns, Rows and Cells
The worksheet is made up of cells. There is a cell at the intersection of each row and column. A cell can contain a value, a formula, or a label. A label is simply a text entry (words, letters, or numbers such as years, that mean something) used to label or explain the contents of the worksheet.
A value is a non-calculated number. It is often a number that will be used by a formula. You get the information for your values from another source. For example, if you are creating a budget worksheet to keep track of your spending, you would get your values from your checkbook and your bills. A formula will also return a value (the answer to the problem). However, we generally refer to that simply as a “formula cell.”
A formula is an equation that we input into the worksheet to return an answer. For example, we might have a row of all of the bills we have in one month. At the bottom of that row we enter a formula to add up all of those bills. The question is “how much do my bills come to?” The answer will appear in the cell, if you write the formula correctly. This is where the spreadsheet shows its value. It can remember the calculations so next month, when you sit down to do your budget again, you don’t have to recreate the formulas. The spreadsheet program remembers them for you.
The Excel worksheet can contain up 65536 rows that extend down the worksheet, numbered 1 through 65536. The worksheet can contain up to 230 columns that extend across the worksheet, lettered A through Z, AA through AZ, BA through BZ, and continuing to IA through IV. The workbook can contain as many as 256 sheets, labeled Sheet1 through Sheet256. The initial number of sheets in a workbook, which can be changed by the user, is 3.
Moving to a New Worksheet
Figure 1: Workbook with worksheets, which have columns, rows and cells.
1

When you open Excel, a workbook containing three worksheets opens with the worksheets labeled Sheet1, Sheet2, and Sheet3. To move from one worksheet to another, click the sheet tab of the worksheet you want to display.
Some workbooks contain so many worksheets that some of the sheet tabs will be hidden from view. In such a case, you can use the scrolling buttons located in the lower-left corner of the workbook window to scroll through the list of sheet tabs. However, you must still click the sheet tab to view the other worksheet; simply using the scroll buttons does not display the worksheet, just the worksheet tabs.
Figure 2: Worksheet tabs at bottom of workbook.
Double clicking on the tab and then typing the new name makes it possible to call the worksheets more descriptive and relevant names. Alternatively, right click on the tab and select “Rename”; then type the new name.
Cell Address
The naming convention for a cell reference is the alphabetic column letter position followed by the row number. You may use either lower or upper case letters when referencing a column. For example, the upper-left cell of a worksheet is A1.G3000 is a valid cell address - - a letter (G) followed by a number (3000) DH30 is a valid cell address - - two letters (DH) followed by a number (30) 20AD is not a valid cell address. Letters (columns) come before numbers (rows). b20 is a valid cell address - - a letter (b) followed by a number (20). Ab6000 is a valid cell address. 550 is not a valid cell address. It is missing the column designation.
Selecting a Range of Cells
A group of cells is called a cell range or range. Ranges can be either adjacent or nonadjacent. An adjacent range is a single block of data entered in adjacent cells and a nonadjacent range is composed of two or more separate adjacent ranges.
To select an adjacent range:Click a cell in the corner of the rectangle of the adjacent cells. Press and hold down the left mouse button and drag the pointer through the cells you want selected. For example: click in cell A1 and drag to cell E7. Release the mouse button. To clear the range, click anywhere in the worksheet.
To select a nonadjacent range :Select an adjacent range of cells. Click in cell A1 and drag your mouse to cell B3. Press and hold down the Ctrl key and then select another adjacent range. Press Ctrl key and click in cell A5 and drag to cell B10. With the Ctrl key still pressed down, continue to select other ranges until all of the ranges that you want are selected. Release the mouse button and the Ctrl key.
To select a large range of cells, you can use several shortcuts:A large range of cells - Click the first cell in the range, press and hold down the Shift key, and then click the last cell in the range.All cells on the worksheet - Click the Select All button, which is the gray rectangle in the upper-left corner of the
Figure 2: A Range of Adjacent Cells or a Block
2

worksheet where the column and row headings meet.All cells in an entire row or column - Click the row or column heading.
Simple Arithmetic in Excel Formulas
Excel allows you to create formula using the equal symbol (=) along with the following operators:+ (plus sign) for addition- (minus sign or dash) for subtraction* (asterisk) for multiplication / (forward slash) for divisionThe ‘=’ symbol tells Excel that the cell contains a formula rather than a label or value.
You can create formulas using the cell reference (A2, E3, etc) and Excel will do the math! Also, when working with columns of data, you can copy and paste a formula and Excel will change the cell references for each line. Let’s see how this works:
Enter the following data in column A (starting at row 1, or cell A1): 3.50, 4.60, 3.75, 4.28, and 3.67. Now enter this data in column B (starting at row 1, or cell B1): 4.99, 5.00, 5.00, 5.01, and 4.99
Let’s say that you want to find the difference between the amounts in columns B and A. In cell C1, you can type the following:
=(B1-A1)
Now Enter. Excel gives the answer in the cell C1 (it should read 1.49). Note that if the ‘=’ symbol is omitted from the formula in the cell, Excel treats the would-be formula merely as a text label. Try this.
Now, instead of typing a new formula for each row, highlight cell C1 and right-click. Select copy. Now Highlight the cells C2 down through C5 and right-click again. Select Paste Special. Another window pops up with choices of what to paste. Select Formula. Now Excel will fill in the remaining answers, but it has adjusted for each row of information. If you look at the formula it has created for C2, you’ll notice that it no longer subtracts A1 from B1. Now it subtracts A2 from B2, according to the row of information it is using.
Displaying Significant Digits Properly
Notice that when you entered your information, Excel shortened the numbers to omit final zeroes. If these zeroes are significant, we want them to remain. To override the default behavior, highlight cells A1 through C5. Right-click and select Format Cells. A window pops up that has several “tabs” at the top. It is currently on Number, which is what we want. In the ‘Category’ list on the left, click on ‘Number’. (We’re telling Excel that this is not just text, but numbers that we can perform mathematical operations on.) Now you can choose the number of decimal spaces. (The default for ‘Number’ is two, which is what we want here, so you don’t need to change it.) Now click OK in the bottom right corner and Excel takes care of the situation. The final worksheet is shown in Figure 4.
The user is responsible for formatting each cell to display the proper number of decimal places, according to the significant figure rules. Don’t assume that Excel’s defaults are always appropriate.
How to Refer to Cells in a Formula
Cell and range references
A reference identifies a cell or a range of cells on a worksheet and tells the program where to look for the values or data you want to use in a formula. With references, you can use data contained in different parts of a worksheet in one formula or use the value from one cell in several formulas.
Figure 4: Worksheet with the significant digits displayed properly.
A B C1 3.50 4.55 1.492 4.60 5.00 0.403 3.75 5.00 1.254 4.28 5.01 0.735 3.67 4.99 1.32
3

To refer to a cell, enter the column letter followed by the row number. For example, C5 refers to the cell at the intersection of column C and row 5. To refer to a range of cells, enter the reference for the cell in the upper-left corner of the range, a colon (:), and then the reference to the cell in the lower-right corner of the range. E.g. A1:E7
Relative cell references
Relative cell references are references to cells relative to the position of the formula. When you create a formula, references to cells or ranges are usually based upon their position relative to the cell that contains the formula. In the following example, cell B2 contains the formula =A1; Microsoft Excel finds the value one cell above and one cell to the left of B2. This is known as a relative referencing.
Figure 5: Relative Referencing.
A B1 52 10 =A1
When a formula that uses relative references is copied into another cell, the references in the pasted formula update and refer to different cells relative to the position of the formula. If the above formula "=A1" were copied and pasted into the cell below it (B3), the formula in cell B3 would be changed to =A2 to refer to the cell that is one cell above and to the left of cell B3 (as shown below).
Figure 6: Relative Reference is Copied into Another Cell.
A B1 52 10 =A13 =A2
The above example was formatted to "display formulas" (an option found by going to "Options" under the "Tools" menu and selecting "formulas" under the "View" tab). If this option were set not to view formulas, the values calculated by these formulas would be shown as follows:
Figure 7: Shows the values calculated by the formulas
A B1 52 10 53 10
Absolute cell references
If you do not want references to change when you copy a formula to a different cell, then use an absolute reference. Absolute references are cell references that always refer to cells in a specific location. Sometimes it is necessary to keep a certain position that is not relative to the new cell location. This is possible by inserting a $ before the Column letter or a $ before the Row number (or both). This is called Absolute Referencing. For example, if your formula multiplies cell A2 with cell B2 (=A2*B2) and you copy the formula to another cell, both references will change. You can create an absolute reference to cell B2 by placing a dollar sign ($) before the parts of the reference that do not change. To create an absolute reference to cell B2, for example, add dollar signs to the formula as follows: =A1*$B$2The dollar signs lock the cell location to a fixed position. When it is copied and pasted it remains EXACTLY the same.
Referencing data from another sheet
4

When you have data on several sheets, cell referencing is more complicated. You can't just use the simple cell references because the program must be provided with the information about the name of the worksheet if it is not the same as the one on which the calculation is being performed. If you had cell C5 on Sheet1 filled, and cell C5 on Sheet3 filled, you can't reference C5 on Sheet3 from Sheet1. Without more direction, it would assume that C5 would be on Sheet1.This means you must use the sheet name to assist in referencing cells on other sheets. To do this, use the sheet name enclosed in single quotes, followed by an exclamation mark, followed finally by the cell reference. So, to reference the information in cell C5 on Sheet3 in Sheet1, you would use: Sheet3!C5.
Functions
A function is a special key word, which can be entered into a cell in order to perform a process to some data, which is appended within brackets. = Function Name (Data) The data (or argument in proper terminology) often includes a range of cells. Excel automatically recognizes the names of these functions provided that they are preceded by an equals sign and finish with brackets.
Sum, Average and Count are the most common functions and the easiest to understand. They each apply to a range of cells containing numbers (or blank but not text) and return either the product of the numbers, the average value or the quantity of values in the range.
Figure 8: Sum, Average and Count functions.
A B C1 Patients seen by doctors23 This Year Last Year4 Dr Smith 120 1105 Dr Lam 80 706 Mrs. Dapper 507 Prof. Plum 102 10589 Total patients 352 285
10 Average number seen 88 9511 Number of values 4 3
In the diagram above the three functions used are as follows:
= SUM (B4:B7) 352 in cell B9= AVERAGE (B4:B7) 88 in cell B10= COUNT (B4:B7) 4 in cell B11
Cell C6 is currently empty. Both Average and Count would be affected by placing a zero value in the cell. Doing so would change last year’s values to 71 and 4 respectively. Sum is unaffected.
The range need not be limited to a single column. For example the function = COUNT (B4:C7) would return 7.
These three functions only take numeric values into account. They ignore text and blank spaces, which may be contained within the range. It is possible to use a variant of the Count function called COUNTA, which returns the number of cells in a range containing any numeric or text value. For example the function =COUNTA (A4:B9) would return 10.
Some built-in worksheet functions are summarized below:
5

SUM() Calculate the algebraic sum of the argument. The arguments may contain, numbers, or references to number that can be ranges, unions or intersections or combination of the above.
AVERAGE() Calculate the average of the argument. The arguments may contain, numbers, or references to number that can be ranges, unions or intersections or combination of the above.
SQRT() Returns the square root of a positive numeric value. STDEV() Estimates standard deviation based on a sample.LOG10() LOG()LN()
Calculate the logarithm of a positive numeric value. LOG() and LOG10() use base 10 and LN() use natural log or base 2.718281828...
COUNT() Calculate the numbers of non-empty cells in the range, intersection or union given in the argument.
INTERCEPT() Calculates the point at which the line will intersect the y-axis by using a best-fit regression line plotted through the known x-values and y-values.
SLOPE() Returns the slope of the linear regression line through the given data points.EXP() Returns e raised to the power of a given number.
Rather than typing the function itself, you may instead use the function button on the toolbar, which offers assistance and useful prompts when entering a function into a spreadsheet cell.
Figure 9a: Inserting a function.
Figure 9b: Filling in the arguments in a given unction.
6

To insert function in a cell, place cursor in the cell and select Insert->Function. Function categories are listed on the right, while alphabetical list of functions within selected category – on the left. Select function, and then select Ok. Function name will be added to the main window edit bar. To select arguments, use keyboard or select data ranges right in the sheet. When a row of arguments is formed, select the Ok button to add function in the cell.
Formatting spreadsheets: Bold, italics, underline, significant figures etc.
Select the cell/cells you want to format. Go to Format on the Menu bar. Click on Format Cells and choose Font and Bold or Italics. Choose the Date or Number tab and then select the required category to make the required changes. The formatting tool bar also has icons for Bold, Italics and Underline.
Figure 10: Formatting Toolbar.
Figure 11: Format Cells dialog box.
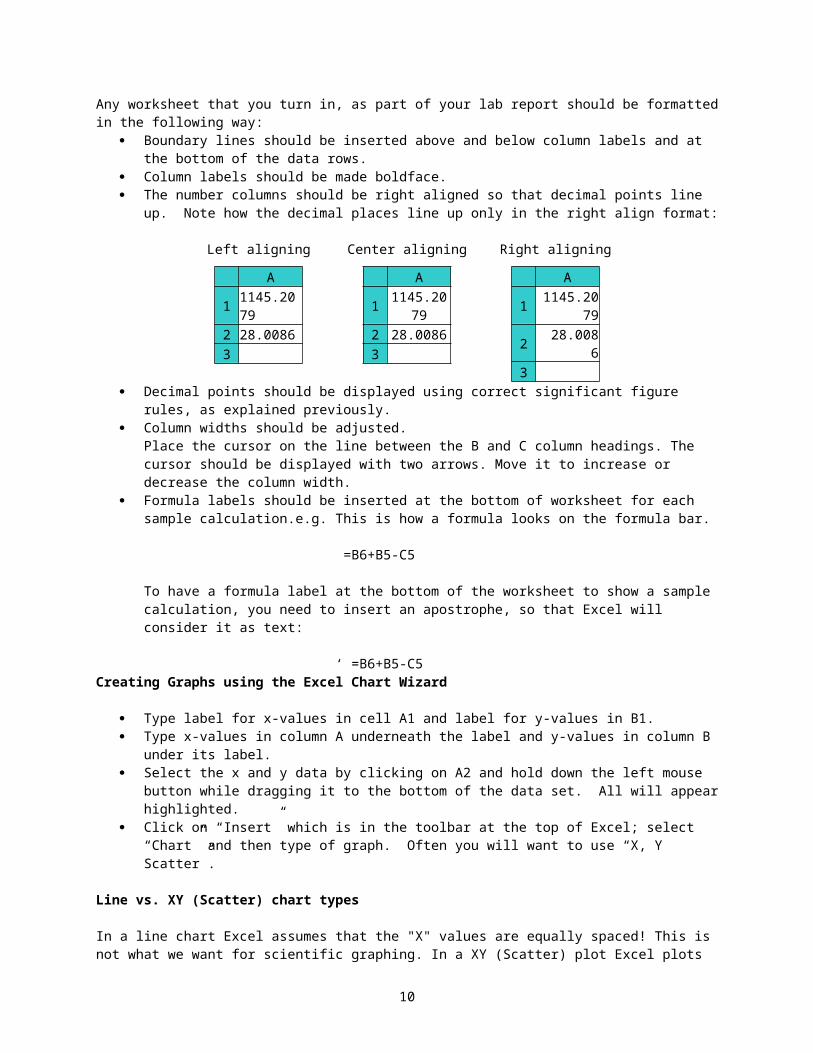
Any worksheet that you turn in, as part of your lab report should be formatted in the following way: Boundary lines should be inserted above and below column labels and at the bottom of the data rows. Column labels should be made boldface. The number columns should be right aligned so that decimal points line up. Note how the decimal places
line up only in the right align format:
Left aligning Center aligning Right aligning
7

Decimal points should be displayed using correct significant figure rules, as explained previously. Column widths should be adjusted.
Place the cursor on the line between the B and C column headings. The cursor should be displayed with two arrows. Move it to increase or decrease the column width.
Formula labels should be inserted at the bottom of worksheet for each sample calculation.e.g. This is how a formula looks on the formula bar.
=B6+B5-C5
To have a formula label at the bottom of the worksheet to show a sample calculation, you need to insert an apostrophe, so that Excel will consider it as text:
‘ =B6+B5-C5Creating Graphs using the Excel Chart Wizard
Type label for x-values in cell A1 and label for y-values in B1. Type x-values in column A underneath the label and y-values in column B under its label. Select the x and y data by clicking on A2 and hold down the left mouse button while dragging it to the
bottom of the data set. All will appear highlighted. Click on “Insert” which is in the toolbar at the top of Excel; select “Chart” and then type of graph. Often
you will want to use “X, Y Scatter”.
Line vs. XY (Scatter) chart types
In a line chart Excel assumes that the "X" values are equally spaced! This is not what we want for scientific graphing. In a XY (Scatter) plot Excel plots (x, y) data pairs. It assumes the first column you give it is the x coordinate, subsequent columns are different lines on the same plot.
Figure 12: Step1 of the Chart Wizard.
On the right side of this menu select the “Chart Sub-type” by clicking on the look that you would want. Use the button underneath these to view the selection. If acceptable, click on “Next”. Click “Next” on the next screen. Choose the one that shows symbols but no connecting line for the exercises.
Figure 13: Step2 of the Chart Wizard
8
A1 1145.20792 28.00863
A1 1145.20792 28.00863
A1 1145.20792 28.00863

This brings you to step 3 of the “Chart Wizard”. Now type a title under the “Chart Title” category. Do the same for “Value (x) Axis” and “Value (y) Axis”.
Figure 14: Step3 of the Chart Wizard.
To add gridlines, legends etc, click on the other tabs. Click next when finished.
9
This takes you to “Step 4 of 4”. Make sure that you choose to have the chart on a new sheet. Click finish after that.
Figure 15: Step4 of the Chart Wizard.
You can and probably should change the background color, ticks and scale for x- and y-axes by right clicking on the area you want to change. A menu pops up; change the desired quantity.
Trendline addition
Right click on symbols (make sure you are selecting all of them and not simply one); choose “Add trendline”. Select “Linear” if it looks like a straight line.
Click “Options” tab and select “Display equation on graph” Use the chart wizard to get an X, Y scatter graph. Excel will give a generic y = mx + b
10

Printing - charts and worksheets.
Make sure your name and information is on the spreadsheet or chart. A convenient way of doing this is to type your name, date and the title of your experiment using a header and/or a footer. Click on “View” in the toolbar at the top of the Excel window; then “Header and Footer”. Select “Custom Header” and then type the name of the experiment and your name. You can use the “Custom Footer” button to place things like file name in the footer area.
Click on File on the Menu bar and then choose Page Setup. Do the following:
Use Landscape Mode! “Page” tab. Try to show all columns on a single sheet.
Select “Page” tab and then “Fit to:…” (Fig. 16).
Scale to a single sheet if necessary. In the case of worksheets, turn on Column
and Row Labels on the Sheet Tab for printouts.
Print one worksheet per page. Print one chart per page. Choose Print preview under File to see
how it looks before you actually print the worksheet or graph.
Finally print the worksheet.
References:http://www.extension.iastate.edu/Pages/Excel/homepage.htmlhttp://www.prairy.org/OnlineCourses/Excel/toc.htmlhttp://www.educ.uvic.ca/compined/Level1/excel/cellref.htm
http://www.meadinkent.co.uk/xlsumavgct.htmhttp://phoenix.phys.clemson.edu/tutorials/excel/regression.htmlhttp://faculty.njcu.edu/tpamer/office/xycharts.htmhttp://www.rpi.edu/dept/arc/web/software/excel/gettingstarted.html
Figure 16: Page Setup dialog box – Page tab
11