Welcome to the OCS Worldwide Selfship User Manual · Welcome to the OCS Worldwide Selfship User...
21
Welcome to the OCS Worldwide Selfship User Manual Introduction OCS Worldwide has developed this facility for you to assist in producing appropriate documentation for your shipments. All that you need is a PC with access to the internet (This Selfship version for Windows OS only), a standard office laser printer and an access password supplied by OCS Worldwide. With Selfship you can, amongst other things Generate a Courier Waybill Pre-store addresses for regular use Print pro-forma invoice Print daily despatch sheet Track shipments View POD details Generate charges for the shipment before sending Book a collection Getting Started You will need to have a password to use this service. Contact OCS Worldwide customer services on 0845 6789800 or email us at [email protected] . We will need to know your OCS account number so please have that ready. You can have more than one password for your account, and each password can be personalised to suit each individual shipper.
Transcript of Welcome to the OCS Worldwide Selfship User Manual · Welcome to the OCS Worldwide Selfship User...

Welcome to the OCS Worldwide Selfship User Manual Introduction OCS Worldwide has developed this facility for you to assist in producing appropriate documentation for your shipments. All that you need is a PC with access to the internet (This Selfship version for Windows OS only), a standard office laser printer and an access password supplied by OCS Worldwide. With Selfship you can, amongst other things
� Generate a Courier Waybill
� Pre-store addresses for regular use
� Print pro-forma invoice
� Print daily despatch sheet
� Track shipments
� View POD details
� Generate charges for the shipment before sending
� Book a collection
Getting Started You will need to have a password to use this service. Contact OCS Worldwide customer services on 0845 6789800 or email us at [email protected]. We will need to know your OCS account number so please have that ready. You can have more than one password for your account, and each password can be personalised to suit each individual shipper.

First you will have to locate Selfship on the internet. Either connect from the link on our website www.ocsworldwide.co.uk or access directly at http://www.ocscourier.co.uk/selfship - (don’t forget to add these to your favourites to make things easier next time).
Enter your account number and password in here, and the click Login.
If you do not have an account with OCS, please click here and fill out an application form.

On the next screen (shown below) you are then asked to check your details. If they are correct, click on Continue or hit the <Enter> key on your keyboard
Check that your details are correct. If they require changing, please click on the Change Details link and enter the new details.

Overview The first screen controls all of the Selfship features. The Menu bar at the top of the screen gives access to various functions – much like the software on the computer that you use.
Each menu feature will be explained in the following pages. From the Selfship screen displayed, you can enter all the relevant details to produce shipping documentation. These details can be typed directly into the fields on the screen, or automatically filled in from saved lists.

Below is one such saved list. If you click on the Receivers tab, it will open a new window. In this window, you have the ability to add regular consignees. You do this by filling in all the fields and clicking Update. This will save it into your list and can then be added to your CWB at a later time. You can also amend, delete and import addresses to this list at any time. You can search through your receivers by entering details in any one of the fields and then clicking on the Search button. There is also the facility to sort by name or town by clicking on the headings. To add a receiver to your CWB, select the name. At this stage, you have the ability to edit the details shown. When you are satisfied with the details on screen, click on Add to CWB. This will close the Receivers window and bring you back to the main screen where all the details will have updated automaticaly.

Contents If you regularly send goods that are consistently the same weight and value, then this list will help you. You can save your frequently shipped goods descriptions here. You can then access them by selecting them from the contents drop down box on the main screen. Once selected, update the quantity, value, and weight and click on the add button. The total of all these fields will be tallied automatically for the shipping documentation.
This is the dropdown box where you can select your goods from the saved list.
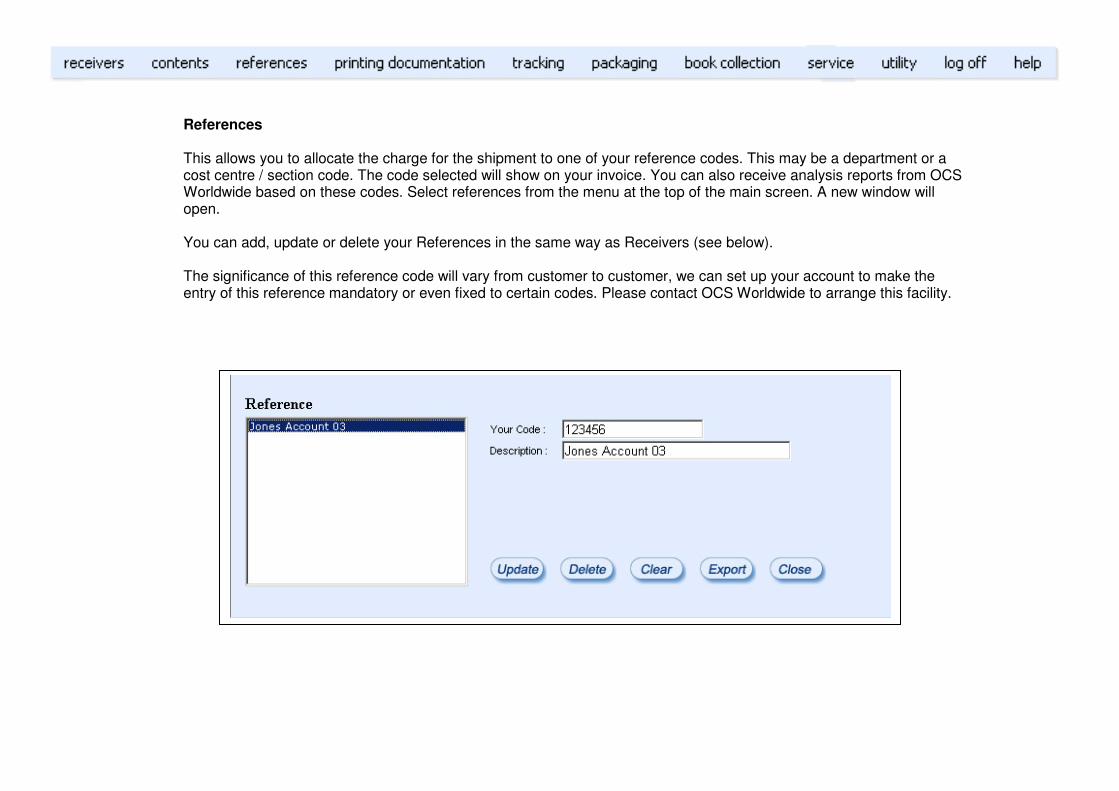
References This allows you to allocate the charge for the shipment to one of your reference codes. This may be a department or a cost centre / section code. The code selected will show on your invoice. You can also receive analysis reports from OCS Worldwide based on these codes. Select references from the menu at the top of the main screen. A new window will open. You can add, update or delete your References in the same way as Receivers (see below). The significance of this reference code will vary from customer to customer, we can set up your account to make the entry of this reference mandatory or even fixed to certain codes. Please contact OCS Worldwide to arrange this facility.

Preparing a shipment Filling out the CWB can be done in any order, but for the purposes of this manual, we will work in a left to right, top to bottom fashion. (i) The first part of the CWB is where the shipment is to be sent. This information can be typed in, or you can use the saved receivers list, available from the left hand side of the Selfship menu. To add a receiver from this menu, select the record and click on Add to CWB. If you need to change any of the fields such as the Contact person etc, this can be done on the main screen.

(ii) The next part of the CWB to be completed is the Shipment details. Again, you can enter these details on an ‘as you go’ basis, or you can use your saved list accessed by clicking in the right hand side of the drop down menu. Once you have completed the details of the fields, click the Add button to the far right and the CWB will be updated with the contents. If you wish to change the weight or quantity after adding them, simply click on remove and add the goods again. (iii) At this stage you can check to see the cost of your shipment by clicking on the Charge Lookup link. By filling in the basic information regarding you shipment, you will be able to get an accurate costing. (iv) If you wish the shipment to go as Free Domicile, please select this field. Information on Free Domicile is available by placing the mouse pointer over the area. (v) Once your goods have been packaged and you know the dimensions and number of pieces that you wish to ship, you will be required to input these details in the bottom half of the screen. First enter the number of pieces making up the shipment and click add per Item. If you are sending your goods using pouches or envelopes supplied by OCS, then simply click on the appropriate button. If you are sending your shipment in boxes or by other means, please select the appropriate type and fill in the number of pieces and dimensions. If a package is oversize and likely to incur additional charges, a warning will appear. There are only 4 rows to present the number of pieces and dimensions, if you are sending your shipment in more than 4 boxes then put the similar boxes together and measure them as a single one. (vi) Please check the total values and weight, as this will be used to produce a pro forma invoice if required, and must be correct to assist in Customs clearance. (vii) You will now be required to select the service you require. Depending on the destination, different services are available. By default, our Express Courier service is selected. (viii) If you require special handling instructions to accompany the shipment, please type them in the field provided. This may be used to assist the delivery personnel, and may include information such as the entrance location or onsite contact. (ix) The last part of completing the CWB is to select the reference you wish to use. This is located on the bottom right, and again uses a drop down box, with a list of references updated via the menu.

(x) At times, when you select a country, a yellow triangle with an exclamation mark in it will show up. This means that the selected country has a special message associated with it. If you click on the triangle, this message will show up in a new window. (xi) Check that all details are correct and all required boxes have been checked. Once you are satisfied, please click on the Submit button. This will now send all the CWB details to OCS and the preparation of your paperwork will start. Printing Documentation After you have submitted a CWB, you are able to print your documentation. From the top blue menu bar select the printing documentation tab. You will be presented with a drop down menu with several options. The first item, print cwbs, is how you will print out your shipping documentation and pro forma invoice (if required). If you click on this, a new window will open with details of the shipments requiring paperwork to be printed.

To print your documentation, click on the blue CWB No. on the left hand side of the window. This will request the pages from the server and then open a print dialogue window. Click on OK, and your documents will now print. Each CWB will need to be printed individually. Selfship will print, by default, four consignment notes, and an extra page for each additional item to be shipped. If a pro forma invoice is required, the text under the Pro forma column title will show as blue pro forma text. You will need to print this (in the same way as the CWB) to accompany your shipment If a pro forma is not required, it will show as “No pro forma”. Once you have printed the documentation for a shipment and checked the details have printed correctly, click on the text “Print OK?” This will move the shipment through to the next part of the process. If for any reason, you do not wish to proceed with the shipment, or need to make corrections, please click on the “Cancel” text to the far right. There is also an “Email” option, which allows you to send an email containing a link for the tracking of the shipment. You may find this helpful when sending details of the shipment to the client. Once finished with printing of your waybills, please click on close Printing Collection sheet The next part of the process, providing you have input and printed all documentation for shipments going on the day, is to print out a collection sheet. If you click on the blue menu bar at the top, and select collection sheet, this will open up a new window displaying your current shipments. By default, all the shipments are selected for printing. If you do not wish to include a shipment on the collection sheet, click on the check box to the left of the screen and deselect it. Once you are ready, click on the blue Print text on the bottom left. This will bring up the print dialog to which you can then click OK.

Once you have printed your collection sheets a new window will open reminding you to book your collection. if you do not have a regular collection set up on your account you will need to book a collection for consignment by using this online booking screen or calling Customer Services direct on 0845 6789800. If, however, you already have a regular collection you can select the cancel button to close this window

Booking a collection
The last stage of processing your shipments for the day is to book the collection. This can be done by clicking on book collection on the blue menu bar. This will open up a new window (as per below). You are required to fill out the relevant fields and then click on Book. If you need to start again, please click on the Reset button. If you have special requirements for your pickup, or the pickup is from another address other than the account holder’s, please call our Customer Services Department on 0845 678 9800 to book your collection.
If you require Packaging assistance you will need to call us directly on 0845 6789800 to book collection
Description of dangerous goods Aerosols Flammable liquids Batteries Bleach Paint compressed containers (thermometer mercury) Dry ice Perfume Hair & Nail products Adhesives Medicinal alcohol

Other features There are several other features available from the blue menu bar. Tracking – (i) cwb tracking: this allows you to manually input a cwb number and view all the relevant information as to its
movements, whether still in transit, delivered, or if available, the POD details of who signed for the shipment

(ii) cwb account search: this allows you to search for shipments using several different parameters. The fields include the CWB number, company, city, country, type of goods, sender’s name, your reference and a date range.

(iii) proforma user maint.: this is where you can add, update and delete the names of the users that are available for selection when you print a pro forma invoice.
Packaging – This is where you can order more OCS packaging supplies. You are required to fill out the fields and select what you require, and we will deliver it to your door.

NI Storage – (i) Stock Summary: Display all stock available based on end user access right. You can filter stock by using search
facility. By clicking on the code of products to select or deselect them and then click on button “get selects” at bottom of the page to store all selected products into clipboard and close current window.

(ii) Request Stock: By default all products in clipboard will present one by one, what you do is change the quantity of product which you request and click add button. You can select product from dropdown list or search product by its code. Filling all information for consignment and instruction if necessary then click submit.

Utility – (iii) Multi shipments: If you have many shipments, where the items being shipped are the same, here you can prepare
CWB’s in batches. It is just like filling in a standard waybill, but with the receivers’ information at the top. You simply select the receivers you want (up to ten at one time) and click Add. The receivers are removed from the left hand side, so you can be assured that you are not doubling up on your shipments
(iv) Charge lookup: This feature is the same as the link available from the main screen. It allows you to get an
accurate quote of the costs of sending your shipment.
(v) Change password: You can change your password at any time. Select change password from the utility menu, enter your old password and the new password you wish to create and click the Submit button. You will need to then logoff and back on again to activate your new password.

Help – This is where you can go to get some quick help from one of our Selfship Support Team Members. You can also view and download a copy of this user manual. To use our online help system, simply click on help online, and type your question or message in the window. The more information you can give the Support Team Member, the more efficiently they will be able to assist you. It is helpful to have information such as your operating system and which program you are using to browse the internet. The response with instructions from the Selfship Team Member will show up in this window. Once you are satisfied that your query has been answered, you can click on Query now resolved.

Browser support –
Up to Internet Explorer 10.0
Up to Opera 9.0
Up to Netscape 7.1
Up to Firefox 21.0
Up to Safari 5.1
Up to Chrome 27.0
** Thank you for using Selfship. We look forward to servicing your courier and postal and mail fulfilment requirements. **