Web Conferencing Tool - Fordham University · an email or calendar invitation ... Or use your...
18
WebEx Web Conferencing Tool FACULTY + STAFF USER GUIDE Fordham IT
Transcript of Web Conferencing Tool - Fordham University · an email or calendar invitation ... Or use your...

WebExWeb Conferencing Tool
FaCulTy + STaFF uSEr GuidE
Fordham IT

ContentsWebEx Faculty + Staff user Guide
Schedule a Meeting using the WebEx Meeting Site 1
WebEx Scheduling Template 2
Join a Meeting 4
Participate in Collaborative Meetings 6
Personal Meeting rooms (PMr) 10
WebEx Meetings using the iOS app 12
WebEx Meetings using the android app 14

1 WebEx Faculty + Staff user Guide | Fordham IT
Schedule a Meeting Using the WebEx Meeting Site
WebEx is an all-in-one web conferencing tool that facilitates productive and engaging web meetings.
The meeting Host, typically the person leading the meeting, schedules a WebEx meeting. Once the meeting begins, the host may transfer host responsibility to a meeting participant.
Schedule a meeting 1. Navigate to your WebEx Meeting Site, located at Fordham.WebEx.com.
2. Click Meeting Center at the top of the browser window.
3. in the left-hand column, select Host a Meeting, then Schedule a Meeting.
4. Enter the meeting topic (the name of the meeting), a password (which will be shared with all invited participants), the meeting date and time, its estimated duration, and emails of invited participants.
5. Click the green Schedule button to finish. (if you schedule a meeting within 5 minutes of its start time, the button will be labeled Start. Click it to immediately begin the meeting.)
Save meeting options for future useTo schedule a meeting and save its options as a template for future use, refer to the WebEx Scheduling Template user guide for more information.
Find your WebEx Meeting Site at Fordham.WebEx.com.

WebEx Faculty + Staff user Guide | Fordham IT 2
WebEx Scheduling Template
WebEx is an all-in-one web conferencing tool that facilitates productive and engaging web meetings.
Schedule a meeting and save your options as a template to use again.
• Quick Scheduler template• Viewing templates• advanced Scheduler template• using templates in Outlook’s Scheduler
Create a template using the Quick Scheduler1. Navigate to your WebEx Meeting Site, located at Fordham.WebEx.com.
2. From the top menu bar, select the Meeting Center tab.3. under the Host a Meeting drop down menu, select Schedule a Meeting.
4. Enter the meeting topic (the name of the meeting), a password, the meeting date and time, and its duration.
5. Select the blue text, Save as template.
Find your WebEx Meeting Site at Fordham.WebEx.com.
6. Enter the Template Name and select the green Save button.

3 WebEx Faculty + Staff user Guide | Fordham IT
1. Navigate to the Schedule a Meeting tab, as described above.
2. Select the blue text, advanced Scheduler.
3. Enter the meeting topic (the name of the meeting), a password, the meeting date and time, its estimated duration, audio options, emails of invited participants, registration (optional), agenda and Welcome, meeting options, attendee privileges.
4. review your work on the review page and then select the blue text, Save as Template.
5. Enter the Template Name and select the green Save button (see image in step 6 on previous page).
Create a template using the advanced Scheduler
1. To access your templates, navigate to your WebEx Site (Fordham.WebEx.com).
2. Select the Meeting Center, then the Host a Meeting dropdown menu and Schedule a Meeting.
3. Here you can select your templates from the dropdown menu in the upper right hand corner.
Viewing Templates via the WebEx Site

WebEx Faculty + Staff user Guide | Fordham IT 4
Join a Meeting
WebEx is an all-in-one web conferencing tool that facilitates productive and engaging web meetings. Meeting participants have several options for joining a meeting:
• an email or calendar invitation • From your WebEx Meeting Site • using audio and video during a meeting
Join from an email or calendar invitation1. Open your email or calendar invite and click the Join WebEx Meeting
hyperlink. a new window will open, taking you to the Meeting information page on your WebEx site.
2. if the meeting has started, you can join. Otherwise, when the meeting becomes available, you will be able to join.
3. Enter your name and email at the prompt.
4. Click the green Start (if you’re a host) or Join (if you’re a participant), to be connected to the meeting.
Join from your WebEx Meeting Siteyour WebEx Meeting Site allows you to join an event by entering the meeting number at your Meeting Site, or by selecting it in your My Meetings tab.
1. at your Meeting Site Home tab, join the event by entering the meeting number.
2. Or, join by navigating to your WebEx Meeting Site.
Select the Meeting Center tab. Then, select My Meetings.
in the calendar that appears, select the green Start (if you are the host) or Join button next to the meeting you wish to attend.
Join WebEx meetingMeeting number: 201 287 175Meeting password: cisco
Find your WebEx Meeting Site at Fordham.WebEx.com.

5 WebEx Faculty + Staff user Guide | Fordham IT
using audio and video during a meetingafter joining your meeting, click the audio option button to enable audio participation. a headset with earphones and a microphone is recommended. Or use your computer’s built-in audio system. Not all computers have a microphone, however.
Turn on video by clicking the Video button next to your name in the participants’ list. The Camera icon turns blue to indicate the video is on.

WebEx Faculty + Staff user Guide | Fordham IT 6
Participate in Collaborative Meetings
WebEx is an all-in-one web conferencing tool that facilitates productive and engaging web meetings. Meeting collaboration features include:
• Chat • Polling• recording • Sharing an application • Note taking on your desktop• Presenting • Whiteboarding• uploading audio/video • Whiteboarding toolbar
Chat
1. during a meeting, click the Chats icon to send public and private messages to attendees.
2. Click the Send to drop down menu and select the message recipient, enter your message in the box below, and hit the enter key.
Find your WebEx Meeting Site at Fordham.WebEx.com.
Note taking Click the Notes icon to easily take meeting notes and save them for your personal use. When you finish entering your notes in the box provided, press the Save button.

7 WebEx Faculty + Staff user Guide | Fordham IT
To view a list of your recordings you would go toyour WebEx Site (Fordham.WebEx.com). Select Meeting Center, Event Center, or Training Center and then choose the recorded meeting you wish to review.
PresentingTo become the presenter during a meeting, drag the WebEx Ball in the participants’ pane and drop it next to your name. The ball remains next to your icon while you are the presenter. Presenter options:
• Share your desktop• Share an application (i.e., document, web browser)
The host may take away sharing privileges anytime during the meeting. Remember! if you share your desktop, meeting attendees can see every- thing on your desktop.
uploading audio and videoupload an audio or video clip to a new presentation tab by clicking Share from the menu bar, then File. in the new window that opens, upload a clip for viewing in the WebEx client.
recording Hosts may record a meeting. Click on the recorder icon to open the recorder Panel. Click the record button to record the meeting. Press the Stop button to end the recording. if you forget to stop the recording before the end of the meeting, don’t worry! WebEx will still render your video and send you a link. after the meeting, a link with the recording will be sent to you, and you may share it with participants. To view a list of your recordings on your WebEx Site, select My recorded Meetings.

WebEx Faculty + Staff user Guide | Fordham IT 8
Find your WebEx Meeting Site at Fordham.WebEx.com.
Participate in Collaborative Meetings (continued)
Polling The Polling Panel allows the host to create a poll that can, for example, ask attendees to vote on something or answer multiple choice questions.
Opening the Polling Panel
1. Select the Polling icon to open the Polling Panel. To create a poll, open the Polling Panel by clicking the Polling button in the upper right hand side tool bar. Note: if you do not see the Polling button, click the drop down arrow to the right of the tool bar.
2. Select Manage Panels.
3. Move the Polling option from the available Panels to the Current Panels column using the add >> button in the center of the window. Select OK.
Creating a Poll
1. in the Polling Panel, select the add new question button and enter your polling question.
2. Select the add new answer button and enter your response.3. use the edit and delete buttons to alter or delete your entries. 4. When you have finished editing your poll you can select Clear all to delete
the poll, select Open Poll to open it to your attendees, click the Save icon to save the poll locally to your computer for future use, or the Open icon to open an existing poll from your desktop.

9 WebEx Faculty + Staff user Guide | Fordham IT
Whiteboardingyou can write, draw, and annotate collaboratively on a whiteboard. Create a new whiteboard by selecting + New Whiteboard, located at the top of the presentation panel.
Whiteboarding ToolbarOpen the whiteboarding tool bar by selecting the whiteboarding icon , located at the top of the presentation or whiteboarding tab.
Sharing an application on your desktopo share an application, select the Quick Start tab from the WebEx window. Then select Share Screen located in the middle of the screen or use the share option in the top menu bar. Select the More Options icon located right below the Share screen to open a new window with your sharing options.
Select Share File and a new window will open where you can select a file for uploading. The file will be imported into WebEx as a new presentation tab.

WebEx Faculty + Staff user Guide | Fordham IT 10
WebEx is an all-in-one web conferencing tool that facilitates productive and engaging web meetings. Personal Meeting rooms (PMr) are a persistent meeting space where links and meeting numbers do not change. This is available to all hosts.
My Personal Meeting roomHosts can lock or unlock rooms, invite attendees to join a WebEx Meeting where they wait in the PMr lobby until the host joins. Hosts can receive notifications if attendees are waiting.
accessing the My Personal room pageNavigate to your WebEx Meeting Site, located at Fordham.WebEx.com.
1. Select My WebEx from the top menu bar.
2. Then, select My Personal room in the left hand column.
3. To view your PMr information: your url, meeting number, call-in numbers, click on the More ways to join icon.
Personal Meeting Rooms (PMR)Find your WebEx Meeting Site at Fordham.WebEx.com.
11 WebEx Faculty + Staff user Guide | Fordham IT
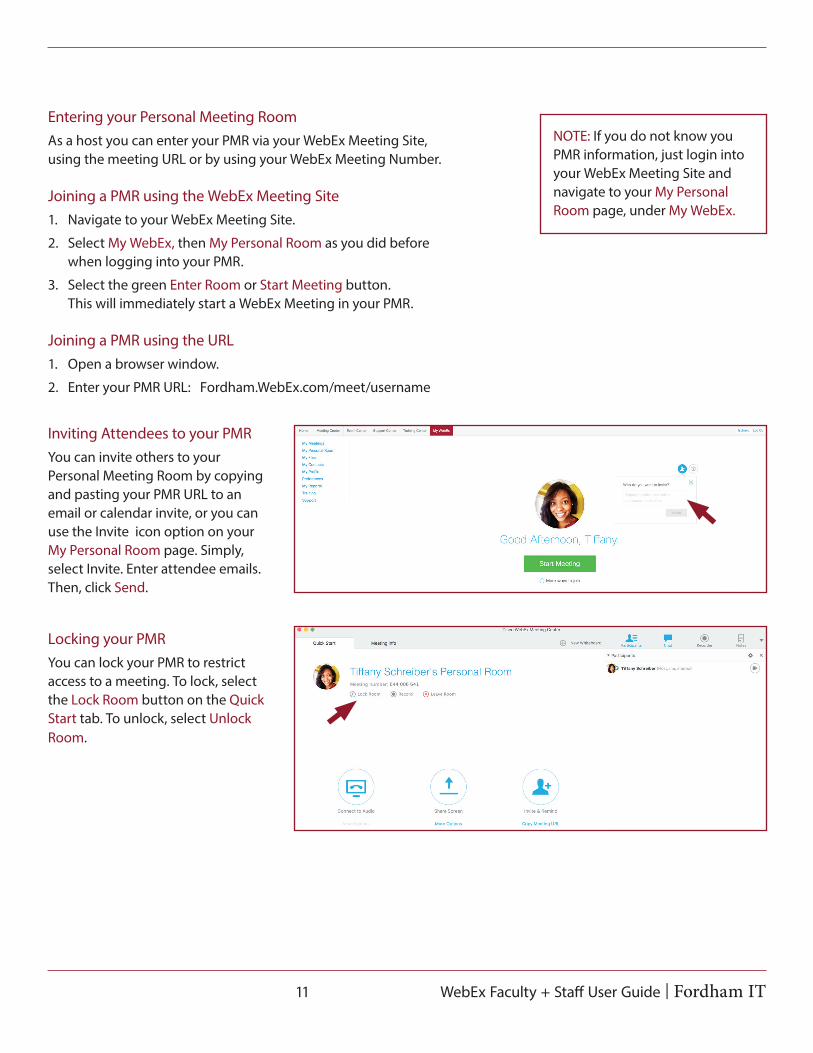
Entering your Personal Meeting roomas a host you can enter your PMr via your WebEx Meeting Site, using the meeting url or by using your WebEx Meeting Number.
Joining a PMr using the WebEx Meeting Site1. Navigate to your WebEx Meeting Site.
2. Select My WebEx, then My Personal room as you did before when logging into your PMr.
3. Select the green Enter room or Start Meeting button. This will immediately start a WebEx Meeting in your PMr.
Joining a PMr using the url 1. Open a browser window.
2. Enter your PMr url: Fordham.WebEx.com/meet/username
NOTE: if you do not know you PMr information, just login into your WebEx Meeting Site and navigate to your My Personal room page, under My WebEx.
inviting attendees to your PMryou can invite others to your Personal Meeting room by copying and pasting your PMr url to an email or calendar invite, or you can use the invite icon option on your My Personal room page. Simply, select invite. Enter attendee emails. Then, click Send.
locking your PMr you can lock your PMr to restrict access to a meeting. To lock, select the lock room button on the Quick Start tab. To unlock, select unlock room.

WebEx Faculty + Staff user Guide | Fordham IT 12
WebEx Meetings Using the iOS AppFind your WebEx Meeting Site at Fordham.WebEx.com.
WebEx is an all-in-one web conferencing tool that facilitates productive and engaging web meetings.
use WebEx on the go by downloading the app to your apple or other iOS-compatible mobile device.
download the WebEx app1. Search for the Cisco WebEx app
at the apple app Store.
2. Tap Get to download.
3. Once downloaded, you can sync your WebEx account to your mobile device and host WebEx meetings.
Sign in with your email address
1. Tap the icon on your phone to open the WebEx app.
2. Select Sign in.
3. Enter your Fordham email. Tap Next.
4. Select the site Fordham.WebEx.com.
5. Enter your access iT id and password.
6. Select yes to open this page in WebEx.
Elizabeth question: is this correct?

13 WebEx Faculty + Staff user Guide | Fordham IT
WebEx is an all-in-one web conferencing tool that facilitates productive and engaging web meetings.
Enter your Personal Meeting room (PMr)
1. Select the Calendar icon in the upper right corner.
2. Tap Enter Personal room to start a meeting there.
Schedule a Meeting
1. Select the Calendar icon in the upper right corner.
2. Tap Schedule.
3. Fill in the meeting information.
Viewing Scheduled Meetings
My Meetings is the default screen displayed in the WebEx Meetings app. When it is time to start or join a meeting, tap on the entry in the list.
app Settings
Tap the gear icon in the upper left corner to open Settings. View your account information, set up auto Connect audio, and manage options for use Mobile data for Video. Select Shake to reload your My Meetings tab by shaking your phone.

WebEx Faculty + Staff user Guide | Fordham IT 14
WebEx Meetings Using the Android App
WebEx is an all-in-one web conferencing tool that facilitates productive and engaging web meetings.
use WebEx on the go by downloading the app to your android or compatible mobile device..
download the WebEx app
1. Search for the Cisco WebEx app from the Google Play store.
2. Tap install to download.
3. Once downloaded, you can sync your WebEx account to your mobile device and host WebEx meetings.
Sign in with your email address
1. Tap the icon on your phone to open the WebEx app.
2. Select Sign in.
3. Enter your Fordham email. Tap Next.
4. Select Fordham.WebEx.com as the site to log in to.
5. Enter your access id and password.
6. Select yes to open this page in WebEx.
Find your WebEx Meeting Site at Fordham.WebEx.com.

15 WebEx Faculty + Staff user Guide | Fordham IT
Navigating the WebEx appMy Meetings
My Meetings is the default tab displayed in the app. View your scheduled meetings for the week.
To join a meeting, tap on the meeting and select Start or Join.
Schedule a Meeting
1. Select the Calendar icon in the upper right corner.
2. Tap Schedule a Meeting.
3. Fill in the meeting information and tap the Schedule Meeting button.
Personal Meeting room (PMr)1. Select the Calendar icon in the upper right corner.
2. Select Enter Personal room to start a meeting in your PMr.
refresh your Calendar
Can’t see a meeting you’ve scheduled? Select the refresh icon in the upper right corner of your My Meetings tab.
app Settings
Tap the More icon in the upper left corner, and then Settings to view your account information and self-paced resources.

WebExWeb Conferencing Tool
FaCulTy + STaFF uSEr GuidE
Fordham.edu/iTTech Help [email protected]
itnews.blog.fordham.edu


![BBC VOICES RECORDINGS€¦ · BBC Voices Recordings) ) ) ) ‘’ -”) ” (‘)) ) ) *) , , , , ] , ,](https://static.fdocuments.us/doc/165x107/5f8978dc43c248099e03dd05/bbc-voices-recordings-bbc-voices-recordings-aa-a-a-a-.jpg)