VW MiniLogger - durhamgeo.comdurhamgeo.com/pdf/manuals/vw-minilogger-ti-2012_52613399.pdf · VW...
28
Copyright ©2012 DGSI. All Rights Reserved. This equipment should be installed, maintained, and operated by technically qualified personnel. Any errors or omissions in data, or the interpretation of data, are not the responsibility of Durham Geo Slope Indicator (DGSI). The information herein is subject to change without notification. This document contains information that is proprietary to DGSI and is subject to return upon request. It is transmitted for the sole purpose of aiding the transaction of business between DGSI and the recipient. All information, data, designs, and drawings contained herein are proprietary to and the property of DGSI, and may not be reproduced or copied in any form, by photocopy or any other means, including disclosure to out- side parties, directly or indirectly, without permission in writing from DGSI. 12123 Harbour Reach Drive Mukilteo, Washington, USA, 98275 Tel: 425-493-6200 Fax: 425-493-6250 E-mail: [email protected] Website: www.slopeindicator.com VW MiniLogger 52613399 01-2012
-
Upload
trinhquynh -
Category
Documents
-
view
228 -
download
1
Transcript of VW MiniLogger - durhamgeo.comdurhamgeo.com/pdf/manuals/vw-minilogger-ti-2012_52613399.pdf · VW...

Copyright ©2012 DGSI. All Rights Reserved.
This equipment should be installed, maintained, and operated by technically qualified personnel. Any errors or omissions in data, or the interpretation of data, are not the responsibility of Durham Geo Slope Indicator (DGSI). The information herein is subject to change without notification.
This document contains information that is proprietary to DGSI and is subject to return upon request. It is transmitted for the sole purpose of aiding the transaction of business between DGSI and the recipient. All information, data, designs, and drawings contained herein are proprietary to and the property of DGSI, and may not be reproduced or copied in any form, by photocopy or any other means, including disclosure to out-side parties, directly or indirectly, without permission in writing from DGSI.
12123 Harbour Reach DriveMukilteo, Washington, USA, 98275Tel: 425-493-6200 Fax: 425-493-6250E-mail: [email protected]: www.slopeindicator.com
VW MiniLogger52613399
01-2
012

Contents
Introduction . . . . . . . . . . . . . . . . . . . . . . . 1
Installing the Manager Program . . . . 2
Connecting to the MiniLogger . . . . . . 4
Setting Up . . . . . . . . . . . . . . . . . . . . . . . . . 8
Data Logging . . . . . . . . . . . . . . . . . . . . . 12
Retrieving Data . . . . . . . . . . . . . . . . . . . 14
About Radio MiniLoggers . . . . . . . . . 18
Installing Base Station Software . . . 19
Making a Radio ID List . . . . . . . . . . . . . 22
Connecting to Radio MiniLoggers . 25
VW MiniLogger, 2012/2/22

Introduction
The MiniLogger System The VW MiniLogger is a compact datalogger designed to moni-tor a single VW sensor, such as a piezometer, crackmeter, strain gauge, or displacement sensor.
MiniLogger Manager for Windows is included with the VW MiniLogger. It is used to program the MiniLogger and also to retrieve the readings that the MiniLogger has recorded.
A wireless option can be added to the MiniLogger. The Mini-Logger can then be set up and programmed remotely by a PC connected to a base-station radio.
Chapters in this Manual Installing the Manager Program tells how to install the MiniLog-ger Manager software on your PC.
Connecting to the MiniLogger tells how to connect your PC to the MiniLogger with a serial cable.
Setting Up tells how to set reading intervals and other functions of the MiniLogger.
Data Logging tells how to connect a sensor to the logger and start data logging.
Retrieving Data tells how to retrieve data from the logger and save it on your PC.
About Radio MiniLoggers provides a brief overview of the wire-less system.
Installing Base Station Software tells how to install drivers for wireless communications.
Entering Radio IDs tells how to make a list of your Radio Mini-Loggers.
Connecting to Radio MiniLoggers tells how to establish a radio link between your PC and the Radio MiniLogger.
VW MiniLogger, 2012/2/22 1

Installing the Manager Program
Introduction The Manager program is used to program the MiniLogger and to retrieve stored data. You can download the most recent ver-sion of the program from www.slopeindicator.com or install the program from a Resource CD.
Downloadthe Manager Program
If you have a good internet connection, we recommended that you download the MiniLogger Manager program. The Slope Indicator website always has the most recent version. If you don’t have a good internet connection, install from the Resource CD, as explained on the next page.
1. Start your internet browser. Click in the address field, enter www.slopeindicator.com, and click Go. When the website appears:
2. Click on Downloads, then click on Software.
3. Read the download instructions at the top of the page, then click on Click on “VW MiniLogger 2” to start the download.
4. *Double-click on the downloaded file, which is called “setupvwml2.msi.”
5. Follow on-screen setup instructions. Afterwards, you will find a shortcut named VW MiniLogger 2 on your start menu. The actual path to your program is normally C:\Program Files\VWMiniLooger 2\VWML2.exe.* If your PC is running Windows 95 and 98, you may have to download and install the “Microsoft Installer.” It is available on the Slope Indicator website.
Updatingthe Manager Program
1. Follow the steps above to download the most recent version of the Manager program.
2. When you double-click on the downloaded file (setupvwml2.msi), a dialog asks if you want to modify, repair, or remove the file. Choose remove. Windows then removes your old Manager program (but not any data).
3. Next, double-click on “setupvwml2.msi” again. This time it will install the updated version.
VW MiniLogger, 2012/2/22 2

Install fromthe Resource CD
If you don’t have a good internet connection, it will be more convenient to install the program from the Resource CD that was included with the MiniLogger.
1. Close all programs and insert the Resource CD.
2. Wait for your browser to start. If necessary, eject and reinsert the CD or start your browser, and navigate to the CD, and open cdmenu.html.
3. Choose Software.
4. Choose VW MiniLogger Manager 2.
5. A dialog appears. Choose “Open.” On older browsers, choose “Run this program from its current location.”
6. Follow the on-screen directions for the setup program.
VW MiniLogger, 2012/2/22 3

Connecting to the MiniLogger
Overview This chapter tells how connect a PC to the MiniLogger using a serial cable.
Power Upthe MiniLogger
The MiniLogger requires two D-cell batteries. Alkaline batteries normally provide about three months of service. Actual battery life depends on the temperature, the reading rate, whether or not a radio is used, and how frequently data is retrieved.
1. Connect the wires of the battery holder to the terminal post, if necessary.
2. Orient and insert the batteries as shown on the battery holder.
3. The MiniLogger takes a reading immediately and then waits for its next scheduled reading.
Red (+) Black (–)
Orient the batteries as shown on the battery holder.
Signal cable not shown.
VW MiniLogger, 2012/2/22 4

Connect by Serial Cable A serial cable is supplied with the MiniLogger. It is a “modem cable” with straight-through wires. (Null-modem cables will not work).
1. .Find your PC’s serial port. Look for a 9-pin connector.Some newer com-puters do not have a serial port. In that case, a USB to serial adaptor or a PC card is required. See troubleshooting later in this chapter.
2. Connect one end of the interface cable to the PC’s serial port and the other end of the cable to the MiniLogger’s serial port.
Start the MiniLoggerManager Program.
1. Click on Start and Choose Programs or All Programs.
2. Point at VW Mini-Logger 2.
3. Double-click on VW MiniLogger 2.
4. Click on the Edit Settings button.
5. You should see a screen similar to this.
MiniLogger’s Serial port
VW MiniLogger, 2012/2/22 5

TroubleshootingSerial Connections
If you see an error message, click OK to clear the message, and then:. Check that the
cables are firmly connected to MiniLogger and computer. Check the connection type, as explained below. Change the comm port, as explained below. Get a USB adapter, if necessary, as explained on the next page.
Check Connection Type 1. Click “Communications” on the menu bar.
2. Confirm that “Serial Cable” is selected. If it was not selected, select it, click OK, and try con-necting again.
Change the Comm Port 1. Click Communications.
2. Click the Refresh Button. The Manager program then creates a list of avail-able Comm ports.
3. Choose a different Comm port from the drop list and click OK.
4. If there is only one choice on the Comm Port list, then some other device probably has control of the serial port. Do you have a PDA? Sometimes PDA synchronization soft-ware takes control of the serial port. In this case, turn off the PDA program, and then try connecting to the MiniLogger again.
VW MiniLogger, 2012/2/22 6
Troubleshootingcontinued
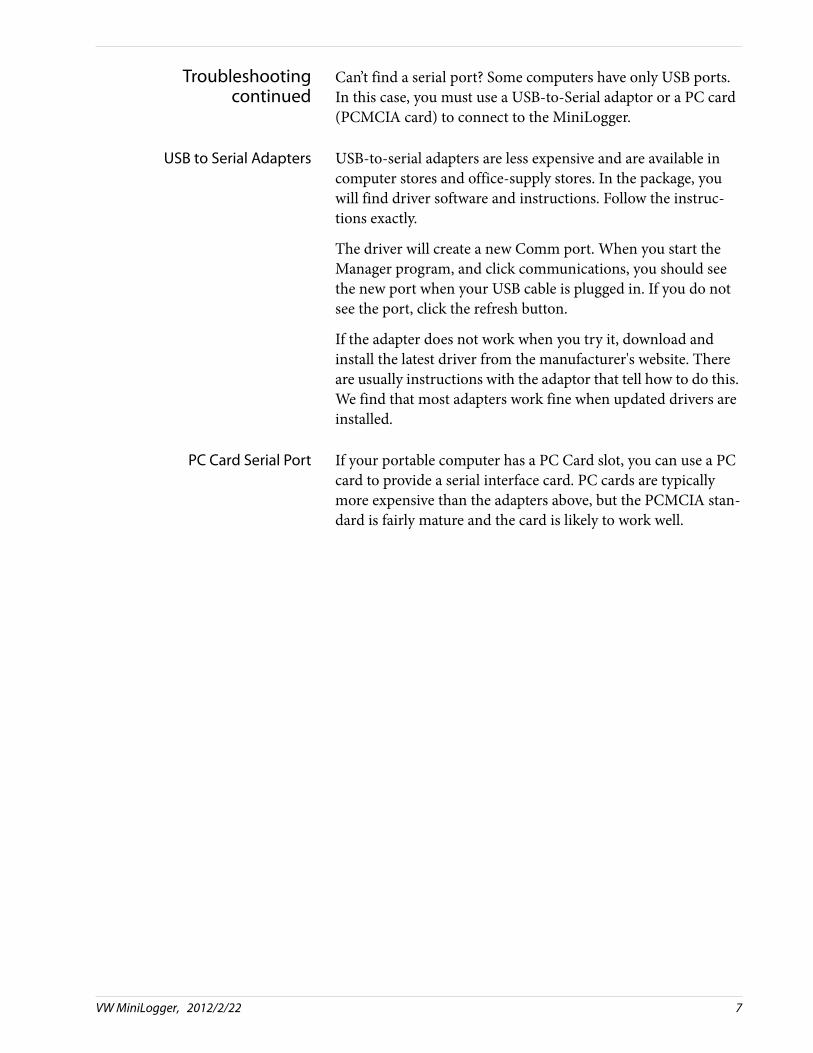
Can’t find a serial port? Some computers have only USB ports. In this case, you must use a USB-to-Serial adaptor or a PC card (PCMCIA card) to connect to the MiniLogger.
USB to Serial Adapters USB-to-serial adapters are less expensive and are available in computer stores and office-supply stores. In the package, you will find driver software and instructions. Follow the instruc-tions exactly.
The driver will create a new Comm port. When you start the Manager program, and click communications, you should see the new port when your USB cable is plugged in. If you do not see the port, click the refresh button.
If the adapter does not work when you try it, download and install the latest driver from the manufacturer's website. There are usually instructions with the adaptor that tell how to do this. We find that most adapters work fine when updated drivers are installed.
PC Card Serial Port If your portable computer has a PC Card slot, you can use a PC card to provide a serial interface card. PC cards are typically more expensive than the adapters above, but the PCMCIA stan-dard is fairly mature and the card is likely to work well.
VW MiniLogger, 2012/2/22 7
Setting Up
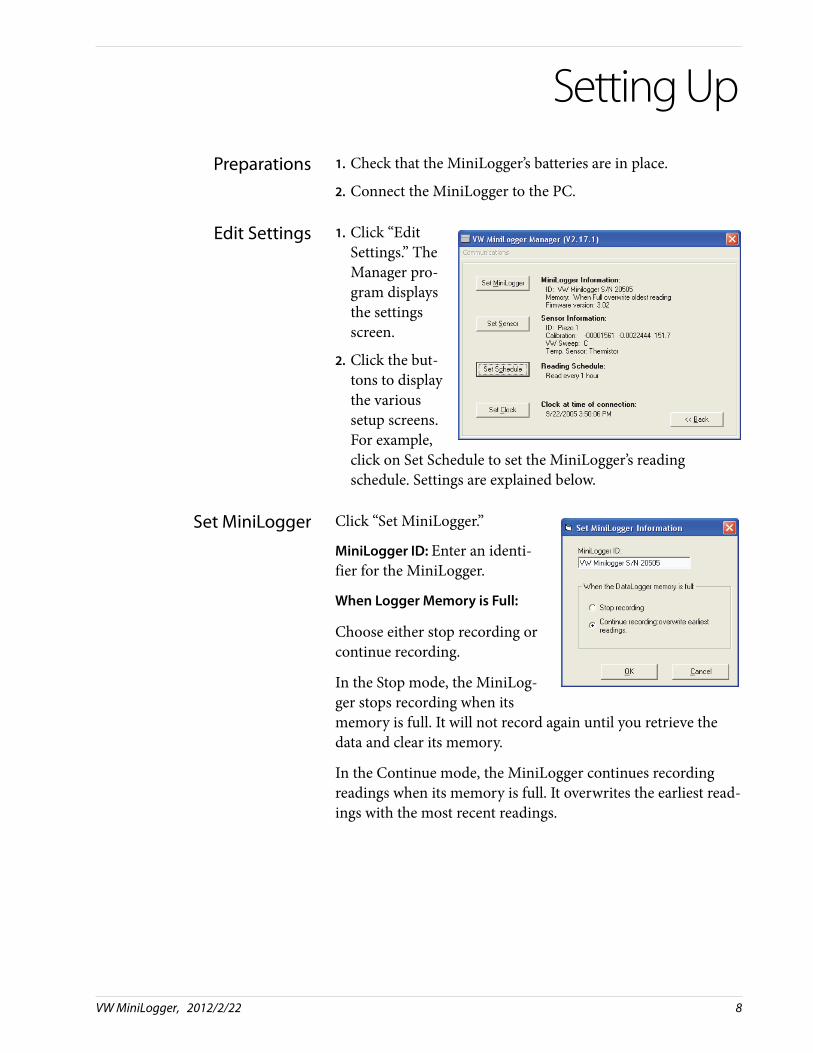
Preparations 1. Check that the MiniLogger’s batteries are in place.
2. Connect the MiniLogger to the PC.
Edit Settings 1. Click “Edit Settings.” The Manager pro-gram displays the settings screen.
2. Click the but-tons to display the various setup screens. For example, click on Set Schedule to set the MiniLogger’s readingschedule. Settings are explained below.
Set MiniLogger Click “Set MiniLogger.”
MiniLogger ID: Enter an identi-fier for the MiniLogger.
When Logger Memory is Full:
Choose either stop recording or continue recording.
In the Stop mode, the MiniLog-ger stops recording when its memory is full. It will not record again until you retrieve the data and clear its memory.
In the Continue mode, the MiniLogger continues recording readings when its memory is full. It overwrites the earliest read-ings with the most recent readings.
VW MiniLogger, 2012/2/22 8
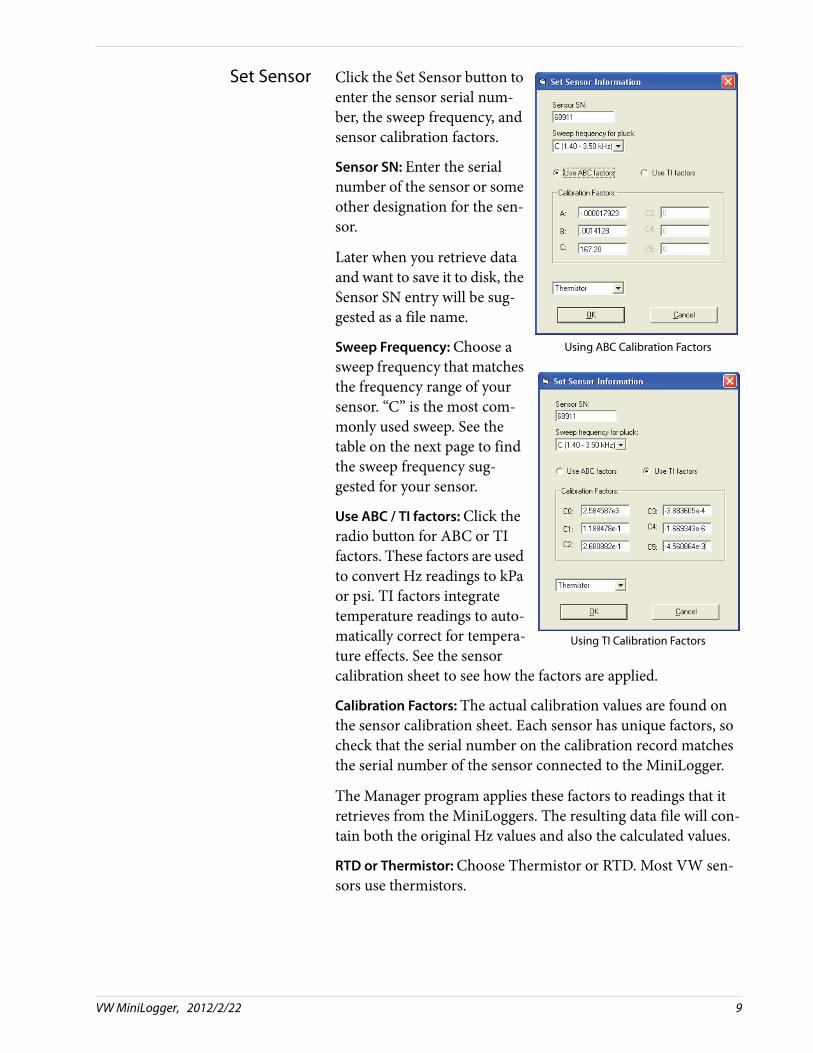
Set Sensor Click the Set Sensor button to enter the sensor serial num-ber, the sweep frequency, and sensor calibration factors.
Sensor SN: Enter the serial number of the sensor or some other designation for the sen-sor.
Later when you retrieve data and want to save it to disk, the Sensor SN entry will be sug-gested as a file name.
Sweep Frequency: Choose a sweep frequency that matches the frequency range of your sensor. “C” is the most com-monly used sweep. See the table on the next page to find the sweep frequency sug-gested for your sensor.
Use ABC / TI factors: Click the radio button for ABC or TI factors. These factors are used to convert Hz readings to kPa or psi. TI factors integrate temperature readings to auto-matically correct for tempera-ture effects. See the sensor calibration sheet to see how the factors are applied.
Calibration Factors: The actual calibration values are found on the sensor calibration sheet. Each sensor has unique factors, so check that the serial number on the calibration record matches the serial number of the sensor connected to the MiniLogger.
The Manager program applies these factors to readings that it retrieves from the MiniLoggers. The resulting data file will con-tain both the original Hz values and also the calculated values.
RTD or Thermistor: Choose Thermistor or RTD. Most VW sen-sors use thermistors.
Using ABC Calibration Factors
Using TI Calibration Factors
VW MiniLogger, 2012/2/22 9

Sensors and Sweeps Locate your sensor by name or part number. Then find the appropriate sweep in the same row. In general, it is best to use the lowest sweep range that covers the sensor frequencies.
Sweep Frequencies If your sensor is not listed above, check your sensor calibration sheet to find the lowest and highest frequencies in the calibra-tion. Then choose the sweep that is closest to those frequencies.
Sensor Name Required Sweep
Crackmeter Sweep C. If necessary, try sweep B.
Displacement Sensor, Extensometer Sweep C. If necessary, try sweep B.
Jointmeter, Mass Concrete Sweep C. If necessary, try sweep B.
Jointmeter, Submersible Sweep C. If necessary, try sweep B.
Piezometer Sweep C
Rebar Stressmeter Sweep C. If necessary, try sweep B.
Settlement Cell, 20 psi Sweep C. If necessary try sweep B.
Settlement Cell, 50 or 100 psi Sweep C
Strain Gauge, Arc-Weldable Sweep B. If necessary, try Sweep A
Strain Gauge, Embedment Sweep B. If necessary try sweep A
Strain Gauge, Concrete Surfaces Sweep B. If necessary, try Sweep A
Strain Gauge, Spot-Weldable Sweep B for measuring compressionSweep C for measuring tension
Stress Station, VW Transducers Sweep C
Total Pressure Cell Sweep C
Total Pressure Cell, Radial Sweep C
Total Pressure Cell, Tangential Sweep C
Sweep Starting Freq Ending Freq
Sweep A 450 1125
Sweep B 800 2000
Sweep C 1400 3500
Sweep D 2300 6000
VW MiniLogger, 2012/2/22 10

Set Schedule Click on the “Set Schedule” button to choose the start mode and read-ing interval. Then click OK.
Start Time: You can choose to have the MiniLogger start when batteries are inserted or you can choose a spe-cific time to start.
If you choose “On power up,” the MiniLogger uses the moment that you insert the batteries as the base time for subsequent readings.
If you choose “At” and enter a time and date, the MiniLogger will use the time and date as the base time for subsequent read-ings.
The default start time is always 2 minutes in the future accord-ing to the MiniLogger’s clock. Edit this as needed, but be sure to specify a start time that is in the future.
Reading Interval: The reading interval controls how often read-ings are taken. For example, if you enter a 1 in the “hours” Hours field, the MiniLogger will take one reading every hour, with the first reading taken according to the Start Time setting. The shortest valid interval is 2 seconds. The longest is 7 days.
Set Clock Click on the “Set Clock” button to set the MiniLogger’s clock. To synchronize the MiniLogger clock to your computer’s clock, click the “Match Computer” button. If you want to set a different time, click in the date and time fields, type in values, and click OK.
Note 1: The date display format is controlled by the short date setting in Windows (Control Panel > Regional Settings > Date).
Note 2: Both the MiniLogger and the Manager program use four-digit years internally.
VW MiniLogger, 2012/2/22 11

Data Logging
Overview 1. Connect the sensor to the MiniLogger.
2. Insert new batteries, if necessary.
3. Check the MiniLogger’s settings.
4. Verify operation using terminal mode (Optional).
Connect the Sensor 1. Remove the MiniLogger’s lid.
2. Prepare to insert cable through the cable gland: remove the nut, the nylon washer, and the rubber compression sleeve. Earlier models of the MiniLogger do not have the nylon washer. Slide the nut, nylon washer, and rubber compression sleeve onto the sensor’s signal cable
3. Insert the cable through the cable gland and connect the wires the MiniLogger’s terminals as explained below.
4. Pull gently on the wires to check the connection.
Function Wire Color Alt Wire Color
VW Orange Red
VW White & Orange Black
Temperature Blue White
Temperature White & Blue Green
Shield (Drain) Bare wire Bare wire
Connect leads from the cable to the terminals:
VW VW Shield Temp Temp
Slide nut and rubber compression sleeve onto cable. Then insert cable into box.
VW MiniLogger, 2012/2/22 12
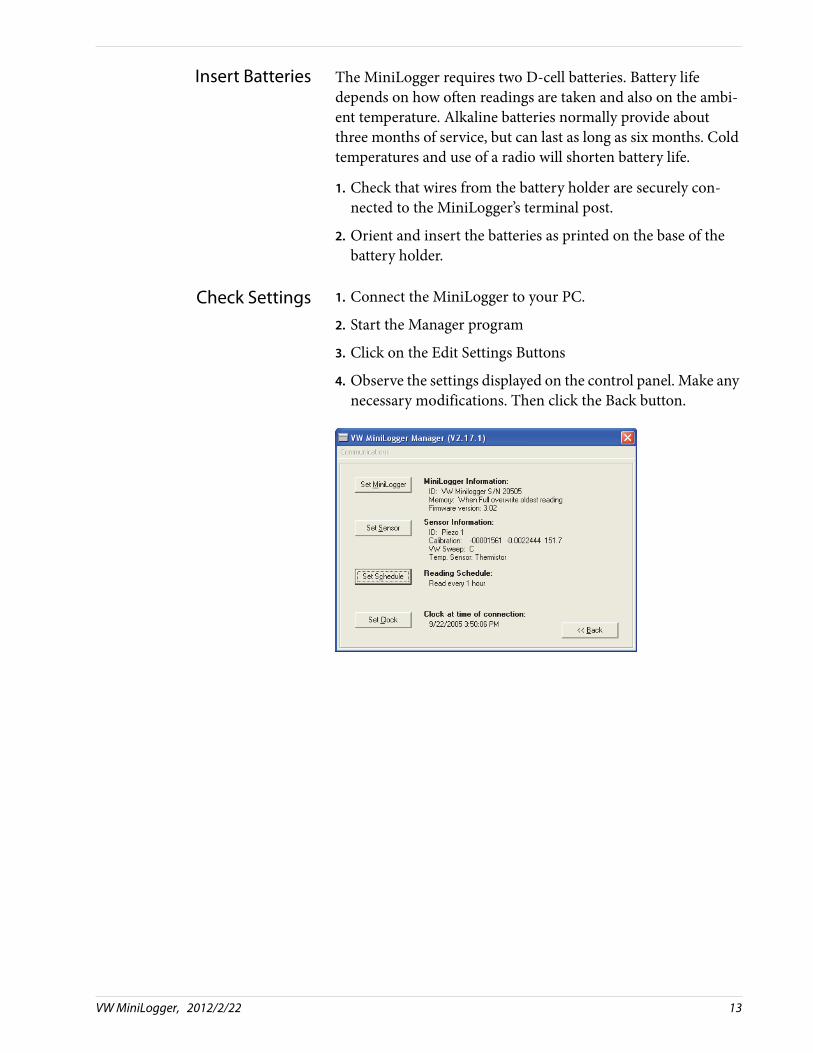
Insert Batteries The MiniLogger requires two D-cell batteries. Battery life depends on how often readings are taken and also on the ambi-ent temperature. Alkaline batteries normally provide about three months of service, but can last as long as six months. Cold temperatures and use of a radio will shorten battery life.
1. Check that wires from the battery holder are securely con-nected to the MiniLogger’s terminal post.
2. Orient and insert the batteries as printed on the base of the battery holder.
Check Settings 1. Connect the MiniLogger to your PC.
2. Start the Manager program
3. Click on the Edit Settings Buttons
4. Observe the settings displayed on the control panel. Make any necessary modifications. Then click the Back button.
VW MiniLogger, 2012/2/22 13

Retrieving Data
Retrieving Readings The MiniLogger is not very speedy in transmitting data to the PC. Retrieval time increases with the number of stored readings. You can minimize retrieval times by regularly clearing the Mini-Logger’s memory after you collect the readings.
1. Connect the MiniLogger to your PC and start the Manager program.
2. Click “Retrieve Readings.”
3. The MiniLogger reports its progress.
Click this button to retrieve readings.
VW MiniLogger, 2012/2/22 14

4. The MiniLogger Manager displays time-stamped readings both in Hz and engineering units.
5. Click “Save” to display options for saving the readings. These options are explained on the next page.
Click on Save to store the readings on your computer, as explained below.
Click on Erase to clear the MiniLogger’s mem-ory to make room for new readings.
Step 1: Choose a folder and a file name for the data.
Step 2: Choose all readings or a range of readings.
Step 3: Choose a format. The default .csv format is suitable for spreadsheets. The optional CR10 .dat format is useful when the MiniLogger is used to supplement a CR10 system.
VW MiniLogger, 2012/2/22 15
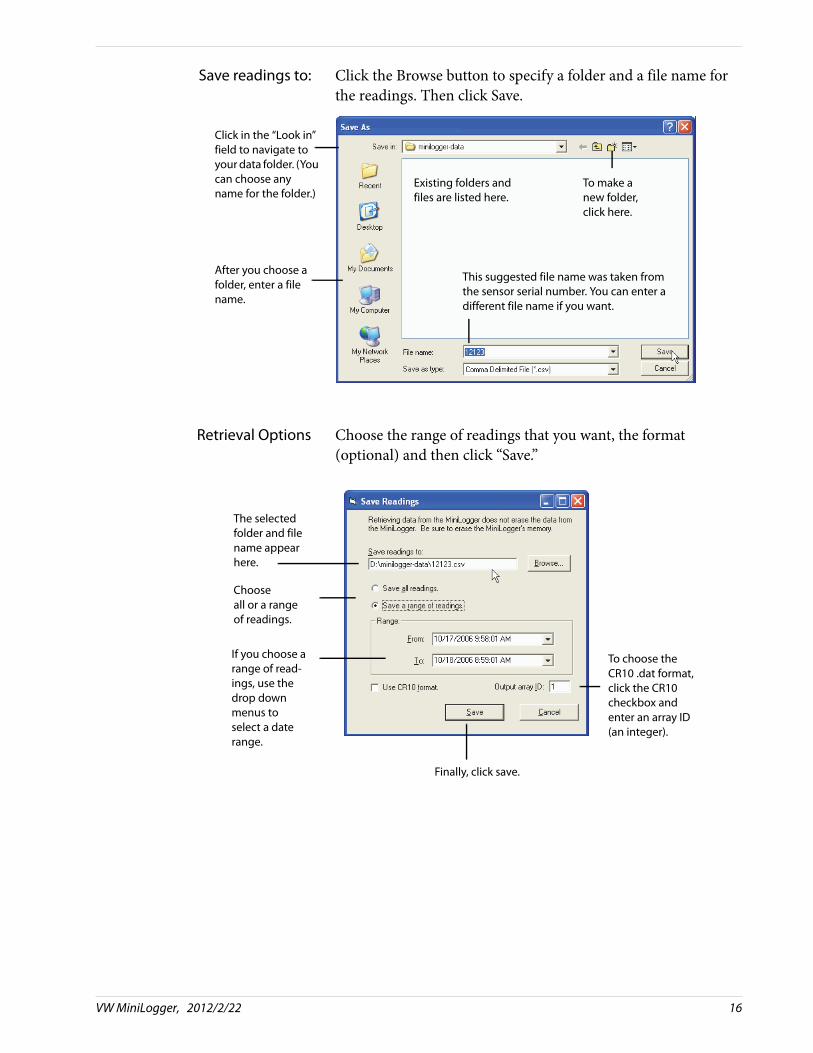
Save readings to: Click the Browse button to specify a folder and a file name for the readings. Then click Save.
Retrieval Options Choose the range of readings that you want, the format (optional) and then click “Save.”
Click in the “Look in” field to navigate to your data folder. (You can choose any name for the folder.)
After you choose a folder, enter a file name.
Existing folders and files are listed here.
To make a new folder, click here.
This suggested file name was taken from the sensor serial number. You can enter a different file name if you want.
Choose all or a rangeof readings.
The selected folder and file name appear here.
If you choose a range of read-ings, use the drop down menus to select a date range.
To choose the CR10 .dat format, click the CR10 checkbox and enter an array ID (an integer).
Finally, click save.
VW MiniLogger, 2012/2/22 16
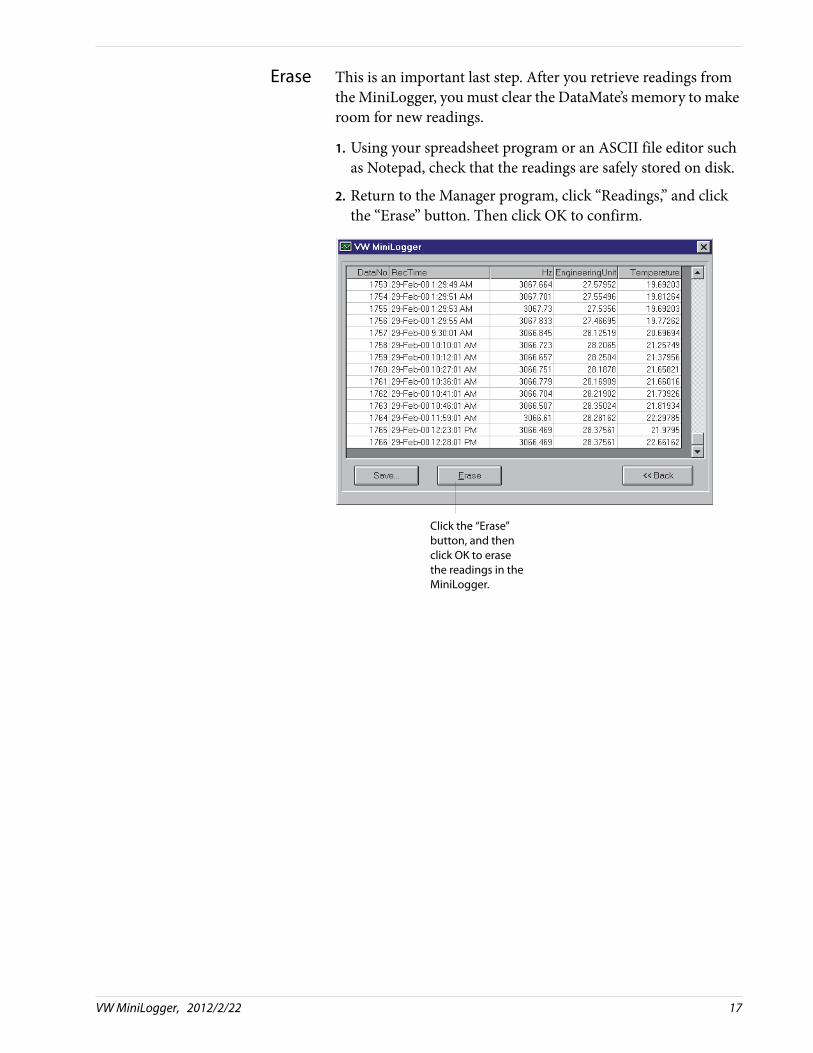
Erase This is an important last step. After you retrieve readings from the MiniLogger, you must clear the DataMate’s memory to make room for new readings.
1. Using your spreadsheet program or an ASCII file editor such as Notepad, check that the readings are safely stored on disk.
2. Return to the Manager program, click “Readings,” and click the “Erase” button. Then click OK to confirm.
Click the “Erase” button, and then click OK to erase the readings in the MiniLogger.
VW MiniLogger, 2012/2/22 17
About Radio MiniLoggers
Components The radio minilogger system includes these components:
MiniLoggerwith Wireless Option
The wireless option is a 900 Mhz or 2.4 Ghz radio embedded in the lid of the MiniLogger. These ‘radio lids’ can be ordered with new MiniLoggers or retrofit to old MiniLoggers.
Each radio lid has a label with an ID and channel number. You will need the ID and channel number to make the wireless con-nection.
The radio lid replaces the standard lid of the MiniLogger. It is connected to the base of the MiniLogger by a cable. One end of the cable plugs into the MiniLogger’s serial port. The other end of the cable plugs into the radio lid. An antenna screws into a terminal on the top of the lid.
Powering the radio naturally shortens battery life. Some testing has shown that when readings are taken at 1 hour intervals and retrieved four times a day, batteries can last three months or more in moderate weather. RF noise and longer distances from the logger will result in longer transmission times and shorten battery life.
Base Station Radio The base station radio is connected to the PC via a USB cable. One end of the cable plugs into the radio and the other end of the cable plugs into a USB port on your PC.
The base station radio is powered through the USB cable. If you are using a portable PC, consider that its battery will be power-ing the radio as well as the PC itself. If you are away from mains power, you may find it necessary to buy a car charger for the PC.
Base Station Software You must install driver software to make the base station work with your computer. You can find this software on a CD sup-plied with the base station. The next chapter tells how to install the software.
VW MiniLogger, 2012/2/22 18
Installing Base Station Software
Installing theBase Station Drivers
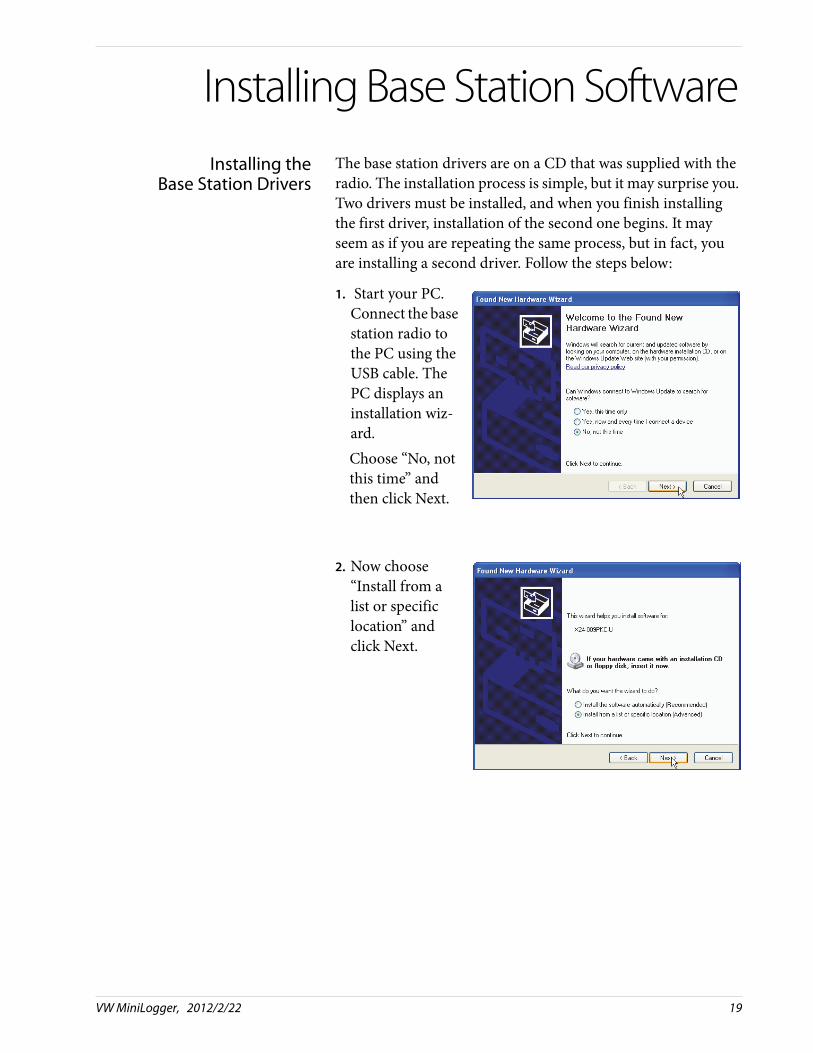
The base station drivers are on a CD that was supplied with the radio. The installation process is simple, but it may surprise you. Two drivers must be installed, and when you finish installing the first driver, installation of the second one begins. It may seem as if you are repeating the same process, but in fact, you are installing a second driver. Follow the steps below:
1. Start your PC. Connect the base station radio to the PC using the USB cable. The PC displays an installation wiz-ard.Choose “No, not this time” and then click Next.
2. Now choose “Install from a list or specificlocation” and click Next.
VW MiniLogger, 2012/2/22 19

Installing the driverscontinued
3. Now choose Search, click the checkbox for “Search remov-able media.” Insert the CD and click Next.
4. After a few sec-onds, the CD may pop up a startup screen.If this happens, click the exit button to close the screen.
5. Windows searches for the driver, installs it, and displays this screen.Click Finish and go to the next step, which installs the sec-ond driver.
Click exit if you see this screen.
VW MiniLogger, 2012/2/22 20

6. Now Windows starts a wizard to install the second driver. Choose “No, not this time” and click Next.
7. Now, choose “Install from a list or specific location,” and click Next.
8. Windows is done. Click Finish.Now you can use the base station.
VW MiniLogger, 2012/2/22 21

Entering Radio IDs
Introduction The Manager program needs a list of the radio IDs of the loggers that you want to connect to. This chapter tells how to create the list.
Selecting the Comm Port 1. Connect the base station to the PC, and start the MiniLogger Manager program.
2. Click “Communications” to display the Communi-cations Setup dialog.
3. Refresh the list of Comm ports, then choose one. Try the highest number first.
Enter Radio IDs 1. Choose Radio. Click in the blank field to the right. Choose Edit List.
VW MiniLogger, 2012/2/22 22

2. Click Add to add a radio ID.
3. When the dialog pops up, enter a name, ID, and chan-nel. Then click OK.The name can be any conve-nient name for the logger.The ID and Channel must be taken from the label on the Radio Lid.
4. Click Save to store the list on your com-puter.
VW MiniLogger, 2012/2/22 23

5. You can specify a folder for the list of radio IDs. The list is a text file named “Radiolst.lst.” You can specify a different name and a different folder for this file. You can also copy this file to other computers as needed. In this example, we made a folder called “minilogger-data” and will store the list in that folder. The Manager program remembers the last file and folder used.
6. Add more addresses to your list as needed. Be sure to click Save each time you add an address. Now you can use the base station with your Radio MiniLoggers.
VW MiniLogger, 2012/2/22 24

Connecting to Radio MiniLogger
Introduction The instructions below tell how to establish the connection between your PC and the Radio MiniLogger. Once the connec-tion is established, the Manager program works just as if you were using a serial cable.
1. Connect the base station to your PC, start the Manager Program, and choose Communi-cations.
2. Select a Radio Logger from the Radio ID list and click Apply.If you don’t see a list, it was probably renamed, moved, or copied from a different computer. Click Edit List. Then click the Load button to load the list.
3. When a connec-tion is made, you see the main menu.Now you can work with the MiniLog-ger as if you were connected by cable.
VW MiniLogger, 2012/2/22 25

4. When you are done with the first logger, you come back to this screen.To connect to another logger, choose communi-cations.
5. Then choose the logger from the list and click Apply.
6. The main menu appears again when you are con-nected.
VW MiniLogger, 2012/2/22 26