Vovici Enterprise Version 6.x to 6 -...
52
Update Guide Vovici Enterprise Version 6.x to 6.5 November 2012 Prepared for the Exclusive Use This document contains proprietary and confidential information of Verint Systems Inc. and may not be distributed to any persons or organizations for which it was not intended.
Transcript of Vovici Enterprise Version 6.x to 6 -...
Update Guide
Vovici Enterprise Version 6.x to 6.5
November 2012 Prepared for the Exclusive Use This document contains proprietary and confidential information of Verint Systems Inc. and may not be distributed to any persons or organizations for which it was not intended.

For installation support, please contact our Vovici Enterprise installation experts at [email protected]. If phone support is requested an installation expert will call the phone number requested. Or visit: www.vovici.com Please contact Vovici technical support if any of the information shown here is incorrect. Companies, names, and data used in examples herein are fictitious unless otherwise noted. No part of this document may be reproduced or transmitted in any form or by any means, electronic or mechanical, for any purpose, without the express written permission of Vovici, A Verint Company. Copyright © 2012 Verint Systems Inc. All Rights Reserved Worldwide. Confidential and Proprietary Information of Verint Systems Inc. All other company and product names are trademarks or registered trademarks of their respective holders. Printed in the United States of America November 2012
Contents Updating Vovici Enterprise ......................................................................... 5
Requirements ............................................................................................ 5
Uninstalling Existing Vovici Enterprise 6 .................................................... 6
Downloading Vovici Enterprise 6.5 File ...................................................... 7
Running the Installer ................................................................................. 8
Options.lic File ......................................................................................... 16
Windows Server 2003 Authentication and Permissions ............................ 17
Windows 2003 Server Permissions ............................................................. 17
Vovici Enterprise Authentication ................................................................. 18
Windows Authentication ............................................................................ 23
Windows Server 2008 Authentication and Permissions ............................ 29
IIS 6 Management Compatibility ................................................................ 29
Windows 2008 Server Permissions ............................................................. 29
Vovici Enterprise Authentication ................................................................. 30
Windows Authentication ............................................................................ 36
Administrative Portal ............................................................................... 42
Access Administrative Portal ...................................................................... 42
Updating the Database to Vovici Enterprise 6.5 ............................................ 44
Embedded Text Analytics .......................................................................... 44
Configuring and Testing Workgroups ....................................................... 45
Stand-alone Survey Engine ...................................................................... 46
Updating the Stand-alone Survey Engine ................................................. 47
Testing Environment ................................................................................ 48
Appendix .................................................................................................. 49
Determining the Web Server Root in Microsoft IIS 6 (Windows Server 2003) ..................................................................................................... 49
Determining the Web Server Root in Microsoft IIS 7 (Windows Server 2008) ..................................................................................................... 49

Contents
Vovici Enterprise Update Guide 4 Vovici, A Verint Company
© 2012 Verint Systems Inc. All Rights Reserved Worldwide. CONFIDENTIAL AND PROPRIETARY INFORMATION OF VERINT SYSTEMS INC.
ASP.NET Framework ................................................................................. 50
Knowledge Base ....................................................................................... 50
IIS Default Documents.............................................................................. 51

Chapter 1 Updating Vovici Enterprise The Update Guide provides the steps on how to upgrade Vovici Enterprise from Vovici 6.x to Vovici 6.5. The upgrade process will reset users who are connected to the system at the time of the upgrade, but will not otherwise affect the server configuration or settings.
Requirements The following requirements must be fulfilled before Vovici Enterprise can be installed.
1 ASP.NET 4.0 Framework needs to be installed on the server. Microsoft .NET Framework (version 4.0.30319) is available at:
http://www.microsoft.com/download/en/details.aspx?id=17851
2 You can find the hardware requirements for Vovici Enterprise here:
http://vovici.com/downloads/commhelp/6_5/vovici_v6_5_sys_requirements.pdf
3 You can find the software requirements for Vovici Enterprise here:
http://help.vovici.net/robohelp/server/Survey_Workbench/System_Requirements.htm
This is in addition to the requirements and prerequisites listed earlier in this document.
4 The following backups must be performed before the migration process begins:
• The physical directory where Vovici Enterprise 6.x is installed. Typically, this is located at C:\Inetpub\wwwroot\Vovici
• The existing database used by the application.

Chapter 2 Uninstalling Existing Vovici Enterprise 6 The existing installation of Vovici Enterprise 6 must be uninstalled to update your environment to the latest build of Vovici Enterprise 6.5. Follow the steps below to achieve this.
1 Inside Control Panel, open Add or Remove Programs.
2 Locate Vovici v6 from the list and select it.
3 Click Remove.
4 Click Yes in the confirmation dialog.
5 Vovici Enterprise 6 is now removed.

Chapter 3 Downloading Vovici Enterprise 6.5 File To begin the installation process, perform the following steps:
1 In a Web browser, navigate to the correct URL for the server’s operating system:
• For 32-bit servers:
http://vovici.com/downloads/comm/6_5/Vovici_Ent_6_5_x86.htm
• For 64-bit servers:
http://vovici.com/downloads/comm/6_5/Vovici_Ent_6_5_x64.htm
2 Click Save. (Steps 2-4 refer specifically to Microsoft Internet Explorer and may be different for other browsers.)
3 Choose a local directory to save the installer and make a note of this directory.
4 Click Save to begin downloading the installer. Once the download is complete, proceed to the next section.
NOTE
Our technicians will prove invaluable in assisting the server configuration and Vovici Enterprise 6.5 installation. You can contact them at [email protected] for assistance downloading and installing Vovici Enterprise 6.5.

Chapter 4 Running the Installer Once the installer has been downloaded, locate the file and follow the steps below to unzip it and begin the installation.
1 Double-click the installer (.MSI) file and click Run to continue. The following warning message may appear.
Running the software
IMPORTANT
Do not select “Never run software from “Vovici Corporation,” otherwise installers produced by Vovici will never work on the server.
Chapter 4 Running the Installer
Vovici Enterprise Update Guide 9 Vovici, A Verint Company
© 2012 Verint Systems Inc. All Rights Reserved Worldwide. CONFIDENTIAL AND PROPRIETARY INFORMATION OF VERINT SYSTEMS INC.
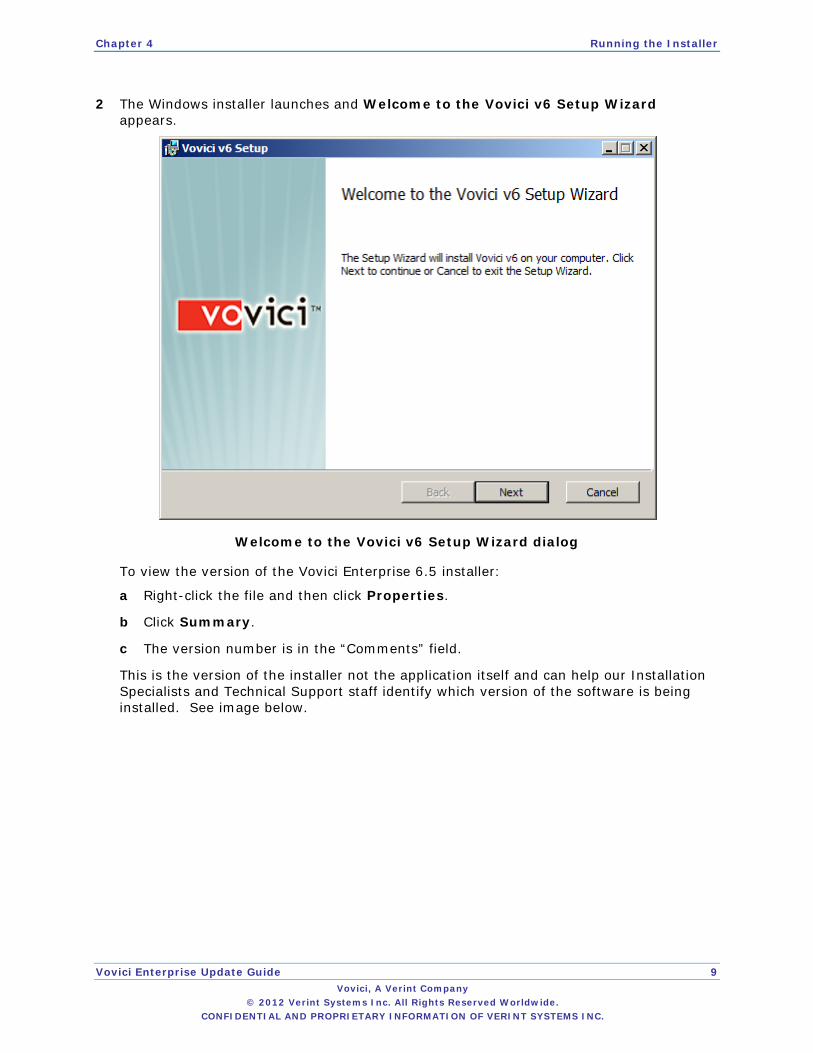
2 The Windows installer launches and Welcome to the Vovici v6 Setup Wizard appears.
Welcome to the Vovici v6 Setup Wizard dialog
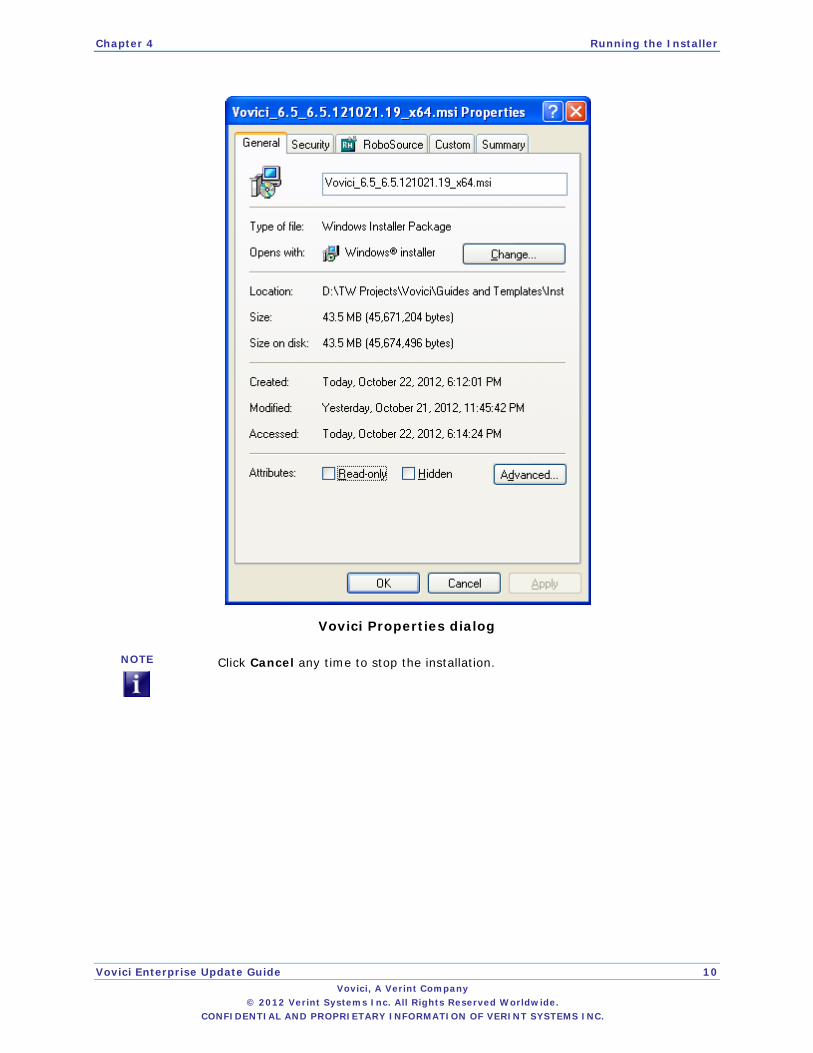
To view the version of the Vovici Enterprise 6.5 installer:
a Right-click the file and then click Properties.
b Click Summary.
c The version number is in the “Comments” field.
This is the version of the installer not the application itself and can help our Installation Specialists and Technical Support staff identify which version of the software is being installed. See image below.
Chapter 4 Running the Installer
Vovici Enterprise Update Guide 10 Vovici, A Verint Company
© 2012 Verint Systems Inc. All Rights Reserved Worldwide. CONFIDENTIAL AND PROPRIETARY INFORMATION OF VERINT SYSTEMS INC.
Vovici Properties dialog
NOTE
Click Cancel any time to stop the installation.
Chapter 4 Running the Installer
Vovici Enterprise Update Guide 11 Vovici, A Verint Company
© 2012 Verint Systems Inc. All Rights Reserved Worldwide. CONFIDENTIAL AND PROPRIETARY INFORMATION OF VERINT SYSTEMS INC.
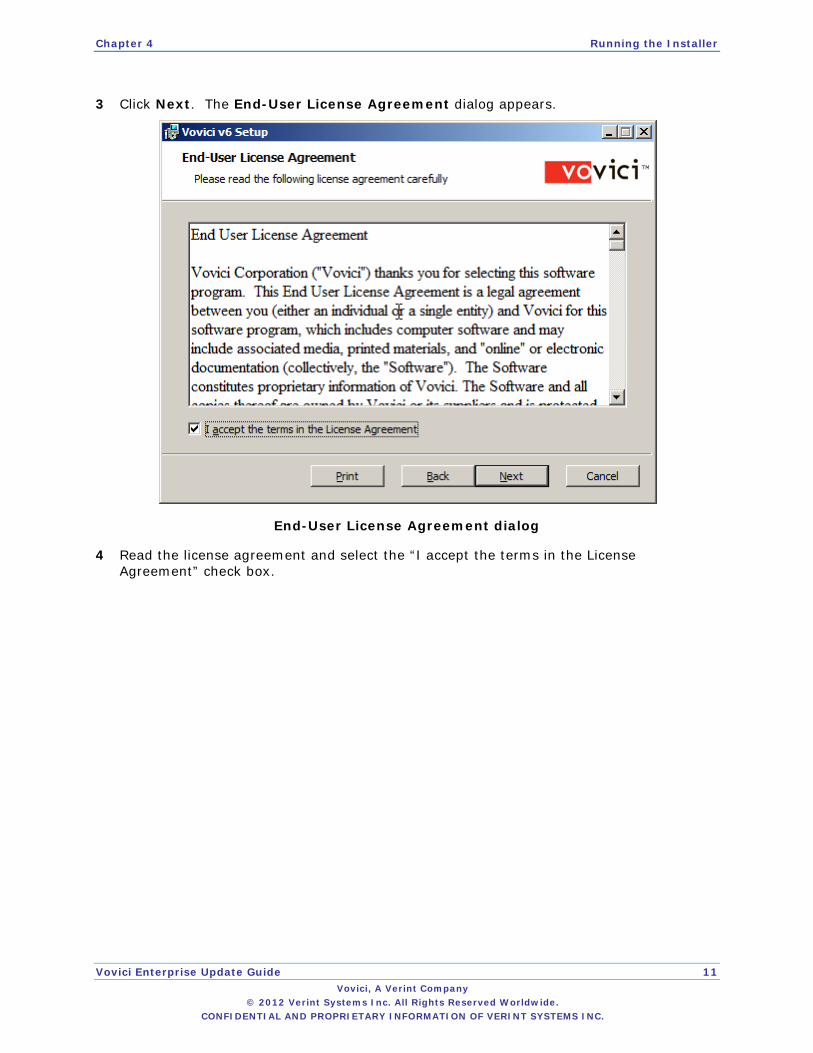
3 Click Next. The End-User License Agreement dialog appears.
End-User License Agreement dialog
4 Read the license agreement and select the “I accept the terms in the License Agreement” check box.

Chapter 4 Running the Installer
Vovici Enterprise Update Guide 12 Vovici, A Verint Company
© 2012 Verint Systems Inc. All Rights Reserved Worldwide. CONFIDENTIAL AND PROPRIETARY INFORMATION OF VERINT SYSTEMS INC.
5 Click Next. The Web Site and Application Name dialog appears.
Web Site and Application Name dialog
6 In the “Select the web site the application should be installed on” drop-down list, select the Web site where the application will be installed.
7 In the “This name will be a part of the application URL” field, enter the name for the virtual directory inside Microsoft IIS that will be used to access the Vovici Enterprise application.
The default value is “Community”
Therefore, the URL to access the main application will be:
http://servername/Community
NOTE
Ensure that the virtual directory name selected is not already in use by another application as a Web site name or virtual directory name on the server.

Chapter 4 Running the Installer
Vovici Enterprise Update Guide 13 Vovici, A Verint Company
© 2012 Verint Systems Inc. All Rights Reserved Worldwide. CONFIDENTIAL AND PROPRIETARY INFORMATION OF VERINT SYSTEMS INC.
8 Click Next. The Custom Setup dialog appears.
Custom Setup dialog
9 Click the “+” sign next to CommunitySetup to expose the following component (it is installed by default):
Vovici Service – This determines the installation options for the Vovici Service that controls the scheduling feature within the main application.
IMPORTANT
The Vovici Service will be installed by default. It provides time-based services to users such as deployment of invitations, opening and closing of surveys, etc. It is highly recommended that the Vovici Service is installed because certain functions require this service to work properly. Installing the service on multiple servers that are in a single Web farm may result in duplicate invitations being sent. Although, if the Vovici Service is disabled on all but one server, this will prevent any duplicate invitations from being sent. This solution allows a quick failover if the server running the Service goes down. Simply enable the Vovici Service on one of the other servers and it will restore the functionality without needing to locate the installer and re-run it to install the service on another server.
Contact our installation specialists for other information regarding the migration of Vovici Enterprise on a Web farm.
Chapter 4 Running the Installer
Vovici Enterprise Update Guide 14 Vovici, A Verint Company
© 2012 Verint Systems Inc. All Rights Reserved Worldwide. CONFIDENTIAL AND PROPRIETARY INFORMATION OF VERINT SYSTEMS INC.
NOTE
Selecting the text for either installation component will display available disk space.
10 Click the icon ( ) next to its name to install one component or the other. Select the “X” icon to cancel installation of the component.
The following buttons (other than the three navigation buttons, Back, Next, and Cancel) are available on this page:
• Reset – Click to return all options to the original default states.
• Disk Usage – Click to open a page that displays the following information about every drive partition either physically connected to the computer or mapped over a network:
Disk Size – The total available disk space.
Available – The amount of free space available.
Required – How much disk space is required for the application.
11 Once all desired options have been configured, click Next.
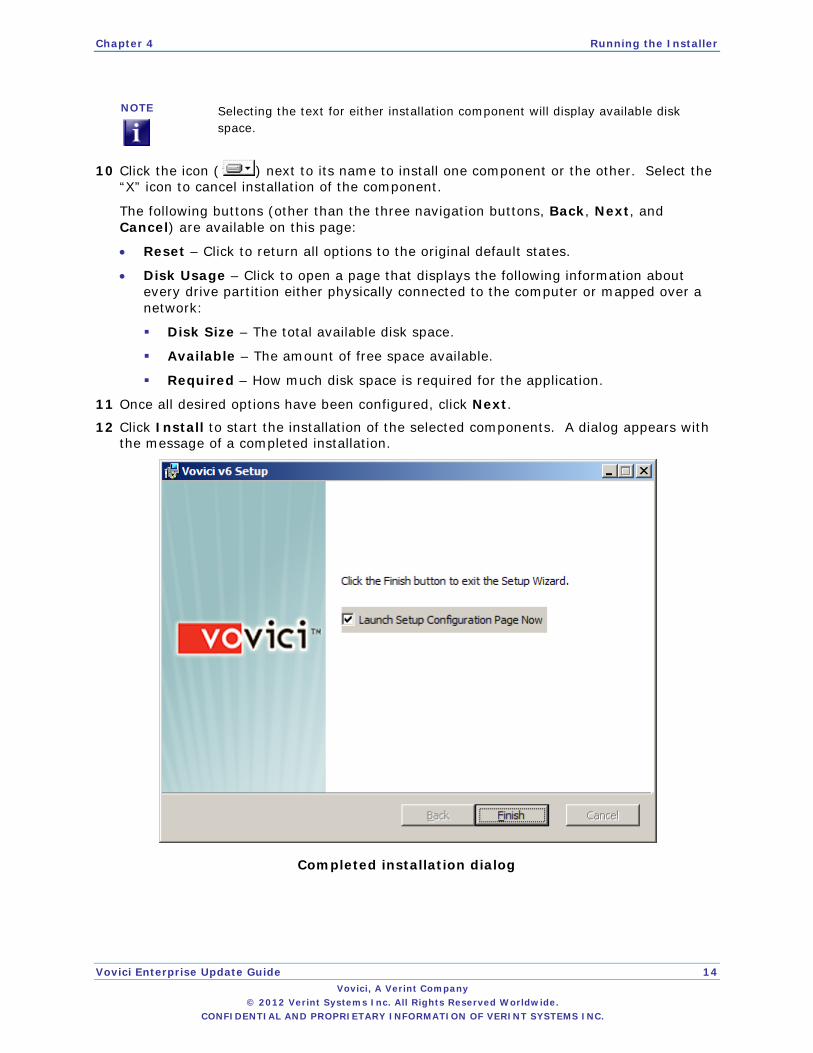
12 Click Install to start the installation of the selected components. A dialog appears with the message of a completed installation.
Completed installation dialog

Chapter 4 Running the Installer
Vovici Enterprise Update Guide 15 Vovici, A Verint Company
© 2012 Verint Systems Inc. All Rights Reserved Worldwide. CONFIDENTIAL AND PROPRIETARY INFORMATION OF VERINT SYSTEMS INC.
13 Select the “Launch Setup Configuration Page Now” check box if you want the application to load the Administrative Portal page based on the information it receives from IIS. Section 8 covers the steps you need to do inside the Administrative Portal.
The steps outlined in Section 5 still need to be done to fully register the application with the new version. Otherwise, the application will be installed in a trial state so that it will expire after 30 days and certain advanced features will not be available in the application.
It is still advisable to verify permissions listed in Section 6 or Section 7 but it is not required because Windows often retains the previous permission settings. If a problem occurs during the remaining installation process, it is recommended that the permissions listed in Section 6 or Section 7 are verified.
14 Click Finish.
15 Click Yes if you are prompted to restart your system before continuing this installation procedure. Otherwise, the Vovici Service will not function correctly.
Restart system dialog
IMPORTANT
A reboot of the server is required for the Vovici Service to function properly (this is a Windows Service that handles the schedule functions inside the application). Until the server is rebooted, the schedule functionality will not work in Vovici Enterprise.

Chapter 5 Options.lic File Vovici Enterprise installation experts should provide the options.lic file. A new file is required for Vovici Enterprise 6.5 as older options.lic files will not work with it. Copy the options.lic file to the following directory before proceeding:
Drive Letter:\pathto\Vovici\AppData
The path for Drive Letter:\pathto\ should be the path to the root of the Web site specified in Step 9 above. This is the license file for the application and is needed to access the application. It also controls which add-ons purchased to the product are accessible.
NOTE
The Application Pool used by our application will need to be recycled in order for this file to be properly read.
Chapter 6 Windows Server 2003 Authentication and Permissions This section deals with a configuration on a machine with Windows Server 2003 and explains how to configure the desired authentication mode and permissions. If Windows Server 2008 is used, skip to the Section 7. Once the machine has been restarted (assuming it was needed), the authentication mode used for granting access to the application must be selected and configured inside IIS.
Windows 2003 Server Permissions Vovici Enterprise has two authentication modes:
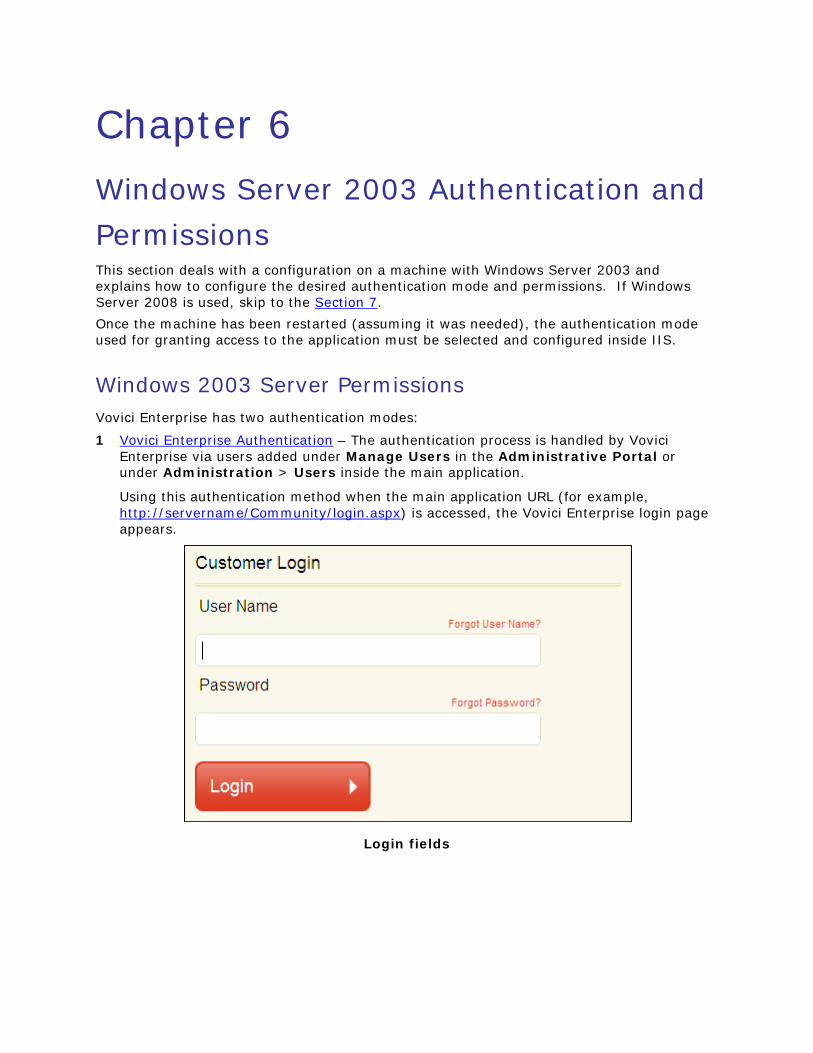
1 Vovici Enterprise Authentication – The authentication process is handled by Vovici Enterprise via users added under Manage Users in the Administrative Portal or under Administration > Users inside the main application.
Using this authentication method when the main application URL (for example, http://servername/Community/login.aspx) is accessed, the Vovici Enterprise login page appears.
Login fields

Chapter 6 Windows Server 2003 Authentication and Permissions
Vovici Enterprise Update Guide 18 Vovici, A Verint Company
© 2012 Verint Systems Inc. All Rights Reserved Worldwide. CONFIDENTIAL AND PROPRIETARY INFORMATION OF VERINT SYSTEMS INC.
2 Windows Authentication – IIS handles the authentication of the user. Vovici Enterprise only verifies that the Windows account used to log into the computer itself was added to the list of authorized users under Manage Users in the Administrative Portal or under Administration > Users inside the main application. No login screen to the application is displayed to the user.
Every setup of the application will only use one of these two authentication methods. This should be determined before allowing users to access the application. Each authentication mode has a different set of permissions that must be allowed in order for Vovici Enterprise to function correctly. Both authentication modes still require the users to be added within Administrative Portal – Manage Users or within the application itself under Administration – Users. These two authentication modes are discussed in more detail in the following sections.
Vovici Enterprise Authentication Anonymous access must be enabled inside IIS in order for Vovici Enterprise Authentication to function correctly.
NOTE
Integrated Windows authentication must be disabled inside IIS in order to attempt to login into Vovici Enterprise using Vovici Enterprise Authentication.
To enable “Anonymous access” and disable “Integrated Windows authentication” in Microsoft IIS, follow the steps below:
1 Open Microsoft IIS.
2 Right-click the Community Virtual Directory.
3 Select Properties.
4 Click the Directory Security tab.
5 Click Edit.
6 Select Anonymous access to enable it.
7 Clear Integrated Windows authentication to disable it.
8 Click OK twice.
Vovici Enterprise Authentication Permissions The following permissions must be assigned after the Vovici Enterprise installer has been run in order for Vovici Enterprise Authentication to function. Most of the permissions listed below are requirements of the Windows Operating System, the Microsoft IIS Web server, and Microsoft ASP.NET 4.0. They are listed for reference to speed the installation process and to aid troubleshooting. Vovici is not responsible for any of the permissions assigned.
Chapter 6 Windows Server 2003 Authentication and Permissions
Vovici Enterprise Update Guide 19 Vovici, A Verint Company
© 2012 Verint Systems Inc. All Rights Reserved Worldwide. CONFIDENTIAL AND PROPRIETARY INFORMATION OF VERINT SYSTEMS INC.
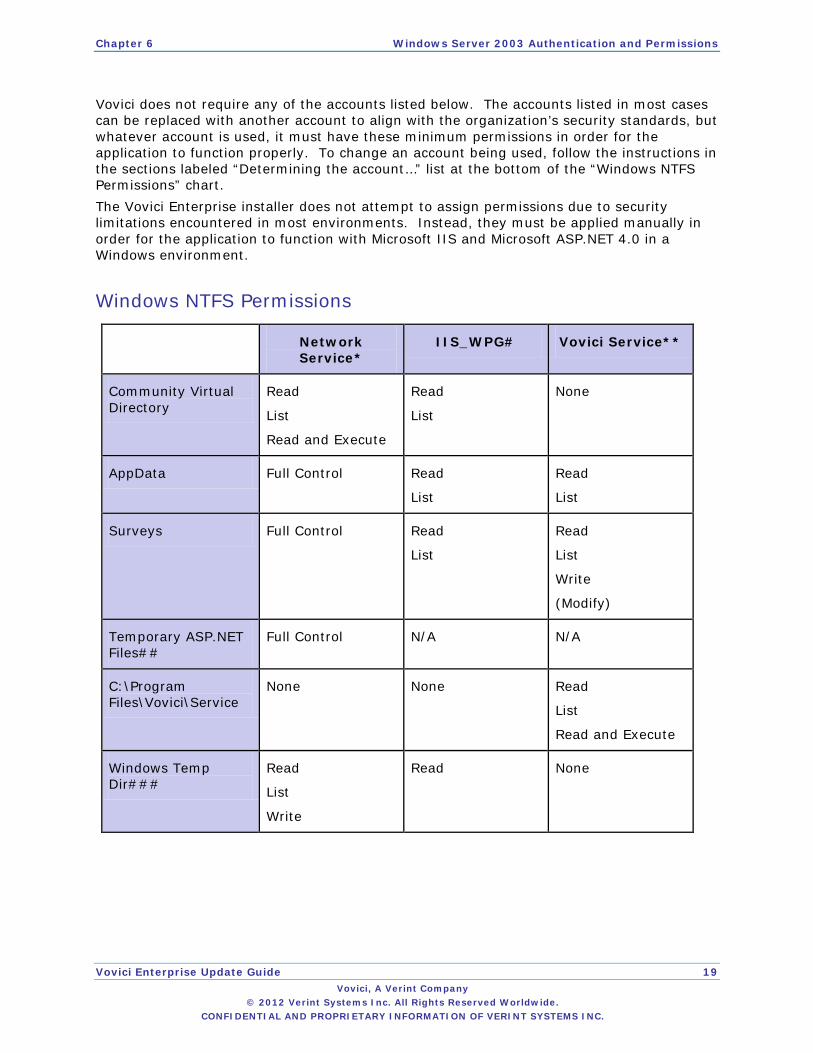
Vovici does not require any of the accounts listed below. The accounts listed in most cases can be replaced with another account to align with the organization’s security standards, but whatever account is used, it must have these minimum permissions in order for the application to function properly. To change an account being used, follow the instructions in the sections labeled “Determining the account…” list at the bottom of the “Windows NTFS Permissions” chart. The Vovici Enterprise installer does not attempt to assign permissions due to security limitations encountered in most environments. Instead, they must be applied manually in order for the application to function with Microsoft IIS and Microsoft ASP.NET 4.0 in a Windows environment.
Windows NTFS Permissions
Network Service*
IIS_WPG# Vovici Service**
Community Virtual Directory
Read
List
Read and Execute
Read
List
None
AppData Full Control Read
List
Read
List
Surveys Full Control Read
List
Read
List
Write
(Modify)
Temporary ASP.NET Files##
Full Control N/A N/A
C:\Program Files\Vovici\Service
None None Read
List
Read and Execute
Windows Temp Dir###
Read
List
Write
Read None
Chapter 6 Windows Server 2003 Authentication and Permissions
Vovici Enterprise Update Guide 20 Vovici, A Verint Company
© 2012 Verint Systems Inc. All Rights Reserved Worldwide. CONFIDENTIAL AND PROPRIETARY INFORMATION OF VERINT SYSTEMS INC.
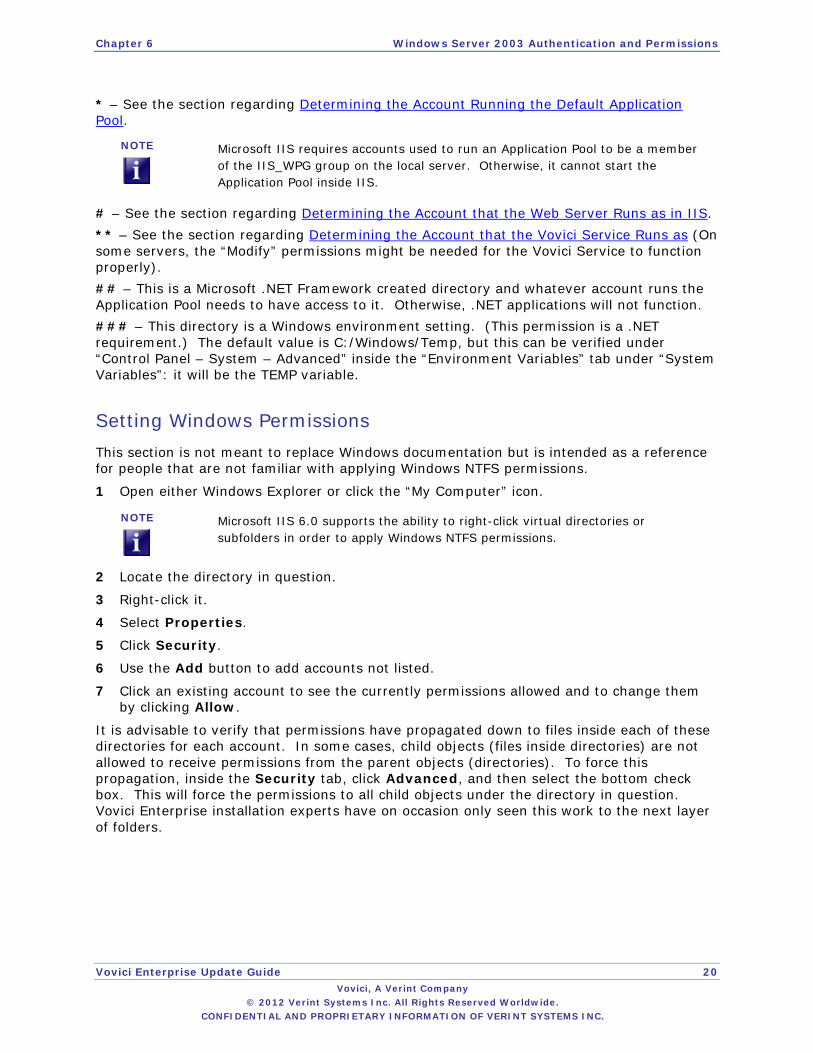
* – See the section regarding Determining the Account Running the Default Application Pool.
NOTE
Microsoft IIS requires accounts used to run an Application Pool to be a member of the IIS_WPG group on the local server. Otherwise, it cannot start the Application Pool inside IIS.
# – See the section regarding Determining the Account that the Web Server Runs as in IIS. ** – See the section regarding Determining the Account that the Vovici Service Runs as (On some servers, the “Modify” permissions might be needed for the Vovici Service to function properly). ## – This is a Microsoft .NET Framework created directory and whatever account runs the Application Pool needs to have access to it. Otherwise, .NET applications will not function. ### – This directory is a Windows environment setting. (This permission is a .NET requirement.) The default value is C:/Windows/Temp, but this can be verified under “Control Panel – System – Advanced” inside the “Environment Variables” tab under “System Variables”: it will be the TEMP variable.
Setting Windows Permissions This section is not meant to replace Windows documentation but is intended as a reference for people that are not familiar with applying Windows NTFS permissions.
1 Open either Windows Explorer or click the “My Computer” icon.
NOTE
Microsoft IIS 6.0 supports the ability to right-click virtual directories or subfolders in order to apply Windows NTFS permissions.
2 Locate the directory in question.
3 Right-click it.
4 Select Properties.
5 Click Security.
6 Use the Add button to add accounts not listed.
7 Click an existing account to see the currently permissions allowed and to change them by clicking Allow.
It is advisable to verify that permissions have propagated down to files inside each of these directories for each account. In some cases, child objects (files inside directories) are not allowed to receive permissions from the parent objects (directories). To force this propagation, inside the Security tab, click Advanced, and then select the bottom check box. This will force the permissions to all child objects under the directory in question. Vovici Enterprise installation experts have on occasion only seen this work to the next layer of folders.

Chapter 6 Windows Server 2003 Authentication and Permissions
Vovici Enterprise Update Guide 21 Vovici, A Verint Company
© 2012 Verint Systems Inc. All Rights Reserved Worldwide. CONFIDENTIAL AND PROPRIETARY INFORMATION OF VERINT SYSTEMS INC.
For example: Permissions set on the /vovici directory are only applied to the:
/vovici/AppData directory
However, permissions will not always be applied to:
/vovici/AppData/admin directory
IIS Permissions
Permissions
Community Virtual Directory
Read
AppData Read
Write
Surveys Read
Write
Determining the Application Pool Used by Vovici Enterprise By default, Vovici Enterprise is run by the default Application Pool, but this varies. Use the information listed above to determine the exact Application Pool.
1 Open Microsoft IIS.
2 Select the Web site that is being used to host Vovici Enterprise.
3 Right-click the Community Virtual Directory folder (specified during the original installation, sometimes called Perseus).
4 Select Properties.
5 Select the Virtual Directory tab.
6 Record the Application Pool setting at the bottom of the page.
Chapter 6 Windows Server 2003 Authentication and Permissions
Vovici Enterprise Update Guide 22 Vovici, A Verint Company
© 2012 Verint Systems Inc. All Rights Reserved Worldwide. CONFIDENTIAL AND PROPRIETARY INFORMATION OF VERINT SYSTEMS INC.
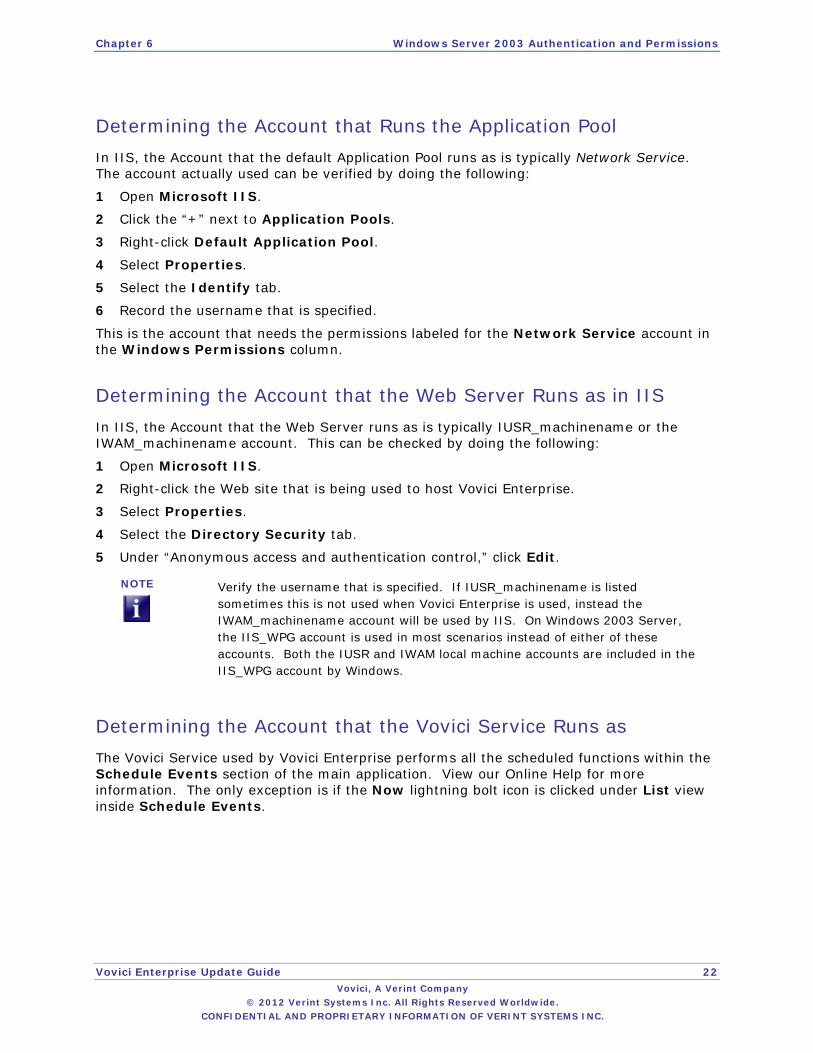
Determining the Account that Runs the Application Pool In IIS, the Account that the default Application Pool runs as is typically Network Service. The account actually used can be verified by doing the following:
1 Open Microsoft IIS.
2 Click the “+” next to Application Pools.
3 Right-click Default Application Pool.
4 Select Properties.
5 Select the Identify tab.
6 Record the username that is specified.
This is the account that needs the permissions labeled for the Network Service account in the Windows Permissions column.
Determining the Account that the Web Server Runs as in IIS In IIS, the Account that the Web Server runs as is typically IUSR_machinename or the IWAM_machinename account. This can be checked by doing the following:
1 Open Microsoft IIS.
2 Right-click the Web site that is being used to host Vovici Enterprise.
3 Select Properties.
4 Select the Directory Security tab.
5 Under “Anonymous access and authentication control,” click Edit.
NOTE
Verify the username that is specified. If IUSR_machinename is listed sometimes this is not used when Vovici Enterprise is used, instead the IWAM_machinename account will be used by IIS. On Windows 2003 Server, the IIS_WPG account is used in most scenarios instead of either of these accounts. Both the IUSR and IWAM local machine accounts are included in the IIS_WPG account by Windows.
Determining the Account that the Vovici Service Runs as The Vovici Service used by Vovici Enterprise performs all the scheduled functions within the Schedule Events section of the main application. View our Online Help for more information. The only exception is if the Now lightning bolt icon is clicked under List view inside Schedule Events.

Chapter 6 Windows Server 2003 Authentication and Permissions
Vovici Enterprise Update Guide 23 Vovici, A Verint Company
© 2012 Verint Systems Inc. All Rights Reserved Worldwide. CONFIDENTIAL AND PROPRIETARY INFORMATION OF VERINT SYSTEMS INC.
Check this by doing the following:
1 Inside Control Panel, open Administrative Tools.
2 Double-click (open) Services.
3 Look for the Vovici Service, it is typically named Vovici Service, and right-click it.
4 Select Properties.
5 Select the Login tab.
NOTE
Please record the username that is specified. This account needs the permissions specified under the “Vovici Services” column in order to open and close surveys.
The account listed here must have the ability to start services on the local server. Otherwise, the Vovici Service cannot be started.
Windows Authentication Integrated Windows authentication must be enabled inside Microsoft IIS to attempt to login into Vovici Enterprise using Windows Authentication. Also, edit the web.config file to support this authentication method.
Editing the Web.Config File for Windows Authentication Inside the \vovici root directory, find the web.config file (this path was specified when the installer was run earlier in the process). Change the following line:
<authentication mode=“Forms” />
To:
<authentication mode=“Windows” />
Editing the App.Config File for Windows Authentication Inside the \AppData subdirectory (of the vovici root directory), find the App.config file (this path was specified when the installer was run earlier in the process). Look for:
<ApplicationSettings>
and add the following line below it:
<AuthenticationMode>WINDOWS</AuthenticationMode>
This should look like the example below when done:
<ApplicationSettings>
<AuthenticationMode>WINDOWS</AuthenticationMode>
Chapter 6 Windows Server 2003 Authentication and Permissions
Vovici Enterprise Update Guide 24 Vovici, A Verint Company
© 2012 Verint Systems Inc. All Rights Reserved Worldwide. CONFIDENTIAL AND PROPRIETARY INFORMATION OF VERINT SYSTEMS INC.
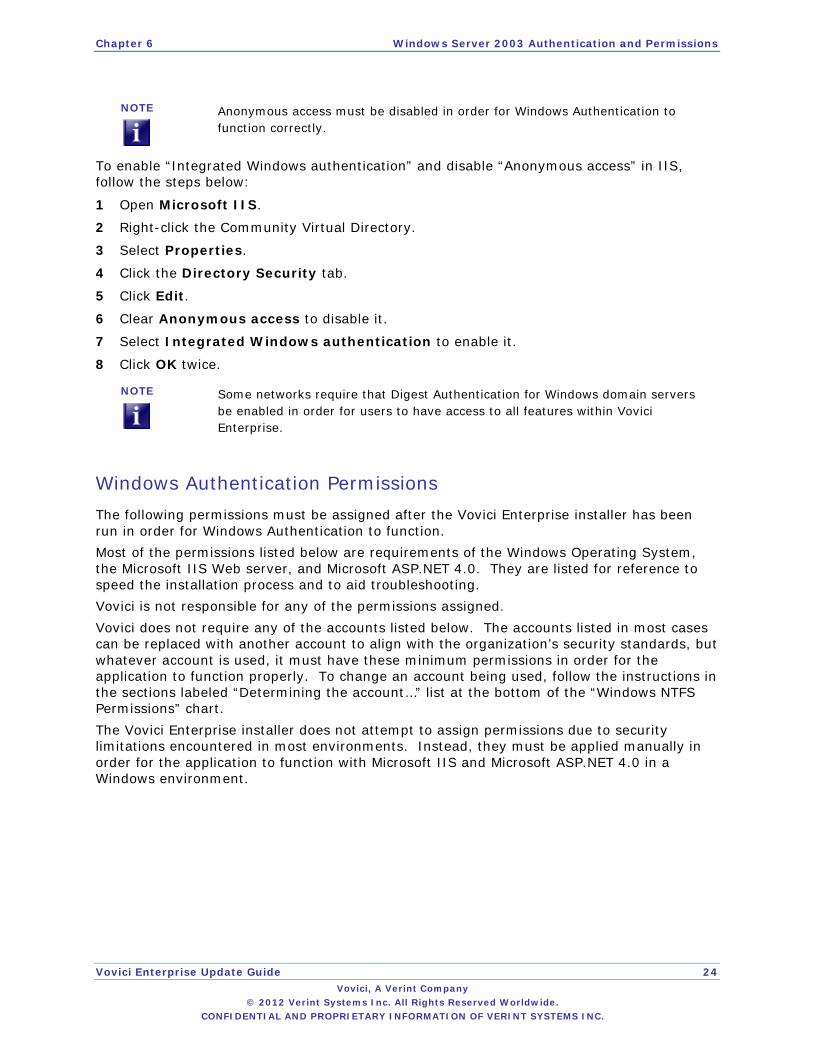
NOTE
Anonymous access must be disabled in order for Windows Authentication to function correctly.
To enable “Integrated Windows authentication” and disable “Anonymous access” in IIS, follow the steps below:
1 Open Microsoft IIS.
2 Right-click the Community Virtual Directory.
3 Select Properties.
4 Click the Directory Security tab.
5 Click Edit.
6 Clear Anonymous access to disable it.
7 Select Integrated Windows authentication to enable it.
8 Click OK twice.
NOTE
Some networks require that Digest Authentication for Windows domain servers be enabled in order for users to have access to all features within Vovici Enterprise.
Windows Authentication Permissions The following permissions must be assigned after the Vovici Enterprise installer has been run in order for Windows Authentication to function. Most of the permissions listed below are requirements of the Windows Operating System, the Microsoft IIS Web server, and Microsoft ASP.NET 4.0. They are listed for reference to speed the installation process and to aid troubleshooting. Vovici is not responsible for any of the permissions assigned. Vovici does not require any of the accounts listed below. The accounts listed in most cases can be replaced with another account to align with the organization’s security standards, but whatever account is used, it must have these minimum permissions in order for the application to function properly. To change an account being used, follow the instructions in the sections labeled “Determining the account…” list at the bottom of the “Windows NTFS Permissions” chart. The Vovici Enterprise installer does not attempt to assign permissions due to security limitations encountered in most environments. Instead, they must be applied manually in order for the application to function with Microsoft IIS and Microsoft ASP.NET 4.0 in a Windows environment.

Chapter 6 Windows Server 2003 Authentication and Permissions
Vovici Enterprise Update Guide 25 Vovici, A Verint Company
© 2012 Verint Systems Inc. All Rights Reserved Worldwide. CONFIDENTIAL AND PROPRIETARY INFORMATION OF VERINT SYSTEMS INC.
Windows NTFS Permissions
Network Service*
Windows User Accounts#
Vovici Service**
Community Virtual Directory
Read
List
Read and Execute
Read
List
None
AppData Full Control Read
List
Read
List
Surveys Full Control Read
List
Read
List
Write
(Modify)
Temporary ASP.NET Files##
Full Control N/A N/A
C:\Program Files\Vovici\Service
None None Read
List
Read and Execute
Windows Temp Dir###
Read
List
Write
Read None
* – See the section regarding Determining the Account Running the Default Application Pool. # – In certain IIS configurations (for example, when Impersonation is enabled) all the domain users that will access Vovici Enterprise will need these permissions to access the product correctly. ** – See the section regarding Determining the Account that the Vovici Service Runs as (On some servers, the “Modify” permissions might be needed for the Vovici Service to function properly).

Chapter 6 Windows Server 2003 Authentication and Permissions
Vovici Enterprise Update Guide 26 Vovici, A Verint Company
© 2012 Verint Systems Inc. All Rights Reserved Worldwide. CONFIDENTIAL AND PROPRIETARY INFORMATION OF VERINT SYSTEMS INC.
## – This is a Microsoft .NET Framework created directory and whatever account runs the Application Pool needs to have access to it. Otherwise, .NET applications will not function. ### – This directory is a Windows environment setting. (This permission is a .NET requirement.) The default value is C:/Windows/Temp, but this can be verified under “Control Panel – System – Advanced” inside the “Environment Variables” tab under “System Variables”: it will be the TEMP variable.
NOTE
In some cases, the “Write” and “Modify” permissions might need to be assigned to these users over the AppData, Surveys, and Reports subdirectories.
It is recommended that a group is created containing all these users under Control Panels – Administrative Tools – Computer Management – Local Users and Groups. This will make assigning the permissions in Windows easier, but the group must be maintained every time a new user is added.
Setting Windows Permissions This section is not meant to replace Windows documentation but is intended as a reference for people that are not familiar with applying Windows NTFS permissions.
1 Open either Windows Explorer or click the “My Computer” icon.
NOTE
Microsoft IIS 6.0 supports the ability to right-click virtual directories or subfolders in order to apply Windows NTFS permissions.
2 Locate the directory in question.
3 Right-click it.
4 Select Properties.
5 Click Security.
6 Use the Add button to add accounts not listed.
7 Click an existing account to see the currently permissions allowed and to change them by clicking Allow.
It is advisable to verify that permissions have propagated down to files inside each of these directories for each account. In some cases, child objects (files inside directories) are not allowed to receive permissions from the parent objects (directories). To force this propagation, inside the Security tab, click Advanced, and then select the bottom check box. This will force the permissions to all child objects under the directory in question. Vovici Enterprise installation experts have on occasion only seen this work to the next layer of folders. For example: Permissions set on the /vovici directory are only applied to the:
/vovici/AppData directory
However, permissions will not always be applied to:
/vovici/AppData/admin directory

Chapter 6 Windows Server 2003 Authentication and Permissions
Vovici Enterprise Update Guide 27 Vovici, A Verint Company
© 2012 Verint Systems Inc. All Rights Reserved Worldwide. CONFIDENTIAL AND PROPRIETARY INFORMATION OF VERINT SYSTEMS INC.
IIS Permissions
Permissions
Community Virtual Directory
Read
AppData Read
Write
Surveys Read
Write
Determining the Application Pool Used by Vovici Enterprise By default, Vovici Enterprise is run by the default Application Pool, but this varies. Use the information listed above to determine the exact Application Pool.
1 Open Microsoft IIS.
2 Select the Web site that is being used to host Vovici Enterprise.
3 Right-click the Community Virtual Directory folder (specified during the original installation, sometimes called Perseus).
4 Select Properties.
5 Select the Virtual Directory tab.
6 Record the Application Pool setting at the bottom of the page.
Determining the Account that Runs the Application Pool In IIS, the Account that the default Application Pool runs as is typically Network Service. The account actually used can be verified by doing the following:
1 Open Microsoft IIS.
2 Click the “+” next to Application Pools.
3 Right-click Default Application Pool.
4 Select Properties.
5 Select the Identify tab.
6 Record the username that is specified.
This is the account that needs the permissions labeled for the Network Service account in the Windows Permissions column.

Chapter 6 Windows Server 2003 Authentication and Permissions
Vovici Enterprise Update Guide 28 Vovici, A Verint Company
© 2012 Verint Systems Inc. All Rights Reserved Worldwide. CONFIDENTIAL AND PROPRIETARY INFORMATION OF VERINT SYSTEMS INC.
Determining the Account that the Vovici Service Runs as The Vovici Service used by Vovici Enterprise performs all the scheduled functions within the Schedule Events section of the main application. View our Online Help for more information. The only exception is if the Now lightning bolt icon is clicked under List view inside Schedule Events. This can be checked by doing the following:
1 Inside Control Panel, open Administrative Tools.
2 Double-click (open) Services.
3 Look for the Vovici Service, it is typically named Vovici Service, and right-click it.
4 Select Properties.
5 Select the Login tab.
NOTE
Please record the username that is specified. This account needs the permissions specified under the “Vovici Services” column in order to open and close surveys.

Chapter 7 Windows Server 2008 Authentication and Permissions This section deals with a configuration on a machine with Windows Server 2008 and explains how to configure the desired authentication mode and permissions.
IIS 6 Management Compatibility In order for the Vovici Service to work on Windows Server 2008, you need to install IIS 6 Management Compatibility. You can install the IIS 6.0 Management Compatibility Components in Windows Server 2008 R2 or in Windows Server by using the Server Manager tool:
1 Click Start. 2 Click Administrative Tools.
3 Click Server Manager.
4 In the navigation pane, expand Roles, right-click Web Server (IIS), and then click Add Role Services.
5 In the Select Role Services pane, scroll down to IIS 6 Management Compatibility.
6 Make sure that all check boxes under IIS 6 Management Compatibility are selected.
7 In the Select Role Services pane, click Next.
8 Click Install at the Confirm Installations Selections pane.
9 Click Close to exit the Add Role Services wizard.
Now, select the authentication mode used to allow access to the application based on the information below.
Windows 2008 Server Permissions Vovici Enterprise has two authentication modes:
1 Vovici Enterprise Authentication – The authentication process is handled by Vovici Enterprise via users added under Manage Users in the Administrative Portal or under Administration > Users inside the main application.
Using this authentication method when the main application URL (for example, http://servername/Community/login.aspx) is accessed, the Vovici Enterprise login page appears.
Chapter 7 Windows Server 2008 Authentication and Permissions
Vovici Enterprise Update Guide 30 Vovici, A Verint Company
© 2012 Verint Systems Inc. All Rights Reserved Worldwide. CONFIDENTIAL AND PROPRIETARY INFORMATION OF VERINT SYSTEMS INC.
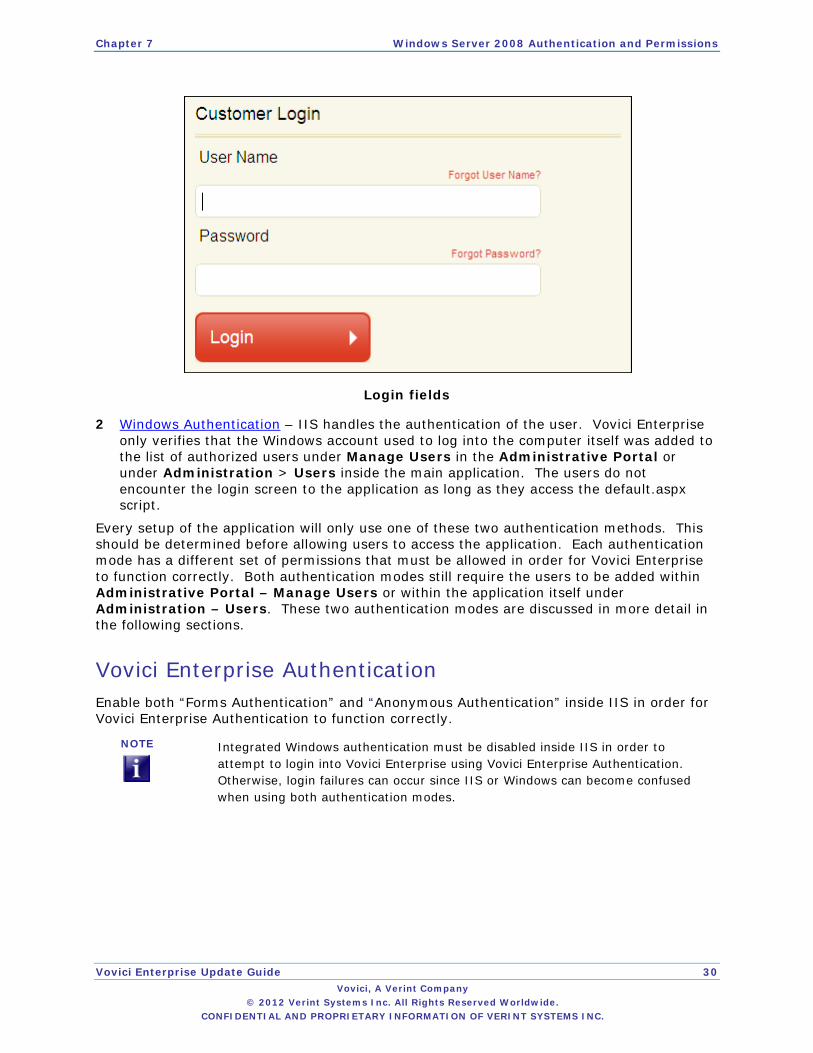
Login fields
2 Windows Authentication – IIS handles the authentication of the user. Vovici Enterprise only verifies that the Windows account used to log into the computer itself was added to the list of authorized users under Manage Users in the Administrative Portal or under Administration > Users inside the main application. The users do not encounter the login screen to the application as long as they access the default.aspx script.
Every setup of the application will only use one of these two authentication methods. This should be determined before allowing users to access the application. Each authentication mode has a different set of permissions that must be allowed in order for Vovici Enterprise to function correctly. Both authentication modes still require the users to be added within Administrative Portal – Manage Users or within the application itself under Administration – Users. These two authentication modes are discussed in more detail in the following sections.
Vovici Enterprise Authentication Enable both “Forms Authentication” and “Anonymous Authentication” inside IIS in order for Vovici Enterprise Authentication to function correctly.
NOTE
Integrated Windows authentication must be disabled inside IIS in order to attempt to login into Vovici Enterprise using Vovici Enterprise Authentication. Otherwise, login failures can occur since IIS or Windows can become confused when using both authentication modes.
Chapter 7 Windows Server 2008 Authentication and Permissions
Vovici Enterprise Update Guide 31 Vovici, A Verint Company
© 2012 Verint Systems Inc. All Rights Reserved Worldwide. CONFIDENTIAL AND PROPRIETARY INFORMATION OF VERINT SYSTEMS INC.
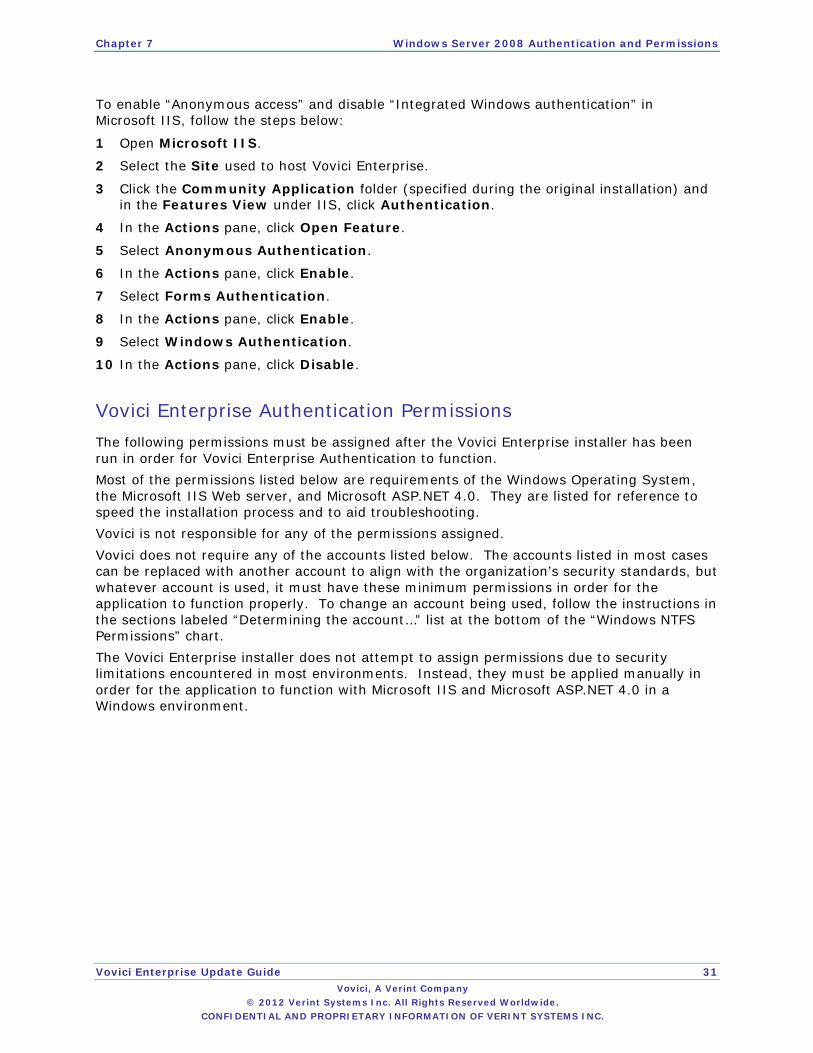
To enable “Anonymous access” and disable “Integrated Windows authentication” in Microsoft IIS, follow the steps below:
1 Open Microsoft IIS.
2 Select the Site used to host Vovici Enterprise.
3 Click the Community Application folder (specified during the original installation) and in the Features View under IIS, click Authentication.
4 In the Actions pane, click Open Feature.
5 Select Anonymous Authentication.
6 In the Actions pane, click Enable.
7 Select Forms Authentication.
8 In the Actions pane, click Enable.
9 Select Windows Authentication.
10 In the Actions pane, click Disable.
Vovici Enterprise Authentication Permissions The following permissions must be assigned after the Vovici Enterprise installer has been run in order for Vovici Enterprise Authentication to function. Most of the permissions listed below are requirements of the Windows Operating System, the Microsoft IIS Web server, and Microsoft ASP.NET 4.0. They are listed for reference to speed the installation process and to aid troubleshooting. Vovici is not responsible for any of the permissions assigned. Vovici does not require any of the accounts listed below. The accounts listed in most cases can be replaced with another account to align with the organization’s security standards, but whatever account is used, it must have these minimum permissions in order for the application to function properly. To change an account being used, follow the instructions in the sections labeled “Determining the account…” list at the bottom of the “Windows NTFS Permissions” chart. The Vovici Enterprise installer does not attempt to assign permissions due to security limitations encountered in most environments. Instead, they must be applied manually in order for the application to function with Microsoft IIS and Microsoft ASP.NET 4.0 in a Windows environment.

Chapter 7 Windows Server 2008 Authentication and Permissions
Vovici Enterprise Update Guide 32 Vovici, A Verint Company
© 2012 Verint Systems Inc. All Rights Reserved Worldwide. CONFIDENTIAL AND PROPRIETARY INFORMATION OF VERINT SYSTEMS INC.
Windows NTFS Permissions
Application Pool Account*
IIS_IUSRS# Vovici Service**
Community Virtual Directory
Read
List
Read and Execute
Read
List
None
AppData Full Control Read
List
Read
List
Surveys Full Control Read
List
Read
List
Write
(Modify)
Temporary ASP.NET Files##
Full Control N/A N/A
C:\Program Files\Vovici\Service
None None Read
List
Read and Execute
Windows Temp Dir###
Read
List
Write
Read None
* – See the section regarding Determining the Account Running the Default Application Pool.
NOTE
Microsoft IIS requires accounts used to run an Application Pool to be a member of the IIS_IUSRS group on the local server. Otherwise, it cannot start the Application Pool inside IIS.
# – See the section regarding Determining the Account that the Web Server Runs as in IIS. ** – See the section regarding Determining the Account that the Vovici Service Runs as (On some servers, the “Modify” permissions might be needed for the Vovici Service to function properly).

Chapter 7 Windows Server 2008 Authentication and Permissions
Vovici Enterprise Update Guide 33 Vovici, A Verint Company
© 2012 Verint Systems Inc. All Rights Reserved Worldwide. CONFIDENTIAL AND PROPRIETARY INFORMATION OF VERINT SYSTEMS INC.
## – This is a Microsoft .NET Framework created directory and whatever account runs the Application Pool needs to have access to it. Otherwise, .NET applications will not function. ### – This directory is a Windows environment setting. (This permission is a .NET requirement.) The default value is C:/Windows/Temp, but this can be verified under “Control Panel – System – Advanced” inside the “Environment Variables” tab under “System Variables”: it will be the TEMP variable.
Setting Windows Permissions This section is not meant to replace Windows documentation but is intended as a reference for people that are not familiar with applying Windows NTFS permissions.
1 Open either Windows Explorer or click the “My Computer” icon.
NOTE
Microsoft IIS 7.5 supports the ability to right-click virtual directories or subfolders in order to apply Windows NTFS permissions (through the “Edit Permissions” menu option). If this is used, skip to Step 6 listed below.
2 Locate the directory in question.
3 Right-click it.
4 Select Properties.
5 Click Security.
6 Click Edit.
7 Use the Add button to add accounts not listed.
8 Click an existing account to see the currently permissions allowed and to change them by clicking Allow.
It is advisable to verify that permissions have propagated down to files inside each of these directories for each account. In some cases, child objects (files inside directories) are not allowed to receive permissions from the parent objects (directories). To force this propagation, inside the Security tab, click Advanced, and then select the bottom check box. This will force the permissions to all child objects under the directory in question. Vovici Enterprise installation experts have on occasion only seen this work to the next layer of folders. For example: Permissions set on the /vovici directory are only applied to the:
/vovici/AppData directory
However, permissions will not always be applied to:
/vovici/AppData/admin directory
Chapter 7 Windows Server 2008 Authentication and Permissions
Vovici Enterprise Update Guide 34 Vovici, A Verint Company
© 2012 Verint Systems Inc. All Rights Reserved Worldwide. CONFIDENTIAL AND PROPRIETARY INFORMATION OF VERINT SYSTEMS INC.
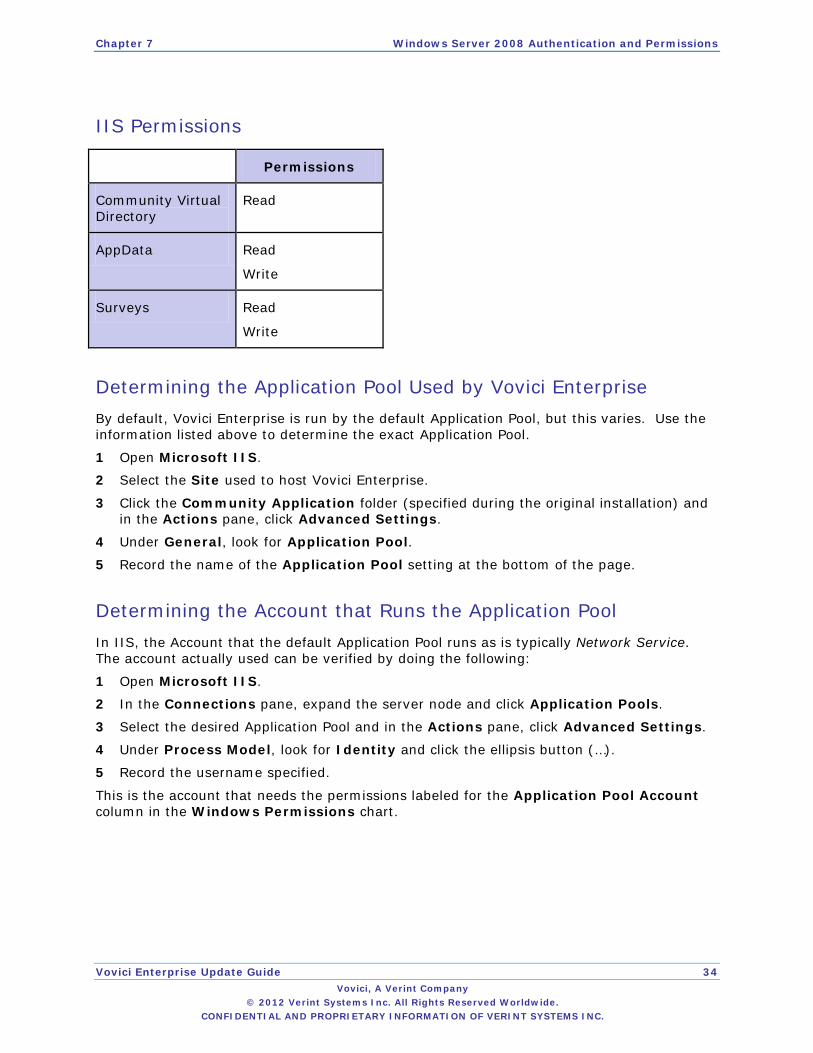
IIS Permissions
Permissions
Community Virtual Directory
Read
AppData Read
Write
Surveys Read
Write
Determining the Application Pool Used by Vovici Enterprise By default, Vovici Enterprise is run by the default Application Pool, but this varies. Use the information listed above to determine the exact Application Pool.
1 Open Microsoft IIS.
2 Select the Site used to host Vovici Enterprise.
3 Click the Community Application folder (specified during the original installation) and in the Actions pane, click Advanced Settings.
4 Under General, look for Application Pool.
5 Record the name of the Application Pool setting at the bottom of the page.
Determining the Account that Runs the Application Pool In IIS, the Account that the default Application Pool runs as is typically Network Service. The account actually used can be verified by doing the following:
1 Open Microsoft IIS.
2 In the Connections pane, expand the server node and click Application Pools.
3 Select the desired Application Pool and in the Actions pane, click Advanced Settings.
4 Under Process Model, look for Identity and click the ellipsis button (…).
5 Record the username specified.
This is the account that needs the permissions labeled for the Application Pool Account column in the Windows Permissions chart.

Chapter 7 Windows Server 2008 Authentication and Permissions
Vovici Enterprise Update Guide 35 Vovici, A Verint Company
© 2012 Verint Systems Inc. All Rights Reserved Worldwide. CONFIDENTIAL AND PROPRIETARY INFORMATION OF VERINT SYSTEMS INC.
Determining the Account that the Web Server Runs as in IIS In IIS, the Account that the Web Server runs as is typically the new IUSR account (not to be confused with the old IUSR_machinename or the IWAM_machinename accounts). Follow the steps below to verify the account used:
1 Open Microsoft IIS.
2 Select the Site used to host Vovici Enterprise.
3 Click the Community Application folder (specified during the original installation) and in the Actions pane, click Basic Settings.
4 Select Properties.
5 Select the Directory Security tab.
6 Under “Anonymous access and authentication control,” click Edit.
NOTE
Verify the username that is specified. If IUSR_machinename is listed sometimes this is not used when Vovici Enterprise is used, instead the IWAM_machinename account will be used by IIS. On Windows 2008 Server, the IIS_WPG account is used in most scenarios instead of either of these accounts. Both the IUSR and IWAM local machine accounts are included in the IIS_WPG account by Windows.
Determining the Account that the Vovici Service Runs as The Vovici Service used by Vovici Enterprise performs all the scheduled functions within the Schedule Events section of the main application. View our Online Help for more information. The only exception is if the Now lightning bolt icon is clicked under List view inside Schedule Events. Follow the steps below to verify the account used:
1 Inside Control Panel, open Administrative Tools.
2 Double-click (open) Services.
3 Look for the Vovici Service, it is typically named Vovici Service, and right-click it.
4 Select Properties.
5 Select the Log On tab.
NOTE
Please record the username that is specified. This account needs the permissions specified under the “Vovici Services” column in order to open and close surveys.
The account listed here must have the ability to start services on the local server. Otherwise, Windows will not start the Vovici Service.
Chapter 7 Windows Server 2008 Authentication and Permissions
Vovici Enterprise Update Guide 36 Vovici, A Verint Company
© 2012 Verint Systems Inc. All Rights Reserved Worldwide. CONFIDENTIAL AND PROPRIETARY INFORMATION OF VERINT SYSTEMS INC.
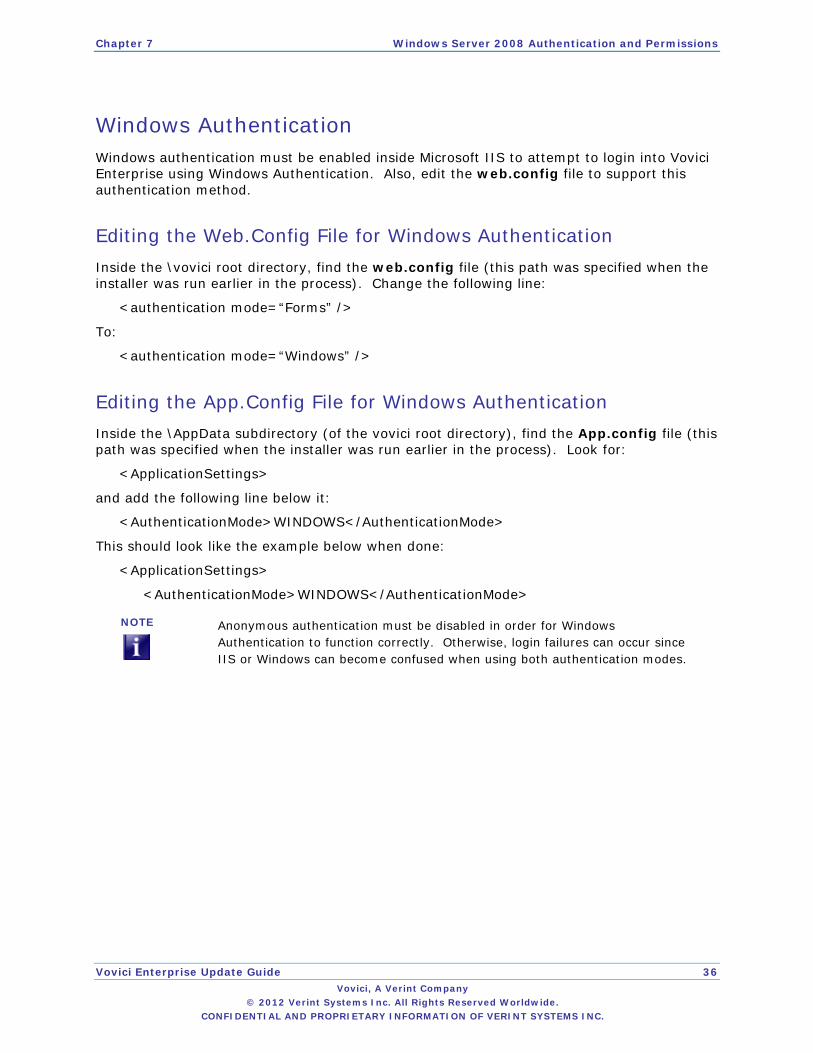
Windows Authentication Windows authentication must be enabled inside Microsoft IIS to attempt to login into Vovici Enterprise using Windows Authentication. Also, edit the web.config file to support this authentication method.
Editing the Web.Config File for Windows Authentication Inside the \vovici root directory, find the web.config file (this path was specified when the installer was run earlier in the process). Change the following line:
<authentication mode=“Forms” />
To:
<authentication mode=“Windows” />
Editing the App.Config File for Windows Authentication Inside the \AppData subdirectory (of the vovici root directory), find the App.config file (this path was specified when the installer was run earlier in the process). Look for:
<ApplicationSettings>
and add the following line below it:
<AuthenticationMode>WINDOWS</AuthenticationMode>
This should look like the example below when done:
<ApplicationSettings>
<AuthenticationMode>WINDOWS</AuthenticationMode>
NOTE
Anonymous authentication must be disabled in order for Windows Authentication to function correctly. Otherwise, login failures can occur since IIS or Windows can become confused when using both authentication modes.
Chapter 7 Windows Server 2008 Authentication and Permissions
Vovici Enterprise Update Guide 37 Vovici, A Verint Company
© 2012 Verint Systems Inc. All Rights Reserved Worldwide. CONFIDENTIAL AND PROPRIETARY INFORMATION OF VERINT SYSTEMS INC.
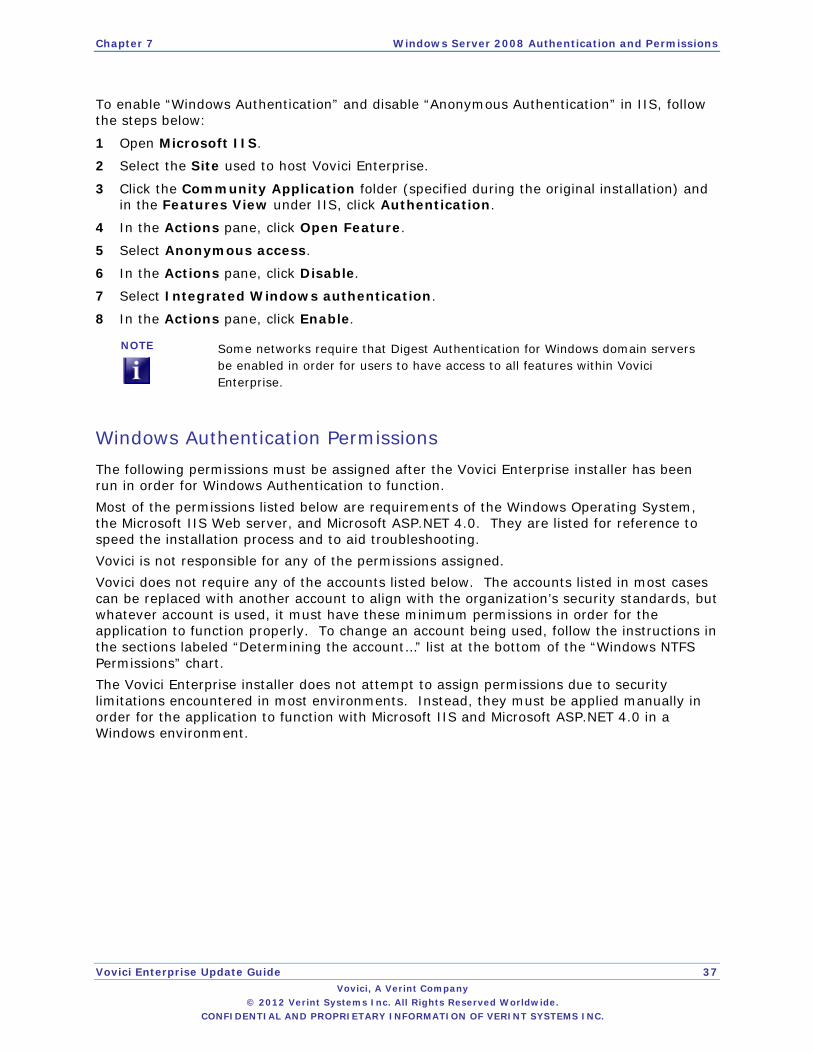
To enable “Windows Authentication” and disable “Anonymous Authentication” in IIS, follow the steps below:
1 Open Microsoft IIS.
2 Select the Site used to host Vovici Enterprise.
3 Click the Community Application folder (specified during the original installation) and in the Features View under IIS, click Authentication.
4 In the Actions pane, click Open Feature.
5 Select Anonymous access.
6 In the Actions pane, click Disable.
7 Select Integrated Windows authentication.
8 In the Actions pane, click Enable.
NOTE
Some networks require that Digest Authentication for Windows domain servers be enabled in order for users to have access to all features within Vovici Enterprise.
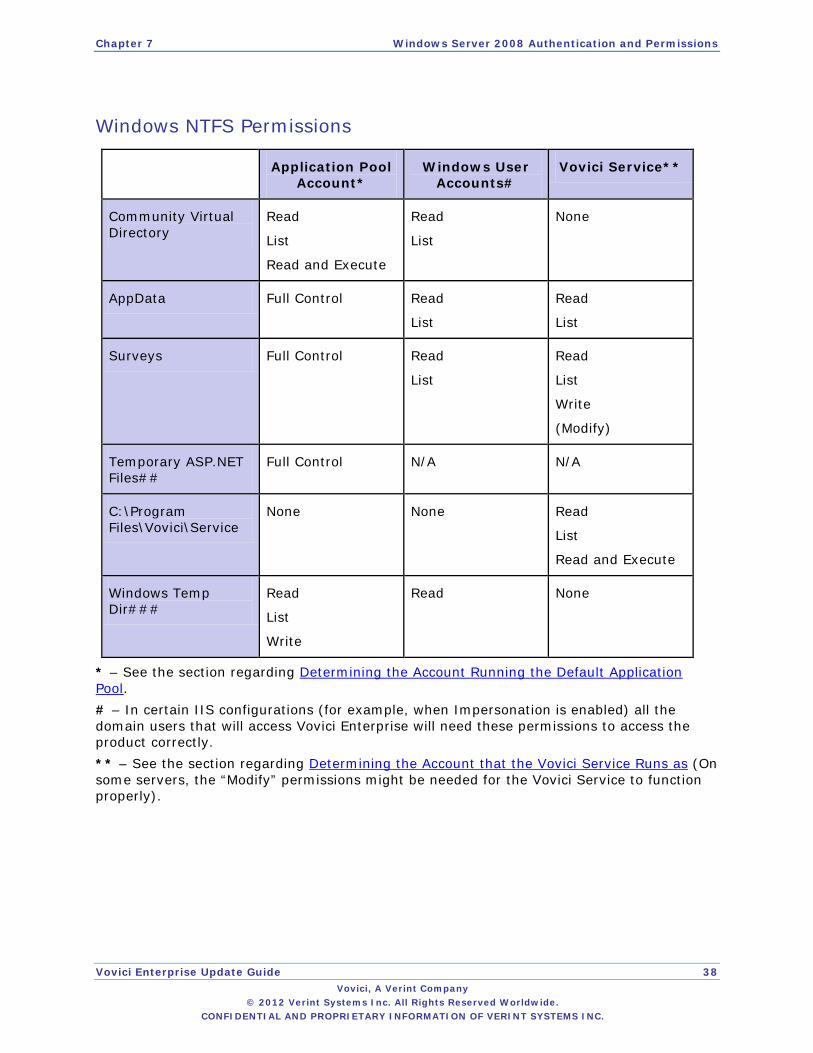
Windows Authentication Permissions The following permissions must be assigned after the Vovici Enterprise installer has been run in order for Windows Authentication to function. Most of the permissions listed below are requirements of the Windows Operating System, the Microsoft IIS Web server, and Microsoft ASP.NET 4.0. They are listed for reference to speed the installation process and to aid troubleshooting. Vovici is not responsible for any of the permissions assigned. Vovici does not require any of the accounts listed below. The accounts listed in most cases can be replaced with another account to align with the organization’s security standards, but whatever account is used, it must have these minimum permissions in order for the application to function properly. To change an account being used, follow the instructions in the sections labeled “Determining the account…” list at the bottom of the “Windows NTFS Permissions” chart. The Vovici Enterprise installer does not attempt to assign permissions due to security limitations encountered in most environments. Instead, they must be applied manually in order for the application to function with Microsoft IIS and Microsoft ASP.NET 4.0 in a Windows environment.
Chapter 7 Windows Server 2008 Authentication and Permissions
Vovici Enterprise Update Guide 38 Vovici, A Verint Company
© 2012 Verint Systems Inc. All Rights Reserved Worldwide. CONFIDENTIAL AND PROPRIETARY INFORMATION OF VERINT SYSTEMS INC.
Windows NTFS Permissions
Application Pool Account*
Windows User Accounts#
Vovici Service**
Community Virtual Directory
Read
List
Read and Execute
Read
List
None
AppData Full Control Read
List
Read
List
Surveys Full Control Read
List
Read
List
Write
(Modify)
Temporary ASP.NET Files##
Full Control N/A N/A
C:\Program Files\Vovici\Service
None None Read
List
Read and Execute
Windows Temp Dir###
Read
List
Write
Read None
* – See the section regarding Determining the Account Running the Default Application Pool. # – In certain IIS configurations (for example, when Impersonation is enabled) all the domain users that will access Vovici Enterprise will need these permissions to access the product correctly. ** – See the section regarding Determining the Account that the Vovici Service Runs as (On some servers, the “Modify” permissions might be needed for the Vovici Service to function properly).

Chapter 7 Windows Server 2008 Authentication and Permissions
Vovici Enterprise Update Guide 39 Vovici, A Verint Company
© 2012 Verint Systems Inc. All Rights Reserved Worldwide. CONFIDENTIAL AND PROPRIETARY INFORMATION OF VERINT SYSTEMS INC.
## – This is a Microsoft .NET Framework created directory and whatever account runs the Application Pool needs to have access to it. Otherwise, .NET applications will not function. ### – This directory is a Windows environment setting. (This permission is a .NET requirement.) The default value is C:/Windows/Temp, but this can be verified under “Control Panel – System – Advanced” inside the “Environment Variables” tab under “System Variables”: it will be the TEMP variable.
NOTE
In some cases, the “Write” and “Modify” permissions might need to be assigned to these users over the AppData, Surveys, and Reports subdirectories.
It is recommended that a group is created containing all these users under Control Panels – Administrative Tools – Computer Management – Local Users and Groups. This will make assigning the permissions in Windows easier, but the group must be maintained every time a new user is added.
Setting Windows Permissions This section is not meant to replace Windows documentation but is intended as a reference for people that are not familiar with applying Windows NTFS permissions.
1 Open either Windows Explorer or click the “My Computer” icon.
NOTE
Microsoft IIS 7.5 supports the ability to right-click virtual directories or subfolders in order to apply Windows NTFS permissions (through the “Edit Permissions” menu option). If this is used, skip to Step 6 listed below.
2 Locate the directory in question.
3 Right-click it.
4 Select Properties.
5 Click Security.
6 Click Edit.
7 Use the Add button to add accounts not listed.
8 Click an existing account to see the currently permissions allowed and to change them by clicking Allow.
It is advisable to verify that permissions have propagated down to files inside each of these directories for each account. In some cases, child objects (files inside directories) are not allowed to receive permissions from the parent objects (directories). To force this propagation, inside the Security tab, click Advanced, and then select the bottom check box. This will force the permissions to all child objects under the directory in question. Vovici Enterprise installation experts have on occasion only seen this work to the next layer of folders.
Chapter 7 Windows Server 2008 Authentication and Permissions
Vovici Enterprise Update Guide 40 Vovici, A Verint Company
© 2012 Verint Systems Inc. All Rights Reserved Worldwide. CONFIDENTIAL AND PROPRIETARY INFORMATION OF VERINT SYSTEMS INC.
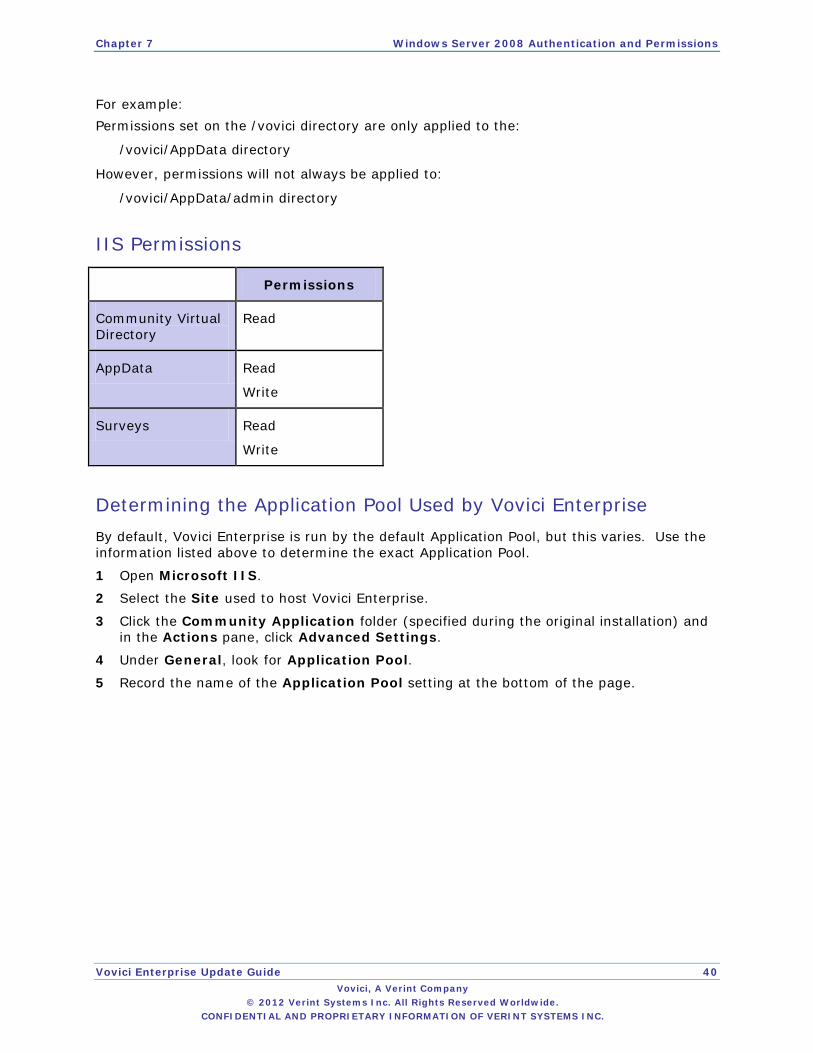
For example: Permissions set on the /vovici directory are only applied to the:
/vovici/AppData directory
However, permissions will not always be applied to:
/vovici/AppData/admin directory
IIS Permissions
Permissions
Community Virtual Directory
Read
AppData Read
Write
Surveys Read
Write
Determining the Application Pool Used by Vovici Enterprise By default, Vovici Enterprise is run by the default Application Pool, but this varies. Use the information listed above to determine the exact Application Pool.
1 Open Microsoft IIS.
2 Select the Site used to host Vovici Enterprise.
3 Click the Community Application folder (specified during the original installation) and in the Actions pane, click Advanced Settings.
4 Under General, look for Application Pool.
5 Record the name of the Application Pool setting at the bottom of the page.
Chapter 7 Windows Server 2008 Authentication and Permissions
Vovici Enterprise Update Guide 41 Vovici, A Verint Company
© 2012 Verint Systems Inc. All Rights Reserved Worldwide. CONFIDENTIAL AND PROPRIETARY INFORMATION OF VERINT SYSTEMS INC.
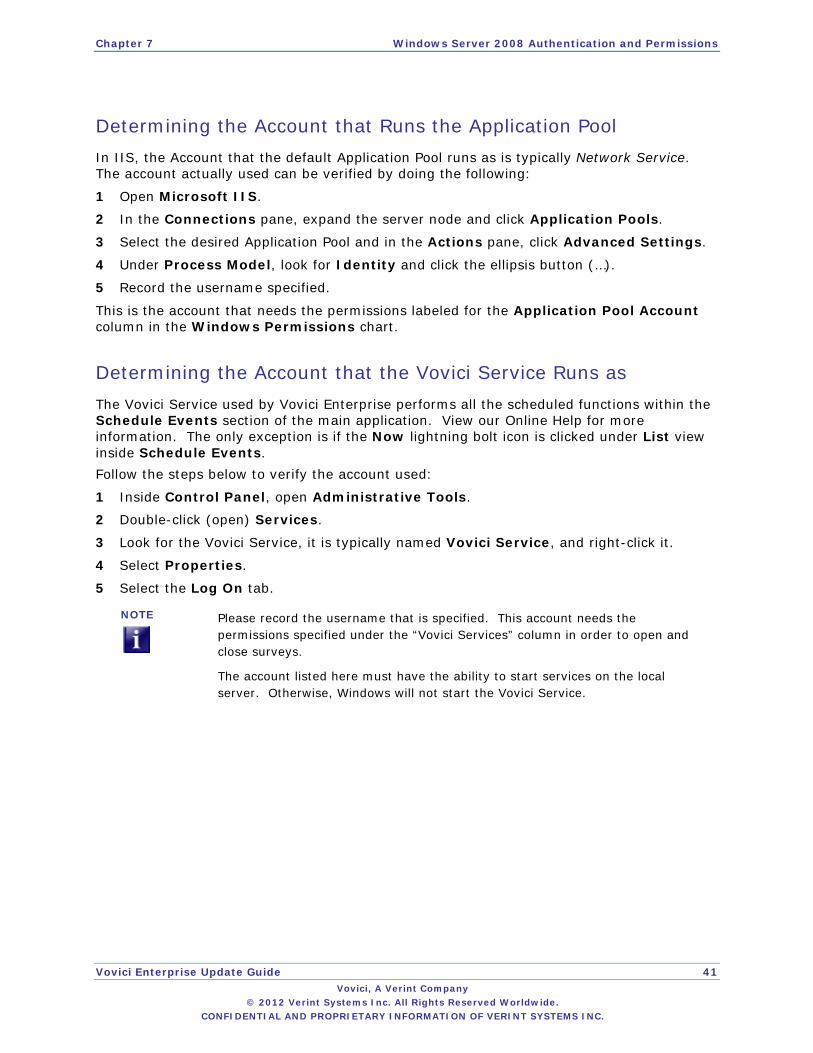
Determining the Account that Runs the Application Pool In IIS, the Account that the default Application Pool runs as is typically Network Service. The account actually used can be verified by doing the following:
1 Open Microsoft IIS.
2 In the Connections pane, expand the server node and click Application Pools.
3 Select the desired Application Pool and in the Actions pane, click Advanced Settings.
4 Under Process Model, look for Identity and click the ellipsis button (…).
5 Record the username specified.
This is the account that needs the permissions labeled for the Application Pool Account column in the Windows Permissions chart.
Determining the Account that the Vovici Service Runs as The Vovici Service used by Vovici Enterprise performs all the scheduled functions within the Schedule Events section of the main application. View our Online Help for more information. The only exception is if the Now lightning bolt icon is clicked under List view inside Schedule Events. Follow the steps below to verify the account used:
1 Inside Control Panel, open Administrative Tools.
2 Double-click (open) Services.
3 Look for the Vovici Service, it is typically named Vovici Service, and right-click it.
4 Select Properties.
5 Select the Log On tab.
NOTE
Please record the username that is specified. This account needs the permissions specified under the “Vovici Services” column in order to open and close surveys.
The account listed here must have the ability to start services on the local server. Otherwise, Windows will not start the Vovici Service.

Chapter 8 Administrative Portal The Vovici Enterprise Administrative Portal is where the application creates the necessary table structure in the database needed to carry out its functions.
Access Administrative Portal This section explains how to enter the URL in a Web browser to access the Vovici Enterprise Administrative Portal. Depending on the authentication method designated in Section 6 or Section 7, access to the Vovici Enterprise Administration Portal will be different.
Vovici Enterprise Authentication The first time the Vovici Enterprise installer is run, it is required that access is made on the server that Vovici Enterprise is installed on or by remotely connecting to it.
NOTE
If a virtual directory other than community was used in Section 4, Step 7 above, replace community in the URL with the name of the virtual directory used. Attempting to access this URL from a different computer by changing “localhost” to the server’s name or IP will fail on all initial installations performed until the administrator account is enabled inside the Vovici Enterprise Administrative Portal. This is by design and is intended as an extra security feature.
Using Localhost on a Web Server Hosting Multiple Web Sites In a Web server hosting multiple Web sites, in order to use localhost as a URL for a specific Web site, a unique port needs to be assigned for localhost for that Web site. The steps below explain how to do this. This example assumes that the port is 8080, but any viable port that Microsoft IIS supports and is not currently in use will work.
1 Open Microsoft IIS.
2 Right-click the Web site that is being used to host Vovici Enterprise.
3 Select Properties.
4 Select the Web Site tab.
5 Click Advanced.
Chapter 8 Administrative Portal
Vovici Enterprise Update Guide 43 Vovici, A Verint Company
© 2012 Verint Systems Inc. All Rights Reserved Worldwide. CONFIDENTIAL AND PROPRIETARY INFORMATION OF VERINT SYSTEMS INC.
6 Click Add.
7 Leave the IP Address (All Unassigned).
8 Enter 8080 for the TCP Port.
9 In the Host Header Name, enter localhost.
10 Click OK.
After the initial setup is configured, usage of the administrator account to access the Vovici Enterprise Administrative Portal remotely will be enabled.
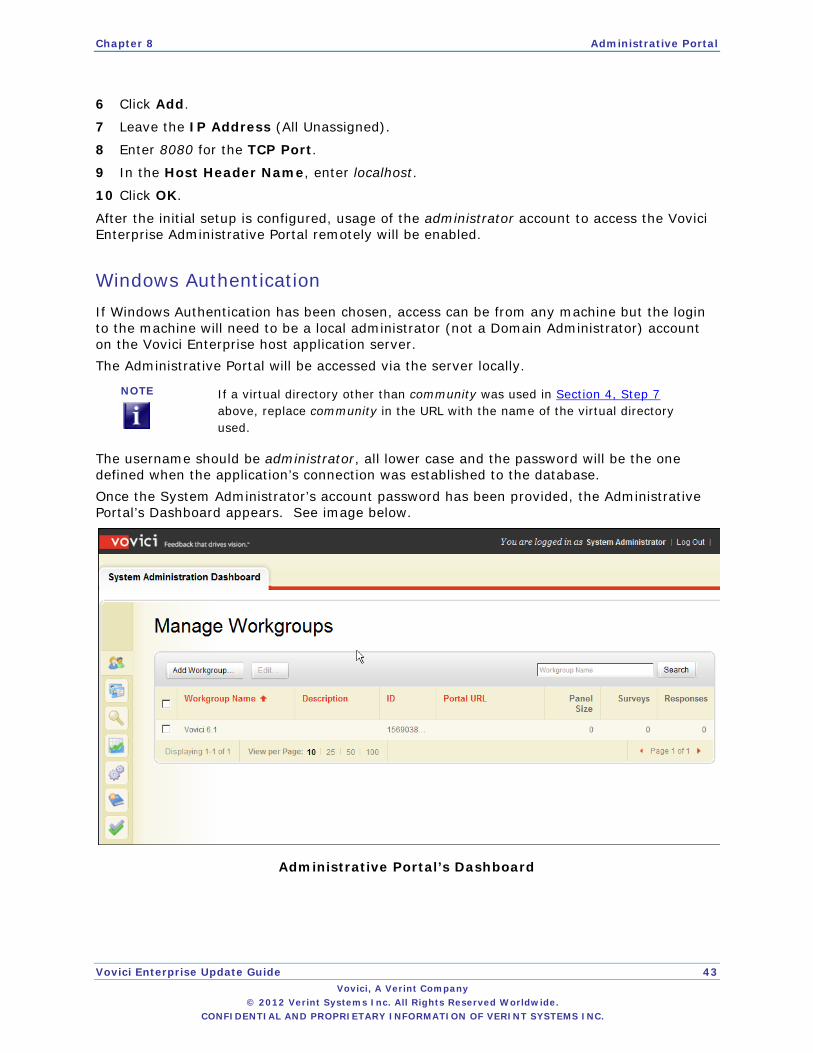
Windows Authentication If Windows Authentication has been chosen, access can be from any machine but the login to the machine will need to be a local administrator (not a Domain Administrator) account on the Vovici Enterprise host application server. The Administrative Portal will be accessed via the server locally.
NOTE
If a virtual directory other than community was used in Section 4, Step 7 above, replace community in the URL with the name of the virtual directory used.
The username should be administrator, all lower case and the password will be the one defined when the application’s connection was established to the database. Once the System Administrator’s account password has been provided, the Administrative Portal’s Dashboard appears. See image below.
Administrative Portal’s Dashboard
Chapter 8 Administrative Portal
Vovici Enterprise Update Guide 44 Vovici, A Verint Company
© 2012 Verint Systems Inc. All Rights Reserved Worldwide. CONFIDENTIAL AND PROPRIETARY INFORMATION OF VERINT SYSTEMS INC.
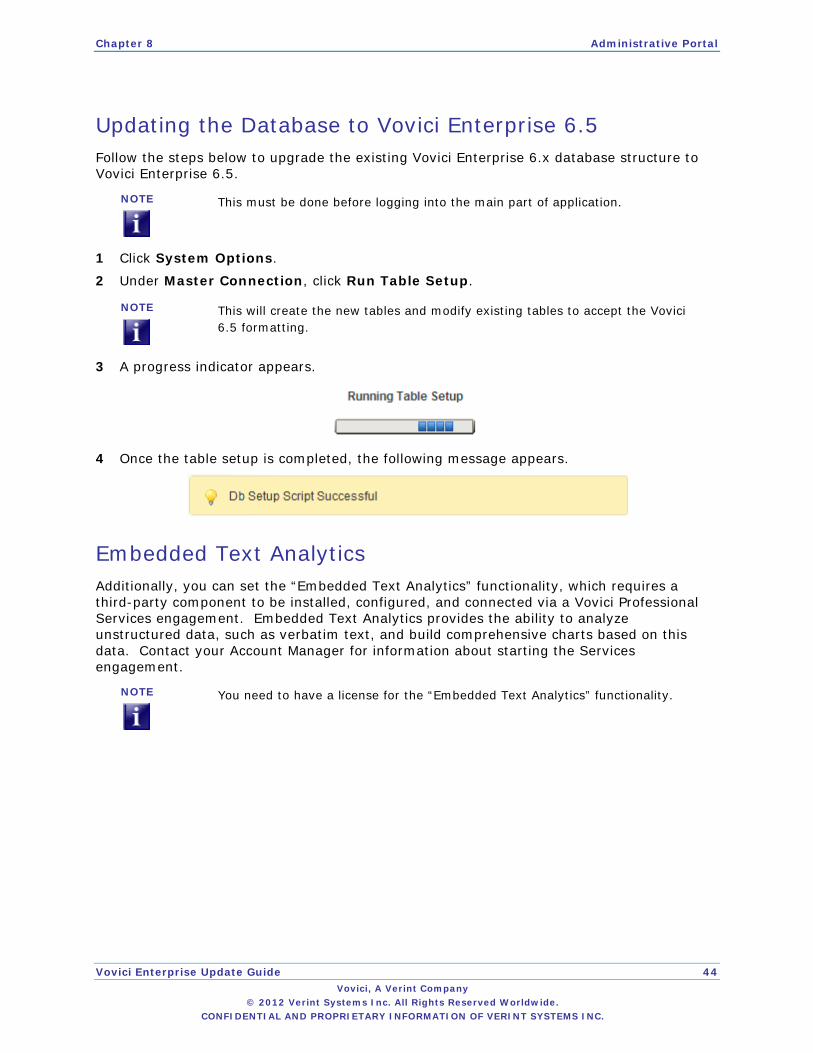
Updating the Database to Vovici Enterprise 6.5 Follow the steps below to upgrade the existing Vovici Enterprise 6.x database structure to Vovici Enterprise 6.5.
NOTE
This must be done before logging into the main part of application.
1 Click System Options.
2 Under Master Connection, click Run Table Setup.
NOTE
This will create the new tables and modify existing tables to accept the Vovici 6.5 formatting.
3 A progress indicator appears.
4 Once the table setup is completed, the following message appears.
Embedded Text Analytics Additionally, you can set the “Embedded Text Analytics” functionality, which requires a third-party component to be installed, configured, and connected via a Vovici Professional Services engagement. Embedded Text Analytics provides the ability to analyze unstructured data, such as verbatim text, and build comprehensive charts based on this data. Contact your Account Manager for information about starting the Services engagement.
NOTE
You need to have a license for the “Embedded Text Analytics” functionality.

Chapter 9 Configuring and Testing Workgroups This section provides information on how to test the publishing paths and email connection to the SMTP Server work within the application.
1 Access the Vovici Enterprise Administrative Portal using the information in Section 8.
2 Click Manage Workgroups.
3 Select the first Workgroup in the list.
4 Click Edit.
5 Click Publishing and make sure the information under the tab is correct.
6 Click Test. The following message should appear.
7 Click Mail and make sure the information under the tab is correct.
8 Click Test. The following message should appear.
9 Click Manage Workgroups.
10 Select the next Workgroup in the list.
11 Repeat Steps 4-11 until all workgroups have been configured.

Chapter 10 Stand-alone Survey Engine The update for the Stand-alone Survey Engine needs to be downloaded onto the Web server. To begin the installation process, perform the following steps:
NOTE
These steps are optional.
1 In a Web browser, navigate to the following URL:
http://vovici.com/downloads/comm/6_5/Vovici_Ent_6_5_SE.htm
2 Click Save. (Steps 2-4 refer specifically to Microsoft Internet Explorer and may be different on other browsers.)
3 Choose a local directory where you want to save the update and make a note of this directory.
4 Click Save to begin downloading the update. Once the download is complete, proceed to the next section.
Chapter 11 Updating the Stand-alone Survey Engine Once the update has been downloaded, follow the steps below to update the Stand-alone Survey Engine to Vovici 6.5.
NOTE
These steps are optional.
1 Locate where the file with the update was downloaded in the previous section.
2 Unzip the contents of the file to the virtual directory on the Web server. The default value is “Community,” but may have been changed to another value during the initial installation process.
NOTE
Older clients who started with EFM Community version 2.2 or earlier most likely have a virtual directory named Perseus instead of Community. It is not recommended that you change this value; otherwise existing survey URLs will not be valid.
3 A dialog appears to overwrite existing files.
4 Select to overwrite the existing files. The Stand-alone Survey Engine is now updated and you can proceed to the next section.

Chapter 12 Testing Environment The installation is complete and testing can be performed. Below is a recommendation of testing that can be done to insure the installation is successful: Create a new survey by following the steps below:
1 Create a test survey via Surveys – Design from Scratch by providing it a name such as First Test Survey and clicking OK.
2 Create two pages for the survey with a simple “Multiple Choice: Choose One” question on each page with three choices labeled 1 through 3 (Add Page is an option in the right corner of the Design page and is just below the Test button).
3 Test publishing by clicking Test and when it is done see if a survey response can be submitted on the Test Your Survey page inside Design.
4 Click Distribute and select Send to an Email List.
5 In the To field enter an email address.
6 Enter a Subject.
7 Place the cursor inside the body of the invitation, click Insert Field, and then select Survey URL in the Fields dialog.
8 Click Save Invitation.
9 Click Schedule.
10 Select Open Survey and click Edit.
11 Set the Start time to the next half-hour period (either the top or bottom of the half hour, for example, 1:00 or 1:30).
12 Set no Recurrence or Advanced options, and then click OK.
13 Inside Schedule, select Send Initial Invitation, and then click Edit.
14 Set the Start time to the next half-hour period after the Open Survey event was scheduled (either the top or bottom of the half hour, for example, 1:00 or 1:30).
15 Set no Recurrence or Advanced options, and then click OK.
16 Check the survey after both time periods entered to confirm that the survey was:
a First “Opened.”
b The initial invitation was sent.
17 Once this is done, take the survey via the invitation that was sent out.
18 Under Analyze, select View Responses and make sure the response entered is listed.
Chapter 13 Appendix
Determining the Web Server Root in Microsoft IIS 6
(Windows Server 2003) The Web server root can be checked under Microsoft IIS by performing the following steps:
1 Open Microsoft IIS.
2 Right-click the Web site that is being used to host Vovici Enterprise.
3 Select Properties.
4 Click the Home Directory tab.
NOTE
The path is specified in the “Local Path” field.
Determining the Web Server Root in Microsoft IIS 7
(Windows Server 2008) The Web server root can be checked under Microsoft IIS by performing the following steps:
1 Open Microsoft IIS.
2 Right-click the Web site that is being used to host Vovici Enterprise.
3 Select Manage Web Site – Advanced Settings.
4 Look in the Physical Path field.
NOTE
The path specified will likely start with %SystemDrive%, which is a Windows Environment variable and is typically C:\ but might be configured differently on some servers.
Chapter 13 Appendix
Vovici Enterprise Update Guide 50 Vovici, A Verint Company
© 2012 Verint Systems Inc. All Rights Reserved Worldwide. CONFIDENTIAL AND PROPRIETARY INFORMATION OF VERINT SYSTEMS INC.
ASP.NET Framework Vovici Enterprise 6.5 only works with version 4.0.30319 of the Microsoft ASP.NET Framework. Microsoft ASP.NET Framework versions 2.0 and 1.1 will not function. If multiple versions are installed on the Application Server inside Microsoft IIS, it is possible to enable the version 4.0.30319 over versions 2.0 and 1.1 by following the steps below.
Allowing ASP.NET 4.0 in Windows Server 2003 1 Open Microsoft IIS.
2 Right-click the Community Virtual Directory.
3 Select Properties.
4 Click the ASP.NET tab.
5 Select v4.0.30319 in the ASP.NET version drop-down list.
6 Click OK.
NOTE
Two different versions of Microsoft ASP.NET cannot be used on the same virtual directory. Applications using one version of ASP.NET (v1.1, for example) cannot run in an application using the other version of ASP.NET (v4.0, for example). A new Application Pool must be created to house one of the applications using the different version of ASP.NET.
Allowing ASP.NET 4.0 in Windows Server 2008 1 Open Microsoft IIS.
2 Select the Site used to host Vovici Enterprise.
3 Click the Community Application folder (specified during the original installation) and in the Features View under IIS, click ISAPI and CGI Restrictions.
4 In the Actions pane, click Open Feature.
5 Select ASP.NET v4.0.30319 in the list.
6 In the Actions pane, click Allow.
Knowledge Base Vovici has a Knowledge Base within our Vovici Customer Support Portal that contains valuable recommendations on maintaining the server on which Vovici Enterprise is installed. It also contains troubleshooting assistance (This is in addition to our installation experts help). It also provides information about best practices for the application:
http://www.vovici.com/support/

Chapter 13 Appendix
Vovici Enterprise Update Guide 51 Vovici, A Verint Company
© 2012 Verint Systems Inc. All Rights Reserved Worldwide. CONFIDENTIAL AND PROPRIETARY INFORMATION OF VERINT SYSTEMS INC.
IIS Default Documents In the past, the installer did not address the issue of IIS Virtual Directory default documents. This meant that the virtual directory / Web application created by the installer would inherit the properties of the parent Web site. If the parent Web site did not have the default.aspx file listed as one of the default documents, this would have to be manually added by the user. In Vovici Enterprise 6.5, the installer should explicitly add the default.aspx file as a default document inside IIS as shown on the image below.
Documents tab
This should avoid permissions problems that sporadically occurred during installations and upgrades of the application.

© 2012 Verint Systems Inc. All Rights Reserved Worldwide. Confidential and Proprietary Information of Verint Systems Inc.
The contents of this material are confidential and proprietary to Verint Systems Inc. and may not be reproduced, published, or disclosed to others without express authorization of Verint Systems Inc.
Vovici, A Verint Company196 Van Buren Street, Suite 400Herndon, VA 20170 USA
www.vovici.com