Voice - api.ivv-aut.comapi.ivv-aut.com/adp/22 - CCTV IP/2230 - SERVIDORES IP/223030... · 11...
38
Voice User’s Manual Version:1.0 Date:07/05/06 1 / 38
Transcript of Voice - api.ivv-aut.comapi.ivv-aut.com/adp/22 - CCTV IP/2230 - SERVIDORES IP/223030... · 11...

Voice
User’s Manual
Version:1.0
Date:07/05/06
1 / 38

CCaattaalloogg 1 Introduction.............................................................................................................................................. 4
1.1 What is PIXORD Voice Server? ................................................................................................... 4 1.2 Advantage Features....................................................................................................................... 4
2 Physical Connections ............................................................................................................................... 5 2.1 Front Panel .................................................................................................................................... 5 2.2 Rear Panel ..................................................................................................................................... 5
3 Installation................................................................................................................................................ 7 3.1 Checking the Hardware Inventory. ............................................................................................... 7 3.2 Voice Server Installation. .............................................................................................................. 7
3.2.1 Connect to the Internet....................................................................................................... 7 3.2.2 Connect to the PiXORD NVS............................................................................................ 9
3.3 Assign IP Address by ARP. ......................................................................................................... 10 3.3.1 Note before IP assignment ............................................................................................... 10
3.4 Assign IP by IP Installer.............................................................................................................. 12 3.5 Verify and Complete the Installation from Your Browser .......................................................... 15
4 PiXORD VOS Home Page .................................................................................................................... 16 4.1 PiXORD VOS Home Page ......................................................................................................... 16
5 PiXORD VOS Configuration Page........................................................................................................ 18 5.1 PiXORD VOS Configuration Page............................................................................................. 18
5.1.1 Configurations Overview................................................................................................. 18 5.2 Server Configurations ................................................................................................................. 19
5.2.1 Server General Settings.................................................................................................... 19 5.2.2 User Settings .................................................................................................................... 20 5.2.3 Clock Settings. ................................................................................................................. 22 5.2.4 System commands ........................................................................................................... 23
5.3 Network....................................................................................................................................... 24 5.3.1 Network General settings................................................................................................. 24 5.3.2 DHCP Settings ................................................................................................................. 25 5.3.3 PiXORD DDNS Settings ................................................................................................. 26
5.4 Voice Management...................................................................................................................... 29 5.4.1 Voice Adjustment ............................................................................................................. 29
6 Appendix ................................................................................................................................................ 31 6.1 Upgrading the Software .............................................................................................................. 31
6.1.1 Check software version.................................................................................................... 31 6.1.2 Obtain the software (flash.bin) ........................................................................................ 31 6.1.3 Upgrade procedure via FTP ............................................................................................. 31
2 / 38

6.2 I/O & COM port Connectors ...................................................................................................... 34 6.2.1 COM port MINI-DIN ...................................................................................................... 34 6.2.2 COM port MINI-DIN ...................................................................................................... 35
6.3 Update custom web pages........................................................................................................... 35 6.4 Specification ............................................................................................................................... 37
3 / 38

1 Introduction 11 IInnttrroodduuccttiioonn
1.1 What is PIXORD Voice Server? PiXORD’s Voice Server (“PiXORD VOS” hereinafter) is an Internet-based digital streaming voice system with a built-in Web server. It’s a fully duplex voice communication system that allows users to listen and speak to persons in remotely monitored areas simultaneously via microphones and loudspeakers. All the operations can be accessed through a standard browser – no additional application or program required.
You can also combine it with the PiXORD Network Video Server (“PiXORD NVS” hereinafter) to offer the live images and live audio over the Internet at the same time. All applications, such as Video Conference, Network Telephone, Wave Radio and Network Voice/Image Surveillance can be easily realized.
1.2 Advantage Features Web-based full duplex voice communication
Complete web-based configuration, no additional software needed.
High quality/compression rate voice DSP, bit rate down to 5.4K bits/second, painless for Internet bandwidth.
Built-in Ethernet interface supporting stand-alone operation for voice streaming.
COM port connection to work with PiXORD Video Server or Network Camera providing Voice + Video streaming.
4 / 38

2 Physical Con ectionns 22 PPhhyyssiiccaall CCoonnnnneeccttiioonss
2.1 Front Panel
Audio In / Out
Two headphone Jack for Line IN and Line Out.
Volume
Build in VR for sensitivity adjustment.
Mic
Build in Microphone.
2.2 Rear Panel
PWR
Power on is constant red.
NET
Network Link (connected): Constant red.
Networks have activities: Blink red.
Data sent out from server: Blink green.
Network disconnected: Constant slow blinking green.
Upgrading software (refer to Appendix A -Upgrading the Software): Constant slow to fast blinking of orange.
5 / 38

Ethernet
RJ-45 Connector for connection of a twisted pair category 5 cable (Standard IEEE802.3 10BaseT).
PS
AC Power input, specification with 9V AC 1A.
COM
RS-232 serial port for connection to PiXORD NVS.
GPIO
One fully opto-isolated alarm inputs and one 3A, 125VAC / 30VDC Relay output
6 / 38

3 Installation 33 IInnssttaallllaattiioonn
3.1 Checking the Hardware Inventory. Unpack and check all the items on the list below. Contact your dealer if anything is missing or damaged. All packing material is recyclable.
Hardw are Descr ip t ion
Vo ice Serve r P iXORD 10 Vo ice Server.
Standard pass th rough E the rne t
cab le
CAT5 cab le te rm ina ted w i th a s tandard RJ-45 connec to r.
Power adap tor Ou tpu t : AC 9V 1A.
I npu t : acco rd ing to the coun t ry t ype .
COM por t cab le 9 p in ma le M in i -D in to 9 p in female D-sub .
CD-ROM P iXORD On l ine CD
Qu ick Ins ta l la t i on Gu ide Inc lud ing a l l P iXORD produc ts .
3.2 Voice Server Installation. There are two kinds of modes of installation on the PiXORD VOS product according to the transmission approach of the streaming voice. One is the streaming voices are transmitted over the Ethernet independently by the PiXORD VOS, and the other is indirectly via the PiXORD NVS. Follow the instructions included in this section to install the PiXORD VOS with the two different installing configurations into your networking environment.
3.2.1 Connect to the Internet This is an easiest and straightest way of the PiXORD VOS installation. In here, the streaming voices are transmitted over the Ethernet independently by the PiXORD VOS. It is capable of using a standard pass through cable twisted pair (CAT5) terminated with a standard RJ-45 connector to the network hub/switch, or using a crossover cable connect directly to your PC. The schematic diagram below illustrates the detailed installation for connecting directly:
7 / 38

Having completed the setup, you can power on the PiXORD VOS and check its power LED (red). If the PWR LED is constant lit and the NET LED (display link status) is lighted up (red) less than 10 seconds, it means the network connection is correct and the setup is successful. Now you can go to assign an IP Address to the PiXORD VOS.
8 / 38

3.2.2 Connect to the PiXORD NVS Though the PiXORD VOS is a standalone streaming voice system, it can also be integrated with the PiXORD NVS as a voice module via connecting the COM port with each other. As a result, the PiXORD NVS would be able to have sending streaming voice capability by communicating with the PiXORD VOS through COM port and streaming Video capability with its built-in feature simultaneously. In this configuration, it doesn’t matter if you having setting a static IP Address to the PiXORD VOS since it uses COM port to communicate to the external. The schematic diagram below illustrates the installation for such a configuration:
Connect to the PiXORD IVS:
Connect to the PiXORD NC:
Having completed the setup, you can power on the PiXORD VOS and check its power LED (red). If the PWR LED is constant lit, it means the setup is successful.
Note: Generally, you can setup the PiXORD VOS in both of the above two configurations concurrently because the PiXORD VOS can work in dual mode. It's able to not only sending streaming voice to the Ethernet, but also to the COM port at the same time.
9 / 38

3.3 Assign IP Address by ARP. This chapter is optional if you don't want to direct connect to the Internet i.e. connect to the PiXORD NVS via COM port. Otherwise, before you begin to use the PiXORD VOS, be sure to have completed the network IP Address assignment.
3.3.1 Note before IP assignment Make sure the PiXORD VOS is powered on and connected to the network correctly.
Obtain a unique IP address from your network administrator.
Each PiXORD VOS has unique Ethernet address (MAC address), which is recorded as 12 digits serial number labeled at the bottom side of the PiXORD VOS (e.g. 000429xxxxxx).
Following examples use PC with IP address 192.168.0.1, and going to setup PiXORD VOS server to IP address 192.168.0.200 whose MAC address is 000429000150. Do not use those addresses featured as examples in this document, always consult your network administrator before assigning an IP address.
The IP address assigned to the PiXORD VOS shall be the same IP domain (presented as same subnet mask) as the PC IP address. In our case, a PC IP address is 192.168.0.1 and the PiXORD VOS is 192.168.0.200, so the subnet mask shall be 255.255.255.0. If a PC subnet mask is 255.255.255.128 or higher, then the domain can’t cover 192.168.0.200, so the setting won't take effective.
For speedily installing and easily setting the IP Address, the PiXORD Corporation provides an IP Installer Wizard for you. Please install the application and see the user’s manual for detailed description and usage.
In Windows, open DOS window. Enter DOS by <Start→Program→MS-DOS Prompt>
Ensure the IP address assigned to PiXORD NVS doesn’t occupy by other Host.
In DOS window, entering <ping 192.168.0.200> shall get “time out” message
C:\>ping 192.168.0.200
Pinging 192.168.0.200 with 32 bytes of data:
Request timed out.
Request timed out.
10 / 38

Request timed out.
Request timed out.
Ping statistics for 192.168.0.200:
Packets: Sent = 4, Received = 0, Lost = 4 (100% loss),
Approximate round trip times in milliseconds:
Minimum = 0ms, Maximum = 0ms, Average = 0ms
C:\>
Enter command <arp –s [PiXORD NVS IP Address] [PiXORD NVS MAC Address]>
In DOS, enter “arp –s 192.168.0.200 00-04-29-00-01-50”
Enter command <ping –t [PiXORD NVS IP Address]> shall get constant reply after 3~4 timeouts, then press CTRL-C to exit pinging.
In DOS, enter “ping –t 192.168.0.200”
C:\>arp -s 192.168.0.200 00-04-29-00-01-50
C:\>ping -t 192.168.0.200
Pinging 192.168.0.200 with 32 bytes of data:
Request timed out.
Request timed out.
Request timed out.
Reply from 192.168.0.200: bytes=32 time=5ms TTL=255
Reply from 192.168.0.200: bytes=32 time=4ms TTL=255
Reply from 192.168.0.200: bytes=32 time=4ms TTL=255
Reply from 192.168.0.200: bytes=32 time=4ms TTL=255
Ping statistics for 192.168.0.200:
Packets: Sent = 7, Received = 4, Lost = 3 (42% loss),
Approximate round trip times in milliseconds:
Minimum = 4ms, Maximum = 5ms, Average = 2ms
Control-C
C:\>
Complete setting and verify the installation. Then, open your web browser (e.g. Internet Explore) and enter the IP address in the Location/Address field. Consequently, the PiXORD NVS video home page will be opened.
11 / 38

Enter “http://192.168.0.200” in Location/Address field of Internet Explore, then the Internet live video can be opened.
3.4 Assign IP by IP Installer The PiXORD IP Installer is a Windows 98/ME/NT/2000 program. It is the software providing an easier way for the setting of IP address and network configurations of PiXORD’s VOS. Using this tool, you can easily set multiple PiXORD VOSs at the same time with the batch setting function. By utilizing IP Installer, the setting process is largely simplified and the setting time is effectively shortened. Moreover, IP installer can not only save all the configurations of PiXORD VOS as backup, but also restore the previous configurations of PiXORD VOS.
Execute IP Installer
Double click the mouse left button on the IP Installer icon.
The PiXORD IP Installer form is displayed on the screen.
Preparation before IP Assignment
Always consult your network administrator before assigning an IP address to your server.
Make sure the PiXORD VOS is powered on and correctly connected to the network.
Obtain an IP address not used yet from your network administrator.
12 / 38

MAC Address: Each PiXORD VOS has a unique Ethernet address (MAC address) shown on the bottom of the PiXORD VOS as the serial number (S/N) with 12 digits (e.g. 000429-XXXXXX).
Assign an IP Address to PiXORD VOS
Select the MAC Address of your PiXORD VOS in the list. The MAC Address is identical to the unit’s S/N (Serial Number). And click the menu bar View/Property to open the Property Page for the selected item. After filling in the properties, click the OK button to submit the settings for the unit and the settings will be activated immediately.
13 / 38

Verify the IP Address and Open the Home Page
To access the Home Page of the selected unit, run the View/Open Web on the menu bar. If you find your browser is opened and automatically connected to the PiXORD VOS Home Page, it means you’ve assigned an IP Address to the unit successfully. Now you can close the IP Installer and start to use your PiXORD VOS.
14 / 38

3.5 Verify and Complete the Installation from Your Browser Start your browser and enter the IP Address of your PiXORD VOS in the address field. The Home page of the PiXORD VOS is now displayed:
The PiXORD VOS only support Microsoft Internet Explorer. When browsing the Home Page at the first time with the Microsoft Internet Explorer, you must temporarily lower your security settings to perform a one-time-only installation of PiXORD’s ActiveX component onto your workstation, as described below.
From the Tools menu, select Internet Options
Click the Security tab and make note of your current security settings
Set the security level to Low and click OK
Type the Internet Address or Host Name of your PiXORD VOS into the Address field
A dialog asking if you want to install wcp10.cab will appear. Click yes to start the installation
Once the ActiveX installation is complete, return the security settings to their original value, as noted above
To continue the configuration of your own application, click the configure button in the top left corner of this window.
15 / 38

4 PiXORD VOS Home Page 44 PPiiXXOORRDD VVOOSS HHoommee PPaaggee
4.1 PiXORD VOS Home Page Start your Web browser and enter the URL(e.g.,“http://192.168.0.127”)in the Address field. The Home page of the PiXORD VOS is now displayed and the remote voice is default opened to play.
Remote Voice
The green waveform is the sound wave of the remote streaming voice.
The received remote voice of workstations is broadcasted from the PiXORD VOS. Every workstation has the choice of listening to the voice or not by click the Listen / Close button.
Local Microphone
The red waveform is the sound wave of the local microphone voice.
Click Talk to remote to send the voice captured by the workstation’s microphone to the PiXORD VOS.
Only administrator has the permission to use this function.
16 / 38

Only one person could talk to the remote voice server at the same time. When one has created the talk-connection, others who want to talk to remote have to wait for the talk-connection released by him.
Listen / Close
Click to listen to the remote voice acquired by the voice server or not.
Talk to remote / Close
Click to talk to remotely monitored areas or not.
Status
The status of the talk to remote action.
Status Descr ip t ion
F ree The ta l k -connec t i on o f the vo ice se rve r i s f ree fo r everyone to
compete the usu f ruc t .
On- l i ne You have go t the usu f ruc t o f t he ta l k -connec t ion and i t i s
ready to ta l k .
Connec t ion Occup ied The ta l k -connec t i on i s occup ied by someone and cou ld no t be
c rea ted . You have to wa i t fo r ta l k -connec t ion re leased .
Configure
Click to Configuration pages of PiXORD VOS. Only the administrator is grant to login in.
17 / 38

5 PiXORD VOS Configuration Page 55 PPiiXXOORRDD VVOOSS CCoonnffiigguurraattiioonn PPaaggee
5.1 PiXORD VOS Configuration Page The Configurations of the PiXORD VOS are now presented as links in the margin of the Configuration Page. Simply click the relevant link for the settings you want to configure.
5.1.1 Configurations Overview Server Configurations
Funct ions Descr ip t ion
Genera l Se t va r i ous in fo rmat ion abou t the se rve r name and the language t ype , e tc .
User Crea te and de le te use rs and passwords .
C lock Se t the p roduc t Date and Time.
Sys tem Prov ide commands fo r rese t t i ng to the fac to ry de fau l t se t t i ngs , res ta r t i ng the sys tem,
and sav ing con f igu ra t ions to f l ash memory fo r pe rmanen t l y s tock .
18 / 38

Network Configurations
Funct ions Descr ip t ion
Genera l Ass ign an IP Address and con f igu re the re levant ne twork pa ramete rs to the se rve r.
DHCP DHCP (Dynamic Hos t Conf igu ra t ion Pro toco l ) i s a p ro toco l tha t l e ts ne twork
admin is t ra to rs cen t ra l l y manage and au tomate the ass ignment o f In te rne t P ro toco l
( IP ) addresses in an o rgan iza t ion ’s ne twork .
DDNS The P ixo rd DDNS (Dynamic Doma in Name Serv i ce ) i s used to access P iXORD VOS
wi th an easy memor i zed name such as h t tp : / / demo.ddns .p i xo rd .com ins tead o f
h t tp : / / 61 .220 .235 .172.
Voice Configurations
Funct ions Descr ip t ion
Vo i ce
Ad jus t
Ad jus t the L ine In Ga in , L ine Ou t Ga in , and Vo ice Ac t i v i t y De tec t ion pa ramete rs , e tc .
5.2 Server Configurations 5.2.1 Server General Settings
19 / 38

Name: Specify server name. This name setting also used by PiXORD DDNS service to recognize each server (see below PiXORD DDNS Settings), e.g. if configure name as "company.user" to DDNS address "ddns.pixord.com", then this PiXORD VOS can be accessed by URL http://company.user.ddns.pixord.com after register to PiXORD DDNS server.
Owner: Specify server owner.
Owner Email: IF Return mail address when using SMTP mail delivery is not specified correctly, some security SMTP server may reject the delivery of this mail.
MAC Address: Display MAC address information for this PiXORD VOS. It’s read only.
Firmware Version: Display firmware version information.
Language: Alternative language option. User may change the language of web contents for different application.
5.2.2 User Settings
PiXORD VOS provides 3- layer user security control as below:
"Open for All" is a factory default when no user enters in User Configuration, it allows any user over Internet to monitor and configure the PiXORD VOS.
20 / 38

"Restricted User" is the user in User Configuration without administration permission.
"Administrator User" is the user in User Configuration with administration permission. The user has all permission to operate the PiXORD VOS, such as managing, configuring, and upgrading the software.
Append New User
Name: New user name to login.
Password: Password for above user
Confirm Password: Type again to confirm password
Permission to: Indicate above user has any permission to.
Administration: If no, then user can’t enter administration page.
Note: that the first user shall set and get administration privilege; otherwise, he can’t get into administration page any more. If this happened, he must use emergency factory default to clean all users.
Submit to add above new user into list
Cancel to abort above operation
When entering "submit" at first time, PiXORD VOS will ask for a new administrator to login in.
Once getting users in list, then you could choose users in list to make modification (update), or remove specified user.
Click "Save Changes" bottom if needed for existing data changed in PiXORD VOS when power off.
21 / 38

5.2.3 Clock Settings.
The built-in real-time clock of PiXORD VOS provides accurate date/time of system even when power off.
For different time zone or long period operation, you may need to adjust the clock --- just enter Time and Date information then click Submit.
Click "Set as PC clock" bottom to set the date/time of the PiXORD VOS as your PC's.
Click "Save Changes" bottom if needed for existing data changed in the PiXORD VOS when power off.
22 / 38

5.2.4 System commands
Load Default: The Load Default retrieves all except network setting.
Note: The factory default just recovers the working setting but it isn’t saved to permanent memory (will back to previous setting after boot). To change the boot settings, you must set "Save Changes".
Save Changes: Save the working setting to permanent memory that will retrieve after reboot.
Reboot System: Force PiXORD VOS to restart.
23 / 38

5.3 Network 5.3.1 Network General settings
IP Address: PiXORD VOS IP address.
Subnet Mask: Subnet mask of your LAN. Note that the IP Address above and Gateway IP Address below should be in the same subnet.
DNS IP Address: Domain name server information is to allow PiXORD VOS to contact external server with mnemonic domain name (e.g. ftp.PiXORD.com) instead of numeric IP address (e.g. 168.95.1.1).
Gateway IP Address: PiXORD VOS traffic to Internet should go through Gateway, if not setting this, only Intranet (LAN) can be accessed.
HTTP Connection Port: Specify the HTTP web server listen port for client (browser) connection. Default uses port 80 (HTTP standard port), valid range from 0~65535.
Note: Before changing the listen port, user must add a port directive “:” in browser URL in order to get correct connection. (i.e. http://<IP>:<Port> , e.g. http://192.168.0.200:8000 to access the PiXORD VOS with IP 192.168.0.200 and port with 8000).
These features enable user to use PiXORD VOS behind NAT or IP Sharing
24 / 38

devices which could access up to 65536 PiXORD VOS with one IP Address.
The factory default won’t change the IP Address and Port setting. Once forgetting the specified port of your PiXORD VOS, you must use ARP & Ping setting to restore the port setting back to 80.
Click “Submit” bottom if needed, then PiXORD VOS will automatically store the setting and reboot system (within 5 seconds to complete boot sequence) to take the setting effective.
5.3.2 DHCP Settings
DHCP Settings: If there is a DHCP server installed on your LAN, you can enable DHCP to automatically obtain network settings such as IP address, subnet mask, default gateway, and DNS servers. Because the assigned IP address can be dynamically changed every time it obtains from the DHCP server, we provide a method called IP Notification to notify users that which IP address is acquired.
IP Notification by FTP: If a FTP server is installed on your network, you can enable this option to obtain the newly assigned IP address of your PiXORD VOS. A HTML file named NewIP_xxxxxx.htm will appear under the upload path for you to link to PiXORD VOS, where xxxxxx is the last six digits of the serial number.
25 / 38

FTP Host Name: FTP server address
Login Name: Name of your FTP account
Password: Password used to log in your FTP account
Upload Path: Path to put the file.
IP Notification by E-mail: With this option enabled, your PiXORD VOS will send E-mail to you as soon as it obtains the IP address from DHCP.
SMTP Host Name: SMTP server.
Recipient: Your E-mail address.
From: Sender’s E-mail address.
Message subject: Subject of this E-mail.
5.3.3 PiXORD DDNS Settings The PiXORD DDNS (Dynamic Domain Name Service) is used when users want to access PiXORD VOS with an easy memorized name such as http://demo.ddns.pixord.com/ instead of http://61.220.235.172/.
This service could be useful when PiXORD VOS is located behind Dial-up ADSL or IP sharing devices, which does not have fix IP address, then it's impossible to reach PiXORD VOS from Internet.
The mechanism of PiXORD DDNS service is described as below:
When PiXORD VOS enables the DDNS service, it will "register" to PiXORD DDNS server with its information, such as server name to access, router virtual port number and updated frequency, etc.
Then PiXORD VOS automatically "update" to PiXORD DDNS server by a fix frequency, so even IP is changed by ISP, the PiXORD DDNS server still could get and update internal database.
Then, once users access from Internet with its register name, e.g. if registering with server name "demo" to DDNS server "ddns.pixord.com", PiXORD VOS could be accessed by http://demo.ddns.pixord.com.
Note: The PiXORD DDNS service is proprietary, which only works with PiXORD DDNS server and PiXORD brands of products.
26 / 38

Dynamic DNS Activate: Click on to activate PiXORD DDNS service.
Dynamic DNS Address: Specify address of PiXORD DDNS server, and the default is "ddns.pixord.com"
Dynamic DNS Port: Specify PiXORD DDNS server listen port, and the default is "80"
Router Incoming Port: Specify your router listen port for PiXORD DDNS server to redirect. The router may configure the different port for incoming (Internet request) and outgoing (Intranet request), e.g. it may configure to redirect Internet HTTP (port 80) request to Intranet port 8000, then, in this case, we must configure the "Router Incoming Port" to 80, and inside the PiXORD VOS Network settings should set HTTP port with 8000.
Update Time: Specify the PiXORD VOS updated frequency in seconds, and the default is 600 (10 minutes), this is interval that PiXORD VOS will automatically send an updated packet to PiXORD DDNS server.
DDNS message: Return messages from remote PiXORD DDNS server, and some hints may help to diagnostic the reason if register fails.
ddnsaddr CGI fail: It means that PiXORD VOS can't communicate with Internet world. Make sure your Network Configuration has correct subnet mask and default gateway, and DNS1 setting is correct and reachable.
27 / 38

Already registered: Another user had registered this name; please change your register name by changing "server name" in Server General Settings.
Example: To setup a PiXORD200 (IP address 192.168.0.200) behind a dialup ADSL router, and wish to access by name http://demo.ddns.pixord.com/. And, the procedure is as below:
Configure the ADSL router with PPPoE enable; Lan IP, 192.168.0.254; and subnet mask, 255.255.255.0.
Assign the ADSL router's virtual server with service port 80 to server IP 192.168.0.200
Configure PiXORD200 network configuration with IP address 192.168.0.200; subnet 255.255.255.0; DNS1 with valid DNS address such as 168.95.192.1 or 168.95.1.1; gateway IP address with 192.168.0.254 (router's IP); HTTP port with port 80.
Configure server name in Server General Settings with "demo".
Configure DDNS with Activate; Address "ddns.pixord.com"; DDNS with port 80; Router Incoming port 80; and update time with 600 (10 minutes). Finally, clicks submit.
If DDNS message success, then enter URL http://demo.ddns.pixord.com/ on browser. Consequentially, it will show PiXORD VOS's home page.
Click "Save Changes" bottom if needed for existing data changed in PiXORD VOS when power off.
28 / 38
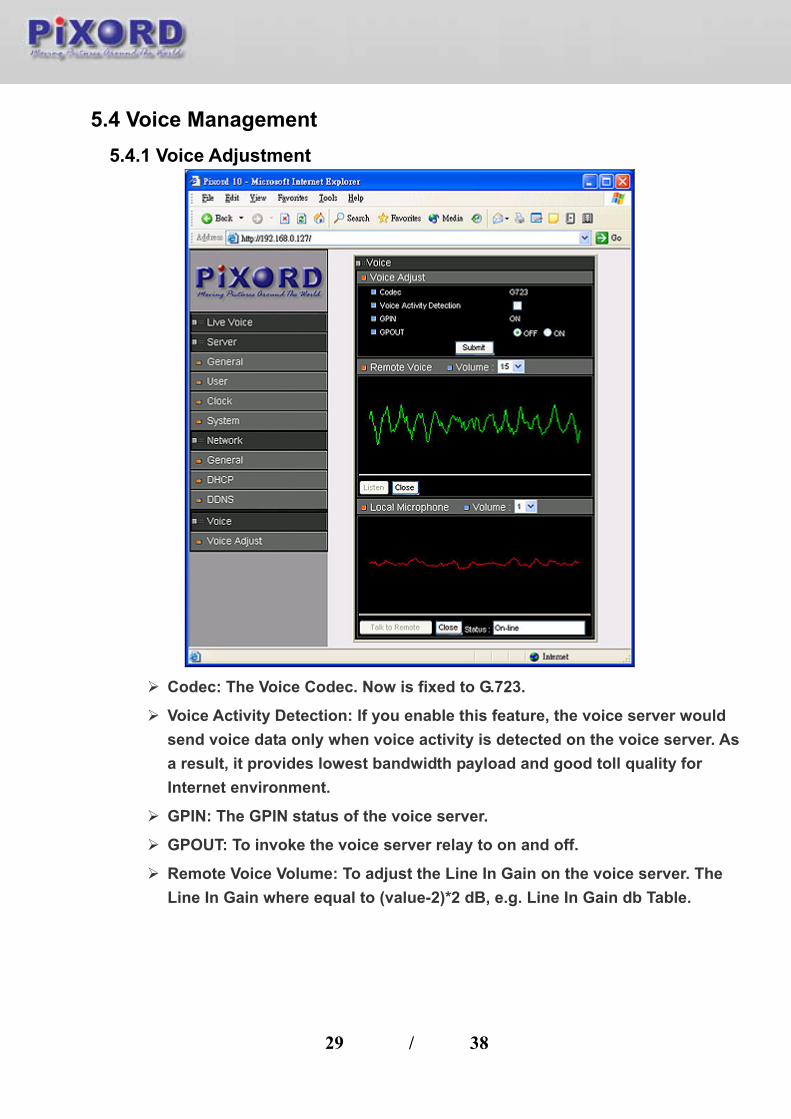
5.4 Voice Management 5.4.1 Voice Adjustment
Codec: The Voice Codec. Now is fixed to G.723.
Voice Activity Detection: If you enable this feature, the voice server would send voice data only when voice activity is detected on the voice server. As a result, it provides lowest bandwidth payload and good toll quality for Internet environment.
GPIN: The GPIN status of the voice server.
GPOUT: To invoke the voice server relay to on and off.
Remote Voice Volume: To adjust the Line In Gain on the voice server. The Line In Gain where equal to (value-2)*2 dB, e.g. Line In Gain db Table.
29 / 38

Va lue L ine In dB
0 -4dB
1 -2dB
2 0dB
3 2dB
. . . . . . . .
20 36dB
Listen / Close: Click to listen to the remote voice acquired by the voice server or not.
Local Microphone Volume: To adjust the Line Out Gain on the voice server. The Line Out Gain where equal to value*(-6) dB, e.g. Line Out Gain db Table.
Va lue L ine In dB
0 0dB
1 -6dB
2 -12dB
3 -18dB
4 -24dB
Talk to remote / Close: Click to talk to remotely monitored areas or not.
Status: The status of the talk to remote action.
Sta tus Desc r ip t i on
F ree The ta l k -connec t i on o f the vo ice se rve r i s f ree fo r everyone to compete the
usu f ruc t .
On- l i ne You have go t the usu f ruc t o f t he ta l k -connec t ion and i t i s ready to ta l k .
Connec t ion
Occup ied
The ta l k -connec t i on i s occup ied by someone and cou ld no t be c rea ted . You
have to wa i t fo r ta l k -connec t ion re leased .
30 / 38

6 Appendix 66 AAppppeennddiixx
6.1 Upgrading the Software PiXORD VOS software is contained in Flash Memory, a silicon chip allowed to be erased and re-written. It provides an easy way to update the software without change any parts; just simply load the newest software from network.
The following procedures are to update the software:
6.1.1 Check software version Enter URL "http://<PiXORD VOS IP address>/ver" in your web browser, which will show you the software version.
Example:
enter "http://192.168.0.200/ver" in Microsoft IE5 URL location, you will see the software version--" Software Version=1.11 Revision 0905.1641 ", which indicates the currently software version is 1.11.
Note: You can also get the software version in configurations page in chapter 5.2.1 Server General Settings.
6.1.2 Obtain the software (flash.bin) The latest version of the PiXORD VOS software is free of charge from PiXORD Corporation or your local distributor. Also you can obtain this software over the Internet. URL:http://www.pixord.com/.
6.1.3 Upgrade procedure via FTP Download the newest software and unzip it into your local Driver, for example "C:\temp". Then, confirm the "flash.bin" file exists in this directory.
Remove all event setting and Reset the PiXORD VOS:
You have two ways to remove the event scripts. One is to choose "Clear" and to use "Save" icon on "Event Script Edit" page to set the event script to empty. The other is to click the "Load Default" icon in Server / System page to reset all settings; however, it will not only delete events, but also all other settings. Then click the "Reboot System" to restart the PiXORD VOS or enter CGI command URL
" http://<PiXORD ICS IP address>/control?reboot=1" in your web browser.
Caution: You must remove all events and reboot the PiXORD VOS before doing the following procedures; otherwise, some occasional internal
31 / 38

conflicts may endanger the Flash devices.
Start the FTP session and log in to the PiXORD VOS
For example, in our case for Windows98:
Enter DOS by "start->Program->MS-DOS Prompt"
Change to the directory where the latest flash.bin exist.
Start ftp session by enter "ftp <PiXORD VOS IP Address>
Enter "root" as USERNAME, "pass" as PASSWORD if no user in User List record. In case any user list exists, you will have to use your administrator's USERNAME and PASSWORD to login
Set FTP to binary mode using the command "bin".
In FTP session window, Enter "bin"
Upload the software into PiXORD VOS by FTP "put" command.
In FTP session window, enter "put flash.bin"
In FTP session window, enter "bye" to quit FTP session.
FTP session may freeze for around 1 minute to transfer and automatically upgrade the software. During that time, ping the PiXORD VOS until get constant reply, which means system had completed upgrading and rebooting, then open browser to verify the software version been updated.
Note: If FTP session quits immediately after issued by command, you should continue pinging PiXORD VOS instantly. If PiXORD VOS replies to the ping command right after pinging, it means PiXORD VOS may not enter the self-programming stage to verify the software version. If not updated, then you should reboot PiXORD VOS and back to step 3 to try again
C:\temp>ftp 192.168.0.200
Connected to 192.168.0.200.
220 192.168.0.200 PiXORD FTP server (ARM_BE - V3.0.H) ready.
User (192.168.0.200:(none)): root
331 Password required for root.
Password: <=enter pass as default
230 User root logged in.
ftp> bin
200 Type set to I.
ftp> put flash.bin
200 PORT command successful.
32 / 38

150 Opening BINARY mode data connection for flash.bin
226 Transfer complete.
ftp: 2097152 bytes sent in 10.11Seconds 207.43Kbytes/sec.
ftp> bye
221 Goodbye. <=Quit ftp session immediately
<=if the window is frozen, please open another dos session
C:\temp>ping -t 192.168.0.200
Pinging 192.168.0.200 with 32 bytes of data:
Request timed out.
Request timed out.
Request timed out.
Request timed out.
Request timed out.
Request timed out.
Request timed out.
Request timed out.
Reply from 192.168.0.200: bytes=32 time=2ms TTL=255
Reply from 192.168.0.200: bytes=32 time=1ms TTL=255
Reply from 192.168.0.200: bytes=32 time<10ms TTL=255
Reply from 192.168.0.200: bytes=32 time<10ms TTL=255
Reply from 192.168.0.200: bytes=32 time<10ms TTL=255
Ping statistics for 192.168.0.200:
Packets: Sent = 13, Received = 5, Lost = 8 (61% loss),
Approximate round trip times in milliseconds:
Minimum = 0ms, Maximum = 2ms, Average = 0ms
Control-C
C:\temp>
C:\>
Note: Flash products can become damaged if the updating operation is not performed correctly. So please follow up above procedures carefully.
33 / 38

6.2 I/O & COM port Connectors The COM port MINI DIM contains only one RS-232. The GPIO MINI DIM contains one GPIO inputs, one GPIO output as relay junction, and one RS-232 port. The two tables of the COM port and GPIO connector pin assignments are detailed listed below.
6.2.1 COM port MINI-DIN
Pin Name Descr ip t ion
1 - No connec t ion .
2 RXD Rece ive Da ta
3 TXD Transmi t Da ta
4 DSR Da ta Set Ready
5 GND Sys tem Ground
6 DTR Data Termina l Ready
7 - No connec t ion
8 - No connec t ion
9 - No connec t ion
34 / 38

6.2.2 COM port MINI-DIN Pin Name Descr ip t ion
1 GPIN1 Opto -coup led GPIO Input . I npu t h igh when open ing the connec t ion ;
i npu t l ow when s ink ing more than 10mA o r shor t i ng to p in 5 (GND)
2 RXD Rece ive Da ta
3 TXD Transmi t Da ta
4 - No connec t ion
5 GND Sys tem Ground
6 - No connec t ion
7 - No connec t ion
8 Re lay_NO Re lay Common po in t
9 Re lay_COM Re lay Norma l Open po in t . I t w i l l se t to on (Shor t w i th Re lay_COM)
when se t GPIO ou tpu t h igh .
6.3 Update custom web pages PiXORD VOS has a built-in web server, so the web contents are contained in Flash Memory, the same as software parts, allowed to erase and re-written. It provides an easy way to update the web pages --- just simply load and issue command from network (FTP and Telnet).
Caution: The update of content page is very sensitive to system operation; therefore, incorrect operation may cause system fail to response to any request. The following operations provided here are only for experienced system integrator. Remember that always consult to your distributor or dealer in advance to update the content.
The following procedures are to update the web page:
Clean up system
Before updating the pages, make the PiXORD VOS back to factory default stage --- click “Load Default” button, click “Save Changes” button, and then click “Reboot System” button in configuration page. Keep the PiXORD VOS in an idle state, which stops all video requests from other station.
Download complete web pages
For backup purpose, we should download the complete built-in contents before updating. The pages layout is described as below:
3.0.0/WWW: Main video pages including static HTML pages and JAVA applets.
35 / 38

3.0.0/WWW/images: All graphical files.
3.0.0/WWW/lang1: All HTML pages for user defined language 1.
3.0.0/WWW/lang2: All HTML pages for user defined language 2.
3.0.0/Sys: Video bitmap font file (Time Stamp and Text Bitmap)
3.0.0/public: Internal message files.
Note: When you login the system, the default root directory is 3.0.0/. Do not change any file in 3.0.0/Sys, and 3.0.0/public, because these files are only used internally.
For convenience, some FTP utilities (e.g. CuteFTP, WSFTP) may be useful to download the complete pages.
Upload custom web pages
You can use FTP utilities to upload the updated/added contents to their original directory. For example, if you wish to replace the PiXORD banner logo (logo.jpg) with your custom made image. First, prepare your own image, and then upload to 3.0.0/WWW/images.
Note: Any file upload to PiXORD VOS should be set to "binary" mode in FTP utility; otherwise, the file may be corrupted in PiXORD VOS.
Verify updated contents
After uploading the custom pages, open browser to verify the correctness of contents. If not correct, modify the pages and return to previous step to upload again.
Save the changes to flash
Telnet to the PiXORD VOS. And run command "Up –w" to write the complete web pages into flash. The detailed procedures are list as below,
Open DOS window
Enter “telnet <IP Address of PiXORD VOS>”
Enter “root” and “pass” as username and password
Enter “Up –w” to start the web content update program. The command is case sensitive. Don’t enter the wrong case or you’ll get the command not find error message. After processing about 30 seconds, the PiXORD VOS will restart automatically and complete the web content updating. Now you can open the browser to see the new web content.
Note: The limitation of overall size of content pages is around 700K Bytes. Any file added/updated plus original downloaded file (~550K Bytes) should not exceed this size; otherwise, some files will be truncated or corrupted. If the corruption of
36 / 38

any page happens, you will have to reload the original binary (see Appendix A - Upgrading the Software) in order to recover the corruption.
For example, the PiXORD VOS IP address is 192.168.0.200, then
C:\temp>telnet 192.168.0.200
C:\temp>
Telnet session <--Open Telnet session
Login: root
Password: <--Enter “pass” as default
Welcome to VidSvr on Telnet ...
IVS> Up –w
Upgrade WWW Pages... <--Frozen here, close and open browser
After 30 seconds to verify the changes.
6.4 Specification CPU: 32 B i ts R ISC Processor
ROM: 2M Bytes F lash ROM
RAM: 16M By tes SDRAM
Watch Dog: Ch ip to mon i to r ou t to le rance sys tem vo l tage and abnorma l p rog ram
execu t ion
Two LEDs to i nd i ca te ne twork and power /sys tem s ta tus
One RJ-45 fo r E the rne t
COM1: RS-232 se r ia l po r t fo r connec t ion to P iXORD Video Serve r o r Ne twork
Camera
COM2: RS-232 se r ia l po r t fo r conso le / ex te rna l dev ice
Bu i ld i n Mic rophone and VR fo r sens i t i v i t y ad jus t
Two headphone Jack fo r L ine IN and L ine OUT
Hardw are
One fu l l y op to - i so la ted a la rm inpu ts and one 3A ,125VAC/30VDC Re lay ou tpu t
Netw ork
In ter face E the rne t (10 /100 Base-T)
Voice Codec Hardware DSP, 5 .4K / 6 .3K bps
Voice
Ad justment
Web base : D ig i ta l Ou tpu t Vo lume and Inpu t Sens i t i v i t y Con t ro l ; VR: Mic rophone
sens i t i v i t y ad jus t
37 / 38

Protocols TCP/ IP, UDP, ARP, ICMP, HTTP, FTP, Te lne t , SMTP, DHCP, PPP
Per formance Ne twork th roughpu t : Max . up to 800K by tes pe r second , 30 connec t ion
s imu l taneous ly
Ins ta l la t ion Ass ign IP address : us ing ARP & P ing or IP - Ins ta l l e r so f tware ; Au tomat i c de tec t i f
connec t to P iXORD Video Serve r o r Network Camera
Loca l o r Remote so f tware up -g radab le us ing FTP Softw are
Upgrade Cus tom web con ten ts upda ted v ia FTP & Te lne t
System
Requi rements
W indows 2000 SP4 o r Windows XP/Windows ME/Windows 98
In te rne t Exp lo re r 6 .0
D i rec tX 9 .0c
Secur i ty Th ree- laye r Password Pro tec t ion
Operat ing
Temperature 5 ~50°C (40 ~ 125 °C )
Operat ing
Humid i ty 20 ~80 %
Input Vol tage AC 9V, 1A
Pow er
Consumpt ion 7 wa t ts
Dimension 128(L ) *90 (W)*31(H) mm
Accessor ies CD Ti t l e w i th manua l /so f tware , Qu ick Ins ta l l a t i on Gu ide , E the rne t Cab le , Power
Adap ter, One cab le conver t M in i -D in to D-sub , to connec t to P iXORD Video Serve r o r
Ne twork Camera
38 / 38