VINYL CLASSIC FREESTANDING PERGOLA ASSEMBLY INSTRUCTIONS › content › VinylClassic... ·...
8
P a g e | 1 VINYL CLASSIC FREESTANDING PERGOLA ASSEMBLY INSTRUCTIONS Shown: 8' x 12' Vinyl Classic Pergola with 12" Top and Main Runner Spacing The design of this pergola is based on all posts being installed plumb and all beams and rafters level. Patios are usually built with a slope to allow rainwater run-off. This factor must be taken into account before beginning assembly of the kit, so that the tops of the posts, and therefore the beams and runners are all level. Some posts may need to be cut. You can also shim posts to attain the proper heights of the posts. The vinyl sleeves and the wood inserts are the same size, so both will need to be cut. Cutting vinyl should be done with a fine tooth circular saw blade, or hand saw so it does not chip. Cut through both at the same time. If attaching to footers or a wooden deck, this must also be checked for level. If there are questions – call before permanently mounting the posts.
Transcript of VINYL CLASSIC FREESTANDING PERGOLA ASSEMBLY INSTRUCTIONS › content › VinylClassic... ·...

P a g e | 1
VINYL CLASSIC FREESTANDING PERGOLA
ASSEMBLY INSTRUCTIONS
Shown: 8' x 12' Vinyl Classic Pergola with 12" Top and Main Runner Spacing
The design of this pergola is based on all posts being installed plumb and all beams and rafters level. Patios are usually built with a slope to allow rainwater run-off. This factor must be taken into account before beginning assembly of the kit, so that the tops of the posts, and therefore the beams and runners are all level.
Some posts may need to be cut. You can also shim posts to attain the proper heights of the posts. The vinyl sleeves and the wood inserts are the same size, so both will need to be cut. Cutting vinyl should be done with a fine tooth circular saw blade, or hand saw so it does not chip. Cut through both at the same time. If attaching to footers or a wooden deck, this must also be checked for level. If there are questions – call before permanently mounting the posts.

P a g e | 2
Setting up the template:
1. Your pergola kit includes a wooden template that is used to mark your post locations. Notice that two of the 2x4 boards have a marking near the ends. Build a box that will reveal the outside corners of the posts when properly placed.
2. Arrange the template pieces so that they are
positioned in the exact location of where the pergola
will be placed. The boards with the marking on the end
will be across from each other. The marks will show
where the other boards will be attached to create this
box.
3. Connect the corners of the template pieces by driving two 2 ½" screws through the side of the template boards.
4. When the template is in position, square the template. Do this by measuring diagonally from one corner to its opposite corner, then measure diagonally between the other two corners. These two dimensions MUST be the same. Adjust the template until the diagonal measurements are identical.
5. Once the template is “square,” mark the post locations using the INSIDE corners of the framed box on a concrete slab with a pencil. After all the post locations are marked on the concrete slab, remove and set the wooden template aside.
SECTION One – Posts

NOTE: When installing posts, notice that they have notches on top. This is to sit the beams on. When installing – be sure that the notches run the correct way, normally along the long side. Also – it is best to set the posts and attach just one or two screws and check to make sure it is level. If not level, unscrew the post(s) and make level by cutting or shimming as needed. If you have cut the posts at the bottom for leveling, notice that there is a hole drilled in the bottom of the post. This is for the bolt in the bracket which may need to be re-drilled or the hole made deeper in the bottom of the post so that the post, sits on the plate of the bracket.
7. Slide the wooden posts into the bracket.
To the right is shown two different posts. On the left is the 36" post base trim, and on right, with no 36" post base trim (standard). For the 36" post base trim see the additional notes at the end of this section.
8. Once the posts are the correct height,
attach with twelve 2 ½" stainless steel screws. (Three per prong). Repeat for each post.
P a g e | 3
9. The vinyl sleeves will slide over the top of the posts. Be sure that the openings cut into the sleeves are positioned for the notches in the posts. NOTE: The top of the vinyl sleeve has a composite vinyl cap. Do not drop the sleeve over the posts since this could break the cap. To cut the posts down to level, cut the vinyl sleeves and make sure that the top cap sits on top of the wood posts. Cut the sleeve so that it is 1" or less from the bottom of the post, which will be covered by trim. With the 36" base trim, there is no need to cut the sleeves since they are already short enough.
6. Set the Brackets: The brackets are stainless steel. Next, drill a hole into your concrete footer or slab. Using a ½" masonry bit, drill a 4" hole through the center of the large hole in the middle of the post base. Make sure all of the concrete dust is cleared from the hole. Use a vacuum if needed. Add the washer and put the nut on the bolt so the threads are just above the nut. Do not set the bolt too deep in the hole, as this will also protect the threads should it need to be tapped with a hammer. Tighten the bolt, and the base of the bolt will expand. If installing the pergola on concrete, use the supplied wedge bolt. If attaching the pergola to a wood deck, use a 4" lag bolt (not included) instead of a wedge bolt.

P a g e | 4
10. Attach the sleeve to the post with one 2 ½" white headed screw (as shown to right.) Do this for all posts.
ADDITIONAL STEPS for 36" Post Trim - If the 36" bottom post trim sections have not been purchased skip to the next section.
1. With each post secured, slide the bottom post trim sleeve and bottom trim ring over the post. Do not secure them at this time.
2. Slide the post sleeve over the wooden post. Be sure that the notches and the cutouts on the sleeve align. NOTE: The top of the vinyl sleeve has a composite vinyl cap. This insures that the post sleeve is at the proper height.
3. After the post vinyl sleeve is in place, slide the top trim over the sleeve and down to the top of the base trim. This is a tight fit to prevent leaking. The cap will snap into place.
P a g e | 5
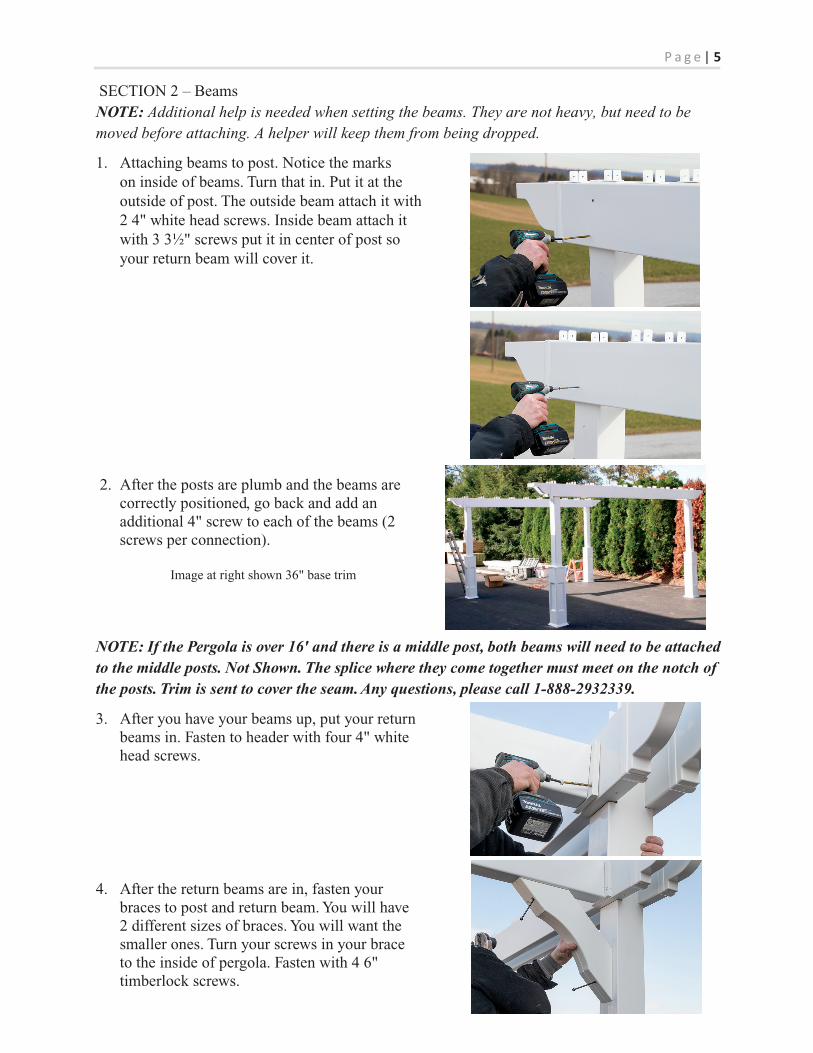
1. Attaching beams to post. Notice the marks on inside of beams. Turn that in. Put it at the outside of post. The outside beam attach it with 2 4" white head screws. Inside beam attach it with 3 3½" screws put it in center of post so your return beam will cover it.
SECTION 2 – Beams NOTE: Additional help is needed when setting the beams. They are not heavy, but need to be moved before attaching. A helper will keep them from being dropped.
NOTE: If the Pergola is over 16' and there is a middle post, both beams will need to be attached to the middle posts. Not Shown. The splice where they come together must meet on the notch of the posts. Trim is sent to cover the seam. Any questions, please call 1-888-293 2339.
2. After the posts are plumb and the beams are correctly positioned, go back and add an additional 4" screw to each of the beams (2 screws per connection).
Image at right shown 36" base trim
3. After you have your beams up, put your return beams in. Fasten to header with four 4" white head screws.
4. After the return beams are in, fasten your braces to post and return beam. You will have 2 different sizes of braces. You will want the smaller ones. Turn your screws in your brace to the inside of pergola. Fasten with 4 6" timberlock screws.

P a g e | 6
SECTION 3 - RUNNERS
1. Set all the runners on top of the beams and into the vinyl brackets.
2. Position each runner with an equal overhang as done with the beams. Measure the overhang from the outside edge of the beam to the decorative end cap. Make sure that this dimension is the same for all runners and on both ends. (Note: the distance shown at the right may not be the same as yours).
3. On one side of the pergola, secure the runners using 1 ½" white headed screws through each side of the runner brackets. Do this along one beam. (one side of each runner) Before attaching the other side, make sure the posts are plumb and the overhangs are equal to the other side. Fasten with 1 ½" screws. Do this for each of the runners.
4. The tops of the main runners are marked for the location of the top runners. Set the top runners on top, and before attaching, make sure that the overhangs are the same on both ends. Start at one end making sure that the top runners remain straight. They are more flexible than the other components. Use the markings, or a straight edge to keep straight and fasten with 2 ½" white headed screws.

P a g e | 7
1. Slide the brace between the beams as shown. Slide up on the post until the marking on the inside of the braces aligns with the bottom of the beam. NOTE: The inside of the brace has the screw and or pencil marking.
SECTION 4 – BRACES
2. Attach the brace to the posts with 2 black 6" screws. The screws will be countersunk. Put caps into cover holes.
3. On the inside of the beams, attach the top of the braces with two 4" white headed screws. Do this on all the posts. NOTE: If there is a middle post, a corner brace is generally installed on both sides.
The Pergola is now complete.
Any other options selected will have their own instruction added to this booklet.