Vintage Ribbing Potholders - Hobbii
7
Hobbii.com - Copyright © 2019 - All rights reserved. Page 1 Vintage Ribbing – Potholders No. 1001-192-3041 Materials: - Rainbow Cotton 8/4 – 3 strands held together - Crochet Hook no. 7 (4.5 mm) - Leather cord for suspension Buy yarn and accessories here: http://shop.hobbii.com/vintage-rib-potholders Measurements: Approx. 8.3 inches (21x21 cm) Yarn usage approx.: 4.8 oz (135g pr set) Abbreviations: St: Stitch Ch: Chain Sc: Single crochet BLO: Back loop (of stitch) only Tog: Together
Transcript of Vintage Ribbing Potholders - Hobbii

Hobbii.com - Copyright © 2019 - All rights reserved.
Page 1
Vintage Ribbing – Potholders No. 1001-192-3041
Materials:
- Rainbow Cotton 8/4 – 3 strands held together
- Crochet Hook no. 7 (4.5 mm)
- Leather cord for suspension
Buy yarn and accessories here:
http://shop.hobbii.com/vintage-rib-potholders
Measurements: Approx. 8.3 inches (21x21 cm)
Yarn usage approx.: 4.8 oz (135g pr set)
Abbreviations:
St: Stitch
Ch: Chain
Sc: Single crochet
BLO: Back loop (of stitch) only
Tog: Together
Hobbii.com - Copyright © 2019 - All rights reserved.
Page 2
Pattern – You can find instructions at the bottom of the pattern
Work with 3 strands of yarn.
Note: turn with 1 ch – it doesn’t replace any stitches.
Crochet in back loop only from row no. 2. The last st on each row can with advantage be crocheted
through both loops. This will give a nicer edge.
1. Cast on 70 ch. Work 1 sc in 2nd ch from the hook. Work 1 sc in the next 32 st. Work the next 3
st tog. Work 1 sc in the last 33 st (67).
2. From now on only work in blo. Turn with 1 ch. Work 1 sc in the next 32 st. Work the next 3 st
tog. Work 1 sc in the last 32 st (65).
3. Turn with 1 ch. Work 1 sc in the next 31 st. Work the next 3 st tog. Work 1 sc in the last 31 st
(63).
4. Turn with 1 ch. Work 1 sc in the next 30 st. Work the next 3 st tog. Work 1 sc in the last 30 st
(61).
5. Turn with 1 ch. Work 1 sc in the next 29 st. Work the next 3 st tog. Work 1 sc in the last 29 st
(59).
6. Turn with 1 ch. Work 1 sc in the next 28 st. Work the next 3 st tog. Work 1 sc in the last 28 st
(57).
7. Turn with 1 ch. Work 1 sc in the next 27 st. Work the next 3 st tog. Work 1 sc in the last 27 st
(55).
8. Turn with 1 ch. Work 1 sc in the next 26 st. Work the next 3 st tog. Work 1 sc in the last 26 st
(53).
9. Turn with 1 ch. Work 1 sc in the next 25 st. Work the next 3 st tog. Work 1 sc in the last 25 st
(51).
10. Turn with 1 ch. Work 1 sc in the next 24 st. Work the next 3 st tog. Work 1 sc in the last 24 st
(49).
11. Turn with 1 ch. Work 1 sc in the next 23 st. Work the next 3 st tog. Work 1 sc in the last 23 st
(47).
12. Turn with 1 ch. Work 1 sc in the next 22 st. Work the next 3 st tog. Work 1 sc in the last 22 st
(45).
13. Turn with 1 ch. Work 1 sc in the next 21 st. Work the next 3 st tog. Work 1 sc in the last 21 st
(43).
14. Turn with 1 ch. Work 1 sc in the next 20 st. Work the next 3 st tog. Work 1 sc in the last 20 st
(41).
15. Turn with 1 ch. Work 1 sc in the next 19 st. Work the next 3 st tog. Work 1 sc in the last 19 st
(39).
16. Turn with 1 ch. Work 1 sc in the next 18 st. Work the next 3 st tog. Work 1 sc in the last 18 st
(37).
17. Turn with 1 ch. Work 1 sc in the next 17 st. Work the next 3 st tog. Work 1 sc in the last 17 st
(35).
18. Turn with 1 ch. Work 1 sc in the next 16 st. Work the next 3 st tog. Work 1 sc in the last 16 st
(33).

Hobbii.com - Copyright © 2019 - All rights reserved.
Page 3
19. Turn with 1 ch. Work 1 sc in the next 15 st. Work the next 3 st tog. Work 1 sc in the last 15 st
(31).
20. Turn with 1 ch. Work 1 sc in the next 14 st. Work the next 3 st tog. Work 1 sc in the last 14 st
(29).
21. Turn with 1 ch. Work 1 sc in the next 13 st. Work the next 3 st tog. Work 1 sc in the last 13 st
(27).
22. Turn with 1 ch. Work 1 sc in the next 12 st. Work the next 3 st tog. Work 1 sc in the last 12 st
(25).
23. Turn with 1 ch. Work 1 sc in the next 11 st. Work the next 3 st tog. Work 1 sc in the last 11 st
(23).
24. Turn with 1 ch. Work 1 sc in the next 10 st. Work the next 3 st tog. Work 1 sc in the last 10 st
(21).
25. Turn with 1 ch. Work 1 sc in the next 9 st. Work the next 3 st tog. Work 1 sc in the last 9 st (19).
26. Turn with 1 ch. Work 1 sc in the next 8 st. Work the next 3 st tog. Work 1 sc in the last 8 st (17).
27. Turn with 1 ch. Work 1 sc in the next 7 st. Work the next 3 st tog. Work 1 sc in the last 7 st (15).
28. Turn with 1 ch. Work 1 sc in the next 6 st. Work the next 3 st tog. Work 1 sc in the last 6 st (13).
29. Turn with 1 ch. Work 1 sc in the next 5 st. Work the next 3 st tog. Work 1 sc in the last 5 st (11).
30. Turn with 1 ch. Work 1 sc in the next 4 st. Work the next 3 st tog. Work 1 sc in the last 4 st (9).
31. Turn with 1 ch. Work 1 sc in the next 3 st. Work the next 3 st tog. Work 1 sc in the last 3 st (7).
32. Turn with 1 ch. Work 1 sc in the next 2 st. Work the next 3 st tog. Work 1 sc in the last 2 st (5).
33. Turn with 1 ch. Work 1 sc in the next st. Work the next 3 st tog. Work 1 sc in the last st (3).
34. Turn with 1 ch. Work 3 sc tog (1).
Cut the yarn and weave in ends.
Make one more just the same.
Optionally you can attach a leather cord for suspension.

Hobbii.com - Copyright © 2019 - All rights reserved.
Page 4
Instructions:
1. Cast on your ch.
2. Work 1 sc in 2nd ch from the hook.
3. Work 1 sc in the next 32 st.
4. Work the next 3 st tog to 1 st.
5. Like this.
6. Work 1 sc in the last 33 st.
Hobbii.com - Copyright © 2019 - All rights reserved.
Page 5
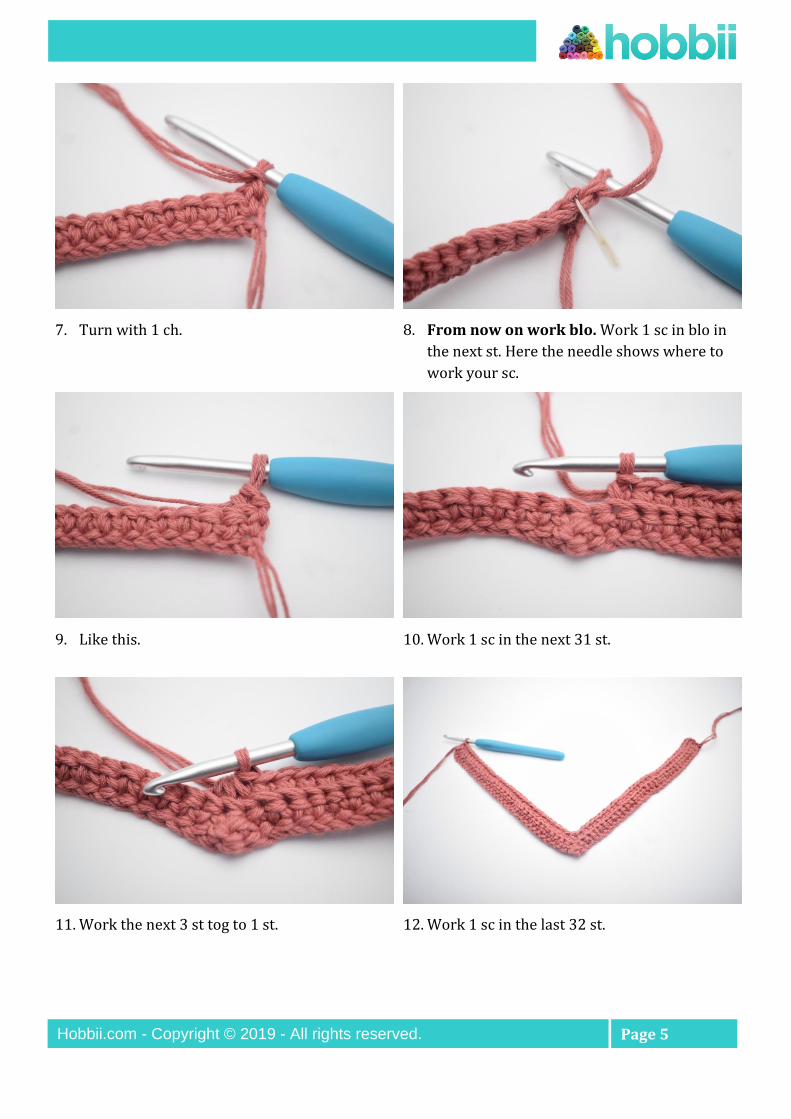
7. Turn with 1 ch.
8. From now on work blo. Work 1 sc in blo in
the next st. Here the needle shows where to
work your sc.
9. Like this.
10. Work 1 sc in the next 31 st.
11. Work the next 3 st tog to 1 st.
12. Work 1 sc in the last 32 st.

Hobbii.com - Copyright © 2019 - All rights reserved.
Page 6
13. Turn with 1 ch.
14. Work 1 sc in blo.
15. Work 1 sc in the next 30 st.
16. Work the next 3 st tog to 1 st.
17. Work 1 sc in the last 31 st.
18. Repeat the rows like this until you have 1 st
left.

Hobbii.com - Copyright © 2019 - All rights reserved.
Page 7
19. Cut the yarn and weave in ends.
Have fun ☺
Best regards, Hobbii